

Page 1
Mobicom 2189
Contents
01
For Your Safety
Safety Tips
Network Service
Usage Warnings
Getting Started
Inserting the SIM card
Charging the Battery
Battery Care
Phone Elements
Keypad Illustration
Basic Operations
Message
Phonebook
3
3
6
7
9
10
12
13
14
16
17
18
23
©Mobicom Corp. 2005 www.mobicomcorp.com
© Mobicom Corp. 2005 www.mobicomcorp.com
Page 2

02
Contents
Mobicom 2189
26
28
32
36
38
39
41
Call History
Network Service
Phone Settings
Organizer
Extra Features
FCC Notice and SAR Statement
Warranty Statement and Card
© Mobicom Corp. 2005 www.mobicomcorp.com
Page 3
Mobicom 2189
For Your safety
For your safety
03
1. Safety Tips
2. Network Service
3. Usage Warnings
©Mobicom Corp. 2005 www.mobicomcorp.com
© Mobicom Corp. 2005 www.mobicomcorp.com
Page 4
For your safety
04
Mobicom 2189
1. Safety Tips
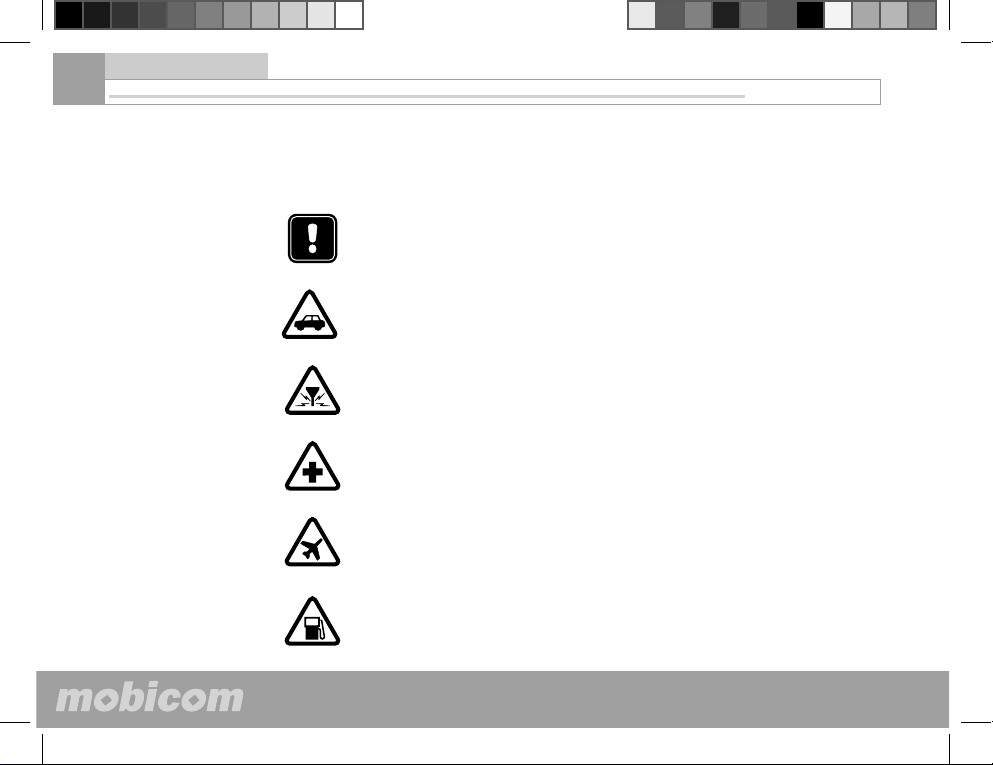
Read these simple guidelines. Not following them may be dangerous or
illegal. Read the complete user guide for further information.
SWITCH ON SAFELY
Do not switch the phone on when wireless phone use is prohibited or when it may cause interference or danger.
ROAD SAFETY COMES FIRST
Obey all local laws. Always keep your hands free to operate the vehicle while driving. Your fi rst
consideration while driving should be road safety.
INTERFERENCE
Obey all local laws. Always keep your hands free to operate. All wireless phones may be susceptible to interference, which could affect performance.
SWITCH OFF IN HOSPITALS
Follow any restrictions. Switch the phone off near medical equipment.
SWITCH OFF IN AIRCRAFT
Follow any restrictions. Wireless devices can cause interference in aircraft.
SWITCH OFF WHEN REFUELING
Turn off your phone prior to entering fueling areas.
© Mobicom Corp. 2005 www.mobicomcorp.com
Page 5
Mobicom 2189
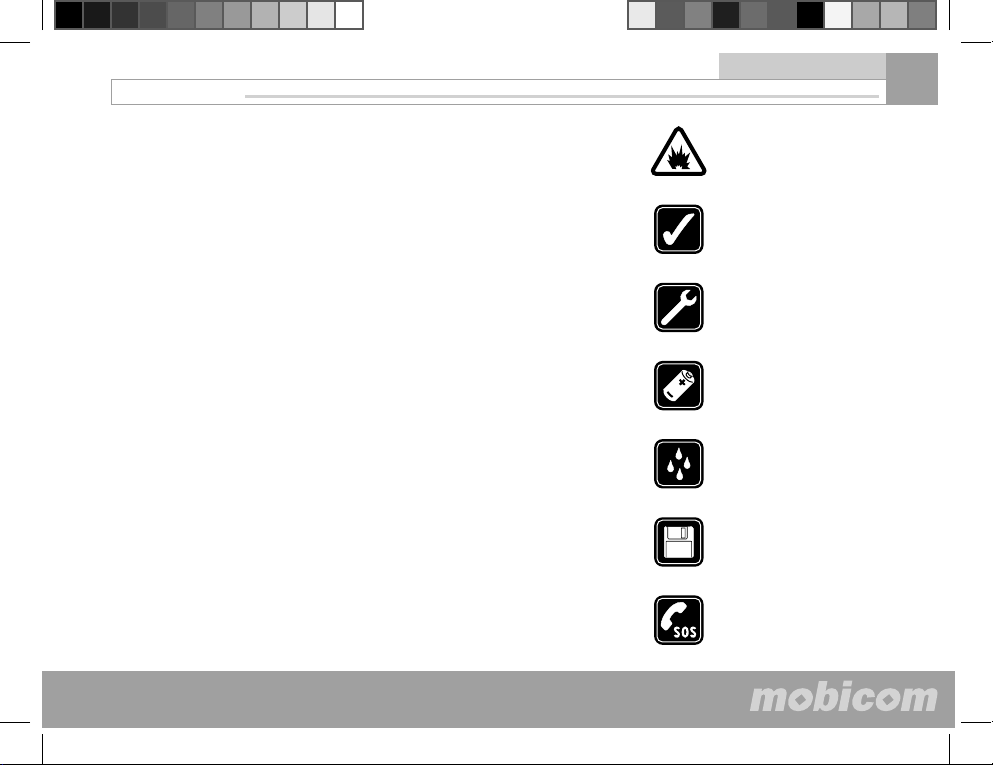
SWITCH OFF NEAR BLASTING
Obey all sign, and instructions. Turn off your phone when you are in a blasting area.
USE SENSIBLY
Use only in the normal position as explained in the product documentation. Don’t touch the
antenna unnecessarily.
QUALIFIED SERVICE
Only qualifi ed personnel may install or repair this product.
ENHANCEMENTS AND BATTERIES
Use only approved enhancements and batteries. Do not connect incompatible products.
WATER-RESISTANCE
Your phone is not water-resistant. Keep it dry.
BACK-UP COPIES
Remember to make back-up copies or keep a written record of all important information stored in
your phone.
EMERGENCY CALLS
Ensure the phone is switched on and in service. Press the End key as many times as needed to
clear the display and return to the main screen. Enter the emergency number, then press the Talk
key. Give your location. Do not end the call until given permission to do so.
For your safety
05
©Mobicom Corp. 2005 www.mobicomcorp.com
© Mobicom Corp. 2005 www.mobicomcorp.com
Page 6
For your safety
06
Mobicom 2189
2. Network Sevice
To use the phone you must have service from a wireless network operator. Many of the features in this device depend on features in the wireless
network to function. These Network Services may not be available on
all networks or you may have to make specifi c arrangements with your
network operators before you can utilize Network Services.
Your service provider may need to give you additional instructions for
their use and explain what charges will apply. Some networks may have
limitations that effect how you can use Network Services. For instance,
some networks may not support all language-dependent characters and
services.
Your network operators may have requested that certain features be
disabled or not activated in your device. If so, they will not appear on your
device menu. Contact your network operators for more information.
© Mobicom Corp. 2005 www.mobicomcorp.com
Page 7

Mobicom 2189
For your safety
07
• Keep the phone and all its parts and accessories out of the reach of
small children.
• Keep the phone clean. Do not use or store the phone in dusty, dirty
areas, as its moving parts may be damaged.
• Keep the phone dry. Precipitation, moisture and liquids contain minerals that will corrode electronic circuits.
• Do not store the phone in hot areas. High temperature can shorten the
life of electronic devices, damage batteries, warp or melt certain plastic
parts.
• Do not store the phone in cold areas. When the phone warms up to its
normal operating temperature, humidity can form inside the phone, which
may damage electronic circuit boards.
• Phone should only be disassembled by an authorized service center.
Unauthorized disassembly may void the warranty.
• Do not drop, knock or shake the phone. Rough handling can break
internal electronic boards.
• Do not use harsh chemicals, cleaning solvents or strong detergents
to clean the phone. Wipe it with a soft cloth slightly dampened in a mild
soap-and-water solution.
©Mobicom Corp. 2005 www.mobicomcorp.com
© Mobicom Corp. 2005 www.mobicomcorp.com
3. Usage Warnings
Page 8

For your safety
08
Mobicom 2189
• Do not paint the phone. Paint can clog the device’s moving parts and
prevent proper operation.
• If the phone, battery, charger or any other accessory is not working
properly, take it to the nearest service facility.
© Mobicom Corp. 2005 www.mobicomcorp.com
Page 9

Mobicom 2189
Getting started
Getting started
09
1. Inserting the SIM card
2. Charging the Battery
3. Battery Care
4. Phone Elements
5. Keypad Illustration
©Mobicom Corp. 2005 www.mobicomcorp.com
© Mobicom Corp. 2005 www.mobicomcorp.com
Page 10
Getting started
10
Mobicom 2189
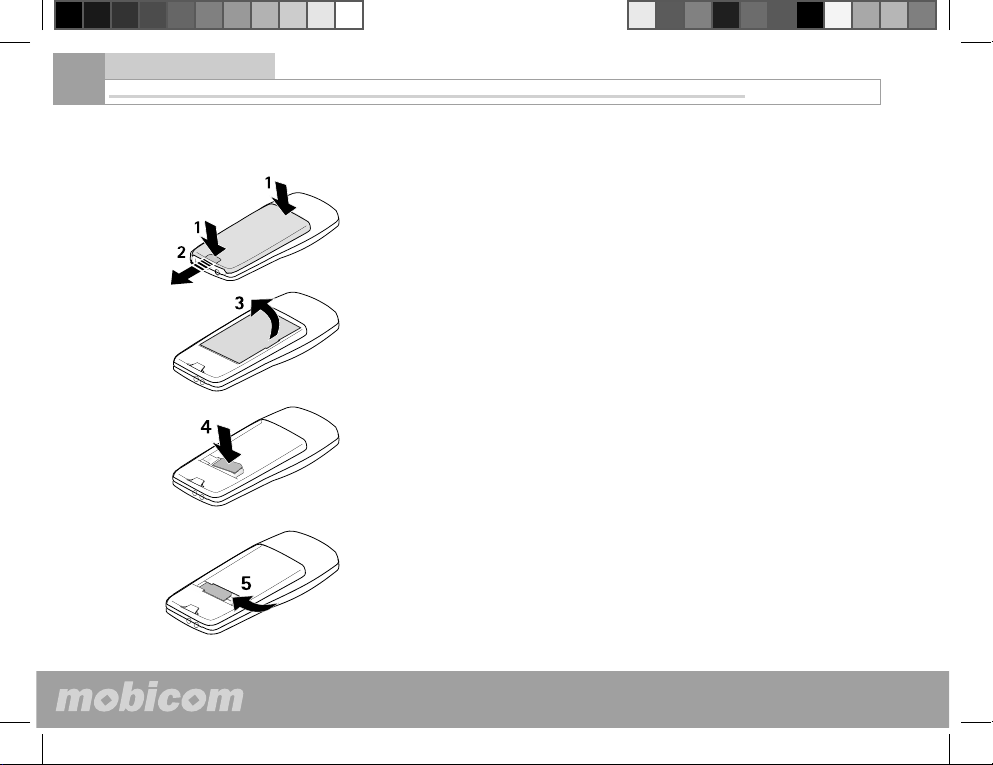
1. Inserting the SIM card Note: Before installing the SIM card, make sure that the phone is
switched off, and disconnected from the charger or any other device.
Remove the back cover:
(1) press the top and the bottom of the battery cover;
(2) slide to open
Remove the battery.
(3) pull up the right side of the battery to take it out
Insert the SIM card
(4) place the SIM card into the slot, with the gold side down and the beveled edge to the right.
(5) push the SIM card to the left
© Mobicom Corp. 2005 www.mobicomcorp.com
Page 11
Mobicom 2189
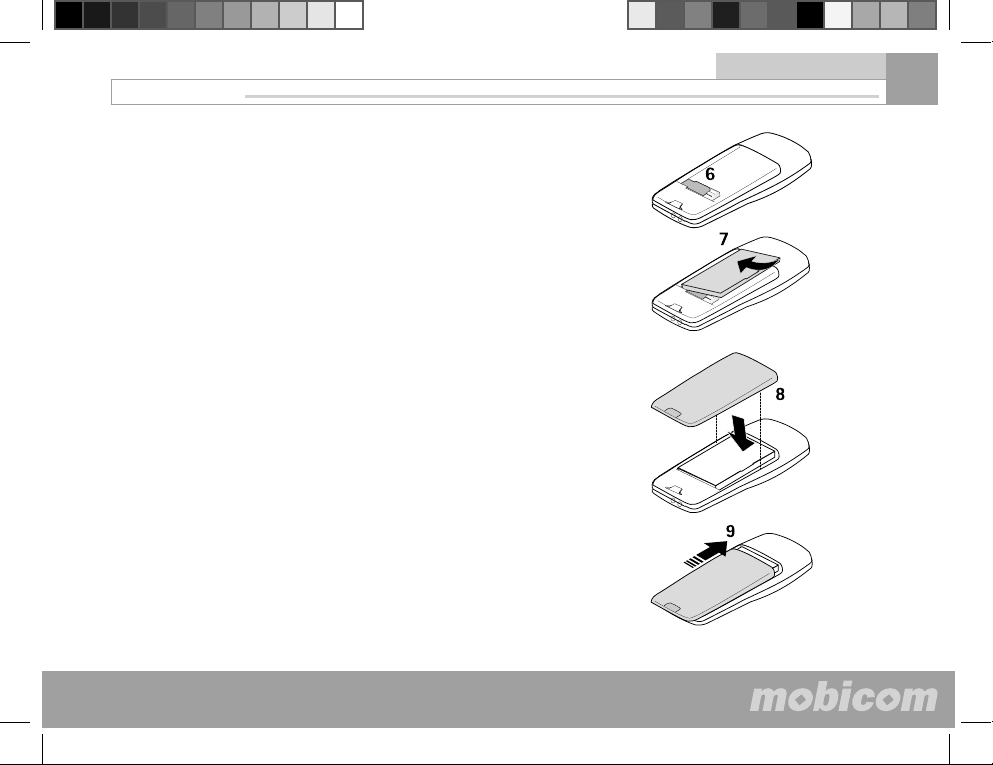
(6) the SIM card stops at the left end of the slot
Replace battery
(7) put the battery back in, left side fi rst, to make sure it goes into the right spot.
Replace the back cover
(8) align the two side clip on the cover with the housing
(9) slide the cover up and snap it into place
Getting started
11
©Mobicom Corp. 2005 www.mobicomcorp.com
© Mobicom Corp. 2005 www.mobicomcorp.com
Page 12
Getting started
12
Mobicom 2189
2. Charging the Battery
Note:
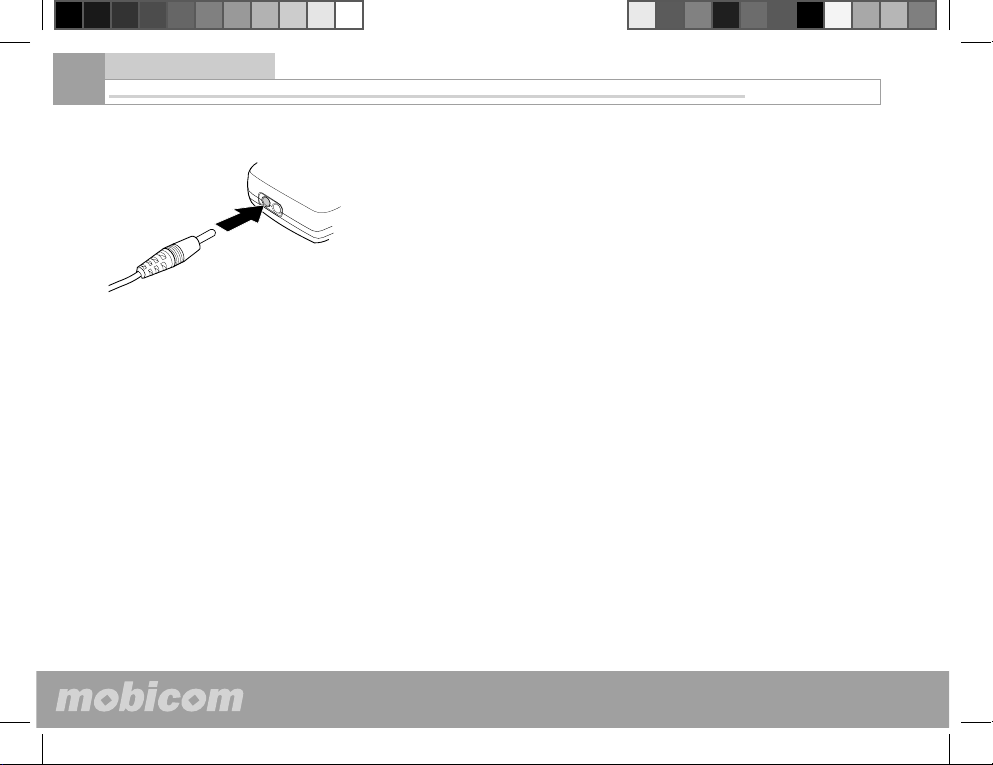
The Charger Connector is the left
one of the two connectors on the
bottom of the phone.Please fi nd
a small charger icon next to the
charger connector to avoid plugging
the charger into the audio connector
by mistake.
(1). Charging the battery with the travel charger
• Plug the travel charger into the bottom outlet.
• The indication bar of battery scrolls when battery charging is in process;
In this process the mobile phone can be used but this will increase the
charging time.
• When the indication bar of battery stops scrolling, it means charging is
complete; Please switch off the power before disconnecting the charger.
The charging time may vary with the residual battery level.
(2). Low Battery Indicator
• When the battery is weak and only a few minutes of talk time remain,
you will hear a warning tone and a message of low battery will be repeated at regular intervals on the display;
• When the battery is too weak for the phone to operate, it switches off
automatically.
(3). Battery Usage
• The battery will consume more power when the phone is in talk mode.
Therefore, the longer the talk time, the shorter the standby time;
• The lifetime of battery may vary with the external environment (i.e.,
number of charging cycles, ambient temperature, method of usage, signal
strength and duration of keypad lighting).
Note: Use only the supplied charger because other chargers may damage the phone.
© Mobicom Corp. 2005 www.mobicomcorp.com
Page 13

Mobicom 2189
Getting started
13
• Do not charge the battery at improper temperatures because it can affect the battery capability.
• Do not charge the battery in sunny or damp environment.
• Keep the battery away from open fl ames. It is prohibited to disassemble
the battery or put it together with explosive substances.
• Please do not knock the battery with a sharp object or place it under
weight, otherwise the electronic circuits and internal parts and components can be damaged, shortening the lifetime of battery.
• The battery is designed to be charged and discharged many times, but
will eventually wear out. You should replace the battery when talk time
and standby time is noticeably shorter than normal.
• Please use the supplied accessories, in order to avoid damaging the
phone and battery.
• Please keep the battery pins and metal parts clean.. Charging may not
be performed if the battery is too dirty.
• Please place the battery in dry and cool environment. Extreme high
or low temperature may damage the battery capability and reduce the
lifetime of battery.
©Mobicom Corp. 2005 www.mobicomcorp.com
© Mobicom Corp. 2005 www.mobicomcorp.com
3. Battery Care
Page 14
gnitteG
41
detrats
ocibo
M
9812 m
en
ohP .4
stnemelE
oM
S
©
)kcab(
draynaL
eceipraE
4
6x69 yalpsiD on
yeK tfo
y
eK noitagivaN
muN
r
gnigrahC
otcennoC
boM
50
moc.p
02 .proC moci
m.www
yeK tfo
S
ire
syeK c
rotcennoC tesdaeH
rocmocibo
Page 15
Mobicom 2189
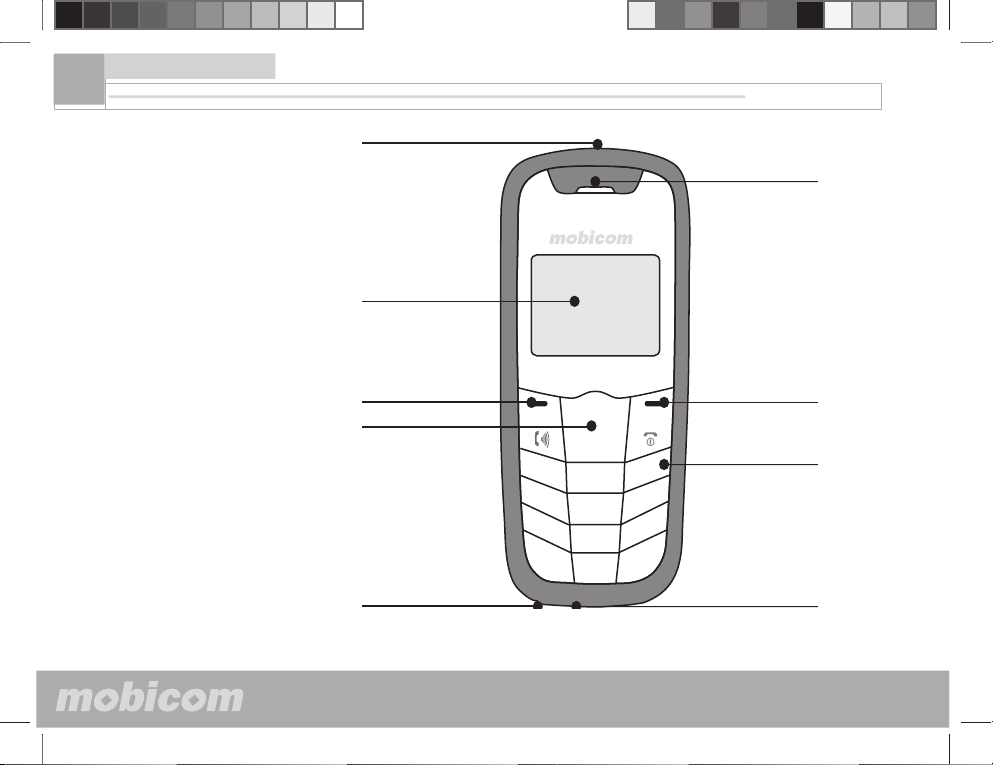
See Illustration on the left:
• Lanyard Holes (on the top of the back housing)
Allows the lanyard to go through to carry the phone.
• Earpiece
Allows sound to be heard through the phone.
• LCD (Liquid Crystal Display)
Mono 96x64, displays messages and icons.
• Soft Keys
Used to display the function.
• Navigation Keys
Help scrolling up and down Menu.
Shortcuts to Call History, Keypad and Ring Tone Setting, Messages, and Phone Book.
• Numeric Keys
Enter numbers, letters and characters. Quickly scroll through the menu options.
• Charging Connector
Charge the phone by plugging the charger in the connector.
• Headset Connector
Allows the headset to be connected to the phone.
Getting started
15
©Mobicom Corp. 2005 www.mobicomcorp.com
© Mobicom Corp. 2005 www.mobicomcorp.com
Page 16
Getting started
16
Mobicom 2189
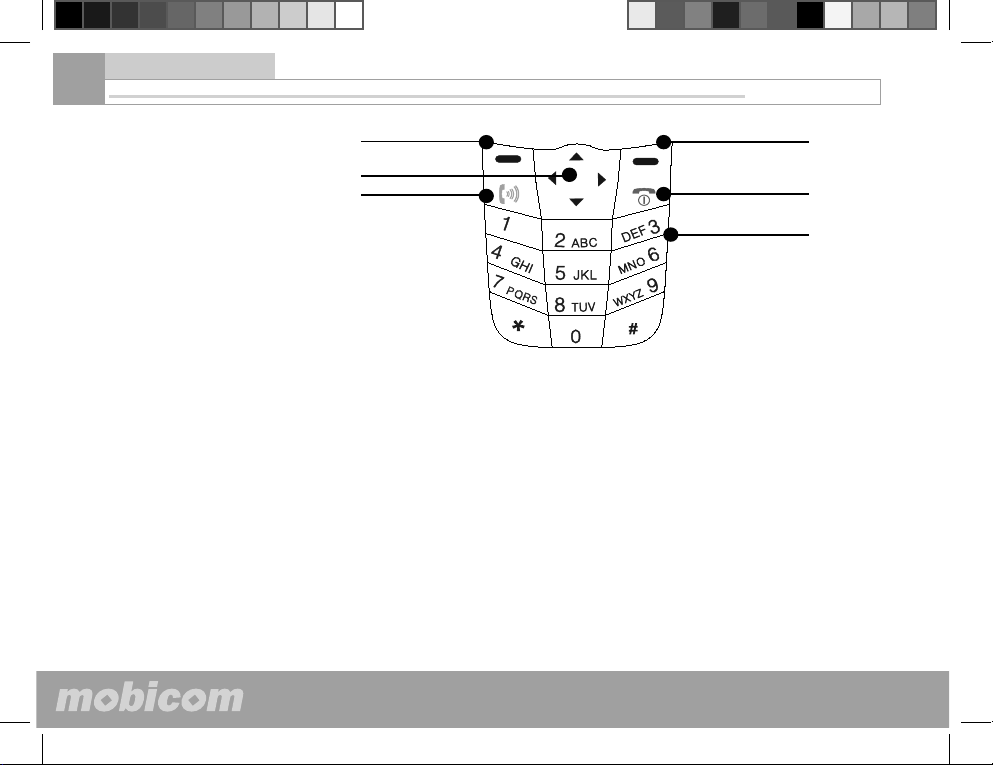
5. Keypad Illustration
Left Soft Key
Navigation Key
Send Key
Right Soft Key
End Key
Numeric Keys
• Send Key: Makes or answers a call.
• End Key: Stops prompt, ends a call or exits from the current menu.
Used to switch phone on/off when pressing and holding down for longer.
• Left Soft Key: Performs the functions shown in the left bottom area of
display. Scroll through menu options in idle mode.
• Right Soft Key: Performs the functions shown in the right bottom area
of display.
• Navigation Keys: Scroll through the menu; shortcuts:
Up Arrow Key: Keypad Tone setting and Ring tone setting.
Down Arrow Key: Phone Book
Left Arrow Key: Messages
Right Arrow Key: Call History
© Mobicom Corp. 2005 www.mobicomcorp.com
Page 17
Mobicom 2189
Basic oPERATIONS
Basic Operations
17
1. Messages
2. Phonebook
3. Call History
4. Network Service
5. Phone Settings
6. Organizer
7. Extra Features
©Mobicom Corp. 2005 www.mobicomcorp.com
© Mobicom Corp. 2005 www.mobicomcorp.com
Page 18
Basic Operations
18
Mobicom 2189
1. Messages
(1). Read
(2). Write
(3). Delete All
(4). Settings
(5). Broadcast
(6). Voice Mail
The shortcut to Messages is the Left arrow key in idle mode.
(1). Read (read a message)
When a message is received, new messages will be displayed on the
screen, and your phone will sound a tone in accordance with the settings
you choose. Press Read to view the message.
I. To view the message immediately, select Read
II. To view a saved message, From Menu, select Messages > Read >
Inbox or Draft. Unread messages are indicated with .
III. While viewing the message, select Options and one of the following:
• Delete — Delete the message you are viewing.
• Reply — While viewing a message, select Options > Reply. Compose
your reply and send the message as described in “Write and send a mes-
sage”.
• Edit — Edit the message.
• Forward — Forwards a received message to another recipient.
i. While viewing a message, select Options > Forward
ii. Edit the message, and select Send.
iii. Enter the recipient’s phone number or retrieve it from contacts, and
select Send.
• Extr. Number — Automatically captures the numbers within the mes-
sage. You can press Next to cycle through them and press Options to
i. Save the number
ii. Call the number
© Mobicom Corp. 2005 www.mobicomcorp.com
*
Page 19
Mobicom 2189
iii. Send a message to the number.
You can also press the Send key directly to call this number.
• Call Number — Call the number that sent you this message.
(2). Write (Write and send a message)
I. From Menu, select Messages > Write
II. Compose a message using the keypad.
Entering text:
Press # to switch modes: Abc - fi rst letter is capitalized
ABC - upper case
abc - lower case
123 - numeric entry
Press to select function marks.
*
Press 1 to enter a space (except in numeric entry mode).
III. For other options while composing the message, select Options and
one of the following:
• Send — Send the message to more than one recipient.
• Save — Select Save to save the message in the Draft.
• Discard — Erase the text clipboard.
IV. To send the message, select Send, enter the recipient’s phone number or select Names to retrieve a number from contacts, and select Send.
Note: When sending messages, your device may display the line Sending Mes-
sage.This is not an indication that the message has been received at the intended
destination. For more details about messaging services, check with your network
Basic Operations
19
©Mobicom Corp. 2005 www.mobicomcorp.com
© Mobicom Corp. 2005 www.mobicomcorp.com
Page 20
Basic Operations
20
Mobicom 2189
operators.
(3). Delete All
I. From Menu, select Messages > Delete All
II. Select OK to delete all or Back to exit.
(4). Settings
I. From Menu, select Messages > Settings
II. If more than one message profi le set is supported by your SIM card,
select the set desired to change; then select one of the following:
• Service Cent. — To save the phone number of the message center
which is necessary for sending text messages; obtain this number from
your network operators.
Save your message center number:
Messages sent by your phone are routed through your network operator
message center. Normally, this number is saved to your phone by your
network operator. To save the number manually, do the following:
I. From Menu, select Messages > Settings > Service center
II. If the box in the display is empty or contains an incorrect number, enter
the number given by your network operator, and select OK.
OR
If the box in the display contains the correct number, select OK. A message appears in the display confi rming your number is saved.
• Validity — To defi ne how long the network attempts to send your mes-
sages before it gives up.
• Status Reports — To request the network to send delivery reports on
your messages.
© Mobicom Corp. 2005 www.mobicomcorp.com
Page 21
Mobicom 2189
• Storage — Screen will display total space and free space.
(5). Broadcast
Broadcast messages are public messages delivered to all the end users,
if the service is available from your network operator. The messages are
categorized by different topics, such as weather forecast, bonus stock,
fl ight lines and so on. Please contact your network operator for the category details.
From Menu, select Messages>Broadcast
The function options include the following:
I. Activate—Activate the message station: to receive messages. Shut
down the message station: stop to receive the messages.
II. Read—Read the messages send by the station.
III. New Broadcast—check the programs categories, and add or delete
programs in your cell phone. Please inquiry the network operator for the
corresponding codes of programs.
IV. List
List of cell broadcast fi lter names and parameters set.
(6). Voice Mail
This option enables you to answer the voice mail. You should apply for
this service from your network operator fi rst, then you can use this function.
From Menu, select Messages > Voice Mail
There are two sub options of this option:
Basic Operations
21
©Mobicom Corp. 2005 www.mobicomcorp.com
© Mobicom Corp. 2005 www.mobicomcorp.com
Page 22
Basic Operations
22
Mobicom 2189
I. Voice Mail: When this option is selected, your phone will directly ac-
cess to the set Voice Mail Box, then you can listen to the voice messages. If the Voice Mailbox is not yet set, a prompt will appear on the screen,
requesting you to enter the Voice Mailbox Number fi rst.
Note: You can quickly access your voice mail by pressing and holding down the
“1” key.
II. Set Voice Mail: Input the voice mail number provided by your network
operators and press OK. This number will be saved.
© Mobicom Corp. 2005 www.mobicomcorp.com
Page 23
Mobicom 2189
Basic Operations
23
You can save the phone numbers and corresponding names into the
phone memory or SIM Card of your phone. Your phone memory allows
you to store 100 names and phone numbers in total. The length and
quantity of names and phone numbers to be stored into the SIM Card
depends on the type of SIM Card provided.
The shortcut to Phone Book is:
1. Press the Down arrow key at the idle screen
2. Select Names at the idle screen
(1). List — Find a name or select from a list.
From Menu, select PhoneBook > list
Press Up/Down keys to scroll through the list of names. The names
stored in the phone memory is indicated with the phone icon and the
names stored in SIM card is indicated by the SIM icon.
Press Send key to call the name or select Options by pressing the soft
key to edit, as one of the following options:
• Send Message — Send a message to the number (See “Write and
send a message”)
• Change — Edit the original information
• Details — From Menu, select Phonebook > List, and then check the
details of the name you selected.
• Call Number — From Menu, select Phonebook > List, choose the
desired number and select Call Number
• Copy — Copy entries from phone memory to SIM and vice versa.
• Move — Move entries from phone memory to SIM and vice versa with-
out keeping them in the original locations.
©Mobicom Corp. 2005 www.mobicomcorp.com
© Mobicom Corp. 2005 www.mobicomcorp.com
2. Phone Book
(1). List
(2). Add new entry
(3). My number
(4). Copy All
(5). Delete All
(6). Memory Stat.
(7). Select Book
(8). 1 Touch Dial
Page 24
Basic Operations
24
Mobicom 2189
• Delete — Delete a name and its associated numbers.
(2). Add New Entry
From Menu, select PhoneBook > Add New Entry.
or, you can also enter new numbers at idle screen and then press Save
to add it to Phone Book.
(3). My Number
From Menu, select PhoneBook > My Number
Screen will suggest Edit or Back. Select Edit to edit the number.
(4). Copy All
From Menu, select PhoneBook > Copy All
Select SIM to Phone to copy all entries from SIM card to the phone; or
select Phone to SIM to copy all entries from the phone to the SIM card.
(5). Delete All
From Menu, select PhoneBook > Delete All
Select SIM or Phone to delete all the entries in the SIM card or in the
phone.
(6). Memory Stat.
From Menu, select PhoneBook > Memory Stat.
The screen displays the content and available spaces of SIM card and
the phone.
© Mobicom Corp. 2005 www.mobicomcorp.com
Page 25
Mobicom 2189
(7). Select Book
From Menu, select PhoneBook > Select Book
Use Up/Down arrow keys to select SIM card or cell phone. Phone book
entries are stored in the selected phone book (SIM or phone’s memory)
(8). 1 Touch Dial
Form Menu, select PB > 1 Touch Dial. Pick one from number keys 2
through 9, and then enter a phone number and press OK. For locations
2 through 9, you can use one touch dialing by pressing and holding the
appropriate number key.
Basic Operations
25
©Mobicom Corp. 2005 www.mobicomcorp.com
© Mobicom Corp. 2005 www.mobicomcorp.com
Page 26
Basic Operations
26
Mobicom 2189
3. Call History
(1). Missed calls
(2). Answered calls
(3). Outgoing Calls
(4). View calls options
(5). Call timer
Call History stores information about the last 10 missed, 10 received,
and 10 dialed calls. It also adds the total duration of all calls. When the
number of calls exceeds the maximum, the most recent call replaces the
oldest. For Call History to work properly:
• Your network operators must support caller ID, and it must be enabled.
• Your calls cannot be blocked.
• Your phone must be on and within the service area.
The shortcut to Call History is the Right arrow key in idle mode.
(1). Missed Calls
From Menu, select Call History > Missed Calls
Missed Calls- Shows the phone numbers of unanswered calls.
(2). Answered Calls -Answered calls are calls that have been answered.
I. From Menu, select Call History > Answered calls.
II. Scroll to a name or number, and select Options and the desired option
from the list.
(3). Outgoing Calls
You can view dialed numbers in one of two ways:
I. At the start screen, press the Talk key.
OR
From Menu, select Call History > Outgoing Calls.
II. Scroll to a name or number, and select Options and the desired option
from the list.
© Mobicom Corp. 2005 www.mobicomcorp.com
Page 27
Mobicom 2189
(4). View calls options
Whether you are viewing missed, answered, or outgoing calls, the menu
options are as follows:
Store Number — Enter a name for the number and save it to contacts.
Send message — Send a message to the number.
Details — Display the date\ number and time of the call.
Delete — Clear the number from memory.
To clear any missed, outgoing, or answer calls from phone memory,
select Call History > missed\outgoing or Answer > Delete
Delete All- To clear any missed, outgoing, or answer calls from phone
memory, select Call History > Missed / Outgoing or Answer > Delete
all
(5). Call Timers
Call timers—View the duration of recent calls and clear the call timers.
From Menu, select Call History > Call timers
Basic Operations
27
©Mobicom Corp. 2005 www.mobicomcorp.com
© Mobicom Corp. 2005 www.mobicomcorp.com
Page 28
Basic Operations
28
Mobicom 2189
4. Network Service
(1). Divert
(2). Network Sel.
(3). Call barring
(4). Call waiting
(5). Hide ID
(1). Divert
I. Not Reachable
This allows you to forward incoming calls when your phone is power off or
in an area where the network is unreachable.
• From Menu, select Network service > Divert
• Scroll to operate these options: Status, Set, Cancel
II. If busy
Forward all calls when you are on a call.
This allows you to forward the incoming calls when your phone is busy.
When this function is activated, Your phone will forward the incoming call
even when you refuse to answer it.
• From Menu, select Network service > Divert > If Busy
• Scroll to operate these options: Status, Set, Cancel
III. If No Answer
Forward all calls to another number if you do not answer. You can also
set a delay before forwarding takes place.
• From Menu, select Network Service > Divert > If No Answer
• Scroll to operate these options: Status, Set, Cancel
IV. All Calls
This network service allows you to forward the incoming call to another
phone number, enabling you to correctly handle the incoming call when
you are unable to answer. This function allows forwarding all the incoming
calls in any instance.
© Mobicom Corp. 2005 www.mobicomcorp.com
Page 29
Mobicom 2189
• From Menu, select Network service > Divert > All Calls
• Scroll to operate these options: Status, Set, Cancel
V. Cancel All
Cancel any call forwarding options you may have set.
From Menu, select Network service > Divert > Cancel All to cancel all
settings.
(2). Network Sel.
This option enables you to select or search your service network.
• From Menu, select Network service > Network Sel > Automatic or
Manual
You can choose Manual Net Sel or Auto Net Sel to search network
(3). Call Barring
This service allows you to restrict your phone to make or answer any
or some calls. You need to enter the network password if you want to
use this function. You need to apply for the password from your network
operator.
From Menu, select Network service > Call Barring, the menu options
are as the following:
I. Outgoing — When this option is activated, you are unable to dial any
number
II. Intern. Calls — When this option is activated, you are unable to dial
Basic Operations
29
©Mobicom Corp. 2005 www.mobicomcorp.com
© Mobicom Corp. 2005 www.mobicomcorp.com
Page 30
Basic Operations
30
Mobicom 2189
any international number.
III. Intern. But Home — It allows you to make a call only to your country
and dial the domestic numbers when you are roaming.
IV. Incoming Call — When this option is activated, you are unable to
answer any incoming call.
V. When Roaming — When this option is activated, and you are abroad,
you are unable to answer any call except it comes domestically.
VI. Cancel All — When this option is activated, all the calling restrictions
set before will be canceled. You need network password for this function.
VII. Change Password — enter original Phone Lock code, after it’s con-
fi rmed correct, enter new code for twice.
Except Cancel All, other options include the same following items:
Status ,Set ,Cancel. When the functions are activated, you need to enter
network password.
(4). Call Waiting
If supported by your network operators, call waiting notifi es you of an incoming call even while you are in a call. You can accept, reject, or ignore
the incoming call.
© Mobicom Corp. 2005 www.mobicomcorp.com
Page 31
Mobicom 2189
I. Check Status
You can see whether call waiting is active, and for which type of calls.
From Menu, select Network service > Call Waiting > Check Status
II. Activate or Deactivate
From Menu, select Network service > Call Waiting > Activate or Deac-
tivate.
(5). Hide ID
From Menu, select Network service > Hide ID, and one of the following:
I. Check Status
II. Activate
III. Deactivate
This function can control whether receiver is able to see your number or
not, please consult your network operator for this service.
Basic Operations
31
©Mobicom Corp. 2005 www.mobicomcorp.com
© Mobicom Corp. 2005 www.mobicomcorp.com
Page 32
Basic Operations
32
Mobicom 2189
5. Phone Settings
(1). Languages
(2). Tones
(3). Clock
(4). Security
(5). AutoRedial
(6). Any-key Answer
(7). Screen Saver
(8). Auto Keylock
(9). Factory Reset
(1). Languages
From Menu, select Phone Settings > Languages and one of the following:
• English
• Spanish
(2). Tones
I. Ringer
From Menu, select Phone Settings > Tones > Ringer, and one of the
following:
• Melody — Enables you to set how the phone informs you of an incom-
ing call.
• Volume — Enables you to set tone volume level of incoming call
II. SMS tone
From Menu, select Phone Settings > Tones > SMS tone
• Melody — Enables you to set different SMS tones.
• Volume — Enables you to set tone volume level of SMS tone
III. Alarm
From Menu, select Phone Settings > Tones > Alarm
• Melody—Select an alarm tone from list.
• Volume— Enables you to set tone volume level.
IV. Keypad Tone
From Menu, select Phone Settings > Tones > Keypad Tone
There are 2 choices:
© Mobicom Corp. 2005 www.mobicomcorp.com
Page 33
Mobicom 2189
• Tones--you can select Silent, Click, or DTMF
• Volume--you can adjust the volume by pressing up and down arrow
keys on the navigation key.
The shortcut of the Keypad Tone control is the Up arrow key in idle mode.
(3). Clock
From Menu, select Phone Settings > Clock. This menu enables you to
set date and time.
To set Time and Date, use navigation key to scroll through menu, and
press Select to make your selection.
(4). Security
I. FDN (Fixed Dialing Number) PhoneBook
Once you set up and activate the FDN, this secondary phone book turns
on to take the place of the regular Phone Book. Your phone can make
calls only to those numbers that you have defi ned in this fi xed dialing list.
This option allows you to restrict your outgoing calls to a limited set of
phone numbers.
From Menu, select Phone Settings > Security > FDN PhoneBook, and
one of the following:
• Activate — to turn FDN on in order to use the restricted list only.
• Deactivate — to turn FDN off in order to use the regular Phone Book.
You need to enter PIN2 code to activate or deactivate this function. When
it is activated, you can go to Menu > Phone Book to add, revise or
delete numbers in this list.
Basic Operations
33
©Mobicom Corp. 2005 www.mobicomcorp.com
© Mobicom Corp. 2005 www.mobicomcorp.com
Page 34
Basic Operations
34
Mobicom 2189
II. PIN
From Menu, select Phone Settings > Security > PIN, The menu options
are as follow:
Status, Activate, Deactivate, Change — You will need to input your PIN
code before you can perform any of PIN options. When this function is
activated, you need to input your PIN code every time the phone is switch
on.
PIN change:
(I). At the prompt, enter the original PIN code, and select OK.
(II). At the prompt, enter the new PIN code, and select OK.
(III). At the prompt, enter the new PIN code again, and select OK.
III. PIN2
The PIN2 code is required for features such as fi xed dialing. If you enter
an incorrect PIN2 code three times in succession, the PIN2 code is
blocked and you will have to enter the PUK2 code.
The original PIN2 code must be obtained from your network operators.
Use this procedure to change your PIN2 code:
From Menu, select Phone Settings > Security > PIN2
Change PIN2
• At the prompt, enter the original PIN2 code, and select OK.
• At the prompt, enter the new PIN2 code, and select OK.
• At the prompt, enter the new PIN2 code again, and select OK.
(5). Auto Redial
From Menu, select Phone Settings > Security > Auto Redial
© Mobicom Corp. 2005 www.mobicomcorp.com
Page 35
Mobicom 2189
You can select On or Off. When this function is activated, your phone will
automatically redial the number up to 10 times after 10 attempts the function will be terminated. (This function must be supported by your network
operator). Press END key to stop auto redial.
(6). Any-key Answer
Any-key answer allows you to answer an incoming call by briefl y pressing
any key except the End key.
From Menu, select Phone settings > Any-key answer > On or Off.
(7). Screen Saver
From Menu, select Phone settings>Screen Saver
Select On to activate or Off to deactivate.
(8). Auto Keylock
From Menu, select Phone settings > Auto Keylock
Select On to activate or Off to deactivate.
(9). Factory Reset
You can reset some of Menu settings to their original values. However,
data that you have entered or downloaded are not affected. For example,
names and numbers in contacts are not affected.
I. From Menu, select Phone settings > Restore factory
II. press OK to enter. Press again to reset some functions to factory set-
tings.
Note: The stored phonebook information and messages will not be affected by
restoring the factory settings.
Basic Operations
35
©Mobicom Corp. 2005 www.mobicomcorp.com
© Mobicom Corp. 2005 www.mobicomcorp.com
Page 36
Basic Operations
36
Mobicom 2189
6. Organizer
(1). Alarm
(2). Power On
(3). Power Off
(4). Caculator
(5). Calendar
(6). Global Time
(7). Game
(1). Alarm
I. Alarm
From Menu, select Organizer > Alarm > Alarm
Enter alarm time and choose frequency, Once, or Daily.
II.Tones
From Menu, select Organizer > Alarm > Tones and one of the following:
• Melody — Enables you to set how the phone informs you of an alarm.
• Volume — Enables you to set tone volume level of alarm.
III. Clear Alarm
From Menu, select Organizer > Alarm > Clear Alarm
(2). Power On
I. From Menu, select Organizer > Power On
Choose ON and set put ON time , and press OK key.
II. From Menu, select Organizer > Power on > Ton es and one of the
following:
• Melody — Enables you to set how the phone informs you of ON music.
• Volume — Enables you to set tone volume level of ON music.
(3). Power Off
I. From Menu, select Organizer > Power Off
Choose Power Off and set off time , and press OK key.
II. From Menu, select Organizer > Power Off > Clr Pwr off to clear
power off setting
(4). Calculator
The calculator adds, subtracts, multiplies, divides digits.
© Mobicom Corp. 2005 www.mobicomcorp.com
Page 37
Mobicom 2189
Note: This calculator has limited accuracy and is designed for simple calculations.
I. From Menu, select Organizer > Calculator
II. In the calculator screen, enter the fi rst number in the calculation.
Press the # key for a decimal point if necessary.
III. To perform an arithmetic calculation, select Options to cycle through
Equals, Plus, Minus, Divide By, Multiple By.
IV. For an arithmetic calculation, enter the second number in your calculation and select Equals.The completed calculation appears in the display.
(5). Calendar
The Calendar function allows the user to view a calendar through December 2049.
From Menu, select Organizer > Calendar
Current date, week, and month are displayed
Note: Date checking ranges from 31st. Jan. 1900 to 31st. Dec. 2049
(6). Global Time
This function provides you conveniences to consult the local time of major cities in the world, in order to better control the time during business
trip and travel.
From Menu, select Organizer > Global Time
you can select the city you want to view.
(7). Games
Two games, Four In A Row and Tetris, are available in this model.
From Menu, select Organizer > Games > Four In A Row or Tetris.
Basic Operations
37
©Mobicom Corp. 2005 www.mobicomcorp.com
© Mobicom Corp. 2005 www.mobicomcorp.com
Page 38
Basic Operations
38
Mobicom 2189
7. Extra Features (1). Shortcuts
In idle Mode:
Up Arrow Key: Keypad Tone Setting and Ring Tone Setting. You can set
them Normal or Slient.
Down Arrow Key: Phone Book menu
Left Arrow Key: Messages menu
Right Arrow Key: Call History menu
(2). Key Lock and Unlock
To lock the keypad: Select Menu and then press key
To unlock the keypad: Select Unlock and then press key.
© Mobicom Corp. 2005 www.mobicomcorp.com
*
*
Page 39
FCC notice and SAR sTATEMENT
Mobicom 2189
FCC Notice and SAR STATEMENT
This device complies with part 15 of the FCC Rules. Operation is subject to the following two conditions: (1)
This device may not cause harmful interference, and (2) this device must accept any interference received,
including interference that may cause undesired operation.
Any changes or modifi cations not expressly approved by Mobicom will void the user’s authority to operate
the equipment. Use only Mobicom approved chargers.
Note: This equipment has been tested and found to comply with the limits for a Class B digital device,
pursuant to part 15 of the FCC Rules. These limits are designed to provide reasonable protection against
harmful interference in a residential installation. This equipment generates, uses, and can radiate radio frequency energy and if not installed and used in accordance with the instructions, may cause harmful interference to radio communications. However, there is no guarantee that interference will not occur in a particular
installation. If this equipment does cause harmful interference to radio or television reception, which can be
determined by turning the equipment off and on, the user is encouraged to try to correct the interference by
one or more of the following measures:
• Reorient or relocate the receiving antenna.
• Increase the separation between the equipment and receiver.
• Connect the equipment into an outlet on a circuit different from that to which the receiver is connected.
• Consult the dealer or an experienced radio/TV technician for help.
39
©Mobicom Corp. 2005 www.mobicomcorp.com
© Mobicom Corp. 2005 www.mobicomcorp.com
Page 40
FCC Notice and SAR sTATEMENT
40
Mobicom 2189
THIS PHONE MODEL HAS BEEN CERTIFIED TO BE IN COMPLIANCE WITH THE GOVERNMENT’S
REQUIREMENTS FOR EXPOSURE TO RADIO WAVES.
Before a phone model is available to sale to the public, it must be tested and certifi ed that it does not exceed
government limits for exposure to radio frequency (RF) energy. Specifi c Absorption Rate (SAR) is a value
that corresponds to the relative amount of RF energy absorbed by the user of a wireless phone. The Federal
Communications Commission of the United States government and Health Canada set SAR limits. The
limits include a safety margin designed to assure the safety of all persons, regardless of age and health.
The maximum allowed SAR value set by the FCC is 1.6 W/kg. Tests for SAR values are conducted using
FCC approved operating positions at the highest possible power levels. Although the SAR is determined at
the highest certifi ed power level, the actual SAR level of the phone while operating is likely well below the
maximum value.
The highest SAR values as reported to the FCC for this model phone are in full compliance with FCC limits.
For more information about RF exposure, visit the FCC website at www.fcc.gov. Additional information on
Specifi c Absorption Rates (SAR) can be found on the Cellular Telecommunications & Internet Association
(CTIA) website:
http://www.ctia.org/wireless_consumers/health_and_safety/index.cfm
or the Canadian Wireless Telecommunications Association (CWTA) website: http://www.cwta.ca
© Mobicom Corp. 2005 www.mobicomcorp.com
Page 41
Mobicom 2189
Warranty statement
Warranty Statement & Card
41
Please read the warranty
statement and send the
completed warranty card
back to Mobicom.
©Mobicom Corp. 2005 www.mobicomcorp.com
© Mobicom Corp. 2005 www.mobicomcorp.com
Page 42
Warranty Statement & Card
42
Mobicom 2189
Mobicom ONE-YEAR LIMITED WARRANTY Statement
Mobicom warrants to the original purchaser (“Purchaser”) that Mobicom’s Phones and accessories (“Products”) are free from defects
in material and workmanship under normal use and service for the period commencing upon the date of purchase and continuing for
the following specifi ed period of time after that date:
Phone: 1 year
Battery, Charger, and other accessories: 6 months
1. The limited warranty extends only to the Purchaser of the Product and may not be assigned or transferred to any subsequent
purchaser or user. The limited warranty extends only to Product purchased in the country for its intended sale.
2. Upon request from Mobicom, Purchaser must prove the date of the original purchase of the Product by a dated bill of sale or dated
itemized receipt showing the serial number of the product and the seller’s name and address.
3. During the limited warranty period, Mobicom will repair or replace the Product, as Mobicom determines, if its limited warranty applies. Mobicom will be responsible for parts and labor to repair or replace the Product or defective parts of the Product.
4. The limited warranty does NOT cover defects in appearance or any parts that do not affect the Product functions.
5. The Purchaser shall bear the cost of shipping the Product to Mobicom or to Mobicom’s authorized return center. Mobicom shall bear
the cost of shipping the Product back to the Purchaser after completion of service, provided that repairs were required to be performed
under this limited warranty.
6. Mobicom’s limited warranty does NOT apply if any of the following circumstances occurs:
• The Product has been subjected to abnormal use or conditions, improper storage, exposure to moisture or dampness, unauthorized
modifi cations, unauthorized connections, unauthorized repairs, misuse, neglect, abuse, accident, alteration, improper installation, or
other acts that are not the fault of Mobicom. This includes damage caused by shipping.
• The Product has been damaged by external causes such as liquid, water, collision with an object, or from fi re, fl ooding, sand, dirt,
windstorm, lightning, or exposure to weather conditions; theft; blown fuse or improper use of any electrical source; computer or Internet viruses, bugs, worms, Trojan Horses, cancelbots; or connection to products not recommended for interconnection by Mobicom.
• Defects or damages are caused by physical damage to the surface of the Product, including scratches or cracks in or to the outside
housing or the LCD display.
© Mobicom Corp. 2005 www.mobicomcorp.com
Page 43
Warranty Statement & Card
Mobicom 2189
• This Limited Warranty covers batteries only if battery capacity falls below 80% of rated capacity or the battery leaks, and this Limited
Warranty does not cover any battery if (i) the battery has been charged by a battery charger not specifi ed or approved by Mobicom for
charging the battery, (ii) any of the seals on the battery are broken or show evidence of tampering, or (iii) the battery has been used in
equipment other than the Mobicom phone for which it is specifi ed.
• You did not advise Mobicom in writing of the alleged defects or malfunction of the Product within fourteen (14) days after the expiration of the warranty period.
• The Product serial number plate or the accessory data code has been removed, defaced, or altered.
7. If damage or a defect develops during the limited warranty period, the Purchaser must take the following step-by-step procedure:
• Return the Product to the place of purchase for repair or replacement. The Purchaser must copy to another device and delete from
the Product any sensitive data that the Purchaser has stored in the Product prior to sending the Product for repair or replacement.
• If return to the place of purchase is not convenient due to distance (more than 50 miles), the Purchaser may contact us:
Mobicom USA Warranty Support Center
630 Margate Drive
Linclonshire, Illinois, 60069
Tel: 1-866-438-4666
• Ship the Product (including the battery and A/C charger), in an appropriate container, prepaid and insured at the Purchaser’s
expense.
• If the Product is covered by Mobicom’s limited warranty, Mobicom will return the repaired or replaced Product to the Purchaser at
Mobicom’s expense.
• Mobicom will repair or authorize the repair of the Product under the limited warranty within 10 business days of receipt of the
Product. If Mobicom cannot perform repairs covered under this warranty within 10 business days, Mobicom will provide a replacement
Product or refund the purchase price.
• If the Product is returned more than fourteen (14) days after the expiration of the limited warranty period, or if the Product is returned
during the limited warranty period, but the problem with the Product is not covered under the terms and conditions of Mobicom’s
limited warranty, Mobicom will so notify the Purchaser and provide an estimate (using Mobicom’s standard rates) of the charges
the Purchaser must pay to repair the Product, including return shipping charges. If you refuse the estimate, Mobicom will return the
Product freight collect.
8. A repaired Product may consist of used components, some of which have been reprocessed. All used components comply with
Product performance and reliability specifi cations.
9. Returning a Product for warranty repair or replacement will not extend the original warranty period.
43
©Mobicom Corp. 2005 www.mobicomcorp.com
© Mobicom Corp. 2005 www.mobicomcorp.com
Page 44
Warranty Statement & Card
44
10. Mobicom’s limit of liability under the warranty shall be the actual cash value of the Product at the time the Purchaser
returns the Product for repair. The cash value shall be determined by the price paid by the Purchaser for the Product less a reasonable amount for usage. Mobicom shall not be liable for any other losses or damages.
11. The remedies set forth in this limited warranty are the Purchaser’s exclusive remedies for breach of warranty.
12. THE FOREGOING LIMITED WARRANTY IS THE PURCHASER’S SOLE AND EXCLUSIVE REMEDY AND IS IN LIEU OF ALL
OTHER WARRANTIES, EXPRESS OR IMPLIED, INCLUDING ANY WARRANTY OF MERCHANTABILITY OR FITNESS FOR A
PARTICULAR PURPOSE OR USE.
IN NO EVENT SHALL Mobicom BE LIABLE FOR SPECIAL, INCIDENTAL, CONSEQUENTIAL OR PUNITIVE DAMAGES, INCLUDING LOSS OF ANTICIPATED BENEFITS OR PROFITS, LOSS OF SAVINGS OR REVENUE, LOSS OF USE OF THE PRODUCT OR
ANY ASSOCIATED EQUIPMENT, LOSS OF DATA, COST OF CAPITAL, COST OF ANY SUBSTITUTE EQUIPMENT OR FACILITIES, DOWNTIME, THE CLAIMS OF ANY THIRD PARTIES, INCLUDING CUSTOMERS, AND INJURY TO PROPERTY, RESULTING FROM THE PURCHASE OR USE OF THE PRODUCT OR ARISING FROM BREACH OF THE WARRANTY, BREACH OF
CONTRACT, NEGLIGENCE, STRICT LIABILITY, OR ANY OTHER LEGAL OR EQUITABLE THEORY, EVEN IF Mobicom KNEW OF
THE LIKELIHOOD OF SUCH DAMAGES. Mobicom SHALL NOT BE LIABLE FOR DELAY IN RENDERING SERVICE UNDER THE
LIMITED WARRANTY, OR LOSS OF USE DURING THE PERIOD THAT THE PRODUCT IS BEING REPAIRED OR FOR LOSS OF
DATA STORED IN THE PRODUCT. SOME STATES DO NOT ALLOW THE EXCLUSION OR LIMITATION OF INCIDENTAL DAMAGES, SO THE ABOVE LIMITATION OR EXCLUSION MAY NOT APPLY TO YOU.
13. Some States do not allow limitations on how long an implied warranty lasts, so the above may not apply to you.
This warranty gives you specifi c legal rights, and you may also have other rights which vary from State to State.
14. This limited warranty is the entire warranty between Mobicom and the Purchaser, and supersedes all prior and contemporaneous
agreements or understandings, oral or written, and all communications relating to the Product. No representative of Mobicom or any
third party seller of Mobicom PRODUCTS may modify these terms, either orally or in writing.
Mobicom 2189
© Mobicom Corp. 2005 www.mobicomcorp.com
Page 45
Mobicom 2189
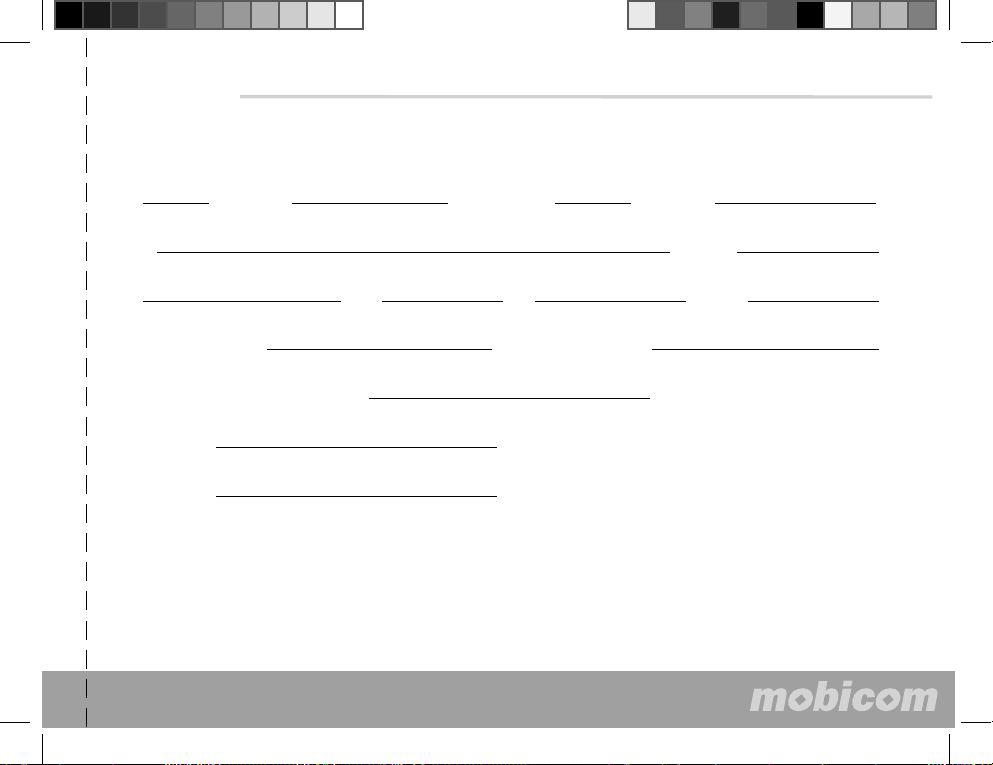
Warranty Card
Title Last NameFirst Name Middle Name
Street Apt. No.
City State Zip Country
Home Phone Number Work Phone Number
Date of Purchase (Month/Day/Year)
Model Number
Serial Number
To register your warranty, please complete this card, tear it off along the
dashed line on the left, and then mail it to:
Customer Service Department
Mobicom Corporation
960 Holmdel Road, Holmdel, NJ 07733
USA
©Mobicom Corp. 2005 www.mobicomcorp.com
© Mobicom Corp. 2005 www.mobicomcorp.com
Page 46

Customer Service Department
Mobicom
960 Holmdel Road,
Holmdel, NJ 07733
USA
 Loading...