

MobiCam DXR Touch User Manual

TABLE OF CONTENTS
!
Introduction 1
Radio Interferece Parameters 1
Package Contents 2
Monitor/Receiver 2
Camera/Transmitter 3
To Sta rt
Charging/Powering On 4
Locking the Screen 4
Set to Another Language 4
Pairing Camera and Monitor 5
Main Menu 6
Touch Navigation
Volume/Display 7
Lullabys 7
Night Light 7
Record 8
Play 9
Quad and Channel View 10
VOX (Voice Activation) 10
Setting
s
Monitor Settings 11-14
Camera Settings 15
Individual Channel & Convenience Icons 16
Webcam Use • Data/File Transfers 17
Audio/Video Out 18
Troubleshooting 18
Factory Default Settings 19
Battery Replacement 20
Product Safety 20
Proper Disposal 21
Limited Warranty 21
Addendum: Focusing Camera Lens 21
About Mobi® / Contact Mobi® 22
INTRODUCTION
!
Congratulations on the purchase of this MobiCam® DXR Touch Monitoring
System, which incorporates the latest advanced technology. To fully maximize and benefit from this product’s avanced features we highly recommend
you review these instructions. This 2.4 GHz Digital monitor enables you to
transmit picture and sound signals cordlessly, which is ideal for many situations suchs as monitoring a baby, young children or the elderly, or used as
office or warehouse monitoring system.
!
IMPORTANT: Use ONLY a fingertip or other NON-SHARP object to select touch screen
options. Using sharp objects can damage the screen and void the warranty.
!
!
RADIO INTERFERENCE PARAMETERS
!
FCC Statement
!
15.19: This device complies with part 15 of the FCC Rules. Operation is subject
to the following two conditions: (1) This device may not cause harmful interference and (2) This device must accept any interference received, including
interference that may cause undesired operation.
15.21: Changes or modifications not expressly approved by the party responsible for compliance could void the user’s authority to operate the equipment.
!
FCC Radiation Exposure Statement
!
This equipment has been tested and complies with Federal Communications
Commission radiation exposure limits as set forth for uncontrolled environments. This equipment should be installed and operated with a minimum
distance of 20cm between the radiator and your body. This Camera must not
be co-located or operating in conjunction with any other antenna or Camera.
This equipment complies with FCC RF radiation exposure limits set forth for
an uncontrolled environment. This device and its antenna must not be co-located or operating in conjunction with any other antenna or Camera. This device has been tested for compliance with FCC RF Exposure (SAR) limits in the
typical laptop computer configuration and this device can be used in desktop
or laptop computers via USB slots. This device and its antenna must not be colocated or operated in conjunction with any other antenna or Camera.
!
IC Statement
!
Operation of this device is subject to the following two conditions: 1. This
device may not cause interference, and 2. This device must accept any interference, including interference that may cause undesired operation of the
device.
!
!
!
A.
A.
B.
B.
!
!
!
!
!
!
C.
C.
!
!
!
!
!
!
D.
D.
PACKAGE CONTENTS
CAMERA
!
• 1 Monitor/Receiver • 1 Camera/Transmitter
• 2 AC/DC Adaptors 5V 800mAh • 1 Li-Ion Rechargeable Battery (for monitor only)
• 1 Attachable Strap Mount • 1 Door/Drawer Hook Attachment
• 1 Wall Anchor Mount with Screw • 1 USB to Mini USB Data Cord
• 1 AV-Out Cable • 1 User Manual
!
!
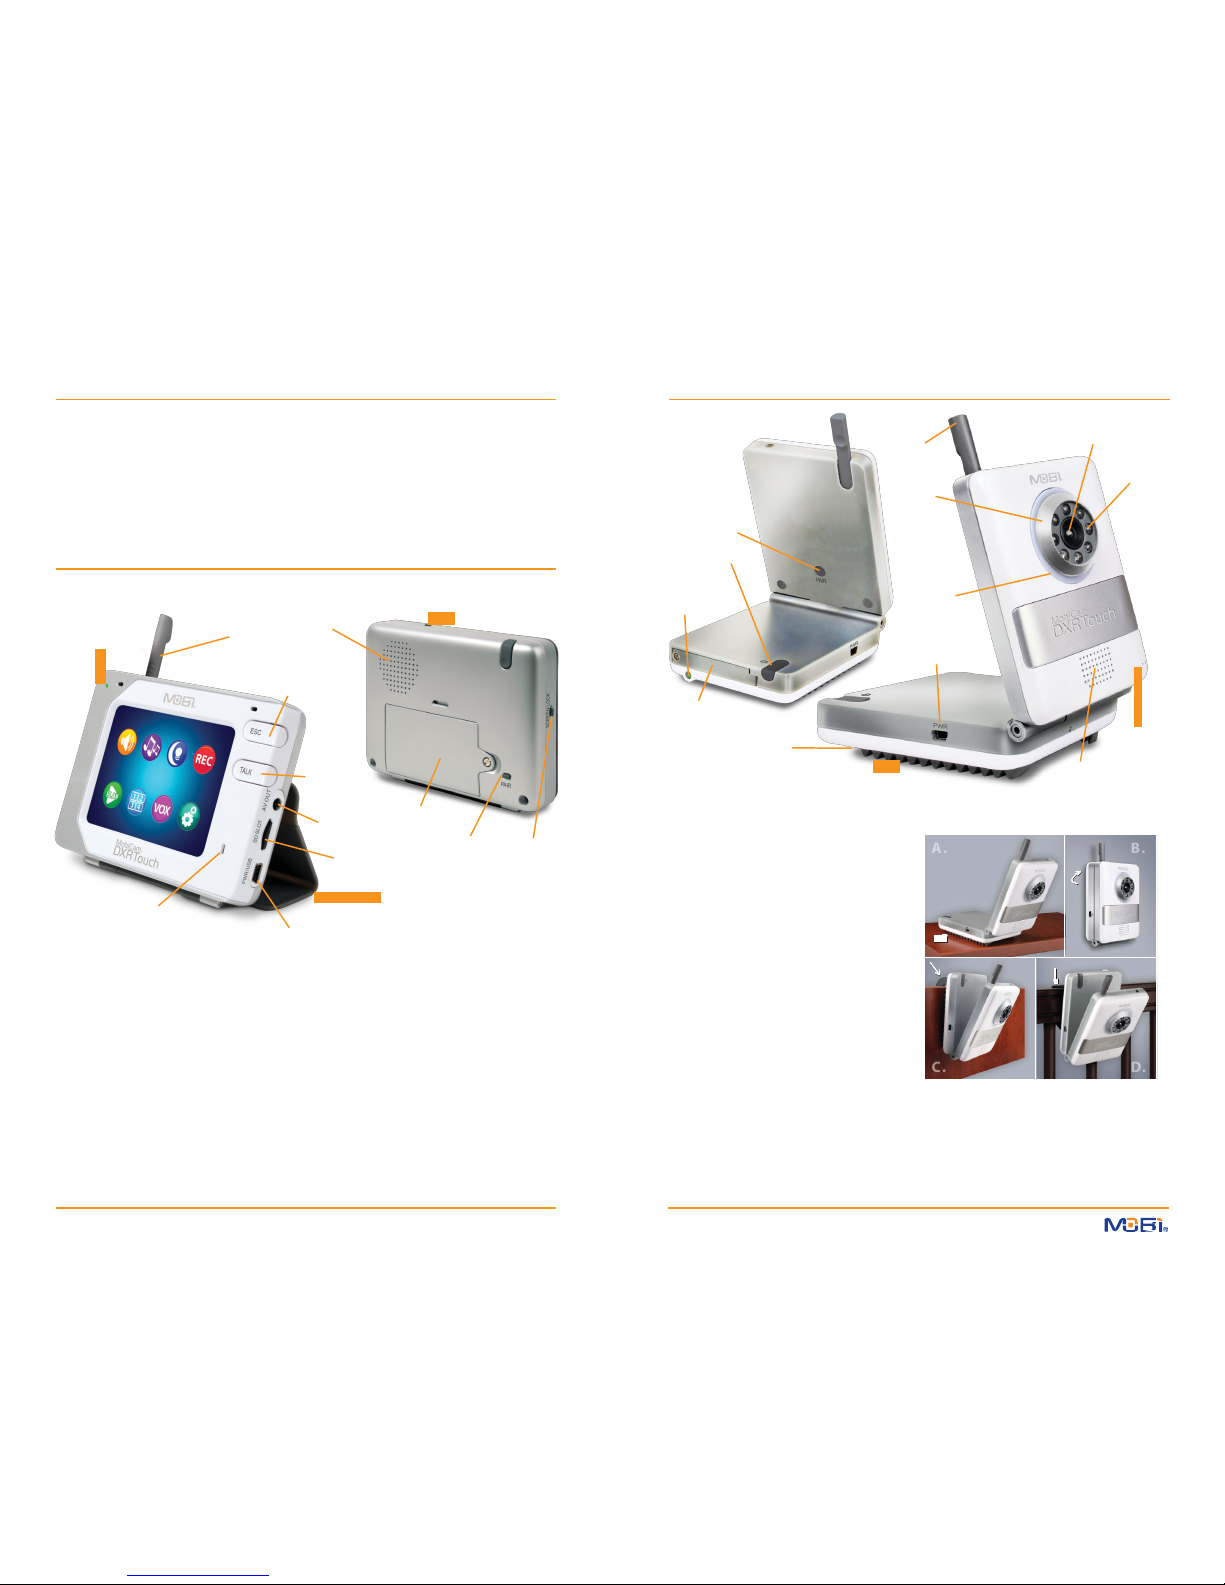
MONITOR
!
!
!
!
!
!
PAIR
Button
!
ON / OFF
Button
!
!
Retractable
Antenna
!
Focus
Ring
(Note: See
Addendum
on page 21
for focusing
instructions)
Camera
Lens
!
Night Vision
IR LEDs
!
!
!
Power ON
LED Indicator
!
!
Retractable
Antenna
!
!
2-Way Talk
Speaker
!
!
ON/OFF
Button
!
Power ON
LED Indicator
!
Night
Light
!
DC Power
Input
!
Escape/Menu
Button
!
!
!
!
!
2-Way Talk
Button
!
!
!
!
!
!
!
Battery
!
Battery
Compartment
Strap Mount
(underneath)
!
!
!
!
Ridge-Grip
Surface Stand
!
!
Microphone
!
2-Way Talk &
Lullaby Speaker
AV
Output
Compartment
PAIR
!
Lock Screen
Camera / Transmitter Unit
features:
SD Card Slot
(card not included)
!
Combo
Button Button
• PAIR Button
• LED for Power ON / Pairing (flashes)
• Microphone & Speaker
2-Way Talk
Microphone
!
!
!
Monitor / Receiver Unit
features:
!
!
DC Power Input /
Mini USB Output
Screen Cover /
Fold-back Stand
• DC Input (AC/DC adaptor included)
• Night Vision
• Temperature Sensor and Alarm
• VOX
(Hi/Mid/Lo/Off
) controlled from receiver
• Adjustable Volume from receiver
• Adjustable TX Power (High-Low) from receiver
• 4 Pre-Recorded Lullaby choices
• 3.5” QVGA resolution TFT touch panel screen
• VGA resolution (640*480) up to 25 frames per
second
• up to 250-300 meter range
• 2-way communication
• MENU/ESCAPE button
• PAIR Button
• A/V Output port
• DC Input (AC/DC adaptor included)
• Two-Color LED: solid green for power on;
flashing red for charging
• Quad-View split screen (up to 4 camera
capability)
• Main Menu with color icon display
• Night Light
• Rechargeable Battery 3.7V 1500 mAh
(not included - sold separately)
• 2.4GHz Digital FHSS, 100% secure with full
privacy and interference free
!
!
!
!
!
Positioning / Mounting Options
• TALK Button
• Lock Screen Button for disabling touch screen
• SD Card Slot up to 32 Gb (not included)
• Mini USB Output port (for connection to a PC
and charging)
• Rechargeable Li-ion Battery 3.7V 1200 mAh
(included for monitor only)
A. Horizontal to Slightly Angled Surfaces - Built-in Ridge-Grip Feet… B. Wall Mount Screw with
Drywall Anchor (included)… C. Door or Drawer Hook Mount / Stand (included)… D. Horizontal
Rails / Drawer Handles - Attachable Strap Mount (included)
!
WARNING: To prevent strangulation never place a power cord within reach of a child.
!
2 3
TO START
!
A. Plug one of the AC/DC adapters (they are interchangeable) into the monitor and allow it to
charge the Monitor Battery for at least 5-1/2 hours.
B. Plug the other AC/DC adapter into the camera. Turn the Camera On by holding the ON/OFF
Button down for several seconds. The green “Power On” Indicator lights when powered up.
C. Turn the Monitor On by holding its ON/OFF Button down for several seconds. Its “Power On”
Indicator will light up (green on battery power, red when charging) and the Mobi logo will
appear on the screen.
D. Press ESC Button to go to the Main Menu.
NOTE: While viewing the Main Menu, if no
buttons are pressed, or the screen is not
touched after 30 seconds, the monitor will
automatically exit the Main Menu mode.
!
!
!
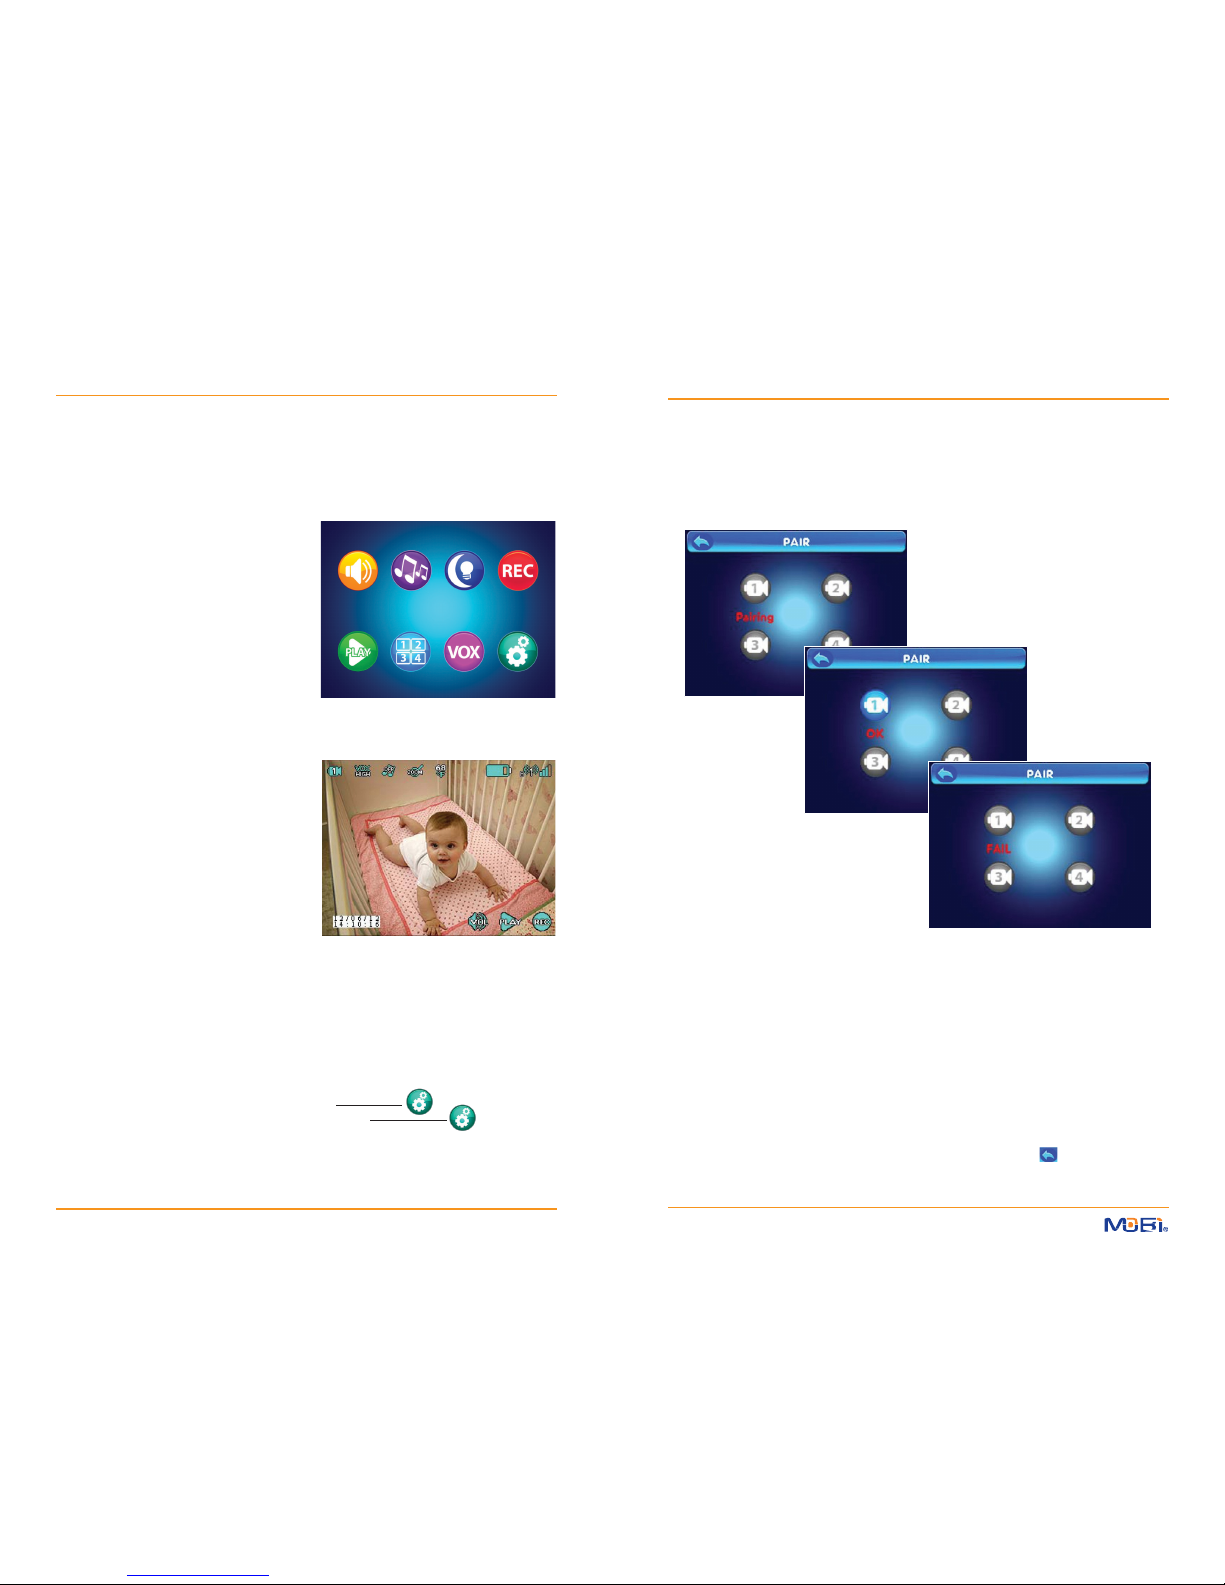
Main Menu
!
!
E. Press ESC Button once again to go to the
Camera View. Along the top and bottom
of the screen, small “Per Camera” Icons (explained on page 16) will appear over the
view from the camera, which should be on
and paired with the monitor.
!
!
!
PAIRING: The monitor and camera are paired (wirelessly linked) by the manufacturer at the fac-
tory. If you ever need to relink the camera, or you want to pair Additional Cameras (sold separately)
you will need to pair each following the steps below:
!
NOTE: Before pairing be sure the camera and monitor are both turned on and both are
within 10 feet of each other.
!
!
!
!
IMPORTANT: Use ONLY
a fingertip or other NONSHARP object to select
touch screen options.
Using sharp objects can
damage the screen and
void the warranty.
!
!
!
Camera View
!
!
!
!
!
!
!
1. Power On the Monitor and Camera
!
2. Press and hold the Pair Button on the back of the Monitor until the “Pair” screen is displayed,
LOCKING THE SCREEN: If you slide the Lock Screen Button a LOCK icon will appear and the
touch-screen function will be disab led. Sliding the Lock S creen Button again will revert it back to
normal touch-screen function.
!
TO SET TO ANOTHER LANGUAGE: The monitor is set to English by default. The
MobiCam® DXR Touch can also display in French, German , Po rt uguese, Spa nish, or
Italia n. To change the language follow these steps: press the ESC Button
touch Setting icon
touch System Setting
touch slider to See More List
select Language from the list
select a new Language
press the ESC Button
then release the button.
!
3. Press and release the Pair Button on the Monitor and selec t a camera number (1-4) to be
paired. The word “Pairing” appears below the icon of the selected camera as it waits to be
paired.
!
4. You have 10 seconds to press and hold the Pair Button on the back of the Camera to com-
plete Pairing, otherwise restart from step 2 above.
!
5. The word “OK” or “Failed” will be displayed on screen. If pairing Failed start again being sure
the camera is on and not too far away.
!
6. When Pairing shows as OK, p ress the ESC Button or the Return icon to go back. To pair
additional cameras repeat the steps above.
!
!
4 5
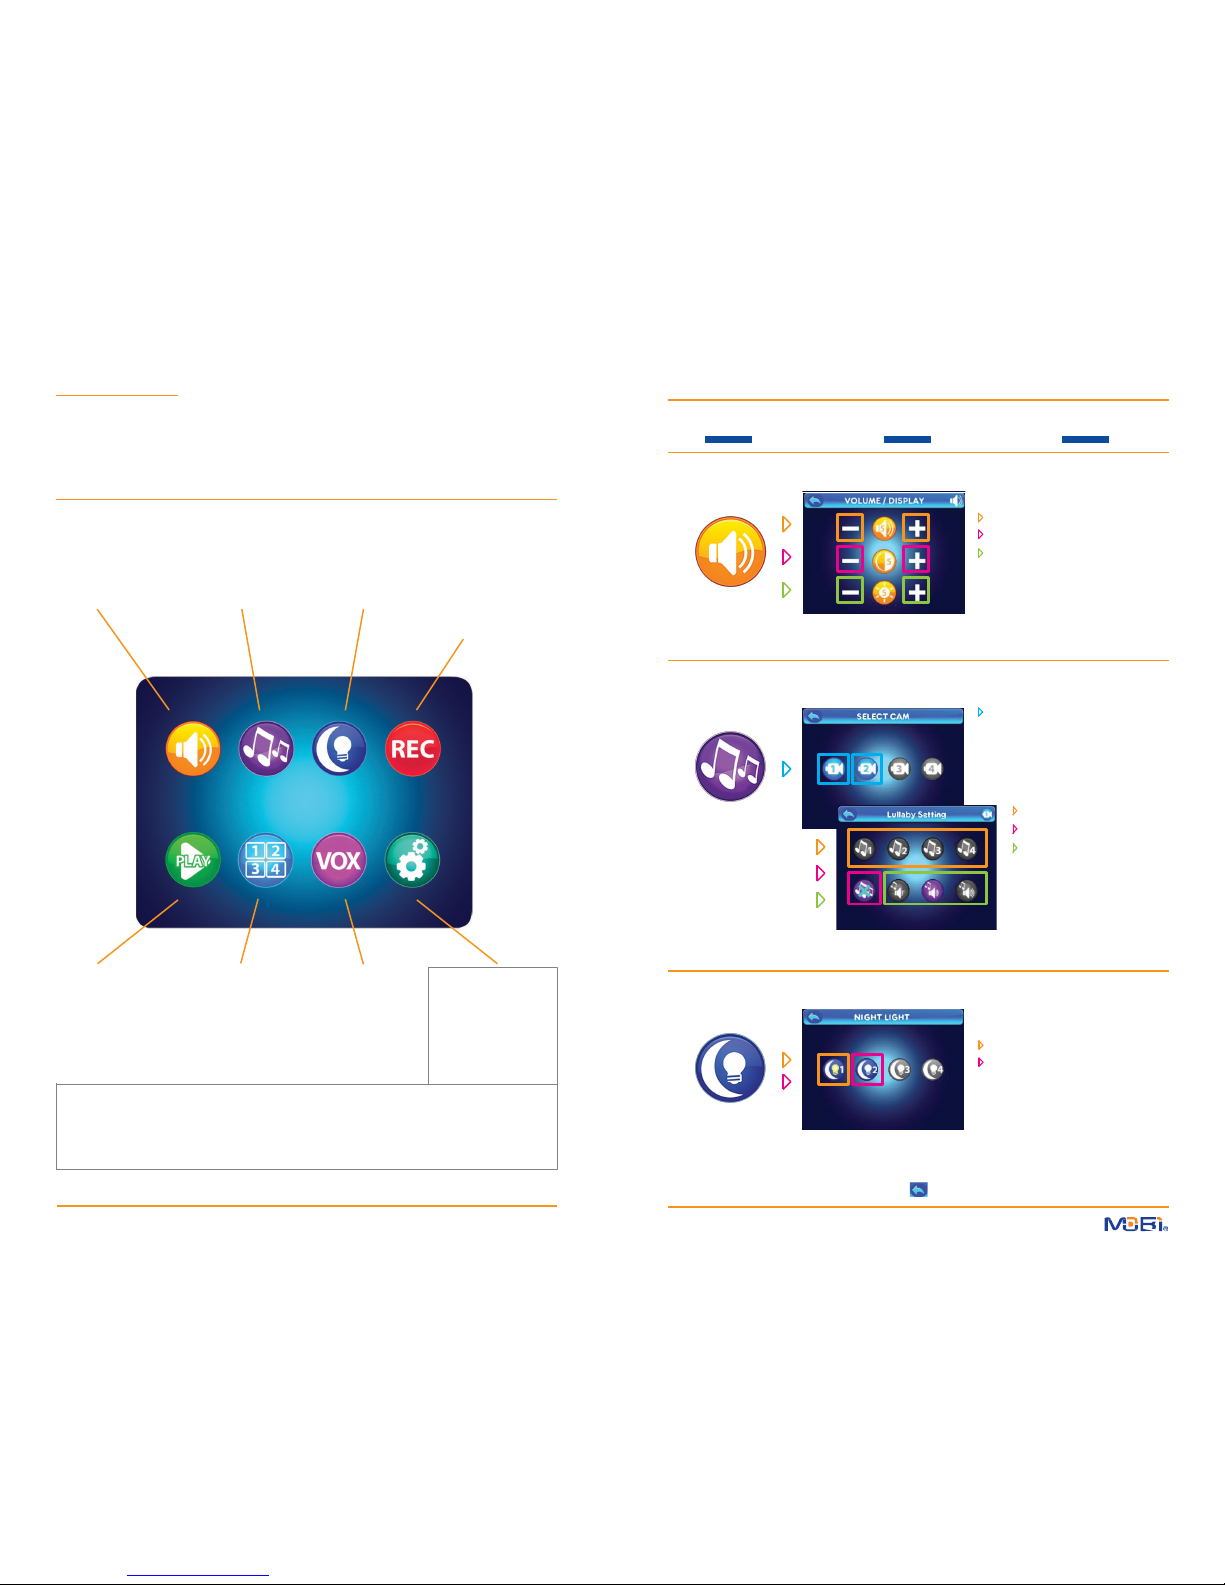
MAIN MENU ... touch the ESC Button to open the Main Menu on screen
TOUCH NAVIGATION ... touch the ESC Button to start at Main Menu
!
!
IMPORTANT: Use ONLY a fingertip or other NON-SHARP object to select touch screen
options. Using sharp objects can damage the screen and void the warranty.
touch a Menu Icon ... to open a Function Screen ... to check or change a Function
!
Touch the appropriate icon t o access all Settings
and Options.
!
!
VOLUME /
DISPLAY
!
touch – or + icons to adjust...
Monitor Volume
VOLUME / DISPLAY
adjust
• Sound Volume
• Screen Contrast
• Screen Brightness
LULLABYS
select
• Camera Number
• Lullaby Choice
• Lullaby Volume
NIGHT LIGHT
select
• Camera Number
• Night Light On
• Night Light Off
RECORD
select
• Take Photo
• Record Video
• Format SD Card
• SD Information
• Time/Date Stamp
!
!
!
!
!
!
!
!
!
!
!
!
LULLA
BYS
Screen Contrast
Screen Brightness
!
!
!
!
!
!
!
!
!
select a Camera...
!
!
!
!
!
select one of four Lullabys
deactivate all Lullabys...
adjust Lullaby Volume
!
!
!
!
!
!
!
!
PLAY
select / play
• Recorded Video
• Recorded Photo
• Delete Files
!
!
SETTINGS
for the Monitor
• Date/Time
• Time Alarm
QUAD / CHANNEL
select
• Quad View
• Specific CAMs
• Switch CAMs
!
!
• Auto Switch Time
• AV Out Format
• Recording Schedule
• Zoom/Pan/Tilt
VOX (Voice Activation)
select
• Camera Number
• VOX On/Off
• Sound Sensitivity
• Auto Record On/Off
!
• Screen Timeout
• Touch Calibration
• USB Output
• SD Card Update
SETTINGS
for the Camera
• Temperature Alarm
• TX Power/Volume
!
!
!
!
• Languages
• Reset to Default
• About / Version
!
!
NIGHT LIGHT
!
!
select a Night Light icon for the
camera you wish to control...
shown with the Night Light ON
shown with the Night Light OFF
!
(the light bulb image in the icon
changes to yellow when ON and
back again when OFF)
!
HINT: To move back one screen touch Return icon or go to camera view by pressing the ESC Button.
!
6 7
 Loading...