

Page 1

T9
FULL COLOR 2.4" LCD DISPLAY
DIGITAL MULTI VIDEO & AUDIO PLAYER
DIGITAL VOICE RECORDER
FM RADIO & FM RECORDER
TOUCH SCREEN
WATCH & ALRAM
0
Page 2

1
Page 3

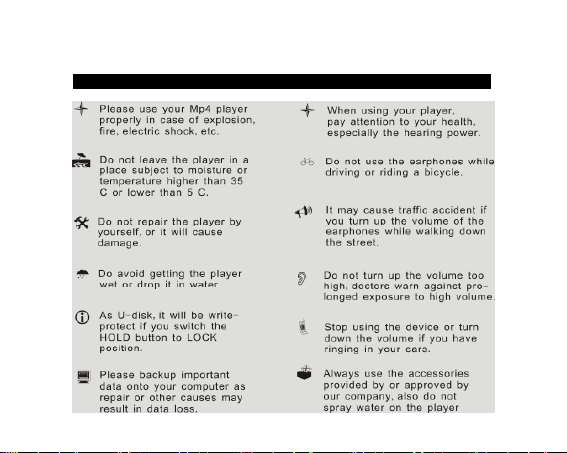
주의사항─ 제품의 올바른 사용 및 물리적 충격으로 인한 위험으로부터
.
마세요
지지
위해 이 사용자 매뉴얼을 주의 깊게 읽어주시기 바랍니다..
안전한 사용을 위해
떨어뜨리거나 강한 충격을 주지 마세요. 제품이 손상 될 수 있습니다.
문제가 있는 상태에서 사용을 계속하면 화재 및 감전의 위험이 있습니다
들어오는 곳이나 난방기구 가까이에 두지 마세요, 제품 폭발의
있습니다.
운전하거나 자전거 또는 오토바이를 탈 때는 이어폰을 사용하지
상태의 손으로 제품을 만지지 마세요.
임의로 분해, 개조하지 마세요
저장된 데이터가 소비자의 부주의로 인하여 손실된 경우, 책임을
. A/S 시 제품 안에 저장된 데이터가 삭제될 수 있습니다.
이나 세척제등은 표면을 변질시키고, 칠을 벗겨지게 하므로 절대
마세요.
높여 장시간 청취할 경우 청력에 문제가 발생할 수 있습니다.
드폰 또는 이어폰이 지하철이나 자동차 문에 끼지 않도록 주의하십시오.
,먼지가 많은 장소는 피하시기 바랍니다.
제품을 사용하는 도중,타는 냄새가 나거나 열이 심하게 날 때는, 당사
센터로 문의하시기 바랍니다.
허가 없이 다른 사람에게 배포하는 것은 저작권법을 위반하는
.
2
Page 4
완료된 후 오랜시간 충전을 지속하지 마십시오. 제품이 손상될
전송을
파우치
이 제품 을 사용 하기 전 충전을 하시기 바랍니다. !
MP3, WMA and WAV 포맷의 음악파일을 지원합니다. .
USB 2.0 을 지원합니다. USB 1.1보다 훨씬 속도가 빨라 컴퓨터와의
보다 빠르게 지원합니다.
목소리 및 FM라디오 녹음을 할 수 있습니다.
반복재생 기능이 있습니다.
비디오재생,그림보기,전자북,슬라이드쇼 기능,기타 기능이 있습니다.
사전시간 설정으로 인해 자동으로 파워를 끄실 수 있습니다.
터치펜을 이용한 터치스크린을 지원합니다.
시계 및 알람 기능을 사용할 수 있습니다.
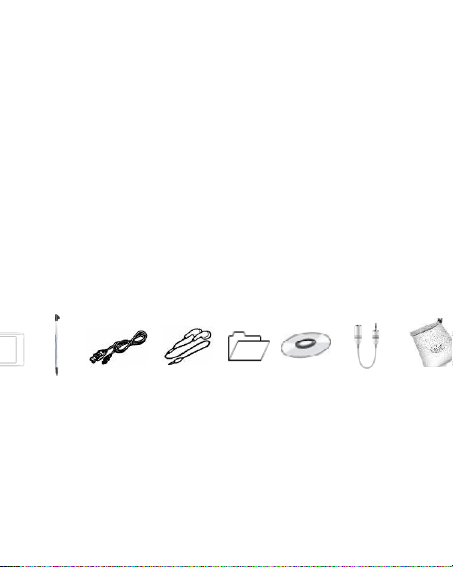
구성
터치펜 USB케이블 이어폰 메뉴얼 시디 3.5변환잭
3
Page 5

버튼기능
/리셋 4. 홀드/파워온/파워오프
-Flash 카드슬롯 8. 이어폰잭 9.터치스크린
2. 볼륨업
6. USB 포트
4
Page 6

기계 충전법
회충전이
메인메뉴로
제공한 USB케이블을 이용해 컴퓨터 USB포트와 연결합니다.
충전을 할 때 움직이는 충전표시가 나타납니다.,
완충이 되면 충전표시가 멈추게 되고, 기계의 파워를 꺼주세요..
대략 2시간정 충전하시면 충전이 완료됩니다.
충전을 멈추고 USB케이블을 빼주세요 .
제품을 처음 사용 하기 전 기계를 충전해 주시기 바랍니다..
제품을 컴퓨터에 연결하여 충전하는 동안 컴퓨터는 켜져 있어야 합니다.
과 충전은 내장 베터리 의 수명을 단축시키게 됩니다.
다른 베터리를 잘못 교체하게 되면 폭발의 위험이 있습니다.
오직 제공 된 베터리 또는 동일한 타입의 베터리를 사용해야 합니다.
제품을 해체하지 마시기 바랍니다. 충격,쇼트 또는 베터리를 태우면
화재,손상또는 다른 위험한 상황을 유발하게 됩니다.
내장 베터리는 소모성 제품입니다., 그래서 기기를 사용을 안해도 년2
필요합니다..
음악듣기
이어폰을 제품이어폰 잭에 연결시킵니다.
【 HOLD】 버튼을 홀드해제 합니다.
【 HOLD】 버튼을 표시부분으로 1초간 당기면 제품이 켜지고
5
Page 7
들어가게 됩니다. (기본 메뉴는 “음악”메뉴).
4. 메인메뉴로 돌아가기: 터치 버튼
음악플레이 : 터치 버튼
멈추기 : 터치 버튼
다음,이전곡: 터치【 】 버튼
제품끄기 : 【 HOLD】 버튼을 표시부분으로 1 초간 당기면 꺼집니다.
알림:
1. 기기에 이상발생시(기기멈춤등) “RESET” 구멍을 가는 물체를 이용하여 눌러
기기를 리셋 시켜주시기 바랍니다.
2. /T-Flash 카드 를 올바른 방향으로 삽입하시기 바랍니다. 어떤 문제가 발생시
제품이 켜진 상태에서 삽입 또는 카드를 빼지 마십시오.
3. LCD 화면이 이상이 있을 경우 다음사항을 따라서 보정하실 수 있습니다.:
제품을 키키전, 【 HOLD 】 버튼을 왼쪽으로 끝까지 당깁니다.
제품로딩화면이 넘어 갈때까지 계속 당기고 있으면 아이콘 나오는
화면보정 화면이 나옵니다. 아이콘을 누르면 화면보정 메뉴가 나타납니다..
“TEST”를 눌러 테스트 화면으로 들어갑니다. 그리고 을 눌러 아이콘이 없어
질때 까지 누릅니다.없어진 후 “EXIT”를 눌러 메인메뉴로 들어갈 수
있습니다.(만약 아이콘이 다 사라지지 않으면 【 HOLD 】 버튼을 왼쪽으로
다시 당기면 보정메뉴로 돌아갑니다.
볼륨조정
음악 , 비디오파일 재생 또는 FM라디오 모드에서 【 】 버튼을 터치또는
6
Page 8
제품위에 【 】 버튼을 눌러 볼륨을 업/다운 시킬 수 있습니다..
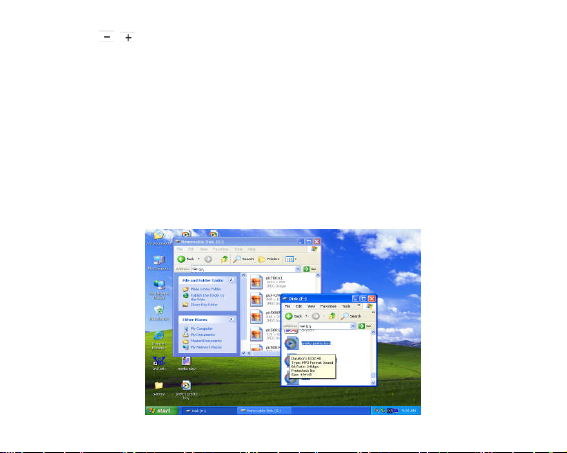
추가/파일삭제/폴더 – 기기를 USB 저장장치로 사용할 수 있습니다.
1. 컴퓨터 USB 포트 와 본제품 USB 포트를 동봉된 USB 케이블을 이용하여
연결시킵니다.
2. 파일추가/폴더 옮기기
Ⅰ . USB 를 연결시킨 후 본 제품에 다운로드 할 파일을 PC 에서 선택하고 마우스
오른쪽 버튼을 이용하여 [복사]를 클릭하세요.
Ⅱ . 복사한 파일을 이동식 디스크에 마우스 오른쪽 버튼을 이용하여 [붙여넣기]를
클릭하세요.
Ⅲ . 파일 업로드 시에는 앞의 과정을 반대로 하시면 본 제품의 파일을 PC 로 저장할
수 있습니다.
7
Page 9

Ⅳ. 본제품은 내컴퓨터 의 하위 드라이브 " 이동식 디스크"로 인식을 합니다 .
Ⅴ. 파일 전송 중에는 절대로 분리하지 마세요.본 제품에 치명적인 오류가 발생할 수
있습니다.
PC 와 본체의 분리하기 –
1. 윈도우 화면 오른쪽 아래의 작업표시줄에 있는 녹색 화살표를 더블 클릭하세요
2. "USB 대용량 저장소 장치"를 선택후 [중지]를 클릭한 후 , [확인] 버튼을
클릭하세요.
3 ."하드웨어 안전제거" 메시지가 나타나면 [닫기]를 클릭하고,USB 케이블을
분리하세요..
주의:
컴퓨터와 연결하여 파일 전송 중에는 제품을 움직이지 미십시오.
파일 전송 중에는 절대로 분리하지 마세요.본 제품에 치명적인 오류가 발생할
수 있습니다.
메뉴 네비게이션
버튼: 하위 메뉴로 들어가기.
스킵버튼【 】 : 이전,다음.
스킵버튼【 】 : 페이지 다운,업.
버튼: 돌아가기/이전메뉴
.
8
Page 10
1. 버튼을 누르면 메인 메뉴로 들어갑니다.
2. 메인메뉴에서 각 모드별 아이콘을 터치하여 원하는 메뉴로
들어갑니다.(음악,파일,보이스,포토,FM,전자북,제품정보 등 )
음악
제품을 켠 후 “음악”아이콘을 터치하여 음악모드로 들어갑니다.
터치 【 】 버튼을 터치하여 음악파일을 고른 후 버튼을 터치하여 재생을
시킵니다..
음악서브메뉴
아이콘을 터치하면 서브메뉴로 들어갑니다. 그리고 아이콘을 터치하여
원하는 모드로 들어갑니다. ( 재생설정, Eq모드, 3D효과, 재생속도,평가,슬라이드쇼
등).
재생설정
1. 재생설정 모드에 들어갑니다.
재생모드를 선택합니다.:
(일반재생,한곡반복,전곡반복,전곡랜덤 ,재생랜덤재생,리스트재생,폴더재생,폴더반복,재
생,폴더랜덤재생)
EQ모드
1. EQ모드에 들어갑니다..
2. 아이콘을 이용해 원하는 옵션을 선택합니다.(노말,팝,록,클래식,재즈,
9
Page 11
베이스,사용자EQ)
사용자 EQ: 【 】 아이콘을 이용하여 원하는 설정을 할 수 있습니다.
3D효과
1. 3D효과 모드에 들어갑니다.
2. 터치펜을 이용하여 원하는 옵션을 선택합니다.(끄기,켜기).
재생속도
1. 재생속도 모드에 들어갑니다.
2. 터치팬을 이용하여 원하는 속도를 선택합니다. (1.00X, 1.14X, 1.33X, 0.67X,
0.80X).
알림 : 음악파일이 WMA포맷일경우 재생속도 옵션이 지원이 안됩니다.
파일
1. 파일모드에 들어갑니다.
2. 터치팬을 이용하여 음악파일을 선택합니다.
3. 아이콘을 눌러 재생파일 리스트에 추가합니다. 아이콘 터치 및
“아니오” 또는 “예”를 선택할 수 있습니다..
4. 아이콘을 터치하여 선택한 파일을 재생할 수 있습니다.
5. 아이콘을 눌러 이전메뉴로 돌아갑니다.
10
Page 12

분류
1. 분류메뉴에 들어갑니다.
2. 터치팬을 이용하여 “아니오”또는 “예”를 선택합니다..
알림:
1. 리스트를 분류하는데 시간이 소요됩니다, 분류를 취소하고 싶을 경우
【 HOLD】 버튼을 방향으로 당기면 됩니다.
2. 분류 후, “분류”메뉴는 “장르”,”가수”,”앨범”,”제목”이 됩니다.
또한 다운로드 한 음악 분류 AP 프로그램을 이용해 , 피시(pc)내에 분류된
데이터베이스 제작 또는 삭제를 할 수 있습니다.
알림: ClassifyMusic_V1.5 는 동본 된 시디 안에 Root\MUSIC 폴더에서 다운로드 할
수 있습니다.
11
Page 13
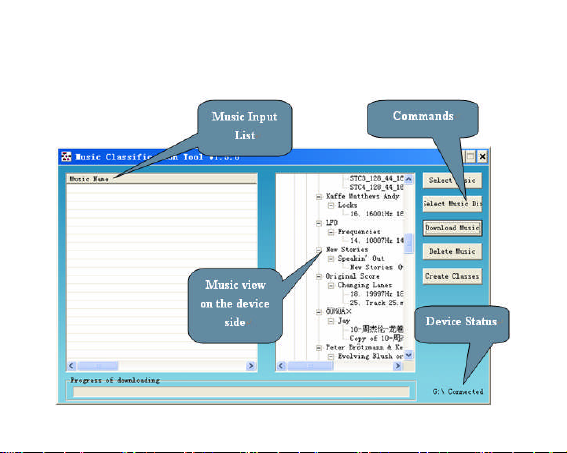
AP 사용방법:
1. 제품을 컴퓨터에 연결합니다.(요구pc사양: Windows 2000, XP, Vista).
2. 시디를 CD드라이브에 넣고, “ClassifyMusic_V1.5” 폴더를 엽니다.
3. “MusicClassify”MFC application 을 클릭하여 아래와 같이 실행합니다.
12
Page 14

4. 제품에 음악파일 다운로드 하기 .
1). “Select Music”을 클릭하여 음악파일 넣기 멍령을 시행합니다.(*.mp3, *.wma
형식).
2). ”Download Music”을 클릭하여 장치 및 제작/선택한 음악 다운로드 명령을
시행하여 장치 및 분류된 데이터 베이스 create/refresh 에 집어넣습니다..
5. “DeleteMusic” 클릭으로 장치 및 분류된 데이터베이스 의 음악파일을 삭제할
수 있습니다. .
알림:
1. “ClassifyMusic_V1.5” AP 는 오직 제품 안의 메모리에 있는 음악파일만 분류
할 수 있습니다.
2. 좀더 세부적인 음악Ap분류는 다음을 참조해주시기 바랍니다.:
CD 디스크 → ”ClassifyMusic_V1.5” fol der→ “Music _ Classification _AP” word
format file.
재생 리스트
“Play List” 를 선택하여 들어가면 재생리스트를 볼 수 있습니다. (My List, *pla, *m3u,
*wpl), 재생리스트 중 한 개의 파일을 열어 터치로 음악파일을 엽니다. 아이콘을
터치하여 그 음악파일을 재생할 수 있습니다..
를 선택하여 음악 파일 중 선택한 파일을 삭제 할 수 있습니다.
알림:
1. 제품 안에 있는 음악파일을 이용해 재생리스트를 만드시기 바랍니다.(except
*pla play list)
13
Page 15

2. 재생리스트 파일들을 (*.m3u or *.wpl) [Root\PLAYLIST] 폴더에 넣으셔야
합니다.;
3. 재생리스트를 열 때 재생중인 음악이 수초간 멈추게 됩니다.
슬라이드쇼
1. ”Slide Show” 를 터치하여 들어갑니다..
2. 아이콘을 터치 하여 시간을 선택합니다. 끄기, 5 초, 10 초, 15 초, 30
초,, 60 초, 그리고 시간선택에 의해 슬라이드쇼가 재생됩니다..
우리의 개인Mp3제품을 위한 슬라이드 쇼를 위해 slide show maker AP프로그램을
이용할 수 있습니다. (제공된 CD를 열면 slide show maker AP프로그램을 찾을 수
있습니다.) .이것은 많은 이미지 파일을 슬라이드 쇼 파일로 변환시킵니다.
슬라이드쇼의 효과는 마치 윈도우 피시에 있는 화면보호 프로그램처럼 보입니다..
유저가 아무것도 시행하지 않는동안 음악파일이 재생될 때 슬라이드쇼 안의
그림파일들이 하나하나 보여집니다.. 슬라이드쇼 중 4가지의 모드(Normal, Shutter
(Left to Right), Shutter (Top to Down), Circle)가 지원됩니다..다른 모드들은 각 다른
비쥬얼한 효과를 나타나게 합니다..
알림: 기기는 하나의 슬라이드 파일만 재생시킬 수 있습니다.그래서 한번에 하나의
SLS파일을 SLS디렉토리 폴더에 넣을 수 있습니다.
14
Page 16
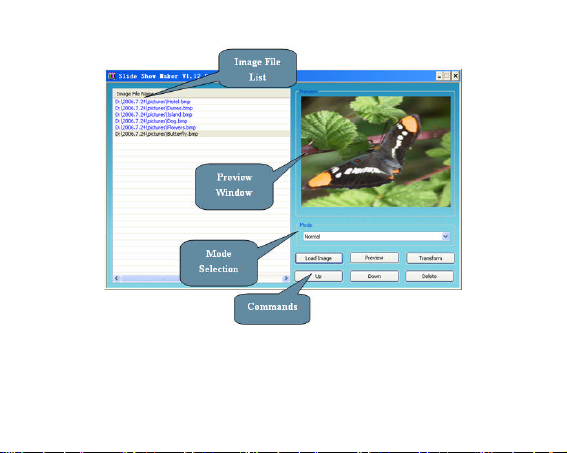
슬라이드쇼 AP 설명:
슬라이드 쇼 만들기
1. 요구시스템:
Windows 2000, XP,Vista
2. AP 사용:
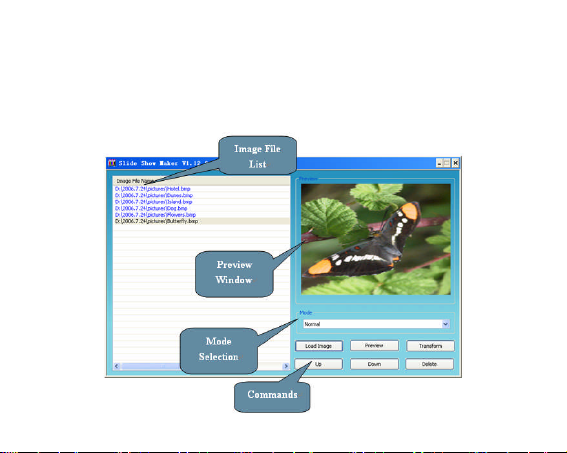
1) “Image File Name List”– 입력한 이미지 파일들이 보입니다..
15
Page 17

2) View of “Preview Window” – 이미지파일들이 슬라이드쇼 효과에 의해
보여집니다.
3) Mode Selection – 4가지 modes: Normal, Shutter (Left to Right), Shutter (Top to
Down), Circle
4) Commandof “Load Image”– 이미지 파일을 입력. (*.jpg, *.gif, *.bmp)
5) Commandof “Preview”– 효과에 의해 슬라이드 쇼를 미리 보기.
6) Commandof “Transform”– 한 개의 슬라이드 쇼 파일로 모든 이미지변환
7) Commandof “Cancel”– 미리보기 또는 파일변환을 취소.
8) Commandof “Delete”– 선택한 파일 삭제.
9) Commandof “Up”– 선택한 파일을 위로 위치.
10) Command of “Down”– 선택한 파일을 아래로 위치.
3. AP 사용방법:
1) 파일을 세팅 합니다.. (LCD사이즈,LCD타입,언어)
2) “Load Image”를 클릭하여 이미지 로드를 시행합니다.(*.jpg, *.gif, *.bmp)
3) 이미지 파일을 관리합니다. ( “Delete”, “Up”,“Down”command)
4) 슬라이드 쇼 모드 및 미리보기 를 선택합니다 : Normal, Shutter (Left to Right),
Shutter (Top to Bottom), Circle.
5) “Transform” 명령을 실행하여 이미지 파일을 SLSL파일로 변환합니다.
알림: 슬라이드쇼 Ap에 대한 자세한 소개는 다음을 참고해 주시기 바랍니다.
: CD 디스크 → ”SlideShowMaker_V1.12.0” 폴더r→ “Slide_Show_Maker_AP”워드포맷
파일
16
Page 18
파일
1. 메인 메뉴에서 “파일” 아이콘을 터치하여 들어갑니다.
2. 스크롤바 를 이용하여 원하는 파일을 선택합니다. ( MTV 파일,
음악파일,그림파일,녹음파일 그리고 TXT 파일, 기타) . 아이콘으로 선택
및 폴더에 들어갑니다.
3. 아이콘을 터치하여 삭제 메뉴로 들어간 다음, “아니오”또는 “예”를 눌러
확인합니다.
4. 아이콘을 눌러 이전메뉴로 돌아갑니다.
녹음
1. 메인 메뉴에서 “녹음”아이콘을 터치하여 메뉴로 들어갑니다.
2. 【 】 아이콘을 이용하여 녹음파일을 선택하고, 를 눌러 원하는
녹음파일을 재생합니다.
3. 아이콘을 눌러 녹음을 시작합니다.
4. 아이콘으로 멈추고, 아이콘으로 녹음파일을 저장합니다.그리고
아이콘을 눌러 재생을 할 수 있습니다.
5. 재생모드중 를 눌러 서브메뉴로 들어갑니다.(반복,EQ,3D효과,재생속도,파일)
이 부분은 음악재생 서브메뉴 부분을 참고하시기 바랍니다.
6. 아이콘으로 메인 메뉴로 돌아갑니다.
7. 알림: 음악,녹음 또는 FM 라디오 모드에서 아이콘을 눌러 녹음할 수
있습니다.
17
Page 19
그림
1. 메인메뉴에서 “그림”아이콘을 터치하여 들어갑니다.
2. 그림파일 터치 및 스크롤바를 이용하여 원하는 그림파일을 선택합니다.그리고
아이콘을 눌러 그림을 크게 봅니다..
3. 그림화면을 3 초안에 다시 터치하거나, 브라우저 상에서 하나하나 선택할 수
있습니다.. 【 HOLD 】 버튼을 방향으로 밀어 그림파일 리스트로 다시
돌아갈 수 있습니다..
4. 그림파일을 고르고 아이콘을 눌러 삭제합니다.
5. 아이콘을 눌러 메인 메뉴로 돌아갑니다.
알림:
1. 기기는 JPEG (Bestline & Progressive mode) 또는 BMP 포멧 이미지 파일을
지원합니다.
2. 만약 JPEG 파일이 썸네일을 가지고 있다면, 그림리스트 의 미니쳐를 볼 수
있습니다.
FM라디오
1. 메인 메뉴에서 “FM 라디오”메뉴를 터치 선택하여 들어갑니다., 아이콘으로
“Normal” 그리고 “Preset” 모드로 변환합니다..
2. “Normal” 모드에서 【 】 아이콘을 터치하여 FM 주파수 87.5MHz
~108MHz(At intervals of 0.1 MHz), 를 맞춥니다. 아이콘을 눌러 서브메뉴로
들어갑니다.:주파수 저장, 자동스캔
3. “Preset” 모드에서 【 】 아이콘을 눌러 미리 저장된 주파수를 맞춥니다.
18
Page 20

주파수 (총 30 개의 저장소), 그리고 아이콘으로 서브메뉴에
들어갑니다.:삭제,자동스캔
4. You can touch 아이콘을 터치하여 FM 라디오를 녹음할 수 있고 아이콘을
눌러 FM 녹음파일을 저장합니다.
5. 를 눌러 메인 메뉴로 돌아갑니다.
알림:
FM라디오를 튜닝 하는 동안 스피커를 키면 이어폰잭에 이어폰 연결이 필요합니다.
셋업
1. 메인메뉴에서 “셋업”아이콘을 터치로 들어갑니다.
2. 아이콘을 이용해 서브메뉴를 선택합니다.: USB 모드,시간
설정,전원설정,언어설정,화면설정,녹음설정,시스템도구,메모리선택,스피커
3. 를 눌러 이전 메뉴로 돌아갑니다.
USB 모드
USB모드 선택 (MSC 모드 또는 MTP 모드) 후 확인합니다.
알림:MTP모드에서 T-Flash카드를 사용한다면,, 먼저 카드를 삽입해야
합니다.그리고 컴퓨터와 연결합니다, 그렇지 않으면 컴퓨터는 인식을 못합니다..
시간:
터치를 이용해 “시간” 메뉴를 선택하고, 다음 아이콘을 선택합니다.: “조정”, 알람”,
“시간대 설정”.
19
Page 21
조정:
1. “조정” 모드를 선택하여 들어갑니다..
2. i아이콘을 선택하여 시간 및 (시간,분) 날짜(년,월,일)를 조정합니다..
알람:
“알람”아이콘을 터치하여 메뉴로 들어갑니다. 그리고 “조정” 메뉴에 들어가
아이콘을 이용하여 알람시간을 조정합니다. ,켜기/끄기 모드로 들어가 알람을 끄기
또는 킵니다..
알림:
1. 꺼짐모드에서 알람시간은 60s 입니다. 버튼을 이용해 알람시간을 취소할
수 있습니다.
2. 켜짐모드 에서 알람시간은 5s입니다. 또한 버튼을 이용해 알람시간을
취소할 수 있습니다.
시간대설정:
터치로 “시간대설정”모드에 들어갑니다.그리고 아이콘을 이용해 시간대를
설정합니다.
전원설정
1. “전원설정”모드를 선택하여 들어갑니다.,”자동꺼짐”또는 “재생중항상켜짐”을
선택할 수 있습니다.
2. 아이콘을 터치하여 선택합니다.: 15분,30분,60분,90분,120분,닫기
3. “재생중항상켜짐”을 선택하고 “예”또는 “아니오”를 선택할 수 있습니다.
20
Page 22
언어
“언어”모드를 터치로 선택 들어갑니다. 아이콘으로 기기의 사용할 언어를
선택합니다.:
영어,프랑스어,독일어,이탈리아어,스페인어,포루투칼어,러시아어,중국어,한국어,일본어
화면설정
1. “화면설정”을 터치로 들어가면., “밝기”또는 “”조명”을 선택할 수 있습니다.
2. 【 】 아이콘을 이용해 화면밝기 또는 화면조명 시간을 설정합니다.(15
초,30초,1분,닫기).
알림: 기본밝기는 최대로 세팅되어 있습니다. 【 】 아이콘을 이용해 조정하면
됩니다.
녹음
“녹음” 모드에 들어가서 “녹음품질”을 선택합니다.:저품질,일반품질,고품질
시스템도구
시스템 도구에 들어갑니다. 아이콘을 이용하여 메뉴를
선택합니다.:삭제,포멧,리셋, 갱신,파일정렬
삭제:
“삭제”메뉴로 들어가서 아이콘으로 파일을 선택 후 아이콘을 누른후
“예” 또는 “아니오”를 선택할 수 있습니다..
포멧:
“포멧”을 터치로 선택한후 “빠른포멧” 또는 “느린포멧”을 선택할 수 있습니다. .
21
Page 23

리셋:
“아니오” 또는 ”예”를 선택합니다,
갱신:
1. “갱신”을 터치로 들어간 후 “아니오:또는 “예”를 선택할 수 있습니다.
2. 만약 “예”를 선택하면 갱신이 시작되고, 취소하려면 【 HOLD 】 버튼을
방향으로 밀면 됩니다.
파일정렬:
“Force Sort” 또는 “Auto Sort”를 선택합니다.
메모리선택:
터치로 T-Flash 메모리 카드를 선택할 수 있습니다. (화면에 체크 중이라 표시..)
스피커 r
스피커를 “끄기” 또는 “켜기”모드로 선택할 수 있습니다.
알림:
1. 기기의 기본 스피커 모드는 꺼짐입니다.
2. 음액재생,FM라디오모드 중에 또한 아이콘을 터치하여 스피커를 키건, 끌 수
있습니다.
비디오
비디오파일을 재생시키기 위해 다음과같이 시행해야 합니다. 반듯이, 비디오파일을
MTV 포맷으로 바꾸어야 합니다.
1. MTV Video Converter
22
Page 24
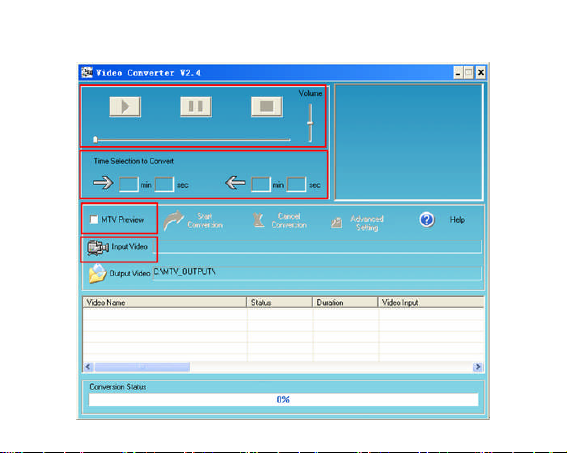
1. 시디를 넣고 “VideoConverter_V2.9” 폴더에 들어갑니다.
2. “VideoConvert” 툴을 클릭하고 아래의 설명그림을 따라합니다.
23
Page 25
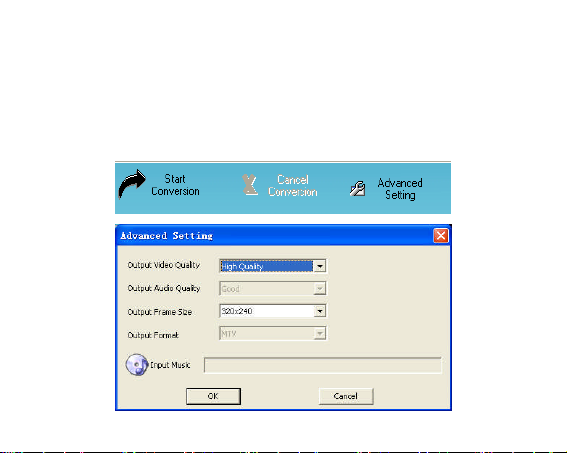
사용법:
1. “Input Video” 클릭 하여 기기에 재생하고 싶은 비디오 파일을 선택합니다.
2. “Advanced Setting” 에서 “Output Video Quality” (Include High Quality, Normal
Quality, Medium Quality, Low Quality). 를 선택합니다. 즉 변환할 때, 재생파일의
퀄리티를 설정합니다.(높음,일반,중간,낮음)
3. “Output Frame Size”( Advised is 320x240) 선택합니다.
4. 기본 “OutputAudio Quality” 는 Good입니다.
24
Page 26
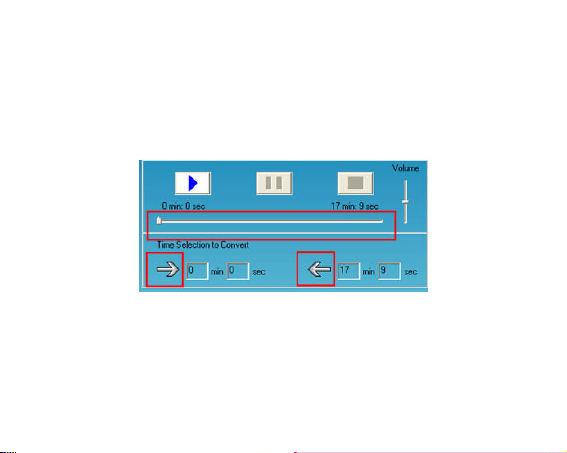
5. MTV video converter 는 오디오파일을 비디오클립에 배경음악을 삽입할 수
있습니다.이작업을 하기 위해, “input mucic”버튼을 선택 ,그리고 비디오
클립에 사용될 배경음악을 선택합니다.
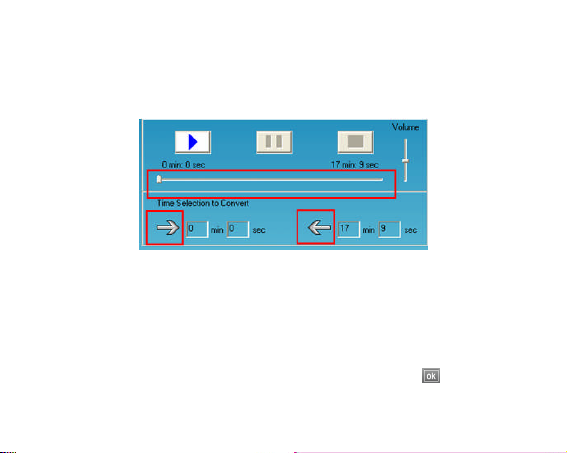
6. MTV video converter는 전체의 클립보다 선택한 비디오 클립 부분을
변환시킵니다. 이 작업을 위해 스크롤바를 끌고 시작시간과 끝나는 시간을
설정해 줍니다.
전체파일을 변환하려면 스탭7로 가십시오.
7. 비디오 파일 변환을 위해 “Start Conversion” 버튼을 클릭합니다.
2. MTV 비디오파일 재생
1 메인 메뉴에서 “비디오” 아이콘을 터치하여 들어갑니다.
25
Page 27

2 터치펜을 이용하여 원하는 비디오파일을 선택후, 아이콘을 눌러 재생 .
3. 터치펜을 이용하여 화면을 클릭하면 하단부분에 재생메뉴가 나옵니다. “M”을
누르면 서브메뉴로 들어가집니다. : 반복,비디오 OSD,비디오 OSD 칼라
반복:
터치펜으로 선택할 수 있습니다.: 일반재생,, 한번반복,모두반복,랜덤반복,
폴더재생,폴더반복,폴더랜덤재생
비디오 OSD 칼라:
Video OSD 칼라 아이콘을 선택합니다.: icon by touching it:
홍색,녹색,파란색,청색,노란색,회색.
4. 를 터치하여 재생또는 멈춥니다., 또한 아이콘을 터치하여 볼륨을
조정할 수 있습니다. 【 HOLD】 버튼을 방향으로 밀면 비디오 재생파일
리스트로 돌아갑니다.
5. 기기안에 저장되어 있는 비디오 파일을 하나 선택한 후 아이콘을 눌러
삭제메뉴로 들어가면 “예”,또는 “아니오”메뉴를 선택할 수 있습니다.
6. 를 눌러 이전메뉴로 돌아 돌아갑니다.
EBOOK
1. 메인 메뉴에서 “EBOOK” 아이콘을 터치하여 들어갑니다.
2. 터치펜 을 이용하여 원하는 파일을 선택 후 아이콘을 눌러 파일을 엽니다.
3. 저장되어 있는 파일 하나를 선택 후 c 아이콘을 눌러 삭제할 수 있습니다..
4. 를 눌러 이전메뉴로 돌아갑니다.
아이콘으로 이전,또는 다음페이지를 볼 수 있습니다.
26
Page 28

알림: the E-BOOK 은 오직 .TXT 파일만 지원합니다.
시스템정보
메인 메뉴에서 “시스템정보”아이콘 을 터치하여 들어갑니다. 그러면 시스템
정보를 보실 수 있습니다. 펌웨어 버전,남은 메모리 용량, 전제 메모리 용량 등
USB 드라이브 인스톨
알림: 윈도우98se 운영체제 컴퓨터 상에서 USB 디스크를 인스톨 하실 때 먼저
기기를 컴퓨터에서 분리 시켜 주십시오.
1. Win98 운영체제 에서 wi98용 드라이브 인스톨 하기
(1) 시디 드라이브를 컴퓨터에 넣습니다.
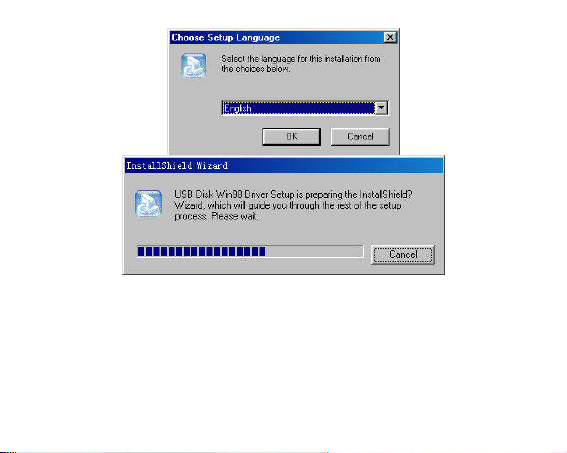
(2) Win98 드라이버를 더블 클릭하여 셋업 을 시작합니다.
(3) 언어를 선택 후 “OK”를 눌러 다음단계로 넘어갑니다.(기본언어를 선택해
주세요).
27
Page 29
28
Page 30
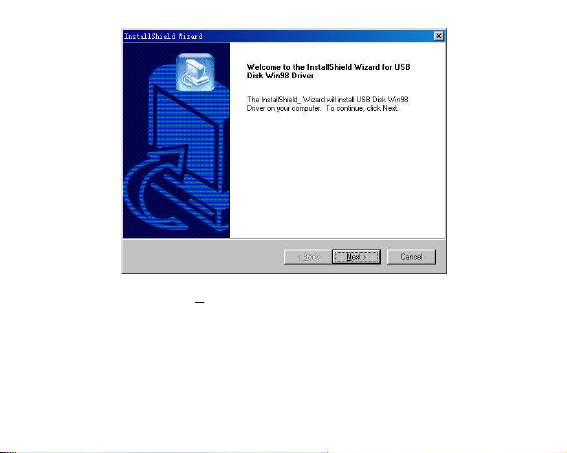
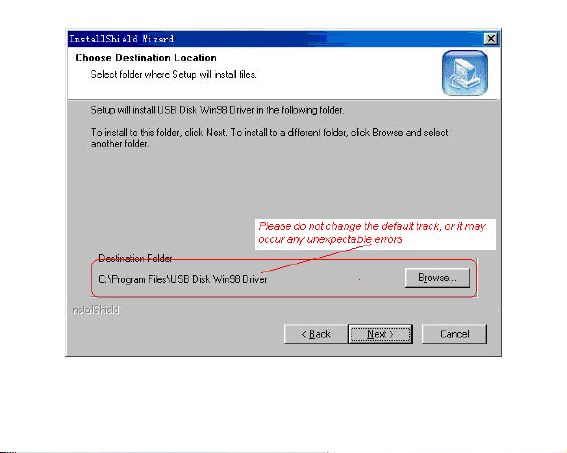
(4) “Next>”버튼을 눌러 다음단계로 넘어갑니다.
29
Page 31
30
Page 32
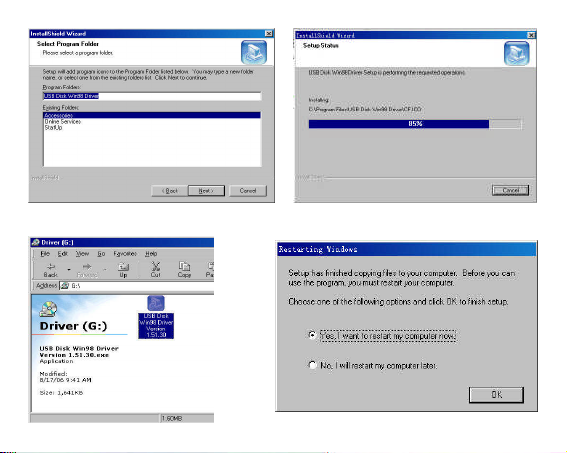
(5) 설치를 마치고 컴퓨터를 재부팅 해주세요 그러면 인스톨이 완료되고, 기기를
연결하여 사용할 수 있습니다.
31
Page 33
2. 기기 포멧 하기
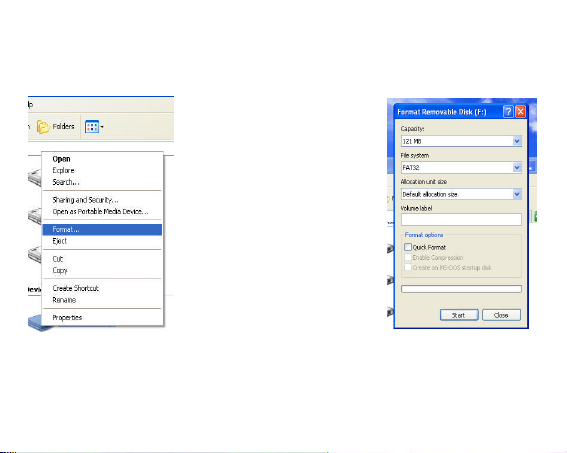
이 기기는 “FAT”포멧 입니다. 기기를 포맷하기 원하면 내 컴퓨터에서
USB드라이브를 선택 후 오른쪽 마우스 버튼을 누르면 “포멧” 메뉴가 나옵니다,
시작을 눌러 포멧 하시면 됩니다.
알림
기기를 사용 하기 전 【 HOLD】 버튼을 “언락:홀드해제” 해주시기 바랍니다.
비가 많이 내릴 때는 되도록 사용하지 마십시오.
Attention should be drawn to the environmental aspects of battery disposal.
32
Page 34

제품에 동본 된 USB 케이블을 사용하여 컴퓨터에 연결하여 사용하시기
바랍니다.
Can’t identify the sixth and above sixth level of directory.
동본 된 시디 의 내용물은 다음의 백신소프트 의해 검사되었습니다.:
Norton Antivirus VER:15.0.0.58
Kaspersky VER:7.0.0.125
PC-Cillin VER:16.00.1671
McAfee VirusScan Plus VER:12.0
Symantec Antivirus VER:10.0.1.1000
33
Page 35
제품사양
번호 항목 사양
메모리용량
1
USB 인터페이스
2
LCD 화면
3
내장베터리
4
5 S/N ratio
오디오 주파수범위
6
이퀄라이저
7
지원파일 형식
8
FM 라디오
9
파일 시스템
10
동작온도
11
동작습도
12
Ver:1.1 736-MP553I111
T-Flash 카드(~2G),
Build-in Flash Memory,.(512M~8G)
USB2.0 (High Speed)
2.4’TFT(320x240)
Li-Polymer (650)
≥ 85dB
20Hz – 20kHz
NORMAL, POP, ROCK,CLASSIC, JAZZ, BASS,
Custom EQ
MP3 and WMA, MTV, BMP and JPEG
87.50 ---- 108.00MHz(Normal)
30 개 주파수 저장지원
FAT16, FAT32
5OC ----35OC (41OF---95OF)
10%— 75%
34
Page 36
A/S
● 제품 A/S 센터 연락처 : WWW.MOBIBLU.COM
1588-3950 모비블루 A/S 센터
● 제품 교환 및 환불 정책(제품 이상시와 소비자 과실시 구분)
: 제품 이상시 수리 및 교환 가능.
그러나 소비자 과실 시 소비자는 적정 수리비를 부담하여야 함.
● A/S 처리 관련 주소
본사 : 대구시 동구 동호동 352-2 모비블루 AS센터/
전화 1588-3950
서울AS센터 : 서울시 광진구 구의동 546-4번지 테크노마트 5층 A-48호
전화 02-3424-5421/5556
B 급기기
(가정용 방송통신기기)
이 기기는 가정용(B 급)으로 전자파적합등록을 한 기기로서 주로
가정에서 사용하는 것을 목적으로 하여, 모든지역에서 사용할 수
있습니다.
35
Page 37

36
Page 38
T9
FULL COLOR 2.4" LCD DISPLAY
DIGITAL MULTI VIDEO & AUDIO PLAYER
DIGITAL VOICE RECORDER
FM RADIO & FM RECORDER
TOUCH SCREEN
WATCH & ALRAM
37
Page 39

38
Page 40
For your safety ─ Read this user guide carefully to ensure proper
use of the product and to avoid any danger of physical damage.
Use Safely
39
Page 41
Note: Please recharge the digital player before using it!
Function features
The player supports MP3, WMA and WAV format music files. Including WMA files
with DRM (Digital Rights Management) function.
Support USB 2.0 capability, much faster than USB 1.1, to enable faster
communication with your PC.
The player can record outside voice and FM radio.
The player has repeat functions.
The player has Video Playback, Photo Viewer, E-book, slide show functions, etc.
The player can power off automatically after a preset time.
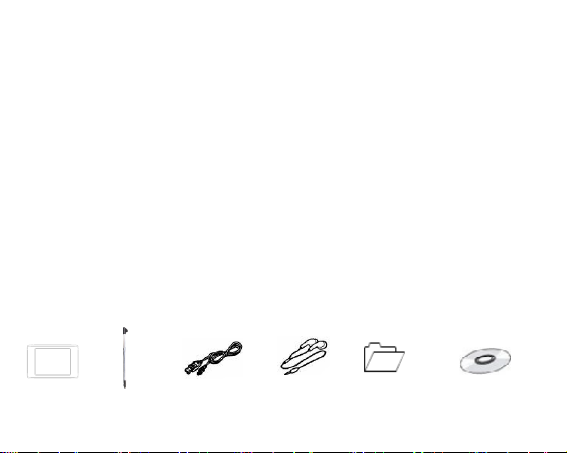
Accessories
Player Touch pen USB Cable Earphones User Guide Installation CD
40
Page 42
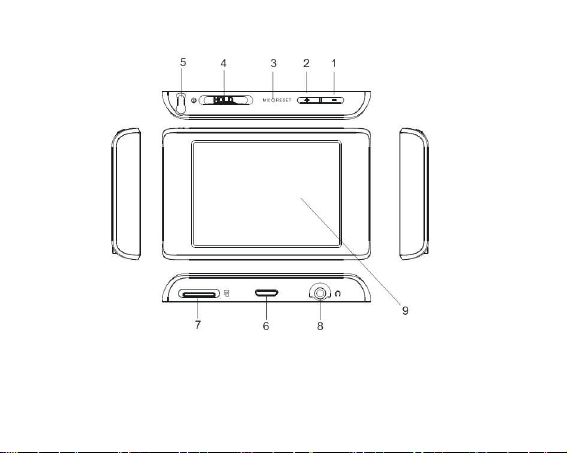
Components and Button functions
2. Volume up
Power on/off
1. Volume down
3. Microphone/RESET button 4. HOLD button/
5. Pencil vase 6. USB port
7. Micro SD/T-Flash card slot 8. Earphone jack
9. Touch screen
41
Page 43

Charging Li –polymer battery safely
4. Connect the PC USB port and the player USB port with the provided USB cable.
5. The power sign is shown dynamic when charging, once full charged, the power
sign will stop moving, power is full, please shut off the power. The charging time is
approximately 2 hours.
6. To stop recharging, disconnect the USB cable.
Notes
Before your first time use, please recharge your digital player.
Your computer must be turned on while connected to your player for charging.
Do not overcharge your player, or it may shorten the battery’s life.
CAUTION
4. Danger of explosion if battery is incorrectly replaced. Replace only with the same
or equivalent type.
5. Do not disassemble, crush, short-circuit or incinerate your battery as it may cause
fire, injury,burns, or other hazards.
6. The li-polymer battery is consumptive material, so recharge it semiannually is
needed even if the player is not be used.
Basic operations
Turn power on and play music
5. Connect earphone to earphone jack.
6. Switch【 HOLD】 button to unlock position
7. Slide and holdthe【 HOLD】 button in the direction of to turn power on and enter
main menu (the default menu is “Music”menu).
8. To return main menu: touch button.
42
Page 44
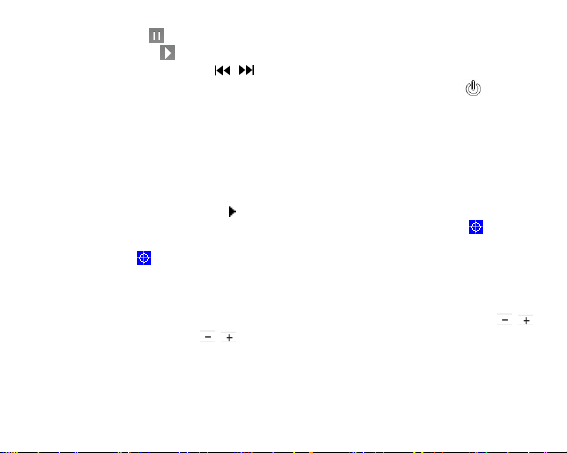
To Play: touch button.
To Pause: touch button.
To change tracks: touch【 】 button
To turn unit off: Slide and hold the【 HOLD】 button in the direction of .
NOTE:
4. Please reset your player by pressing the RESET hole while failing to power on or
hanging up in power on mode.
5. Please insert Micro SD/T-Flash card as the indicated direction, in case of
happening anything wrong, do not insert or pull out the card while power on.
6. If the display is insensitive, you can calibrate it as follows: before power it on,
Slide and hold the【 HOLD 】 button in the opposite direction of the arrow until
enter into calibration interface, touch “Calibration”to enter and touch icon as
the order of appearance. Secondly, touch “Test”to enter into test interface, and
then touch icon in the display until all the icons disappear, so you can touch
“Exit”to enter into main menu.
VolumeAdjustment
InAudio playing, playback video files, ortuning FM radio mode,you can touch【 】
icons in the display or press【 】 button on the top of the player to turn down/turn up
the volume.
Adding/Removing files/Folders – you can use the player as a removable USB storage.
3. Connect the PC USB port and the player USB port with the provided USB cable.
4. Add files/folders to the USB storage‘sfolder.
43
Page 45
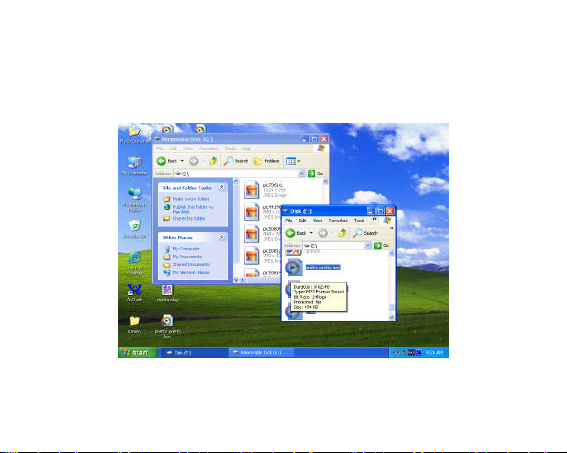
Ⅰ . Open files/folders to transfer from your computer.
Ⅱ . Open My Computer → Removable Disk from the desktop.
Ⅲ . Select the files/folders to transfer from your computer and draw and put them to a
folder of your choice in the Removable Disk (you also can transfer files on your PC to the
player using the "Copy" and "Paste" functions).
5. Delete files from the removable USB storage (use the "Delete" command).
44
Page 46
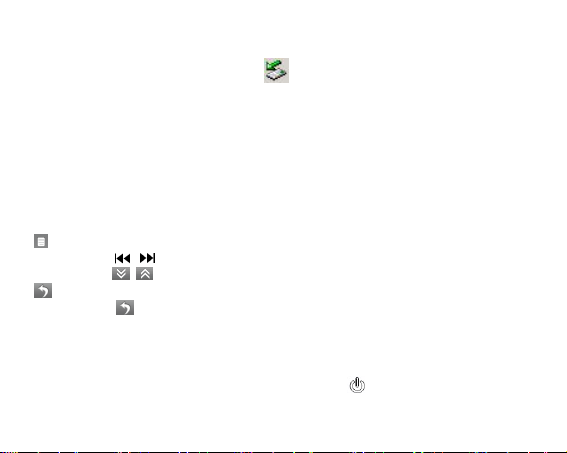
Remove the player from PC – please follow the steps in case of damaging the player or
data loss.
1. Click the left mouse button on the icon that is on the taskbar at the bottom
right corner of the desktop.
2. Click the "Safely remove USB Mass storage Device – Drive (X:)" column.
3. Disconnect the player from your computer.
CAUTION:
Do not remove the player while files within the USB Mass Storage are being
played on your computer.
Do not disconnect the player from your computer while transferring files and do
not press any button, or it will cause damage to the player or data loss.
Menu Navigation
button: Enter submenu.
Skip button【 】 : Shift menus.
Skip button【 】 : Shift pages.
button: Return /previous menu
3. Press button to return to main menu.
4. Touch the icons to enter into your desired option (e.g. MUSIC, FILE, VOICE,
PHOTO, FM, SETUP, VIDEO, EBOOK, Sys Info).
MUSIC
Slide and hold the【 HOLD】 button in thedirection of to turn unit on andenter main
menu, then select “Music”icon and enter the music mode by touching it.
45
Page 47
Touch 【 】 button to select music files and touch button to playback it.
Music Playback Submenu
Touch icon to enter into submenu and touch icons to switch page and
select your desired mode (e.g. Repeat, Equalizer, 3D, Play Rate, File, Classified, Play
List, Slide Show).
Repeat
2. Select Repeat mode and touch it to enter.
3. Select and touch the repeat mode: No Repeat, Repeat One, Repeat All, Random
All, Folder Normal, Folder Repeat, Folder Random).
Equalizer
3. Select Equalizer mode and touch it to enter.
4. Touch icons to switch page and select your desired option (e.g. Normal,
Pop, Rock, Classic, Jazz, Bass, Custom EQ).
Custom EQ: youcan setup theEQ as your opinion,just need to touchthe【 】 icons.
3D
3. Select 3D mode and touch it to enter.
4. Use the touch pen to select your desired option (e.g. Off, On).
Play Rate
3. Select Play Rate mode and touch it to enter.
4. Use the touch pen to select your desired speed (e.g. 1.00X, 1.14X, 1.33X, 0.67X,
0.80X).
NOTE: If the audio file is WMA format, it does not support “Play Rate” mode.
File
6. Select File mode and touch it to enter.
46
Page 48
7. Use the touch pen to select the music files.
8. Touch icon to add your selected files to the play list, touch icon and you
can select: “NO" or “YES”.
9. Touch icon to playback your selected file.
10. Touch icon to return to previous list.
Classified
3. Select Classified mode and touch it to enter.
4. Use the touch pen to select “No”or “Yes”.
NOTE:
3. It will take longer time to build classify list, or you can slide【 HOLD】 button in the
direction of to cancel the classify process.
4. After classify, the “Classified” menu will appear “Genre”, “Artist”, “Album”, “Title”
lists.
You also can use Music Classification AP to download, create or delete music
classification database on PC.
NOTE: ClassifyMusic_V1.5 will download music files into Root\MUSIC folder
automatically.
AP Usage Step:
5. Connect your player to the PC (Require the PC operating system: Windows 2000,
XP, Vista).
6. Put CD disk into the CD driver and open “ClassifyMusic_V1.5”folder.
7. Click “MusicClassify”MFC application.
47
Page 49
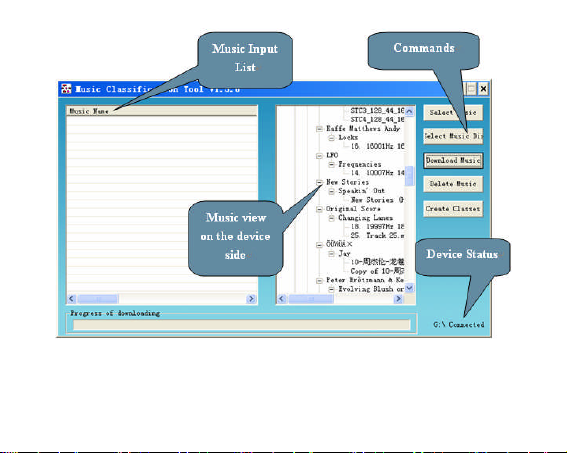
8. Download music files to the player.
1). Click “Select Music”command to input music files (*.mp3, *.wma formats).
2). Click ”Download Music”command to download selected music into the device and
create/refresh music classification database.
48
Page 50
5. Click “Delete Music”command to delete music files on the device side and create
/refresh music classification database.
NOTE:
3. The “ClassifyMusic_V1.5”AP only can classify music files within the internal flash;
4. About the detailed introduction to the Classify Music AP, please refer to: CD disk
→ ”ClassifyMusic_V1.5”folder→ “Music _ Classification _AP”word format file.
Play List
Touch “Play List”to enter and you can see the play list (My List, *pla, *m3u, *wpl), open
one of the play list and select the music files by touching it, then you can touch icon
to playback it.
You can touch to select to delete the play list or the music file.
NOTE:
4. Please build the play list (except *pla play list) based on the device’s music files;
5. You must put the play list files (*.m3u or *.wpl) into [Root\PLAYLIST] folder;
6. The music playback will pause for several seconds while opening a play list.
Slide Show
3. Touch ”Slide Show”to enter.
4. Touch icons to switch page and select the time: Off, 5 Seconds, 10
Seconds, 15 Seconds, 30 Seconds, 60 Seconds, and it will playbackslide show file
after playback music for the selected time.
You can use slide show maker AP (open the provided CD and you will see the slide
show maker AP) to make slide show files for our portable audio player chip. It transforms
many images files into single slide show file. The effect of the slide show is like the
window protection program on PC Windows. When a music file is played for a while and
end users do not haveany actions, the pictures inthe slide show file will be displayedone
49
Page 51
bye one. Four (Normal, Shutter (Left to Right), Shutter (Top to Down), Circle) modes of
the slide show are supported. Different modes show different visual effects.
NOTE: The player just can playback one slide show file, so put one SLS file into the
SLS.DIR folder at one time.
Slide Show AP Usage:
50
Page 52

Make Slide Show
1. Required System:
Windows 2000, XP,Vista
2. APOperation:
1) Viewof “ImageFile Name List”– Show all image input files.
2) Viewof “PreviewWindow”– Show an image file or the effects of the slide show
3) Mode Selection – Four modes: Normal, Shutter (Left to Right), Shutter (Top to
Down), Circle
4) Commandof “Load Image”– Input image files. (*.jpg, *.gif, *.bmp)
5) Commandof “Preview”– Show the effects of the slide show.
6) Commandof “Transform”– Transform all image input files to single slide show file.
7) Commandof “Cancel”– Cancel preview or transformation.
8) Commandof “Delete”– Delete selected image files in the image file name list.
9) Commandof “Up”– Move the selected image file up in the image file name list.
10) Command of “Down” – Move the selected image file down in the image file name
list.
3. APUsage Step:
1) Setconfiguration files. (Panel Size, Panel Type, Language)
2) Click “Load Image”command to load Images (*.jpg, *.gif, *.bmp)
3) ManageImage File Name List (Using the “Delete”, “Up”, “Down”command)
4) Select a mode of the slid show & Preview: Normal, Shutter (Left to Right), Shutter
(Top to Bottom), Circle.
5) Click “Transform”command to transform the images into SLS file.
NOTE: About the detailed introduction to the slide show AP, please refer to: CD disk
→ ”SlideShowMaker_V1.12.0”folder→ “Slide_Show_Maker_AP” word format file.
51
Page 53
FILE
5. In main menu, select “File”icon and enter by touching it.
6. Slide the scroll bar and select your desired file (including MTV files, music files,
photo files, recorded files and TXT files, etc) . you can select the folder and enter
by touching icon.
7. Touch icon to enter “Delete”menu, and select “No”or “Yes” and touch it for
confirm.
8. Touch icon to return previous menu..
VOICE
8. In main menu, select “Voice”icon and enter by touching it.
9. Touch【 】 to choose the recorded files, and touch to playback your
desired recorded file.
10. Touch icon to start recording.
11. Touch icon to play or pause, touch icon to save the recorded file, and
touch to playback it.
12. Whilst in playback mode, touch to enter into submenu (e.g. Repeat, Equalizer,
3D, Play Rate, File). this part please refer to <music playback submenu>
13. Touch to return to main menu.
14. NOTE: In music, voice or FM mode, you can touch icon to record.
PHOTO
6. In main menu, select “Photo”icon and enter by touching it.
7. Touch the photo files or slide the scroll bar to choose your desired photo file, and
touch the photo icon or touch icon to scan it.
52
Page 54
8. Touch the screen again to browse all photos at interval of 3 seconds, or touch the
screen to browse one by one. Slide the【 HOLD 】 button in the direction of to
return to photos list.
9. You can select one of the photo files and touch icon to delete it.
10. Touch icon to return to main menu.
NOTE:
3. The player supports JPEG (Bestline & Progressive mode) and BMP format
image files.
4. If the JPEG image files has thumbnail, you can see their miniatures in
PHOTO list.
FM
6. In main menu, select “FM”icon and enter by touching it, then touch icon to
switch between “Normal”and “Preset”mode.
7. In “Normal”mode, touch【 】 icons to tune FM frequency between 87.5MHz
and 108MHz(At intervals of 0.1 MHz), then touch icon to enter submenu: Save
Preset, Auto Scan.
8. In “Preset”mode, touch【 】 icons to select the preset stations (Total 30
preset stations), and touch icon to enter submenu: Delete, Auto Scan.
9. You can touch icon to start recording FM stations, and touch icon to save
the FM recorded file.
10. Touch to return to main menu.
NOTE:
If you open the speaker while tuning FM radio, you also need to connect the earphones
to earphones jack.
53
Page 55
SETUP
4. In main menu, select “SETUP”icon and enter by touching it.
5. You can touch icons to switch page and enter the submenu by touching
the icon: USB Mode, Time, Power, Language, Display, Record, Sys Tools,
Storage, Speaker.
6. Touch to return to previous menu.
USB Mode
Select USB Mode (MSC mode or MTP mode) and touch it to confirm.
NOTE: If using Micro SD/T-Flash card in MTP mode, you must insert the card firstly then
connect with PC, or the PC will not identify it.
Time:
Enter the “Time” menu by touching it and touch the relevant icon to select: “Adjust”,
“Alarm”,“Time Zone”.
Adjust:
3. Select “Adjust”mode and enter by touching it.
4. Touch icons to adjust time (hour, minute) and date (year, month, day).
Alarm:
Select “Alarm” mode and enter by touching Alarm icon, and touch “Adjust” to enter,
then adjust the alarm clock time by touching icons , touch On/Off mode to turn off
or turn on the alarm clock,.
NOTE:
3. In power off mode, the alarm clock time is 60s, you can press to cancel the
alarm clock;
54
Page 56
4. In power on mode, the alarm clock time is 5s, you also can press to cancel
the alarm clock.
Time Zone:
Select “Time Zone”mode and enter by touching it, then touch icons to setup the
time zone.
Power
4. Select “Power” mode and enter by touching it, then you can touch to select: “Auto
off”or “Always on while playing”.
5. You can touch icons and select: 15 Minutes, 30 Minutes, 60 Minutes, 90
Minutes, 120 Minutes, close.
6. You can touch “Always on while playing”icon and select: No, Yes.
Language
Select “Language”mode and enter by touching it, then you can touch icons and
select the system language by touching it: English, French, German, Italian, Spanish,
Portuguese, Polish, Russia. CHI (Simp), CHI (Trad).
Display
1. Select “Display” and enter by touching it, then touch “Brightness” or “Backlight”
menu to enter.
2. Touch【 】 icons to setup screen brightness or set screen backlight time (15
Seconds, 30 Seconds, 1 Minute, Close).
Note: the default brightness is maximum, you can press【 】 button to adjust it.
55
Page 57
Record
Enter “Record”mode by touching it and touch “Quality”to select: Long Time, Normal
Quality, High Quality.
Sys Tools
Select “Sys Tools”and enter by touching it, then you can touch icons and
touch the relevant icon: Delete, Format, Reset, Refresh, File Sort.
Delete:
Select “Delete”and enter by touching it, touch icons and select the files, then
touch icon and then you can select “No”or “Yes”.
Format:
Select “Format”and enter by touching it, then you can touch to select “Quick”or
“Complete”.
Reset:
Select “No”or “Yes”to decide if you will restore the default setting.
Refresh:
3. Select “Refresh”and enter by touching it, then you can touch to select “No”or “Yes”.
4. If you select “Yes”, it will start to refresh, and you can slide【 HOLD 】 button in the
direction of to cancel the process.
File Sort:
You can touch to select “ForceSort”or “Auto Sort”.
Storage
You can touch it to select Internal or Micro SD/T-Flash, (the LCD will display:
Checking… ).
Speaker
56
Page 58

You can touch and select speaker “Off”or “On” mode.
Note:
1. The player default speaker mode is off while power on.
2. Inaudio playing, tuning FM radio mode, you also can touch icon in the display to
turn on or off the speaker.
VIDEO
In order to play video files in this digital player, you must change the video files into
MTV format.
7. MTV Video Converter
1. PutCD disk into the CD driver and open “VideoConverter_V2.9” folder
2. Click “VideoConvert”tool, as following picture shows:
57
Page 59
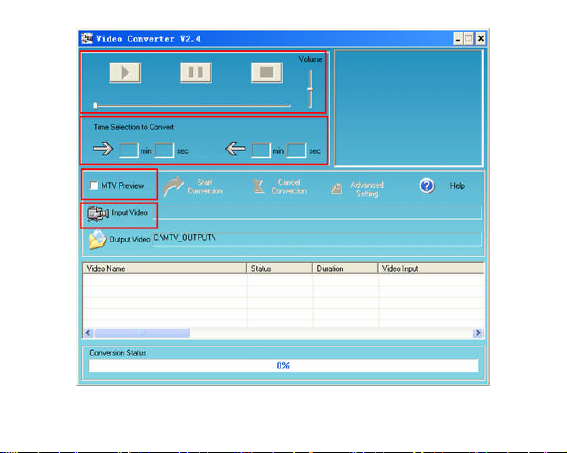
Usage steps for conversion:
6. Click “Input Video”column to select the video file you wish to convert for use on the
58
Page 60
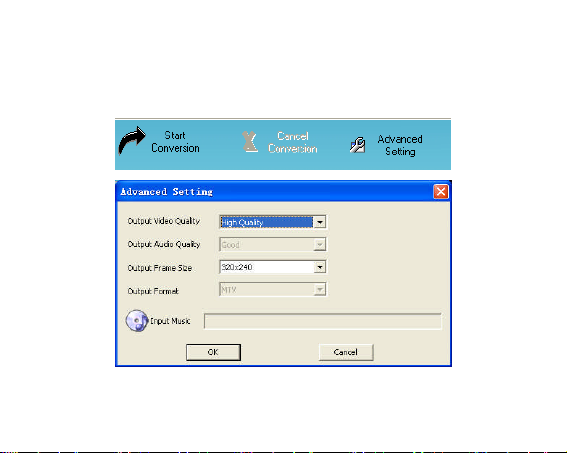
digital player.
7. Select the “Advanced Setting”and setup the “Output Video Quality” (Include High
Quality, Normal Quality,Medium Quality,Low Quality).
8. Select “Output Frame Size”(Advised is 320x240)
9. The default “Output Audio Quality”is Good.
10. MTV video converter allows the user to replace the video clip audio track with an
audio file of their own choice.To do this, select the “Input Music”button and choose
59
Page 61
a music file to replace the original background audio of the input video clip.
icon to playback
(Go to 6. if you want to keep the original audio of the video input clip.)
6. MTVvideo converter allows the user to convert a segment of the selected video clip
rather than the whole clip. To do this, drag the scroll bar and click the arrowhead on
the front of the starting time and the finish time.
To convert the whole input video file, go straight to step 7
To proceed with the conversion process simply deselect the “MTV Preview”
checkbox and go to step 7.
7. Click “Start Conversion”button to convert video file.
8. Play MTV Video files
3 In main menu, touch “Video”icon to enter the mode.
4 Use the touch pen to select your desired file, then touch it or
it.
9. Use the touchpen to click the screen, the menu will display inthe bottom, touch M
60
Page 62
to enter into the submenu: Repeat, Video OSD Color,
Repeat:
You can use the touch pen to select: No Repeat, Repeat One, Repeat All, RandomAll,
Folder Normal, Folder Repeat, Folder Random.
Video OSD Color:
Select Video OSD Color icon by touching it: Red, Green, Blue, Cyan, Yellow, Gray,.
10. Touch to play or pause, you also can touch in the display to adjust the
volume. Slide the【 HOLD】 button in the direction of to return to video files list.
11. Select one of the video files stored in the player, you can touch icon to enter
“Delete”menu, and touch to select “No”or “Yes”.
12. Touch to return to previous menu.
EBOOK
5. In main menu, select and touch “EBOOK”icon to enter the mode.
6. Use the touch pen to select your desired file, then touch it or touch icon to
open it. Youcan touch toscan previous or next page.
7. Select one file stored in the player, you can touch icon to delete it.
8. Touch to return to previous menu.
Note: the E-BOOK function only can browse .TXT files.
Sys Info
In main menu, touch “Sys Info”icon to enter, then you can see some system
information, like: Firmware version, free flash capacity and total flash capacity.
USB Driver Installation
61
Page 63
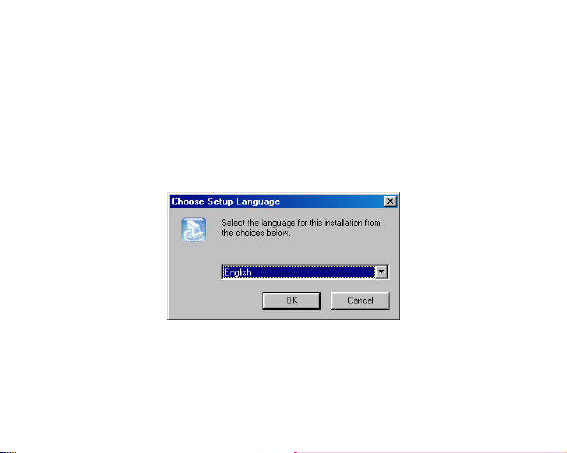
Note: Please remove the player from the computer when you install USB Disk
Win98 driver in Windows98se Operating system.
1. Install USB Disk Win98 driver for computer windows98 Operating system
(1) Put CD disk to CD driver
(2) Double click the USB Disk Win98 driver to start setup.
(3) Select installation language and click “OK”to enter into next step (Please select the
default language).
62
Page 64
63
Page 65
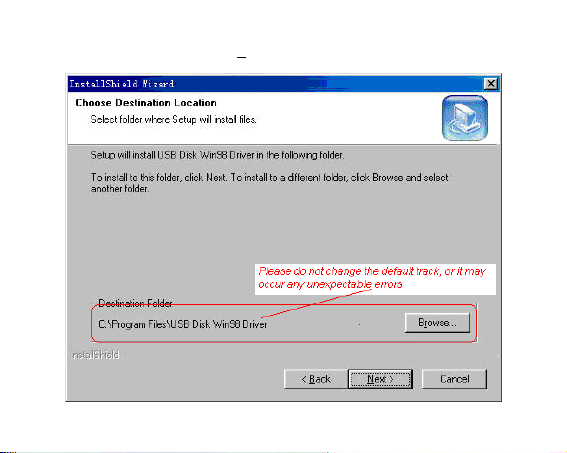
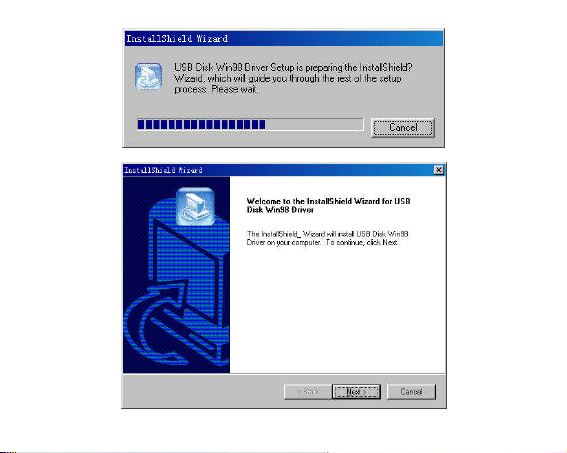
(4) Click “Next>”to enter into next step.
64
Page 66
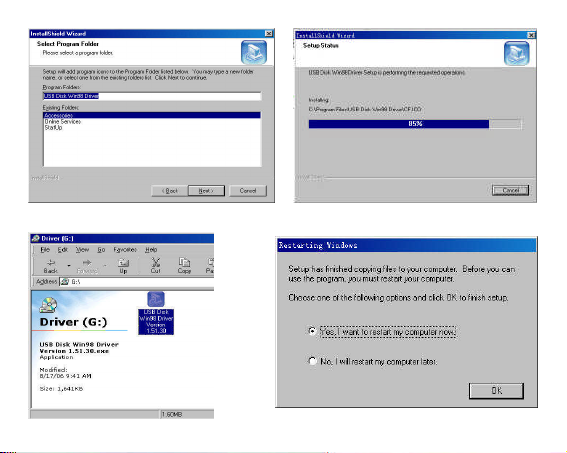
(5) Close the Driver (X:) window,then click “OK”to finish setup process and restart your
computer now, then you can use the player.
65
Page 67
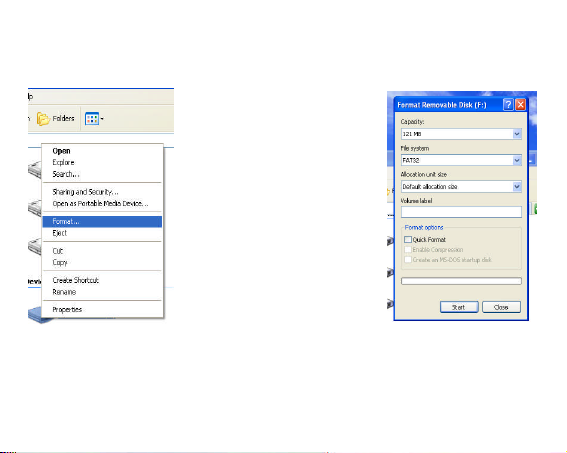
2. Format the player
The player is “FAT” format. If you wish to format it, right click removable disk and
choose “Format” mode, then click “Start” to format in operating system. As following
pictures show:
Notice
Please setup the【 HOLD】 button in “unlock”mode before using the player.
Do not use the player while raining.
Attention should be drawn to the environmental aspects of battery disposal.
Please use provided USB cable to connect the player with PC directly.
66
Page 68

Can’t identify the sixth and above sixth level of directory.
The user guide is only for reference. It is standard by the sample.
The contents of our Installation CD had been detected by the following
anti-virus software:
Norton Antivirus VER:15.0.0.58
Kaspersky VER:7.0.0.125
PC-Cillin VER:16.00.1671
McAfee VirusScan Plus VER:12.0
Symantec Antivirus VER:10.0.1.1000
67
Page 69
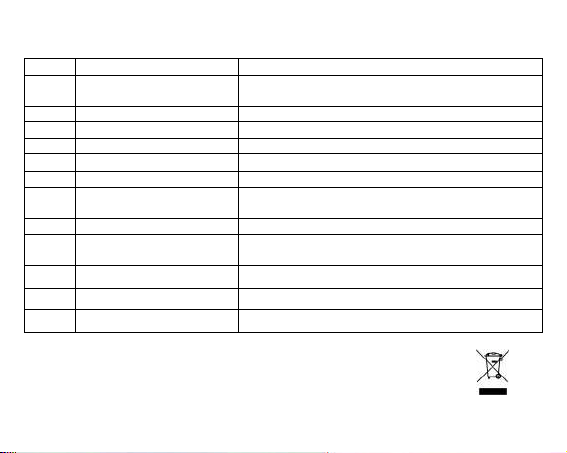
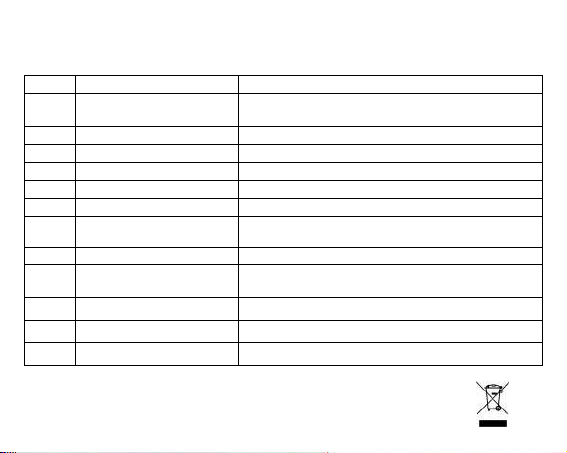
Technical Specification
No. Name Description
Capacity of Flash
1
Memory
2 USB Interface USB2.0 (High Speed)
3 LCD Display 2.4’TFT(320x240)
4 Power supply Li-Polymer
5 S/N ratio
6 Audio Frequency Range 20Hz – 20kHz
7 EQ
8 Support file format MP3 and WMA, MTV, BMP and JPEG
9 FM
10 File System FAT16, FAT32
11 Operating Temperature 5OC ----35OC (41OF---95OF)
12 Operating Moisture 10%— 75%
Ver:1.1 736-MP553I111
Support Micro SD/T-Flash Card, up to 2G;
Build-in Flash Memory, up to 8G.
≥ 85dB
NORMAL, POP, ROCK,CLASSIC, JAZZ, BASS,
Custom EQ
87.50 ---- 108.00MHz(Normal)
Support 30 preset stations
68
 Loading...