

Page 1
P/N : SAH015D0B1
www.mobibluamerica.com
Page 2

T able of Contents
On Products
Cautions For Safety
Product Features
Specifications
Accessories
Names of Each Part
Minimum Requirements for PC
Getting Started
Using AC Adapter
On Power
USB Connection & Disconnection
Basics of How to Operate
LCD Display
Simple Key Operations
Power On/Off
Resetting
Changing Modes
Navigation (Folder Search during the Playback)
Enjoying EQs
Card Copy
Locking
Listening Music
Listening Music
Selecting Music
Setting Section Repeats
Changing Play Modes
1
5
7
8
10
12
13
15
16
20
21
23
25
26
27
29
30
31
33
34
36
37
Page 3
T able of Contents
Cautions For Safety
Recording
Voice Recording
Music Recording
Setting Menus
Setting Menus 45
Remocon(Optional)
Using LCD Remocon(Optional) 5 9
About Programs
Installing a driver
File Uploads & Downloads
Formatting Files
Customer Support
All These Things Are Normal
Warranty Services
FCC RF INTERFERENCE STATEMENT
For proper use of the player, be sure to keep the following directions to avoid danger or physical
38
41
62
65
67
69
70
71
damage.
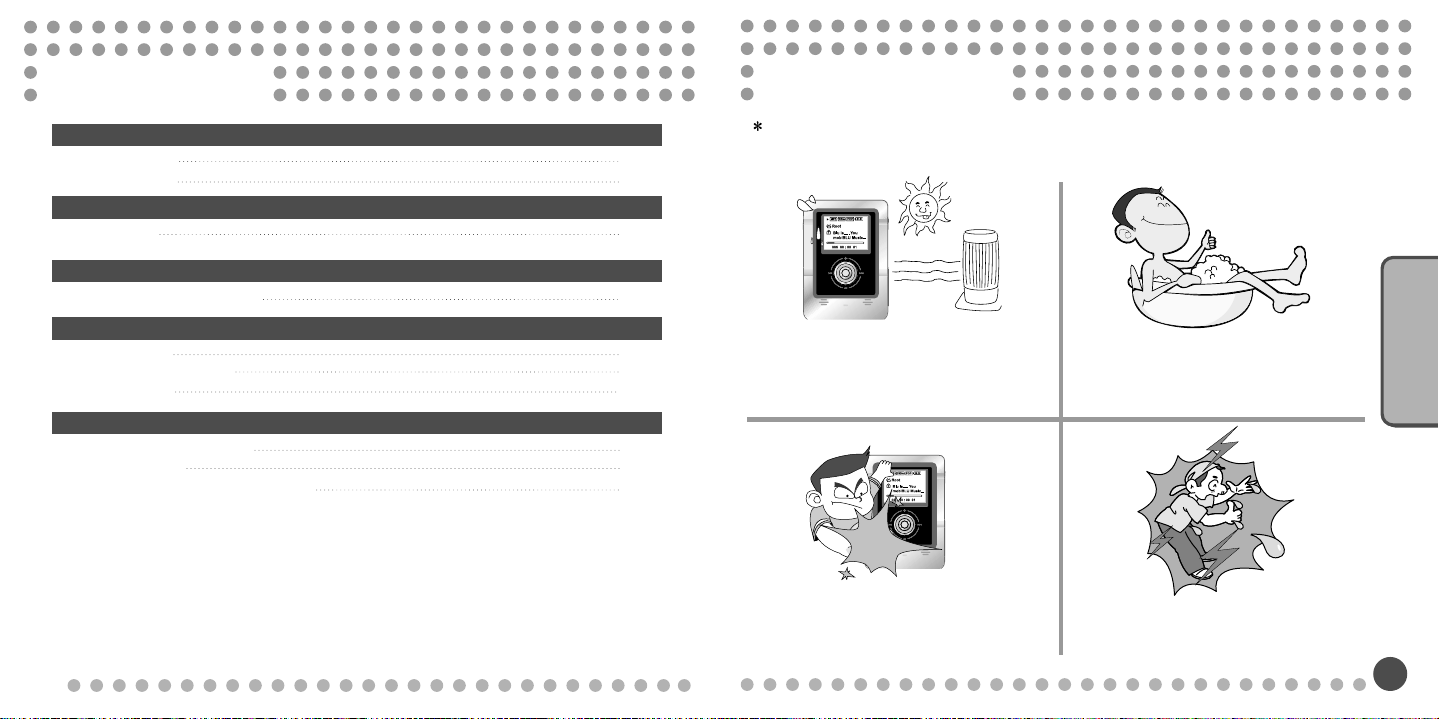
Don’t expose the player to a direct ray of
light or hot spots like a stove if possible.
(The player can be damaged by heat
conductivity causing to set a fire.)
Don’t drop or give a severe shock to the
player. (This may cause a direct damage.)
On Products
Don’t’ expose the player to dusty and humid
places if possible. (The player can be
damaged.)
Don’t touch or connect the player to other devices
with wet hands. (If the player is connected to a
power source, you could get an electric shock.)
1
Page 4
Cautions For Safety
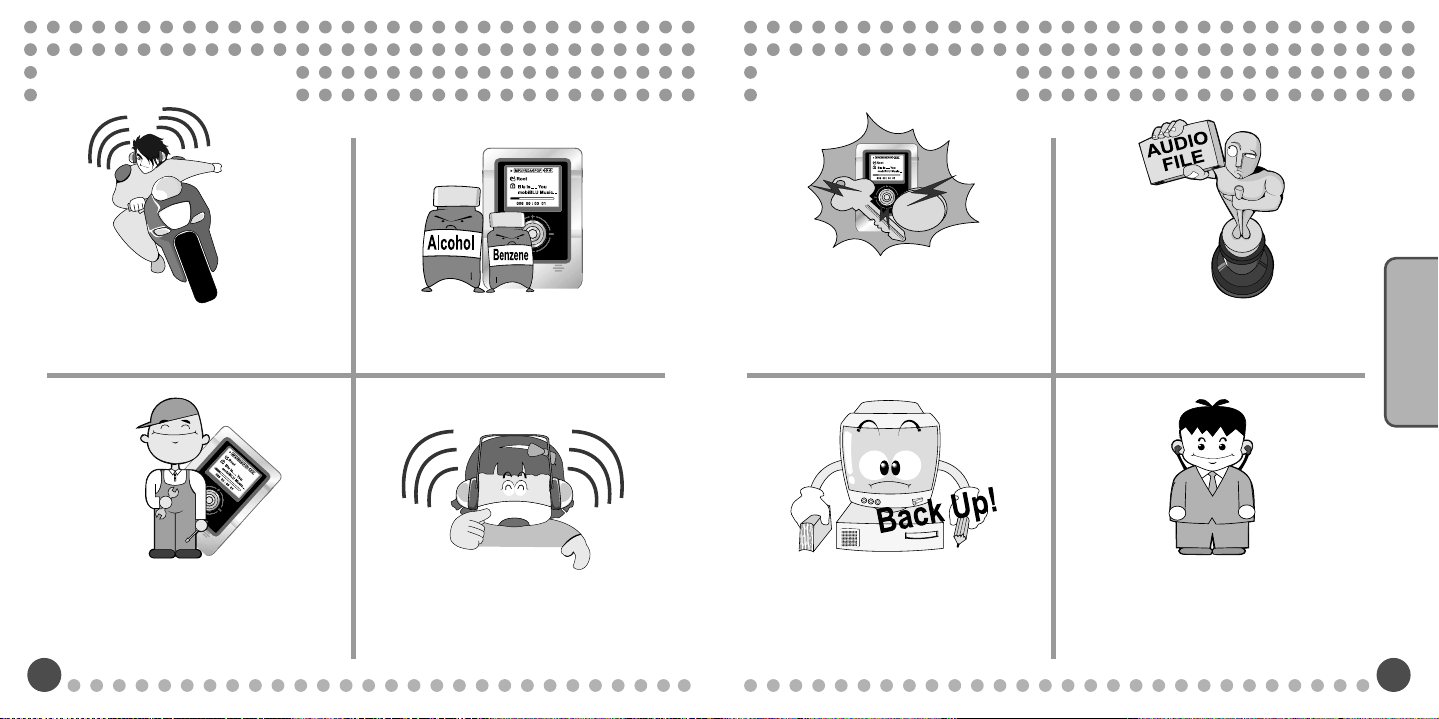
Don’t use headphones while driving
cars or riding bikes or motorcycles.
As chemicals or rinsing detergents can
change or peel the surface off of the player,
don’t use them.
Cautions For Safety
When carrying the player and a battery
in your pocket, do not put metals like
coins or keys together in it. (This may
cause to set a fire because of the friction
between the metals and the battery)
On Products
Distributing music files to other people
without permission is a violation of a
copyright law.
If the player is out of order, call our
customer services, but never try to
disassemble, repair or rebuild it.
2
Listening to music long time with high volume
may cause a hearing sense disorder.
We shall not be liable for the losses of
data in the player by users’
carelessness. (Be sure to back up
important data)
Earphones should have a long strap. When
you wear headphones, the strap should be
positioned behind your neck.
3
Page 5
Cautions For Safety
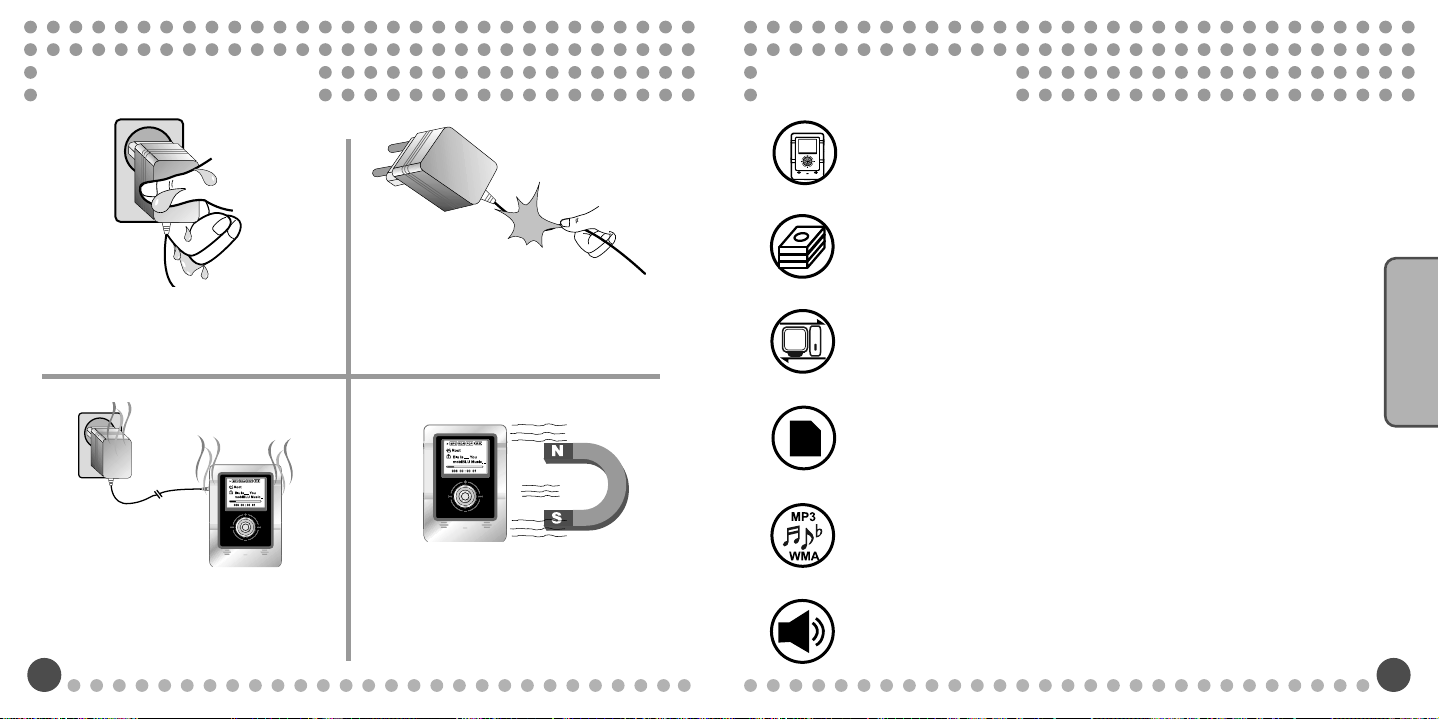
Don’t touch the AC adapter with wet
hands. You could get an electric shock if
the internal or external parts of the adapter
are exposed to water.
Do not bend or pull the cable of the AC
adapter. It may set a fire or give an electric
shock if it’s damaged.
Product Features
Sensible & Comfortable Design
With a combination of highly sensible black color and chrome, luxuriousness design is
even more upgraded, and ease of use is highly considered.
Large Capacity HDD Type Jukebox
You won’t have any problem in carrying the player with you because of the handy
size of 80 X 56 X 22.4 (mm). Moreover the HDD Type Jukebox MP3 Player can
download music files more than 1,000 songs.
Mass Storage
Connected to a computer, it’s recognized as a Jukebox in “Windows Explorer,”
enabling you to upload and download files easily.
Card Copy
This is a very comfortable function, enabling you to transfer data stored in memory
cards such as SD and MMC for a Digital Camera and MP3 Players, by inserting it
directly to the card slot of the player, instead of connecting it to a PC.
Multi-Codec for Various Digital Files
With a support of the Multi-Codec, MP3 files and WMA files can be played.
On Products
When charging the battery with using the
AC adapter, unplug it from the outlet if
there is anything wrong with the adapter
such as smells, smoke and noises.
4
Do not put magnets or magnetic materials near
the player. (It may cause malfunction)
Excellent Output of the Built-in Stereo Speakers
You not only can listen to music with the built-in speakers of the player, but also listen to
the music through the external outputs. Now enjoy your music with a strong output and
high quality sound through the stereo speakers.
5
Page 6
Product Features
Specifications
OS Firmware Upgradeable
By upgrading OS firmware, users will get the most recent OS updates through the
Internet, giving them additional functions and file format support.
User-Centered EQ
It provides 5 basic EQs (Normal, Rock, Jazz, Classic, and Pop) and 10 user defined EQ,
so that users can adjust high quality of music by setting the right preference of quality
users want.
Fast Transmission Speed
Thanks to the support of the USB 2.0 interface, the maximum speed of the file
transmission is 480Mbps.
Voice Recording
With a high-sensitive built-in microphone, it can be used as professional voice recorder
having versatile functions.
Music Recording
Without having to connect to any PCs, you can directly save and record data to the
player as digital files in real-time while enjoying, CDs and music or contents in an
audiocassette tape, so this is a must-have for students and workmen who not only want
to enjoy music but also need a repeat function for studying TOEIC and TOEFL and
practicing Conversational Skills Recording.
6
Classification Items Specifications
Audio
File Support
USB
Weight (including batteries)
Frequency Characteristics
Output
S/N Ratio
File Types
Bit Rate
Download speed 480Mbps
Recording
Time
Max. Playback Time
Operation Temperatures
Dimensions (W x L x H)
Batteries (Built-in)
20Hz ~ 20KHz
Max. Volume .15mW (16
Max. Volume 300mW (8 ) (Speakers)
90
MP3, WMA
MP3:16~320Kbps,
WMA:32~160Kbps
360 Hours for 5 GB. Voice Recording with
Recording Mode of 32Kbps
Approximately 10 Hours
-5 ~70
80
56 22.4 (mm)
100g
4.2V Li-Polymer
) (Headphones)
On Products
7
Page 7
Accessories
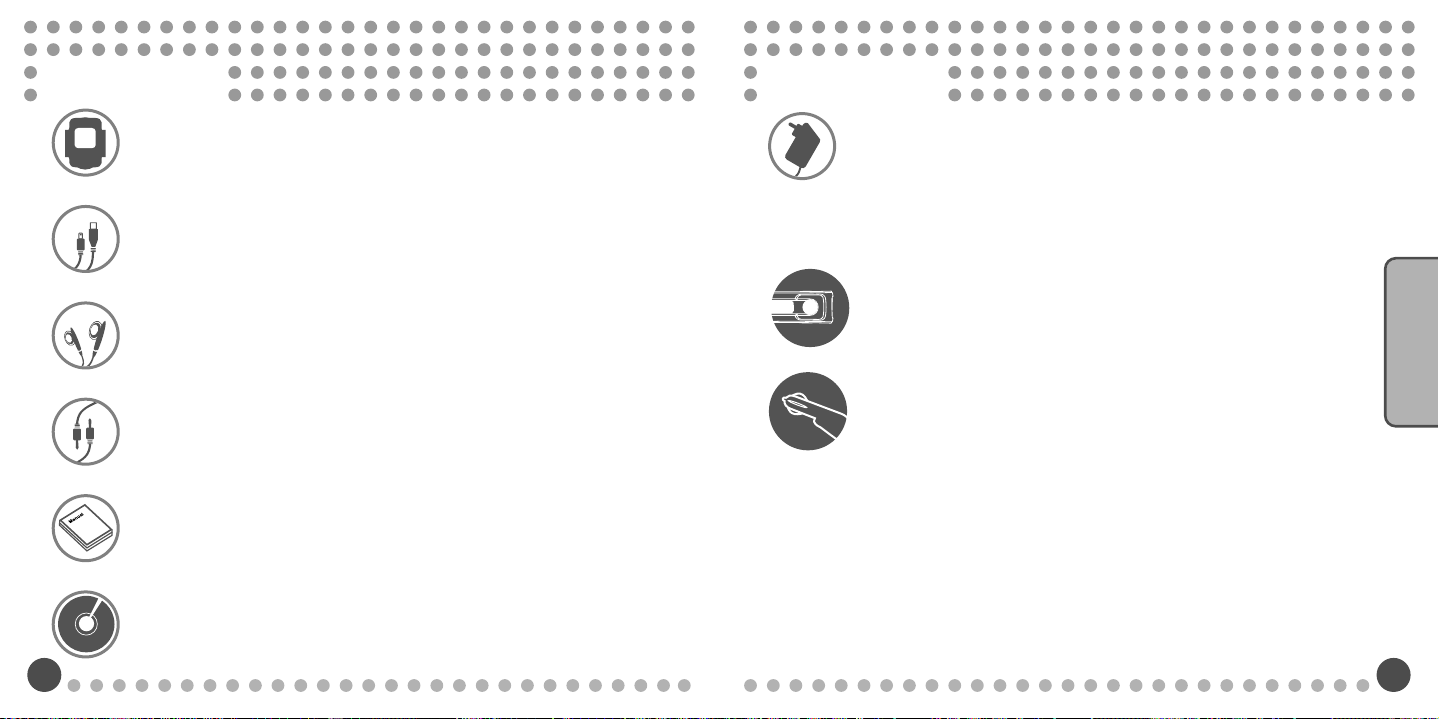
Accessories
High-Quality Carrying Case
A high-quality carrying case protecting the player from external shocks is provided.
AC Adapter
With the use of the rechargeable batteries powered by the AC Adapter, you can use
the player more comfortable and longer than before.
USB Cable
Fast file transfer with PC
Earphones
Bundled with high quality earphones, you can enjoy even more powerful sound.
Direct Encoding Cable
When you directly encode sounds, you can use this cable to connect this player with
an external audio.
[Options]
On Products
LCD Graphic Remocon
DC Adapter for Car Charge
Manual
A detailed explanation of how to use the player is provided for new users of digital
audio players.
Installation CD
For users whose operating system is Windows 98 SE that does not support a mass
storage function, install this program before connecting the player with your PC.
8
9
Page 8
Names of Each Part
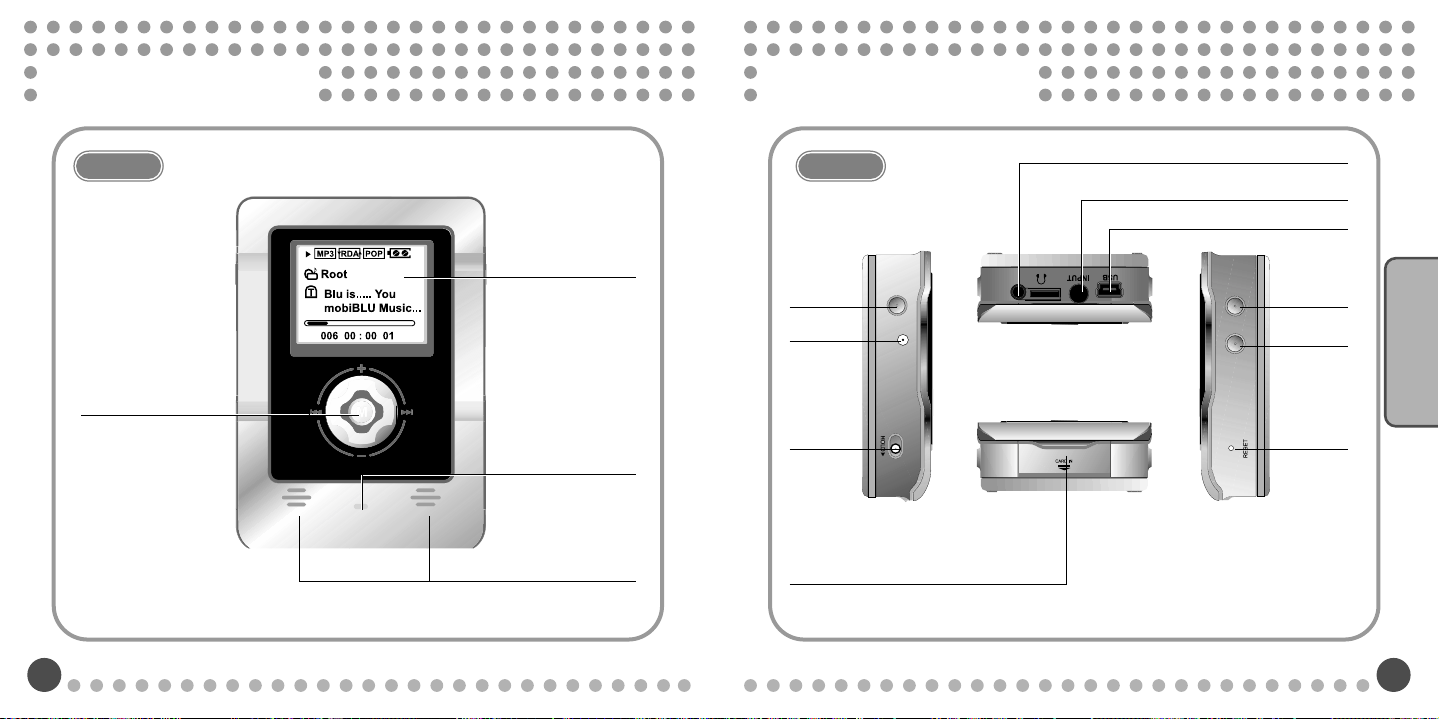
Names of Each Part
Front
Menu / Mode / FF / REW /
VOL+,- Button
10
LCD Display
High Sensitive
Voice Recording
Microphone
Built-in Stereo Speaker
Sides
EQ/
Navigation
Button
Jack for
DC IN
Hold Switch
SD Card Slot
Earphones Jack
Encoding Port
USB Port
Power
On/Power
Off/Play/Stop
Rec/A-B
Button
Reset Button
On Products
11
Page 9
Minimum Requirements for PC
Using AC Adapter
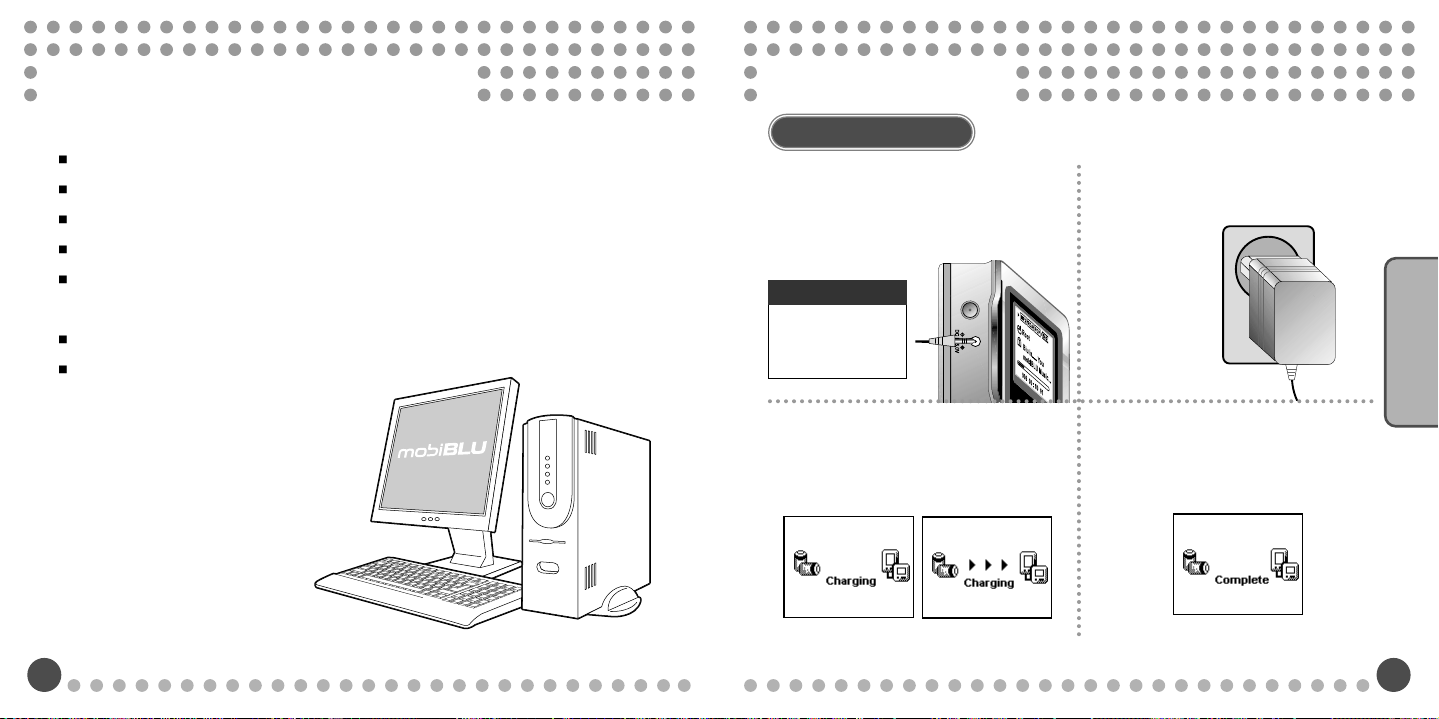
The minimum requirements for PC to use the player are as follows;
Microsoft OS (Windows 98 SE, 2000, ME, and XP)
CD–ROM Drive
Pentium 200MHz or higher
More than 32 MB of RAM (64 MB or more for Windows ME or 2000).
More than 128MB of Hard Disk Space
(Additional Disk Space is needed for storing music files)
USB Port (Ver. 2.0) Available
Mac 9.X ~ X
12
Using AC Adapter
Connect the AC Adapter to DC IN
1
jack.
Caution
Under the state of
HOLD, do not
charge the battery.
During the charging, LCD screen
3
displays the following:
Connect the plug of the AC Adapter
2
to the outlet.
When completed, LCD displays
4
the following:
Getting Started
13
Page 10
Using AC Adapter
On Power
For Your Reference!!
It takes up to 3 hours to fully charge a completely exhausted battery.
You can recharge the battery if the player is connected to PC with a USB cable.
(Under the state of HOLD, do not charge the battery)
It may take more time if you charge the battery with files played.
When the player is connected to the AC Adapter of the player with the power on, the
icon of the battery ( ) will appear.
When the battery is completely discharged, the LCD displays “Low Battery.”
When charging the battery using the adapter, unplug it from the outlet if there is
anything wrong with the adapters such as smells, smoke and noises. It may set to a
fire or give an electric shock.
When connecting the adapter, don’t touch it with wet hands.
14
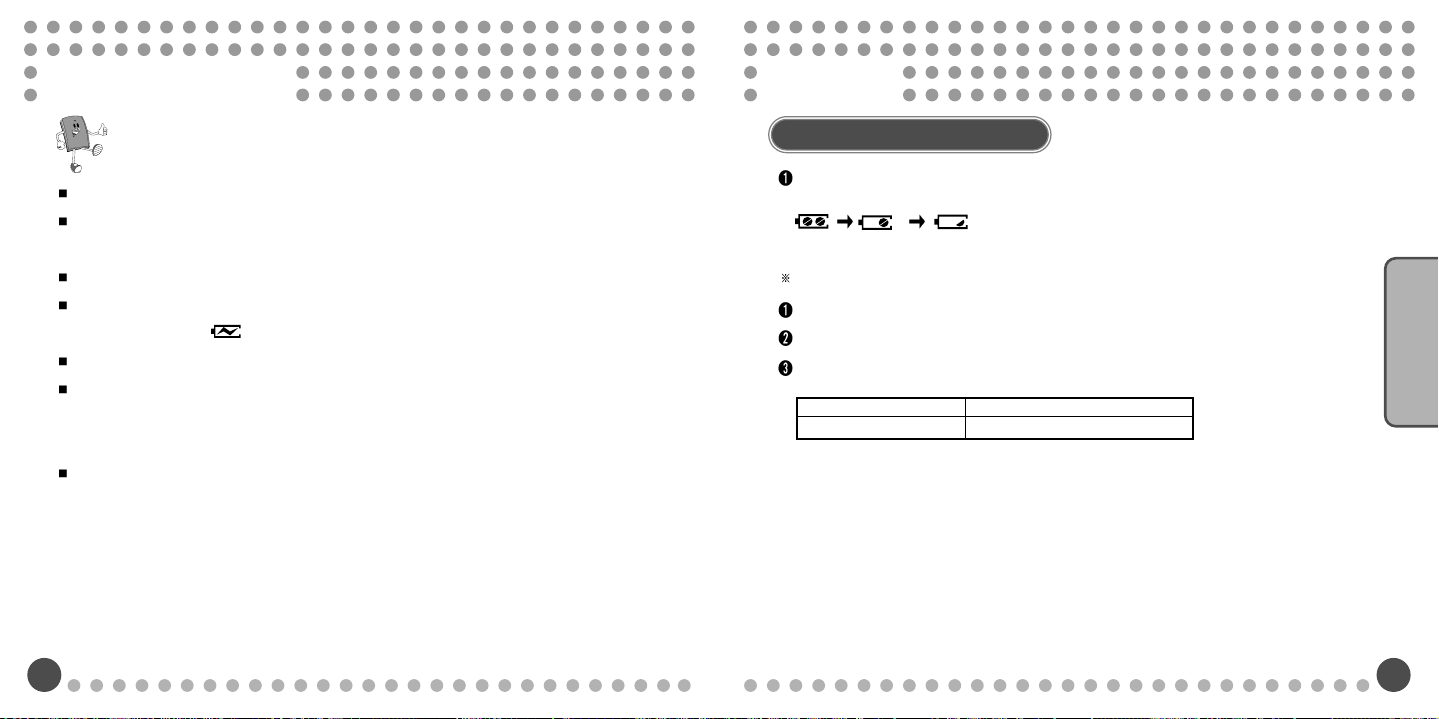
Remaining Power Display
The display of battery residue capacity can vary at the beginning of the operation. It
will be stabilized after 5 to 6 seconds displaying the real amount of battery residue.
(Based on the battery included)
(Full) (Medium) (Low)
For the cases below, charge the battery with an AC Adapter.
LCD displays “Low Battery.”
The player does not respond to the buttoning or stops immediately.
LCD does not respond to the buttoning.
Distinction MP3 Playback
Lithium-Polymer Battery 10 Hrs. (700mA)
1. Consecutive Playback Time
- Lithium-Polymer Battery: 10 Hrs.
- MP3 128 Kbps
- Volume Level: 15
- The above result is measured using lithium-polymer batteries included in the product and is subject to
change according to the conditions of use
15
Getting Started
Page 11
USB Connection & Disconnection
USB Connection & Disconnection
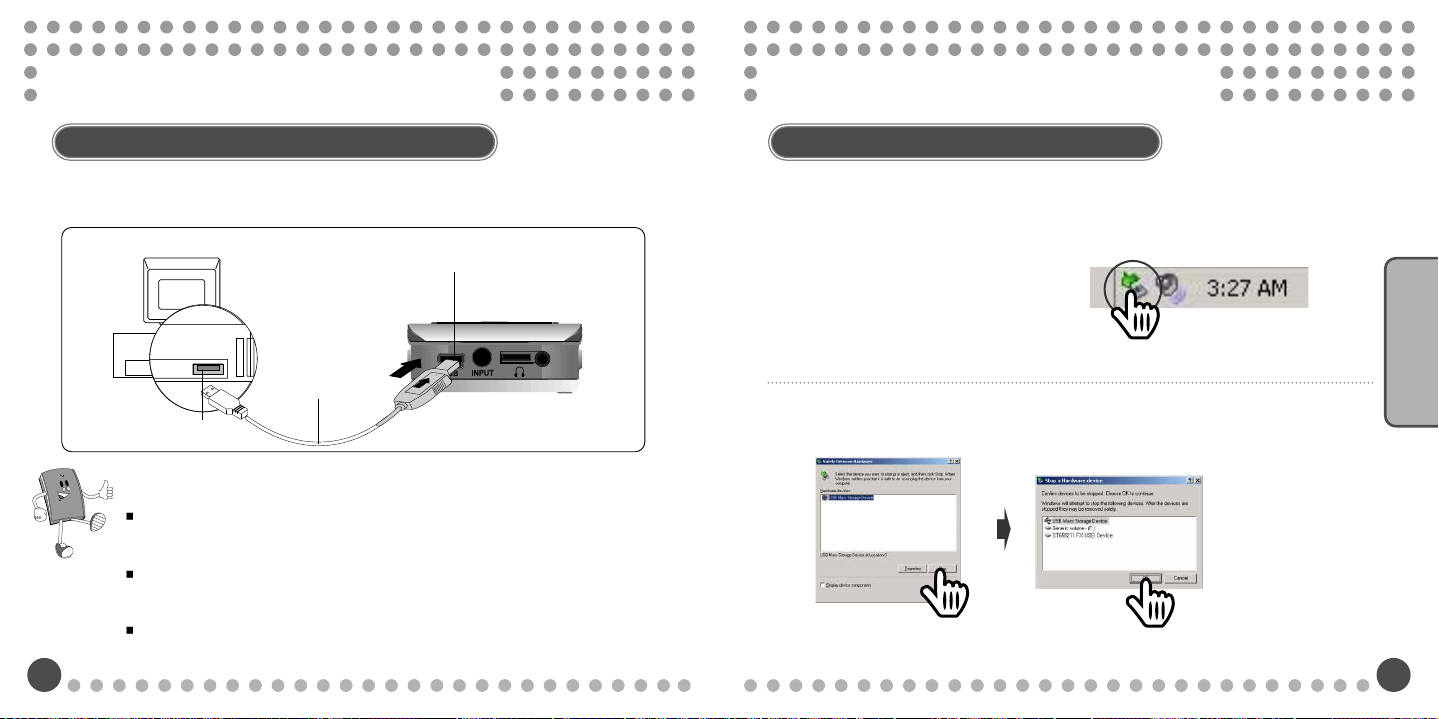
Connecting Player to PC Using USB Cable
Like the following picture, connect one end of the USB cable at the back of your PC and
connect the other end of the cable to the USB port of the player.
USB Port in the Player
USB Cable
PC USB Port
For Your Reference!!
During the HOLD state, connecting the Player to PC using the USB cable may not
work properly. In that case, make sure to release the HOLD switch and try to connect
the Player to PC.
To use it efficiently, connect the USB cable directly to the USB port located at the back
of PC. Connecting it to the USB port at the front of the PC or USB hub may cause a
connection failure.
For windows 98 users, make sure to install the program before connecting the USB
Cable.
16
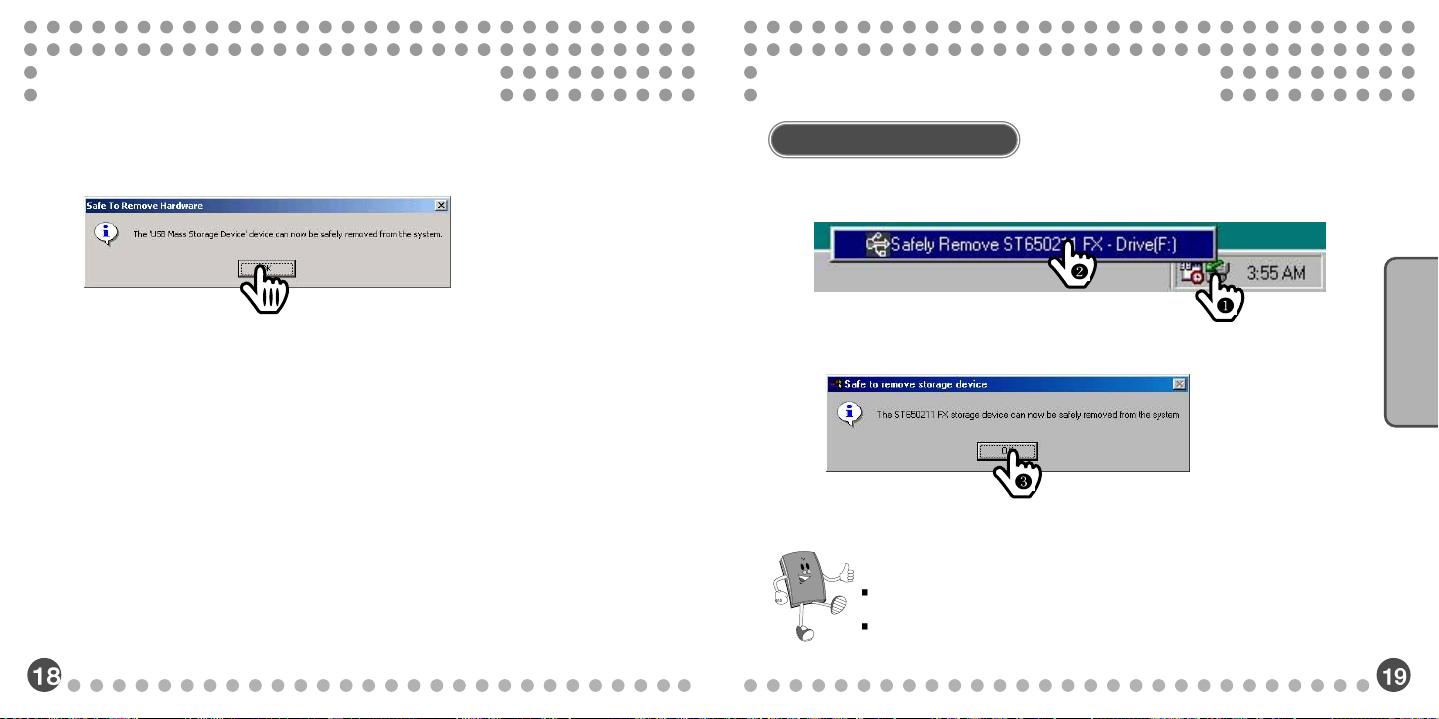
For Windows ME, 2000, and XP Users
- You have to close the Jukebox window and remove the hardware in the
order below.
1
To disconnect the player from the USB
cable, double click the green arrow at
the right bottom right of your Windows
screen.
Double Click!
Double Click!
Double Click!
Double Click!
Double Click!
Double Click!
Double Click!
Double Click!
Double Click!
Double Click!
Double Click!
Double Click!
Double Click!
Double Click!
Double Click!
Double Click!
Double Click!
Double Click!
Double Click!
Double Click!
Double Click!
Double Click!
Double Click!
Double Click!
Double Click!
Double Click!
Double Click!
Double Click!
Double Click!
Double Click!
Double Click!
Double Click!
Double Click!
Double Click!
Select the “USB Mass Storage Device” and select “Stop.” Click “OK.”
2
Click!
Click!
Click!
Click!
Click!
Click!
Click!
Click!
Click!
Click!
Click!
Click!
Click!
Click!
Click!
Click!
Click!
Click!
Click!
Click!
Click!
Click!
Click!
Click!
Click!
Click!
Click!
Click!
Click!
Click!
Click!
Click!
Click!
Click!
Click!
Click!
Click!
Click!
Click!
Click!
Click!
Click!
Click!
Click!
Click!
Click!
Click!
Click!
Click!
Click!
Click!
Click!
Click!
Click!
Click!
Click!
Click!
Click!
Click!
Click!
Click!
Click!
Click!
Click!
Click!
Click!
Click!
Click!
Getting Started
17
Page 12
USB Connection & Disconnection
USB Connection & Disconnection
After you see the message “Safely Remove Hardware” ,click “OK” and remove the
3
cable.
Click!
Click!
Click!
Click!
Click!
Click!
Click!
Click!
Click!
Click!
Click!
Click!
Click!
Click!
Click!
Click!
Click!
Click!
Click!
Click!
Click!
Click!
Click!
Click!
Click!
Click!
Click!
Click!
Click!
Click!
Click!
Click!
Click!
Click!
For Windows 98 Users
To disconnect the player from the USB cable, click the green arrow at the right bottom
right of your Windows screen.
Click!
Click!
Click!
Click!
Click!
Click!
Click!
Click!
Click!
Click!
Click!
Click!
Click!
Click!
Click!
Click!
Click!
Click!
Click!
Click!
Click!
Click!
Click!
Click!
Click!
Click!
Click!
Click!
Click!
Click!
Click!
Click!
Click!
Click!
Click!
Click!
Click!
Click!
Click!
Click!
Click!
Click!
Click!
Click!
Click!
Click!
Click!
Click!
Click!
Click!
Click!
Click!
Click!
Click!
Click!
Click!
Click!
Click!
Click!
Click!
Click!
Click!
Click!
Click!
Click!
Click!
Click!
Click!
Click!
Click!
Click!
Click!
Click!
Click!
Click!
Click!
Click!
Click!
Click!
Click!
Click!
Click!
Click!
Click!
Click!
Click!
Click!
Click!
Click!
Click!
Click!
Click!
Click!
Click!
Click!
Click!
Click!
Click!
Click!
Click!
Click!
Click!
For Your Reference!!
If you disconnect the cable without following the instructions above, you will see a warning
message and it may cause a serious failure to PC or the player.
Disconnecting a USB cable from PC while downloading, uploading, formatting, and OS updating
may cause a serious failure to PC or the player.
Getting Started
Page 13
LCD Display
Connecting Player to PC By Using USB Cable
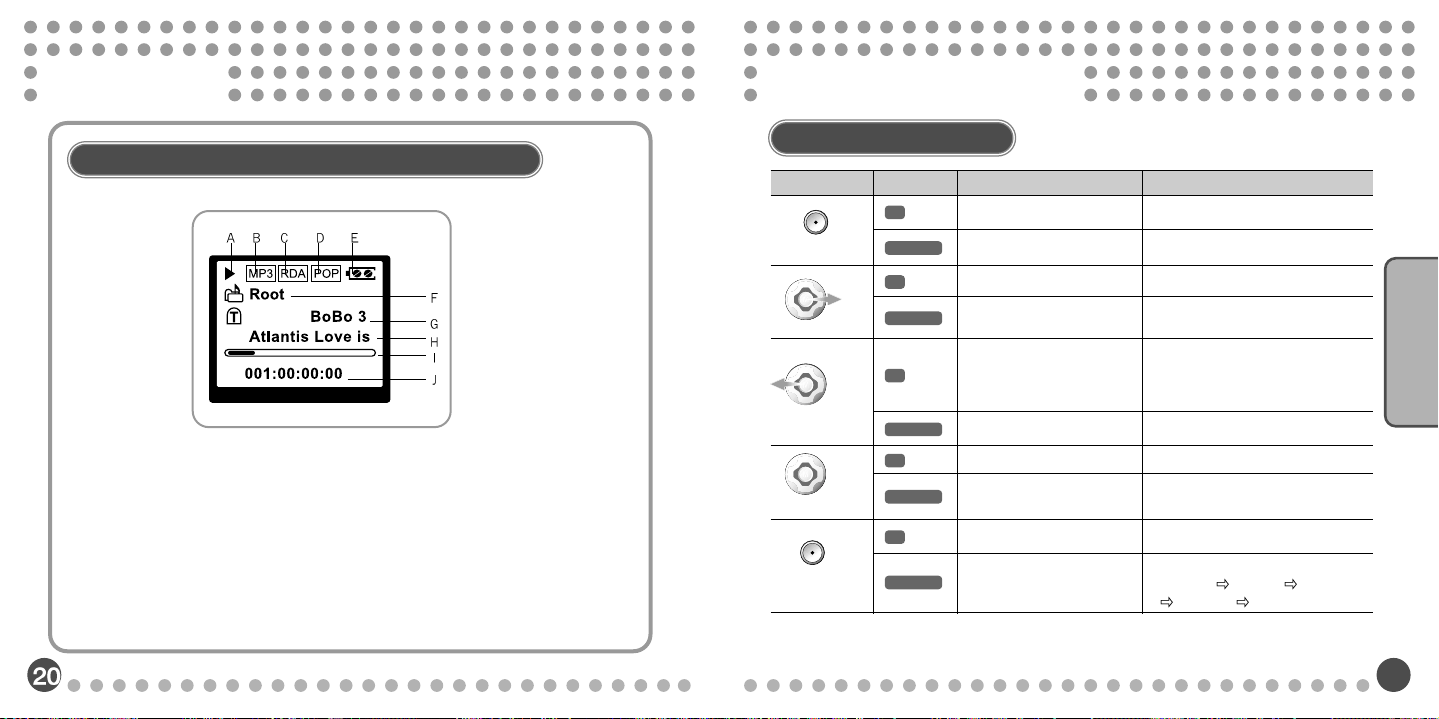
A: Status of Files (Play/Pause/Stop)
B: Format of the Playing Files
C: Playing Modes
D: Equalizer
E: Remaining Battery
F: Folder Name
G: ID 3 Tag
H: File Names
I: Play Position
J: Track Number, Elapsed Time
Simple Key Operations
Music Playback Mode
Button
PLAY/PAUSE
FF
REW
MENU
REC/A-B
Time Pressed
Stop State Play State
Plays a current song.
Power Off
Moves to the next track.
Successive forward track
search.
Moves back to the
previous track.
Successive backward track search.
Selects menus.
Selects modes.
(MUSIC<->VOICE<-LINE)
Waits for voice/music
recording.
Pauses a current song.
Power Off
Moves to the next song.
Fast forward search from the
current position.
Within 5 sec. after play: Moves back
to the previous song.
5 sec. after play: Plays the song at
the beginning of it.
Fast backward search from the
current position.
Selects menus.
Selects modes.
(MUSIC<->VOICE<-LINE)
Section Repeat: A <-> B/Cancel.
Changes play modes.
(Normal Repeat Repeat All
Random Random All)
Basics of How to Operate
21
Page 14
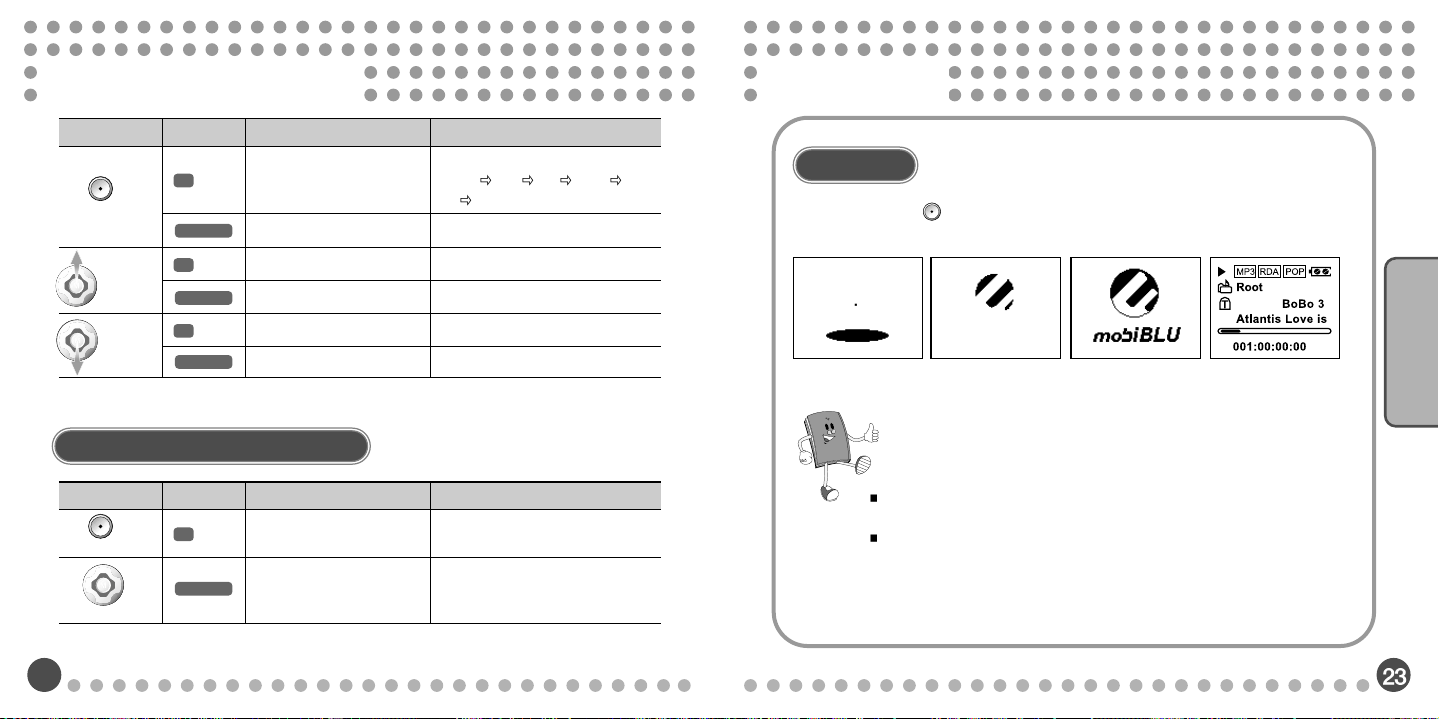
Simple Key Operations
Power On/Off
Button
EQ
VOL+
VOL-
Time Pressed
Executes navigation.
Volume 1 level up.
Volume up successively.
Volume 1 level down.
Volume down successively.
Music/V oice Recording Mode
Button
Rec
MENU
Time Pressed
REC Ready State Recording State
Voice Record/Music
Selects modes
(MUSIC<->VOICE<->LINE)
22
Stop State Play State
Change of EQs
(Normal Rock Jazz Classic
Pop User EQ1~10)
Executes navigation.
Turns the volume up 1 level.
Turns the volume up successively.
Turns the volume down 1 level.
Turns the volume down successively.
Voice Record/Music Record
Record starts.
stops.
Power On
Pressing the Play ( ) button once and long will turn on the power with the
following LCD screen.
Basics of How to Operate
For Your Reference!!
Under the state of HOLD, HOLD screen is displayed but the power is not
turned on.
When the battery is completely discharged, the message “Low Battery” is
displayed but the power is not turned on.
Page 15
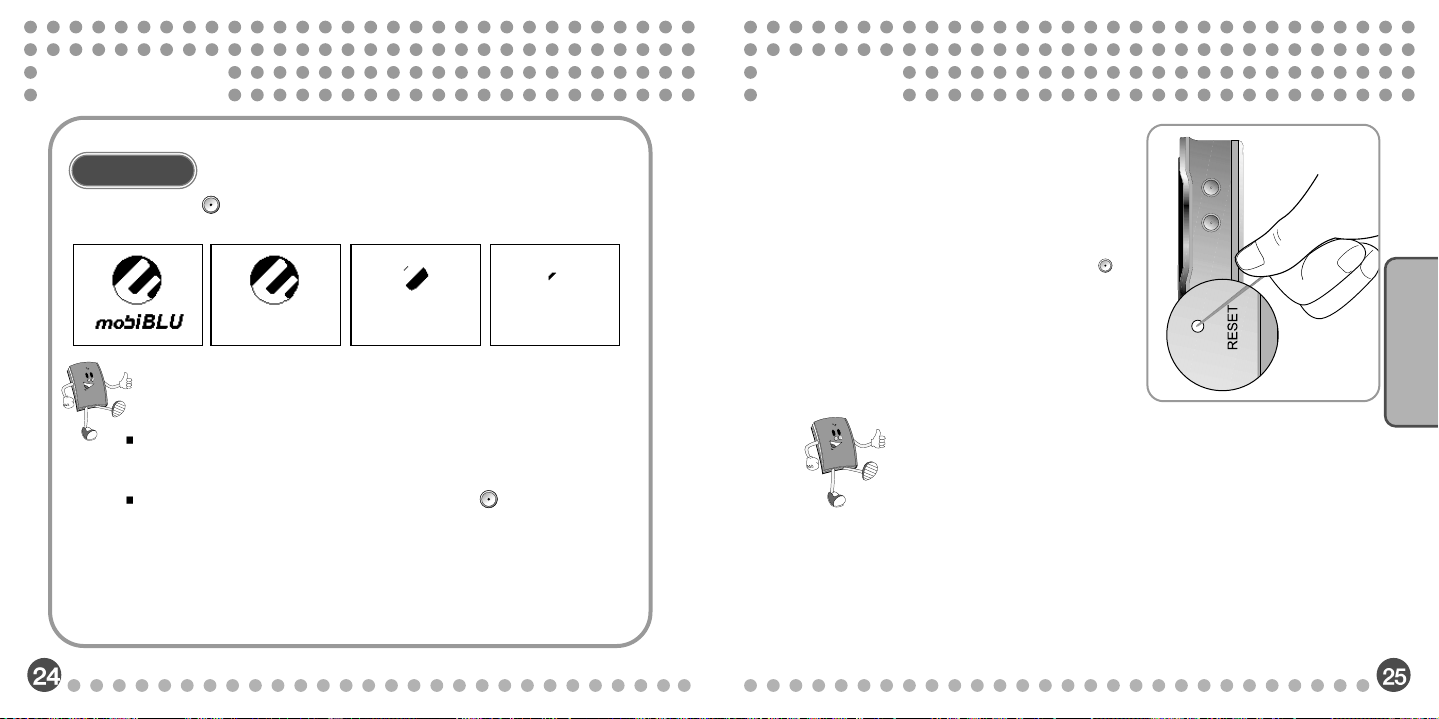
Power On/Off
Power Off
Pressing the Play ( ) button once and long will turn off the power with the
following LCD screen.
Resetting
If the player malfunctions such as stopping
1
or operating abnormally, push the reset
button with a pointed thing.
For Your Reference!!
Under the state of Pause or Stop, if no further operation is made and the time
for “Auto Power Off’ exceeds designated time, then the power will be turned off
automatically.
After turning off the power, if the user presses the Play ( ) button long, then
playback will begin at the very position of the latest song played. In this case,
all the settings such as track numbers and equalizer are completely restored.
(Seconds-Based Resume Function)
Basics of How to Operate
After power is turned off, pressing the Play ( )
2
button long will turn the power on.
Basics of How to Operate
For Your Reference!!
- Pressing the reset button with a pointed thing pin too deep will cause a
damage to the player.
- Reset will not erase or delete the music songs. Reset is use to restart
the MP3 player if the player malfunctions.
Page 16
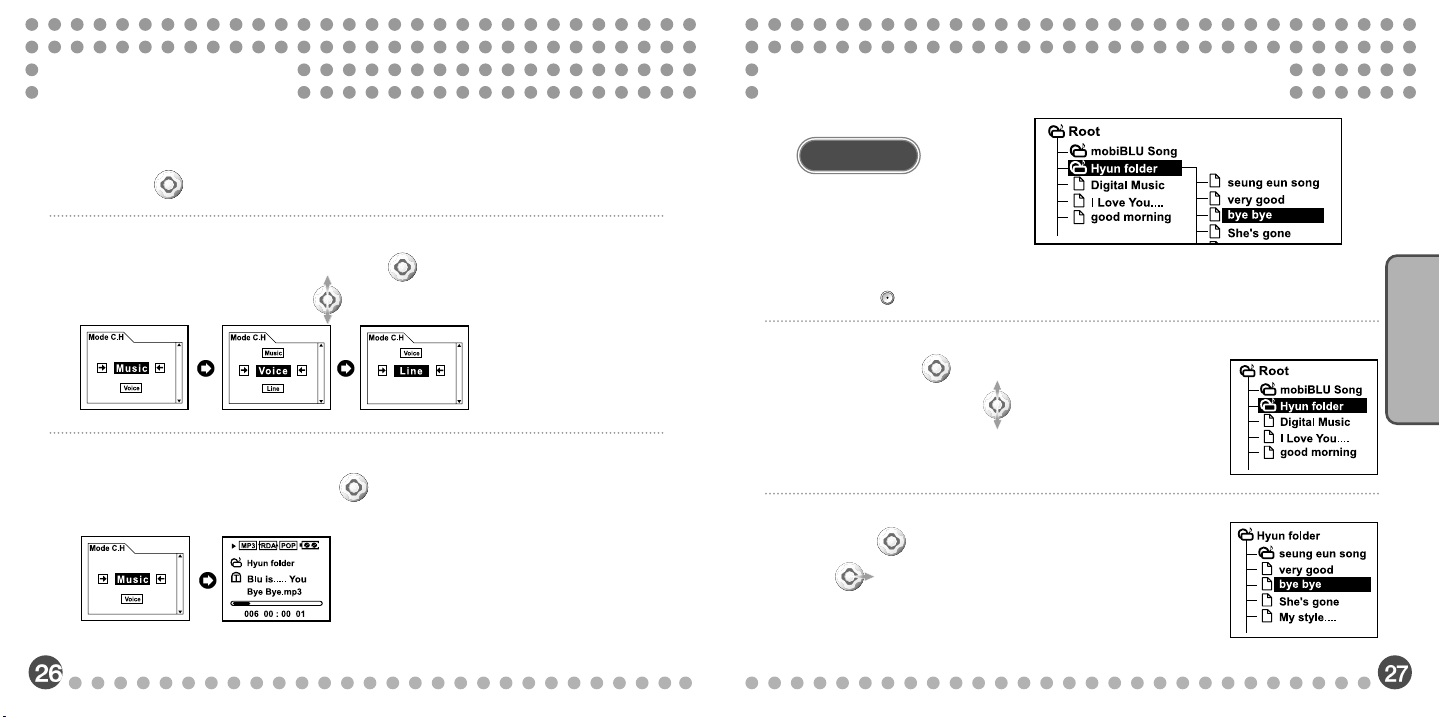
Changing Modes
There are 3 modes; MUSIC, VOICE, LINE
Press the ( ) button on the front long.
1
Table of Contents
Navigation (Folder Search during the Playback)
Example:
In case of playing a file “Bye Bye.”
Move to the mode you want by pressing the ( ) button on the front to the
2
direction of either VOL+ or VOL- ( ).
After the movement, if you press the ( ) button on the front, you will enter the
3
mode.
27
Press EQ ( ) button long to enter the navigation mode.
1
By pressing the ( ) button on the front to the
2
direction of VOL+ / VOL-( ), you can search folders
and files.
Push the ( ) button on the front to the direction of
3
FF ( ) to move to sub folders.
28
Basics of How to Operate
Page 17
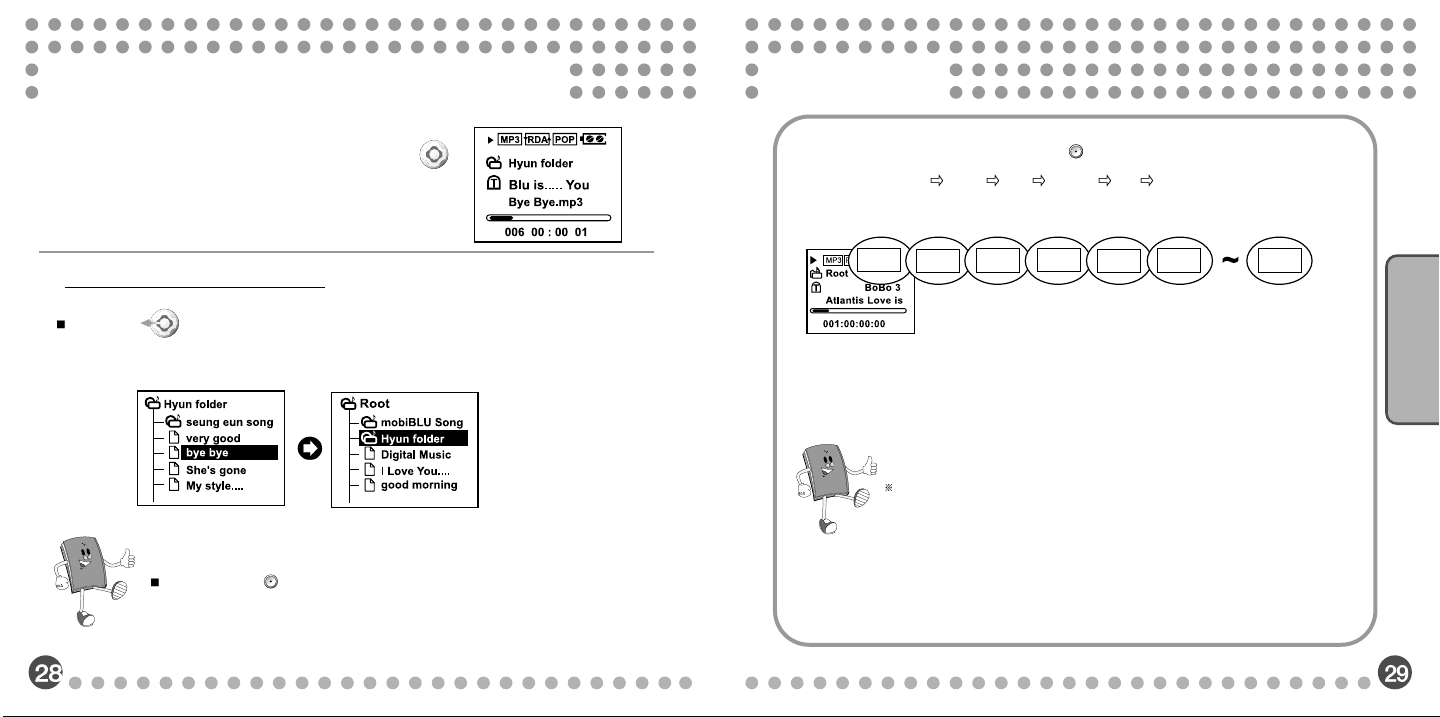
Navigation (Folder Search during the Playback)
NOR
ROC
JAZ
CLA
POP
EQ01
EQ10
Enjoying EQs
After selecting the music file or a folder, press the ( )
4
button on the front to play them.
Moving to a higher folder
Push the ( )button on the front to the direction of REW to move to the
main folder.
For Your Reference!!
Press the EQ ( ) button briefly will exit from the navigation mode.
During the play mode, pressing the EQ ( ) button briefly will change the
Equalizer to Normal
in order
Rock Jazz Classic Pop User EQ 1 ~ User EQ10
For Your Reference!!
User EQ editing that fits to the taste of the user can be done by
entering the menu mode.
Basics of How to Operate
Page 18
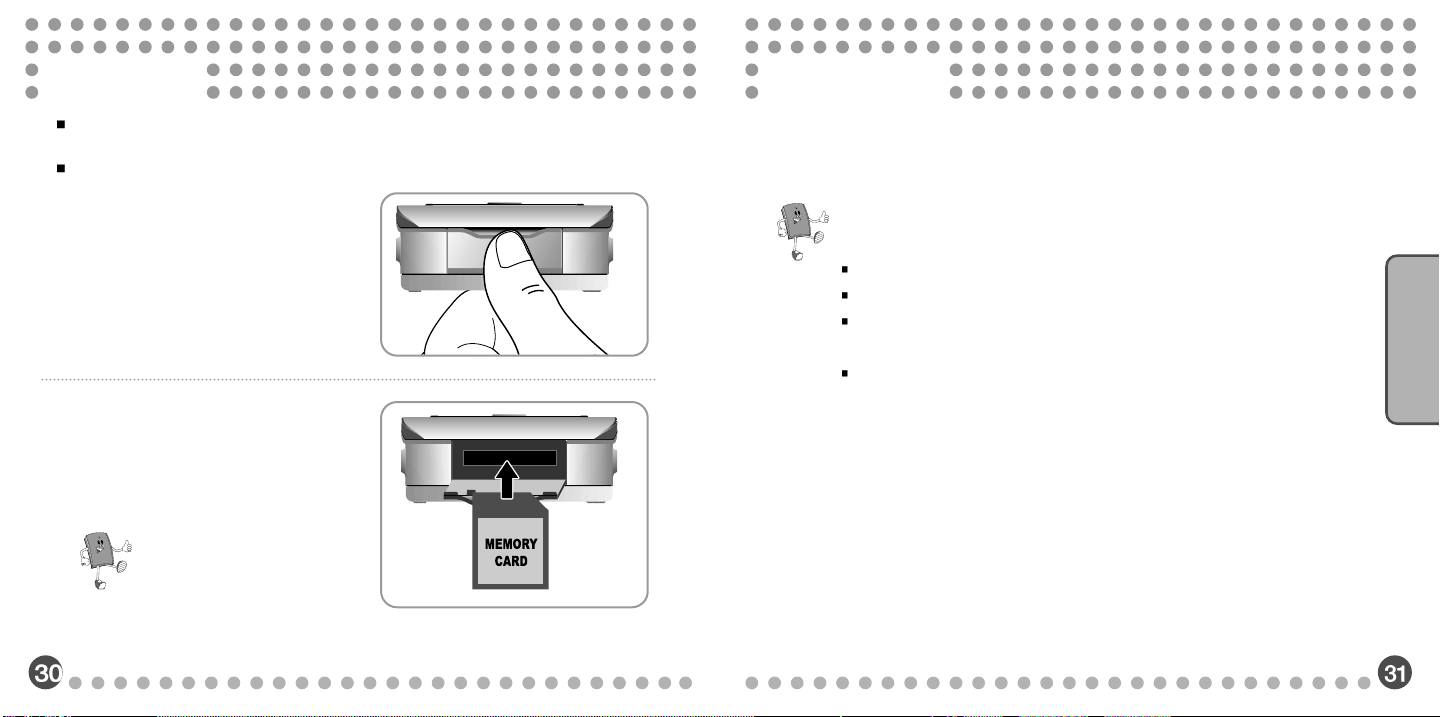
Card Copy
Card Copy
It’s the function that enables a user to copy data stored in SD and MMC memory
cards to the player.
Card Copy performed only in the Stop State mode.
Open the cover of the “CARD IN” at the
1
bottom of the player.
Insert the memory cards such as SD and
2
MMC into the CARD IN.
For Your Reference!!
Make sure to insert the card in the correct
direction.
31
Enter the menu and select Card Copy “Yes,” then the Card Copy will be
3
performed.
For Your Reference!!
It may take awhile to perform the Card Copy.
If the storage to copy the data is not sufficient, data transfer may fail.
Despite the selection of the Card Copy “Yes, ” Card Copy may not be performed if no card is
inserted.
Data copied by “Card Copy” to HDD will be saved into the folder called CARD.
32
Basics of How to Operate
Page 19
Locking
Listening Music
Locking
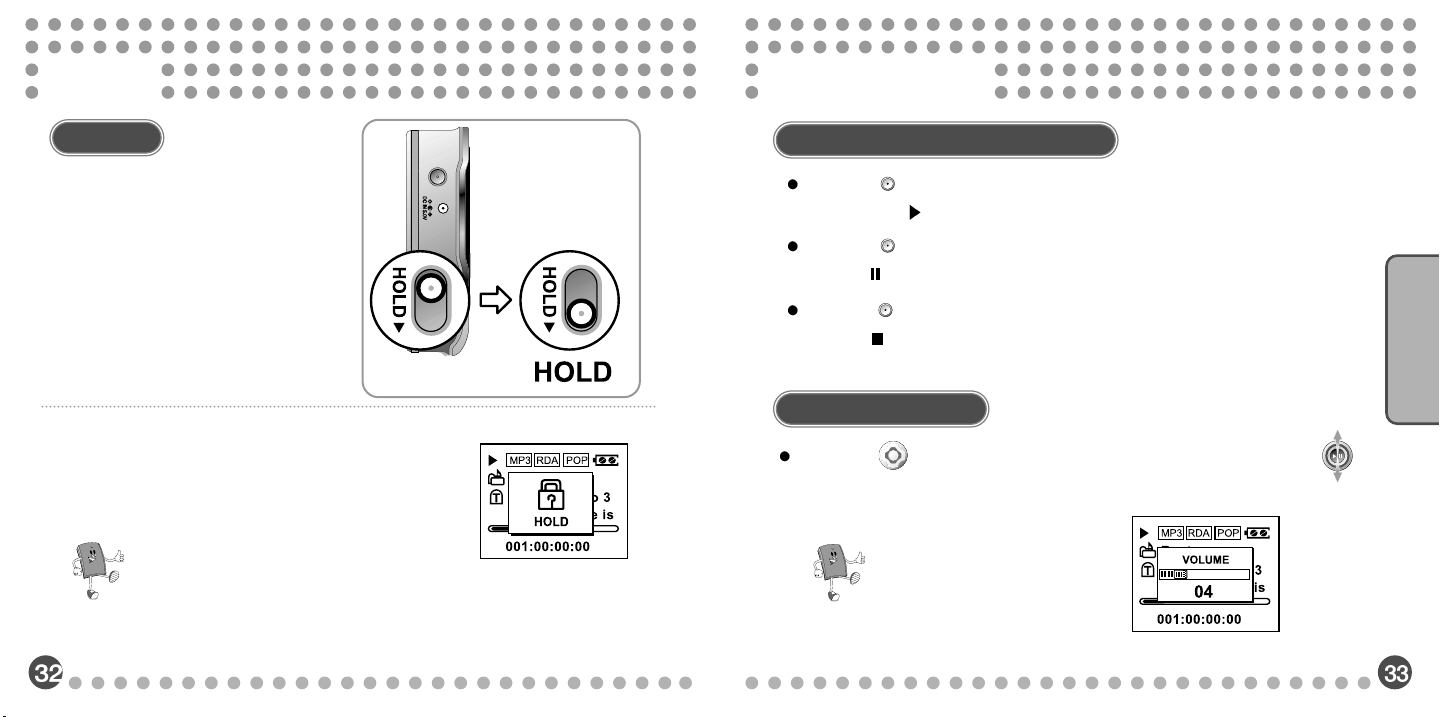
Pushing the HOLD switch at the side of
1
the player downward will lock the player.
If an operation is made under the state of HOLD, the
2
followings will be displayed for 2-3 seconds and
disappear.
For Your Reference!!
Under the state of HOLD, no buttons will work.
Under the state of HOLD, no power will be turned on.
(Only HOLD screen will be displayed and disappear)
33
Playing/Pausing/Stopping Music
If the Play ( ) button of the player is pressed under the state of Stop or Pause, files will
be played with (
If the Play ( ) button of the player is pressed during the state of Play, files will be paused
showing ( ) on the LCD screen.
If the Play ( ) button of the player is pressed under the state of Pause, the player will stop
showing ( ) on the LCD screen.
) on the LCD screen.
Controlling V olume
Pushing the ( ) button on the front of the player to the direction of VOL+ / VOL- ( )
will adjust the volume with the following LCD display.
For Your Reference!!
The Volume display will disappear
after 2~3 seconds
34
Listening Music
Page 20
Selecting Music
Selecting Music
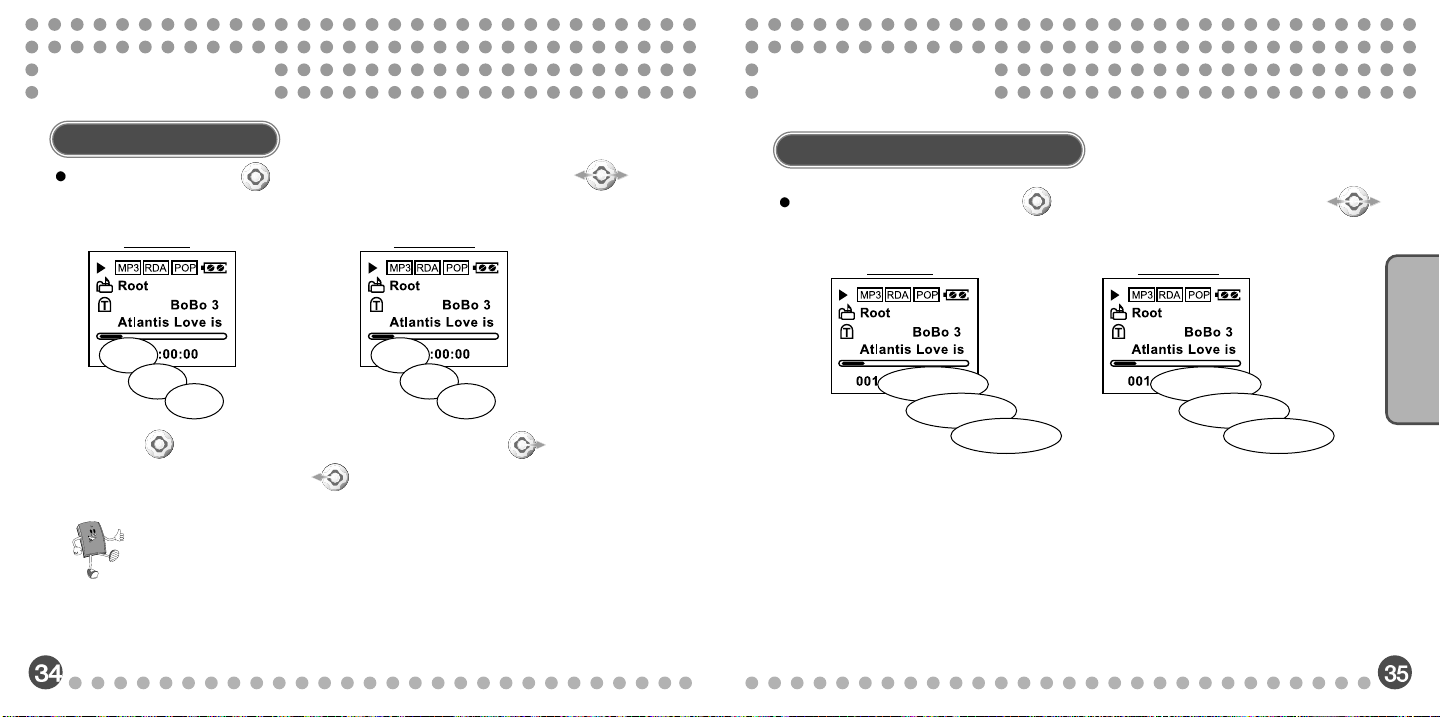
Moving Playing Files
Move files by pushing the ( ) button on the front to the direction of FF/REW ( )
under the state of Stop, Pause and Playback.
FF
001
002
003
Pushing the ( ) button on the front briefly to the direction of FF ( ) will move
the player to the next track and REW ( ) will moves back to the previous track.
REW
003
002
001
For Your Reference!!
Pushing the buttons long under the state of Stop and Pause will lead to the fast
movement.
Navigation During Playback
During the play mode, pushing the ( ) button on the front long to either FF/REW ( )
will let the player do a fast search the current song forward and backward.
FF REW
00:00:01
00:00:03
00:00:02
00:00:03
00:00:02
00:00:01
Listening Music
Page 21
Setting Section Repeats
NO
RP
RPA
RD
RAD
Changing Play Modes
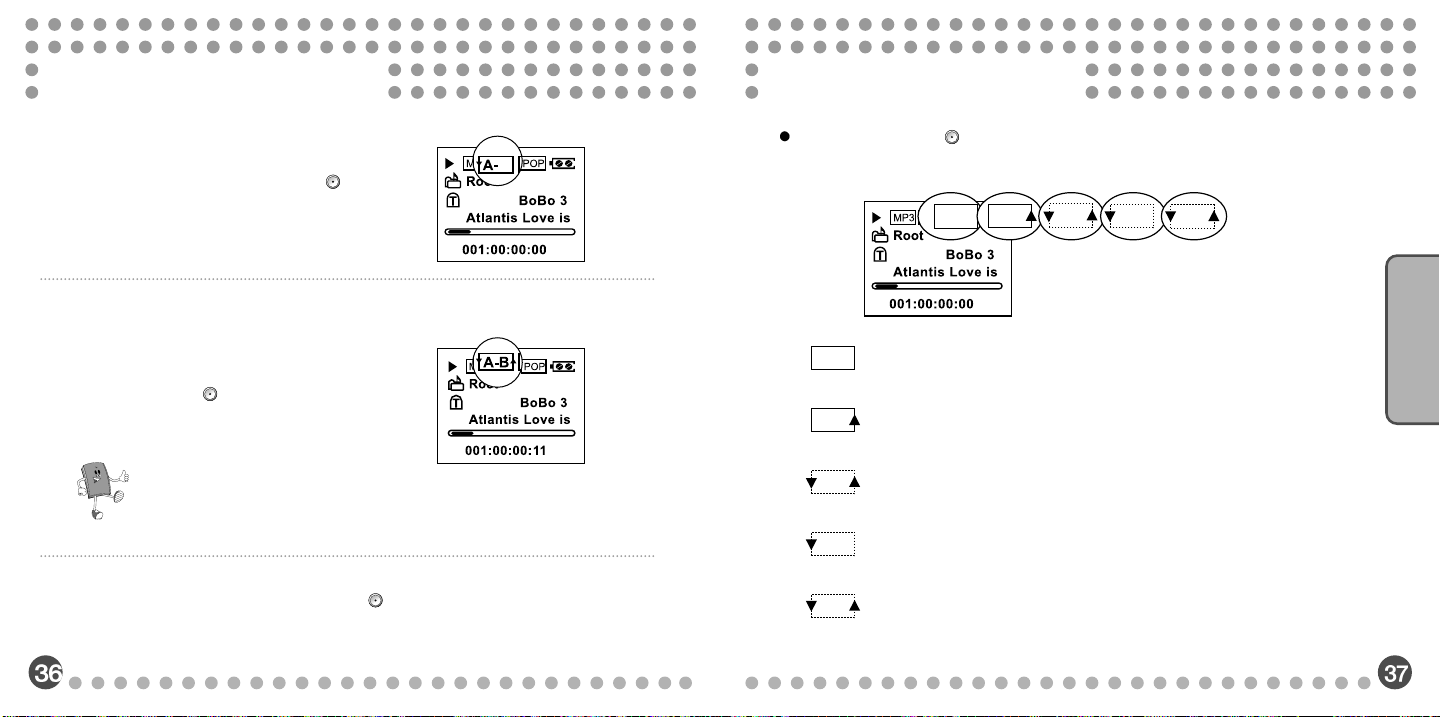
REPEA T A
1
During the play mode, press the REC ( ) button
briefly at the starting point of the section repeat.
REPEA T B
2
Pressing the REC ( ) button once again briefly at the
end of the section repeat will activate the section repeat
and the interval will be repeatedly played.
For Your Reference!!
If you don’t specify the ending point of the section repeat, the end of the
file will be the ending point automatically.
To cancel the section repeat, press the REC ( ) button briefly.
3
37
If you press the REC ( ) button long during the playback, the modes change in the
order of Normal, Repeat, Repeat All, Random, and Random All.
Normal: Plays music files once in order.
NO
Repeat: Plays a specified song repeatedly.
RP
Repeat All: Plays all the files repeatedly in order.
RPA
Random: Regardless of the order of the songs, they will be played randomly and
RD
stop automatically after playing the entire songs once.
Random All: Like Random, files are played continuously without stop.
RAD
38
Listening Music
Page 22
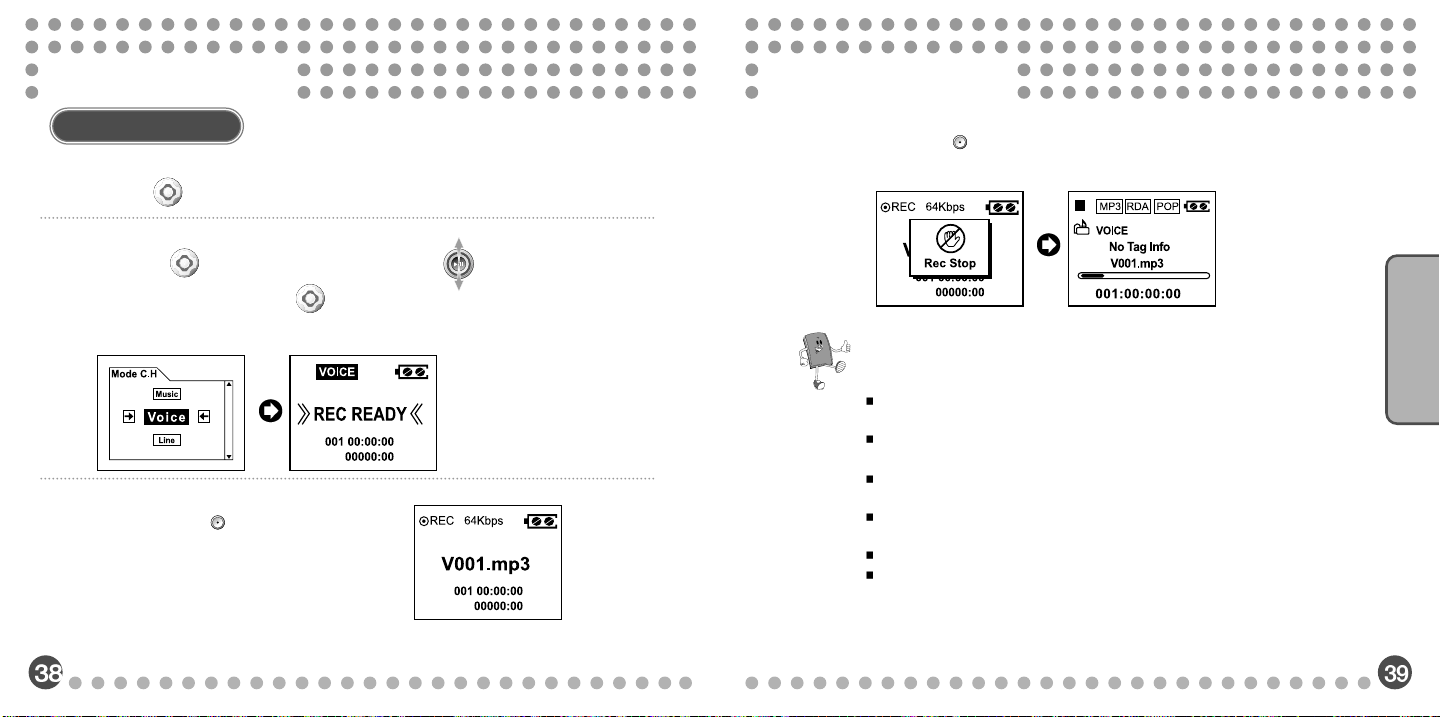
Voice Recording
Voice Recording
V oice Recording
Press the ( ) button on the front long.
1
Pushing the ( ) button on the front to VOL+/VOL- ( ) will lead you to the
2
“VOICE” menu. Now press the ( ) button on the front to enter the “VOICE”
mode.
Pressing the REC ( ) button briefly under
3
“REC READY” will start the recording
39
If you press the REC ( ) button again, the recording will stop with the following LCD
4
display.
For Your Reference!!
After the voice recording, files will be saved as MP3 files into a Voice folder and will
be seen as VOO1.MP3.
During the VOICE recording, you can select the quality of the recording by adjusting
the bit rates.
If the voice recording reaches to the status of “Memory Full,” the recording will stop
automatically and only the files recorded just before the stop will be saved.
The quality of the recording will be subject to the sensitivity or distance of the sound
source.
If the power is low, recording will not be performed properly.
The player may make some sound due to the characteristics of the built-in hard disk
during the voice recording.
40
Recording
Page 23
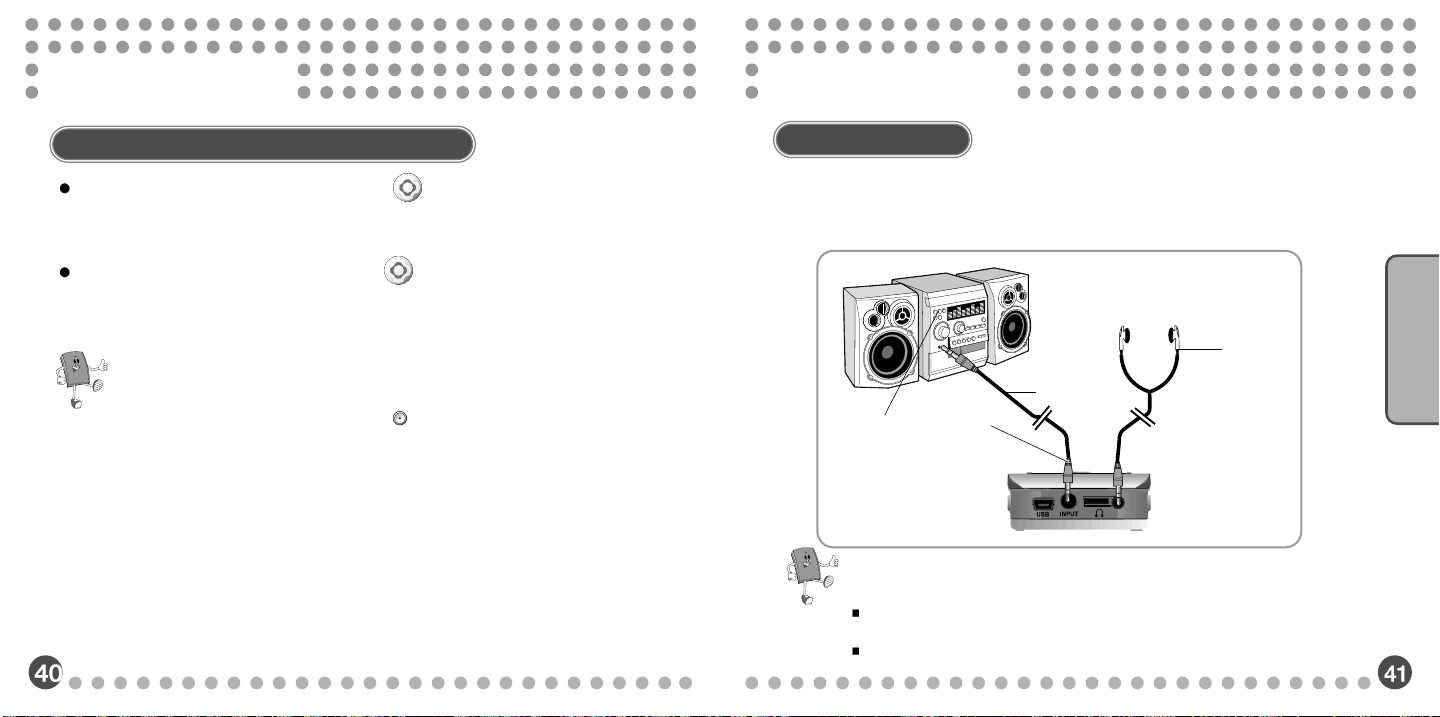
Voice Recording
Music Recording
Playing & Stopping V oice Recorded Files
Under the state of Pause/Stop, press the Play ( ) button to play the voice
recorded file.
Under the state of play mode, press the Play ( ) button to pause the voice
recorded file.
For Your Reference!!
After voice recording, pressing the REC ( ) button long, under the state of
Stop, will make the player REC READY, enabling continuous voice
recording.
Music Recording
Like the picture below, connect the LINE IN cable to both the player and a jack of
1
the audio headphones (LINE OUT) that you want to record.
Earphones
(Loop Back)
Line-In Cable
Audio
Connection
Jack
Line-In
Connection
Jack
For Your Reference!!
By connecting external devices to the player, analog sound can be converted to
digital sound and recorded and played.
Recorded things can be heard through earphones. (Loop Back)
Recording
Page 24
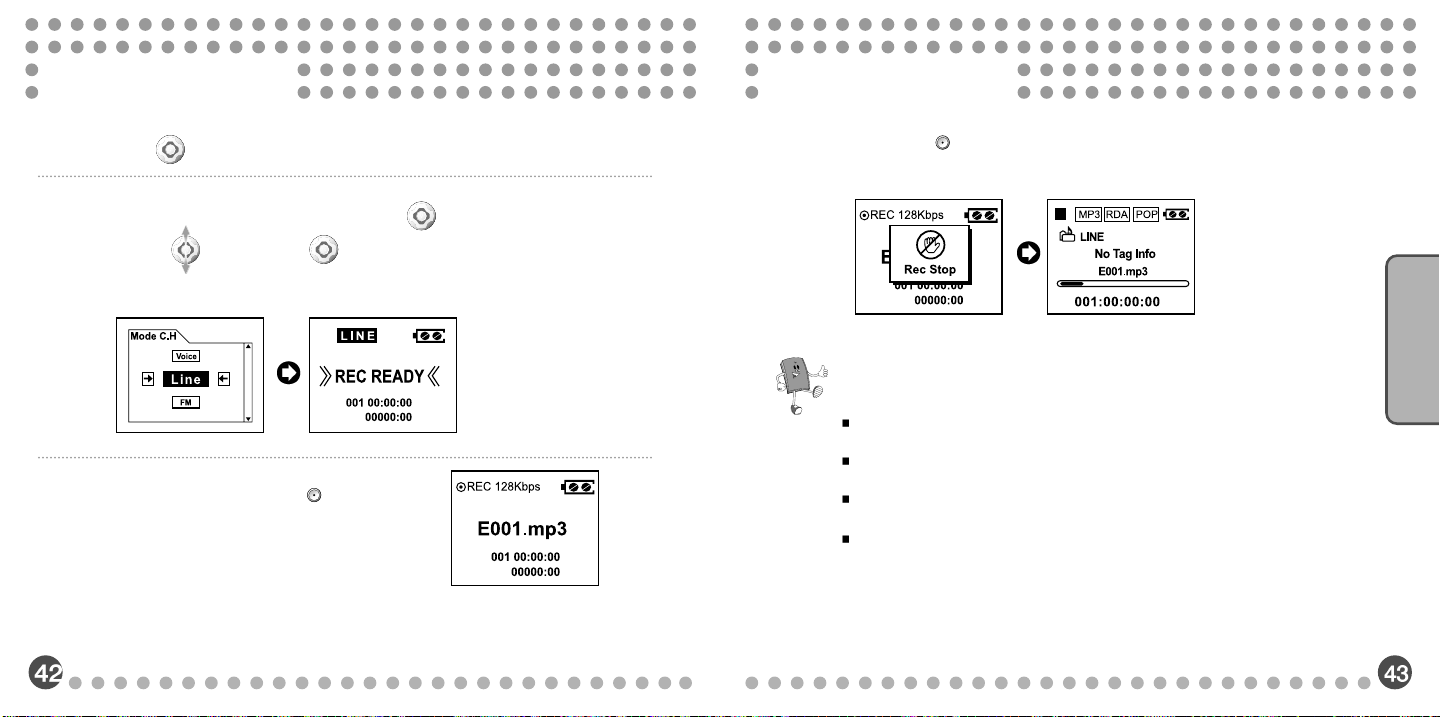
Music Recording
Press the ( ) button on the front long.
2
After moving to the “Line” menu by pushing the ( ) button on the front to
3
VOL+/VOL- ( ), pressing the ( ) button on the front will lead you to the “LINE”
Music Recording
Pressing the REC ( ) button again briefly will stop the recording with the
5
following LCD display.
mode.
In “REC READY” press the REC( ) button once
4
and it will start to record the music.
Recording
For Your Reference!!
After the music recording, they are stored as MP3 files into the LINE folder, named
as E001.MP3, E002.MP3, etc.
During the recording under the menu of LINE, you can adjust the sound quality
with the use of bit rate.
If the recording reaches to the status of “Memory Full,” the music recording will stop
automatically and only the files recorded immediately before the stop will be saved.
If the power is low, recording will not be performed properly.
Page 25
Music Recording
Setting Menus
Playing & Stopping Music Recording
If you press the Play ( ) button under the state of Stop/Pause, recorded files
will be played.
If you press the Play ( ) button during the play mode, playing of the
recorded music files will stop.
For Your Reference!!
After recording the music, under the state of Stop, press the REC ( )
button long, then the player will be in a state of LINE-IN REC READY.
This enables the player to record music continuously.
45
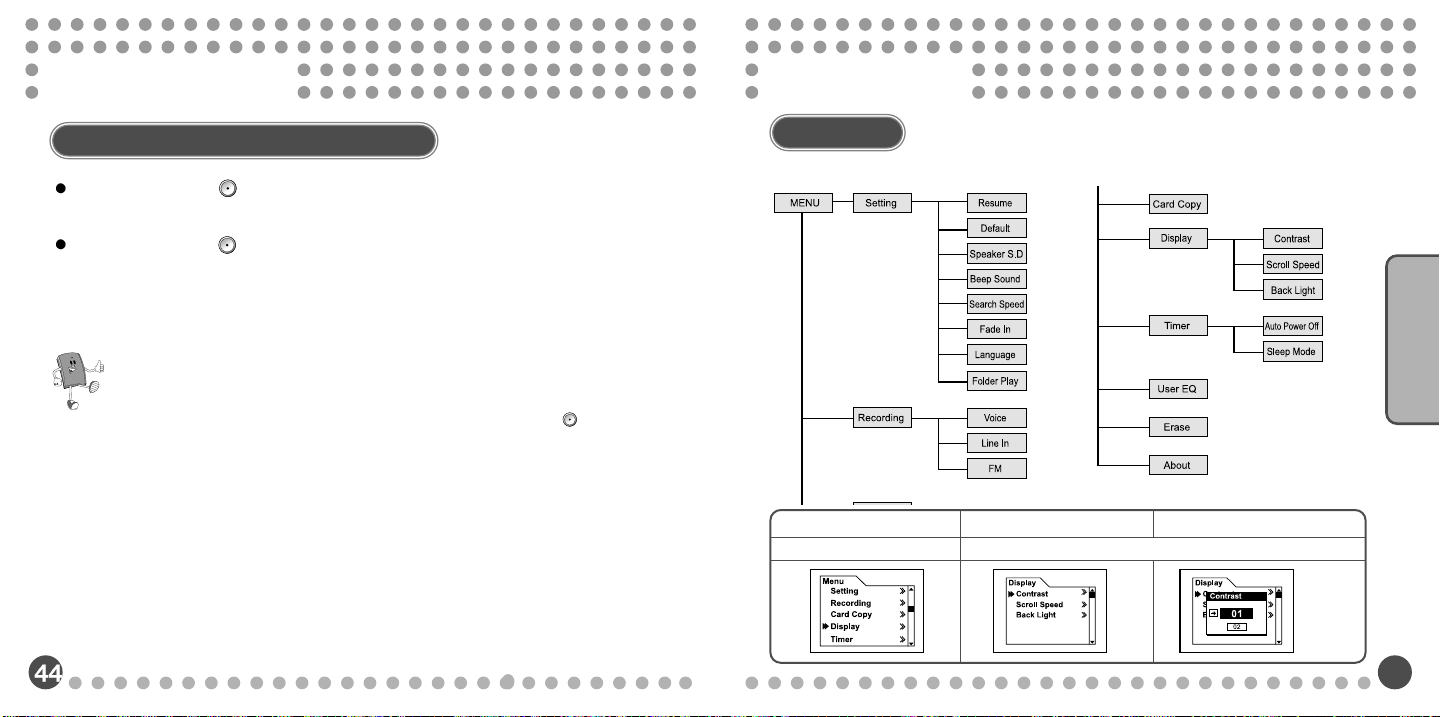
Menu Map
These are the menus of the player. Please refer to this before use.
Main Menu Sub Menu
8 Main Menus.
Each main menu contains sub-menus and setting menus.
Setting Menu
Setting Menus
45
Page 26
Setting Menus
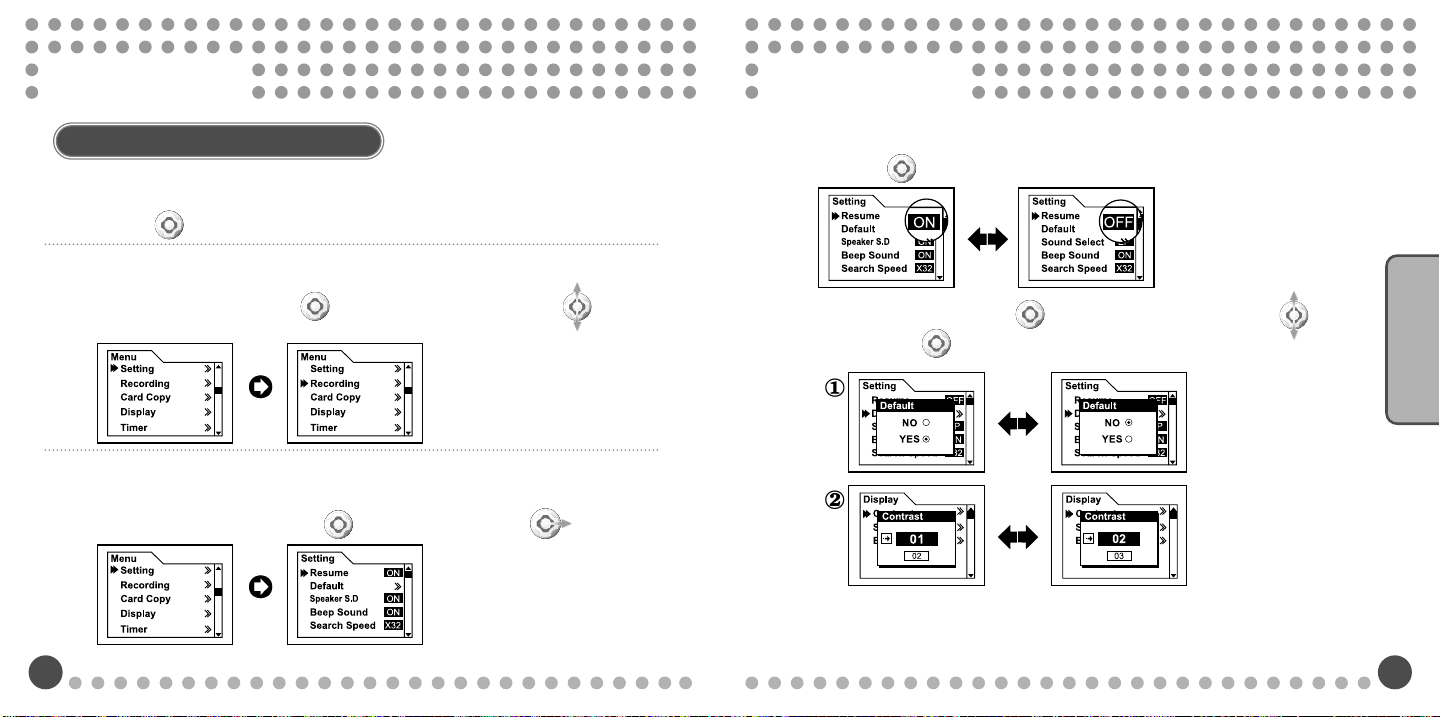
Basics of How to Use the Menu
Entering Into Menu
1
Press the ( ) button on the front briefly.
Setting Menus
Changing and Saving Setting Values
4
1) Press the ( ) button on the front briefly.
Searching Menus
2
Search the menu by pushing the ( ) button on the front to VOL+/VOL- ( ).
Entering into Sub-Menus & Setting Menus
3
Enter the sub-menus by pushing the ( ) button on the front to FF ( ).
46
Setting Menus
2) Set the value by pushing the ( ) button on the front to VOL+/VOL- ( )
and press the ( ) button on the front briefly.
47
Page 27
Setting Menus
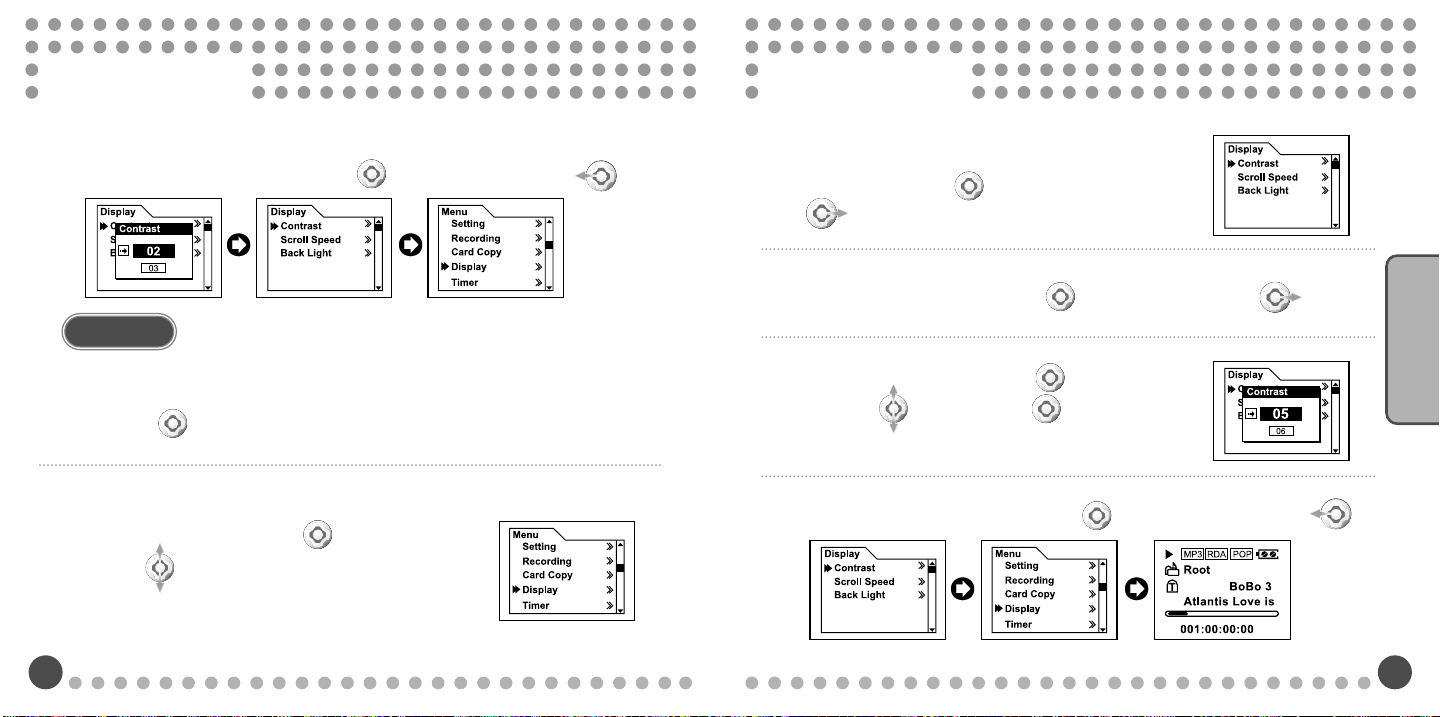
Returning to the Main Menus (Main Menus, Sub-Menus)
5
Return to the main menus by pushing the ( ) button on the front to REW ( ).
Setting Menus
Enter into the sub-menus (Contrast, Scroll Speed, Back
3
Light) by pushing the ( ) button on the front to FF
( ).
Example
Suppose that the user set the value of Display Contrast as 5.
Press the ( ) button on the front briefly.
1
Select “Display” by pushing the ( ) button on the front to
2
VOL+/- ( ).
48
After selecting “Contrast,” push the ( ) button on the front to FF ( ).
4
Select the value 5 by pushing the ( ) button on the front
5
to VOL+/- ( ), and press the ( ) button on the front
to save it
Return to the main menu by pushing the ( ) button on the front to REW ( ).
6
Setting Menus
49
Page 28
Setting Menus
Setting Menus
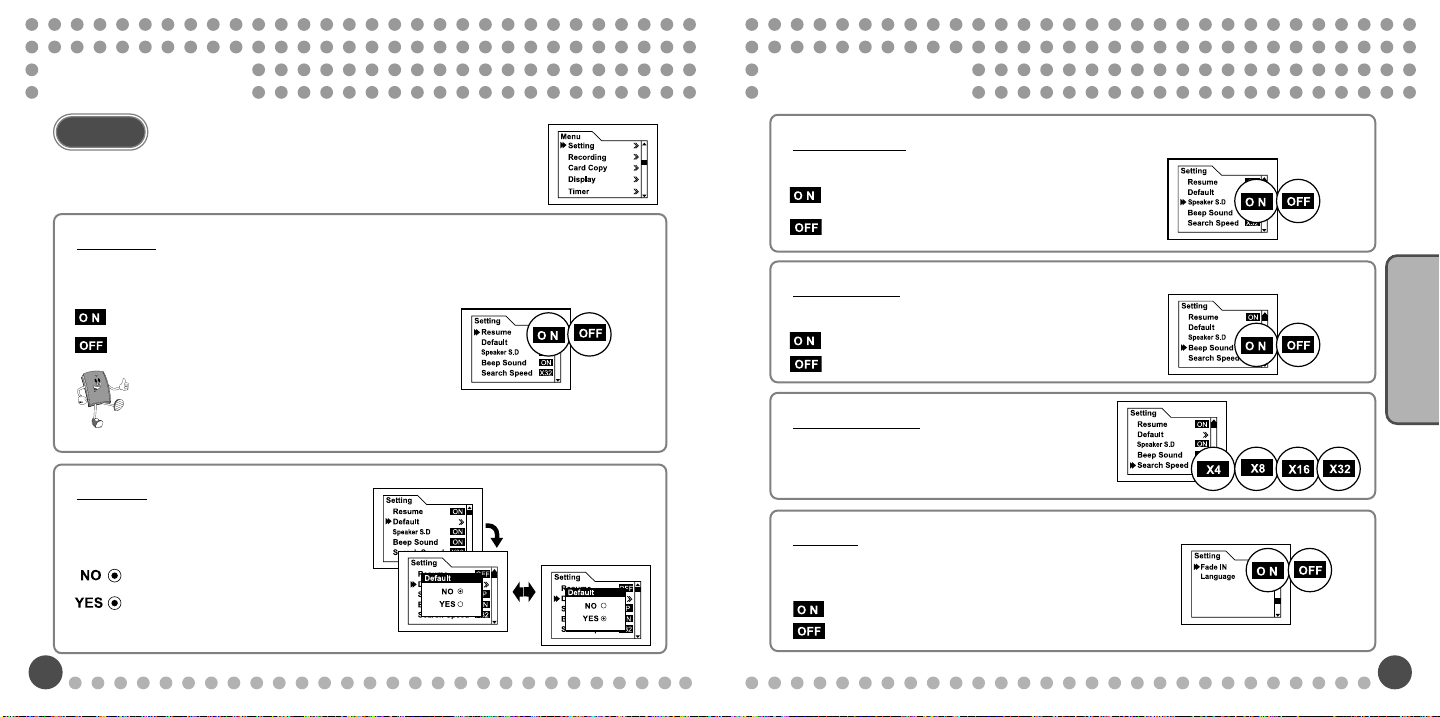
Setting
From the main menu, select the “Setting” to enter into the menu that
you want.
Resume
When you turn off the player and turn it on later, the player will resume back the
EQ and play list of the last music you listened to the same status.
:This restores all the previous information before it was turned off.
: Values set by users will not be saved.
For Your Reference!!
- If the volume was in the range of 0 to 10 when you turned off the player, the volume level will be 10.
- If the volume was in the range of 25 to 30 when you turned off the player, the volume level will be 25.
Default
This initializes all the functions set and
saved.
:This saves the information that users set.
:This initializes all the information.
50
Speaker S.D
This allows the user to select the stereo speaker on or off.
: Users can listen to music through both earphones and stereo
speakers.
: Only through the earphones can the user listen to music.
Beep Sound
This enables the beep sound on or off when operating buttons.
: If selected, there will be beep sound upon the button operation.
: If selected, there will be no beep sound upon the button operation.
Search Speed
Users can select the speed of the Fast Search.
(X4, X8, X16, and X32)
Fade In
Music will be played with volumes increased gradually.
: Volume will be increased by stages.
: Volume will become increased at once.
Setting Menus
51
Page 29
Setting Menus
Setting Menus
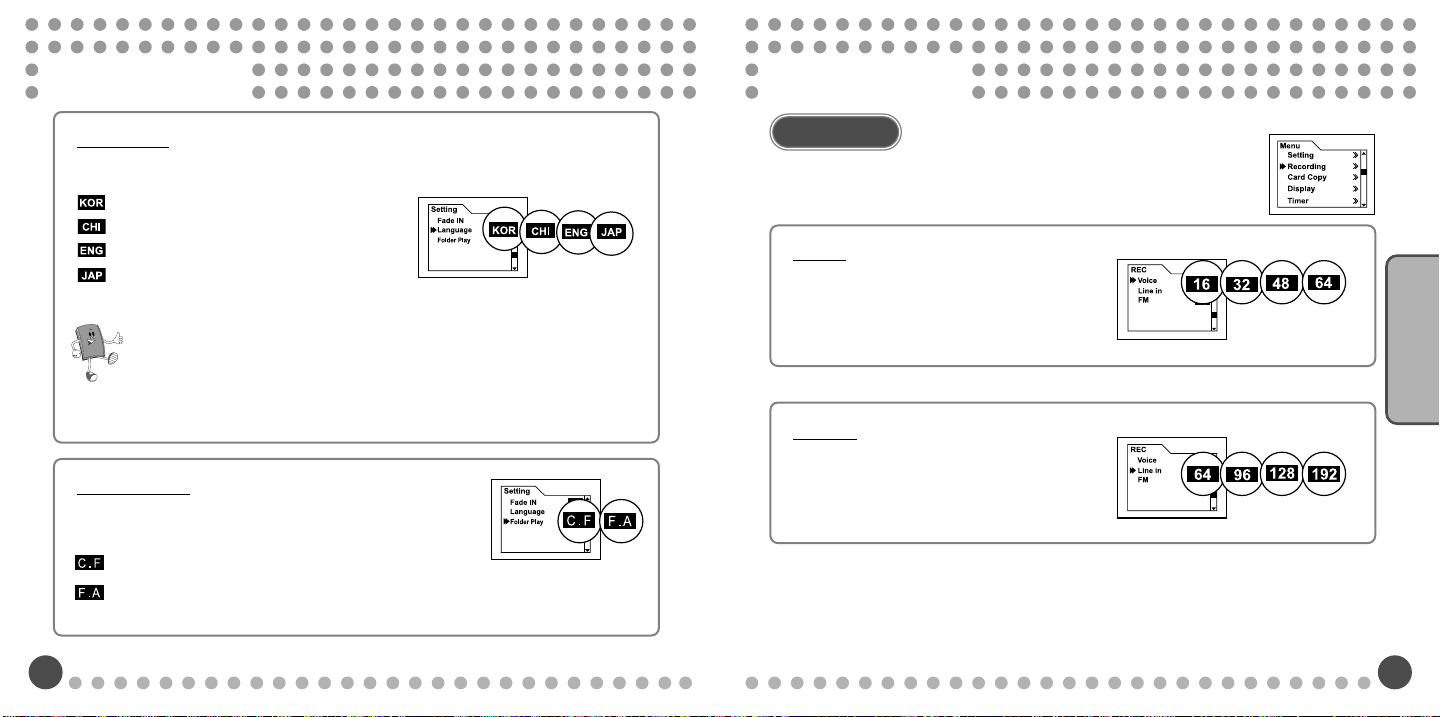
Language
: This sets the tag as KOR if made in Korean Windows OS.
: This sets the tag as CHI if made in Chinese Windows OS.
: This sets the tag as ENG if made in English Windows OS.
: This sets the tag as JAP if it was made in Japanese Windows OS.
For Your Reference!!
Those that are composed of Unicode such as Song titles and folders are displayed normal,
regardless of the setting values, but you should set the language of the tag since it’s not made of
Unicode.
Folder Play
This function allows the user to select to play music files in a
current folder or the entire folder according to the play mode.
: This plays a music file in a current folder according to the play mode (Normal,
Repeat, Repeat All, Random, Random All).
: This plays a music file in the entire folder according to the play mode (Normal,
Repeat, Repeat All, Random, Random All).
52
Recording
From the main menu, enter the sub-menus by selecting “Recording”.
Voice
When recording voices, users can set the bit
rates to 16 / 32 / 48 / 64 Kbps.
Line In
When recording music, users can set the bit
rates to 64 / 96 / 128 / 192 Kbps.
Setting Menus
53
Page 30
Setting Menus
Setting Menus
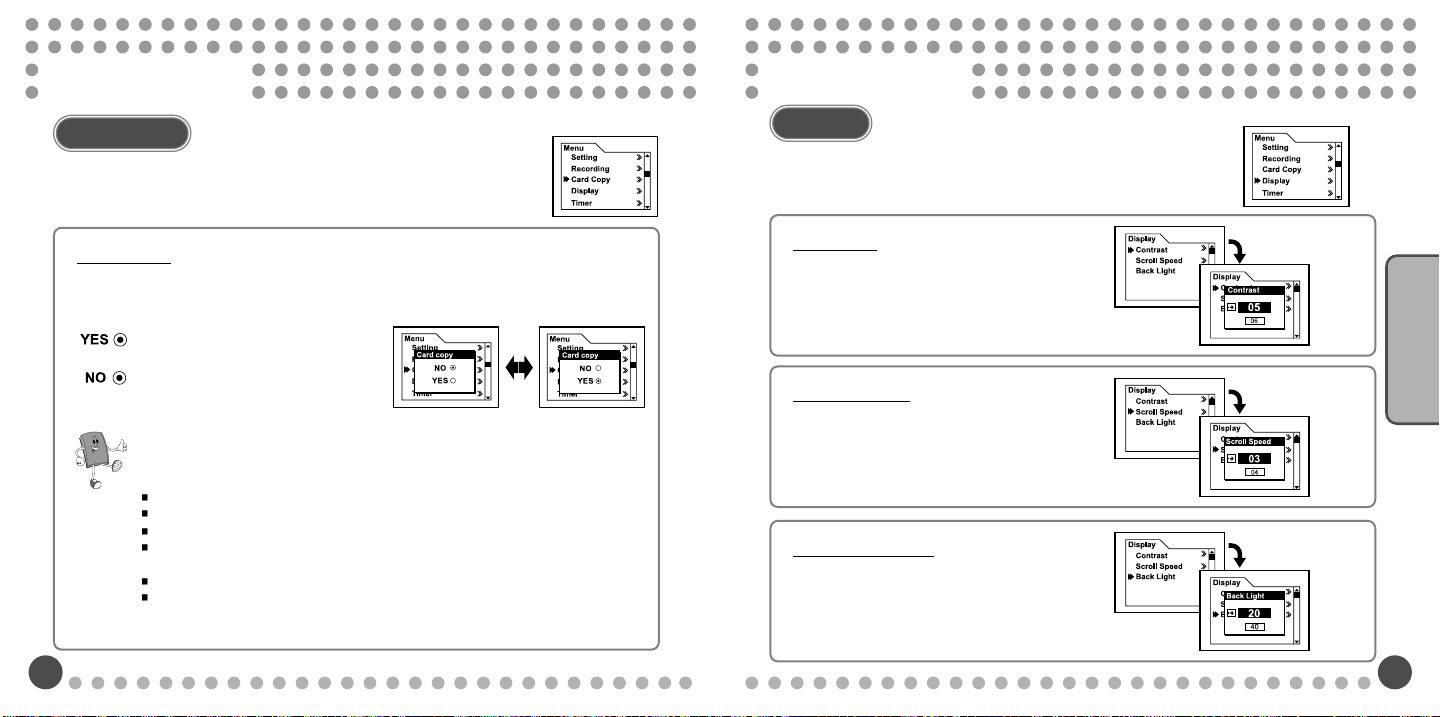
Card Copy
Select “Card Copy” from the main menu to enter the menu.
Card Copy
Select “Card Copy” from the main menu to enter the menu you want.
This is the function which copies the data stored in SD and MMC Memory Cards to
the player.
: Data stored in memory cards (SD,
MMC) will be moved to the player.
: Data stored in memory cards (SD,
MMC) will not be moved to the player.
For Your Reference!!
To do the “Card Copy,” you should insert the memory cards to “CARD IN.”
It may take a while for “Card Copy.”
During the Card Copy, data transfer may fail due to the shortage of the HDD space.
Although you set the value of the “Card Copy” to “Yes”, the Card Copy will not be done if
the memory card is not inserted.
Only under the state of Stop will the Card Copy be performed.
Data copied by “Card Copy” to HDD will be saved into the folder called CARD.
54
Display
Select “Display “ from the main menu to enter the menu.
Contrast
This is to adjust the brightness of the LCD display
from 1 to 10.
Scroll Speed
This is to adjust the speed of the files scrolling on the
LCD display from 1 to 5.
Backlight Time
This is to adjust the time of backlight duration on the
LCD display. (Disable, 5/10/15/20/30 Sec)
Setting Menus
55
Page 31
Setting Menus
Setting Menus
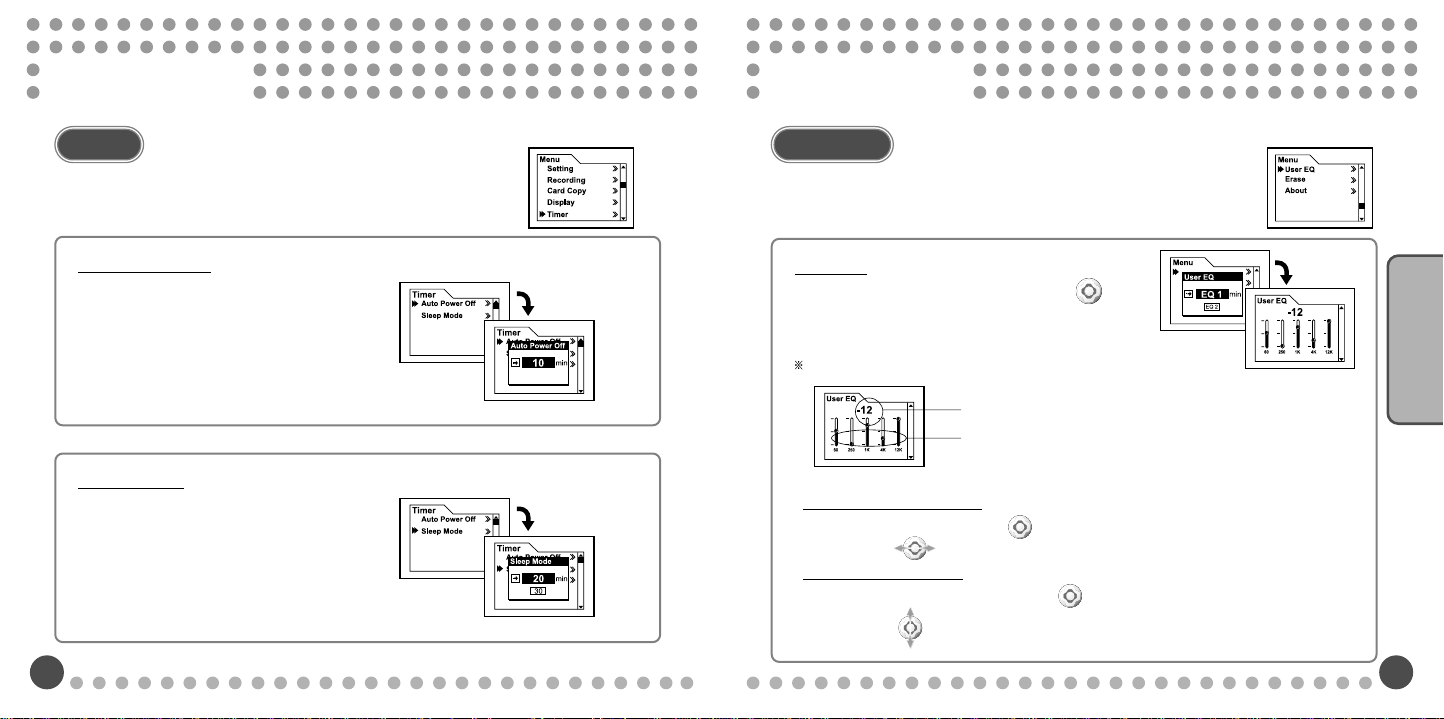
Timer
Select the “Timer “ from the main menu to enter it.
Auto Power Off
Under the state of Pause/Stop, power will be
turned off automatically if no button operation
is made for more than the designated time
(Disable/30 sec/1/2/5/10 min).
Sleep Mode
Under the state of Pause/Stop/Play, if the
user set the “Sleep Mode”
(Disable/10/20/30/60 min), then the power
will be turned off after the designated time.
56
User EQ
- Select “User EQ” from the main menu to enter the menu.
- Users can edit the User EQ fitting for their tastes.
User EQ
Select User EQ No. to set and press the ( )
button on the front, then you will see the EQ edit
display.
Editing EQs
Setting Values of Audible Frequencies
Values of Audible Frequencies (Band)
Moving Bands (5-Band)
To move the band, push the ( ) button on the front to the direction of either
FF or REW ( ).
Adjusting Frequency
To change a setting value, push the ( ) button on the front to the direction of
VOL+/VOL- ( ). There are 25 stages (-12 ~ +12).
User EQ
Erase
About
Setting Menus
57
Page 32
Setting Menus
Using LCD Remocon (Optional)
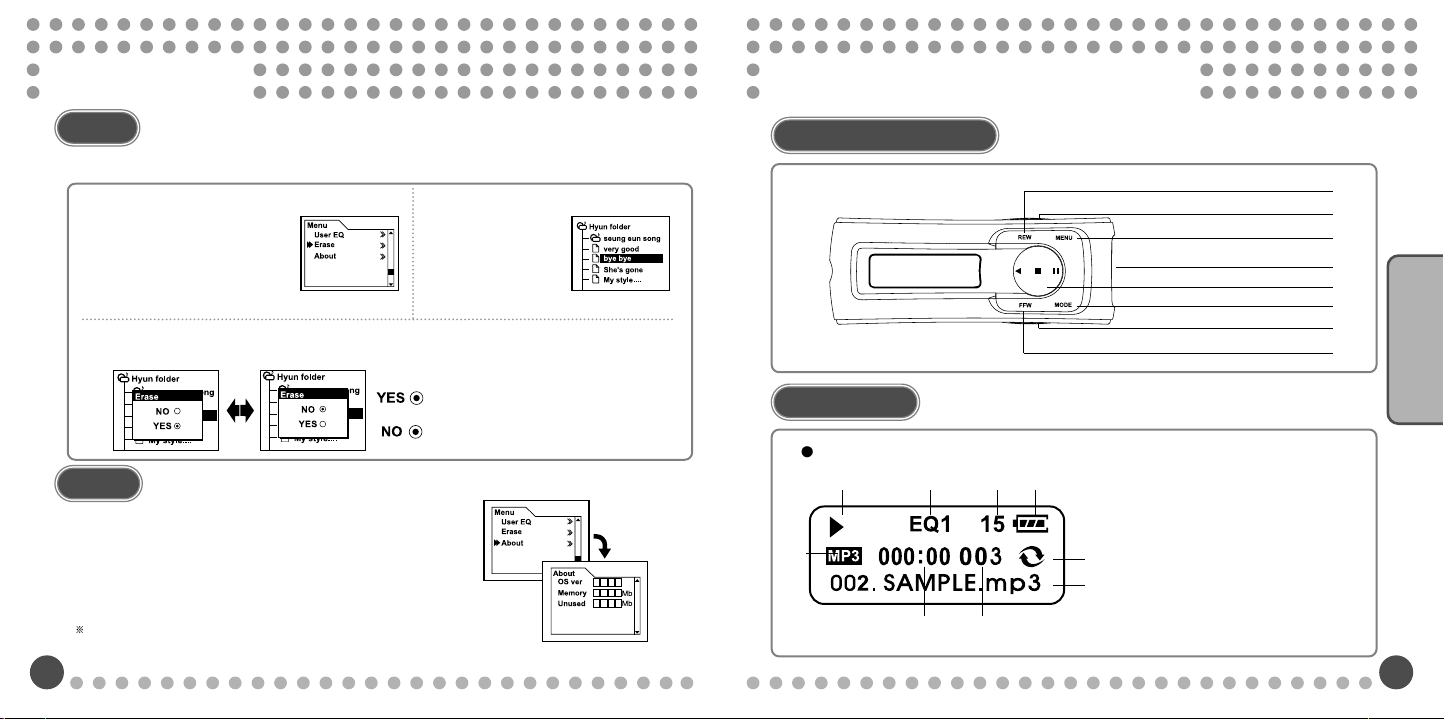
Erase
User can erase files manually.
Select “Erase” from the main
1
menu.
Select “Yes” or “No.”
3
2
: Users can delete the files by entering the
: The player does not erase files.
About
Select “About” from the main menu to enter into the menu.
- This shows the information such as OS version, entire
memories, and available memories of the player.
Only available memories will be displayed except the built-in OS memories of the
player.
58
Select the file to
erase.
navigation mode.
Names of Each Part
LCD Display
Music Mode Display
A B C D
E
FG
REW Button
RECORD Button
MENU Button
Earphones Jack
PLAY/PAUSE/STOP Button
A. Current Status of PLAY, STOP, and PAUSE
B. Equalizer
C. Volume
D. Remaining Battery
E. File Types
I
F. Elapsed Time
G. Order of File Playing
H
H. File Name
I. PLAY MODE (REPEAT)
MODE Button
VOL+/- Button
FF Button
Remocon
59
Page 33
Using LCD Remocon (Optional)
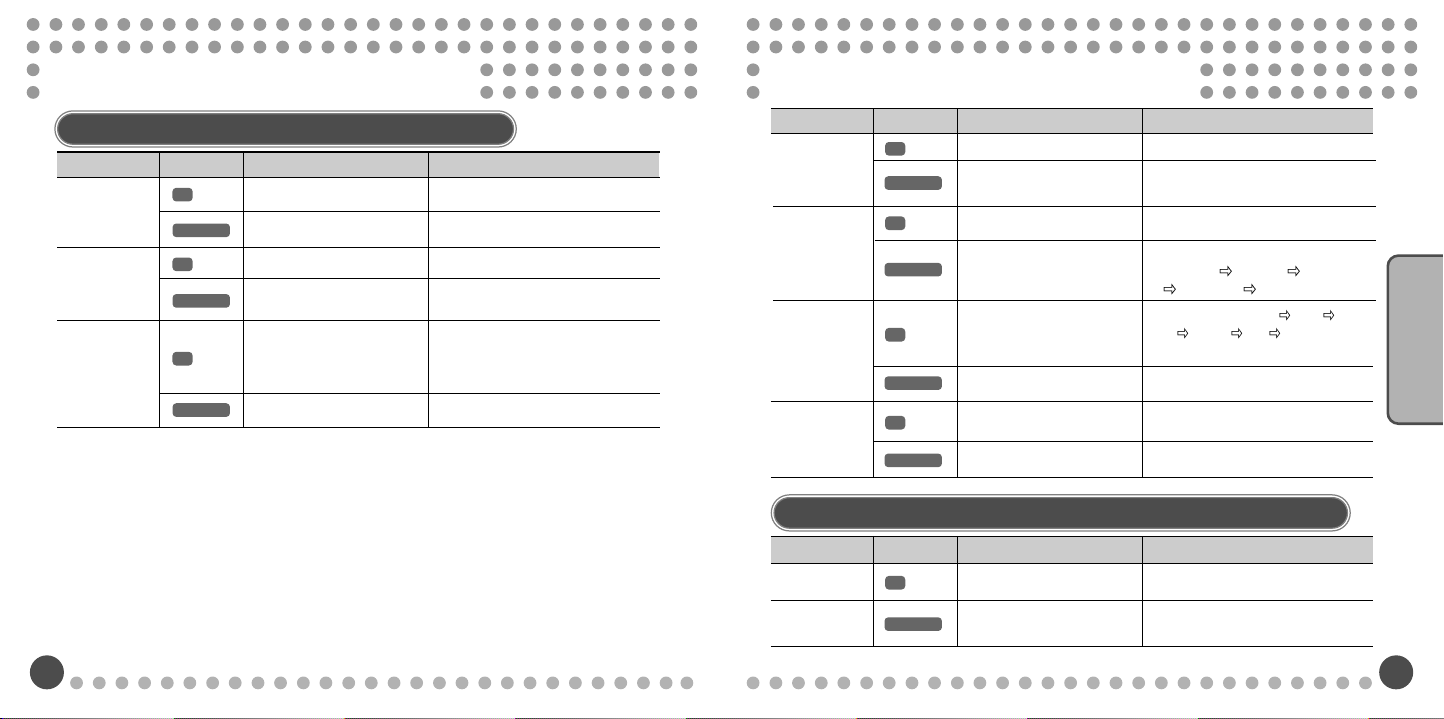
Simple Key Operations for Music Play Mode
Button
PLAY/PAUSE
FF
REW
Time Pressed
Stop State Play State
Plays a current song.
Power Off
Moves to the next track.
Successive forward track
search.
Moves back to the
previous track.
Successive backward track search.
Pauses a current song.
Power Off
Moves to the next song
Fast forward search from the
current position
Within 5 Sec. After play:
Moves back to the previous song.
5 Sec. after play:
Plays the song at the beginning of it.
Fast backward search from the
current position
Using LCD Remocon (Optional)
Button
MENU
REC/A-B
MODE
VOL +/-
Time Pressed
Simple Key Operations for Music/V oice Recording Mode
Stop State Play State
Selects menus
Selects menus
(MUSIC<->VOICE<->LINE)
Waits for voice/music
recording.
Change of EQs (Normal Rock
Jazz Classic Pop User
EQ1~10)
Executes navigation
Volume 1 level up/down
Volume up/down successively
Executes navigation
Turns the volume up/down 1 level
Turns the volume up/down
successively
Selects menus
Selects menus
(MUSIC<->VOICE<->LINE)
Section Repeat: A<->B/Cancel
Changes play modes
(Normal Repeat Repeat All
Random Random All)
Remocon
60
Button
Rec
MENU
Time Pressed
REC Ready State Recording State
Voice Record/Music
Record starts
Selects modes
(MUSIC<->VOICE<->LINE)
Voice Record/Music Record stops.
61
Page 34
Installing a driver
For Your Reference!!
This player can upload and download not only music files but also various kinds of
data including .jpg, .xls, .hwp, etc as a portal drive.
Without having to install a separate software installation, the player can upload and
download files because of the Mass Storage system.
When connected to PC, the icon will be created on the task bar at the right
bottom of the desktop.
Run Windows Explorer by going to Start Program Window Explorer to check the
appearance of “Jukebox” on it.
Windows 98SE Driver Installation
For Windows 98SE users, install a driver program as shown below before downloading
or uploading files.
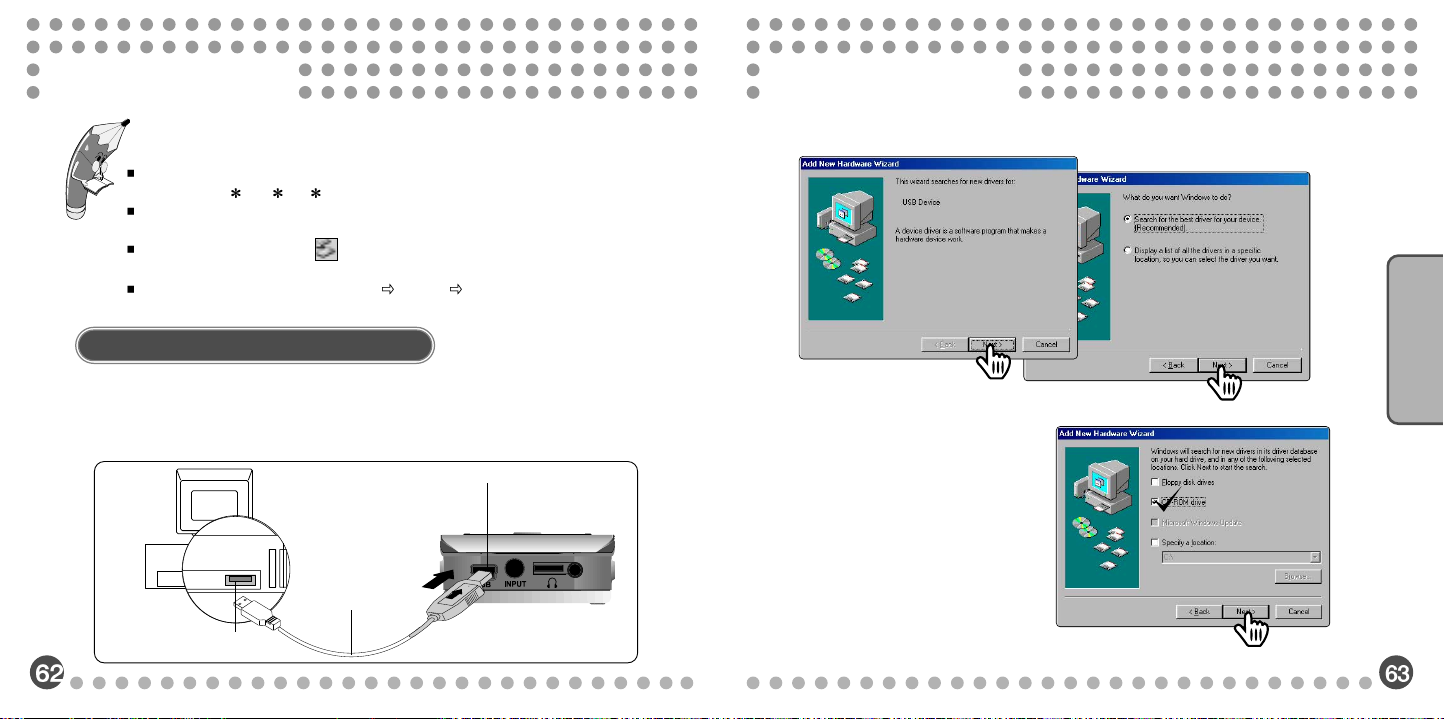
Connect the player to your PC using the USB cable.
1
USB Port in the Player
USB Cable
PC USB Port
Installing a driver
If you see the following windows, then install the program in order.
2
Click!
Click!
Click!
Click!
Click!
Click!
Click!
Click!
Click!
Click!
Click!
Click!
Click!
Click!
Click!
Click!
Click!
Click!
Click!
Click!
Click!
Click!
Click!
Click!
Click!
Click!
Click!
Click!
Click!
Click!
Click!
Click!
Click!
Click!
Put the CD that are provided into
3
the CD-Rom and check the item
as the right picture and then
continue the installation.
Click!
Click!
Click!
Click!
Click!
Click!
Click!
Click!
Click!
Click!
Click!
Click!
Click!
Click!
Click!
Click!
Click!
Click!
Click!
Click!
Click!
Click!
Click!
Click!
Click!
Click!
Click!
Click!
Click!
Click!
Click!
Click!
Click!
Click!
Click!
Click!
Click!
Click!
Click!
Click!
Click!
Click!
Click!
Click!
Click!
Click!
Click!
Click!
Click!
Click!
Click!
Click!
Click!
Click!
Click!
Click!
Click!
Click!
Click!
Click!
Click!
Click!
Click!
Click!
Click!
Click!
Click!
Click!
About Programs
Page 35
Installing a driver
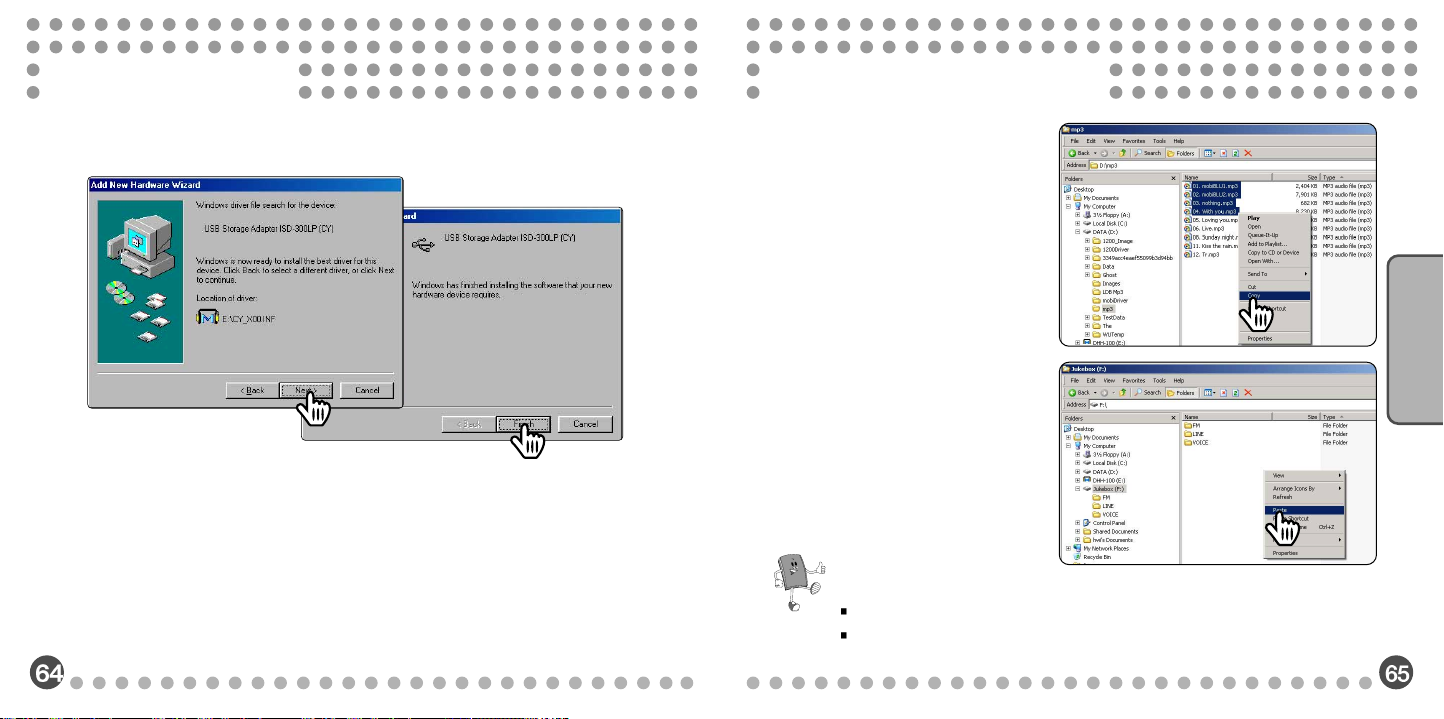
Install it like the pictures below.
4
A driver for Windows 98SE is completed.
5
Click!
Click!
Click!
Click!
Click!
Click!
Click!
Click!
Click!
Click!
Click!
Click!
Click!
Click!
Click!
Click!
Click!
Click!
Click!
Click!
Click!
Click!
Click!
Click!
Click!
Click!
Click!
Click!
Click!
Click!
Click!
Click!
Click!
Click!
Click!
Click!
Click!
Click!
Click!
Click!
Click!
Click!
Click!
Click!
Click!
Click!
Click!
Click!
Click!
Click!
Click!
Click!
Click!
Click!
Click!
Click!
Click!
Click!
Click!
Click!
Click!
Click!
Click!
Click!
Click!
Click!
Click!
Click!
Table of Contents
File Upload & Download
Connect the USB cable to the PC
1
and select the file(s) to download to
the player from the PC by rightclicking “Copy” from the menu.
Like the picture below, paste the
2
copied files to the Jukebox by
selecting “Paste” by right-clicking the
mouse.
For Your Reference!!
The player will be recognized as a “Jukebox” in the folder “My computer” under the main drive.
Don’t disconnect the USB cable during the transfer of files. Otherwise, it may cause a fatal error to
either your PC or the player.
Click!
Click!
Click!
Click!
Click!
Click!
Click!
Click!
Click!
Click!
Click!
Click!
Click!
Click!
Click!
Click!
Click!
Click!
Click!
Click!
Click!
Click!
Click!
Click!
Click!
Click!
Click!
Click!
Click!
Click!
Click!
Click!
Click!
Click!
Click!
Click!
Click!
Click!
Click!
Click!
Click!
Click!
Click!
Click!
Click!
Click!
Click!
Click!
Click!
Click!
Click!
Click!
Click!
Click!
Click!
Click!
Click!
Click!
Click!
Click!
Click!
Click!
Click!
Click!
Click!
Click!
Click!
Click!
About Programs
Page 36
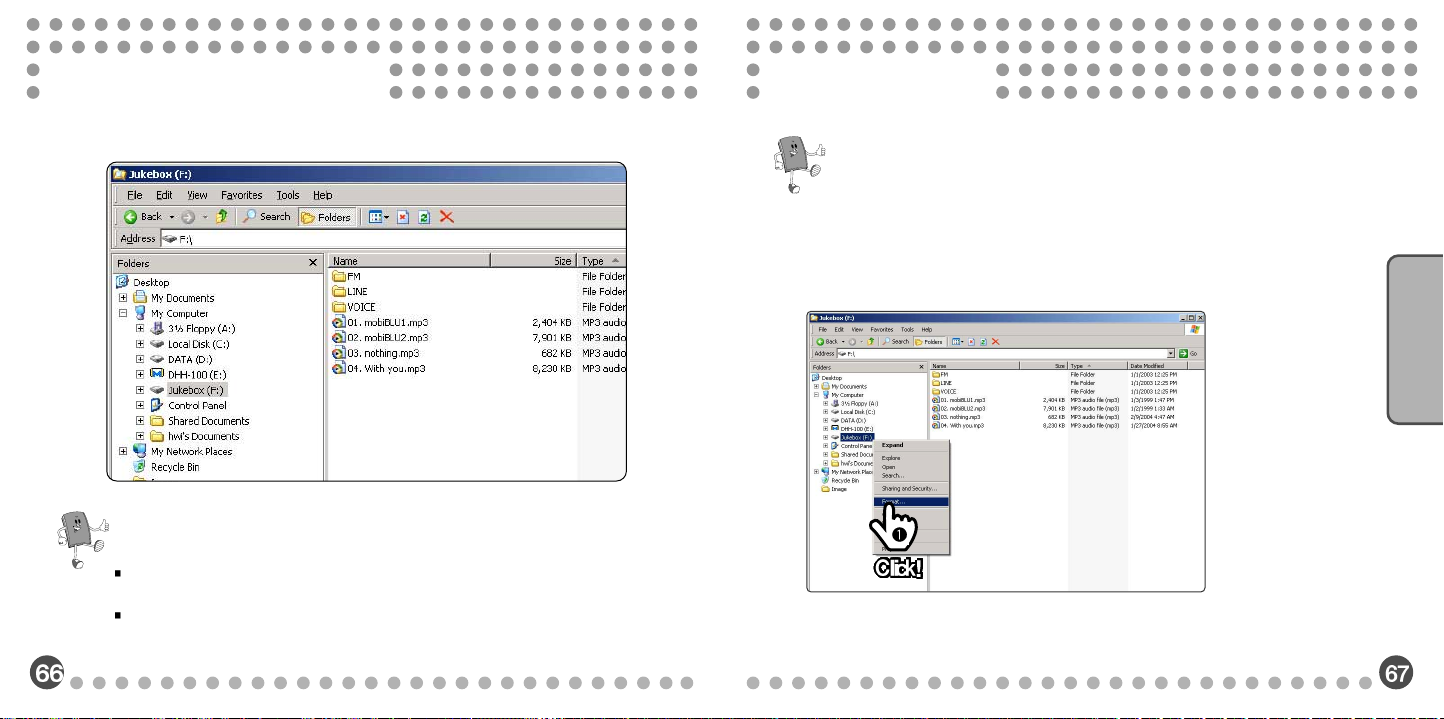
Table of Contents
File Upload & Download
Like the picture below, saving the file to the player is finished.
3
Formatting Files
For Your Reference!!
Be cautious when formatting since it will erase all the data and the data can’t be
restored.
For Your Reference!!
During the file uploading, you can save the files in the player to the PC by following the reversed
direction of the above.
You can use Drag & Drop function of your mouse to download and upload files.
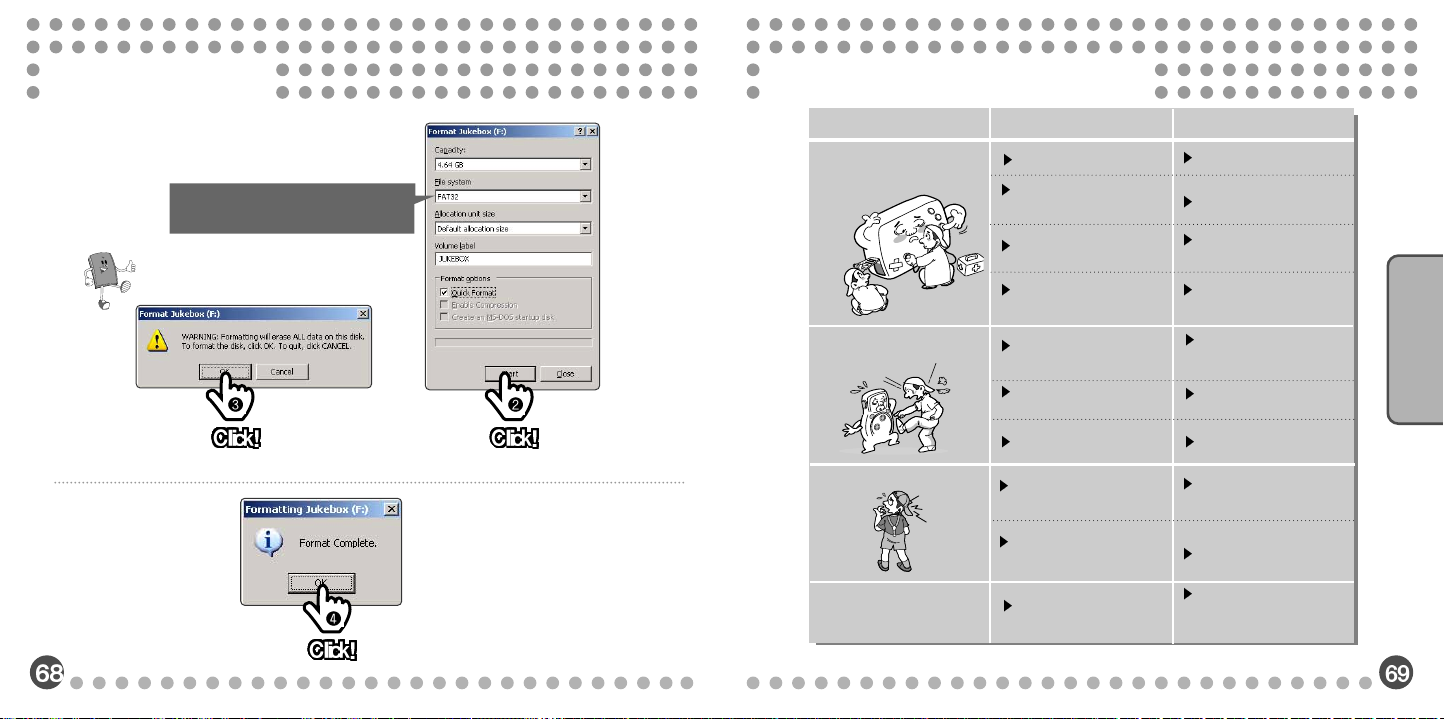
Select the menu Format in “Windows Explorer” by right-clicking.
1
About Programs
Page 37
Formatting Files
When you see the format window, click
2
“Start.”
Make sure whether the file
system is “FAT32.”
Be very careful when formatting~
All These Things Are Normal
Situations Check these Action
Buttons will not work
when pressed.
Malfunctions of the
Digital Audio Players
Check the power is on?
Is the USB cable
connected to the player?
Is the player locked?
Earphone is not plugged
in securely.
Are the modes correctly
set?
Excessive Button
Operations?
Is the battery used up?
Turn the power on.
Disconnect the USB cable.
Unlock it.
Plug it in securely.
Read the manual very
carefully and try to set the
modes again.
Just press the necessary
buttons.
Recharge it with the Adapter.
About Programs
Format is finished.
3
Can’t play the MP3 Files
Unable to download MP3
Files
Is there any song in builtin hard disk?
Isn’t the battery in low
status?
Is the USB cable
connected correctly?
Download the songs from the
hard disk.
Recharge it with the adapter.
Check the status of the cable
connection again, and if not
connected, connect it securely.
Page 38

Warranty Services
FCC RF INTERFERENCE STATEMENT
Customers are entitled to warranty service for a period of one year from
the date of purchase. Warranty service does not apply to defects
resulting from customer fault or acts of God.
Non-warranty service shall apply to defects resulting from :
1. Infiltration of foreign matter, such as water, liquid, or sand.
2. Breakage due to dropping or severe impact.
3. Damage to or deformation of the outer case caused by
organic solvents, such as benzene.
4. Use of parts other than those certified by the manufacturer.
5. Loss or breakage of any parts or components caused by
unauthorized disassembly.
6. Repair or modification done by any persons other than
manufacturer authorized personnel.
7. Acts of God, such as lightning, storm or flood.
8. Purchase from unauthorized retailers.
Note
This equipment has been tested and found to comply with the limits for a Class B digital device,
pursuant to Part 15 of the FCC Rules. These limits are designed to provide reasonable protection
against harmful interference in a residential installation.
This equipment generates, uses and can radiate radio frequency energy and, if not installed and used
in accordance with the instructions, may cause harmful interference to radio communications. However,
there is no guarantee that interference will not occur in a particular installation.
If this equipment does cause harmful interference to radio or television reception which can be
determined by turning the equipment off and on, the user is encouraged to try to correct the
interference by one or more of the following measures.
- Reorient or relocate the receiving antenna.
- Increase the separation between the equipment and receiver.
- Connect the equipment into an outlet on a circuit different from that to which the receiver is
connected.
- Consult the dealer or an experienced radio, TV technical for help.
- Only shielded interface cable should be used.
Finally, any changes or modifications to the equipment by the user not expressly approved by the
grantee or manufacturer could void the users authority to operate such equipment.
CAUTION
Changes or modifications not expressly approved by the party responsible for compliance
could void the user's authority to operate the equipment.
THIS DEVICE COMPLIES WITH PART 15 OF THE FCC RULES. OPERATION IS SUBJECT TO THE
FOLLOWING TWO CONDITIONS: (1) THIS DEVICE MAY NOT CAUSE HARMFUL INTERFERENCE, AND (2)
THIS DEVICE MUST ACCEPT ANY INTERFERENCE RECEIVED INCLUDING INTERFERENCE THAT MAY
CAUSE UNDESIRED OPERATION.
Customer Support
Page 39

WARRANTY FORM
Warranty Term: 1 year from the date of purchase Product
Model :
Date of Purchase : (month) (day) (year)
Name of purchaser : Phone Number :
Address :
Place Purchased : Phone Number :
Address :
Hyunwon Incorporated
You need to show this Warranty Certificate with the date of purchase when
requesting service, in order to receive satisfactory services. Please keep the
Warranty Certificate in a safe place.
1. The warranty service on this product is provided based on the information contained in the Warranty
Certificate.
2. The warranty service takes effect from the date of purchase, so please make sure you enter the date of
purchase on the Warranty Certificate at the time of purchase. (If the date of purchase cannot be verified, the
date 6 months from the date of manufacturing will be use instead.)
3. This Warranty Certificate is not reissued.
The exterior or dimensions are subject to change without prior notice to the customer in order to
improve the product quality.
 Loading...