

Page 1
P/N : SAF190M0B2
User’s Manual
DAH-1900
http://www.mobiblu.com
Please read this user’s manual carefully before getting started.
Recharge the built-in battery using the USB cable supplied with
the device before getting started.
Page 2
Getting Started
03
Safety Precautions/ Special Features/
Specifications/ Accessories/ Location of Controls/
Buttons/ LCD/ Power/ Recharge/ Connecting
(Disconnecting) to (from) a PC /
Resetting
FM Radio
FM Radio/ Region/ Frequency-search & save
Preset Mode/ Preset Delet
Recording FM program/ Sound quality
Programmed Recording
46
24
Basic Functions
Power on-off / Modes/
Navigation (Folder search in a file playing)/
Menus/ Hold/ Clock
30
Music
Listening to Music/ File Selection/ EQ/
Section Repeat/ Play Mode Setting
Convenient Functions
35
Playlist/ Delete-File/
Bookmark/ View-Lyric
Recording
42
Voice/ Line - in
Menus
Menu List/ Menu Buttons/ Setting
Recording/ Display/ Play/ Timer
Watch/ EQ/ SRS/ About
Program
Program CD installation/
File Download-Upload/
Format
Support
“It may not be a problem!”
FCC RF INTERFERENCE STATEMENT
Warranty Card
58
76
86
Page 3
Safety Precautions
Special Features
Specifications
Accessories
Location of Controls
Buttons
LCD
Power
Recharge
Connecting to a PC
Disconnecting from the PC
Resetting
Getting Started
4
7
9
10
11
13
15
17
19
20
21
23
Safety Precautions
* Carefully read this part before using the device.
* The Safety Precautions are classified into three categories; Danger,
Warning and Caution.
* We are not responsible for any damage or loss if the device was not used in
conformity with these precautionary provisions.
The user may be in danger of death or a major injury if
he/she does not use the device in conformity with the
provisions stated in this mark.
The user may be subject to a major injury if he/she does
not conform to the provisions disclosed in this mark.
The user may be subject to a minor injury or property
damage when he/she does not conform to the
provisions of this mark.
Getting Started
04
Page 4
05
DANGER
DANGER
Getting Started
Safety Precautions
Safety Precautions
Getting Started
06
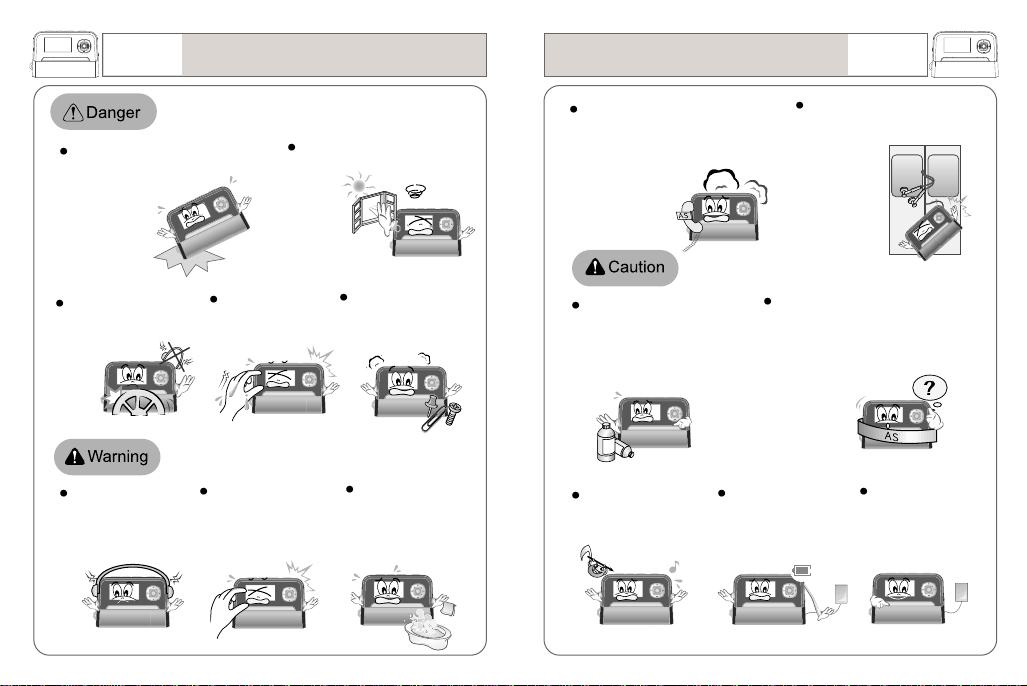
Prevent the Device from
dropping or receiving
excessive shock. It may
damage the Device.
Fire or electric
shock may take
place with the
damaged Device.
Don’t use the earphone set
while riding a bicycle or
motorcycle, or driving a car.
Listening to sound
sources with a high
volume may cause a
hearing disorder.
Don’t put the Device close to
any heating device or in direct
sunlight. It
may
explode.
Don’t touch the device
with a wet hand.
Keep the device away
from children’s access.
Parental attention is
advised for children’s use.
Don’t disassemble or
modify the device on your
own discretion.
Avoid humidity and
dusty areas
Immediately reset the device when it
generates excessive heat or if there
is a burning smell, and then contact
our A/S agent for repair.
Never use any chemicals or
cleanser to clean the device as this
may damage the surface of the device.
Distributing music files
without authorization is
against copyright law.
Continual recharge after
the completion of battery
recharge may damage the
Device.
Be cautious and avoid the
headphones or earphones from
being caught between doors.
The manufacturer is not responsible for any
damaged data stored in the device if the
device error was caused by the user’s
carelessness. The data stored in the device
may be deleted or damaged during A/S.
Use only the AC
adapter supplied with
the Device.
Page 5
07
Getting Started
Special Features
Special Features
Getting Started
08
1.It lasts a month!
You can use the device for up to 150 hours by only one battery recharge.
Practically you can recharge the battery only once in a month by simply
connecting with a PC through a USB cable.
2.OLED Display
Enjoy more dynamic and sharp-cut images wit the OLED display system. It
provides you with even elegant screens, better clarity and more beauty.
3.Multi-Codec
The device supports Multi-codec function which allows you to enjoy not only
MP3 files but also other digital files including WMA.
4.SRS
This SRS function offers you not only 3D surround music but deep and
abundant tone with the aid of the enhanced bass.
5.Clock
You may utilize the Device as a clock, stopwatch and an alarming device. You
can also program the auto recording of a Radio program.
6.Bookmark
This function allows you to search and enjoy a certain part of the file.
7.Auto/ Manual Lyric Streaming
You can simply write the lyrics for your favorite songs and they will appear on
the display. This device supports an easy lyric writing function with the aid of
the Auto Lyric system. You may also edit lyrics as per your need.
8.Playlist
You can make a playlist with your favorites songs. Enjoy the music of your
taste whenever you so desire.
9.LCD Pivot
You can turn the screen up or down with this function.
10.Voice Recording
The built-in high performance microphone enables you to use many functions
of a professional voice recorder.
11.Music Recording
The device enables you to record sound sources from a FM radio, CD player,
Walkman or other external audio devices.
12.Language-learning Aid
With all the convenient and essential functions for language-learning such as
section-repeat, sectional FF/REW, resumption, bookmark and more, the
device enables you to study languages very effectively.
Page 6
09
Getting Started
Functions
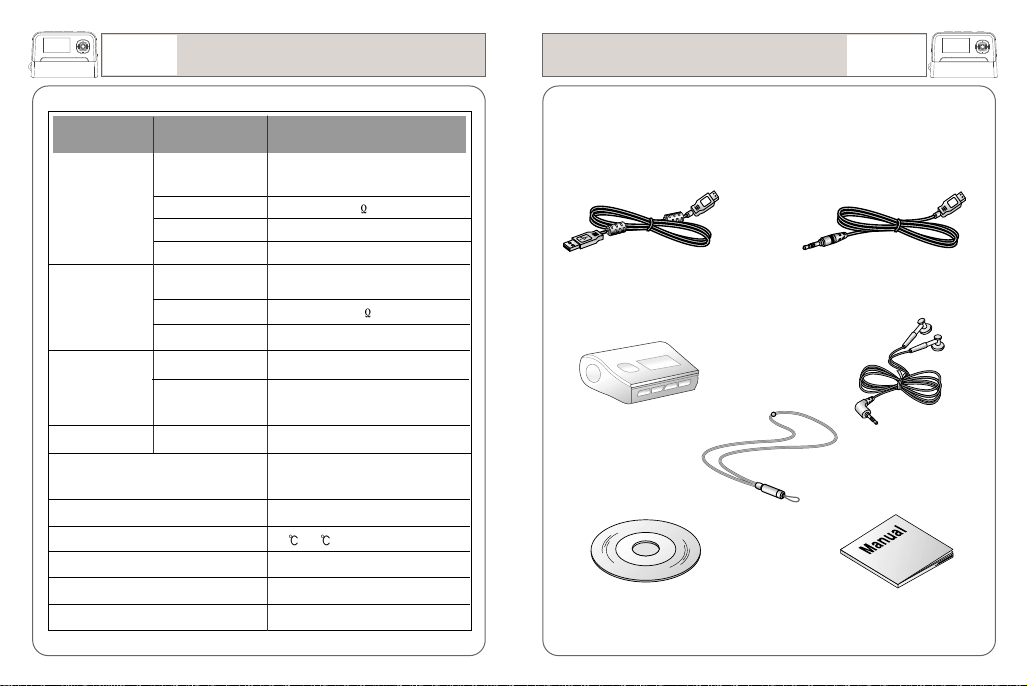
FM Tuner
Audio
Supporting Files
USB
Recording period
Max. Playback hours
Operating Temperature
Size (W*H*D)
Weight (battery inclusive)
Battery (built-in)
Specifications
FM Frequency
Range
Headset Output
S/N Ratio
Antenna
Frequency
Characteristics
Headset Output
S/N Ratio
Supporting file types
Bit Rate
Download speed
SpecificationsItems
Worldwide : 87.50MHz ~108.00MHz
Japan : 76.00MHz ~108.00MHz
Max. 7mW (16 )at Max. Volume
50dB
Headset/earphone code antenna
20Hz ~ 20KHz
Max. 15mW (16
90dB
MP3, WMA
MP3: 8 ~ 320Kbps
WMA: 32 ~ 192Kbps
20Mbps
Audio: approx. 1040minutes
(based on 256MB at 32Kbps rate)
153 hours
-5
~70
65mm X 44.5mm X 21.3mm
66g
Li - Ion
)at Max. Volume
Accessories
* The depicted images of the accessories below may look slightly different to
their actual look.
* The accessories below can be changed without prior notice.
USB Cable
Portable Case
Getting Started
Line-in Cable
Earphone
10
(option)
Neck Strap
Program CD User’s Manual
Page 7
11
Getting Started
Location of Controls
Location of Controls
Getting Started
12
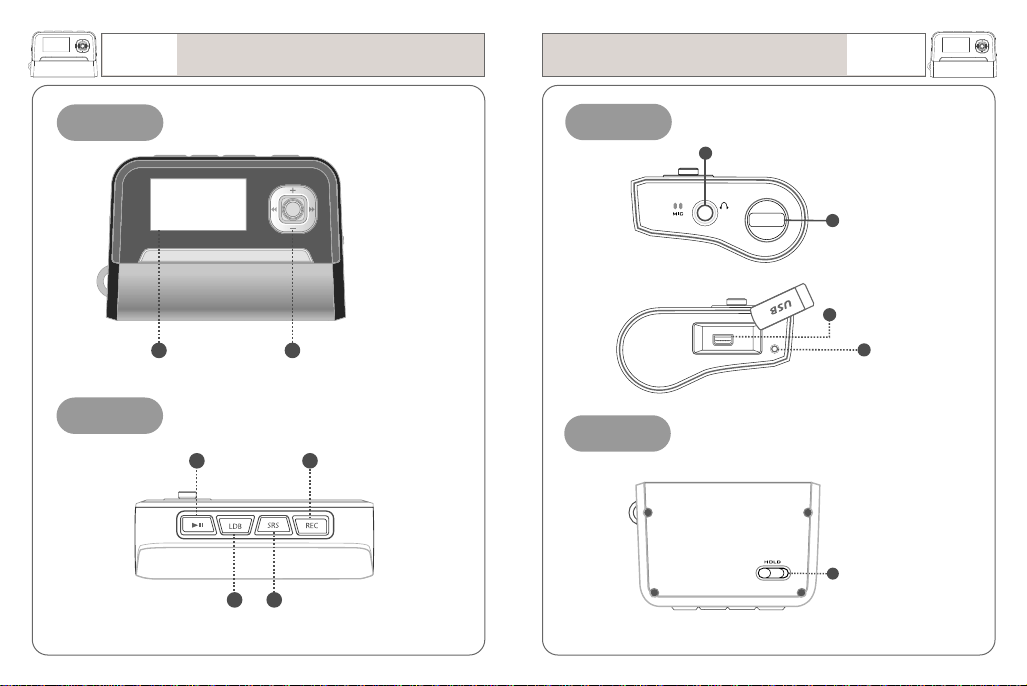
Front
LCD
Top
Power/ Play
/ Pause
View lyric/ Clock/
Mode change
Menu search/ Navigation/
File-track search or move/
Volume
Record/ Section Repeat/
Play mode change
EQ/ Bookmark
Side
Earphone port
Neck strap hook
USB port
RESET Button
Back
Hold
Page 8
13
Getting Started
Buttons
Buttons
Getting Started
14
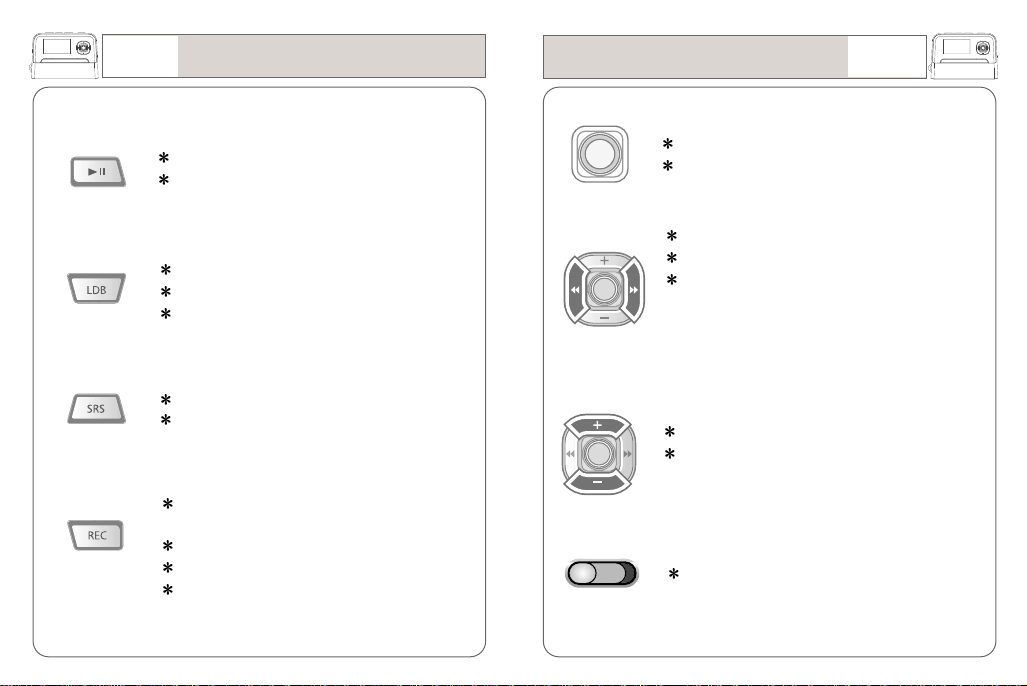
Power ON/OFF
Play/ Pause
View lyrics in ‘music playing’
Mode Change
View the time in ‘pause or stop’
EQ/SRS setting
Bookmark
Voice recording, Music recording, FM Radio
recording
A-B section repeat in ‘play’
Play mode change
Cancel button
Entering navigation/menu mode
Save & Enter
Move to the previous/next file
Search in the file
Search
- move from navigation/menu mode to main
<-> sub phase
- Menu: selecting set value in the last sub
phase.
Volume increase or decrease
Search
- move from navigation/menu to up or down
menus.
Hold all key functions.
Page 9
15
Ready
V001.mp3
000:00 115:48
Getting Started
Display
Display
Getting Started
16
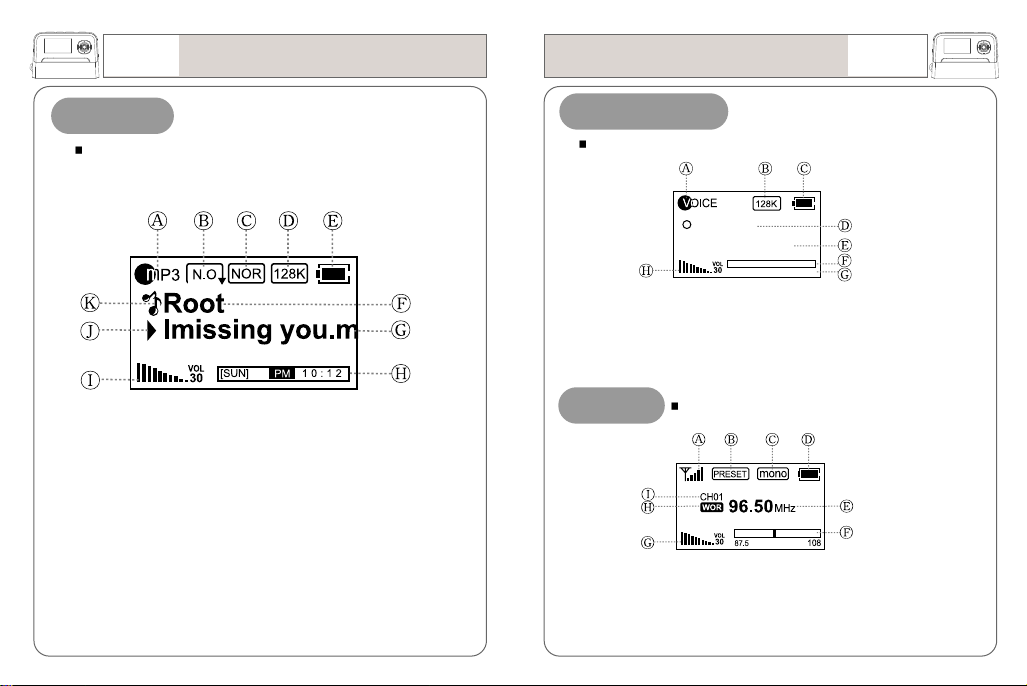
Music Mode
You can enjoy music files in this mode.
A: ‘Playing’ file format
(Play/ Pause/ Stop)
B: Play mode
C: EQ
D: Bitrate/ LDB
E: Battery capacity
F: Folder name
G: File name/ ID3 Tag
H: Graphic EQ
I: Volume
J: Status (Play/ Pause/ Stop)
K: Mode
Recording Mode
You can record voice of line-in sound source in the mode.
A: Sound source (voice/ line-in/ FM)
B: Bitrate
C: Battery capacity
D: Recording status
(ready/ recording/ pause)
FM Mode
A: Signal receiving/ ready
B: Preset/scan
C: Stereo/Mono
D: Battery capacity
E: Frequency
You can listen to FM radio in this mode.
E: File name
F: Process bar
G: ‘Recording’ elapsing time/ time to go
H: Volume
F: Frequency search/ Preset search
G: Volume
H: Territory
I: Preset channel no.
Page 10
17
Getting Started
Power
Power
Getting Started
18
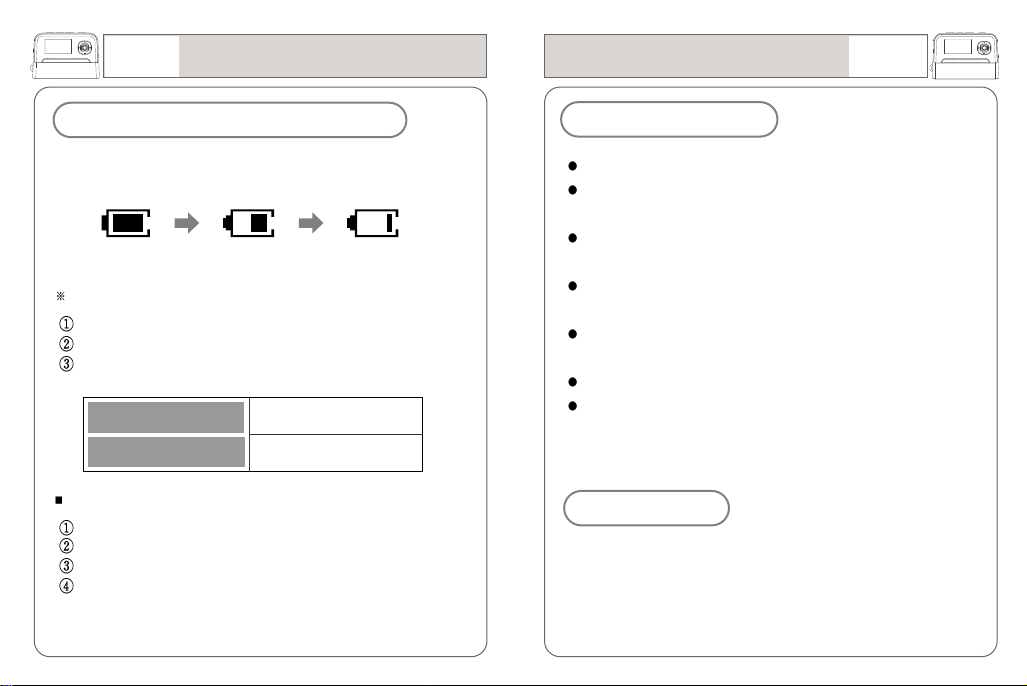
Battery indicator for remaining capacity
When initially turning on the device, the battery status may vary.
It is stabilized 5 to 6 seconds after the power is ON.
(Full) (Mid) (Low)
Recharge the battery using a USB cable in the following cases;
“Low Battery” displays on LCD
The button is not functioning correctly
LCD is not activated by pushing the power button.
Battery Type
Lithium-Ion
Playback hours
Playback hours with the built-in batter: 153hours
MP3: 128 Kbps
Volume: based on 20
The above results were derived from the test on the built-in
Lithium Ion Battery and are subject to change according to the
using condition.
MP3 playing
153hours (1620mAh)
Built-in Battery
Don’t use damaged built-in battery.
Avoid excessive recharge longer than specified hours (4hours) to
prevent fire.
Fully recharge the battery when trying to use it for the first time or
after a long-term disuse.
When the ‘using hours’ of the battery gets shorter in comparison
with recharging hours, replace the battery.
Since the battery supplied with the device is consumable the using
hours of it slowly gets reduced.
The built-in battery can be recharged about 500 times.
Avoid any metal part from contacting DC converter or built-in
battery to avoid unexpected fire or electric shock.
Disposal
The Device includes a built-in Lithium-ion battery. The battery is
recyclable so please return it to nearest ‘recycle center’ when you
dispose the Device. Don’t disassemble the device for disposal.
Page 11
19
Getting Started
Recharge
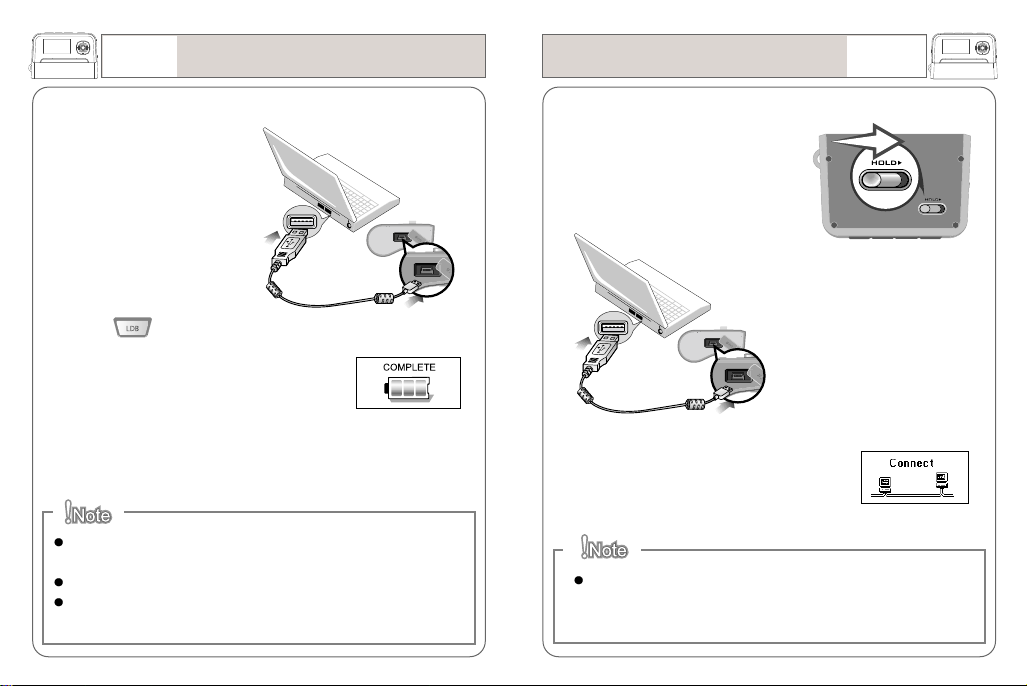
1.Connect the device into a PC
using the USB cable supplied
in the package.
2.
The device can be recharged
while it’s play music.
3.Press shortly in ‘Pause/Stop’
to check the progress of recharging.
The device displays “COMPLETE” at
the completion of the recharge.
Connecting to a PC
1.Place the HOLD key on upper
position to activate the HOLD.
2.
Connect the device into a
PC using a USB cable
Getting Started
20
4.Disconnect the USB cable from the computer (safe hardware
removal; see page 21)
If the Hold key is activated in recharge process, the USB connection is
also effective to down/upload the files.
Recharge the device using a USB cable when LCD is not activated.
It takes approximately 4 hours to completely recharge a completely
consumed battery.
3.
The screen displays the icon on the left
if the connection is correctly made.
Don’t disconnect the device from the PC when “Don’t Disconnect”
message is displayed on LCD. It may cause an unexpected error to
occur.
Page 12
21
Getting Started
Disconnecting from the PC
Disconnecting from the PC
Getting Started
22
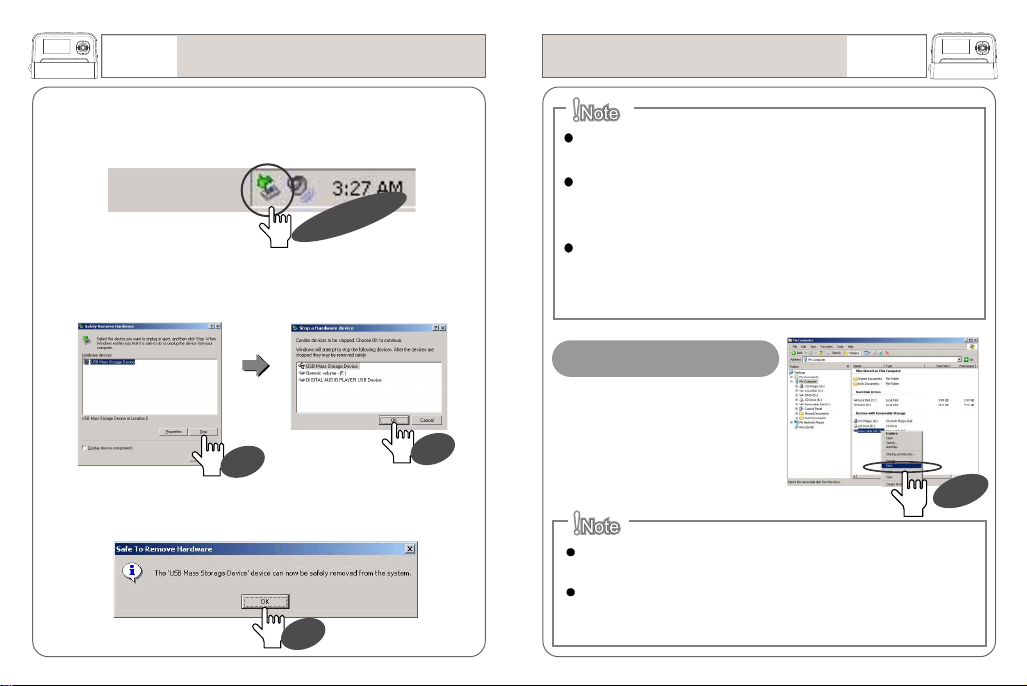
1.Double click on the green arrow on the right-bottom of the initial
Screen.
Double CLICK
2.Click on Stop and OK (enter) consecutively after selecting “USB
Mass Storage Device”
Click
Click
3.Click on OK (enter) on the “Safe Hardware Removal” message
box followed by cable removal.
Click
What’s USB (Universal Serial Bus)? This is the new data
connection system between a PC and its peripheral devices.
Connect the USB cable supplied with the Device into a USB port
in PC. An unexpected error can occur when connecting the cable
to the USB port located in the front face of the PC or USB hub.
The Device can not be identified in the PC installed with Windows
98SE or lower version. Install the program CD supplied with the
Device in the PC.
In the case with Windows 98SE
Open “My Computer” or “Windows
Search” and click on “Removable
Disk.” click on “Remove” using the
right mouse button and then remove
the USB cable.
CLICK
Removing the cable without following the above instructions may cause
a fatal error in the PC or the device.
Removing the cable while downloading or uploading files, or formatting
the device may cause a fatal error in the PC or the device.
Page 13

23
Getting Started
Resetting
If the player malfunctions such as stopping or operating
abnormally, push the reset button with a pointed thing.
After power is turned off, pressing the long will
turn the power on.
Basic Functions
Pressing the reset button with a pointed thing pin too deep
will cause a damage to the player.
Reset will not erase or delete the music songs. Reset is
use to restart the MP3 player if the player malfunctions.
Power on-off
Modes
Navigation (Folder search in a file playing)
Menus
Hold/ Clock
25
26
27
28
29
Page 14
25
Basic Functions
Power on/off
Modes
Basic Functions
26
Power ON
Press and hold to turn the power on.
The device is not activated when it is in HOLD mode. (“HOLD” is
displayed)
When the battery is discharged the display shows “Low Battery” and
the device is not activated.
Recharge the battery when LCD is not activated.
Power OFF
Press and hold to turn the power off.
When no button manipulation in the pause or stop condition is made
within the set period of time for “Auto Power Off,” it automatically turns
off the power.
When you try to play the file again by pressing , following the
restart of the device, it completely recovers all previous settings. All
track numbers, the equalizer and other settings are recovered.
Regardless of the “memory for previous setting” the volume level stored
in the device will be 10 if the original volume level before the turning off
was ranged from 0 to 10 while it is 25 if the original volume level was
ranged from 25 to 30.
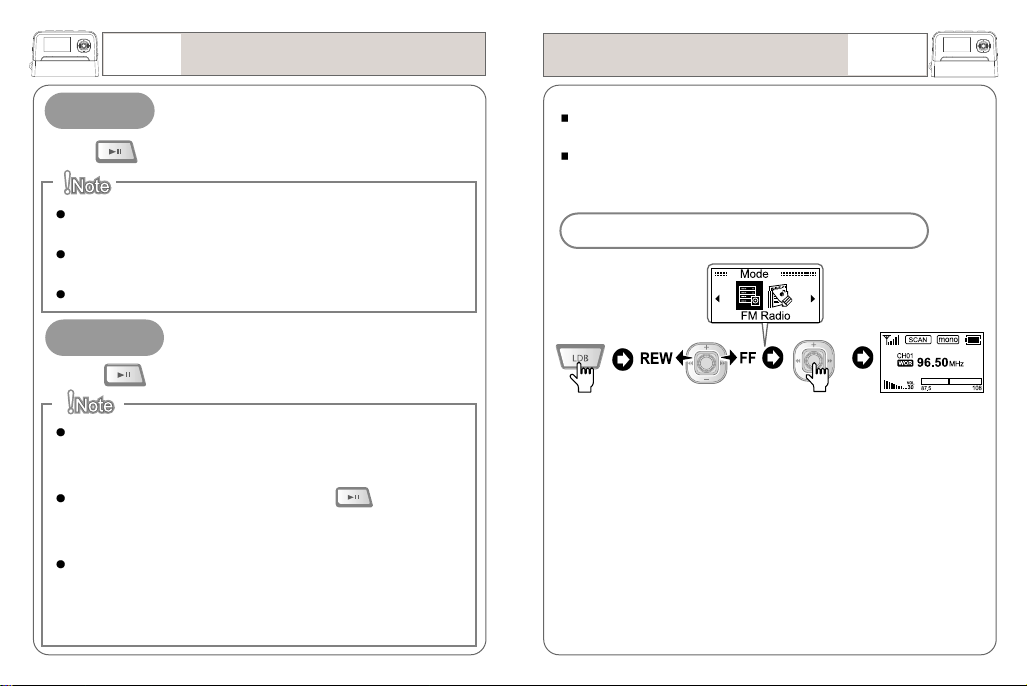
There are all 5 modes programmed in the device; Music playing,
Voice recording, Music recording, FM Radio and Playlist.
Different functions are available for each mode.
Example) How to enter FM radio mode
Press
and hold
Press
to the arrow
directions to
move to ‘FM
Radio’ mode
Press
to enter ‘FM
Radio’ mode
‘FM Radio’
mode
Page 15
27
Basic Functions
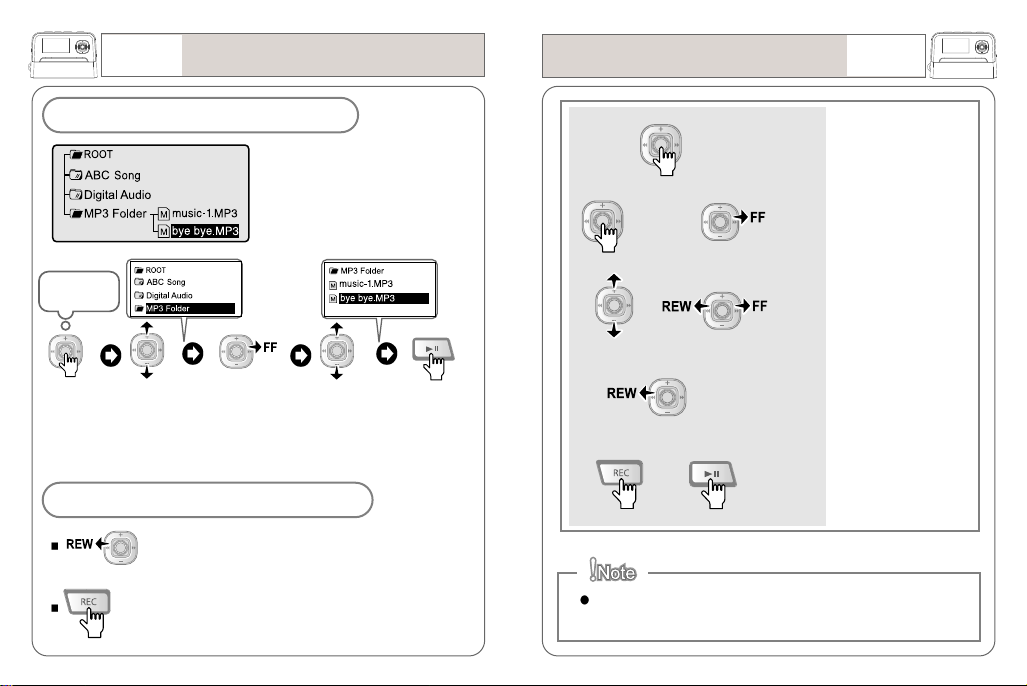
Navigation (Folder search in playing)
Example) when trying to play “bye bye”;
Basic Menu Operation
Press and hold
Basic Functions
to enter the menu
28
In Music
mode...
Press
push
to move to the
“MP3 Folder”
push
to enter the
“MP3 Folder”
To move to the upper folder level;
to the arrow direction to move back to the upper level
push
to get out of the Navigation mode.
Press
push
to move to
“Bye Bye.mp3.”
Press
to play “Bye
Bye.mp3”
Press
or push
/
push
to enter the lower
push
folder level
to move to another
menu and to adjust
the set value
push
to move back to
the main menu
or
Press
to get out of the
menu mode
See Page 61 for details about the menu.
Page 16
29
Basic Functions
Hold/ Clock
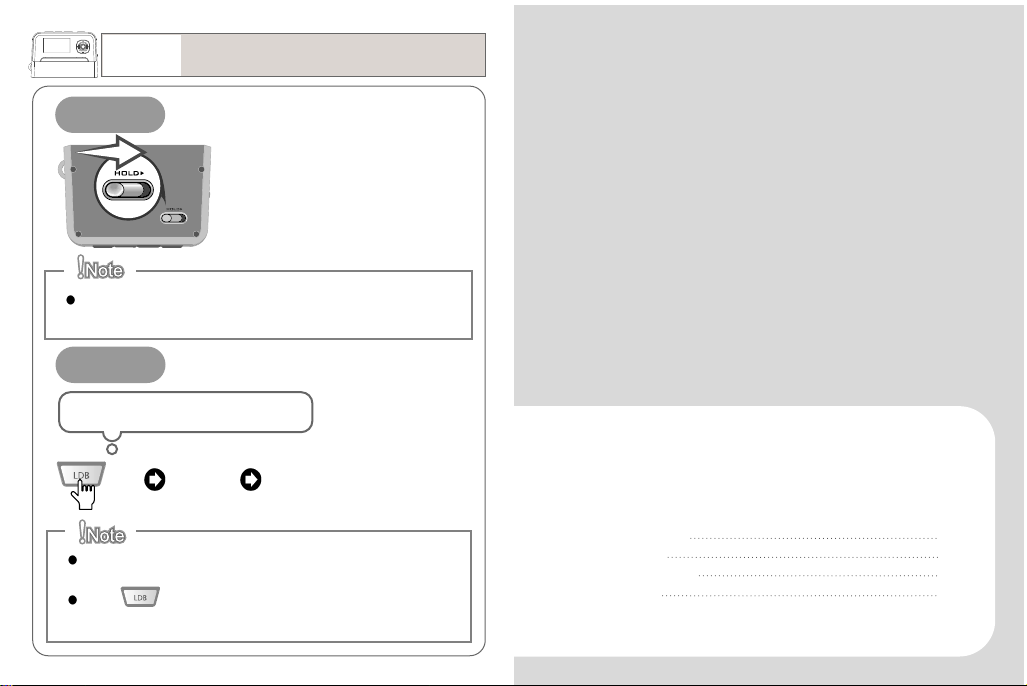
HOLD
1.Place the button on the side of
the device to the arrow direction
to hold all key functions
2.No key will function while in hold
status.
Power can not be turned on when it is on Hold. (a HOLD
indication is displayed shortly).
View Time
In the modes of Music, Stop and Pause
Press
View time
press any button to cancel the
function.
Music
The view time will be canceled on the display when there is no
button manipulation for more than 5 seconds.
Press to check the recharging progress while the device
is being recharged using a USB cable.
Listening to Music
File Selection
EQ/Section Repeat
Mode Setting
31
32
33
34
Page 17
31
Music
Listening to Music
File Selection
Music
32
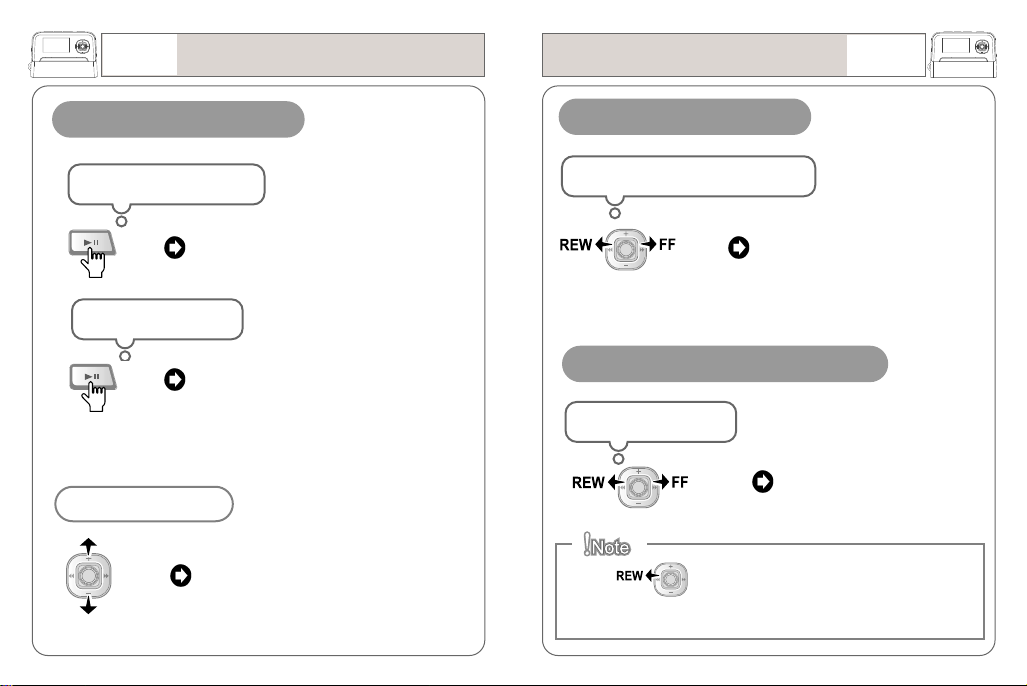
Playing Music/ Stop
In Stop or Pause mode
Press
In Play mode
Press
Volume control
Push
to play the file
to pause the file
to adjust the sound volume
Going to other files
In Stop, Pause or Play modes
Push
to move to the previous/next file
Searching a certain part in a file
In Play mode;
Press
and hold
Press to get back to the initial part of the file when
the play elapsing time is within 5 seconds.
to fast search a certain part in the
current file (FF/REW)
Page 18
33
Music
EQ/ Section repeat
Play Mode Setting
Music
34
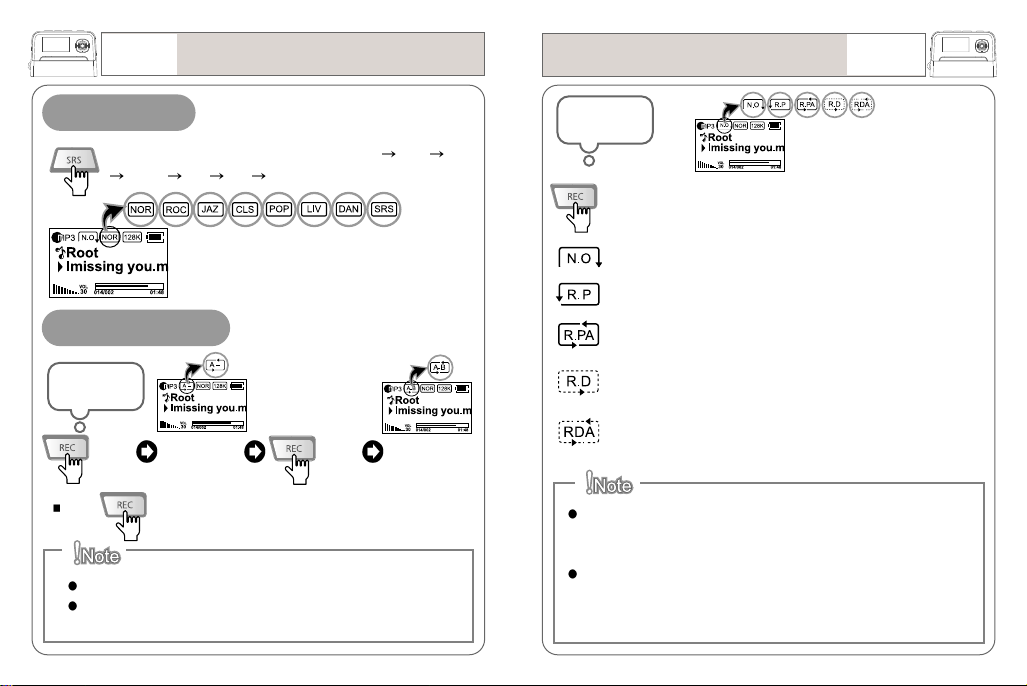
EQ
Press to change the EQ settings from Normal Rock Jazz
Classic Pop Live Dance through to SRS.
Section repeat
In Play
status
Press
Press to cancel the section.
The end of the file will be set for “B” If it is not specified.
“B” can be only set from 1 second after “A.”
to set “A”
Press
section “A-B”
to set the
In Play
status;
Press and hold to change the mode among the following
options; Normal/ Repeat1/ Repeat All/ Random/ Random All
Normal: plays music files once in correct sequence.
Repeat1 : repeats the current file continually.
Repeat All : repeats all files in correct sequence.
Random : plays all files once in random sequence.
Random All : repeats all files continually in random
sequence.
The play modes can be set by entering ‘Menu – Play – Play
Folder (Folder All / Current Folder)’ mode. (See Page 70)
Regardless of the setting for Play Folder (Folder All / Current
Folder), the number of files displayed on the device includes the
currently-played file.
Page 19
Playlist
Convenient
functions
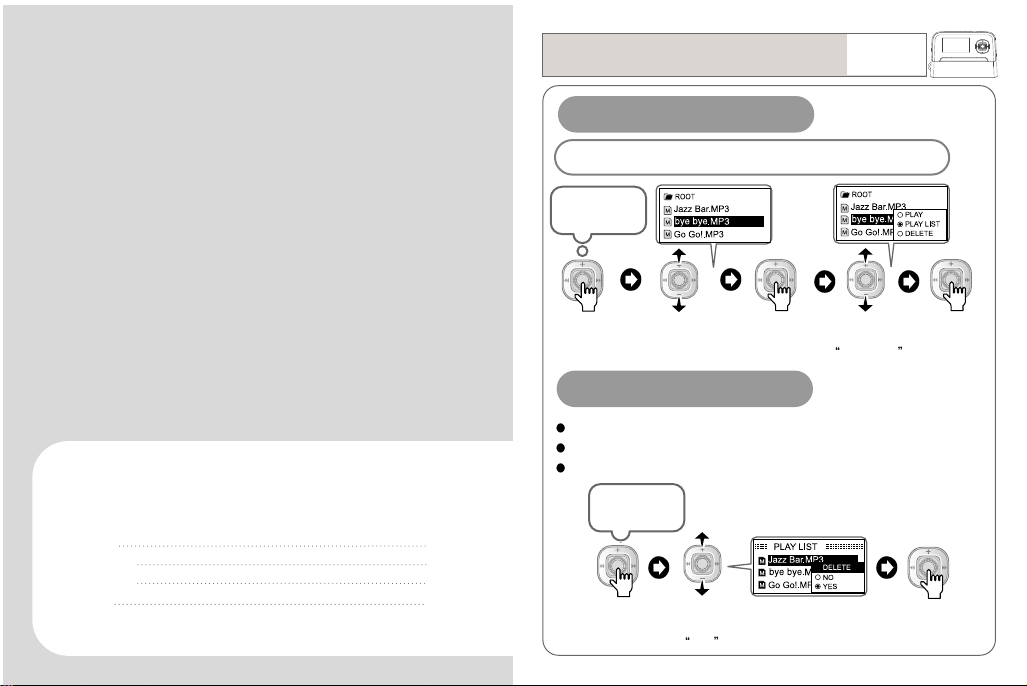
Writing Playlist
Example) when adding “Bye Bye.mp3’ into a Playlist.
In music ‘Play/
Pause’ mode,
36
Playlist
Delete-File
Bookmark
Lyrics
Convenient Functions
Press
Push
to move to
“Bye Bye.mp3”
Press
to display a
popup box
Push
to move to
PLAYLIST
Press
to complete
the playlist.
Deleting Playlist
Enter the Playlist you want to remove. (Page 37)
The original file is not deleted at the deletion of the playlist
The Delete function is only available while in Stop/ Pause mode.
Following the
file selection
36
38
39
41
Press
to display a
popup box
Push
to move to
YES
Press
to delete
the playlist.
Page 20
37
Convenient
functions
Playlist
Deleting files
Convenient
functions
38
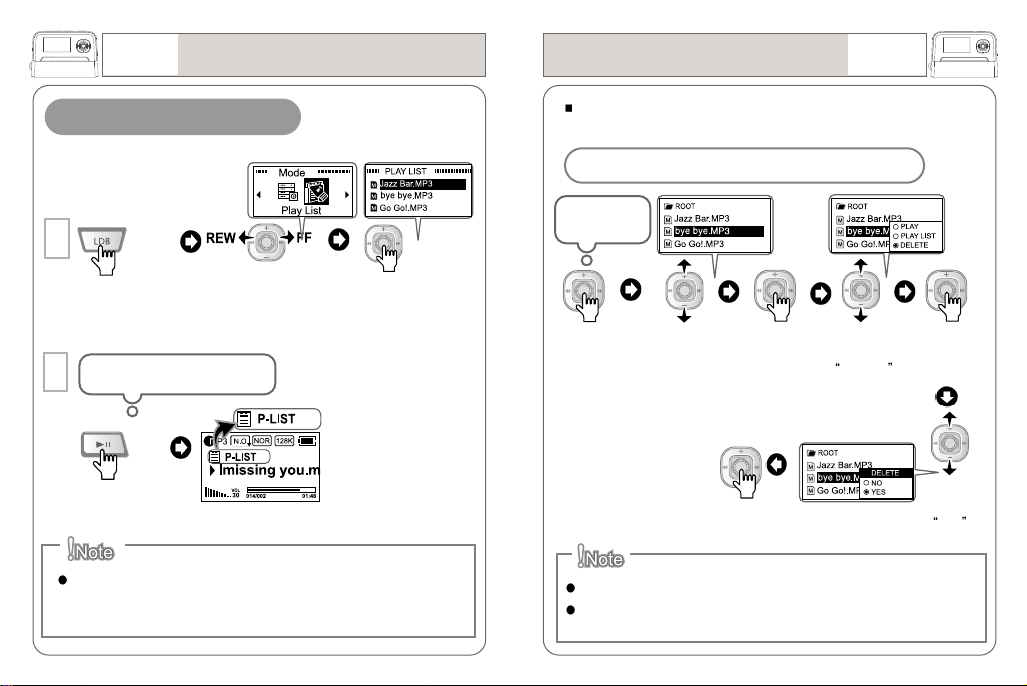
Playing a Playlist
1
2
Press
and hold
Push
to move to the
“Playlist” mode
Following the file selection;
Press
Only the files added in the Playlist can be played in the mode of
“Playlist.”
Press
to enter the
“Playlist” mode.
This enables you to delete the files stored in the device.
Example) when deleting the file “bye bye.mp3.”
In pause/stop
mode;
Press
Once the file is removed, it cannot be recovered.
File deletion is only available in Stop/ Pause mode.
Push
to move to
“Bye Bye.mp3”
to delete the file.
to display a
popup box
Press
Press
Push
to move to
DELETE
Press
to display a
popup box
Push
to move to
YES
Page 21
39
Book Mark 01
Convenient
functions
Bookmark
Bookmark
Convenient
functions
40
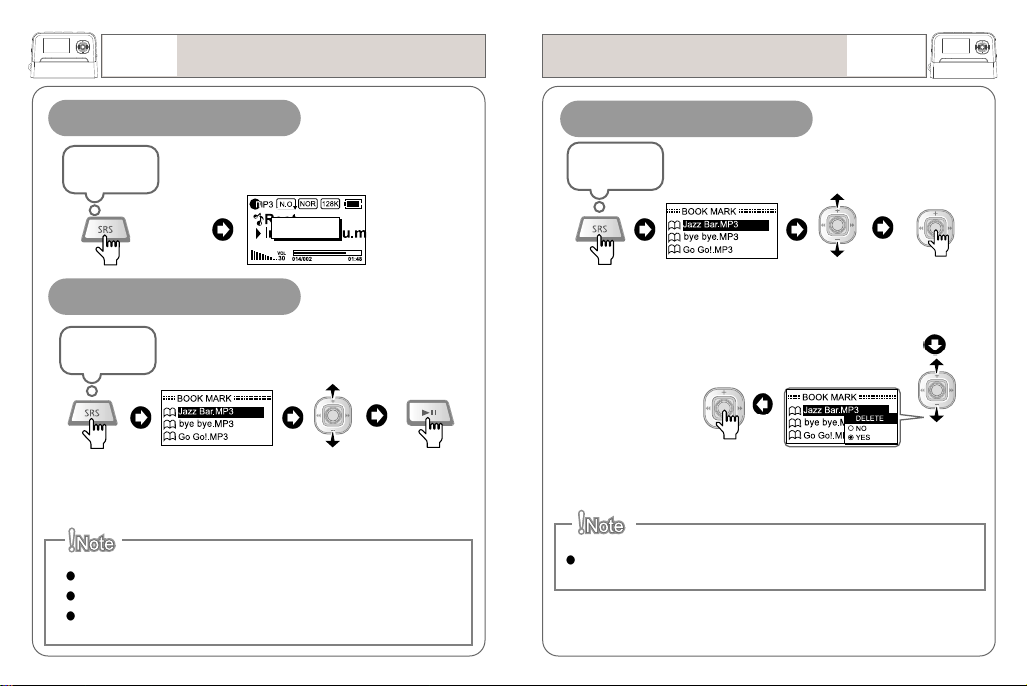
Setting Bookmark
In play mode;
Press and
hold
Playing bookmarked file
In Stop/pause
mode;
Press
and hold
to display the
bookmark list
Bookmarking is not available in Stop/pause mode.
The maximum file number for “bookmark” is 10.
Bookmark is available on Music mode only.
to arrow directions
to move to the file
to be played
Push
Press
to play.
Deleting bookmarked file
In Stop/Pause
mode;
Press and
hold
to display the
bookmark
to move to the
file to be
removed
Press
to delete the
“bookmark.”
The original file is not deleted at the deletion of the “bookmark.”
PressPress
to popup the
display
Push
to move to
“YES”
Page 22
41
Convenient
functions
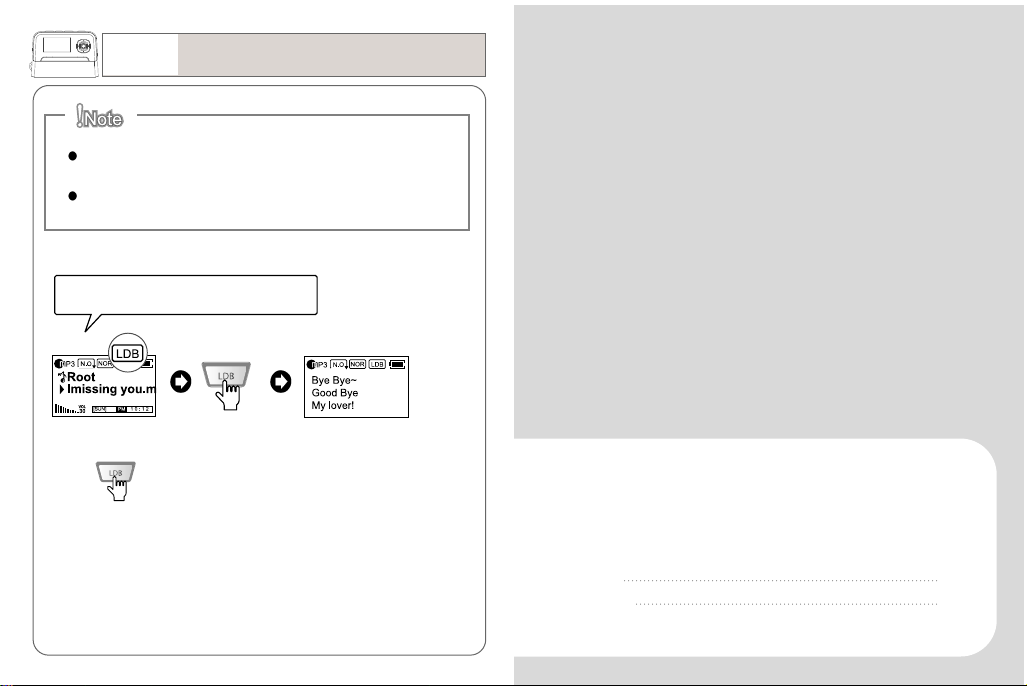
View Lyrics
The “Lyric” option is only available with the device when it is
marked by the “Lyric Manager.
You can only view the lyrics when the file is playing.
While the file marked with “Lyrics” are playing;
Press
Press again – to display the Music Play screen.
Voice
Line - in
Recording
43
44
Page 23
43
Recording
Voice
Line - in
Recording
44
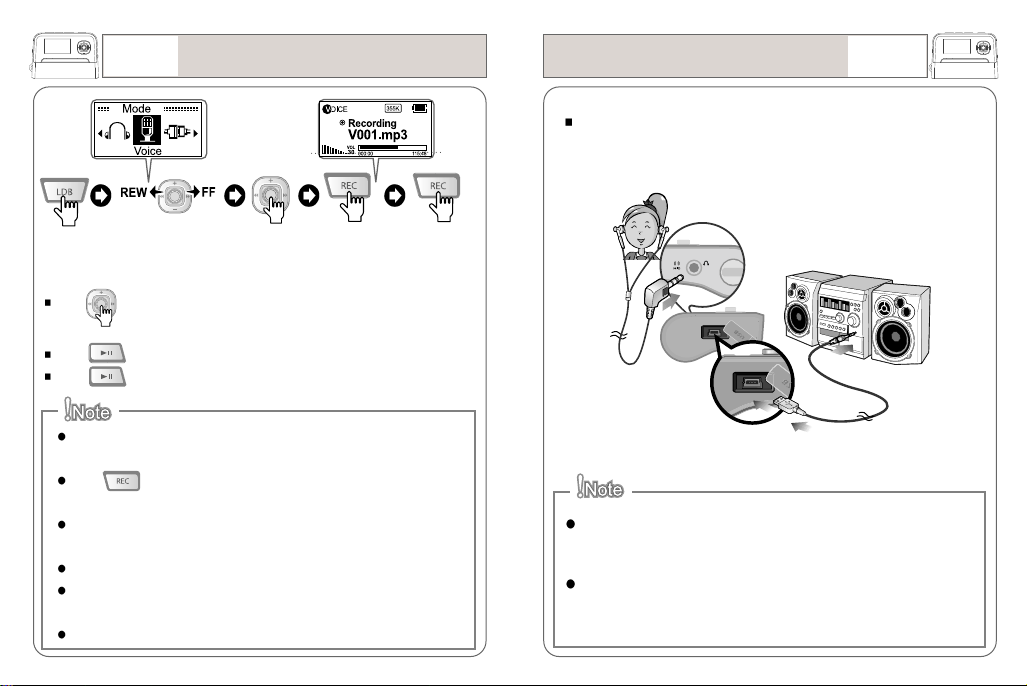
Record
elapsing
time
Press
and hold
Press in the ready status to change the recording source. (e.g. Voice recording
to Music recording)
Press button in the recording to pause and press the button again to resume.
Press button to listen to the recorded file.
Recorded files are stored in MP3 format in the VOICE folder in the following
sequence; V001.MP3, V002.MP3...
Press and hold in Music, Stop or Pause mode to get into recordingready mode.
The recording will be interrupted when the memory gets full. The prerecorded voice source only is stored in the memory in this incident.
Sound quality may vary according to the distances from the sound source.
In the case where the power is not enough to run the device, the recording
may not be done correctly.
You can not get out of the mode in pause (recording) mode.
to move to
“Voice”
Press
to get ready for
“Voice”
Press
to start
recording
Record
remaining
time
PressPush
to stop the
recording
Connect the device into the external audio player with the Line-in
cable supplied in the package.
Analog sound signals can be converted into digital sounds by
recording the external audio sources with the Line-in cable
supplied in the package.
With the aid of an earphone set, you may listen to the music
which is being recorded to the device (Loop back).
Page 24
45
Recording
Line - in
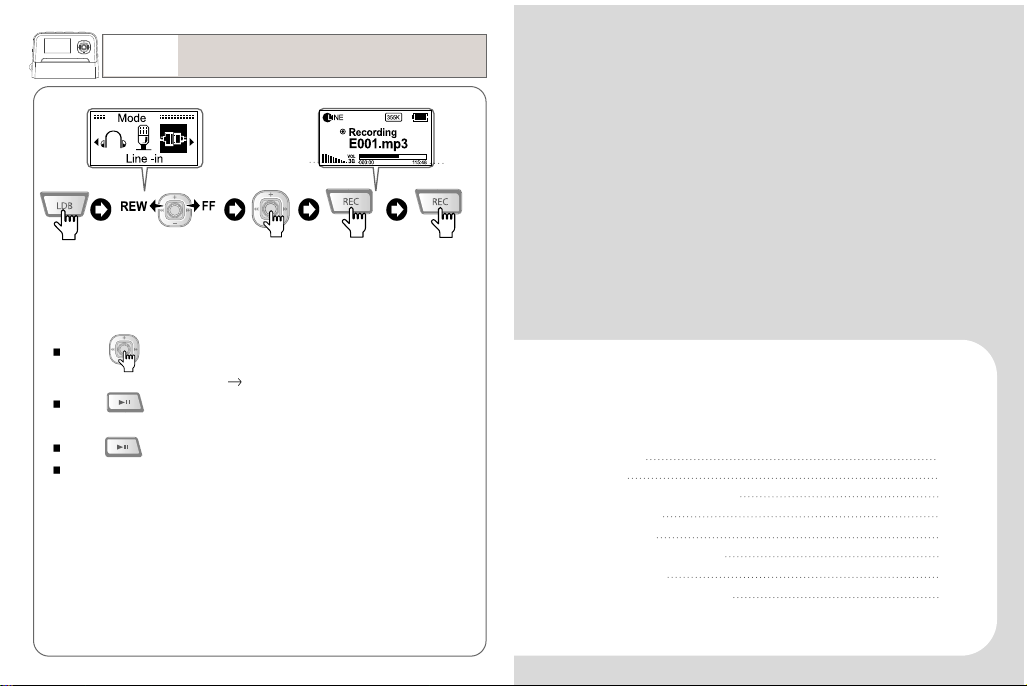
Press
and hold
Push
to move to
“Line-in”
Record
elapsing
time
Press
to get ready for
“Line-in”
Press Press
to start
recording
Record
remaining
time
to stop the
recording
Press in voice recording “ready” mode to change the
recording source. (Line - in voice)
Press in the recording to pause and press the button again
to resume.
Press to listen to the recorded file.
You cannot get out of the recording mode while in pause
(recording) mode.
FM Radio
Region
Frequency-search & save
Preset Mode
Preset Delet
Recording FM program
Sound quality
Programmed Recording
FM Radio
47
48
49
51
52
54
55
56
Page 25
47
FM Radio
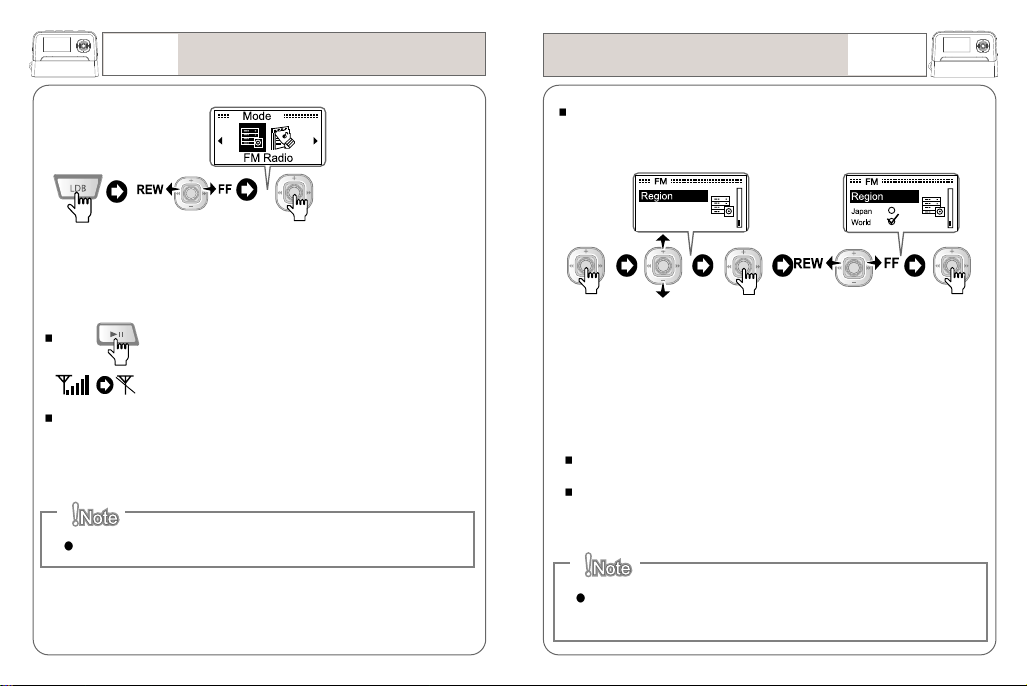
Listening to FM Radio
to enter the mode and
receive the radio
Press
and hold
Push
to move to
signals.
“FM Radio”
mode
Press in receiving the signals to get into the “ready.”
Press any button in the “ready” condition to receive the signals again.
The earphone takes the role of an antenna.
Region
FM Radio
48
This function helps you set the correct frequency ranges which are
variable according to the countries.
Press
and hold
Push
to move to
“Region”
Press
Push
to move to
“World”
Press
to set for
“World”
Japan : from 76.0 to 108.0MHz in 50Khz pitch
World : from 87.5 to 108.0MHz in 50Khz pitch
At the change of the territory, the previous territory will be
initialized.
Page 26
49
FM Radio
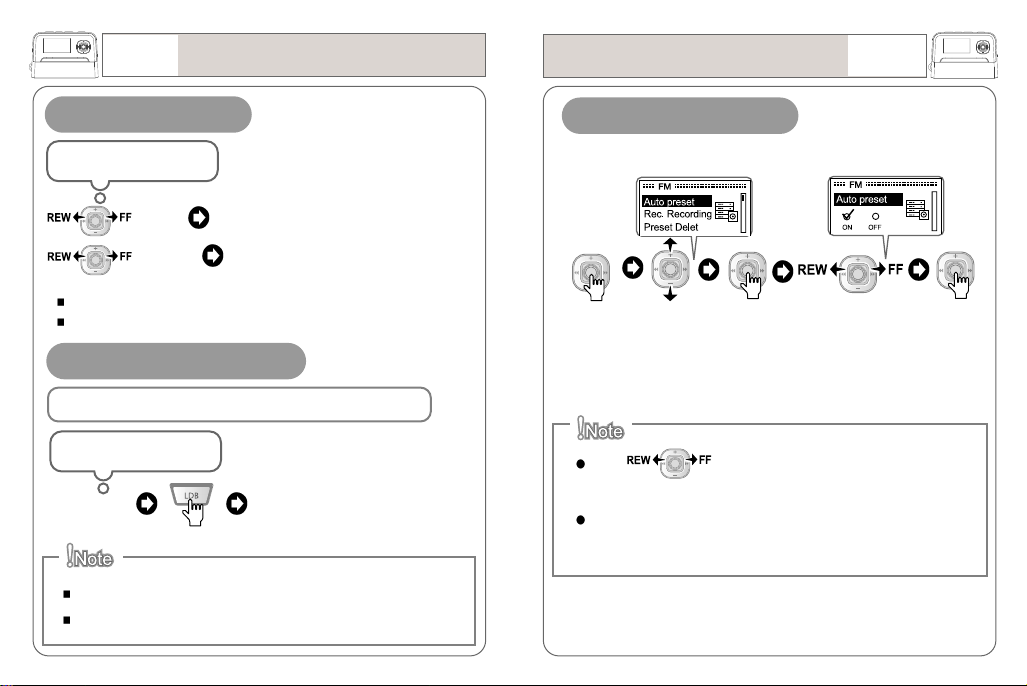
Frequency search/save
Frequency search/save
FM Radio
50
Frequency scanning
In FM scan mode;
Push
Push
and hold
The frequency with the higher receiving rates will be selected.
The frequency band range will vary according to the Territory.
to increase or decrease by 0.05MHz
to continually increase or decrease
the frequency
‘Manual save’ for frequency
Example) when saving the channel (frequency) 96.50MHz
In FM search mode;
Select
96.50MHz
press
By entering the preset, you can enjoy the channel for 96.50MHz.
Up to 20 channels can be saved.
saving completed
‘Auto preset’ for frequency
Press
and hold
Push to the arrow directions to interrupt the
frequency scan.
The mode will be automatically changed to the ‘Preset’ mode at
the completion of the search.
Push
to move to
“Auto preset”
Press
Push
to move to
“ON”
Press
to save the
frequencies
automatically.
Page 27
51
FM Radio
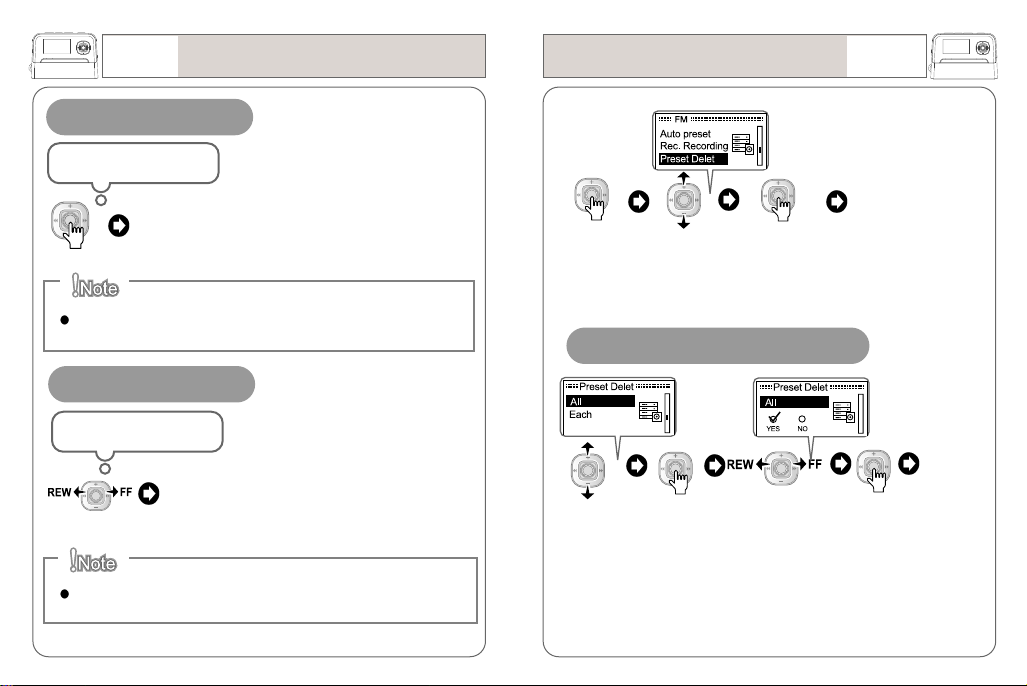
Preset Mode
Entering Preset Mode
In FM scan mode;
to enter ‘Preset’
Press
You can scan the saved frequency by entering the Preset mode.
Preset Mode Search
In Preset mode;
to increase/decrease the channel number
Push
You can’t search the channels if there is no frequency stored.
Preset Delet
Press
and hold
When deleting all frequencies;
Push
to move to
“All”
Push
to move to
“Preset Delet”
Press Press
Press
Push
to move to
“Yes”
FM Radio
you can delete all or
some of channels
52
to delete
all stored
channels.
Page 28
53
FM Radio
Preset Delet
Recording FM Radio
FM Radio
54
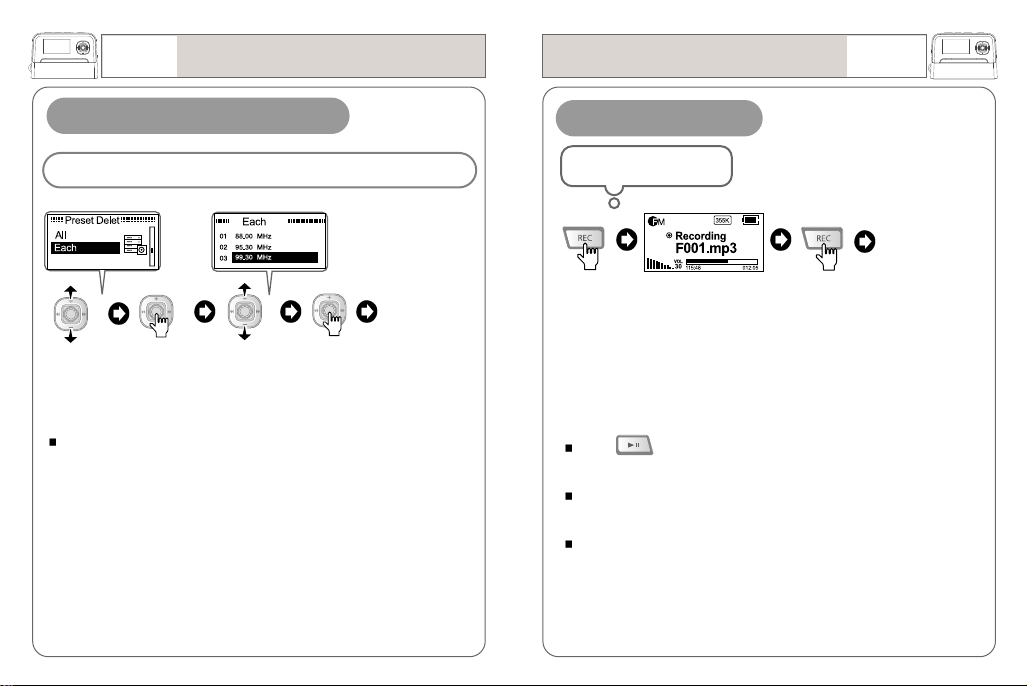
When deleting a channel
when deleting the frequency “99.30MHz” stored in CH03;
Example)
delete
completed.
Move to
“Each”
The frequency saved in the next channel moves to the empty channel
(03).
Press
move to
“99.30MHz”
Press
Recording FM Radio
In FM receiving status
to stop the
recording
Press
Press in the recording to pause and press the button again
to resume.
Recorded sound sources are saved in MP3 format in FM folder in
the following sequence; F001.MP3, F002.MP3…..
You can listen to the recorded file by entering “Music” – “FM”
folder.
to start the
recording
Press
[ you can still
listen to the FM
program after
the completion
of the recording ]
Page 29
55
FM Radio
Quality
Rec. Recording
FM Radio
56
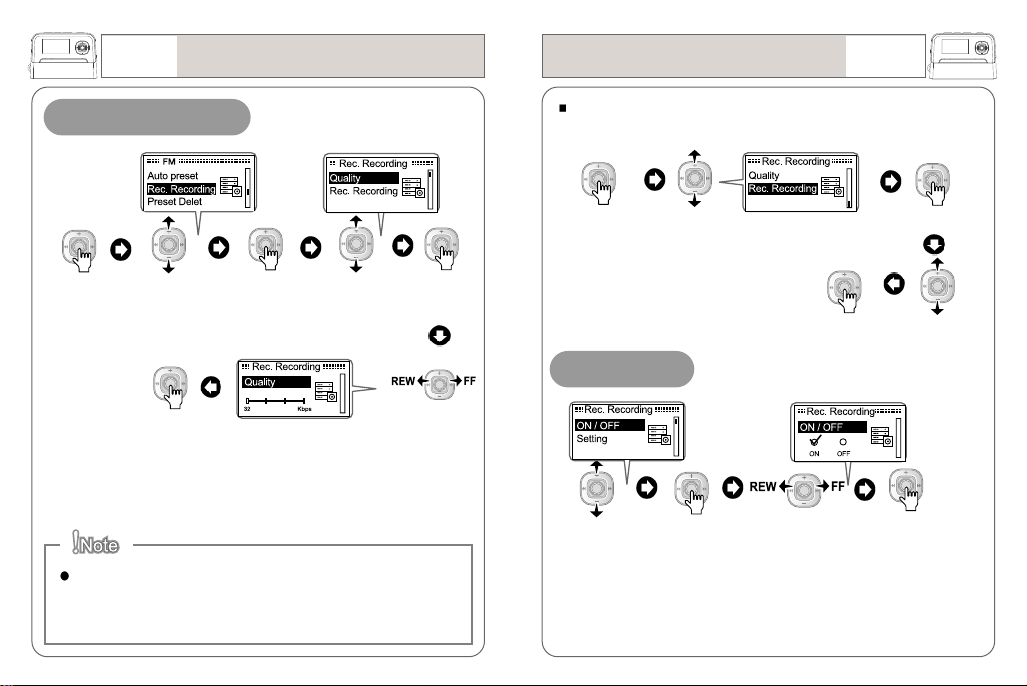
Quality
Press
and hold
When the sound quality is set for ‘low’ it takes only small memory
space while ‘high’ quality takes larger space with lesser quality
loss.
Push
to move to
“Rec. Recording”
Press
[setting completed]
Press
Push
to move to
“Quality”
Press
Push
You can set ‘Rec. Recording’ for any FM Radio program you
desire by setting the date and time.
Press
and hold
Push
to move to
“Rec. Recording”
Press
ON/OFF
Push
to move to
“on/off”
On: Programming the recording for specified date and time
Off: Programming is not available.
Press
Push
Press
Push
to move to
“Rec. Recording”
Press
Page 30
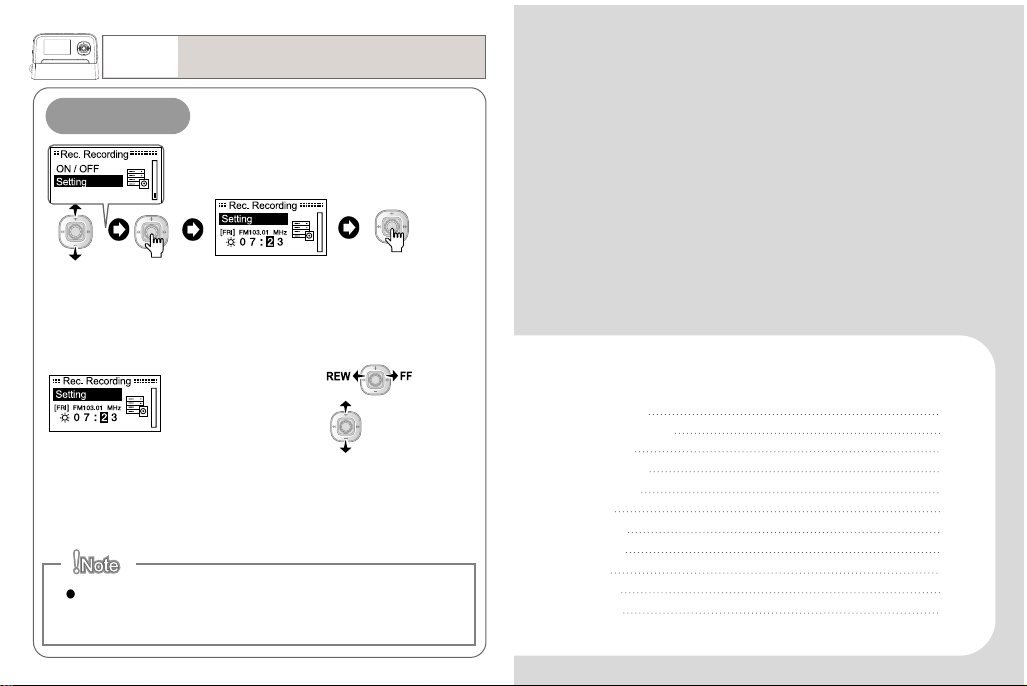
57
FM Radio
Setting
Rec. Recording
Push
to move to
“setting”
Press
Press
to enter the
setting.
Move to another selection:
setting value adjustment :
Press
Once the setting is made, the recording will start even when the
device is turned off by automatically turning the power on.
Press
Menu List
Menu Buttons
Setting
Recording
Display
Play
Timer
Watch
EQ
SRS
About
Menus
59
61
63
67
68
70
71
72
73
74
75
Page 31
59
Menus
Menu List
Menu List
Menus
60
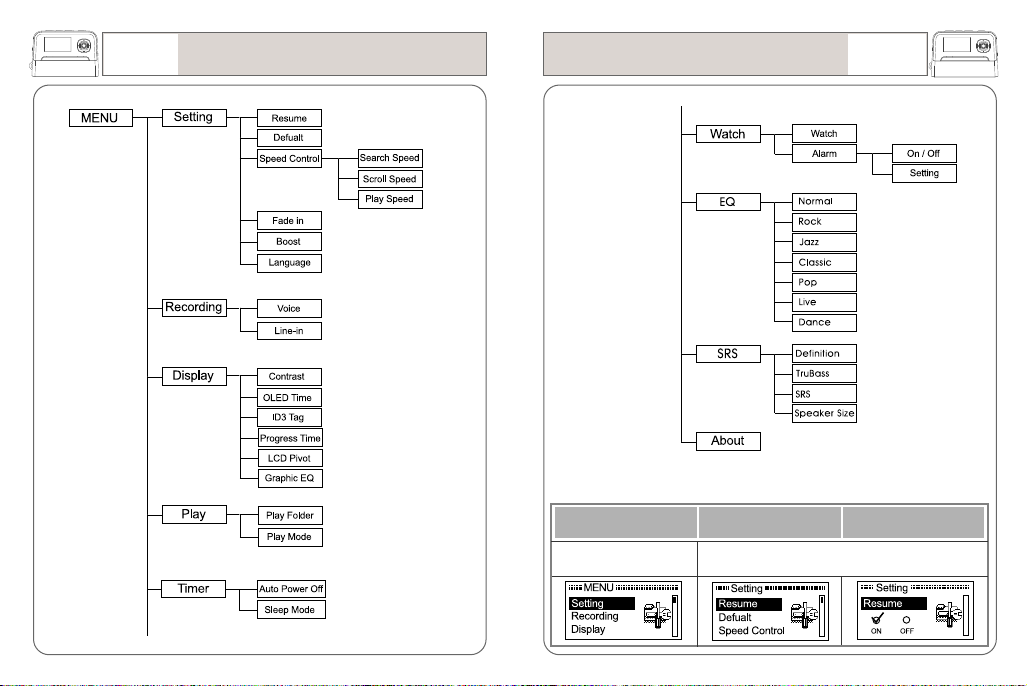
Main menu Sub menu Set menu
There are all 9 main menus in
the device
There are sub menus underneath each main menu.
Page 32
61
Menus
Menu Buttons
Menu Buttons
Menus
62
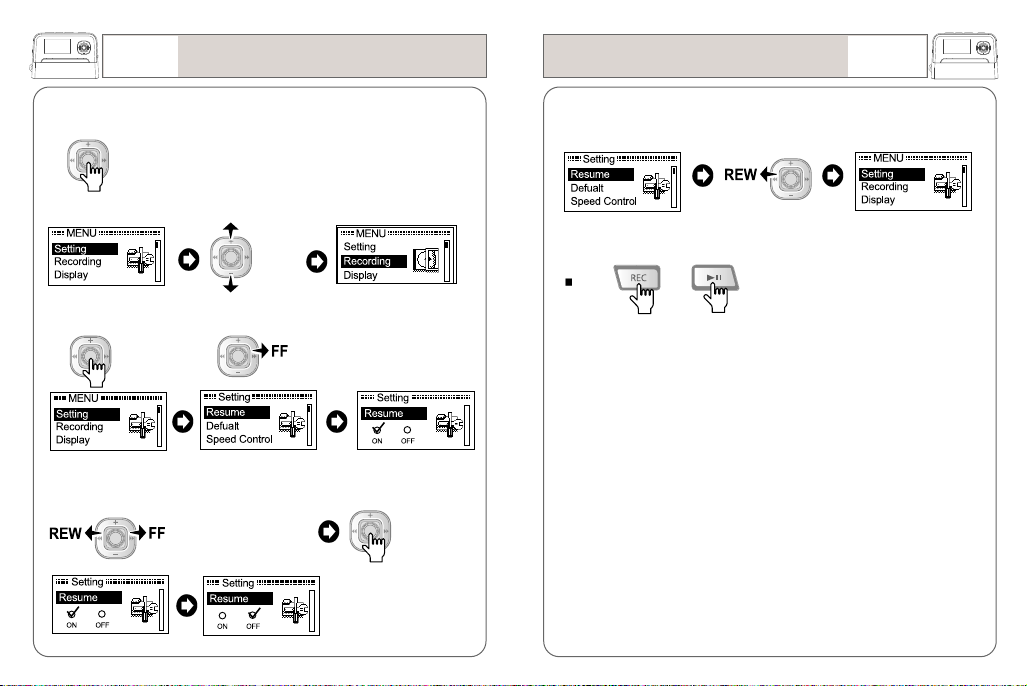
1.Entering ‘Menu’
Press and hold
2.Searching menus
push
3.Entering the sub-menus (setting menus)
Press or push
push
4.Changing and saving ‘Setting values’
to the arrow directions
to change the value
5.Returning to the Main menu
push
Press or to exit the menu modes.
Press
Page 33
63
Menus
Setting
Setting
Menus
64
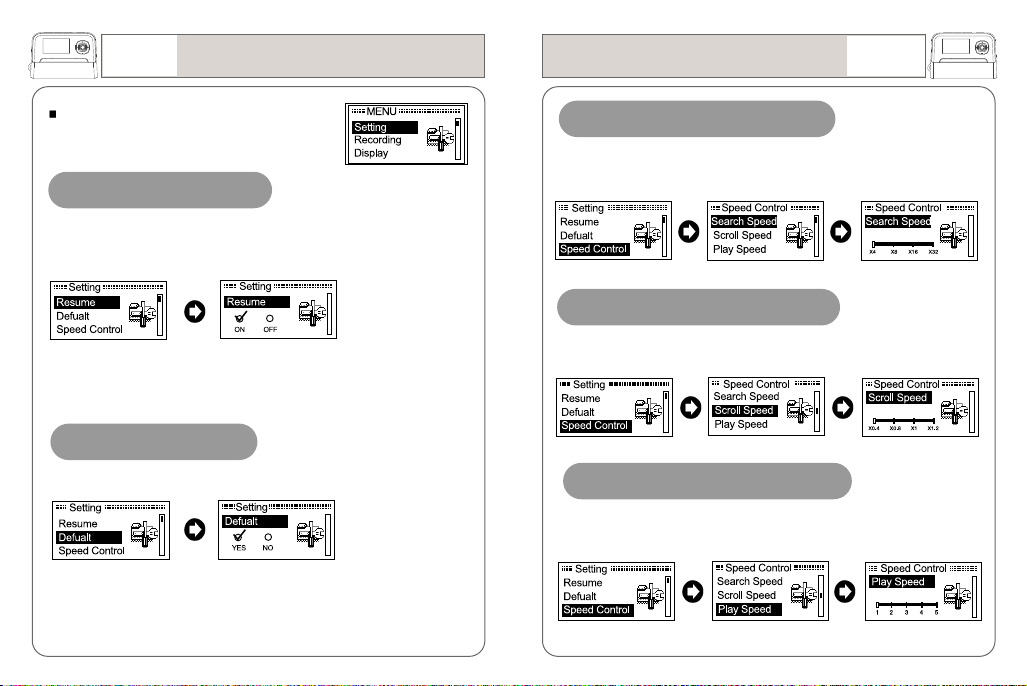
Select “Setting” from the main menu.
Resume
This function fully recovers all previous settings used for the last
song’s volume, EQ, Playlist and others when you turn the power on
again.
On: fully recovers all previous setting information
Off: The setting values are not saved
Defualt
You can reset all settings you made into the defalut values.
Yes: All information will be initialized
No: The settings you made will be saved.
Speed Control - Search Speed
The search speed (FF/REW) can be set with this function among the
following options; (X4, X8, X16, X32)
Speed Control - Scroll Speed
The speed of file playing can be set among the following options; (X0.4,
X0.6, X0.8, X1, X1.2)
Speed Control - Play Speed
The speed of the text streaming can be adjusted within the range from
1 to 5.
Page 34
65
Menus
Setting
Setting
Menus
66
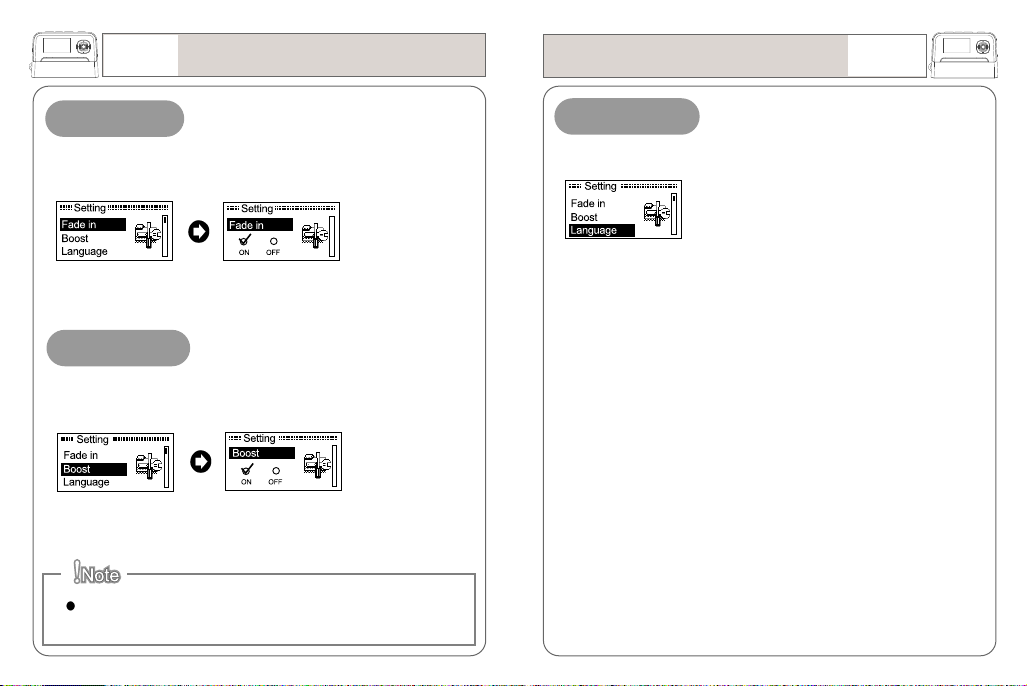
Fade in
This function slowly increases the intro volume of music up to the set
volume level .
On: The volume of the file is increased to the preset level.
Off: The file plays with the set volume level.
Boost
This enables you to listen to a music file with higher volume when the file
is in low volume.
On: You can enjoy the higher volume.
Off: The function is not available.
The power volume function may consume more battery power.
Language
The language for Menus can be selected in the mode.
The language you selected will be displayed for menus.
Page 35
67
Menus
Recording
Display
Menus
68
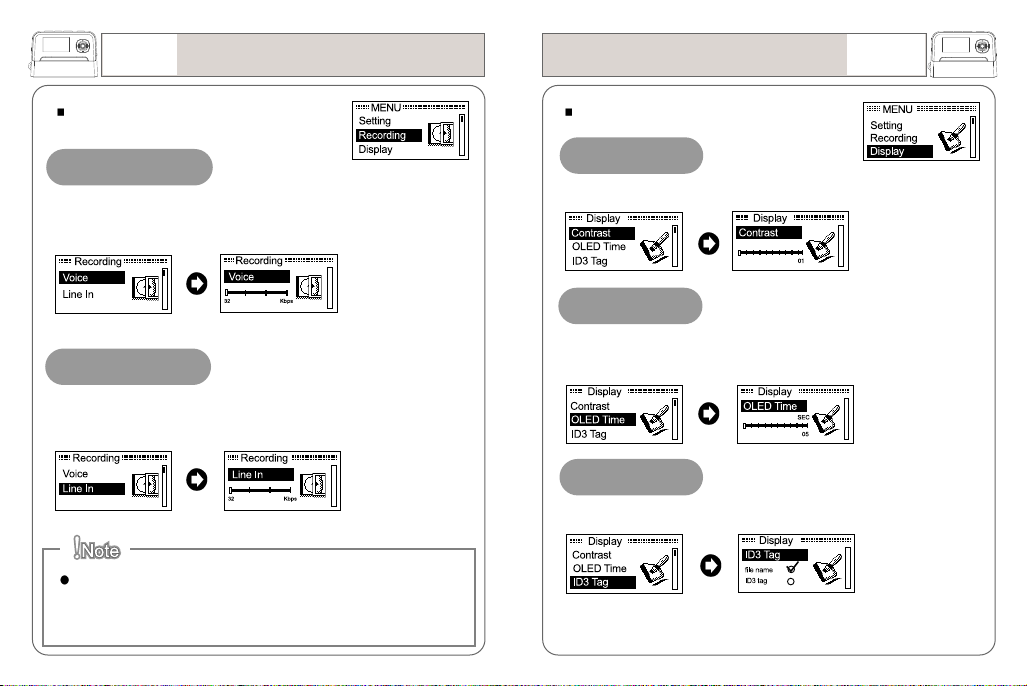
Select “Recording” from the main menu
Voice
Bit rates for the recording can be selected among 64, 96, 128 and
192kbps.
Line In
Bit rates for the recording can be selected among 64, 96, 128 and
192kbps.
When the sound quality is set for ‘low’ it takes only small
memory space while ‘high’ quality takes larger space with lesser
quality loss.
Select “Display” from the main menu
Contrast
You can set the brightness of LCD within the range from 1 to 10.
OLED Time
Lightening period can be set among the following options; 5sec./
15sec./ 30sec./ 100sec./ always)
ID3 Tag
It enables you to select the displaying type for file names
file name : displays the name of the music file
ID3 tag : displays the ID3 tag info. saved in the music file.
Page 36
69
Menus
Display
Play
Menus
70
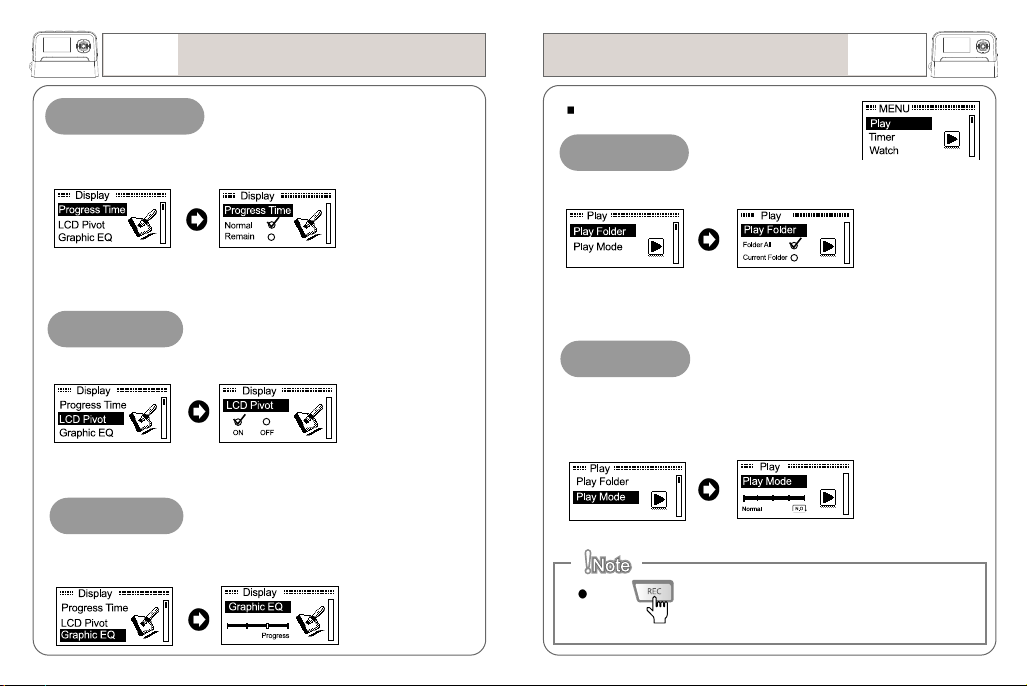
Progress Time
This enables you to select the method how to display the file
elapsing time.
Normal : displays the current file’s progress
Remain : displays the remaining time for the file
LCD Pivot
It enables you to turn the screen up or down.
On: The LCD screen turns 180 degrees.
Off: No change
Graphic EQ
This enables you to display four different types of images on the LCD;
Wave / Stereo/ Progress/ Watch)
Select “Play” from the main menu.
Play Folder
You can select the playing range for files.
Folder All : All music files stored in the device will be played.
Current Folder : The music files in the current file will be played.
Play Mode
You can select the play mode you desire among the following
options; ( Normal/ Repeat1/ Repeat All/ Random/ Random All )
Press and hold in play mode to change the play mode.
(see page 34)
Page 37
71
Menus
Timer
Watch
Menus
72
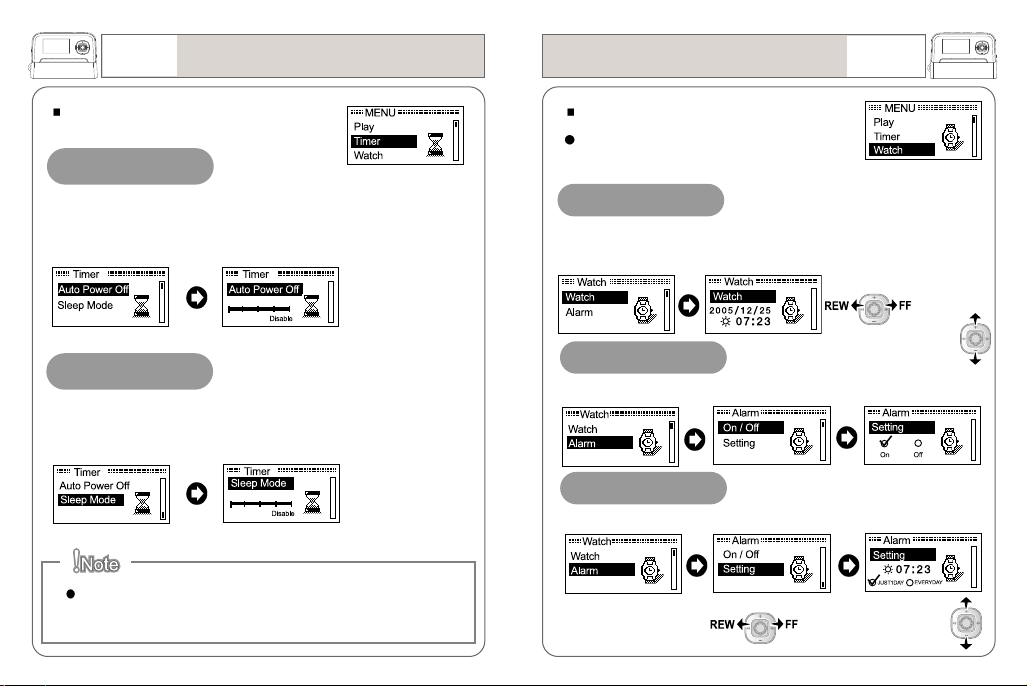
Select “Timer” from the main menu.
Auto Power Off
This function turns off the device power automatically when there is
no button manipulation made for the preset period of time in the
Pause or Stop mode. (Disable/ 1min/ 2min/ 5min/ 10min)
Sleep Mode
This function automatically turns off the power of the device after a
preset period of time; Disable/ 10min/ 20min/ 30min/ 60min.
Sleep Mode: When turning the power on again, the mode is set
for OFF.
Select “Watch” from the main menu.
You cannot enter into clock mode while
playing music.
Watch
The current time is displayed on the LCD according to your setting for
Year, Month, Date, Day and time.
Move to another items :
Alarm – On/Off
You can use or cancel the alarm function using this function.
Set value adjustment :
Alarm – Setting
You can set the time and the number of alarms in the mode.
Move to another items : Set value adjustment :
Page 38
73
Menus
EQ
SRS
Menus
74
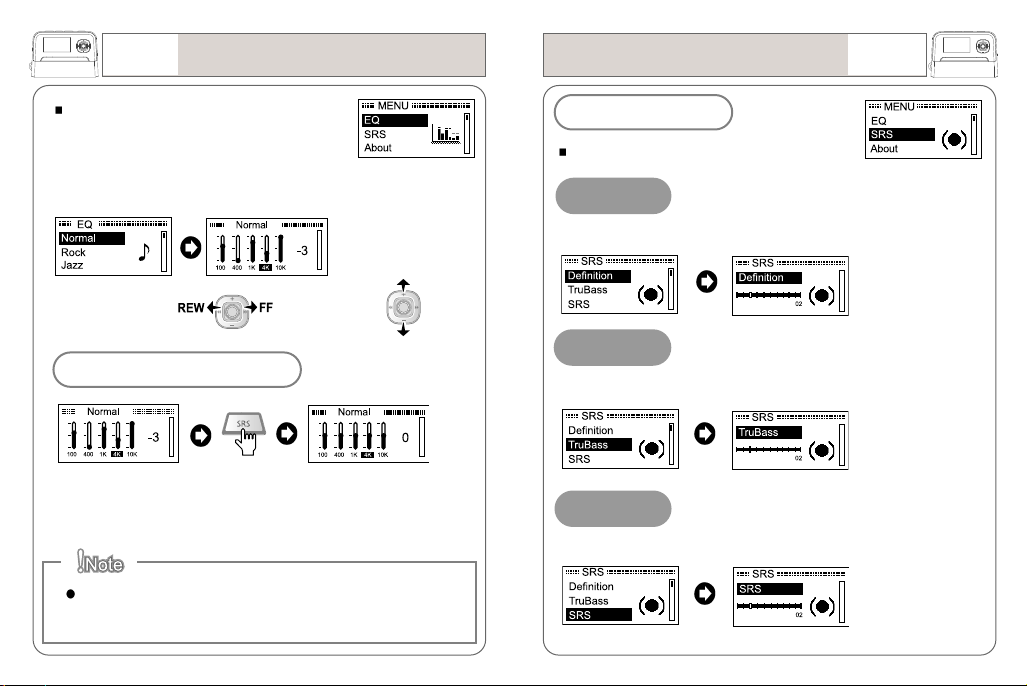
Select “EQ” from the main menu.
You can edit the EQ setting according to your own taste among the
following options; Normal, Rock, Jazz, Classic, Pop, Live, Dance)
Band shift (5-band): Tone control:
EQ Reset
Press
You can reset the EQ to the original value.
If further setting is not made, you can listen to the music in the
tone originally set in the device.
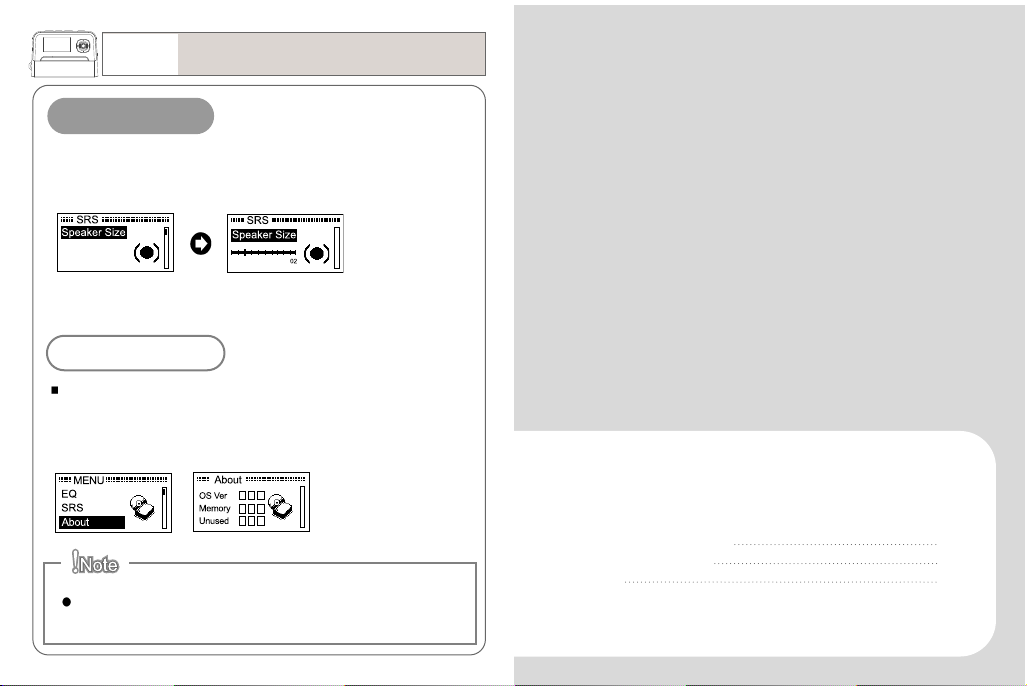
SRS
Select “SRS” from the main menu.
Definition
You can set the sound definition within the range from 0 to 10.
TruBass
This function enhances the bass within the range from 0 to 10.
SRS
3D surround volume can be set within the ranger from 0 to 10.
Page 39
75
Menus
SRS/ About
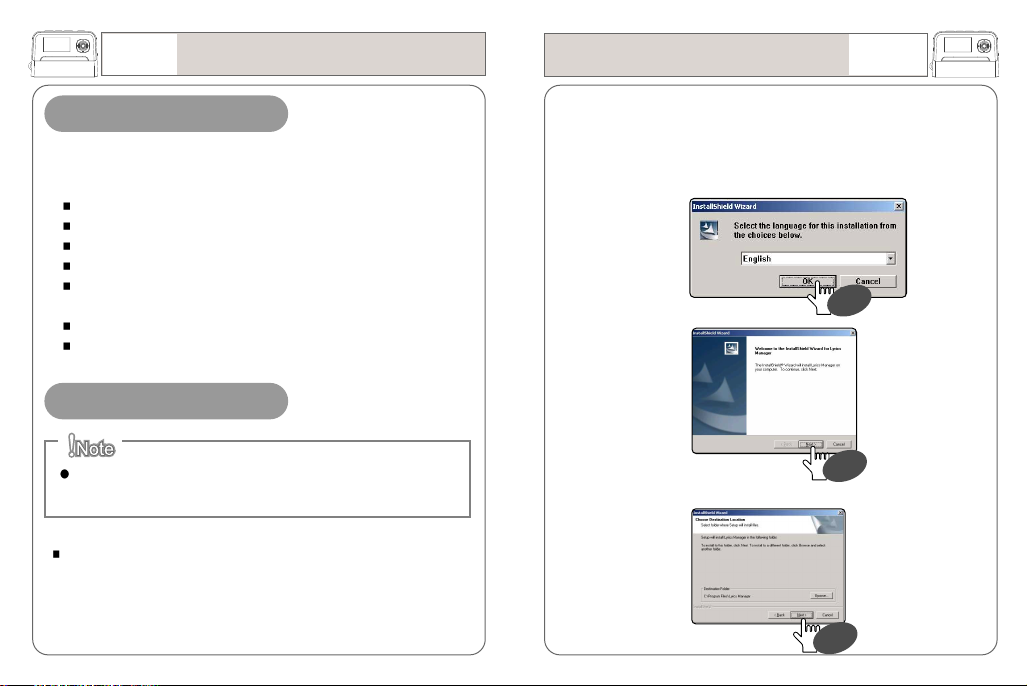
Speaker Size
This enables you to set the optimum sound condition for SRS by
selecting the speaker sizes within the range from 0 to 7.
About
Select “About” from the main menu.
It displays device information such as OS version, memory capacity,
remaining memory and others.
Programs
The information for OS memory is not displayed.
Program CD installation
File Download-Upload
Format
77
80
83
Page 40
77
Programs
Program CD installation
Program CD installation
Programs
78
System Requirement
The minimal requirements for the PC to support the device is
as follows;
Microsoft OS (Windows 98SE, ME, 2000, XP)
CD-Rom Drive
Pentium 200MHz or higher version
RAM 32MB (64MB or more for Windows ME or higher version)
More than 128Mb free space in the hard disk (additional space is
required to save more music files)
USB port (Ver. 2.0)
Mac. 9.X- X
Installation
This Mass Storage type device can upload or download files
without installing any extra software.
In case of using Windows 98SE: Please install the program CD
supplied with the device before uploading or downloading files.
(PC may not recognize the device)
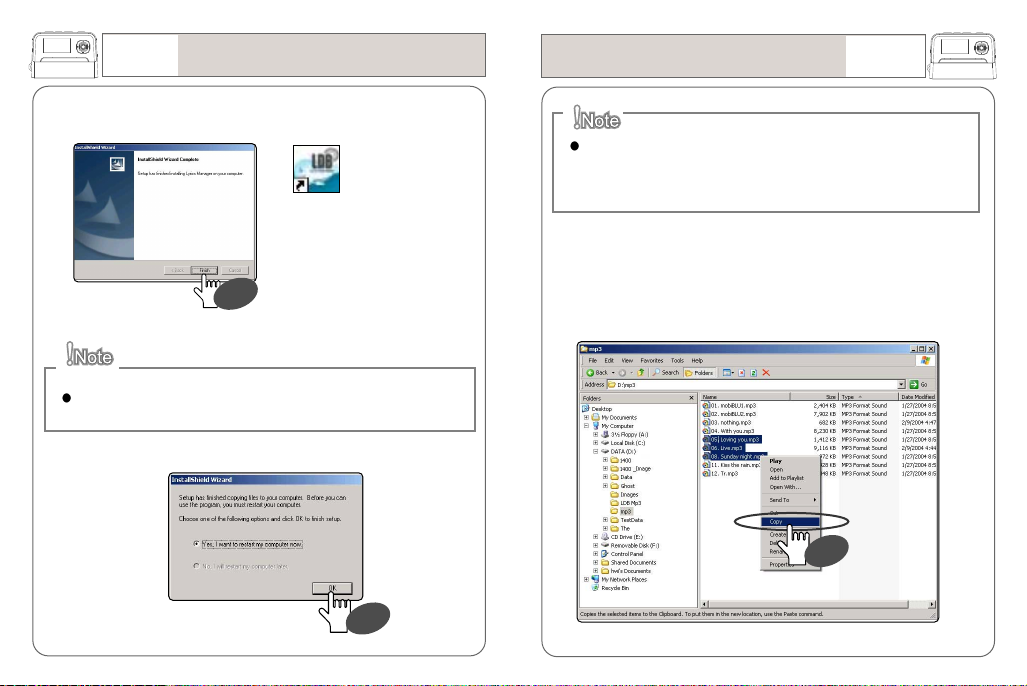
1.The files in the CD will be executed automatically following the
insertion and a popup box for ‘installation language’ will appear.
Click on OK following the selection of the language you desire. (If
the setup file is not opened automatically, you may find the
setup.exe file in the CD Rom and execute it manually.)
2.Click on “Next”
Click
Click
3.Click on “Next” following the selection of the file you want to install
in the PC.
Click
Page 41
79
Programs
Program CD installation
4.Click on (Finish) button to complete the installation.
An icon “Lyrics Manager” is
created on the desktop.
File Download/ Upload
This Device downloads or uploads all types of data files (*.jpg,
*.xls, *.hwp……) taking the role as a removable disk as well as a
music player.
Programs
80
Click
Below box will pop up if you use Windows 98SE. Click on OK.
Click
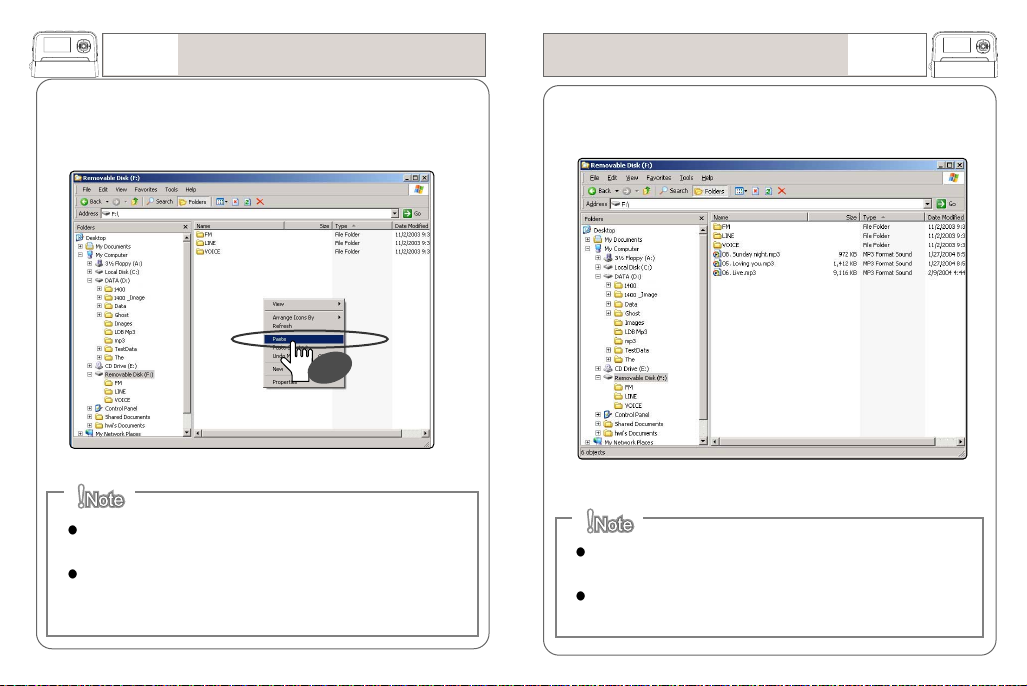
1.To download files connect the USB cable and click on “Copy” using
the right mouse button following the selection of files in PC.
Click
Page 42
81
Programs
File Download/ Upload
File Download/ Upload
Programs
82
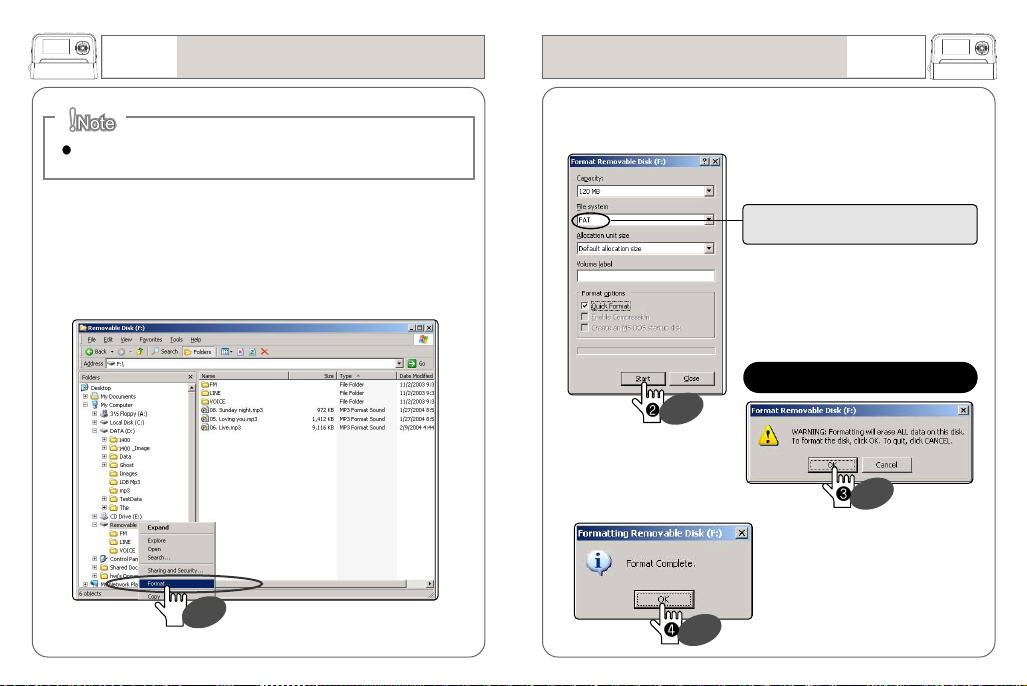
2.Click on “Paste” to paste the copied file into the ‘Removable Disk’
box using the right mouse button.
Click
The PC recognizes the device as a removable disk in “My
Computer.”
Don’t remove the USB cable while transferring the files otherwise
it may cause a fatal error in PC or the Device.
3.Downloading the files selected in the PC to the Device is
completed.
You can upload the files from the device to the PC by following
the same procedures but in reverse way.
Drag & Drop makes it very easy to download or upload files.
Page 43
83
Programs
The removed files can not be recovered!
Format
Format
Programs
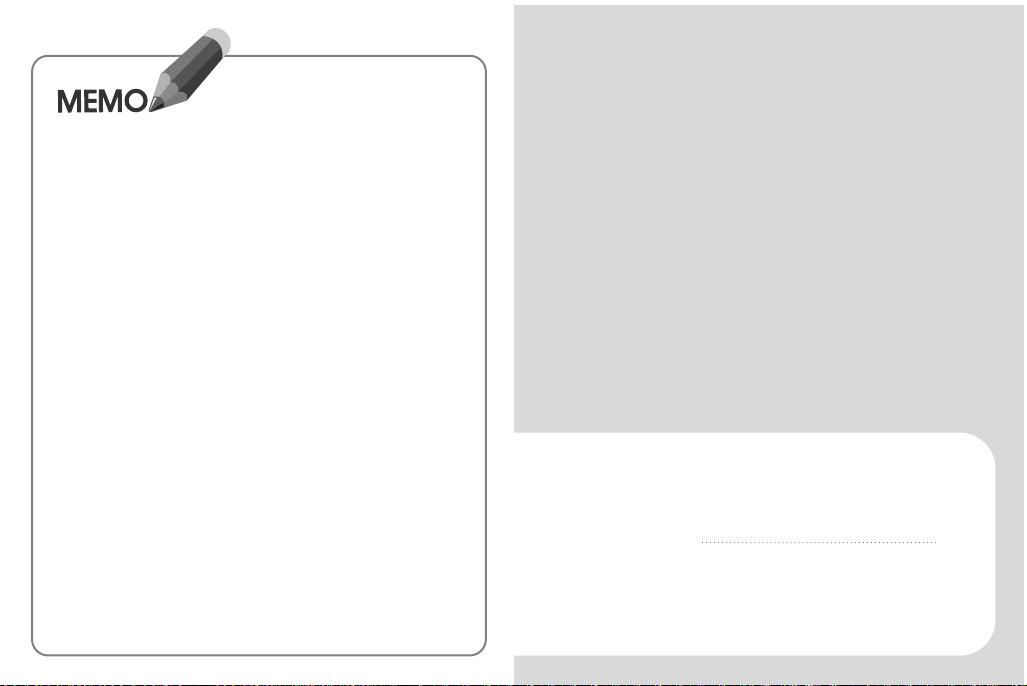
2.Click on ‘Start’ button when a format box pops up.
84
1.Choose “format” in the removable disk folder using the right mouse
button.
Click
32
Check if file system is set for FAT32
Be very careful at formatting!
Click
3.Format has been completed!
Click
Click
Page 44
Support
It may not be a problem!
FCC RF INTERFERENCE STATEMENT
Warranty Card
87
Page 45
87
Support
It may not be a problem!
It may not be a problem!
Support
88
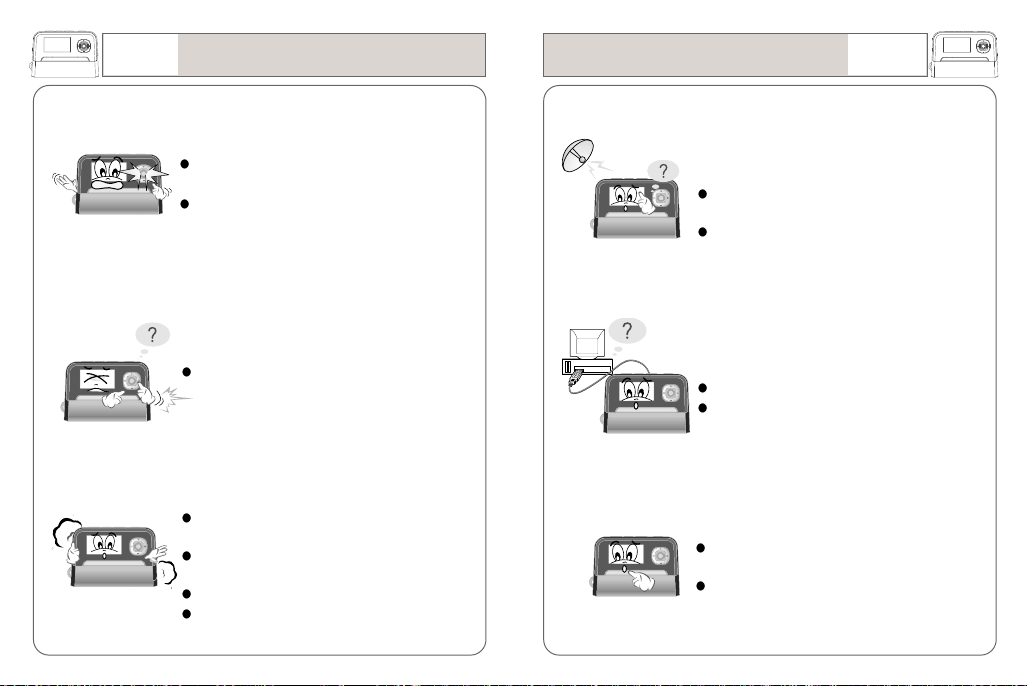
1.Cannot turn the Power on?
Check battery capacity. Recharge the battery
with a USB cable.
Check if the device is in HOLD.
2.The button is not functioning.
Check if the device is in HOLD.
3.Can not properly hear the sound sources, and there is a
noise interference?
Check if any foreign material is applied on the
earphone tip, and if yes, remove it.
Completely connect the earphone into the
device.
Check if the file is damaged.
Check the volume.
4.Too much noise interference in receiving FM signals?
Check if the earphone is completely inserted
into the jack. It functions as an antenna.
Use the device away from peripheral electric
devices
5.There is a trouble with file downloading?
Check the connection of the USB cable.
Check the memory capacity.
6.LCD is not activated?
Check the LCD brightness setting. Menu –
Display – Contrast
Check the battery. Recharge it with a USB
cable if needed.
Page 46
FCC RF INTERFERENCE STATEMENT
Warranty Card
Note
This equipment has been tested and found to comply with the limits for a Class B
digital device, pursuant to Part 15 of the FCC Rules. These limits are designed to
provide reasonable protection against harmful interference in a residential
installation.
This equipment generates, uses and can radiate radio frequency energy and, if
not installed and used in accordance with the instructions, may cause harmful
interference to radio communications. However, there is no guarantee that
interference will not occur in a particular installation.
If this equipment does cause harmful interference to radio or television reception
which can be determined by turning the equipment off and on, the user is
encouraged to try to correct the interference by one or more of the following
measures.
- Reorient or relocate the receiving antenna.
- Increase the separation between the equipment and receiver.
- Connect the equipment into an outlet on a circuit different from that to which
the receiver is connected.
- Consult the dealer or an experienced radio, TV technician for help.
- Only a shielded interface cable should be used.
Finally, any changes or modifications to the equipment by the user not expressly
approved by the
guarantee or manufacturer could void the warranty the users authority to operate
such equipment.
CAUTION
Changes or modifications not expressly approved by the
manufacturer could void the warranty.
THIS DEVICE COMPLIES WITH PART 15 OF THE FCC RULES. OPERATION IS SUBJECT
TO THE FOLLOWING TWO CONDITIONS: (1) THIS DEVICE MAY NOT CAUSE HARMFUL
INTERFERENCE, AND (2) THIS DEVICE MUST ACCEPT ANY INTERFERENCE RECEIVED
INCLUDING INTERFERENCE THAT MAY CAUSE UNDESIRED OPERATION.
Product Name:
Model:
Date of Purchase: (m) (d) (y)
Name of Customer Telephone Number:
Address:
Name of Agent: Telephone Number:
Address:
You need to present this Warranty Card with the date of purchase written thereon
when required in order to receive satisfactory services. Please keep this card in a
secure place.
1 year from
the date of
purchase
1. The warranty service for the product shall be provided based on the
information contained in this Warranty Card.
2. The warranty service is available effective from the date of purchase, so
please put the date of purchase on this Warranty Card. (If the date of
purchase is not identified in the card, the effective warranty period will start
from the date 6 months from the date of manufacture.)
3. This Warranty Card can not be reissued
The design and size of the product are subject to change without prior notice in order
to improve product quality.
 Loading...