

Page 1

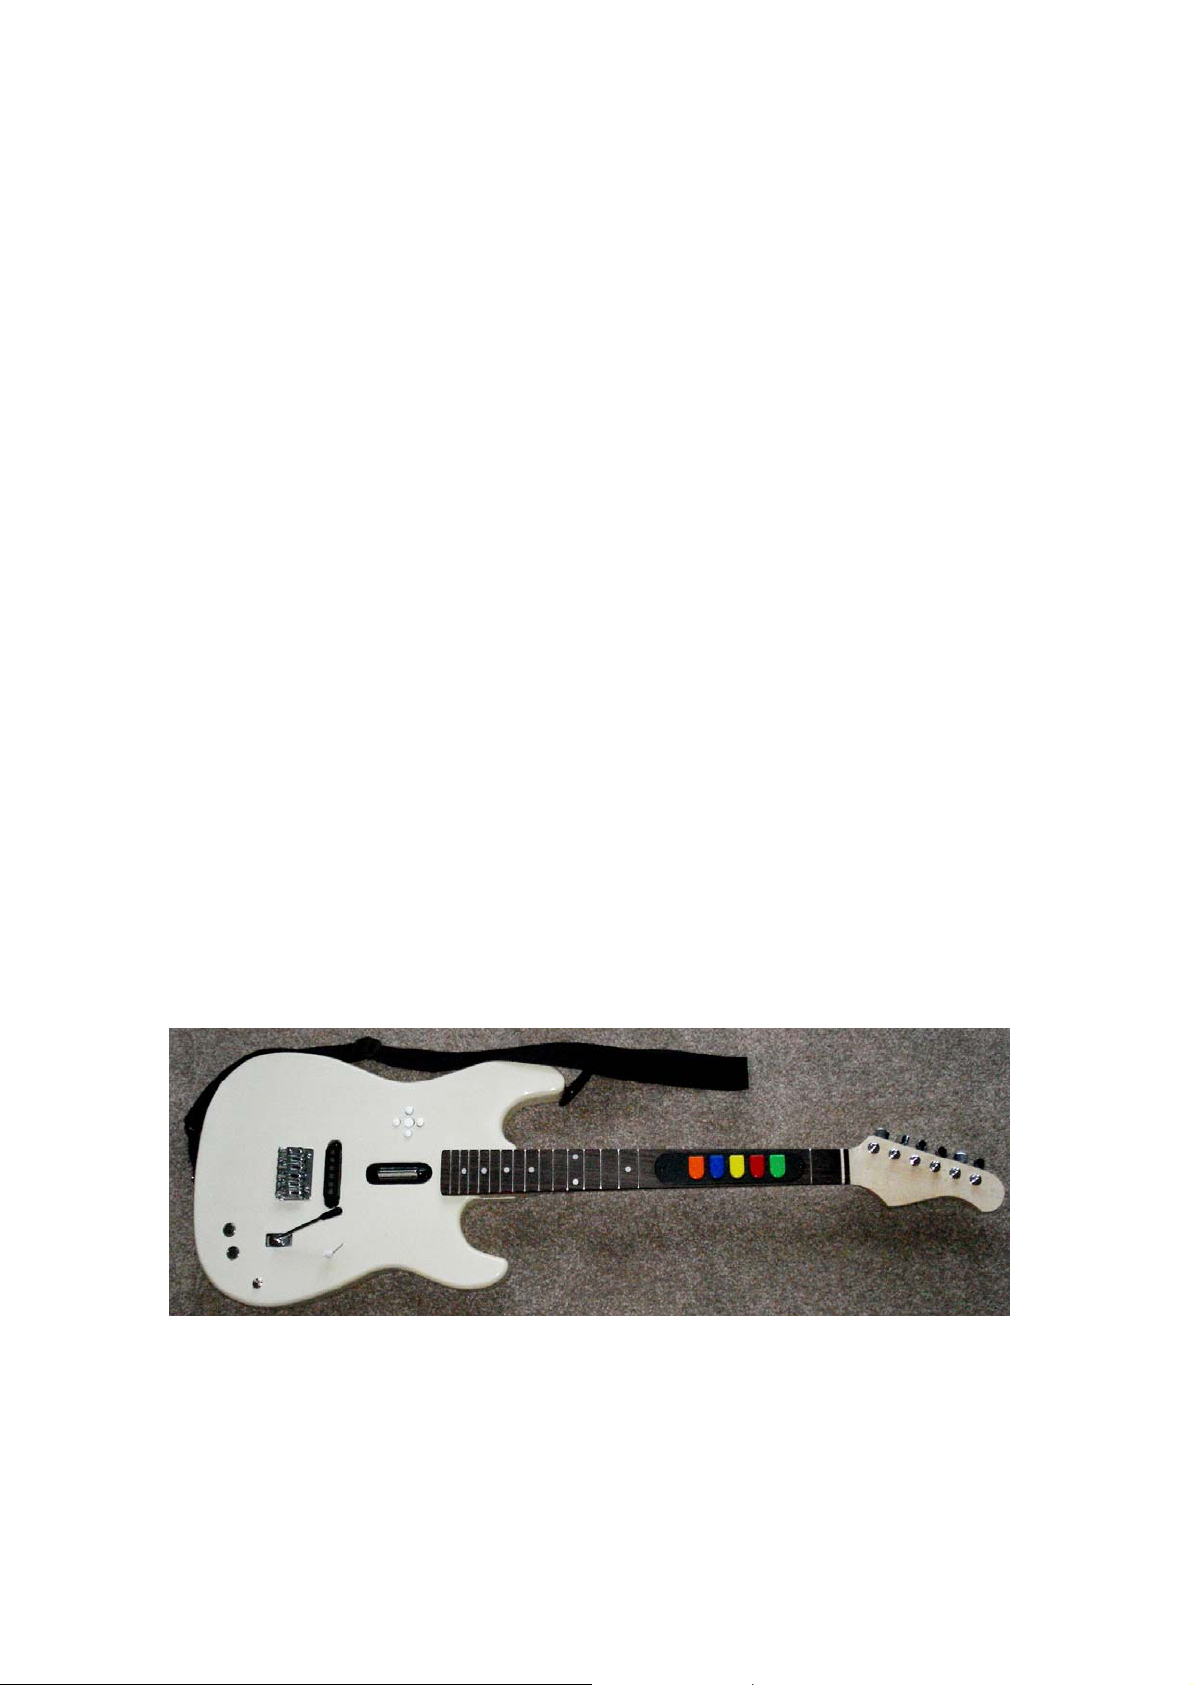
Thank you for purchasing a real
RiffMaster™ Game Controller.
This controller is designed to operate both Guitar Hero and Rock Band rhythm-based
video games on the PlayStation 2 and PlayStation 3. Before you begin to play, please read
and understand this owner’s manual.
Controller Set-up - On the back of your RiffMaster™ controller, there is a compartment
for 4 AA batteries. Press the tab on the battery door and open outward. Insert 4 batteries in
alternating directions as indicated inside the compartment. Your controller also comes
with a guitar strap. Attach one end of the strap to the horn of your controller and the other
to the peg on the bottom center of th e body. Adjust the strap with the sliding buckle.
PlayStation Set-up - Along with your controller, there is a 2.4GHz wireless receiver with
a plug to fit into each PlayStation. On each side of the receiver is a switch. Set the switch
on the left for the PS 2 or PS 3 console you are using and set the other switch for RB
(Rock Band) or GH (Guitar Hero). If, during play, you change to the other game, your
console must be turned off and switch reset then turned on again. If this action is not
taken, the game may not operate properly.
Controller Features
• On/Off Toggle Switch – On the lower section of your controller is a toggle switch
which turns power on and off. If the controller sits idle for 10 minutes with the
switch on, it automatically goes into sleep mode. The switch must be turned off,
then on again to resume play. It is recomm ended that the switch be turned off
when finished playing to avoid battery fatigue. A blue light will momentarily
illuminate under the strummer when switch is turned on.
• Start Button – There are 2 chrome buttons on the face of the controller. The
lower button can be used to start game play, confirm an action on the game screen
or pause the game during pla y.
• Select Button – The upper (closer to center) chrome button can be used to go back
one level and to manually activate Star Power.
• PS/Directional Button Cluster – This group of buttons is used to communicate
with the PlayStation console (menus ) an d o verrides any game play in progress.
See you PlayStation owner’s manual for specific instructions.
• Genre Positional Toggle – A five position slide toggle used in Rock Band only. It
is used to change audio modes be tween wah-wah, flanger, echo, chorus and none.
Page 2
• Strummer - The strum bar is a two-directional switch in the center of the guitar
body. Push or pull this up or down in order to play a note. The note which you
play is determined by pressing som e combination of the five fret buttons on the
guitar's neck. They are colored to match the video screen. Also used to navigate
through screen menu items.
• Whammy Bar - Near the strummer is the whammy bar, a small stick which can
be moved during play in order to modulate the sound produced by an extended
note. Earns extra points when used while in Star Power mode.
• Green Fret Button – Activate the green no te or confirm a screen choice.
• Red Fret Button – Activate the red not e or ca ncel/go back.
• Yellow Fret Button – Activate the yellow note.
• Blue Fret Button – Activate the Blue note.
• Orange Fret Button – Activate the Orange note.
• Tilt Sensor – When ready to activate Star Power, tilt your controller up sharply
and drive the crowd crazy while earning extra poi nt s.
Page 3

Starting the game - Turn on your TV, your console, your sound system (if applicable),
make sure the wireless receiver is connected and put the game disk into the disk tray. The
yellow light on the wireless receiver will flash indicating it is searching for a compatible
wireless controller. Turn on your RiffMaster™ controller and the flashing yellow light
will turn steady, indicating connectivity.
If you're playing career mode for the first time, you need to come up with a name for your
band. Be as inventive as you like, it isn't the most important decision that you'll ever make.
Game Menu - The main menu screen will give you a number of options: Career, Quick
Play, Multiplayer, Training and Opti ons.
Career is where the bulk of the game's fun lies - playing son gs a cross four difficulty
levels allow you to accumulate cash, kudos and fame; the completion of each set of songs
increasing your status, allo wing you to play at a new venue and unlock a new set of songs.
Your earnings allow you to "purchase" unlockables such as new guitars, songs and
characters.
Quick Play allows you to play any of the songs that you have unlocked on Career mode at
any difficulty level as a single e x perience. It includes a high-score table.
Multiplayer will be unavailable unless you have two controllers plugged in. Face-off splits
the songs notes between two players, while Pro Face-off allows both players to play the
song as they would in Quick Play mode. Ther e is als o a "battle" mode, where you use
"battle power" to try to make the other player fail the song.
Tutorial is a great introduction to how to play the game; giving you experience with
playing the simplest of notes outside of the pressure of a full song. There are multiple
tutorials, and it's recommended that you play through each tutorial sequentially. This how
to introduces play from first principles and, though playing the tutorials is certainly
beneficial and more visual, this guide assumes that the player hasn't.
Options - A very important option here is lefty-flip which you will want to turn on if you
are left-handed and pressing the fret buttons with your right hand - it will reorient the
notes on the screen to your perspective.
Playing the game - The best way to get used to playing is by having a crack at a song;
and the simplest songs are the songs at the very beginning of the setlist. If you already
have a good sense of rhythm or musical background, you should try playing the Medium
difficulty level first. Start playing by going to the main menu and selecting "Quick Play"
or "Career" and then choose the first song in the setlist.
After a loading screen which will c o nsist of a helpful message and last few words of
advice, which could either be pe rtaining to playing the game or entirely unrelated; you
will be greeted by a spiraling vi ew of the venue that you're playing in, the band that you're
a member of and your (randomly selected, if playing Quick Play) avatar holding a guitar.
Page 4

A board will then appear in the lower middle of th e screen, along with two structures in
the lower corners.
The main bit, and the key to your suc ce ss, is the scrolling fret board in the middle of the
screen. On this, notes are positioned with colors corresponding to the colors of the fret
buttons on your guitar; their position on screen also reflects their position on the neck (i.e.
the green key will always scroll down on the far left of the board - or right if lefty-flip is
on). At the bottom of the screen are 5 colored circles; pressing one of the fret buttons
lights up the corresponding circle.
On the lower left is your score, and "score multiplier". You receive a certain number of
points for each note you hit, but stringing together 10 successive notes will increase your
score multiplier so that you get twice as many points per note. This increases up to a 4x
bonus. If you miss a note, the multiplier is rese t to 1 x.
The lower right has a meter w hich shows the crowd's opinion of you. A needle will swing
to the green when you're playing well a nd t he crowd is loving you. The needle will swing
into the red when you're playing poorly. If it goes too far into the red you will get booed
off of the stage and have to restart the song. Above the meter is a bar which is your "star
power" indicator - this is explained later.
On Easy mode, only the green, red and ye llo w b uttons are used. On Medium, the blue
button is added. On Hard and Expert difficulties, all five colored buttons are used.
Colored notes will begin to scroll down from the top of the scrolling fret board. When you
see the first note, hold down the corresponding fret button. When the note reaches the
bottom of the screen level to the greyed out circl es, strum usin g t he st rum bar. For each
successive note, strum again. Other notes are played in exactly the same way: you press
the corresponding buttons and strum when the note reaches the bottom of the screen using the music's beat and melody will help you gauge when to play. Distilled to it's most
basic level - that's all there is to th is gam e , strumming in time to the note while using the
fret buttons to play the appropriate note. If you play too late or too early, you'll "miss" the
note, hear a ghastly noise, and lose some popularity.
This will be extended by playing chords: here you have to press two or more of the fret
buttons instead of one. Again, the buttons you press correspond with those denoted on
screen.
Long notes are notes where the note is sustained after it has been played. They are denoted
by a colored line trailing a note down the screen; and are played by holding down the
appropriate fret button until the line has passed. After playing its initial note, you do not
need to strum again. Instead, you can use your strumming hand to operate the whammy
bar and distort the sustain.
That's it! Play the notes that are requested on screen. Don't be put off if you fail on your
first few attempts, because it takes a while to get used to playing competently. Working
Page 5

through songs progressively, regardless of how badly you feel that you are doing, and
how low the scores you scrape through with are, will make you better - even though you
don't realize it. As soon as you feel c onfident that you can string a few notes together, hop
onto career mode and play through some songs.
Advanced techniques - there are a number of advanced tec h niq ues that you can use:
Star Power, alluded to above, as a quality which you increase if you play all of the notes
successfully in a series of "star notes". These notes appear in the shape of spinning stars
rather than circles, and often appear in the more grandiose pieces of music. If there is a
long star note, using the whammy bar on this will give yo u e x tra star power. Try to nail
these if you can! If you get enough of it (the meter fills up beyond its mark), you can
"use" it and enter star power mode by br ie fly tilting up your guitar or pressing the Select
button. This will temporarily double the points that you get from each note, and
drastically increase the rate that your popularity rises; so try to use it when there are lots
of consecutive notes. Also, once you enter Star Mode, there is no exiting it until the power
meter drains out, so wait until there are notes coming up or your Star Power will be
wasted. You can also use Star Power to help you get through tough parts of songs that you
can't get through otherwise.
Hammer-ons and Pull-offs , Looking closely at the notes moving up the screen, you' ll see
that some notes are different than others. Normal notes have a hollow, black center, while
"hammer-on" notes have a filled-in, white center . To simulate real guitar playing, some
sequences of notes can be played by hammering-on or pulling-off: Simply strum normally
for the black-center note (the first note in the sequence), and just press the correc t button
for the filled-in notes at the right time. "Hammer-on" notes will register as correctly
played as long as you time it correctly. Try to perfect this technique, since eventually, on
the most difficult songs, notes become too fast and close together to strum accurately.
Squeezing, This is one of the most advanced te c hn iques in the game, and learning how to
get 100% on a song should come befor e lea rning how to squeeze on a song. To do a
successful squeeze, activate star power JUST as a note passes by, and strum it. Then
before the star power ends, hit the last star power note slightly early. You can manage to
squeeze a couple more points out of a song by doing this.
Whammying, If you can hit long notes, then you can use the whammy bar. On long notes
(sustains), move the whammy bar up and down. Make sure you whammy on the star
power sustains, you'll get more Star P o wer in your meter! Whammying does not give you
any advantage on normal held no tes, it's just fun to do.
Tips
If you cannot master the orange button (it's okay, we all went through it) go into Training
mode, and play the bass parts on Hard and/or Expert. The bass part usually doesn't have
insane riffs that require you to press the orange button in excess. Instead, it rarely rises to
the orange button in most songs, and will allow you to adjust.
Page 6

Relax. Failing a song or missing a note (or even a dozen) is not the end of the world; and
you'll be less likely to hit succe ssive notes if you are too tense.
If you find a particular passage hard, try playing it in a different position.
Can't get past a song for a while? Go bac k a n d t ry to improve your score on some of the
easier ones, improving your technique and giving you the skill needed to beat it.
Find a mate and play multipla yer, or even host a Guitar Hero party. It's fun!
Prepare for notes by holding down the button coming before it gets to the strum area.
If you hold down a button to the left (or for a lefty, right) of the one you need to strum
while also holding down the required button, strumming will not make you miss the note.
This doesn't work with chords.
Have fun with it. If you can't beat a so n g, d on't beat yourself up. Play a few songs you
enjoy, then come back to the song la ter and try again.
On Medium mode, learn to use you r pinky to hit the blue fret button and you won't have
to move your hand at all.
On Hard mode, you can learn to shift your whole hand up and down, but as you get better
it starts to get easier when you actually slide your hand up and down on the "fretboard"
kind of like you were actually playing the guitar. Your pinky will just cramp up too much
on Hard and Expert.
As loading screens are kind of boring, you can try to strum up and down while pressing
each colored fret from green to oran g e then back to green with your other hand. This will
make you improve in moving your han d u p an d d o wn in hard and expert modes. Once you
can go fast, try to strum each fret two or three times.
If you already play guitar or another instrument that requires rapid moving of the left hand
fingers then you've pretty much got the whole concept of this game down and could go
pro if you are really good.
Take advantage of hammer-ons an d pull-of fs.
Remember when you're playing a note you can hold down a lower fret button for later use.
Don't hesitate to use your Star power when you re ach the red. Waiting until the blinking
red is dangerous, and it may well becom e too late to save yourself at that point.
Use STAR POWER wisely! Good uses are at 4x multipliers, lots of notes, and tough
verses.
Page 7

Warnings
This game is not for those who suffer from epilepsy, so if you do, consult your doctor
before you play this. Anytime you start feeling pain, take a break.
Remember that if your arm tires from down strumming, try strumming both up and down
alternatively.
If you are sure that you are hitting the correct notes, but still missing them, then you may
have screen lag. Go into the options menu to calibrate your guitar to the TV.
Troubleshooting
Be certain your wireless receiver is connected and the switches are properly positioned.
The receiver should have a red light on if it is connected to the PlayStation. The yellow
light will blink if it cannot find a controller and will stay on ste ady if connected to an
active RiffMaster™. If you are playing Rock Band™ the switch must be set to RB and if
playing Guitar Her o™ it must be set to GH. Remember to set the console switch to the
appropriate PlayStation, II or III. If any setting is incorrect, turn off your console, set the
switches properly and restart the c o nsole.
If you are playing with two controllers, you must use 2 wireless receivers. Each controller
requires a dedicated receiver i n or der to register to the game. The green light on the top of
the wireless receiver must be lit with be a different number for each controller.
Check the batteries. Batteries may be improperly positioned in their compartment (check
the diagram under the batte ries) and will drain over an extended period of time. Alwa y s
turn off the toggle switch when your RiffMaster™ is not in use.
Maintenance
Do not leave your RiffMaster™ or its wireless receiver in direct sunlight, high
temperature, high humidity or dusty environments for extended periods of time.
Use only a dry or lightly dampened c l oth for cleaning. Never use chemical cleaning
products.
Take breaks during extended play to allow you and your RiffMaster™ to cool.
Warranty
Every effort has been made to ensure that your real RiffMaster™ has passed our rigorous
quality control standards. This controller is covered by a 60 day warranty (f rom date of
purchase) to the original purchaser for normal intended use only. RiffMaster™ will repair
or replace any defective components at no charge to you within 60 of purchase. Yo u must
Page 8

furnish a copy of the sales receipt. Any damage resulting from modification or improp er
use is not covered under the terms of this warranty. Please see www.RealRiffMaster.com
for further information regarding this limite d 60 day warranty.
IMPORTANT NOTICE
FCC ID: W3NRMPS
FCC ID: W3NRMPSREC
Operation is subject to the following conditions: (1) this device may not cause harmful
interference, and (2) this device must accept an y interference received including
interference that may cause undesired operation.
Warning: Changes or modificati o ns n ot expressly approved by the party responsible for
compliance could void the user's authority to operate the equipment.
 Loading...