

Page 1

MMF POS
Volume
1
E
E
E
N
N
N
G
G
G
L
L
L
I
I
I
S
S
S
H
H
H
_____________________________________________________________________________________________________
Instruction Manual
/User Guide
Page 2
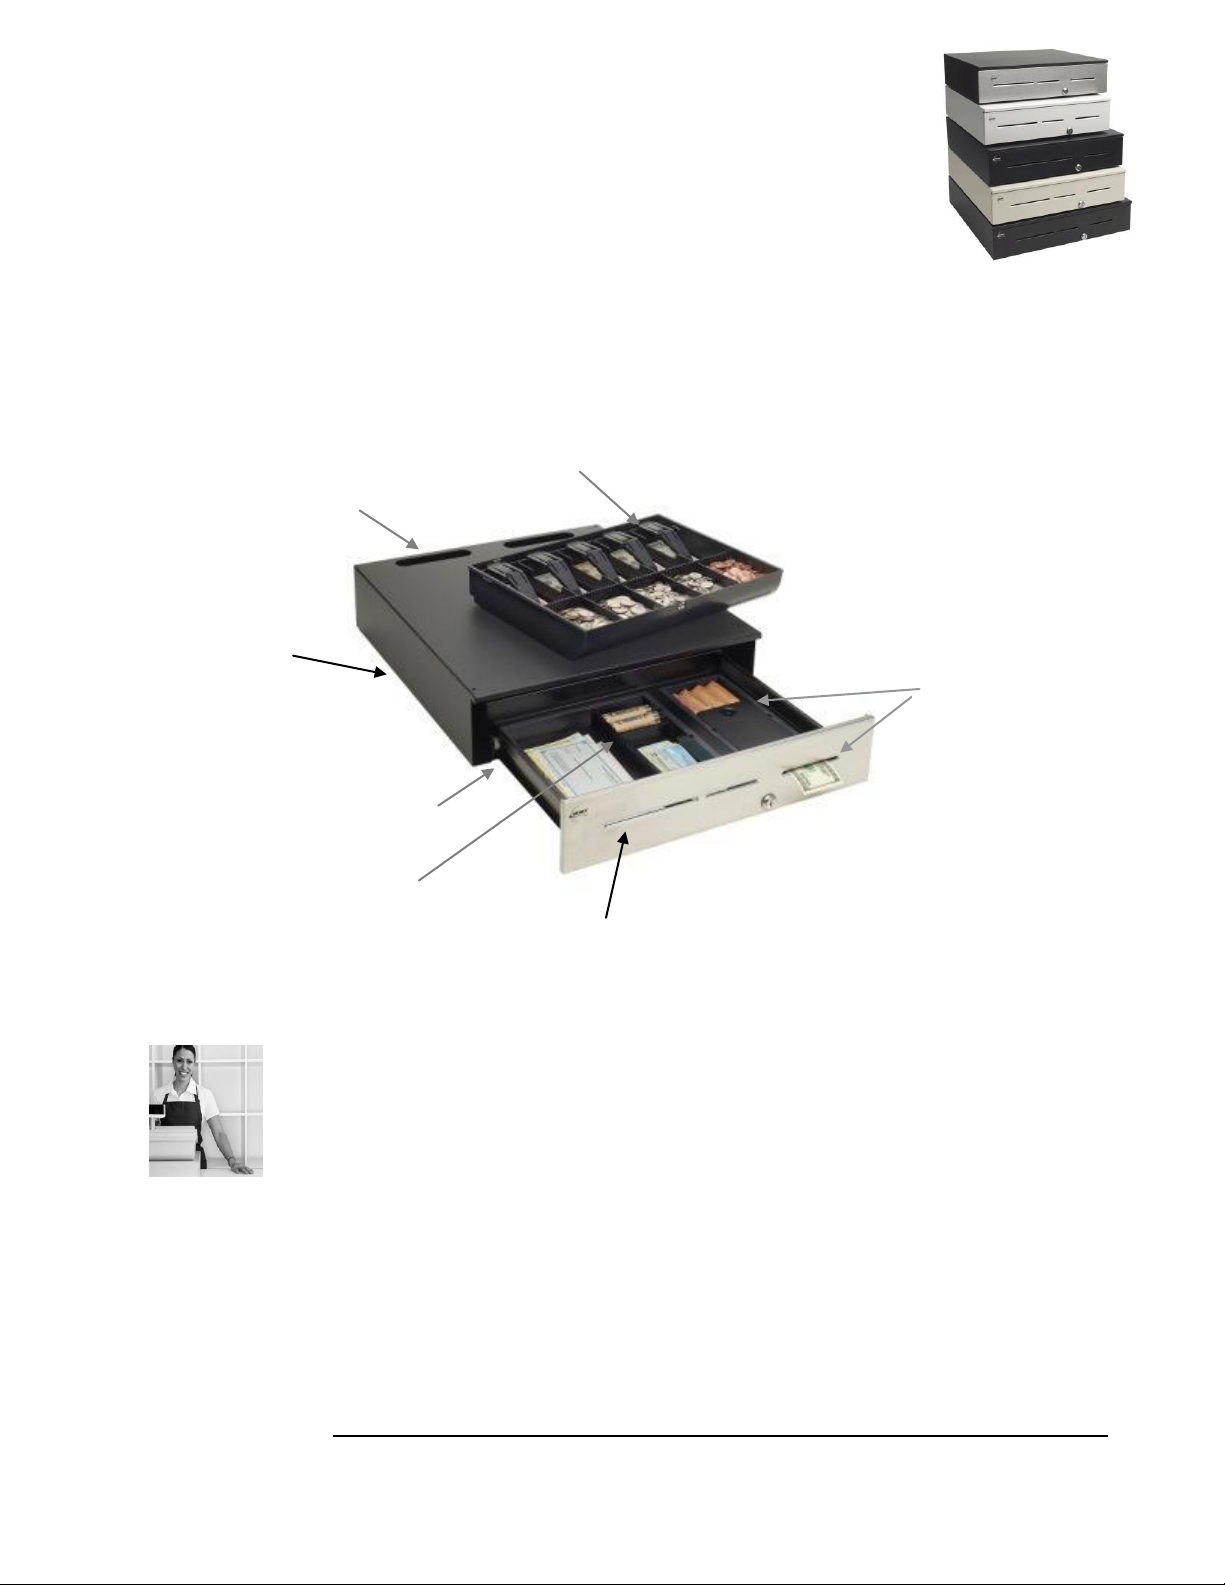
1
®
Media Slots
Lock
Cash Till
Bill Weights
Cash Drawer
Housing / Chassis
Tray Dividers
Nylon Roller
Rail System
LockIt™
LockIt™
Cable Management
(Body Sizes C1 & C2 Only)
Advantage
…featuring LockIt ™ - Stop Shrinkage Where it Starts
The Advantage™ Series solution has been engineered to offer a full-size product with many robust
capabilities. With the secured and discrete LockIt™ compartment and the optional High Security
Lock this cash drawer will add extra measures of protection at the POS station minimizing your losses.
The benefits and usefulness of this cash drawer are many; the media & coin storage compartments
allow more space and organization. An array of upgradeable interfaces connection offers the flexibility
to be used in any application.
Series Cash Drawer
Getting Started
Prepare a location for the cash drawer by selecting a secured, leveled surface that is no
smaller than the cash drawer.
Operating temperature should be controlled at 20° F to 100°F (-7° C to 37°C).
Remove all the packing tape or guards from the till and inner drawer. Remove white
edge guards from both sides of the cash drawer’s housing before use.
It is recommended to anchor the cash drawer to counter surface or if mounting under
counter at all times to prevent any injuries if cash drawer is over loaded. Follow
instructions detailed in this manual under Surface Mount or Under-Counter Brackets
on the next page.
Advantage User Manual
Last revised: 9/1/2012
Page 3
2
10 5/16”
13 1/2”
F
R
O
N
T
F
R
O
N
T
Support Screws
Lock Type / Functions
The Advantage™ Series cash drawer has been designed with standard 3-Position / 4Function lock. Locks come in Standard and High Security Levels. Each cash drawer is
equipped with one (1) set of 2 keys. The Standard and High Security locks provide the
following functions:
3-Position / 4 –Function Lock
12 o’clock position – Electronically ON
3 o’clock position – Locked Open
9 o’clock position - Locked Closed
To manually open the cash drawer turn the key 45 degrees to the right. To avoid the possibility of losing,
damaging, or breaking the key from the lock during transactions, please place lock in the 12 o’clock
position and remove key.
The Standard Security Keys will operate all functions of the locks.
The High Security Keys come with a two (2) keys set, one (1) Operator Key which will only open the cash
drawer electronically and one (1) Manager Key which will have full functionality of the lock.
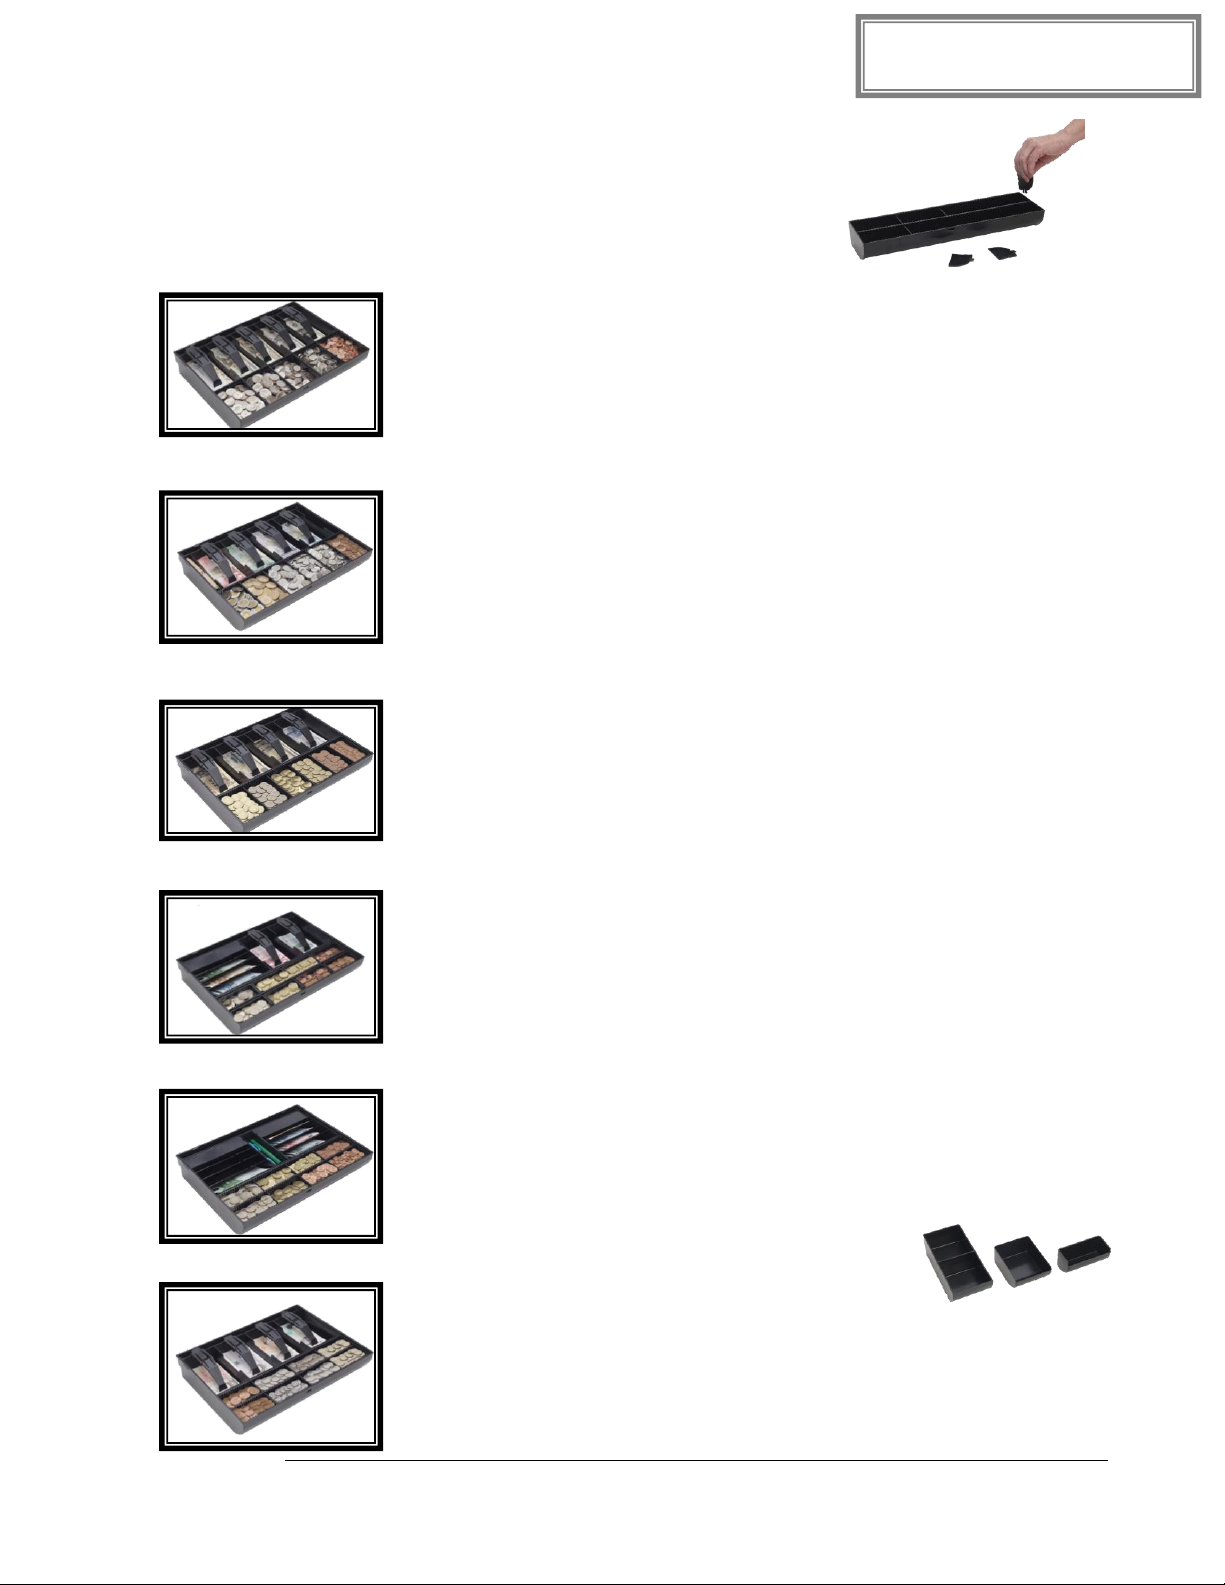
Media Storage
3 Media Slots - Widths: 5 ¼”, 3”, 3 ½”
Configurable Trays: Ridges placed horizontally and vertically of the storage
compartment trays allow the dividers to be swapped and secured for any desired
configuration.
Cash drawer is equipped with dividers in 8 ¾”, 5 ½”, and 3 ¼” lengths for
various placements within the trays.
Surface Mount
The Surface Mount holes were designed to allow the Advantage Series to fit in already
built-in spaces on a counter previously with mounting holes 10 5/16” apart or 13 1/2”
apart.
No Hardware Provided
Under Counter Brackets
The two (2) small mounting holes ( ) on each side of the drawer in between
the three support screws are for the Under-Counter Mounting Bracket.
Follow the procedures detailed in the
the brackets or could be downloaded from www.mmfpos.com.
Under Counter Brackets Manual
which came with
Advantage User Manual
Last revised: 9/1/2012
Page 4
3
TILL DIMENSION:
12.09” (D) x 15.50” (W) x 2.50” (H)
Global Till - For Advantage Series Cash Drawer use only
The Global Till has been designed to allow maximum configurability in one cash drawer for all
world currency denominations. Its adjustable dividers and ABS Plastic or metal bill weights
offer customers the highest flexibility for any bank notes and coins
organization.
US Configuration
5 Configurable Coin Dividers
5 Configurable Bank Notes Dividers
Removable Coin Tray
Adjustable Bill Weight
Canadian Configuration
6 Configurable Coin Dividers
4 Configurable Bank Notes Dividers
Removable Coin Tray
Adjustable Bill Weight
Asian Configuration
6 Configurable Coin Dividers
4 Configurable Bank Notes Dividers
Removable Coin Tray
Adjustable Bill Weight
European Configuration
8 Configurable Coin Dividers
2 Flat/4 Slanted Configurable Bank Notes Dividers
Removable Dual Row Coin Tray
Adjustable Bill Weight
Dual Currency Configuration
8 Configurable Coin Dividers
8 Slanted Configurable Bank Notes Dividers
Removable Dual Row Coin Tray
Accessories (Pen) Holder Compartment
United Kingdom Configuration
8 Configurable Coin Dividers
4 Configurable Bank Notes Dividers
Removable Dual Row Coin Tray
Adjustable Bill weight
Dual Bank Note Tray w/Bill weight Available
Advantage User Manual
Last revised: 9/1/2012
Page 5

4
Warning! Make all electrical
connections to the cash
drawer with the computer’s
power turned off.
Warning!
Do not assign
two (2) USB
interface cash
drawers
within the
same system
with the same
cash drawer
number.
Upgradeable Interface Connections
USB with Statistics Interface
The USB Interface has been designed to interface with any standard
Universal Serial Bus (USB) 2.1 or 1.1 Type A Port.
The MMF POS USB Interface Board is factory defaulted to recognize the cash drawer
as drawer number zero (0) or seven(7), the dip-switch pins need to be configured to
recognize the Drawer to number (1), refer to USB Interface Manual for Dip-Switch
Position (Default Setting) or follow the pin configuration illustrated in the label attached
to the interface for correct pin orientation.
Connect the power supply by plugging the small plug tip to the interface recepticle in the
back of the cash drawer. Plug the power adapter end into a 120 Volt AC Recepticle.
The utility drivers, test utility, and User Manual for the USB Interface can be found
online at: www.mmfpos.com > Software Drivers
USB with Statistics & 4-Port USB Hub Combo Interface
The MMF USB Hub feature offers the end user the capability to link an array of USB
devices via the four (4) USB ports within the cash drawer interface. This solution will
increase your connectivity potential and accessibility.
USB 2.0 & 1.1 compliant
Plug & Play and hot swappable capability
System Requirements: PC - Pentium 233 and Higher, 1 USB 2.0 port, WIN
98SE/ME/2000/XP
6 ft. USB 2.0 A-B cable
Follow the procedures detailed in the USB with Statistics & 4-Port USB Hub Combo User
with the cash drawer or could be downloaded from www.mmfpos.com.
Manual
which came
Advantage User Manual
Last revised: 9/1/2012
Page 6

5
OPTIONAL SERIAL CABLES AND ADAPTERS
P/N: 2261 99SD9F06 00 : STD. CABLE DB-9 FEMALE TO DB-9 MALE
P/N: 2261 99ND9F06 00 : DAISY-CHAIN 2 CASH DRAWERS DB-9 F TO DB-9 M AND DB-9 M.
P/N: 2261 99ND9FA6 0 : DAISY-CHAIN 2 OR MORE CASH DRAWERS OR TO DAISY-CHAIN A SERIAL
PERIPHERAL SUCH AS A PRINTER OR OTHER DEVICE. DB-9 F TO DB-9 M AND DB-9 M.
P/N: 2261 99DB9250 00 : SERIAL ADAPTOR TO CONVERT A DB-9 MALE TO A DB-25 FEMALE
USB with Serial Emulation Interface
The MMF USB with Serial Emulation interface has been designed for customers
with Legacy software whose computers do not have an actual COM port
available. Serial Emulation will change the USB to a Serial (COM) Device in by
creating a virtual COM port in the host computer once installed, which will be
used by the cash drawer interface.
USB 2.0 & 1.1 compliant
Plug & Play and hot swappable capability
System Requirements: PC - Pentium 233 and Higher, 1 USB 2.0 port, WIN
98SE/ME/2000/XP
6 ft. USB 2.0 A-B cable
Follow the procedures detailed in the USB with Emulation User Manual which came with the cash drawer or
could be downloaded from www.mmfpos.com.
PoweredUSB Interface
The MMF PoweredUSB Interface feature offers the end user the capability to have only one
cable for both signal and power, there is no need for an external power supply. This solution
will increase your connectivity potential, accessibility, and cable management issues.
12V PoweredUSB Rated Cable (12VDC / .8 Amp)
Plug & Play and hot swappable capability
System Requirements: PC - Pentium 233 and Higher, 1 USB 2.0 port, WIN
98SE/ME/2000/XP
Follow the procedures detailed in the PoweredUSB User Manual which came with the cash drawer or
could be downloaded from www.mmfpos.com.
Multi-Serial Programmable Interface
The Multi-Serial Interface has been designed to open the Advantage Series electronically through the serial
port of the computer.
Connect the power supply by plugging the small plug tip to the interface recepticle in
the back of the cash drawer. Plug the power adapter end into a 120 Volt AC Recepticle.
Uncoil the corresponding interface cable and securely fasten to COM1 or COM2 of the
computer. Refer to the chart below for the optional cables available for this interface.
Advantage User Manual
Last revised: 9/1/2012
Page 7

6
Warning!
Do not use the
MMF OPOS
drivers if the
cash drawer
connects
directly to a
The Multi Serial Interface comes with factory default settings which are set so that
any one (1) ASCII character will open the cash drawer and the RS-232 settings are autodetected automatically by the cash drawer. To modify the cash drawer settings by adjusting
the dipswitches remove the two side screws to access the serial PC board and locate the
three banks of DIP switches SW1/SW2/SW3 and follow the procedure detailed in the
Multi-Serial Interface Operators Manual
which came with your drawer or could be
downloaded from www.mmfpos.com to verify correct settings.
Follow test procedure detailed in the
Standard Serial Interface Manual
to verify
proper operation of the interface.
Standard - Serial Interface
The Standard-Serial Interface has been designed to open the Advantage Series electronically through the
serial port of the computer.
Connect the power supply by plugging the small plug tip to the interface recepticle
in the back of the cash drawer. Plug the power adapter end into a 120 Volt AC
Recepticle. Make sure the Green LED on the back of the cash drawer is ON.
Uncoil the interface cable and securely fasten to COM1 or COM2 of the computer.
Follow test procedure detailed in the
Standard Serial Interface Manual
that came with
your drawer or could be downloaded from www.mmfpos.com to verify operation of the
interface.
Printer-Driven Interface
The printer-driven Interface has been designed to use the Advantage Series with a variety of POS printers by
connecting printer specific cables. The corresponding printer specific cable is NOT included with the cash
drawer and should be purchased separately through a dealer or online at:
http://mmfpos.com/index.php/connectivity/cables/kwickkable-rj12-cable.html
Connect one side of the corresponding printer-specific MMF RJ-12 Cable to the
interface connection located under the cash drawer. The end of the cable that has a label
with the MMF cable part number will plug into the Cash Drawer and the end that has a
label that reads: “Connect to Printer” would plug into the receipt printer.
Follow the set-up instructions from the printer manufacturer to properly connect the cash
drawer to the receipt printer.
Software Drivers
MMF offers application developers and end users most of the choices available for cash
drawer control. OPOS Drivers are used by developers for its built-in networking
capabilities, which makes it easy to connect a variety of current and legacy retail device
peripherals, PCs, servers, and services in the retail and hospitality markets that work together
on a single point-of-service system.
To download the MMF OPOS DRIVER Version 1.13 visit our website at
www.mmfpos.com > Software Drivers
The user installing the MMF POS software and configuring the cash drawer devices on Windows 2000, Windows XP, or
Windows 7 is required to have Administrator Rights. Once the software is installed, all users with normal rights can use it.
Advantage User Manual
Last revised: 9/1/2012
Page 8

7
Optional Accessories
Platform System Solution (Available for selected drawers only)
MMF POS’s Advantage™ Platform has been designed to fit the 18.8 x 21”
Body size (C2) in order to integrate the POS peripherals. From simple add-on
platforms to integrated garage-style PC enclosures, all of our designs help you
organize and protect your peripherals, manage cables and conserve valuable
counter space. Full set of instruction sheets for specific Platform System
Solutions are available at www.mmfpos.com.
Display Poles for LCD Monitors or Touch Screens
MMF POS’s Mounting Solutions are built to VESA mounting standards and attach securely
to any MMF cash drawer or countertop offering a great deal of viewing flexibility. Visit our
website to see all available models and accessories. Full set of instruction sheets for
mounting the VESA Mounts are available at www.mmfpos.com.
Locking Till Cover
Placed on top of the global till and locked with a separate set of keys, the till cover protects the content inside
the till when till is away from the cash drawer.
Position till cover in a 45° Angle and align with the back opening of the till.
Bring cover down and rotate key to the left to lock the cover in place.
Till Conversion Kits
The Advantage™ Till Conversion kits allow Advantage™ Cash Drawer owners to keep
and use select legacy, MMF, APG®, M-S®, NCR® and IBM® tills in their new
Advantage™ Cash Drawers. Full set of instruction sheets for mounting the Till
Conversion kits are available at www.mmfpos.com.
Advantage User Manual
Last revised: 9/1/2012
Page 9

8
For replacement parts and/or
accessories, contact your
supplier or visit our website at
www.mmfpos.com
Replacement / Removal of Components
Inner Drawer Removal (Roller Suspension System)
Open the cash drawer and remove the currency till.
Place one hand on the front lip of the inner drawer front and grasp the bottom
of the cash drawer with the other hand.
Pull cash drawer out until the two side rollers touch and then pull the drawer
up and out of the cash drawer housing.
Inner Drawer Replacement (Roller Suspension System)
Place the inner drawer’s rollers behind the fixed rollers placed on each side of the cash
drawer’s housing walls.
Guide the rollers into the side rails by pushing the inner drawer in.
Push inner drawer inside cash drawer housing until closed.
When the inner drawer is fully in closed position, open it and close it a few times to
verify proper operation.
Roller System Replacement
The removal and replacement of the rails are simply made by releasing the side screw
and nut of the roller.
Lock Removal / Replacement
Remove the inner drawer as directed above. Flip Inner drawer over.
Remove clip holding lock.
Tap or push end of lock rod to remove lock from inner drawer.
Remove lock from lock rod.
Reverse steps 1 thru 3 to install new lock.
Advantage User Manual
Last revised: 9/1/2012
Page 10

9
Please visit MMF POS on-line at www.mmfpos.com for Advanced Technical Support or call 1-800-769-1954.
F
R
O
N
T
Cash Drawer Maintenance
Troubleshooting:
Cash Drawer does not open electronically
If using Printer-driven Interface: MMF POS’s Advantage Series Cash Drawer
connects directly to a receipt printer. This connection requires the POS application
to send the proper opening codes to the printer, which will then send the signal to
open the Cash Drawer. Consult the documentation or manuals for your particular
printer for the proper open codes.
If using Printer-driven Interface: Verify the correct end of the RJ-12 printer cable is
connected to the cash drawer as well as the printer.
If using a Multi-Serial, Standard Serial or USB Interface please refer to their
individual User Manuals for specific instructions on troubleshooting. .
Verify correct position of the lock. To open electronically the lock would need to
be in the 12 o’clock position.
Cash Drawer does not open manually or electronically
Make sure all packing tapes were removed from the cash till and that no foreign
objects are obstructing the cash till from opening.
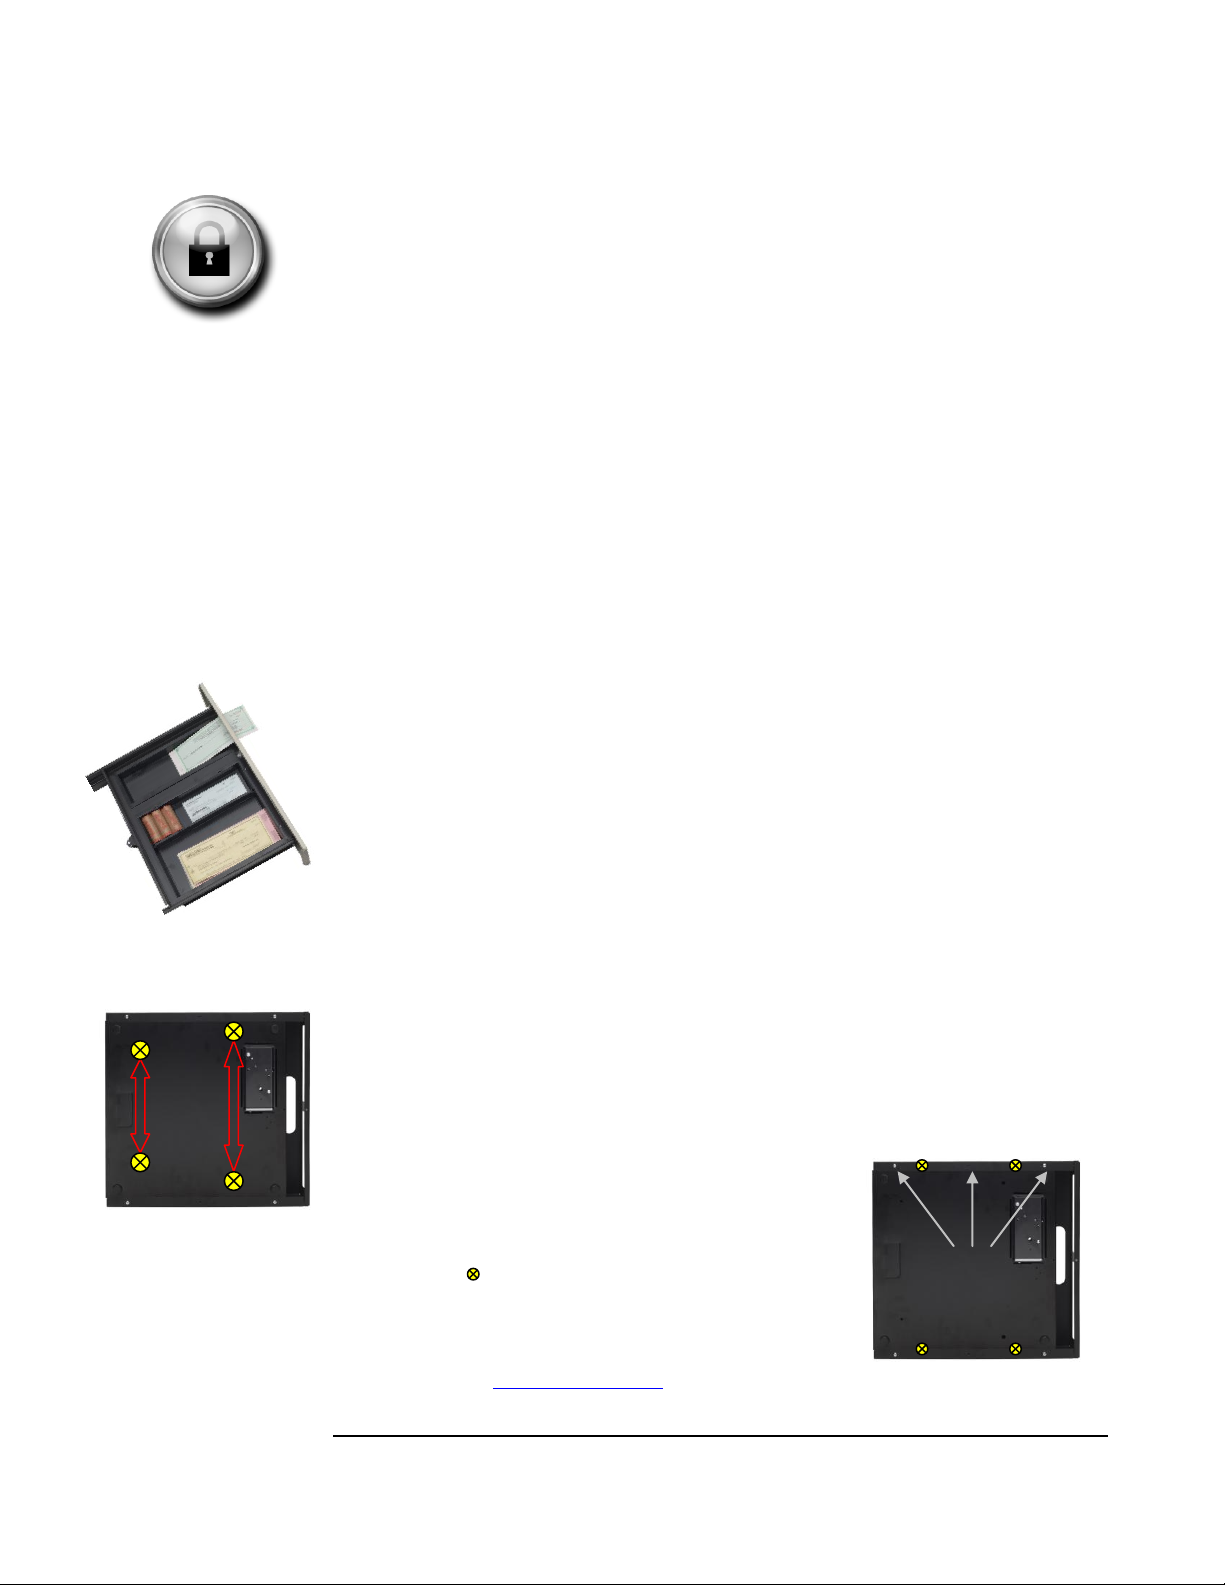
If there is an object obstructing the cash drawer from opening, as a last resource
remove bottom plate of cash drawer by flipping it upside down and removing the
support screws on the following places: (As Illustrated on the left)
*On drawers with 16.7” or 18.7” Depth - Remove screws on the bottom right & left side of the unit and
on each side of the upgradeable interfaces. (Total- 8 Screws)
*On drawers with 20” or 21” Depth - Just remove bottom screws on the right & left side of the unit.
(Total- 6 Screws)
Flip the drawer over to the up-right position and slide the bottom plate out while
holding the housing in place.
Keys are locked inside cash drawer. Use the Manual Latch Release.
Flip cash drawer upside down to access the bottom plate.
Find the hole located on the rectangle shaped section where the internal latch is
attached to (See Illustration on the left). If there is a cover plate over it, remove it by
unscrewing it.
Insert any sharp object and push the arm to the operator’s right side to manually
open the cash drawer.
Preventive Maintenance:
Lubricate the slides and latch mechanism periodically. Inspection and lubrication
will vary based on operating conditions.
Remove any debris from slides, if present.
A thin film of lithium-based grease or a few drops of general purpose oil should be
maintained on the ball bearing tracks of the slides.
Warnings/Safety Instructions:
Avoid breaking coin rolls on the drawer front or the currency till.
Do not clean roller bearings or slides with any water or substance cleaners; use a
lint-free fabric to wipe old grease and/or debris.
Advantage User Manual
Last revised: 9/1/2012
Page 11

10
Warranty - Detailed Terms and Conditions
Advantage User Manual
Last revised: 9/1/2012
 Loading...