

Page 1
Johnny Tractor Swing Manual
Manuel d’instructions de la balançoire
Johnny Tractor
Installation, Operation & Maintenance Instructions
Instructions d’installation, de fonctionnement et d’entretien
X3. SECTION 4 OF THE CONSUMER PRODUCT SAFETY COMMISSION’S
OUTDOOR HOME PLAYGROUND SAFETY HANDBOOK
X3.1 Select Protective Surfacing – One of the most important things you can do to reduce the likelihood of serious head injuries is to install shock-
absorbing protective surfacing under and around your play equipment. The protective surfacing should be applied to a depth that is suitable for the
equipment height in accordance with ASTM Specication F 1292. There are dierent types of surfacing to choose from; whichever product you select,
follow these guidelines:
X3.1.1 Loose Fill Materials:
X3.1.1.1 Maintain a minimum depth of 9 inches of loose-ll materials such as wood mulch/ chips, engineered wood ber (EWF), or shredded/ recycled
rubber mulch for equipment up to 8 feet high; and 9 inches of sand or pea gravel for equipment up to 5 feet high. NOTE: An initial ll level of 12 inches
will com-press to about a 9-inch depth of surfacing over time. The surfacing will also compact, displace, and settle, and should be periodically relled
to maintain at least a 9-inch depth.
X3.1.2 Use a minimum of 6 inches of protective surfacing for play equipment less than 4 feet in height. If maintained properly, this should be
adequate. (At depths less than 6 inches, the protective material is too easily displaced or compacted.) NOTE: Do not install home playground equipment
over concrete, asphalt, or any other hard surface. A fall onto a hard surface can result in serious injury to the equipment user. Grass and dirt are not
considered protective surfacing because wear and environmental factors can reduce their shock absorbing eectiveness. Carpeting and thin mats are
generally not adequate protective surfac-ing. Ground level equipment such as a sandbox, activity wall, playhouse or other equipment that has no
elevated play surface does not need any protective surfacing.
X3.1.3 Use containment, such as digging out around the perimeter and/orv lining the perimeter with landscape edging. Don’t forget to account for
water drainage.
X3.1.3.1 Check and maintain the depth of the loose-ll surfacing material. To maintain the right amount of loose-ll materials, mark the correct level
on play equipment support posts. That way you can easily see when to replenish and/or redistribute the surfacing.
X3.1.3.2 Do not install loose ll surfacing over hard surfaces such as concrete or asphalt.
X3.1.4 Poured-in-Place Surfaces or Pre-Manufactured Rubber Tiles You may be interested in using surfacing other than loose ll materials like rubber
tiles or poured-in-place surfaces.
X3.1.4.1 Installations of these surfaces generally require a professional and are not “do-it-yourself” projects.
X3.1.4.2 Review surface specications before purchasing this type of surfacing. Ask the installer/ manufacturer for a report showing that the product
has been tested to the following safety standard: ASTM F1292 Standard Specication for Impact Attenuation of Surfacing Materials within the Use
Zone of Playground Equipment. This report should show the specic height for which the surface is intended to protect against serious head injury.
This height should be equal to or greater than the fall height – the vertical distance between a designated play surface (elevated surface for standing,
sitting, or climbing) and the protective surfacing below – of your play equipment.
X3.1.4.3 Check the protective surfacing frequently for wear.
X3.1.5 Placement – Proper placement and maintenance of protective surfacing is essential. Be sure to: X3.1.5.1 Extend surfacing at least 6 feet from
the equipment in all directions.
X3.1.5.2 For to-fro swings, extend protective surfacing in front of and behind the swing to a distance equal to twice the height of the top bar from
which the swing is suspended.
X3.1.5.3 For tire swings, extend surfacing in a circle whose radius is equal to the height of the suspending chain or rope, plus 6 feet in all directions.
To reduce the likelihood of injury please follow the guidelines as outlined in
this manual. Your M&M Web Riderz Swing has been tested to ensure safety
and complies with: ASTM F1148 Standard Consumer Safety Performance
Specications for Home Playground Equipment, F1487 Standard Consumer
Safety Performance Specications for Playground Equipment for Public Use,
and CPSIA Specications for lead paint.
Pour réduire le risque de blessure, veuillez suivre les lignes directrices
soulignées dans le présent manuel. Votre balançoire M&M a été testée pour
vérier sa sécurité et sa conformité avec: ASTM F1148 Standard Consumer
Safety Performance Specications pour les équipements de jeu résidentiels,
F1487 Standard Consumer Safety Performance Specications pour les
équipements de jeu d’utilisation publique, et les normes CPSIA sur la peinture
au plomb.
For assistance please contact: Pour obtenir de l’aide, veuillez communiquer avec :
M&M Sales Enterprises, Inc.
7425 Chavenelle Rd. Suite 200 · Dubuque, IA 52002
877-242-0154 · info@mandmsalesinc.com
www.mandmsalesinc.com
Page 2
SECURE YOUR CHILD ATTACHEZ VOTRE ENFANT
Rope
Hook
Cross Bar or Branch
Barre transversale ou branche
Corde
Crochet
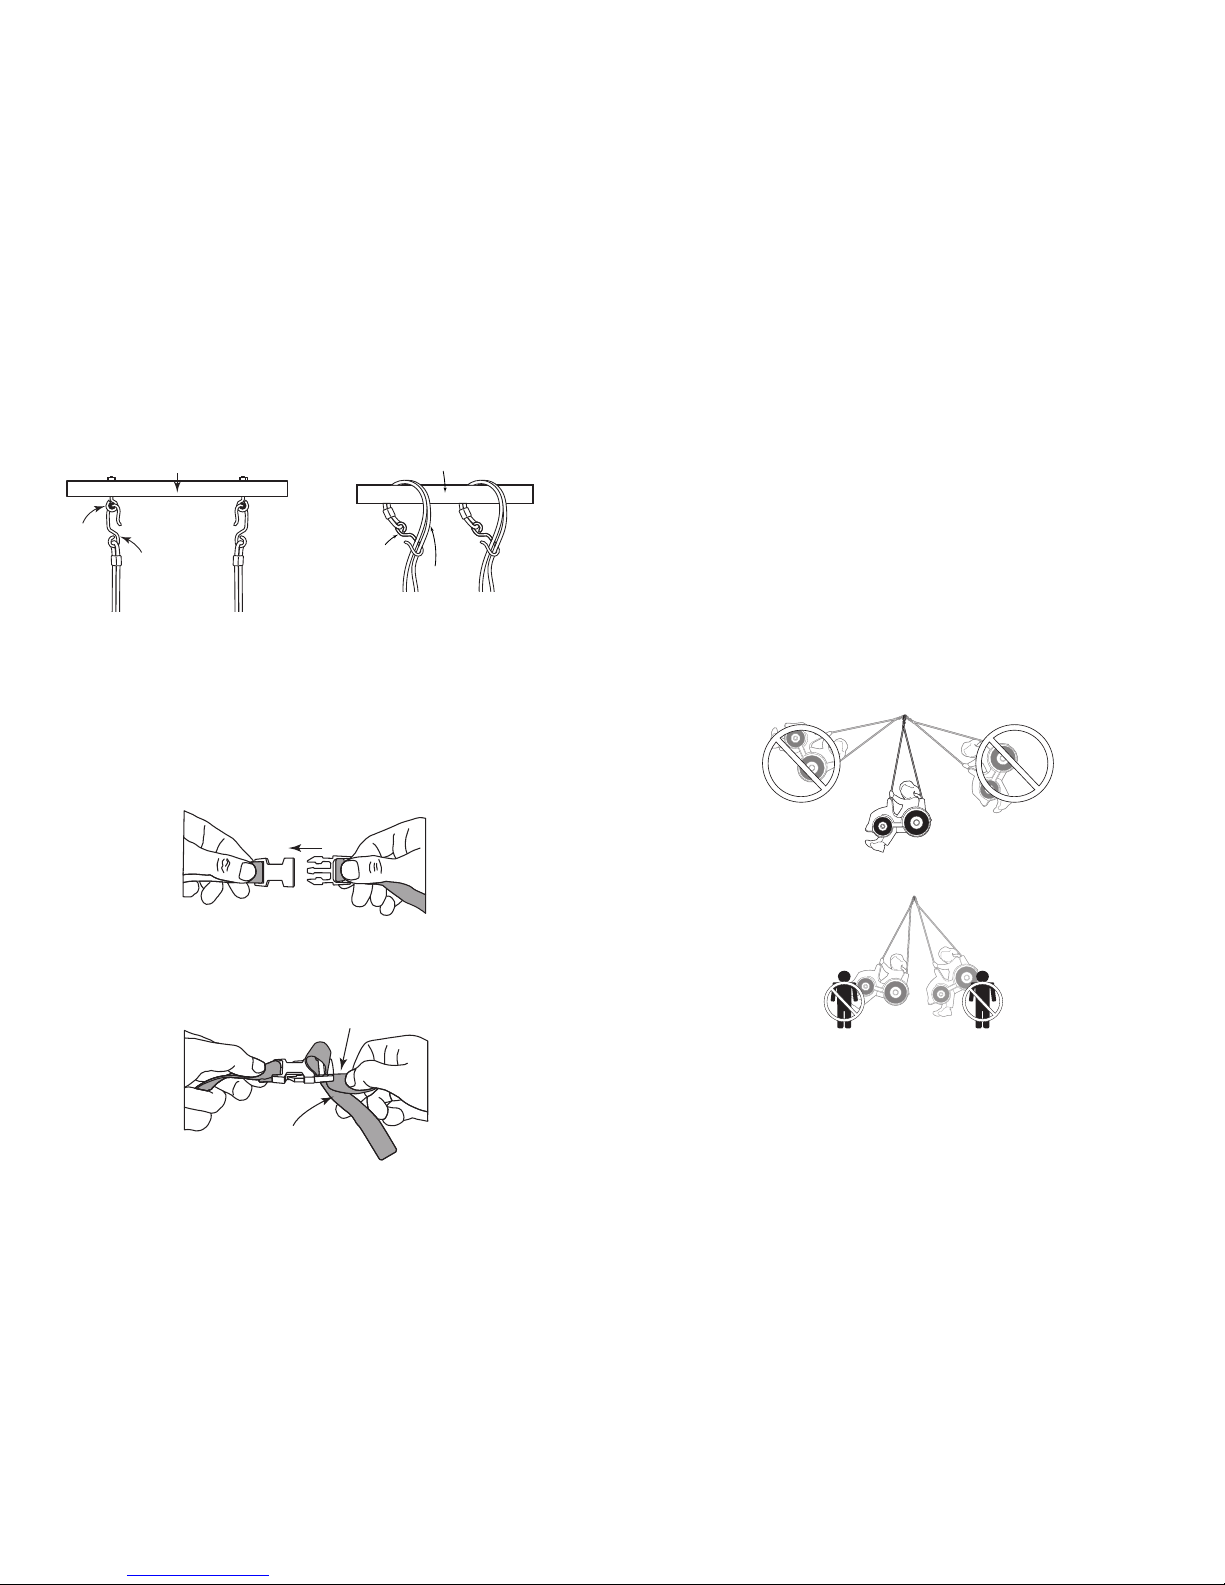
Wrap the hook ends of the swing rope around the cross bar or tree
branch. Place the hook around the rope as shown above and pull
the rope down tightly to secure.
Enroulez les extrémités du câble de la balançoire autour
de la barre transversale ou de la branche d’arbre. Placez
le crochet autour du câble, tel qu’illustré ci-dessus, et
tirez fermement la corde vers le bas pour xer.
Simply slip the swing hooks through the existing swing set cross
bar hook eyes on the swing set as shown above.
Glissez simplement les crochets de la balançoire à travers
les oeillets déjà en place sur la barre transversale de
l’ensemble de balançoire, tel qu’illustré ci-dessus.
Swing
hook
Cross bar hook
with nylon
bushing
Swing set cross bar
Barre transversale de l'ensemble de balançoire
Crochetde
la balançoire
Crochetde
la barreavec
bagueen
nylon
INSTALLATION
To install on an existing swing set Cross bar or Tree branch installation
Anchor end
Extrémité de l'attache
Free end/Extrémité libre
Place your child in the swing, then place the safety belt over your
child’s lap and snap the connectors together as shown below.
Installez votre enfant dans la balançoire, puis placez la ceinture de
sécurité par dessus ses genoux et entrez les connecteurs l’un dans
l’autre, tel qu’illustré ci-dessous.
Tighten belt by pushing the anchor end of the belt up through the
buckle, creating a loop. Now pull the free end of the belt to secure
it in place. Repeat until the belt ts snuggly around your child’s
waist. Do not over tighten.
Serrez la ceinture en poussant l’extrémité de l’attache vers le haut
par la boucle de ceinture, créant une boucle. Maintenant, tirez sur
l’extrémité libre de la ceinture pour xer en place. Répétez jusqu’à
ce que la ceinture soit solidement installée autour de la taille de
votre enfant. Ne serrez pas trop.
To loosen the belt push the free end of the belt up through the
buckle, creating a loop, then pull the anchor end of the belt.
Pour desserrer la ceinture, poussez l’extrémité libre de la ceinture
vers le haut par la boucle, créant une boucle puis tirez sur
l’extrémité de l’attache de la ceinture.
OPERATION INSTRUCTIONS
1. An adult should supervise play on this product for children of all
ages.
2. Limit: 1 child per swing.
3. Only for family domestic indoor or outdoor use by children 9 to
36 months old.
4. Dress children appropriately, including wearing well-tting shoes
that fully protect the feet.
5. Follow these guidelines:
• avoid swinging empty seats or swings.
• do not swing higher than hook attachment.
• remove child from the swing only after it has completely
stopped.
• remove articles before playing on equipment that create
hazards. Examples include: ponchos, scarves, and other
loose-tting clothing, bike or other sports helmets.
• do not walk close to, in front of, behind, or between moving
swing.
INSTRUCTIONS DE FONCTIONNEMENT
1. Un adulte doit superviser le jeu avec ce produit pour les enfants
de tous âges.
2. Limite : 1 enfant par balançoire.
3. Pour utilisation domestique familiale uniquement, intérieure et
extérieure, pour des enfants de 9 à 36 mois.
4. Habillez les enfants de façon appropriée, incluant le port de
chaussures bien ajustées qui protègent complètement les pieds.
5. Suivez ces directives :
• évitez de faire balancer les sièges vides ou les balançoires;
• ne faites pas balancer plus haut que les crochets d’attache;
• sortez l’enfant de la balançoire uniquement après un arrêt
complet;
• retirez les objets qui peuvent causer des accidents avant de
jouer avec l’équipement.Par exemple :
• ponchos, foulards, et autres vêtements amples, casques de
vélo ou d’autres sports;
• ne marchez pas près, devant, derrière une balançoire en
mouvement ou entre deux
• balançoires en mouvement.
DO NOT walk in front or behind swing while in motion
NE marchez PAS devant ou derrière la balançoire lorsqu’elle est en mouvement
WARNING: Never swing higher than hook attachment
AVERTISSEMENT : ne balancez jamais plus haut que le crochet d’attache
MAINTENANCE INSTRUCTIONS
1. At the beginning of each season and at least twice monthly during
usage, treat ropes with a Teon-based lubricant.
2. Before each use, check the rope, knots, support and all connections for evidence of deterioration, excessive wear, fractures, breaks
or sharp edges and replace as necessary. 3. Take tire swing indoors
when the temperature drops below 32 degrees Fahrenheit. WARNING: Failure to carry out these checks and inspections could result
in a fall or injury.
INSTRUCTIONS D’ENTRETIEN
1. Au début de chaque saison et au moins deux fois par mois pendant
les périodes d’utilisation, traitez les cordes avec un lubriant à base
de Téon.
2. Avant chaque utilisation, vériez la corde, les nœuds, le support
et tous les liens pour vous assurer qu’il n’y a pas de signes de
détérioration, d’usure excessive, de bris ou d’arêtes coupantes, et
remplacez l’élément si nécessaire.
3. Rentrez la balançoire à l’intérieur quand la température descend
sous 0 ºCelsius. MISE EN GARDE: le fait de ne pas eec tuer ces
vérications et ces inspections pourrait entraîner une chute ou une
blessure.
Pour installation sur un ensemble de balançoire
déjà existant
Installation sur la barre transversale ou sur une
branche d’arbre
INSTALLATION
 Loading...