

M&M FOLLOW YOUR ARROW Instructions Manual
Follow Your ArrowTM Adventure Swing Series Models:
M&M Sales enterprises, Inc.
Dubuque, Iowa 877.242.0154
mandmsalesinc.com
ASSEMBLY • installation • operation •maintenance • safety
INSTRUCTIONS
SAFETY INFORMATION
To reduce the likelihood of injury please follow the guidelines as outlined in this instructions. You can visit our website
www.mandmsalesinc.om to review the instruction manual in the future or keep this instruction sheet for reference:
Follow Your Arrow
TM
Adventure Swing Series Models: MM00153, MM00154, MM00155, MM00156.
The installation instructions above are reflective of the U.S. Consumer Product Safety Commission’s Outdoor
Playground Safety Handbook. For a complete description of installation instructions and warnings for outdoor
playground equipment you can visit our website www.mandmsalesinc.com to link to the current CPSC handbook and
review in its entirety.
Our products are tested to ensure safety and compliance with Consumer Product Safety Improvement Act of 2008
(CPSIA) including specifications for lead paint and phthalates and ASTM International F1148 Standard Consumer
Safety Performance Specifications.
maintenance instructions
1. At the BEGINNING of each play season: Check all moving parts including swing seats, ropes, cables, and chains
for wear, rust, or other deterioration. Replace as needed; Check metal parts for rust. If found, sand and repaint
using a non-lead-based paint meeting the requirements of 16 CFR 1303; Reinstall any plastic parts, such as
swing seats or any other items that were removed for the cold season; Rake and check depth of loose fill
protective surfacing materials to prevent compaction and to maintain appropriate depth. Replace as necessary
2. TWICE A MONTH DURING play season: Rake and check depth of loose fill protective surfacing materials to
prevent compaction and to maintain appropriate depth. Replace as necessary.
3. ONCE A MONTH DURING play season: Check all moving parts including swing seats, ropes, cables, and chains
for wear, rust, or other deterioration. Replace as needed.
4. At the END of each play season or when the temperature drops below 32°F: Remove plastic swing seats and
other items as specified by the manufacturer and take indoors or do not use; Rake and check depth of loose fill
protective surfacing materials to prevent compaction and to maintain appropriate dept h. Replace as necessary;
Owners shall be responsible for maintaining the legibility of the warning labels.
5. When you are ready to dispose of swing, make sure that all swing components are disposed of in accordance
with local waste ordinances.
6. Swing should disassembled and disposed of in such a way that no unreasonable hazards exist at the time the
swing is discarded.
7. WARNING: Failure to carry out these checks and inspections could result in fall or injury.
3. Riders should be dressed appropriately including wearing well-fitting shoes that fully protect feet. Remove articles
before swinging that create hazards when they get tangled and caught (examples include: ponchos, scarves, and
other loose-fitting clothing, bike or sports helmets.
4. INSTRUCT CHILDREN: Not to swing higher than hook attachment • Get off swing only after it has completely
stopped and hold onto the rope or chain until both feet are planted firmly on the ground • Not to twist swing
chains or ropes or loop them over the top support bar since this may reduce the strength of the chain or rope •
To avoid swinging empty seats • Not to walk close to, in front of, or behind, or between moving items • To sit in
center of the swings with their full weight on the seats • Not to use the equipment in a manner other than
intended • Not to attach items to the playground equipment that are not specifically designed for use with the
equipment, such as, but not limited to, jump ropes, clothesline, pet leashes, cables and chain as they may cause a
strangulation hazard • To remove their bike or other sports helmet before playing on the playground equipment
operation instructions
1. An adult should supervise play on this product for children of all ages.
2. Only for family residential domestic use. Design for multi-rider use. 350 lb. maximum load.
mandmsalesinc.com
join o ur m i ssion to inspire c hil dr en
to
get up, g e t out , a n d pl ay!
outdoor
adventuresin spiring
Ages
5
+
MM00153
Find Your Wild
MM00154
Move Mountains
MM00155
Be Brave
MM00156
Soar High
S
A
F
E
R
.
B
E
T
T
E
R
.
S
T
R
O
N
G
E
R
.
ASSEMBLY instructions
BEFORE YOU START
• WARNING: Due to the presence of small parts during assembly, keep out of reach of children until assembly
is complete.
• Assembly should be completed by adult person(s). We intend for our products to bring joy not frustration.
Because the Follow Your Arrow
TM
Adventure Swing Series is meant to enjoy with friends too, we say invite a friend
(or someone you can spend at least 20 minutes with) to help you assemble and install your new swing.
• A flat level surface approximately 4 ft. x 4 ft. will be needed to spread out swing cover material for assembly.
• A wrench will be needed for tightening four nuts.
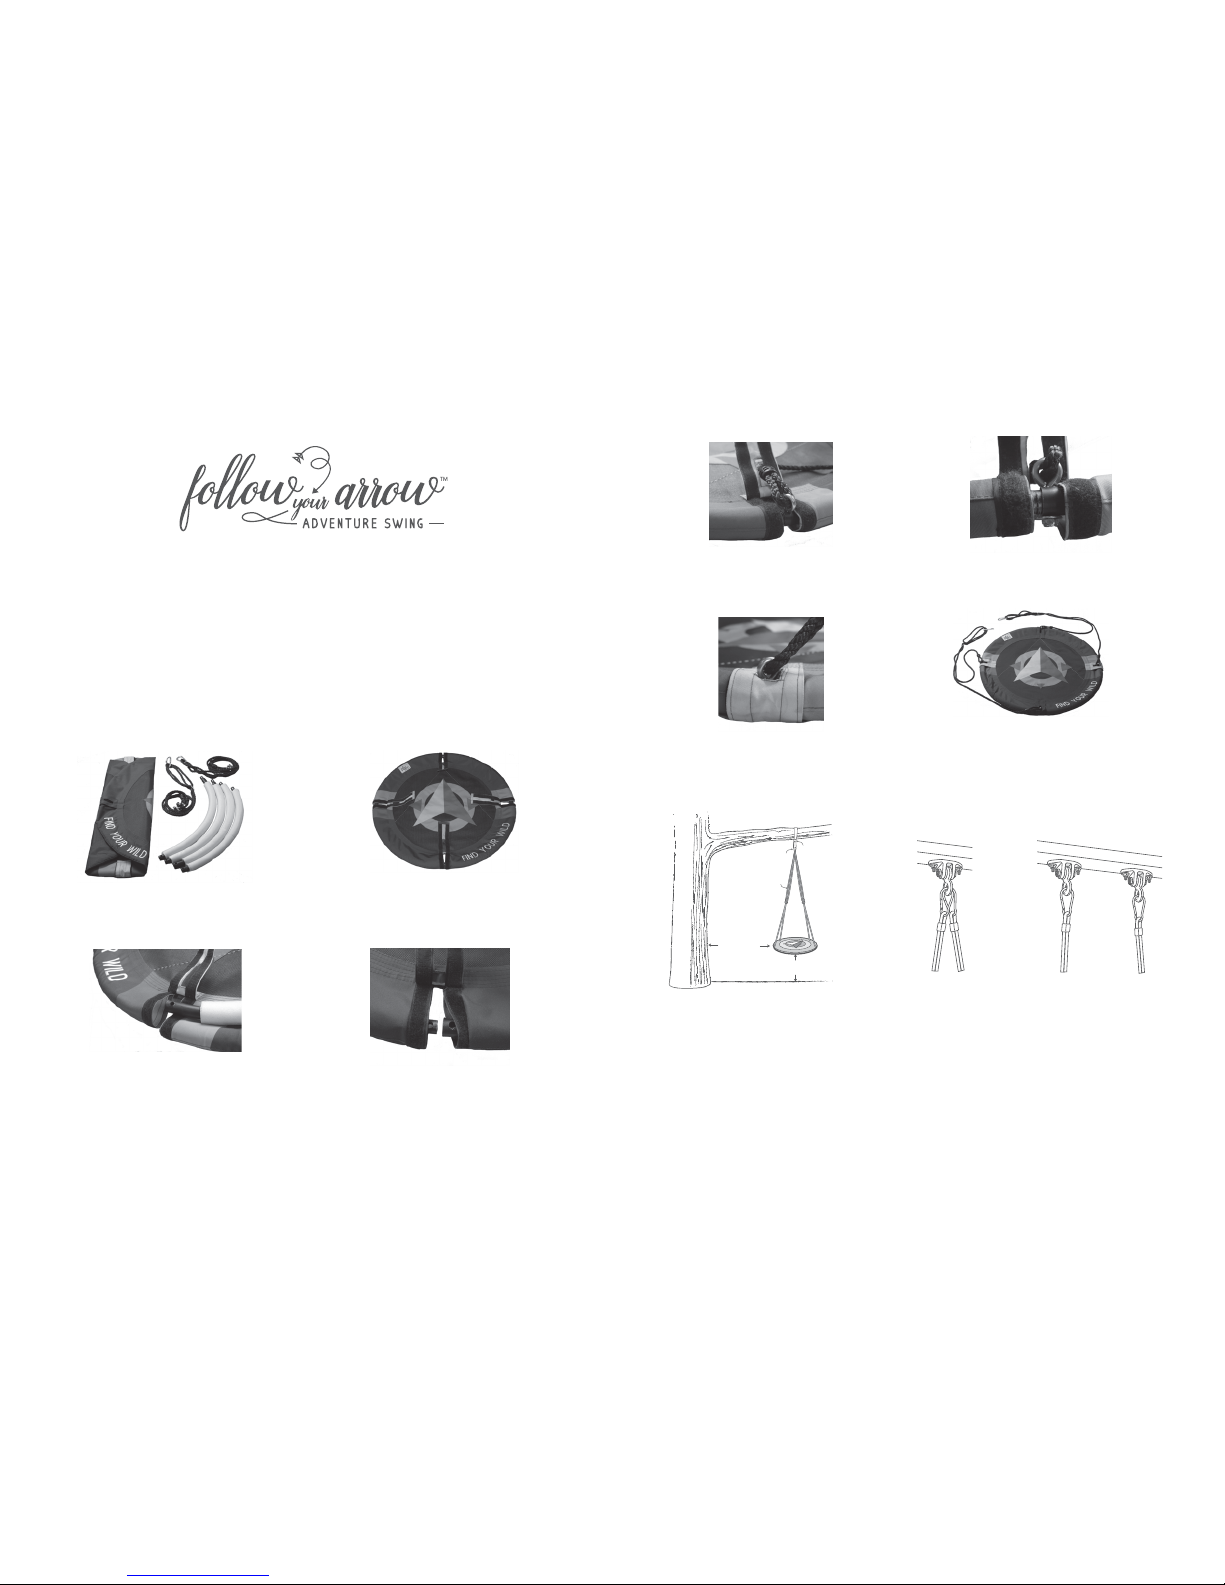
ASSEMBLY
1. Lay out all necessary swing components
pictured above.
2. Unfold material swing cover on level surface with
design facing up. Pull the four hook/loop straps
toward the center so the fastening side faces up.
3. Insert one curved tube through the swing
cover sleeve. Before inserting the remaining
tubes, note the direction of the first tube.
All narrow ends of tube will fit into wider
opening end of an adjoining tube. Insert the
remaining three tubes.
4. Insert all narrow ends of tube into wider end of
adjoining tube, making sure to align the
overlapping holes.
installation instructions
TREE LIMB ASSEMBLY: Test tree limb to ensure that it will hold the weight limit of 350 lbs. safely.
SWING SET OR OTHER HORIZONTAL BEAM ASSEMBLY: Attach swing to a swing set by removing two sets of swings from
the existing swing set and attach the spring clips to the chain support hooks.
1. Do not install home playground equipment over concrete, asphalt, packed earth, grass, carpet or any other hard surface.
A fall onto a hard surface can result in serious injury or death to the equipment user.
2. To prevent serious injury, children must not use the equipment until properly installed.
3. Confirm that the supporting structure is secure, it will support at least 350 lbs., is over level ground, has a minimum height
of 7 ft. and is no less than 6 ft. on all sides from vertical elements. Web swing should have a clearance of at least 1.5 times
the total length of all the rope measured from the tree limb/horizontal beam to the spring clip(s) attachment point.
4. Adjust swing hanging length so platform is parallel with ground. Bottom of swing should be no more than 24 in. and no
less than 18 in. from the ground.
18 in. minimum to 24 in. maximum
ground clearance
Rope
Tree Strap
Spring clips
At least 6 ft.
from
trunk or
1.5 times
the length of
the swing’s
rope
SINGLE ATTACHMENT EXAMPLE
CLEARANCE REQUIREMENTS DUAL ATTACHMENT EXAMPLE
5. Pull the screw ends of each rope through the slot
at the end of the straps. Insert the bolt through
the holes formed at the tubes connection points.
6. Add washer and nut to the bottom side of tube
bolt and secure. Tighten with wrench. Repeat
both Steps 5 and 6 for remaining three screw
ends and hardware.
7. Pull the hook/loop straps back over the tubing
frame and attach to the hook/loop fastener on
underside of swing.
8. Finished swing should look as pictured above.
Ropes should not cross each other above swing.
 Loading...