

Page 1

INSTALLATION & MAINTENANCE MANUAL
TRKxxxx
Page 2

GENERAL INSTRUCTIONS
These instructions should be read carefully and retained after installation by the
end-user for future reference and maintenance.
These instructions should be used to aid the installation of the TRKx x track
products.
SAFETY
• This product must be installed in accordance with the latest edition of the IEE Wiring
Regulations (BS7671) and current Building Regulations. If in any doubt, consult a
qualified electrician
• Please isolate mains prior to installation or maintenance
• Check the total load on the circuit (including when this product is fitted) does not exceed
the rating of the circuit cable, fuse or circuit breaker
• Please note the IP (Ingress Protection) rating of this product when deciding the location
for installation
• This product is for indoor use only
• This product is Class I and must be earthed
• This product series is IP20 rated
Page 3

TRACK INSTALLATION
NOTE: The live end on each track accessory has an earth tab on either side.
Depending on which end you wish to insert the accessory, snap off one of the
earth tabs using a pair of pliers. Thereafter it will only fit on one end of the track
and cannot be reversed. DO NOT try to force the live end into the incorrect end
of the track.
• Provide power to the required point of installation
• Ensure the location surface will be adequate to support the weight of the track and fittings
when installed
• Remove the terminal cover from the live end by removing the terminal cover screw
• Choose the cable entry and remove the knockout either in the plastic end (surface wiring)
or the metal rear (concealed wiring)
• Using the track as a template, mark the location for, and drill the fixing holes ensuring not
to infringe with any gas/water pipes or electrical cables
• Feed the mains cable through the chosen knockout
• Connect the track to the mains supply ensuring the correct polarity is observed: L - Live
(Brown), E - Earth (Green/Yellow), N - Neutral (Blue)
• Replace the terminal cover and securing screw
Page 4
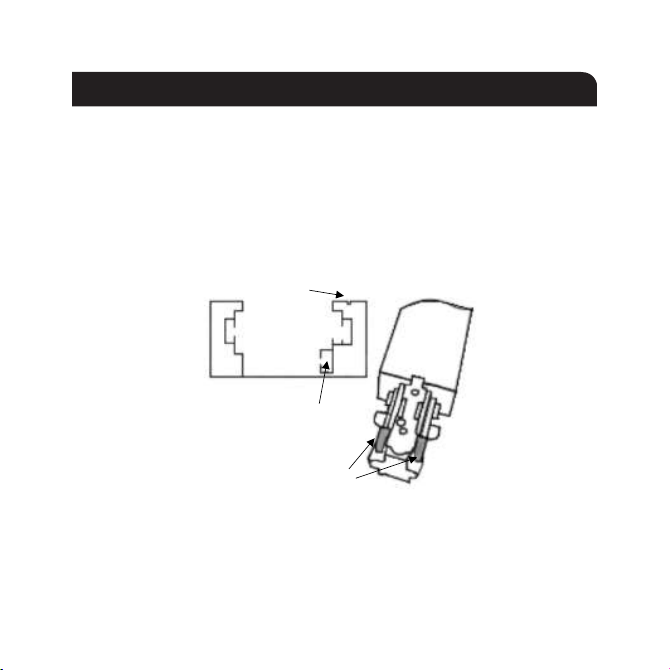
ACCESSORY INSTALLATION
• The track accessories are provided with earth connection points on both sides
• When offering the accessory to the track, verify which tab needs to be removed
• To remove the tab, grasp firmly with a pair of pliers and lever back. The tab should snap
off cleanly. The side of the track with the earthing conductor has a polarity groove on top
of the track to help identify which way round to insert the accessories (see Fig. 1)
• Locate the accessory into the track and insert fully
Polarity groove
Earth conductor
Fig. 1
• The track connectors TRKC1xx / TRKFC1xx / TRKRA1xx / TRKT1xx / TRKX1xx also have
the two earth tabs and can be used as power feeds and rewired if required
Remove one earth tab
Page 5
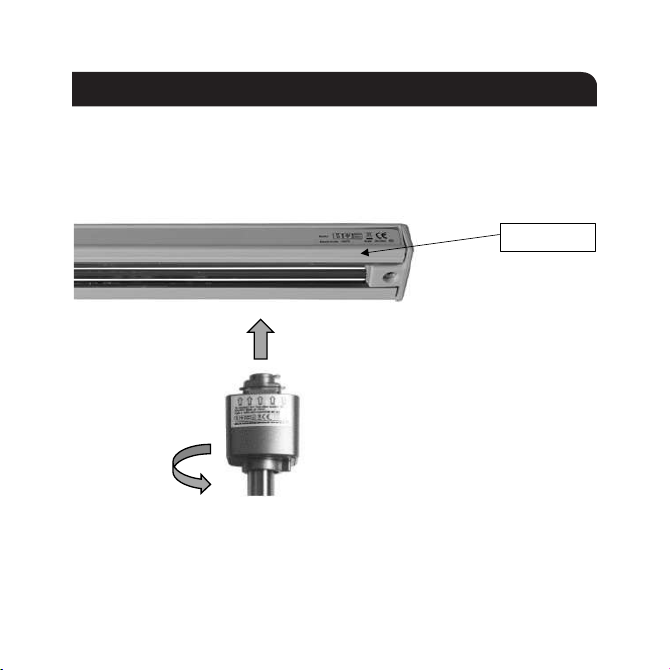
Polarity groove
SPOTLIGHT INSTALLATION
• Align the arrows on the spotlight track adaptor with the polarity groove on the track, push
into the track and rotate anti-clockwise (see Fig. 2). The polarity groove is a shallow
groove on the surface on one side the of the track
Fig. 2
• Insert a suitable lamp
• Switch on and check for correct operation
Page 6

GENERAL
This product should be recycled in the correct manner when it reaches the end of its life.
Check local authorities for where facilities exist.
Clean with a soft dry cloth only, do not use aggressive cleaning products or solvents which
may damage the product.
This product is dimmable dependent on lamp type.
WARRANTY
This product has a warranty of 2 years from the date of purchase. Failure to install this
product in accordance with the current edition of the IEE Wiring Regulations (BS7671),
improper use, or removal of the batch code will invalidate the warranty. If this product
should fail within its warranty period, it should be returned to the place of purchase for a
free of charge replacement. ML Accessories does not accept responsibility for any installation
costs associated with the replacement product. Your statutory rights are not affected. ML
Accessories reserve the right to alter product specification without prior notice.
Page 7
INTERNATIONAL
INTERNATIONAL
CONTACT DETAILS
INTERNATIONAL
CONTACT DETAILS
CONTACT DETAILS
ML Accessories Limited LU5 4LT
www.mlaccessories.co.uk
101
AKJUL21_V2
 Loading...