

MK Sound SW-85, SW-51, SW-50, SW-95, SW-62 User Manual
...
SW-95, SW-85, SW-62
SW-54, SW-52, SW-51
SW-50
Miller & Kreisel Sound, Inc.
9351 Deering Avenue
Chatsworth, CA 91311-5858 USA
(818) 701-7010 fax (818) 701-0369
www.mksound.com
©2002 Miller & Kreisel Sound, Inc.
frameless in-wall speaker
operation manual
TM

Please record the following information for your records:
Serial Number:
Date of Purchase:
Dealer Name:
Dealer Address:
City/State/Zip:
Country:
Invoice Number:
TABLE OF CONTENTS
1. INTRODUCTION........................................................................................3
COMPONENT OVERVIEW...................................................................................3
2. INSTALLATION INTO EXISTING WALLS..........................................................4
3. SPEAKER WIRING..........................................................................................4
4. SPEAKER WIRING FOR SW-85 AND SW-95 ONLY..........................................4
SOUND VARIATIONS (SW-85 & SW-95 only)...................................................4
REMOTE SWITCHING OF V ARIATIONS OF SOUND (SW-85 & SW -95 only)......6
5. MOUNTING THE SPEAKER IN THE WALL
................................................................6
6. SATELLITE AND SUBWOOFER PHASE TEST................................................8
7. SPEAKER DAMAGE & HOW TO AVOID IT.......................................................8
8. IF YOU NEED SERVICE...................................................................................9
9. M&K TEN YEAR WARRANTY.........................................................................9
10. REMOVING THE SPEAKER FROM THE WALL...............................................9
11. PRE-CONSTRUCTION BRACKET INSTALLATION.........................................10
12. SPECIFICATIONS...............................................................................................11
FRAMELESS IN-WALL SPEAKER

3
FRAMELESS IN-WALL SPEAKER
1. INTRODUCTION
Congratulations! Your new M&K in-wall speaker system will give you years of unmatched enjoyment and excitement while
listening to your favorite musical and audio/video sources. We encourage you to read this owner’s manual, as there is a great
deal of information provided here to help you achieve the best possible performance.
If you have any questions about your in-wall speaker system, please contact your M&K dealer or call the M&K factory
directly at (818) 701-7010, from 8:30 AM to 5:00 PM Pacific Time, Monday through Friday. We will be happy to help you with any
question. Additional information may also be obtained on our web site: www.mksound.com
or you may send us an e-mail to
suppor
t@mksound.com.
If you are installing your new speaker into existing walls, please see section 2, on page 4.
If you are installing your speakers into walls that are being constructed, go to section 12, page 10 or the Pre-Construction
Bracket Instructions that are included with your Pre-Construction Bracket Kit SPRE50, SPRE85, or SPRE95.
All M&K In-wall speakers is well suited for either wall mount or ceiling mount applications. Although, the SW-50, with its
circular grille, is the aesthetically preferred speaker for ceiling mount locations.
Speaker Grille
Foam Frame
(Installed inside
wall)
Foam Dampening Pad
(Installed inside wall)
Pre-Construction Assembly*
(Sold separately)
Inwall Speaker Assembly
THESE ARE THE MAJOR COMPONENTS OF YOUR NEW SPEAKER SYSTEM
*not required; available from your dealer as part number SPRE85 (for use with SW-85, SW-52);
SPRE95 (for use with SW-95, SW-62); or SPRE50 (for use with SW-50, SW-51, SW-54).
4
FRAMELESS IN-WALL SPEAKER
2. INSTALLATION INTO EXISTING WALLS
3. SPEAKER WIRING
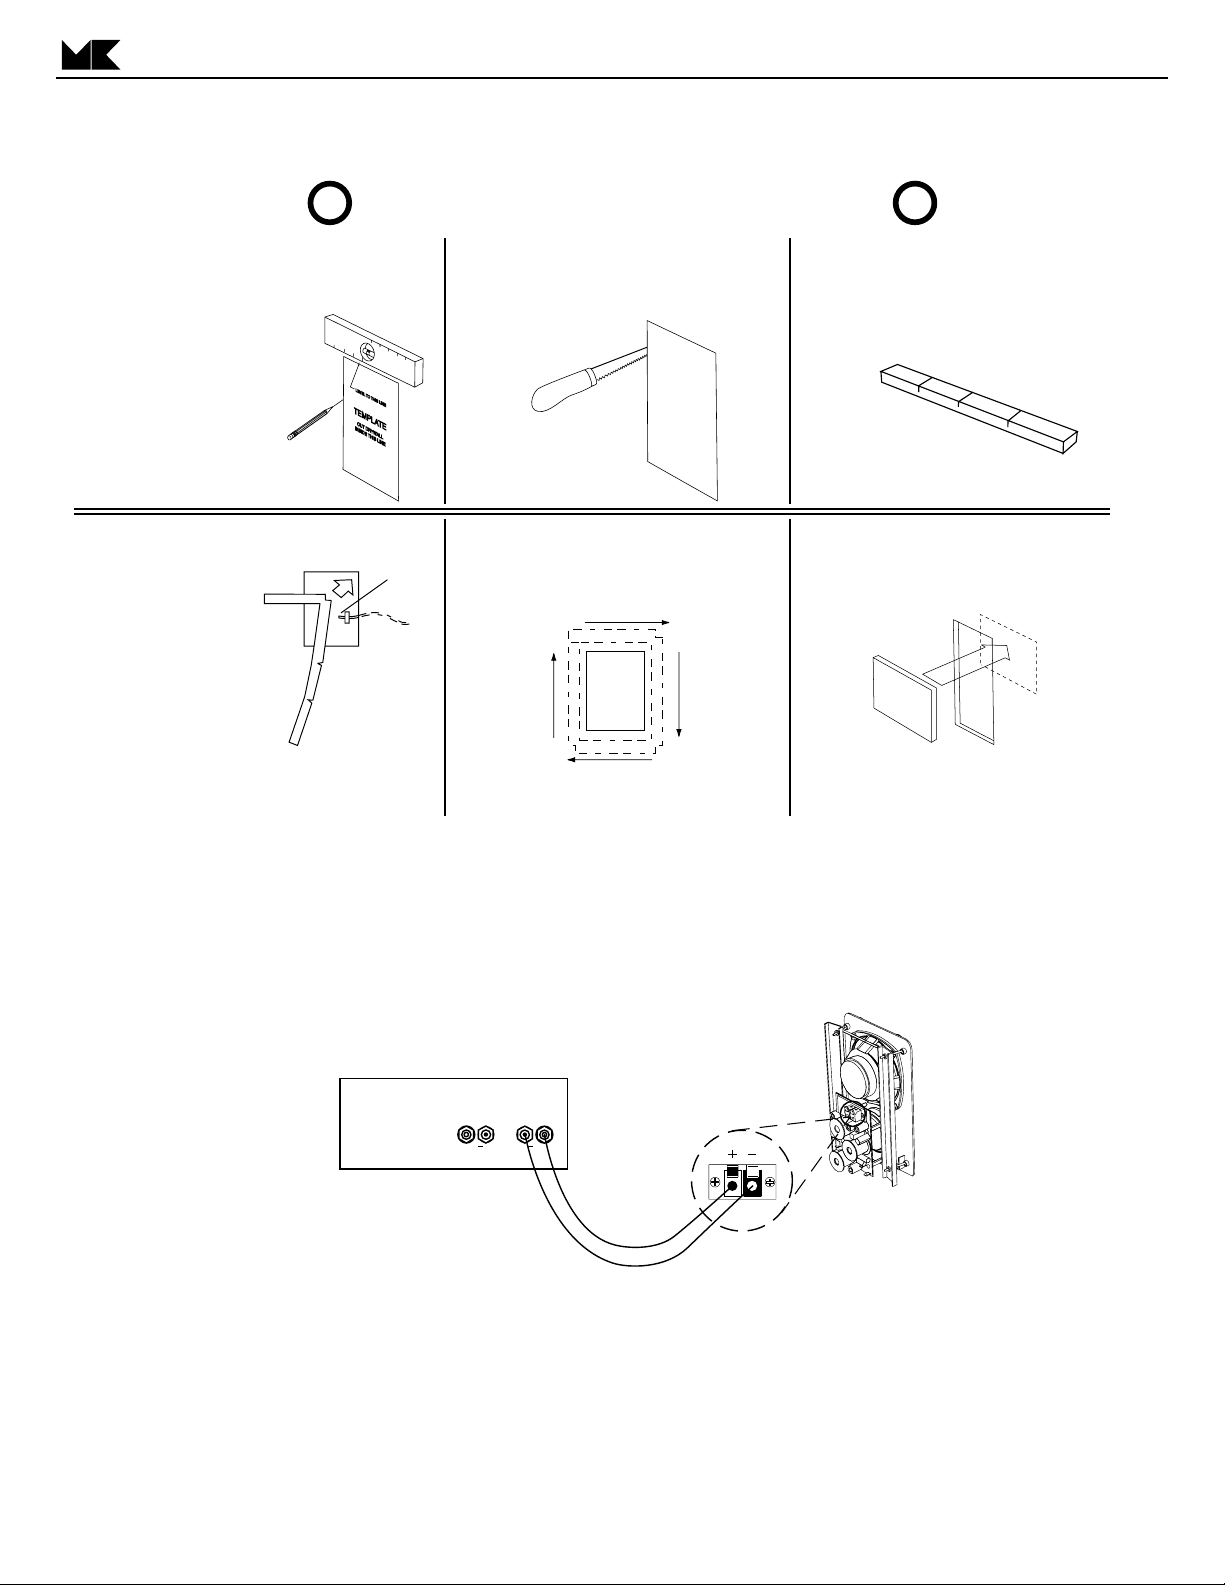
The Positiv e (+) lead from your amplifier or receiv er should be connected to one of the RED (+) INPUT terminal, and the Negative
(-) lead from your amplifier or receiver should be connected to one BLACK (-) INPUT terminal.
4. SPEAKER WIRING FOR SW-85 AND SW-95 SPEAKERS ONLY
VARIATIONS OF SOUND (SW-85 and SW-95 only)
Your M&K SW-85 & SW-95 speakers reproduce sound with e xceptional tr ansient accuracy and a very wide dynamic range. They
will give you outstanding results with any high quality amplifier or receiver.
IMPORTANT! - MAKE SURE WALL ELECTRICITY IS
! !
TURNED OFF BEFORE STARTING INSTALLATION
1. ALL MODELS: Mark wall with template,
using a stud finder to maintain a 2" distance
from any stud. Make sure that you are clear
of any crossbraces in the
wall structure.
FOR STANDARD INSTALLATION
DRYW ALL THICKNESS CANNOT
EXCEED 1.25 INCHES.
FOR THICKER WALLS CALL
M&K SOUND.
4. SW-95, SW-50, SW-51 ONLY:
Tape the speaker wire to
the back wall so the
speaker
wire
end is within the
opening as shown.
5. Fold the first section of the foam strip and
insert the corner through the wall opening.
2. ALL MODELS: Cut opening precisely
with drywall saw, drywall router, etc.
Sand edges and clean debris from
installation area.
6. SW-95, SW-50, SW-51 ONLY:
Continue folding and inserting the rest of
the foam strip into the wall opening until
the foam frame is created.
7. Make sure that the frame is centered
within the opening
3. SW-95, SW-50, SW-51 ONLY:
Your speaker installation kit includes a foam
strip to fill in the wall space around the back
of your speaker. The foam strip has 1"deep
slits to allow bending it into a 4-sided frame.
NOTE: Be careful when bending and handling the
strip so that you do not rip it.
8. ALL MODELS: Mount the adhesive
backed foam pad in the wall approximately
five inches above the bottom of the cutout.
This puts the foam behind the woofer.
NOTE: Do not put any other acoustic filler
within the wall opening as it can interfere
with speaker mounting.
AMPLIFIER OR RECEIVER
LEFT RIGHT
+
+
 Loading...