

Page 1

Read the operating instructions prior to
commissioning
Operating instructions
Bratt pan
Unit Type of energy Version Model
Bratt pan Electric Without tilting, EcoControl OPEMPF...
Side arm, manual tilting,
EcoControl
Side arm, motorised tilting,
EcoControl
Translation from the original document • 2021441-20ABDE-B • 12/09/2016
O7EMPF...
OIEMPF...
OPEKBP...
OIEKBP...
OPEKBP...
OIEKBP...
2021441-20ABBE-B en-GB
Page 2

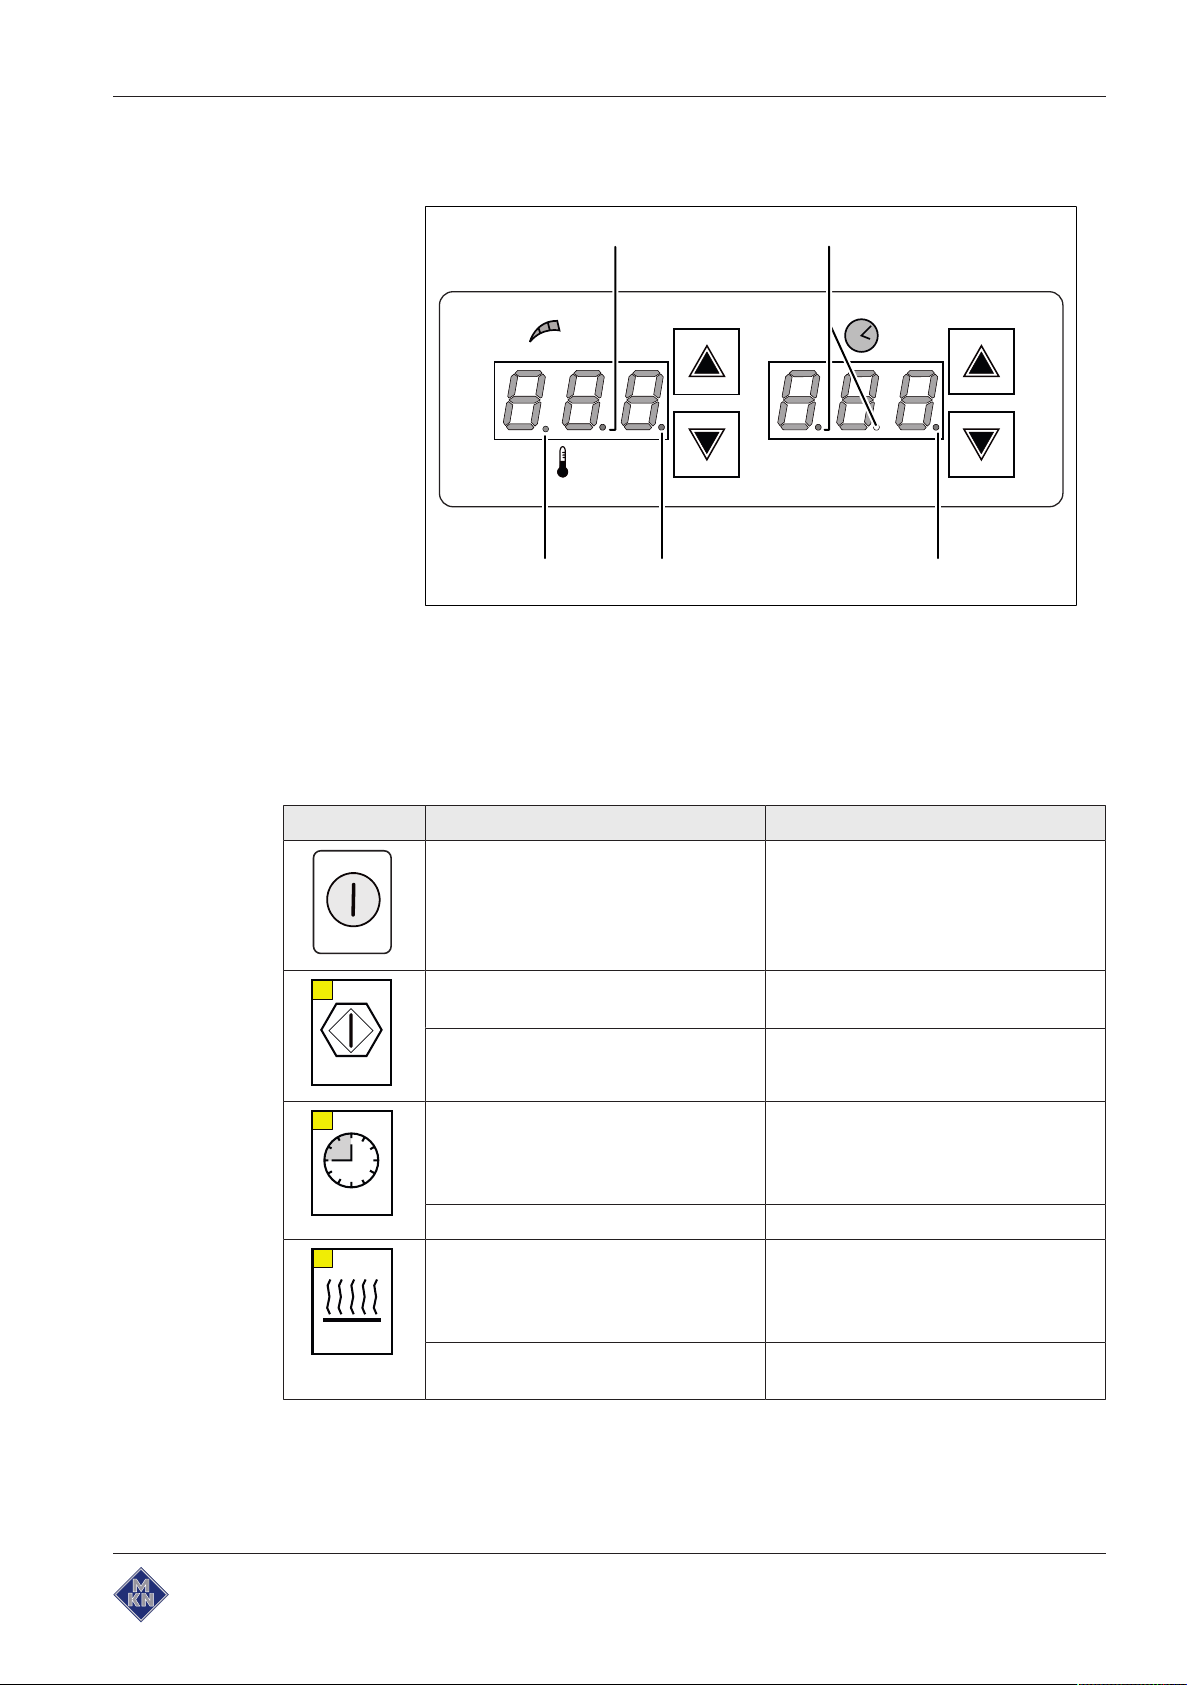
Operating and display elements
1 2 3
on
off
start
stop
°C/F
h min
Prog.
g r i l l
cook soft
start
auto
Eco Control
M
KN
a b
c
d
e
f
g
hjln
ikmo
a "Cooking temperature/level"
i "Auto start" indicator light
display
b "Cooking temperature/level"
j "grill" button
button
c "Cooking time" display k "grill" indicator light
d "Cooking time" button l "Soft" button
e "On Off" button m "Soft" indicator light
f "Start Stop" button n "Cook" button
g "Start Stop" indicator light o "Cook" indicator light
h "Auto start" button
Image: Handwheel for manual tilting
Image: Control knob for motorised tilting
2 Operating instructions
2021441-20ABBE-B
Page 3

Manufacturer
MKN Maschinenfabrik Kurt Neubauer GmbH & Co. KG
Halberstädter Strasse 2a
38300 Wolfenbüttel
Germany
Phone +49 5331 89-0
Fax +49 5331 89-280
Internet www.mkn.eu
Copyright
All rights to text, graphics and pictures in this documentation are held by MKN Maschinenfabrik Kurt
Neubauer GmbH & Co. KG. Distribution or duplication is only permitted with the prior written consent
of MKN.
Copyright by MKN Maschinenfabrik Kurt Neubauer GmbH & Co. KG.
3Operating instructions
Page 4

Directory of contents
1Introduction......................................................................... 7
1.1About this manual ............................................................................ 7
1.1.1Explanation of signs .................................................................................. 8
1.2Intended use ..................................................................................... 9
1.3Warranty............................................................................................ 9
2Safety information............................................................ 10
3Description of the unit ..................................................... 13
3.1Overview of the unit ....................................................................... 13
3.1.1Floor-standing unit................................................................................... 13
3.1.2Suspended unit ....................................................................................... 16
3.2Function of the operating and display elements......................... 17
3.3Operating temperature................................................................... 19
3.4Fill quantity ..................................................................................... 20
4Operating the unit............................................................. 21
4.1Initial commissioning..................................................................... 21
4.2Switching the unit on and off ........................................................ 21
4.2.1Switching on ............................................................................................ 21
4.2.2Switching off ............................................................................................ 21
4.3Performing basic control setting .................................................. 22
4.3.1Changing the EcoControl basic control setting - Level 1......................... 23
4.3.2Changing the EcoControl basic control setting - Level 2......................... 25
4.3.3Changing the EcoControl basic control setting - Level 3......................... 25
4.4Basic functions............................................................................... 26
4.4.1Setting the temperature........................................................................... 26
4.4.2Setting the temperature for low-temperature cooking ............................. 26
4.4.3Setting start-time preselection................................................................. 27
4.4.4Setting the cooking time .......................................................................... 28
4.4.5Starting the cooking mode....................................................................... 29
4.4.6Ending the cooking mode........................................................................ 29
4.4.7Selecting cooking mode .......................................................................... 30
4.4.8Setting the level....................................................................................... 31
4.4.9Setting the continuous cooking temperature ........................................... 32
4.4.10Tilting the pan........................................................................................ 32
4.5Cooking ........................................................................................... 33
4.5.1Cooking with the cooking insert............................................................... 35
4.6Steaming ......................................................................................... 35
4.7Soft cooking.................................................................................... 37
4.8Low-temperature cooking ............................................................. 38
4.9Keeping food warm ........................................................................ 39
4.10Burning-in a frying surface made of steel ................................. 41
4.11Frying ............................................................................................ 42
4 Operating instructions
2021441-20ABBE-B
Page 5

Directory of contents
4.12Braising ......................................................................................... 44
4.13Emptying the unit ......................................................................... 46
4.13.1Emptying a unit with drain valve............................................................ 46
4.13.2Emptying with a ladle ............................................................................ 46
4.13.3Emptying with manual tilting.................................................................. 47
4.13.4Emptying with motorised tilting.............................................................. 48
4.14Pausing and end of use ............................................................... 48
5Cleaning and caring for the unit ..................................... 49
5.1Preventing corrosion ..................................................................... 49
5.1.1Protecting a frying surface made of steel ................................................ 49
5.2Removing rust spots...................................................................... 50
5.3Cleaning the housing..................................................................... 50
5.4Cleaning the frying surface between cooking processes ......... 50
5.5Cleaning the pan ............................................................................ 51
5.5.1Cleaning a non-tiltable pan...................................................................... 51
5.5.2Cleaning a tiltable pan............................................................................. 52
5.6Cleaning the drain valve ................................................................ 53
5.6.1Removing and attaching the drain valve ................................................. 53
5.6.2Disassembling and assembling the drain valve ...................................... 54
5.6.3Changing the seals.................................................................................. 56
5.7Inspecting the unit.......................................................................... 57
5.7.1Performing a visual inspection ................................................................ 57
6Troubleshooting ............................................................... 58
6.1Cause of failure and the remedy................................................... 58
6.2Nameplate ....................................................................................... 58
7Carrying out maintenance ............................................... 59
7.1Carrying out recommended maintenance ................................... 59
7.1.1Lubricating the lid hinge .......................................................................... 59
8Dispose of unit in an environmentally responsible
manner ................................................................................. 61
9Manufacturer's declaration.............................................. 62
2021441-20ABBE-B
5Operating instructions
Page 6

Directory of contents
6 Operating instructions
2021441-20ABBE-B
Page 7

1 Introduction
1.1 About this manual
Introduction
The operating instructions are part of the unit and contain information:
• On safe operation,
• On cleaning and care,
• On remedies in case of faults.
Be aware of the following notes and adhere to them:
• Read the operating instructions completely before operating the
unit for the first time.
• Make the operating instructions available to the operator at all
times at the operating site of the unit.
• Insert any supplements from the manufacturer.
• Keep the operating instructions throughout the service life of the
unit.
• Pass on the operating instructions to any subsequent operator of
the unit.
Target group The target group of the instruction manual is the operator, who is
entrusted with the operation, cleaning and care of the unit.
Figures All figures in this manual are intended as examples. Discrepancies
between these and the actual unit can arise.
2021441-20ABBE-B
7Operating instructions
Page 8

Introduction
1.1.1 Explanation of signs
DANGER
Imminent threat of danger
Failure to comply will lead to death or very severe injuries.
WARNING
Possible threat of danger
Failure to comply can lead to death or very severe injuries.
CAUTION
Dangerous situation
Failure to comply can lead to slight or moderately severe
injuries.
ATTENTION
Physical damage
Failure to comply can cause physical damage.
Notes for better understanding and operation of the unit.
Symbol / sign Meaning
• Listing of information.
Action steps, which can be performed
in any sequence.
1.
2.
Action steps, which must be performed
in the specified sequence.
Result of an action performed or
additional information about it.
8 Operating instructions
2021441-20ABBE-B
Page 9

1.2 Intended use
Introduction
This unit is intended to be used solely for commercial purposes,
particularly in commercial kitchens.
This unit may only be used with suitable accessories and for the
cooking of food.
It is forbidden to use the unit for purposes, which include the
following:
• As set-down area or working surface
• Storing supplies
• Drying cloths, paper or dishes
• As a basin for keeping things warm
• Heating rooms
• For heating cooking utensils on the frying surface
1.3 Warranty
• Heating preserved food
• Heating acids, alkaline solutions or other chemicals
• For smoking fish or meat
• Heating of warmer plates and GN containers
• Heating flammable liquids
• Deep-frying
The use of the unit is prohibited in the following countries:
• USA
• Canada
The warranty is void and safety is no longer assured in the event of:
• Improper conversion or technical modifications of the unit,
• Improper use,
• Incorrect startup, operation or maintenance of the unit,
• Problems resulting from failure to observe these instructions.
2021441-20ABBE-B
9Operating instructions
Page 10

Safety information
2 Safety information
The unit complies with applicable safety standards. Residual risks
associated with operation or risks resulting from incorrect operation
cannot be ruled out and are mentioned specifically in the safety
instructions and warnings.
The operator must be familiar with regional regulations and observe
them.
Operation During operation, the following group of individuals must be
supervised by an individual who is responsible for safety:
• Individuals with physical, sensory, or mental handicaps, or who
The supervising individual must be familiar with the unit and the risks
associated with it.
Hot surfaces Risk of burns from hot surfaces
• Protect arms and hands by wearing suitable protective gloves.
lack the knowledge and experience to operate the unit properly.
• Do not touch heating elements, hot surfaces or accessories
immediately after use.
• Allow surfaces to cool prior to cleaning.
• Open the lid carefully.
• Remove containers only with suitable protective gloves or
potholders.
Hot liquids Risk of burns from hot liquids
• Protect arms and hands by wearing suitable protective gloves.
• Observe the maximum filling quantity.
Risk of chemical burns from evaporating cleaners
• Follow the instructions of the cleaning agent manufacturer.
Risk of burns from steam
• Protect arms and hands by wearing protective gloves.
• First open the lid slightly and allow the steam to escape. Then
open the lid completely.
• Open the drain valve carefully and empty the unit.
Defective unit Risk of injury from a defective unit
• Disconnect a defective unit from the electric mains.
• Do not operate a defective unit.
• Allow only an authorized technician to repair the unit.
10 Operating instructions
2021441-20ABBE-B
Page 11

Fire prevention Risk of fire from dirt and grease deposits
• Clean the unit when finished using it.
• Do not use the unit as a deep fat fryer.
Risk of fire from overheating
• Observe the unit during operation.
• Observe the maximum filling quantity.
Firefighting
• In the event of a fire, disconnect the unit from the electric mains.
• Close the lid to smother a fire.
• Use a Fire Class F fire extinguisher, never water, to extinguish
grease fires. Other fires, for instance, can be extinguished with fire
extinguishers suitable for Fire Classes A, B, C, CO2 fire
extinguishers or extinguishing media suitable for the fire class
confronted.
Safety information
Unit on casters Risk of injury from a unit on casters
• Move the unit only for cleaning or maintenance.
• Lock casters during operation.
• Only move an empty unit.
Risk of a line breaking if subjected to high tensile load
• Secure the unit with a chain as a strain relief for the power
connection at the installation site so that no tensile load is applied
to the power connection if the unit is moved.
Improper cleaning Risk of chemical burns from cleaning agent
• Follow the instructions of the cleaning agent manufacturer.
• Take appropriate protective measures when handling aggressive
cleaning agents.
Risk of falling on smooth floors
• Keep the floor in front of the unit clean and dry.
2021441-20ABBE-B
11Operating instructions
Page 12

Safety information
Risk of physical damage from improper cleaning
• Clean the unit after using it.
• Do not clean the unit with a high-pressure cleaner or water jet.
• Do not clean the housing with highly abrasive or chemically
aggressive cleaning agents.
• Do not clean the housing with highly abrasive sponges.
• Follow the instructions of the cleaning agent manufacturer.
• Do not cool shock the unit by cooling it abruptly.
• Use only a stainless steel scraper or stainless steel spatula for
cleaning.
• Remove rust spots with an abrasive.
• Keep the unit free of calcium deposits.
Hygiene Health risk from insufficient hygiene
• Observe applicable regional hygiene regulations.
• Follow the cleaning instructions.
• Observe food processing regulations when keeping food warm.
Improper use Risk of physical damage from improper use
• Do not operate the unit outdoors.
• Use only original accessories.
• Train operators regularly.
• Do not heat food warmer plates or tins of preserved food.
• Observe the unit during operation.
• Do not use the frying surface as a heating surface for pots.
• Do not use or cook any aggressive or caustic substances.
• Operate the unit only by hand.
12 Operating instructions
2021441-20ABBE-B
Page 13
3 Description of the unit
a
b
c
d
e
i
h
g
f
3.1 Overview of the unit
The unit is intended for universal use in commercial kitchens for
cooking food in a pan. Possible uses are cooking, stewing, frying,
braising and boiling.
The pan with drain valve is permanently built-in. The pan with
motorised or manual tilting can be turned in the left and right side
arms, and the bearing of the pivoting point is located right at the front
for optimum pouring.
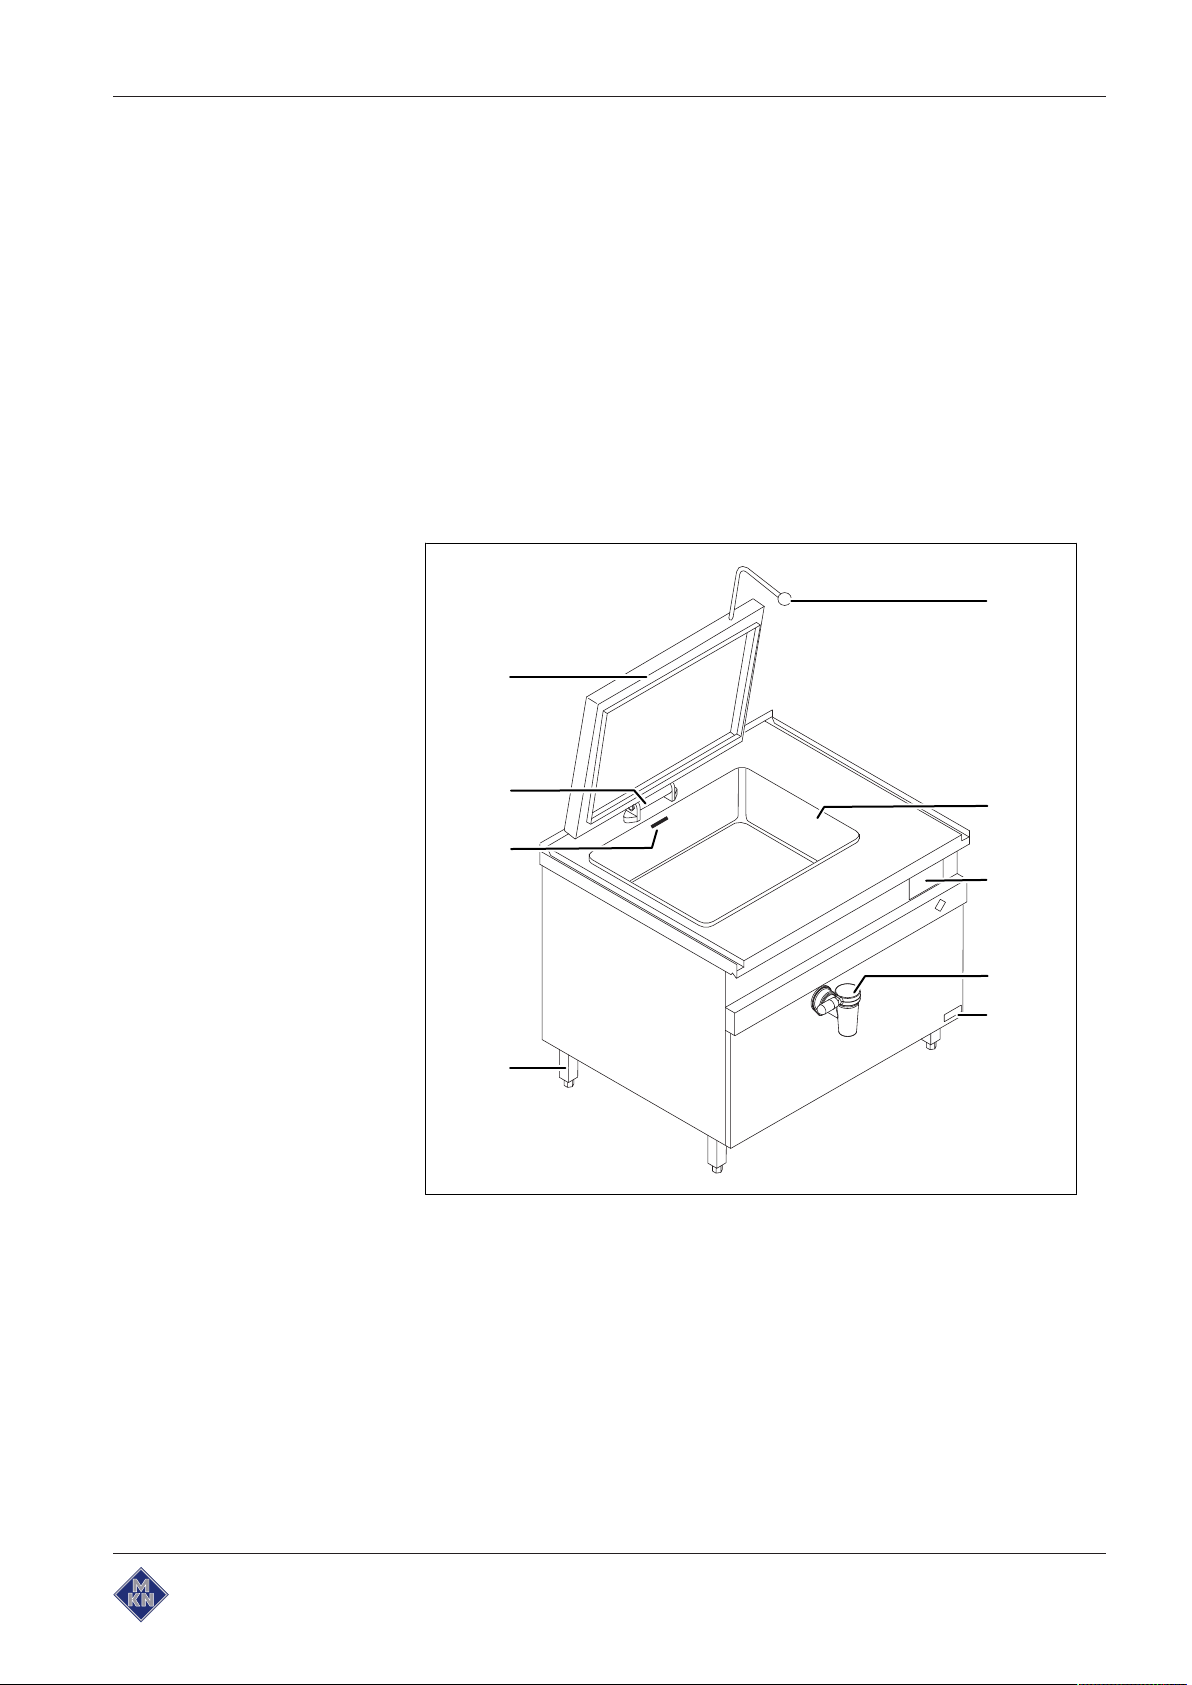
3.1.1 Floor-standing unit
Description of the unit
2021441-20ABBE-B
Image: Bratt pan with EcoControl
a Lid handle f Equipment leg
b Pan g
c Operating element h Lid hinge
d Drain valve i Lid
e Nameplate
Maximum fill level
mark
13Operating instructions
Page 14
Description of the unit
a
c
e
f
g
k
j
i
d
b
h
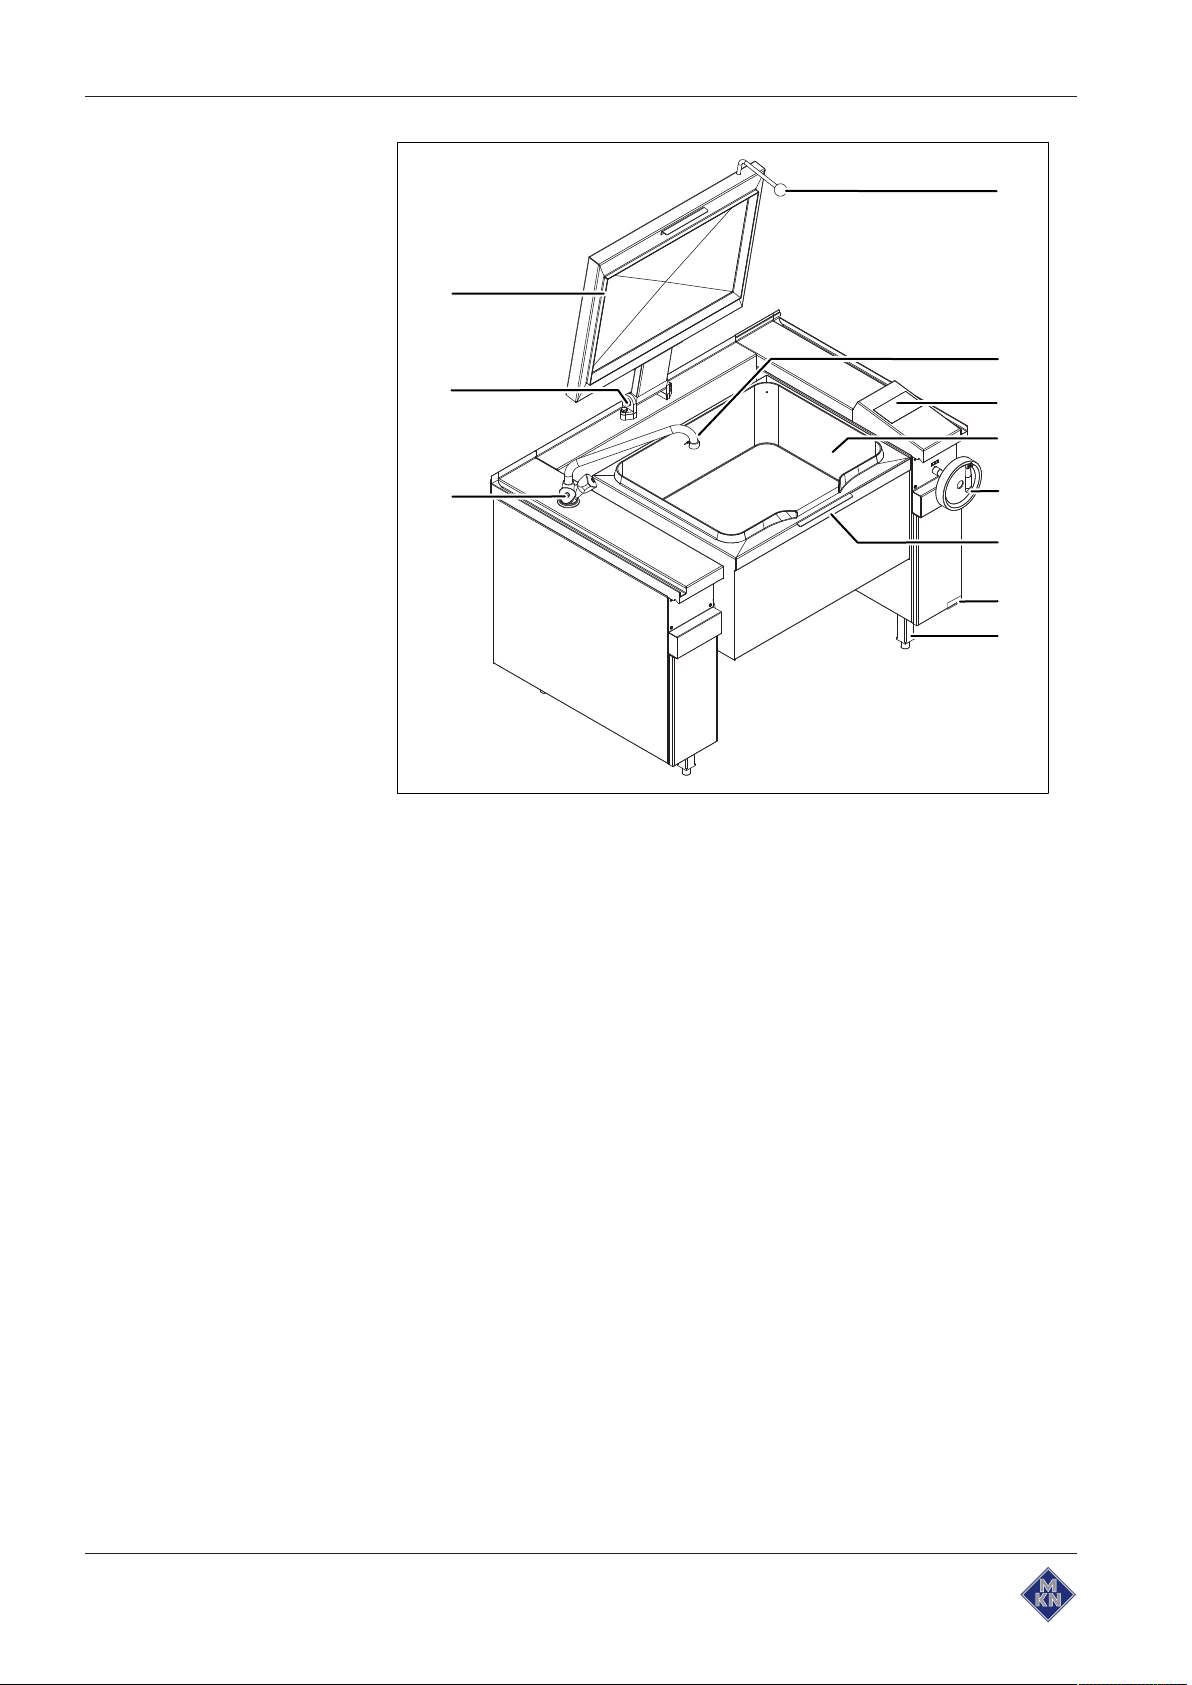
Image: Bratt pan with EcoControl, manual tilting and mixer tap
a Lid handle g Nameplate
b
Maximum fill level
c Operating element i Mixer tap (optional)
d Pan j Lid hinge
e Operating element for
f Spout
mark h Equipment leg
tilting
k Lid
14 Operating instructions
2021441-20ABBE-B
Page 15
Description of the unit
a
b
d
e
f
j
i
h
g
c
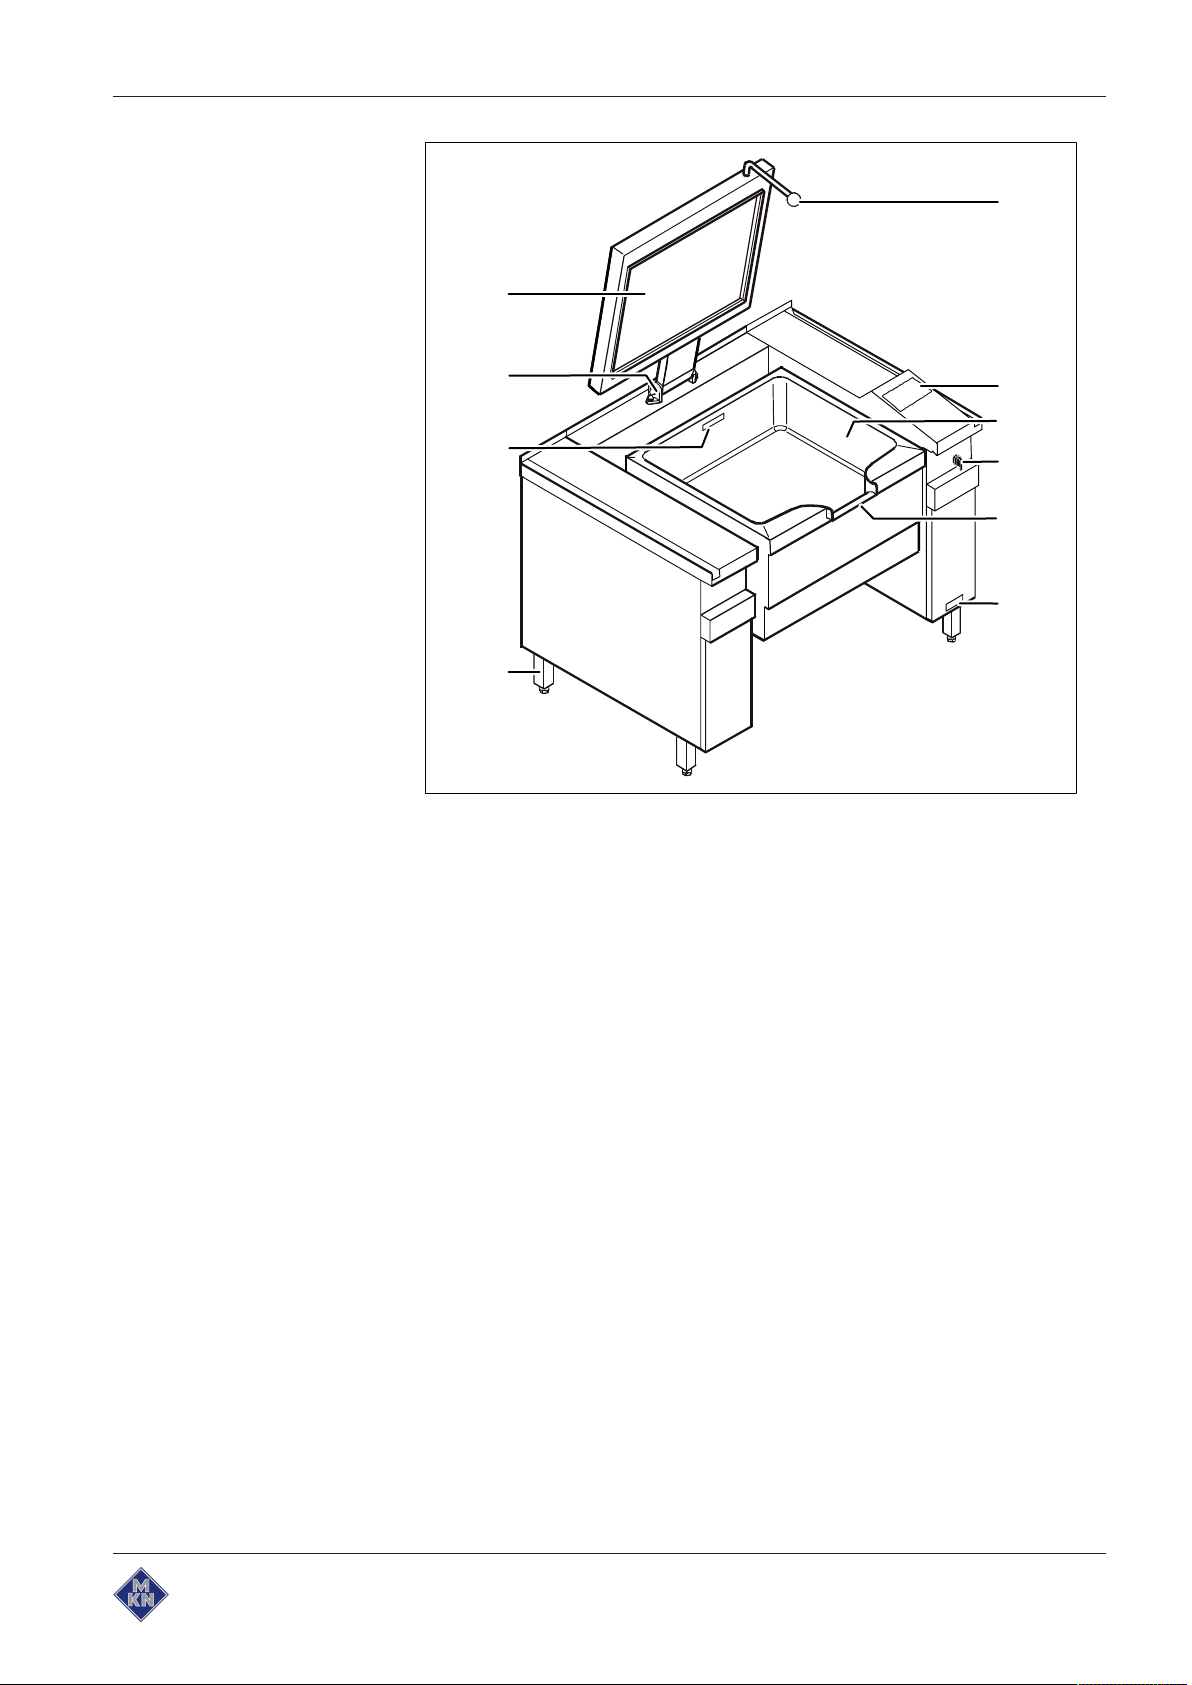
Image: Bratt pan with EcoControl and motorised tilting
a Lid handle f Nameplate
b Operating element g Equipment leg
c Pan h
d Operating element for
e Spout j Lid
tilting
Maximum fill level
i Lid hinge
mark
2021441-20ABBE-B
15Operating instructions
Page 16
Description of the unit
a
c
e
g
f
j
i
h
d
b
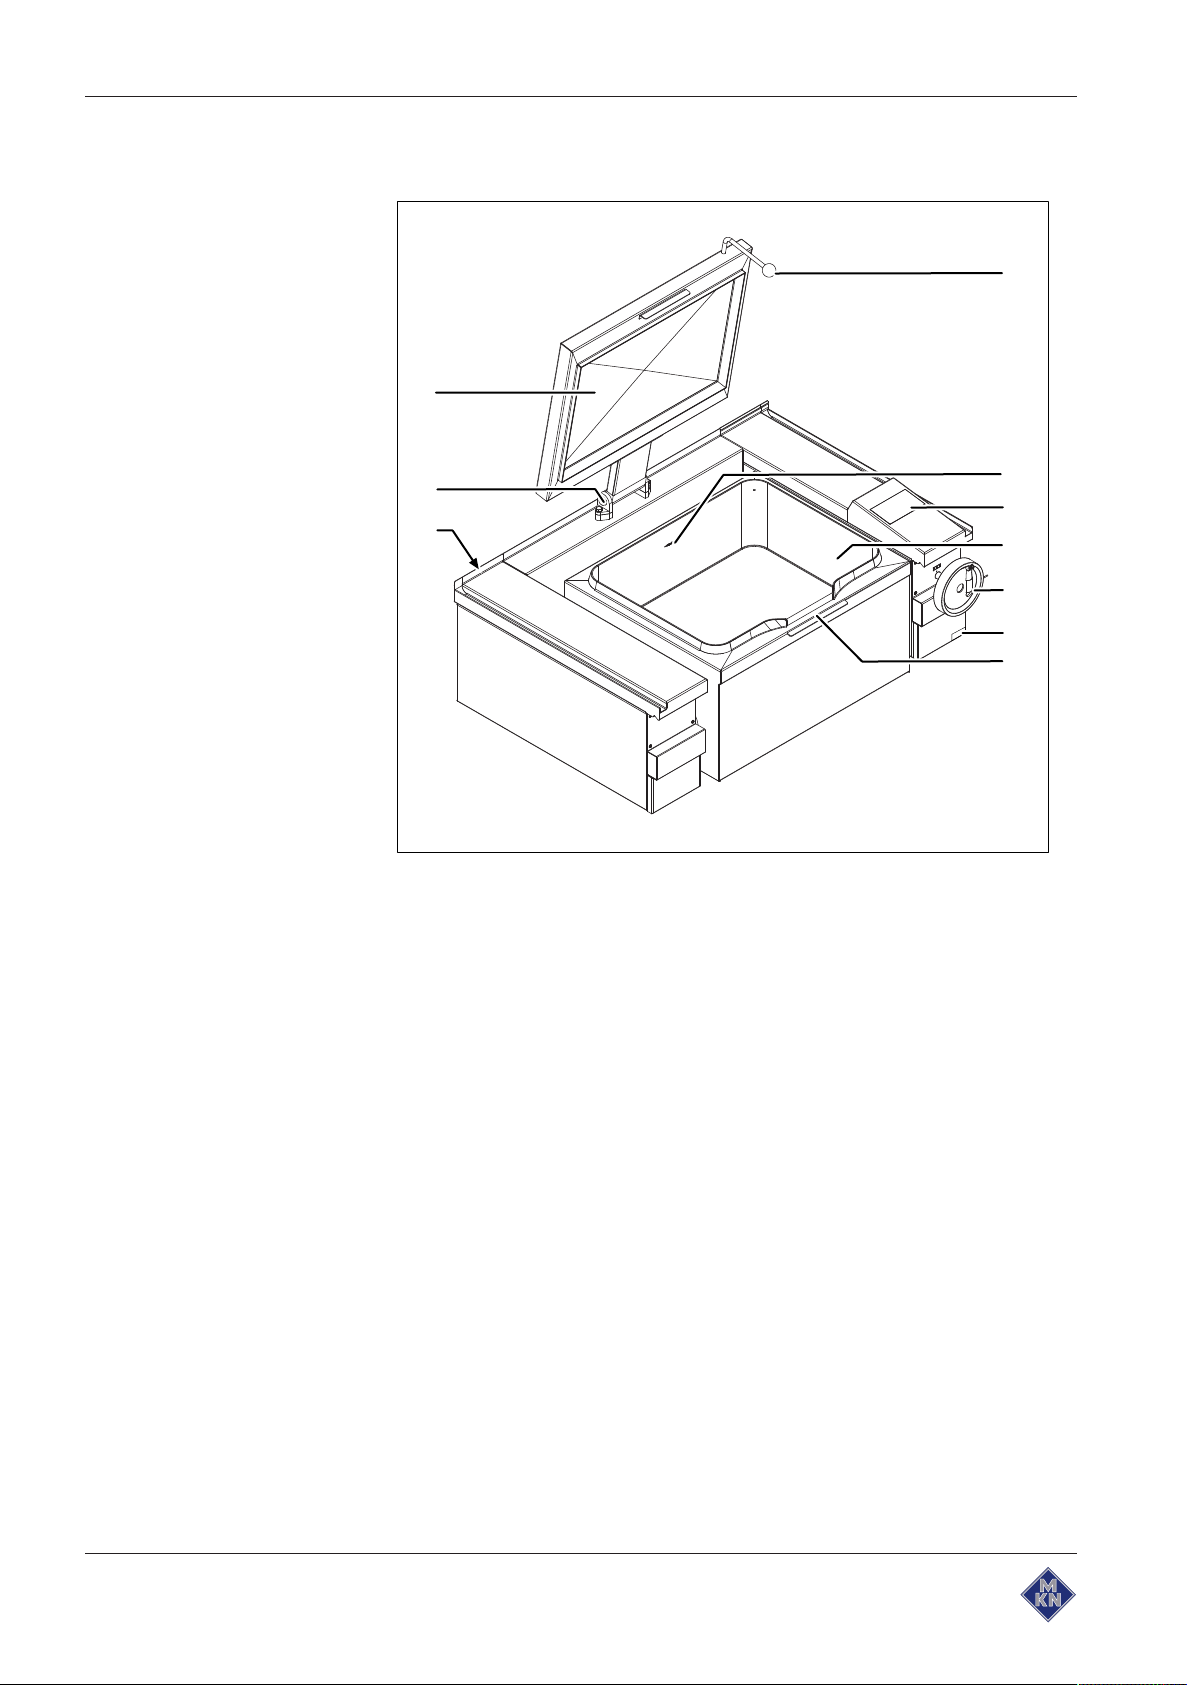
3.1.2 Suspended unit
Image: Bratt pan with EcoControl and manual tilting
a Lid handle f Nameplate
b
Maximum fill level
c Operating element h Suspension mounting
d Pan i Lid hinge
e Operating element for
mark g Spout
tilting
j Lid
16 Operating instructions
2021441-20ABBE-B
Page 17
3.2 Function of the operating and display elements
1 2 3
°C/F
h min
Prog.
a
b
c
d
e
on
off
start stop
auto start
grill
Image: Display field
Description of the unit
a Decimal point for "Cooking
temperature/level"
b Decimal point for "Cooking time" e
c
Time display
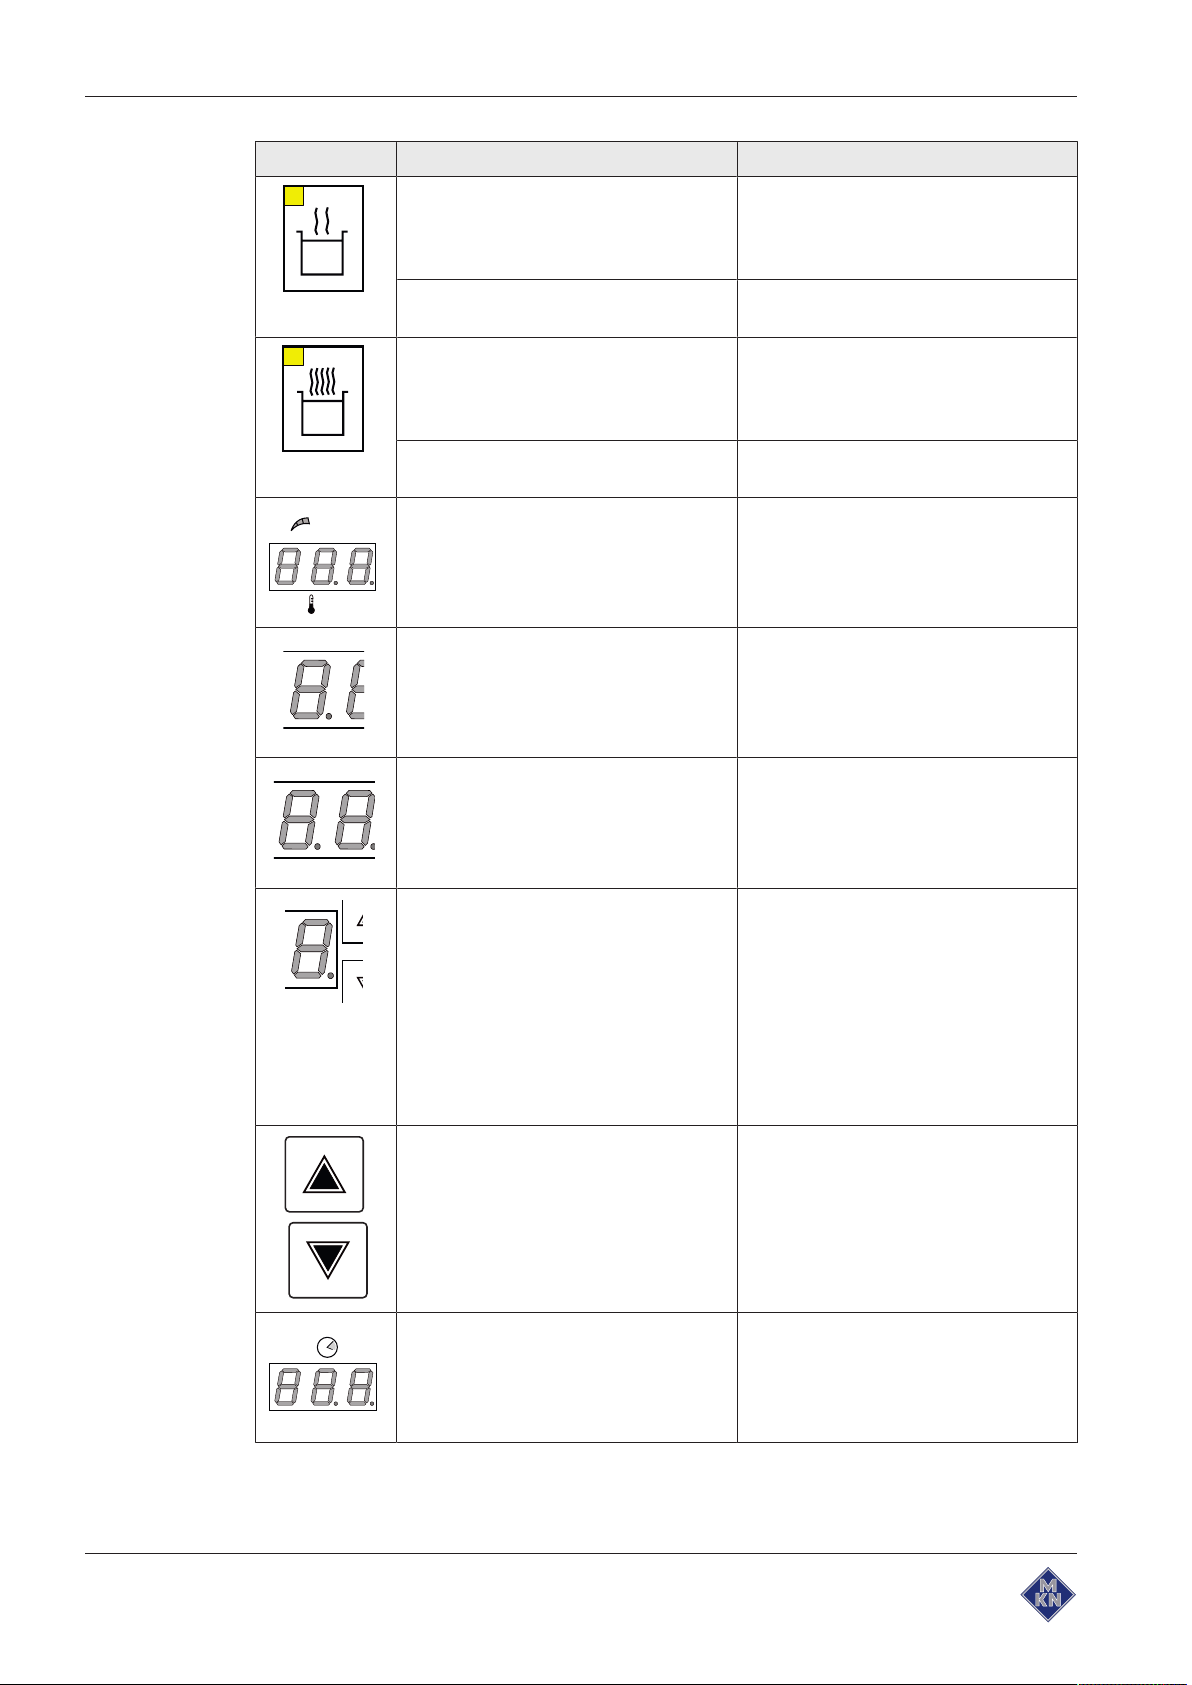
Symbol Operating/display element Function
"On Off" button • Switch on the unit.
"Start Stop" indicator light • Illuminates when the cooking pro-
"Start Stop" button • Start the cooking mode.
"Auto start" indicator light • Flashes when the start time is being
"Auto start" button • Set the start-time preselection.
indicator light
d Indicator light for
display
Status display
• Switch off the unit.
cess is active.
• End the cooking mode.
set.
• Illuminates when the start-time
preselection is active.
heating status
indicator light
2021441-20ABBE-B
"grill" indicator light • Flashes when the temperature for
"Frying" cooking mode is being set.
"grill" button • Select the settings for the "Frying"
• Illuminates when the "Frying" cooking mode is selected.
cooking mode.
17Operating instructions
Page 18
Description of the unit
soft
cook
1 2 3
°C/F
Prog.
h min
h min
Symbol Operating/display element Function
"Soft" indicator light • Flashes when the temperature for
the "Soft cooking" mode is being set.
• Illuminates when the "Soft cooking"
mode is selected.
"Soft" button • Select the settings for the "Soft cook-
ing" mode.
"Cook" indicator light • Flashes when the temperature or
level for "Cook" mode is being set.
• Illuminates when the "Cook" mode is
selected.
"Cook" button • Select the settings for the "Cook"
mode.
"Cooking temperature/level" display • Shows the selected level when set-
ting a cooking program.
• Shows the selected cooking temperature for all cooking modes.
Decimal point for "Cooking
• No further function
temperature/level"
Status display
indicator light • Illuminates during the heating phase
when the unit is started.
• Goes out when the unit has reached
the desired continuous cooking level.
Indicator light for
heating status display
• Illuminates when heating is active.
• Goes out when the heating is inact-
ive, for example if the set temperature has been reached.
• Flashes if activation of the unit is interrupted, for example in the case of
a tilted pan (unit with tilting), activated power optimisation system (unit
with power optimisation system) or
pressure build-up (pressurised unit).
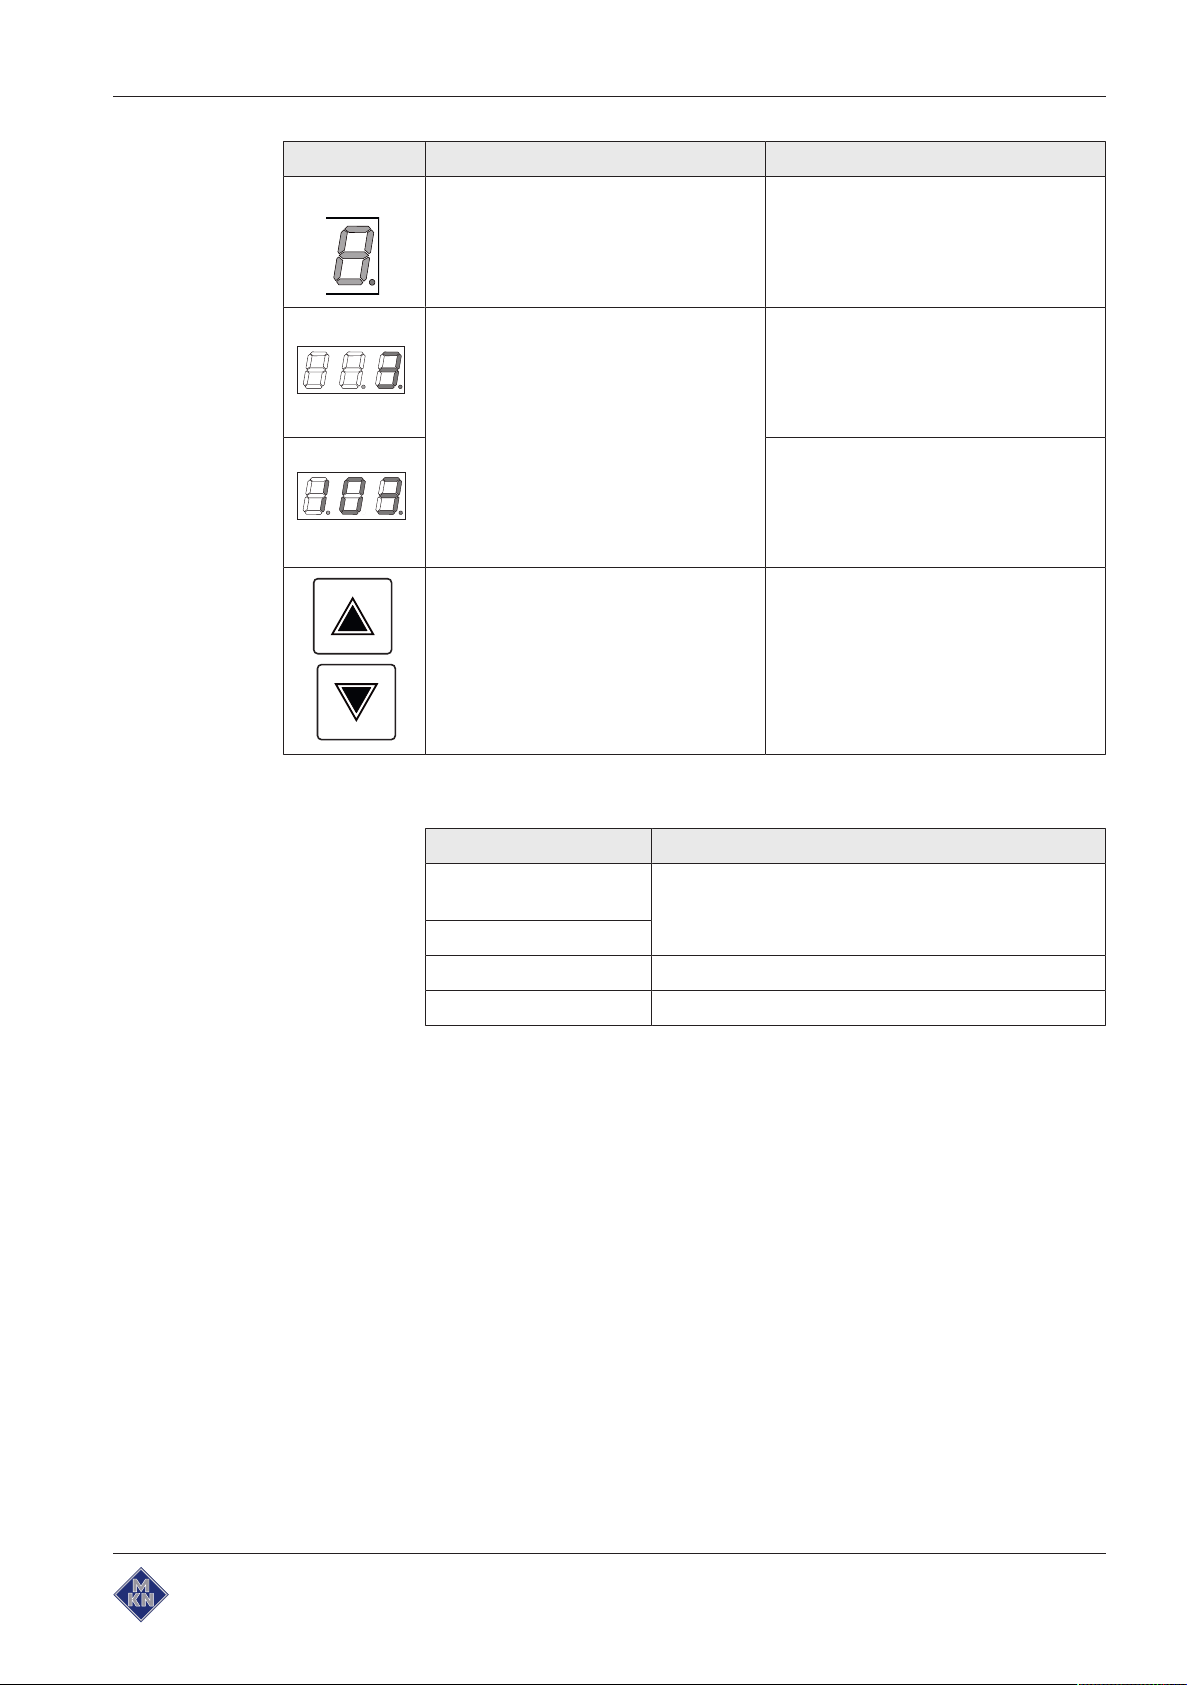
"Cooking temperature/level" button • Save the cooking program or select
the saved cooking program.
• Increase the temperature.
• Reduce the temperature.
18 Operating instructions
"Cooking time" display • Shows the selected preselection
time or cooking time as the remaining time for the cooking mode in
hours and minutes.
2021441-20ABBE-B
Page 19
Symbol Operating/display element Function
Description of the unit
Time display
The "Cooking time" decimal point
jumps between two positions and
displays either the waiting time
(decimal point on the right) or the
cooking time (decimal point on the left).
"Cooking time" button • Increase the cooking time.
indicator light • Flashes while the preselection time
or cooking time elapses.
• Goes out when the desired time has
elapsed.
• Shows the waiting time before the
start of a cooking program in 10minute increments.
• (Example: 30 minutes)
• Shows the cooking time for a running
cooking program in 1-minute increments.
• (Example: 1 hour and 3 minutes)
• Reduce the cooking time.
3.3 Operating temperature
Cooking mode Temperature
Low-temperature
cooking ("Slow")
Soft cooking ("Soft")
Cooking ("Cook") 100°C
Frying ("Grill") 50 — 300°C
50 — 100°C
2021441-20ABBE-B
19Operating instructions
Page 20

Description of the unit
3.4 Fill quantity
The fill quantity depends on the model and pan size.
Model Pan size Quantity (l)*
Without tilting 2/1 GN 77
2/1 GN – 300 96
3/1 GN 113
3/1 GN – 300 143
With tilting 2/1 GN 65
2/1 GN – 300 96
3/1 GN 94
3/1 GN – 300 143
* Maximum fill quantity in accordance with DIN 18857
20 Operating instructions
2021441-20ABBE-B
Page 21
4 Operating the unit
CAUTION
Risk of burns from hot surfaces
• Protect arms and hands by wearing suitable protective
gloves.
4.1 Initial commissioning
The following work must be carried out before the initial
commissioning:
1. Perform the basic settings (see "Performing basic control
settings").
2. Unit with steel frying surface: Burn-in the frying surface (see
"Burning-in a steel frying surface").
4.2 Switching the unit on and off
Operating the unit
4.2.1 Switching on
4.2.2 Switching off
Press the "On Off" button.
Unit is ready for use.
Heating is off.
"Cooking temperature/level" display briefly shows "200°C".
The "grill" indicator light flashes.
After several seconds the "Cooking temperature/level" display
shows the actual temperature.
"Cooking time" display shows "– –. –.".
The "grill" indicator light illuminates.
The unit is on.
The unit is on
Desired cooking mode or cooking program has ended
1. Press the "Start Stop" button.
"Start Stop" indicator light goes out.
2021441-20ABBE-B
"Cooking time" display shows "– –. –.".
Unit switches to operating readiness.
"Cooking temperature/level" display shows the actual
temperature.
21Operating instructions
Page 22

Operating the unit
2. Press the "On Off" button.
Heating switches off.
The "Heating" indicator light goes out.
Unit cools down.
The unit is off.
4.3 Performing basic control setting
The control can be set only on models with EcoControl.
Changing parameters that are not indicated can lead to the
warranty possibly becoming void.
MKN does not assume any responsibility or liability for damage,
which is caused by unauthorized changing of parameters.
Claims against MKN that are due to this can not be upheld, not
even within the scope of the guarantee or warranty.
The basic setting for the unit is preset at the time of delivery. The
values can be changed. For an overview of the settings, see the
following list.
EcoControl basic control setting - Level 1: Bratt pan
Setting ParametersStandard
value
Program number Id 001 1—255 Without function
Automatic process
start
Without function dt_ --- --- Without function
Without function tc_ --- --- Without function
Altitude H__ 0 0—30 Altitude in 100m increments
Set the temperature
unit
Process start at
overtemperature
APS 1 0 Deactivated, signal sounds
F__ 0 0 Degrees Celsius (°C)
PSO 0 0 Process start only if set temperature
Range of
adjustment
1 Activated, no signal at process start
1 Degrees Fahrenheit (°F)
1 Process start even if temperature is above
Explanation
reached
set value
22 Operating instructions
2021441-20ABBE-B
Page 23

EcoControl basic control setting - Level 2: Bratt pan
Operating the unit
Setting ParametersStandard
value
Process start signal
tone
Process end signal
tone
Kitchen management
system interface
53 10 000 Deactivated
54 10 000 Deactivated
59 01 01 — 63 Unit address for interface
Range of
adjustment
001 — 099 Duration in seconds (s)
100 Continuous sound
001 — 099 Duration in seconds (s)
100 Continuous sound
EcoControl basic control setting - Level 3: Bratt pan
Setting ParametersStandard
value
Temperature for
"Grill" cooking mode
Temperature for
"Cook" mode, Level 1
Temperature for
"Cook" mode, Level 2
80 200 0 — 300 Temperature in the particular cooking
82 50 50 — 100 Temperature in the particular cooking
83 70 50 — 100 Temperature in the particular cooking
Range of
adjustment
Explanation
Explanation
mode
mode
mode
Temperature for
"Cook" mode, Level 3
Temperature for
"Soft" cooking mode
84 90 50 — 100 Temperature in the particular cooking
mode
85 95 50 — 100 Temperature in the particular cooking
mode
4.3.1 Changing the EcoControl basic control setting - Level 1
Only change the indicated parameters.
If no button is pressed within 5 seconds, the Setting menu
closes automatically without saving.
Requirement The unit is on
1. Press and hold the "Cook" button.
2. Also press the "grill" button.
3. Release the "Cook" button.
4. Release the "grill" button.
"Cooking temperature/level" display shows the parameters.
"Cooking time" display shows the set value.
5. Select the parameters using the "Cooking temperature/level"
button in the "Cooking temperature/level" display.
6. Set the desired value using the "Cooking time" button in the
"Cooking time" display.
7. To save the settings, press and hold the "Cook" button.
2021441-20ABBE-B
23Operating instructions
Page 24

Operating the unit
Requirement The unit is on
Requirement The unit is on
8. Also press the "grill" button.
9. Release the "Cook" button.
10.Release the "grill" button.
Setting the temperature display
Level 1 is activated
1. Select the "F__" parameter using the "Cooking temperature/level"
button in the "Cooking temperature/level" display.
2. Using the "Cooking time" button in the "Cooking time" display, set
"0" or "1" to display the temperature.
3. Set "0" for °C.
4. Set "1" for °F.
Setting the process start
Level 1 is activated
1. Select the "APS" parameter using the "Cooking temperature/level"
button in the "Cooking temperature/level" display.
2. Using the "Cooking time" button in the "Cooking time" display, set
"0" or "1" for "manual/automatic" process start.
3. Set "0" for manual start with signal.
When the set temperature is reached, a signal sounds.
The remaining time does not start.
4. Set "1" for automatic start without signal.
The remaining time starts, as soon as the set temperature is
reached.
Setting the process start at overtemperature
Requirement The unit is on
1. Select the "PSO" parameter using the "Cooking temperature/level"
button in the "Cooking temperature/level" display.
2. Using the "Cooking time" button in the "Cooking time" display, set
"0" or "1" for process start at overtemperature.
3. Set "0" for "No".
4. Set "1" for "Yes".
24 Operating instructions
2021441-20ABBE-B
Page 25

4.3.2 Changing the EcoControl basic control setting - Level 2
Only change the indicated parameters.
Requirement The unit is on
1. Press the "grill" button, "Auto start" button, "Soft" button and
"Cook" button in succession.
"Cooking temperature/level" display shows the parameters.
"Cooking time" display shows the set value.
2. Select the parameters using the "Cooking temperature/level"
button in the "Cooking temperature/level" display.
3. Set the desired value using the "Cooking time" button in the
"Cooking time" display.
4. To save the settings, press the "Start Stop" button.
5. Press the "On Off" button to leave the Setting menu.
Operating the unit
4.3.3 Changing the EcoControl basic control setting - Level 3
Only change the indicated parameters.
Requirement The unit is on
Level 2 is activated
1. Select the "64" parameter using the "Cooking temperature/level"
button in the "Cooking temperature/level" display.
"Cooking temperature/level" display shows "64.-".
"Cooking time" display shows "- - - ".
2. Press the "Start Stop" button.
"Cooking temperature/level" display shows "64.1".
"Cooking time" display shows "000 ".
3. Using the "Cooking time" button, change the value of parameter
"64" to "1.234".
"Cooking temperature/level" display shows "64.1".
"Cooking time" display shows "234".
4. Press the "Start Stop" button.
2021441-20ABBE-B
Display jumps to parameter "0" of Level "3".
"Cooking temperature/level" display shows "00.0".
"Cooking time" display shows the unit number.
5. Perform the changes in accordance with the table (see
"Performing basic control settings").
6. To save the settings, press the "Start Stop" button.
7. Press the "On Off" button to leave the Setting menu.
25Operating instructions
Page 26

Operating the unit
4.4 Basic functions
4.4.1 Setting the temperature
Requirement The unit is on
1. Select the desired cooking mode.
2. Press the "Cooking temperature/level" button.
3. Set the desired temperature with the "Cooking temperature/level"
The adjustable temperature range depends on the cooking
mode selected.
The temperature is adjusted in 1-degree increments.
The indicator light for the selected cooking mode flashes.
"Cooking temperature/level" display shows the preset cooking
temperature.
buttons, while the indicator light for the selected cooking mode is
flashing.
The indicator light for the selected cooking mode illuminates.
The temperature for the selected cooking mode is set.
4.4.2 Setting the temperature for low-temperature cooking
Requirement The unit is on
"Cook" mode is set
The "Cook" indicator light illuminates.
"Cooking temperature/level" display shows the continuous cooking
level
1. Press the "Cooking temperature/level" button.
"Cooking temperature/level" display shows the level.
2. Select the desired level with the "Cook" button.
3. Press both "Cooking temperature/level" buttons at the same time.
The "Cook" indicator light flashes.
"Cooking temperature/level" display shows the preset
temperature.
4. Set the desired temperature with the "Cooking temperature/level"
buttons, while the indicator light for the selected level is flashing.
"Cooking temperature/level" display shows the set
temperature.
After a few seconds the "Cooking temperature/level" display
shows the actual temperature of the food being cooked.
The "grill" indicator light illuminates.
The temperature for
26 Operating instructions
Low temperature cooking
is set.
2021441-20ABBE-B
Page 27

4.4.3 Setting start-time preselection
CAUTION
Health risk from harmful microorganisms due to insufficient
temperatures
When using start-time preselection, temperatures that promote
the growth of harmful microorganisms on the food being cooked
can occur in the cooking zone.
• Observe food processing regulations when keeping food
warm.
• Check whether start-time preselection is suitable for the
particular food being cooked.
Cooking processes can be individually adapted by means of
start-time preselection.
Start-time preselection can be used to set the waiting period until the
program starts.
Operating the unit
The maximum time, which can be set with start-time preselection, is 0
- 12 hours. Start-time preselection can be adjusted in 10-minute
increments.
The unit can be prepared and filled with food to be cooked before the
program is started, or you can select a cooking program to be
performed.
Requirement The unit is on
1. Set or select the desired cooking program but do not start it.
2. Press the "Auto start" button.
The "Auto start" indicator light flashes.
"Cooking time" display shows "0.0".
3. Press the "Cooking time" buttons and set the waiting time.
4. Press the "Start Stop" button to begin start-time preselection.
The "Start Stop" indicator light illuminates.
The "Auto start" indicator light illuminates.
The "Cooking time" display flashes. The "Cooking time" display
shows the remaining time until the start. After the waiting time
has elapsed, the set cooking program starts automatically.
Start-time preselection is set
5. If the "Start Stop" button is pressed before start-time preselection
has elapsed, start-time preselection is cancelled.
2021441-20ABBE-B
"Start Stop" indicator light goes out.
"Auto start" indicator light goes out.
"Cooking time" display shows "–.– –.".
Start-time preselection is not set
27Operating instructions
Page 28

Operating the unit
Tip
4.4.4 Setting the cooking time
The cooking time can be set with the "Cooking time" buttons. The
maximum time that can be set is 9:59 hours. The cooking time can be
adjusted in 1-minute increments.
Requirement The unit is on
1. Set or select the desired cooking program and level but do not
2. Press the "Cooking time" button.
Start-time preselection allows bottlenecks in the preparation and
cooking of food to be avoided.
Cooking processes can be individually adapted by means of the
"Cooking time" function.
The cooking time can be adapted at any time, even while a
cooking process is running.
start them.
The cooking time for each level can be individually set and
saved for the cooking modes.
Cooking time preselection is even possible if there is no
cooking program saved.
The indicator light for the selected cooking mode illuminates.
"Cooking time" display shows "–.– –.".
3. Press both "Cooking time" buttons at the same time.
The "Cooking time" display shows the last set cooking time.
4. Short pressing of the "Cooking time" button.
The set time is adjusted in 1-minute increments.
5. Long pressing (several seconds) of the "Cooking time" button.
The time display changes more quickly.
Cooking time set
28 Operating instructions
2021441-20ABBE-B
Page 29

4.4.5 Starting the cooking mode
The "Status display" indicator light illuminates while the unit is
heating up.
The "Status display" indicator light goes out, as soon as the set
temperature is reached. If the temperature falls below the set
level, the unit automatically heats up again.
The "Status display" indicator light flashes, when the power
optimisation system is active.
Requirement The unit is on
Press the "Start Stop" button.
Operating the unit
"Cooking temperature/level" display shows the actual
temperature or the selected level.
The "Start Stop" indicator light illuminates.
4.4.6 Ending the cooking mode
The audible signal at the end of the set cooking time lasts 5
seconds.
Requirement The unit is on
The "Start Stop" indicator light illuminates
The "Heating" indicator light illuminates
The indicator light for
Heating status display
goes out, as soon
as the set temperature is reached.
If a waiting time is set, the cooking process starts after the set
waiting time has elapsed.
The "Cooking time" display shows the remaining time.
An audible signal sounds, after the cooking time has elapsed.
Unit switches to operating readiness.
Heating is off.
Press the "Start Stop" button.
"Start Stop" indicator light goes out.
2021441-20ABBE-B
"Cooking time" display shows "–.– –."
Unit switches to operating readiness.
"Cooking temperature/level" display shows the actual
temperature.
Heating switches off.
The "Heating" indicator light goes out.
Unit cools down.
29Operating instructions
Page 30

Operating the unit
4.4.7 Selecting cooking mode
The unit has several possible methods of starting a cooking process.
"Cooking", "Soft cooking" and "Frying" are selected directly via the
corresponding buttons in the operating field.
The unit is intended for the following cooking modes:
1. Cooking ("Cook")
2. Low-temperature cooking ("Slow")
3. Keeping food warm ("Hold")
4. Soft cooking ("Soft")
5. Frying ("Grill")
Requirement The unit is on
"Low-temperature cooking" is selected via the "Frying" button.
"Keeping food warm" is selected via the "Cook" button.
1. Press the button for the selected cooking mode.
The indicator light for the desired cooking mode flashes.
2. Perform the desired settings for the selected cooking mode.
The indicator light for the desired cooking mode illuminates, when
all the settings have been performed.
30 Operating instructions
2021441-20ABBE-B
Page 31

4.4.8 Setting the level
Operating the unit
Cooking processes can be started with several settings.
The basic setting for the unit is preset at the time of delivery.
The temperature for continuous cooking output is freely
adjustable.
Level Definition
"Cook" 1 Cooking process, which at the start first heats the food to be
cooked to 100°C, and then automatically continues to heat it
with continuous cooking output of 30%.
If "Cook" 1 level is preselected, the changeover to the
corresponding continuous cooking output can be made
immediately by pressing both "Cooking temperature/level"
buttons. The preset temperature is 50°C.
"Cook" 2 Cooking process, which at the start first heats the food to be
cooked to 100°C, and then automatically continues to heat it
with continuous cooking output of 70%.
If "Cook" 2 level is preselected, the changeover to the
corresponding continuous cooking output can be made
immediately by pressing both "Cooking temperature/level"
buttons. The preset temperature is 70°C.
"Cook" 3 Cooking process, which at the start first heats the food to be
cooked to 100°C, and then automatically continues to heat it
with continuous cooking output of 90%.
If "Cook" 3 level is preselected, the changeover to the
corresponding continuous cooking output can be made
immediately by pressing both "Cooking temperature/level"
buttons. The preset temperature is 90°C.
Requirement Unit ready for use
1. Switch on the unit.
The "Hold" indicator light flashes.
2. Press the "Cook" button to select a level.
The "Cook" indicator light flashes.
"Cooking temperature/level" display shows the preset level.
3. Set the desired level with the "Cooking temperature/level" buttons,
while the "Cook" indicator light is flashing.
The "Cook" indicator light illuminates after a few seconds, if
input is completed and no more changes are made.
2021441-20ABBE-B
"Cooking temperature/level" display shows the level.
The level is set.
31Operating instructions
Page 32

Operating the unit
4.4.9 Setting the continuous cooking temperature
Requirement The unit is on
1. Press the "Cook" button to select a level and with it the continuous
cooking temperature.
The "Cook" indicator light flashes.
"Cooking temperature/level" display shows the level.
2. Press both "Cooking temperature/level" buttons at the same time
in order to set the continuous cooking temperature directly.
"Cooking temperature/level" display shows the stored
temperature for the continuous cooking level selected.
3. Set the desired temperature with the "Cooking temperature/level"
buttons, while the "Cook" indicator light is flashing.
The "Cook" indicator light illuminates after a few seconds, if
input is completed and no more changes are made.
The desired continuous cooking temperature is set.
4.4.10 Tilting the pan
Requirement Lid opened
CAUTION
Risk of crushing from the pan moving
When tilting or tilting back, ensure that persons and obstacles
are removed from the tilting area behind the pan.
Take care when tilting or tilting back.
CAUTION
Risk of crushing from the pan tilting
When tilting or tilting back, keep hands and other body parts
away from the area of the pan's suspension mounting.
Tilting or tilting back the pan with manual tilting
1. Fold out the handwheel handle.
2. Turn the handwheel clockwise.
The pan is tilted (unloading position).
3. Turn the handwheel anticlockwise.
The pan is tilted back (operating position).
4. Fold in the handwheel handle.
32 Operating instructions
2021441-20ABBE-B
Page 33

Tilting or tilting back the pan with motorised tilting
If the
Motorised tilting
movement of the unit stops.
Requirement Lid opened
Operating the unit
control knob is released, the tilting
4.5 Cooking
1. Turn the
Motorised tilting
control knob to the left and hold it.
The pan is tilted (unloading position).
2. Turn the
Motorised tilting
control knob to the right and hold it.
The pan is tilted back (operating position).
The unit has several possible methods of starting cooking processes:
1. Cooking ("Cook") with 3 levels (1, 2, 3)
2. "Slow" low-temperature cooking with 3 levels (1, 2, 3)
3. Soft cooking ("Soft")
4. Keeping food warm ("Hold")
Cooking ("Cook") enables the food being cooked to be cooked
particularly efficiently.
The food to be cooked is first heated up to boiling temperature
at full output. The food being cooked then continues to cook at
reduced output.
There are 3 levels available.
Level Description
1 Light boiling
2 Medium boiling
3 Heavy boiling
The temperatures for the levels are preset. The temperatures are
freely adjustable.
CAUTION
Risk of scalding from food that is cooking
Do not exceed the
maximum fill level
mark
CAUTION
Risk of scalding from hot steam
Scalding from hot escaping steam can occur, when cooking
utensils are being opened.
• Open the lid of the unit carefully.
2021441-20ABBE-B
33Operating instructions
Page 34

Operating the unit
Requirement The unit is on
Keep the lid closed during operation in order to save energy and
improve the climate in the room.
1. Open the lid.
2. In the case of units without tilting, close the drain valve and put the
drain screen into the drain.
3. Load in the food to be cooked.
4. Add liquid.
Observe the
Maximum load level
mark.
5. Close the lid.
6. Select the cooking mode (see "Operating the unit").
7. Select the level (see "Operating the unit").
8. Set the cooking temperature (see "Operating the unit").
9. Set the cooking time (see "Operating the unit").
10.Start cooking (see "Operating the unit").
11.Stir occasionally during cooking.
The heat is distributed more evenly.
The food being cooked does not burn.
12.End cooking (see "Operating the unit").
An audible signal sounds, after the cooking time has elapsed.
13.Open the lid approx. 5cm (gap).
The steam escapes.
14.Open the lid completely.
15.Remove the food being cooked (see "Emptying the unit").
16.Switch off the unit (see "Operating the unit").
Unit cools down.
17.Empty the unit (see "Emptying the unit").
18.Clean the unit (see "Cleaning and caring for the unit").
34 Operating instructions
2021441-20ABBE-B
Page 35

4.5.1 Cooking with the cooking insert
Requirement The unit is on
Lid opened
1. Insert the base shelf.
2. Insert the cooking insert with the food to be cooked.
3. Add liquid.
Operating the unit
4.6 Steaming
Observe the
4. Close the lid.
5. Select the cooking mode (see "Operating the unit").
6. Select the level (see "Operating the unit").
7. Set the cooking temperature (see "Operating the unit").
8. Set the cooking time (see "Operating the unit").
9. Start cooking (see "Operating the unit").
10.End cooking (see "Operating the unit").
An audible signal sounds, after the cooking time has elapsed.
11.Open the lid approx. 5cm (gap).
The steam escapes.
12.Open the lid completely.
13.Remove the cooking insert with the extraction handle.
14.Remove the base shelf with the extraction handle.
15.Allow the water to drain from the cooking insert.
16.Switch off the unit.
Unit cools down.
17.Clean the unit (see "Cleaning and caring for the unit").
Maximum load level
mark.
2021441-20ABBE-B
In the case of steaming, the food to be cooked is cooked particularly
gently in a perforated cooking insert (screen) over the water.
The water is heated up to boiling temperature at full output, so
that there is hot steam at approx. 100°C. The food to be cooked
is cooked in the steam.
The heat is distributed more evenly.
Delicate food being cooked is not burnt.
CAUTION
Risk of burns from hot surfaces
• Protect arms and hands by wearing suitable protective
gloves.
35Operating instructions
Page 36

Operating the unit
Requirement The unit is on
CAUTION
Risk of scalding from hot steam
Scalding from hot escaping steam can occur, when cooking
utensils are being opened.
• Open the lid of the unit carefully.
Keep the lid closed during operation in order to save energy and
improve the climate in the room.
1. Open the lid.
2. In the case of units without tilting, close the drain valve and put the
drain screen into the drain.
3. Load in approx. 3cm of water.
When doing this, ensure that the cooking insert is not in direct
contact with the water.
4. Insert the base shelf (see "Cooking with base shelf").
5. Load the cooking insert with the food to be cooked and then insert
it.
6. Close the lid.
7. Select the "Cook" cooking mode (see "Operating the unit").
8. Select the level (see "Operating the unit").
9. Set the cooking temperature (see "Operating the unit").
10.Set the cooking time (see "Operating the unit").
11.Start cooking (see "Operating the unit").
12.End cooking (see "Operating the unit").
Tip
An audible signal sounds, after the cooking time has elapsed.
13.Open the lid approx. 5cm (gap).
The steam escapes.
14.Open the lid completely.
15.Remove the food being cooked (see "Emptying the unit").
16.Switch off the unit (see "Operating the unit").
Unit cools down.
17.Empty the unit (see "Operating the unit").
18.Clean the unit (see "Cleaning and caring for the unit").
In the case of longer cooking times or larger quantities of food to
be cooked, it may be necessary to top up the water for
steaming.
Every time the unit is opened, the cooking process is slowed
down and the cooking time extended.
36 Operating instructions
2021441-20ABBE-B
Page 37

4.7 Soft cooking
Operating the unit
Soft cooking ("Soft") enables the food being cooked to be cooked
slowly.
The food to be cooked is heated up at full output to a
temperature, which is 25°C below the set temperature. The
food being cooked is heated up at intervals, until the set
temperature is reached.
Delicate food being cooked is not burnt.
CAUTION
Risk of scalding from food that is cooking
Do not exceed the
CAUTION
Risk of scalding from hot steam
Scalding from hot escaping steam can occur, when cooking
utensils are being opened.
• Open the lid of the unit carefully.
Requirement The unit is on
1. Open the lid.
2. In the case of units without tilting, close the drain valve and put the
drain screen into the drain.
3. Load in the food to be cooked.
4. Add liquid.
Observe the
5. Close the lid.
6. Select the cooking mode (see "Operating the unit").
7. Select the level (see "Operating the unit").
8. Set the cooking temperature (see "Operating the unit").
9. Set the cooking time (see "Operating the unit").
10.Start cooking (see "Operating the unit").
11.Stir occasionally during cooking.
maximum fill level
mark
Maximum load level
mark.
2021441-20ABBE-B
The heat is distributed more evenly.
The food being cooked does not burn.
12.End cooking (see "Operating the unit").
An audible signal sounds, after the cooking time has elapsed.
13.Open the lid approx. 5cm (gap).
The steam escapes.
14.Open the lid completely.
15.Remove the food being cooked (see "Emptying the unit").
37Operating instructions
Page 38

Operating the unit
16.Switch off the unit (see "Operating the unit").
17.Empty the unit (see "Emptying the unit").
18.Clean the unit (see "Cleaning and caring for the unit").
4.8 Low-temperature cooking
CAUTION
Risk of scalding from food that is cooking
Unit cools down.
Do not exceed the
maximum fill level
mark
CAUTION
Risk of scalding from hot steam
Scalding from hot escaping steam can occur, when cooking
utensils are being opened.
• Open the lid of the unit carefully.
Low-temperature cooking ("Slow") produces particularly gentle
cooking.
The food to be cooked is heated up from the beginning of the
cooking process with a reduced continuous cooking output.
Delicate food being cooked is not burnt.
The temperatures for the levels are preset. The temperatures are
freely adjustable.
There are 3 levels available.
Level Temperature
1 50°C
2 70°C
3 90°C
Requirement The unit is on
1. Open the lid.
2. In the case of units without tilting, close the drain valve and put the
drain screen into the drain.
3. Load in the food to be cooked.
4. Add liquid.
Observe the
Maximum load level
5. Close the lid.
6. Select the cooking mode (see "Operating the unit").
7. Select the level (see "Operating the unit").
8. Set the cooking temperature (see "Operating the unit").
38 Operating instructions
mark.
2021441-20ABBE-B
Page 39

4.9 Keeping food warm
Operating the unit
9. Set the cooking time (see "Operating the unit").
10.Start cooking (see "Operating the unit").
11.Stir occasionally during cooking.
The heat is distributed more evenly.
The food being cooked does not burn.
12.End cooking (see "Operating the unit").
An audible signal sounds, after the cooking time has elapsed.
13.Open the lid approx. 5cm (gap).
The steam escapes.
14.Open the lid completely.
15.Remove the food being cooked (see "Emptying the unit").
16.Switch off the unit (see "Operating the unit").
Unit cools down.
17.Empty the unit (see "Emptying the unit").
18.Clean the unit (see "Cleaning and caring for the unit").
CAUTION
Risk of scalding from food that is cooking
Do not exceed the
CAUTION
Risk of scalding from hot steam
Scalding from hot escaping steam can occur, when cooking
utensils are being opened.
• Open the lid of the unit carefully.
CAUTION
Health risk from harmful microorganisms due to food that
is not sufficiently heated through
When warming up food being cooked, temperatures that
promote the growth of harmful microorganisms on the food
being cooked can occur in the cooking zone.
• The food being cooked must be heated through completely,
so that a core temperature of > 72° is achieved.
• The core temperature must be maintained for at least 2
minutes to ensure that harmful microorganisms are killed.
• After the food has been completely warmed to 72°C, the
maximum permitted duration for keeping food warm is 3
hours at 65°C.
maximum fill level
mark
2021441-20ABBE-B
The extended function of keeping food warm ("Hold") enables
delicate food being cooked to be "warmed up" gently and "kept
warm".
39Operating instructions
Page 40

Operating the unit
The food being cooked is warmed up at maximum heat output to
the desired temperature (30 — 110°C).
Temperature range of 50°C to 300°C.
Delicate food being cooked is not burnt.
There are 3 levels available.
Level Heat output
1 Warming up the food being cooked with 15% of the
maximum output.
2 Warming up the food being cooked with 50% of the
maximum output.
3 Warming up the food being cooked with the maximum
output.
Requirement The unit is on
1. Open the lid.
2. In the case of units without tilting, close the drain valve and put the
drain screen into the drain.
3. Load in the food to be cooked.
4. Add liquid.
Observe the
5. Close the lid.
6. Select the "Cook" cooking mode (see "Operating the unit").
7. Select the level (see "Operating the unit").
8. Set the temperature for keeping food warm (see "Operating the
unit").
9. Set the cooking time (see "Operating the unit").
10.Start cooking (see "Operating the unit").
11.Stir occasionally during cooking.
The heat is distributed more evenly.
The food being cooked does not burn.
12.End cooking (see "Operating the unit").
An audible signal sounds, after the cooking time has elapsed.
13.Open the lid approx. 5cm (gap).
Maximum load level
mark.
The steam escapes.
14.Open the lid completely.
15.Remove the food being cooked (see "Emptying the unit").
16.Switch off the unit (see "Operating the unit").
Unit cools down.
17.Empty the unit (see "Emptying the unit").
18.Clean the unit (see "Cleaning and caring for the unit").
40 Operating instructions
2021441-20ABBE-B
Page 41

4.10 Burning-in a frying surface made of steel
CAUTION
Risk of burns from hot surfaces
• Protect arms and hands by wearing suitable protective
gloves.
If a pan has a frying surface made of steel, the frying surface
must be burnt-in before being used for the first time.
If a pan has a frying surface made of stainless steel, it is not
necessary to burn-in the frying surface.
Use commercially available frying fat or oil. Margarine and butter
are not suitable for burning-in a frying surface.
Requirement Unit empty and cleaned
The unit is on
Operating the unit
1. Set the cooking temperature to 250°C.
2. Set the cooking time to 5 minutes.
"Cooking time" display shows "0.05".
3. Press the "Start Stop" button.
The "Start Stop" indicator light illuminates.
The "Heating" indicator light illuminates.
The frying surface heats up.
4. After the set temperature has been reached, brush the frying
surface thinly with commercially available frying fat or oil.
5. Burn-in the frying surface with the frying fat or oil, until the surface
is lightly browned.
6. Press the "Start Stop" button.
"Start Stop" indicator light goes out.
"Cooking time" display shows "– –. –."
Unit switches to operating readiness.
"Cooking temperature/level" display shows the actual
temperature.
7. Repeat the procedure several times.
8. Press the "On Off" button to switch off the unit.
2021441-20ABBE-B
The "Heating" indicator light goes out.
Heating switches off.
The frying surface cools down.
The unit is off.
9. After it has cooled down, clean the frying surface with a stainless
steel wire brush, stainless steel spatula and kitchen paper.
The frying surface is burnt-in.
41Operating instructions
Page 42

Operating the unit
4.11 Frying
Frying ("grill") enables the food being cooked to be dry cooked.
The food being cooked is heated up at full output to the desired
temperature and cooked without the addition of liquid.
The temperatures are freely adjustable.
CAUTION
Risk of burns from hot surfaces
• Protect arms and hands by wearing suitable protective
gloves.
ATTENTION
Risk of physical damage from extremely abrupt cooling
Extremely abrupt cooling deforms the frying surface
• Do not place any frozen food to be cooked on the hot frying
surface.
If there is heavy contamination, clean the frying surface between
the frying procedures with a stainless steel wire brush, stainless
steel spatula and kitchen paper.
Requirement Unit ready for use
1. Open the lid.
2. In the case of units without tilting, close the drain valve and put the
drain screen into the drain.
3. Switch on the unit.
Unit is ready for use.
4. Press the "grill" button.
The "grill" indicator light flashes.
5. Set the temperature (see "Basic functions").
6. Set the temperature (see "Basic functions"), while the "grill"
indicator light is flashing.
The "grill" indicator light illuminates.
"Cooking temperature/level" display shows the actual
temperature.
42 Operating instructions
2021441-20ABBE-B
Page 43

Operating the unit
7. Press the "Start Stop" button.
The "Start Stop" indicator light illuminates.
The "Start Stop" indicator light goes out, as soon as the set
temperature is reached
The "Cooking time" display shows the remaining time.
The "Heating" indicator light illuminates.
The frying surface heats up.
Once the set temperature is reached, heating switches off.
The "Heating" indicator light goes out.
If the temperature falls below the set level, the heating
switches on.
8. Brush the frying surface thinly with commercially available frying
fat or oil.
9. Fry the food to be cooked.
Turn the food being cooked with a suitable utensil during
frying, so that the pores of the food being cooked are closed on
all sides.
10.If required, set the cooking time (see "Operating the unit").
The "Cooking time" display shows the remaining time.
An audible signal sounds, after the cooking time has elapsed.
"Cooking time" display shows "–.– –."
Unit switches to operating readiness.
Heating is off.
"Cooking temperature/level" display shows the actual
temperature.
The frying surface cools down.
11.Press the "Start Stop" button to end the frying procedure without a
cooking time being set.
"Start Stop" indicator light goes out.
"Cooking time" display shows "–.– –."
Unit switches to operating readiness.
"Cooking temperature/level" display shows the actual
temperature.
The frying surface cools down.
12.Remove the food being cooked.
13.Press the "On Off" button to switch off the unit.
2021441-20ABBE-B
Heating switches off.
The "Heating" indicator light goes out.
The "grill" indicator light goes out.
"Cooking temperature/level" display goes out.
"Cooking time" display goes out.
Unit cools down.
14.Empty the unit (see "Emptying the unit").
43Operating instructions
Page 44

Operating the unit
4.12 Braising
15.Clean the unit (see "Cleaning and caring for the unit").
The unit is off.
Braising is a variation on the "Frying" cooking mode and is performed
by setting the "Frying/grill" cooking mode.
The food being cooked is first cooked at full output and very
high temperature, and then it is cooked at reduced temperature
with the addition of liquid.
The temperatures are freely adjustable.
CAUTION
Risk of scalding from food that is cooking
Do not exceed the
CAUTION
Risk of scalding from hot steam
Scalding from hot escaping steam can occur, when cooking
utensils are being opened.
• Open the lid of the unit carefully.
Requirement Unit ready for use
Lid opened
Frying surface cleaned
Drain screen and drain plug inserted into the drain
1. Open the lid.
2. In the case of units without tilting, close the drain valve and put the
drain screen into the drain.
3. Switch on the unit.
Unit is ready for use.
4. Press the "grill" button.
The "grill" indicator light flashes.
5. Set the temperature (see "Basic functions"), while the "grill"
indicator light is flashing.
maximum fill level
mark
The "grill" indicator light illuminates.
"Cooking temperature/level" display shows the actual
temperature.
44 Operating instructions
2021441-20ABBE-B
Page 45

Operating the unit
6. Press the "Start Stop" button.
The "Start Stop" indicator light illuminates.
The "Start Stop" indicator light goes out, as soon as the set
temperature is reached
The "Cooking time" display shows the remaining time.
The "Heating" indicator light illuminates.
The frying surface heats up.
Once the set temperature is reached, heating switches off.
The "Heating" indicator light goes out.
7. Brush the frying surface thinly with commercially available frying
fat or oil.
8. Fry the food to be cooked.
Turn the food being cooked with a suitable utensil during
frying, so that the pores of the food being cooked are closed on
all sides.
9. Load in the liquid.
10.Close the lid.
11.Set the cooking time (see "Operating the unit").
The "Cooking time" display shows the remaining time.
An audible signal sounds, after the cooking time has elapsed.
Unit switches to operating readiness.
Heating is off.
Unit cools down.
12.Stir occasionally during cooking.
The heat is distributed more evenly.
The food being cooked does not burn.
13.End cooking (see "Operating the unit").
An audible signal sounds, after the cooking time has elapsed.
14.Open the lid approx. 5cm (gap).
The steam escapes.
15.Open the lid completely.
16.Remove the food being cooked (see "Emptying the unit").
17.Press the "Start Stop" button to end the cooking time before the
set cooking time has elapsed.
"Start Stop" indicator light goes out.
The frying surface cools down.
2021441-20ABBE-B
Unit cools down.
18.Empty the unit (see "Emptying the unit").
19.Clean the unit (see "Cleaning and caring for the unit").
45Operating instructions
Page 46

Operating the unit
4.13 Emptying the unit
CAUTION
Risk of scalding from hot steam
Scalding from hot escaping steam can occur, when cooking
utensils are being opened.
• Open the lid of the unit carefully.
CAUTION
Risk of physical damage and personal injury from
containers that are not heat-resistant
Use heat-resistant containers with handles and locking lids to
transport food being cooked.
Use a heat-resistant container with handles and lockable lid for
transportation.
Observe the maximum fill quantity.
4.13.1 Emptying a unit with drain valve
Requirement Unit switched off
1. Open the lid approx. 5cm (gap).
The steam escapes.
2. Open the lid completely.
3. Place a suitable container under the drain valve.
4. If necessary, remove the drain plug and drain screen from the
drain with the lifting hook.
5. Slowly open the drain valve and carefully fill the container with the
food being cooked.
6. Close the drain valve.
Tip
Liquid food being cooked, such as soup, sauce or stock can be
conveniently dosed and removed.
Solid constituent parts should be smaller than 1cm, so that
blocking of the drain valve is prevented.
4.13.2 Emptying with a ladle
Requirement Unit switched off
1. Open the lid approx. 5cm (gap).
The steam escapes.
2. Open the lid completely.
3. Make a suitable container ready.
4. Load the food being cooked into the container with the ladle.
46 Operating instructions
2021441-20ABBE-B
Page 47
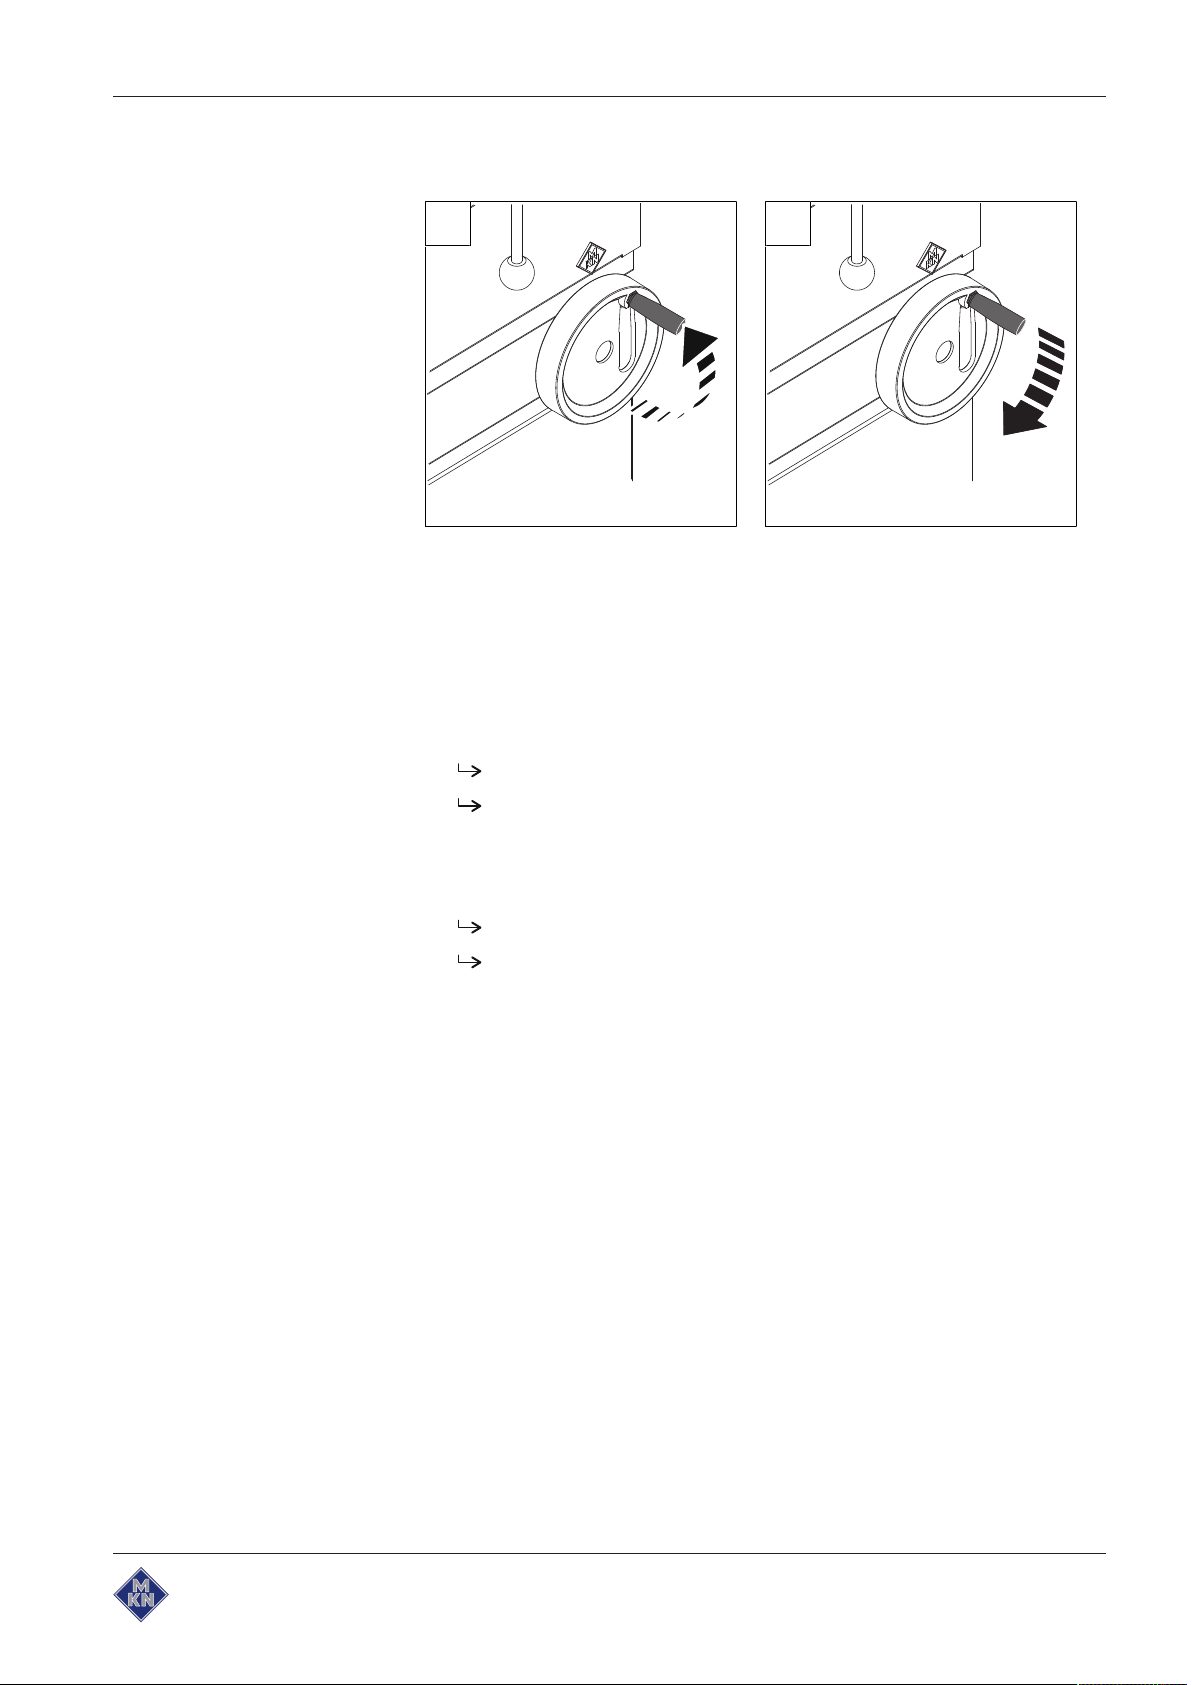
4.13.3 Emptying with manual tilting
A B
Image: Fold out the handwheel handle (A), turn the handwheel (B)
Requirement Cooking ended
Unit switched off
Lid opened
Operating the unit
1. Fold out the handwheel handle.
2. Turn the handwheel clockwise.
The pan is tilted.
Pan in unloading position.
3. Make a suitable container ready.
4. Load the food being cooked into the container.
5. Turn the handwheel anticlockwise.
The pan is tilted back.
Pan in the operating position.
6. Fold in the handwheel handle.
2021441-20ABBE-B
47Operating instructions
Page 48

Operating the unit
0
0
A B
4.13.4 Emptying with motorised tilting
If the
Motorised tilting
movement of the unit stops.
Image: Tilting the pan (A), Tilting back the pan (B)
control knob is released, the tilting
Requirement Cooking ended
Lid opened
1. Make a suitable container ready.
2. Turn the
3. Load the food being cooked into the container.
4. Turn the
4.14 Pausing and end of use
Switch off the unit during pauses and at end of use.
Motorised tilting
control knob to the right and hold it.
The pan is tilted.
Pan in unloading position.
Motorised tilting
control knob to the left and hold it.
The pan is tilted back.
Pan in the operating position.
48 Operating instructions
2021441-20ABBE-B
Page 49

5 Cleaning and caring for the unit
CAUTION
Risk of burns from hot surfaces
• Allow surfaces to cool prior to cleaning.
ATTENTION
Risk of physical damage from extremely abrupt cooling
• Do not cool shock the unit by cooling it abruptly.
ATTENTION
Risk of physical damage from improper cleaning
• Do not clean the unit with a high-pressure cleaner or water
jet.
5.1 Preventing corrosion
Cleaning and caring for the unit
• Keep the surfaces of the unit clean and with access to air.
• Remove lime, grease, starch and protein deposits.
• Only expose parts made from non-rusting steel to brief contact
with highly acidic foods, spices, salts or the like.
• Avoid damaging the stainless steel surface with other metal items,
for example steel spatulas or steel wire brushes.
• Prevent contact with iron and steel, for example steel wool and
steel spatulas.
• Do not use bleaching or chlorine-containing cleaning agents.
• Clean contact surfaces with water.
5.1.1 Protecting a frying surface made of steel
A frying surface made of steel will corrode, if the burnt-in surface is
damaged. This is not a deficiency in the unit but rather a
characteristic of a frying surface made of steel.
• Ensure that the burnt-in surface is not damaged by cleaning or
use.
• Do not use any scraping objects for cleaning.
2021441-20ABBE-B
• After intensive cleaning has been completed, repeat the burning-in
process.
49Operating instructions
Page 50

Cleaning and caring for the unit
5.2 Removing rust spots
• Remove fresh rust spots with a mild abrasive or fine sandpaper.
• Always remove rust spots completely.
• Expose treated areas to fresh air for at least 24 hours. During this
time, do not allow any contact with greases, oils or foods so that a
new protective layer can form.
5.3 Cleaning the housing
ATTENTION
Risk of physical damage from improper cleaning
• Do not clean the housing with highly abrasive or chemically
• Do not clean the housing with highly abrasive sponges.
Requirement Unit switched off and cooled down
aggressive cleaning agents.
Clean the housing with warm water and commercially available
washing-up liquid.
5.4 Cleaning the frying surface between cooking processes
CAUTION
Risk of burns from hot surfaces
• Protect arms and hands by wearing suitable protective
gloves.
The frying surface must be cleaned of frying residue between the
frying processes.
50 Operating instructions
2021441-20ABBE-B
Page 51

5.5 Cleaning the pan
5.5.1 Cleaning a non-tiltable pan
ATTENTION
Risk of physical damage from improper cleaning
• Do not clean the housing with highly abrasive or chemically
• Do not clean the housing with highly abrasive sponges.
Requirement Unit switched off and cooled down
Pan emptied
Lid opened
Drain valve opened
Drain plug removed from the pan
Cooking insert and base shelf removed from the pan
Cleaning and caring for the unit
aggressive cleaning agents.
1. Remove the drain screen from the drain of the pan.
2. Thoroughly clean the drain screen, drain plug, base shelf and
cooking insert with warm water.
Use a mild cleaning agent if required.
3. Remove the drain valve and clean it.
The drain valve must be disassembled in order to clean it
thoroughly (see "Cleaning the drain valve").
Use a mild cleaning agent if required.
4. Clean the pan thoroughly with warm water.
Remove coarse contamination with a spatula or sponge.
Use a mild cleaning agent if required.
Cook stubborn food residue away at low temperature.
5. Rinse out the pan thoroughly with water.
6. Polish the pan dry.
7. Brush the frying surface thinly with commercially available frying
fat or oil.
8. Insert the drain screen and drain plug into the drain.
9. Insert the base shelf and cooking insert into the pan.
10.Attach the drain valve.
11.Close the lid.
2021441-20ABBE-B
51Operating instructions
Page 52

Cleaning and caring for the unit
5.5.2 Cleaning a tiltable pan
ATTENTION
Risk of physical damage from improper cleaning
• Do not clean the housing with highly abrasive or chemically
• Do not clean the housing with highly abrasive sponges.
Requirement Unit switched off and cooled down
Pan emptied
Lid opened
1. Tilt the pan.
2. Clean the pan thoroughly with warm water.
3. Rinse out the pan thoroughly with water.
4. Polish the pan dry.
5. Brush the frying surface thinly with commercially available frying
fat or oil.
6. Tilt back the pan.
7. Close the lid.
aggressive cleaning agents.
Remove coarse contamination with a spatula or sponge.
Use a mild cleaning agent if required.
Cook stubborn food residue away at low temperature.
52 Operating instructions
2021441-20ABBE-B
Page 53

5.6 Cleaning the drain valve
5.6.1 Removing and attaching the drain valve
Removing the drain valve
Cleaning and caring for the unit
Image: Removing the drain valve
Requirement Unit switched off
Boiling kettle emptied
1. Undo the screw on the drain valve.
2. Turn the drain valve about 30° clockwise and remove it.
Attaching the drain valve
2021441-20ABBE-B
Image: Attaching the drain valve
Requirement Unit switched off
Boiling kettle emptied
Drain valve cleaned
Drain valve assembled
1. Turn the position of the drain valve about 30° clockwise and place
it on the spigot.
53Operating instructions
Page 54

Cleaning and caring for the unit
2. Push the drain valve onto the connection.
3. Turn the drain valve about 30° anticlockwise.
4. Align the drain valve vertically.
5. Screw the screw into the drain valve.
5.6.2 Disassembling and assembling the drain valve
ATTENTION
Risk of physical damage from improper cleaning
Aggressive cleaners can damage seals and plastic parts.
• Do not clean the components of the drain valve in the
dishwasher.
• Do not use aggressive cleaners.
The seals must not be damaged.
Use special grease suitable for fittings.
The drain valve must be disassembled for cleaning.
Image: Drain valve
Disassembling the drain valve
Requirement Unit switched off and cooled down
Unit emptied
1. Pull the release handle backwards and completely open the drain
valve clockwise as far as possible.
2. Turn the drain valve through 15° anticlockwise.
3. Pull the release handle backwards and carefully pull out the piston
upwards.
4. Thoroughly clean the drain valve with a bottle brush.
54 Operating instructions
2021441-20ABBE-B
Page 55

Cleaning and caring for the unit
5. Thoroughly clean the sealing surfaces, pilot pin and guide groove
of the piston.
6. Rinse thoroughly with clear water.
Use a mild cleaning agent if required.
7. Carefully dry all components.
8. Grease all components with valve grease suitable for food use.
Image: Grease the drain valve
Assembling the drain valve
Requirement Seals checked for integrity and correct seating
Sealing surfaces, pilot pin and guide groove of the piston thoroughly
greased
1. Insert the piston carefully into the housing from above and lock it.
2. Turn the drain valve through 15° anticlockwise to close it.
3. Attach the drain valve (see "Removing and attaching the drain
valve").
Tip
If carefully cared for, the drain valve will retain its ease of
movement.
2021441-20ABBE-B
55Operating instructions
Page 56

Cleaning and caring for the unit
A B
a
5.6.3 Changing the seals
If individual seals are worn, always change all of them together.
When changing them, ensure that the guide grooves are not
damaged.
In order to prevent leaks through twisting, first hook the diagonal
seal onto the top of the piston, do not push it on from below.
Use special grease suitable for fittings.
Requirement Drain valve clean and undamaged
Image: Changing the seals of the drain valve
a Seal
New seals are intact and undamaged
1. Remove damaged or worn seals with a pointed knife.
2. Insert the new seals.
56 Operating instructions
2021441-20ABBE-B
Page 57

5.7 Inspecting the unit
5.7.1 Performing a visual inspection
ATTENTION
Risk of physical damage from improper inspection
• Inspect in accordance with the inspection intervals.
• Have inspections performed by a capable user.
• In the event of damage or signs of wear, contact customer
service immediately and stop using the unit.
Requirement Unit not live
Pan empty and cleaned
Lid completely opened
Inspect the housing, pan and lid for deformation and damage.
In the case of units with a tiltable pan, inspect the pan suspension
mounting for deformation and damage.
Cleaning and caring for the unit
2021441-20ABBE-B
57Operating instructions
Page 58

Troubleshooting
6 Troubleshooting
6.1 Cause of failure and the remedy
Failure Possible causes Remedy
The control does not react The control is defective • Disconnect the unit from the electric
mains.
• Contact Customer service.
An internal fuse has tripped • Contact Customer service.
The "Start Stop" indicator light
flashes twice when the "Start Stop"
button is pressed
An audible signal sounds over 3
seconds
?????? In the case of units with tilting: Pan
The unit does not heat up Unit switched off • Switch on the unit.
Insufficient heat output Unit defective • Disconnect the unit from the electric
The
Heating
illuminate
An audible signal sounds over 3
seconds
indicator light does not
The safety temperature limiter has
tripped
is not in the operating position
Temperature
Power supply interrupted • Contact the authorized technical person-
Unit defective • Disconnect the unit from the electric
Mains phase missing • Contact the authorized technical person-
Pan tilted (unit with tilting) • Tilt back the pan (operating position)
Unit defective • Disconnect the unit from the electric
display on "0" • Set the temperature.
• Disconnect the unit from the electric
mains.
• Contact Customer service.
Bring the pan into the operating position
nel.
mains.
• Contact Customer service.
mains.
• Contact Customer service.
nel.
mains.
• Contact Customer service.
The
Heating
indicator light flashes Interruption of the power
optimisation system
6.2 Nameplate
When contacting Customer service, please always provide the
following data from the nameplate:
Serial number
(SN)
Type number
(TYP)
58 Operating instructions
• Disconnect the unit from the electric
mains.
• Contact Customer service.
2021441-20ABBE-B
Page 59

7 Carrying out maintenance
The manufacturer recommends maintenance of the unit at intervals of
3 months.
7.1 Carrying out recommended maintenance
7.1.1 Lubricating the lid hinge
Use special grease suitable for fittings.
Requirement Unit switched off
Unit emptied
1. Close the lid.
Carrying out maintenance
Image: Unscrewing the cap nut
2. Unscrew the cap nut with a spanner.
Image: Lubricating the lid hinge
3. Place the grease gun on the lubrication nipple.
4. Inject the special grease with the grease gun.
2021441-20ABBE-B
Image: Screwing on the cap nut
5. Screw the cap nut on with a spanner.
59Operating instructions
Page 60

Carrying out maintenance
6. Open and close the lid several times.
The special grease is distributed in the lid hinge.
7. Remove any excessive special grease.
8. Clean the unit (see "Cleaning and caring for the unit").
Type of maintenance (3 monthly, 6 monthly, 12
monthly)
Type of maintenance (3 monthly, 6 monthly, 12
monthly)
Type of maintenance (3 monthly, 6 monthly, 12
monthly)
Type of maintenance (3 monthly, 6 monthly, 12
monthly)
Type of maintenance (3 monthly, 6 monthly, 12
monthly)
Type of maintenance (3 monthly, 6 monthly, 12
monthly)
Date Company, person Signature
Date Company, person Signature
Date Company, person Signature
Date Company, person Signature
Date Company, person Signature
Date Company, person Signature
60 Operating instructions
2021441-20ABBE-B
Page 61

Dispose of unit in an environmentally responsible manner
8 Dispose of unit in an environmentally responsible manner
Do not dispose of unit or the unit's components together with nonrecyclable waste. If the unit is disposed of together with nonrecyclable waste or treated improperly, toxic substances contained in
the unit can damage health and pollute the environment.
Dispose of the unit in accordance with local regulations for used
appliances. Clarify any open questions with the responsible agencies
(for instance, solid waste management).
Unit In addition to valuable materials, used electrical and electronic
equipment also contains harmful substances that were needed for
their operation and safety.
Oil and fat Residue that contains oil and fat must be collected in suitable
containers and disposed of in accordance with the local disposal
regulations.
Cleaning agents Dispose of leftover cleaning agents and cleaning agent containers in
accordance with the information provided by the cleaning agent's
manufacturer. Observe applicable regional regulations.
2021441-20ABBE-B
61Operating instructions
Page 62

Manufacturer's declaration
EC Declaration of Conformity
1 / 2
2021441--0KOBE-B en-GB
Manufacturer
MKN Maschinenfabrik Kurt Neubauer GmbH & Co. KG • Halberstädter Straße 2a • 38300 Wolfenbüttel,
Germany
We hereby declare, that the following product:
Description of the unit
Unit for cooking food in commercial applications
Unit type
Electric tilting frying pan with electronic control (side arm)
Unit number
2021430B 2021430C 2021436C 2021441C 2021445C 2021449C 2021453C 2121430C
2121436C 3021441C 3021445C 3021449C
complies with the relevant provisions of the following directives, but does not contain any assurance of
properties:
• Directive 2011/65/EU (RoHS) dated 01 July 2011
• Directive 2014/30/EU dated 26 February 2014 on electromagnetic compatibility
• Directive 2014/35/EU dated 26 February 2014 on electrical equipment used within certain voltage limits
• REGULATION (EC) No. 1935/2004 dated 27 October 2004 on materials and objects, which are intended to
come into contact with food
Adduced basis for verification
EN ISO 12100:2010
DIN EN 55014-1:2012-05
EN 60335-1:2012
EN55014-2:2015
EN 60335-2-39:2003/AC:2007
The manufacturer bears the sole responsibility for issuing this Declaration of Conformity. This Declaration of
Conformity becomes invalid, if changes are made which are not agreed with us.
Wolfenbüttel, 30/05/2016
Person authorised to compile the technical documents: ppa. Peter Helm,Chief Technical Officer (address as
manufacturer)
Translation from the original document • 2021441--0KODE-B
9 Manufacturer's declaration
62 Operating instructions
2021441-20ABBE-B
Page 63

Manufacturer's declaration
EC Declaration of Conformity
2 / 2
2021441--0KOBE-B en-GB
Manufacturer
MKN Maschinenfabrik Kurt Neubauer GmbH & Co. KG • Halberstädter Straße 2a • 38300 Wolfenbüttel,
Germany
We hereby declare, that the following product:
Description of the unit
Unit for cooking food in commercial applications
Unit type
Electric tilting frying pan with electronic control and motorised tilting (side arm)
Unit number
2021431C 2021437C 2021443C 2021447C 2021451C 2021455C 2121431C 2121437C
3021443C 3021447C 3021451C 3021455C
complies with the relevant provisions of the following directives, but does not contain any assurance of
properties:
• Directive 2006/42/EC dated 17 May 2006 on machinery
• Directive 2011/65/EU (RoHS) dated 01 July 2011
• Directive 2014/30/EU dated 26 February 2014 on electromagnetic compatibility
• REGULATION (EC) No. 1935/2004 dated 27 October 2004 on materials and objects, which are intended to
come into contact with food
Adduced basis for verification
EN ISO 12100:2010
DIN EN 55014-1:2012-05
EN 60335-1:2012/A11:2014
EN55014-2:2015
EN 60335-2-39:2003/AC:2007
The manufacturer bears the sole responsibility for issuing this Declaration of Conformity. This Declaration of
Conformity becomes invalid, if changes are made which are not agreed with us.
Wolfenbüttel, 30/05/2016
Person authorised to compile the technical documents: ppa. Peter Helm,Chief Technical Officer (address as
manufacturer)
Translation from the original document • 2021441--0KODE-B
2021441-20ABBE-B
63Operating instructions
Page 64

Manufacturer's declaration
EC Declaration of Conformity
1 / 1
2022701--0KOBE-C en-GB
Manufacturer
MKN Maschinenfabrik Kurt Neubauer GmbH & Co. KG • Halberstädter Straße 2a • 38300 Wolfenbüttel,
Germany
We hereby declare, that the following product:
Description of the unit
Unit for cooking food in commercial applications
Unit type
Magnum electric casserole
Unit number
0722702 0722704 0722706 0722708 10012633 1422703 1422704 1422706
1422708 2022701 2022703 2022705 2022707 2122701 2122703 3022701
3022703 3022705 3022707
complies with the relevant provisions of the following directives, but does not contain any assurance of
properties:
• Directive 2011/65/EU (RoHS) dated 01 July 2011
• Directive 2014/30/EU dated 26 February 2014 on electromagnetic compatibility
• Directive 2014/35/EU dated 26 February 2014 on electrical equipment used within certain voltage limits
• REGULATION (EC) No. 1935/2004 dated 27 October 2004 on materials and objects, which are intended to
come into contact with food
Adduced basis for verification
EN ISO 12100:2010
DIN EN 55014-1:2012-05
EN 60335-1:2012
EN55014-2:2015
EN 60335-2-39:2003/AC:2007
The manufacturer bears the sole responsibility for issuing this Declaration of Conformity. This Declaration of
Conformity becomes invalid, if changes are made which are not agreed with us.
Wolfenbüttel, 30/05/2016
Person authorised to compile the technical documents: ppa. Peter Helm,Chief Technical Officer (address as
manufacturer)
Translation from the original document • 2022701--0KODE-C
64 Operating instructions
2021441-20ABBE-B
Page 65

Page 66

Page 67

Page 68

www.mkn.eu
 Loading...