

Page 1
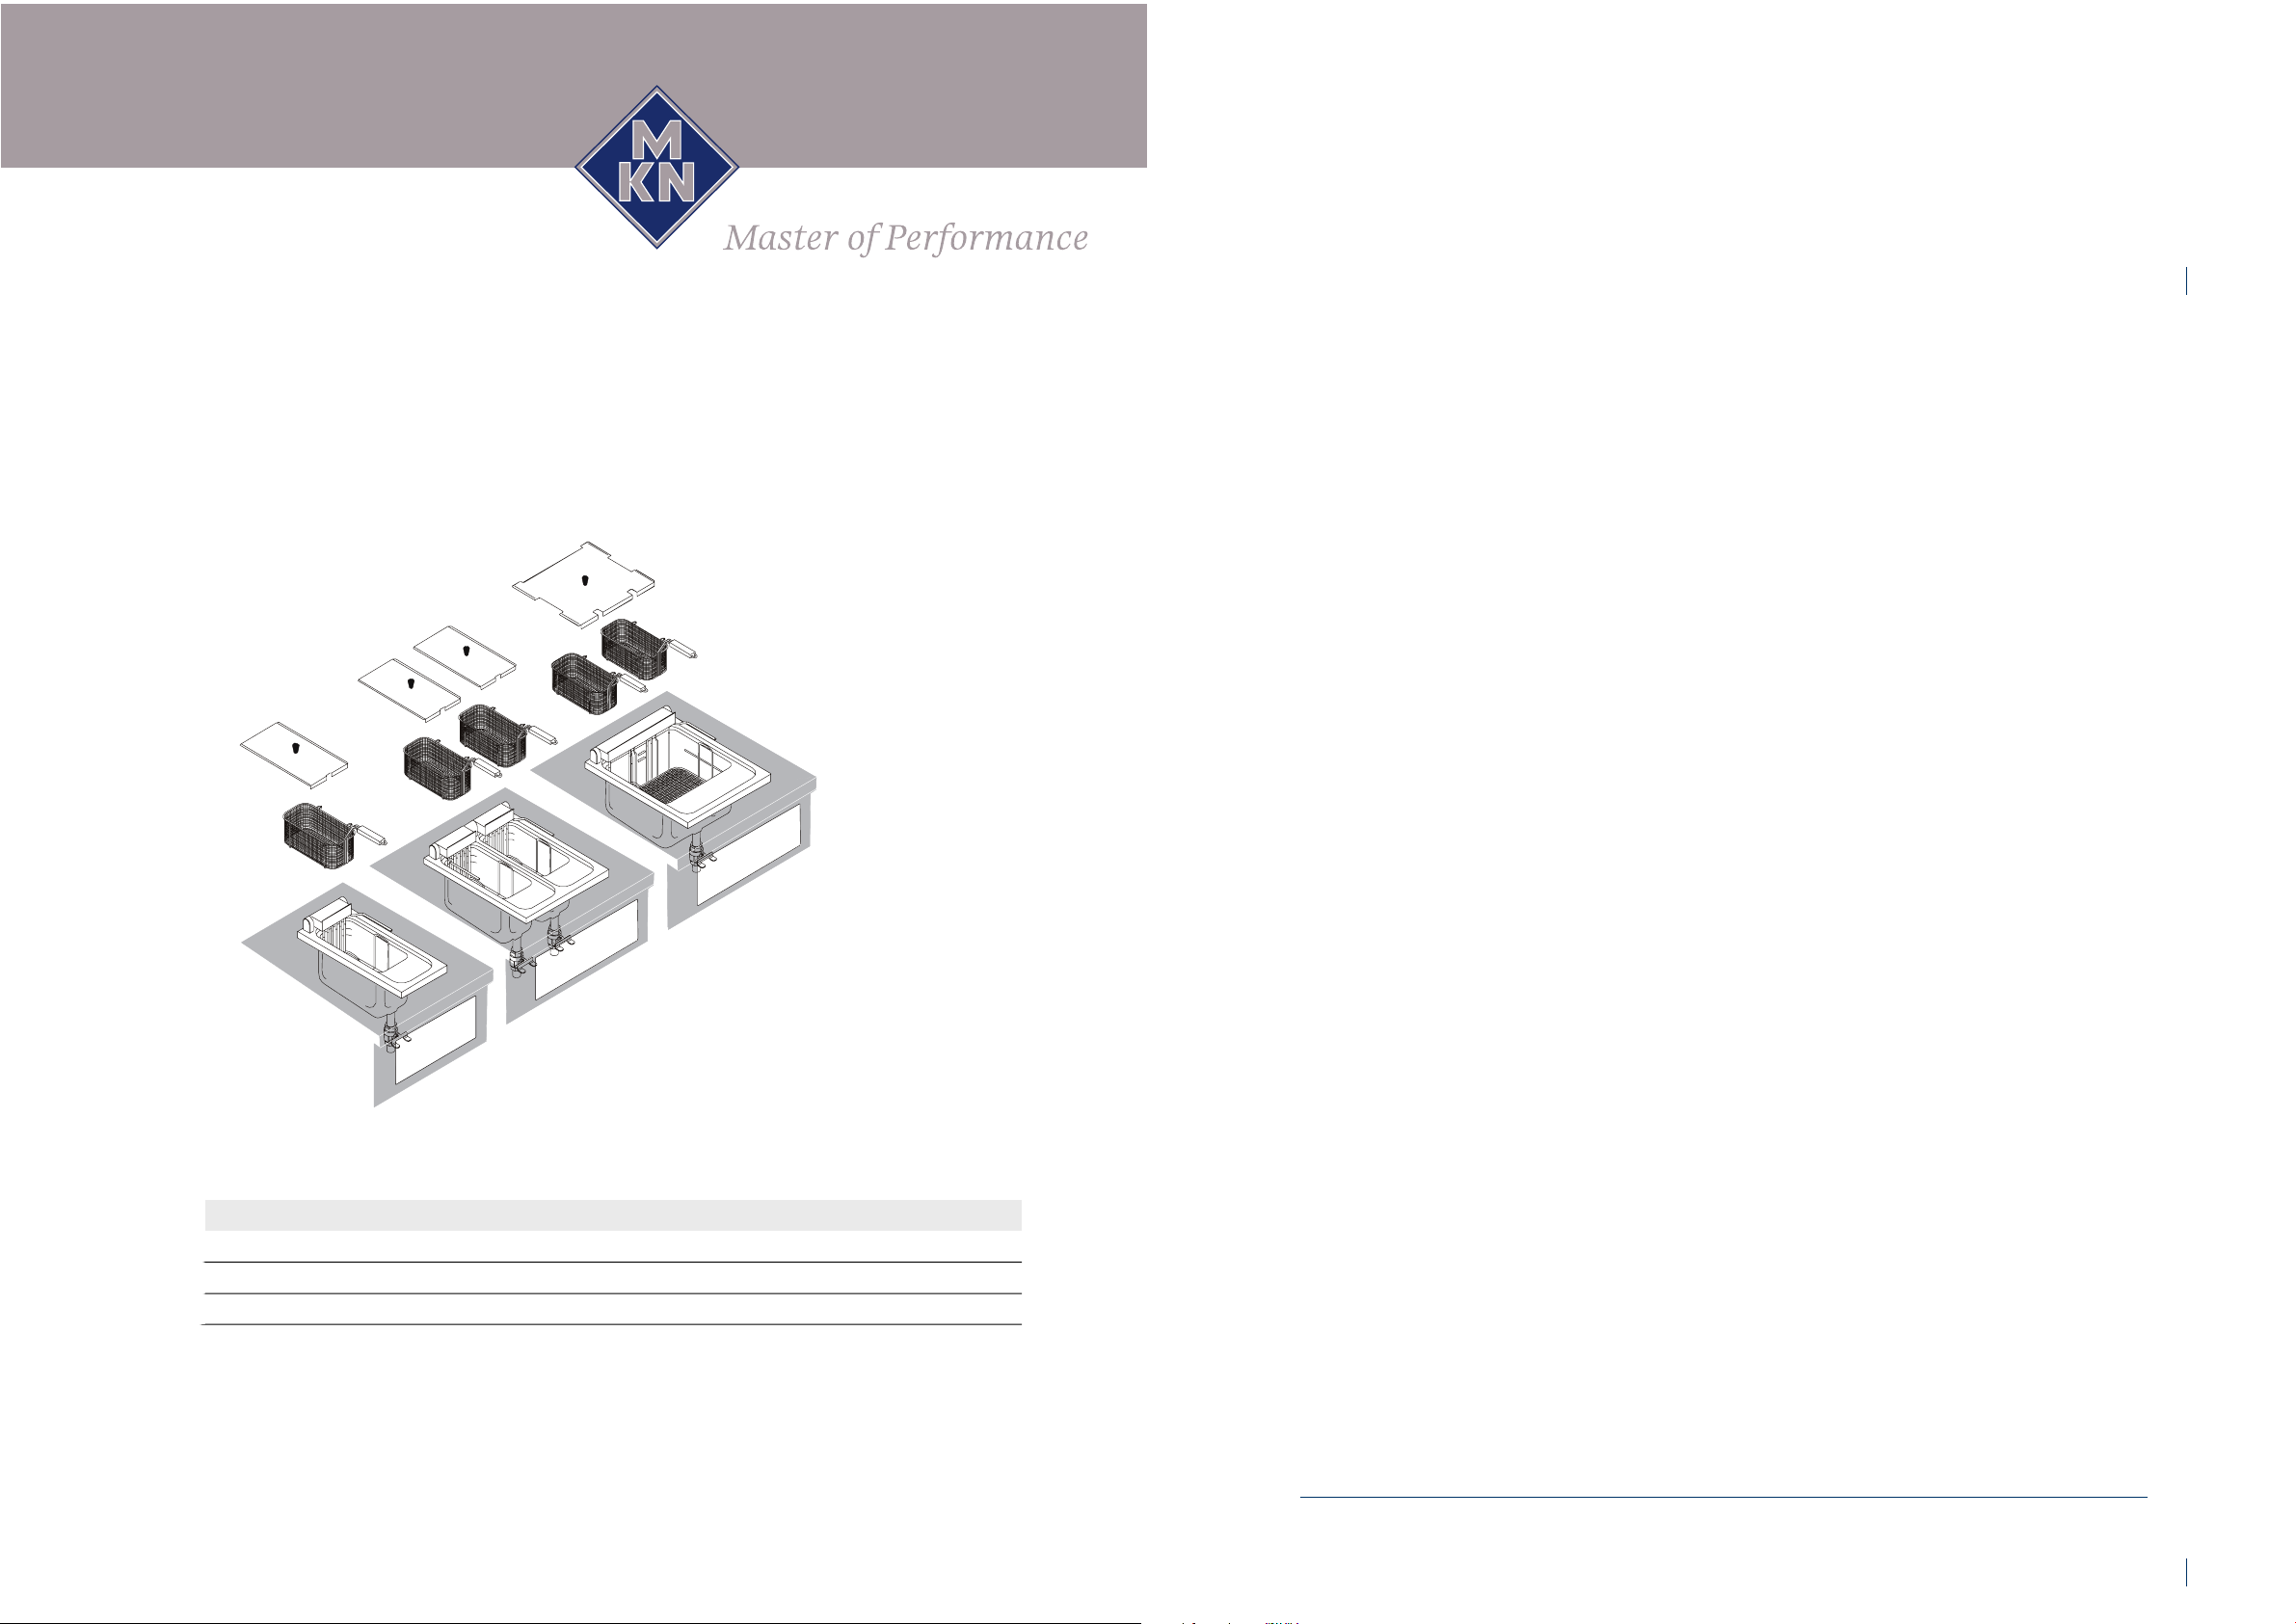
Operating manual
Deep fat fryer (electric)
Open out the cover page to see the
controls.
Translation of the original operating instructions 2020321-03ABDE-C / 05.04.2011 / TAG-MaBr
Version
London I
London II
Paris
2020321-03ABBE-C / en-GB
Operating manual
Page 2
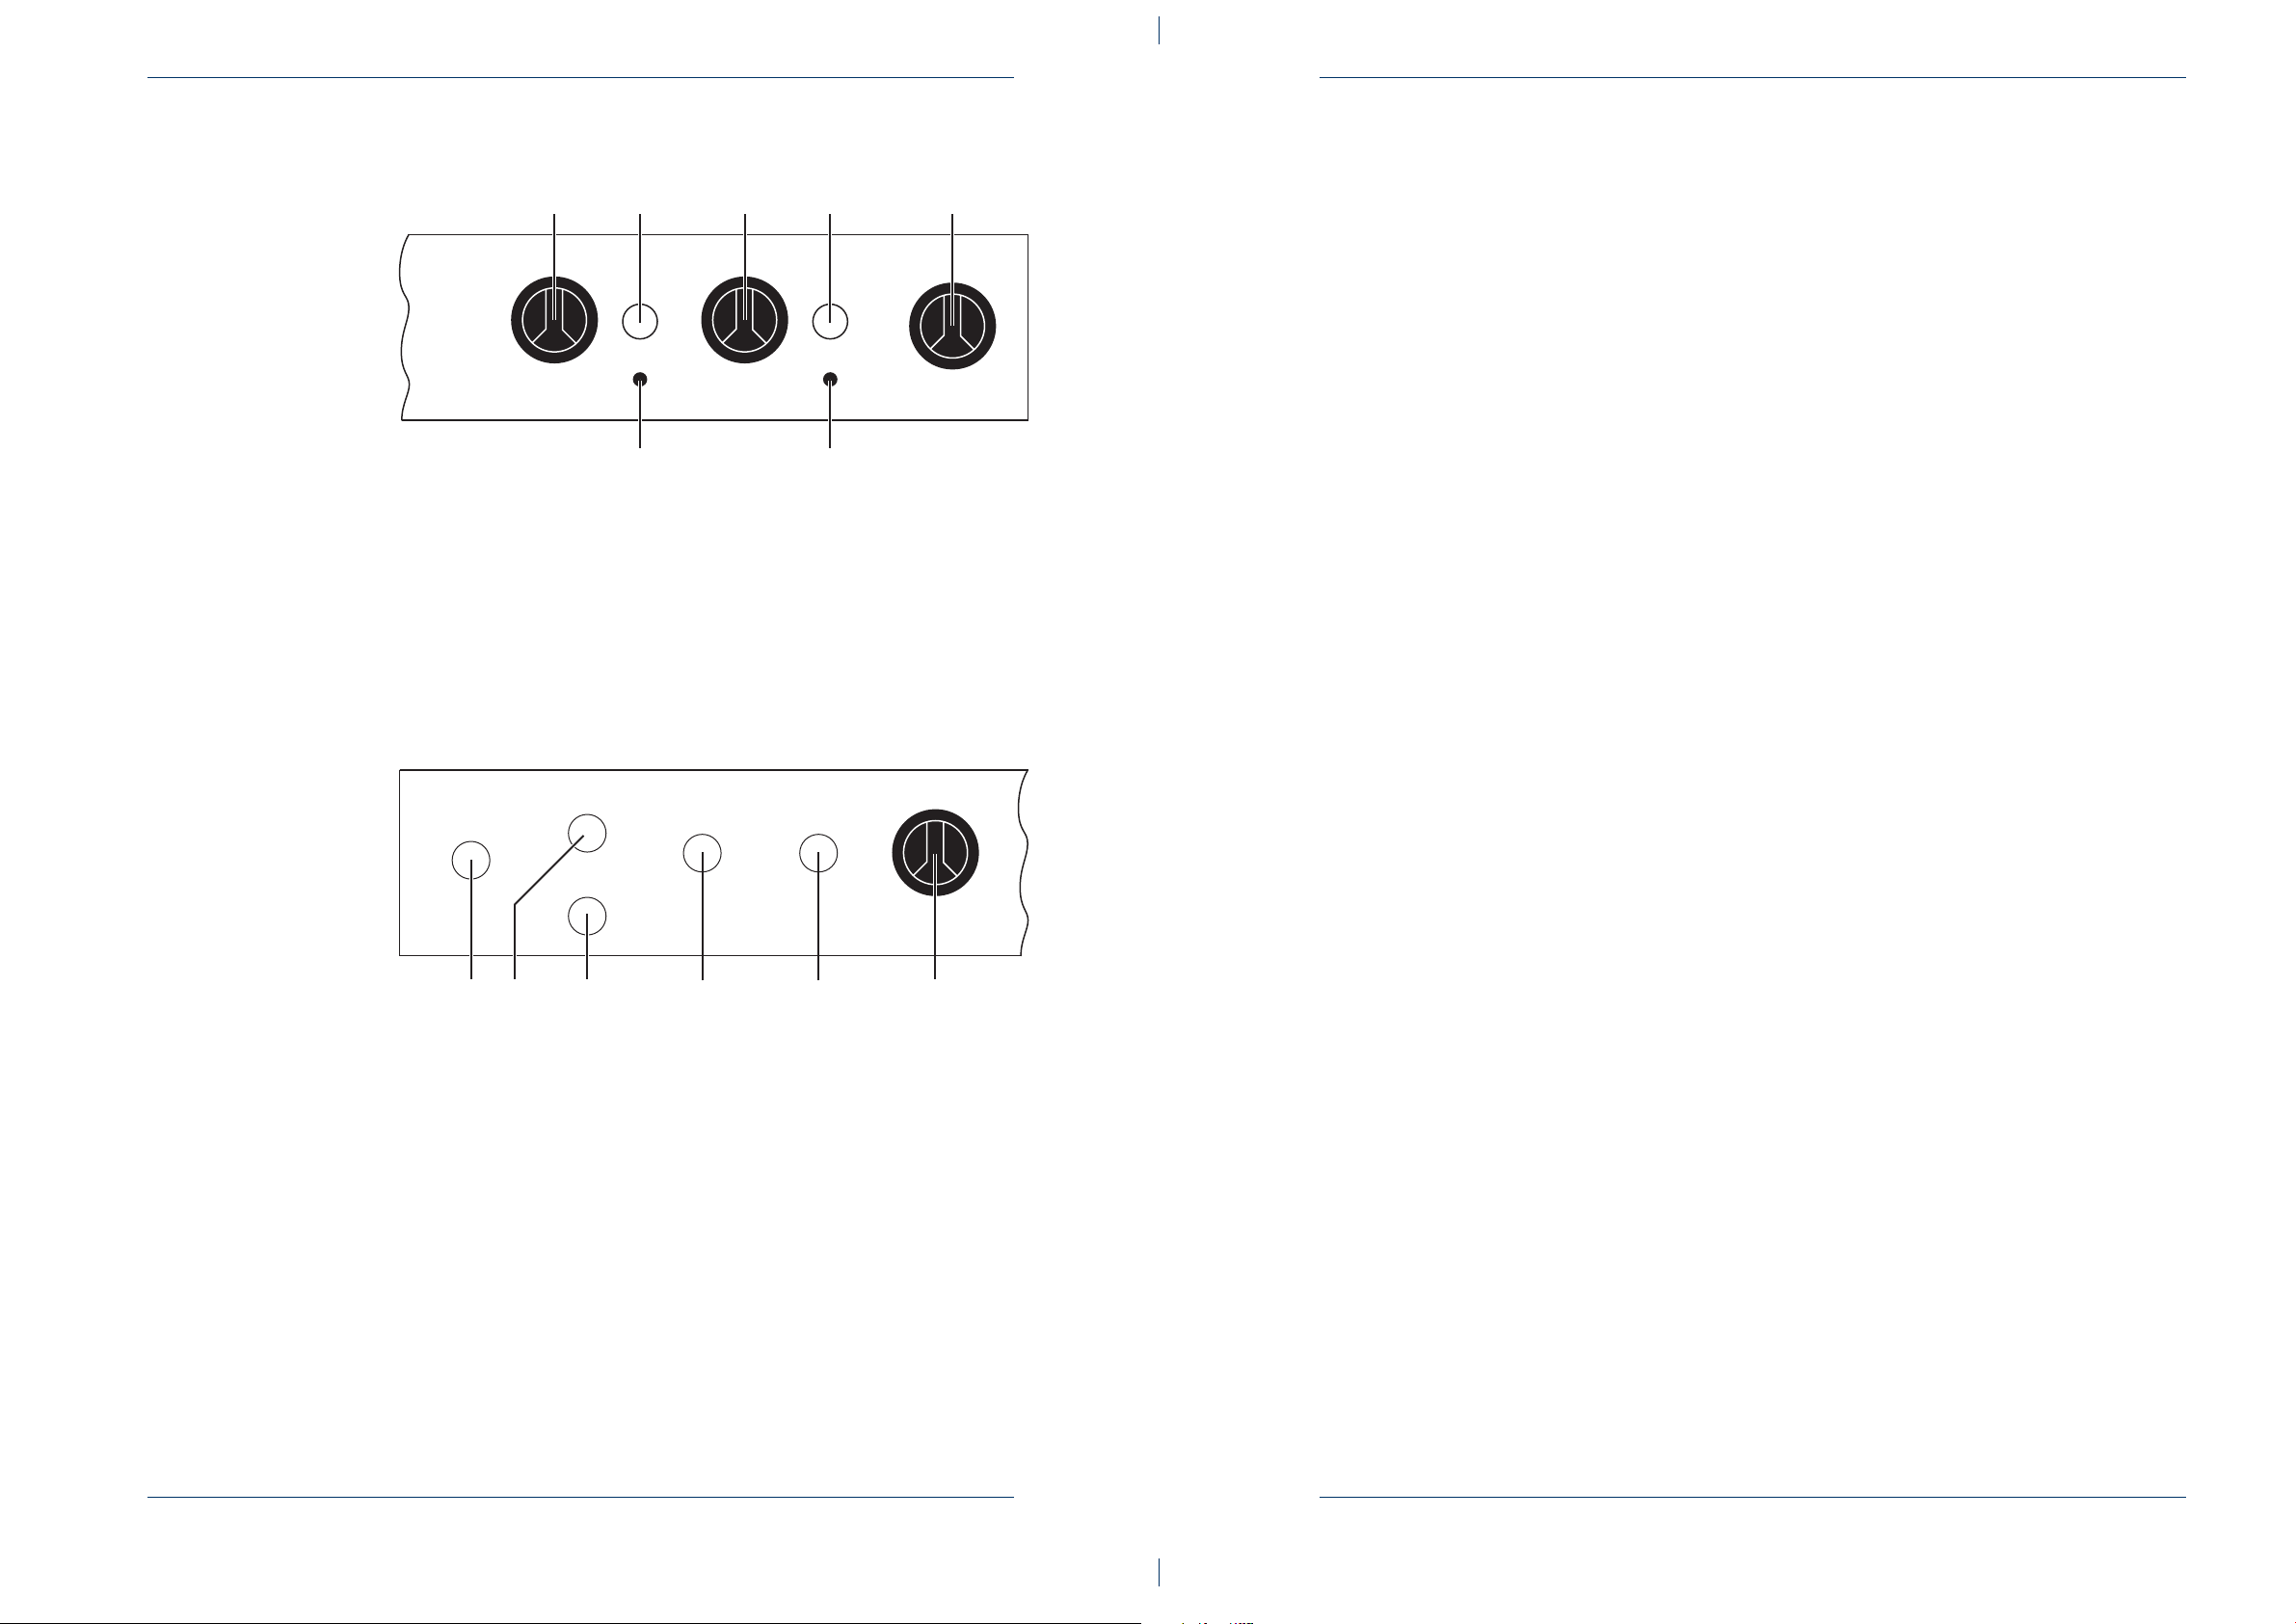
Controls
123
4
23
5
6
8
O
I
L
P
U
M
P
7
R
E
S
E
T
91011
O
I
L
-
L
E
V
E
L
O
V
E
R
T
E
M
P
-
2
O
V
E
R
T
E
M
P
-
1
Figure 1: Standard version
1 Unit switch
2 “Heating mode” control lamp
Deep fat fryer (electric)Deep fat fryer (electric)
3 Temperature regulator
4 Safety temperature limiter
(not with marine versions)
5 2. Safety temperature limiter (optional)
Figure 2: Optional equipment
6 Timer
(units with frying basket lifting mechanism)
7 “Reset” button
8 Switch for fat filter system
9 “Over-temperature 2” control lamp
(units with FSC)
10 “Over-temperature 1” control lamp
(units with 2 safety temperature limiters and FSC)
11 “Filling level” control lamp
(units with FSC)
Operating manualOperating manual
Page 3

ContentsDeep fat fryer (electric)
5Introduction ...........................................................1
5Intended use ......................................................................1.1
5About this operating manual ...........................................1.2
6Warnings ............................................................................1.3
6Warranty and liability ........................................................1.4
7Signs and symbols ...........................................................1.5
8Safety information ................................................2
10Construction and function ...................................3
10Description of the unit ......................................................3.1
10Version London I .........................................................................3.1.1
11Version London II ........................................................................3.1.2
12Version Paris ...............................................................................3.1.3
12Features .............................................................................3.2
13Description of the controls ..............................................3.3
14Using frying fat and oil .....................................................3.4
14Recommended frying temperatures and times ..............3.5
15Filling quantities ...............................................................3.6
16Operation ...............................................................4
16Commissioning .................................................................4.1
16Filling with frying fat .........................................................4.2
16Switching on/switching off unit .......................................4.3
16Switching on ...............................................................................4.3.1
17Switching off ...............................................................................4.3.2
17Basic functions .................................................................4.4
17Setting the temperature ..............................................................4.4.1
18Setting the time ...........................................................................4.4.2
18Deep frying ........................................................................4.5
19Frying (with the frying basket lifting mechanism) .........4.6
20End of operation and breaks ...........................................4.7
21Emptying the unit ..............................................................4.8
21Draining off the frying fat .............................................................4.8.1
21Filtering frying fat with the integrated fat filtering system ............4.8.2
23Cleaning ................................................................5
23Avoiding corrosion ...........................................................5.1
3Operating manual
Page 4

Deep fat fryer (electric)Contents
23General cleaning ...............................................................5.2
24Cleaning the housing .......................................................5.3
24Cleaning the frying basin .................................................5.4
25Cleaning the tubular heating elements ...........................5.5
26Faults .....................................................................6
26Correcting faults ...............................................................6.1
26Safety temperature limiter (STL) triggered .....................6.2
6.2.1
6.2.2
Switching the STL back on after exceeding the maximum
operating temperature ................................................................
Switching the STL back on if the ambient temperature falls below
0 °C .............................................................................................
26
27
27Control lamp is defective .................................................6.3
28Cause of errors and troubleshooting ..............................6.4
29Service ...................................................................7
29Disposal .............................................................................7.1
30Declarations of Conformity ..................................8
Operating manual4
Page 5

1 Introduction
1.1 Intended use
MKN deep fat fryers are appliances solely intended to be used for
commercial purposes, especially in commercial kitchens.
The unit may only be used with suitable frying fats for the purpose of deep
frying food.
It is not permitted to use the unit for the following purposes, among others:
●
Drying towels, paper or dishes
●
Heating acids, brines or other chemicals
●
Heating inflammable liquids
●
Melting fats or salts
●
As a food warmer
●
Cooking noodles, potatoes, vegetables or other food in salt water
●
Cooking soups or sauces
●
Defrosting frozen foods
IntroductionDeep fat fryer (electric)
1.2 About this operating manual
Target group
This operating manual is part of the equipment and contains information
required by the persons operating the unit to enable them to operate it
safely, for cleaning and looking after the unit and for handling faults.
●
The employees engaged to perform any tasks with the unit must have
read the operating manual, especially the section “Safety information”,
before beginning work.
●
Keep this operating manual stored safely during the life of the unit.
●
Make sure that this operating manual is constantly available for the
staff at the place where the unit is used.
●
Supply this operating manual to any subsequent owner or user of the
unit.
●
Include any supplements received from the manufacturer.
●
Supplement the instructions, including supervisory or notification
requirements, to take account of special operational circumstances
e.g. work organisation, workflows or deployed staff.
●
This operating manual is intended for employees who are responsible
for operating, cleaning and looking after the unit as well as handling
faults.
●
Repairs to the unit may only be carried out by specially trained
technical staff.
5Operating manual
Page 6

●
Adults may not use the unit without supervision if
-
they are unable to do so due to their physical, sensory or mental
capabilities,
-
they do not have the knowledge and experience required to
operate the unit safely and in the manner intended.
1.3 Warnings
Warnings are indicated with a pictogram and a signal word.
The type and source of the risk as well as the consequences are described
together with instructions for avoiding the danger. The meanings of the
pictograms and signal words used are explained in section “Signs and
symbols” (see Chapter “Signs and symbols”, Page 7).
1.4 Warranty and liability
The unit may not be modified or technically changed.
Deep fat fryer (electric)Introduction
All guarantees or warranties cease to exist if technical changes are made.
Furthermore, the safety of the unit is no longer guaranteed.
Claims for warranty or liability for damages to persons or property are
excluded if they arise from one or more of the following causes:
●
Improper use of the unit
●
Incorrect installation, commissioning, operation or servicing of the
unit
●
Technical changes to the unit without the binding agreement of the
manufacturer
●
Use of spare parts or accessories not approved by MKN
●
Faults resulting from the failure to comply with these operating
instructions
Operating manual6
Page 7

1.5 Signs and symbols
DANGER
Imminent danger
→
Non-compliance poses a threat of death or serious injury.
WARNING
Possible danger
→
Non-compliance may pose a threat of death or serious injury.
CAUTION
Dangerous situation
→
Non-compliance may result in slight injuries.
IntroductionDeep fat fryer (electric)
CAUTION
Dangerous situation
→
Non-compliance may result in equipment damage.
Provides helpful information regarding use.
ExplanationMeaningSymbol
These must be fulfilled before you can
follow the instructions.
An action is required here.Instruction, single
Instructions must be followed in the order given.
Emphasises the name of the controlControlOn/Off
1.
2.
RequirementsRequirements
step
Instruction, multiple
steps
7Operating manual
Page 8

Deep fat fryer (electric)Safety information
2 Safety information
MKN appliances comply with the relevant safety standards. However,
this does not exclude all possible dangers from arising, e.g. due to
improper use.
Therefore, when installing and operating the unit, the operating personnel
must be familiar with and observe local regulations, including BGR 111
“Working in catering kitchens”.
The following safety measures must also be observed:
Hot surfaces, steam and
liquids
Electricity Risk of electric shock
Risk of burns due to hot surfaces
●
Wear insulated protective gloves during operation.
●
Allow surfaces to cool before cleaning.
●
Do not touch the heating elements immediately after operation.
Risk of scalding due to hot steam
●
Hot fat causes traces of water to evaporate in an explosive manner;
dry the unit completely after cleaning.
Risk of scalding due to hot fat
●
Observe the effective capacity.
●
Whenever possible, thaw frozen food before deep frying.
●
Dry foods containing a lot of water before deep frying.
●
Do not mix frying fats and oils or different kinds of frying fats.
●
Units with rollers:
-
Only move the unit when the basin is empty.
-
Lock the rollers during operation.
●
To avoid damaging the electronics, do not operate the unit if the
controls are damaged.
●
Only put a defective unit back into operation after it has been repaired.
Risk of fire Risk of fire due to self-igniting fat, soiling and greasy films
●
Clean the unit after each use.
●
Observe the instructions regarding cleaning.
●
Do not leave the unit unattended during operation.
●
Observe the effective capacity.
●
Consider the lower flash point when using old frying fat.
Operating manual8
Page 9

Safety informationDeep fat fryer (electric)
Firefighting
●
Disconnect the unit from the mains immediately in the event of fire.
●
Never attempt to put out a fire with water. Use a class F fire
extinguisher to put out oil and fat fires. For other fires, use ABC fire
extinguishers.
Hygiene Personal injury and damage to equipment due to inadequate cleaning
●
Observe the cleaning instructions.
Cleaning Risk of burns caused by cleaning agents
●
Wear protective gloves and glasses when using caustic cleaning
agents.
●
Observe the information provided by the manufacturer of the cleaning
agent.
Risk of injury due to slippery floors
●
Clean the floor in front of the unit regularly to remove splattered
grease.
Damage to equipment due to incorrect cleaning
●
Do not cool the unit abruptly after operation.
●
Do not clean the unit with a high-pressure cleaner.
●
Do not clean the surfaces with abrasive cleaners, scouring pads or
chemically aggressive cleaners.
●
Observe the reaction times for cleaning agents.
●
Clean the unit regularly.
●
Collect used fat in suitable containers and dispose of properly
according to the harmful substance ordinances.
Improper use Damage to equipment due to improper use
●
Only use the unit with standard frying fats or oils. Liquid and semi-solid
frying fats are suitable.
●
Do not melt solid frying fat in the frying basin.
Liquify solid frying fat before filling.
●
Do not operate the unit without the oil clarifying tray.
●
Only use original accessories.
9Operating manual
Page 10
2
3
4
56 7
8
1
Deep fat fryer (electric)Construction and function
3 Construction and
function
3.1 Description of the unit
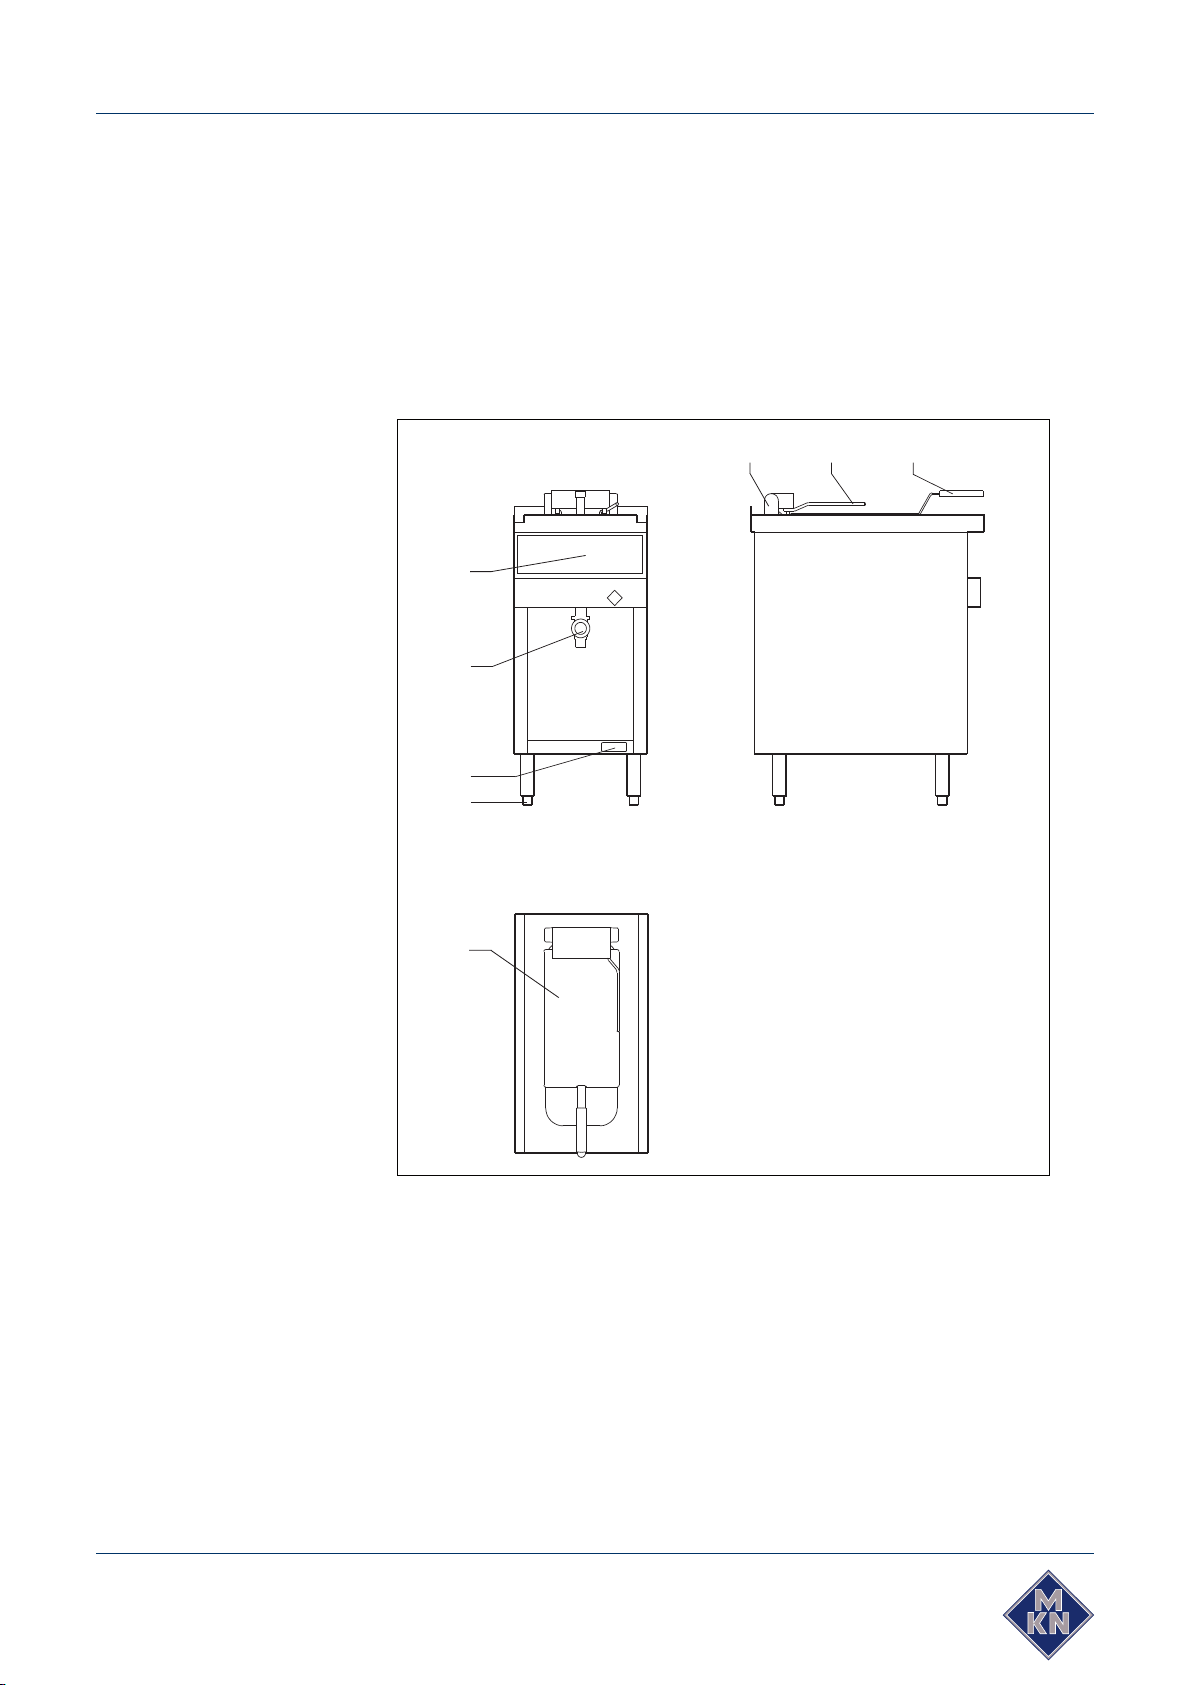
3.1.1 Version “London I”
Figure 3: Version “London I”
Swivel housing5Height-adjustable feet1
Swivel lever6Type plate2
Frying basket “L”7Drain3
Lid8Controls4
Operating manual10
Page 11
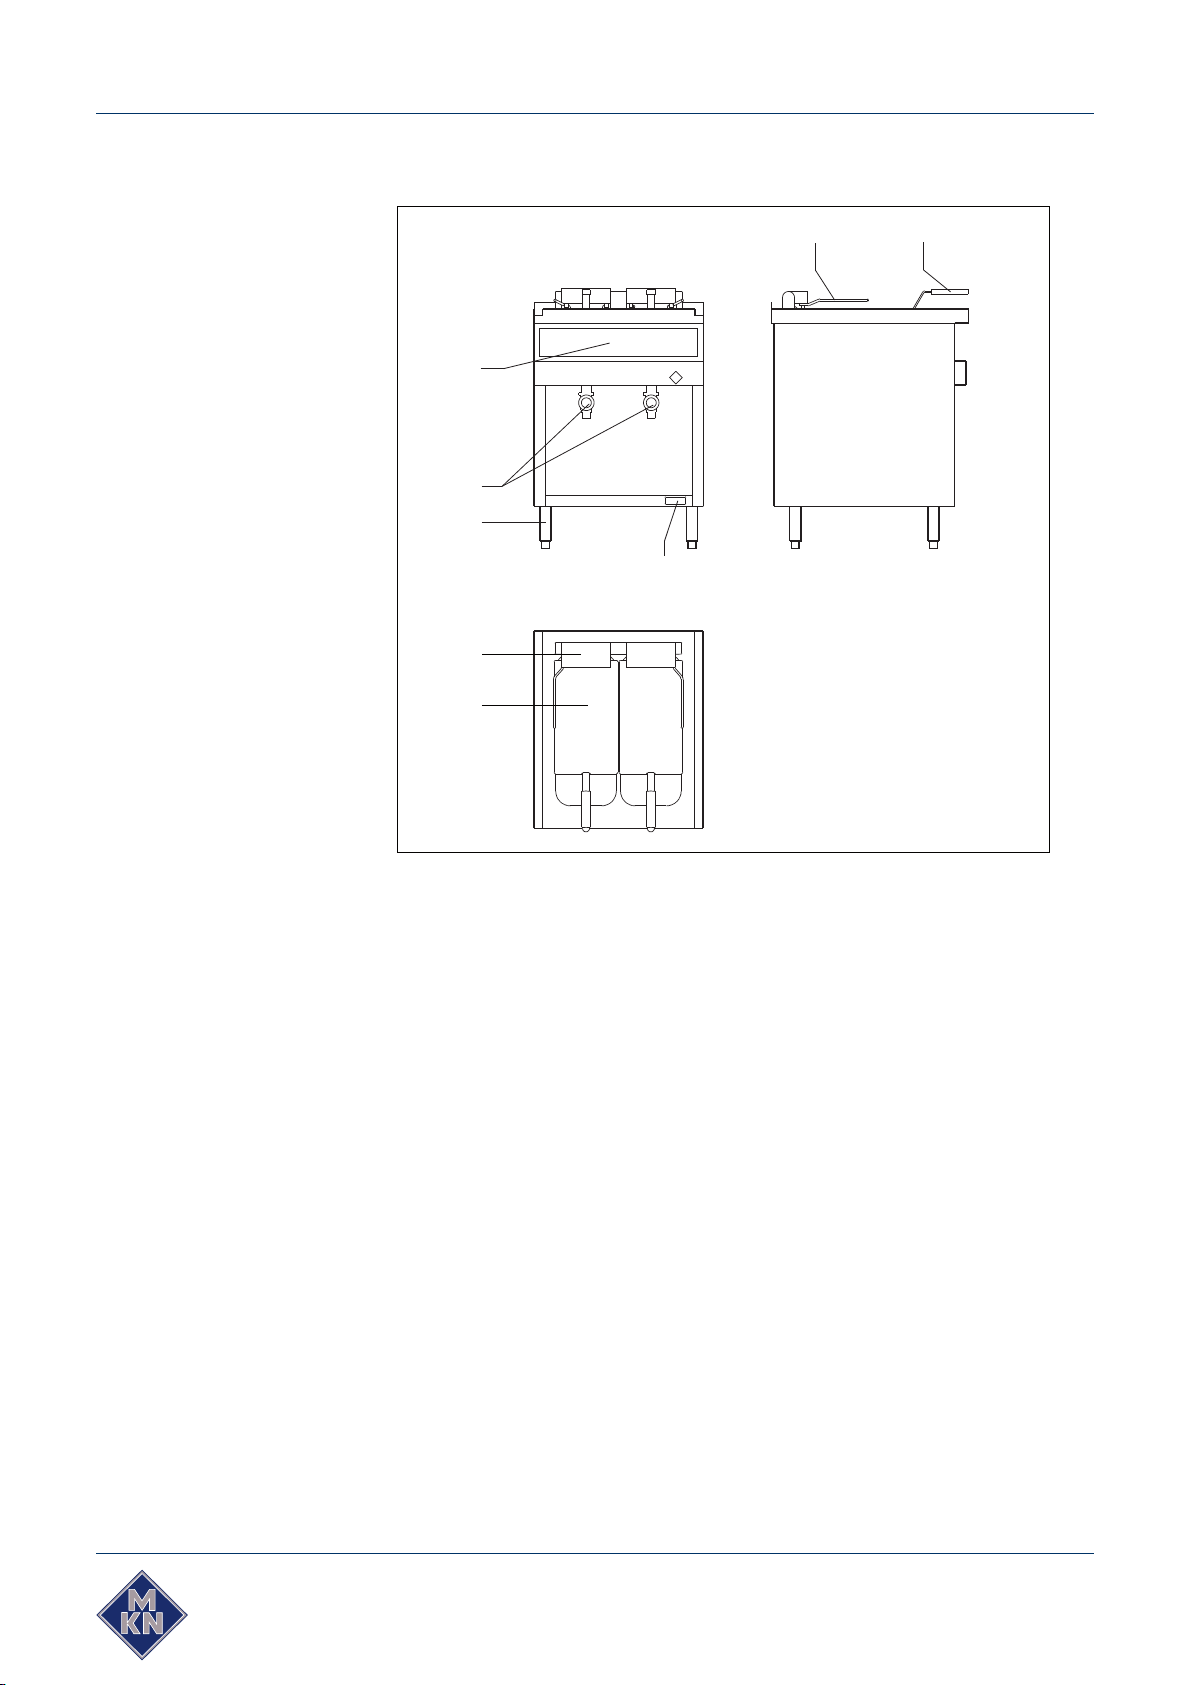
3.1.2 Version “London II”
1
3
2
4
56
7
8
Construction and functionDeep fat fryer (electric)
Figure 4: Version “London II”
Swivel lever5Type plate1
Frying basket “L”6Height-adjustable feet2
Swivel housing7Drain3
Lid8Controls4
11Operating manual
Page 12

3.1.3 Version “Paris”
1
3
4
57
8
9
2
6
Deep fat fryer (electric)Construction and function
Figure 5: Version “Paris”
Frying basket “P”6Type plate1
Frying basket “L”7Height-adjustable feet2
Swivel housing8Drain3
Lid9Controls4
Swivel lever5
3.2 Features
Main components
Electrical features
●
Self-supporting housing made of chrome nickel steel (material no.
1.4301)
●
Frying basin with deeper, cooler fat zone and drainage at the bottom
(front drainage optional)
●
Direct heating with swivelling tubular heating elements
●
Unit switch
●
Temperature regulator
●
Control lamps (visual signal)
Operating manual12
Page 13

●
Buzzer (audible signal)
●
Safety temperature limiter
-
Optional Fryer Safety Control (FSC) system
-
Optional second Safety Temperature Limiter (STL)
●
Heating contactors
Construction and functionDeep fat fryer (electric)
Units with frying basket
lifting mechanism
Units with fat filter system
Accessories and optional
equipment
3.3 Description of the controls
●
Drive motor
●
End switch
●
Timer
●
Pull-out fat collection receptacle
●
2 fat-filter inserts
●
Pump with removable intake and return flow nozzles.
●
Return flow line with self-closing coupling
●
Lid
●
Oil clarifying tray
●
Frying baskets
●
Fat collection receptacle
●
Connection rails for setting up several units
●
Side connection rails
Open out the cover page to see the controls.
“Filling level” control lamp
“Over-temperature” control lamp
Safety temperature limiter
DescriptionControl
Switch on/offUnit switch
Lights up when heating is activated“Heating mode” control lamp
Lights if the oil/fat level is below the
minimum.
Lights when the maximum operating
temperature is exceeded.
Units with FSC:
●
“Over-temperature 1” lights if the
FSC has detected a fault.
●
“Over-temperature 2” lights if the
maximum operating temperature is
exceeded (STL has triggered)
Sets the frying temperatureTemperature regulator
Switches the safety temperature limiter
back on
13Operating manual
Page 14

Deep fat fryer (electric)Construction and function
DescriptionControl
Activate heating“Reset” button
Switches the fat filter system on/offSwitch for fat filter system
Sets the frying timeTimer
3.4 Using frying fat and oil
Frying fat as a food The food being fried absorbs frying fat during frying, e.g. French fries
7-12%, doughnuts 20-25%. The fat is eaten along with the food; this is
why frying fat also counts as a food in terms of nutritional physiology.
Suitability for consumption Frying fat must be suitable for consumption, this means that it must be
replaced in good time before it becomes spoiled.
The period of use given by the manufacturer is always decisive. Good
frying fat can be used for about 30-40 hours depending on the method
of use and the food being fried.
Extending the usable life
of the fat
Used frying fat Do not top up used frying fat with new fat; replace completely instead.
3.5 Recommended frying temperatures and
To determine whether the fat is suitable for consumption, quick tests (e.g.
3M Oil Testing Strips) are available from specialised suppliers.
The fat will stay suitable for consumption for longer by taking the following
measures:
●
Store frying fat cool when not in use
●
Choose foods for frying that contain only small amounts of water
●
Use the frying fat for only one type of food.
●
Do not overheat the fat (160-180 °C is sufficient)
●
Do not fry breadcrumbed food
Collect used fat in suitable containers and dispose of properly according
to the harmful substance ordinances.
times
Frying time (minutes)Frying temperature (°C)Food
3–4170Doughnuts
2–3170Cauliflower
2–6170Fish fillet
2–4160Trout
3–8170Chicken, portioned
2–4170Pan fried items
Operating manual14
Page 15

and deep frozen
and thawed
Table 1: Recommended frying temperatures and times
3.6 Filling quantities
Table 2: Filling quantities (food to be fried)
Construction and functionDeep fat fryer (electric)
Frying time (minutes)Frying temperature (°C)Food
3–5180French fries, blanched
2–3180French fries, blanched
2–3180Crullers
1–3170Onion rings
Filling quantity (kg)Version
1.2London I
2 x 1.2London II
2.5Paris
Table 3: Filling quantities (frying fat)
Filling quantities min./max. (l)Version
6.5/12.5London I
2 x 6.5/2 x 12.5London II
15/30Paris
15Operating manual
Page 16

4 Operation
4.1 Commissioning
The unit was tested for functioning and safety after manufacture.
Before putting into service:
1. Remove any remaining production residues and packaging.
2. Clean the unit (see Chapter “Cleaning”, Page 23).
4.2 Filling with frying fat
Requirements Unit is switched off and is cool
CAUTION
Deep fat fryer (electric)Operation
Risk of fire caused by frying fat
The fat or oil can ignite if the filling quantity is below the minimum level.
→
Observe the filling mark.
1. Liquify solid frying fat in a saucepan before filling the unit.
2. Remove the lid.
3. Close the drain.
4. Fill with fat or oil according to the amount of food to be fried (see
Chapter “Filling quantities”, Page 15).
You will find the filling marks on the rear wall of the frying basin: Observe
the minimum and maximum quantities!
4.3 Switching on/switching off unit
4.3.1 Switching on
Requirements Unit is filled with frying fat or oil at least up to the lower filling mark
WARNING
Risk of fat fires
The fat or oil can ignite if the filling quantity is below the minimum level.
→
Observe the filling mark.
Operating manual16
Page 17

1. Turn the unit switch (1).
Unit is switched on.
2. Press Reset (7).
Heating is switched on.
3. Set the temperature with the temperature regulator (3).
Control lamp (2) lights up, frying fat is being heated.
Units with frying basket lifting mechanism: Lifting bars will move to the
upper end position and a signal will sound.
The unit is ready for operation once the control lamp goes out.
4.3.2 Switching off
CAUTION
Damage to equipment due to switching off incorrectly
OperationDeep fat fryer (electric)
Switching on again with cold, solidified fat blocks the frying tray lifting
mechanism.
→
Do not switch the unit off when the basket holding bracket is lowered.
→
Turn the unit switch (1) to the setting “0”.
Unit is switched off.
4.4 Basic functions
4.4.1 Setting the temperature
→
Turn the temperature regulator (3) to the desired temperature.
The control lamp (2) lights up.
17Operating manual
Page 18

4.4.2 Setting the time
→
Turn the timer (6), to set the frying time.
Minimum: 1 minute, maximum: 15 minutes
4.5 Deep frying
Requirements Unit is filled with frying oil or fat
Unit is switched on and pre-heated
WARNING
Risk of fire
→
Never leave the unit unattended during operation.
→
Observe information about fighting fires in chapter “Safety
information”.
Deep fat fryer (electric)Operation
CAUTION
Risk of burns due to frying oil or fat frothing over
→
Whenever possible, thaw or partly thaw frozen food before adding.
→
Observe the specified filling quantities.
Observe the information about using frying fats and oils (see Chapter
“Using frying fat and oil”, Page 14).
1. Dry damp food before frying.
2. Place the food to be fried in the frying basket, observing the maximum
filling quantity (see Chapter “Filling quantities”, Page 15).
3. Check the temperature.
The control lamp (2) goes dark as soon as the set temperature is reached.
4. Place the frying basket in the frying basin.
Version “Paris”: When frying with the frying basket “L”, use the frying
basket “P” as well.
Observe the recommended frying temperatures and times (see Chapter
“Recommended frying temperatures and times”, Page 14).
Operating manual18
Page 19

OperationDeep fat fryer (electric)
Figure 6: Positioning the frying basket
5. After frying, place the frying basket in the swivel housing and allow
the fat to drain off.
4.6 Frying (with the frying basket lifting mechanism)
Requirements Unit is filled with frying oil or fat
Unit is switched on and pre-heated
WARNING
Risk of fire
→
Never leave the unit unattended during operation.
→
Observe information about fighting fires in chapter “Safety
information”.
CAUTION
Risk of burns due to frying oil or fat frothing over
→
Whenever possible, thaw or partly thaw frozen food before adding.
→
Observe the specified filling quantities.
The frying basket lifting mechanism lowers the frying basket into the frying
basin automatically and lifts it out again after a pre-set time.
1. Dry damp food before frying.
2. Place the holding bracket for the basket on the lifting bars behind the
swivel housing.
3. Position the frying basket on the holding bracket.
Version “Paris”: When frying with the frying basket “L”, use the frying
basket “P” as well.
19Operating manual
Page 20

6
5
4
3
7
8
9
10
11
Deep fat fryer (electric)Operation
4. Place the food to be fried in the frying basket, observing the maximum
filling quantity (see Chapter “Filling quantities”, Page 15).
5. Setting the time.
Observe the recommended frying temperatures and times (see Chapter
“Recommended frying temperatures and times”, Page 14).
6. Check the frying temperature.
The control lamp (2) goes out as soon as the frying temperature is
reached.
7. Press timer (6), to start frying.
The frying basket will be lowered into the frying basin.
At the end of the pre-set time, the frying basket will be raised from the
frying basin and a signal will sound.
To interrupt frying, press timer (6) again.
4.7 End of operation and breaks
Switch off the unit at the end of operation and during breaks.
1.
Turn temperature regulator to “Δ”.
2. Turn the unit switch to “0”.
The unit is switched off.
Operating manual20
Page 21

4.8 Emptying the unit
4.8.1 Draining off the frying fat
Requirements Frying fat is liquid
Unit is switched on
CAUTION
Risk of scalding due to hot fat
→
Wear heat-resistant protective gloves.
Observe the information about using frying fats and oils (see Chapter
“Using frying fat and oil”, Page 14).
When transporting, use a heat-resistant container with handles and
sealable lid.
OperationDeep fat fryer (electric)
Observe the effective filling capacity of the unit.
1. Place a suitable container underneath.
2. Slowly open the drain.
3. Collect used fat in suitable containers and dispose of properly
according to the harmful substance ordinances.
4. Close the drain.
4.8.2 Filtering frying fat with the integrated fat filtering system
Requirements Frying fat is liquid
CAUTION
Risk of scalding due to hot fat
→
Wear heat-resistant protective gloves.
Observe the information about using frying fats and oils (see Chapter
“Using frying fat and oil”, Page 14).
With the London II version, filter the fat in the two frying basins separately.
1. Switch off the unit.
2. Pull out the fat collection receptacle as far as possible.
3. Insert the fine frying fat filter.
21Operating manual
Page 22

Deep fat fryer (electric)Operation
4. Insert the coarse frying fat filter.
5. Push the fat collection receptacle back in completely.
The intake nozzle must engage in the pump.
6. Open the drain slowly and let the fat run into the container.
7. Close the drain.
8. Insert the return pump nozzle into the coupling of the return line.
9. Turn the switch for the fat filter system to the right and hold it.
The fat will be pumped into the frying basin.
10. London II version: To filter the second frying basin, pull out the return
pump nozzle and refit it.
Operating manual22
Page 23

5 Cleaning
5.1 Avoiding corrosion
●
Keep the surfaces of the unit clean and well aired.
●
Regularly remove accumulated layers of scale, grease, starch and
protein.
●
Regularly remove salt deposits.
●
Only allow parts made of stainless steel brief contact with
concentrated acids, spices, salts or similar substances.
●
Avoid damaging the stainless steel surface with other metallic items
(steel spatulas, steel wire brushes).
●
Avoid contact with iron and steel (steel wool, steel spatulas, chippings
from the water pipes, iron-containing water).
●
Eliminate newly rusted points, which may have formed due to contact
with iron for example, using a mild scouring agent or fine sandpaper.
●
Do not use any bleaching or chlorine-containing cleansers.
●
Clean contact surfaces with fresh water.
CleaningDeep fat fryer (electric)
5.2 General cleaning
CAUTION
Risk of burns due to hot surfaces
→
Allow surfaces to cool before cleaning.
CAUTION
Equipment damage due to water penetrating the electronic controls
→
Do not spray the outside of the housing with water jets.
CAUTION
Damage to surfaces caused by incorrect cleaning
→
Do not use abrasive cleaners or cloths.
→
Do not use aggressive cleaners (e.g. grill cleaner).
CAUTION
Damage caused by incorrect cooling
→
Allow the unit to cool before cleaning.
→
Do not use ice or cold water for cooling.
23Operating manual
Page 24

1. Clean the unit after each use.
2. Switch off unit and allow to cool before cleaning.
3. Wipe the outside of the housing with a standard stainless steel cleaner
and fresh water.
5.3 Cleaning the housing
→
Clean the housing daily with warm water and a standard detergent.
5.4 Cleaning the frying basin
Requirements Frying fat drained off
CAUTION
Risk of burns due to hot surfaces
→
Allow surfaces to cool before cleaning.
Deep fat fryer (electric)Cleaning
CAUTION
Risk of scalding due to hot steam
Hot frying fat causes traces of water to evaporate in an explosive manner.
→
Dry the unit completely after cleaning.
1. Turn off the unit and allow it to cool.
2. Close the drain.
3. Remove the frying basket.
4. Units with frying basket lifting mechanism: Remove the holding bracket
for the basket from the lifting bars.
5. Swivel out the heating coil using the swivel lever and lock in place.
6. Carefully remove the oil clarifying tray from the frying basin and empty
it.
7. Thoroughly clean the frying basin, frying basket and oil clarifying tray
with warm water and dishwashing detergent.
8. Rinse thoroughly with clear water.
9. Wipe dry with a lint-free cloth.
Ensure that no water remains in the drain.
10. Lift the heating coil slightly with the swivel lever and fold in the
supporting bracket.
Operating manual24
Page 25

11. Swivel the heating coil back into the frying basin using the swivel
lever.
12. Replace the oil clarifying tray.
13. Units with frying basket lifting mechanism: Place the holding bracket
for the basket on the lifting bar.
14. Replace the frying basket.
15. Put the lid on.
5.5 Cleaning the tubular heating elements
Requirements Frying fat drained off
CAUTION
Risk of burns due to hot surfaces
→
Allow surfaces to cool before cleaning.
CleaningDeep fat fryer (electric)
CAUTION
Risk of scalding due to hot steam
Hot frying fat causes traces of water to evaporate in an explosive manner.
→
Dry the unit completely after cleaning.
1. Turn off the unit and allow it to cool.
2. Close the drain.
3. Place a suitable container underneath.
4. Fill with water up the maximum filling level mark.
5. Switch on the unit and heat the water to 90 °C.
6. Switch off the unit.
7. Allow encrustation to soften for 30 minutes.
8. Open the drain slowly and let the water run into the container.
9. Close the drain again.
10. Swivel the tubular heating element outward with the swivel lever and
allow it to lock in place.
11. Allow tubular heating element to cool down.
12. After allowing to cool, push the supporting plate under the heating
unit in its swivelled-out position.
13. Clean the tubular heating element with a soft brush.
25Operating manual
Page 26

Deep fat fryer (electric)Faults
6 Faults
6.1 Correcting faults
This section describes the steps to be taken in the event that faults occur
on the unit during operation.
1. Observe the instructions in Chapter “Cause of errors and
troubleshooting”, Page 28.
2. Contact customer service.
6.2 Safety temperature limiter (STL) triggered
CAUTION
Damage of the safety temperature limiter due to improper switching
back on
→
Allow unit to cool down.
→
Determine the cause of the triggering and eliminate it.
The safety temperature limiter is a safety device that prevents the unit
from being damaged.
It is triggered when
●
the unit exceeds its maximum operating temperature
●
the ambient temperature falls below 0 °C
If the maximum operating temperature is exceeded, the unit's heating
switches off.
6.2.1 Switching the STL back on after exceeding the maximum operating temperature
1. Allow unit to cool down.
2. Determine the cause of the STL triggering.
3. Eliminate the cause.
4. Remove the cap in the switch cover.
5. Press the red unlocking button.
6. Replace the cap in the switch cover.
Operating manual26
Page 27

FaultsDeep fat fryer (electric)
6.2.2 Switching the STL back on if the ambient temperature falls below 0 °C
If the ambient temperature falls below 0 °C (e.g. during storage in a
warehouse or operation in a mobile sales cart), the STL triggers. The unit
cannot be switched on.
DANGER
Risk of injury due to the sensor bursting
The sensor tip may burst if it becomes overheated.
→
Never heat sensors with a lighter or similar source of heat.
1. Warm the sensors to room temperature (20 °C).
2. Remove the cap in the switch cover.
3. Press the red unlocking button.
4. Replace the cap in the switch cover.
6.3 Control lamp is defective
CAUTION
Equipment damage due to penetration of water
→
Replace control lamps according to the applicable replacement parts
list.
An unsealed lens or control lamp could allow penetration of cleansers.
Only put the defective unit back into service after replacing the defective
lens or control lamp with an original component.
27Operating manual
Page 28

Deep fat fryer (electric)Faults
6.4 Cause of errors and troubleshooting
Open out the cover page to see the controls.
RemedyPossible causesError
●
Control is defective.Control does not respond
Disconnect the unit from the mains.
●
Contact customer service.
up; signal sounds.
(units with FSC)
“Over-temperature” control
lamp lights up during operation;
signal sounds.
Unit shuts off
cracked
Ambient temperature is below 0 °C.
Safety temperature limiter (STL) has
triggered.
Not enough frying fat.“Filling level” control lamp lights
Maximum operating temperature exceeded. STL has triggered.
Temperature regulator at “Δ”
Power supply disrupted
Unit is defective
Unit is defectiveInsufficient heat output
Operating temperature exceeded, STL
has triggered
Control lamp is defectiveControl lamp not working or is
Check the STL (see Chapter “Safety
temperature limiter (STL) triggered”,
Page 26)
●
Switch off unit and top up the frying
fat. Observe the filling mark.
Switch unit on again after 2 minutes.
●
Allow the unit to cool down again if
the “filling level” control lamp does not
go out.
●
Turn off the unit and allow it to cool
down.
Switch unit on again after 2 minutes.
●
Allow the unit to cool down again if
the “over-temperature” control lamp
does not go out.
●
Switch on the unit.Unit is switched offUnit does not heat up
●
Press “Reset” button.Heating is not activated
●
Set the temperature.
●
Connect the unit to the mains.
●
Check the STL (see Chapter “Safety
temperature limiter (STL) triggered”,
Page 26)
●
Disconnect the unit from the mains.
●
Contact customer service.
●
Disconnect the unit from the mains.
●
Contact customer service.
●
Check the STL (see Chapter “Safety
temperature limiter (STL) triggered”,
Page 26)
●
Disconnect the unit from the mains.
●
Contact customer service.
Operating manual28
Page 29

7 Service
MKN GmbH & Co D-38300 Wolfenbüttel
SN: XXXXXXX Typ: XXXXXXXXXX
XX,X kW IP XX
21 3
When contacting the service department, please always provide the serial
number (1) and device type (2) of your unit.This information can be found
on the type plate (3).
Figure 7: Type plate
Enter the data in the provided table.
ServiceDeep fat fryer (electric)
Serial numberDevice type
7.1 Disposal
Used electric and electronic appliances, in addition to valuable materials,
also contain harmful substances which were necessary for their functioning
and safety.
Do not dispose of the unit with regular non-recyclable waste.These
substances can be damaging to your health or to the environment if
incorrectly handled or disposed of with regular waste. Observe local
regulations for used appliances and dispose of accordingly. If you have
any questions, please contact the responsible authorities (e.g. the offices
of waste management).
29Operating manual
Page 30

Deep fat fryer (electric)Declarations of Conformity
8 Declarations of
Conformity
Operating manual30
Page 31

Declarations of ConformityDeep fat fryer (electric)
31Operating manual
Page 32

Deep fat fryer (electric)
Operating manual32
Page 33

Deep fat fryer (electric)
33Operating manual
Page 34

Deep fat fryer (electric)
Operating manual34
Page 35

Deep fat fryer (electric)
Page 36

Deep fat fryer (electric)
MKN Maschinenfabrik
Kurt Neubauer GmbH & Co.
Halberstaedter Strasse 2
D-38300 Wolfenbuettel (Germany)
Phone +49 (0) 53 31 / 89-0
Fax +49 (0) 53 31 / 89-280
 Loading...