

MKN FlexiCombi Classic 6.21, FlexiCombi Classic 10.21, FlexiCombi Classic Series, FlexiCombi Classic 20.21, FlexiCombi Classic 10.15 Operating Instructions Manual
...Page 1
Read the operating instructions prior to
commissioning
Operating instructions
Combisteamer
Unit Model Type of energy Version
FlexiCombi Classic 6.15
6.21
10.15
10.21
20.15
20.21
Translation from the original document • 10014471-0ABDE-A • 23/01/2017
Gas HandClean
WaveClean (optional)
Door with rear-ventilated pane
Door with hygiene glazing
(optional)
1-point core temperature sensor
4-point core temperature sensor
(optional)
Sous-vide core temperature
sensor (optional)
10014471-0ABBE-A en-GB
Page 2
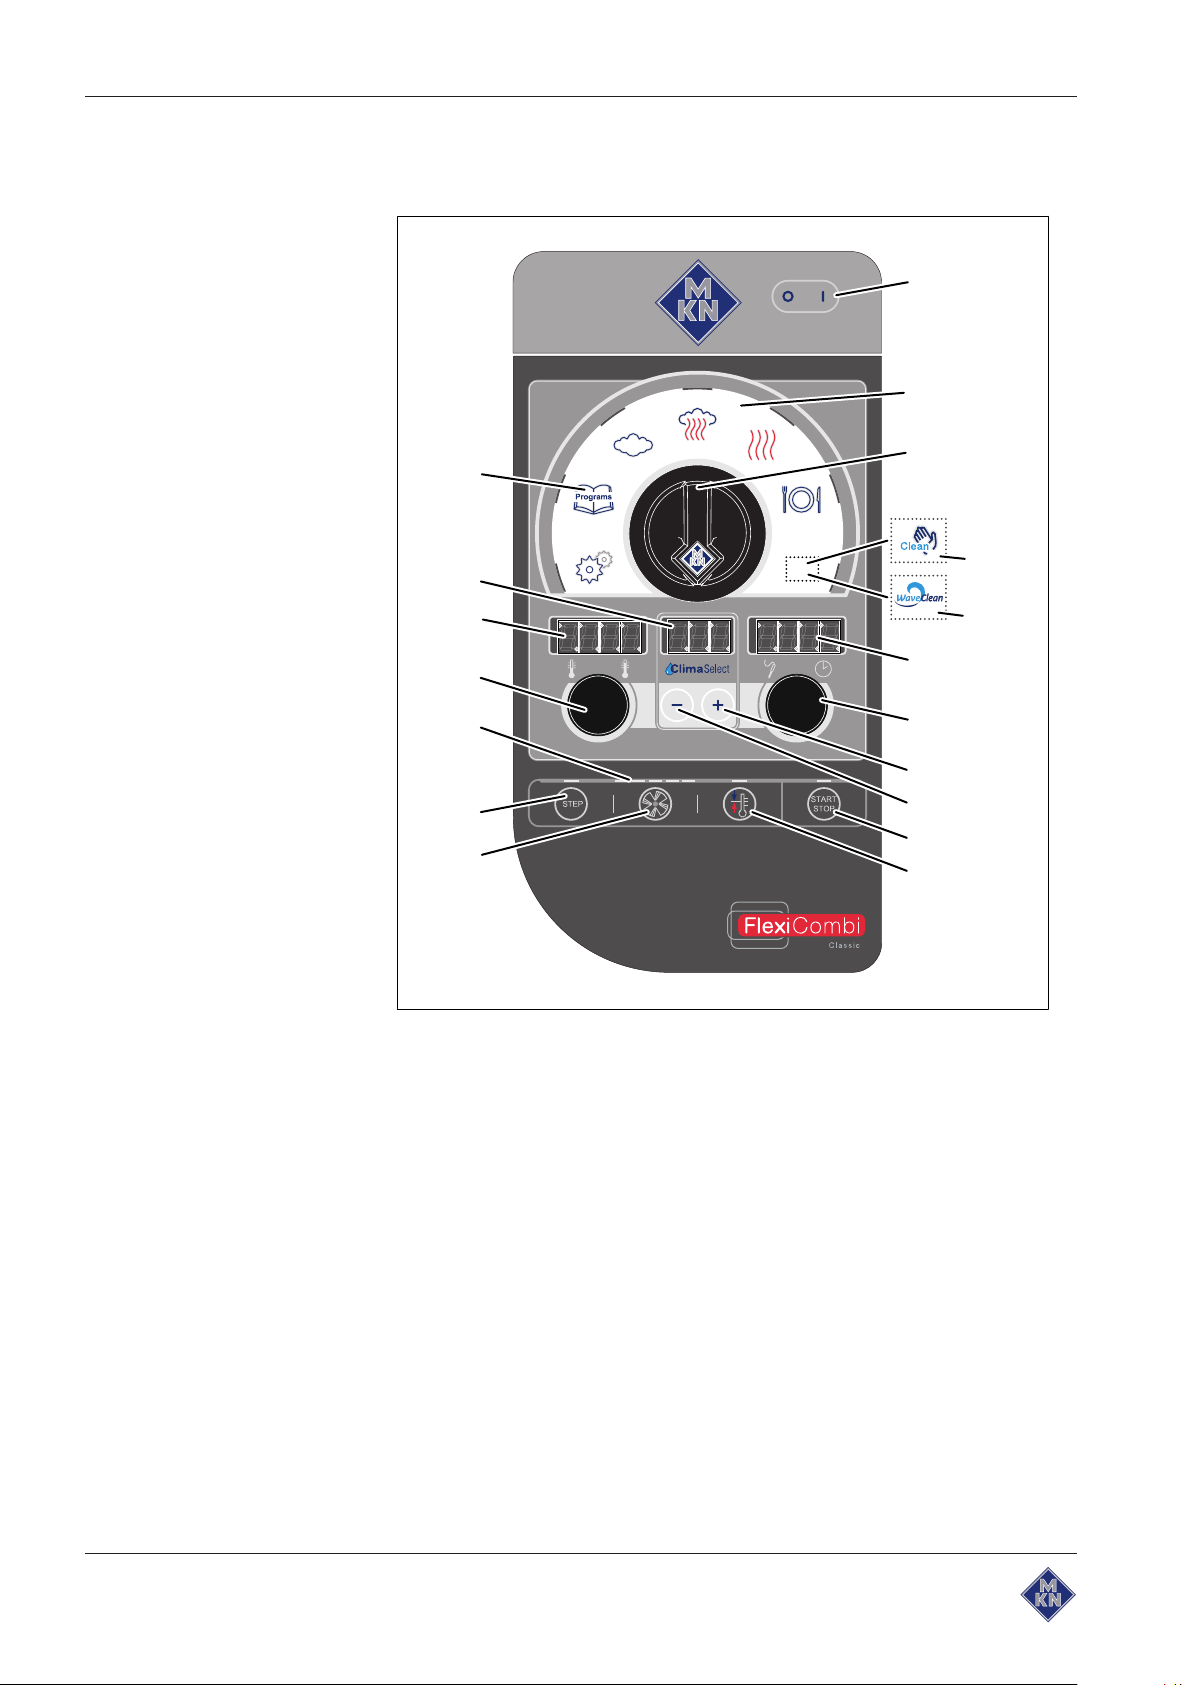
Operating and display elements
MAXI
a
b
c
d
e
f
g
h
i
j
k
l
m
n
o
p
q
r
a
On Off "I O"
b Selection range k
c
Select
d
HandClean
e
WaveClean
f Right display o Left knob
g Right knob p Left display
h
Plus
i
Minus
button j "START STOP" button
knob l
symbol m "STEP" button
symbol n Indicator light
button q Middle display
button r "Programs" button
Ready2Cook
Fan speed
button
button
10014471-0ABBE-A
2 Operating instructions
Page 3

Manufacturer
MKN Maschinenfabrik Kurt Neubauer GmbH & Co. KG
Halberstädter Straße 2a
38300 Wolfenbüttel, Germany
Telephone +49 53 31 / 89-0
Fax +49 53 31 / 89-280
Copyright
All rights to text, graphics and pictures in this documentation are held by MKN Maschinenfabrik Kurt
Neubauer GmbH & Co. KG. Distribution or duplication is only permitted with the prior written consent
of MKN.
Copyright by MKN Maschinenfabrik Kurt Neubauer GmbH & Co. KG.
3Operating instructions
Page 4

Directory of contents
1Introduction......................................................................... 7
1.1About this manual ............................................................................ 7
1.1.1Explanation of signs .................................................................................. 8
1.2Intended use ..................................................................................... 9
1.3Warranty............................................................................................ 9
2Safety information............................................................ 10
3Rules of conduct when the smell of gas is detected .... 13
4Description of the unit ..................................................... 14
4.1Overview of the unit ....................................................................... 14
4.1.1Countertop unit........................................................................................ 14
4.1.2Floor-standing unit................................................................................... 15
4.2Features .......................................................................................... 16
4.2.1Characteristics......................................................................................... 16
4.2.2USB port.................................................................................................. 16
4.2.3HACCP log .............................................................................................. 16
4.2.4WaveClean automatic cleaning (optional)............................................... 16
4.2.5Preheat bridge for models 20.15 and 20.21 ............................................ 17
4.3Operating and cooking modes...................................................... 17
4.3.1Operating modes..................................................................................... 17
4.3.2Types of cooking ..................................................................................... 17
4.3.3Expanded cooking functions ................................................................... 18
4.3.4Core temperature measurement ............................................................. 18
4.4Operating, control and display element functions...................... 19
4.4.1Abbreviations in the displays................................................................... 20
4.5Loading capacity ............................................................................ 21
4.5.1Loading capacity ..................................................................................... 21
4.5.2Plate capacity during regeneration.......................................................... 21
4.6Standard setting values................................................................. 22
4.6.1Temperature standard setting ................................................................. 22
4.6.2Core temperature standard-setting ......................................................... 22
4.6.3Cooking zone humidity standard setting ................................................. 22
4.7Basic settings ................................................................................. 23
5Operating the unit............................................................. 25
5.1Operating the unit in an environmentally responsible manner .......
25
5.2Switching the unit on and off ........................................................ 25
5.2.1Switching on ............................................................................................ 25
5.2.2Switching off ............................................................................................ 25
5.3Opening and closing the cooking zone door .............................. 25
5.3.1Opening the single-stage door latch........................................................ 25
5.3.2Closing the single stage door latch ......................................................... 26
4 Operating instructions
10014471-0ABBE-A
Page 5

Directory of contents
5.3.3Opening the two-stage door latch ........................................................... 26
5.3.4Closing the two-stage door latch ............................................................. 27
5.4Loading and emptying the unit ..................................................... 27
5.4.1Loading and emptying ............................................................................. 27
5.4.2Loading and emptying with a tray rack trolley ......................................... 28
5.4.3Loading and emptying with a tray trolley ................................................. 29
5.5Making the basic settings.............................................................. 30
5.5.1Opening the Setting menu....................................................................... 30
5.5.2Changing the basic setting ...................................................................... 30
5.6Basic functions............................................................................... 31
5.6.1Select cooking mode ............................................................................... 31
5.6.2Setting the cooking temperature ............................................................. 31
5.6.3Setting the cooking zone humidity level .................................................. 31
5.6.4Setting the cooking time .......................................................................... 32
5.6.5Setting the core temperature................................................................... 32
5.6.6Displaying actual values.......................................................................... 33
5.6.7Setting the fan speed .............................................................................. 33
5.6.8Inserting and removing a USB flash drive ............................................... 33
5.6.9Displaying the HAACP log number ......................................................... 33
5.6.10Exporting the HACCP log...................................................................... 34
5.7Using the core temperature sensor.............................................. 34
5.7.1Measuring with a 4-point core temperature sensor ................................. 35
5.7.2Measuring with a sous-vide core temperature sensor............................. 35
5.7.3Measuring the core temperature when cooking frozen food ................... 36
5.8Manual cooking .............................................................................. 36
5.8.1Starting the type of cooking..................................................................... 36
5.8.2Ending the cooking mode........................................................................ 37
5.9User's own cooking programs ...................................................... 37
5.9.1Creating user's own cooking program ..................................................... 37
5.9.2Saving user's own cooking program........................................................ 38
5.9.3Deleting user's own cooking program ..................................................... 38
5.10Automatic cooking ....................................................................... 39
5.10.1Selecting the cooking program.............................................................. 39
5.10.2Starting the cooking program ................................................................ 39
5.10.3Cooking program ends .......................................................................... 39
5.10.4Cancelling the cooking program............................................................ 40
5.10.5Changing the cooking program while cooking....................................... 40
5.11Multi-step cooking program ........................................................ 41
5.11.1Starting .................................................................................................. 41
5.12Expanded cooking functions ...................................................... 41
5.12.1Manual humidification............................................................................ 41
5.12.2Setting the start time delay.................................................................... 41
5.12.3Cancelling the start time delay .............................................................. 42
5.12.4Starting Ready2Cook ............................................................................ 42
10014471-0ABBE-A
5Operating instructions
Page 6

Directory of contents
5.12.5Cancelling Ready2Cook........................................................................ 42
5.13Pausing and finishing use........................................................... 43
5.13.1Perform a hygiene flush after an extended period of idleness .............. 43
6Cleaning and caring for the unit ..................................... 44
6.1Preventing corrosion ..................................................................... 44
6.2Remove rust spots ......................................................................... 44
6.3Cleaning the housing..................................................................... 45
6.4Cleaning the door handle, operating elements and control panel ..
45
6.5Cleaning the door seal................................................................... 45
6.6Cleaning the cooking zone door................................................... 46
6.6.1Cleaning the door with hygienic glazing .................................................. 46
6.6.2Cleaning the door with a back-ventilated window ................................... 46
6.7Cleaning the steam outlet.............................................................. 47
6.8Cleaning the condensation hood (optional) ................................ 47
6.9Removing calcium deposits from the unit................................... 48
6.10Cleaning the cooking zone automatically with WaveClean
(optional) ............................................................................................... 49
6.10.1Preparing for cleaning ........................................................................... 50
6.10.2Selecting the cleaning level................................................................... 50
6.10.3Inserting the cleaning cartridge ............................................................. 51
6.10.4Starting automatic cleaning ................................................................... 52
6.10.5Cancelling automatic cleaning............................................................... 52
6.10.6Ending automatic cleaning .................................................................... 52
6.11Cleaning the cooking zone semi-automatically ........................ 53
6.11.1Preparing the cooking zone................................................................... 53
6.11.2Starting the cleaning program ............................................................... 53
6.11.3Rinsing the cooking zone ...................................................................... 54
6.11.4Drying the cooking zone........................................................................ 54
6.12Swinging the air diverter open and closed ................................ 55
6.13Inspecting the unit........................................................................ 56
6.13.1Performing a visual inspection .............................................................. 56
7Troubleshooting ............................................................... 57
7.1Emergency mode ........................................................................... 57
7.2Causes of errors and remedies..................................................... 57
7.3Nameplate ....................................................................................... 59
8Dispose of unit in an environmentally responsible
manner ................................................................................. 60
9Manufacturer's declaration.............................................. 61
6 Operating instructions
10014471-0ABBE-A
Page 7

1 Introduction
1.1 About this manual
Introduction
The operating instructions are part of the unit and contain information:
• On safe operation,
• On cleaning and care,
• On remedies in case of faults.
Be aware of the following notes and adhere to them:
• Read the operating instructions completely before operating the
unit for the first time.
• Make the operating instructions available to the operator at all
times at the operating site of the unit.
• Insert any supplements from the manufacturer.
• Keep the operating instructions throughout the service life of the
unit.
• Pass on the operating instructions to any subsequent operator of
the unit.
Target group The target group of the instruction manual is the operator, who is
entrusted with the operation, cleaning and care of the unit.
Figures All figures in this manual are intended as examples. Discrepancies
between these and the actual unit can arise.
10014471-0ABBE-A
7Operating instructions
Page 8
Introduction
1.1.1 Explanation of signs
DANGER
Imminent threat of danger
Failure to comply will lead to death or very severe injuries.
WARNING
Possible threat of danger
Failure to comply can lead to death or very severe injuries.
CAUTION
Dangerous situation
Failure to comply can lead to slight or moderately severe
injuries.
ATTENTION
Physical damage
Failure to comply can cause physical damage.
Notes for better understanding and operation of the unit.
Symbol / sign Meaning
• Listing of information.
Action steps, which can be performed
in any sequence.
1.
2.
Action steps, which must be performed
in the specified sequence.
Result of an action performed or
additional information about it.
8 Operating instructions
10014471-0ABBE-A
Page 9

1.2 Intended use
Introduction
This unit is intended to be used solely for commercial purposes,
particularly in commercial kitchens.
This unit may only be used with suitable accessories and for the
cooking of food.
It is forbidden to use the unit for purposes, which include the
following:
• Washing dishes
• Storing supplies
• Drying cloths, paper or dishes
• Heating acids, alkaline solutions or other chemicals
• Heating preserved food
• Heating flammable liquids
• Heating rooms
1.3 Warranty
• Cleaning air filters
The use of the unit is prohibited in the following countries:
• USA
• Canada
The warranty is void and safety is no longer assured in the event of:
• Improper conversion or technical modifications of the unit,
• Improper use,
• Incorrect startup, operation or maintenance of the unit,
• Problems resulting from failure to observe these instructions.
10014471-0ABBE-A
9Operating instructions
Page 10

Safety information
2 Safety information
The unit complies with applicable safety standards. Residual risks
associated with operation or risks resulting from incorrect operation
cannot be ruled out and are mentioned specifically in the safety
instructions and warnings.
The operator must be familiar with regional regulations and observe
them.
Operation During operation, the following group of individuals must be
supervised by an individual who is responsible for safety:
• Individuals with physical, sensory, or mental handicaps, or who
The supervising individual must be familiar with the unit and the risks
associated with it.
Children are not allowed to operate the unit or play with it.
Hot surfaces Risk of burns from hot surfaces
lack the knowledge and experience to operate the unit properly.
• Protect arms and hands by wearing suitable protective gloves.
• Allow surfaces to cool prior to cleaning.
• Remove hot cookware only with suitable protective gloves or
potholders.
• Remove containers and baking sheets only with suitable
protective gloves or potholders.
Hot liquids Risk of burns from hot liquids
• Protect arms and hands by wearing suitable protective gloves.
• Remove, transport and empty containers carefully.
Risk of chemical burns from evaporating cleaners
• Follow the instructions of the cleaning agent manufacturer.
• Allow the cooking so to clean to a temperature below 60 °C and
then clean.
Risk of burns from steam
• Protect arms and hands by wearing protective gloves.
• Do not hold hands in front of the extractor hood.
• First open the cooking zone door slightly and allow the steam to
escape. Then open the cooking zone door completely.
• Dry unit completely after cleaning it.
Defective unit Risk of injury from a defective unit
• Disconnect a defective unit from the electric mains.
• Use gas shut-off valve to isolate unit from gas supply.
• Do not operate a defective unit.
10 Operating instructions
10014471-0ABBE-A
Page 11

Safety information
• Allow only an authorized technician to repair the unit.
Escaping gas or exhaust
gas
Fire prevention Risk of fire from dirt and grease deposits
Risk of asphyxiation and explosion from escaping gas
• Follow the rules of conduct when the smell of gas is detected (see
"Rules of conduct when the smell of gas is detected").
Risk of asphyxiation and poisoning from exhaust gases
• Ensure that air inlet openings are free and that a sufficient amount
of the necessary combustion air is supplied.
• Ensure that the exhaust gas outlet openings are free and that the
exhaust gases are discharged properly.
• Clean the unit when finished using it.
• Do not use the unit as a deep fat fryer.
• Do not store any combustible objects or plastic containers in the
cooking zone.
Risk of fire from objects
• Do not obstruct the exhaust gas duct.
Firefighting
• In the event of a fire, disconnect the unit from the electric mains.
• In the event of a fire, use the gas shut-off valve to isolate the unit
from the gas supply.
• Use a Fire Class F fire extinguisher, never water, to extinguish
grease fires. Other fires, for instance, can be extinguished with fire
extinguishers suitable for Fire Classes A, B, C, CO2 fire
extinguishers or extinguishing media suitable for the fire class
confronted.
Unit on casters Risk of injury from a unit on casters
• Lock casters during operation.
• Only move an empty unit.
Risk of a line breaking if subjected to high tensile load
• Secure the unit with a chain as a strain relief for the power
connection at the installation site so that no tensile load is applied
to the power connection if the unit is moved.
Improper cleaning Risk of chemical burns from cleaning agent
• Follow the instructions of the cleaning agent manufacturer.
10014471-0ABBE-A
• Take appropriate protective measures when handling aggressive
cleaning agents.
11Operating instructions
Page 12

Safety information
Risk of falling on smooth floors
• Keep the floor in front of the unit clean and dry.
Risk of injury from improper cleaning
• Clean the cooking zone carefully. The cooking zone sensor
protrudes into the cooking zone.
Risk of physical damage from improper cleaning
• Clean the unit after using it.
• Do not clean the unit with a high-pressure cleaner or water jet.
• Do not clean the housing with highly abrasive or chemically
aggressive cleaning agents.
• Do not clean the housing with highly abrasive sponges.
• Follow the instructions of the cleaning agent manufacturer.
• Do not cool shock the unit by cooling it abruptly.
• Clean the cooking zone carefully. The cooking zone sensor
protrudes into the cooking zone.
• Do not use any bleaching or chlorine-containing cleaners.
• Remove rust spots with an abrasive.
• Keep the unit free of calcium deposits.
Hygiene Health risk from insufficient hygiene
• Observe applicable regional hygiene regulations.
Core temperature
measurement
Risk of injury from overheated core temperature sensor
• Do not heat the core temperature sensor over an open flame.
Improper use Risk of physical damage from improper use
• Use only original accessories.
• Train operators regularly.
• Do not heat food warmer plates or tins of preserved food.
• Do not cover air inlet and outlet openings.
• Do not operate the unit at temperatures below 4° C.
• Remove the core temperature sensor before the cooked food is
removed.
• Insert the core temperature sensor back into the holder after use.
12 Operating instructions
10014471-0ABBE-A
Page 13

Rules of conduct when the smell of gas is detected
3 Rules of conduct when the smell of gas is detected
DANGER
Risk of asphyxiation and explosion from escaping gas
Follow the rules of conduct when the smell of gas is detected.
• Remain calm.
• Open windows and doors and ventilate rooms.
• Avoid rooms with the smell of gas.
• Do not smoke.
• Do not ignite any flames. Extinguish flames.
• Do not strike any sparks. Do not operate any switches, electrical
devices or use telephones.
• Remove mobile phones and radio-controlled devices from the
hazard area.
• Close gas shut-off valves at the gas meter, at the main feed and, if
possible, at the units.
• Warn other individuals in the building. Call out and knock, do not
ring doorbells.
• Leave the building and prevent entry by others.
• Observed the safety instructions of the gas utility.
• Once outside the building, notify responsible parties:
– If the smell of gas comes from the unit, notify customer service.
– If the source of the smell of gas cannot be localised
immediately, notify the gas utility.
– If the escaping gas is audible, leave the building immediately,
prevent others from entering and notify the fire brigade, police
and gas utility.
– If the smell of gas comes from inaccessible rooms, notify the
fire brigade, police and gas utility.
10014471-0ABBE-A
13Operating instructions
Page 14
Description of the unit
t
s
q
p
o
n
m
l
k
j
i h g f
e
d
c
b
a
r
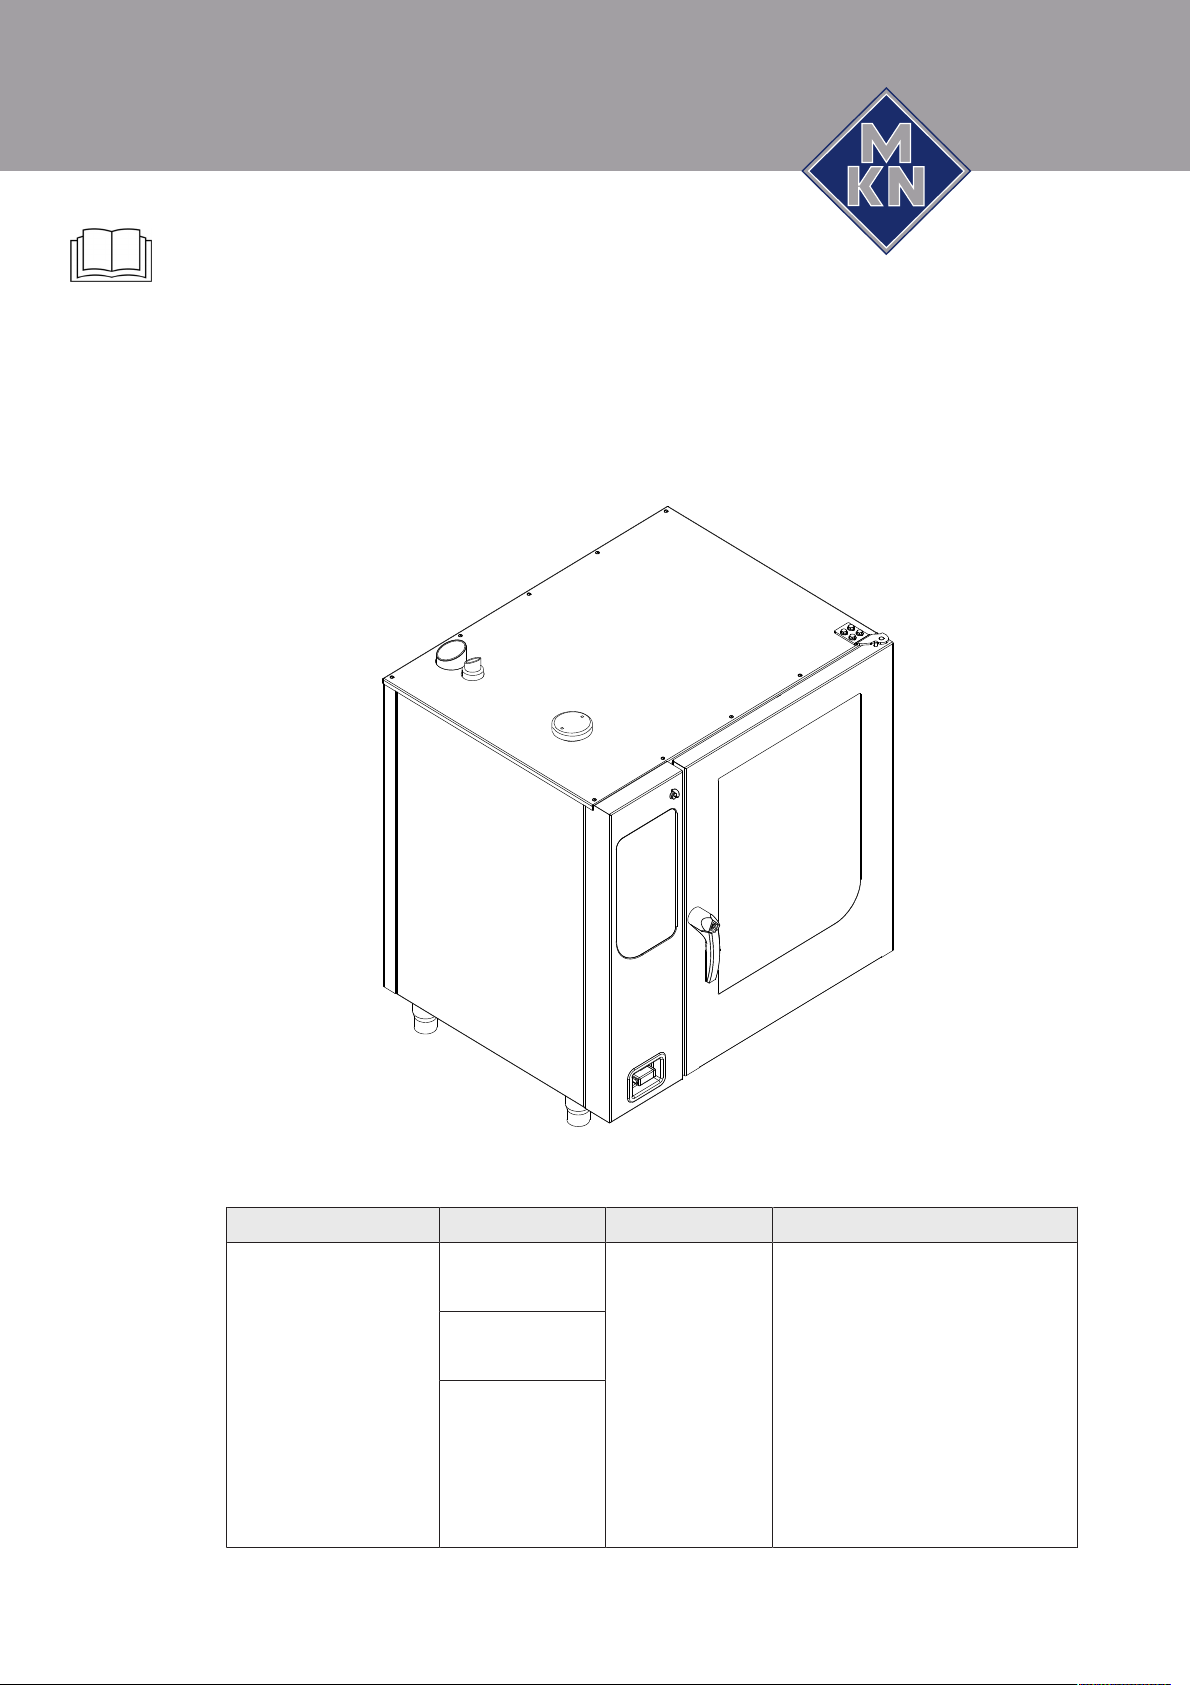
4 Description of the unit
The unit is a hot air steamer, which is suitable for most cooking
methods used in commercial kitchens. It can be used with either hot
air or unpressurised live steam, either individually, in sequence, or in
conjunction with moist or dry heat.
4.1 Overview of the unit
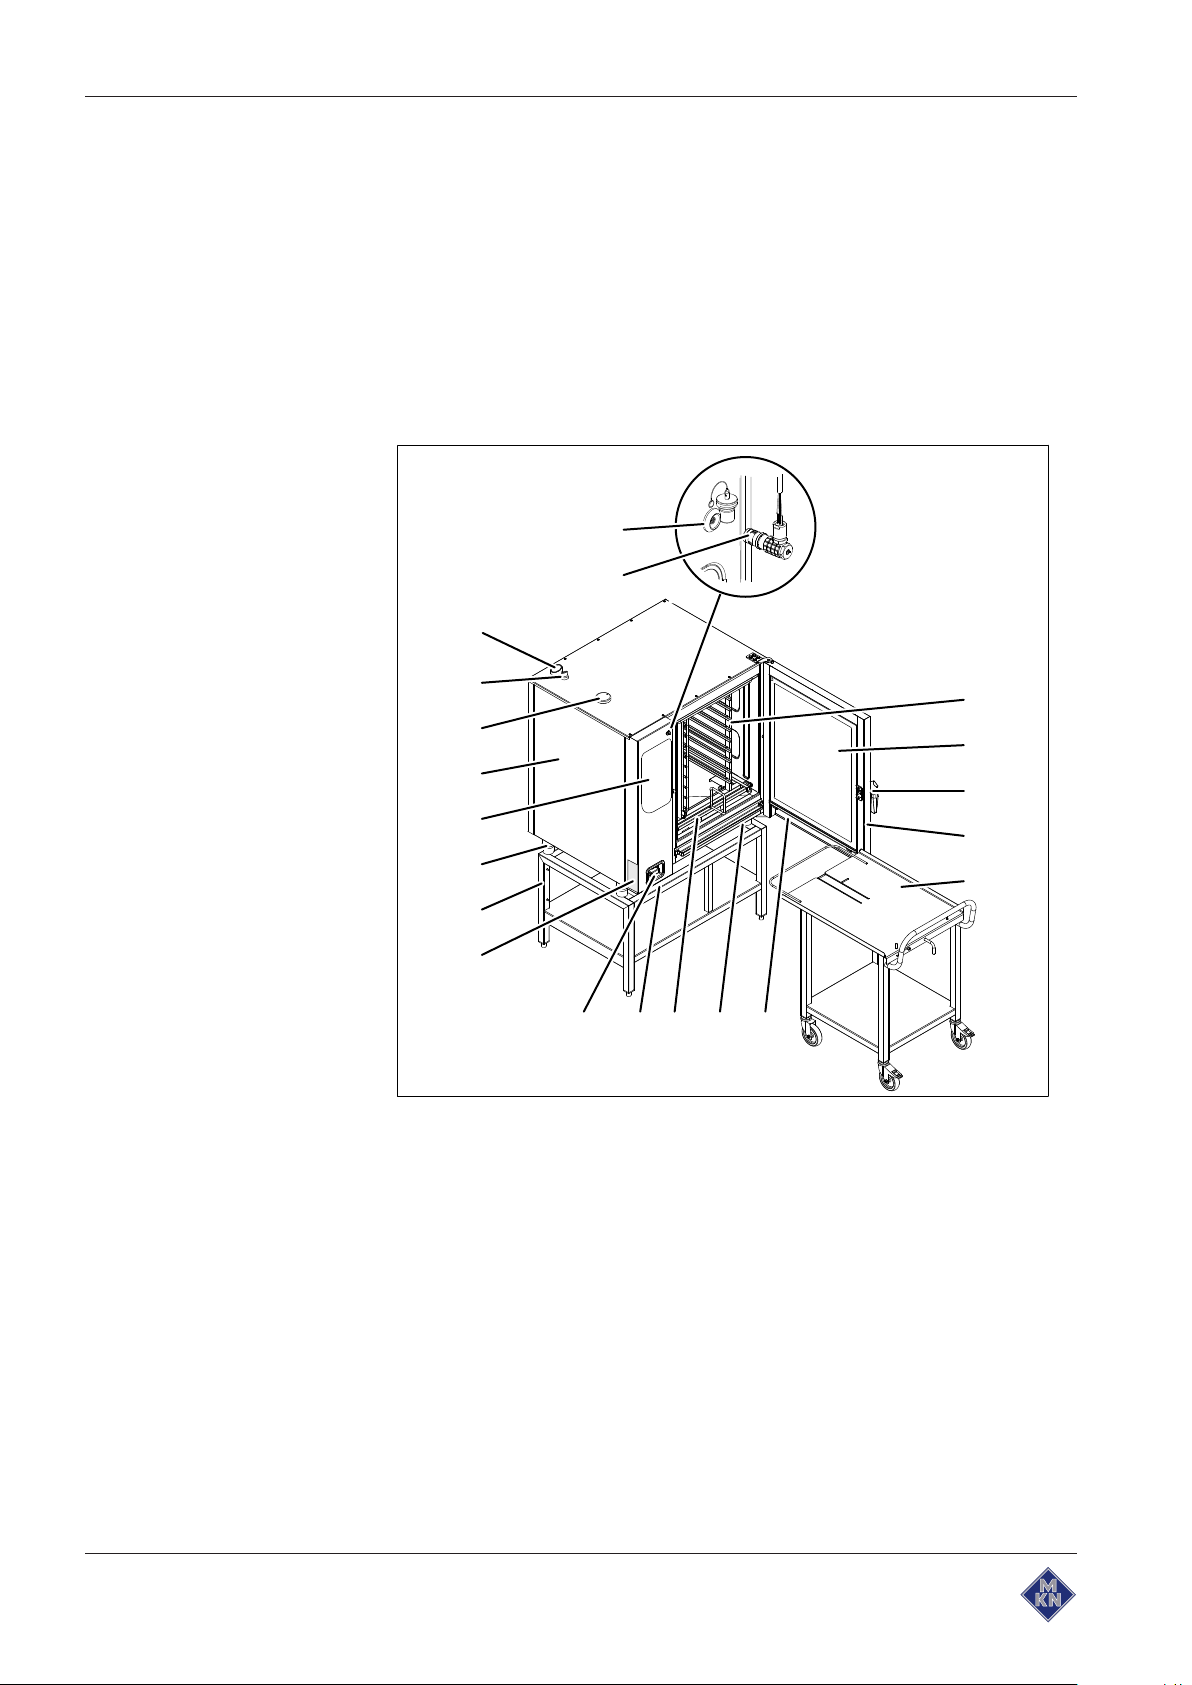
4.1.1 Countertop unit
Image: Unit with tray rack trolley
a Tray rack k Nameplate
b Insulated window l Base frame (optional)
c Door handle m Equipment leg
d Cooking zone door n Control unit
e Tray rack trolley (optional) o Housing
f Steam drain channel, door p Air inlet
g Steam drain channel, unit q Waste gas connection
h Guide rail for tray rack (optional) r Steam outlet
i USB port (covered) s Core temperature sensor
j Hand shower t Connection for core temperature
14 Operating instructions
(optional)
sensor (optional)
10014471-0ABBE-A
Page 15
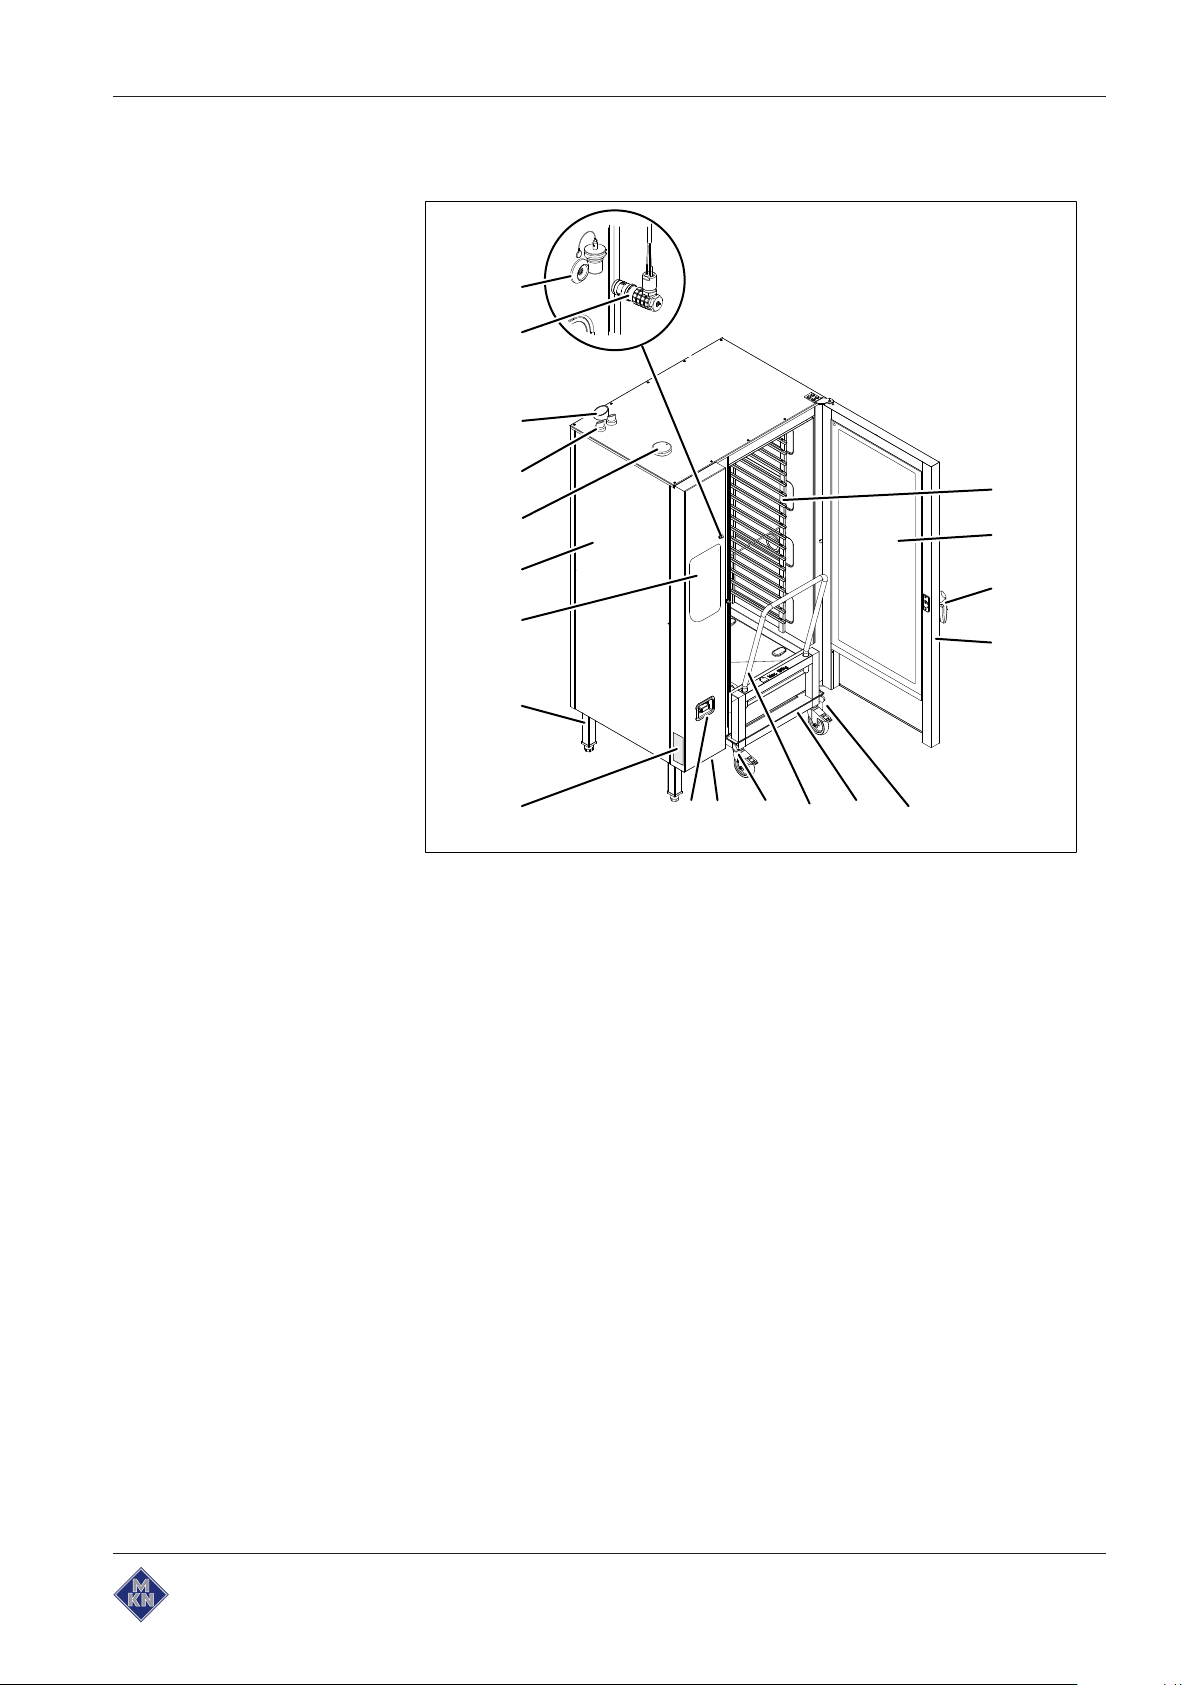
4.1.2 Floor-standing unit
s
r
q
p
o
n
m
l
k
i
j
h g f e
d
c
b
a
Description of the unit
Image: Unit with tray trolley
a Tray rack k Nameplate
b Insulated window l Equipment leg
c Door handle m Control unit
d Cooking zone door n Housing
e Guide rail (right) o Air inlet
f Tray trolley p Waste gas connection
g Push handle q Steam outlet
h Guide rail (left) r Core temperature sensor
(optional)
i USB port (covered) s Connection for core temperature
sensor (optional)
j Hand shower
10014471-0ABBE-A
15Operating instructions
Page 16

Description of the unit
4.2 Features
4.2.1 Characteristics
• 1-point core temperature sensor
• 4-point core temperature sensor (optional)
• Sous-vide core temperature sensor (optional)
• Hand shower (optional)
• Back-ventilated cooking zone door
• Cooking zone door with hygienic glazing (optional)
• Single-stage door latch
• Two-stage door latch (optional); this feature is standard on size 20
units
• Power optimizing system (optional)
• Cooking zone door hinged at right
• Cooking zone door hinged at left (optional)
• HandClean
• WaveClean (optional)
4.2.2 USB port
The unit is equipped with a USB port (USB 2.0).
HACCP logs can be exported to the USB flash drive and archived on
an external PC as necessary.
4.2.3 HACCP log
All cooling programs run are recorded in the HACCP log.
The data are exported via the USB port.
4.2.4 WaveClean automatic cleaning (optional)
With WaveClean automatic cleaning,the cooking zone is cleaned with
the aid of a cleaning cartridge intended specifically for the program
and then rinsed clean.
16 Operating instructions
10014471-0ABBE-A
Page 17
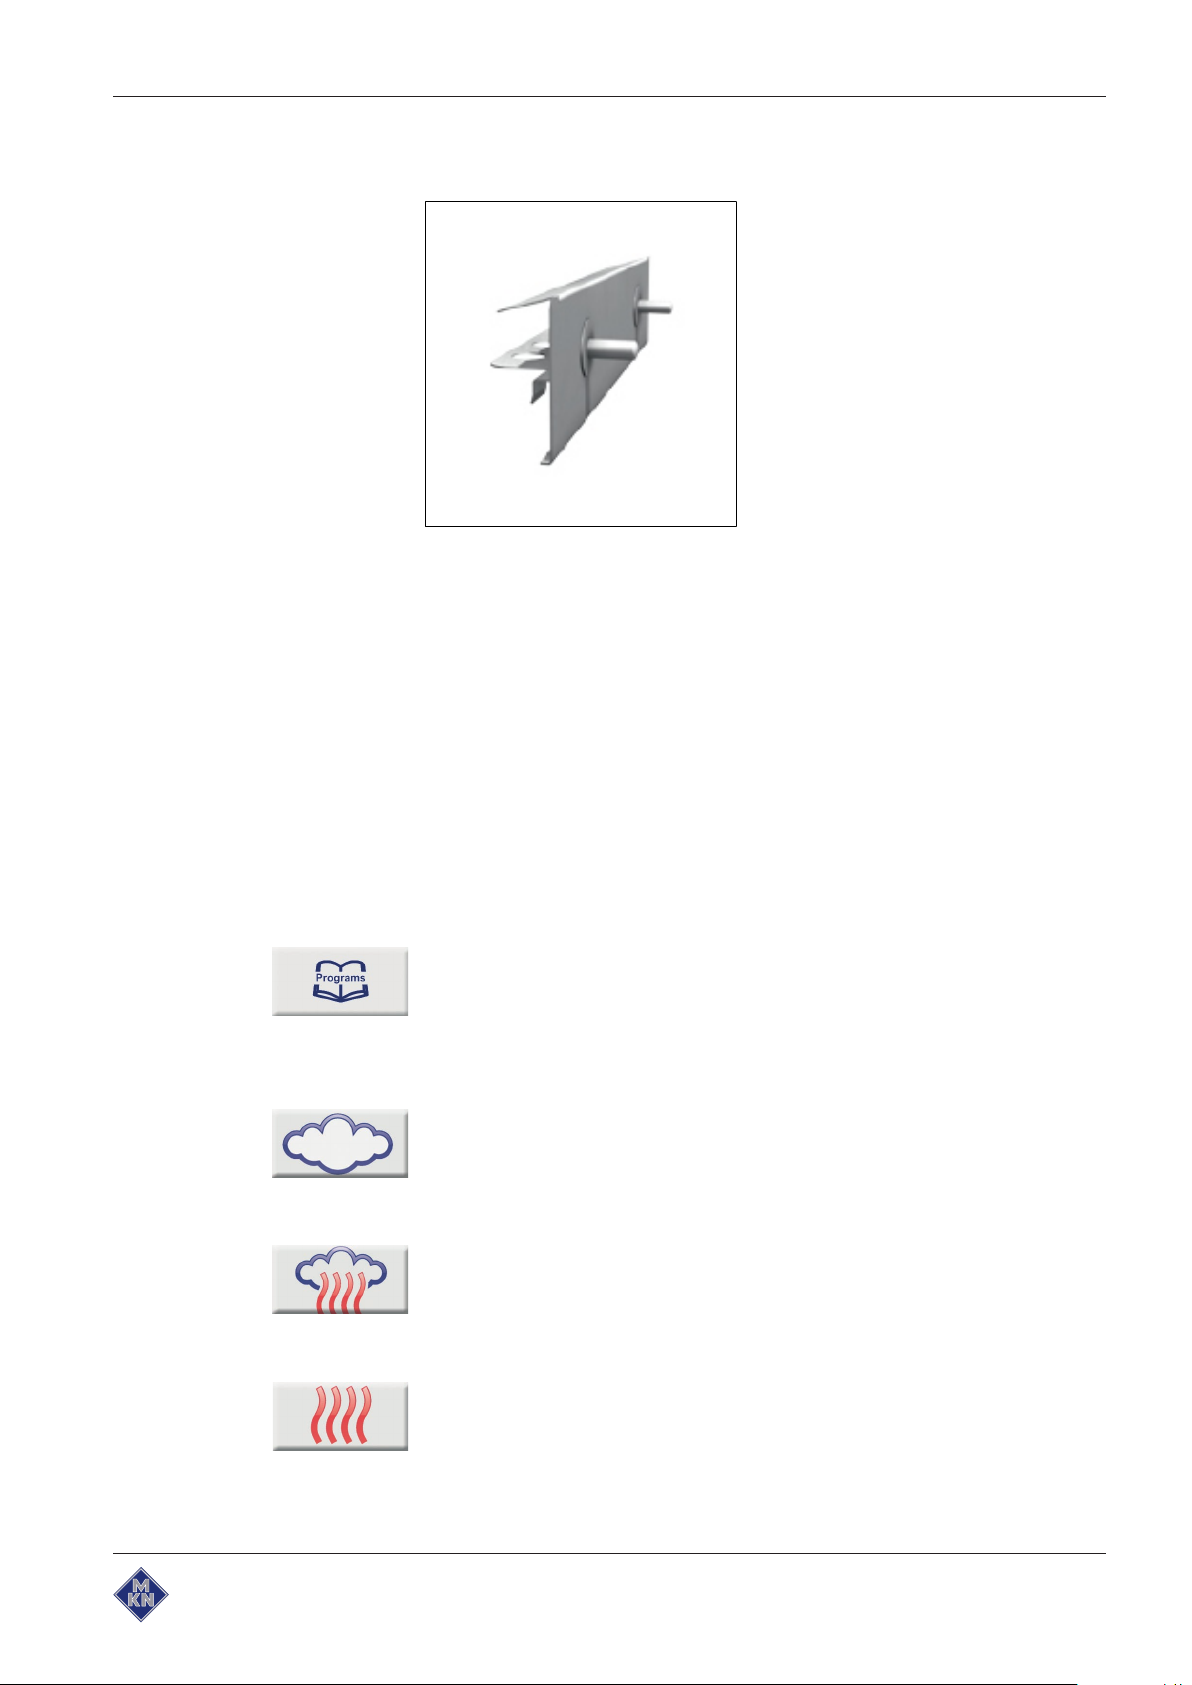
4.2.5 Preheat bridge for models 20.15 and 20.21
Image: Preheat bridge
In the case of the 20.15 and 20.21 models of Combisteamer, the
preheat bridge is attached to the bottom edge of the cooking zone
opening, if the cooking zone is heated or cleaned with WaveClean,
and if there is no tray trolley in the Combisteamer.
Description of the unit
4.3 Operating and cooking modes
4.3.1 Operating modes
Manual cooking
In the Manual cooking mode, individual cooking programs and
equipment functions can be activated directly. The various cooking
modes and equipment functions can be modified individually.
Automatic cooking
In the Automatic cooking mode, saved cooking programs can be
activated and modified if necessary.
4.3.2 Types of cooking
Steaming
Steaming is a cooking mode, in which the food to be cooked is
cooked gently by means of steam in a temperature range of 30 °C to
130 °C.
Combisteaming
Combisteaming is a cooking mode, in which large roasts, casseroles
and baked goods can be cooked in a temperature range of 30 °C to
250 °C.
10014471-0ABBE-A
Hot air
Hot air is a cooking mode, in which the food to be cooked is cooked
without additional moisture in a temperature range of 30 °C to 250 °C.
17Operating instructions
Page 18
Description of the unit
Regeneration
Regeneration is a cooking mode, in which the food being cooked can
be kept warm and prepared in a temperature range of 30 °C to 155
°C.
4.3.3 Expanded cooking functions
Expanded cooking functions can be used to modify individual cooking
steps for the particular food being cooked.
The following expanded cooking functions are available:
Manual humidification Manual humidification allows the cooking zone humidity to be
increased during operation.
Start time delay
When using the start time delay, temperatures that promote the
growth of harmful microorganisms on the food being cooked can
occur in the cooking zone. Observe food processing regulations.
The start time delay can be used to set a waiting period until the
program starts.
In this way, bottlenecks in production and preparation can be
avoided.
The prepared food to be cooked can be loaded into the unit and the
desired cooking program selected.
Heat (Ready2Cook)
The function can be selected when starting the cooking
program.
For many cooking programs such as baking, for instance, the correct
starting temperature is important.
The expanded heating function can be used to warm the cooking
zone to the correct starting temperature.
4.3.4 Core temperature measurement
When using core temperature measurement, the temperature inside
the food being cooked is measured by means of a core temperature
sensor.
As soon as the target core temperature is reached, the cooking
process is ended automatically or, in the case of a multi-step cooking
program, the next cooking step starts.
The use of core temperature measurement offers the following
benefits:
• Reduced energy and water consumption
• No overcooking
• Less weight lost by the food being cooked
• High HACCP safety
18 Operating instructions
10014471-0ABBE-A
Page 19

4.4 Operating, control and display element functions
Programs
SymbolOperating and display element Function
Description of the unit
On Off"I O"
Select
Steaming
Combisteaming
Hot air
Regeneration
Programs
"Programs" button • Saves a cooking program
HandClean
button • Switch unit on "I"
• "O" switches off the unit
knob • Selects the cooking mode,
cooking programs, cleaning
and settings
symbol • Indicates that the Steaming
cooking modecan be selected
here
symbol • Indicates the the Combisteam-
ing cooking modecan be selected here
symbol • Indicates that the Hot air cook-
ing mode can be selected here
symbol • Indicates that the Regeneration
cooking mode can be selected
here
symbol • Selects a cooking program
symbol • Indicates that the semi-auto-
matic
HandClean
be selected here
program can
WaveClean
Settings
Left display • Displays the cooking temperat-
Cooking temperature symbols • Indicate that settings for the
Left knob • Sets the temperature
Middle display • Shows the cooking zone hu-
ClimaSelect
Minus
symbol • Indicates that the automatic
WaveClean
selected here
symbol • Selects the settings and ser-
vice functions
ure
temperature can be made here
midity
symbol • Indicates that settings for the
cooking zone humidity can be
made here
button • Reduces the cooking zone hu-
midity
program can be
10014471-0ABBE-A
Plus
button • Increases the cooking zone hu-
midity
19Operating instructions
Page 20
Description of the unit
STEP
START
STOP
SymbolOperating and display element Function
Right display • Shows the cooking time or core
temperature
Core temperature
symbol • Indicates that settings for the
core temperature can be made
here
Cooking time
symbol • Indicates that settings for the
time can be made here
Right knob • Sets the cooking time or core
temperature
"STEP" button • Advances to the next step in
the cooking program
• Acknowledges an error message
Fan speed
button • On Model 6.10: Sets the fan
speed
Ready2Cook
button • Starts and stops the heating or
cooling process
"START STOP" button • Starts and stops the cooking
programs or the cleaning
Indicator light • Illuminates if active
• Confirms the setting or selection
4.4.1 Abbreviations in the displays
Information appears in the displays only in the form of abbreviations.
Abbreviation Explanation
Calc Calcium deposit removal
CAr Cartridge
CLE Manual cleaning
CL1 Cleaning for about 1 hour
CL2 Cleaning for about 2 hours
CL3 Cleaning for about 3 hours
dLAY Start time delay
dIA Diagnostic error display
End End
Err Error
HAC HACCP
HOt Too hot
OPn Open
OPt Option
PASS Password entry
10014471-0ABBE-A
20 Operating instructions
Page 21

4.5 Loading capacity
Description of the unit
Abbreviation Explanation
Prot Log number
Pro Program number
rdY Ready
SEr Service
SHO Rinse
SOF Software
SPr Spray
SPU Forced rinse
STEP Step
USb USB
X-Y Step X of Y
4.5.1 Loading capacity
Tray rack trolley and tray trolley
Version Per shelf maximum (kg) Per unit maximum (kg)
6.15 15 50
6.21 15 50
10.15 15 80
10.21 15 80
20.15 15 150
20.21 15 150
4.5.2 Plate capacity during regeneration
Cooking time and cooking temperature depend on the number of
plates.
Version Plate diameter
6.15 30 24 22
6.21 30 24 22
26 cm 28 cm 32 cm
10014471-0ABBE-A
10.15 50 40 40
10.21 50 40 40
20.15 100 80 80
20.21 120 120 80
on 1/1 GN grate Tray rack or tray trolley
21Operating instructions
Page 22

Description of the unit
4.6 Standard setting values
4.6.1 Temperature standard setting
The setting range for the cooking zone temperature depends on the
cooking mode.
Cooking mode Standard value
(°C)
Steaming 100 30 - 130 1
Combisteaming 150 30 - 250 1
Hot air 180 30 - 250 1
Regeneration 50 30 - 150 1
4.6.2 Core temperature standard-setting
The adjustment range for the core temperature depends on the
cooking mode.
Cooking mode Standard value
(°C)
Steaming 70 0 - 99 1
Combisteaming 70 0 - 99 1
Hot air 70 0 - 99 1
Regeneration 50 0 - 99 1
4.6.3 Cooking zone humidity standard setting
Adjustment
range (°C)
Adjustment
range (°C)
Alteration
increments (°C)
Alteration
increments (°C)
The setting range for the cooking zone humidity depends on the type
of cooking.
Type of
cooking
Steaming 100 90 - 110 90 - 100 - 110
Combisteaming 90 20 - 100 20 - 40 - 70 - 90 -
Hot air 100 0 - 100 0 - 25 - 50 - 75 -
Regeneration 100 0 - 100 0 - 25 - 50 - 75 -
Standard value
(%)
Setting range
(%)
Change
increments (%)
100
100
100
22 Operating instructions
10014471-0ABBE-A
Page 23

4.7 Basic settings
Description of the unit
The unit is already preset, when it is delivered.
The values in the following list can be modified.
Basic setting No. Standard
value
Password 7 111 0 – 500 Individual passwords can be set in this
Start-time preselection with
or without fan
Steam elimination 48 1 0 = Low
Displays
Temperature display 1 0 0 = °C
Water quantity display 34 0 0 = ml
Water quantity display in fl.
oz.
13 0 0 = Without fan
35 0 0 = Imperial
Adjustment
range
1 = With fan
1 = Normal
2 = High
1 = °F
1 = fl.oz.
fl.oz.
1 = US fl.oz.
Explanation
area.
If the "0" setting is selected, the fan
remains off during the preset time period.
If the "1" setting is selected, the fan runs at
intervals during the preset time period.
The intensity of steam elimination can be
adjusted in three levels.
The temperature can be displayed in °C or
°F.
The water quantity can be displayed in ml
or fl.oz.
The fl.oz. water quantity can be displayed
in Imperial or US.
Signal output
Duration of signal output 6 20 0 – 180s Duration of the audible signal
0 = Signal off
Volume of signal output 33 0 0 = Quiet
1 = Loud
Cooking modes
Steaming temperature 9 100 30 – 130 °C The cooking temperature for this cooking
Combisteaming temperature 10 150 30 – 250 °C The cooking temperature for this cooking
Hot air temperature 11 180 30 – 250 °C The cooking temperature for this cooking
Regeneration temperature 12 130 30 – 150 °C The cooking temperature for this cooking
Ready2Cook
Volume of the audible signal
mode can be selected within the range of
settings.
mode can be selected within the range of
settings.
mode can be selected within the range of
settings.
mode can be selected within the range of
settings.
10014471-0ABBE-A
23Operating instructions
Page 24

Description of the unit
Basic setting No. Standard
value
Ready2Cook preheating
temperature in percent
Max. waiting time in minutes
after the Ready2Cook
temperature has been
reached, if set T > 250 °C
Max. waiting time in minutes
after the Ready2Cook
temperature has been
reached, if set T <= 250 °C
FlexiCombi Air
Time extension for the
condensation hood
4 15 0 – 30% If the unit is fully loaded with a large mass
37 120 0 - 300 Here you can set, how long the preheating
38 30 0 - 60
5 60 0 – 600s Time extension for the condensation hood,
Adjustment
range
Explanation
(roasts, loaves of bread), increase the
preheating temperature, so that the
cooking zone temperature does not drop
too suddenly.
temperature is to be held after it has been
reached, without a cooking process being
started.
after the cooking zone door has been
opened
24 Operating instructions
10014471-0ABBE-A
Page 25

Operating the unit
5 Operating the unit
5.1 Operating the unit in an environmentally responsible manner
If used correctly, this Combisteamer achieves very low energy
consumption.
You can assist low energy consumption by:
• Avoiding continuous operation - the Combisteamer heats up very
quickly, which means that continuous operation is not necessary.
• Loading the cooking zone as full as possible - if practical, use a
Combisteamer with a smaller cooking zone.
5.2 Switching the unit on and off
5.2.1 Switching on
Press the
The unit is now on.
On Off"I O"
button to "I".
5.2.2 Switching off
Press the
The unit is now off.
On Off"I O"
button to "O".
5.3 Opening and closing the cooking zone door
The single-stage door latch is standard on sizes 6 and 10.
The two-stage door latch is standard on size 20, and optional on
sizes 6 and 10.
5.3.1 Opening the single-stage door latch
10014471-0ABBE-A
Image: Opening the single-stage door latch
1. Rotate the door handle anti-clockwise or clockwise.
The cooking zone door opens.
If the door handle is released, it returns automatically to its initial
position.
2. Open the cooking zone door completely.
25Operating instructions
Page 26

Operating the unit
A
B
5.3.2 Closing the single stage door latch
Image: Closing the single stage door latch
Requirement Door handle in initial position
Close the cooking zone door with pressure.
The cooking zone door is closed.
5.3.3 Opening the two-stage door latch
Image: Opening the two-stage door latch
On size 6 and size 10, first rotate the door handle anticlockwise.
1. Rotate the door handle to a horizontal position.
The cooking zone door opens, but is still held.
2. Continue rotating the door handle upwards.
The cooking zone door is no longer held.
If the door handle is released, it returns automatically to its initial
position.
3. Open the cooking zone door completely.
10014471-0ABBE-A
26 Operating instructions
Page 27

5.3.4 Closing the two-stage door latch
A B
Image: Closing the two-stage door latch
Requirement Door handle in initial horizontal position
1. Close the cooking zone door with pressure.
The cooking zone door latches.
2. Rotate the door handle downwards.
The cooking zone door is closed.
Operating the unit
5.4 Loading and emptying the unit
CAUTION
Risk of burns from hot liquid
• Never insert a food-carrying tray with cooking liquid above
eye level.
• Use only suitable trays to hold food. The food-containing
trays must rest securely on the support brackets.
• Always insert the food-containing trays into the U-rails.
CAUTION
Risk of physical damage and personnel injury from
exceeding the loading capacity
• Do not exceed the maximum loading capacity.
To not use bent or damaged support racks.
5.4.1 Loading and emptying
10014471-0ABBE-A
Loading
1. Open the cooking zone door.
2. Insert food-containing trays into the support racks.
3. Close the cooking zone door.
4. Start the cooking process.
Emptying
1. Open the cooking zone door.
2. Remove the food-containing trays.
3. Remove all food residues from the drain screen.
27Operating instructions
Page 28

Operating the unit
a
b
c
d
e
f
g
4. Leave the cooking zone door slightly ajar.
This extends the service life of the door seal.
No moisture builds up in the cooking zone.
5.4.2 Loading and emptying with a tray rack trolley
Image: Loading and emptying with a tray rack trolley
a Tray rack e Tray rack trolley
b Push handle f Tray rack support plate
c Lever g Guide rail
d Locking casters
Loading with a tray rack trolley
Requirement Remove support racks and place guide rails on pins.
Food-containing trays resting securely on the tray rack
1. Open the cooking zone door.
2. Rotate the lever on the tray rack trolley.
The tray rack is secured to prevent its rolling down.
Check that the tray rack is locked in place by pulling on it
slightly.
3. Load the tray rack.
4. Position the tray rack trolley at the unit.
Lock the casters to prevent the trolley's rolling away.
5. Rotate the lever.
The tray rack is now free to move.
6. Insert the tray rack completely until the rollers rest in the openings
in the guide rail.
7. Retract the tray rack support plate and secure in place with the
lever.
8. Move the tray rack trolley away from the unit.
9. Close the cooking zone door.
10.Start the cooking process.
28 Operating instructions
10014471-0ABBE-A
Page 29

Emptying with a tray rack trolley
a
b
c
d
e
f
g
1. Open the cooking zone door.
2. Position the tray rack trolley at the unit.
Lock the casters to prevent the trolley's rolling away.
3. Insert the tray rack support plate and secure the tray rack on the
plate.
4. Pull the tray rack onto the tray rack trolley and secure in place.
5. Release the locking casters and move the tray rack trolley away
from the unit.
6. Remove all food residues from the drain screen.
7. Leave the cooking zone door slightly ajar.
This extends the service life of the door seal.
No moisture builds up in the cooking zone.
5.4.3 Loading and emptying with a tray trolley
Operating the unit
10014471-0ABBE-A
Image: Loading and emptying with a tray trolley
a Tray rack e Cleaning cartridge holder
b Push handle f Guide rail (left)
c Tray trolley g Guide rail (right)
d Locking casters
Loading with a tray trolley
Requirement Checked that food-containing trays are sitting securely in the tray
trolley
1. Load the tray trolley.
2. Move the tray trolley in completely.
3. Withdraw the push handle from the tray trolley.
4. Close the cooking zone door.
5. Start the cooking process.
29Operating instructions
Page 30

Operating the unit
Emptying with a tray trolley
1. Open the cooking zone door.
2. Insert the push handle into the tray trolley.
3. Retract the tray trolley.
4. Remove all food residues from the drain screen.
5. Leave the cooking zone door slightly ajar.
5.5 Making the basic settings
The basic settings for operation can be displayed and changed by
entering the password "111".
The list of adjustable parameters can be found in the chapter on
"Description of the unit".
5.5.1 Opening the Setting menu
This extends the service life of the door seal.
No moisture builds up in the cooking zone.
Each basic setting of the unit is stored under a number that can
be displayed.
Requirement The unit is on
1. Turn the
2. Use the right not to set the password.
3. Press the "START STOP" button.
4. Use the left knob to select OPt.
The basic settings can be changed.
5.5.2 Changing the basic setting
1. Press the "START STOP" button.
Select
The indicator light illuminates.
The left display shows "PASS".
The right display flashes "0000".
The right display shows the set password.
The left display flashes "HAC".
The left display flashes "OPt".
knob to the
Settings
symbol.
Left display flashes the basic setting parameter (see
"Equipment and connection data").
"OPt" appears on the centre display.
The right display shows the first set value.
2. Turn the left knob.
Set number.
3. Press the "START STOP" button.
The basic setting can be adjusted.
30 Operating instructions
10014471-0ABBE-A
Page 31

5.6 Basic functions
180°C 100 85°C
5.6.1 Select cooking mode
Requirement The unit is on
Operating the unit
4. Turn the right knob.
Set new value.
5. Press the "START STOP" button.
Accept changes.
6. Press and hold the "STEP" button for 3 seconds.
Changes are saved.
"OPt" flashes on the left display.
The centre display shows "Stor".
7. Press the "STEP" button to leave the Settings menu.
8. Fill out the commissioning report.
Use the
The indicator light above the selected type of cooking
illuminates.
The left display flashes the preset cooking time.
The right display flashes the cooking time.
The centre display shows the cooking zone humidity for the
selected cooking mode.
5.6.2 Setting the cooking temperature
Requirement Cooking mode selected
Turn the left rotary knob.
Turning to the left lowers the cooking temperature.
Turning to the left raises the cooking temperature.
The left display shows the cooking temperature.
Select
knob to select the type of cooking desired.
Image: Cooking temperature set
5.6.3 Setting the cooking zone humidity level
Requirement Cooking mode selected
Press the
The cooking zone humidity level is increased or decreased.
The centre display shows the cooking zone humidity.
10014471-0ABBE-A
Plus
button or the
Minus
button.
31Operating instructions
Page 32

Operating the unit
180°C
100 00:45
180°C
100 00:45
180°C 100 85°C
Image: Cooking zone humidity set
5.6.4 Setting the cooking time
Requirement Cooking mode selected
The cooking time can be set for up to 23 hours and 59 minutes
in 1-minute increments.
Continuous operation is stopped automatically after 23 hours
and 59 minutes.
The hours and minutes appear in the display.
Turn the right knob.
Image: Cooking time set
5.6.5 Setting the core temperature
Requirement Cooking mode selected
Turn the right knob to the left beyond continuous operation to core
temperature.
Turn the right knob.
The right display shows the cooking time.
Rotate to the left, unit switches to continuous operation, right
display indicates "- - - -".
Rotate to the right, increase cooking time.
The right display shows the standard value for the core
temperature.
Turning clockwise increases the core temperature.
Turning anti-clockwise lowers the core temperature.
The right display shows the core temperature.
Image: Core temperature set
32 Operating instructions
10014471-0ABBE-A
Page 33

5.6.6 Displaying actual values
Temperature setpoint
Remaining time or actual core temperature
5.6.7 Setting the fan speed
Operating the unit
The actual cooking zone temperature, elapsed cooking time or
actual core temperature can be displayed during cooking.
Turn the left knob.
The left display shows the current cooking zone temperature
for 5 seconds. Then, the temperature setpoint is displayed.
Turn the right knob.
The right display shows the elapsed cooking time for 5
seconds. Then, the remaining time or actual core temperature
is displayed.
The fan speed is adjusted in up to five steps. Each step is
displayed by an indicator light.
The number of steps depends on the type of cooking.
Press the
is reached.
The indicator lights illuminate.
Fan speed
5.6.8 Inserting and removing a USB flash drive
Inserting a USB flash drive
Requirement USB flash drive with a minimum of 2 GB and maximum of 32 GB
available storage capacity (not included with delivery)
USB flash drive not write-protected
Insert the USB flash drive.
The USB flash drive is ready after at most 20 seconds.
Removing the USB flash drive
Requirement Exporting or importing of data completed
button several times until the desired speed
Remove the USB flash drive.
5.6.9 Displaying the HAACP log number
Requirement The cooking process is running
1. Press the Minus button.
The current log number is displayed.
2. Record the log number.
10014471-0ABBE-A
33Operating instructions
Page 34

Operating the unit
5.6.10 Exporting the HACCP log
Briefly pressing the "START STOP" button transfers the
selected logs.
Pressing the "START STOP" button for longer (3 seconds)
transfers all the available logs.
Requirement USB flash drive inserted
Registered with password under Settings
1. Turn the left rotary knob.
2. Press the "START STOP" button.
3. Turn the left and right knobs and select the log range.
4. Press the "START STOP" button.
The left display flashes "HAC".
The left display shows the lowest log number.
"HAC" appears on the centre display.
The right display flashes the highest log number.
"HAC" appears on the left display.
The centre display shows USb".
The right display shows a continuous stream of characters.
The HACCP log is exported to the USB flash drive.
5. Press the "STEP" button.
This returns you to the Setting menu.
5.7 Using the core temperature sensor
WARNING
Risk of injury from a bursting core temperature sensor
• The core temperature sensor can burst as the result of
overheating of the measuring tip.
• Never heat a core temperature sensor with a cigarette lighter
or other heat source.
Measuring the core temperature is recommended for all types of
cooking to achieve an optimal result.
The unit has a core temperature sensor in the cooking zone and
can be equipped with an optional connection for an external
core temperature sensor.
34 Operating instructions
10014471-0ABBE-A
Page 35

5.7.1 Measuring with a 4-point core temperature sensor
b
c
b
d
a
a
b
Image: Core temperature sensor with one and four measuring points
Insert the core temperature sensor completely into the food being
cooked.
Insert the core temperature sensor into the thickest point of the
food being cooked.
If there is a bone in the food being cooked, insert the core
temperature sensor close to the bone.
If the food being cooked is elongated, insert the core temperature
sensor across the food to avoid a hole in the centre of the slice.
When cooking poultry, insert the core temperature sensor into the
inside of the leg.
Operating the unit
5.7.2 Measuring with a sous-vide core temperature sensor
The sous-vide core temperature sensor, which is available as an
accessory, is connected to the
10014471-0ABBE-A
sensorconnection
Image: Sous-vide core temperature sensor with sous-vide pads
Attach foam rubber or expanded rubber sous-vide pads to the
vacuum-packed food to be cooked.
Always insert the core temperature sensor through the sous-vide
pads completely into the food to be cooked.
Insert the core temperature sensor into the thickest section of the
food to be cooked.
When food with a bone is being cooked, insert the core
temperature sensor close to the bone.
When elongated pieces of food are being cooked, insert the core
temperature sensor across the food to avoid a hole in the centre
of the slice.
outside the unit.
Core temperature
35Operating instructions
Page 36

Operating the unit
When cooking poultry, insert the core temperature sensor into the
inside of the leg.
5.7.3 Measuring the core temperature when cooking frozen food
When cooking frozen food, measuring with a sous-vide core
temperature sensor is not possible.
Image: Drilling a hole with a hand drill
1. Use a hand drill to make a hole for inserting the sensor.
2. Place the food to be cooked on the baking sheet or into the
cooking pan.
3. Place the cooking sheet or cooking pan into the unit.
4. Insert the core temperature sensor into the food being cooked.
5.8 Manual cooking
5.8.1 Starting the type of cooking
Requirement The unit is on
1. Use the
2. Set the cooking temperature.
3. Set the cooking time or core temperature.
4. Set the cooking zone humidity.
5. Set the fan speed.
6. Load the unit.
7. If necessary, insert the core temperature sensor into the food
being cooked.
Select
The indicator light above the selected cooking mode
illuminates.
The left display flashes the preset cooking temperature.
The centre display flashes the preset cooking zone humidity.
The right display flashes the cooking time.
knob to select the desired cooking mode.
36 Operating instructions
10014471-0ABBE-A
Page 37

8. Press the "START SROP" button.
The indicator light for the "START STOP" button flashes.
Operating the unit
The number of indicator lights above the
displays the speed level.
The left display shows the set cooking temperature.
The centre display shows the set cooking zone humidity.
The right display shows the cooking time remaining or the core
temperature.
5.8.2 Ending the cooking mode
1. Press the "START STOP" button.
The cooking program is cancelled.
The indicator light for the selected cooking mode illuminates.
The left display shows the preset cooking temperature.
The right display shows the preset cooking time.
2. Open cooking zone door.
5.9 User's own cooking programs
5.9.1 Creating user's own cooking program
Requirement The unit is on
Fan speed
button
1. Use the
cooking step.
2. Set the cooking temperature.
3. Set the cooking zone humidity.
4. Set the fan speed.
5. Set the cooking time or core temperature.
6. Press the "STEP" button.
7. Use the
cooking step.
8. Set the cooking temperature.
9. Set the cooking zone humidity.
10.Set the fan speed.
11.Set the cooking time or core temperature.
12.Add more cooking steps as required.
Select
The indicator light illuminates.
The displays flash the preset standard values.
The indicator light illuminates.
"STEP" appears on the left display for the step.
The centre display shows "2" for the second cooking step.
Select
The indicator light illuminates.
The displays flash the preset standard values.
knob to select the cooking mode for the first
knob to select the cooking mode for the second
10014471-0ABBE-A
37Operating instructions
Page 38

Operating the unit
To correct the settings, press the "STEP" button several times to
return to the desired cooking step. Set the values again.
5.9.2 Saving user's own cooking program
Requirement Cooking program entered
1. Press the "Programs" button for 3 seconds.
"Pro" appears on the left display.
The indicator light flashes.
The centre display is off.
The right display shows the first free program position.
2. Turn the right knob and select the number of the program position.
The centre display does not show anything if the program
position is unoccupied, or it shows "===" if the program
location is occupied.
3. Press the "Programs" button for 3 seconds.
A signal sounds.
The centre display shows "===".
The cooking program is saved.
5.9.3 Deleting user's own cooking program
Deleting all programs
Turn the
Press and hold the
for 3 seconds.
All the program space is free again.
Deleting individual cooking programs
Turn the
Select
"Pro" appears on the left display.
All the cooking programs are deleted.
Select
"Pro" appears on the left display.
The right display shows the number of the current cooking
program selected.
knob to the
Plus
button and
knob to the
Programs
Minus
Programs
symbol.
button at the same time
symbol.
Using the right knob, select the number of the cooking program to
be deleted.
Press and hold the
The cooking program is deleted.
The program space is free again.
38 Operating instructions
Minus
button for 3 seconds.
10014471-0ABBE-A
Page 39

5.10 Automatic cooking
5.10.1 Selecting the cooking program
Requirement No cooking program selected
Operating the unit
Rotate the
"Pro" appears on the left display.
The right display shows the number of the saved cooking
program or it shows "1" if no cooking program is saved.
Turn the right knob and select the number of the program position.
The centre display does not show anything if the program
position is unoccupied, or it shows "===" if the program
location is occupied.
For immediate start: Press the "START STOP" button. To start
Ready2Cook: Press the
The program is loaded and starts.
5.10.2 Starting the cooking program
Requirement No cooking program selected
Rotate the
"Pro" appears on the left display.
The right display shows the number of the saved cooking
program or it shows "1" if no cooking program is saved.
Select
Select
knob to the
Ready2Cook
knob to the
Programs
button.
Programs
symbol.
symbol.
5.10.3 Cooking program ends
1. The cooking program ends automatically.
2. Press the "START STOP" button or open the cooking zone door.
Turn the right knob and select the number of the program position.
The centre display does not show anything if the program
position is unoccupied, or it shows "===" if the program
location is occupied.
For immediate start: Press the "START STOP" button. To start
Ready2Cook: Press the
The program is loaded and starts.
The cooking program ends once the cooking time has elapsed
or the core temperature has been reached.
A signal sounds.
"End" appears on the right display.
The indicator lights go off.
The signal is switched off.
Ready2Cook
button.
10014471-0ABBE-A
39Operating instructions
Page 40

Operating the unit
5.10.4 Cancelling the cooking program
1. Press the "START STOP" button.
The cooking program is cancelled.
The indicator light for the selected cooking mode illuminates.
The left display shows the preset cooking temperature.
The right display shows the preset cooking time.
2. Open cooking zone door.
5.10.5 Changing the cooking program while cooking
The cooking time, cooking zone humidity, fan speed, cooking
temperature and target core temperature can be changed during
cooking. These changes apply only to the currently running
cooking program and are not retained as presets.
In the case of multi-step cooking programs, press the "STEP"
button repeatedly until the centre display shows the desired
cooking step.
1. Press the "STEP" button.
The indicator light for the cooking mode illuminates.
The left display flashes the set cooking temperature.
The centre display flashes the set cooking zone humidity.
The right display flashes the set cooking time.
The number of indicator lights above the
Fan speed
button
displays the speed level.
2. Set the cooking time, cooking zone humidity level, fan speed,
cooking temperature or target core temperature.
The displayed values are saved automatically after 2 seconds.
40 Operating instructions
10014471-0ABBE-A
Page 41

5.11 Multi-step cooking program
5.11.1 Starting
Requirement Multi-step cooking program entered
Press the "START STOP" button to start the cooking program.
The
last program step.
The
The indicator light for the type of cooking used in the currently
active program step illuminates.
The left display shows the cooking temperature for the
currently active program step.
The right display shows the total cooking time or "--;--L if a later
cooking step with core temperature follows.
The right display shows the actual core temperature if the core
temperature is selected for the currently active program step.
START STOP
STEP
indicator light illuminates.
indicator light flashes until the end of the
Operating the unit
5.12 Expanded cooking functions
5.12.1 Manual humidification
This function is not programmable.
Requirement Cooking program selected and started
Press and hold the
The centre display shows a slowly increasing bar. The cooking
zone humidity level is increased.
5.12.2 Setting the start time delay
If the fan option is selected at the start time delay, the fan
switches on in short intervals until the start time is reached.
Requirement Cooking program selected or a manual cooking program set
1. Press the "START STOP" button for 3 seconds.
"dLAY" appears on the left display.
Plus
button.
10014471-0ABBE-A
The right display flashes "00:01".
2. Turn the right knob anti-clockwise or clockwise.
The right display shows the selected time.
3. Press the
The centre indicator light for the
Fan speed
button.
Fan speed
button illuminates.
41Operating instructions
Page 42

Operating the unit
4. Press the "START STOP" button.
Start-time preselection starts.
The indicator light for the "START STOP" button illuminates.
The right display shows the remaining time before starting and
the colon in the time display flashes.
After the remaining time before starting has expired, the set
cooking program starts automatically.
5.12.3 Cancelling the start time delay
Press the "START STOP" button.
The start time delay is cancelled.
The cooking zone light illuminates.
5.12.4 Starting Ready2Cook
The unit is brought to the correct starting temperature with
Ready2Cook.
Requirement Cooking program selected or a manual cooking program set
1. Briefly press the
Temperature of the cooking chamber is set at 15% via set-up
start temperature.
The indicator light for the
The indicator light for the "START STOP" button flashes.
The left display shows the current cooking zone temperature.
The right display shows the starting temperature.
A signal sounds when the starting temperature is reached.
"rdY" appears on the left display.
2. Open cooking zone door.
The signal is switched off.
The indicator light for the
The displays show the current settings for the selected cooking
program.
3. Load the unit.
4. Close the cooking zone door.
The set cooking program starts automatically.
Ready2Cook
button.
Ready2Cook
Ready2Cook
button flashes.
button goes out.
5.12.5 Cancelling Ready2Cook
Briefly press the
Ready2Cook stops.
The indicator light for the
The set cooking program starts automatically.
42 Operating instructions
Ready2Cook
button.
Ready2Cook
button goes out.
10014471-0ABBE-A
Page 43

5.13 Pausing and finishing use
Switch off the unit during pauses and at end of use.
5.13.1 Perform a hygiene flush after an extended period of idleness
For reasons of hygiene, flush the water lines in the unit and on-site
water lines before using the unit.
Pause in operation lasting more than 2 days
Requirement GN containers, baking trays and grates removed from the cooking
zone
The cooking zone contains no food to be cooked
1. Operate the hand shower for 1 minute.
2. Run the "Steaming" cooking mode for 7 minutes at 100 °C.
Idle period for more than 7 days
Requirement GN containers, baking trays and grates removed from the cooking
zone
There is no food to be cooked in the cooking zone
Operating the unit
1. Operate the hand shower for 5 minutes.
2. Run the "Steaming" cooking mode for 1 hour at 100 °C.
10014471-0ABBE-A
43Operating instructions
Page 44

Cleaning and caring for the unit
6 Cleaning and caring for the unit
CAUTION
Risk of burns from hot surfaces
• Allow surfaces to cool prior to cleaning.
CAUTION
Risk of chemical burns from cleaning agent
• Follow the instructions of the cleaning agent manufacturer.
• Take appropriate protective measures when handling
aggressive cleaning agents.
ATTENTION
Risk of physical damage from extremely abrupt cooling
• Do not cool shock the unit by cooling it abruptly.
6.1 Preventing corrosion
• Keep the surfaces of the unit clean and with access to air.
• Remove lime, grease, starch and protein deposits from the
• Remove salt accumulations.
• Only expose parts made from non-rusting steel to brief contact
• Avoid damaging the stainless steel surface with other metal items,
• Avoid contact with iron and steel, such as for example steel wool
• Do not use bleaching or chlorine-containing cleaning agents.
ATTENTION
Risk of physical damage from improper cleaning
• Do not clean the unit with a high-pressure cleaner or water
jet.
surfaces of the unit.
with highly acidic foods, spices, salts or the like.
such as for example steel spatulas or steel wire brushes.
and steel spatulas.
• Clean the contact surfaces with water.
6.2 Remove rust spots
• Remove fresh rust spots with a mild abrasive or fine sandpaper.
• Always remove rust spots completely.
• Expose treated areas to fresh air for at least 24 hours. During this
time, do not allow any contact with greases, oils or foods so that a
new protective layer can form.
44 Operating instructions
10014471-0ABBE-A
Page 45

Cleaning and caring for the unit
6.3 Cleaning the housing
Requirement Unit switched off and cooled down
Clean the housing with warm water and commercially available
washing-up liquid.
6.4 Cleaning the door handle, operating elements and control panel
ATTENTION
Risk of physical damage from improper cleaning
• Do not clean the surface with highly abrasive or chemically
aggressive cleaning agents.
• Do not clean the surface with highly abrasive sponges.
Requirement Unit disconnected from the electric mains
Clean the door handle, operating elements and control panel with
a damp cloth and commercially available detergent.
6.5 Cleaning the door seal
ATTENTION
Risk of physical damage from improper cleaning
Animal fats in combination with high temperatures can damage
the door seal very quickly if it is not maintained properly.
• Clean the door seal regularly.
• Do not use aggressive cleaners.
During automatic cleaning and semi-automatic cleaning, the
outside surface of the door seal is not cleaned.
The door seal must be cleaned separately.
If the unit is used primarily for roasting, also clean the door seal
during pauses in use.
When finished using the unit, clean the door seal with warm water
and a commercially available detergent.
10014471-0ABBE-A
45Operating instructions
Page 46

Cleaning and caring for the unit
a
b
b
6.6 Cleaning the cooking zone door
CAUTION
Risk of burns from hot surfaces
• Allow surfaces to cool prior to cleaning.
ATTENTION
Risk of physical damage from improper cleaning of the
surface
• Do not use abrasive cleaners or cloths.
• Do not use grill cleaners.
6.6.1 Cleaning the door with hygienic glazing
Remove residual calcium deposits from the glass window with
vinegar or citric acid.
6.6.2 Cleaning the door with a back-ventilated window
Image: Swing open the inner window on the cooking zone door
a Inner window b Retaining spring
1. Open the cooking zone door 90°.
2. Release the retaining spring and swing open the inner window
90°. Do not lift the inner window when swinging it open. Do not
swing the inner window open completely. Hold the inner window
securely during cleaning.
3. Remove residual calcium deposits from the glass window with
vinegar or citric acid.
4. After cleaning the inner window, swing it in again and engage the
retaining spring.
46 Operating instructions
10014471-0ABBE-A
Page 47

6.7 Cleaning the steam outlet
Image: Cleaning the steam outlet
ATTENTION
Risk of physical damage from deposits
• Check the steam outlet and connected piping for deposits.
Use a liquid cleaner containing at most 20% sodium or
potassium hydroxide.
Cleaning and caring for the unit
Flushing with water is not necessary.
1. Examine the steam outlet and connected piping for deposits.
2. Spray liquid cleaner into the steam outlet.
6.8 Cleaning the condensation hood (optional)
CAUTION
Risk of fire from dirt and grease accumulation
• Clean the hood after use.
• Follow the cleaning instructions.
CAUTION
Risk of burns from hot surfaces
• Allow surfaces to cool prior to cleaning.
CAUTION
Risk of injury from sharp edges
• Wear protective gloves.
10014471-0ABBE-A
Image: Cleaning the condensation hood
47Operating instructions
Page 48

Cleaning and caring for the unit
Requirement Unit and hood disconnected from the electric mains
Unit and hood cool
1. Clean the housing daily with warm water and a commercially
available cleaner.
2. Push the grease filter upwards.
3. Pull the grease filter on the underside of the hood forward to
remove it.
4. Clean the grease filter and hood with a commercially available
cleaning agent.
5. Rinse and dry the grease filter, and replace it in the hood.
6.9 Removing calcium deposits from the unit
To remove calcium deposits manually, fill a manual spray gun
with a special decalcifier.
Requirement Cooking zone temperature less than 40 °C
Cooking zone cleaned
1. Dilute special decalcifier with water in a ratio of 1:2.
2. Fold open the air diverter.
3. Spray the diluted special decalcifier into the cooking zone.
4. Allow to act for 30 minutes.
5. Flush the cooking zone thoroughly.
6. Examine the cooking zone for any remaining calcium deposits.
7. If necessary, repeat the decalcification.
8. Open the cooking zone door and leave it open with a slight gap
until the unit is used again.
This extends the service life of the door seal.
No moisture builds up in the cooking zone.
48 Operating instructions
10014471-0ABBE-A
Page 49

Cleaning and caring for the unit
6.10 Cleaning the cooking zone automatically with WaveClean (optional)
CAUTION
Risk of chemical burns
Keep the cooking zone door closed during the cleaning
procedure.
CAUTION
Risk of chemical burns
In the case of the 20.15 and 20.21 models, put the preheat
bridge on the bottom edge of the cooking zone opening, if there
is no tray trolley in the Combisteamer.
The use of unsuitable cleaning agents often causes damage to
units. MKN makes great efforts to be able to offer a cleaning
agent, which on the one hand achieves an outstanding cleaning
performance, but which on the other hand does not attack and
damage the hot air steamer. We therefore recommend that only
our cleaning agent is used. MKN does not assume any
responsibility or liability for damage, which is caused by
unsuitable cleaning agents. Claims against MKN that are due to
this can not be upheld, not even within the scope of the
guarantee or warranty.
It is not permitted to cool the temperature sensor down in order
to start the cleaning procedure more quickly. The whole cooking
zone must be cooled down to 60 °C for effective cleaning.
Depending on the cleaning level selected, the fan may come to
a standstill for up to 60 minutes. This is not a cancellation of
cleaning but part of the cleaning program.
Automatic forced rinse is triggered in the following situations.
• Cleaning is cancelled manually. Cancelling within the first 10
minutes of cleaning does not trigger an automatic forced
rinse.
• Cleaning is cancelled automatically in the event of a fault.
• The Combisteamer is switched off and then back on during
cleaning. The automatic forced rinse begins when the unit is
switched back on.
If the automatic forced rinse is cancelled, it starts again from the
beginning.
It is not possible to start a cooking program, before the forced
rinse is ended.
10014471-0ABBE-A
49Operating instructions
Page 50

Cleaning and caring for the unit
6.10.1 Preparing for cleaning
ATTENTION
Risk of physical damage from improper cleaning
• Do not clean the unit with a high-pressure cleaner or water
jet.
Requirement GN containers, baking trays and grates removed from the cooking
zone
1. Remove any food remains from the cooking zone.
2. Leave only the support rack in the cooking zone in countertop
units, and leave only the tray trolley in the cooking zone in floorstanding units.
3. Close the cooking zone door.
6.10.2 Selecting the cleaning level
The drain screen is not obstructed.
Despite different cleaning times, all cleaning levels required the
same amount of water.
Tip
Requirement The unit is on
In the case of automatic cleaning overnight, we recommend the
"normal" or "extra" cleaning levels. This ensures that there is
sufficient drying.
1. Turn the
The indicator light illuminates.
The left display flashes the last selected cleaning level.
2. Turn the left knob and select a cleaning level.
For cleaning level 1 with a cleaning time of approx. 1 hour, the
display shows "CL1".
For cleaning level 2 with a cleaning time of approx. 2 hour, the
display shows "CL2".
For cleaning level 3 with a cleaning time of approx. 3 hour, the
display shows "CL3".
The left display shows the selected cleaning level.
3. Press the "START STOP" button.
Select
knob to the
WaveClean
symbol.
If the cooking zone temperature is too high, "HOt" appears on
the right display; if the cooking zone temperature is too low,
"--:--" appears on the right display.
The indicator light for the
Once the cleaning temperature is reached, a signal sounds.
The centre display shows the cleaning level.
"CAr" appears on the right display.
50 Operating instructions
Ready2Cook
button flashes.
10014471-0ABBE-A
Page 51

6.10.3 Inserting the cleaning cartridge
Image: Wax seal on the cartridge damaged
Use only cleaning cartridges with an undamaged wax seal.
If the wax seal is damaged, the cleaner can enter the cleaning
circuit prematurely or not dissolve completely, so that complete
cleaning is no longer assured.
Insert the cleaning cartridges only when requested to do so.
Cleaning and caring for the unit
Requirement Cleaning cartridges sealed and undamaged
1. Open the cooking zone door.
2. Open the lid of the cartridge.
Image: Inserting the cartridge
3. Insert the cartridge into the holder on the air diverter or into the
holder on the tray trolley.
Never operate the unit in the automatic cleaning mode without a
cleaning cartridge.
If there is a high level of contamination, select the "CL3"
cleaning level and use 2 cleaning cartridges.
10014471-0ABBE-A
4. Close the cooking zone door.
The centre display shows the selected cleaning level.
"CAr" appears on the right display.
51Operating instructions
Page 52

Cleaning and caring for the unit
6.10.4 Starting automatic cleaning
Requirement Water connection is opened
The unit is on
Cooking zone temperature at 60 °C
Press the "START STOP" button.
The button's indicator light flashes.
The centre display shows the selected cleaning level.
The right display shows the remaining time.
6.10.5 Cancelling automatic cleaning
Press the "START STOP" button.
The cleaning program is cancelled.
"End" appears on the left display.
The centre display shows the selected cleaning level.
Automatic cleaning is cancelled.
On cancellation, automatic rinsing of the cooking zone is
initiated.
6.10.6 Ending automatic cleaning
Requirement Automatic rinsing has stopped after the cleaning program was
cancelled or the cleaning time has elapsed
1. Open the cooking zone door.
2. Remove the empty cleaning cartridge.
3. Use the hand-held shower to thoroughly flush away any remaining
cleaner or rinsing agent.
CAUTION
Risk of chemical burns
Droplet quantities can contain caustic constituents, so suitable
protective measures must be taken.
"CAr" flashes on the right display.
4. Empty any droplets of the cleaning water from the collection
container of the tray trolley and flush it afterwards with a soft water
jet.
5. Flush away any droplets of cleaning water on the floor in front of
the unit with a soft water jet.
6. Leave the cooking zone door open with a slight gap until the unit
is to be used again.
This extends the service life of the door seal.
No moisture builds up in the cooking zone.
52 Operating instructions
10014471-0ABBE-A
Page 53

Cleaning and caring for the unit
6.11 Cleaning the cooking zone semi-automatically
6.11.1 Preparing the cooking zone
ATTENTION
Risk of physical damage from improper cleaning
• Do not clean the unit with a high-pressure cleaner or water
jet.
Requirement GN containers, baking trays and grates removed from the cooking
zone
1. Remove any food remains from the cooking zone.
The drain screen is not obstructed.
2. Leave only the support rack in the cooking zone in countertop
units, and leave only the tray trolley in the cooking zone in floorstanding units.
3. Close the cooking zone door.
6.11.2 Starting the cleaning program
CAUTION
Dangerous situation
Failure to observe precautions can result in slight to moderately
severe injuries.
• Wear protective clothing.
• Wear breathing protection.
ATTENTION
Risk of physical damage from exceeding the recommended
acting time of the cleaner
• Do not allow the cleaner to act longer than specified by the
program.
Requirement The unit is on
1. Using the
2. The left display flashes the last selected cleaning program.
3. Use the left knob to select CLE on the display.
Select
knob, select
HandClean
or
WaveClean
.
10014471-0ABBE-A
The indicator light illuminates.
"CLE" flashes on the centre display.
4. Press the "START STOP" button.
The cleaning program starts. The cooking zone is heated or
cooled.
"HOt" appears on the right display while cooling or "--:--"
appears on the right display while heating.
Until the cooking zone temperature is reached.
53Operating instructions
Page 54

Cleaning and caring for the unit
5. The softening process starts automatically.
6. Softening time elapsed.
7. Put on protective clothing, safety goggles and protective gloves.
8. Open cooking zone door.
9. Spray the cooking zone, heat register and fan wheel with cleaner.
10.Close the cooking zone door.
11.The acting time starts automatically.
12.The acting time of the cleaner has elapsed.
13.The cleaning time starts automatically.
The right display shows the remaining softening time.
"SPr" flashes on the right display.
"CLE" appears on the left display.
The right display shows the remaining acting time of the
cleaner.
The indicator light for the "START STOP" button flashes.
The right display shows the remaining cleaning time.
14.Press the "START STOP" button.
15.Press the "START STOP" button.
6.11.3 Rinsing the cooking zone
Requirement The cleaning process has completed
"SHO" appears on the right display
1. Open the cooking zone door.
2. Using the hand shower, thoroughly rinse through the openings in
the air diverter.
3. Thoroughly rinse the cooking zone with the hand shower for 3
minutes.
4. Close the cooking zone door.
6.11.4 Drying the cooking zone
Requirement Cooking his own door closed
Cleaning time expired.
"SHO" appears on the right display.
Rinse the cooking zone thoroughly.
Cleaning stops.
1. The drying process starts automatically.
The indicator light over the
The right display shows the remaining time.
The cooking zone is heated.
2. After the end of the drying process, a signal sounds.
"End" appears on the right display.
54 Operating instructions
Hot air
symbol illuminates.
10014471-0ABBE-A
Page 55

3. Open the cooking zone door and leave it ajar until the unit is used
a
b
c
a
b
c
d
again.
This extends the service life of the door seal.
No moisture builds up in the cooking zone.
6.12 Swinging the air diverter open and closed
CAUTION
Pinch hazard from rotating fan
• Prior to working on the unit, ensure that the unit has been
disconnected from the mains.
• Do not operate the unit without the air diverter.
Cleaning and caring for the unit
Image: Air diverter fasteners on countertop and floor-standing units
a Air diverter c Lower fastener
b Upper fastener d Centre fastener
Swinging the air diverter open
Requirement Unit switched off
1. Remove the left support rack; present only in size 6 and size 10.
2. Loosen the upper fastener.
3. Loosen the lower fastener.
4. Loosen the centre fastener; present only in size 20.
5. Swing the air diverter toward the back wall.
Swinging the air diverter closed
1. Swing back the air diverter along the side wall.
2. Close the upper fastener.
3. Close the lower fastener.
4. Close the centre fastener; present only in size 20.
6. Insert the left support rack; present only in size 6 and size 10.
5. Check the fasteners.
10014471-0ABBE-A
55Operating instructions
Page 56

Cleaning and caring for the unit
6.13 Inspecting the unit
6.13.1 Performing a visual inspection
ATTENTION
Risk of physical damage from improper inspection
• Inspect in accordance with the inspection intervals.
• Have inspections performed by a capable user.
• In the event of damage or signs of wear, contact customer
service immediately and stop using the unit.
Requirement Unit disconnected from power
Unit empty and cleaned
Cooking zone door opened completely
Inspect housing, cooking zone door and cooking zone yearly for
deformation and damage.
Visual inspection has been performed.
56 Operating instructions
10014471-0ABBE-A
Page 57

7 Troubleshooting
Troubleshooting
Image: Left, centre and right displays
If an error occurs during operation, the error group and the error
number within the group are displayed.
• The left display shows the error group.
• The right display flashes the error number.
For a remedy, give customer service the error group and error
number displayed.
7.1 Emergency mode
Emergency programs handle the limited further operation of the
appliance until servicing. Deviating cooking results and
temperature deviations are possible.
In order to allows limited use in case of error, the unit has several
different emergency programs. Emergency operation is activated
automatically and displayed. After elimination of the error indicated,
the controls switch back into normal operation automatically. A reset
is not necessary.
7.2 Causes of errors and remedies
Fault
group
04 04 No water • Water valve closed
07 10 Cooking zone sensor is
Fault no. Failure Possible causes Remedy
• Unit defective
• Sensor failure • The core temperature
defective
• Open the water valve
• Contact Customer service
sensor is used as a substitute sensor
• Do not insert the core
temperature sensor into
the food to be cooked
• The core temperature
sensor must remain in the
cooking zone
• Contact Customer service
10014471-0ABBE-A
57Operating instructions
Page 58

Troubleshooting
Fault
group
07 11 Top cooking zone sensor is
07 12 Bottom cooking zone sensor
07 13 Emergency mode due to
07 14 Emergency mode due to
07 16 Vapour sensor defective • Sensor failure • Contact Customer service
07 17 Humidity sensor defective • Sensor failure
07 18 Excess temperature in the
07 40 Internal core temperature
07 41 External core temperature
Fault no. Failure Possible causes Remedy
• Sensor failure • The second cooking zone
defective
• Sensor failure
is defective
• Sensor failure
defective top cooking zone
sensor
• Sensor failure
defective bottom cooking
zone sensor
cooking zone
• Sensor failure • Contact Customer service
sensor is defective
• Sensor failure • Switches over to internal
sensor is defective
sensor is used as a substitute sensor
• Contact Customer service
• Contact Customer service
4-point core temperature
sensor
• Contact Customer service
07 42 Internal core temperature
sensor is defective
07 43 Sous-vide core temperature
sensor is defective
07 60 Fan fault or temperature
limiter is triggered
07 61 Fault on the top fan or
temperature limiter is
triggered
07 62 Fault on the bottom fan or
temperature limiter is
triggered
07 70 Water pressure too low • Water valve closed
08 1 No gas • Open the gas infeed
08 2 No gas at the top
08 3 No gas at the bottom
• Sensor failure • Switches over to external
4-point core temperature
sensor
• Contact Customer service
• Sensor failure • Switches over to internal
core temperature sensor
• Contact Customer service
• Contact Customer service
• Contact Customer service
• Contact Customer service
• Open the water valve
• Too many water con-
sumers opened at the
same time
• Close the other water consumers
• Contact Customer service
• If necessary, switch on
the condensation hood
• Contact Customer service
08 4 / 5 / 6 No flame / at top / at bottom • Contact Customer service
08 7 / 8 / 9 No gas fan / at top / at
bottom
08 10 / 11 /
12
Wiring fault in flame / at top /
at bottom
• Contact Customer service
• Contact Customer service
58 Operating instructions
10014471-0ABBE-A
Page 59

Troubleshooting
Fault
group
08 13 / 14 /
08 16 - 24 Internal gas fault • Contact Customer service
08 25 / 26 /
Fault no. Failure Possible causes Remedy
15
27
Wiring fault in gas solenoid
valve / at top / at bottom
Fault in communication with
ignition box / at top / at
bottom
• Contact Customer service
• Contact Customer service
7.3 Nameplate
When contacting customer service, please always provide the data
from the nameplate:
Serial number
(SN)
Type number
(TYP)
10014471-0ABBE-A
59Operating instructions
Page 60

Dispose of unit in an environmentally responsible manner
8 Dispose of unit in an environmentally responsible manner
The unit has been designed to provide a lifetime of 10 years with
average use.
Do not dispose of unit or the unit's components together with nonrecyclable waste. If the unit is disposed of together with nonrecyclable waste or treated improperly, toxic substances contained in
the unit can damage health and pollute the environment.
Dispose of the unit in accordance with local regulations for used
appliances. Clarify any open questions with the responsible agencies
(for instance, solid waste management).
Unit In addition to valuable materials, used electrical and electronic
equipment also contains harmful substances that were needed for
their operation and safety.
Cleaning agents Dispose of leftover cleaning agents and cleaning agent containers in
accordance with the information provided by the cleaning agent's
manufacturer. Observe applicable regional regulations.
60 Operating instructions
10014471-0ABBE-A
Page 61

9 Manufacturer's declaration
EC Declaration of Conformity
1 / 2
10014471--KOBE-C en-GB
Manufacturer
MKN Maschinenfabrik Kurt Neubauer GmbH & Co. KG • Halberstädter Straße 2a • 38300 Wolfenbüttel,
Germany
We hereby declare, that the following product:
Description of the unit
Unit for cooking food in commercial applications
Designation / Unit type
FlexiCombi gas combisteamer / FKGCOD...
Unit number
MagicPilot FKGCOD115TXXXX FKGCOD121TXXXX FKGCOD215TXXXX FKGCOD221TXXXX
FKGCOD615TXXXX FKGCOD621TXXXX
Classic FKGCOD115CXXXX, FKGCOD121CXXXX FKGCOD215CXXXX FKGCOD221CXXXX
FKGCOD615CXXXX FKGCOD621CXXXX
X: Equipment feature
complies with the relevant provisions of the following directives, but does not contain any assurance of
properties:
• Directive 2006/42/EC dated 17 May 2006 on machinery
• Directive 2009/142/EG dated 30 November 2009 on appliances burning gaseous fuels
• Directive 2014/35/EU dated 26 February 2014 on electrical equipment used within certain voltage limits
• Directive 2011/65/EU (RoHS) dated 01 July 2011
• Directive 2014/30/EU dated 26 February 2014 on electromagnetic compatibility
• REGULATION (EC) No. 1935/2004 dated 27 October 2004 on materials and objects, which are intended to
come into contact with food
We hereby declare, that the listed units comply with the type of construction described in the EU Type
Examination Certificate, and that they meet the requirements of the specified Gas Appliances Directive.
Product identification number of the EU type examination certificate:
CE-0063BR3266
Wolfenbüttel, 18/01/2017
Person authorised to compile the technical documents: ppa. Peter Helm,Chief Technical Officer (address as
manufacturer)
Translation from the original document • 10014471--KODE-C
Manufacturer's declaration
10014471-0ABBE-A
61Operating instructions
Page 62

Manufacturer's declaration
EC Declaration of Conformity
2 / 2
10014471--KOBE-C en-GB
Adduced basis for verification
EN 203-1:2014
EN 203-2-2:2006
EN 203-3:2009
EN 55014-1:2006
EN 55014-2:1997
EN 60335-2-102:2006
EN 61000-3-2:2014
EN 61000-3-3:2013
EN 60335-1:2002 + A11:2004 + A1:2004 + A12:2006 + A2:2006 + A13:2008 + A14:2010 + A15:2011
The manufacturer bears the sole responsibility for issuing this Declaration of Conformity. This Declaration of
Conformity becomes invalid, if changes are made which are not agreed with us.
Wolfenbüttel, 18/01/2017
Person authorised to compile the technical documents: ppa. Peter Helm,Chief Technical Officer (address as
manufacturer)
Translation from the original document • 10014471--KODE-C
62 Operating instructions
10014471-0ABBE-A
Page 63

Page 64

www.mkn.eu
 Loading...