

Page 1
24-INCH CUTTING KIT (Document Part Number 158364)
Disconnect Saw
Wrench
The 24-Inch Cutting Kit modifies the MK-101 Series Tile Saws allowing the saw to cut tile up to 24 inches.
NOTE: If problems arise during the installation of the 24-Inch Cutting Kit, contact the MK Diamond Service
Center – (800) 474-5594
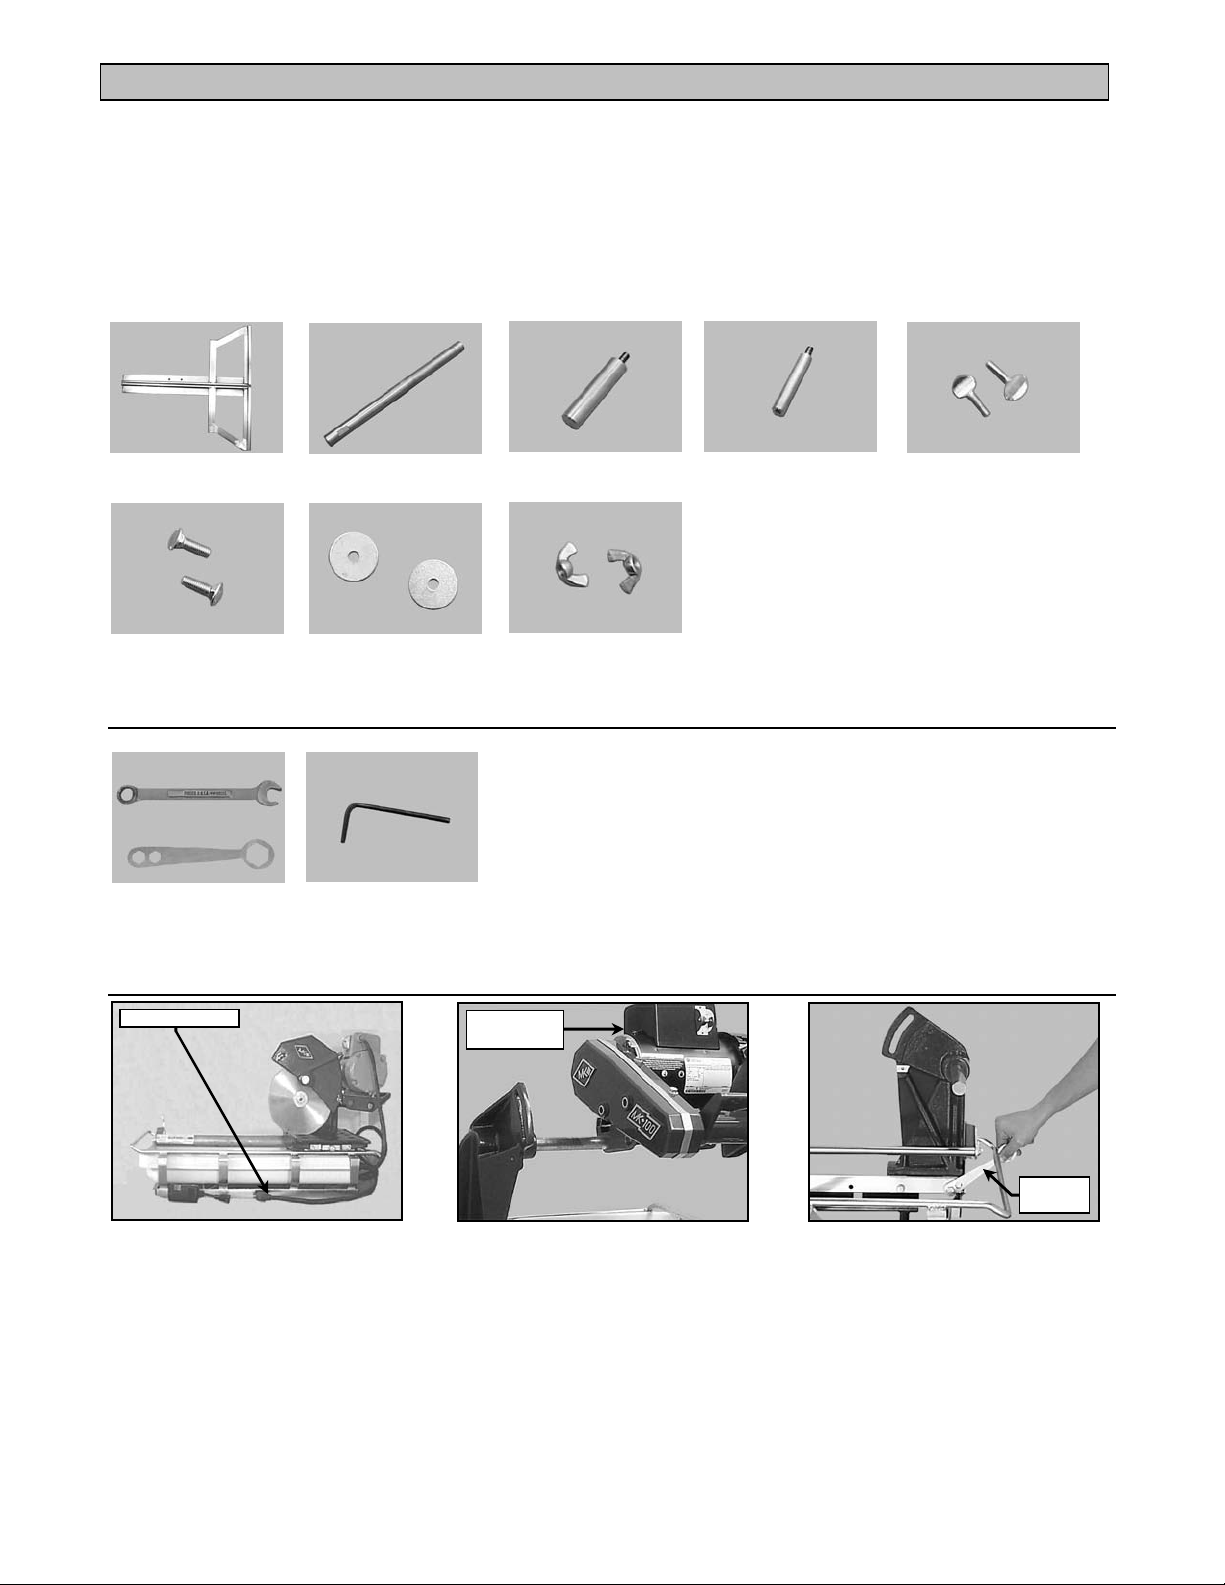
CONTENTS:
one (1) 24-inch frame, one (1) replacement shaft, one (1) shaft extension, one (1) adjustment knob extension,
two (2) retaining thumbscrews, two (2) carriage bolts, two (2) flat washers, two (2) wing nuts.
24 Inch
Frame
Carriage
Bolts
Replacement
Shaft
Flat
Washers
Shaft
Extension
Wing
Nuts
Adjustment Knob
Extension
Retaining
Thumbscrew
Tools Needed:
- OR -
Blade Wrench or
9/16-inch Wrench
3/8-Inch Allen
Wrench
Preparation:
Remove
Cutting Head
(A)
Remove Tile Saw
from Power Source
24 Inch Cutting Kit Revision 02/01, Effective Date February 7, 2001
Remove the Cutting Head
(See Tile Saw Owner’s Manual)
(B)
9/16-inch
(C)
Adjust Cutting Head Post for
maximum cutting length
(See Tile Saw Owner’s Manual)
Page 1
Page 2

24-INCH CUTTING KIT (Document Part Number 158364)
Cutting Head With Threaded Pivot Shaft:
NOTE: Found on older models
Rotate clockwise
to install
Shaft
Extension
(A)
Install the Shaft Extension
into the threaded end of the
Cutting Head Pivot Shaft
Cutting Head Without Threaded Pivot Shaft:
3/8-Inch
Allen Wrench
Rotate counter-
clockwise to loosen
Shaft Retaining
Screw
(A)
Loosen the Cutting Head Pivot
Shaft retaining screw
Installation
Direction
Square Indentation
Facing Retaining Screw
Shaft Retaining
Screw
(D)
Install the square indentation
end of the Replacement Shaft
into the Post
Removal
Direction
Pivot
Shaft
Post
(B)
Remove the Cutting Head
Pivot Shaft from the Post
3/8-Inch
Allen Wrench
Rotate clockwise
to tighten
Shaft Retaining
Screw
(E)
Tighten the Cutting Head Pivot
Shaft retaining screw
Replacement
Shaft
(C)
Grease the square indentation
end of the Replacement Shaft
24 Inch Cutting Kit Revision 02/01, Effective Date February 7, 2001
Page 2
Page 3

24-INCH CUTTING KIT (Document Part Number 158364)
Bolt
Cutting Head Installation:
Installation
Direction
(A)
Install the front pivot hole of
the Cutting Head onto the
Replacement Shaft
Rotate clockwise
to install
Adjustment
Knob Extension
Retaining
Hole
(B)
Thread the Adjustment Knob
Extension into the front
adjustment knob retaining hole
Adjusting
Knob
Install the Cutting Head
Adjustment Knob
Rotate clockwise
to install
(C)
24-Inch Frame Installation:
Front
Channel
Align front channel
to Ruler/Stop
Ruler/Stop
Center Blade
Groove to Blade
Rotate clockwise
to tighten
Retaining
Thumbscrew
(A)
Place the 24-Inch Frame onto
the Movable Cutting Table
Carriage
(D)
Install the two carriage
bolts through the holes in
the 24-Inch Frame and
Movable Cutting Table
(B)
Align the 24-Inch Frame blade
groove to the Diamond Blade
Movable
Cutting Table
Rotate clockwise
to tighten
Wing-nut and
Flat Washer
(E)
Raise the Movable Cutting Table,
install the flat washers and wing
nuts onto the carriage bolts,
tighten to hold the 24-Inch Frame
in place
(C)
Install and tighten the two
Retaining Thumbscrews
24 Inch Cutting Kit Revision 02/01, Effective Date February 7, 2001
Page 3
Page 4

24-INCH CUTTING KIT (Document Part Number 158364)
Position
Switch
Position
Switch
GFCI
Points
Placing And Cutting The Tile:
Follow all directions for setup, adjustment and operation found in the Tile Saw Owner’s Manual
before beginning the cutting operation.
Backstop
GFCI Plugged
Into Power
Source
(A)
Plug MK-101 into the GFCI
Plug the GFCI into the
(B)
Power source
(C)
Place the tile onto the 24-Inch
Frame against the backstop
and adjust the tile for the cut
Use care when cutting so as not to damage the Ruler/Stop.
NOTE: The first cut requires the Cutting Head to be placed on top of the tile and a Step Cut to be performed. A
Step Cut is performed by a series of small cuts of increasing depth.
ON/OFF
(D)
Turn the motor ON
On
Cooling Flow
(E)
Verify proper cooling flow on
both sides of the blade
First pass will cut
one-half of the tile
Hold in
Position
(F)
Position the piece to be cut onto
the 24-inch Cutting Kit Frame
and perform the initial cut
NOTE:
Second pass will
complete the
complete cut
(G)
Rotate the tile 180° on the 24-
inch Cutting Kit Frame to
ON/OFF
(H)
Turn the motor OFF when
work is complete
Off
complete the cut
MK Diamond Products, Inc. 1315 Storm Parkway Drive, Torrance, CA 90509-2803
Phone: 800-421-5830
24 Inch Cutting Kit Revision 02/01, Effective Date February 7, 2001
Page 4
 Loading...