

Page 1
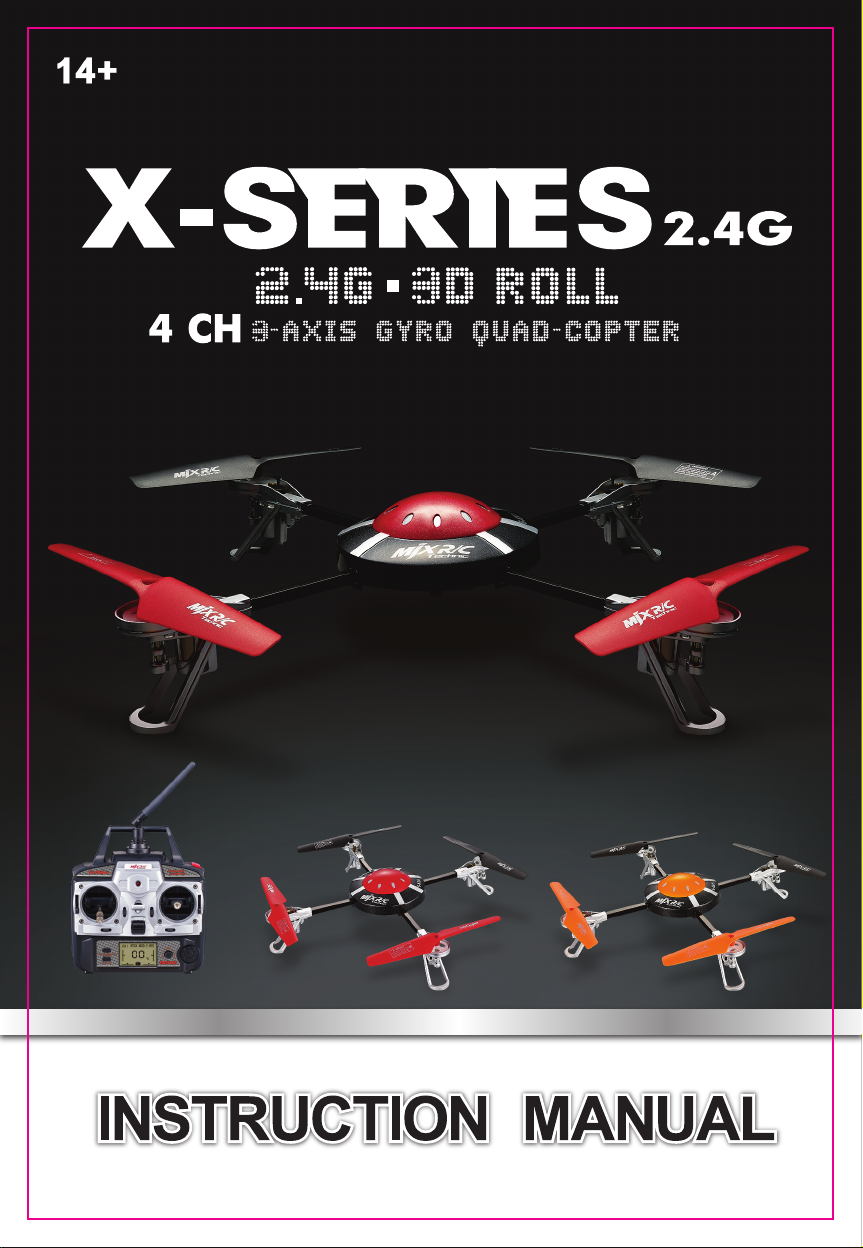
ITEM NO.X200/X6200
Page 2
Thank you for purchasing this product. Please read this manual carefully
before use and retain it for future reference.
Technical parameter of the Quad-copter
Fuselage Length:300MM
Overall height: 55MM
Charging Time: about 1.5hours
Gross Weight: about 90g
Battery : Li-polymer 3.7V 600mAh
Main Rotor Diameter: 135MM
Motor: Coreless Motor
Introduction
Quad-rotor design insure more stable and powerful performance and
make all kinds of 3D action more easier.
New designed structure makes assembly and maintainance easier.
Adopting 2.4G auto connection technology, scores of quad-copters can
be played at the same time.
Equipped with the newest 3-Axis Gyro control system, this quad-copter
has the characteristics of stable flight and easy operation.
Full charged battery can support 13 minutes steady flight.
Safety Guidelines
This product is not a toy. It is not applicable for children who are under
14 years old.
Please read this instruction manual carefully before playing and operate
the product according to the manual.
The users are in full charge of proper operating the quad-copter. The
manufacturer and dealers disclaim all responsibility for the damage
caused by misuse.
Keep the small accessories away from the kids to avoid accident.
Keep batteries away from fire or high temperature environment.
When flying the quad-copter, keep it 1~2 meters away from user or others
to avoid injury due to collision.
Not to decompose or modify the product which may cause malfunction
or accident.
Fly the quad-copter within your eye vision for easy and safety control.
Need adult supervision when this quad-copter is being played by children.
Only batteries of the same or equivalent type as recommended are to be
used.
Insert batteries with correct polarity.
Non rechargeable batteries are not to be charged; the transmitter need
3XAA batteries for work.
Do not mix old and new batteries.
1
Page 3
Product/spare parts included in this packaging
Description
Quad-copter 1
Remote controller
Rotor blade
Qty(pc)
1
2
Description
3.7V 600mAh li-polymer battery
Manual
Charger
Qty(pc)
1
1
1
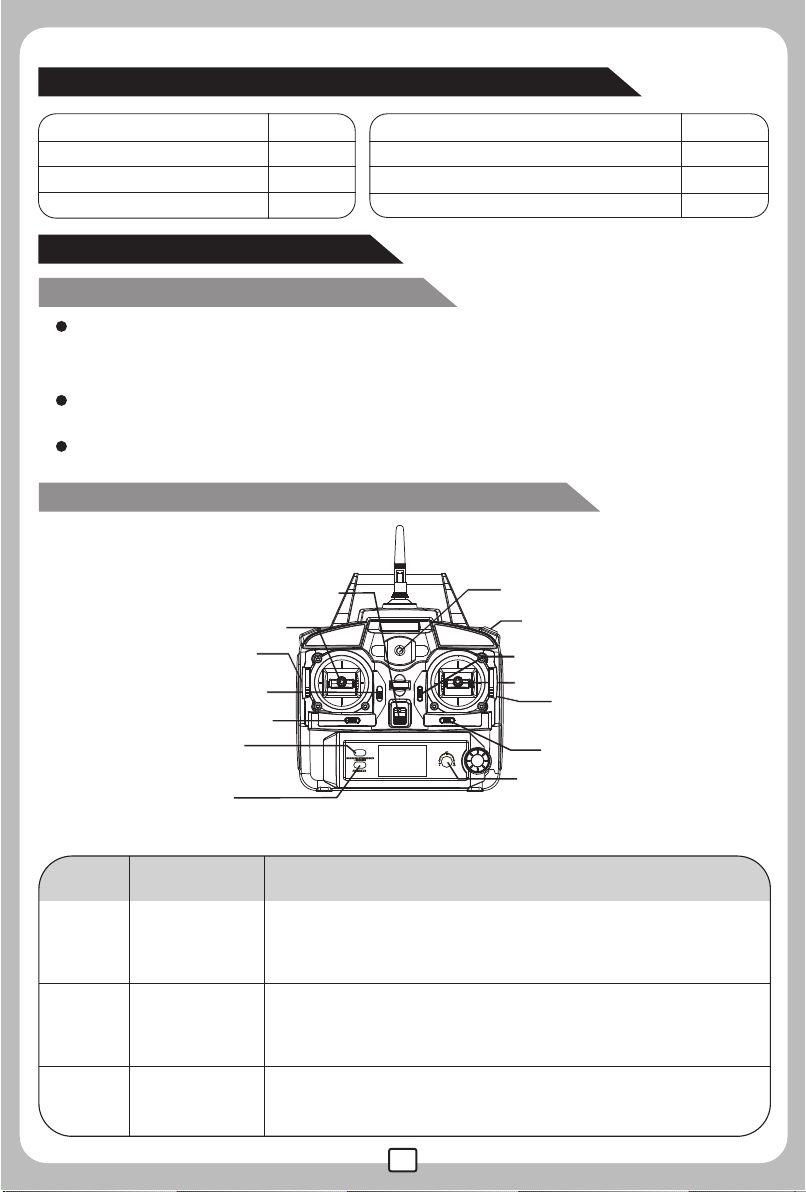
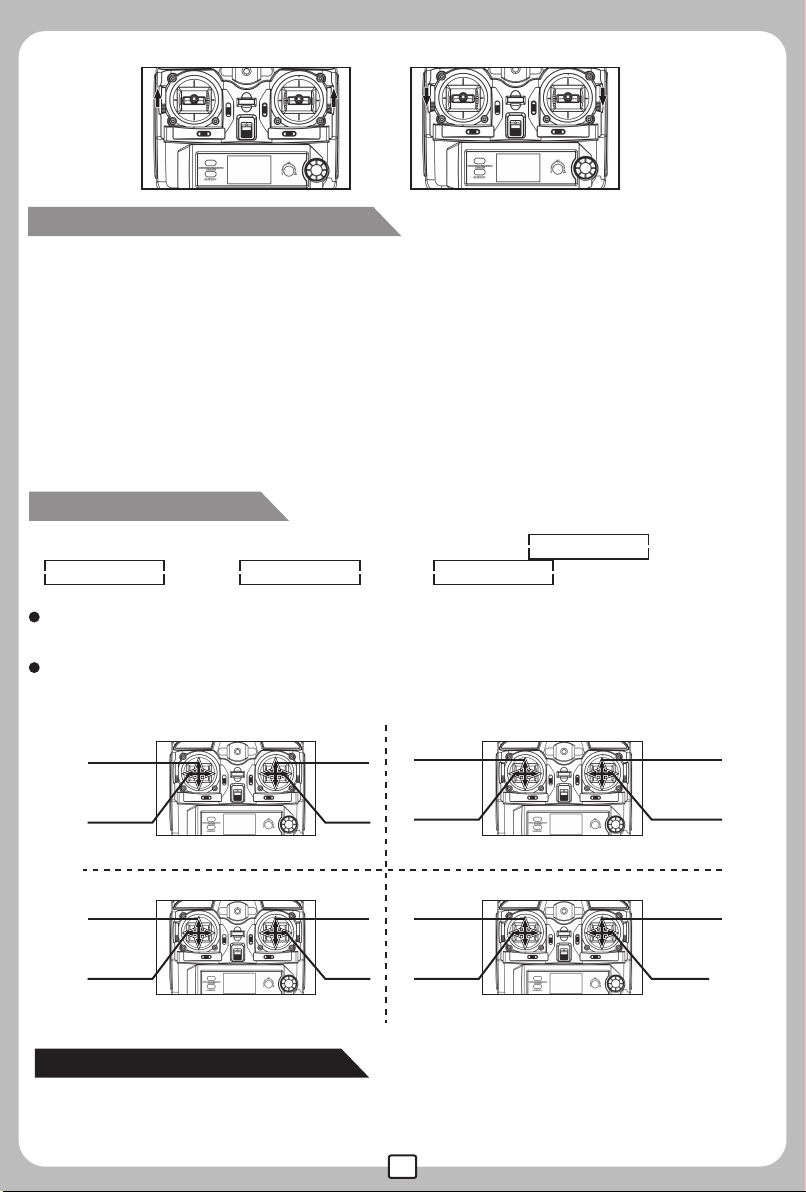
The LCD Remote controller
Main features of the remote controller
Adopt microcomputer control remote controller system and 2.4G auto
connection technology, scores of cotpers can be played at the same
time without any interference.
Control the function of upward,downward,forward,backward, leftward,
rightward,turn left, turn right 3D flips & roll of the copter.
Throttle control stick can be freely switched according to player's habit.
Sketch and function switches of the remote controller
8. Antenna
7. Power switch
1. Left stick
12. Throttle changing
button (Left)
3. Trimmer A
4. Trimmer B
14.flight mode
changing button
15.aileron/rudder
changing button
No. Function switch Function description
1
2
3 Trimmer A
Left stick
Right stick
Remote Controller
STICK MOD2:upward/downward,turn left/turn right;
STICK MOD4:upward/downward,leftward/rightward.
STICK MOD1:forward/backward,turn left/turn right;
STICK MOD3:forward/backward,leftward/rightward.
STICK MOD1: upward/downward,leftward/rightward;
STICK MOD3: upward/downward, turn left/turn right;
STICK MOD2: forward/backward,leftward/rightward;
STICK MOD4: forward/backward,turn left/turn right.
In stick Mod 2 and 4, this button is null.
In stick Mod 1and 3, it helps to tune the quad-copter's
forward and backward flight.
POWER
(Transmitter)
2
9. Power indicator
10. Function/Camera
6. Trimmer D
2. Right stick
5. Trimmer C
11.Throttle limit knob
13. Throttle changing
button (Right)
Page 4
No. Function switch Function description
In stick Mod 3 and 4, it helps to tune the quad-copter's
4
5 Trimmer C
6 Trimmer D
7
Trimmer B
Power switch
sideward flight.
In stick Mod 1 and 2,it helps to tune the quad-copter's left
and right direction turning speed.
In stick Mod 3 and 4, it helps to tune the quad-copter's
left and right direction turning speed.
In stick Mod 1 and 2,it helps to tune the quad-copter's
sideward flight.
In stick Mod 1 and 3, this button is null.
In stick Mod 2 and 4, it helps to tune the quad-copter's
forward and backward flight.
It controls the power source of the transmitter.Slide
the power switch to the “ON” position, the transmitter
is powered on; slide the power switch to the “OFF”
position, the transmitter is powered off.
8
9
10
11
12/13
14
15
Antenna
Power
indicator
3D roll button/
Camera button
Throttle limit
knob
Throttle
changing button
flight mode
changing button
aileron/rudder
changing button
Transmits wireless signal.
The indicator light keeps blinking slowly: the transmitter
is not activated.
The indicator light keeps flashing rapidly: the transmitter
is sending out connectional signal to the quad-copter.
The indicator light keeps on without blinking: the transmitter
is ready for controlling the flight.
Press the function button to achieve 3D roll action when the
quad-copter is flying under Roll mode.
When the quad-copter build a camera, this button is used for
shooting or taking photo.
The throttle of the quad-copter can be adjuted by this button,
player can use this button to increase or decrease the
quad-copter’s upward/downward speed.
Slide down or slide up the 2 buttons at the same time
to select the throttle control stick
There are 3 flight modes of the quad-copter: low speed,
medium speed and maximum speed.
Also named Stick Mode changing button.Press this button
to change the control stick mode.
Remote controller’s setting
Select the throttle control stick
There is 1 throttle button on either side of the remote controller.
Slide both of the 2 buttons to "R", the right stick is the throttle control stick.
Slide both of the 2 buttons to "L", the left stick is the throttle control stick.
Tip: both of the 2 buttons should be either on the position of "R" or "L",
otherwise, the remote controller can not be activated.
3
Page 5
Pic.1 Pic.2
Activate the LCD remote controller
Slide the power switch to "ON" position after throttle control stick
selection is done.To activate the remote controller, slowly push up the
throttle control stick to the top and then push it down to the bottom. The
remote controller is activated once a beep sound is heard. Then, the
indicator light keeps flashing while the remote controller is sending out
connectional signal. It takes about 10 seconds to finish the signal
transmission process. After signal transmission is completed, the indicator
light keeps constant "on”. User can turn either the left stick or the right stick
to skip the signal transmission process and enter into the start-up interface
directly.
Stick Mode Selection
There are 4 stick modes available for selection: Stick Mod 1 (Pic.3)
Stick Mod 2 (Pic.4) Stick Mod 3 (Pic.5) Stick Mod 4 (Pic.6)
Forward /
Backward
control
Left/Right
turning
control
Throttle
control
Leftward/
Rightward
control
Pic.3
Throttle
control
Left/Right
turning
control
Forward /
Backward
control
Leftward/
Rightward
control
Pic.4
STICK MOD:1 STICK MOD:2
Forward /
Backward
control
Leftward/
Rightward
control
Throttle
control
Left/Right
turning
control
Pic.5
Throttle
control
Leftward/
Rightward
control
Forward /
Backward
control
Left/Right
turning
control
Pic.6
STICK MOD:3 STICK MOD:4
Flight mode selection
There are 3 flight modes available: low speed, medium speed and maximum
speed.Player can select the flight speed by pressing the flight mode button.
4
Page 6

STICK MOD
CH
1
STICK MOD
2
CH
1
2
STICK MOD
CH
1
2
00
This is the low speed icon. This is the medium speed icon. This is the maximum speed icon .
Pic.7 Pic.8 Pic.9
00
00
The Quad-copter
Rotor blade
Motor
How to charge the Quad-copter
battery compartment
Connect the charger to the Power socket,the green indicator light will
turn on.
Insert the charging plug into the jack of the battery wire to start
charging.(Pic.10)
Once charging is proceeding, the Green light on charger is ON. When
charging is finished, the light will turn Red.
Full charge takes about 1.5 hours.
NOTE:Battery should be full charged before storing.
Light
Landing gear
Pic.10
Preparation for flight
Put the battery into the battery compartment of the quad-copter;install 3 X AA
batteires into the battery compartment of the remote controller.
Connect the battery wire plug with power plug of the quad-copter.The LED light
on the tail of quad-copter will keep constand "on" and the LED light on the head
of the quad-copter will keep flashing Then, set the quad-copter to the platform.
Slide the power switch of the remote controller to " ON" postion.To
activate the remote controller,slowly push up the throttle stick to the top
5
Page 7

and then push it down to the bottom. The remote controller is activated
once you hear a beep sound.Then, the indicator light flashes slowly while
the remote controller is sending out connectional signal.
The indicator light on quad-copter will flashing rapidly when it received
the signal. It will takes about 5 seconds to check out the gyro before the
whole auto signal connection process is finished.
STICK MOD
To ensure steady flight, please set the value
of the Trimmer to the midpoint.(Pic.11)
Push up the throttle stick slowly and the
CH
1
2
00
quad-copter takes off.
Pic.11
Counterclockwise
(A1 Rotor blade)
Clockwise
Head of the
quad-copter
Left
Tail of the
quad-copter
Clockwise
(B4 Rotor blade)
Right
Counterclockwise
(A3 Rotor blade)(B2 Rotor blade)
Pic.12
Remark: The left-front and the right-back rotor blades rotate in Counterclockwise direction, the right-front and left-back rotor blades rotate in
clockwise direction when the copter is flying.
Operational Tips
User may push either of the control sticks to skip the auto signal
connection process once the quad-copter finished signal connection.
Set the connection one by one. Otherwise, it may not be connected.
Once the transmitter is turned off, the connection procedure must be
repeated to operate the quad-copter.
If the quad-copter keeps moving sidward even no control signal is
given, players may adjust trimmer button to keep the quad-copter
balanced.
Please pull out the battery plug from the quad-copter battery socket.
Trimmer Functions
1.If the quad-copter keeps moving forward/backward even there is no
control signal given, users may adjust the trimmer button to keep the
quad-copter balanced.
6
Page 8

ITEM NO.X200/X6200
Page 9

Thank you for purchasing this product. Please read this manual carefully
before use and retain it for future reference.
Technical parameter of the Quad-copter
Fuselage Length:300MM
Overall height: 55MM
Charging Time: about 1.5hours
Gross Weight: about 90g
Battery : Li-polymer 3.7V 600mAh
Main Rotor Diameter: 135MM
Motor: Coreless Motor
Introduction
Quad-rotor design insure more stable and powerful performance and
make all kinds of 3D action more easier.
New designed structure makes assembly and maintainance easier.
Adopting 2.4G auto connection technology, scores of quad-copters can
be played at the same time.
Equipped with the newest 3-Axis Gyro control system, this quad-copter
has the characteristics of stable flight and easy operation.
Full charged battery can support 13 minutes steady flight.
Safety Guidelines
This product is not a toy. It is not applicable for children who are under
14 years old.
Please read this instruction manual carefully before playing and operate
the product according to the manual.
The users are in full charge of proper operating the quad-copter. The
manufacturer and dealers disclaim all responsibility for the damage
caused by misuse.
Keep the small accessories away from the kids to avoid accident.
Keep batteries away from fire or high temperature environment.
When flying the quad-copter, keep it 1~2 meters away from user or others
to avoid injury due to collision.
Not to decompose or modify the product which may cause malfunction
or accident.
Fly the quad-copter within your eye vision for easy and safety control.
Need adult supervision when this quad-copter is being played by children.
Only batteries of the same or equivalent type as recommended are to be
used.
Insert batteries with correct polarity.
Non rechargeable batteries are not to be charged; the transmitter need
3XAA batteries for work.
Do not mix old and new batteries.
1
Page 10

Product/spare parts included in this packaging
Description
Quad-copter 1
Remote controller
Rotor blade
Qty(pc)
1
2
Description
3.7V 600mAh li-polymer battery
Manual
Tail Rotor 1
Qty(pc)
1
1
The LCD Remote controller
Main features of the remote controller
Adopt microcomputer control remote controller system and 2.4G auto
connection technology, scores of cotpers can be played at the same
time without any interference.
Control the function of upward,downward,forward,backward, leftward,
rightward,turn left, turn right 3D flips & roll of the copter.
Throttle control stick can be freely switched according to player's habit.
Sketch and function switches of the remote controller
8. Antenna
7. Power switch
1. Left stick
12. Throttle changing
button (Left)
3. Trimmer A
4. Trimmer B
14.flight mode
changing button
15.aileron/rudder
changing button
No. Function switch Function description
1
2
3 Trimmer A
Left stick
Right stick
Remote Controller
STICK MOD2:upward/downward,turn left/turn right;
STICK MOD4:upward/downward,leftward/rightward.
STICK MOD1:forward/backward,turn left/turn right;
STICK MOD3:forward/backward,leftward/rightward.
STICK MOD1: upward/downward,leftward/rightward;
STICK MOD3: upward/downward, turn left/turn right;
STICK MOD2: forward/backward,leftward/rightward;
STICK MOD4: forward/backward,turn left/turn right.
In stick Mod 2 and 4, this button is null.
In stick Mod 1and 3, it helps to tune the quad-copter's
forward and backward flight.
POWER
(Transmitter)
2
9. Power indicator
10. Function/Camera
6. Trimmer D
2. Right stick
5. Trimmer C
11.Throttle limit knob
13. Throttle changing
button (Right)
Page 11

No. Function switch Function description
In stick Mod 3 and 4, it helps to tune the quad-copter's
4
5 Trimmer C
6 Trimmer D
7
Trimmer B
Power switch
sideward flight.
In stick Mod 1 and 2,it helps to tune the quad-copter's left
and right direction turning speed.
In stick Mod 3 and 4, it helps to tune the quad-copter's
left and right direction turning speed.
In stick Mod 1 and 2,it helps to tune the quad-copter's
sideward flight.
In stick Mod 1 and 3, this button is null.
In stick Mod 2 and 4, it helps to tune the quad-copter's
forward and backward flight.
It controls the power source of the transmitter.Slide
the power switch to the “ON” position, the transmitter
is powered on; slide the power switch to the “OFF”
position, the transmitter is powered off.
8
9
10
11
12/13
14
15
Antenna
Power
indicator
3D roll button/
Camera button
Throttle limit
knob
Throttle
changing button
flight mode
changing button
aileron/rudder
changing button
Transmits wireless signal.
The indicator light keeps blinking slowly: the transmitter
is not activated.
The indicator light keeps flashing rapidly: the transmitter
is sending out connectional signal to the quad-copter.
The indicator light keeps on without blinking: the transmitter
is ready for controlling the flight.
Press the function button to achieve 3D roll action when the
quad-copter is flying under Roll mode.
When the quad-copter build a camera, this button is used for
shooting or taking photo.
The throttle of the quad-copter can be adjuted by this button,
player can use this button to increase or decrease the
quad-copter’s upward/downward speed.
Slide down or slide up the 2 buttons at the same time
to select the throttle control stick
There are 3 flight modes of the quad-copter: low speed,
medium speed and maximum speed.
Also named Stick Mode changing button.Press this button
to change the control stick mode.
Remote controller’s setting
Select the throttle control stick
There is 1 throttle button on either side of the remote controller.
Slide both of the 2 buttons to "R", the right stick is the throttle control stick.
Slide both of the 2 buttons to "L", the left stick is the throttle control stick.
Tip: both of the 2 buttons should be either on the position of "R" or "L",
otherwise, the remote controller can not be activated.
3
Page 12

Pic.1 Pic.2
Activate the LCD remote controller
Slide the power switch to "ON" position after throttle control stick
selection is done.To activate the remote controller, slowly push up the
throttle control stick to the top and then push it down to the bottom. The
remote controller is activated once a beep sound is heard. Then, the
indicator light keeps flashing while the remote controller is sending out
connectional signal. It takes about 10 seconds to finish the signal
transmission process. After signal transmission is completed, the indicator
light keeps constant "on”. User can turn either the left stick or the right stick
to skip the signal transmission process and enter into the start-up interface
directly.
Stick Mode Selection
There are 4 flight modes available for selection: Stick Mod 1 (Pic.3)
Stick Mod 2 (Pic.4) Stick Mod 3 (Pic.5) Stick Mod 4 (Pic.6)
Forward /
Backward
control
Left/Right
turning
control
Throttle
control
Leftward/
Rightward
control
Pic.3
Throttle
control
Left/Right
turning
control
Forward /
Backward
control
Leftward/
Rightward
control
Pic.4
STICK MOD:1 STICK MOD:2
Forward /
Backward
control
Leftward/
Rightward
control
Throttle
control
Left/Right
turning
control
Pic.5
Throttle
control
Leftward/
Rightward
control
Forward /
Backward
control
Left/Right
turning
control
Pic.6
STICK MOD:3 STICK MOD:4
Flight mode selection
There are 3 flight modes available: low speed, medium speed and maximum
speed.Player can select the flight speed by pressing the flight mode button.
4
Page 13

STICK MOD
CH
1
STICK MOD
2
CH
1
2
STICK MOD
CH
1
2
00
This is the low speed icon. This is the medium speed icon. This is the maximum speed icon .
Pic.7 Pic.8 Pic.9
00
00
The Quad-copter
Rotor blade
Motor
How to charge the Quad-copter
battery compartment
Connect the charger to the Power socket,the green indicator light will
turn on.
Insert the charging plug into the jack of the battery wire to start
charging.(Pic.10)
Once charging is proceeding, the Green light on charger is ON. When
charging is finished, the light will turn Red.
Full charge takes about 1.5 hours.
NOTE:Battery should be full charged before storing.
Light
Landing gear
Pic.10
Preparation for flight
Put the battery into the battery compartment of the quad-copter;install 3 X AA
batteires into the battery compartment of the remote controller.
Connect the battery wire plug with power plug of the quad-copter.The LED light
on the tail of quad-copter will keep constand "on" and the LED light on the head
of the quad-copter will keep flashing Then, set the quad-copter to the platform.
Slide the power switch of the remote controller to " ON" postion.To
activate the remote controller,slowly push up the throttle stick to the top
and then push it down to the bottom. The remote controller is activated
once you hear a beep sound.Then, the indicator light flashes slowly while
the remote controller is sending out connectional signal.
5
Page 14

The indicator light on quad-copter will flashing
rapidly when it received the signal. It will takes
about 5 seconds to check out the gyro before
the whole auto signal connection process is
finished.
To ensure steady flight, please set the value of
the Trimmer to the midpoint.(Pic.11)
Push up the throttle stick slowly and the
quad-copter takes off.
STICK MOD
CH
1
00
Pic.11
2
Counterclockwise
(A1 Rotor blade)
Clockwise
Head of the
quad-copter
Left
Tail of the
quad-copter
Clockwise
(B4 Rotor blade)
Right
Counterclockwise
(A3 Rotor blade)(B2 Rotor blade)
Pic.12
Remark: The left-front and the right-back rotor blades rotate in Counterclockwise direction, the right-front and left-back rotor blades rotate in
clockwise direction when the copter is flying.
Operational Tips
User may push either of the control sticks to skip the auto signal
connection process once the quad-copter finished signal connection.
Set the connection one by one. Otherwise, it may not be connected.
Once the transmitter is turned off, the connection procedure must be
repeated to operate the quad-copter.
If the quad-copter keeps moving sidward even no control signal is
given, players may adjust trimmer button to keep the quad-copter
balanced.
Please pull out the battery plug from the quad-copter battery socket.
Trimmer Functions
1.If the quad-copter keeps moving forward/backward even there is no
control signal given, users may adjust the trimmer button to keep the
quad-copter balanced.
6
 Loading...