

Page 1
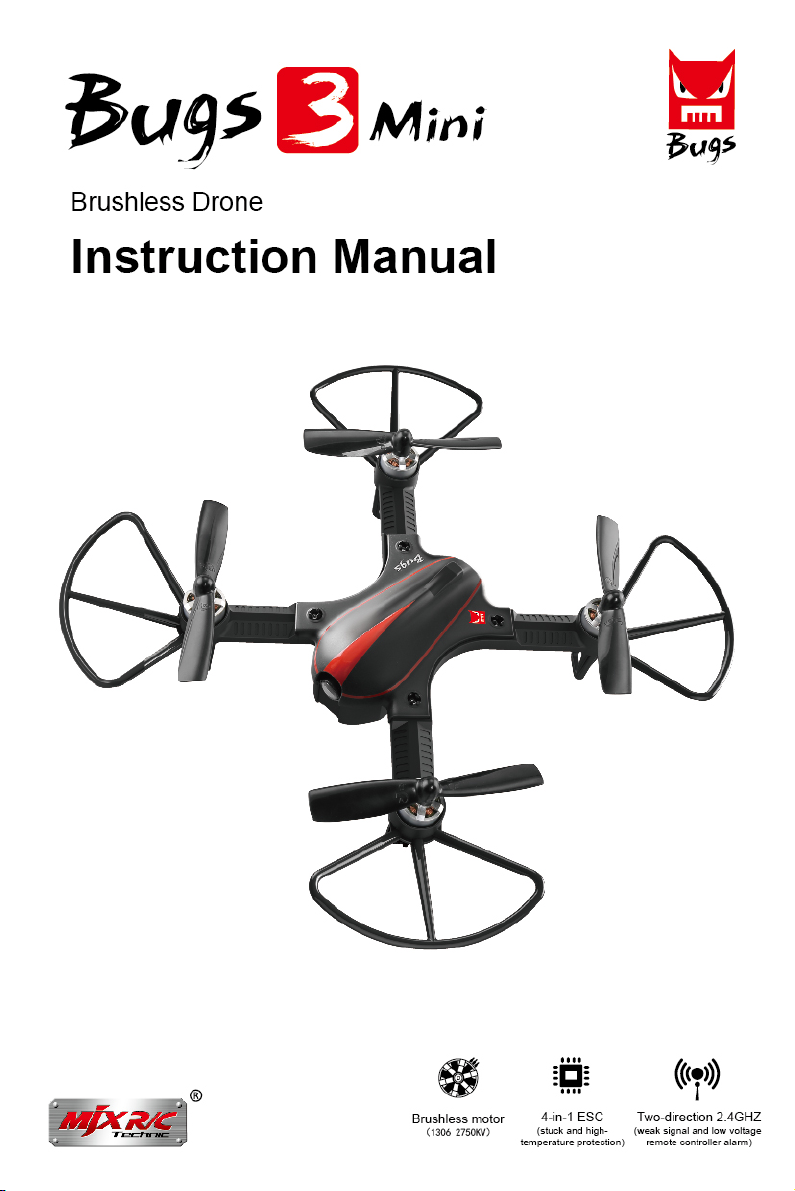
Brushless Drone
Instruction Manual
k
LJ
*
or
Brushless motor
(1906 275001
19:
4-in-I ESC Two-direction 2.4GHZ
(sleek and high- (weak signal and low voltage
temperature protection). remote onnireler alarm)
(070
Page 2
Important statement and safety guidelines
Thank you for purchasing MJX product. Please read this manual carefully before use and retain it for
future reference.
Important statement
•
This aircraft is not a toy, but hobby grade model. It should be assembled and operated properly. Pilot
must operate this hobby model in safe way. Improper operation may cause injury or property damage.
•
This aircraft is applicable for pilots aged 14+ who are with skilled flying experience.
•
Users are in full charge of proper operating this aircraft. Manufacturer and dealers disclaim any
responsibity for damages caused by misuse.
•
Keep the small accessories away from kids to avoid accident.
Flight safety guidelines
Hobby grade radio control aircraft is somewhat considered to be the highest danger potential article.
Users should firmly uphold the principle of "safety comes first". Never fly the aircraft near airports,
above crowds or in zones storing dangerous goods and understand the responsibility of the accident
may cause by improper operations.
•
Stay away from obstacles, crowds, power lines. trees or waters
Always choose a wide open area for every flight, well away from people and property. Never fly directly
over people or animals. Please c:on't sly in such bad weather conditions as high temperature, snow,
strong wind (?level 5), rain or fog. Maintain a 7ft (2m) distance from the aircraft when taking off and
landing.
•
Keep the aircraft in dry environment
The aircraft is composed by sophisticated electronic components and mechanical parts. To avoid
damages on the mechanical and electronic components, please keep the aircraft in dry environment
and use clean cloth to wipe the surface and keep it clean.
•
Practice flying together with skillful pilot
Beginners are suggested to practice flying together with skillful pilot's guidance. Do not fly alone.
Page 3
•
Bear proper operation and safe flight guidelines in mind
Please take a careful look at the manuals before flights for important information of product functions
and operation tips, and learn how to use the accessory, safe flight always comes first. Stay informed
of and abide strictly by relevant local laws and regulations. Keep away from any non-flight zones and
respect other people's privacy.
•
Safe flying
Please make sure you are in good shape mentally before every flight. Fly the aircraft as per your flying
experience. Never fly under influence of alcohol or drugs. Keep the remote controller at least 20 cm
away from your body when flying the aircraft
•
Keep distance from a flying aircraft
Never use your hands to touch a flying aircraft under any circumstance. Don't approach and touch a
landed aircraft before its propellers are completely locked.
•
Keep away from heat source
The aircraft is made of metal, fiber, plastic, electronic component and other material. Please keep it
away from the heat source to avoid deformation or even damage caused by sun exposure and high
temperature.
•
Environmental protection requirements
To protect our blue planet, so please recycle the aircraft as per local laws and regulations.
Product profile
Product configuration
Package includes
Aircraft (camera not included) X1 Extra Propellers A/B X2
Propeller changing tool X1
Remote controller X1
Charging converter X1
Battery X1
Technical parameter of the aircraft
Diagonal. 175mm
Gross Weight: about 190g
Maximum flying time: about 10 minutes
Overall height: 65mm
Battery: 7.4V 850mAh 45C Charging time: about 3 —3.5 hours
-2-
Protection guard X4
USB cable X1
Screw driver X1
Brushless motor: 1306 2750KV
Page 4
Product assemble
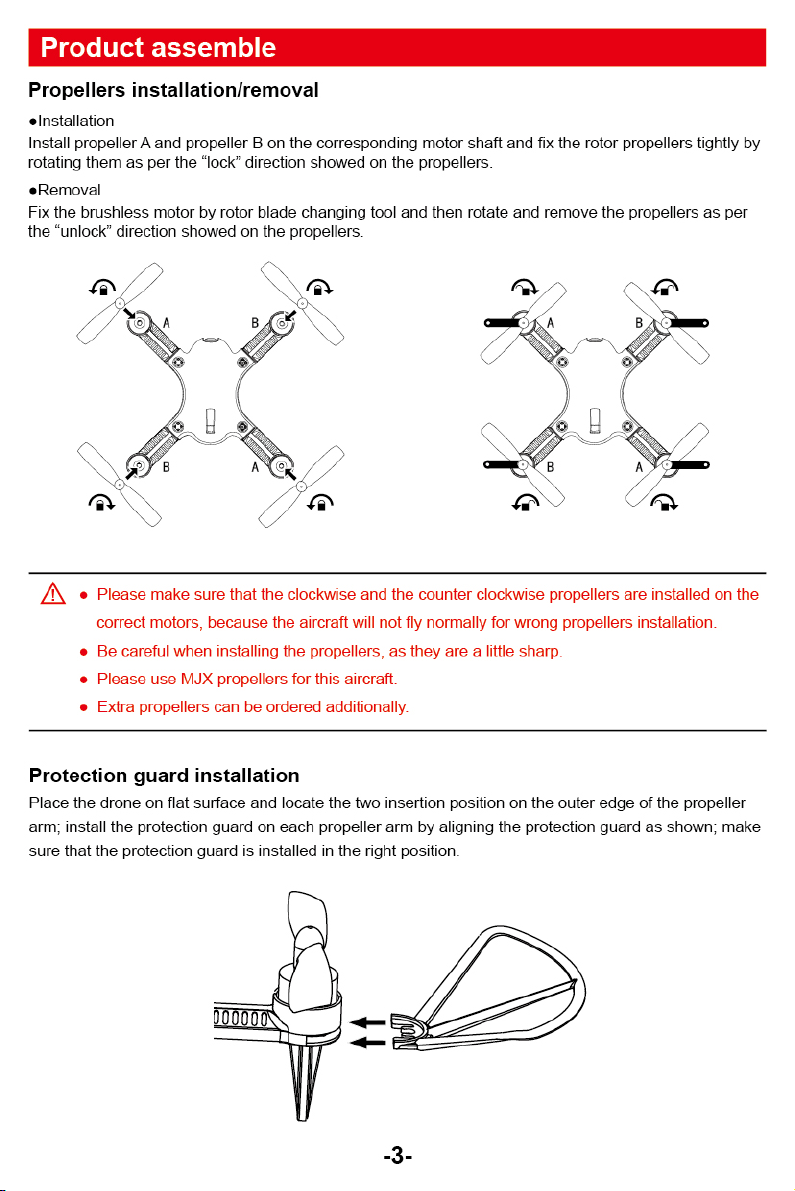
Propellers installation/removal
•
Installation
Install propeller A and propeller B on the corresponding motor shaft and fix the rotor propellers tightly by
rotating them as per the "lock" direction showed on the propellers.
•
Removal
Fix the brushless motor by rotor blade changing tool and then rotate and remove the propellers as per
the "unlock" direction showed on the propellers.
• Please make sure that the clockwise and the counter clockwise propellers are installed on the
A
correct motors, because the aircraft will not fly normally for wrong propellers installation.
•
Be careful when installing the propellers, as they are a little sharp.
•
Please use MJX propellers for this aircraft.
•
Extra propellers can be ordered additionally.
Protection guard installation
Place the drone on flat surface and locate the two insertion position on the outer edge of the propeller
arm; install the protection guard on each propeller arm by aligning the protection guard as shown; make
sure that the protection guard is installed in the right position.
-3-
Page 5
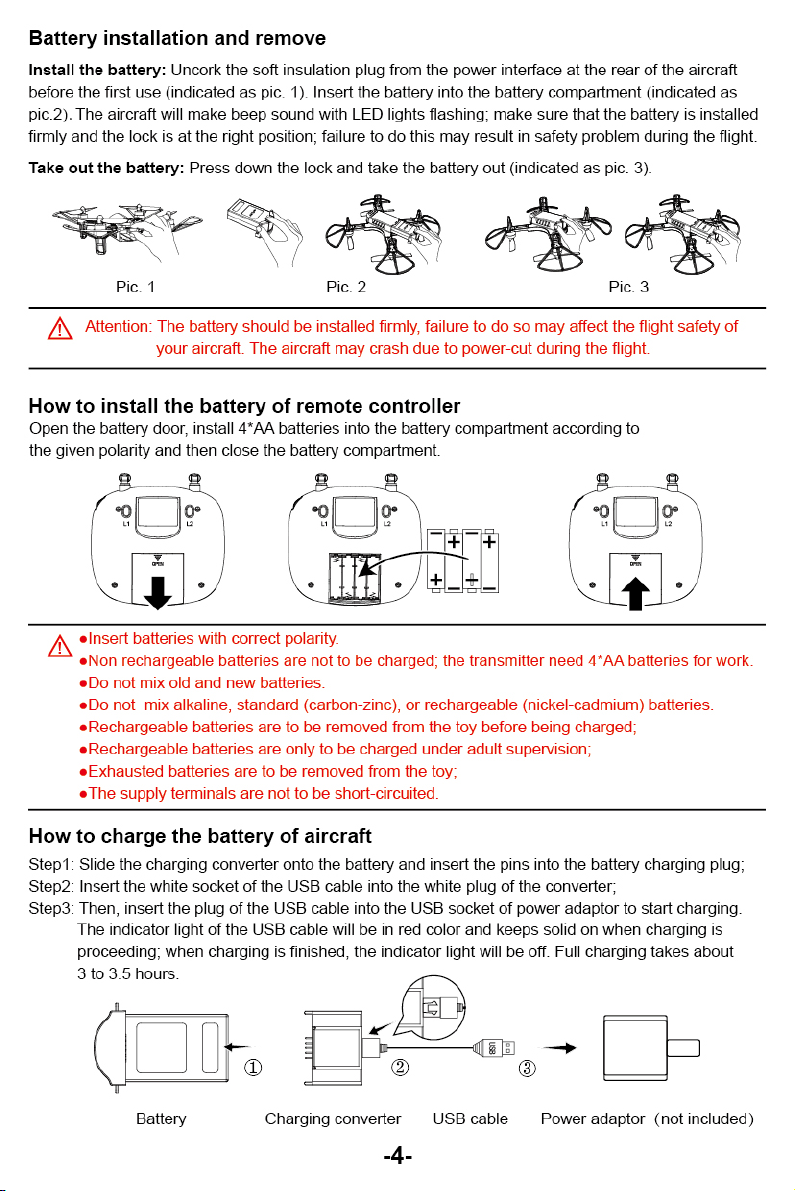
Battery installation and remove
Install the battery:
before the first use (indicated as pic. 1). Insert the battery into the battery compartment (indicated as
pic2). The aircraft will make beep sound with LED lights flashing; make sure that the battery is installed
firmly and the lock is at the right position; failure to do this may result in safety problem during the flight.
Take out the battery:
Uncork the soft insulation plug from the power interface at the rear of the aircraft
Press down the lock and take the battery out (indicated as pic. 3).
Pic_ 1
4
L Attention: The battery should be installed firmly, failure to do so may affect the flight safety of
your aircraft. The aircraft may crash due to power-cut during the flight.
How to install the battery of remote controller
Open the battery door, install
the given polarity and then i:;lose the battery compartment.
A' AA
batteries into the battery compartment according to
Pic.
LI
2
Pic. 3
t-)
.Insert batteries with correct polarity.
A
.
Non rechargeable batteries are not to be charged; the transmitter need CAA batteries for work.
.
Do not mix old and new batteries.
.
Do not mix alkaline, standard (carbon-zinc), or rechargeable (nickel-cadmium) batteries.
.
Rechargeable batteries are to be removed from the toy before being charged;
.
Rechargeable batteries are only to be charged under adult supervision;
.
Exhausted batteries are to be removed from the toy;
.
The supply terminals are not to be short-circuited.
How to charge the battery of aircraft
Stew!: Slide the charging converter the battery and insert the pins into the battery charging plug;
Step2: Insert the white socket o the 1._ISE cable into the white
Step3: Then, insert the plug tl-e USB cable into the USB socket of power adaptor to start charging.
The indicator light of the LISB
proceeding; when charging is finished, the indica or light will be off. Full charging takes about
3 to 3.5 hours.
will be in red color and keeps solid on when charging is
plug
of the converter;
Battery
[0
Charging converter USB cable Power adaptor (not included)
-4-
Page 6

Warm tips: We recommend using 5V 1A adaptor for charging.
A
•
Need adult supervision when this model is being played by children.
•
Only batteries of the same or equivalent type as recommended are to be used
•
Insert batteries with correct polarity.
•
Nan rechargeable batteries are not to be charged; the transmitter need VAA batteries for
work.
•
Do not mix old and new batteries.
•
Do not mix alkaline, standard (carbon-zinc), or rechargeable (nickel-cadmium) batteries.
•
Rechargeable batteries are to be removed from the toy before being charged.
•
Rechargeable batteries are only to be charged under adult supervision.
•
Exhausted batteries are to be removed from the toy.
•
The supply terminals are not to be short-circuited.
•
The charging line to be used with the product should be regularly examined for potential
hazard, such as damage to the cable or cord, plug, enclosure of other parts and that in the
event of such damage, the product must not be used until that damage had been properly
removed.
It is not suggested to charge by computer
LED light installation
❑
pen the upper cover and install the LED light in place (shown as plc. 1) and screw tightly by clockwise
(shown as pic.2)
pie. 1
Major parts of the model
[1]
[2]
[3]
-5-
pic. 2
[1]
LED light
[2]
Brushless motor
[3]
Undercarriage
[4]
Propeller
[5]
Protection guard
Page 7

[7]
[6]
[9]
Major parts of the remote controller
[7]
•71
Bi
111pr,
I
[10]
[11]
[12]
[6]
Battery compartment
Front light
[7]
[8]
Rear light
[1]
Unlock (short-press)!
lock (long-press)
[2]
Light switch
[3]
Lei stick
[4]
Turn left right trimmer
[5]
r
.
. U] Right stick
[11]
[12]
: moce:Acro mode
Angl.
f)
POW& SWitCh
POV,:a
-
indicator
8. High/Lov,: speed switch
. Photolshooting
9
Leftward/rightward flight trimmer
Forward/backward trimmer
[13] [14]
-6-
[13]
3D flips & rolls button
[14]
Null button
Page 8

Remote controller
How to connect the signal of the aircraft with the
remote controller
•
Keep pressing the red button and turn on the remote controller. The remote controller makes 2 beep
sounds, and the indicator lights keeps flashing; the remote controller is under signal connection
status.
•
Turn on the aircraft. Once signal connection is done, the remote controller will send out a long beep
sound and the indicator light keeps solid on
■
A
Signal connection is done once for all if the remote controller is not linked to other aircraft.
•
Set the connection one by one to avoid signal connection error.
Remote controller control stick calibration
1.
Keep pressing the red locking button and turn on the remote controller.
2.
Push down the calibration button (shown as pic.1) and hold on for 3 seconds, the remote controller
will make 3 beep sounds and the indicator light of the remote controller turns from flashing quickly to
slowly. Maximum rotate both of the left and right control stick to any direction for 2 circles (shown as
3.
Then, again, push down the calibration button and hold on for 3 seconds. The remote controller will
send out 3 beep sounds and the indicator light of the remote controller turns from flashing slowly to
quickly, which means that the control stick calibration is completed.
j
inni
Warm tips: All remote controllers have been calibrated when manufacturing.
A
Remote controller calibration is requested only if pilots find that the remote controller
control sticks are not working normally.
Attention: Please do not power on your aircraft when calibrate the control stick for the remote
controller.
-7-
Page 9

Aircraft gyro calibration
After the aircraft and the remote controller are banded, set the aircraft on flat ground and follow the
indication photo as below to calibrate the gyro. Once the aircraft front lights turn from flashing to solid
on, the gyro calibration is succeeded.
•
This is not compulsory step. But it is recommended to do gyro calibration for every flight to obtain
best flight experience.
How to lock and unlock the aircraft
Unlock the aircraft
Once the aircraft and the remote controller are banded, the front lights of the aircraft keep solid on
Short-press the red button (indicated as below photo), the aircraft and the remote controller make a long
beep sound; and the rear lights of the aircraft keep solid on; the motors rotate slowly, the aircraft is
unlocked.
Lock the aircraft
Method 1: Pull down the throttle stick to the bottom position, long-press the red button (indicated as
below photo). The remote controller sends out interrupted beep sound. Then, the motors stop
rotating and the rear light is off, which means that the aircraft is locked.
Method 2: After the aircraft lands on the ground, pull down the throttle stick to the bottom position for
15 seconds; then, the motors stop rotating and the aircraft lock automatically. Once the
aircraft is locked, it could not fly unless the motor is unlocked.
Warnings: The throttle control stick should be skied to the bottom position when long-press
A
the red button to lock the aircraft. Otherwise, the aircraft could not be locked.
Angle Mode/Acro Mode
Angle mode:
Angle mode. also named as self-level mode, is an assisted flight mode where the flight controller would
alv,:ays attempt to put the aircraft in its neutral position when there is no user control. This means that
with yoi.r hands off the controls, it will use 6-axis gyroscope to keep the aircraft level. The aircraft can
pel'orrn flips and rolls by pressing the rolls button and operating joystick. It is suitable for beginner.
-8-
Page 10

Acro
mode:
Acro mode, as known as rate mode, doesn't level the aircraft automatically but always requires manual
control during flight. Acro mode uses only the 3-axis gyro sensor. This is the more difficult mode for
flying but also much more responsive. Acro mode is great for acrobatics such as flips and rolls. The
aircraft can preform flips and rolls by operating joystick. It requires that pilot should be skillful enough
and beginner is not suitable for Acro mode.
•
Please choose flight mode before turn on the remote controller.
How to choose the flight mode:
Step 1. Slide the flight mode button to the top position of
on the aircraft and the remote controller. It is null at "
Step 2. Open the remote controller and install the battery of the aircraft.
q)"
or the bottom position of "®'' before power
X ''
position.
Pic. 1
Warm tips:
A
•
Under Acro mode, the aircraft and the remote controller will make "beep beep beep' sound
when it is in signal connection status.
•
Acro mode is the more difficult flying mode, which is also much more responsive. It requires
skillful pilots.
Operate the aircraft
Remote controller
Aircraft
Pic. 2
Remote controller
Pic. 3
Aircraft
Turn Right
Left Side Flight
Front
Turn Left
-9-
Rear
Right
Side Flight
Page 11

Flips & rolls
Flips & rolls
3D flips & roils button
Warm tips: To flip and roll, please press down the 3D flips & rolls button and push the direction
A
operation
control stick at the same time If not, the aircraft could not perform flips & rolls
action normally.
How to fine-tune the aircraft
If the model keeps moving in any direction even this is no control signal given after flying, users may
adjust the remote controllers trimmer button to keep the model balance.
Forward/backward trimmer
Turn left/ turn right trimmer
Leftwardlrightward trimmer
-10-
Page 12

Status indicator
Front light
Sound of the drone
-
_
The aircraft sends out °beep...
beep... beep... beep" continuously
-
-
Status lights of the drone
The front lights flash rapidly.
The front lights flash twice and stop
fort seconds.
The front lights flash slowly or the
frontlrear lights flash at the same time.
The front lights keep solid on and the
rear lights are off.
The front and rear lights keep solid on
Rear light
Description
The gyro is under calibration status.
The aircraft is riot linked -..-., •s.1- As. o.-Alt•.:.'ier
or the signal of the reiT c.i.e cc.- isclls.- ,s lost.
The aircraft
The aircraft is under unlocking or flying status.
is underpowered and the remote
controller or the aircraft sends out "beep...
beep..beep" sound.
The aircraft is under lock status.
Remote controller power indicator light description
Remote controller sound
Send out continuous beep sound
Send out continuous beep
Send out a long beep sound only
Send
out °beep beep sound continuously
Send out beep occasionally
sound slowly
quickly
Power indicator
On
On
On
Flashing slowly
On
Power indicator
Description
1.
The aircraft is too fd • ay..a/ frci- r- e rer. e co-rrcller
h'ar re
2.
T•.: aircraft is powered cl Ars.' s..oce:s',. :i.-,inal
connecdon.
The
The
successfully.
The remote controller is under power.
The aircraft receives very weak signal from the remote
controller.
_
ill
ted in wea,. r.::.:. v ‘.•
aircraft is in low voltage status.
remote controller has connected with the aircraft
iii' a
Page 13

Flight
Before you take off, check and make sure that
1.The aircraft and the remote controller are full charged.
2.The propellers are installed correctly.
3.The motors work normally after unlocking.
Basic flight operations
Basic flight operations step
1.Connect the remote controller with the aircraft
2.
Unlock the aircraft after the detection of gyro of the aircraft is completed.
3.
Pull up the throttle stick then the aircraft takes off, and control the aircraft flight by left/right stick.
4Push the throttle stick to the bottom, lock the aircraft by press the lock button for long time
5.Take out the battery from the aircraft.
Receiver PCB connecting diagram
To make sure the drone works normally, the installation direction of the flight-control board and the
connection location of the insertion wiring must be the same as shown below:
(Flight-control board)
(ESC board)
The front indicator
i
o
FPV
The front indicator
,L Warnings: Please purchase MJX camera.
The rear indicator
“
The rear indicator
0 0
Power cord
ESC port
ESC cord
-12-
Front
motor B
Front
motor A
e
e'
el
I Rear
motor A
l
Rear
motor B
I
l
e
I
la 0
•
is
I.
Power cord
Page 14

Product components
Basic parts
CPC'?
cPbc{?
Upper cover
MINI01
Clockwise motor
MINI05
ESC board
MINI09
Main frame
MINI02
Counter clockwise motor
MINI06
Front white light board
M1N110
Propeller NB
MINI03
BEI
BEL
Undercarriage
MINI07
Rear blue light board
MIN111
Protection guard
MINI04
Bolt
MINIOB
Lamp cover of the
front and rear light
MINI12
Flight-control board
MIN113
40,
Charging converter
MINI14
-13-
USB cable
MINI1 5
Battery
MIN116
Page 15

Screws pack
Soft insulation plug
MIN117
Accessories
5G IMF! Camera
C5007
Trouble shooting
MIN118
Propeller changing tool
830017
Remote control
GR6120E
1
No.
1
2
3
4
5
Phenomenon
The lights are flashing quickly.
The model can't be kept balance after
taking off and lean one side.
The model is shaking fiercely.
The drone fail to unlock, the rear indicator
flash slowly.
The model can't be locked.
Solution
The Gyro of the model is under signal detecting condition, set the model
to any flat surface.
1)Adjust all trimmer buttons to the middle value.
2) Lay the model in the flat surface or flat ground and proofread the gyro
of the model again.
The rotor blade is out of shape, change the propellers.
The battery is under low power situation, please charge the battery full.
11 Push the throttle stick to the bottom first, then press the lock button for
long time.
21 Proofread the stick of the remote control then push the throttle stick to
the bottom, later press the lock button for long time
-14-
Page 16

Note:
a)
Changes or modifications not expressly approved by the party responsible for compliance could
void the users authority to operate the equipment.
b)
This equipment has been tested and found to comply with the limits for a Class B digital device,
pursuant to part 15 of the FCC Rules. These limits are designed to provide reasonable protection
against harmful interference in a residential installation. This equipment generates, uses and can
radiate radio frequency energy and, if not installed and used in accordance with the instructions,
may cause harmful interference to radio communications. However, there is no guarantee that
interference will not occur in a particular installation. If this equipment does cause harmful
interference to radio or television reception, which can be determined by turning the equipment off
and on, the user is encouraged to try to correct the interference by one or more of the following
measures:
—
Reorient or relocate the receiving antenna.
—
Increase the separation between the equipment and receiver.
—
Connect the equipment into an outlet on a circuit different from that to which the receiver is
connected.
—
Consult the dealer or an experienced radio/TV technician for help.
C E
MADE IN CHINA
 Loading...