

Page 1
T2702
7” Table t
Inst ructio n Ma nual
Page 2

A. Precautions
1. Please r ead the manual before use the device.
2. Do not put the device at any high temperature, high humidity or
dusty place. Do not use this device where electronics is
forbidden, such as on the airplane. Do not use this device while
walking and driving to avoid traffic accident.
3. Do not drop or crash the device. Do not dismantle this device
by yourself, and do not polish it with alcohol, dilution, or
benzene. Never use sharp object to click the screen to avoid
damage. Any unauthorized dismantling of the device will make
the warranty null and void.
4. Use the supplied AC adapter and USB cable only. When
charging, the device may become warm (not too hot), this is
normal. If you do not use this set for a long time, please charge
and release it once a month to avoid deep discharge. The
damage caused by battery over-consuming is not included in
the warranty.
5. Do not disconnect the device while formatting, downloading or
uploading, bec aus e it may make the error.
6. Our company won’t bear the duty for the loss of the memory
erasing on account of the damage, re pair or some other reason .
Please backup the important data in time.
7. Users are solely responsible for the Apps they download. Our
company is not liable for any shape or form should the tablet be
damaged for dow nload.
8. Virus can damage this device. So please use proper computer
antivirus and keep it updated.
9. Please choose the suitable volume. If you feel uncomfortable,
please turn down the volume or stop playback.
10. The spec and design are subject to change without notice.
Page 3
B. Contents
1. Device
2. AC adapter
3. USB cable
4. Instruction Manual
C. Controls/Connectors/Indicators
Page 4

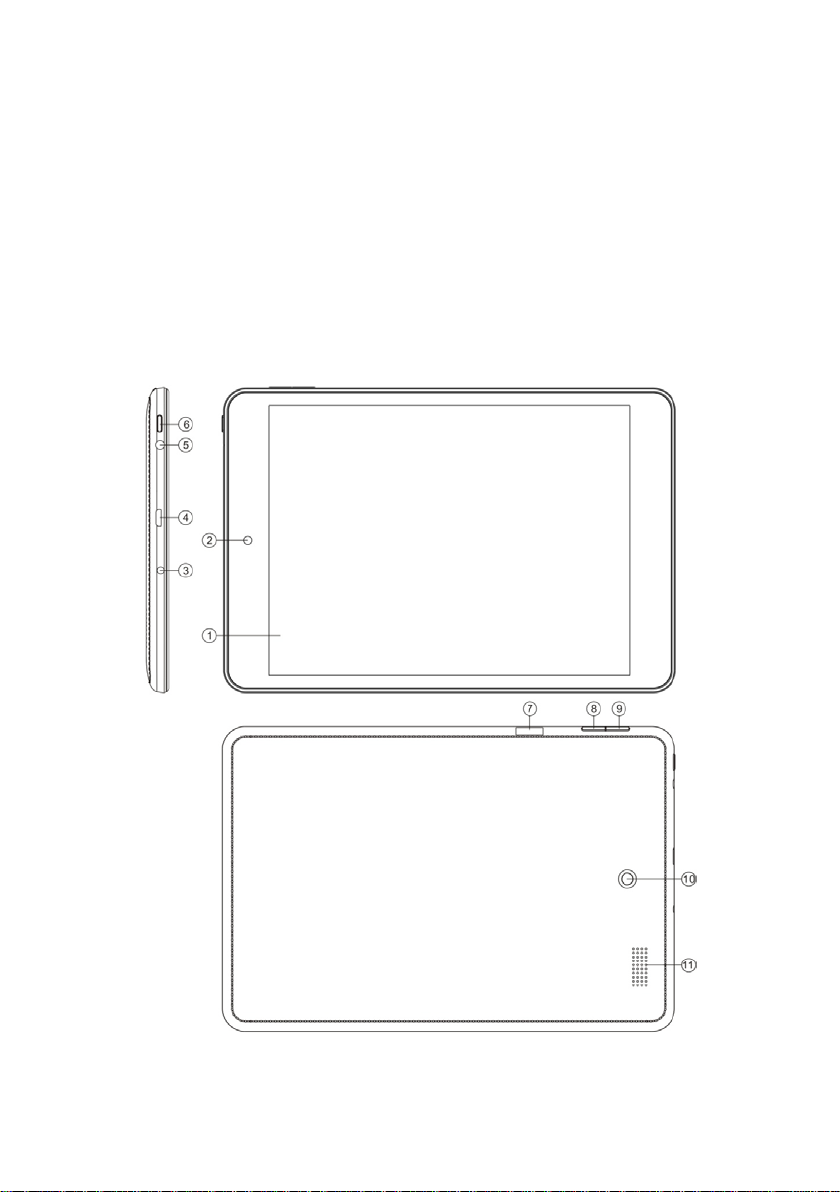
1. Touch screen - Click and drag her e for oper ation.
2. Fro nt came ra - Take photo or video fr om the face of screen
3. MIC: Receive voice .
4. Micro USB jack – Input the USB cable to supply power
and charge the device.
5. Earphon e jack - Input the earphone cable.
6. Power button - Press and hol d the button over 2 seconds to
turn on the device with the screen on, Android OS will activate
automatically and enter the home page.
Press the button once to go to the sleep mode, and the screen
is standby under low battery consumption.
Press the button once again to wake up the screen.
Press and hold the button again, the screen will display “shut
down”. Select “Yes” to tur n off the unit completely.
Note: If shut down the device illegally, when you restart,
because device need scan and repair the disk, the screen will
stay with a progress bar for long time.
7. Micro SD/TF card slot - Input the micro SD/ TF card and read.
8. Volume- button - Turn down the volume.
9. Volum e+ bu tto n - Turn up the volume.
10. Rear camera - Take photo or video from the back of screen.
11. Speaker - Output sounds.
12. Reset hole – reset all settings to factory default.
Page 5
D. Hookups
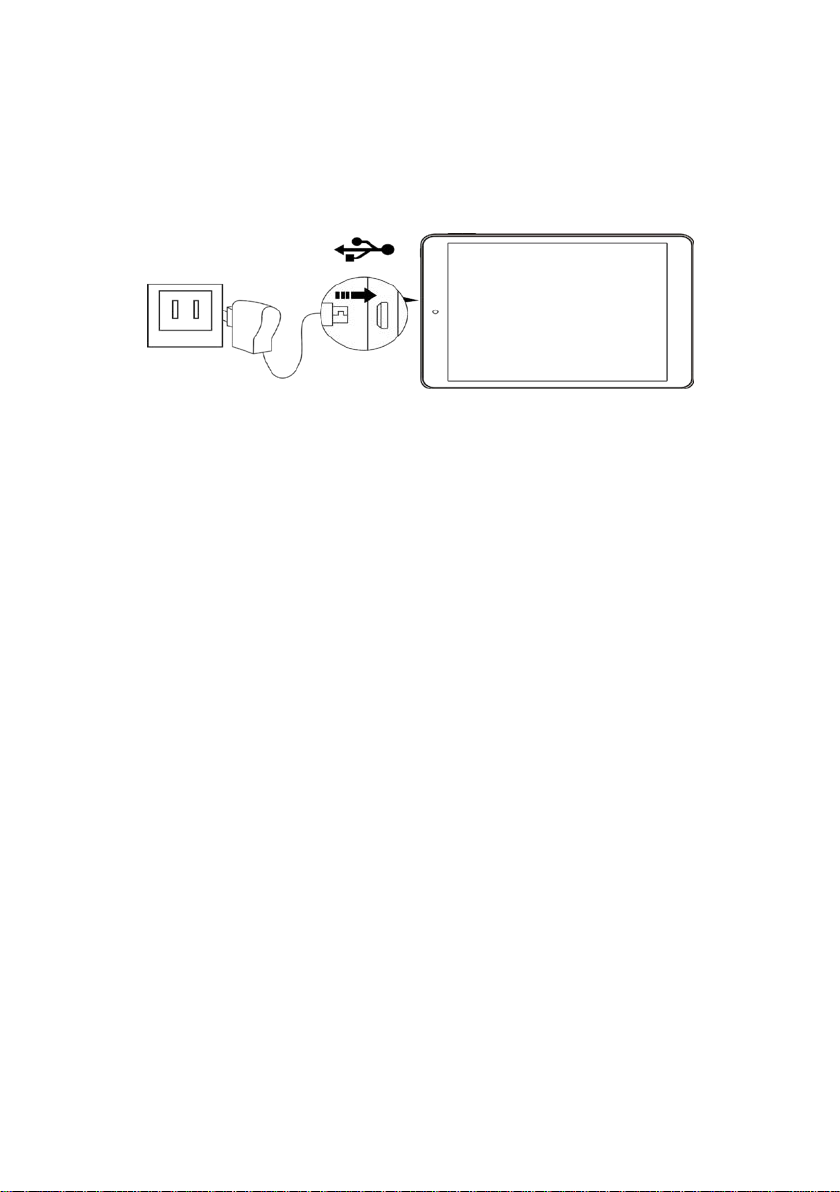
1. Power supply and char ge
Input the USB plug of supplied cable into the socket of supplied
AC adapter, input the micro-USB plug into the socket of
micro-USB jack of tablet, and input the AC plug in to the AC
receptacle. The device will be char ged automatically till the
battery power is full.
Note: For first use need charge for 10 hours. When the battery
power is too low, the device will turn off automatically. Please
charge if low battery icon appears. Batte ry Saving: Go to the
sleep mode, shut dow n som e Apps, turn off WLAN, shut off
Apps sync, set a short time for display backlight, and reduce
brightness of display.
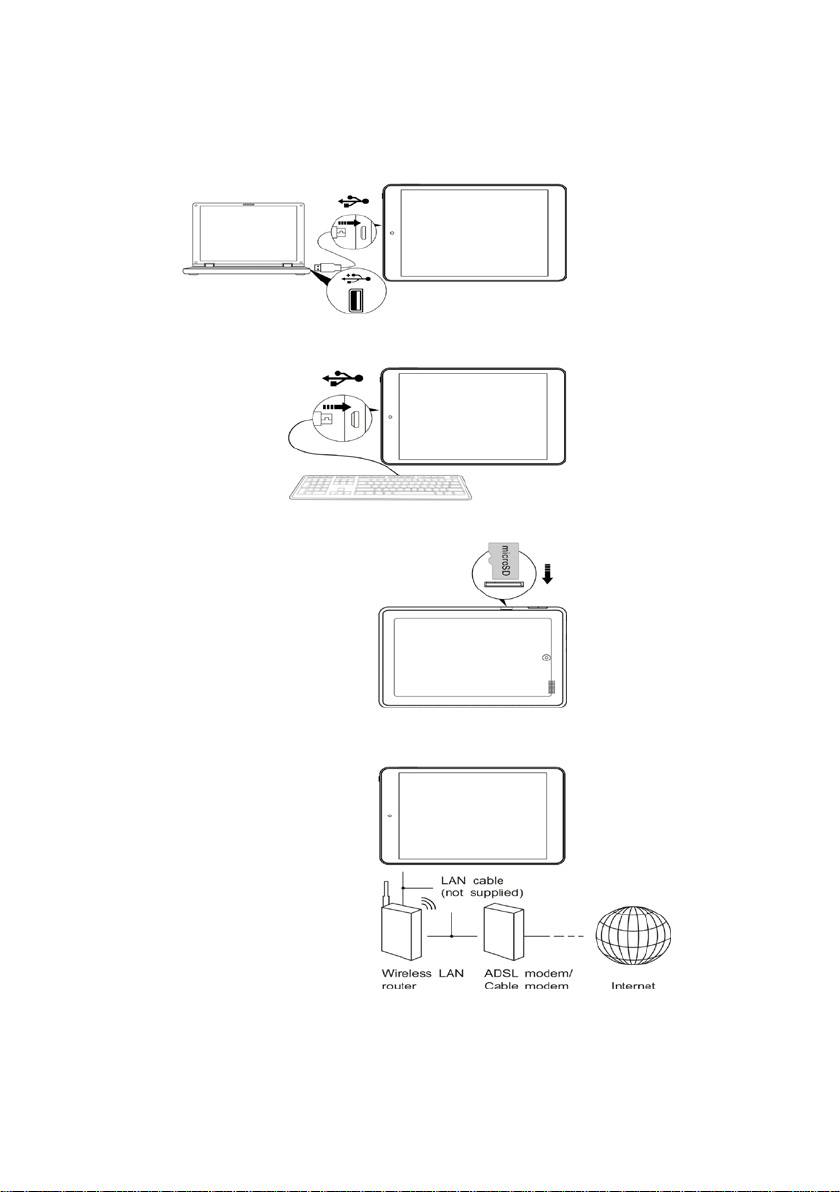
2. Transfer data
Connect the device with the supplied USB cable to PC or USB
disc, or insert micro SD car d, or search and connect to WiFi
network, so you can transfer data between them.
Note: Assure no accessing data before disconnect.
Page 6
Page 7
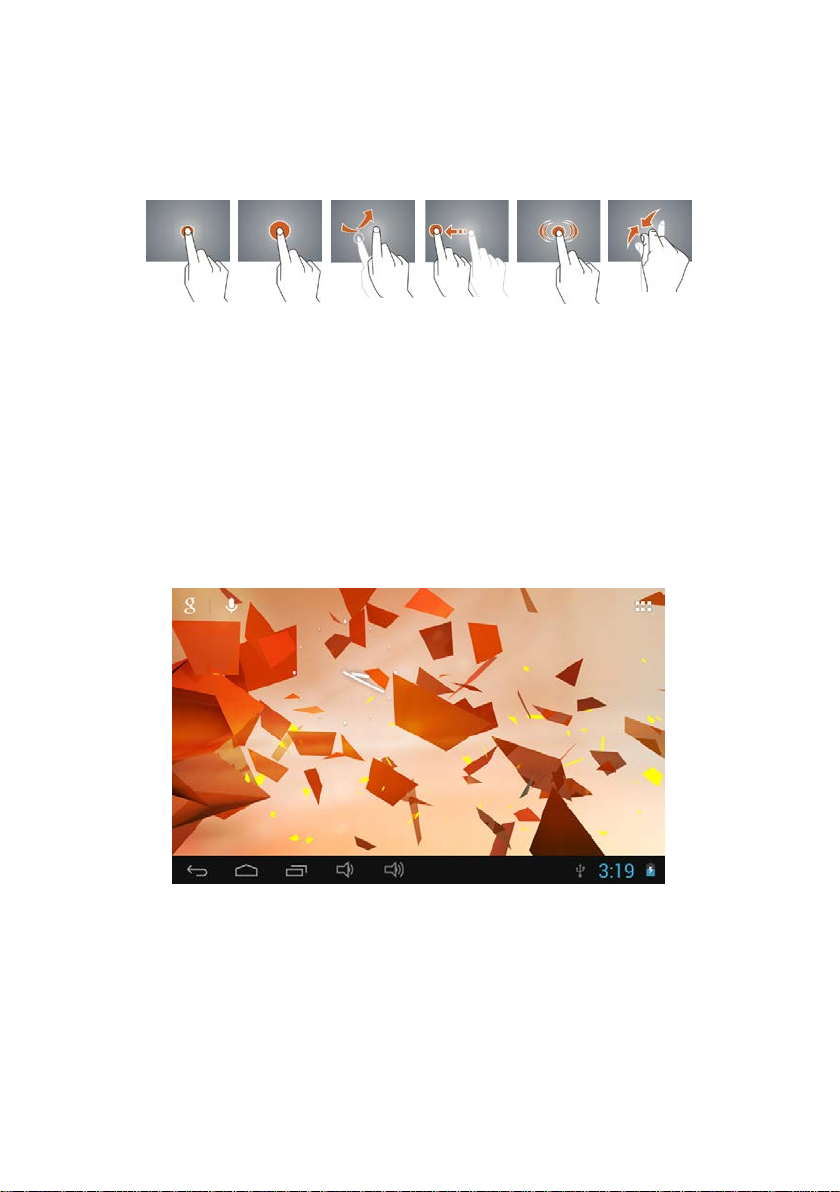
E. Touch Panel
1. Click -- Select or activate
2. Tap and hol d – Open an option list
3. Slide -- Fast scrolling browsing page or display screen
4. Drag – Relocate the position
5. Double Click – Enlarge or shrink the display size
6. Shut – Enlar ge or to shrink the display scale.
F. Ho me Screen
Page 8

1. Google search box
2. Voice search touch (assure WiFi on )
3. Apps page access
4. Return touch
5. Home touch
6. Last Apps touch
7. Volume down/up
Slid e l eft/ right to switch to any of 5 screens.
1. Change wallpaper: Press and hold the screen to pop-up the
wallpaper selection. Select preloaded wallpaper or picture and
click “Setup” to confirm.
2. Add shortcut: Tag the App icon in the appl icati on page. Locate
it to the designated position or in another screen.
3. Add widget: Slide to the Widget page. Slide left /right to select
the widget, tag and locate it in home screen.
Note: Some widgets linked to internet service may occur data
cost. Some widgets may only be used in certain countries or
under assi gned provi de rs.
4. Relocate shortcut: Tag the App icon and move it to the
designated position.
5. Cancel shortcut: Tag the App icon and drag it into the recycle
bin on upper screen.
6. Notification screen:
Page 9
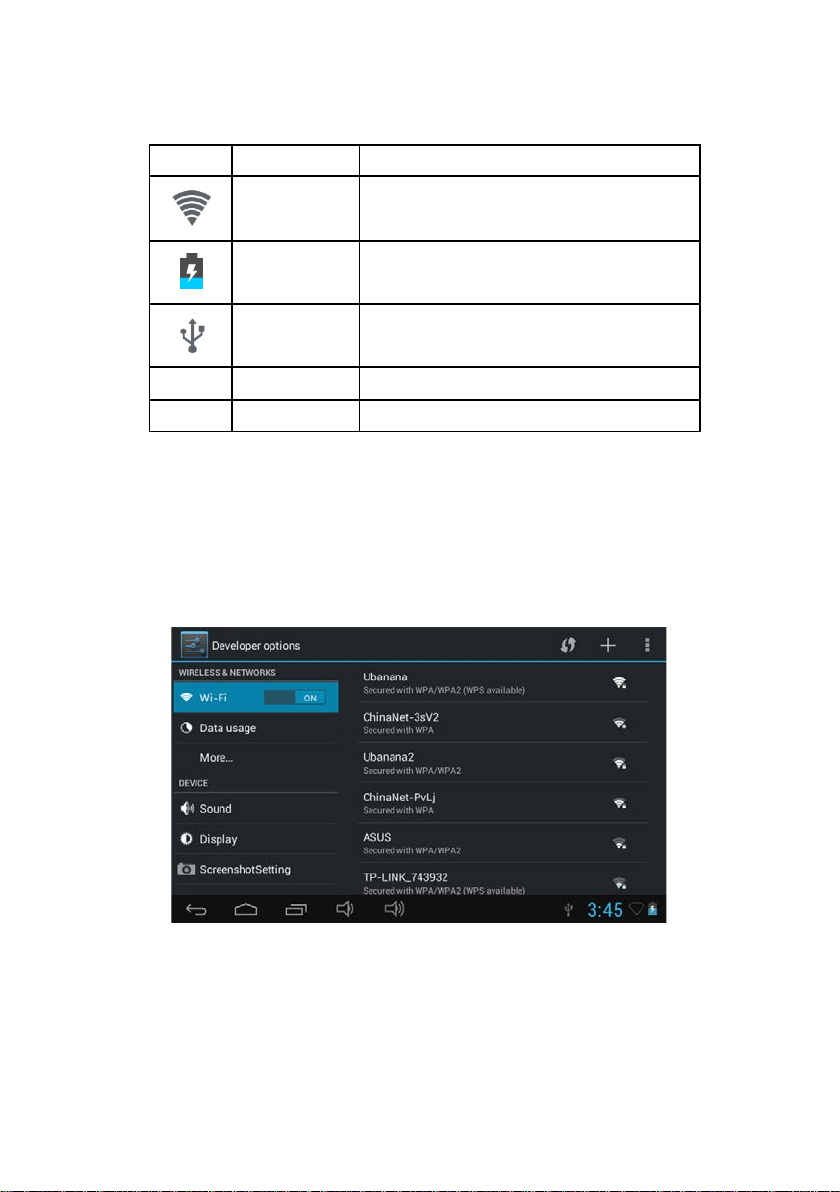
Icon
Meaning
Showing
WiFi signal
Wifi connection and how strong of
SD Card
If SD card is inserted
Time
Current tim e
G. Setup
Battery
power
USB
Connect
signal
Power balance of battery and if
charging or not
If USB port is connected
Press the setup icon to enter the s ettin g page.
1. WiFi: Click “Wireless & Networks”, and then Click “ON”/”OFF”
to open/close WiFi. When WiFi is on, the device will search and
show the networ ks nearby, for you to select and join.
2. Sound: Click “Device”, then press “Sound”. Tick or not “Touch
sounds” and “Screen lock sound” to tur n on or off the sound.
Page 10
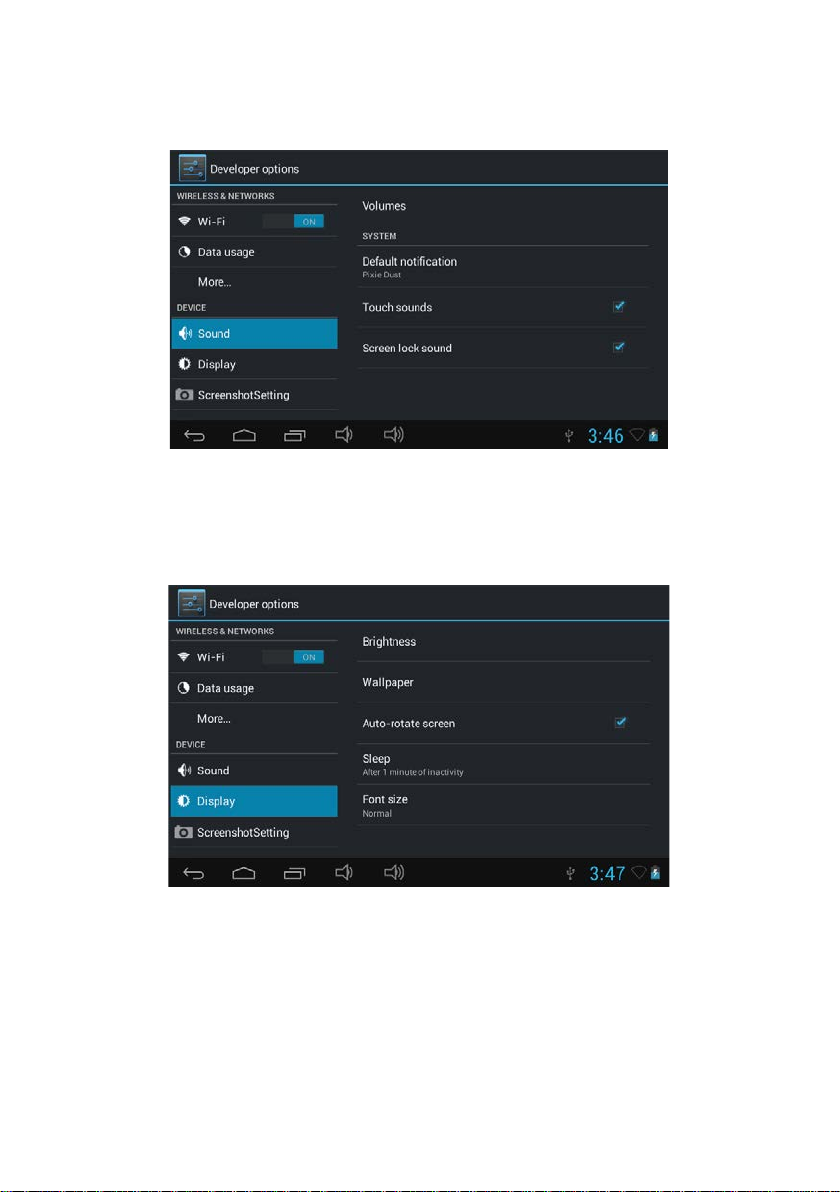
3. Display: Click “Device”, then press “Display” to show
Brightness, Wallpaper, Auto-rotate screen, Sleep, and Font size.
Select one and set the parameters.
4. Apps: Click “ Apps”, then press “M anage applicat ion ” to show
the program list. Select to install or uninstall an application.
Page 11
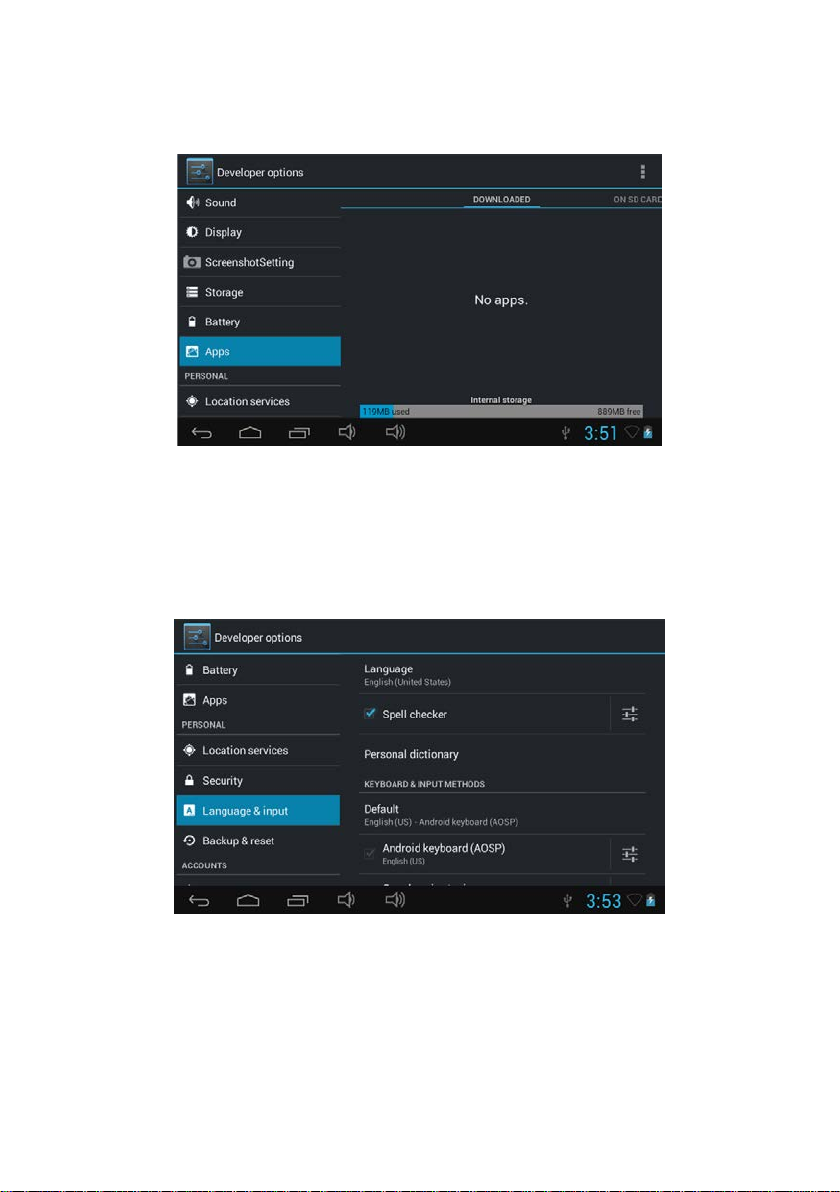
5. Language & input: Click “Language & Input” to show the list
and click the language you desire for OSD.
Click the language you desire for “Keyboard & Input Method”.
You can switch the input method.
6. Backup & reset: Click “Backup & reset”, tick the backup
options, and select if r eset to factory default.
Page 12
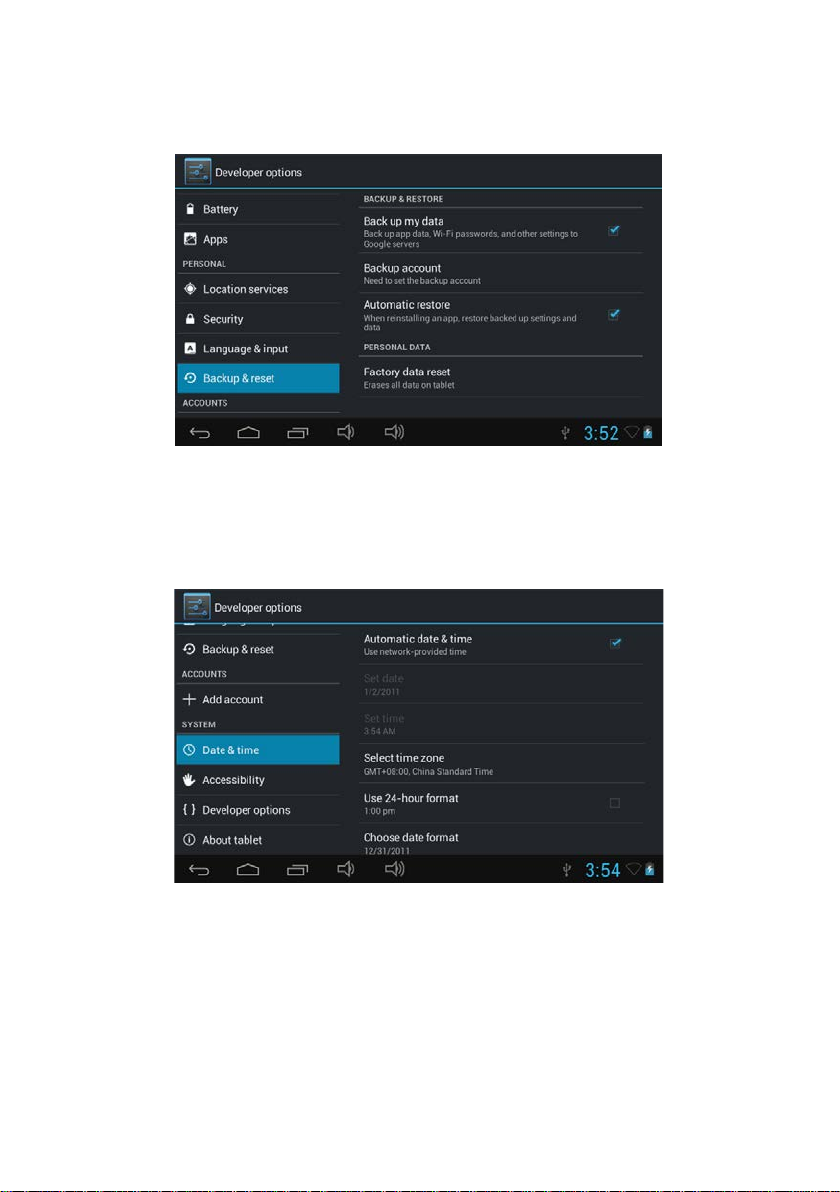
7. Date & time : Click Date & Time to show the synchronized date
and time. If incorrect, set your time zone and it will display
correct date and time.
Page 13
H. Apps
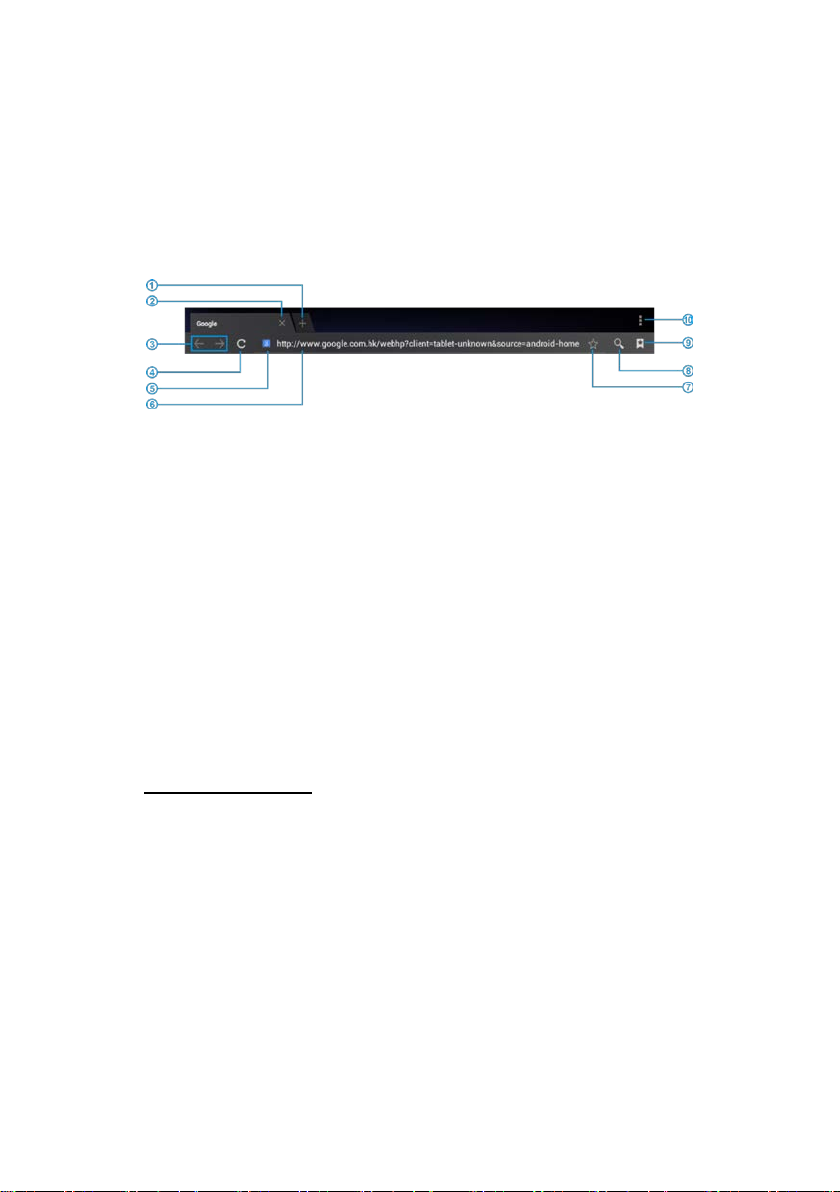
1. Internet Browsing: Click “Browser” in the application page to
open the webpage. Input the website address and select
“confirm”.
① Open new window
② Close
③ Previous/Next webpage
④ Refresh/Close
⑤ Message of webpage
⑥ Input field
⑦ Bookmark
⑧ Search
⑨ Bookmark/history
⑩ List of browser
2. Email
Set email account: Click “Email” on in the application page and
click Em ai l. Input your email address and password, select next
step for personal account or Manual Setting for commercial
account. Input your server respectively for sending and
receiving. Repeat the process to set more email accounts.
You can write, send and receive emails with attachments using
different accounts, and can check email messages.
Page 14
3. Audio Player
Click “Play Music” in applicati on page. Music is categorized by
artists, album, and playlist inside “Songs”. Click t he song name
for playback.
4. Vid eo player
Click “Video” in the application page. All video files will be
displayed and click the video name for playback.
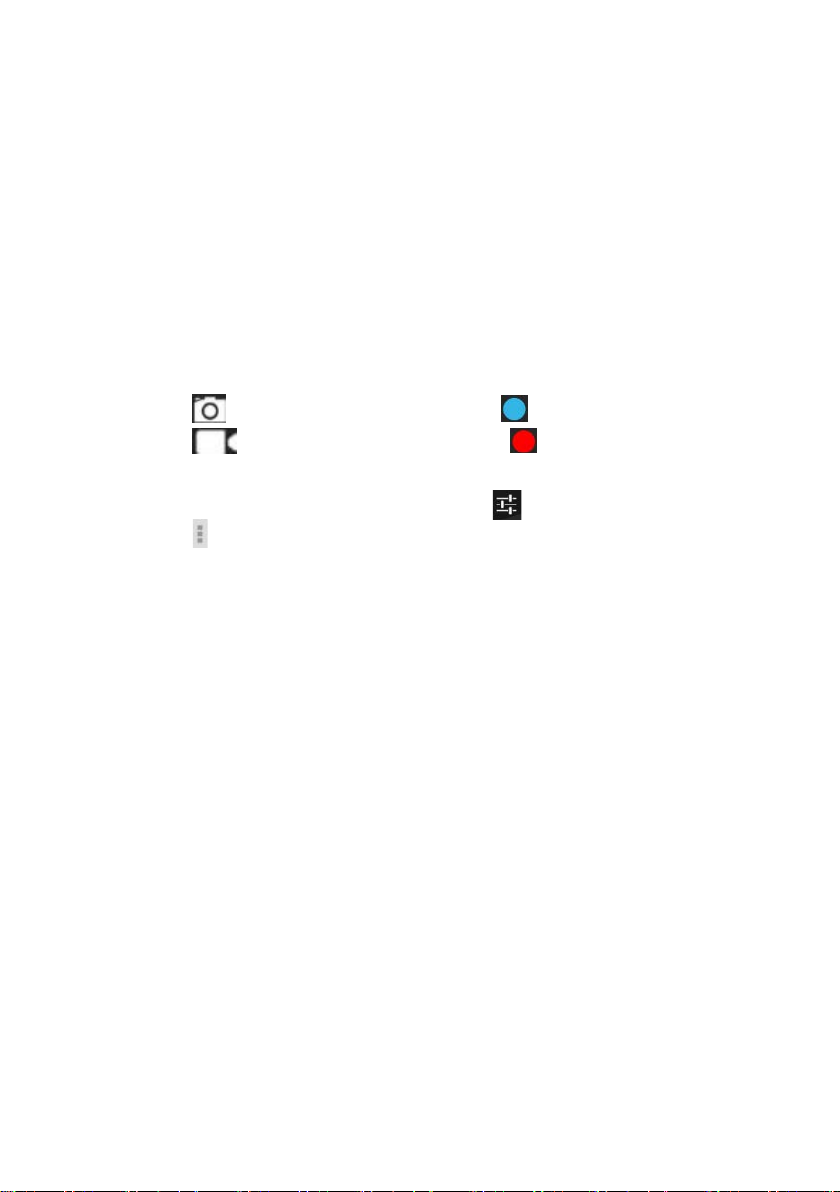
5. Camera
Click to open the camera and click to take picture.
Click to open the camcorder, click to start recording
video, and click again to stop.
In the camera/camcorder mode, click for set up and click
to select option.
6. File Explorer
Click “Explorer” in the application page to check files in the
internal memory, SD card, or USB device connected with OTG
cable (not supplied).
To operate files, select the file or file path, press file or folder
over 2 seconds, select Multi, file/folder, Editor, and perform
function in the list.
7. Manag em ent of applicat ion fil es
In Android OS a ll f iles are in APK format. Dow nl oad AP K file
rd
from PC, APK market or the 3
party, save it in TF card or in the
device through OTG cable (not supplied), click the APK file
under “Apk Install” in the applicati o n page. Af ter complete
installation, the application icon will be shown in the application
page.
To uninstall the file, click ”Apk Installer ” in the application page,
select “Manage” and click it.
Page 15
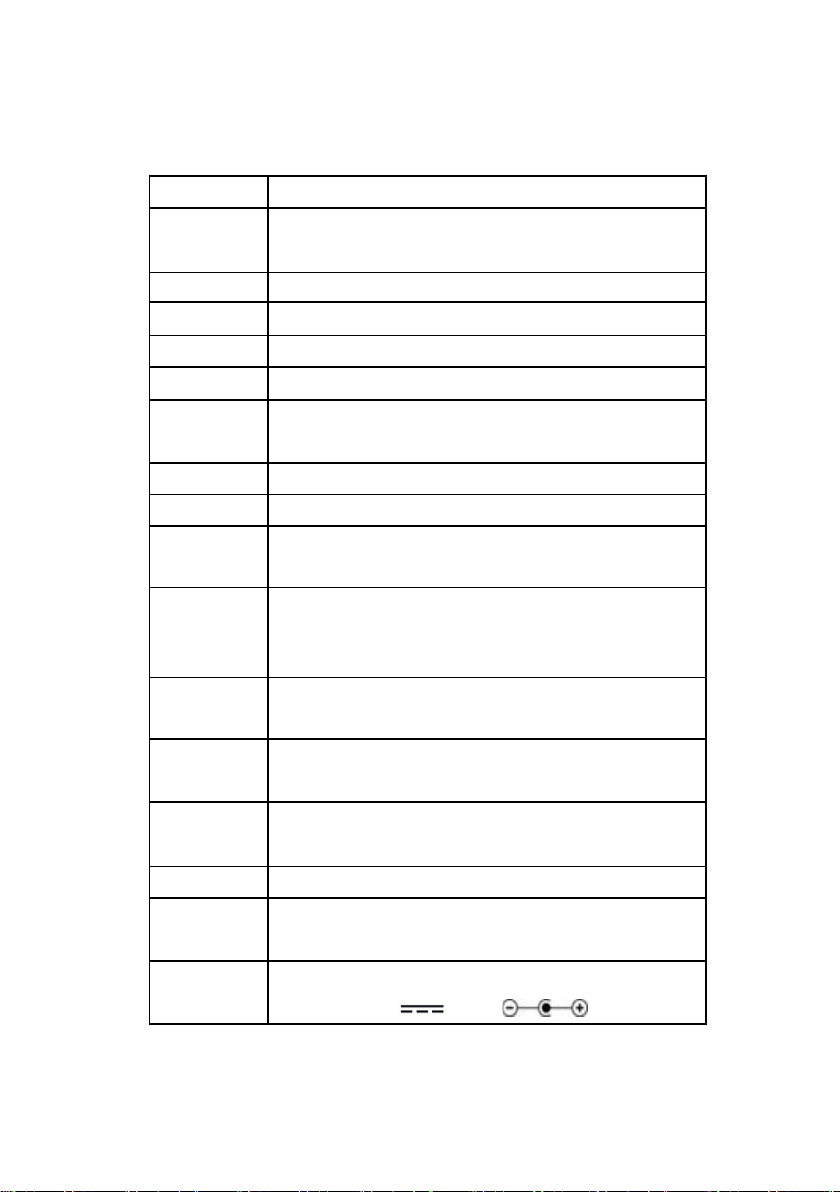
I. Spec
LCD
7" 1024*600 TN LED backlit
OS
Android 5.1
RAM
512MB DDR3
Cam
0.3 megapixel front, 2.0 megapixel rear
Touch
G+P 5 points Capacitive touch scr een
WiFi
802.11 b/g/n
Gravity
3D gravity sensor
format
H.263HP
format
Ebook
TXT, LRC, PDF, Html, Htm, EPUB (Max
Speaker
Mono
adapter
Input: AC 100-240V 50/60Hz max 0.4A
CPU RK3126B Quad Core Cortex-A7 ARM
1.2GHz
Flash 8G B eMMC
Panel
Music
Video
format
Picture
format
Record
format
Battery Lithium polymer 3.7V/2500mAh,
AC
MP3, WMA, OGG, APE, FLAC, AAC, WA V
MKV, AVI, RM, RMVB, MP4, MOV, VOB,
DAT, FLV, 3GP, VP8, RV, WMV, AVS,
JPG, JPEG, BMP, GIF
20M)
WAV
approximate 4 hours playback
Output: 5.0V 1.5A
Page 16

J. Trouble shooti ng
1. Can’t power on: Charge the device
2. Serious noise: Check if the music file is damaged.
3. Can’ t dow nl oa d/ copy: Check if connect correctly, if memory is
not full
4. USB conn e ct failed: Check if connect correctly, if USB
device/cable is damaged,
5. Can’t con n ect to LAN router: Check if router on, move closer
to router , keep away from devices of 2.4GHz frequency band.
FCC Statement:
This device complies with Part 15 of the FCC Rules. Operation is s
ubject to the following two conditions:
(1) This device may not cause harmful interference, and
(2) This device must accept any interference received, including int
erference that may cause undesired operation.
Changes or modifications not expressly approved by the party
responsible for compliance could void the user’s authority to
operate the equipment.
This equipment has been tested and found to comply with the limits
for a Class B digital device, pursuant to Part 15 of the FCC Rules.
These limits are designed to provide reasonable protection against
harmful interference in a residential installation. This equipment
generates, uses and can radiate radio frequency energy and, if not
installed and used in accordance with the instructions, may cause
harmful interference to radio communications. However, there is no
guarantee that interference will not occur in a particular installation.
If this equipment does cause harmful interference to radio or
television reception, which can be determined by turning the
equipment off and on, the user is encouraged to try to correct the
Page 17

interference by one or more of the following measures:
-- Reorient or relocate the r eceiving antenna.
-- Increase the separation between the equipment and receiver.
-- Connect the equipment into an outlet on a circuit different from
that to which the receiver is connected.
-- Consult the dealer or an experienced radio/TV technician for
help.
 Loading...