

Page 1
User Manual
Page 2

vibe-watermark-bright.pdf 25/10/2010 17:41:48
Contents
1 Welcome 4
2 Connections 5
2.1 Stand alone setup 5
2.2 External mixer setup 6
2.3 External audio interface setup 7
2.4 External mixer and external audio interface setup 8
3 Software installation 9
4 Getting started 10
4.1 Configuring display settings 10
4.2 Launching MIXVIBES VFX 10
4.3 Software activation 10
4.4 Install Wizard 10
4.5 Choosing the skin 11
4.6 Configuring the audio 11
4.7 Importing media 14
4.8 Analyzing media 14
4.9 Loading media 14
5 Controller overview 15
5.1 Top panel overview 15
5.2 Rear panel overview 19
6 Software user interface 20
6.1 Header menus 20
6.2 Players 22
6.3 Integrated Mixer 26
6.4 The Crossfader rack 28
6.5 The Main Volume / Record rack 28
6.6 The Mix rack 29
6.7 The Video Mixer rack 29
6.8 The Video Titler rack 30
6.9 Audio Sampler 31
6.10 The Preview rack 32
7 Media management 33
7.1 MediaView 33
7.2 Explorer window 36
7.3 Selection window 36
7.4 Edit media information 37
8 Preferences 38
8.1 General 38
8.2 Mix 39
8.3 Skin 39
8.4 Soundcard 39
8.5 EQ/Gain 40
8.6 Video 40
8.7 Projection 41
8.8 Effect 41
8.9 Keyboard 41
8.10 MIDI 42
8.11 Vinyl/CD input 43
9 Troubleshooting 45
10 Frequently Asked Questions 46
11 Technical specifications 48
2 / 50
Page 3
vibe-watermark-bright.pdf 25/10/2010 17:41:48
Important safety instructions
1 Read these Instructions.
2 Keep these Instructions.
3 Heed all Warnings.
4 Follow all Instructions.
5 Do not use this apparatus near water.
6 Clean only with a damp cloth.
7 Do not block any of the ventilation openings. Install in accordance with the manufacturer’s instructions.
8
Do not install near any heat sources such as radiators, heat registers, stoves, or other apparatus (including amplifiers)
that produce heat.
9
Do not defeat the safety purpose of the polarized plug. The wide blade is provided for your safety. If the provided plug
does not fit into your outlet, consult an electrician for replacement of the obsolete outlet.
10
Protect the power cord from being walked on or pinched particularly at plug, convenience receptacles, and point where
they exit from the apparatus.
11 Only use attachments/accessories specified by the manufacturer.
12
Use only with a cart, stand, tripod, bracket, or table specified by the manufacturer, or sold with the apparatus. When a
cart is used, use caution when moving the cart/apparatus combination to avoid injury from tip-over.
13 Unplug this apparatus during lighting storms or when unused for long periods of time.
14
Refer all servicing to qualified service personnel. Serving is required when the apparatus has been damaged in any
way, such as power-supply cord or plug is damaged, liquid has been spilled or objects have fallen into the apparatus,
the apparatus has been exposed to rain or moisture, does not operate normally, or has been dropped.
WARNING
To reduce the risk of the fire or electric shock, do not expose this apparatus to rain or moisture. The apparatus
shall not be exposed to dripping or splashing and that no objects filled with liquids, such as vases, shall be
placed on the apparatus.
CAUTION: To reduce the risk of electric shock, do not remove
any cover. No user-serviceable parts inside. Refer servicing to
qualified service personnel only.
The lightning flash with arrowhead symbol within the equilateral triangle is intended to alert the use to
the presence of un-insulated “dangerous voltage” within the product’s enclosure that may be of
sufficient magnitude to constitute a risk of electric shock.
The exclamation point within the equilateral triangle is intended to alert the user to the presence of
important operation and maintenance (servicing) instructions in the literature accompanying this
appliance.
CAUTION
To prevent electric shock, do not use this polarized plug with an extension cord, receptacle or other outlet
unless the blades can be fully inserted to prevent blade exposure
CAUTION
3 / 50
Page 4

vibe-watermark-bright.pdf 25/10/2010 17:41:48
1 Welcome
Thank you for choosing MIXVIBES VFX CONTROL. MIXVIBES VFX CONTROL is an all-in-one mobile Video DJ system featuring
standard DJ controls including 2 players and a central mixer. The controller has been designed to be light and mobile, with a
compact format. The controller comes with a built-in soundcard with two separate stereo outputs and a headphone output for
monitoring. For high precision mixing, the two ultra touch sensitive wheels will perfectly scratch your video files without any
latency.
This is a comprehensive manual that goes over the MIXVIBES VFX CONTROL functions and features. Take the time to read
this manual to take full advantage of the potential of MIXVIBES VFX CONTROL. It will guide you through the essential steps,
following the usual DJ & VJ workflow:
• Device connections
• Software installation
• ‘Get started’: First settings and configuration, software activation, installation wizard, media import and analyze.. .
• VFX CONTROL – MIDI controller features
• VFX software user interface and main features
• In-depth look at the preferences
• Troubleshooting and FAQs
We invite you to be part of the MIXVIBES community and share your experiences with other video DJs, find help and advice,
and check for available updates. See you online on the forum1or on the website2!
MIXVIBES VFX is constantly being improved. Please make sure that you are always using the latest version of MIXVIBES VFX.
Find on our website a french version of this user manual.
Minimum System Requirements
• Windows® XP SP2 or Windows® Vista SP2 or Windows® 7. We recommend Windows® 7 over Vista or XP.
• Processor Intel® Core 2 Duo 2.2GHz or equivalent
• 2 GB RAM
•
3D video card with 256 MB dedicated video memory, DirectX9 compatible + secondary monitor output (VGA, DVI,
HDMI)
• One available USB port
• Hard drive space for music and video files
Performance advice
Global performance depends mainly on CPU, hard disk drive speed and Graphics Processing Unit performance.
Box Contents
• MIXVIBES VFX installation disc
• MIXVIBES VFX CONTROL controller
• This user manual
• Switching power supply 6V DC
• 1 USB cable
• Set of RCA and auto-start cables
1
http://forum.mixvibes.com
2
http://www.mixvibes.com
4 / 50
Page 5
vibe-watermark-bright.pdf 25/10/2010 17:41:48
2 Connections
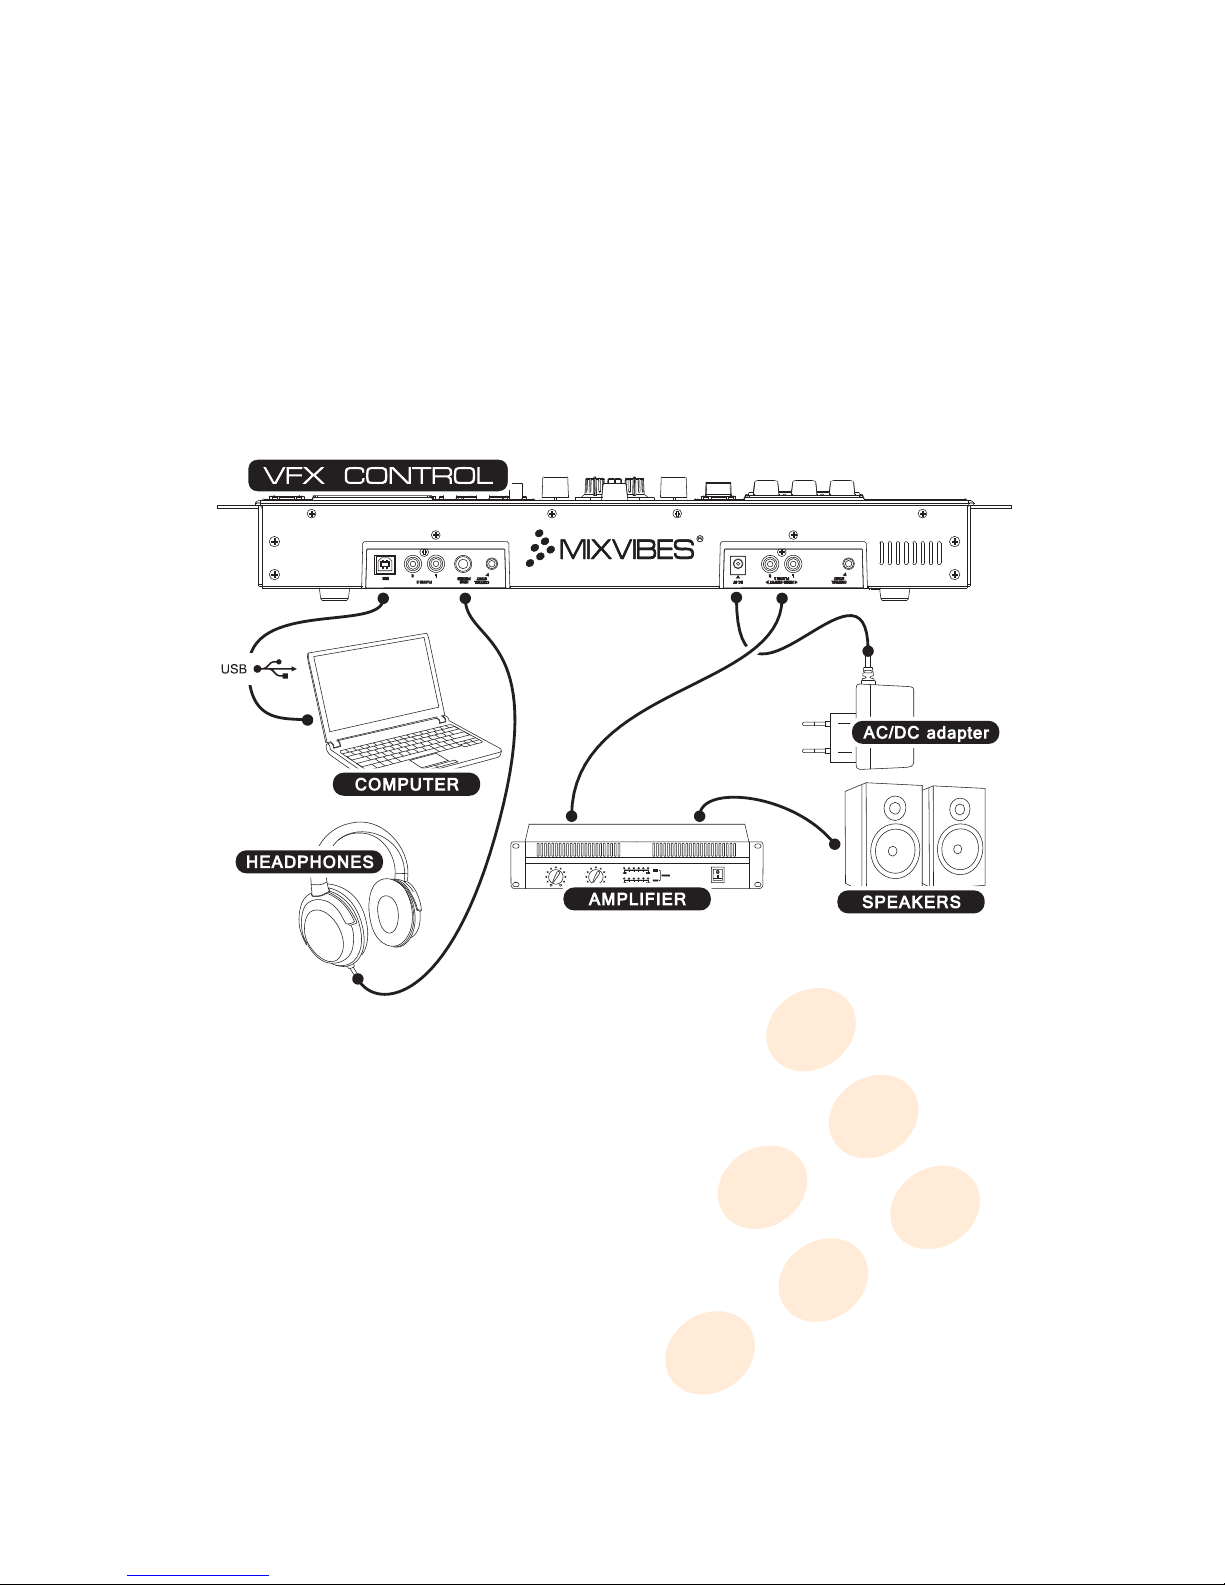
2.1 Stand alone setup
Follow the instructions below to use MIXVIBES VFX CONTROL with the integrated mixer.
1 Connect your VFX CONTROL ‘mixed output’ to your sound system
(amplifier, powered speakers, or home
stereo).
2 Connect your headphones to the ’headphones’ output of your VFX CONTROL.
3 Connect the supplied USB cable between the USB output of your VFX CONTROL and a free USB slot of your computer.
4 Connect the supplied power adapter.
5 Turn on your VFX CONTROL.
stand_alone.pdf 10/11/2009 11:11:59
Stand alone setup
5 / 50
Page 6
vibe-watermark-bright.pdf 25/10/2010 17:41:48
2 Connections
2.2 External mixer setup
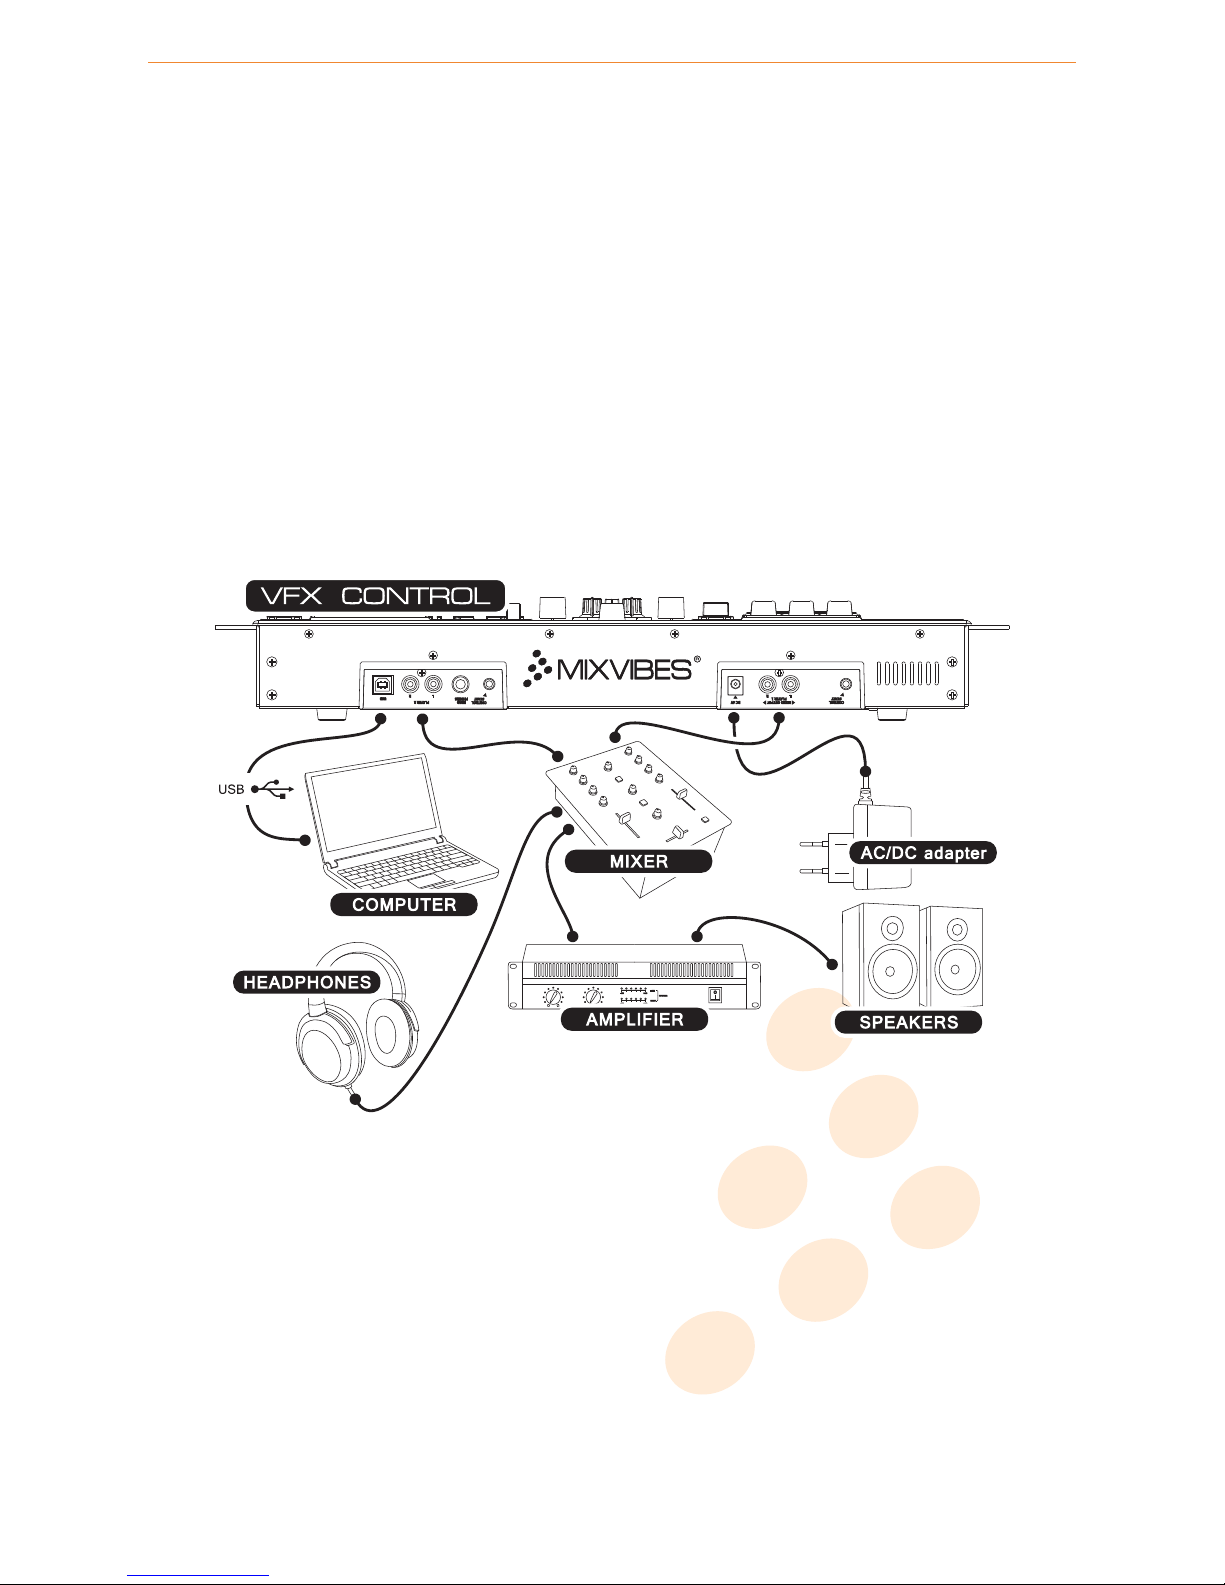
Follow the instructions below to use MIXVIBES VFX CONTROL with an external mixer.
1 Connect your VFX CONTROL outputs to your mixer line inputs
. Connect the ‘player 1’ outputs into a mixer line
input using the included RCA cables, then repeat for the ‘player 2’ outputs into another available mixer line input.
2 Connect your headphones to the external mixer’s headphone output
and
connect your sound system
(amplifier, powered speakers, or home stereo) to the external mixer’s main output.
3
If fader start is needed use the supplied fader start cables to connect the ’control start’ outputs with the corresponding
fader start inputs of your mixer.
4 Connect the supplied USB cable between the USB output of your VFX CONTROL and a free USB slot of your computer.
5 Connect the supplied power adapter.
6 Turn on your VFX CONTROL.
Note: the external analog mixer can not control the video mixing alone.
external_mixer.pdf 10/11/2009 11:15:02
External mixer setup
6 / 50
Page 7

vibe-watermark-bright.pdf 25/10/2010 17:41:48
2 Connections
2.3 External audio interface setup
Follow the instructions below to use MIXVIBES VFX CONTROL with the
integrated mixer and an external audio interface
.
1 Connect outputs 1/2 of your audio interface to your sound system
(amplifier, powered speakers, or home
stereo).
2 Connect your headphones to your audio interface’s headphone output
. Audio interfaces may vary, please
refer to the owner’s manual included with your audio interface for details on its headphone output.
3 Connect the audio interface to your computer (USB or Firewire).
4 Turn on your audio interface.
5 Connect the supplied USB cable between the USB output of your VFX CONTROL and a free USB slot of your computer.
6 Connect the supplied power adapter.
7 Turn on your VFX CONTROL.
external_audio_interface.pdf 10/11/2009 11:15:51
External audio interface setup
7 / 50
Page 8
vibe-watermark-bright.pdf 25/10/2010 17:41:48
2 Connections
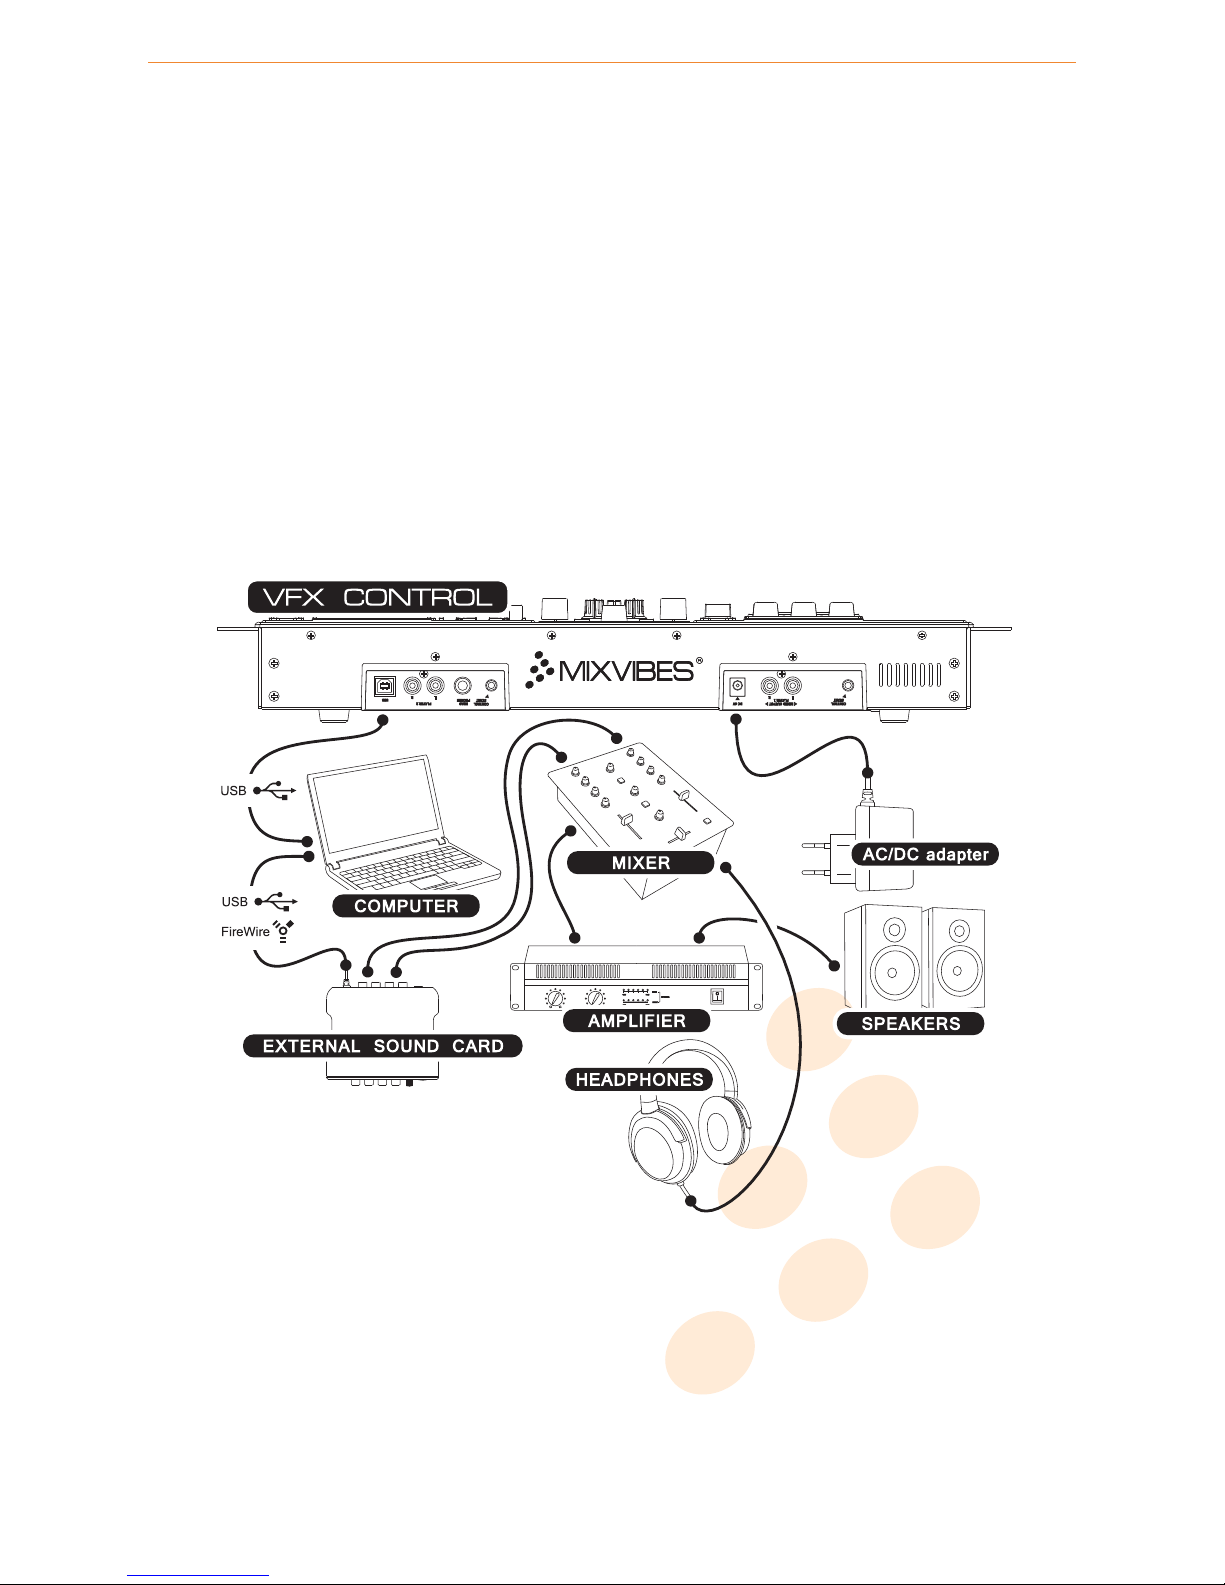
2.4 External mixer and external audio interface setup
Follow the instructions below to use MIXVIBES VFX CONTROL with an external mixer and an external audio interface.
1 Connect your audio interface outputs to your mixer line inputs
. Connect the ‘player 1’ outputs into a mixer
line input using the included RCA cables, then repeat for the ‘player 2’ outputs into another available mixer line input.
2 Connect your headphones to the external mixer’s headphone output
and
connect your sound system
(amplifier, powered speakers, or home stereo) to the external mixer’s main output.
3 Connect the audio interface to your computer (USB or Firewire).
4 Turn on your audio interface.
5 Connect the supplied USB cable between the USB output of your VFX CONTROL and a free USB slot of your computer.
6 Connect the supplied power adapter.
7 Turn on your VFX CONTROL.
Note: the external analog mixer can not control the video mixing alone.
external_audio_interface_mixer.pPage 1 10/11/2009 11:16:33
External mixer and external audio interface setup
8 / 50
Page 9
vibe-watermark-bright.pdf 25/10/2010 17:41:48
3 Software installation
1 Check that your VFX CONTROL is plugged into an active USB port.
2
Insert MIXVIBES VFX installation disc into your computer’s CD-ROM drive. The installation program will launch
automatically. In case it does not, open Windows Explorer, navigate to the MIXVIBES VFX installation disc and doubleclick on the «install_vfx.exe» file.
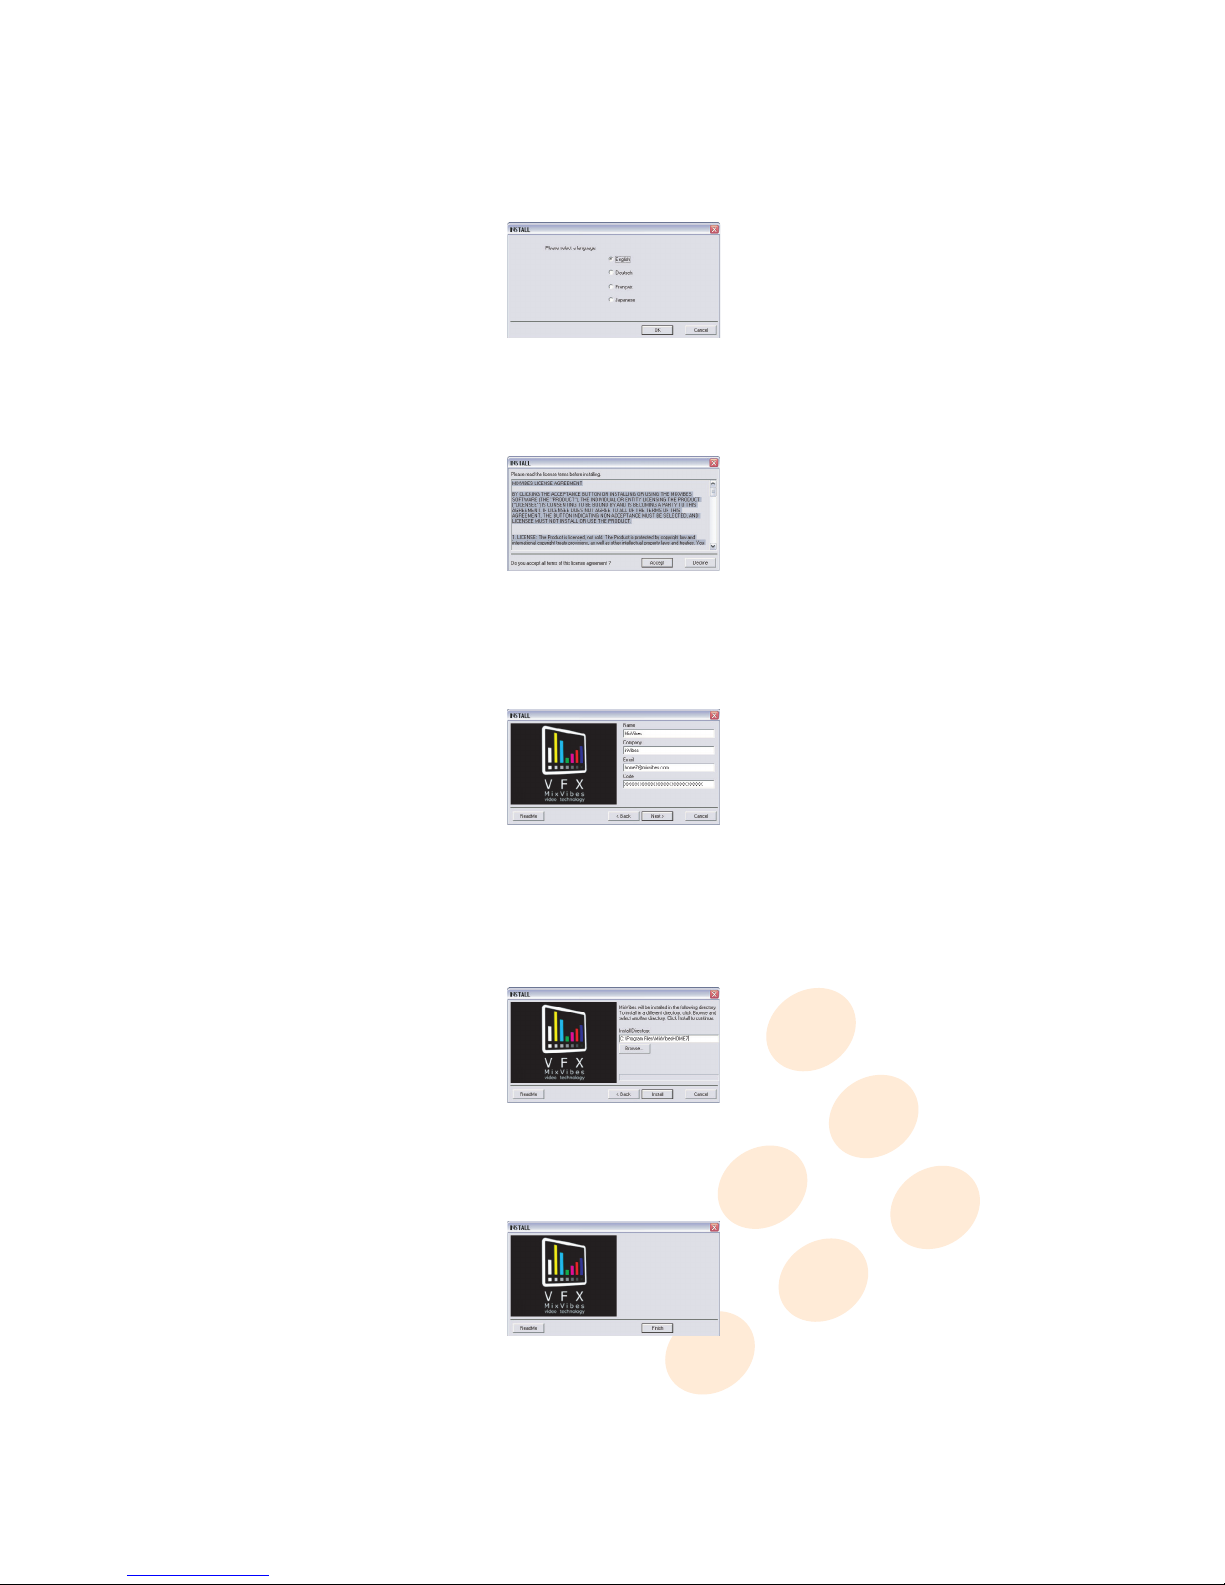
3 Choose the installation language and click OK.
install1.pdf 06/04/2009 14:27:32install1.pdf 06/04/2009 14:27:32
Language Selection
4 Please read and validate the user agreement by clicking Accept.
install2.pdf 06/04/2009 14:28:10install2.pdf 06/04/2009 14:28:10
End-User License Agreement
5
Enter your first name, last name, e-mail address, country, birth-date and the serial number supplied on the CD-ROM
sleeve and click Next.
install3.pdf 22/10/2009 16:26:41install3.pdf 22/10/2009 16:26:41
License key
6
Select the folder you want to install MIXVIBES VFX into. You can keep the default folder, or choose a new one by
typing directly into the box or clicking on ‘Browse..’. Press
Install
to begin installation.
Be patient, the installation
process can take a few minutes.
install4.pdf 22/10/2009 16:27:08install4.pdf 22/10/2009 16:27:08
Choose Install location
7 Click Finish to end the installation process.
install5.pdf 22/10/2009 16:27:22install5.pdf 22/10/2009 16:27:22
Finish Installation
Congratulations, your MIXVIBES VFX is now installed and ready for use.
Please log in on our forum in order to register your product and to check for the latest download version of
MIXVIBES VFX software.
9 / 50
Page 10
vibe-watermark-bright.pdf 25/10/2010 17:41:48
4 Getting started
4.1 Configuring display settings
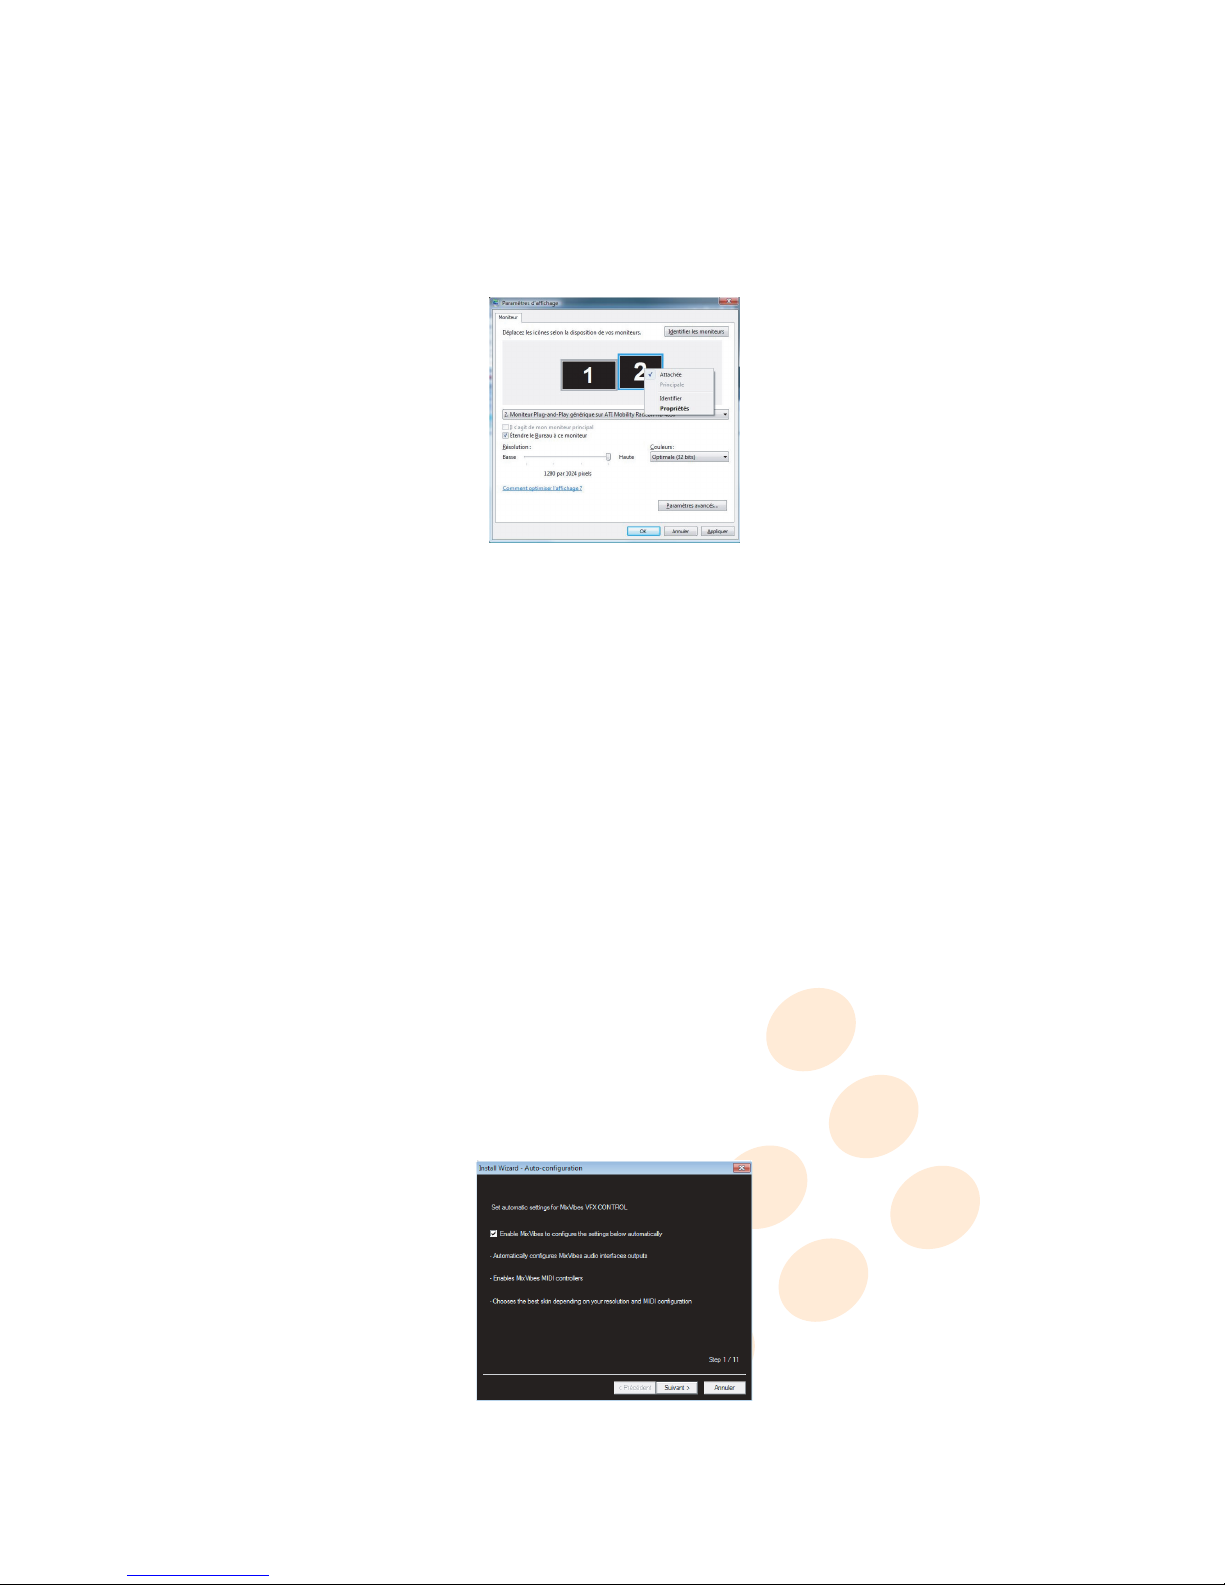
To configure display settings:
1
Right-click on your Desktop and select
Screen resolution
in Windows®Vista/7 (
Properties
then
Display settings
in Windows® XP).
2
If you wish to connect a second monitor, plug the second monitor to your computer’s secondary output (please refer to
the owner’s manual for details). Right-click on the second monitor then select Attached.
3 Choose the screen resolution then click OK to confirm.
display_setting.pdf 21/09/2009 17:07:05display_setting.pdf 21/09/2009 17:07:05
Display settings
4.2 Launching MIXVIBES VFX
To launch MIXVIBES VFX, go to [Start > All Programs > MixVibesVFX] and click on MixVibes VFX or double-click on the MIXVIBES
VFX shortcut on your desktop.
4.3 Software activation
Before you use MIXVIBES VFX, you need to register and activate the software.
4.4 Install Wizard
The install wizard launches automatically when running MIXVIBES VFX for the first time. The install wizard can be launched
manually in [Options/Install Wizard].
4.4.1 Auto-configuration
Auto-configuration allows MIXVIBES to:
• automatically configure MIXVIBES audio interfaces outputs.
• enable MIXVIBES MIDI controllers.
• choose the best skin according to your resolution and your MIDI setup.
Auto-configuration
If you use MIXVIBES VFX CONTROL in stand alone setup, it is advisable to choose the auto-configuration.
10 / 50
Page 11
vibe-watermark-bright.pdf 25/10/2010 17:41:48
4 Getting started
4.4.2 Manual configuration
The manual configuration allows you to choose the skin and configure the audio preferences quickly.
4.5 Choosing the skin
1 Open [Options/Preferences/Skin].
2 Select a skin. Comments will help you select the skin:
•
1280 or 1440 pixels
screen resolution
. The VFX 1280 skin is optimized for monitors wider than 1280 pixels. The
VFX 1440 skin is optimized for monitors wider than 1440 pixels.
• VFX or VFX+mixer
skin. The VFX+mixer skin is designed for a perfect use with VFX CONTROL controller. To
show more controls, click on the Control button of the integrated mixer. VFX skin was designed to display all
functions within MIXVIBES VFX. To show 4 players, go to the menu [Options > Number of players].
4.6 Configuring the audio
To change the audio settings, you must uncheck the ’Enable the auto-configuration’ box.
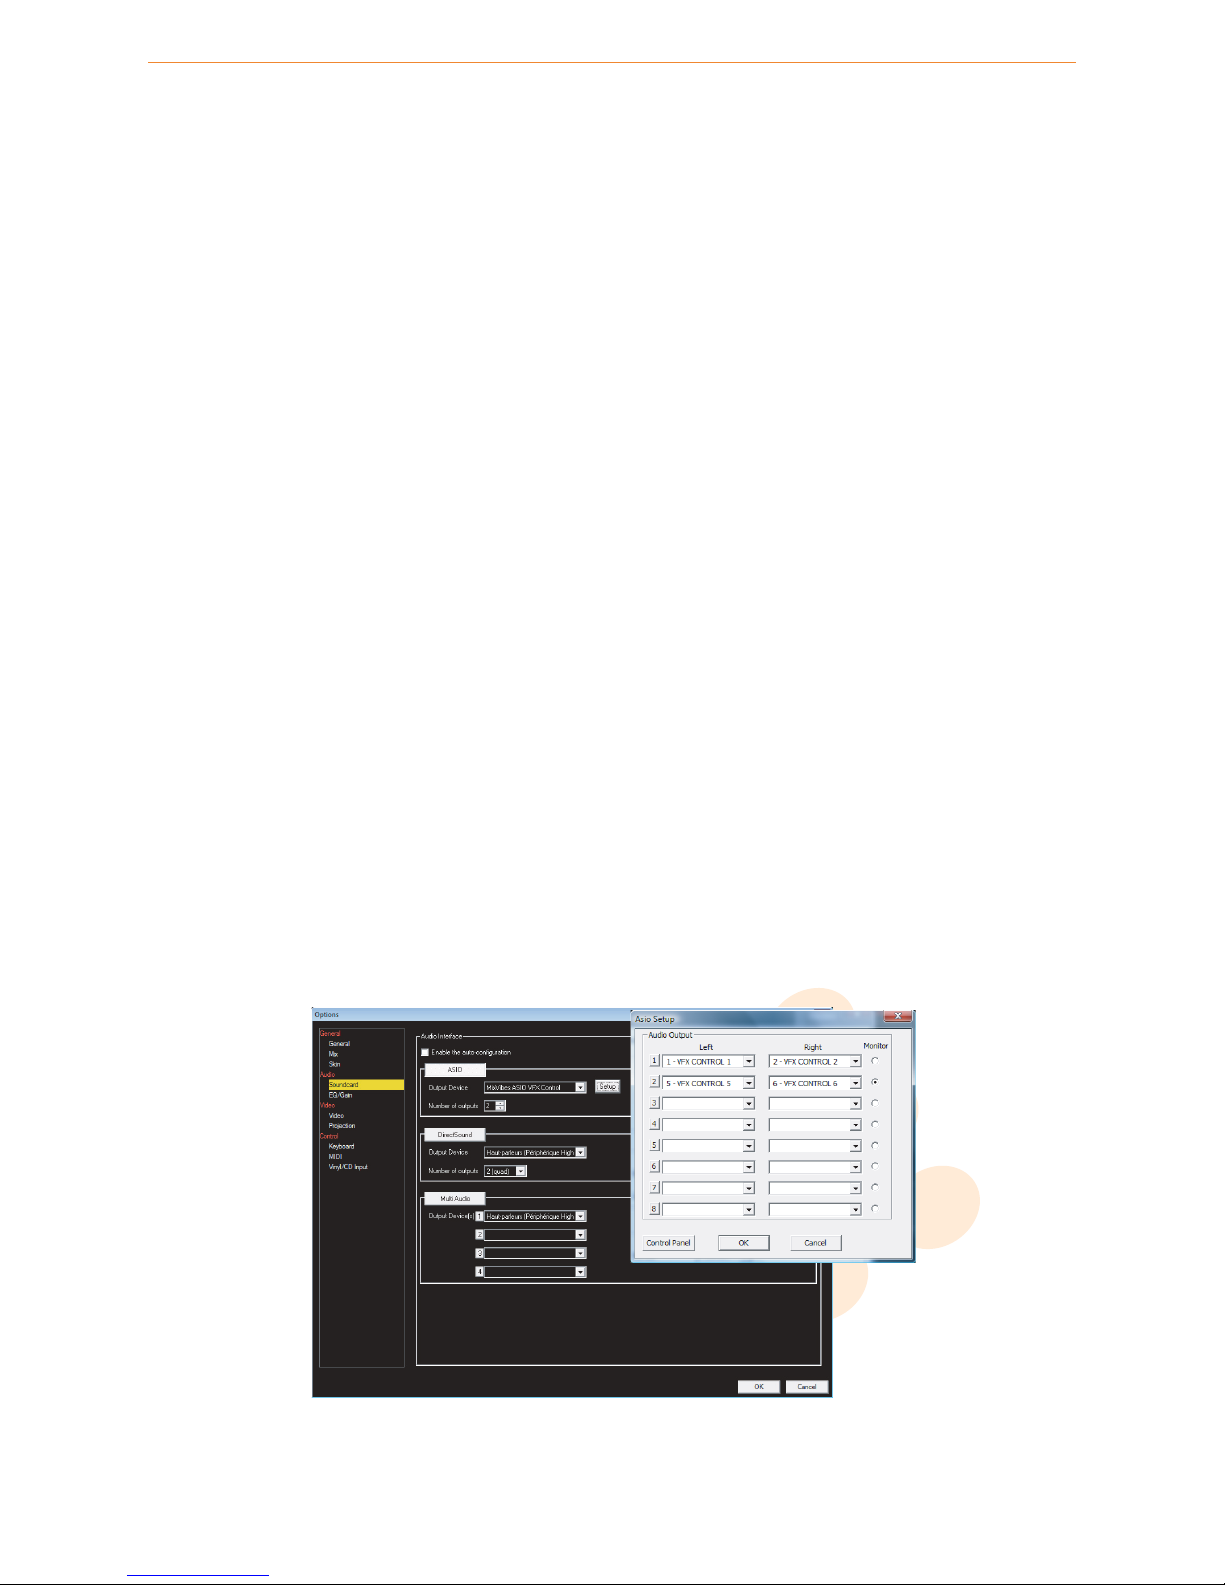
4.6.1 Stand alone setup
Standalone mode is the default audio configuration when using your VFX CONTROL controller in auto-configuration. All the
following should already be set up.
1 Check that all player outputs are set to 1.
2 Open [Options/Preferences/Soundcard].
3 Choose the ASIO mode.
4 Select Mixvibes ASIO VFX Control as your output device.
5 Select ’2’ as the number of outputs.
6
Click on the
’Setup’ button
to select the audio outputs (click ‘Control options’ to open the soundcard driver control
panel if necessary).
7
Choose
’VFX CONTROL 1’ and ’VFX CONTROL 2’ on the first line for stereo out 1
(this output is your system’s
MASTER out) and choose
’VFX CONTROL 5’ and ’VFX CONTROL 6’ on the second line for stereo out 2
then
click on the monitor button to set this output as your system’s MONITORING out.
8 Click OK twice.
9 Press the CUE button on your VFX CONTROL to pre-listen a media in the player of your choice.
audio_1.pdf 09/02/2010 14:20:41
Stand alone setup
11 / 50
Page 12

vibe-watermark-bright.pdf 25/10/2010 17:41:48
4 Getting started
4.6.2 External mixer setup
1 Check that all player outputs are correctly set on all players: player 1 to output 1 and player 2 to output 2.
2 Open [Options/Preferences/Soundcard].
3 Choose the ASIO mode.
4 Select MixVibes ASIO VFX Control as your output device.
5 Select ’2’ as the number of outputs.
6
Click on the
’Setup’ button
to select the audio outputs (click ‘Control options’ to open the soundcard driver control
panel if necessary).
7
Choose
’VFX CONTROL 1’ and ’VFX CONTROL 2’ on the first line for stereo out 1
(this output is then linked to
player 1) and choose
’VFX CONTROL 3’ and ’VFX CONTROL 4’ on the second line for stereo out 2
(this output
is then linked to player 2).
8 Click OK twice.
9 Press the CUE button on your external mixer to pre-listen a media in the player of your choice.
audio_2.pdf 09/02/2010 14:20:11
External mixer setup
4.6.3 External audio interface setup
1 Check that all player outputs are set to 1.
2 Open [Options/Preferences/Soundcard].
3 Choose the ASIO mode.
4 Select your external audio interface as your output device.
5 Select ’2’ as the number of outputs.
6
Click on the
’Setup’ button
to select the audio outputs (click ‘Control options’ to open the soundcard driver control
panel if necessary).
7
Choose your
external audio interface output 1 and 2 on the first line for stereo out 1
(this output is your
system’s MASTER out) and choose your
headphone output on the second line for stereo out 2
then
click on
the monitor button to set this output as your system’s MONITORING out.
8 Click OK twice.
9 Press the CUE button on your VFX CONTROL to pre-listen a media in the player of your choice.
12 / 50
Page 13

vibe-watermark-bright.pdf 25/10/2010 17:41:48
4 Getting started
audio_3.pdf 09/02/2010 14:17:50
External audio interface setup
4.6.4 External mixer and external audio interface setup
1 Check that all player outputs are correctly set on all players: player 1 to output 1 and player 2 to output 2.
2 Open [Options/Preferences/Soundcard].
3 Choose the ASIO mode.
4 Select your external audio interface as your output device.
5 Select ’2’ as the number of outputs.
6
Click on the
’Setup’ button
to select the audio outputs (click ‘Control options’ to open the soundcard driver control
panel if necessary).
7
Choose
external audio interface output 1 and 2 on the first line for stereo out 1
(this output is then linked to
player 1) and choose
external audio interface output 3 and 4 on the second line for stereo out 2
(this output
is then linked to player 2).
8 Click OK twice.
9 Press the CUE button on your external mixer to pre-listen a media in the player of your choice.
audio_4.pdf 09/02/2010 14:17:16
External mixer and external audio interface setup
13 / 50
Page 14
vibe-watermark-bright.pdf 25/10/2010 17:41:48
4 Getting started
4.7 Importing media
4.7.1 Media types
MIXVIBES VFX is a real multimedia player. It can handle many sorts of familiar of media types :
• Audio files: reads all major audio formats out of the box (WAV, MP3, WMA, OGG, CDA, AAC, M4A, FLAC).
• Video files
: reads all major video formats out of the box (MP4, MPG, MPEG, MJPEG, AVI, DIVX, MOV, VOB, FLV, M4V,
M2T, DAT).
• Flash files: you can use regular SWF flash (as media or in titler rack).
• Flash text files : you can use special SWF files with customizable text (as media or in titler rack).
• Live video feed: you can use webcams or camcorders as soon as they are Windows® compatible.
Advice about video codecs
MIXVIBES VFX supports lots of video codec, but they have not the same performance. So,
what kind of DJ/VJ are you ?
• Simple (fade from one to other): any codec will do the job.
• Live remixer (use advanced functions like loops or locations): use a codec with light compression like MPEG2.
• Scratcher: use a codec with light compression and a lot of keyframes like MJPEG.
In all cases, global performance depends on your computer power (mainly hard drive and CPU speed).
4.7.2 Importing media
Next we suggest that you scan your computer to find your media. You can do this in three ways:
• Right-click while the cursor is over the MediaBase window, from the menu select Scan .
• In the Explorer window, right-click on an item and select Scan or drag and drop it in the MediaBase window.
• Select [Media/Scan] from the top level menu.
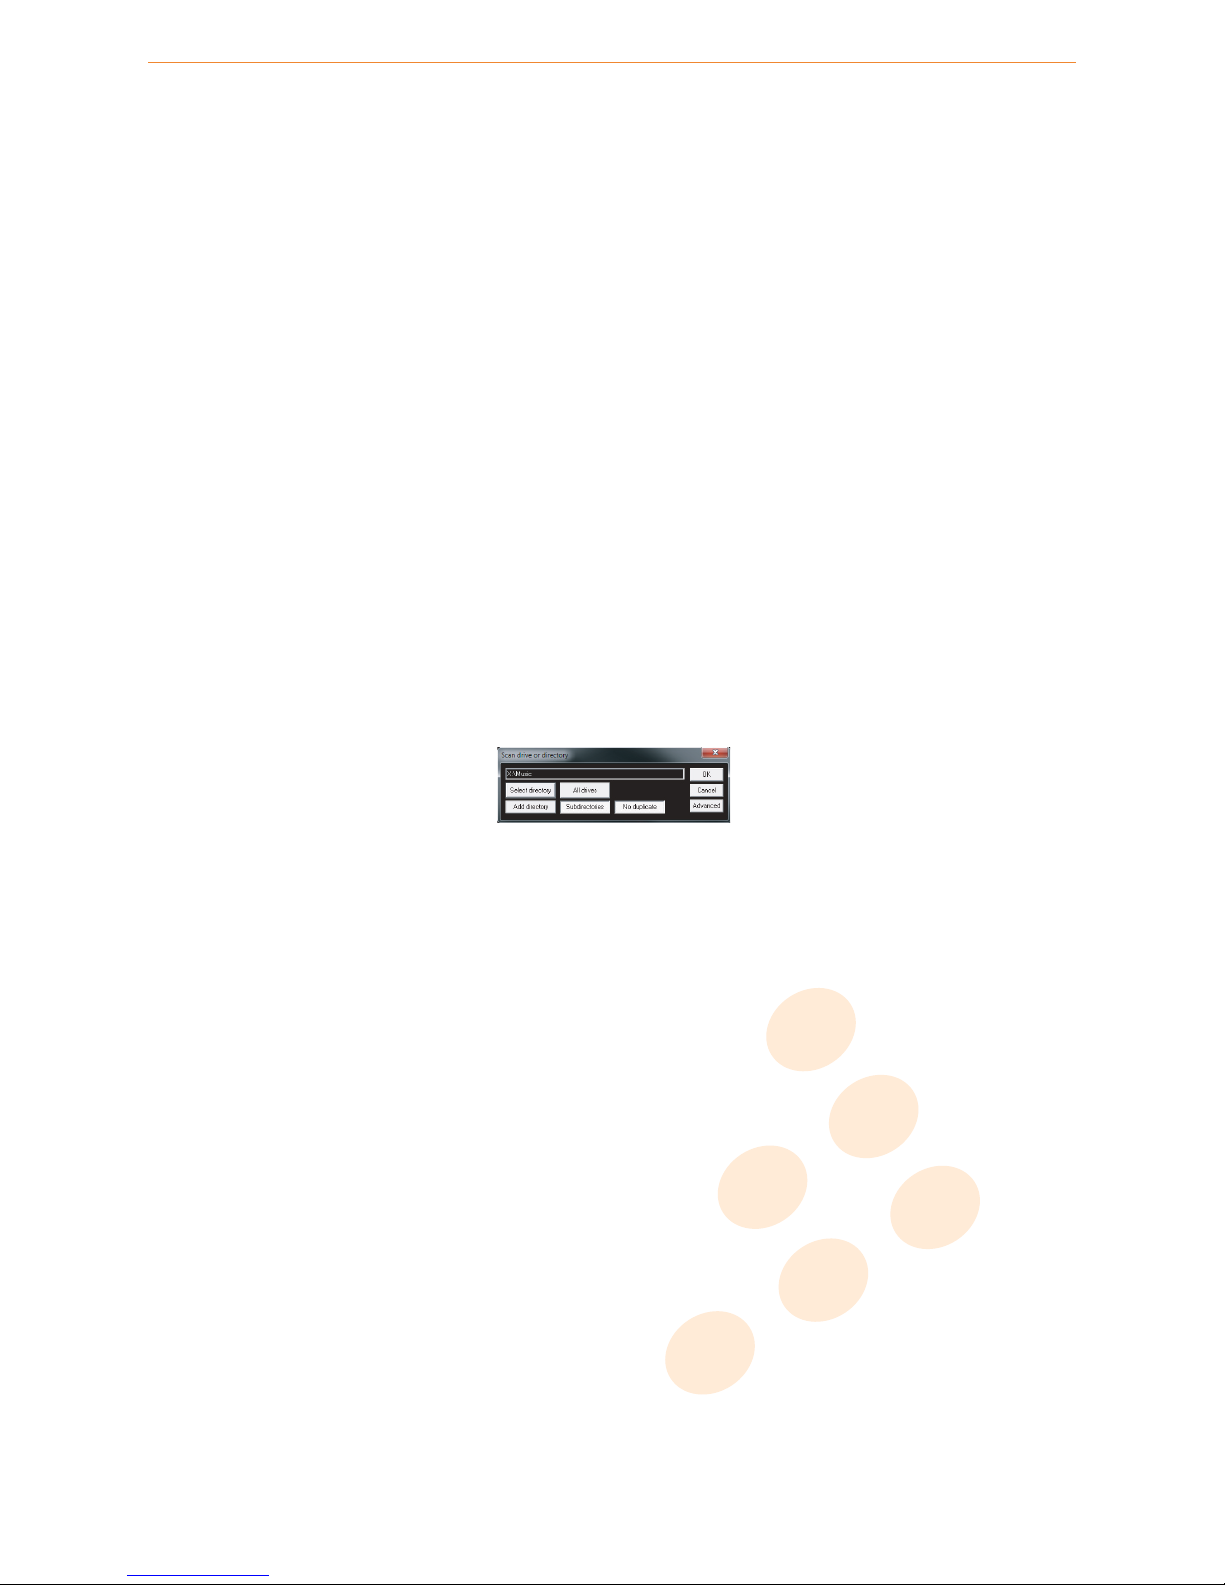
scan1.pdf 08/11/2010 17:42:18
Adding your music and video
On this screen you can scan your computer for a specific media folder. If you want to just add music or video with specific tag
information (Artist, Title etc.), simply enter these into the relevant boxes and then click OK .
You can also add media to the MediaBase by dragging and dropping files from the
Explorer
window or by selecting
Add an
audio file or Add a video file from Media menu.
4.8 Analyzing media
Before you play your medias in VFX, it is important to first analyze your files. The analyze files function processes the medias
in your MediaBase to calculate gain, BPM, duration, peak, video preview and miniatures. To analyze medias, select them in
the MediaBase and click the ’BPM >’ button of the MediaBase control bar or right-click and select from the contextual menu
Analyse. It is strongly recommended to analyze files before a mix.
Note: If you analyze a large number of media at the same time, the analysis can be time consuming.
4.9 Loading media
After importing your media you can load them into the players. There are three ways of loading tracks:
• With the controller
: Use the ’Media Select’ button to scroll through your media windows (MediaView and Explorer).
Load the highlighted track into one of the players by using the ’Load A’ or ’Load B’ buttons. Use the ’Browse’ button
(’Shift’ + ’Load A’) to switch between the media windows (MediaView and Explorer). Use the ’Open’ button to open/close
directories in the Explorer window.
• With the mouse: Drag and drop a track from the media windows (MediaView and Explorer) to one of the players.
• With the keyboard
: Choose a keyboard file in
[Options/Preferences/Keyboard]
. Use the up and down arrow keys
to scroll through your MediaView. Load the highlighted track into one of the players by using the Load shortcut.
14 / 50
Page 15
vibe-watermark-bright.pdf 25/10/2010 17:41:48
5 Controller overview
5.1 Top panel overview
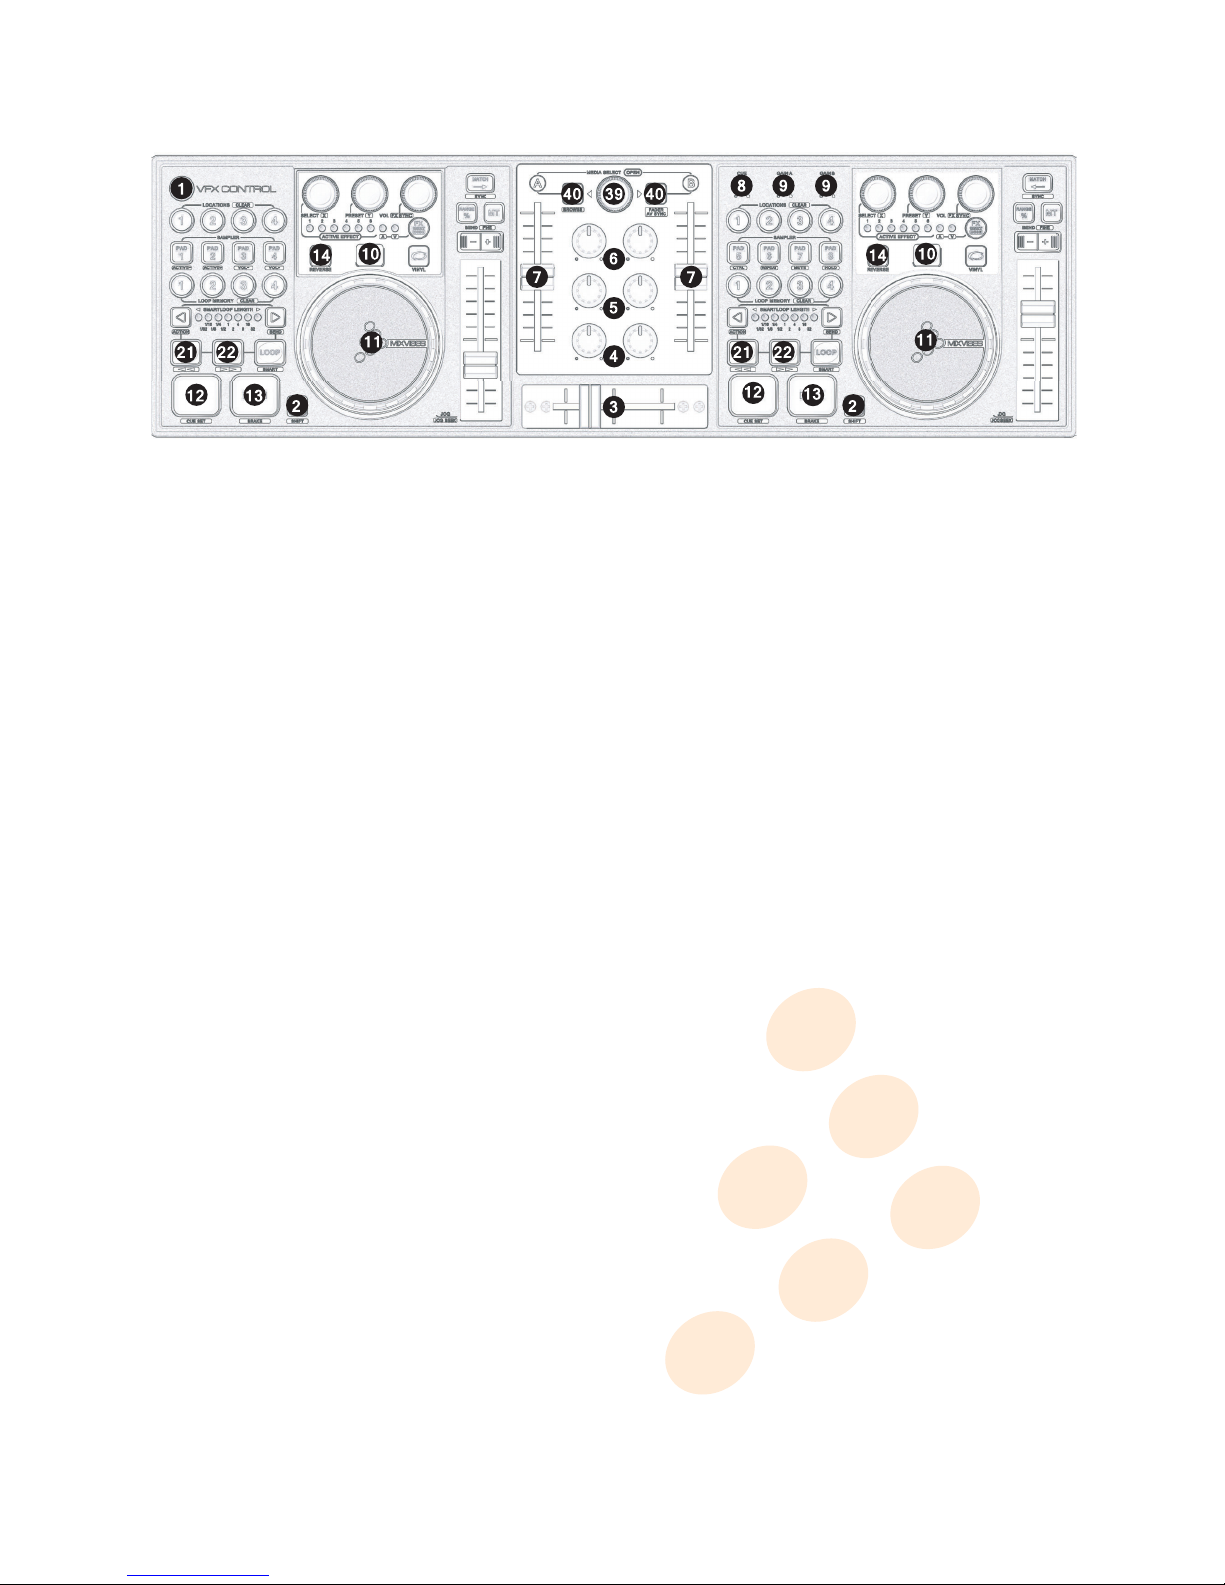
Top panel: mixer and playback controls
1. Power switch
: turns VFX CONTROL on and off. Turn on VFX CONTROL before you turn on amplifiers. Turn off amplifiers
before you turn off VFX CONTROL.
To activate the MIDI and audio standby, press the button for 3 seconds: the power switch LED is then lighted on.
To activate the MIDI standby, perform a short click: the LEDs of the effect section are then lighted on. All elements of the top
panel (buttons, jog wheels, knobs, sliders) are disabled while the audio interface is still turned on.
2. Shift
: holding shift gives many of the buttons a secondary function. Secondary functions are printed inside a grey box.
Each button has a primary and a secondary function. Primary functions are direct, just press the desired button. To access the
secondary functions, hold SHIFT and press the desired button.
Shift Open function
39. Control of players 1/2 or 3/4
: switches between the control of players 1/2 or 3/4 with the controller.
MIXER CONTROLS
3. Crossfader : use it to balance the mix of the 2 media files.
4. 5. 6. Equalization
: a 3-band equalizer is available to modify the equalization of your media file. Treble, medium and
bass can be adjusted with these knobs.
7. Volume : adjusts the players’ volume level (video, audio or video+audio).
8. Cue/Monitor knob: adjusts the volume of the headphones.
Shift function
Cue/Monitor Mix knob
: controls the balance in the headphones via software between the master output and
the headphone cue.
9. Gain: adjusts the pre-fader, pre-EQ audio level of the corresponding channel.
10. Cue/Monitor button: sends the corresponding deck to the headphone mix.
Shift Media Select function 39. Transition mode : selects the crossfader video transition mode.
Shift Load B function
40. Fader AV Sync
: synchronizes volume faders and crossfader mode (video, audio or video+audio).
PLAYBACK CONTROLS
11. Jog Wheel
: the jog wheel can be used for a number of functions. When the media is first loaded you can use the jog
wheel to cue up the media. When a media is playing and Vinyl mode is active you can use the top panel of the jog wheel to
scratch and the jog wheel margin to temporarily change the pitch of the media. When a media is playing and Vinyl mode is
not active you can use the jog wheel to temporarily change the pitch of the media. Note: this will automatically revert back to
the default pitch when you let go of the jog wheel.
Shift function Jog Seek: skips through the media at high speed.
12. Cue/Stop
: If no Cue Point is assigned, or if the deck is paused, press Cue to set a Current Cue Point. While the media is
playing, press it again to skip back to the Current Cue Point and pause playback. You can hold down Cue to start playback
from the Current Cue Point. Release it to skip back to the Current Cue Point and pause playback. You can hold down Cue and
Play/Pause simultaneously to start playback from the Current Cue Point. Release both buttons to allow playback to continue.
Shift function Cue/Set: defines a cue point on the fly.
13. Play/Pause: starts or pauses playback of a media file.
Shift function Brake: starts or pauses gradually playback of a media file.
14. Reverse: reverses the media playback.
Shift Loop in/out functions 21. 22. Rewind/Fast Forward: skips through the media at high speed.
15 / 50
Page 16

vibe-watermark-bright.pdf 25/10/2010 17:41:48
5 Controller overview
Top panel: pitch and loop controls
PITCH CONTROLS
15. Pitch slider: changes the speed of the currently playing media.
16. Pitch bend
: hold these buttons down to temporarily alter the speed the playing media. When released, the media
playback will return to the speed designated by the pitch slider.
Shift function Fine: hold these buttons down to temporarily and finely alter the speed the playing media.
17. Pitch range: sets the range of the Pitch slider. Push this button to change it between 6%, 10%, 16% and 100%.
18. Speed/Master Tempo select
: selects Speed or Master Tempo. Note: If Speed has been selected you can adjust the
pitch like with a normal turntable; If the Master Tempo has been activated it is possible to change the pitch via the pitch fader
without influencing the tone pitch. This means that the song’s tonal key remains the same while changing its speed.
19. Match : synchronizes the BPM with the adjacent player.
Shift function Sync : synchronizes the BPM and beat with the adjacent player.
20. Vinyl mode on/off
: while a track is playing with this option turned on you can use the jog wheel to scratch your media,
if this button is off the jog wheel will allow you to change the speed.
LOOP CONTROLS
• If Smart is disabled (when using manual loops)
• If no loop was defined
21. Loop in: sets the entry point of a manual loop. The Loop in button blinks.
22. Loop out
: sets the exit point of a manual loop. The Loop out button blinks and the Loop button lights on. Activate
‘Loop assist’ in the Options menu if you want the out point to be relative to the entry point and the BPM.
23. Loop: nothing will happen. The Loop button is lighted off.
• If a loop was defined
21. Loop in: goes back to the loop entry point. The Loop in button is lighted on.
22. Loop out: sets again the exit point of a manual loop. The Loop out button is lighted on.
23. Loop
: disables the loop (the Loop button lights off) or goes back and activates the last loop (the Loop button lights
on and the Loop in and Loop out buttons blink).
• If Smart is enabled (when using automatic loops)
• If no loop was defined
21. Loop in: nothing will happen.
22. Loop out: nothing will happen.
23. Loop
: activates automatically a BPM synchronized loop whose size depends on the previously set number of beats.
When the automatic loop function is switched on, the button flashes. The Loop button stops to blink and the button
Loop in and Loop out blink.
• If a loop was defined
21. Loop in: goes back to the loop entry point. The Loop in button is lighted on.
22. Loop out: cuts the loop interval by half. The Loop out button is lighted on.
23. Loop: disables the loop. The Loop button blinks.
Shift Loop function 23. Smart: activate/deactivate the loop smart mode.
24. Beat -/+: selects the number of beats used to create an automatic loop.
16 / 50
Page 17
vibe-watermark-bright.pdf 25/10/2010 17:41:48
5 Controller overview
Top panel: memory and sampler controls
MEMORY CONTROLS
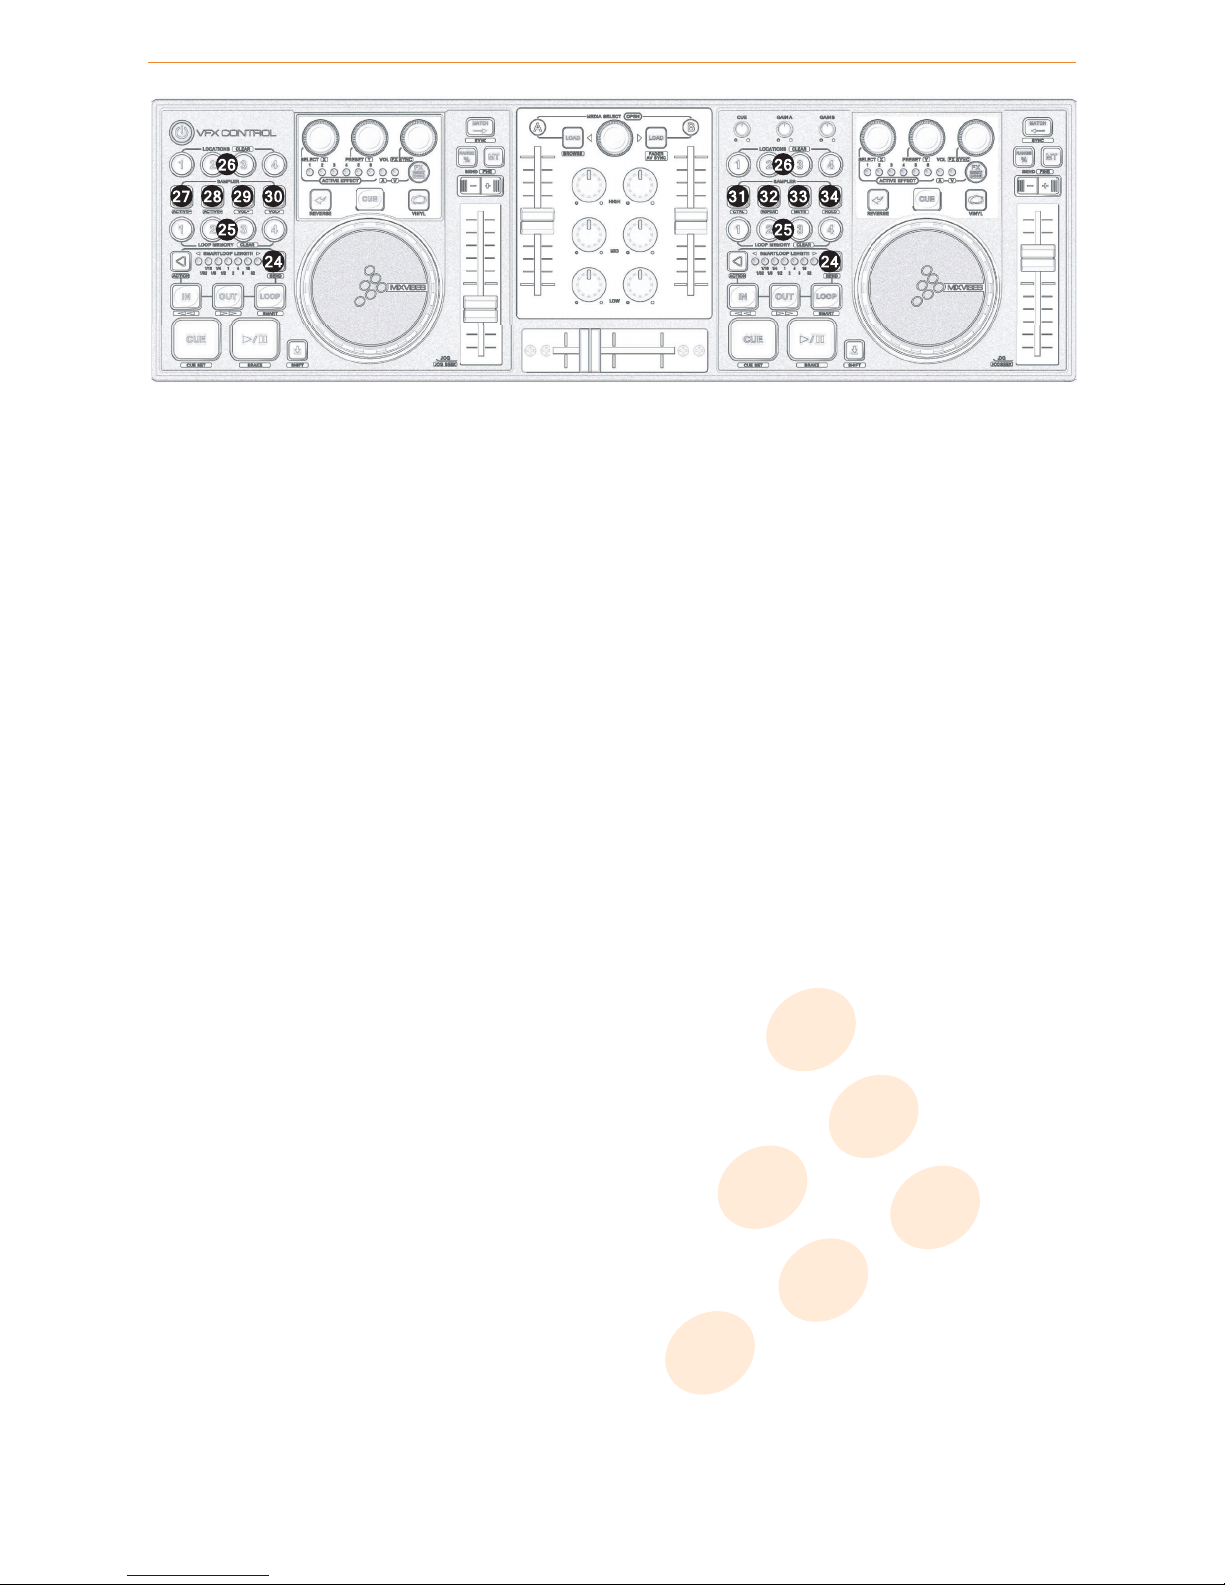
25. Loop memory
: memorizes several loops by media and returns to them. To memorize a loop, simply create a loop
manually or automatically then press the appropriate memorized loop button. To return to the start of a memorized loop,
press the appropriate memorized loop button again.
Shift function Clear loop memory: clears a memorized loop.
26. Locations
: defines and reaches several location points (hot cues) in the media being played. To save a location point,
push a location button. To go to a location point, push a previously saved location button again.
Shift function Clear locations: clears a defined location point.
SAMPLER CONTROLS
27. 28. 29. 30. 31. 32. 33. 34. Pad: launches pad media playback.
Shift function 27. Active pad -: selects the active pad (previous).
Shift function 28. Active pad +: selects the active pad (next).
Shift function 29. Pad volume -: decreases active pad volume. Each pad can have its own volume level.
Shift function 30. Pad volume +: increases active pad volume. Each pad can have its own volume level.
Shift function 31. Ctrl: chooses the sample playback mode:
• Norm: allows simultaneous playback of multiple samples.
• All: allows simultaneous playback of all samples.
• Solo: allows one sample playback at a time.
• Row: allows multiple samples playback on the same column but one per line only.
• Col: allows multiple samples playback on the same line but one per column only.
Shift function 32. Repeat: enables/disables repetitive sample playback.
Shift function 33. Mute: enables/disables sample playback mute.
Shift function 34. Hold: enables/disables start-to-end sample playback when launching pad playback.
Shift Beat+ function 24. Send: sends an audio sample from current player media to sampler’s active pad.
17 / 50
Page 18

vibe-watermark-bright.pdf 25/10/2010 17:41:48
5 Controller overview
Top panel: effect and navigation controls
EFFECT CONTROLS
35. Effect on/off: enables/disables current effect.
Shift function Effect mode: selects the effect mode: video, audio or both.
• If you turn the button
36. Selected effect: selects an effect.
Shift function Effect X parameter: controls X parameter for the current effect. Parameters depend on the selected effect.
37. Preset: selects a preset for current effect.
Shift function Effect Y parameter: controls Y parameter for the current effect. Parameters depend on the selected effect.
38. Effect Volume: sets current effect volume (dry/wet).
Shift function FX Sync: sets effect synchronization with media:
none: no synchronization.
on Beat: synchronizes parameters with music energy (like speakers movement).
T: 1/4, T: T/2 etc: synchronizes parameters with BPM.
Note: at this time, some effects are audio only (brake ,reverse, ...).
• if you press the button
36. Active effect: selects the next effect.
Shift function Active effect: selects the previous effect.
VISUALIZATION CONTROLS
• if you press the button
37. Visualization on/off: enables/disables current visualization.
38. Selected visualization: selects the next visualization.
Shift function Selected visualization: selects the previous visualization.
BROWSE CONTROLS
• if you turn the button
39. Media Select
: allows to navigate in the media windows (MediaBase, Playlist and Explorer) to find the appropriate media.
• if you press the button
39. Open: opens/closes folders in the Explorer window.
40. Load: loads selected media into the chosen player.
Shift Load A function Browse: commutes between media windows (MediaBase, Playlist and Explorer).
18 / 50
Page 19
vibe-watermark-bright.pdf 25/10/2010 17:41:48
5 Controller overview
5.2 Rear panel overview
1
2
3
4
5
6 6
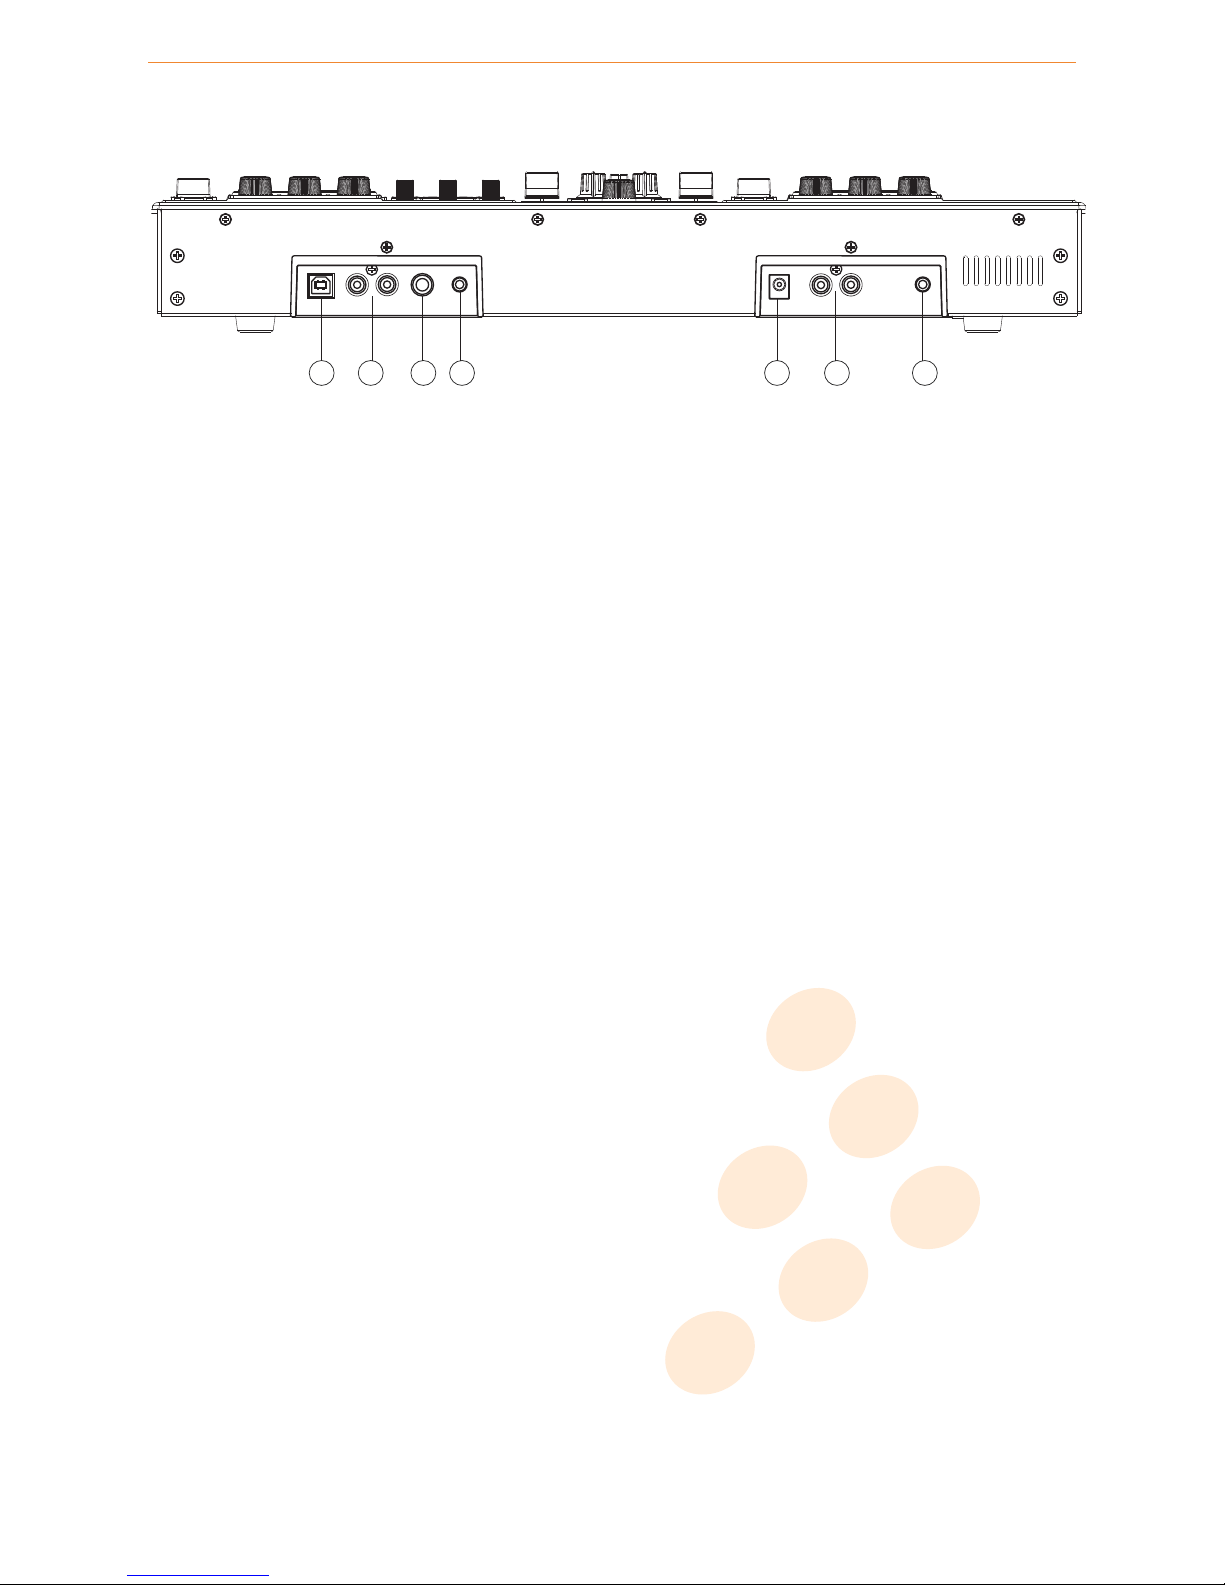
Rear panel
1. USB connection: used to connect VFX CONTROL to your PC or LAPTOP to control MIXVIBES VFX.
2. Player2 output: used to connect VFX CONTROL with your mixer.
• Standalone setup: not used.
• External mixer setup: connect this output to a mixer line input.
3. Headphones output: used to connect your headphones to your VFX CONTROL.
• Standalone setup: connect your headphones for monitoring here.
• External mixer setup: not used.
4. Power adapter input: connect the included power adapter here.
5. Player1/mixed output: used to connect VFX CONTROL with your sound system or mixer.
• Standalone setup: connect your sound system here.
• External mixer setup: connect this output to a mixer line input.
6. Fader start
: when used with an external mixer you can connect this output with the mixer fader start input to control the
start/stop function of the player from your mixer. (attention: works only with compatible mixer).
19 / 50
Page 20

vibe-watermark-bright.pdf 25/10/2010 17:41:48
6 Software user interface
6.1 Header menus
1
2 3 4 5 6 7
8
9
10 11 12
header_menus.pdf 08/11/2010 17:57:27
Header menus
1 File
•
MediaBase > New : creates a new MediaBase (VIBX format). A MediaBase is the database where all your music,
video and flash information are located. One VIBX file contains one MediaBase.
• MediaBase > Open : loads a new MediaBase (VIBX, VIB or MPX format).
• MediaBase > Save : saves your MediaBase.
• MediaBase > Save as : saves the MediaBase (VIBX format) in the directory of your choice.
• MediaBase > Import iTunes® library : imports your iTunes® library.
• MediaBase > Import WMP library : imports your Windows® Media Player library.
• MediaBase > Import Serato® library : imports your Serato® library.
• Playlist > Import : imports a M3U, TXT format playlist.
• Playlist > Export : exports a playlist in M3U, TXT format.
• Sampler session > New : creates a new Sampler session (VIBS format).
• Sampler session > Open : loads a new Sampler session (VIBS format).
• Sampler session > Save as : saves a Sampler session (VIBS format) with any name.
• Recent files : last MediaBases you loaded.
• Quit : quits MIXVIBES VFX.
2 Media
• Add an audio file : adds the current audio file to the MediaBase.
• Add a video file : adds the current video file to the MediaBase.
• Scan : scans one or several files selected in the Windows Explorer.
•
Selected item(s) > Edit info... : edits the information of the selected file. There are 9 available tabs to edit or view
information.
• Selected item(s) > Locate on disk : shows the media directory.
• Selected item(s) > Save ID3-Tag : saves all the tag information of the selected MP3 media file (in the file itself).
• Selected item(s) > Analyse : automatically analyzes the selected media.
•
Selected item(s) > Analyse BPM manually : manually sets the BPM for the current track. First select the required
track you want to manually beat count into the MediaBase and then drag it onto the player. Start the track playing,
go back to the MediaBase, right-click and select ‘Analyse BPM Manually’. Press the F1 key when you get to the
Start Position of the track and F2 when you get to the End Position. You can also manually select these points by
entering the start and end numbers. Now you can either press the Calculate button or enter the Beat number. You
can also use the Space key to set the BPM.
• Selected item(s) > Add to playlist : adds the file to the current Playlist.
• Selected item(s) > Delete : deletes the current media from the MediaBase.
• Selected item(s) > Select all : selects all the media of the MediaBase.
• Selected item(s) > Change path : changes the location of the selected media on the hard drive.
• Selected item(s) > Remove file(s) from disk : deletes the media file from the MediaBase and Hard Drive.
3 Options
•
Preferences : opens the MixVibes VFX preferences window. Find more details in the Preferences chapter of this
manual.
•
Security : activates a security lock that prevents you from loading tracks on an active player, right clicking and
saving ID3 tags.
•
Loop assist : activate/deactivate this option to enable an adjustment of entry and exit points of your loops. This
allows you to make near to perfect loops easily.
• Bar : shows/hides bars in players and rack mix.
20 / 50
Page 21

vibe-watermark-bright.pdf 25/10/2010 17:41:48
6 Software user interface
• Tooltips : activates/deactivates the contextual information pop-ups in MIXVIBES VFX.
• Learning : activates/deactivates learn feature.
• Number of players : shows/hides 2, 3 or 4 players.
• Install wizard : the fastest way to set up your MIXVIBES VFX.
• Configuration report : generates a system configuration report file (TXT format).
4 Windows
• Menu: shows/hides the menu.
• Info: shows/hides the info bar.
• Explorer: shows/hides the explorer.
• Selection: shows/hides the selection window.
• Preview: shows/hides the preview.
• Mix: shows/hides the mix rack.
• Crossfader: shows/hides the crossfader rack.
• Main volume: shows/hides the main volume rack.
• Video mixer: shows/hides the video mixer rack.
• Video titler: shows/hides the video titler rack.
• Sampler: shows/hides the sampler.
5 Help
• Manual: opens this user manual.
• Help: connects to the MIXVIBES forum.
• Update: connects to the MIXVIBES download center.
• About: checks your MIXVIBES VFX version.
6 Maximize/restore Browser: maximizes the Browser window or restores the Browser window to its original size.
7 Auto-configuration status
: enables/disables the auto-configuration (to validate a change, you must restart MIXVIBES).
Auto-configuration allows MIXVIBES to:
• automatically configure MIXVIBES audio interfaces outputs.
• enable MIXVIBES MIDI controllers.
• choose the best skin according to your resolution and your MIDI setup.
8 MIDI indicator
: displays any incoming MIDI-commands. The icon will light upon receiving incoming MIDI data. Click on
it to go to the MIDI preferences.
9 Clock
: displays the time of your system clock. You can also use a timer indicating its duration. The icon will flash at the
end of the countdown.
10 Minimize: reduces the MIXVIBES VFX window in the taskbar.
11 Maximize/restore: switches to a full screen view or restores the MIXVIBES VFX window to its original size.
12 Quit: quits MIXVIBES VFX.
21 / 50
Page 22
vibe-watermark-bright.pdf 25/10/2010 17:41:48
6 Software user interface
6.2 Players
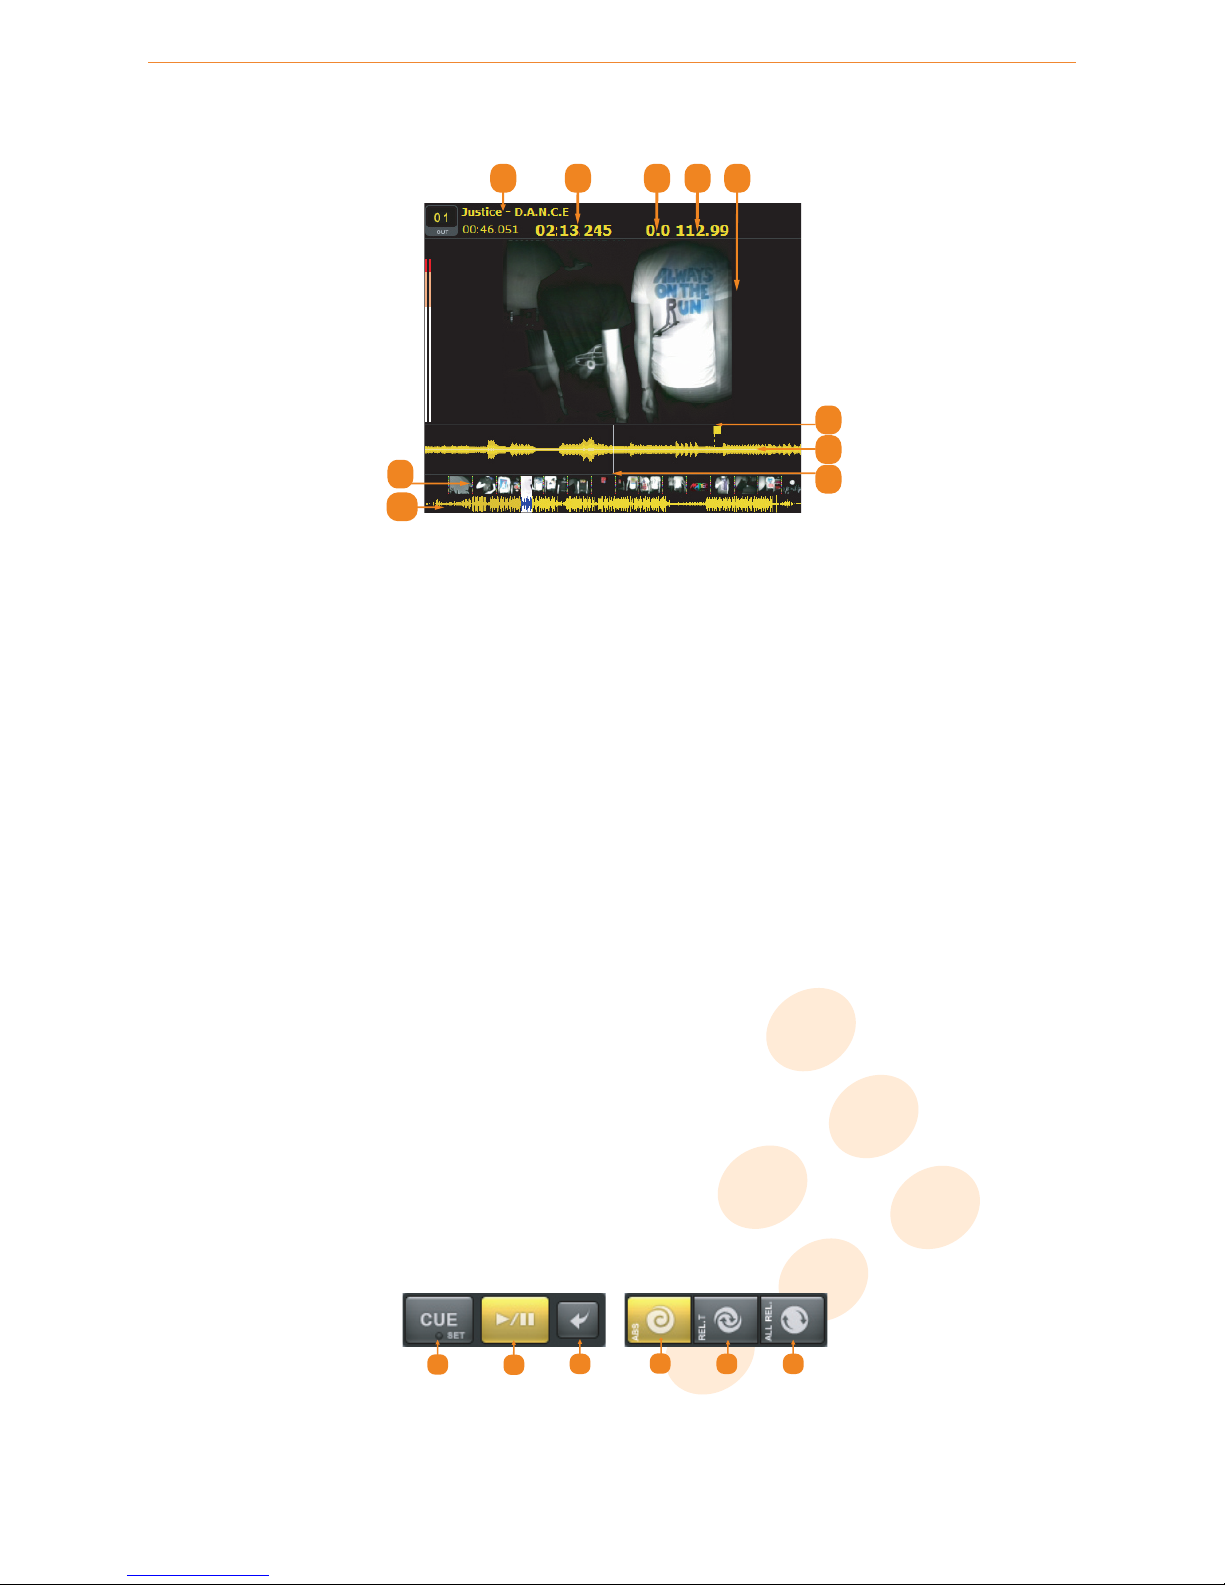
1 2 3 4 5
6
7
8
9
10
player1.pdf 09/11/2010 11:36:05
Player display screen
1 Media information
: displays the artist and title if the media is tagged correctly. It flashes at the end of the media.
You can set the end of the media alarm in [Options/Preferences/Mix].
2 Time elapsed/remaining
: displays the elapsed and remaining time. Toggle between elapsed and remaining time by
clicking this option with the right mouse button.
3 Pitch value : shows the pitch value.
4 BPM value : shows the BPM value.
5 Video
: shows the video of the current section of media being played. Right click on the video and select ’set media
thumbnail’ to generate an artwork for the media.
6 Beat timer or bar
7 Waveform
: shows the waveform of the current section of the track being played. Right click on the waveform to
change various display options for the waveform.
8 Tick
: toggles between waveform scrolling and tick scrolling (for low performances computer). The tick is thicker if the
Master Tempo mode is selected.
9 Video search bar
: displays several pictures of the whole media. You can go to any point on the media by simply
clicking on an image.
10 Audio search bar
: displays a waveform of the whole media. You can go to any point on the media by simply clicking
on the waveform.
You can move an audio file from a player to another by dragging and dropping from the area ’media information’ (2) to the
display area of the waveform (5).
You can use the ’clone’ feature which allows to:
• copy an audio file and its information (gain, locations, loops, pitch, key) into the other player.
• put its playback at the same position
from a player to another by doing [Ctrl] + drag and drop from the area ’media information’ (2) to the display area of the
waveform (5) or by loading the same audio file from the Base Media. This feature only works for audio files.
6.2.1 Transport Controls
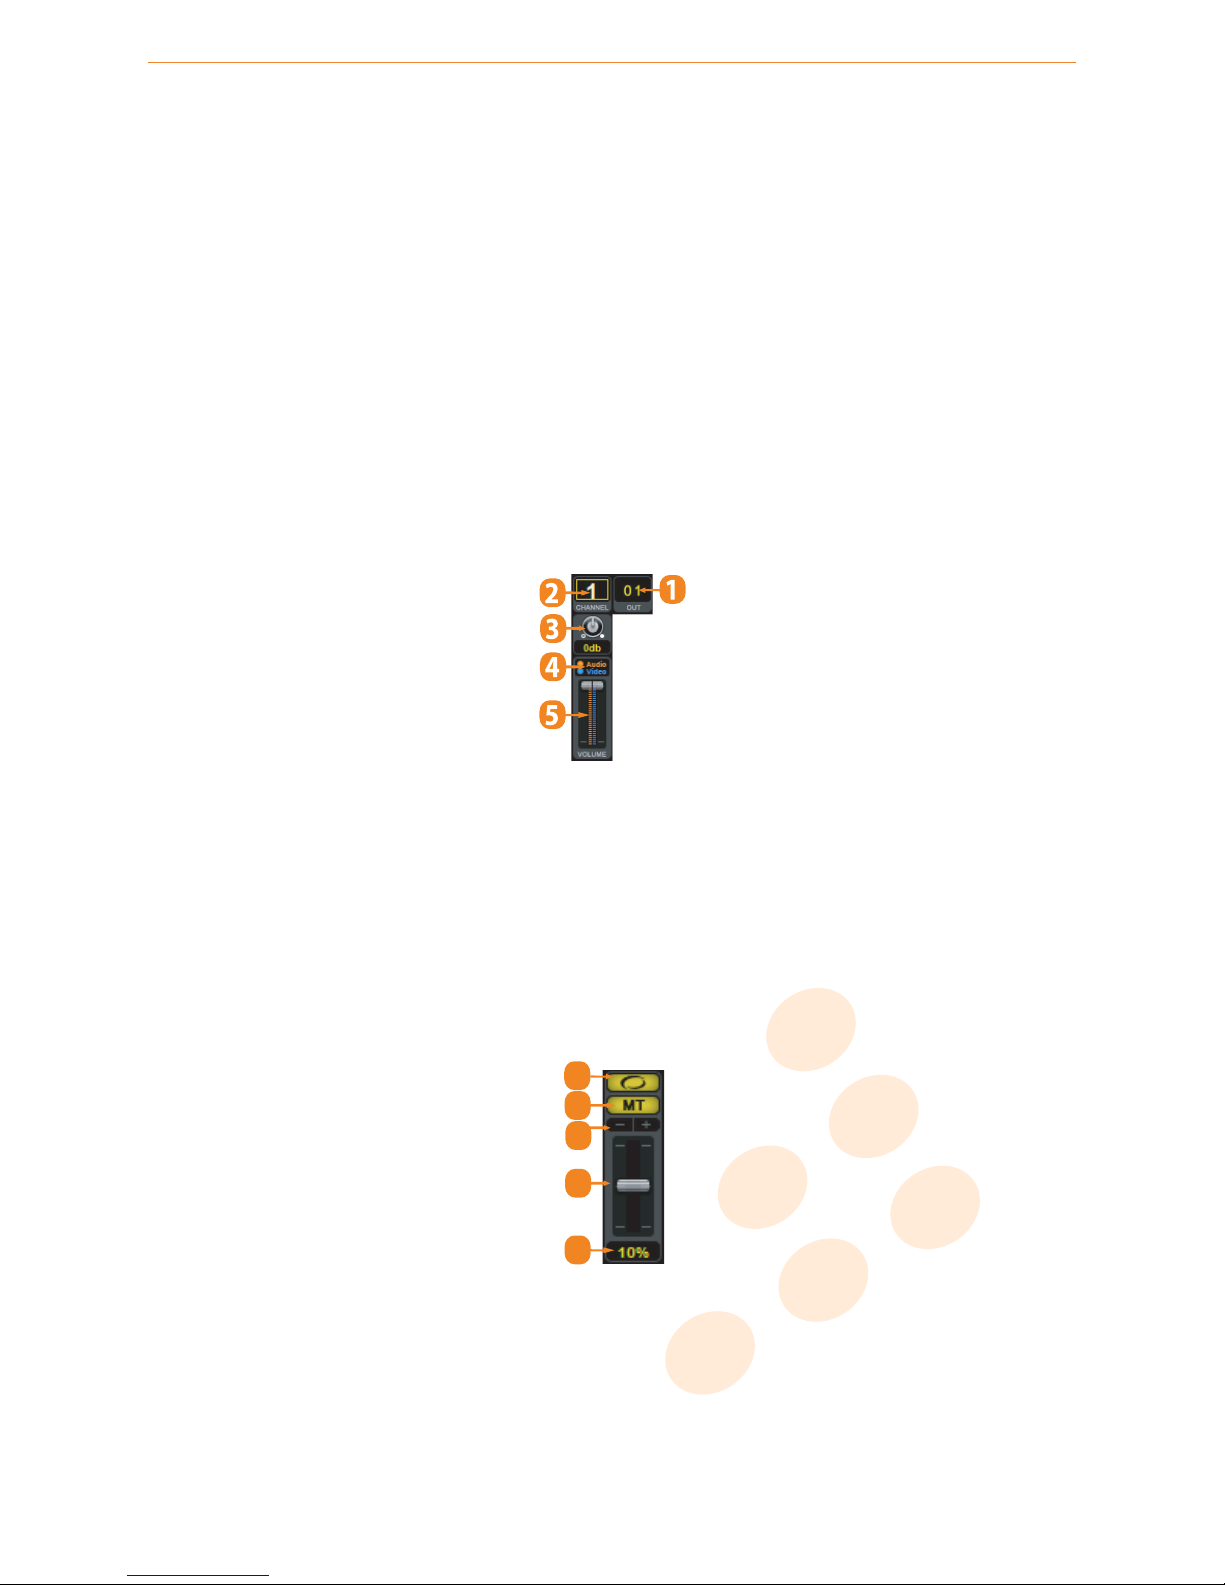
1
2
3
4
5 6
player2.pdf 09/11/2010 11:42:09
Transport controls
1 Cue/Stop
: If no Cue Point is assigned, or if the deck is paused, press Cue to set a Current Cue Point. While the media
is playing, press it again to skip back to the Current Cue Point and pause playback. You can hold down Cue to start
22 / 50
Page 23
vibe-watermark-bright.pdf 25/10/2010 17:41:48
6 Software user interface
playback from the Current Cue Point. Release it to skip back to the Current Cue Point and pause playback. You can hold
down Cue and Play/Pause simultaneously to start playback from the Current Cue Point. Release both buttons to allow
playback to continue.
2 Play/Pause: starts or pauses playback of a media file.
3 Reverse: reverses the media playback.
4 Absolute
: needle drop support. In this mode, the playback position of the control record/disc corresponds precisely to
the playback position of the audio file in the player. Use the Absolute mode when you want to use your turntable’s
tonearm (or the seek function on your CD) to skip through the track. If you are using CD decks, you can use their cueing
and looping capabilities as well.
5 Relative time
: needle drop support. In this mode, the playback position of the control record/disc does not correspond
to the playback position of the audio file in the player. Use the Relative Time mode when you want to use non-linear
functions like locations (loops, pitch bend, ffw/rew) and when you want to use your turntable’s tonearm (or the seek
function on your CD) to skip through the track.
6 All Relative
: no needle drop. In this mode, the playback position of the control record/disc does not correspond with
the playback position of the audio file in the player. Use the All Relative mode when you want to use non-linear functions
like locations (loops, pitch bend or ffw/rew).
6.2.2 Mixer Controls
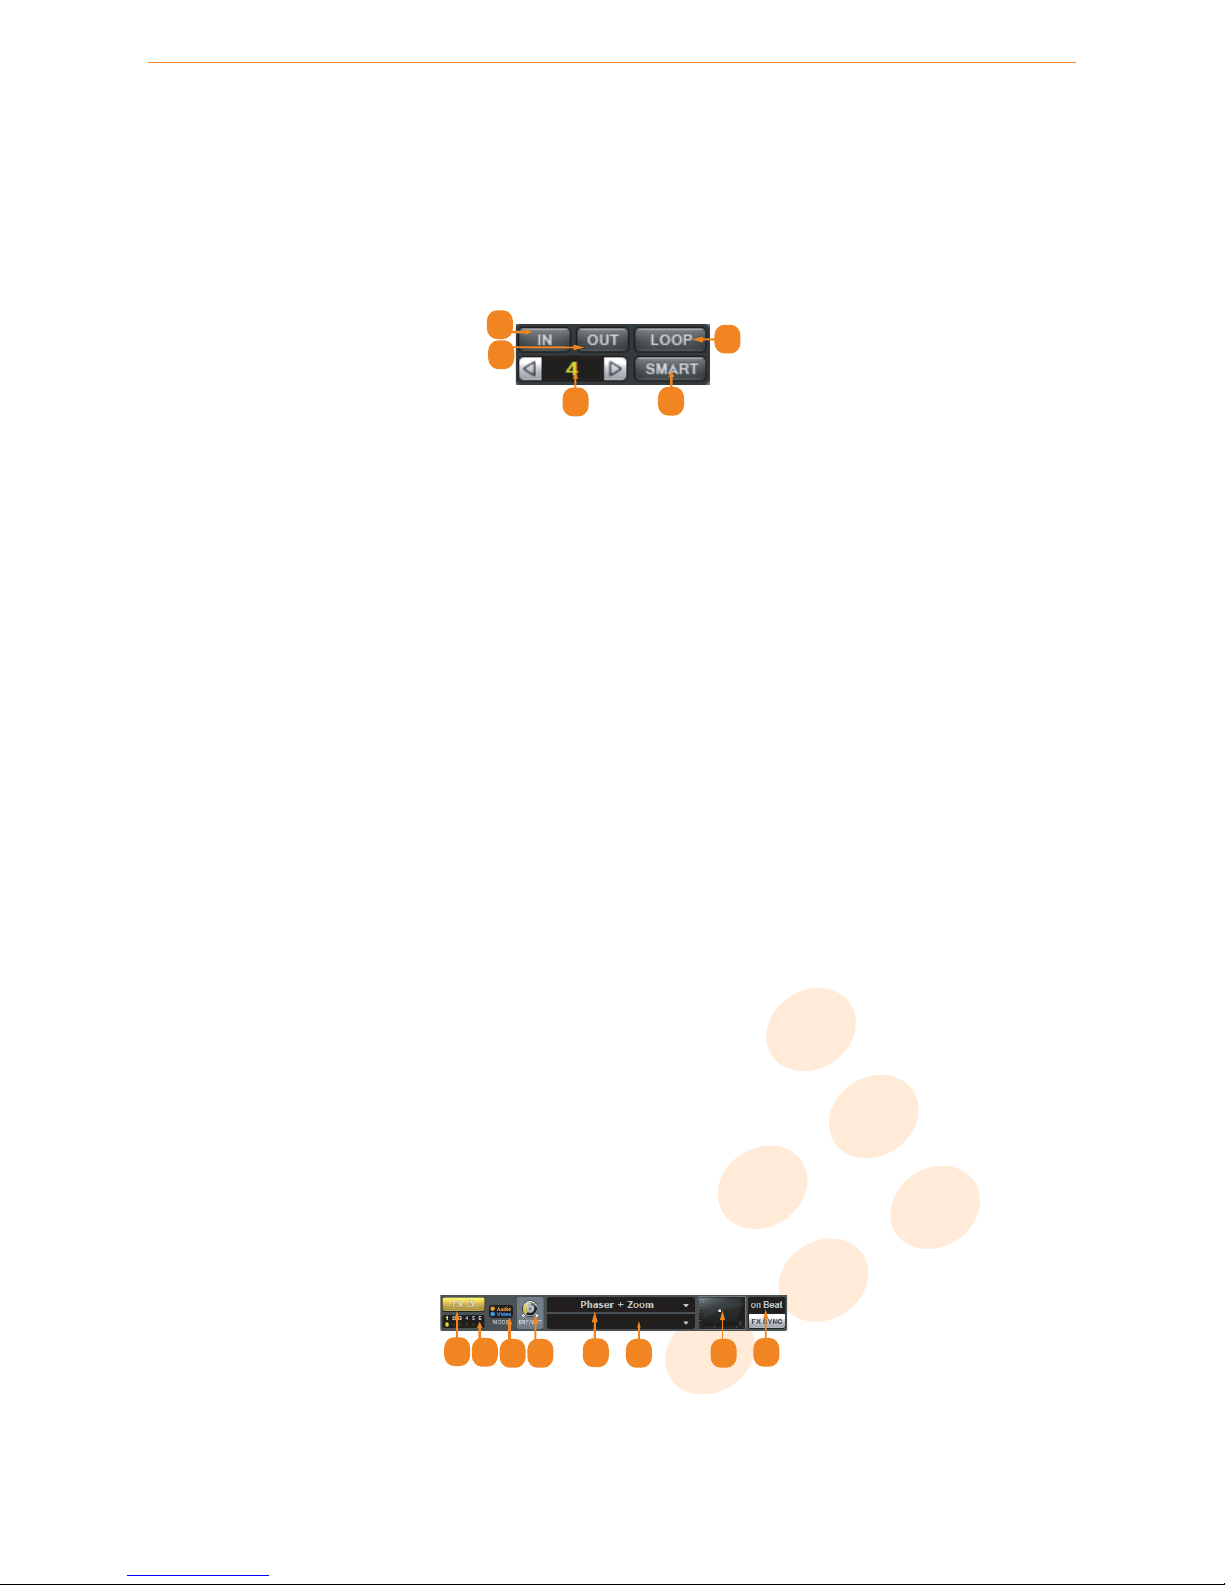
player3.pdf 09/11/2010 11:49:27
Mixer controls
1 Audio output: selects the audio output.
2 Channel: selects the active player.
3 Gain: adjusts the pre-fader, pre-EQ audio level of the corresponding channel.
4 Audio/Video mode: selects the volume fader mode (audio, video or audio+video).
5 Audio/Video volume: adjusts the players volume level (video, audio or video+audio).
6.2.3 Pitch Controls
1
2
3
4
5
Pitch controls
1 Vinyl on/off
: while a track is playing with this option turned on you can use the jog wheel to scratch your media, if this
button is off the jog wheel will allow you to change the speed.
2 Master Tempo On/Off
: selects Speed or Master Tempo. Note: If Speed mode has been selected you can adjust the
pitch like with a normal turntable; If the Master Tempo mode has been activated it is possible to change the pitch via the
pitch fader without influencing the tone pitch. This means that the song’s tonal key remains the same while changing
its speed.
23 / 50
Page 24
vibe-watermark-bright.pdf 25/10/2010 17:41:48
6 Software user interface
3 Pitch bend
: temporarily alters the speed of the playing media. When released, the media playback will return to the
speed designated by the pitch slider.
4 Pitch slider: changes the speed of the currently playing media.
5 Pitch range
: sets the range of the Pitch slider. Click on it to change it between 6%, 10%, 16% and 100%. This allows
greater sensitivity of the slider by reducing its range.
6.2.4 Loop Controls
1
2
3
4
5
player5.pdf 09/11/2010 11:57:13
Loop controls
1 Beat -/+: selects the number of beats used to create an automatic loop.
2 Smart: activates/deactivates the loop smart mode.
3 Loop in:
• If Smart is disabled (when using manual loops)
• If no loop was defined: sets the entry point of a manual loop.
• If a loop was defined: goes back to the loop entry point.
• If Smart is enabled (when using automatic loops)
• If no loop was defined: nothing will happen.
• If a loop was defined: goes back to the loop entry point.
4 Loop out:
• If Smart is disabled (when using manual loops)
•
If no loop was defined: sets the exit point of a manual loop. Activate ‘Loop assist’ in the Options menu if you
want the out point to be relative to the entry point and the BPM.
• If a loop was defined: sets again the exit point of a manual loop.
• If Smart is enabled (when using automatic loops)
• If no loop was defined: nothing will happen.
• If a loop was defined: cuts the loop interval by half.
5 Loop:
• If Smart is disabled (when using manual loops)
• If no loop was defined: nothing will happen.
• If a loop was defined: disables the loop or goes back and activates the last loop.
• If Smart is enabled (when using automatic loops)
•
If no loop was defined: activates automatically a BPM synchronized loop whose size depends on the previously
set number of beats. When the automatic loop function is switched on, the button flashes.
• If a loop was defined: disables the loop.
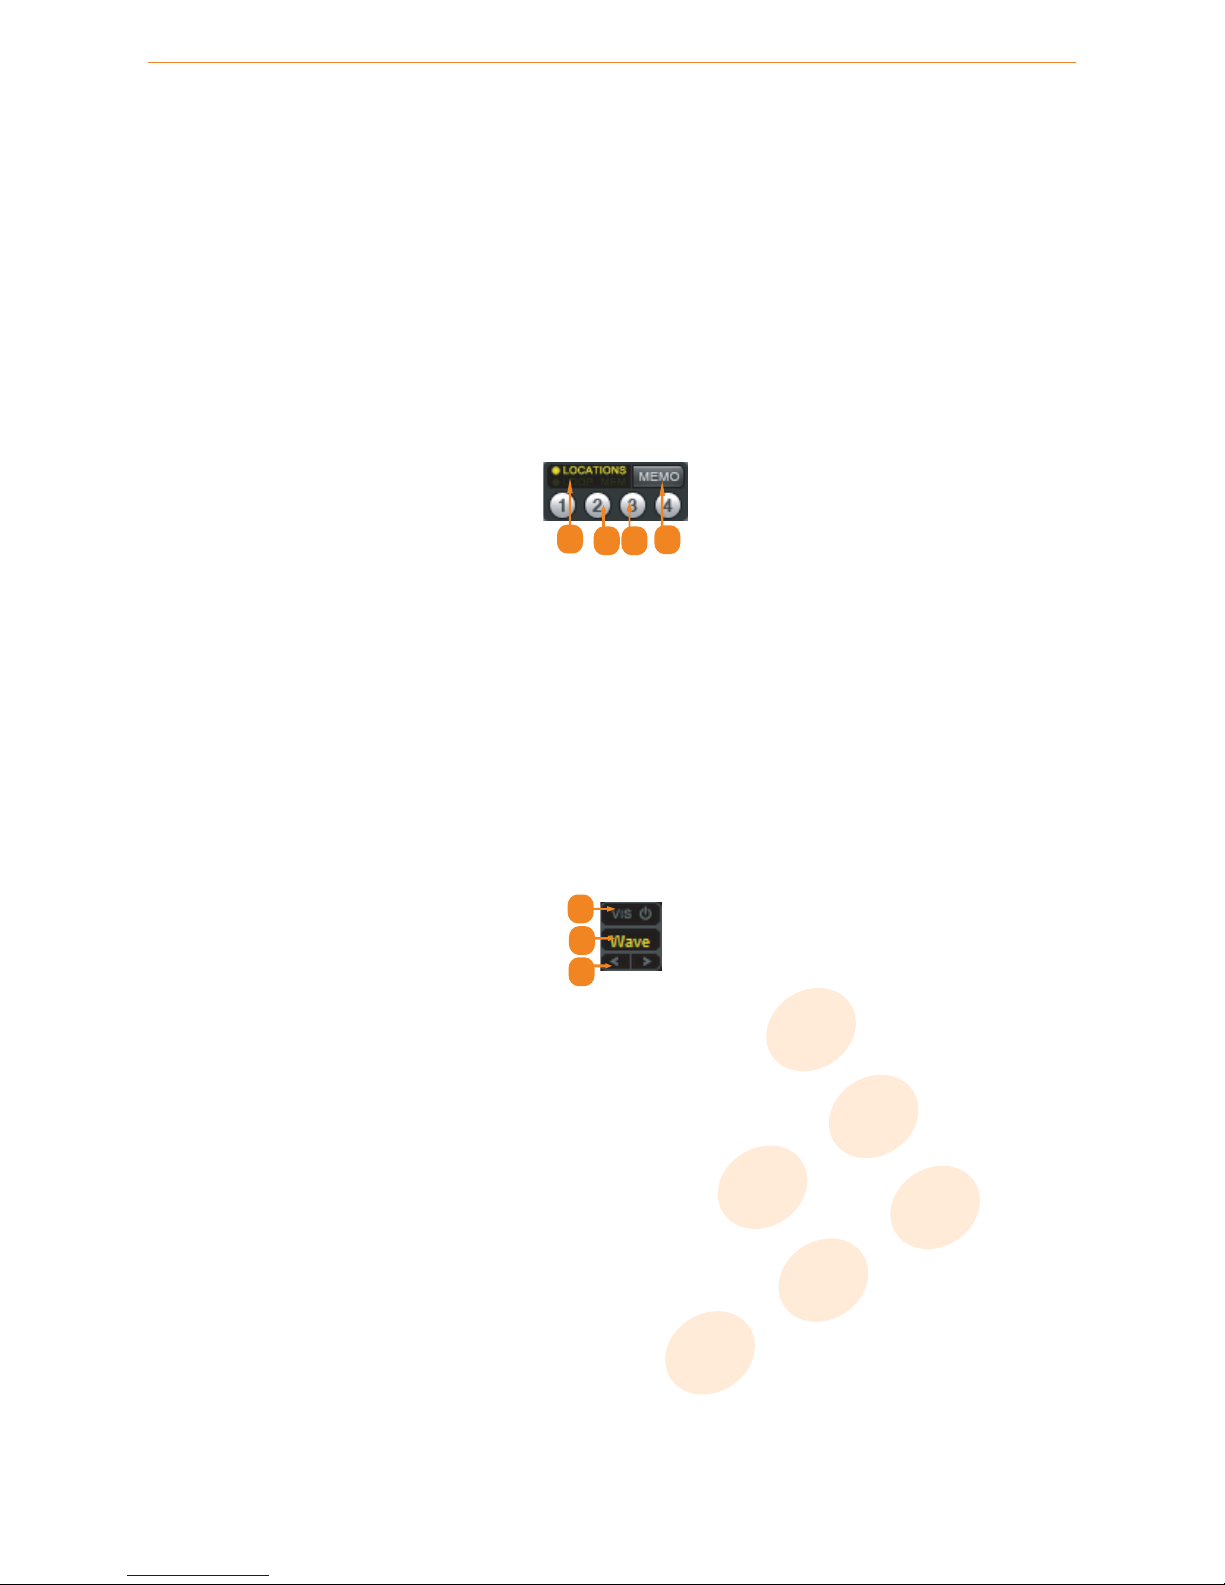
6.2.5 Effect Controls
1
2
3
4
5
6
7
8
player6.pdf 09/11/2010 12:03:43
Effect controls
1 Effect On/Off: activates/deactivates the effect.
2 Active effect: shows the selected active effect.
24 / 50
Page 25
vibe-watermark-bright.pdf 25/10/2010 17:41:48
6 Software user interface
3 Effect mode: shows the effect mode (audio, video or audio+video).
4 Effect dry/wet : adjusts the effect volume.
5 Current selected effect: shows the current selected effect.
6 Current selected preset: shows the current selected preset.
7 Effect parameters
: allows you to control over the current effect parameters. The adjustment will depend on the
effect selected.
8 FX sync : defines the effect synchronization:
• none : no synchronization.
• on Beat: synchronizes the parameters on the music’s energy (like speakers movement).
• T:1/4, T:1/2 etc : synchronizes the parameters on the BPM.
6.2.6 Memory Controls
1
2
3
4
player7.pdf 09/11/2010 12:06:30
Memory controls
1 Select Locations/Loop memory: switches between the commands of the locations and the loop memory.
2 Memo: switches the function of the memory buttons between record and call.
3 Locations
: defines and reaches several location points (hot cues) in the media being played. To save a location point,
push a location button. To go to a location point, push a previously saved location button again.
4 Loop memory
: memorizes several loops by media and returns to them. To memorize a loop, simply create a loop
manually or automatically then press the appropriate memorized loop button. To return to the start of a memorized
loop, press the appropriate memorized loop button again.
6.2.7 Visualization Controls
1
2
3
player8.pdf 09/11/2010 12:09:03
Generator controls
1 Visualization On/Off
: shows/hides a visualization (Wave, Color particles, Vinyl, Disco-Ball, Vu-Meter, etc...) rather
than the video being played. You can also activate a visualization while playing an audio file (to add a BPM-synchronized
animation).
2 Current selected visualization: shows the current selected visualization.
3 Select visualization: selects the visualization.
25 / 50
Page 26
vibe-watermark-bright.pdf 25/10/2010 17:41:48
6 Software user interface
6.3 Integrated Mixer
Mixer
6.3.1 Main video output view
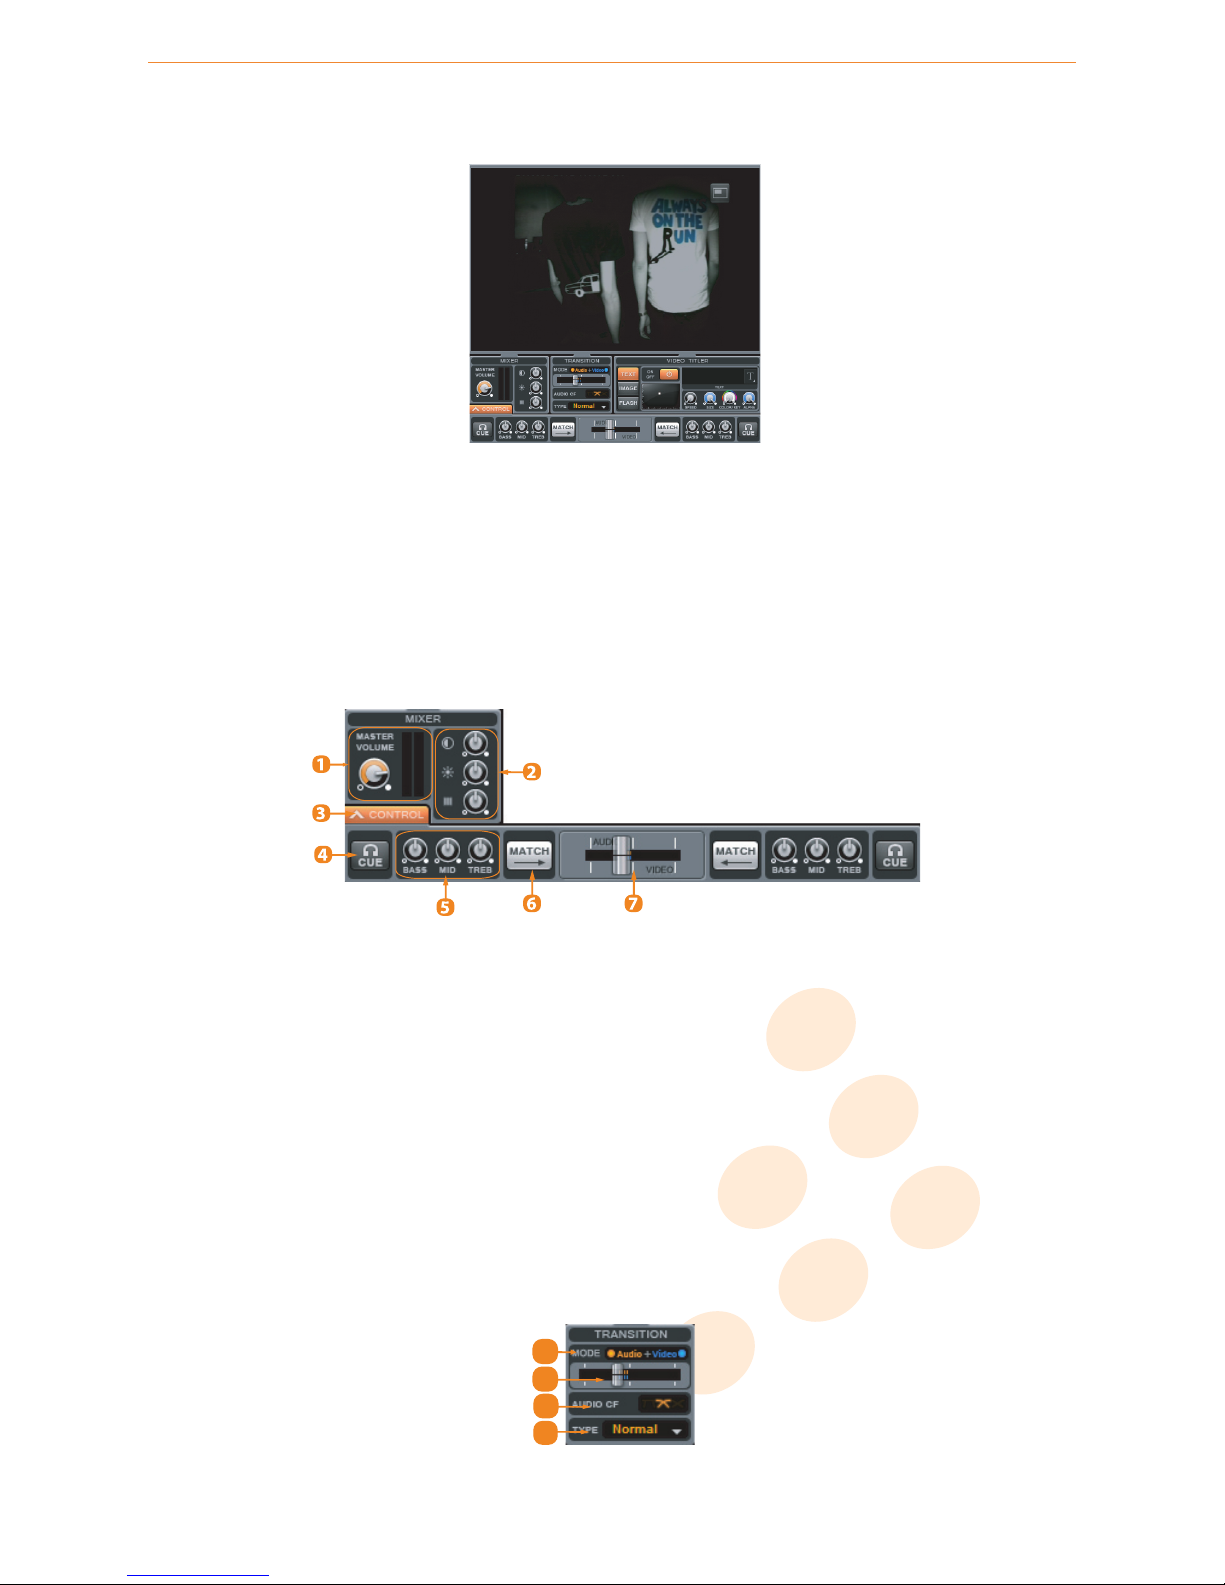
This view displays the main monitor output window. You can open it by double-clicking this display. If one monitor is used, a
pop up window asks for confirmation. If two monitors are used, the video window is placed on the second. To switch from full
screen to window display, you need to double-click again on the mixer view.
6.3.2 Mixer
Mixer
1 Master volume
: sets the master of your audio signal (audio output 1). To avoid saturation, check the audio signal
view.
2 Image parameters: enables you to set the contrast, brightness and saturation of your images.
3 Open/Close extended controls: opens or closes the extended controls.
4 Cue/Monitor: sends the corresponding deck to the headphones mix.
5 Equalization
: a 3-band equalizer is available to modify the equalization of your media file. Treble, medium and bass
can be adjusted with these knobs.
6 Match: synchronizes the BPM with the adjacent player.
7 Crossfader
: this component’s function is identical to the traditional crossfader on an analog DJ mixer. It is used to
balance the mix (audio, video or audio+video) of the 2 media files.
6.3.3 Transition
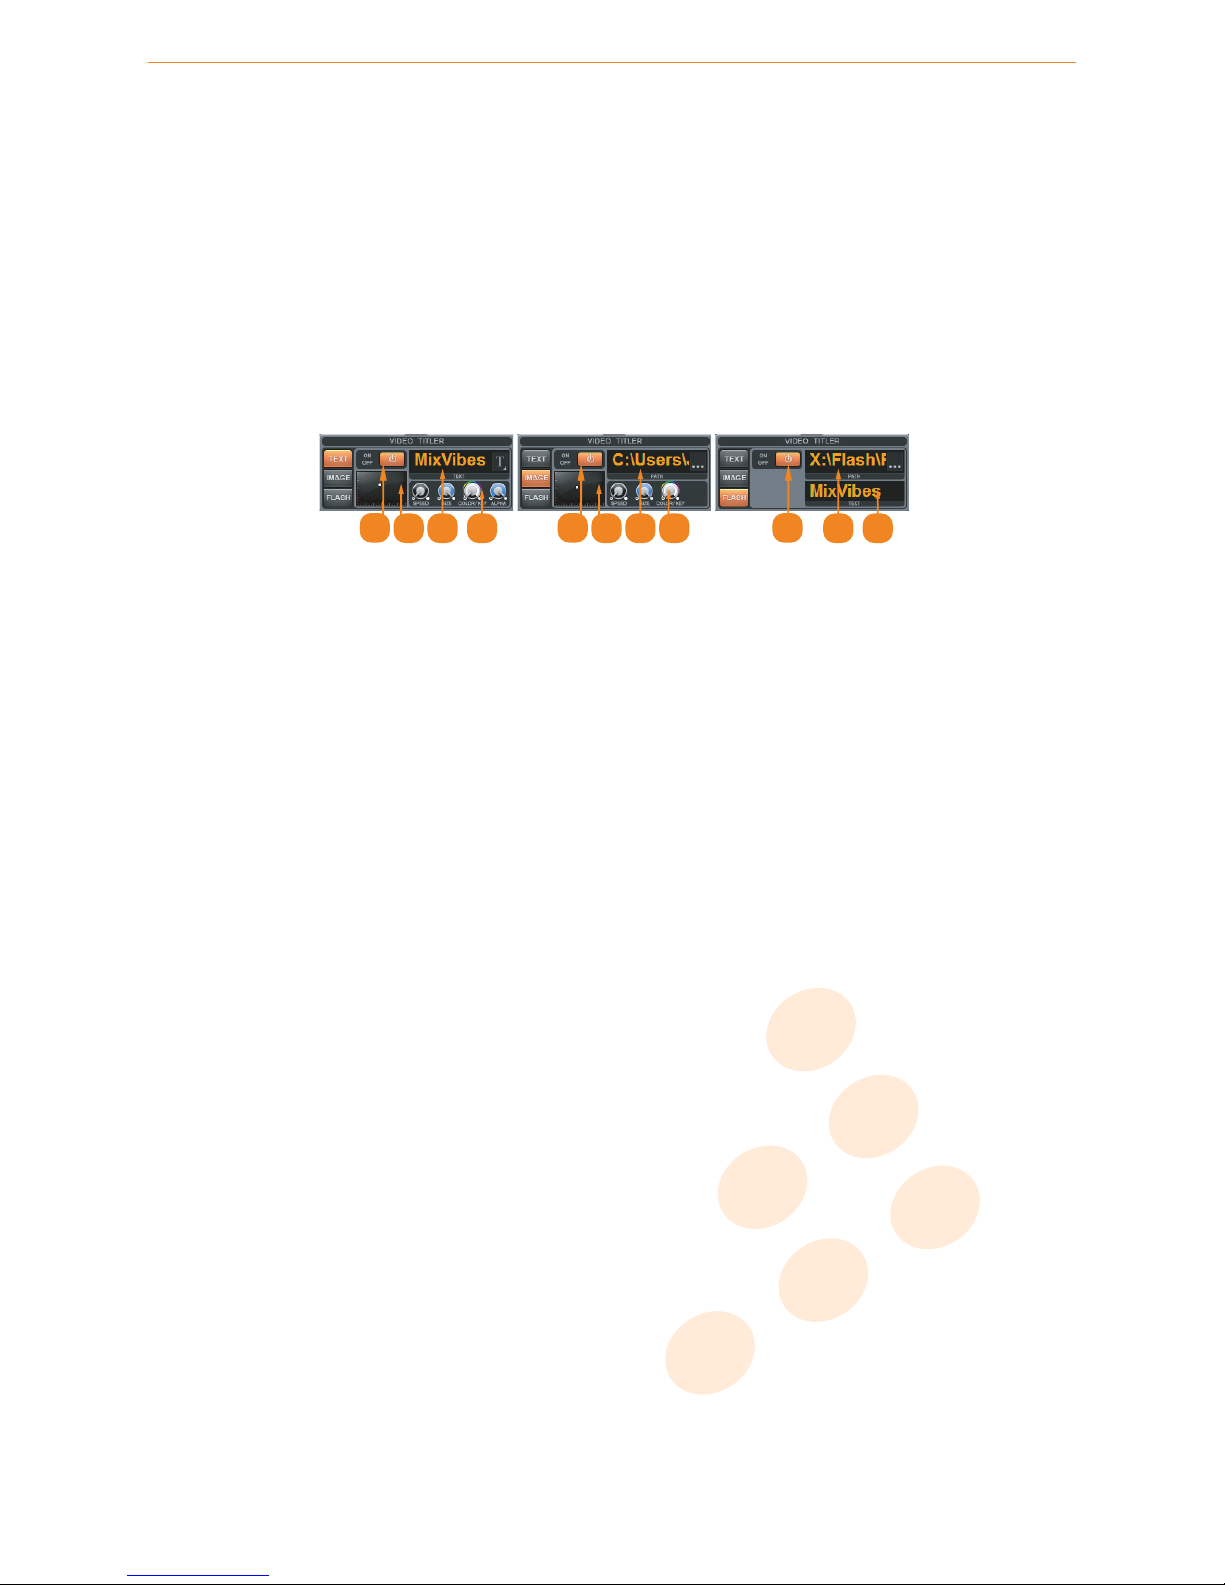
1
2
3
4
Transition
26 / 50
Page 27
vibe-watermark-bright.pdf 25/10/2010 17:41:48
6 Software user interface
1 Mode
: selects and synchronizes the crossfader and players faders mode (audio, video or audio+video). To not
synchronize the crossfader mode with the players’ mode, go to [Options/Preferences/Video] and uncheck ’Synchronize
crossfader AV mode with players’.
2 Crossfader
: this component’s function is identical to the traditional crossfader on an analog DJ mixer. It is used to
balance the mix (audio, video or audio+video) of the 2 media files.
3 Audio CF
: selects the audio crossfader curve. Linear is especially practical for long mixes. Cut is especially practical
for scratching and cutting.
4 Type: selects the crossfader video transition mode.
6.3.4 Video titler
This tool enables you to add text, images and flash files to the main output window. Feel free to use the configured keyboard
shortcuts to control the video titler.
1
2 3 4
1
2 3 4
1
2 3
Text titler / Image titler / Flash titler
Text titler
1 Text on/off: shows/hides the text in the main output window.
2 Pad: moves the text position in the main output window.
3 Text box
: enter a text then press [Enter] with your keyboard. You can change the font theme by clicking on the ’T’ icon.
4 Text parameters:
• speed: adjusts the scrolling speed.
• size: adjusts the text size.
• color: modifies the text color (based on the chromatic wheel: minimum = white, maximum = black).
• alpha: modifies the transparency.
Image titler
1 Image on/off: shows/hides the image in the main output window.
2 Pad: moves the image position in the main output window.
3 Image box
: select an image. Click on the
’...’
icon to choose an image. MIXVIBES VFX supports PNG format with
transparency (recommended) but also BMP, GIF, JPEG formats.
4 Image parameters:
• speed: adjusts the scrolling speed.
• size: adjusts the image size.
• color: use the color to set a transparent area: white/black background images are recommended.
Flash titler
1 Flash on/off: shows/hides the flash animation in the main output window.
2 Path box: select a flash file. Click on the ’...’ icon to choose a ’classic’ flash or a ’text’ flash.
3 Text box: if you use a ’text’ flash, you can enter a text in the text box to modify the flash ’text’, then press [Enter].
27 / 50
Page 28
vibe-watermark-bright.pdf 25/10/2010 17:41:48
6 Software user interface
6.4 The Crossfader rack
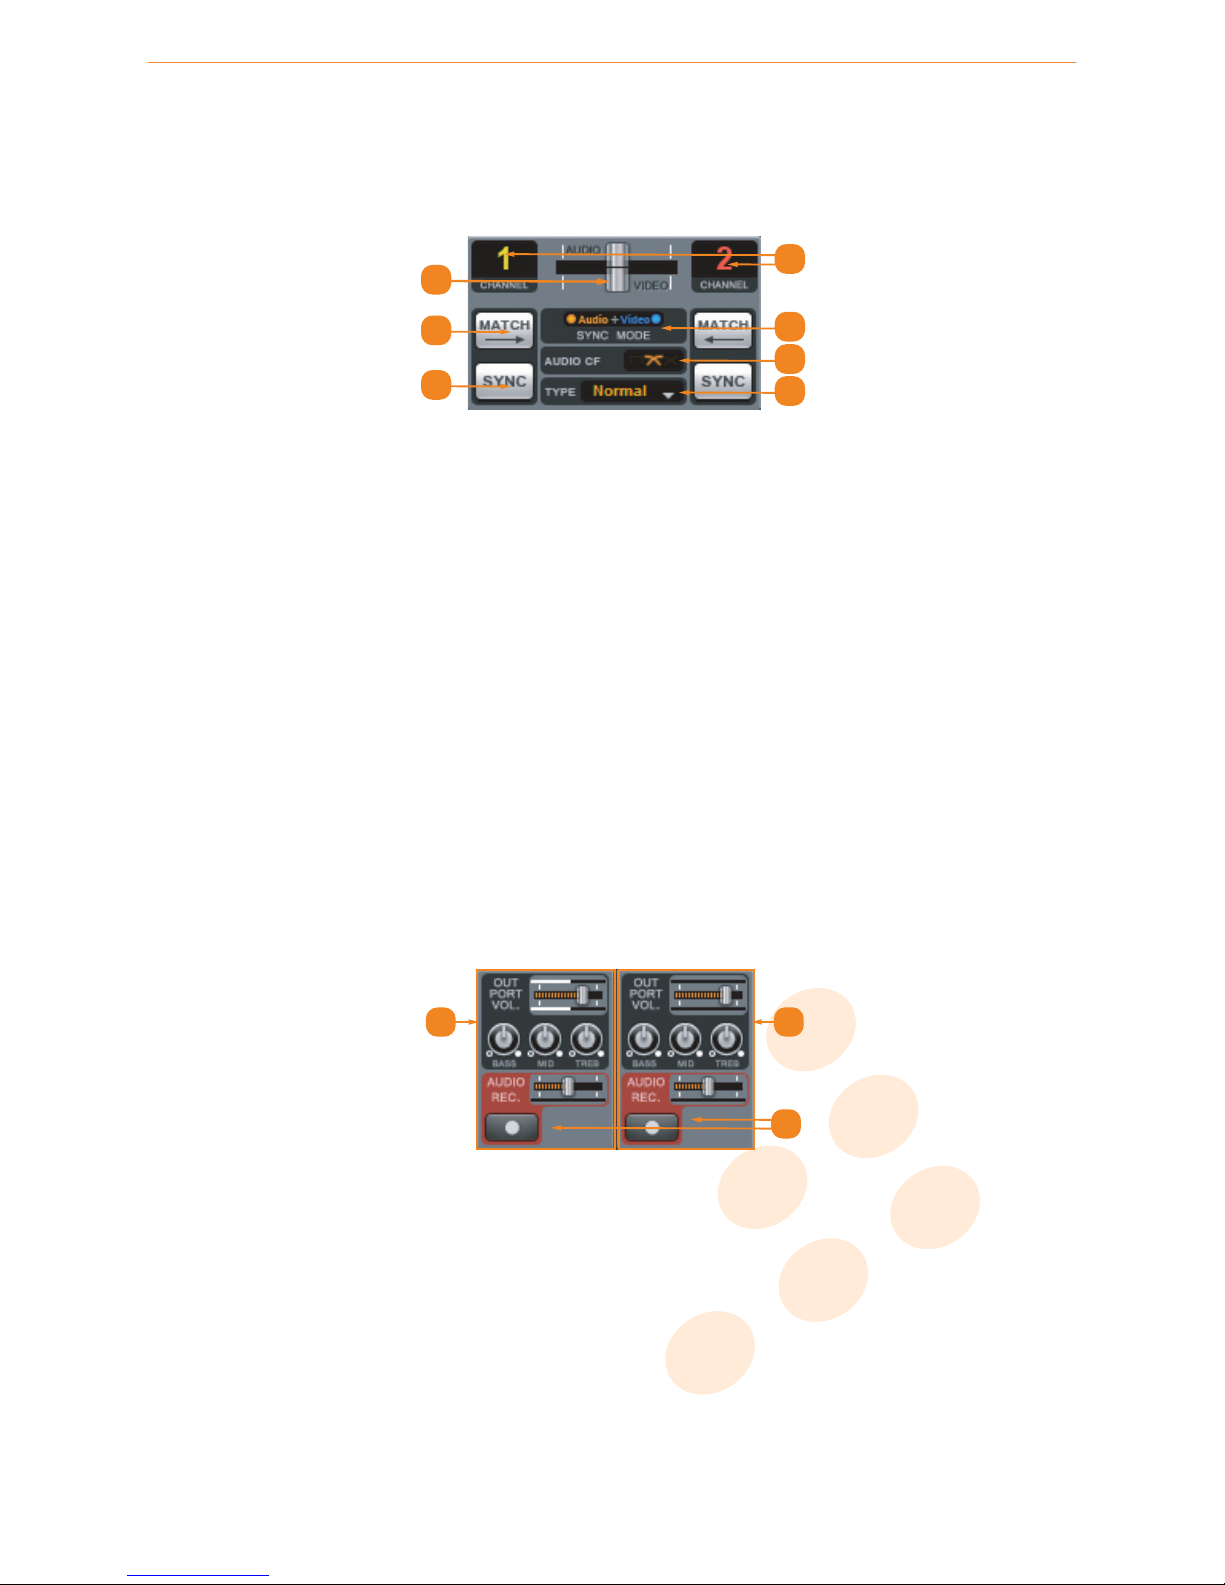
If you are using a DJ mixer connected to a multiple output audio interface, you will not need to use the MIXVIBES VFX
crossfader. You can use your mixer’s crossfader for direct control. Note: The crossfader of your mixer does not work to control
VFX (except if it is used in MIDI and mapped in VFX).
1
2
3
4
5
6
7
Crossfader
1 Crossfader
: this component’s function is identical to the traditional crossfader on an analog DJ mixe. It is used to
balance the mix (audio, video or audio+video) of the 2 media files.
2 Match
: matches the BPM of one Player to the other. Click on the right-hand match button to match the BPM of Player B
with Player A. Alternately click on the left-hand match button and this will match the BPM of Player A with Player B.
3 Sync
: synchronizes the BPM and beat of one Player to the other. Click on the right-hand sync button to sync the Player
B with Player A. Alternatively click on the left-hand match button and this will sync the Player A with Player B. This tool
gives access in one click to two of the DJs usual tasks. It combines beat matching and synchronization of 2 media files.
4 Channel: assigns a channel to either right or left side of the crossfader.
5 Sync Mode
: selects and synchronizes the crossfader and players faders mode (audio, video or audio+video). To not
synchronize the crossfader mode with the players’ mode, go to [Options/Preferences/Video] and uncheck ’Synchronize
crossfader AV mode with players’.
6 Audio CF
: selects the audio crossfader curve. Linear is especially practical for long mixes. Cut is especially practical
for scratching and cutting.
7 Type: selects the crossfader video transition mode.
6.5 The Main Volume / Record rack
The screenshot above shows how the Main volume / Record rack looks with two stereo outputs.
1
2
3
Main Volume/Record
6.5.1 Stand alone setup / External audio interface setup
With two stereo outputs, this rack controls the master and the monitor volume.
1 Master
: the master rack is a tool used to master your audio signal. To avoid saturation, check the audio signal view. If
the signal is saturated you must change your settings in the Master volume section or Equalizer/mixer section.
2 Monitor: the monitor rack is a tool used to preview your audio signal.
3 Recording
: records your mix in WAV format. Click the button in the volume rack of your choice and designate the
name and directory for the recording. The recording is active at once! Click again to stop the recording. Keep an eye on
the Record output vu-meter to make sure the recording does not saturate!
28 / 50
Page 29

vibe-watermark-bright.pdf 25/10/2010 17:41:48
6 Software user interface
6.5.2 External mixer setup / External mixer and external audio interface setup
With two stereo outputs, this rack controls the output volume of players A and B.
1 Player A output
: the main volume rack is a tool used to master your player A audio signal. To avoid saturation,
check the audio signal view. If the signal is saturated you must change your settings in the Master volume section or
Equalizer/mixer section.
2 Player B output
: the main volume rack is a tool used to master your player B audio signal. To avoid saturation,
check the audio signal view. If the signal is saturated you must change your settings in the Master volume section or
Equalizer/mixer section.
3 Recording
: records your mix in WAV format. Click the button in the volume rack of your choice and designate the
name and directory for the recording. The recording is active at once! Click again to stop the recording. Keep an eye on
the Record output vu-meter to make sure the recording does not saturate!
6.6 The Mix rack
This tool enables you to control visually that the media files are in sync. Indeed the peaks represent a sound increase and
usually correspond to the beat of a track. When two media files are in sync, the peaks are simultaneous. The player B peaks
are displayed in the lower part, while the player A beats are displayed above.
1
432
Mix
1 Zoom : zooms in and out.
2 Beat : displays the beats. When two media files are in sync, their beats and peak are running simultaneously.
3 Bar : displays the bars.
4 Sync : chooses between three different synchronization modes:
• Tempo : automatic synchronization based on the music’s energy.
• Beat : beats synchronization.
• Bar : bars synchronization.
6.7 The Video Mixer rack
1 2
Video Mixer
1 Main video output view
: displays the main monitor output window. You can launch it by double-clicking this display.
If one monitor is used, a pop-up window asks for confirmation. If two monitors are used, the video window is placed on
the second one. To switch from full screen to window display, you need to double-click again on the mixer view. If you
use the VFX+mixer skin, this rack does not display the main monitor output window.
2 Image parameters: sets image contrast, brightness and saturation of your images.
29 / 50
Page 30

vibe-watermark-bright.pdf 25/10/2010 17:41:48
6 Software user interface
6.8 The Video Titler rack
This tool enables you to add text, images and flash files to the main output window. Feel free to use the configured keyboard
shortcuts to control the video titler.
1
2 3 4
1
2 3 4
1
2 3 4
Text titler / Image titler / Flash titler
6.8.1 Text titler
First choose the ’text’ button.
1 Text on/off: shows/hides the text in the main output window.
2 Text box
: enter a text then press [Enter] with your keyboard. You can change the font theme by clicking on the ’T’ icon.
3 Pad: moves the text position within the main output window.
4 Text parameters:
• speed: adjusts the scrolling speed.
• size: adjusts the text size.
• color: modifies the text color (based on the chromatic wheel: minimum = white, maximum = black).
• alpha: modifies the transparency.
6.8.2 Image titler
First choose the ’image’ button.
1 Image on/off: shows/hides the image in the main output window.
2 Image box
: select an image. Click on the
’...’
icon to choose an image. MIXVIBES VFX supports PNG format with
transparency (recommended) but also BMP, GIF, JPEG formats.
3 Pad: moves the image position in the main output window.
4 Image parameters:
• speed: adjusts the scrolling speed.
• size: adjusts the image size.
• color: use the color to set transparent area: white/black background images are recommended.
6.8.3 Flash titler
First choose the ’flash’ button.
1 Flash on/off: shows/hides the flash animation in the main output window.
2 Path box: select a flash file. Click on the ’...’ icon to choose a ’classic’ flash or a ’text’ flash.
3 Text box: if you use a ’text’ flash, you can enter a text in the text box to modify the flash ’text’ then press [Enter].
30 / 50
Page 31
vibe-watermark-bright.pdf 25/10/2010 17:41:48
6 Software user interface
6.9 Audio Sampler
6.9.1 Sampler control
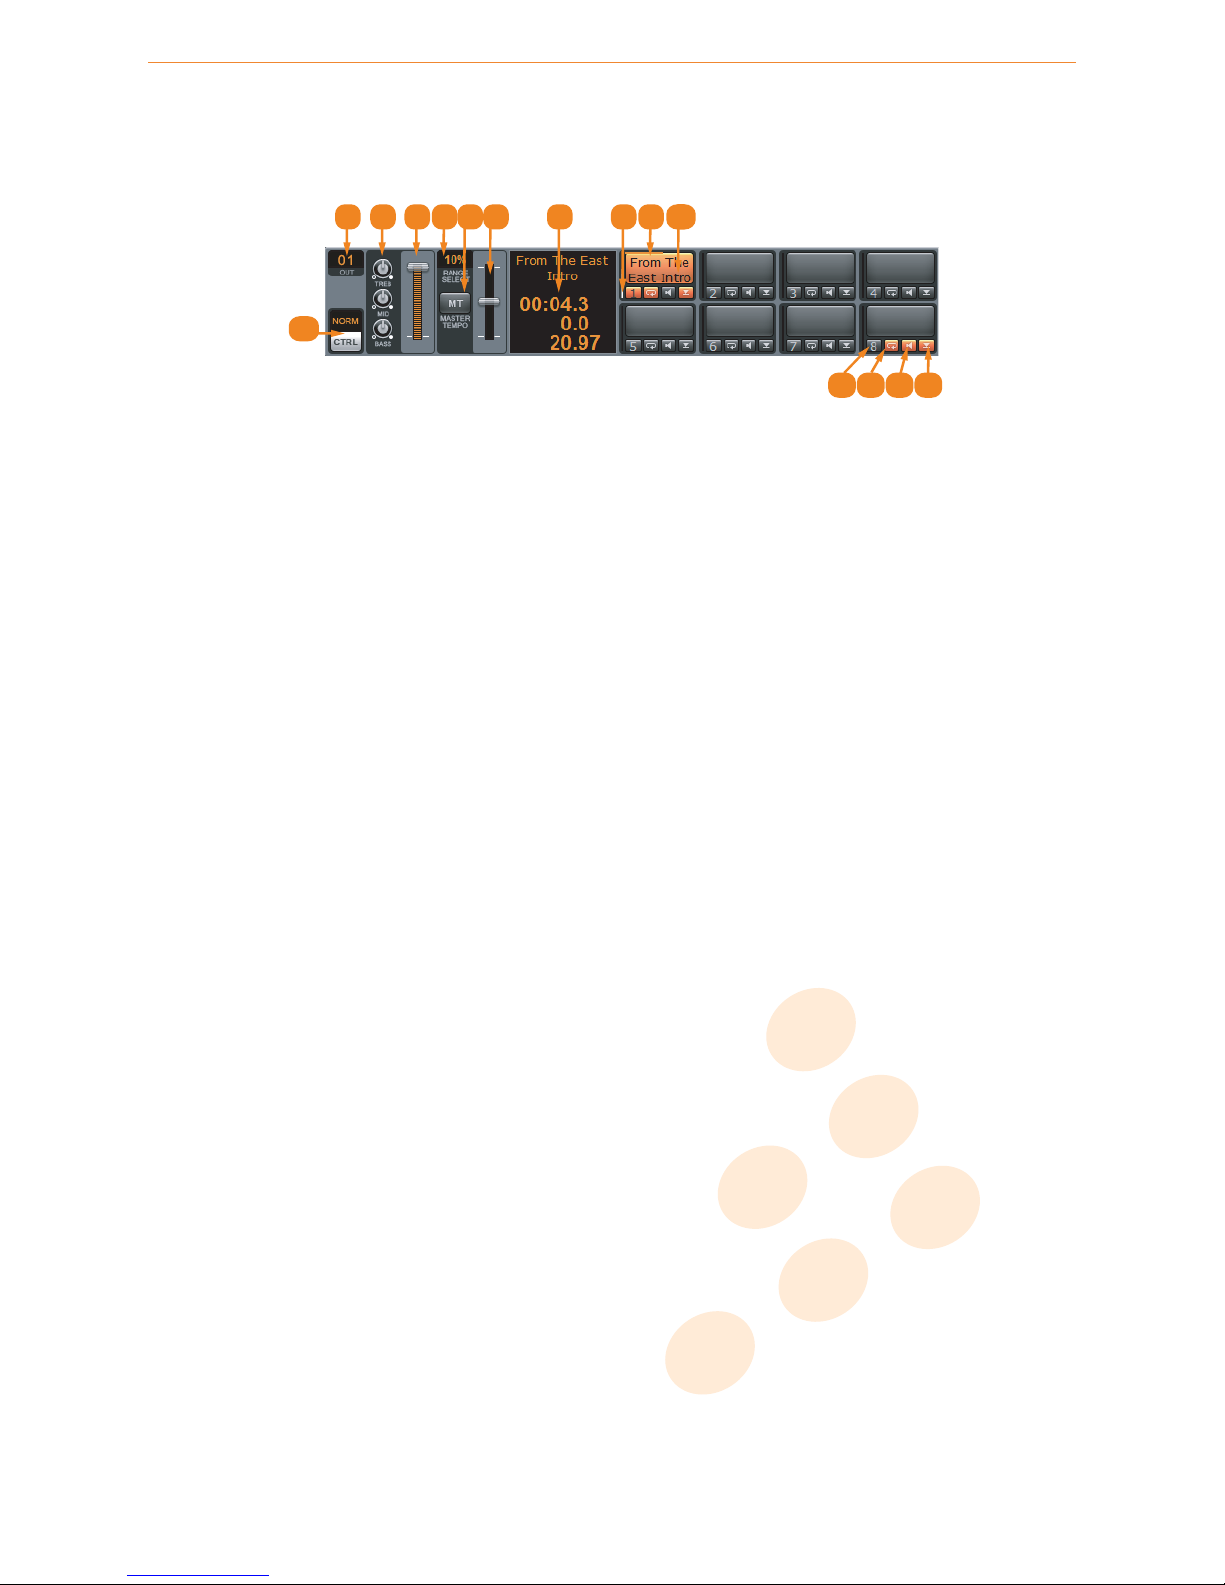
1 2 3 4 5 6 7 8 9 10
11
12131415
Sampler
1 Output: sets the output the sample will be played through (either 1 or 2) depending on the number of audio outputs.
2 Equalization: sets the equalization for the current active pad (Treble, Middle and Bass).
3 Pad Volume: sets the volume of the active pad. You can set a different volume for each pad.
4 Pitch range
: sets the range of the pitch slider. Click on it to change it between 6%, 10%, 16% and 100%. This allows
greater sensitivity of the slider by reducing its range.
5 Pitch mode selector: selects Speed or Master Tempo.
6 Pitch slider: changes the currently selected option: Speed or Master Tempo.
7 This window displays information about the active sample: Pitch, BPM, Artist name and song, time and total time.
8 Vu-meter: shows the pad output level.
9 Playback position: shows the playback position of the sample.
10 Pad
: left click your mouse button on the pad to play the sample. Right click the mouse button to stop the sample if the
Lock button is active. You can also drag and drop samples onto the sample pad.
11 Control mode: sets the play mode of the sampler pads:
• Norm: plays several samples together.
• All: plays all the samples at the same time.
• Solo: plays samples one by one.
• Row: plays several samples on the same column but only one per row.
• Col: plays several samples on the same row but only one per column.
12 Active Pad
: the active pad is displayed in orange. Click on this button in any of the 8 sample pads to make it the
active one (you can only have one active pad at a time).
13 Repeat: loops the sample.
14 Mute: mutes the sound against the active pad.
15 Hold
: when this option is active, the sample is played once in its entirety. If ’Hold’ is not active, clicking the pad will
only play while you hold the left mouse button down.
6.9.2 Loading samples
There are many ways to load a sample in the sampler:
• You can drag and drop a sample straight from your MediaView or Explorer onto a sampler pad.
• You can also sample directly from a media file that is loaded in your player. Indeed you can send a predefined sample
(entry/exit point) from your track to your sampler in real time (even while playback is active). There are multiple
methods to do so:
•
create a smart loop using the player loop function. Make sure the loop button is active before using this method.
•
position the playback to the entry point of your desired sample. Make sure loop is not active. Choose the desired
length in beat units of your sample (BEATLOOP section).
After you choose your method to define the sample length, click on the Send button to send the sample towards the
active sample pad.
31 / 50
Page 32
vibe-watermark-bright.pdf 25/10/2010 17:41:48
6 Software user interface
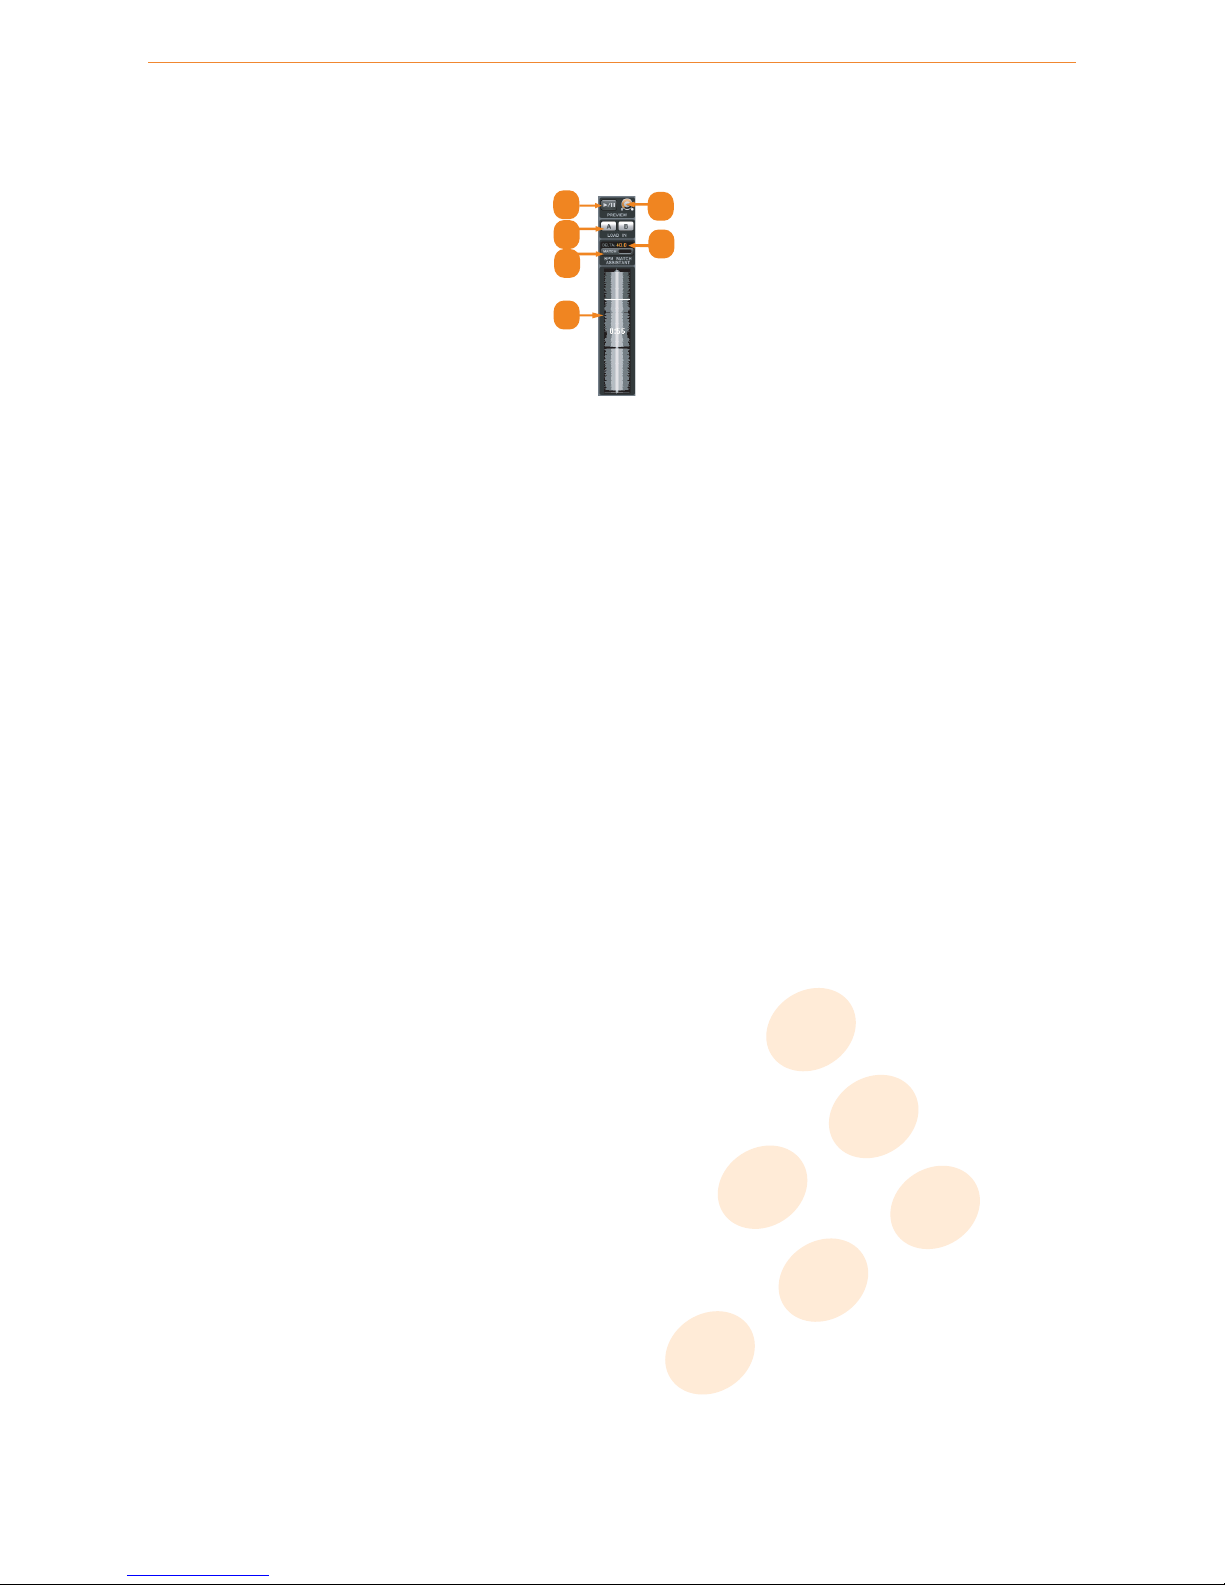
6.10 The Preview rack
The preview rack enables you to quickly preview and select media in the headphones without loading them into a player.
1
3
2
4
5
6
The Preview
1 Play/Pause: when in Play mode the preview rack will play the media currently selected in the MediaBase.
2 Preview volume: adjusts the volume of the headphones.
3 Load A/B
: loads selected media in the chosen player. The media is automatically loaded at its current position of the
preview. It is also matched with the player pointed by the crossfader if you previously clicked on Match.
4 BPM difference
: displays the difference between the BPM of the player pointed by the crossfader and the BPM of the
media being pre-listened.
5 Match: synchronizes the BPM of the media pre-listening and the BPM of the player pointed by the crossfader.
6 Search bar
: displays a waveform of the whole media. You can go to any point on the media by simply clicking on the
waveform.
If the Artwork column is showed in the MediaBase, you can see a video preview by clicking and moving the mouse pointer
over the artwork.
32 / 50
Page 33
vibe-watermark-bright.pdf 25/10/2010 17:41:48
7 Media management
To avoid losing time browsing for media files, MIXVIBES VFX proposes a selection of advanced media management features. To
improve your efficiency and organize your playlists efficiently, you must create one or many « MediaBases » (media libraries)
or « Playlists ». This will allow you to access media very easily without browsing with your Explorer through your hard drive.
7.1 MediaView
7.1.1 MediaBase
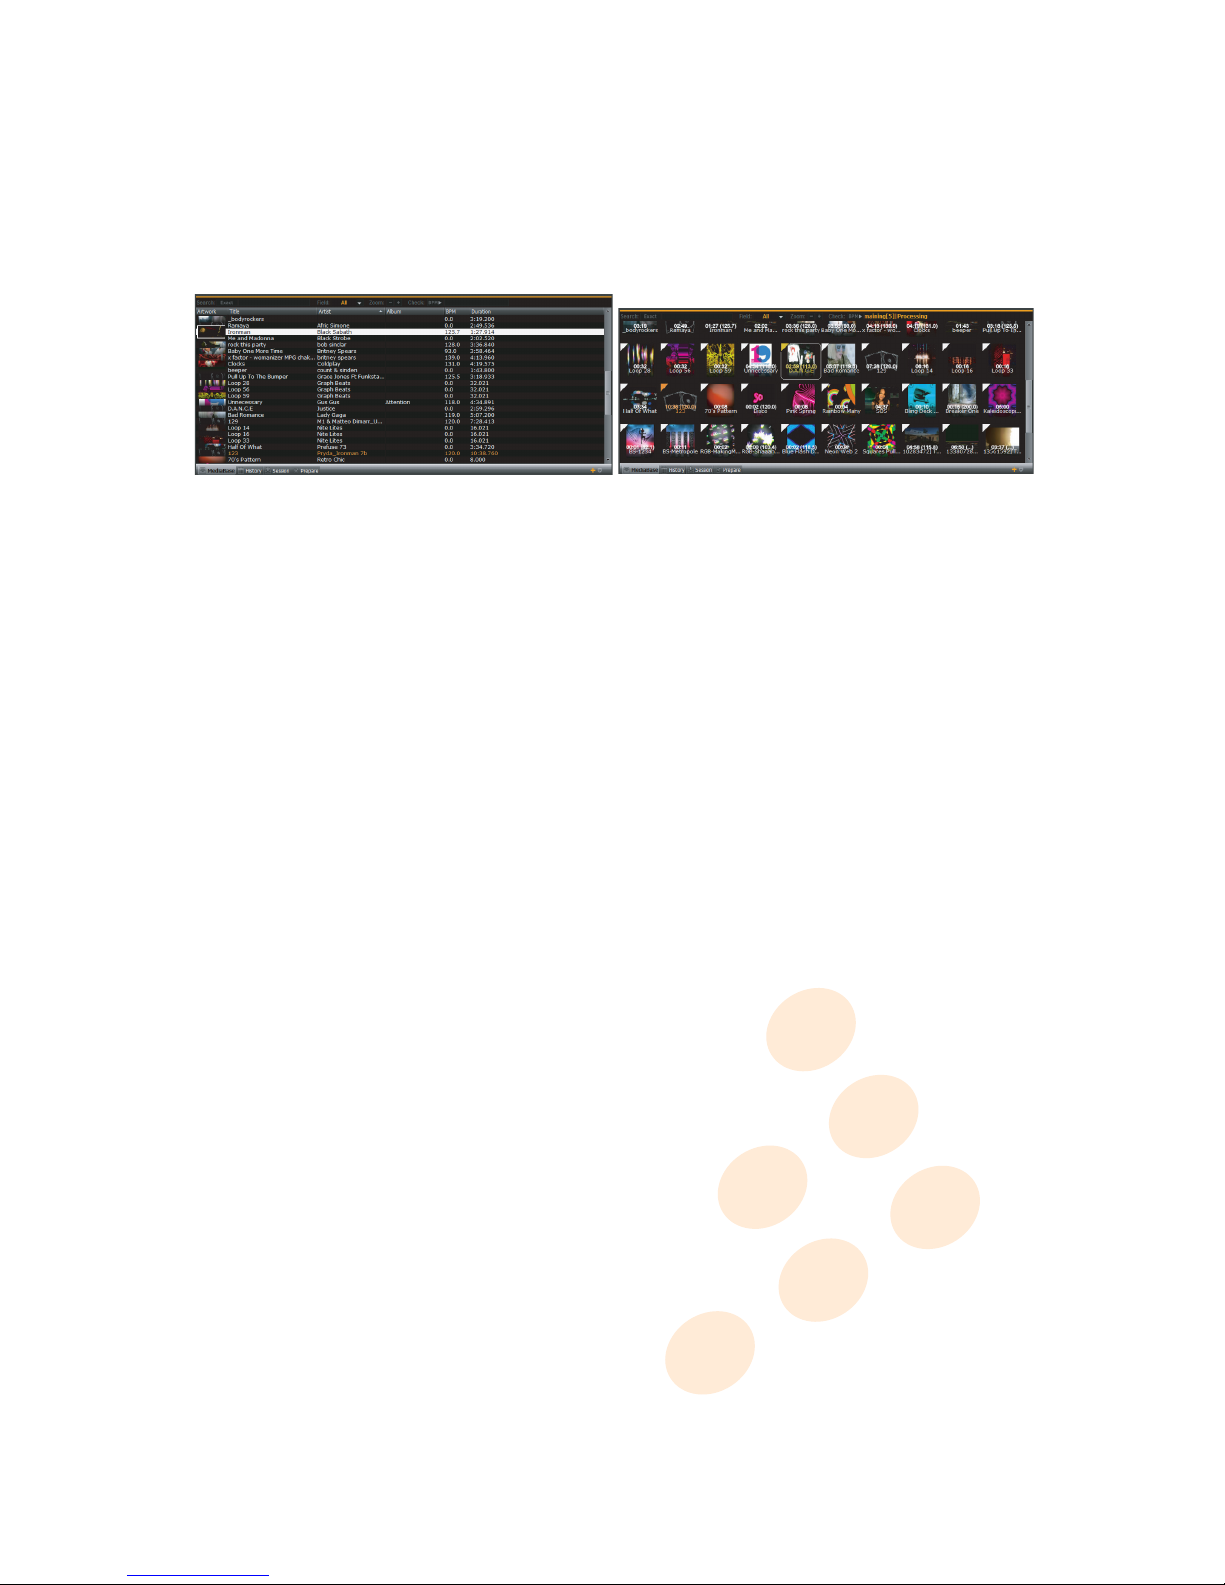
mediabase1.pdf 20/10/2010 14:48:14
mediabase2.pdf 20/10/2010 14:49:02
List and Grid views
The MediaBase is a selection of shortcuts pointing to your media files, making it easy to retrieve your tracks. Once you have
your whole MediaBase organized, you will find your media within seconds!
7.1.1.1 Add a file to the MediaBase
Simply, drag and drop your media files from the browser to the MediaBase. The media file information is automatically loaded
into the MediaBase. You can also add a complete directory to the MediaBase. To do so, right click on the desired folder in the
Explorer, then choose
Scan
to add all the files to the MediaBase or drag and drop the folder to the MediaBase. If you load a
media file straight from the Explorer to a MIXVIBES VFX player it will automatically be added into your MediaBase.
7.1.1.2 Manage the MediaBase
As previously mentioned, you can manage multiple MediaBases.
Create To create a new empty MediaBase you can click on New MediaBase in the File menu.
Save
Once you finished organizing your MediaBase, save it. To do so you can click on ’Save MediaBase’ in the File menu. If
you have not saved your MediaBase yet, a dialog box will pop-up upon shut down. Choose a name and directory to store your
MediaBase in VIBX format. Click Save to confirm. This file will not only store your MediaBase but also your players’ status and
your media’s cue points, locators and loops.
Load
To load an existing MediaBase, click on ’Open MediaBase’ in the File menu. A dialog box is then prompted. Select the
desired VIBX, VIB or MPX file and click on Open.
Sort
To find your media more easily you can sort your media following different parameters called Tags. Click on the desired
tag in the MediaBase, for example Album, to class the media alphabetically per album, click again to reverse the sorting from
increasing to decreasing classification.
A right click on a MediaBase column gives you access to column properties. You can select/uncheck the order in which columns
are displayed.
Modify a media tag
A right click on a media file gives you a range of choices. Choose ’Edit’ to access and modify the tag
properties of the file (track name, artist name, album name, etc). You can also edit a media tag by double-clicking on it.
7.1.1.3 Import your iTunes®, Windows® Media Player or Serato® libraries
If you use Apple iTunes®, Windows®Media Player or Serato®to sort your media files you can load your library straight into
MIXVIBES VFX. Click on ’Import library’ in the File menu. All the referenced media are then loaded into the MediaBase as well.
The iTunes®playlists appear as groups in the Selection window. This is just an import function, the modification to the tags
made in MIXVIBES VFX will not be recognized by iTunes®, Windows® Media Player or Serato® .
33 / 50
Page 34

vibe-watermark-bright.pdf 25/10/2010 17:41:48
7 Media management
7.1.1.4 Control bar
MediaBase control bar
Media Search (Search filter)
Once you have created a large MediaBase in MIXVIBES VFX, the fastest way to access media
is through the Media Search box.
Click on the ’Exact Search’ button to activate/deactivate the option. Once active, only the media that matches precisely the
typed information will be prompted.
The Field criteria list orients the MIXVIBES VFX search tool towards a unique tag parameter (Title, Author, etc.). In default
position, the criteria is neutral (All). The search is directed towards all the tag parameters. To access the full MediaBase, don’t
forget to empty the search box when you have found the desired track!
Zoom-/+
Click on Zoom -/+ or hold [Ctrl] and use the mouse wheel to maximize or minimize the MediaBase font or artworks.
Check BPM
Click on BPM to automatically analyze the selected items. It is strongly recommended to analyze files before a
mix.
7.1.1.5 MediaBase options
When you right click in the MediaBase you are provided with a number of options:
1 Edit info. . . : edits the information of the selected file. There are 9 tabs available to edit or view information.
2 Locate on disk: shows the media directory.
3 Analyse: automatically analyzes the selected items.
4 Analyse BPM Manually
: manually sets the BPM for the current track. First select the required track you want to
manually beat count into the MediaBase and then drag it onto the player. Start the track playing, go back to the
MediaBase, right-click and select ‘Analyse BPM Manually’. Press the F1 key when you get to the Start Position of the
track and F2 when you get to the End Position. You can also manually select these points by entering the start and end
numbers. Now you can either press the Calculate button or enter the Beat number. You can also use the Space key to
set the BPM.
5 Add to playlist: adds the file to a Playlist.
6 Select all: selects all the tracks of the MediaBase.
7 Delete: deletes the current track from the MediaBase.
8 Group
: the group option has two choices. Add Selected Items to Group: If you have added Groups in the Selection
window then you can use this option to add the current (or selected items) in the MediaBase to a group. Delete Selected
Items to Group: If the current (or selected tracks) have been added to a group you can delete them from this group.
9 List view: displays the MediaBase in a list format with all the selected columns.
10 Grid view: displays the MediaBase in a grid format with artworks.
When you right click on a media file in the MediaBase you are provided with a number of options:
1 Add an audio file: adds an audio file to the MediaBase.
2 Add a video file: adds a video file to the MediaBase.
3 Scan: see the information regarding Importing Audio and Video within the ’Getting Started’ Section of this manual.
4 Select all: selects all the tracks of the MediaBase.
5 List view: displays the MediaBase in a list format with all the selected columns.
6 Grid view: displays the MediaBase in a grid format with artworks.
34 / 50
Page 35
vibe-watermark-bright.pdf 25/10/2010 17:41:48
7 Media management
7.1.2 History
The History window lists all the media you have played with MIXVIBES VFX. You can choose to show the medias played during
a specific date or during a period by clicking the Calendar button in the control bar. You can also add a media to a playlist or a
MediaBase by right clicking on this media.
7.1.3 Session
The Session window lists all the medias played during the current mix session. At the end of a mix, you can create a playlist
from your Session list by right-clicking on the Session tab and selecting Duplicate. Before creating a playlist, you can edit it by
deleting a media. Be careful because if you delete a media, it will not appear in the history. All medias in the Session window
will be discarded when you exit MXIVIBES VFX.
7.1.4 Prepare
The Prepare window is a holding area for medias, much like preparing a set by lifting records part way out of your record bag.
You can drag medias (or whole folders) from the Explorer window into the Prepare window, or simply drag them from the
MediaBase window onto the Prepare tab. To create a playlist from your Prepare list, right-click on the Prepare tab and select
Duplicate.
7.1.5 Playlists
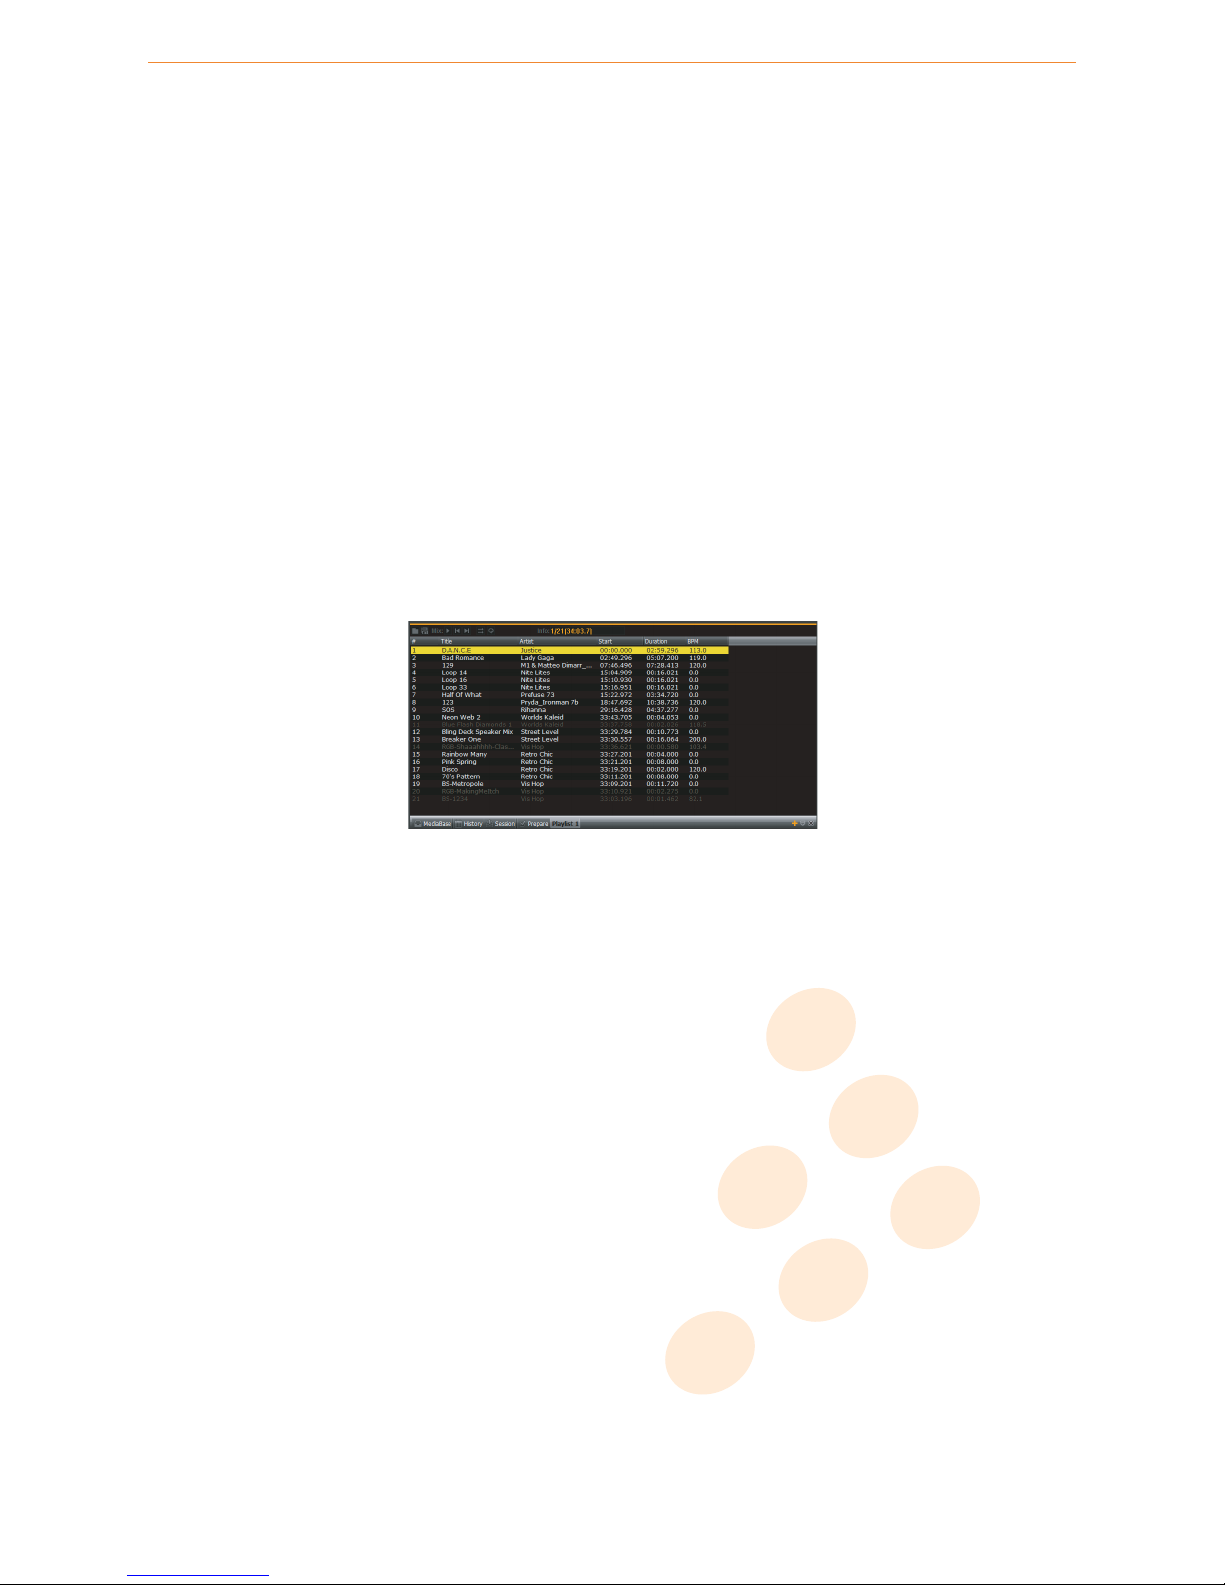
playlist1.pdf 20/10/2010 14:58:22
Playlist
A playlist is a custom compilation of medias. For example, you might want to create a playlist of medias for a set because
playlists are an effective way of organizing your medias while preparing for a set.
7.1.5.1 Manage a playlist
Create
Click the Add button ’+’ in the bottom-right corner of the MediaView window and type a name for the playlist. You
can also delete a playlist by clicking the Delete button ’x’ in the bottom-right corner of the MediaView window.
Add a file to a playlist
• Drag a media from the MediaBase or Explorer windows to the playlist title until a ’+’ sign appears.
• Right-click within the MediaBase window and selecting Add to playlist.
Import and export a playlist
Choose [File/Playlist] and then ’Import’ or ’Export’. Note: The MIXVIBES VFX playlists are
compatible with most of mp3 player software on the market. You can import and export playlist in M3U and TXT format.
7.1.5.2 Play a playlist
To start or play the Playlist you can:
• Click the Play button in the control bar.
• Press [Ctrl] + [Space] together.
• Right click within the Playlist window and select Play.
Right clicking within the playlist will bring up the Playlist options.
35 / 50
Page 36

vibe-watermark-bright.pdf 25/10/2010 17:41:48
7 Media management
7.1.5.3 Control bar
1 Import: imports a M3U, TXT format playlist.
2 Export: exports a playlist in M3U, TXT format.
3 Play: starts the auto-playlist playback.
4 Stop: stops the auto-playlist playback (but not the media playback).
5 Previous: skips to the previous media in the playlist.
6 Next: skips to the next media in the playlist.
7 Shuffle: shuffles the playlist.
8 Repeat: repeats the playlist.
9 Info: shows information about the mix (selected row / number of items / total duration).
Playlist control bar
7.2 Explorer window
explorer1.pdf 20/10/2010 14:56:59
Explorer
The Explorer window allows you to explore your computer directory to find media.
Media from the Explorer window can be dragged and dropped directly onto the Player, Sampler, MediaBase or Playlists. You
can
scan
a folder by right-clicking within the Explorer window and selecting Scan or simply drag and drop a folder directly
onto the MediaView. You can
create a shortcut
by right-clicking within the Explorer window and selecting Add directory. You
can also find the Charts directory.
Furthermore here you can also find the audio and video interface under the item
Audio Input
and
Video Input
. Each input
is listed there. Via drag and drop it is possible to drag single inputs onto the player for an easy assignment.
7.3 Selection window
selection1.pdf 20/10/2010 14:57:36
Selection
36 / 50
Page 37

vibe-watermark-bright.pdf 25/10/2010 17:41:48
7 Media management
7.3.1 Advanced Selection window
Click on [Windows/Selection] to prompt the advanced Selection window.
The advanced Selection window gives you a range of filters you can use to access your media files. It allows you to select
criteria and reduce the MediaBase to the media files that respect the selected criteria (tag). Remember to click
All
to
deactivate the filter and access your full MediaBase again! To combine multiple search criteria, you can multiply the current
tree selection by clicking the ’+’ button.
For example the
Artist
filter lets you sort your MediaBase by author. Click on the cross next to Author to access the list of
authors available in your MIXVIBES VFX MediaBase. Click on the desired author to reduce your MediaBase to the relevant
media. The
Album, Genre, Rating, Remix, Year, File extension, Directory, File name
filters are presented the same
way as Author. Some filters work differently.
For example the
Title
filter only refers to the first letter or number of a media file’s Title. Click on A to prompt all the media
files with a title that starts by the letter “A. . .”.
The File filter works in the same way, only it refers to the file name on your hard drive.
The
BPM
filter selects media files in a predefined media interval. For example 120-124 let’s our access all the media with an
analyzed BPM between 120 and 124 BPM. Make sure you analyze your MediaBase first to access the BPM information of your
media files.
The
Duration
filter classifies the media by playback length. Click on 3 mn to access all tracks from 3 minutes (included) to 4
minutes long (not included).
7.3.2 Groups
MIXVIBES VFX Selection window lets you create your own groups with your personal selections. These groups are available
through the advanced Selection window. They don’t apply a predefined filter. Instead, they let you access a user defined list
of media files.
Create a group
Right click on ’Groups’ in the advanced Selection window and choose ’Add group’. Choose a name for your
group and hit [Enter]. To fill up your media list, hit ’All’ in the advanced Selection window. Then drag and drop the desired
media in your new Group. You can also add a multiple selection of tracks in your MediaBase by right clicking on the selected
tracks and choosing ’Group>Add Selected Items’ in group. Choose the name of the desired destination group and click on it!
Modify a group
To delete a media file from a Group, right click on the file and choose ’Group>Delete Selected Items’ in
group. If you choose to Edit>Delete the media file, it will be deleted from the MediaBase.
Rename a group
Simply right click on the desired Group and choose Edit name. Type in the new name and validate with
[Enter].
Delete a group If you want to delete a Group, right click on the Group and choose ’Delete group’.
7.4 Edit media information
In the ’Edit info’ you can activate the settings and data of a media. You can reach the ’Edit info’ under the menu item
[MediaBase/Selected items(s)] or by clicking the right mouse button on the track in the MediaBase.
Info
: edit and see various information like title, artist or label for example. Additionally it is possible to save comments to a
media.
File: see information regarding saving location and audio quality.
Lyrics: type in and display song lyrics here.
Artwork
: update and display the track cover. Double click on media artwork path, open the artwork directory. If you import
multiple images in the Artwork tab of an audio file, then they will scroll during its playback as a slideshow.
Media: edit and see settings such as starting and ending points, loops or pitch.
Volume: preset gain, pan or fade in/out for a track.
Equalization: adjust the EQ settings.
Locations: pre-define up to 10 locations if required.
Loop: pre-define up to 10 loops if required.
37 / 50
Page 38
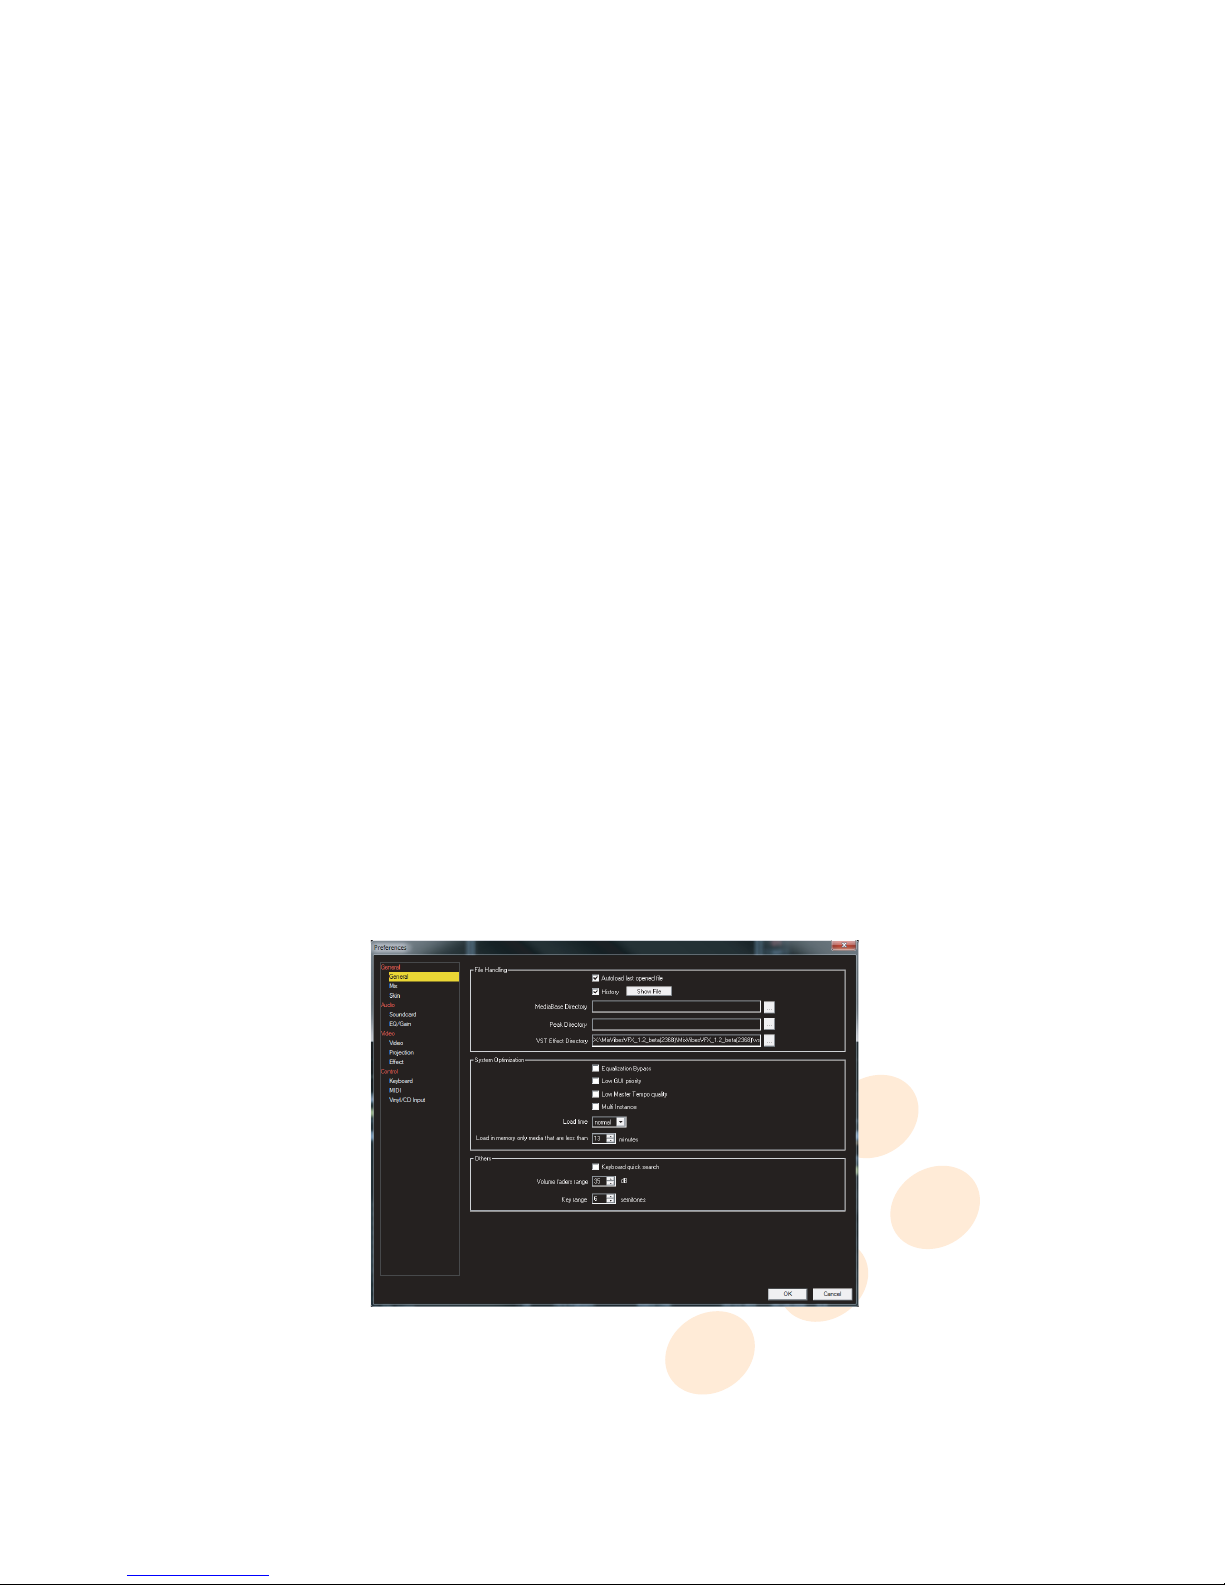
vibe-watermark-bright.pdf 25/10/2010 17:41:48
8 Preferences
The options screen will enable you to view or change settings of your program. You can reach the Preferences menu under
[Options/Preferences].
8.1 General
FILE HANDLING
Autoload last opened file
: automatically loads the last played media and MediaBase that will be loaded when starting
MIXVIBES VFX.
History: stores the history of files played during a MIXVIBES VFX session. Click on Show File to access the history.
MediaBase Directory: defines a MediaBase folder where the MediaBase should be saved and loaded.
Peak Directory
: defines a peak folder to stock the (VPK format) peak file. Default location is (C:\Documents and Set-
tings\User_Name\Application Data\MixVibes\mixvibesVFX\Peak\).
VST Directory: defines a VST folder to stock the VST plug-ins. Default location is (C:\Program Files\MixVibesVFX\VST\).
SYSTEM OPTIMIZATION
Equalization bypass: enables/disables MIXVIBES VFX equalization. Disable this feature if you use the mixer EQ.
Low GUI priority
: lower the graphic interface priority allowing more sound processing priority. It can be useful to set this
option for vinyl control as it gives more priority.
Low Master Tempo quality: activates/deactivates a low Master Tempo quality using less CPU resources.
Multi Instance: authorizes you to open multiple MIXVIBES VFX sessions at the same time.
Load Time: lets you choose how fast the media should be loaded to RAM. ’Normal’ is strongly recommended.
Load in memory only tracks that are less than
: defines the maximum length (in minutes) of a media file MIXVIBES VFX
can load in the RAM memory (only for audio file). Note that video files and their audio part are always in memory.
OTHERS
Keyboard quick search: lets you browse media in the MediaBase and Explorer window by simply typing in a letter.
Volume faders range
: defines the dB range between the lowest and highest dB value. Ex: Volume faders range = 35 dB,
the volume will range from -35dB to 0dB.
Key range
: defines the highest/lowest values of key distortion (in semi-tons). Ex: Key range = 6%, the maximum variation is
of ± 6 semi-tons (½ an octave).
generalities_options.pdf 20/10/2010 17:24:52
General
38 / 50
Page 39
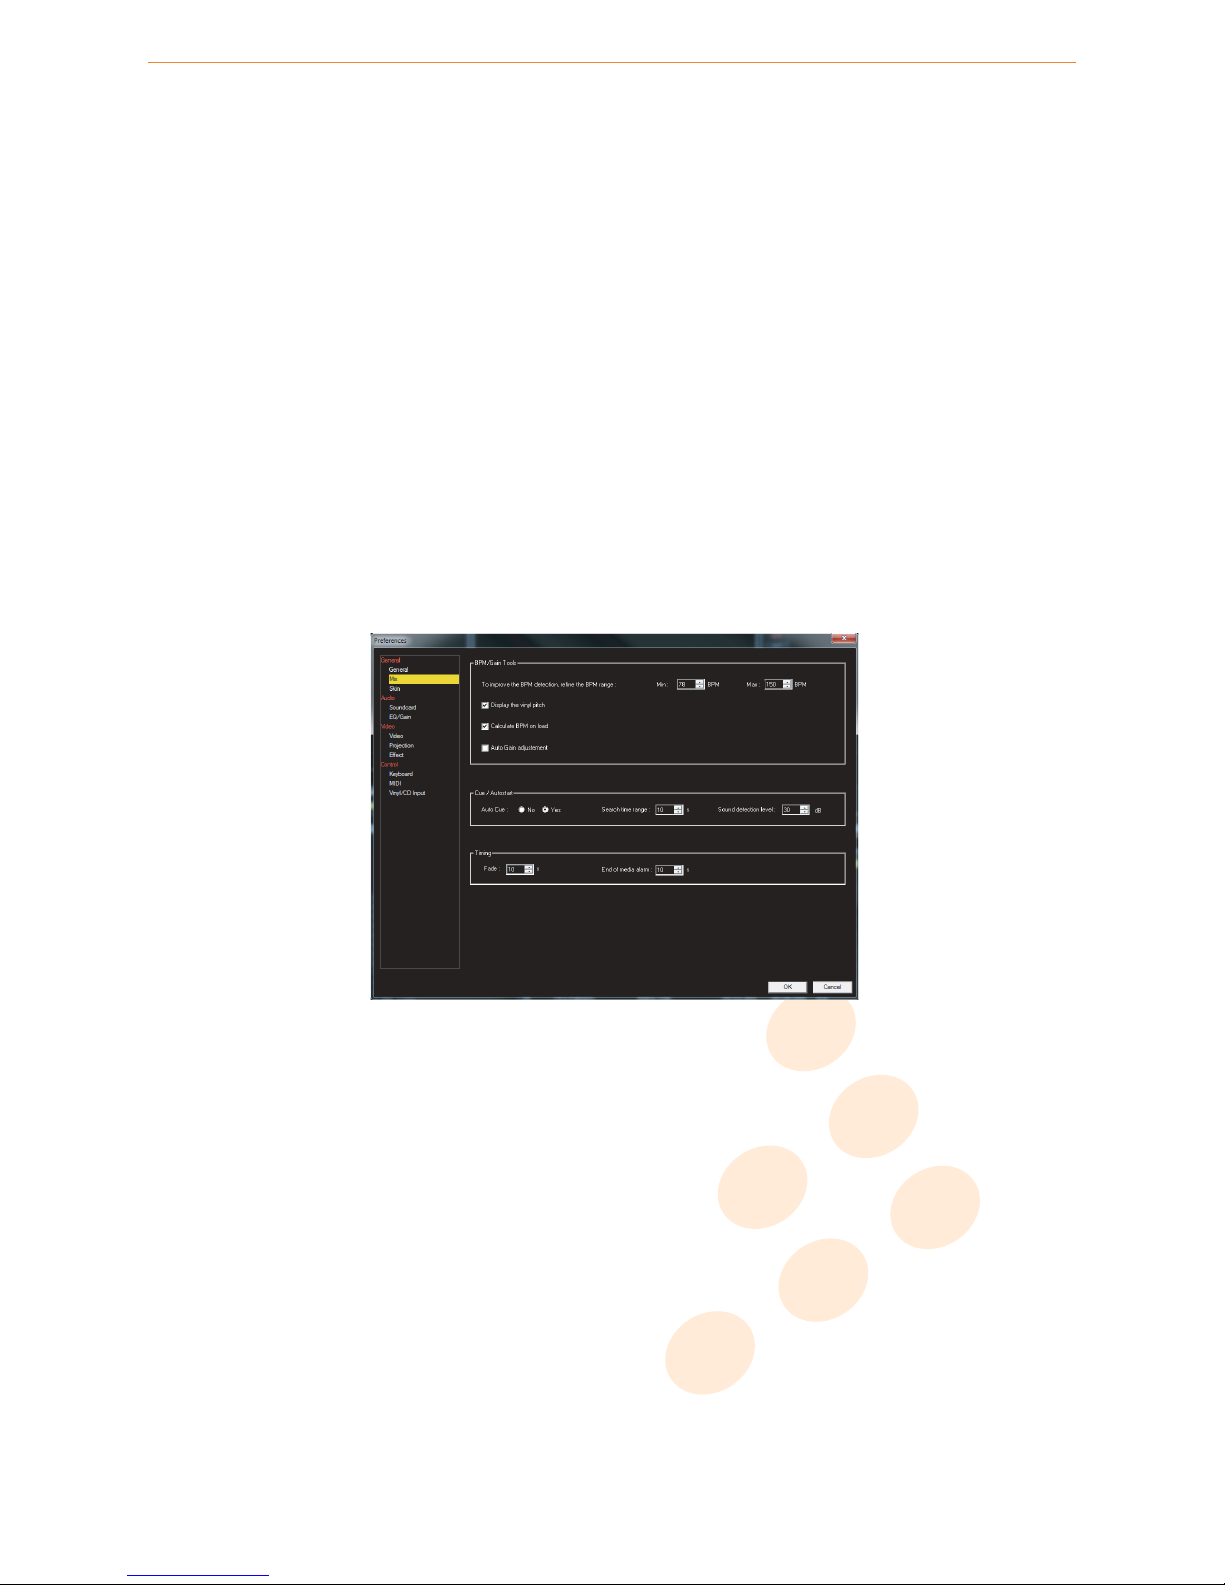
vibe-watermark-bright.pdf 25/10/2010 17:41:48
8 Preferences
8.2 Mix
BPM/GAIN TOOLS
To improve the BPM detection, refine the BPM range
: define the range of tempo MIXVIBES VFX can analyze. Note: A
smaller range will ensure a faster and more accurate analysis of your MediaBase. Each style has its own classic BPM range.
You can find more information about this topic on the Internet.
Display vinyl pitch: displays your turntable’s pitch analyzed by MIXVIBES VFX.
Calculate BPM on load
: activates/deactivates the BPM calculation upon media load depending on the resources of your
computer.
Auto Gain adjustment : the gain values of media with a different volume level will be matched. This will avoid saturation.
CUE / AUTOSTART
Audio Auto Cue : activates/deactivates the audio Auto Cue.
Search time range : sets the time interval from the beginning of the track in which MIXVIBES VFX will set a Cue point.
Sound detection level
: sets the minimum sound level (dB) for the Cue point. Note: MIXVIBES VFX will set the cue at the
first point within the time interval that reaches the sound detection value.
TIMING
Fade : defines the time (in seconds) of your Auto mix transitions (playlist).
End of media alarm
: defines the maximum time (in seconds) until the end of the track before the alert starts. Note: In the
example below, MIXVIBES VFX will start the alarm 10 seconds before the end of the track.
mix_options.pdf 20/10/2010 17:25:46
Mix
8.3 Skin
This option will allow you to select the default skin for VFX. Under each skin preview, you’ll find a short layout description of
your skin (screen resolution, simple/complete).
Comments will help you select the skin:
•
1280 or 1440 pixels
screen resolution
. The VFX 1280 skin is optimized for monitors wider than 1280 pixels. The VFX
1440 skin is optimized for monitors wider than 1440 pixels.
• VFX or VFX+mixer
skin. The VFX+mixer skin is designed for a perfect use with VFX CONTROL controller. To show
more controls, click on the Control button of the integrated mixer. VFX skin was designed to display all functions within
MIXVIBES VFX. To show 4 players, go to the menu [Options > Number of players].
8.4 Soundcard
This menu lets you define which audio hardware you will use, the number of devices, and the latency time.
You can enable/disable the
auto-configuration
(to validate a change, you must restart MIXVIBES).
Auto-configuration
allows MIXVIBES to:
39 / 50
Page 40
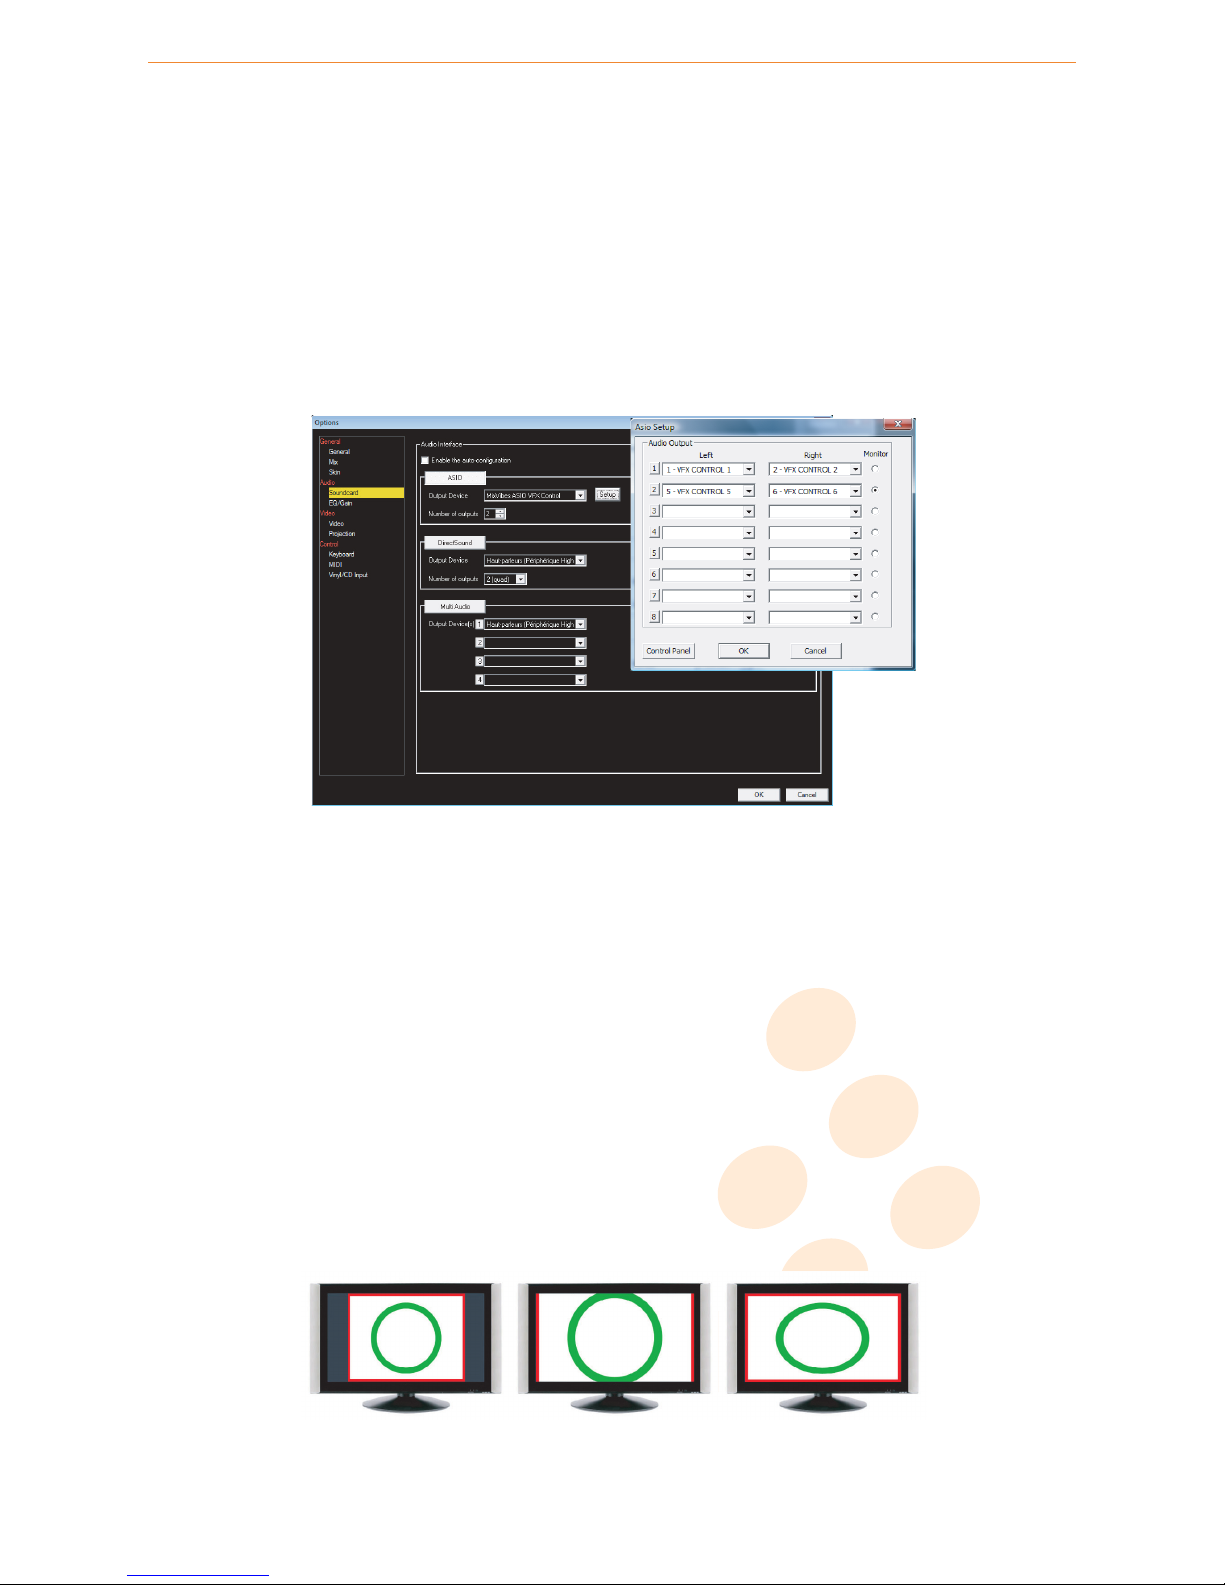
vibe-watermark-bright.pdf 25/10/2010 17:41:48
8 Preferences
• automatically configure MIXVIBES audio interfaces outputs.
• enable MIXVIBES MIDI controllers.
• choose the best skin according to your resolution and your MIDI setup.
If you use MIXVIBES VFX CONTROL in stand alone setup, it is advisable to choose the auto-configuration.
Depending on your hardware, a latency time that is set too low can affect media playback. If you experience sound cuts,
progressively increase latency until the problem is solved. If you feel an important delay between your actions within MIXVIBES
VFX and their effect on the sound, reduce it.
In ASIO mode, press the Setup button to select audio outputs. Press the control panel button to access to the soundcard
driver’s control panel.
You can also set up the monitoring: this is useful if you do not use an external mixer. In the example below, the soundcard
audio output 1/2 connects to your sound system’s MASTER input and output 5/6 is used to connect your headphones. You only
have to set up your players on output 1 and click on the monitoring button to monitor a media in the appropriate player.
audio_1.pdf 09/02/2010 14:20:41
Soundcard
8.5 EQ/Gain
The equalization option sets the sound quality with more accuracy. Be careful, depending on your media set you may need to
set up the gain amount to 20 dB (indeed video files can have a lower gain than audio files).
8.6 Video
SCREEN CONFIGURATION
Video resolution: configures the video quality (output resolution).
Display properties: opens the display settings window.
VIDEO CONFIGURATION
Cache size for each loaded video: modifies the cache size for each loaded video. You should keep the value 100MB.
Media Ratio: images below show the three media ratio types.
Media Ratio: Preserve / Crop to fill / Stretch
40 / 50
Page 41

vibe-watermark-bright.pdf 25/10/2010 17:41:48
8 Preferences
AUDIO / VIDEO CONTROL
Video Auto Cue: activates/deactivates the audio Auto Cue for videos.
Synchronize crossfader AV mode with players
: synchonizes the crossfader audio and video mode with the players’
modes if you press the button ’Fader AV sync’.
video_options.pdf 20/10/2010 17:27:06
Video
8.7 Projection
MASK
Mask file
: shows/hides a mask or a frame in the main monitor output. A mask file should be a PNG image with transparency.
KEYSTONE CORRECTION
This option allows you to perform a keystone correction: if you use a videoprojector to project the output of the main monitor,
you can distort the projected image to obtain a rectangular shape. Drag the four corners to distort the projected image.
Double click to restore. Hold down the CTRL key to move green squares horizontally and vertically .
Without Keystone Correction With Keystone Correction
Keystone correction
8.8 Effect
This option allows you to combine the audio effects and video effects at your own convenience. So you can choose the video
effect that will be coupled with an audio effect.
8.9 Keyboard
Here you can view the short cut keys that are configured within MIXVIBES VFX. The operation of the software is primarely
mouse orientated, but you can also mix using your computer’s keyboard. In the keyboard options, you’ll find several keyboard
41 / 50
Page 42
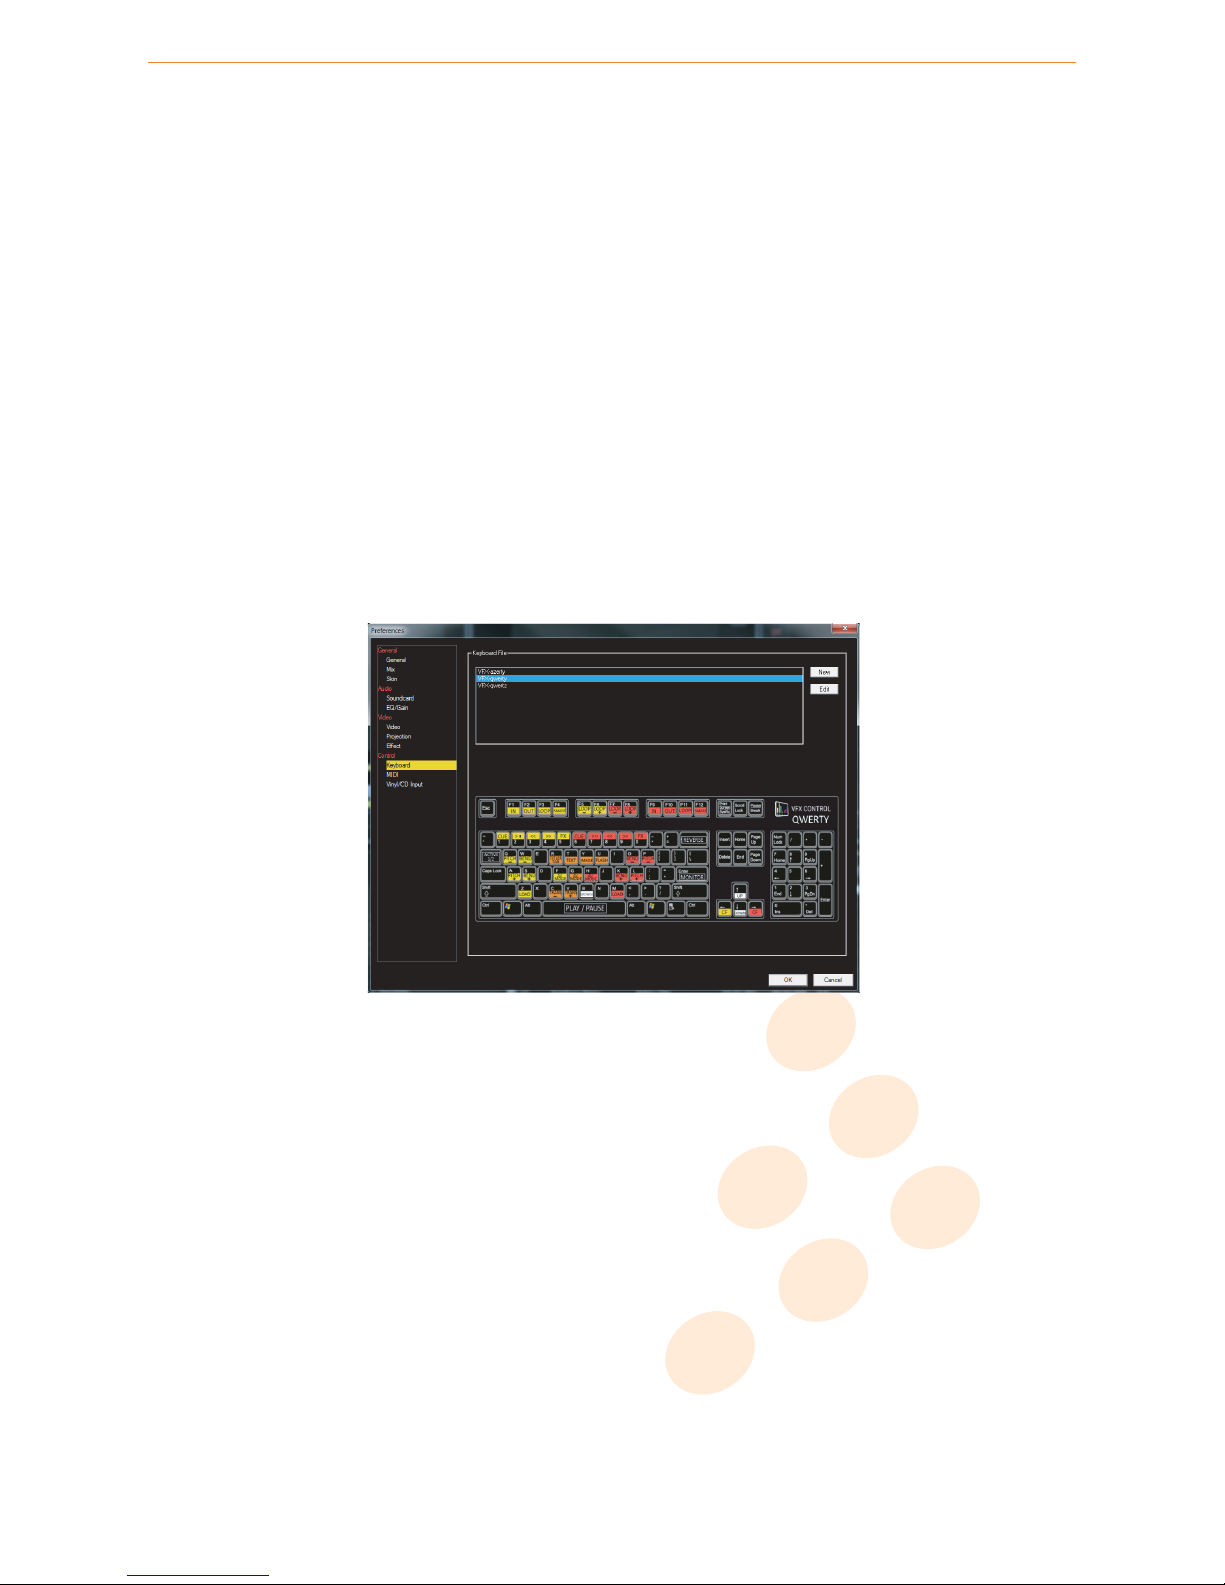
vibe-watermark-bright.pdf 25/10/2010 17:41:48
8 Preferences
presets, recommended for an easy use of MIXVIBES VFX. If you don’t feel comfortable with these presets, you can make your
own.
CAUTION: by editing a preset, you may not be able to get back to the original preset. If you want to make your own preset, we
recommend you to first create a New keyboard file before mapping your keyboard.
KEYBOARD LEARNING
This MIXVIBES VFX feature allows you to map your keyboard in a just a few seconds by placing your mouse over a player
button and pressing the desired keyboard key.
First, create a new Keyboard file by pressing
New
in the keyboard options menu, name it, press ‘return’ to apply and then
OK
to leave the options menu. In the options menu, activate the learning button as shown bellow.
In order to map a key, follow these steps:
1 Pass your mouse over a button of your MIXVIBES VFX player: the button is highlighted.
2 Press the desired keyboard key for the chosen action (e.g. CUE).
3
Your key is now mapped. In order to map further buttons, move your mouse to the next button and press the next
desired keyboard key.
4
Once you’re finished, deactivate the learning button from the options menu. Check out in the keyboard options > Edit,
that all your changes have been taken into account.
CAUTION: All buttons of the player, like sliders, cannot be mapped thanks to keyboard learning. You may still drive them with
your mouse or choose a keyboard preset file and edit a few keys using keyboard learning while keeping faders and sliders
working or edit the keyboard file manually.
keyboard_options.pdf 20/10/2010 17:28:26
Keyboard
8.10 MIDI
MIXVIBES VFX can be controlled by a MIDI controller (we recommend the VFX CONTROL; MIXVIBES does not ensure 100%
compability with non-listed 3rd party controllers).
1 Select your MIDI input device from the pull down menu.
2 Select your MIDI device mapping by clicking on it.
3 Validate by clicking on OK.
MIDI LEARNING
This MIXVIBES VFX feature allows you to map your midi controller in a just a few seconds by placing your mouse over a player
button and pressing the wished key of your midi controller.
First, create a new MIDI file by pressing
New
in the MIDI option menu, name it, press ‘return’ to apply and thenOKto leave
the options menu. In the options menu, activate the learning button as shown below.
In order to map a key, follow these steps:
1 Move your mouse over a button of your MIXVIBES VFX player: the button is highlighted.
2 Press the desired controller key for the chosen action (e.g. CUE).
42 / 50
Page 43
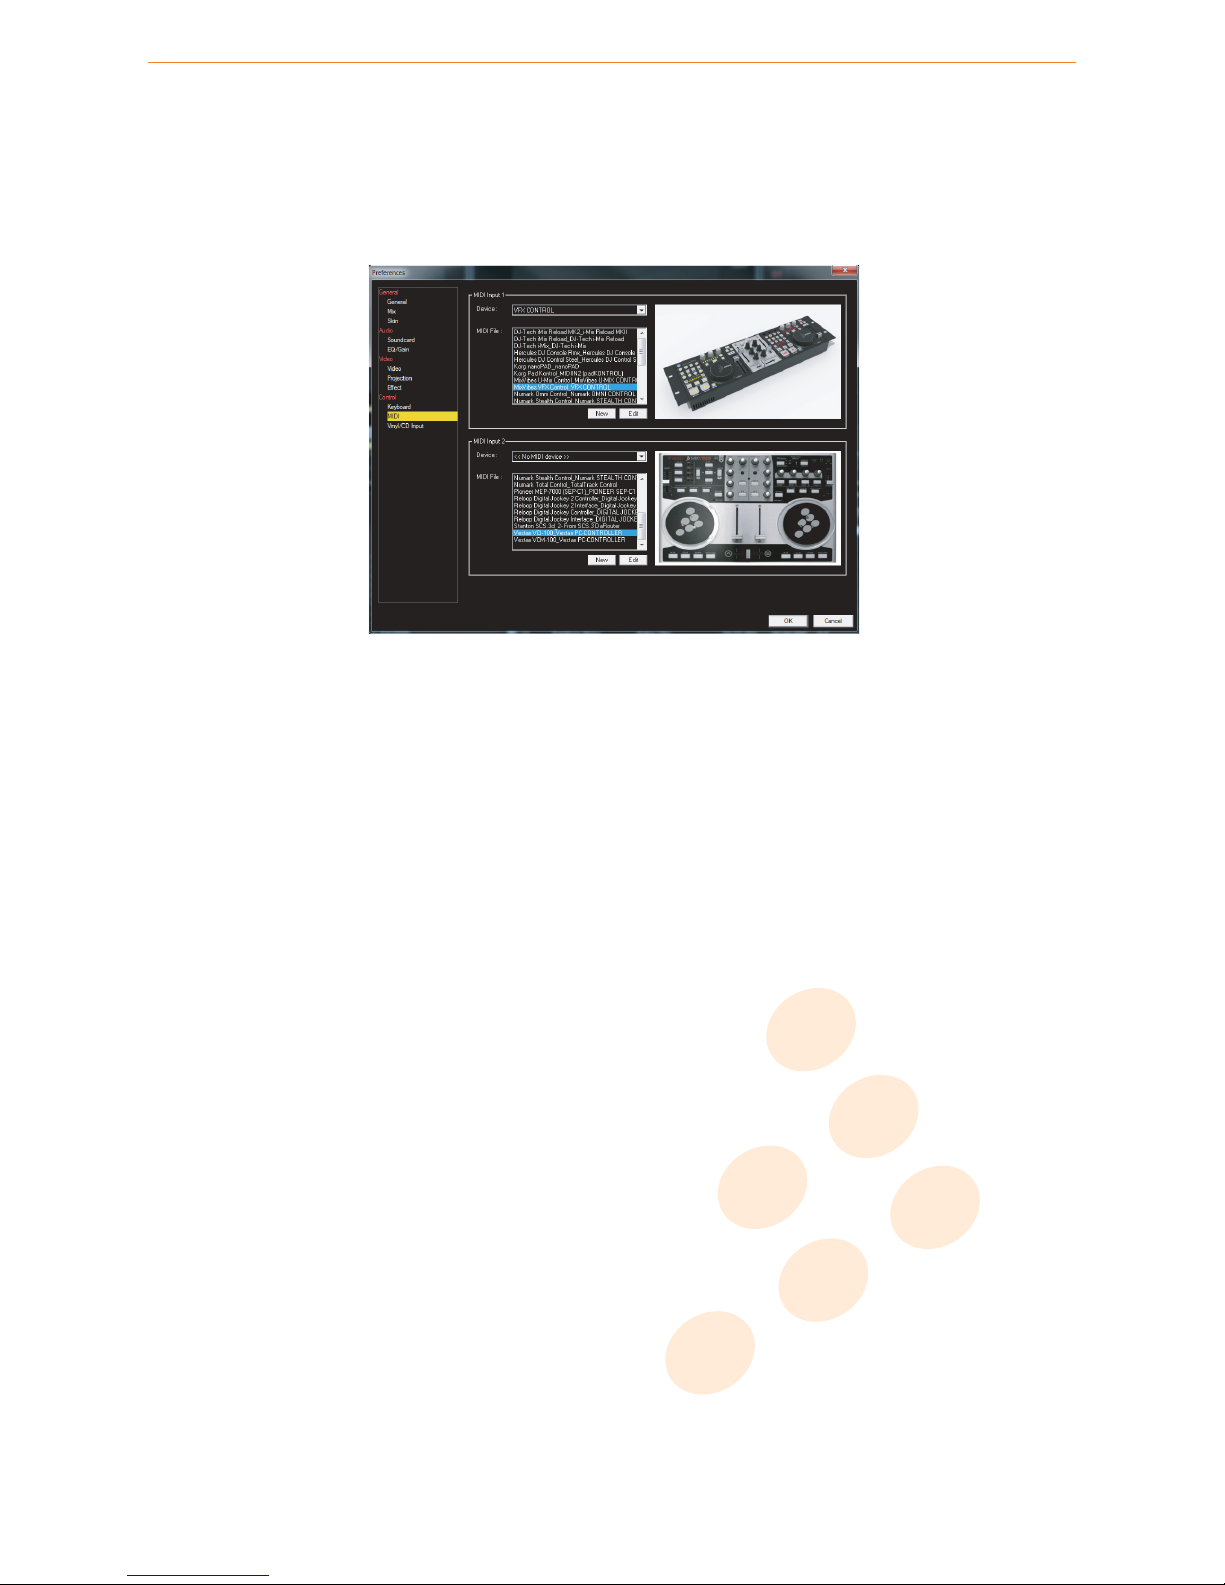
vibe-watermark-bright.pdf 25/10/2010 17:41:48
8 Preferences
3
Your key is now mapped. In order to map further buttons, move your mouse to the next button and press the next
desired controller key.
4
Once you’re finished, deactivate the learning button from the options menu. Check out in the midi options > Edit, that
all your changes have been taken into account.
Thanks to this midi feature, and as long as your controller sends sufficient information to the computer, you’ll be able to map
every key of your midi controller.
midi_options.pdf 20/10/2010 17:29:40
MIDI
8.11 Vinyl/CD input
TIME CODE CALIBRATION
This menu lets you
configure the vinyl or CD inputs
to use vinyl turntables or CD players with an external audio interface.
1 Select the control type that you will be using: vinyl or CD.
2 Select the control mode.
3 Select the audio interface.
4 Select the audio inputs corresponding to the decks that will playback the control vinyl/CDs.
5 Start the playback of the control records making sure that the pitch is set to zero on your decks and the playback
direction is forward. If your decks have a Master Tempo function or any on-board effects, make sure they are also
disabled as those will interfere with the calibration, and with the time code in general. Finally click the
Calibrate
buttons.
OPTIONS
Type: choose what kind of controller is connected to the channel: turntable or CD player.
Mode: choose the control mode of your turntables or CD players.
•
Absolute: in this mode, the playback position of the control record/disc corresponds precisely to the playback position of
the audio file in the player. Use the Absolute mode when you want to use your turntable’s tonearm (or the seek function
on your CD) to skip through the track. If you are using CD decks, you can use their cueing and looping capabilities as
well.
•
Relative time: needle drop support. Needle drop is proportional to the vinyl time. If you want to go to the middle of the
song, place the needle to the middle of the vinyl record. In this mode, MIXVIBES VFX will not update the position of the
song if there are needle small moves. Then the position in the vinyl and the song can be different. With this mode, you
can loop or skip to location (cue point). This mode is interesting for mixing.
•
All Relative: in this mode, the playback position of the control record/disc does not correspond to the playback position
of the audio file in the player. Use the All Relative mode when you want to use non-linear functions like hot cues
(Locations) and Loops. In this mode you can use the ’drop to location’ feature.
’Drop to location’: with vinyl, setting the needle on a vinyl position (3s-1mn/1-2mn/2-3mn/3-4mn/4-5mn) allows to go to a
MIXVIBES VFX location. With CD, store locations on the CD deck at positions ~50ms/100ms/150ms and go to these locations
allow to go to a MIXVIBES VFX location.
Audio interface: select your audio interface.
43 / 50
Page 44
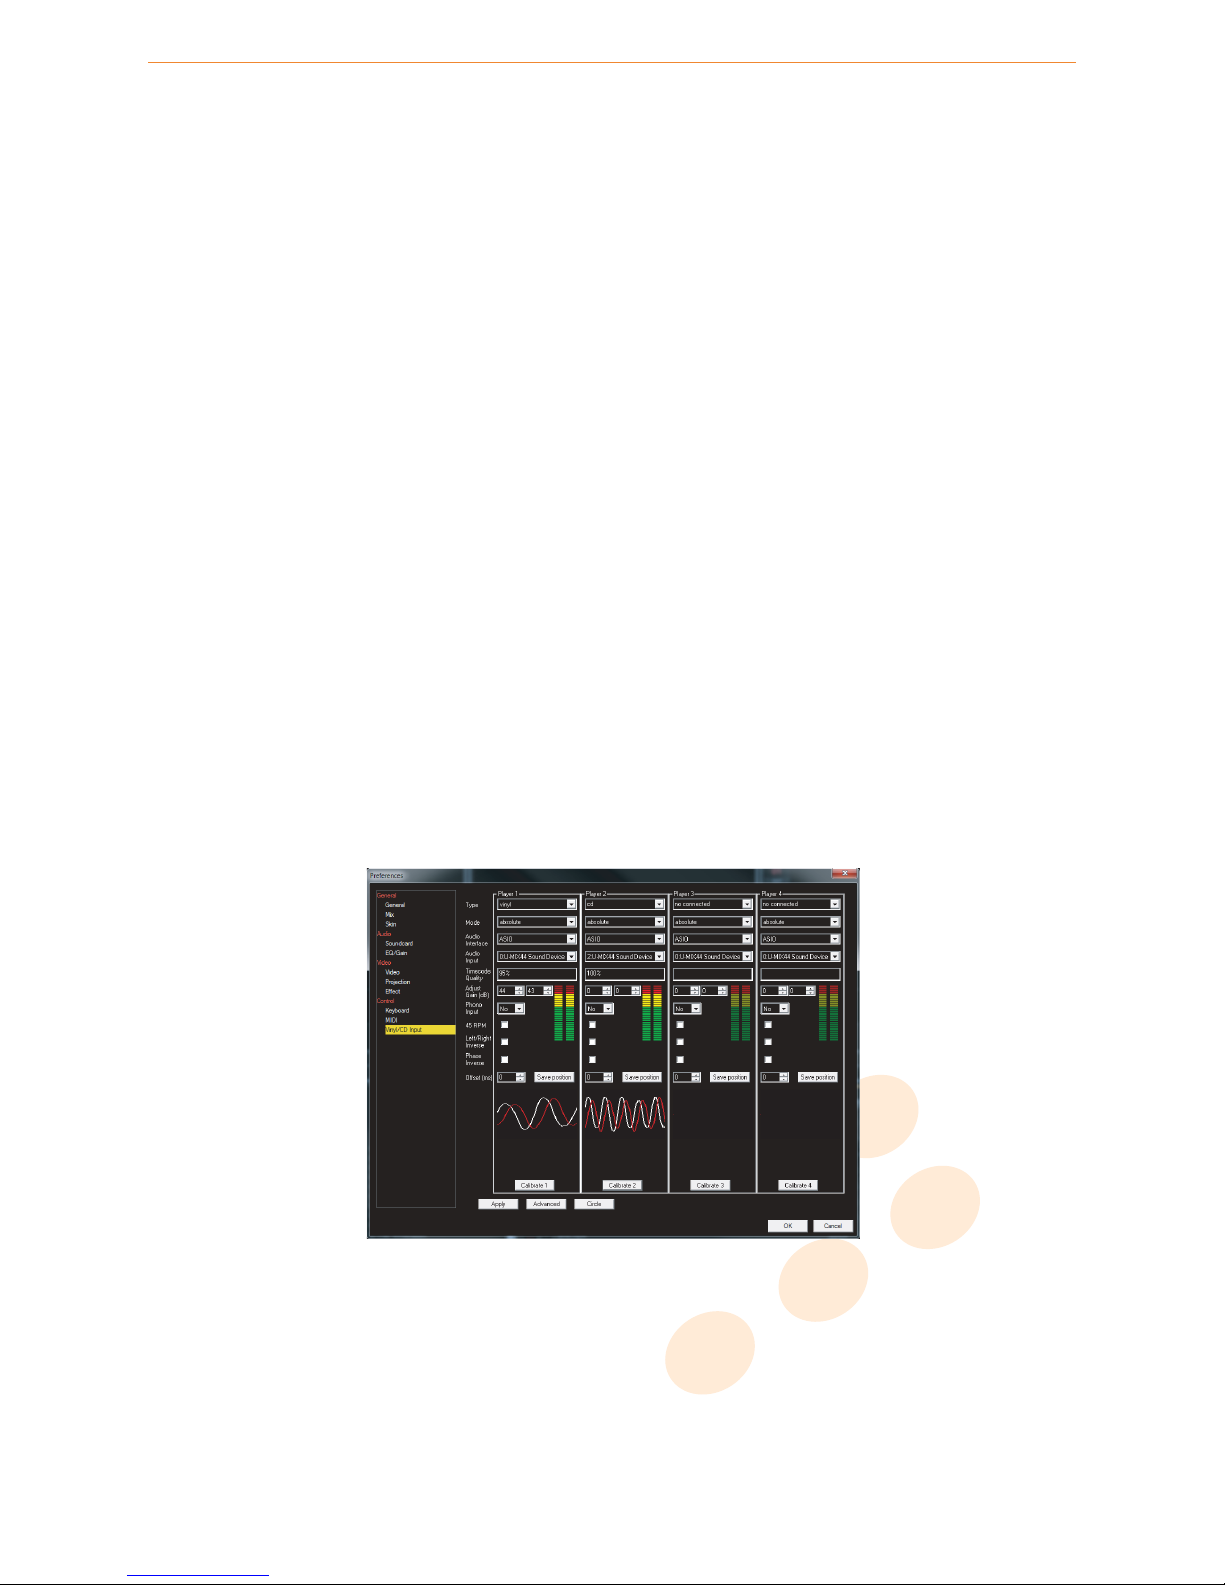
vibe-watermark-bright.pdf 25/10/2010 17:41:48
8 Preferences
Audio input: choose the signal source among the inputs.
Timecode Quality
: displays the timecode quality percentage and the volume value. The percentage must be 90% or higher.
If the percentage is not satisfactory, clean up your needles or visit our support webpage.
Adjust Gain
: sets the gain dB value of the input signal. This value could be immediately controlled through the vu-meter:
the vu-meter should reach the red level.
Phono Input
: this is a software emulation of RIAA preamp. This allows you to plug your PHONO turntables directly in your
soundcard. If your turntables have LINE signal, there is no need to use this preamp.
45RPM: checks this option if the turntable works in 45RPM speed.
Left/Right Inverse: allows a left/right inversion of your turntable/CD player wires.
Phase Inverse: allows a phase inversion. Some needles create a phase inversion (MIXVIBES VFX automatically detects it).
Offset
: creates a lead-in on your vinyl. Define this lead either in millisecond (1000ms= 1 second) and press ’Apply’ or put the
needle where you want on your vinyl, press ’Save’ then ’Apply’. You can also right click on CUE button on the mixer channel.
Visual control
of the signal that is going through your turntable. You may detect on this screen grounding problems, electric
interference or even rumbles.
Noise level: sets the noise level in dB.
Noise filter: sets the anti noise filter frequency.
These 2 options are really important. If there are rumble, electrical problems, bad ground or others noises coming from the
turntable you should increase the noise filter (e.g. 150) to cleanup the input signal. The more important the noise coming
from your turntable is, the more you should increase the frequency but the precision will decrease mainly at a low speed. If
when you stop the vinyl, MIXVIBES VFX continues to play, then you need to increase the noise Level: for ex. -35dB (default is
-40dB). For a better sensibility you can lower this value: e.g. -45 dB
Calibrate 1, 2, 3 or 4: launches the calibration of your first, second, third, fourth turntable.
One active turntable
: activates/deactivates the ’one active turntable’ mode. Use this feature only if you are using only one
turntable.
Apply: applies a modification. After each modification, you must click on this button.
Advanced: gives access to special parameters of MIXVIBES VFX.
Circle: switches your calibration view from sinusoid to a circle. A clean time code is represented by a homogeneous circle.
Absolute Locked
: doesn’t automatically switch from Absolute to All Relative if you perform an action position (locations,
loop, seek).
vinyl_cd_input.pdf 21/10/2010 10:27:30
Vinyl/CD input
44 / 50
Page 45

vibe-watermark-bright.pdf 25/10/2010 17:41:48
9 Troubleshooting
The audio tracks are not playing back
• Make sure you selected the correct audio mode and audio interface in the soundcard preferences window.
• Make sure you selected two audio outputs in the soundcard preferences window.
•
Make sure you selected the correct audio outputs of your audio interface in the ASIO setup of the soundcard preferences
window.
•
If you use vinyl or CD, make sure you selected the correct audio inputs of your audio interface in the vinyl/CD inputs
preferences window.
•
If you use vinyl or CD, make sure that your control records/discs have been properly calibrated in the vinyl/CD inputs
preferences window.
There is no sound going out of the speakers
•
Check for activity on the outputs meters of the main volume rack. If there is no response from the meters, check all the
controls of the mixer: faders, gain, kills, etc. and audio configuration.
•
If you use an external mixer, check your connections from your audio interface to your mixer and from your mixer to
your sound system. Make sure you have the selected proper inputs on your mixer.
The time code quality is bad
• Check for proper connections of your turntables’ ground wires.
• Make sure your needles are clean and in a good condition.
• Make sure there is no dust on your records and needles.
• Make sure your cables are in good condition. Troubleshoot by using a different cable.
• Make sure your decks are properly connected to your audio interface.
• Make sure the right and left channels are not inverted.
• Make sure your record is not scratched.
The controller has no effect on VFX software
• Check that the Power button standby LED is off.
• Check/change the USB cable.
• Check that the adaptor is plugged.
• Try another USB port.
• Close the program and open it again after you have connected and powered on the controller correctly.
There are some audio dropouts or slow response
•
Choose another buffer size setting in the Soundcard preferences. If you hear crackling sounds, it means your latency
setting is too low, choose a larger buffer size and test again.
• Close any unnecessary application.
• Disable your anti-virus, spyware and firewall software.
• Turn off your computer’s wireless card (or disconnect from the Internet).
•
Close useless background processes by deactivating them. Hit CTRL + ALT + DEL, open the ’Task manager’, go to the
processes tab, close the useless processes.
•
If you are very serious about your DJing, the first thing to do is partition your hard drive and dedicate a clean install only
to MixVibes. Make sure you never use Internet. This will avoid all potential worms and backdoors that can considerably
slow down your computer.
45 / 50
Page 46

vibe-watermark-bright.pdf 25/10/2010 17:41:48
10 Frequently Asked Questions
How do I update my software?
To download the latest version of your MixVibes software, you will need to be registered on the MixVibes Forum.
To register:
• Go to our forum.
• Click on ’Register’ on the ’Board Index’ sidebar.
• Read the terms and click on ’I agree to the terms’.
• Fill out your profile with your username, valid e-mail address, and password.
•
IMPORTANT: You will need your software license key to complete the registration (written on the back of your installation
CD sleeve).
• You will receive an e-mail with an activation link to complete registration.
To download/install:
• Go to our forum.
• Go to the Download Center.
• Select your version of MixVibes and find the latest update.
• Click the ’Download’ button near the bottom of the page.
• Once the download is finished, extract the folder and run the ’install_vfxupdate.exe’.
• The update will overwrite your current version.
How do I recover my lost serial number?
We recommend keeping your serial number (which is printed on the back of the installation CD sleeve) by registering on the
forum, and entering it in the provided space. We’ll be able to recover it for you in case you lose it.
How do I know the controller’s firmware version?
1 Make sure your controller adaptor DC-6V and USB cable are unplugged.
2 Press and hold the right deck Shift button.
3 Plug your adaptor DC-6V, keep holding the right deck Shift button.
4 Release the right deck Shift button.
5 The firmware version is given by the ligthed LEDs of the Smartloop length and FX section: Version X .Y
1 X (on the deck 1): 1 (1/32), 2 (1/16), 3 (1/4), 4 (1), 5 (4), 6 (16), 7 (32), 8 (active effect 1), 9 (active effect 2)
2 Y (on the deck 2): 1 (1/32), 2 (1/16), 3 (1/4), 4 (1), 5 (4), 6 (16), 7 (32), 8 (active effect 1), 9 (active effect 2)
How do I upgrade my controller’s firmware?
1 Make sure your controller adaptor DC-6V and USB cable are unplugged.
2 Press and hold the left deck Shift button.
3 Plug your adaptor DC-6V, keep holding the the left deck Shift button.
4 Release the left deck Shift button.
5 Connect the VFX Control USB cable to PC.
6 A new drive named "midiUpgDisk" should be found in your system.
7 Drag and drop the firmware file ("PDJ-2E_V*.bin") into the "midiUpgDisk" drive.
8 The effect-LEDs will start to flash while upgrading.
9 After the firmware is updated, VFX Control will reboot automatically.
Warning: MIXVIBES assumes no liability for misuse of this firmware and in case of any problem arising. Thus MIXVIBES
disclaims any liability for damage to your controller.
46 / 50
Page 47

vibe-watermark-bright.pdf 25/10/2010 17:41:48
10 Frequently Asked Questions
How does the power button work?
To activate the MIDI and audio standby, press the button for 3 seconds: the power switch LED is then lighted on.
To activate the MIDI standby, perform a short click: the LEDs of the effect section are then lighted on. All elements of the top
panel (buttons, jog wheels, knobs, sliders) are disabled while the audio interface is still turned on.
To summarize:
• Power button light ON: MIDI and audio standby.
• Power button light OFF: MIDI and audio ON.
• Effect LEDs light ON: MIDI standby.
47 / 50
Page 48
vibe-watermark-bright.pdf 25/10/2010 17:41:48
11 Technical specifications
TYPICAL LIMIT CONDITION
LINE: 1.94V +/-0.5dB 1.94V +/-1dB 1KHz, 0dB (TCD-782 TRK.2)
MIXED OUT: 1.93V +/-0.5dB 1.93V +/-1dB 1KHz, 0dB (TCD-782 TRK.2)
PHONES: 0.42V +/-0.5dB 0.42V +/-1dB 1KHz,-20dB (TCD-782 TRK.16)
LINE: WITHIN 0.5dB WITHIN 1dB 1KHz, 0dB (TCD-782 TRK.2)
MIXED OUT: WITHIN 1dB WITHIN 3dB 1KHz, 0dB (TCD-782 TRK.2)
LINE: 95dB 85dB 1KHz, 0dB (TCD-782 TRK.9 & 11)
MIXED OUT: 95dB 85dB 1KHz, 0dB (MAX. OUT, EQ FLAT)
LINE: 0.007% 0.002% 1KHz, 0dB (TCD-782 TRK.2)
MIXED OUT: 0.008% 0.002% 1KHz, 0dB (MAX. OUT, EQ FLAT)
PHONES: 0.024% 0.005% 1KHz, 0dB (1V OUTPUT)
LINE: 95dB 85dB 1KHz, 0dB (TCD-782 TRK.2 & 8)
MIXED OUT: 95dB 85dB 1KHz, 0dB (MAX. OUT, EQ FLAT)
LINE: 95dB 85dB 1KHz, -60dB (TCD-782 TRK.18)
MIXED OUT: 94dB 85dB 1KHz, -60dB (TCD-782 TRK.18)
LINE: 17-16KHz +/-0.5dB 17-16KHz +/-1dB (TCD-781 TRK.1,4 & 16)
MIXED OUT: 17-16KHz +/-0.5dB 17-16KHz +/-1dB (MAX.OUT, EQ FLAT)
Phones max. output: 1.6V 1.4V 1KHz, 0dB, THD=1%
LOW BAND: +9 +/-1dB +9/-3dB 100Hz,-20dB(TCD-782 TRK.15)
-16 +/-1dB -16 +/-3dB
MID BAND: +9 +/-1dB +9 +/-3dB 100Hz,-20dB(TCD-782 TRK.16)
-19 +/-1dB -19 +/-3dB
HI BAND: +9 +/-1dB +9 +/-3dB 100Hz,-20dB(TCD-782 TRK.17)
-20 +/-1dB -20 +/-3dB
Power supply:
Dimensions:
Weight:
482(W) x 132(H) x 74.8(D)mm
2.1 Kg
Frequency response:
EQ: (Mix output=0.2V)
Notes:
*1: With 20KHz low pass filter.
*2: With 20KHz low pass filter, "IHF-A" weighted
DC6V
Dynamic range(*2): (Max.output, EQ Flat)
ITEM
OUTPUT LEVEL: (maximum gain, EQ Flat)
CHANNEL BALANCE: (From 0 to -40dB for mix. out)
L/R channel separation(*2):
THD+N(*1):
S/N ratio(*2):
Technical specifications
48 / 50
Page 49

vibe-watermark-bright.pdf 25/10/2010 17:41:48
Index
Analysis, 20, 34
Artwork, 22, 34, 37
Audio Clone, 22
Audio Configuration, 11, 39
Auto-configuration, 10, 21, 39
Camcorders, 36
CD, 43
Control of players 1/2 or 3/4, 15
Crossfader video transitions, 15, 27, 28
Cue/Monitor Mix, 15
Effect, 18, 24, 41
Firmware, 46
Flash animation, 27, 30
Image, 27, 30
Keyboard, 41
Keystone correction, 41
Learning, 21, 42
Locations, 17, 25, 37
Loop, 16, 24
Loop memory, 17, 25
Mask, 41
Master, 26, 28
Media types, 14
MIDI, 42
Number of players, 21
Playlist, 35
Power button, 15, 47
Sampler, 17, 31
Serial number, 46
Skin, 11, 39
Slideshow, 37
Text, 27, 30
Timer, 21
Update, 21, 46
Vinyl, 43
Visualization, 18, 25
Webcams, 36
49 / 50
Page 50

vibe-watermark-bright.pdf 25/10/2010 17:41:48
vibe-watermark-dark.pdf 25/10/2010 17:37:28
Contact
• For all technical or sales information, please contact your local reseller or MIXVIBES directly:
MIXVIBES
4, rue de la Sablière
92230 Gennevilliers
FRANCE
www.mixvibes.com
• Technical support:
• online on our forum
1
• Sales Information:
• by email to [email protected]
Copyright 2011 MIXVIBES. All rights reserved.
The contents of this manual may change without prior notice. Best efforts have been put forth to insure the accuracy of the
contents of this manual. MIXVIBES is not liable for any errors, typographical or other, contained herein. Except as specifically
permitted herein, no portion of the information on this manual may be reproduced in any form or by any means without
the prior written permission of MIXVIBES. Trademarks and trade names displayed on this manual are the property of their
respective owners.
MIXVIBES VFX CONTROL - User Manual 1.2.0
This manual may be updated from time to time. Please check for updates on our website2.
1
http://forum.mixvibes.com
2
http://www.mixvibes.com
50 / 50
 Loading...