

Page 1
User’s Manual
MODEL:T1
TRUE WIRELESS EARPHONE
Page 2

1. Introduction
Thank you for purchasing the Mixcder T1 True
Wireless Sports Earbuds. The earbuds feature Φ
8mm large speaker unit, wireless V5.0 technology
and CVC 8.0 call noise reduction, which guarantees
great performance and superior sound quality. The
user-friendly buttons make it easy to play/pause, skip
audio, answer/reject a call with hands-free feature. T1
is coupled with sweatproof design, therefore, it's
perfect for driving, Yoga, jogging, running, hiking, etc.
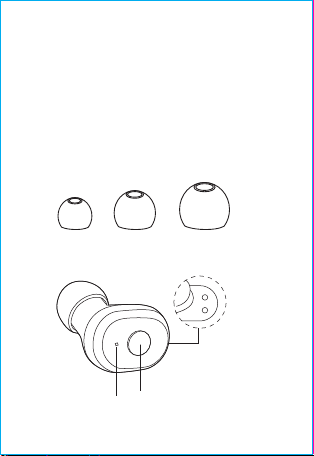
It comes with 3 pairs of ear tips, among which you can
choose the one that fits you most to maximize the
comfort and snug fit. Besides, the built-in rechargeable battery provides more music playing time and
standby time.
Note: Please read the user’s manual carefully before
using, and keep it properly for future reference.
2.Package Contents
-1 x Pair of Wireless Earphones
-1 x Charging Case
-1 x Micro USB Charging Cable
-1 x User Manual
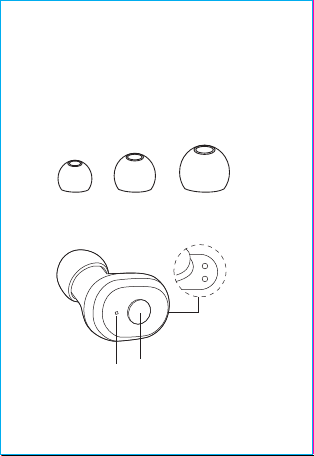
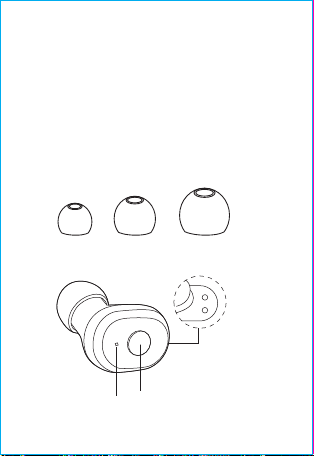
-3 x Pairs of Ear Tips (S/M/L)
(Note: One of them is equipped with earphones)
EN-1
Page 3
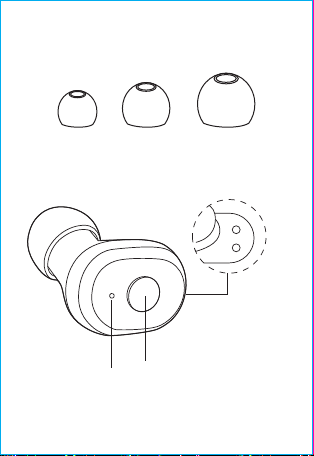
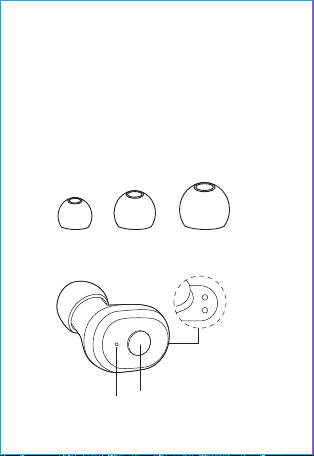
3. Overview
S M L
Power Button
LED
EN-2
Charging Contacts
Page 4
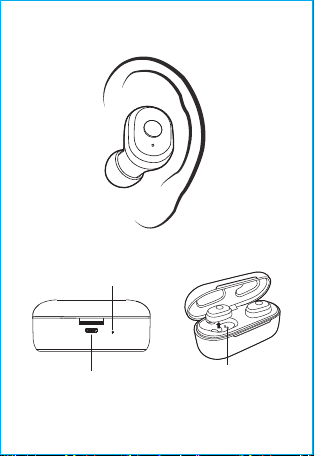
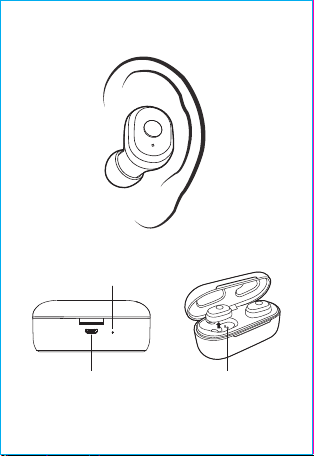
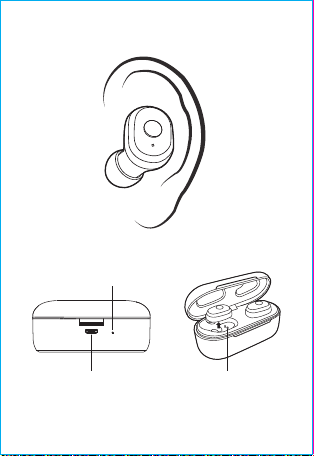
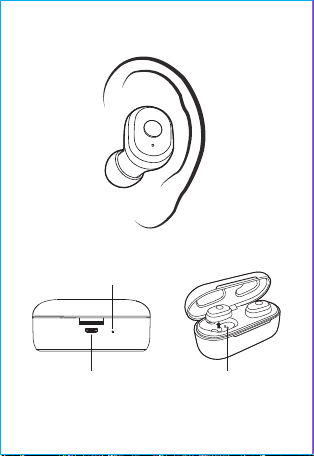
Wearing Instruction
Right ear
LED
Micro USB interface
for charging
Charging Contacts
EN-3
Page 5

4. Charging
4-1. Charge the Earphones
Insert the earphones into the charging case, and the
earphones will be charged automatically. During
charging, LED turns solid red. After fully charged, LED
turns into blue for 1min and then turns off.
Note: If it fails to charge the earphones, please
charge the charging case via USB cable.
Please make sure that the Earphones are fully
charged for the first-time use.
If you store the earphones in the charging case for a
long time, it may not turn on due to battery dead. On
condition you charge the charging case, both
earphones will automatically turn on again when you
take them out of the charging case.
4-2. Charge the Charging Case
Please charge the case via the supplied USB cable.
LED flashes red when charging, and turns to solid red
when fully charged. When the charging case is in low
battery, LED flashes blue.
5. Pairing
The earphones can both work individually as a single
earbud (Single Earphone Mode), or work as a pair of
EN-4
Page 6

stereo earphones (Dual Earphones Mode). Please
follow the different pairing steps to use in different
modes. Before getting started, please turn off other
Bluetooth devices nearby. And do not place the
earphone and the Bluetooth device more than 3ft/1m
away from each other.
Note: For the first time pairing, please take out both
earphones and re-insert them into the charging case
to activate the earphones.
If a PIN code is required for pairing, please try ''0000''
(4 zeros).
The earphones will stay in pairing mode for 3 minutes
at most. It will power off automatically if no device
found.
If paired device is switched off or Bluetooth
disconnected for 3 minutes, the earphones will power
off automatically.
6. Single Earphone Mode
A. Wake up the earphone by taking it out of the
charging case. It enters the pairing mode directly with
a prompt. LED flashes blue and red alternately.
B. Turn on the Bluetooth on your device. When
Mixcder T1 shows up on the Bluetooth list, click it to
connect.
EN-5
Page 7

C. If you have previously paired the earbud with a
device, it will reconnect with the device automatically
when you take it out of the charging case.
7. Dual Earphones Mode
A. Take out both earphones from the charging case,
and they will pair with each other automatically. Once
connected, they enter pairing mode with a prompt.
LED on the left earbud flashes blue and red alternately and LED on the right earbud flashes blue.
B. Turn on the Bluetooth on your device. When
Mixcder T1 shows up on the Bluetooth list, click it to
connect.
C. If you have previously paired the earbuds with a
device, it will reconnect with the device automatically
when you take the earphones out of the charging
case.
Note: If the two earphones fail to connect with each
other, please try the following steps by hands.
a). Press and hold the power buttons of two
Earphones for 3s to power off.
b). Press and hold the power buttons of two
Earphones for 15s until both LED indicators light off.
EN-6
Page 8

c). Press and hold the power buttons of two
Earphones for 2s again to power on (LED flashes
blue), or put the earphones back into the charging
case and take them out.
d). Two Earphones will automatically pair with each
other. Once successfully connected, LED on the left
earphone flashes blue and red alternatively and the
right earphone flashes blue.
8. Operating Instructions
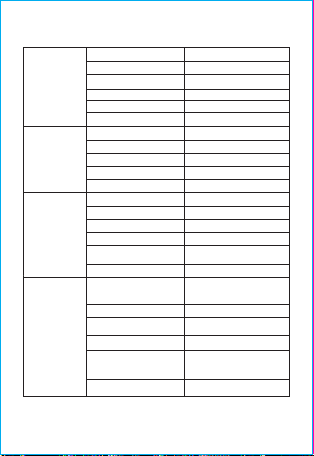
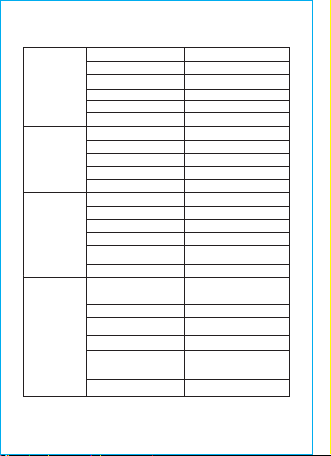
Function Operation
Power on
Power off
Reject a Call
Answer a Call
Call Switching
Take the earphones out of the charging case and they
will automatically power on (LED flashes blue).
Press and hold the power button for 2s (LED flashes
blue).
Put the earphones back into the charging case, it will
automatically power off.
Press and hold the power button for 3s.
Press and Hold the power button for 2s.
Press the power button once to answer the incoming
call and press again to end it (it works on both single
and dual mode).
During call, press and hold the power button for 2s to
switch the call between mobile phone and earphones.
EN-7
Page 9

During call, double press the power button to switch
Mute-on/off
Play/Pause Press the power button once to play/pause.
Next Track Press the power button twice on the right earphone.
Previous Track Press the power button twice on the left earphone.
Voice Assistant
mute-on/off. Under mute-on mode, your voice will not
be heard.
Press and hold the power button for 2s to activate voice
assistant (like siri).
9. Troubleshooting
Q: Both earbuds can connect with my phone
individually, but they can't connect with each
other now.
A: Take out both earbuds and power them off. Press
and hold the power buttons for 15s until both LED
indicators turn off. Power them on again and they will
automatically pair with each other.
Q: Why I can't hear any sound from the second
earphone in Dual Earphones Mode?
A:Please check if the second earphone has
successfully connected with the first one. If not,
please follow the instruction in "7. Dual Earphones
Mode—Note" section.
Q: Why the earphones can't be found by the phone?
EN-8
Page 10

A: Please check whether they’re in the pairing mode.
If left unconnected for a long while, they will fail to
enter the pairing mode. Please wake up the
earphones to access the pairing mode again.
Q: Why the earphones can't turn on automatically
when I take them out of the charging case?
A: Please recharge the charging case (when the
earphones are inside the case), and both earphones
will automatically turn on when you take them out.
Q: Why I fail to charge the charging case.
A: Please assure that the charging cable is intact and
plugged in correctly.
Q:Why the connection is not stable and the
sound is not very clear?
A: Please assure that there are no objects between
the earphones and your Bluetooth device, and no
radio or Wi-Fi interference nearby.
10. Warranty
The Mixcder T1 is covered by a 1-year manufacturer
warranty. For more information, visit: https://www.mixcder.com/.
Contact Customer Service at
(US) +1 (888) 588 1361 Mon-Sat 9AM-5PM (PT)
EN-9
Page 11
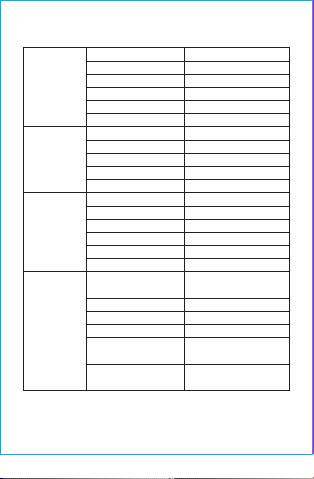
11. Specifications
EN-10
Φ4.0 x 1.5mm
Omni-directional
-42±3dB
2V
<2.2KΩ
20Hz-20KHz
Φ8mm
16Ω
90±3dB(1K,1mW)
10mW
20Hz-20KHz
5.0
10m/33ft
2.402GHz-2.48GHz
-82dBm
HSP/HFP/A2DP/AVRCP
Mixcder T1
Earphone:50mAh;
Charging Case:600mAh
Micro USB 5V/1A
about 5hours
about 8 hours
Earphone: about 1 hour;
Charging Case: about 1.5 hours
about 2000 hours
Microphone Unit
Directivity
Microphone
Spec.
Speaker Spec.
Wireless Spec.
Battery Spec.
Note:Features and technical specifications are subject
to change without notice, we apologize for any inconvenience.
S.P.L
Operating Voltage
Impedance
Frequency Response
Speaker Diameter
Impedance
S.P.L
Rated Power
Frequency Response
Wireless Version
Wireless Distance
Transmission Range (Hz)
Reception Sensitivity
Support Profile
Pairing Name
Battery Capability
Charging Port
Music Time
Talking Time
Charging Time
Standby Time
(power-off state)
Page 12

1. Einführung
Vielen Dank, dass Sie sich für die Mixcder T1 True
Wireless Sports-Ohrhörer entschieden haben. Diese
Ohrhörer sind mit einer 8-mm-Lautsprechereinheit,
kabelloser V5.0-Technologie und CVC 8.0
Rauschreduktion ausgestattet, wodurch großartige
Leistung und eine herausragende Klangqualität
gewährleistet sind. Die benutzerfreundlichen Tasten
sorgen für eine einfache Bedienung der Funktionen
Pause/Wiedergabe, Audio überspringen, sowie
Rufannahme/-ablehnung über Freisprechfunktionen.
Der T1 ist schweißbeständig und eignet sich somit
perfekt zum Radfahren, Yoga, Joggen, Laufen,
Wandern und weitere Aktivitäten. Ausgestattet mit
drei Paar Ohrstöpseln ist die passende Größe für
maximalen Komfort und optimale Passform
garantiert. Dank des integrierten Akkus sind ein
langer Musikgenuss und Standby-Zeit garantiert.
Hinweis: Lesen Sie bitte die Bedienungsanleitung
vor der erstmaligen Verwendung und bewahren Sie
sie auf.
2.Paketinhalt
DE-1
Page 13
- 1 x Paar kabellose Ohrhörer
- 1 x Ladebox
- 1 x Micro-USB-Ladekabel
- 1 x Bedienungsanleitung
- 3 x Paar Ohrstöpsel (S/M/L)
(Hinweis: Eines davon befindet sich schon am Ohrhörer)
3. Overview
S M L
Ladekontakte
Netztaste
LED
DE-2
Page 14
Trageanleitungen
Rechtes Ohr
LED
Micro-USB-Schnittstelle
für das Aufladen
DE-3
Ladekontakte
Page 15

4. Laden
4-1. Aufladen der Ohrhörer
Die Ohrhörer in die Ladebox einführen, danach
werden diese automatisch aufgeladen. Während des
Aufladens leuchtet die LED statisch rot. Nach der
vollständigen Aufladung leuchtet die LED eine Minute
lang blau, danach erlischt sie.
Hinweis: Falls sich die Ohrhörer nicht aufladen
lassen, laden Sie die Ladebox bitte über das
USB-Kabel auf.
Vor der erstmaligen Verwendung müssen die
Ohrhörer vollständig aufgeladen werden.
Wenn die Ohrhörer über einen längeren Zeitraum in
der Ladebox aufbewahrt werden, lassen sie sich
wegen der Tiefentladung des Akkus unter Umständen
nicht aufladen. Wenn die Ladebox aufgeladen wird,
schalten sich beide Ohrhörer automatisch ein, sobald
sie aus der Ladebox genommen werden.
4-2. Aufladung der Ladebox
Die Ladebox kann über das mitgelieferte USB-Kabel
aufgeladen werden. Während des Ladevorgangs
blinkt die rote LED. Nach der vollständigen Aufladung
leuchtet diese statisch rot. Bei niedrigem Akkuladestand der ladebox blinkt die blaue LED.
DE-4
Page 16

5. Koppeln
Die Ohrhörer können sowohl als Stereokopfhörer
(Dual-Kopfhörer-Modus) paarweise als auch als
einzelner Ohrstöpsel (Einzel-Ohrhörer-Modus)
verwendet werden. Beachten Sie bitte die
unterschiedlichen Kopplungsschritte für die
verschiedenen Modi. Schalten Sie bitte zuerst alle
anderen Bluetooth-Geräte in der Nähe aus. Stellen
Sie den Ohrhörer und das Bluetooth-Geräte bitte in
einer Entfernung von maximal einem Meter
zueinander auf.
Hinweis: Für die erstmalige Kopplung nehmen Sie
bitte beide Ohrhörer heraus und legen Sie sie in die
Ladebox ein, um die Ohrhörer zu aktivieren.
Geben Sie gegebenenfalls den PIN-Code für die
Kopplung ein: „0000“ (4 x Null).
Die Ohrhörer sind maximal drei (3) Minuten im
Kopplungsmodus. Wenn kein Gerät für die Kopplung
gefunden wird, schalten sie sich automatisch aus.
Wenn ein gekoppeltes Gerät ausgeschaltet oder die
Bluetooth-Verbindung für drei (3) Minuten getrennt
wird, schalten sich die Ohrhörer automatisch aus.
DE-5
Page 17

6. Einzel-Ohrhörer-Modus
A. Um den Ohrhörer zu aktivieren, legen Sie ihn bitte
in die Ladebox. Der Kopplungsmodus wird aktiviert.
Die LED blinkt abwechselnd blau und rot.
B. Schalten Sie Bluetooth an Ihrem Gerät ein. Sobald
Mixcder T1 in der Bluetooth-Liste angezeigt wird,
klicken Sie darauf, um die Verbindung herzustellen.
C. Falls der Ohrhörer bereits zuvor mit dem Gerät
gekoppelt war, wird die Verbindung mit dem Gerät
automatisch hergestellt, sobald Sie den Ohrhörer aus
der Ladebox nehmen.
7. Dual-Ohrhörer-Modus
A. Nehmen Sie beide Ohrhörer aus der Ladebox, die
Kopplung wird automatisch ausgeführt. Nachdem die
Verbindung hergestellt wurde, wird ein Ton ausgegeben und sie schalten in den Kopplungsmodus. Die
LED am linken Ohrhörer blinkt abwechselnd blau und
rot; die LED am rechten Ohrhörer blinkt blau.
B. Schalten Sie Bluetooth an Ihrem Gerät ein. Sobald
Mixcder T1 in der Bluetooth-Liste angezeigt wird,
klicken Sie darauf, um die Verbindung herzustellen.
DE-6
Page 18

C. Falls der Ohrhörer bereits zuvor mit dem Gerät
gekoppelt war, wird die Verbindung mit dem Gerät
automatisch hergestellt, sobald Sie den Ohrhörer aus
der Ladebox nehmen.
Hinweis: Wenn die Kopplung fehlschlägt, gehen Sie
bitte folgendermaßen vor:
a) Die Netztasten der beiden Ohrhörer drei (3)
Sekunden gedrückt halten, um sie auszuschalten.
b) Die Netztasten der beiden Ohrhörer 15 Sekunden
gedrückt halten, bis beide LEDs erlöschen.
c) Die Netztasten der beiden Ohrhörer erneut für
zwei (2) Sekunden gedrückt halten, um sie
einzuschalten (die blaue LED blinkt) oder die
Ohrhörer in die Ladebox legen und wieder
herausnehmen.
d) Die beiden Ohrhörer werden automatisch
gekoppelt. Nach der erfolgreichen Verbindung blinkt
die LED am linken Ohrhörer abwechselnd blau und
rot; die LED am rechten Ohrhörer blinkt blau.
DE-7
Page 19

8. Bedienungsanleitung
Die Ohrhörer aus der Ladebox nehmen; sie schalten
Einschalten
Ausschalten
Gespräch
ablehnen
Gespräch
annehmen
Gesprächsumschaltung
Stummschalten
Wiedergabe/Pause
Nächster Titel
Vorheriger
Titel
Sprachassistent
sich automatisch ein (die blaue LED blinkt).
Die Netztaste zwei (2) Sekunden gedrückt halten (die
blaue LED blinkt).
Die Ohrhörer wieder in die Ladebox legen; sie schalten sich
automatisch aus.
Die Netztaste drei (3) Sekunden gedrückt halten.
Die Netztaste zwei (2) Sekunden gedrückt halten.
Die Netztaste einmal drücken, um das eingehende
Gespräch anzunehmen; erneut drücken, um das
Gespräch zu beenden (sowohl im Einzel- als auch im
Dualmodus).
Während des Gesprächs die Netztaste zwei (2)
Sekunden gedrückt halten, um zwischen Mobiltelefon
und Ohrhörern umzuschalten.
Während des Gesprächs zweimal die Netztaste
drücken, um stumm zu schalten/die Stummschaltung
aufzuheben. Während der Stummschaltung ist Ihre
Sprache nicht hörbar.
Für die Wiedergabe/Pause einmal die Netztaste
drücken.
Zweimal die Netztaste am rechten Ohrhörer drücken.
Zweimal die Netztaste am linken Ohrhörer drücken.
Die Netztaste zwei (2) Sekunden gedrückt halten, um
den Sprachassistent (z. B. Siri) zu aktivieren.
DE-8
Page 20

9. Fehlerbehandlung
F: Beide Ohrhörer verbinden sich einzeln mit
meinem Telefon, aber sie verbinden sich nicht
miteinander.
A: Nehmen Sie beide Ohrhörer heraus und schalten
Sie sie aus. Die Netztasten der beiden Ohrhörer 15
Sekunden gedrückt halten, bis beide LEDs erlöschen.
Die beiden Ohrhörer erneut einschalten, danach
werden sie automatisch gekoppelt.
F: Warum höre ich im Dual-Ohrhörer-Modus
keinen Ton im zweiten Ohrhörer?
A: Bitte überprüfen, ob der zweite Ohrhörer sich
erfolgreich mit dem ersten verbunden hat. Ist dies
nicht der Fall, befolgen Sie bitte die Anweisungen im
Abschnitt „7. Dual-Ohrhörer-Modus—Hinweis“.
F: Wieso findet das Telefon die Ohrhörer nicht?
A: Vergewissern Sie sich bitte, dass sie im Kopplungsmodus sind. Wenn sie über einen längeren Zeitraum
nicht miteinander verbunden sind, schalten sie nicht
in den Kopplungsmodus. Aktivieren Sie bitte beide
Ohrhörer, um erneut auf den Kopplungsmodus
zuzugreifen.
F: Wieso schalten sich die Ohrhörer nicht
DE-9
Page 21

automatisch ein, wenn ich sie aus der Ladebox
nehme?
A: Laden Sie die Ladebox bitte auf (die Ohrhörer
befinden sich in der Ladebox. Dann schalten sich
beide Ohrhörer automatisch ein, wenn Sie sie
herausnehmen.
F: Wieso kann ich die Ladebox nicht aufladen?
A: Vergewissern Sie sich, dass das Ladekabel intakt
und richtig eingesteckt ist.
F: Wieso ist die Verbindung nicht stabil und der
Klang nicht klar?
A: Stellen Sie bitte sicher, dass sich zwischen den
Ohrhörern und dem Bluetooth-Gerät keine
Gegenstände befinden und dass in der Nähe keine
Funk- oder WLAN-Störungen auftreten.
DE-10
Page 22

10.Technische Daten
Mikrofon
Mikrofon
Lautsprecher
Wireless
atterie
Hinweis:
Feature und Spec. können ohne vorherige Ankündigung geändert werden, Wir bitten
um Entschuldigung für die Unannehmlichkeiten.
Richtung
Schalldruckkurve
Impedanz
Betriebsspannung
der Frequenzgang
Lautsprecher Durchmesser
Impedanz
Schalldruckkurve
Nennleistung
der Frequenzgang
Wireless-Version
Wireless-Reichweite
Übertragungsfrequenz
die Empfangsempfindlichkeit
Unterstützt
Pairing Namen
Batteriekapazität
Ladeanschluss
Spielzeit
Sprechzeit
Ladezeit
Stand-by-Zeit
DE-11
Φ4.0 x 1.5mm
Omni-direktional
-42±3dB
<2.2KΩ
2V
20Hz-20KHz
Φ8mm
16Ω
90±3dB(1K,1mW)
10mW
20Hz-20KHz
V5.0
33ft/10m
2.402GHz-2.48GHz
-82dBm
HSP/HFP/A2DP/AVRCP
Mixcder T1
Ohrhörer: 50mAh;
Ladebox: 600mAh
Micro USB 5V/1A
etwa 5 Stunden
etwa 8 Stunden
Ohrhörer: etwa 1 Stunden;
Ladebox: etwa 1.5 Stunden;
etwa 2000 Stunden
Page 23

1. Введение
Благодарим вас за приобретение беспроводных
спортивных наушников-вкладышей Mixcder T1.
Наушники оснащены большим динамиком
диаметром 8 мм, технологией беспроводной
связи V5.0 и системой шумоподавления CVC
8.0, что гарантирует отличную работу
наушников и превосходное качество звука.
Удобные кнопки позволяют легко
воспроизводить/приостанавливать аудио,
пропускать треки, отвечать на вызов/отклонять
его в режиме «свободные руки». Наушники
модели T1 имеют защиту от пота, и поэтому
идеально подходят для вождения автомобиля,
занятий йогой и бегом, походов и т. д. Наушники
поставляются в комплекте с 3 парами ушных
вкладышей, среди которых вы можете выбрать
те, которые подходят вам наилучшим образом,
для обеспечения максимального комфорта.
Встроенный аккумулятор обеспечивает более
продолжительную работу, как при
воспроизведении музыки, так и в режиме
ожидания.
Примечание:Пожалуйста,внимательно
прочтите это руководство перед началом
эксплуатации и сохраните его для дальнейшего
использования в справочных целях.
RU-1
Page 24
2.Содержимое упаковки
-1 x пара беспроводных наушников
-1 x футляр для зарядки
-1 x кабель зарядки с разъемом Micro USB
-1 x руководство пользователя
-3 x пары ушных вкладышей (S/M/L)
(Примечание: Одна из пар надета на наушники)
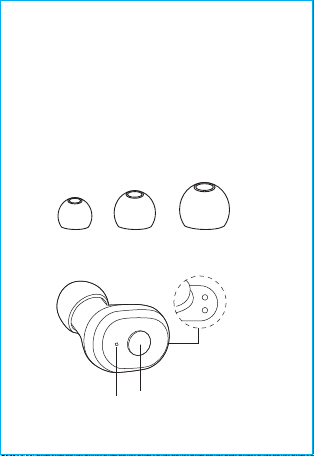
3. Overview
S M L
Контакты для зарядки
Кнопка питания
LED
RU-2
Page 25
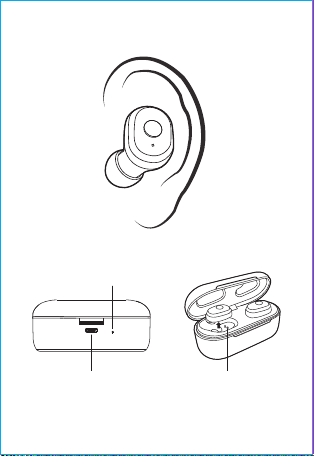
Как носить
Правое ухо
LED
Разъем Micro USB
для зарядки
RU-3
Контакты для
зарядки
Page 26

4. Зарядка
4-1. Зарядка наушников
Вставьте наушники в зарядный футляр, и они
начнут заряжаться автоматически. Во время
зарядки светодиод горит красным. После полной
зарядки светодиод в течение 1 минуты горит
синим, а затем выключается.
Примечание:Если не удается зарядить
наушники, зарядите сам футляр для зарядки с
помощью USB-кабеля.
Перед первым использованием наушники
необходимо полностью зарядить.
Если вы долго хранили наушники в футляре для
зарядки, они могут не включиться из-за
разряженной батареи. После того как вы зарядите
сам футляр, оба наушника автоматически
включатся, когда вы достанете их из зарядного
футляра.
4-2. Зарядка зарядного футляра
Зарядите футляр с помощью прилагаемого
USB-кабеля. Во время зарядки светодиод мигает
красным, после полной зарядки горит красным
непрерывно. Когда зарядный чехол разряжены
или почти разряжены, светодиод мигает синим
цветом.
RU-4
Page 27

5. Соединение
Наушники могут работать к ак по отдельности
(режим с одним наушником), так и в к ачестве пары
стереонаушников (режим с двумя наушниками).
Порядок действий по соединению наушников с
устройством воспроизведения зависит от
выбранного режима. Перед началом соединения,
пожалуйста, выключите другие устройства
Bluetooth, имеющиеся поблизости. Наушники и
соединяемое устройство Bluetooth должны
находиться на расстоянии не более 1 м друг от
друга.
Примечание:При первом соединении извлеките
оба наушника и снова вставьте их в футляр для
зарядки, чтобы активировать наушники.
Если для сопряжения требуется PIN-код,
попробуйте ввести ''0000'' (4 нуля).
Наушники будут находиться в режиме сопряжения
не более 3 минут. Они автоматически выключатся,
если устройство сопряжения не будет найдено.
Если устройство сопряжения выключено или
функция Bluetooth отключена в течение 3 минут,
наушники автоматически выключатся.
RU-5
Page 28

6. Режим с одним наушником
A. Разбудите наушник, вынув его из зарядного
футляра. Наушник сразу входит в режим
сопряжения, с подсказкой. Светодиод замигает
попеременно синим и красным цветом.
Б. Включите Bluetooth на своем устройстве. Когда
Mixcder T1 появится в списке устройств Bluetooth,
щелкните по нему для подключения.
В. Если вы ранее связывали наушник со своим
устройством, он автоматически подключится, как
только вы вытащите наушник из зарядного
футляра.
7. Режим с двумя наушниками
A. Извлеките оба наушника из зарядного футляра, и
они автоматически соединятся друг с другом.
Соединившись друг с другом, они перейдут в режим
сопряжения с устройством, с подсказкой. Светодиод
на левом наушнике замигает попеременно синим и
красным цветом, а светодиод на правом наушнике
замигает синим цветом.
Б. Включите Bluetooth на своем устройстве. Когда
RU-6
Page 29

Mixcder T1 появится в списке устройств Bluetooth,
щелкните по нему для подключения.
В. Если вы ранее связывали наушники с
устройством, они автоматически подключатся,
как только вы извлечете наушники из зарядного
футляра.
Примечание:Если два наушника не могут
соединиться друг с другом, попробуйте
выполнить следующие действия.
а) Нажмите и удерживайте кнопки питания на
обоих наушниках в течение 3 секунд, чтобы
выключить питание.
б) Нажмите и удерживайте кнопки питания на
обоих наушниках в течение 15 сек, до тех пор,
пока оба светодиода не погаснут.
в) Нажмите и удерживайте кнопки питания на
обоих наушниках еще в течение 2 секунд, чтобы
включить питание (светодиод замигает синим
цветом), или вставьте наушники обратно в
зарядный футляр и вновь выньте их из футляра.
г) Два наушника автоматически соединятся друг с
другом. Как только соединение будет успешно
установлено, светодиод на левом наушнике
замигает попеременно синим и красным цветом,
а светодиод на правом наушнике замигает синим.
RU-7
Page 30

8. Инструкции по эксплуатации
Извлеките наушники из зарядного футляра, и они
Включение
питания
Выключение
питания
Отклонение
вызова
Ответ
на вызов
Переключени
е вызова
Включение/в
ыключение
звука
Воспроизвед
ение/пауза
Следующий
трек
Предыдущий
трек
Голосовой
помощник
автоматически включатся (светодиод замигает
синим цветом).
Нажмите и удерживайте кнопку питания в течение 2
секунд (светодиод замигает синим цветом).
Поместите наушники обратно в зарядный футляр, и они
автоматически выключатся.
Нажмите и удерживайте кнопку питания в течение 3
секунд.
Нажмите и удерживайте кнопку питания в течение 2
секунд.
Нажмите кнопку питания один раз, чтобы ответить
на входящий вызов, и нажмите ее снова, чтобы
завершить вызов (для обоих режимов – с одним и с
двумя наушниками).
Во время разговора нажмите и удерживайте кнопку
питания в течение 2 секунд, чтобы переключить
вызов с мобильного телефона на наушники (и
наоборот).
Во время разговора дважды нажмите кнопку
питания, чтобы включить/выключить звук. В
режиме отключения звука ваш голос не будет
слышен.
Нажмите кнопк у питания один раз для активации
воспроизведения/паузы.
Дважды нажмите кнопку питания на правом
наушнике.
Дважды нажмите кнопку питания на левом
наушнике.
Нажмите и удерживайте кнопку питания в течение 2
секунд, чтобы активировать голосового помощника
(например, Siri).
RU-8
Page 31

9. Устранение неисправностей
В: Оба наушника могут соединяться с моим
телефоном по отдельности, но не могут
соединиться друг с другом.
О: Выньте оба наушника из футляра и выключите
их. Нажмите и удерживайте кнопки питания на
обоих наушниках в течение 15 сек, до тех пор,
пока оба светодиода не погаснут. Включите
наушники снова, и они автоматически соединятся
друг с другом.
В: Почему я не слышу звук во втором
наушнике в режиме с двумя наушниками?
О: Проверьте, успешно ли второй наушник
соединился с первым. Если это не так, то
следуйте инструкциям в п.7. «Режим с двумя
наушниками – Примечание».
В: Почему мой телефон не может найти
наушники?
О: Проверьте, вошли ли наушники в режим
сопряжения. Если наушники не были подключены
в течение длительного времени, они не смогут
войти в режим сопряжения. Пожалуйста,
разбудите наушники, чтобы они смогли вновь
войти в режим сопряжения.
RU-9
Page 32

В:Почему наушники не включаются
автоматически, когда я вынимаю их из
зарядного футляра?
О: Пожалуйста, зарядите футляр для зарядки
(когда наушники находятся внутри футляра), и
оба наушника автоматически включатся, когда вы
достанете их.
В: Почему я не могу зарядить футляр для
зарядки.
О: Убедитесь, что зарядный кабель не поврежден
и правильно подключен.
В: Почему связь не стабильна и звук не очень
чистый?
О: Убедитесь, что между наушниками и вашим
устройством Bluetooth нет никаких предметов, и
поблизости нет помех от радио или Wi-Fi.
RU-10
Page 33

10. Характеристики
Микрофон
Направленность
Характеристи
ки микрофона
Характеристи
ки динамиков
Характеристи
ки Wireless
Величина звукового
давления
Импеданс
Рабочее напряжение
диапазон воспроизводимых
частот
Диаметр
Импеданс
Величина звукового давления
номинальная мощность
Частотные характеристики
ВерсияBluetooth
Расстояниедействия
Частотапередачи
чувствительность
Профиль для дистанционно
го управления
Сопряжение имя
емкость батареи
Разъем
в режиме прослушива
Характеристи
кибатареи
ния музыки
в режиме разговора
Время заряда
в режиме ожидания
Примечание: Функции и технические характеристики могут быть изменены без
предварительного уведомления.
RU-11
Φ4.0 x 1.5mm
всенаправленная
-42±3dB
<2.2KΩ
2 В
20Hz-20KHz
Φ8mm
16Ω
90±3dB(1K,1mW)
10mW
20Hz-20KHz
V5.0
33ft/10m
2.402GHz-2.48GHz
-82dBm
HSP/HFP/A2DP/AVRCP
Mixcder T1
наушники: 50mAh;
зарядный чехол: 600mAh
Micro USB 5V/1A
примерно 5 часов
примерно 8 часов
наушники:
примерно 1 часов;
зарядный чехол:
примерно 1.5 часов
примерно 2000 часов
Page 34

1. Introduction
Merci d’avoir fait l’acquisition des écouteurs Mixcder T1
True Wireless Sports. Ils sont dotés d'un haut-parleur
de 8 mm, de la technologie sans fil V5.0 et d'une
réduction du bruit des appels CVC 8.0, ce qui garantit
des performances exceptionnelles et une qualité
sonore supérieure. Des boutons conviviaux facilitent la
lecture/pause, saut audio, répondre/refuser un appel
avec la fonction mains libres. T1 est doublé d’un design
résistant à la transpiration, il est donc parfait pour la
conduite, le yoga, le jogging, la course, la randonnée,
etc. Il est livré avec 3 paires d'embouts auriculaires
parmi lesquels vous pouvez choisir celui qui vous
convient le mieux pour maximiser le confort et le bon
ajustement. En outre, la batterie rechargeable intégrée
offre plus de temps de lecture de musique et de veille.
Note:Veuillez lire attentivement le manuel avant
l'utilisation et le conserver soigneusement pour toute
consultation ultérieure.
2. Contenu de l’emballage
-1 x paire d’écouteurs sans fil
-1 x boîtier de recharge
-1 x câble de chargement micro USB
FR-1
Page 35
-1 x manuel d'utilisation
-3 x paires d'embouts auriculaires (S/M/L)
(Remarque : l'une d'elles est équipée d'écouteurs)
3. Vue d’ensemble
S M L
Contacts de charge
Bouton d'alimentation
LED
FR-2
Page 36
Instructions de port
Oreille droite
LED
Micro USB pour le
chargement de la batterie
FR-3
Contacts de charge
Page 37

4. Chargement
4-1 Chargement des écouteurs
Introduisez les écouteurs dans le boîtier de recharge
pour leur chargement automatique. Pendant
l’opération, le voyant LED vire au rouge permanent.
Une fois le chargement complet achevé, le voyant
LED vire au bleu pendant 1 minute, puis s’éteint.
Remarque: Si le chargement des écouteurs échoue,
veuillez charger le boîtier de recharge via le câble USB.
Veuillez vous assurer que les écouteurs sont
complètement chargés lors de la première utilisation.
En cas de rangement des écouteurs dans le boîtier
de recharge pendant une longue période, ceux-ci
risquent de ne pas s'allumer si la batterie est à plat.
En cas de recharge du boîtier de recharge, les deux
écouteurs se rallumeront automatiquement lorsque
vous les retirez dudit boîtier.
4-2. Chargement du boîtier de recharge
Chargement du boîtier via le câble USB fourni. Le
voyant LED clignote en rouge pendant le chargement
et vire au rouge permanent une fois la charge
complète. Lorsque la batterie des boîte de chargeest
faible, le voyant LED se met à clignoter en bleu.
FR-4
Page 38

5. Couplage
Les écouteurs peuvent fonctionner individuellement
comme simple écouteur (mode simple écouteur) ou
en tant que double écouteurs stéréo (mode double
écouteurs). Veuillez suivre les différentes étapes de
couplage à utiliser dans différents modes. Avant de
commencer, veuillez désactiver les autres
périphériques Bluetooth à proximité. Ne pas placer
les écouteurs et le périphérique Bluetooth à plus de 1
m l'un de l'autre.
Remarque: Lors du couplage pour la première fois,
retirez les deux écouteurs et réinsérez-les dans le
boîtier de recharge pour les activer.
Si un code PIN est requis pour le couplage, veuillez
essayer «0000» (4 zéros).
Les écouteurs resteront en mode de couplage
pendant 3 minutes au maximum. Ils s'éteignent
automatiquement si aucun appareil de couplage n'est
trouvé.
Si l'appareil couplé est éteint ou si Bluetooth est
déconnecté pendant 3 minutes, les écouteurs
s'éteignent automatiquement.
FR-5
Page 39

6. Mode écouteur unique
A. Activez l’écouteur en le sortant du boîtier de
recharge. Il entre directement en mode couplage
avec une invite. Le voyant LED clignote alternativement en bleu et rouge.
B. Activer le Bluetooth sur votre appareil. Pour vous
connecter, cliquez sur Mixcder T1 lorsqu’il apparaît
dans la liste Bluetooth.
C. Si vous avez déjà couplé l’écouteur à un appareil,
celui-ci se reconnectera automatiquement à l’appareil
lorsque vous le retirerez de son boîtier de recharge.
7. Mode double écouteur
A. Retirez les deux écouteurs du boîtier de recharge.
Ils se coupleront l’un à l’autre automatiquement. Une
fois connectés, ils entreront en mode couplage avec
une invite. La LED de l’écouteur gauche clignote
alternativement en bleu et rouge et la LED de
l’écouteur droit en bleu.
B. Activer le Bluetooth sur votre appareil. Pour vous
connecter, cliquez sur Mixcder T1 lorsqu’il apparaît
dans la liste Bluetooth.
FR-6
Page 40

C. Si vous avez déjà couplé les écouteurs à un
appareil, ceux-ci se reconnecteront automatiquement à l’appareil lorsque vous les retirerez du boîtier
de recharge.
Remarque: Si les deux écouteurs ne parviennent
pas à se connecter entre eux, essayez les étapes
suivantes manuellement.
a). Appuyez sur les boutons d’alimentation des deux
écouteurs et maintenez-les enfoncés pendant 3
secondes pour éteindre.
b). Appuyez sur les boutons d’alimentation des deux
écouteurs et maintenez-les enfoncés pendant 15
secondes jusqu’à ce que les deux voyants
s’éteignent.
c). Appuyez de nouveau sur les boutons d’alimentation des deux écouteurs et maintenez-les enfoncés
pendant 2 secondes (le voyant clignote en bleu), ou
replacez les écouteurs dans le boîtier de recharge et
retirez-les.
d). Deux écouteurs seront automatiquement couplés
l’un à l’autre. Une fois connectés avec succès, la LED
de l’écouteur gauche clignote alternativement en bleu
et rouge et la LED de l’écouteur droit en bleu.
FR-7
Page 41

8. Instructions d'utilisation
Sortez les écouteurs du boîtier de recharge; ils
s’allumeront automatiquement (le voyant clignote en
Mise sous
tension
Mise
hors tension
Rejeter un
appel
Répondre à
un appel
Commutation
d'un appel
Activer/désactiver le mode muet
Lecture/Pause
Prochaine
track
Track
précédente
Assistance
vocale
bleu).
Appuyez sur le bouton d'alimentation et maintenez-le
enfoncé pendant 2 s (le voyant clignote en bleu).
Remettez les écouteurs dans le boîtier de recharge, ils
s'éteindront automatiquement.
Appuyez sur le bouton Alimentation et maintenez-le enfoncé
pendant 3 s.
Appuyez sur le bouton Alimentation et maintenez-le enfoncé
pendant 2 s.
Appuyez une fois sur le bouton d'alimentation pour
répondre à l'appel entrant et appuyez à nouveau pour
mettre fin à l'appel (cela fonctionne en mode simple ou
double).
Pendant un appel, maintenez le bouton d'alimentation
enfoncé pendant 2 secondes pour basculer l'appel
entre le téléphone portable et les écouteurs.
Pendant l'appel, appuyez deux fois sur le bouton
d'alimentation pour activer/désactiver le mode muet.
En mode muet, votre voix ne sera pas entendue.
Appuyez une fois sur le bouton d'alimentation pour
lire/mettre en pause.
Appuyez deux fois sur le bouton d'alimentation de
l'écouteur droit.
Appuyez deux fois sur le bouton d'alimentation de
l'écouteur gauche.
Appuyez sur le bouton d'alimentation et maintenez-le
enfoncé pendant 2 secondes pour activer l'assistance
vocale (comme Siri).
FR-8
Page 42

9. Dépannage
Q : Les deux écouteurs peuvent se connecter à
mon téléphone individuellement, mais, alors, ils
ne peuvent plus se connecter l’un à l’autre.
R : Retirez les deux écouteurs et éteignez-les.
Appuyez sur les boutons d’alimentation des deux
écouteurs et maintenez-les enfoncés pendant 15
secondes jusqu’à ce que les deux voyants LED
s’éteignent. Remettez-les sous tension et ils
s’apparieront automatiquement.
Q : Pourquoi est-ce que je ne peux pas entendre
le son du second écouteur en mode double
écouteurs ?
R : Vérifiez si le deuxième écouteur s'est connecté
avec succès au premier. Sinon, veuillez suivre les
instructions de la section «7 Mode Double écouteurs
— Note ».
Q : Pourquoi est-ce que les écouteurs ne sont pas
détectés par le téléphone ?
R : Vérifiez qu’ils sont en mode de couplage. S’ils ne
sont pas connectés pendant un long moment, ils ne
pourront pas entrer en mode de couplage. Veuillez
réactiver les écouteurs pour accéder au mode de
couplage.
FR-9
Page 43

Q : Pourquoi les écouteurs ne s'allument-ils pas
automatiquement lorsque je les sors du boîtier
de recharge ?
R : Rechargez le boîtier de recharge (lorsque les
écouteurs sont à l’intérieur de celui-ci); les deux
écouteurs s’allumeront automatiquement lorsque
vous les retirerez.
Q : Pourquoi est-ce que je ne parviens pas à
charger le boîtier de recharge ?
R : Veuillez vous assurer que le câble de recharge est
intact et branché correctement.
Q : Pourquoi est-ce que la connexion n'est pas
stable et le son pas très clair ?
R : Assurez-vous qu'aucun objet ne se trouve entre
les écouteurs et votre périphérique bluetooth, ni
qu’aucune interférence radio ou Wi-Fi ne se trouve à
proximité.
FR-10
Page 44
10. Spécifications
Microphone
Spécifications
du microphone
Spécifications
du haut-parleur
Spécifications
du Wireless
Spécifications
du Batterie
Remarque: Les caractéristiques et les spécifications techniques sont sujettes à
modification sans préavis, nous nous excusons pour tout inconvénient.
Directivité
S.P.L
Impédance
Voltage
Fréquence de Réponse
Diamètre du haut-parleur
Impédance
S.P.L
Puissance Nominale
Gamme de fréquence
Version Wireless
Distance du Wireless
Fréquence de transmission
Sensibilité de réception
Profil de support
nom appariement
Capacité de batterie
Port de charge
Durée de musique
Durée de parole
Durée de charge
Durée d’attente
FR-11
Φ4.0 x 1.5mm
Omnidirectionnelle
-42±3dB
<2.2KΩ
2V
20Hz-20KHz
Φ8mm
16Ω
90±3dB(1K,1mW)
10mW
20Hz-20KHz
V5.0
33ft/10m
2.402GHz-2.48GHz
-82dBm
HSP/HFP/A2DP/AVRCP
Mixcder T1
Ecouteur: 50 mAh;
Boîte de charge: 600mAh
Micro USB 5V/1A
environ 5 heures
environ 8 heures
Ecouteur: environ 1 heures ;
Boîte de charge: environ
1.5 heures
environ 2000 heures
Page 45

1. Introducción
Gracias por adquirir los auriculares Mixcder T1
True Wireless Sports. Estos auriculares cuentan
con una unidad de altavoz grande de 8 mm de
diámetro, La tecnología inalámbrica V5.0 y
reducción de ruido de las llamadas CVC 8.0, lo que
garantiza un rendimiento óptimo y una calidad de
sonido superior. Los prácticos botones permiten
reproducir/pausar, activar/desactivar el audio y
responder/rechazar una llamada en el modo de
manos libres. El T1 tiene un diseño resistente a la
transpiración, por lo que es perfecto para
actividades como conducir, practicar yoga, salir a
correr, hacer senderismo, etc. Incluye tres pares de
Almohadillas de Silicona para garantizar un ajuste
y comodidad óptimos. Además, la batería
recargable integrada proporciona más tiempo de
reproducción y autonomía.
Nota: Lea atentamente el manual del usuario antes
de usarlo y guárdelo correctamente para futuras
consultas.
ES-1
Page 46
2.Contenido del paquete
-1 x par de auriculares inalámbricos
-1 x estuche de carga
-1 x cable de carga micro USB
-1 x manual del usuario
-tres pares de Almohadillas de Silicona (S/M/L)
(Nota: uno de ellos incorpora los auriculares)
3. Presentación
S M L
Contactos de carga
Botón de encendido/apagado
LED
ES-2
Page 47
Instrucciones de uso
Oreja derecha
LED
Interfaz micro USB
para la carga
Contactos de carga
ES-3
Page 48

4. Carga
4-1. Cargar los auriculares
Introduzca los auriculares en el estuche de carga
para que se carguen automáticamente. Durante la
carga, el LED se encenderá en rojo. Una vez que se
haya completado la carga, el LED cambiará a azul
durante un minuto y después se apagará.
Nota: en caso de que no se carguen los auriculares,
cargue el estuche de carga con el cable USB.
La primera vez que utilice los auriculares, asegúrese
de que estén completamente cargados.
Si tiene previsto guardar los auriculares en el estuche
de carga durante un periodo prolongado, es posible
que no se enciendan porque se haya agotado la
batería. Cargue el estuche de carga para que ambos
auriculares se vuelvan a encender automáticamente
cuando los saque del estuche.
4-2. Cargar el estuche de carga
Cargue el estuche con el cable USB suministrado. El
LED parpadeará en rojo durante la carga y cambiará
a rojo fijo cuando el estuche esté completamente
cargado.Cuando el estuche de carga tiene poca
batería, el LED parpadeará en azul .
ES-4
Page 49

5. Emparejamiento
Los auriculares pueden funcionar de forma individual
(modo de un solo auricular) o como un par de
auriculares estéreo (modo de dos auriculares).Por
favor, siga los diferentes pasos de emparejamiento
para usar en diferentes modos. Siga los distintos
pasos de emparejamiento para utilizar cada modo.
Antes de empezar, apague todos los dispositivos
Bluetooth a su alrededor y procure que la distancia
entre los auriculares y el dispositivo Bluetooth no sea
superior a 1m (3 pies).
Nota: la primera vez que lleve a cabo el emparejamiento, saque los dos auriculares del estuche de
carga y vuelva a introducirlos para activarlos.
Si se solicita un código PIN, introduzca «0000»
(cuatro ceros).
Los auriculares permanecerán en modo de
emparejamiento durante tres minutos como máximo.
Se apagarán automáticamente si no se encuentra
ningún dispositivo para realizar el emparejamiento.
Si se apaga el dispositivo emparejado o si se
desconecta el Bluetooth durante tres minutos, los
auriculares se apagarán automáticamente.
ES-5
Page 50

6. Modo de un solo auricular
A. Saque el auricular del estuche de carga para
activarlo. Entrará directamente en modo de
emparejamiento con una indicación. El LED
parpadeará en azul y rojo de forma alternada.
B. Encienda el Bluetooth en su dispositivo. Cuando el
Mixcder T1 aparezca en la lista de dispositivos
Bluetooth, selecciónelo para establecer la conexión.
C. Si previamente ya ha emparejado el auricular con
un dispositivo, se volverá a conectar con el
dispositivo automáticamente cada vez que lo saque
del estuche de carga.
7. Modo de dos auriculares
A. Saque ambos auriculares del estuche de carga
para que se emparejen automáticamente entre ellos.
Una vez conectados, entrarán en modo de emparejamiento con una indicación. El LED del auricular
izquierdo parpadeará en azul y rojo de forma
alternada, y el LED del auricular derecho parpadeará
en azul.
B. Encienda el Bluetooth en su dispositivo. Cuando el
Mixcder T1 aparezca en la lista de dispositivos
ES-6
Page 51

Bluetooth, selecciónelo para establecer la conexión.
C. Si previamente ya ha emparejado los auriculares
con un dispositivo, se volverán a conectar con el
dispositivo automáticamente cada vez que los saque
del estuche de carga.
Nota: si los dos auriculares no se conectan entre
ellos, siga estos pasos:
a). Mantenga pulsados los botones de encendido/apagado de los dos auriculares durante tres segundos
para apagarlos.
b). Mantenga pulsados los botones de encendido/apagado de los dos auriculares durante 15 segundos
hasta que se apaguen los indicadores LED.
c). Mantenga pulsados los botones de encendido/apagado de los dos auriculares durante dos segundos
para encenderlos (el LED parpadeará en azul) o
vuelva a introducir y sacar los auriculares del estuche
de carga.
d). Los dos auriculares se emparejarán automáticamente entre ellos. Una vez que se hayan conectado,
el LED del auricular izquierdo parpadeará en azul y
rojo de forma alternada, y el LED del auricular
derecho parpadeará en azul.
ES-7
Page 52

8. Instrucciones de uso
Saque los auriculares del estuche de carga para que
se enciendan automáticamente (el LED parpadeará en
Encender
Apagar
Rechazar una
llamada
Responder a
una llamada
Transferir una
llamada
Activar/Desactivar el audio
Reproducir
/Pausar
Pista siguiente
Pista anterior
Asistente de
voz
azul).
Mantenga pulsado el botón de encendido/apagado
durante dos segundos (el LED parpadeará en azul).
Vuelva a introducir los auriculares en el estuche de carga
para que se apaguen automáticamente.
Mantenga pulsado el botón de encendido/apagado durante
tres segundos.
Mantenga pulsado el botón de encendido/apagado durante
dos segundos.
Pulse el botón de encendido/apagado una vez para
responder a la llamada entrante y vuelva a pulsarlo
para finalizarla (se aplica a los dos modos).
Durante la llamada, mantenga pulsado el botón de
encendido/apagado durante dos segundos para
transferir la llamada entre el teléfono móvil y los
auriculares.
Durante la llamada, pulse dos veces el botón de
encendido/apagado para activar/desactivar el audio.
En el modo de audio activado, no se escuchará su voz.
Pulse el botón de encendido/apagado una vez para
reproducir/pausar.
Pulse dos veces el botón de encendido/apagado del
auricular derecho.
Pulse dos veces el botón de encendido/apagado del
auricular izquierdo.
Mantenga pulsado el botón de encendido/apagado
durante dos segundos para activar el asistente de voz
(como Siri).
ES-8
Page 53

9. Solución de problemas
P: Ambos auriculares pueden conectarse a mi
teléfono individualmente, pero ahora no pueden
conectarse entre ellos.
R:Saque ambos auriculares y apáguelos. Mantenga
presionados los botones de encendido durante 15
segundos hasta que ambos indicadores LED se
apaguen. Enciéndalos de nuevo y se emparejarán
automáticamente entre ellos.
P: ¿Por qué no puedo escuchar el sonido del
segundo auricular en el modo de doble
auriculares?
R: Compruebe si el segundo auricular se ha
conectado correctamente con el primero. Si no es
así, siga las instrucciones en la sección «7. Modo de
dos auriculares - Nota».
P:¿por qué los auriculares no pueden ser
encontrados por el teléfono?
R: Por favor, compruebe si están en el modo de
emparejamiento. Si se deja desconectado por un
largo tiempo, no podrán ingresar al modo de
emparejamiento. Por favor, despierte los auriculares
para acceder nuevamente al modo de emparejamiento.
ES-9
Page 54

P:¿Por qué los auriculares no se pueden
encender automáticamente cuando los saco del
estuche de carga?
R: Recargue la caja de carga (cuando los auriculares
están dentro de la caja), y ambos se encenderán
automáticamente cuando los saque.
P: ¿Por qué no puedo cargar el estuche de
carga?
R: Asegúrese de que el cable de carga esté intacto y
enchufado correctamente.
P: ¿Por qué la conexión no es estable y el sonido
no es muy claro?
R: Asegúrese de que no haya objetos entre los
auriculares y el dispositivo Bluetooth ni haya
interferencias de radio o Wi-Fi.
ES-10
Page 55
10.Especificaciones técnicas
Unidad del micrófono
Especificaciones técnicas
del micrófono
Especificaciones técnicas
del altavoz
Especificaciones técnicas
del Wireless
Directividad
Nivel de presión sonora(SPL)
Impedancia
Tensión
Respuesta de frecuencia
Diámetro del altavoz
Impédance
Nivel de presión sonora(SPL)
Potencia nominal
Respuesta en frecuencia
Versión inalámbrica
Distanciainalámbrica
Rango de Transmisión(Hz)
Sensibilidad de recepción
Perfil de soporte
nombre de emparejamiento
Capacidad de la batería
Port de charge
Especificaciones técnicas
de la
Tiempo de música
Tiempo de conversación
Tiempo de carga
Tiempo de espera
Nota: Las características y especificaciones técnicas están sujetas a cambios sin
previo aviso, le pedimos disculpas por cualquier inconveniente.
ES-11
Φ4.0 x 1.5mm
omnidireccional
-42±3dB
<2.2KΩ
2V
20Hz-20KHz
Φ8mm
16Ω
90±3dB(1K,1mW)
10mW
20Hz-20KHz
V5.0
33pies/10m
2.402GHz-2.48GHz
-82dBm
HSP/HFP/A2DP/AVRCP
Mixcder T1
Auriculares: 50mAh;
Estuche de carga: 600mAh
Micro USB/ 5V-1A
aproximadamente 5 horas
aproximadamente 8 horas
Auriculares:
aproximadamente 1 horas;
Estuche de carga:
aproximadamente 1.5 horas
aproximadamente 2000 horas
Page 56

1. Introduzione
Grazie per aver scelto di acquistare gli auricolari sportivi
Mixcder T1 True Wireless. Gli auricolari sono dotati di
una grande unità altoparlante Φ8mm, della tecnologia
wireless V5.0 e della funzionalità di riduzione del
rumore CVC 8.0, che garantisce prestazioni ottimali
oltre a una qualità audio eccellente. I pulsanti facili da
usare semplificano le operazioni di riproduzione/pausa,
salto audio, risposta/rifiuto di una chiamata con la
funzionalità mani-libere. Il dispositivo T1 è dotato di un
design a prova di sudore e sono quindi perfette per
guidare, fare, jogging, corsa, escursionismo, ecc. Il
prodotto viene fornito in dotazione con 3 paia di
auricolari, fra i quali è possibile scegliere quello più
adatto per ottimizzare il comfort e l’indossabilità. Inoltre,
la batteria ricaricabile integrata offre un tempo di
riproduzione e di stand-by più lungo.
Nota:
Si prega di leggere con attenzione il manuale
dell’utente prima dell’uso e di conservarlo in modo
adeguato per poterlo consultare in futuro.
2.Contenuto della confezione
IT-1
Page 57
-1 x paio di cuffie wireless
-1 x custodia di caricamento
-1 x cavo di caricamento micro-USB
-1 x manuale dell’utente
-3 x paia di punte auricolari (S/M/L)
(Nota: Un paio è installato sulle cuffie)
3. Panoramica
S M L
Contatti di caricamento
Tasto Accensione
LED
IT-2
Page 58
Istruzioni per indossarle
Orecchio destro
LED
Interfaccia micro-USB
per il caricamento
IT-3
Contatti di
caricamento
Page 59

4. Caricamento
4-1. Caricare le cuffie auricolari
Inserire le cuffie auricolari nella custodia di caricamento,
e si caricheranno in modo automatico. In fase di
caricamento, il LED diventa rosso fisso. Dopo il
caricamento completo, il LED diventa blu per 1
minuto e poi si spegne.
Nota: Qualora non sia possibile caricare le cuffie,
caricare la custodia tramite il cavo USB.
Verificare che le cuffie siano completamente cariche
prima di iniziare a usarle.
Qualora le cuffie vengano tenute nella custodia a
lungo, potrebbero non accendersi se la batteria è
completamente scarica. A condizione che venga
caricata la custodia di caricamento, le due Cuffie
auricolari si accenderanno automaticamente quando
vengono estratte dalla custodia di caricamento.
4-2. Caricare la custodia di caricamento
Si prega di caricare la custodia servendosi del cavo
USB fornito in dotazione. Il LED lampeggia di colore
rosso in fase di caricamento e la luce diventa fissa
quando il caricamento del dispositivo è giunto al
termine. Quando custodia di caricamento hanno le
batterie scariche, il LED lampeggia di colore blu.
IT-4
Page 60

5. Abbinamento
Le cuffie possono funzionare individualmente come
auricolare singolo (Modalità auricolare singolo),
oppure funzionano come coppia di cuffie stereo
(Modalità doppia cuffia). Si prega di attenersi ai vari
passaggi di abbinamento per l’uso nelle diverse
modalità. Prima di iniziare spegnere gli altri dispositivi
Bluetooth nelle immediate vicinanze. Non mettere le
cuffie e il dispositivo Bluetooth a più di 1m l’uno
dall’altro.
Nota: Per il primo abbinamento, estrarre le due cuffie
e re-inserirle nella custodia di caricamento per
attivare le cuffie.
Qualora il codice PIN venga richiesto per l’abbinamento,
digitare “0000” (4 zeri).
Le cuffie resteranno nella modalità di abbinamento
per un massimo di 3 minuti. Il dispositivo si spegnerà
automaticamente qualora non venga trovato un
dispositivo abbinato.
Qualora il dispositivo abbinato venga spento o il
Bluetooth venga scollegato per 3 minuti, le cuffie si
spegneranno automaticamente.
IT-5
Page 61

6. Modalità Cuffia Singola
A. Attivare la cuffia estraendola dalla custodia di
caricamento. Accede direttamente alla modalità di
abbinamento con un segnale. Il LED lampeggia in
modo alternato di blu e di rosso.
B. Attivare il dispositivo Bluetooth sul dispositivo.
Quando il Mixcder T1 compare sull’elenco Bluetooth,
fare clic per eseguire la connessione.
C. Qualora la cuffia sia stata abbinata in precedenza
a un dispositivo, si ricollegherà automaticamente al
dispositivo non appena viene estratta dalla custodia
di caricamento.
7. Modalità doppia cuffia
A. Estrarre le due cuffie dalla custodia di caricamento
e si abbineranno fra loro automaticamente. Dopo
aver eseguito la connessione, accedono alla modalità
di abbinamento con un segnale. Il LED sull’auricolare
sinistro lampeggia di colore blu e rosso in modo
alternato e il LED sull’auricolare destro lampeggia di
colore blu.
B. Attivare il Bluetooth sul proprio dispositivo. Quando
IT-6
Page 62

il Mixcder T1 compare sull’elenco Bluetooth, fare clic
per eseguire la connessione.
C. Qualora in precedenza siano state abbinate le
cuffie con un dispositivo, quest’ultimo si ricollegherà
automaticamente al dispositivo quando le cuffie
vengono estratte dalla custodia di caricamento.
Nota: Qualora le due cuffie non si colleghino - si
prega di riprovare i passaggi uno dopo l’altro in
sequenza.
a). Premere e tenere premuto i pulsanti di alimentazione delle due Cuffie per 3s per spegnerle.
b). Premere e tenere premuto i pulsanti di alimentazione delle due Cuffie per 15s fino a che le due spie
LED non si spengono.
c). Premere e tenere premuti i pulsanti di alimentazione delle due Cuffie per 2s per accendere (il LED
lampeggia di colore blu), o rimettere le cuffie nella
custodia di caricamento ed estrarle.
d). Le due cuffie si abbinano automaticamente fra
loro. Dopo che la connessione è stata stabilita
correttamente, il LED sulla cuffia sinistra lampeggia in
modo alternato di blu e rosso e la cuffia destra
lampeggia di colore blu.
IT-7
Page 63

8. Istruzioni di funzionamento
Estrarre le cuffie dalla custodia di caricamento e si
accenderanno automaticamente (il LED lampeggia di
Accensione
Spegnimento
Rifiutare una
chiamata
Rispondere a
una chiamata
Passaggio
chiamata
Disattivazione
audio On/Off
Play/Pausa
Traccia
successiva
Traccia
precedente
Assistente
vocale
colore blu).
Premere e tenere premuto il pulsante di alimentazione
per 2 secondi (il LED lampeggia di colore blu).
Rimettere le cuffie nella custodia di caricamento, si
spegneranno automaticamente.
Premere e tenere premuto il pulsante di alimentazione per
3s.
Premere e tenere premuto il pulsante di alimentazione per
2s.
Premere una volta il pulsante di alimentazione per
rispondere alla chiamata in ingresso e premere
nuovamente per concluderla (funziona sia con la
modalità singola che con la modalità doppia).
Durante una chiamata, premere e tenere premuto il
pulsante di alimentazione per 2s per spostare la
chiamata fra telefono cellulare e cuffie.
Nel corso di una chiamata, premere due volte il
pulsante di alimentazione per attivare/disattivare il
pulsante Mute. In modalità Disattivazione audio On la
voce non si sentirà.
Premere il pulsante di alimentazione una volta per
riprodurre/mettere in pausa.
Premere il pulsante di alimentazione due volte su ogni
cuffia.
Premere due volte il tasto di alimentazione sulla cuffia
sinistra.
Premere e tenere premuto il pulsante di alimentazione
per 2s per attivare l’assistente vocale (come ad
esempio Siri).
IT-8
Page 64

9. Guida alla risoluzione dei problemi
D: Le due cuffie si collegano al telefono singolarmente, ma non si collegano fra loro.
R: Togliere le due cuffie e spegnerle. Premere e
tenere premuto i pulsanti di alimentazione per 15s
fino a che i due LED non si spengono. Spegnerle
nuovamente e si abbineranno automaticamente fra
loro.
D: Perché non sento nulla dalla seconda cuffia in
Modalità Doppia Cuffia?
R: Verificare che la seconda cuffia si sia collegata con
successo alla prima. In caso contrario, attenersi alle
istruzioni alla sezione “7. Modalità doppia cuffia—Nota".
D: Perché il telefono non trova le cuffie?
R: Verificare che si trovino in modalità di abbinamento. Se restano disconnesse per un po’ di tempo non
entreranno in modalità di abbinamento. Riattivare le
cuffie per accedere nuovamente alla modalità di
abbinamento.
D: Perché le cuffie non si accendono automaticamente quando le estraggo dalla custodia di
caricamento.
IT-9
Page 65

R: Ricaricare la custodia di caricamento (quando le
cuffie sono al loro interno), e le due cuffie si accenderanno automaticamente quando vengono estratte
dalla confezione.
D: Perché non riesco a caricare la custodia di
caricamento?
R: Verificare che il cavo di caricamento sia intatto e
collegato correttamente.
D: Perché la connessione non è stabile e l’audio
non è molto chiaro?
R: Verificare che non ci siano oggetti fra le cuffie e il
dispositivo Bluetooth, e che non vi siano interferenze
radio o Wi-Fi.
IT-10
Page 66
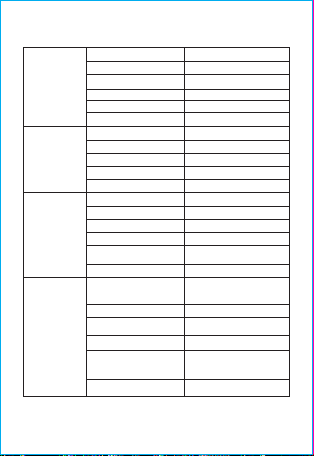
10. Specifiche
Unità Microfono
Specifiche del
Microfono
Specifiche
Altoparlante
Specifiche
Wireless
Specifiche
Batteria
Nota: le caratteristiche e le specifiche tecniche sono soggette a modifiche senza
preavviso, ci scusiamo per eventuali inconvenienti.
Direttività
S.P.L
Impedenza
Voltaggio operativo
Risposta in frequenza
Diametro altoparlante
Impedenza
S.P.L
Potenza nominale
Risposta di frequenza
Versione Bluetooth
Distanza Bluetooth
Frequenza di trasmissione
Sensibilità di ricezione
Profilo supportato
nome di accoppiamento
Capacità della batteria
Porta di ricarica
Tempo di musica
Tempo di conversazione
Tempo di ricarica
Tempo di Standby
IT-11
Φ4.0 x 1.5mm
Omni-direzionale
-42±3dB
<2.2KΩ
2V
20Hz-20KHz
Φ8mm
16Ω
90±3dB(1K,1mW)
10mW
20Hz-20KHz
V5.0
33ft/10m
2.402GHz-2.48GHz
-82dBm
HSP/HFP/A2DP/AVRCP
Mixcder T1
Auricolare: 50mAh;
Custodia di ricarica: 600mAh
Micro USB 5V/1A
circa 5 ore
circa 8 ore
Auricolare: circa 1 ore;
Custodia di ricarica:
circa 1.5 ore
circa 2000 ore
Page 67
1.はじめに
MixcderT1完全ワイヤレススポーツイヤフォンをお
買い上げいただきありがとうございます。イヤーバッ
ドはΦ8mmの大型スピーカーユニット、ワイヤレス
V5.0技術、CVC8.0通話ノイズキャンセリング技術を
搭載しており、高性能と優れた音質を保証します。ユ
ーザーフレンドリーなボタンを通じて、再生/一時停
止、オーディオのスキップ、ハンズフリー機能を用い
た通話の応答/拒否を簡単に行えます。T1は防汗設計
を施 されており、運 転、ヨガ、ジョギング、ラン ニング、
ハイキングなどに最適です。3組のイヤーチップが付
属しており、最 も快適に 、ぴったりとはまるサ イズを 選
べます。さらに、内蔵の充電式バッテリーが長時間の
音楽再生とスタンバイを提供します。
注 意:
使用前にユーザーマニュアルを注意深く読み、
将来に備えて適切に保管してください。
2.パッケージ内容
-1xワイヤレスイヤフォン
-1x充電用ケース
-1xMicroUSB充電ケーブル
-1xユーザーマニュアル
-3xイヤーチップ(S/M/L)
(注 意:このうち1組 はイヤフォンに 取り付けられて います )
JP-1
Page 68
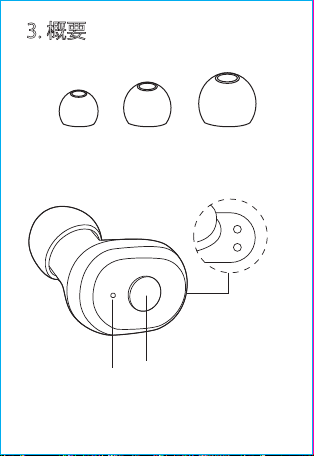
3.概要
S M L
電源ボタン
LED
充電用接点
JP-2
Page 69
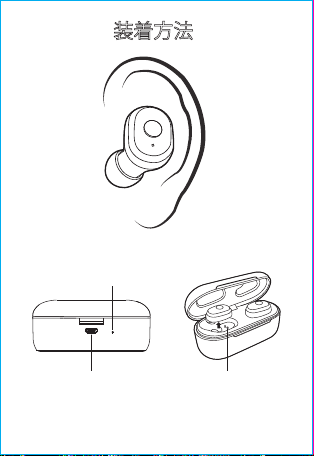
装着方法
右耳
LED
充電用MicroUSB
インターフェース
充電用接点
JP-3
Page 70
4.充電
4-1.イヤフォンの充電
イヤフォンを充電用ケースに挿入すれば、自動的に
充電されます。充電中にLEDは赤色に点灯します。フ
ル充電されると、LEDは1分間青色に点灯した後、消
灯します。
注 意:
イヤフォンが充電されない場合、USBケーブル
を使用して充電用ケースを充電してください。
初回仕様時はイヤフォンを完全に充電してください。
イヤフォンと充電用ケースを長時間保管する場合は、
バッテリーが消耗して電源がオンにならない可能性
があります。その場合は充電用ケースを充電してくだ
さい。イヤフォンを充電用ケースから取り出すと、両方
共に電源が自動的にオンになります。
4-2.充電用ケースの充電
付属のUSBケーブルを使用してケースを充電してくだ
さい。LEDは充電中に赤色に点滅し、フル充電される
と赤色に点灯します。充電ケースのバッテリー残量が
低い場合、LEDは青色に点滅します。
JP-4
Page 71

5.ペアリング.
イヤフォンは単一のイヤーバッド(シングルイヤフォ
ンモード)または1組のステレオイヤフォン(デュアル
イヤフォンモード)の両 方にて機能します。モードに
応じてペアリングの手順は異なるため、指示に従って
ください。ペアリング前に、周りに存在する無関係の
Bluetoothデバイスの電源をオフにしてください。ま
た、イヤフォンとBluetoothデバイスの距離は1m未満
に収めてください。
注 意:
初回のペアリング時は、イヤフォンを両方、充電
用ケースから取り出した後に再度収納して、イヤフォ
ンをアクティブにしてください。
ペアリング時にPINコードの入力が要求される場合は
、「0000」を入力します。
イヤフォンは最大3分間、ペアリングモードに留まりま
す。ペアリング用のデバイスが存在しない場合は、自
動的に電源がオフとなります。
ペアリングされたデバイスがオフにされたり、
Bluetoothが3分間以上切断されると、イヤフォンの電
源は 自動 的 にオフとなります。
JP-5
Page 72
6.シングルイヤフォンモード
A. イヤ フォンを充 電 用ケースから取り出して起 動さ せ
ます。効果音が鳴り、イヤフォンは自動的にペアリング
モード へ切り替 わります。LEDが青色と赤色の交互に
点滅します。
B.お手持ちのデバイスにてBluetoothをオン にします。
Mixcder T1がBluetoothデバイス一覧に出現したら、ク
リックして 接続します。
C. 以前にデバイスと本イヤーバッドをペアリング済
の場合は、充電用ケースから取り出した瞬間に自動的
にデ バイスと再 接 続します。
7.デュアルイヤフォンモード
A. 両方のイヤフォンを充電用ケースから取り出すと、
自動的に互いとペアリングします。接続された後に、効
果音 が 鳴ってペ アリングモ ードへ 切り替わります。左
イ ヤ ー バ ッド の LEDが青色と赤色の交互に点滅し、右
イ ヤ ー バ ッド の LEDは青色に点滅します。
B. デバイスのBluetooth機能 をオンにしま す。Mixcder
T1がBluetoothデバイス一覧に出現したら、クリックし
て接続します。
C. 以前にデバイスとイヤーバッドをペアリング済の
JP-6
Page 73

場合、イヤフォンを充電用ケースから取り出した際に
デバイスと自動的に再接続されます。
注 意:2台のイヤフォンが互いに接続されない場合は
、手動で以下の手順を踏んでください。
a).2台のイヤフォンの電源ボタンを3秒間押し続け、
電源 をオ フにしま す。
b).2台のイヤフォンの電源ボタンを15秒間押し続け、
両方のLEDインジケータが消灯するまで待ちます。
c).2台のイヤフォンの電源ボタンを再び2秒間押し続
けると、電源 がオンに なります( LEDは青色に点滅し
ます)。または、イヤフォンを充 電用ケースへ戻し、取り
出します。
d).2台のイヤフォンは自動的に互いとペアリングされ
ます。接続が完了すると、左イヤフォンのLEDは青色と
赤色の交互に点滅し、右イヤフォンのLEDは青色に
点滅します。
JP-7
Page 74
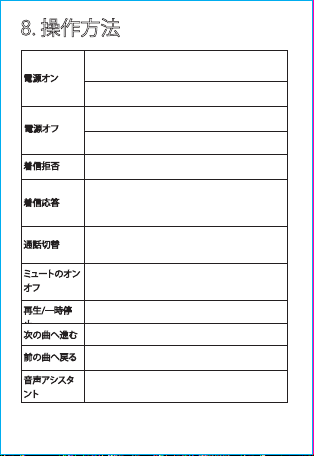
8.操作方法
イヤフォンを充電ケースから取り出すと、自動的に電源
電源オン
電源オフ
着信拒否
着信応答
通話切替
ミュート の オン
オフ
再生/一時停
止
次の曲へ進む
前の曲へ戻る
音声 アシスタ
ント
がオンになります(LEDは青色に点滅します)。
電源ボタンを2秒間押し続けます(LEDは青色に点滅し
ま す )。
イヤフォンを充電用ケースへ戻すと、自動的に電源がオ
フに なります。
電源ボタンを3秒間押し続けます。
電源ボタンを2秒間押し続けます。
電源ボタンを1度押せば着信に応答でき、再び押せば
終了できます(シングルモードとデュアルモードの両方
で機能します)。
通話中、電源ボタンを2秒間押し続けると、携帯電話と
イヤフォンの 間で 通話を 切り替えられま す。
通話中、電源ボタンを2度押すと、ミュートをオンまたは
オフできます。ミュートがオンの最中は、お客様 の音声
は相手側に聞こえません。
電源ボタンを1度押すと、再生または一時停止されます
。
右イヤフォンにて電 源ボタンを2回押します。
左イヤフォンにて電 源ボタンを2回押します。
電源ボタンを2秒間押し続けると、音声アシスタントが
起動します(Siriの要領です)。
JP-8
Page 75
9.よくある問題とその解決法
Q:両方のイヤーバッド共に携帯電話と個別に接続
できますが、互いに接続されません。
A:イヤー バッドを 両方 取り出し、電源 をオフにしてく
ださい。電源 ボタンを15秒間押し続け、両方のLEDイ
ンジケータがオフになるまでお待ちください。再 度電
源をオンにすると、自動的 に互いとペアリングされます。
Q:デュアルイヤフォンモードで第二イヤフォンから
音声が出力されません。
A: 第二イヤフォンが第一イヤフォンと接続されている
か、確かめてください。接続されていない場合は、第7
章にてデュアルイヤフォンモードの注意事項に従って
ください。
Q:携帯電話がイヤフォンを検出できません。
A: ペアリングモードに入っているか、確 かめてくださ
い。長時間接続されていない場合、ペアリングモード
に入りません。イヤフォンの電源をオンにして、再度ペ
アリング モード に 入ってくださ い。
Q:イヤフォンを充電用ケースから取り出しても、自動
的に電源がオンになりません。
A: イヤフォンを納めた状態で、充電用ケースを充電し
てください。その後、イヤフォンをケースから取り出 す
と、自動的に電源がオンになります。
JP-9
Page 76

Q:充電用ケースを充電できません。
A: 充電用ケーブルに損傷がなく、正しく接続されてい
るか確かめてください。
Q:接続が安定せず、音声が明瞭になりません。
A:イヤ フォンとBluetoothデバイスの間に障害物が
なく、周りに無 線またはWi-Fiの干渉物が存在しない
ことを確かめてください。
JP-10
Page 77
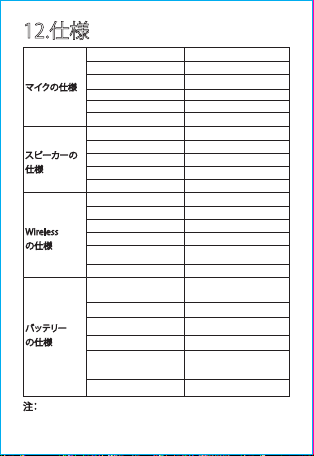
12.仕様
マ イク ユ ニット
指向性
マイクの仕様
スピーカーの
仕様
Wireless
の仕様
バッテリー
の仕様
注:機能および技術仕様は予告なしに変更されることがあります
。ご迷惑をおかけして申し訳ありません。
S.P.L
インピーダンス
動作電圧
周波数応答
スピーカーの直径
インピーダンス
S.P.L
定格出力
周波数応答
Wirelessバージョン
Wirelessの距離
伝送範囲(Hz)
受信感度
対応プロファイル
ペアリング名
電力
充電ポート
音楽放送
通話時間
充電時間
待機時間
JP-11
Φ4.0x1.5mm
全指向性
-42±3dB
<2.2KΩ
2V
20Hz-20KHz
Φ8mm
16Ω
90±3dB(1K,1mW)
10mW
20Hz-20KHz
V5.0
33フィート/10メートル
2.402GHz-2.48GHz
-82dBm
HSP/HFP/A2DP/AVRCP
MixcderT1
イヤホン:50mAh;
充電ケース:600mAh
マイクロUSB/5V-1A
約5時間
約8時間
イヤホン:約1時間;充
電ケース:約1.5時間
約2000時間
Page 78
WARRANTY CARD
ATTENTIONS:
- Please read the return procedures and warranty policy
on www.mixcder.com/Support/Warranty.html
carefully
efore sending items back to point-of-purchase.
b
- Please fill the card and send it to your reseller together with
the product if your product's warranty is valid.
S.N:
Date of Purchase:
Product Model:
RMA Number:
Return Reason:
Customer Name:
TEL:
E-mail:
Address:
Page 79

For more information, please visit our official website
www.mixcder.com
Your valuable comments and suggestions on improving
Mixcder products are welcomed!
www.mixcder.com
 Loading...