

User’s Manual
MODEL:MSH101
Wireless Headphone

EN-1
2. Package Contents
1. Introduction
Thank you for purchasing the Mixcder MSH101 Wireless
headphone. MSH101 has fashionable appearance and
eco-friendly package design. The headphone provides
foldable design for easy storage and carrying. Artificial
protein leather of earmuffs is simulated to human skin
texture, giving you a long-time comfort. Built-in recharge-
able battery provides more music playing and standby
time.
Note: Please read the user’s manual carefully before
using, and keep it properly for future reference.
- Wireless headphone*1
- Micro USB charging cable*1
- 3.5mm audio cable*1
- User’s manual*1
4. Features
- Wireless V4.1
- Large buttons, more human operations
- Foldable design, easy to carry
- High-grade leather headphone sheath and ear pads
- Built-in microphone and hands-free
3. Product Overview
Leather headband
LED indicator
Micro USB charging cable 3.5mm audio cable
Control buttons
*Power on/off button( )
*Previous track(<)
*Next track(>)
*Volume up(+)
*Volume down(-)
Adjustable headband
Foldable hinge
Leather ear pad
3.5mm input jack
Micro-USB port

EN-2
5. Connection
5.1 Audio Connection
Connect to the 3.5mm jack connector on your audio device
(ex. mobile phone or PC) using the included audio cable.
The headphone provides you plug and play feature that
lets you play the music automatically.
Note:
When a call comes in with the Wireless connection, the
audio connection will stop.
5.2 USB Connection
Connect to a power supply using the included USB
charging cable.
Note:
It will not affect the Wireless and audio connections during
charging.
5.3 Wireless Connection
MSH101 allows you to connect to a device with Wireless
feature.
1. Press and hold the power button on the headphone
until it powers on but don't let go just yet. Continue holding
down on the power button until you see the LED indicator
flashes blue and red alternately.
2. Connect the headphone to a device with Wireless
feature (ex. mobile phone). For more pairing information,
refer to “7. Pairing Configurations”.
3. When the connection is completed, you can talk and
play music through the Wireless feature.
- Charging the battery with USB cable
1. Press and hold the power button on the headphone
until it powers on but don't let go just yet. Continue
EN-3
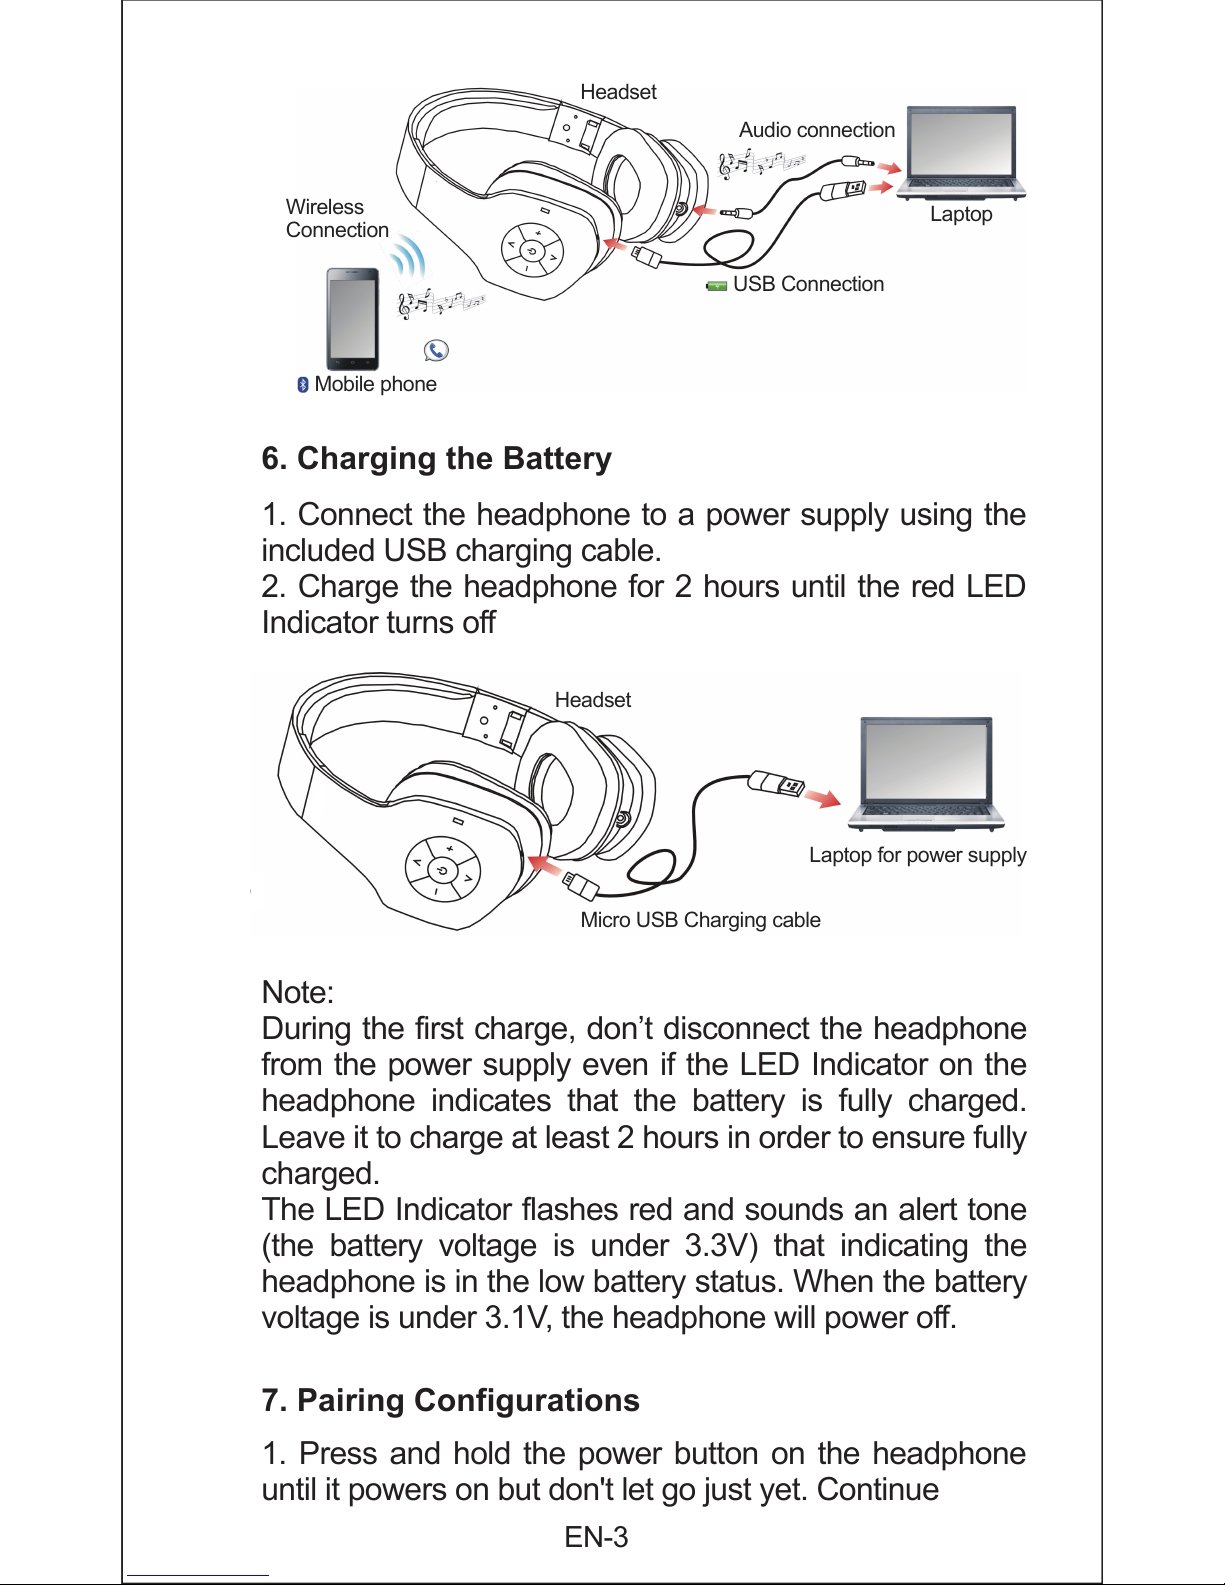
6. Charging the Battery
1. Connect the headphone to a power supply using the
included USB charging cable.
2. Charge the headphone for 2 hours until the red LED
Indicator turns off
Note:
During the first charge, don’t disconnect the headphone
from the power supply even if the LED Indicator on the
headphone indicates that the battery is fully charged.
Leave it to charge at least 2 hours in order to ensure fully
charged.
The LED Indicator flashes red and sounds an alert tone
(the battery voltage is under 3.3V) that indicating the
headphone is in the low battery status. When the battery
voltage is under 3.1V, the headphone will power off.
7. Pairing Configurations
Wireless
Connection
Mobile phone
Headset
Audio connection
USB Connection
Laptop
Laptop for power supply
Headset
Micro USB Charging cable
EN-4
Note:
When using the mobile phone and headphone for a
Wireless connection, the distance between both can not
exceed 10 meters.
You can only comm unicate w ith one devic e vi a Wireless
connection. To switch between Wireless devices,
disconnect the headphone from the current device (disable
the Wireless feature) before connecting to another.
8. Answering a Call
Before answering a call, make sure the headphone is
already paired with the mobile phone. Refer to “7. Pairing
Configurations” to get more pairing information.
1.Press and hold the power button for 2 seconds to
power on the headphone.
2.For a moment, the headphone will enter “Pairing Mode”
directly if it has ever been paired with the Wireless device.
3.The LED indicator turns solid blue indicating the pairing
is connected between the headphone and mobile phone.
4.Using the mobile phone to dial a number.
5.When the call is connected, press the power button on
the headphone to talk with the build-in microphone.
6.To end the call, press the power button once. You can
also use the mobile phone to end a call.
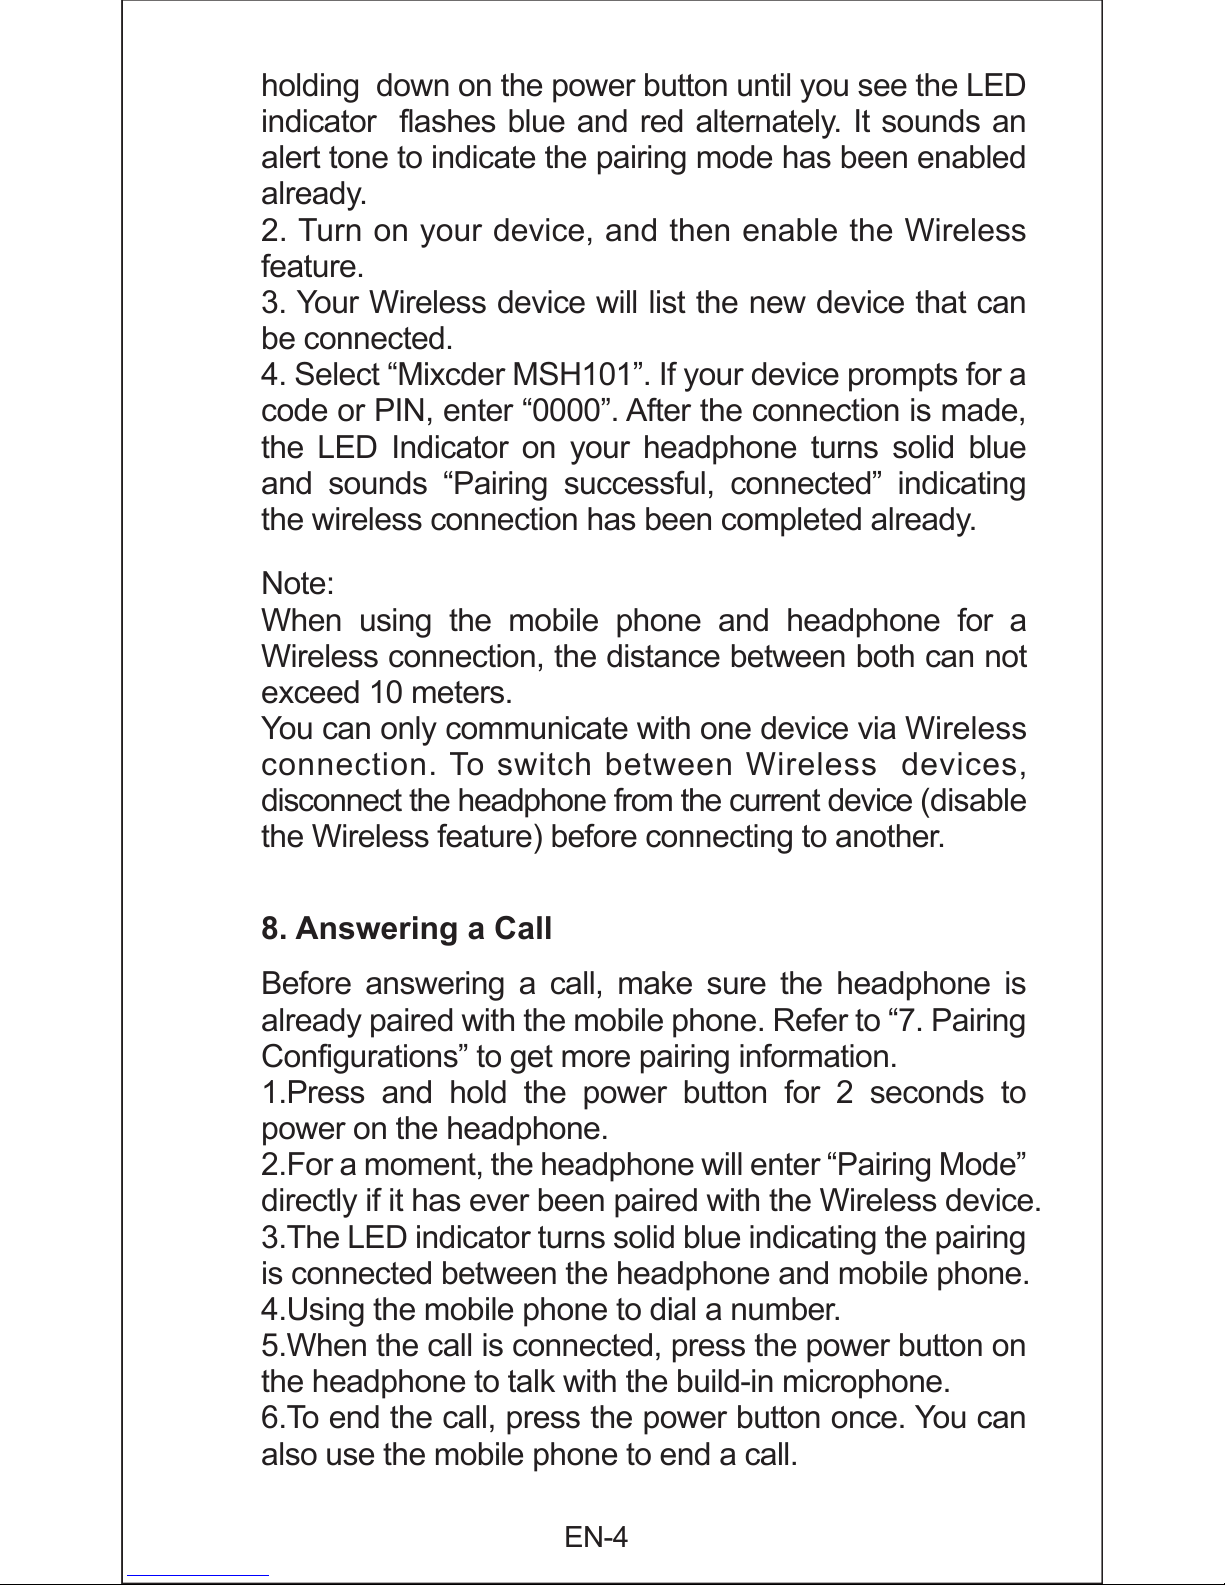
holding down on the power button until you see the LED
indicator flashes blue and red alternately. It sounds an
alert tone to indicate the pairing mode has been enabled
already.
2. Turn on your device, and then enable the Wireless
feature.
3. Your Wireless device will list the new device that can
be connected.
4. Select “Mixcder MSH101”. If your device prompts for a
code or PIN, enter “0000”. After the connection is made,
the LED Indicator on your headphone turns solid blue
and sounds “Pairing successful, connected” indicating
the wireless connection has been completed already.

EN-5
Note:
You can pre ss + or – button loca ted on t he side of your
headphone to adjust the volume. When the volume is
adjusted to maximum or minimum, the headphone will
sounds an alert tone.
9. Using the Headphone
The table below shows you how to use the button on your
headphone.
Action Description
Power On
Press and hold the power button for 2
seconds to power on the headphone. The
LED indicator flashes blue 1 time and sounds
a short music indicating the headphone has
been powered on already.
Power Off
Press and hold the power button for 4
seconds to power off the headphone. The
LED indicator flashes red 2 time and sounds
a short music indicating the headphone has
been powered off already.
Pairing Mode
Press and hold the power button on the
headphone until it powers on but don't let go
just yet. Continue holding down on the power
button until you see the LED indicator flashes
blue and red alternately.
It sounds an alert tone to indicate the pairing
mode has been enabled already.
Play Music
Press the power button once to continue
playing music when the music is paused.
Pause Music
Press the power button once to stop the
music playback.
Adjust Volume
Press the + or - button to adjust the volume.
Wireless connection
Dial phone number
Hello
Incoming call
EN-6
Select Music Track
Press the Previous Track or Next Track
button to select the music track.
Answer a Call
Press the power button or use your mobile
phone to answer a call.
End a Call
Press the power button or use your mobile
phone to end the call.
Cancel Dialing
Press the power button to cancel dialing.
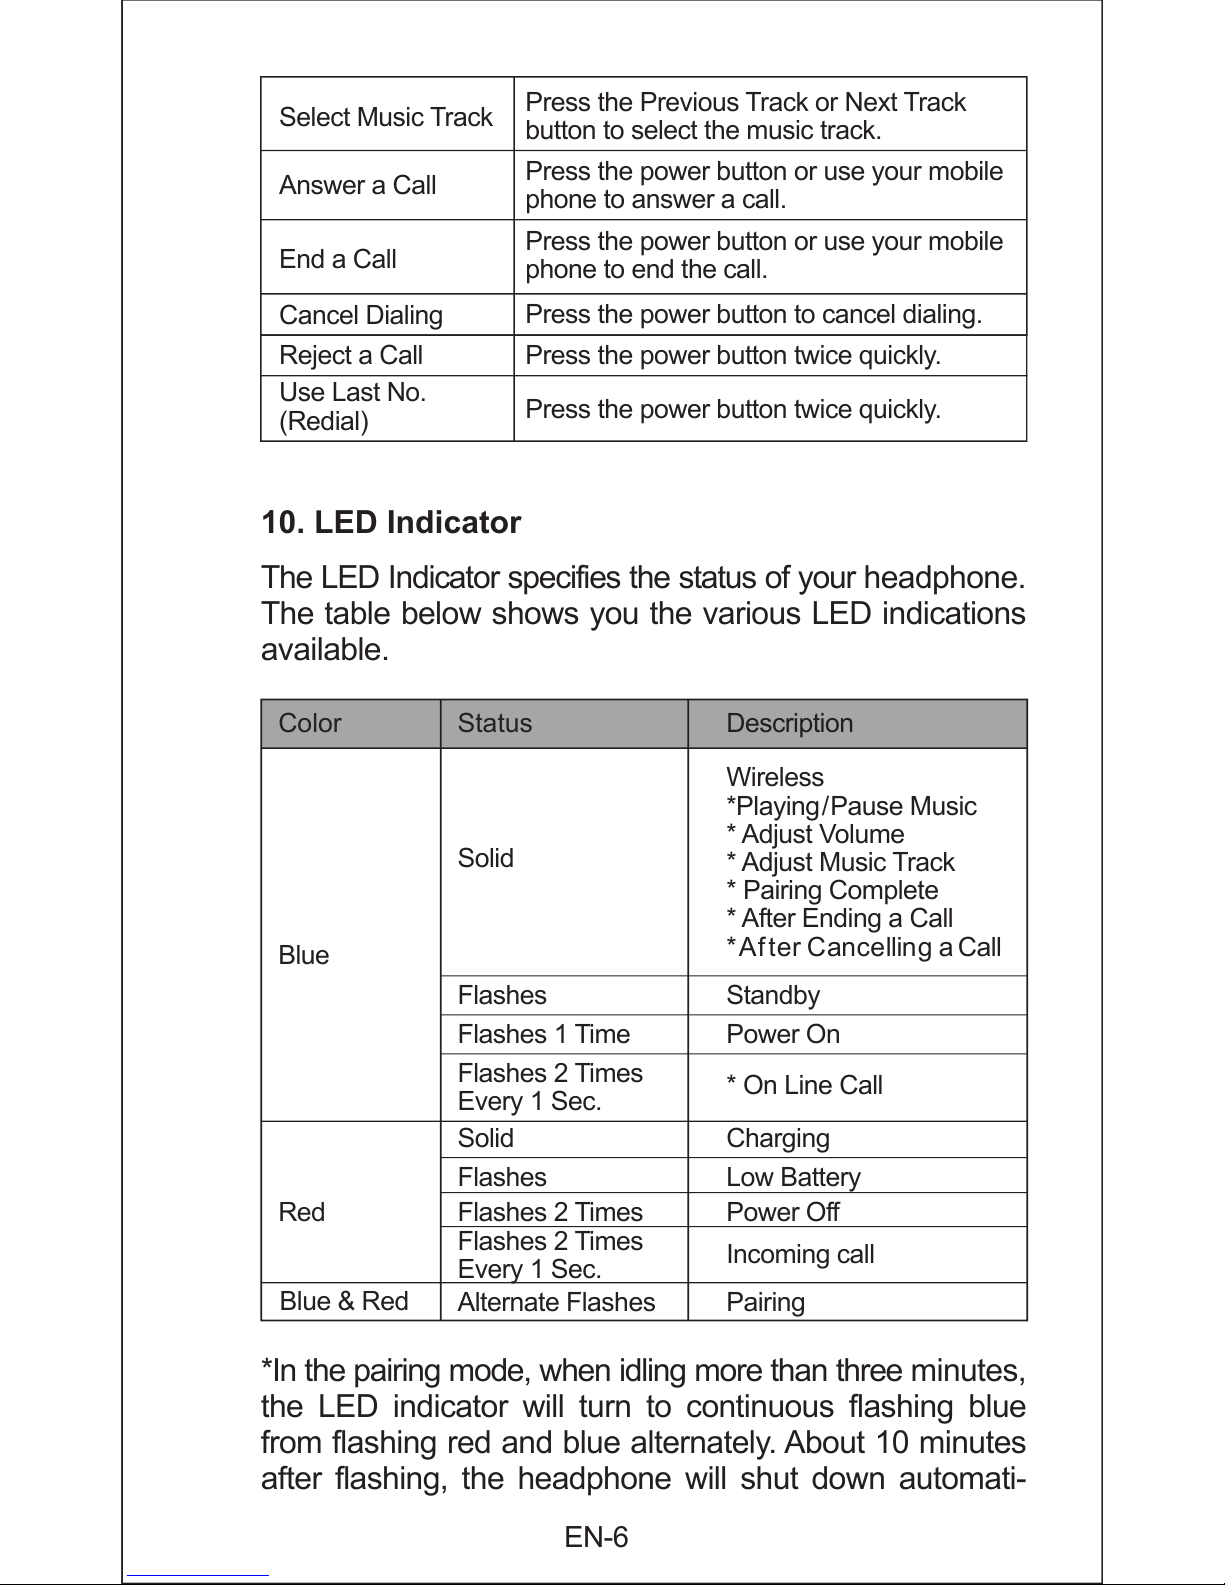
10. LED Indicator
The LED Indicator specifies the status of your headphone.
The table below shows you the various LED indications
available.
Color Status Description
Blue
Solid
Wireless
*Playing/Pause Music
* Adjust Volume
* Adjust Music Track
* Pairing Complete
* After Ending a Call
* After Cancelling a Call
Red
Flashes Standby
Flashes 1 Time Power On
Flashes 2 Times
Every 1 Sec.
* On Line Call
Solid Charging
Flashes Low Battery
Flashes 2 Times Power Off
Blue & Red
Alternate Flashes Pairing
Flashes 2 Times
Every 1 Sec.
Incoming call
*In the pairing mode, when idling more than three minutes,
the LED indicator will turn to continuous flashing blue
from flashing red and blue alternately. About 10 minutes
after flashing, the headphone will shut down automati-
Reject a Call
Press the power button twice quickly.
Use Last No.
(Redial)
Press the power button twice quickly.
EN-7
11. Take Care of Your Headphone
1. Avoid exposing the headphone to rain or other liquids.
2. Avoid getting moisture or liquids into any button and
other equipments.
3. Always store the headphone upon power off and safely
protected.
4. Only use a dry cloth to wipe and clean the headphone.
5. You can use a damp cloth to wipe the ear leatherette
cushions carefully.
6. Store the headphone at a suitable temperatures between
-25
o
C~60oC. High temperature may damage the battery
life and reduce the battery performance.
12. Troubleshooting
Q:I can’t hear anything in my headphone when using the
mobile phone.
A:Try and Check the following:
Make sure your headphone and mobile phone have been
paired and are within the allowed range.
Adjust the speaker volume on the headphone by press
the volume up button.
Q: Why doesn’t my headphone work with the mobile phone?
A:Try and Check the following:
Make sure the headphone is charged. The LED indicator
is solid blue when the headphone is pairing completed.
Make sure you are within available range of the Wireless
signal.
It is a long time without pairing and connection with
Wireless device, please re-pairing again.
Q: My headphone is not charging?
A:Try and Check the following:
Make sure to use the USB charging cable.
Connect the cable directly to a USB port on your PC. Do
not use other charging device to charge your headphone.
cally. In the period before the headphone shut down, you
can still pair and connect the Wireless device.
EN-8
13. Warranty
The MSH101 is covered by a 1-year manufacturer warranty.
For more information, visit
www.mixcder.com/warranty.
When charging, the LED indicator should solid red. If not,
the USB port may be fail or not providing enough power.
Try another power supply.
Q: Will the headphone support other Wireless equipment?
A:The headphone is designed to work with Wireless
configuration. It can also support other Wireless devices
just for a headphone, hands-free or advance audio
distribution profile.
Q: Why doesn’t my computer connect the headphone via
Wireless?
A:Make sure your computer has Wireless signal or used
the USB Wireless Adapter. And the Wireless feature is
enabled.
Q: Why won’t my headphone pair with the mobile phone?
A:Try and Check the following:
Make sure the headphone is charged and is in pairing
mode. Low battery may cause the connection fail.
Make sure Wireless feature is active on your mobile
phone, and put it into Wireless pairing mode.
Make sure the name of pairing connection is correctly.
You might also be prompte d to enter the pass code
“0000” to accept pairing.
EN-9
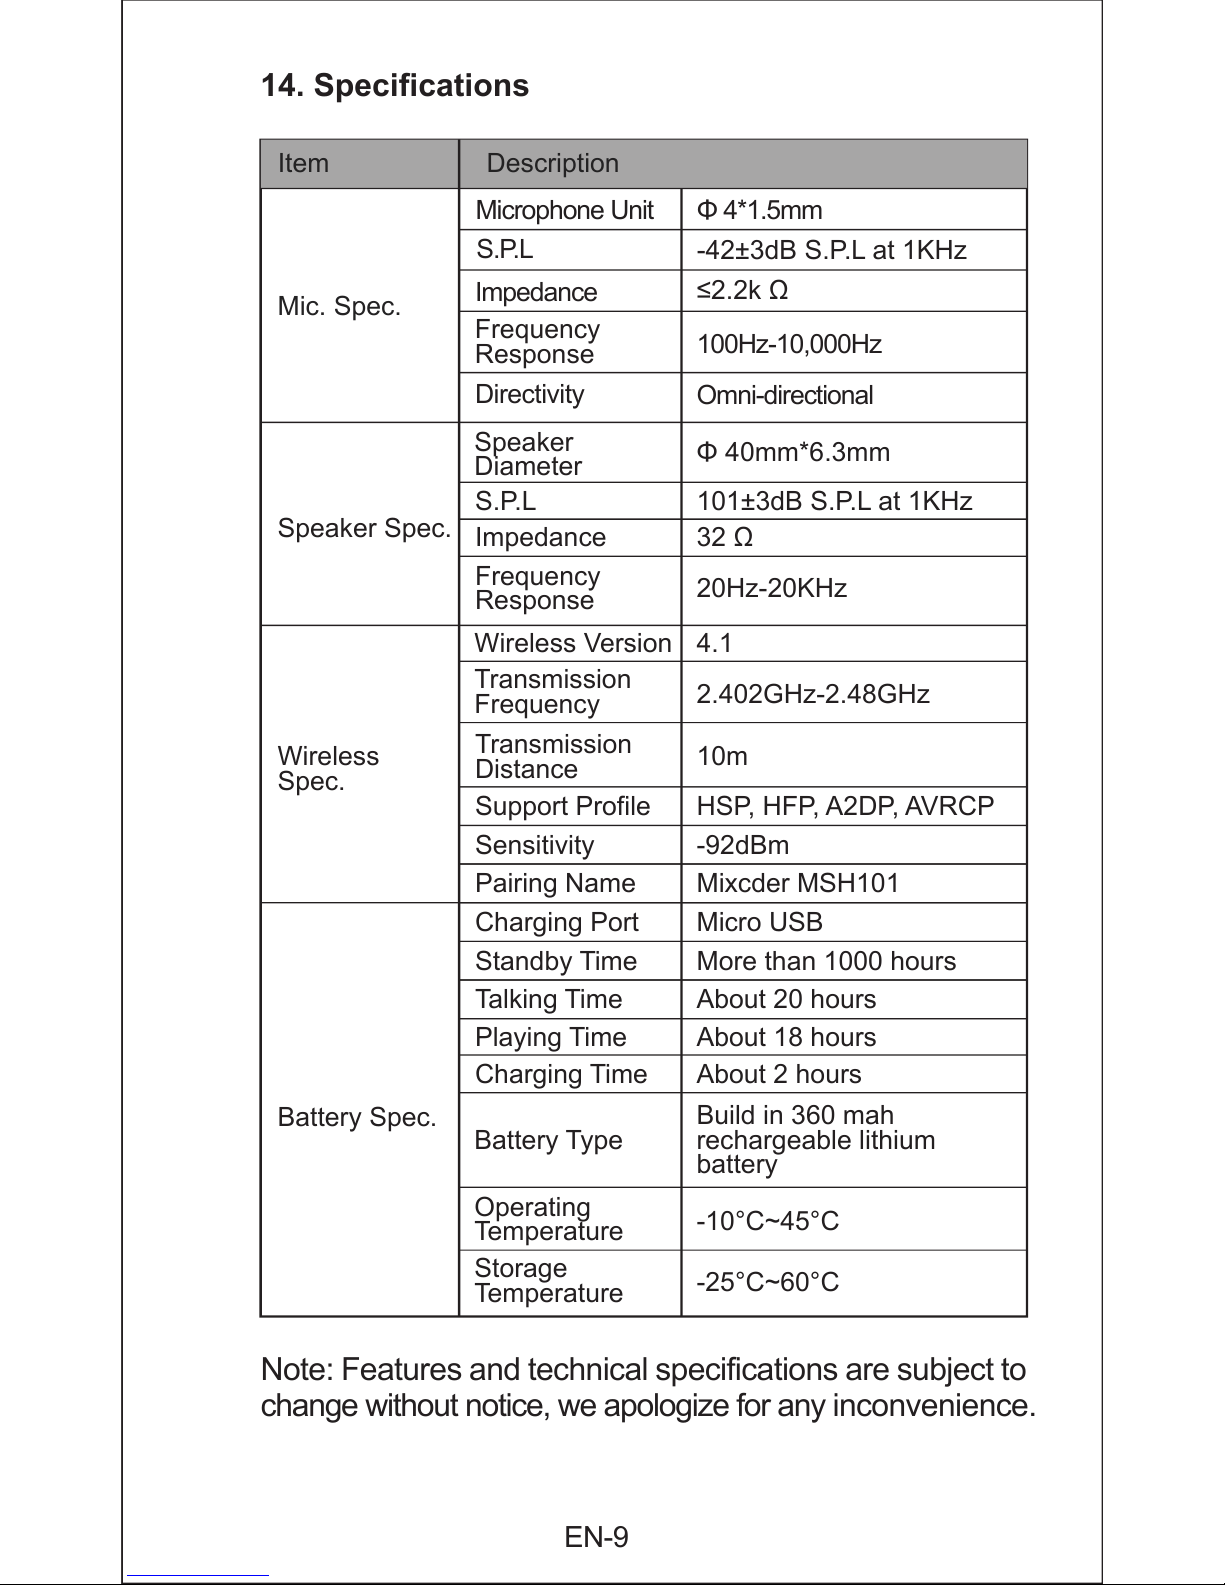
14. Specifications
Note: Features and technical specifications are subject to
change without notice, we apologize for any inconvenience.
Mic. Spec.
≤2.2k Ω
100Hz-10,000Hz
Omni-directional
Speaker Spec.
Wireless
Spec.
Battery Spec.
Impedance
101±3dB S.P.L at 1KHzS.P.L
32 Ω
Impedance
20Hz-20KHz
Frequency
Response
Frequency
Response
Φ 40mm*6.3mm
Speaker
Diameter
10m
Transmission
Distance
4.1Wireless Version
HSP, HFP, A2DP, AVRCPSupport Profile
-92dBm
Sensitivity
Mixcder MSH101Pairing Name
Micro USBCharging Port
More than 1000 hoursStandby Time
About 20 hoursTalking Time
2.402GHz-2.48GHz
Transmission
Frequency
Playing Time About 18 hours
Charging Time About 2 hours
-10°C~45°C
Operating
Temperature
Build in 360 mah
rechargeable lithium
battery
Battery Type
-25°C~60°C
Storage
Temperature
Directivity
Item Description
Microphone Unit Φ 4*1.5mm
-42±3dB S.P.L at 1KHz
S.P.L
DE-1
1. Einführung
Wir bedanken uns für Ihren Kauf des Mixcder MSH101
Wireless Kopfhörers. MSH101 hat ein modisches
Erscheinen und ein öko-freundliches Verpackungsde-
sign. Der Kopfhörer bietet ein faltbares Design für
bequemes Unterbringen und Tragen Proteinkunstleder
der Ohrmuscheln simuliert die menschliche Hauttextur,
und gibt Ihnen langfristigen Komfort. Eingebaute
wiederaufladbare Batterie erlaubt längeres Musikab-
spielen und Wartezeit.
Hinweis: Bitte lesen Sie diese Bedienungsanleitung
sorgfältig durch, bevor Sie es nutzen, und Sie sie richtig
für die Zukunft zu halten.
2. Verpackungsinhalt
- Wireless Kopfhörer*1
- Mikro USB Ladekabel*1
- 3, 5 mm Audiokabel*1
- Benutzerhandbuch*1
- WirelessV4.1
- Große Tasten, ergonomische Bedienung
- Klappbares Design, bequem zu tragen
- Hochqualitative Lederhülle für Kopfhörer und
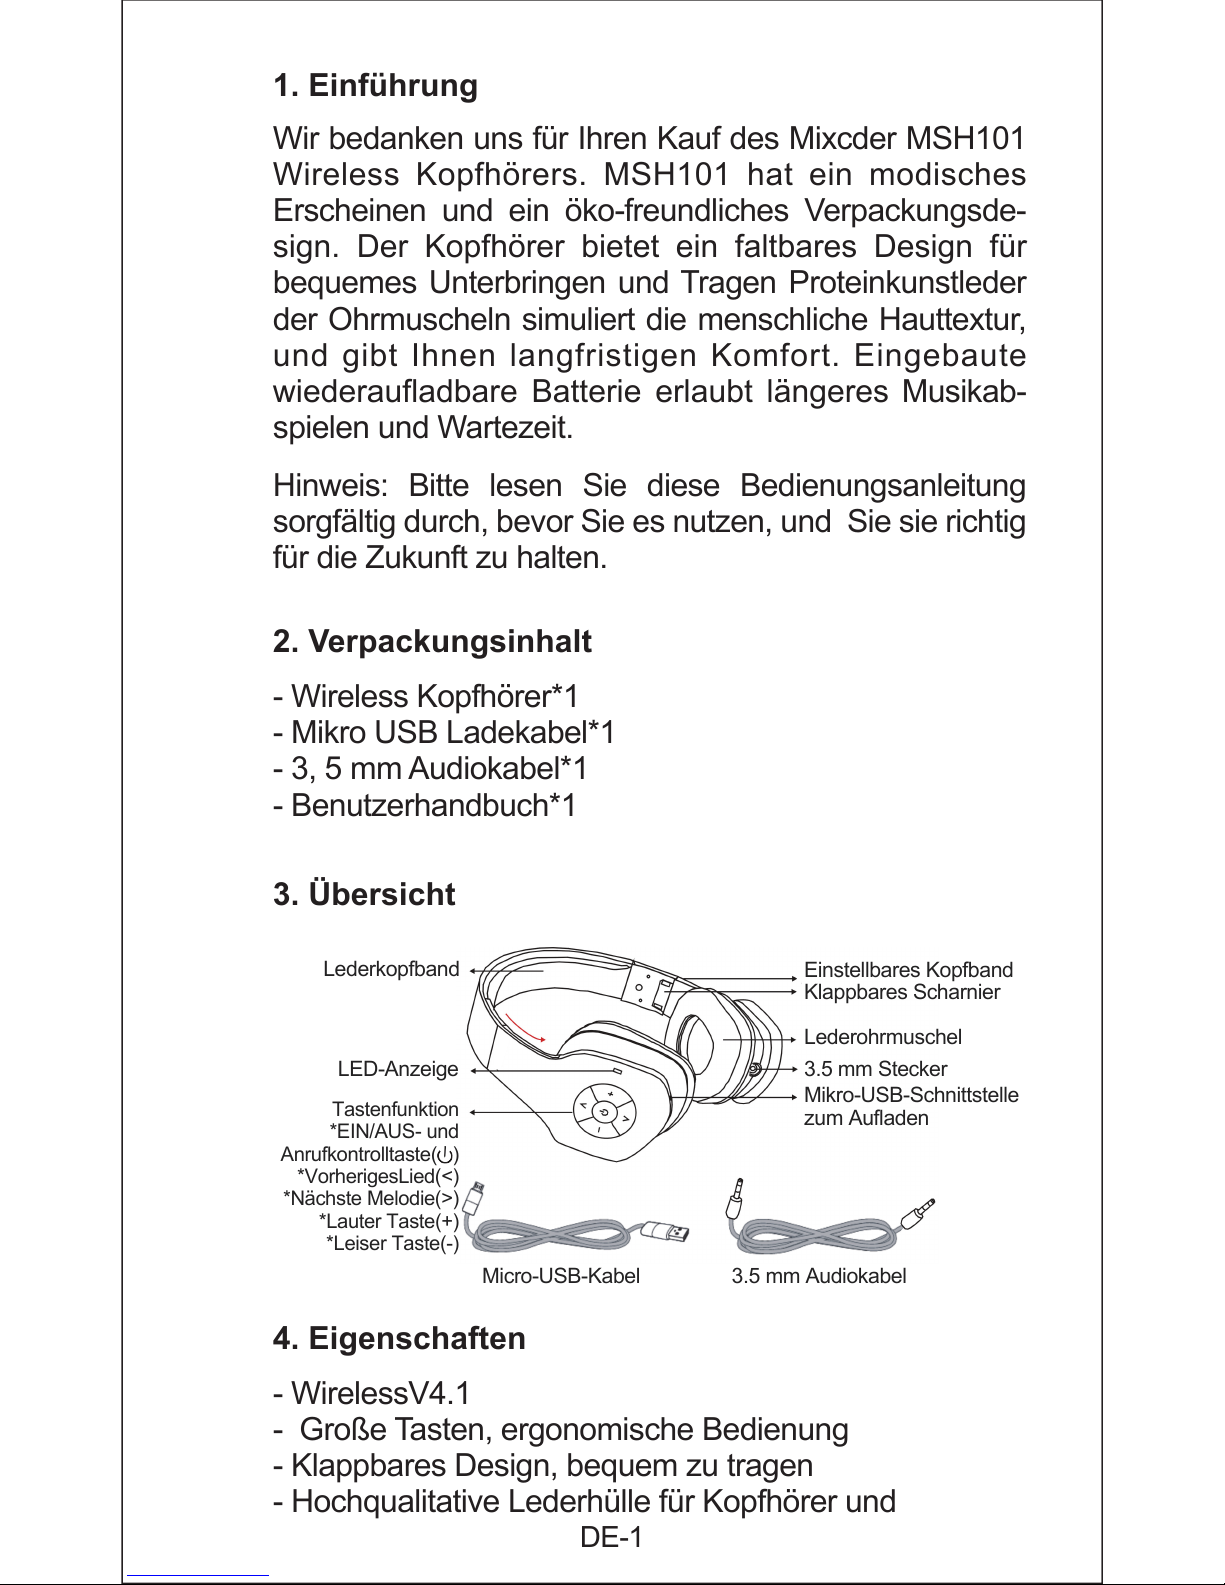
3. Übersicht
4. Eigenschaften
Lederkopfband
Einstellbares Kopfband
Klappbares Scharnier
Lederohrmuschel
3.5 mm Stecker
Mikro-USB-Schnittstelle
zum Aufladen
LED-Anzeige
Micro-USB-Kabel 3.5 mm Audiokabel
Tastenfunktion
*EIN/AUS- und
Anrufkontrolltaste( )
*VorherigesLied(<)
*Nächste Melodie(>)
*Lauter Taste(+)
*Leiser Taste(-)
DE-2
5. Verbindung
5.1 Audio Verbindung
Verbinden Sie das enthaltene Audiokabel mit der 3,5
mm Buchse an Ihrem Audiogerät (zum Beispiel Handy
oder PC). Der Kopfhörer bietet die Plug and Play
Eigenschaft, mit der Sie Musik automatisch abspielen
können.
Hinweis:
Bei eingehendem Anruf mit der Wireless Verbindung,
unterbricht sich die Audioverbindung.
5.2 USB Verbindung
Verbinden Sie mit dem enthaltenen USB Ladekabel an
ein Netzteil.
Hinweis:
Das Aufladen beeinträchtigt die Wireless und Audio
Verbindungen nicht.
5.3 Wireless drahtlose Verbindung
Mit dem MSH101 können Sie sich mit einem Gerät mit
der Wireless Eigenschaft verbinden.
1. Halten Sie die Netztaste an einem Kopfhörer
gedrückt, bis er einschaltet - lösen Sie die Taste jetzt
noch nicht. Halten Sie die Netztaste weiter gedrückt, bis
die LED-Meldeleuchte abwechselnd blau und rot blinkt.
2.Verbinden Sie den Kopfhörer mit einem Gerät mit der
Wireless Eigenschaft (zum Beispiel Handy). Für weitere
Kopplungsinformation beziehen Sie sich auf „7. Kopplung
Konfigurationen“.
3.Nach Herstellung der Verbindung, können Sie mit der
Wireless Eigenschaft sprechen und Musik abspielen .
Ohrmuschel
- Eingebautes Mikrofon und Freisprechen
- Laden der Batterie mit USB Kabel
DE-3
7. Kopplung Konfigurationen
1. Halten Sie die Netztaste an einem Kopfhörer gedrückt,
bis er einschaltet - lösen Sie die Taste jetzt noch nicht.
Halten Sie die Netztaste weiter gedrückt, bis die
6. Batterie aufladen
1.Verbinden Sie den Kopfhörer mit dem USB Ladekabel
an ein Netzteil.
2. Laden Sie den Kopfhörer während 2 Stunden, bis der
LED Anzeiger ausschalten
Hinweis:
Während des ersten Aufladens, trennen Sie den
Kopfhörer nicht vom Netzteil, auch wenn der LED
Anzeiger anzeigt, daß die Batterie vollständig aufgeladen
sei. Warten Sie wenigstens 2-3 Stunden, um sicherzustel-
len, daß die Batterie vollständig aufgeladen ist.
Der LED Anzeiger blinkt rot und es wird ein Warnton
ausgegeben, welcher anzeigt, daß der Batteriestatus
des Kopfhörers schwach ist.
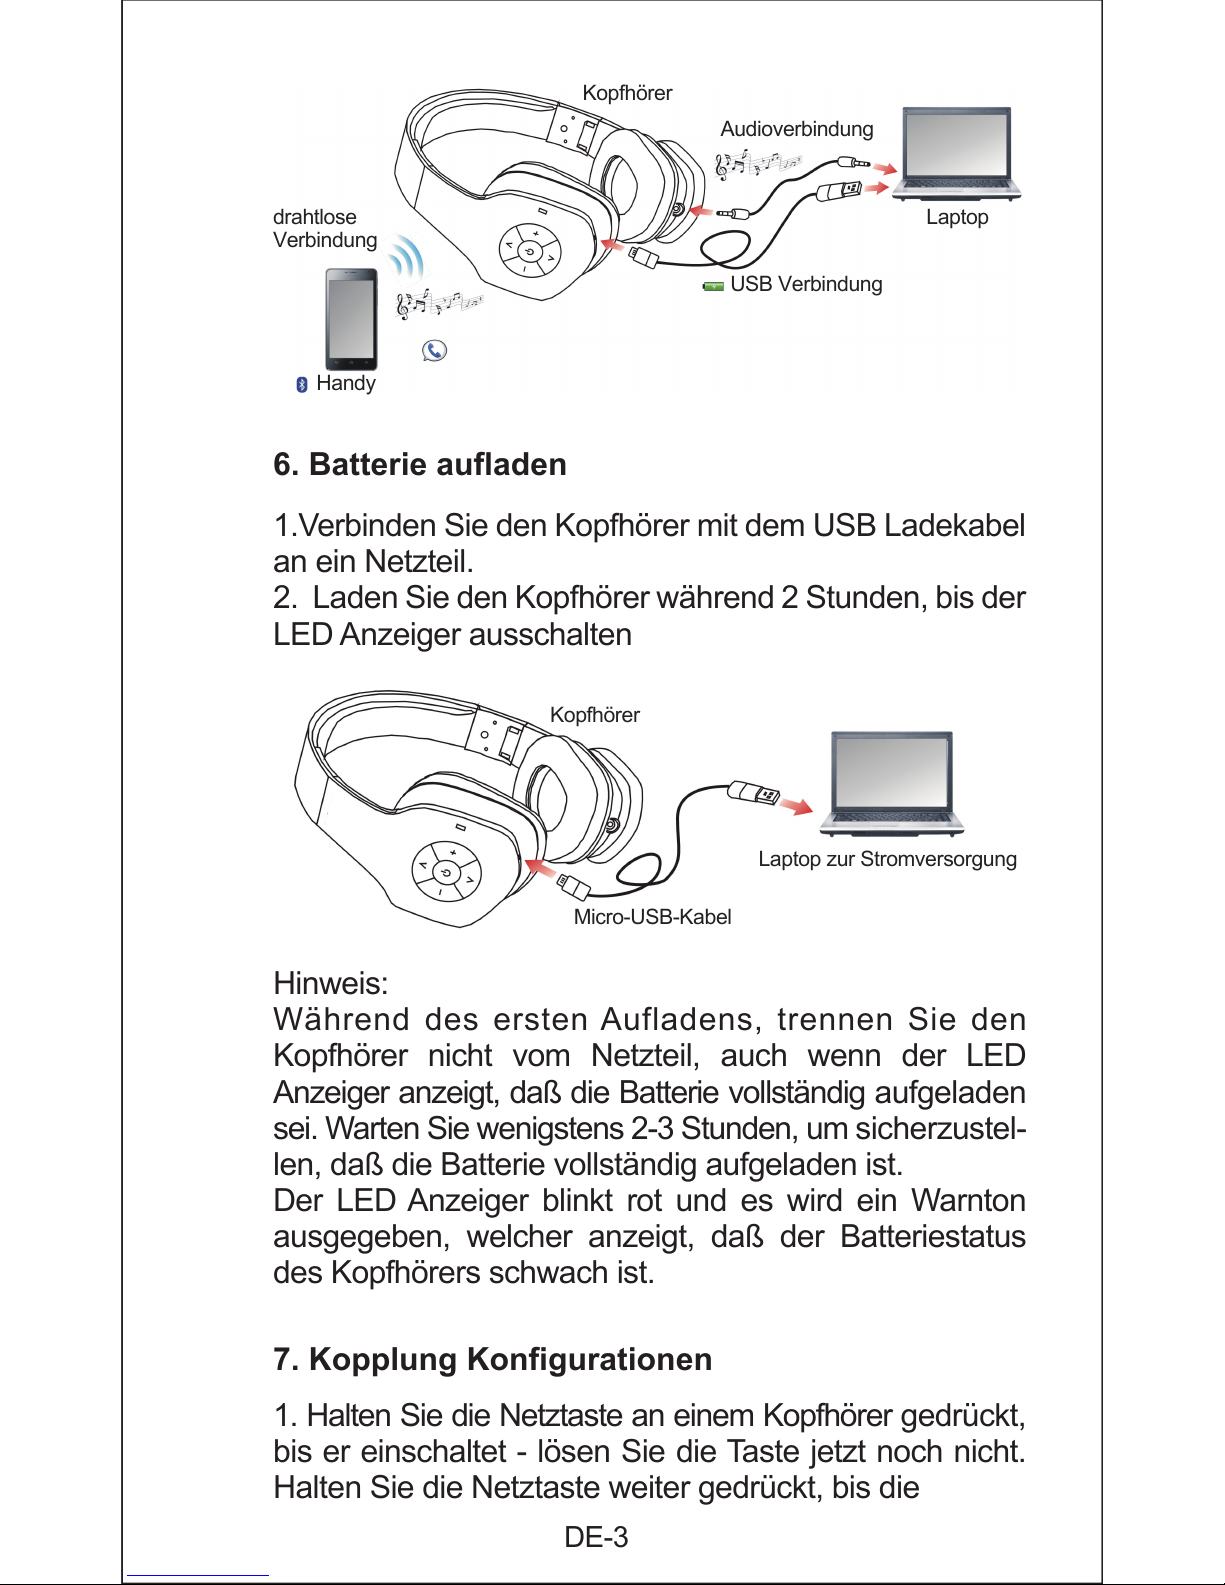
drahtlose
Verbindung
Handy
Kopfhörer
Audioverbindung
USB Verbindung
Laptop
Laptop zur Stromversorgung
Kopfhörer
Micro-USB-Kabel
DE-4
Hinweis:
Wenn Sie das Handy und den Kopfhörer für eine
Wireless Verbindung benutzen, darf die Entfernung
zwischen beiden 10 Meter nicht überschreiten.
Sie können jeweils nur mit einem Gerät verbinden und
koppeln. Um das Wireless Gerät zu wechseln, trennen Sie
den Kopfhörer vom jetzigen Gerät (deaktivieren Sie die
Wireless Eigenschaft), bevor Sie ein anderes Gerät
verbinden.
8. Anruf beantworten
Bevor Sie einen Anruf beantworten, stellen Sie sicher,
daß der Kopfhörer bereits mit dem Handy gekoppelt ist.
Sehen Sie „7. Kopplung Konfigurationen“ für weitere
Kopplungsinformationen.
1.Drücken und halten Sie die Stromtaste für 2
Sekunden, um den Kopfhörer einzuschalten.
2.Kurzfristig schaltet der Kopfhörer in den „Kopplungsmo-
dus“, falls er schon mit einem Wireless Gerät gekoppelt
war.
3.Der LED Anzeige leuchtet solid blau, um anzuzeigen,
daß die Kopplung zwischen dem Kopfhörer und dem
Handy hergestellt ist.
4.Benutzen Sie das Handy, um eine Nummer zu wählen.
5.Wenn der Anruf verbunden ist, drücken Sie die
LED-Meldeleuchte abwechselnd blau und rot blinkt. Nun
ist Ihr Kopfhörer im "Modus Paaren" und wartet auf die
Verbindung mit Ihrem Gerät.
2.Schalten Sie Ihr Gerät ein und aktivieren Sie die
Wireless Eigenschaft.
3.Ihr Wireless Gerät wird das neue, verbindungsfähige
Gerät anzeigen.
4.Wählen Sie „Mixcder MSH101“. Falls das Gerät Sie
auffordert ein Kennwort oder PIN einzugeben, schreiben
Sie „0000“. Nach Herstellung der Verbindung, leuchtet
der LED Anzeiger solides blau und tönt, um anzuzeigen,
daß die drahtlose Wireless Verbindung hergestellt wurde.
Hinweis:
Um die Lautstärke einzustellen, Sie könenn die Taste,
die an der Seite des Kopfhörer befindet, drücken. Wenn
die Lautstärke auf Maximum oder Minimum eingestellt
wird, wird der Kopfhörer einen Warnton geben.
DE-5
9. Benutzung des Kopfhörers
Die untenstehende Tabelle zeigt Ihnen die Benutzung
der Tasten Ihres Kopfhörers
Betätigung Beschreibung
Strom einschalten
Drücken und halten Sie die Stromtaste für
2 Sekunden, um den Kopfhörer
einzuschalten. Der LED Anzeiger blinkt 1
mal blau und es tönt ein, dies zeigt an, daß
der Kopfhörer bereits eingeschaltet ist.
Halten Sie die Netztaste an einem
Kopfhörer gedrückt, bis er einschaltet -
lösen Sie die Taste jetzt noch nicht. Halten
Sie die Netztaste weiter gedrückt, bis die
LED-Meldeleuchte abwechselnd blau und
rot blinkt. Nun ist Ihr Kopfhörer im "Modus
Paaren" und wartet auf die Verbindung mit
Ihrem Gerät.
Kopplungsmodus
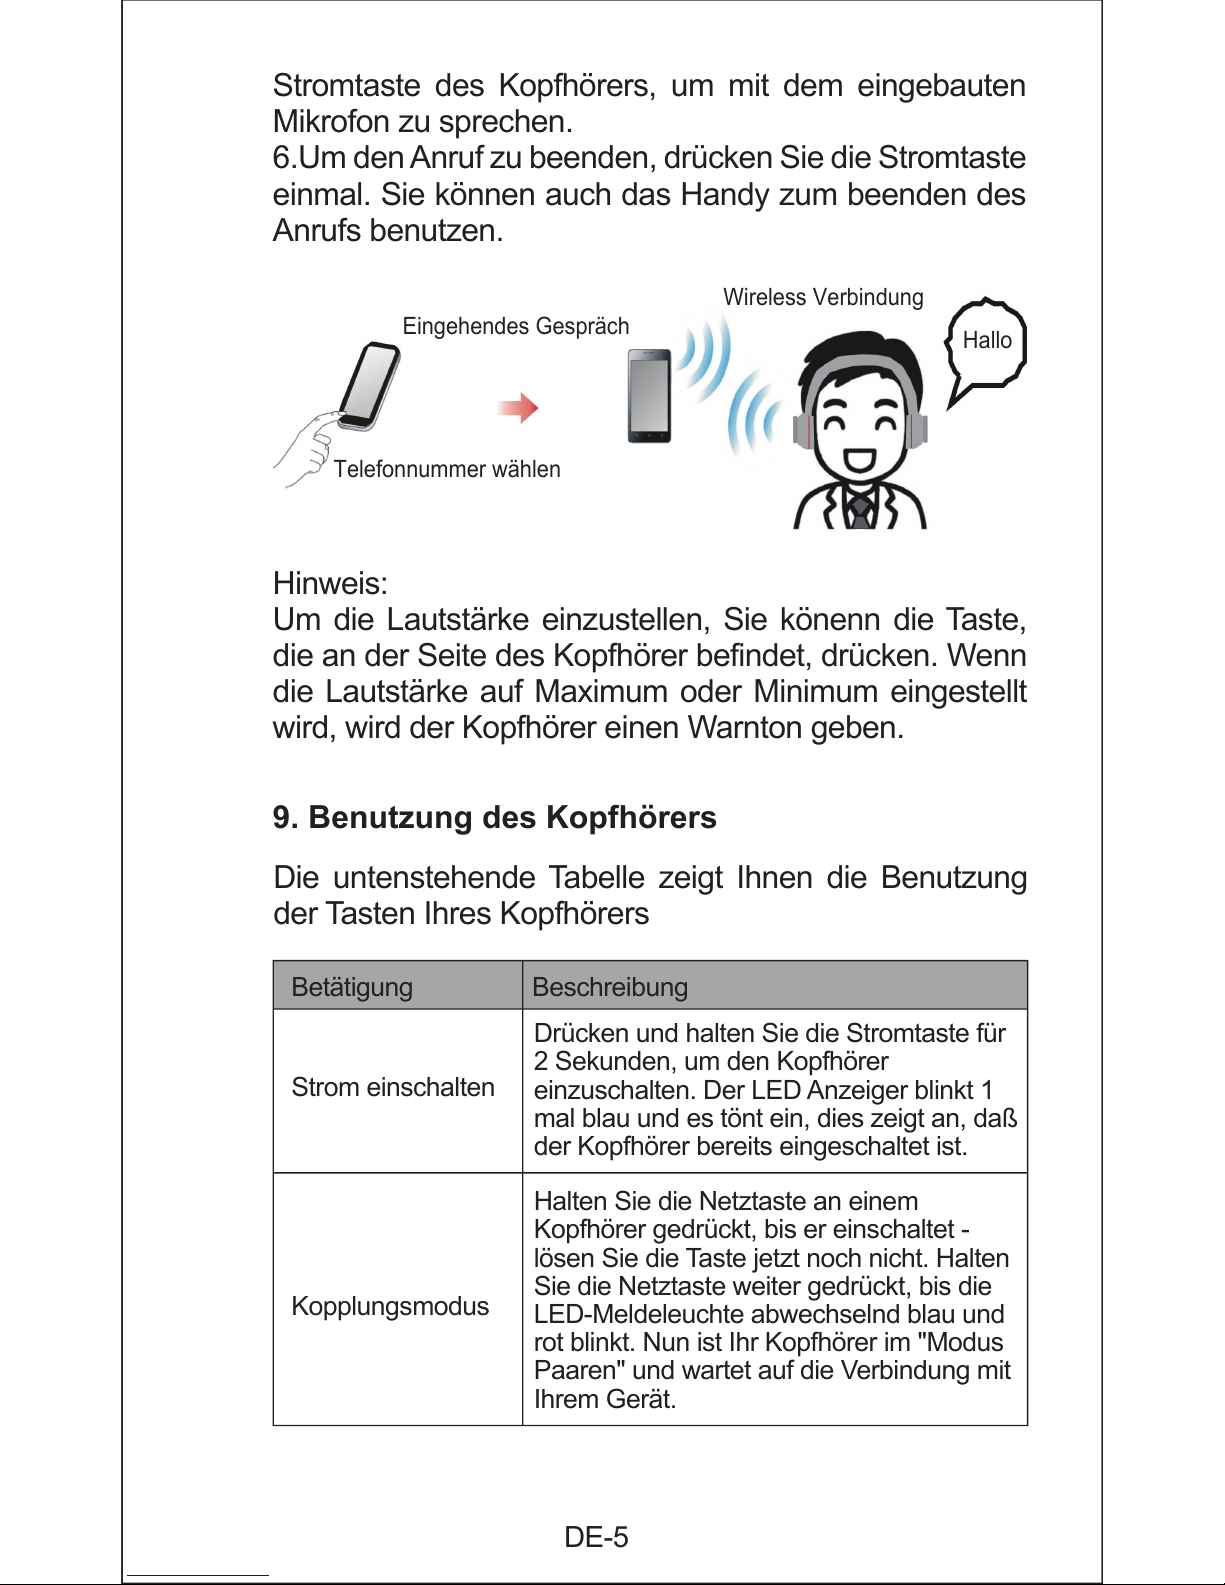
Wireless Verbindung
Telefonnummer wählen
Hallo
Eingehendes Gespräch
Stromtaste des Kopfhörers, um mit dem eingebauten
Mikrofon zu sprechen.
6.Um den Anruf zu beenden, drücken Sie die Stromtaste
einmal. Sie können auch das Handy zum beenden des
Anrufs benutzen.

DE-6
10. LED Anzeiger
Der LED Anzeiger gibt den Status Ihres Kopfhörers an.
Die nachstehende Tabelle zeigt Ihnen die verschiedenen,
verfügbaren LED Anzeigen.
blinkt Standby
Blinkt 1 mal Strom eingeschaltet
Musik pausieren
Drücken Sie die Stromtaste einmal, um
die Musikwiedergabe zu beenden.
Lautstärke
anpassen
Drücken Sie die Lautstärke lauter oder
leiser Taste, um die Laustärke anzupassen.
Musikpiste wählen
Drücken Sie die Vorherige Piste oder
Nächste Piste, um die Musikpiste zu wählen.
Anruf beantworten
Drücken Sie die Stromtaste oder benutzen Sie
Ihr Handy, um einen Anruf zu beantworten.
Anruf beenden
Drücken Sie die Stromtaste oder benutzen
Sie Ihr Handy, um einen Anruf zu beenden.
Strom ausschalten
Drücken und halten Sie die Stromtaste für
4 Sekunden, um den Kopfhörer
auszuschalten. Der LED Anzeiger blinkt 2
mal rot und es tönt ein eine kurze Musik,
dies zeigt an, daß der Kopfhörer bereits
ausgeschaltet ist.
Musik abspielen
Drücken Sie die Stromtaste einmal nach
der Verbindung des Audio.
Abbrechen eines
Anrufs
Drücken Sie die Power-Taste Anwahl
abzubrechen.
Farbe Status Beschreibung
Blau
Solid
Wireless
* Musik abspielen/ pausieren
* Lautstärke anpassen
* Musikpiste wählen
*Kopplung vollständig
* Gespräch beenden
* Nach Abbrechen eines Anrufs
Anruf ablehnen
Drücken Sie die Stromtaste zweimal
schnell hintereinander.
Letztgewählte
Nummer benutzen
(Wiederwahl)
Drücken Sie die Stromtaste zweimal
schnell hintereinander.
11. Pflege des Kopfhörers
1.Vermeiden Sie den Kopfhörer Regen oder anderen
Flüssigkeiten auszusetzen.
2.Vermeiden Sie, daß Feuchtigkeit oder Flüssigkeit
zwischen die Tasten oder andere Einrichtungen eindringt.
3.Lagern Sie den Kopfhörer immer im ausgeschalteten
Zustand und sicher geschützt.
4.Benutzen Sie nur ein trockenes Tuch zum Abwischen
und zur Säuberung des Kopfhörers.
5.Sie können zum vorsichtigen Abwischen der
Ohrlederkissen ein feuchtes Tuch benutzen.
6.Lagern Sie den Kopfhörer bei einer passenden
Te mp er at ur zw is ch en - 25
o
C~60oC. Hohe Temperaturen
können dem Batterieleben schaden und seine Leistung
mindern.
* Im Kopplungsmodus, wenn es länger als drei Minuten
inaktiv ist, wird der LED Anzeiger auf fortlaufendes blaues
Blinken wechseln, anstatt des abwechselnden roten und
blauen Blinkens. Nach 10 Minuten Blinken, schaltet sich
der Kopfhörer automatisch aus. Vor dem Ausschalten
des Kopfhörers können Sie noch koppeln und das
Wireless Gerät verbinden.
DE-7
12. Problemlösungen
Frage: Bei der Benutzung des Handys kann ich in
meinem Kopfhörer nichts hören.
Antwort:Stellen Sie sicher, daß Ihr Kopfhörer und Handy
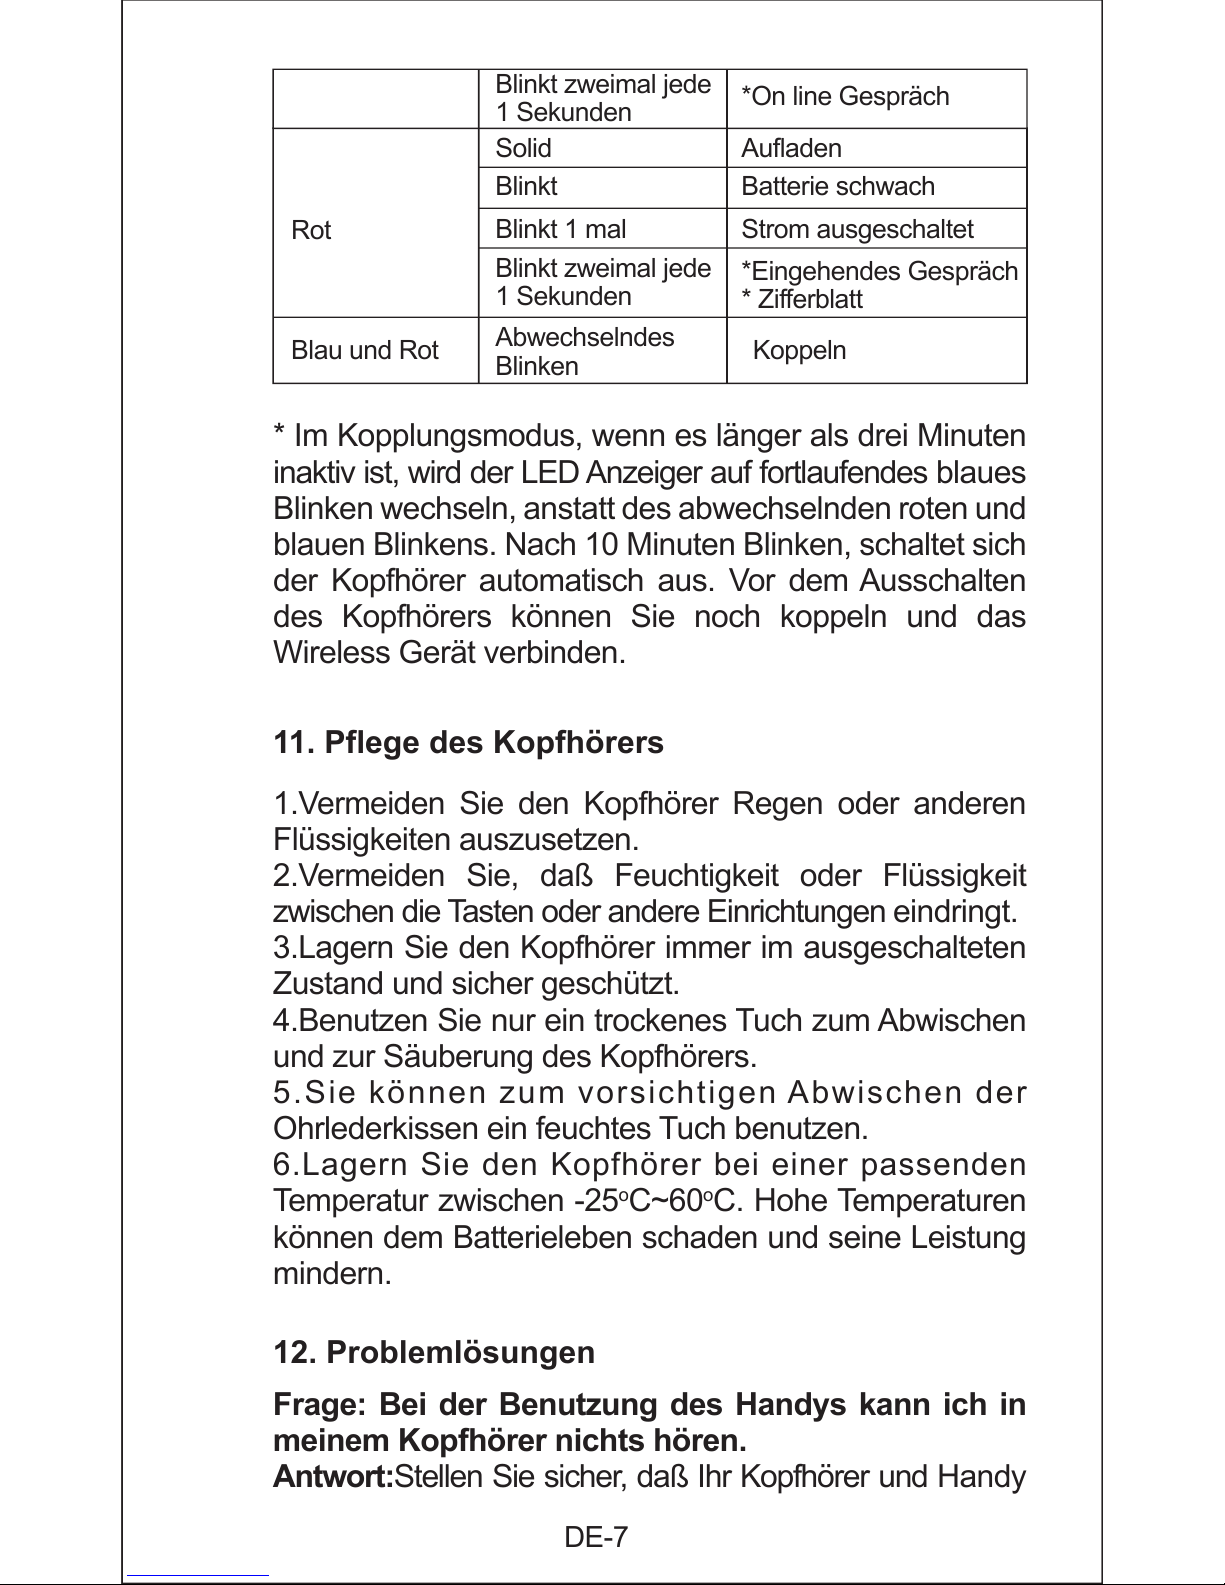
Blinkt 1 mal Strom ausgeschaltet
Blau und Rot
Rot
Abwechselndes
Blinken
Koppeln
Blinkt zweimal jede
1 Sekunden
*Eingehendes Gespräch
* Zifferblatt
Solid Aufladen
Blinkt Batterie schwach
Blinkt zweimal jede
1 Sekunden
*On line Gespräch
DE-8
gekoppelt sind und sich in der empfohlenen Entfernung
befinden.
Passen Sie die Lautstärke der Kopfhörers and, indem
Sie die Lautstärke-erhöhen Taste drücken.
F: Warum arbeitet mein Kopfhörer nicht mit meinem
Handy?
A:Stellen Sie sicher, daß Ihr Kopfhörer aufgeladen ist.
Der LED Anzeiger zeigt solid blau, nachdem die Kopfhörer
Kopplung vollständig ist.
Stellen Sie sicher, daß Sie sich innerhalb der Wireless
Gerät Reichweite befinden.
Falls es lange dauert und sich das Wireless Gerät nicht
gekoppelt hat, versuchen Sie ein erneutes Koppeln.
F: Warum lädt mein Kopfhörer nicht?
A:Versuchen und prüfen Sie folgendes:
Stellen Sie sicher, daß Sie das USB Ladekabel benutzen.
Verbinden Sie das Kabel direkt mit einem USB Port an
Ihrem PC. Benutzen Sie keine anderen Kabel, um Ihren
Kopfhörer aufzuladen.
Beim Aufladen sollte der LED Anzeiger solide rot sein.
Falls nicht, kann es eine Störung im USB Port geben
oder er versorgt nicht ausreichenden Strom. Versuchen
Sie eine andere Stromquelle.
F: Unterstützt der Kopfhörer andere Wireless
Ausrüstung?
A:Der Kopfhörer wurde entwickelt, um mit der Wireless
Konfiguration zu arbeiten. Er kann auch andere Wireless
Geräte unterstützen, wie ein Kopfhörer-, Freisprech-
oder modernes Audioverteilungsprofil.
F: Warum verbindet mein Computer nicht den
Kopfhörer über das Wireless?
A:Stellen Sie sicher, daß Ihr Computer ein Wireless
Signal besitzt oder den Wireless USB Adapter benutzt.
Dann ist die Wireless Eigenschaft aktiviert.
F: Warum koppelt mein Kopfhörer nicht mit dem
Handy?
DE-9
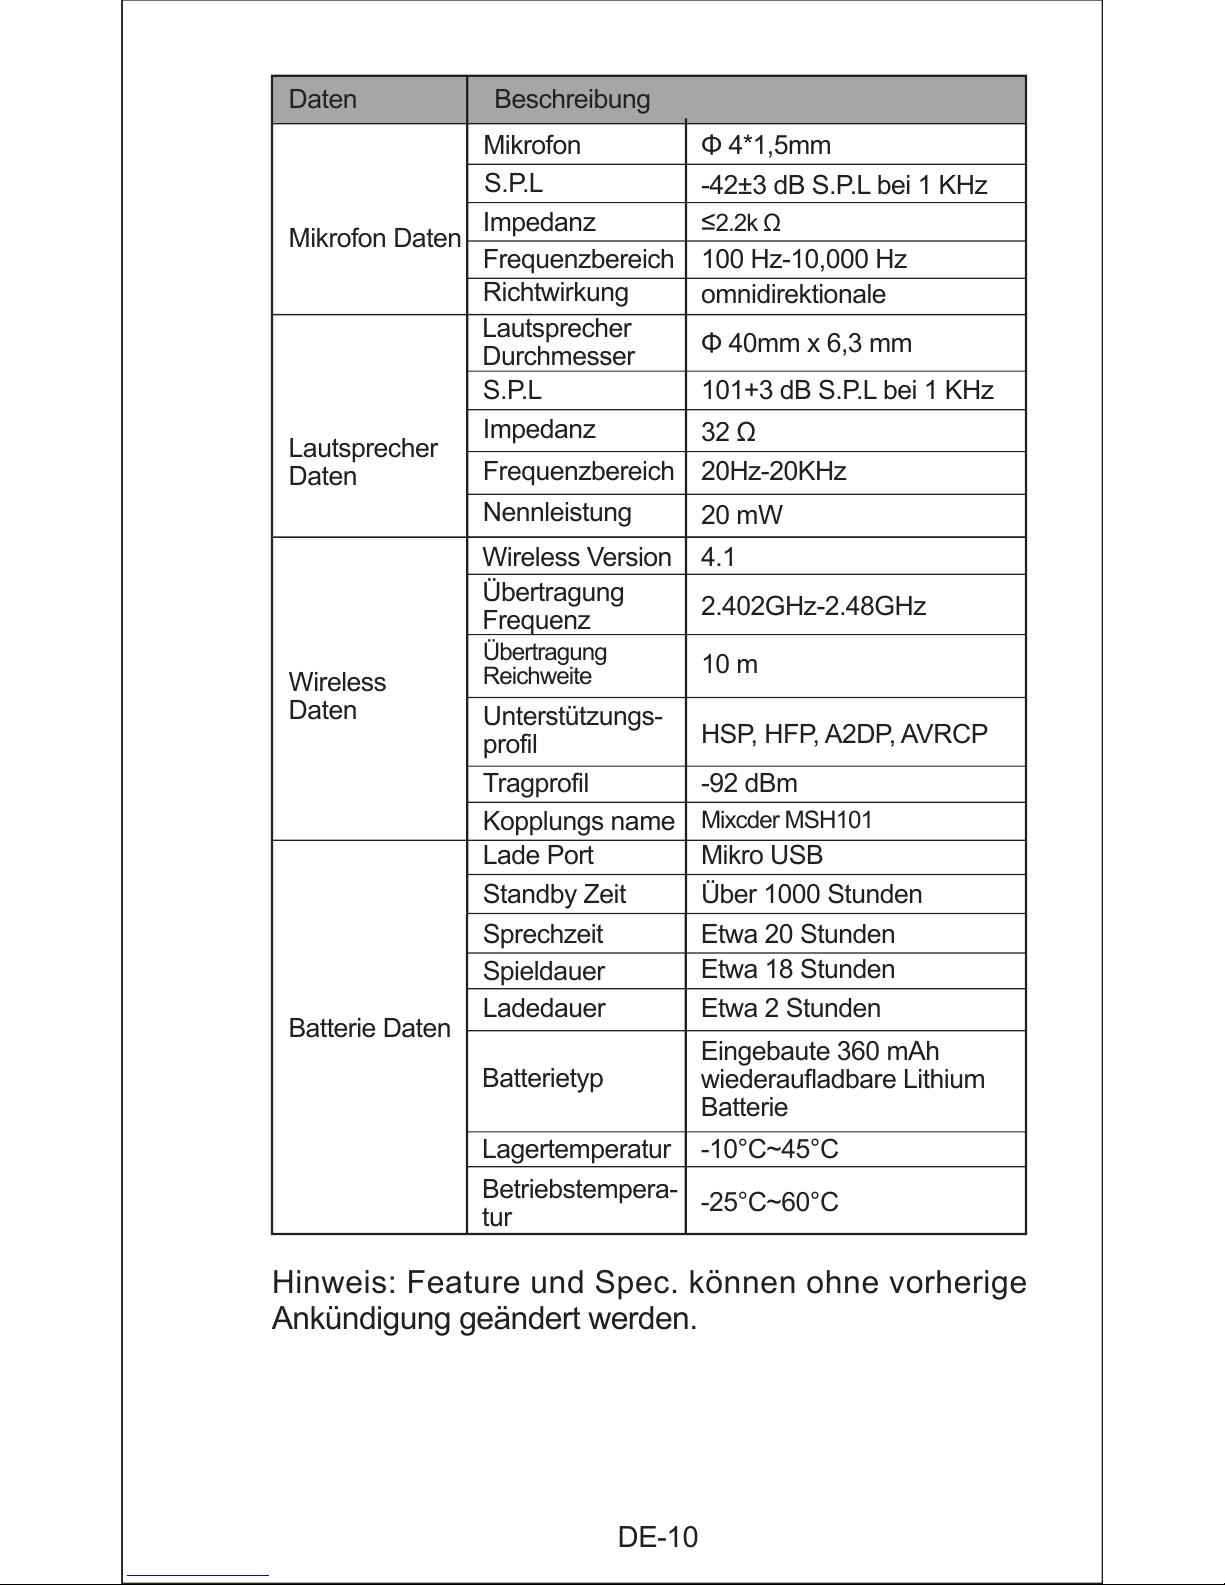
13. Technische Daten
A:Versuchen und prüfen Sie folgendes:
Stellen Sie sicher, daß der Kopfhörer aufgeladen ist und
sich im Kopplungsmodus befindet. Eine schwache
Batterie kann zur Störung der Verbindung führen.
Stellen Sie sicher, daß die Wireless Eigenschaft auf
Ihrem Handy aktiviert ist, und stellen Sie es in den
Wireless Kopplungsmodus.
Stellen Sie sicher, daß die Kopplungsverbindung den
richtigen Namen benutzt. Sie können auch aufgefordert
werden das Kennwort „0000“ einzugeben, damit die
Kopplung akzeptiert wird.
DE-10
Batterie Daten
-10°C~45°CLagertemperatur
Eingebaute 360 mAh
wiederaufladbare Lithium
Batterie
Batterietyp
-25°C~60°C
Betriebstempera-
tur
Etwa 20 Stunden
Etwa 18 Stunden
Sprechzeit
Spieldauer
Ladedauer Etwa 2 Stunden
Hinweis: Feature und Spec. können ohne vorherige
Ankündigung geändert werden.
Daten Beschreibung
Mikrofon Daten
Mikrofon Φ 4*1,5mm
-42±3 dB S.P.L bei 1 KHz
≤
2.2k Ω
100 Hz-10,000 Hz
omnidirektionale
Lautsprecher
Daten
Wireless
Daten
S.P.L
Impedanz
101+3 dB S.P.L bei 1 KHzS.P.L
32 Ω
Impedanz
20Hz-20KHz
20 mW
Nennleistung
Frequenzbereich
Frequenzbereich
Φ 40mm x 6,3 mm
Lautsprecher
Durchmesser
10 m
Übertragung
Reichweite
4.1Wireless Version
HSP, HFP, A2DP, AVRCP
Unterstützungs-
profil
-92 dBmTragprofil
Mixcder MSH101
Kopplungs name
Mikro USBLade Port
Über 1000 StundenStandby Zeit
2.402GHz-2.48GHz
Übertragung
Frequenz
Richtwirkung
RU-1
1. Введение
Спасибо за покупку наушников Mixcder MSH101
Wireless. MSH101 имеет модный внешний вид и
экологичный дизайн упаковки. Наушники обладают
складной конструкцией для удобного хранения и
переноски. Искусственная кожа наушников
стилизована под человеческую текстуру кожи,
обеспечивая долговременный комфорт.
Встроенный аккумулятор обеспечивает более
длительное воспроизведение музыки и режим
ожидания.
Примечание: Пожалуйста,прочитайте эту
инструкцию перед использованием, и сохранить его
должным образом для дальнейшего использования.
4. Особенности
- Wireless V4.1
- Большие кнопки, больше управляемых операций
- Гнущийся дизайн, удобен для переноски
2. Комплектация
- Гарнитура Wireless*1
- Микро-USB кабель для зарядки*1
- Аудиокабель 3.5мм*1
- Руководство пользователя*1
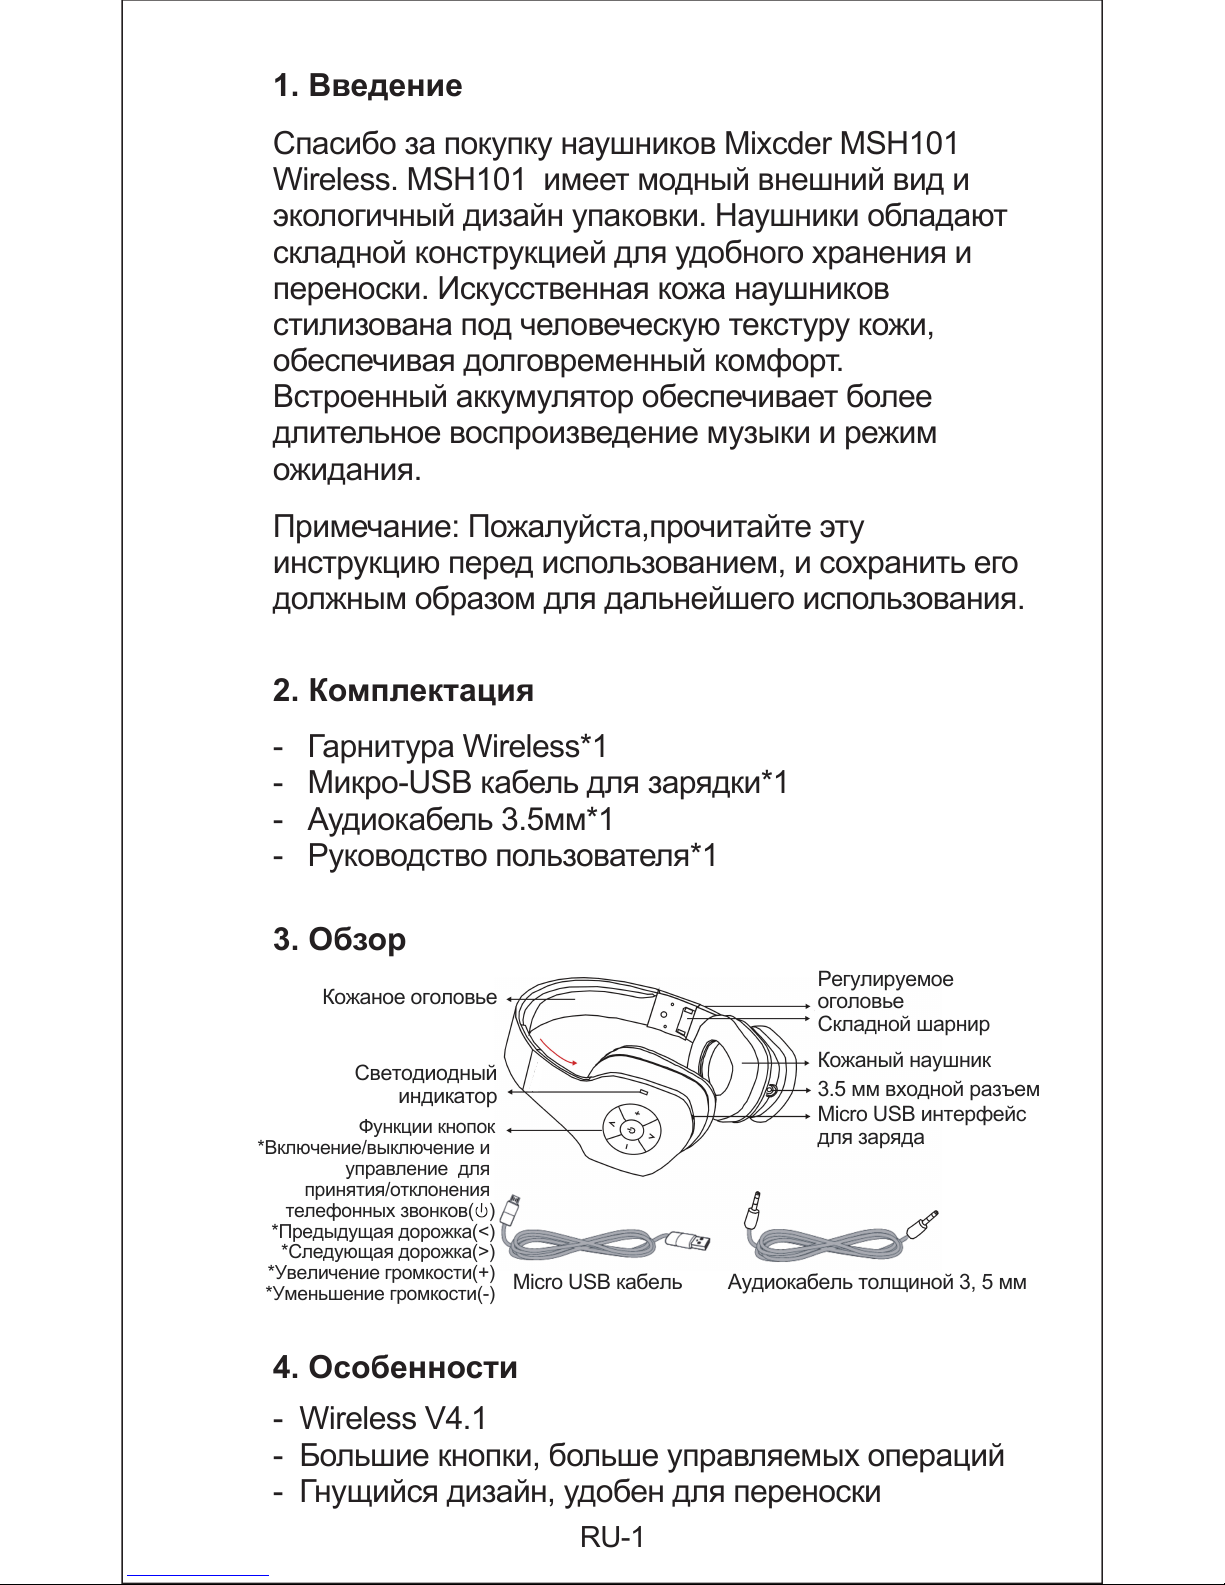
3. Обзор
Кожаное оголовье
Регулируемое
оголовье
Складной шарнир
Кожаный наушник
3.5 мм входной разъем
Micro USB интерфейс
для заряда
Светодиодный
индикатор
Micro USB кабель Аудиокабель толщиной 3, 5 мм
Функции кнопок
*Включение/выключение и
управление для
принятия/отклонения
телефонных звонков( )
*Предыдущая дорожка(<)
*Следующая дорожка(>)
*Увеличение громкости(+)
*Уменьшение громкости(-)

RU-2
5. Соединение
5.1 Аудио соединение
Подключите к 3,5-мм разъему на вашем аудио
устройстве (например, мобильный телефон или ПК)
с помощью прилагаемого аудио кабеля. Гарнитура
предоставляет функцию моментального
проигрывания после включекния, которая позволяет
проигрывать музыку автоматически.
Примечание:
При входящем звонке во время соединения
Wireless, аудио соединение будет прервано.
5.2 USB соединение
Подключитесь к источнику питания с помощью
предостав-ленного USB кабеля
Примечание:
Это не повлияет на Wireless и аудио соединение во
время зарядки.
5.3 Беспроводное соединение Wireless
MSH101 может подсоединиться к устройству с
функцией Wireless
1. Нажмите и удерживайте кнопку питания на одной
гарнитуре, пока она не включится. Продолжайте
удерживать кнопку питания нажатой, пока
светодиодный индикатор не начнет мигать синим и
красным цветом попеременно.
2. Подсоедините гарнитуру к устройству с функцией
Wireless(например, мобильному телефону). Больше
информации по сопряжению вы сможете найти в “7.
Настройка сопряжения”
3.После завершения подсоединения вы сможете
разговаривать и проигрывать музыку через
- Высококачественный кожаный чехол для
наушников и амбушюры
- Встроенный микрофон и хэндс-фри
- Подзарядка через USB кабель

RU-3
7. Настройка сопряжения
1. Нажмите и удерживайте кнопку питания на одной
гарнитуре, пока она не включится. Продолжайте
6. Подзарядка батареи
1. Подключитесь к источнику питания с помощью
предоставленного USB кабеля
2. Заряжайте гарнитуру в течение 2 часов, пока
Сид-индикатор выключает.
Примечание:
Во время первой зарядки не отключайте гарнитуру
от источника питания, даже если Сид индикатор
или индикаторы гарнитуры показывают, что батарея
полностью заряжена. Пусть батарея заряжается в
течение 2-3 часов.
Если Сид-индикатор мигает красным, и звучит
сигнал тревоги, то это означает, что батарея почти
разряжена.
функцию Wireless.
Беспроводное
соединение
Мобильный телефон
наушников
Аудио соединение
USB соединение
Ноутбук
Ноутбук для энергопитания
наушников
Micro USB кабель

RU-4
Примечание:
При Wireless соединении телефона и гарнитуры,
расстояние между ними не должно превышать 10
метров.
Вы можете сопрягать и подсоединять только одно
устройство одновременно. Для переключения
Wireless устройства, отсоедините гарнитуру от
текущего устройства (отключите функциюWireless)
перед подключением следующего.
8. Ответ на вызов
Перед принятием вызова убедитесь в том, что
гарнитура уже сопряжена с мобильным телефоном.
Более подробная информация указана в “7.
Настройка сопряжения”.
1. Нажмите и удерживайте 2-3 секунды кнопку
питания, чтобы включить гарнитуру.
2.Через некоторое время гарнитура
непосредственно войдет в “режим сопряжения”,
если она ранее сопрягалась с устройством Wireless.
3.Сид-индикатор будет светиться синим цветом,
показывая, что указывает на завершение
удерживать кнопку питания нажатой, пока
светодиодный индикатор не начнет мигать синим и
красным цветом попеременно. Это означает, что
гарнитура находится в "режиме сопряжения",
ожидая соединения либо с вашим устройством.
2.Включите ваше устройство, и включите функцию
Wireless.
3.Устройство Wireless покажет все новые
устройства, которые можно подключить.
4.Выберите “Mixcder MSH101”. Если устройство
запрашивает код или PIN-код, введите “0000”.
После подключения, СИД-
индикатор гарнитуры загорится синим цветом, и
прозвучит оповещение сигнал , это означает, что
беспроводное Wireless соединение успешно
выполнено.

Примечание:
Вы можете нажать кнопку + или -, расположенный
на боковой стороне наушников для регулировки
громкости. Когда объем доводят до максимума или
минимума, наушники воля звуковой сигнал.
RU-5
9. Использование гарнитуры
В таблице ниже описаны способы применения
кнопок на вашей гарнитуре
Действие Описание
Включение
Нажмите и удерживайте 2 секунды
кнопку питания на гарнитуре.
Сид-индикатор мигнет 1 раза синим
цветом, и вы услышите небольшая
музыкальная - гаритура включена.
Выключение
Нажмите и удерживайте 4 секунды
кнопку питания на гарнитуре.
Сид-индикатор мигнет 2 раза красным
цветом, и вы услышите небольшая
музыкальная гаритура выключена.
соединение Wireless
Набрать номер телефона
При
вет
Входящий вызов
сопряжения гарнитуры и мобильного телефона.
4.Наберите номер с помощью мобильного
телефона.
5.После соединения нажмите кнопку питания на
гарнитуре, чтобы разговаривать через встроенный
микрофон.
6.Для завершения звонка, нажмите кнопку питания
еще раз. Также, вы можете завершить звонок с
помощью мобильного телефона.

RU-6
10. СИД-индикатор
СИД-индикатор отражает статус вашей гарнитуры.
В таблице ниже указаны существующие состояния
СИД-индикатора.
Режим сопряжения
Нажмите и удерживайте кнопку питания
на одной гарнитуре, пока она не
включится. Продолжайте удерживать
кнопку питания нажатой, пока
светодиодный индикатор не начнет
мигать синим и красным цветом
попеременно. Это означает, что
гарнитура находится в "режиме
сопряжения", ожидая соединения либо
с вашим устройством.
Проигрывание
музыки
Нажмите кнопку питания один раз при
подключенном аудио.
Пауза музыки
Нажмите кнопку питания один раз
чтобы остановить музыку
Настройка звука
Нажмите кнопку повышения или
понижения звука для настройки звука
Выбор трека
Нажмите кнопку предыдущего или
следующего трека для выбора трека
Ответ на вызов
Нажмите кнопку питания или
воспользуйтесь мобильным
телефоном, чтобы ответить на вызов
Завершение
вызова
Нажмите кнопку питания или
воспользуйтесь мобильным
телефоном, чтобы завершить вызов
Нажмите кнопку питания для отмены
набора.
Отменить набор
номера
Отклонить вызов
Быстро нажмите кнопку питания
дважды
Вызов последнего
номера (повторный
набор)
Быстро нажмите кнопку питания
дважды

11. Берегите свою гарнитуру
1.Не подвергайте гарнитуру дождю и другим
жидкостям.
2.Избегайте попадения жидкостей на кнопки и
другие элементы.
3.Всегда храните гарнитуру в выключенном
состоянии.
4.Для чистки гарнитуры используйте только сухие
трапки.
5.Вы можете аккуратно протереть ушную подушку
влажной тряпкой.
* В режиме сопряжения, когда в течение трех минут
не производится никаких действий, СИД-индикатор
начнет мигать синим, перестав попеременно мигать
синим и красным. Через 10 минут гарнитура
автоматически выключится. До отключения
гарнитуры вы все еще можете выполнить
сопряжение и подключение к Wireless устройству.
RU-7
Красный
Мигает 1 раза Питание включено
Мигает 2 раза
каждые 1сек
*Звонок онлайн
Постоянный Подзарядка
Мигает Низкий заряд
Мигает 1 раза Питание выключено
Синий и
красный
Мигает
попеременно
Сопряжение
Мигает 2 раза
каждые 1сек
Входящий звонок
Синий
Мигает Ожидание
Постоянный
Wireless
*Проигрывание/Пауза музыки
*Настройка звука
*Выбор трека
*Сопряжение завершено
*После окончания вызова
*После отмены вызова
Цвет Статус Описание

12. Устранение неполадок
RU-8
B: Я ничего не слышу через гарнитуру во время
использования мобильного телефона
O:Убедитесь в том, что гарнитура и мобильный
телефон были сопряжены и находятся на
допустимом расстоянии.
Настройте громкость гарнитуры с помощью кнопки
повышения звука.
B: Почему моя гарнитура не работает с
мобильным телефоном?
O:Убедитесь в том, что гарнитура заряжена.
СИД-индикатор мигает синим после завершения
сопряжения.
Убедитесь в том, что вы находитесь в пределах
доступности сигнала Wireless.
Прошло много времени после сопряжения и
подключения Wireless устройства, повторите
сопряжение.
B: Почему моя гарнитура не заряжается?
O:Убедитесь в том, что вы используете USB кабель
для зарядки.
Подсоедините кабель непосредственно к USB порту
на вашем ПК. Не используйте другие зарядные
устройства.
Во время зарядки СИД-индикатор должен светиться
красным цветом. Если это не так, то возможно, что
USB порт неисправен или дает недостаточно
энергии. Попробуйте другой источник энергии.
B: Будет ли гарнитура поддерживать другое
Wireless оборудование?
O:Гарнитура спроектирована для работы с Wireless .
Она также может поддерживать другие Wireless
6.Храните гарнитуру при подходящей температуре
между -25
o
C~60oC. Высокая температура может
повредить батарею, и снизить ее
производительность.

RU-9
13. Характеристики
устройства с гарнитурой, хэндс-фри или
продвинутыми аудио устройствами.
B: Почему мой компьютер не подсоединяет
гарнитуру через Wireless?
O:Убедитесь в том, что ваш компьютер имеет
Wireless сигнал или использует USB Wireless
адаптер. И что функция Wireless включена.
B: Почему моя гарнитура не выполняет
сопряжение с мобильным телефоном?
O:Убедитесь в том, что гарнитура заряжена и
находится в режиме сопряжения. Низкий заряд
батареи может привести к разрыву соединения.
Убедитесь в том, что на вашем компьютере
активирован режим Wireless, и установите его в
режим Wireless сопряжения.
Убедитесь в том, что указано правильное имя
соединения. У вас также могут запросить пароль
“0000” для принятия сопряжения.

RU-10
Наименование Описание
Характеристик
и микрофона
Блок микрофона Φ 4*1.5мм
-42
±3дБ S.P.L при 1кГц
<2.2k Ω
100Гц-10,000Гц
Всенаправленный
Характеристик
и динамиков
Характеристик
и Wireless
Характеристик
и батареи
S.P.L
Сопротивление
101+3дБ S.P.L при1кГцS.P.L
32 Ω
Сопротивление
20Гц-20кГц
Частотный
диапазон
Частотный
диапазон
Φ 40мм*6.3
Диаметр
динамика
10м
Дистанция
передачи
4.1Версия Wireless
HSP, HFP, A2DP, AVRCP
Поддерживаемые
форматы
-92dBmчувствительность
Mixcder MSH101
Название
сопряжения
Микро USBЗарядный порт
Более 1000 часовВремя ожидания
Примерно 20 часовВремя разговора
2.402ГГц-2.48ГГц
Частота
передачи
Время
проигрывания
Примерно 18 часов
Время зарядки Примерно 2 часа
-10oC~45oC
Рабочая
температура
Встроенная 360 мАч
перезаряжаемая литиевая
батарея
Тип батареи
-25oC~60oC
Температура
хранения
Направленность
Примечание. Функции и технические
характеристики могут быть изменены без
предварительного уведомления.

FR-1
1. Introduction
Merci d'avoir acheté le casque d’écoute Wireless Mixcder
MSH101. Le MSH101 qui a une apparence à la mode et
la conception de l'emballage écologique.Le casque offre
un design pliable pour un rangement et transport facile.
Des cache-oreilles en protéine de cuir artificielle à la
texture de la peau humaine simulé, vous offre un confort
de longue durée. Une batterie rechargeable intégrée
fournit un temps de musique et de veille plus élevé.
Remarque: S'il vous plaît lire ce manuel attentivement
avant d'utiliser, et de le conserver correctement pour
référence future.
2. Contenu de l’emballage
- Casque Wireless*1
- Câble de recharge micro-USB*1
- Câble audio 3,5mm*1
- Manuel de l’utilisateur*1
4. Caractéristiques
- WirelessV4.1
- Gros boutons, fonctionnement plus humain
- Design pliable, facile à porter
- Etui de casque et coussinets en cuir et haut grade
3.Overview
Serre-tête en cuir
Serre-tête réglable
Charnière pliable
Coussinets en cuir
Jack d’ entrée 3,5mm
Port micro-USB
Indicateur LED
Câble de recharge micro-USB Câble audio 3,5mm
Boutons de contrôle
*Bouton d’
alimentation on/off( )
*Piste précédente(<)
*Piste suivante(>)
*Volume +(+)
*Volume -(-)

FR-2
5. Connexion
5.1 Connexion audio
Connectez le connecteur jack 3,5mm de votre dispositif
audio (par exemple, téléphone portable ou PC) en
utilisant le câble audio fourni. Le casque offre la fonction
plug-and-play qui vous permet de jouer automatique-
ment de la musique.
Note:
Lorsque le Wirelesses connecté et qu’un appel entre, la
connexion audio sera stoppée.
5.2 Connexion USB
Connectez le dispositif à l’alimentation électrique en
utilisant le câble de recharge USB inclus.
Note:
Ceci n’influencera pas les connexions Wirelesset audio
pendant la recharge
5.3 Connexion Wireless sans fil
MSH101 vous permet de se connecter à un dispositif via
Wireless.
1. Appuyez longuement le bouton marche arrêt d’un
casque et attendez que celui-ci, mais ne relâchez pas
encore le bouton. Attendez pour cela que le voyant LED
clignote alternativement en bleu et rouge.
2. Connectez le casque à un dispositif (par exemple, à
un téléphone portable) en utilisant la fonction Wireless.
Pour plus d’informations sur le jumelage, veuillez lire la
partie 7. Configurations de jumelage.
3.Une fois la connexion réussie, vous pouvez discuter et
jouer de la musique via Wireless.
- Microphone intégré et main libre
- Chargement de batterie avec câble USB

6. Charger la batterie
1.Connectez le casque à la source d’alimentation en
utilisant le câble de recharge USB inclus.
2. Chargez le casque pendant 2 heures jusqu’à ce que
l’indicateur LED éteindre.
Note:
A la première recharge, ne déconnectez pas le casque
de la source d’alimentation même si l’indicateur LED du
casque indique que la batterie est complètement chargée.
Laissez charger pendant au moins 2-3 heures pour une
recharge complète.
L’indicateur LED clignote en rouge avec un son d’alerte
indiquant que la batterie du casque est faible.
7.Configurations de jumelage
1. Appuyez longuement le bouton marche arrêt d’un
casque et attendez que celui-ci, mais ne relâchez pas
encore le bouton. Attendez pour cela que le voyant LED
clignote alternativement en bleu et rouge, ce qui indique
FR-3
Connexion
sans fil
Téléphone portable
Casque
Connexion audio
Connexion USB
Ordinateur portable
Ordinateur pour
source d’ alimentation
Casque
Câble de recharge micro-USB

FR-4
Note:
En utilisant un téléphone portable et le casque pour
effectuer une connexion Wireless, la distance entre les
deux dispositifs ne doit pas dépasser 10 mètres.
Vous ne pouvez jumeler et connecter qu’un dispositif à
la fois. Pour éteindre le dispositif Wireless, déconnectez
le casque du dispositif actuel (désactiver la fonction
Wireless) avant de le reconnecter à un nouveau dispositif.
8. Répondre à un appel
Avant de répondre à un appel, assurez-vous que le
casque soit déjà jumelé avec votre téléphone portable.
Veuillez-vous référer à la partie 7. Configurations de
jumelage pour obtenir plus d’informations sur le jumelage.
1. Appuyez et maintenez le bouton d’alimentation pendant
2 secondes pour allumer le casque.
2.Après un petit moment, le casque entrera directement
en mode Jumelage s’il n’a jamais été jumelé avec le
dispositif Wireless.
3.L’indicateur LED deviendra bleu solide, indiquant que
le jumelage a été effectué entre le casque et le téléphone
portable.
4.Utilisez le téléphone portable pour faire un appel.
5.Une fois l’appel connecté, appuyez le bouton
d’alimentation sur le casque pour discuter à l’aide du
microphone intégré.
6.Pour terminer l’appareil, appuyez le bouton
d’alimentation une fois. Vous pouvez également utiliser
le téléphone portable pour terminer l’appel.
que le casque est en mode d’appariement et en attente
d’être apparié soit à votre appareil.
2.Allumez le dispositif et activer le Wireless
3.Le Wireless listera les nouveaux dispositifs connectés.
4.Sélectionnez Mixcder MSH101. Si le dispositif demande
un code ou un PIN, saisisez 0000. Une fois la connexion
terminée, l’indicateur LED sur votre casque deviendra
bleu et sortira un son une tonalité d'alerte indiquant que
la connexion Wireless sans fil a bien été effectuée.

FR-5
Note:
Vous pouvez appuyer sur + ou - bouton situé sur le côté
de votre casque pour régler le volume. Lorsque le
volume est réglé au maximum ou minimum, la volonté
de casque émet un signal sonore.
9. Utilisation du casque
Le tableau ci-dessous montre comment utiliser le bouton
sur votre casque.
Action Description
Allumer
Appuyez et maintenez le bouton d’alimentation
pendant 2 secondes pour allumer le casque.
L’indicateur LED clignotera en bleu 1 fois puis
sortira un son un bref musique, indiquant que le
casque a été allumé.
Eteindre
Appuyez et maintenez le bouton d’alimentation
pendant 4 secondes pour éteindre le casque.
L’indicateur LED clignotera en rouge 2 fois puis
sortira un son un bref musique, indiquant que le
casque a été éteint.
Mode Jumelage
Appuyez longuement le bouton marche arrêt
d’un casque et attendez que celui-ci, mais ne
relâchez pas encore le bouton. Attendez pour
cela que le voyant LED clignote alternativement
en bleu et rouge, ce qui indique que le casque
est en mode d’appariement et en attente d’être
apparié soit à votre appareil.
Envoyer la musique
Appuyez le bouton d’alimentation une fois sur
connexion de l’audio.
Stopper la musique
Appuyez le bouton d’alimentation une fois pour
arrêter la lecture de la musique.
Régler le volume
Appuyez le bouton Volume + ou Volume - pour
régler le volume.
Sélectionnez la
piste musicale
Appuyez et maintenez le Up ou Down pour
Sélectionnez la piste musicale
Répondre à un appel
Appuyez le bouton d’alimentation ou utilisez votre
téléphone portable pour répondre à un appel.
Connexion Wireless
Faites un appel
Allo!
Appel entrant
FR-6
Terminer un appel
Appuyez le bouton d’alimentation ou utilisez
votre téléphone portable pour terminer un appel.
* En mode Jumelage, lorsque l’appareil est inactif pendant
plus de 3 minutes, l’indicateur LED qui clignote en rouge
et bleu alternativement changera en clignotement continu
en bleu. Et environ 10 minutes après les clignotements,
le casque s’éteindra automatiquement. Avant que le
Appuyez sur le bouton d'alimentation pour
annuler la numérotation.
Annuler la
numérotation
Appuyez le bouton d’alimentation rapidement
2 fois.
Prendre le dernier
numéro appelé
(recomposer)
Rejeter un appel
Appuyez le bouton d’alimentation rapidement 2
fois.
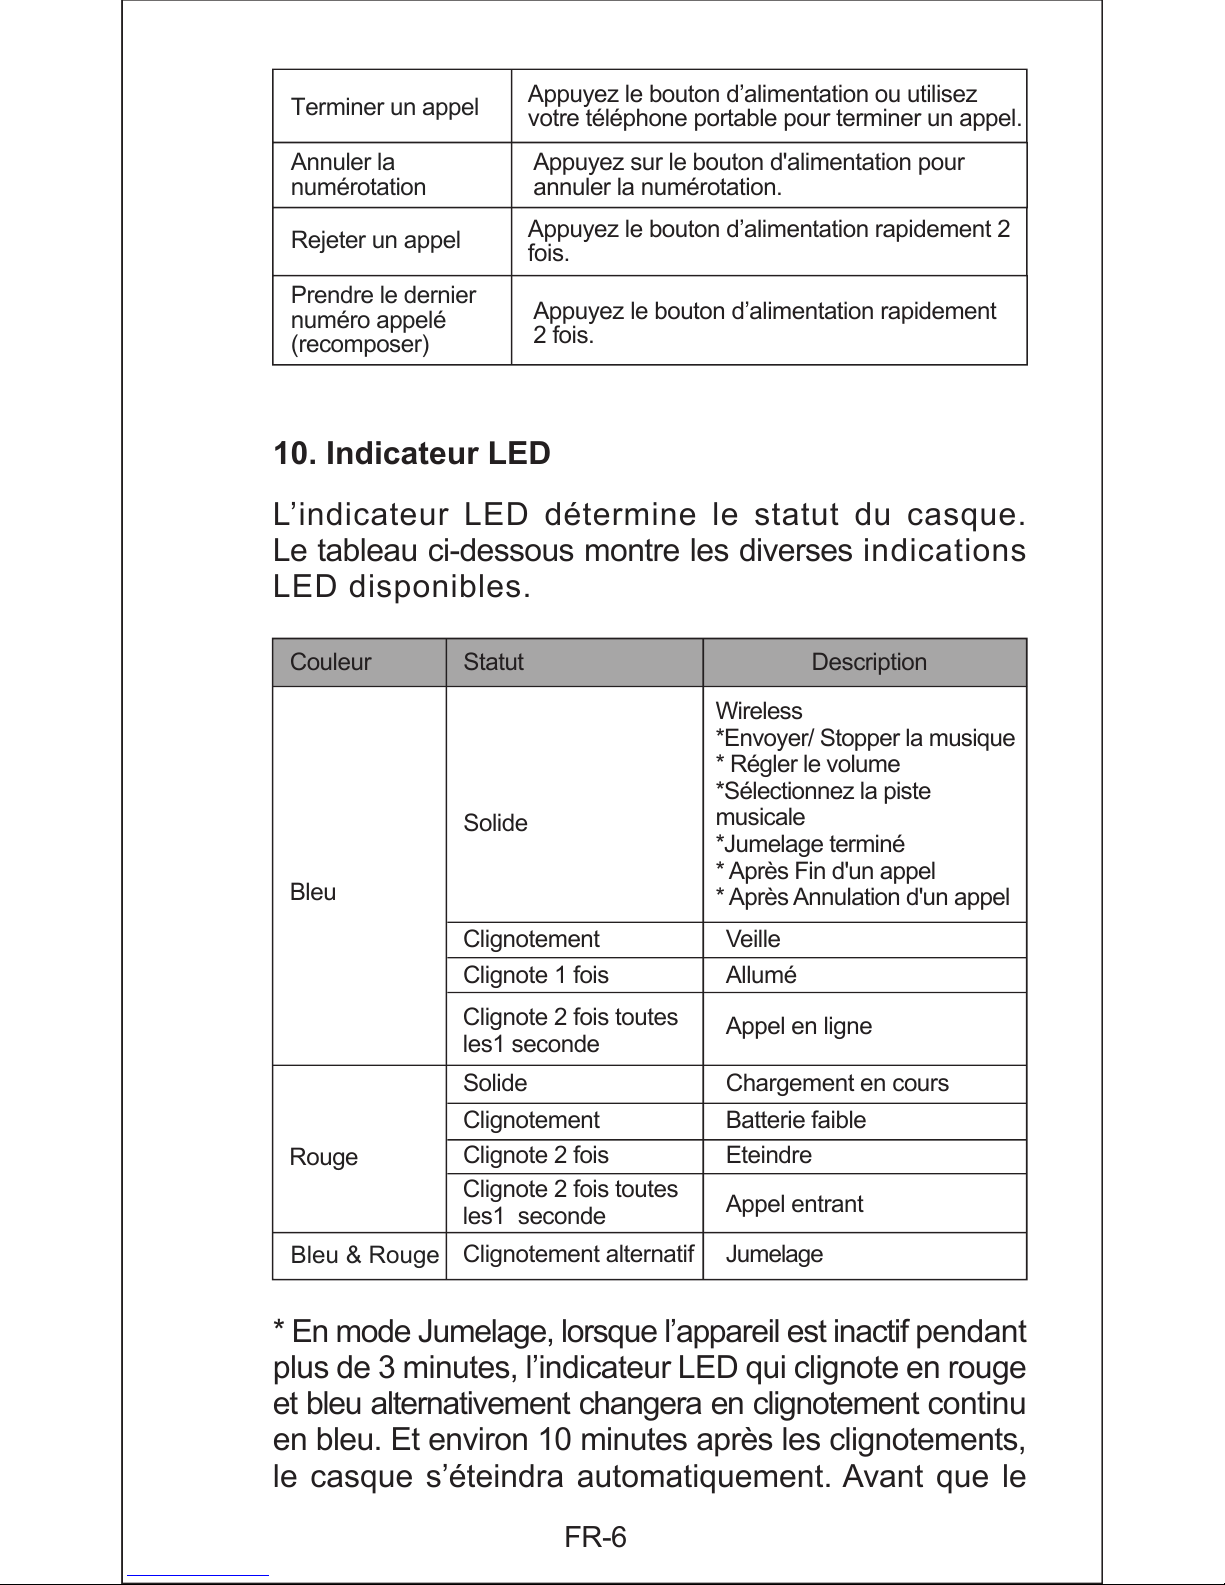
10. Indicateur LED
L’indicateur LED détermine le statut du casque.
Le tableau ci-dessous montre les diverses indications
LED disponibles.
Rouge
Clignotement Veille
Clignote 1 fois Allumé
Clignote 2 fois toutes
les1 seconde
Appel en ligne
Solide Chargement en cours
Clignotement Batterie faible
Clignote 2 fois Eteindre
Bleu & Rouge
Clignotement alternatif Jumelage
Clignote 2 fois toutes
les1 seconde
Appel entrant
Couleur Statut Description
Bleu
Solide
Wireless
*Envoyer/ Stopper la musique
* Régler le volume
*Sélectionnez la piste
musicale
*Jumelage terminé
* Après Fin d'un appel
* Après Annulation d'un appel

FR-7
11. Prenez soin de votre casque
1. Eviter d’exposer le casque à la pluie ou à d’autres
liquides.
2. Eviter que l’humidité ou les liquides ne pénètrent dans
les boutons et les autres appareils.
3. Rangez toujours le casque après l’avoir éteint, et
conservez-le dans un endroit protégé.
4. Utilisez uniquement un chiffon sec pour essuyer et
nettoyer le casque.
5.Vous pouvez utiliser un chiffon humide pour essuyer
les coussinets des oreillettes en cuir.
6. Gardez le casque dans un endroit avec température
entre -25°C~60°C. Une température élevée pourrait
réduire la vie de la batterie et sa performance.
12. Dépannage
Q:Lorsque j’utilise mon téléphone portable, je
n’entends rien de mon casque.
R:Assurez-vous que votre casque et votre téléphone
portable ont bien été jumelés et soient tous les deux dans
la gamme de distance permise.
Réglez le volume du casque en appuyant le bouton
Volume +.
Q: Pourquoi mon casque ne fonctionne pas avec
mon téléphone portable ?
R:Assurez-vous que le casque soit bien chargé.
L’indicateur LED est bleu solide lorsque le jumelage du
casque est réussi.
Assurez-vous d’être dans la gamme de distance autorisée
du signal Wireless.
Le casque est resté trop longtemps sans jumelage et
sans avoir été connecté par Wireless. Veuillez réessayer.
Q: Mon casque ne recharge pas?
casque ne s’éteigne, vous pouvez toujours effectuer un
jumelage et connecter le dispositif Wireless.

FR-8
13. Spécifications
R:Assurez-vous d’utiliser le câble de recharge USB.
Branchez directement le câble au port USB de
l’ordinateur. N’utilisez pas d’autre dispositif de recharge
pour recharger le casque.
Lorsque vous rechargez, l’indicateur LED doit être un
rouge solide. Si non, il est probable que le port USB est
inopérant ou n’a pas d’alimentation.
Q: Est-ce que le casque supporte d’autre appareil
Wireless?
R:Le casque est destiné à fonctionner avec une configura-
tion Wireless. Il peut également supporter d’autres
dispositifs Wireless pour casque, main libre ou avec
distribution audio avancée.
Q: Pourquoi mon ordinateur ne connecte pas le
casque via Wireless?
R:Assurez-vous que votre ordinateur détecte le signal
Wirelessou si l’adaptateur Wireless USB est bien activé,
et que la fonction Wireless soit activée.
Q: Pourquoi mon casque ne peut pas se jumeler
avec mon téléphone portable ?
R:Assurez-vous que le casque soit chargé et soit en
mode Jumelage. Une faible batterie pourrait causer une
déconnexion.
Assurez-vous que la fonction Wireless soit activée sur
votre téléphone portable puis réessayer d’entrer en mode
Jumelage Wireless.
Assurez-vous que le nom de jumelage soit correct. Il est
possible que le dispositif vous demande à entrer un
code. Saisissez 0000 pour accepter le jumelage.

FR-9
Option Description
Spéc. micro
Le microphone Φ 4*1,5mm
-42
±3dB S.P.L à 1KHz
<2,2k Ω
100Hz-10000Hz
Omni-directionnelle
Spéc.
haut-parleur
Spéc. Wireless
Spéc. batterie
S.P.L
Impédance
20Hz-20KHz
Réponse en
fréquence
32 Ω
Impédance
101+3dB S.P.L à 1KHz
S.P.L
Réponse en
fréquence
Φ 40mm*6.3mm
Diamètre du
haut-parleur
2,402GHz-2,48GHz
Fréquence de
transmission
4.1Version Wireless
10m
Distance de
transmission
-92dBmSensibilité
Mixcder MSH101Nom de jumelage
Micro USBPort de charge
Plus de 1000 heuresTe m p s de ve il le
Environ 20 heuresTemps de discussion
HSP, HFP, A2DP, AVRCPProfil de support
Te m p s de le ct ure Environ 18 heures
Te m p s de ch ar ge Environ 2 heures
-10oC~45oC
Température de
fonctionnement
Batterie au lithium
rechargeable intégrée de
360 mah
Type de batterie
-25oC~60oC
Température de
stockage
Directivité
Remarque : Les caractéristiques et les spécifications
pourront être modifiées sans avis préalable.

ES-1
1. Introducción
Gracias por elegir los auriculares Wireless Mixcder
MSH101. MSH101, que se presenta en un paquete
ecológico, destaca por su moderno diseño trefilado. El
diseño plegable de los auriculares permite almacenarlos
y transportarlos fácilmente. Las almohadillas de los
auriculares están fabricadas con piel artificial cuya textura
es similar a la de la piel humana, lo que garantiza su
comodidad durante más tiempo. Además, cuentan con
una batería recargable integrada gracias a la cual el
tiempo de espera del dispositivo es mayor, lo que le
permitirá disfrutar de su música durante más tiempo.
Nota: Por favor, lea este manual de usuario antes de
utilizar, y mantenerlo adecuadamente para futuras
consultas.
2. Contenido del paquete
- Auriculares Wireless*1
- Cable de Micro USB de carga*1
- Cable de audio de 3.5mm*1
- Manual de usuario*1
3. Resumen
4. Características
- WirelessV4.1
- Botones grandes, más operaciones humanas
Cinta de piel
para la cabeza
Cinta ajustable
para la cabeza
Unión abatible
Auriculares con
almohadillas de piel
Conector de entrada de 3,5 mm
Puerto Micro USB para
cargar el dispositivo
Indicador LED
Cable Micro USB Cable de audio de 3,5 mm
Función de los botones
*Botón de encendido /
apagadoy de llamada ( )
*Pista anterior(<)
*Pista siguiente(>)
*Botón para subir
el volumen(+)
*Botón para bajar
el volumen(-)

ES-2
5. Conexión
5.1 Conexión de audio
Conecte al conector jack de 3,5 mm en su dispositivo de
audio (ej. Teléfono móvil o PC) el cable de audio incluido.
El auricular es del tipo conecta y reproduce, caracter-
ística que te permite reproducir la música automática-
mente.
Nota:
Cuando entra una llamada con la conexión Wireless, la
conexión de audio se detendrá.
5.2 Conexión USB
Conecte a una fuente de alimentación mediante el cable
de carga USB incluido.
Nota:
No se afectará el Wireless ni las conexiones de audio
durante la carga.
5.3 Conexión inalámbrica
MSH101 le permite conectarse a dispositivos con función
Wireless.
1. Mantenga pulsado el botón de encendido de uno de
los auriculares hasta que se encienda el auricular y no lo
suelte hasta que el indicador LED parpadee en azul y
rojo alternadamente.
2. Conecte el auricular a un dispositivo con función
Wireless(ej. Teléfono móvil). Para obtener más
información de emparejamiento, consulte "7. Configura-
ciones de emparejamiento".
3. Cuando se haya completado la conexión, usted
puede hablar y escuchar música a través de la función
Wireless.
- Diseño plegable, fácil de llevar
- Auriculares de cuero de alto grado con almohadillas
- Micrófono incorporado y manos libres
- Carga de la batería con el cable USB

1. Mantenga pulsado el botón de encendido de uno de
los auriculares hasta que se encienda el auricular y no lo
suelte hasta que el indicador LED parpadee en azul y
ES-3
Nota:
Durante la primera carga, no desconecte el auricular de
la energía eléctrica, incluso si el indicador LED del
auricular indica que la batería está completamente
cargada. Deje que se cargue por lo menos 2-3 horas para
asegurar que esté completamente cargada.
El indicador LED parpadea en rojo y suena un tono de
alerta que indica que el auricular está en el estado de
batería baja.
7. Configuración de emparejamiento
6. Carga de la Batería
1. Conecte el auricular a una fuente de alimentación
mediante el cable de carga USB incluido.
2. Cargue los auriculares durante 2 horas hasta que el
LED rojo fijo se apaga.
Conexión
inalámbrica por
Teléfono móvil
Auriculares
Conexión de audio
Conexión USB
PC portátil
PC portátil para alimentación
Auriculares
Cable Micro USB

8. Respondiendo llamadas
Antes de responder una llamada, asegúrese de que el
auricular ya está emparejado con el teléfono móvil.
Consulte "7. Configuraciones de emparejamiento "para
obtener más información de emparejamiento.
1. Mantenga pulsado el botón de encendido durante 2
segundos para encender los auriculares.
2. Por un momento, el auricular entrará en "modo de
emparejamiento" directamente si alguna vez se ha
emparejado con el dispositivo Wireless.
3. El indicador LED se vuelve azul sólido indicando que
el emparejamiento está realizado entre el auricular y el
teléfono móvil.
4. Uso del teléfono móvil para marcar un número.
5. Cuando se conecte la llamada, pulse el botón de
encendido en el auricular para hablar con el micrófono
integrado.
ES-4
Nota:
Cuando se utiliza el móvil con el auricular para una
conexión Wireless la distancia entre ambos no puede
ser superior a 10 metros.
Sólo se puede vincular y conectar un dispositivo cada
vez. Para cambiar el dispositivo Wireless, desconecte el
auricular del dispositivo actual (deshabilitar la función
Wireless) antes de conectar el otro.
rojo alternadamente. Esto indica que los auriculares
están en “modo de emparejamiento”, a la espera de ser
emparejados con su dispositivo.
2. Encienda el dispositivo y, a continuación, activar la
función Wireless
3. Puede detectar un nuevo dispositivo con su móvil.
4. Seleccione "Mixcder MSH101". Si el dispositivo solicita
un código o PIN, introduzca "0000". Una vez establecida
la conexión, el indicador LED del auricular se vuelve
azul sólido y suena un tono de alerta, indicando que la
conexión inalámbrica se ha terminado ya.

Nota:
Puede pulsar + o - situado en el lado de los auriculares
para ajustar el volumen. Cuando se ajusta el volumen al
máximo o mínimo, la voluntad de auriculares suena un
tono de alerta.
ES-5
9. Utilizando los auriculares
La tabla siguiente muestra cómo utilizar los botones del
auricular.
Acción Descripción
Encendido
Mantenga pulsado el botón de encendido durante
2 segundos para encender los auriculares. El
indicador LED parpadea de color azul 1 veces
y suena una música corta, indicando que el
audífono se ha encendido.
Apagado
Mantenga pulsado el botón de encendido
durante 4 segundos para apagar el auricular. El
indicador LED parpadea de color rojo 2 veces y
suena una música corta, indicando que el
auricular se ha apagado.
Modo de
emparejamiento
Mantenga pulsado el botón de encendido de
uno de los auriculares hasta que se encienda
el auricular y no lo suelte hasta que el indicador
LED parpadee en azul y rojo alternadamente.
Esto indica que los auriculares están en “modo
de emparejamiento”, a la espera de ser
emparejados con su dispositivo.
Conexión inalámbrica por Wireless
Marcar número de teléfono
Hola
Llamada entrante
6. Para finalizar la llamada, pulse el botón de encendido
una vez. También puede utilizar el teléfono móvil para
finalizar una llamada.
Reproducir música
Pulse el botón de encendido una vez que el
audio esté conectado.
Pausar la música
Pulse el botón de encendido una vez para
detener la reproducción.

ES-6
10. Indicador LED
El indicador LED indica el estado de su auricular. La
siguiente tabla muestra las diferentes indicaciones LED
disponibles.
* En el modo de emparejamiento, al durar más de tres
minutos, el indicador LED encenderá en azul con destellos
Parpadeo Suspender
Parpadea 1 veces Encendido
Parpadea 2 veces
cada 1segundos
Llamada en linea
Sólido Cargando
Color Estado Descripción
Azul
Sólido
Wireless
*Reproducir/ Pausar la música
* Ajustar volume
* Seleccionar música
* Emparejamiento completado
* Después de Finalización de
una llamada
* Después de Cancelación de
una llamada
Ajustar volumen
Pulse el botón de volumen para ajustarlo.
Seleccionar música
Pulse el botón de música anterior o siguiente
para seleccionar música.
Responder llamadas
Pulse el botón de alimentación o utilice su
teléfono móvil para contestar una llamada
Finalizar llamadas
Pulse el botón de alimentación o utilice su
teléfono móvil para finalizar la llamada.
Cancelar la marcación
Pulse el botón de encendido para cancelar la
marcación.
Rechazar llamadas
Pulse el botón de encendido dos veces
rápidamente.
(Volver a marcar) el
último número
Pulse el botón de encendido dos veces
rápidamente.
Azul y Rojo
Parpadea
alternativamente
Emparejamiento
Rojo
Parpadea Batería baja
Parpadea 1 veces Apagado
Parpadea 2 veces
cada 1 segundos
Llamada entrante

11. Cuidado del auricular
1. Evite exponer el auricular a la lluvia u otros líquidos.
2.Evite que la humedad o líquidos caigan en cualquier
botón y otros equipos.
3.Guarde siempre el auricular apagado y en un lugar
seguro.
4.Utilice únicamente un paño seco para limpiar el auricular.
5.Puede utilizar un paño húmedo para limpiar las
almohadillas de cuero sintético con cuidado.
6.Guarde el auricular a una temperatura ambiente
adecuada entre -25 C a 60 C. La alta temperatura puede
dañar la batería y reducir el rendimiento de la batería.
ES-7
12. Resolviendo fallas
Q:No oigo nada en el auricular cuando utilizo el
teléfono móvil.
A:Trate y compruebe lo siguiente:
Asegúrese de que el auricular y el teléfono móvil se han
emparejado y están dentro del rango permitido.
Ajuste el volumen del altavoz del auricular pulsando el
botón de volumen hacia arriba.
Q: ¿Por qué no funciona mi auricular con el teléfono
móvil?
A:Trate y compruebe lo siguiente:
Asegúrese de que el auricular está cargado. El indicador
LED es azul sólido cuando el auricular está emparejado
correctamente.
Asegúrese de que está en el alcance de la señal Wireless.
Si se dura un largo tiempo sin emparejamiento y la
conexión con el dispositivo Wireless, por favor vuelva a
emparejar nuevamente.
parpadeando en rojo y azul alternativamente. Unos 10
minutos después de parpadear, el auricular se apagará
automáticamente. En el período antes que el auricular
se apague, todavía se puede vincular y conectar el
dispositivo Wireless.

ES-8
Q: ¿El auricular soporta otros equipos Wireless?
A:El auricular está diseñado para trabajar con la
configuración Wireless. También puede soportar otros
dispositivos Wireless sólo para un auricular, manos libres o
para el perfil de distribución de audio avanzando.
Q: Mi auricular no está cargando?
A:Trate y compruebe lo siguiente:
Asegúrese de utilizar el cable de carga USB.
Conecte el cable directamente a un puerto USB de su
PC. No use otro dispositivo de carga para cargar el
auricular.Durante la carga, el indicador LED debe rojo
sólido. Si no es así, el USB puede fallar o no proporcio-
nar suficiente energía. Pruebe otra fuente de alimentación.
Q: ¿Por qué la computadora no conecta el auricular
vía Wireless?
A:Asegúrese de que su equipo tiene señal Wireless o
utilice el adaptador Wireless USB. Y que la función Wireless
esté habilitada.
Q: ¿Por qué no se empareja mi auricular con el teléfono
móvil?
A:Trate y compruebe lo siguiente:
Asegúrese de que el auricular está cargado y se encuentra
en modo de emparejamiento. La batería baja puede
causar que la conexión falle.
Asegúrese que la función Wireless está activada en su
teléfono móvil, y póngalo en modo de sincronización
Wireless.Asegúrese de que el nombre de la conexión de
sincronización es correcto. Es posible que también le
solicite que introduzca el código de acceso "0000" para
aceptar el emparejamiento.

ES-9
13. Especificaciones
Artículo Descripción
Especificaciones
de Micrófono
Unidad de micrófono Φ 4*1.5mm
-42
±3dB S.P.L at 1KHz
<2.2k Ω
100Hz-10,000Hz
Omni-directional
Especificaciones
de Altavoz
Especificaciones
de Wireless
Especificaciones
de la batería
S.P.L
Impedancia
20Hz-20KHz
Frecuencia de
respuesta
32Ω
Impedancia
101+3dB S.P.L at 1KHz
S.P.L
Frecuencia de
respuesta
Φ 40mm*6.3mm
Diámetro del altavoz
2.402GHz-2.48GHz
Frecuencia de
transmisión
4.1Versión de Wireless
10m
Distancia de
transmisión
-92dBm
Sensibilidad
Mixcder MSH101
Nombre de
emparejamiento
Micro USBPuerto de carga
Más de 1000 hora
Tiempo de
suspención
20horasTiempo de hablar
HSP, HFP, A2DP, AVRCPPerfíl de soporte
Tiempo de
reproducción
18horas
Tiempo de carga 2 horas
-10oC~45oC
Temperatura de
operación
Construído para batería de
litio 360 mah recargable
Tipo de batería
-25oC~60oC
Temperatura de
almacenamiento
Dirección
Nota: las funciones y especificaciones están sujetas a
cambios sin previo aviso.

IT-1
1. Introduzione
Grazie per aver acquistato le Cuffie Mixcder MSH101
Wireless. Le MSH101 dall’aspetto accattivante e alla
moda e dal design rispettoso dell’ambiente della confezione.
Le cuffie hanno un design pieghevole per facilità di
riposizione e di trasporto. La pelle sintetica dei paraorec-
chie simula la consistenza della pelle umana, dandovi
duratura confortevolezza. La batteria incorporata
ricaricabile fornisce una maggiore durata di riproduzione
musicale e tempo di sospensione.
Nota: Si prega di leggere attentamente il presente
manuale prima di utilizzare, e tenerlo correttamente per
riferimento futuro.
2. Contenuto della Confezione
- Cuffie Wireless*1
- Cavo di Ricarica Micro USB*1
- Cavo audio 3.5mm*1
- Manuale d’Uso*1
4. Caratteristiche
- Wireless V4.1
- Tasti larghi, per facilità di utilizzo
- Design ripiegabile, facile da trasportare
- Cerchio e paraorecchie delle cuffie in pelle di alta
3. Panoramica
Cerchietto in pelle
Cerchietto regolabile
Cerniera pieghevole
Paraorecchie in pelle
Spinotto input 3.5 mm
Interfaccia Micro USB
per la ricarica
Indicatore LED
Cavo Micro USB Cavo Audio 3.5mm
Funzione dei tasti
*Alimentazione on/off e tasto
di controllo chiamata( )
*Traccia precedente(<)
*Traccia successiva(>)
*Tasto di Volume su(+)
*Tasto di Volume giù(-)

IT-2
5. Connessione
5.1 Connessione Audio
Connettere a uno spinotto di connessione da 3.5mm su
proprio dispositivo audio (ad es. cellulare o PC) utilizzando
il cavo audio accluso. Le cuffie sono provviste della
funzione plug&play che vi consente di riprodurre la
musica automaticamente.
Nota:
Quando una chiamata giunge in connessione Wireless,
l’audio connessione si interromperà.
5.2 Connessione USB
Connettere a una sorgente di alimentazione utilizzando
l’accluso cavo di ricarica USB.
Nota:
Ciò non comprometterà le connessioni Wireless e audio
durante la ricarica.
5.3 Connessione Wireless Wireless
MSH101 permettono di collegarvi a un dispositivo con
caratteristica Wireless.
1. Premere e tenere premuto il pulsante di alimentazione
su una cuffia fino a che non si accende, ma non lasciarlo.
Continuare a tenere premuto il pulsante di alimentazione
fino a che l’indicatore LED non lampeggia di colore blu e
rosso in modalità alternata.
2. Collegare le cuffie a un dispositivo con caratteristica
Wireless(ad es. cellulare). Per ulteriori informazioni circa
l’abbinamento, far riferimento a “7. Configurazioni di
Abbinamento”.
3.A connessione completata, potete parlare e riprodurre
musica attraverso la caratteristica Wireless.
qualità
- Microfono e viva-voce incorporati
- Ricarica della batteria mediante cavo USB

IT-3
6. Ricarica della Batteria
1.Connettere le cuffie a una fonte di alimentazione
utilizzando il cavo di ricarica USB incluso.
2.Caricare la cuffia per 2 ore fino a quando il LED rosso
solido si spegne.
Nota:
Durante la prima ricarica, non disconnettere le cuffie
dalla sorgente di alimentazione anche se l’indicatore
LED sulle cuffie indica che la batteria è completamente
ricaricata. Lasciare in carica per almeno 2-3 ore per
assicurare la ricarica completa.
L’indicatore LED lampeggia di luce rossa e suona un
tono di allerta che indica che le cuffie hanno le batterie
scariche.
7. Configurazioni di Abbinamento
1. Premere e tenere premuto il pulsante di alimentazi-
one su una cuffia fino a che non si accende, ma non
lasciarlo. Continuare a tenere premuto il pulsante di
alimentazione fino a che l’indicatore LED non
Connessione
Wireless
Telefono Cellulare
Cuffie
Connessione Audio
Connessione USB
Laptop
Laptop per Alimentazione
Cuffie
Cavo Micro USB

IT-4
Nota:
Quando si usano il cellulare e le cuffie per una
connessione Wireless, la distanza tra loro non può
superare i 10 metri.
Potete abbinare e collegare solo un dispositivo per
volta. Per passare a un altro dispositivo, scollegare le
cuffie dal dispositivo corrente (disabilitare la funzione
Wireless) prima di collegarle a un altro.
8. Rispondere a una chiamata
Prima di rispondere a una chiamata, assicurarsi che le
cuffie siano abbinate con un dispositivo mobile. Far
riferimento a “7. Configurazioni di Abbinamento” per
ottenere ulteriori informazioni di abbinamento.
1.Premere e tenere premuto il tasto di alimentazione per
2 secondi per accendere le cuffie.
2.Per un momento, le cuffie entreranno direttamente in
“Modalità di Abbinamento” se sono state in precedenza
abbinate a un dispositivo Wireless.
3.L’indicatore LED diventerà blu fisso per indicare che è
stato effettuato l’abbinamento tra cuffie e telefono cellulare.
4.Utilizzare il cellulare per digitare un numero.
5.Quando la chiamata è connessa, premere il tasto
alimentazione sulle cuffie per parlare con il microfono
incorporato.
lampeggia di colore blu e rosso in modalità alternata, il
che significa che la cuffia è in “modalità abbinamento”, e
attende di essere abbinata al proprio dispositivo
2.Accendere il vostro dispositivo, e quindi abilitare la
caratteristica di Wireless.
3.Il vostro dispositivo Wirelesselencherà la lista dei
nuovi dispositivi che possono essere connessi.
4.Selezionare “Mixcder MSH101”. Se il vostro dispositivo
chiede un codice o un PIN, immettere “0000”. Dopo
aver effettuato la connessione, l’Indicatore LED sulle
vostre cuffie diventa blu fissa e emette un suono di un
tono di avviso a indicare che la connessione Wireless è
già stata completata.

Nota:
È possibile premere + o - situato sul lato della vostra
cuffia per regolare il volume. Quando il volume viene
regolato per il massimo o minimo, la volontà delle cuffie
emette un tono di avviso.
IT-5
9. Uso delle Cuffie
La tabella sottostante mostra come usare il tasto sulle
cuffie.
Azione Descrizione
Accensione
Premere e tenere premuto il tasto di
alimentazione per 2 secondi per accendere le
cuffie. L’indicatore LED lampeggia in blu 1 volte e
emette un suono di una breve musica indicante
che le cuffie sono state accese.
Spegnimento
Premere e tenere premuto il tasto di
alimentazione per 4 secondi per spegnere le
cuffie. L’indicatore LED lampeggia in rosso 2 volte
e emette un suono di una breve musica indicante
che le cuffie sono state spente.
Abbinamento
Premere e tenere premuto il pulsante di
alimentazione su una cuffia fino a che non si
accende, ma non lasciarlo. Continuare a tenere
premuto il pulsante di alimentazione fino a che
l’indicatore LED non lampeggia di colore blu e
rosso in modalità alternata, il che significa che la
cuffia è in “modalità abbinamento”, e attende di
essere abbinata al proprio dispositivo
Riprodurre Musica
Premere il tasto di alimentazione una volta per
connettere l’audio.
Connessione Wireless
Digitare numeric telefonico
Salve
Chiamata in arrivo
6.Per chiudere la chiamata, premere il tasto alimentazi-
one una volta. Potete anche usare un cellulare per
terminare la chiamata.

IT-6
Mettere in pausa
la Musica
Premere il tasto di alimentazione una volta per
interrompere la riproduzione.
Regolare il Volume
Premere il tasto di Volume Su o Giù per regolare
il Volume.
Selezionare la
Traccia Musicale
Te ner e pr emut o il tas to + o - per sele zion are il
brano musicale.
Rispondere a una
Chiamata
Premere il tasto di alimentazione o usare il
cellulare per rispondere a una chiamata.
Chiudere una
chiamata
Premere il tasto di alimentazione o usare il
cellulare per chiudere la chiamata.
Annullare la chiamata
Premere il pulsante di accensione per
annullare la chiamata.
Rifiutare una chiamata
Premere il tasto di alimentazione due volte
velocemente.
Richiamare l’ultimo
numero (Ridigitare)
Premere il tasto di alimentazione due volte
velocemente.
10. Indicatore LED
L’indicatore LED specifica lo stato delle vostre cuffie. La
tabella sottostante mostra le diverse indicazioni LED
possibili.
Rosso
Lampeggiante Standby
Lampeggia 1 volte Accensione
Lampeggia 2
volte ogni 1 Sec.
Chiamata in linea
Fisso Ricarica
Lampeggiante Batteria scarica
Colore Stato Descrizione
Blu
Fisso
Wireless
* Riprodurre / Mettere in pausa la
Musica
* Regolare il Volume
* Selezionare la Traccia Musicale
*Abbinamento complete
* Dopo terminare una chiamata
* Dopo aver annullato una chiamata
Lampeggia 1 volte Spegnimento
Blu & Rosso
Lampeggianti
alternativamente
Abbinamento
Lampeggia 2 volte
ogni 1 Sec.
Chiamata in arrivo

IT-7
11. Prendersi Cura delle Cuffie
1. Evitare di esporre le cuffie alla pioggia o ad altri liquidi.
2. Evitare di introdurre umidità o liquidi in qualsiasi tasto
o altri apparati.
3. Immagazzinare sempre le cuffie dopo averle spente e
protette.
4. Usare solo un panno asciutto per pulire e detergere le
cuffie.
5. Potete usare un panno umido per pulire delicatamente i
cuscinetti in pelle dei paraorecchie.
6. Immagazzinare le cuffie a temperature idonee tra i
-25°C~60°C. Temperature elevate possono danneggi-
are la vita della batteria e ridurre le prestazioni della
batteria.
12. Risoluzione dei problemi
D:I Non riesco a sentire nulla nelle cuffie quando uso
il cellulare.
R:Assicurarsi che cuffie e cellulare siano stati abbinati e
che sono dentro il campo concesso.
Regolare il volume dell’altoparlante sulle cuffie mediante
la pressione del tasto di volume su.
D: Perché le cuffie non funzionano con il mio cellulare?
R:Assicurarsi che le cuffie siano cariche. L’indicatore LED
è a luce fissa blu quando l’abbinamento delle cuffie è
completato.
Assicurarsi di essere entro il campo di segnale Wireless.
Se si è stati per lungo tempo senza abbinamento e
connessione con il dispositivo Wireless, si prega di
* In modalità di abbinamento, quando è in sospeso per
più di tre minuti, l’indicatore LED diventerà blu a luce
lampeggiante continua da rossa&blu lampeggiante
alternativamente. Dopo 10 minuti circa di lampeggia-
mento, le cuffie si spegneranno automaticamente. Nel
periodo prima che le cuffie si spengano, potete ancora
abbinare e collegare il dispositivo Wireless.

IT-8
abbinare di nuovo.
D: Perché le mie cuffie non si ricaricano?
R:Assicurarsi di usare il cavo di ricarica USB.
Collegare il cavo direttamente alla porta USB sul tuo PC.
Non usare altri dispositivi di ricarica per ricaricare le
cuffie.
Durante la ricarica, l’indicatore LED dovrebbe essere
rosso a luce fissa. Se no, la porta USB potrebbe essere
gusta o non fornire sufficiente energia. Provare un’altra
fonte di alimentazione.
D: Le cuffie possono supportare un altro apparec-
chio Wireless?
R:Le cuffie sono progettate per funzionare con la configura-
zione Wireless. Possono anche sostenere altri dispositivi
Wirelesssolo per un set di cuffie vivavoce o profilo di
distribuzione audio avanzato.
D: Perché il mio computer non si college alle cuffie
via Wireless?
R:Assicurarsi che il proprio computer abbia il segnale
Wirelesso utilizzi l’adattatore USB Wireless e che la
funzione Wirelesssia abilitata.
D: Perché le mie cuffie non si abbinano al telefono
cellulare?
R:Assicurarsi che le cuffie siano cariche e siano in modalità
di abbinamento. Batterie scariche potrebbero far fallire la
connessione.
Assicurarsi che la caratteristica di Wirelesssia attiva sul
proprio telefonino, e metterlo in modalità Wireless.
Assicurarsi che il nome della connessione di abbinamento
sia corretto. Potrebbe anche esservi richiesto di immettere
il codice “0000” perché l’abbinamento venga accetato.

IT-9
13. Specifiche
Voce Descrizione
Spec.
Microfono
Unità Microfono Φ 4*1.5mm
-42
±3dB S.P.L at 1KHz
<2.2k Ω
100Hz-10,000Hz
Omni-direzionale
Spec.
Altoparlante
Spec.
Wireless
Spec.
Batteria
S.P.L
Impedenza
20Hz-20KHzRisposta di Freq.
32Ω
Impedenza
101
±3dB S.P.L at 1KHz
S.P.L
Risposta di
Frequenza
Φ 40mm*6.3mm
Diametro Altopar.
2.402GHz-2.48GHzFreq. di Trasmissione
4.1Vers. Wireless
10m
Distanza di
Trasmissione
-92dBmsensibilità
Mixcder MSH101Nome di Abbinam
Micro USBPorta di ricarica
Più di 1000 oreTe m p o di St an dby
Circa 20ore
Te m p o di
Conversazione
HSP, HFP, A2DP, AVRCPProfilo supportato
Te m p o di Ri pr od. Circa 18 ore
Te m p o di Ri ca ric a Circa 2 ore
-10oC~45oC
Temp. Di
funzionamento
Batteria di 360 mah
incorporata agli ioni di litio
Tipo di Batteria
-25oC~60oC
Temp. di
conservazione
Direttività
Nota: funzionalità e specifiche sono soggette a variazioni
senza preavviso.

JP-1
1.簡単な紹介
このたびは Mixcder MSH1 01 W irele ss ヘッドフォンをご
購入いただき誠にありがとうございます。MSH101 はス
タイリッシュでなめらかで環境にやさしいデザインにな
っています。このヘッドフォンは 折りたたみ可 能で、保 管
や持ち運びに便利です。イヤーマフは人間の肌の感触に
合わせた人工プロテインレザーで覆われており、長時間
快適にご利用いただけます。内蔵型の再充電可能バッテ
リーにより、長時間の音楽再生と待機時間を可能 にして
います。
注:慎 重 使 用 す る 前 に 、こ の マ ニ ュア ル を 読 み、今後の参
考のために適切に保管してください。
2.パッケージの内容
-Wirelessヘッドフォン*1
-マイクロUSB充電ケーブル*1
-3.5mmオーディオケーブル*1
-ユーザーマニュアル*1
4.特徴
-WirelessV4.1
3.概要
レザーヘッドバンド
調節可能ヘッドバンド
折りたたみ可能ヒンジ
レザーイヤーパッド
3.5mm入力端子
マイクロUSBポート
LEDインジケーター
マイクロUSB充電ケーブル 3.5mmオーディオケーブル
コントロールボタン
*電源ボタン()
*音量大(+)
*音量小(-)
前の曲(<)
次の曲(>)
JP-2
5.接続
5.1オーディオ接続
付属のオーディオ ケーブルを使用して、オーディオ デバ
イス (スマートフォンや PC など) の 3.5mmジャックに接
続します。ヘッドフォンは、プラグ アンド プレイ機能で自
動的に音楽を再生します。
注意:
Wireless で接続中に着信があると、オーディオ接続が停
止します。
5.2USB接続
付属のUSB充電ケーブルで電源に接続します。
注意:
充電中は、Wirelessおよびオーディオ接続に影響を与え
ません。
5.3Wirelessワイヤレス接続
ヘッドフォンは、Wireless 機能のあるデバイスに接続で
きます。
1. ヘッドフォンの電源ボタンを長押しして電源が入るま
で待ち、電源が入ってもまだボタンを押したままにしてく
ださい。LED インジケーターが青と赤に交互に点滅する
まで電源を押したままにします。これは、ヘッドフォンが「
ペアリング モード」それは、デバイスとのペアリングまで
待つことを意味します。
2.ヘッドフォンをWireless機能のあるデバイス(スマー
トフォンなど) に接 続します。ペアリング の詳細 につ いて
は、「7.ペアリング設定」を参照してください。
-大きなボタン、より人間の操作
-折りたたみ可能、移動時や保管に便利
-高級レザーのヘッドバンドシースとイヤーパッド
-マイクおよびハンズフリー機能内蔵
-USBケーブルでバッテリーを充電

JP-3
6.バッテリーの充電
1. 付属の USB 充電ケーブルでヘッドフォンを電源に接
続します。
2. 赤色LEDインジケータが青色に変わります,2 時間ヘ
ッド フォン を 充 電してくだ さ い 。
注意:
- 初めて充電する場合は、ヘッドフォンの LEDインジケ
ーターがバッテリの充電完了を示しても、電源からヘッ
ドフォンを抜かないでください。完全に充電されるよう
に、少なくとも2時間はそのまま充電してください。
-LEDインジケーターが赤く点滅し、アラートオンを鳴ら
します。バッテリー電圧が 3. 1V より低くなると、ヘッドフ
ォンの電 源 が 切 れま す。
7.ペアリング設定
3.接続が完了すると、Wireless機能で通話したり、音楽を
再生したりできるようになります。
Wireless
ワイヤレス接 続
スマートフォン
ヘッドセット
オーディオ接続
USB接続
ノートPC
電源となるノートPC
ヘッドセット
マイクロUSB充電ケーブル

JP-4
8.電話に出る
電話に出る前に、ヘッドフォンがスマートフォンにペアリ
ングされていることを確認してください。ペアリング情報
の詳細については、「7. ペアリング設定」を参照してくだ
さい。
1.電源ボタンを2秒間長押しして、ヘッドフォンの電源を
オンにします。
2. ヘッドフォンを Wireless デバイスに接続したことがあ
る場合は、すぐに「ペアリングモード」になります。
1. ヘッドフォンの電源ボタンを長押しして電源が入るま
で待ち、電源が入ってもまだボタンを押したままにして
くだ さ い 。L E D イン ジ ケ ー ター が 青と 赤 に 交 互 に 点 滅 す
るまで電源を押したままにします。これは、ヘッドフォン
が「 ペ ア リ ン グ モ ー ド 」そ れ は 、デ バ イ ス と の ペ ア リ ン グ
まで待つことを意味します。
2.デバイスをオンにして、Wireless機能を有効にします。
3. Wireless デバイスが接続可能な新しいデバイスをリ
ストします。
4.「Mixcder MSH101」を選択します。デバイスにコード
またはPINの入力を求められたら、「0000」と入力します
。接 続 が 完 了 す る と 、ヘ ッ ド フ ォ ン の L E D イ ン ジ ケ ー タ ー
が青く点灯し、Wirelessワイヤレス接続が完了したことを
示すアラート音を鳴らします。
注意:
a)スマートフォンとヘッドフォンをWireless接続で使用
する場合は、両 者の間の距 離は 10 メートル以下でなけ
ればなりません。
b) Wireless接続できるのは1台のデバイスのみです。
Wireless デバイスを切り替えるには、現在のデバイスか
らヘッドフォンを接続解除してから (Wireless 機能を無
効にする)別のデバイスに接続してください。

注意:
音量を調整するためにあなたのヘッドフォンの側面に
あるボタン -あなたは+またはを押すことができます。ボ
リュームが最大または最小に調整されている場合、ヘッ
ドフォン意志が警告音を鳴らします。
JP-5
9.ヘッドフォンの使用
以下の表では、ヘッドフォンのボタンの使い方を説明し
ます。
操作 説明
電源オン
ヘッドフォンの電源ボタンを2秒間長押ししま
す。LEDインジケーターが青く1度点滅してか
ら短い音を鳴らし、ヘッドフォンの電源がオン
になったことを示します。
電源オフ
電源ボタンを4秒間長押しして、ヘッドフォン
の電源をオフにします。LEDインジケーターが
赤く2度点滅してから短い音を鳴らし、ヘッド
フォンの電源がオフになったことを示します。
Wireless接続
電話番号をダイヤル
こんに
ちは
着信
3. LED インジケーターが青く点灯し、ヘッドフォンとスマ
ートフォン の ペ アリング が 完了したことを 示します。
4.スマートフォンを使用して番号をダイヤルします。
5.電話がつながったら、ヘッドフォンの電源ボタンを押し
て内蔵マイクで話します。
6. 電話を切るには、電源ボタンをもう一度押します。スマ
ートフォン で 電 話 を切 ることもで きます。

JP-6
10.LEDインジケーター
LED インジケーターは、ヘッドフォンのステータスを示し
ます。以下の表では、LEDが示すステータスを説明します。
音楽の一時停止
音楽の再生を停止するには、電源ボタンを一度
長押しします。
音量の調節 音量を調節するには、+ または - ボタンを押します。
曲の選択 曲を選択するには、+ または - ボタンを押します。
電話に出る
電話に出るには、電源ボタンを押すか、スマー
トフォンを 使 用します。
電話を切る
電話を切るには、電源ボタンを押すか、スマー
トフォンを 使 用します。
ダイヤルをキャ
ンセル
ダイヤルをキャンセルする電源ボタンを押して
くだ さ い 。
通話拒否
電源ボタンを2回すばやく押します。
最後の番号を使用
(リダイヤル)
電源ボタンを2回すばやく押します。
音楽の再生
音楽が一時停止されている場合は、電源ボタ
ンを一度長押しすると音楽が再生されます。
ペアリングモード
ヘッドフォンの電源ボタンを長押しして電源が
入るまで待ち、電源が入ってもまだボタンを押
したままにしてください。LEDインジケーター
が青と赤に交互に点滅するまで電源を押したま
まにします。これは、ヘッドフォンが「ペアリ
ングモード」それは、デバイスとのペアリン
グまで待つことを意味し。
点滅 スタンバイ
1回点滅 電源オン
1秒ごとに2回点滅 通話中
色 ステータス 説明
青いライト
点灯
無線
*プレイ/一時停止音楽
*音量を調整します
*調整ミュージックトラック
*ペアリングコンプリート
*通話の終了
*コールをキャンセルした後、

JP-7
11.ヘッドフォンの使用上の注意
- ヘッドフォンを雨やその他の液体で濡らさないでくだ
さい。
- ボタンやその他の装置を湿らせたり濡らしたりしない
でください。
- ヘッドフォンは電源をオフにして安全に保護して保管
してください。
-ヘッドフォンをお手入れするときは、必ず乾いた布を使
用してください。
- イヤーパッドのレザーのクッション部分は湿らせた布で
注意して拭いてください。
-ヘッドフォンは-25°C〜60°Cの適温で保管してくださ
い。高温の場所での保管は、バッテリーの寿命に影響を
与え、バッテリーの性能が悪くなります。
* ペアリング モードでは、3 分以上無操作状態が続くと、
LED インジケーターが赤と青の交互の点滅から、青の連
続点滅になります。点滅から約 10 分後に、ヘッドフォン
は自動でシャットダウンします。ヘッドフォンがシャットダ
ウンする前の状態では、まだ Wire les s デバイスにペアリ
ングして接続 することができます。
12.トラブルシューティング
Q:スマートフォンを使っているときにヘッドフォンから何
赤いライト
点灯 充電中
点滅 バッテリー残量残りわずか
1回点滅
電源オフ
赤ライトと青ラ
イト交 互 に 点 滅
交互に点滅 ペアリング
1秒ごとに2回点滅 *電話の着信

JP-8
も音が聞こえません。
A:
- ヘッドフォンとスマートフォンがペアリングされていて、
使用可能な範囲内にあることを確認してください。
-音量大ボタンを押してヘッドフォンのスピーカー音量を
調節してください。
Q:スマートフォンでヘッドフォンが使えません。
A:
-ヘッドフォンが充電されていることを確認してください。
ヘッドフォンのペアリングが完了すると、LED インジケー
ターが青く点灯します。
-Wireless信号の受信可能範囲内であることを確認してく
ださい。
-Wirelessデバイスとペアリングおよび接続していない時
間が長すぎた可能性があります。もう一度ペアリングして
くだ さ い 。
Q:ヘッドフォンが充電されません。
A:
-必ずUSB充電ケーブルを使用してください。
-ケーブルをPCのUSBポートに直接接続してください。
ヘッドフォンの充電に他の充電デバイスを使用しないで
くだ さ い 。
-充電中はLEDインジケーターが赤く点灯するはずです。
点灯しない場合は、USB ポートが機能していないか、十
分な電力がない可能性があります。別の電源を試してく
ださい。
Q:ヘッドフォンは他の Wireless 機器にも対応しています
か?
A:ヘッドフォンは Wireless 構成で動作するように設計さ
れています。ヘッドフォン、ハンズフリー、または高度なオ
ーディオ配信プロファイル用のその他の Wirelessデバイ
スにも対応しています。

JP-9
Q:コンピューターが Wireless でヘッドフォンに接続しま
せん。
A:コンピューターに Wireless 信号があること、または
USB Wireless アダプターを使用したことを確認してくだ
さい。Wireless 機能が有効になっていることも確認してくだ
さい。
Q:ヘッドフォンをスマートフォンにペアリングできません。
A:以下を試してください。
- ヘッドフォンが充電されていて、ペアリング モードにな
っていることを確認してください。バッテリー残量が少な
いと、接続が失敗することがあります。
-スマートフォンのWireless機能がアクティブになってい
ることを確 認して、Wi re le ss ペアリング モードにしてくだ
さい。
ペアリング接続の名前が正しいことを確認してください。
ペアリングを承認するために、コード「0000」を入力する
よう求められる場 合 があります。

JP-10
13.仕様
項目 説明
マイクの仕様
マイクユニット Φ4*1.5mm
1KHzで-42±3dBS.P.L
<2.2kΩ
100Hz-10,000Hz
全指向性
スピーカー
の仕様
Wirelessの
仕様
バッテリー
の仕様
S.P.L
インピーダンス
1KHzで101±3dBS.P.LS.P.L
32Ω
インピーダンス
20Hz-20KHz
周波数応答
周波数応答
Φ40mm*6.3mm
スピーカーの直径
2.402GHz-2.48GHz伝送周波数
4.1Wirelessバージョン
10 メートル
伝送距離
-92dBm
S.P.L
MixcderMSH101ペアリング名
マイクロ USB充電ポート
1000時間以上待機時間
約20時間
通話時間
HSP,HFP,A2DP,AVRCP対応プロファイル
再生時間 約18時間
充電時間 約2時間
-10°C~45°C
動作温度
バッテリータイプ
内蔵型360mah再充電可能
リチウムバッテリー
バッテリータイ
プ
-25°C~60°C
保管温度
指向性
注:特徴と仕様は予告なく変更されることがあります。

ATTENTIONS:
- Please read the return procedures and
warranty policy carefully on
www.mixcder.com/warranty before sending
items back to point-of-purchase.
- Please fill the card and send it to your reseller
together with the product if your product's
warranty is valid.
WARRANTY CARD
S.N:
Date of Purchase:
Product Model:
RMA Number:
Return reason:
Customer Name:
TEL:
E-mail:
Address:

For more information, please visit our official website
www.mixcder.com
Your valuable comments and suggestions on improving
Mixcder products are welcomed!
www.mixcder.com
support@mixcder.com
 Loading...