


The exclamation point within the equilateral triangle is intended to alert the user to the presence
of important operation and maintenance (servicing) instructions in the literature accompanying
this appliance.
The lightning flash with arrowhead symbol within the equilateral triangle is intended to alert the
use to the presence of un-insulated “dangerous voltage” within the product’s enclosure that may
be of sufficient magnitude to constitute a risk of electric shock.
WARNING
To reduce the risk of fire or electric shock, do not expose this apparatus to rain or moisture. The
apparatus shall not be exposed to dripping or splashing and that no objects filled with liquids,
such as vases, shall be placed on the apparatus.
CAUTION
To prevent electric shock, do not use this polarized plug with an extension cord, receptacle or other
outlet unless the blades can be fully inserted to prevent blade exposure.
CAUTION
To reduce the risk of electric shock, do not remove
any cover. No user-serviceable parts inside.
Refer servicing to qualified service personnel only.
1
Safety Instructions
1. Read these Instructions.
2. Keep these Instructions.
3. Heed all Warnings.
4. Follow all Instructions.
5. Do not use this apparatus near water.
6. Clean only with dry cloth.
7. Do not block any ventilation openings. Install in accordance with the manufacturer’s instructions.
8. Do not install near any heat sources such as radiators, heat registers, stoves, or other apparatus
(including amplifiers) that produce heat.
9. Do not defeat the safety purpose of the polarized plug. A polarized plug has two blades with one
winder than the other. The wide blade is provided for your safety. If the provided plug does not fit into
your outlet, consult an electrician for replacement of the obsolete outlet.
10. Protect the power cord from being walked on or pinched particularly at plugs, convenience
receptacles, and the point where they exit from the apparatus.
11. Only use attachments/accessories specified by the manufacturer.
12. Use only with the cart, stand, tripod, bracket, or table specified by the manufacturer,
or sold with the apparatus. When a cart is used, use caution when moving the cart/apparatus
combination to avoid injury from tip-over.
13. Unplug this apparatus during lightning storms or when unused for long periods of time.
14. Refer all servicing to qualified service personnel. Servicing is required when the apparatus has been
damaged in any way, such as power-supply cord or plug is damaged, liquid has been
spilled or objects have fallen into the apparatus, the apparatus has been exposed to rain or moisture,
does not operate normally, or has been dropped.
15. WARNING: To reduce the risk of fire or electric shock, do not expose this apparatus to rain or
moisture.
16. Since the appliance coupler is used as the disconnection device, the disconnect device shall remain
readily operable.
17. The ventilation should not be impeded by covering the ventilation openings with items, such as
newspapers, table-cloths, curtains, etc.
18. No naked flame sources, such as lighted candles, should be placed on the apparatus.
19. The apparatus should be used in moderate climate.
20. The apparatus shall not be exposed to dripping or splashing and that no objects filled with liquids,
such as vases, shall be placed on the apparatus.
Hardware guide x 1
USB Cable x 1
Power Adaptor x 1
The Mixars Primo is a class-compliant device for Mac OS X however will require drivers for Windows.
Please make sure you have completed driver installation before use with Serato DJ.
2
A. Accessories and Driver Installation
Check for the following parts included in the package with the main unit:
Driver installation
Mac
No driver needed
Windows
Download the driver via our website: www.mixars.com
Double click on the .exe file to start installation and follow the on-screen instructions.
Please note that you may have to reconnect Primo after installation.
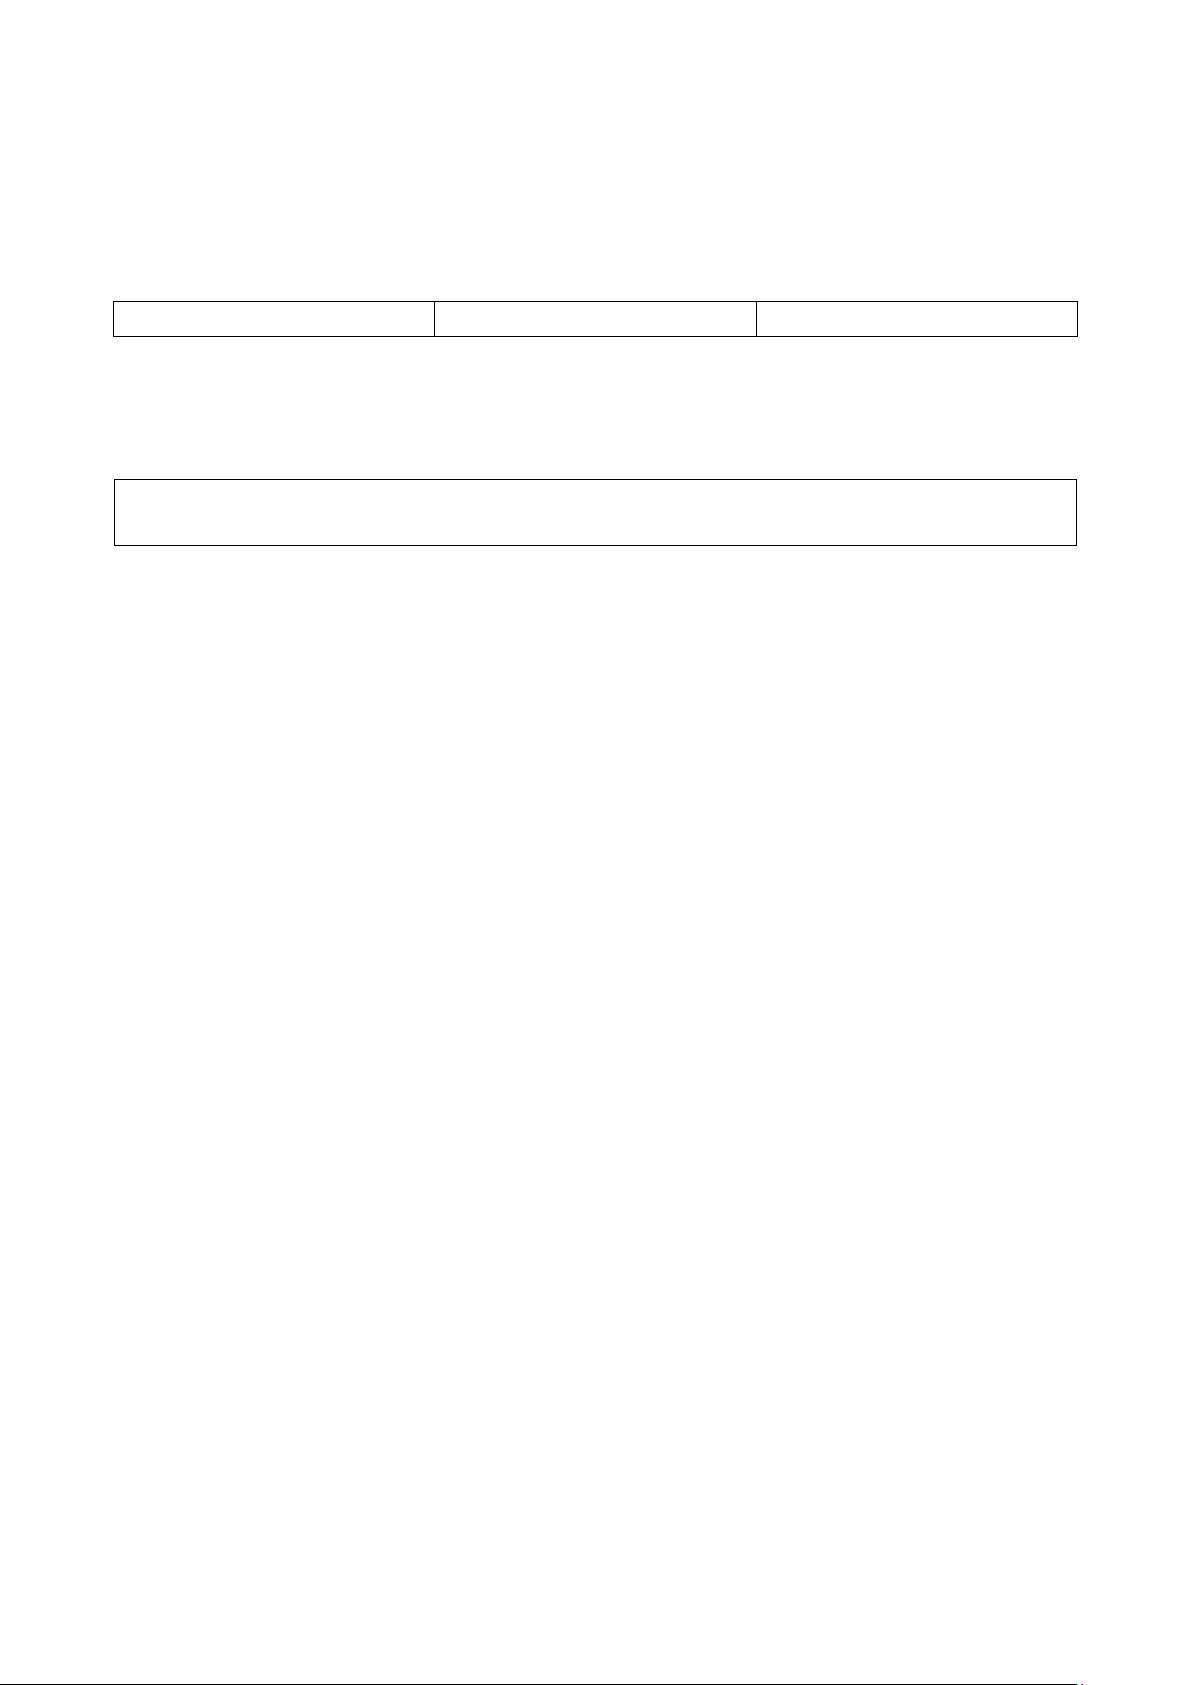
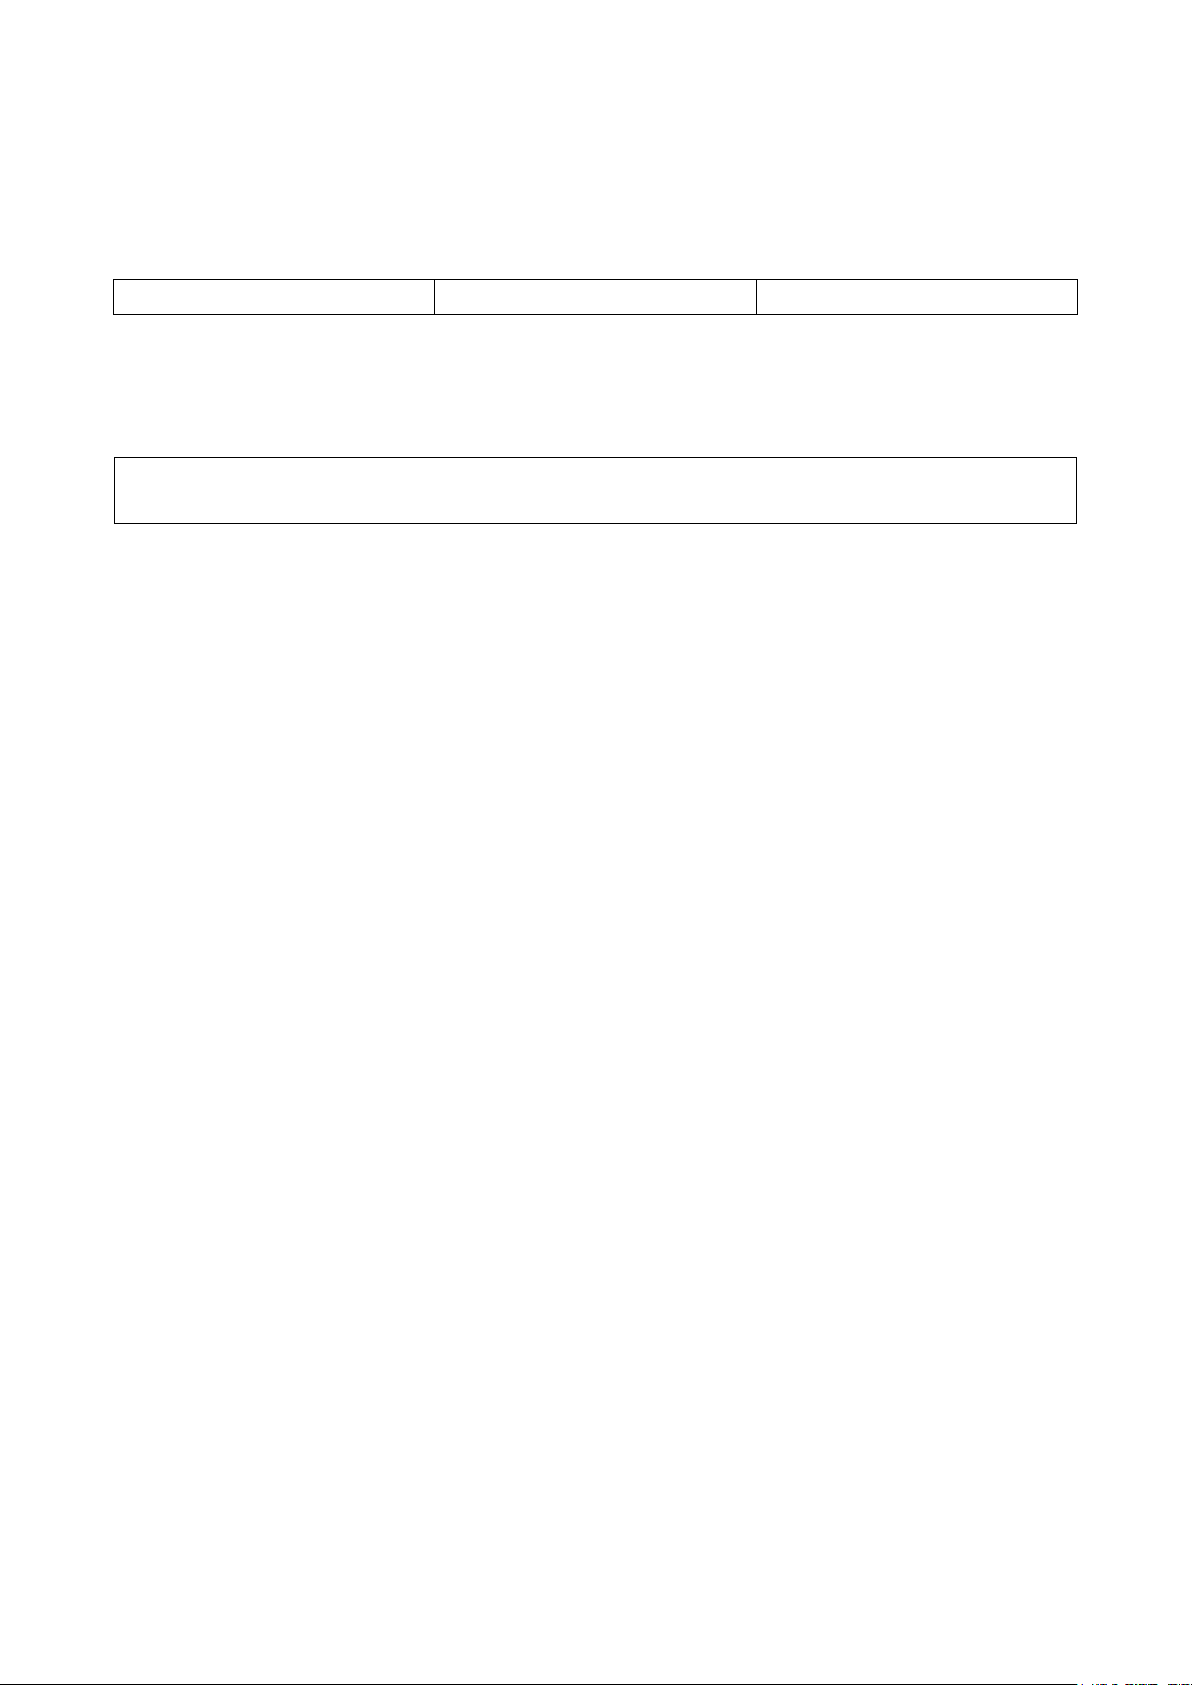
1. Booth Output, TRS
Secondary TRS output (Bal.), controlled via the
«Booth» knob
2. Master output, Balanced XLR
Main Balanced XLR output, controlled via the
«Master» knob
3. Secondary Master output, RCA
Secondary RCA Master output (Unbal.), controlled
via the «Master» knob
4. Phono/Line inputs (Serato Inputs)
Main Phono / Line Inputs for each channel.
Use these inputs for Serato timecode Vinyls/ CDs in
order to use with Serato DJ.
5. Phono/Line inputs switch
Select the right setting for the Phono/Line input the
depending on the equipment used (Phono or Line
sources).
6. Mic input
XLR / TRS Combo Microphone input, controlled via
the «MIC/AUX» knob.
7. USB connector
Connect the mixer to your computer using the
included USB cable for using it with Serato DJ.
The Primo is capable of powering by a USB power
that can provide more than 1A (1000mA) current.
Please consult your computer manufacture for the
current available from the USB port.
8. Power On/Off switch
Turn the power of the unit On and Off.
9. DC adaptor connector
Connect the supplied Power adaptor here.
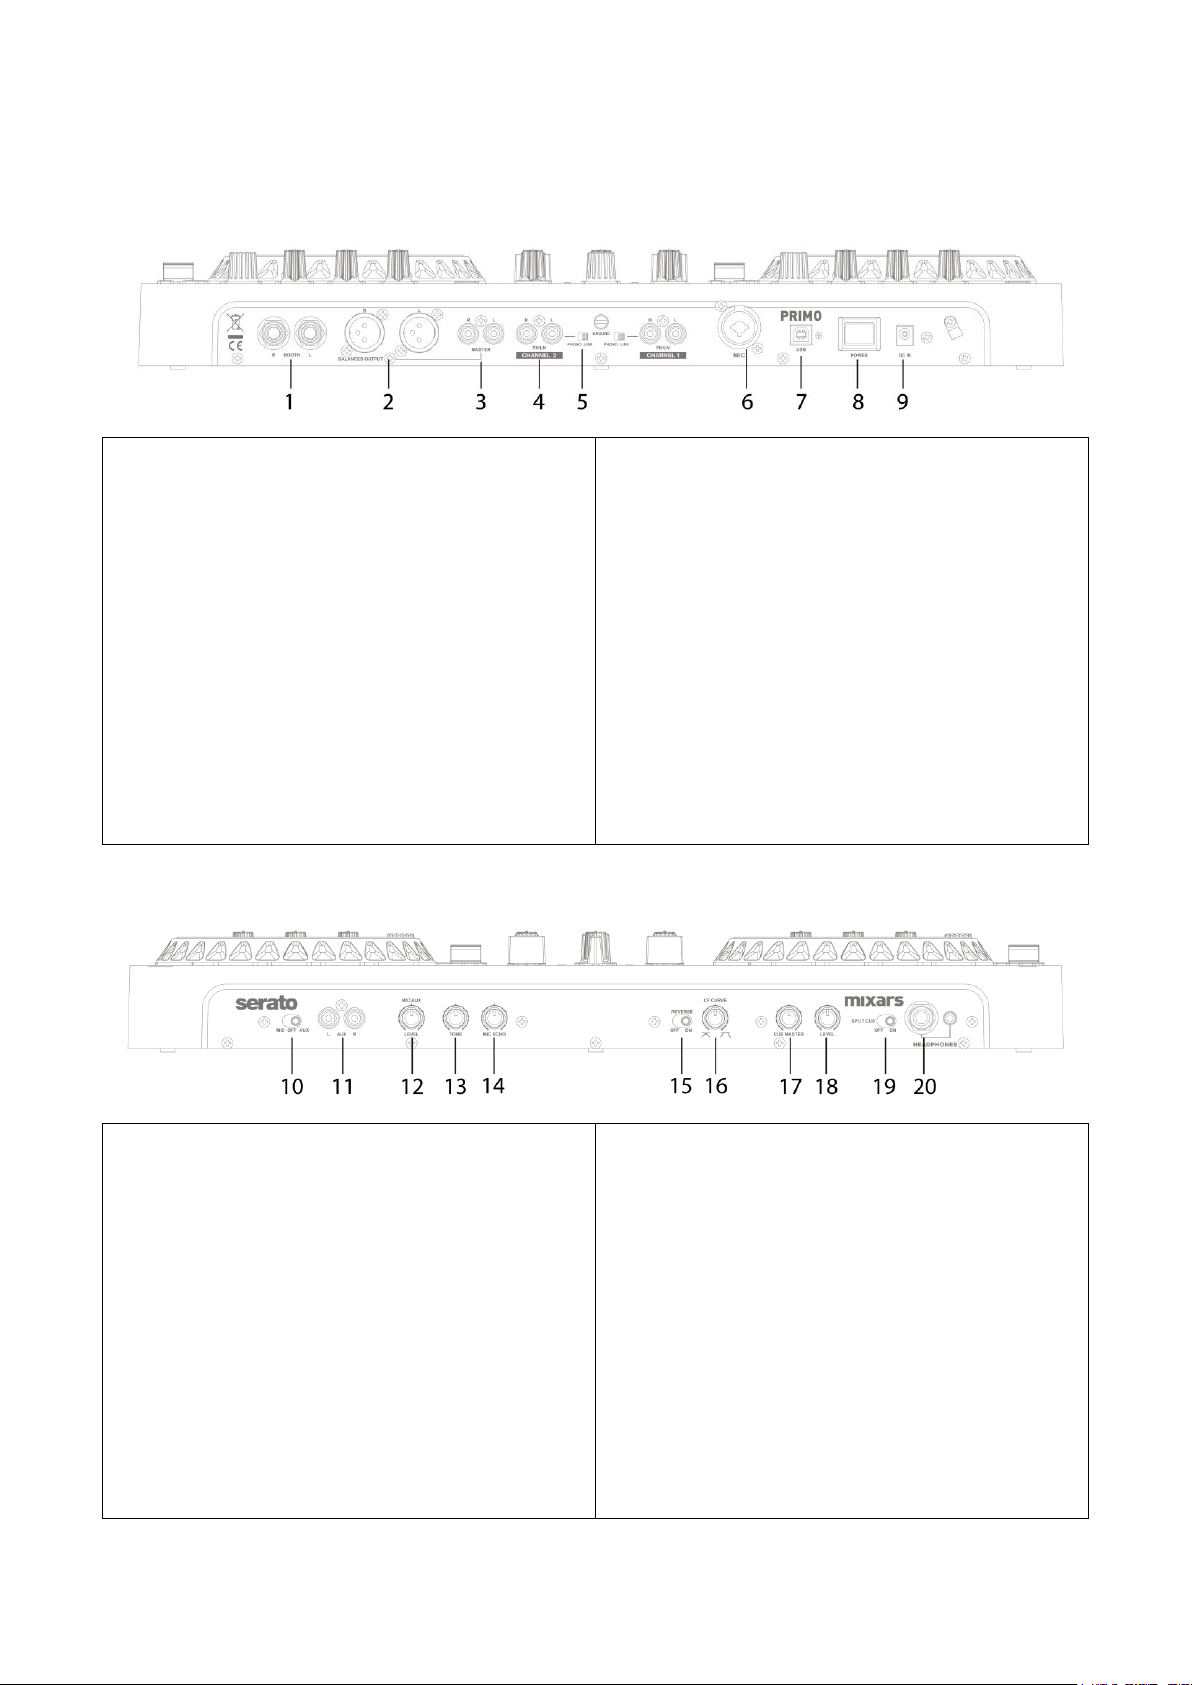
10. Mic / Aux switch
Select if using the Mic Input (switch towards left)
or the Aux input (switch towards right). Center
position turns the Mic/Aux Input off.
11. Aux input
Additional Aux input for connecting various Line
signal sources, controlled via the «MIC/AUX» knob.
12. Mic / Aux Level
Adjust the level of the Mic or Aux input.
13. Mic / Aux Tone adjust
Adjust the tone of the Mic or Aux input.
14. Mic Echo adjust
Adjust the Echo effect of the Mic input.
15. Crossfader reverse switch
Reverses the Left with the Right Channel control on
the crossfader.
16. Crossfader adjustment
Adjust the Crossfader curve from Hard (towards
right) to Soft (towards left).
17. Headphones CUE/MASTER MIX
Turn for adjusting between Cue and Master signal
on the headphones output.
18. Headphones Volume
Adjust the headphones volume.
19. Split Cue On/Off switch
If enabled, the headphones signal gets split:
Master signal on one channel, and the enabled Cue
signals selected via the «CUE» buttons on the other
channel.
20. Headphones output
TRS and Mini-Jack Headphones output controlled
via the «Headphones» knob.
3
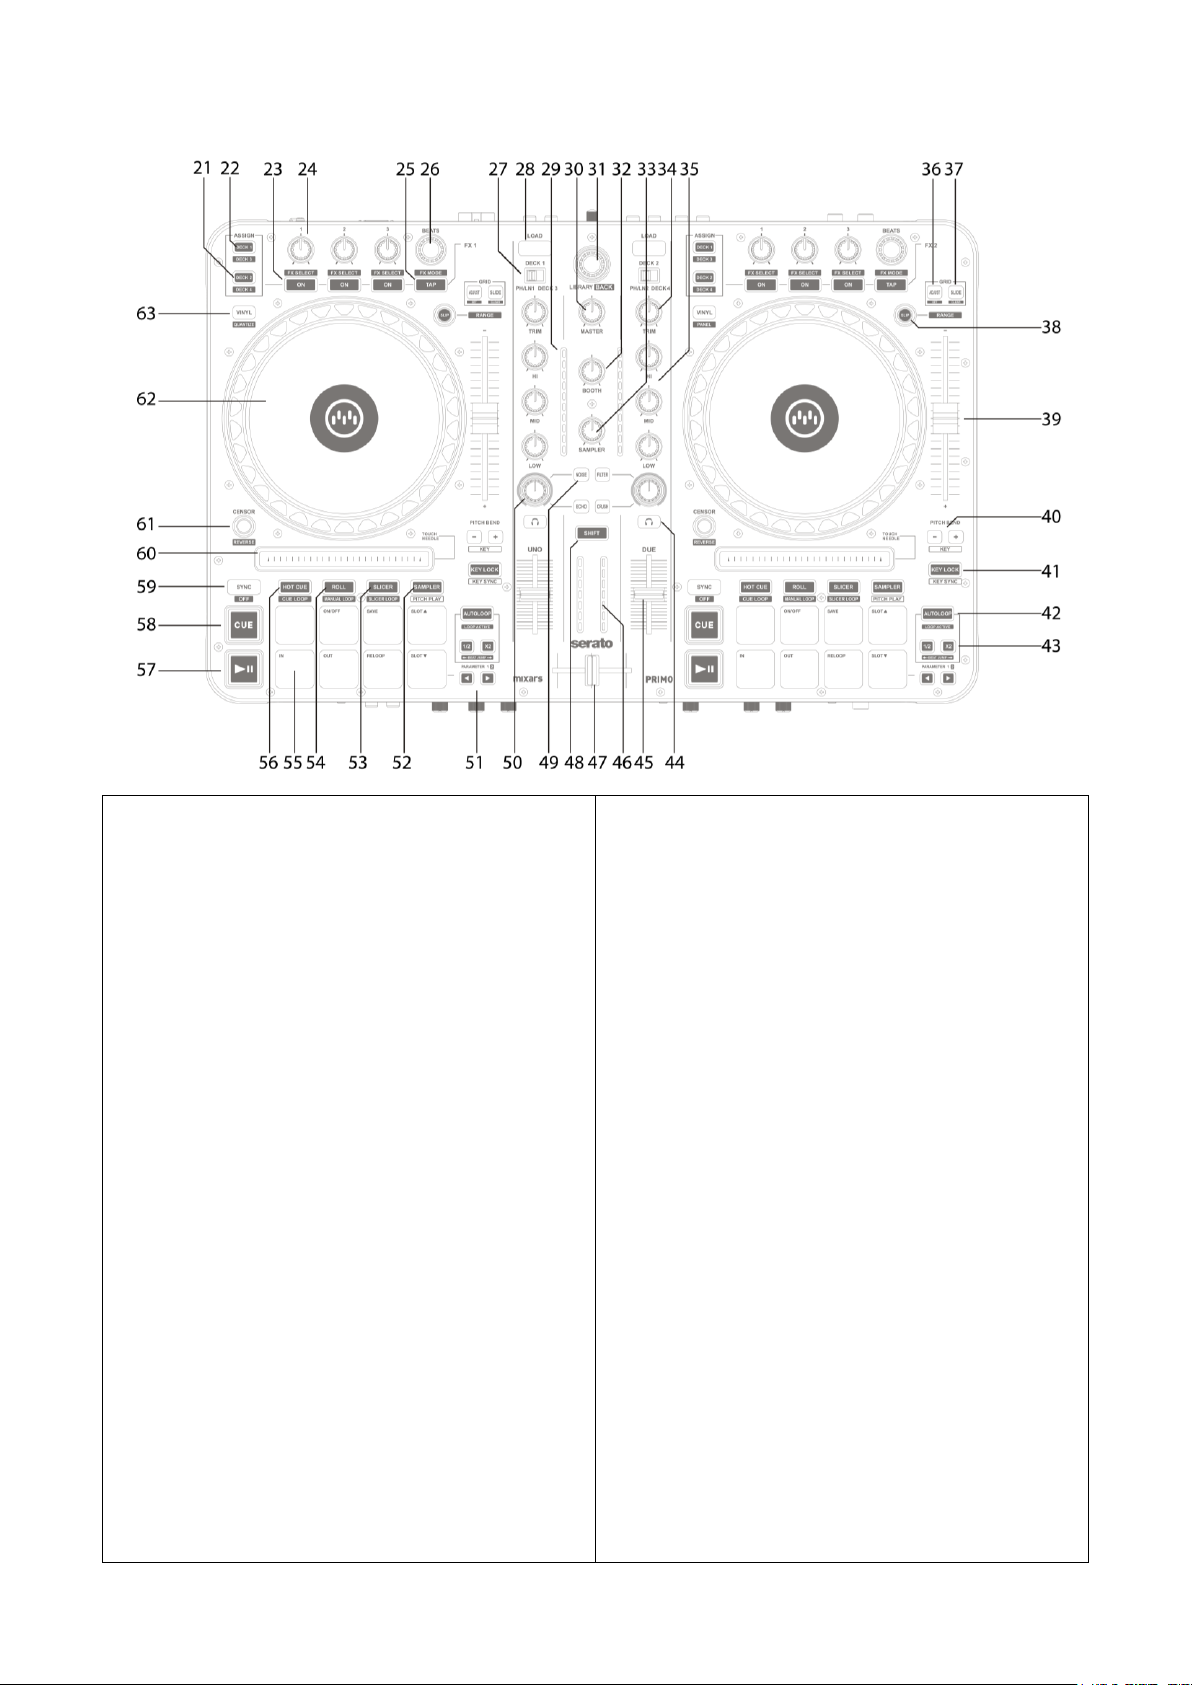
B. Controls and functions
Rear
Front

Top
21. FX Deck2/4 Assignment switch
Press to assign corresponding FX to Deck 2.
Hold «Shift» and press to assign corresponding FX
to Deck 4.
22. FX Deck1/3 Assignment switch
Press to assign corresponding FX to Deck 1.
Hold «Shift» and press to assign corresponding FX
to Deck 3.
23. FX ON/OFF switch
Press to turn on/off FX.
Hold «Shift» and press to Select FX.
24. FX Level
Turn to adjust the FX level.
25. FX TAP
Press for tap tempo for the FX.
Hold «Shift» and press to Select FX modes.
26. FX BEATS encoder
Control FX beats.
27. Input/Deck selector
Select the input source:
At PH/LN1 (or PH/LN2 for the right deck) – Primo
act also as a standalone mixer to mix the audio
source connected to the PH/LN RCA inputs.
At Deck1/3 (or Deck 2/4 for the right deck) –
Select the deck in Serato DJ to control.
28. LOAD button
Press to load the track in Serato DJ to the selected
deck.
29. Channel level meter
Display the corresponding channel level signal
30. Master volume
Adjust the volume of the master level signal.
31. Library, Load controls
Library:
Scroll the Library by turning the knob and display
the next level. Hold «Shift» and press for turning to
the previous level.
32. Booth
Adjust the level of the «Booth» output.
33. Sampler Volume
Control sampler volume level in Serato DJ.
34. Channel Trim
Adjust the overall level for the corresponding
channel.
35. Channel EQ
Adjust the equalizer settings for the corresponding
channel.
36. Grid Adjust button
Press to adjust the grid.
Hold «Shift» and press to set.
37. Grid Slide button
Press to slide the grid.
Hold «Shift» and press to clear.
38. Slip button
Press to turn on/off slip mode.
Hold «Shift» and press to change the pitch fader
range.
39. Pitch fader
Control the pitch of the current track.
40. Pitch bend buttons
Press to pitch bend up (+) or down (-) the current
track.
If Serato DJ’s Pitch 'n Time is enabled, hold «Shift»
and press to change key.
4

41. Key Lock button
Press to turn on/off key lock of the current track.
If Serato DJ’s Pitch 'n Time is enabled, hold «Shift»
and press to turn on/off key sync.
42. Autoloop button
Press to turn on/off autoloop.
Hold «Shift» and press to active loop.
43. Loop halve/ double buttons
Press to halve of double the loop size.
Hold «Shift» and press to jump loop beat.
44. PLF button
Press to turn on/off PFL of the corresponding
channel.
45. Channel faders
Adjust the volume level of the corresponding
channel.
46. Master Level Meter
Display the Master Level Signal.
47. Crossfader
Crossfade between the Left and Right channels of
audio signal.
48. Shift button
Hold for enabling the shifted functions of some
controls
49. Sound Texture FX selection switch
Switch between Filter, Noise, Crush and Echo effect
and control the FX parameter by «Channel Sound
Texture FX knob»
50. Channel Sound Texture FX knob
Adjust the parameter/ level of the selected sound
texture FX.
51. Parameters buttons
Press to adjust the parameter 1 of the performance
pads.
Hold «Shift» and press to adjust the parameter 2 of
the performance pads.
52. Sampler Button
Switch the performance pads to Sampler Mode.
If Serato DJ’s Pitch 'n Time is enabled, hold «Shift»
and press to switch to Pitch Play mode .
53. Slicer Button
Switch the performance pads to Slicer Mode. Hold
«Shift» and press to switch to Slicer Loop Mode.
54. Roll Button
Switch the performance pads to Roll Mode. Hold
«Shift» and press to switch to Manual Loop Mode.
55. Cues Button
Switch the performance pads to Cues Mode. Hold
«Shift» and press to switch to Cue Loop Mode.
56. Performance Pads
Use to trigger cue points, samples, roll, slicer, cue
loop, manual loop, slicer loop or pitch play in
Serato DJ.
57. Play Button
Press to play or pause the track.
58. Cue Button
Press to cue.
59. Sync Button
Press to turn on sync.
Hold «Shift» and press to turn off sync.
60. Touch Needle search
Touch on the stripe to quickly search to the desired
location of the current track.
61. Censor Button
Press to turn on/off Censor mode.
Hold «Shift» and press to turn on/off Reverse.
62. Touch sensitive performance platter
Touch on the touch sensitive area and turn the
platter for scratching performance.
Turn the platter on the outer area for temporary
pitch bend.
The middle illuminating logo and blue LED ring
show the status of the scratch performance.
63. Vinyl Button
Press to turn on/off Vinyl mode.
Hold «Shift» and press to turn on/off Quantize.
5
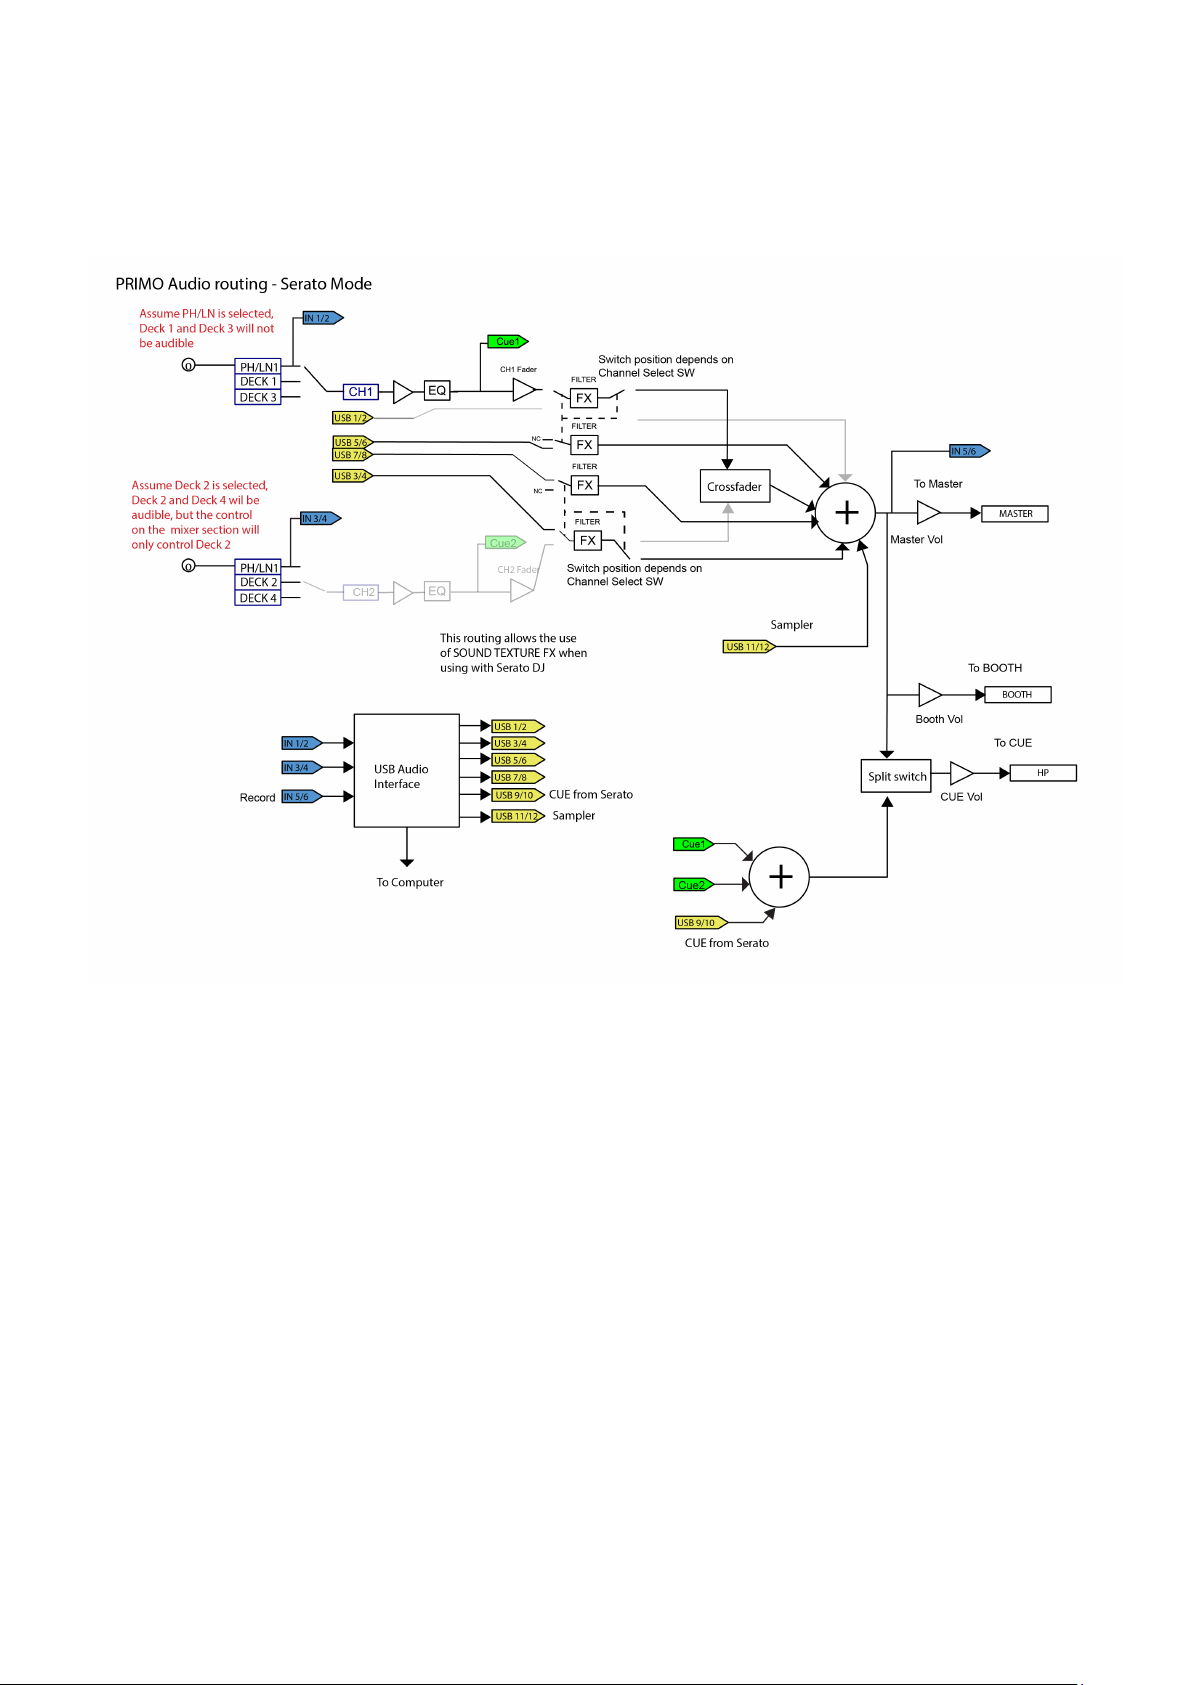
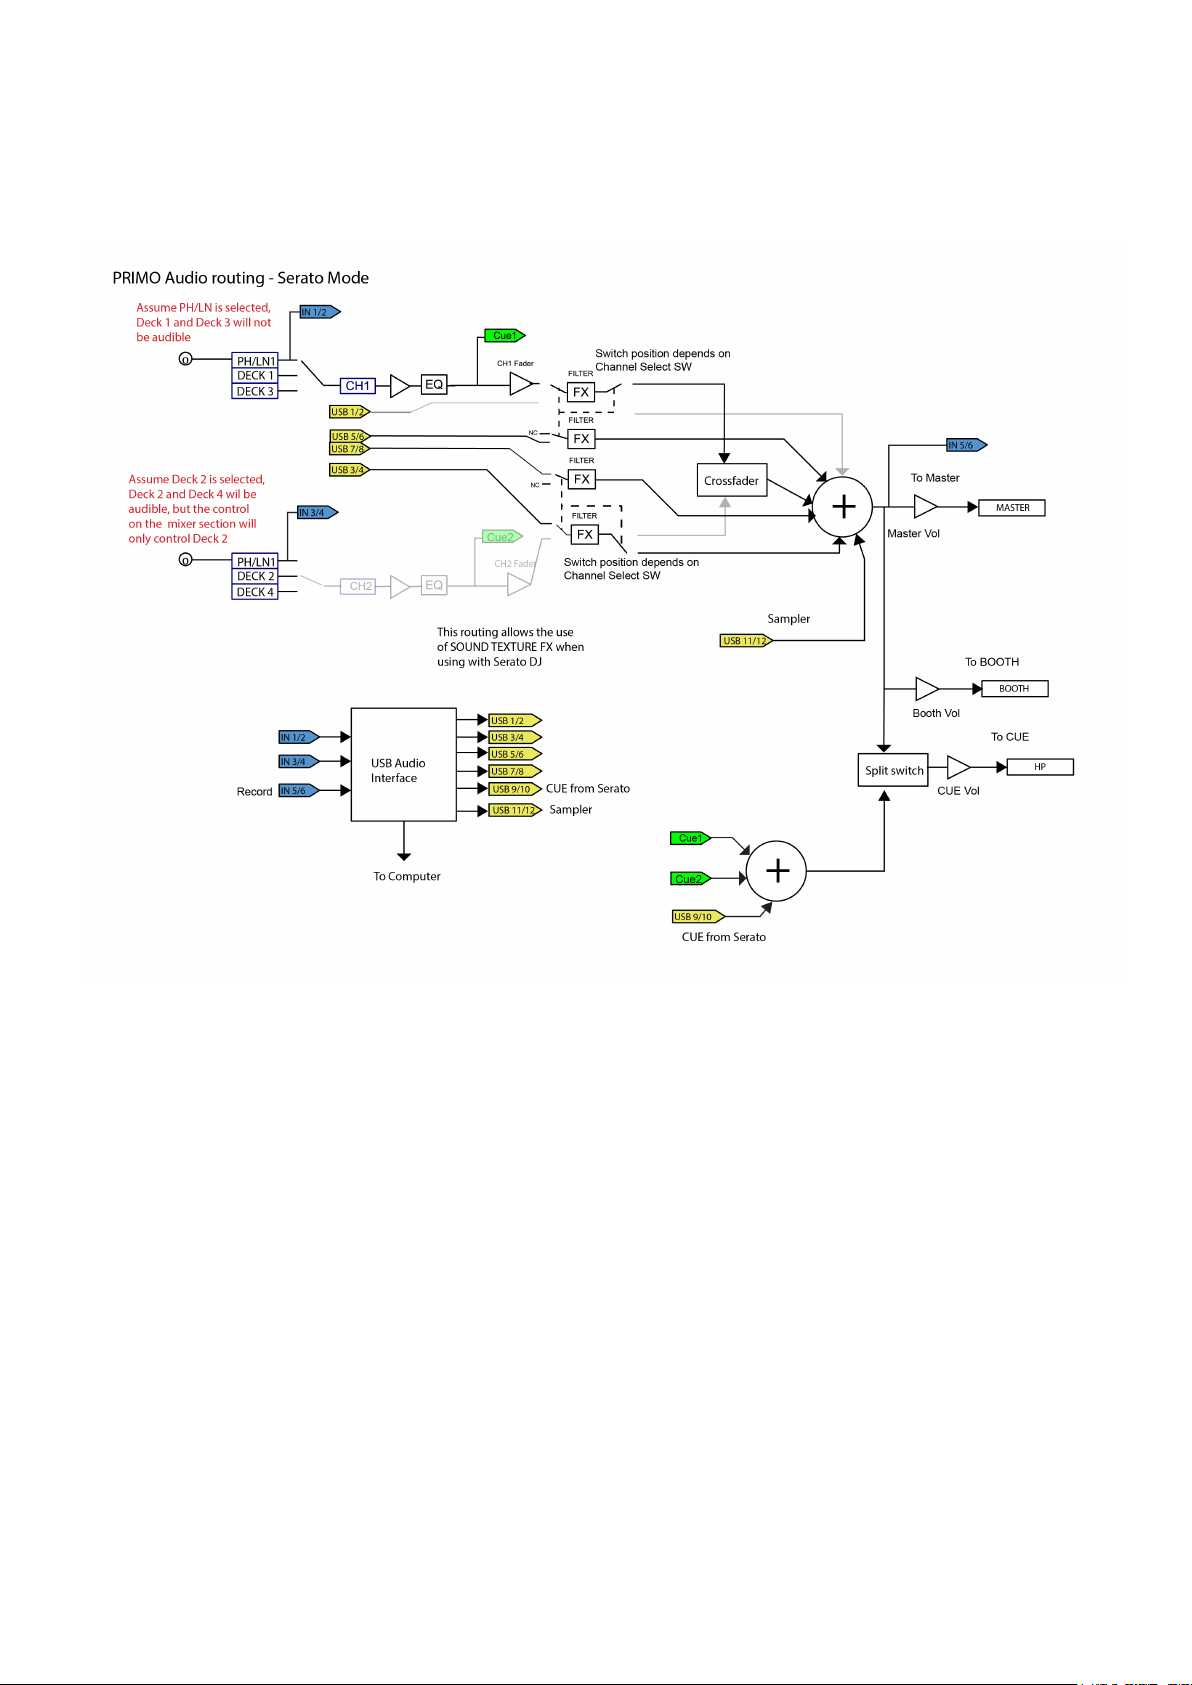
C. Audio Routing
6
There are 2 audio routing settings in Primo, namely the Serato routing and non-Serato routing.
In Serato mode routing, the Primo acts as a controller and most of the mixing is done in Serato DJ
software. It allows post-crossfader FX from Serato DJ.
The Serato mode audio routing:
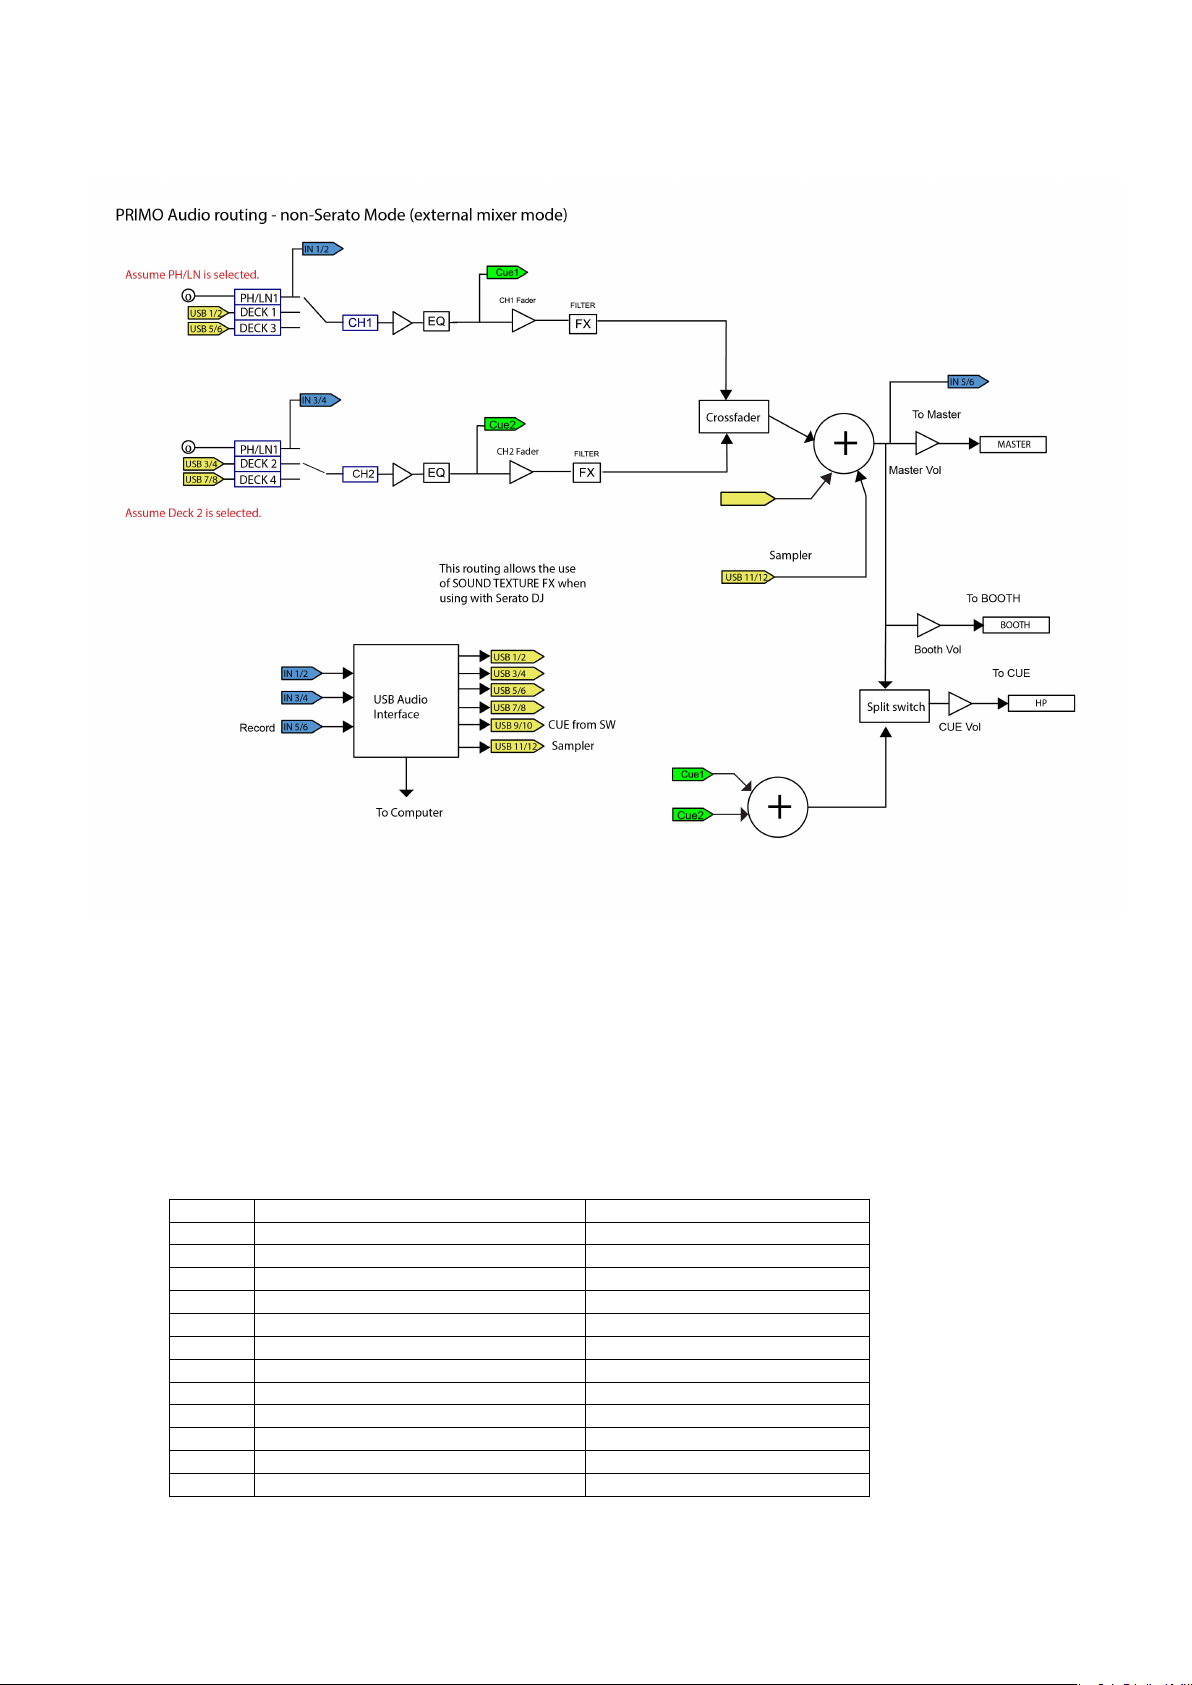
In non-Serato mode routing, the Primo works as a MIDI control with standalone external mixer that the
CH
Inputs
Outputs
1
Deck 1 in L (DVS)
Deck 1 out L
2
Deck 1 in R (DVS)
Deck 1 out R
3
Deck 2 in L (DVS)
Deck 2 out L
4
Deck 2 in R (DVS)
Deck 2 out R
5
Record in L
Deck 3 out L
6
Record in R
Deck 3 out R
7
NA
Deck 4 out L
8
NA
Deck 4 out R
9
NA
CUE out L
10
NA
CUE out R
11
NA
Sampler out L
12
NA
Sampler out R
7
mixing is done by Primo hardware.
The non-Serato mode Audio routing:
USB 9/10
CUE from DJ Software
There are different ways to switch between the 2 audio routings:
1. When Serato DJ software is open and initiated, it will trigger the connected Primo to change to
Serato mode routing automatically.
2. Or, press and hold the NOSIE button and FILTER button and power on the Primo. Wait for a few
seconds until the left or the right PFL button is lit in blue. Release SHIFT button.
3. Press either one PFL button to select the audio routing:
Right: Serato Mode
Left: Non-Serato Mode
The corresponding PFL button should be lit in blue
4. Press SHIFT to confirm the choice and the Primo will be ready to use.
The audio interface is a 6-in 12-out interface with assignment:

D. Firmware Update
8
Mixars will continue improve the product and fix bugs by releasing new firmware for the production.
New firmware and firmware update software tool can be downloaded from Mixars website
(http://www.mixars.com). Firmware update procedure:
1. Download the firmware update tool and latest firmware from Mixars website.
2. Connect the USB able to the computer.
3. Press and hold the 2 PFL buttons and power on. The master level LED meter will be running from
bottom to top repeatedly meaning the unit is in firmware update mode.
4. Open the firmware update software and locate the firmware update file.
5. Follow the on-screen instruction to start firmware update and wait for the prompt for update
finish
6. Power cycle the Primo after firmware update.
Istruzioni di sicurezza
Il punto esclamativo all’interno del triangolo ha lo scopo di attirare l’attenzione dell’utente sulla
presenza di istruzioni di funzionamento e di manutenzione (assistenza) importanti riportate nella
documentazione fornita insieme all’apparecchiatura.
Il simbolo del lampo all’interno del triangolo ha lo scopo di attirare l’attenzione dell’utente sulla
presenza di “tensione pericolosa” non isolata nei ripari del prodotto, che potrebbe avere una
potenza sufficiente a costituire un rischio di scossa elettrica.
AVVERTENZA
Per ridurre il rischio di incendio o di folgorazione, non esporre l’apparecchiatura alla pioggia o
all’umidità.
L’apparecchiatura non deve essere esposta a gocciolamento o schizzi e pertanto nessun oggetto
contenente liquidi, come ad esempio vasi, dovrà essere posizionato sulla stessa.
ATTENZIONE
Per prevenire le scosse elettriche non utilizzare questa spina polarizzata con una prolunga, una presa a
muro o altre prese a meno che i piedini non possano essere inseriti completamente così da evitare
l’esposizione degli stessi.
ATTENZIONE
Per ridurre il rischio di scosse elettriche non
rimuovere i pannelli di copertura. Non sono presenti
all’interno componenti che prevedono una
manutenzione da parte dell’utente.
Affidare le operazioni di manutenzione solamente a
personale qualificato.
9
1. Leggere queste istruzioni.
2. Conservare queste istruzioni.
3. Prestare attenzione a tutte le avvertenza.
4. Seguire tutte le istruzioni.
5. Non utilizzare quest’apparecchiatura in prossimità di acqua.
6. Pulire solo con un panno asciutto.
7. Non ostruire le aperture di ventilazione. Eseguire l’installazione secondo le istruzioni del costruttore.
8. Non effettuare l’installazione in prossimità di fonti di calore come radiatori, regolatori di calore, stufe o
altre apparecchiature (compresi gli amplificatori) che producono calore.
9. Non inibire la funzione di sicurezza della spina polarizzata. La spina polarizzata ha due piedini, uno più
largo dell’altro. Il piedino più largo ha una funzione di sicurezza. Qualora la spina fornita non si inserisse
nella vostra presa, consultare un tecnico per la sostituzione della presa.
10. Assicurarsi che il cavo di alimentazione non possa essere calpestato o schiacciato, in particolare in
prossimità delle spine, delle
prese a muro e nei punti in cui esce dall’apparecchio.
11. Utilizzare solamente accessori specificati dal costruttore.
12. Utilizzare solamente con il carrello, il cavalletto, il treppiedi, la staffa o il piano specificati dal
costruttore
oppure forniti insieme all’apparecchio. Quando si utilizza un carrello, prestare attenzione nella
movimentazione del gruppo carrello/apparecchio per evitare lesioni provocate dal ribaltamento del
gruppo stesso.
13. Scollegare questo apparecchio in caso di tempeste di fulmini oppure di inutilizzo prolungato.
14. Affidare tutte le operazioni di manutenzione a personale qualificato. Gli interventi di manutenzione
sono necessari quando l’apparecchio viene danneggiato in qualunque modo, ad esempio in caso di danni
al cavo di alimentazione o alla spina, di fuoriuscita di liquido
o di caduta di oggetti all’interno dell’apparecchio stesso, o ancora qualora l’apparecchio, dopo esser stato
esposto a pioggia o umidità, non funzioni correttamente o qualora sia caduto.
15. AVVERTENZA: Per ridurre il rischio di incendio o di folgorazione, non esporre l’apparecchiatura alla
pioggia o all’umidità.
16. Poiché l’accoppiatore dell’apparecchio viene utilizzato come sezionatore, esso deve essere sempre
prontamente azionabile.
17. Non ostacolare la ventilazione coprendo le relative aperture con oggetti, giornali, tovaglie, tende o
altro.
18. Evitare di posizionare sull’apparecchiatura fonti di fiamme libere, come ad esempio candele accese.
19. L’apparecchiatura è progettata per essere utilizzata in ambienti con clima temperato.
20. L’apparecchiatura non deve essere esposta a gocciolamento o schizzi e pertanto nessun oggetto
contenente liquidi, come ad esempio vasi, dovrà essere posizionato sulla stessa.
A. Accessori e installazione dei driver
guida hardware x 1
cavo USB x 1
Alimentatore x 1
Mixars Primo è un dispositivo compatibile con Mac OS X; tuttavia richiede alcuni driver per Windows.
Accertarsi di aver completato l’installazione dei driver prima dell’utilizzo con Serato DJ.
10
Verificare che i componenti riportati di seguito siano contenuti
nell’imballaggio dell’unità principale:
Installazione dei driver
Mac
Non è necessario alcun driver
Windows
Scaricare il driver dal nostro sito: www.mixars.com
Fare doppio click sul file .exe per avviare l’installazione e seguire le istruzioni a video.
Potrebbe essere necessario ricollegare Primo dopo l’installazione.
1. Uscita cabina, TRS
Uscita TRS secondaria (bil.), comandata tramite il
pomello “Cabina”
2. Uscita master, XLR bilanciato
Uscita XLR principale bilanciata, comandata tramite
il pomello “Master”
3. Uscita master secondaria, RCA
Uscita master RCA secondaria (sbil.), comandata
tramite il pomello "Master"
4. Ingressi phono/linea (ingressi Serato)
Ingressi phono/linea principali per ogni canale.
Utilizzare questi ingressi per vinili/CD timecode di
Serato per utilizzare Serato DJ.
5. Interruttore ingressi phono/linea
Selezionare l'impostazione corretta per l'ingresso
Phono/Linea in base all'attrezzatura in uso
(sorgenti Phono o Linea).
6. Ingresso Mic
Ingresso microfono combinato XLR/TRS,
comandato tramite pomello “MIC/AUX”.
7. Connettore USB
Consente di collegare il mixer al vostro computer
utilizzando il cavo USB fornito in dotazione per
utilizzare il mixer con Serato DJ.
Primo può essere alimentato da una alimentazione
USB che fornisca una corrente superiore a 1A
(1000mA). Si prega di consultare il costruttore del
computer per conoscere la corrente disponibile
sulla porta USB.
8. Interruttore di accensione/spegnimento
Consente di attivare e disattivare l’alimentazione
dell’unità.
9. Connettore alimentatore CC
Collegare qui l'alimentatore fornito.
10. Interruttore Mic / Aux
Selezionare se si sta usando l'ingresso Mic
(interruttore verso sinistra) o l'ingresso Aux
(interruttore verso destra). La posizione centrale
spegne l'ingresso Mic/Aux.
11. Ingresso Aux
Ingresso Aux aggiuntivo per il collegamento di
svariate sorgenti di segnale Linea, comandato
tramite pomello “MIC/AUX”.
12. Livello Mic / Aux
Regolare il livello dell'ingresso Mic o Aux.
13. Regola Tono Mic / Aux
Regolare il tono dell'ingresso Mic o Aux.
14. Regola Eco Mic
Regolare l'effetto Eco dell'ingresso Mic.
15. Interruttore inversione crossfader
Consente di invertire il comando canale sinistro con
il destro sul crossfader.
16. Regolazione crossfader
Regolare la curva Crossfader da Hard (verso
destra) a Soft (verso sinistra).
17. CUE/MASTER MIX cuffie
Ruotarlo per regolare il segnale Cue e Master
sull’uscita delle cuffie.
18. Volume cuffie
Regolare il volume delle cuffie.
19. Interruttore accensione/spegnimento
split cue
Se abilitato, il segnale delle cuffie viene suddiviso:
segnale master su un canale e segnali Cue abilitati
tramite i pulsanti “CUE” sull’altro canale.
20. Uscita cuffie
Uscita Cuffie Mini-Jack e TRS controllata tramite il
pomello "Headphones".
11
B. Comandi e funzioni
Lato posteriore
Anteriore
Parte superiore
21. Interruttore assegnazione FX Deck2/4
Premere per assegnare l'FX corrispondente al Deck
2.
Mantenere premuto il tasto "Shift" e premere per
assegnare l'FX corrispondente al Deck 4.
22. Interruttore assegnazione FX Deck1/3
Premere per assegnare l'FX corrispondente al Deck
1.
Mantenere premuto il tasto "Shift" e premere per
assegnare l'FX corrispondente al Deck 3.
23. Interruttore FX ON/OFF
Premere per attivare/disattivare l'FX.
Mantenere premuto il tasto "Shift" e premere per
Selezionare FX.
24. Livello FX
Ruotare per regolare il livello dell'FX.
25. FX TAP
Premere per battere il tempo per l'FX.
Mantenere premuto il tasto "Shift" e premere per
Selezionare le modalità FX.
26. Encoder BEATS FX
Controlla i beat dell'FX.
27. Selettore Ingresso/Deck
Selezionare la sorgente dell'ingresso:
PH/LN1 (o PH/LN2 per il deck di destra) – Primo
funge anche da mixer indipendente per mixare la
sorgente sonora collegata agli ingressi RCA LN/PH.
Deck1/3 (o Deck 2/4 per il deck di destra) –
Selezionare il deck in Serato DJ da comandare.
28. Pulsante LOAD
Premere per caricare la traccia in Serato DJ sul
deck selezionato.
29. Misuratore livello canale
Visualizza il segnale del livello del canale
corrispondente
30. Volume master
Regolare il volume del segnale di livello master.
31. Comandi libreria, caricamento
Libreria:
consente di scorrere la libreria ruotando il pomello,
visualizzare il livello successivo. Mantenere
premuto il tasto "Shift" e premere per ritornare al
livello precedente.
32. Cabina
Consente di regolare il livello dell’uscita “Cabina”.
33. Volume campionatore
Consente di controllare il volume del campionatore
in Serato DJ.
34. Regolazione canale
Consente di regolare il livello generale del canale
corrispondente.
35. Equalizzatore canale
Consente di regolare le impostazioni
dell'equalizzatore per il canale corrispondente.
36. Pulsante Grid Adjust
Premere per regolare la beatgrid.
Mantenere premuto il tasto "Shift" e premere per
impostare.
37. Pulsante Grid Slide
Premere per spostare la beatgrid.
Mantenere premuto il tasto "Shift" e premere per
cancellare.
38. Pulsante Slip
Premere per attivare/disattivare la modalità Slip.
Mantenere premuto il tasto "Shift" e premere per
cambiare il range del pitch fader.
12

39. Pitch fader
Controlla il pitch della traccia corrente.
40. Pulsanti Pitch bend
Premere per modificare il pitch della traccia
corrente verso l'alto (+) o il basso (-).
Se Pitch 'n Time di Serato DJ è abilitato, mantenere
premuto il tasto "Shift" e premere per cambiare
chiave.
41. Pulsante Key Lock
Premere per attivare/disattivare il blocco chiave per
la traccia corrente.
Se Pitch 'n Time di Serato DJ è abilitato, mantenere
premuto il tasto "Shift" e premere per
attivare/disattivare la sincronizzazione della chiave.
42. Pulsante Autoloop
Premere per attivare/disattivare l'Autoloop.
Mantenere premuto il tasto "Shift" e premere per
attivare il loop.
43. Pulsanti dimezza/raddoppia loop
Premere per dimezzare o raddoppiare le dimensioni
del loop.
Mantenere premuto il tasto "Shift" e premere per
saltare il beat di loop.
44. Pulsante PFL
Premere per attivare/disattivare il PFL per il canale
corrispondente.
45. Fader canali
Consente di regolare il livello del volume del canale
corrispondente.
46. Misuratore livello master
Visualizza il segnale del livello master.
47. Crossfader
Crossfade tra i canali del segnale sonoro Sinistro e
Destro.
48. Tasto Shift
Mantenere premuto il tasto Shift per abilitare le
funzioni “shiftate” degli stessi comandi
49. Interruttore di selezione FX texture del
suono
Consente di impostare Filtro, Disturbo, effetto
Crush ed Eco e di controllare il parametro FX
tramite il pomello “FX texture del suono del canale”
50. Pomello FX texture del suono del canale
Consente di regolare il parametro/livello dell’FX
texture suono selezionata.
51. Pulsanti Parametri
Premere per regolare il parametro 1 dei
performance pad.
Mantenere premuto il tasto "Shift" e premere per
regolare il parametro 2 dei performance pad.
52. Pulsante campionatore
Commuta i performance pad nella modalità
Campionatore.
Se Pitch 'n Time di Serato DJ è abilitato, mantenere
premuto il tasto "Shift" e premere per passare alla
modalità Pitch Play.
53. Pulsante Slicer
Consente di commutare i performance pad alla
modalità Slicer. Mantenere premuto il tasto "Shift"
e premere per passare alla Modalità Slicer Loop.
54. Pulsante Roll
Consente di commutare i performance pad alla
modalità Roll. Mantenere premuto il tasto "Shift" e
premere per passare alla Modalità Manual Loop.
55. Pulsante Cues
Consente di commutare i performance pad alla
modalità Cues. Mantenere premuto il tasto "Shift" e
premere per passare alla Modalità Cue Loop.
56. Performance Pad
Usarli per attivare punti di cue, campionamenti,
roll, slicer, cue loop, manual loop, slicer loop o
pitch play in Serato DJ.
57. Pulsante Play
Premere per riprodurre la traccia o metterla in
pausa.
58. Pulsante Cue
Premere per eseguire il cue.
59. Pulsante Sync
Premere per attivare il sync.
Mantenere premuto il tasto "Shift" e premere per
disattivare il sync.
60. Touch strip per Needle search
Toccare la striscia per andare velocemente ad un
punto desiderato della traccia corrente.
61. Pulsante Censor
Premere per attivare/disattivare la modalità
Censor.
Mantenere premuto il tasto "Shift" e premere per
attivare/disattivare la modalità Reverse.
62. Piatto Touch sensitive performance platter
Toccare la zona sensibile al tocco e girare il piatto
per lo scratching.
Girare il piatto sulla parte esterna per un pitch
bend momentaneo.
L'anello LED blu e il logo centrale che si illuminano
indicano lo stato della performance di scratching.
63. Pulsante Vinyl
Premere per attivare/disattivare la modalità Vinyl.
Mantenere premuto il tasto "Shift" e premere per
attivare/disattivare la modalità Quantize.
13
C. Percorso audio
14
Sono disponibili 2 impostazioni di percorso audio in Primo: il percorso Serato e quello non Serato.
Nel percorso Serato, Primo funge da controller e la maggior parte del mixing viene eseguito nel software
Serato DJ. Consente l’effetto post-crossfader da Serato DJ.
Modalità di percorso audio Serato:

Nella modalità di percorso non Serato, Primo funge da comando MIDI con mixer esterno indipendente e il
Canale
Ingressi
Uscite
1
Deck 1 ingresso S (DVS)
Deck 1 uscita S
2
Deck 1 ingresso D (DVS)
Deck 1 uscita D
3
Deck 2 ingresso S (DVS)
Deck 2 uscita S
4
Deck 2 ingresso D (DVS)
Deck 2 uscita D
5
Registrazione ingresso S
Deck 3 uscita S
6
Registrazione ingresso D
Deck 3 uscita D
7
N.D.
Deck 4 uscita S
8
N.D.
Deck 4 uscita D
9
N.D.
CUE uscita S
10
N.D.
CUE uscita D
11
N.D.
Campionatore uscita S
12
N.D.
Campionatore uscita D
15
mixing viene eseguito dall’hardware Primo.
Modalità di percorso audio non Serato:
USB 9/10
CUE from DJ Software
Vi sono diversi modi per passare da un percorso audio all’altro:
1. quando il software Serato DJ è aperto e avviato, farà cambiare a Primo automaticamente la
modalità del percorso in modalità Serato.
2. In alternativa, premere e tenere premuto i pulsanti NOISE e FILTER e avviare l’accensione di
Primo. Attendere qualche secondo fino a quando il pulsante PFL sinistro o destro si accende di
colore blu. Rilasciare il tasto SHIFT.
3. Premere uno dei pulsanti PFL per selezionare il percorso audio:
Destra: Modalità Serato
Sinistra: Modalità Non Serato
Il pulsante PFL corrispondente dovrebbe accendersi in colore blu
4. Premere il tasto SHIFT per confermare la scelta e Primo sarà pronto all'uso.
L’interfaccia audio è un’interfaccia a 6 ingressi 12 uscite con assegnazione:

D. Aggiornamento del firmware
16
Mixars continuerà ad apportare migliorie al prodotto e ad eliminare i bug rilasciando un nuovo
firmware per la produzione. Il nuovo firmare e il software di aggiornamento del firmware possono
essere scaricati dal sito della Mixars (http://www.mixars.com). Procedura di aggiornamento del
firmware:
1. Scaricare lo strumento di aggiornamento del firmware e l’ultimo firmware dal sito della Mixars.
2. Collegare il cavo USB al computer.
3. Premere e tenere premuto i 2 pulsanti PFL e avviare l’accensione. Il misuratore livello master a
LED andrà continuamente dal basso verso l'alto ad indicare che l'unità si trova in modalità di
aggiornamento del firmware.
4. Aprire il software di aggiornamento del firmware e individuare il file di aggiornamento del
firmware.
5. Seguire le istruzioni a video per avviare l’aggiornamento del firmware e attendere il messaggio di
richiesta di completamento dell’aggiornamento
6. Effettuare l’accensione di Primo dopo l’aggiornamento del firmware.

Instructions de sécurité
Le point d’exclamation dans un triangle équilatéral est destiné à avertir l’utilisateur de l’existence
d’instructions importantes pour le fonctionnement et la maintenance (entretien) dans la
documentation accompagnant cet appareil.
L’éclair fléché dans le triangle équilatéral est destiné à avertir l’utilisateur de la présence d’une
« tension dangereuse » non isolé e dans le boîtier du produit ayant une magnitude suffisante pour
constituer un risque d’électrocution.
AVERTISSEMENT
Afin de réduire le risque d’incendie ou d’électrocution, ne pas exposer cet appareil à la pluie ou à
l’humidité. L’appareil ne doit pas être exposé à un écoulement goutte à goutte ou à des éclaboussures,
et aucun objet rempli de liquide, tel qu’un vase, ne doit être posé sur l’appareil.
PRÉ CAUTION
Pour prévenir tout risque d’électrocution, ne pas utiliser de rallonge sur la prise polarisée, la prise
murale ou autre
PRÉ CAUTION
Pour limiter le risque d’électrocution, ne retirer
aucun cache. L’appareil ne contient aucune pièce
réparable par l’utilisateur.
Ne confier la maintenance qu’à un personnel qualifié.
17
1. Lire ces instructions.
2. Conserver ces instructions.
3. Respecter tous les avertissements.
4. Suivre toutes les instructions.
5. Ne pas utiliser cet appareil à proximité d’eau.
6. Nettoyer uniquement avec un chiffon sec.
7. N’obstruer aucune des ouvertures de ventilation. Installer conformément aux instructions du fabricant.
8. Ne pas installer à proximité de sources de chaleur telles que des radiateurs, des grilles de chauffage,
des poêles ou d’autres appareils (y compris des amplificateurs) qui dégagent de la chaleur.
9. Ne pas essayer de contourner les caractéristiques de sécurité de la prise polarisée. Une prise polarisée
présente deux broches dont l’une est plus large que l’autre. La broche plus large est destinée à votre
sécurité. Si la prise fournie ne s’adapte pas à votre prise murale, contacter un électricien pour qu’il
remplace la prise murale obsolète.
10. Protéger le câble d’alimentation pour qu’il ne soit pas piétiné ou coincé, notamment au niveau des
fiches de connexion, des prises de
courant, et de leur point de sortie de l’appareil.
11. N’utiliser que des connexions / accessoires spécifiés par le fabricant.
12. N’utiliser qu’avec le chariot, le pied, le trépied, le rack ou la table spécifiés par le fabricant,
ou vendus avec l’appareil. Lorsqu’un chariot est usé, faire preuve de prudence en déplaçant
l’ensemble chariot / appareil pour éviter de se blesser s’il bascule.
13. Débrancher l’appareil pendant les orages ou s’il reste inutilisé pendant de longues périodes.
14. Confier toute opération de maintenance à un personnel qualifié. Une maintenance est nécessaire quel
que soit le type de dommage subi par l’appareil, comme un cordon d’alimentation ou une prise
endommagé(e), un liquide
renversé ou des objets qui seraient tombés dedans, si l’appareil a été exposé à la pluie ou à l’humidité,
ne fonctionne pas normalement ou est tombé.
15. AVERTISSEMENT : Afin de réduire le risque d’incendie ou d’électrocution, ne pas exposer cet
appareil à la pluie ou à l’humidité.
16. Puisque le connecteur est utilisé en tant que dispositif de sectionnement, celui-ci doit toujours rester
accessible.
17. La ventilation ne doit pas être entravée par des objets recouvrant les ouvertures de ventilation,
comme des journaux, des nappes, des rideaux, etc.
18. Ne poser sur l’appareil aucune source de flamme nue comme des bougies allumées.
19. L’appareil doit être utilisé dans une atmosphère tempérée.
20. L’appareil ne doit pas être exposé à un écoulement goutte à goutte ou à des éclaboussures, et aucun
objet rempli de liquide, tel qu’un vase, ne doit être posé sur l’appareil.

A. Accessoires et installation du pilote
1 x guide pour le matériel
1 x câble USB
1 x adaptateur de courant
Le Mixars Primo est un dispositif compatible avec Mac OS X mais nécessitera toutefois des pilotes pour
Windows.
18
Vé rifiez toutes les pièces suivantes comprises dans l’emballage faisant partie
de l’unité principale :
Installation du pilote
Mac
Aucun pilote nécessaire
Windows
Téléchargez le pilote via notre site Internet : www.mixars.com
Faites un double clic sur le fichier .exe pour commencer l’installation et suivez les instructions
à l’écran.
Veuillez noter que vous devrez rebrancher le Primo après l’installation.

B. Commandes et fonctionnalité s
1. Sortie Booth (cabine du DJ), TRS
Sortie secondaire TRS (sym.), contrôlée via la
molette « Booth »
2. Sortie Master, XLR symé trique
Sortie principale XLR symétrique, contrôlée via la
molette « Master »
3. Sortie Master secondaire, RCA
Sortie maître RCA secondaire (asymétrique),
contrôlée via la molette « Master »
4. Entrées Phono/Line (entré es Serato)
Entrées principales Phono/Ligne pour chaque canal.
Utiliser ces entrées pour les vinyles / CD timecodés
Serato afin de pouvoir les utiliser avec Serato DJ.
5. Commutateur pour entré es Phono/Line
Choisir la bonne configuration pour l’entrée
Phono/Line selon l’équipement utilisé (sources
Phono ou Line).
6. Entrée Mic
Entrée microphone combo XLR / TRS, contrôlée via
la molette « MIC/AUX ».
7. Connecteur USB
Connecter le mixer à votre ordinateur à l’aide du
câble USB fourni pour pouvoir l’utiliser avec Serato
DJ.
Le Primo peut être alimenté par un câble USB
capable de fournir plus de 1 A (1000 mA) de
courant. Veuillez consulter les spécifications de
votre ordinateur pour vérifier le courant fourni par
le port USB.
8. Commutateur d’alimentation On/Off
Met l’unité sous et hors tension.
9. Connecteur pour l’adaptateur de CC
Brancher l’adaptateur de courant sur ce
connecteur.
10. Commutateur Mic / Aux
Utiliser le commutateur si vous utilisez l’entrée Mic
(commutateur vers la gauche) ou l’entrée Aux
(commutateur vers la droite). La position au centre
annule l’entrée Mic/Aux.
11. Entré e Aux
Entrée Aux supplémentaire pour brancher diverses
sources de signal Ligne, contrôlée via la molette
« MIC/AUX ».
12. Mic / Aux Level
Ajuste le niveau de l’entrée Mic ou Aux.
13. Ajustement Mic / Aux Tone
Ajuste la tonalité de l’entrée Mic ou Aux.
14. Ajustement Mic Echo
Ajuste l’effet écho de l’entrée Mic.
15. Commutateur Crossfader Reverse
Intervertit le contrôle du canal droit avec le gauche
sur le crossfader.
16. Ré glage du Crossfader
Ajuste la dureté de la courbe du crossfader, de
dure (vers la droite) à souple (vers la gauche).
17. Headphones CUE/MASTER MIX
Tourner pour l’ajustage entre le signal Cue (point
d’entrée verrouillé) et Master sur la sortie
écouteurs.
18. Volume des é couteurs
Ajuste le volume des écouteurs.
19. Commutateur On/Off Split Cue
S’il est activé, les signaux des écouteurs sont
fractionnés : le signal maître sur un canal, et les
signaux Cue (repères) activés sélectionnés via les
boutons « CUE », sur l’autre canal.
20. Sortie Headphones
Sortie d’écouteurs TRS et mini-jack contrôlée via la
molette « Headphones ».
19
Arriè re
Avant

Dessus
21. Commutateur d’assignation FX Deck 2/4
Appuyer dessus pour assigner le FX correspondant
à la platine 2.
Maintenir « Shift » et appuyer pour assigner le FX
correspondant à la platine 4.
22. Commutateur d’assignation FX Deck1/3
Appuyer dessus pour assigner le FX correspondant
à la platine 1.
Maintenir « Shift » et appuyer dessus pour assigner
le FX correspondant à la platine 3.
23. Commutateur FX ON/OFF
Appuyer pour annuler ou activer le FX.
Maintenir « Shift » et appuyer pour choisir le FX.
24. Niveau FX
Tourner pour ajuster le niveau du FX.
25. FX TAP
Appuyer pour le tap tempo du FX.
Maintenir « Shift » et appuyer pour choisir les
modes du FX.
26. Codeur FX BEATS
Contrôle les battements du FX.
27. Sélecteur d’entrée/de deck
Choisit la source d’entrée :
Sur PH/LN1 (ou PH/LN2 pour la platine droite) –
Primo fonctionne également comme mixer
autonome pour mixer la source audio connectée
aux entrées PH/LN RCA.
Sur Deck 1/3 (ou Deck 2/4 pour la platine droite) –
Choisir le contrôle de la platine sur le Serato DJ.
28. Bouton LOAD
Appuyer dessus pour charger la piste du Serato DJ
sur la platine choisie.
29. Mesure du niveau du canal
Affiche le niveau de signal du canal correspondant
30. Volume Master
Règle le volume du niveau de signal maître.
31. Library, commandes Load
Bibliothèque :
Fait défiler Library (bibliothèque) en tournant la
molette et affiche le niveau suivant. Maintenir
« Shift » et appuyer pour revenir au niveau
précédent.
32. Booth
Ajuste le niveau de la sortie « Booth » (cabine du
DJ).
33. Volume du Sampler
Contrôle le volume de l’échantillonneur dans Serato
DJ.
34. Channel Trim (ajusteur de séquence)
Ajuste le niveau général du canal correspondant.
35. EQ de canal
Ajuste les paramètres de l’égaliseur du canal
correspondant.
36. Bouton Grid Adjust
Appuyer pour ajuster la grille.
Maintenir « Shift » et appuyer pour l’activer.
37. Bouton Grid Slide
Appuyer pour faire coulisser la grille.
Maintenir « Shift » et appuyer pour dé sactiver.
38. Bouton Slip
Appuyer pour annuler ou activer le mode slip.
Maintenir « Shift » et appuyer pour changer la
plage du pitch fader.
39. Pitch fader
Contrôle le pitch de la piste actuelle.
40. Boutons pitch bend
Appuyer pour augmenter (+) ou diminuer (-) le
pitch bend de la piste actuelle.
Si le Pitch 'n Time du Serato Dj est activé,
maintenir « Shift » et appuyer pour changer la
touche.
20

41. Bouton de verrouillage de tonalité
Appuyer pour activer/désactiver le verrouillage de
tonalité de la piste actuelle.
Si le Pitch 'n Time du Serato Dj est activé,
maintenir « Shift » et appuyer pour
activer/désactiver la sync. de tonalité.
42. Bouton autoloop
Appuyer pour activer/désactiver le bouclage
automatique.
Maintenir « Shift » et appuyer pour activer la
boucle.
43. Boutons de doublage / division de boucle
Appuyer pour diviser ou doubler la taille de la
boucle.
Maintenir « Shift » et appuyer pour sauter le temps
de la boucle.
44. Bouton PFL
Appuyer pour activer/désactiver le PFL du canal
correspondant.
45. Curseurs de canaux
Règlent le niveau du volume du canal
correspondant.
46. Indicateur de niveau Master
Affiche le niveau du signal maître.
47. Crossfader
Réalise un crossfade entre le canal gauche et le
canal droit du signal audio.
48. Bouton Shift
Maintenir pour activer les fonctions décalées de
certaines commandes
49. Commutateur de sélection de texture de
son FX
Bascule entre l’effet filtre, bruit blanc, écrasement
et écho, et commande le paramètre FX par la
« Molette FX de texture du canal son »
50. Molette FX de texture du canal son
Ajuste le paramètre / niveau de texture FX du son
sélectionné.
51. Boutons de paramètres
Appuyer pour ajuster le paramètre 1 des micropavés de performance.
Maintenir « Shift » et appuyer pour ajuster le
paramètre 2 des micro-pavés de performance.
52. Bouton Sampler
Bascule entre les micro-pavés de performance et le
mode Sampler.
Si le Pitch 'n Time du Serato Dj est activé,
maintenir « Shift » et appuyer pour basculer en
mode Pitch Play.
53. Bouton Slicer
Fait passer les micro-pavés de performance au
mode Slicer. Maintenir « Shift » et appuyer pour
passer en mode Slicer Loop.
54. Bouton Roll
Fait passer les micro-pavés de performance au
mode Roll. Maintenir « Shift » et appuyer pour
passer au mode de boucle manuelle.
55. Bouton CUES
Fait passer les micro-pavés de performance au
mode CUES. Maintenir « Shift » et appuyer pour
passer au mode Cue Loop.
56. Micro-pavé s de performance
Utiliser pour déclencher des points cue,
échantillons, roll, slicer, boucle cue, boucle
manuelle, boucle slicer ou pitch play sur le Serato
DJ.
57. Bouton Lecture
Appuyer pour lire ou mettre la piste en pause.
58. Bouton Cue
Appuyer pour créer un repère.
59. Bouton Sync
Appuyer pour activer la sync.
Maintenir « Shift » et appuyer pour dé sactiver la
sync.
60. Touch Needle search
Toucher la bande pour rechercher rapidement le
point désiré de la piste actuelle.
61. Bouton Censor
Appuyer pour activer/désactiver le mode de
censure.
Maintenir « Shift » et appuyer pour
activer/désactiver Reverse.
62. Plateau de performance sensible au
toucher
Toucher la zone sensible au toucher et tourner le
plateau pour une performance de scratching.
Tourner le plateau sur la zone extérieure pour un
pitch bend temporaire.
Le logo éclairé au milieu et l’anneau LED bleu
indiquent l’état de la performance de scratching.
63. Bouton Vinyl
Appuyer pour activer/désactiver le mode Vinyle.
Maintenir « Shift » et appuyer pour
activer/désactiver Quantize.
21

C. Routage Audio
22
Il y a 2 paramètres de routage audio dans Primo, à savoir le routage Serato et le routage non-Serato.
En routage mode Serato, le Primo agit en tant que contrôleur et la plus grande partie du mixage est
réalisée dans le logiciel Serato DJ. Il autorise l’effet post-crossfader (post-fondu-enchaîné) depuis Serato
DJ.
Le routage audio en mode Serato :

En mode de routage non-Serato, le Primo fonctionne comme un contrôle MIDI avec une table de mixage
CH
Entrées
Sorties
1
Platine 1 entrée G (DVS)
Platine 1 sortie G
2
Platine 1 entrée D (DVS)
Platine 1 sortie D
3
Platine 2 entrée G (DVS)
Platine 2 sortie G
4
Platine 2 entrée D (DVS)
Platine 2 sortie D
5
Enregistrement entrée G
Platine 3 sortie G
6
Enregistrement entrée D
Platine 3 sortie D
7
NA
Platine 4 sortie G
8
NA
Platine 4 sortie D
9
NA
CUE sortie G
10
NA
CUE sortie D
11
NA
Échantillonneur sortie G
12
NA
Échantillonneur sortie D
23
externe autonome dont le mixage est effectué par un matériel Primo.
Le mode de routage audio non-Serato :
USB 9/10
CUE from DJ Software
Il y a deux façons différentes pour basculer entre les deux routages audio :
1. Lorsque le logiciel Serato DJ est ouvert et initialisé, il va déclencher le Primo connecté pour qu’il
modifie le mode de routage Serato automatiquement.
2. Vous pouvez également appuyer et maintenir enfoncés les boutons NOISE et FILTER et mettre le
Primo sous tension. Attendez quelques secondes jusqu’à ce que le bouton PFL gauche ou droit
s’allume en bleu. Relâcher le bouton SHIFT.
3. Appuyer sur un des boutons PFL pour choisir le routage audio :
Droit : Mode Serato
Gauche : Mode non-Serato
Le bouton PFL correspondant doit s’allumer en bleu
4. Appuyer sur le bouton SHIFT pour confirmer la sélection, le Primo sera prêt à être utilisé .
L’interface audio est une interface 6 entrées/12 sorties avec attribution :

D. Mise à jour du micrologiciel
24
Mixars va continuer à améliorer le produit et à ré parer les bogues en éditant un nouveau
micrologiciel au niveau de la production. Le nouveau micrologiciel et l’outil de mise à jour du
micrologiciel peuvent être téléchargé s sur le site Internet Mixars (http://www.mixars.com).
Procédure de mise à jour du micrologiciel :
1. Télécharger l’outil de mise à jour du micrologiciel et le dernier micrologiciel sur le site Internet
Mixars.
2. Connecter le câble USB à l’ordinateur.
3. Appuyer et maintenir enfoncés les 2 boutons PFL et mettre sous tension. L’indicateur LED de
niveau maître se déplacera de bas en haut de façon répétée, indiquant que l’unité se trouve en
mode de mise à jour du micrologiciel.
4. Ouvrir le logiciel de mise à jour du micrologiciel et localiser le fichier de mise à jour du
micrologiciel.
5. Suivre les instructions à l’écran pour commencer la mise à jour du micrologiciel et attendre
l’invite de fin de mise à jour.
6. Réinitialiser le Primo après la mise à jour du micrologiciel.

El signo de exclamación en el triángulo equilátero sirve para llamar la atención del usuario sobre
instrucciones de funcionamiento o mantenimiento (asistencia) importantes en la documentación
adjunta al equipo.
El símbolo del rayo con la flecha en el triángulo equilátero sirve para advertir al usuario sobre la
presencia de "tensión peligrosa" no aislada en la caja del producto, que puede ser suficiente para
constituir un riesgo de descarga eléctrica.
ADVERTENCIA
Para reducir el riesgo de incendio o descargas eléctricas, no se debe exponer este equipo a la lluvia o a
la humedad. El equipo no debe exponerse a goteo o salpicaduras y no se deben colocar objetos llenos
de líquido, como floreros, encima del mismo.
ATENCIÓ N
Para evitar las descargas eléctricas, no utilizar el enchufe polarizado con alargadores, ladrones u otras
tomas si las clavijas no caben completamente, para evitar que queden expuestas.
ATENCIÓ N
Para reducir el riesgo de descargas eléctricas, no
quitar las coberturas. El equipo no contiene partes
que el usuario pueda reparar.
Para la asistencia, dirigirse solo a personal
cualificado.
25
Instrucciones de seguridad
1. Leer estas Instrucciones.
2. Guardar estas Instrucciones.
3. Respetar todas las Advertencias.
4. Seguir todas las Instrucciones.
5. No utilizar el equipo cerca del agua.
6. Limpiar solo con un paño seco.
7. No obstruir las aberturas de ventilación. Instalar segú n las instrucciones del fabricante.
8. No instalar cerca de fuentes de calor como radiadores, rejillas de aire caliente, estufas u otros equipos
(incluidos los amplificadores) que produzcan calor.
9. No ignorar la función de seguridad del enchufe polarizado. Un enchufe polarizado cuenta con dos
clavijas planas, una más ancha que la otra. La clavija ancha garantiza la seguridad de la conexión. Si el
enchufe suministrado no es compatible con la toma, contactar con un electricista para sustituir la toma
obsoleta.
10. Evitar que el cable de alimentación sea pisoteado o comprimido, en particular en los enchufes, en las
tomas
y en el punto de salida del equipo.
11. Utilizar solo los accesorios especificados por el fabricante.
12. Usar solo con el carro, poste, trípode, soporte o mesa especificados por el fabricante o vendidos
con el equipo. Si se utiliza un carro, prestar atención al desplazarlo con el equipo encima para
evitar vuelcos y accidentes.
13. Desconectar el equipo de la alimentación durante tormentas o largos periodos de inutilización.
14. Para la asistencia, dirigirse solo a personal cualificado. El equipo necesita asistencia si ha sufrido
algún dañ o, por ejemplo al cable de alimentación o al enchufe, ha sido mojado por algú n líquido
o golpeado por un objeto, se ha expuesto a lluvia o humedad, no funciona normalmente o se ha caído.
15. ADVERTENCIA: Para reducir el riesgo de incendio o descargas eléctricas, no se debe exponer este
equipo a la lluvia o a la humedad.
16. El conector del dispositivo funciona como dispositivo de desconexión. Por esto, debe ser posible
utilizarlo sin problemas.
17. No se debe impedir la ventilación cubriendo las aberturas de ventilación con objetos como periódicos,
manteles, cortinas, etc.
18. No se debe colocar ninguna fuente de llamas libres, como velas encendidas, sobre el equipo.
19. El equipo debe utilizarse en climas templados.
20. El equipo no debe exponerse a goteo o salpicaduras y no se deben colocar objetos llenos de líquido,
como floreros, encima del mismo.

A. Accesorios e instalació n del software controlador
Guía hardware x 1
Cable USB x 1
Adaptador de alimentación x 1
El Mixars Primo es un dispositivo con soporte nativo para Mac OS X, mientras que para Windows
requiere un software controlador.
Asegurarse de completar la instalación de este controlador antes de usar Serato DJ.
26
Comprobar que el paquete de la unidad principal incluya estos componentes:
Instalació n del controlador del dispositivo
Mac
Ningún controlador necesario
Windows
Descargar el controlador en nuestro sitio web: www.mixars.com
Hacer doble clic en el archivo .exe para iniciar la instalación y seguir las instrucciones
visualizadas.
Podría ser necesario volver a conectar el Primo después de la instalación.

B. Mandos y funciones
1. Salida Booth, TRS
Salida Booth secundaria TRS (bal.), controlada por
el mando «Booth»
2. Salida Master, balanceada XLR
Salida principal balanceada XLR, controlada por el
mando «Master»
3. Salida Master secundaria, RCA
Salida Master secundaria RCA (no bal.), controlada
por el mando «Master»
4. Entradas Line/Phono (entradas Serato)
Entradas principales de la señal de línea/phono por
cada canal.
Utilizar estas entradas para los vinilos/CD con
código de tiempo Serato, para el uso con Serato
DJ.
5. Selector de entradas Line/Phono
Seleccione el ajuste correcto para la entrada de
línea/Phono en función del equipo utilizado (fuentes
Phono o Line).
6. Entrada Mic
Entrada del micrófono combinada XLR / TRS,
controlada por el mando «MIC/AUX» .
7. Conector USB
Sirve para conectar la mezcladora al ordenador
mediante el cable USB para el uso con Serato DJ.
El Primo puede recibir alimentación a través de una
toma USB que proporcione una corriente de más de
1 A (1000 mA). Consulte con el fabricante de su
ordenador la corriente disponible desde el puerto
USB.
8. Selector Power On/Off
Enciende y apaga el equipo.
9. Conector del adaptador de corriente
continua
Conectar el adaptador de alimentación
suministrado aquí.
10. Selector Mic / Aux
Seleccionar si se utiliza la entrada Mic (selector
hacia la izquierda) o la entrada Aux (selector hacia
la derecha). La posición central apaga la entrada
Mic/Aux.
11. Entrada Aux
Entrada Aux adicional para conectar diversas
fuentes de señales Line, controladas a través del
mando «MIC/AUX» .
12. Nivel Mic / Aux
Ajustar el nivel de la entrada Mic o Aux.
13. Ajuste del tono de Mic / Aux
Ajustar el tono de la entrada Mic o Aux.
14. Ajuste de efecto Echo de Mic
Ajustar el efecto Echo de la entrada Mic.
15. Selector Crossfader Reverse
Invierte el control del canal izquierdo con el
derecho en el crossfader.
16. Ajuste de crossfader
Ajustar la curva del Crossfader de Hard (hacia la
derecha) a Soft (hacia la izquierda).
17. Auriculares CUE/MASTER MIX
Girar para ajustar entre la señal Cue y Master en la
salida de los auriculares.
18. Volumen de los auriculares
Ajustar el volumen de los auriculares.
19. Selector Split Cue On/Off
Si está activado, la señ al en los auriculares se
divide: señal Master en un canal, y señ ales Cue
activadas con los botones «CUE» en el otro canal.
20. Salida de auriculares
TRS y salida de auriculares Mini-Jack controladas a
través del mando « Auriculares».
27
Panel trasero
Parte delantera

Panel superior
21. Selector de asignació n FX Deck2/4
Presionar para asignar FX correspondiente a Deck
2.
Mantener presionado «Shift» y presionar para
asignar el FX correspondiente a Deck 4.
22. Selector de asignació n FX Deck1/3
Presionar para asignar FX correspondiente a Deck
1.
Mantener presionado «Shift» y presionar para
asignar el FX correspondiente a Deck 3.
23. Selector FX ON/OFF
Presionar para encender o apagar FX.
Mantener presionado «Shift» y presionar para
seleccionar FX.
24. Nivel FX
Girar para ajustar el nivel FX.
25. FX TAP
Presionar para activar el efecto Tap Tempo para el
FX.
Mantener presionado «Shift» y presionar para
seleccionar los modos FX.
26. Conmutador rotativo FX BEATS
Controla FX beats.
27. Selector de entrada/Deck
Selecciona la fuente de entrada:
En PH/LN1 (o PH/LN2 para el deck derecho) –
Primo actúa tambié n como una mezcladora
independiente para mezclar la fuente de audio
conectada a las entradas PH/LN RCA.
En el Deck 1/3 (o Deck 2/4 para el deck derecho) –
Seleccione el deck a controlar en Serato DJ.
28. Botó n LOAD
Presionar para cargar la pista en Serato DJ hasta el
deck seleccionado.
29. Volumen del canal
Visualiza el volumen de la señal del canal
correspondiente
30. Mando Master
Regula el volumen de la señal master.
31. Mandos Library y Load
Library:
Desplazarse por la librería girando el mando y
visualizar el nivel sucesivo. Mantener presionado
«Shift» y presionar el mando para volver al nivel
anterior.
32. Booth
Regula el volumen de la salida «Booth» .
33. Volumen Sampler
Regula el volumen del sampler en el Serato DJ.
34. Mando Trim
Regula el nivel general del canal correspondiente.
35. Ecualizador canal
Regula la configuración del ecualizador para el
canal correspondiente.
36. Botó n de ajuste de cuadrícula
Presionar para ajustar la cuadrícula.
Mantener presionado «Shift» y presionar para
establecer.
37. Botó n de ajuste de la cuadrícula
Presionar para deslizar la cuadrícula.
Mantener presionado «Shift» y presionar para
borrar.
38. Botó n slip
Presionar para encender o apagar el modo Slip.
Mantener presionado «Shift» y presionar para
cambiar el rango del regulador de tono (pitch).
39. Regulador de tono (pitch)
Controla el tono de la pista actual.
28

40. Botones de ayuda Pitch bend
Presionar para seleccionar Pitch bend arriba (+) o
abajo (-) la pista actual.
Si la función Serato DJ’s Pitch 'n Time está
habilitada, mantener presionado «Shift» y
presionar la tecla de cambio.
41. Botó n de bloqueo de la tecla
Presionar para encender o apagar el bloqueo de la
pista actual.
Si la función Serato DJ’s Pitch 'n Time está
habilitada, mantener presionado «Shift» y
presionar la tecla para encender o apagar la
sincronización.
42. Botó n de bucle automá tico
Presionar para encender o apagar el bucle
automático.
Mantener presionado «Shift» y presionar para
activar el bucle.
43. Botones de mitad/doble bucle
Presionar para dividir a la mitad el tamaño del
bucle.
Mantener presionado «Shift» y presionar para
saltar el beat del bucle.
44. Botó n PLF
Presionar para encender o apagar PLF del canal
correspondiente.
45. Reguladores de los canales
Regulan el volumen de los canales
correspondientes.
46. Volumen Master
Visualiza el volumen de la señal master.
47. Crossfader
Crossfade entre los canales izquierdo y derecho de
la señal de audio.
48. Botó n Shift
Mantenerlo presionado para activar las funciones
opuestas de algunos mandos
49. Selector del FX de textura sonora
Selector para elegir entre el efecto Filter, Noise,
Crush y Echo y controlar el parámetro FX mediante
el «mando FX de textura sonora del canal»
50. Mando FX de textura sonora del canal
Regula el parámetro / nivel del FX de textura
sonora seleccionado.
51. Botones de parámetros
Presionar para ajustar el parámetro 1 de los pads.
Mantener presionado «Shift» y presionar para
ajustar el parámetro 2 de los pads.
52. Botó n Sampler
Configura el modo Sampler en todos los pads.
Si la función Serato DJ’s Pitch 'n Time está
habilitada, mantener presionado «Shift» y
presionar para cambiar al modo Pitch Play
53. Botó n Slicer
Cambia los pads el modo Slicer. Mantener
presionado «Shift» y presionar para cambiar al
modo bucle Slicer.
54. Botó n Roll
Cambiar los pads al modo Roll. Mantener
presionado «Shift» y presionar para cambiar al
modo de bucle manual.
55. Botó n Cues
Cambiar los pads al modo Cues. Mantener
presionado «Shift» y presionar para cambiar al
modo bucle Cue.
56. Pads
Utilizar para activar puntos Cue, Muestras, Roll,
Slicer, bucle Cue, bucle manual, bucle Slicer o Pitch
Play en Serato DJ.
57. Botó n Play
Presionar para reproducir o pausar la pista.
58. Botó n Cue
Presionar para activar Cue.
59. Botó n Sync
Presionar para activar sincronización.
Mantener presionado «Shift» y presionar para
activar la sincronización.
60. Bú squeda Touch Needle
Tocar en la línea para buscar rápidamente hasta la
ubicación deseada de la pista actual.
61. Botó n Censor
Presionar para encender o apagar el modo Censor.
Mantener presionado «Shift» y presionar para
encender o apagar Reverse.
62. Plato sensible tá ctil
Tocar en el área sensible táctil y girar el plato para
realizar scratching.
Girar el plato en el área exterior para Pitch bend
especial.
El logo iluminado en la parte intermedia y el LED
azul muestran el estado de la ejecución del scratch.
63. Botó n Vinilo
Presionar para encender o apagar el modo Vinilo.
Mantener presionado «Shift» y presionar para
encender o apagar la función Quantize.
29

C. Enrutamiento de audio
30
Existen 2 opciones de enrutamiento de audio en el Primo, es decir, el enrutamiento Serato y el
enrutamiento no Serato.
En el enrutamiento Serato, el Primo funciona como controlador y la mayoría de las mezclas se realizan en
el software Serato DJ. Es posible el FX post-crossfader desde Serato DJ.
Enrutamiento de audio modo Serato:

En el enrutamiento no Serato, el hardware de Primo funciona como un control MIDI con una mezcladora
CANAL
Entradas
Salidas
1
Deck 1 entrada Izq (DVS)
Deck 1 salida Izq
2
Deck 1 entrada Dcha (DVS)
Deck 1 salida Dcha
3
Deck 2 entrada Izq (DVS)
Deck 2 salida Izq
4
Deck 2 entrada Dcha (DVS)
Deck 2 salida Dcha
5
Grabación entrada Izq
Deck 3 salida Izq
6
Grabación entrada Dcha
Deck 3 salida Dcha
7
NA
Deck 4 salida Izq
8
NA
Deck 4 salida Dcha
9
NA
CUE salida Izq
10
NA
CUE salida Dcha
11
NA
Sampler salida Izq
12
NA
Sampler salida Dcha
31
externa independiente, donde se realiza la mezcla.
Enrutamiento de audio modo no Serato:
USB 9/10
CUE from DJ Software
Para pasar de un enrutamiento al otro existen varias opciones:
1. Al abrir e iniciar el software Serato DJ, el Primo conectado pasará automáticamente al modo de
enrutamiento Serato.
2. O, presionar y mantener presionados los botones NOSIE y FILTER y encender el Primo. Esperar
algunos segundos hasta que el botón PFL izquierdo o derecho se ilumine en azul. Liberar el botón
«Shift» .
3. Presionar cualquiera de los botones PLF para seleccionar el enrutamiento de audio:
Derecho: Modo Serato
Izquierdo: Modo no Serato
El botón PFL correspondiente debe iluminarse en azul
4. Presionar «Shift» para confirmar la selección y el Primo estará preparado para funcionar.
La interfaz de audio cuenta con 6 entradas y 12 salidas, asignadas como se indica:

D. Actualizació n del firmware
32
Mixars seguirá mejorando el producto y resolviendo errores, por lo tanto, publicará nuevas versiones
del firmware. Para descargar los nuevos firmware y la herramienta de actualización correspondiente,
visitar el sitio web de Mixars (http://www.mixars.com). Procedimiento de actualización del firmware:
1. Descargar la herramienta de actualización y la última versión del firmware en el sitio web de
Mixars.
2. Conectar el cable USB al ordenador.
3. Presionar y mantener presionados los 2 botones PFL y encender. El medidor LED de volumen
Master se activará de abajo a arriba repetidamente; esto quiere decir que la unidad está en el
modo de actualización del firmware.
4. Abrir el software de actualización e identificar el archivo del firmware.
5. Seguir las instrucciones en la pantalla para iniciar la actualización y esperar el mensaje al final.
6. Reiniciar el Primo después de la actualización del firmware.

Sicherheitsanweisungen
Das Ausrufezeichen mit dem gleichseitigen Dreieck soll den Benutzer auf die wichtigen
Bedienungs- und Wartungsanleitungen (Servicearbeiten) hinweisen, die in den Informationen
enthalten sind, die diesem Gerät beiliegen.
Das Blitzsymbol mit Pfeilspitze in einem gleichseitigen Dreieck weist den Benutzer auf das
Vorhandensein einer nicht isolierten „gefährlichen elektrischen Spannung“ innerhalb des
Systemgehäuses hin, so dass die Gefahr von Stromschlägen besteht.
WARNUNG
Um Feuergefahr und die Gefahr eines elektrischen Schlags zu verringern, setzen Sie das Gerät weder
Regen noch sonstiger Feuchtigkeit aus. Das Gerät darf keinen Tropfen oder Spritzern ausgesetzt
werden und keine Gegenstände, die mit Flüssigkeit gefüllt sind, wie Vasen, dü rfen auf dem Gerät
platziert werden.
VORSICHT
Zur Vermeidung von Stromschlaggefahr benutzen Sie dieses Gerät bitte nicht mit Verlängerungskabeln
oder Steckdosen,
VORSICHT
Um das Risiko eines Stromschlags zu reduzieren,
entfernen Sie nicht die Abdeckungen. Es gibt keine
vom Anwender zu wartenden Teile im Inneren des
33
1. Lesen Sie diese Anweisungen.
2. Halten Sie diese Anweisungen ein.
3. Beachten Sie sämtliche Warnhinweise.
4. Befolgen Sie sämtliche Anweisungen.
5. Verwenden Sie dieses Gerät nicht in der Nähe von Wasser.
6. Nur mit einem trockenen Tuch reinigen.
7. Lüftungsschlitze dü rfen nicht blockiert werden. Die Installation muss gemäß den Anweisungen des
Herstellers erfolgen.
8. Installieren Sie keine Wärmequellen, wie Heizkörper, Heizregister, Herde oder andere Geräte
(einschließlich Verstärker), die Hitze produzieren, in der Nähe.
9. Vernichten Sie nicht den Sicherheitszweck des polarisierten Steckers. Ein polarisierter Stecker hat zwei
Kontakte, einer davon ist breiter als der andere. Der breite Kontakt ist für Ihre Sicherheit. Wenn der
gelieferte Stecker nicht in Ihre Steckdose passt, konsultieren Sie einen Elektriker für den Austausch der
veralteten Steckdose.
10. Achten Sie darauf, dass auf dem Netzkabel nicht gelaufen wird oder es zusammengedrückt wird, vor
allem bei den Steckern, Gerätesteckdosen
oder an dem Punkt, wo diese das Gerät verlassen.
11. Verwenden Sie nur Zubehör, das durch den Hersteller spezifiziert wurde.
12. Verwenden Sie nur Wagen, Ständer, Stativhalterungen und Tische, die vom Hersteller spezifiziert
wurden oder die zusammen mit dem Gerät verkauft werden. Wenn ein Wagen verwendet wird,
seien Sie beim Bewegen der Wagen/Gerätekombination vorsichtig, um Verletzungen durch
Umkippen zu vermeiden.
13. Stecken Sie dieses Gerät während Gewitterstü rmen aus, oder wenn es über lä ngere Zeit nicht
verwendet wird.
14. Lassen Sie sämtliche Servicearbeiten durch qualifiziertes Servicepersonal durchführen.
Servicearbeiten sind erforderlich, wenn das Gerät beschädigt wurde, und zum Beispiel ein
Stromanschlusskabel beschädigt wurde, Flüssigkeit
ausgelaufen ist, das Gerät Regen oder Feuchtigkeit ausgesetzt wurde, nicht normal betrieben werden
kann, oder heruntergefallen ist.
15. WARNUNG: Um Feuergefahr und die Gefahr eines elektrischen Schlags zu verringern, setzen Sie das
Gerät weder Regen noch sonstiger Feuchtigkeit aus.
16. Der Netzstecker oder eine Gerätesteckvorrichtung wird als Trennvorrichtung verwendet, die
Trennvorrichtung muss immer betriebsbereit sein.
17. Die Lüftungsschlitze dü rfen nicht durch davor liegende Gegenstä nde wie Zeitungen, Tischdecken,
Vorhänge usw. behindert werden.
18. Kein offenes Feuer, wie z.B. brennende Kerzen, auf das Gerät stellen.
19. Das Gerät sollte in gemäß igtem Klima verwendet werden.
20. Das Gerät darf keinen Tropfen oder Spritzern ausgesetzt werden und keine Gegenstände, die mit
Flüssigkeit gefü llt sind, wie Vasen, dü rfen auf dem Gerät platziert werden.

A. Zubehö r und Treiberinstallation
Hardware Guide x 1
USB-Kabel x 1
Netzadapter x 1
Der Mixars Primo ist ein der Klasse entsprechendes Gerät für Max OS X, benö tigt jedoch Treiber für
Windows.
Stellen Sie bitte sicher, dass die Treiberinstallation abgeschlossen wurde, bevor Sie es mit Serato DJ
verwenden.
34
Prü fen Sie folgende Teile, die in der Verpackung mit der Haupteinheit
enthalten sind:
Treiberinstallation
Mac
Kein Treiber notwendig
Windows
Laden Sie den Treiber ü ber unsere Webseite herunter: www.mixars.com
Doppelklick auf die .exe Datei, um die Installation zu starten und dann die Anweisungen auf
dem Bildschirm befolgen.
Bitte beachten Sie, dass Sie vielleicht nach der Installation Primo erneut verbinden mü ssen.

B. Funktionen und Bedienelemente
1. Booth-Ausgang, TRS
Sekundärer TRS-Ausgang (symmetrisch), gesteuert
über den « Booth» Knopf
2. Master Ausgang, symmetrisch XLR
Hauptausgang symmetrisch XLR, gesteuert über
«Master» Knopf
3. Sekundä rer Master-Ausgang, RCA
Sekundärer RCA Master-Ausgang (unsym.),
gesteuert über den « Master» Knopf
4. Phono/Leitungseingang (Serato Eingänge)
Haupt-Phono / Leitungseingänge für jeden Kanal.
Verwenden Sie diese Eingänge für Serato Timecode
Vinyls / CDs zur Verwendung mit Serato DJ.
5. Phono/Leitungseingä nge Schalter
Wählen Sie die korrekte Einstellung für den
Phono/Leitungseingang, abhängig von der
verwendeten Ausrüstung (Phono oder
Leitungsquellen).
6. Mic Eingang
XLR / TRS Combo-Mikrofon-Eingang, gesteuert
über « MIC/AUX» Knopf.
7. USB Anschluss
Schließen Sie den Mixer an Ihren Computer an mit
dem enthaltenen USB-Kabel für die Verwendung
mit dem Serato DJ.
Der Primo ist in der Lage, eine USB-Energiequelle
anzutreiben, die mehr als 1A (1000mA) Strom
liefern kann. Bitte fragen Sie Ihren
Computerhersteller nach dem vom USB-Anschluss
verfügbaren Strom.
8. An/Ausschalter
Schaltet die Einheit An oder Aus.
9. DC-Adapterstecker
Schließen Sie den gelieferten Adapterstecker hier
an.
10. Mic / Aux Schalter
Wählen Sie aus, ob Sie den Mic Eingang (Schalter
nach links) oder den Aux Eingang (Schalter nach
rechts) verwenden. Die mittlere Position schaltet
den Mic/Aux Eingang aus.
11. Aux Eingang
Zusätzlicher Aux Eingang für den Anschluss
verschiedener Leitungssignal-Quellen, gesteuert
über den « MIC/AUX» Knopf.
12. Mic / Aux Level
Stellen Sie den Pegel des Mic oder Aux Eingangs
ein.
13. Mic / Aux Toneinstellung
Stellen Sie den Ton des Mic oder Aux Eingangs ein.
14. Mic Echo Einstellung
Stellen Sie den Echo-Effekt des Mic Eingangs ein.
15. Crossfader Umkehrschalter
Kehrt die Steuerung des linken mit dem rechten
Kanal auf dem Crossfader um.
16. Crossfader Einstellung
Einstellung der Crossfader Kurve von Hart (nach
rechts) auf Weich (nach links).
17. Kopfhö rer CUE/MASTER Mix
Drehen zur Einstellung zwischen Cue und
Mastersignal auf dem Kopfhörer-Ausgang.
18. Kopfhö rer-Lautstä rke
Zur Einstellung der Kopfhörer-Lautstärke.
19. Cue teilen An-/Ausschalter
Wenn aktiviert, wird das Kopfhörer-Signal geteilt:
Das Mastersignal auf einem Kanal und das
aktivierte Cue-Signal ausgewählt über die «CUE» Tasten auf dem anderen Kanal.
20. Kopfhö rer Ausgang
TRS und Mini-Jack Kopfhörer Ausgang gesteuert
über den « Kopfhörer» Knopf.
35
Hinten
Vorne

Oben
21. FX Deck2/4 Belegungsschalter
Drücken, um entsprechende FX auf Deck 2 zu
belegen.
Halten Sie «Shift» gedrü ckt, um entsprechende FX
auf Deck 4 zu belegen.
22. FX Deck1/3 Belegungsschalter
Drücken, um entsprechende FX auf Deck 1 zu
belegen.
Halten Sie «Shift» gedrü ckt, um entsprechende FX
auf Deck 3 zu belegen.
23. FX AN/AUS Schalter
Drücken, um FX an-/auszuschalten.
Halten Sie «Shift» gedrü ckt, um FX auszuwählen.
24. FX Level
Drehen, um FX Level einzustellen.
25. FX TAP
Drücken, fü r Tap-Tempo fü r den FX.
Halten Sie «Shift» gedrü ckt, um FX-Modi
auszuwählen.
26. FX BEATS Encoder
FX Beats steuern.
27. Eingang/Deck Wä hlschalter
Eingangsquelle wählen:
Auf PH/LN1 (oder PH/LN2 für rechtes Deck) –
Primo fungiert auch als Stand-Alone-Mischer, um
die mit den PH/LN RCA Eingängen verbundene
Audioquelle zu mischen.
Auf Deck1/3 (oder Deck 2/4 für rechtes Deck) –
Wählen Sie das Deck in Serato DJ, um zu steuern.
28. LADE-Taste
Drücken, um den Titel in Serato DJ auf das
gewählte Deck zu laden.
29. Kanal Pegelmesser
Anzeige des entsprechenden Kanal Pegelsignals
30. Master-Lautstä rke
Passen Sie die Lautstärke des Master-Pegel-Signals
an.
31. Bibliothek, Ladekontrollen
Bibliothek:
Scrollen Sie durch die Bibliothek durch Drehen des
Knopfes und lassen Sie sich die nächste Stufe
anzeigen. Halten Sie «Shift» und drü cken Sie, um
zur vorherigen Stufe zurückzukehren.
32. Booth
Passen Sie den Pegel des «Booth» Ausgangs an.
33. Sampler-Lautstä rke
Steuert die Sampler-Lautstärke im Serato DJ.
34. Kanal-Trimmung
Einstellung des gesamten Pegels des
entsprechenden Kanals.
35. Kanal EQ
Anpassung der Equalizer-Einstellungen für den
entsprechenden Kanal.
36. Rastereinstellung Taste
Drücken, um das Raster einzustellen.
Halten Sie «Shift» gedrü ckt, um die Einstellung
vorzunehmen.
37. Raster Schiebetaste
Drücken, um das Raster zu schieben.
Halten Sie «Shift» gedrü ckt, um zu löschen.
38. Schiebetaste
Drücken, um Schiebemodus an-/auszuschalten.
Halten Sie «Shift» gedrü ckt, um den PitchfaderBereich zu ändern.
39. Pitchfader
Steuert den Pitch des aktuellen Titels.
36

40. Pitch Biegungstasten
Drücken, um die Tonhöhe des aktuellen Titels nach
oben (+) oder unten (-) zu stellen.
Wenn die DJ Pitch 'n Time von Serato nicht
aktiviert ist, halten Sie «Shift» gedrü ckt, um den
Schlüssel zu ändern.
41. Verriegelungstaste
Drücken, um Verriegelung des aktuellen Titels an/abzuschalten.
Wenn die DJ Pitch ‚n Time von Serato aktiviert ist,
halten Sie «Shift» gedrü ckt, um Key Sync an/auszuschalten.
42. Autoloop-Taste
Drücken, um Autoloop an-/auszuschalten.
Halten Sie «Shift» gedrü ckt, um Loop zu aktivieren.
43. Loop Halbe/Doppelte Tasten
Drücken, um das Doppelte der Loopgrö ße zu
halbieren.
Halten Sie «Shift» gedrü ckt, um Loop Beat zu
überspringen.
44. PLF-Taste
Drücken, um PFL des entsprechenden Kanals an/abzuschalten.
45. Kanal-Fader
Einstellung der Lautstärke des entsprechenden
Kanals.
46. Master-Pegelmesser
Zeigen Sie das Master-Pegel-Signal an.
47. Crossfader
Ü berblenden zwischen linken und rechten Kanälen
des Audiosignals.
48. Shift-Taste
Halten, um die Shift-Funktionen einiger
Steuerungen zu aktivieren
49. Sound-Struktur FX-Wä hlschalter
Schalten Sie zwischen Filter, Geräusch, Crush und
Echo Effekt und steuern Sie die FX-Parameter über
den «Kanal und Sound-Struktur FX-Knopf»
50. Kanal Sound-Struktur FX Knopf
Einstellung der Parameter / Stufe der gewählten
Sound-Struktur FX.
51. Parameter Tasten
Drücken, um Parameter 1 der Performance Pads
einzustellen.
«Shift» drü cken, um Parameter 2 der Performance
Pads einzustellen.
52. Sampler-Taste
Schalten Sie die Performance Pads auf SamplerModus.
Wenn die DJ Pitch 'n Time von Serato aktiviert ist,
halten Sie «Shift» gedrü ckt, um in den Pitch Play
Modus zu schalten.
53. Slicer-Taste
Schalten Sie die Performance Pads in den SlicerModus. Halten Sie «Shift» gedrü ckt, um in den
Slicer Loop Modus zu schalten.
54. Roll-Taste
Schalten Sie die Performance Pads in den RollModus. Halten Sie «Shift» gedrü ckt, um in den
Manual Loop Modus zu schalten.
55. CUES-Taste
Schalten Sie die Performance Pads in den CuesModus. Halten Sie «Shift» gedrü ckt, um in den Cue
Loop Modus zu schalten.
56. Performance Pads
Verwenden, um Cue Punkte, Samples, Roll, Slicer,
Cue Loop, Manual Loop, Slicer Loop oder Pitch Play
in Serato DJ auszulösen.
57. Play Taste
Drücken, um Titel zu spielen oder anzuhalten.
58. Cue Taste
Für Cue drü cken.
59. Sync Taste
Drücken, um Sync anzuschalten.
Halten Sie «Shift» gedrü ckt, um Sync.
abzuschalten.
60. Nadelberü hrung Suche
Streifen berühren, um schnell die gewü nschte
Position des aktuellen Titels zu suchen.
61. Censor Taste
Drücken, um Censor Modus an-/abzuschalten.
Halten Sie «Shift» gedrü ckt, um Reverse an/abzuschalten.
62. Berü hrungsempfindliche Performance
Platter
Berühren Sie den berü hrungsempfindlichen Bereich
und drehen Sie den Platter für Kratzleistung.
Drehen Sie den Platter am äußeren Bereich fü r
vorübergehende Tonhö henveränderung.
Das mittlere Beleuchtungslogo und der blaue LEDRing zeigen den Status der Kratzleistung.
63. Vinyl Taste
Drücken, um Vinyl Modus an-/abzuschalten.
Halten Sie «Shift» gedrü ckt, um Quantize an/abzuschalten.
37

C. Audio-Routing
38
Es gibt 2 Audio-Routing Einstellungen in Primo, nämlich das Serato-Routing und das nicht-Serato-Routing.
Im Serato-Modus-Routing, funktioniert der Primo als Steuerung und das meiste Mixen wird in der Serato
DJ Software erledigt. Dies ermöglicht einen Post-Crossfader FX von Serato DJ.
Das Serato-Modus Audio-Routing:

Im nicht-Serato-Modus-Routing funktioniert der Primo als MIDI Steuerung mit unabhängigem externen
CH
Eingänge
Ausgänge
1
Deck 1 ein L (DVS)
Deck 1 aus L
2
Deck 1 ein R (DVS)
Deck 1 aus R
3
Deck 2 ein L (DVS)
Deck 2 aus L
4
Deck 2 ein R (DVS)
Deck 2 aus R
5
Aufzeichnung ein L
Deck 3 aus L
6
Aufzeichnung ein R
Deck 3 aus R
7
NA
Deck 4 aus L
8
NA
Deck 4 aus R
9
NA
CUE aus L
10
NA
CUE aus R
11
NA
Sampler aus L
12
NA
Sampler aus R
39
Mixer, bei dem das Mixen über die Primo Hardware erledigt wird.
Das nicht-Serato-Modus Audio-Routing:
USB 9/10
CUE from DJ Software
Es gibt verschiedene Arten, um zwischen den 2 Audio-Routings zu wechseln:
1. Wenn die Serato-DJ-Software geöffnet und angefangen ist, wird der angeschlossene Primo
ausgelöst, um automatisch in das Serato-Modus-Routing zu schalten.
2. Oder drücken und halten Sie die NOSIE und FILTER Taste und schalten Sie den Primo an. Warten
Sie ein paar Sekunden, bis die linke oder rechte PFL Taste blau leuchtet. SHIFT Taste lösen.
3. Drücken Sie entweder eine PFL Taste, um das Audio Routing auszuwählen:
Rechts: Serato Modus
Links: Nicht-Serato Modus
Die entsprechende PFL Taste sollte blau leuchten
4. SHIFT drücken, um die Auswahl zu bestätigen und der Primo ist gebrauchsbereit.
Die Audioschnittstelle ist eine 6-ein 12-aus Schnittstelle mit Zuordnung:

D. Firmware-Update
40
Mixars verbessert kontinuierlich die Produkte und behebt Fehler durch die Herausgabe von neuer
Firmware für die Produktion. Neue Firmware und Firmware-Update-Software-Tool können von der
Mixars Webseite heruntergeladen werden (http://www.mixars.com). Firmware-Update-Vorgang:
1. Laden Sie das Firmware-Update-Tool und die neueste Firmware von der Mixars-Webseite
herunter.
2. Schließen Sie das USB-Kabel an den Computer an.
3. Drücken und halten Sie die 2 PFL Tasten und schalten Sie diese an. Der Master Level LED Messer
läuft wiederholt von unten nach oben, was bedeutet, dass die Einheit im Firmware Update Modus
ist.
4. Ö ffnen Sie die Firmware-Update-Software und lokalisieren Sie die Firmware-Update-Datei.
5. Befolgen Sie die Anweisungen auf dem Bildschirm, um das Firmware-Update zu starten und
warten Sie auf die Eingabeaufforderung für die Beendung des Updates
6. Zyklus des Primo nach Firmware-Update antreiben.

Specifications
POWER SOURCE
- DC ADAPTOR AC 100V – 240V 50/60Hz
- USB POWERED
POWER SUPPLY
- DC ADAPTOR: DC IN 5V2A
- USB POWER: USB PORT WITH CURRENT SUPPLY
>1A
41
1. GENERAL SECTION
PRODUCT PROFESSIONAL 2CH CONTROLLER FOR SERATO
WITH 4-DECK CONTROL
DIMENSIONS 508.4mm (W) X 330.7mm (D) X 65.6 mm (H)
WEIGHT 4.2kg
2. STANDARD TEST CONDITION:
Ambient Temperature 23 +/- 2 degC
Relative Humidity 65% +/- 5%
NOTE: Measurements can be carried out between 5 degC to 35 degC and 45% to
85% relative humidity.
3. Audio Characteristics (Unbalance Output Load = 100K ohm, Balance
Output Load = 600 ohm
Phones = 33 ohm, EQ/Filter Flat, Mic Echo at Min, Fader At Max. Unless
Otherwise Noted)
4. INPUT/OUTPUT IMPEDANCE & SENSITIVITY: (1KHz INPUT, MIC/AUX,
TRIM, MASTER AT MAX.)
4-1. INPUT IMPEDANCE AND REFERENCE INPUT LEVEL:
LINE: 10K OHM /-14dBV(200mV)
PHONO: 47K OHM /-50dBV(3.16mV)
AUX: 10K OHM /-14dBV(200mV)
MIC: 5K OHM /-54dBV(1.99mV) (Unbalance)
USB: 90 OHM /-23.4dBFS Non Serato Mode
4-2. OUTPUT IMPEDANCE AND REFERENCE OUT LEVEL:
Nominal Limited
MASTER: 1K OHM /0dBV (1V) ± 1dB ± 2dB
BALANCED: 600 OHM /0dBV (1V) ± 1dB ± 2dB
BOOTH: 600 OHM /0dBV (1V) ± 1dB ± 2dB
PHONES: 33 OHM / 0dBV (1V) ± 1dB ± 2dB
5. FREQUENCY RESPONSE: (REFERENCE INPUT LEVEL, MIC/AUX, TRIM AT
MAX. MASTER AT 12 O'CLOCK.)
Nominal Limited
LINE: 20 - 20K Hz +1/-1.5dB +2/-3dB
AUX: 20 - 20K Hz +1/-1.5dB +2/-3dB
PHONO: 20 - 20K Hz +1/-2dB +2/-3dB (RIAA)
MIC: 20 - 20K Hz +1/-2dB +2/-3dB
6. MAXIMUM INPUT: (MIC/AUX, TRIM, MASTER AT 9 O'CLOCK. ADJUST
INPUT 1KHz LEVEL TO OUTPUT LEVEL LESS THAN 1% T.H.D WITH Aw/20KHz LPF)
Nomina Limited
LINE: +10dBV +8dBV
PHONO: -25dBV -28dBV
MIC: -20dBV -23dBV

7. MAXIMUM OUTPUT: (MIC/AUX, TRIM, MASTER AT MAX. ADJUST INPUT 1KHz
42
LEVEL TO OUTPUT LEVEL LESS THAN 1% T.H.D WITH A-w/20kHz LPF)
Nominal Limited
MASTER UNBALANCED: +11 dBV +9dBV
MASTER BALANCED: +11 dBV +9dBV
BOOTH BALANCE: +11 dBV +9dBV
PHONE: +5dBV +4dBV
8. S/N RATIO: (1KHz INPUT, MIC/AUX, TRIM, MASTER AT 12 O’CLOCK, WITH
A-w/20KHz LPF, INPUT SHORT WHEN NO SIGNAL)
Nominal Limited
LINE: 94dB 90dB AT 0dB INPUT
PHONO: 90dB 86dB AT -36dB INPUT
AUX: 92dB 88dB AT 0dB INPUT
MIC: 80dB 76dB AT -40dB INPUT
9. THD + N: (1KHz INPUT , MIC/AUX, TRIM, MASTER AT 12 O’CLOCK, WITH
A-w/20KHz LPF)
Nominal Limited
LINE: 0.005 % 0.01% AT 0dB INPUT
AUX: 0.005 % 0.01% AT 0dB INPUT
PHONO: 0.02 % 0.05% AT -36dB INPUT
MIC: 0.02% 0.05 % AT -40dB INPUT
10. CROSSTALK: (1KHz INPUT , MIC/AUX, TRIM, MASTER AT 12 O’CLOCK WITH
A-w/ 20KHz LPF, INPUT SHORT WHEN NO SIGNAL)
Nominal Limited
LINE: 94dB 90dB @EACH CHANNEL INPUT AT 0dB INPUT
PHONO: 88dB 84dB @EACH CHANNEL INPUT AT -36dB INPUT
AUX: 88dB 84dB @EACH CHANNEL INPUT AT 0dB INPUT
11. L&R CHANNEL SEPARATION: (1KHz INPUT, MIC/AUX, TRIM, MASTER AT 12
O’CLOCK WITH A-w/20KHz LPF, INPUT SHORT WHEN NO SIGNAL)
Nominal Limited
LINE: 93dB
AUX: 90dB
PHONO: 86dB
89dB
@BETWEEN L AND R CHANNEL AT 0dB INPUT
86dB
@BETWEEN L AND R CHANNEL AT 0dB INPUT
82dB
@BETWEEN L AND R CHANNEL AT -36dB INPUT
12. EQUALIZER RESPONSE: (REFERENCE INPUT LEVEL, MIC/AUX, TRIM AT MAX
MASTER AT 12 O'CLOCK. WITH 20KHz LPF)
LINE: Nominal Limited
(1) Low Band:(Low Band Reference Frequency is 70Hz)
Maximum level: +12 ± 1dB ± 1.5dB
Minimum level: -25 ± 1dB ± 1.5dB
(2) Middle Band:(Middle Band Reference Frequency is 1KHz)
Maximum level: +12 ± 1dB ± 1.5dB
Minimum level: -25 ± 1dB ± 1.5dB
(3) High Band:(Hi Band Reference Frequency is 13KHz)
Maximum level: +12 ± 1dB ± 1.5dB
Minimum level: -25 ± 1dB ± 1.5dB
MIC TONE: Nominal Limited
MAX: -28dB -26dB AT 100Hz
MIN : -28dB -26dB AT 10KHz

13. Fader Kill: (0dB 1KHz INPUT LEVEL, TRIM/MASTER AT 12 O’CLOCK. MIC
43
SW OFF WITH A-w/ 20KHz LPF)
Nominal Limited
Channel Fader: -95dB -91dB
Cross Fader: -95dB -91dB
14. LEVEL DIFFERENCE L&R: (1KHz REFERENCE INPUT LEVEL, TRIM, MASTER
AT MAX. WITH A-w/20KHz LPF)
Nominal Limited
LINE: 0dB ± 0.5dB ± 1dB
PHONO: 0dB ± 1dB ± 1.5dB
AUX: 0dB ± 0.5dB ± 1dB
15. USB Interface
Channels: 6 in/ 12 out
Sampling Rate: 48kHz
Resolution: 24-bit
16. NOTES
(1)The specifications are subject to change to any improvement by negotiations in
advance.
(2)The parts are subject to change to any improvement within the range of the
specifications.

MIDI MAP
Functionality
Control
Type
Output
Lighting MIDI
MIDI Type
MIDI
Channel
Key
MIDI
Control
MIDI
Control
(Shifted)
EQ HI
Rotary Pot
Absolute
--
CC N 23
EQ MID
Rotary Pot
Absolute
CC N 24 EQ LOW
Rotary Pot
Absolute
CC N 25
Upfaders
Slider
Absolute
CC N 28 Channel Trim
Rotary Pot
Absolute
CC N 22
CUE Channel (PFL)
Button
Trigger
Yes.
Lit blue = On.
Dim blue = Off
Note 27
CUE Volume
Rotary Pot
Absolute
CC G 12 CUE Mix
Rotary Pot
Absolute
CC G 13 Split CUE
Switch
Selector
Note G 28 Channel Filter
Rotary Pot
Absolute
CC N 26 Crossfader
Slider
Absolute
CC G 8 Master Volume
Rotary Pot
Absolute
CC G 10 Channel Meter
N/A
LED CC N 31 Master Meter Left
N/A
LED CC G 25 Master Meter Right
N/A
LED CC G 29 Crossfader Curve
Rotary Pot
Absolute
CC G 9
Crossfader
Reverse
Switch
Selector
Note G 9
Source Select
Switch – PH/LN1
or PH/LN2
Switch
Selector
CC N 50 Source Select
Switch – DECK1 to
DECK4
Switch
Selector
CC
Note N N
34 8
Sampler Volume
Rotary Pot
Absolute
CC G 26
Functionality
Control
Type
Output
Lighting MIDI
MIDI Type
MIDI
Channel
Key
MIDI
Control
MIDI
Control
(Shifted)
FX 1 Depth
Rotary Pot
Absolute
CC E 0
11
FX 2 Depth
Rotary Pot
Absolute
CC E 1
12
FX 3 Depth
Rotary Pot
Absolute
CC E 2
13
FX BEATS (Turn)
Encoder
(Turn)
Trigger
CC E 3
FX BEATS (Press)
Encoder
(Press)
Trigger
Note E 3
FX 1 ON
Button
Trigger
Yes.
Lit blue = On.
Dim blue = Off
Note E 0
11
FX 2 ON
Button
Trigger
Note E 1
12
FX 3 ON
Button
Trigger
Note E 2
13
FX TAP
Button
Trigger
Note E 4
FX Assignment
(Deck1)
Button
Trigger
Note E 7
FX Assignment
(Deck2)
Button
Trigger
Note E 8
Functionality
Control
Type
Output
Lighting MIDI
MIDI Type
MIDI
Channel
Key
MIDI
Control
MIDI
Control
(Shifted)
LOOP
Button
Trigger
Note P 50
LOOP X2
Button
Trigger
Note P 53
55
LOOP 1/2
Button
Trigger
Note P 52
54
Channel Category
MIDI Channel
Key
Deck 1 (Transport + Mixer)
1 N Deck 2 (Transport + Mixer)
2 N Deck 3 (Transport + Mixer)
3 N Deck 4 (Transport + Mixer)
4 N Deck 1 (Other Functions)
5 P Deck 2 (Other Functions)
6 P Deck 3 (Other Functions)
7 P Deck 4 (Other Functions)
8
P
Effect Unit 1
9 E Effect Unit 2
10
E
Global
16
G
44
MIDI Channel Key
Mixer Controls – Channel
Effects
Looping

Transport Controls
Functionality
Control
Type
Output
Lighting MIDI
MIDI Type
MIDI
Channel
Key
MIDI
Control
MIDI
Control
(Shifted)
Sync
Button
Trigger
Yes.
Lit blue =
On. Dim blue
= Off
Note N 2 3 CUE
Button
Trigger
Yes.
Lit red = On.
Dim red =
Off
Note N 1
Play
Button
Trigger
Yes.
Lit blue =
On. Dim blue
= Off
Note N 0 Censor
Button
Trigger
Note N 16
17
Slip
Button
Trigger
Note N 15 Pitch Bend Up
Button
Trigger
Note N 12
40
Pitch Bend Down
Button
Trigger
Note N 11
39
Key Lock
Button
Trigger
Note N 13
41
Vinyl
Button
Trigger
Note N 7
Touch Needle
Touch Strip
Absolute
CC N 43 Tempo Slider
Fader
Absolute
CC N 9 Platter Touch
Button
Trigger
Note N 6
Platter Position
Platter
Relative
CC N 6
Channel Fader Start
(Shift and move
fader from minimum
position, relative to
channel reverse
condition)
Shift +
Fader
Trigger
Note N
49
Functionality
MIDI
Type
MIDI
Channel
Key
MIDI
Control
Control Value (HEX)
Platter Ring LED (24
LEDs in the Ring)
CC N 10
0x00: All LEDs OFF
0x01 to 0x18: Single LED ON from 12 O’clock positon, other LEDs OFF
0x21 to 0x38: Single LED OFF from 12 O’clock positon, other LEDs ON
0x41 to 0x58: Accumulating LED ON from 12 O’clock position.
0x7F: All LEDs ON
Other value: ALL LEDs OFF
Platter Logo LED
(Red)
CC N 12
0x00 to 0x05: LED OFF to LED brightest
Platter Logo LED
(Green)
CC N 13
0x00 to 0x05: LED OFF to LED brightest
Platter Logo LED
(Blue)
CC N 14
0x00 to 0x05: LED OFF to LED brightest
Functionality
Control
Type
Output
Lighting MIDI
MIDI Type
MIDI
Channel
Key
MIDI
Control
MIDI
Control
(Shifted)
Track Load A
(Deck 1/3)
Button
Trigger
Yes.
Lit blue(red)
= On. Dim
blue (red) =
Off
Note G 4
Track Load B
(Deck 2/4)
Button
Trigger
Yes.
Lit blue(red)
= On. Dim
blue(red) =
Off
Note G 5
Library Back
Encoder
(Press)
Trigger
Note G 6
7
Library Scroll
Encoder
(Turn)
Trigger
CC G 0
1
Functionality
Control
Type
Output
Lighting MIDI
MIDI Type
MIDI
Channel
Key
MIDI
Control
MIDI
Control
(Shifted)
HOT CUE
Button
Trigger
Yes.
Lit blue =
On. Dim blue
= Off
Note N 1
3
ROLL
Button
Trigger
Note N 7
14
SLICER
Button
Trigger
Note N 9
10
SAMPLER
Button
Trigger
Note N 11
15
45
Platter LED control
Library Controls
Performance Pads – Mode switching

Performance Pads
1 2 3
4
5 6 7
8
Functionality
Control
Type
Output
Lighting MIDI
MIDI Type
MIDI
Channel
Key
MIDI
Control
MIDI
Control
(Shifted)
Pad 1
Button
Trigger
Refer to pad
light section
Note N 20
28
Pad 2
Button
Trigger
Note N 21
29
Pad 3
Button
Trigger
Note N 22
30
Pad 4
Button
Trigger
Note N 23
31
Pad 5
Button
Trigger
Note N 24
32
Pad 6
Button
Trigger
Note N 25
33
Pad 7
Button
Trigger
Note N 26
34
Pad 8
Button
Trigger
Note N 27
35
Parameter <
Button
Toggle
Note N 40
42
Parameter >
Button
Toggle
Note N 41
43
Functionality
Control
Type
Output
Lighting MIDI
MIDI Type
MIDI
Channel
Key
MIDI
Control
MIDI
Control
(Shifted)
SHIFT
Button
Trigger
Note G 0
Functionality
Control
Type
Output
Lighting MIDI
MIDI Type
MIDI
Channel
Key
MIDI
Control
MIDI
Control
(Shifted)
Grid Addjust
Button
Trigger
Note P 70
71
Grid Slide
Button
Trigger
Note P 72
73
Color Name
MIDI value for
pad display (HEX)
Dim Version
MIDI value
(HEX)
Off/ Black
0x00 Red
0x01
0x11
Mango
0x02
0x12
Blue
0x03
0x13
Rioja
0x04
0x14
Lime
0x05
0x15
Magenta
0x06
0x16
Light Blue
0x07
0x17
Purple
0x08
0x18
Orange
0x09
0x19
Ferrari Red
0x0a
0x1a
Indigo
0x0b
0x1b
Cyan
0x0c
0x1c
Emerald
0x0d
0x1d
Grass Green
0x0e
0x1e
46
Other/ Special
Miscellaneous
Lighting – Color of the pad vs MIDI value

47
www.mixars.com
 Loading...