

Mixars Duo User manual

Safety Instructions
1. Read these Instructions.
2. Keep these Instructions.
3. Heed all Warnings.
4. Follow all Instructions.
5. Do not use this apparatus near water.
6. Clean only with dry cloth.
7. Do not block any ventilation openings. Install in accordance with the manufacturer’s instructions.
8. Do not install near any heat sources such as radiators, heat registers, stoves, or other apparatus
(including amplifiers) that produce heat.
9. Do not defeat the safety purpose of the polarized plug. A polarized plug has two blades with one
winder than the other. The wide blade is provided for your safety. If the provided plug does not fit into
your outlet, consult an electrician for replacement of the obsolete outlet.
10. Protect the power cord from being walked on or pinched particularly at plugs, convenience
receptacles, and the point where they exit from the apparatus.
11. Only use attachments/accessories specified by the manufacturer.
12. Use only with the cart, stand, tripod, bracket, or table specified by the manufacturer,
or sold with the apparatus. When a cart is used, use caution when moving the cart/apparatus
combination to avoid injury from tip-over.
13. Unplug this apparatus during lightning storms or when unused for long periods of time.
14. Refer all servicing to qualified service personnel. Servicing is required when the apparatus has been
damaged in any way, such as power-supply cord or plug is damaged, liquid has been
spilled or objects have fallen into the apparatus, the apparatus has been exposed to rain or moisture,
does not operate normally, or has been dropped.
15. WARNING: To reduce the risk of fire or electric shock, do not expose this apparatus to rain or
moisture.
16. Since the appliance coupler is used as the disconnection device, the disconnect device shall remain
readily operable.
17. The ventilation should not be impeded by covering the ventilation openings with items, such as
newspapers, table-cloths, curtains, etc.
18. No naked flame sources, such as lighted candles, should be placed on the apparatus.
19. The apparatus should be used in moderate climate.
20. The apparatus shall not be exposed to dripping or splashing and that no objects filled with liquids,
such as vases, shall be placed on the apparatus.
WARNING
To reduce the risk of fire or electric shock, do not expose this apparatus to rain or moisture. The
apparatus shall not be exposed to dripping or splashing and that no objects filled with liquids,
such as vases, shall be placed on the apparatus.
CAUTION
To reduce the risk of electric shock, do not remove
any cover. No user-serviceable parts inside.
Refer servicing to qualified service personnel only.
The exclamation point within the equilateral triangle is intended to alert the user to the
presence of important operation and maintenance (servicing) instructions in the literature
accompanying this appliance.
The lightning flash with arrowhead symbol within the equilateral triangle is intended to alert
the use to the presence of un-insulated “dangerous voltage” within the product’s enclosure
that may be of sufficient magnitude to constitute a risk of electric shock.
CAUTION
To prevent electric shock, do not use this polarized plug with an extension cord, receptacle or other
outlet unless the blades can be fully inserted to prevent blade exposure.
EN 1

Accessories and Driver Installation
Check for the following parts included in the package with the main unit:
Hardware guide x 1 USB Cable x 1 AC cord x 1
Driver installation
The Mixars Duo is a class-compliant device for Mac OS X however will require drivers for Windows.
Please make sure you have completed driver installation before use with Serato DJ.
Mac
No driver needed
Windows
Download the driver via our website: www.mixars.com
Double click on the .exe file to start installation and follow the on-screen instructions.
Please note that you may have to reconnect DUO after installation.
EN 2

Controls and functions
Rear
1. Power On/Off switch
Turns the power of the unit On and Off.
2. AC In
Connect the powercord here.
3. Main output, Balanced XLR
Main Balanced XLR output, controlled via the
«Master» knob (see 30).
4. Booth Output, TRS
Secondary TRS output (Bal.), controlled via the
«Booth» knob (see 31).
5. Secondary Master output, RCA
Secondary RCA Master output (Unbal.), controlled
via the «Master» knob (see 30).
6. Additional Rec. output
Additional RCA Record output (Unbal.), controlled
via the «Master» knob (see 30).
7. Secondary Line inputs
Line signal dedicated secondary input for each
channel.
8. Main Phono/Line inputs
Main Phono / Line Inputs for each channel.
Use the dedicated «Phono / Line» button nearby
for selecting the right setting depending on the
equipment used (Phono or Line sources).
9. USB Hub
2 x Extra USB Inputs for connecting various
accessories to your computer.
10. Main USB soundcard output
Connect the mixer to your computer using the
included USB cable for using it with Serato DJ.
Front
11. Mic input
XLR / TRS Combo Microphone input, controlled via
the «MIC/AUX» knob (see 25).
12. Aux input
Additional Aux input for connecting various Line
signal sources, controlled via the «MIC/AUX» knob
(see 25).
13. Mic / Aux switch
Select if Using the Mic Input (switch towards left)
or the Aux input (switch towards right)
Center position turns the Mic/Aux Input off.
14. Channel Fader Curve Adjustment and
Reverse switch
Adjust the Channel fader curve characteristics for
the corresponding channel and enable or disable
Reverse for each channel.
15. Crossfader adjustment and reverse switch
Cf Cut-In:
Personalize your Cut. Adjust the Cut-In time for the
crossfader. Turn towards left for minumum dead
space - faster cut, and towards right for a larger
dead space – slower/longer cut-in.
Cf Curve:
Adjust the Crossfader curve from Hard (towards
right) to Soft (towards left).
Reverse switch:
Reverses the Left with the Right Channel.
16. Headphones output
TRS and Mini-Jack Headphones output controlled
via the «Headphones» knob (see 29).
17. Split Cue On/Off switch
If enabled, the headphones signal gets split:
Master signal on one channel, and the enabled Cue
signals selected via the «CUE» buttons (see 32),
on the other channel.

EN 3
Please visit https://serato.com/hardware/mixars-duo for our
Duo - Serato DJ Quickstart Guide.
Top
18. Channel faders
Adjust the volume level of the corresponding
channel.
19. Crossfader
Switch between Left, Right, or the mix of both
channels.
20. Pads
Use to trigger cue points and samples in Serato DJ.
Bank:
Switch between pad bank 1 (Cues from 1 to 4)
and pad bank 2 (Cues from 5 to 8).
21. Loop / Loop roll
Control the loop and loop roll function in Serato DJ
by turning and pressing the knob. Press and
hold the «SHIFT» button (see 33) for controlling
the loop roll function.
22. FX 1 and FX 2 Control
Adjust the intensity of the corresponding effect by
turning the knob, and turn the effect on and off by
pressing the «ON» Button. Press and hold «SHIFT»
for enabling FX select.
23. Beats
Select the beat fraction for the FX syncronization.
24. Mic / Aux Tone adjust
Adjust the tone of the Mic or Aux input.
25. Mic / Aux Level
Adjust the level of the Mic or Aux input
26. Source Switch
Select the input to be controlled on the
corresponding channel.
Switch between Phono/Line (see 8), Line (see 7) or
Serato - USB (see 10).
Filter:
Control the analogue filter for the corresponding
channel. Center position: Off
Level meters:
Display the level of the corresponding channel
adjusted via the «Trim» control.
28. Library, Load and Sync controls
Load:
Load a track on the corresponding deck by pressing
the «Load» Buttons.
Library:
Scroll the Library by turning the «Library» knob
and display the next level by pressing it. Hold
«Shift» and press for turning to the previous level.
Sync:
Syncronize a track to another by pressing the
corresponding «Sync» button and turn off the
function by pressing «Sync» while holding «Shift».
29. Headphones and Sampler controls
Mix:
Turn for adjusting between Cue and Master singnal.
Headphones:
Adjust the headphones volume.
Sampler:
Adjust the volume of the sample player.
Cue/Sampler switch:
Select if controlling the Cue Points or the Sample
player with the «Pads» (see 20).
30. Master volume
Adjust the volume of the master level signal.
31. Booth
Adjust the level of the «Booth» output.
32. Cue On/Off
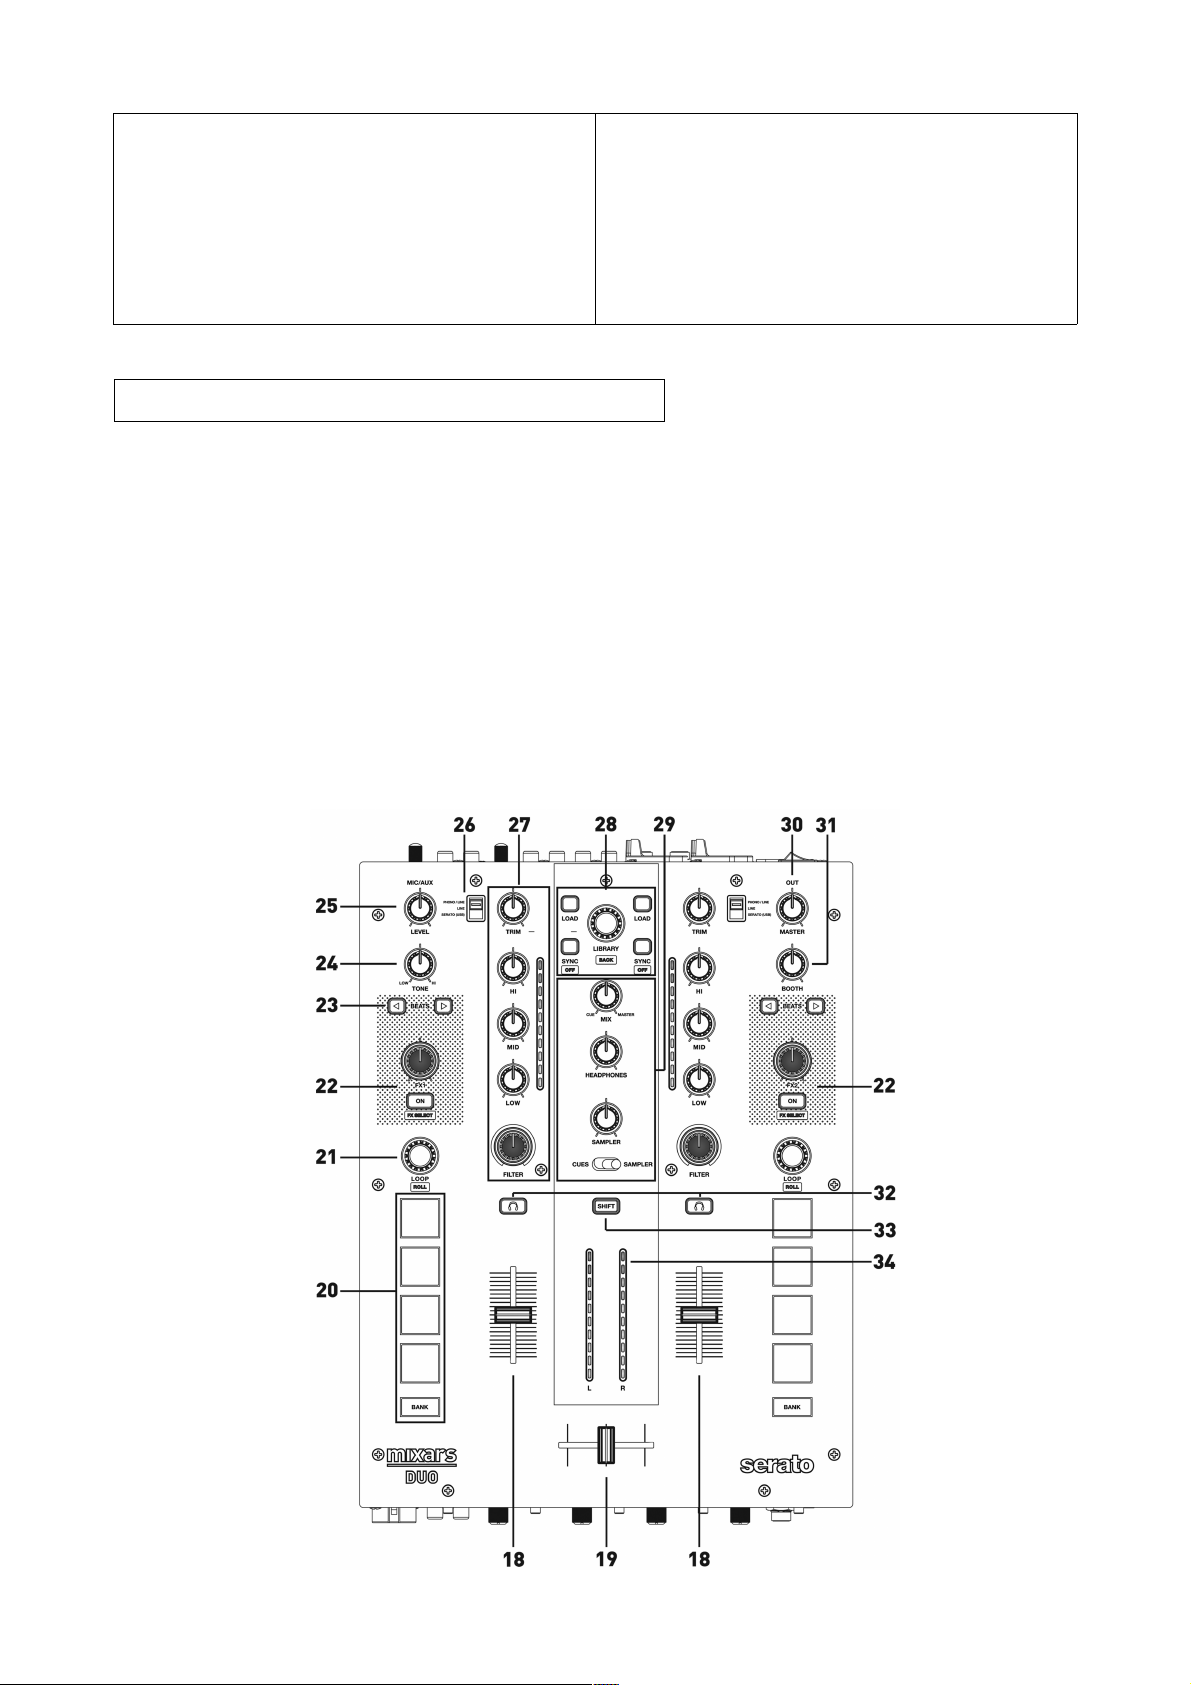
27. Trim, EQ, Filter and channel level meters
Trim:
Adjust the overall level for the corresponding
channel.
Hi, Mid, Low:
Adjust the equalizer settings for the corresponding
channel.
Assign the corresponding channel to the Cue
signal.
33. Shift button
See Points 21, 22, 28. Hold for enabling the
controls:
Loop Roll, FX select, Sync-off and Library-back.
34. Master Level Meters
Display the Master Level Signal.
Please note that all faders and controls support MIDI
EN 4
Specifications

1. GENERAL SECTION
POWER SOURCE AC 100~240V 50/60Hz
POWER CONSUMPTION 13WATTS
DIMENSIONS 265mm (W) X 369mm (D) X 104.1mm (H)
WEIGHT 4.15kg
2. INPUT/OUTPUT IMPEDANCE & SENSITIVITY:
( 1KHz INPUT , MIC/AUX, TRIM, MASTER AT MAX.)
2-1.
INPUT IMPEDANCE AND REFERENCE INPUT LEVEL:
LINE: 10K OHM /-14dBV(200mV)
PHONO: 47K OHM /-50dBV(3.16mV)
AUX: 10K OHM /-14dBV(200mV)
MIC: 5K OHM /-54dBV(1.99mV) (Unbalance)
USB: (N/A)/-3.4dBV(96K-782 TK.16/1KHz -20dB)
2-2. OUTPUT IMPEDANCE AND REFERENCE OUT LEVEL:
Nominal Limited
MASTER: 1K OHM /0dBV (1V) ± 1dB ± 2dB
BALANCED: 600 OHM /0dBV (1V) ± 1dB ± 2dB
BOOTH: 600 OHM /0dBV (1V) ± 1dB ± 2dB
PHONES: 33 OHM /-3dBV (708mV) ± 1dB ± 2dB
RECORD: 1K OHM /-9dBV (400mV) ± 1dB ± 2dB
3. FREQUENCY RESPONSE: ( REFERENCE INPUT LEVEL , MIC/AUX, TRIM, MASTER AT MAX.)
Nominal Limited
LINE: 20 - 20K Hz +1/-1.5dB +2/-3dB
AUX: 20 - 20K Hz +1/-1.5dB +2/-3dB
PHONO: 20 - 20K Hz +1/-2dB +2/-3dB (RIAA)
MIC: 20 - 20K Hz +1/-2dB +2/-3dB
EN 5
4. MAXIMUM INPUT:
( MIC/AUX, TRIM, MASTER AT 9 O'CLOCK. ADJUST INPUT 1KHz LEVEL TOOUTPUT LEVEL LESS
THAN 1% T.H.D WITH A-w/20KHz LPF)
Nominal Limited
LINE: +15dBV +14dBV
AUX: +15dBV +14dBV
PHONO: -21dBV -22dBV
MIC: -25dBV -26dBV
5. MAXIMUM OUTPUT: ( MIC/AUX, TRIM, MASTER AT MAX. ADJUST INPUT 1KHz LEVEL TO
OUTPUT LEVEL LESS THAN 1% T.H.D WITH A-w/20kHz LPF )
Nominal Limited
MASTER UNBALANCED: +17 dBV +16dBV
MASTER BALANCED: +17 dBV +16dBV
BOOTH BALANCED: +17 dBV +16dBV
PHONES: +5dBV +4dBV
6. S/N RATIO: ( 1KHz INPUT , MIC/AUX, TRIM, MASTER AT 12 O’CLOCK, WITH A-w/20KHz
LPF, INPUT SHORT WHEN NO SIGNAL )
Nominal Limited
LINE: 86dB 83dB AT 0dB INPUT
PHONO: 86dB 83dB AT -36dB INPUT
AUX: 86dB 83dB AT 0dB INPUT
MIC: 79dB 75dB AT -40dB INPUT
7. THD + N: ( 1KHz INPUT , MIC/AUX, TRIM, MASTER AT 12 O’CLOCK, WITH A-w/20KHz LPF)
Nominal Limited
LINE: 0.01 % 0.02% AT 0dB INPUT
AUX: 0.01 % 0.02% AT 0dB INPUT
PHONO: 0.02 % 0.05% AT -36dB INPUT
MIC: 0.03% 0.06 % AT -40dB INPUT
8. CROSSTALK: ( 1KHz INPUT , MIC/AUX, TRIM, MASTER AT 12 O’CLOCK WITH A-w/ 20KHz
LPF, INPUT SHORT WHEN NO SIGNAL )
Nominal Limited
LINE: 85dB 82dB @EACH CHANNEL INPUT AT 0dB INPUT
PHONO: 85dB 82dB @EACH CHANNEL INPUT AT -36dB INPUT
9. L&R CHANNEL SEPARATION: ( 1KHz INPUT , MIC/AUX, TRIM, MASTER AT 12 O’CLOCK WITH

A-w/20KHz LPF, INPUT SHORT WHEN NO SIGNAL )
Nominal Limited
LINE: 85dB 82dB @BETWEEN L AND R CHANNEL AT 0dB INPUT
PHONO: 85dB 82dB @BETWEEN L AND R CHANNEL AT -36dB
INPUT
10. EQUALIZER RESPONSE: ( REFERENCE INPUT LEVEL , MIC/AUX, TRIM MASTER AT MAX.
WITH20KHz LPF )
LINE:
Nominal Limited
(1) Low Band: (Low Band Reference Frequency is 70Hz)
Maximum level: +12 ± 1dB ± 1.5dB
Minimum level: -25 ± 1dB ± 1.5dB
(2) Middle Band: (Middle Band Reference Frequency is 1KHz)
Maximum level: +12 ± 1dB ± 1.5dB
Minimum level: -25 ± 1dB ± 1.5dB
(3) High Band: (Hi Band Reference Frequency is 13KHz)
Maximum level: +12 ± 1dB ± 1.5dB
Minimum level: -25 ± 1dB ± 1.5dB
11. AUDIO CARD USB
24 Bit
48 kHz
EN 6
Consignes de sécurité
1. Lisez ces instructions.
2. Conservez ces instructions.
3. Respectez tous les avertissements.
4. Suivez toutes les instructions.
5. Ne pas utiliser cet appareil près de l'eau.
6. Nettoyer uniquement avec un chiffon sec.
7. Ne pas bloquer les ouvertures de ventilation. Installez conformément aux instructions du fabricant.
8. Ne pas installer près de sources de chaleur telles que des radiateurs, registres de chaleur, poêles ou
autres appareils (incluant les amplificateurs) qui produisent de la chaleur.
9. Ne pas contourner le dispositif de sécurité de la fiche polarisée. Une fiche polarisée possède deux
lames dont une bobineuse que l'autre. La lame large est fournie pour votre sécurité. Si la fiche fournie ne
rentre pas dans votre prise, consultez un électricien pour le remplacement de la prise obsolète.
10. Protégez le cordon d'alimentation d'être piétiné ou pincé, particulièrement au niveau des fiches,
de la commodité récipients, et le point où ils sortent de l'appareil.
11. Utilisez uniquement des fixations / accessoires spécifiés par le fabricant.
12. Utilisez uniquement avec le chariot, stand, trépied, support ou table spécifié par le
fabricant, ou vendu avec l'appareil. Quand un chariot est utilisé, faites attention en
déplaçant l'ensemble chariot / appareil pour éviter les blessures en cas de chute.
13. Débranchez cet appareil pendant les orages ou lorsqu'il est inutilisé pendant de longues périodes de
temps.
14. Confiez toute réparation à un personnel qualifié. Une réparation est nécessaire lorsque l'appareil a été
endommagé de quelque façon que ce cordon d'alimentation ou la fiche est endommagé, du liquide a été
renversé ou des objets sont tombés dans l'appareil, l'appareil a été exposé à la pluie ou à l'humidité, ne
fonctionne pas normalement, ou est tombé.
15. AVERTISSEMENT: Pour réduire le risque d'incendie ou de choc électrique, ne pas exposer cet
appareil à la pluie ou à l'humidité.
16. Où un coupleur d'appareil est utilisé comme dispositif de déconnexion, le dispositif de déconnexion
doit rester facilement accessible.
17. La ventilation ne doit pas être empêchée en couvrant les ouvertures de ventilation avec des objets
tels que journaux, nappes, rideaux, etc.
18. Aucune source de flamme nue, telle que des bougies allumées, ne doit être placé sur l'appareil.
19. L'appareil doit être utilisé en climat tempéré.
20. Le appareil ne doit pas être exposé à des éclaboussures et aucun objet rempli de liquide, comme des
vases, doivent être placés sur l'appareil.
ATTENTION
Pour réduire le risque d'incendie ou de choc électrique, ne pas exposer cet appareil à la pluie ou à
l'humidité. La appareil ne doit pas être exposé à des éclaboussures et aucun objet rempli de liquide,
tels que des vases, ne doit être placé sur l'appareil.
ATTENTION
Pour réduire le risque de choc électrique, ne pas
retirer le couvercle. Aucune pièce réparable par
l'utilisateur. Confiez l'entretien à du personnel
qualifié.
L'éclair avec le symbole de flèche dans le triangle équilatéral est destiné à alerter
l'utilisation de la présence de non-isolé "tension dangereuse" dans l'enceinte du produit
qui peut être d'une ampleur suffisante pour constituer un risque de choc électrique.
ATTENTION
Pour éviter un choc électrique, ne pas utiliser cette fiche polarisée avec une rallonge, une prise ou une
autre sortie, si les lames peut être entièrement insérée pour empêcher l'exposition de la lame.
Le point d'exclamation dans un triangle équilatéral est destiné à alerter l'utilisateur de la
présence d'opération et de maintenance (entretien) dans la littérature accompagnant
cet appareil.
FR 1
Accessoires et Driver installation
Vérifiez les éléments suivants inclus dans le forfait avec l'unité principale:
Hardware Guide x 1 Cable USB x 1 Cordon d'alimentation x 1
Driver installation
Le Mixars Duo est un dispositif de class-compliant pour Mac OS X sera cependant nécessiter
des driver pour Windows. S'il vous plaît assurez-vous que vous avez terminé installation du
driver avant de l'utiliser avec Serato DJ.
Mac
Aucun driver est nécessaire.
Windows
Download le driver via notre site web: www.mixars.com
Double-cliquez sur le file .exe pour lancer l'installation et suivez les instructions.
S'il vous plaît noter que vous pouvez avoir à se reconnecter DUO après l'installation.

Commandes et fonctions
FR 2
Arrière
1. Interrupteur Power On/Off
Coupez l'alimentation en marche et arrêt.
2. AC In
Branchez le cordon d'alimentation ici.
3. Output Principal , symétrique XLR
Output principale XLR symétrique, contrôlée par le
bouton «Master» (30).
4. Output Booth, TRS
Output TRS secondaire (sym.), Contrôlée par le
bouton «Booth» (31).
5. Output Master secondaire , RCA
Output Master Secondaire RCA (asym.),
Commandé par le «Master» bouton (30) .
6. Output Rec. Supplémentaire
Output RCA rec. supplémentaire (asym.),
Commandé par le bouton «Master» (30).
7. Inputs Line secondaire
Input de ligne secondaire pour chaque canal.
8. Inputs Phono/Line
Input Phono / Line pour chaque canal. Utilisez le
bouton dédié de «Phono / Line» à proximité pour
choisir le bon réglage en fonction de l'équipement
utilisé (sources Phono ou Ligne).
9. Hub USB
2 x entrées USB supplémentaires pour connecter
différents accessoires à votre ordinateur.
10. Output USB soundcard principale
Connectez la console à votre ordinateur via le câble
USB inclus pour l'utiliser avec Serato DJ.
Avant
11. Input Micro
Input XLR / TRS Combo Micro, contrôlée via le
bouton «MIC / AUX» (25).
12. Input Aux
Input auxiliaire supplémentaire pour connecter
différentes sources de signal de ligne, contrôlées
par le bouton «MIC / AUX» (25).
13. Interrupteur Mic/Aux
Sélectionnez si vous utilisez l'entrée micro
(interrupteur vers la gauche) ou l'entrée Aux
(interrupteur vers la droite)
Position centrale tourne l'entrée Mic/AUX OFF.
14. Réglage de la courbe du Line Fader et le
commutateur reverse
Ajustez les caractéristiques de courbe de fader
pour le canal correspondant et activer ou
désactiver inverse pour chaque canal.
15. Réglage de crossfader et le commutateur
reverse
Cf Cut-In:
Personnalisez votre Cut. Ajuster le temps Cut-In
pour le crossfader. Tournez vers la gauche pour
minumum 'dead space' - cut plus rapide,
et vers la droite pour un 'dead space' plus grand -
plus lent / plus cut-in.
Cf Curve:
Ajustez la courbe de crossfader de Hard (vers la
droite) à Soft (vers la gauche).
Reverse:
Inverse la canal gauche avec le canal droit.
16. Headphones out
Sortie casque TRS et mini-jack contrôlé par les
«Headphones» bouton (29).
17. Commutateur Split Cue On/Off
Si elle est activée, le signal du casque devient
cassés: signal de Master sur un seul canal, et les

signaux de Cue permis sélectionnés via les boutons
«CUE» (32), sur l'autre canal.
FR 3
S'il vous plaît visitez https://serato.com/hardware/mixars-duo pour notre
Duo-Serato DJ Quickstart Guide.
Top
18. Channel faders
Ajustez le niveau de volume du canal
correspondant.
19. Crossfader
Alterner entre Gauche, Droite, ou la combinaison
des deux canaux.
20. Pads
Utiliser pour déclencher des cue points et des
samples à Serato DJ
Bank: Alterner entre la banque de pads 1 (Cues de
1 à 4) et la banque de pads 2 (Cues de 5 à 8)
21. Loop / Loop roll
Contrôler la fonction de Loop et Loop Roll dans
Serato DJ en tournant et en appuyant sur le
bouton. Appuyez et maintenez le bouton «SHIFT»
(voir 33) pour commander la fonction de Loop Roll.
22. FX 1 et FX 2
Ajuster l'intensité de l'effet correspondant en
tournant le bouton, et activer l'effet et en appuyant
sur «ON» Bouton. Appuyez et maintenez «SHIFT»
pour permettre FX Select.
23. Beats
Sélectionnez le fraction pour la synchronisation de
FX.
24. Mic / Aux Tone
Réglez la tonalité de l'entrée Mic ou Aux.
25. Mic / Aux Level
Ajustez le niveau de l'entrée Mic ou Aux
26. Source
Sélectionner l'entrée à contrôler sur le canal
correspondant.
Alterner entre Phono / Ligne (8), ligne (7) ou
Serato - USB (10)
Filter:
Contrôler le filtre analogique pour le canal
correspondant. Position centrale: Off
Level meters:
Afficher le niveau du canal correspondant ajustée
via la commande «Trim».
28. Library, Load et Sync
Chargez une piste sur le deck correspondante en
appuyant sur les Boutons «Load».
Faites la Library en tournant le bouton «Library» et
afficher le niveau suivant en appuyant dessus.
Maintenez «Shift» et appuyez sur pour retourner
au niveau précédent.
Synchroniser une piste à l'autre en appuyant sur le
bouton correspondant de «Sync» et désactiver la
fonction en appuyant sur «Sync» tout en
maintenant «Shift».
29. Headphones et Sampler
Mix:
Tournez pour ajuster entre Cue et le signal Master.
Headphones:
Réglez le volume du casque.
Sampler:
Réglez le volume du sample player.
Interrupteur Cue/Sampler:
Sélectionnez si le contrôle des cue points ou le
smaple player avec le «Pads» (20).
30. Master
Réglez le volume du signal de niveau Master.
31. Booth
Ajustez le niveau de la sortie «Booth».
32. Cue On/Off
Assignez le canal correspondant au signal de Cue.
33. Shift
 Loading...