

Page 1
MVM8903
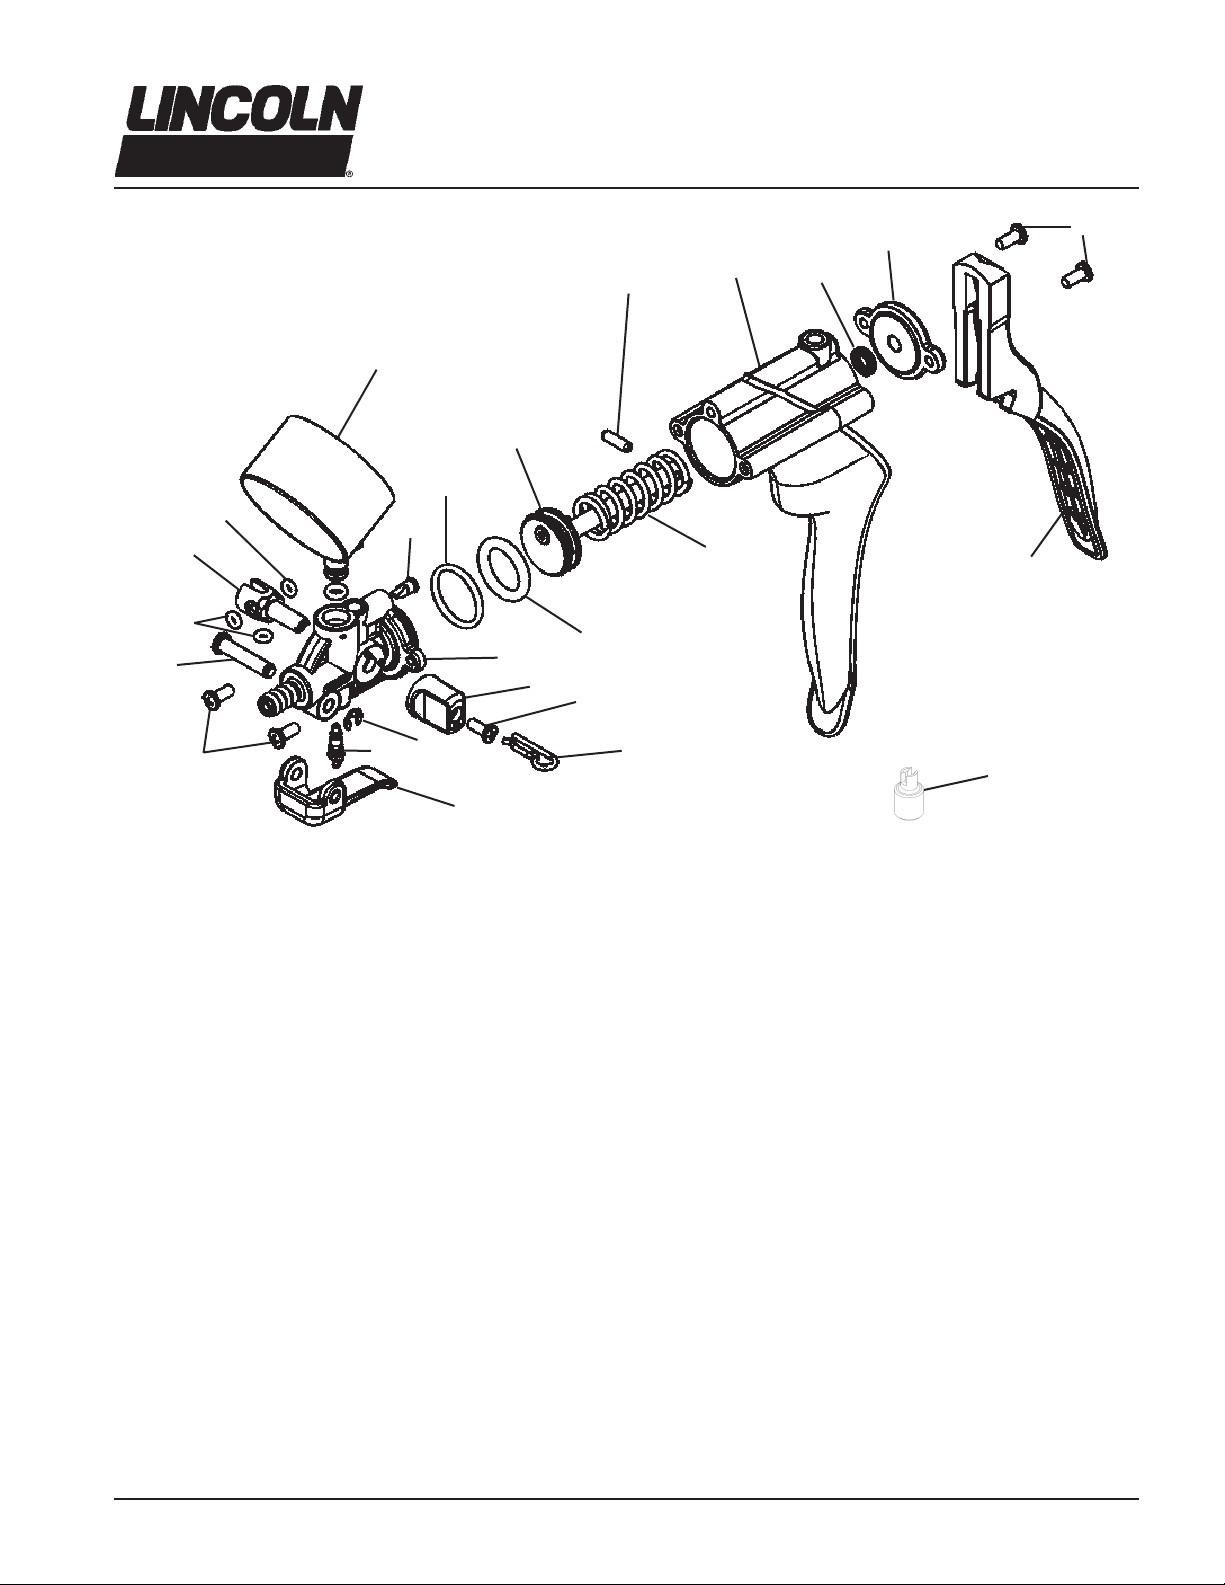
Pump Rebuild Kit
19
12
13
Pump Body
5
20
7
9
13
3
16
10
18
17
11
14
6
8
15
22
4
2
1
23
3
For replacement of parts 1 through 16
1. Remove Dual Converter Knob Screw (15)
2. Remove Dual Converter Knob (14)
3. Remove the Dual Converter Valve (12) by
pushing the stem through the Valve Housing (11)
4. Remove the two Valve Housing Screws (3)
5. Remove the Valve Housing (11) from the
Pump Body
6. With your thumb, push the Piston Assembly
(7) into the Pump Body cylinder. This will
compress the Piston Spring (6) and cause
the Piston Rod (5) to extend from the back
of the Pump Body assembly
7. With the Piston Rod extended, remove the
Piston Rod Pin and Pump Handle (1)
8. Remove the Piston Assembly (7) from the
Pump Body cylinder
9. Remove the two Back Cap Screws (3)
10. Remove the Back Cap (2)
* Lubricate with Silicone Oil
11. Note the direction of the Piston Rod Seal
(4) the new seal must be installed in the
same direction (cup side inward) for the
pump to function properly
12. Remove the Piston Rod Seal (4)
13. Lightly lubricate* the new Piston Rod Seal
(4) and install into Pump Body
14. Replace the Back Cap (2), and secure it
with the two new Back Cap Screws (3)
15. Clean and lightly lubricate the inside of the
Pump Body cylinder
16. Lightly lubricate the new Piston Seal (8)
and install onto the new Piston Assembly
(7)
17. Assemble new Piston Spring (6) onto new
Piston Assembly (7) and install into Pump
Body cylinder
18. With your thumb, push the Piston Assembly
(7) into the Pump Body cylinder. This will
compress the Piston Spring (6) and cause
the Piston Rod to extend from the back of
the Pump Body assembly
APR - 2009
Form 824566
Section
- MV86
Page
- 1
Page 2

MVM8903
Pump Rebuild Kit
19. Assemble the pump handle (1) onto the
Piston Rod end and install the new Piston
Rod Pin (5)
20. Install the new O-ring (9) onto the new
Front Valve Housing (11)
21. Install new Duckbill Valve (10) into the new
Valve Housing (11)
22. Install new Valve Housing (11) onto the
Pump Body using two new Valve Housing
Screws (3)
23. Lightly lubricate the three new Dual Converter Valve O-rings (13), and install them
onto the new Dual Converter Valve (12)
24. Carefully slide the Dual Converter Valve Assembly into the new Valve Housing with the
stem extending through the valve housing
25. Properly align the new Dual Converter
Knob (14) with the notch on the end of the
Dual Converter Valve stem, and install the
knob. Secure it with the new Dual Converter Knob Screw (15)
26. Install new Schrader Valve (16) into the
new Valve Housing (11) using the Schrader
Valve Tool (23)
27. Remove the Lever Pin Retaining Ring (18),
Lever Pin (19), and Lever (17) from the old
Valve Housing (11) and install onto the new
Valve Housing
Americas:
One Lincoln Way
St. Louis, MO 63120-1578
USA
Phone +1.314.679.4200
Fax +1.800.424.5359
Page Number - 2
Europe /Africa/Middle East
Lincoln GmbH
Heinrich-Hertz-Str. 2-8
69190 Walldorf - Germany
Phone/Fax +49.6227.33-0/-259
www.lincolnindustrial.de
Asia/Pacic:
51 Changi Business Park
Central 2
#09-06 The Signature
Singapore 486066
Phone +65.6588.0188
Fax +65.6588.3438
© Copyright Lincoln Industrial
Corporation 2009
Printed in USA
Web site:
www.lincolnindustrial.com
Form 824566
 Loading...