

Page 1
MityCAM-B2521
EPIX XCAP User’s Guide
Page 1 of 13 60-000014
May 13, 2015
www.criticallink.com
(CT031 Revision 1)
Page 2

MityCAM-B2521 EPIX XCAP User’s Guide
Contents
1 Installing Laptop Express Card .......................................................................................................................... 3
2 Using the Camera in Single Camera Link mode (Laptop) .................................................................................... 3
3 Single Camera Link Notes ................................................................................................................................. 4
4 Using the Camera in Dual Camera Link mode (Desktop) .................................................................................... 5
5 Configure ........................................................................................................................................................ 6
6 Resolution ....................................................................................................................................................... 7
7 Mode .............................................................................................................................................................. 8
8 MultiTap ......................................................................................................................................................... 9
9 Serial Configuration ....................................................................................................................................... 10
10 Image Capture Example ............................................................................................................................... 13
11 Revision History........................................................................................................................................... 13
Figures
Figure 1: Configure Configuration Menu ...................................................................................................................... 6
Figure 2: Resolution Configuration Menu .................................................................................................................... 7
Figure 3: Mode Configuration Menu ............................................................................................................................ 8
Figure 4: MultiTap Configuration Menu ....................................................................................................................... 9
Figure 5: PIXCI Serial Terminal Window ..................................................................................................................... 10
Figure 6: Controls/Setup Menu .................................................................................................................................. 10
Figure 7: Configure Serial Port (Enable, 115200, 8n1) ................................................................................................ 11
Figure 8: Set Bits per Pixel to 16 (default is 8) ............................................................................................................ 11
Figure 9: Send <STRT> Command to Begin Capture ................................................................................................... 12
Figure 10: Send <STOP> Command to Halt Capture ................................................................................................... 12
Figure 11: Image Capture Example ............................................................................................................................. 13
Page 2 of 13 60-000014
May 13, 2015
www.criticallink.com
Page 3

MityCAM-B2521 EPIX XCAP User’s Guide
1 Installing Laptop Express Card
1.1 Insert the EPIX Installation CD/DVD into your Windows PC.
1.2 It should open an installation type dialog box. Select “XCAP Imaging Application for Win 8/7/Vista – 64-
Bit”.
1.3 Complete the setup process using all default settings and OK through prompts.
1.4 Once complete you will be prompted for an activation key, enter:
1.4.1 M8CB/3G3R/NHZU
1.4.2 This is for the “Lite” version
1.5 At some point you should be prompted to install the Capture Driver (dialog that occurs and process taking
usually 1 second).
1.6 Close all applications and insert the Express Card EPIX Camera Link card into your card slot.
1.7 Once Windows says that the device has “been installed properly” reboot your PC.
1.8 Once rebooted open the PIXCI Application (recommend “run as administrator” by right clicking).
1.9 It should open without any error or driver warnings/messages at this time and be sitting at the
configuration and viewer screens.
1.10 Continue to the “Using the Camera in Single Camera Link mode (Laptop)” section of this document.
2 Using the Camera in Single Camera Link mode (Laptop)
2.1 Open “XCAP for Windows” from the Desktop Shortcut.
2.2 Say “OK” to the dialog that is shown on startup.
2.3 Set your settings for each of the “Generic Camera Link: Capture and Adjust” options.
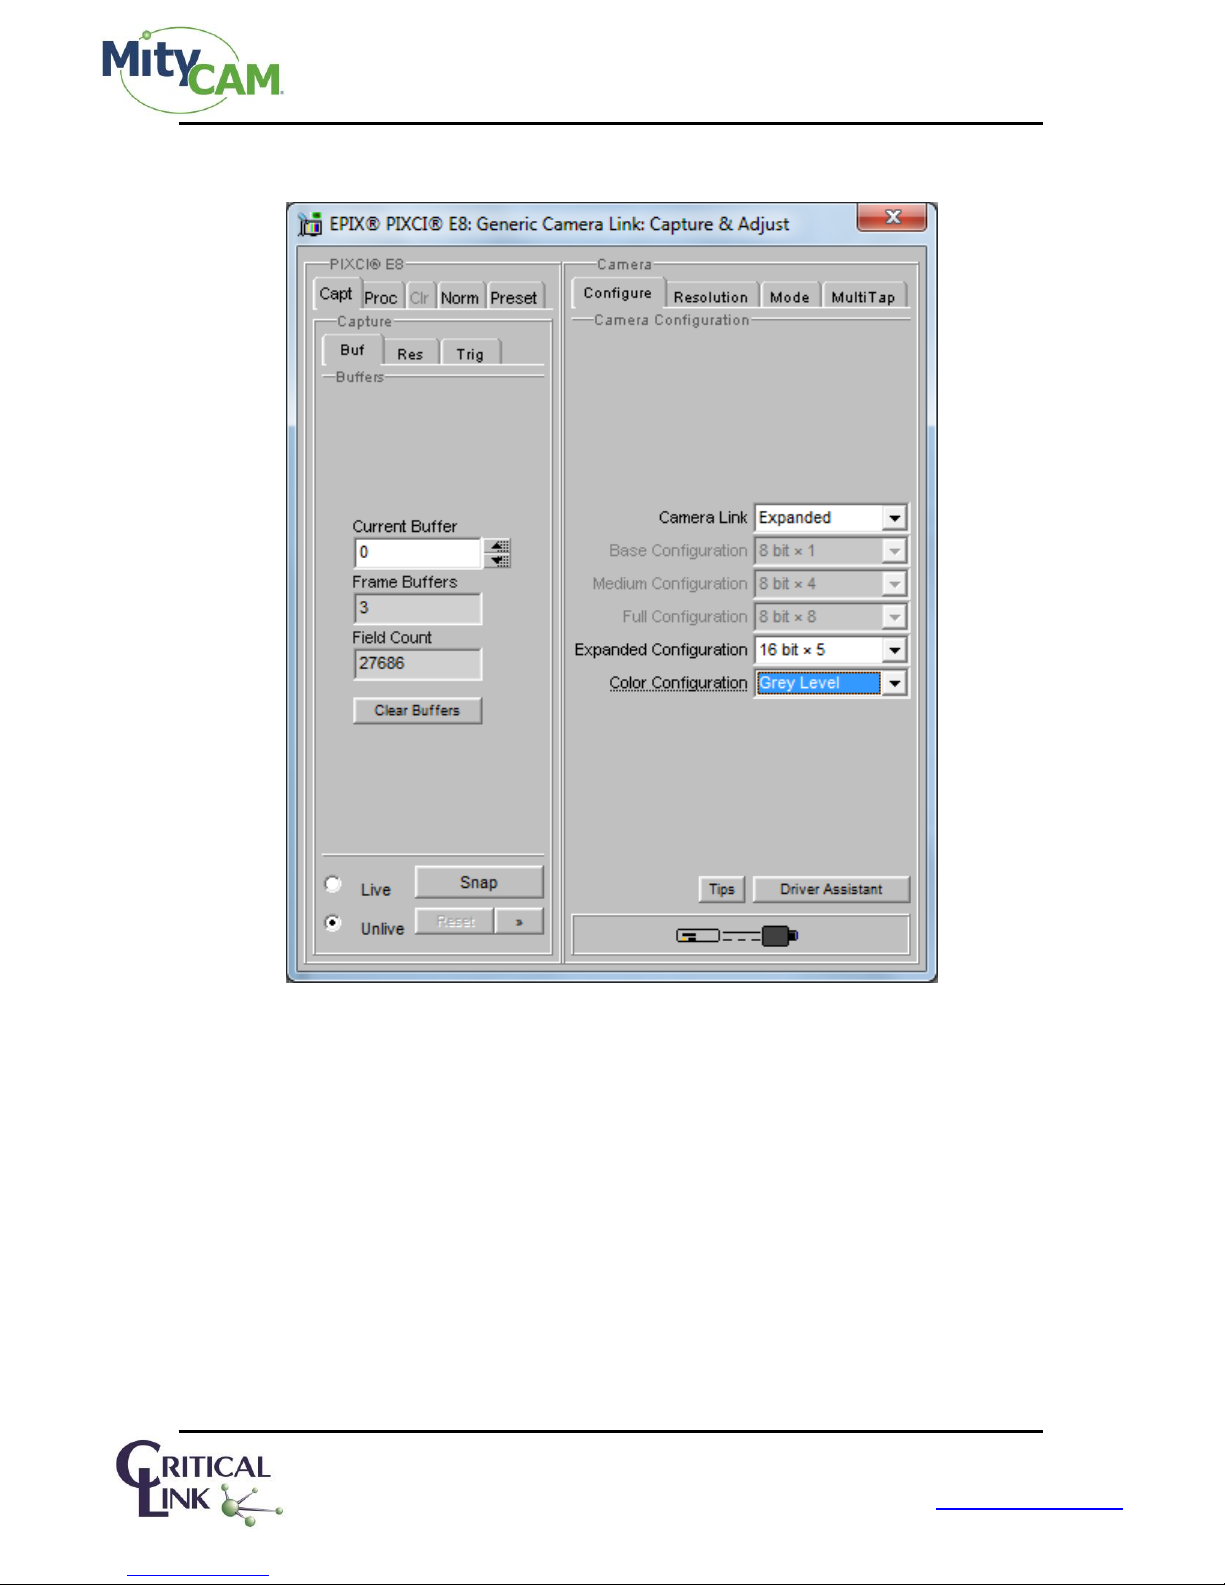
2.3.1 Configure ( Figure 1 ) with following alternate settings:
2.3.1.1 Camera Link Base
2.3.1.2 Either 8 bit x 2 (28 FPS) or 16 bit x 1 (14 FPS)
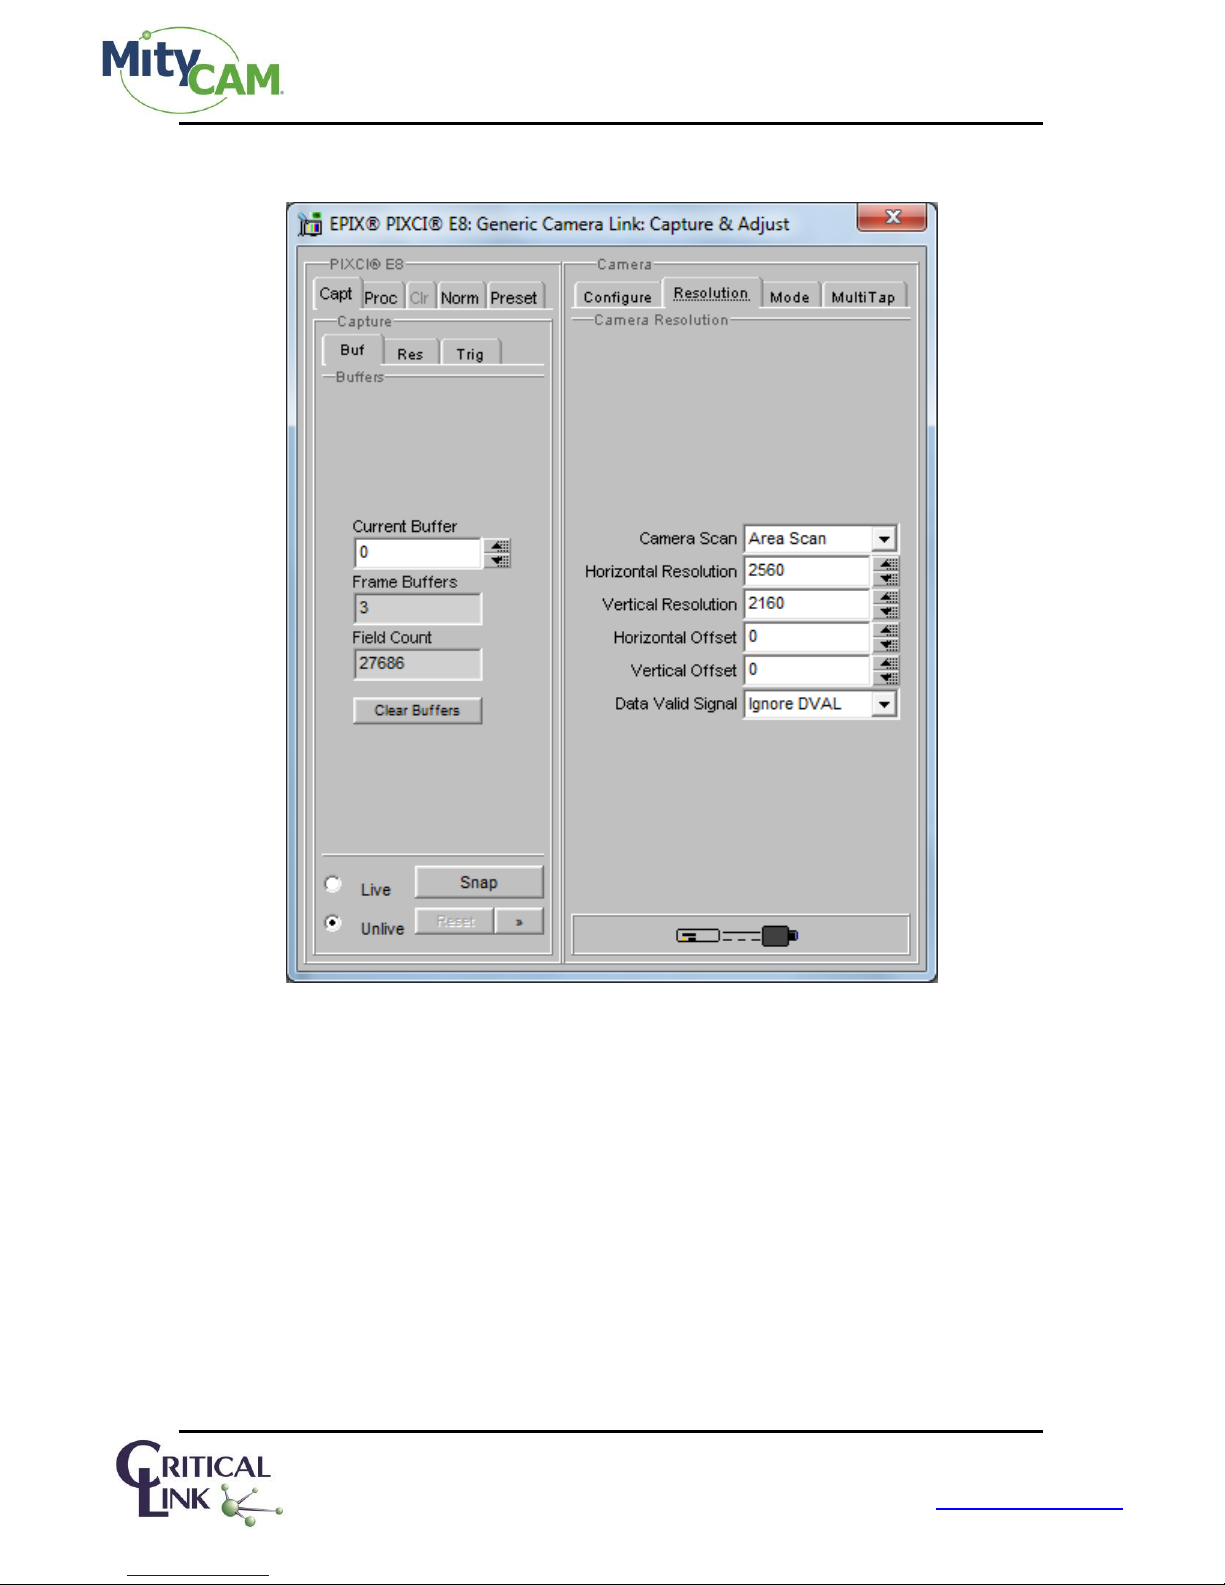
2.3.2 Resolution ( Figure 2 )
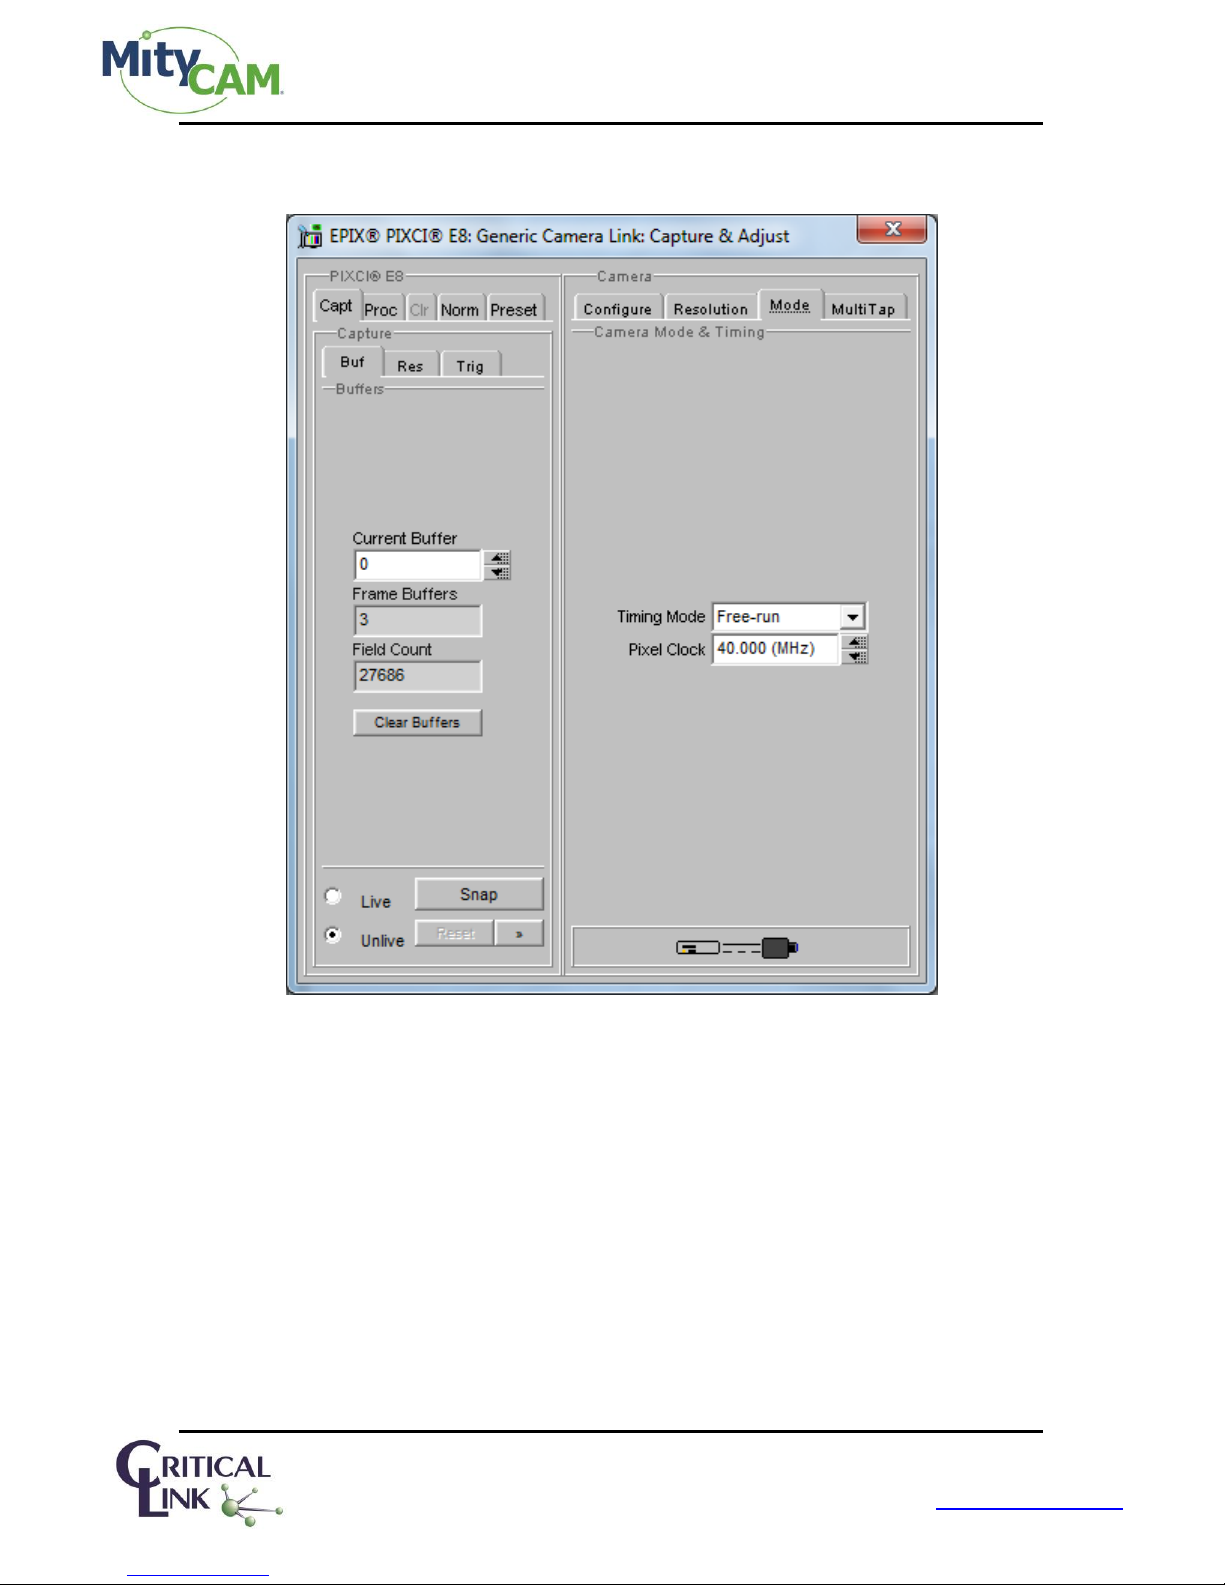
2.3.3 Mode ( Figure 3 )
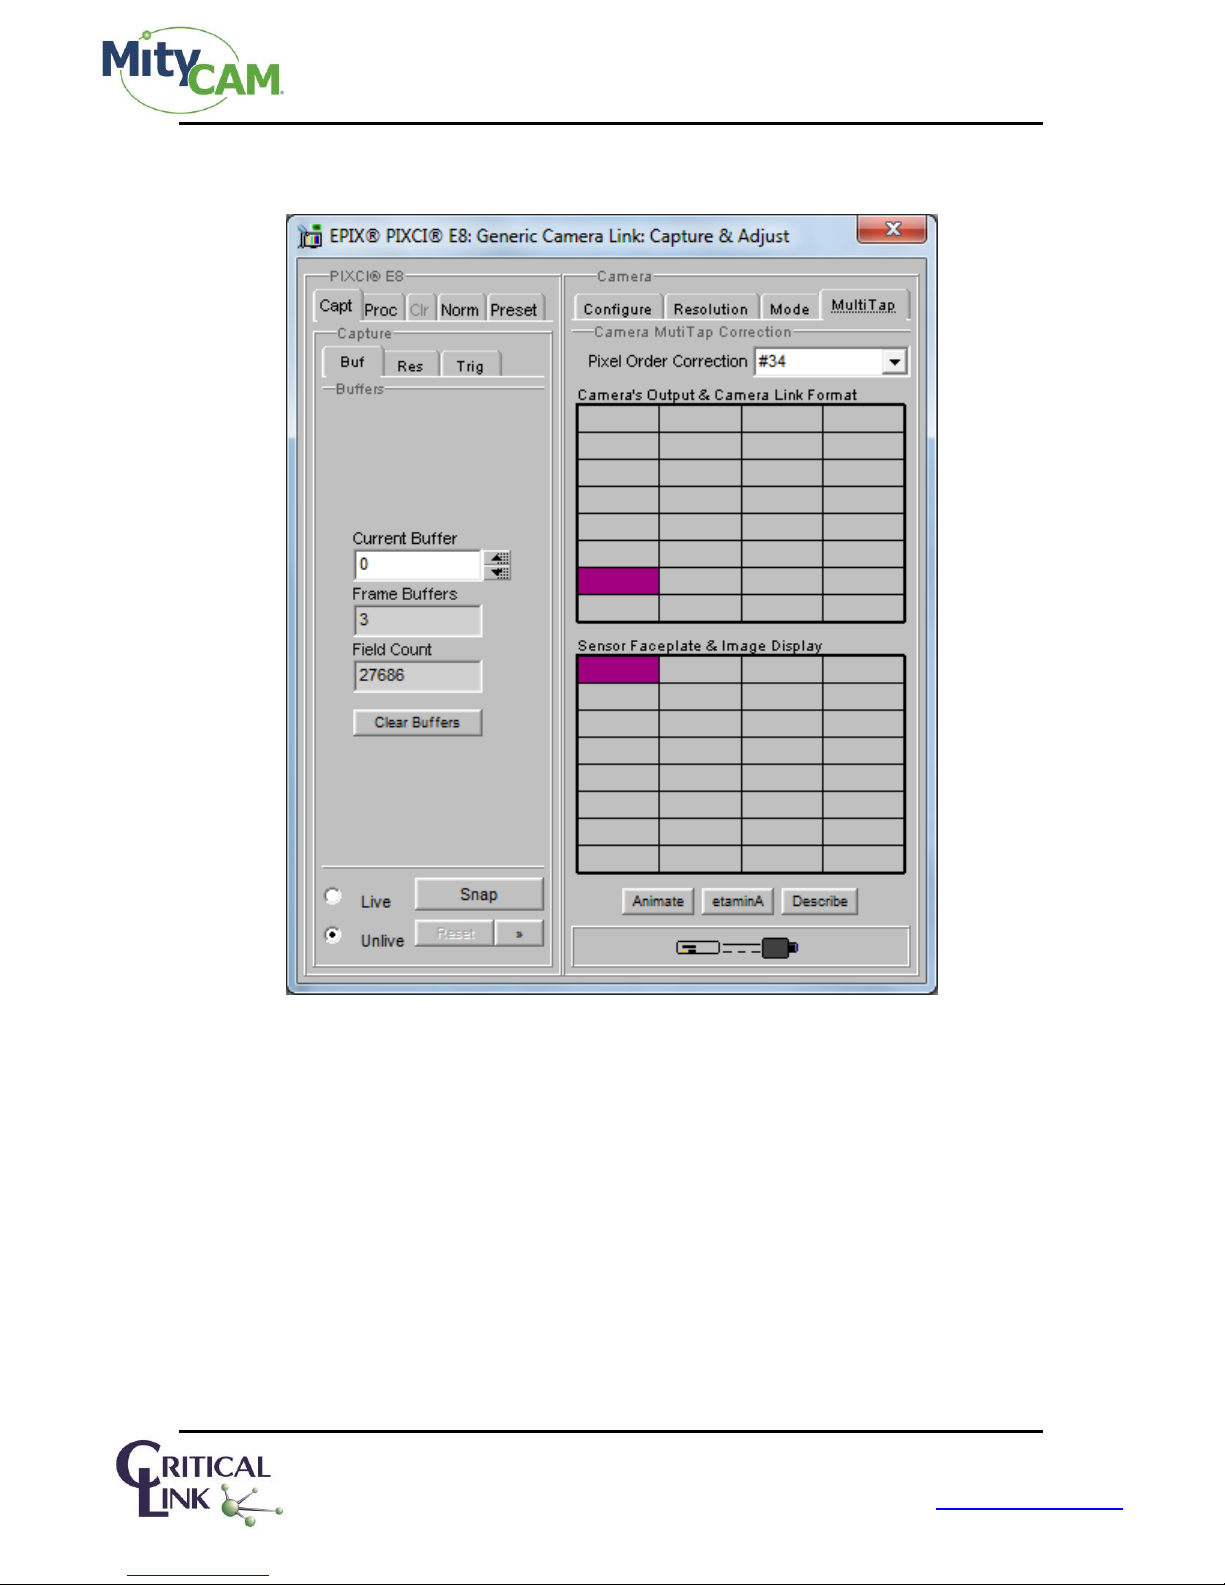
2.3.4 Multi-Tap ( Figure 4 )
2.4 Connect the Camera Link cable from the ExpressCard to the “Camera Link 1” connector (near the USB port)
on the camera.
2.5 Plug the power connector into P200 on the camera (Not the GPIO connector w/6-pins).
2.6 Wait until the Green LED is on.
2.7 In the XCAP utility menu configure the serial port.
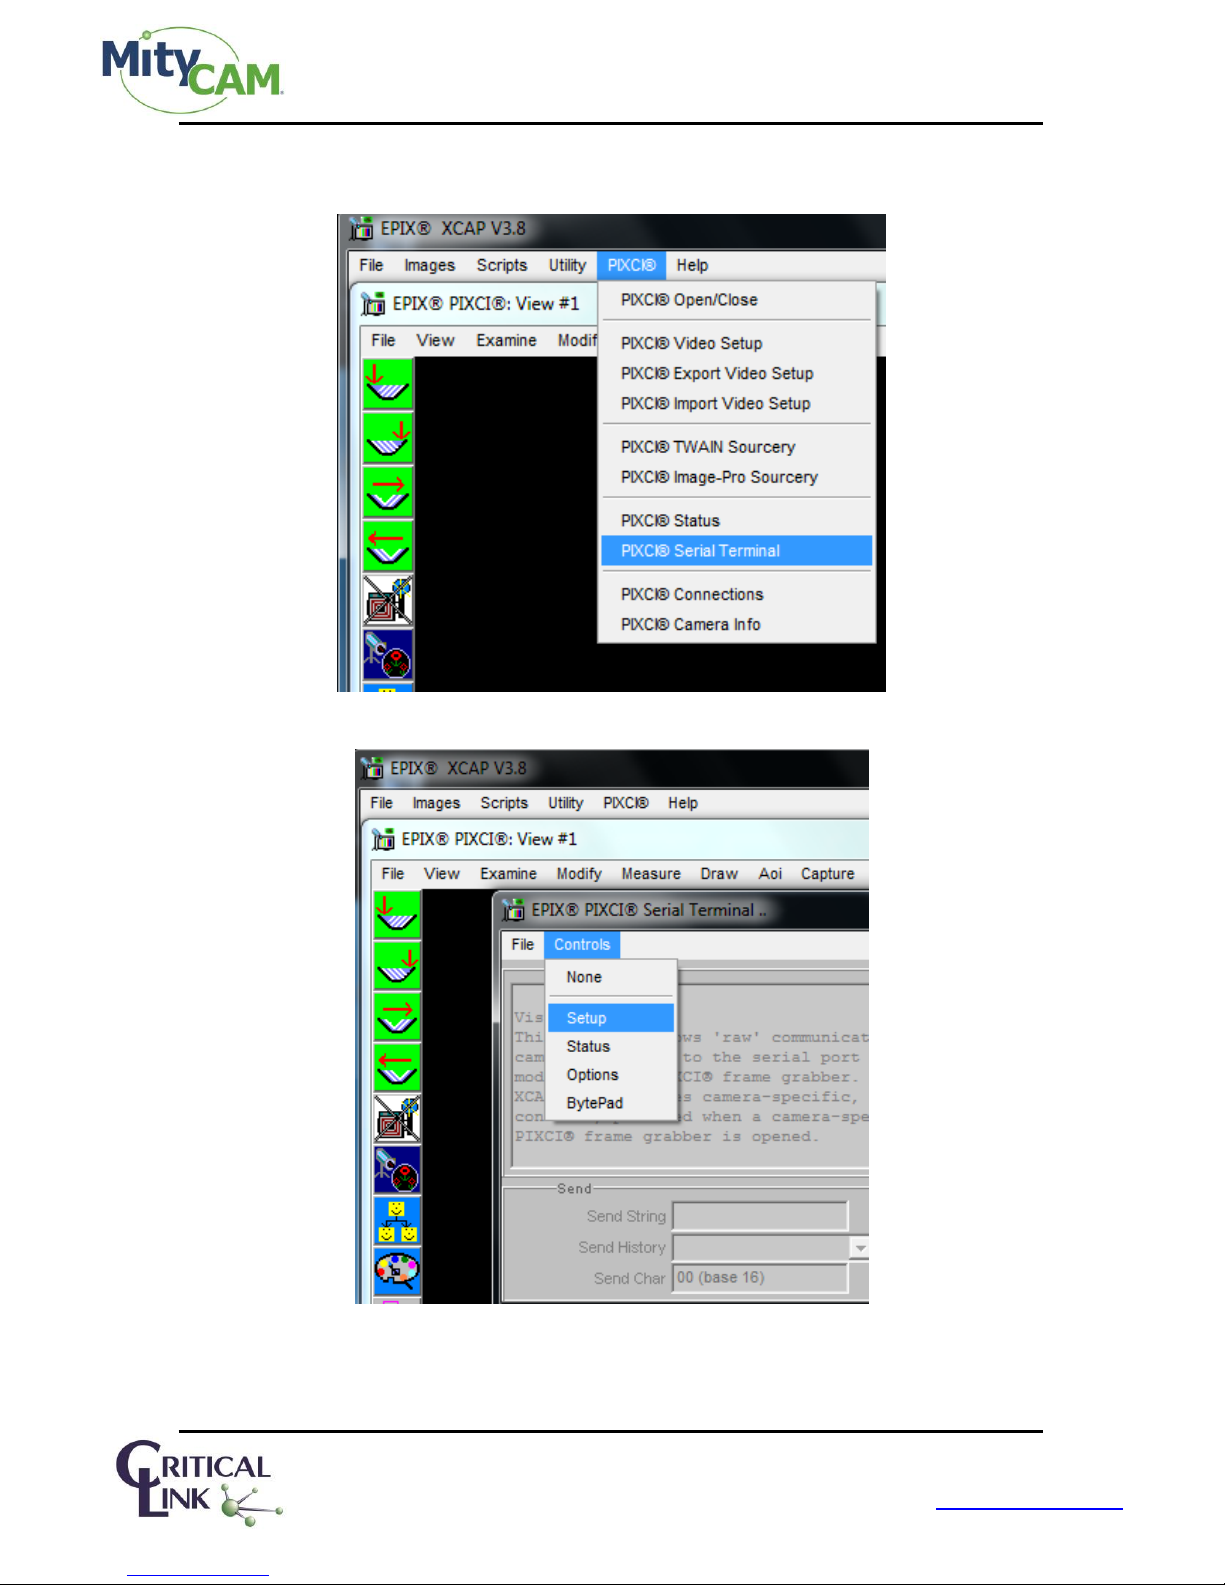
2.7.1 Open the PIXCI Serial Terminal Window ( Figure 5 ).
2.7.2 Go into the “Controls” -> “Setup” menu ( Figure 6 ).
Page 3 of 13 60-000014
May 13, 2015
www.criticallink.com
Page 4

MityCAM-B2521 EPIX XCAP User’s Guide
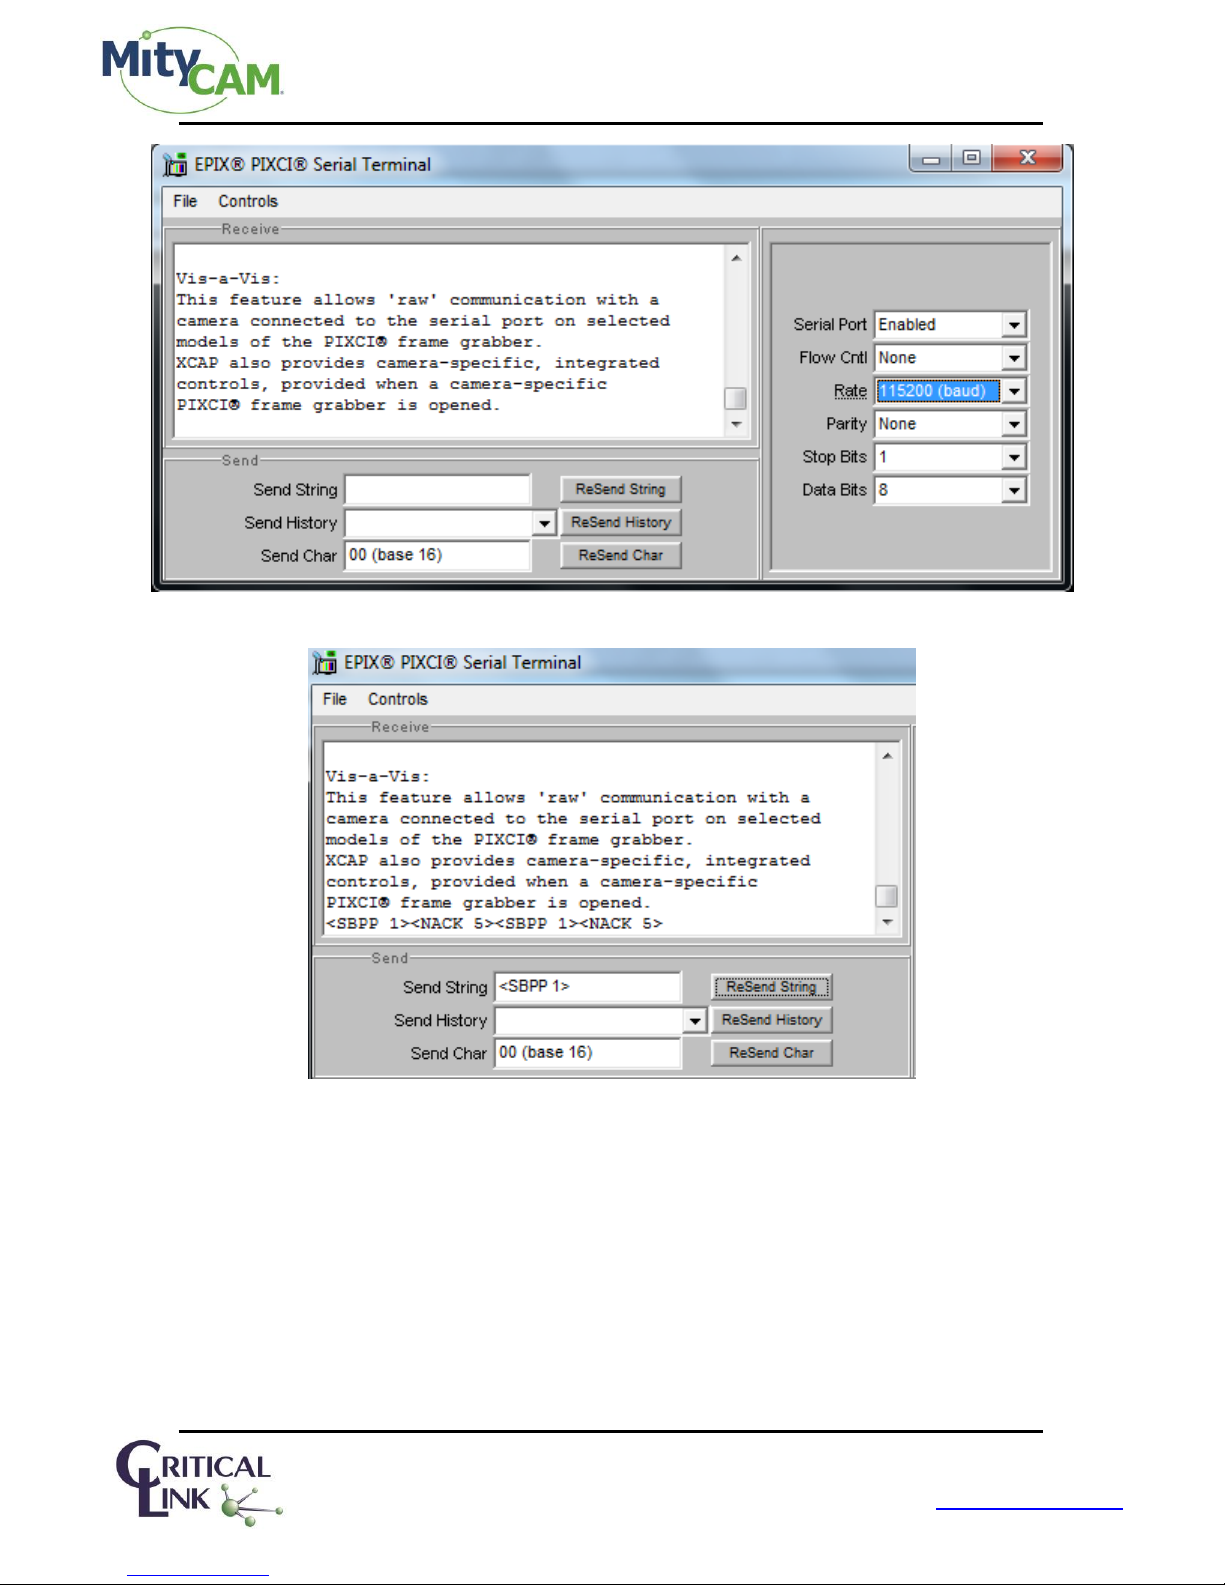
2.7.3 Enable the serial port, set it as 115200 baud rate and 8-n-1 ( Figure 7 ).
2.7.4 Send the <SBPP X> command (similar to Figure 8 ).
2.7.4.1 <SBPP 5> to set the camera to 8 BBP x 2 @ 28 FPS.
2.7.4.2 <SBPP 4> to set the camera to 16 BPP x 1 @ 14 FPS.
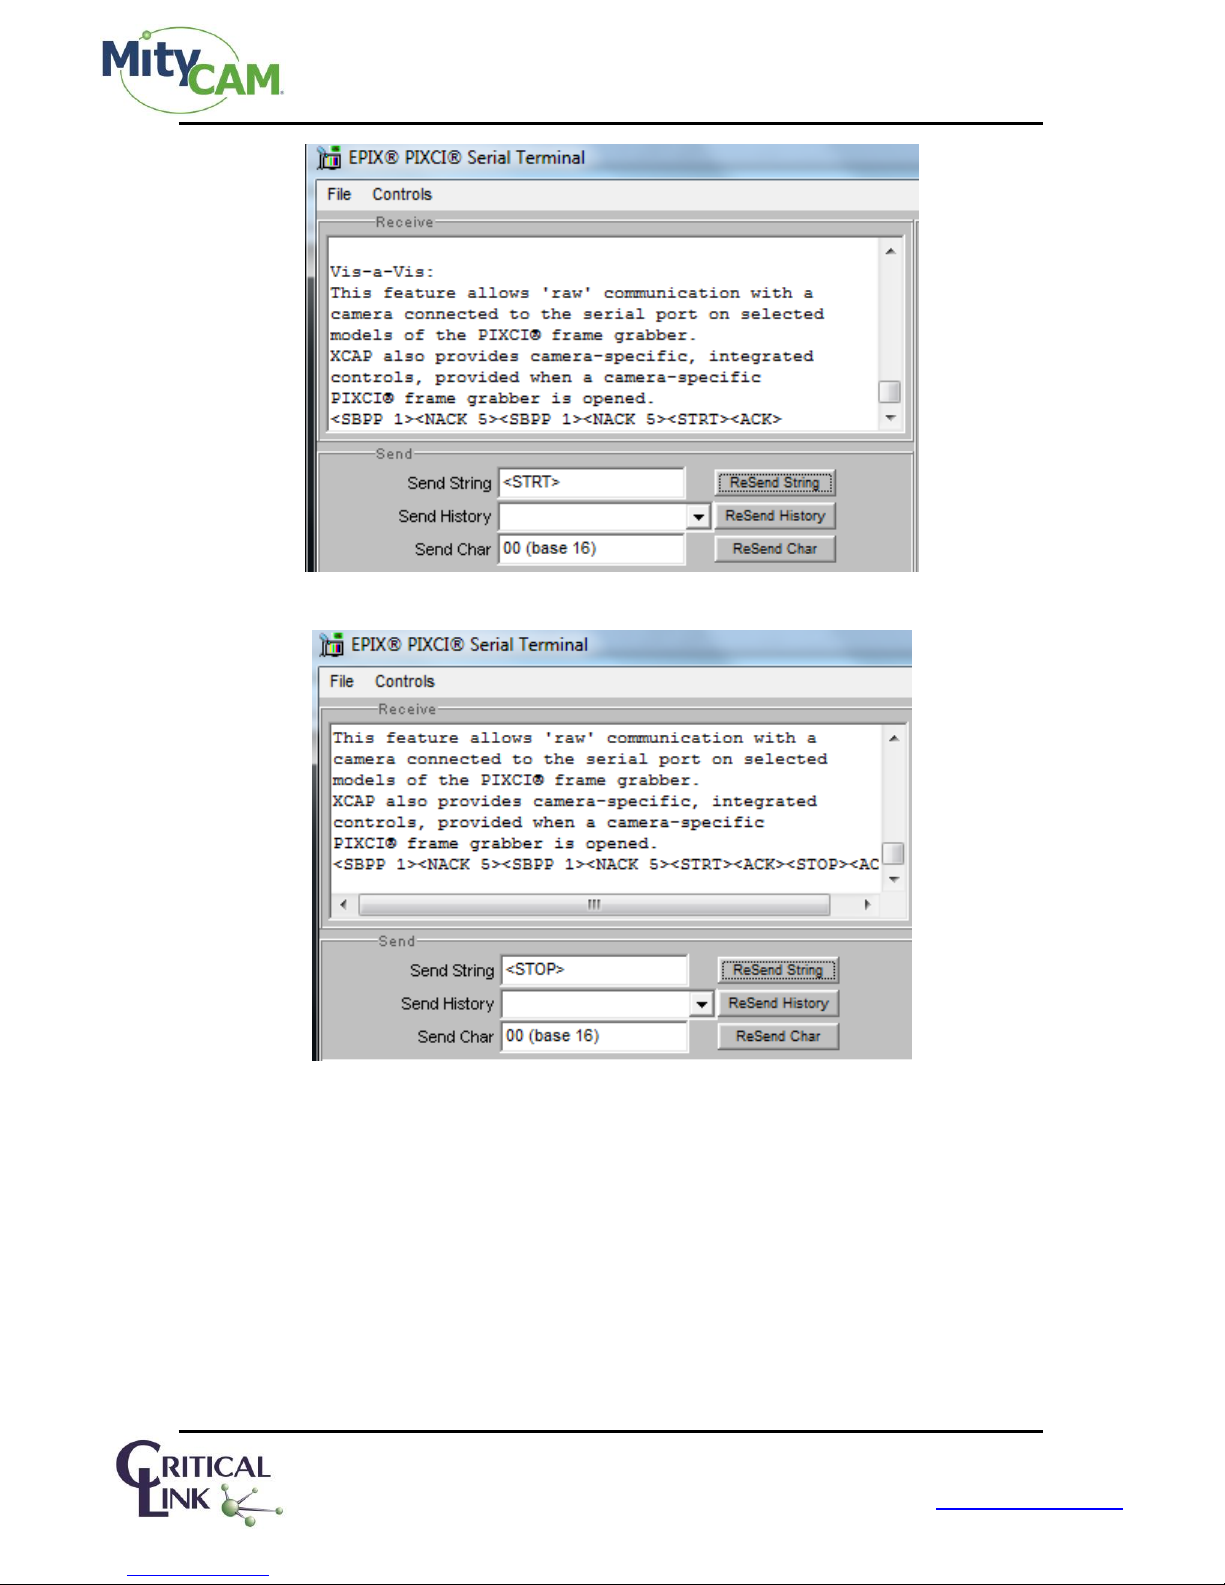
2.7.5 Send the <STRT> command to start capture ( Figure 9 ).
2.7.6 The blue LED should begin to blink once per second.
2.8 Return to the “Capture and Adjust” window and press the “Live” radio button in the bottom left.
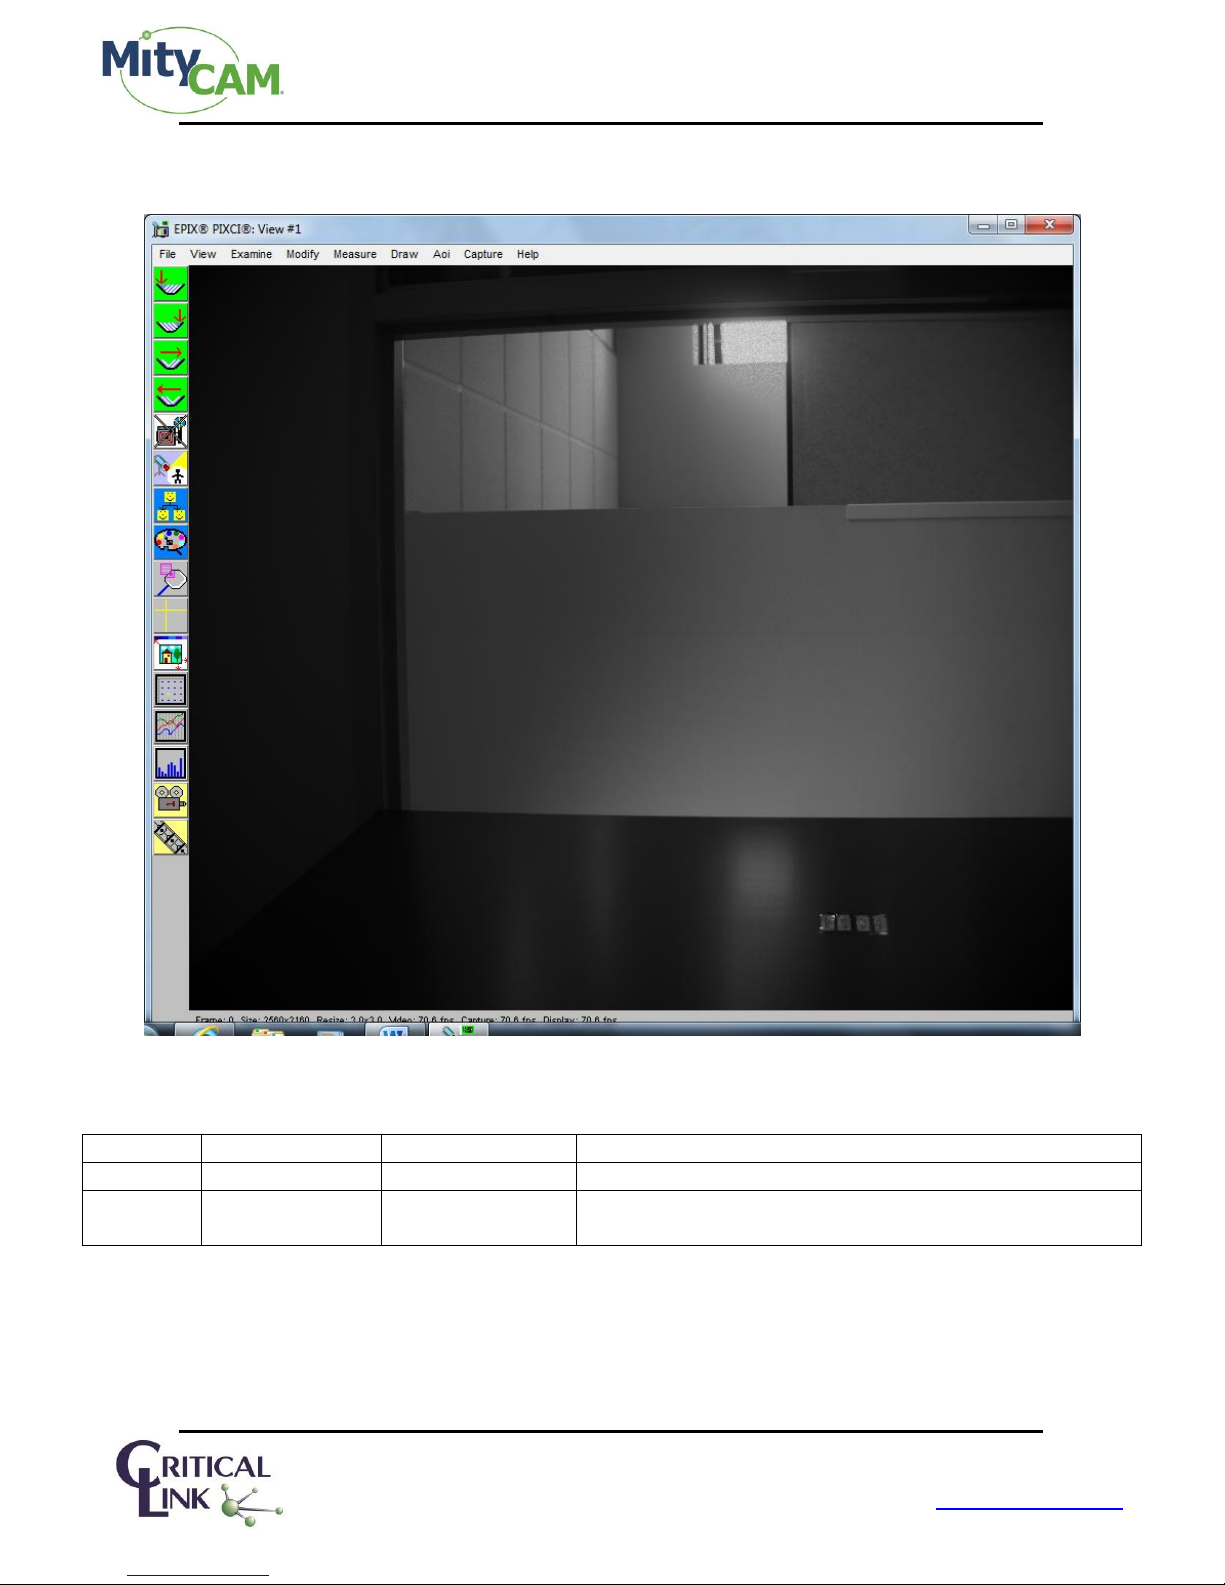
2.9 You should now see an image from the sensor in the main viewer window ( Figure 11 ).
2.10 You may need to rotate the image if mounted on a tripod. In the “Generic Camera Link: Capture and
Adjust” window open the “Proc” tab on the left side and select “Bottom R-L”.
3 Single Camera Link Notes
3.1 Max FPS Info
Note: Due to the bandwidth limitations of a single PCI-e slot (effectively what the Express card slot is) the FPS is
limited to 28 FPS. This is due to a 190 MB/second bandwidth of this bus. If a single channel Camera Link was used
in a “Desktop” PC with more than a single PCI-e channel, approximately 240 MB/second would be possible,
providing approximately 40 FPS in the same 8 BPP x 2 mode.
3.2 If using the USB-RNDIS driver the PC should be set to 10.1.47.1 and the camera fixed at 10.1.47.2
Page 4 of 13 60-000014
May 13, 2015
www.criticallink.com
Page 5

MityCAM-B2521 EPIX XCAP User’s Guide
4 Using the Camera in Dual Camera Link mode (Desktop)
4.1 Open “XCAP for Windows” from the Desktop Shortcut.
4.2 Say “OK” to the dialog that is shown on startup.
4.3 Set your settings for each of the “Generic Camera Link: Capture and Adjust” options:
4.3.1 Configure ( Figure 1 ) – Expanded and 16 bit x 5
4.3.2 Resolution ( Figure 2 )
4.3.3 Mode ( Figure 3 )
4.3.4 MultiTap ( Figure 4 )
4.4 Connect Cable J202 to the J202 connector on both the camera and Camera Link card.
4.5 Connect Cable J201(white tape) to the J201 connector on both the camera and Camera Link card.
4.6 Plug the power connector into P200 on the camera (not the GPIO connector w/6-pins).
4.7 Wait until the Green LED is on.
4.8 In the XCAP utility configure the serial port:
4.8.1 Open the PIXCI Serial Terminal Window ( Figure 5 ).
4.8.2 Go into the “Controls” -> “Setup” menu ( Figure 6 ).
4.8.3 Enable the serial port, set it as 115200 baud rate and 8-n-1 ( Figure 7 ).
4.8.4 Send the <SBPP 1> command to set the camera to 16 BPP x 5 (default is 8 BPP x 10) ( Figure 8 ).
4.8.5 Send the <STRT> command to start capture ( Figure 9 ).
4.8.6 The blue LED should begin to blink once per second.
4.9 Return to the “Capture and Adjust” window and press the “Live” radio button in the bottom left.
4.10 You should now see an image from the sensor in the main viewer window. ( Figure 11 )
4.11 You may need to rotate the image if mounted on a tripod. In the “Generic Camera Link: Capture and
Adjust” window open the “Proc” tab on the left side and select “Bottom R-L”.
Page 5 of 13 60-000014
May 13, 2015
www.criticallink.com
Page 6
MityCAM-B2521 EPIX XCAP User’s Guide
5 Configure
Figure 1: Configure Configuration Menu
Page 6 of 13 60-000014
May 13, 2015
www.criticallink.com
Page 7
MityCAM-B2521 EPIX XCAP User’s Guide
6 Resolution
Figure 2: Resolution Configuration Menu
Page 7 of 13 60-000014
May 13, 2015
www.criticallink.com
Page 8
MityCAM-B2521 EPIX XCAP User’s Guide
7 Mode
Page 8 of 13 60-000014
May 13, 2015
www.criticallink.com
Figure 3: Mode Configuration Menu
Page 9
MityCAM-B2521 EPIX XCAP User’s Guide
8 MultiTap
Page 9 of 13 60-000014
May 13, 2015
www.criticallink.com
Figure 4: MultiTap Configuration Menu
Page 10
MityCAM-B2521 EPIX XCAP User’s Guide
9 Serial Configuration
Figure 5: PIXCI Serial Terminal Window
Page 10 of 13 60-000014
May 13, 2015
www.criticallink.com
Figure 6: Controls/Setup Menu
Page 11
MityCAM-B2521 EPIX XCAP User’s Guide
Figure 7: Configure Serial Port (Enable, 115200, 8n1)
Page 11 of 13 60-000014
May 13, 2015
www.criticallink.com
Figure 8: Set Bits per Pixel to 16 (default is 8)
Page 12
MityCAM-B2521 EPIX XCAP User’s Guide
Figure 9: Send <STRT> Command to Begin Capture
Page 12 of 13 60-000014
May 13, 2015
www.criticallink.com
Figure 10: Send <STOP> Command to Halt Capture
Page 13
MityCAM-B2521 EPIX XCAP User’s Guide
Revision
Date
Author
Description
1A
3/7/2014
Alex Block
Initial Release.
1B
5/13/2015
Mike Williamson
Add Critical Link style guide and document number
markings.
10 Image Capture Example
11 Revision History
Page 13 of 13 60-000014
May 13, 2015
www.criticallink.com
Figure 11: Image Capture Example
 Loading...