

Page 1
E
B
A
C F D
Accu-Lign Operating Manual
Caution: Read and understand these instructions before using this tool.
Set Up
1. Remove Accu-lign from packaging.
2. Unlock all 8 wheel brakes
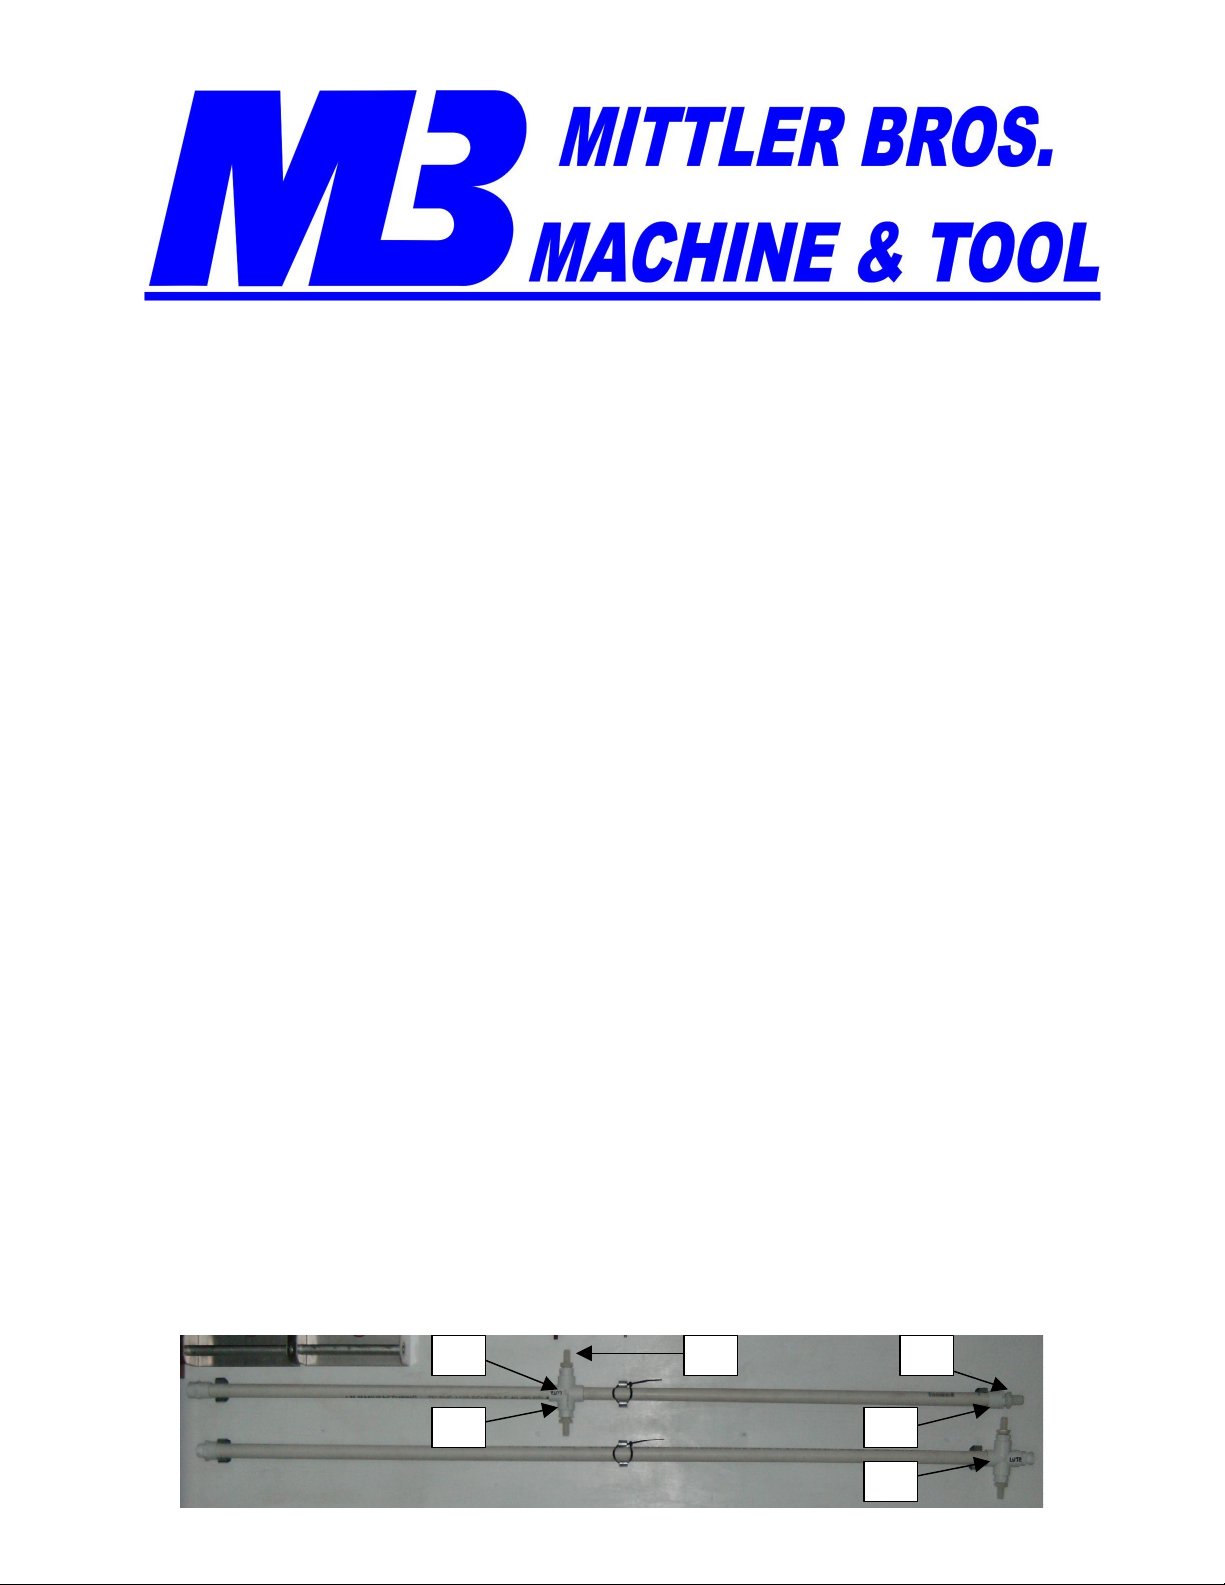
Water Level Manifold Construction
To minimize shipping costs and complexity, fabrication of a simple water level
manifold is left to the customer. Instructions follow:
1. At your local home center purchase the following:
1. 10’ of 1” OD PVC plastic pipe
2. 1 PVC 1” Tee (Figure 1 Letter A)
3. 1 PVC 1” Cross (Figure 1 Letter B)
4. 4 adapters – Tee or Cross to ½” NPTF (Figure 1 Letter C)
5. 1 adapter- 1” PVC to ¾” NPTF (Figure 1 Letter D)
6. 4 barb fittings- ½” NPTF to 3/8” ID tubing (Figure 1 Letter E)
7. 1 barb fitting- ¾’ NPTF to ¾” ID tubing (Figure 1 Letter F)
8. 16’ of clear 5/8” OD, 3/8” ID vinyl tubing, to be cut into 4 equal pieces
9. 4’ of clear 1”OD, ¾” ID vinyl tubing to mate with gas can reservoir snout
and barb fitting
10. 1 gallon plastic fuel can with pour snout and vent feature or similar
reservoir with at least 50 in^2 water surface area exposed to atmosphere
11. 1 small can PVC cement
2. Cut the 1” OD PVC tubing to the length of the wheelbase of the cars you will be
aligning. Assemble and glue the tee, cross, adapters, barb fittings as shown in the
photo. Consider adding additional fittings mid length to ease trailer storage. (as
shown)
Figure 1
Page 2

Operation/Use
1. Locate a fairly level (roughly 2” max variation) asphalt or concrete alignment
surface.
2. Attach PVC/clear vinyl tubing manifold leveling hardware centered below the
planned location of the vehicle. Pull the 4 wheel vinyl tubes out toward the wheel
locations. Place the reservoir port at the front of the vehicle
3. Place vehicle in this location over the manifold.
4. Ensure that the vehicle cannot be accidentally started when the Accu-lign plates
are installed.
5. Ensure that all 8 wheel brakes are loose. (Figure 2 Letter A)
6. Raise one side of vehicle enough for tires to clear the ground by roughly 6”.
7. Place jack stands under the vehicle for safety.
8. Remove wheels and tires.
9. Place smooth surface electronic wheel scales or roll plates under wheel locations
centering as needed. Use smooth surface scales or utilize smooth surface shim
plates to allow the 8 roller bearing wheels to move freely.
10. Bolt on Accu-lign plates in place of wheels. Note that it may be necessary to use
wheel spacers to move the plates away from the brake caliper. Secure lug nuts.
11. Lower the vehicle onto the scale pads
12. Rotate toe arms parallel to laser etched alignment marks. (Figure 2 Letter B)
Snug bolts tight.
13. Repeat steps 6 – 12 on opposite side of vehicle.
14. Tighten1 wheel brake to prevent vehicle from rolling off scales
15. Lace all 4 clear vinyl leveling tubes fully into the central slots. Secure using tire
wraps. (Figure 2 Letter C)
16. Add 2 drops of liquid detergent (acts as a wetting agent to minimize bubble
formation) to the reservoir. Partially fill and attach the water reservoir so that the
water level at the wheel ends is roughly half scale. If necessary, raise the
elevation of the gas can reservoir to raise the water level using any stable item.
The exact water level does not matter.
17. Check the water level at the bottom of the water meniscus on all 4 corners, noting
the lowest water level of all 4. This elevation is the highest elevation wheel
position and now becomes the reference elevation for the other 3 levels. Raise
and shim each of the 3 low corners, one at a time, using floor tiles or any other
suitable shims under each scale or flat contact plate (no scale). Shim until all 4
corners read the same number on the level scale. Remember, the actual number
that elevation turns out to be is irrelevant so long as they must all read the same.
18. Once all of the water meniscus’s read the same number, all 4 hub centerlines are
in exactly the same plane and perfectly level.
19. Note additional special features including;
a. Laser engraved level line on inside surface of wheel plates to allow laser
leveling.
b. Additional toe plate tapped holes to allow measuring toe near the ground
plane.
c. Slots just above the wheel blocks to allow quick toe checks, similar to
traditional toe plates. (Don’t forget to adjust toe readings for the shorter
wheel diameter distance)
d. Carrying handle
Page 3

e. Wall hanging hole
C
A
20. Special notes for multi bolt pattern insert:
a. Limited slip circumferential holes are provided in main plate.
b. Additional insert plates are available.
21. Proceed with your preferred corner weight, alignment process including:
a. Erect strings parallel to the vehicle centerline either at hub centerline or at
the ground plane. The preferred method is to attach the strings to the
chassis by fabricating string holders at the front and rear of the vehicle.
These string holders should mount in a location where normal racing
contact will not compromise consistent string position.
b. Set caster angles by wheel turn or direct measurement.
c. Set camber angles.
d. Set corner weights or wedge %’s. Note that there is no need to roll the car
fore and aft for suspension settling.
e. Set wheel toe by measurement to parallel strings
Figure 2
B
 Loading...