


THE
THE USER
THE THE
This device complies with part 15 of the FCC Rules. Operation is subject to the following two
conditions: (1) This device may not cause harmful interference, and (2) this device must accept any
interference received, including interference that may cause undesired operation.
Caution : Any changes or modifications in construction of this device which are not expressly
approved by the party responsible for compliance could void the user's authority to operate the
equipment.
USER’’’’S GUIDE MANUAL
USERUSER
S GUIDE MANUAL
S GUIDE MANUALS GUIDE MANUAL
USER
USER’’’’s GUIDE MANUAL
USERUSER
Introduction
Congratula t ions on y our purc hase of a M its uk i Wave Num e ric Dis play pa ger.
This User’s guide explains how easy it is to use the Mitsuki Wave pagers.
CONTENTs.
PAGER LAYO UT
1-1. FUNCTION INDICATORS.
1-2. CONTROLS.
OPERATING INTRODUCTIONS.
2-1.POWER ON.
2-2.RECEIVING AND READING MESSAGE.
SELECTING FUNCTIONS.
3-1.SETTING THE MODE.
s GUIDE MANUAL
s GUIDE MANUALs GUIDE MANUAL

3-2.ERASING THE ALL MESSAGE.
3-3.SETTING THE ALERT MODE.
3-4.TURNING YOUR PAGER OFF.
3-5.SETTING THE CLOCK.
3-6.SETTING THE ALRAM.
3-7.SE TTIN G T HE AU TO ON /O FF.
THE REST FEATURES.
4-1.CONTINUOUS MESSAGE.
4-2.PROTECTING & UNPROTECTING MESSAGE.
4-3.DEL ETI NG I NDI VIDU AL MESSAGE S.
4-4.DUPLI CATE MESSAGES.
4-5.OVERFLOW THE MEMORY.
4-6 .O VER FLO W THE P R OTECTED MESSAGE.
4-7.BACK LIGHT.
4-8.PRE-PROGRAMMED MESSAGE(CANNED MESSAGE)
BATTERY INFORMATION.
5-1.BATTERY BACK-UP.
5-2 .R EP L ACEM EN T T HE B ATTERY.
1.
1.
1.1.
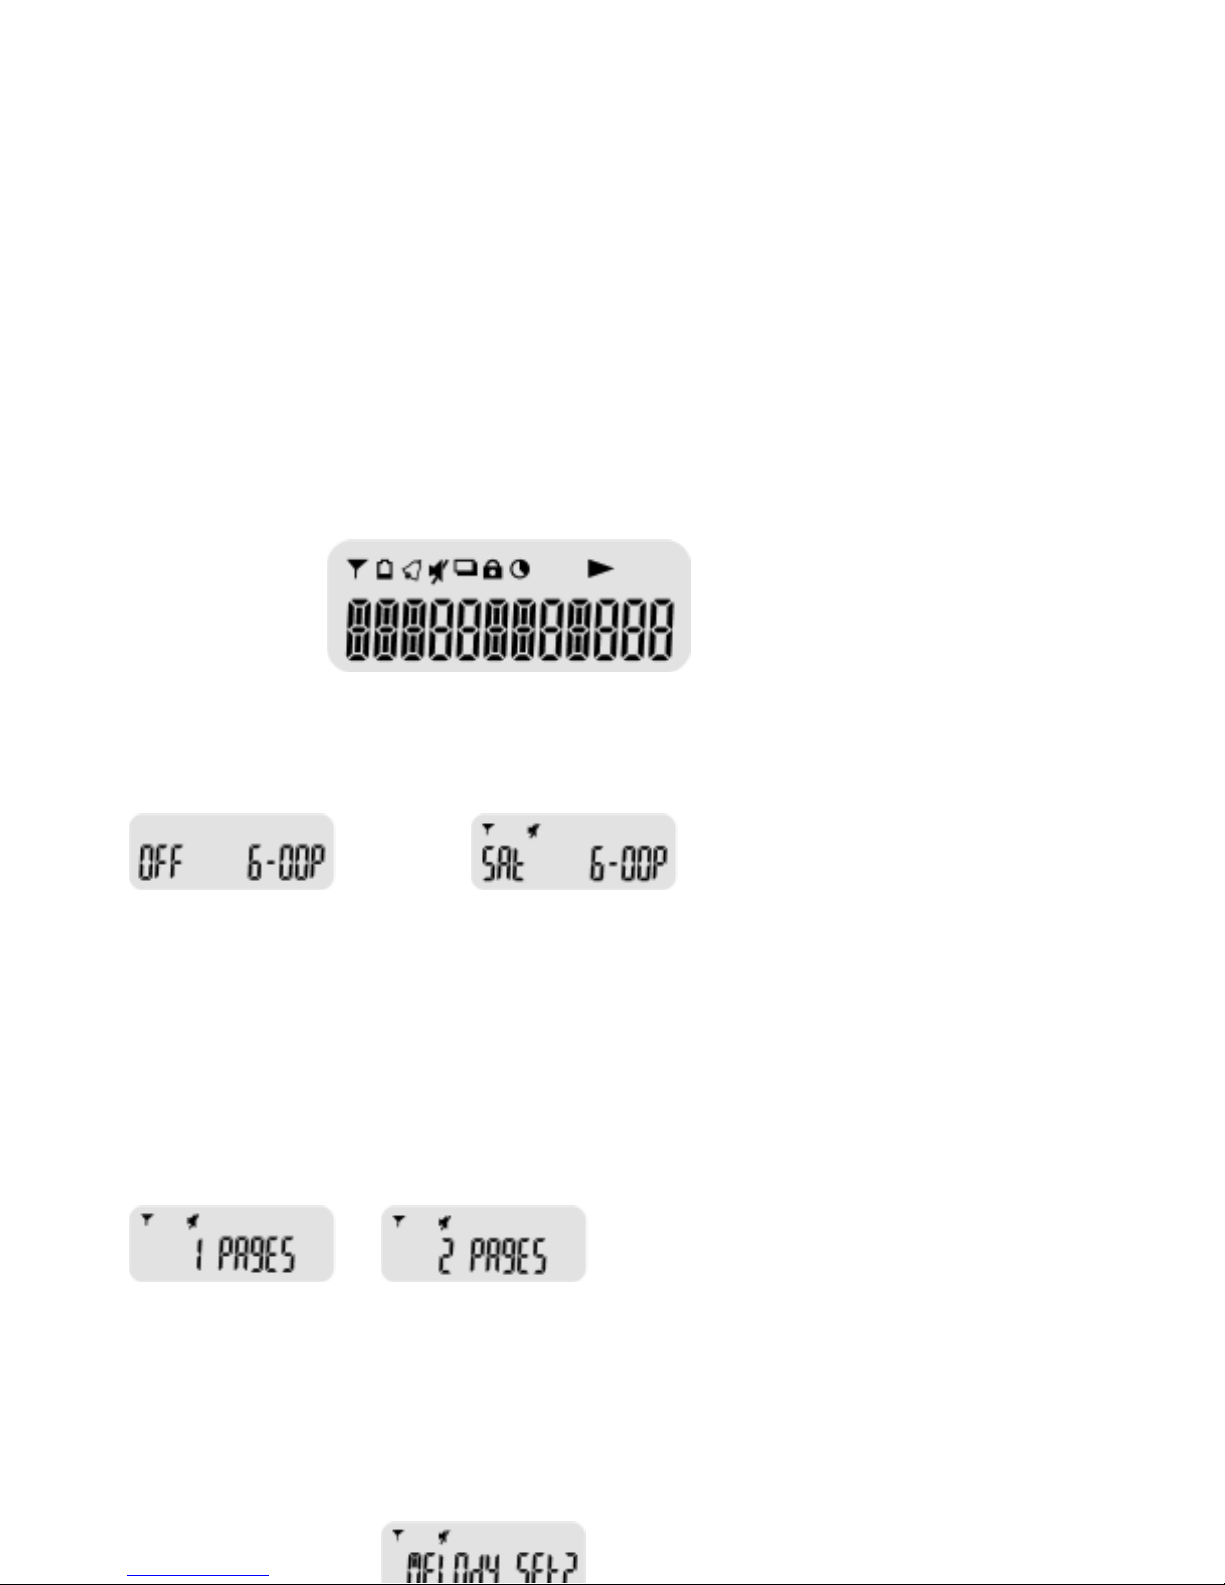
1-1.FUNCTION INDICATORS.
1-1.FUNCTION INDICATORS.
1-1.FUNCTION INDICATORS.1-1.FUNCTION INDICATORS.
PAGER LAYOUT.
PAGER LAYOUT.
PAGER LAYOUT.PAGER LAYOUT.
SERVICE AREA. DUPLICATE MESSAGE
LOW BATTERY. PROTECTED MESSAGE.
ALARM. AUTO ON/OFF.
VIBRATE/ALARM MODE. CONTINUOUS MESSAGE.
1-2.CONTROLS.
1-2.CONTROLS.
1-2.CONTROLS.1-2.CONTROLS.
UP BUTTON
UP BUTTON
UP BUTTON UP BUTTON
(MODE)
(MODE)
(MODE) (MODE)
*Control Alarm.
Set Mode.
Delete & Lock Selective Message.
Turn the back light ON/OFF.
Enter the function menu.
Return the pager to the standby screen.
DOEN BUTTON
DOEN BUTTON
DOEN BUTTON DOEN BUTTON
(SELECT)
(SELECT)
(SELECT)(SELECT)
Select Function.
*Read Mes sage.
Control Alarm.
Delay to return the Standby Screen.
2.
2.
2.2.
2-1.POWER ON.
2-1.POWER ON.
2-1.POWER ON.2-1.POWER ON.
OPERATING INTRODUCTIONS.
OPERATING INTRODUCTIONS.
OPERATING INTRODUCTIONS.OPERATING INTRODUCTIONS.
Press Up or Down button for two seconds in power Off or replace a new battery to
Tur n y our pager o n.Your page r give s an a le r t sound and vibration.
Afte r displayong the power up scree n, the time of day, day of wee k, and an alert indica tor
are shown on the standby screen.
2-2.RECEIVING AND READING MESSAGE.
2-2.RECEIVING AND READING MESSAGE.
2-2.RECEIVING AND READING MESSAGE.2-2.RECEIVING AND READING MESSAGE.
Your FLEX pager can receive up to sixteen 20 character messages. When a message is
received the pager alerts for eight seconds.
Press the doen button to dis play the message and the time the message was recevied.
Press the down button to display the second screen.
The first screen of your message displays the message slot number and time recevied.
If a me ssa ge is no t re a d, t he sc reen display s t he number of unre ad message
(1 memos/2 me mos ) until all mess a ge are read.
1 Unread Message 2 Unread Message
3.
3.
3.3.
3-1.SETTING THE MODE.
3-1.SETTING THE MODE.
3-1.SETTING THE MODE.3-1.SETTING THE MODE.
SELECTING FUNCTIONS.
SELECTING FUNCTIONS.
SELECTING FUNCTIONS.SELECTING FUNCTIONS.
Press the up button for two seconds to enter the mode function on the standby screen.
Either “ DELETE ALL?’ or ‘ M EL ODY SET ?’ is dis pla yed, depending on the me s s age.

Press dow n but to n Press dow n butt on Press down button
Press dow n but to n Pres s dow n butt on Pr ess dow n butt on
*Press the down for two se cond to enter the function me nu at the selective modes.
3-2.ERASING ALL MESSAGE.
3-2.ERASING ALL MESSAGE.
3-2.ERASING ALL MESSAGE.3-2.ERASING ALL MESSAGE.
When there’s any message received, press the up button for two seconds to enter the
“DELETE ALL?”mode. If you press the down button for two seconds to erase all messages
exce pt pr o tecte d mes s a ges.T he “ AL L DELETED”is dis olay e d w ith
delete beep.
3-3.SETTING ALERT MODE.
3-3.SETTING ALERT MODE.
3-3.SETTING ALERT MODE.3-3.SETTING ALERT MODE.
Press the up button for two seconds to
Enter the “MELODY SET?”mode.
If you press the down button for two ▼
Seconds,”MELODY[01]”is displayed
With the melody.
Whenever you press the down button,
The alert menu is increased up to ▼
“M ELODY [ 1 5] ” s c rolling and v ibra t io n
by turns .
When you press the up button to select
Alert menu, It is re turned to the standby
Screen automatically.
3-4.TURNING YOUR PAGER OFF.
3-4.TURNING YOUR PAGER OFF.
3-4.TURNING YOUR PAGER OFF.3-4.TURNING YOUR PAGER OFF.
Press the up button for two seconds to enter the mode.

Press the down button shortly to enter the “POWER OFF?” mode.
Press the down button for two seconds to turnyour page r off.
Whe n y o ur pa g er is turne d o ff, it ca nno t r eceiv e any me s sa g e and is only d is played
The time.(Press either up or down button for two sconds to turn your pager on).
3-5.SETTING THE CLOCK
3-5.SETTING THE CLOCK
3-5.SETTING THE CLOCK3-5.SETTING THE CLOCK
Press the up button for two seconds
to enter the mode.
Press the down button twice to enter
▼ the ❝CL O CK SET !❞ mode
press the down button for two sec onds and it is displayed ❝(00-01-01)❞
The year blinks.
If you press the down button, you
can change the year.
If you press the down button for two
▼ Seconds, the month is blinks.
Press the down button to change the
Month.
The way to change the day is the
Same.
After you set the date , press the down button for two seconds
to set the day of the week and time.
The da y blinks . I f y ou pre ss the dow n butt on, y o u can cha nge
the day.
Press the down button for tw o seconds to swilch to the hour.
The ho ur blink .
Press the down button to change the hour | .
Press the down button for two seconds to switch to the minutes.
The first diglt of the minutes blinks.
Press the down button to change the first minute digit.
Press the down button for two seconds to switch to the se cond
Digit.
The s e co nd diglt of minutes blinks .
Press the button to change the s e cond minute digit.
Press the down button for two seconds to switch to AM/PM.
The A o r blinks.
Press the down button to change A or P.
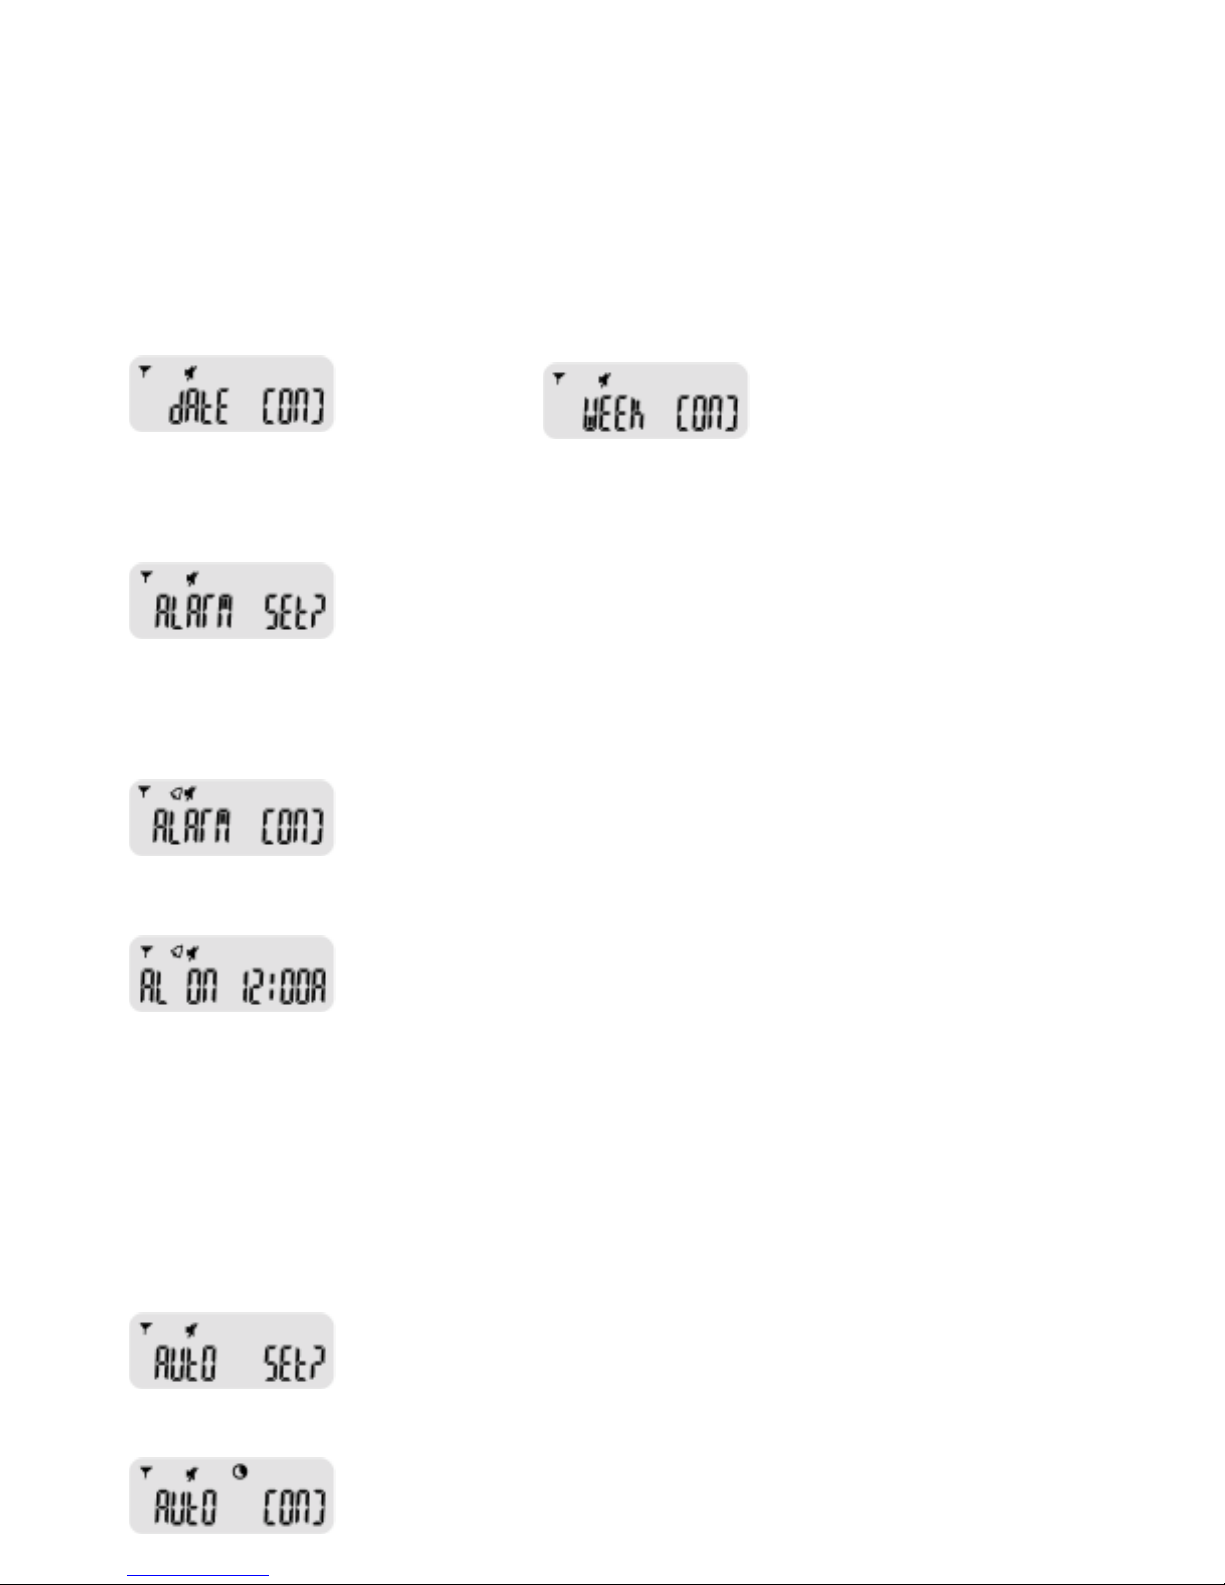
After you set day of the week and the time of the da y, press
the down button for two seconds to enter “DATE ON/WEEK
ON” mode.
By pressing the down button shortly, you can choose the date
Displaying type or the week type.
Press the up button set the clock type a nd to retum to the
Standby scr e e n.
3-6.SETTING THE ALARM
3-6.SETTING THE ALARM
3-6.SETTING THE ALARM3-6.SETTING THE ALARM
Press the up button for two seconds to enter
The mode.
Press the down button three times to enter
The “ALARM SET?” mode.
▼ If you press the down button for two seconds,
you can enter”ALARM(ON)/(OFF)” mode.
You can change (ON)/(OFF) by pressing the
Down button.
If you select ”ALARM (OFF)”, it is retumed to
the standby screen by pressing either up but ▼ ton shortly or down button for two seconds.
If you want to select “ALARM (ON)” mode,
Press the down button for two seconds.
It is displayed “AL ON 7:00A” and the hour
Blink.
The way to change the alarm time is the
Same with setting the clock.
When it is set “ALARM(ON)”. alarm is operated in
Spite of power OFF mode.
3-7.SE TTIN G AUTO ON /O FF
Press the up button for two seconds to
Enter the mode.
Press the down button four times to
Enter the “AUTO SET?” mode.
If you press the down button for two sec ▼ onds, you can enter “AUTO(ON)/(OFF)”
mode.
You can change (ON)/(OFF) by press-

ing the down button.
If you want to select “AUTO (ON)” mode,
▼ press the down button for two se conds.
It is displayed “6:00A 2:00” and the
starting hour blinks.
The first time is “ON” time and second
time is “OFF” time.
The way to change the auto on/off time
Is same with setting the clock.
When it is set “AUTO (ON)”. auto ON is operated in spite of
power OFF mode .
4. THE REST FEATURES
4. THE REST FEATURES
4. THE REST FEATURES4. THE REST FEATURES
4-1. CONTINUOUS MESSAGE
4-1. CONTINUOUS MESSAGE
4-1. CONTINUOUS MESSAGE4-1. CONTINUOUS MESSAGE
Message longer then 12 characters display on screen, indicate d by the ( )Icon. It is display e d up to 31 cga ra ct ers .
4-2. PROTECTING & UNPROTECTING MESSAGES
4-2. PROTECTING & UNPROTECTING MESSAGES
4-2. PROTECTING & UNPROTECTING MESSAGES4-2. PROTECTING & UNPROTECTING MESSAGES
You can prote ct up to 10 messages so they ar e not erased or
repla c e d by new mess ages.
The messa ge yo u want t o prot e c t/ unpr o tect m us t be dis Plated on the screen.
To pr ot e c t a messag e , press the up butt on a nd I t is displa y e d
“LOCK?”.
Press the dow n butt on and it is dis pla yed “LOCKED”
When reading a protected message, the protect( )icon
is dis playe in the upper po r t io n o f the s cree n.
Press up button
Press down button
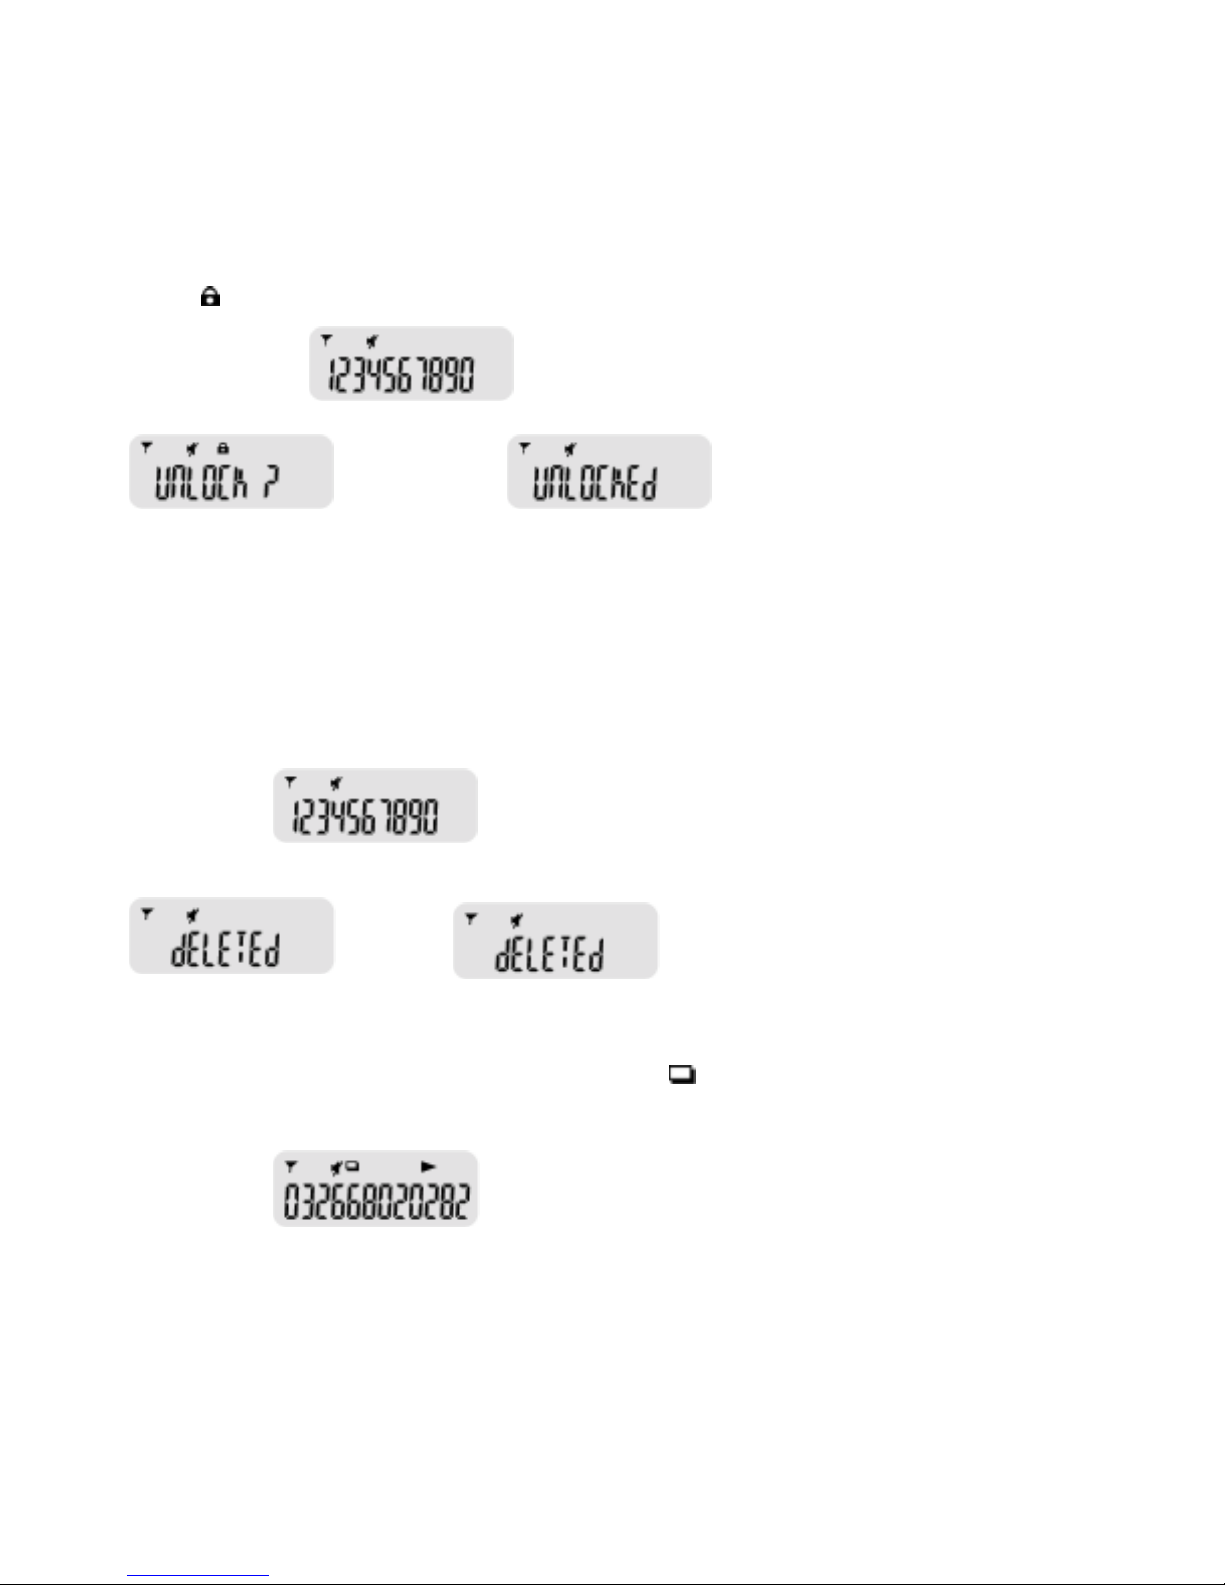
To unprotect a message, press the up button and the message is displaye d “ U N LICK?”
Press the dow n butt on and it is dis pla yed “UNLO CKED.” The
Prot ect( )ic on is no lo nge r disp la y ed.
4-3. DELETING INDIVIDUAL MESSAGES
4-3. DELETING INDIVIDUAL MESSAGES
4-3. DELETING INDIVIDUAL MESSAGES4-3. DELETING INDIVIDUAL MESSAGES
Press the down button twice while the message is displayed and
“DEL ET E?” is dis played.
Press the down button to delete a message. All remaining
messages are moved to the next available message slots.
4-4. DUPLCATE MESSAGE
4-4. DUPLCATE MESSAGE
4-4. DUPLCATE MESSAGE4-4. DUPLCATE MESSAGE
If the same message is received more than once, the ( )
Icon is d is played w hen re ceiving y o ur lates t me ss age . T his
Message contains the latest time stamp.
4-5.
4-5. OVERFLOW THE MEMORY
OVERFLOW THE MEMORY
4-5. 4-5.
OVERFLOW THE MEMORYOVERFLOW THE MEMORY
Your FLEX page r ca n sto r e up to s ix t ee n 20 charac ter mes Sages. If the pager receives more mes s a ges tha n its a vailable
memory ca n hold, the me w messa ge re pla ces t he oldest re a d,
unlocked mess age.
Whe n all mes sa ge s lo ts are filled, t he pa ger displa y s ‘PAGES
FULL.” Message must be read and erased to clear the ovetFlow cond it ion.

4-6.
4-6. OVERFLOW THE PROTECTED MESSAGE
OVERFLOW THE PROTECTED MESSAGE
4-6. 4-6.
OVERFLOW THE PROTECTED MESSAGEOVERFLOW THE PROTECTED MESSAGE
Your pager c a n store up to 10 prot e cted me ss a ge s . If you
Intend to protect more ma s sages than its available memory.
The pa ge r displa ys “L OCK FU L L.”
4-7. BACK LIGHT
4-7. BACK LIGHT
4-7. BACK LIGHT4-7. BACK LIGHT
Press up button to tum the ba ck light ON.
Press up button again to tum the back light OFF.
The back light tum of f automatically eight seconds after
retuming to the standby screen
4-8. PRE-PROGRAMMED
4-8. PRE-PROGRAMMED MESSAGE(CANNED MESSAGE)
4-8. PRE-PROGRAMMED 4-8. PRE-PROGRAMMED
MESSAGE(CANNED MESSAGE)
MESSAGE(CANNED MESSAGE)MESSAGE(CANNED MESSAGE)
this page r is capa ble o f displa ying pr e -pro gr a mme d alpga numeric mes sage s.
The code number s for ther e mess a ges s ho uld only be give n t o
You freq ue nt ly.
This code is ma de up of four digit de clima l numbe r ..
Sending a pre-programmed messages:
Dial the pagers pho ne numbe r as you would no r maily do e nter
indent ity - co de a nd me s sa ge co des below followe d by the
sgarp(#)
sign-t he m ha nd up.
LIST OF PRE-PROGRAMMED MESSAGES:
LIST OF PRE-PROGRAMMED MESSAGES:
LIST OF PRE-PROGRAMMED MESSAGES:LIST OF PRE-PROGRAMMED MESSAGES:
Code: Message
1100: Call home urgent
1101: Call home not urgent
1102: Call office urgent
1103: Call office not urgent
1104: I love you
1105: I miss you
1106: Swee t dream
1107: Call boss urgent
1108: Call boss mot urgent
1109: Good morning
1110: Have a nice day
1111: Happy valentine’s da y
1112: Happy birthday
1113: Marr y christmas
1114: Happy me w year
1115: Happy mother ’s day

1116: Happy father ’s day
1117: Congratulation
1118: Call me sweet hear t
1119: Come home ear ly
5.BATTERY INFORMATION
5.BATTERY INFORMATION
5.BATTERY INFORMATION5.BATTERY INFORMATION
The FLEX p a g er o per ates wit h o ne AAA-s iz e alk aline batt er y.
Whe n t he battery is lo w, the us er w ill b e ale rted by t o m e a nd
Low ba t ter y( )icon display on t he s tandby s creen. (The
Aler t t o ne a nd ic o n will dis appe ar o nly whe n a m e w batt er y is
Replaced)
5-1. BATTERY BACK-UP
5-1. BATTERY BACK-UP
5-1. BATTERY BACK-UP5-1. BATTERY BACK-UP
Although you remove the battery, the memory such as
Received messages and the mode values you set remains for
About 10 seconds.
5-2. REPLACEMENT THE
5-2. REPLACEMENT THE BATTERY(1.5V
5-2. REPLACEMENT THE 5-2. REPLACEMENT THE
BATTERY(1.5V×”
BATTERY(1.5VBATTERY(1.5V
×”AAA
×”×”
AAA’’’’size alraline battery cell)
AAAAAA
size alraline battery cell)
size alraline battery cell)size alraline battery cell)
Unlock the battery cabinet by up lift the battery door lock.
Sli de the lid forward to open the cabinet.
Take the old cell out.
Match the “+” on the battery with “+” marking outside the
Pager .
Close the battery cabinet.
 Loading...