

Mitsubishi Heavy Industries SRK20MA-S, SRC20MA-S, SRK25MA-S, SRC25MA-S, SRK35MA-S Technical Manual
...
- 1 -
Mitsubishi Heavy Industries Air Conditioners
Technical Manual
Manual Number: 2011 No. W2-01
Variable Frequency Wall Mounted Type
Room Air Conditioners
(Split system, heat pump type)
SRK20MA-S/SRC20MA-S
SRK25MA-S/SRC25MA-S
SRK35MA-S/SRC35MA-S
SRK50MA-S/SRC50MA-S
(R410A Refrigerant Used)
MITSUBISHI HEAVY INDUSTRIES, LTD.

- 2 -
Table of Contents
1. GENERAL INFORMATION…………..……………………….……1
1.1 Features……………………………………..……………………..…1
1.2 Model identification………………………………………………1
2 MODEL SELECTION…………………………………………………2
2.1 Model function..…………..…….……..………………………..……2
2.2 Range of usage……………………………………………..………6
2.3 Outline drawing……………………………..……………………..…6
2.4 Cooling cycle system diagram…….………………..…………...…8
2.5 Performance curve……………………………………………………9
3 ELECTRICAL WIRING DIAGRAM……………………………….10
4 NAME OF EACH PART AND ITS FUNCTION………….12
4.1 Name of each part………………………….......…………………....15
4.2 Emergency switch………………………….......…………………....15
4.3 Automatic restart……………..…………..………………………..15
4.4 Key lock………….…………..……..……………………………..15
4.5 CLEAN operation………………...……..…………………………..15
4.6 SLEEP operation……..……..…………………………….……..16
4.7 Timing off………...............................................................16
4.8 Timing on ...........................................................................17
4.9 Programmed timer........................................................................17
4.10 Current time setting.....................................................................18
4.11 HI POWER operation....................................................................18
4.12 JET operation.........................................................................18
4.13 POWER SAVE operation.................................................................19
4.14 Air direction adjustment..............................................................19
4.15 Area setting…......................................................................20
4.16 Installation location setting.............................................................20
4.17 Outline of automatic operation..................................................20

- 3 -
4.18 Outline of drying operation..................................................21
4.19 Outline of defrosting operation.................................................21
4.20 Outline of vertical and horizontal flaps control................................23
4.21 Outline of electronic expansion valve (EEV) control.....................24
4.22 Outline of compressor control.........................................24
4.23 Outline of outdoor fan control.........................................24
4.24 Outline of indoor fan control.........................................25
5 INSTALLATION................................................................................27
5.1 Selection of installation location.................................................29
5.2 Installation of indoor unit..................................................................30
5.3 Installation of outdoor unit...............................................................33
5.4 Pipe connection.................................................................................33
5.5 Precautions for wireless remote controller operation.........................35
5.6 Standard running data........................................................................36
6 MAINTENANCE................................................................................37
6.1 Electrical parts failure diagnosis method.....................................37
6.2 Servicing.............................................................................................58
7 SERVICING MANUAL.......................................................................59
8 MOUNT ASSEMBLY…………………………...........................74
8.1 Indoor unit.........................................................................................74
8.2 Outdoor unit......................................................................................90
- 1 -
1 GENERAL INFORMATION
1.1 Features
(1) Inverter
● Heating/cooling
The rotate speed of the compressor is changed steplessly in relation to varying load, and is linked
with the fans of indoor and outdoor units controlled by the changes of frequency, thus controls
the power.
● Allowing quick heating/cooling operation during start-up period.
The room temperature is kept constant through fine-tuned control after the machine is stabilized.
(2) Fuzzy control: According to the fuzzy control technology, the indoor temperature and humidity,
etc. are obtained through dynamic analysis to accurately regulate the rotate speeds
of the compressor and the fan to realize precise temperature control.
(3) Comfort: 3D air blowing, sleep mode, and other air blowing modes.
(4) Humanization: Room temperature displaying, key lock, concentrated/area air blowing.
(5) Life: Actual service life: over 20,000 hours; Working life: over 100,000 hours; On/off of relay:
over 50,000 times; Continuous on of LED: over 50,000 hours; On/off of emergency switch:
over 10,000 times.
(4) Self diagnosis function: We will continuously provide the best services for our customers through
devices judging abnormal operation, as follows:
Indoor indication
Error
RUN lamp
TIMER lamp
Temp.
indication
Indoor
unit
Sensors
Indoor heat exchanger sensor error
1 time/8 sec.
ON
06
Indoor inlet air (room temp.) sensor error
2 times/8 sec.
--
Others
Indoor fan motor error
6 times/8 sec.
16
Display communication error
--
--
00
Outdoor unit
Sensors
Outdoor temp. sensor error
Continuous
flashing
1 time/8 sec.
38
Outdoor heat exchanger (liquid pipe)
sensor error
2 times/8 sec.
37
Vent-pipe sensor error
4 times/8 sec.
39
Others
Power cut for current protection
ON
1 time/8 sec.
42
Failure of outdoor unit
2 times/8 sec.
59
Current safety
3 times/8 sec.
58
Failure of power module
4 times/8 sec.
51
Compressor over heat protection
5 times/8 sec.
36
Serial signal transmission error
6 times/8 sec.
05
Outdoor fan motor error
7 times/8 sec.
48
Cool room high pressure protection
control
Continuous
flashing
35
Controllable silicon voltage error
5 times/8 sec.
ON
47
Cooling circulation system protection
7 times/8 sec.
57
Locked-rotor/rotor lock
2 times/8 sec.
2 times/8 sec.
60
The air conditioner indicates the error of the indoor and outdoor sensors (thermistors) only when it is
in the stop mode. Error indication is removed after restart.
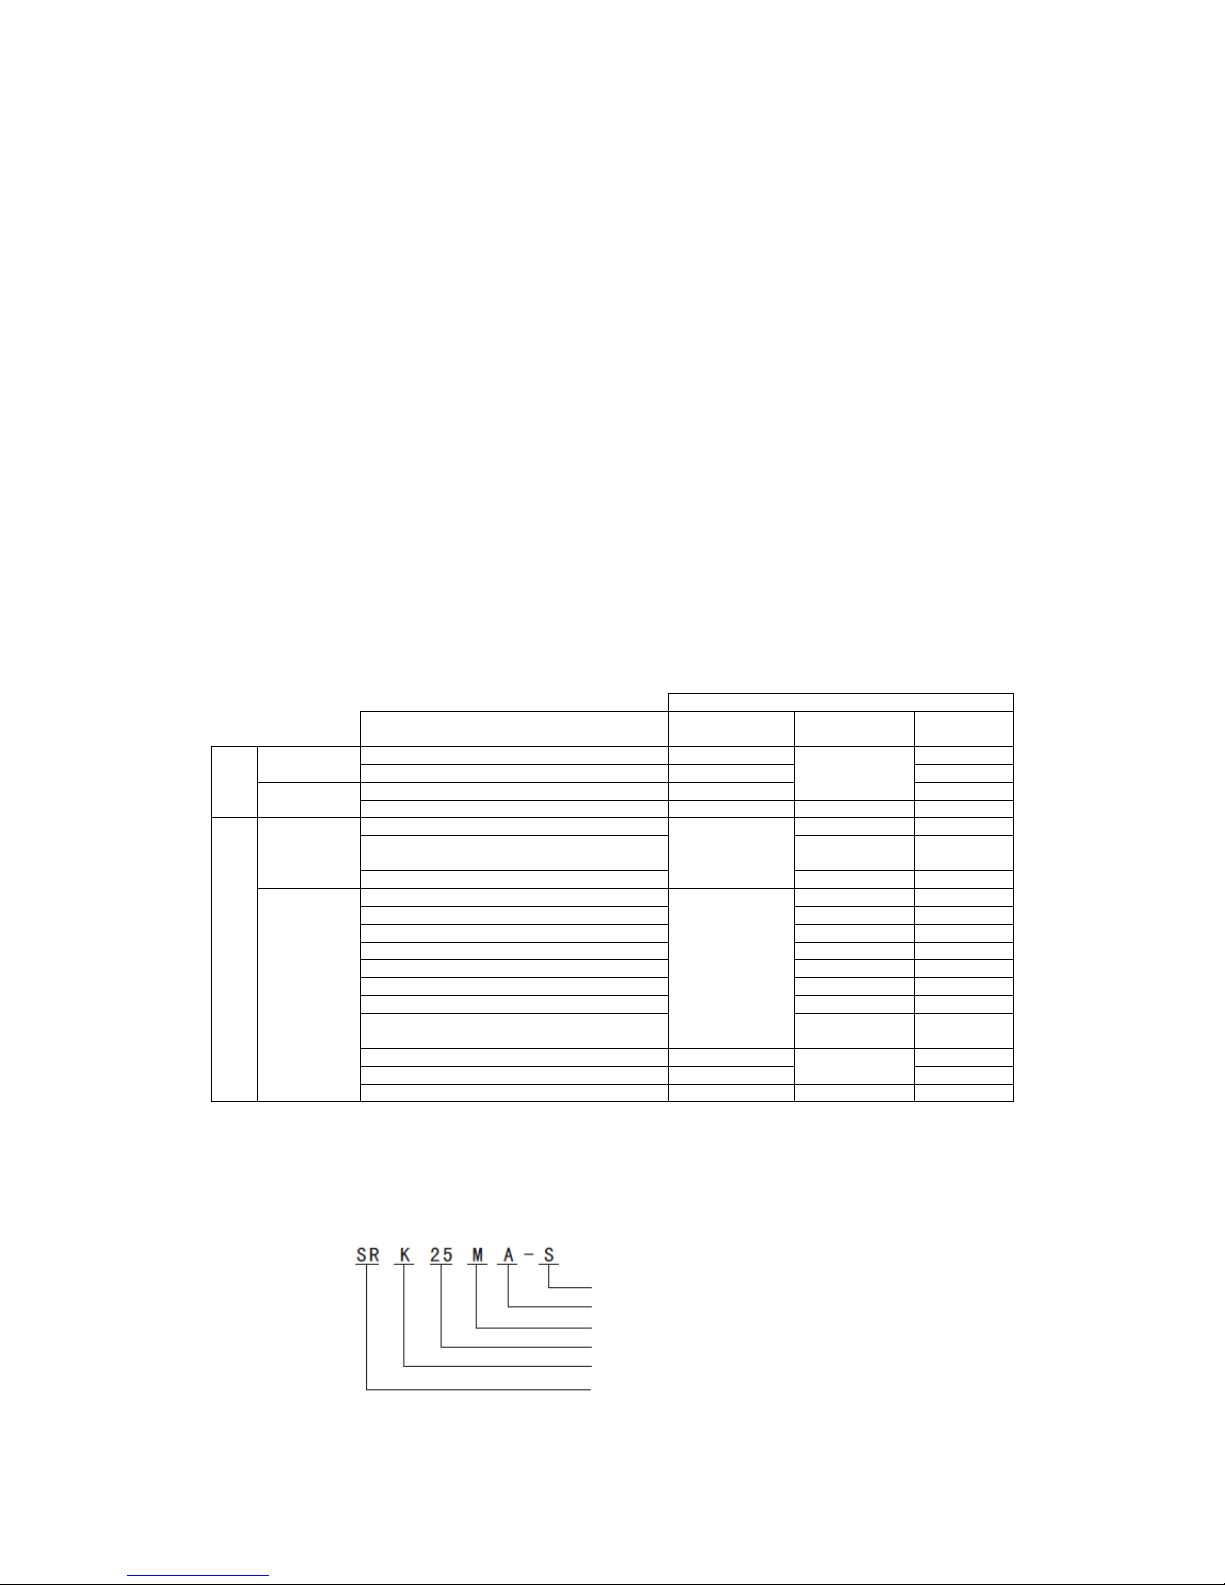
1.2 Model identification
For example:
R410A Refrigerant used
Master pattern change code
Master pattern
Capacity
Wall mounted type (C is the code for outdoor unit.)
Split type room air conditioner
- 2 -
2 MODEL SELECTION
2.1 Model function
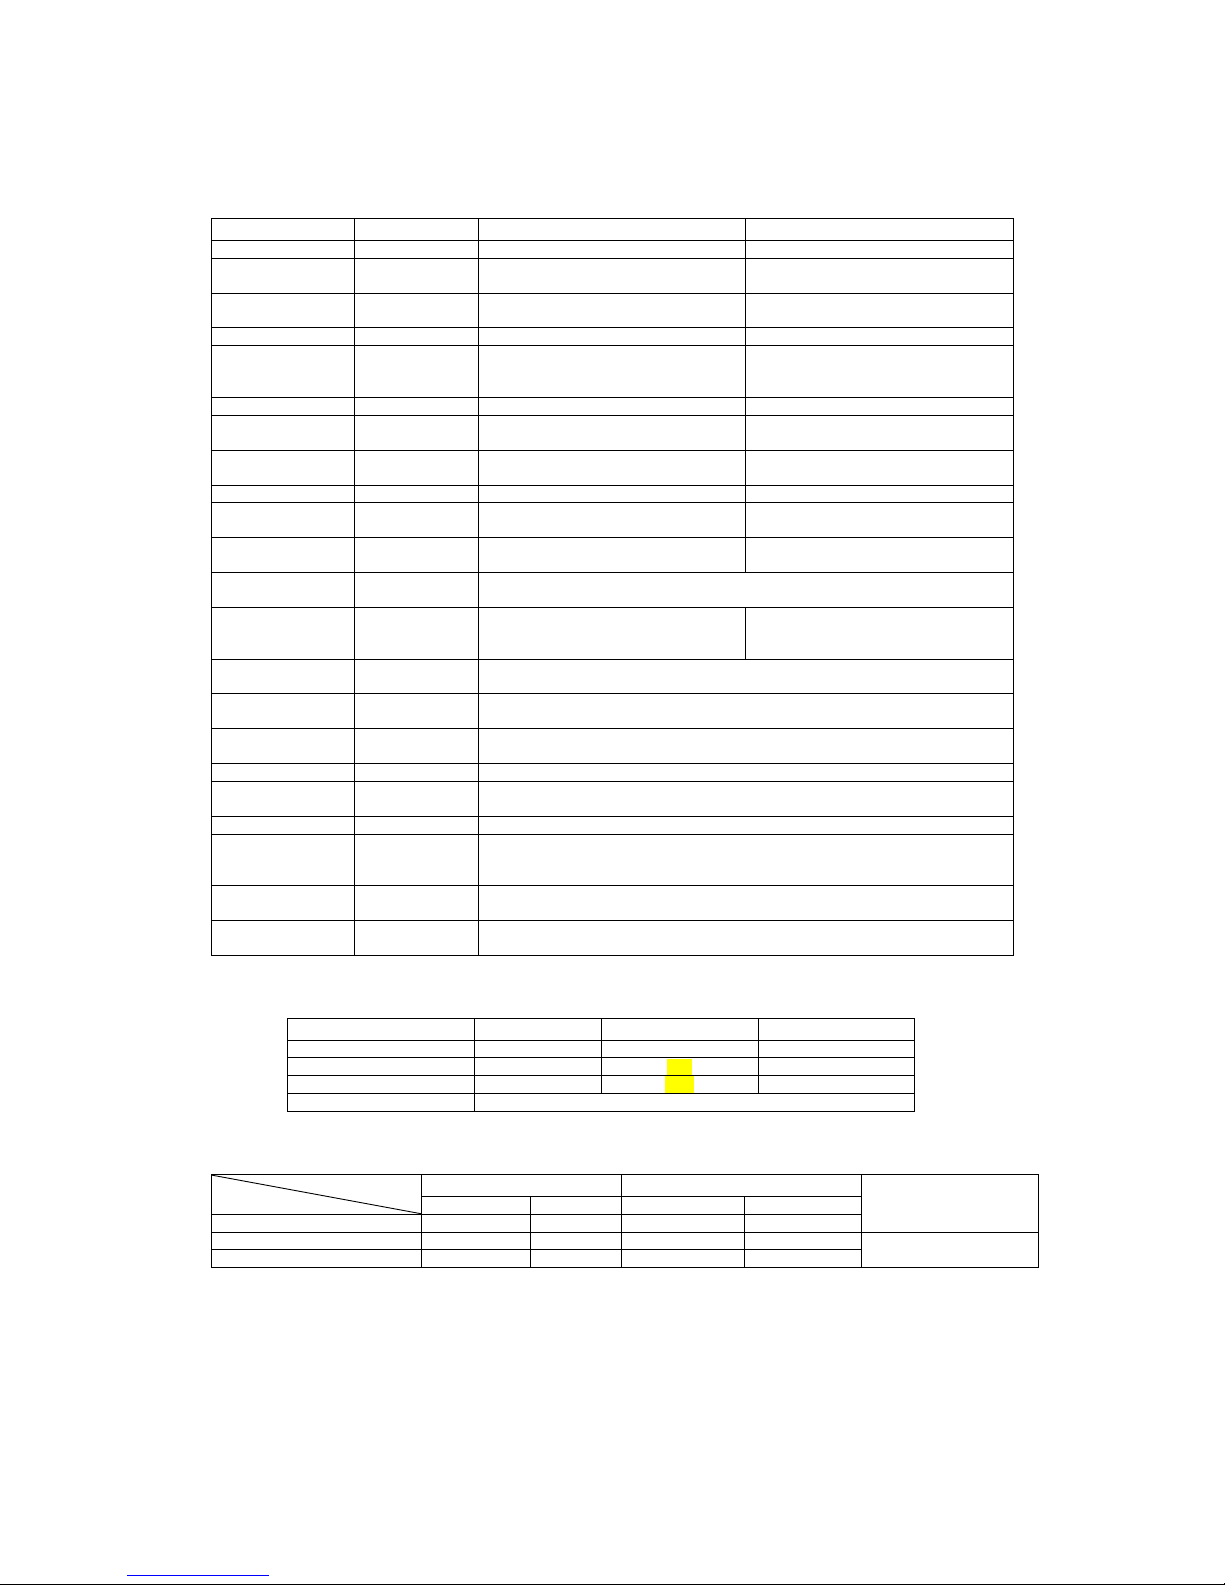
2.1.1 Model: SRK20MA–S (Indoor unit)
SRC20MA–S (Outdoor unit)
Item
Unit
Indoor unit SRK20MA–S
Outdoor unit SRC20MA–S
Net weight
kg
10
32
Machine
dimension
mm
798×230×294
780×290×540
Package
dimension
Length×
Width ×Height
850×365×310
920×380×590
Color White
Ash-colored
Fan
Through-flow type, AS resin +
glass fiber
Axial flow type, AS resin + glass
fiber (embedded damping spindle
sleeve)
Air flow
m3/h
600
1800
Noise in cool
room
dB(A)
Hi/Me/Lo: 37/27/21(completely
mute, SPL)
43(completely mute, SPL)
Noise in warm
room
dB(A)
Hi/Me/Lo: 37/28/24(completely
mute, SPL)
45(completely mute, SPL)
Fan motor
Nominal value
33W, DC motor, insulation grade E
24W, DC motor, insulation grade E
Power of motor
W (reference
value)
19
20
Power of electric
control
W (reference
value)
2
7.5
Power supply and
power cord
Single-phase, 220V, 50Hz and 3-core, 1.0mm2, 250V, 10A, 2m, w/o plug
Heat exchanger
Spiral, hydrophilic, 4-folded,
15-section, 2-row, 528-fin, 1-2
circuit
Spiral, hydrophilic, 20-section,
1-row, 621-fin, 2-1 circuit
Compressor
Nominal value
THACOM RM-B5077MDE2, 527W, DC frequency conversion
compressor, insulation grade E
Refrigerating
machine oil
ml
300, DIAMOND FREEZE MA68
Refrigerant
controller
Electronic expansion valve (Φ1.5mm) + hush pipe
Refrigerant
g
R-410A, 900g, addition/reduction not needed within the use range of 15m
Operating
pressure limit
Mpa
Max.: 4.15, Min.: 1.47
Air filters
Lysozyme filter + Antibacterial deodorizing filter + Mould-proof air filter
Accessories and
quantity
Indoor unit 1, mounting plate 1, tapping screw 5, battery 2, use and
installation manual 1, remote controller 1, filter components 2, outdoor unit
1, Drain elbow 1, Water shutoff plug 1
Operation control
devices
Wireless remote controller, electronic thermostat controlling room
temperature, microcomputer controlling defrosting
Safety devices
Serial signal protection, fan error protection, compressor over heat
protection, high voltage protection, over current protection, etc.
* The nominal values of “Noise in cool room” and “Noise in warm room” in the above table are tested in a dead
room.
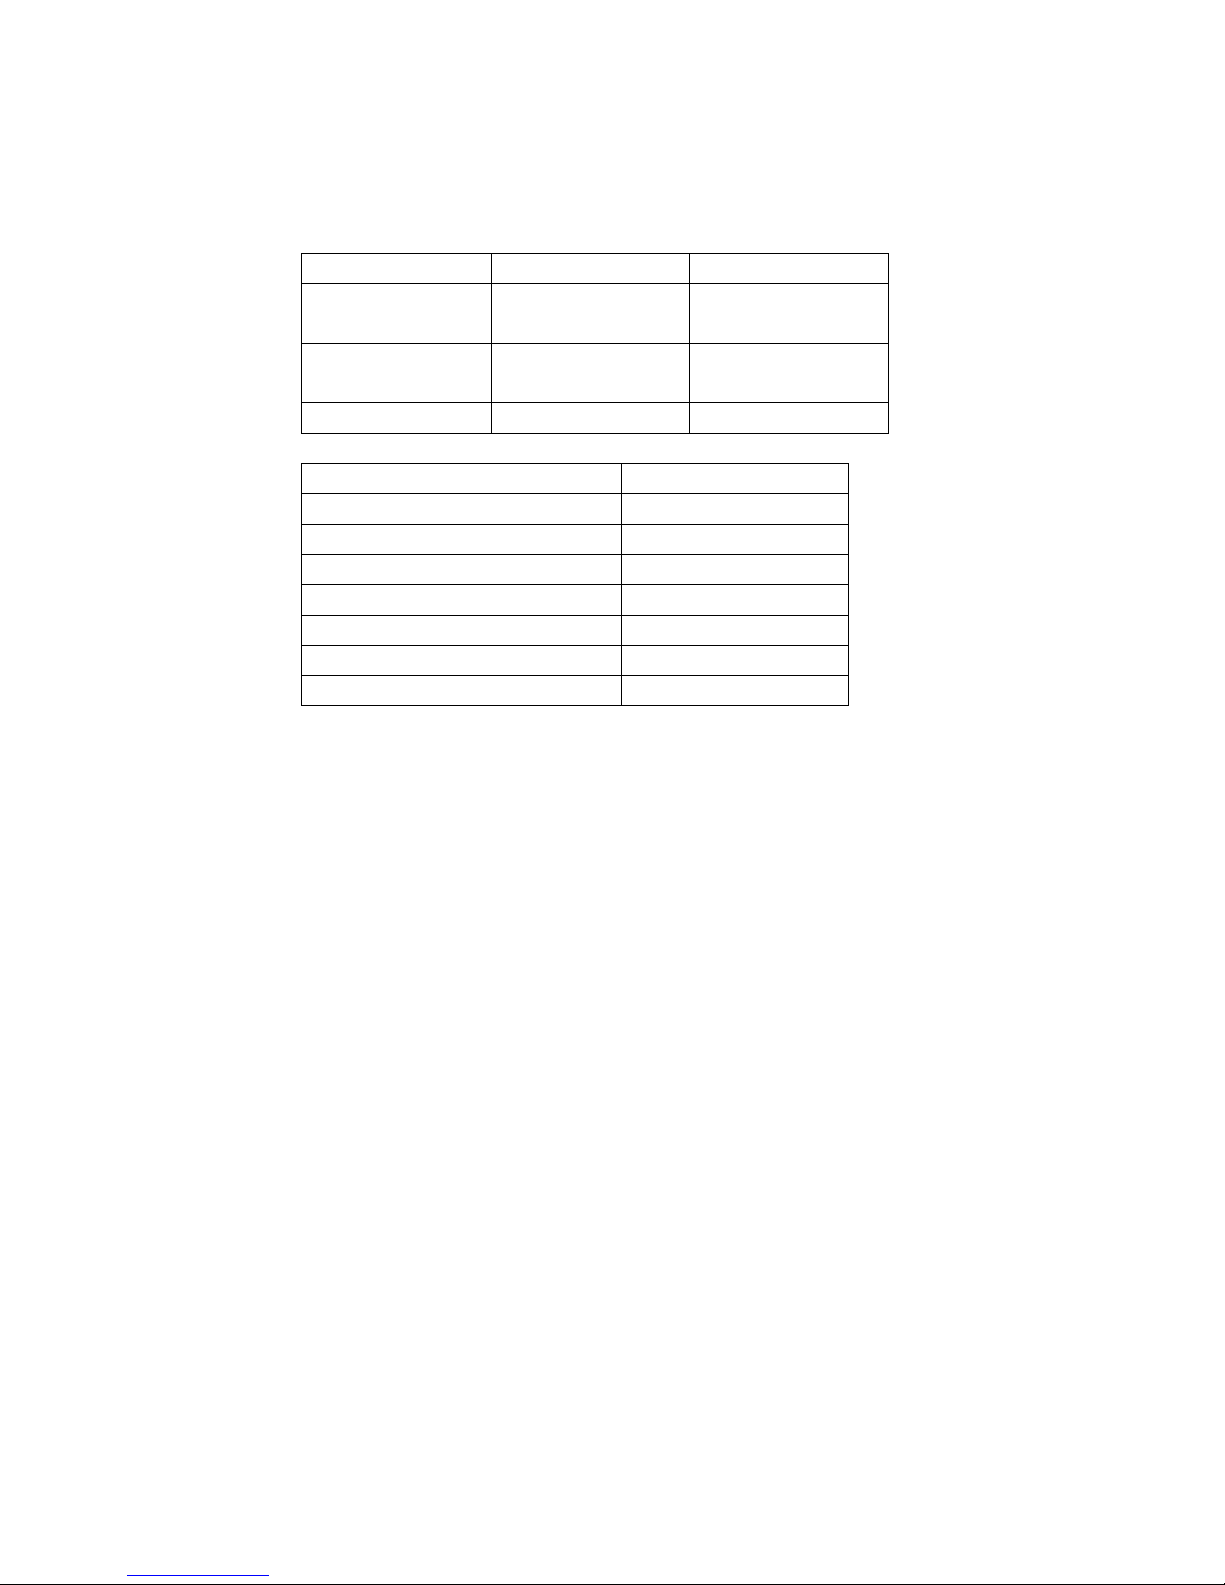
Item
Unit
Rating cooling
Rating heating
Capacity
W
2000
2700
Power
W
450
600
Energy efficiency ratio
4.44
4.50
Energy efficiency grade
Grade A (European norm)
Note (1) The data are measured at the following conditions. The pipe length is 5m.
Item
Operation
Indoor air temperature
Outdoor air temperature
Standards
DB
WB
DB
WB
Cooling
27℃
19℃
35℃
24℃
Heating
20℃
—
7℃
6℃
Low temperature Heating
20℃ — 2℃
1℃
(2) The operation data are applied to the 220Vdistricts respectively.
(3) The refrigerant quantity to be charged includes the refrigerant in 15m connecting piping.
(Purging is not required even for the short piping.)
- 3 -
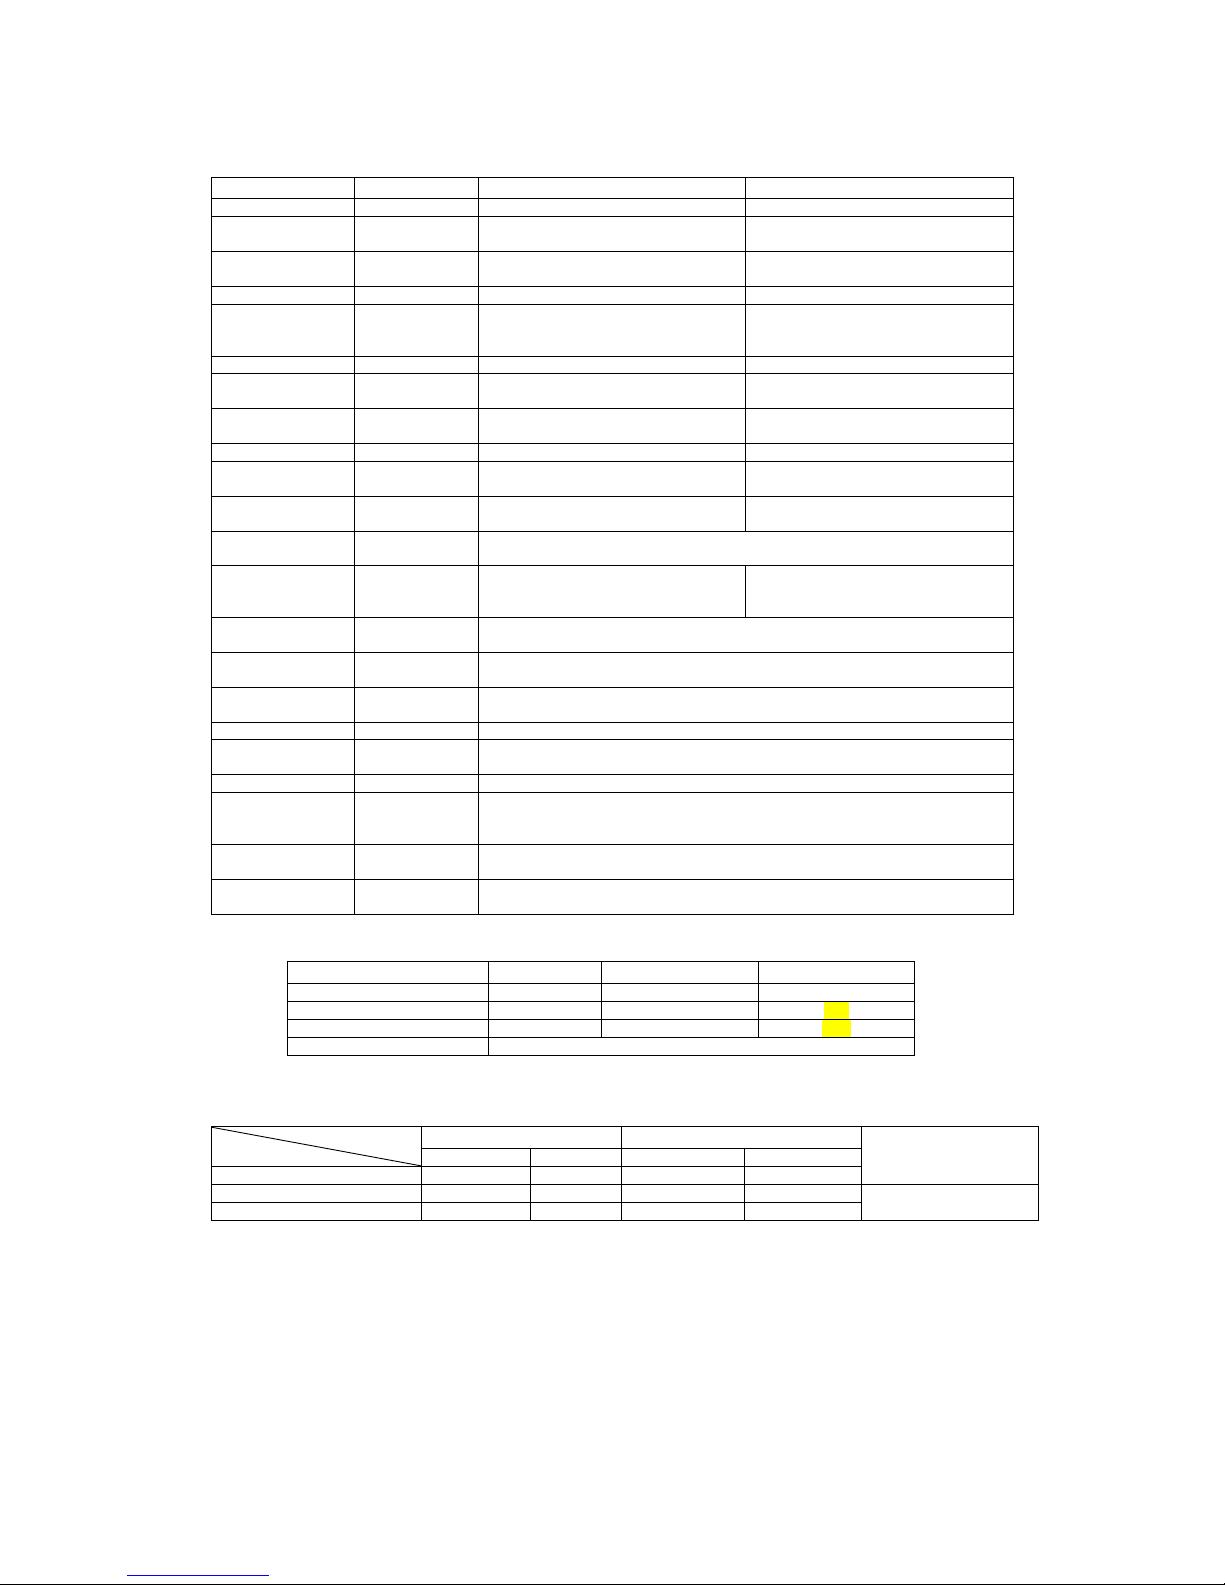
2.1.2 Model: SRK25MA–S (Indoor unit)
SRC25MA–S (Outdoor unit)
Item
Unit
Indoor unit SRK25MA–S
Outdoor unit SRC25MA–S
Net weight
kg
10
32
Machine
dimension
mm
798×230×294
780×290×540
Package
dimension
Length×
Width ×Height
850×365×310
920×380×590
Color White
Ash-colored
Fan
Through-flow type, AS resin +
glass fiber
Axial flow type, AS resin + glass
fiber (embedded damping spindle
sleeve)
Air flow
m3/h
600
1800
Noise in cool
room
dB(A)
Hi/Me/Lo: 37/27/22(completely
mute, SPL)
44(completely mute, SPL)
Noise in warm
room
dB(A)
Hi/Me/Lo: 38/29/23(completely
mute, SPL)
45(completely mute, SPL)
Fan motor
Nominal value
33W, DC motor, insulation grade E
24W, DC motor, insulation grade E
Power of motor
W (reference
value)
19
20
Power of electric
control
W (reference
value)
2
7.5
Power supply and
power cord
Single-phase, 220V, 50Hz and 3-core, 1.0mm2, 250V, 10A, 2m, w/o plug
Heat exchanger
Spiral, hydrophilic, 4-folded,
15-section, 2-row, 528-fin, 1-2
circuit
Spiral, hydrophilic, 20-section,
1-row, 621-fin, 2-1 circuit
Compressor
Nominal value
THACOM RM - B5077MDE2, 527W, DC frequency conversion
compressor, insulation grade E
Refrigerating
machine oil
ml
300, DIAMOND FREEZE MA68
Refrigerant
controller
Electronic expansion valve (Φ1.5mm) + hush pipe
Refrigerant
g
R-410A, 900g, addition/reduction not needed within the use range of 15m
Operating
pressure limit
Mpa
Max.: 4.15, Min.: 1.47
Air filters
Lysozyme filter + Antibacterial deodorizing filter + Mould-proof air filter
Accessories and
quantity
Indoor unit 1, mounting plate 1, tapping screw 5, battery 2, use and
installation manual 1, remote controller 1, filter components 2, outdoor unit
1, water elbow 1, Water shutoff plug 1
Operation control
devices
Wireless remote controller, electronic thermostat controlling room
temperature, microcomputer controlling defrosting
Safety devices
Serial signal protection, fan error protection, compressor over heat
protection, high voltage protection, over current protection, etc.
* The nominal values of “Noise in cool room” and “Noise in warm room” in the above table are tested in a dead
room.
Item
Unit
Rating cooling
Rating heating
Capacity
W
2500
3200
Power
W
680
790
Energy efficiency ratio
3.68
4.05
Energy efficiency grade
Grade A (European norm)
Note (1) The data are measured at the following conditions. The pipe length is 5m.
Item
Operation
Indoor air temperature
Outdoor air temperature
Standards
DB
WB
DB
WB
Cooling
27℃
19℃
35℃
24℃
Heating
20℃
—
7℃
6℃
Low temperature Heating
20℃ — 2℃
1℃
(2) The operation data are applied to the 220Vdistricts respectively.
(3) The refrigerant quantity to be charged includes the refrigerant in 15m connecting piping.
(Purging is not required even for the short piping.)
- 4 -
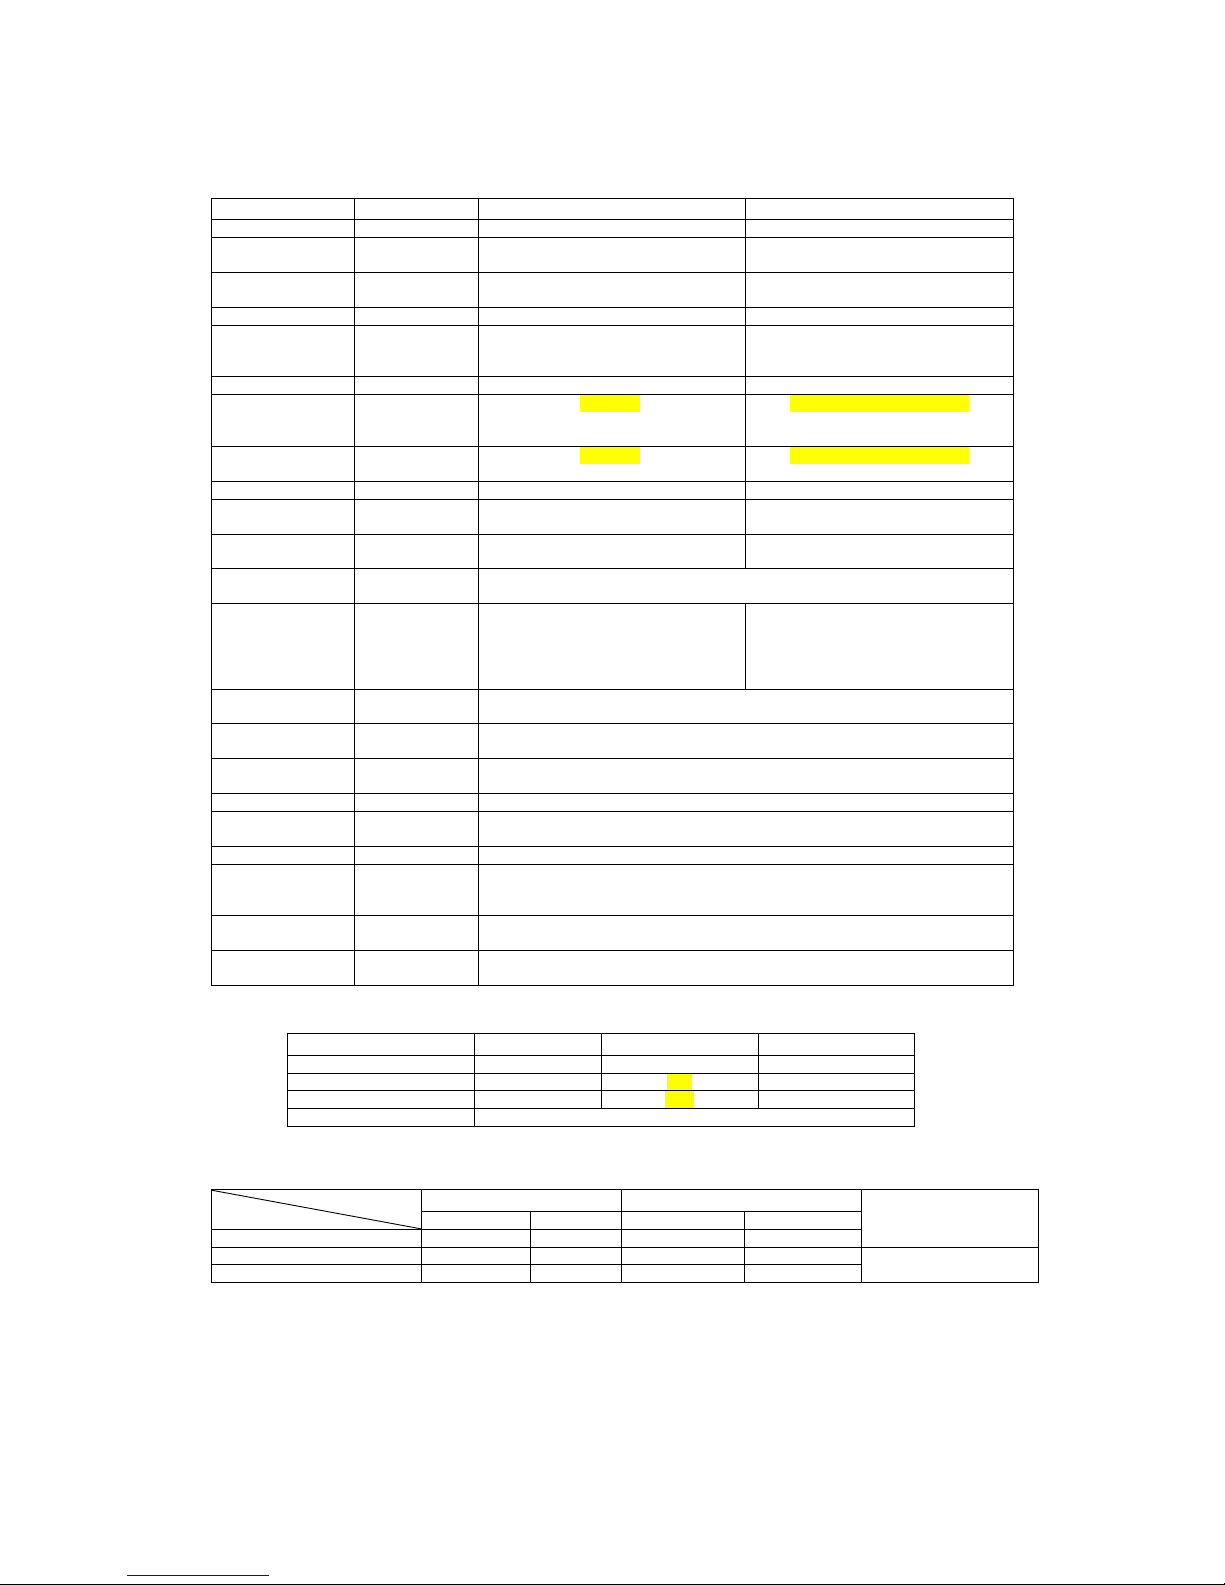
2.1.2 Model: SRK35MA–S (Indoor unit)
SRC35MA–S (Outdoor unit)
Item
Unit
Indoor unit SRK35MA–S
Outdoor unit SRC35MA–S
Net weight
kg
10.5
35
Machine
dimension
mm
798×230×294
780×290×540
Package
dimension
Length×
Width ×Height
850×365×310
920×380×590
Color White
Ash-colored
Fan
Through-flow type, AS resin +
glass fiber
Axial flow type, AS resin + glass
fiber (embedded damping spindle
sleeve)
Air flow
m3/h
600
1870
Noise in cool
room
dB(A)
Hi/Me/Lo: 39/31/23(completely
mute, SPL)
46(completely mute, SPL)
Noise in warm
room
dB(A)
Hi/Me/Lo: 41/34/23(completely
mute, SPL)
50(completely mute, SPL)
Fan motor
Nominal value
33W, DC motor, insulation grade E
24W, DC motor, insulation grade E
Power of motor
W (reference
value)
19
20
Power of electric
control
W (reference
value)
2
7.5
Power supply and
power cord
Single-phase, 220V, 50Hz and 3-core, 1.0mm2, 250V, 10A, 2m, w/o plug
Heat exchanger
Parent: Spiral, hydrophilic,
4-folded, 15-section, 2-row,
528-fin, Pf1.2
Child: Spiral, hydrophilic,
4-section, 1-row, 452-fin, Pf1.4
Spiral, hydrophilic, 20-section,
2-row, 1221-fin, 2-1 circuit, Pf1.4
Compressor
Nominal value
THACOM RM - B5077MDE2, 527W, DC frequency conversion
compressor, insulation grade E
Refrigerating
machine oil
ml
300, DIAMOND FREEZE MA68
Refrigerant
controller
Electronic expansion valve (Φ1.5mm) + hush pipe
Refrigerant
g
R-410A, 900g, addition/reduction not needed within the use range of 15m
Operating
pressure limit
Mpa
Max.: 4.15, Min.: 1.47
Air filters
Lysozyme filter + Antibacterial deodorizing filter + Mould-proof air filter
Accessories and
quantity
Indoor unit 1, mounting plate 1, tapping screw 5, battery 2, use and
installation manual 1, remote controller 1, filter components 2, outdoor unit
1, Drain elbow 1, Water shutoff plug 1
Operation control
devices
Wireless remote controller, electronic thermostat controlling room
temperature, microcomputer controlling defrosting
Safety devices
Serial signal protection, fan error protection, compressor over heat
protection, high voltage protection, over current protection, etc.
* The nominal values of “Noise in cool room” and “Noise in warm room” in the above table are tested in a dead
room.
Item
Unit
Rating cooling
Rating heating
Capacity
W
3500
4000
Power
W
960
1100
Energy efficiency ratio
3.65
3.64
Energy efficiency grade
Grade A (European norm)
Note (1) The data are measured at the following conditions. The pipe length is 5m.
Item
Operation
Indoor air temperature
Outdoor air temperature
Standards
DB
WB
DB
WB
Cooling
27℃
19℃
35℃
24℃
Heating
20℃
—
7℃
6℃
Low temperature Heating
20℃ — 2℃
1℃
(2) The operation data are applied to the 220Vdistricts respectively.
(3) The refrigerant quantity to be charged includes the refrigerant in 15m connecting piping.
(Purging is not required even for the short piping.)

- 5 -
2.1.2 Model: SRK50MA–S (Indoor unit)
SRC50MA–S (Outdoor unit)
Item
Unit
Indoor unit SRK50MA–S
Outdoor unit SRC50MA–S
Net weight
kg
10.5
43
Machine
dimension
mm
798×230×294
850×290×640
Package
dimension
Length×
Width ×Height
850×365×310
990×395×700
Color White
Ash-colored
Fan
Through-flow type, AS resin +
glass fiber
Axial flow type, AS resin + glass
fiber (embedded damping spindle
sleeve)
Air flow
m3/h
720
2400
Noise in cool
room
dB(A)
Hi/Me/Lo: 44/34/25(completely
mute, SPL)
50(completely mute, SPL)
Noise in warm
room
dB(A)
Hi/Me/Lo: 48/34/25(completely
mute, SPL)
50(completely mute, SPL)
Fan motor
Nominal value
33W, DC motor, insulation grade E
24W, DC motor, insulation grade E
Power of motor
W (reference
value)
19
20
Power of electric
control
W (reference
value)
2
7.5
Power supply and
power cord
Single-phase, 220V, 50Hz and 3-core, 1.5mm2, 250V, 16A, 2m, w/o plug
Heat exchanger
Parent: Spiral, hydrophilic,
4-folded, 15-section, 2-row,
528-fin, Pf1.2
Child: Spiral, hydrophilic,
4-section, 1-row, 452-fin, Pf1.4
Spiral, hydrophilic, 24-section,
2-row, 1334-fin, 4-1 circuit, Pf1.2
Compressor
Nominal value
THACOM RM - B5077MDE2, 527W, DC frequency conversion
compressor, insulation grade E
Refrigerating
machine oil
ml
300, DIAMOND FREEZE MA68
Refrigerant
controller
Electronic expansion valve (Φ1.5mm) + hush pipe
Refrigerant
g
R-410A, 1250g, addition/reduction not needed within the use range of 15m
Operating
pressure limit
Mpa
Max.: 4.15, Min.: 1.47
Air filters
Lysozyme filter + Antibacterial deodorizing filter + Mould-proof air filter
Accessories and
quantity
Indoor unit 1, mounting plate 1, tapping screw 5, battery 2, use and
installation manual 1, remote controller 1, filter components 2, outdoor unit
1, Drain elbow 1, Water shutoff plug 1
Operation control
devices
Wireless remote controller, electronic thermostat controlling room
temperature, microcomputer controlling defrosting
Safety devices
Serial signal protection, fan error protection, compressor over heat
protection, high voltage protection, over current protection, etc.
* The nominal values of “Noise in cool room” and “Noise in warm room” in the above table are tested in a dead
room.
Item
Unit
Rating cooling
Rating heating
Capacity
W
5000
5800
Power
W
1560
1600
Energy efficiency ratio
3.21
3.63
Energy efficiency grade
Grade A (European norm)
Note (1) The data are measured at the following conditions. The pipe length is 5m.
Item
Operation
Indoor air temperature
Outdoor air temperature
Standards
DB
WB
DB
WB
Cooling
27℃
19℃
35℃
24℃
Heating
20℃
—
7℃
6℃
Low temperature Heating
20℃ — 2℃
1℃
(2) The operation data are applied to the 220Vdistricts respectively.
(3) The refrigerant quantity to be charged includes the refrigerant in 15m connecting piping.
(Purging is not required even for the short piping.)
- 6 -
2.2 Range of usage
Please use the air conditioners within the following range of usage, otherwise the protector will be
triggered.
Cooling Operation
Heating Operation
Outdoor temperature
About 18℃~43℃
About -15~24℃
Indoor temperature
About18℃~32℃
About below 30℃
Indoor humidity
About below 80%
20~50 Models
Max. piping one-way length
Within 15 m
Vertical height difference
Within 5 m
Additional R410A Refrigerant
Not required
Voltage
Rating ±10%
Starting voltage
At least 85% of rating
Switching frequency
Max. 10 times per hour
Time interval between stop and start
Min. 3 min
2.3 Outline drawing
(1) Indoor unit: MA-S Series Unit: mm
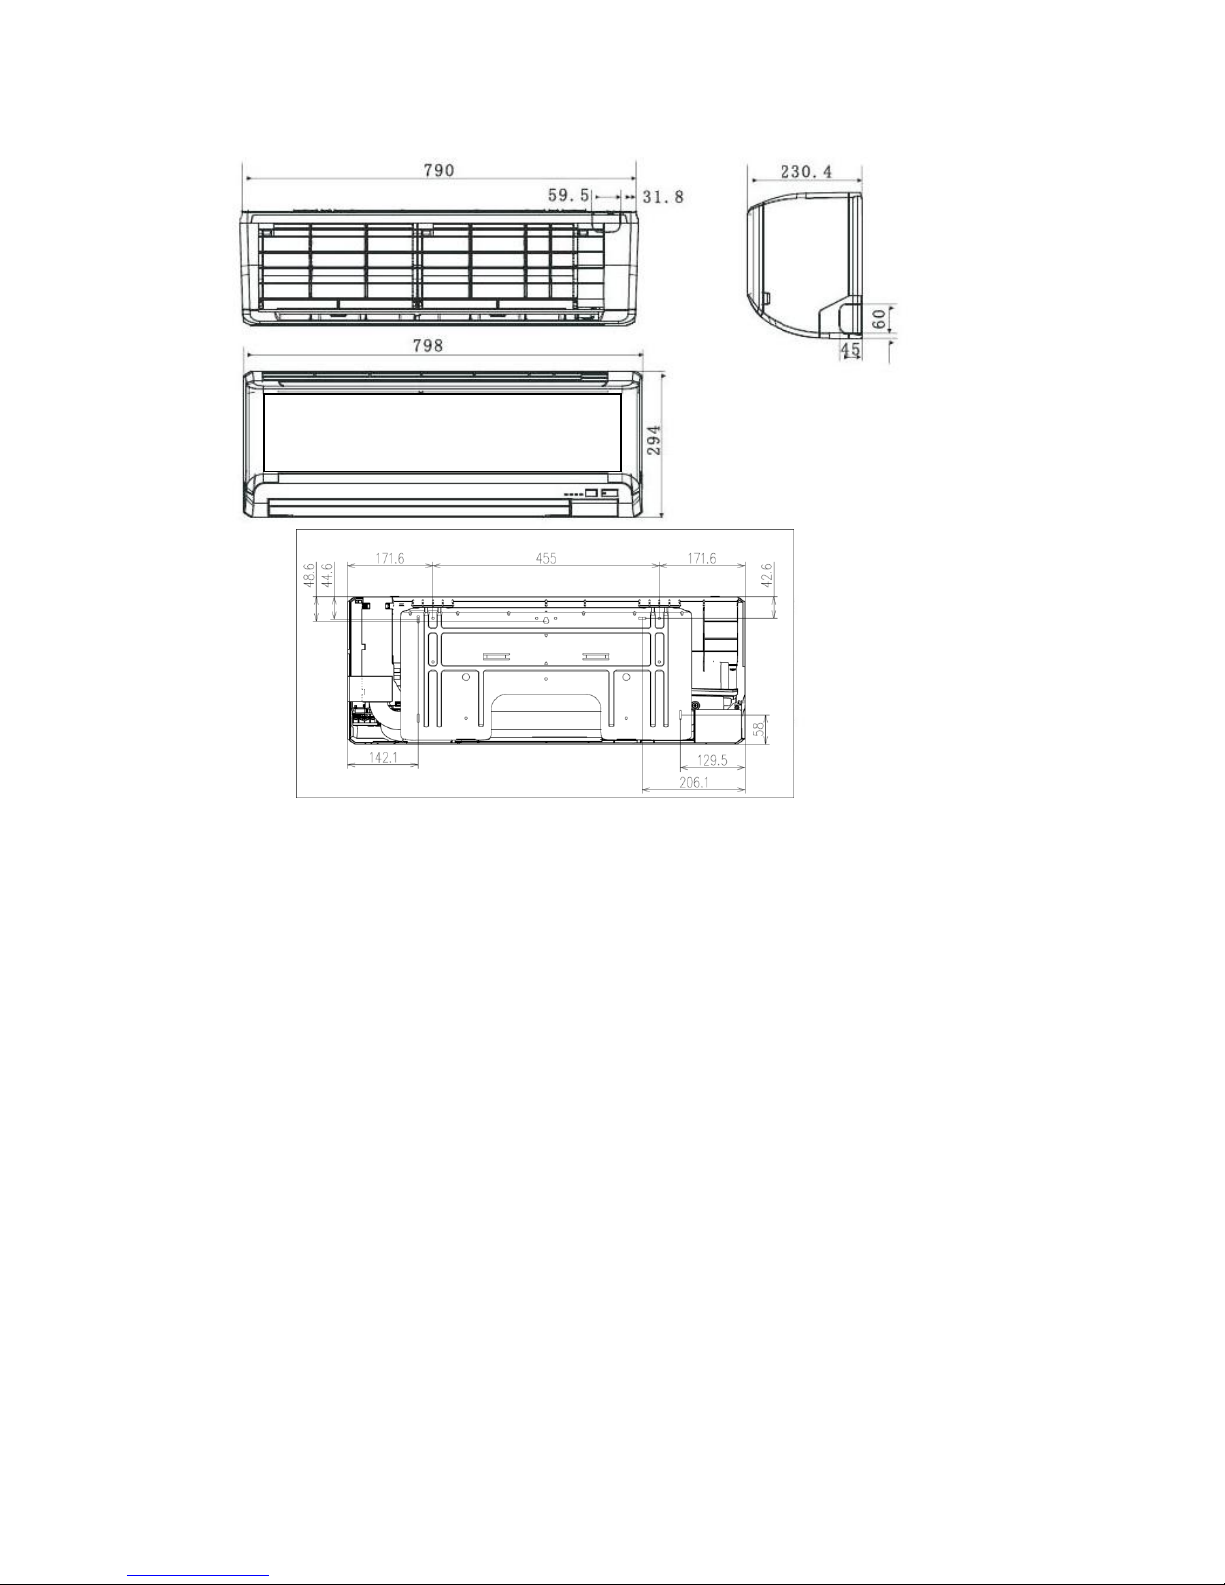
- 7 -

- 8 -
(2) Outdoor unit: SRC20MA-S/ SRC25MA-S/ SRC35MA-S Unit: mm
(3) Outdoor unit: SRC50-MA-S Unit: mm
Drainage pipes
Junction box
Operation valve (Liquid)
Flare connecting
Operation valve (Gas)
Flare connecting
Drain holes
Terminal block
Operation valve (Liquid)
Flare connecting
Operation valve (Gas)
Flare connecting
- 9 -
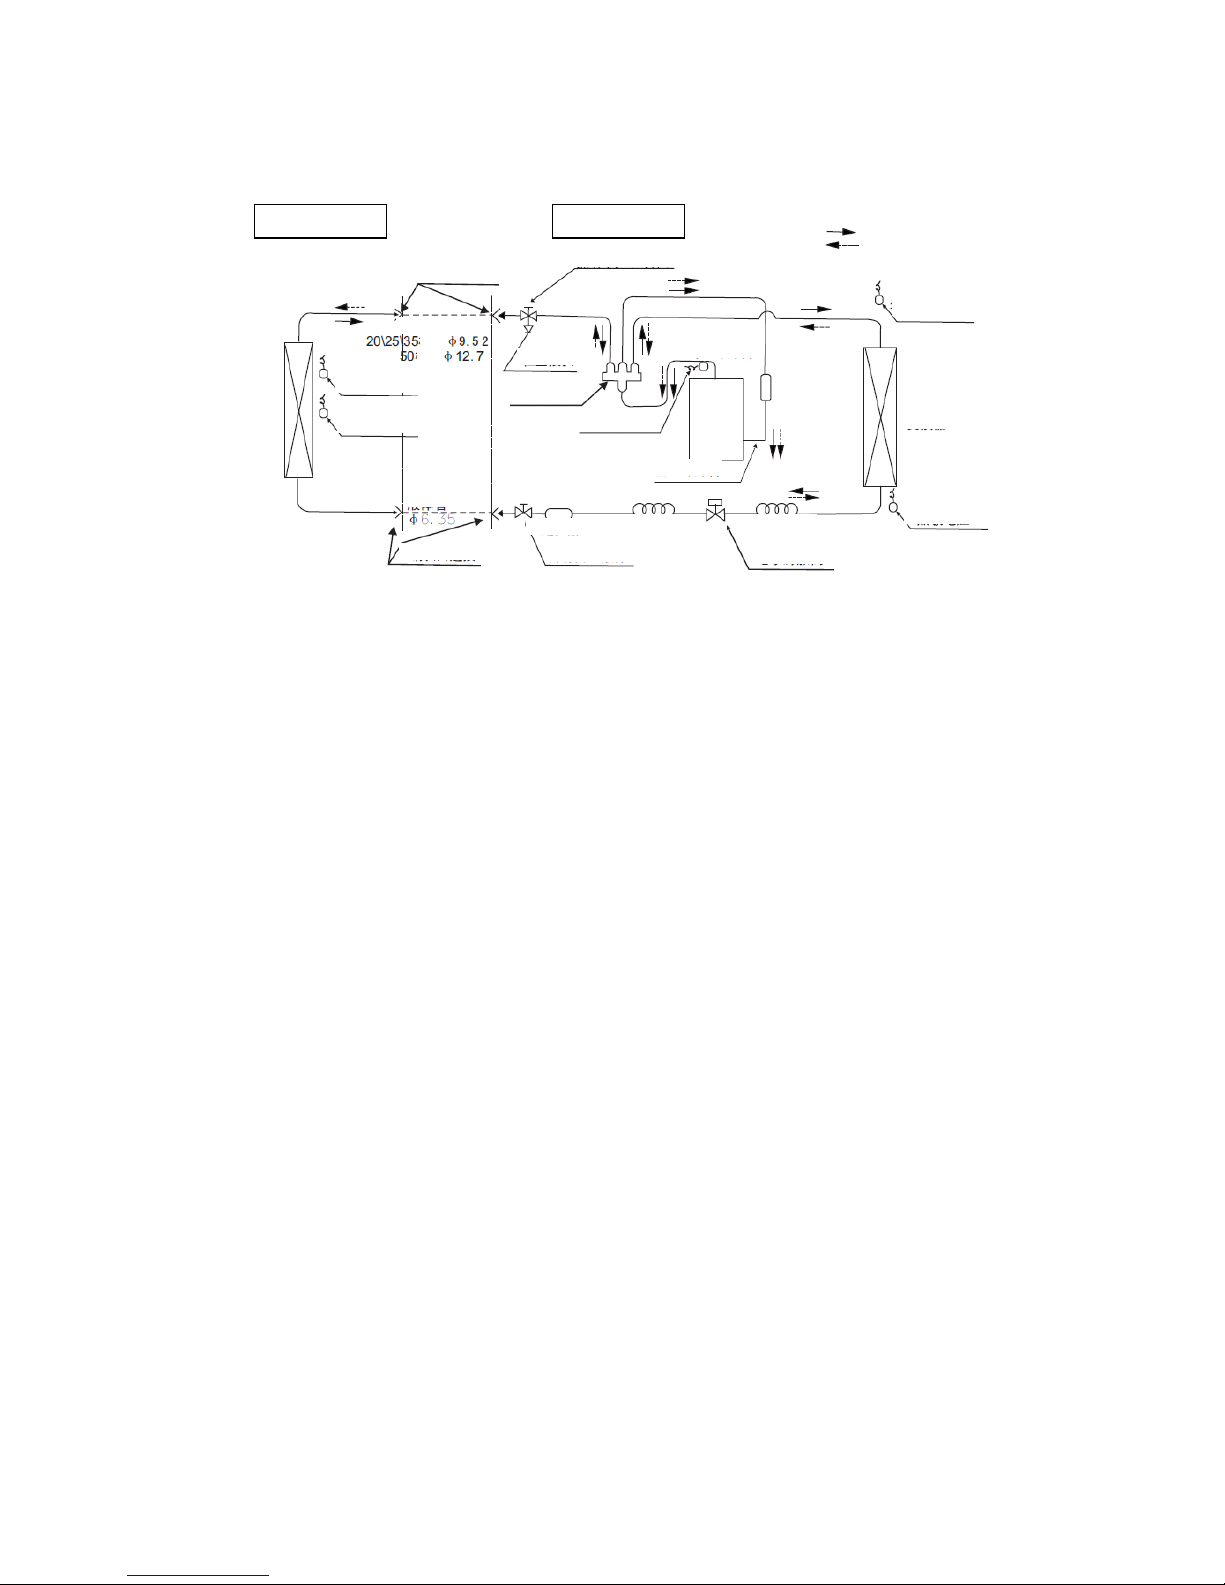
2.4 Cooling cycle system diagram
Models: MA-S Series
Note (1)……line is piping for site construction.
Indoor unit
Outdoor unit
Circulation of cooling
Circulation of heating
Flare connecting
Operation valve (Gas)
Outdoor air
temp. sensor
Air heat
exchanger
Heat exchanger
sensor
Gas liquid
separator
Compressor
Discharge pipe sensor
4-way valve
Check joint
Gas pipe Note (1)
model
Air heat
exchanger
Inlet air temp.
sensor
Air heat exchanger
sensor
Liquid pepe
Flare connecting
Filter
Electronic expansion valve
Hush pipe
Hush pipe
Operation valve (Liquid)
Refrigerant inlet pipe
Refrigerant outlet
pipe
model
- 10 -
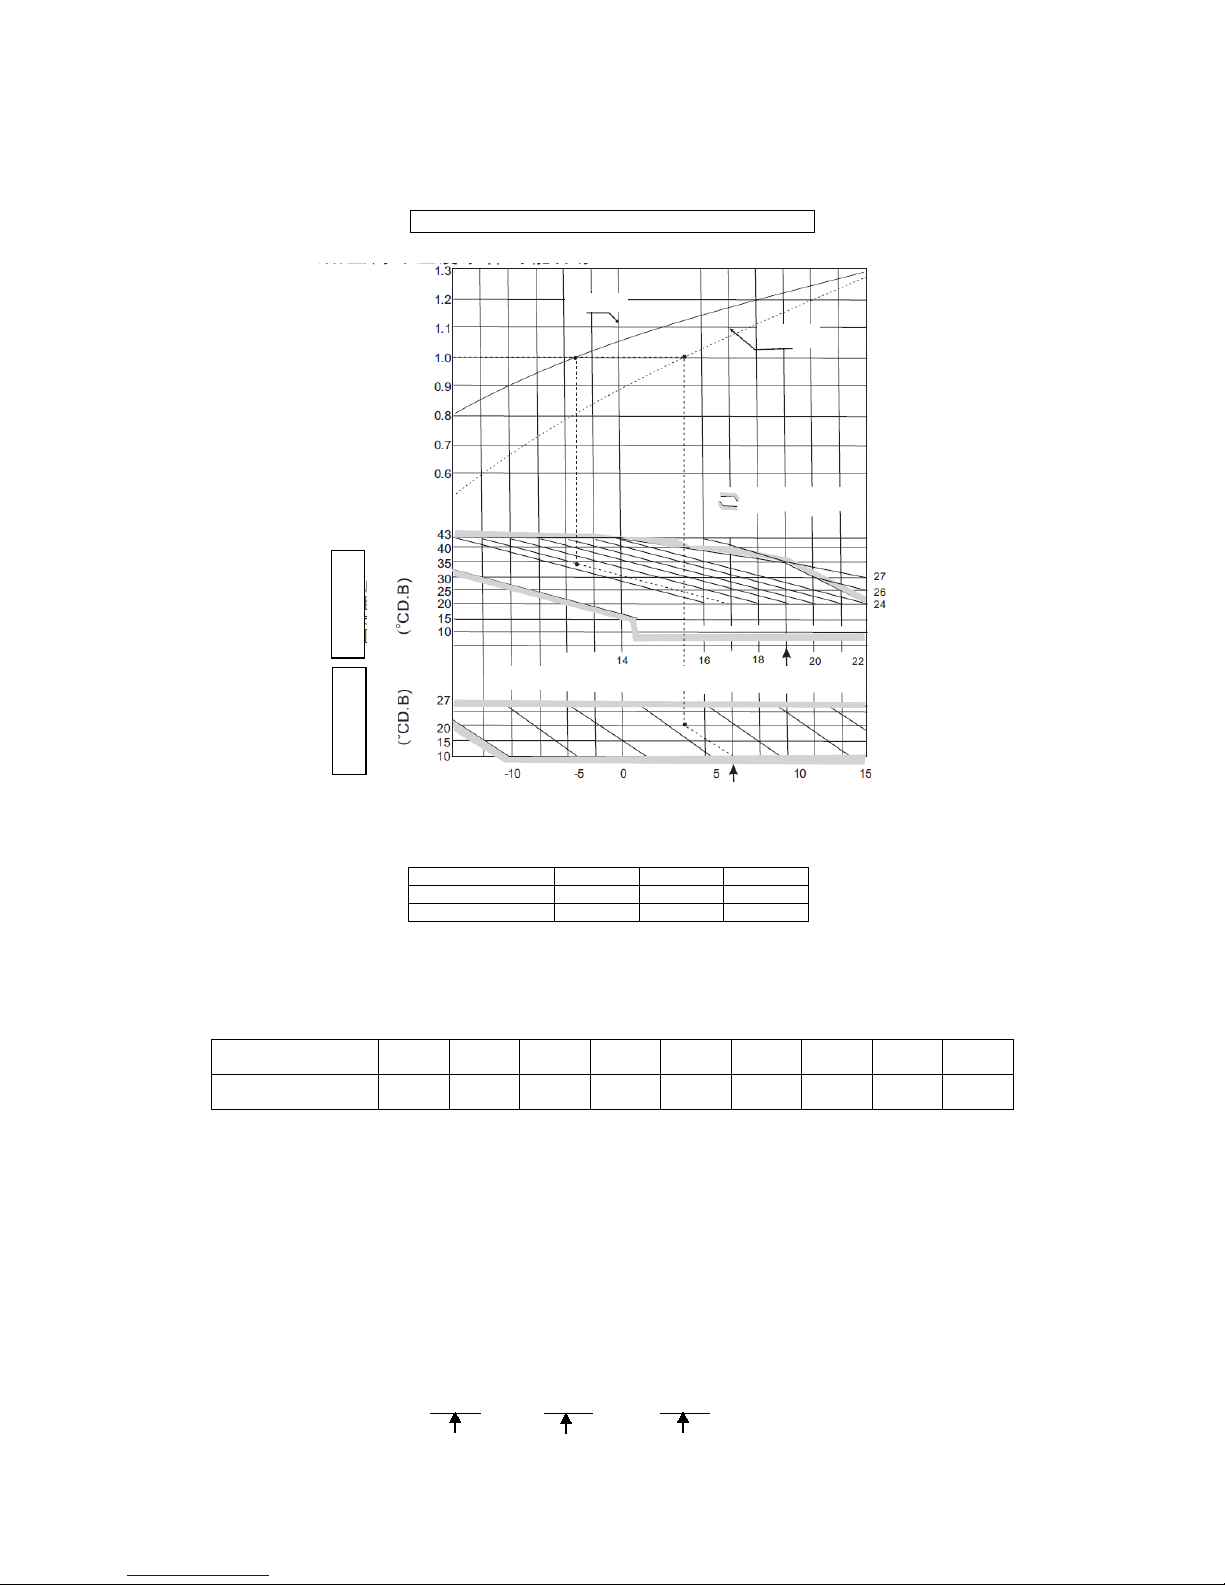
2.5 Performance curve
The cooling and heating capacities are measured in the following conditions. The actual capacity can
be obtained with the following formula.
Actual capacity = Rating capacity x Correction factor
(1) Capacity correction according to indoor and outdoor temperatures:
Outdoor air W.B. temperature (°C W.B.) ISO-T1 Standard
⑵ Capacity correction according to one way length of refrigerant piping:
It is necessary to correct the cooling and heating capacity according to the one way length of refrigerant
piping.
Piping length (m)
7
10
15
Cooling
1.0
0.99
0.975
Heating
1.0
1.0
1.0
⑶ Capacity correction according to frosting on outdoor heat exchanger during heating:
In additions to the foregoing corrections (1) and (2), the heating capacity also needs to be corrected
according to the frosting on the outdoor heat exchanger.
Air inlet temperature
of outdoor unit
-10
-9
-7
-5
-3
-1 1 3 5 Frosting correction
factor
0.95
0.94
0.93
0.91
0.88
0.86
0.87
0.92
1.00
⑷ Example of cooling and heating capacity calculation:
The actual cooling capacity of model SRK50MA-S with the one way piping length of 25m at the
indoor wet-bulb temperature of 19℃ and outdoor dry-bulb temperature of 35℃in summer or indoor
dry-bulb temperature of 20℃, outdoor dry-bulb temperature of 1℃and indoor wet-bulb temperature of
-1℃ in winter is
Actual cooling capacity = 5000 x 1.0 x 0.95 ≈ 4750W
Cooling
Heating
Accommodation
Correction factor of cooling & heating
capacity in relation to temperature
Cooling operation
Heating operation
Indoor air D.B.
temperature
Outdoor air D.B.
temperature
Indoor air W.B. temperature (°C W.B) ISO-T1 Standard

- 11 -
Nominal cooling Temp. correction Piping length
capacity factor correction factor
Actual heating capacity = 5800 x 0.81 x 0.95 x 0.86 ≈ 3838W
Nominal heating Temp. correction Piping length Frosting
capacity factor correction factor correction factor
- 12 -
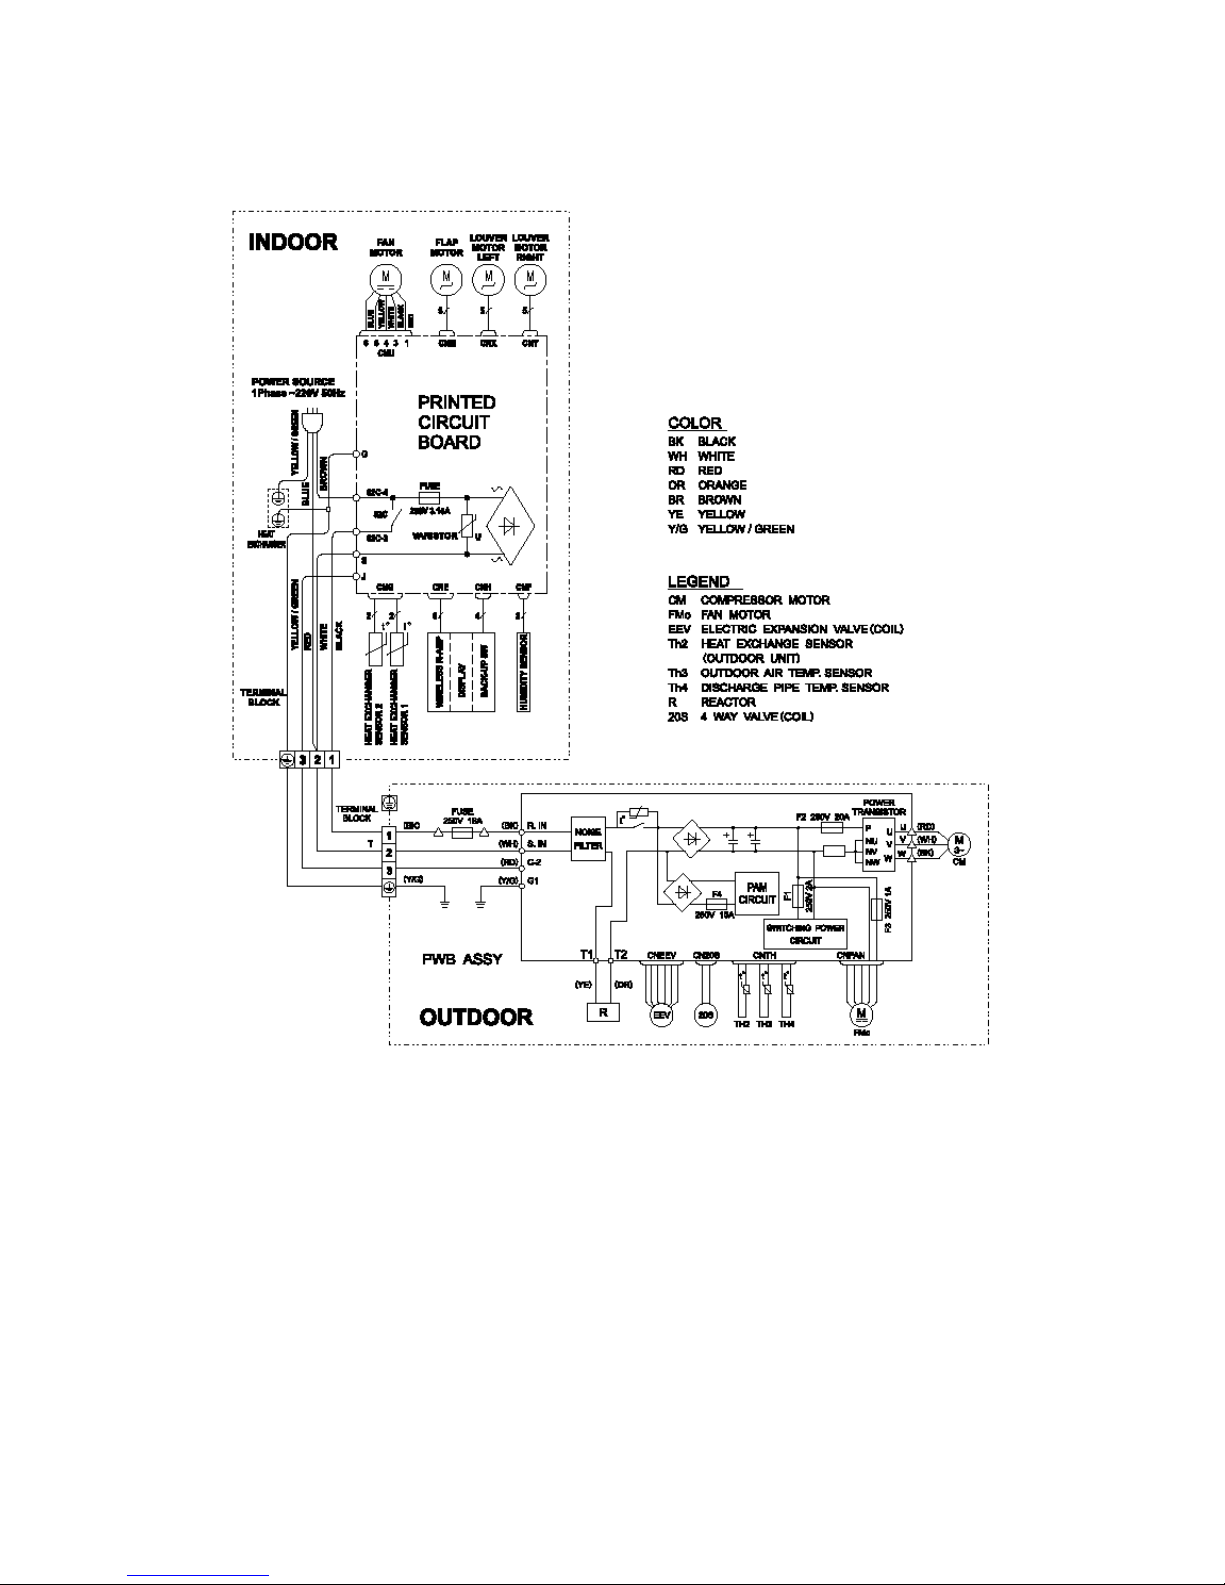
3 ELECTRICAL WIRING DIAGRAM
3.1 Circuit diagram: 20, 25, 35MA-S

- 13 -
3.2 Circuit diagram: 50MA-S

- 14 -
4 NAME OF EACH PART AND ITS FUNCTION
4.1 Name of each part
Indoor unit
Suctions air in the room
Wireless remote controller
Air filter
Page 19
Filter
Indoor fan
Power switch
Vent
Air blows from here.
Up/down air direction flap
Page 11
Left/right air direction flap
Page 11
Drainage pipe
Drains water removed from air
Refrigerant pipe joint and electric wire
Outdoor unit
Accessories
Air inlet
Vent
(on the side and back)
Batteries
Wireless remote controller
Filter retainer (2 pcs)
Lysozyme filter and
antibacterial deodorizing filter
Indication section of A/C and signal receiver of remote controller
Air inlet panel
Draws in the indoor air.
Removes dust or dirt from the inlet air
Room temperature detector
- 15 -
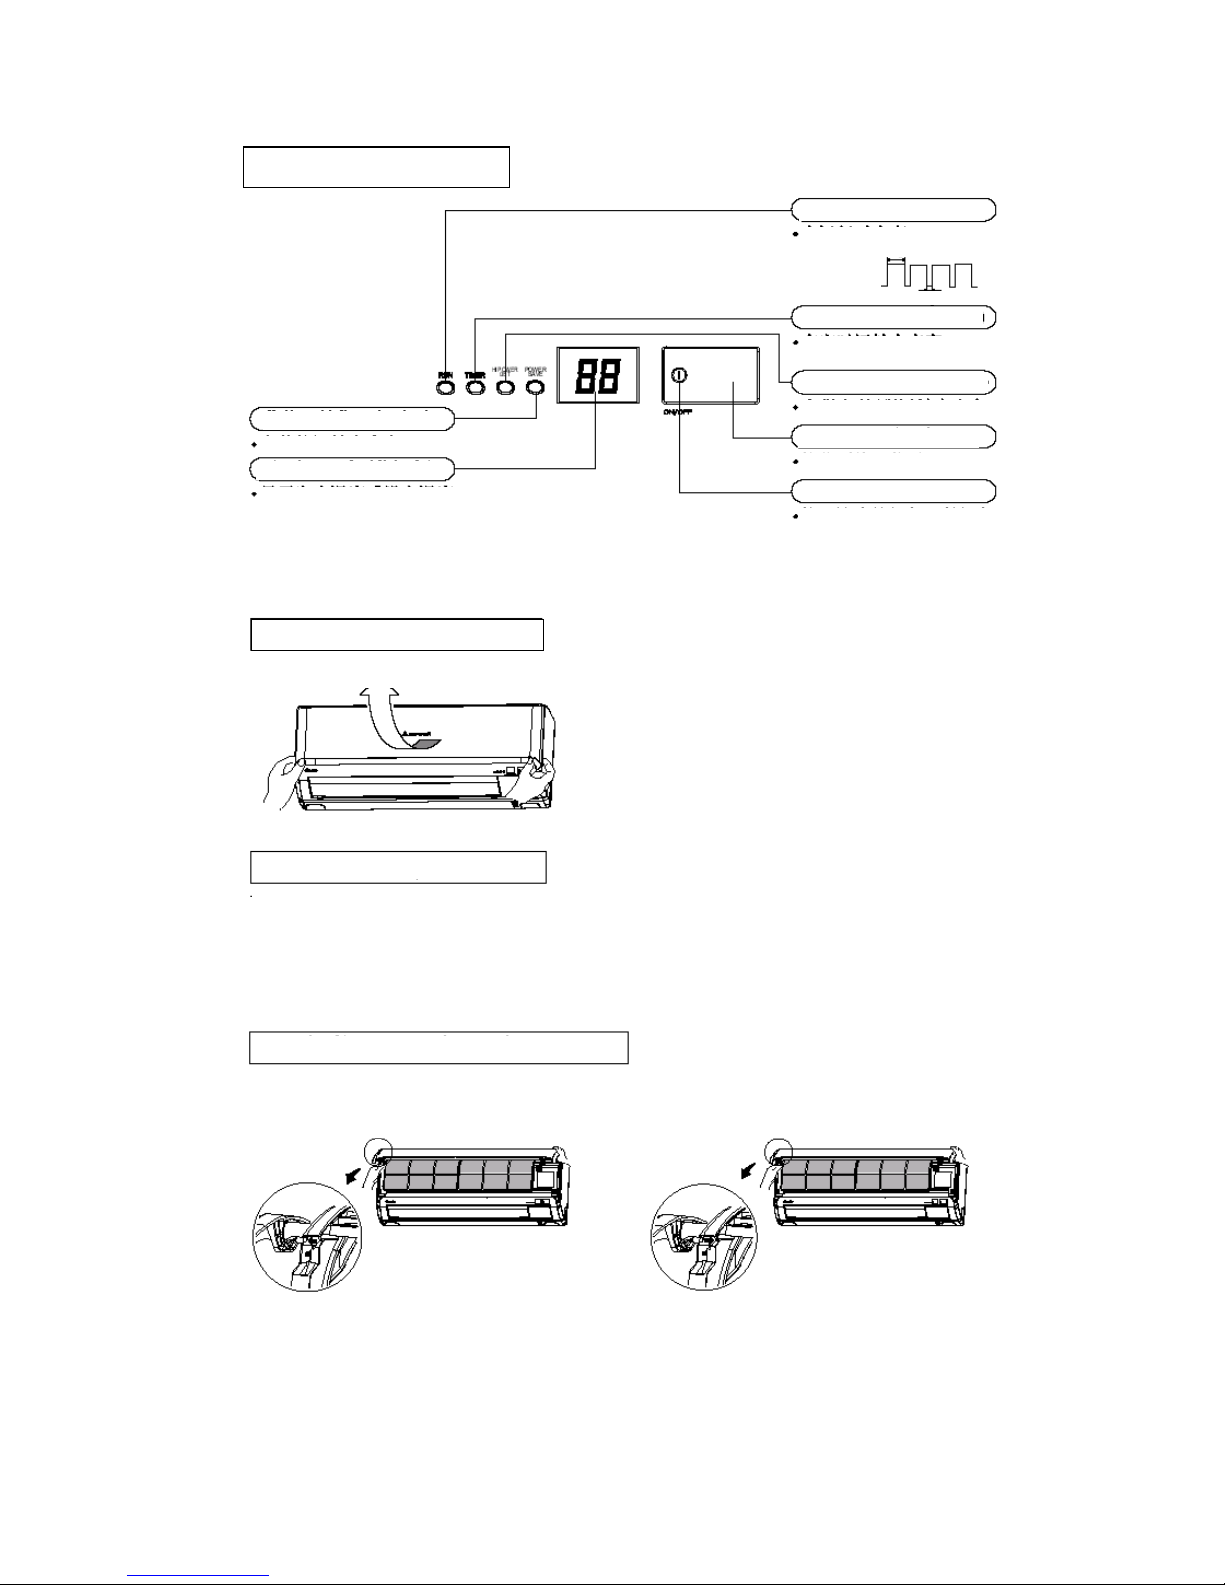
Indication section of air conditioner
RUN lamp (green)
ON during running
Heat-retaining
Running
Stop
1.5 sec.
0.5 sec.
ON during HI POWER/JET running
TIMER lamp (yellow)
ON during timing operation
HI POWER/JET lamp (green)
Receiving part of remote controller
Receives signals from remote controller
ON/OFF button
Press this button to begin
running; press it again to stop
running.
POWER SAVE lamp (green)
ON during Power Save running
Temp. displaying lamp (olivine)
It displays the room temperature or
set temperature. (Each time the
remote controller is pressed, the
temperature set with the remote
controller flashes for 10 seconds,
and then the room temperature is
displayed.
Opening the air inlet grille
Put your hands on the indentations on both sides, raise the grille towards yourself, and stop at the opening position of
about 60°.
Closing the air inlet grille
Gently push both sides and then gently push the central portion.
Removing and mounting the air inlet grille
To remove the air inlet grille to clean the inside, open it
at the position of about 65° and pull it towards yourself
to remove the grille.
To mount the air inlet grille, insert the mounting arm
onto the pin roll and close the grille.
- 16 -
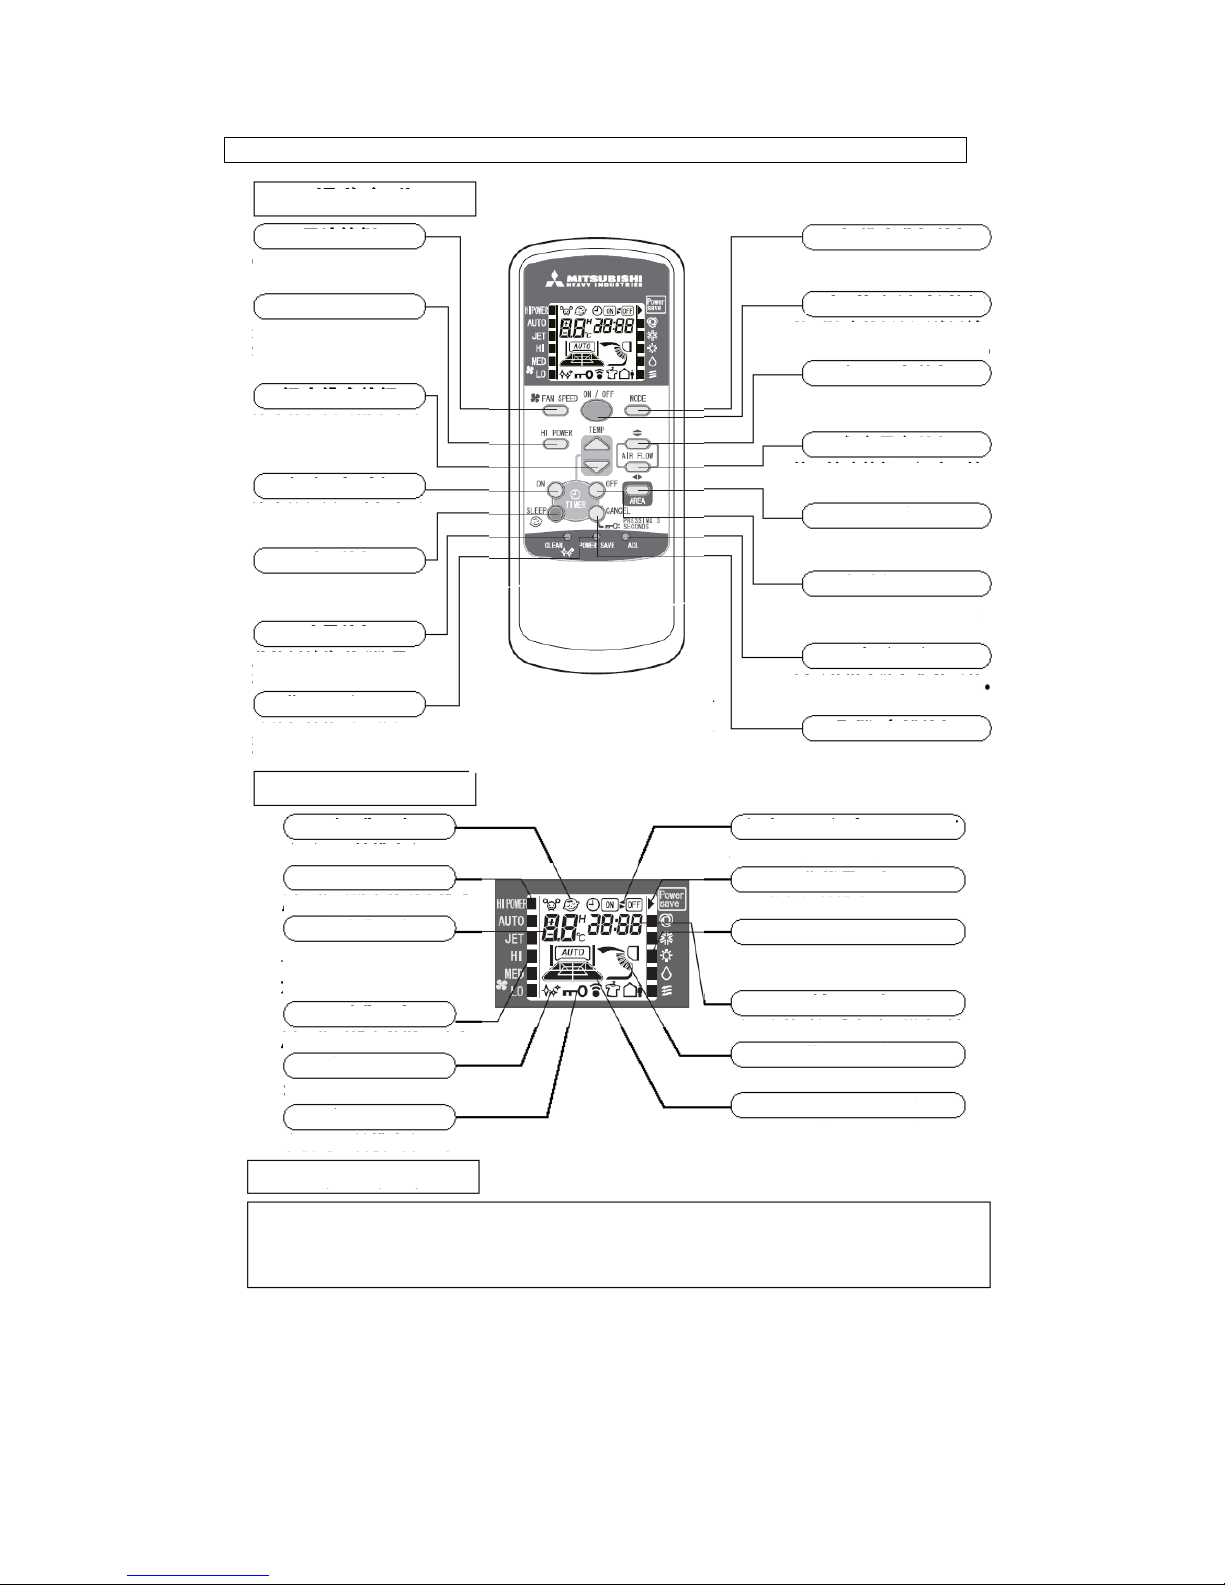
Operation and indication section for remote control
Operation section
FAN SPEED button
Each time this button is pressed,
■ displaying changes in order.
HI POWER button
This button is used to change
the HI POWER mode.
TEMP button
This button is used to set the room
temp. (or select the current time
and set time for timing operation.)
TIMER ON button
This button is used to select
the Timing ON operation.
SLEEP button
Press this button to switch to
the SLEEP operation.
CLEAN button
Press this button to switch to
the CLEAN mode.
POWER SAVE button
Press this button to switch to the
POWER SAVE mode.
Displaying section
SLEEP indicator
Appears in the SLEEP mode
HI POWER indicator
■ is used to indicate the HI POWER mode
TEMP indicator
Displays the set temperature
(No temperature is displayed in
the AUTO mode.
FAN SPEED indicator
■ is used to indicate the fan speed set.
CLEAN indicator
Appears in the CLEAN mode
KEY LOCK indicator
Appears in the CLEAN mode
Transmission method
MODE button
Each time this button is pressed, ■
displaying changes in order.
ON/OFF (luminous) button
Press this button to begin running;
press it again to stop running.
Up/Down air direction button
Press this button and the air flap begins
to swing upwards and downwards.
Left/Right air direction button
Press this button and the air flap begins to
swing to the left and the right.
AREA button
Press this button to set the air
regulation area in the room.
TIMER OFF button
This button is used to select the
Timing OFF operation.
ACL switch
Used to reset the microcomputer
CANCEL/KEY LOCK button
Press this button to cancel Timing ON/OFF
and SLEEP operations; press and hold it for 3
seconds to lock the functional keys.
Timing ON/ Timing OFF indicator
Appears in the Timing ON/ Timing OFF mode
Power Save indicator
Indicates the POWER SAVE mode
MODE indicator
■ is used to indicate the mode selected:
[AUTO/ COOLING/ HEATING/ DRYING/ BLOW]
TIME indicator
Displays the current time or the set time of the timer
AIR FLOW indicator
Displays the swinging mode of the flap
AREA indicator
Displays the air regulation area in the room
When the remote controller is pointed at the air conditioner, press a button on the remote controller and the signal will be
transmitted to the air conditioner. When the signal is received correctly, the air conditioner will issue the receiving sound. The
effective linear distance of transmission of the remote controller is 5 meters. The transmission head of the remote controller
should be pointed at the receiving head, otherwise, the receiving may be impacted.
● The above figure shows all
control contents for convenient
explanation. However, in actual
use, only related contents are
displayed.
- 17 -
4.2 Emergency switch:
(1) When the remote controller is not used, the emergency operation switch “ON/OFF” button
can be used to turn on/off the machine.
(2) Press the “ON/OFF” button to begin operation. Press it
again to stop.
(3) Operation items:
● Operating mode: Automatic
● Fan speed: Automatic
● Air direction: Automatic
(4) Note:
Press and hold it for over 5 seconds to set to the cooling mode automatically.
4.3 Automatic restart due to power cut:
(1) This function can rapidly record the operation state immediately before the air conditioner is
switched off due to power failure, and will resume operation automatically after the power
supply is restored.
(2) This function is set to Active by default.
(3) Operation state memorized immediately before power cut includes:
● Indoor operation switching (cool room · warm room · drying · automatic · air flow, stop)
● Air flow
● Power Save
● Set temperature
● Air direction
(4) After automatic restart due to power cut, the following settings will be canceled:
Timing operation, HI POWER operation, CLEAN operation
(5) Priority of start:
Compressor 3 min. delayed start control > Automatic restart due to power cut
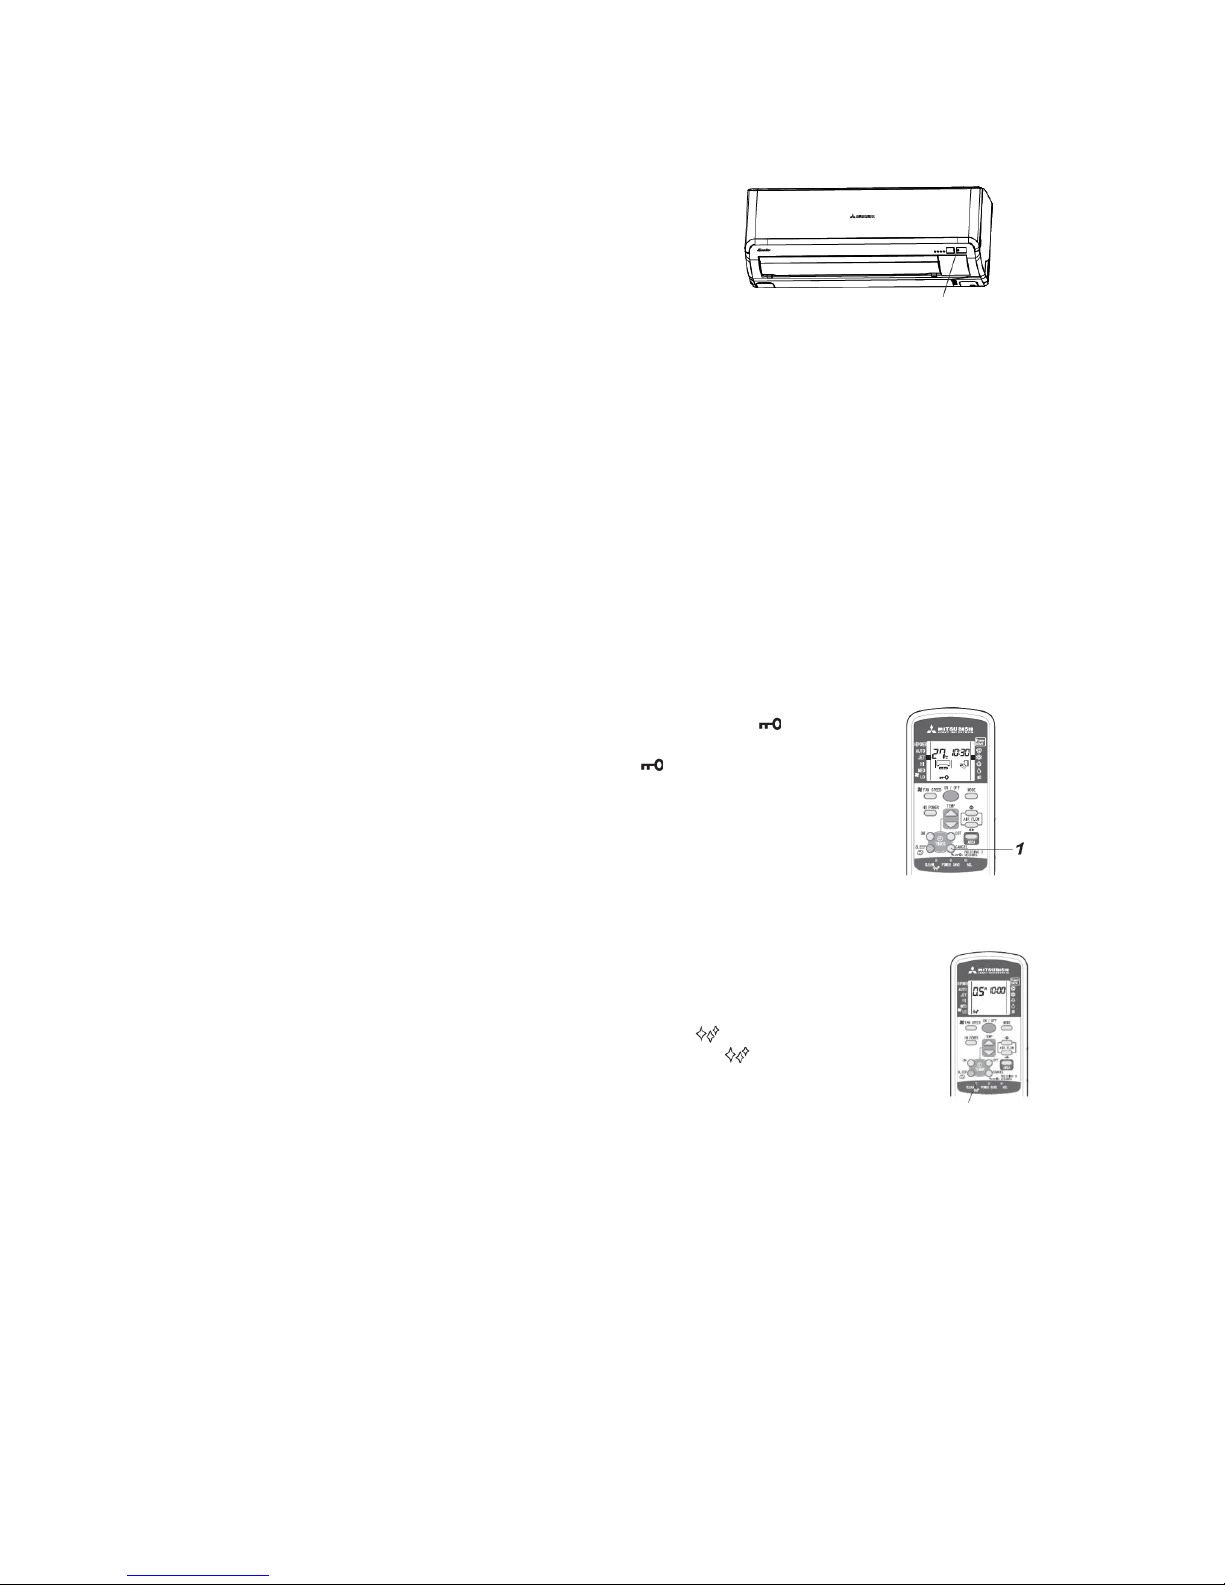
4.4 Key lock:
(1) The key lock setting prevents misoperation.
(2) Press and hold the KEY LOCK button for over 3 seconds and will appear
on the remote controller, which means the function is enabled; press and hold
the KEY LOCK button for over 3 seconds and on the remote controller
will disappear, which means the function is disabled
(3) When the function is enabled, only the ON/OFF button can be operated, and
the settings of temperature, air flow, air direction, etc. can’t be changed.
(4) When the function is enabled in the JET/ HI POWER operating mode, the
operation and action are valid before the air conditioner stops and become
invalid when the air conditioner operates again.
(5) The key lock function can’t be set in the CLEAN operation and various timing operations.
4.5 CLEAN operation:
(1) CLEAN operation: In the automatic, cooling and drying operating modes, when the
air conditioner is turned off, the fan of the indoor unit will continue to run for 30
minutes to dry the moisture in the indoor unit and inhibit the growth of mould and
bacteria. However, mould, bacteria, stain, etc. attached can’t be removed.
(2) Press the CLEAN button on the remote controller and will appear, which
means the CLEAN function is enabled; press it again and will disappear,
which means the CLEAN operation is disabled.
(3) After the CLEAN function is enabled, in the automatic/cooling/drying mode, press
the ON/OFF button to stop the operation of the air conditioner. In such case, the
RUN lamp will go off; the CLEAN indicator on the remote controller will light up; and the
CLEAN operation will run for about 30 minutes.
(4) During the CLEAN operation, press the ON/OFF button and the CLEAN operation will stop.
(5) According to the relative humidity, the rotate speed of the fan will be selected automatically
(including 3 rotate speeds) and will not be changed during the operation.
(6) When Air Flow, Timing On and SLEEP Operation stop, the CLEAN operation can’t run.
(7) During the CLEAN operation, press the SLEEP button and the CLEAN operation will be
switched to the SLEEP operation.
(8) The CLEAN function is disabled by default. Users need to set it according to the above steps.
ON/OFF button of the equipment
CLEAN
- 18 -
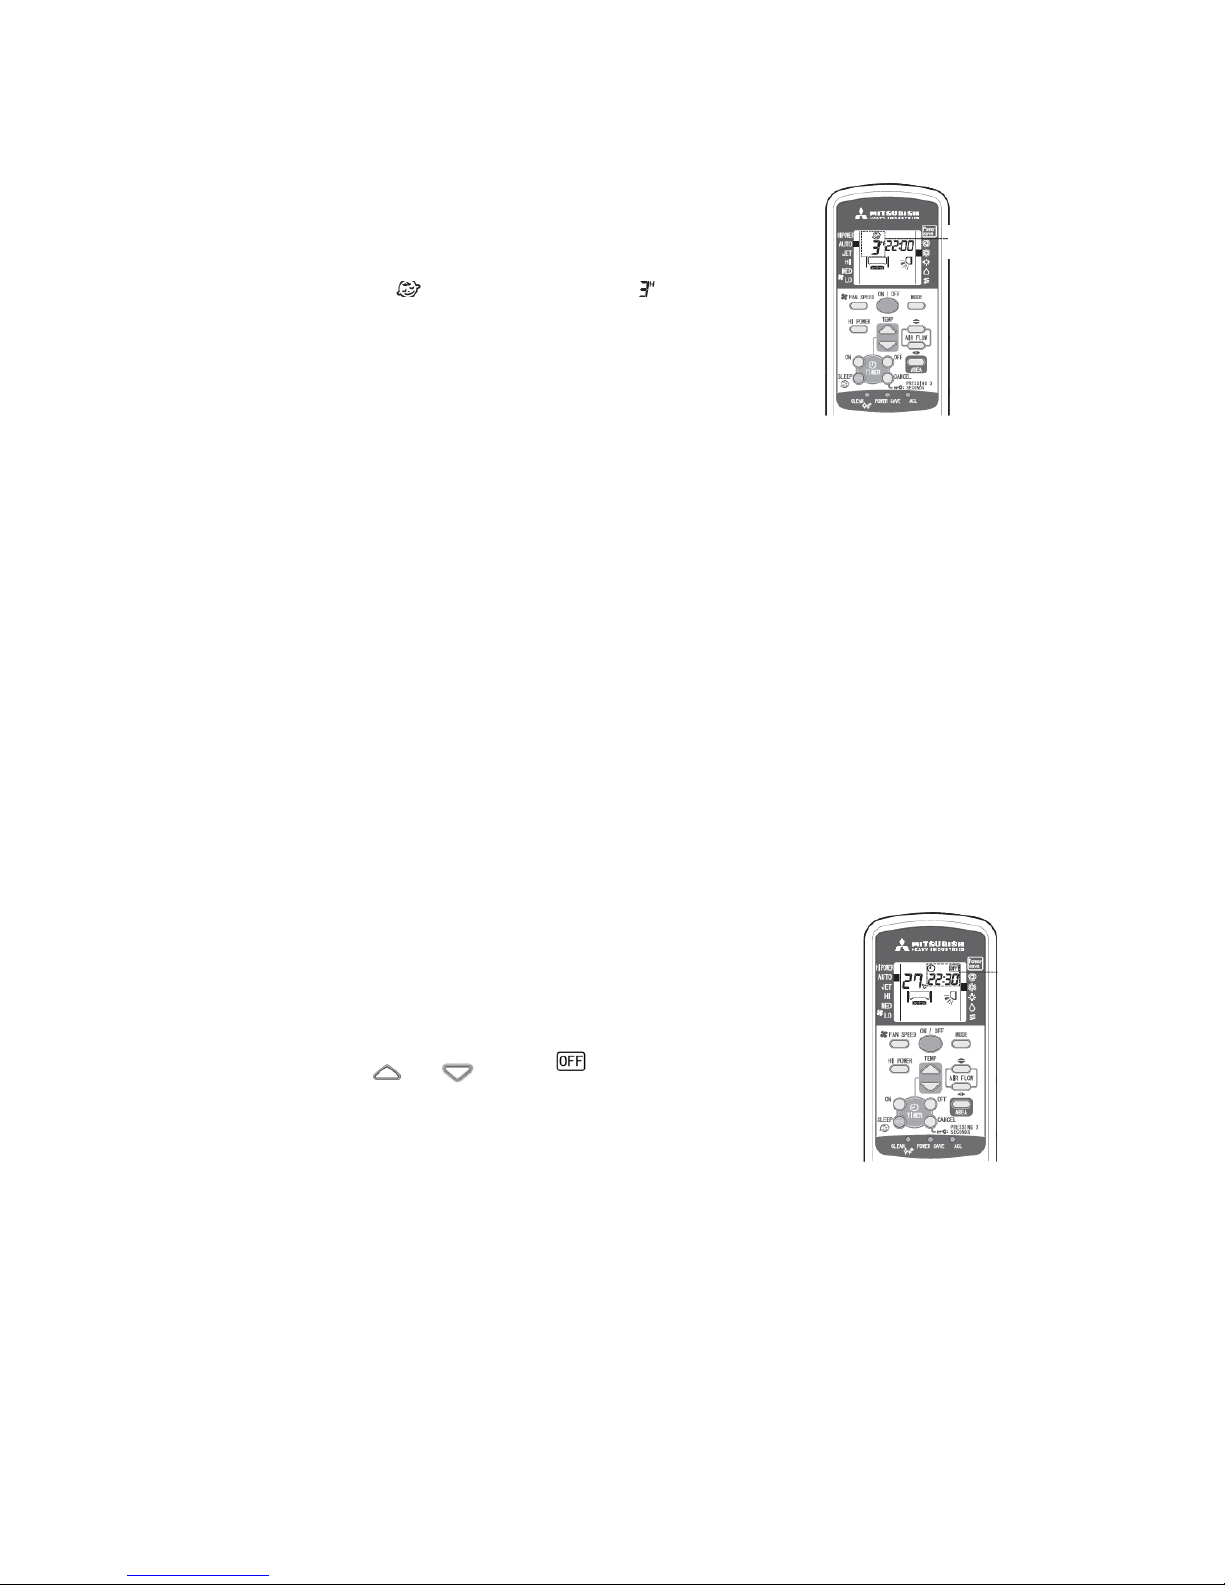
4.6 SLEEP operation:
(1) SLEEP operation: This function prevents the temperature in the cooling operation from
becoming too low and the temperature in the heating operation from
becoming too high; regulates the room temperature automatically as
time goes by; and stops automatically after the time set.
(2) Operation method:
① If the SLEEP button is pressed during the operation of the air
conditioner, and the run time, such as , will appear.
There are 11 options, including 1-10 hours (interval of 10 hours)
and OFF.
② If the SLEEP button is pressed when the air conditioner is in the
stop mode, the air conditioner will execute the previous
operation settings and stop after the time set.
(3) Making correction based on the set temperature and regulating the
room temperature automatically:
① During cooling operation:
Beginning (-1℃), 1 hour later (±0℃), 2 hours later (+1℃);
② During heating operation:
Beginning (-1℃), 30 minutes later (-2℃), 1 hour later (-1℃), 2 hours later (-6℃); 4 hours
later (-3℃)
(4) The set time of SLEEP operation can be changed with the SLEEP button at any time. Since
the remote controller receives the change signal, the air conditioner continues to run
according to the changed set time.
(5) When the operation switch change signal is received during the SLEEP operation, the air
conditioner will control the sleep setting according to the operation switching and the
temperature correction value in the elapsed time will be retained.
(6) When the set temperature change signal is received during the SLEEP operation, the
temperature correction value will be recalculated.
(7) When the air conditioner is set to automatic control (fuzzy automatic) and the indoor
operating mode (cool room · drying · warm room) is set, the SLEEP operation begins. The
change of cool room · drying · warm room state arising from the automatic control (fuzzy
automatic) is made only when the set temperature is changed. (In other words, the operating
mode judgment according to the operation judgment timing is not executed.)
(8) Priority of sleep timing operation
① Set temperature correction: HI POWER operation > Setting correction temperature
② Timing: Sleep timing run > HI POWER run
4.7 Timing OFF:
(1) Timing OFF: The timing OFF operation begins when the Timing OFF
signal is received from the remote controller and stops after the set time.
(2) Operation method:
① When the air conditioner is in the stop mode, press the ON/OFF
button;
② When the air conditioner is running, press the TIMER OFF button
and the Timing OFF indicator will flash;
③ Press the or button to set the OFF time (unit: 10
minutes);
④ Within 60 seconds, press the TIMER OFF button and the indicator
will change from flashing to a fixed state. The setting is finished;
⑤ The TIMER lamp (yellow) of the indoor unit lights up.
(3) Use the TIMER OFF button to set a new Timing OFF time at any time.
(4) During the Timing OFF operation, all setting change signals from the remote controller are
accepted.
(5) During the Timing OFF operation, when the Timing ON signal is received, the operation will
become the programmed timing operation and the remaining Timing OFF time will be
retained.
(6) During the Timing OFF operation, when the Sleep signal is received, the Timing OFF
operation will be canceled (and the remaining time will be canceled too) and the operation
will be switched to the SLEEP operation. (In other words, the SLEEP operation can’t be used
with the Timing OFF function.)
(7) To cancel the Timing OFF function, press the Cancel button and the TIMER lamp will go
off.
Sleep
timing
Timing
OFF

- 19 -
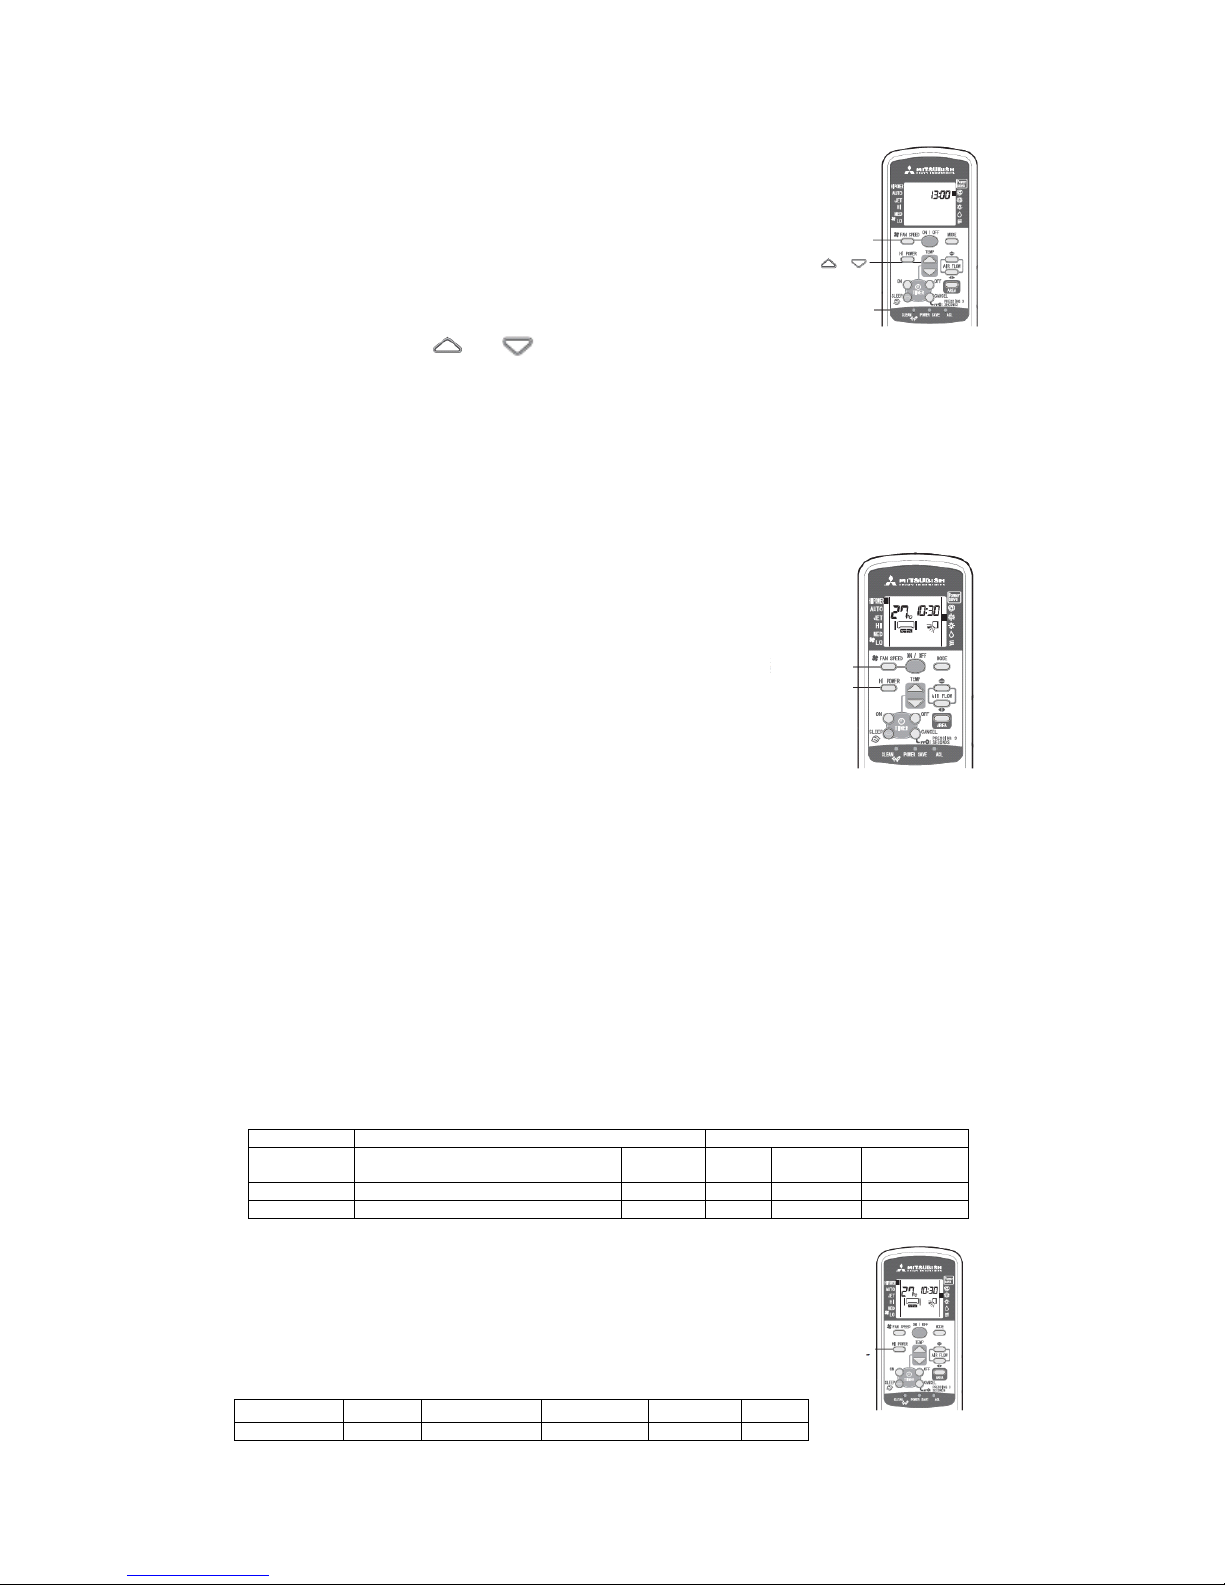
4.8 Timing ON:
(1) Timing ON: The air conditioner begins to detect the room temperature 60 minutes before
the set time and commences operation 5-60 minutes in advance according to the difference
between the room temperature and the set temperature to make the room temperature reach
the best value at the set time.
(2) Operation method:
① To set the Timing ON operation, whether the air conditioner is running is not considered.
② Press the TIMER ON button and the Timing ON lamp will flash;
③ Press the or button to set the ON time (unit: 10 minutes);
④ Within 60 seconds, press the TIMER ON button and the lamp will change from flashing
to a fixed state. The setting is finished;
⑤ The TIMER lamp (yellow) of the indoor unit lights up.
(3) Composition of Timing ON operation:
(4) Notes:
① The air conditioner commences operation 5-60 minutes before the set time.
② When the time reaches the set time, the TIMER lamp (yellow) will go off;
③ During the Timing ON operation, the current time is not displayed.
(5) Use the TIMER ON button to set a new Timing ON time at any time and the air conditioner
will enter the stand-by state or warm-up running state after the changed set time.
(6) When the Timing OFF signal is received, the air conditioner will run in the timing mode with
an earlier set time.
(7) During the Timing ON operation and stand-by, when the operation switching, mode
switching or set temperature change signal is received from the remote controller, only the
changed content will be accepted.
4.9 Programmed timer:
(1) Timing operations include Timing ON and Timing OFF. Once the function is enabled, the
operation begins. As long as the ON/OFF button is not pressed, the air conditioner will begin
operation at the same time everyday till the stop time.
(2) Operation method:
For example, to set the air conditioner to turn on at 8:00 and turn off at 22:30,
① Step 1: By referring to “4.9 Timing ON”, set it to ;
② Step 2: By referring to “4.8 Timing OFF”, set it to ;
③ When the TIMER lamp (yellow) lights up, the setting is finished;
④ The time will be displayed on the remote controller;
⑤ The displaying will change with the operation state: Stop( ),
Run.( )
(3) Repeated running:
(4) Notes:
① The operation becomes programmed running only when both the Timing On and Timing
OFF signals are received;
② The Timing ON and Sleep combined operation is executed once only and will not
become programmed operation.
(5) Use the TIMER ON or OFF button to set new ON time.
Timing ON
RUN Lamp
TIMER Lamp
Running state of compressor
Lamp lights up
Lamp lights up
Stop
△Timing ON signal
Timing ON stand-by
Warm-up running
(MAX 1 hour)
△Timing ON set time
Timing ON running
Timing ON run
Timing ON run
Timing ON run
Timing OFF run
Timing OFF run
Timing OFF
setting
Timing OFF
set time
Timing ON
set time
24 hours
Timing ON
set time
24 hours
Timing OFF
set time
24 hours
Timing OFF
set time
- 20 -
4.10 Current time setting:
(1) After inserting the batteries, the current time is set to 13:00
automatically.
In time setting, all contents displayed on the remote controller
are reset.
(2) Operation method:
For example, to set to 11:30,
① Step 1: Use the pen point to press the ACL switch and the
TIMER lamp will flash. Here you can set the current time;
② Step 2: Press the or button to set the current time to 11:30;
③ Within 60 seconds, press the ON/OFF button and the lamp will change from flashing to a
fixed state, thus the setting is finished.
(3) Notes:
① Timing operation is set according to the current time;
② The time on the remote controller changes according to the setting of current time.
4.11 HI POWER operation
(1) HI POWER operation: Press the HI POWER button to enable the HI POWER operation, that
is, the cooling or heating function runs continuously for 15 minutes with the fan speed set to
High.
(2) Operation method:
① Step 1: In the Automatic, Cooling or Heating mode, press
the ON/OFF button;
② Step 2: Press the HI POWER button to switch to the HI
POWER mode, and the indoor unit will commence HI
POWER or JET operation 5 seconds after receiving the
signal.
(3) The HI POWER mode is canceled in one of the following
cases:
① The HI POWER button is pressed again;
② The operating mode is changed;
③ After 15 minutes;
④ The FAN SPEED button is pressed;
⑤ The system enters the Timing operation.
(4) Notes:
① During the HI POWER operation, the room temperature is not controlled.
② The HI POWER operation is not supported during the drying and programmed timer
operation.
③ The Shower and Warm Feet modes can’t be used with the HI POWER mode.
④ During the Timing ON operation, the HI POWER operation commences only after the
time reaches the ON time.
⑤ During the timing operation, the HI POWER operation can be set only after the timing
setting is finished.
(5) Setting difference between HI POWER and JET operations:
“O” means the option can be set; “X” means the option can’t be set.
Operating mode
Settings
Auto Cooling Heating Drying
Air flow
Temp.
Fan
speed
Air
direction
HI POWER
X
X X X O JET O X O
O
4.12 JET operation:
(1) JET operation: The system runs at the maximum fan speed to rapidly
achieve cooling or heating.
(2) Operation method: Press the FAN SPEED button to switch to the JET
mode.
(3) Note: JET operation has no time limit.
★ In the Cooling or Heating mode, the fan speeds corresponding to the
various modes are as follows:
Mode
Auto
JET
HI POWER
Standard
Econo
Fan Speed
Auto
Ultra high
Hi
Me
Lo
ON/OFF
ACL
ON/OFF
HI POWER
FAN SPEED
- 21 -
4.13 POWER SAVE operation:
(1) The Power Save function regulates the frequency of the compressor, etc. and
reduces the current value during operation, thus reduces the cooling/heating
capacity to save energy.
(2) Operation method: Point the remote controller at the air conditioner and use the
pen point to press the POWER SAVE button to make point at Power Save
. The Power Save operation is enabled.
(3) Notes:
① The Power Save operation is set to disabled by default;
② When Power Save is enabled, other operations following it (except reset and CLEAN
operation) are valid.
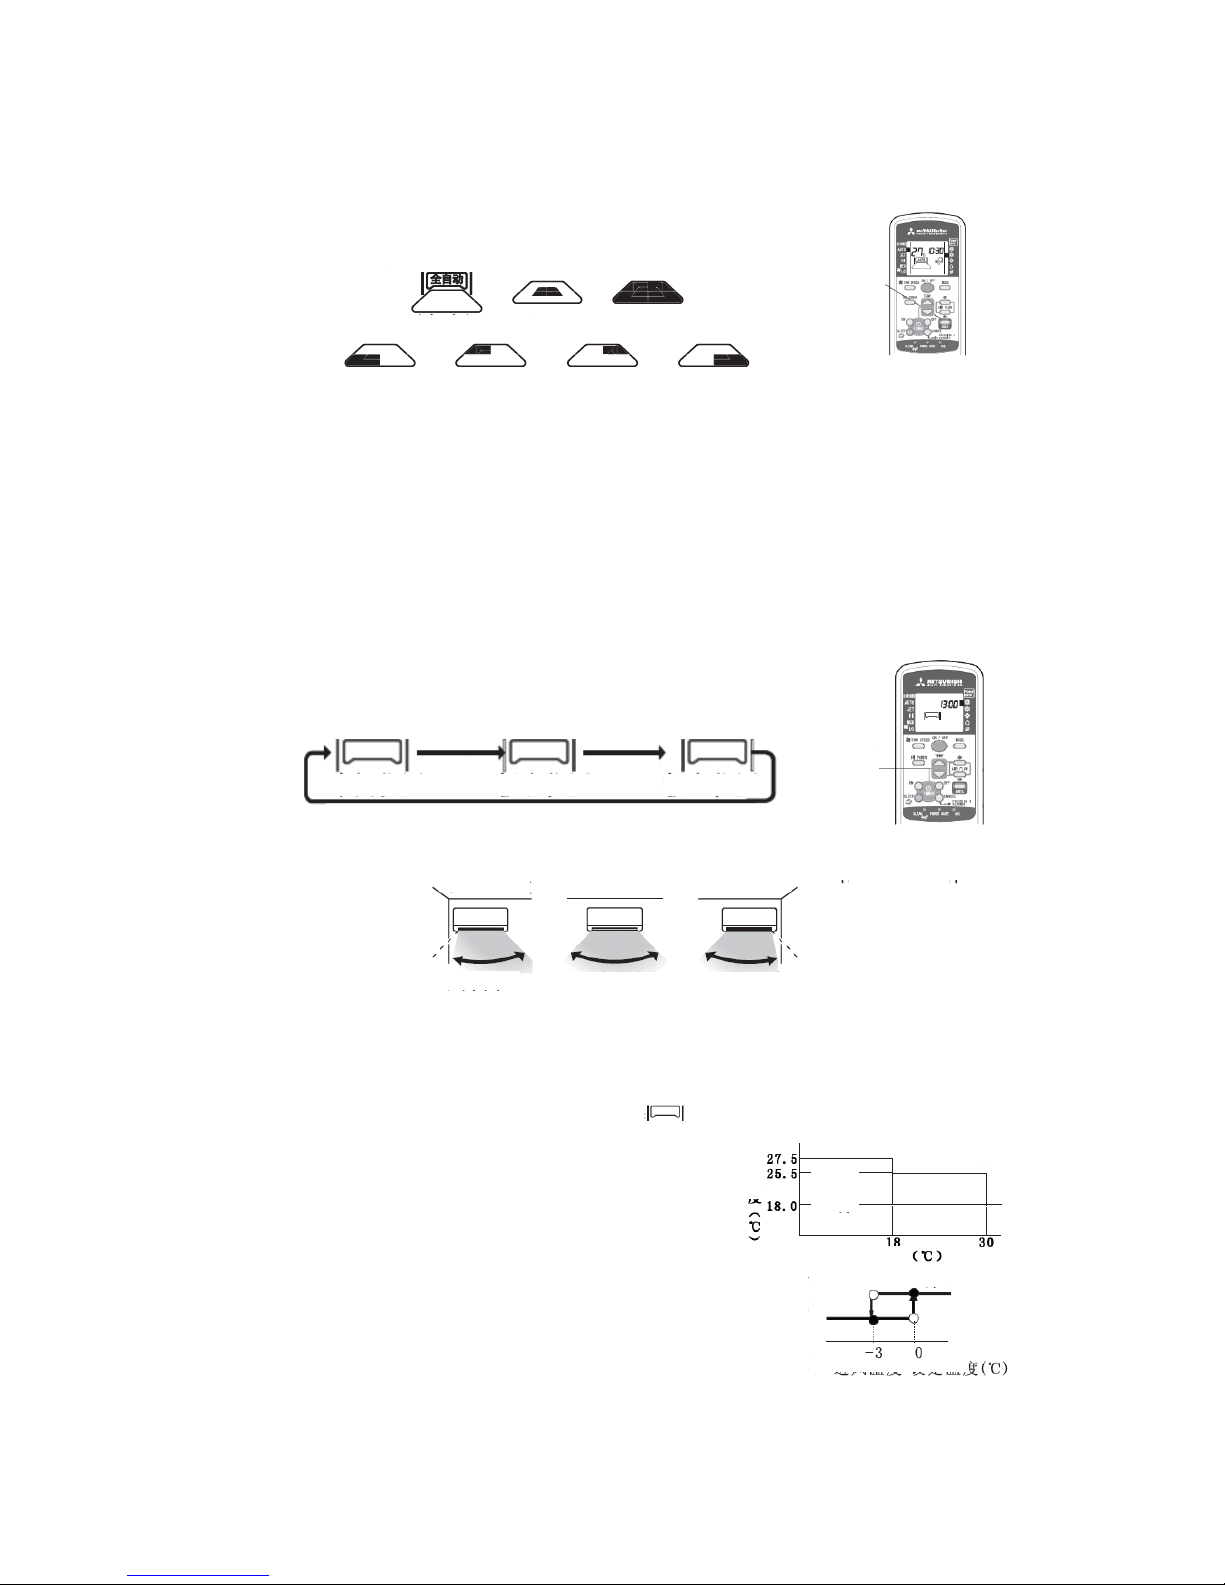
4.14 Air direction regulation:
(1) Operation method:
● Step 1: Press the ON/OFF button to run the air conditioner;
② Step 2: Press the Up/Down AIR FLOW button, as shown in the figure
below, to regulate the up/down direction of the vertical flap;
(Up/down swing) (Warm Feet)
③ Step 3: Press the Left/Right AIR FLOW button, as shown in the figure below, to regulate
the left/right air direction of the horizontal flap:
(2) Notes:
① Cool Air Shower (for cooling only): Through air direction regulation, cool air can be
blown everywhere in the room;
② Warm Feet (for heating only): Through air direction regulation, warm air can be even
blown to the bottom of feet;
(3) Use suggestions:
① Avoid directly blowing to the body for a long time;
② During cooling and drying, the up/down air direction is set to to prevent too
much cool air from going down;
③ During heating, the up/down air direction is set to to prevent too much warm
air from going up.
(4) Notes:
① When the Heating mode is enabled (that is, the heating operation begins), in order to
prevent cool air from blowing, the flap will move to the level position, in which case, the
air direction can’t be set. When warm air begins to blow, the air flap will be restored to
the set position, in which case, the air direction can be set.
② During the heating operation, when the room temperature is higher than the set
temperature, or during the defrosting operation, when the flap is at the level position, the
air direction can’t be set. The air direction can be set only when warm air begins to blow.
③ In the Cool Air Shower or Warm Feet mode, the horizontal flap will be at the level
position.
④ In the Cooling or Drying mode, avoid blowing downwards for a long time, otherwise,
condensation may appear on the air outlet grille and drip down;
⑤ Never attempt to regulate the air flap or regulating port manually, otherwise, the control
angle may change and the flap can’t be fully closed.
⑥ Flap memorizing function (stop of flap): When the flap is swinging, press the AIR
FLOW (Up/Down or Left/Right) button once, it will stop at that angle. As this angle is
memorized in the microcomputer, the flap will automatically operate at the same angle
next time the machine is started.
Power
Save
Up/Down
Left/Right
(Swing stops) (Cool Air Shower)
(Swing stops) (Leftmost) (Left) (Level) (Right)
(Left/right swing) (Fixed point) (Wide-angle) (Rightmost)
- 22 -
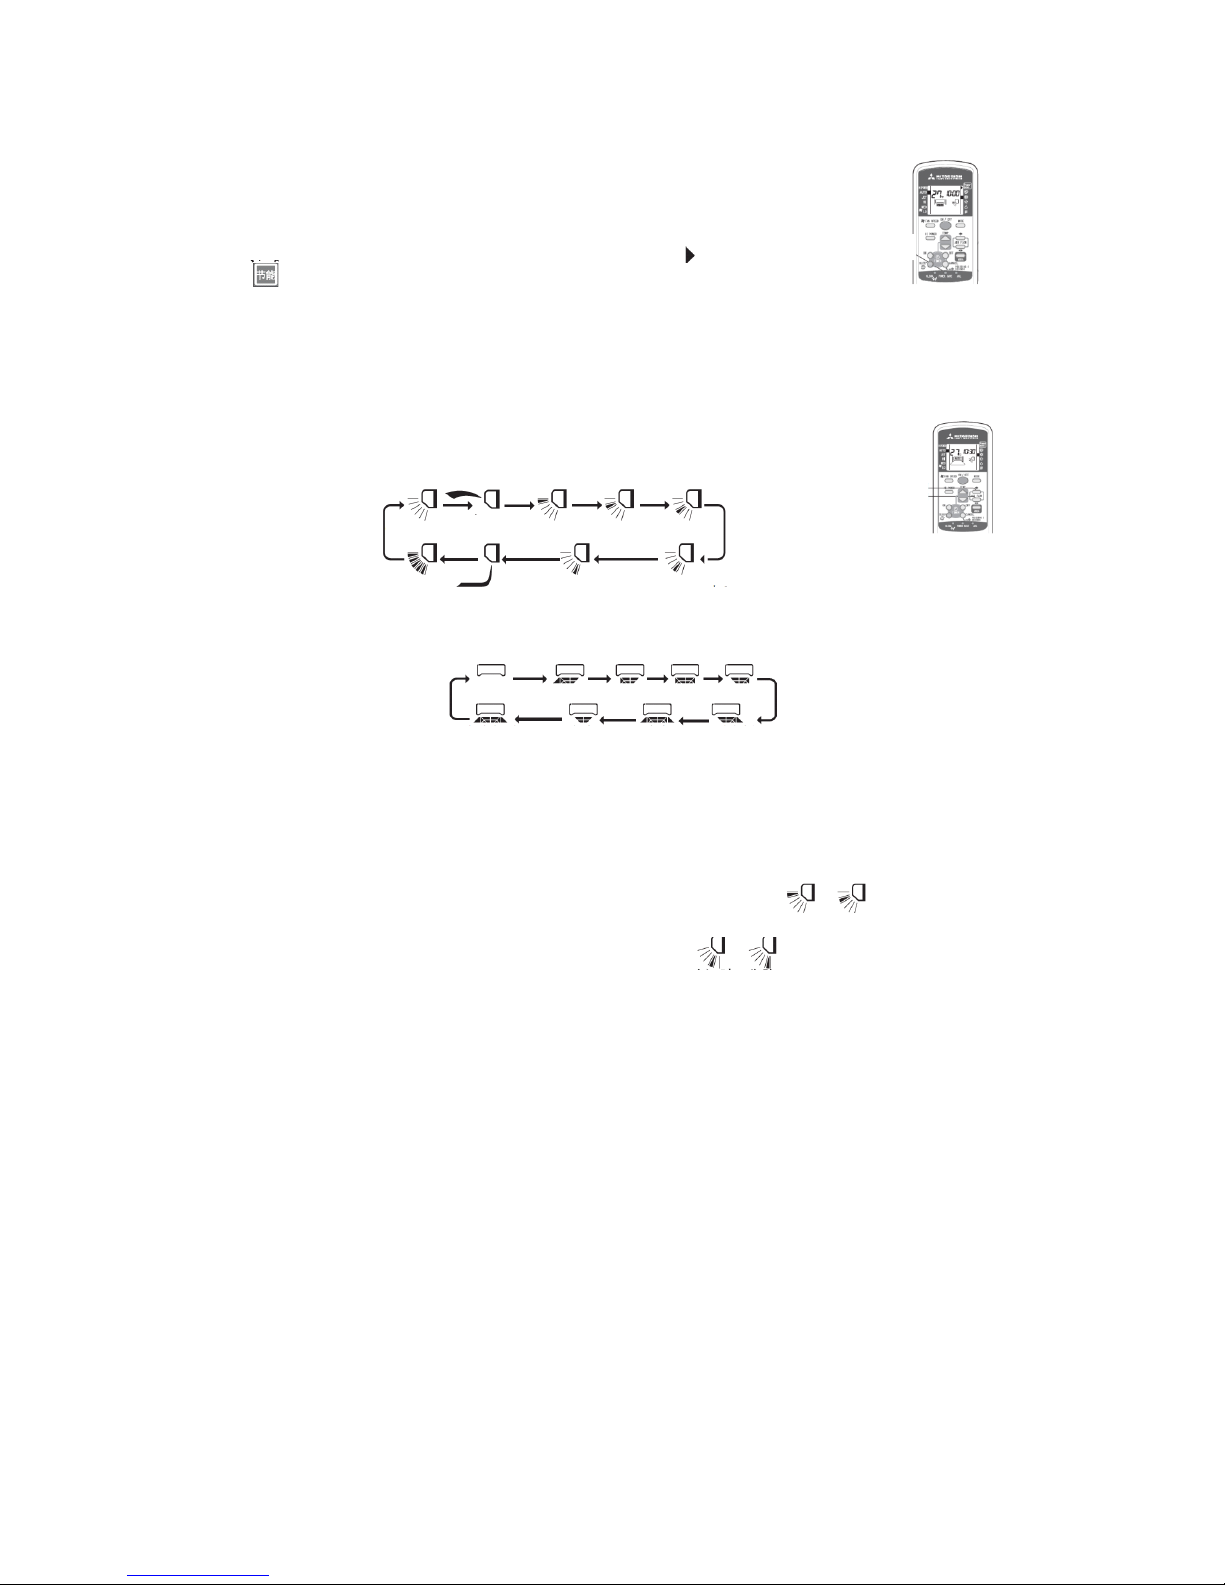
4.15 Area setting:
(1) The area setting function is used to regulate the indoor air and the air in the specific area in
the room.
(2) Operation method: When the air conditioner is running, press the AREA
button, as needed, to switch to the desired area.
(3) The area indications are as follows:
(Bottom left) (Top left) (Top right) (Bottom right)
(4) Cancelation: Press the Up/Down or Left/Right button to regulate the air direction.
(5) Notes:
① In the AUTO mode, the HI POWER and JET modes are not supported;
② After the Area setting is canceled, when the air conditioner is started again, the air
direction before the Area setting will be displayed.
4.16 Installation location setting:
(1) The installation location setting function is used to consider the installation location of air
conditioner and regulate the maximum space of the left/right air flow.
(2) Operation method:
① Switch on the air conditioner and let it stay in the stop mode;
If it is running, press the ON/OFF button to stop;
② Press and hold both the Up/Down and Left/Right buttons for over 5 seconds, and the
installation location will flash on the display;
③ Press the Left/Right button to regulate to the desired position;
whenever the Left/Right button is pressed, the displaying changes in
the following order:
④ Within 1 minute, press the ON/OFF button again to send a signal to
the air conditioner and the air conditioner will memorize the installation location.
(3) The installation location and air direction range of the air conditioner are as follows:
(4) Notes:
① After the installation location is set again, even when the plug is unplugged, the air
conditioner will also memorize the installation location;
② During operation, the installation location can’t be set;
③ After the installation location is set, if the air conditioner is reset or the batteries are
replaced, the remote controller will display , i.e. the installation location
memorized by the air conditioner.
4.17 Outline of automatic operation:
(1) Determination of operating mode:
After the indoor and outdoor fans operate at the 2nd speed
and 4th speed respectively for 20 seconds, the system will
check the room temperature, humidity and outdoor
temperature to automatically select the cooling, heating or
drying mode and the room temperature compensation
value, and operate automatically. (Note: Here, the vertical
flap stops at the level position and the horizontal flap
stops at the central position.)
(2) The system checks the temperature every hour after the
operation begins. When the operating mode is judged to be different from the previous one,
the operating mode will be changed;
Area
setting
(Central)
(Central)
(Full)
Area
setting
Press and
hold both
buttons
for 5 sec.
Central
Rightmost
Lefttmost
(About 30° from front
direction)
(About 30° from front
direction)
Central
Left
Right
Right
Left
Air direction
range
Cooling
Drying
Heating
Area A
Room
temp
Judgement
conditon
forArea A
Heating
Cooling
Air inlet temp. – set temp.
Outdoor temp.
- 23 -
(3) If the air conditioner is started again within 1 hour after the automatic operation stops, or it is
converted to automatic operation in the heating, cooling or drying mode, it will operate in the
previous mode.
(4) The temperature can be set in the following range. The relationship between the signals of
the wireless remote controller and the set temperature is as follows:
Signals of wireless remote controller (displaying)
-6
-5
-4
-3
-2
-1 0 +1
+2
+3
+4
+5
+6
Set
temp
Cooling
18
19
20
21
22
23
24
25
26
27
28
29
30
Drying
18
19
20
21
22
23
24
25
26
27
28
29
30
Heating
20
21
22
23
24
25
26
27
28
29
30
31
32
(5) Operation of remote controller:
① In the AUTO mode, press the or button to regulate 6 levels of temperature;
② Each time the or button is pressed, the temperature will be switched in the
following order: -6 ~ -5 ~ -4 ~ -3 ~ -2 ~ -1 ~ ±0 ~ +1 ~ +2 ~ +3 ~ +4 ~ +5 ~ +6
③ When -6 or +6 is displayed, press the or button and the displaying will not
change;
④ The set temperature of ±0 in AUTO mode is: Cooling 24℃, Heating 26 ℃, Drying
24℃.
4.18 Outline of drying operation:
(1) Judgment of operation state:
① After the indoor and outdoor fans run at the 2nd speed and 3rd speed respectively for 20
minutes. the system checks the room temperature (Tai) and outdoor temperature (Th0-A)
to determine the operation state. (Note: Here, the vertical flap stops at the level position
and the horizontal flap stops at the central position.)
② The system checks the temperature every hour after the operation begins. When the
operating mode is judged to be different from the previous one, the operating mode will
be changed.
③ Judgment of operating mode:
Tai and TS (setting correction temperature), Th0-A relationship
Operating mode
Tai > TS-3 or Th0-A ≥ 19℃
Slightly cool heating & drying
Tai ≤ TS-3 or Th0-A < 19℃
Slightly warm heating & drying
(2) Notes:
① After the operating mode is judged, the system decides the running range according to
the room temperature and setting correction temperature every 5 minutes;
② Slightly cool heating & drying includes four running ranges, all of which are cooling
operations;
③ Slightly warm heating & drying includes four running ranges, in which three are cooling
operations and one is heating operation.
4.19 Outline of defrosting operation:
(1) Beginning conditions:
Case 1 (The defrosting running begins when all of the following conditions are met):
① After the heating begins and the defrosting ends, the accumulated running time of the
compressor exceeds 45 minutes;
② The outdoor heat exchanger sensor (Th0-R) meets one of the following conditions:
A) Accumulated running time of compressor < 150 minutes, Th0-R ≤ -5℃;
B) Accumulated running time of compressor ≥ 150 minutes, Th0-R ≤ -3.5℃;
③ The outdoor heat exchanger sensor (Th0-R) and the outdoor air temp. sensor (Th0-A)
meet one of the following conditions:
A) When outdoor air temp. sensor Th0-A ≥ 0℃:
Accumulated running time of compressor < 150 minutes, (Th0-A) - (Th0-R) ≥ 7.0;
B) When outdoor air temp. sensor Th0-A ≥ 0℃:
Accumulated running time of compressor ≥ 150 minutes, (Th0-A) - (Th0-R) ≥ 4.0;
C) When outdoor air temp. sensor -15℃ ≤Th0-A < 0℃:
Accumulated running time of compressor < 150 minutes, (Th0-A) - (Th0-R) ≥ 4/15 *
(Th0-A) + 7;
D) When outdoor air temp. sensor -15℃ ≤ Th0-A < 0℃:
Accumulated running time of compressor ≥ 150 minutes, (Th0-A) - (Th0-R) ≥ 4/15 *
(Th0-A) + 6;
E) When outdoor air temp. sensor Th0-A < -15℃: (Th0-A) - (Th0-R) ≥ -5.0;
④ The compressor runs for over 7 minutes continuously.
Case 2: Low load running (The defrosting running begins when all of the following conditions
are met):
① After the heating begins and the defrosting ends, the accumulated running time of the
compressor is 45 minutes with air flow controlled;
- 24 -
② The outdoor heat exchanger sensor (Th0-R) meets one of the following conditions:
A) When the actual rotate speed of the compressor N ≥ 62 rps: Th0-R ≤ -5℃;
B) When the actual rotate speed of the compressor N < 62 rps: Th0-R ≤ -4℃;
③ Outdoor air temp. sensor (Th0-A): Th0-A ≤ 3℃;
④ The compressor runs for over 7 minutes continuously.
(2) Ending conditions:
135 seconds after the system is switched to the defrosting mode, the defrosting running is
canceled when one of the following conditions is met:
① Outdoor heat exchanger sensor (Th0-R): Th0-R ≥ 13℃;
② The elapsed time of defrosting running is 15±0.5 min.
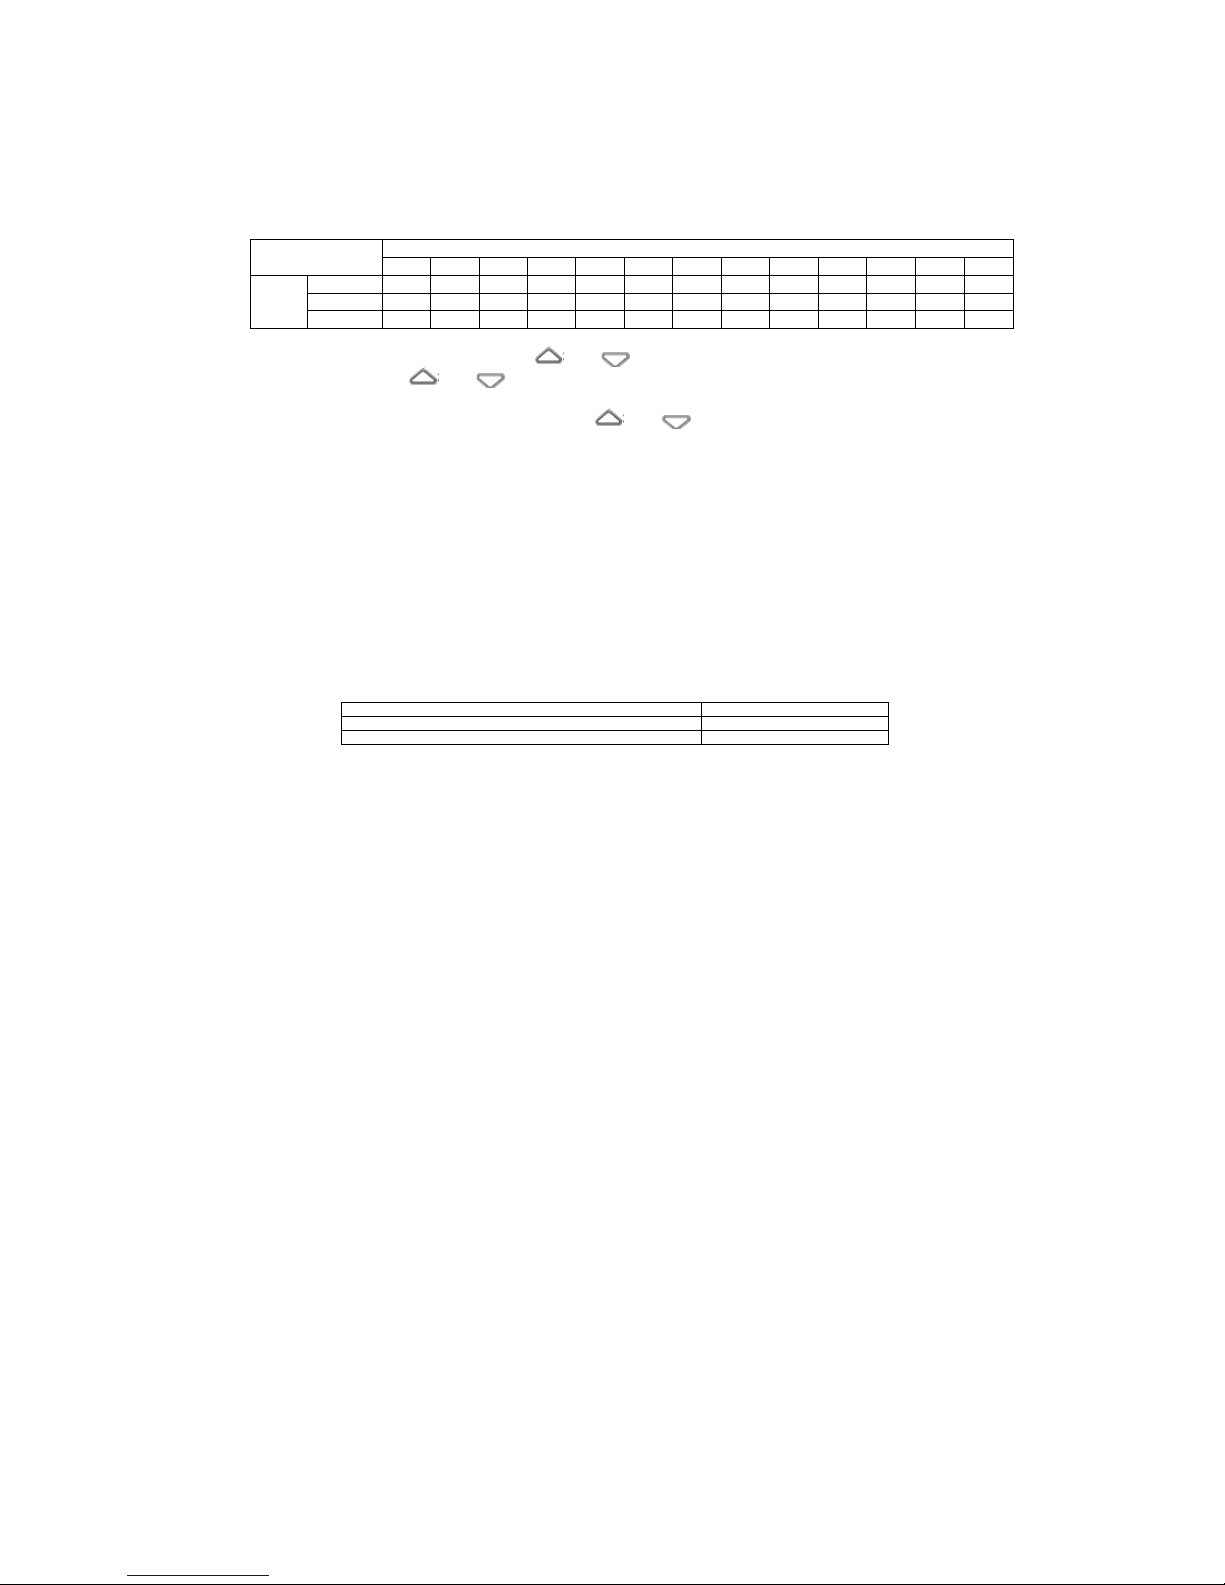
(3) Operation time pattern of various functional parts in defrosting control:
Defrosting
Compressor
4-way valve
Outdoor fan
Operation of outdoor
functional parts
5 sec.
speed
Usual control
Usual control
Enter
EEV openng
EEV control
EEV openng
EEV control
End running
EEV openng
Usual heating
Usual heating
Defrosting
running state
Beginning
conditions met
Enter defrosting
running
Ending
conditions
met
End defrosting
running
Heat-retaining
Heat-retaining
Heat-retaining
ineffective
Indoor fan
RUN lamp
Operation of indoor
functional parts
Indoor → outdoor
communication
Verhical/horizontal flap
Response
Flahsing
(heat-retaining)
Control
Set position
In the defrosting control, even when the compressor
displays OFF, the heat-retaining displaying is effective.
Singnal of
compressor
Defrosting
singnal
- 25 -
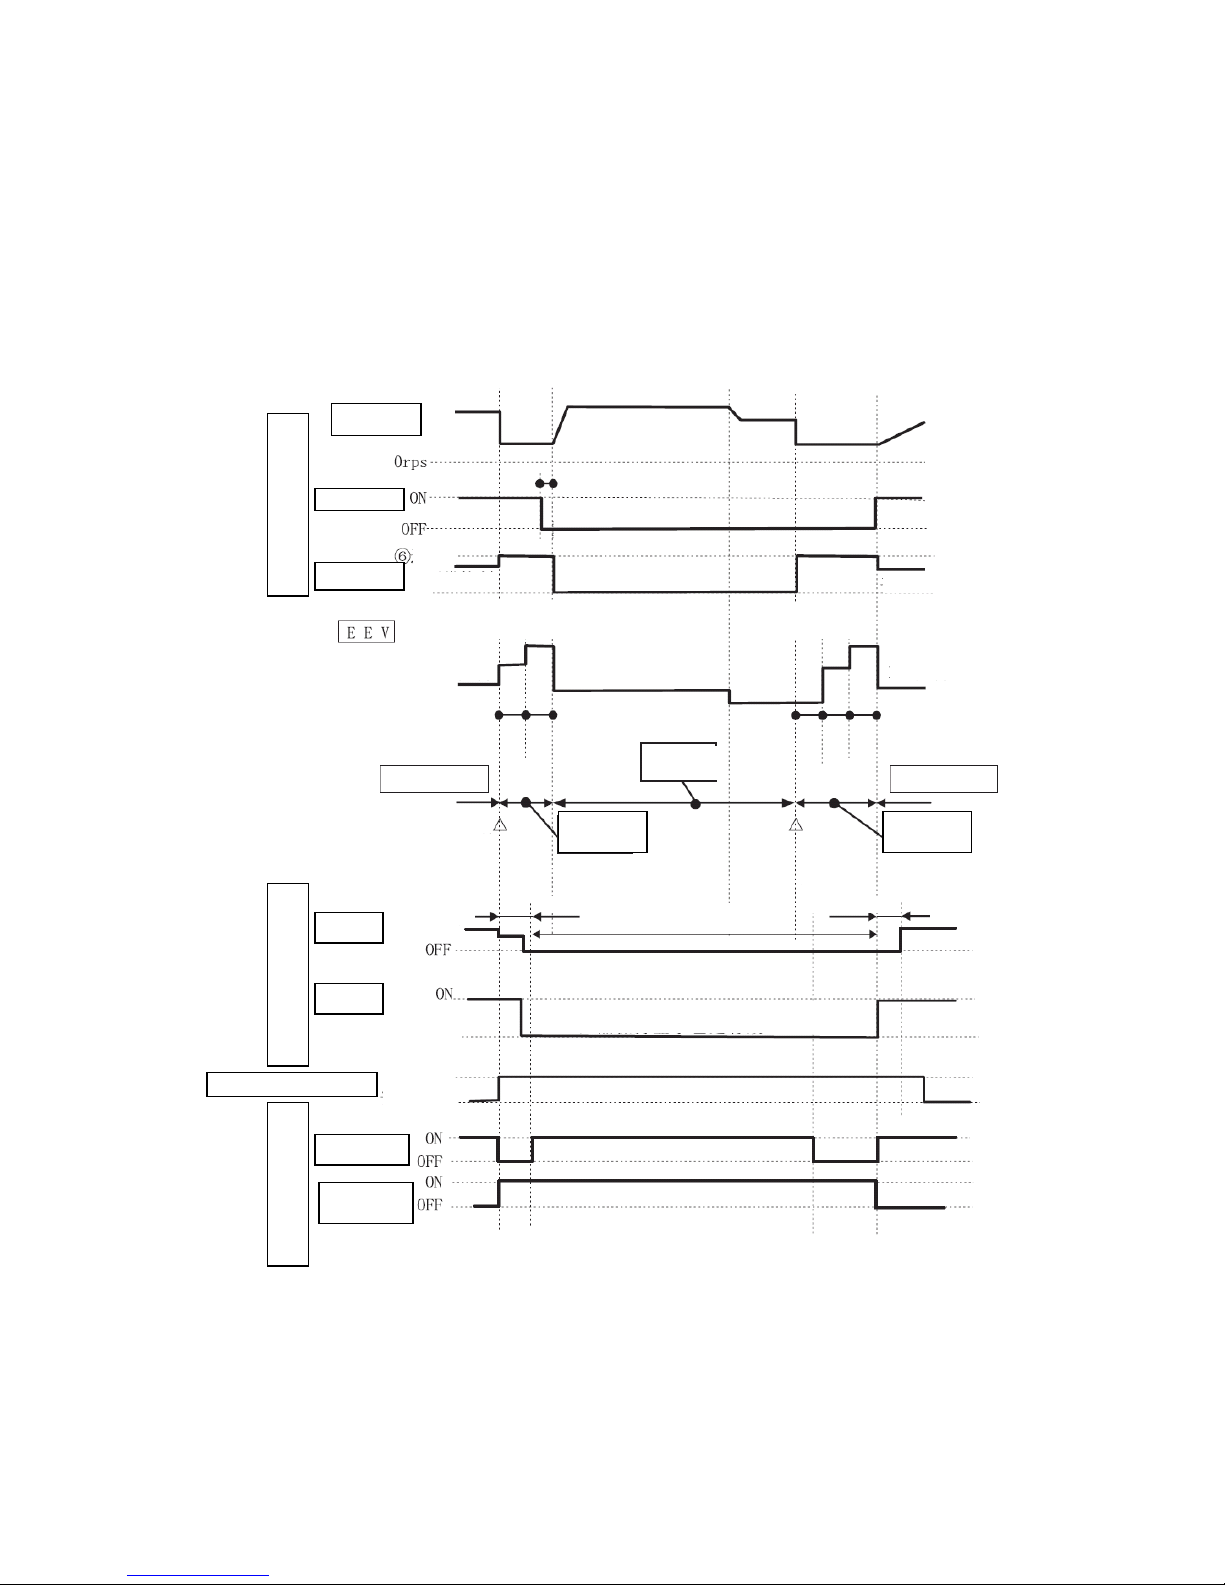
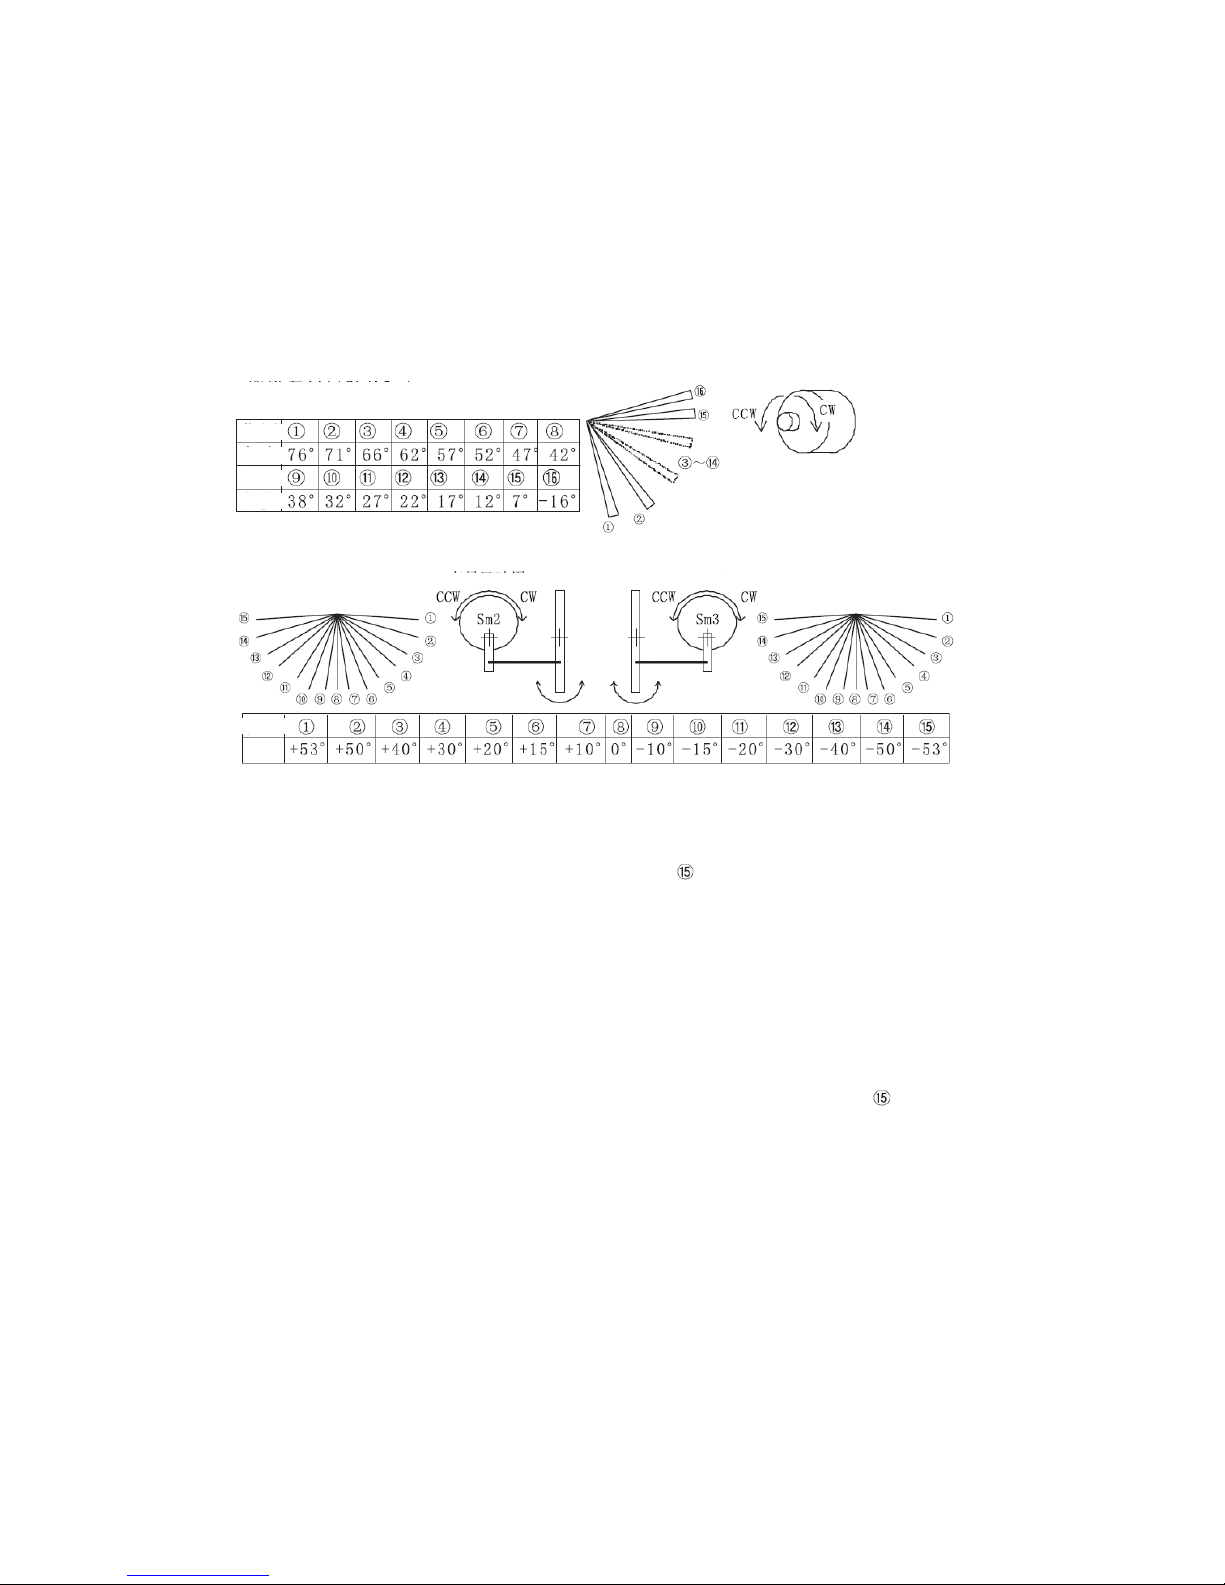
4.20 Outline of vertical and horizontal flaps control:
(1) Overview:
Sm1: Vertical flap (mounted on the right side when you face the appliance);
Sm2: Left horizontal flap (mounted on the left side when you face the appliance);
Sm3: Right horizontal flap (mounted on the right side when you face the appliance);
(2) Vertical flap Sm1:
The level set is 0℃.
(3) Horizontal flaps Sm2 and Sm3:
(4) Reference position control:
① Beginning condition: This control is executed only when the air conditioner begins to run.
It is not executed when the operating mode is switched and the flap mode is changed.
② Control: This control ends when the vertical flap Sm1 moves to position ① and the
horizontal flaps Sm2 and Sm3 move to position . The flaps stop at the position set with
the remote controller or the preset position memorized.
(4) Control of vertical flap and horizontal flaps at the start of heating, stop of heating and for
defrosting:
To avoid blowing cool air during heating before the indoor heat exchanger is fully warmed.
① Beginning condition (when one of the following conditions is met):
A) The indoor running mode is switched from a mode other than Heating to the Heating
mode, and the temperature measured by the indoor heat exchanger sensor is < 28℃;
B) During the Heating mode, the compressor displays OFF;
C) During the Heating mode, the defrosting signal is received.
② Control: This control ends when the vertical flap Sm1 moves to position and the
horizontal flaps Sm2 and Sm3 move to position ⑧.
③ Ending conditions (when one of the following conditions is met):
A) The indoor running mode is switched from a mode other than Heating to the Heating
mode, and the temperature measured by the indoor heat exchanger sensor is ≥ 28℃;
B) In the Heating mode, the compressor is changed from OFF to ON, and the
temperature measured by the indoor heat exchanger sensor is ≥ 28℃;
C) In the Heating mode, the defrosting signal is canceled, and the temperature measured
by the indoor heat exchanger sensor is ≥ 28℃;
D) When this control is canceled, the flap position before the control is restored.
④ Notes:
A) This control is not executed in the JIS mode;
B) This control is not executed when the temperature measured by the indoor heat
exchanger sensor is approximately below -28℃ (disconnection of sensor).
Position
Position
Angle
Angle
Relationship between rotation direction
of motor and state of vertical flap
Vertical flap closed → CCW of motor
Vertical flap opened → CW of motor
Position
Angle
For left flap
For right flap
Wide-angle
Wide-angle
Fixed point direction

- 26 -
4.21 Outline of electronic expansion valve (EEV) control:
(1) Overview:
① Initial control: When the power is ON and the reference position is determined, the EEV opening is
widened within 5 minutes to let the refrigerant return, thus makes the low pressure rise easily and
avoid misdiagnosis of insufficient refrigerant and poor EEV operation as the low pressure can’t rise
after decline;
② Open loop control: After the initial control, when the temperature measured by the sensor, etc. are
unstable, the EEV opening is set according to the balance of the compressor;
③ Area control: During quasi-steady running and steady running, the EEV opening is set according to
the extent of over heat of exhaust, mainly aiming at the measure for the deviation due to open loop
control;
④ Stop control: The EEV opening is set according to the stop control;
⑤ Negative pressure countermeasure control: When the mode is switched from a mode other than
Heating to the Heating mode, the compressor is changed from OFF to ON, and the outdoor
temperature is too low (temperature measured by discharge pipe sensor (Th0-D) - temperature
measured by outdoor air temp. sensor (Th0-A) < 10℃), this control is executed for 8 minutes to
avoid negative pressure risk;
⑥ Throttle correction control of cooling & drying: Five minutes after the area control, when the actual
rotate speed of the compressor is below 24 rps and the temperature measured by the outdoor air
temp. sensor (Th0-A) meets the condition 25℃≤ Th0-A < 38℃ and the temperature measured by
the indoor heat exchanger sensor (Th1-RX) is above 10℃, this control is executed to increase the
latent heat capacity in cooling;
⑦ Condensation prevention control: When the actual rotate speed of the compressor is above 32 rps
and the value measured by the humidity sensor (HS) is above 68% for 30 minutes continuously, this
control is executed to make the actual rotate speed of the compressor reduce to below 32 rps or
make the value measured by HS reduce to below 63%.
(2) Priority of various EEV controls:
Stop control > Defrosting control > Indoor issued fixed opening control > Initial control > Protective
control > Open loop control and area control
(3) Except the special situations such as reference position control, etc., others are controlled within the
pulse range of 41-47.
4.22 Outline of compressor control:
(1) Overview of ON/OFF of cooling and heating running:
① When the outdoor running mode is Cooling or Heating, the compressor has stopped for over 3
minutes, and the compressor running signal from the indoor unit is received, the compressor will be
turned on;
② When the compressor is ON, the rotate speed of the compressor is fuzzily calculated using the
temperature of the indoor inlet air, the temperature set with the remote controller, the setting
correction temperature, etc., and the outdoor unit sends the compressor ON signal, the value of
fuzzy calculation, the actual rotate speed, etc. to the indoor unit;
③ When the outdoor running mode is Cooling or Heating, the compressor has run for over 5 minutes,
and the compressor stop signal from the indoor unit is received, the compressor will be turned off;
④ When the compressor is OFF, the outdoor unit sends the compressor OFF signal, the value of fuzzy
calculation, the actual rotate speed, etc. to the indoor unit;
⑤ In defrosting control, the compressor OFF conditions are not judged.
(2) Running range: 20-120 rps (varying depending on the model).
(3) In order to prevent the oil level of the compressor from falling and ensure that oil is supplied to the
pump of the compressor normally, enable the protection against temporary rise of rotate speed of
compressor.
(4) In order to guarantee the pressure difference for switching the 4-way valve, enable the low load for
temporary rise of rotate speed of compressor.
(5) With respect to the change rate of the actual rotate speed of the compressor, the instructed rotate speed
from the outdoor inverter to the compressor and the temperature measured by the outdoor heat
exchanger sensor (during cooling) or the temperature measured by the indoor heat exchanger sensor
(during heating) should be observed to decide the rise/fall speed of the compressor (2 rps, 1/2 rps) and
finally make the compressor operate in the appropriate working state.
4.23 Outline of outdoor fan control:
(1) The settings of rotate speed of the outdoor fan are as follows:
Speed position
① ② ③ ④ ⑤ ⑥ ⑦
⑧
Rotate speed
(rpm)
20MA-S
150
240
570
630
720
780
840
920
25 MA-S
150
240
570
630
720
780
840
920
35 MA-S
150
240
570
640
750
840
900
950
50 MA-S
150
290
520
650
700
750
800
850

- 27 -
(2) Priority of rotate speed control:
Error response control > Outdoor fan control in compressor soft start control > Outdoor fan
control in defrosting control > Outdoor fan control/indoor forcing outdoor fan running
control in stop mode > Outdoor fan control at start > Outdoor fan control at the low outdoor
temperature in cooling > Outdoor fan control under overload in cooling > Delayed speed
position switching > Outdoor fan control under overload in heating > Speed position control
(3) Error response control:
When the outdoor fan runs at a speed below 75 rpm for over 30 seconds, the inverter will
immediately stop output to the fan and indicate results of self-diagnosis; if this occurs 3
times, it will send the error code to the indoor unit; if the speed exceeds 75 rpm once before
the 3 times, recount will be conducted.
(4) The minimum rotate speed of the outdoor fan in the compressor soft start control is speed
④.
(5) In the defrosting control, the rotate speed of the outdoor fan is OFF or speed ⑥.
(6) Outdoor fan control in the stop mode:
When the actual rotate speed of the compressor is 0, the outdoor fan continues to run at speed
③ for 1 minute or 2 minutes and 55 seconds and then stop.
(7) Indoor forced running control:
When the outdoor fan running start signal is received from the indoor unit, the operation at
the fan speed received will begin, and this control is unrelated to the running mode,
compressor instruction and protection stop (except outdoor fan error, low voltage). This
control is canceled when the outdoor fan running cancel signal is received from the indoor
unit.
(8) At start, the outdoor fan operates according to the speed position control; when the
compressor is started and in the ON state in the cooling mode and the outdoor temperature is
below 22℃, it will run at speed ② or ① for 30 seconds.
(9) Outdoor fan control of low outdoor temperature in cooling, overload in cooling, low outdoor
temperature in heating and overload in heating:
① In the cooling or heating mode, when the compressor is in the ON state and the
temperature measured by the outdoor air temp. sensor meets the control conditions, this
control will begin.
② This control is canceled when either of the above conditions is not met.
③ According to the temperature measured by the outdoor heat exchanger liquid pipe sensor
and the temperature measured by the outdoor air temp. sensor, the rotate speed of the
outdoor fan is decreased (to as low as speed ② or ①) or increased (up to speed ⑧).
(10) Delayed speed position switching control:
When the outdoor fan is changed from a high speed position to a low one, the switching is
generally delayed for 60 seconds. If it is changed to a high speed position within 60 seconds,
the delay will be canceled and it is converted to the high speed position immediately. If the
outdoor fan is changed to OFF, there will be no delay and it will stop immediately.
(11) The speed position control is generally between speed ③ and ⑧.
4.24 Outline of indoor fan control:
(1) The settings of rotate speed of the indoor fan are as follows:
(2) Priority of rotate speed switching:
HI POWER > AUTO/HI/ME/LO
(3) Error response control:
When the indoor fan runs at a speed below 75 rpm for over 30 seconds, the air conditioner
will fully stop to indicate the results of self-diagnosis.
(4) When the indoor fan is started and runs for 1 second under the initial voltage at the speed of
300 rpm, the system will compare with the signal from the fan to correct the rotate speed to
the determined one.
(5) Rate of rotate speed adjustment: 80 rpm for increase and 10 rpm for decrease.
(6) The speed positions corresponding to the fan speeds are as follows:
Air flow switching
AUTO
HI
ME
LO
HI POWER
Speed position of indoor fan
⑤ ⑥ ⑤ ④ ⑦
Speed position
Rotate
speed
(rpm)

- 28 -
(7) The relationship between the rotate speed of heat-retaining during heating and the
temperature measured by the indoor heat exchanger sensor Th1-R1 is as follows:
Speed position of indoor fan
Temperature measured by the
indoor heat exchanger sensor
When the compressor displays ON
When the compressor displays OFF

- 29 -
5 Installation
○ Use this system only for household and
residence.
○ This appliance must be installed according to the national wiring regulation.
○ A 2-level switch must be used for the fixed wiring of the power supply and its disconnection
clearance must be at least 3mm.
○ If the outdoor unit may tip over or move and drop from the original installation location, use
trip bolts or string to secure it in place.
○ The liquid pipe and gas pipe in the piping should be insulated with thermal insulation.
SAFETY PRECAUTIONS
• Please read this “SAFETY PRECAUTIONS” carefully before the installation work in order to ensure correct installation.
• The precautions described below are divided into WARNING and CAUTION. The matters with possibilities leading to
serious consequences such as death or serious personal injury due to erroneous handling are listed in the WARNING, however
the matters listed in CAUTION may sometimes lead to serious accidents. These are very important precautions for safety. Be
sure to observe all of them without fail.
• For qualified installing personnel, take precautions in respect to themselves by using suitable protective clothing, groves, etc., and then
perform the installation works.
• Please pay attention not to fall down the tools, etc. when installing the unit at the high position.
• If unusual noise can be heard during operation, consult the local dealer.
• Be sure to confirm no anomaly on the equipment by commissioning after completed installation and explain the operating methods as
well as the maintenance methods of this equipment to the user according to the owner’s manual.
• Symbols which appear frequently in the text have the following meaning:
Strictly prohibited
Observe instructions
Provide proper earthing
• Keep the installation manual together with owner’s manual properly. Moreover if necessary, ask to hand them to a new user.
WARNING
• Installation must be carried out by the qualified
installer and only the specified optional components
should be used.
If you install the system by yourself, it may cause serious
trouble such as water leaks, electric shocks, fire and
personal injury, as a result of a system malfunction.
• Install the system in full accordance with the
instruction manual.
Incorrect installation may cause bursts, personal injury,
water leaks, electric shocks and fire.
• Be sure to use only for household and residence.
If this appliance is installed in inferior environment such
as machine shop etc., it can cause malfunction.
• Use the original accessories and the specified
components for installation.
If parts other than those prescribed by us are used, it may
cause drop of machine, water leaks, electric shocks, fire,
refrigerant leakage, insufficient performance, poor control,
and personal injury.
• Install the unit in a location with good support and
ensure the unit is stable when installed, so that it can
withstand earthquakes and strong winds.
Unsuitable installation locations can cause the unit to fall
and cause material damage and personal injury.
• Ventilate the working area well in the event of
refrigerant leakage during installation.
If the refrigerant comes into contact with naked flames,
poisonous gas is produced.
• When the equipment is to be installed in a small room,
take preventive measures to avoid refrigerant leakage
exceeding the density limit.
Consult with the installation professionals about the
preventive measures. If the density is greater than the limit
of refrigerant, it may cause serious accidents such as
refrigerant leakage, shortage of oxygen, etc.
• Confirm there is no refrigerant leakage after the
installation.
If the refrigerant leaked comes into contact with the fire of
an air blowing type heater, oven, etc., poisonous gas is
produced.
• Use the prescribed pipes, flare nuts and tools for
R410A.
Using conventional parts (for R22) can cause the unit
failure and serious accidents due to burst of the refrigerant
circuit.
• Tighten the flare nut by torque wrench with specified
method.
If the flare nuts were tightened with excess torque, this
may cause burst and refrigerant leakage after a long
period.
• Do not open the operation valves for liquid line and
gas line until completed refrigerant piping work, air
tightness test and evacuation.
If the compressor is operated when operation valves are
open before the connection of refrigerant piping work is
completed, it can cause frostbite or injury due to rapid
refrigerant leakage, and burst or personal injury due to
anomalously high pressure in the refrigerant circuit into
which air is sucked.
• The electrical installation must be carried out by the
qualified electrician in accordance with “the norm for
electrical work” and “national wiring regulation”, and
the system must be connected to the dedicated circuit.
Power supply with insufficient capacity and incorrect
function done by improper work can cause electric shocks
and fire.
• Be sure to shut off the power before starting electrical
work.
Failure to shut off the power can cause electric shocks,
unit failure or incorrect function of equipment.
• Be sure to use the cables conformed to safety standard
and cable ampacity for power distribution work.
Unconformable cables can cause electric leak, anomalous
heat production or fire.
• This appliance must be connected to main power
supply by means of a circuit breaker or switch
(fuse:16A) with a contact separation of at least 3mm.
• If the appliance has a plug, the plug must comply with
IEC 60884-1.
• Use the prescribed cables for electrical connection,
tighten the cables securely in terminal block and
relieve the cables correctly to prevent overloading the
terminal block.
Loose connections or cable mountings can cause
anomalous heat production or fire.
• Arrange the wiring in the control box so that it cannot
be pushed up further into the box. Install the case and
service panel correctly.
Incorrect installation may result in overheating and fire.
• Be sure to mount the service panel.
Incorrect mounting can cause electric shocks or fire due to
intrusion of dust or water.
• Be sure to switch off the power supply before
installation, inspection or servicing.
If the power supply is not shut off, there is a risk of
electric shocks, unit failure or personal injury due to the
unexpected start of fan.
Precautions for installation

- 30 -
WARNING
• To recover refrigerant, stop the compressor before closing the valve and disconnecting the refrigerant piping.
If the refrigerant piping is disconnected before the compressor stops and when the service valve is opened, it can cause
frostbite or injury due to rapid refrigerant leakage, and burst or personal injury due to anomalously high pressure in the
refrigerant circuit into which air is sucked
• Do not put the drainage pipe directly into drainage
channels where poisonous gases such as sulphide gas
can occur.
Poisonous gases will flow into the room through drainage
pipe and seriously affect the user’s health and safety.
• Never connect the power cord to the central socket.
Never use extended wires or share a socket with other
electrical appliances.
This may cause fire or electric shocks due to defective
contact, poor insulation and over-current etc.
• Do not discharge R410A to the atmosphere. R410A is a
fluoride greenhouse gas and can cause global warming
if it is discharged to the atmosphere.
• Ensure that no air enters in the refrigerant circuit
when the unit is installed and removed.
If air enters in the refrigerant circuit, the pressure in the
refrigerant circuit becomes too high, which can cause
burst and personal injury.
• Do not bundle or wind the power cord. Or, do not
deform the power plug by treading it.
This may cause electric shocks, heating or fire.
• Do not run the unit with removed panels or
protections.
Touching rotating equipments, hot surfaces or high
voltage parts can cause personal injury due to entrapment,
burn or electric shocks.
• Do not perform any change of protective device itself
or its setup condition.
The forced operation by short-circuiting protective device
of pressure switch and temperature controller or the use of
non specified component can cause fire or burst.
• Carry out the electrical work for ground lead with care.
Do not connect the ground lead to the gas line, liquid line, lightning conductor or telephone line’s ground lead. Incorrect
grounding can cause unit faults such as electric shocks due to short-circuiting. Never connect the ground lead to the gas
line as gas leakage can cause explosion or fire.
CAUTION
• Use the circuit breaker with correct breaking capacity
at all electrodes.
If a wrong breaker is used, it can cause the unit
malfunction and fire.
• Earth leakage breaker must be installed.
If the earth leakage breaker is not installed, it can cause
fire or electric shocks.
• Secure a space for installation, inspection and
maintenance specified in the manual.
Insufficient space can result in accident such as personal
injury due to falling from the installation place.
• After maintenance, all wiring, wiring ties and the like,
should be returned to their original state and wiring
route, and the necessary clearance from all metal parts
should be secured.
• Take care when carrying the unit by hand.
If the unit weighs more than 20kg, it must be carried by
two or more persons. Do not carry by the plastic straps,
always use the carry handle when carrying the unit by
hand. Use gloves to minimize the risk of cuts by the
aluminum fins.
• Dispose of any packing materials correctly.
Any remaining packing materials can cause personal
injury as it contains nails and wood. And to avoid danger
of suffocation, be sure to keep the plastic wrapper away
from children and to dispose after tearing it up.
• Be sure to insulate the refrigerant pipes so as not to
condense the ambient air moisture on them.
Insufficient insulation can cause condensation, which can
lead to moisture damage on the ceiling, floor, furniture
and any other valuables.
• When the air conditioner is operating (cooling &
drying operation) and the ventilator installed in the
room is also running, there is the possibility that drain
water may backflow as the room enters the negative
pressure state. Therefore, set up the opening port to let
air enter the room to provide appropriate ventilation
(for example, open the door a little). In addition, just
as above, set up the opening port if the room enters the
negative pressure state due to the aerator for the high
rise apartment etc.
• Install isolator or disconnect switch on the power
supply wiring in accordance with the local codes and
regulations.
• Do not install the unit in the locations listed below.
• Locations where carbon fiber, metal powder or any
powder is floating.
• Locations where any substances that can affect the unit
such as sulphide gas, chloride gas, acid and alkaline can
occur.
• Vehicles and ships.
• Locations where cosmetic or special sprays are often
used.
• Locations with direct exposure to oil mist and steam such
as kitchen and machine plant.
• Locations where any machines which generate high
frequency harmonics.
• Locations with salty atmospheres such as coastlines.
• Locations with heavy snow.
• Locations where the unit is exposed to chimney smoke.
• Locations at high altitude (more than 1000m high).
• Locations with ammonic atmospheres.
• Locations where heat radiation from other heat source
can affect the unit.
• Locations without good air circulation.
• Locations with any obstacles which can prevent inlet and
outlet air of the unit.
• Locations where short circuit of air can occur (in case of
multiple units installation).
• Locations where strong air blows against the vent of
outdoor unit. It can cause remarkable decrease in
performance, corrosion and damage of components,
malfunction and fire.

- 31 -
CAUTION
• Do not install the outdoor unit in the locations listed
below.
• Locations where discharged hot air or operating sound of
the outdoor unit can bother neighborhood.
• Locations where outlet air of the outdoor unit blows
directly to animals or plants. The outlet air may cause
adverse impact on plants, etc.
• Locations where vibration and operation sound generated
by the outdoor unit can affect seriously (on the wall or at
the place near bed room).
• Locations where vibration can be amplified and
transmitted due to insufficient strength of structure.
• Locations where an equipment affected by high
harmonics is placed (TV set or radio receiver is placed
within 5m).
• Locations where drainage cannot run off safely. It can
affect surrounding environment and cause a complaint.
• Do not install the unit where corrosive gas (such as
sulfurous acid gas etc.) or combustible gas (such as
thinner and petroleum gases) can accumulate or
collect, or where volatile combustible substances are
handled.
Corrosive gas can cause corrosion of heat exchanger,
breakage of plastic parts and etc. And combustible gas can
cause fire.
• Do not use the base flame for outdoor unit which is
corroded or damaged due to long periods of operation.
Using an old and damaged base flame can cause the unit
falling down and cause personal injury.
• Do not touch the suction or aluminum fin on the
outdoor unit.
This may cause injury.
• Do not install the outdoor unit in a location where
insects and small animals can inhabit.
Insects and small animals can enter the electric parts and
cause damage or fire. Instruct the user to keep the
surroundings clean.
• Do not install nor use the system close to the
equipment that generates electromagnetic fields or
high frequency harmonics.
Equipment such as inverters, standby generators, medical
high frequency equipments and telecommunication
equipments can affect the system, and cause malfunctions
and breakdowns. The system can also affect medical
equipment and telecommunication equipment, and
obstruct its function or cause jamming.
• Do not use any materials other than a fuse with the
correct rating in the location where fuses are to be
used.
Connecting the circuit with copper wire or other metal
thread can cause unit failure and fire.
• Do not touch any buttons with wet hands.
It can cause electric shocks.
• Do not touch any refrigerant pipes with your hands
when the system is in operation.
During operation the refrigerant pipes become extremely
hot or extremely cold depending on the operating
condition, and it can cause burn injury or frost injury.
• Do not put anything on the outdoor unit and operating
unit.
This may cause damage of the object or injury due to the
fall of the object.
5.1 Selection of installation location
Indoor unit
○ Where there are no obstructions and
where cool air and warm air can blow in
the room.
○ Where the indoor unit or wall does not
vibrate and where is strong.
○ Where there is adequate space for
servicing. (The space mentioned below is
safe.)
○ Where wire and pipe mounting is
convenient.
○ Where direct sunlight and strong light do
not hit the unit.
○ Where water from the unit can drain
easily.
○ Where there is at least 1 meter distance
from the TV set or radio. (Otherwise, it
may interfere with TV reception or
produce noise.)
Outdoor unit
○ Where rain, snow and sunlight do not
directly hit the unit, and where there is
enough air circulation.
○ Where blasts of cold or hot air and noise
do not bother the neighbors.
○ Where there are installation and servicing
conditions.
○ A location where vibrations are not enhanced and where is strong.
※ Please avoid the following locations.
○ A location near the room, etc. to prevent the operating noise from causing trouble.
○ Where there are possibilities of flammable gas leaks.
○ Where there is constant exposure to harsh winds.
At least 6.5 cm from ceiling
Mounting plate
At least 10 cm from wall
At least 5 cm from wall
Wall
hole
sleeve
Wall
hole
sleeve
cover
Electric component
service panel

- 32 -
Selection of installation location
○ The appliance must be installed at a location with the vents and air intake being 10cm away from
walls.
(In case the fence is 1.2m or above in height, or is overhead, the sufficient space between the
unit and wall shall be secured.)
○ When the unit is installed, the space of the following dimension shall be secured.
○ Removal
① Remove the air inlet grille.
② Remove the 2 screws
securing the front panel.
③ Remove the 3 latches on
the upper part of the front
panel and remove the front
panel from the unit.
○ Installation
① Remove the air filter.
② Cover the unit with the
front panel.
③ Tighten the 2 screws to
secure the front panel.
④ Mount the air filter.
⑤ Mount the air inlet grille.
5.2 Installation of indoor unit
How to remove and install the front panel
Mountng of mounting plate
Air intake
10cm MIN
No obstacles (Service
space for electrical
parts)
10cm MIN
Air
intake
Air outlet
60cm MIN
Caution
If the wall is 1.2m or above in
height or there is a ceiling, the
sizes should be greater than
those indicated above.
Latches
Front panel
Air inlet grille
Screw
Screw
Fixing the mounting plate
Firstly find the position of
support or columella in the wall.
Check that the mounting
location is level and then fix the
unit more securely.
Plane mating mark
○ In the loose state, use
four screws to adjust the
mounting plate
horizontally.
Standard
hole
○ Turn the mounting
plate with the standard
hole as the center to
make it level.
Setting the relationship between
plate and indoor unit
Installation space
(Indoor unit) (Front view)
Service space
Indoor unit
Service
space
Mounting plate
Pipe
hole
Gas piping
Liquid piping
Drainage pipe
Pipe hole
Service space
Service space
Fixing on the concrete wall
Using nut retainer
Using screw retainer
Mounting plate
Mounting
plate
Nut
Nut
Max.

- 33 -
Installation of indoor unit
Drilling holes and securing sleeve (optional)
Drilling a hole with Φ65 whole core drill
Indoor
Outdoor
Adjusting the length of the sleeve
Top
Thickness of wall
Use the whole core drill to drill a hole.
Mounting the sleeve.
○ If the rear pipe is pulled out, cut the
lower part and right side of the axle
collar
Sleeve Declined plate Sealing ring
Turn to
tighten
Indoor
Outdoor
Putty
Insert the sleeve.
Sketch of state after mounting
Sleeve
Indoor
Outdoor
Declined
flange
Sealing ring
Caution
Drill a hole at an angle of 5°
Preparation for installation of indoor unit
Preparation for mounting of electric wire
① Open the air inlet grille.
② Remove the cover.
③ Open the wire clamp.
④ Connect the electric wire to the connection board
securely.
1) Connect the electric wire to the connection board
securely. If the electric wire is not fixed
completely, the contacting will be poor, thus
causes risk, as the connection board may heat
which causes fire.
2) Please note that the number of terminals of the
indoor and outdoor connections should not be
confused.
3) Use the wire clamp to connect the electric wire.
⑤ Connect the electric wire through the wire clamp.
⑥Secure the cover.
⑦ Close the air inlet grille.
Connection board
Terminal
cover
Inlayed piece
of the base
Wire
clamp
Screw
● Some space shall
be left to unload
screw after
installation.
Caution
In case of failure of wiring connection, the indoor unit
will stop running, the RUN lamp will light up, and the
TIMER lamp will flash.

- 34 -
Mounting pipe support
● Precautions for connection to the left and to
center/rear [Top view]
Pipe shaping
Pipe
Drainage pipe
○ Hold the root segment of
the pipe, pull out the
pipe, and shape the
extended section.
Insulation tape winding
Connecting the pipe to the left
Connecting the pipe to the right
Connecting the pipe to the left
rear
Connecting the pipe to the
right rear
Connecting the pipe to the right
Connecting the pipe to the left
The pipe can be connected to
the rear, left, left rear, bottom
left, right or bottom right.
[Steps for drainage pipe displacement]
1. Removing the drainage pipe
2. Removing the drain cover
○ Turn the drainage pipe to
remove it.
○ Remove it by hand or with
pliers.
To the
right
To rear
Downward
To the left
To left
rear
To
bottom
left
3. Inserting the drain cover
○ Use the hexagon wrench to securely insert the
drain cover removed in Step 2.
Note: If it is not inserted securely enough, water
leakage may occur.
4. Connecting the drainage pipe
○ Securely insert the drainage pipe and make it
rotate.
Note: If it is not inserted securely enough, water
leakage may occur.
○ Wind the section
extending to outdoor with
exterior insulation tape.
○ Be sure to wind the
wiring and the piping
together with exterior
insulation tape.
○ To apply the exterior
insulation tape, be sure to
begin from the lower part
of the piping to avoid
intrusion of rain.
Securing the indoor unit
Indoor unit
Mounting
plate
Wall
Mounting plate
Lower latch on base
of indoor unit
Mounting steps
① Pull the pipe through the
hole in the wall, and hang
the upper section of the
indoor unit on the mounting
plate.
② Gently push the lower
section and secure the unit.
● How to remove the indoor unit from the
mounting plate
① Push the lower latch on the base of the indoor
unit upwards on the mark. (The lower latch
can be removed from the mounting plate.)
② Push the indoor unit upwards to remove the
indoor unit from the mounting plate.
Inlayed piece of the base
(Right)
Latches (2)
Mark on lower latch on
base of indoor unit
The air conditioner has a drain
pan collecting dew mounted on
the back. Never put power cord
on the drain pan.
Drain pan
Pipe collection section

- 35 -
Drainage pipe
○ Mount the drainage pipe at a downward angle.
○ Avoid the following drainage pipe connections.
Caution
After all mounting steps, check
whether the drain is proper.
Otherwise, water leakage may occur.
Higher than as required
End of drainage pipe
in water
Undulating
Less than 5cm away
from ground
Odor
from sink
End of drainage
pipe in sink
Shielded-plate
tube
Drainage pipe
When exposed in
the room
Extended drainage pipe
○ Pour the water into the drain pan under the heat
exchanger and ensure the water is drained to outdoor
○ When the extended drainage pipe is in the room, be
sure to use a shielded-plate tube (to be mounted by
the user) to ensure thermal insulation.
Installation of outdoor unit
○ Make sure that the unit is stable in installation. Fix
the unit to stable base.
○ When installing the unit at higher place or where
it could be toppled by strong winds, secure the unit
firmly with foundation bolts, wire, etc.
○ Perform wiring, making wire terminal numbers
conform to terminal numbers of indoor unit
terminal block.
○ Connect using ground screw located near
mark.
○ Never install the water elbow when the
temperature is below 0℃ for several days in a row.
Water elbow
Groundwater-
preventing
piston
Ethylene hose
(Ethylene hose available on the
market)
(For heat pump type only)
Pipe connection
Preparation
Before pipe connection, cover the pipes with tape, etc. to prevent dust, sand, etc.
from entering.
Indoor
Outdoor
Size A
Caution
Do not apply
refrigerating
machine oil to the
flared surface.
(Do not turn)
Press
Press
Liquid: side
Gas side:
Models 20-35:
○ Screw off the flare
nut (liquid and gas
sides)
○ Screw off the flare
nut (liquid and gas
sides)
○ Mount the flare nut screwed off
onto the pipe to be connected to
form a trumpet shape.

- 36 -
Flaring
Measurement B
Flaring
block
Copper
pipe
Model
Copper pipe
diameter
Measurement B
Clutch type flare tool
for R410A
Conventional (R22) flare tool
Clutch type
Wing nut type
Use a flare tool designed for R410A or a conventional flare tool. Please note that measurement B (protrusion from the
flaring block) will vary depending on the type of flare tool in use. If a conventional flare tool is used, please use a copper
pipe gauge or a similar instrument to check protrusion so that you can keep measurement B to a correct value.
Caution
Do not apply excess torque to the flared nuts. Otherwise, the flared nuts may crack depending on the conditions and
refrigerant leak may occur.
Connection
Indoor
Outdoor
Liquid side
Gas side
(Do not turn)
Liquid side
Gas side
○ Connect the pipes on both liquid and gas sides.
○ Tighten the nuts to the following torque.
Liquid side
Gas side
○ Connect the pipes on both liquid and gas sides.
○ All torques are the same as on the indoor liquid
side.
Air purging
① Secure all flare nuts on both indoor and outdoor sides
to prevent leaks from the pipes.
② Connect the operation valves, charge hose, manifold
valve and vacuum pump as shown in the right figure.
③Fully open Handle Lo for the manifold valve, and
pump a vacuum for over 15 minutes. Ensure that the
meter is indicating -76cmHg (-0.1MPa).
④ After vacuuming, fully open the operation valve (both
liquid and gas sides) with a hexagon wrench.
⑤ Ensure that there are no gas leaks from the joints in
the indoor and outdoor units.
Compound
pressure gauge
Operation valve
(2-way valve)
Gauge manifold
(Designed specifically for R410A)
Pressure gauge
Operation valve
(3-way valve)
Service port
Charge hose
(Designed specifically for
R410A)
Vacuum pump adapter (Anti-reverse flow type)
(Designed specifically for R410A)
Handle Hi
Charge hose (Designed specifically for R410A)
Handle Lo
● Since the system uses service ports differing in diameter from those found on the conventional models, a
charge hose (for R22) presently in use is not applicable. Please use one designed specifically for R410A.
● Please use an anti-reverse flow type vacuum pump adapter so as to prevent vacuum pump oil from
running back into the system. Oil running back into an air-conditioning system may cause the refrigerant
cycle to break down.
Heat insulation for joints
Finish and fixing
Cover the joint with insulation material for the
indoor unit and tape it.
Vinyl tape
Position so the slit
comes on top.
Apply exterior tape and
shape along the place where
the pipes will be routed.
Secure to the wall with a
pipe clamp.
Pipe clamp
Pipes
Exterior tape
Drainage pipe
Tapping screw
Ground wire
Crossover wires
Earthing Work
○ Earth work shall be carried out without fail in order to prevent electric shock
and noise generation.
○ The connection of the earth cable to the following substances causes
dangerous failures, therefore it shall never be done. (City water pipe, Town
gas pipe, TV antenna, lightning conductor, telephone line, etc.)

- 37 -
5.5 Precautions for wireless remote controller operation:
(1) Effective distance of wireless remote controller:
(2) Precautions:
① The remote controller should be correctly facing the receiver of the air conditioner for
manipulation.
② The typical coverage is indicated in the left illustration. It may be increased or decreased
depending on the installation.
③ The coverage may be decreased or even nil, if the receiver is exposed to strong light, such as
direct sunlight, illumination, etc., or covered by dust or used behind a curtain, etc.
Moving or removing the appliance
○ In order to meet the requirement of environmental protection, pump down (recovering
refrigerant) is required.
○ The effect of pump down is to return the refrigerant from the indoor unit to the outdoor unit
when the pipes are removed from the main frame. (Pump down method)
① Connect the charge hose to the service port.
② Liquid side: Close the liquid valve with a hexagon wrench.
Gas side: Fully open the gas valve
Cooling operation (If the room temperature is too low, run the HI POWER cooling.)
③ When the pressure gauge indicates 0.01Mpa, stop cooling and close the gas valve.
Safe disposal of product after the useful life
● The safe, comfortable useful life of the product is 10 years.
● Some products may be used even after the normal useful life is expired.
● For the destruction or disposal of the product and waste after the useful life has expired, the
impact on safety and environment must be considered.
Installation test check points
Check the following points after completion of the installation, and before turning on the
power. Conduct a test run and ensure that the unit operates properly.
At the same time, explain to the customer how to use the unit and how to take care of the unit
following the installation manual.
After installation
□ The power supply voltage is correct as the rating.
□ No gas leaks from the joints of the operation
valve.
□ Power cables and crossover wires are securely
fixed to the terminal block.
□ Operation valve is fully open.
□ The pipe joints for indoor and outdoor pipes
have been insulated.
When the air conditioner is restarted or
when changing the operation, the unit
will not start operating for approximately
3minutes. This is to protect the unit and it
is not a malfunction.
Test run
□ Air conditioning and heating are normal.
□ No abnormal noise.
□ Water drains smoothly.
□ Protective functions are not working.
□ The remote control is normal.
□ Operation of the unit has been explained to the
customer.
(Three-minute restart preventive timer)
Wireless remote
controller
5 m or less
60° or less
30° or
less
30° or
less
Receiver
6 m or less
Remote control is
possible within this range

- 38 -
5.6 Standard running data:
SRK20MA-S
SRK25MA-S
SRK35MA-S
SRK50MA-S
High pressure (MPa)
Cooling - - - -
Heating
2.2~2.9
2.2~2.9
2.0~3.2
2.4~3.6
Low pressure (MPa)
Cooling
1.0~1.2
1.0~1.2
0.9~1.2
0.8~1.2
Heating - - - -
Temp. difference
between inlet and
outlet air of indoor
unit (℃)
Cooling
9~10
9~11
8~14
10~16
Heating
9~15
9~16
10~21
10~22
Operating current (A)
Cooling
1.4~4.1
1.4~6.0
1.3~6.6
2.0~10.8
Heating
1.7~5.6
1.7~6.1
1.7~6.6
2.0~13.8
Notes: ① The above data complies with the standard:
and is measured at the following ambient temperature:
indoor side: cooling……27℃DB, 19℃WB; heating……20℃DB
outdoor side: cooling……35℃DB, 24℃WB; heating……7℃DB, 6℃WB
② The length of the pipe between the indoor and outdoor units is 5 meters in the test. The
length of the pipe supplied with the appliance may vary.

- 39 -
6. MAINTENANCE
6.1 Electrical parts failure diagnosis method
(1) Precautions:
① Be sure to switch off the power before disassembling and checking the air conditioner.
Maintenance of the indoor unit should commence 1 minute after the power is switched off.
With respect to maintenance of the outdoor unit, the major circuit (electrolytic capacitor),
which may be charged, should be fully discharged before the maintenance.
② When removing the circuit board, do not vigorously press the circuit board or the bonded
parts.
③ When unplugging the plug connector, do not drag the electric wire and be sure to hold the plug
frame.
(2) Matters to be confirmed before diagnosis:
① Have you asked the user about the details of the failure?
② Does the air conditioner run? Does the self-diagnosis have any indication?
③ Is the voltage of the power socket correct?
④ Is the connection between the indoor and outdoor units wrong?
⑤ Is the outdoor refrigerant disconnecting valve opened?
(3) Procedure of diagnosis (when the air conditioner can’t run at all). When the air conditioner runs
but malfunctions, follow the procedure described in (4).
Important The air conditioner does not run at all when all of the following are met.
① The RUN lamp does not light up;
② The flap does not open;
③ The motor of the indoor fan does not rotate;
④ The self-diagnosis does not have indication.

- 40 -
Procedure of diagnosis (when the air
conditioner does not run at all)
* Correct voltage refers to the voltage between
198-242V.
Has the cable been
inserted into the power
supply with correct
voltage?
No
No
Check that the cable is inserted
into the correct power supply.
Check the operation situation.
Yes
Yes
Switch off the power supply
and open the flap manually.
Is the flap closed when the
cable is inserted into the
power supply?
Yes
No
Is the current protective tube
on the circuit board of the
indoor unit broken?
To “Check method for
circuit board”
If the bonded parts are
not damaged, replace the
protective tube and check
the operation situation.
No
Does the system issue
the sound for receiving
signals when the remote
controller operates?
Yes
Replace the indoor
circuit and check the
operation situation.
To “Remote controller
failure diagnosis method”

- 41 -
(4) Procedure of failure diagnosis (when the air conditioner can run)
Note: (1) When only stop data is indicated, the air conditioner is normal. However, when the same
protection is triggered repeatedly (more than 3 times), which becomes the user’s complaint, it
should be judged according to the content of failure.
Confirm the content of failure of the user’s air conditioner.
Is the cause of error
confirmed?
No
No
No
Yes
Yes
Yes
Yes
No
Confirm the displaying of self-diagnosis.
Eliminate the cause of error and check the
operation situation.
Has the self-diagnosis been
conducted?
Use the maintenance mode to read the past
indication of self-diagnosis
Is there any history of
indication of self-diagnosis?
Use the maintenance mode to read the history
of stop due to the past protection control.
Is there any history of stop
due to protection control?
(1)
Specifically check the defective part against
the content of failure according to the check
method.
Replace the defective part and check the
operation situation.
The air conditioner is normal.

- 42 -
(5) Indication of self-diagnosis
When the air conditioner stops abnormally, the cause is indicated with lamps. Three minutes after
abnormal stop, use the remote controller to start the appliance. The error indication will disappear
and the appliance will commence operation
(2)
.
Note: (2) It can’t be restarted with the remote controller 3 minutes after abnormal stop. The abnormal stop disappears when the
power of the air conditioner is switched off.
Indoor indication
Content of error
Main cause
Indication (flash, light up) conditions
RUN lamp
TIMER lamp
Temp.
indication
Indoor unit
Sensors
Flash 1 time
Light up
06
Indoor heat
exchanger sensor
error
Wire break of indoor
heat exchanger sensor,
poor plug contacting
When the appliance does not operate after the power is
switched on, the temperature measured is below -28℃ for
over 15 min.
No indication during operation.
During operation, the temperature measured is below -28℃
for over 40 min.
The air conditioner stops and the error is indicated.
Flash 2 times
Light up
-
Room
temperature
sensor error
Wire break of room
temperature sensor,
poor joint contacting
When the appliance does not operate after the power is
switched on, the temperature measured is below -45℃ for
over 15 sec.
No indication during operation.
Others
Flash 5 times
Light up
Input voltage
error
Input voltage is too
high or too low.
Flash 6 times
Light up
16
Indoor fan motor
error
Defective indoor fan
motor,
poor plug contacting,
defective indoor circuit
board
When the indoor fan is operating, the rotate speed measured
is below 300 rpm for over 30 sec.
The air conditioner stops and the error is indicated.
- - 01
Display
communication
error
Break of display
connecting wire,
failure, poor joint
contacting
Outdoor unit
Sensors
Continuous
flashing
Flash 1 time
38
Outdoor air
temp. sensor
error
Wire break of outdoor
air temp. sensor, poor
joint contacting
When the power is switched on , within 20 sec. during
which the appliance does not operate or after the
compressor runs for 2 min. ~ 2 min. and 20 sec., the
temperature measured is below -55℃ for over 15 sec.
No indication during operation.
Continuous
flashing
Flash 2 times
37
Outdoor heat
exchanger liquid
pipe sensor error
Wire break of outdoor
heat exchanger liquid
pipe sensor, poor joint
connection
When the power is switched on , within 20 sec. during
which the appliance does not operate or after the
compressor runs for 2 min. ~ 2 min. and 20 sec., the
temperature measured is below -55℃ for over 15 sec.
No indication during operation.
Continuous
flashing
Flash 4 times
39
Compressor
vent-pipe sensor
error
Wire break of vent-pipe
sensor, poor joint
contacting
When the rotational frequency of over 0 rps of outdoor unit
lasts for 9 min.; the temperature measured by the vent-pipe
sensor is below 7℃ for over 15 sec.
After the compressor runs for 10 min. ~ 10 min. and 20 sec.,
the temperature measured is below -25 ℃ for over 15 sec.
The air conditioner stops and the error is indicated.
Continuous
flashing
Flash 5 times
53
Air suction pipe
sensor error
(multi-split
system)
Other s
Light up
Flash 1 time
42
Power cut for
current
protection
Missing phase, short
circuit and lock of
compressor,
defective outdoor
circuit board,
defective EEV,
disconnecting valve
closed
When the compressor is started, the output current of the
inverter (current of compressor) exceeds the setting
The air conditioner stops and the error is indicated.
Light up
Flash 2 times
59
Outdoor unit
error
No connection or wire
break of compressor,
disconnecting valve
closed,
over heat running of
compressor,
wire break of vent-pipe
sensor,
poor joint contacting,
defective EEV,
insufficient refrigerant
The current value of the motor in the initial excitation is
lower than 1A;
The compressor is forced to stop, which is caused by
protection control of outdoor unit and which occurs over 3
times within 20 min. after power is switched on;
Five sec. after the power is switched on, the DC voltage is
abnormal (less than about DC210V);
The voltage reduces when the compressor is running;
The inverter stops immediately when the failure of outdoor
unit is detected.
Light up
Flash 3 times
58
Current safety
Protection control of
outdoor inverter
The input current value of the outdoor inverter exceeds the
control value.
The inverter stops immediately when the failure is detected.
Light up
Flash 4 times
51
Power module
error
Short circuit of power
transistor,
Over current protection
Light up
Flash 5 times
36
Compressor over
heat protection
To prevent over heat of
compressor in running,
deterioration of
refrigerant,
deterioration of
refrigerating machine
oil, winding damage of
compressor motor, etc.
Temperature measured by vent-pipe sensor ≥ 110℃: the
compressor stops;
100℃ ≤ Temperature measured by vent-pipe sensor <
110℃: the frequency of the compressor reduces;
90℃ ≤ Temperature measured by vent-pipe sensor <
100℃: the compressor keeps the frequency;
Temperature measured by vent-pipe sensor <90℃: the
inverter restores the regulation frequency.
Light up
Flash 6 times
05
Serial transfer
error protection
Break of connecting
wire, poor contacting,
defective indoor and
outdoor circuit boards,
strong external
interference
The indoor circuit board can’t receive signals from the
outdoor circuit board for 10 sec. after the power is switched
on or for over 1 min. and 50 sec. at other times.
Light up
Flash 7 times
48
Outdoor fan error
Error of outdoor fan
motor,
poor joint contacting,
defective outdoor
circuit board
The rotational frequency of the outdoor fan motor is below
75 rpm for over 30 sec. and this occurs 3 times.
The air conditioner stops and the error is indicated.
Light up
Continuous
flashing
35
Cool room high
pressure
protection
control
When the temperature measured by the outdoor heat
exchanger liquid pipe sensor is abnormal, the compressor
stops or reduces to keep the frequency, etc.
Flash 5 times
Light up
47
Controllable
silicon voltage
error
Flash 7 times
Light up
57
Cooling cycle
protection
Running with low
refrigerant,
running with
disconnecting valve
closed,
poor 4-way valve
switching,
defective indoor sensor
Five min. after the compressor is started, the actual rotate
speed is ≥ 50 and the temperature measured by the indoor
sensor meets the following condition for 5 min.:
Cooling (inlet air -4℃ < heat exchanger) or cooling (heat
exchanger < inlet air +6℃).
Flash 2 times
Flash 2 times
60
Locked-rotor,
rotor lock
Defective compressor,
defective circuit board
of outdoor unit
The state out of control is detected when the compressor is
started.
The inverter stops immediately after the detection.

- 43 -
(6) Service mode (failure mode reading function)
The air conditioner records the past error indication and protection stops (service data). If the
indication of self-diagnosis can’t be confirmed, it can be confirmed through service data to grasp
the condition when the error occurs.
(a) Terms
Term
Description
Service mode
Service mode refers to indicating service data with the lamp on the display board
through the operation of the indoor controller described in (b).
Service data
Refers to the content of past error indication and protection stops of the air conditioner.
The controller of the indoor unit uses nonvolatile memory (the data stored will not
disappear even after the power is cut) to memorize the past error indication and
protection stops of the air conditioner. Service data is composed of self-diagnosis data
and stop data.
Self-diagnosis data
Refers to the indication data of causes of past stops of the indoor unit (self-diagnosis
indication). Data of last 5 times can be memorized and the older data is deleted
automatically. It also includes the temperatures measured by the various sensors (room
temperature, indoor heat exchanger, outdoor liquid pipe, and outdoor temperature
discharge pipe sensors) and information of the remote controller (operation switching
and air flow changes). More detailed data can be confirmed.
Stop data
Data of causes of past stops due to protection control, etc. in the air conditioner. If only
stop data is indicated, the system will be restored automatically. (The indication will be
restored automatically after the appliance enters the stop mode normally). Data of last
10 times can be memorized and the older data is deleted automatically. (Important) If
only stop data is indicated, the air conditioner is normal. However, when the same
protection repeats (more than 3 times), it will become the cause of user’s complaint.
(b) Indication sequence of service modes
Begin
Temporarily switch off the power and wait over one
minute.
Press and hold the back-up switch and insert the cable
into the socket.
No
Yes
Does the buzzer on the indoor
unit sound?
*1: If the buzzer does not sound after
several operations, the back-up
switch may be defective.
Use the remote controller to send signals within one
minute after inserting the cable into the supply.
(*2)
*2: The settings of the remote
controller are “Cooling operation”,
“Air flow: Me”, and “Set temperature:
21℃).
Count the flashing and going off of the RUN lamp and
TIMER lamp
(*3)
, and confirm the content of failure in the
list.
No
Is there any other data
Restart the appliance more than one
minute after the power is switched off
and the maintenance mode is ended.
Yes
Make changes according to the remote controller setting
list.
(*4)

- 44 -
*3: Counting of flashing in service mode: 1.5 sec. light-up (beginning signal) and number of
continuous flashes (Number of continuous flashes excluding the 1.5 sec. light-up (beginning signal)).
● Safe current (heating safety I) (for example, the stop code is “32”)
RUN lamp (tens place) flashes 3 times and TIMER lamp (ones place) flashes 2 times:
3 x 10 + 2 x 1 = 32. The code 32 “Safe current (heating safety I)” can be read from the list.
*4: In the service mode, set the remote controller (operation switching, air flow setting, and
temperature setting) according to the table below. When sending signals to the main frame of the air
conditioner, the service data indication will change.
① Self-diagnosis data
What is self-diagnosis data?
Refers to the indication data of causes of past stops of the indoor unit (self-diagnosis indication). Data
of last 5 times can be memorized and the older data is deleted automatically. It also includes the
temperatures measured by the various sensors (room temperature, indoor heat exchanger, outdoor
liquid pipe, and outdoor temperature discharge pipe sensors) and information of the remote controller
(operation switching and air flow changes). More detailed data can be confirmed.
As shown in the table below, for different operating modes, temperature settings and air flow settings
of the remote controller, different contents are indicated.
Settings of remote controller
Content of output data
Operation
switching
Air flow
switching
Cooling
Me
Indicates the causes of past stops (error code) indicated in the past
Hi
Indicates the temperature measured by the room temperature sensor when the
error code was indicated
Auto
Indicates the temperature measured by the indoor heat exchanger sensor when
the error code was indicated
Heating
Lo
Indicates the information on the remote controller when the error code was
indicated
Me
Indicates the temperature measured by the outdoor air temp. sensor when the
error code was indicated
Hi
Indicates the temperature measured by the outdoor heat exchanger sensor when
the error code was indicated
Auto
Indicates the temperature measured by the discharge pipe sensor when the error
code was indicated
Setting of remote
controller
Indicates the time number
of indication data of
previous errors
Temperature setting
21℃
Last time
22℃
Second to last time
23℃
Third to last time
24℃
Fourth to last time
25℃
Fifth to last time
(Example)
Settings of remote controller
Indication data
Operation
switching
Air flow
switching
Temperature
setting
Cooling
Me
21℃
Indicates the cause of stop indicated last time (error code)
22℃
Indicates the cause of stop indicated second to last time (error code)
23℃
Indicates the cause of stop indicated third to last time (error code)
24℃
Indicates the cause of stop indicated fourth to last time (error code)
25℃
Indicates the cause of stop indicated fifth to last time (error code)
RUN lamp
(tens place)
TIMER lamp
(ones place)
1.5 sec.
0.5 sec.
0.5 sec.
11 sec. cycle

- 45 -
② Stop data
Settings of remote controller
Indication data
Operation
switching
Air flow
switching
Temperature
setting
Cooling
Lo
21℃
Indicates the cause of the last stop due to protection control, etc.
(stop code)
22℃
Indicates the cause of second to last stop due to protection control,
etc. (stop code)
23℃
Indicates the cause of third to last stop due to protection control, etc.
(stop code)
24℃
Indicates the cause of fourth to last stop due to protection control,
etc. (stop code)
25℃
Indicates the cause of fifth to last stop due to protection control, etc.
(stop code)
26℃
Indicates the cause of sixth to last stop due to protection control,
etc. (stop code)
27℃
Indicates the cause of seventh to last stop due to protection control,
etc. (stop code)
28℃
Indicates the cause of eighth last stop due to protection control, etc.
(stop code)
29℃
Indicates the cause of ninth to last stop due to protection control,
etc. (stop code)
30℃
Indicates the cause of tenth to last stop due to protection control,
etc. (stop code)
(c) List of error codes and stop codes (for all models)
No. of flashes in
service mode
Stop
code or
error
code
Content of
failure
Cause
Conditions
Error
indication
Automatic
restoration
RUN
lamp
(tens
place)
TIMER
lamp
(ones
place)
Category
Class
Off
Off 0 Normal
-
-
-
-
-
Flash 1
time
Flash 1
time
11
Power cut
Start of
compressor
program
Compressor lock
Short circuit of compressor wiring
Output missing phase of compressor
Defective circuit board of outdoor unit
The cause of final failure is power cut after
the compressor fails to start after 42
continuous attempts.
O
(twice)
O
Flash 2
times
12
Below 20 rps
Disconnecting valve closed
Output missing phase of compressor
Defective EEV
The compressor, after starting, stops after
power cut, as the rotational frequency is
below 20 rps.
-
O
Flash 3
times
13
Over 20 rps
Disconnecting valve closed
Output missing phase of compressor
Defective compressor
Defective EEV
Stops after power cut when the rotational
frequency is above 20 rps
-
O
Flash 4
times
14
Over voltage
(DC350V)
Defective outdoor circuit board
Error of power supply
DC voltage (DC280V) exceeds 350V.
-
O
Flash 5
times
15
Short circuit of
power
transistor (high
voltage side)
Defective circuit board of outdoor unit
Damage of mains transformer
Failure of power transistor is determined
when the compressor starts.
O
-
Flash 6
times
16
Circuit failure
due to power
cut
Defective circuit board of outdoor unit
Damage of mains transformer
Failure of power transistor is determined
when the compressor starts.
O
-
Flash 2
times
Flash 1
time
21
Failure of
outdoor
unit
Abnormal
result of PWM
algorithm
Wiring break of compressor
Damage of mains transformer
The result of PWM algorithm (0%) lasts
for over 3 min.
O
-
Flash 2
times
22
Input below
2A (PWM
above 90%)
Wiring break of compressor
Defective outdoor circuit board
The result of PWM algorithm is 90% and
the input current is below the setting for 3
min. continuously.
O
-
Flash 3
times
23
3 abnormal
stops within 20
min.
Disconnecting valve closed
Output missing phase of compressor
Defectivee EEV
Insufficient refrigerant
Automatic restoration and abnormal stop
repeat 3 times within 20 min. after the
outdoor unit is powered on.
O
-
Flash 8
times
28
Different
voltage
Defective power supply engineering
Wrong voltage input
O
-
Flash 9
times
29
Low voltage
Defective power supply engineering
Defective outdoor circuit board
Supply voltage reduces during operation.
-
O
Flash 7
times
27
Error of
outdoor
fan motor
Error of
outdoor fan
motor (for DC
motor only)
Defective outdoor fan motor
Poor plug contacting
Defective outdoor circuit board
75 rpm lasts for over 30 sec.
O
(thrice)
O
Flash 3
times
Flash 1
time
31
Safe
current
Cooling safe
current I
Excessive refrigerant
Safe current stops in the safe current I
mode during cooling operation.
-
O
Compressor lock
Flash 2
times
32
Heating safe
current I
Excessive refrigerant
Safe current stops in the safe current I
mode during heating operation.
-
O
Compressor lock
Flash 3
times
33
Cooling safe
current II
Excessive refrigerant
Safe current stops in the safe current II
mode during cooling operation.
-
O
Compressor lock
Flash 4
times
34
Heating safe
current II
Excessive refrigerant
Safe current stops in the safe current II
mode during heating operation.
-
O
Compressor lock
Flash 5
times
35
Cooling safe
current III
Excessive refrigerant
Safe current stops in the safe current III
mode during cooling operation.
-
O
Compressor lock
Flash 6
times
36
Heating safe
current III
Excessive refrigerant
Safe current stops in the safe current III
mode during heating operation.
-
O
Compressor lock

- 46 -
Flash 7
times
37
Heating safe
current III
+3A
Excessive refrigerant
Safe current stops in the safe current
III+3A mode during heating operation.
-
O
Compressor lock

- 47 -
No. of flashes in
service mode
Stop
code or
error
code
Content of
failure
Cause
Conditions
Error
indication
Automatic
restoration
RUN
lamp
(tens
place)
TIMER
lamp
(ones
place)
Category
Class
Flash 4
times
Flash 1
time
41
Safe current
Cooling
overload 1
(outdoor temp.
36~40℃)
Excessive refrigerant
Compressor lock
Operation with overload
Stops in the overload 1 mode during
cooling operation.
-
O
Flash 2
times
42
Heating
overload 1
(outdoor temp.
5~12℃)
Excessive refrigerant
Compressor lock
Operation with overload
Stops in the overload 1 mode during
heating operation.
-
O
Flash 3
times
43
Cooling
overload 2
(outdoor temp.
40~45℃)
Excessive refrigerant
Compressor lock
Operation with overload
Stops in the overload 2 mode during
cooling operation.
-
O
Flash 4
times
44
Heating
overload 2
(outdoor temp.
12~17℃)
Excessive refrigerant
Compressor lock
Operation with overload
Stops in the overload 2 mode during
heating operation.
-
O
Flash 5
times
45
Cooling
overload 3
(outdoor temp.
45~℃)
Excessive refrigerant
Compressor lock
Operation with overload
Stops in the overload 3 mode during
cooling operation.
-
O
Flash 6
times
46
Heating
overload 3
(outdoor temp.
17~℃)
Excessive refrigerant
Compressor lock
Operation with overload
Stops in the overload 3 mode during
heating operation.
-
O
Flash 5
times
Off
50
Compressor
over heat
125℃
Insufficient refrigerant
Defective vent-pipe sensor
Disconnecting valve closed
The value of vent-pipe sensor exceeds
the setting.
O
(twice)
O
Flash 6
times
Off
60
Error of indoor
and outdoor
communication
Can’t receive
signals for 1
min. and 55 sec.
continuously
(reply in
communication)
Defective power supply
Power wire, signal cable and signal
cabling error
Defective indoor and outdoor circuit
boards
The outdoor unit can’t correctly detect
signals from the indoor unit for 1 min.
and 55 sec. continuously.
-
O
Flash 1
time
61
Defective
indoor and
outdoor
connection
Poor indoor and outdoor connection
Defective indoor and outdoor circuit
boards
After the power is switched on, the
indoor unit can’t correctly detect signals
from the outdoor unit for 10 sec.
continuously.
O
-
Flash 2
times
62
Serial signal
transmission
error
Defective indoor and outdoor circuit
boards
Wrong operation of electromagnetic
noise
The indoor unit can’t correctly detect
signals from the outdoor unit for 1 min.
and 55 sec. continuously.
O
(thrice)
O
Flash 7
times
Flash 1
time
71
Rotor lock
Below 16 rps
Defective compressor
Output missing phase of compressor
Defective EEV
Operation with overload
Defective outdoor circuit board
The compressor, after starting, stops
after the rotor is locked when the
rotational frequency is below 16 rps.
-
O
Flash 2
times
72
Above 16 rps
Defective compressor
Output missing phase of compressor
Defective EEV
Operation with overload
Defective outdoor circuit board
Stops after the rotor is locked when the
rotational frequency is above 16 rps
-
O
Flash 3
times
73
Poor phase
position
switching (U
phase)
Defective compressor
Compressor wiring break
Short circuit of compressor wiring
Defective outdoor circuit board
The cause of final failure is rotor locked
after the compressor fails to start after 42
continuous attempts.
O
(twice)
O
Flash 4
times
74
Poor phase
position
switching (V
phase)
Defective compressor
Compressor wiring break
Short circuit of compressor wiring
Defective outdoor circuit board
The cause of final failure is rotor locked
after the compressor fails to start after 42
continuous attempts.
O
(twice)
O
Flash 5
times
75
Poor phase
position
switching (W
phase or not
determined)
Defective compressor
Compressor wiring break
Short circuit of compressor wiring
Defective outdoor circuit board
The cause of final failure is rotor locked
after the compressor fails to start after 42
continuous attempts.
O
(twice)
O
Flash 6
times
76
Start of
compressor
program (within
4 sec. after
phase position
switching)
Defective compressor
Compressor wiring break
Short circuit of compressor wiring
Defective outdoor circuit board
The cause of final failure is rotor locked
after the compressor fails to start after 42
continuous attempts.
O
(twice)
O
Flash 8
times
Off
80
Protection
control
operation
Error of fan
motor of indoor
unit
Defective fan motor
Poor socket connection
Defective indoor circuit board
When the air conditioner is operating
and the indoor fan motor is ON, the
rotational frequency of the indoor fan
motor is below 300 rps for over 30sec.
O
-
Flash 1
time
81
Vent-pipe
sensor error
(abnormal stop)
Wire break of vent-pipe sensor
Poor socket contacting
After the outdoor rotational frequency is
0 rps for 9 min. continuously, the
discharge pipe sensor data sends wire
break signals for over 15 sec. (below
7℃)
O
(4 times)
O
Flash 2
times
82
Indoor heat
exchanger
sensor error
(abnormal stop)
Wire break of indoor heat exchanger
sensor
Poor socket contacting
The temperature is below -20℃ for 40
min. continuously during heating
operation. (The compressor stops.)
O
-
Flash 3
times
83 Heat exchanger
liquid pipe
sensor error
(abnormal stop)
Wire break of heat exchanger liquid pipe
sensor
Poor socket contacting
The temperature is below -50℃ for 40
min. continuously during heating
operation. (The compressor stops.)
O
-
Flash 4
times
84
Condensation
prevention
control
High indoor humidity
Defective humidity sensor
The condensation prevention control
operates.
-
O
Flash 5
times
85
Defrost control
Reduced indoor air flow
Wire break of indoor heat exchanger
sensor
During cooling operation, the
condensation prevention control operates
and the compressor stops.
-
O
Flash 6
times
86
High pressure
control
Overload in heating
Reduced indoor air flow
Short circuit of indoor heat exchanger
sensor
During heating operation, the high
pressure control operates and the
compressor stops.
-
O
Flash 7
times
87
Compressor
over heat
protection
control
Insufficient refrigerant
Defective vent-pipe sensor
Disconnecting valve closed
The over heat protection control of the
compressor operates and the compressor
stops. - O
Flash 8
times
88
Cooling cycle
system
protection
control
Disconnecting valve closed
Insufficient refrigerant
The cooling cycle system protection
control operates.
-
O

- 48 -
Notes: (1) The number of flashes in service mode excludes the 1.5 sec. light-up (beginning signal).
(See the following example.)
● Safe current (heating safety I) (for example, the stop code is “32”)
RUN lamp (tens place) flashes 3 times and TIMER lamp (ones place) flashes 2 times:
3 x 10 + 2 x 1 = 32. The code 32 “Safe current (heating safety I)” can be read from the
list.
(2) Abnormal stop indication: - No indication (automatic restoration only)
O With indication
Indication with ( ) means the number of automatic restorations for
the same cause, with error indication.
Indication without ( ) means one error indication occurs.
(3) Automatic restoration: - No indication
O With indication
(d) Remote controller information list
1) Operation switching 2) Air flow switching
Indication in service
mode
Operation switching
status at the time of
abnormal stop
Indication in service
mode
Air flow switching status
at the time of abnormal
stop
RUN lamp
(Operation switching)
TIMER lamp
(Air flow switching)
0
AUTO 0 AUTO
1
DRYING 2 HI
2
COOLING
3
ME
4
HEATING
4
LO 6
HI POWER
7
ECONO
* If there is no data recorded (the error code is normal), the information on the remote controller is as
showed in the table below:
Settings of remote controller
Indication when the error code is normal
Operation switching
AUTO
Air flow switching
AUTO
(Example): Operation switching: Cooling, Air flow switching: HI
RUN lamp
(tens place)
TIMER lamp
(ones place)
1.5 sec.
0.5 sec.
0.5 sec.
11 sec. cycle
RUN lamp
(tens place)
TIMER lamp
(ones place)
1.5 sec.
0.5 sec.
0.5 sec.
11 sec. cycle

- 49 -
(e) List of temperatures measured by room temperature sensor, indoor heat exchanger sensor,
outdoor air temp. sensor, and outdoor heat exchanger liquid pipe sensor
Unit: ℃
* If there is no data recorded (the error code is normal), the information of each sensor is as showed in
the table below:
Name of sensor
Value displayed by the sensor when the error
code is normal
Temperature measured by room
temperature sensor
-19℃
Temperature measured by indoor heat
exchanger sensor
-64℃
Temperature measured by outdoor air
temp. sensor
-64℃
Temperature measured by outdoor
heat exchanger liquid pipe sensor
-64℃
(Example): Temperature measured by room temperature sensor, indoor heat exchanger sensor, outdoor
air temp. sensor and outdoor heat exchanger liquid pipe sensor: “-9℃”
Does the buzzer sound?
(Sound means negative)
RUN lamp
(tens place)
TIMER lamp
(ones place)
Yes
(Sounds for
0.1 sec.)
No
(Not sound)

- 50 -
RUN lamp
(tens place)
TIMER lamp
(ones place)
1.5 sec.
0.5 sec.
0.5 sec.
11 sec. cycle
Sound of
buzzer
(Negative)
0.1 sec.
When the temperature is < 0, the buzzer will sound.
When the temperature is ≥ 0, the buzzer will not sound.

- 51 -
(f) List of temperatures of compressor vent-pipe
Unit: ℃
* If there is no data recorded (the error code is normal), the information of each sensor is as showed in
the table below:
Name of sensor
Value displayed by the sensor when the error code is
normal
Temperature measured by
vent-pipe sensor
-64℃
(Example): Temperature of compressor vent-pipe: “122℃”
* The temperature data of compressor vent-pipe should be two times the reading. (The following, 61 x
2= “122℃”)
Does the buzzer sound?
(Sound means negative)
RUN lamp
(tens place)
TIMER lamp
(ones place)
Yes
(Sounds for
0.1 sec.)
No
(Not sound)
RUN lamp
(tens place)
TIMER lamp
(ones place)
1.5 sec.
0.5 sec.
0.5 sec.
11 sec. cycle
Sound of
buzzer
(Negative)
0.1 sec.
When the temperature is < 0, the buzzer will sound.
When the temperature is ≥ 0, the buzzer will not sound.

- 52 -
Check data recording sheet
Customer
Model
Date
Equipment name
Complaint
Settings of remote controller
Content of indication data
Indication result
Content of
indication
Temp.
setting
Operation
switching
Air flow
switching
Buzzer
(yes/no)
RUN lamp
(no. of
times)
TIMER
lamp (no. of
times)
21
Cooling
Me
Code of last error
Hi
Temp. measured by room temp. sensor of last
error
Auto
Temp. measured by indoor heat exchanger sensor
of last error
Heating
Lo
Info of remote controller of last error
Me
Temp. measured by outdoor air temp. sensor of
last error
Hi
Temp. measured by outdoor heat exchanger
liquid pipe sensor of last error
Auto
Temp. measured by discharge pipe sensor of last
error
22
Cooling
Me
Code of second to last error
Hi
Temp. measured by room temp. sensor of second
to last error
Auto
Temp. measured by indoor heat exchanger sensor
of second to last error
Heating
Lo
Info of remote controller of second to last error
Me
Temp. measured by outdoor air temp. sensor of
second to last error
Hi
Temp. measured by outdoor heat exchanger
liquid pipe sensor of second to last error
Auto
Temp. measured by discharge pipe sensor of
second to last error
23
Cooling
Me
Code of third to last error
Hi
Temp. measured by room temp. sensor of third to
last error
Auto
Temp. measured by indoor heat exchanger sensor
of third to last error
Heating
Lo
Info of remote controller of third to last error
Me
Temp. measured by outdoor air temp. sensor of
third to last error
Hi
Temp. measured by outdoor heat exchanger
liquid pipe sensor of third to last error
Auto
Temp. measured by discharge pipe sensor of
third to last error
24
Cooling
Me
Code of fourth to last error
Hi
Temp. measured by room temp. sensor of fourth
to last error
Auto
Temp. measured by indoor heat exchanger sensor
of fourth to last error
Heating
Lo
Info of remote controller of fourth to last error
Me
Temp. measured by outdoor air temp. sensor of
fourth to last error
Hi
Temp. measured by outdoor heat exchanger
liquid pipe sensor of fourth to last error
Auto
Temp. measured by discharge pipe sensor of
fourth to last error
25
Cooling
Me
Code of fifth to last error
Hi
Temp. measured by room temp. sensor of fifth to
last error
Auto
Temp. measured by indoor heat exchanger sensor
of fifth to last error
Heating
Lo
Info of remote controller of fifth to last error
Me
Temp. measured by outdoor air temp. sensor of
fifth to last error
Hi
Temp. measured by outdoor heat exchanger
liquid pipe sensor of fifth to last error
Auto
Temp. measured by discharge pipe sensor of fifth
to last error
21
Cooling
Lo
Code of last stop
22
Code of second to last stop
23
Code of third to last stop
24
Code of fourth to last stop
25
Code of fifth to last stop
26
Code of sixth to last stop
27
Code of seventh to last stop
28
Code of eighth to last stop
29
Code of ninth to last stop
30
Code of tenth to last stop
Judgment
Checker
Remark

- 53 -
(7) Check method according to the content of failure
● List of temperatures and resistance properties of sensor
<Temperature of vent-pipe of outdoor compressor>
● Curve and table of temperatures and resistance properties of sensors
<Room temperature sensor, heat exchanger (indoor and outdoor) sensors, and outdoor air temp.
sensor >
Error of sensor (Wire break of sensor and poor joint contacting)
Is the joint contacting normal?
No
No
Is the resistance value of the sensor
Yes
Yes
Replace the PCB.
Replace the sensor.
Correct the plug/socket (replace the joint)
(Open circuit)
Resistance
(Short circuit)
Temp.
5 KΩ at 25 ℃
Temp. (℃)
Resistance(KΩ)
Temp. (℃)
Resistance(KΩ)
Temp. (℃)
Temp. (℃)
Resistance(KΩ)
Resistance(KΩ)

- 54 -
Error of outdoor unit (Damage of power transistor, wiring break of compressor)
Compressor over heat (Insufficient refrigerant, failure of discharge pipe sensor)
Power cut (Open-phase of output terminal of compressor, compressor lock)
Has all three-phase output voltage
been applied to the power transistor?
No
Failure of inverter
No
Yes
Yes
Has the wiring for the compressor
been properly connected?
Connect it properly.
Check the compressor.
No
No
No
Yes
Yes
Is the resistance value of the
discharge pipe sensor normal?
Check that the connection of the connector is
correct; check the resistance value; replace
the discharge pipe sensor.
Yes
Is the refrigerant circulating load
normal?
Is the situation the same after
refrigerant is charged?
Insufficient
refrigerant
Failure of inverter
Blockage of hush pipe, etc.
No
No
No
Yes
Yes
Yes
Disconnect the wiring of the compressor and
operate the inverter to check whether the
power cut function does not work.
Failure of inverter
Failure of inverter
Has all three-phase output voltage been
applied to the power transistor?
Whether there is no short circuit?
Check the compressor.
Ensure the space of air suction and air blowing.
Visually inspect wiring of compressor
Check insulating resistor (above 1MΩ)
Check winding coil resistor (about several Ω)
In normal cases, the
compressor is locked.

- 55 -
Serial signal transmission error (Wrong power supply and signal cable connection, failure of
indoor and outdoor PCB, error of power supply system)
Indoor fan motor error (Failure of fan motor, failure of indoor PCB)
Compressor lock (Failure of compressor, failure of outdoor PCB)
No
Is the power supply abnormal in
operation after reset?
No
No
No
No
No
Yes
Yes
Yes
Yes
Yes
Yes
Failure caused by one-time reason (noise,
etc.), not failure of machine
Is the indoor and outdoor
connection correct?
Correct the indoor and outdoor connection
Dose the voltage between indoor
terminal block 2~3 fluctuate
between DC 0V and about 12V?
Failure of indoor PCB
Check the connection
Dose the voltage between outdoor
terminal block 2~3 fluctuate
between DC 0V and about 12V?
Is there AC voltage of
220/230/240V between outdoor
terminal block 1~2?
Failure of indoor PCB. Check the
connection.
Is the power supply system
(protective tube, choke, etc.) in
good condition?
Replace the protective tube, choke, etc.
Failure of outdoor PCB
No
No
Yes
Yes
Is the connection of the connector
normal?
Correct the connector.
Has voltage been applied to the fan
motor?
Failure of indoor PCB
Failure of fan motor
No
Yes
Has all three-phase output
voltage been applied to the power
transistor?
Failure of inverter
Check the compressor.
Visually inspect wiring of compressor
Check insulating resistor (above 1MΩ)
Check winding coil resistor (about several Ω)
In normal cases, the
compressor is locked.

- 56 -
Outdoor fan motor error (Failure of fan motor, failure of outdoor PCB)
(8) Actions in case of short circuit and wire break of sensor
(a) Indoor unit
Sensor
Operation type
Actions
Short circuit
Wire break
Room
temp.
sensor
Cooling
Become the compressor continuous
operation instruction
No compressor operation instruction
obtained
Heating
No compressor operation instruction
obtained
Become the compressor continuous
operation instruction
Heat
exchanger
sensor
Cooling
Usual operation of system is
possible.
No compressor operation instruction
obtained (frost prevention)
Heating
High pressure control mode
(inverter stop instruction)
Heat-retaining (stop of indoor fan)
Humidity
sensor
(1)
Cooling
① in the table below
② in the table below
Heating
Usual operation of system is possible.
Note: (1) Only Model 50 has a humidity sensor.
① Actions of humidity sensor
Failure mode
Reading of
control input
circuit
Operation of air
conditioner
Wire
break
① wire
break
Humidity
reading 0%
Operating in drying
mode
② wire
break
Humidity
reading 0%
Operating in drying
mode
①② wire
break
Humidity
reading 0%
Operating in drying
mode
Short
circuit
① and ②
short circuit
Humidity
reading 100%
Operating in cooling
mode
Note: Do not use an instrument for power-on inspection of the humidity
sensor. Accidents may occur if DC is applied.
(b) Outdoor unit
Sensor
Operation type
Actions
Short circuit
Wire break
Heat
exchanger
liquid pipe
sensor
Cooling
Usual operation of system is
possible.
Usual operation of system is
possible.
Heating
The defrosting does not function.
10 min. defrosting about once an
hour
Outdoor air
temp. sensor
Cooling
Usual operation of system is
possible.
Usual operation of system is
possible.
Heating
The defrosting does not function.
10 min. defrosting about once an
hour
Compressor
vent-pipe
sensor
All modes
Compressor over heat protection is
impossible. (The unit can run.)
The compressor stops. (The inverter
does not output.)
No
Is the connection of the connector
normal?
No
Yes
Correct the connector.
Has voltage been applied to the fan
motor?
Yes
Failure of outdoor PCB
Failure of fan motor
Humidity sensor element
Humidity sensor component
Joint

- 57 -
(9) Check method for indoor electrical components
(10) Check method for indoor fan motor (DC motor)
Method for checking whether the fan motor or the circuit board malfunctions when the indoor fan
motor is abnormal
1) Output check of indoor PCB
A) Unplug the wire from the power socket.
B) Remove the panel and the cable socket for the fan motor.
C) Plug the cable into the power supply and press the ON/OFF button; the machine runs and the
voltage shown in the figure below outputs for about 30 sec.; if the error is detected, it indicates
that the circuit board is basically normal and the fan motor malfunctions.
If there is no voltage as shown in the figure below at contact pins ①, ④ and ⑤ of the socket,
it indicates that the indoor circuit board malfunctions and the fan motor is basically normal.
2) Check of resistance value of DC fan motor
Measurement point
Resistance value in
normal cases
Notes: (1) Remove the fan motor and measure
without power.
(2) The fan motor is abnormal if the
measurement is below the normal
value.
①-③ (red and
black)
Above 25MΩ
④-③ (white and
black)
Above 30MΩ
No
Is the fuse (3.15A) intact?
No
No
Yes
Yes
Yes
Replace the fuse.
Has voltage been applied to
between terminal block 1~2
(AC220/230/240V)?
Dose the voltage between terminal
block 2~3 fluctuate between DC
0~12V?
Replace the PCB.
Replace the PCB.
The indoor electrical components are
normal.
Notes: (1) Communication is sent only when 52C is ON, so please check the
operation status.
(2) Measure voltage on the terminal block.
● Power supply: Between ①~② (AC220/230/240)
● Signal: Between ②~③ (Fluctuates between DC 0 ~ about 12V)
(3) Press and hold the back-up switch for over 5 sec. to enter the HI
POWER cooling mode.
Circuit board of indoor unit
Red
White
Blue
Yellow
Black
several V

- 58 -
(11) Remote controller failure diagnosis procedure
No
Is the remote
controller
normal after
reset?
Note (1)
No
No
Yes
●Low battery of remote controller
● Defective remote controller Replace
Restart
Does the air
conditioner
operate?
Yes
Yes
No error
Defective PCB of indoor
unit
Can the air
conditioner operate
when the back-up
switch is used?
Replace the wireless
receiving part.
Defective wireless receiving
part
Yes
Can the air conditioner
operate when the
remote controller is
used?
No
Defective remote controller
Replace
Note (1)
(a) Press the ACL switch on the remote controller.
(b) If the set temperature displayed is 0℃ and the current
time displayed is 12:00, it indicates there are no
obvious problems.

- 59 -
(12) Check method for outdoor unit
1) Circuit diagram of 20, 25 and 35MA-S outdoor units

- 60 -
2) Circuit diagram of 50MA-S outdoor unit

- 61 -
(13) Check method for outdoor circuit board (inverter)
Make confirmation after checking that the indoor circuit board is normal.
(I) Use a multimeter to conduct inspection.
a) Unplug the plug.
b) Remove the output cables U, V and W (to the compressor) of the power transistor.
(Note: The inspection of inverter can be conducted only after the capacitor is discharged and
after making sure the residual voltage is below 10V.)
c) Insert the plug and press and hold the back-up switch for over 5 sec. till the appliance
commences operation.
d) Measure the voltages between U and V, V and W, and W and U of the power transistor with the
analogue instrument within the range of AC1000V.
If the voltages between U and V, V and W, and W and U as shown in the following figure can be
detected regularly, it indicates the outdoor circuit board is normal.
Compressor start test-running voltage
Press and hold the switch on the main frame for over 5 sec. [ON]
The indoor RUN lamp flashes 2 times and the TIMER lamp flashes 2 times. (Error code 73-76)
Note (1) After the one-time output one minute after this power transistor outputs voltage, the error of
the indoor unit is detected.
(II) Judgment through defective inverter detector (MRE part number: SA01927)
1) Detector setting procedure
a. Switch off the power supply (turn off the switch).
b. Remove the output (power transistor) U, V and W of the inverter (control) circuit board from
the connection of the compressor.
c. Connect the wires of the detector (U=Red, V=White, W=Black) to the terminal wires of the
power transistor.
2) Judging the operation method
a. Insert the plug and press and hold the back-up switch for over 5 sec. till the appliance
commences operation.
b. Confirm the flashing and ON status of the 6 LEDs. The flashing and ON status, which
repeats for 300 sec., is shown below:
Flash (about 3 sec.) ←→ On (about 5 sec.) The flashing stops for one minute and then
repeats for 300 sec.
c. Judge according to the flashing and ON status of the LEDs.
Flashing and ON status of
LEDs
6 LEDs flash at the same
time.
6 LEDs go off or several
LEDs flash or light up.
Inverter
Normal
Defective
d. Let it operate for a while and the error will be indicated (the indoor RUN lamp flashes 2
times and the TIMER lamp flashes 2 times). The output of the inverter stops.
Note: The terminals of the power transistor that control the circuit board are mounted on the back
of the control casing. Remove the control circuit board before connection.
About AC 170V
About 10 sec.
About 300 sec.
The indoor RUN lamp
flashes 2 times and the
TIMER lamp flashes 2
times.
(Error code 73-76)
Insert them into the terminals
of the power transistor

- 62 -
(14) Check method for EEV
After the power is switched on, check the opening of the EEV and the sound and voltage within 10
sec. of operation.
[In operation, only the opening is changed and the voltage can’t be measured.]
1) If sound of the EEV is heard, it indicates the EEV is basically good.
2) If no sound of the EEV is heard, measure the output voltage.
3) If there is voltage, it indicates the circuit board is normal.
4) If there is voltage and the EEV can’t operate (or has no sound), it indicates that the EEV is
defective.
5) Check method for EEV coil: Measure the resistance value between the terminals with a
multimeter.
Measurement point
Resistance value in
normal cases
6-wire EEV
5-wire EEV
46±4Ω
(at 20℃)
①-④ (red and orange)
①-③ (red and green)
①-⑥ (red and white)
①-④ (red and orange)
②-③ (brown and green)
①-⑤ (red and yellow)
②-⑤(brown and yellow)
①-⑥ (red and white)
(15) Check method for outdoor fan motor (DC motor)
● Failure diagnosis method for outdoor circuit board or motor when the fan motor can’t operate
● Check it after confirming the indoor unit is normal.
(Ⅰ) Output check of outdoor circuit board
1) Unplug the plug.
2) Remove the plug CAN for the outdoor fan motor.
3) Insert the plug and press and hold the back-up switch for over 5 sec. (ON) till the indoor unit
commences operation. If, 20 sec. after the back-up switch is turned ON, the contact pin No. ②
of the plug as shown in the following figure outputs voltage for about 30 sec., it indicates the
circuit board is basically normal and the fan motor malfunctions. If there is no voltage output,
it indicates the circuit board malfunctions and the fan motor is basically normal.
Note (1) After the one-time output another 30 seconds after the contact pin ② of the plug outputs
voltage for 3 minutes, the error of the indoor unit is detected.
(Ⅱ) Checking resistance of DC fan motor
Measure the resistance between the terminals with a multimeter.
Measurement point
Resistance value in
normal cases
Notes: (1) Remove the fan motor and
measure without power.
(2) The fan motor is abnormal if the
measurement is below the normal
value.
①-③ (red and black)
Above 25MΩ
④-③ (white and
black)
Above 30MΩ
EEV
1 or 2
Red Brown Green Orange Yellow White
About 5V for about 10 sec. after
power is switched on
Red Black White Yellow Blue
DC several V
Circuit board of
outdoor unit

- 63 -
6.2 Servicing
(1) Evacuation
Evacuation refers to the process of purging non-condensable gas, air, water, etc. from the
refrigerant equipment with a vacuum pump.
The R410A refrigerant is highly water insoluble, therefore even a little water left in the refrigerant
equipment will be frozen, which causes the so-called water blockage.
The refrigeration oil of the compressor is esterification oil or synoil which has strong
hygroscopicity, so deposit may be formed easily when foreign matters enter, which causes many
inexplicable faults.
● Evacuation procedure
(a) Check whether there is internal pressure in the machine. If there is any, use the inspection
connector to eliminate it.
(b) Connect the service hose of the collecting pipe gauge to the gas and liquid pipes.
(c) Connect the vacuum pump to the charge hose . Conduct evacuation repeatedly in the
following order.
(2) Refrigerant charging
In case of leakage of R410A, be sure to discharge it all, evacuate the machine till the acceptance
value is reached, and charge new refrigerant according to the specified weight. Never add
refrigerant.
(a) Discharge all refrigerant from the machine and evacuate the machine.
Note: It is unreasonable to add refrigerant without evacuation, as this will cause insufficient or
excessive charging.
(b) Retain the collecting pipe gauge, and connect the refrigerant cylinder to the machine.
(c) Record the weight of the refrigerant cylinder on the scale. This is necessary to ensure the amount
of refrigerant to be charged.
(d) Purge the air in the charge hose .
Loosen the connection between the charge hose and the collecting pipe gauge; open the
valve ③ for several seconds; and tighten the connection immediately after the gas blown from
the loose part is observed.
(e) After the air is released from the charge hose , open the valves ① and ③ and the
refrigerant gas will immediately flow from the cylindar into the machine. Ensure the refrigerant
cylindar is kept vertical to allow the gas to flow into the machine.
(f) The refrigerant will not move several procedures after it is charged into the system. In such case,
start the compressor to start the cooling cycle, till the machine is fully charged with gas of the
specified weight.
(g) After the amount of refrigerant is determined, close the valve ③.
(h) Remove the charge hose from the mahine. Cover the valve mouth of the refrigerant pipe with the
blanking cover and tighten it.
(i) Use the gas leak detector to check for any leakage along the piping.
(j) Start the air conditioner, and ensure that its operation, the high/low pressure and temperature
difference between inlet air and outlet air, etc. are normal.
Liquid
Gas
Turn on the vacuum pump.
The combined pressure gauge displays -0.1MPa (-76cmHg).
When -0.1MPa (-76cmHg) is displayed, run the vacuum pump for over
15 min.
Close the low pressure valve ① of the collecting pipe gauge.
Turn off the vacuum pump.
Inspection connector
Service hose
Collecting pipe
gauge
Refrigerant
cylinder
Charge hose
Vacuum
pump
Notes: (1) Never use the pressure of the refrigerant
to purge the air.
(2) Never use the compressor for
evacuation.
(3) Never operate the compressor in the
vacuum mode.

- 64 -
7 Service Manual for Air Conditioners with Refrigerant Piping Mounted/Using R410A
Refrigerant
(The following is selected from the document published by The Japanese Refrigeration and
Air Conditioning Industry Association)
7.1 Overview
7.1.1 R410A Refrigerant
(1) Using R410A in air conditioners
In 1974, scientists found that the ozone in the upper stratosphere (about 20-40 km away from the
ground) may be damaged by ozone depleting substances such as CFC (chlorofluorocarbon) and
HCFC (hydrochlorofluorocarbon), etc. From then on, many countries have taken various measures
to protect the ozone layer.
As a kind of HCFC, the conventional refrigerant (R22) used in air conditioners will damage the
ozone layer. Therefore, in accordance with the international protocols (i.e. Protocols of Montreal
(Ozone Depleting Substances)) and the relevant laws and regulations of the various countries, other
refrigerants that will not damage the ozone layer must be used to substitute R22.
Refrigerants composed of hydrogen (H), fluorine (F) and carbon (C) are called HFC which will not
damage the ozone layer. R410A is a kind of HFC, with a pressure higher than R22 by about 1.6
times and a performance about the same as R22 at the same temperature of refrigerant.
(2) Chemical properties of R410A
a) Chemical stability
Like R22, R410A is a harmfulless, inflammable refrigerant with stable chemical properties.
However, just like R22, with a specific gravity of vapor heavier than that of air, if R410A is
leaked to a closed room, it will be distributed at a low level and cause oxygen starvation. If
R410A is directly exposed to fire, it may produce poisonous gas, so be sure to dispose of it in a
place with good ventilation.
b) Compositional variation (property of false azeotropic point)
R410A is a kind of false azeotropic mixture refrigerant composed of R32 and R125. The “false
azeotropic” condition refers to the dew point curve and the boiling point curve-gas-liquid balanced
curve (constant pressure) are located at each other’s peak respectively. Multi-component
refrigerant with this chemical property will not change in ingredients basically even when its state
is changed, such as becoming vapor (or condensation). Therefore, even in case of gas refrigerant
leakage at a position during pipe mounting, the ingredients of the circulating refrigerant will keep
unchanged basically.
Therefore, R410A can basically be disposed of as a single component refrigerant similar to R22.
However, with respect to the charging of R410A, in consideration of the little changes in
ingredients during the conversion from gaseous to liquid state when it is put into the cylinder, it
should be charged in liquid state.
c) Property of pressure
As shown in Table 2, the vapor pressure of R410A is higher than that of R22 by 1.6 times at the
same temperature, so be sure to use the tools and materials designed specifically for R410A that
can bear high pressure for installation and servicing.
Table 1 Comparison of thermo-physical properties
between R410A and R22
Table 2 Comparison of pressure of
saturated vapor between R410A and R22
Unit: MPa
R410A
R22
Refrigerant
R410A
R22
Ingredient (wt%)
R22/R125
(50/50)
R22
(100)
Temp. (℃)
Molecular weight
72.6
86.5
-20
0.30
0.14
Boiling point (℃)
-51.4
-40.8
0
0.70
0.40
Vapor pressure (25℃,
MPa)
1.56
0.94
20
1.35
0.81
Density of saturated
vapor (25℃, kg/m2)
64.0
44.4
40
2.32
1.43
Inflammability
Inflammable
Inflammable
60
3.73
2.33
Ozone depletion
potential (ODP)
0
0.055
65
4.15
2.60
Global warming
potential (GWP)
1730
1700
Source: Thermo-physical Properties List,
NIST REFPROP V5.10, etc. prepared by
JRAIA.
Source: Thermo-physical Properties List, NIST REFPROP
V5.10, etc. prepared by JRAIA.

- 65 -
(3) Lubricants for R410A
Mineral oil, AB (Alkybenzene), etc. are widely used as the lubricants for R22. R410A is not easily
dissolved in conventional lubricants such as mineral oil, etc. and such lubricants likely stay in
refrigerant cycle, so ester, ether and other synoil in which R410A is highly dissoluble are generally
used. However, such synoil has high hygroscopicity, so they must be handled more carefully than
conventional lubricants. In addition, if such synoil is mixed with mineral oil, AB (Alkybenzene),
etc., this may cause deterioration, thus blocks the hush pipe or causes failure of compressor.
Therefore, never mix these synoil.
7.1.2 Safety of installation/servicing
The pressure of R410A is higher than that of R22 by about 1.6 times, so unreasonable installation/
servicing may cause severe consequences. Therefore, be sure to use tools and materials designed
specifically for R410A, conduct installation/ servicing carefully, and pay attention to the following
precautions.
1) Never use refrigerants other than R410A in air conditioners designed to use R410A.
2) In case of refrigerant gas leakage during installation/ servicing, be sure to provide sufficient
ventilation.
If the refrigerant gas is exposed to fire, poisonous gas may be produced.
3) Prevent air or vapor from entering the refrigerant cycle when installing or removing air
conditioners. Otherwise, the pressure in the refrigerant cycle may become exceptionally high,
which will cause fracture of equipment or personal injury.
4) After the installation is completed, check that there is no refrigerant gas leakage.
If the refrigerant gas is leaked to the room and comes into contact with the fire in the fan driven
heater, small heating stove, etc., it may produce poisonous gas.
5) If an air conditioner charged with large amount of refrigerant (such as a multi-functional air
conditioner) is installed in a small room, be sure to take more care and ensure that the
concentration will not exceed the limit even in case of refrigerant leakage.
In case the refrigerant is leaked and its concentration exceeds the limit, oxygen starvation may be
caused.
6) Be sure to conduct installation or removal according to the Installation Manual.
Incorrect installation may cause failure of refrigerant, water leakage, electric shocks, fire, etc.
7) Unauthorized operation of air conditioners may be very dangerous. In case of failure of the
machine, please call the qualified air conditioner technician or electrician.
Incorrect servicing may cause water leakage, electric shocks, fire, etc.
7.2 Mounting refrigerant pipes
7.2.1 Piping materials and joints used
Refrigerant pipes are mounted mainly with copper pipes and joints. Be sure to select and mount
copper pipes and joints suitable for refrigerant. In addition, be sure to use clean copper pipes and
joints and try to keep their inner walls clean.
(1) Copper pipes
Be sure to use seamless copper pipes made of copper or copper alloy. Copper pipes with residual
oil less than 40mg/10m are ideal. Do not use fractured, distorted or discolored copper pipes
(especially in respect of inner walls). Otherwise, the filth may block the EEV or hush pipe.
As the pressure of air conditioners using R410A is higher than that of air conditioners using R22, be
sure to select appropriate materials.
The thickness of copper pipes for R410A is shown in Table 3. Never use copper pipes with a
thickness less than 0.8mm.
Table 3 Thickness of annealed copper pipes
Thickness (mm)
Rating diameter
Outside diameter
(mm)
R410A
[Reference]
R22
1/4
6.35
0.80
0.80
3/8
9.52
0.80
0.80
1/2
12.70
0.80
0.80
5/8
15.88
1.00
1.00

- 66 -
(2) Joints
Copper pipes use flared joints or sleeve joints. Be sure to clean them before use.
a) Flared joints
Flared joints are used to connect copper pipes that can’t be used for piping as their outside
diameter exceeds 20mm. In such case, sleeve joints may also be used.
The sizes of ends of flared pipes, ends of flared joints and flare nuts are shown in Tables 5~8 (see
pages 112 and 113). In addition, double-ended loose joints, single end loose joints, pipe tee joints
and corner joints are generally used. (See Figure 1.)
Double-ended loose joint Single end loose joint Pipe tee joint Corner joint Single end corner joint
Figure 1 Flared joints
b) Sleeve joints
Sleeve joints need welding for connection and are mainly used for pipes with a diameter
exceeding 20mm. The thicknesses of sleeve joints are shown in Table 4. Sleeve joints, corner
joints and pipe tee joints are generally used. (See Figure 2.)
Table 4 Min. thickness of sleeve joints
Rating diameter
Reference outside diameter of
sleeve joints (mm)
Min. joint thickness
(mm)
1/4
6.35
0.50
3/8
9.52
0.60
1/2
12.70
0.70
5/8
15.88
0.80
Figure 2 Sleeve joints
7.2.2 Handling of piping materials
When mounting refrigerant pipes, be careful to prevent water or dust from entering the pipes, do not
use oil other than the lubricant used in the air conditioner and avoid refrigerant leakage. Use
dehydrated lubricant for piping. Be sure to use airtight cover or similar cover gasket to seal the
container for storage.
(1) Flaring procedure and precautions
a) Cutting pipes
Use a pipe cutter to cut the pipes slowly to avoid distortion.
b) Removing burrs and nicks
Burrs or nicks on the flared position may cause refrigerant leakage. Remove all burrs and clean
the cutting surface carefully before mounting.
c) Inserting flare nuts
Sleeve joint
A sleeve joint of different diameters
90°corner type A
90°corner type B
Mounting reducing joint
Pipe tee joint
A pipe tee joint of
different diameters

- 67 -
d) Flaring
Ensure to clean the clamps and copper pipes.
Use the clamping bars to conduct flaring correctly.
Use the flare tools for R410A or conventional flare tools.
The size of flaring varies depending on the kinds of flare tool. Please
note that the size must be adjusted to “Size A” with the size
adjustment scaled rule when using conventional flare tools.
Figure 3 Flare tool
Table 5 R410A flaring sizes
Table 6 R22 flaring sizes
Figure 4 Relationship between flare nut and flaring sealing surface
Table 7 Sizes of R410A flaring and flare nut
[Unit: mm]
Rating diameter
Outside diameter
(mm)
Thickness
(mm)
Flare tool for R410A
Clutch type
Conventional flare tools
Clutch type
Wing nut type
Rating diameter
Outside diameter
(mm)
Thickness
(mm)
Flare tool for R410A
Clutch type
Conventional flare tools
Clutch type
Wing nut type
Rating
diameter
Outside
diameter
Thickness
Size
Width of flare nut

- 68 -
Table 8 Sizes of R22 flaring and flare nut
[Unit: mm]
(2) Flaring procedure and precautions
a) Ensure there is not any defect or dust, etc. on the flaring and connection.
b) Correctly connect the flared surface and the joint axis.
c) Use a torque wrench to tighten the flaring to the specified torque. The tightening torque for
R410A is the same as that for R22. Insufficient torque may cause gas leakage. Excessive torque
may cause the flare nut damaged and can’t be removed. Please select the tightening torque of
the value specified by the manufacturer. Table 9 shows the reference values.
Note: Apply the oil specified by the manufacturer on the flared surface. If other types of oil are used, it
may cause deterioration of the lubricant and failure of the compressor.
Table 9 Tightening torque for flaring for R410A [reference values]
7.2.3 Storage of piping materials
(1) Types and storage of piping materials
The refrigerant piping materials for air conditioners are generally divided into the following types.
The pressure of R410A is higher than that of R22 by about 1.6 times, so be sure to use copper pipes
of the thickness as shown in Table 3 (see Page 56) and try to keep them clean. Be careful in
handling/storing copper pipes to avoid bending, distorting or damaging them. Be careful to prevent
dust, water, etc. from entering the pipes.
Seal the pipe opening with caps, etc. Ensure the sealing is intact during storage. To store coated or
bare copper pipes, use clamps, tape, etc. to fully seal the opening.
Rating
diameter
Outside diameter
(mm)
Thickness
Width of flare nut
Rating
diameter
Tightening torque
N · m (kgf · cm)
Tightening torque of torque wrench available
on the market N · m (kgf · cm)
Refrigerant
piping
materials
With thermal
insulation
Without thermal
insulation
(Bare copper
pipe)
Flared
Not flared
Not flared
Common name
: (a) Pipe sleeve
: (b) Insulated copper pipe
: (c) Bare copper pipe
Outside
diameter

- 69 -
(2) Characteristics
a) Pipe sleeve
Copper pipes as R410A pipe sleeves must have a thickness as shown in Table 3 (see Page 59)
and Tables 5 and 6 (see Page 61), and sizes of flaring and flare nuts different from those of R22.
Therefore, be sure to select pipe sleeves suitable for R410A.
b) Insulated copper pipes
Before using insulated copper pipes, ensure their thickness is suitable for R410A.
c) Bare copper pipes
Be sure to use bare copper pipes of a thickness as shown in Table 3 (see Page 59) and try to keep
them clean. The surface of bare copper pipes is exposed, so be especially careful to handle them
and mark them to prevent misuse.
(3) Precautions before mounting
Pay attention to the following during pipe connection.
a) Before connecting to the appliance, use caps, etc. to seal all pipe opening.
b) Be especially careful in pipe mounting in rainy days.
If water enters the pipe, the lubricant may deteriorate, which causes failure of the appliance.
c) Connect the pipes as quickly as possible.
If the pipes are kept open for a long time, please fully charge them with nitrogen or use a
vacuum pump for drying.
7.2.4 Welding
(1) Processing connection
Due to fusion cast between the surfaces of joints, which produces very high adhesive strength, be
sure to leave adequate space for welding and keep adequate gap between the surfaces of joints. The
minimum depth of penetration of joint of copper pipe, the outside diameter of inner pipe and the
gap between the outer pipe and the inner pipe are shown in Table 10. If copper brazing filler is used,
the pipe connection is the most secure when the gap is kept between about 0.05~0.1mm.
Table 10 Minimum depth of penetration and gap between copper pipe and joint
* When inserting the pipe, either process the end of the pipe or connect the pipe with a sleeve joint
through welding.
(2) Brazing filler
a) Alloy brazing filler
Alloy mainly composed of silver and copper is used to bond iron, copper or copper alloy. In
spite of its outstanding solderability, it’s expensive.
b) Phosphor bronze brazing filler
Phosphor bronze brazing filler is generally used to bond copper or copper alloy.
c) Low melting temperature solder
Alloy of tin and lead. Conventional solder. Due to its weak adhesive strength, it can’t be used for
refrigerant pipe welding.
* Notes:
1) BCuP reacts with sulfur easily and produces a complex aqueous solution, which may cause
gas leakage. Therefore, please use other types of brazing filler for SPA, etc. and apply paint
on pipe surface.
2) If welding is needed during servicing, please use the same type of brazing filler.
Inside diameter of
outer pipe
D (mm)
Minimum depth of
penetration
B (mm)
Gap
(A-D) x 1/2
(mm)

- 70 -
(3) Welding flux
a) Reasons for using welding flux
● To remove the oxide film and impurity from metal surface to help the flow of brazing filler.
● To prevent oxidization on metal surface in welding.
● To reduce the surface tension of brazing filler to make it better adhere to the treated metal.
b) Features of welding flux required
● The active temperature and welding temperature of the welding flux are the same.
● Due to the wide range of effective temperature, the welding flux is hard to carbonize.
● Slag is easily removed after welding.
● The corrosion of treated metal and brazing filler is slight.
● Good spreading property, harmless to human body.
As described above, the working of welding flux is complex, therefore an appropriate type of
welding flux must be selected according to the type and shape of treated metal, type of brazing
filler and welding mode, etc.
c) Types of welding flux
● Corrosion resistant welding flux
This type of welding flux is generally composed of borax and boric acid.
Suitable for welding temperature of above 800℃.
● Active welding flux
Most welding fluxes used for silver brazing are active welding fluxes.
The borax-boric acid compound is added with potassium fluoride, potassium chloride, sodium
fluoride, etc., so it has enhanced oxide film removing ability.
* Precautions:
① Remove the welding flux after welding.
② If the chlorine contained in the welding flux is left in the pipe, it may cause deterioration
of lubricant. Therefore, do not use welding flux containing chlorine.
③ When adding water to the welding flux, do not use water containing chlorine (such as
distilled water or ion exchange water).
(4) Welding
Welding requires complicated technique and experience, so it must be operated by professionals.
In order to prevent the formation of oxide film in the pipe, conduct welding when the nitrogen (N2)
is flowing.
<Welding method to prevent oxidation>
a) Connect a reducing valve to the nitrogen cylinder.
b) Charge nitrogen into the piping with a copper pipe and install a flowmeter on the nitrogen
cylinder.
c) Seal the gap between the piping and the inserted pipe to prevent return of nitrogen.
d) When the nitrogen is flowing, be sure to keep the end of the piping open.
e) Adjust the flow velocity of nitrogen. Use the reducing valve to keep it below 0.05m3/h or
0.02MPa (0.2kgf/cm2).
f) After the above steps, keep the nitrogen flowing till the piping cools to a certain extent (that is, to
the finger temperature).
g) Remove all welding flux after welding.

- 71 -
Figure 5 Preventing oxidation in welding
* Precautions for welding
① General precautions
1) The weld strength should meet the requirement.
2) Keep air tightness under the pressure condition after the operation.
3) During welding, avoid damaging the components due to high temperature.
4) Do not allow the oxide or welding flux to block the refrigerant piping.
5) Prevent the welding portion from hindering the flow in the refrigerant circuit.
6) Avoid corrosion of the welding portion.
② Over heat prevention
Due to over heat, the inner and outer surfaces of the treated metal may be oxidized. Particularly,
if the inside of the refrigerant circuit is oxidized due to over heat, the oxide film produced will
severely damage the circuit. Therefore, keep the appropriate welding temperature and try to
reduce the heating area during welding.
③ Over heat protection
In order to prevent damaging or downgrading the components near the welding position due to
over heat, please take appropriate protection measures, such as using (1) a metal plate, (2) wet
cloth, or (3) heat absorbent.
④ Movement during welding
Avoid any vibration during welding to prevent breaking or damaging the welded splice.
⑤ Oxidation prevention
In order to improve the efficiency of welding, several types of antioxidant available on the
market may be used. However, the ingredients of such antioxidant may differ in thousands ways,
and some may erode the piping materials or have negative impact on HFC refrigerants, lubricants,
etc. Therefore, be especially careful in the use of antioxidants.
7.3 Installation, Removal and Servicing
7.3.1 Tools for R410A
For air conditioners using R410A, in order to prevent charging other types of refrigerant accidently,
the diameter of the service opening of the control valve (3-way valve) for the outdoor unit is changed.
In addition, in order to improve the compressive strength, the sizes of flaring and flare nut (for
copper pipes, the rating diameters are 1/2 and 5/8) are also changed. Therefore, prepare the tools
designed specifically for R410A as shown in (1) on Page 117 and the general tools as shown in (2)
on Page 118 for installation/servicing.
Reducing
valve
Nitrogen
Flowmeter
Disconnecting
valve
From nitrogen
cylinder
Nitrogen
Piping
Rubber stopper
for sealing

- 72 -
(1) Tools designed specifically for R410A
a) Manifold pressure gauge
● As R410A has the property of high pressure, conventional tools can’t be used.
Table 11 Difference between conventional high/low pressure gauge and pressure gauge for R410A
● In order to prevent charging other types of refrigerant accidently, the shapes of the various ports
of the branch manifold are changed.
Table 12 Difference between conventional branch manifold and branch manifold for R410A
Conventional branch manifold
Branch manifold for R410A
Port size
7/16 UNF
20 screw threads per inch
1/2 UNF
20 screw threads per inch
b) Charge hose
● Due to the property of high pressure of R410A, the pressure impedance of the charge hose must
be improved and the material is changed to HFC impedance type material. Furthermore, in
order to comply with the sizes of the various ports of the branch manifold, the sizes of hose
caps are also changed. In addition, in order to prevent gas pressure reaction, the charge hose
with a valve mounted beside the hose cap may be used.
Table 13 Difference between conventional charge hose and charge hose for R410A
Conventional charge hose
Charge hose for R410A
Pressure
impedance
Normal
pressure
3.4 MPa (34 kgf/cm2)
5.1 MPa (51 kgf/cm2)
Breakdown
pressure
17.2 MPa (172 kgf/cm2)
27.4 MPa (274 kgf/cm2)
Engineering material
NBR rubber
HNBR rubber
With nylon coating inside
Size of hose cap
7/16 UNF
20 screw threads per inch
1/2 UNF
20 screw threads per inch
c) Electronic loadcell scale for charging refrigerant
● As a kind of HFC, due to the properties of high pressure and high vapor rate, R410A can’t keep
the liquid state and foam state of pneumatolytic refrigerant in the cylinder when the charging
cylinder is used to charge R410A, and the value is difficult to read. Therefore, it is
recommended to use an electronic loadcell scale for charging refrigerant.
● The electronic loadcell scale can measure the weight of the refrigerant cylinder though the 4
supporting points, therefore it has higher strength. The connection of the charge hose has two
ports, one for R22 (7/16 UNF, 20 screw threads per inch) and one for R410A (1/2 UNF, 20
screw threads per inch), so it can be used to charge general refrigerants.
● There are two types of electronic loadcell scale for charging refrigerant, one for 10kg cylinders
and one for 20kg cylinders.
Electronic loadcell scale for 10kg cylinders precision ±2g
Electronic loadcell scale for 20kg cylinders precision ±5g
● Refrigerant can be charged manually by opening/closing the valve.
d) Torque wrench (for rating diameters of 1/2 and 5/8)
● In order to enhance the pressure impedance, the size of flare nut is changed. Therefore the
side-to-center distance of the torque wrench for R410A varies.
Table 14 Difference between conventional wrench and wrench for R410A
Conventional torque wrench
Torque wrench for R410A
For 1/2
(side-to-center
distance x
torque)
24mm X 55N · m
(550 kgf · cm)
26mm X 55N · m
(550 kgf · cm)
For 5/8
(side-to-center
distance x
torque)
27mm x 65N · m
(650 kgf · cm)
29mm x 65N · m
(650 kgf · cm)
Conventional pressure gauge
Pressure gauge designed specifically for R410A
High pressure gauge
(Red)
Compound pressure
gauge (Blue)

- 73 -
e) Flare tool (clutch type)
● The flare tool for R410A has a big clamping bar receiving hole, so as to set the copper pipe
portion protruding from the clamping bar during flaring to 0~0.5mm and have stronger elasticity
for the increased torque of EEV. This type of flare tool can also be used for R22 copper pipes.
f) Adjusting the scaled rule for the protruding portion (used when a conventional flare tool
(including clutch type) is used for flaring)
● A scaled rule with the thickness of 1.0mm helps setting the protruding portion of the copper
pipe in the clamp to 1.0~1.5mm.
g) Vacuum pump adapter
● In order to prevent the vacuum pump oil from returning into the charge hose, be sure to use an
adapter. The connection of the charge hose has two ports, one for conventional refrigerants
(7/16 UNF, 20 screw threads per inch) and one for R410A. If the vacuum pump oil (mineral oil)
is mixed with R410A, deposit may be produced, which will damage the appliance.
h) Refrigerant cylinder
● According to the U.S.A regulations, refrigerant cylinders designed specifically for R410A are
marked with the refrigerant name and have pink coating.
i) Charging port and package for refrigerant cylinder
● According to the cap size of the charge hose, a charging port (1/2 UNF, 20 screw threads per
inch) and corresponding package are required.
j) Gas leakage detector
● Use a highly sensitive gas leakage detector designed specifically for HFC refrigerants. For
R410A, the detection sensitivity is about 23g/ year.
(2) Frequently used tools
a) Vacuum pump
b) Torque wrench
For 1/4, side-to-center distance 17 mm x (16 N · m)
(160 kgf · cm)
For 1/4, side-to-center distance 17 mm x (18 N · m)
(180 kgf · cm)
For 3/8, side-to-center distance 22 mm x (42 N · m)
(420 kgf · cm)
c) Pipe cutter
d) Driller
e) Screw driver (+,-)
f) Steel saw
g) Hollow drill (Φ65 or 70)
h) Hexagon wrench
(side-to-center distance 4 or 5
mm)
i) Wrench or monkey wrench
j) Tapeline
k) Thermometer
l) Clamping ammeter
m) Insulation resistance meter
(megameter)
n) Circuit tester
o) Pipe bender
(3) Applicability of tools for R410A to models using R22
Table 15 Applicability of tools for R410A to models using R22
Tools for R410A
Applicability to models using R22
a)
Manifold pressure gauge
X
b)
Charge hose
X
c)
Electronic loadcell scale for charging refrigerant
O
d)
Torque wrench (rating diameter 1/2, 5/8)
X
e)
Flare tool (clutch type)
O
f)
Scaled rule for adjusting protruding portion*
O
g)
Vacuum pump adapter
O
h)
Refrigerant cylinder
X
i)
Charging port and package for refrigerant cylinder
X
j)
Gas leakage detector
X
* Used when the conventional flare tool (clutch type) is used.
Note: If you have any questions, please consult your dealer.

- 74 -
7.3.2 New installation (when new refrigerant piping is used)
(1) Use the vacuum pump to suction air and detect any gas leakage (see Figure 6)
a) Connect the charge hose to the outdoor unit. ①
b) Connect the charge hose to the vacuum pump adapter. ②
Here, fully close the control valves. ③④
c) Push Handle Lo to the full open position ⑤ and turn on the power switch of the vacuum pump.
In this step, evacuate the appliance (for about 10~15 minutes). For the time of evacuation, see
the manual provided by the equipment manufacturer.
d) When the pointer of the compound pressure gauge indicates -0.1MPa (-76cmHg) ⑥, push
Handle Lo to the full close position ⑤ and turn off the power switch of the vacuum pump.
Keep the status for 1~2 minutes and ensure the pointer of the compound pressure gauge has not
turned back.
e) Fully open the control valves. ③④
f) Disconnect the charge hoses. ①②
g) Tighten the cover on the service opening. ⑦
h) Secure the covers on the control valves and check for any gas leakage around the covers. ③④⑦
Figure 6 Evacuation structure of vacuum pump
(2) The refrigerant pipe required for additional refrigerant charging should be longer than the standard
pipe length. (After step e in (1) above, execute the following steps. See Figure 7.)
a) Put the refrigerant cylinder on the electronic loadcell scale and connect the charge hoses of the
cylinder to the connection ports of the electronic loadcell scale.
* Note:
Be sure to make setting so as to charge liquid. When a cylinder with syphon tube is used, you
can charge liquid without turning the cylinder.
b) Connect the charge hose of the manifold pressure gauge to the connection port of the electronic
loadcell scale. ③②
c) Open the valve of the refrigerant cylinder, and slightly open the charging valve and then close it.
①②
d) After zero position (0) adjustment, open the charging valve and open Valve Lo of the manifold
pressure gauge to charge the liquid refrigerant. ②⑤
(Please read the user’s manual before using the electronic loadcell scale.)
e) If the specified amount of refrigerant can’t be charged, charge more little by little through the
cooling operation. (For the amount of each additional charging, see the operation manual
prepared by the equipment manufacturer.) If the amount of the first charge is inadequate, charge
for the second time with the same method as for the first charge after one minute.
* Note:
Never charge large amount of liquid refrigerant at a time in the cooling mode, as the liquid
refrigerant is charged from the gas side.
⑥ Compound
pressure gauge
Manifold pressure
gauge
⑤ Handle Lo
① Charge hose
③ Control valve
(2-way)
⑧ Handle Hi
(always closed)
② Charge hose
Vacuum pump adapter
Vacuum pump Vacuum pump
⑦ Service opening
④ Control valve
(3-way)
Notes:
● Be sure to carefully read the user’s manuals before using the
vacuum pump, vacuum pump adapter and manifold pressure
gauge.
● Ensure the oil level in the vacuum pump complies with the
level specified in the oil level indicator.

- 75 -
f) After charging the liquid refrigerant into the air conditioner by closing the charging valve, fully
close Valve Lo of the manifold pressure gauge to stop. ②⑤
g) Quickly move the charge hose away from the service opening.⑥
If the movement is slow, the circulating refrigerant may be leaked.
h) Secure the covers of the service opening and control valve, and check for any gas leakage around
the covers. ⑥⑦
Figure 7 Structure for additional refrigerant charging
7.3.3 Removal (when new refrigerant piping is used)
(1) Removing the equipment
a) To recover refrigerant from the outdoor unit through evacuation
● Use the manifold pressure gauge designed specifically for R410A in evacuation.
● Recover refrigerant from the outdoor unit when the equipment is operating in the HI POWER
cooling mode.
(For the steps and precautions for recovery, see the user’s manual prepared by the equipment
manufacturer.)
* Precaution:
Use the refrigerant recovery device for outdoor unit in which evacuation is impossible.
b) To remove indoor unit/ outdoor unit
● Remove the pipes and wires between the indoor and outdoor units.
● Tighten the control valve and service opening of the outdoor unit to the specified torque.
● Tighten the flare nut with cap at the connection between the indoor and outdoor units to the
specified torque.
● Remove the indoor unit/outdoor unit.
* Precaution:
Be careful not to break the piping for the indoor unit when it is stored in the original place.
(2) Installing the equipment
a) According to the steps described in “7.3.2 New installation”.
7.3.4 Replacing equipment (never use the existing refrigerant piping)
To replace an air conditioner using conventional refrigerant (R22) with one using the alternative
refrigerant (R410A) or replace an air conditioner using the alternative refrigerant (R410A) with
another using the alternative refrigerant (R410A), please use completely new refrigerant piping (1),
otherwise the difference of pressure properties of refrigerants or the difference of lubricants may
cause failure. (Not all air conditioners using R410A use the same type of lubricant.)
7.3.5 Refitting equipment
Do not charge the air conditioner which used the conventional refrigerant (R22) with the alternative
refrigerant (R410A). Otherwise, the equipment may malfunction or such severe consequences as
interruption of refrigerant cycle, etc.
(Liquid side)
(Indoor unit)
(Outdoor unit)
Control valve ⑦
(2-way)
Start
(Gas side)
Control valve ⑦
(3-way)
Start
Service opening ⑥
Charging valve
②
Service opening
④
Refrigerant cylinder
(with syphon tube)
Electronic loadcell scale for charging refrigerant

- 76 -
7.3.6 Recharging refrigerant in servicing
If it is necessary to charge refrigerant, charge the specified amount of refrigerant by following these
steps.
(For details, see the operation manual prepared by the equipment manufacturer.)
1) Connect the charge hose to the service opening of the outdoor unit.
2) Connect the charge hose to the vacuum pump adapter. Here, push the control valve to the full
open position.
3) Push Handle Lo to the full open position (ON) and turn on the power switch of the vacuum pump.
(For the time of evacuation, see the manual of the equipment manufacturer.)
4) When the pointer of the compound pressure gauge indicates -0.1MPa (-76cmHg), push Handle
Lo to the full close position and turn off the power switch of the vacuum pump. Keep the status
for 1~2 minutes and ensure the pointer of the compound pressure gauge has not turned back,
5) According to the steps described in 7.3.2(2) (Pages 119-120), use the electronic loadcell scale to
charge liquid refrigerant.
7.4 Refrigerant recovery
7.4.1 Recovery procedure
The following is the general procedure for recovering refrigerant. The recovery procedure varies
depending on the type of refrigerant recovery device. The connection and disposal methods for
different types of refrigerant recovery device may be different. Therefore, see the user’s manual, etc.
of the various equipment to learn the detailed operation information.
(1) Check before the recovery procedure
a) Check the refrigerant recovery device
① Gas leakage (Servicing is required when there is any failure.)
② Oil extractor (for discharging residual oil)
③ Weighing function, excessive charging prevention function (floating switch), moisture
indicator, dryer and other ancillary functions of the recovery device (subject to adjustment or
replacement when necessary).
④ Circuit
b) Check the accessories to the refrigerant recovery device.
(2) Preparation for the recovery procedure
a) Installing the refrigerant recovery device
The device should be installed in a place meeting the following requirements as far as possible.
① Ambient temperature above 0℃ and below 40℃.
② Flat, dry floor.
③ A position as near the air conditioner as possible.
b) Preparing a recovery cylinder
Use a compliant recovery cylinder suitable for recovering refrigerant.
c) Connecting to the power supply
d) Preparing the air conditioner for refrigerant recovery
① If the air conditioner from which refrigerant is to be recovered can operate, evacuate the
appliance to store the refrigerant in the outdoor unit (condenser side).
● Evacuate the air conditioner after confirming the specifications of the air conditioner from
which refrigerant is to be recovered.
② If there are any blocking components, such as EEV, etc., please fully open such components.
(3) Connecting the refrigerant recovery device
a) Connect the air conditioner from which refrigerant is to be recovered to the refrigerant recovery
device.
① With service opening (recovery port):
Use the manifold pressure gauge to connect the charge hose to the service opening (recovery
port).
② Without service opening (recovery port):
Use the needle valve to connect in a way similar to ①.
b) Connect the refrigerant recovery device to the recovery cylinder
Manifold
pressure gauge
Refrigerant
recovery device
(Outlet)
(Inlet)
Recovery cylinder
Air conditioner from which
refrigerant is recovered

- 77 -
(4) Recovery procedure
a) According to the instructions on refrigerant recovery device (see the operation manual supplied),
operate the device to recover refrigerant.
b) Pay attention to the following during the operation.
① Confirm that the refrigerant recovery device runs according to the requirements and the
operation status is always monitored, so as to take correct actions in case of emergency.
② During the operation, stay at the working site to ensure safety.
③ If you have to leave the working site due to irresistible reasons, confirm the recovery cylinder
is not over charged before stopping the operation.
c) If, during the operation, the overcharge protection of the refrigerant recovery device is triggered
and the device stops automatically, please replace with an empty recovery cylinder.
d) If the reading of the pressure gauge increases not long after the recovery is completed and the
refrigerant recovery device stops automatically, please restart the device. If the device stops
again, end the recovery.
(5) Procedure after the recovery is completed
a) Close the valves of the air conditioner from which refrigerant has been recovered, the refrigerant
recovery device, and the recovery cylinder.
b) Disconnect the recovery cylinder for charging refrigerant and store it according to the
regulations.
7.4.2 Accessories/tools
A number of accessories/tools are used to recover R410A.
The following are standard accessories.
(1) Recovery cylinder
● Use the recovery cylinder specified by the equipment manufacturer.
● Be sure to use a removable cylinder compliant with the laws and regulations.
● Do not use a general cylinder as recovery cylinder.
Note 1: The cylinder used when R410A is bought is borrowed.
Note 2: The cylinder with a check valve used when R410A is bought can’t be used as recovery
cylinder.
● Types (divided by function)
Figure 8 Types of cylinder
● Note
Laws prohibit recovery of R410A into discarded cylinders or one-way cylinders.
(2) Dryer
● A desiccant container used to remove water from R410A
● The dryer should be used as supplies.
● Before the installation, keep the dryer sealed.
● Used to protect the R410A recovery device.
(3) Connection hose
a) Charging port and charging port sealing ring
● It is generally sold separately from the refrigerant cylinder.
● The use of a two-port cylinder, which may have special diameter,
should be confirmed by the manufacturer.
● Sealing rings are supplies.
Liquid valve
Gas valve
Valve
(a) Basic type
● 1-port valve
● Suitable for R410A
recovery
●Turn it to pour out
liquid R410A.
(b) 2-port valve
● Can provide liquid
R410A or release
gas at the vertical
position.
● Easy to maintain.
Liquid
(c) Floater type
dedicated cylinder
● With a floater in it to
prevent overcharge.
Insert the conduit of the liquid valve
near the bottom of the cylinder.
Gas valve
(For releasing gas)
Signal cable
Floater
Liquid
Liquid
Charging port

- 78 -
b) Charge hose (pressure resistant fluorocarbon hose) and sealing ring
● Thickness 1/48, multiple lengths available
● Hose with the pressure resistance property higher than 5.2MPa
(52kg/cm2G)
● In general, only one end has fixture.
(4) Manifold pressure gauge
● The most important servicing tool for coolers and air conditioners
● It is widely used to check gas pressure when R410A is being charged/recovered.
(5) Conduit needle valve
a) To recover R410A from the equipment without gas charging or recovery port, use the tool to
drill a hole in the copper pipe. There are a number of types available on the market which have
different names.
b) The edge of needle may be damaged easily, so such valve should be treated as semi-supplies.
c) When the vacuum level rises, air will be absorbed into the hole easily. Therefore, please operate
carefully.
(6) Vacuum pump
Used to evacuate the recovery device and the recovery cylinder.
Hose
sealing ring
Fixture
Compound
pressure gauge
Pressure gauge
Disconnecting valve
Charge hose
Manifold
pressure gauge
Punch pliers
Needle valve
Vent
Air inlet

- 79 -
8 MOUNT ASSEMBLY
8.1 Indoor unit
8.1.1 SRK20MA-S
SRK20MA-S-PANEL&FAN ASSY
NO.
Parts No
Parts Name
RE.Q
1-7
RYD102A033H
PANEL ASSY,FRONT
1
1
RYD122A057C
PANEL,FRONT
1
2
RYD435A056G
GRILLE,AIR INLET
1
3
RYD437A030
FILTER,AIR
2
4
RYD129A088A
CAP 2 5
RYD133A049
PLATE ASSY,ORNAMENT
1
6
RYD129A047
HOLDER,FILTER
2
7
RYD011F037
LABEL,MODEL NAME
1
8-26
RYD435A054A
GRILLE ASSY,AIR OUT
1
8
RYD435A055
GRILLE,AIR OUTLET
1
9
RYD436A033A
FLAP(A)
1
10
RYD436A034A
FLAP(B)
1
11-12
RYD436A035
LOUVER ASSY(R)
1
11
RYD436A037
LOUVER
5
12
RYD129A096
PLATE,CONNECTING(R)
1
13-14
RYD436A036
LOUVER ASSY(L)
1
13
RYD436A037
LOUVER
5
14
RYD129A097
PLATE,CONNECTING(L)
1

- 80 -
15
RYD935C005
COLLAR
6
16
RYD129A098
BRACKET,MOTOR(L)
1
17
RYD129A099
BRACKET,MOTOR(R)
1
18
RYD144A018
CRANK(C)
2
19
RYD512T002J
MOTOR,STEPPING
1
20
RYD512T002K
MOTOR,STEPPING
1
21-22
RYD129A100
BOX ASSY,GEAR
1
22
RYD512T019B
MOTOR,STEPPING
1
23
RYD504A028
HARNESS ASSY
1
24
RYD423A009
HOSE,DRAIN
1
25
SSA326A047
PLUG 1 26
RYD111A017A
BASE ASSY
1
27
RYD129A084
CASE,MOTOR(U)
1
28
RYD129A085
CASE,MOTOR(L)
1
29
RYG923C001
BEARING,PLANE
1
30
RYD431G002
IMPELLER
1
31
RYD512T022A
MOTOR,DC
1
32
RYD032A007A
PLATE,INSTALLATION
1
33
RYD129A103A
COVER(PIPE)
1
34
RYD913A003
SCREW,TAP
10
35
RYD132A011A
LID
1

- 81 -

- 82 -
SRK20MA-S-HEAT EXCH.&CONTROL
NO.
Parts No
Parts Name
RE.Q
1-8
RYD301A057B
HEAT EXCH ASSY(AIR)
1 2 RYD129A093
BRACKET(L)
1 3 RYD315D031
HEADER ASSY
1 4 RYD321A139
PIPE 1 5-7
RYD321A140C
PIPE ASSY
1 6 RYG323F002
UNION,SOLDER
1 7 RYG323F002A
UNION,SOLDER
1 8 RYD129A089
PLATE,BAFFLE
1
9-20
RYD501A073H
CONTROL ASSY, UNIT
1
9-10
RYD142A083
BOX ASSY,CONTROL(R)
1 9 RYD142A081
BOX,CONTROL(R)
1
10
RYD132A006
COVER,CONTROL(R)
1
11-12
RYD142A082
BOX ASSY,CONTROL(L)
1
11
RYD142A080
BOX,CONTROL(L)
1
12
RYD132A007
COVER,CONTROL(L)
1
13
RYD129A092
COVER,BEND
1
14
RYD551A010
SENSOR ASSY
1
15
SSA551B017A
SENSOR(HUMIDITY)
1
16
RYG561B001A
BLOCK,TERMINAL
1
17
RYD011G020D
LABEL,WIRING
1

- 83 -
18-20
RYD505A048F
PWB ASSY
1
19
RYG555B002A
VARISTOR
1
20
RYG564A003
FUSE(CURRENT)
1
21
RYD503A016
DISPLAY ASSY
1
22
RYD505A016
PWB ASSY(DISPLAY)
1
23-24
RYD132A010
LID ASSY,CONTROL
1
23
RYD132A009
LID,CONTROL
1
24
RYD132A008
COVER,LID
1
25
RYA941F001
SPRING,LEAF
1
26
RYD129A104
COVER ASSY(TB)
1
27
RYD008A046B
PARTS SET
1
28
RYD437A004A
FILTER ASSY,CLEAN(PP,HEPA)
1
29
RYD437A010A
FILTER ASSY,CLEAN(PP,HEPA)
1
30
RYD012A193
MANUAL,INSTRUCTION&INS
1
31
RLA502A001D
CONTROL ASSY,REMOTE
1
32
SSA554D183
KILLER,NOISE
1
33
RYD566A092
CORD,POWER
1
(34)
RYD011H050
LIST,LABEL(ENERGY)
1

- 84 -

- 85 -
8.1.2 SRK25MA-S
SRK25MA-S-PANEL&FAN ASSY
NO.
Parts No
Parts Name
RE.Q
1-7
RYD102A033H
PANEL ASSY,FRONT
1
1
RYD122A057C
PANEL,FRONT
1
2
RYD435A056G
GRILLE,AIR INLET
1
3
RYD437A030
FILTER,AIR
2
4
RYD129A088A
CAP 2 5
RYD133A049
PLATE ASSY,ORNAMENT
1
6
RYD129A047
HOLDER,FILTER
2
7
RYD011F037A
LABEL,MODEL NAME
1
8-26
RYD435A054A
GRILLE ASSY,AIR OUT
1
8
RYD435A055
GRILLE,AIR OUTLET
1
9
RYD436A033A
FLAP(A)
1
10
RYD436A034A
FLAP(B)
1
11-12
RYD436A035
LOUVER ASSY(R)
1
11
RYD436A037
LOUVER
5
12
RYD129A096
PLATE,CONNECTING(R)
1
13-14
RYD436A036
LOUVER ASSY(L)
1
13
RYD436A037
LOUVER
5
14
RYD129A097
PLATE,CONNECTING(L)
1
15
RYD935C005
COLLAR
6

- 86 -
16
RYD129A098
BRACKET,MOTOR(L)
1
17
RYD129A099
BRACKET,MOTOR(R)
1
18
RYD144A018
CRANK(C)
2
19
RYD512T002J
MOTOR,STEPPING
1
20
RYD512T002K
MOTOR,STEPPING
1
21-22
RYD129A100
BOX ASSY,GEAR
1
22
RYD512T019B
MOTOR,STEPPING
1
23
RYD504A028
HARNESS ASSY
1
24
RYD423A009
HOSE,DRAIN
1
25
SSA326A047
PLUG 1 26
RYD111A017A
BASE ASSY
1
27
RYD129A084
CASE,MOTOR(U)
1
28
RYD129A085
CASE,MOTOR(L)
1
29
RYG923C001
BEARING,PLANE
1
30
RYD431G002
IMPELLER
1
31
RYD512T022A
MOTOR,DC
1
32
RYD032A007A
PLATE,INSTALLATION
1
33
RYD129A103A
COVER(PIPE)
1
34
RYD913A003
SCREW,TAP
10
35
RYD132A011A
LID
1

- 87 -

- 88 -
SRK25MA-S-HEAT EXCH.&CONTROL
NO.
Parts No
Parts Name
RE.Q
1-8
RYD301A057B
HEAT EXCH ASSY(AIR)
1
2
RYD129A093
BRACKET(L)
1
3
RYD315D031
HEADER ASSY
1
4
RYD321A139
PIPE 1 5-7
RYD321A140C
PIPE ASSY
1
6
RYG323F002
UNION,SOLDER
1
7
RYG323F002A
UNION,SOLDER
1
8
RYD129A089
PLATE,BAFFLE
1
9-20
RYD501A073J
CONTROL ASSY, UNIT
1
9-10
RYD142A083
BOX ASSY,CONTROL(R)
1
9
RYD142A081
BOX,CONTROL(R)
1
10
RYD132A006
COVER,CONTROL(R)
1
11-12
RYD142A082
BOX ASSY,CONTROL(L)
1
11
RYD142A080
BOX,CONTROL(L)
1
12
RYD132A007
COVER,CONTROL(L)
1
13
RYD129A092
COVER,BEND
1
14
RYD551A010
SENSOR ASSY
1
15
SSA551B017A
SENSOR(HUMIDITY)
1
16
RYG561B001A
BLOCK,TERMINAL
1
17
RYD011G020D
LABEL,WIRING
1

- 89 -
18-20
RYD505A048G
PWB ASSY
1
19
RYG555B002A
VARISTOR
1
20
RYG564A003
FUSE(CURRENT)
1
21
RYD503A016
DISPLAY ASSY
1
22
RYD505A016
PWB ASSY(DISPLAY)
1
23-24
RYD132A010
LID ASSY,CONTROL
1
23
RYD132A009
LID,CONTROL
1
24
RYD132A008
COVER,LID
1
25
RYA941F001
SPRING,LEAF
1
26
RYD129A104
COVER ASSY(TB)
1
27
RYD008A046B
PARTS SET
1
28
RYD437A004A
FILTER ASSY,CLEAN(PP,HEPA)
1
29
RYD437A010A
FILTER ASSY,CLEAN(PP,HEPA)
1
30
RYD012A193
MANUAL,INSTRUCTION&INS
1
31
RLA502A001D
CONTROL ASSY,REMOTE
1
32
SSA554D183
KILLER,NOISE
1
33
RYD566A092
CORD,POWER
1
(34)
RYD011H050A
LIST,LABEL(ENERGY)
1

- 90 -

- 91 -
8.1.3 SRK35MA-S
SRK35MA-S-PANEL&FAN ASSY
NO.
Parts No
Parts Name
RE.Q
1-7
RYD102A033H
PANEL ASSY,FRONT
1
1
RYD122A057C
PANEL,FRONT
1
2
RYD435A056G
GRILLE,AIR INLET
1
3
RYD437A030
FILTER,AIR
2
4
RYD129A088A
CAP 2 5
RYD133A049
PLATE ASSY,ORNAMENT
1
6
RYD129A047
HOLDER,FILTER
2
7
RYD011F037B
LABEL,MODEL NAME
1
8-26
RYD435A054A
GRILLE ASSY,AIR OUT
1
8
RYD435A055
GRILLE,AIR OUTLET
1
9
RYD436A033A
FLAP(A)
1
10
RYD436A034A
FLAP(B)
1
11-12
RYD436A035
LOUVER ASSY(R)
1
11
RYD436A037
LOUVER
5
12
RYD129A096
PLATE,CONNECTING(R)
1
13-14
RYD436A036
LOUVER ASSY(L)
1
13
RYD436A037
LOUVER
5
14
RYD129A097
PLATE,CONNECTING(L)
1
15
RYD935C005
COLLAR
6

- 92 -
16
RYD129A098
BRACKET,MOTOR(L)
1
17
RYD129A099
BRACKET,MOTOR(R)
1
18
RYD144A018
CRANK(C)
2
19
RYD512T002J
MOTOR,STEPPING
1
20
RYD512T002K
MOTOR,STEPPING
1
21-22
RYD129A100
BOX ASSY,GEAR
1
22
RYD512T019B
MOTOR,STEPPING
1
23
RYD504A028
HARNESS ASSY
1
24
RYD423A009
HOSE,DRAIN
1
25
SSA326A047
PLUG 1 26
RYD111A017A
BASE ASSY
1
27
RYD129A084
CASE,MOTOR(U)
1
28
RYD129A085
CASE,MOTOR(L)
1
29
RYG923C001
BEARING,PLANE
1
30
RYD431G002
IMPELLER
1
31
RYD512T022A
MOTOR,DC
1
32
RYD032A007A
PLATE,INSTALLATION
1
33
RYD129A103A
COVER(PIPE)
1
34
RYD913A003
SCREW,TAP
10
35
RYD132A011A
LID
1

- 93 -

- 94 -
SRK35MA-S-HEAT EXCH.&CONTROL
NO.
Parts No
Parts Name
RE.Q
1-8
RYD301A059F
HEAT EXCH ASSY(AIR)
1
2
RYD129A093
BRACKET(L)
1
3
RYD315D033
HEADER ASSY
1
4
RYD321A152
PIPE 1 5-7
RYD321A140C
PIPE ASSY
1
6
RYG323F002
UNION,SOLDER
1
7
RYG323F002A
UNION,SOLDER
1
8
RYD129A089
PLATE,BAFFLE
1
9-20
RYD501A073K
CONTROL ASSY, UNIT
1
9-10
RYD142A083
BOX ASSY,CONTROL(R)
1
9
RYD142A081
BOX,CONTROL(R)
1
10
RYD132A006
COVER,CONTROL(R)
1
11-12
RYD142A082
BOX ASSY,CONTROL(L)
1
11
RYD142A080
BOX,CONTROL(L)
1
12
RYD132A007
COVER,CONTROL(L)
1
13
RYD129A092
COVER,BEND
1
14
RYD551A010
SENSOR ASSY
1
15
SSA551B017A
SENSOR(HUMIDITY)
1
16
RYG561B001A
BLOCK,TERMINAL
1
17
RYD011G020D
LABEL,WIRING
1

- 95 -
18-20
RYD505A048H
PWB ASSY
1
19
RYG555B002A
VARISTOR
1
20
RYG564A003
FUSE(CURRENT)
1
21
RYD503A016
DISPLAY ASSY
1
22
RYD505A016
PWB ASSY(DISPLAY)
1
23-24
RYD132A010
LID ASSY,CONTROL
1
23
RYD132A009
LID,CONTROL
1
24
RYD132A008
COVER,LID
1
25
RYA941F001
SPRING,LEAF
1
26
RYD129A104
COVER ASSY(TB)
1
27
RYD008A046B
PARTS SET
1
28
RYD437A004A
FILTER ASSY,CLEAN(PP,HEPA)
1
29
RYD437A010A
FILTER ASSY,CLEAN(PP,HEPA)
1
30
RYD012A193
MANUAL,INSTRUCTION&INS
1
31
RLA502A001D
CONTROL ASSY,REMOTE
1
32
SSA554D183
KILLER,NOISE
1
33
RYD566A092
CORD,POWER
1
(34)
RYD011H050B
LIST,LABEL(ENERGY)
1

- 96 -

- 97 -
8.1.4 SRK50MA-S
SRK50MA-S-PANEL&FAN ASSY
NO.
Parts No
Parts Name
RE.Q
1-7
RYD102A033H
PANEL ASSY,FRONT
1
1
RYD122A057C
PANEL,FRONT
1
2
RYD435A056G
GRILLE,AIR INLET
1
3
RYD437A030
FILTER,AIR
2
4
RYD129A088A
CAP 2 5
RYD133A049
PLATE ASSY,ORNAMENT
1
6
RYD129A047
HOLDER,FILTER
2
7
RYD011F037C
LABEL,MODEL NAME
1
8-26
RYD435A054A
GRILLE ASSY,AIR OUT
1
8
RYD435A055
GRILLE,AIR OUTLET
1
9
RYD436A033A
FLAP(A)
1
10
RYD436A034A
FLAP(B)
1
11-12
RYD436A035
LOUVER ASSY(R)
1
11
RYD436A037
LOUVER
5
12
RYD129A096
PLATE,CONNECTING(R)
1
13-14
RYD436A036
LOUVER ASSY(L)
1
13
RYD436A037
LOUVER
5
14
RYD129A097
PLATE,CONNECTING(L)
1
15
RYD935C005
COLLAR
6
 Loading...