

Page 1

Features
This chapter describes how to operate technology
features.
Audio System
About Your Audio System................. ***
USB Port(s) ...................................... ***
HDMI® Port
Audio Antenna ............................... ***
Audio System Theft Protection ........... ***
Audio Remote Controls
Models with color audio
system
.................................. ***
................... ***
Audio System Basic Operation ............. ***
Audio/Information Screen .................... ***
Adjusting the Sound ............................ ***
Display Setup ...................................... ***
Playing the AM/FM Radio....................... ***
Playing a CD ........................................ ***
Playing an iPod .................................... ***
Playing Internet Radio .......................... ***
Playing a USB Flash Drive ....................... ***
Playing Bluetooth® Audio..................... ***
Playing a Video Using the HDMI® ........... ***
Smartphone Apps........
Siri Eyes Free......................................... ***
Audio Error Messages ...........................
***
......................... ***
General Information on the Audio
System ........................................... ***
Customized Features............................. ***
Bluetooth® HandsFreeLink®
Using HFL........................................... ***
Page 2

Audio System
About Your Audio System
Models with navigation system
See the navigation system manual for operation of the audio system.
Models without navigation syst em
The audio system features AM/FM radio. It can also play audio CDs, WMA/MP3/AAC
files, USB flash drives, and iPod, iPhone and Bluetooth® devices.
You can operate the audio system from the buttons and switches on the panel, the
remote controls on the steering wheel, or the icons on the touchscreen interface.
>>About Your Audio System
SiriusXM® Radio is available on a subscription basis only.
For more information on SiriusXM® Radio, contact a
dealer.
⇒General Information on the Audio System
P. ***
SiriusXM® Radio is available in the United States and
Canada, except Hawaii, Alaska, and Puerto Rico.
SiriusXM® is a registered trademark of Sirius XM Radio,
Inc.
Features
USB Ports HDMI®
Video CDs, DVDs, and 3-inch (8-cm) mini CDs are not
supported.
iPod, iPhone and iTunes are trademarks of Apple Inc.
State or local laws may prohibit the operation of handheld
electronic devices while operating a vehicle.
Page 3
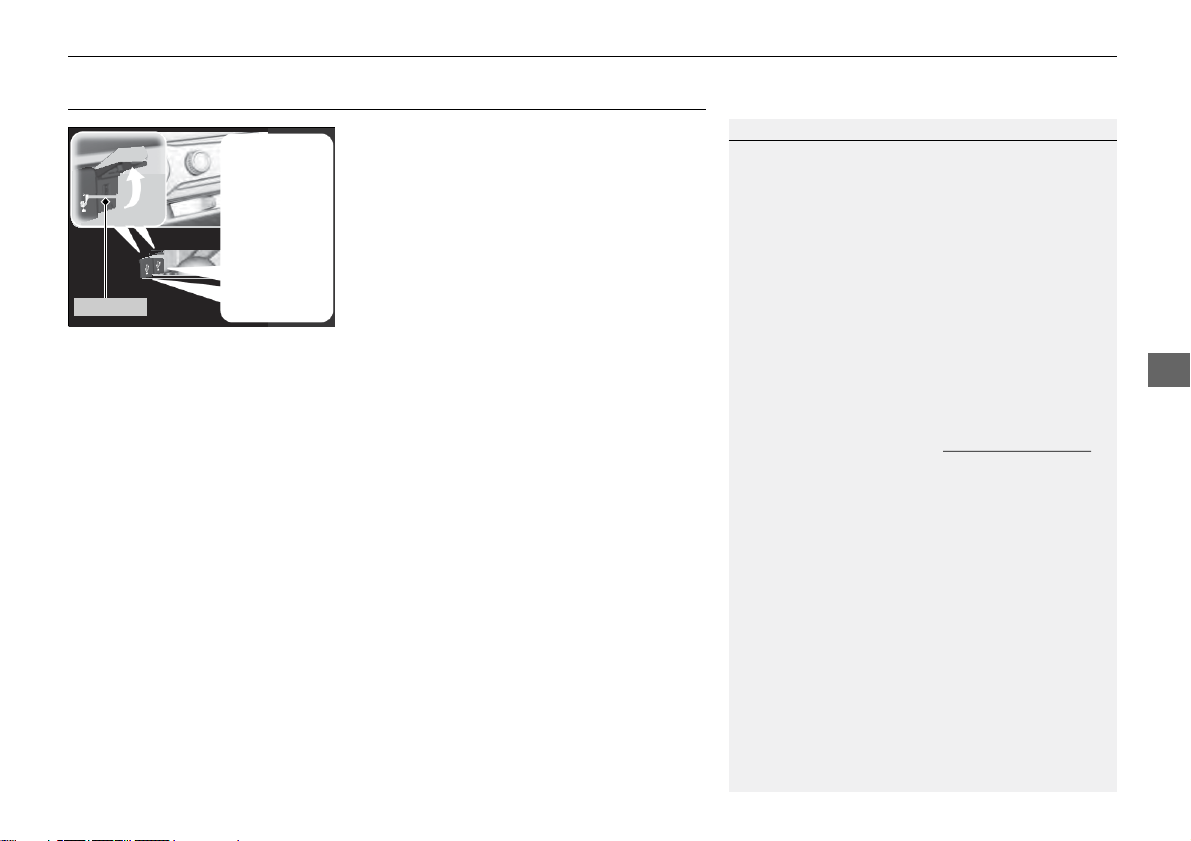
USB Ports
1. Open the cover
2. Install the iPod dock connector or the USB flash
drive to he USB port.
▶▶Audio System▶USB Ports
>>USB Ports
• Do not leave the iPod or USB flash drive in the vehicle.
Direct sunlight and high temperatures may damage it.
• We recommend using an extension cable with the USB
port.
• Do not connect the iPod or USB flash drive using a hub.
• Do not use a device such as a card reader or hard disk
drive, as the device or your files may be damaged.
• We recommend backing up your data before using the
device in your vehicle.
• Displayed messages may vary depending on the device
model and software version.
If the audio syst em does not recognize the iPod, try
reconnecting it a few times or reboot the device. To
reboot, follow the manufacturer’s instructions
provided with the iPod or visit www.apple.com/ipod.
Features
Page 4

▶▶Audio System▶HDMI® Port
HDMI® Port
HDMI Port
Feature
s
1. Open the cover.
2. Install the HD
MI® cable to the HDMI®
port.
>>HDMI® Port
• Do not leave the HDMI® connected device in the vehicle.
Direct sunlight and high temperatures may damage it.
• We recommend backing up your data before using the
device in your vehicle.
• Displayed messages may vary depending on the device
model and software version.
The terms HDMI and HDMI High-Definition Multimedia
Interface, and the HDMI Logo are trademarks or
registered trademarks of HDMI Licensing LLC in the
United States and other countries.
Audio Antenna
Your vehicle is equipped with a removable
antenna at the rear of the roof.
>>Audio Antenna
NOTICE
Before using a “drive-through” car wash, remove the
antenna by unscrewing it by hand. This prevents the antenna
from being damaged by the car wash brushes.
Page 5

Audio System Theft Protection
The audio system is disabled when it is disconnected from the power source, such as
when the battery is disconnected or goes dead. In certain conditions, the system may
display Enter code
■Reactivating the audio system
1. Turn the ignition switch to ON Ⅱ*1.
2. Turn on the audio sys
3. Press and hold the a
▶ The audio system is reactivated when the audio control unit establishes a
connection with the vehicle control unit. If the control unit fails to recognize
the audio unit, you must go to a dealer and have the audio unit checked.
*2
. If this occurs, reactivate the audio system.
tem.
udio system power button for more than two seconds.
▶▶Audio System▶Audio System Theft Protection
Features
* 1 : M odels with the smart entry system have an ENGINE START/STOP button instead of an ignition switch.
* 2 : M odels with display audio system.
Page 6
▶▶Audio System▶ Audio Remote Controls
Audio Remote Controls
Allow you to operate the audio system while driving.
Button
Button
Button
SOURCE Button
Cycles through the audio modes as follows:
FM→AM→CD→USB→iPod→Bluetooth® Audio
→Pandora®→Aha
TM
→Apps*1→AUX HDMI®
>>Audio Remote Controls
The CD or AUX mode appears only when a CD is loaded
or HDMI
device is connected. Pandora®
Audio appear when a connection (Bluetooth® or USB)
is established with a device.
and Bluetooth®
Button
(Menu)
Button
Features
• When listening to the radio
Press
Press
Button
: To select the next preset radio station.
: To select the previous preset radio station.
Press and hold
Press and hold
SOURCE
Button
(Volume) Buttons
Press
Press
: To increase the volume.
: To decrease the volume.
: To select the next strong radio station.
: To select the previous strong radio station.
• When listening to a CD, iPod, USB flash drive, or Bluetooth® Audio
Press
Press
: To skip to the next song.
: To go back to the beginning of the current or previous song.
• When listening to a CD or USB flash drive
Press and hold
Press and hold
• When listening to Internet radio
: To skip to the next folder.
: To go back to the previous folder.
*
Press : To skip to the next song.
Press and hold
Press and hold
*1 : Appears only when connected to HondaLinkTM.
: To select the next station.
: To select the previous station.
Page 7
▶▶Audio System▶ Audio Remote Cont rols
Models with display audio system
Steering Wheel (Menu) Button
• When listening to the r
adio
Press and hold : To display the menu items. You can select Scan, Save Preset,
or Seek.
• When listening to a
CD or USB flash drive
Press and hold : To display the menu items. You can select Scan, Repeat, or
Random.
• When listening to an iPo
d
Press and hold : To display the menu items. You can select Repeat or
Shuffle.
• When listening to a B
luetoot h® Audio
Press and hold : To display the menu items. You can select Pause or Play.
• When listening to a P
andora®
Press and hold : To display the menu items. You can select Bookmark, or
Play/Pause.
>>Audio Remote Controls
The button is available only wh en the audio
mode is FM, AM, CD, USB, iPod, Pandora®, Aha
Bluetooth® Audio.
TM
, or
Features
Page 8
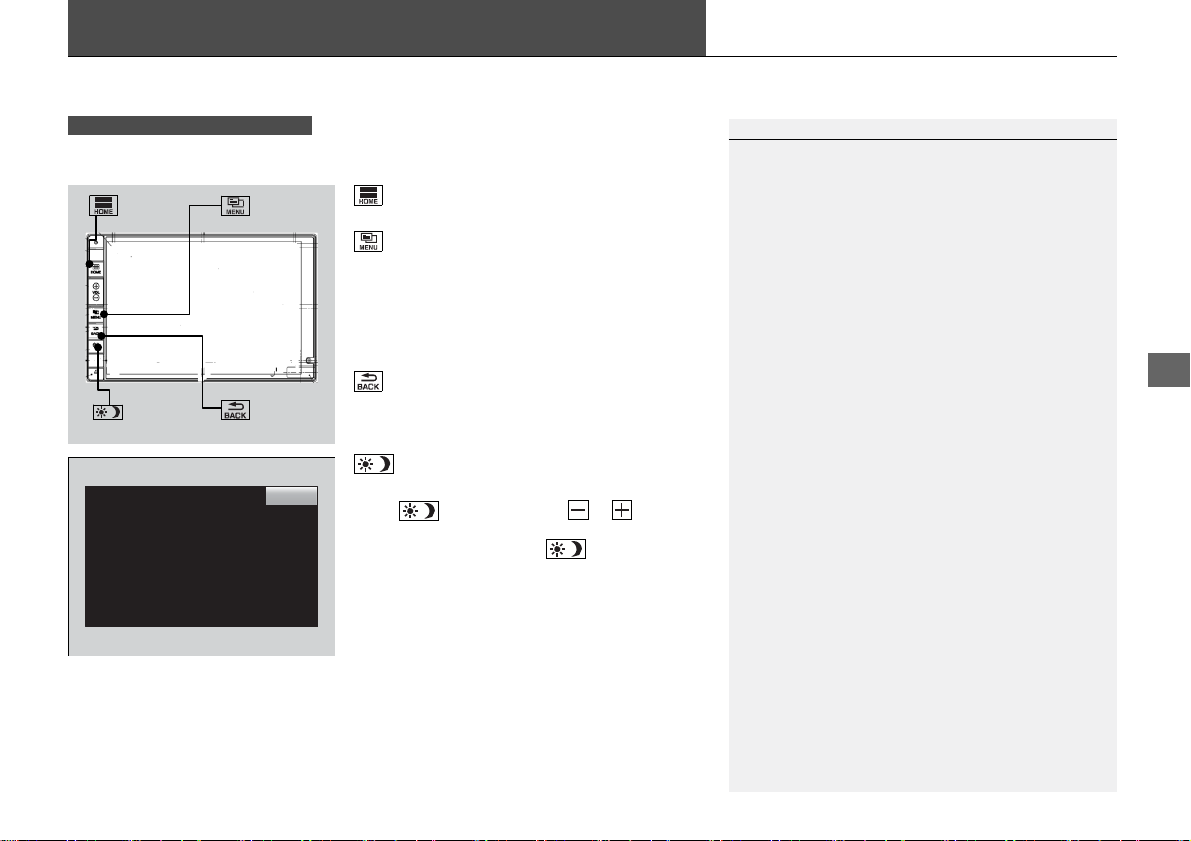
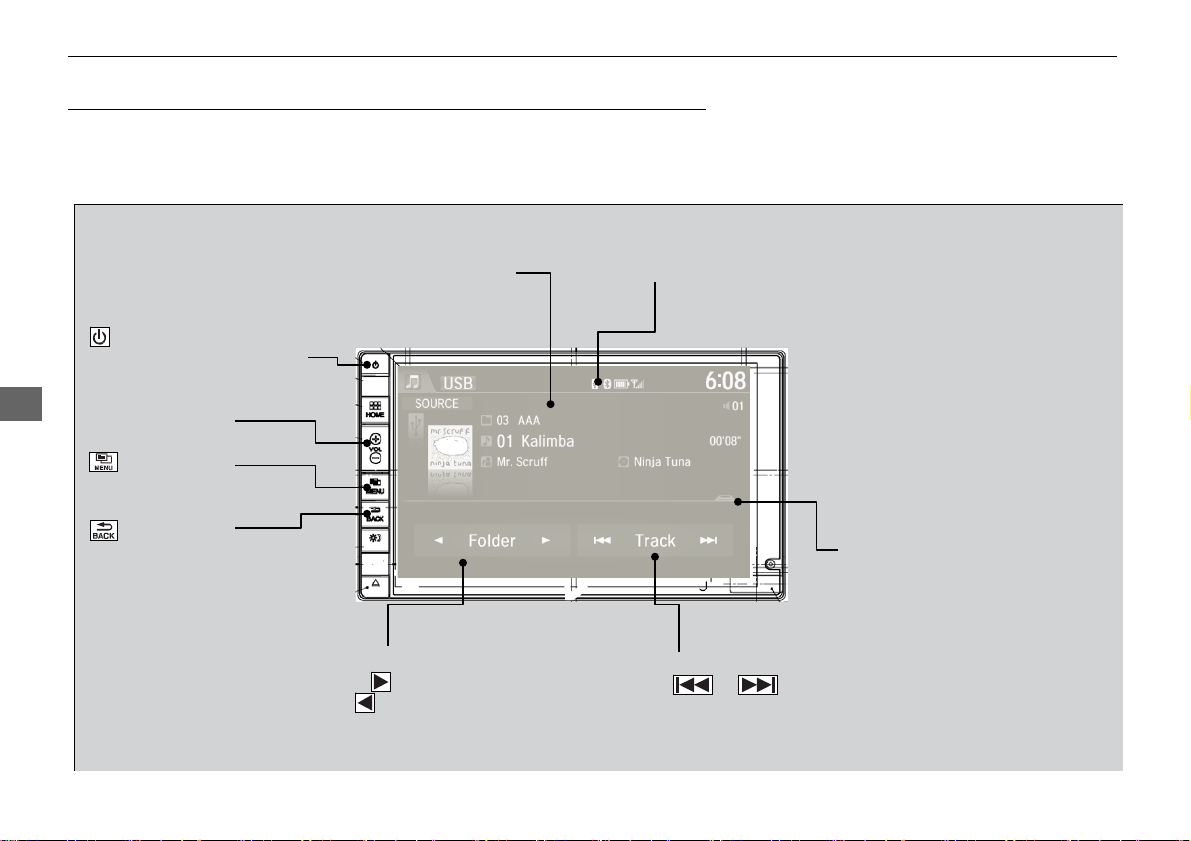
A
udio System Basic Operation
Models with display audio system
To use the audio system function, the ignition switch must be in ACCESSORY Ⅰ or ON Ⅱ*1.
(HOME)
button
(MENU)
button
button: Select to go to the HOME screen.
⇒Switching the Display P. 192
button: Touch to select any mode.
The available mode includes Change
Source, Station List, Save Preset,
Radio Text, Music Search, and play
modes. Play modes can be also selected
from Scan, Random/Repeat, and so
on.
button: Select to go back to the previous
(BACK)
button
(BACK)
button
display when it is displayed.
button: Press to change the audio/
information screen brightness.
Press once and select or to make
an adjustment.
▶Each time you press , the mode
switches between the daytime mode,
nighttime mode and OFF mode.
>>Audio System Basic Operation
Audio Menu Items
⇒Station List P. 200
⇒Music Search P. 203, 206, 211
⇒Random/Repeat P. 204, 212
⇒Scan P. 201, 204, 212
Features
* 1 : M odels with th e smart entry system have an ENG INE START/STOP button instead of an ignition switch.
Page 9
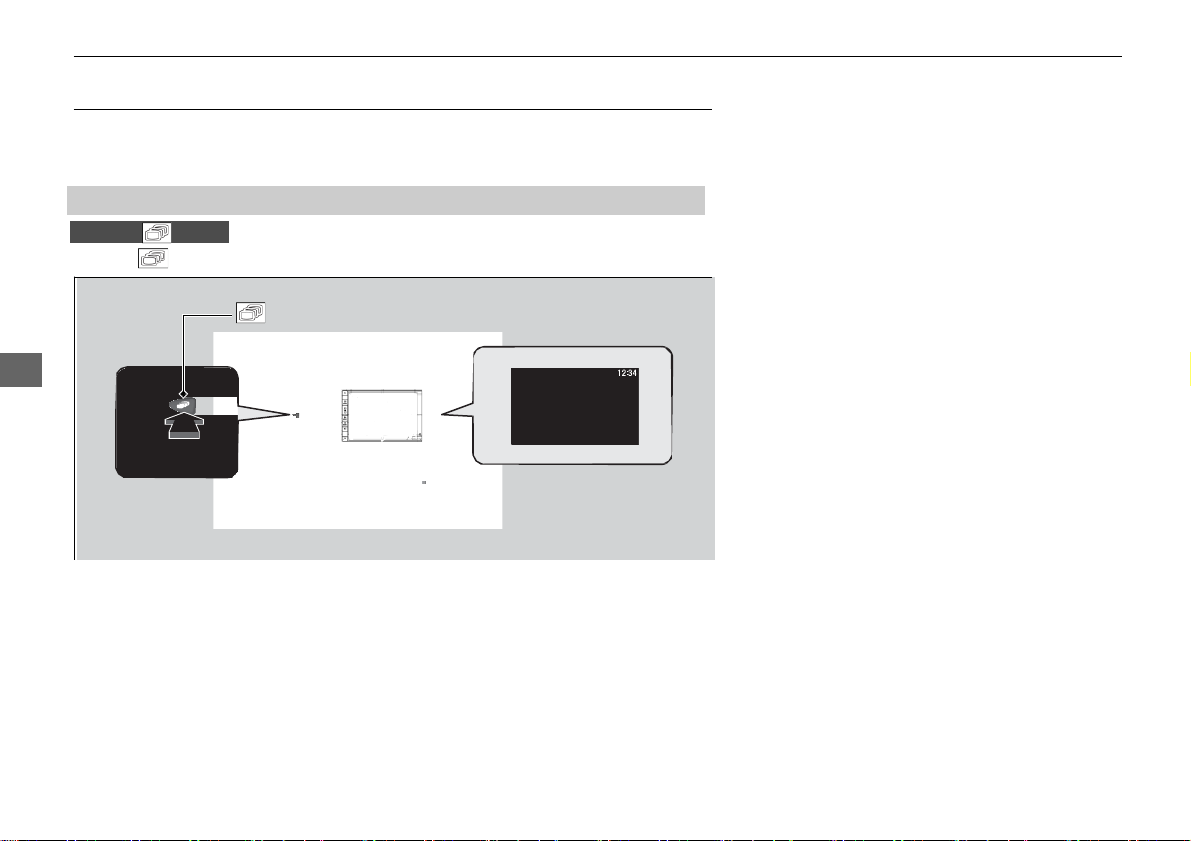
▶▶Audio System Basic Operation ▶ Audio/Inf ormation Screen
Audio/Information Screen
Displays the audio status and wallpaper. From this screen, you can go to various setup
options.
■Switching the Display
Using the button
Press the (display) button on the steering wheel to change the display.
Features
Page 10
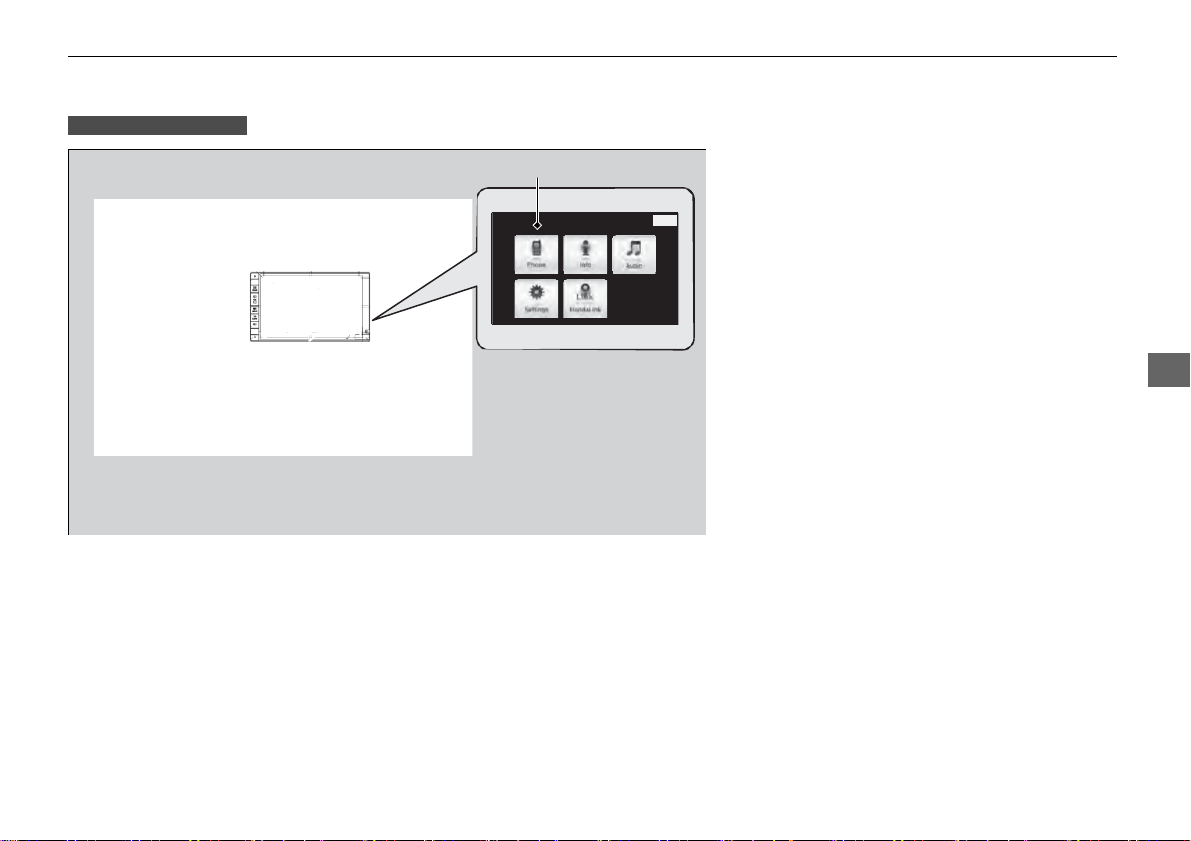
▶▶Aud io System Basic Opera tion ▶ Audio/Inf ormation Screen
Using the HOME screen
Select HOME to go to the HOME screen.
Select Phone, Info, Audio, Settings, or HondaLink.
■ Phone
Shows the HFL information.
⇒ Bluetooth® HandsFreeLink® P. 248
■ Info
Shows the Trip Computer, Clock/Wallpaper, Voice Info, or System/Device
Information.
Features
Page 11

▶▶Audio System Basic Operation ▶ Audio/Information Screen
■ Audio
Shows the current audio information.
■ Settings
Enters the customizing menu screen.
⇒ Customized Features P. 226
■ HondaLink Apps
Connects with your smartphone
social media streams.
⇒ Smartphone Apps P. 217
Features
*1
to play personalized music, information, and
*1 : Available on specific phones only. Check handsfreelink.honda.com for compatible
phones and hondalink.com for feature details.
Page 12
▶▶Aud io System Basic Opera tion ▶ Audio/Inf ormation Screen
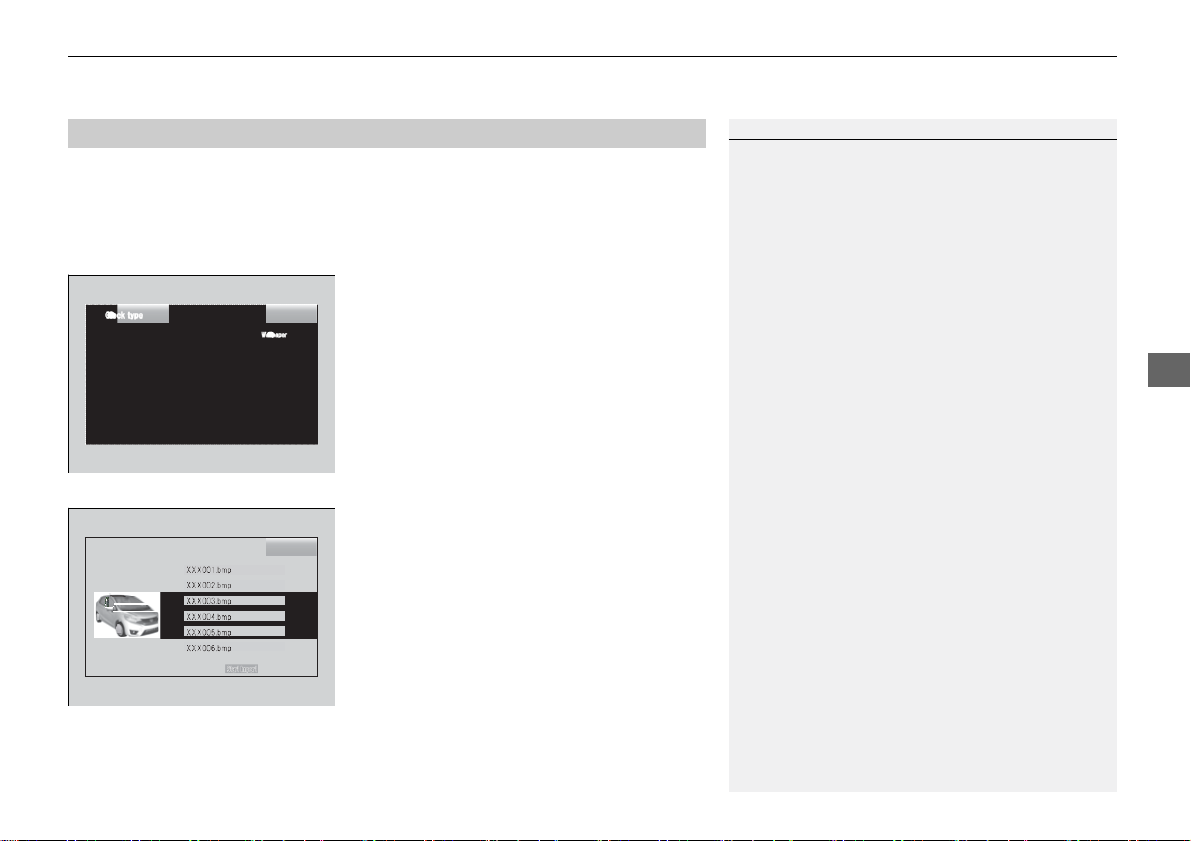
■Wallpaper Setup
You can change, store, and delete the wallpaper on the audio/information screen.
■ Import wallpaper
You can import up to five images, one at a time, for wallpaper from a USB flash
drive.
1. Connect the USB f
port.
⇒ USB Port(s) P. 163
2. Select Settings to go to the Settings
screen.
3. Select Info.
4. Select Clock/W
Wallpaper tab.
5. Select Add New.
▶ The picture name is displayed on the list.
6. Select a desired pi
▶ The preview is displayed on the left side
on the screen.
7. Select Start Im
▶ Then the display will return to
the wallpaper list.
lash drive to the USB
allpaper Type, then the
cture.
port to save the data.
>>Wallpaper Setup
• When importing wallpaper files, the image must be
in the USB flash dri ve’s root directory. Images in a
folder cannot be imported.
• The file name must be fewer than 256 characters.
• The file format of the image that can be imported
is BMP (bmp) or JPEG (jpg).
• The individual file size limit is 5 MB.
• The maximum image size is 4,096 x 4,096 pixels. If
the image size is less than 800 × 480 pixels, the
image is displayed in the middle of the screen with
the extra area appearing in black.
• Up to 5 files can be selected.
• If the USB flash drive does not have any pictures,
the No files detected message appears.
Features
Page 13
▶▶Audio System Basic Operation ▶ Audio/Information Screen
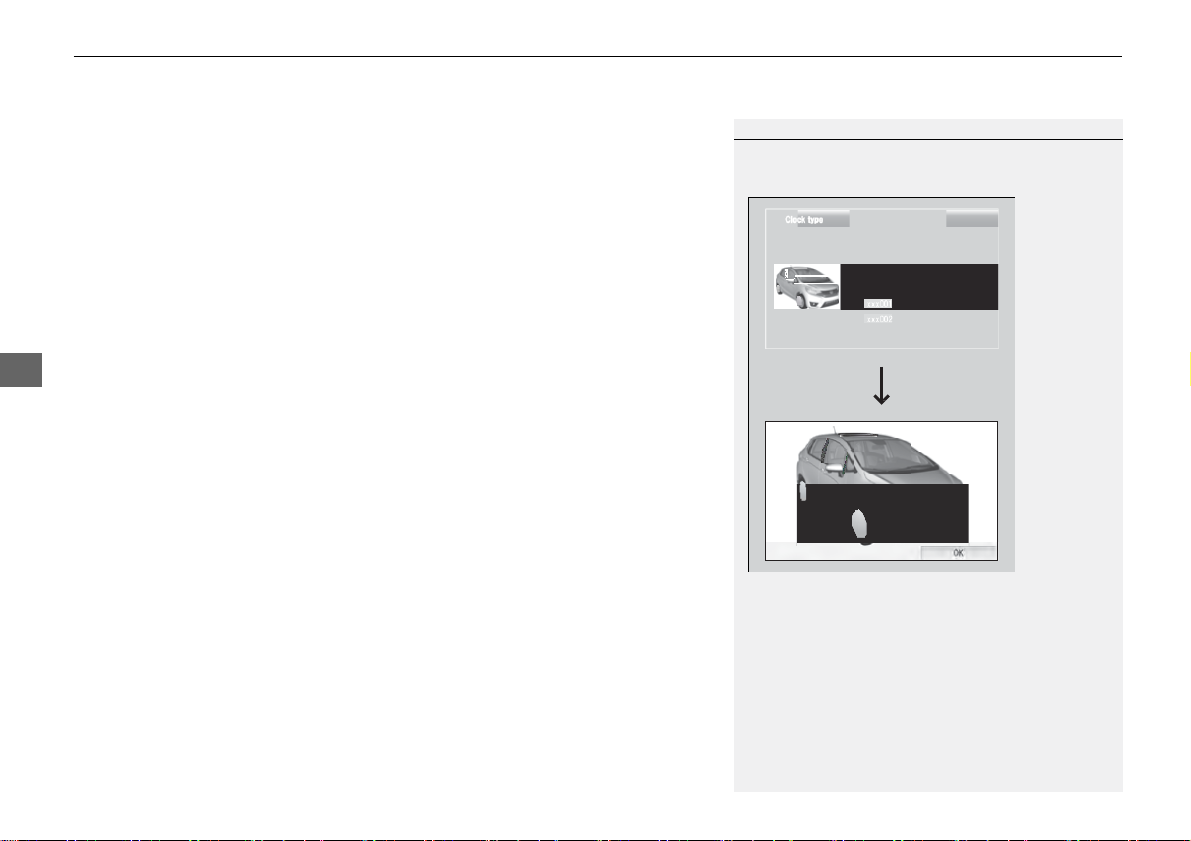
■ Select wallpaper
1. Select Settings to go to the Setti
2. Select Info.
3. Select Clock
▶ The screen changes to the wallpaper list.
4. Select a desired wa
▶ The preview is displayed on the left side on the screen.
▶ The pop-up menu appears on the screen.
5. Select Set.
▶ The disp
■ Delete wallpaper
Features
1. Select Settings to go to the Setti
2. Select Info.
3. Select Clock
▶ The screen changes to the wallpaper list.
4. Select a wallpaper that
▶ The preview is displayed on the left side on the screen.
▶ The pop-up menu appears on the screen.
5. Select Delete.
▶ The confirm
6. Select Yes to
▶ The display will return to the wallpaper list.
llpaper Type, then the Wallpaper tab.
/Wa
llpaper.
lay will return to the wallpaper list.
llpaper Type, then the Wallpaper tab.
/Wa
ation message will appear.
delete completely.
ngs screen.
ngs screen.
you want to delete.
>>Wallpaper Setup
From the pop-up menu, select Preview to see a
preview at full-size screen.
To go back to the previous screen, select OK, or
BACK.
When the file size is large, it takes a while to be
previewed.
To delete all wallpapers you add, select Delete All,
then Yes.
Page 14
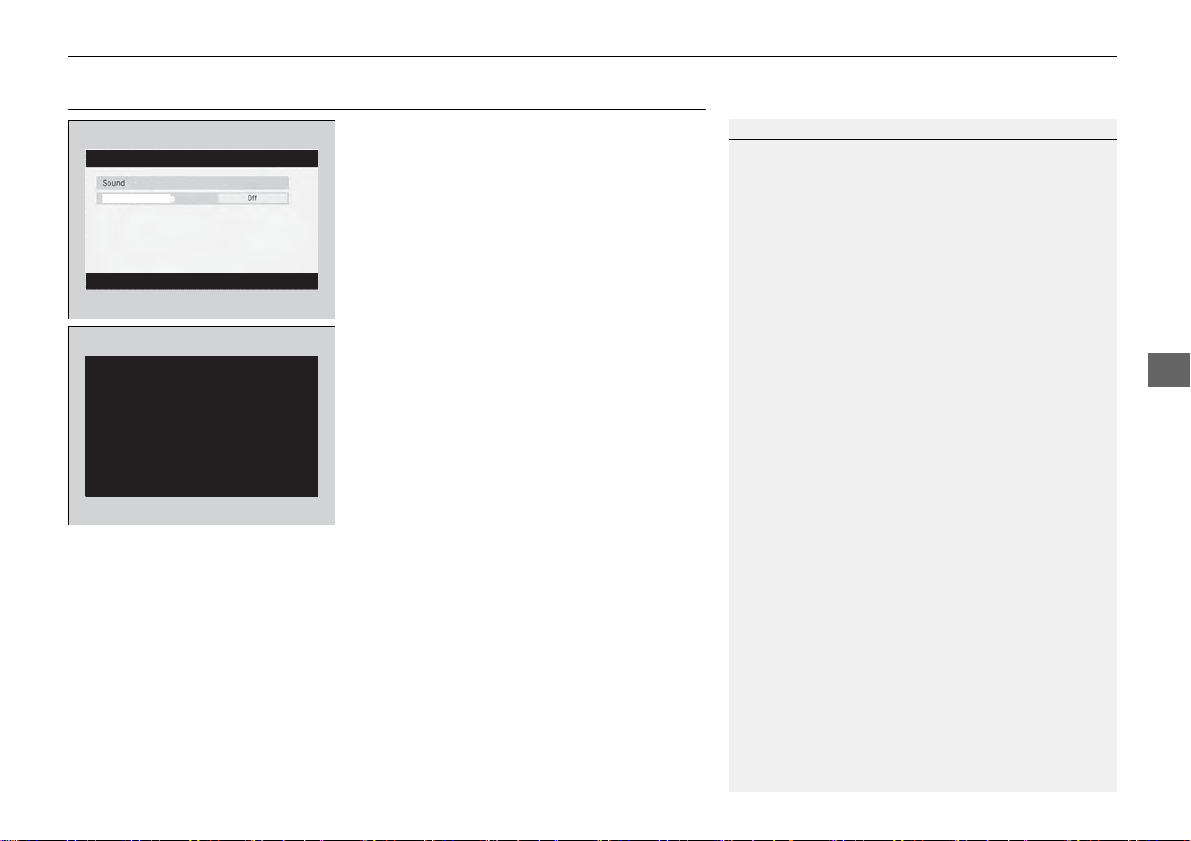
Adjusting the Sound
1. Select HOME button.
2. Select Settings.
3. Select Audio.
4. S
elect Sound.
Select t
he tabs to adjust the following choices:
BASS, TREBLE, FADER, BALANCE, SVC
(Speed-sensitive Volume Compensation)
▶▶Audio System Basic Operation ▶ Adjusting the Sound
1 Adjusting the Sound
The SVC has four modes: Off, Low , Mid, and High.
SVC adjusts the volume level based on the vehicle
speed. As you go faster, audio volume increases. As
you slow down, audio volume decreases.
Features
Page 15
▶▶Audio System Basic Operation ▶ Display Setup
Display Setup
You can change the brightness or color theme of the audio/information screen.
■Changing the Screen Brightness
1. Select HOME button.
2. Select Settings to go to th
e Settings
>>Changing the Screen Brightness
You can change the Contrast and Black level
set tings in the same manner.
screen.
3. Select System.
4. Select the Dis
5. Select Display Setting
6. Select the se
play tab.
s.
tting you want.
7. Select OK.
Feature
s
■Changing the Screen’s Color Theme
1. Select HOME button.
2. Select Settings to go to the Settings
screen.
3. Select System.
4. Select the Display tab.
5. Select Background Color.
6. Select the setting you want.
7. Select OK.
Page 16
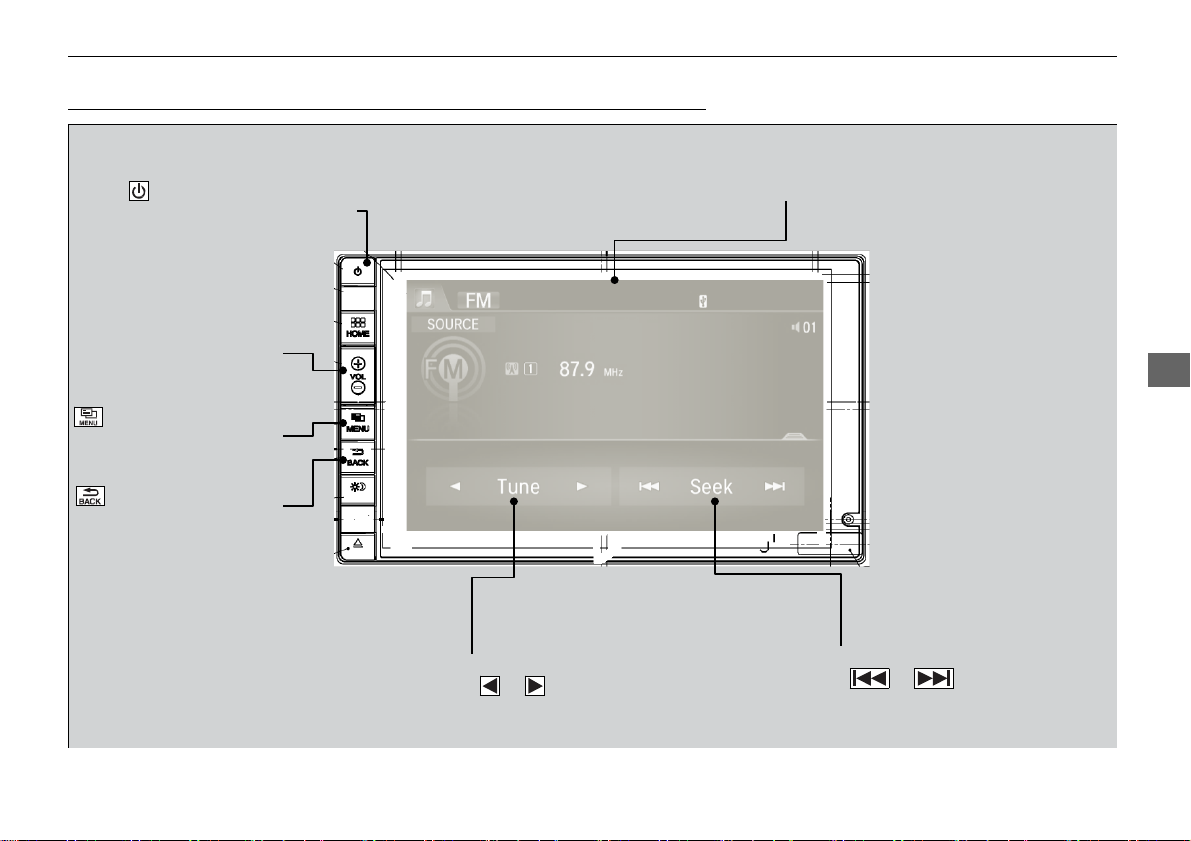
Playing the AM/FM Radio
(Power) Button
Press to turn th e audio system
on and off.
VOL (Volume) Button
Select to adjust the volume.
(MENU) Button
Select to display the menu items.
(BACK) Button
Select to go back to the previous
display.
▶▶Audio System Basic Operation ▶ Playin g th e AM/FM Radio
Audio/Information Screen
Audio/Information Screen
HOME
VOL Open/Close Icon
Features
Displays/hides the
MENU
BACK
detailed infor mation.
Features
*1
* 1 : Some or all of the lists may not be displayed.
Tune Icons
Select or
frequency.
to tune th e radio
Seek Icons
Select
down the selected band for a station
with a strong signal.
or to search up and
Page 17

▶▶Aud io System Basic Operation ▶ Playing th e AM/FM Radio
■Preset Memory
To store a station:
1. Tune to the selec
ted stat ion.
2. Select MENU.
3. Select Sav
4. Select the prese
et.
e Pres
t number you want to store that station.
Features
■Radio Data System (RDS)
Provides text data information related to your selected RDS-capable FM station.
■ To find an RDS station from Station List
1. Select MENU while l
2. Select Station List
3. Select the station.
■ Manual update
Updates your available station list at any time.
1. Select MENU while l
2. Select Station List
3. Select Refresh.
istening to an FM station.
.
istening to an FM station.
.
>>Playing the AM/FM Radio
The ST indicator appears on the display indicating stereo
FM broadcasts.
Stereo reproduction in AM is not available.
Switching the Audio Mode
Press the SOURCE button on the steering wheel or select
SOURCE on the list.
⇒ Audio Remote Controls
You can also switch the mode by selecting Change Source
on the MENU screen.
You can store 6 AM stations and 12 FM stations into the
preset memory.
>>Radio Data System (RDS)
When you select an RDS-capable FM station, the RDS
automatically turns on, and the frequency display changes to
the station name. However, when the signals of that station
become weak, the display changes from the st ation name to
the frequency.
P. ***
Page 18

■ Radio text
Displays the radio text information of the selected RDS station.
1. Select MENU.
elect View Radio Text.
2. S
■ Scan
Samples each of the strongest stations on the selected band for 10 seconds.
1. Select MENU.
elect Scan.
2. S
To turn of
f scan, select Cancel.
▶▶Audio System Basic Operation ▶ Playing th e AM/FM Radio
Features
201
Page 19
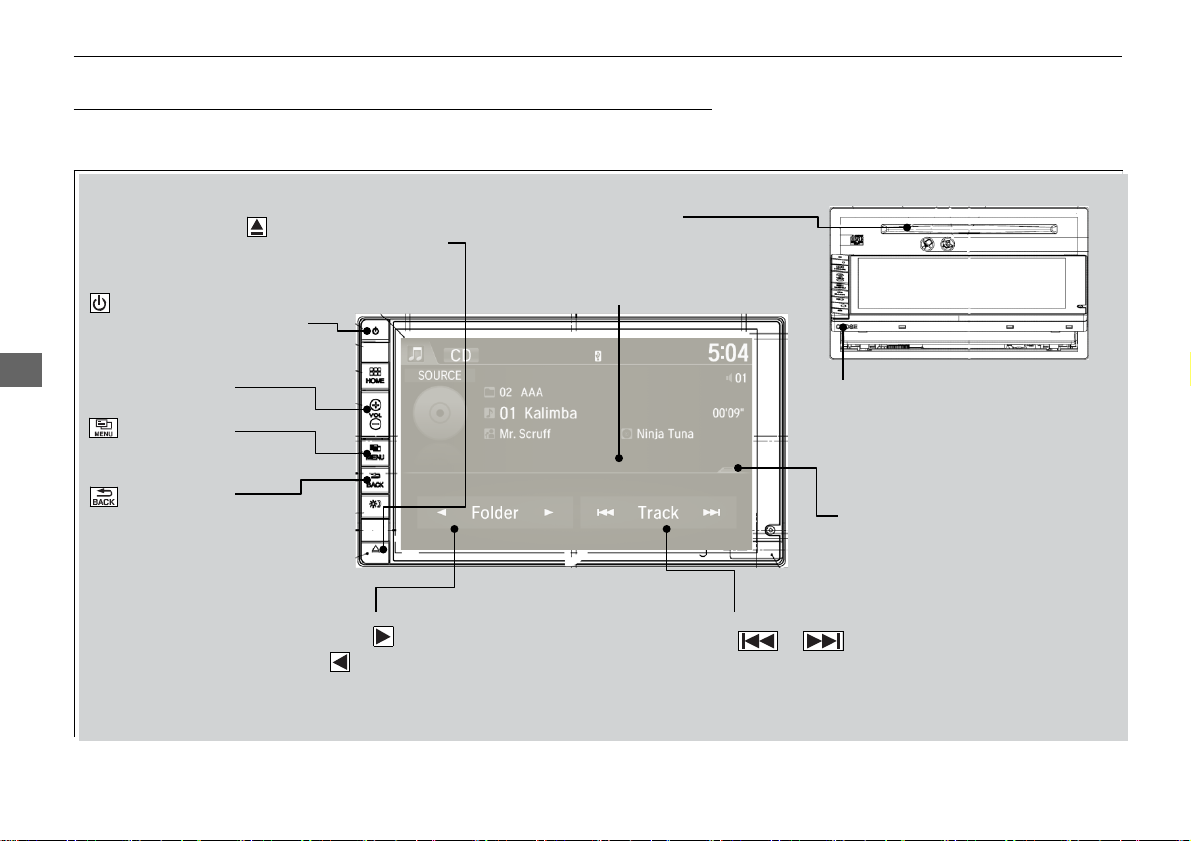
▶▶Aud io System Basic Operation ▶ Playing a CD
Playing a CD
Your audio system supports audio CDs, CD-Rs, and CD-RWs in either MP3 or WMA,
or AAC*1 format. With the CD loaded, select the CD mode.
(CD Eject) Button
The panel opens automatically.
(Power) Button
Press to turn the audio system
on and off.
Button
Features
VOL (Volume) Button
Select to adjust the volume.
(MENU)
Select to display the menu items.
Button
(BACK)
Select to go back to the
previous display.
Folder Icons
Select to skip t o the next folder, and
to sk ip to the beginning of the
previous folder in MP3, W MA, or AAC.
*1 : Only AAC format files recorded with iTunes® are playable on this unit.
*2 : Some or all of the lists may not be displayed.
CD Slot
Insert a CD about halfway into
the CD slot.
Audio/Information Screen
Track Icons
Select or to change tracks
(files in MP3, W M A, or AA C).
Select and hold to move rapidly within a
tr ack.
CLOSE Button
Open/Close Icon*2
Displays/hides the detailed
information.
.
Page 20
▶▶Aud io System Basic Opera tion ▶ Playin g a CD
■How to Select a File from the Music Search List
(MP3/WMA/ AAC)
1. Select MENU and select Music Search.
Folder
Selection
Track
Selection
2. Select a folder.
3. Select a track.
>>Playing a CD
NOTICE
Do not use CDs with adhesive labels. The label can cause
the CD to jam in the unit.
WMA files protected by digital rights management (DRM)
cannot be played.
The audio system displays Unplayable File, then skips to
the next file.
Text data appears on the display under the following
circumstances:
• When you select a new folder, file, or track.
• When you change the audio mode to CD.
• When you insert a CD.
If you eject the CD but do not remove it from the slot, the
system reloads the CD automatically after several seconds.
Features
Page 21

▶▶Aud io System Basic Operation ▶ Playing a CD
■How to Select a Play Mode
You can select scan, repeat, and random modes when playing a track or file.
1. Select MENU.
2. Select Scan or Rando
3. Select a mode.
Random/Repeat is selected.
Features
■ To turn off a play mode
1. Select MENU.
2. Select the m
ode you w
ant to turn off.
m/Repeat.
>>How to Select a Play Mode
Play Mode Menu Items
Scan
Scan Folders (M P3/WMA/AAC): Provides 10- second
sampling of the first file in each of the main folders.
Scan Tracks: Provides 10-second sampling of all tracks on
the CD (all files in the current folder in MP3, W MA, or AAC).
Random/Repeat
Repeat Folder (MP3/WMA/AAC): Repeats all files in the
current folder.
Repeat Track: Repeats the current track/file.
Random in Folder (MP3/WMA/AAC): Plays all files in the
current folder in random order.
Random All Tracks: Pl ays all tracks/files in random order.
204
Page 22
Playing an iPod
Your audio system supports audio CDs, CD-Rs, and CD-RWs in either MP3 or WMA,
or AAC*1 format. With the CD loaded, select the CD mode.
Audio/Information Screen
(Power) Button
Press to turn the audio system
on and off.
▶▶Audio System Basic Operation ▶ Playing an iPod
USB Indicato r
Appears when an iPod is connected.
Button
VOL (Volume) Button
Select to adjust the volume.
(MENU)
Select to display the menu items.
Button
(BACK)
Select to go back to the
previous display.
Cover Art
* 1 : Some or all of the lists may not be displayed.
Open/Close Icon*1
Displays/hides the detailed
information.
Songs Icons
Select or to change songs.
Select and hold to move rapidly within a
song.
Features
.
Page 23
▶▶Audio System Basic Operatio n▶ Playi ng an iPod
■How to Select a Song from the Music Search List
1. Select MENU and select M usic Search.
2. Select the items on t
Folder
Selection
Features
Track
Selection
hat menu.
>>How to Select a Song from the Music Search List
Available operating functions vary on models or versions.
Some functions may not be available on the vehicle’s audio
system.
If there is a problem, you may see an error message on the
audio/information screen.
⇒ iPod/USB Flash Drive P. ***
If you operate the music app on your iPhone/iPod while the
phone is connected to the display audio system, you may no
longer be able to operate the same app on the display audio.
Reconnect the device if necessary.
206
Page 24

▶▶Audio System Basic Operation ▶ Playing an iPod
■How to Select a Play Mode
You can select repeat and shuffle modes when playing a file.
1. Select MENU.
elect Shuffle/Repeat.
2. S
3. Select a mode.
■ To turn off a play mode
1. Select MENU.
2. S
elect the mode you
want to turn off.
1 How to Select a Play Mode
Play Mode Menu Items
Repeat Song: Repeats the current file.
Shuffle Albums: Plays all available albums in a selected list
(playlists, artists, albums, songs, genres, or composers) in
random order.
Shuffle All Songs: Plays all available files in a selected list
(playlists, artists, albums, songs, genres, or composers) in
random order.
Features
Page 25
▶▶Audio System Basic Operation ▶ Playing Internet Radio
U.S. models
Compat ible phones only
Playing Internet Radio
Connect a compatible phone through Bluetooth®.
⇒Phone Setup P. ***
iPhone only
You can also connect the phone using your dock connector to the USB port. Select
Source to select Pandora mode.
Cover Art
(Power) Button
Press to turn the audio
System on and off.
Features
Button
Button
VOL (Volume) Button
Select to adjust the volume.
(MENU)
Select to display the
menu items.
(BACK)
Select to go back to the
previous display.
Station Up/Down Icons
Select to change a station.
*1 : Some or all of the lists may not be displayed.
208
Audio/Information Screen
Like/Dislike Icons
Select to evaluate a song.
Play/Pause Icon
Select to resume or
play a song.
Skip Icon
Select to skip a song.
>>Playing Internet Radio
Pandora®, the Pandora logo, and the Pandora trade
dress are trademarks or registered trademarks of
Pandora Media, Inc., used with permission. Pandora
is currently available exclusively in the United States.
To find out if your phone is compatible with this
feature, visit www.handsfreelink.honda.com, or call
1-888-528-7876
To use this service in your vehicle, the Pandora® app
must first be installed on your phone. Visit
www.pandora.com. for more information.
Page 26

▶▶Aud io System Basic Opera tion ▶ Playing Internet Radio
■Pandora® Menu
You can operate some of the Pandora® menu items from your vehicle’s audio system.
The available items are:
• Bookmark
on Lis
• Stati
• New Station
• Change Source
• Sound
■ Operating a menu item
t
1. Select MENU.
2. S
elect an item.
>>Playing Internet Radio
Pandora® is free, personalized radio that plays music and
comedy you’ll love. Just start with the name of one of your
favorite artists, songs, comedians or composers and
Pandora® will create a custom station that plays similar tracks.
Pandora® also features hundreds of genre stations ranging
from Dubstep to Smooth Jazz to Power Workout.
If you cannot operate Pandora® through the audio system,
it may be streaming through Bluetooth® Audio. Make sure
Pandora® mode on your audio system is selected.
Changing Stations
To change stations, activate the Pandora® menu, select
Station List, and then select a new station.
>>Pandora® Menu
Available operating functions vary on software versions.
Some functions may not be available on the vehicle’s audio
system.
If there is a problem, you may see an error message on the
audio/information screen.
⇒ Pandora® P. ***
Pandora® may limit the total number of skips allowed on the
service. If you dislike a track after the skip limit has been
reached, your feedback will be saved but the current track
will continue to play.
Features
Page 27
▶▶Aud io System Basic Operation ▶ Playing a USB Flash Drive
Playing a USB Flash Drive
Your audio system reads and plays sound files on a USB flash drive in either MP3,
WMA or AAC*1 format.
Connect your USB flash drive to the USB port, then select the USB mode.
⇒USB Ports P. ***
Audio/Information Screen
(Power) Button
Press to turn the audio system
on and off.
USB Indicato r
Appears when an iPod is connected.
Button
Features
VOL (Volume) Button
Select to adjust the volume.
(MENU)
Select to display the menu items.
Button
(BACK)
Select to go back to the
previous display.
Folder Icons
Select to skip to the next folder,
and to skip to the beginning of
the previous folder.
*1 : Only AAC format files recorded with iTunes are playable on this unit.
*2 : Some or all of the lists may not be displayed.
Open/Close Icon*2
Displays/hides the detailed
information.
Track Icons
Select or to change files.
Select and hold to move rapidly within
a track.
.
Page 28

▶▶Audio System Basic Operat ion ▶ Playing a USB Flash Drive
■How to Select a File from the Music Research List
1. Select MENU and select Music Search.
Folder
Selection
Track
Selection
2. Select a folder.
3. Select a track.
>>Playing a USB Flash Drive
Use the recommended USB flash drives.
⇒General Information on the Audio System P. ***
Files in WMA format protected by digital rights
management (DRM) are not played.
The audio system displays Unplayable File, and then skips to
the next file.
If there is a problem, you may see an error message on the
audio/information screen.
⇒ iPod/USB Flash Drive P. ***
Features
Page 29

▶▶Aud io System Basic Operation ▶ Playing a USB Flash Drive
■How to Select a Play Mode
You can select scan, repeat, and random modes when playing a file.
1. Select MENU.
2. Select Scan or Rando
3. Select a mode.
Random/Repeat is selected.
Features
■ To turn off a play mode
1. Select MENU.
2. Select the m
ode you w
ant to turn off.
m/Repeat.
>>How to Select a Play Mode
Play Mode Menu Items
Scan
Scan Folders: Provides 10-second sampling of the first file
in each of the main folders.
Scan Tracks: Provides 10-second sampling of all files in the
current folder.
Random/Repeat
Repeat Folder: Repeats all files in the current folder.
Repeat Track: Repeats the current file.
Random in Folder: Plays all files in the current folder
in random order.
Random All Tracks: Pl ays all files in random order.
Page 30

Playing Bluetooth® Audio
Your audio system allows you to listen to music from your Bluetooth®-compatible phone.
This function is available when the phone is paired and connected to the vehicle’s
Bluetooth® HandsFreeLink® (HFL) system.
⇒ Phone Setup P. ***
Bluetooth Indicator
Appears when your phone is
Audio/Information Screen
(Power) Button
Press to turn the audio
System on and off.
Button
VOL (Volume) Button
Select to adjust the volume.
(MENU)
Select to display the
menu items.
Button
(BACK)
Select to go back to the
previous display.
Play Icon
Pause Icon
*1 : Depending on the Bluetooth device you connect, some or all of the lists may not be displayed.
Group Icons
Select or to change
group.
connected to HFL.
Track Icons
Select or to
change tracks.
▶▶Audio System Basic Operation ▶ Playing Bluetooth® Audio
>>Playing Bluetooth® Audio
Not all Bluetooth-enabled phones with streaming
audio capabilities are compatible with the system.
For a list of compatible phones:
• U.S.: Visit www.handsfreelink.honda.com, or call
1-888-528-7876.
• Canada: Visit www.handsfreelink.ca, or call 1-888528-7876.
In some states, it may be illegal to perform some data
device functions while driving.
Only one phone can be used with HFL at a time.
When there are more than two paired phones in the
vehicle, the first paired phone the system finds is
automatically linked.
If more than one phone is paired to the HFL system,
there may be a delay before the system begins to play.
In some cases, the name of the artist, album, or track
may not appear correctly.
A NO CONNECT message may be displayed if:
• The phone is not linked to HFL.
• The phone is not turned on.
• The phone is not in the vehicle.
• An incompatible phone is connected.
The following functions may not be available on
some devices:
• Pause function
• Group selection
Features
Page 31

▶▶Aud io System Basic Operation ▶ Playing Bluetooth® Audio
■To Play Bluetooth® Audio Files
Features
■ To pause or resume a file
Select the play icon or pause icon.
■Searching for Music
1. Make sure that your phone is paired and
connected to HFL.
2. Press the Bluetoot
If the phone is not recognized, another HFLcompatible phone, which is not compatible for
Bluetooth® Audio, may already be connected.
1. Select MENU.
2. Select Music Search.
3. Select a s
4. Select an item.
u T
he selection begins playing.
h® Audio mode.
earch categor
y (e.g., Albums).
>>To Play Bluetooth® Audio Files
To play the audio files, you may need to operate your phone.
If so, follow the phone maker's operating instructions.
Switching to another mode pauses the music playing from
your phone.
>>Searching for Music
Depending on the Bluetooth device you connect, some
or all of the lists may not be displayed.
214
Page 32

Playing a Video Using the HDMI®
Your audio system allows you to play videos from an HDMI®-compatible device.
Connect the device, using an HDMI® cable, then select the HDMI® mode.
⇒ HDMI® Port* P. ***
Audio/Information Screen
(Power) Button
Press to turn the audio
System on and off.
▶▶Aud io System Basic Operation ▶ Playing a Video Using the HDMI®
Features
Button
VOL (Volume) Button
Select to adjust the volume.
(MENU)
Select to display the
menu items.
Button
(BACK)
Select to go back to the
previous display.
Page 33

▶▶Aud io System Basic Operation ▶ Playing a Video Using t he HDMI®
■Changing the Screen Aspect
Features
1. Select HOME.
2. Select Settings to go to the
screen.
3. Select Audio.
lect Aspect Ratio Adjustm
4. Se
5. Select the setting you w
6. Select OK.
ant.
Settings
ent.
>>Playing a Video Using the HDMI®
This feature is limited while driving. To play videos, stop
your vehicle and apply the parking brake.
Page 34

Smartphone Apps
You can connect a compatible smartphone to the system to enable integration between the
smartphone’s approved apps and the vehicle. This allows you to control the phone through
the vehicle display. To check smart phone compatibility, download the HondaLink app, and
view connection instructions, visit handsfreelink.honda.com. For the latest apps and feature
details, check hondalink.com.
Microphone
(Power) Button
Press to turn the audio
System on and off.
(HOME) Button
Select to go back to HOME
or to a previous display.
(MENU) Button
Select to display the
menu on the app you
selected. (Not available
on all apps.)
Audio/Information Screen
▶▶Audio System Basic Operation ▶ Smartphone Apps
>>Smartphone Apps
Park in a safe place before connecting your phone
and while operating the displayed apps.
Not all phones and apps are compatible with the
system. The system does not display all the available
apps on smartphone, and some apps need to be
preinstalled. Ask a dealer for details.
You need to switch the Bluetooth connection to your
smartphone if another electronic device is connected.
⇒ Changing the currently paired phone P. ***
The following may vary by phone type:
• Connection methods.
• How to connect a smartphone to the system.
• Apps that can be operated on the screen.
• Display response time/update time.
We do not support every app operation on the display
audio. Ask the app provider for any questions on the
app’s features
Features
(BACK) Icon
Select to go back to the previous
display. (Not available on all phones.)
Page 35

▶▶Audio System Basic Operation ▶ Siri Eyes Free
Siri Eyes Free
You can talk to Siri using the Talk button on the steering wheel when your iPhone is
paired to Bluetooth® HandsFreeLink®.
⇒Phone Setup P. ***
>>Siri Eyes Free
Siri is a trademark of Apple Inc.
Check Apple Inc. website for features available for
Siri.
When operating the vehicle, only use Siri through the
Talk button.
■Using Eyes Free
Features
Appears when Siri is
activated in Eyes Free
While in Eyes Free:
The display remains the
same. No feedback or
commands appear.
(Talk) button:
Press and hold until the display changes as shown.
(Hang-up/back) button:
Press to deactivate Siri.
>> Using Eyes Free
Some commands work only on specific phone
features or apps.
Page 36

Audio Error Messages
CD Player
If a disc error occurs, you may see the following error messages.
Error Message
Unplayable File Track/file format not supported
Bad Disc
Please Check Owners
Manual
Push Eject
Mecha Error
Bad Disc
Please Check Owners
Manual
Check Disc Disc error
Cause
Mechanical error
Servo error
● Current track/file will be skipped. The next supported track/file
Solution
plays automatically.
● Press the (eject) button and remove the disc, and check that the
error message is cleared.
● Check that the disc is not damaged or deformed, and insert the
disc again.
⇒ Protecting CDs P. ***
● If the error message reappears, press the button, and pull out
the disc.
● Insert a different disc.
If the new disc plays, there is a problem with the first disc.
● If the error message repeats, or the disc cannot be removed,
contact a dealer.
Do not try to force the disc out of the player.
● Check that the disc is not damaged or deformed.
⇒ Protecting CDs P. ***
● Turn the audio system off and allow the player to cool down until
the error message is cleared.
Features
Page 37

▶▶Aud io Error Messages▶ iPod/USB Flash Drive
iPod/USB Flash Drive
If an error occurs while playing an iPod or USB flash drive, you may see the following error
messages. If you cannot clear the error message, contact a dealer.
Error Message Solution
USB Error
The connected USB device has a problem.
See Owner’s Manual
Unsupported Version
Features
Connect Retry
Unplayable File
No Data
Unsupported
Appears when there is a problem with the USB adapter unit. Check if the device is compatible
with the USB adapter unit.
Appears when an incompatible device is connected. Disconnect the device. Then turn the
audio system off, and turn it on again. Do not reconnect the device that caused the error.
Appears when an unsupported iPod is connected. If it appears when a supported iPod is
connected, update the iPod software to the newer version.
Appears when the system does not acknowledge the iPod. Reconnect the iPod.
Appears when the files in the USB flash drive are DRM or an unsupported format. This error
message appears for about 3 seconds, then plays the next song.
iPod
Appears when the iPod is empty.
USB f lash drive
Appears when the USB flash drive is empty or there are no MP3, WMA, or AAC files in the
USB flash drive.
iPod and USB flash drive
Check that compatible files are stored on the device.
Appears when an unsupported device is connected. If it appears when a supported device is
connected, reconnect the device.
Page 38

Models with display audio system
Pandora®
If an error occurs while playing Pandora®, you may see the following error messages. If you
cannot clear the error message, contact a dealer.
Error Message Solution
▶▶Audio Erro r Messages ▶ Pandora®
The maximum number of stations that can be created is
100. To create more, please delete one or more previously
created stations.
Unable to create new station. Please try again.
Unable to play Pandora. Please try again later.
Unable to save bookmark.
This Pandora station is currently not available. Please
select another station.
Unable to play Pandora. When stopped, log-in to Pandora.
Unable to connect to Pandora. When stopped, check
your mobile phone.
Unable to play Pandora. Please try again later.
Connect Retry
● Appears when the number of stations that can be created
is exceeded. Follow the message.
● Appears when the commanded operation is failed. Try
again later.
Features
● Appears when the station you selected is not available.
Change a station, or try again later.
● Appears when you have not logged into Pandora®. Follow
the message.
● Appears when failed to connect. Check your device and try
again.
Page 39

▶▶Aud io Error Messages▶ Pandora®
Error Message Solution
Unsupported ● Appears when the device is not supported. Use another device.
Unsupported Version
Pandora App version is not supported
Unable to connect to the phone.
Please make sure the phone’s Bluetooth setting is ON and
tr y again.
No Data
Features
The connected USB device has a
problem. See Owner’s Manual
No station list on
device.
Use device to create
station.
No Stations stored in Pandora App
The maximum number of tracks that can be skipped per
hour has been reached.
● Appears when Pandora® version is not supported.
Update Pandora® to the latest version.
● Appears when Pandora® is unable to play music. Check
the Bluetooth status on your device.
● Appears when no data is available with Pandora®
activated. Reboot the app and reconnect the device.
● Appears when an incompatible device is connected.
Disconnect the device. Then turn the audio system off, and
turn it again. Do not reconnect the device that caused the
error.
● Appears when there is no station list on the device. Create one
on your device.
● Appears when there is no station on app. Store some.
● Appears when you try to skip a song or select Dislike over
the predetermined number of times in an hour.
Page 40

General Information on the Audio System
Recommended CDs
• Use only high-quality CD-R or CD-RW discs labeled for audio use.
• Use only CD-R
• Play only standard round-
The CD packages or jackets should have one of these marks.
■CDs with MP3, WMA, or AAC files
• Some software files may no
• Some versions of
or CD-RW discs on which the recordings are closed.
shaped CDs.
t allow for audio play or text data display.
MP3, WMA, or AAC formats may be unsupported.
>>Recommended CDs
A Dual-disc cannot play on this audio unit. If recorded under
certain conditions, a CD-R or CD-RW may not play either.
Features
Continued
223
Page 41

u u General Informa tion on the Audio System u Recommended CDs
■ Protecting CDs
Follow these precautions when handling or storing CDs:
• Store a CD in its case when it
• When wiping a
• Handle a CD by its
• Never insert for
• Keep CDs out of direc
• Do not pl
ace stabilizer rings or labels on the CD.
• Avoid fingerprints, li
Features
CD, use a soft clean cloth from the center to the outside edge.
edge. Never touch either surface.
eign objects into the CD player.
is not being played.
t sunlight and extreme heat.
quids, and felt-tip pens on the CD.
>>Protecting CDs
NOTICE
Do not insert a damaged CD. It may be stuck inside and
damage the audio unit.
Exam ples:
● Bubbled, wrinkled, labeled, and
excessively thick CDs
Bubbled/ With Label/ Using
Wrinkled Sticker
Sealed With Plastic Ring
● Damaged CDs
Chipped/
Cracked
● Small CDs
3-inch (8-cm)
CD
Warped Burrs
Printer Label
Kit
● Poor quality
CDs
224
Page 42

▶▶General Info rmation on the Audio System▶ Compatible iPod, iPhone, and USB Flash Drives
Compatible iPod, iPhone, and USB Flash Drives
■iPod and iPhone Model Compatibility
Model
iPod (5th generation)
iPod classic 80GB/160GB (launch in 2007)
iPod classic 120GB (launch in 2008)
iPod classic 160GB (launch in 2009)
iPod nano
iPod touch
iPhone 3G/iPhone 3GS/iPhone 4/iPhone 4S/iPhone 5
>>iPod and iPhone Model Compatibility
This system may not w ork with all software versions of these
devices.
■USB Flash Drives
• Use a recommended USB flash drive of 256 MB or higher.
• Some digital audio p
• Some USB flash dr
• Some software files may no
• Some versions of
layers may not be compatible.
ives (e.g., a device with security lockout) may not work.
t allow for audio play or text data display.
MP3, WMA, or AAC formats may be unsupported.
>>USB Flash Drives
Files on the USB flash drive are played in their stored order.
This order may be different from the order displayed on your
PC or device.
Features
225
Page 43

Customized Features
Use the audio/information screen to customize certain features.
Models with navigation system
See the navigation system manual for information of the customized features.
Models without navigation system
■ How to customize
While the vehicle is at a complete stop with the ignition switch in ON Ⅱ*1, select
Settings, then select a setting item.
Features
Audio/Information Screen
>>Customized Features
When you customize settings:
• Make sure that the vehicle is at a complete stop.
•
Automatic transmission (CVT) models
Shift to P.
•
Manual transmission models
Set the parking brake.
>>How to customize
To customize other features, select Settings.
⇒ List of customizable options P. ***
* 1 : Models with the smart entry system have an ENGINE START/STOP button instead of an ignition switch.
Page 44

▶ ▶ Customized Features▶
Models with display audio system
■Customization Flow
Select HOME.
Select Settings.
Features
System
Home Home Screen Edit Order
Display Display Settings Brightness
Contrast
Black Level
Background Color
Sound/Beep Volume
Beep Volume
Voice Recog. Voice Prompt
Volume
Phonebook Phonetic Modification
Automatic Phone Sync
Clock Clock/Wallpaper Type Clock
Wallpaper
Clock Adjustment
Clock Format
Clock Display
Clock Location
Sync Clock With Smartphone
Clock Reset
*
*
Others Language
Keyboard Layout
Voice Command Tips
Remember Last Screen
Factory Data Reset
Default
* Not available on all models
Page 45

▶▶Customized Featu res▶
Audio
*1 : May change depending on your currently selected source.
Sound
Audio Source Pop-Up
[Your selected media] Cover Art
Displa y Adjustment
*1
*1
Aspect Ratio Adjustment
Aspect Ratio Adjustment*1
Change Bluetooth Audio Device
Change Bluetooth Audio Device*1
Bluetooth Device List
Bluetooth Device List*1
Default
Default
*1
*1
*1
Display Brightness
Contrast
Black Level
Color
Color
Tint
Features
Page 46

▶▶Customized Featu res▶
Clock Clock/Wallpaper Type Clock Info
Wallpaper
Clock Adjustment
Clock Format
Clock Display
Clock Location
Sync Clock With Smartphone
Features
Clock Reset
*
*
Other Info Screen Preference
Default
* Not available on all models
Page 47

▶ ▶ Customized Features▶
Phone
Phone Connect Phone
Bluetooth Device List
Edit Speed Dial
Ring Tone
Automatic Phone Sync
HondaLink Assist
Features
Text/Email Enable Text/Email
Select Account
New Message Notification
Default
Page 48

▶▶Customized Featu res▶
Camera
Rear Wide Camera Fixed Guideline
Dynamic Guideline
Default
LaneWatch
Features
*
Show with Turn Signal
Display Time after Turn Signal Off
Reference Line
Default
Bluetooth
Bluetooth On/Off Status
Bluetooth Device List
Edit Pairing Code
Default
* Not available on all models
Page 49

■List of customizable options
Setup
Group
Home
Display
System
Sound/
Beep
*1 : Default Setting
Customizable Features Description
Home Screen Edit Order Changes the HOME screen icon layout.
Display
Settings
Background Color
Volume Changes the sound volume. 0-6*1-11
Beep Volume Changes the beep volume. Off/1/2*1/3
Brightness
Contrast
Black Level
Changes the brightness of the audio/
information screen.
Changes the contrast of the audio/
information screen.
Changes the black level of the audio/
information screen.
Changes the background color of the audio/
information screen.
▶▶Customized Featu res▶
Selectable Settings
—
—
—
—
Blue*1/Amber/Red/Violet
Features
Page 50

▶▶Customized Featu res▶
Features
System
*1 : Default Setting
Setup
Group
Voice
Recog.
Clock
Customizable Features Description Selectable Settings
Voice Prompt Turns the voice prompt on and off. On*1/Off
Volume Changes the volume of the voice prompt. 0-6*1-11
Phonebook Phonetic
Modification
Automatic Phone Sync
Clock Changes the clock display type.
Clock/
Wallpaper
Type
Wallpaper
Clock Adjustment
Clock Format
Clock Display Selects whether the clock display comes on. On/Off
Clock Location
Sync Clock With
Smartphone
Clock Reset
*
*
Modifies a voice command for the phonebook. —
Sets a phonebook data to be automatically
imported when a phone is paired to HFL.
On/Off
Analog/Digital*1/Small
Digital/Off
● Changes the wallpaper type.
● Imports an image file for a new wallpaper.
● Deletes an image file for a wallpaper.
⇒ Wallpaper Setup P. ***
Adjusts Clock.
⇒ Clock P. ***
Selects the digital clock display from 12H to
24H.
Changes the clock display layout.
Selects whether the clock links to the device
you connect.
Cancels/Resets all customized items for clock
display as default.
Blank/Galaxy*1/Metallic
—
12H*1/24H
*1
Right upper*1/Left upper/
Right lower/Left lower/Off
On*1/Off
Yes/No
* Not available on all models
Page 51

▶▶Customized Featu res▶
Setup
Group
System Others
Default
Sound
Audio
High (SVC)
Audio Source Pop-Up sources comes on or not when Audio is On/Off
*1 : Default Setting
Customizable Features Description Selectable Settings
Language
Keyboard Layout
Voice Command
Tips
Changes the display language. English*1/French/Spanish
Selects the on-screen keyboard type.
Alphabet/QWERTY
*1
Alerts you when manual control of the
system is disabled to prevent
distraction while driving.
On*1/Off
Only voice commands are available.
Remember Last Screen
Factory Data Reset
remembers the last screen.
Resets all the settings to their factory default.
Cancels/Resets all customized items
in the System group as default.
Adjusts the settings of the audio speaker’s
sound
⇒ Adjusting the Sound P. ***
-6 ~ 0
Yes/No
TREBLE), RR9~0
(FADER), L9~0
(BALANCE), Off/Low/Mid
On/Off
Yes/No
*1
*1
~ +6 (BASS and
*1
~FR9
*1
~R9
Selects whether the device
Selects whether the list of selectable audio
*1
selected on the HOME screen.
Features
*1
/
Page 52

▶▶Customized Featu res▶
Features
Audio
*1 : Default Setting
Setup
Group
Customizable Features Description Selectable Settings
iPod or USB mode
[Your selected media]
Turns on and off the cover art display. On*1/Off
Cover Art
Brightness
Contrast
Black Level
Color
Tint
HDMI® mode
Display
Adjustment
HDMI® mode
Display
Color
Aspect Ratio Adjustment
Bluetooth® Audio mode
Change Bluetooth Audio Device
Bluetooth® Audio mode
Bluetooth Device List
⇒ Phone S
Default
⇒ System P. ***
Changes the color of the audio/information
screen.
Changes the tint of the audio/information
screen.
Changes the aspect ratio and zoom sett ings of the
audio/information screen.
Connects, disconnects or pairs a Bluetooth®
Audio device to HFL.
Pairs a new phone to HFL, edits or deletes a
paired phone.
Cancels/Resets all customized items in the
Audio group as default.
—
—
Normal/Full /Zoom
etup P. ***
Yes/No
*1
—
—
Page 53

▶▶Customized Featu res▶
Clock/
Wallpaper
type
Setup
Group
Info
*1 : Default Setting
Clock
Other
Default
Customizable Features Description Selectable Settings
Clock
Wallpaper
*
*
⇒ System P. ***
Cancels/Resets all customized items in the
Info group as default.
*1
Yes/No
Clock Adjustment
Clock Format
Clock Display
Clock Location
Sync Clock With
Smartphone
Clock Reset
Info Screen Preference Changes the Info Screen type. Info Top/Info Menu/Off
Features
* Not available on all models
Page 54

▶▶Customized Featu res▶
Features
Phone
*1 : Default Setting
Setup
Group
Customizable Features Description Selectable Settings
Phone
Text/Email
Default
Pairs a new phone to HFL, connects or
Connect Phone
Bluetooth Device List
⇒ Phone Setup P. ***
Edit Speed Dial —
⇒ Speed Dial P. ***
Ring Tone
Automatic Phone Sync
HondaLink Assist
Enable Text/Email
disconnects a paired phone.
⇒ Phone Setup P. ***
Pairs a new phone to HFL, edits or deletes a
paired phone.
Edits, adds or deletes a speed dial entry.
Selects the ring tone. Fixed/Mobile Phone
Sets a phonebook data to be automatically
imported when a phone is paired to HFL.
Turns HondaLink Assist on and off. On/Off
Turns the text message/e-mail function on and off.
On/Off
*1
/Off
On
—
—
*1
*1
Select Account Selects a mail or text message account. —
Selects whether a pop-up alert comes on the
New Message
Notification
screen when HFL receives a new text message/
e-mail.
Cancels/Resets all customized items in the
Phone and Text/Email group as default.
Yes/No
On/Off
*1
244
Page 55

▶▶Customized Featu res▶
Setup
Group
Camera
*1 : Default Setting
Customizable Features Description Selectable Settings
Rear Wide
Camera
LaneWatch
Fixed Guideline
Dynamic Guideline
Default
Selects whether the fixed guidelines come on
on the rear camera monitor.
Selects whether the dynamic guidelines come
on on the rear camera monitor.
Cancels/Resets all customized items in the
Rear Wide Camera group as default.
Selects whether the LaneWatch display comes
Show with Turn Signal on when you move the turn signal lever to the On
passenger side.
Display Time after Turn
Signal Off
Reference Lines
Default
Changes the length of time the LaneWatch
display stays on after you pull the turn signal 0 second
lever back.
Selects whether the reference lines come on
the LaneWatch monitor.
Cancels/Resets all customized items in the
LaneWatch group as default.
On
*1
*1
/Off
On
*1
/Off
Yes/No
/Off
*1
On
Yes/No
/Off
*1
/2 seconds
Features
Page 56

▶▶Customized Featu res▶
Bluetooth
*1 : Default Setting
Features
Setup
Group
Customizable Features Description Selectab le Settings
*1
Bluetooth On/Off Status Changes the Bluetooth® stat us. On
Pairs a new phone to HFL, edits or deletes a
Bluetooth Device List
⇒ Phone Setup P. ***
⇒ To change the pairing code setting P. ***
Edit Pairing Code Random/Fixed
Default Yes/No
paired phone, or creates a security PIN.
Edits Pairing Code.
Cancels/Resets all customized items in the
Bluetooth group as default.
/Off
—
*1
Page 57

Defaulting All the Settings
Reset all the menu and customized settings as the factory defaults.
1. Select HOME.
2. Select Settings.
3. S
elect System.
▶ Repeat
the procedure to select Others
tab, then Factory Data Reset.
▶ The confirmation message will appear.
4. Select Yes to reset
5. Select Yes again to res
▶ The confirmation message will appear.
Select OK.
the settings.
▶▶Customized Featu res ▶ Defaultin g All th e Settings
>>Defaulting All the Settings
When you transfer the vehicle to a third party, reset all
settings to default and delete all personal data.
The following settings will be reset:
• Audio preset settings
• Phonebook entries
• Other display and personal settings.
et the settings.
Features
Page 58

Bluetooth® HandsFreeLink®
Models with navigation system
See the navigation system manual for how to operate the Bluetooth® HandsFreeLink®.
Models witho ut navigation syst em
Bluetooth® HandsFreeLink® (HFL) allows you to place and receive phone calls using your vehicle’s
audio system, without handling your cell phone.
Using HFL
■HFL Buttons
(MENU) Button
Features
Volume down
Volume up
SOURSE Button
/ Buttons
(Talk) Button
(Hang-up/Back) Butto n
(HOME) But ton
(MENU) Button
>>Using HFL
To use HFL, you need a Bluetooth-compatible cell
phone. For a list of compatible phones, pairing
procedures, and special feature capabilities:
• U.S.: Visit www.handsfreelink.honda.com, or call
1-888-528 -7876.
• Canada: Visit www.handsfreelink.ca, or call 1-888528-7876.
To use HFL, the Bluetooth On/Off Status setting
must be On.
⇒ Customized Features P. ***
Voice control tips
• Press and release the button when you want to
call a number using a stored voice tag, a
phonebook, name or a number. Speak clearly and
naturally after a beep
• If the microphone picks up voices other than yours,
the command may be misinterpreted.
• To change the volume level, use the audio system's
VOL (Volume) or use the remote audio controls on
the steering wheel.
State or local laws may prohibit the operation of
handheld electronic devices while operating a
vehicle.
(Pick-up) Button
Page 59

▶▶Bluetooth® HandsFreeLink®▶ Using HFL
(Pick-up) button: Press to go directly to the Phone screen, or to answer an incoming
call.
(Hang-up/Back) button: Press to end a call, go back to the previous
command, or to cancel a command.
(Talk) button: Press to call a number with a stored voice tag, a phonebook, name, or a
number.
button: Press to display Speed Dial, Call History, or Redial on the Phone
screen.
/ button: Press to select an item displayed on the Phone screen.
SOURCE button: Press to call a number listed in the selected item on the Phone
screen.
Features
To go to the Phone menu screen:
1. Select HOME.
elect Phone to swit
2. S
ch the display to the Phone screen.
3. Select MENU.
>>Using HFL
Up to six speed dial entries can be displayed among a total of
20 that can be entered. If there is no entries in the system,
Speed Dial is disabled.
⇒ Speed Dial P. ***
Bluetooth® Wireless Technology
The Bluetooth® word mark and logos are registered
trademarks owned by Bluetooth SIG, Inc., and any use of
such marks by Honda Motor Co., Ltd., is under license. Other
trademarks and trade names are those of their respective
owners.
HFL Limitatio ns
An incoming call on HFL will interrupt the audio system
when it is playing. It will resume when the call is ended.
Page 60

▶▶Bluetooth® HandsFreeLink®▶ Using HFL
■HFL Status Display
The audio/information screen notifies you when there is an incoming call.
Bluetooth Indicator
Co mes on when your p hon e is
connected to HFL.
HFL Mode
Battery Level Status
Signal Strength
Caller’s Name
Caller’s Number
■Limitations for Manual Operation
Certain manual functions are disabled or inoperable while the vehicle is in motion. You cannot
select a grayed-out option until the vehicle is stopped.
Only previously stored speed dial entries with voice tags, phone book names, or numbers
can be called using voice commands while the vehicle is in motion.
⇒ Speed Dial P. ***
>>HFL Status Display
The information that appears on the audio/ information
screen varies between phone models.
You can change the system language to English, French,
or Spanish.
⇒ Customized Features P. ***
Features
Page 61

▶▶Bluetooth® HandsFreeLink®▶ HFL Menus
HFL Menus
The ignition switch must be in ACCESSORY Ⅰ or Ⅱ
*1
to use HFL.
>>HFL Menus
■ Phone settings screen
Features
Phone Connect Phone
*2
Bluetooth Device List
1. Select HOME.
2. Select Settings.
3. S
elect Phone Setting
Add Bluetooth Device
(Existing entry list)
Disconnect
(Existing entry list)
Add Bluetooth Device
s.
To use HFL, you must first pair your Bluetooth-
compatible mobile phone to t he system while the vehicle
is parked.
Some functions are limited while driving. A message appears
on the screen when the vehicle is moving and the operation
is canceled.
Pair a phone to the syst em.
Connect a phone to the system.
Disconnect a paired phone from t he system.
*2
Edit Device Name
Delete This Device
Edit a previously paired
pho ne nam e.
Delete a previously paired
pho ne.
Pair a phone to the syst em.
* 1 : Models with the smart ent ry system have an ENGINE START/STOP button instead of an ignition switch.
*2 : Appears only when a phone is connected to HFL.
Page 62

▶▶Bluetooth® HandsFreeLink®▶ HFL Menus
Edit Speed Dial
*1
Ring Tone
Automatic Phone Sync
HondaLink Assist
*1
New Entry
Manual Input
Enter a phone nu mber to store
as a speed dial number.
Import from Call History
Select a phone number f rom the
call history to store as a speed
dial number.
Import from Phonebook
Select a phone number f rom the
pho nebook t o store as a speed
dial number.
(Existing entry list) Edit
Edit a previously st ored speed dial
number.
● Change a name.
● Change a nu mber.
● Create or delete a voice tag.
Delete a previously stored
speed dial num ber.
Delete All
Delete
Delete all of the previousl y stored speed dial num ber.
Select th e ring to ne.
*1
Set phonebook data to be automatically imported when a phone is paired to HFL.
Turn HondaLink Assist on and off.
Features
*1 : Appears only when a phone is connected to HFL.
Page 63

▶▶Bluetooth® HandsFreeLink®▶ HFL Menus
Text/Email
*1
Enable Text/Email
Turn the text message/e-mail f unction on and off.
Select a mail or text message account. Select Account
New Message Notification Select whether a pop-up alert comes on the screen when HFL
receives a new text message/e-mail.
Features
Default
Cancel/Reset all customized items in th e Phone Settings group as default.
*1 : Appears only when a phone is connected to HFL.
Page 64

■Phone menu screen
1. Press
, or select HOME, then select
Phone.
2. Press (MENU) on the steering wheel, or
select MENU.
▶▶Bluetooth® HandsFreeLink®▶ HFL Menus
Speed Dial
*1
New Entry Manual Input
(Existing entry list) Dial the selected number in t he speed dial list.
Phonebook
Redial
Dial
*1 : Appears only when a phone is connected to HFL.
*1
Display the paired phone’s phonebook.
*1
*1
Redial the last number dialed in the phone’s history.
Enter a phone number to dial.
Import from Call History
Import from Phonebook
Enter a phone number to store as a speed dial
number.
Select a phone number from t he call history to st ore as a
speed dial nu mber.
Select a phone number from the phon ebook to store as a
speed dial nu mber.
Features
Page 65

▶▶Bluetooth® HandsFreeLink®▶ HFL Menus
Call History
Features
Text/Email
*1
*1
All
Dialed
Received
Missed
Select Account
Display the last 20 out goin g, in coming and missed calls.
Display the last 20 out goin g calls.
Display the last 20 incoming calls.
Display the last 20 missed calls.
*
Select a mail or t ext message account.
Select a message.
Message is read aloud.
Read/Stop
System reads received message aloud, or stop
message from being read.
Previous
Next
Reply
See the previous message.
See the next m essage.
Reply to a received message using one o f six fixed
phrases.
Call
Make a call to the sender.
*1 : Appears only when a phone is connected to HFL.
* Not available on all models
Page 66

▶▶Bluetooth® HandsFreeLink®▶ HFL Menus
■Phone Setup
■ To pair a mobile phone (when there is no
phone paired to the system)
1. Select Phone.
2. Select Yes.
3. Make sure your
discoverable mode, then select OK.
▶ HFL automatically searches for a
Bluetooth device.
4. Select your phone
▶ If your phone does not appear, you can select
Refresh to search again.
▶ If your phone still does not appear, select
Phone not found and search for
Bluetooth devices using your phone.
From your phone, select
HandsFreeLink.
5. The syst em gives you a pairing
audio/information screen.
▶ Confirm if the pairing code on the screen and
your phone match.This may vary by phone.
6. A notification appears on t
pairing is successful.
phone is in search or
when it appears on the list.
code on the
he screen if
>>Phone Setup
Your Bluetooth-compatible phone must be paired to HFL
before you can make and receive hands-free calls.
Phone Pairing Tips:
• You cannot pair your phone while the vehicle is
moving.
• Up to six phones can be paired.
• Your phone’s battery may drain faster when it is paired
to HFL.
• If your phone is not ready for pairing or not found
by the system, t he system will return to the
previous screen.
Features
Page 67

▶▶Bluetooth® HandsFreeLink®▶ HFL Menus
■ Changing the currently paired phone
1. Go to the Phone setting
⇒ Phone settings screen P. ***
2. Select Connect Phone.
3. Select a phone
to connect.
s screen.
>>Changing the currently paired phone
If no other phones are found or paired when trying to switch
to another phone, HFL will inform you that the original phone
is connected again.
▶ HFL disconnects the current phone and starts
searching for another paired phone.
■ To change the pairing code setting
1. Select HOME.
2. S
elect Settings.
Features
3. S
elect Bluetooth.
4. S
elect Bluetooth tab.
5. S
elect Edit Pai
ring Code.
6. Select Fixed or Ra
ndom.
>>To change the pairing code setting
The default pairing code is 0000 until you change the setting.
To create your own, select Fixed, and delete the current
code, then enter a new one.
For a randomly generated pairing code each time you pair a
phone, select Random.
Page 68

■ To edit an already-paired phone name
1. Go to the Phone setting
⇒ Phone settings screen P. ***
2. Select Phone tab.
3. Select Bluetooth Device L
4. Select a paired phone you want
5. Select Edit Device
6. Edit the name
and select OK.
7. A notification appea
successful.
s screen.
ist.
to edit.
Name.
rs if the change is
▶▶Bluetooth® HandsFreeLink®▶ HFL Menus
Features
Page 69

▶▶Bluetooth® HandsFreeLink®▶ HFL Menus
Features
■ To delete a paired phone
1. Go to the Phone setting
⇒ Phone settings screen P. ***
2. Select Phone tab.
3. Select Bluetooth Device L
4. Select a phone you w
5. Select Delete This Devic
6. You will receive
a confirmation message on the
screen. Select Yes.
7. A notification appea
successful.
s screen.
ant to delete.
e.
rs if the deletion is
ist.
Page 70

To Set Up a Text Message/E-mail Options
■
■ To turn on or off the text/e-mail
function
1. Go to the Phone setting
⇒ Phone settings screen P. ***
Select Text/Email tab, then Enable Text/
Email.
▶ A pop-up menu appears on the screen.
3. Select On or Off.
▶▶Bluetooth® HandsFreeLink®▶ HFL Menus
s screen.
■ To turn on or off the text/e-mail notice
1. Go to the Phone setting
⇒ Phone settings screen P. ***
Select Text/Email tab, then New Message
Notification.
▶ A pop-up menu appears on the screen.
3. Select On or Off.
s screen.
>>To turn on or off the text/e-mail notice
On: A pop-up notification comes on every time you receive
a new message.
Off: The message you receive is stored in the system without
notification.
Features
Page 71

▶▶Bluetooth® HandsFreeLink®▶ HFL Menus
Ring Tone
■
You can change the ring tone setting.
Features
1. Go to the Phone setting
⇒ Phone settings screen P. ***
2. Select Phone tab, then Ring Tone.
3. Select Fixed or M
s screen.
obile Phone.
>>Ring Tone
Fixed: The fixed ring tone sounds from the speaker. Mobile
Phone: The ring tone stored in the connected cell phone is
heard through the vehicle speakers.
Page 72

▶▶Bluetooth® HandsFreeLink®▶ HFL Menus
Automatic Import of Cellular Phonebook and Call History
■
■ When Automatic Phone Sync is set to On:
When your phone is paired, the contents of its
phonebook and call history are automatically
imported to the system.
■ Changing the Automatic Phone Sync
setting
1. Go to the Phone setting
⇒ Phone settings screen P. ***
2. Select Phone tab, then Automatic Phone
Sync.
3. Select On or Off.
s screen.
1 Automatic Import of Cellular Phonebook and Call History
When you select a person from the list in the cellular
phonebook, you can see up to three category icons. The
icons indicate what types of numbers are stored for that
name.
On some phones, it may not be possible to import the
category icons to the system.
The phonebook is updated after every connection. Call
history is updated after every connection or call.
Pref Fax
Home Car
Mobile Other
Work Voice
Pager
Features
Page 73

▶▶Bluetooth® HandsFreeLink®▶ HFL Menus
Speed Dial
■
Up to 20 speed dial numbers can be stored per phone.
Features
To store a speed dial number:
1. Go to the Phone menu
⇒ Phone menu screen P. ***
2. Select Speed Dial.
▶ Repeat the procedure to select New
Entry.
3. Select a place
From Import from Call History:
▶ Select a number from the call hist ory. From
Manual Input:
▶ Input the number manually. From
Import from Phonebook:
▶ Select a number from the linked cell
phone’s imported phonebook.
4. When the speed dia
Import from Call History or Import from
Phonebook, you are asked to create a voice tag
for the number. Select Yes or No.
5. Select Record to stor
speed dial entry.
▶ Using the button, follow the prompts to
store a voice tag for the speed dial entry.
to choose a number.
screen.
l is successfully stored from
e a voice tag for the
>>Speed Dial
When a voice tag is stored, press the button to call the
number using the voice tag. Say “ Call” and the voice tag
name.
Page 74

▶▶Bluetooth® HandsFreeLink®▶ HFL Menus
■ To add a voice tag to a stored speed dial
number
1. Go to the Phone setting
⇒ Phone settings screen P. ***
s screen.
2. Select Phone tab, then Edit Speed Dial.
3. Select an existing spe
ed dial entry.
▶ From the pop-up menu, select Edit.
4. Select Voice Tag.
▶ From the pop-up menu, select Record.
5. Select Record to stor
6. Using the button, f
e the voice tag.
ollow the prompts to
complete the voice tag.
■ To delete a voice tag
1. Go to the Phone setting
⇒ Phone settings screen P. ***
2. Select Phone tab, then Edit Speed Dial.
3. Select an existing spe
▶ From the pop-up menu, select Edit.
4. Select Voice Tag.
▶ From the pop-up menu, select Clear.
5. A confirmation messa
screen. Select Yes.
s screen.
ed dial entry.
ge appears on the
>>Speed Dial
Avoid using duplicate voice tags. Avoid
using “ home” as a voice tag.
It is easier for the system to recognize a longer name. For
example, use “ John Smith” instead of “ John.”
Features
Page 75

▶▶Bluetooth® HandsFreeLink®▶ HFL Menus
■ To delete a speed dial
1. Go to the Phone setting
2. Select Phone tab, then Edit Speed Dial.
3. Select an existing spee
4. A confirmation m
⇒ Phone settings screen P. ***
s screen.
d dial entry.
▶ From the pop-up menu, select Delete.
essage appears on the
screen. Select Yes.
Making a Call
■
Features
You can make calls by inputting any phone
number, or by using the imported phonebook, call
history, speed dial entries, or redial.
>>Making a Call
Any voice-tagged speed dial entry, phonebook name, or
number can be dialed by voice from most screens. Press the
button and say “ Call” and the stored voice tag name.
The maximum range between your phone and
vehicles is 30 feet (10 meters).
Once a call is connected, you can hear the voice of the
person you are calling through the audio speakers.
Page 76

▶▶Bluetooth® HandsFreeLink®▶ HFL Menus
■ To make a call using the imported
phonebook
1. Go to the Phone menu s
⇒ Phone menu screen P. ***
creen.
2. Select Phonebook.
3. Select a name
.
▶ You can also search by letter. Select
Search.
▶ Use the keyboard on the touch screen for
entering letters.
4. Select a number.
ling starts automatically.
▶ Dia
■ To make a call using a phone number
1. Go to the Phone menu s
⇒ Phone menu screen P. ***
2. Select Dial.
3. Select a number.
▶ Use
the keyboard on the touch screen for
entering numbers.
4. Select .
▶ Dialing starts aut
creen.
omatically.
>>To make a call using the imported phonebook
This function is disabled while the vehicle is moving.
However, you can call a stored voice-tagged speed dial
number using voice commands.
⇒ Limitations for Manual Operation P. ***
⇒ Speed Dial P. ***
Features
>>To make a call using a phone number
This function is disabled while the vehicle is moving.
However, you can call a stored voice-tagged speed dial
number using voice commands.
⇒ Limitations for Manual Operation P. ***
⇒ Speed Dial P. ***
Page 77

▶▶Bluetooth® HandsFreeLink®▶ HFL Menus
■ To make a call using redial
1. Go to the Phone menu
⇒ Phone menu screen P. ***
screen.
>>To make a call using redial
Press and hold the button to redial the last
number dialed in your phone’s history.
2. Select Redial.
▶ Dialing starts automatically.
■To make a call using the call history Call
history is stored by All, Dialed, Received, and
Features
Missed.
1. Go to the Phone menu
⇒ Phone menu screen P. ***
screen.
>>To make a call using the call history
The call history displays the last 20 dialed, received, or missed
calls.
(Appears only when a phone is connected to the system.)
2. Select Call History.
3. Select All, Di
aled, Received, or Missed.
4. Select a number.
▶ D
ialing starts automatically.
■ To make a call using a speed dial entry
1. Go to the Phone menu
⇒ Phone menu screen P. ***
2. Select Speed Dial.
screen.
>>To make a call using a speed dial entry
When a voice tag is stored, press the button to
call the number using the voice tag.
⇒ Speed Dial P. ***
3. Select a number.
▶ D
ialing starts automatically.
Any voice-tagged speed dial entry can be dialed by voice
from any screen.
Press the button and follow the prompts.
Page 78

▶▶Bluetooth® HandsFreeLink®▶ HFL Menus
Receiving a Call
■
When there is an incoming call, an audible
notification sounds and the Incoming call
screen appears.
Press the
Press the
Options During a Call
■
The available options appear on the screen during a call.
Mute: Mute your voice.
▶ The mute icon appears when Mute is selected.
ᵁᵁᵁᵁᵁᵁᵁᵁ
Mute Icon
Select Mute again to turn it off.
Transfer: Transfer a call from the system to your
phone.
Touch Tones: Send numbers during a call. This is
useful when you call a menu-driven
phone system.
button to answer the call. button to
decline or end the call.
>>Receiving a Call
Call Waiting
Press the button to put the current call on hold
to answer the incoming call.
Press the button again to return to the current call.
Select Ignore to ignore the incoming call if you do not
want to answer it.
Press the button if you want to hang up the
current call.
You can select the icons on the touch screen instead of the
and buttons.
Features
1 Options During a Call
Touch Tones: Available on some phones.
You can select the icons on the touch screen.
Page 79

▶▶Bluetooth® HandsFreeLink®▶ HFL Menus
Receiving a Text Message/E-mail
■
HFL can display newly received text or e-mail messages as well as 20 of the most recently
received messages on a linked cell phone. Each received message can be read aloud and
replied to using a fixed common phrase.
1. A pop-up
appears and notifies you of a new text
message or e-mail.
2. Select Read to li
sten to the message.
▶ The text message or e-mail is displayed.
The system automatically starts reading out
the message.
Features
3. To discontinue the
Stop.
message read-out, select
1 Receiving a Text Message/E-mail
The system does not display any received messages while
you are driving. You can only hear them read aloud.
With some phones, you may be able to display up to 20
most recent text messages and e-mails.
State or local laws may limit your use of the HFL text message/e-mail
feature. Only use the text message/e-mail feature when conditions
allow you to do so safely.
When you receive a text message or e-mail for the first
time since the phone is paired to HFL, you are asked to
turn the New Message Notification setting to On.
⇒ To turn on or off the text/e-mail notice P. ***
Page 80

▶▶Bluetooth® HandsFreeLink®▶ HFL Menus
Selecting a Mail Account
■
If a paired phone has text message or mail accounts, you can select one of them to be active
and receive notifications.
1. Go to the Phone setting
⇒ Phone settings screen P. ***
2. Select Text/Email tab, then Select
Account.
▶ A pop-up menu appears on the screen.
3. Select Text M essage o
want.
s screen.
r an e-mail account you
1 Selecting a Mail Account
You can also select a mail account from the folder list screen
or the message list screen.
Select
Account
You can only receive notifications from one text
message or mail account at a time.
Features
Page 81

▶▶Bluetooth® HandsFreeLink®▶ HFL Menus
Displaying Messages
■
Message List
Features
Text Message
■ Displaying text messages
1. Go to the Phone menu
⇒ Phone menu screen P. ***
2. Select Text/Email.
▶ Select account if necessary.
3. Select a message.
he text message is displayed. The system
▶ T
automatically starts reading the message
aloud.
screen.
>>Displaying Messages
The icon appears next to an unread message.
If you delete a message on the phone, the message is also
deleted in the system. If you send a message from the
system, the message goes to your phone’s outbox.
To see the previous or next message, select Previous
or Next on the message screen.
Page 82

▶▶Bluetooth® HandsFreeLink®▶ HFL Menus
Folder List
Message List
E-m ail
■ Displaying e-mails
1. Go to the Phone menu s
⇒ Phone menu screen P. ***
2. Select Text/Email.
▶ Select Select Account if necessary.
3. Select a folder.
ect a message.
4. Sel
▶ T
he e-mail is displayed. The system
automatically starts reading the message
aloud.
creen.
Features
Page 83

▶▶Bluetooth® HandsFreeLink®▶ HFL Menus
■ Read or Stop reading a message
1. Go to the text or e-m
2. Select Stop to stop reading.
ail message screen.
▶ The system automatically starts reading the
message aloud.
⇒ Displaying Messages P. ***
Select Read again to start reading the
message from the beginning.
■ Reply to a message
1. Go to the text or e-m
▶ The system automatically starts reading the
Features
message aloud.
⇒ Displaying Messages P. ***
2. Select Reply.
3. Select the reply m
▶ The pop-up menu appears on the screen.
4. Select Send to s
▶ Complete appears on the screen when the
ail message screen.
essage.
end the message.
>>Reply to a message
The available fixed reply messages are as follows:
• Talk to you later, I’m driving.
• I’m on my way.
• I’m running late.
• OK
• Yes
• No
You cannot add, edit, or delete reply messages.
reply message was successfully sent.
Page 84

■ Making a call to a sender
1. Go to the text mess
2. Select Call.
age screen.
▶▶Bluetooth® HandsFreeLink®▶ HFL Menus
Features
Page 85

▶▶Bluetooth® HandsFreeLink®▶ HFL Menus
In Case of Emergency
■
■ Automatic collision notification
If your vehicle’s airbags deploy or if the unit detects
that the vehicle is severely impacted, your vehicle
automatically will attempt to connect to the
HondaLink operator. If connected, information
about your vehicle, its location, and its condit ion
will be sent to the operator; you also can speak to
the operator when connected.
Features
IMPORTANT: For vehicles equipped with HondaLink Assist, owner activation constitutes
authorization for Honda to collect information from your vehicle needed to provide the service,
and agreement to the Terms of Use at www.hondalink.com/
HondaLink Assist will attempt to notify emergency services but NEITHER HONDA NOR ITS
SERVICE PROVIDERS GUARANTEE THAT SUCH NOTIFICATION WILL OCCUR.
Honda reserves the right to terminate HondaLink Assist services at any time or for any reason,
and in the future may not be able to provide services due to changes in, or obsolescence of,
technology integral to the service or changes in government al regulation.
TermsAndConditions. In a crash,
>>In Case of Emergency
Your vehicle may not be able to connect to the operat or if
the battery level is low, t he line is disconnected, or you do
not have adequate cellular coverage.
You cannot use this emergency services when:
• You travel outside the HondaLink service coverage areas.
• There is a problem with the connecting devices, such as
the microphones, speakers, or the unit
itself.
You cannot operate other phone-related functions using the
screen while talking t o the operator. Select Hang Up to
terminate the connection to your vehicle.
>>Automatic collision notification
If the unit fails to connect to the operator, it
repeatedly tries until it succeeds.
Page 86

▶▶Bluetooth® HandsFreeLink®▶ HFL Menus
■ To enable notification
1. Go to the Phone setting
⇒ Phone settings screen P. 274
s screen.
2. Select Phone tab, then HondaLink Assist.
▶ A pop-up menu appears on the screen.
3. Select On or Off.
>>To enable notification
Setting options:
• On: Notification is available.
• Off: Disable the feature.
Features
Page 87

Devices that Emit Radio Waves
The following product
Audio system
Bluetooth® Audio
Bluetooth® HandsFreeLink®
Immobilizer System
Remote Transmitter
Models with Rear Entertainment System
Rear Entertainment System Remote Control
Each of the above complies with the appropriate requirements or the required standards
of FCC (Federal Communications Commission) and Industry Canada Standard, described
below:
s and systems on your vehicle emit radio waves when in operation.
Information
Page 88

ThisdevicecomplieswithPart15ofFCCRules
andIndustryCanadalicence‐exemptRSS
standard(s)
ThisequipmentcomplieswithFCC/ICradiation
exposurelimitssetforthforanuncontrolled
environmentandmeetstheFCCradiofrequency
(RF)ExposureGuidelinesandRSS‐102oftheICradio
frequency(RF)Exposurerules.Thisequipmenthas
verylowlevelsofRFenergythatitdeemedto
complywithoutmaximumpermissive
evaluation(MPE).
exposure
 Loading...