

Page 1

CONFIDENTIAL
Please see page 17 of 30(labeled 16/29) for FCC manual statements.
NR-204 Outline manual
-Application-
Head Unit High US Changer (NR-204-6U)
Mitsubishi Electric Corporation
Page 2

Introduction
Total System
Function
䂾1
COMAND-Display
䂾
2
Display
Swivel and Folding
䂾3
COMAND-HeadUnit
䂾4
COMAND-Controller
(Central Control Element)
Components of COMAND system
COMAND consists the following main
functions
x Display for informations to customer
x the COMAND control unit with the
single DVD drive assembly or the
DVD changer drive.
x the COMAND CONTROLLER with
back and erase key.
With COMAND you serve the following
main functions
x Navigation system with voice guidance
x Audio system with Radio, Sirius,
Disc(CD-Audio, DVD-Audio, MP3),
PCMCIA-memory card (MP3), Music
Register and Audio AUX.
x Hands free system for telephone and
the communication of SMS and
Address book. Via Bluetooth
communication.
x DVD-Video
x The vehicle system settings.
䋨1䋯29䋩
Page 3
Introduction
selected a main function, the main area is
active.
Menu Overview
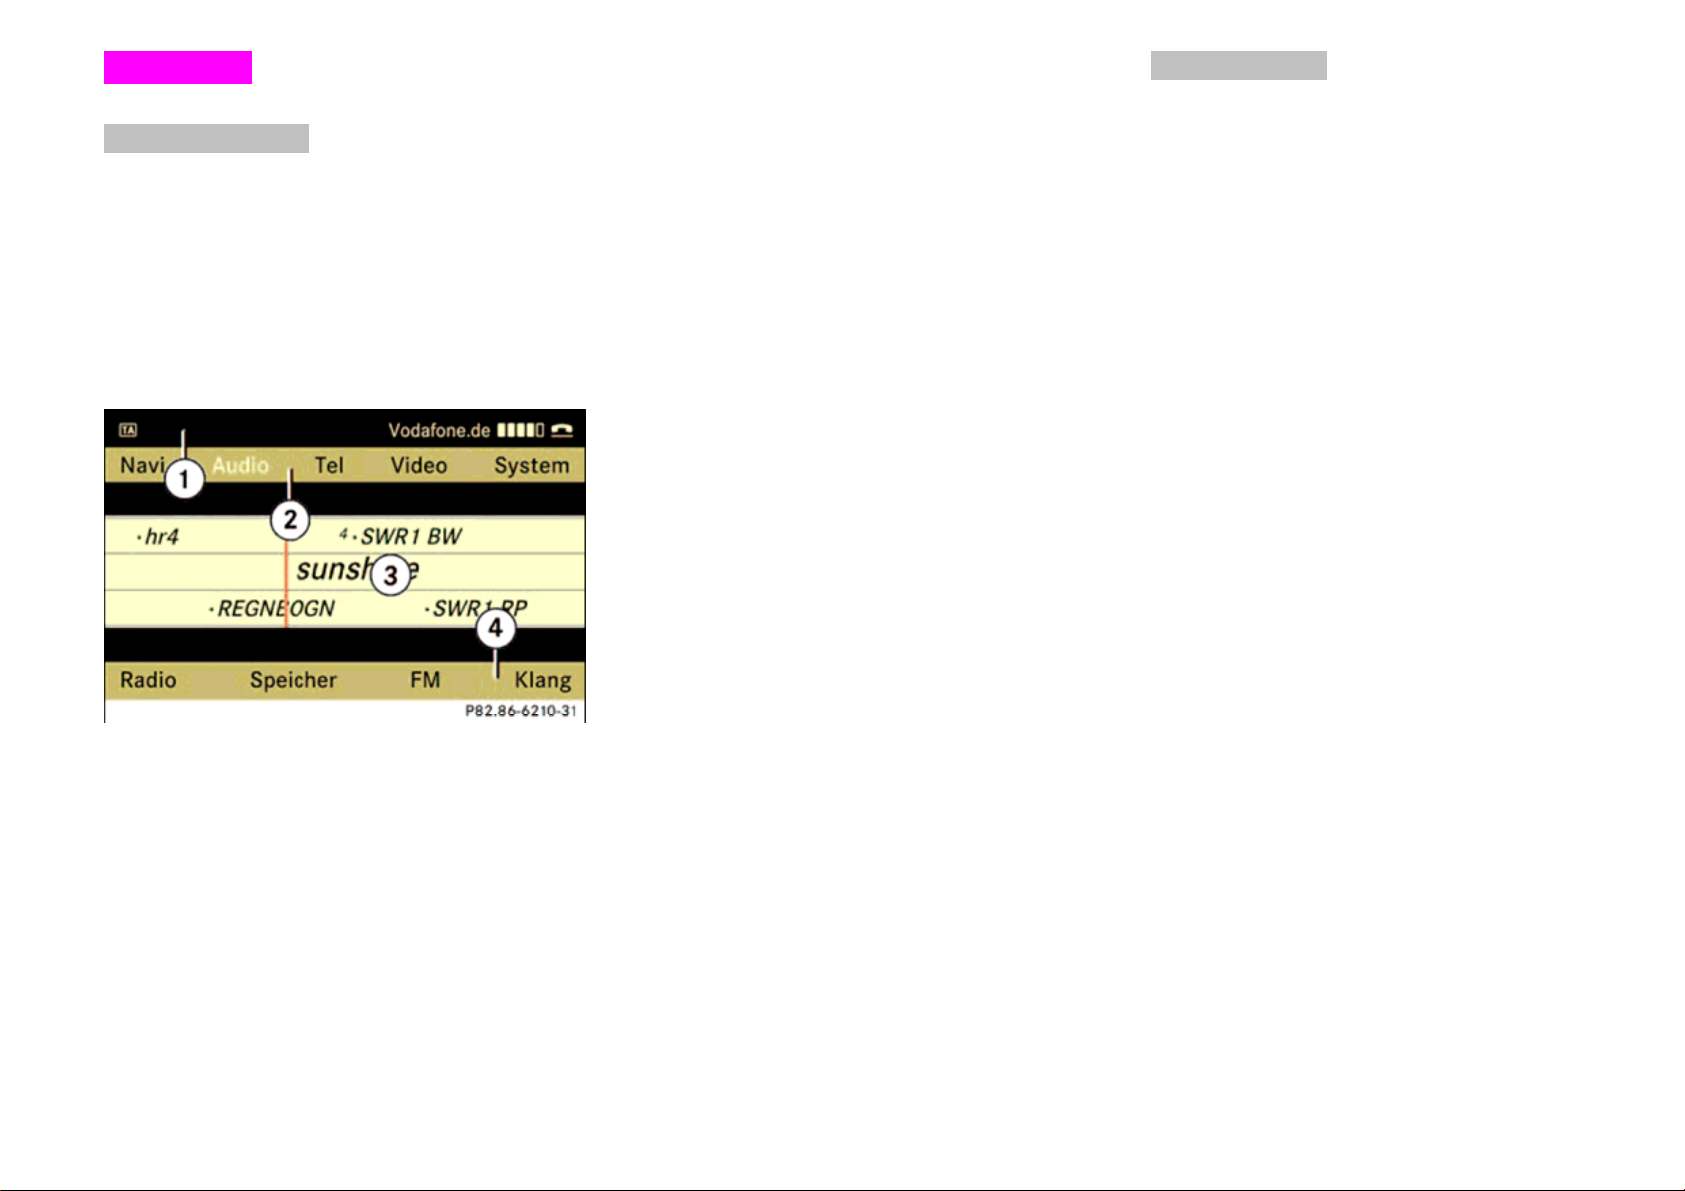
COMAND-Display
In the display of COMAND you see the
momentarily selected function and the
associated menus. The COMAND display
is divided into several ranges. In the
example you see the radio
announcement.
The status line 䂾
1 shows current
attitudes for radio, telephone status and
current time.
Over the menu line 䂾2 you can call the
desired main function.
The choice takes place with the
COMAND CONTROLLER.
For example, if radio function in Audio
application group is selected, the main
area 䂾3 become active and shows the
application screen.
After choice of a main function you find
the associated menu in the COMAND
display at the lower edge 䂾4 .
For the main functions navigation, audio
and telephone, additional menus in the
COMAND display are available if you
select the main functions on 䂾2 .
䂾1 Status Line
䂾2 main functions
䂾3 Main area
䂾4 Sub menus
The COMAND display shows the function
currently selected and its associated
menus.
The COMAND display is divided into
several rows. The active line is
highlighted in white. Once you have
䋨2䋯29䋩
Page 4
Introduction
Control system COMAND
䋨3䋯29䋩
Page 5

Introduction
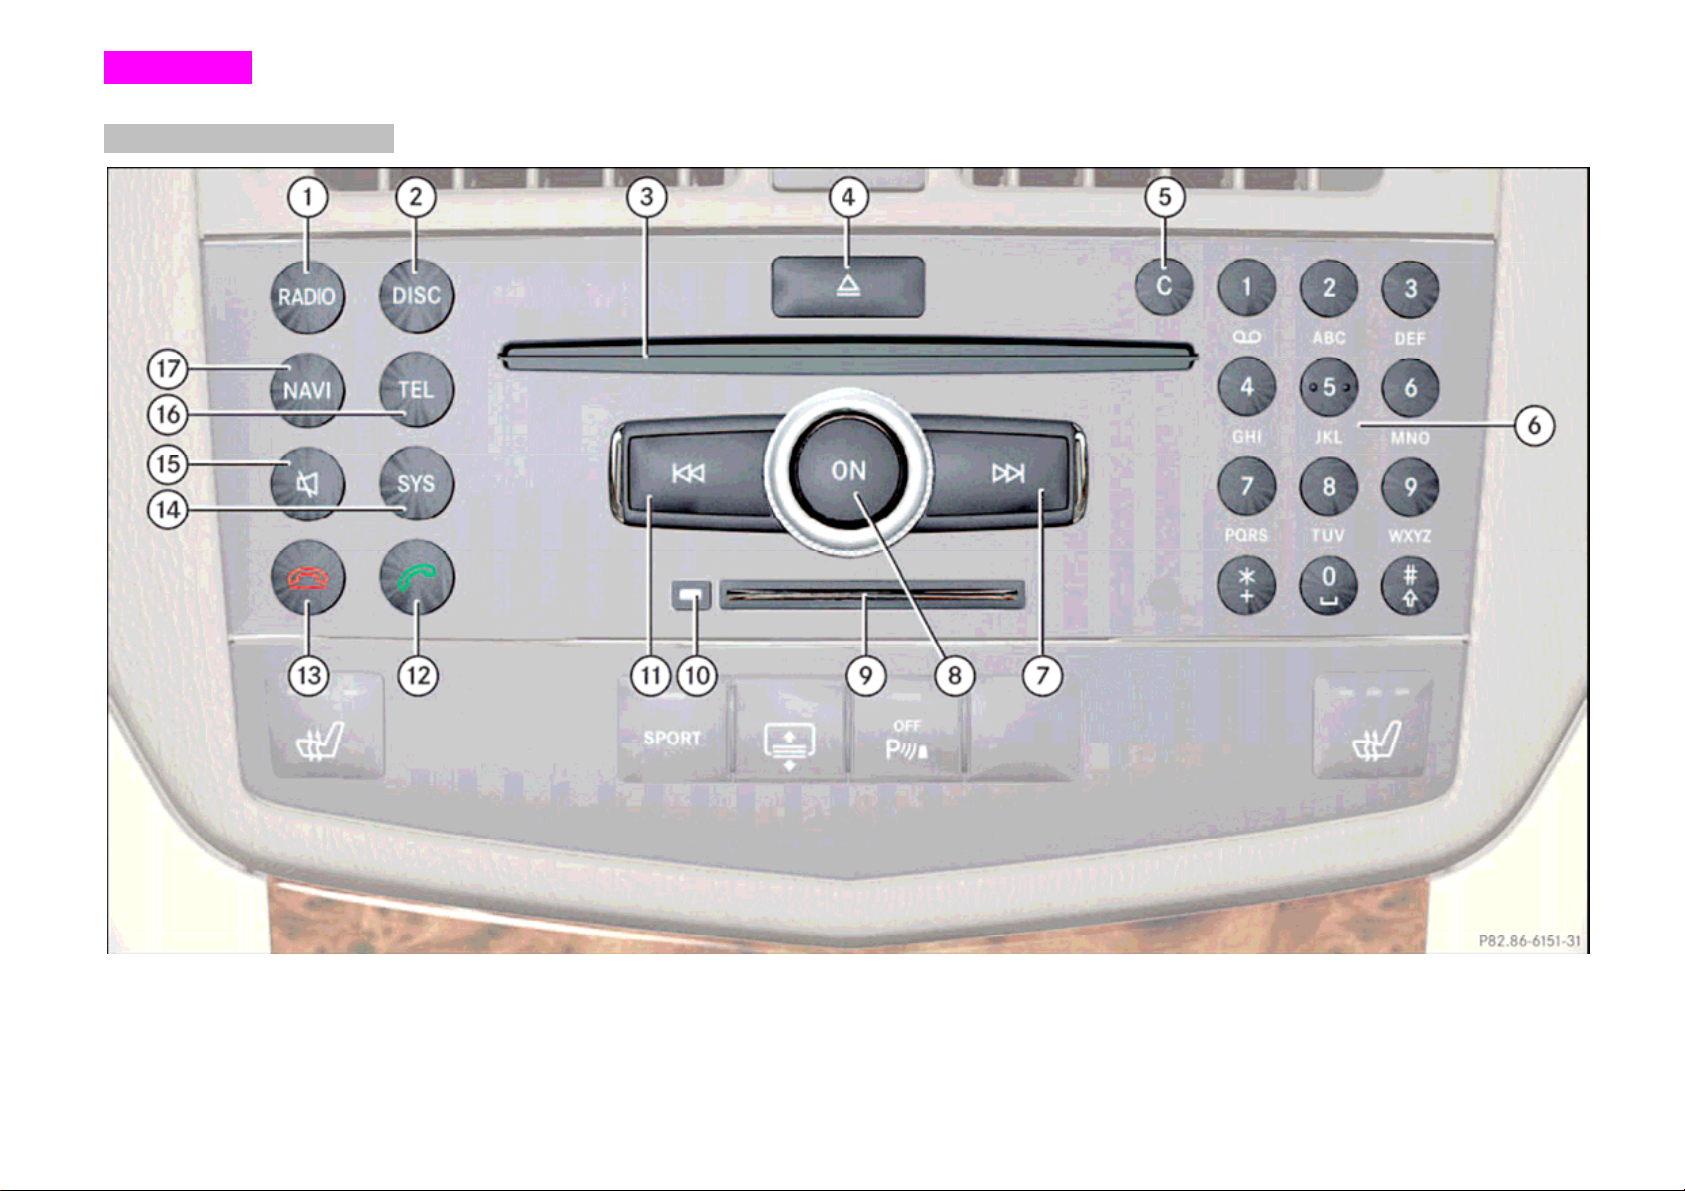
Function
To select Radio functions
䂾1
And if Radio is active, select
wave band.
To select Disc functions,
2
䂾
CD-Audio, DVD-Audio, MP3
files. Also for DVD-Video screen.
Disc slot.
䂾3
CDs/DVDs, and Map update disc
for Navigation system.
Eject of CDs/DVDs
䂾4
Clear key for
䂾5
delete entries on spellers and
PIN / Number entry.
10 keypad for
6
䂾
Enter telephone number
PIN entry
DTMF-Tone send
Select preset stations
Select Disc medias
Function
Select Next track / First forward
䂾7
by long press.
System Power switch
䂾8
PCMCIA-Card Slot
䂾9
for MP3 files, Address book.
Eject button for PCMCIA-Card
䂾10
Select Previous track / Backword
䂾11
by longpress.
Pin confirm
䂾12
call accept
call establish
re-dialling
Function
Call reject
䂾13
Terminate active call
Reject waiting call
Terminate waiting call
Initiate system menu
䂾14
Mute current sound source
䂾15
Turn off microphone
Mute Traffic announcements /
Voice guidance of Navigation
Initiate Telephone application
䂾16
Initiate Navigation application
䂾17
䋨4䋯29䋩
Page 6
Introduction
Control system COMAND
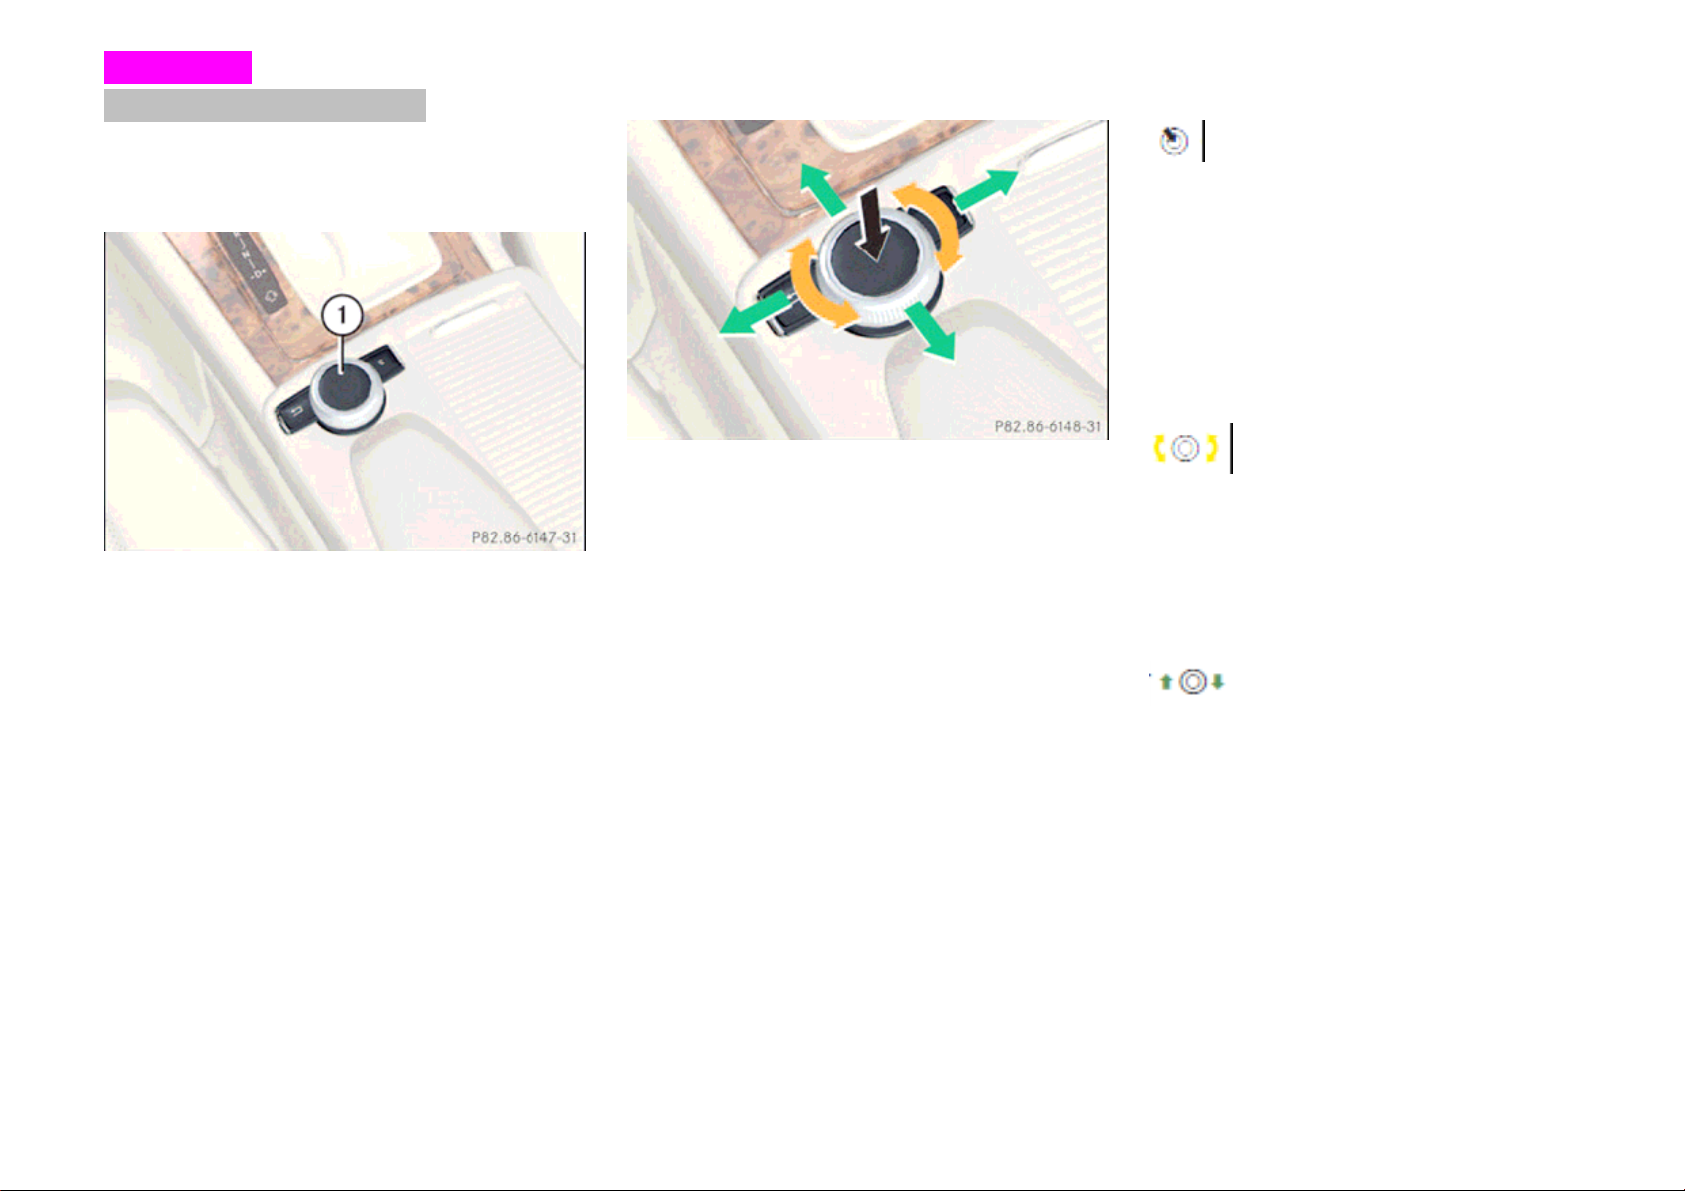
COMAND-Controller
䂾1 COMAND-Controller
With the COMAND CONTROLLER you
select the menu options on the COMAND
display.
You move a selection bar.
In this way you can call menus or lists,
within menus or lists move and menus or
lists leave.
The COMAND controller can be:
x Pressed briefly or pressed and held
x Tuned clockwise of anti-clockwise
x Slide to the left, to right, up, down or
diagonally.
This allows you to move within a menu, to
select a menu item or to exit a menu.
You can also move within a menu by
tuning or sliding the controller.
Press briefly
x Select a menu item
x Exit the full screen view
Press and Hold until the selected action is
carried out
x Stores a channel/ station
x Accepts a destination for navigation
Turn
x Scrolls through vertical or horizontal
menus
x Scrolls through text
x Makes settings
Slides (up/down/left/right/diagonally)
x Scrolls through menus
x Exit a horizontal menu (UP/Down)
x Moves Navigation map
䋨5䋯29䋩
x Exit a vertical menu (Left/Right)
x Fast-forward / rewind during CD or
DVD/ PCMCIA playback.
Page 7
Introduction
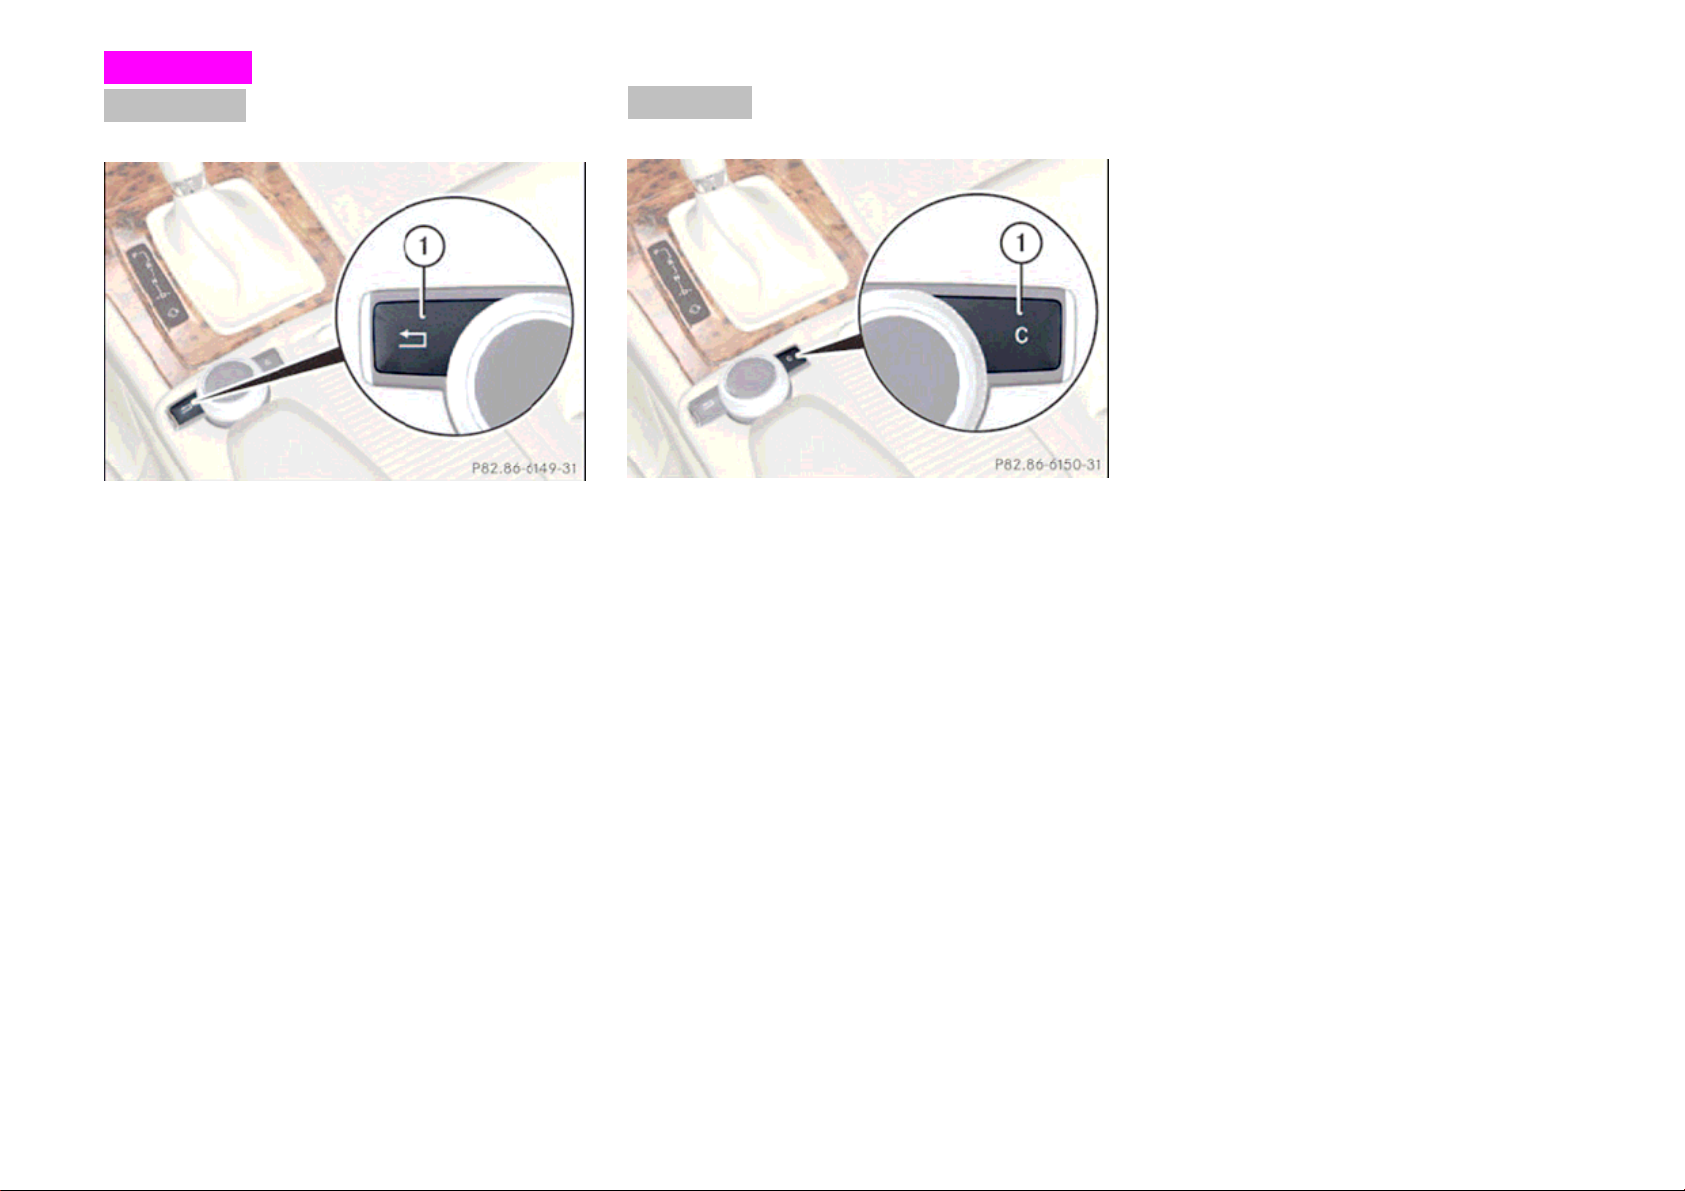
Return Key
䂾1 Back Key
Short press:
COMAND ch
enu level.
m
Long press:
COMAND changes into t
f last used application.
o
anges into the last higher
he basic screen
Clear Key
1 Clear Key
䂾
Short press:
Deletion of single indication
Long press:
Deletion of whole indication
䋨6䋯29䋩
Page 8
Introduction
Calling up the basic menu
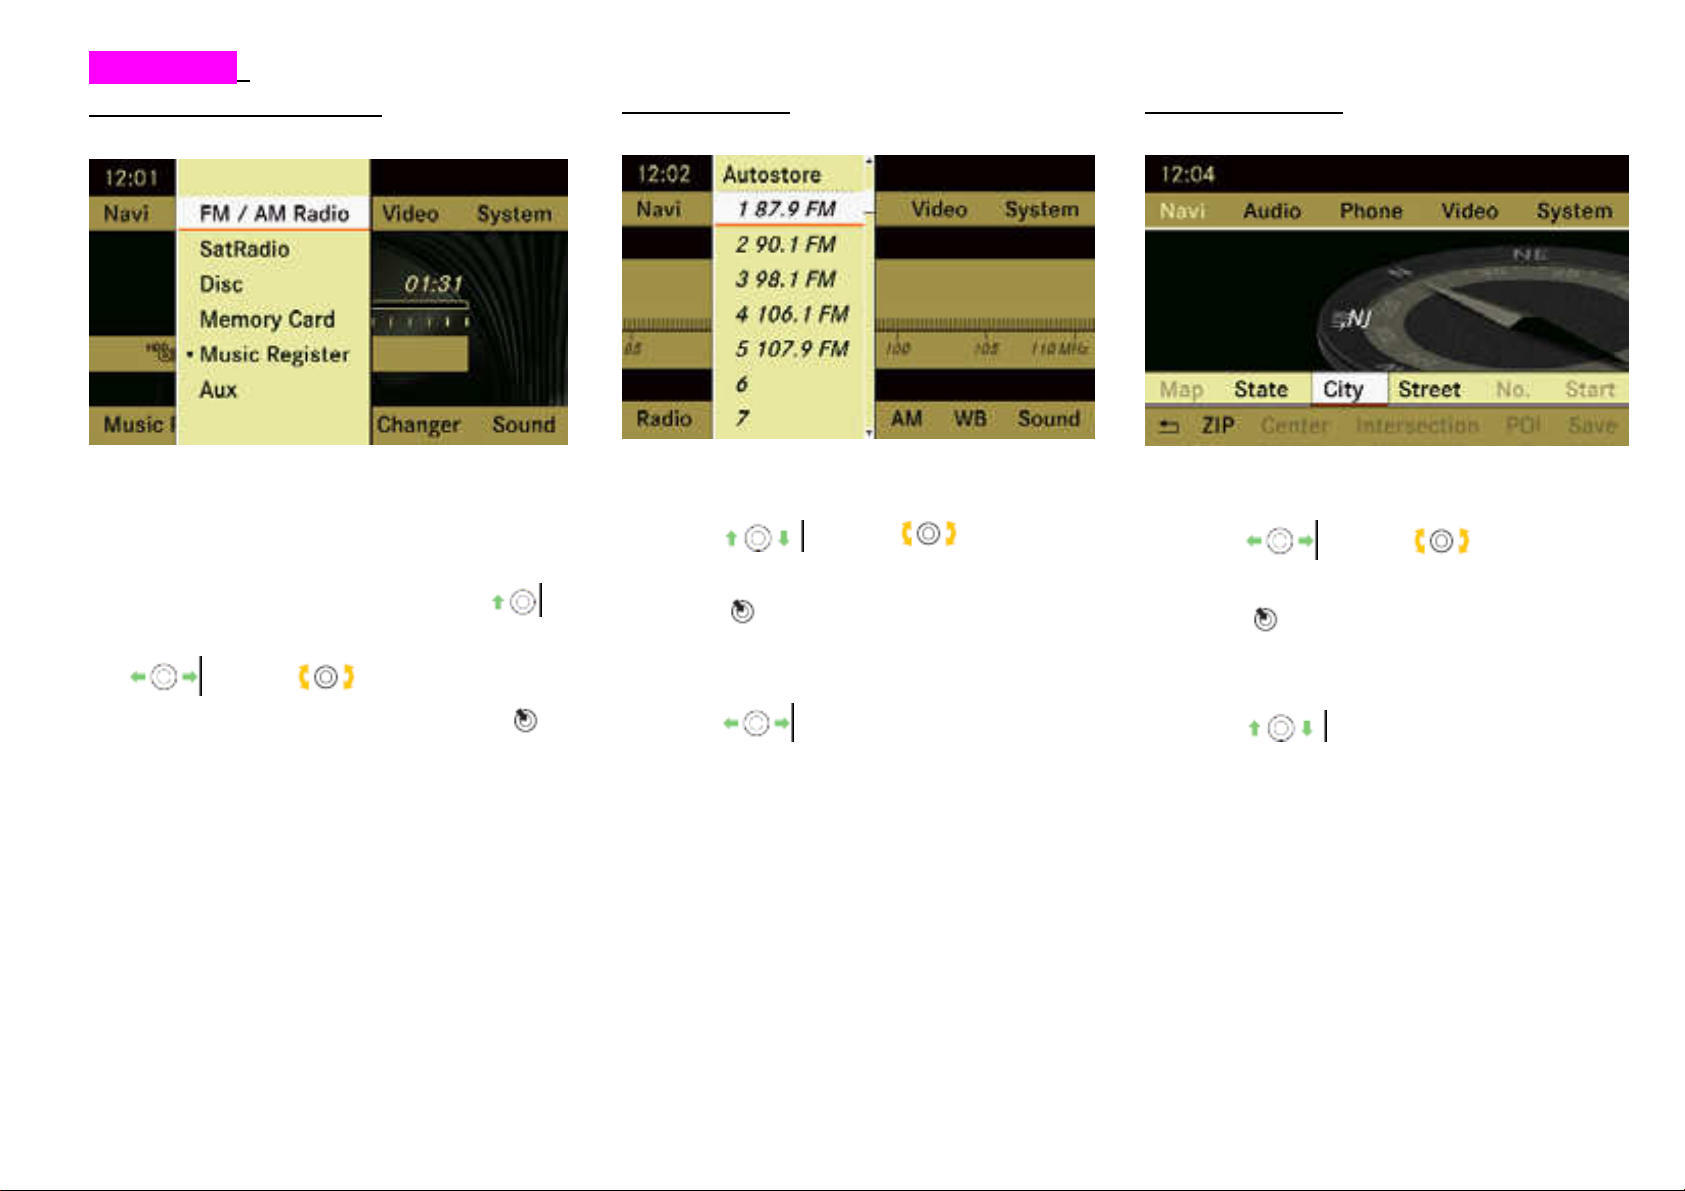
Vertical menus
Horizontal menus
Illustration; the basic Audio Menu
The basic menu for a main function can be
called up as follows:
¾To move to the top line: slide
¾To select a main functions; slide
or turn.
¾To confirm the selection: press
.
Move within a menu
¾Slide
Selecting a menu item
¾Press
Exiting a menu without making a
selection
¾Slide
to the direction of the list.
or turn. .
in the opposite direction
Move within a menu
¾Slide
Selecting a menu item
¾Press
Exiting a menu without making a
selection
¾Slide
to the direction of the list.
or turn. .
in the opposite direction
䋨7䋯29䋩
Page 9

Radio
1
2
3
4
5 6 7
䂾
1 Main area showing station and fre-
quency
䂾
2 Preset position of selected station.
䂾3 Frequency of the selected station.
䂾
4 For sound setting
䂾5 Radio options
䂾6 Preset options
䂾7 Display / switch wave band (depends
on selected radio source)
Switching wavebands
You can switch the radio between the FM, AW,
WB wavebands.
¾Select “Audio”
㹢
“Audio”㹢 “Radio”
㹢
“waveband display
䂾
7
¾Select the desired waveband.
or
¾Press
.function button.
Tuning in stations
You can tune in stations from the station
list or by manually entering the frequency.
¾Slide
or turn when the
main area is selected.
or
¾Press
The station list appears. The in
front of a list entry indicates the current
selected station. A number in front of
the list entry indicates the preset
position in the station preset memory.
¾Select a station
or
¾Press
or button on front
panel.
䋨8䋯29䋩
Switching to radio mode
¾Select “Audio” 㹢 “Audio” 㹢 “Radio”
or
¾Press
.function button.
The radio display appears once you have
switched to radio mode. You will hear the
previously set station on the preciously
set waveband.
䂾i The number of times you have to
press the function button depends on the
operating mode currently selected.
Wave band Frequency
FM 87.7-107.9MHz
AM 530-1710kHz
WB 162,400-162,550kHz
Page 10

Audio CD/ audio DVD and MP3
Notes about MP3 mode
File structure on a disc
Safety notes
Risk of injury
COMAND is classified as Class 1 laser
product. You must not open the casing.
There is the risk of exposure to invisible
laser radiation if you open the casing, or if
the casing is faulty or damaged.
COMAND does not contain any parts that
can be serviced by the user. For safety
reasons, have any necessary
maintenance work carried out by qualified
after sales technicians only.
Risk of accident
Do the following only the vehicle is
stationary:
Loading the disc
Ejecting the disc
There is a risk of being distracted from the
road and traffic conditions if this is done
while vehicle is in motion.
Permissible discs
xCD-R and CD-RW
xDVD+R and DVD+RW
xDVD-R and DVD-RW
xPCMCIA-Card
Permissible file systems
xISO9660/Joliet for CD-data writer
xUDF for DVD-data writer
xFAT16 or FAT32 for PCMCIA-Cards
with storage medium
Multisession CDs
For multisession CDs, the content of the
first session determines ho COMAND will
process the CD.
If the first session contains data in audio
CD format, for example, and the second
session contains MP3 tracks, COMAND
will treat the CD as a conventional audio
CD. This means that it is not possible to
access the MP3 tracks.
If the first session contains MP3 tracks, for
example, and the second session contains
data in audio CD format, COMAND will
treat the CD as an MP3 file. This means
that it is not possible to access the audio
CD tracks.
When you create an MP3 discs, the MP3
tracks can be organized in folders. A folder
can also contain other folders. A disc can
contain a maximum of 255 folders.
Each folder can contain a maximum of 255
tracks and 255 folders. A disc can contain
a maximum of 4,000 tracks.
Track and file names
When you create an MP3 discs, you can
assign names to the MP3 tracks and
folders. COMAND uses these names for
the corresponding display in MP3 mode.
Empty folders or folders which contain data
other than MP3 tracks are not displayed by
COMAND.
If MP3 files are stored in the root directory
itself, the root directory will also be treated
as a folder. COMAND will then show the
name of the root directory as the folder
name.
You must observe the following when
assigning track names:
xTrack names must have at lease one
character.
xTrack names must have the extension
“mp3”
xThere must be a full stop between the
track name and the extension.
Example of a correct track name:
Track1.mp3
䋨9䋯29䋩
䂾
i
COMAND does not support ID3 tags.
Page 11

Audio CD/ audio DVD and MP3
Permissible MP3 formats
COMAND㩷supports the MPEG1 Audio
Layre3 format.
䂾i This format is generally known as
“MP3” in everyday usage.
your own compositions and recordings, or
the copyright folder has granted you
permission, these restrictions do not
apply.
Notes about CDs/ DVDs
䂾
i
Discs with copy protection are not
cannot be ejected and can damage
COMAND.
Do not use discs of 8cm diameter, even
with an adapter. Only use round discs
12cm in diameter.
Permissible bit and sampling rates
xFixed and variable bit rates from
32kBit/s to 320kBit/s
xSampling rate from 8kHz to 48kHz.
䂾i Only use MP3 tracks with a bit rate of
at least 128kBit/s and a sampling rate of
at least 44.1kHz. Smaller rates can cause
a noticeable deterioration in quality. This
is especially the case if you have
activated a surround sound function.
Notes on copyright
The music tracks that you create for MP3
mode and can play back in MP3 mode are
generally subject to copyright protection in
accordance with the applicable
international and national regulations.
In many countries, reproductions are not
permitted without the prior consent of the
copyright holder, not for private use.
Make sure that you know the applicable
copyright regulations and that you comply
with these.
If you own these rights yourself, e.g. for
compatible with the CD audio standard
and therefore may not be able to be
played by COMAND.
There may be playback problems when
playing copied discs.
There is a large variety of discs,
disc-writing software and writers available.
This variety means that there is no
guarantee that the system will be able to
play discs that you have copied yourself.
There may be playback problems if you
play CDs that you have copied yourself
with a storage capacity of more than
700MB. These CDs are not compatible
with currently applicable standards.
!
Do not affix stickers or labels to the
discs, as they could peel off and damage
COMAND.
COMAND is designed to hold discs which
comply with the EN 60908 standard. You
can therefore only use discs with a
maximum thickness of 1.3mm.
If you insert thicker discs, e.g. those that
contain data on both sides (DVD on one
side and audio data on the other), they
䋨10䋯29䋩
Page 12

Audio CD/ audio DVD and MP3
If a disc is loaded, it will be ejected.
Magazine menu:
Loading CDs and DVDs
Risk of accident
Only load a CD or DVD when the vehicle
is stationary. There is a risk of being
distracted from the road and traffic
conditions if this is done while the vehivcle
is in motion.
䂾i If the CD/DVD has a printed side, this
must face upwards when the CD/DVD is
loaded.
If neither side is printed, the side to be
played should face downwards.
CDs/DVDs with copy protection may not
be able to be played the system.
Loading and eject the single DVD
drive
¾Take the disc out of slot 䂾
1
¾Slide a disc into slot 䂾1
The drive draws the discs in and plays
it, if it has been inserted correctly and is
permissible.
¾
Loading and eject the DVD changer
The DVD changer has a fixed magazine
with six trays.
¾Press eject button 䂾
2
A menu shows the current magazine
occupancy.
Magazine, which shows with Gold disc,
are filled with discs, and the magazine
with Silver disc and/or red magazine
number is the current targeted
magazine.
Magazine without the disc image is
empty slot.
1 Disc slot
䂾
䂾2 Eject button
¾Press eject button 䂾2
1 Disc slot
䂾
䂾2 Eject button
䋨11䋯29䋩
¾Select magazine: slide or turn.
to select target magazine.
¾Eject disc: press
Then target disc will be ejected.
¾Load disc: slide
or turn.
to select empty magazine.
Then slide a disc into slot 䂾1
The drive draws the disc in and plays it,
if it has been inserted correctly and is
permissible.
Page 13

Audio CD/ audio DVD and MP3
Loading a PCMCIA-Card
Not all PCMCIA㩷cards and storage
䂾i
media are designed for the temperatures
which occur in the vehicle.
Due to wide range of PCMCIA cards
available on the market, it cannot be
guaranteed that playback will be possible
with every make of PCMCIA card.
Eject a PCMCIA-Card
䂾1 Eject button
䂾2 Slot for PCMCIA card.
¾Press eject button
The PCMCIA card is ejected.
¾Take the PCMCIA card out of slot 䂾2
1 twice.
䂾
Switching to audio CD, audio DVD or
MP3 mode.
¾Load a CD/DVD or PCMCIA card
or
¾Select “Audio” 㹢“Audio” , then “CD”
or “DVD-A” or “MP3”
or
¾Press the
button once or twice.
䂾i The function button takes you directly
to the previously set disc mode.(audio CD,
audio DVD, MP3 CD or video DVD). The
number or times you have to press the
function button depends on the previously
set mode.
䂾1 Slot for PCMCIA card.
¾Insert the PCMCIA㩷card into slot 䂾1
The side with the contact must point
towards the slot.
If the PCMCIA card contains a storage
medium with MP3 tracks, COMAND
switched to MP3 mode.
䋨12䋯29䋩
Page 14

Audio CD/ audio DVD and MP3
1 2
3
4
5
67
8
9
10
11
䂾1 Track number
䂾2 Track name
䂾3 Track time
䂾
4 Graphic time and track display
䂾5 Random play mode (if set)
䂾6 Sound settings
䂾7 Medium selection (“Medium” display on
single DVD drive)
䂾
8 Disc name
䂾9 To call up track listing
䂾10 Disc type㩷(
㩷or㩷
)
䂾11 Playback options
䋨13䋯29䋩
Example display in audio CD mode
2
1
12
11
3
10
9
䂾1 Track number
䂾2 Disc number (for DVD changer only).
3 Track name
䂾
䂾4 Track time
5 Graphic time and track display
䂾
䂾6 Random play mode
䂾7 Sound settings
䂾8 Medium selection (“Medium” display on
single DVD drive)
䂾9 Disc name
䂾10 To call up track listing ( In CD mode,
“TrackList”
11 Disc type
䂾
12 Playback options
䂾
4
5
6
78
Example display in audio DVD mode
1 2
12
11
10
9
8
䂾1 Track number
䂾2 Track name
䂾3 Track time
䂾4 Graphic time and track display
䂾5 Random play mode (if set)
6 Sound settings
䂾
䂾7 Medium selection (“Medium” display on
single DVD drive)
䂾8 Disc name
䂾9 To call up track listing
10 Play control (Ŷ Stop playing, || Pause)
䂾
䂾11 Disc type
䂾12 Playback options
3
4
5
67
Example display in MP3 mode
Page 15

Audio CD/ audio DVD and MP3
To select from Track list
Media List
¾In CD-Audio, DVD-Audio and MP-3
mode: select “Changer”㩷or “ Media”.
䂾i The “Changer” menu items is only
diplayed if the systems has a DVD
changer. The “Medium” menu items is
only displayed for a system with a single
DVD drive.
Or
¾Only in audio CD and audio DVD
mode: press
is selected.
The media list appears. The
indicates the current medium.
¾Select a medium or folder: press
COMAND changes the medium.
Select media direct from Keypad.
Medium can select directly from the
Keypad.
xDVD-Changer ( Discs managed by 1 to
6 magazines) or Single DVD drive.
Press 1 to 6 on Front Panel 10 Keypad.
If the magazine which is filled with disc,
COMAND will switch to the selected
magazine and start playing.
xPress “7” to select PCMCIA-Card if
inserted.
when the main area
dot
Selecting a track
To select from Track skipping
¾To skip forwards of backwords to a
track: turn
or
.
¾Press or button on
front panel briefly.
䂾i Skipping forwards through the tracks
skips to the next track. Skipping
backwards through the tracks skips to the
beginning of the current track if the track
has been playing for more than 8 seconds.
If the track has been playing less than 8
seconds, it skips to the start of the
precious track.
If you have switched on the “Random
tracks” playback option, the order of the
tracks is random.
¾Select “track list” or “Brows”
¾Select desired track from the list by turn
or Slide
¾Press
Fast forward / rewind
¾To fast forwards of rewind a track:
select the main ariea
¾Slide and hold
play position is reached.
or
¾Press and hold
button on front panel.
until the desired
or
Audio AUX
䂾i You can connect an external audio
source (AUX) to COMAND. Please
consult a Mercedes-Benz Service Center
for further information.
Switching to audio Aux mode
¾Select “Audio” 㹢 “Audio” 㹢 “Aux”
The audio AUX menu appears.
You will hear the medium inexternal
audio source if it is connected and
switched to playback.
xPress “8” to select music from HDDrive if
already some sound file is stored.
䋨14䋯29䋩
Page 16

TELEPHONE
Safety notes
Risk of Accidents
You must observe the legal requirements
in the country in which you are currently
driving when operation a mobile phone in
the vehicle.
If it is permitted to operate a mobile
phone while the vehicle is in motion, you
must only operate it when road and traffic
conditions permit. You could otherwise be
distracted from the traffic conditions,
cause an accident and injure yourself and
others.
For reasons of safety, only use
hands-free mode if you use the telephone
while the vehicle is in motion.
If you use hands-free mode to make a
call, you must continue to drive carefully,
close all the windows and prevent any
disruptive noises.
If you wish to make a telephone call
without using hands-free mode, you must
stop or park the vehicle. Do not stop or
park in area as where stopping and
parking is forbidden.
Risk of Accidents
Mobile phones without exterior aerials
may interfere with the vehicle electronics
and thereby jeopardize the operational
safety of the vehicle. You must therefore
only use these devices when the are
connected to a separate exterior aerial
which has been approved by
Mercedes-Benz.
General notes
You can use telephone over Bluetooth
connection and Comfort telephone.
COMAND offers a two-stage telephone
functionality to you.
In the basic equipment the connection with
Bluetooth equipped mobile telephone the
telephone function is to you over the
Bluetooth interface.
Over the Bluetooth interface, you can use
the Hands-free mechanism of the
COMAND with the suitable mobile
telephones and receive electronic visiting
cards (vCards)
If your vehicle is equipped with the comfort
telephone function, you can select and buy
a cradle for certain mobile telephones in its
Mercedes Benz service base.
With a suitable mobile telephone with the
comfort telephone function, not only the
Hand free function but the phone book and
SMS can import from mobile phone to your
COMAND system.
䂾i If COMAND is equipped with the
comfort telephone function, you can
connect it also with an Bluetooth equipped
mobile telephone by the Bluetooth
interface.
Then the functions of the comfort
telephone are not to you.
Detail information to suitable mobile
telephones and for connecting Bluetooth
equipped mobile telephones with the
COMAND, you can contact to Mercedes
Benz service base or over the InterNet
(www.mercedes benz.com).
While Vehicles is in motion
Calls disconnected while the vehicle is in
motion.
A call may be disconnected if :
xThere is insufficient Mobile network
coverage in certain areas
xYou move from one base station /
receiver area ( Mobile cell ) into another
and no channels are free
xYou use a mobile subscription, which is
not compatible.
䋨15䋯29䋩
Page 17

TELEPHONE
CAUTION: This transmitter must not be
co-located or operated in conjunction
with any other antenna or transmitte
CAUTION: This equipment complies with
FCC radiation exposure limits set forth for
uncontrolled equipment and meets the
FCC radio frequency (RF) Exposure
Guidelines in Supplement C to OET65.
This equipment has very low levels of RF
energy that it deemed to comply without
maximum permissive exposure evaluation
(MPE). But it is desirable that it should be
installed and operated with at least 20cm
and more between the radiator and
person's body (excluding extremities:
hands, wrists, feet and legs).
Operating Options
If the mobile phone is inserted in the
bracket or connected via Bluetooth, you
can operate the phone using the following
devices:
xMobile phone keypad
FCC Notices
This device complies with Part 15 of the
FCC Rules. Operation is subject to the
following two conditions:
(1) This device may not cause harmful
interference, and
(2) This device must accept any
interference received, including
interference that may cause undesired
operation.
xCOMAND / Telephone keypad
xMulti-function steering wheel
xLinguatronic (Voice Control)
Function restrictions
In following situation, you may not able to
use the telephone functionality.
xWhen telephone is not in the mobile
phone network or not subscribed to the
net.
xIf no telephone network is available, you
can not also make a emergency call. In
this case, COMAND shows “NO service”
if you make a phone call to ordinary
telephone number.
xIf the mobile phone is in restricted area.
CAUTION: Change or modification not
expressly approved by the party
responsible for compliance could void the
user's authority to operate this
equipment.
NOTE: This equipment has been tested
and found to comply with the limits for a
Class A digital device, pursuant to Part 15
of the FCC Rules.
These limits are designed to provide
reasonable protection against harmful
interference when the equipment is
operated in a commercial environment.
This equipment generates, uses and can
radiate radio frequency energy and, if not
installed and used in accordance with the
instruction manual, may cause harmful
interference to radio communications.
Operation of this equipment in a
residential area is likely to cause harmful
interference in which case the user will be
required to correct the interference at his
or her own expense.
䋨16䋯29䋩
Page 18

TELEPHONE
Activation of Telephone
Mobile phone with Bluetooth Interface
Conditions at the mobile telephone
xSwitch on the mobile phone and enter
pin-code (See the manual of mobile
phone).
xActivate Bluetooth functionality of mobile
phone (See the manual of mobile
phone)
䂾i At some mobile telephones not only
mobile telephone, then new connection will
be established automatically.
You can switch between authorized
telephones by menu.
Looking for the mobile phone.
For telephoning over the Bluetooth
interface with the COMAND you need a
mobile phone, which equips Bluetooth
interface.
䂾i Not all mobile telephones available at
the market are equally suitable.
For detail information to suitable mobile
telephones and for connecting Bluetooth
able mobile telephones with the COMAND,
visit www.wireless4mb.com or call
AutoWireless Solutions (800) 910-1021 to
speak to a wireless specialist.
Bluetooth Activation
䂾i Even COMAND with comfort-
telephone, you can connect it also with
Bluetooth equipped mobile telephone by
the Bluetooth Interface. This connection
remains active until switching off of the
COMAND and switch back to the comforte
telephone.
the Bluetooth function must be activated,
but be switched on additionally the
Bluetooth visibility. Each Bluetooth
equipment has a Bluetooth device name.
You had better to assign a personal
name with which you recognize your
mobile telephone clearly.
䂾
i
If the function “Bluetooth” is switched
off at the COMAND by system menu, the
message “Bluetooth is not activated” will
be shown in screen.
xBluetooth connection at COMAND shall
be activeated.
Authorization of Mobile phone
If you use your mobile telephone at the
first time in the connection with COMAND,
you must authorize your telephone to
COMAND.
The connection is always established with
the mobile telephone which connected at
last if available. If you authorize new
From submenu “Telephone”
“Telephone List” 㹢 “Update”㩷selected.
COMAND start search of the Bluetooth
Telephone around and shows found
telephones in list.
㩷㹢
䋨17䋯29䋩
Page 19

TELEPHONE
¾To erase one digit, press C short time.
¾To exit Passkey screen, select and press
“back”.
¾To finish the Passkey entry, select OK
button and press it.
In successful Bluetooth-connection, you
are requested at the mobile phone to input
a same passkey to mobile phone (see
operating instructions of mobile phone).
¾At the mobile phone input the same
Passkey as well as at the COMAND.
After the successful Bluetooth
authorizeation, screen will be changed and
you can use COMAND㩷telephone.
䋨18䋯29䋩
current status of found devices.
Activation of Telephone
䂾1 Authorized
䂾2 Authorized, available (Dark Icon)
and current connection (with Dotted
mark)
3 Available but not authorized (No check
䂾
mark)
䂾i If the devices list contains already ten
authorized devices, you must de-authorize
already authorized device.
After that you must turn off this device and
newly must start subsequently the search.
Otherwise a device to be sought newly
does not appear in the list.
Pass key entry
¾In the list ,select and press CCE on the
not yet authorized device (The device not
check marks).
¾Select the not yet authorized device and
select Option and press CCE at
“Authorize”
Then passkey entry screen is shown.
䂾i The Passkey is one-digit until sixteen
place number, that you yourself can
determine. They must input the same
number at the COMAND and at the device
to be authorized.
Note to this also the references in the
operating instructions of the mobile phone.
¾Input at the COMAND: Select after
each other the digits in the menu bar, or
use panel 10 Key.
Just after you turned on COMAND, these
Icons will not shown. After you update the
list, then the Icons will be shown and show
Page 20

TELEPHONE
Authorize from external device
If the COMAND does not find your mobile
phone, your mobile phone may in special
security setting.
In this case, you can try to find COMAND㩷
from your mobile phone.
The Bluetooth “user friendly name “ of
COMAND is “MB Bluetooth”.
De-Authorize the mobile phone
¾“Telephone”
¾Highlight mobile phone you want to
de-authorize in list.
¾“Option” 㹢select and press
“De-authorization”
Then you see a query whether the device
de-authorization become actual.
¾Select “Yes” or “No” and press.
“Telephone List “
㹢
Convenience Phone
For the utilization of the convenience
telephone function* you require an
installed telephone cradle and a suitable
mobile phone.
¾Insert activated mobile phone to cradle.
Or
¾If mobile is off COMAND automatically
turn on the mobile phone.
¾“Telephone”
“Update”㹢 “Option”㹢 “Connect from
external Bluetooth Device”
¾Start Bluetooth device search from your
mobile phone (see operating instructions
of your mobile phone)
¾Select “MB Bluetooth” at your mobile
phone.
¾Input the Passkey at the mobile phone
and after that at the COMAND.
“ Telephone List”
㹢
㹢
Activate other mobile phone
If you authorized several mobile phones,
you can change between the other mobile
phones.
If you authorize a new mobile phone, this
automatically is activated.
It is always only a mobile phone active.
¾“Telephone” 㹢“Telephone List “
¾Highlight mobile phone you want to
switch to in list.
¾Press
Then selected mobile phone become
active.
¾Shows PIN entry screen and you must
input your PIN number of your
subscription in COMAND㩷screen.
Receipt and transmission volume
settings
䂾i These settings are normaly not
necessaly. Default settiing at the factory is
suitable for ordinaly mobile phones.
Optimal setting for your mobile tephone is
available at Mercedes Benz service center
or InterNet.
䂾i changes can lead to strong
impairments of the transmission quality.
These attitudes cannot be changed during
an active telephone call.
䋨19䋯29䋩
.
Page 21

TELEPHONE
¾“Telephone” 㹢“Telephone List “
¾Highlight mobile phone you want to
change settings.
¾Select “Option” 㹢“Send volume “㩷or
“Receiving volume”.
¾Pin confirm:
Select OK in the Number speller.
COMAND examines those pin.
During correct input the telephone basic
menu appears.
Enter over the COMAND control unit
Some mobile telephones can be protected
with a UNLOCK code from unauthorized
use.
When Lockedtelephone is inserted to the
cradle, COMAND requests UN-Lock-code
tobe managed.
Emergency Call
Then you can see “Slider bar” for changing
the volume level.
PIN Entry ( Convenient-Telephone)
Entering on COMAND
¾Telephone on
You see the message "request pin
entering".
¾Enter:
Select all number in the PIN-speller.
¾Number Delete:
Select C and press CCE.
Or
Press C key on CCE.
The number in indication left of the cursor
is deleted.
¾Line Delete:
Select C and long press CCE.
Or
Long press C key on the front panel.
¾Telephone on
You see the message "request pin
entering".
Then you see the message "request pin"
entering.
¾Enter:
Enter successively all numbers on the
numerical keyboard.
¾Number Delete:
Press 䂾C Key short time.
OR
¾Line Delete
Select C and long repress CCE.
¾Pin confirm:
After entering the whole SIM number,
COMAND examines those pin. During
correct input the telephone basic menu
appears
After the successive entering number,
also works for comfirming entering
the PIN.
An emergency call without pin input or
input of the UNLOCK code is possible only
over the mobile telephone.
The proceeding you infer please from the
manual of the mobile telephone.
䋨20䋯29䋩
Page 22

TELEPHONE
㪩㪜㪘㪛㪰
Incoming call
Rejecting or accepting the call
Telephone Basic Menu.
The telephone basic menu appears after
input and confirmation the correct PIN.
Activation of Telephone Menu
¾Press Button of Panel key to select
telephone base screen.
Or
¾ “Tel” 㹢 “Tel” 㹢 “Telephone”
䂾i if the telephone function was last
application, you only needs to select “Tel”
in Menu.
Or
¾Press
if press button when the basic
䂾i
telephone menu has already been called
up, the “Calls dialed” Call list will appear.
in the Panel.
1 2 3
6
5
䂾1 Network Status
2 Field strength
䂾
䂾3 Indicator for current status
䂾4 Display COMAND Telephone book
䂾5 To display Call List
䂾6 Number Speller
CALL Lists
COMAND㩷can display the following calls
in a list:
4
xMissed calls
xIncoming calls
xOut going calls
Calling up a list
¾Select “Call lists” from the basic
telephone menu.
¾Select “Calls missed” or “Incoming
calls” or “Calls dialed”.
¾To reject : select “ reject” in popup
menu.
or
¾Press
the multi-function steering wheel.
¾To accept: Select “Accept”
or
¾Press
the multi-function steering wheel.
Once you have accepted the call, you can
conduct your telephone conversation in
Hands-free mode. The call volume can be
adjusted with the Volume knob of front
panel.
button on the front panel or
button on the front panel or
䂾i you can also accept a call if the
COMAND display is showing other than
the telephone mode. Once you have
accepted the call, the COMAND display
shows the telephone base screen.
¾To switch the display to telephone
screen : select “Tel”㹢 “Tel”
“Telephone”
or
¾Press
button on the front panel.
㹢
Then corresponding list appears.
䋨21䋯29䋩
Page 23

TELEPHONE
Making a outgoing call
Connecting a call to an entry on a call list
or in the COMAND telephone book
¾orCall up a call list and select an entry
During the microphone is switched off, the
icon appears in the main area.
Entering the telephone number using the
COMAND controller
¾Call up the basic telephone menu
To enter digits: Select all of the
¾
digits in sequence from number speller
or panel 10 key.
¾
To delete individual digits: select C
and press briefly.
To delete entire telephone number :
¾
select C and press and hold
the telephone number is d.
To connect a call select “
¾
or Press
Redialling
¾Call up the basic telephone menu
Use the COMAND contro r to select
¾lle
“
the front panel.
Then the list of dialed numbers appears.
The most r
op of list.t
¾Select the desired call
press
To connect the call: ¾
button on the front panel.
SEND” or Press button on
ecently dialed number is at the
delete
until
SEND”
¾Call up the COMAND telephone book
and select an entry
¾To connect a call: press
Functions during a call connection
1
2 3
5
4
6
䂾Name and telephone number you are
1
calling
䂾 Field strength2
Indicator for current status 3
䂾
䂾4 To switch Hands-free microphone off
and on.
䂾Terminate current call5
䂾send DTMF tones. 6
Switching the hands-free microphone on
or off
¾Call up the basic telephone menu.
¾To switch off: select “Micro off”
¾To switch on: select “Micro on”
The icon
goes out.
Ending an active call
¾To end a call: Select “Tel”
“Telephone” 㹢 press
or
¾Press
multi-function steering wheel.
The COMAND display switches to the last
display selected if necessary.
button on front panel or the
㹢
.
“Tel”
㹢
COMAND Telephone book
The COMAND phone book contains all
address book entries that have at lease
one telephone number. COMAND㩷also
reads the phone book entries stored in the
phone book on the mobile phone and
displays them in the COMAND phone
book.
These entries can be imported from your
mobile phone via Bluetooth.
䂾i These imported entries be preserved,
also if you use the COMAND with one of
other mobile phone.
You should delete these entries if
necessary before delivery or sale of your
vehicle.
䋨22䋯29䋩
Page 24

Navigation system
Navigation system (introduction)
Safety Notes
Risk of accident
For safety reasons, only enter a new
destination when the vehicle is stationary.
You may otherwise be distracted from the
traffic conditions, cause an accident and
injure yourself and others.
COMAND calculates the route to the
destination without taking account of the
following, for example:
xTraffic lights
xStop and give way signs
xParking or stopping prohibited signs
xLane narrowing
xOther road and traffic controls and
regulations.
Map software
The digital maps generated by the map
software become outdate in the same way
as conventional road maps. Optimum
route guidance can only be provided by
the navigation system in conjunction with
the most up-to-date map software.
Information about new map software
versions can be obtained from a
Mercedes-Benz Service Centre.
General Notes
GPS reception
Correct functioning of the navigation
system depends amongst other things on
GPS㩷reception. In certain situations,
GPS㩷reception may be impaired, there
may be interference or there maybe no
reception at all, e.g. in tunnels, in
multi-storey car parks or due to snow on
the GPS㩷aerial. If there is snow on the
GPS㩷aerial, you should remove it. The
GPS㩷aerial is at the back of the vehicle
roof.
COMAND may give incorrect navigation
commands if the reality does not
correspond to the data in the digital map.
For example, if the traffic routing has been
changed or the direction of a one-way road
has been reversed.
For this reason, you must always observe
applicable road and traffic controls and
regulations during your journey. Road and
traffic controls and regulations always
have priority over the navigation
commands generated by the system.
䋨23䋯29䋩
Page 25

Navigation system
Root guidance after vehicle
transportation
COMAND has to redetermine the position
of the vehicle if the vehicle has been
transported.( e.g. by ferry, by motorail or
after towing).
positioning take place automatically even
when COMAND is switched off. The
duration will vary from on e case to
antoher.
Route guidance may be restricted as
follows during vehicle positioning:
xNavigation announcements, route
guidance displays and displayed street
names are not consistent with the actual
location of the vehicle.
xCOMAND does not generate navigation
announcements.
xInstead of the route guidance displays,㩷
you see the “Off road” display and an
arrow. The arrow shows the compass
heading to the destination.
When positioning is complete, route
guidance is resumed using navigation
announcements and route guidance
displays.
Interrupting the journey duration route
guidance
The following applies if you interrupt the
journey during route guidance and
continue the journey later on:
xCOMAND㩷resumes route guidance
automatically if you continue the journey
within 2 hours.
xRoute guidance is canceled if you
continue the journey after more than 2
hours. It will be necessary to resume the
canceled route guidance manually.
䂾i Interrupting the journey means
parking the vehicle and switching off
COMAND.
Hard disk errors
COMAND㩷has an integrated hard disk on
which the map software is stored.
If an area of the hard disk has an error,
COMAND can no longer access the map
data in this area, for example, when
calculating a route.
The “Navigation Unavailable. Please
observe the operating instructions”
message then appears.
¾To delete the message: switch
COMAND on and back on.
䂾
i
If you switch the navigation system
off/on, it will be operational again until it
has to access the faulty area of the hard
disk again.
The message will then appear again.
Consult a Mercedes-Benz Service Center.
Units of measurement
The units of measurement in navigation
mode are identical to those set in the
instrument cluster.
Input restrictions
On vehicles for certain countries, there is
a restriction on entering data.
The restriction is active above a vehicle
speed of about 5 km/h. The restriction is
deactivated as soon as the vehicle speed
drops below about 3km/h.
When the restriction is active it is not
possible to enter specific items, e.g.town
or road name.
You will be aware of this because certain
menu items cannot be selected.
䋨24䋯29䋩
Page 26

Navigation system
43
1
2
䂾1 Current set map scale
䂾2 Currrently set map scale as indicate d
by the needle on the scale bar
䂾3 Previously set scale before calling up
current scale.
䂾
4 Scale bar
䋨25䋯29䋩
Calling up the map display and
switching to navigateon mode
¾Press function button.
or
¾Select “Navi” in the main function line.
Both of these will call up the map display.
You will see the map with the menu
system either shown or hidden.
1
Map with route guidance inactive,
showing the menu system
䂾1 Current vehicle position
1
23
Map with route guidance inactive and
with the menu system hidden
1 Current vehicle position
䂾
䂾2 Map orientation
3 Current Map scale.
䂾
Hiding or showing the menu system
¾To hide: Slide
The “Full-screen” menu item appears in
the main area of the display, it is
automatically selected.
¾Press
The menu system is hidden. The map
can be seen in the full-screen.
Adjusting the map scale
䂾
i
It is only possible to adjust the map
scale with the menu system hidden
(Full-screen map display)
¾Turn.
scale is set.
As soon as you turn.
mapscale 䂾4 appears. Turning
clockwise enlages the map, tunring
anti-clockwise reduces it.
until the desired map
, the
¾To Show: Press
map display.
in the full-screen
Page 27

Navigation system
It is only possible to adjust the map
䂾i
scale with the menu system hidden
(Full-screen map display)
In certain countries, it is not possible to
move the map freely if the vehicle is
traveling at more than approximately
5km/h. As soon as the vehicle speed
drops below 3km/h, it is possible to move
the map freely again.
¾Slide
A crosshair appears on the map.
3
, or
1
2
Display 䂾2 may be the name of a
䂾i
road, for example, provided the digital
map contains the necessary area.
If no data is available, display
䂾2 shows:
xthe coordinates of the crosshair if the
geo-coordintae display isswitched on
and the PGS signal is strong enough.
xNo display if the geo-coordinate display
is switched off.
Storing the crosshair position as a
destination in the list of previous
destinations
xIf necessary, display the menu
system : Press
.
xTo store: select “Position” 㹢 “Save
position”
COMAND㩷stores the crosshair position
as a destination in the list of previous
destinations.
Centering the map on the vehicle or
destination position
If you have moved the map, you can
䂾i
use this function to rapidly return the map
to the position of the vehicle or destination.
It is only possible to center the map on the
destination position when route guidance
is active.
¾To center on the vehcile’s position:
Select “Navi” 㹢 “Position” 㹢
“Vehicle position map”.
Or
¾Press the
crosshair is displayed
¾To center on the destination: Select
“Navi” 㹢 “Position” 㹢 “Map on
destination position”.
back button when the
䂾1 Crosshair
2 Details of the crosshair position
䂾
䂾3 Map scale selected.
Hiding the cross hair
xPress the
or
xPress the
The crosshair disappears and the map
is set to the vehicle position.
or
back button.
function button
xSet the map to the vehicle or destination
position; see the explanation below.
䋨26䋯29䋩
Page 28

Navigation system
Entering a destination by address
Navigation system (entering a
destination)
Risk of accident
For safety reasons, only enter a new
destination when the vehicle is stationary.
You may otherwise be distracted from the
traffic conditions, cause an accident and
injure yourself and others.
䂾i It is possible to enter a destination
regardless of where route guidance is
active or inactive.
The following destination entry options are
available.
xEnter a destination by address
xEnter a destination from the destination
memory.
xEnter a destination from the list of
previous destinations.
xEnter a destination using the map.
xEnter an intermediate stop.
xEnter a special destination
In certain countries, it is not possible
䂾i
to enter an address if the vehicle is
traveling at more than approximately
5km/h. As soon as the vehicle speed drops
below 3km/h, it is possible to move the
function is available again.
When entering an address as the
destination entry, you have the following
options.
xEnter the country, town and street
xEnter the country, town and center
xEnter the country, town, street and
house number
xEnter the country, town, street and
junction.
xa destination by address
Calling up the address input menu
¾Select “Navi” 㹢 “Destination” 㹢
“Address input”
The address input menu appears.
It shows the destination that was last
used for starting route calculation.
Menu items in the address input menu
Depending on the sequence in which you
enter the address and on the data status of
the digital map, some menu items may not
be available at all or may not yet be
available.
Example: after selecting the country, the
“Street”, “No.”, “Centre”, ”Junction”, ”Save”
and “Start” menu items are not yet
available. Also, the “Postcode” menu item
will not be available at all if the digital map
does not contain any postcode.
䋨27䋯29䋩
Page 29

Navigation system
Entering a destination from the
destination memory
¾Select “Navi”
“From memory”
The display shows either the
destination memory list with input
characters or without input characters.
Whether or not the input characters are
displayed depends on the number of
entries in the destination memory.
䂾
i
The destination memory always
contains an entry named “
You may wish to assign your home
address to this entry, for example. Like any
other entry, the “Own address” entry can
be selected using input characters or from
the beginning of a list. This entry always
appears at the top of the list.
“Destination”
㹢
㩷
Own address”.
㹢
Destination memory list with input
characters
1 Characters entered by the user
䂾
2 Characters automatically added by the
䂾
system
䂾3 List entry that most closely matched to
the current input string
䂾4 OK to finish the entry
䂾5 clear entered characters
䂾6 Characters not currently available for
selection
䂾7 Characters available to select
䂾8 Speller field
䂾9 Current selected character
䂾10 “Back” button to go back previous
screen
䂾11 Destination memory list
Destination memory list without input
characters
¾To select the destination: Slide
or turn
¾To cancel the selection: press the
button.
or
¾Select “Back and press
¾To confirm the selection: press
¾
To start route calculation: select
“Start”.
.
䂾i With in characters 䂾9 , you can only
select the characters that are currently
available. Which these are depends on the
current input string and the entries stored
in the destination memory.
䋨28䋯29䋩
Page 30

Navigation system
Entering a destination from the list of
previous destinations
¾Select “Navi” 㹢 “Destination” 㹢
“From last destinations”.
The list of previous destinations
appears. The most recent detination is
at the top ot the list.
¾Select the desired destination.
¾To Start route calculation: select
“Start”
Updating the map software
You can update the map software yourself
using a DVD.
Notes about handling DVDs
xOnly hold discs by the edge.
xHandle discs carefully to prevent read
problems.
xAvoid getting scratches, fingerprints and
dust on discs.
xUse a commercially-available cleaning
cloth to clean discs. Do not wipe them
with a circular motion, but only in
straight lines from the center outwards.
xPlace discs back in cases after use.
xProtect discs from heat and direc
sunlight.
switched off and the vehicle battery
insufficient power, COMAND may
automatically switched off during the
process in order to protect the battery. If
this occurs, restart the update with the
engine running.
has
Risk of poisoning
Never leave the engine running in
enclosed spaces. The exhaust gases
contain carbon monoxide. Inhaling
exhaust fumes constitutes a health
hazard and could lead to loss of
consciousness or even death.
Updating process
The updating process has the following
phases:
xLoading the DVD㩷into the DVD drive
xUpdating process
The Updating process can take up to
䂾i
2 hours, depending on the size of the map
updating software. If possible, carry out
the update when the vehicle is stationary.
If you carry out the update with the engine
䋨29䋯29䋩
 Loading...