

Page 1

COMAND Online
Supplement
Nur für internen Gebrauch / For internal use only
Page 2

Symbols
$
%
!
+
X
YY
(Y page)
Display
Warning
Environmental note
Possible vehicle damage
Tip
Instruction
Continuation symbol
Page reference
Displays in the multifunction display/COMAND
Page 3

Welcome to the world of Mercedes-Benz
Before you drive off, familiarise yourself with
your COMAND control panel and read this
manual. This will help you to obtain the maximum pleasure from your COMAND control
panel and to avoid endangering yourself and
others.
Depending on the model and equipment level,
the functions and equipment of your
COMAND control panel may deviate from
some descriptions and illustrations.
Mercedes-Benz is constantly updating its systems to the state of the art and therefore
reserves the right to introduce changes in
design, equipment and technical features at
any time.
You cannot, therefore, base any claims on the
data, illustrations or descriptions in this manual.
Please consult a Mercedes-Benz Service
Centre if you have any questions.
This manual is an integral part of the vehicle.
You should always keep it in the vehicle and
pass it on to the new owner if you sell the
vehicle.
The technical documentation team at
Daimler AG wishes you safe and pleasant
motoring.
1725840781Z102
É1725840781Z102YËÍ
Page 4

Page 5

Contents
3
Index ....................................................... 4
Introduction ......................................... 11
At a glance ........................................... 13
System settings .................................. 41
Navigation system .............................. 49
Telephone .......................................... 111
COMAND Online and Internet .......... 149
Audio .................................................. 185
Video .................................................. 225
Rear Seat Entertainment System .... 243
Page 6

Index
4
A
Access data of the mobile phone
network provider
Deleting ......................................... 157
Editing ........................................... 157
Making entries ............................... 155
Selecting ........................................ 152
Active partition (USB devices only)
Selecting ........................................ 202
Address book
Browsing ........................................ 140
Calling up ....................................... 140
Changing an entry .......................... 142
Connecting a call ........................... 143
Creating an entry ........................... 141
Deleting an entry ........................... 141
Details about an entry ................... 142
Importing contacts ........................ 145
Searching for an entry ................... 141
Starting route guidance ................. 143
Voice tag ....................................... 144
Address book entry
Adopting as a home address ............ 92
Showing the details ....................... 142
Address entry menu ............................ 53
Alternative route ................................. 82
Area
Avoiding ......................................... 103
Audio AUX jack .................................. 223
Audio CD/DVD or MP3 mode
Switching on .................................. 196
Audio DVD
Pause function ............................... 251
Stop function ................................. 198
Audio format
Setting (audio DVD mode) ............. 202
Automatic disconnection
Setting the length of time .............. 157
Autostore ........................................... 190
AUX jacks
CD/DVD drive ................................. 37
B
Back button ......................................... 17
Bird's-eye view .................................... 98
Bluetooth
Bluetooth® audio basic display ........ 216
Bluetooth® audio device
Bluetooth® audio devices
Bluetooth® audio mode
Bluetooth® device list ....................... 213
Bluetooth® interface telephony
Bluetooth® telephones list ............... 115
Buttons on the COMAND control-
ler .......................................................... 17
®
Activating/deactivating ................... 46
External authorisation .................... 116
General information ......................... 46
Interface ........................................ 114
Settings ........................................... 46
Telephony ...................................... 114
Reconnecting ................................. 214
Connecting .................................... 212
Switching on .................................. 215
Conditions ..................................... 114
C
Call
Accepting ...................................... 123
Connecting .................................... 124
Rejecting ....................................... 123
Call list
Opening and selecting an entry ..... 134
Saving an entry in the address
book .............................................. 134
Call lists ............................................. 133
Displaying details ........................... 134
Storing an entry which has not yet
been stored ................................... 134
Category list (music search) ............ 205
CD
Copy protection ............................. 205
Disc ............................................... 205
General information ....................... 205
Multisession .................................. 203
Playback options ........................... 203
Selecting a medium ....................... 198
Selecting a track ............................ 199
CD/audio DVD or MP3 mode
Switching on (Rear Seat Entertain-
ment System) ................................ 249
Page 7

Index
5
CD/DVD
Ejecting (DVD drive) ....................... 194
Ejecting (DVD single drive) ............ 193
Ejecting (Rear Seat Entertainment
System) ......................................... 249
Inserting (DVD changer) ................ 193
Inserting (DVD single drive) ........... 193
Inserting (Rear Seat Entertain-
ment System) ................................ 248
Changing direction
Announcement phase ...................... 76
Change of direction phase ............... 76
Preparation phase ............................ 75
Character entry ................................... 25
Characters
Entering ........................................... 28
COMAND
Basic functions ................................ 29
Components .................................... 14
Switching on/off .............................. 29
COMAND controller ............................. 17
COMAND control panel ....................... 15
COMAND display ................................. 19
Cleaning instructions ....................... 21
Setting ............................................. 42
Switching on/off .............................. 30
COMAND Online
Importing POIs ............................... 168
Settings ......................................... 183
COMAND Online and Internet
Ending the connection ........... 158, 159
Establishing the connection ........... 158
Manually setting the access data
of the mobile phone network pro-
vider .............................................. 153
Selecting the access data of the
mobile phone network provider ..... 152
COMAND operating system ................ 14
Compass function ............................. 106
Connecting a USB device ................. 196
Convenience telephony .................... 119
Copy protection (CD/DVD) ............... 205
Country
Selecting .......................................... 54
Crosshair position
Saving .............................................. 97
D
Data carrier
Audio DVD ..................................... 203
MUSIC REGISTER ........................... 208
Date format
Setting ............................................. 43
Delete button ....................................... 18
Deleting
Call lists ......................................... 136
Destination
Adopting from the list of previous
destinations ..................................... 94
Assigning a destination to an
address book entry .......................... 94
Destination entry
Special destination .......................... 66
Using geo-coordinates ..................... 62
Destination information ..................... 83
Destination input ................................. 53
Address ........................................... 53
Destination memory ........................ 59
Intermediate stop ............................ 62
Last destination ............................... 60
Map ................................................. 61
destination memory ............................ 92
Destination memory
Deleting an entry ............................. 95
My address ...................................... 92
Storing a destination ........................ 93
Digital map
Updating ........................................ 107
Digital TV channels
Programme preview ....................... 231
Disc
CD/DVD ........................................ 205
MP3 ............................................... 203
Displaying the track and album ....... 202
Distance
see Route overview
DTMF tones
Sending ......................................... 127
DVD
Copy protection ............................. 205
Disc ............................................... 205
Selecting a track ............................ 199
DVD menu .......................................... 236
DVD playback conditions ................. 233
Page 8

Index
6
Dynamic route guidance ..................... 88
E
Emergency call (999 or 112) ............ 113
Entering characters
In navigation mode .......................... 25
In the address and the phone
book ................................................ 27
Using the number pad ..................... 26
Entering the town ................................ 54
Entry
Deleting ........................................... 26
Saving .............................................. 29
Selecting ........................................ 131
Example: entering an address ............ 53
Example display
Audio CD mode .............................. 197
MUSIC REGISTER ........................... 208
Example of operation .......................... 24
F
Fast forward
CD/DVD mode .............................. 200
Favourites (Internet) ......................... 180
Favourites button ................................ 47
Favourites buttons .............................. 18
First list entry
Accepting ......................................... 26
Frequency entry
Manual ........................................... 189
Function restrictions
Using the telephone ....................... 113
Video DVD mode ........................... 233
G
Google™ POI search
All search queries .......................... 166
Free text search ............................. 163
Importing a POI .............................. 165
Selecting the search position ........ 164
Top search queries ........................ 166
Using a POI as the destination ....... 165
Gracenote Media Database .............. 201
H
Hands-free microphone
Switching on/off ........................... 125
Harman/kardon® Logic 7® Sur-
round Sound system ........................... 32
Home address ...................................... 92
Entering and saving ......................... 57
Selecting from the destination
memory ........................................... 59
I
Indicator lamp
Remote control ................................ 38
Individualisation
Activating/deactivating ................... 46
Intermediate stop
Deleting ........................................... 63
Entering ........................................... 62
Internet
Calling up the carousel view .......... 174
Entering the URL ............................ 174
Favourites manager ....................... 181
Favourites menu ............................ 182
Menu functions .............................. 178
Opening favourites ......................... 179
Internet access
Conditions ..................................... 150
Internet access data
Selecting/setting ........................... 151
®
iPod
Alphabetic track selection ............. 222
Connecting to Media Interface ...... 218
Selecting a category/playlist ......... 221
iTunes® ............................................... 222
L
Lane recommendations ...................... 77
Explanation ...................................... 79
Presentation .................................... 79
LINGUATRONIC
Settings ........................................... 44
List as selection list
Calling up ......................................... 27
List of access data
New provider ................................. 154
Page 9

Index
7
List of mobile phone network providers
Calling up ....................................... 151
Empty ............................................ 152
With the selected provider ............. 153
Load/eject button ............................. 193
®
Logic 7
see harman/kardon® Logic 7
®
surround sound system
M
Map
Arrival time/distance to destina-
tion ................................................ 100
Calling up ......................................... 61
City model ..................................... 102
Map settings .................................... 97
Moving ....................................... 61, 97
RDS-TMC displays ............................ 88
Showing geo-coordinates .............. 100
Showing road names ..................... 100
Showing the map data version ....... 106
Topographic map ........................... 101
Map information .................................. 99
Map orientation ................................... 98
Map scale
Setting ............................................. 96
Media Interface
Basic menu .................................... 219
Connection options ....................... 218
iPod® ............................................. 218
Mode ............................................. 218
Notes for the MP3 player ............... 222
Selecting music files ...................... 220
Switching on .................................. 219
USB mass storage device .............. 218
Media list ........................................... 198
Menu
Exiting .............................................. 33
Hiding/showing (TV mode) ............ 228
Showing ................................... 51, 234
Special destinations ......................... 66
System settings ............................... 21
Menu item
Selecting .......................................... 23
Menu overview
COMAND ......................................... 20
Mercedes-Benz Contact .................... 147
Mobile phone
Authorisation ................................. 115
Authorising .................................... 115
Connecting (Bluetooth® interface) . 114
Connecting (convenience teleph-
ony) ............................................... 119
De-authorisation ............................ 118
External authorisation .................... 116
Motorway information ...................... 101
MP3
Bit/sampling rates ......................... 204
Copyright ....................................... 204
Disc ............................................... 203
File systems ................................... 203
Formats ......................................... 204
Selecting a medium ....................... 198
Multifunction display
Lane recommendations ................... 80
Multifunction steering wheel ............. 22
Selecting a TV channel .................. 229
Using the telephone ....................... 131
Multisession CDs ............................... 203
Music Register
Copying music data ....................... 209
MUSIC REGISTER
Deleting all music files ................... 210
Memory space info ........................ 210
Playback options ........................... 211
Switching on .................................. 208
Music search ..................................... 205
My address .......................................... 92
N
Navigation announcements
Switching off .................................... 81
Navigation menu
Showing/hiding ..................... 227, 234
Navigation mode
Switching on .................................... 51
North up orientation ........................... 98
O
Off-map ................................................ 87
Off-road ................................................ 87
Options menu (COMAND Online) ..... 159
Page 10

Index
8
Orientation in direction of travel ....... 98
P
Passcode
Entering ......................................... 116
Pause function ................................... 197
Personal special destination
Selecting as the destination ............. 74
Personal special destinations
Displaying on the map ..................... 71
Managing categories ........................ 72
Saving .............................................. 73
Settings ........................................... 71
Visual information ............................ 72
Phone book
Adding a number to an address
book entry ..................................... 133
Calling up ....................................... 128
Creating a new entry ..................... 132
Deleting an entry ........................... 132
Symbol overview ............................ 130
Phone book entry
Searching ...................................... 130
PIN
Entering ......................................... 119
Playback options .............. 203, 211, 222
Previous destinations ......................... 95
R
Radio mode
Radio Data System ........................ 191
Radio mode and DAB radio mode
Switching on .................................. 186
Radio station
Storing ........................................... 190
RDS
Switching off .................................... 30
Switching on/off ........................... 191
RDS (Radio Data System) ................. 191
Interrupting an announcement ...... 192
RDS-TMC
Example message ............................ 91
Selecting messages ......................... 89
Read-aloud function
Automatic ........................................ 91
Read-aloud speed
Setting ............................................. 44
Rear-compartment screens ................ 35
Rear Seat Entertainment System
Adjusting the sound settings ......... 246
Audio CD/DVD and MP3 mode ..... 248
AUX mode ...................................... 264
Changing the batteries .................. 244
Changing the picture format .......... 247
Setting the brightness ................... 246
Setting the colour .......................... 246
Setting the contrast ....................... 246
Several users ................................. 246
System settings ............................. 247
TV mode ........................................ 253
Using headphones ......................... 245
Using the main loudspeaker .......... 245
Video DVD mode ........................... 257
Wireless headphones ....................... 38
Recording the route
Turning off from the route on the
map ................................................. 86
Redials ................................................ 124
Remote control
Rear Seat Entertainment System ..... 36
Reset .................................................... 48
Rewinding
CD/DVD mode .............................. 200
Route
Calculating ....................................... 56
Estimated time of arrival .................. 83
Recording ........................................ 85
Route overview ................................ 84
Route calculation
Starting ............................................ 56
Route display ....................................... 84
Route guidance .................................... 75
Cancel ............................................. 80
Continue .................................... 80, 81
Destination reached ......................... 81
Lane recommendations ................... 77
Off-road ........................................... 87
Route options
Setting ............................................. 52
Route overview .................................... 84
Route type
Setting ............................................. 52
Page 11

Index
9
S
Safety notes
Audio CD/DVD and MP3
mode ..................................... 192, 248
Using the telephone ....................... 112
Video DVD mode ........................... 232
Screen
Selecting for remote operation ........ 36
SD memory card
Ejecting .......................................... 196
Inserting ........................................ 196
Selecting options (COMAND
Online)
POIs download ............................... 162
POI search ..................................... 159
Restoring the settings .................... 163
Weather display ............................. 160
SMS
Notes and requirements ................ 137
Sound
Switching on/off .............................. 30
Sound settings ..................................... 31
Special destination
Category .......................................... 68
Defining the position for the spe-
cial destination search ..................... 67
Entering ........................................... 66
Entering using the map .................... 70
Special destination icon
Setting ............................................. 98
Special destination list ....................... 68
With character bar ........................... 70
Speed dial list
Storing a phone book entry in the
speed dial list ................................ 136
Speed Limit Assist ............................ 103
see Speed Limit Assist
Station list ......................................... 188
Station pre-sets ................................. 189
Stations
Saving ............................................ 190
Tuning in ........................................ 188
Station search ................................... 189
Storage options
Selecting .......................................... 94
Summer and standard time
Switching ......................................... 43
Surround sound ................................... 32
System language
Setting ............................................. 47
T
Telephone
Accepting or rejecting a waiting
call ................................................. 126
Ending an active call ...................... 126
Entering phone numbers ................ 124
Incoming call ................................. 123
Making a call ................................. 126
Making a call via speed dial ........... 125
Outgoing call ................................. 123
Sending DTMF tones ...................... 127
Single call ...................................... 125
Switching hands-free microphone
on/off ............................................ 125
Toggling ......................................... 126
Telephone basic menu
Bluetooth® interface ...................... 118
Convenience telephony ................. 120
Telephone mode
Redialling ....................................... 124
Telephone number
Entering ......................................... 123
Teletext .............................................. 232
Text message (SMS)
Call sender .................................... 139
Inbox .............................................. 138
Reading .......................................... 138
Reading aloud ................................ 138
Storing sender in address book ..... 139
Text messages
Deleting ......................................... 140
Time
Setting ............................................. 43
Time format
Setting ............................................. 43
Time zone
Setting ............................................. 43
Tone settings
Balance and fader ............................ 31
Treble and bass ............................... 31
Track
Selecting ........................................ 250
Track information .............................. 252
Page 12

10
Index
Traffic announcements on ............... 191
Traffic-dependent route guidance
see Dynamic route guidance
Traffic jam function ............................. 82
Traffic jam icon
Showing on route ............................. 89
Traffic jam message
Reading out on route ....................... 91
Traffic jams
Showing in the map ......................... 88
Traffic Programme
Switching traffic announcements
on/off ............................................ 191
Traffic reports
Reading out on route ....................... 91
Showing in the map ......................... 88
Showing on route ............................. 89
Transferring a call (convenience
telephone) .......................................... 128
Treble and bass
Adjusting ......................................... 31
TV
Picture settings .............................. 226
TV basic settings
Channel fix ..................................... 231
Setting the reception region .......... 232
TV channel
Setting ........................................... 228
Storing ........................................... 230
TV mode
Notes on the channel list ............... 228
Reception quality ........................... 227
Switching on .................................. 227
Selecting a film/title ...................... 236
Selecting a scene/chapter ............ 235
Stop function ................................. 235
Video DVD mode
Automatic picture shutoff .............. 226
Switching on .................................. 233
Volume
Adjusting ......................................... 30
Navigation announcements ............. 30
Phone calls ...................................... 31
Traffic announcements .................... 30
W
Waveband
Switching (radio) ............................ 187
Waypoints
Accepting waypoints for the route ... 65
Editing .............................................. 65
Entering ........................................... 63
Weather display (COMAND Online)
Calling up the weather map ........... 172
Information chart ........................... 169
Selecting the location .................... 170
Switching off .................................. 170
Switching on .................................. 169
Weather map (COMAND Online)
Legend ........................................... 173
Showing/hiding the menu ............. 172
Switching the weather informa-
tion display on/off ......................... 173
Website
Add to favourites ........................... 179
U
Using the telephone .......................... 123
V
vCards
Receiving ....................................... 146
Video DVD
Fast forward/rewind ...................... 235
Operation ....................................... 232
Pause function ............................... 235
Picture settings .............................. 226
Selecting ........................................ 236
Page 13

Introduction
11
Operating safety
General notes
Risk of accident
G
Your attention must always be focused on the
traffic conditions.
Only use COMAND or the telephone when the
road and traffic conditions permit.
Bear in mind that, at a speed of only
50 km/h, your vehicle covers a distance of
nearly 14 m per second. The navigation system will not provide you with information
about stop signs, give-way signs, traffic regulations or road safety features. It is up to you
to pay attention to these while driving the
vehicle. Only enter a new destination when
the vehicle is stationary.
COMAND has a radio included as part of the
audio functions.
This radio receiver is suitable for operation by
all persons in accordance with the valid EC
directive.
The device conforms to currently applicable
European or harmonised national standards.
Therefore, adherence to the relevant specifications for electromagnetic compatibility is
guaranteed for this device.
As a result, interference caused by your
equipment with other electrical/electronic
equipment and interference with your equipment caused by other electrical/electronic
equipment can be largely prevented.
The equipment is approved by the vehicle
manufacturer in accordance with European
Automotive EMC Directive 95/54/EC. Therefore, operation according to its intended purpose is approved for your vehicle. The equipment does not require certification.
It complies with device-specific EMC requirements according to the following European
standards:
R
EN 55013
R
EN 55020
Correct use
Observe the following information when using
COMAND:
R
the safety notes in this manual
R
national road traffic regulations
i
Improper work on electronic components
or other systems (such as radio, DVD
changer) and their software may result in
malfunction or failure. Even systems that
have not been modified could be affected
because the electronic systems are connected. Electronic malfunctions can seriously jeopardise the operational safety of
your vehicle.
i
Only have work or changes to electronic
components carried out at a qualified specialist workshop which has the necessary
specialist knowledge and tools to carry out
the work required. Daimler recommends
that you use a Mercedes-Benz Service
Centre for this purpose. In particular, work
relevant to safety or on safety-related systems must be carried out at a qualified specialist workshop.
i
Protection against theft: this device is
equipped with technical provisions to protect it against theft. Further information on
protection against theft can be obtained
from a Mercedes-Benz Service Centre.
Information on copyright
Macrovision™
This product incorporates copyright protection technology that is protected by U.S. patents and other intellectual property rights.
Use of this copyright protection technology
must be authorised by Rovi Corporation, and
is intended for home and other limited viewing uses only unless otherwise authorised by
Rovi Corporation. Reverse engineering or disassembly is prohibited.
Z
Page 14

Introduction
12
libJPEG
This software is based in part on the work of
the Independent JPEG Group.
Free Type
Portions of this software are copyright © 2005
The FreeType Project http://
www.freetype.org.
All rights reserved.
NetFront™
This product contains NetFront Browser software of ACCESS Co., Ltd. Copyright
1996-2010 ACCESS Co., Ltd. All rights
reserved.
The NetFront Browser software is based in
part on the work of the Independent JPEG
Group.
©
Camellia
Copyright © 2006, 2007 NTT (Nippon Telegraph and Telephone Corporation).
All rights reserved.
The conditions and disclaimers in connection
with use of Camellia are available at http://
info.isl.ntt.co.jp/crypt/eng/index.html.
press. Country-specific deviations are possible. Please note that your vehicle may not be
equipped with all features described. This
also applies to safety-relevant systems and
functions. Therefore, the equipment on your
vehicle may differ from that in the descriptions and illustrations. The original purchase
contract documentation for your vehicle contains a list of all of the systems in your vehicle.
Contact a Mercedes-Benz Service Centre if
you have any questions about equipment or
operation.
Function restrictions
For safety reasons, some COMAND functions
are restricted or unavailable while the vehicle
is in motion. You will notice this, for example,
because either you will not be able to select
certain menu items or COMAND will display
a message to this effect.
Flash® Lite™
This product contains Flash® Lite™ technology by Adobe Systems Incorporated. This
product contains Adobe® Flash® player software under license from Adobe Systems
Incorporated, Copyright © 1995-2010 Adobe
Macromedia Software LLC. All rights
reserved. Adobe and Flash are registered
trademarks of Adobe Systems Incorporated
in the United States and/or other countries.
Vehicle equipment
These operating instructions describe all the
standard and optional equipment for your
vehicle, as available at the time of going to
Page 15

COMAND operating system ............... 14
Multifunction steering wheel ............. 22
Operating COMAND ............................ 22
Basic functions of COMAND ............... 29
Climate control status display ........... 33
Rear Seat Entertainment System ...... 34
Reversing camera ............................... 39
13
At a glance
Page 16
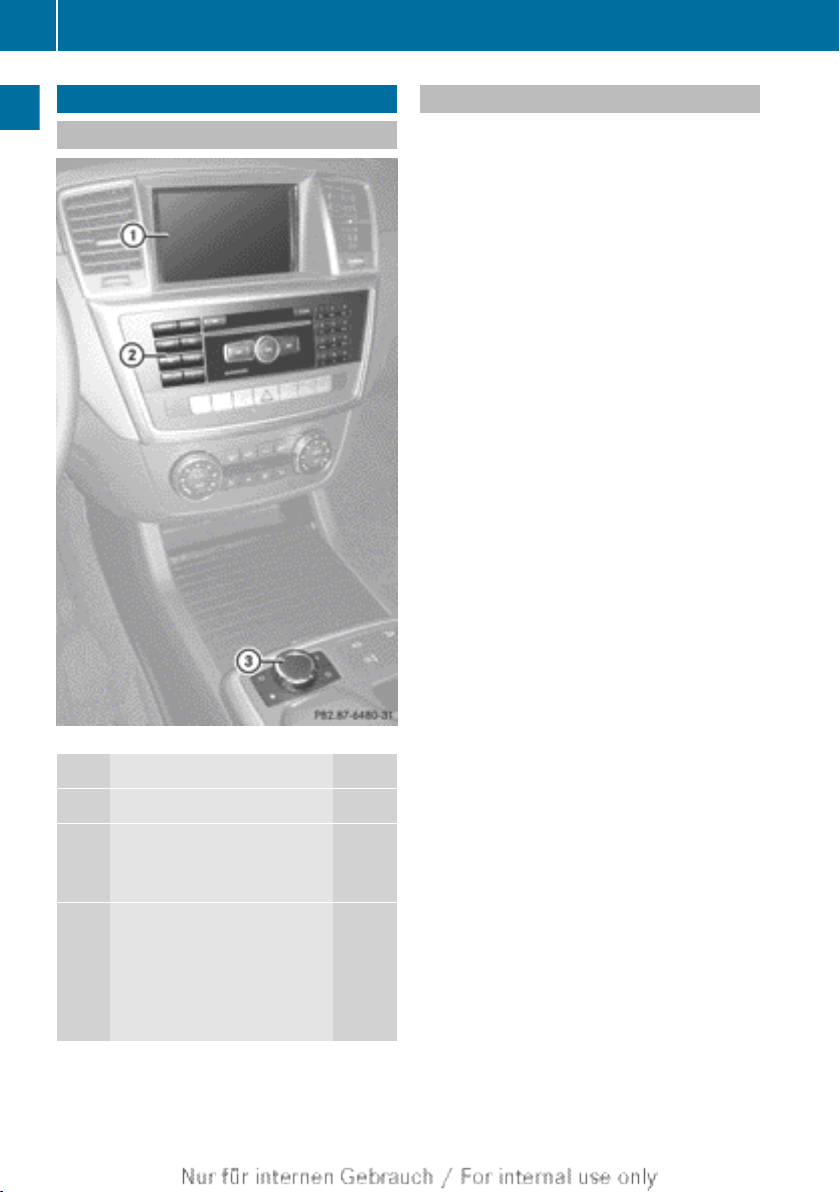
COMAND operating system
14
COMAND operating system
Overview
At a glance
ML example
Function Page
:
COMAND display 19
;
COMAND control panel
with a single DVD drive or
DVD changer 15
=
COMAND controller 17
Back button (left) 17
Delete button (right) 18
Favourites button (left) 18
Favourites button (right) 18
Components of COMAND
COMAND consists of:
R
the COMAND display
R
the COMAND control panel with a single
DVD drive or DVD changer
R
the COMAND controller
R
the back and delete buttons
R
up to two favourites buttons (ML), depending on the vehicle equipment
You can use COMAND to operate the following main functions:
R
the system settings
R
the navigation system
R
the telephone with text message function
and the address book
R
COMAND Online and Internet
R
the audio function in the following modes:
radio and DAB radio mode, disc (audio CD/
DVD and MP3 mode), memory card (MP3
mode), MUSIC REGISTER, USB storage
device, Media Interface and Bluetooth
®
audio
R
the video function in TV, video DVD and
video AUX modes
You can call up the main functions:
R
using the corresponding function buttons
R
using the main function bar in the COMAND
display
Page 17
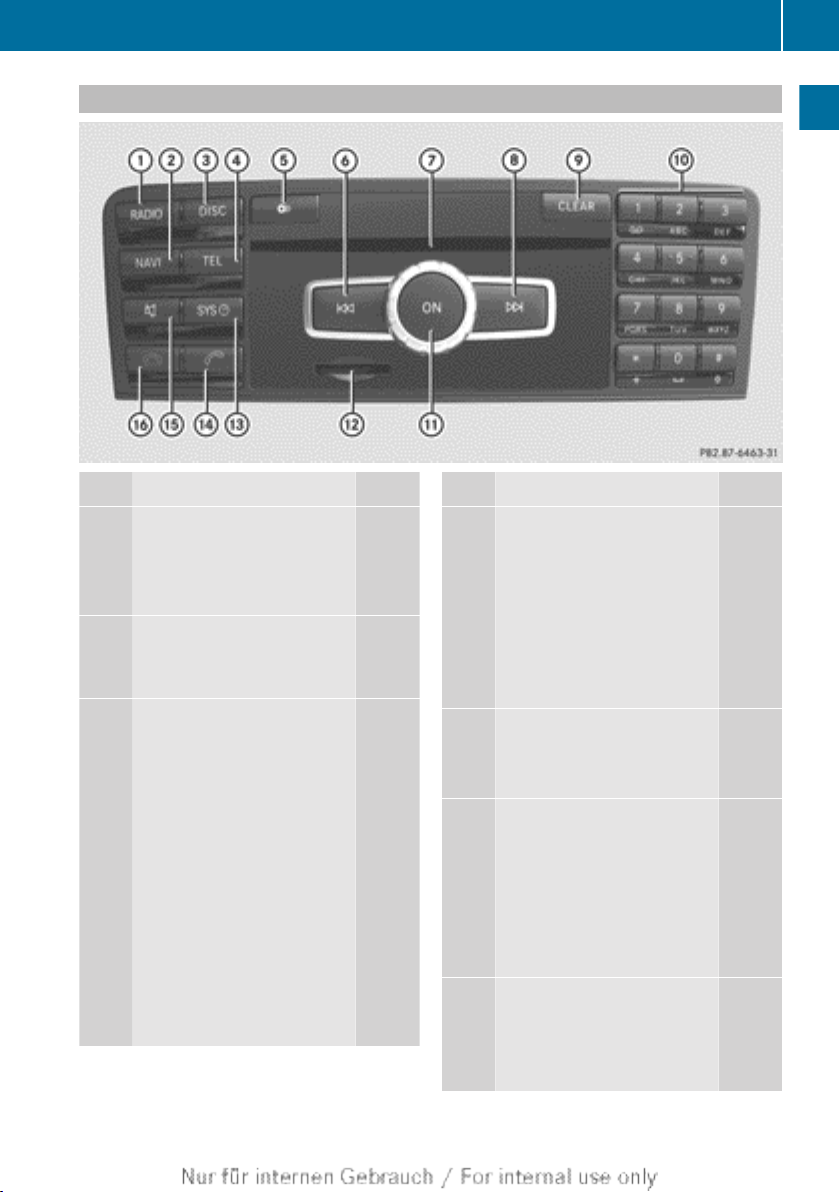
COMAND control panel
COMAND operating system
15
At a glance
Function Page
:
Switches to radio mode 186
Switches wavebands 187
Switches to DAB radio
mode 186
;
Switches to navigation
mode 51
Shows the menu system 51
=
Press h repeatedly
• Switches to audio CD,
audio DVD and MP3 mode
or DVD video mode 196
• Switches to memory card
mode 196
• Switches to MUSIC REGISTER 208
• Switches to USB storage
device mode 196
• Switches to Media Interface or audio AUX mode 219
• Switches to Bluetooth
audio mode 215
Function Page
?
Calls up the telephone
basic menu:
• Bluetooth® interface telephony 118
• Convenience telephony 120
SAP telephony; see the separate operating instructions.
A
Load/eject button
8 Single DVD drive
V DVD changer
B
Selects a station using the
station list (FM and DAB
radio mode) 188
Selects a station using the
station search function 189
Rewind 200
Selects the previous track 199
C
®
Disc slot
• To load CDs/DVDs 193
• To eject CDs/DVDs 194
• To update the digital map 107
193
193
Page 18

COMAND operating system
16
Function Page
D
Selects a station using the
station list (FM and DAB
radio mode) 188
Selects a station using the
station search function 189
At a glance
Fast forward 200
Selects the next track 199
E
Delete button
• Deletes characters 26
• Deletes an entry 26
F
Number keypad
• Selects stations via the
station presets 189
• Stores stations manually 190
• Mobile phone authorisation 115
• PIN entry (convenience
telephony) 119
• Telephone number entry 123
• Sends DTMF tones 127
• Character entry 25
• Selects a location for the
weather forecast from the
memory 170
z Displays the current
track being played 202
g Selects stations by
entering the frequency
manually 189
g Selects a track
199
Function Page
G
Switches COMAND on/off 29
Adjusts the volume 30
H
SD memory card slot 196
I
Calls up the system menu 24
J
PIN confirmation (convenience telephony) 119
Accepts a call 123
Dials a number 124
Redials a number 124
Accepts a waiting call 126
K
Mute 30
Switches the hands-free
microphone on/off 125
Cancels the text message
read-aloud function 138
Switches off the traffic and
navigation announcements 138
L
Rejects a call 123
Ends an active call 126
Rejects a waiting call 126
Page 19
COMAND operating system
17
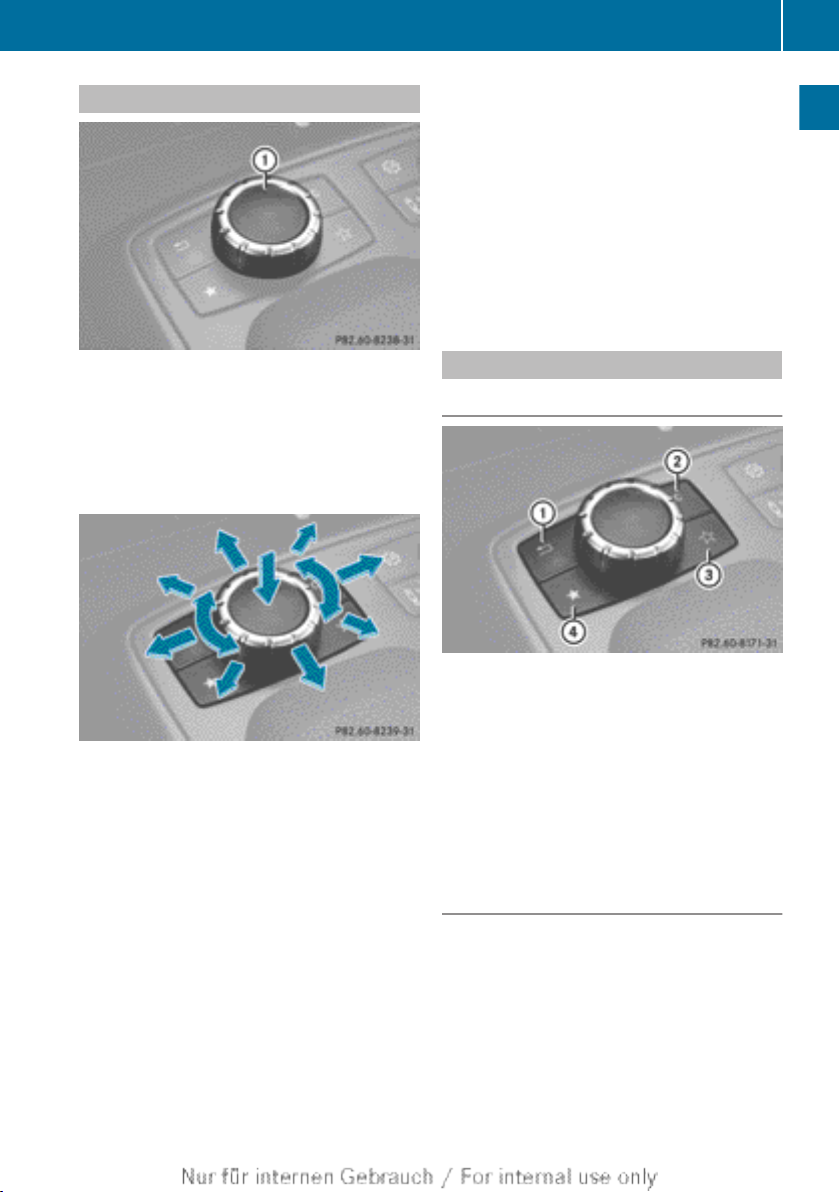
COMAND controller
ML example
:
COMAND controller
You can use the COMAND controller to select
the menu items in the COMAND display.
You can call up menus or lists, scroll through
menus or lists and exit menus or lists.
Operating the COMAND controller (example)
The COMAND controller can be:
R
pressed briefly or pressed and held W
R
turned clockwise or anti-clockwise cVd
R
slid left or right XVY
R
slid forwards or back ZVÆ
R
slid diagonally aVb
In the instructions, operating sequences are
described as follows:
X
Press the $ button.
Radio mode is activated.
X
Select Radio by sliding VÆ and turning
cVd the COMAND controller and press
W to confirm.
X
Confirm Station list by pressing W.
The station list appears.
Buttons on the COMAND controller
Overview
ML example
:
Back button
;
Delete button
=
Favourites button (if available)
?
Favourites button
i
Depending on the vehicle equipment,
there are up to two favourites buttons available for the ML.
Back button
You can exit a menu or call up the basic display of the current operating mode using this
button.
X
To exit the menu: press back button :
briefly.
COMAND changes to the next higher menu
level in the current operating mode.
At a glance
Page 20

COMAND operating system
18
i
You can also exit a menu by sliding the
COMAND controller XVY or ZVÆ.
X
To call up the basic display: press and
hold back button :.
COMAND changes to the basic display of
the current operating mode.
At a glance
Delete button
You can delete individual characters or an
entire entry during character entry using this
button.
X
To delete individual characters: briefly
press delete button ;.
X
To delete an entire entry: press and hold
delete button ;.
Favourites buttons
Depending on the vehicle equipment, there
are up to two favourites buttons available for
the ML.
You can assign predefined functions in
favourites buttons = and ? and call them
up by pressing the button (Y page 47).
Page 21
COMAND operating system
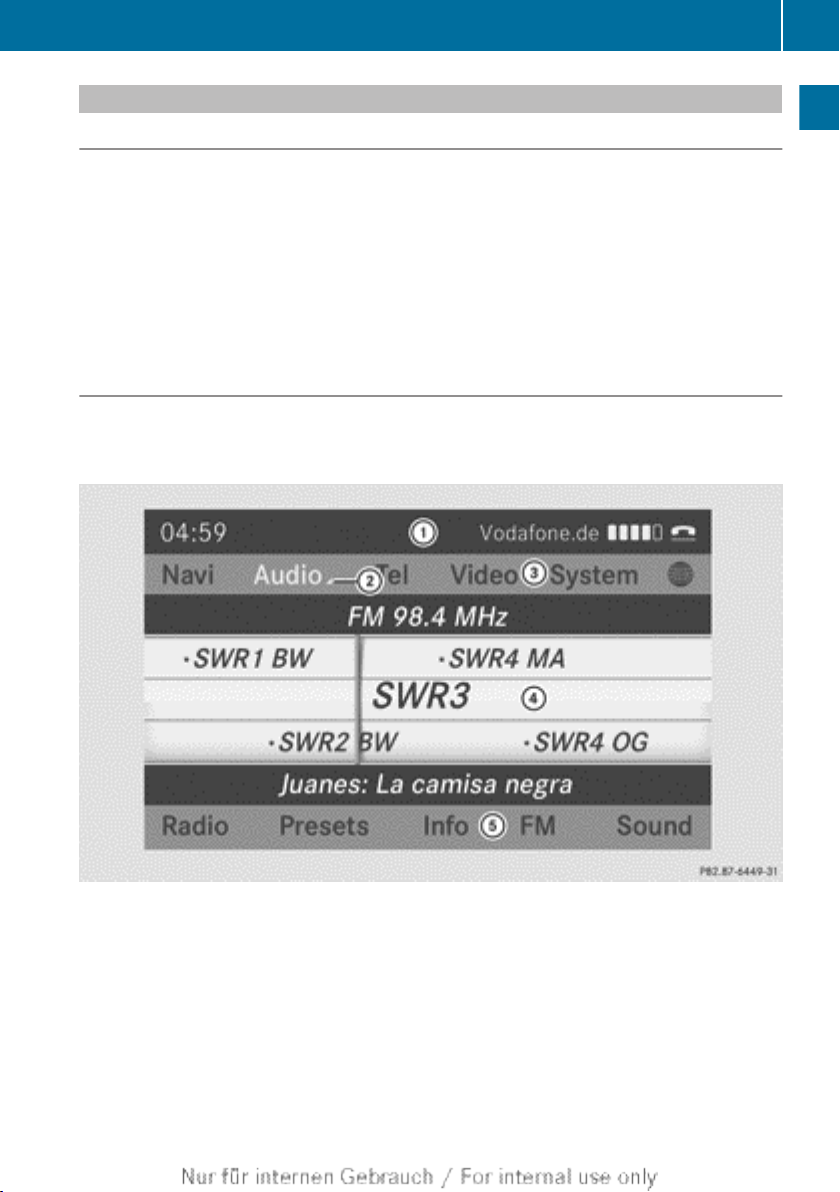
COMAND display
General notes
!
Do not use the space in front of the display for storage. Items stored there may damage
the display or impair its function. Avoid any direct contact with the display surface. Furthermore, pressure on the display surface may result in impairments to the display which
could be irreversible.
Wearing polarised sunglasses may impair your ability to read the display.
The display has an automatic temperature-controlled switch-off feature. The screen's brightness dims automatically if the display overheats. The display may temporarily switch off completely.
Display overview
The COMAND display shows the function currently selected and its associated menus. The
COMAND display is divided into several areas.
The radio display is shown in the example.
19
At a glance
:
Status bar
;
To call up the audio menu
=
Main function bar
?
Display/selection window
A
Radio menu bar
Status bar : shows the time and the current settings for telephone operation. If the traffic
announcement function is switched on, the . symbol appears and when the sound is
switched off, the , symbol is displayed.
Page 22
COMAND operating system
20
The main functions navigation, audio, telephone and video feature additional menus. This is
indicated by triangle ;. The following table lists the available menu items.
Main function bar = allows you to call up the desired main function.
In the example, the Audio main function is set to radio mode and display/selection window ? is active.
Radio menu bar A allows you to operate the radio functions.
At a glance
Menu overview
Navi Audio Tele-
phone
Route settings Radio (includ-
ing DAB radio)
Map settings Disc Address
Personal POIs Memory card AUX
O Activating/
deactivating the
read aloud function for TMC
reports
O Activating/
deactivating road
name announcement
O Audio fadeout
on/off
O Activating/
deactivating the
alternative routes
function
MUSIC REGISTER
USB storage
device
Media Interface
Bluetooth
audio
Telephone
book
®
Video System Globe symbol
TV Calling up
Video
DVD
the system
menu
Calling up
COMAND
Online and
Internet
Avoiding an area Rear
Showing the map
version
AUX
Page 23

COMAND operating system
System menu overview
Settings Time Consumption Display off
21
Display settings Setting the time Calling up the fuel
consumption display
Setting the text
reader speed
LINGUATRONIC settings
Setting the language
Favourites button
Reversing camera
O Activating/deactivating Bluetooth
Importing/exporting
data
Resetting COMAND
The favourites button function is available for the ML.
Reversing camera function: if the function is activated and COMAND is switched on, the
image of the reversing camera is automatically shown in the COMAND display when reverse
gear is engaged.
Cleaning instructions
!
Do not touch the COMAND display. The
display has a very sensitive high-gloss surface; there is a risk of scratching. If you
have to clean the screen, however, use a
mild cleaning agent and a soft, lint-free
cloth.
The display must be switched off and cooled
down before you start cleaning. Clean the
display screen, when necessary, with a commercially available microfibre cloth and
cleaning agent for TFT/LCD displays. Do not
apply pressure to the display surface when
cleaning it, as this could cause irreversible
damage. Then, dry the surface with a dry
microfibre cloth.
Setting the format
Setting the time zone
®
Avoid using alcoholic thinners, petrol or abrasive cleaning agents. These could damage the
display surface.
Switching off the
display
At a glance
Page 24
Operating COMAND
22
Multifunction steering wheel
At a glance
Example: SLK
Function Page
:
Multifunction display (see
the vehicle Owner's Manual)
;
?
Switches on LINGUATRONIC (see the separate
operating instructions)
=
~
Rejects or ends a call 123
6
Makes or accepts a call 123
Switches to the redial memory 124
WX
Adjusts the volume 30
8
Mutes 30
?
=;
Selects a menu 124
Function Page
9:
Selects a submenu or
scrolls through lists 124
a
Confirms selections and
fades out messages 124
A
%
Back button or switches
LINGUATRONIC off (see the
separate operating instructions)
Operating COMAND
Selecting a main function
Initial situation
You would like to switch from navigation
mode (address entry menu) to the system
settings, for example.
X
To switch on navigation mode: press the
Ø function button.
X
To show the menu: press W the COMAND
controller.
X
Select Destination by sliding VÆ and
turning cVd the COMAND controller and
press W to confirm.
X
Select Address entry and press W to
confirm.
The address entry menu appears.
Page 25
Address entry menu
:
Main function bar
X
Slide the COMAND controller ZV and
switch to main function bar :.
X
Select System in the main function bar by
turning cVd the COMAND controller and
press W to confirm.
The system menu appears.
Operating COMAND
:
To call up the audio menu
X
Select Audio in the main function bar by
sliding ZV the COMAND controller and
press W to confirm.
The Audio menu appears.
23
At a glance
Calling up the menu of a main function
If one of the main functions navigation, audio,
telephone or video is switched on, triangle : appears next to the entry. You can now
select an associated menu.
The example describes how to call up the
audio menu from audio CD mode. Insert a
CD/DVD (Y page 193).
Audio menu
The # dot indicates the current audio mode.
X
Select another audio mode, e.g. Radio, by
turning cVd the COMAND controller and
press W to confirm.
Selecting a menu item
The example describes how to select a station
from the station presets in radio mode.
X
Press the $ function button.
X
Select Presets by sliding VÆ and turning
cVd the COMAND controller and press
W to confirm.
The station preset memory appears.
Page 26
Operating COMAND
24
At a glance
X
Select the station by turning cVd the
COMAND controller and press W to confirm.
The station is set.
Calling up the current audio function
X
Select Audio in the main function bar by
sliding ZV and turning cVd the COMAND
controller and press W to confirm.
The basic display of the current audio function, e.g. audio CD mode, appears.
Example of operation
Initial situation
You would like to switch from the system
function to radio mode and set a station, for
example.
The operating example describes how to:
R
call up the current audio function
R
switch on radio mode
R
set a station.
X
To call up the system menu: press the
W button.
System menu
:
To call up the audio menu
Switching on radio mode
Option 1
X
Press the $ function button.
The radio or DAB radio display appears.
i
Repeatedly pressing this function button
switches between the FM, MW, SW and LW
wavebands in that order and then calls up
DAB radio mode. Pressing the button again
takes you back to FM radio mode.
Option 2
X
Select Audio again by sliding ZV the
COMAND controller and press W to confirm.
The Audio menu appears. Radio is highlighted.
Page 27

X
Press W the COMAND controller and confirm Radio.
The radio basic display appears with the
waveband last selected.
Operating COMAND
selection list, you select an entry to copy it to
the address entry menu.
Option 1: town list with character bar
X
Call up the town list with character bar
(Y page 54).
The alphabetically sorted town list shows
the first available entries.
Entering characters using the character
bar
X
Select B by turning cVd the COMAND con-
troller and press W to confirm.
25
At a glance
X
To set a station: turn cVd or slide XVY
the COMAND controller while the display/
selection window is active.
Entering characters in navigation mode (entering a town)
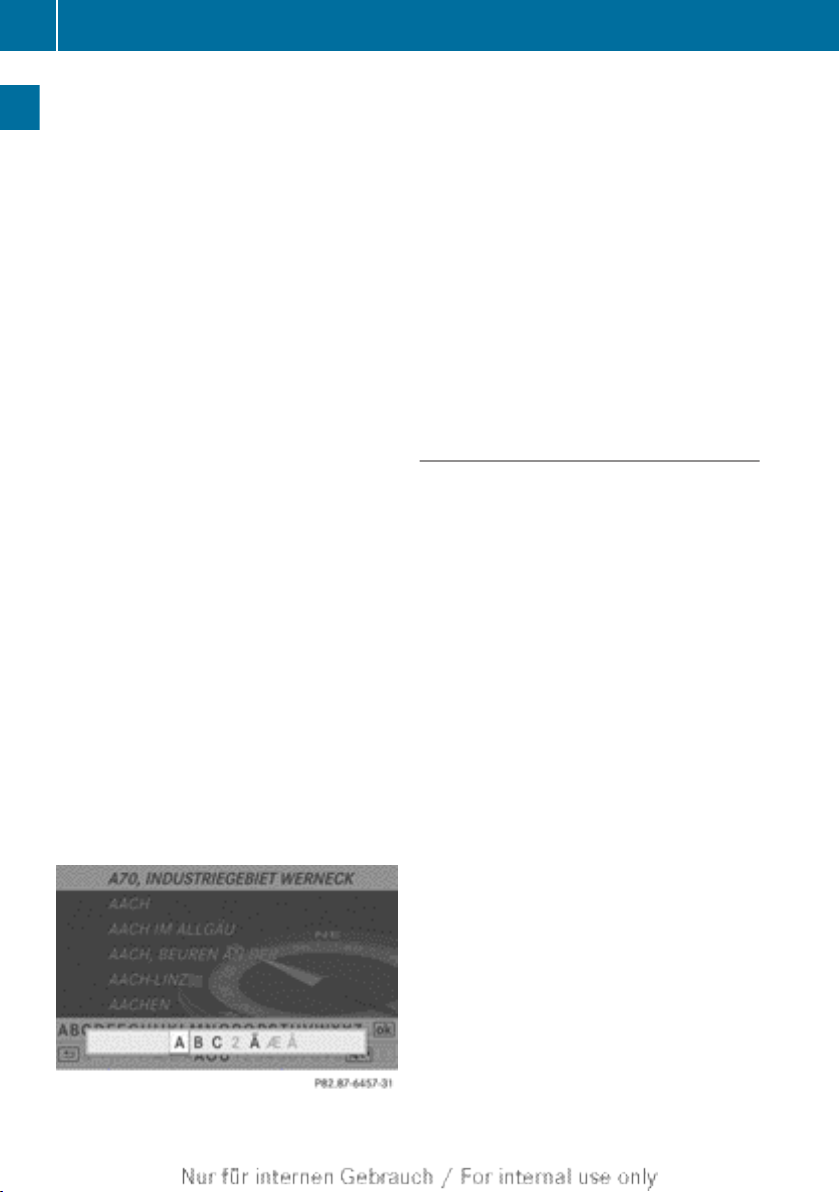
General information
The following paragraphs describe how to
enter characters using town input for BER‐
LIN as an example.
If you want to use the address entry menu
(Y page 53) to enter a town, a street or a
house number, for example, COMAND provides either a list with a character bar
(option 1) or a selection list (option 2).
You can enter the characters using either the
character bar or the number keypad. In the
:
Character entered by the user B
;
Characters automatically added by
COMAND AABE
=
List entry that most closely resembles the
current entry by the user
?
To switch to the selection list
A
To delete an entry
B
To change the character set (Latin/Cyrillic)
C
Characters not currently available
Page 28
Operating COMAND
26
D
Characters currently available
E
Character bar
F
To cancel an entry
G
Currently selected character
H
List
List H shows all available town names begin-
At a glance
ning with a B. List entry most closely resembling the current entry by the user = is
always highlighted at the top of the list
(BAABE in the example).
All characters currently entered by the user
are shown in black (letter B : in the example). Letters added by COMAND are shown in
grey ; (letters AABE in the example).
Character bar E shows the letters still available for selection in black D. These can be
selected. In the example, the letter A is highlighted G. Which characters remain available
depends on the characters already entered
by the user and on the data stored in the digital map. Characters that are no longer available are shown in grey C.
X
Select E, R, L, I, N in succession, confirming
each by pressing W.
Entering characters using the number
keypad
X
Press number key l twice in quick succession to select the letter B.
The character appears at the bottom of the
display when the key is pressed. The first
available letter is highlighted.
You see which characters you can enter with
that key. Each time the key is pressed, the
next character is selected.
Example: key l:
R
press once = A
R
press twice = B
R
press three times = C
X
Wait until the character display goes out.
The entries matching your input are shown
in the list.
X
Enter E, R, L, I, N using the corresponding
keys.
Further functions in the list with character bar
X
To delete characters: select F by sliding
VÆ and turning cVd the COMAND con-
troller and press W to confirm.
or
X
Press the j button next to the
COMAND controller.
X
To delete an entry: select F and press
and hold W the COMAND controller until
the entire entry has been deleted.
or
X
Press the j button next to the
COMAND controller and hold it until the
entire entry is deleted.
X
To switch the character set: select
B and press W to confirm.
This will switch the character set from Latin
to Cyrillic and back.
X
To cancel an entry: select the & symbol
in the bottom left of the character bar and
press W to confirm.
or
X
Press the % back button.
The address entry menu appears.
Page 29
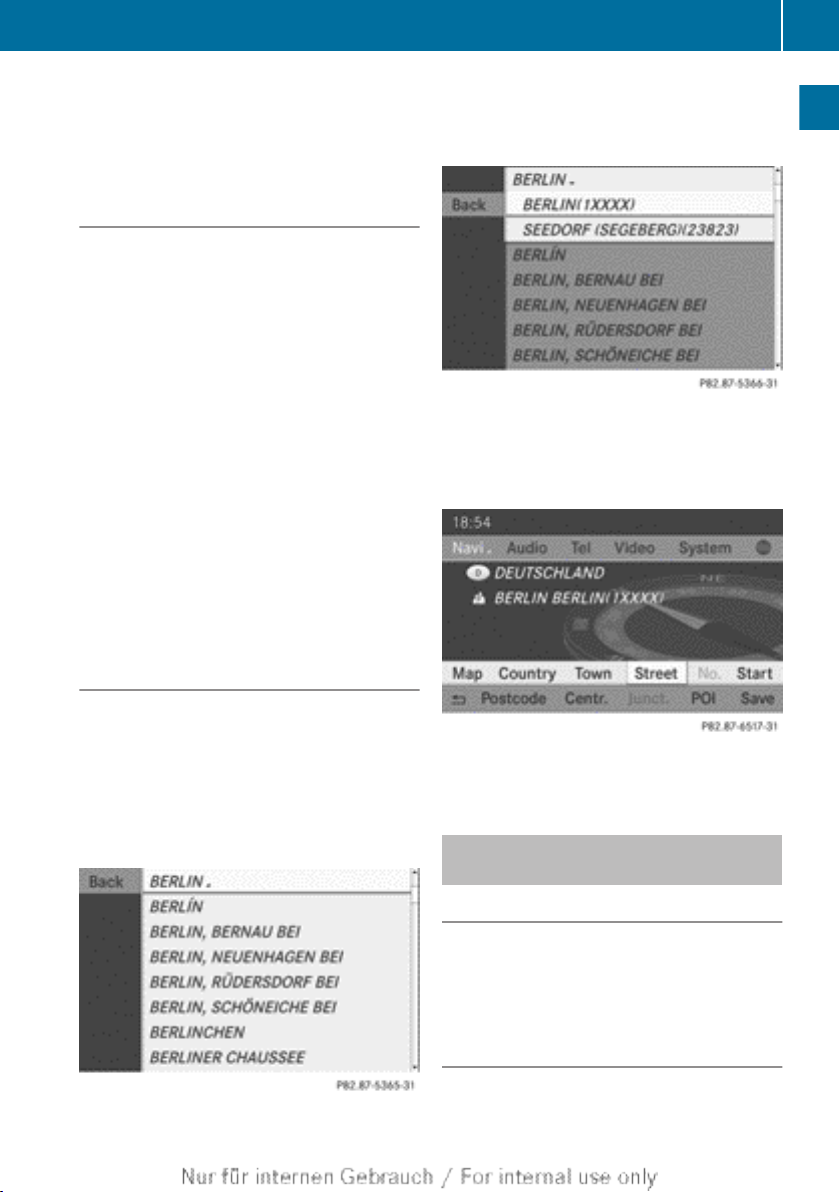
Operating COMAND
27
X
To accept the first list entry: press and
hold W the COMAND controller until the
address entry menu appears.
The accepted list entry is shown there.
Calling up the list as a selection list
Select the desired town from the selection
list.
If there are several entries for a town or if
several towns of the same name are stored,
then ¬ is highlighted in the character bar.
X
Press W the COMAND controller.
It is also possible to switch the town list to
the selection list at any time during character
input.
X
Slide ZV the COMAND controller repeatedly until the town list appears as a selection list.
or
X
Select ¬ in the character bar by turning
cVd the COMAND controller and press
W to confirm.
X
Confirm BERLING by pressing W the
COMAND controller.
You see the available entries.
X
Confirm BERLIN (1XXXX) by pressing W
the COMAND controller.
The address entry menu appears. You can
now enter a street, for example.
At a glance
Option 2: town list as selection list
COMAND either shows the selection list automatically or you can call up the selection list
from the list with character bar.
The example shows the selection list after the
town BERLIN has been entered. The entry is
highlighted automatically. The G icon indicates that there are several entries.
i
You will find further information in the
"Destination entry" section (Y page 53).
Entering characters in the address and the phone book
Introduction
The following section describes how to enter
characters in the phone book (Y page 128)
and the address book (Y page 141) when
creating a new entry.
Creating a new entry in the phone book
X
Call up the input menu with data fields
(Y page 132).
Page 30
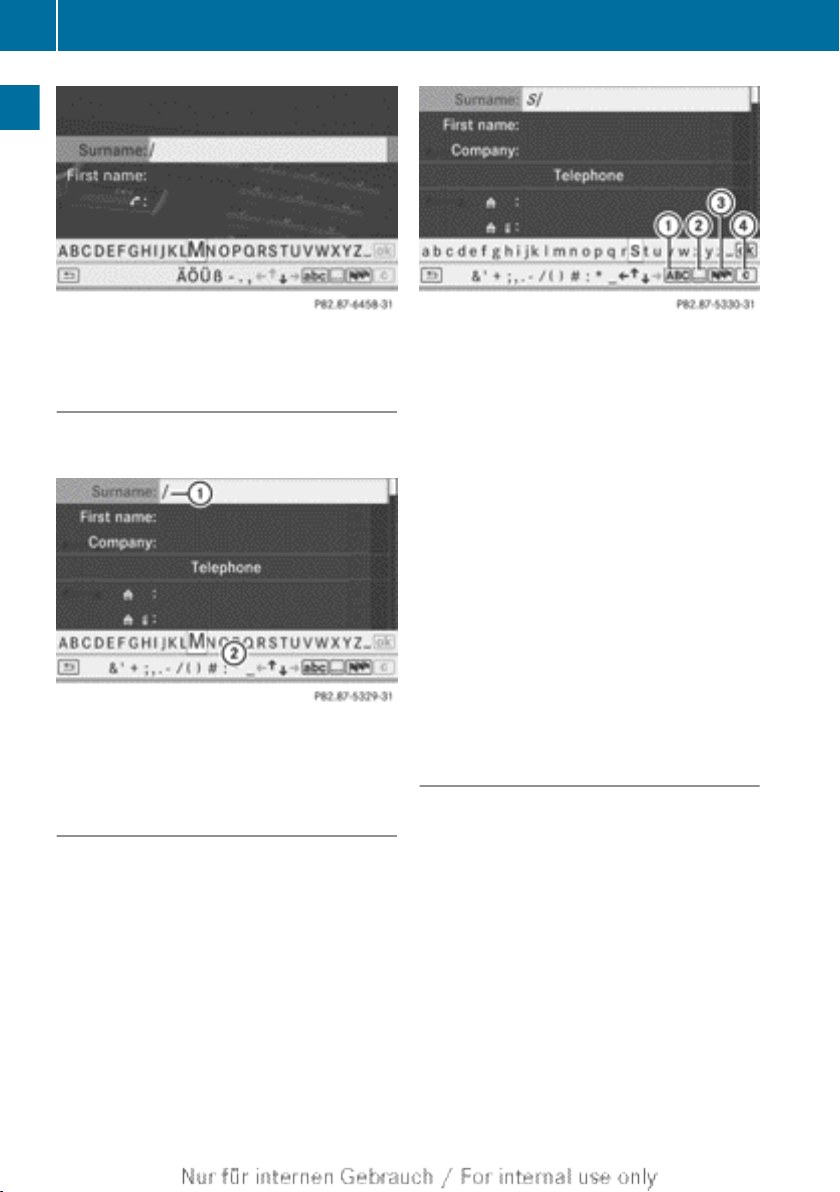
Operating COMAND
28
At a glance
Phone book: input menu with data fields
Creating a new entry in the address
book
X
Call up the input menu with data fields
(Y page 141).
Input menu with data fields
:
Selected data field with cursor
;
Character bar
Entering characters
The example describes how to enter the surname Schulz.
X
Select S by turning cVd and sliding ZVÆ
the COMAND controller and press W to
confirm.
S is entered into the data field. All charac-
ters are shown in black and can always be
selected in the character bar.
The character bar offers characters corresponding to the respective data field (letters or digits).
:
To switch the character bar to upper-
case/lower-case letters
;
To switch the character bar from upper/
lower-case letters to digits
=
Changing the language of the character
bar
?
To delete a character/an entry
X
Select c and confirm by pressing W the
COMAND controller.
The letter c is added to S in the data field.
X
Repeat the process until the name has
been entered in full.
X
To enter a phone number: select the digits one by one in the corresponding data
field by turning cVd and sliding ZVÆ the
COMAND controller and press W to confirm.
Switching data fields
If you want to enter a first name after you have
entered a surname, for example, proceed as
follows to switch between the data fields:
Option 1
X
Select 4 or 5 in the character bar and
press W to confirm.
The input menu shows the data field selected.
Page 31

:
Cursor in the next data field
;
To store an entry
=
4 and 5 icons to select a data field
Option 2
X
Slide ZV the COMAND controller repeatedly until the character bar disappears.
X
Select the data field by sliding ZVÆ and
press W to confirm.
Storing an entry
X
Select ¬ in the character bar by turning
cVd the COMAND controller and press
W to confirm.
The entry is stored in the address book.
Further functions available in the character bar
X
To switch the character bar to upper/
lower-case characters: select * or
E and press W to confirm.
X
To switch the character set: select
p and press W to confirm.
The character set switches between
upper/lower-case letters and digits.
X
To change the language of the character bar: select B and press W to con-
firm.
X
Select the language by turning cVd the
COMAND controller and press W to confirm.
Basic functions of COMAND
X
To reposition the cursor within the data
field: select 2 or 3 and press W to con-
firm.
:
Cursor (repositioned)
;
2 and 3 icon to reposition the cursor
X
Delete the character/entry (Y page 26).
Basic functions of COMAND
Switching COMAND on/off
X
Press the q control knob.
A warning message appears. COMAND
calls up the previously selected menu.
i
If you switch off COMAND, playback of
the current audio or video source will also
be switched off.
29
At a glance
Page 32

Basic functions of COMAND
30
Switching the COMAND display on/ off
X
Press the W function button.
or
X
Select System in the main function bar by
sliding ZV and turning cVd the COMAND
controller and press W to confirm.
At a glance
In both cases, the system menu appears.
X
To switch off: select Display off and
press W to confirm.
X
To switch on: press one of the function
buttons, e.g. W, Ø or the % back
button.
Mute
Switching audio and video sources on/
off
X
Press the 8 button on COMAND or on
the multifunction steering wheel.
The sound from the respective audio or
video source is switched on or muted.
i
When the sound is off, the system dis-
plays the , icon in the status line. When
you change the audio or video source, or
adjust the volume, sound automatically
switches on again.
i
Even if the sound is switched off, you will
still hear traffic and navigation system
announcements.
Switching off Traffic Programme and
navigation announcements completely
X
Traffic Programme: press and hold the
8 button until the . display disap-
pears from the status bar of the display.
A confirmation tone sounds.
X
Navigation announcements: press the
8 button during the announcement.
Switching Traffic Programme and navigation announcements on again
X
Traffic Programme: press and hold down
the 8 button until the . display in the
status bar appears.
A confirmation tone sounds.
X
Navigation announcements: switch
COMAND off and then on again
(Y page 30).
or
X
Start a new route calculation
(Y page 56).
or
X
If the navigation menu is shown, select
+ and press W to confirm
(Y page 81).
Adjusting the volume
Adjusting the volume for the audio or
video source
X
Turn the q control knob.
or
X
Press the W or X button on the multifunction steering wheel.
The volume of the currently selected audio
or video source changes.
You can also adjust the volume for the following:
R
traffic announcements
R
navigation announcements
R
phone calls
R
LINGUATRONIC voice control (see the separate operating instructions)
Adjusting the volume for traffic
announcements and navigation
announcements
i
You can set the volume of traffic and navigation announcements relative to the volume of the audio or video source.
Page 33

Basic functions of COMAND
31
During traffic or navigation announcements:
X
Turn the q control knob.
or
X
Press the W or X button on the multifunction steering wheel.
Adjusting the volume for phone calls
You can adjust the volume for hands-free
mode during a telephone call.
X
Turn the q control knob.
or
X
Press the W or X button on the multifunction steering wheel.
Adjusting the sound settings
Calling up the sound menu
You can make various sound settings for the
different audio and video sources. This means
that it is possible to set more bass for radio
mode than for audio CD mode, for example.
You can call up the respective sound menu
from the menu of the desired mode.
The example describes how to call up the
sound menu in radio mode.
X
Press the $ function button.
The radio display appears. You will hear the
last station played on the last waveband.
X
Select Sound by sliding VÆ and turning
cVd the COMAND controller and press
W to confirm.
You can now set the treble and bass or the
balance and fader for radio mode.
Adjusting treble and bass
X
Select Treble or Bass in the sound menu
by turning cVd the COMAND controller
and press W to confirm.
An adjustment scale appears.
Adjusting the bass (example: SLK)
X
Select a setting by turning cVd the
COMAND controller and press W to confirm.
The setting is stored and you exit the menu.
Adjusting balance and fader
With the Balance function, you can control
whether the sound is louder on the driver's or
front-passenger side.
With the Fade function, you can control
whether the sound is louder in the front or the
rear of the vehicle.
At a glance
Fader Vehicle
Function available C-Class, ML
Function not availa-
SL, SLK
ble
X
Select Balance or Bal./Fad. (Balance/
Fader) in the sound menu by turning cVd
Page 34

Basic functions of COMAND
32
the COMAND controller and press W to
confirm.
At a glance
Adjusting the balance (example: SLK)
X
Select a balance setting by sliding XVY the
COMAND controller and press W to confirm.
X
Select a fader setting by sliding ZVÆ the
COMAND controller and press W to confirm.
The setting is stored and you exit the menu.
Surround sound
General notes
If your vehicle is equipped with the harman/
kardon® Logic 7® surround sound system,
you can set the optimum surround sound in
the vehicle interior.
The harman/kardon®Logic 7® surround
sound system is available for the following
operating modes:
R
radio (FM only)
R
DAB radio
R
audio CD
R
audio DVD (MLP, dts, PCM and Dolby Digital audio formats)
R
MP3 (including SD memory card and USB
storage device)
R
Media Interface
R
Bluetooth® audio mode
R
TV
R
video DVD (PCM, dts and Dolby Digital
audio formats)
R
AUX
Because some DVDs contain both stereo and
multichannel audio formats, it may be necessary to set the audio format (Y page 202).
i
The Logic7® on function creates a surround sound experience for every
passenger when playing, for example,
stereo recordings. It enables optimum playback of music and films on CD, audio DVD
or video DVD with multichannel audio formats, such as MLP, dts or Dolby Digital.
This results in sound characteristics like
those intended by the sound engineer
when the original was recorded.
i
If you select Logic7® off, all permissible
formats are played as stored on the
medium. Due to the design of the
passenger compartment, an optimum
audio experience cannot be guaranteed for
all passengers.
i
Discs which support the audio formats
mentioned have the following logos:
Dolby Digital
dts
Page 35

MLP
Switching surround sound on/off
The example describes how to set the surround sound for radio mode.
X
Press the $ function button.
The radio display appears. You will hear the
last station played on the last waveband.
X
Select Sound by sliding VÆ and turning
cVd the COMAND controller and press
W to confirm.
X
Select surround and press W to confirm.
Climate control status display
X
Select Logic7® on or Logic7® off by turning cVd the COMAND controller and press
W to confirm.
Depending on your selection, surround
sound is switched on or off and the menu
is exited.
X
To exit the menu without saving: press
the % back button or slide XVY the
COMAND controller.
i
Please note the following: for the optimum audio experience for all passengers
when LOGIC7® is switched on, the balance
and fader settings should be set to the
centre of the vehicle interior.
You will achieve the best sound results by
playing high-quality audio and video DVDs.
MP3 tracks should have a bit rate of at least
128 kbit/s.
Surround sound playback does not function for mono signal sources, such as the
medium wave range (MW) in radio mode.
If radio reception is poor, e.g. in a tunnel,
you should switch off Logic 7®, as it may
otherwise switch between stereo and
mono and cause temporary sound distortions.
On some stereo recordings, the sound
characteristics may differ from conventional stereo playback.
33
At a glance
Setting surround sound (example: SLK)
Climate control status display
If you change the settings of the climate control system (see the vehicle Owner's Manual),
the climate status display appears for three
seconds at the bottom of the screen in the
COMAND display. It displays the current settings of the various climate control functions.
The climate status display appears when you:
X
Turn one of the two temperature controls
and set the temperature for the left or
Page 36

Rear Seat Entertainment System
34
1, 2
right
or turn the temperature control and
set the temperature
3, 4
.
or
X
Turn the control to set the airflow
or
X
Press one of the following buttons:
K increases air flow
At a glance
I decreases air flow
1, 2
1, 2
¿ switches climate control on/off
á switches the "ZONE" function on/
1, 2
off
à controls the air conditioning automatically
1, 2
ñ sets the climate control style in automatic mode (FOCUS/MEDIUM/DIF-
2
FUSE)
_ sets the air distribution
M, P or O sets the air distribu-
3, 4
tion
.
¬ turns on the "Defrost" func-
1, 2, 3, 4
tion
i
The climate status display does not
appear when the image from the reversing
camera is displayed.
1, 2
3, 4
.
1, 2, 3
The illustration shows an example of current
settings for the "Defrost" function (above)
and the climate control style in automatic
mode (below).
X
To hide the display: turn or press the
COMAND controller.
or
X
Press one of the buttons on the COMAND
operating system.
i
A detailed description of the climate con-
trol is available in the Owner's Manual.
Rear Seat Entertainment System
Components
Overview
The Rear Seat Entertainment System comprises:
R
two rear-compartment screens behind the
front-seat head restraints
R
the remote control
R
a CD/DVD drive
R
AUX jacks on both screens (AUX display)
and on the CD/DVD drive (AUX drive)
R
two sets of cordless headphones
The climate status display in the COMAND display
(example)
1
Available for THERMOTRONIC 2-zone automatic climate control.
2
Available for THERMOTRONIC 3-zone automatic climate control.
3
Available for the air-conditioning system.
4
Available for Heatmatic.
Page 37

Rear Seat Entertainment System
Rear-compartment screens
:
AUX jacks, detailed view in the "CD/DVD drive and AUX jacks" section (Y page 37)
;
Display
35
At a glance
Page 38

Rear Seat Entertainment System
36
Remote control
Overview
At a glance
:
Switching the screen on/off
;
To switch the button lighting on/off
=
To select the screen for the remote con-
trol
?
To select a menu or menu item
A
To confirm a selection or setting
B
To switch sound on/off (for corded head-
phones)
C
To adjust the volume (for corded head-
phones)
D
To skip, fast-forward/fast-rewind
E
To select a track, to enter directly
F
To exit a menu (back)
Selecting the screen for the remote control
You can use the remote control to operate
one of the two rear screens at a time. To do
so, you must switch the remote control to the
desired screen.
X
To select the left-hand screen: turn thumbwheel = until "L REAR" is highlighted in the
window.
X
To select the right-hand screen: turn
thumbwheel = until "REAR R" is highlighted in the window.
Switching the screen on/off
If the key is in position 0 or 1 in the ignition
lock (see the vehicle Owner's Manual), or the
key is not inserted, the screens in the rear will
switch off after 30 minutes. Before the
screens switch off, they show a message to
this effect.
You can switch the screens back on. However, this will discharge the starter battery.
X
Point the remote control at the rear-compartment screen which has been selected
for remote operation.
X
Press button : on the remote control.
The respective rear screen switches on or
off.
i
You can only switch the screens on using
the remote control if the ignition is
switched on.
Switching the button lighting on/off
X
Press button ; on the remote control.
Depending on the previous status, the button lighting is switched on or off.
i
If you do not use the remote control for
about 15 seconds, the button lighting
switches off automatically.
Page 39

Switching the sound on/off (corded
headphones only)
X
Press button B on the remote control.
The sound is switched on/off.
Selecting a menu/menu item and confirming your selection
X
Select a menu/menu item using the
=;9: buttons on the
remote control and press the 9 button to
confirm.
CD/DVD drive and AUX jacks
Rear Seat Entertainment System
37
At a glance
:
CD/DVD slot
;
AUX, right-hand (R) jack for audio signal
(red)
=
AUX, left-hand (L) jack for audio signal
(white)
?
AUX, video (V) jack (yellow)
A
CD/DVD eject button
The AUX jacks shown are for the AUX drive.
Identical jacks can be found on the right-hand
side of the rear-compartment screens (AUX
display), (Y page 35).
Page 40

Rear Seat Entertainment System
38
Cordless headphones
Overview
At a glance
:
Volume control
;
Selecting a screen for the headphones
=
Battery compartment cover
?
To switch the cordless headphones on/off
A
Indicator lamp with various displays (Y page 38)
X
Open both sides of the headphones and adjust the fit of the headphones by pulling the
headphone band in the direction of the arrow.
Switching the cordless headphones
on/off
X
Press button ?.
Depending on the previous status, the
headphones are switched on or off. To save
the battery, the headphones are switched
off automatically if they do not receive an
audio signal within three minutes.
Adjusting the volume of the headphones
X
Turn volume control : until the desired
volume has been set.
i
If you have connected corded headphones to a rear-compartment screen, you
can adjust the volume by pressing buttons
C on the remote control (Y page 36).
Selecting a screen for the headphones
X
Move push slider ; to L (left-hand screen)
or R (right-hand screen).
Indicator lamp displays
The colour of the indicator lamp shows
whether the headphones are switched on or
off and indicates the charge level of the batteries inserted.
Page 41

Reversing camera
39
LED dis-
Status
play
Green The headphones are switched
on and connected to a screen.
Flashes
green
The headphones are establishing the connection to a
screen.
Red The headphones are switched
on and the batteries are
almost discharged.
No display
(dark)
The headphones are switched
off or the batteries are discharged.
Connecting additional headphones
You can connect one additional set of corded
headphones to each of the two rear screens
(Y page 35). The socket is designed for headphones with a 3.5 mm stereo jack plug and
an impedance of 32 ohms.
Changing batteries
Batteries are required for the remote control
and for the two sets of cordless headphones.
For changing batteries: (Y page 244)
viously selected display as soon as you shift
out of reverse gear.
i
Further information on the reversing camera driving system can be found in the vehicle Owner's Manual.
X
Press the W function button.
The system menu appears.
X
Select Settings by turning cVd the
COMAND controller and press W to confirm.
X
Select Rear view camera and press W to
confirm.
X
Select Activation by R gear and press
W to confirm.
The function is switched on O or off ª,
depending on the previous status.
At a glance
Reversing camera
Risk of accident
G
The reversing camera is designed to assist
you when reversing.
Please observe the corresponding safety
notes in your vehicle's Owner's Manual.
If your vehicle is equipped with a reversing
camera, its image is automatically relayed to
the COMAND display if the function is activated and you engage reverse gear.
If the function is activated, the COMAND display will automatically switch back to the pre-
Z
Page 42

40
Page 43

Vehicle equipment .............................. 42
Display settings .................................. 42
Time settings ....................................... 42
Fuel consumption display .................. 44
Text reader settings ............................ 44
LINGUATRONIC settings ..................... 44
Bluetooth® settings ............................ 46
System language settings .................. 47
Assigning the favourites button ........ 47
Importing/exporting data .................. 48
Reset function ..................................... 48
41
System settings
Page 44

Time settings
42
Vehicle equipment
i
These Operating Instructions describe all
standard and optional equipment available
for your vehicle at the time it was purchased. Please note that your vehicle may
not be equipped with all features described.
Display settings
Setting the brightness
System settings
The brightness detected by the display light
sensor affects the setting options for this
function.
X
Press the W button.
X
Select Settings by turning cVd the
COMAND controller and press W to confirm.
X
Select Display and press W to confirm.
X
Select Brightness and press W to confirm.
design by manually selecting day or night
design or opt for an automatic setting.
X
Press the W button.
X
Select Settings by turning cVd the
COMAND controller and press W to confirm.
X
Select Display and press W to confirm.
X
Select Day design, Night design or
Automatic by turning cVd the COMAND
controller and press W to confirm.
A dot indicates the current setting.
Design Explanation
Day design
The display is set permanently to day design.
Night design
The display is set permanently to night design.
Automatic When the Automatic
setting is selected,
COMAND evaluates the
readings from the automatic vehicle light sensor and switches
between the display
designs automatically.
X
Adjust the brightness by turning cVd the
COMAND controller and press W to confirm.
Display design
Your COMAND display features optimised
designs for operation during daytime and
night-time hours. You can customise the
Time settings
General information
If COMAND is equipped with a navigation system and has GPS reception, COMAND automatically sets the time and date. You can also
adjust the time yourself in 30-minute increments, but the date cannot be changed.
i
If you set the time in 30-minute increments, any time zone settings and settings
for changing between summer and standard time are lost (Y page 43).
Page 45

Time settings
43
i The following navigation system functions
require the time, time zone and summer/
standard time to be set correctly in order
to work properly:
R
route guidance on routes with timedependent traffic guidance
R
calculation of expected time of arrival
Setting the time
X
Press the W button.
X
Select Time by turning cVd the COMAND
controller and press W to confirm.
X
Select Set time and press W to confirm.
X
Set the time by turning cVd the COMAND
controller and press W to confirm.
The time is accepted.
Setting the time/date format
X
Press the W button.
X
Select Time by turning cVd the COMAND
controller and press W to confirm.
X
Select Format and press W to confirm.
The # symbols show the current settings.
Abbreviation Meaning
DD/MM/YYYY
Day/Month/Year
(date format)
HH/MM
Hours/Minutes
(time format)
You can set the 24-hour or the AM/PM format.
X
Set the format by turning cVd the
COMAND controller and press W to confirm.
Setting the time zone and switching between summer and standard time
X
Press the W button.
X
Select Time by turning cVd the COMAND
controller and press W to confirm.
X
Select Time zone and press W to confirm.
The country list appears. The # dot indicates the current setting.
X
Select the country you are currently in by
turning cVd the COMAND controller and
press W to confirm.
A time zone list may also be displayed,
depending on the country selected.
X
Select the time zone and press W to confirm.
Further steps depend on whether the navigation system currently has GPS reception and
on which country you have selected.
You have the following two options:
X
To change manually: select Summer
time or Standard time and press W to
confirm.
X
To switch automatic changeover on/
off: select Autom. Summer / Winter
time on or Autom. Summer / Winter
System settings
Page 46

LINGUATRONIC settings
44
time off by turning cVd the COMAND
controller and press W to confirm.
The # dot indicates the current setting.
i
If you have switched off the automatic
changeover function, you must change
from summer to standard time and vice
versa manually using the "Set time" function (Y page 43).
Fuel consumption display
Overview
System settings
You can display the fuel consumption in the
COMAND display.
If your vehicle is a hybrid vehicle, you can call
up other displays (see the separate operating
instructions).
Calling up displays
X
Press the W button.
X
In the System menu, slide ZV the
COMAND controller up until the full screen
is displayed.
X
Slide XVY the COMAND controller repeatedly until the fuel consumption indicator
appears.
The COMAND display shows the fuel consumption for the last 15 minutes of the
journey.
The fuel consumption display may differ from
the display in the From Start trip computer
in the Trip menu, see the vehicle Owner's
Manual.
Exiting the display
X
Slide XVY the COMAND controller repeatedly until the clock display appears.
X
Press W the COMAND controller.
The system menu appears.
Text reader settings
Setting the text reader speed
X
Press the W button.
X
Select Settings by turning cVd the
COMAND controller and press W to confirm.
X
Select Text reader speed and press W
to confirm.
A list appears. The # dot indicates the
current setting.
X
Select a setting by turning cVd the
COMAND controller and press W to confirm.
LINGUATRONIC settings
Every bar of the graph displays the average
value for one minute.
Opening/closing the help window
The help window provides information in addition to the audible instructions during individualisation as well as later, when you are
using voice control.
X
Press the W button.
X
Select Settings by turning cVd the
COMAND controller and press W to confirm.
X
Select Linguatronic and press W to con-
firm.
Page 47

LINGUATRONIC settings
45
X
Select Help window and press W to confirm.
You have switched the help window on
O or off ª.
Individualisation
Introduction
Using individualisation, you can fine tune LINGUATRONIC to your own voice and thus
improve voice recognition. This means that
other users' voices will not be recognised as
easily, and therefore this function can be
deactivated (Y page 46).
Individualisation comprises two parts and
takes approximately 5 minutes. It consists of
training the system to recognise a certain
number of digit sequences and voice commands.
X
Select Linguatronic and press W to con-
firm.
X
Select Start new individualisation
and press W to confirm.
You see and hear a prompt asking whether
you would like further information.
X
Select Yes or No and press W to confirm.
If you select No, the first part of individualisation begins. You will be asked whether
you would like to train digits or voice commands.
If you select Yes, you will see and hear
information on the individualisation process. The first part of individualisation then
begins automatically.
X
To close the display: press W the
COMAND controller.
You will be asked whether you would like
to train digits or voice commands.
System settings
Starting new individualisation
Individualisation can only be started when the
vehicle is stationary. Before starting, switch
off all devices or functions which could interfere, such as the radio or the navigation system. After starting the session, the system
guides you through the training with spoken
instructions.
X
Press the W button.
X
Select Settings by turning cVd the
COMAND controller and press W to confirm.
At the end of the first part, a prompt will
appear asking whether you wish to begin the
second part.
X
Select Yes or No and press W to confirm.
If you select No, individualisation will be
cancelled. The data from the first part is
stored automatically.
If you select Yes, the second part will begin.
Individualisation is completed at the end of
the second part. You will see a message to
this effect. The data from the second part is
stored automatically.
Page 48

46
Bluetooth® settings
Cancelling the first or second part of
individualisation
System settings
X
Confirm Cancel by pressing W the
COMAND controller.
A prompt appears asking whether you
really wish to cancel.
X
Select Yes or No and press W to confirm.
If you select Yes, the voice training will be
cancelled. The data from the part during
which you exited is not stored.
If you select No, the current part begins
again.
Deleting existing individualisation data
X
Press the W button.
X
Select Settings by turning cVd the
COMAND controller and press W to confirm.
X
Select Linguatronic and press W to con-
firm.
X
Select Delete individualisation and
press W to confirm.
A prompt appears asking whether you
really wish to delete.
X
Select Yes or No and press W to confirm.
If you select No, the process will be aborted.
If you select Yes, the individualisation is
deleted. You will see a message to this
effect.
Activating/deactivating individualisation
X
Press the W button.
X
Select Settings by turning cVd the
COMAND controller and press W to confirm.
X
Select Linguatronic and press W to con-
firm.
X
Select Individualisation on and press
W to confirm.
Individualisation is activated O or deactivated ª.
Bluetooth® settings
General information about Blue-
®
tooth
Bluetooth® technology is the standard for
short-range wireless data transmission of up
to approximately 10 metres. Bluetooth
®
allows, for example, the exchange of vCards.
Bluetooth® is a registered trademark of Bluetooth Special Interest Group (SIG) Inc.
Activating/deactivating Bluetooth
X
Press the W button.
®
The system menu appears.
X
Select Settings by turning cVd the
COMAND controller and press W to confirm.
X
Select Activate Bluetooth and press
W to confirm.
This switches Bluetooth® on O or off ª.
Page 49

System language settings
This function allows you to determine the language for the menu displays and the navigation announcements. The selected language
affects the characters available for entry.
If you change the system language, the language for LINGUATRONIC will be also be
changed. If the selected language is not supported by LINGUATRONIC, English will be
selected.
X
Press the W button.
X
Select Settings by turning cVd the
COMAND controller and press W to confirm.
X
Select Language and press W to confirm.
The list of languages appears. The # dot
indicates the current setting.
X
Select the language by turning cVd the
COMAND controller and press W to confirm.
COMAND loads the selected language and
sets it.
Assigning the favourites button
This function is available for the ML. Depending on the vehicle equipment, you can assign
one or two favourites buttons. They are located on the left (one favourites button fitted)
or on the left and right (two favourites buttons
fitted) beside the COMAND controller
(Y page 17).
You can select the following predefined functions in a menu:
R
Display off/on: you can switch the dis-
play off or on.
R
Full screen: 'Clock': you can show the
clock in full screen.
R
Full screen: 'Map': you can show the
map in full screen.
R
Spoken driving tip: you can call up the
current driving recommendation.
Assigning the favourites button
R
Display traffic messages: you can call
up traffic reports.
R
Navigate to 'Home address': you can
start route guidance to your home address
if you have already entered and saved the
address (Y page 57).
R
Detour menu: you can call up the Detour
menu and then avoid a section of the route
and recalculate the route (Y page 82).
R
Compass screen: you can call up the com-
pass.
X
To assign a favourites button: press the
W button.
X
Select Settings by sliding VÆ and turning
cVd the COMAND controller and press
W to confirm.
X
Select Assign as favourite and press
W to confirm.
The list of predefined functions appears.
If your vehicle is equipped with a favourites
button, the # dot indicates the currently
selected function.
If your vehicle is equipped with two favourites buttons, two asterisks indicate the currently selected function for the respective
favourites button.
X
Select the function by turning cVd the
COMAND controller and press W to confirm.
If your vehicle is equipped with a favourites
button, it is assigned with the function
selected.
If your vehicle is equipped with two favourites buttons, you will see a submenu.
X
Select the favourites button by turning
cVd and sliding ZVÆ the COMAND con-
troller and press W to confirm.
The favourites button selected is assigned
the predefined function.
X
To call up a favourite (example): press
the g favourites button.
This calls up the predefined function.
47
System settings
Page 50

Reset function
48
Importing/exporting data
With this function, you can transfer COMAND
data from one system (vehicle) to another
system (vehicle). You can either use an SD
memory card or a USB storage device (e.g. a
USB stick) as temporary storage.
X
Press the W button.
The system menu appears.
X
Select Settings by turning cVd the
COMAND controller and press W to confirm.
System settings
X
Select Import/export data and press
W to confirm.
X
Select Import data or Export data and
press W to confirm.
X
To select a storage location: insert the
memory card (Y page 196) or USB storage
device into the USB port (Y page 196).
X
Select Memory card or USB storage and
press W to confirm.
X
To select all data: select All data and
press W to confirm.
This function exports all the data to the
selected disc.
X
Select the data type and press W to confirm.
Depending on the previous entry, select the
data type for the export O or not ª.
Reset function
You can reset COMAND to the factory settings. Amongst other things, this will delete
all personal data (e.g. station presets,
address book entries, entries in the destination memory and in the list of previous destinations in the navigation system). Resetting
is recommended before selling or transferring
ownership of your vehicle, for example.
Data on the internal hard drive, e.g. music
files in the MUSIC REGISTER, will be deleted.
You can also delete music files from the
MUSIC REGISTER using the "Delete all music
files" (Y page 210) function.
X
Press the W function button.
X
Select Settings by turning cVd the
COMAND controller and press W to confirm.
X
Select Reset and press W to confirm.
A prompt appears asking whether you wish
to reset.
X
Select Yes or No and press W to confirm.
If you select No, the process will be aborted.
If you select Yes, a prompt will appear again
asking whether you really wish to reset.
X
Select Yes or No and press W to confirm.
If you select Yes, a message will be shown.
COMAND is reset and restarted.
If you select No, the process will be aborted.
Export data menu (example)
Page 51

Vehicle equipment .............................. 50
Introduction ......................................... 50
Basic settings ...................................... 52
Destination entry ................................ 53
Entering a special destination ........... 66
Personal special destinations ............ 71
Route guidance ................................... 75
Dynamic route guidance .................... 88
Destination memory ........................... 92
Previous destinations ......................... 95
Map operation and settings ............... 96
Additional settings ........................... 103
Problems with the navigation sys-
tem ..................................................... 109
49
Navigation system
Page 52

Introduction
50
Vehicle equipment
i
These Operating Instructions describe all
standard and optional equipment available
for your vehicle at the time it was purchased. Please note that your vehicle may
not be equipped with all features described.
Introduction
Safety notes
Risk of accident
G
For safety reasons, only enter a new destination when the vehicle is stationary. You may
Navigation system
otherwise be distracted from the traffic conditions, cause an accident and injure yourself
and others.
COMAND calculates the route to the destination without taking account of the following,
for example:
R
traffic lights
R
stop and give way signs
R
parking or stopping restrictions
R
lane narrowing
R
other road and traffic rules and regulations
COMAND may give incorrect driving recommendations if the data on the digital map does
not correspond to the actual conditions. For
example, a route may have been diverted or
the direction of a one-way street may have
changed.
For this reason, you must always observe the
respective road and traffic rules and regulations during your journey. Road and traffic
rules and regulations always have priority
over system driving recommendations.
General notes
Operational readiness of the navigation
system
In vehicles for certain countries, the navigation system is not operational immediately
after delivery because the digital map is not
pre-installed.
If this is the case, the following message
appears in the display after you switch to navigation mode:
Please insert the map DVD to acti‐
vate navigation.
X
To install the map software: proceed as
described in the "Updating the digital map"
section (Y page 107).
The navigation system must determine the
position of the vehicle before first use or
whenever operational status is restored.
Therefore, you may have to drive for a while
before precise route guidance is possible.
GPS reception
Correct functioning of the navigation system
depends, amongst other things, on GPS
reception. In certain situations, GPS reception may be impaired, there may be interference or there may be no reception at all, e.g.
in tunnels or multi-storey car parks.
Entry restriction
On vehicles for certain countries, there is a
restriction on entering data.
The restriction is active above a vehicle speed
of about 5 km/h. The restriction is deactivated as soon as the vehicle speed drops below
about 3 km/h.
When the restriction is active, certain entries
cannot be made. This will be indicated by the
fact that certain menu items are greyed out
and cannot be selected.
Page 53

The following entries are not possible, for
example:
R
entering the destination town and street
R
entering a destination via the map
R
entering special destinations in the vicinity
of a town or via a name search
R
editing entries
R
direct entry using the number keypad
Other entries are possible, such as entering
special destinations in the vicinity of the destination or current position.
Addresses can be entered via LINGUATRONIC (see separate Operating Instructions) while the vehicle is in motion.
Switching on navigation mode
Option 1
X
Press the Ø function button.
The map is displayed with the menu either
shown or hidden.
Option 2
X
Select Navi in the main function bar by
sliding ZV and turning cVd the COMAND
controller and press W to confirm.
The map is displayed with the menu shown.
Introduction
Map without the menu; route guidance inactive
:
Current vehicle position
;
Map orientation selected
=
Map scale selected
"Route guidance active" means that you have
entered a destination and that COMAND has
calculated the route. The display shows the
route, changes of direction and lane recommendations. Navigation announcements
guide you to your destination.
"Route guidance inactive" means that no destination has been entered and that no route
has been calculated.
Showing/hiding the menu
X
To hide the menu: slide ZV the COMAND
controller and, when the Full screen
menu item is shown, press W to confirm.
or
X
Press the % back button.
The map can be seen in the full-screen display.
X
To show the menu: press W the COMAND
controller when the map is shown in fullscreen display.
51
Navigation system
Map showing the menu; route guidance inactive
:
Status bar
;
Main function bar
=
Current vehicle position
?
Navigation menu bar
Z
Page 54

Basic settings
52
Basic settings
Route settings
Setting route type and route options
You can select the following route types:
R
Fast route: COMAND calculates a route
with the shortest (minimised) journey time.
R
Dynamic route: same route type as Fast
route. COMAND also takes into account
any RDS-TMC traffic reports received during route guidance5. Thus, the navigation
system is able to guide you around a traffic
jam, for example. If a faster route is determined due to a received RDS-TMC traffic
announcement, the navigation system
Navigation system
changes the route. If possible, it will bypass
blocked roads.
R
Eco route: the Eco route (economic
route) is a variant of the Fast route route
type. COMAND will attempt to minimise the
journey distance at the expense of a slightly
increased journey time.
R
Short route: COMAND calculates a route
with the shortest possible (minimised)
route distance.
i
On very long routes, the "Economic route"
more or less corresponds to the "Fast
route" route type.
X
To call up the route settings menu: press
the Ø function button.
X
Select Navi in the main function bar by
sliding ZV and turning cVd the COMAND
controller and press W to confirm.
X
Select Route settings and press W to
confirm.
Route settings menu (start of menu)
:
To select the route type
;
To set route options
Route settings (end of menu)
X
Select a route type and press W to confirm.
A filled circle indicates the current setting.
X
Select the route option(s) and press W to
confirm.
The route options are switched on O or off
ª, depending on the previous status.
i
If you change the route type and/or the
route options while route guidance is active
(the route has been calculated), COMAND
will calculate a new route.
If you change the route type and/or the
route options while route guidance is inactive (no destination has been entered yet),
COMAND uses the new setting for the next
route guidance.
i
The route calculated may, for example,
include ferry connections, even if the
5
RDS-TMC traffic reports are not available in all countries.
Page 55

Destination entry
53
Avoid ferries route option is switched
on.
In some cases, e.g. when calculating particularly long routes, COMAND may not be
able to take all the selected route options
into account.
X
To exit the menu: slide XVY the COMAND
controller.
Destination entry
Introduction to destination entry
Risk of accident
G
For safety reasons, only enter a new destination when the vehicle is stationary. You could
otherwise be distracted from the traffic conditions, cause an accident and injure yourself
and others.
The following destination entry options are
available:
R
entering a destination by address
R
entering a destination from the destination
memory
R
entering a destination from the list of last
destinations
R
entering a destination using the map
R
entering a destination using geo-coordinates
R
entering an intermediate stop
R
entering waypoints
R
entering a special destination
R
entering a personal special destination
Entering a destination by address
Introduction
When entering an address as the destination,
you have the following options:
R
entering the country, town/postcode,
street and house number
R
entering the country, town/postcode and
street
R
entering the country, town/postcode and
centre
R
entering the country, town/postcode,
street and junction
R
entering the country and town
Country and town are sufficient to start navigation. You can enter either a town or a postcode. By entering further address data such
as the street and house number, you can
specify the destination more precisely.
i
Note that you can only enter a street,
house number, junction or centre once you
have entered a country and a town or postcode.
i
You can only enter those towns, streets,
postcodes etc. that are stored in the digital
map. This means that for some countries,
you cannot enter postcodes, for example.
Example of entering an address
The following is a step-by-step example of
how to enter an address. The destination
address is as follows:
Germany
Berlin
Unstrutstraße 1
You can of course enter any country, town,
street and house number desired and enter,
for example, your home address (My
address).
Navigation system
Calling up the address entry menu
X
To switch on navigation mode: press the
Ø function button.
Z
Page 56

Destination entry
54
X
To show the menu: press W the COMAND
controller.
X
Select Destination by turning cVd the
COMAND controller and pressing W to
confirm.
X
Select Address entry and press W to
confirm.
The address entry menu appears. If you
have previously entered a destination, this
will be shown in the display.
Navigation system
Address entry menu
Depending on the sequence in which you
enter the address and on the data status of
the digital map, some menu items may not be
available at all or may not yet be available.
Example: after country selection, the menu
items Street, No., Centr. (centre), Junct.
(junction), POI, Save and Start are not yet
available. The Postcode menu item will not
be available unless the digital map contains
postcodes.
Selecting the country
X
Select Country in the address entry menu
by turning cVd and sliding ZVÆ the
COMAND controller and press W to confirm.
You see the list of countries with the character bar.
Instructions for entering characters using
town input as an example can be found in the
"Entering characters in navigation mode
(entering a town)" section (Y page 25).
X
To switch to the country list as a selection list: select ¬ in the character bar
by turning cVd the COMAND controller
and press W to confirm.
or
X
Slide ZV the COMAND controller once or
twice.
X
Select GERMANY by turning cVd the
COMAND controller and pressing W to
confirm.
The address entry menu appears again.
GERMANY has now been entered.
Entering the town
X
Select Town in the address entry menu by
turning cVd and sliding ZVÆ the
Page 57

COMAND controller and press W to confirm.
You will see the town list either with the
character bar (option 1) or as a selection
list (option 2).
Option 1: town list with character bar
X
Enter BERLIN. Instructions for entering
characters can be found in the "Entering
characters in navigation mode (entering a
town)" section (Y page 25).
Option 2: town list as selection list
Destination entry
X
Select BERLIN(1XXXX) by turning cVd the
COMAND controller and press W to confirm.
The address entry menu appears again.
BERLIN(1XXXX) has now been entered.
Entering a street name
X
Select Street in the address entry menu
by turning cVd and sliding ZVÆ the
COMAND controller and press W to confirm.
You will see the street list either with the
character bar (option 1) or as a selection
list (option 2).
Option 1: street list with character bar
X
Enter UNSTRUTSTRASSE. Instructions for
entering characters using town input as an
example can be found in the "Entering characters in navigation mode (entering a
town)" section (Y page 25).
55
Navigation system
:
Highlighted selection and G icon for
additional entries
X
Select BERLIN by turning cVd the
COMAND controller and press W to confirm.
Entries with the G icon cannot be uniquely
assigned. Another selection list is shown.
Option 2: street list as selection list
Z
Page 58

Destination entry
56
Street list
X
Select UNSTRUTSTRASSE by turning cVd
the COMAND controller and press W to
confirm.
X
Irrespective of the option, press W to con-
Navigation system
firm your selection.
The address entry menu appears again.
UNSTRUTSTRASSE has now been entered.
Entering the house number
X
Select No. in the address entry menu by
turning cVd and sliding ZVÆ the
COMAND controller and press W to confirm.
You will see the house number list either
with the character bar (option 1) or as a
selection list (option 2).
Option 1: house number list with character bar
X
Enter 1. Instructions for entering characters using town input as an example can be
found in the "Entering characters in navigation mode (entering a town)" section
(Y page 25).
Option 2: house number list as selection
list
House number list
X
Select 1 by turning cVd the COMAND con-
troller and press W to confirm.
X
Irrespective of the option, press W to confirm your selection.
The address entry menu appears again. 1
has now been entered.
Starting route calculation
You can now have COMAND calculate the
route to the address entered or save the
address first, e.g. as your home address (My
address) (Y page 57).
Page 59

Destination entry
i
Route calculation takes a certain amount
of time. The time depends on the distance
from the destination, for example.
COMAND calculates the route using the
digital map data.
The calculated route may differ from the
ideal route, e.g. due to roadworks or incomplete map data. Please also refer to the
notes about the digital map (Y page 107).
57
Address entry menu with destination address
:
Destination address
;
To start route calculation
X
In the address entry menu, confirm Start
by pressing W.
If no other route has been calculated, route
calculation starts immediately (Option 1). If
another route has already been calculated
(route guidance is active), a prompt
appears (option 2).
Option 1 — no route guidance active: route
calculation starts. While route calculation is
in progress, an arrow will indicate the direction to your destination. Below this, you will
see a message, e.g. Calculating fast
route....
Once the route has been calculated, route
guidance begins. If the vehicle is travelling on
a non-digitised road, the system displays the
linear distance to the destination, the direction of the destination and the Off road
message. In this case, the display will be
greyed out.
Option 2 – route guidance is already
active: if route guidance is already active, a
prompt will appear asking whether you wish
to terminate the currently active route guidance.
X
Select Yes or No and press W to confirm.
If you select Yes, COMAND will stop route
guidance and start route calculation for the
new destination.
If you select No, COMAND will continue
with the active route guidance.
Entering and storing your home address
You can either enter your home address for
the first time (option 1) or edit a previously
stored home address (option 2).
X
Option 1: enter the address, e.g. a town,
street and house number (Y page 54).
X
Once you have entered the address, select
Save in the address entry menu by turning
cVd and sliding ZVÆ the COMAND con-
troller and press W to confirm.
X
Select Save as "My Address" and press
W to confirm.
COMAND stores your home address as My
address in the destination memory.
X
Option 2: proceed as described under
"Option 1".
A prompt appears asking whether the current home address should be overwritten.
X
Select Yes and press W to confirm.
After selecting Yes, the Saving proce‐
dure successful message appears.
Entering a postcode
Entering a postcode will delete a previously
entered town.
X
Select Postcode in the address entry menu
by turning cVd and sliding ZVÆ the
COMAND controller and press W to confirm.
You will see the postcode list either with
the character bar (option 1) or as a selection list (option 2).
Navigation system
Z
Page 60

Destination entry
58
Option 1: postcode list with character bar
X
Enter a postcode. Instructions for entering
characters using town input as an example
can be found in the "Entering characters in
navigation mode (entering a town)" section
(Y page 25).
Navigation system
Option 2: postcode list as selection list
location. Only streets in the area covered
by the entered postcode are available.
X
Start route calculation (Y page 56).
Entering a centre
Entering a centre will, for example, delete a
previously entered street.
X
Select Centr. (centre) in the address entry
menu by turning cVd and sliding ZVÆ the
COMAND controller and press W to confirm.
You will see the centre list either with the
character bar (option 1) or as a selection
list (option 2).
Option 1: centre list with character bar
X
Enter a centre. Instructions for entering
characters using town input as an example
can be found in the "Entering characters in
navigation mode (entering a town)" section
(Y page 25).
i
In big cities, you can also enter the cen-
tres of districts.
Postcode list
X
Select the desired postcode by turning
cVd the COMAND controller.
X
Irrespective of the option, press W to confirm your selection.
If COMAND can assign the postcode to one
town unambiguously (e.g. 74172 for NECKARSULM), the address entry menu appears
again. You can now complete the address,
e.g. by entering a street.
If COMAND cannot assign the postcode
unambiguously to a specific address, the
address entry menu also appears again.
The postcode is automatically entered. You
can now enter the street for a more precise
Option 2: centre list as a selection list
Page 61

X
Select a centre by turning cVd the
COMAND controller.
X
Irrespective of the option, press W to confirm your selection.
The address entry menu appears again. The
centre selected has been entered.
X
Start route calculation (Y page 56).
Entering a junction name
Entering a junction will delete a previously
entered house number.
X
Select Junct. (junction) in the address
entry menu by turning cVd and sliding
ZVÆ the COMAND controller and press
W to confirm.
You will see the junction list either with the
character bar (option 1) or as a selection
list (option 2).
Option 1: junction list with character bar
X
Enter a junction. Instructions for entering
characters using town input as an example
can be found in the "Entering characters in
navigation mode (entering a town)" section
(Y page 25).
Destination entry
:
G icon indicating more selection options
X
Select a junction by turning cVd the
COMAND controller and press W to confirm.
Entries with the G icon cannot be uniquely
assigned. Another selection list is shown.
X
Select an entry by turning cVd the
COMAND controller and press W to confirm.
The address entry menu appears again. The
junction selected has been entered.
X
Start route calculation (Y page 56).
Selecting a destination from the destination memory (e.g. My address)
59
Navigation system
Option 2: junction list as selection list
Introduction
The destination memory always contains an
entry named "My address". You may wish to
assign your home address to this entry, for
example (Y page 57), and select it for route
guidance. This entry is always located at the
top of the list in the destination memory.
X
To switch on navigation mode: press the
Ø function button.
X
To show the menu: press W the COMAND
controller.
X
Select Destination in the navigation system menu bar by turning cVd the
COMAND controller and pressing W to
confirm.
Z
Page 62

Destination entry
60
X
Select From memory and press W to confirm.
You will see the destination memory list
either with the character bar (option 1) or
as a selection list (option 2).
Option 1: destination memory list with
character bar
X
Enter a destination, e.g. "My address".
Instructions for entering characters using
town input as an example can be found in
the "Entering characters in navigation
mode (entering a town)" section
(Y page 25).
Navigation system
Option 2: destination memory list as a
selection list
X
Irrespective of the option, press W to confirm your selection.
The address entry menu appears again.
"My address" has been entered.
:
To start route calculation
X
To start route calculation: select Start
and press W to confirm.
Entering a destination from the list of last destinations
X
To switch on navigation mode: press the
Ø function button.
X
To show the menu: press W the COMAND
controller.
X
Select Destination in the navigation system menu bar by turning cVd the
COMAND controller and pressing W to
confirm.
X
Select From last destinations and
press W to confirm.
Destination memory list
X
Select My address by turning cVd the
COMAND controller.
"Last destinations" list
Page 63

X
Select the desired destination by turning
cVd the COMAND controller and press
W to confirm.
The address entry menu appears again. The
destination address selected has been
entered.
X
To start route calculation: select Start
and press W to confirm.
Once the route has been calculated, route
guidance begins (Y page 75).
i
Further information on the "Last destinations" memory can be found on
(Y page 95).
Entering a destination using the map
Calling up the map
X
To switch on navigation mode: press the
Ø function button.
X
To show the menu: press W the COMAND
controller.
X
Select Destination in the navigation system menu bar by turning cVd the
COMAND controller and pressing W to
confirm.
X
Select Using map and press W to confirm.
You see the map with the crosshair.
:
Current vehicle position
;
Crosshair
=
Details of the crosshair position
?
Map scale selected
Destination entry
Display = depends on the settings selected
in "Map information in the display"
(Y page 99). The current road name can be
shown, provided the digital map contains the
necessary data, or it may show the geo-coordinate position of the crosshair if the geocoordinates display is switched on.
Moving the map and selecting the destination
X
To move the map: slide XVY, ZVÆ or
aVb the COMAND controller.
X
To set the map scale: as soon as you turn
cVd the COMAND controller, the scale bar
appears.
X
Turn cVd until the desired scale is set.
Turning clockwise zooms out from the map;
turning anti-clockwise zooms in.
X
To select a destination: press W the
COMAND controller.
If the crosshair lies outside the digital map,
COMAND uses the nearest digitised road
for route calculation. You will see the The
crosshair is off the map message. If
the crosshair is located over a body of
water, you will see the message: The des‐
tination is located in a body of
water. Please select another des‐
tination.
X
Select OK and press W to confirm.
If the destination is within the limits of the
digital map, COMAND attempts to assign
the destination to the map.
If the destination can be assigned, you will
see the address entry menu with the
address of the destination. If not, you will
see the Destination from map entry.
X
To start route calculation: select Start
and press W to confirm.
61
Navigation system
Z
Page 64

Destination entry
62
Entering a destination using geo-coordinates
X
To switch on navigation mode: press the
Ø function button.
X
To show the menu: press W the COMAND
controller.
X
Select Destination in the navigation system menu bar by turning cVd the
COMAND controller and pressing W to
confirm.
X
Select Using geo-coordinates and
press W to confirm.
An entry menu appears.
Navigation system
You can now enter the latitude and longitude
coordinates.
X
To change a value: turn cVd the
COMAND controller.
X
To move the mark within the line: slide
XVY the COMAND controller.
X
To move the mark between the lines:
slide ZVÆ the COMAND controller.
X
To confirm the value: press W the
COMAND controller.
i
If the selected position is outside the digital map, COMAND uses the nearest digitised road for route calculation. You will see
the The position is off the map mes-
sage. If the selected position is located
over a body of water, you will see the message: The destination is located in
a body of water. Please select
another destination.
Entering an intermediate stop
Introduction
You can use this function to enter an intermediate stop while the vehicle is in motion.
COMAND provides a selection of predefined
destinations in eight categories for this purpose, e.g. FILLING STATION or CAFÉ.
When you have entered your intermediate
stop, COMAND automatically recalculates
the route to the main destination.
Entering predefined destinations
X
To switch on navigation mode: press the
Ø function button.
X
To show the menu: press W the COMAND
controller.
X
Select Destination in the navigation system menu bar by turning cVd the
COMAND controller and pressing W to
confirm.
X
Select Stopover and press W to confirm.
Option 1: the route does not have an intermediate stop.
Intermediate stop categories
X
Select a category, see option 2.
Option 2: the route already has an intermediate stop.
X
Select Change stopover and press W to
confirm.
Page 65

X
To select a category: select a category by
turning cVd the COMAND controller and
press W to confirm.
COMAND first searches in the selected category for destinations along the route. If
there are no destinations available there,
COMAND searches for destinations within
a radius of up to 100 km of the vehicle
position.
If COMAND finds destinations, a list
appears on the right-hand side of the display.
Search result for the selected category FILLING
STATION (example)
:
Highlighted intermediate stop, current
distance from the vehicle position and
name of the intermediate stop
The intermediate stops along the route are
displayed at the top of the list, sorted by
increasing distance from the vehicle's current
position. Below this you will see the intermediate stops that COMAND finds in the
vicinity of the vehicle's current position.
i
For intermediate stops that are not located along the calculated route, the linear
distance is shown.
X
Select the intermediate stop by turning
cVd the COMAND controller and press
W to confirm.
The address entry menu appears, showing
the destination address.
X
To start route calculation: select Start
and press W to confirm.
Destination entry
If COMAND does not find any destinations,
you will see a message to this effect.
X
Confirm OK by pressing W.
X
Select a different category.
Deleting an intermediate stop
If an intermediate stop has already been
entered, you can delete it.
X
To switch on navigation mode: press the
Ø function button.
X
To show the menu: press W the COMAND
controller.
X
Select Destination in the navigation system menu bar by turning cVd the
COMAND controller and pressing W to
confirm.
X
Select Stopover and press W to confirm.
X
Select Delete stopover and press W to
confirm.
COMAND deletes the intermediate stop
and recalculates the route to the main destination.
Entering waypoints
Introduction
You can map the route yourself by entering
up to two waypoints. The sequence of the
waypoints can be changed at any time.
i
An intermediate stop is always between
the current position of the vehicle and the
first waypoint.
Creating waypoints
X
To switch on navigation mode: press the
Ø function button.
X
To show the menu: press W the COMAND
controller.
63
Navigation system
Z
Page 66

Destination entry
64
X
Select Dest. in the navigation system
menu bar by turning cVd the COMAND
controller and pressing W to confirm.
X
Select Way points and press W to confirm.
The destination is entered in the menu.
Navigation system
Waypoint menu without waypoints
X
Confirm the symbol for waypoint 1 by
pressing W the COMAND controller.
Selection Step
X
From last desti‐
nations
Select a destination from the list
of last destinations (Y page 60).
X
From POIs
Enter a special
destination
(Y page 66).
X
From personal
POIs
Enter a destination from the personal special destinations
(Y page 74).
X
Using map
Enter a destination using the map
(Y page 61).
X
Using geo-coor‐
dinates
Enter a destination using the geocoordinates
(Y page 62).
X
Confirm Set by pressing W the COMAND
controller.
X
Enter the waypoint via one of the following
options.
Selection Step
X
Address entry
Enter a destination by address
(Y page 53).
X
From memory
Select a destination from the destination memory
(Y page 59).
When the entry is complete, the waypoint
appears.
X
To accept the waypoint: confirm OK by
pressing W.
X
To display the details: select Details by
turning cVd the COMAND controller and
press W to confirm.
X
To make a call: select Call with the
COMAND controller and press W to con-
Page 67

Destination entry
65
firm. COMAND switches to telephone
mode (Y page 125).
i
This menu item is available if the waypoint
has a telephone number and a mobile
phone is connected to COMAND
(Y page 114).
X
To call up the map: select Map with the
COMAND controller and press W to confirm.
X
You can move the map and select the destination.
X
To store the waypoint in the destination
memory: select Presets with the
COMAND controller and press W to confirm.
When you have accepted the waypoint, it is
entered in the waypoint menu. The example
shows the menu with two entered waypoints.
by turning cVd the COMAND controller
and press W to confirm.
X
Select Edit and press W to confirm.
X
Use one of the destination entry options
offered.
X
To change the sequence of the waypoints: select Swap in the waypoint menu
by turning cVd the COMAND controller
and press W to confirm.
The entries are swapped.
X
To delete waypoints: select the symbol
for waypoint 1 or 2 in the waypoint menu
by turning cVd the COMAND controller
and press W to confirm.
X
Select Delete and press W to confirm.
i
You can delete a waypoint directly after
entry using this menu item.
Accepting waypoints for the route
X
Select Start in the waypoint menu by turn-
ing cVd the COMAND controller and press
W to confirm.
The route is calculated with the entered
waypoints.
Navigation system
Waypoint menu with two waypoints
Editing waypoints
You can:
R
change waypoints
R
change the sequence in the waypoint menu
R
delete waypoints
To change the sequence, both waypoints
must be entered.
X
To change waypoints: select the symbol
for waypoint 1 or 2 in the waypoint menu
i
Continue is displayed instead of Start
when Calculate alternative routes is
activated in the navigation menu
(Y page 82), option 2.
In the example, there is an intermediate stop
P and a waypoint.
Z
Page 68

Entering a special destination
66
Entering a special destination
Calling up the special destinations menu
Special destinations are predefined destinations within categories, e.g. a filling station in
the AUTOMOTIVE category.
You can look for special destinations:
R
in the vicinity of the destination
R
near the current vehicle position
R
in the vicinity of another town
R
using its name
You can also select special destinations in the
map that are available on the map view
shown.
Navigation system
X
To switch on navigation mode: press the
Ø function button.
X
To show the menu: press W the COMAND
controller.
X
Select Destination in the navigation system menu bar by turning cVd the
COMAND controller and press W to confirm.
X
Select From POIs and press W to confirm.
A menu appears.
Special destinations menu ("Search by name"
selected)
Page 69

Entering a special destination
Defining the position for the special destination search
Selection Characteristic Instructions
Near destina‐
tion
Entry is only possible
when route guidance is
active.
X
Select Near destination from the spe-
cial destinations menu (Y page 66) and
press W to confirm.
X
Select a special destination category
(Y page 68).
67
Current posi‐
tion
Other town
Search by name
The system looks for a
special destination in the
vicinity of the current
vehicle position.
After entering a town,
the system looks for the
special destination
within the town.
You can call up all the
special destinations in
the digital map or focus
your search on the three
previously selected positions.
X
Select Current position in the special
destinations menu and press W to confirm.
X
Select a special destination category
(Y page 68).
Option 1
X
Select Other town in the special destinations menu and press W to confirm.
X
Select the country, if desired
(Y page 54).
X
Enter the town. Proceed as described in
the "Entering a town" section
(Y page 54).
X
Select a special destination category
(Y page 68).
Option 2
X
Enter a town in the address entry menu
(Y page 53).
X
Select POI and press W to confirm.
X
Select a special destination category.
X
Select Search by name in the special
destinations menu and press W to confirm.
X
Select All POIs or one of the three pre-
viously selected positions.
The special destination list with character bar appears.
X
Proceed as described in the "Special
destination list with character bar" section (Y page 70).
Navigation system
Z
Page 70

Entering a special destination
68
Search by special destination category
After selecting the menu items, the special
destination categories appear:
R
Near destination
R
Current position
R
Other town (after entering a town)
i
If you have selected Search by name and
then defined the position for the search,
the special destination list with character
bar appears (Y page 70).
Navigation system
X
Select a special destination category by
turning cVd the COMAND controller and
press W to confirm.
In the example, the AUTOMOTIVE category
has been selected. The G arrow behind an
entry shows that other categories are available.
X
Select a category and press W to confirm.
In the example, the FILLING STATION cat-
egory has been selected.
X
Select the ALL entry or one of the different
filling station brands.
The search for special destinations begins
in the vicinity of the selected position.
Special destination search near the current position (example)
i
The special destination search is cancelled when 50 special destinations have been
found. COMAND searches within a radius
of 100 km.
If COMAND does not find any special destinations within this radius, it extends its
search range to approximately 200 km. If
COMAND finds one special destination
within this radius, it finishes the search.
Once the search is completed, the special
destination list is displayed.
Special destination list
Introduction
The special destination list displays the
search results for the selection made.
Page 71

Special destination list (example)
An entry contains the following information:
R
an arrow that shows the linear direction to
the special destination
R
the linear distance to the special destination
R
the name of the special destination
i
The arrow and linear distance to the destination are not visible if you have entered
a special destination within a specific town.
The arrow is not shown either when entering a special destination in the vicinity of
the destination.
Depending on the special destination
selected, COMAND uses different reference points in determining the linear distance to the destination:
R
vicinity of current position: the linear distance is the distance from the current
vehicle position to the special destination.
R
vicinity of destination: the linear distance
is the distance from the destination
entered to the special destination.
Entering a special destination
COMAND controller and press W to confirm.
The complete address of the special destination selected is shown.
:
Special destination with address
;
To start route calculation
=
To store an address in the destination
memory
?
To display details
A
To make a call when available
B
To display a special destination's position
on the map
X
To start route calculation: select Start
and press W to confirm.
X
To store an address in the destination
memory: select Save and press W to con-
firm. You can now select storage options
(Y page 94).
X
To show the detailed view: select
Details and press W to confirm.
X
To make a call: select Call and press W
to confirm. COMAND switches to telephone mode (Y page 125).
69
Navigation system
Selecting a special destination
The example has been selected in the special
destination category BAR & RESTAURANT.
X
Select the special destination in the special
destination list by turning cVd the
i
This menu item is available if the special
destination has a telephone number and a
mobile phone is connected to COMAND
(Y page 114).
X
To call up the map: select Map and press
W to confirm.
X
You can move the map and select the destination (Y page 61).
Z
Page 72

Entering a special destination
70
Special destination list with character
bar
If you have selected Search by name in the
special destination menu (Y page 66) and
then defined the position for the search
(Y page 67), the special destination list with
character bar appears.
Depending on your selection, you can select
all available special destinations on the digital
map or the special destinations in the vicinity
of the selected position.
Navigation system
Search by name in the vicinity of the destination
(example)
Proceed as described in the "Searching for a
phone book entry" section (Y page 130).
i
If COMAND can assign the characters
entered to one entry unambiguously, the
address entry appears automatically.
X
To start route calculation: select Start
and press W to confirm.
Selecting a special destination using the map
You can select special destinations that are
available in the selected (visible) section of
the map.
X
To switch on navigation mode: press the
Ø function button.
X
To show the menu: press W the COMAND
controller.
X
Select Guide in the navigation system
menu bar by turning cVd the COMAND
controller and press W to confirm.
If special destinations are available:
Depending on the map scale selected, special destination icons appear on the map.
The scale at which the icons are displayed
on the map varies according to the icon.
You can select the icons that COMAND will
display (Y page 98).
If no special destinations are available, you
will see a message to this effect.
i
You also see this message if you have
selected the No symbols menu item under
"Map display" (Y page 98).
X
To confirm the message: press W the
COMAND controller.
Special destination on the map
The special destination is highlighted on the
map, you will see information on the upper
edge of the display.
X
To select a special destination: select
Next or Previous and press W to confirm.
X
To show details for the selection: select
Details and press W to confirm.
X
To change to the map: slide ZV the
COMAND controller.
You can move the map and select the map
section.
Page 73

X
To start route calculation: select Start
and press W to confirm.
A prompt appears asking whether the special destination should be used as the destination.
X
Select Yes or No and press W to confirm.
If you select Yes, route guidance starts.
If you select No, you can choose a new special destination.
i
Continue is displayed instead of Start
when Calculate alternative routes is
activated in the navigation menu
(Y page 82), option 2.
Personal special destinations
Settings
Overview
Personal destinations can be:
R
displayed on the map
R
highlighted on the map as you approach
them
R
managed in categories
R
managed
Personal special destinations
Displaying personal special destinations on the map
The personal special destinations are shown
on the map with an icon according to their
category.
X
Select Display personal POIs on map
in the menu and press W to confirm.
You can select different categories.
71
Navigation system
Calling up the "Personal special destinations" menu
X
To switch on navigation mode: press the
Ø function button.
X
To show the menu: press W the COMAND
controller.
X
Select Navi in the main function bar by
sliding ZV and turning cVd the COMAND
controller and press W to confirm.
X
Select Personal POIs and press W to
confirm.
Selection Explanation
ªNot clas‐
sified
ªCOMAND
Online
Standard entry for personal special destinations
Personal special destinations which you have
imported via COMAND
Online (Y page 168).
If you have created your own categories
(e.g. "Café", "Top 10") (Y page 72), they
are also displayed.
Z
Page 74

Personal special destinations
72
X
Select a category and press W to confirm.
The icon display is switched on O or off
ª, depending on the previous status.
i
The icons are displayed on the map scales
50 m, 100 m and 200 m.
Visual information for personal special
destinations
When the vehicle is approaching a personal
special destination and the display of the relevant category is switched on, it is highlighted
on the map.
X
Select Visual warning for personal
POIs in the menu and press W to confirm.
X
Press W to confirm the entry.
Navigation system
This will switch the visual information for
the personal special destinations of this
category on O or off ª, depending on the
previous setting.
X
To create a new category: select New and
press W to confirm.
X
Enter the name of the category. Proceed as
described under "Entering characters" in
the "Entering characters in the address and
phone books" section (Y page 28).
X
Select the ¬ icon and press W to confirm.
A list with icons appears. You can assign an
icon to the category.
Visual information for a personal special destination (example)
Managing categories for personal special destinations
X
Select Manage categories for per‐
sonal POIs in the menu and press W to
confirm.
X
Select an icon by turning cVd the
COMAND controller and press W to confirm.
You have created a new category with a
name and icon. This category appears
when selecting the display on the map or
when selecting the destination.
X
To rename a category, to change an
icon: select Rename or Change icon and
press W to confirm.
X
Proceed as described under "To create a
new category".
Page 75

Personal special destinations
73
X
To delete a category: select Delete and
press W to confirm.
A prompt appears asking whether the category should be deleted.
i
If you delete a category, all special desti-
nations of this category are also deleted.
X
Select Yes and press W to confirm.
If you select Yes, the category will be
deleted.
If you select No, the process will be aborted.
Managing personal special destinations
X
Select Manage personal POIs in the
menu and press W to confirm.
X
Select Not classified, COMAND Online
or your own category and press W to confirm.
X
Select a personal special destination and
press W to confirm.
The personal special destination is displayed.
The following functions are described in the
"Select as destination" section
(Y page 74):
R
renaming
R
changing the category
R
deleting
i
The crosshair position is saved while
scrolling the map (Y page 61).
Option 2
X
Insert the SD memory card (Y page 61).
X
To show the menu: press W the COMAND
controller.
X
Select Position in the navigation system
menu bar by turning cVd the COMAND
controller and press W to confirm.
X
Select Save position as pers. POI or
Save crosshair pos. as personal
POI ("Move map" function active) and press
W to confirm.
The current position of the vehicle or the
crosshair is saved as a personal special
destination on the SD memory card in the
"Unclassified" category.
Option 3
X
Insert the SD memory card (Y page 196).
X
Select Save in the address entry menu and
press W to confirm.
X
Select Save as personal POI and press
W to confirm.
X
Select a category.
X
Enter the name.
The current address is saved as a personal
special destination on the SD memory card.
Navigation system
Saving personal special destinations
There are three ways of saving personal special destinations. You must insert an SD memory card to do so. The No memory card mes-
sage otherwise appears.
Option 1
X
Insert the SD memory card (Y page 196).
X
Press W the COMAND controller for longer
than two seconds.
The current position of the vehicle is saved
as a personal special destination on the SD
memory card in the "Unclassified" category.
Importing personal special destinations via COMAND Online
You can import personal special destinations
via COMAND Online (Y page 168). When
importing, you can choose whether to write
files to the SD memory card or to file them in
the address book. The imported personal special destinations have their own icon and are
filed in the "COMAND Online" category.
Z
Page 76

Personal special destinations
74
Selecting as the destination
X
Insert the SD memory card (Y page 196).
X
To switch on navigation mode: press the
Ø function button.
X
To show the menu: press W the COMAND
controller.
X
Select Destination in the navigation system menu bar by turning cVd the
COMAND controller and press W to confirm.
X
Select From personal POIs and press
W to confirm.
A menu appears.
Navigation system
X
Select a personal special destination and
press W to confirm.
X
Select an entry and press W to confirm.
Selection Explanation
Not classi‐
fied
Standard entry for personal special destinations.
COMAND
Online
Personal special destinations which you have
imported via COMAND
Online (Y page 168).
Café
Icon and category that
you have created yourself
(Y page 72).
In the example, COMAND Online has been
selected. The received special destinations
are displayed.
X
To rename a personal special destination: select Rename and press W to con-
firm.
X
To change the category: select Change
category and press W to confirm.
X
To change to the map: select Map and
press W to confirm.
The position of the personal special destination is shown in the map.
i
An icon is displayed according to the "Displaying personal special destinations on
the map" setting (Y page 71).
X
To start route calculation: select Start
and press W to confirm.
If route guidance has been activated, a
prompt will appear asking whether you
wish to accept the personal special destination as the destination.
Page 77

Route guidance
75
If route guidance has not been activated,
route calculation for the personal special
destination will start immediately.
X
Select Yes or No and press W to confirm.
If you select Yes, the personal special destination is accepted as the destination.
If you select No, the process will be aborted.
X
To make a call: select Call and press W
to confirm. COMAND switches to telephone mode (Y page 125).
i
This menu item is available if the personal
special destination has a telephone number and a mobile phone is connected to
COMAND (Y page 114).
X
To delete a personal special destination: select Delete and press W to con-
firm.
A prompt appears asking whether you wish
to delete the special destination.
X
Select Yes or No and press W to confirm.
If you select Yes, the personal special destination is deleted.
If you select No, the process will be aborted.
Route guidance
General notes
tions during your journey. Road and traffic
rules and regulations always have priority
over system driving recommendations.
Route guidance begins once a route has been
calculated (Y page 56).
COMAND guides you to your destination by
means of navigation commands in the form
of audible navigation announcements and
route guidance displays.
The route guidance displays can only be seen
if the display is switched to navigation mode.
If you do not follow the navigation announcements or if you leave the calculated route,
COMAND automatically calculates a new
route to the destination.
If the digital map contains the corresponding
information, the following applies:
R
when selecting a route, COMAND tries to
avoid roads that only have limited access,
e.g. roads closed to through traffic and nonresidents.
R
roads that have time restrictions (e.g.
closed on Sundays and public holidays) are
considered for route guidance on days
when they are open. For this purpose, the
relevant times must be correctly stored in
the database.
Navigation system
Risk of accident
G
COMAND calculates the route to the destination without taking account of the following,
for example:
R
traffic lights
R
stop and give way signs
R
parking or stopping restrictions
R
lane narrowing
R
other road and traffic rules and regulations
COMAND may give incorrect driving recommendations if the data on the digital map does
not correspond to the actual conditions, e.g.
the road layout has changed.
For this reason, you must always observe the
respective road and traffic rules and regula-
Change of direction
Introduction
Changes of direction have three phases:
R
preparation phase
R
announcement phase
R
change-of-direction phase
Preparation phase
COMAND prepares you for the upcoming
change of direction. Based on the example
display below, the change of direction
is announced by the Prepare to turn
right message. You see the full-screen map.
Z
Page 78

Route guidance
76
Example display: preparation phase
:
Point at which the change of direction
takes place (light blue dot)
;
Next road
=
Current vehicle position (the tip of the triangle indicates the vehicle’s direction of
Navigation system
travel)
?
Current road
Display ? depends on the setting selected
for "Information in map" (Y page 99).
Announcement phase
COMAND announces the imminent change of
direction. Based on the following example,
the change of direction is announced with the
In 400 metres turn right onto the
A81 message.
The display is now split into two sectors. In
the left half, you see the normal map view.
The right half shows an enlarged section of
the area around the junction (Crossing Zoom)
or a 3D image of the road's course with the
route indicating the next manoeuvre.
Example display: announcement phase
:
Next road
;
Point at which the change of direction
takes place (light blue dot, shown in both
the left and right half of the display)
=
Graphic representation of the distance to
the next change of direction
?
Change of direction (turn right here)
A
Distance to the next change of direction
B
Route (blue line, shown in both the left
and right half of the display)
i
The filled-in section of visual display for
distance = gets shorter the nearer you get
to the announced change of direction.
Change-of-direction phase
COMAND announces the imminent change of
direction. Based on the example display
below, the change of direction is announced
40 metres before the change of direction with
the Now turn right message. The display is
split into two halves, as in the announcement
phase.
Page 79

Example display: change-of-direction phase
:
Current vehicle position (the tip of the tri-
angle indicates the vehicle’s direction of
travel)
;
Graphic representation of the distance to
the next change of direction
=
Distance to the next change of direction
Example display: roundabout
Once the change of direction is completed,
COMAND automatically switches back to fullscreen display.
Route guidance
Example of a display without changes of direction
:
Route (highlighted in blue)
;
Current vehicle position
=
Current road
?
Map orientation selected
A
Map scale selected
Lane recommendations
Overview
On multilane roads, COMAND can display
lane recommendations for the next change of
direction. The relevant data must be available
on the digital map.
COMAND displays lane recommendations
B, based on the next two changes of direction. The number of lanes applies to the point
at which the next change of direction is
required.
77
Navigation system
Z
Page 80

Route guidance
78
Lane recommendations (example)
:
Point of the next change of direction
;
Point of the change of direction after next
=
Direction display, number of junction and
of motorway
?
Graphic representation of the distance to
Navigation system
the next change of direction
A
Distance to the next change of direction
B
Recommended lane (dark blue)
C
Next change of direction (in this case, exit
to the right)
D
Possible lanes (light blue)
E
Not recommended lanes (light brown)
F
Current vehicle position (the tip of the triangle indicates the vehicle’s direction of
travel)
i
The multifunction display also shows lane
recommendations, Only the recommended
lanes are displayed here (Y page 80).
Page 81

Route guidance
Display and description of lane recommendations
The colours used in the lane recommendation display vary depending on whether day or night
design is switched on.
Lane Day design Night design
79
Recommended lane B
In this lane, you will be able to complete the
next two changes of direction without changing lanes.
Possible lane D
In this lane, you will only be able to complete
the next change of direction without changing lanes.
Lane not recommended E
In this lane, you will not be able to complete
the next change of direction without changing lane.
Further display examples
During the change of direction, there may be
additional lanes which are displayed differently.
Dark blue Light blue
Light blue Dark blue
Light brown Grey
Day design (example)
:
The displayed lane recommendations
apply to this position (light blue circle)
Navigation system
:
New lane (dark blue)
Night design (example)
Z
Page 82

Route guidance
80
Lane recommendations at a motorway junction
(example)
Example display: multifunction display
X
Use = or ; to select the Navi menu.
Navigation system
:
Road to which the change of direction
leads
;
Distance to the change of direction and
distance graphic
=
Lane recommendation
?
Change of direction icon
On multilane roads, the system can display
lane recommendation = for the next change
of direction. During the change of direction,
additional lanes may be displayed.
Announcing the street names
If the function is switched on, the name of the
street which you are turning into is
announced.
Street names may be announced in the following languages:
R
Danish
R
German
R
English
R
French
R
Dutch
R
Portuguese
R
Swedish
Announcements are not made in these languages in all countries. They are made when
relevant street names for the selected language are available in the database.
X
To switch on navigation mode: press the
Ø function button.
X
To show the menu: press W the COMAND
controller.
X
Select Navi in the main function bar by
sliding ZV the COMAND controller and
press W to confirm.
X
Select Announce street names and press
W to confirm.
Depending on the previous status, the function is switched on O or off ª.
Cancelling or continuing route guidance
Cancelling route guidance
X
To switch on navigation mode: press the
Ø function button.
X
To show the menu: press W the COMAND
controller.
X
Select Dest. in the navigation system
menu bar by turning cVd the COMAND
controller and pressing W to confirm.
X
Select Cancel route guidance and press
W to confirm.
Page 83

Route guidance
81
Continuing route guidance
X
To switch on navigation mode: press the
Ø function button.
X
To show the menu: press W the COMAND
controller.
X
Select Dest. in the navigation system
menu bar by turning cVd the COMAND
controller and pressing W to confirm.
X
Select Continue route guidance and
press W to confirm.
COMAND calculates the route.
Destination or area of destination reached
When you reach your destination, COMAND
displays a chequered flag and route guidance
is automatically ended.
If the destination is not in close proximity to
a digitised street, the Area of destina‐
tion reached message appears when the
destination is reached.
Navigation announcements
Repeating navigation announcements
i
Audible navigation announcements are
muted during a telephone call.
If you have missed an announcement, you can
call up the current announcement at any
time.
X
To show the menu: press W the COMAND
controller.
X
Select + in the navigation system menu
bar by turning cVd the COMAND controller and press W to confirm.
Switching navigation announcements
on/off
X
To switch off: press the 8 button dur-
ing an announcement.
You will briefly see the message: The
guidance instructions have been
muted.
X
To switch on: press W the COMAND con-
troller.
X
Select + in the navigation system menu
bar by turning cVd the COMAND controller and press W to confirm.
i
COMAND automatically switches the nav-
igation announcements back on when:
R
it receives RDS-TMC traffic reports during dynamic route guidance
(Y page 88) and recalculates the route
accordingly.
R
you have a new route calculated.
R
you switch COMAND back on again or
start the engine.
Reducing volume during a navigation
announcement
The volume of an active audio or video source
can be automatically reduced during a navigation announcement.
X
Select Navi in the main function bar by
sliding ZV and turning cVd the COMAND
controller and press W to confirm.
X
Select Audio fadeout and press W to
confirm.
Depending on the previous status, the function is switched on O or off ª.
Setting the volume manually
X
Adjust the volume using the q control
knob during a navigation announcement.
or
X
Select + in the map view with the menu
shown and adjust the volume using the
q control knob.
Navigation system
Z
Page 84

Route guidance
82
Avoiding a section of the route blocked by a traffic jam
This function blocks a section of the route
ahead of you. You can set the length of the
blocked route section. If possible, COMAND
calculates a detour around the blocked section of the route.
X
To switch on navigation mode: press the
Ø function button.
X
To show the menu: press W the COMAND
controller.
X
Select Route in the navigation system
menu bar by turning cVd the COMAND
controller and press W to confirm.
X
Navigation system
Select Detour and press W to confirm.
X
To block a section of the route: select
Longer or Shorter repeatedly and confirm
using W until the desired section has been
selected.
i
The total length of the section that can be
blocked is defined by the digital map. The
menu items are available accordingly.
X
To delete the blocked section: select
Delete while the message is shown and
press W to confirm.
COMAND calculates the route without the
block.
Selecting an alternative route
Introduction
With the "Alternative route" function, routes
other than the original one can be calculated.
i
Ensure that the "Alternative routes" setting is activated in the navigation menu
(option 2).
Option 1
X
To switch on navigation mode: press the
Ø function button.
X
To show the menu: press W the COMAND
controller.
X
Select Route in the navigation system
menu bar by turning cVd the COMAND
controller and press W to confirm.
X
Select Alternative route and press W
to confirm.
On the right-hand side, you will see information on the currently selected alternative route, e.g. distance, estimated remaining driving time and estimated time of
arrival. Route sections used (e.g. motorways, tunnels) are displayed as symbols.
:
Length of the blocked route section
;
Name of route section
=
Blocked route section
X
To start route calculation: select Start
and press W to confirm.
Route 1 (example)
Page 85

The route is shown in the map with a dark blue
line.
Route 1 is calculated with the current settings
for the route type and route options
(Y page 52). The alternative routes 2 to 4 are
calculated with the same route options as for
route 1. Route 4 is the economic route (eco
route).
Route 4 (example: eco route)
The route is shown in the map with a green
line.
Option 2
X
To switch on navigation mode: press the
Ø function button.
X
To show the menu: press W the COMAND
controller.
X
Select Navi in the main function bar by
sliding ZV the COMAND controller and
press W to confirm.
X
Select Calculate alternative routes
and press W to confirm.
Depending on the previous status, the function is switched on O or off ª.
Function is activated: alternative routes
are calculated directly after the destination
is entered.
Menu functions
X
To select the next or previous alternative route: select Next or Previous and
press W to confirm.
Route guidance
X
To start route guidance using the selected alternative route: select Start and
press W to confirm.
COMAND calculates the alternative route.
Displaying destination information
You can display destination information for
the destination, for both waypoints and the
intermediate stop, if they are part of the
route.
X
To switch on navigation mode: press the
Ø function button.
X
To show the menu: press W the COMAND
controller.
X
Select Route in the navigation system
menu bar by turning cVd the COMAND
controller and press W to confirm.
X
Select Destination information and
press W to confirm.
Destination information is displayed.
Destination information (example)
The example shows:
R
the destination O
R
two waypoints
R
the relevant information on distance, estimated time of arrival and estimated
remaining driving time
i
If a mobile phone is connected to
COMAND (Y page 114) and a phone number is included in the destination information, you can call it.
83
Navigation system
Z
Page 86

Route guidance
84
X
To call up further destination information: turn cVd the COMAND controller.
X
To close the destination information:
slide XVY the COMAND controller or press
the % back button.
Route overview
You can use the route overview to move along
the active route section by section and view
information and details about each section of
the route.
X
To switch on navigation mode: press the
Ø function button.
X
To show the menu: press W the COMAND
Navigation system
controller.
X
Select Route in the navigation system
menu bar by turning cVd the COMAND
controller and press W to confirm.
X
Select Route browser and press W to
confirm.
i
If the first or last route section is high-
lighted, you cannot select Previous or
Next.
X
To zoom in or out of the map: select N
or M and press W to confirm.
X
To close the route overview: select
Back and press W to confirm.
Route display
You can see the route before starting your
journey. This function is only available when
the vehicle is stationary.
X
To switch on navigation mode: press the
Ø function button.
X
To show the menu: press W the COMAND
controller.
X
Select Route in the navigation system
menu bar by turning cVd the COMAND
controller and press W to confirm.
X
Select Route demonstration and press
W to confirm.
The map with the crosshair appears.
Route overview (example)
At the top of the display, you will see information about the highlighted route section,
for example the distance to be driven on the
road and road designation. The highlighted
route section is marked in white with a red
border on the map.
X
To view the next or previous route section: select Next or Previous and press
W to confirm.
X
To get to the destination: press W to
confirm the highlighted symbol.
X
To stop the route display: confirm the
Ë symbol by pressing W.
Page 87

Route display stopped (example)
:
Road name and location display
;
Distance of the crosshair from current
vehicle position
X
To get to the current vehicle position:
press W to confirm the symbol for the current vehicle position.
X
To change the map scale: select Scale
and press W to confirm.
The scale bar appears.
X
Turn cVd the COMAND controller and
press W to confirm.
Route guidance
Calling up the "Routes" menu
X
Insert the SD memory card (Y page 196).
X
To switch on navigation mode: press the
Ø function button.
X
To show the menu: press W the COMAND
controller.
X
Select Destination in the navigation system menu bar by turning cVd the
COMAND controller and pressing W to
confirm.
X
Select Routes.
85
Navigation system
Recording the route
Notes
If you have activated COMAND and the SD
memory card has been inserted, you should
not take it out of the slot.
When you record a route, COMAND uses socalled support points and displays the route
as a series of lines. If the route is then calculated, COMAND attempts to align the recorded route with the digital map.
The support points of the route may not be on
a digitised road.
This is often the case with routes which are
drawn up using other map data and imported
via COMAND Online, e.g.:
R
routes from the Google™ special destination search (Y page 165)
R
routes from the special destination download (Y page 168)
Starting/ending recording
X
To start recording: select Start record‐
ing in the "Routes" menu by turning cVd
the COMAND controller and press W to
confirm.
The route is recorded and entered in a
list.#REC is displayed in red :.
X
To end recording: select End recording
in the "Routes" menu by turning cVd the
Z
Page 88

Route guidance
86
COMAND controller and press W to confirm.
Displaying and editing the recorded
route
X
Insert the SD memory card (Y page 196).
X
Select List in the "Routes" menu by turning cVd the COMAND controller and press
W to confirm.
Previously recorded routes are displayed.
Navigation system
X
Select a route and press W to confirm.
The map appears with a menu. The recorded route is shown in the map with a blue
dotted line.
Starting route calculation
X
Select Start in the menu by turning cVd
the COMAND controller and press W to
confirm.
COMAND attempts to align the recorded
route with the digital map.
Editing the route
You can change the route name and the icon.
X
Select Edit in the menu by turning cVd
the COMAND controller and press W to
confirm.
X
To change the route name: select
Rename and press W to confirm.
i
The name cannot be changed while the
vehicle is in motion.
X
To change the icon: select Change icon
and press W to confirm.
X
A description for both entries can be found
in the "Personal special destinations" section under "Managing categories for personal special destinations" (Y page 72).
Turning off from the route on the map
X
Select Demo by turning cVd the COMAND
controller and press W to confirm.
The map with the crosshair appears.
X
Proceed as described in the "Route display"
section (Y page 84).
Changing direction for route calculation
You can set the icon for the route to the starting point or to the destination thereby changing the direction for route calculation.
i
During route calculation, one-way streets
or turn restrictions, for example, are taken
into account. Therefore, the outward and
return routes may differ from each other.
Page 89

Route guidance
87
X
Select Swap in the menu by turning cVd
the COMAND controller and press W to
confirm.
Deleting the route
X
Select Delete in the menu by turning
cVd the COMAND controller and press
W to confirm.
A prompt appears asking whether the route
should be deleted.
X
Select Yes or No and press W to confirm.
If you select Yes, the route will be deleted.
If you select No, the process will be aborted.
Scanning the memory
The SD memory card is inserted.
X
Select Memory in the "Routes" menu
(Y page 85) by turning cVd the COMAND
controller and press W to confirm.
The route memory is displayed.
gation announcements and displays on roads
known to the system.
Route guidance to an off-road destination (example)
:
Off-road destination
;
Off-road route section (dashed blue)
=
Current vehicle position (the tip of the triangle indicates the vehicle’s direction of
travel)
Shortly before you reach the last known point
on the map, you will hear the "Area of destination reached" announcement. The display
shows a direction arrow with the linear distance to the destination.
Navigation system
Off-road and off-map
Route guidance to a destination that is
not on a digitised road
COMAND can guide you to destinations
which are within the area covered by the digital map, but which are not themselves recorded on the map.
These destinations are known as off-road
destinations, which you can enter using the
map, for example. In these cases, COMAND
guides you for as long as possible with navi-
Route guidance from an off-road location to a destination
If the vehicle position is within the area covered by the digital map, but the map does not
contain any information about that location,
the vehicle is in an off-road location.
COMAND is also able to guide you to a destination even from an off-road location.
At the start of the route guidance, you will see
the Off road message, an arrow and the dis-
tance to the destination. The arrow shows the
compass heading to the actual destination.
The route is highlighted blue, starting from
the last recognised street the vehicle was on
before it left the map.
As soon as the vehicle is back on a road
known to the system, route guidance continues in the usual way.
Z
Page 90

Dynamic route guidance
88
Route guidance from an off-map location to a destination
If the vehicle position is outside the area covered by the digital map, then the vehicle is in
an off-map location. COMAND is also able to
guide you to a destination even from an offmap location.
At the start of the route guidance, you will see
the Off road message, an arrow and the dis-
tance to the destination. The arrow shows the
compass heading to the road left last.
The route is highlighted blue from the nearest
road known to the system.
As soon as the vehicle is back on a road
known to the system, route guidance continues in the usual way.
Navigation system
Off-road during route guidance
Due to roadworks, for example, there may be
differences between the data on the digital
map and the actual course of the road.
In such cases, the system will temporarily be
unable to locate the vehicle position on the
digital map and thus considers the vehicle to
be in an off-road position.
In the display, you will see the Off road mes-
sage, an arrow and the distance to the destination. The arrow shows the compass heading to the last road you were driving on.
As soon as the system can assign the vehicle
position to the map again, route guidance
continues in the usual way.
Dynamic route guidance
Introduction
An RDS-TMC radio station transmits RDSTMC traffic reports in addition to the radio
programme. COMAND can receive the RDSTMC traffic reports and take them into consideration for dynamic (traffic-dependent)
route guidance. The navigation system can,
for example, guide you around a traffic jam.
In Germany, COMAND uses the high-quality
traffic data from T-systems Traffic for the
TMCPro traffic jam warning system. In contrast to the public TMC service, TMCPro uses
exclusive traffic data that is detected with an
automated sensor network, in addition to the
messages generated by the TMC service. The
traffic data received from the traffic jam warning services named above could differ.
There may also be differences between the
traffic reports received and the actual road
and traffic conditions.
The respective traffic data being received
appears at the bottom right of the display with
the symbols "TMCPro" or "TMC". If there is no
reception, no symbol is displayed.
Switching dynamic route guidance on/off
X
To switch on: set Dynamic route as the
route type6(Y page 52).
X
To switch off: select the Fast route or
Short route route type (Y page 52).
i
COMAND calculates a new route if you
change the route type setting with route
guidance active. If you change the route
type setting when route guidance is inactive, COMAND uses the new setting for the
next route guidance.
RDS-TMC displays on the map
COMAND can show certain traffic incidents
on the map. These displays can be seen on
map scales 50 m (0.05 miles) to 20 km
(20 miles).
X
To set the map scale: turn cVd the
COMAND controller until the desired map
scale is set.
Turning clockwise zooms out from the map;
turning anti-clockwise zooms in.
6
RDS-TMC is not available in all countries.
Page 91

Traffic jam on the route (example)
i
COMAND uses corresponding icons to
highlight the entire section of the affected
route, regardless of how long the incident
actually is. The icons are placed on the side
of the carriageway affected by the incident.
The following illustration shows the RDS-TMC
icons used.
Dynamic route guidance
X
To show the menu: press W the COMAND
controller.
X
Select TMC in the navigation system menu
bar by turning cVd the COMAND controller and pressing W to confirm.
COMAND scans for RDS-TMC stations
within reception range.
No RDS-TMC station found: a message to
this effect appears.
X
To close the message: confirm OK by press-
ing W the COMAND controller.
RDS-TMC station found: COMAND scans for
traffic reports.
If there are no traffic reports, you will see a
message to this effect.
X
To close the message: confirm OK by press-
ing W the COMAND controller.
If there are traffic reports, you will see a list.
The content of the list depends on whether
route guidance is active.
89
Navigation system
RDS-TMC icons
:
Traffic jam on the route
;
Slow-moving traffic on the route
=
Road blocked
?
Road blocked
A
Traffic jam (red)
B
Slow-moving traffic (yellow)
Displaying RDS-TMC traffic reports
Displaying the report list
X
To switch on navigation mode: press the
Ø function button.
List when route guidance is not active
The list shows all the roads, areas or regions
for which reports are available.
:
To call up TMC icon information
;
Icon for warning message
=
Country designation
?
Road affected
i
A report may also relate to an area or
region rather than a road, e.g. impaired visibility due to fog.
Z
Page 92

Dynamic route guidance
90
X
To show traffic report: select a road
(area, region) by turning cVd the COMAND
controller and press W to confirm.
You will find an example of a traffic report
on (Y page 91).
X
To show TMC symbols: select TMC sym‐
bol information by turning cVd the
COMAND controller and press W to confirm.
Navigation system
Example display
:
Affected section of motorway
;
Icon for incident (traffic jam in the example shown)
=
Icon display for the section of route affected
X
To show the next/previous incident:
select Next or Previous (if available) and
press W to confirm.
X
To show the detailed view: select
Details and press W to confirm.
X
To scroll the map: select Map and press
W to confirm.
You can move the map (Y page 61) to enable further traffic reports to be displayed.
:
To display all reports (including those not
affecting the route)
;
To have traffic reports read out on route
(Y page 91)
=
Affected roads, areas or regions (only
available when there are traffic reports for
the route)
X
To show all traffic reports: select Dis‐
play all messages and press W to con-
firm.
You will see a list of all roads, areas or
regions for which reports are available,
including those that do not affect the route.
X
To show a traffic report: select a road, an
area or a region and press W to confirm.
You will find an example of a traffic report
below.
X
To exit the list: slide XVY the COMAND
controller once or several times.
List when route guidance is active
By default, the list shows the roads, areas and
regions that lie along the route and are affected by traffic reports.
Page 93

Dynamic route guidance
91
Example message
:
Depending on your selection: Messages
on the route or All messages
;
Icon for report type (e.g. warning message)
=
Country designation
?
Road, area or region for which there is a
traffic report
A
Report 1 of 1 (example) for the road affected
B
Report text
The icons for possible report types are shown
below.
:
Traffic jam
;
Slow-moving traffic
=
Warning message
?
Road blocked
X
To scroll within a report or to access
the next report: turn cVd the COMAND
controller.
X
To return to the list of messages: press
W or slide XVY the COMAND controller.
Reading out traffic reports on the route
Calling up traffic reports
The read-aloud function is only available
when route guidance is active. You can set
the language (Y page 47) and the text reader
speed (Y page 44).
X
To switch on navigation mode: press the
Ø function button.
X
To show the menu: press W the COMAND
controller.
X
Select TMC in the navigation system menu
bar by turning cVd the COMAND controller and pressing W to confirm.
X
Select Read out all messages on
route and press W to confirm.
COMAND reads out the messages in
sequence.
i
The Read out all messages on
route menu item has no function if there
are no reports relating to the route.
X
To cancel the read-aloud function: select
Cancel read-aloud function and press
W to confirm.
The current traffic report is read out to the
end and the function is then deactivated.
or
X
Press the 8 button briefly.
The function is deactivated immediately.
i
COMAND interrupts the read-aloud function automatically as it recalculates the
route following a new RDS-TMC traffic
announcement.
Automatic read-aloud function
You can have TMC traffic reports on your
route read aloud automatically. Announcements are made as you approach traffic incidents.
Navigation system
Z
Page 94

Destination memory
92
X
To switch the automatic read-aloud
function on/off: select Navi in the main
function bar by sliding ZV and turning
cVd the COMAND controller and press
W to confirm.
X
Select Read traffic messages auto‐
matically and press W to confirm.
Depending on the previous status, the function is switched on O or off ª.
Destination memory
Home address (My address)
Entering the home address via address
entry
Navigation system
X
Initially proceed as described in the "Adopting an address book entry as a home
address" and confirm My address by
pressing W.
X
To enter the home address for the first
time: confirm New entry by pressing W.
X
To change the home address: select
Change in the menu showing the home
address by turning cVd the COMAND con-
troller and press W to confirm.
X
Confirm New entry by pressing W.
X
In both cases, enter the home address as a
destination, e.g. as a town, street and
house number (Y page 53). Then save the
home address (Y page 57).
X
Select From memory and press W to confirm.
You will see the destination memory list
either with the character bar (option 1) or
as a selection list (option 2).
Option 1: destination memory list with
character bar
:
Entry contains data that can be used for
navigation
;
To call up options
X
Slide ZV the COMAND controller repeatedly until the destination memory list
appears as a selection list.
Option 2: destination memory list as a
selection list
Adopting an address book entry as a
home address
X
To switch on navigation mode: press the
Ø function button.
X
To show the menu: press W the COMAND
controller.
X
Select Dest. in the navigation system
menu bar by turning cVd the COMAND
controller and pressing W to confirm.
The My address entry is listed as the first
entry in the destination memory.
X
Select My address by turning cVd the
COMAND controller and press W to confirm.
i
If you have not yet entered any charac-
ters, the My address entry is automatically
highlighted in the selection list.
Page 95

Destination memory
93
If no home address has been stored yet, you
can now assign an address book entry. If a
home address already exists, it is displayed
and you can alter it.
i
If you select New entry, you are also
offered the option of entering the home
address for the first time. You can then
save the home address without having to
start route guidance.
X
To enter the home address for the first
time: select Assign to address book
entry and press W to confirm.
X
Select Home or Work and press W to confirm.
X
To change the home address: select
Change and press W to confirm.
X
Select Assign to address book entry
and press W to confirm.
i
If you select New entry, you are also
offered the option of changing the home
address by entering an address. You can
then save the Home address without having to start route guidance.
X
Select Home or Work and press W to confirm.
In both cases, you will see the address book
either with the character bar or as a selection list.
X
To select an address book entry: proceed as described in the "Searching for an
address book entry" section
(Y page 141).
X
To confirm the selection: press W the
COMAND controller.
If no home address has been stored,
COMAND saves the entry. You will see a
message and then the address menu with
the selected address. Start is highlighted
automatically.
If a home address has already been stored,
you will see a prompt asking you whether
the My address entry should be overwritten.
X
Select Yes or No and press W to confirm.
If you select Yes, COMAND overwrites the
destination. You will see a message and
then the address menu with the selected
address. Start is highlighted automatically.
If you select No, the list will appear again.
Selecting the home address for route
guidance
X
Proceed as described in the "Selecting a
destination from the destination memory"
section (Y page 59).
Storing a destination in the destination memory
Notes
This function also stores the destination in
the address book.
When the address book is full, no destinations
can be saved in the destination memory. You
must first delete address book entries
(Y page 141).
After destination entry
X
The destination has been entered and is
shown in the address entry menu
(Y page 56).
X
Select Save by sliding VÆ and turning
cVd the COMAND controller and press
W to confirm.
You can now select storage options
(Y page 94).
During route guidance
X
To show the menu: press W the COMAND
controller.
X
Select Dest. in the navigation system
menu bar by turning cVd the COMAND
controller and pressing W to confirm.
Navigation system
Z
Page 96

Destination memory
94
X
Select Save destination and press W to
confirm.
You can now select storage options
(Y page 94).
From the list of previous destinations
X
To show the menu: press W the COMAND
controller.
X
Select Dest. in the navigation system
menu bar by turning cVd the COMAND
controller and pressing W to confirm.
X
Select From last destinations and
press W to confirm.
The list of last destinations appears.
X
Select a destination by turning cVd the
Navigation system
COMAND controller and press W to confirm.
The destination address is shown.
X
Select Save and press W to confirm.
You can now select storage options.
Selecting storing options
X
To save the destination without a
name: select Save without name and
press W to confirm.
COMAND stores the destination in the destination memory and uses the address as
the destination name.
X
To save the destination as My address:
select Save as "My Address" and press
W to confirm.
COMAND stores the destination in the destination memory as My address. If the
selected address book entry already contains address data that can be used for
navigation (L icon), a prompt will appear
asking whether you wish to overwrite the
existing data.
X
Select Yes or No and press W to confirm.
If you select Yes, the entry is overwritten.
If you select No, the process will be aborted.
X
To save the destination with a name:
select Save with name and press W to
confirm.
X
Select a category, e.g. Home, and press W
to confirm.
The input menu appears with data fields
and the character bar.
Saving a destination with a name (example)
:
Selected data field with cursor
;
Character bar
X
Proceed as described under "Entering characters using the character bar" in the
"Entering characters in navigation mode
(entering a town)" section (Y page 28).
X
Then, select ¬ and press W to confirm.
COMAND stores the destination under the
name entered.
Assigning a destination to an address
book entry
An address with complete address data that
is suitable for navigation can be assigned to
a pre-existing address book entry. You can
then later start route guidance to this address
straight from the address book
(Y page 143).
X
Select Assign to address book entry
and press W to confirm.
X
Select a category, e.g. Home, and press W
to confirm.
You will see the address book either with
the character bar or as a selection list.
Page 97

Previous destinations
95
X
To select an address book entry: proceed as described in the "Searching for an
address book entry" section
(Y page 141).
COMAND stores the data if the address
book entry selected does not yet contain
navigable address data.
If the selected address book entry already
contains navigable address data, a prompt
will appear asking whether you wish to
overwrite the existing data.
X
Select Yes or No and press W to confirm.
If you select Yes, COMAND stores the data.
Deleting a destination or the home address from the destination memory
X
To switch on navigation mode: press the
Ø function button.
X
To show the menu: press W the COMAND
controller.
X
Select Dest. in the navigation system
menu bar by turning cVd the COMAND
controller and pressing W to confirm.
X
Select From memory and press W to confirm.
You will see the destination memory list
either with the character bar (option 1) or
as a selection list (option 2).
X
Option 1: destination memory list with
character bar: proceed as described in the
"Entering characters using the character
bar" section (Y page 28).
X
Option 2: destination memory list as
selection list: select a destination by turn-
ing cVd the COMAND controller and press
W to confirm.
You see the address data of the selected
entry.
X
Select Delete and press W to confirm.
A prompt appears asking whether you wish
to delete the destination.
X
Select Yes or No and press W to confirm.
If you select Yes, COMAND deletes the
destination. You will see a message to this
effect.
If you select No, the process will be aborted.
i
If the navigable address data for the destination being deleted is also assigned to
an address book entry, COMAND will also
delete this data from there. If the corresponding address book entry does not contain any further data, such as telephone
numbers, COMAND deletes the entire
address book entry.
Previous destinations
Introduction
COMAND automatically stores the previous
destinations for which the route calculation
has been started. If the memory is full,
COMAND deletes the oldest destination. You
can also save a destination from the list of
previous destinations in the destination memory. It will be stored there permanently.
Storing a destination permanently in the destination memory
X
Proceed as described in the "From the list
of previous destinations" section
(Y page 94).
Storing the vehicle position in the list of previous destinations
X
To switch on navigation mode: press the
Ø function button.
X
To show the menu: press W the COMAND
controller.
X
Select Position in the navigation system
menu bar by turning cVd the COMAND
controller and press W to confirm.
Navigation system
Z
Page 98

Map operation and settings
96
X
Select Save vehicle position and press
W to confirm.
COMAND stores the current vehicle position as a destination in the list of previous
destinations.
Storing the crosshair position in the list of previous destinations
A crosshair appears on the map if you have
moved the map manually. You can store the
crosshair position as a destination in the list
of previous destinations.
X
To show the menu: press W the COMAND
controller.
X
Select Position in the navigation system
Navigation system
menu bar by turning cVd the COMAND
controller and press W to confirm.
X
Select Save crosshair position and
press W to confirm.
Deleting one of the previous destinations
X
To switch on navigation mode: press the
Ø function button.
X
To show the menu: press W the COMAND
controller.
X
Select Destination in the navigation system menu bar by turning cVd the
COMAND controller and pressing W to
confirm.
X
Select From last destinations and
press W to confirm.
The list of last destinations appears.
X
Select the desired destination and press
W to confirm.
The destination address appears.
X
Select Delete and press W to confirm.
A prompt appears asking whether the entry
should be deleted.
X
Select Yes or No and press W to confirm.
If you select Yes, the entry is deleted.
If you select No, the process will be aborted.
Map operation and settings
Note
Company logos displayed on the map are
trademarks of the respective companies and
used solely for the purpose of indicating the
location of these companies. The use of such
logos on the map does not indicate approval
of, support of or advertising by these companies for the navigation system itself.
Setting the map scale
X
To hide the menu: slide ZV the COMAND
controller and, when the Full screen
menu item is shown, press W.
X
To call up the scale bar: as soon as you
turn cVd the COMAND controller, scale
bar ? appears.
X
Turn cVd until the desired scale is set.
:
Currently set map scale expressed as a
number with unit, in this case 500 m
;
New map scale
=
Currently set map scale as indicated by
the needle on the scale bar
?
Map scale
Unit of measurement : in the COMAND display depends on the selection made for the
instrument cluster (see the vehicle Owner's
Manual).
Page 99

Map operation and settings
97
Moving the map
Showing the crosshair
X
To hide the menu: slide ZV the COMAND
controller and, when the Full screen
menu item is shown, press W.
X
To move the map: slide XVY, ZVÆ or
aVb the COMAND controller.
A crosshair appears on the map. If you slide
it again, the map moves in the corresponding direction under the crosshair.
Map with crosshair
:
Current vehicle position
;
Crosshair
=
Details of the crosshair position
?
Map scale selected
Display = may be the name of a street, for
example, provided the digital map contains
the necessary data. Alternatively, it may show
the geo-coordinate position of the crosshair
if the Geo-coordinates display is switched
on (Y page 100).
Centring the map on the vehicle or destination position
Centring the map on the vehicle position
X
To show the menu: press W the COMAND
controller.
X
Select Position in the navigation system
menu bar by sliding VÆ and turning cVd
the COMAND controller and press W to
confirm.
X
Select Vehicle position map and press
W to confirm or, if the crosshair is shown,
press the % back button.
This hides the crosshair.
Centring on the destination
This function requires that a route to a destination has been calculated. If the route
includes waypoints and an intermediate stop,
the map can also be set to these positions.
X
To show the menu: press W the COMAND
controller.
X
Select Position in the navigation system
menu bar by sliding VÆ and turning cVd
the COMAND controller and press W to
confirm.
X
Select Destination position map and
press W to confirm.
The crosshair position is set to the relevant
destination.
Navigation system
Hiding the crosshair and centring the
map on the vehicle position or destination
X
Press the % back button twice.
The crosshair disappears and the map is
set to the vehicle position.
or
X
Set the map to the vehicle position; see the
explanation below.
Map settings
Calling up the map settings menu
X
To show the menu: press W the COMAND
controller.
X
Select Navi in the main function bar by
sliding ZV and turning cVd the COMAND
controller and press W to confirm.
Z
Page 100

Map operation and settings
98
X
Select Map settings and press W to con-
firm.
The map settings menu appears.
Setting the map orientation
Navigation system
Map orientation
:
Current map orientation
The following display modes are possible:
R
0 North orientation (the map view is displayed so that north is always up).
R
¤ Orientation in direction of travel (the
map is displayed so that the direction of
travel is always up; the orange point of the
icon points north).
R
¤ Bird's-eye view (the map is displayed so
that the direction of travel is always up; the
map projection reproduces the curvature
of the earth and the orange point of the icon
points north).
R
¤ 3D map (the map is displayed so that
the heading is always up; at a scale of
1 km or less, the map displays elevation;
the orange point of the icon points north)
X
To show the menu: press W the COMAND
controller.
X
Select Navi in the main function bar by
sliding ZV and turning cVd the COMAND
controller and press W to confirm.
X
Select Map settings and press W to con-
firm.
The map settings menu appears.
X
Select Map orientation and press W to
confirm.
A # dot indicates the current setting.
Map orientation menu
X
Select North up, Heading up, Bird's-
eye view or 3-D map by turning cVd the
COMAND controller and press W to confirm.
A # dot indicates the new setting.
Setting the special destination icons in
the map
You can set the special destinations you wish
to have displayed as symbols on the map.
Special destinations are, for example, filling
stations, hotels, cinemas and restaurants.
The following settings are possible:
R
Standard symbols
Symbol display determined by the factory
settings.
R
Personal symbols
You can determine the symbols yourself.
R
No symbols
The map does not show any symbols.
X
To show the menu: press W the COMAND
controller.
 Loading...