

Page 1
Features
Audio System
1About Your Audio System
SiriusXM® Radio is available on a subscription basis
only. For more information on SiriusXM® Radio,
contact a dealer.
2 General Information on the Audio System
P. 299
SiriusXM® Radio is available in the United States and
Canada, except Hawaii, Alaska, and Puerto Rico.
SiriusXM® is a registered trademark of SiriusXM
Radio, Inc.
iPod, iPhone and iTunes are trademarks of Apple Inc.
State or local laws may prohibit the operation of
handheld electronic devices while operating a
vehicle.
Place your phone where you can get good reception.
* Not available on all models
About Your Audio System
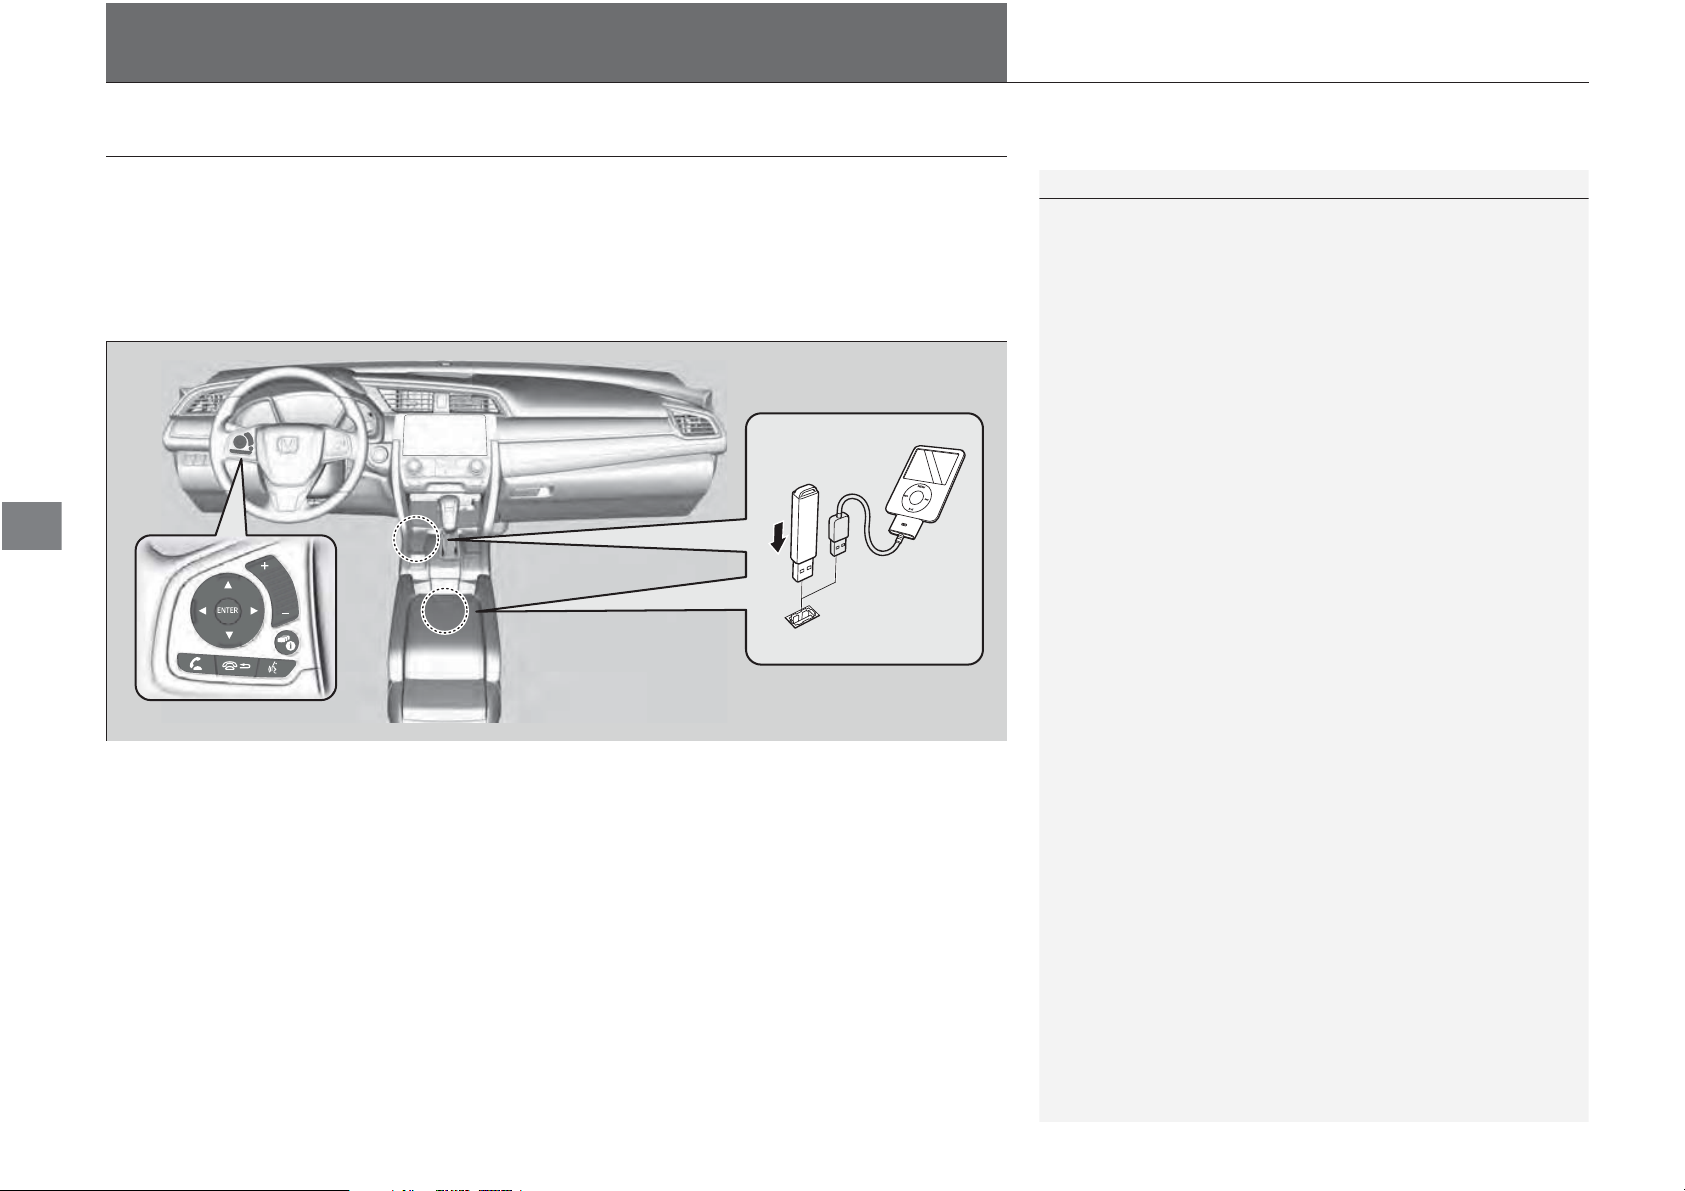
The audio system features AM/FM radio and SiriusXM® Radio service. It can also play
USB flash drives, and iPod, iPhone and Bluetooth® devices.
You can operate the audio system from the buttons and switches on the panel, the
remote controls on the steering wheel, or the icons on the touchscreen interface
USB Flash
Drive
*
.
Remote Controls
iPod
202
Page 2

Features
USB Port(s)
1USB Port(s)
• Do not leave the iPod or USB flash drive in the
vehicle. Direct sunlight and high temperatures may
damage it.
• We recommend using an extension cable with the
USB port.
• Do not connect the iPod or USB flash drive using a
hub.
• Do not use a device such as a card reader or hard disk
drive, as the device or your files may be damaged.
• We recommend keeping your data backed up
before using the device in your vehicle.
• Displayed messages may vary depending on the
device model and software version.
If the audio system does not recognize the iPod, try
reconnecting it a few times or reboot the device. To
reboot, follow the manufacturer’s instructions
provided with the iPod or visit www.apple.com/ipod.
The USB port can supply up to 1.5 A of power. It does
not output 1.5 A unless the device requests.
For amperage details, read the operating manual of
the device that needs to be charged.
Turn the ignition switch to ACCESSORY
(q or ON
(w
*1
first.
Under certain conditions, a device connected to the
port may generate noise in the radio you are listening
to.
USB charge (1.5 A)
Models with color audio system
Models with display audio system
In the console compartment
* Not available on all models
Install the iPod USB connector or the USB flash
drive to the USB port.
u The USB port (1.0 A) is for playing sound
files on a USB flash drive and connecting
cellular phone.
u The USB port (1.5 A) is for playing sound
files and connecting with Apple CarPlay
and Android Auto through cellular
phone and charging devices.
■ In the console compartment
*
The USB port (1.0 A) is for playing sound files
on the USB flash drive and connecting cellular
phone.
uuAudio Systemu USB Port(s)
*1: Models with the smart entry system have an ENGINE START/STOP button instead of an
ignition switch.
203
Page 3
Features
Audio Remote Controls
1Audio Remote Controls
Some mode appears only when an appropriate
device or medium is used.
Depending on the Bluetooth® device you connect,
some functions may not be operated.
Models with information display
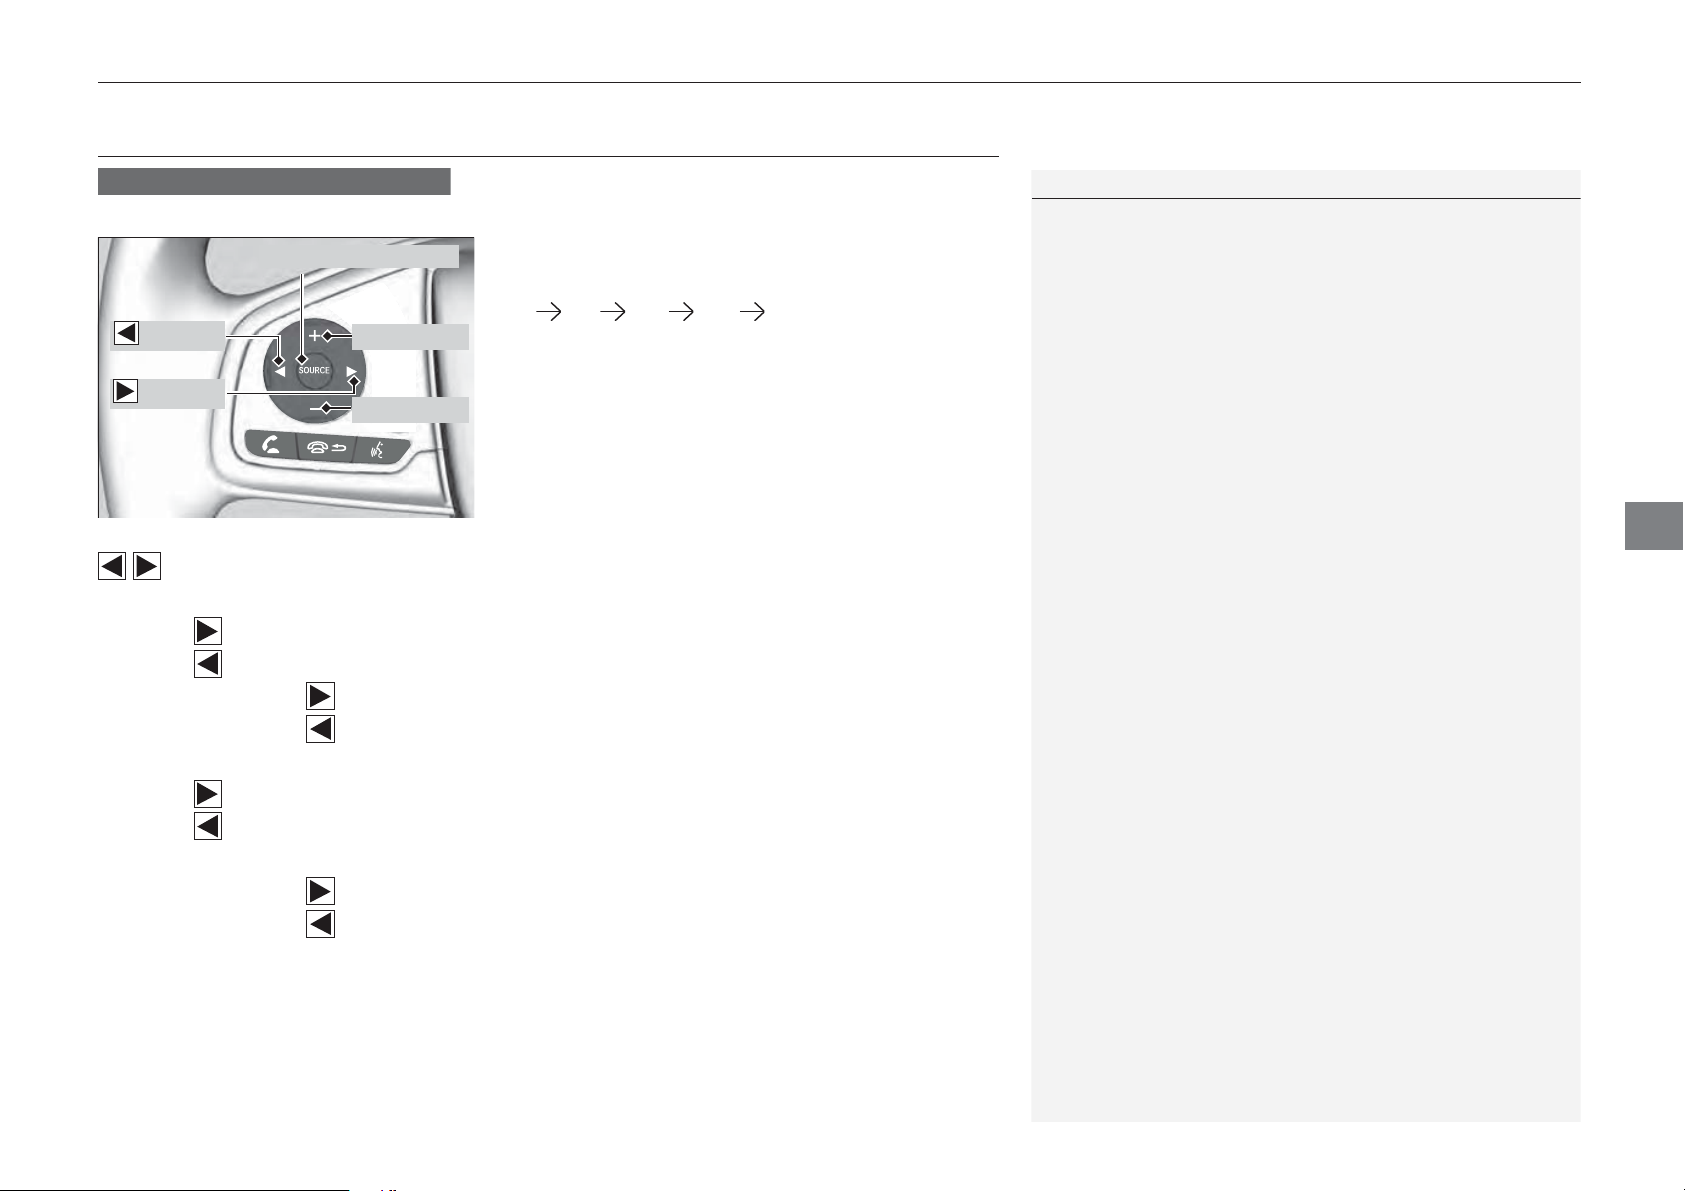
Button
(+ Button
(- Button
Allow you to operate the audio system while driving.
SOURCE Button
SOURCE Button
Cycles through the audio modes as follows:
FM AM USB iPod Bluetooth® Audio
uuAudio System uAudio Remote Controls
Button
Buttons
• When listening to the radio
Press : To select the next preset radio station.
Press : To select the previous preset radio station.
Press and hold : To select the next strong station.
Press and hold : To select the previous strong station.
• When listening to an iPod, USB flash drive, or Bluetooth® Audio
Press : To skip to the next song.
Press : To go back to the beginning of the current or previous song.
• When listening to an USB flash drive
Press and hold : To skip to the next folder.
Press and hold : To go back to the previous folder.
(+ (- (Volume) Buttons
Press
Press
(+: To increase the volume.
(-: To decrease the volume.
Continued
205
Page 4

uuAudio Systemu Audio Remote Controls
Features
1Audio Remote Controls
Some mode appears only when an appropriate
device or medium is used.
Depending on the Bluetooth® device you connect,
some functions may not be operated.
Press (Hang-up/back) button to go back to the
previous command or cancel a command.
Press button to switch display.
2 Switching the Display P. 210
Models with multi-information display
Button
3
4
3
4
3
4
3
4
3
4
3
4
3
4
* Not available on all models
Allow you to operate the audio system while driving. The information is shown on
the i-MID.
ENTER Button
(+ Button
Button
(- Button
Buttons
Press or to cycles through the audio
mode as follow:
FM AM SiriusXM®
*
Aha*Bluetooth® Audio Audio Apps
®
*
USB iPod Pandora
*
• When listening to the radio and SeriusXM®
1. Press ENTER to switch the display to a
preset list you stored in the preset buttons.
2. Press or to select a preset, then press
ENTER.
• When listening to an USB flash drive
1. Press ENTER to display the folder list.
2. Press or to select a folder.
3. Press ENTER to display a list of tracks in that
folder.
4. Press or to select a track, then press
ENTER.
• When listening to an iPod
1. Press ENTER to display the iPod music list.
2. Press or to select a category.
3. Press ENTER to display a list of items in the
category.
4. Press or to select an item, then press
ENTER.
*
206
Page 5

Features
u Press ENTER and press or
3
4
3
4
3
4
Models with display audio system
* Not available on all models
repeatedly until a desired item you want
to listen is displayed.
• When listening to a Pandora®
*
1. Press ENTER to display the station list.
2. Press or to select an item, then press
ENTER.
• When listening to a Bluetooth® audio
1. Press ENTER to display the track list.
2. Press or to select a track, then press
ENTER.
uuAudio System uAudio Remote Controls
(+ (- (Volume) Bar
Press
Press
(+: To increase the volume.
(-: To decrease the volume.
Slide up or down also increase or decrease the
volume.
Continued
207
Page 6
Features
Audio System Basic Operation
1Audio System Basic Operation
Audio Menu Items
2 Station List P. 256, 258
2 Music Search List P. 269, 269, 279
2 Scan P. 257, 259, 267, 259, 280
2 Play Mode P. 270, 270, 280
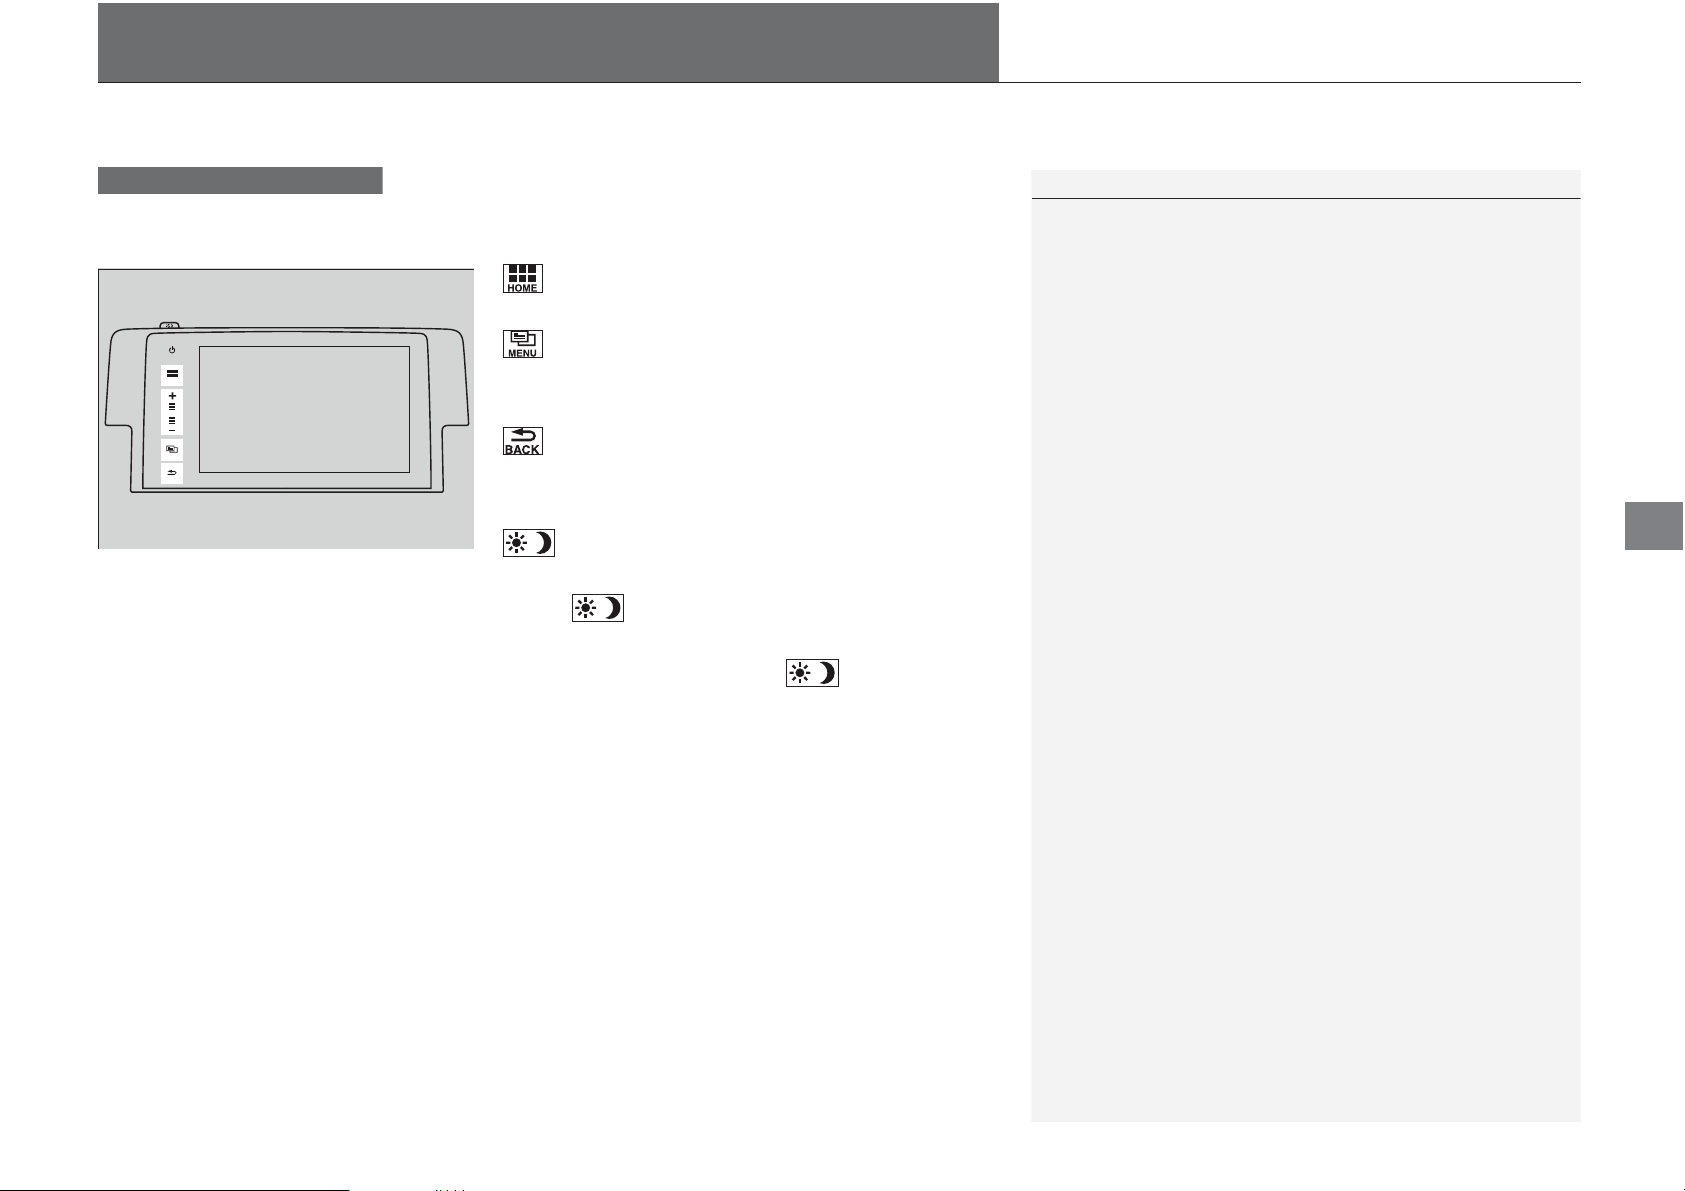
Models with Display Audio
VOL
HOME
MENU
BACK
AUDIO
To use the audio system function, the ignition switch must be in ACCESSORY (q or
(w
*1
.
ON
: Select to go to the home screen.
2 Switching the Display P. 228
: Select to display any mode.
The available mode includes Sound, View
Radio Text, Music Search, and play modes.
: Select to go back to the previous display
when it is displayed.
: Select to change the audio/information
screen brightness.
Select once and select
(- or (+ to make
an adjustment.
u Each time you select , the mode
switches among the daytime mode,
nighttime mode and off mode.
*1: Models with the smart entry system have an ENGINE START/STOP button instead of an
ignition switch.
227
Page 7

uuAudio System Basic OperationuAudio/Information Screen
Features
■
Changing the Home Screen Icon Layout
1. Select .
2. Select and hold an icon.
u The screen switches to the customization
screen.
3. Drag and drop the icon to where you want
it to be.
4. Select OK.
u The screen will return to the home
screen.
232
Page 8
Features
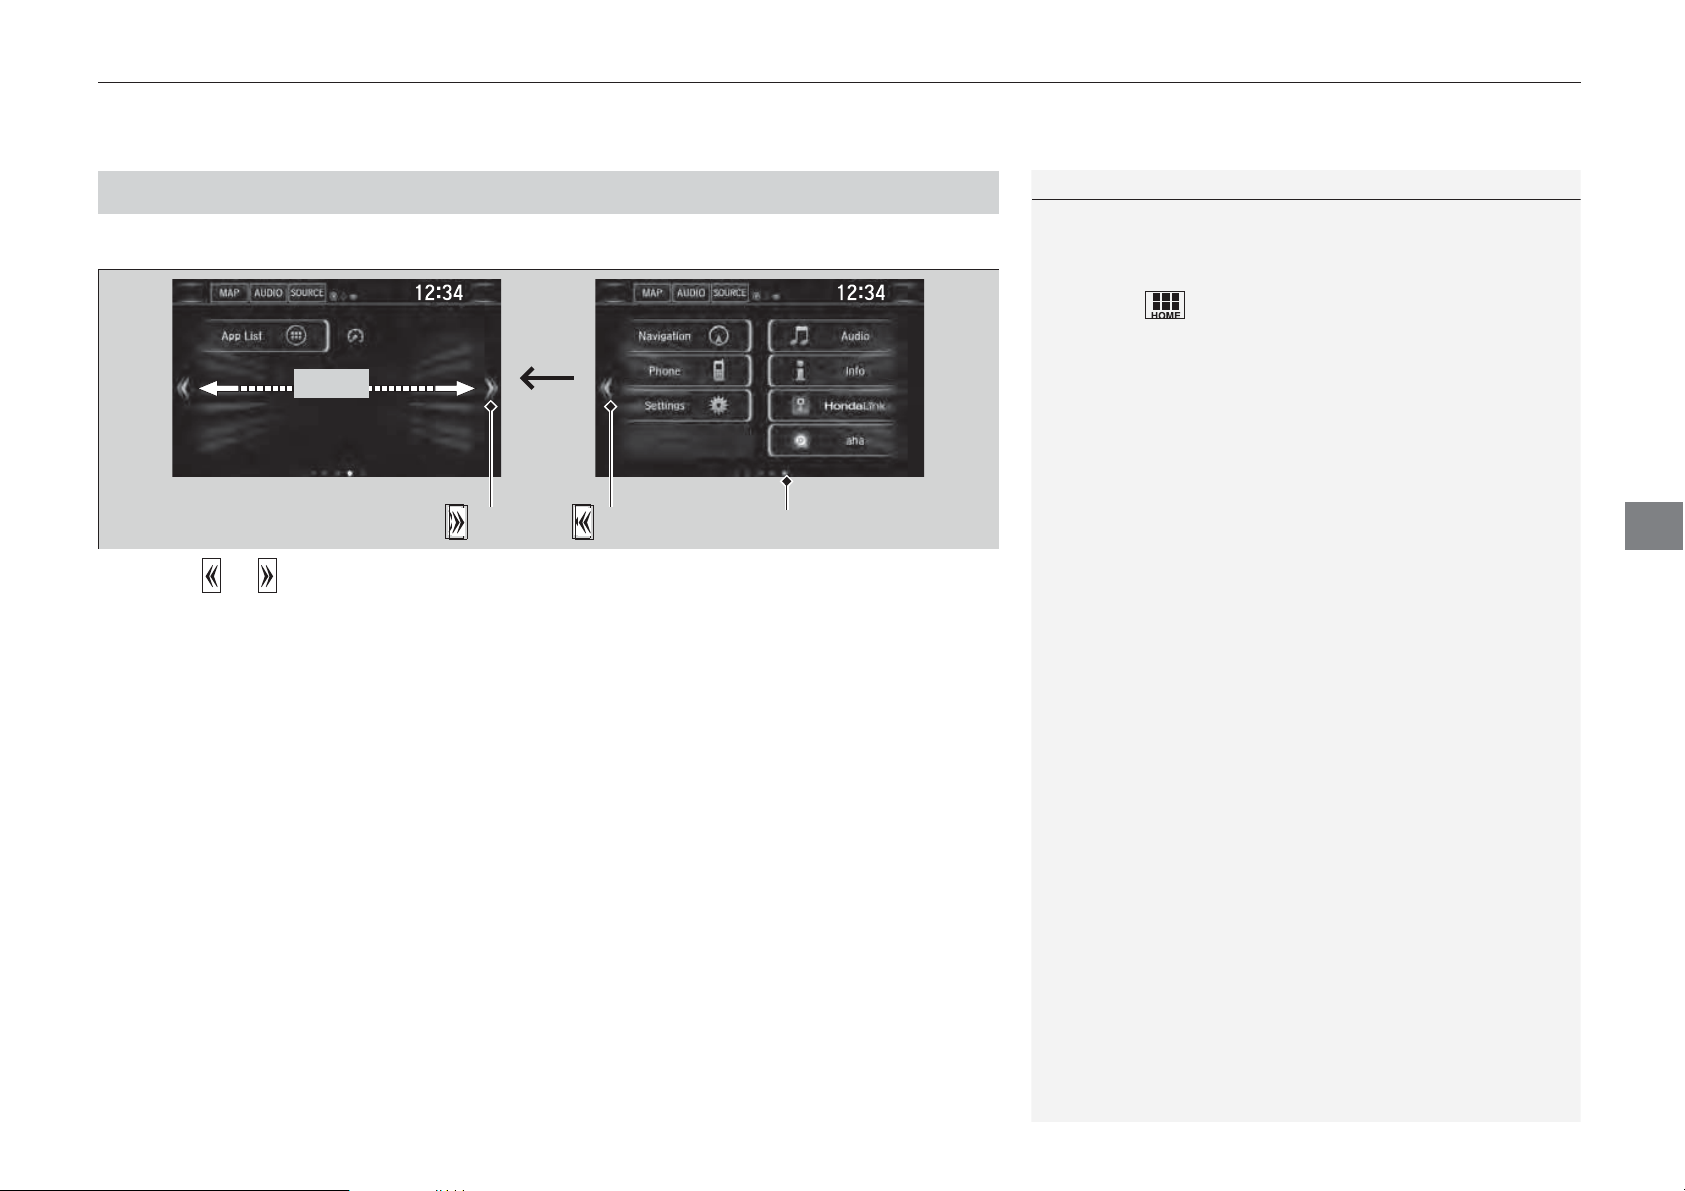
Home Screen
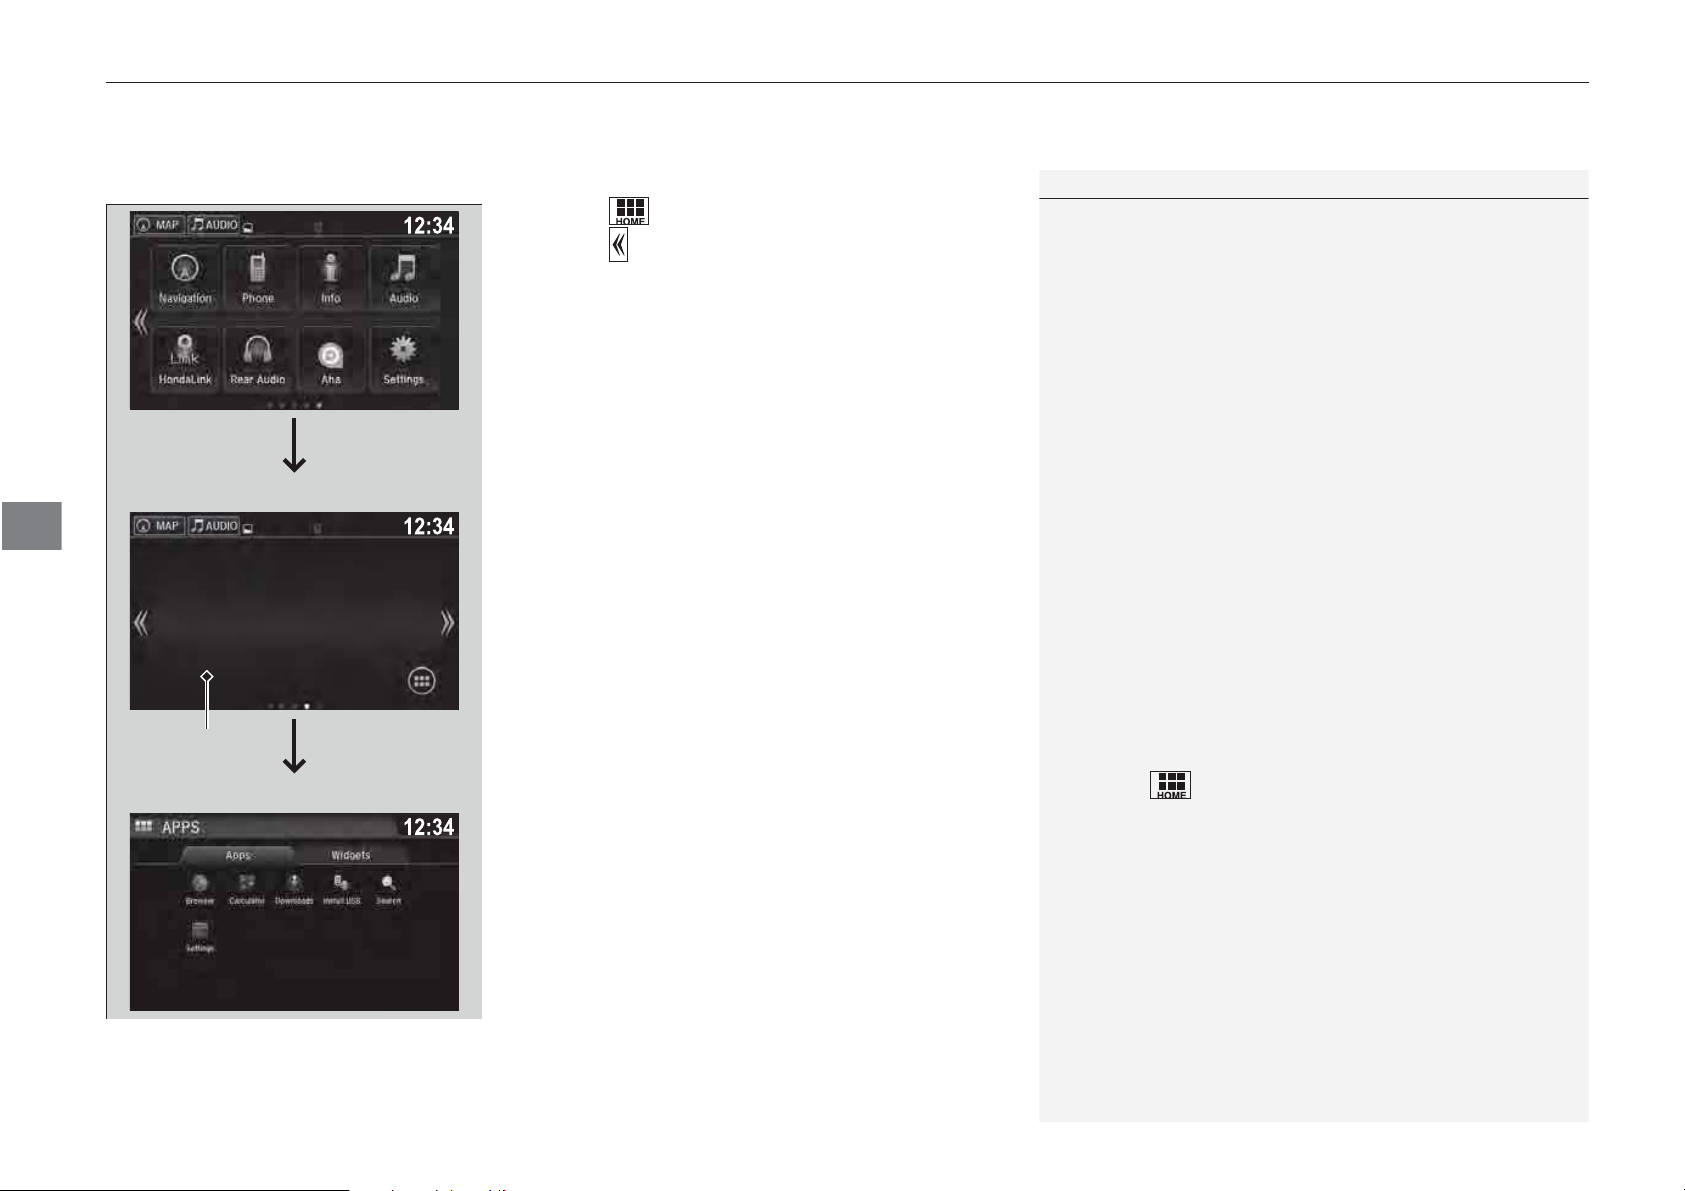
1Home Screen
The home screen has 5 pages (fixed). You cannot add
any more pages.
Selecting to go back to the first page of the
home screen quickly from any pages.
■
■ To change to a next screen
Swipe
uuAudio System Basic Operationu Audio/Information Screen
Icon
Selecting or , or swiping the screen left or right changes to the next screen.
Icon Current page position
Continued
239
Page 9
uuAudio System Basic OperationuAudio/Information Screen
Features
1To use apps or widgets
Select and hold a selected app or widget to add that
app's or widget's shortcut on the home screen.
Pre-installed apps may not start up normally. If this
occurs, you need to reset the system.
2 Defaulting All the Settings P. 329
If you perform Factory Data Reset, it may reset all
the settings to their factory default.
2 Defaulting All the Settings P. 329
In case those apps still do not startup normally even
after Factory Data Reset, contact your dealer.
There is a possibility that a browser is shut down in
the situation of the use. In that situation, the screen
will return to before the browser startup.
You can delete user installed apps by the following
procedure.
1. Select .
2. Select Settings.
3. Select System.
4. Select the Others tab.
5. Select Detail Information.
6. Select an App that you want to delete.
7. Select Delete.
Pre-installed apps cannot be deleted.
■ To use apps or widgets
App List Icon
1. Select .
2. Select .
3. Select App List.
u The Apps screen appears.
4. Select the app or widget you want to use.
Preinstall app list:
• Browser: Displays the web browser utilized
by smartphone and Wi-Fi connection.
• Calculator: Displays Calculator.
• Downloads: Displays the data downloaded
from the web browser and so on.
• Install USB: Installs and updates app
stored in the USB flash drive.
• Search: Displays various retrieval screens.
• Settings: Displays the Android setting
screen.
• Aha Radio:
• AndroidAuto:
• AvPlayer:
• Calendar: Displays calendar.
• CarPlay:
• Clock: Displays clock.
• DaSettings:
• DealerDiagActivity:
• EcoTripComputer:
• ETC:
• FileManager:
240
Page 10

Features
uuAudio System Basic Operationu Audio/Information Screen
• Gallery:
• Garmin Navigator:
• Info:
• Phone:
• TaskManager:
• TelemaSettings:
• TelematicsAPP:
• WavPlayer:
Continued
241
Page 11
Features
■
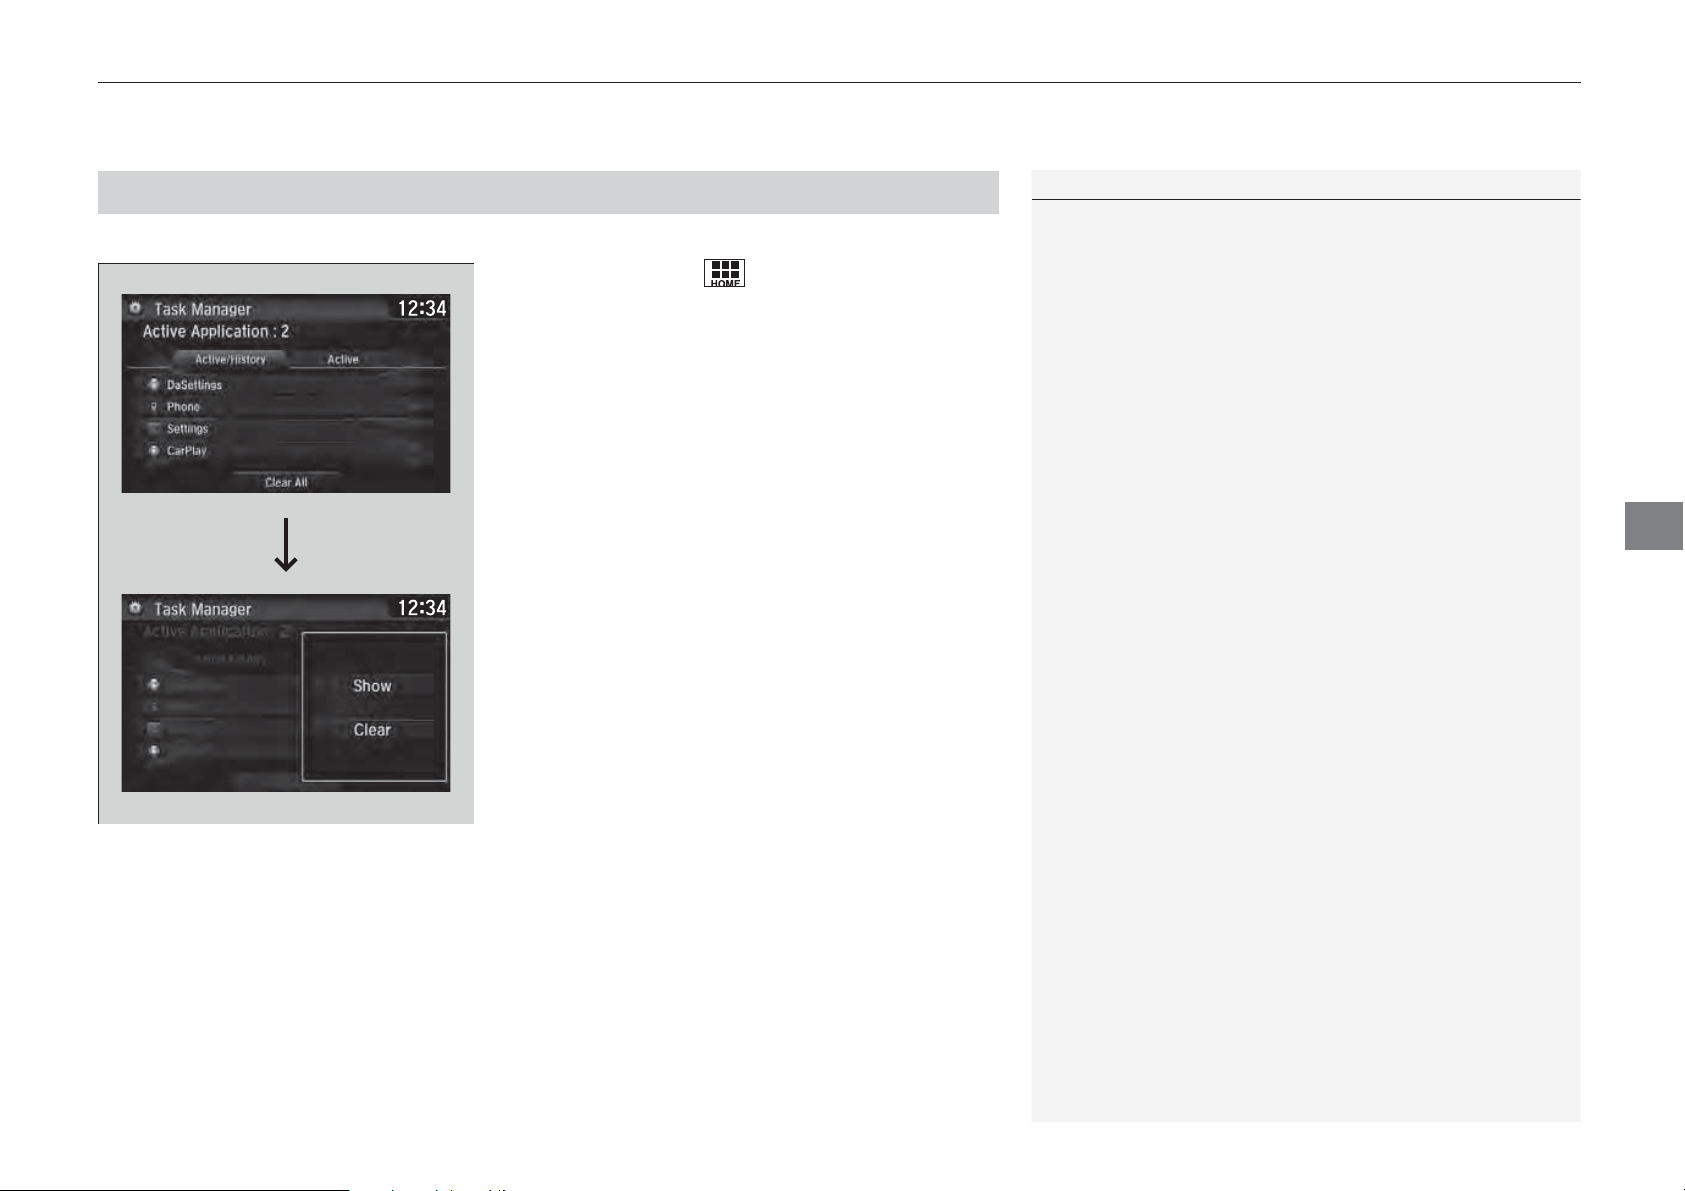
1Closing Apps
If you leave the apps used open in the background,
some apps may stop operating properly next time
using them.
If this happens close unused apps.
To close all apps on the system, select Clear All, then
Yes.
You cannot close the apps of HondaLink®, Aha
TM
and
Garmin
*
.
* Not available on all models
You can close specific apps running in the background on the system.
uuAudio System Basic Operationu Audio/Information Screen
Closing Apps
1. Select and hold .
2. Select an app you want to close.
3. Select Clear.
u The display will return to the app list.
247
Page 12
uuAudio System Basic OperationuAdjusting the Sound
Features
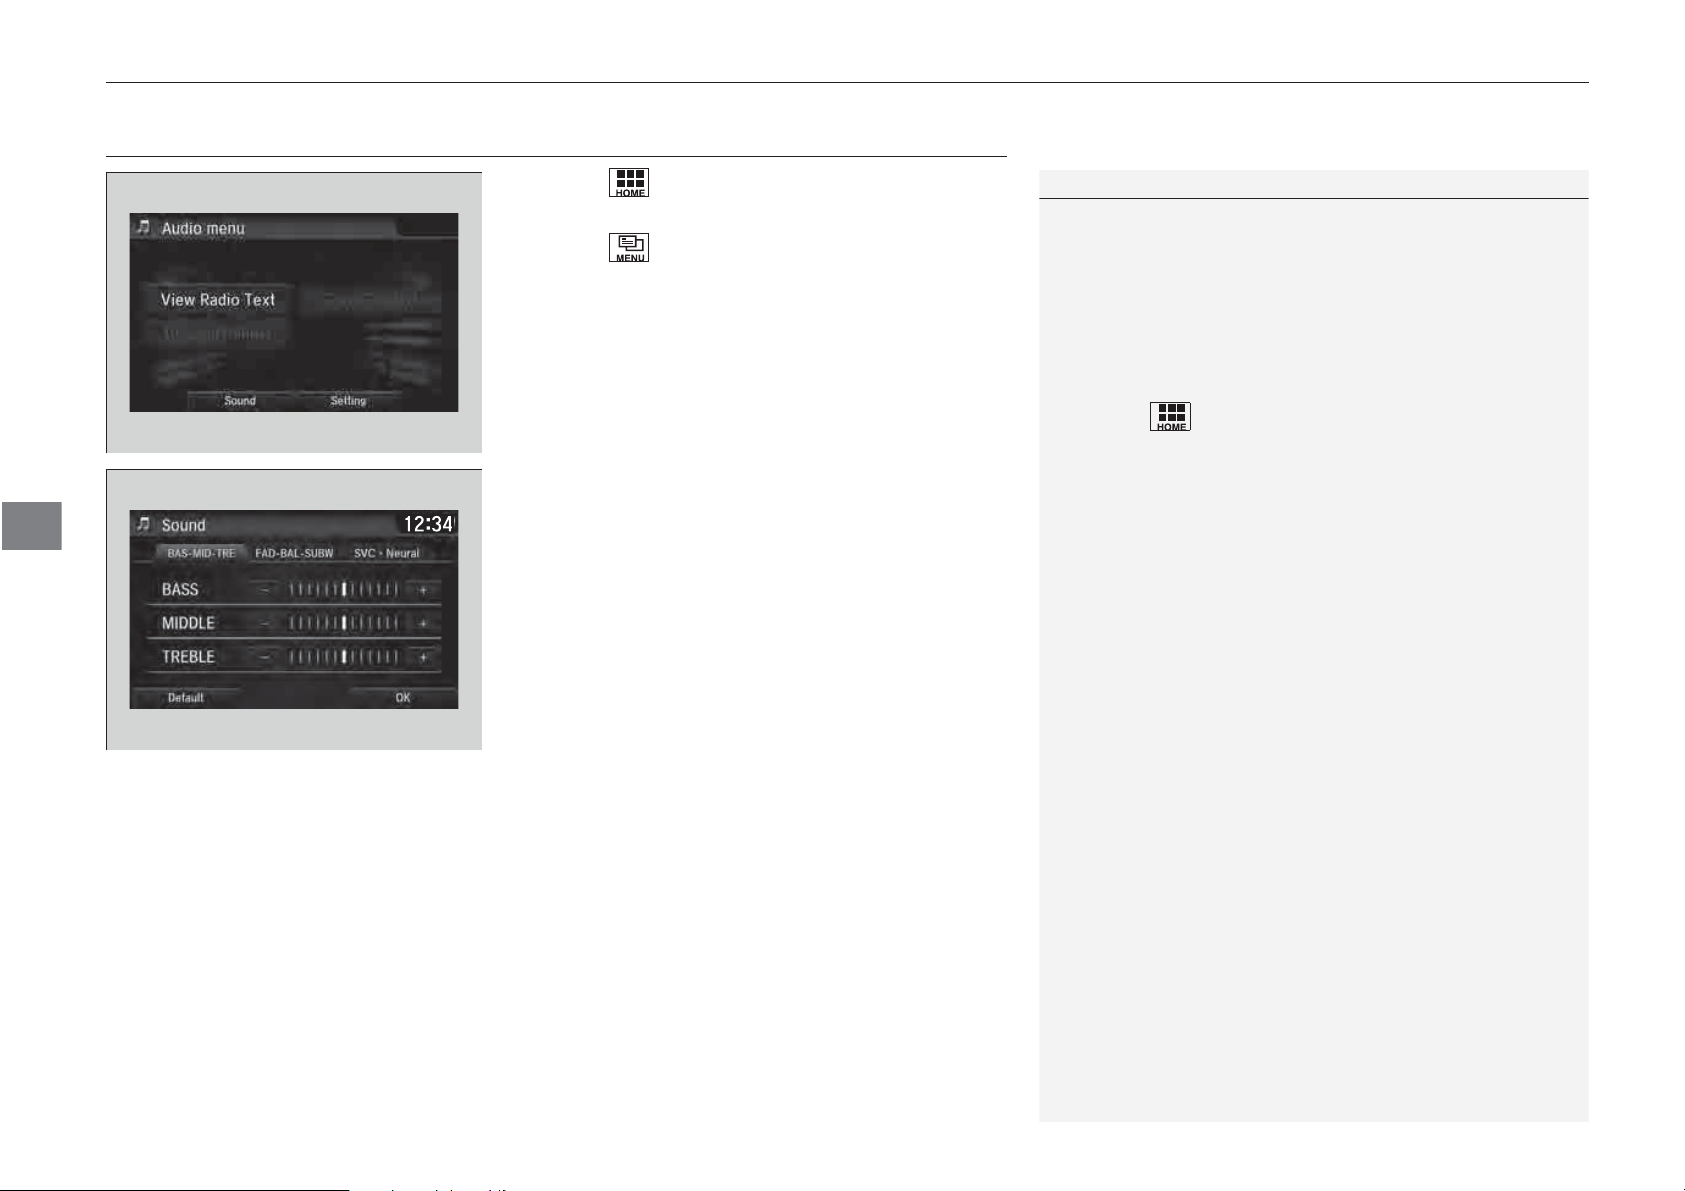
1Adjusting the Sound
The SVC has four modes: Off, Low, Mid, and High.
SVC adjusts the volume level based on the vehicle
speed. As you go faster, audio volume increases. As
you slow down, audio volume decreases.
You can also adjust the sound the following
procedure.
1. Select .
2. Select Settings.
3. Select Audio.
4. Select Sound.
Adjusting the Sound
1. Select .
2. Select Audio.
3. Select .
4. Select Sound.
Select a tab from the following choices:
BASS, MIDDLE, TREBLE, FADER, BALANCE,
SUBW, Speed Volume Compensation
(SVC), DTS Neural Surround
248
Page 13
uuAudio System Basic OperationuDisplay Setup
Features
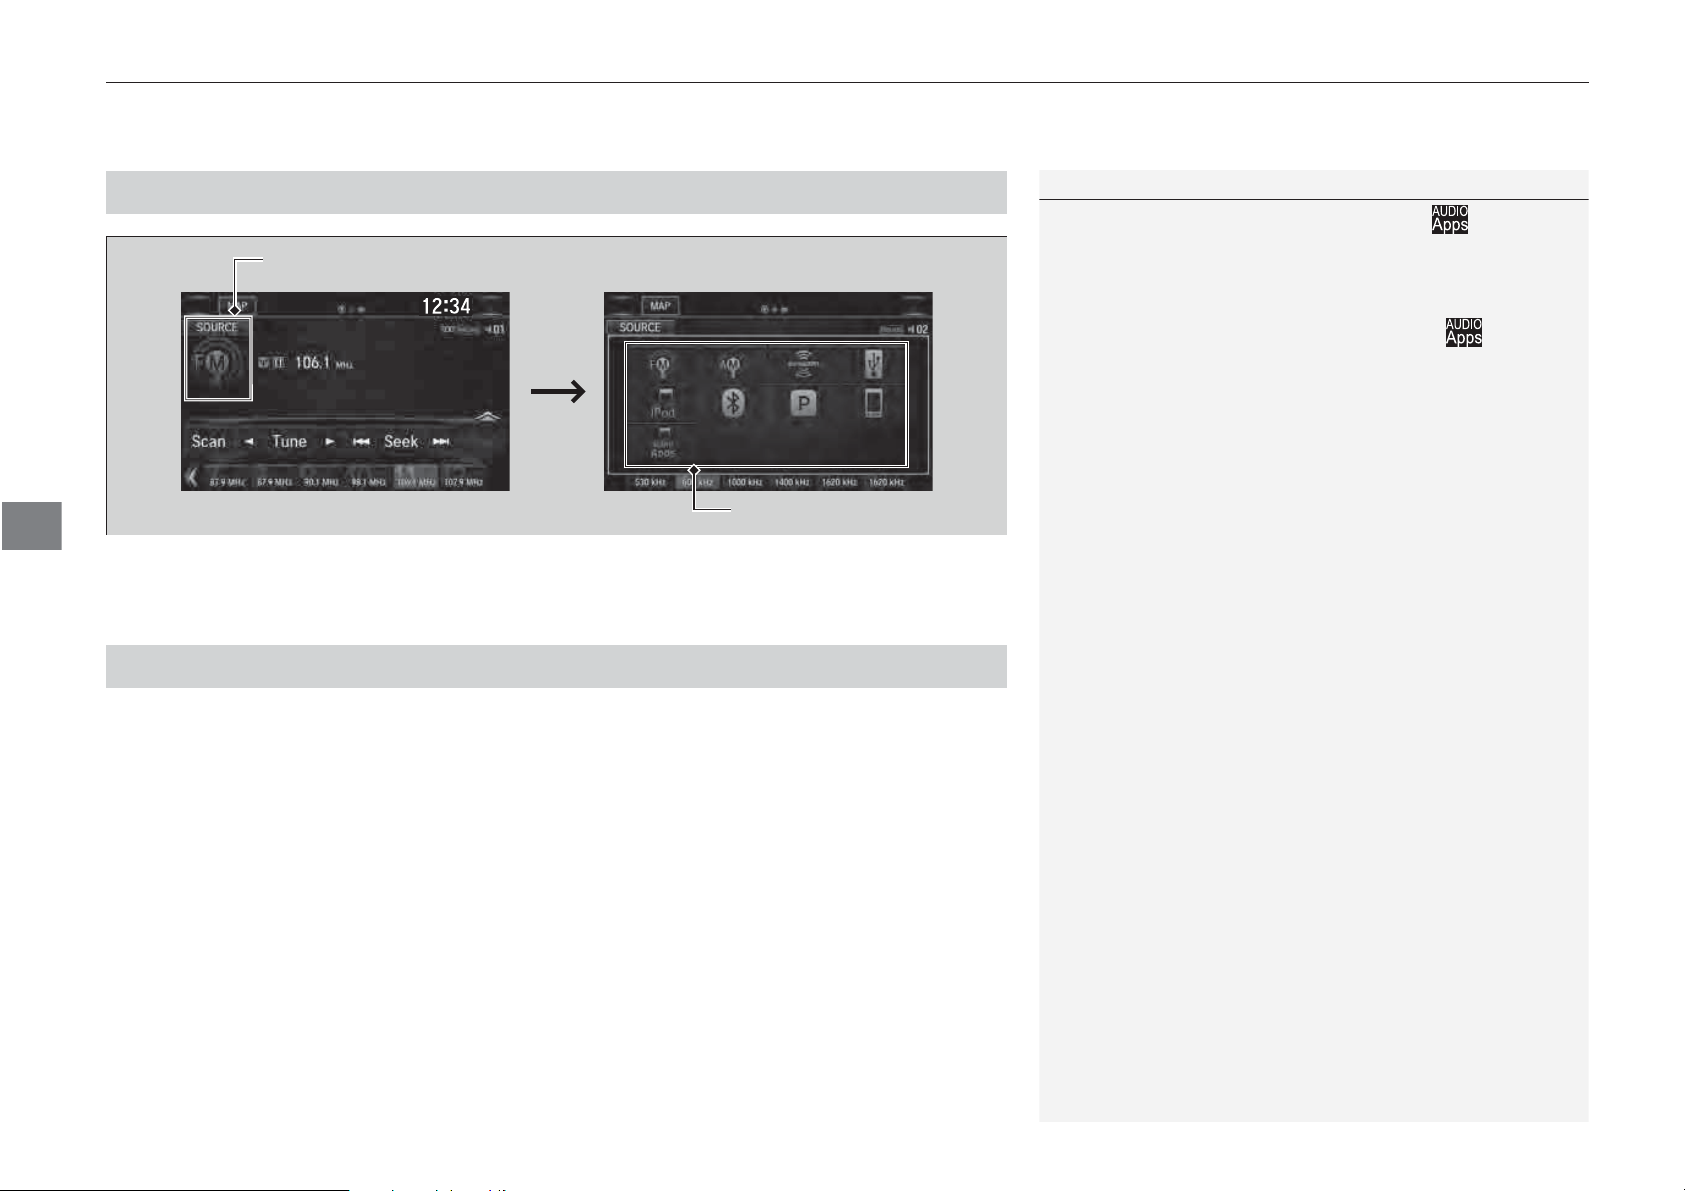
1Selecting an Audio Source
If you startup preinstalled audio apps, is
displayed on the lower right of the screen.
These preinstalled apps cannot be displayed on the
source select screen.
You can startup those audio apps from .
When you are using the Aha
TM
screen and you want
to select another source, select AUDIO on the upper
left of the screen. The source select screen will
appear. Select the source you want.
Selecting an Audio Source
■
Select the source icon.
Select the current source icon, then select an icon on the source list to switch the
audio source.
Limitations for Manual Operation
■
Certain manual functions are disabled or inoperable while the vehicle is in motion.
You cannot select a grayed-out option until the vehicle is stopped.
Source Select Screen
Source List Icons
250
Page 14

Features
Playing AM/FM Radio
Models with HD RadioTM
uuAudio System Basic OperationuPlaying AM/FM Radio
Multi-Information Display
Audio/Information Screen
/AUDIO (Power/Audio) Icon
Select to turn the audio system
on and off.
AUDIO
HOME
VOL (Volume) Icons
VOL
Select to adjust the volume.
(Menu) Icon
MENU
Select to display the menu items.
BACK
(Back) Icon
Select to go back to the previous display.
Scan Icon
Select to scan each station with a strong signal.
Tune Icons
Select or to tune the radio
frequency.
Open/Close Icon
*1
Displays/hides the detailed
information.
TAG
Select to tag the song if it is played
on an HD Radio
TM
station. The iPod/
iPhone should be connected to the
audio system to store the tagged
song information on your device.
Seek Icons
Select or to search up
and down the selected band for a
station with a strong signal.
Preset Icons
Tune the radio frequency for preset memory.
Select and hold the preset icon to store that
station. Select to display preset 7 onwards.
*1:Some or all of the lists may not be displayed.
Continued
255
Page 15
uuAudio System Basic OperationuPlaying AM/FM Radio
Features
1Playing AM/FM Radio
If the audio system has the memory capacity, the
tagged song information can be stored in it.
Models with HD Radio
TM
1Preset Memory
The ST indicator appears on the display indicating
stereo FM broadcasts.
Stereo reproduction in AM is not available.
Switching the Audio Mode
Press the or button on the steering wheel or
select SOURCE on the screen.
2 Audio Remote Controls P. 205
You can store 6 AM stations and 12 FM stations into
preset memory.
HD Radio Technology manufactured under license
from iBiquity Digital Corporation. U.S. and Foreign
Patents. HD Radio
TM
and the HD, HD Radio, and
“Arc” logos are proprietary trademarks of iBiquity
Digital Corp.
3
4
Preset Memory
■
To store a station:
1. Tune to the selected station.
2. Select and hold the preset number for the station you want to store.
You can also store a preset station by the following procedure.
1. Tune to the selected station.
2. Select the open/close icon to display a list.
3. Select the Preset tab.
4. Select and hold the preset number for the station you want to store.
Station List
■
Lists the strongest stations on the selected band.
1. Select the open/close icon to display a list.
2. Select the Station List tab.
3. Select the station.
256
■ Manual update
Updates your available station list at any time.
1. Select the open/close icon to display a list.
2. Select the Station List tab.
3. Select Refresh.
Page 16
Features
Models with HD RadioTM
Models with HD RadioTM
Scan
■
Samples each of the strongest stations on the selected band for 10 seconds. To turn
off scan, select Cancel or .
Tag Song to Device
■
If your iPod/iPhone is connected to the USB port, you can store the TAG information.
If the iPod/iPhone is not connected to the audio system, the information is stored in
the audio system temporarily, then once the device is connected to the system, data
is transferred to the iPod/iPhone.
To store the TAG information to the iPod/iPhone or the audio system, select TAG.
uuAudio System Basic OperationuPlaying AM/FM Radio
Tagged Song List
■
Displays the TAG information saved to the audio system.
1. Select .
2. Select Song Tag List.
Continued
257
Page 17
uuAudio System Basic OperationuPlaying AM/FM Radio
Features
Models with HD Radio
TM
1Radio Data System (RDS)
When you select an RDS-capable FM station, the RDS
automatically turns on, and the frequency display
changes to the station name. However, when the
signals of that station become weak, the display
changes from the station name to the frequency.
HD Subchannel
■
Displays the subchannel list when an HD RadioTM station is selected while listening to
an FM station.
1. Select .
2. Select HD Subchannel.
3. Select the channel number.
Radio Data System (RDS)
■
Provides text data information related to your selected RDS-capable FM station.
■ To find an RDS station from Station List
1. Select the open/close icon to display a list while listening to an FM station.
2. Select the Station List tab.
3. Select the station.
■ Manual update
Updates your available station list at any time.
1. Select the open/close icon to display a list while listening to an FM station.
2. Select the Station List tab.
3. Select Refresh.
258
Page 18

Features
uuAudio System Basic OperationuPlaying AM/FM Radio
■ Radio text
Displays the radio text information of the selected RDS station.
1. Select .
2. Select View Radio Text.
■ Scan
Samples each of the strongest stations on the selected band for 10 seconds.
To turn off scan, select Cancel or .
259
Page 19

uuAudio System Basic OperationuPlaying SiriusXM® Radio
Features
Audio/Information Screen
Scan Icon
Select to scan each channel.
Preset Icons
Tune the radio frequency for preset
memory. Select and hold the preset
icon to store that station. Select
to display preset 7 onwards.
Playing SiriusXM® Radio
/AUDIO (Power/Audio) Icon
Press to turn the audio system
on and off.
Album Art
Multi-Information Display
Channel Icons
Select or to the previous
or next channel.
Select and hold to rapidly skip 10
channels at a time.
VOL (Volume) Icons
Select to adjust the volume.
(Menu) Icon
Select to display the menu items.
(Back) Icon
Select to go back to the previous display.
Category Icons
Select or to display and select a
SiriusXM® Radio category.
*1:Some or all of the lists may not be displayed.
260
AUDIO
HOME
VOL
MENU
BACK
Skip Icons
Select or to change
section in the channel.
Select and hold to move rapidly
within the section.
Station Art
Open/Close Icon
*1
Displays/hides the detailed
information.
TAG
Select to tag a song played at a
SiriusXM® Radio channel. The iPod/
iPhone should be connected to the
audio system to store the tagged
song information on your device.
Page 20

Features
To Change the Tune Mode
1Playing SiriusXM® Radio
In the channel mode, all available channels are
selectable. In the category mode, you can select a
channel within a category (Jazz, Rock, Classical, etc.).
There may be instances when SiriusXM® Radio does
not broadcast all the data fields (artist name, title).
This does not indicate a problem with your audio
system.
SiriusXM® Radio stations load in ascending order,
which can take about a minute. Once they have
loaded you will be able to scroll up or down to make
your selections.
Switching the Audio Mode
Press the SOURCE button on the steering wheel or
select SOURCE on the screen.
2 Audio Remote Controls P. 205
Tune Start:
When you change to a preset channel, a song being
played on that channel restarts from the beginning
with this function. This can be turned on or off from
the Audio settings screen.
2 Customized Features P. 302
■
1. Select .
2. Select Tune Mode.
3. Select Channel Mode or Category Mode.
uuAudio System Basic Operation uPlaying SiriusXM® Radio
Continued
261
Page 21

uuAudio System Basic OperationuPlaying SiriusXM® Radio
Features
1Playing SiriusXM® Radio
You can store 12 SiriusXM® channels into the preset
memory.
Preset Memory
■
To store a channel:
1. Tune to the selected channel.
2. Select to hold the preset number for the station you want to store.
3. Select Replace.
You can also store a channel by the following procedure.
1. Tune to the selected channel.
2. Select the open/close icon to display a list.
3. Select the Preset tab.
4. Select and hold the preset number for the station you want to store.
■ Multi-channel preset (for music channels only)
You can store up to four of your preferred music channels per preset.
1. Tune a station.
2. Select the open/close icon to display a list.
3. Select the Preset tab.
4. Select and hold the preset number you
want to add a music channel.
u A message appears if there are no
available presets.
5. Select Combine.
262
Page 22

Features
1Listening to Featured Channels
Up to three featured channels by SiriusXM® can be
displayed.
Featured channel lists are at the top of the channel
list.
Listening to Featured Channels
■
Suggested channel listing received from SiriusXM® can be displayed and selected.
1. Select the open/close icon to display a channel list.
2. Select the Channel List tab.
3. Select the featured channel list title you want to listen to.
u The selected channel list of the title is displayed.
4. Select the channel.
uuAudio System Basic Operation uPlaying SiriusXM® Radio
Continued
263
Page 23

uuAudio System Basic OperationuPlaying SiriusXM® Radio
Features
1Replay Function
The system starts storing broadcast in memory when
the power mode is turned ON. You can go back to
the program from that point.
You can no longer replay any program once the
power mode is turned off as it erases memory.
You can check how long the program has been
stored in memory from the audio/information screen.
After 30 or 60 minutes of recording the system will
automatically start deleting the oldest data.
(A): Shows how much time the replayed segment is
behind the real-time broadcast
(B): Replayed segment
(C): Length stored in memory
Audio/Information Screen
(C)
(B)
(A)
Replay Function
■
The system can record up to the last 60 minutes broadcast of your currently tuned
channel as well as the last 30 minutes broadcast of preset channels, starting from
the moment you turn the vehicle on. If you tuned to preset channel, the system
records up to 60 minutes of a broadcast instead of up to 30 minutes. You can
rewind and replay the last 30 or 60 minutes of a broadcast.
1. Select .
2. Select Playback Position.
3. Move the gauge to the position you want to replay.
To play or pause on playback mode:
1. Select .
2. Select Play/Pause.
■ Returning to real-time broadcast
1. Select .
2. Select Play Live Broadcast.
264
Page 24

Features
Live Sports Alert
1Live Sports Alert
The sports alert function at SiriusXM® mode only.
1To set up a favorite team
Sports alerts cut in only when SiriusXM® mode is on.
Selecting On(one time) from the customize settings
disables the alert feature next time you turn the
power mode to ON.
2 Customized Features P. 302
You can also set up a favorite team by the following
procedure.
1. Select Audio.
2. Select .
3. Select Setting.
4. Select Sports Flash Setup.
■
While listening to other channel, you can receive sports alerts such as scores from
your favorite teams.
■ To set up a favorite team
■ To set up a alert message
1. Select .
2. Select Settings.
3. Select Audio.
4. Select Sports Flash Setup.
5. Select Interrupt.
6. Select On(one time) or On(continue).
uuAudio System Basic Operation uPlaying SiriusXM® Radio
1. Select .
2. Select Settings.
3. Select Audio.
4. Select Sports Flash Setup.
5. Select Favorite Team.
6. Select a team.
Continued
265
Page 25

uuAudio System Basic OperationuPlaying SiriusXM® Radio
Features
1To set up a alert beep
You can also set up a alert beep by the following
procedure.
1. Select Audio.
2. Select .
3. Select Settings.
4. Select Sports Flash Setup.
1Traffic and Weather Information
The traffic and weather information function at
SiriusXM® mode only.
You can also set up the traffic and weather
information by the following procedure.
1. Select Audio.
2. Select .
3. Select Settings.
4. Select Sports Flash Setup.
■ To set up a alert beep
1. Select .
2. Select Settings.
3. Select Audio.
4. Select Sports Flash Setup.
5. Select Interrupt Beep.
6. Select On.
■ Traffic and Weather Information
You can receive traffic and weather information.
1. Select .
2. Select Settings.
3. Select Audio.
4. Select Traffic & Weather Setup.
5. Select the region.
u When you do not want to receive the information, select Unset.
266
Page 26

Features
Scan
1Scan
The “Scan Songs in Presets” function is based on
TuneScan
TM
technology of SiriusXM®.
The “Featured Channels” function is based on
Featured Favorites
TM
technology of SiriusXM®.
TuneScan
TM
and Featured FavoritesTM are registered
trademarks of SiriusXM® Radio, Inc.
■
Sample each channel on the selected mode for 10 seconds.
1. Select Scan.
2. Select Scan Channels.
u You can select the desired channel by songs using Scan Songs in Presets.
To turn off scan, select Cancel Scan.
Tag Song to Device
■
uuAudio System Basic Operation uPlaying SiriusXM® Radio
If your iPhone/iPod is connected to the USB port, you can store the TAG information.
If the iPod/iPhone is not connected to the audio system, the information is stored in
the audio system temporarily. Once the device is connected to the system, data is
transferred to the iPod/iPhone.
To store the TAG information to the iPod/iPhone, or the audio system, select TAG.
Tagged Song List
■
Displays the TAG information saved to the audio system.
1. Select .
2. Select Tagged Song List.
267
Page 27

uuAudio System Basic Operation u Playing Pandora®
Features
U.S. models
1Playing Pandora®
*
Pandora®, the Pandora logo, and the Pandora trade
dress are trademarks or registered trademarks of
Pandora Media, Inc., used with permission. Pandora
is currently available exclusively in the United States.
To find out if your phone is compatible with this
feature, visit www.handsfreelink.honda.com, or call
1-888-528-7876.
To use this service in your vehicle, the Pandora® app
must first be installed on your phone. Visit
www.pandora.com. for more information.
Pandora® is free, personalized radio that plays music
and comedy you’ll love. Just start with the name of
one of your favorite artists, songs, comedians or
composers and Pandora® will create a custom station
that plays similar tracks. Pandora® also features
hundreds of genre stations ranging from Dubstep to
Smooth Jazz to Power Workout.
If you cannot operate Pandora® through the audio
system, it may be streaming through Bluetooth®
Audio. Make sure Pandora® mode on your audio
system is selected.
* Not available on all models
*
Playing Pandora®
*
Your audio system allows you to listen to music from the Pandora® app on a
compatible smartphone.
This function is available when the phone is paired and connected to the vehicle’s
Bluetooth® HandsFreeLink® (HFL) system, or with an iPhone, you can connect using
your USB cable to the USB port.
2 Phone Setup P. 336
2 USB Port(s) P. 203
Multi-Information Display
/AUDIO (Power/
Audio) Icon
Select to turn the audio
system on and off.
VOL (Volume) Icons
Select to adjust the
volume.
Cover Art
Audio/Information Screen
*1:Some or all of the lists may not be displayed.
(Menu) Icon
Select to display
the menu items.
(Back) Icon
Select to go back to the
previous display.
Station Up/Down Icons
Select to change a station.
Like/Dislike Icons
Select to evaluate a song.
Play/Pause Icon
Select to resume or play a song.
Skip Icon
Select to skip a song.
Continued
275
Page 28

uuAudio System Basic OperationuPlaying Pandora®
Features
1Pandora® Menu
Available operating functions vary on software
versions. Some functions may not be available on the
vehicle’s audio system.
If there is a problem, you may see an error message
on the audio/information screen.
2 Pandora®
*
P. 297
Pandora® may limit the total number of skips allowed
on the service. If you dislike a track after the skip limit
has been reached, your feedback will be saved but
the current track will continue to play.
To change stations, activate the Pandora® menu,
select Station List, and then select a new station. It
also changes stations on the main Pandora® screen.
* Not available on all models
Pandora® Menu
■
You can operate some of the Pandora® menu items from your vehicle’s audio
system. The available items are:
• Bookmark
• Station List
• New Station
• Sound
• Setting
■ Operating a menu item
*
1. Select .
2. Select an item.
276
Page 29

uuAudio System Basic Operation uPlaying Aha
Features
1Playing Aha
TM
AhaTM by Harman is a cloud-based service that
organizes your favorite web content into live radio
stations. You can access podcasts, internet radio,
location-based services, and audio updates from
social media sites.
Available operating functions vary on software
versions. Some functions may not be available on the
vehicle’s audio system.
The menu items vary depending on the station you
selected.
You must have a previously set up Aha
TM
account
prior to using the service in your vehicle. Visit
www.aharadio.com for more information.
You want to select another source, select AUDIO on
the upper left of the screen. The source select screen
will appear. Select the source you want.
TM
Playing Aha
TM
AhaTM can be displayed and operated on the audio/information screen when your
smartphone is connected to the audio system by Wi-Fi or through Bluetooth® with
the HondaLink® app downloaded to your smartphone.
2 Wi-Fi Connection P. 288
2 HondaLink® P. 283
/AUDIO (Power/
Audio) Icon
Select to turn the audio
system on and off.
Multi-Information Display
Audio/Information Screen
VOL (Volume) Icons
Select to adjust the
volume.
(Back) Icon
Select to go back to the
previous display.
277
Page 30

uuAudio System Basic OperationuPlaying a USB Flash Drive
Features
Track Icons
Select or to change files.
Select and hold to move rapidly
within a track.
Playing a USB Flash Drive
Your audio system reads and plays sound files on a USB flash drive in either MP3,
WMA, or AAC
Connect your USB flash drive to the USB port, then select the USB mode.
*1
format.
2 USB Port(s) P. 203
/AUDIO (Power/Audio) Icon
Select to turn the audio system
on and off.
Multi-Information Display
USB Indicator
Appears when a USB flash drive is
connected.
278
VOL (Volume) Icons
Select to adjust the volume.
(Menu) Icon
Select to display the menu items.
(Back) Icon
Select to go back to the previous
display.
Folder Icons
Select to skip to the next folder, and to skip
to the beginning of the previous folder.
*1:Only AAC format files recorded with iTunes are playable on this unit.
*2:Some or all of the lists may not be displayed.
Audio/Information Screen
Open/Close Icon
Displays/hides the detailed
information.
*2
Page 31

Features
How to Select a File from the Music Search List
1Playing a USB Flash Drive
Use the recommended USB flash drives.
2 General Information on the Audio System
P. 299
WMA files protected by digital rights management
(DRM) cannot be played.
The audio system displays Unplayable File, then
skips to the next file.
If there is a problem, you may see an error message
on the audio/information screen.
2 iPod/USB Flash Drive P. 296
Select Switch USB Device in the Audio menu
screen to switch to another USB device.
Folder Selection
Track Selection
■
uuAudio System Basic Operationu Playing a USB Flash Drive
1. Select and select Music Search.
2. Select Music.
3. Select a folder.
4. Select a track.
Continued
279
Page 32

uuAudio System Basic OperationuPlaying a USB Flash Drive
Features
1How to Select a Play Mode
Play Mode Menu Items
Scan
Scan Folders: Provides 10-second sampling of the
first file in each of the main folders.
Scan Tracks: Provides 10-second sampling of all files
in the current folder.
Random/Repeat
Random in Folder: Plays all files in the current
folder in random order.
Random All Tracks: Plays all files in random order.
Repeat Folder: Repeats all files in the current folder.
Repeat Track: Repeats the current file.
How to Select a Play Mode
■
You can select scan, repeat, and random modes when playing a file.
■ Scan
1. Select .
2. Select Scan.
3. Select a play mode.
■ Random/Repeat
Select a play mode.
280
■ To turn off a play mode
Select the mode you want to turn off.
Page 33

Features
Playing Bluetooth® Audio
1Playing Bluetooth® Audio
Not all Bluetooth-enabled phones with streaming
audio capabilities are compatible.
To check if your phone is compatible, visit
http://www.handsfreelink.com/Honda/.
It may be illegal to perform some data device
functions while driving.
Only one phone can be used with HFL at a time.
When there are more than two paired phones in the
vehicle, the first paired phone the system finds is
automatically connected.
The connected phone for Bluetooth® Audio can be
different.
If more than one phone is paired to the HFL system,
there may be a delay before the system begins to
play.
In some cases, the name of the artist, album, or track
may not appear correctly.
Some functions may not be available on some
devices.
Bluetooth Indicator
Appears when your
phone is connected
to HFL.
Track Icons
Select or
to change tracks.
Your audio system allows you to listen to music from your Bluetooth-compatible
phone.
This function is available when the phone is paired and connected to the vehicle’s
Bluetooth® HandsFreeLink® (HFL) system.
2 Phone Setup P. 361
uuAudio System Basic OperationuPlaying Bluetooth® Audio
Multi-Information
Display
/AUDIO (Power/
Audio) Icon
Select to turn the
audio system on
and off.
VOL (Volume)
Icons
Select to adjust
the volume.
(Menu) Icon
Select to display the
menu items.
(Back) Icon
Select to go back to
the previous
display.
Play Icon
Pause Icon
*1:Depending on the Bluetooth® device you connect, some or all of the lists may not
be displayed.
Audio/Information
Screen
Open/Close Icon
Displays/hides the
detailed
information.
Group Icons
Select or to
change group.
*1
Continued
281
Page 34

uuAudio System Basic OperationuPlaying Bluetooth® Audio
Features
1To Play Bluetooth® Audio Files
To play the audio files, you may need to operate your
phone. If so, follow the phone maker's operating
instructions.
Switching to another mode pauses the music playing
from your phone.
You can change the connected phone in the
Bluetooth® settings on the Audio menu screen by
the following procedure.
1. Select .
2. Select Settings.
1Searching for Music
Depending on the Bluetooth® device you connect,
some or all of the lists may not be displayed.
To Play Bluetooth® Audio Files
■
1. Make sure that your phone is paired and
connected to the system.
2 Phone Setup P. 361
2. Select the Bluetooth® Audio mode.
If the phone is not recognized, another HFLcompatible phone, which is not compatible
for Bluetooth® Audio, may already be
connected.
■ To pause or resume a file
Select the play icon or pause icon.
Searching for Music
■
282
1. Select .
2. Select Music Search.
3. Select a search category (e.g., Albums).
4. Select an item.
u The selection begins playing.
Page 35

uuAudio System Basic OperationuWi-Fi Connection
Features
1Wi-Fi mode (setting for the first time)
You cannot go through the setting procedure while a
vehicle is moving. Park in a safe place to setup the
Wi-Fi connection.
Some cell phone carriers charge for tethering and
smartphone data use. Check your phone’s data
subscription package.
Check your phone manual to find out if the phone
has Wi-Fi connectivity.
You can confirm whether Wi-Fi connection is on or
off with the icon on Wi-Fi Network List.
Transmission speed and others will not be displayed
on this screen.
Wi-Fi Connection
You can connect the display audio to the Internet using Wi-Fi and browse websites
or use online services on the audio/information screen. If your phone has cell
hotspot capabilities, the system can be tethered to the phone. Use the following
steps to setup.
Wi-Fi mode (setting for the first time)
■
1. Select .
2. Select Settings.
3. Select Bluetooth/Wi-Fi.
4. Select the Wi-Fi tab.
5. Select Wi-Fi On/Off Status, then On.
6. Select Wi-Fi Network List.
u Make sure your phone’s Wi-Fi setting is
in access point (tethering) mode.
u Select the phone you want to connect to
the system.
u If you do not find the phone you want to
connect in the list, select Scan.
7. Select Connect.
u Enter a password for your phone, and
select OK.
u When the connection is successful, the
icon is displayed on the list.
8. Select to go back to the home screen.
288
Page 36

Features
1Wi-Fi mode (after the initial setting has been made)
You may need to go through an initial setup for WiFi connection again after you boot your phone.
iPhone users
Wi-Fi mode (after the initial setting has been made)
■
Make sure your phone's Wi-Fi setting is in access point (tethering) mode.
uuAudio System Basic OperationuWi-Fi Connection
289
Page 37

Features
Phone Setup
1Phone Setup
Your Bluetooth-compatible phone must be paired to
the system before you can make and receive handsfree calls.
Phone Pairing Tips:
• You cannot pair your phone while the vehicle is
moving.
• Up to six phones can be paired.
• Your phone's battery may drain faster when it is
paired to the system.
• If your phone is not ready for pairing or not found
by the system within three minutes, the system will
time out and return to idle.
■
uuBluetooth® HandsFreeLink®*uHFL Menus
■ To pair a cell phone (when there is no
phone paired to the system)
1. Select Phone.
2. Select Yes.
3. Make sure your phone is search or
discoverable mode, then select Continue.
u HFL automatically searches for a
Bluetooth® device.
4. Select your phone when it appears on the
list.
u If your phone does not appear, you can
select Refresh to search again.
u If your phone still does not appear, select
Phone Not Found and search for
Bluetooth® devices using your phone.
From your phone, search for
HandsFreeLink.
5. The system gives you a pairing code on the
audio/information screen.
u Confirm if the pairing code on the screen
and your phone match.
This may vary by phone.
Continued
361
Page 38

uuBluetooth® HandsFreeLink®*uHFL Menus
Features
1To change the currently paired phone
If no other phones are found or paired when trying to
switch to another phone, HFL will inform you that the
original phone is connected again.
To pair other phones, select Add Bluetooth Device
from the Bluetooth device list screen.
1To change the pairing code setting
The default pairing code is 0000 until you change the
setting.
To create your own, select Fixed, and delete the
current code, then enter a new one.
For a randomly generated pairing code each time you
pair a phone, select Random.
■ To change the currently paired phone
1. Go to the phone settings screen.
2 Phone settings screen P. 356
2. Select Bluetooth Device List.
3. Select a phone to connect.
u HFL disconnects the connected phone
and starts searching for another paired
phone.
4. Select Connect Phone/Audio, Connect
Phone, or Connect Audio.
■ To change the pairing code setting
1. Select .
2. Select Settings.
3. Select Bluetooth/Wi-Fi.
4. Select the Bluetooth tab.
5. Select Edit Pairing Code.
362
6. Select Random or Fixed.
Page 39

Features
uuBluetooth® HandsFreeLink®*uHFL Menus
■ To delete a paired phone
1. Go to the phone settings screen.
2 Phone settings screen P. 356
2. Select Bluetooth Device List.
3. Select a phone you want to delete.
4. Select Delete.
5. A confirmation message appears on the
screen. Select Yes.
Continued
363
Page 40

uuBluetooth® HandsFreeLink®*uHFL Menus
Features
1To Set Up a Text Message/E-mail Options
To use the text message/e-mail function, it may be
necessary to set up on your phone.
1To turn on or off the text/e-mail notice
On: A pop-up notification comes on every time you
receive a new message.
Off: The message you receive is stored in the system
without notification.
■
To Set Up a Text Message/E-mail Options
■ To turn on or off the text/e-mail
function
1. Go to the Phone settings screen.
2 Phone settings screen P. 356
2. Select the Text/Email tab, then Enable
Text/Email.
u A pop-up menu appears on the screen.
3. Select On or Off.
■ To turn on or off the text/e-mail notice
1. Go to the Phone settings screen.
2 Phone settings screen P. 356
2. Select the Text/Email tab, then New
Message Notification.
u A pop-up menu appears on the screen.
3. Select On or Off.
364
Page 41

Features
1Ring Tone
Fixed: The fixed ring tone sounds from the speakers.
Mobile Phone: The ring tone stored in the
connected cell phone sounds from the speakers.
Ring Tone
■
You can change the ring tone setting.
uuBluetooth® HandsFreeLink®*uHFL Menus
1. Go to the phone settings screen.
2 Phone settings screen P. 356
2. Select Ring Tone.
3. Select Fixed or Mobile Phone.
Continued
365
Page 42

uuBluetooth® HandsFreeLink®*uHFL Menus
Features
1Automatic Import of Cellular Phonebook and Call History
When you select a name from the list in the cellular
phonebook, you can see up to three category icons.
The icons indicate what types of numbers are stored
for that name.
On some phones, it may not be possible to import the
category icons to the system.
The phonebook is updated after every connection.
Call history is updated after every connection or call.
Automatic Import of Cellular Phonebook and Call History
■
■ When Automatic Phone Sync is set to
On:
When your phone is paired, the contents of its
phonebook and call history are automatically
imported to the system.
Pref
Fax
■ Changing the Automatic Phone Sync
1. Go to the phone settings screen.
2. Select Automatic Phone Sync.
3. Select On or Off.
setting
2 Phone settings screen P. 356
Home
Mobile
Work
Pager
Car
Other
Voice
Blank
366
Page 43

Features
1Speed Dial
When a voice tag is stored, press the button to
call the number using the voice tag. Say the voice tag
name.
Speed Dial
■
Up to 20 speed dial numbers can be stored per phone.
To store a speed dial number:
1. Go to the Phone menu screen.
2 Phone menu screen P. 359
2. Select Speed Dial.
3. Select New Entry.
From Import from Call History:
u Select a number from the call history.
From Manual Input:
u Input the number manually.
From Import from Phonebook:
u Select a number from the connected cell
phone’s imported phonebook.
4. When the speed dial is successfully stored,
you are asked to create a voice tag for the
number. Select Yes or No.
uuBluetooth® HandsFreeLink®*uHFL Menus
5. Select Record to store a voice tag for the
speed dial entry.
u Using the button, follow the prompts
to store a voice tag for the speed dial
entry.
Continued
367
Page 44

uuBluetooth® HandsFreeLink®*uHFL Menus
Features
1Speed Dial
Avoid using duplicate voice tags.
Avoid using “home” as a voice tag.
It is easier for the system to recognize a longer name.
For example, use “John Smith” instead of “John.”
■ To add a voice tag to a stored speed
dial number
1. Go to the phone settings screen.
2 Phone settings screen P. 356
2. Select Edit Speed Dial.
3. Select an existing speed dial entry.
u From the pop-up menu, select Edit.
4. Select Voice Tag.
u From the pop-up menu, select Record.
5. Select Record, or use the button and
follow the prompts to complete the voice
tag.
368
■ To delete a voice tag
1. Go to the phone settings screen.
2 Phone settings screen P. 356
2. Select Edit Speed Dial.
3. Select an existing speed dial entry.
u From the pop-up menu, select Edit.
4. Select Voice Tag.
u From the pop-up menu, select Clear.
5. A confirmation message appears on the
screen. Select Yes.
Page 45

Features
uuBluetooth® HandsFreeLink®*uHFL Menus
■ To edit a speed dial
1. Go to the phone settings screen.
2 Phone settings screen P. 356
2. Select Edit Speed Dial.
3. Select an existing speed dial entry.
u From the pop-up menu, select Edit.
4. Select a setting you want.
■ To delete a speed dial
1. Go to the phone settings screen.
2 Phone settings screen P. 356
2. Select Edit Speed Dial.
3. Select an existing speed dial entry.
u From the pop-up menu, select Delete.
4. A confirmation message appears on the
screen. Select Yes.
Continued
369
Page 46

uuBluetooth® HandsFreeLink®*uHFL Menus
Features
1Phonebook Phonetic Modification
You can store up to 20 phonetic modification items.
■
Add phonetic modifications or a new voice tag to the phone’s contact name so that
it is easier for HFL to recognize voice commands.
Phonebook Phonetic Modification
■ To add a new voice tag
1. Select .
2. Select Settings.
3. Select System.
4. Select the Voice Recog tab.
5. Select Phonebook Phonetic
Modification.
6. Select the phone you want to add
phonetic modification to.
370
Page 47

Features
uuBluetooth® HandsFreeLink®*uHFL Menus
7. Select New Voice Tag.
8. Select a contact name you want to add to.
u The pop-up menu appears on the
screen.
9. Select Modify.
10. Using Record or the button, follow
the prompts to complete the voice tag.
11. You will receive a confirmation message
on the screen, then select OK.
Continued
371
Page 48

uuBluetooth® HandsFreeLink®*uHFL Menus
Features
1Phonebook Phonetic Modification
You can only modify or delete contact names for the
currently connected phone.
■ To modify a voice tag
1. Select .
2. Select Settings.
3. Select System.
4. Select the Voice Recog tab.
5. Select Phonebook Phonetic
Modification.
6. Select the phone you want to modify
phonetic modification.
7. Select a contact name you want to
modify.
u The pop-up menu appears on the
screen.
8. Select Modify.
9. Using Record or the button, follow
the prompts to complete the voice tag.
10. You will receive a confirmation message
on the screen, then select OK.
372
Page 49

Features
uuBluetooth® HandsFreeLink®*uHFL Menus
■ To delete a modified voice tag
1. Select .
2. Select Settings.
3. Select System.
4. Select the Voice Recog tab.
5. Select Phonebook Phonetic
Modification.
6. Select the phone you want to delete
phonetic modification.
7. Select a contact name you want to delete.
u The pop-up menu appears on the screen.
8. Select Delete.
u The selected contact name has been
selected.
9. Select OK.
Continued
373
Page 50

uuBluetooth® HandsFreeLink®*uHFL Menus
Features
1Making a Call
Any voice-tagged speed dial entry can be dialed by
voice from most screens.
Press the button and say the voice tag name.
Once a call is connected, you can hear the voice of
the person you are calling through the audio
speakers.
■ To delete all modified voice tags
1. Select .
2. Select Settings.
3. Select System.
4. Select the Voice Recog tab.
5. Select Phonebook Phonetic
Modification.
6. Select the phone you want to delete
phonetic modification.
u The contact name list appears.
7. Select Delete All.
8. You will receive a confirmation message on
the screen, then select Yes.
Making a Call
■
374
You can make calls by inputting any phone
number, or by using the imported
phonebook, call history, speed dial entries, or
redial.
Page 51

Features
AAA
BBB
CCC
AAA
AAA
BBB
BBB
CCC
CCC
uuBluetooth® HandsFreeLink®*uHFL Menus
■ To make a call using the imported
phonebook
1. Go to the Phone menu screen.
2 Phone menu screen P. 359
2. Select Phonebook.
3. Select a name.
u You can also search by letter. Select
Search.
u Use the keyboard on the touch screen for
entering name, if multiple numbers exist
select a number.
4. Select a number.
u Dialing starts automatically.
■ To make a call using a phone number
1. Go to the Phone menu screen.
2 Phone menu screen P. 359
2. Select Dial.
3. Select a number.
u Use the keyboard on the touch screen for
entering numbers.
4. Select Dial.
u Dialing starts automatically.
Continued
375
Page 52

uuBluetooth® HandsFreeLink®*uHFL Menus
Features
1To make a call using redial
Press and hold the button to redial the last
number dialed.
1To make a call using the Call History
The call history displays the last 20 all, dialed,
received, or missed calls.
(Appears only when a phone is connected to the
system.)
1To make a call using a Speed Dial entry
When a voice tag is stored, press the button to
call the number using the voice tag.
2 Speed Dial P. 367
Any voice-tagged speed dial entry can be dialed by
voice from any screen.
Press the button and follow the prompts.
■ To make a call using redial
1. Go to the Phone menu screen.
2 Phone menu screen P. 359
2. Select Redial.
u Dialing starts automatically.
■ To make a call using the Call History
Call history is stored by All, Dialed,
Received, and Missed.
1. Go to the Phone menu screen.
2 Phone menu screen P. 359
376
2. Select Call History.
3. Select All, Dialed, Received, or Missed.
4. Select a number.
u Dialing starts automatically.
■ To make a call using a Speed Dial entry
1. Go to the Phone menu screen.
2 Phone menu screen P. 359
2. Select Speed Dial.
3. Select a number.
u Dialing starts automatically.
Page 53

Features
1Receiving a Call
Call Waiting
Press the button to put the current call on hold to
answer the incoming call.
Press the button again to return to the current
call.
Select Ignore to ignore the incoming call if you do
not want to answer it.
Press the button if you want to hang up the
current call.
You can select the icons on the audio/information
screen instead of the and buttons.
1Options During a Call
Touch Tones: Available on some phones.
You can select the icons on the audio/information
screen.
Receiving a Call
■
Options During a Call
■
uuBluetooth® HandsFreeLink®*uHFL Menus
When there is an incoming call, an audible
notification sounds (if activated) and the
Incoming call screen appears.
Press the button to answer the call.
Press the button to decline or end the call.
The following options are available during a call.
Mute: Mute your voice.
Transfer: Transfer a call from the system to your phone.
Touch Tones: Send numbers during a call. This is useful when you call a menu-
driven phone system.
Mute Icon
The available options are shown on the lower
half of the screen.
Select the option.
u The mute icon appears when Mute is
selected. Select Mute again to turn it off.
Continued
377
Page 54

Information
&,9,&'7%$ERRN࣮࣌ࢪ㸰㸮㸯㸳ᖺ㸳᭶㸰㸵᪥ࠉỈ᭙᪥ࠉ༗ᚋ㸶㸳㸳ศ
Devices that Emit Radio Waves
The following products and systems on your vehicle emit radio waves when in
operation.
Audio System
Bluetooth® Audio
Bluetooth® HandsFreeLink®
Collision Mitigation Braking System
Immobilizer System
Remote Transmitter
Charging Cable Interactive Remote Control
Each of the above complies with the appropriate requirements or the required
standards of FCC (Federal Communications Commission) and Industry Canada
Standard, described below:
As required by the FCC:
This device complies with Part 15 of the FCC rules. Operation is
subject to the following two conditions: (1) This device may not
cause harmful interference, and (2) this device must accept any
interference received, including interference that may cause
undesired operation.
TM
Changes or modifications not expressly approved by the party
responsible for compliance could void the user’s authority to
operate the equipment.
This device complies with Industry Canada Standard RSS-Gen/210/251/310.
Operation is subject to the following two conditions: (1) this device may not cause
interference, and (2) this device must accept any interference, including interference
that may cause undesired operation of the device.
569
Page 55

Thisdevicecomplieswithpart15ofFCCRulesandIndustryCanadaslicence-exemptRSSs.Operationissubject
licence-exempt
tothefollowingtwoconditions:(1)thisdevicemaynotcauseharmfulinterference,and(2)thisdevicemustaccept
anyinterferencereceived,includinginterferencethatmaycauseundesiredoperation.
Leprésentappareilestconformeàlapartie15desrèglesdelaFCCetauxnormesdesCNRd'IndustrieCanada
applicablesauxappareilsradioexemptsdelicence.L'exploitationestautoriséeauxdeuxconditionssuivantes:(1)
l'appareilnedoitpasproduiredebrouillage,et(2)l'appareildoitacceptertoutbrouillagesubi,mêmesilebrouillage
estsusceptibled'encompromettrelefonctionnement.
Changes or modifications not expressly approved by the party responsible for compliance could void the user’s authority to operate the
equipment.
This transmitter must not be co-located or operated in conjunction with any other antenna or transmitter.
This equipment complies with FCC/IC radiation exposure limits set forth for an uncontrolled environment and meets the FCC radio frequency
(RF) Exposure Guidelines and RSS-102 of the IC radio frequency (RF) Exposure rules. This equipment should be installed and operated
keeping the radiator at least 20cm or more away from person’s body.
Cet équipement est conforme aux limites d’exposition aux rayonnements énoncées pour un environnement non contrôlé et respecte les
règles les radioélectriques (RF) de la FCC lignes directrices d'exposition et d’exposition aux fréquences radioélectriques (RF) CNR-102 de
l’IC. Cet équipement doit être installé et utilisé en gardant une distance de 20 cm ou plus entre le radiateur et le corps humain.
 Loading...