

Mitsubishi TG-2000A Tutuorial
A
A
,
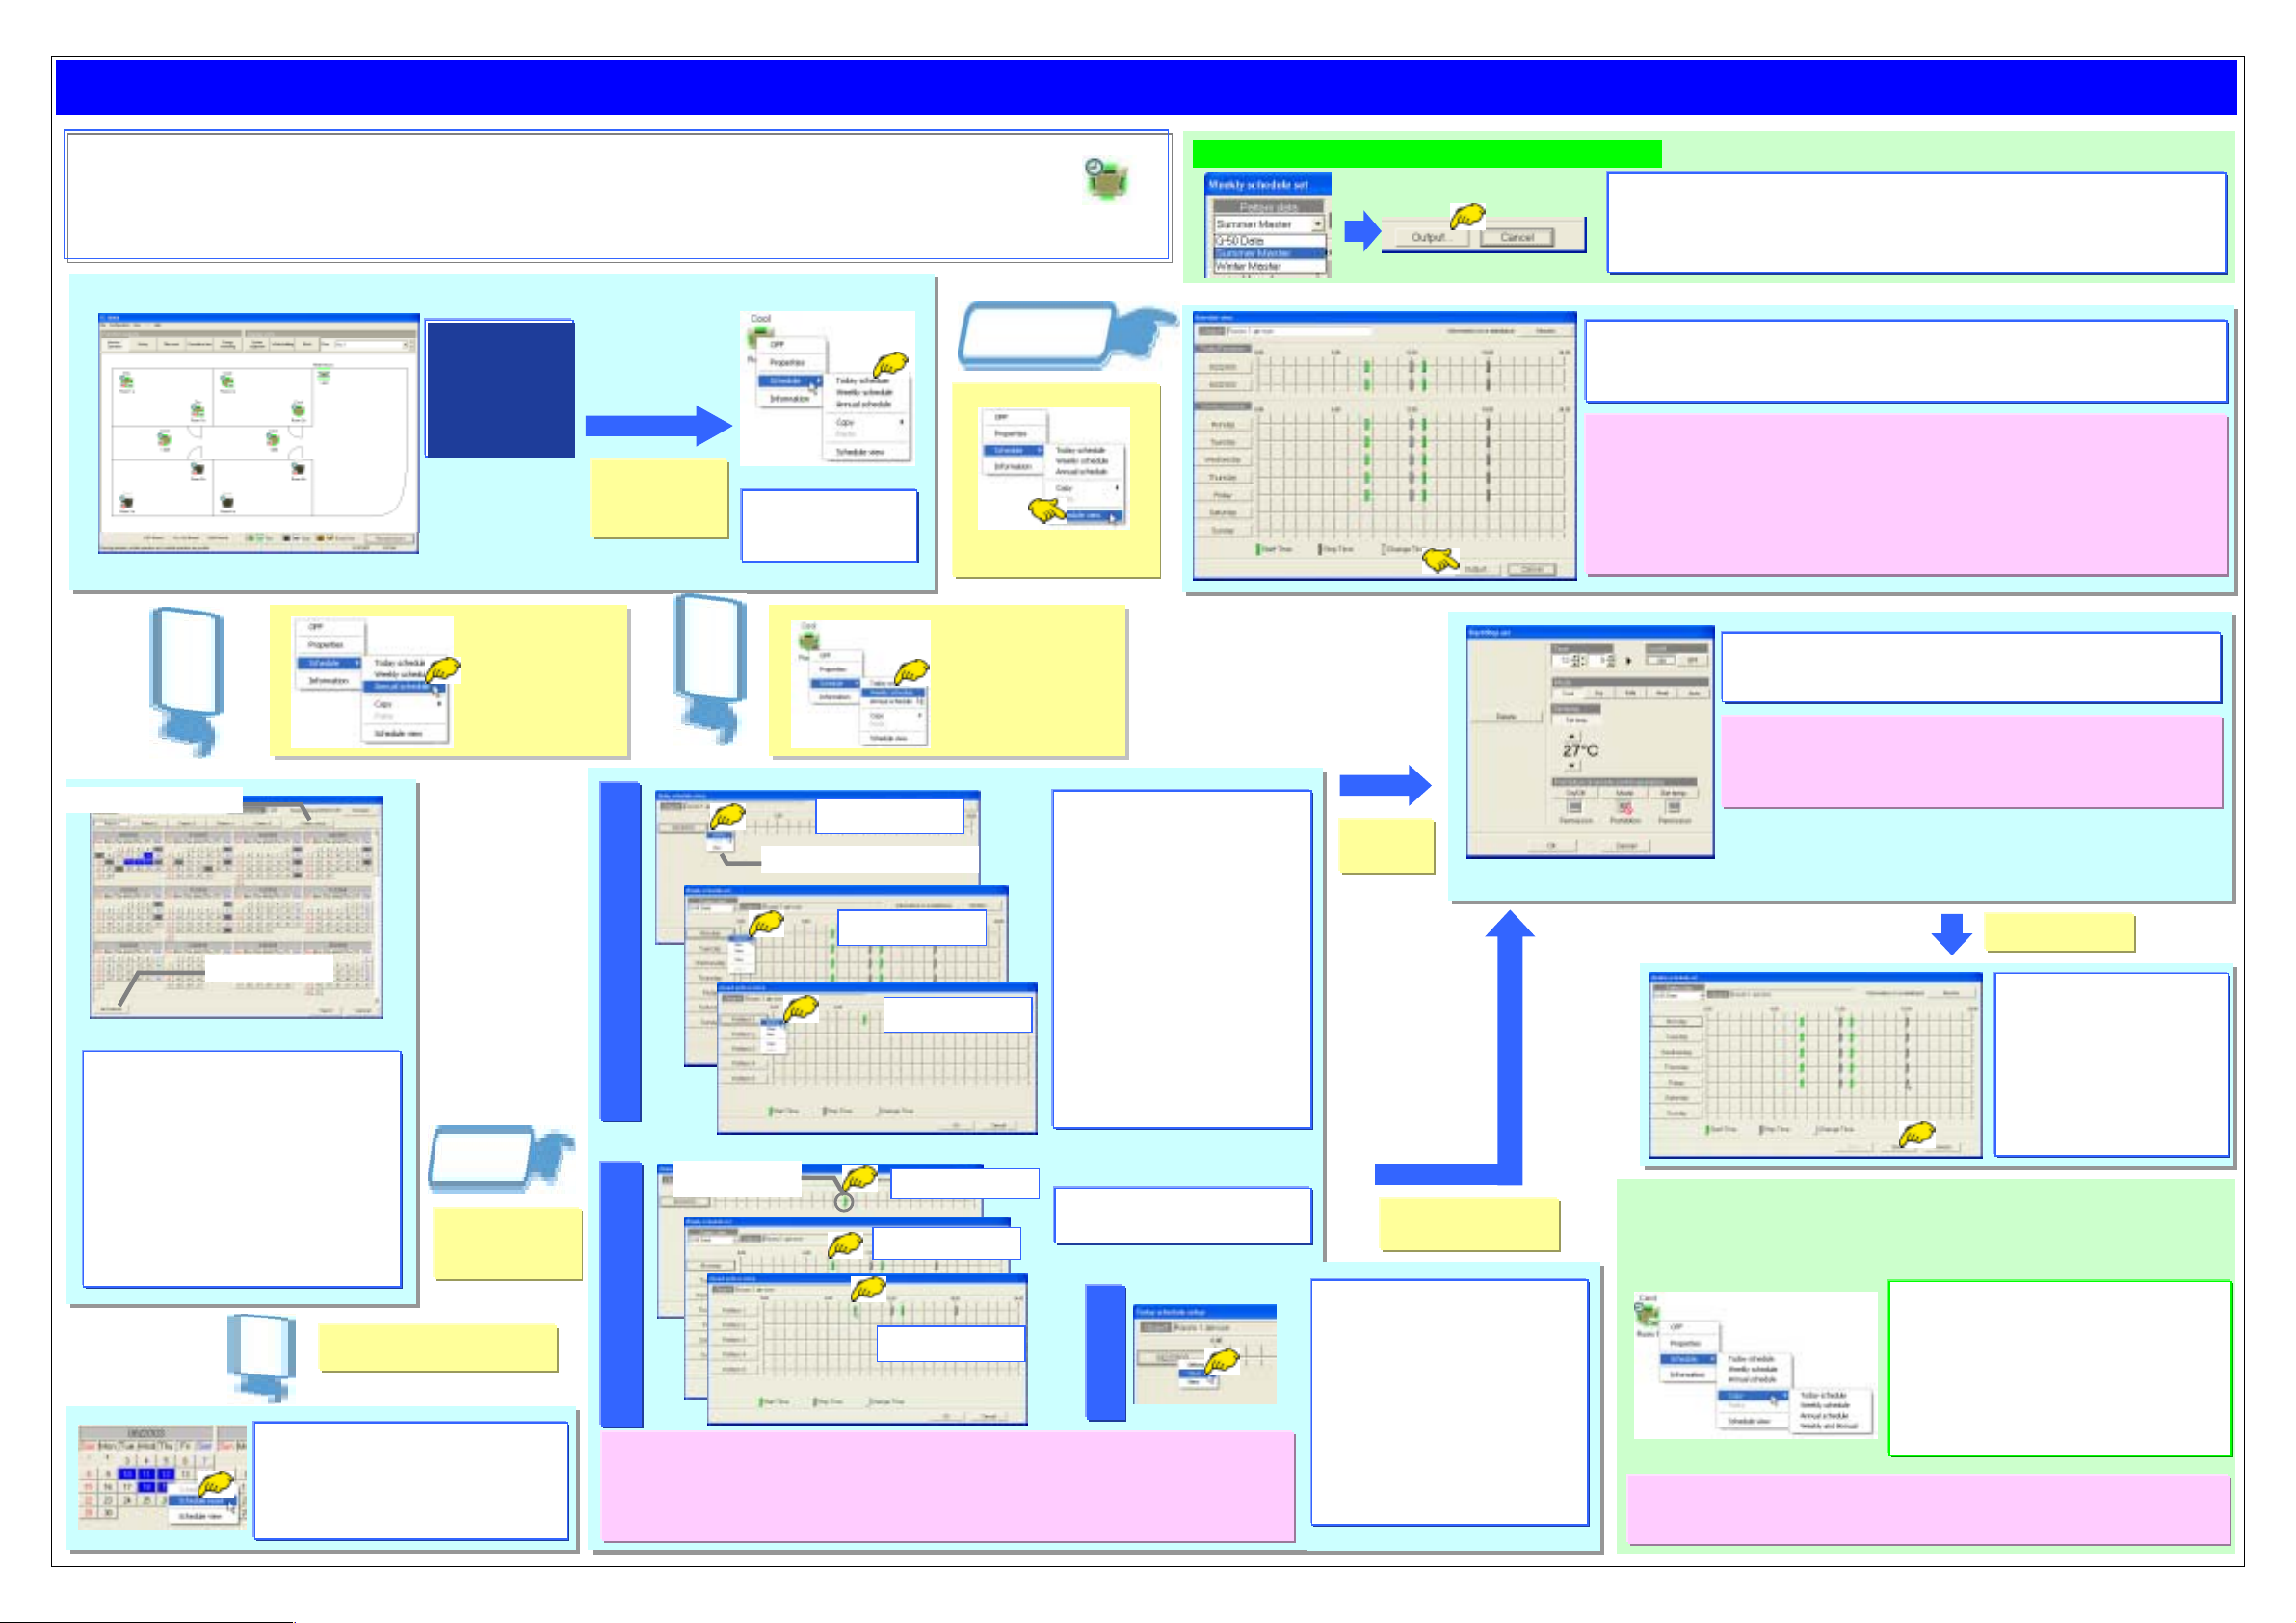
SCHEDULE OPERATION METHOD OF TG-2000A (INTEGRATE D CENTRALIZED CONTROL SOFTWARE)
Outline of TG-2000A Schedule Function
· With the schedule setting function, the starting/stopping, operation mode, temperature, prohibition/permit of rem ote control l e r operat i on
at a specified time can be set.
· The types of the schedule include today’s schedule, weekly schedule and annual schedule. A schedule for each day can be set in the
weekly schedule, and a schedule for up to 50 days (during 24 months) can be set in the annual schedule.
The setting priority is today's, annual and weekly in order.
· The minimum unit that can be set is a group. (Controllable objects : group, whole floor, operation block, whole building)
How to move to schedule relating screens
To change/set the
annual schedule
Each screen
Press the [Monitor/
operation] of the
function selection
buttons to display
the monitor/operation screen.
Click the [Annual
schedule].
Click the target
icon or the [Floor
batch].
To change/set
the today's
and weekly
schedule
Select the [Schedule]
and select the item you
desire to execute.
To check the details
of the schedule
Select the [Schedule view].
Select the schedule
you desire to change/
set from the [Today
schedule] or [Weekly
schedule].
Display of icon
with schedule
setting
Switching method of [Summer Master] and [Winter Master]
The weekly schedule is available in two applications, for summer use and winter use.
For switching, monitor the weekly schedule in a unit of switching (with the procedure for
the [Schedule detail check], select the [Summer Master] or [Winter Master] from the
[Pattern data selection box], and click the [Send] button.
The details of the weekly, today's and next day's schedule are displayed.
To output the schedule details, press the [Output] button and enter the file name.
Then the output can be get as a CSV file.
Notice
· T o see the details being executed by G-50, click the [Update] button.
· The schedule can not be changed on this screen.
· When applying batch schedule monitor to two or more groups, the setting field is
highlighted in light blue color if there are different settings.
· The output style is the CSV type format. Printer output is not available.
Select the operation time and operation details (on/off, operation mode,
set temperature, operation prohibition). Clicking the [OK] button after
setting moves to the setting screen of each schedule.
Pattern setting/changing
ll clear button
Annual schedule screen
The [Annual schedule set screen] displays
the days from the current month up to 24
months, where the schedule starting from
the next day can be set or changed.
[Meaning of color for calendar date frame]
Blue : Schedule set for target pattern
Dark gray : Schedule set for non-target
pattern
Light gray : No schedule set
Light blue : Different schedule set for
multiple groups
To set/change
the pattern
Click the [Pattern
set up] button.
Setting method
Operation display
button
Today’s schedule
Pattern data selection box
Weekly schedule
Annual schedule
Today's schedule
Weekly schedule
· Today's schedule
Click the [Set] from the [Date
buttons].
· Weekly schedule
From the [Pattern data selection
box], select the [G-50 Data],
[Summer Master] or [Winter
Master]. Then click the button
of the [Pattern] you desire to set,
and select the [Set] from the
menu.
· Annual schedule
Select the button of the [Pattern]
you desire to set, and select the
[Set] from the menu.
Click the [Operation display button]
to display the "Details set screen".
Click the
[Set].
Click the [Operation
display button].
Details set screen
Copying function
The details set for schedule can be copied in a unit of group.
The copy target can be selected from the today's schedule, weekly
schedule
Notice
· Setting can be made without selecting the items (to maintain the
current conditions) other than the operation time.
· The operation setting can be set for 12 times maximum.
Click [OK].
Return to the [Schedule set
screen].
fter completing the schedule
setting/changing, press the
[Send] button to transmit the set
data to G-50A unit.
Pressing the [Cancel] makes
the set data invalid.
annual schedule or weekly & annual schedule.
· Select the [Monitor/operation] function.
· Select the original data of the schedule to be
copied.
· Select the [Schedule] - [Copy] - [Schedule
desired to be copied].
· Select the object on which the schedule is to
be copied.
· Select the [Schedule] - [Paste] from the menu.
The schedule will be pasted fully.
To clear the
schedule set
Selecting the [Schedule reset] from the
menu clears the annual schedule set to the
day.
Pressing the [All Delete] button clears all
annual schedules.
Click the date set with schedule.
Changing method
Notice
· Before conducting the schedule setting/changing, display the schedule being set to G-50A on the
monitor screen by using the [Monitor].
· When applying schedule monit oring to two groups or more in a batch, the set field will be
displayed in blue color if different setting is existing.
Annual schedule
How to delete
· Today's schedule
Click the [Clear] from the [Date]
button.
· Weekly schedule
Click the [Day] button and select the
[Clear] from the menu.
· Annual schedule
Select the [Clear] from the [Pattern]
button. Or select the [Delete] on
the [Details set screen] and click
[OK].
Notice
·The [Summer Master] and [Winter Master] are not included in the object of the
schedule copy.
(for TG-2000A Ver.4.10) WT04081X02
 Loading...