

Page 1

INDOOR UNIT OF CITY MULTI R410A SERIES
PWFY-P100VM-E-BU
PWFY-P100VM-E-AU
PWFY-P200VM-E-AU
GB
OPERATION MANUAL
For safe and correct use, please read this operation manual thoroughly before operating the indoor unit.
BEDIENUNGSANLEITUNG
Zum sicheren und ordnungsgemäßen Gebrauch der Innenanlage die Bedienungsanleitung vor dem Betrieb gründlich durchlesen.
MODE D’EMPLOI
Avant de mettre en marche l’appareil intérieur, prière de lire ce mode d’emploi avec attention pour un usage correct et en toute sécurité.
MANUAL DE OPERACIÓN
Para la utilización segura y correcta, lea detenidamente este manual de operación antes de operar la unidad interior.
MANUALE DI ISTRUZIONI
Per un uso sicuro e corretto, leggere attentamente questo manuale di istruzioni prima di mettere in funzione l’unità interna.
BEDIENINGSHANDLEIDING
Voor veilig en correct gebruikt dient u deze bedieningshandleiding geheel te lezen voor het bedienen van het toestel voor binnenshuis.
MANUAL DE OPERAÇÃO
Para uma utilização segura e correcta, é favor ler este manual de instalação por completo, antes de operar a unidade interior.
∂°Ã∂πƒπ¢π√ §∂π∆√Àƒ°π∞™
°И· ·ЫК¿ПВИ· О·И ЫˆЫЩ‹ ¯Ъ‹ЫЩЛ, ·Ъ·О·ПВ›ЫЩВ У· ‰И·‚¿ЫВЩВ ЪФЫВОЩИО¿ ·˘Щfi ЩФ ВБ¯ВИЪ›‰ИФ ПВИЩФ˘ЪБ›·˜ ЪИУ ЩЛ ПВИЩФ˘ЪБ›· ЩЛ˜
ВЫˆЩВЪИО‹˜ МФУ¿‰·˜.
РУКОВОДСТВО ПО ЭКСПЛУАТАЦИИ
Для безопасной и правильной эксплуатации аппарата необходимо тщательно ознакомиться с данным руководством по
эксплуатации перед включением внутреннего блока.
D
F
E
I
I
NL
P
GR
RU
KULLANIM EL K‹TABI
Emniyetli ve do¤ru biçimde nas›l kullan›laca¤›n› ö¤renmek için, lütfen iç mekan ünitesinin kullan›m›ndan önce bu el kitab›n› dikkatle
okuyunuz.
TR
CZ
SV
SL
HG
PO
Page 2
GB
Operation Section
D
Abschnitt Betrieb
F P
Section d'opération
1
2
3
TEMP.
ON/OFF
4
CIR.WATER
5
MENU
MONITOR/SET
BACK DAY
PAR-W21MAA
ON/OFF
INITIAL SETTING
CHECK TEST
CLOCK CLEAR
GB
D
*
F
A
0
9
8
7
6
E
Sección operativa
I
Sezione operativa
NL
Bedieningsgedeelte
Secção de operações
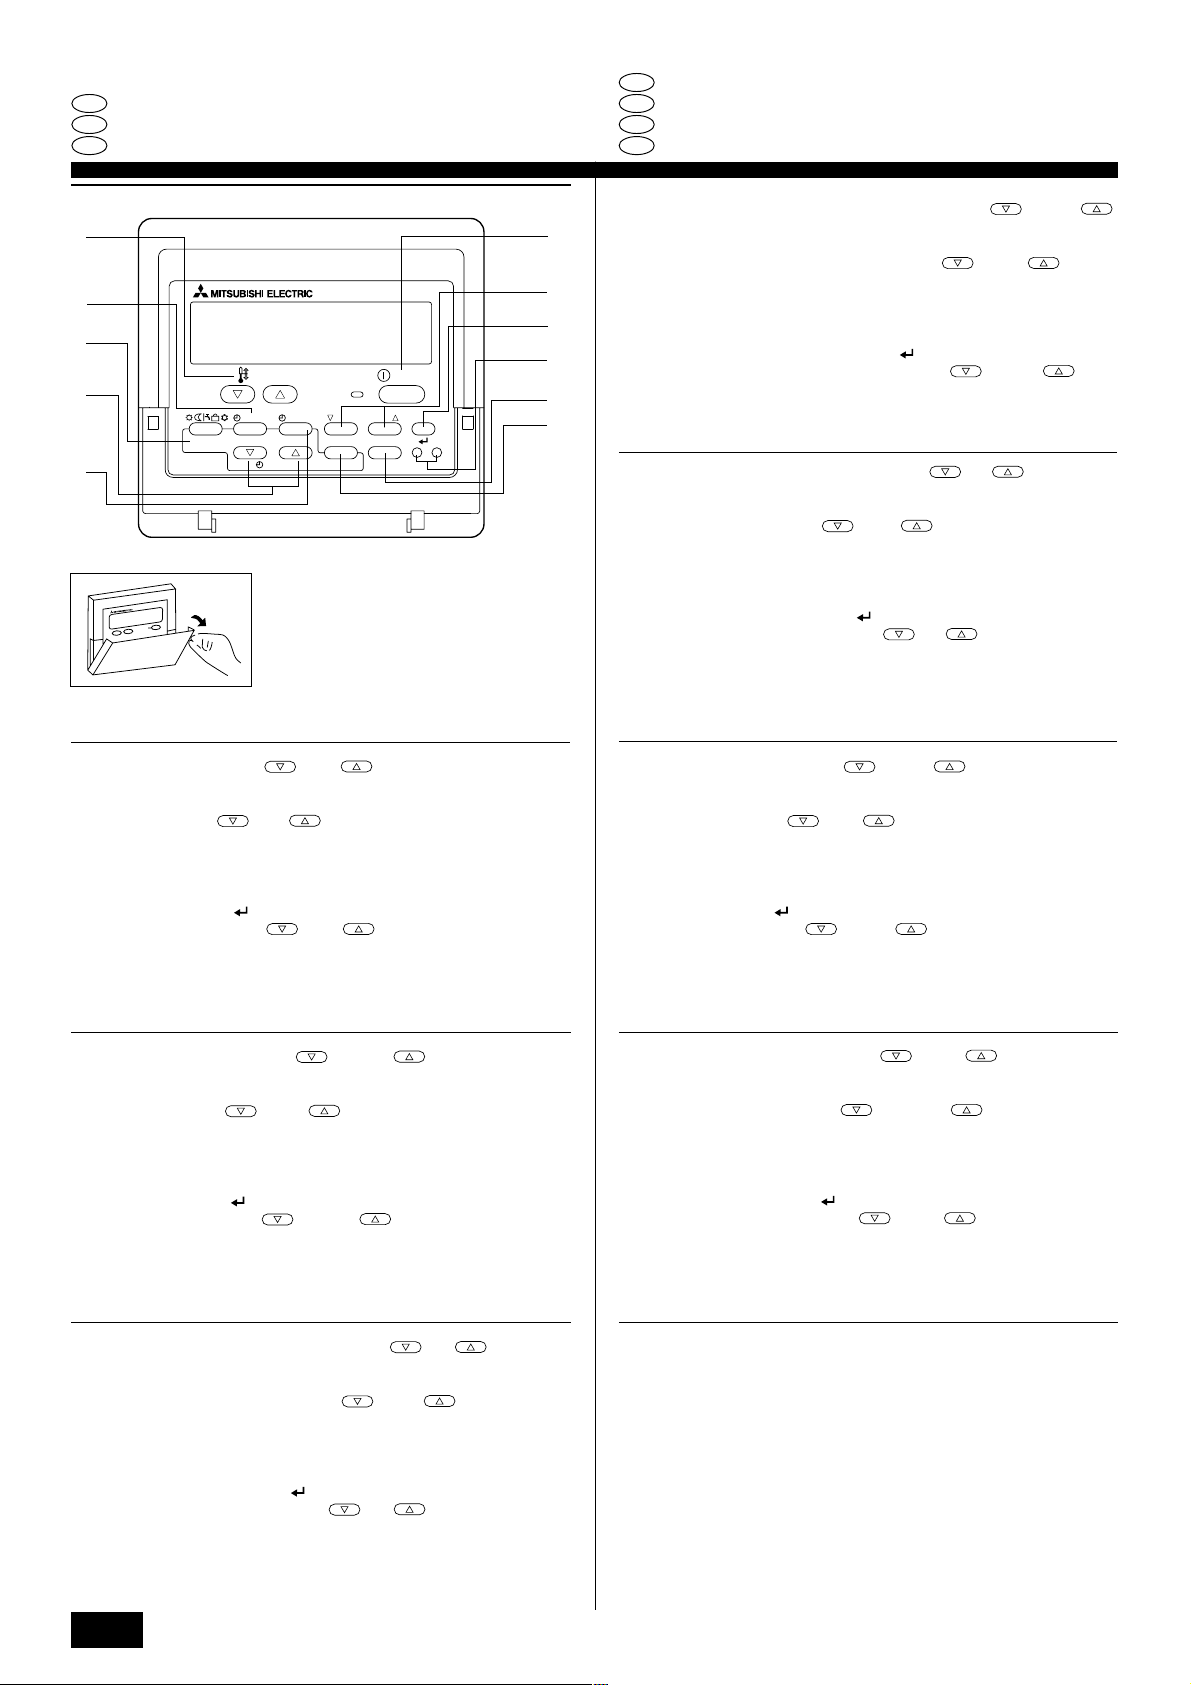
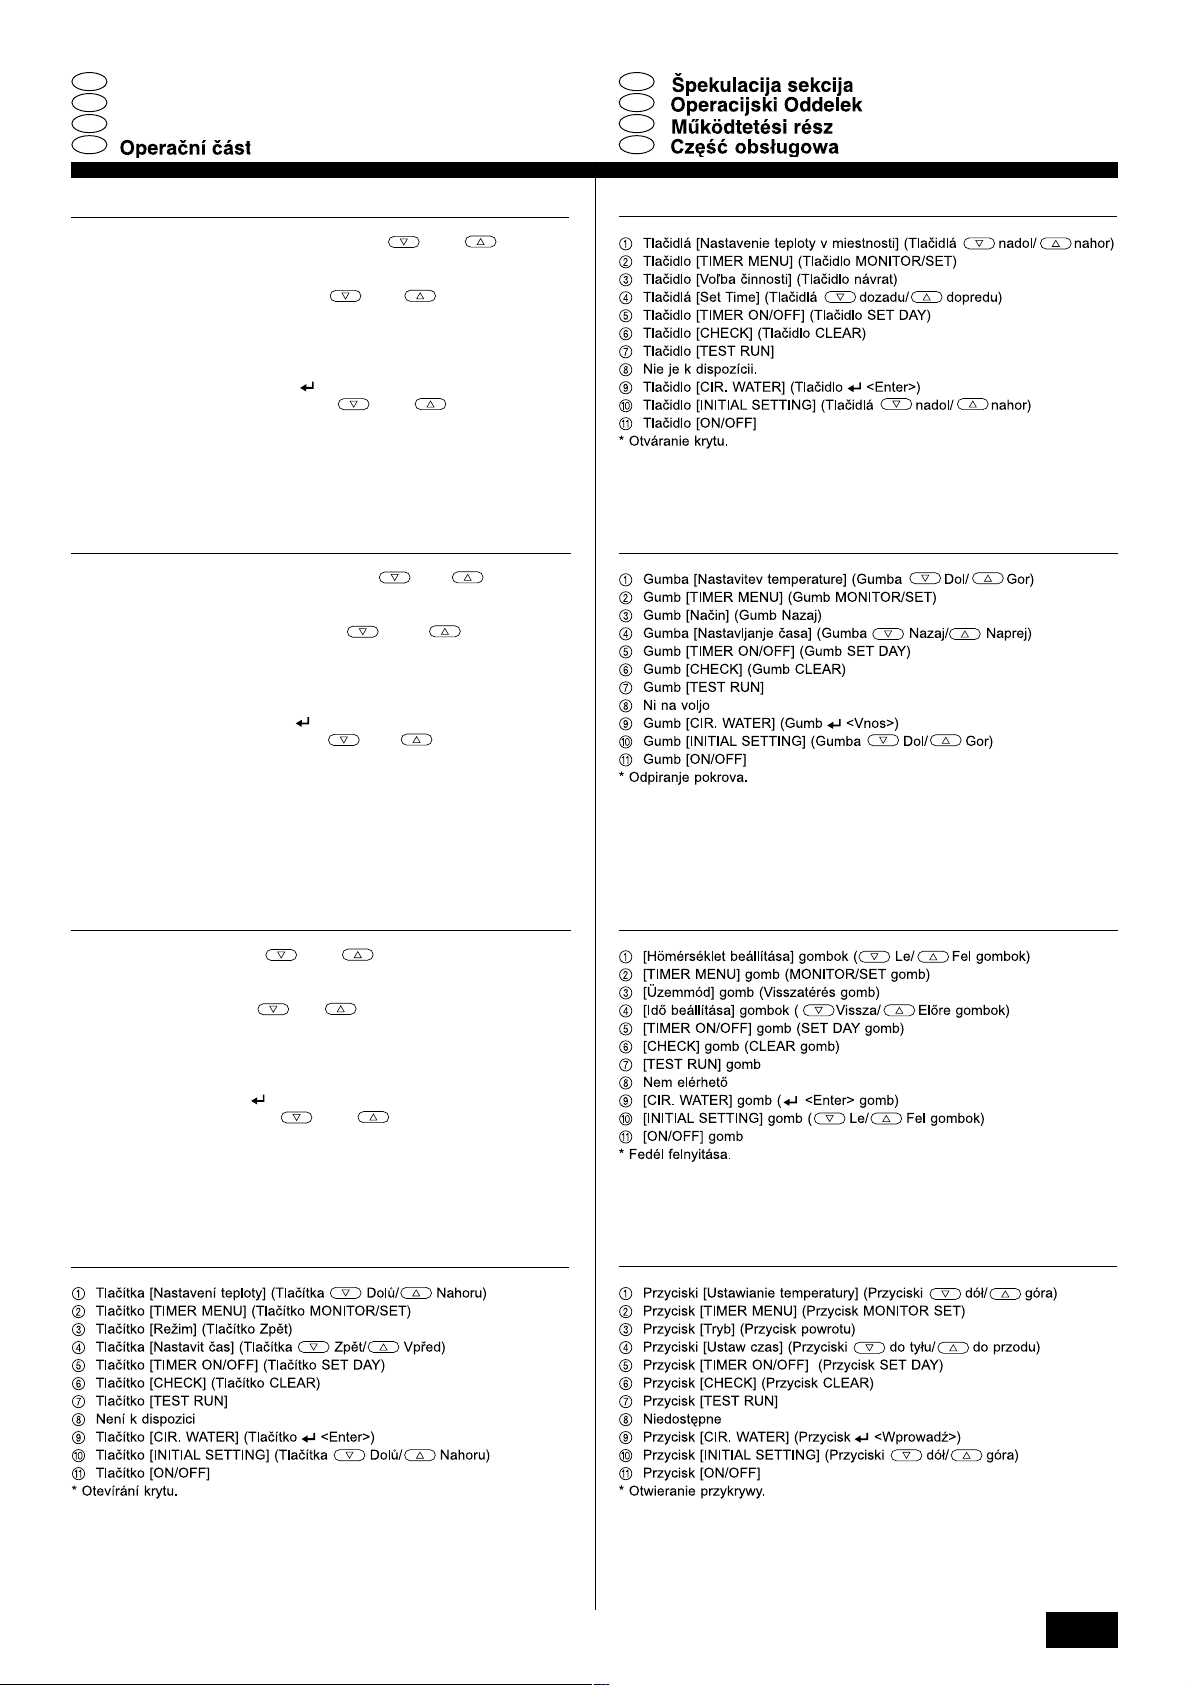
1 Botónes [Ajuste de la temperatura] (Botónes de descenso /ascenso )
2 Botón [TIMER MENU] (Botón MONITOR/SET)
3 Botón [Modo] (Botón de retorno)
4 Botónes [Ajuste de hora] (Botónes de retroceso
5 Botón [TIMER ON/OFF] (Botón SET DAY)
6 Botón [CHECK] (Botón CLEAR)
7 Botón [TEST RUN]
8 No disponibles
9 Botón [CIR. WATER] (Botón <Introducir>
0 Botón [INITIAL SETTING] (Botónes de descenso
A Botón [ON/OFF]
* Apertura de la tapa.
1 Pulsanti [Impostazione temperatura] (Pulsanti
2 Pulsante [TIMER MENU](Pulsante MONITOR/SET)
3 Pulsante [Modalità] (Pulsante Invio)
4 Pulsanti [Set Time] (Pulsanti
5 Pulsante [TIMER ON/OFF] (Pulsante SET DAY)
6 Pulsante [CHECK] (Pulsante CLEAR)
7 Pulsante [TEST RUN]
8 Non disponibile
9 Pulsante [CIR. WATER] (Pulsante
0 Pulsante [INITIAL SETTING] (Pulsanti
A Pulsante [ON/OFF]
* Apertura del coperchio.
)
Avanti/ Indietro)
<Invio>)
/avance )
/ascenso )
Giù/ Su)
Giù/ Su)
1 [Set Temperature] buttons ( Down/ Up buttons)
2 [TIMER MENU] button (MONITOR/SET button)
3 [Mode] button (Return button)
4 [Set Time] buttons (
5 [TIMER ON/OFF] button (SET DAY button)
6 [CHECK] button (CLEAR button)
7 [TEST RUN] button
IE
8 Not available
9 [CIR. WATER] button (
0 [INITIAL SETTING] button (
A [ON/OFF] button
* Opening the lid.
1 [Temperatureinstellung]-Tasten ( Niedriger/ Höher-Tasten)
2 [TIMER MENU]-Taste (MONITOR/SET-Taste)
PGRRUTR
3 [Modus]-Taste (Wieder-Taste)
4 [Zeiteinstell]-Tasten (
5 [TIMER ON/OFF]-Taste (SET DAY-Taste)
6 [CHECK]-Taste (CLEAR-Taste)
7 [TEST RUN]-Taste
8 Nicht verfügbar
9 [CIR. WATER]-Taste (
0 [INITIAL SETTING]-Taste (
A [ON/OFF]-Taste
* Öffnen des Deckels.
Back/ Ahead buttons)
<Enter> button)
Down/ Up buttons)
Zurück/ Vorwärts-Tasten)
<Enter>-Taste)
Niedriger/ Höher-Tasten)
1 [Temperatuur instellen]-toetsen (
2 [TIMER MENU]-toets (MONITOR/SET-toets)
3 [Modus]-toets (Toets terug)
4 [Tijd Instellen] toetsen (
5 [TIMER ON/OFF]-toets (SET DAY-toets)
6 [CHECK] toets (CLEAR toets)
7 [TEST RUN]-toets
8 Niet beschikbaar
9 [CIR. WATER] toets (
0 [INITIAL SETTING] toets (
A [ON/OFF]-toets
* De klep openen.
1 Botões [Ajustar Temperatura] (Botões
2 Botão [TIMER MENU] (Botão MONITOR/SET)
3 Botão [Modo] (Botão Retornar)
4 Botões [Ajustar tempo] (Botões
5 Botão [TIMER ON/OFF] (Botão SET DAY)
6 Botão [CHECK] (Botão CLEAR)
7 Botão [TEST RUN]
8 Não disponível
9 Botão [CIR. WATER] (Botão
0 Botão [INITIAL SETTING] (Botões
A Botão [ON/OFF]
* Abertura da tampa.
<Enter> toets)
Omlaag/ Omhoog toetsen)
Terug/ Vooruit toetsen)
Omlaag/ Omhoog toetsen)
Descer/ Subir)
Retroceder/ Avançar)
<Entrar>)
Descer/ Subir)
1 Touches [Réglage de la température] (Touches Bas/ Haut)
2 Touche [TIMER MENU] (Touche MONITOR/SET)
3 Touche [Mode] (Touche de retour)
4 Touches [Réglage de l’heure] (Touches
5 Touche [TIMER ON/OFF] (Touche SET DAY)
6 Touche [CHECK] (Touche CLEAR)
7 Touche [TEST RUN]
8 Non disponible
9 Touche [CIR. WATER] (Touche
0 Touche [INITIAL SETTING] (Touches
A Touche [ON/OFF]
* Ouverture du couvercle.
<Validation>)
Arrière/ Avant)
Bas/ Haut)
2
Page 3
GR
∆Ì‹Ì· §ÂÈÙÔ˘ÚÁ›·˜
RU
Операционный раздел
TR
Çal›flt›rma Bölümü
CZ
1 ∫Ф˘МИ¿ [ƒ‡ıМИЫЛ˜ £ВЪМФОЪ·Ы›·˜] (∫Ф˘МИ¿ ∫¿Ùˆ/ ∂¿Óˆ)
2 ∫Ô˘ÌÈ [TIMER MENU] (∫Ô˘ÌÈ MONITOR/SET)
3 ∫Ф˘МИ [∆ЪfiФ §ВИЩФ˘ЪБ›·˜] (∫Ф˘МИ ВИЫЩЪФК‹˜)
4 ∫Ô˘ÌÈ¿ [ƒ‡ıÌÈÛ˘ ÒÚ·˜] (∫Ô˘ÌÈ¿
5 ∫Ô˘ÌÈ [TIMER ON/OFF] (∫Ô˘ÌÈ SET DAY)
6 ∫Ô˘ÌÈ [CHECK] (∫Ô˘ÌÈ CLEAR)
7 ∫Ô˘ÌÈ [TEST RUN]
8 ¢ÂÓ Â›Ó·È ‰È·ı¤ÛÈÌÔ
9 ∫Ô˘ÌÈ [CIR. WATER] (∫Ô˘ÌÈ
0 ∫Ô˘ÌÈ [INITIAL SETTING] (∫Ô˘ÌÈ¿
A ∫Ô˘ÌÈ [ON/OFF]
* ХУФИБМ· ЩФ˘ О··ОИФ‡.
1 Кнопки [Установить температуру] (Кнопки Вниз/ Вверх)
2 Кнопка [TIMER MENU] (Кнопка MONITOR/SET)
3 Кнопка [Режим] (Кнопка возврата)
4 Кнопки [Настройка времени] (Кнопки
5 Кнопка [TIMER ON/OFF] (Кнопка SET DAY]
6 Кнопка [CHECK] (Кнопка CLEAR)
7 Кнопка [TEST RUN]
8 Недоступно
9 Кнопка [CIR. WATER] (Кнопка
0 Кнопка [INITIAL SETTING] (Кнопки
A Кнопка [ON/OFF]
* Открывание крышки.
¶›Ûˆ/ ªÚÔÛÙ¿)
<Enter>)
∫¿Ùˆ/ ∂¿Óˆ)
Назад/ Вперед)
<Ввод>)
Вниз/ Вверх)
SV
SL
HG
PO
GB
D
F
E
1 [S›cakl›k Ayar›] Dü¤meleri ( Afla¤›/ Yukar› dü¤meleri)
2 [TIMER MENU] Dü¤mesi (MONITOR/SET Dü¤mesi)
3 [Program Seçme] Dü¤mesi (Geri Dön dü¤mesi)
4 [Zaman Ayar›] dü¤meleri (
5 [TIMER ON/OFF] Dü¤mesi (SET DAY Dü¤mesi)
6 [CHECK] dü¤mesi (CLEAR dü¤mesi)
7 [TEST RUN] Dü¤mesi
8 Mevcut de¤il
9 [CIR. WATER] dü¤mesi (
0 [INITIAL SETTING] dü¤mesi (
A [ON/OFF] Dü¤mesi
* Kapa¤› aç›yor.
Geri/ ‹leri dü¤meleri)
<Girifl> dü¤mesi)
Afla¤›/ Yukar› dü¤meleri)
INL
PGRRUTR
3
Page 4
GB
Display Section
D
Abschnitt Anzeige
1
2
3
0A
TIME SUN MON TUE WED THU FRI SAT
TIMER
AFTER
ERROR CODE
˚F˚C
˚F˚C
Hr
AFTER
ON
OFF
FUNCTION
WEEKLY
SIMPLE
AUTO OFF
9
8
FR
Section de visualisation
ES
Sección de visualización
4
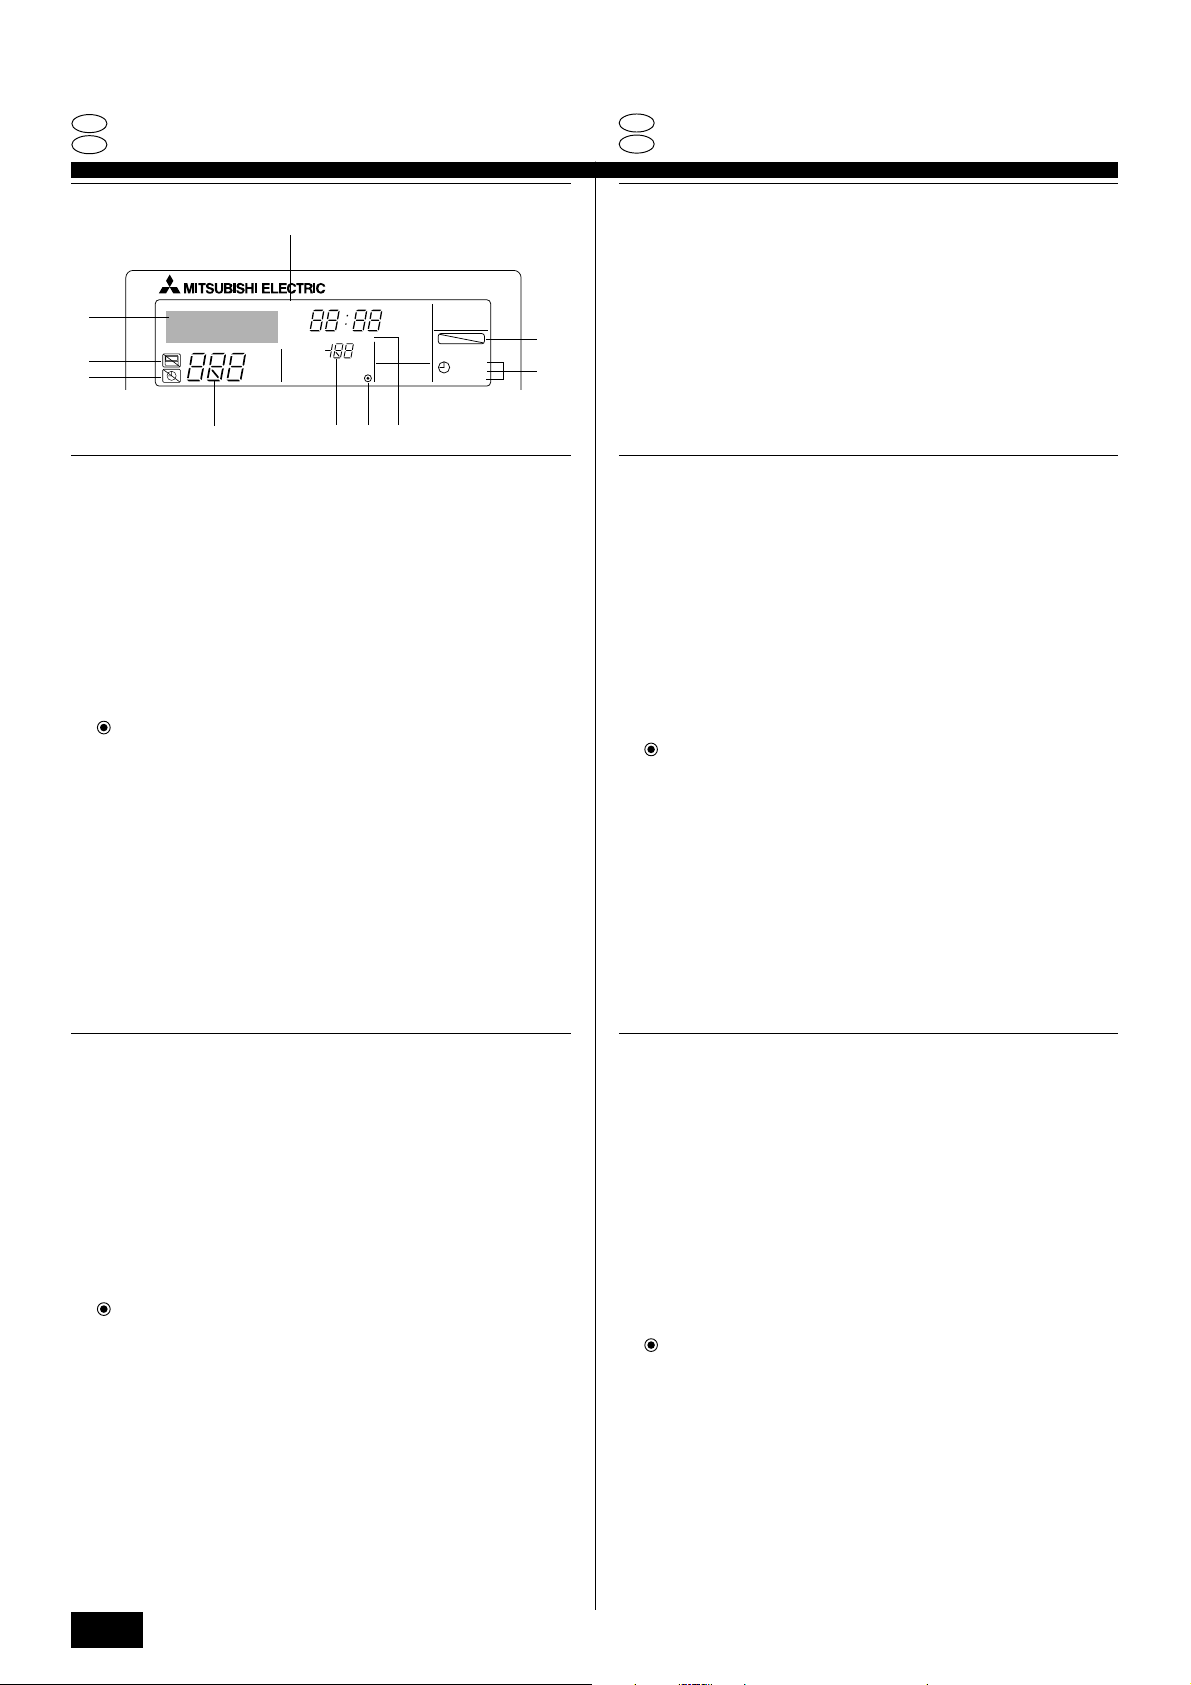
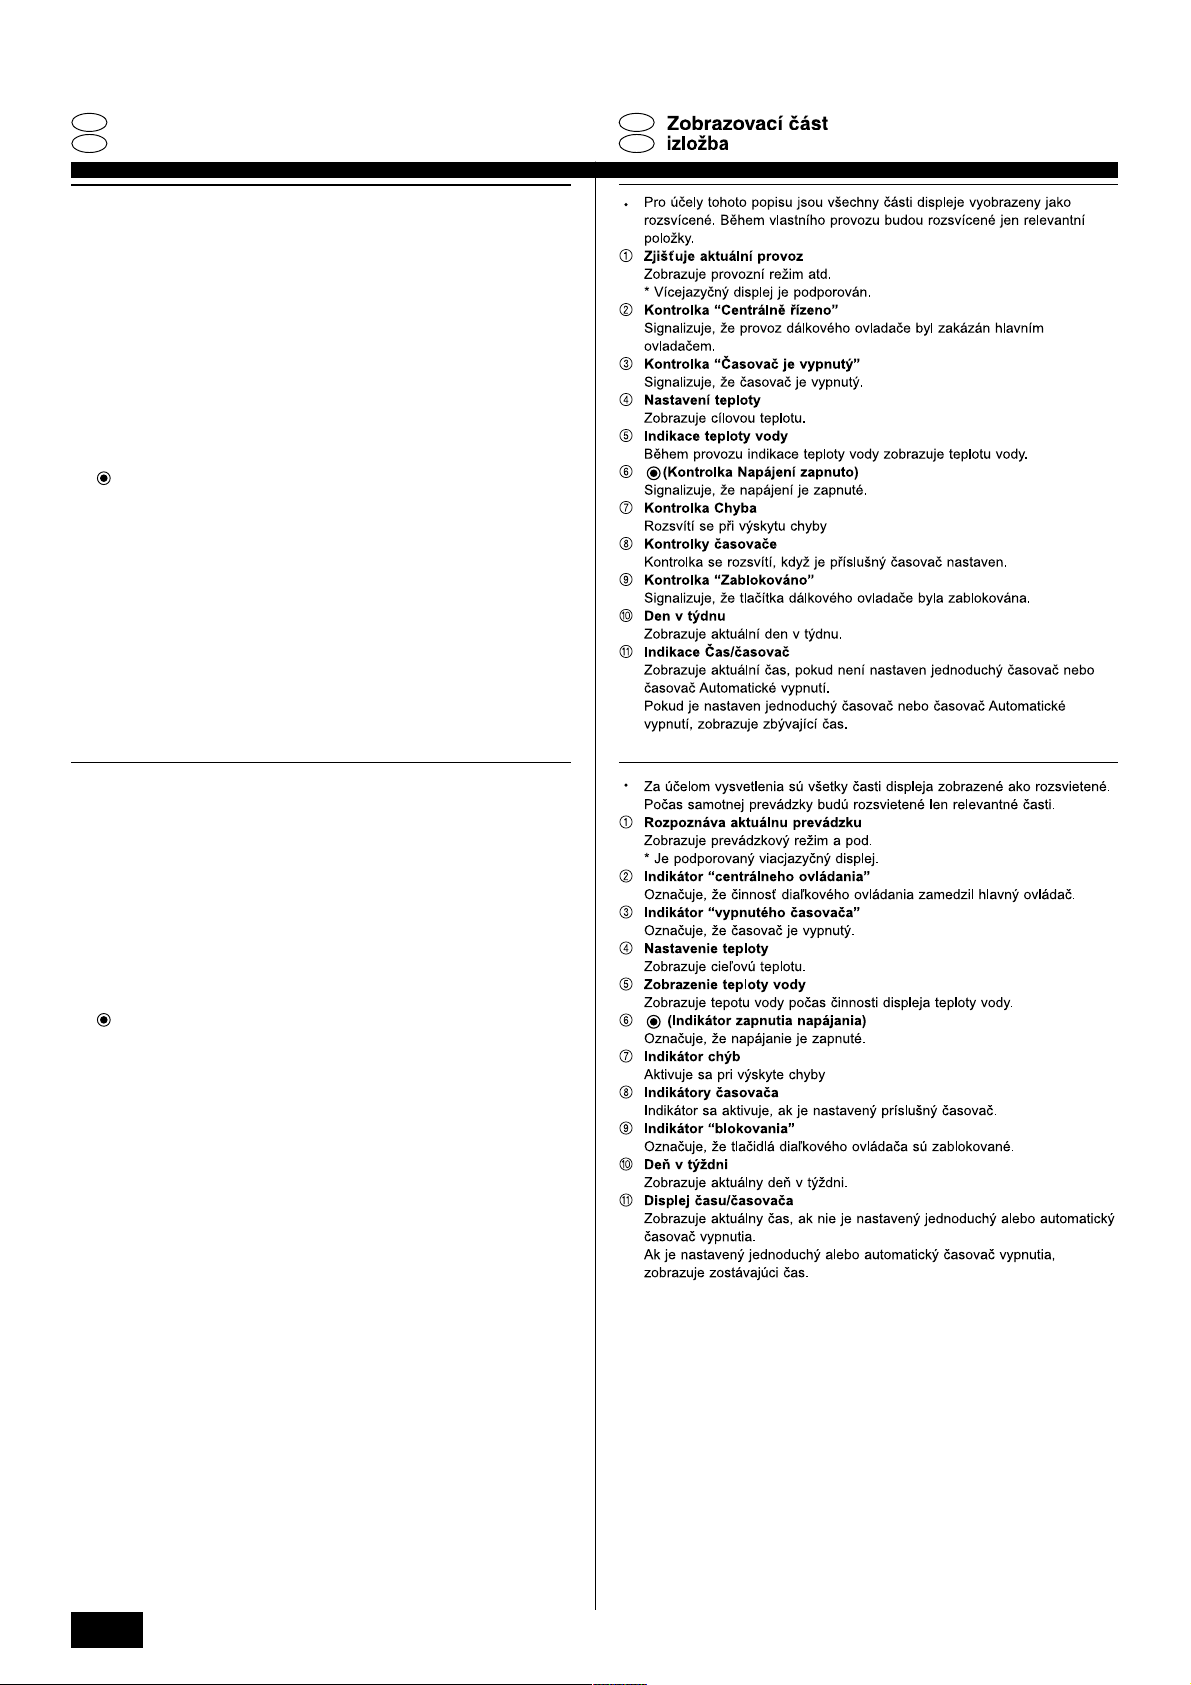
• For purposes of this explanation, all parts of the display are shown as lit. During actual operation, only the relevant items will be lit.
1 Identifies the current operation
GB
Shows the operating mode, etc.
* Multilanguage display is supported.
2 “Centrally Controlled” indicator
Indicates that operation of the remote controller has been prohibited by a main
controller.
D
3 “Timer Is Off” indicator
Indicates that the timer is off.
4 Temperature Setting
Shows the target temperature.
5 Water Temperature Display
F
Shows the water temperature during water temperature display operation.
6 (Power On indicator)
Indicates that the power is on.
7 Error indicator
Comes on when error occurs
E
8 Timer indicators
The indicator comes on if the corresponding timer is set.
9 “Locked” indicator
Indicates that remote controller buttons have been locked.
0 Day-of-Week
Shows the current day of the week.
INL
A Time/Timer Display
Shows the current time, unless the simple or Auto Off timer is set.
If the simple or Auto Off timer is set, shows the time remaining.
5
6
7
• Pour les explications, tous les éléments de l’affichage sont éclairés. En réalité,
tous ces éléments ne s’éclairent pas en même temps.
1 Identifie l’opération actuelle
Indique le mode de fonctionnement, etc.
* L’affichage est disponible en plusieurs langues.
2 Indicateur “Contrôle centralisé”
Indique que la commande à distance a été mise hors service par le contrôle
centralisé.
3 Indicateur “Minuterie hors service”
Indique que la minuterie est hors service.
4 Réglage de la température
Indique la température souhaitée.
5 Indication de la température de l’eau
Indique la température de l’eau lors d’une opération causant l’affichage de la
température de l'eau.
6 (Indication En service)
Indique que l’appareil est en service.
7 Indicateur d’erreur
Apparaît lorsqu’une erreur se produit
8 Indicateurs de minuterie
L’indicateur apparaît si la minuterie correspondante est active.
9 Indicateur “Verrouillé”
Indique que les touches de la commande à distance ont été verrouillées.
0 Jour de la semaine
Indique le jour de la semaine actuel.
A Indication de l’heure/de la minuterie
Indique l’heure actuelle, à moins que la minuterie simple ou de mise hors
service automatique soit active.
Si la minuterie simple ou de mise hors service automatique soit active, indique
le temps restant.
• Zur Vereinfachung der Erklärung werden alle Teile des Displays als aufleuchtend
gezeigt. Beim tatsächlichen Betrieb leuchten nur die relevanten Elemente auf.
PGRRUTR
1 Identifiziert die aktuelle Bedienung
Zeigt den Betriebsmodus usw.
* Mehrsprachige Anzeige ist unterstützt.
2 “Zentral gesteuert”-Anzeige
Zeigt eine Bedienung der Fernbedienung an, die von Hauptsteuerteil untersagt
wurde.
3 “Timer ist ausgeschaltet”-Anzeige
Zeigt an, dass der Timer ausgeschaltet ist.
4 Temperatureinstellung
Zeigt die Zieltemperatur an.
5 Wassertemperaturanzeige
Zeigt die Wassertemperatur bei der Wassertemperaturanzeige an.
6 (Einschaltanzeige)
Zeigt an, dass die Stromversorgung eingeschaltet ist.
7 Fehleranzeige
Leuchtet auf, wenn ein Fehler auftritt
8 Timeranzeigen
Die Anzeige leuchtet auf, wenn der entsprechende Timer eingestellt ist.
9 “Gesperrt”-Anzeige
Zeigt an, dass die Fernbedienungstasten gesperrt sind.
0 Wochentag
Zeigt den aktuellen Wochentag an.
A Zeit/Timer-Anzeige
Zeigt die aktuelle Zeit an, wenn nicht der einfache oder Auto-Abschalttimer
eingestellt ist.
Wenn der einfache oder Auto-Abschalttimer eingestellt ist, wird die Restzeit
angezeigt.
4
• Para fines de esta explicación, todas las partes del visualizador se muestran
encendidas. Durante la operación real, solamente estarán encendidos los
elementos correspondientes.
1 Identifica la operación actual
Muestra el modo de operación, etc.
* Se soporta visualización multilingüe.
2 Indicador “Centralmente controlado”
Indica que la operación del controlador remoto se ha prohibido mediante un
controlador principal.
3 Indicador “El temporizador está desactivado”
Indica que el temporizador está desactivado.
4 Ajuste de temperatura
Muestra la temperatura deseada.
5 Visualización de temperatura de agua
Muestra la temperatura del agua durante la operación de visualización de
temperatura del agua.
6 (Indicador de alimentación conectada)
Indica que la alimentación está conectada.
7 Indicador de error
Se encenderá cuando ocurra un error.
8 Indicadores del temporizador
El indicador se encenderá cuando el temporizador correspondiente esté
programado.
9 Indicador de “bloqueado”
Indica que los botones del controlador remoto han sido bloqueados.
0 Día de la semana
Muestra el día de la semana actual.
A Visualización de hora/fecha
Muestra la hora actual, a menos que se haya programado el temporizador
sencillo o el de desconexión automática.
Si se ha programado el temporizador sencillo o el de desconexión automática,
mostrará el tiempo restante.
Page 5
IT
Sezione di visualizzazione
NL
Schermgedeelte
PT
Secção de visualização
GR
∆Ì‹Ì· ∞ÂÈÎfiÓÈÛ˘
• A scopo esplicativo, tutte le parti del display vengono presentate come se
fossero illuminate. Durante il funzionamento reale, saranno accese solo le
voci rilevanti.
1 Identifica l’operazione in corso.
Visualizza la modalità operativa ecc.
* Viene supportata la visualizzazione multilingua.
2 Indicatore “controllato centralmente”
Indica che il funzionamento del telecomando è stato bloccato dal controllore
centrale.
3 Indicatore “Timer disattivo”
Indica che il timer è spento.
4 Impostazione della temperatura
Mostra la temperatura impostata.
5 Display della temperatura dell’acqua
Mostra la temperatura dell’acqua durante il funzionamento del display della
temperatura dell’acqua.
6 (Indicatore di accensione)
Indica che l’alimentazione è accesa.
7 Indicatore di errore
Appare quando si verifica un errore
8 Indicatori di timer
L’indicatore appare quando è impostato il corrispondente timer.
9 Indicatore “bloccato”
Indica che i pulsanti del telecomando sono stati bloccati.
0 Giorno della settimana
Mostra il giorno attuale della settimana.
A Display ora/timer
Mostra l’ora attuale, a meno che non sia impostato il timer semplice o a
spegnimento automatico.
Se è impostato il timer semplice o a spegnimento automatico, mostra il tempo
rimanente.
• Voor het doel van deze uitleg zijn alle delen van het display verlicht
weergegeven. Tijdens de feitelijke werking zullen alleen de relevante items
verlicht zijn.
1 toont de huidige werking
Geeft de werkingsmodus, etc. aan.
* Meertalig display wordt ondersteund.
2 “Centraal bestuurd” indicator
Geeft aan dat de werking van de afstandsbediening is verboden door de
hoofdcontroller.
3 “Timer staat uit” indicator
Geeft aan dat de timer uitstaat.
4 Temperatuurinstelling
Toont de doeltemperatuur.
5 Watertemperatuur display
Toont de watertemperatuur tijdens de werking van de watertemperatuurweergave.
6 (Aan indicator)
Geeft aan dat het apparaat aanstaat.
7 Foutmelding indicator
Verlicht als een fout optreedt
8 Timer indicatoren
De indicator gaat aan als de corresponderende timer is ingesteld.
9 “Vergrendeld” indicator
Geeft aan dat de toetsen van de afstandsbediening zijn vergrendeld.
0 Dag-van-de-week
Toont de huidige dag van de week.
A Time/Timer Display
Toont de huidige tijd, tenzij de eenvoudige of de Auto Uit timer is ingesteld.
Indien de eenvoudige of Auto Uit timer is ingesteld, wordt de resterende tijd
laten zien.
• Para propósitos desta explanação, toda as partes no mostrador estão indicadas
em aceso. Durante a operação real, somente os itens relevantes estarão
acesos.
1 Identifica a operação actual
Indica o modo de operação, etc.
* É suportada a indicação Multi-idiomas.
2 Indicador de “Controlo Central”
Indica que a operação no controlador remoto foi proibida pelo controlador
principal.
3 Indicador “Temporizador Desactivado”
Indica que o temporizador está desactivado.
4 Ajuste da Temperatura
Indica a temperatura almejada.
5 Indicação da Temperatura da Água
Indica a temperatura da água durante a operação de indicação da temperatura da
água.
6 (Indicador de Operação)
Indica que a alimentação está ligada.
7 Indicador de Erro
Acende-se na ocorrência de um erro
8 Indicadores dos Temporizadores
O indicador acende-se ao ajustar o temporizador correspondente.
9 Indicador de “Bloqueio”
Indica que as Botões do controlador remoto estão bloqueadas.
0 Dia da Semana
Indica o dia da semana presente.
A Indicação da Hora/Temporizador
Indica a hora actual, ao menos que o temporizador simples ou de desactivação
esteja ajustado.
Se o temporizador simples ou de desactivação estiver ajustado, indica o tempo
restante.
• °È· ÏfiÁÔ˘˜ ÂÂÍ‹ÁËÛ˘, fiÏ· Ù· ̤ÚË ·˘Ù‹˜ Ù˘ ÔıfiÓ˘ ÂÌÊ·Ó›˙ÔÓÙ·È
·У·ММ¤У·. ∫·Щ¿ ЩЛ ‰И¿ЪОВИ· ЩЛ˜ Ъ·БМ·ЩИО‹˜ ПВИЩФ˘ЪБ›·˜, МfiУФ Щ· Ы¯ВЩИО¿
ЫЩФИ¯В›· ı· В›У·И ·У·ММ¤У·.
1 ¶ЪФЫ‰ИФЪ›˙ВИ ЩЛУ ЩЪ¤¯Ф˘Ы· ПВИЩФ˘ЪБ›·
∂МК·У›˙ВИ ЩЛУ О·Щ¿ЫЩ·ЫЛ ПВИЩФ˘ЪБ›·˜, ОП.
* АФЫЩЛЪ›˙ФУЩ·И ВУ‰В›НВИ˜ ЫВ ФПП¤˜ БПТЫЫВ˜.
2 ŒУ‰ВИНЛ “∫ВУЩЪИОfi˜ ¤ПВБ¯Ф˜”
¢ЛПТУВИ ˆ˜ Л ПВИЩФ˘ЪБ›· ЩФ˘ ЩЛПВ¯ВИЪИЫЩЛЪ›Ф˘ ¤¯ВИ ··БФЪВ˘ЩВ› ·fi
¤У·У ОВУЩЪИОfi ВПВБОЩ‹.
3 ŒУ‰ВИНЛ “∞ВУВЪБФФИЛМ¤УФ˜ ¯ЪФУФ‰И·ОfiЩЛ˜”
¢ЛПТУВИ ˆ˜ Ф ¯ЪФУФ‰И·ОfiЩЛ˜ В›У·И ·ВУВЪБФФИЛМ¤УФ˜.
4 ƒ‡ıМИЫЛ ıВЪМФОЪ·Ы›·˜
∂МК·У›˙ВИ ЩЛУ ВИı˘МЛЩ‹ ıВЪМФОЪ·Ы›·.
5 ŒУ‰ВИНЛ ıВЪМФОЪ·Ы›·˜ УВЪФ‡
∂МК·У›˙ВИ ЩЛ ıВЪМФОЪ·Ы›· ЩФ˘ УВЪФ‡ О·Щ¿ ЩЛ ‰И¿ЪОВИ· ЩЛ˜ ПВИЩФ˘ЪБ›·˜ ВМК¿УИЫЛ˜
ЩЛ˜ ıВЪМФОЪ·Ы›·˜ УВЪФ‡.
6 (ŒУ‰ВИНЛ ПВИЩФ˘ЪБ›·˜)
¢ЛПТУВИ ˆ˜ Л Ы˘ЫОВ˘‹ В›У·И ВУВЪБФФИЛМ¤УЛ.
7 ŒÓ‰ÂÈÍË ÛÊ¿ÏÌ·ÙÔ˜
∞Ó¿‚ÂÈ fiÙ·Ó ·ÚÔ˘ÛÈ·ÛÙ› ¤Ó· ÛÊ¿ÏÌ·
8 ∂Ӊ›ÍÂȘ ¯ÚÔÓԉȷÎÔÙÒÓ
∏ ¤У‰ВИНЛ ·У¿‚ВИ fiЩ·У Ъ˘ıМИЫЩВ› Ф ·УЩ›ЫЩФИ¯Ф˜ ¯ЪФУФ‰И·ОfiЩЛ˜.
9 ŒÓ‰ÂÈÍË “∫ÏÂȉÒÌ·ÙÔ˜”
¢ЛПТУВИ ˆ˜ ¤¯Ф˘У ОПВИ‰ТЫВИ Щ· ОФ˘МИ¿ ЩФ˘ ЩЛПВ¯ВИЪИЫЩЛЪ›Ф˘.
0 ∏̤ڷ Ù˘ ‚‰ÔÌ¿‰·˜
∂ÌÊ·Ó›˙ÂÈ ÙËÓ ÙÚ¤¯Ô˘Û· Ë̤ڷ Ù˘ ‚‰ÔÌ¿‰·˜.
A ŒУ‰ВИНЛ flЪ·˜/ГЪФУФ‰И·ОfiЩЛ
∂МК·У›˙ВИ ЩЛУ ЩЪ¤¯Ф˘Ы· ТЪ·˜, ВОЩfi˜ ·У ¤¯ВИ Ъ˘ıМИЫЩВ› Ф ·Пfi˜
¯ЪФУФ‰И·ОfiЩЛ˜ ‹ Ф ¯ЪФУФ‰И·ОfiЩЛ˜ ·˘ЩfiМ·ЩЛ˜ ·ВУВЪБФФ›ЛЫЛ˜.
∞У ¤¯ВИ Ъ˘ıМИЫЩВ› Ф ·Пfi˜ ¯ЪФУФ‰И·ОfiЩЛ˜ ‹ Ф ¯ЪФУФ‰И·ОfiЩЛ˜ ·˘ЩfiМ·ЩЛ˜
·ВУВЪБФФ›ЛЫЛ˜, ВМК·У›˙ВИ ЩФ ¯ЪfiУФ Ф˘ ·ФМ¤УВИ.
GB
D
F
E
INL
PGRRUTR
5
Page 6
RU CZ
Раздел отображения
TR SV
Gösterge Bölümü
• С целью пояснения все части дисплея показаны как светящиеся. Во время
реальной работы кондиционера загораются только соответствующие
обозначения.
1
Определяет текущее действие
Показывает режим работы и т.д.
* Поддерживается индикация на нескольких языках.
2
Индикатор “С централизованным управлением”
Показывает, что работа контроллера дистанционного управления запрещена
главным контроллером.
3
Индикатор “Таймер выключен”
Показывает, что таймер выключен.
4
Установка температуры
Показывает температуру объекта.
5
Индикатор температуры воды
Показывает температуру воды во время работы индикатора температуры воды.
6
(Индикатор питания)
Показывает, что электропитание включено.
7
Индикатор ошибки
GB
Включается при возникновении ошибки
8
Индикаторы таймера
Данный индикатор включается, если установлен соответствующий таймер.
9
Индикатор “Заблокировано”
Показывает, что кнопки контроллера дистанционного управления заблокированы.
D
0
День недели
Показывает текущий день недели.
A
Дисплей Время/Таймер
Показывает текущее время, если не установлен обычный таймер или таймер
автоматического выключения.
F
Если устанавливается обычный таймер или таймер автоматического выключения,
на дисплее отображается оставшееся время.
• Sadece bu tan›mlama amac› için, bütün gösterge ›fl›klar› yan›k gösterilmifltir.
Gerçek iflletim s›ras›nda sadece o iflletime ba¤›nt›l› göstergeler yanacakt›r.
1 Mevcut iflletimi tan›mlar
‹flletim modunu vs. gösterir.
* Çoklu dil görüntü desteklenir.
2 “Merkezi Kontrol” göstergesi
IE
Uzaktan kumanda iflletiminin ana kontroller taraf›ndan k›s›tland›¤›n› belirtir.
3 “Zamanlay›c› Kapal›” göstergesi
Zamanlay›c›n›n kapal› oldu¤unu belirtir.
4 S›cakl›k Ayar›
Hedef s›cakl›¤› gösterir.
5 Su S›cakl›k Görüntüleme
Su s›cakl›k görüntüleme iflletimi s›ras›nda su s›cakl›¤›n› gösterir.
6 (Güç Aç›k göstergesi)
Gücün aç›k oldu¤unun belirtir.
7 Hata göstergesi
Hata olufltu¤unda yanar.
PGRRUTR
8 Zamanlay›c› göstergeleri
Uygun zamanlay›c› ayarland›¤›nda bu gösterge yanar.
9 “Kilitli” göstergesi
Uzaktan kumanda dü¤melerinin kilitlendi¤ini belirtir.
0 Haftan›n Günü
Haftan›n hangi gününde olundu¤unu gösterir.
A Zaman/Zamanlay›c› Göstergesi
E¤er temel veya Otomatik Kapatma zamanlay›c›s› ayarlanmam›flsa, mevcut
saati gösterir.
E¤er temel veya Otomatik Kapatma zamanlay›c›s› ayarlanm›flsa, kalan zaman›
gösterir.
6
Page 7
SL PO
HG
GB
D
F
E
INL
PGRRUTR
7
Page 8
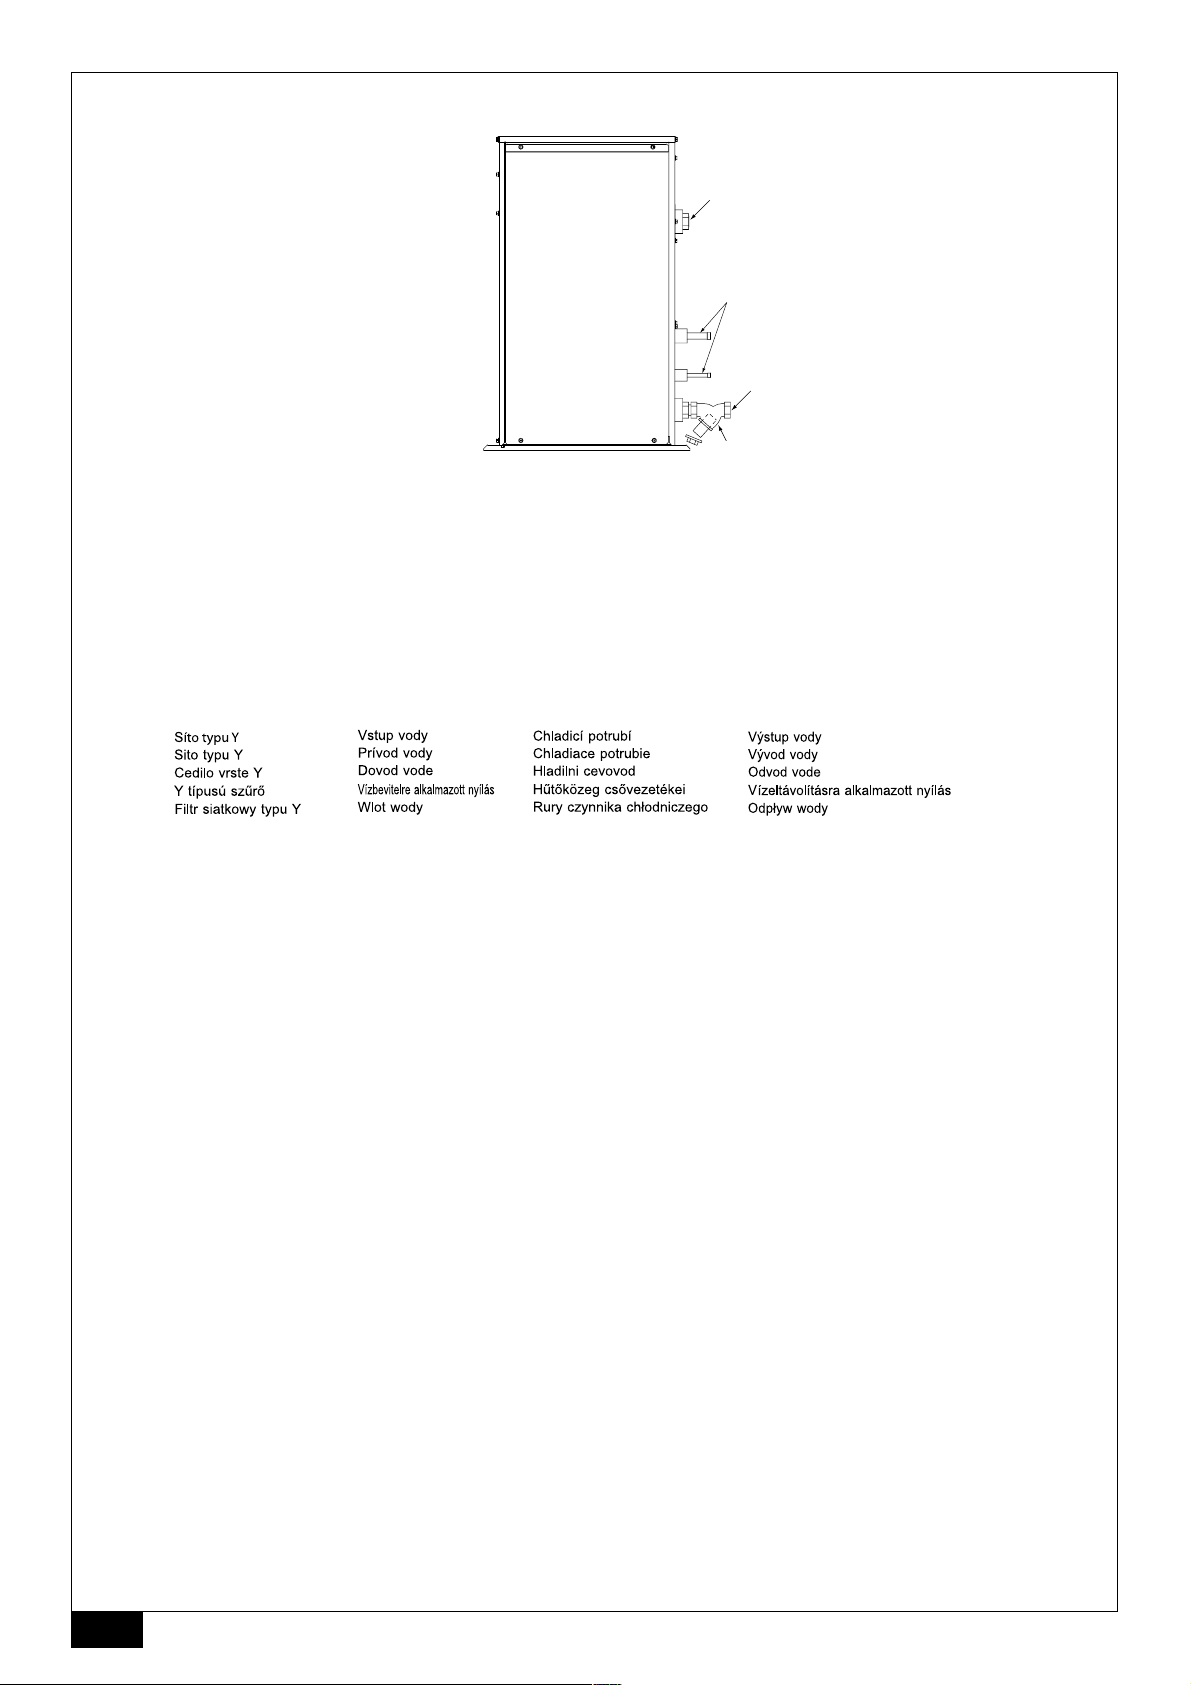
[Fig. A]
D
C
B
A
A: Y-type strainer B: Water inlet C: Refrigerant piping D: Water outlet
Siebfilter des Typs Y Wassereinlaß Kältemittelrohrleitung Wasserauslauf
Vanne de type en Y Arrivée d’eau Tuyaux de réfrigérant Evacuation de l’eau
Purgador tipo Y Entrada de agua Tubería de refrigerante Salida de agua
Filtro a Y Ingresso acqua Tubazione refrigerante Scarico acqua
Filter type Y Waterinlaatopening Koelstofleiding Wateruitlaatopening
Filtro tipo Y Entrada da água Tubagem do refrigerante Saída da água
¢ÈËıËÙÈÎfi Ê›ÏÙÚÔ Ù‡Ô˘ À
Стрейнер развилочного типа
Tek çatal ba¤lama a¤›zl›¤›
∂›ÛÔ‰Ô˜ ÓÂÚÔ‡ ™ˆП‹УˆЫЛ „˘ОЩИОФ‡ ŒÍÔ‰Ô˜ ÓÂÚÔ‡
Водозабор Трубы хладагента Водовыпуск
Su girifli So¤utucu borular Su ç›k›fl›
8
Page 9
Contents
1. Safety precautions ...................................................................................... 9
1.1. Installation ................................................................................. 9
1.2. During operation ........................................................................ 9
1.3. Disposing of the unit ................................................................ 10
2. How to operate ......................................................................................... 10
2.1. Using the Remote Controller ................................................... 10
2.2. Water temperature adjustment ................................................. 11
2.3. Setting the Day of the Week and Time ..................................... 11
2.4. Using the Timer ........................................................................ 11
1. Safety precautions
s Before operating the unit, make sure you read all the “Safety
precautions”.
s “Safety precautions” lists important points about safety.
Please be sure to follow them.
Symbols used in the text
Warning:
Describes precautions that should be observed to avoid the risk of injury or
death to the user.
Caution:
Describes precautions that should be observed to prevent damage to the
unit.
Symbols used in the illustrations
: Indicates an action that must be avoided.
: Indicates that important instructions must be followed.
: Indicates a part which must be grounded.
: Beware of electric shock. (This symbol is displayed on the main unit label.)
<Color: yellow>
: Beware of hot surface.
Warning:
Carefully read the labels affixed to the main unit.
1.1. Installation
s After you have read this manual, keep it and the Installation Manual in a
safe place for easy reference whenever a question arises. If the unit is
going to be operated by another person, make sure that this manual is
given to him or her.
Warning:
• The unit should not be installed by the user. Ask the dealer or an authorized company to install the unit. If the unit is installed improperly, water
leakage, electric shock or fire may result.
• Use only accessories authorized by Mitsubishi Electric and ask your
dealer or an authorized company to install them. If accessories are installed improperly, water leakage, electric shock or fire may result.
• Do not touch the unit. The unit surface can be hot.
• Do not install the unit where corrosive gas is generated.
• The Installation Manual details the suggested installation method. Any
structural alteration necessary for installation must comply with local
building code requirements.
• Never repair the unit or transfer it to another site by yourself. If repair is
performed improperly, water leakage, electric shock or fire may result. If
you need to have the unit repaired or moved, consult your dealer.
• Keep the electric parts away from water (washing water) etc.
• It might result in electric shock, catching fire or smoke.
Note1: When washing the Heat Exchanger and Drain Pan, ensure the
Control Box, Motor and LEV remain dry, using a water proof covering.
Note2: Never drain the washing water for the Drain Pan and the Heat
Exchanger using the Drain Pump. Drain separately.
• The appliance is not intended for use by young children or infirm persons without supervision.
• Young children should be supervised to ensure that they do not play
with the appliance.
• Do not use a leak detection additive.
3. Function Selection .................................................................................... 15
4. Caring for the machine ............................................................................. 17
5. Troubleshooting ........................................................................................ 17
6. Installation, transferring works, and checking ........................................... 18
7. Specifications ............................................................................................ 18
1) Outdoor unit
Warning:
• The outdoor unit must be installed on a stable, level surface, in a place
where there is no accumulation of snow, leaves or rubbish.
• Do not stand on, or place any items on the unit. You may fall down or the
item may fall, causing injury.
Caution:
The outdoor unit should be installed in a location where air and noise emitted by the unit will not disturb the neighbours.
2) Indoor unit
Warning:
The indoor unit should be securely installed. If the unit is loosely mounted, it
may fall, causing injury.
3) Remote controller
Warning:
The remote controller should be installed in such a way that children cannot
play with it.
4) Drain hose
Caution:
Make sure that the drain hose is installed so that drainage can go ahead
smoothly. Incorrect installation may result in water leakage, causing damage to furniture.
5) Power line, fuse or circuit breaker
Warning:
• Make sure that the unit is powered by a dedicated supply. Other appliances connected to the same supply could cause an overload.
• Make sure that there is a main power switch.
• Be sure to adhere to the unit’s voltage and fuse or circuit breaker ratings.
Never use a piece of wire or a fuse with a higher rating than the one
specified.
6) Grounding
Caution:
• The unit must be properly grounded. Never connect the grounding wire
to a gas pipe, water pipe, lightning conductor or telephone grounding
wire. If the unit is not grounded properly, electric shock may result.
• Check frequently that the ground wire from the outdoor unit is properly
connected to both the unit’s ground terminal and the grounding electrode.
1.2. During operation
Caution:
• Do not use any sharp object to push the buttons, as this may damage the
remote controller.
• Do not twist or tug on the remote controller cord as this may damage the
remote controller and cause malfunction.
• Never remove the upper case of the remote controller. It is dangerous to
remove the upper case of the remote controller and touch the printed
circuit boards inside. Doing so can result in fire and failure.
• Never wipe the remote controller with benzene, thinner, chemical rags,
etc. Doing so can result in discoloration and failure. To remove heavy
stains, soak a cloth in neutral detergent mixed with water, wring it out
thoroughly, wipe the stains off, and wipe again with a dry cloth.
• Never block or cover the indoor or outdoor unit’s intakes or outlets. Tall
items of furniture underneath the indoor unit, or bulky items such as
large boxes placed close to the outdoor unit will reduce the unit’s efficiency.
9
GBDFEINLPGRRUTRGBGBGBGBGB
I
Page 10
Warning:
• Do not splash water over the unit and do not touch the unit with wet
hands. An electric shock may result.
• Do not spray combustible gas close to the unit. Fire may result.
• Do not place a gas heater or any other open-flame appliance where it will
be exposed to the air discharged from the unit. Incomplete combustion
may result.
Warning:
• Do not remove the front panel or the fan guard from the outdoor unit
when it is running. You could be injured if you touch rotating, hot or highvoltage parts.
• Never insert fingers, sticks etc. into the intakes or outlets, otherwise injury may result, since the fan inside the unit rotates at high speed. Exercise particular care when children are present.
• If you detect odd smells, stop using the unit, turn off the power switch
and consult your dealer. Otherwise, a breakdown, electric shock or fire
may result.
• When you notice exceptionally abnormal noise or vibration, stop operation, turn off the power switch, and contact your dealer.
• Do not over-cool. The most suitable inside temperature is one that is
within 5
• Do not leave handicapped people or infants sitting or standing in the path
°C of the outside temperature.
of the airflow from the air-conditioner. This could cause health problems.
GBDFEINLPGRRUTRGBGBGBGB
Caution:
• Do not direct the airflow at plants or caged pets.
• Ventilate the room frequently. If the unit is operated continuously in a
closed room for a long period of time, the air will become stale.
In case of failure
Warning:
• Never remodel the air conditioner. Consult your dealer for any repair or service. Improper repair work can result in water leakage, electric shock, fire, etc.
• If the remote controller displays an error indication, the air conditioner
does not run, or there is any abnormality, stop operation and contact
your dealer. Leaving the unit as it is under such conditions can result in
fire or failure.
• If the power breaker is frequently activated, get in touch with your dealer.
Leaving it as it is can result in fire or failure.
• If the refrigeration gas blows out or leaks, stop the operation of the air
conditioner, thoroughly ventilate the room, and contact your dealer. Leaving the unit as it is can result in accidents due to oxygen deficiency.
When the air conditioner is not to be used for a long
time
• If the air conditioner is not to be used for a long time due to a seasonal
change, etc., run it for 4 - 5 hours with the air blowing until the inside is
completely dry. Failing to do so can result in the growth of unhygienic,
unhealthy mold in scattered areas throughout the room.
• When it is not to be used for an extended time, keep the [power supply]
turned OFF.
If the power supply is kept on, several watts or several tens of watts will
be wasted. Also, the accumulation of dust, etc., can result in fire.
• Keep the power switched ON for more than 12 hours before starting operation. Do not turn the power supply OFF during seasons of heavy use.
Doing so can result in failure.
• When not operating the unit for a long time during the winter season,
remove the water inside the water pipe to prevent freeze.
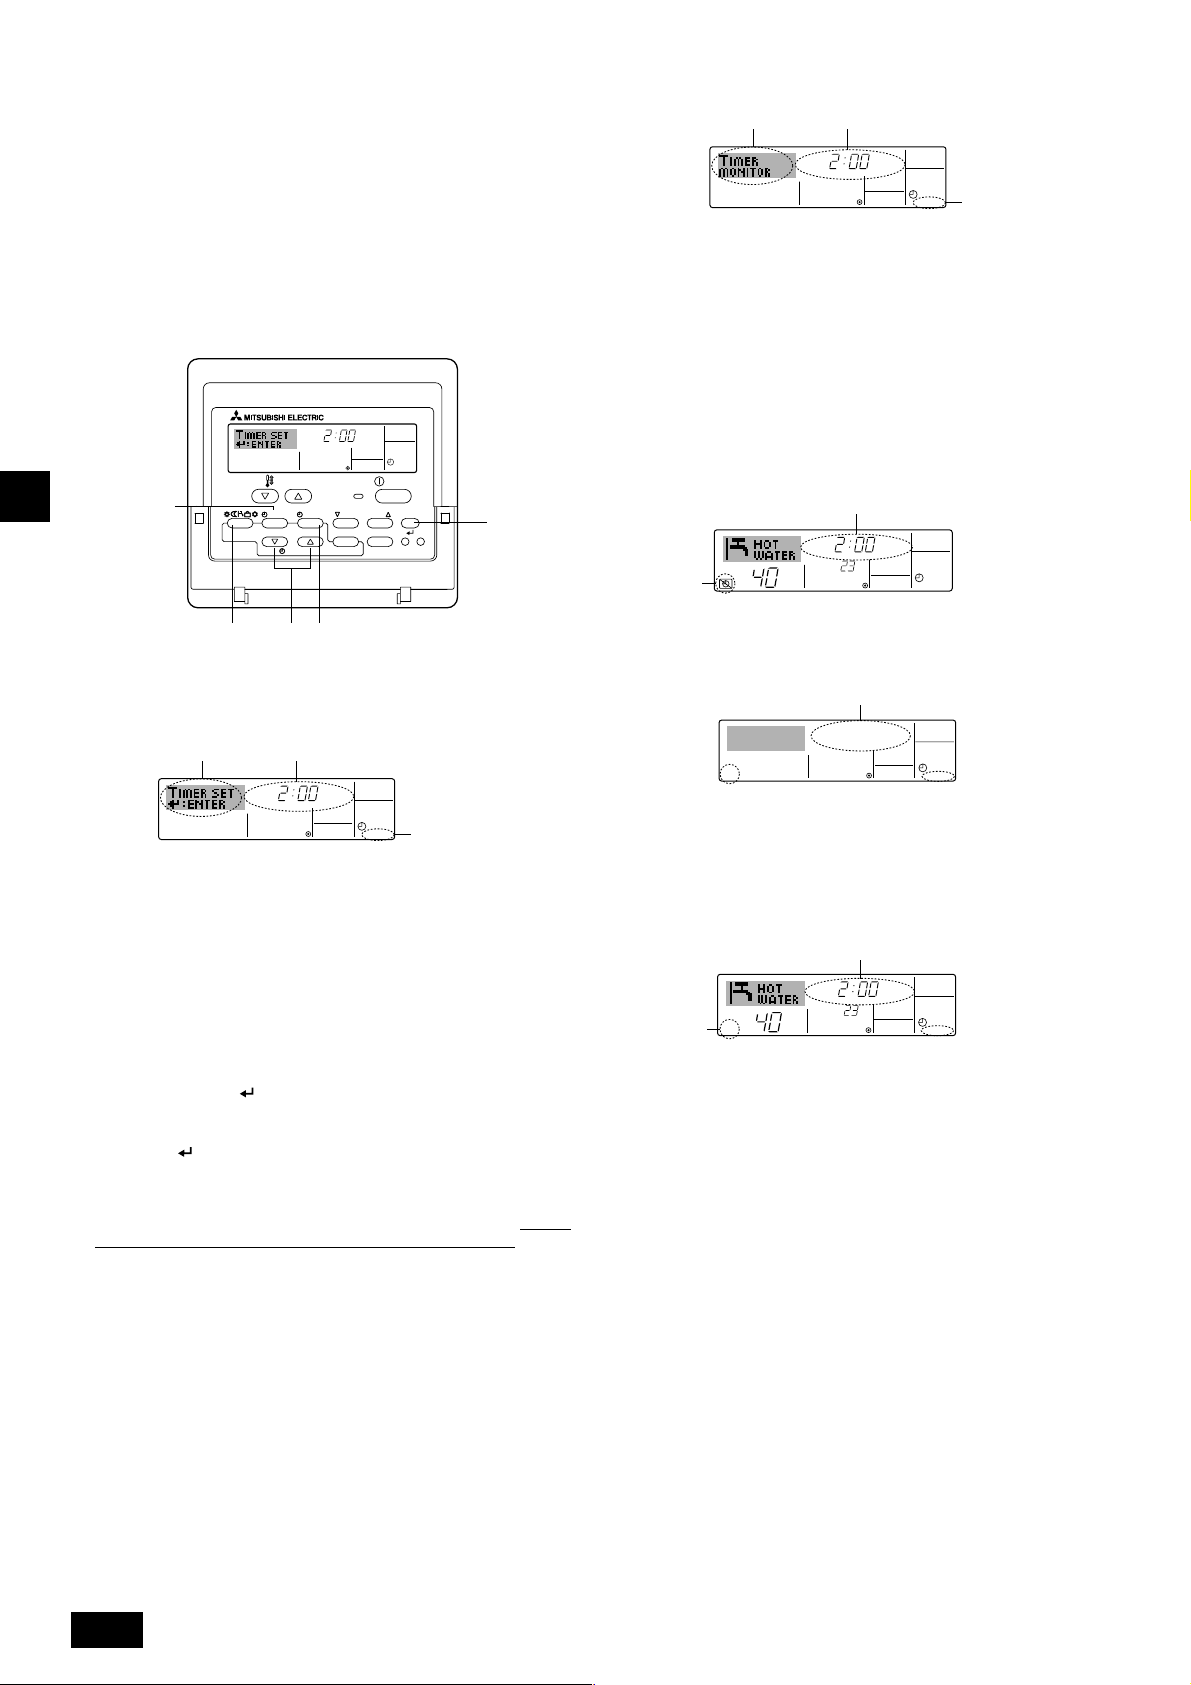
2. How to operate
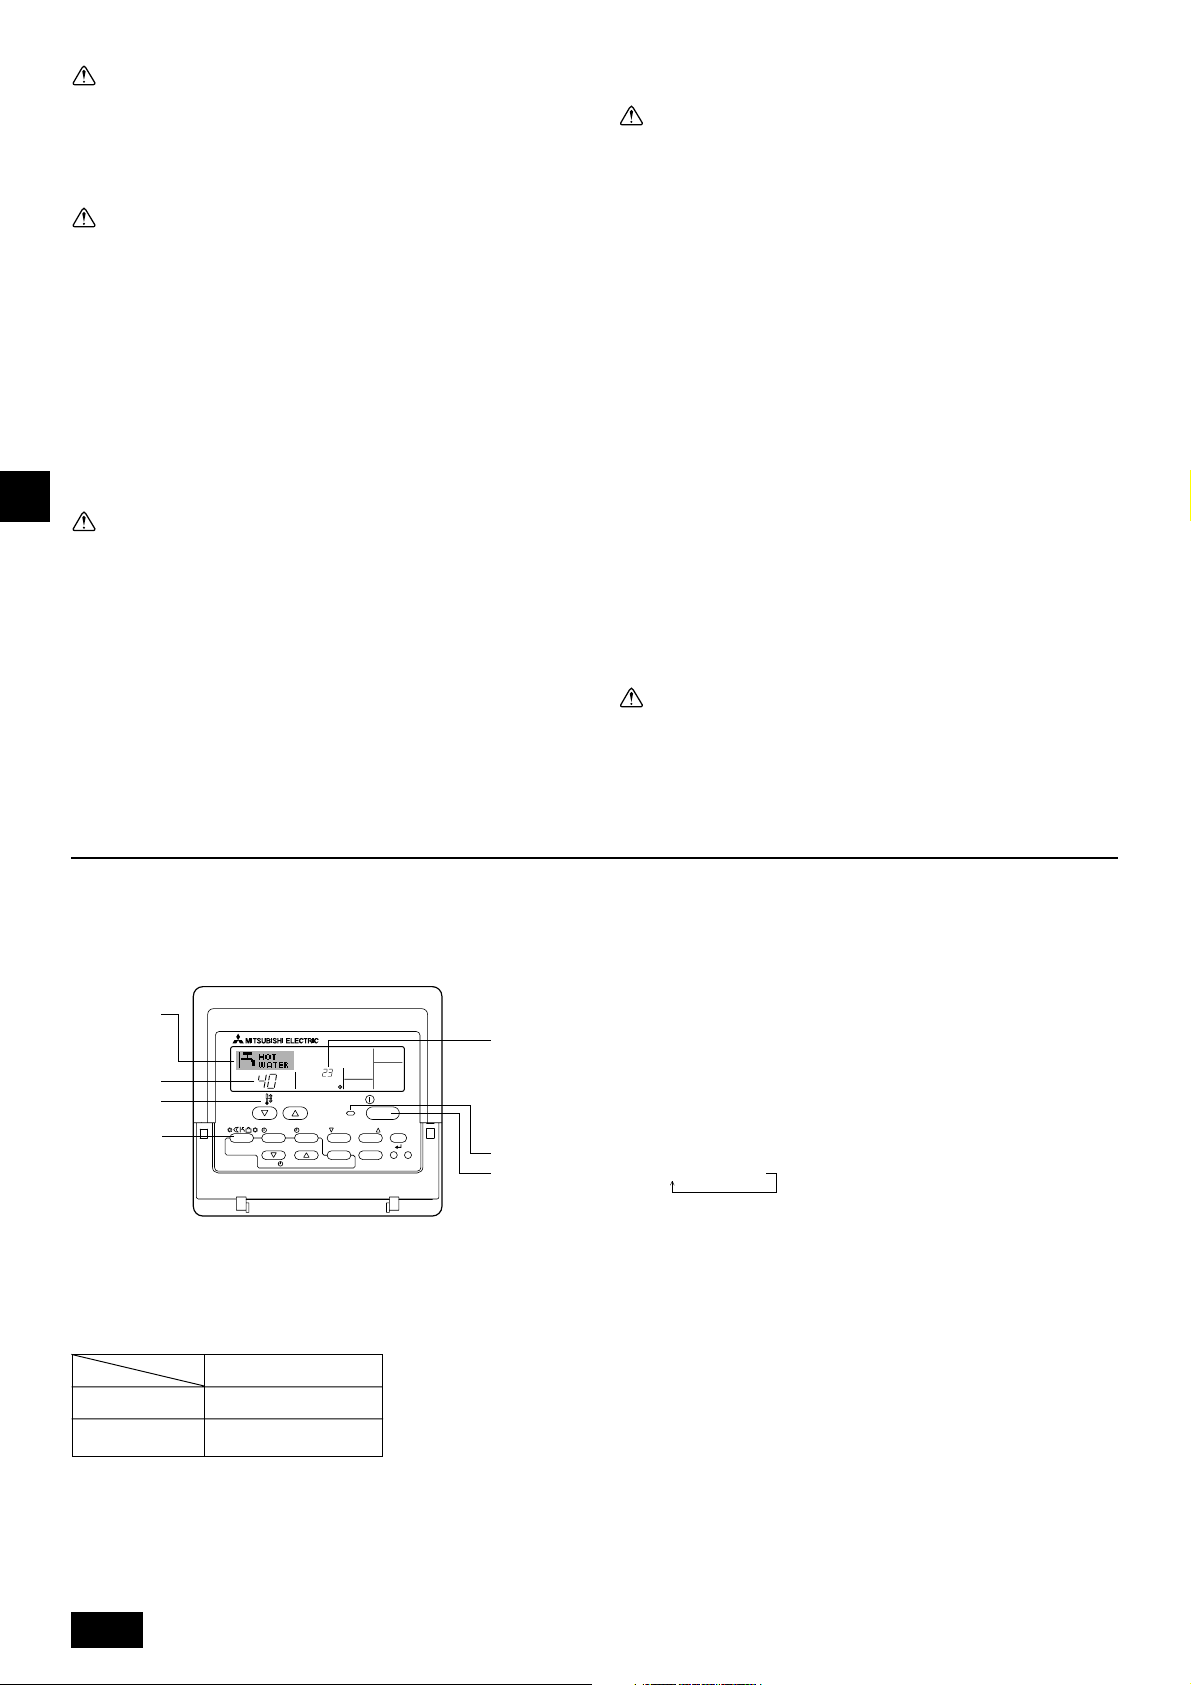
2.1. Using the Remote Controller
How to Start, Stop, Change the Mode, and Adjust the
Water Temperature
2
4
˚C
3
3
2
PAR-W21MAA
To Start Operation
1. Press the ON/OFF button 1.
The ON lamp 1 and the display area come on.
Note:
• When the unit is restarted, initial settings are as follows.
Remote Controller settings
Mode
Temperature setting
˚C
TEMP.
MENU
ON/OFF
MONITOR/SET
BACK DAY
CLOCK CLEAR
Last operation mode
Last set temperature
INITIAL SETTING
CHECK TEST
ON/OFF
CIR.WATER
1
1
1.3. Disposing of the unit
Warning:
When you need to dispose of the unit, consult your dealer. If pipes are removed incorrectly, refrigerant (fluorocarbon gas) may blow out and come
into contact with your skin, causing injury. Releasing refrigerant into the
atmosphere also damages the environment.
To Stop Operation
1. Press the ON/OFF button 1 again.
The ON lamp 1 and the display area go dark.
Selecting the Mode
1. With the unit running, press the Mode button 2 as many times as necessary.
• Each press switches operation to the next mode, in the sequence shown
below.
The currently selected mode is shown at 2.
PWFY-P100VM-E-BU
Hot water only
PWFY-P100/P200VM-E-AU
Heating → Cooling
10
Page 11
To Change the Temperature Setting...
1. To lower the temperature: Press the Set Temperature button 3.
2. To raise the temperature: Press the
Set Temperature button 3.
• Each press changes the setting by 1 °C (1 °F). The current setting is dis-
played at 3.
• The available ranges are as follows. *1, *2
Hot Water CoolingHeating
30 °C - 70 °C
87 °F - 158 °F
30 °C - 45 °C
87 °F - 113 °F
10 °C - 30 °C
50 °F - 87 °F
Note:
*1 Available ranges vary according to the type of unit connected.
*2 If temperature range limits have been set at Function Selection of remote
controller, the available ranges will be narrower than shown above. If you attempt
to set a value outside of the restricted range, the display will show a message
indicating that the range is currently restricted.
For information about how to set and clear these range limits, refer to section 3,
item [3]–2 (3).
*3 If Function Selection of remote controller are set to display the temperature in
Fahrenheit. For information about how to select °C or °F , refer to section 3, item
[3]–4 (1).
2.2. Water temperature adjustment
To change water temperature
Press the
perature of your choice.
Pressing
If the pressing is continued, the setting continues to change by 1 °C.
• Indoor temperature can be set within the following range.
• It is impossible to set the water temperature by the Inlet Water Temp. or Outlet
* The range of water temperature display is 0 °C to 100 °C. Outside this range,
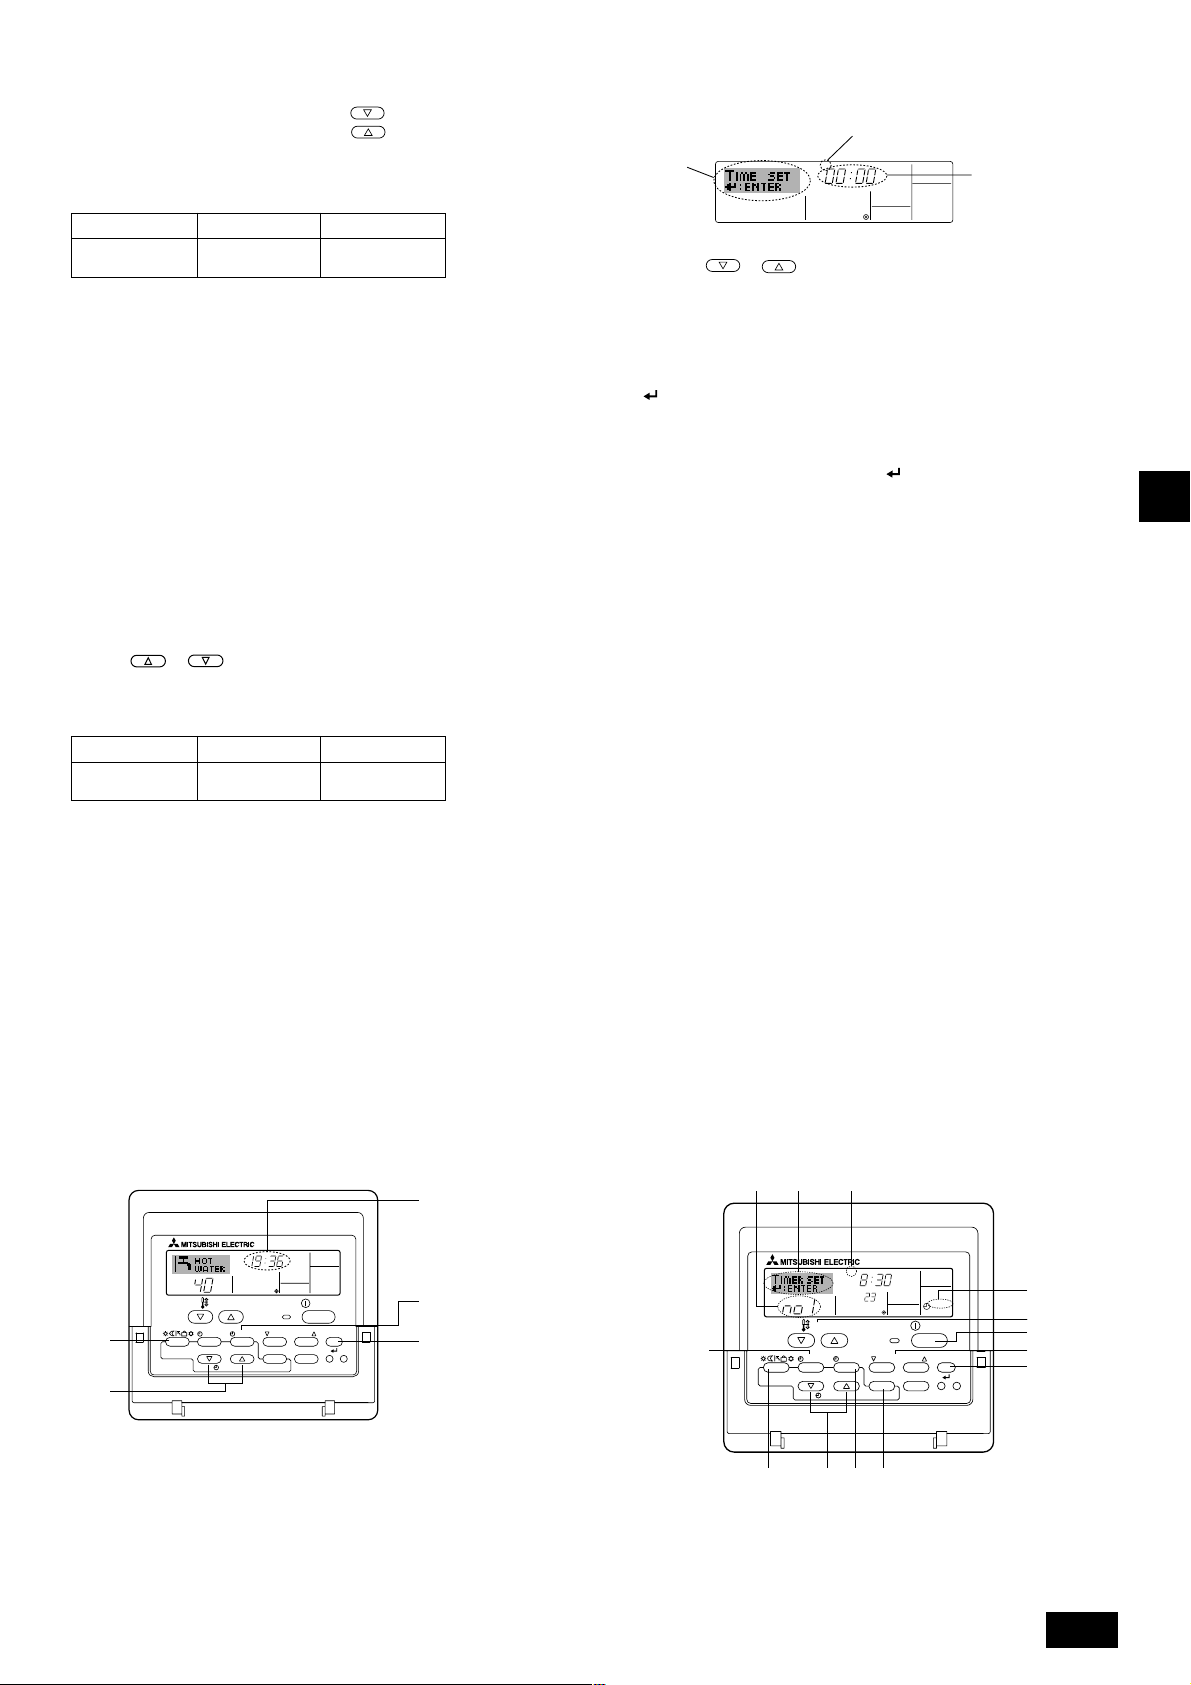
2.3.
Use this screen to change the current day of the week
and time setting.
Note:
The day and time will not appear if clock use has been disabled at Function Selection
of remote controller.
11
1 [water temperature adjustment] button and set the water tem-
11
or once changes the setting by 1 °C.
Hot Water CoolingHeating
30 °C - 70 °C
87 °F - 158 °F
30 °C - 45 °C
87 °F - 113 °F
10 °C - 30 °C
50 °F - 87 °F
Water Temp.
the display flashes either 0 °C or 100 °C to inform you if the water temperature
is lower or higher than the displayed temperature.
Setting the Day of the Week and Time
1
Day of the Week &
Time display
TIME SUN
˚C
9
4
2
A
MENU
MONITOR/SET
BACK DAY
PAR-W21MAA
TEMP.
ON/OFF
CLOCK CLEAR
INITIAL SETTING
CHECK TEST
ON/OFF
CIR.WATER
How to Set the Day of the Week and Time...
3
Day of the Week Setting
2
TIME SUN
4
Time Setting
1. Press the or Set Time button A to show display 2.
2. Press the TIMER ON/OFF (SET DAY) button 9 to set the day.
* Each press advances the day shown at 3 : Sun → Mon → ... → Fri → Sat.
3. Press the appropriate Set Time button A as necessary to set the time.
* As you hold the button down, the time (at 4) will increment first in minute
intervals, then in ten-minute intervals, and then in one-hour intervals.
4. After making the appropriate settings at Steps 2 and 3, press the CIR.WATER
button 4 to lock in the values.
Note:
Your new entries at Steps 2 and 3 will be cancelled if you press the Mode (Return)
button 2 before pressing the CIR.WATER
button 4.
5. Press the Mode (Return) button 2 to complete the setting procedure. This will
return the display to the standard control screen, where 1 will now show the
newly set day and time.
2.4. Using the Timer
This section explains how to set and use the timer. You can use Function Selection
of remote controller to select which of three types of timer to use: 1 Weekly timer,
2 Simple timer, or 3 Auto Off timer.
For information about how to set the Function Selection of remote controller, refer
to section 3, item [3]–3 (3).
Using the Weekly Timer
1. The weekly timer can be used to set up to six operations for each day of the
week.
• Each operation may consist of any of the following: ON/OFF time together
with a temperature setting, or ON/OFF time only, or temperature setting only.
• When the current time reaches a time set at this timer, the unit carries out the
action set by the timer.
2. Time setting resolution for this timer is 1 minute.
Note:
*1. Weekly Timer/Simple Timer/Auto Off Timer cannot be used at the same time.
*2. The weekly timer will not operate when any of the following conditions is in
effect.
The timer feature is off; the system is in an malfunction state; a test run is in
progress; the remote controller is undergoing self-check or remote controller
check; the user is in the process of setting a function; the user is in the process
of setting the timer; the user is in the process of setting the current day of the
week or time; the system is under central control. (Specifically, the system will
not carry out operations (unit on, unit off, or temperature setting) that are
prohibited during these conditions.)
Operation No.
42 3
SUN
TEMP.
B
MONITOR/SET
BACK DAY
PAR-W21MAA
MENU
ON/OFF
CLOCK CLEAR
˚C
INITIAL SETTING
CHECK TEST
ON
WEEKLY
ON/OFF
CIR.WATER
1
3
1
7 8
4
GBDFEINLPGRRUTRGBGBGBGBGB
I
2
A90
11
Page 12
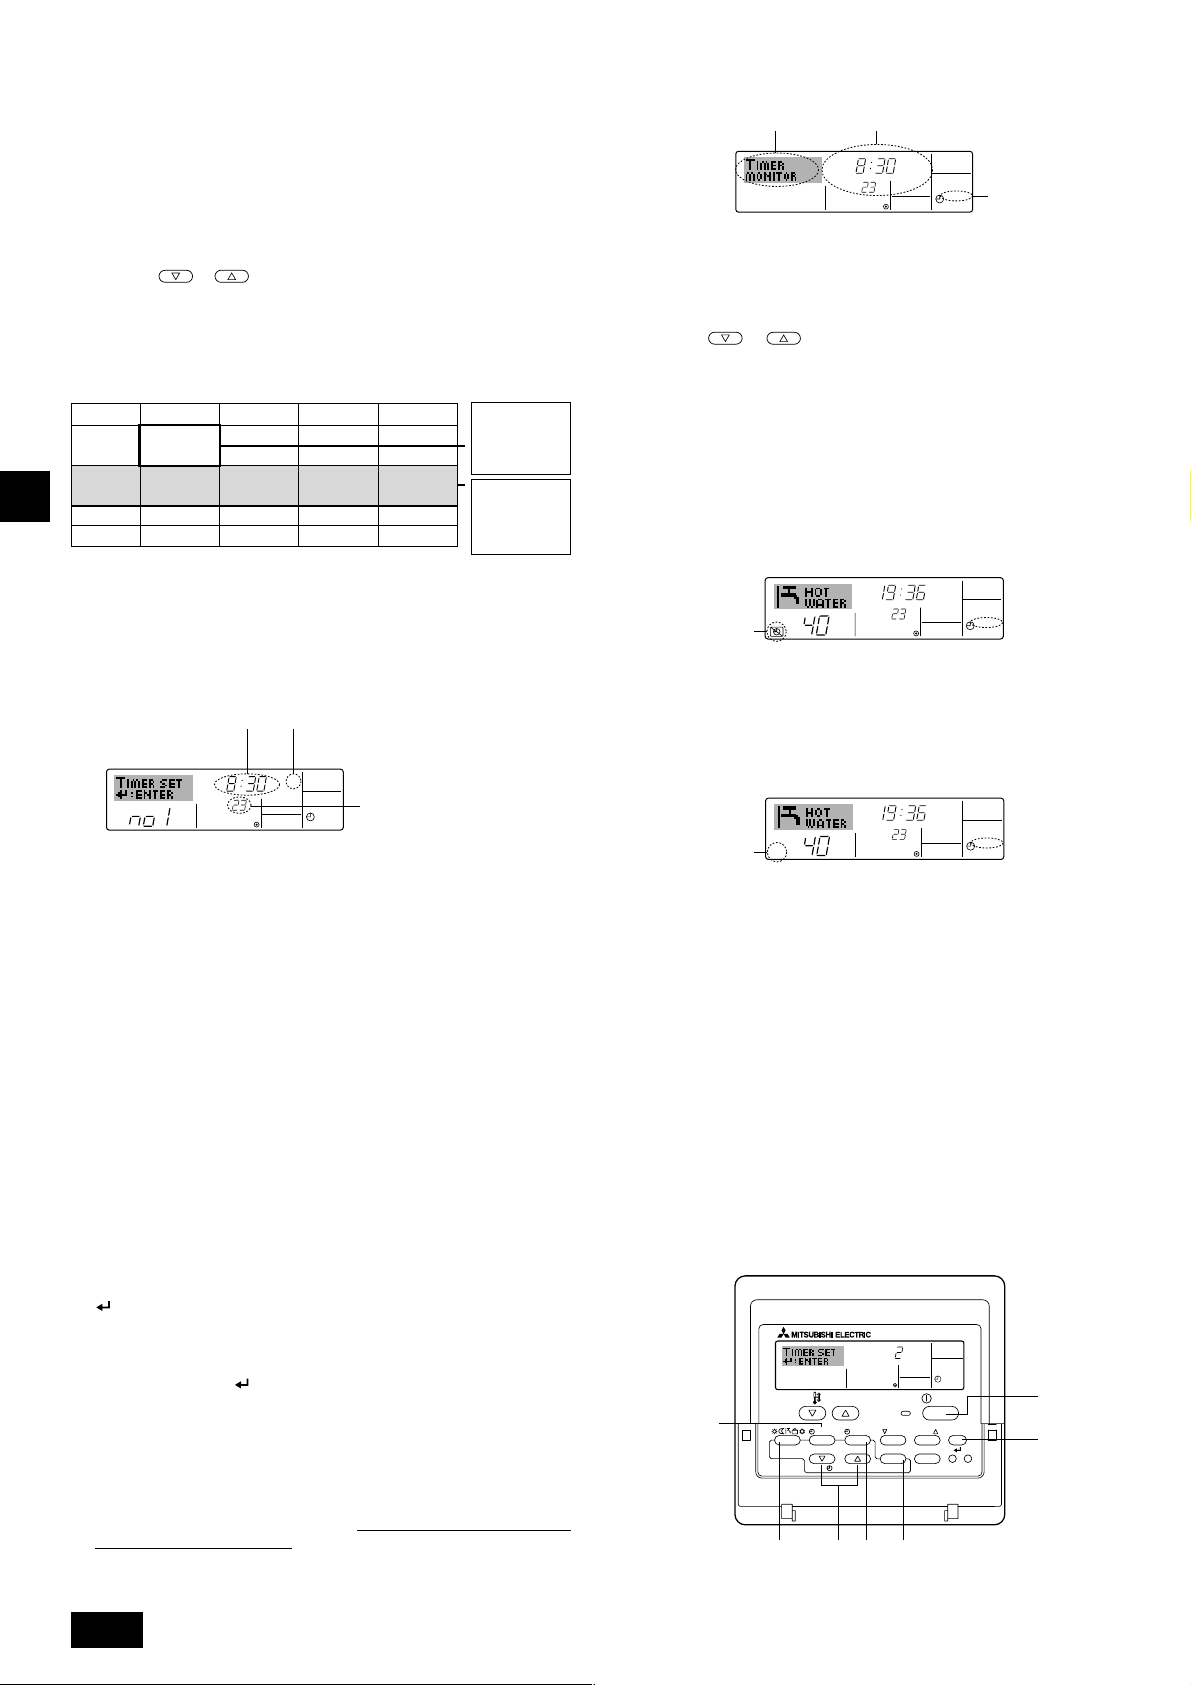
How to Set the Weekly Timer
1. Be sure that you are at a standard control screen, and that the weekly timer
indicator 1 is shown in the display.
2. Press the TIMER MENU button B, so that the “Set Up” appears on the screen
(at 2). (Note that each press of the button toggles the display between “Set
Up” and “Monitor”.)
3. Press the TIMER ON/OFF (SET DAY) button 9 to set the day. Each press
advances the display at 3 to the next setting, in the following sequence: “Sun
Mon Tues Wed Thurs Fri Sat” → “Sun” → ... → “Fri” → “Sat” → “Sun Mon Tues
Wed Thurs Fri Sat”...
4. Press the
select the appropriate operation number (1 to 6) 4.
* Your inputs at Steps 3 and 4 will select one of the cells from the matrix illus-
trated below.
(The remote-controller display at left shows how the display would appear
when setting Operation 1 for Sunday to the values indicated below.)
Setup Matrix
Op No.
No. 1
No. 2
GBDFEINLPGRRUTRGBGBGBGB
…
No. 6
Note:
By setting the day to “Sun Mon Tues Wed Thurs Fri Sat”, you can set the same
operation to be carried out at the same time every day.
(Example: Operation 2 above, which is the same for all days of the week.)
or INITIAL SETTING button (7 or 8) as necessary to
Sunday Monday … Saturday
• 8:30
• ON
•
23 °C (73 °F)
• 10:00
• OFF
• 10:00
• OFF
• 10:00
• OFF
• 10:00
• OFF
▲
▲
<Operation 1 settings for Sunday>
Start the unit at 8:30,
with the temperature
set to 23 °C (73 °F).
<Operation 2 settings for every
day>
Turn off the unit at
10:00.
How to View the Weekly Timer Settings
SUN
Timer Settings
9
˚C
ON
OFF
WEEKLY
1
8
TIMER
1. Be sure that the weekly timer indicator is visible on the screen (at 1).
2. Press the TIMER MENU button B so that “Monitor” is indicated on the
screen (at 8).
3. Press the TIMER ON/OFF (SET DAY) button 9 as necessary to select
the day you wish to view.
4. Press the
change the timer operation shown on the display (at 9).
* Each press will advance to the next timer operation, in order of time
setting.
5. To close the monitor and return to the standard control screen, press the
Mode (Return) button 2.
or INITIAL SETTING (7 or 8) as necessary to
To Turn Off the Weekly Timer
Press the TIMER ON/OFF button 9 so that “Timer Off” appears at 0.
TIME SUN
˚C
WEEKLY
0
˚C
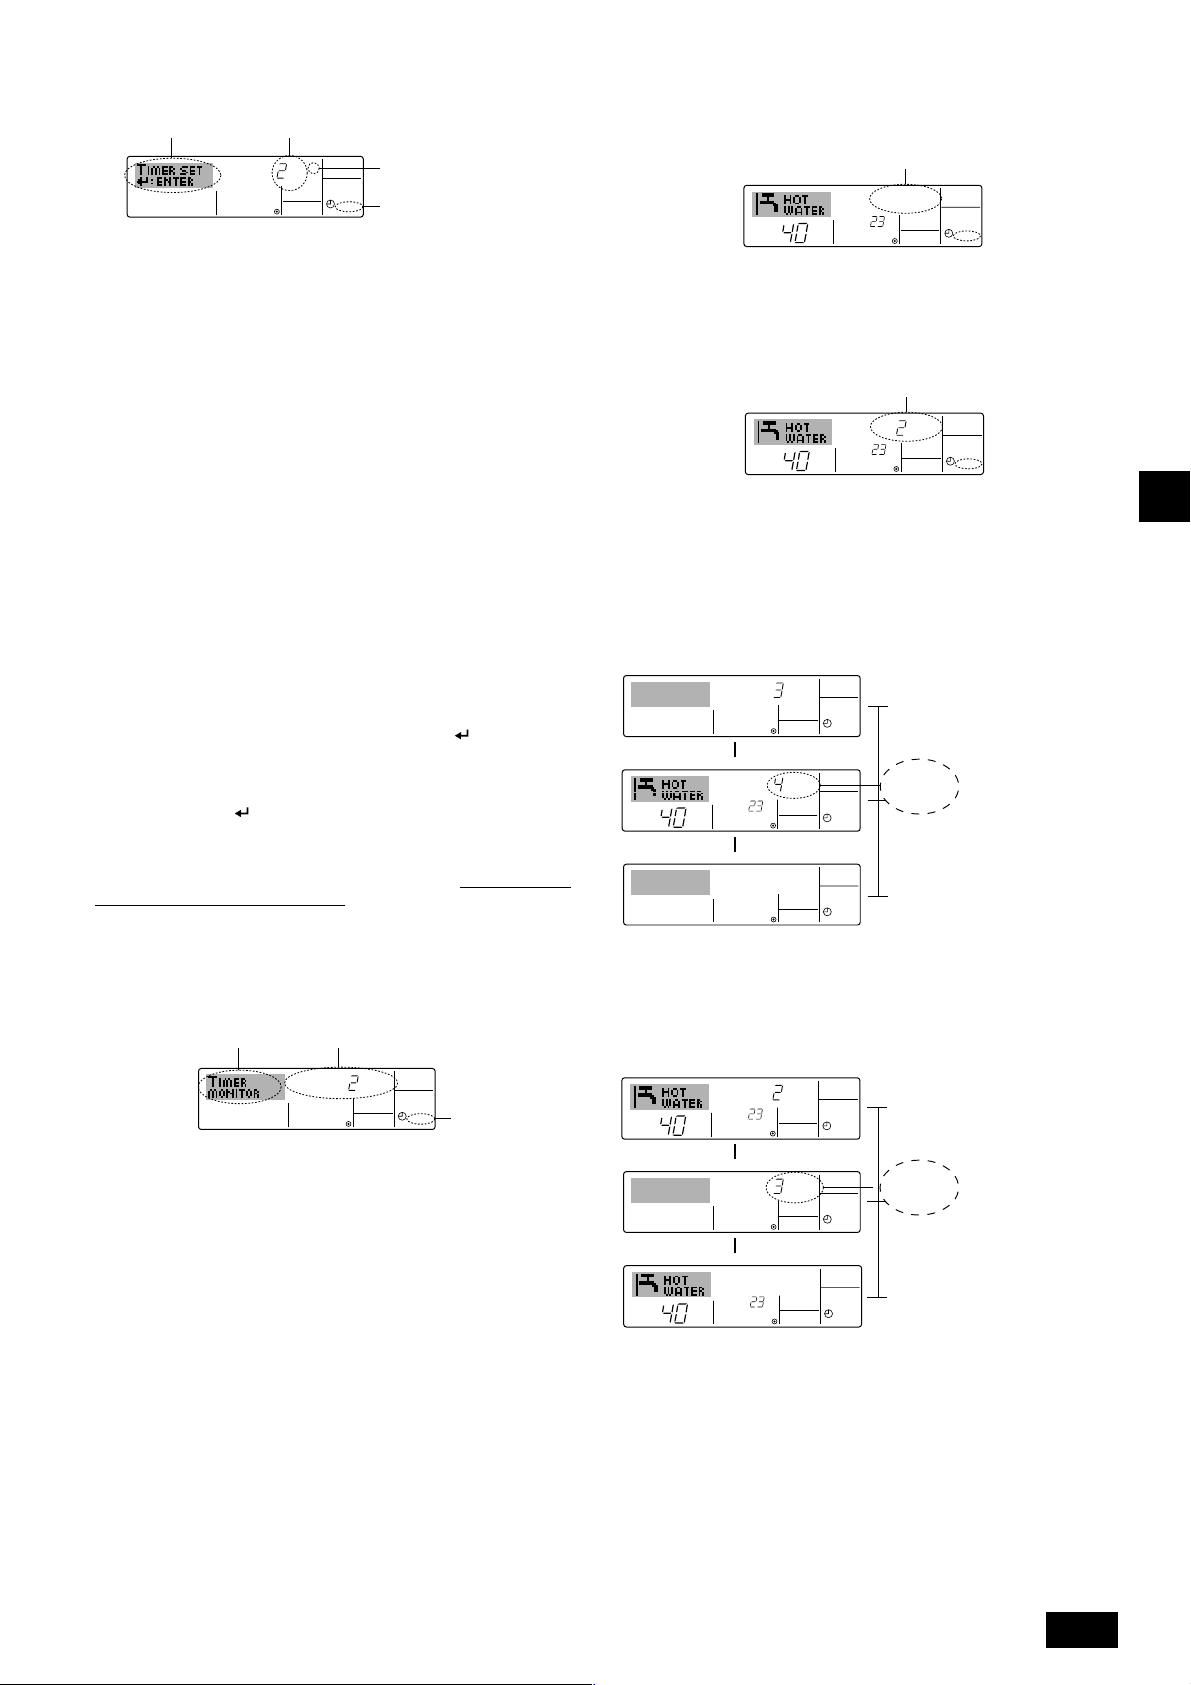
Setting the Weekly Timer
Shows the time setting Shows the selected operation (ON or
SUN
5. Press the appropriate Set Time button A as necessary to set the desired time
(at 5).
* As you hold the button down, the time first increments in minute intervals,
then in ten-minute intervals, and then in one-hour intervals.
6. Press the ON/OFF button 1 to select the desired operation (ON or OFF), at
6.
* Each press changes the next setting, in the following sequence: No display
(no setting) → “ON” → “OFF”
7. Press the appropriate Set Temperature button 3 to set the desired tempera-
ture (at 7).
* Each press changes the setting, in the following sequence: No display (no
setting) ⇔ 5 (41) ⇔ 6 (43) ⇔ ... ⇔ 89 (192) ⇔ 90 (194) ⇔ No display.
(Available range: The range for the setting is 5 °C (41 °F) to 90 °C (194 °F).
The actual range over which the temperature can be controlled, however, will
vary according to the type of the connected unit.)
8. To clear the currently set values for the selected operation, press and quickly
release the CHECK (CLEAR) button 0 once.
* The displayed time setting will change to “—:—”, and the ON/OFF and tem-
perature settings will all disappear.
(To clear all weekly timer settings at once, hold down the CHECK (CLEAR)
button 0 for two seconds or more. The display will begin flashing, indicating
that all settings have been cleared.)
9. After making the appropriate settings at Steps 5, 6. and 7, press the CIR.WATER
button 4 to lock in the values.
5
6
OFF)
* Does not appear if operation is not set.
ON
˚C
WEEKLY
7
Shows the temperature
setting
* Does not appear if tempera-
ture is not set.
To Turn On the Weekly Timer
Press the TIMER ON/OFF button 9 so that the “Timer Off” indication (at 0) goes
dark.
TIME SUN
˚C
WEEKLY
0
˚C
Using the Simple Timer
1. You can set the simple timer in any of three ways.
• Start time only : The unit starts when the set time has elapsed.
• Stop time only : The unit stops when the set time has elapsed.
• Start & stop times : The unit starts and stops at the respective elapsed
2. The simple timer (start and stop) can be set only once within a 72-hour period.
The time setting is made in hour increments.
Note:
*1. Weekly Timer/Simple Timer/Auto Off Timer cannot be used at the same time.
*2. The simple timer will not operate when any of the following conditions is in effect.
The timer is off; the system is in malfunction state; a test run is in progress; the
remote controller is undergoing self-check or remote controller check; the user
is in the process of selecting a function; the user is in the process of setting the
timer; the system is under central control. (Under these conditions, ON/OFF
operation is prohibited.)
times.
Note:
Your new entries will be cancelled if you press the Mode (Return) button 2 before
pressing the CIR.WATER
button 4.
If you have set two or more different operations for exactly the same time, only the
operation with the highest Operation No. will be carried out.
10. Repeat Steps 3 to 8 as necessary to fill as many of the available cells as you
wish.
11. Press the Mode (Return) button 2 to return to the standard control screen and
complete the setting procedure.
12. To activate the timer, press the TIMER ON/OFF button 9, so that the “Timer
Off” indication disappears from the screen.
Be sure that the “Timer Off” indi-
cation is no longer displayed.
* If there are no timer settings, the “Timer Off” indication will flash on the screen.
12
ONHr
AFTER
INITIAL SETTING
0
SIMPLE
ON/OFF
CIR.WATER
TEMP.
B
MENU
ON/OFF
MONITOR/SET
BACK DAY
PAR-W21MAA
CLOCK CLEAR
2A9
CHECK TEST
1
4
Page 13
How to Set the Simple Timer
˚C
˚C
SIMPLE
7
7
˚C
˚C
ONHr
AFTER
SIMPLE
ONHr
AFTER
SIMPLE
SIMPLE
˚C
˚C
OFFHrAFTER
SIMPLE
˚C
˚C
SIMPLE
Timer Setting
2
1. Be sure that you are at a standard control screen, and that the simple timer
indicator is visible in the display (at 1).
When something other than the Simple Timer is displayed, set it to SIMPLE
TIMER using the function selection of remote controller (see 3.[3]–3 (3)) timer
function setting.
2. Press the TIMER MENU button B, so that the “Set Up” appears on the screen
(at 2). (Note that each press of the button toggles the display between “Set
Up” and “Monitor”.)
3. Press the ON/OFF button 1 to display the current ON or OFF simple timer
setting. Press the button once to display the time remaining to ON, and then
again to display the time remaining to OFF. (The ON/OFF indication appears at
4).
•“ON” timer: The unit will start operation when the specified number of
hours has elapsed.
•“OFF” timer: The unit will stop operation when the specified number of
hours has elapsed.
4. With “ON” or “OFF” showing at 3: Press the appropriate Set Time button A as
necessary to set the hours to ON (if “ON” is displayed) or the hours to OFF (if
“OFF” is displayed) at 4.
• Available Range: 1 to 72 hours
5. To set both the ON and OFF times, repeat Steps 3 and 4.
* Note that ON and OFF times cannot be set to the same value.
6. To clear the current ON or OFF setting: Display the ON or OFF setting (see
step 3) and then press the CHECK (CLEAR) button 0 so that the time setting
clears to “—” at 4. (If you want to use only an ON setting or only an OFF
setting, be sure that the setting you do not wish to use is shown as “—”.)
7. After completing steps 3 to 6 above, press the CIR.WATER
in the value.
Note:
Your new settings will be cancelled if you press the Mode (Return) button 2 before
pressing the CIR.WATER
8. Press the Mode (Return) button 2 to return to the standard control screen.
9. Press the TIMER ON/OFF button 9 to start the timer countdown. When the
timer is running, the timer value is visible on the display.
timer value is visible and appropriate.
4
AFTER
button 4.
ONHr
SIMPLE
Action (On or Off)
3
* “— —” is displayed if there is
no setting.
1
button 4 to lock
Be sure that the
To Turn Off the Simple Timer...
Press the TIMER ON/OFF button 9 so that the timer setting no longer appears on
the screen (at 7).
To Turn On the Simple Timer...
Press the TIMER ON/OFF button 9 so that the timer setting becomes visible at 7.
Examples
If ON and OFF times have both been set at the simple timer, operation and display
are as indicated below.
Example 1:
Start the timer, with ON time set sooner than OFF time
ON Setting: 3 hours
OFF Setting: 7 hours
At Timer
Start
▲
SIMPLE
At 3 hours
after timer
start
OFFHrAFTER
˚C
˚C
▲
At 7 hours
after timer
start
Display shows the timer’s ON
setting (hours remaining to
ON).
Display changes to show the
timer’s OFF setting (hours
remaining to OFF).
The time displayed is OFF
setting (7 hours) – ON setting (3 hours) = 4 hours.
The unit goes off, and will
remain off until someone restarts it.
GBDFEINLPGRRUTRGBGBGBGBGB
I
Viewing the Current Simple Timer Settings
5
1. Be sure that the simple timer indicator is visible on the screen (at 1).
2. Press the TIMER MENU button B, so that the “Monitor” appears on the screen
(at 5).
• If the ON or OFF simple timer is running, the current timer value will appear
at 6.
• If ON and OFF values have both been set, the two values appear alternately.
3. Press the Mode (Return) button 2 to close the monitor display and return to
the standard control screen.
6
Timer Setting
TIMER ON
OFFHrAFTER
SIMPLE
1
Example 2:
Start the timer, with OFF time is sooner than ON time
ON Setting: 5 hours
OFF Setting: 2 hours
At Timer
Start
▲
SIMPLE
At 2 hours
after timer
start
AFTER
ONHr
▲
At 5 hours
after timer
start
Display shows the timer’s
OFF setting (hours remaining to OFF).
Display changes to show the
timer’s ON setting (hours remaining to ON).
The time displayed is ON
setting (5 hours) – OFF setting (2 hours) = 3 hours.
The unit comes on, and will
continue to run until someone turns it off.
13
Page 14
Using the Auto Off Timer
AUTO OFF
7
1. This timer begins countdown when the unit starts, and shuts the unit off when
the set time has elapsed.
2. Available settings run from 30 minutes to 4 hours, in 30-minute intervals.
Note:
*1. Weekly Timer/Simple Timer/Auto Off Timer cannot be used at the same time.
*2. The Auto Off timer will not operate when any of the following conditions is in
effect.
The timer is off; the system is in malfunction state; a test run is in progress; the
remote controller is undergoing self-check or remote controller check; the user
is in the process of selecting a function; the user is in the process of setting the
timer; the system is under central control. (Under these conditions, ON/OFF
operation is prohibited.)
Checking the Current Auto Off Timer Setting
Timer Setting
TIMER
AFTER
5
OFF
AUTO OFF
1
4
1. Be sure that the “Auto Off” is visible on the screen (at 1).
2. Hold down the TIMER MENU button B for 3 seconds, so that “Monitor” is
indicated on the screen (at 4).
• The timer remaining to shutdown appears at 5.
3. To close the monitor and return to the standard control screen, press the Mode
(Return) button 2.
AFTER OFF
GBDFEINLPGRRUTRGBGBGBGB
TEMP.
B
MENU
MENU
BACK
MONITOR/SET
BACK DAY
PAR-W21MAA
ON/OFF
ON/OFF
CLOCK
CLOCK CLEAR
INITIAL SETTING
INITIAL SETTING
CHECK TEST
CHECK TEST
CLEAR
AUTO OFF
ON/OFF
CIR.WATER
CIR.WATER
4
2A9
How to Set the Auto Off TIMER
Timer Setting
2
1. Be sure that you are at a standard control screen, and that the Auto Off timer
indicator is visible in the display (at 1).
When something other than the Auto Off Timer is displayed, set it to AUTO
OFF TIMER using the function selection of remote controller (see 3.[3]–3 (3))
timer function setting.
2. Hold down the TIMER MENU button B for 3 seconds, so that the “Set Up”
appears on the screen (at 2).
(Note that each press of the button toggles the display between “Set Up” and
“Monitor”.)
3. Press the appropriate Set Time button A as necessary to set the OFF time (at
3).
4. Press the CIR.WATER
Note:
Your entry will be cancelled if you press the Mode (Return) button 2 before pressing
the CIR.WATER
button 4.
3
AFTER OFF
AUTO OFF
1
button 4 to lock in the setting.
To Turn Off the Auto Off Timer...
• Hold down the TIMER ON/OFF button 9 for 3 seconds, so that “Timer Off”
appears (at 6) and the timer value (at 7) disappears.
7
AFTER OFF
6
˚C
• Alternatively, turn off the unit itself. The timer value (at 7) will disappear from the
screen.
˚C
AUTO OFF
To Turn On the Auto Off Timer...
• Hold down the TIMER ON/OFF button 9 for 3 seconds. The “Timer Off”
indication disappears (at 6), and the timer setting comes on the display (at 7).
• Alternatively, turn on the unit. The timer value will appear at 7.
7
AFTER OFF
˚C
AUTO OFF
6
˚C
5. Press the Mode (Return) button 2 to complete the setting procedure and re-
turn to the standard control screen.
6. If the unit is already running, the timer starts countdown immediately. Be sure
to check that the timer setting appears correctly on the display.
14
Page 15
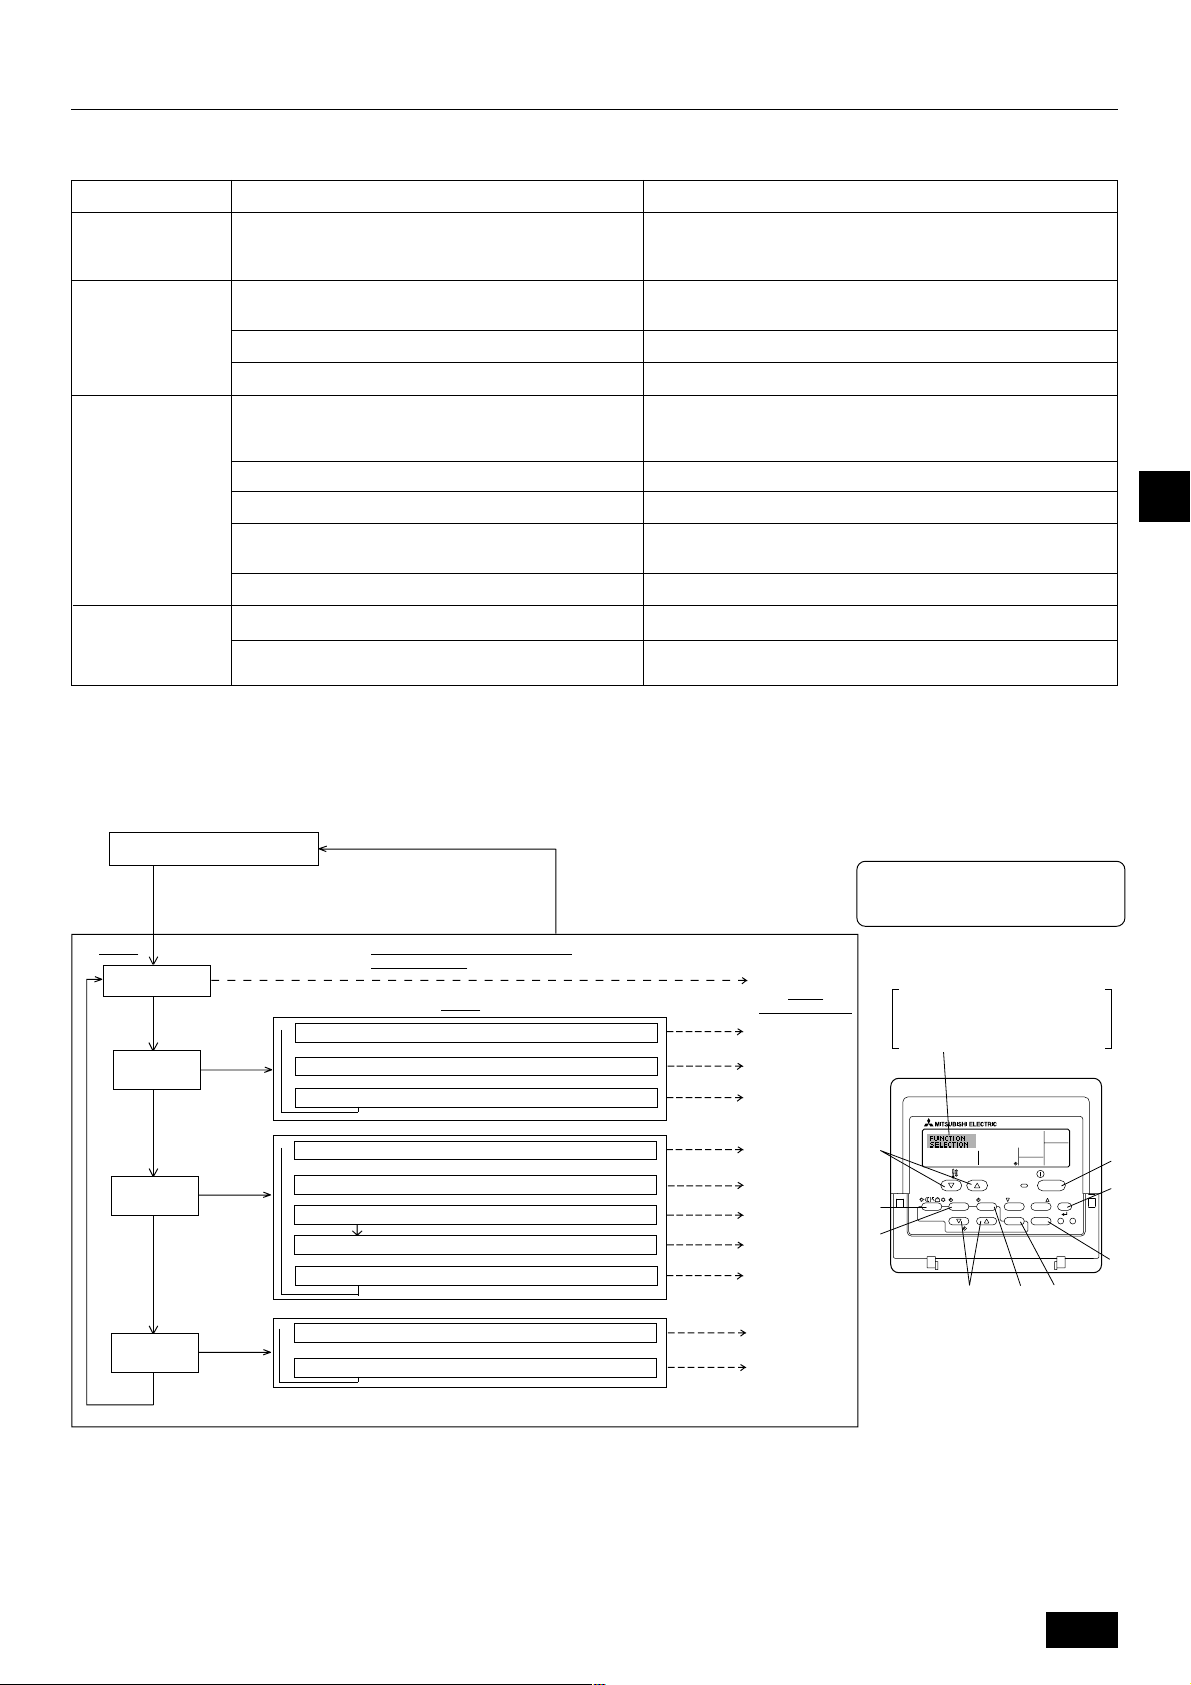
3. Function Selection
PAR-W21MAA
ON/OFF
TEMP.
MENU
BACK DAY
CHECK TEST
MONITOR/SET
CLOCK CLEAR
ON/OFF
INITIAL SETTING
CIR.WATER
F
G
C
D
B
I
A
H
E
Function selection of remote controller
The setting of the following remote controller functions can be changed using the remote controller function selection mode. Change the setting when needed.
Item 1
1. Change Language
Language setting to display
Item 2
Item 3 (Setting content)
• Display in multiple languages is possible
(“CHANGE
LANGUAGE”)
2. Function limit
(“FUNCTION
SELECTION”)
3. Mode selection
(“MODE SELECTION”)
(1) Operation function limit setting (operation lock) (“LOCKING
FUNCTION”)
(2) Operation mode skip setting (“SELECT MODE”)
(3) Temperature range limit setting (“LIMIT TEMP FUNCTION”)
(1) Remote controller main/sub setting (“CONTROLLER MAIN/
SUB”)
(2) Use of clock setting (“CLOCK”)
(3) Timer function setting (“WEEKLY TIMER”)
(4) Contact number setting for error situation (“CALL.”)
• Setting the range of operation limit (operation lock)
• Setting the use or non-use of each operation mode
• Setting the temperature adjustable range (maximum, minimum)
• Selecting main or sub remote controller
* When two remote controllers are connected to one group, one
controller must be set to sub.
• Setting the use or non-use of clock function
• Setting the timer type
• Contact number display in case of error
• Setting the telephone number
4. Display change
(“DISP MODE
SETTING”)
(5) Temp off set setting (“TEMP OFF SET FUNCTION”)
(1) Temperature display °C/°F setting (“TEMP MODE °C/°F”)
(2) Water temperature display setting (“WATER TEMP DISP
SELECT”)
• Setting the use or non-use of setback amount setting
• Setting the temperature unit (°C or °F) to display
• Setting the use or non-use of the display of water temperature
Function selection flowchart
[1] Stop the unit to start remote controller function selection mode. → [2] Select from item 1. → [3] Select from item 2. → [4] Make the setting. (Details are specified in item
3) → [5] Setting completed. → [6] Change the display to the normal one. (End)
Normal display (Display when
the unit is not running)
(Hold down the E button and press the D button for two
seconds.)
* The display cannot be changed during the test run and
the self diagnosis.
Item 1 Remote Controller Function
Change Language
(“CHANGE LANGUAGE”)
Press the G button.
Selection Mode
Item 2
Function limit
(“FUNCTION
SELECTION”)
Press the
E button.
Mode selection
SELECTION”)
Press the
E button.
Press the
E button.
(“MODE
Press the
E button.
Press the
G button.
Press the
G button.
→
Operation function limit setting (“LOCKING FUNCTION”)
→
→
Operation mode skip setting (“SELECT MODE”)
Press the G button.
Temperature range limit setting (“LIMIT TEMP FUNCTION”)
→
Remote controller main/sub setting (“CONTROLLER MAIN/SUB”)
→→→
Use of clock setting (“CLOCK”)
Press the G button.
Timer function setting (“WEEKLY TIMER”)
→
Contact number setting for error situation (“CALL.”)
Temp off set setting (“TEMP OFF SET FUNCTION”)
Display change
(“DISP MODE
SETTING”)
Press the
G button.
→
Temperature display °C/°F setting (“TEMP MODE °C/°F”)
→
Press the G button.
Water temperature display setting (“WATER TEMP DISP SELECT”)
(Hold down the E button and press
the D button for two seconds.)
* The remote controller records the
setting that is made in this way.
See [3]–1
Item 3
(Setting content)
Press the
D button.
See [3]–2. (1)
See [3]–2. (2)
See [3]–2. (3)
Press the
D button.
See [3]–3. (1)
See [3]–3. (2)
See [3]–3. (3)
See [3]–3. (4)
See [3]–3. (5)
Press the
D button.
See [3]–4. (1)
See [3]–4. (2)
NOTE
Timer operation stops when the display for
remote controller function selection is
changed to the normal one.
Dot display
The language that is selected in
CHANGE LANGUAGE mode appears on this display. English is
set in this manual.
GBDFEINLPGRRUTRGBGBGBGBGB
I
15
Page 16
Detailed setting
[3]–1. CHANGE LANGUAGE setting
The language that appears on the dot display can be selected.
• Press the [
1 English (GB), 2 German (D), 3 Spanish (E), 4 Russian (RU),
5 Italian (I), 6 French (F), 7 Swedish
[3]–2. Function limit
(1) Operation function limit setting (operation lock)
• To switch the setting, press the [
1 no1 : Operation lock setting is made on all buttons other than the
2 no2 : Operation lock setting is made on all buttons.
3 OFF (Initial setting value) : Operation lock setting is not made.
* To make the operation lock setting valid on the normal screen, it is necessary to
press buttons (Press and hold down the [CIR.WATER] and [
at the same time for two seconds.) on the normal screen after the above setting
is made.
(2) Operation mode skip setting
After setting is changed, the operation mode can not be changed within the changed
range.
• To switch the following settings, press the [
1 Heating mode : Sets the use or non-use of the Heating mode.
GBDFEINLPGRRUTRGBGBGBGB
2 Heating ECO mode : Sets the use or non-use of the Heating ECO
3 Hot Water mode : Sets the use or non-use of the Hot Water mode.
4 Anti-freeze mode : Sets the use or non-use of the Anti-freeze
5 Cooling mode : Sets the use or non-use of the Cooling mode.
6 OFF (Initial setting value) : Operation mode skip is not executed.
* When the setting, other than OFF, is made, the skip settings of the Heating,
Heating ECO, Hot Water, Anti-freeze, and Cooling modes are executed at the
same time.
* A mode that is not available on the unit to connect cannot be used even if the
setting is “AVAILABLE.”
(3) Temperature range limit setting
After this setting is made, the temperature can be changed within the set range.
• To switch the setting, press the [
1 LIMIT TEMP HEATING MODE:
The temperature range can be changed on heating mode.
2 LIMIT TEMP HOT WATER MODE:
The temperature range can be changed on heating/hot water mode.
3 LIMIT TEMP ANTI-FREEZE MODE:
The temperature range can be changed on anti-freeze mode.
4 LIMIT TEMP COOLING MODE:
The temperature range can be changed on cooling mode.
5 OFF (Initial setting) : The temperature range limit is not active.
* When the setting, other than OFF, is made, the temperature range limit setting
on hot water, anti-freeze and cooling mode is made at the same time. However,
the range cannot be limited when the set temperature range has not changed.
• To increase or decrease the temperature, press the [
button.
• Settable range
Hot Water mode : Lower limit: 30 ~70 °C (87 ~158 °F)
Heating mode : Lower limit: 30 ~45 °C (87 ~113 °F)
Cooling mode : Lower limit: 10 ~30 °C (50 ~ 87 °F)
* The settable range varies depending on the unit to connect.
MENU] button to change the language.
ON/OFF] button.
[
ON/OFF] button.
mode.
mode.
ON/OFF] button.
Upper limit: 70 ~30 °C (158 ~ 87 °F)
Upper limit: 45 ~30 °C (113 ~ 87 °F)
Upper limit: 30 ~10 °C (87 ~ 50 °F)
ON/OFF] buttons
ON/OFF] button.
TEMP. or ]
[3]–3. Mode selection setting
(1) Remote controller main/sub setting
• To switch the setting, press the [
1 Main : The controller will be the main controller.
2 Sub : The controller will be the sub controller.
(2) Use of clock setting
• To switch the setting, press the [
1 ON : The clock function can be used.
2 OFF : The clock function cannot be used.
(3) Timer function setting
• To switch the setting, press the [
followings.).
1 WEEKLY TIMER (Initial setting value): The weekly timer can be used.
2 AUTO OFF TIMER : The auto off timer can be used.
3 SIMPLE TIMER : The simple timer can be used.
4 TIMER MODE OFF : The timer mode cannot be used.
* When the use of clock setting is OFF, the “WEEKLY TIMER” cannot be used.
(4) Contact number setting for error situation
• To switch the setting, press the [
1 CALL OFF : The set contact numbers are not displayed in case of error.
2 CALL **** *** **** : The set contact numbers are displayed in case of error.
CALL_ : The contact number can be set when the display is as
shown on the left.
• Setting the contact numbers
To set the contact numbers, follow the following procedures.
Move the flashing cursor to set numbers. Press the [
] button F to move the cursor to the right (left). Press the [ CLOCK
or ] button C to set the numbers.
(5) Temp off see. setting
• To switch the following settings, press the [
1 ON : The setback amount setting is displayed under the water temperature
initial setting mode.
2 OFF : The setback amount setting is not displayed under the water tempera-
ture initial setting mode.
ON/OFF] button D.
ON/OFF] button D.
ON/OFF] button D (Choose one of the
ON/OFF] button D.
TEMP. or
ON/OFF] button D.
[3]–4. Display change setting
(1) Temperature display °C/°F setting
• To switch the setting, press the [
1 °C: The temperature unit °C is used.
2 °F: The temperature unit °F is used.
(2) Water temperature display setting
• To switch the setting, press the [
1 ON : The water temperature is displayed.
2 OFF : The water temperature is not displayed.
ON/OFF] button D.
ON/OFF] button D.
16
Page 17
4. Caring for the machine
Always have strainer maintenance performed by a service person.
Before care-taking, turn the power supply OFF.
Caution:
• Before you start cleaning, stop operation and turn OFF the power supply.
Remember that the fan is rotating inside at high speed, posing a serious
risk of injury.
• Indoor units are equipped with strainer to remove the dust of sucked-in
air. Clean the strainer using the methods shown in the following sketches.
• The life of the strainer depends on where the unit is installed and how it
is operated.
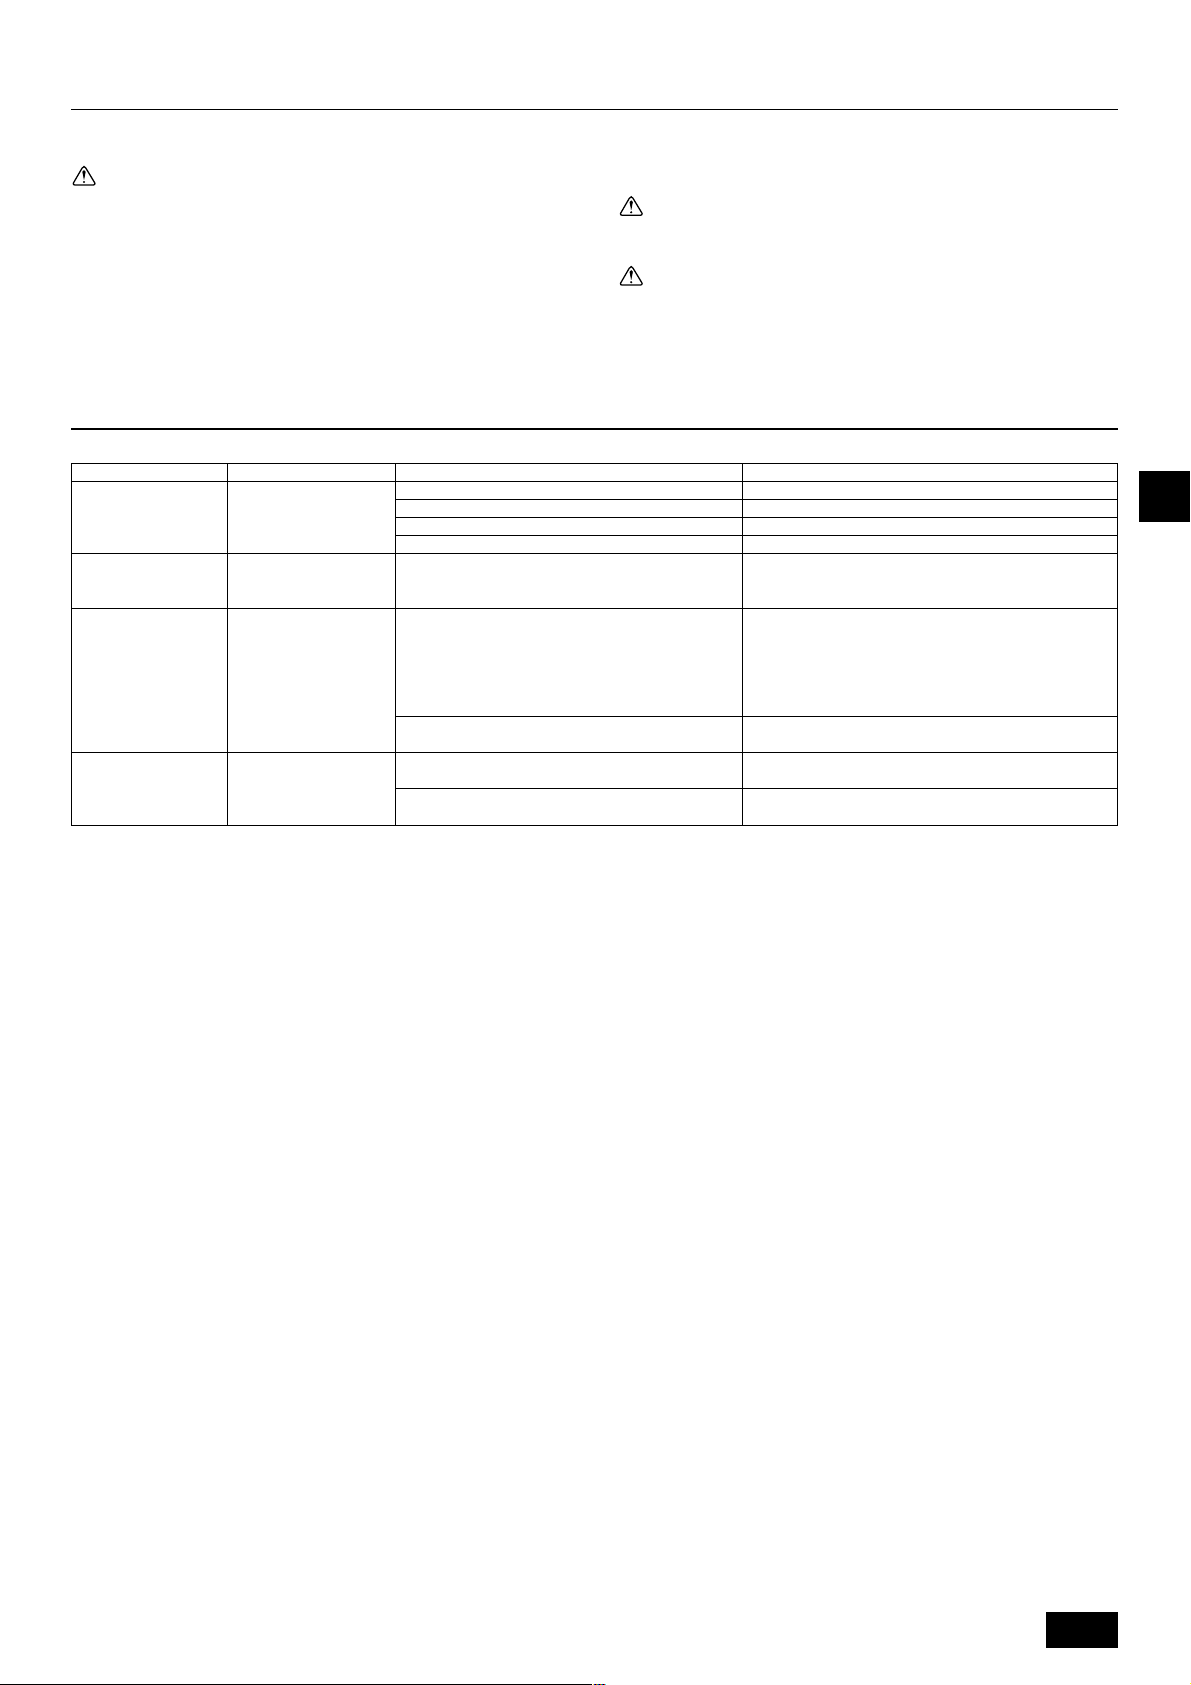
5. Troubleshooting
Before you ask for repair service, check the following points:
State of Machine
It does not run.
Water out but it does
not cool enough or heat
enough.
Cool water or warm
water does not come
out.
It runs briefly, but soon
stops.
Remote Controller
“'” display is not lit up
No display appears even
when the [ON/OFF] button is pressed.
The liquid crystal display
shows that it is in the
state of operation.
The liquid crystal display
shows that it is in operation.
The “CHECK” and check
code flashes on the liquid
crystal display.
Power failure
The power supply is turned OFF.
The fuse in the power supply is gone.
The earth leakage breaker is gone.
Improper temperature adjustment
The restart-preventing circuit is in operation for 3 minutes.
Indoor unit operation was restarted during the heating
and defrosting operation.
There are some obstacles at the air inlet and outlet of
the indoor and outdoor units.
The strainer is filled with dust and dirt.
Cause
How to clean
• When washing the strainer, remove the cover and scrub the strainer inside
with brush.
Caution:
• Do not dry the strainer by exposing it to direct sunlight or warming it
using fire, etc. Doing so can result in the deformation of the strainer.
Caution:
Never pour water or flammable sprays onto the air conditioner. Cleaning using
these methods can result in the failure of the air conditioner, electric shock,
or fire.
Troubleshooting
Press the [ON/OFF] button after power restoration.
Turn the power supply ON.
Replace fuse.
Put in the earth leakage breaker.
After checking the set temperature and inlet temperature
on the liquid crystal display, refer to [Water temperature adjustment], and operate the adjustment button.
Wait for a while.
(To protect the compressor, a 3-minute restart-preventing
circuit is built into the indoor unit. Therefore, there are occasions sometimes when the compressor does not start running immediately. There are cases when it does not run for
as long as 3 minutes.)
Wait for a while.
(Heating operation starts after ending defrosting operation.)
Rerun after removal
Rerun after cleaning the strainer. (Refer to [Caring for the
machine].)
GBDFEINLPGRRUTRGBGBGBGBGB
• If operation stops due to a power failure, the [restart-preventing circuit at power failure] operates and disables unit operation even after power restoration. In this case,
press the [ON/OFF] button again and start operation.
If malfunctions persist after you have checked the above, turn the power supply OFF and contact your dealer with information about the product name, the nature of the
malfunction, etc. If the display of “[CHECK]” and (4 digit) check code flashes, tell the dealer contents of the display (check code). Never attempt to repair by yourself.
The following symptoms are not air conditioner failures:
• The air blown out from the air conditioner can sometimes give off odors. This is due to cigarette smoke contained in the air of the room, the smell of cosmetics, the walls,
furniture, etc., absorbed in the air conditioner.
• A hissing noise can be heard immediately after the air conditioner is started or stopped. This is the sound of the refrigeration flowing inside the air conditioner. This is
normal.
• The air conditioner sometimes snaps or clicks at the beginning or end of cooling/heating operation. This is the sound of friction on the front panel and other sections due
to expansion and contraction caused by temperature change. This is normal.
I
17
Page 18
6. Installation, transferring works, and checking
Regarding place for installation
Consult with your dealer for details on installation and transferring the installation.
Caution:
Never install the air conditioner where there is a risk of leakage of flammable
gas.
If gas leaks and accumulates around the unit, fire can result.
Never install the air conditioner at the following place:
• where there is a lot of machine oil
• near the ocean and beach areas where there is salt air.
• where humidity is high
• where there are hot springs nearby
• where there is sulphurous gas
• where there is a high-frequency processing machinery (a high-frequency welder,
etc.)
• where acid solution is frequently used
• where special sprays are frequently used
• Install the indoor unit horizontally. Otherwise, water leakage can result.
GBDFEINLPGRRUTRGBGBGBGB
• Take sufficient measures against noise when installing the air conditioners at
hospitals or communication-related businesses.
If the air conditioner is used in any of the above-mentioned environments, frequent
operational failure can be expected. It is advisable to avoid these types of installation sites.
For further details, consult with your dealer.
Regarding electrical work
Caution:
• The electrical work must be undertaken by a person who is qualified as
an electrical engineer according to the [technical standard respecting
electrical installation], [internal wiring rules], and the installation instruction manual with the absolute use of exclusive circuits. The use of other
products with the power source can result in burnt-out beakers and fuses.
• Never connect the grounding wire to a gas pipe, water pipe, arrester, or
telephone grounding wire. For details, consult with your dealer.
• In some types of installation sites, the installation of an earth leakage
breaker is mandatory. For details, consult with your dealer.
Regarding water pipe installation
• Do not use steel pipes as water pipes. Copper pipes are recommended.
• The water circuit should be a closed circuit.
Regarding transfer of installation
• When removing and reinstalling the air conditioner when you enlarge your
home, remodel, or move, consult with your dealer in advance to ascertain the
cost of the professional engineering work required for transferring the installation.
Caution:
When moving or reinstalling the air conditioner, consult with your dealer.
Defective installation can result in electric shock, fire, etc.
Regarding noise
• In installing work, choose a place that can fully bear the weight of the air conditioner, and where noise and vibration can be reduced.
• Choose a place where cool or warm air and noise from the outdoor air outlet of
the air conditioner does not inconvenience the neighbors.
• If any alien object is placed near the outdoor air outlet of the air conditioner,
decreased performance and increased noise can result. Avoid placing any
obstacles adjacent to the air outlet.
• If the air conditioner produces any abnormal sound, consult with your dealer.
Maintenance and inspection
• If the air conditioner is used throughout several seasons, the insides can get
dirty, reducing the performance.
Depending upon the conditions of usage, foul odors can be generated and
drainage can deteriorate due to dust and dirt, etc.
7. Specifications
Model
Power source
Heating capacity kW
Cooling capacity kW
Sound level
Net weight kg
Dimension
Accessory
Water Flow rate m
*1 Nominal heating conditions
Outdoor Temp.: 7 °C DB/6 °C WB (45 °F DB/43 °F WB)
Pipe length: 7.5 m (24-9/16 ft)
Level difference: 0 m (0 ft)
Inlet water Temp 65 °C Water flow rate 2.15 m
*3 Nominal cooling conditions
Outdoor Temp.: 35 °C DB (95 °F DB)
Pipe length: 7.5 m (24-9/16 ft)
Level difference: 0 m (0 ft)
Inlet water Temp 23 °C Water flow rate 1.93 m
*5 Nominal cooling conditions
Outdoor Temp. : 35 °C DB (95 ° F DB)
Pipe length: 7.5 m (24-9/16 ft)
Level difference: 0 m (0 ft)
Inlet water Temp 23 °C Water flow rate 3.86 m
Height mm
Width mm
Depth mm
3
/h
PWFY-P100VM-E-BU
1
12.5 *
–
44 dB<A>
60 kg
PWFY-P100VM-E-AU
1-phase 220-230-240 V 50/60 Hz
12.5 *
11.2 *
2
3
29 dB<A>
35 kg
800
450
Strainer, Heat insulation material, Connecter sets × 2,
300
Expansion joint × 2 (PWFY - P200VM - E - AU)
0.6-2.15 1.2-4.3
0.6-2.15
*2 Nominal heating conditions
Outdoor Temp.: 7 °C DB/6 °C WB (45 °F DB/43 °F WB)
Pipe length: 7.5 m (24-9/16 ft)
3
/h
Level difference: 0 m (0 ft)
Inlet water Temp 30 °C Water flow rate 2.15 m
*4 Nominal heating conditions
Outdoor Temp.: 7 °C DB/6 °C WB (45 °F DB/43 °F WB)
Pipe length: 7.5 m (24-9/16 ft)
3
/h
3
/h
Level difference: 0 m (0 ft)
Inlet water Temp 30 °C Water flow rate 4.3 m
PWFY-P200VM-E-AU
4
25.0 *
5
22.4 *
29 dB<A>
38 kg
3
/h
3
/h
18
Page 19
Inhalt
1. Sicherheitsvorkehrungen .......................................................................... 19
1.1. Einbau ..................................................................................... 19
1.2. Während des Betriebs............................................................. 20
1.3. Die Anlage entsorgen .............................................................. 20
2. Bedienung ................................................................................................. 20
2.1. Verwenden der Fernbedienung ............................................... 20
2.2. Wassertemperatureinstellung.................................................. 21
1. Sicherheitsvorkehrungen
s Vor Inbetriebnahme der Anlage vergewissern, daß Sie alle
Hinweise über “Sicherheitsvorkehrungen” gelesen haben.
s “Sicherheitsvorkehrungen” ist eine Liste von wichtigen, die
Sicherheit betreffenden, Punkten.
Sie sollten sie uneingeschränkt befolgen.
Im Text verwendete Symbole
Warnung:
Beschreibt Vorkehrungen, die beachtet werden sollten, damit Gefahren für
Leib und Leben des Benutzers vermieden werden.
Vorsicht:
Beschreibt Vorkehrungen, die beachtet werden sollten, damit an der Anlage
keine Schäden entstehen.
In den Abbildungen verwendete Symbole
: Beschreibt eine Handlung, die unterbleiben muß.
: Zeigt an, daß wichtige Anweisungen zu befolgen sind.
: Verweist auf einen Teil der Anlage,, der geerdet werden muß.
: Elektrisierungsgefahr (Dieses symbol befindet sich als Aufkleber auf der
Hauptanlage.) <Farbe: gelb>
: Gefahr heißer Oberflächen
2.3. Einstellen des Wochentags und der Zeit ................................. 21
2.4. Verwenden des Timers ............................................................ 21
3. Funktionsauswahl ..................................................................................... 25
4. Pflege ........................................................................................................ 27
5. Störungssuche .......................................................................................... 27
6. Installation, Verlagerung und Prüfung ....................................................... 27
7. Specifications ............................................................................................ 28
• Das Gerät ist nicht für unbeaufsichtigte Verwendung durch junge Kinder
oder gebrechliche Personen gedacht.
• Junge Kinder sollten beaufsichtigt werden, um sicherzustellen, dass sie
nicht mit dem Gerät spielen.
• Kein Zusatzmittel für Leckentdeckung verwenden.
1) Außenanlage
Warnung:
• Die Außenanlage muß auf einem festen, waagerechten Untergrund an
einem Platz angebracht werden, an dem sich weder Schnee, Blätter noch
Abfälle ansammeln können.
• Nicht auf die Anlage stellen oder Gegenstände darauf ablegen. Sie selbst
oder der Gegenstand können herunterfallen und Personenschäden verursachen.
Vorsicht:
Die Außenanlage sollte an einem Ort angebracht werden, an dem Nachbarn
nicht durch austretende Luft und entstehende Geräusche gestört werden.
2) Innenanlage
Warnung:
Die Innenanlage sollte sicher befestigt werden. Wenn die Anlage nicht fest
genug montiert wurde, kann sie herunterfallen und Personenschäden verursachen.
DFEINLPGRRUTRGBGBGBGBGB
GB
Warnung:
Sorgfältig die auf der Hauptanlage aufgebrachten Aufschriften
lesen.
1.1. Einbau
s Wenn Sie dieses Handbuch gelesen haben, verwahren Sie es zusammen
mit dem Installationshandbuch an einem sicheren Ort, damit Sie problemlos nachschlagen können, wann immer Sie eine Frage haben Wenn die
Anlage von einer anderen Person bedient werden soll, vergewissern, daß
sie dieses Handbuch erhält und liest.
Warnung:
• Die Anlage sollte nicht vom Benutzer eingebaut werden. Bitten Sie Ihren
Händler oder eine Vertragswerkstatt, die Anlage einzubauen. Wenn die
Anlage unsachgemäß eingebaut wurde, kann Wasser auslaufen, können
Stromschläge erfolgen, oder es kann Feuer ausbrechen.
• Verwenden Sie nur von Mitsubishi Electric genehmigtes Zubehör und
wenden Sie sich wegen des Einbaus an Ihren Händler oder eine Vertragswerkstatt. Wenn Zubehörteile unsachgemäß eingebaut werden, kann Wasser auslaufen, können Stromschläge erfolgen oder es kann Feuer ausbrechen.
• Nicht die Anlage berühren. Die Oberfläche kann heiß sein.
• Anlage nicht an Orten installieren, wo korrodierendes Gas erzeugt wird.
• In der Einbaubeschreibung sind die vorgeschlagenen Einbauverfahren
detailliert aufgeführt. Alle baulichen Veränderungen, die beim Einbau gegebenenfalls notwendig sind, müssen den örtlichen Bauvorschriften entsprechen.
• Sie sollten die Anlage niemals eigenhändig reparieren oder an einen anderen Standort verbringen. Wenn die Reparatur unsachgemäß durchgeführt wird, kann Wasser auslaufen, können Stromschläge erfolgen oder
es kann Feuer ausbrechen. Wenn die Anlage repariert oder an einen anderen Ort verlegt werden muß, wenden Sie sich an Ihren Händler.
• Halten Sie Elektroteile fern von Wasser (Waschwasser usw.)
• Dies kann zu elektrischem Schlag, Feuer oder Rauch führen.
Hinweis 1: Stellen Sie beim Waschen von Wärmeaustauscher und Tau-
wasserschale durch Verwendung einer wasserdichten Abdekkung sicher, dass der Steuerkasten, der Motor und LEV trokken bleiben.
Hinweis 2: Verwenden Sie niemals die Ablasspumpe, um Wasser aus der
Tauwasserschale oder dem Wärmeaustauscher abzulassen.
Lassen Sie immer separate ab.
3) Fernbedienung
Warnung:
Die Fernbedienung sollte so angebracht werden, daß Kinder nicht damit spielen können.
4) Auslaufschlauch
Vorsicht:
Vergewissern, daß der Auslaufschlauch installiert ist, damit der Auslauf störungsfrei vor sich gehen kann. Falscher Einbau führt zu Wasseraustritt und
kann Möbelschäden nach sich ziehen.
5) Stromanschluß, Sicherung oder Stromunterbrecher
Warnung:
• Dafür sorgen, daß das Gerät an einen dafür geeigneten Netzanschluß
angeschlossen wird. Andere Geräte, die an den gleichen Netzanschluß
angeschlossen sind, könnten eine Überlastung verursachen.
• Vergewissern, daß ein Hauptschalter vorhanden ist.
• Stellen Sie sicher, daß alle Angaben über Spannung, Sicherungen oder
Stromunterbrechung beachtet werden. Als Sicherung niemals ein Stück
Draht verwenden. Auch darf keine Sicherung einen höheren Wert als den
angegebenen besitzen.
6) Erdung
Vorsicht:
• Die Anlage muß vorschriftsmäßig geerdet werden. Erdleitung niemals an
ein Gas- oder Wasserrohr, eine Licht- oder Telefonerdleitung anschließen. Wenn die Anlage unsachgemäß geerdet wurde, können Stromschläge
entstehen.
• Häufiger vergewissern, daß die Erdleitung der Außenanlage ordnungs-
gemäß an den Erdungsanschluß der Anlage selbst und an die Erdungselektrode angeschlossen ist.
19
Page 20
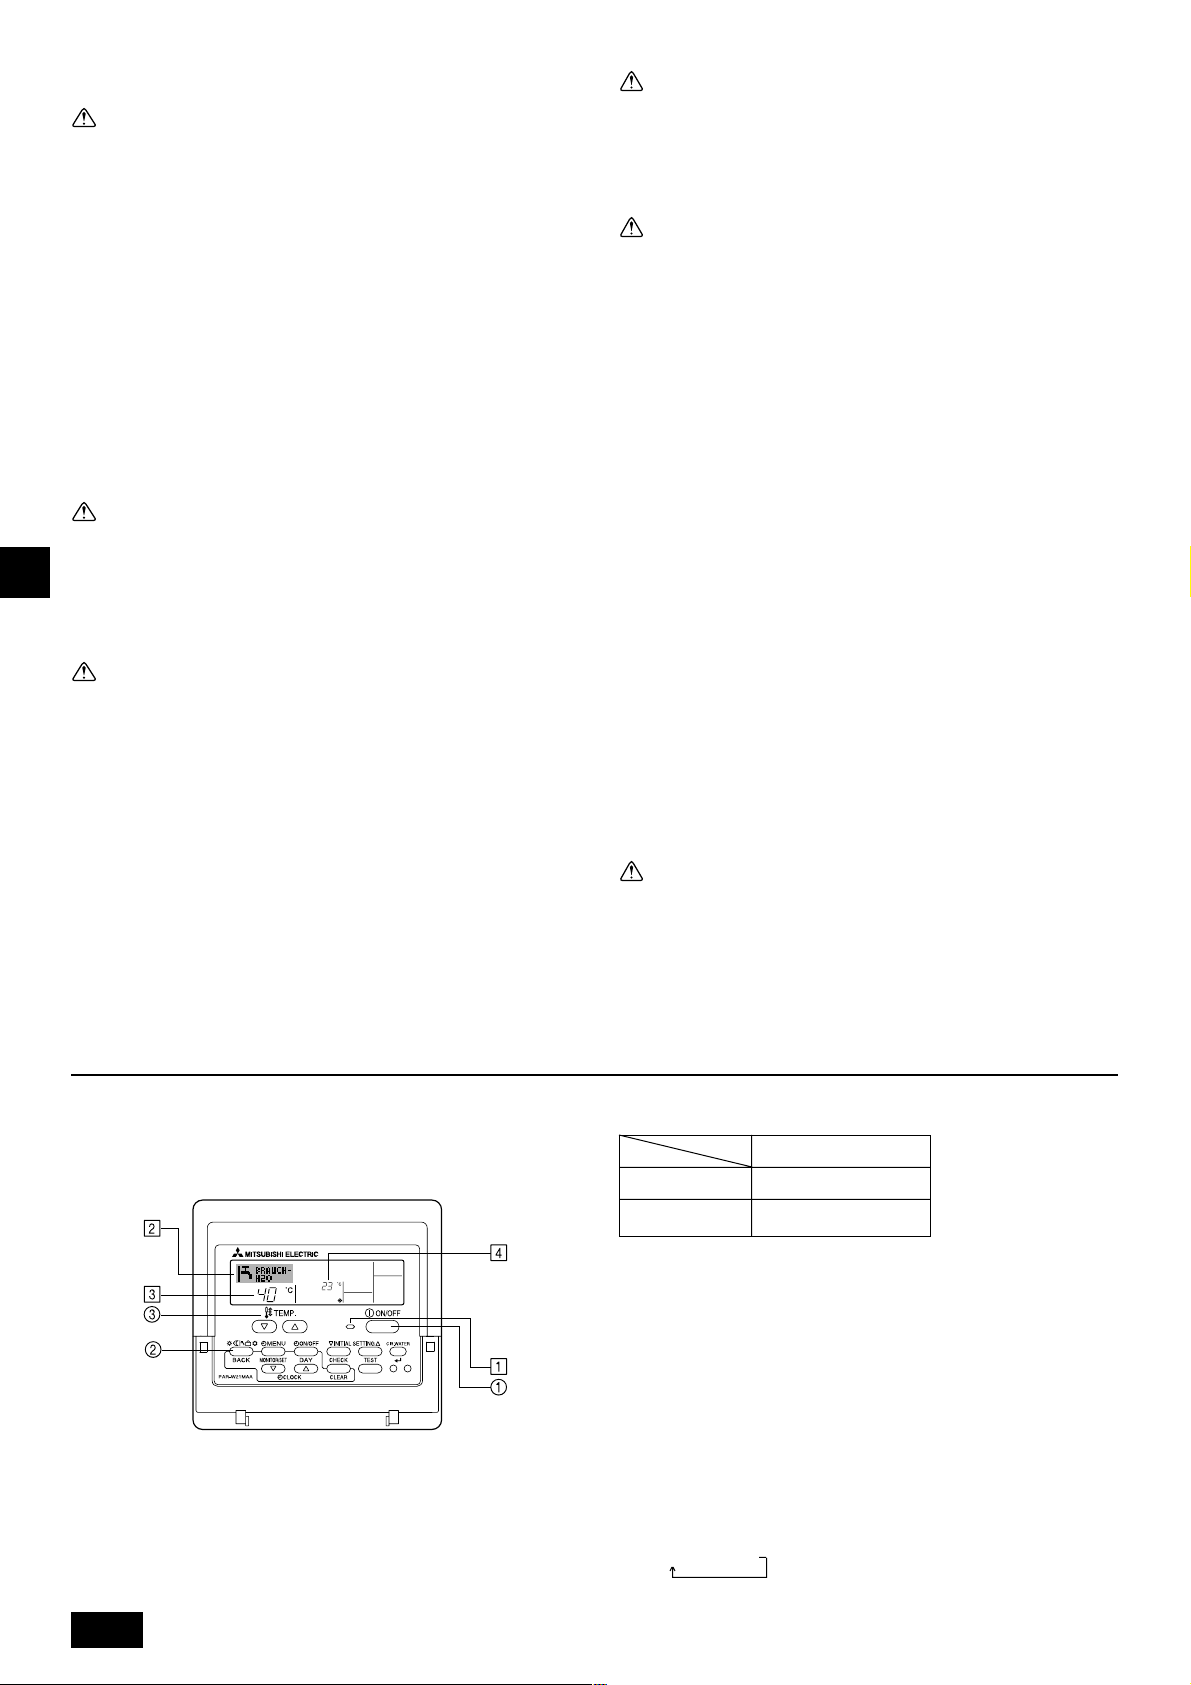
1.2. Während des Betriebs
Vorsicht:
• Zum Drücken der Tasten keine scharfen Gegenstände benutzen, da dadurch die Fernbedienung beschädigt werden kann.
• Das Kabel der Fernbedienung niemals verdrehen oder daran ziehen, da
dies zu Schäden an der Fernbedienung führt und Fehlfunktionen verursacht.
• Das obere Gehäuse der Fernbedienung nicht entfernen. Entfernen des
oberen Gehäuses der Fernbedienung und Berühren der Schaltplatte usw.
auf der Innenseite ist gefährlich und kann Feuer oder Störungen verursachen.
• Die Fernbedienung nicht mit Waschbenzin, Verdünnungsmittel, chemisch
behandelten Reinigungstüchern usw. abwischen. Dies kann Verfärbung
und Störungen verursachen. Bei starker Verschmutzung einen Lappen
mit durch Wasser verdünntem neutralem Waschmittel anfeuchten, ihngut auswringen, den Schmutz abwischen, und dann mit einem trockenen
Llappen nachwischen.
• Die Ansaug- oder Austrittsöffnungen weder der Innen- noch der Außenanlage blockieren oder abdecken. Große Möbelstücke unterhalb der Innenanlage oder massige Gegenstände wie Kisten, die in der Nähe der Außenanlage abgestellt sind, beeinträchtigen die Leistungsfähigkeit der
Anlage.
Warnung:
• Kein Wasser über die Anlage spritzen und die Anlage auch nicht mit nassen Händen berühren. Dies kann zu Stromschlägen führen.
• Kein brennbares Gas in der Nähe der Anlage versprühen. Es kann Feuer
DFEINLPGRRUTRGBGBGBGBGB
ausbrechen.
GB
• Keine Gasheizung oder sonstige Geräte mit offenen Flammen in Bereichen abstellen, an denen Luft aus der Anlage ausströmt. Unvollständige
Verbrennung kann die Folge sein.
Warnung:
• Wenn die Anlage läuft, nicht die Frontplatte oder den Gebläseschutz von
der Außenanlage abnehmen. Sie könnten sich verletzen, wenn Sie drehende, heiße oder unter Hochspannung stehende Teile berühren.
• Niemals die Finger, Stöcke etc. in die Ansaug- oder Austrittsöffnungen
stecken. Dies kann zu Verletzungen führen, da sich der Gebläseventilator
im Inneren der Anlage mit hoher Geschwindigkeit dreht. In Gegenwart
von Kindern besondere Vorsicht walten lassen.
• Wenn Sie merkwürdige Gerüche feststellen, sollten Sie die Anlage nicht
mehr benutzen, den Strom abschalten und sich an Ihren Kundendienst
wenden, da sonst schwere Defekte an der Anlage, ein Stromschlag oder
ein Brand verursacht werden können.
• Wenn das Geräusch oder die Vibrationen anders als normal oder besonders stark sind, den Betrieb einstellen, den Hauptschalter ausschalten,
und das Verkaufsgeschäft um Hilfe bitten.
• Nicht zu stark abkühlen. Die am besten geeignete Innentemperatur liegt
im Bereich von 5
• Behinderte oder Kinder sollten nicht im Luftstrom der Klimaanlage sitzen oder stehen. Dies könnte Gesundheitsprobleme mit sich bringen.
°C im Verhältnis zur Außentemperatur.
Vorsicht:
• Den Luftstrom nicht auf Pflanzen oder Tiere in Käfigen lenken.
• Den Raum häufig lüften. Wenn die Anlage dauernd über einen längeren
Zeitraum in einem geschlossenen Raum betrieben wird, wird die Luft
muffig.
Bei Störungen
Warnung:
• Bauen Sie niemals die Klimaanlage um. Wenden Sie sich für Reparatur
oder Wartung an Ihren Händler. Unsachgemäße Reparaturarbeit kann
Lecken von Wasser, elektrischen Schlag, Feuer usw. verursachen.
• Wenn die Fernbedienung einen Fehler anzeigt und Betrieb nicht möglich
ist oder wenn eine Störung auftritt, so stellen Sie den Betrieb ein und
wenden Sie sich an das Verkaufsgeschäft. Wenn keine Maßnahmen getroffen werden, kann es zu Feuer oder Beschädigung kommen.
• Wenn die Sicherung häufig ausgelöst wird, so wenden Sie sich an das
Verkaufsgeschäft. Weiterverwendung in diesem Zustand kann zu Feuer
oder Beschädigung führen.
• Wenn gasförmiges oder flüssiges Kühlmittel entweicht, die Klimaanlage
abstellen, den Raum ausreichend lüften und das Verkaufsgeschäft benachrichtigen. Wenn dies vernachlässigt wird, kann es zu Sauerstoffmangel kommen.
Bei Abstellung für lange Zeit
• Wenn die Klimaanlage längere Zeit nicht verwendet werden soll, z.B. nach
dem Ende der Kühlsaison, sie erst 4 – 5 Stunden im Kühlbetrieb laufen
lassen, um sie völlig auszutrocknen, da es sonst zu unhygienischer
Schimmelbildung und Beeinträchtigung der Gesundheit kommen kann.
• Wenn die Klimaanlage lange Zeit nicht verwendet wird, den [Hauptschalter] ausschalten (OFF).
Bei eingeschalteter Stromversorgung verbraucht das Gerät einige Watt
bis einige 10 Watt. Außerdem kann sich Staub ansammeln und eine Feuergefährdung bilden.
• Die Stromversorgung mindestens 12 Stunden vor Wiederaufnahme des
Betriebs einschalten. Während der Saison die Hauptstromversorgung
nicht ausschalten, da dies Unfälle verursachen kann.
• Wenn die Anlage im Winter längere Zeit nicht betrieben werden soll, das
Wasser aus den Wasserrohrleitungen ablassen, um Einfrieren zu verhindern.
1.3. Die Anlage entsorgen
Warnung:
Zum Entsorgen des Gerätes wenden Sie sich an Ihren Kundendienst. Wenn
Rohrleitungen unsachgemäß abgenommen werden, kann Kühlmittel (Fluorkohlenstoffgas) austreten, mit Ihrer Haut in Berührung kommen und Verletzungen hervorrufen. Kühlgas in die Atmosphäre ablassen führt auch zu
Umweltschäden.
2. Bedienung
2.1. Verwenden der Fernbedienung
So starten, stoppen, ändern Sie den Modus und stellen die Wassertemperatur ein
So starten Sie den Betrieb
1. Drücken Sie die Taste ON/OFF 1.
Die Lampe ON 1 und der Anzeigebereich erscheinen.
20
Hinweis:
• Wenn das Gerät neu gestartet wird, sind die Anfangseinstellungen wie folgt.
Fernbedienungseinstellungen
Modus
Temperatureinstellung
Letzte Einstellung
Letzte Einstellung
So stoppen Sie den Betrieb
1. Drücken Sie die Taste ON/OFF 1 erneut.
Die Lampe ON 1 und der Display-Bereich verschwinden.
Auswählen des Modus
1. Drücken Sie, während das Gerät läuft, die Taste Modus 2 so oft wie nötig.
• Mit jedem Drücken wird in den nächsten Modus in der unten dargestellten
Reihenfolge umgeschaltet.
Der aktuell ausgewählte Modus ist unter 2 dargestellt.
PWFY-P100VM-E-BU
Nur Warmwasser
PWFY-P100/P200VM-E-AU
Heizen → Kühlen
Page 21
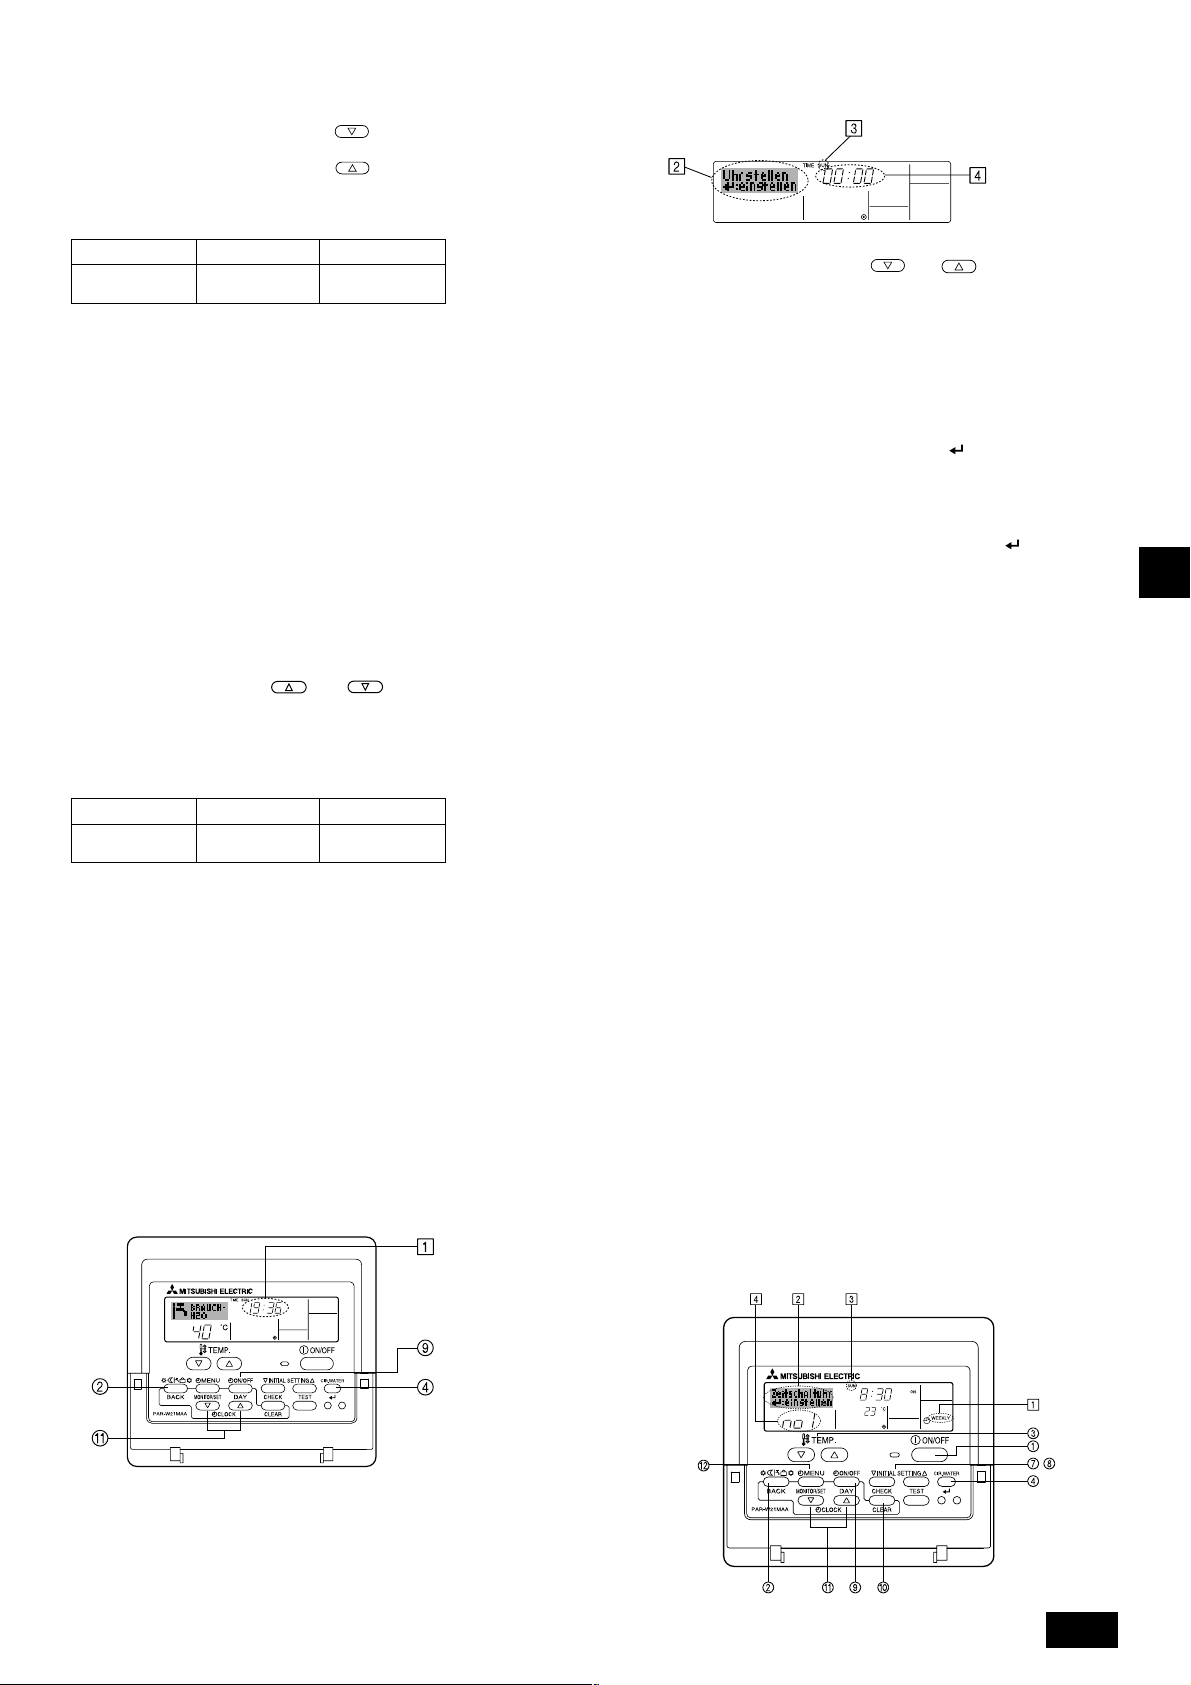
So ändern Sie die temperatureinstellung...
1. So verringern Sie die Temperatur: Drücken Sie die Taste Temperatur einstel-
2. So erhöhen Sie die Temperatur: Drücken Sie die Taste Temperatur einstel-
• Mit jedem Drücken ändert sich die Einstellung um 1 °C (1 °F). Die aktuelle
Einstellung wird unter 3 angezeigt.
• Die verfügbaren Bereiche sind wie folgt. *1,*2
Brauch H2O KühlungHeizen
30 °C - 70 °C
87 °F - 158 °F
Hinweis:
*1 Die verfügbaren Bereiche sind je nach Art des angeschlossenen Geräts ver-
schieden.
*2 Wenn Grenzen für den Temperaturbereich in der Funktionseinstellung einge-
stellt wurden, sind die verfügbaren Bereiche enger als oben dargestellt. Wenn
Sie versuchen, einen Wert außerhalb des eingeschränkten Bereichs einzustellen, wird eine Meldung angezeigt, dass der Bereich zur Zeit eingeschränkt ist.
Informationen darüber, wie Sie diese Bereichsgrenzen einstellen und löschen,
finden Sie in Abschnitt 3, Punkt [3]–2 (3).
*3 Falls die Funktionsauswahl so eingestellt ist, dass die Temperatur in Fahrenheit
angezeigt wird. Informationen darüber, wie Sie °C oder °F auswählen, finden Sie
in Abschnitt 3, Punkt [3]–4 (1).
30 °C - 45 °C
87 °F - 113 °F
len
len
3.
3.
10 °C - 30 °C
50 °F - 87 °F
So stellen Sie den Wochentag und die Zeit ein…
Einstellung des Wochentags
Zeit-Einstellung
1. Drücken Sie die Taste Zeit einstellen oder A, um 2 anzuzeigen.
2.
Drücken Sie die Taste TIMER ON/OFF (SET DAY) 9, um den Tag einzustellen.
* Mit jedem Drücken rückt die Anzeige unter 3 einen Tag vor : Sun → Mon →
... → Fri → Sat.
3. Drücken Sie die entsprechenden Taste Set Time A nach Bedarf, um die Zeit
einzustellen.
* Wenn Sie die Taste gedrückt halten, rückt die Zeit (unter 4) zuerst in Minuten-
intervallen vor, dann in Zehn-Minuten-Intervallen und dann in Ein-StundenIntervallen.
4. Nachdem Sie die entsprechenden Einstellungen unter Schritt 2 und 3 durchgeführt haben, drücken Sie die Taste CIR.WATER
chern.
Hinweis:
Ihre neuen Einträge unter Schritt 2 und 3 werden storniert, wenn Sie die Taste
Modus (Wieder) 2 drücken, bevor Sie die Taste CIR.WATER
4 um die Werte zu spei-
4 drücken.
2.2. Wassertemperatureinstellung
Zum Ändern der Wassertemperatur
Die Taste
ratur nach Wunsch einstellen.
Durch einmaliges Drücken von
geändert.
Wenn weiter gedrückt wird, wird die Einstellung weiter in Schritten von 1 °C geändert.
• Die Innentemperatur kann innerhalb des folgenden Temperaturbereichs ein-
• Es ist unmöglich, die Wassertemperatur nach Einlass-Wassertemp. oder
* Der Bereich der Wassertemperaturanzeige ist 0 °C bis 100 °C. Außerhalb die-
2.3.
Verwenden Sie diesen Bildschirm um den aktuellen Wochentag und die Zeiteinstellung zu ändern.
Hinweis:
Der Tag und die Zeit erscheinen nicht, wenn die Uhr in der Funktionsauswahl
deaktiviert wurde.
11
1 [Wassertemperatureinstellung] drücken, und die Wassertempe-
11
oder wird die Einstellung um 1 °C
gestellt werden.
Brauch H2O KühlungHeizen
30 °C - 70 °C
87 °F - 158 °F
Auslass-Wassertemp. einzustellen.
ses Bereichs blinkt im Display die Angabe 0 °C oder 100 °C, um Sie darauf
hinzuweisen, dass die Wassertemperatur je nach der angezeigten Temperatur
höher oder niedriger ist.
30 °C - 45 °C
87 °F - 113 °F
10 °C - 30 °C
50 °F - 87 °F
Einstellen des Wochentags und der Zeit
Anzeige des Wochentags und der
Zeit
5. Drücken Sie die Taste Modus (Wieder) 2, um den Einstellvorgang abzuschlie-
ßen. Die Anzeige kehrt zum Standardkontrollbildschirm zurück, auf dem 1
jetzt die neue Einstellung für den Tag und die Zeit erscheint.
2.4. Verwenden des Timers
Dieser Abschnitt erklärt, wie Sie den Timer einstellen und verwenden. Sie können
die Funktionsauswahl verwenden, um auszuwählen, welchen der drei Timer Sie
verwenden möchten: 1 Wöchentlicher Timer, 2 Einfacher Timer oder 3 Auto-OffTimer.
Informationen darüber, wie Sie die Funktionsauswahl einstellen, finden Sie in
Abschnitt 3, Punkt [3]–3 (3).
Verwenden des wöchentlichen Timers
1. Der wöchentliche Timer kann verwendet werden, um bis zu sechs Betriebsarten für jeden Tag der Woche einzustellen.
• Jede Betriebsart kann aus Folgendem bestehen: ON/OFF-Zeit zusammen
mit einer Temperatureinstellung oder nur ON/OFF-Zeit oder nur Temperatureinstellung.
• Wenn die aktuelle Zeit eine vom Timer eingestellte Zeit erreicht, führt die
Anlage die vom Timer eingestellte Aktion durch.
2. Die Einteilung der Zeiteinstellung für diesen Timer ist 1 Minute.
Hinweis:
*1. Der wöchentliche Timer/einfache Timer/Auto-Off-Timer können nicht gleich-
zeitig eingestellt werden.
*2. Der wöchentliche Timer funktioniert nicht, wenn eine der folgenden Bedingun-
gen wirksam ist.
Die Timerfunktion ist ausgeschaltet; das System befindet sich in einem
unnormalen Zustand; ein Testlauf wird durchgeführt; die Fernbedienung führt
einen Selbstcheck oder einen Fernbedienungscheck durch; der Benutzer stellt
gerade eine Funktion ein; der Benutzer stellt gerade einen Timer ein; der
Benutzer stellt gerade den aktuellen Wochentag oder die Zeit ein; das System
wird zentral gesteuert. (Das System führt insbesondere dann keine Betriebsarten durch (Gerät ein, Gerät aus oder Temperatureinstellung), die während
diesen Bedingungen deaktiviert sind.)
Betriebsart Nr.
DFEINLPGRRUTRGBGBGBGBGB
GB
21
Page 22
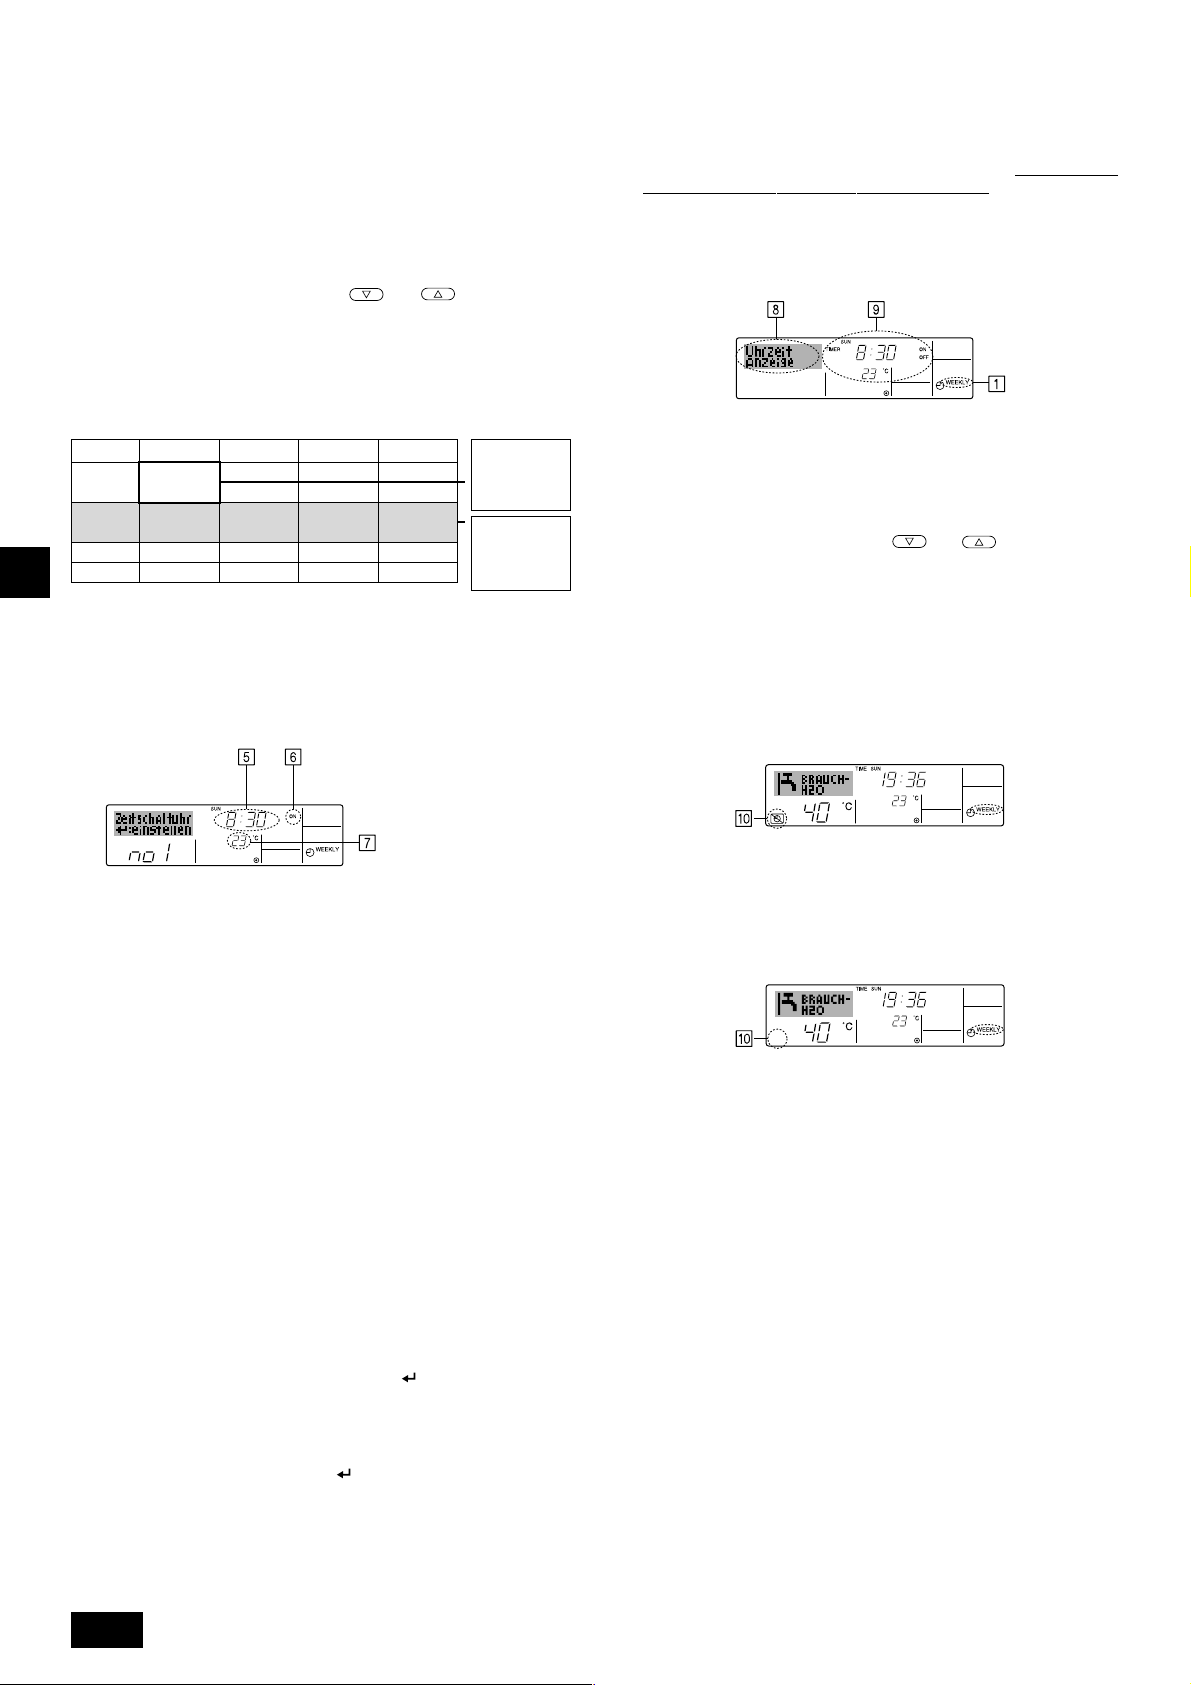
So stellen Sie den wöchentlichen Timer ein
1. Achten Sie darauf, dass Sie sich im Standardkontrollbildschirm befinden und
dass die Anzeige für den wöchentlichen Timer 1 auf dem Display angezeigt
wird.
2. Drücken Sie die Taste TIMER MENU B, so dass “Set Up” auf dem Bildschirm
erscheint (unter 2). (Beachten Sie, dass mit jedem Tastendruck die Anzeige
zwischen“Set Up” und “Monitor” umgeschaltet wird.)
3. Drücken Sie die Taste TIMER ON/OFF (SET DAY) 9, um den Tag einzustel-
len. Mit jedem Drücken geht die Anzeige unter 3 zur nächsten Einstellung in
der folgenden Reihenfolge: “Sun Mon Tues Wed Thurs Fri Sat” → “Sun” → ... →
“Fri” → “Sat” → “Sun Mon Tues Wed Thurs Fri Sat”...
4. Drücken Sie die Taste INITIAL SETTING
wie nötig, um die entsprechende Betriebsnummer auszuwählen (1 bis 6) 4.
* Mit Ihren Eingaben unter Schritt 3 und 4 wählen Sie eine der Zellen aus der
unten dargestellten Matrix.
(Die Fernbedienungsanzeige auf der linken Seite zeigt, wie das Display aussieht, wenn Betrieb 1 für Sonntag auf die unten angegebenen Werte eingestellt ist.)
Setup-Matrix
Betr.-Nr. Sunday Monday … Saturday
• 8:30
•ON
No. 1
•
23 °C (73 °F)
DFEINLPGRRUTRGBGBGBGBGB
GB
No. 2
…
No. 6
Hinweis:
• 10:00
• OFF
• 10:00
• OFF
• 10:00
• OFF
Durch Einstellen des Tags auf “Sun Mon Tues Wed Thurs Fri Sat”, können Sie
festlegen, dass derselbe Betrieb jeden Tag zur selben Zeit durchgeführt wird.
(Beispiel: Betrieb 2 oben, der für jeden Tag der Woche gleich ist.)
oder (7 oder 8) so oft
<Einstellungen von Betrieb
1 für Sonntag>
▲
Die Anlage um 8.30 Uhr
mit auf 23 °C (73 °F) eingestellter Temperatur starten.
• 10:00
• OFF
▲
<Einstellung von
Betrieb 2 für jeden
Tag>
Die Anlage um 10.00
Uhr ausschalten.
10. Wiederholen Sie die Schritte 3 bis 8 nach Bedarf, um so viele der verfügbaren
Zellen auszufüllen, wie Sie möchten.
11. Drücken Sie die Taste Modus (Wieder) 2, um zum Standardkontrollbildschirm
zurückzukehren und den Einstellvorgang zu beenden.
12. Um den Timer zu aktivieren, drücken Sie die Taste TIMER ON/OFF 9, so
dass die Anzeige “Timer Off” vom Bildschirm verschwindet.
Achten Sie dar-
auf, dass die Anzeige “Timer Off” verschwunden ist.
* Wenn es keine Timer-Einstellungen gibt, blinkt die Anzeige “Timer Off” auf
dem Bildschirm.
So zeigen Sie den wöchentlichen Timer an
Timer-Einstellungen
1. Achten Sie darauf, dass die wöchentliche Timer-Anzeige auf dem Bildschirm sichtbar ist (unter 1).
2. Drücken Sie die Taste TIMER MENU B, so dass “Monitor” auf dem Bildschirm erscheint (unter 8).
3. Drücken Sie die Taste TIMER ON/OFF (SET DAY) 9 so oft wie nötig, um
den Tag einzustellen, den Sie anzeigen möchten.
4. Drücken Sie die Taste INITIAL SETTING
oft wie nötig, um den auf dem Display angezeigten Timer-Betrieb zu ändern (unter 9).
* Mit jedem Drücken gelangen Sie zur nächsten Timer-Betriebsart in der
Reihenfolge der Zeiteinstellung.
5. Um den Monitor zu schließen und zum Standardkontrollbildschirm zurückzukehren, drücken Sie die Taste Modus (Wieder) 2.
oder (7 oder 8) so
Einstellen des wöchentlichen Timers
Zeigt die Zeiteinstellung
5. Drücken Sie die entsprechende Taste Set Time A so oft wie nötig, um die
gewünschte Zeit einzustellen (unter 5).
* Wenn Sie die Taste gedrückt halten, rückt die Zeit zuerst in Minutenintervallen,
dann in Zehn-Minuten-Intervallen und dann in Ein-Stunden-Intervallen vor.
6. Drücken Sie die Taste ON/OFF 1, um die gewünschte Betriebsart auszuwäh-
len (ON oder OFF) unter 6.
* Jedes Drücken ändert die nächste Einstellung in der folgenden Reihenfolge:
keine Anzeige (keine Einstellung) → “ON” → “OFF”.
7. Drücken Sie die Taste Temperatur einstellen 3, um die gewünschte Temperatur einzustellen (unter 7).
* Jedes Drücken ändert die Einstellung in der folgenden Reihenfolge: keine
Anzeige (keine Einstellung) ⇔ 5 (41) ⇔ 6 (43) ⇔ ... ⇔ 89 (192) ⇔ 90 (194)
⇔ keine Anzeige.
(Verfügbarer Bereich: Der Bereich für die Einstellung ist 5 °C (41 °F) bis 90 °C
(194 °F). Der tatsächliche Bereich, über den die Temperatur gesteuert werden
kann, variiert jedoch entsprechend des Typs des angeschlossenen Geräts.)
8. Um die aktuell eingestellten Werte für den ausgewählten Betrieb einzustellen,
drücken Sie die Taste CHECK (CLEAR) 0 einmal kurz.
* Die angezeigte Zeiteinstellung ändert sich zu “—:—” und die ON/OFF- und
Temperatureinstellungen verschwinden.
(Um alle wöchentlichen Timer-Einstellungen gleichzeitig zu löschen, halten
Sie die Taste CHECK (CLEAR) 0 mindestens zwei Sekunden lang gedrückt.
Das Display beginnt zu blinken, wodurch angezeigt wird, dass alle Einstellungen gelöscht wurden.)
9. Nachdem Sie die entsprechenden Einstellungen unter Schritt 5, 6 und 7 durchgeführt haben, drücken Sie die Taste CIR.WATER
chern.
Hinweis:
Ihre neuen Einträge werden storniert, wenn Sie die Taste Modus (Wieder) 2
drücken, bevor Sie die Taste CIR.WATER
Wenn Sie zwei oder mehr unterschiedliche Betriebsarten für genau dieselbe Zeit
eingestellt haben, wird nur die Betriebsart mit der höchsten Betriebsart-Nr. ausgeführt.
Zeigt die ausgewählte Betriebsart an (ON
oder OFF)
* Erscheint nicht, wenn die Betriebsart nicht eingestellt ist.
Zeigt die Temperatureinstellung an
*
Erscheint nicht, wenn die Temperatur nicht eingestellt ist.
4 um die Werte zu spei-
4 drücken. .
So schalten Sie den wöchentlichen Timer aus
Drücken Sie die Taste TIMER ON/OFF 9, so dass “Timer Off” unter 0 erscheint.
So schalten Sie den wöchentlichen Timer ein
Drücken Sie die Taste TIMER ON/OFF 9, so dass die Anzeige “Timer Off” (unter
0) verschwindet.
Verwenden des einfachen Timers
1. Sie haben drei Möglichkeiten, den einfachen Timer einzustellen.
• Nur Startzeit : Die Anlage startet, wenn die eingestellte Zeit vergangen ist.
• Nur Stopzeit : Die Anlage stoppt, wenn die eingestellte Zeit vergangen ist.
• Start- und Stopzeiten : Die Anlage star tet und stoppt, wenn die entsprechenden Zeiten vergangen sind.
2. Der einfache Timer (Start und Stop) kann nur einmal innerhalb eines Zeitraums von 72 Stunden eingestellt werden. Die Zeiteinstellung erfolgt in Stunden-Schritten.
Hinweis:
*1. Der wöchentliche Timer/einfache Timer/Auto-Off-Timer können nicht gleich-
zeitig eingestellt werden.
*2. Der einfache Timer funktioniert nicht, wenn eine der folgenden Bedingungen
wirksam ist:
Die Timerfunktion ist ausgeschaltet; das System befindet sich in einem
unnormalen Zustand; ein Testlauf wird durchgeführt; die Fernbedienung führt
einen Selbstcheck oder eine Diagnose durch; der Benutzer wählt gerade eine
Funktion aus; der Benutzer stellt gerade den Timer ein; das System wird zentral
gesteuert. (Unter diesen Bedingungen ist der ON/OFF-Betrieb deaktiviert.)
22
Page 23
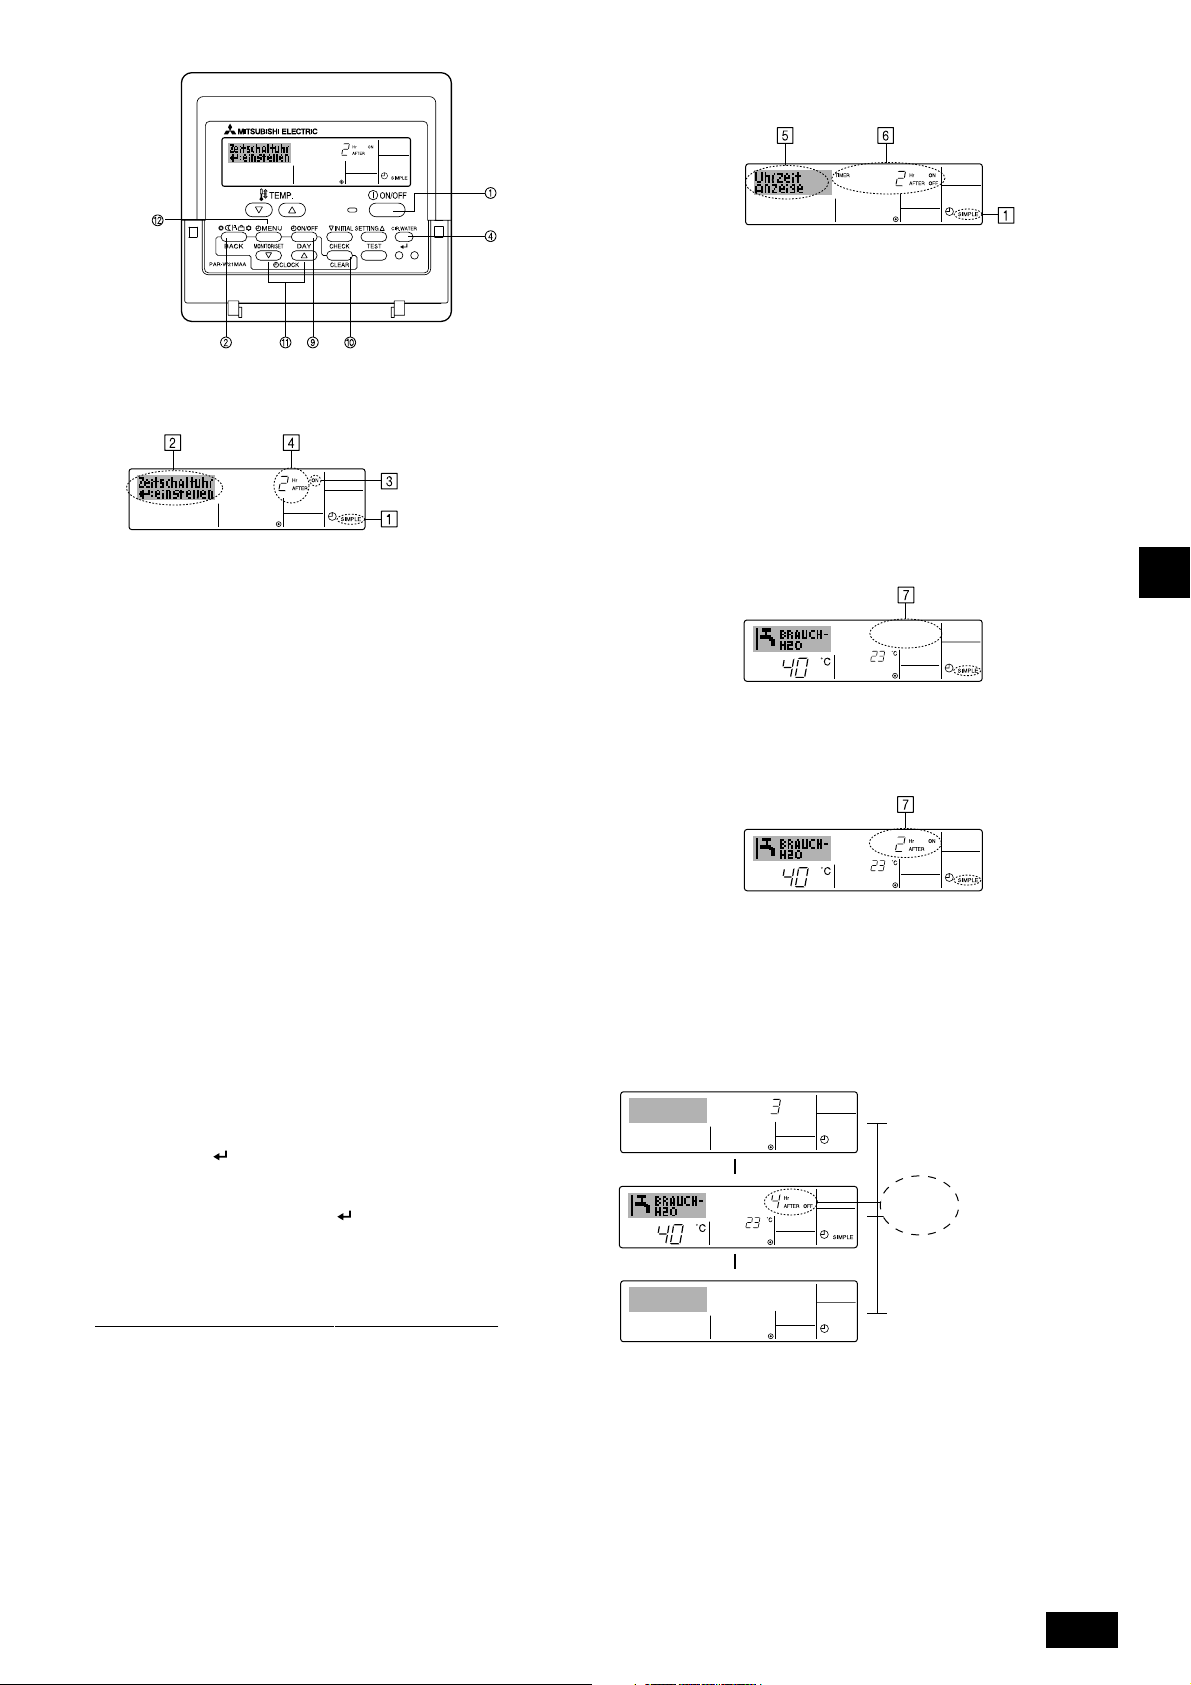
ONHr
AFTER
SIMPLE
SIMPLE
So stellen Sie den einfachen Timer ein
Timer-Einstellung
Aktion (ON oder OFF)
* “— —” wird angezeigt, wenn
es keine Einstellung gibt.
1.
Achten Sie darauf, dass Sie sich im Standardkontrollbildschirm befinden und dass
die Anzeige des einfachen Timers auf dem Display angezeigt wird (unter 1).
Wenn etwas anderes als der einfache Timer angezeigt wird, stellen Sie den
SIMPLE TIMER mit Hilfe der Timer-Funktionseinstellung der Funktionsauswahl
ein (siehe 3.[3]–3 (3)).
2. Drücken Sie die Taste TIMER MENU B, so dass “Set Up” auf dem Bildschirm
erscheint (unter 2). (Beachten Sie, dass mit jedem Tastendruck die Anzeige
zwischen “Set Up” und “Monitor” umgeschaltet wird.)
3. Drücken Sie die Taste ON/OFF 1, um die aktuelle ON- oder OFF-Einstellung
des einfachen Timers anzuzeigen. Drücken Sie die Taste einmal, um die restliche Zeit unter ON anzuzeigen, und dann noch einmal, um die restliche Zeit
unter OFF anzuzeigen. (Die Anzeige ON/OFF erscheint unter 4.)
•“ON”-Timer: Die Anlage star tet den Betrieb, wenn die angegebene An-
•“OFF”-Timer: Die Anlage stoppt den Betrieb, wenn die angegebene An-
4. Wenn “ON” oder “OFF” unter 3 angezeigt wird: Drücken Sie die entsprechen-
de Taste Zeit einstellen A so oft wie nötig, um die Stunden auf ON (falls “ON”
angezeigt wird) oder die Stunden auf OFF (falls “OFF” angezeigt wird) unter 4
einzustellen.
• Verfügbarer Bereich: 1 bis 72 Stunden
5. Um sowohl die Zeiten für ON als auch für OFF einzustellen, wiederholen Sie
die Schritte 3 und 4.
* Beachten Sie, dass die OFF- und ON-Zeiten nicht auf denselben Wert einge-
stellt werden können.
6. So löschen Sie die aktuelle ON- oder OFF-Einstellung: Zeigen Sie die ON-
oder OFF-Einstellung (siehe Schritt 3) an und drücken Sie dann die Taste
CHECK (CLEAR) 0, so dass die Zeiteinstellung zu “—” unter 4 zurückkehrt.
(Wenn Sie nur eine ON-Einstellung oder nur eine OFF-Einstellung verwenden
wollen, achten Sie darauf, dass die Einstellung, die Sie nicht verwenden möchten, als “—” angezeigt wird.)
7. Nach Durchführung der oben angegebenen Schritte 3 bis 6 drücken Sie die
Taste CIR.WATER
Hinweis:
Ihre neuen Einstellungen werden storniert, wenn Sie die Taste Modus (Wieder) 2
drücken, bevor Sie die Taste CIR.WATER
8. Drücken Sie die Taste Modus (Wieder) 2, um zum Standardkontrollbildschirm
zurückzukehren.
9. Drücken Sie die Taste TIMER ON/OFF 9, um den Timer-Countdown zu star-
ten. Wenn der Timer läuft, wird der Timer-Wert auf dem Display angezeigt.
Achten Sie darauf, ob der Timer-Wert sichtbar und richtig ist.
zahl Stunden vergangen ist.
zahl Stunden vergangen ist.
4, um den Wert zu speichern.
4 drücken.
Anzeigen der aktuellen Einstellungen des einfachen Timers
Timer-Einstellung
1. Achten Sie darauf, dass die Anzeige des einfachen Timers auf dem Bildschirm
sichtbar ist (unter 1).
2. Drücken Sie die Taste TIMER MENU B, so dass “Monitor” auf dem Bildschirm
erscheint (unter 5).
• Falls der einfache ON- oder OFF-Timer läuft, erscheint der aktuelle TimerWert unter 6.
• Falls die ON- und OFF-Werte beide eingestellt wurden, erscheinen beide
Werte abwechselnd.
3. Drücken Sie die Taste Modus (Wieder) 2, um die Monitoranzeige zu schlie-
ßen und zum Standardkontrollbildschirm zurückzukehren.
So schalten Sie den einfachen Timer aus...
Drücken Sie die Taste TIMER ON/OFF 9, so dass die Timer-Einstellung nicht
mehr auf dem Bildschirm erscheint (unter 7).
So starten Sie den einfachen Timer...
Drücken Sie die Taste TIMER ON/OFF 9, so dass die Timer-Einstellungen unter
7 sichtbar sind.
Beispiele
Falls die ON- und OFF-Zeiten beide im einfachen Timer eingestellt wurden, werden
der Betrieb und die Anzeige wie unten dargestellt.
Beispiel 1:
Starten Sie den Timer, wobei die ON-Zeit früher als die OFF-Zeit eingestellt ist.
ON-Einstellung: 3 Stunden
OFF-Einstellung: 7 Stunden
Beim
Timer-
▲
Start
3 Stunden
nach dem
Timer-Start
▲
7 Stunden
nach dem
Timer-Start
Das Display zeigt die ONEinstellung des Timers
(Stunden bleiben ON).
Die Anzeige wechselt zur Anzeige der OFF-Einstellung des
Timers (Stunden bleiben OFF).
Die angezeigte Zeit entspricht der Einstellung OFF
(7 Stunden) – Einstellung ON
(3 Stunden) = 4 Stunden.
Die Anlage schaltet sich aus
und bleibt aus, bis sie von jemandem erneut gestartet wird.
DFEINLPGRRUTRGBGBGBGBGB
GB
23
Page 24
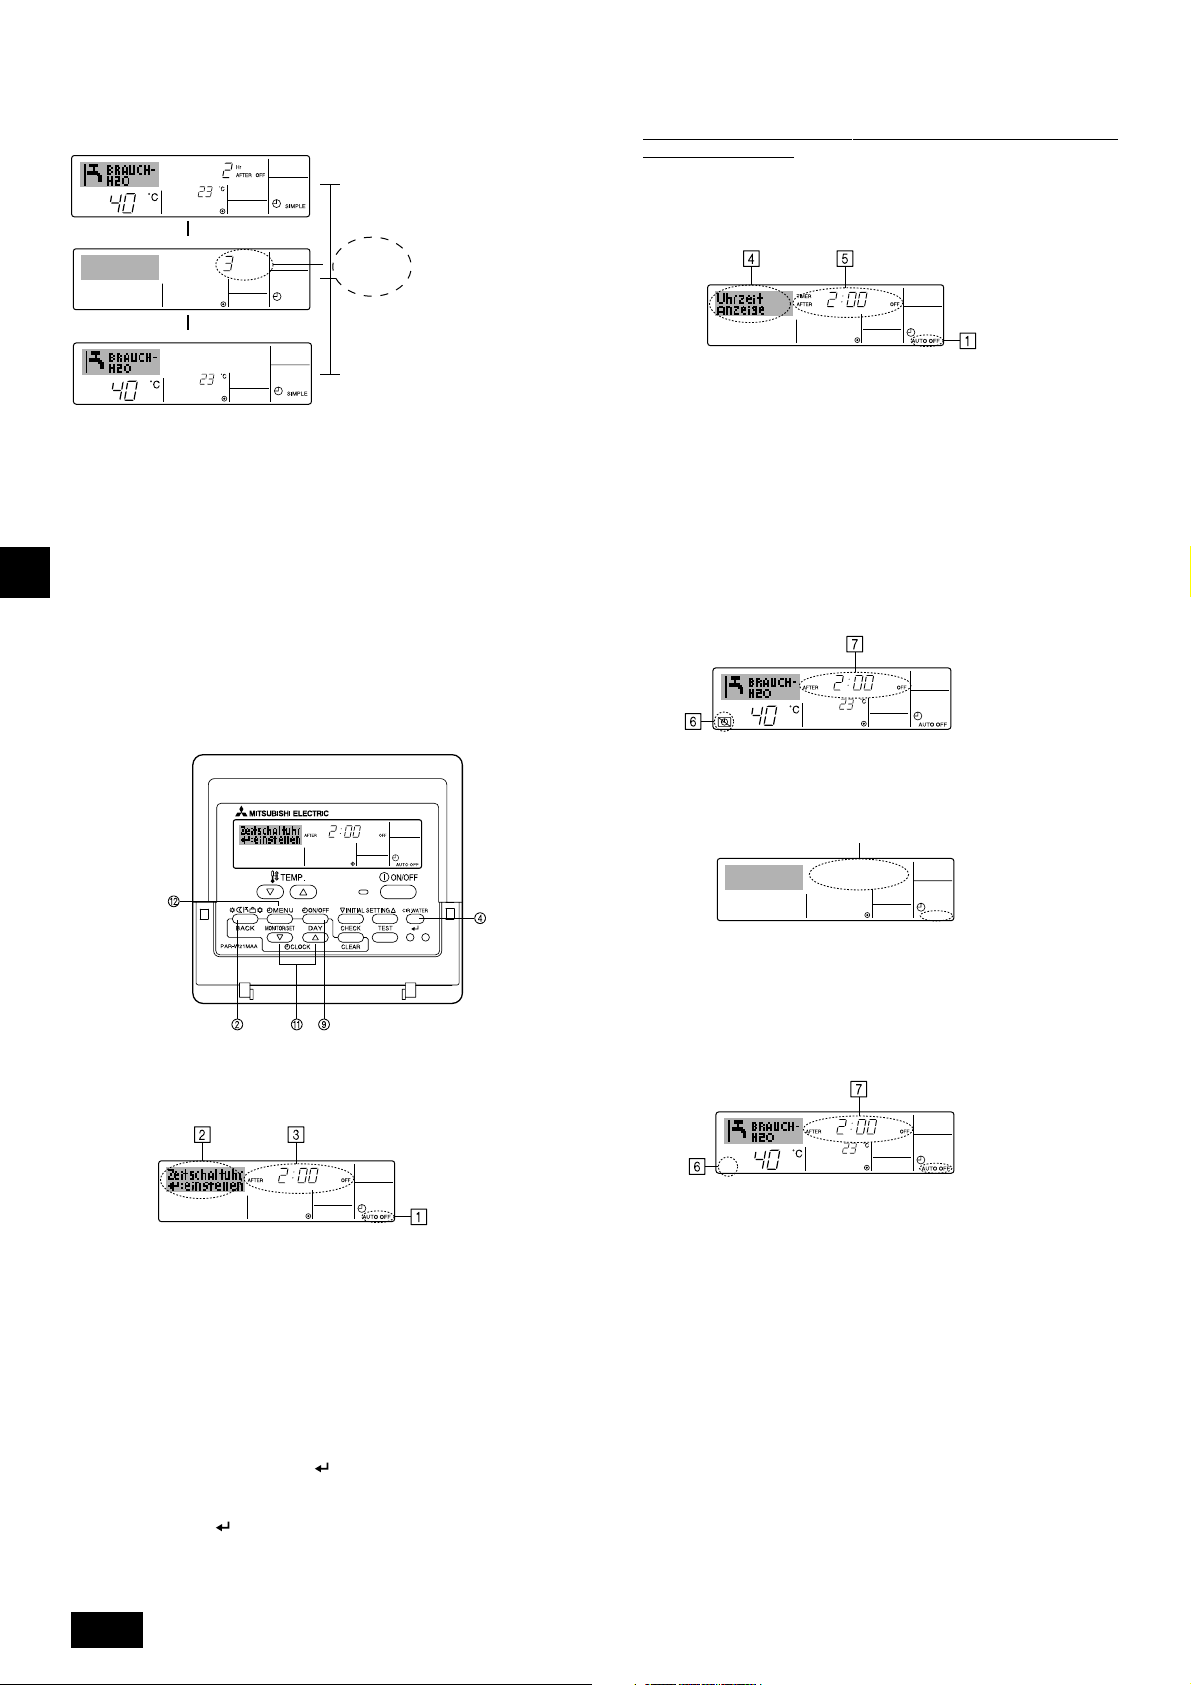
AUTO OFF
7
Beispiel 2:
Starten Sie den Timer, wobei die OFF-Zeit vor der ON-Zeit liegt.
ON-Einstellung: 5 Stunden
OFF-Einstellung: 2 Stunden
Beim
Timer-
▲
ONHr
AFTER
SIMPLE
Start
2 Stunden
nach dem
Timer-Start
▲
5 Stunden
nach dem
Timer-Start
Das Display zeigt die OFFEinstellung des Timers
(Stunden bleiben OFF).
Das Display wechselt zur Anzeige der ON-Einstellung des
Timers (Stunden bleiben ON).
Die angezeigte Zeit entspricht
der Einstellung ON (5 Stunden) – Einstellung OFF (2
Stunden) = 3 Stunden.
Die Anlage schaltet sich ein
und läuft weiter, bis sie jemand ausschaltet.
Verwenden des Auto-Off-Timers
1. Dieser Timer beginnt den Countdown, wenn die Anlage startet, und schaltet
die Anlage aus, wenn die eingestellte Zeit abgelaufen ist.
2. Die verfügbaren Einstellungen gehen in 30-Minuten-Intervallen von 30 Minu-
ten bis zu 4 Stunden.
Hinweis:
DFEINLPGRRUTRGBGBGBGBGB
*1. Der wöchentliche Timer/einfache Timer/Auto-Off-Timer können nicht gleich-
zeitig eingestellt werden.
GB
*2. Der Auto-Off-Timer funktioniert nicht, wenn eine der folgenden Bedingungen
wirksam ist:
Die Timerfunktion ist ausgeschaltet; das System befindet sich in einem
unnormalen Zustand; ein Testlauf wird durchgeführt; die Fernbedienung führt
einen Selbstcheck oder eine Diagnose durch; der Benutzer wählt gerade eine
Funktion aus; der Benutzer stellt gerade den Timer ein; das System wird zentral
gesteuert. (Unter diesen Bedingungen ist der ON/OFF-Betrieb deaktiviert.)
5. Drücken Sie die Taste Modus (Wieder) 2, um den Einstellvorgang zu been-
den und zum Standardkontrollbildschirm zurückzukehren.
6. Falls die Anlage bereits läuft, beginnt der Timer sofort mit dem Countdown.
Achten Sie darauf, zu überprüfen, ob die Timer-Einstellung richtig auf
dem Display erscheint.
Überprüfen der aktuellen Einstellung des Auto-OffTimers
1. Achten Sie darauf, dass “Auto Off” auf dem Bildschirm sichtbar ist (unter 1).
2. Halten Sie die Taste TIMER MENU B 3 Sekunden lang gedrückt, so dass
“Monitor” auf dem Bildschirm angegeben wird (unter 4).
• Der Timer, der noch beendet werden muß, erscheint unter
3. Um den Monitor zu schließen und zum Standardkontrollbildschirm zurückzu-
kehren, drücken Sie die Taste Modus (Wieder) 2.
Timer-Einstellung
55
5.
55
So schalten Sie den Auto-Off-Timer aus...
• Halten Sie die Taste TIMER ON/OFF 9 3 Sekunden lang gedrückt, so dass
“Timer Off” erscheint (unter 6) und der Timer-Wert (unter 7) verschwindet.
So stellen Sie den Auto-Off-Timer ein
Timer-Einstellung
1. Achten Sie darauf, dass Sie sich im Standardkontrollbildschirm befinden und
dass die Anzeige “Auto Off Timer” auf dem Display angezeigt wird (unter 1).
Wenn etwas anderes als der Auto-Off-Timer angezeigt wird, stellen Sie den
AUTO-OFF- TIMER mit Hilfe der Timer-Funktionseinstellung der Funktionsauswahl ein (siehe 3.[3]–3 (3)).
2. Halten Sie die Taste TIMER MENU B 3 Sekunden lang gedrückt, so dass
“Set Up” auf dem Bildschirm erscheint (unter 2).
(Beachten Sie, dass mit jedem Tastendruck die Anzeige zwischen “Set Up”
und “Monitor” umgeschaltet wird.)
3. Drücken Sie die entsprechende Taste Zeit einstellen A so oft wie nötig, um die
OFF-Zeit einzustellen (unter 3).
4. Drücken Sie die Taste CIR.WATER
Hinweis:
Ihr Eintrag wird storniert, wenn Sie die Taste Modus (Wieder) 2 drücken, bevor Sie
die Taste CIR.WATER
4 drücken.
4, um die Einstellung zu speichern.
• Oder schalten Sie die Klimaanlage selbst aus. Der Timer-Wert (unter 7)
verschwindet vom Bildschirm.
So starten Sie den Auto-Off-Timer...
• Halten Sie die Taste TIMER ON/OFF 9 3 Sekunden lang gedrückt. Die Anzeige
“Timer Off” erscheint (unter 6) und die Timer-Einstellung erscheint auf dem
Display (unter 7).
• Oder schalten Sie die Anlage ein. Der Timer-Wert erscheint unter 7.
24
Page 25
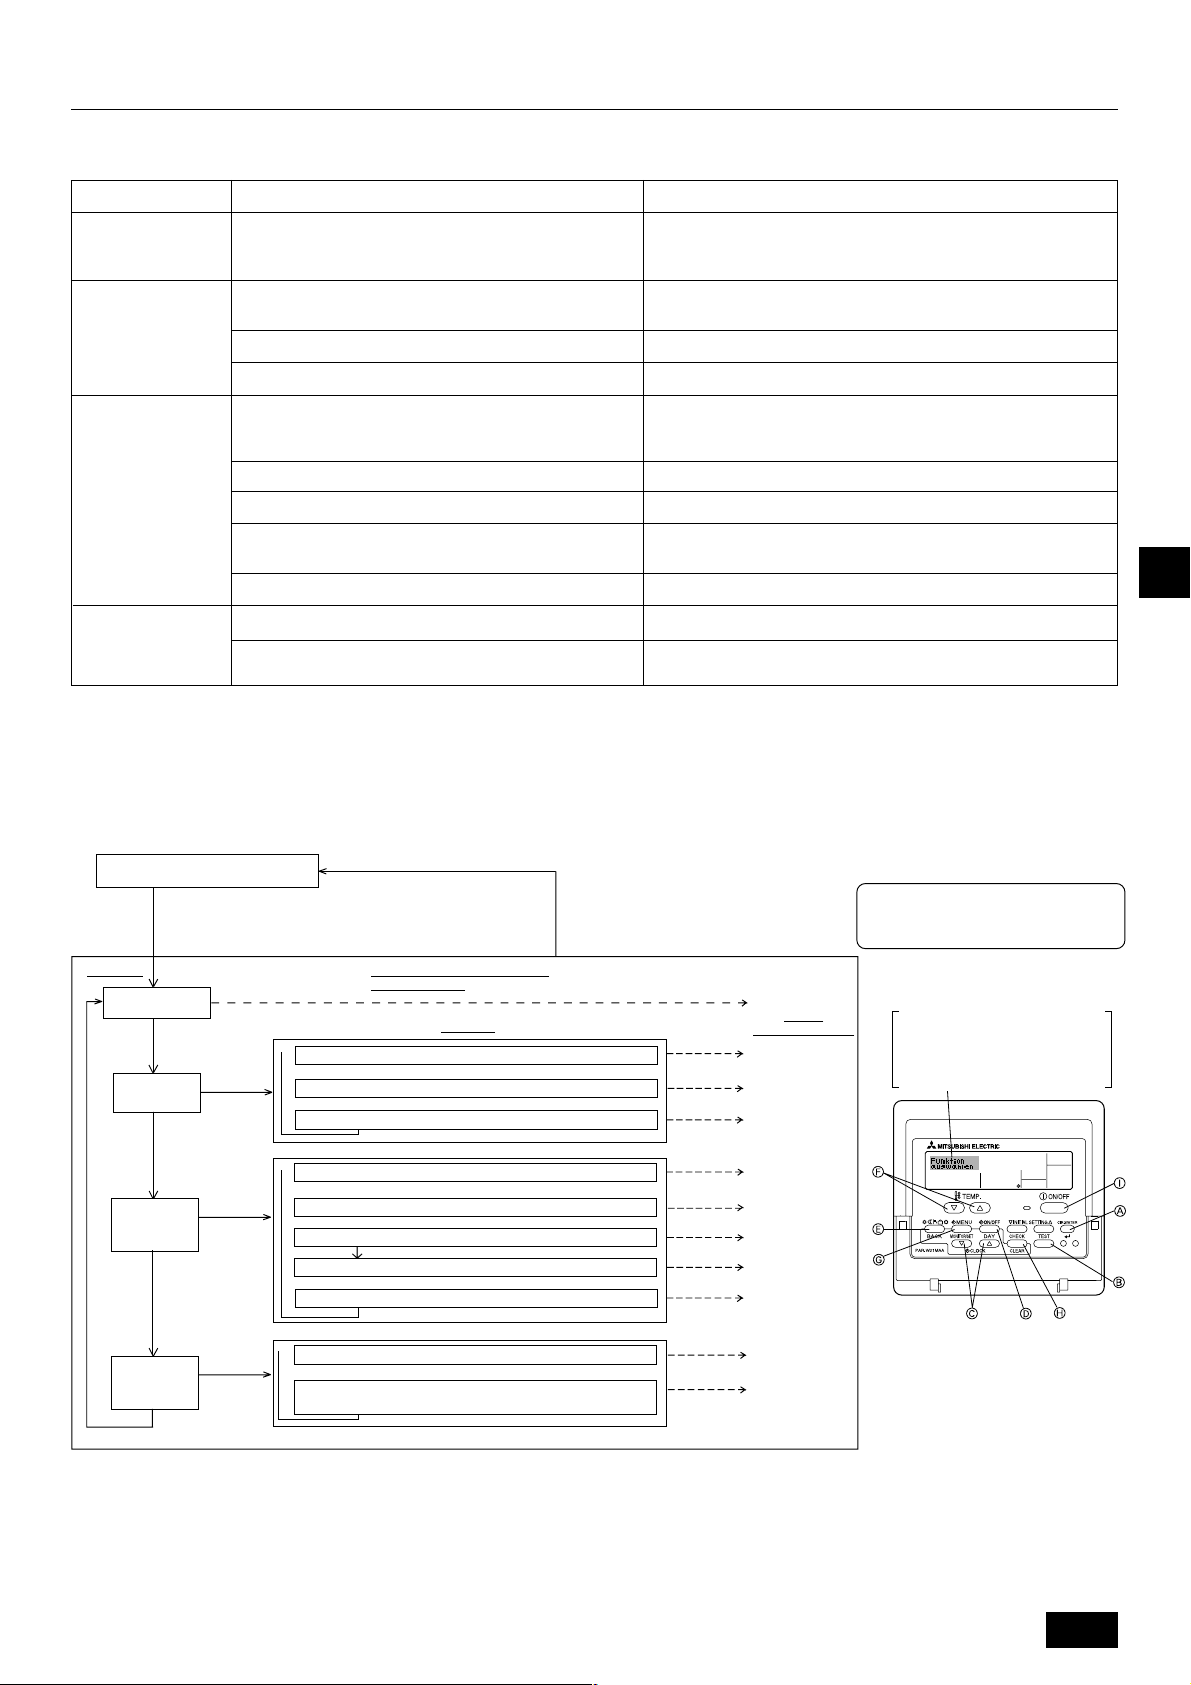
3. Funktionsauswahl
Funktionsauswahl an der Fernbedienung
Die Einstellung der folgenden Fernbedienungsfunktionen kann mit dem Auswahlmodus der Fernbedienungsfunktion geändert werden. Ändern Sie die Einstellung nach Bedarf.
Eintrag 1
1. Sprache ändern
(“CHANGE
LANGUAGE”)
2. Funktionsgrenzen
(“Funktion
auswahlen”)
3. Auswahl der
Betriebsart
(“Betriebsart
wahlen”)
4. Änderung der
Anzeige (“Anzeige
betriebsart”)
Einstellung der angezeigten Sprache
(1) Einstellung der Funktionsgrenzen bei der Bedienung
(Operation Lock) (“Sperr-Funktion”)
(2)
Überspringen der Betriebsarten-Einstellung (“AUSWAHL BETRIEBSART”)
(3) Einstellung der Temperaturgrenzen (“Limit Temp Funktion”)
(1) Haupt-/Nebenfunktion der Fernbedienung (“Haupt/Neben
controller”)
(2) Benutzung der Uhreinstellung (“Uhr”)
(3) Einstellung der Timer-Funktion (“Wochenzeit schalt uhr”)
(4) Kontaktnummer für den Fall von Fehlfunktionen (“CALL.”)
(5) Einstellung des Temperaturoffsets (“SET T FUNKTION”)
(1) Temperatureinstellung in °C/°F (“Wechsel °C/°F”)
(2) Einstellung der Anzeige der Wasseransaugtemperatur
(“H2O-TEMP. DISP WAHL”)
Eintrag 2
Eintrag 3 (Inhalt der Einstellungen)
• Anzeige in mehreren Sprachen ist möglich
• Einstellung der Funktionsgrenzen bei der Bedienung (Operation Lock)
Einstellung der Verwendung oder Nichtverwendung einer jeden Betriebsart
•
• Einstellung des Temperaturbereichs (Maximum, Minimum)
• Auswahl der Funktion als Haupt-/Nebenfernbedienung
* Wenn zwei Fernbedienungen in einer Gruppe angeschlossen sind,
muss eine der beiden als Nebengerät arbeiten.
• Einstellung, ob die Zeitfunktionen benutzt werden oder nicht
• Einstellen des Timer-Typs
• Anzeige der Kontaktnummer für den Fall von Fehlfunktionen
• Einstellen der Telefonnummer
•
Verwendung oder Nichtverwendung der Einstellung des Reduzierungswerts
• Einstellen der Temperatureinheit der Anzeige (°C oder °F)
• Einstellung, ob die Temperatur der (angesaugten) Innenluft angezeigt
wird oder nicht
Flussdiagramm der Funktionsauswahl
[1] Stoppen Sie die Anlage, um den Funktionsauswahlmodus der Fernbedienung zu starten → [2] Wählen Sie aus Eintrag 1 aus. → [3] Wählen Sie aus Eintrag 2 aus. →
[4] Nehmen Sie die Einstellung vor. (Einzelheiten werden in Eintrag 3 angegeben) → [5] Einstellung abgeschlossen. → [6] Umschaltung der Anzeige auf Normalbetrieb.
(Ende)
DFEINLPGRRUTRGBGBGBGBGB
GB
Normalbetriebsanzeige (Anzeige
bei deaktivierter Anlage)
(Halten Sie die Taste E gedrückt und drücken Sie Taste D
zwei Sekunden lang.)
* Die Anzeige lässt sich während des Testlaufs und der
Selbstdiagnose nicht ändern.
Eintrag 1 Funktionsauswahlmodus der
Sprache ändern
(“CHANGE LANGUAGE”)
Funktionsgrenzen
(“Funktion
auswahlen”)
Drücken Sie
Taste E.
Auswahl der
Betriebsart
(“Betriebsart
wahlen”)
Änderung der
Anzeige
(“Anzeige
betriebsart”)
Drücken Sie Taste G.
Drücken Sie
Taste E.
Drücken Sie
Taste G.
Drücken Sie
Taste E.
Drücken Sie
Taste G.
Drücken Sie
Taste E.
Drücken Sie
Taste G.
→
Einstellung der Funktionsgrenzen bei der Bedienung (“Sperr-Funktion”)
Überspringen der Betriebsarten-Einstellung (“AUSWAHL BETRIEBSART”)
Einstellung der Temperaturgrenzen (“Limit Temp Funktion”)
→
Haupt-/Nebenfunktion der Fernbedienung (“Haupt/Neben controller”)
Benutzung der Uhreinstellung (“Uhr”)
Einstellung der Timer-Funktion (“Wochenzeit schalt uhr”)
Kontaktnummer für den Fall von Fehlfunktionen (“CALL.”)
Einstellung des Temperaturoffsets (“SET T FUNKTION”)
→
Temperatureinstellung in °C/°F (“Wechsel °C/°F”)
Einstellung der Anzeige der Wasseransaugtemperatur
(“H2O-TEMP. DISP WAHL”)
Fernbedienung
→
→
→→→
→
→
Eintrag 2
Drücken Sie Taste G.
Drücken Sie Taste G.
Drücken Sie Taste G.
(Halten Sie die Taste E gedrückt und
drükken Sie Taste D zwei Sekunden lang.)
* Die Fernbedienung speichert die vor-
genommenen Änderungen.
Siehe [3]–1
Eintrag 3
(Inhalt der Einstellungen)
Drücken Sie
Taste D.
Drücken Sie
Taste D.
Drücken Sie
Taste D.
Siehe[3]–2. (1)
Siehe [3]–2. (2)
Siehe [3]–2. (3)
Siehe [3]–3. (1)
Siehe [3]–3. (2)
Siehe [3]–3. (3)
Siehe [3]–3. (4)
Siehe [3]–3. (5)
Siehe [3]–4. (1)
Siehe [3]–4. (2)
HINWEIS
Der Timer-Betrieb stoppt, wenn die Anzeige des Funktionsauswahlmodus auf die
Normalbetriebsanzeige umschaltet.
Punktmatrixanzeige
Die mit CHANGE LANGUAGE
(Sprache einstellen) eingestellte
Sprache wird hier angezeigt. In
den Darstellungen dieser Anleitung ist Englisch ausgewählt.
25
Page 26
Genaue Einstellung
[3]–1. Einstellung CHANGE LANGUAGE (Sprache ändern)
Die Sprache des Punktmatrix-Displays kann eingestellt werden.
• Drücken Sie die Taste [
1 Englisch (GB), 2 Deutsch (D), 3 Spanisch (E), 4 Russisch (RU),
5Italienisch (I), 6 Französisch (F), 7 Schwedisch
[3]–2. Funktionsgrenzen
(1) Einstellung der Funktionsgrenzen bei der Bedienung (Operation Lock)
• Zur Umschaltung der Einstellung drücken Sie die Taste [
1 no1 : Die Einstellung der Bedienungssperre (Operation Lock) gilt für alle
Tasten außer der [
2 no2 : Die Einstellung der Bedienungssperre gilt für alle Tasten.
3 OFF (Anfängliche Einstellungswert): Die Einstellung der Bedienungssperre
* Damit die Bedienungssperre (Operation Lock) in der normalen Anzeige gültig ist,
müssen Sie die [CIR.WATER]-Taste gedrückt halten und währenddessen die
Taste [
Einstellung durchgeführt haben.
(2) Überspringen der Betriebsarten-Einstellung
Nach Änderung der Einstellung, kann die Betriebsart innerhalb des gewählten
Bereichs geändert werden.
• Drücken Sie die Taste [
1 Heizmodus : Einstellung der Verwendung oder Nicht-
2 Heizmodus ECO : Einstellung der Verwendung oder Nicht-
ON/OFF] zwei Sekunden lang drücken, nachdem Sie die obige
DFEINLPGRRUTRGBGBGBGBGB
3 Brauch-H2O-Modus : Einstellung der Verwendung oder Nicht-
GB
4 Frostschutzmodus : Einstellung der Verwendung oder Nicht-
5 Kalt-H2O-Modus : Einstellung der Verwendung oder Nicht-
6 OFF (Anfangseinstellung) : Die Einstellung der Betriebsart wird nicht über-
* Ist die Einstellung nicht auf OFF gesetzt, werden die Überspringungs-
Einstellungen für die Modi Heizen, Heizen ECO, Brauch-H2O, Frostschutz
und Kalt-H2O zur gleichen Zeit ausgeführt.
* Ein Modus, der in der anzuschließenden Anlage nicht verfügbar ist, kann nicht
verwendet werden, selbst wenn die Einstellung auf “AVAILABLE (VERFÜG-
BAR)” steht.
(3) Einstellung der Temperaturgrenzen
Nach dieser Einstellung kann die Temperatur im eingestellten Bereich verändert
werden.
• Zur Umschaltung der Einstellung drücken Sie die Taste [
1 LIMIT TEMP HEIZEN:
Einstellung des Temperaturbereichs in der Betriebsart Heizen.
2 LIMIT TEMP BRAUCH-H2O:
Einstellung des Temperaturbereichs in der Betriebsart Heizen/Brauch-H2O.
3 LIMIT TEMP FROSTSCHUTZ:
Einstellung des Temperaturbereichs in der Betriebsart Frostschutz.
4 LIMIT TEMP KÜHLEN:
Einstellung des Temperaturbereichs in der Betriebsart Kühlen.
5 OFF (Anfangseinstellung):
Die Temperaturbereichsgrenzen sind nicht aktiv.
* Wenn eine andere Einstellung als OFF gewählt wird, werden die Temperatur-
bereichsgrenzen für Betriebsarten Brauch-H2O, Frostschutz und Kühlen gleichzeitig eingestellt. Der Bereich kann jedoch nicht begrenzt werden, wenn der
eingestellte Temperaturbereich sich nicht geändert hat.
• Um die Temperatur zu erhöhen oder zu verringern, drücken Sie die Taste [
oder ].
• Einstellbarer Bereich
Brauch-H2O-Modus : Untergrenze: 30 ~ 70 °C (87 ~ 158 °F)
Heizmodus : Untergrenze: 30 ~ 45 °C (87 ~ 113 °F)
Kühlmodus : Untergrenze: 10 ~ 30 °C (50 ~ 87 °F)
* Der einstellbare Bereich hängt vom angeschlossenen Gerät ab.
MENU], um die Sprache einzustellen.
ON/OFF].
ON/OFF]-Taste.
wird nicht vorgenommen.
ON/OFF] um folgende Einstellungen umzuschalten..
verwendung des Heizmodus.
verwendung des Heizmodus ECO.
verwendung des Brauch-H2O-Modus.
verwendung des Frostschutzmodus.
verwendung des Kalt-H2O-Modus.
sprungen.
ON/OFF].
Obergrenze: 70 ~ 30 °C (158 ~ 87 °F)
Obergrenze: 45 ~ 30 °C (113 ~ 87 °F)
Obergrenze: 30 ~ 10 °C (87 ~ 50 °F)
TEMP.
[3]–3. Einstellen der Auswahl der Betriebsart
(1) Haupt-/Nebenfunktion der Fernbedienung
• Zur Umschaltung der Einstellung drücken Sie die Taste [
1 Haupt : Die Fernbedienung fungiert als Hauptfernbedienung.
2 Neben : Die Fernbedienung fungiert als Nebenfernbedienung.
(2) Benutzung der Uhreinstellung
• Zur Umschaltung der Einstellung drücken Sie die Taste [
1 ON : Die Clock-Funktion kann benutzt werden.
2 OFF : Die Clock-Funktion kann nicht benutzt werden.
(3) Einstellung der Timer-Funktion
• Zur Umschaltung der Einstellung drücken Sie die Taste [
Sie einen der folgenden Einträge aus.).
1 Wochenzeit schalt uhr (Anfängliche Einstellungswert):
2
Auto Zeit funktion Aus
3
Einfnche zeit funktion
4 Zeitschaltuhr Aus : Der Timer-Modus kann nicht benutzt werden.
* Wenn die Verwendung der Clock-Einstellung auf OFF steht, kann “Wochenzeit
schalt uhr” nicht benutzt werden.
(4) Kontaktnummer für den Fall von Fehlfunktionen
• Zur Umschaltung der Einstellung drücken Sie die Taste [
1 CALL OFF : Die eingestellten Kontaktnummern werden im Falle von
2 CALL **** *** **** : Die eingestellten Kontaktnummern werden im Falle
CALL_ : Die Kontaktnummer kann eingegeben werden, wenn
• Eingabe der Kontaktnummern
Zur Eingabe der Kontaktnummern gehen Sie wie folgt vor.
Bewegen Sie den blinkenden Cursor auf die eingestellten Nummern. Drücken
Sie die Taste [
(links) zu bewegen. Drücken Sie die Taste [
um die Nummern einzustellen.
(5) Einstellung des Temperaturoffsets
• Drücken Sie die Taste [
ten.
1 ON : Der eingestellte Reduzierungswert wird unter der Anfangseinstellung
2 OFF : Der eingestellter Reduzierungswert wird nicht unter der Anfangsein-
der Wassertemperatur angezeigt.
stellung der Wassertemperatur angezeigt.
Der Wochen-Timer kann benutzt werden.
: Der Auto-Off-Timer kann benutzt werden.
: Der einfache Timer kann benutzt werden.
Fehlfunktionen nicht angezeigt.
von Fehlfunktionen angezeigt.
das Display so aussieht wie links gezeigt.
TEMP. oder ] F, um den Cursor nach rechts
CLOCK oder ] C,
ON/OFF] D, um folgende Einstellungen umzuschal-
ON/OFF] D.
ON/OFF] D.
ON/OFF] D (Wählen
ON/OFF] D.
[3]–4. Einstellung der Anzeige
(1) Temperatureinstellung in °C/°F
• Zur Umschaltung der Einstellung drücken Sie die Taste [
1 °C: Für die Temperatur wird die Einheit Celsius (° C) verwendet.
2 °F: Für die Temperatur wird die Einheit Fahrenheit (°F) verwendet.
(2) Einstellung der Anzeige der Wassertemperatur
• Zur Umschaltung der Einstellung drücken Sie die Taste [
1 ON : Die Wassertemperatur wird angezeigt.
2 OFF : Die Wassertemperatur wird nicht angezeigt.
ON/OFF] D.
ON/OFF] D.
26
Page 27
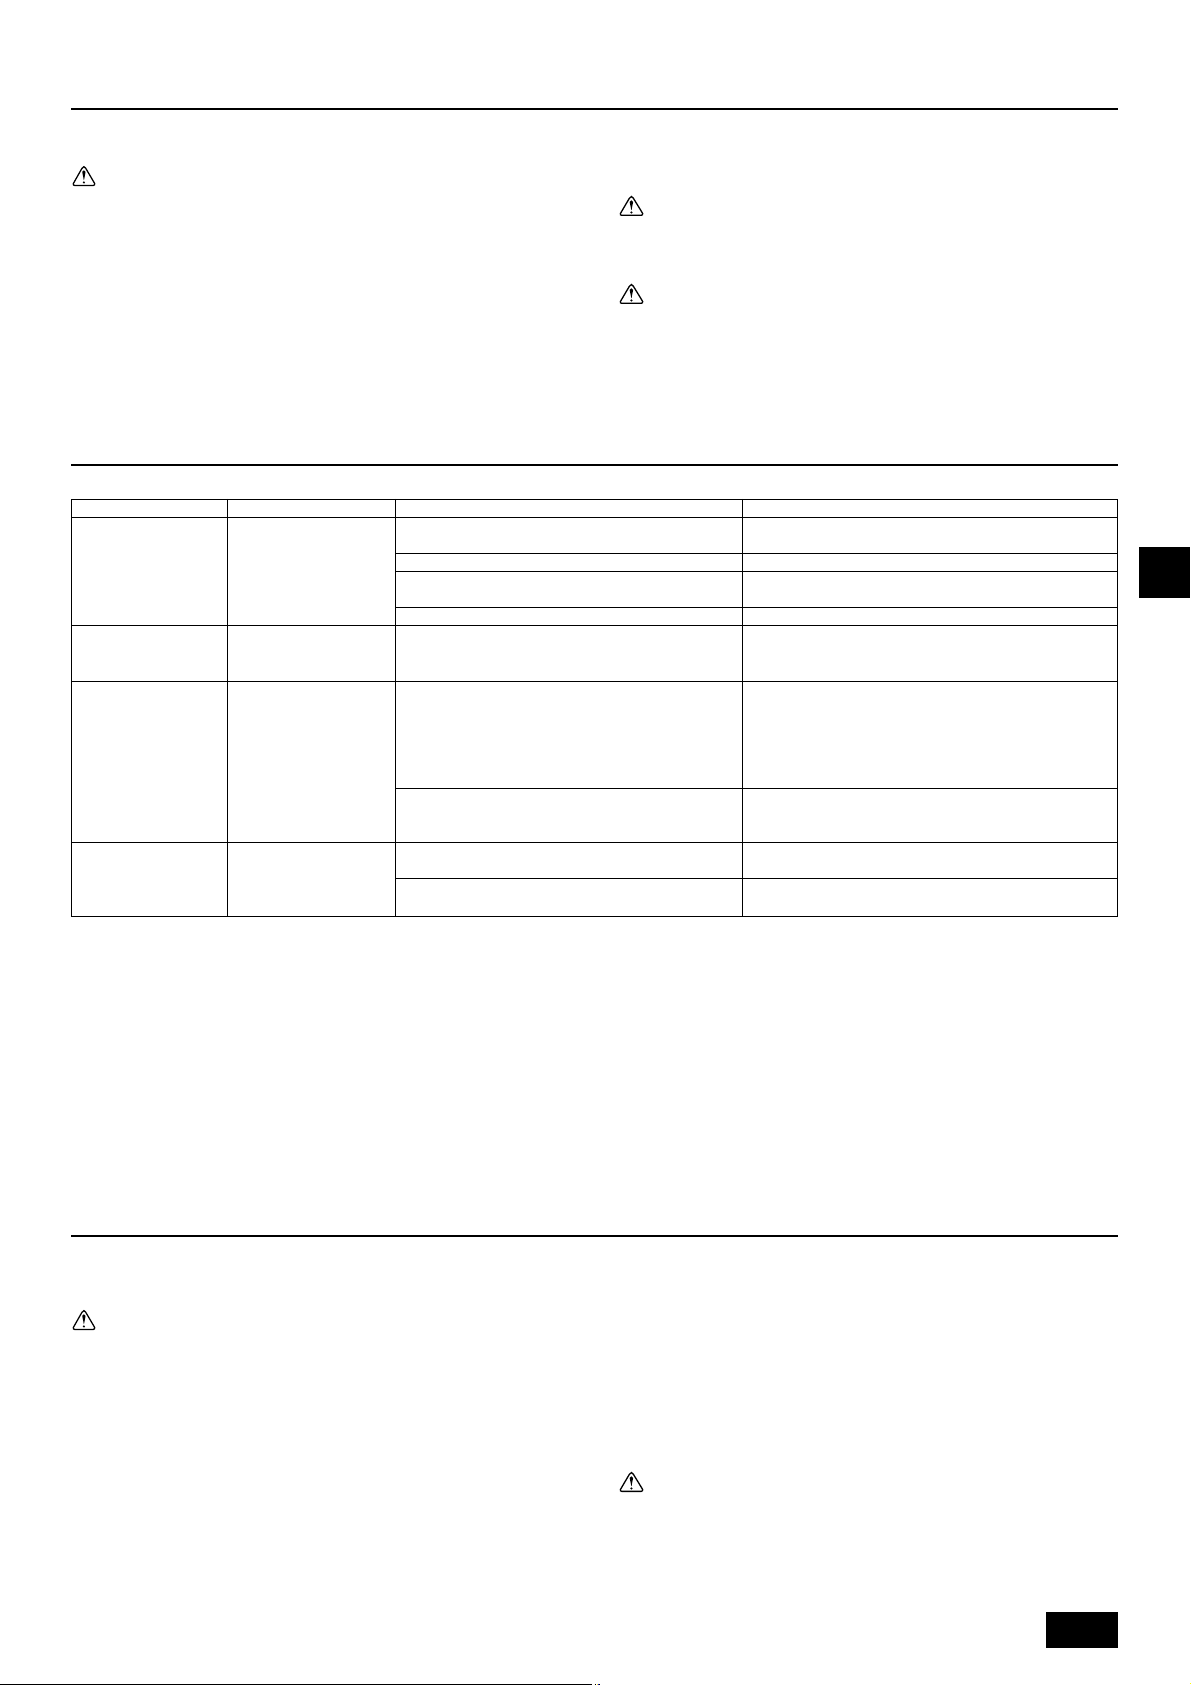
4. Pflege
Die Wartung der Siebfilter muß stets von Fachpersonal vorgenommen werden.
Vor der Pflege unbedingt die Hauptstromversorgung ausschalten.
Vorsicht:
• Zur Reinigung muß unbedingt der Betrieb eingestellt und die Stromversorgung ausgeschaltet werden. Der Ventilator auf der Innenseite dreht
sich mit hoher Geschwindigkeit und kann Verletzungen verursachen.
• Jede Inneneinheit hat Siebfilter, um Staub aus der angesaugten Luft zu
entfernen. Den Siebfilter auf die in den folgenden Zeichnungen dargestellte Weise reinigen.
• Die Lebensdauer des Siebfilters hängt davon ab, wo die Anlage aufgestellt ist und wie sie bedient wird.
Reinigungsmethode
• Beim Waschen des Siebfilters die Abdeckung abnehmen und den im Inneren
befindlichen Siebfilter mit einer Bürste abbürsten.
Vorsicht:
• Nicht versuchen, den Siebfilter im Sonnenlicht oder durch Erwärmen mit
Feuer usw. zu trocknen. Dadurch kann Verformung des Siebfilters bewirkt werden.
Vorsicht:
Die Klimaanlage nicht mit Wasser bespritzen und kein brennbares Sprühmittel usw. in die Klimaanlage sprühen. Verwendung von Wasser oder brennbarem Sprühmittel kann Störungen, elektrischen Schlag oder Feuer verursachen.
5. Störungssuche
Bitte überprüfen Sie die folgenden Punkte, bevor Sie sich an den Kundendienst wenden.
Zustand der Klimaanlage
Kein Betrieb
Wasser tritt aus, aber
es kühlt oder heizt nicht
ausreichend.
Kaltes oder warmes
Wasser tritt nicht aus.
Der Betrieb wird nach
kurzer Zeit wieder eingestellt.
• Wenn der Betrieb aufgrund eines Stromausfalls unterbrochen wird, tritt der [Startwiederholungsverhinderungs-Stromkreis bei Stromausfall] in Funktion und verhindert,
daß das Gerät auch nach Wiederanliegen des Stroms den Betrieb [ON/OFF] wieder aufnimmt.
Wenn auch die obigen Maßnahmen die Störung nicht beheben, so schalten Sie bitte die Hauptstromversorgung der Klimaanlage aus (OFF) und wenden Sie sich mit dem
Ausrüstungsnamen und einer Beschreibung des Störungszustands an das Geschäft, in dem Sie die Klimaanlage gekauft haben. Wenn die Flüssigkristallanzeige “[CHECK]”
und einen vierstelligen Inspektionscode angezeigt hat, sollte der Inspektionscode auch mitgeteilt werden. Auf keinen Fall selbst eine Reparatur versuchen.
Fernbedienung
Die Anzeige “'” leuchtet
nicht. Die Anzeige erscheint auch nicht, wenn
auf die Taste [ON/OFF]
gedrückt wird.
Die Flüssigkristallanzeige
zeigt den Betriebszustand an.
Die Flüssigkristallanzeige
zeigt den Betriebszustand an.
“CHECK” und ein Inspektionscode werden blinkend auf der
Flüssigkristallanzeige angezeigt.
Ausfall der Stromversorgung.
Die Hauptstromversorgung ist nicht eingeschaltet (OFF).
Die Sicherung der Hauptstromversorgung ist durchgebrannt.
Das Erdschlußrelais ist ausgelöst worden.
Die Temperatureinstellung ist nicht angemessen.
Der Stromkreis zur Verhütung von Neustart innerhalb
von 3 Minuten ist tätig.
Die Inneneinheit wurde während Heiz- und
Entfrostungsbetrieb erneut gestartet.
Lufteinlaß und Luftauslaß von Innenund Außeneinheit
sind versperrt.
Der Siebfilter ist mit Schmutz und Staub verstopft.
Ursache
Nach Wiederherstellung der Stromversorgung die Taste
[ON/OFF] drücken.
Die stromversorgung einschalten (ON).
Die Sicherung auswechseln.
Das Erdschlußrelais einschalten.
Die Ansaugtemperatur und die eingestellte Temperatur auf
der Flüssigkristallanzeige überprüfen und die Temperatur
unter Bezug auf [Wassertemperatureinstellung] einstellen.
Bitte einige Zeit warten.
(Da die Außeneinheit zum Schutz des Kompressors einen
Stromkreis enthält, der Neustart innerhalb von 3 Minuten
verhindert, beginnt der Kompressor möglicherweise nicht
sofort mit dem Betrieb. Maximal erfolgt 3 Minuten lang kein
Betrieb.)
Bitte einige Zeit warten.
(Heizbetrieb beginnt nach Beendigung des Entfrostungsbetriebs.)
Die Hindernisse entfernen und dann wieder mit dem Betrieb beginnen.
Den Siebfilter säubern und erneut betreiben. (Siehe [Pflege].)
Behebung
DFEINLPGRRUTRGBGBGBGBGB
GB
In den folgenden Fällen handelt es sich nicht um eine Störung:
• Die aus der Klimaanlage ausgeblasene Luft kann einen Geruch haben. Der in der Raumluft enthaltene Geruch von Zigaretten, Kosmetika, Wänden, Möbeln usw. haftet
in der Klimaanlage an und wird wieder ausgeblasen.
• Bei laufender oder angehaltener Klimaanlage kann das Geräusch von fließendem Kühlmittel zu hören sein. Dies ist normal.
• Nach Start oder Stop von Kühl- oder Heizbetrieb kann sich die Vorderplatte usw. Dies ist das Geräusch von Reibung an der Frontplatte und in anderen Bereichen, das
durch die Ausdehnung und das Zusammenziehen aufgrund der Temperaturänderung entsteht. Dies ist normal.
6. Installation, Verlagerung und Prüfung
In bezug auf den Installierungsort
Bitte wenden Sie sich für Installierung und Verlegung an das Verkaufsgeschäft
oder einen Spezialisten.
Vorsicht:
Nicht an Orten installieren, an denen Lecken von brennbarem Gas zu befürchten ist.
Falls Gas entweichen und sich in der Nähe der Klimaanlage ansammeln sollte, so ist Entzündung zu befürchten.
Die Klimaanlage niemals an den folgenden Orten installieren:
• wo es eine Menge Maschinenöl gibt
• in Regionen nahe am Meer und am Strand, wo es salzhaltige Luft gibt.
• Orte mit hoher Luftfeuchtigkeit
• Thermalbäder
• wo Schwefelgas vorhanden ist
• Orte mit Hochfrequenzgeräten (Hochfrequenz-Schweißgeräte usw.)
• Orte mit häufiger Verwendung von sauren Lösungen
• Orte mit häufiger Verwendung besonderer Sprühmittel
• Die Inneneinheit muß unbedingt waagerecht installiert werden, da es sonst zu
Lecken von Wasser usw. kommen kann.
• Bei Installierung in Krankenhäusern, Kommunikationseinrichtungen usw. sind
ausreichende Lärmschutzmaßnahmen zu treffen.
Wenn eine Klimaanlage an den obigen Plätzen oder an Orten mit besonderen
Umgebungsbedingungen verwendet werden, so kann es in vielen Fällen zu Stö-
rungen kommen. Vermeiden Sie Verwendung an solchen Orten.
Wenden Sie sich für Einzelheiten an das Verkaufsgeschäft.
Über die elektrische Installierung
Vorsicht:
• Die elektrische Installierung muß von einem qualifizierten Elektriker unter Bezug auf den [technischen Standard für Elektrogeräte], die [Vorschriften für Verdrahtung in Geräten] und die Installierungsanweisung durchgeführt werden, und es muß ein eigener Stromkreis verwendet werden.
Gemeinsame Verwendung mit anderen Elektrogeräten kann zu Durchbrennen der Sicherung bzw. Auslösen des Relais führen.
27
Page 28
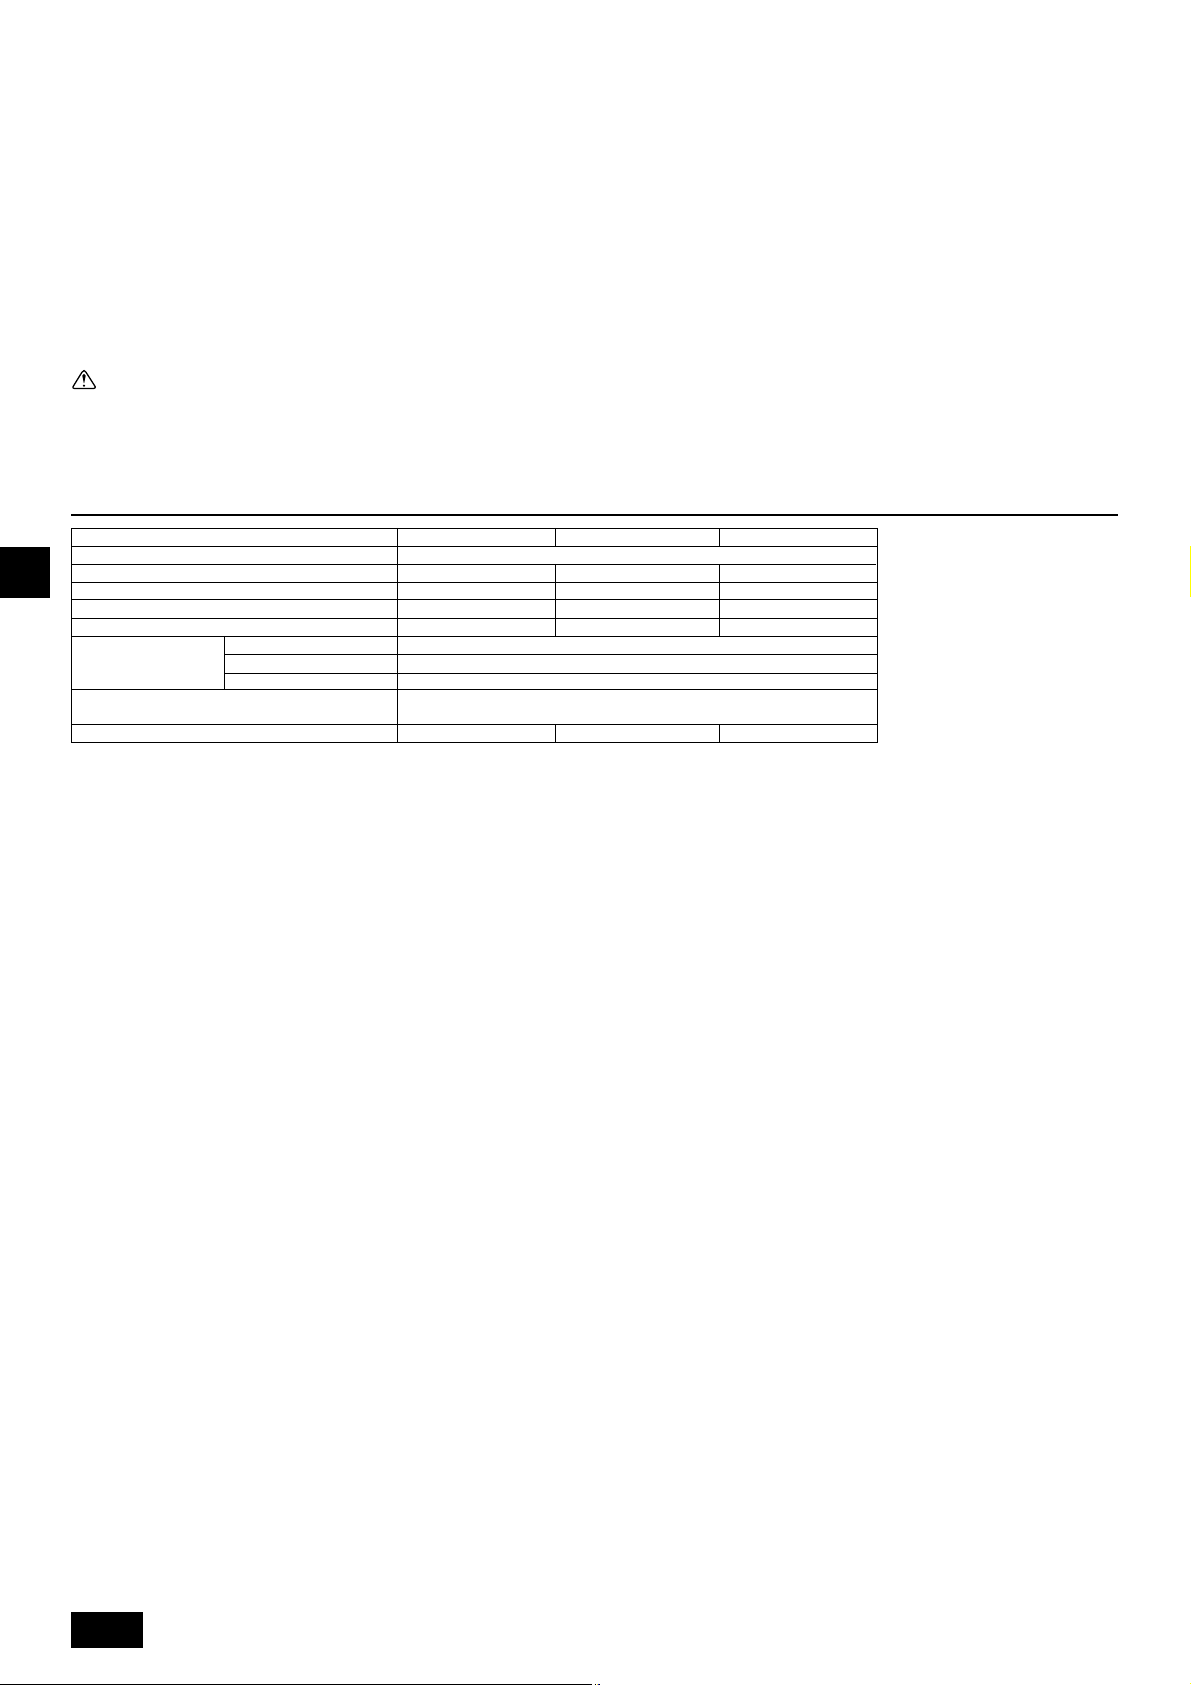
• Die Erdleitung nicht an ein Gasrohr, ein Wasserrohr, einen Blitzableiter
oder die Erdleitung eines Telefons anschließen. Wenden Sie sich für Einzelheiten an das Verkaufsgeschäft.
• Je nach dem Aufstellungsort ist ein Erdschlußrelais erforderlich. Wenden Sie sich für Einzelheiten an das Verkaufsgeschäft.
Zur Installation der Wasserrohrleitung
• Niemals Stahlrohrleitungen als Wasserrohrleitungen einsetzen. Kupferrohrleitungen werden empfohlen.
• Der Wasserkreis soll als geschlossener Kreis ausgelegt sein.
Über Verlegung
• Wenn die Klimaanlage wegen Erweiterung, Umzug usw. verlegt werden soll,
so erfordert dies einen qualifizierten Techniker und Bezahlung der Arbeitskosten. Wenden Sie sich bitte im voraus an das Verkaufsgeschäft.
Vorsicht:
Bitte wenden Sie sich für Verlegung der Klimaanlage an das Verkaufsgeschäft.
Unfachmäßige Installierung kann elektrischen Schlag, Feuer usw. verursachen.
7. Specifications
Lärmschutzmaßnahmen
• Bei der Installierung einen Ort auswählen, der das Gewicht der Klimaanlage
ausreichend aushält und nicht die Schwingungen und Geräusche verstärkt.
• Die Außeneinheit so installieren, daß Nachbarn nicht durch die ausgeblasene
warme bzw. kalte Luft und durch Geräusche belästigt werden.
• Wenn Gegenstände in der Nähe des Luftauslasses der Außeneinheit aufgestellt werden, so kann dies Abnahme der Leistung und Zunahme der Geräu-
sche verursachen. Bitte keine Hindernisse in der Nähe des Luftauslasses auf-
stellen.
• Bitte wenden Sie sich bei ungewöhnlichen Geräuschen während des Betriebs
an das Verkaufsgeschäft.
Wartungsinspektion
• Wenn die Klimaanlage mehrere Jahre lang verwendet wird, so kann es zu
Verschmutzung der Innenseite und Abnahme der Leistungsfähigkeit führen.
Je nach dem Verwendungszustand kann es auch zu Auftreten von Geruch
kommen, oder der Ablaß kann durch Staub usw. beeinträchtigt werden. Zusätzlich zur normalen Pflege empfehlen wir den Abschluß eines Wartungsinspektionsvertrags (gegen Bezahlung).
Modell
Netzanschluss
HeizkapazitätkW
DFEINLPGRRUTRGBGBGBGBGB
KühlkapazitätkW
GB
Geräuschpegel
Nettogewicht kg
PWFY-P100VM-E-BU
1
12,5 *
–
44 dB<A>
60 kg
Höhe mm
Abmessungen
Breite mm
Tiefe mm
Zubehör
Wasserstromrate m
3
/h
*1 Nominelle Heizbedingungen
Außentemp.: 7 °C DB/6 °C WB (45 °F DB/43 °F WB)
Rohrlänge: 7,5 m (24-9/16 ft)
Pegelunterschied:
0 m (0 ft)
Einlass-Wassertemp. 65 ° C Wasserstromrate 2,15 m
*3 Nominelle Kühlbedingungen
Außentemp.: 35 °C DB (95 °F DB)
Rohrlänge: 7,5 m (24-9/16 ft)
Pegelunterschied:
0 m (0 ft)
Einlass-Wassertemp. 23 °C Wasserstromrate 1,93 m
Siebfilter, Wärmeisolierungsmaterial, Anschlusssätze × 2,
Expansionsverbindung × 2 (PWFY - P200VM - E - AU)
0,6-2,15 1,2-4,3
*2 Nominelle Heizbedingungen
Außentemp.: 7 °C DB/6 °C WB (45 °F DB/43 °F WB)
Rohrlänge: 7,5 m (24-9/16 ft)
3
/h
Pegelunterschied:
Einlass-Wassertemp. 30 °C Wasserstromrate 2,15 m
*4 Nominelle Heizbedingungen
Außentemp.: 7 °C DB/6 °C WB (45 °F DB/43 °F WB)
Rohrlänge: 7,5 m (24-9/16 ft)
3
/h
Pegelunterschied:
Einlass-Wassertemp. 30 °C Wasserstromrate 4,3 m
*5 Nominelle Kühlbedingungen
Außentemp.: 35 °C DB (95 °F DB)
Rohrlänge: 7,5 m (24-9/16 ft)
Pegelunterschied:
Einlass-Wassertemp. 23 °C Wasserstromrate 3,86 m
0 m (0 ft)
3
/h
PWFY-P100VM-E-AU
1 stufe 220-230-240 V 50/60 Hz
12,5 *
11,2 *
2
3
29 dB<A>
35 kg
800
450
300
0,6-2,15
0 m (0 ft)
0 m (0 ft)
PWFY-P200VM-E-AU
4
25,0 *
5
22,4 *
29 dB<A>
38 kg
3
/h
3
/h
28
Page 29
Table des matières
1. Consignes de sécurité .............................................................................. 29
1.1. Installation ............................................................................... 29
1.2. Pendant le fonctionnement...................................................... 29
1.3. Rangement de l’appareil ......................................................... 30
2. Comment faire fonctionner le climatiseur ................................................. 30
2.1. Utiliser la télécommande ......................................................... 30
2.2. Réglage de la température de l’eau ........................................ 31
1. Consignes de sécurité
s Avant de faire fonctionner le climatiseur, lire attentivement
toutes les “consignes de sécurité”.
s Les “consignes de sécurité” sont réparties en listes de points
importants concernant la sécurité. Veiller à bien les respecter.
Symboles utilisés dans le texte
Avertissement:
Décrit les précautions à suivre pour éviter tout risque de blessure ou de
danger mortel pour l’utilisateur.
Précaution:
Décrit les précautions qui doivent être prises pour éviter d’endommager l’appareil.
Symboles utilisés dans les illustrations
: Indique une action qui doit être évitée.
: Indique que des instructions importantes doivent être prises en considéra-
tion.
: Indique un élément qui doit être mis à la terre.
: Danger d’électrocution (Ce symbole se trouve sur l’étiquette de l’appareil
principal) <Couleur: jaune>
: Attention surface chaude
Avertissement:
Prendre soin de lire les étiquettes se trouvant sur l’appareil principal.
1.1. Installation
s Lorsque vous aurez lu le présent manuel, veuillez le conserver avec le
manuel d’installation dans un endroit sûr afin de pouvoir le consulter
ultérieurement, lorsqu’une question se pose. Si une autre personne va
être chargée de faire fonctionner l’appareil, veiller à bien lui remettre le
présent manuel.
Avertissement:
• Cet appareil ne doit pas être installé par l’utilisateur. Demander au revendeur ou à une société agréée de l’installer. Si l’appareil n’est pas correctement installé il peut y avoir un risque de fuite d’eau, d’électrocution ou
d’incendie.
• Utiliser uniquement les accessoires agréés par Mitsubishi Electric et demander à votre revendeur ou à une société agréée de les installer. Si les
accessoires ne sont pas correctement installés, il peut y avoir un risque
de fuite d’eau, d’électrocution ou d’incendie.
• Ne pas toucher l’appareil. Sa surface peut être très chaude.
• Ne pas installer l’appareil à un endroit exposé à des gaz corrosifs.
• Le manuel d’installation décrit en détails la méthode d’installation suggérée. Toute modification de structure nécessaire pour l’installation doit
être conforme aux normes locales de l’édifice.
• Ne jamais réparer ou déménager personnellement l’appareil. Si les réparations effectuées ne sont pas correctes, il peut y avoir un risque de fuite
d’eau, d’électrocution ou d’incendie. En cas de panne ou de déménagement de l’appareil, veuillez contacter votre revendeur.
• Maintenez les pièces électriques à l’écart de l’eau (eau de lavage) etc.
• Cela pourrait provoquer une électrocution, une inflammation ou de la
fumée.
Note 1: Au lavage de l’échangeur thermique et de la cuvette d’écoule-
ment, assurez-vous que la boîte de commande, le moteur et le
LEV restent secs en utilisant une couverture étanche.
Note 2: N’évacuez jamais l’eau de lavage pour la cuvette d’écoulement et
l’échangeur thermique avec la pompe de drainage. Evacuez-la
séparément.
2.3. Régler le jour de la semaine et l’heure .................................... 31
2.4. Utiliser le programmateur ........................................................ 31
3. Sélection des fonctions ............................................................................. 35
4. Entretien de l’appareil ............................................................................... 37
5. Guide de dépannage ................................................................................ 37
6. Installation, travaux en cas de déplacement et vérifications ..................... 38
7. Spécifications techniques ......................................................................... 38
• Ne pas permettre l’usage de cet appareil à des enfants en bas âge ou à
des handicapés sans supervision.
• Toujours prendre toutes les précautions nécessaires pour éviter que des
enfants en bas âge jouent avec cet appareil.
• N’utilisez pas d’additif de détection des fuites.
1) Appareil extérieur
Avertissement:
• L’appareil extérieur doit être installé sur une surface plane et stable, dans
un endroit non sujet à l’accumulation de neige, de feuilles ou de détritus.
• Ne pas marcher sur l’appareil ni y déposer des objets. La personne ou
l’objet risqueraient de tomber et de se blesser ou de blesser quelqu’un.
Précaution:
L’appareil extérieur doit être placé dans un endroit où l’air et le bruit engendrés ne risquent pas de déranger les voisins.
2) Appareil intérieur
Avertissement:
L’appareil intérieur doit être correctement fixé car dans le cas contraire, il
pourrait tomber et blesser quelqu’un.
3) Commande à distance
Avertissement:
La commande à distance doit être installée de telle sorte que les enfants ne
puissent pas y avoir accès.
4) Tuyau d’évacuation
Précaution:
Assurez-vous que le tuyau d’évacuation est installé de telle façon à ce que
l’évacuation se fasse sans problèmes. Si l’installation n’est pas faite correctement, il pourrait en résulter des fuites d’eau, ce qui endommagerait les
meubles.
5) Ligne d’alimentation électrique, fusible, ou coupe-
circuit
Avertissement:
• Vérifier si l'appareil est alimenté par un circuit réservé. La connexion
d'autres appareils au même circuit pourrait provoquer une surcharge.
• S’assurer de la présence d’un interrupteur secteur principal.
• Veiller à toujours respecter la tension indiquée sur l’appareil ou le voltage du fusible ou du coupe-circuit. Ne jamais utiliser un morceau de
câble ou un fusible d’un voltage supérieur à celui spécifié.
6) Mise à la terre
Précaution:
• L’appareil doit être correctement raccordé à la terre pour éviter tout risque d’électrocution. Ne jamais raccorder le câble de mise à la terre à un
tuyau de gaz ou d’eau, à un paratonnerre ou à un câble de terre du téléphone.
• Vérifier régulièrement que le câble de terre de l’appareil extérieur est
correctement raccordé à la borne de terre de l’appareil et à l’électrode de
mise à la terre.
1.2. Pendant le fonctionnement
Précaution:
• Ne pas utiliser d’objet pointu pour enfoncer les boutons car cela risquerait d’endommager la commande à distance.
• Ne pas tordre le câble de la commande à distance ni tirer dessus car cela
risquerait de l’endommager et de provoquer un mauvais fonctionnement.
GB
FEINLPGRRUTRGBGBGBGBGB
D
29
Page 30
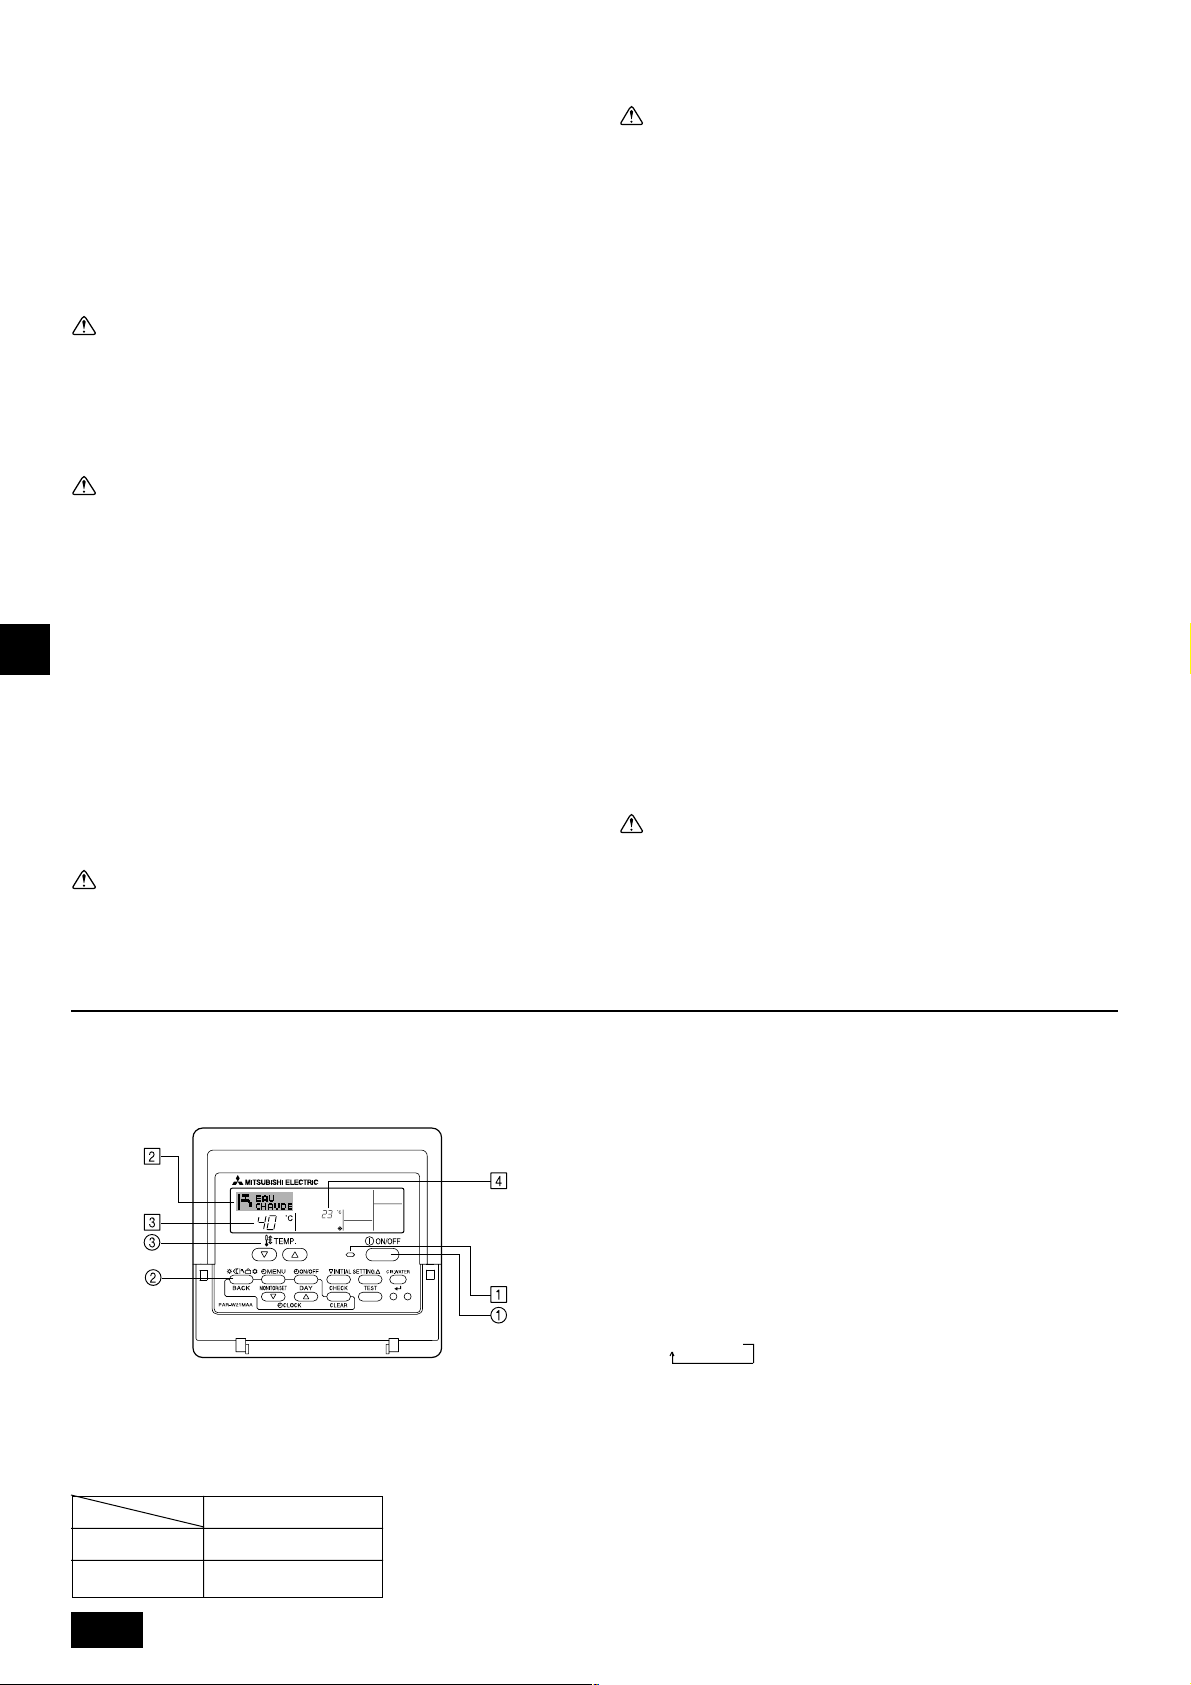
• Ne jamais retirer la partie supérieure de la commande à distance car vous
risqueriez de toucher les cartes de circuits imprimés qui se trouvent à
l’intérieur et de provoquer un court-circuit ou une panne.
• Ne jamais essuyer la commande à distance avec du benzène, du thinner,
des produits chimiques, etc. Vous risqueriez de la décolorer et de provoquer des pannes. Pour nettoyer les taches persistantes, tremper un chiffon dans un détergent neutre non abrasif dilué avec de l’eau, le tordre
convenablement, essuyer les taches puis essuyer à nouveau avec un
chiffon sec.
• Ne jamais obstruer les entrées et sorties des appareils extérieurs et intérieurs. Un mobilier élevé placé sous l’appareil intérieur ou des objets
volumineux comme des grandes boîtes laissées à proximité de l’appareil extérieur vont en réduire l’efficacité.
Avertissement:
• Ne jamais éclabousser l’appareil ni le toucher avec des mains humides.
Il pourrait en résulter un risque d’électrocution.
• Ne pas vaporiser de gaz inflammable à proximité de l’appareil sous risque d’incendie.
• Ne pas placer de chauffage au gaz ou tout autre appareil fonctionnant
avec une flamme vive là où il serait exposé àl’échappement d’air du climatiseur. Cela risquerait de provoquer une mauvaise combustion.
Avertissement:
• Ne pas retirer la face avant ou la protection du ventilateur de l’appareil
GBD
extérieur pendant son fonctionnement. Vous risqueriez de vous blesser
si vous touchez les éléments rotatifs, les parties chaudes ou sous haute
tension.
• Ne jamais mettre les doigts, des bâtons, etc. dans les entrées et sorties
d’air sous risque de blessure car le ventilateur situé à l’intérieur de l’appareil tourne à grande vitesse. Faire tout particulièrement attention en
présence d’enfants.
• Si vous sentez des odeurs étranges, arrêter l’appareil, le mettre hors
FEINLPGRRUTRGBGBGBGBGB
tension et contacter le revendeur. Si vous ne procédez pas de cette façon, il pourrait y avoir risque de panne, d’électrocution ou d’incendie.
• Si vous remarquez des vibrations ou des bruits particulièrement anormaux, arrêter l’appareil, éteindre l’interrupteur et prendre contact avec le
revendeur.
• Ne pas refroidir exagérément. La température intérieure idéale se situe
sur une plage de 5
rieure.
• Ne pas laisser des enfants ou des personnes handicapées assis ou debout sur le passage du flux d’air provenant du climatiseur. Cela pourrait
provoquer des problèmes de santé.
°C de différence par rapport à la température exté-
Précaution:
• Ne pas diriger le flux d’air vers des plantes ou des animaux en cages.
• Aérer fréquemment la pièce. Si l’appareil fonctionne continuellement dans
une pièce fermée pendant un long moment, l’air va devenir vicié.
En cas de panne
Avertissement:
• Ne jamais tenter aucune réparation sur le climatiseur. Consulter votre
revendeur pour toute réparation ou intervention technique. Une mauvaise réparation peut causer des fuites d’eau, une électrocution voire un
incendie etc.
• Si la commande à distance affiche un code d’erreur, si le climatiseur ne
fonctionne pas ou si vous détectez une anomalie quelconque, arrêter
l’appareil et contacter le revendeur. Si l’appareil est laissé dans de telles
conditions il risque de tomber en panne ou de provoquer un incendie.
• Si le coupe-circuits fonctionne fréquemment, prendre contact avec le
revendeur. S’il n’est pas remédié à la situation, l’appareil risque de tomber en panne ou de provoquer un incendie.
• Si le gaz de réfrigérant fuit, arrêter le fonctionnement du climatiseur, aérer convenablement la pièce et prendre contact avec le revendeur. S’il
n’est pas remédié à la situation, des accidents risquent de se produire
suite à un manque d’oxygène.
Lorsque le climatiseur ne doit pas être utilisé pendant
une certaine période
• Si le climatiseur ne doit pas être utilisé pendant une certaine période à
cause d’un changement de climat, etc. le faire fonctionner pendant 4 – 5
heures avec la soufflerie d’air jusqu’à ce que l’intérieur soit complètement sec. Sinon de la moisissure non hygiénique et insalubre risque de
se développer à des endroits divers.
• Lorsqu’il ne doit pas être utilisé pendant un certain temps, mettre
l’[alimentation] hors tension (sur OFF).
Si l’appareil est maintenu sous tension, vous risquez en effet de gaspiller plusieurs watts voire des dizaines de watts et l’accumulation de
poussières, etc. pourrait être la cause de court-circuits.
• Allumer l’interrupteur d’alimentation au moins 12 heures avant le début
de la mise en fonctionnement. Ne jamais couper l’alimentation pendant
les périodes de forte utilisation sinon le climatiseur risque de tomber en
panne.
• Si l’appareil ne doit pas être utilisé pendant un certain temps durant l’hiver, purger l’eau des tuyaux pour qu’elle ne risque pas de geler.
1.3. Rangement de l’appareil
Avertissement:
Lorsque vous devez ranger l’appareil, veuillez consulter votre revendeur. Si
les tuyaux ne sont pas correctement retirés, du produit réfrigérant (gaz
fluorocarbonique) pourrait s’échapper et entrer en contact avec votre peau,
causant ainsi des blessures. L’échappement de produit réfrigérant dans l’atmosphère pollue également l’environnement.
2. Comment faire fonctionner le climatiseur
2.1. Utiliser la télécommande
Comment démarrer, arrêter, changer de mode et ajuster la température
Pour commencer l’opération
1. Appuyez sur le bouton ON/OFF 1.
Le témoin de marche 1 et la zone d’affichage s’allument.
Remarque:
• Quand l’unité est relancée, les réglages de base sont les suivants.
Réglages de télécommande
Mode
Réglage de température
Dernier mode de fonctionnement
Dernière température réglée
Pour arrêter le fonctionnement
1. Appuyez de nouveau sur le bouton ON/OFF 1.
Le témoin de marche 1 et la zone d’affichage s’éteignent.
Sélectionner le mode
1. Quand l’unité est en fonction, appuyez sur le bouton 2 Mode autant de fois
que nécessaire.
• À chaque fois que vous appuyez, vous passez au mode de fonctionnement
suivant, selon la séquence indiquée ci-dessous :
Le mode actuel est indiqué en 2.
PWFY-P100VM-E-BU
Eau chaude seulement
PWFY-P100/P200VM-E-AU
Chaud → Froid
30
Page 31

Pour changer le réglage de température...
1. Pour baisser la température : Appuyez sur le bouton 3 de réglage de tem-
2. Pour augmenter la température : Appuyez sur le bouton 3 de réglage de tem-
• À chaque fois que vous appuyez sur le bouton, vous changez le réglage de
1 °C (1 °F). Le réglage actuel est affiché en 3.
• Les plages disponibles sont les suivantes : *1, *2
pérature
pérature
.
.
Comment régler le jour de la semaine et l’heure…
Réglage du jour de la semaine
Réglage de l’heure
Eau chaude FroidChaud
30 °C - 70 °C
87 °F - 158 °F
Remarque :
*1 Les portées possibles varient en fonction du type d’unité connecté.
*2 Si les limites de la plage de température ont été réglées à partir de la sélection
des fonctions, les plages disponibles seront plus faibles que celles indiquées cidessus.
Si vous tentez de régler une valeur hors de la plage restreinte, l’affichage
indiquera un message expliquant que la portée est actuellement limitée.
Pour de plus amples informations sur comment régler et réinitialiser cette
fonction, voyez la section 3, paragraphe [3]–2 (3).
*3 Si les sélection de fonctions sont réglées sur l’affichage de la température en
Fahrenheit. Pour de plus amples informations sur comment sélectionner °C ou
°F, voyez la section 3, paragraphe [3]–4 (1).
30 °C - 45 °C
87 °F - 113 °F
10 °C - 30 °C
50 °F - 87 °F
2.2. Réglage de la température de l’eau
Pour changer la température de l’eau
Appuyer sur la touche
température de l’eau.
La température change de 1°C à chaque pression sur
Une pression continue permet de changer en continu la température de 1°C.
• La température intérieure peut être réglée dans la plage suivante.
Eau chaude FroidChaud
30 °C - 70 °C
87 °F - 158 °F
• Il est possible de régler la température pour l’entrée et la sortie de l’eau.
* La température est indiquée de 0 °C à 100 °C. Hors de cette plage, 0 °C ou
100 °C clignote pour signaler que la température de l’eau est inférieure ou
supérieure à la température indiquée.
2.3.
Régler le jour de la semaine et l’heure
Utilisez cet écran pour changer le jour de la semaine et
l’heure.
Remarque:
Le jour et l’heure n’apparaîtront pas si l’horloge a été déconnectée dans la sélection
des fonctions.
11
1 [réglage de la température de l’eau] et régler la
11
ou .
30 °C - 45 °C
87 °F - 113 °F
10 °C - 30 °C
50 °F - 87 °F
Affichage du jour
de la semaine et
de l’heure
1. Appuyez sur le bouton de réglage horaire A ou pour appeler
l’affichage 2.
2. Appuyez sur le bouton 9 TIMER ON/OFF (SET DAY) pour régler le jour.
* À chaque fois que vous appuyez, vous avancez le jour affiché en 3 : Dim →
Lun → ... → Ven → Sam.
3. Appuyez sur le bouton de réglage correspondant A afin de régler l’heure.
* À chaque fois que vous maintenez le bouton appuyé, l’heure (en 4) aug-
mentera d’abord toutes les minutes, puis toutes les 10 minutes, puis toutes
les heures.
4. Après avoir effectué les réglages nécessaires des étapes 2 et 3, appuyez sur
le bouton 4 CIR.WATER
Remarque:
Vos nouvelles informations des étapes 2 et 3 seront effacées si vous tapez le bouton
2 Mode (Retour) avant d’appuyer sur le bouton 4 CIR.WATER .
5. Appuyez sur le bouton 2 Mode (Retour) pour terminer la procédure de ré-
glage. Cela ramènera l’affichage sur l’écran de contrôle standard, où 1 vous
indiquera le nouveau jour et la nouvelle heure.
pour valider ces informations.
2.4. Utiliser le programmateur
Cette section explique comment régler et utiliser le minuteur. Vous pouvez utiliser
la sélection des fonctions pour sélectionner le type de programmateur, entre les
trois disponibles.
1 Hebdomadaire, 2 Simple, ou 3 Arrêt auto.
Pour de plus amples informations sur comment régler la sélection des fonctions,
voyez la section 3, paragraphe [3]–3 (3).
Utiliser le programmateur hebdomadaire
1. Le programmateur hebdomadaire peut servir à régler les six opérations pour
chaque jour de la semaine.
• Chaque opération permet l’une ou l’autre des fonctions suivantes : Program-
mateur ON/OFF un réglage de température ou programmateur ON/OFF
seulement, ou réglage de température seulement.
• À l’heure dite, le l’unité d’air effectue l’action programmée.
2. La précision horaire de ce programmateur est de 1 minute.
Remarque:
*1. Les programmateurs hebdomadaire / simple / Arrêt auto ne peuvent être
utilisés en même temps.
*2. Le programmateur hebdomadaire ne fonctionne pas dans les conditions
suivantes.
La fonction de temporisateur est désactivée ; le système est dans un état
anormal ; une exécution de test est en cours ; la télécommande est soumise à
un auto-diagnostic ou à un diagnostic externe ; l’utilisateur est en train de définir
une fonction ; l’utilisateur est en train de régler le temporisateur ; l’utilisateur est
en train de régler l’heure ou le jour de la semaine ; le système est sous
commande centralisée. (Précisément, le système n’exécute pas les opérations
(allumage, extinction ou réglage de la température) désactivées dans ces
situations.)
N° de fonctionnement
GB
FEINLPGRRUTRGBGBGBGBGB
D
SUN
ON
˚C
WEEKLY
31
Page 32

Comment régler le programmateur hebdomadaire
1. Assurez-vous que vous êtes sur l’écran de contrôle standard, et que le témoin
du programmateur hebdomadaire 1 s’affiche.
2. Appuyez sur le bouton TIMER MENU B, de manière à ce que le “Réglage”
apparaisse à l’écran (en 2). (Notez qu’à chaque fois que vous appuyez sur le
bouton, vous passez de “Réglage” à “Moniteur” (moniteur).)
3. Appuyez sur le bouton TIMER ON/OFF (SET DAY) 9 pour régler le jour. À
chaque fois que vous appuyez, vous changez le réglage en 3, selon la séquence suivante : “Dim Lun Mar Mer Jeu Ven Sam” → “Dim” → ... → “Ven” →
“Sam” → “Dim Lun Mar Mer Jeu Ven Sam”...
4. Appuyez sur le bouton (7 ou 8) INITIAL SETTING
ou autant de
fois que nécessaire pour sélectionner le numéro d’opération approprié (1 à 6)
4.
* Vos choix aux étapes 3 et 4 sélectionneront l’une des cellules de la matrice
affichée ci-dessous
(l’affichage de la commande à distance à gauche montre comment l’affichage devrait apparaître lors du réglage de l’opération 1 pour dimanche aux
valeurs indiquées cidessous).
Matrice de réglage
N ° d’op. Sunday Monday … Saturday
GBD
Remarque:
En réglant le jour sur “Dim Lun Mar Mer Jeu Ven Sam”, vous pouvez régler la même
opération à effectuer au même moment tous les jours.
FEINLPGRRUTRGBGBGBGBGB
(Exemple : L’opération 2 ci-dessus, qui est la même pour tous les jours de la
semaine.)
No. 1
No. 2
…
No. 6
• 8:30
•ON
•
23 °C (73 °F)
• 10:00
• OFF
• 10:00
• OFF
• 10:00
• OFF
• 10:00
• OFF
<Réglage de l’opération
1 pour dimanche>
▲
Démarrer l’unité à 8:30,
avec la température à
23 °C (73 °F).
▲
<Réglage de
l’opération 2 pour
tous les jours>
Éteindre l’unité à
10:00.
Régler le programmateur hebdomadaire
12. Pour activer le programmateur, appuyez sur le bouton TIMER ON/OFF (programmateur Marche/arrêt) 9, de manière à ce que l’indication “Timer Off”
(arrêt programmateur) disparaisse de l’écran.
Veillez à ce que l’indication
“Timer Off” ne s’affiche plus.
* Si le programmateur n’est pas réglé, l’indication “arrêt programmateur” cli-
gnote à l’écran.
Comment visualiser les réglages du programmateur
hebdomadaire
Réglage du programmateur
1. Assurez-vous que l’indication du programmateur hebdomadaire apparaisse à
l’écran (en 1).
2. Appuyez sur le bouton TIMER MENU B, de manière à ce que l’écran affiche
“Moniteur” (en 8).
3. Appuyez sur le bouton TIMER ON/OFF (SET DAY) 9 tant qu’il faut pour choi-
sir le jour.
4. Appuyez sur le bouton (7 ou 8) INITIAL SETTING
ou autant
que nécessaire pour changer l’opération du programmateur à l’affichage (en
9).
* À chaque fois que vous appuyez, vous passez à l’opération du programma-
teur suivante, dans l’ordre du réglage horaire.
5. Pour fermer le moniteur et retourner à l’écran de contrôle standard, appuyez
sur le bouton 2 Mode (Retour).
Pour éteindre le programmateur hebdomadaire
Appuyez sur le bouton TIMER ON/OFF 9 , de manière à ce que
l’indication “arrêt programmateur” apparaisse en 0.
Affiche le réglage de
l’heure
Affiche l’opération choisie (Marche ou
Arrêt)
* N’apparaît pas si l’opération n’est pas réglée.
Affiche le réglage de la
température
* N’apparaît pas si la
température n’est pas réglée.
5. Appuyez sur le bouton de réglage de l’heure A approprié autant de fois que
nécessaire pour régler l’heure choisie (en 5).
* Quand vous maintenez le bouton appuyé, l’heure augmentera d’abord tou-
tes les minutes, puis toutes les 10 minutes, puis toutes les heures.
6. Appuyez sur le bouton ON/OFF 1 pour sélectionner l’opération choisie (ON
ou OFF : marche ou arrêt), en 6.
* À chaque fois que vous appuyez vous passez au réglage suivant, selon la
séquence suivante : aucun affichage (pas dé réglage) → “ON” → “OFF”
7. Appuyez sur le bouton de réglage de température 3 approprié pour régler la
température choisie (en 7).
* À chaque fois que vous appuyez vous changez le réglage, selon la séquence
suivante : aucun affichage (pas de réglage) ⇔ 5 (41) ⇔ 6 (43) ⇔ ... ⇔ 89
(192) ⇔ 90 (194) ⇔ pas d’affichage.
(Plage disponible : La plage disponible pour ce réglage va de 5 °C (41 °F) till
90 °C (194 °F). La plage réelle au-delà de laquelle la température peut être
contrôlée, toutefois, peut changer en fonction du type d’unité connectée.)
8. Pour effacer les valeurs actuelles de l’opération choisie, appuyez et relâchez
rapidement le bouton 0 CHECK (CLEAR) une fois.
* Le réglage du temps affiché devient “—:—”, et les réglages de température
et ON/OFF s’éteignent tous.
(Pour effacer tous les réglages du programmateur hebdomadaire d’un coup,
appuyez sur le bouton 0 CHECK (CLEAR) pendant 2 secondes ou plus.
L’affichage commencera à clignoter, ce qui indiquera que tous les réglages
ont été effacés.)
9. Après avoir effectué les réglages nécessaires des étapes 5, 6 et 7, appuyez
sur le bouton 4 CIR.WATER
pour valider ces informations.
Pour allumer le programmateur hebdomadaire
Appuyez sur le bouton TIMER ON/OFF 9 , de manière à ce que l’indication “arrêt
programmateur” s’éteigne en 0.
Utiliser le programmateur simple
1. Vous pouvez régler le programmateur simple de trois manières possible.
• Heure de démarrage uniquement : L’unité démarre quand le temps indiqué s’est écoulé.
• Heure d’arrêt uniquement : L’unité s’arrête quand le temps indiqué
s’est écoulé.
• Horaires de marche & d’arrêt : L’unité démarre et s’arrête quand les
temps indiqués se sont écoulés.
2. Le programmateur simple (démarrage et arrêt) peut être régler une fois seulement sur une période de 72 heures. Le réglage se fait heure par heure.
Remarque:
*1. Les programmateurs hebdomadaire / simple / Arrêt auto ne peuvent être
utilisés en même temps.
*2. Le programmateur simple n’opérera pas dans les cas suivants.
La fonction programmateur est éteinte ; anomalie du système ; un test est en
cours ; la commande à distance effectue un auto-test ou un diagnostic ;
l’utilisateur est en train de sélectionner une fonction ; l’utilisateur est en train de
régler le programmateur ; le système est sous contrôle central. (Dans ces
conditions, l’opération ON/OFF est désactivée.)
Remarque:
Vos nouvelles informations seront effacées si vous tapez le bouton 2 Mode
(Retour) avant d’appuyer sur le bouton 4 CIR.WATER
.
Si vous avez réglé deux opérations différentes ou plus pour le même temps
exactement, seule l’opération ayant le n °le plus élevé sera effectuée.
10. Répétez les étapes 3 à 8 autant de fois que nécessaire pour remplir les cellu-
les disponibles que vous souhaitez.
11. Appuyez sur le bouton 2 Mode (Retour) pour revenir à l’écran de contrôle
standard et terminer la procédure de réglage.
32
Page 33

Comment régler le programmateur simple
ONHr
AFTER
SIMPLE
SIMPLE
Réglage du programmateur
Action (Marche ou Arrêt)
* “— —” s’affiche s’il n’ y a pas
de réglage.
1. Assurez-vous que vous êtes sur un écran de contrôle standard, et que le té-
moin du programmateur simple s’affiche (en 1).
Lorsque qu’une fonction autre que le temporisateur simple est affichée, réglez
la télécommande sur SIMPLE TIMER en utilisant le paramètre de fonction
temporisateur de la sélection des fonctions (voir 3.[3]–3 (3)).
2. Appuyez sur le bouton TIMER MENU B, de manière à ce que le “Réglage”
apparaisse à l’écran (en 2). (Notez qu’à chaque fois que vous appuyez sur le
bouton, vous passez de “Réglage” à “Moniteur”.)
3. Appuyez sur le bouton ON/OFF 1 pour afficher le réglage du programmateur
simple (Marche ou Arrêt : marche ou arrêt). Appuyez une fois sur le bouton
pour afficher le temps restant sur Marche, et une fois encore pour afficher le
temps restant sur Arrêt (l’indication ON/OFF apparaît en 4).
• Programmateur “ON”: L’unité démarre quand le nombre d’heures indiqué
• Programmateur “OFF”: L’unité s’arrête quand le nombre d’heures indiqué
4. Avec l’indication “Marche ” ou “Arrêt” en 3: Appuyez sur le bouton de réglage
d’heure A approprié autant de fois que nécessaire pour régler l’heure sur ON
(si “ON” s’affiche) ou sur OFF (si “OFF” s’affiche en 4).
• Plage disponible : 1 à 72 heures
5. Pour régler à la fois pour ON et pour OFF, répéter les étapes 3 et 4.
* Notez que les temps pour ON et OFF ne peuvent avoir la même valeur.
6. Pour effacer le réglage ON ou OFF actuel : Afficher le réglage ON ou OFF (voir
étape 3) puis appuyer sur le bouton CHECK (CLEAR) 0 de manière à ce que
le réglage passe à “—” en 4. (Si vous souhaitez utiliser un réglage ON ou OFF
uniquement, assurez vous que le réglage dont vous ne voulez pas est bien sur
“—”.)
7. Après avoir effectué les étapes 3 à 6, appuyez sur le bouton 4 CIR.WATER
pour valider ces informations.
Remarque:
Vos nouvelles informations seront effacées si vous tapez le bouton 2 Mode
(Retour) avant d’appuyer sur le bouton 4 CIR.WATER
8. Appuyez sur le bouton 2 Mode (Retour) pour retourner à l’écran de contrôle
standard.
9. Appuyez sur le bouton TIMER ON/OFF 9 pour lancer le compte à rebours.
Pendant que le programme s’exécute, l’affichage indique l’état du programmateur.
Veillez à ce que la valeur du programmateur soit visible et convena-
ble.
s’est écoulé.
s’est écoulé.
.
Pour éteindre le programmateur simple...
Appuyez sur le bouton TIMER ON/OFF 9 de manière à ce que le réglage du
programmateur n’apparaisse plus à l’écran (en 7).
Pour lancer le programmateur simple…
Appuyez sur le bouton TIMER ON/OFF 9 de manière à ce que le réglage du
programmateur apparaisse en 7.
Exemples
Si les horaires de marche et d’arrêt ont été réglés pour le programmateur simple,
l’opération et l’affichage sont comme indiqués comme ci-dessous.
Exemple 1:
Démarrer le programmateur, avec l’heure de démarrage avant l’heure d’arrêt
Réglage Marche : 3 heures
Réglage Arrêt : 7 heures
Au démarrage du
programmateur
▲
3 heures après le
démarrage du
programmateur
▲
7 heures après
le démarrage du
programmateur
Affiche le réglage de démarrage
du programmateur (les heures
restant avant le démarrage).
l’Affichage change pour montrer
le réglage d’arrêt du
programmateur (les heures
restant avant l’arrêt). L’affichage
indique l’horaire de la manière
suivante : ARRÊT (7 heures) –
MARCHE (3 heures) = 4 heures.
L’unité s’éteint et restera
éteinte jusqu’à ce que
quelqu’un la relance.
GB
FEINLPGRRUTRGBGBGBGBGB
D
Afficher les réglages actuels du programmateur
simple
Réglage du programmateur
1. Assurez-vous que l’indication du programmateur simple apparaisse à l’écran
(sur 1).
2. Appuyez sur le bouton TIMER MENU B, de manière à ce que le “Moniteur”
apparaisse à l’écran (en 5).
• Si le programmateur simple ON ou OFF est en fonction, son état actuel
apparaîtra en 6.
• Si les valeurs ON et OFF ont été réglées toutes les deux, les deux valeurs
apparaîtront alternativement.
3. Appuyez sur le bouton 2 Mode (Retour) pour fermer le moniteur et retourner
à l’écran de contrôle standard.
Exemple 2:
Démarrer le programmateur, avec l’heure d’arrêt avant l’heure de démarrage
Réglage Marche : 5 heures
Réglage Arrêt : 2 heures
Au démarrage du
programmateur
▲
SIMPLE
2 heures après le
démarrage du
programmateur
AFTER
ONHr
▲
5 heures après
le démarrage du
programmateur
Affiche le réglage d’arrêt du
programmateur (les heures
restant avant l’arrêt).
l’Affichage change pour montrer le
réglage de démarrage du
programmateur (les heures restant
avant le démarrage).
L’affichage indique l’horaire de la
manière suivante : MARCHE (5 heures)
– ARRÊT (2 heures) = 3 heures.
L’unité s’allume et restera
allumée jusqu’à ce que
quelqu’un l’éteigne.
33
Page 34

Utiliser le programmateur Arrêt Auto
AUTO OFF
7
1. Ce programmateur commence le compte à rebours au démarrage de l’unité et
éteint l’unité quand le temps indiqué s’est écoulé.
2. les réglages possibles vont de 30 minutes à 4 heures, par tranches de 30
minutes.
Remarque:
*1. Les programmateurs hebdomadaire / simple / Arrêt auto ne peuvent être
utilisés en même temps.
*2. Le programmateur Arrêt Auto n’opérera pas quand l’une des conditions
suivantes est en fonction.
La fonction programmateur est éteinte ; anomalie du système ; un test est en
cours ; la commande à distance effectue un auto-test ou un diagnostic ;
l’utilisateur est en train de sélectionner une fonction ; l’utilisateur est en train de
régler le programmateur ; le système est sous contrôle central. (Sous ces
conditions, l’opération ON/OFF est désactivée.)
GBD
Vérifier le réglage actuel du programmateur Arrêt Auto
Réglage du programmateur
1. Assurez-vous que l’indication “Arrêt Auto” apparaisse à l’écran (sur 1).
2. Appuyez sur le bouton TIMER MENU B pendant 3 secondes, de manière à
ce que “Moniteur” apparaisse à l’écran (en 4).
• Le temps restant avant l’extinction apparaît en 5.
3. Pour fermer le moniteur et retourner à l’écran de contrôle standard, appuyez
sur le bouton 2 Mode (Retour).
Pour éteindre le programmateur Arrêt Auto...
• Appuyez sur le bouton TIMER ON/OFF 9 pendant 3 secondes, de manière à
ce que l’indication “Arrêt programmateur” apparaisse (en 6) et que la valeur du
programmateur (en 7) disparaisse.
FEINLPGRRUTRGBGBGBGBGB
Comment régler le programmateur Arrêt Auto
Réglage du programmateur
1. Assurez-vous que vous êtes sur un écran de contrôle standard, et que le té-
moin du programmateur Arrêt Auto s’affiche (en 1).
Lorsque qu’une fonction autre que le temporisateur à extinction automatique
est affichée, réglez la télécommande sur AUTO OFF TIMER en utilisant le
paramètre de fonction temporisateur de la sélection des fonctions (see 3.[3]–
3 (3)).
2. Appuyez sur le bouton TIMER MENU B pendant 3 secondes, de manière à
ce que le “Réglage”apparaisse à l’écran (en 2).
(Notez qu’à chaque fois que vous appuyez sur le bouton, vous passez de
“Réglage” à “Moniteur”.)
3. Appuyez sur le bouton de réglage d’heure A approprié autant de fois que
nécessaire pour régler l’heure d’arrêt (en 3).
4. Appuyez sur le bouton 4 CIR.WATER
Remarque:
Vos informations seront effacées si vous tapez le bouton 2 Mode (Retour) avant
d’appuyer sur le bouton 4 CIR.WATER
5. Appuyez sur le bouton 2 Mode (Retour) pour terminer la procédure de ré-
glage et retourner à l’écran de contrôle standard.
6. Si l’unité est déjà en fonctionnement, le programmateur démarre le compte à
rebours immédiatement.
teur apparaisse correctement à l’écran.
Veillez à vérifier que le réglage du programma-
pour enregistrer le réglage.
.
• Sinon, il est possible d’éteindre l’unité elle-même. La valeur du programmateur
(en 7) disparaîtra de l’écran.
Pour démarrer le programmateur Arrêt Auto...
• Appuyez sur le bouton TIMER ON/OFF 9 pendant 3 secondes. L’indication
“Arrêt programmateur” disparaît (en 6), et le réglage du programmateur apparaît
(en 7).
• Sinon, il est possible d’allumer l’unité elle-même. La valeur du programmateur
apparaît en 7.
34
Page 35

3. Sélection des fonctions
Sélection des fonctions de la commande à distance
Le réglage des fonctions de la commande suivantes peut être modifié à l’aide du mode de sélection des fonctions de la commande à distance. Modifiez le réglage au besoin.
Elément 1
1. Modification de la
langue (“CHANGE
LANGUAGE”)
2. Limitation des
fonctions
(“SELECTION
FONCTIONS”)
3. Sélection des
modes
(“SELECTION DU
MODE”)
4. Modification de
l’affichage
(“AFFICHAGE
SOUS MENU”)
Elément 2
Réglage des langues d’affichage
(1)
Réglage de la limitation des fonctions de fonctionnement
(verrouillage de fonctionnement) (“BLOCAGE FONCTIONS”)
(2)
Réglage de la désactivation du mode de fonctionnement (“SELECTION MODE INACTIF”)
(3)
Réglage de la limite de la plage de températures (“LIMITATION TEMPERATURE”)
(1) Réglage de la commande à distance principale/secondaire
(“TELCOMMANDE MAITRE/ESCLAVE”)
(2)
Utilisation du réglage de l’horloge (“AFFICHAGE HORLOGE”)
(3)
Réglage de la fonction de minuterie (“PROG HEBDO MADAIRE”)
(4) Réglage du numéro à contacter en cas d’erreur (“CALL.”)
(5)
Réglage du décalage de température (“REGLAGE DELTA T EAU”)
(1)
Réglage de l’affichage de la température °C/°F (“TEMPERATURE ° C/°F”)
(2) Réglage de l’affichage de la température de l’eau
(“AFFICHAGE TEMP EAU”)
• L’affichage en plusieurs langues est possible
• Réglage de la plage de limitation de fonctionnement (verrouillage de
fonctionnement)
•
Réglez l’utilisation ou la non utilisation de chaque mode de fonctionnement
• Réglage de la plage de températures ajustable (maximum, minimum)
• Sélection de la commande à distance principale ou secondaire
* Lorsque deux commandes à distance sont connectées à un groupe,
l’une des deux doit être réglée en tant que commande secondaire.
• Activation ou désactivation de la fonction d’horloge
• Réglage du type de minuterie
• Affichage du numéro à contacter en cas d’erreur
• Réglage du numéro de téléphone
•
Réglez l’utilisation ou la non utilisation du réglage de la quantité de décrochement
• Réglage de l’unité de température (°C ou °F) à afficher
• Activation ou désactivation de l’affichage de la température de l’eau
Elément 3 (contenu de réglage)
Organigramme de sélection des fonctions
[1] Arrêtez l’unité pour activer le mode de sélection des fonctions de la commande à distance. → [2] Sélectionnez l’élément 1. → [3] Sélectionnez l’élément 2. → [4] Effectuez
le réglage (vous trouverez plus de détails dans la colonne Elément 3).→ [5] Réglage terminé. → [6] Repassez à l’affichage normal (fin).
Affichage normal (affichage
lorsque l’unité ne fonctionne pas)
(Maintenez la touche E enfoncée et appuyez sur la touche
D pendant deux secondes.)
*L’affichage ne peut pas être modifié pendant l’essai de
fonctionnement et l’auto-diagnostic.
Elément 1 Mode de sélection des fonctions
Change Language
(“CHANGE LANGUAGE”)
Limitation des fonctions
(“SELECTION
FONCTIONS”)
Appuyez sur
la touche E.
Sélection des modes
(“SELECTION DU
MODE”)
Modification de l’affichage
(“AFFICHAGE SOUS
MENU”)
Appuyez sur la touche G.
Appuyez sur
la touche E.
Appuyez sur
la touche G.
Appuyez sur
la touche E.
Appuyez sur
la touche G.
Appuyez sur
la touche E.
Appuyez sur
la touche G.
→
Réglage de la limitation des fonctions de fonctionnement (“BLOCAGE FONCTIONS”)
Réglage de la désactivation du mode de fonctionnement (“SELECTION MODE INACTIF”)
Réglage de la limitation de la plage de températures (“LIMITATION TEMPERATURE”)
→
Réglage de la commande à distance principale/secondaire (“TELCOMMANDE MAITRE/ESCLAVE”)
Utilisation du réglage de l’horloge (“AFFICHAGE HORLOGE”)
Réglage de la fonction de minuterie (“PROG HEBDO MADAIRE”)
Réglage du numéro à contacter en cas d’erreur (“CALL.”)
Réglage du décalage de température (“REGLAGE DELTA T EAU”)
→
Réglage de l’affichage de la température °C/°F (“TEMPERATURE ° C/°F”)
Réglage de l’affichage de la température de l’eau (“AFFICHAGE TEMP EAU”)
de la commande à distance
Elément 2
→
→
→→→
→
→
Appuyez sur la touche G.
Appuyez sur la touche G.
Appuyez sur la touche G.
(Maintenez la touche E enfoncée et
appuyez sur la touche D pendant
deux secondes.)
*De la sorte, la commande à
distance enregistre les réglages
effectués.
Reportez-vous
au point [3]–1
Elément 3
(contenu de réglage)
Appuyez sur
la touche D.
Appuyez sur
la touche D.
Appuyez sur
la touche D.
Reportez-vous
au point [3]–2. (1)
Reportez-vous
au point [3]–2. (2)
Reportez-vous
au point [3]–2. (3)
Reportez-vous
au point [3]–3. (1)
Reportez-vous
au point
Reportez-vous
au point [3]–3. (3)
Reportez-vous
au point [3]–3. (4)
Reportez-vous
au point [3]–3. (5)
Reportez-vous
au point [3]–4. (1)
Reportez-vous
au point [3]–4. (2)
[3]–3. (2)
REMARQUE
Le fonctionnement de la minuterie est
interrompu lorsque l’affichage de sélection
des fonctions de la commande à distance
passe à l’affichage normal.
Ecran à pixels
Cet écran s’affiche dans la langue sélectionnée dans le mode
CHANGE LANGUAGE (Modification de la langue). L’anglais
est sélectionné dans ce manuel.
GB
FEINLPGRRUTRGBGBGBGBGB
D
35
Page 36

Réglage détaillé
[3]–1. Réglage CHANGE LANGUAGE (Modification de la langue)
La langue d’affichage de l’écran à pixels peut être sélectionnée.
• Appuyez sur la touche [
1 Anglais (GB), 2 Allemand (D), 3 Espagnol (E), 4 Russe (RU),
5 Italien (I), 6 Français (F), 7 Suédois
[3]–2. Limitation des fonctions
(1)
Réglage de la limitation des fonctions de fonctionnement (verrouillage de fonctionnement)
• Pour commuter le réglage, appuyez sur la touche [ ON/OFF].
1 no1 : Le réglage du verrouillage de fonctionnement est appliqué à toutes
les touches autres que la touche [
2 no2 : Le réglage du verrouillage de fonctionnement est appliqué à toutes les
touches.
3 OFF (valeur de réglage initial) : Le réglage du verrouillage de fonctionnement
* Pour appliquer le réglage du verrouillage de fonctionnement à l’écran normal, il
est nécessaire d’appuyer sur les touches (Appuyez simultanément sur les
touches [CIR.WATER] et [
pendant deux secondes.) sur l’écran normal après avoir effectué le réglage cidessus.
(2) Réglage de la désactivation du mode de fonctionnement
Une fois ce réglage modifié, vous pouvez modifier le mode de fonctionnement dans
GBD
la plage modifiée.
• Pour basculer parmi les réglages suivants, appuyez sur le bouton [
1 Mode Chaud : Règle l’utilisation ou la non utilisation du mode
2 Mode Chauffage ECO : Règle l’utilisation ou la non utilisation du mode
3 Mode Eau chaude : Règle l’utilisation ou la non utilisation du mode
n’est pas appliqué.
FEINLPGRRUTRGBGBGBGBGB
4 Mode Anti givre : Règle l’utilisation ou la non utilisation du mode
5 Mode Froid : Règle l’utilisation ou la non utilisation du mode
6 INACTIF (valeur initiale du réglage)
* Lorsqu’un autre réglage que OFF est sélectionné, les modes Chaud, Chauffage
ECO, Eau chaude, Anti givre et Froid sont désactivés simultanément.
* Si un mode n’est pas disponible sur l’unité à connecter, il ne peut être utilisé
même si le réglage est “disponible.”
(3) Réglage de la limitation de la plage de températures
Une fois ce réglage effectué, la température peut être modifiée dans la plage
définie.
• Pour commuter le réglage, appuyez sur la touche [
1 MODE LIMITE TEMP INACTIF:
Vous pouvez modifier la plage de températures sur le mode Chaud.
2 MODE LIMITE TEMP EAU CHAUDE:
Vous pouvez modifier la plage de températures sur le mode Chaud/Eau
chaude.
3 MODE LIMITE TEMP ANTI GIVRE:
Vous pouvez modifier la plage de températures sur le mode Anti givre.
4 MODE LIMITE TEMP EN FROID:
Vous pouvez modifier la plage de températures sur le mode Froid.
5 OFF (programmation initiale) :
La limitation de la plage de températures n’est pas active.
* Lorsqu’un réglage autre que OFF est sélectionné, le réglage de la limitation de
la plage de températures des modes refroidissement, chauffage et automatique
s’effectue en même temps. Toutefois, la plage ne peut pas être limitée lorsque
la plage de températures réglée n’a pas été modifiée.
• Pour augmenter ou diminuer la température, appuyez sur la touche [
ou ].
• Plage réglable
Mode Eau chaude : Limite inférieure: 30 ~70 °C (87 ~158 °F)
Mode Chaud : Limite inférieure: 30 ~45 °C (87 ~113 °F)
Mode Froid : Limite inférieure: 10 ~30 °C (50 ~ 87 °F)
* La plage réglable varie en fonction de l’appareil à connecter.
MENU] pour modifier la langue.
ON/OFF].
ON/OFF] en même temps et les maintenir enfoncées
Chaud.
Chauffage ECO.
Eau chaude.
Anti givre.
Froid.
: Le mode de fonctionnement n’est pas activé.
ON/OFF].
Limite supérieure: 70 ~30 °C (158 ~ 87 °F)
Limite supérieure: 45 ~30 °C (113 ~ 87 °F)
Limite supérieure: 30 ~10 °C (87 ~ 50 °F)
ON/OFF].
TEMP.
[3]–3. Réglage de la sélection des modes
(1) Réglage de la commande à distance principale/secondaire
• Pour commuter le réglage, appuyez sur la touche [
1 Maitre : La commande devient la commande principale.
2 Esclave : La commande devient la commande secondaire.
(2) Utilisation du réglage de l’horloge
• Pour commuter le réglage, appuyez sur la touche [
1 ON : La fonction d’horloge peut être utilisée.
2 OFF : La fonction d’horloge ne peut pas être utilisée.
(3) Réglage de la fonction de minuterie
• Pour commuter le réglage, appuyez sur la touche [
l’une des fonctions suivantes.).
1 PROG HEBDO MADAIRE (Valeur de réglage initial):
2 PROG HORAIRE ARRET AUTO:
3 PROG HORAIRE SIMPLIFIE: La minuterie simple peut être utilisée.
4 PROG HORAIRE INACTIF: Le mode de minuterie ne peut pas être utilisé.
* Lorsque l’utilisation du réglage de l’horloge est définie sur OFF, la fonction
“PROG HEBDO MADAIRE” ne peut pas être utilisée.
(4) Réglage du numéro à contacter en cas d’erreur
• Pour commuter le réglage, appuyez sur la touche [
1 CALL OFF : Les numéros à contacter définis ne s’affichent pas en cas
2 CALL **** *** **** : Les numéros à contacter définis s’affichent en cas
CALL_ : Le numéro à contacter peut être réglé lorsque l’affichage
• Réglage des numéros à contacter
Pour régler les numéros à contacter, effectuez la procédure suivante.
Déplacez le curseur clignotant sur les numéros réglés. Appuyez sur la touche
[
TEMP. ou ] F pour déplacer le curseur vers la droite (gauche).
Appuyez sur la touche [
(5) Réglage du décalage de température
• Pour basculer parmi les réglages suivants, appuyez sur le bouton
[
ON/OFF] D.
1 ON : Le réglage de la quantité de décrochement apparaît sous le mode de
2 OFF : Le réglage de la quantité de décrochement n’apparaît pas sous le
réglage initial de la température de l’eau.
mode de réglage initial de la température de l’eau.
La minuterie hebdomadaire peut être utilisée.
L’arrêt différé automatique peut être utilisé.
d’erreur.
d’erreur.
est tel qu’illustré à gauche.
CLOCK ou ] C pour régler les numéros.
ON/OFF] D.
ON/OFF] D.
ON/OFF] D (Choisissez
ON/OFF] D.
[3]–4. Réglage de l’affichage
(1) Réglage de l’affichage de la température °C/°F
• Pour commuter le réglage, appuyez sur la touche [
1 °C: L’unité de température ° C est utilisée.
2 °F: L’unité de température °F est utilisée.
(2) Réglage de l’affichage de la température de l’eau
• Pour commuter le réglage, appuyez sur la touche [
1 ON : La température de l’eau s’affiche.
2 OFF : La température de l’eau ne s’affiche pas.
ON/OFF] D.
ON/OFF] D.
36
Page 37

4. Entretien de l’appareil
Toujours demander à la personne responsable de la maintenance d’effectuer l’entretien de la crépine.
Avant d’effectuer tout entretien, mettre le système hors tension (OFF).
Comment nettoyer les filtres
• Pour nettoyer la crépine, déposer le couvercle et frotter l’intérieur de la crépine
avec un brosse.
Précaution:
• Avant de commencer le nettoyage, arrêter l’appareil et couper l’alimentation (OFF). Ne pas oublier que le ventilateur interne tourne à grande
vitesse et peut être la cause de sérieuses blessures.
• Les appareils intérieurs sont équipés de crépines servant à extraire les
poussières que l’air aspire. Nettoyer le filtre à tamis de la façon indiquée
sur les dessins suivants.
• La durée de vie de la crépine dépend de l’endroit où l’appareil est installé
et de la façon dont il fonctionne.
Précaution:
• Ne pas faire sécher la crépine en l’exposant à la lumière directe du soleil
ou le chauffant près d’un feu, etc. Elle pourrait se déformer.
Précaution:
Ne jamais verser de l’eau ou vaporiser des produits inflammables dans le
climatiseur car cela pourrait provoquer des pannes, un danger d’électrocution, voire un incendie.
5. Guide de dépannage
Avant de faire appel au service après-vente, veuillez vérifier les points suivants:
Etat de l’appareil
L’appareil ne fonctionne pas.
L’eau sort mais elle ne
refroidit pas assez ou
ne chauffe pas assez.
L’eau froide ou l’eau
chaude ne sort pas.
Le climatiseur fonctionne pendant un bref
instant puis s’arrête
aussitôt.
• Si le fonctionnement s’arrête à cause d’une interruption de courant, la fonction [d’empêchement de redémarrage des circuits après une interruption de courant] s’active
et empêche le fonctionnement de l’appareil même (la touche [ON/OFF]) après le rétablissement de l’alimentation.
Si le mauvais fonctionnement persiste après avoir vérifié tous les points ci-dessus, mettre l’appareil hors tension (OFF) et contacter votre revendeur en lui donnant toutes les
informations concernant le nom du produit, la nature du problème, etc. Si l’affichage de “[CHECK]” et le code de vérification (à 4 chiffres) clignote, expliquer au revendeur le
contenu de l’affichage (et lui donner le code de vérification). Ne jamais essayer d’effectuer les réparations vous-même.
Commande à distance
Le témoin“'” ne s’allume pas.
Aucun affichage n’apparaît
même quand on appuie sur la
touche [ON/OFF].
L’affichage à cristaux liqui-
des indique que l’appareil est
en cours de fonctionnement.
L’affichage à cristaux li-
quides indique que l’ap-
pareil est en cours de
fonctionnement.
Le code et la mention de
vérification “CHECK” clignotent sur l’affichage à
cristaux liquides
Panne de courant.
L’alimentation est coupée (OFF).
Le fusible de la prise d’alimentation a sauté.
Le coupe-circuit de fuite à la terre s’est déclenché.
Mauvais réglage de la température.
Le circuit empêchant la remise en marche trop rapide
fonctionne pendant 3 minutes après l’arrêt.
L’appareil intérieur a été remis en fonctionnement pen-
dant l’opération de chauffage et de dégivrage.
Des obstacles bloquent l’arrivée et la sortie d’air des
appareils intérieurs et extérieurs.
La crépine est remplie de poussière et de saleté.
Cause
Appuyer sur la touche [ON/OFF] après la remise sous tension.
Brancher l’alimentation (ON).
Remplacer le fusible.
Remettre le coupe-circuit de fuite à la terre.
Après avoir vérifié le réglage de température et la température ambiante sur l’affichage à cristaux liquides, se reporter au paragraphe
[Réglage de la température de l’eau] et utiliser la touche de réglage.
Attendre un instant.
(Pour protéger le compresseur, un circuit empêchant la remise en marche dans les 3 minutes est incorporé à l’appa-
reil intérieur. C’est pourquoi, dans certains cas, le compresseur ne se met pas en marche immédiatement et il se peut
qu’il ne fonctionne pas pendant 3 minutes.)
Attendre un instant.
(L’opération de chauffage commence lorsque l’opération de dégivrage est terminée.)
Remettre en marche après le retrait des obstacles.
Remettre en marche après le nettoyage de la crépine. (Se
reporter [Entretien de l’appareil].)
Remède
GB
FEINLPGRRUTRGBGBGBGBGB
D
Les symptômes suivants ne constituent pas des pannes provenant du climatiseur:
• L’air soufflé par le climatiseur peut parfois dégager certaines odeurs. Cela est dû notamment à la fumée de cigarettes contenue dans l’air de la pièce, aux odeurs de
cosmétiques, des murs, des meubles, etc. absorbées par le climatiseur.
• Un bruit de sifflement peut être audible immédiatement après la mise en marche ou l’arrêt du climatiseur. Il s’agit du bruit du réfrigérant qui se répand à l’intérieur du
climatiseur, cela n’a rien d’anormal.
• Le climatiseur émet parfois un bruit ou un déclic au début ou à la fin de l’opération de refroidissement/de chauffage. Il s’agit du son de frottement sur le panneau avant
et sur d’autres éléments suite à l’expansion et à la contraction provoquées par les changements de température. Cela n’a rien d’anormal.
37
Page 38

6. Installation, travaux en cas de déplacement et vérifications
A propos de l’emplacement de l’installation
Veuillez prendre contact avec votre revendeur pour les détails concernant l’instal-
lation et son déménagement.
Précaution:
Ne jamais installer le climatiseur dans un endroit sujet à des fuites de gaz
inflammable.
Un incendie pourrait se déclarer suite à des fuites ou à une accumulation de
gaz à proximité de l’appareil.
Ne jamais installer le climatiseur dans les endroits suivants:
• dans des endroits où on utilise beaucoup d'huile pour machines
•à proximité de l'océan et des zones balnéaires où l'air est salé.
• où le taux d’humidité est important
•à proximité de sources chaudes
• en présence de gaz sulfuriques
• en présence de machines fonctionnant à haute fréquence (soudeuse à haute-
fréquence, etc.)
• où on utilise fréquemment des solutions acides
GBD
• où on vaporise régulièrement des produits spéciaux
• Installer l’appareil intérieur à l’horizontale sinon il risque d’y avoir des fuites
d’eau.
• Prendre des mesures suffisantes contre les interférences en cas d’installation
du climatiseur dans des hôpitaux ou dans des centres de communications.
Si le climatisuer doit servir dans un des milleux repris cidessus, il faut s’attendre à
des pannes de fonctionnement fréquentes. Il est dès lors conseillé d’éviter de
FEINLPGRRUTRGBGBGBGBGB
l’installer dans ce genre d’endroits.
Pour plus de détails, prendre contact avec votre revendeur.
A propos de l’installation électrique
Précaution:
• Les travaux électriques doivent être menés à bien par des électriciens
qualifiés, conformément aux normes à respecter “pour les installations
électriques” et conformément aux explications données dans les manuels d’installation. Des circuits spéciaux doivent être utilisés. L’utilisation d’autres équipements sur la même source d’alimentation risque de
faire sauter les coupe-circuits et les fusibles.
• Ne jamais raccorder le câble de terre à une conduite de gaz, à une conduite d’eau, à un paratonnerre ou à un câble de terre téléphonique. Pour
plus de détails, veuillez prendre contact avec votre revendeur.
• Dans certains types d’installations, l’introduction d’un coupe-circuit de
fuite à la terre est obligatoire. Pour plus de détails à ce sujet, veuillez
prendre contact avec votre revendeur.
A propos de l’installation des tuyaux d’eau
• Ne pas utiliser de tuyaux en acier comme tuyaux d’eau. Les tuyaux en cuivre
sont recommandés.
• Le circuit d’eau devrait être un circuit fermé.
En ce qui concerne le déménagement de l’installation
• Pour retirer et réinstaller le climatiseur en cas de déménagement ou de réaménagement de votre habitation, veuillez prendre contact au préalable avec
le revendeur pour une estimation du coût des travaux requis pour le déména-
gement de l’installation.
Précaution:
Lors du déménagement et de la réinstallation du climatiseur, veuillez prendre contact avec votre revendeur car une installation défectueuse peut être
la cause d’électrocution, d’incendie, etc.
Faire également attention au bruit
• Lors des travaux d’installation, choisir un endroit capable de supporter entièrement le poids du climatiseur et où le bruit et les vibrations sont atténués.
• Choisir un emplacement où l’air froid ou chaud et le bruit causé par la sortie de
l’air à l’extérieur n’incommodent pas les voisins.
• Si un corps étranger doit se trouver à proximité de la sortie d’air extérieure du
climatiseur, son rendement risque de diminuer et il peut en résulter un bruit
accru. Eviter de placer tout obstacle à proximité de la sortie d’air extérieure.
• En cas de bruit anormal provenant du climatiseur, contacter votre revendeur.
Vérification et maintenance
• Si le climatiseur est utilisé pendant plusieurs saisons, ses parties internes peuvent s’encrasser, ce qui en diminue le rendement.
En fonction des conditions d’utilisation, il peut générer de mauvaises odeurs
et l’écoulement peut être perturbé par les poussières et la saleté, etc.
7. Spécifications techniques
Modèle
Source d’alimentation
Capacité de chauffage kW
Capacité de refroidissement kW
Niveau sonore
Poids net kg
Dimension
Accessoire
Débit d’eau m
*1 Conditions de chauffage nominales
Temp. extérieure.: 7 °C DB/6 °C WB (45 °F DB/43 °F WB)
Longueur de tuyau: 7,5 m (24-9/16 ft)
Différence de niveau: 0 m (0 ft)
Temp. eau à l’aspiration 65 °CDébit d’eau 2,15 m
*3 Conditions de refroidissement nominales
Temp. extérieure.: 35 °C DB (95 °F DB)
Longueur de tuyau: 7,5 m (24-9/16 ft)
Différence de niveau: 0 m (0 ft)
Temp. eau à l’aspiration 23 °CDébit d’eau 1,93 m
*5 Conditions de refroidissement nominales
Temp. extérieure. : 35 °C DB (95 °F DB)
Longueur de tuyau: 7,5 m (24-9/16 ft)
Différence de niveau: 0 m (0 ft)
Temp. eau à l’aspiration 23 °CDébit d’eau 3,86 m
Hauteur mm
Largeur mm
Profondeur mm
PWFY-P100VM-E-BU
3
/h
PWFY-P100VM-E-AU
1-phase 220-230-240 V 50/60 Hz
1
12,5 *
–
44 dB<A>
60 kg
Crépine, Matière isolant contre la chaleur, Jeu de connecteurs x 2,
Joint d’expansion X 2 (PWFY - P200VM - E - AU)
0,6-2,15 1,2-4,3
*2 Conditions de chauffage nominales
Temp. extérieure.: 7 °C DB/6 °C WB (45 °F DB/43 °F WB)
Longueur de tuyau: 7,5 m (24-9/16 ft)
3
/h
3
/h
3
/h
Différence de niveau: 0 m (0 ft)
Temp. eau à l’aspiration 30 °CDébit d’eau 2,15 m
*4 Conditions de chauffage nominales
Temp. extérieure.: 7 °C DB/6 °C WB (45 °F DB/43 °F WB)
Longueur de tuyau: 7,5 m (24-9/16 ft)
Différence de niveau: 0 m (0 ft)
Temp. eau à l’aspiration 30 °CDébit d’eau 4,3 m
12,5 *
11,2 *
29 dB<A>
35 kg
800
450
300
0,6-2,15
2
3
PWFY-P200VM-E-AU
4
25,0 *
5
22,4 *
29 dB<A>
38 kg
3
/h
3
/h
38
Page 39

Índice
1. Medidas de seguridad .............................................................................. 39
1.1. Instalación ............................................................................... 39
1.2. Durante el funcionamiento ...................................................... 39
1.3. Eliminación de la unidad ......................................................... 40
2. Cómo manejar la unidad ........................................................................... 40
2.1. Utilización del mando a distancia ............................................ 40
2.2. Ajuste de la temperatura del agua .......................................... 41
1. Medidas de seguridad
s Antes de poner en marcha la unidad, lea detenidamente to-
das las “Medidas de seguridad”.
s En el apartado “Medidas de seguridad” se enumeran ins-
trucciones importantes sobre seguridad. Cerciórese de que
se cumplen.
Símbolos utilizados en el texto
Advertencia:
Describe las medidas de seguridad que deben cumplirse para evitar el riesgo de lesiones o incluso de muerte del usuario.
Precaución:
Describe las precauciones que se deben tener para evitar daños en la unidad.
Símbolos utilizados en las ilustraciones
: Indica una acción que debe evitarse.
: Indica que deben seguirse unas instrucciones importantes.
: Indica una pieza que debe estar conectada a tierra.
: Tenga cuidado con las descargas eléctricas. (Este símbolo aparece en la
etiqueta de la unidad principal.) <Color: amarillo>
: Tenga cuidado con la superficie caliente.
Advertencia:
Lea atentamente las etiquetas adheridas a la unidad principal.
1.1. Instalación
s Una vez leído este manual, consérvelo junto con el manual de instala-
ción en un lugar seguro para poder consultarlo siempre que lo necesite.
Si la unidad será utilizada por otra persona, cerciórese de que se le entrega este manual.
Advertencia:
• La unidad no debe ser instalada por el usuario. Pida a su distribuidor o a
una empresa debidamente autorizada que se lo instale. La incorrecta
instalación de la unidad puede dar lugar a goteo de agua, descarga eléctrica o fuego.
• Utilice sólo accesorios autorizados por Mitsubishi Electric y pida a su
distribuidor o a una empresa autorizada que se los instale. La incorrecta
instalación de los accesorios puede dar lugar a goteo de agua, descarga
eléctrica o fuego.
• No toque la unidad. La superficie de la unidad puede estar caliente.
• No instale la unidad en lugares donde pueda generarse gas corrosivo.
• El Manual de Instalación detalla el método recomendado de instalación.
Cualquier alteración estructural necesaria para la instalación deberá cumplir las normas locales de edificación y obra.
• No repare nunca la unidad ni la traslade a otro lugar usted mismo. La
incorrecta realización de una reparación puede dar lugar a goteo de agua,
descarga eléctrica o fuego. Si necesita reparar o trasladar la unidad, consulte a su distribuidor.
• Mantenga las partes eléctricas alejadas del agua (agua de lavado), etc.
• Eso puede dar como resultado descargas eléctricas, incendio o humo.
Nota 1: Cuando lave el intercambiador de calor y el recipiente de drena-
je, haga que la caja de control, el motor y el LEV permanezcan
secos, mediante la utilización de una cubierta impermeable.
Nota 2: Nunca drene el agua de lavado del Recipiente de Drenaje y del
Intercambiador de Calor usando la Bomba de Drenaje. Drénelos
por separado.
• El equipo no fue diseñado para usar por niños pequeños o personas
débiles sin vigilancia.
• Los niños pequeños deben ser vigilados constantemente para que no
jueguen con el equipo.
• No utilice aditivo detector de fuga.
2.3. Configuración de día de la semana y hora.............................. 41
2.4. Utilización del temporizador .................................................... 41
3. Selección de función ................................................................................. 45
4. Mantenimiento de la máquina ................................................................... 47
5. Solución de problemas ............................................................................. 47
6. Instalación, tareas de transferencia y verificación .................................... 48
7. Especificaciones ....................................................................................... 48
1) Unidad exterior
Advertencia:
• La unidad exterior debe instalarse sobre una superficie plana y estable,
en un lugar en el que no haya acumulación de nieve, de hojas o de basura.
• No se suba encima ni coloque objetos sobre la unidad. Podría caer y
hacerse daño y los objetos podrían caer causando lesiones.
Precaución:
La unidad exterior deberá instalarse en un lugar donde el aire y el ruido que
produce la unidad no molesten a los vecinos.
2) Unidad interior
Advertencia:
La unidad interior se instalará de forma segura. Si la unidad se monta suelta,
podría caer causando daño.
3) Controlador remoto
Advertencia:
El controlador remoto debe instalarse de forma que quede fuera del alcance
de los niños.
4) Manguito de drenaje
Precaución:
Asegúrese de que el manguito de drenaje se instala de forma que en drenaje
pueda fluir sin trabas. Una instalación incorrecta puede producir goteos que
dañarían el mobiliario.
5) Toma de corriente, fusible o interruptor de corte
Advertencia:
• Verifique que la unidad esté conectada mediante una línea dedicada. Otros
aparatos conectados a la misma fuente de alimentación pueden provocar una sobrecarga.
• Asegúrese de que hay un interruptor principal de corriente.
• Asegúrese de que la corriente de red coincide con el voltaje de la unidad
y del fusible o interruptor de corte. No instale nunca un fusible con capacidad mayor a la indicada.
6) Conexión a tierra
Precaución:
• La unidad debe estar correctamente conectada a tierra. No conecte nunca el cable de toma de tierra a una tubería de gas, de agua, conductor
eléctrico o cable de tierra telefónico. Si la unidad no se conecta correctamente a tierra puede haber peligro de descarga eléctrica.
• Compruebe con frecuencia que el cable de tierra de la unidad exterior
está correctamente conectado tanto al terminal de tierra de la unidad
como a los electrodos de toma de tierra.
1.2. Durante el funcionamiento
Precaución:
• No utilice objetos puntiagudos para apretar los botones ya que podría
dañarse el controlador remoto.
• No tuerza ni tire del cable del controlador remoto ya que podría dañar al
controlador remoto y provocar un mal funcionamiento.
• Nunca quite la cubierta superior del mando a distancia, porque dejaría al
descubierto las placas de los circuitos impresos y si se tocan se puede
estropear o provocar un incendio.
GBD
EINLPGRRUTRGBGBGBGBGB
F
39
Page 40

• Nunca limpie el mando a distancia con gasolina, disolvente u otros productos químicos, porque podría decolorarlo y provocar alguna avería.
Para quitar las manchas más resistentes, moje un paño con un poco de
detergente neutro disuelto en agua, escúrralo bien, quite las manchas y
vuelva a pasar un paño bien seco.
• No bloquee ni cubra nunca las tomas y salidas de las unidades interior y
exterior. La colocación de muebles altos cerca de la unidad interior o de
objetos como cajas grandes cerca de la unidad exterior puede reducir el
rendimiento de la unidad.
Advertencia:
• No vierta agua sobre la unidad ni la toque con las manos húmedas. Puede producirse una descarga eléctrica.
• No rocíe gases combustibles en las proximidades de la unidad. Puede
haber riesgo de incendio.
• No coloque calentadores de gas o cualquier otro aparato de llama abierta expuestos a la corriente de aire descargada por la unidad. Puede dar
lugar a una combustión incompleta.
Advertencia:
• No extraiga el panel frontal del ventilador de la unidad exterior mientras
esté en funcionamiento. Puede resultar herido si toca piezas giratorias,
calientes o de alto voltaje.
• No inserte nunca dedos, palos, etc. en las tomas o salidas de aire ya que
pueden ocurrir graves accidentes debido a la alta velocidad de giro de la
GBDF
unidad. Tenga especial cuidado cuando haya niños cerca.
• Si detecta olores raros pare la unidad, desconecte el interruptor de red y
consulte con su distribuidor. De lo contrario puede haber una rotura,
una descarga eléctrica o fuego.
• Cuando note ruidos o vibraciones que no sean normales, pare la unidad,
desconecte la fuente de alimentación y póngase en contacto con su proveedor.
• No sobreenfríe. La temperatura má adecuada para el interior está a unos
5
°C menos que la exterior.
• No permita que minusválidos o niños permanezcan en plena corriente
de aire del acondicionador. Podría causar problemas de salud.
EINLPGRRUTRGBGBGBGBGB
Precaución:
• No dirija la corriente de aire hacia plantas o animales enjaulados.
• Ventile la habitación con frecuencia. Si la unidad funciona continuamente en una habitación cerrada durante mucho tiempo, el aire se viciará.
En caso de avería
Advertencia:
• Nunca repare personalmente el acondicionador. Ante qualquier avería o
servicio, avise siempre a su proveedor. Una reparación defectuosa puede provocar fugas de agua, descarga eléctrica, un incendio, etc.
• Si el mando a distancia muestra alguna indicación de error, el acondicionador de aire no funciona o se produce cualquier tipo de anomalía, pare
la unidad y póngase en contacto con su proveedor. Si deja la unidad
funcionando en tales condiciones puede provocar alguna avería o un
incendio.
• Si los fusibles saltan con frecuencia, avise a su proveedor. Si deja que
siga pasando eso, podría llegar ocurrir alguna avería o un incendio.
• Si se producen fugas de gas refrigerante, pare la unidad, ventile bien la
habitación y avise a su proveedor. Si mantiene la unidad funcionando en
esa situación, podría producirse algún accidente provocado por la falta
de oxígeno.
Cuando el acondicionador de aire no vaya a usarse
durante un tiempo prolongado
• Si no va a usar el acondicionador durante un tiempo prolongado debido
a los cambios de estación, etc., téngalo en marcha durante 4 – 5 horas
en modo de ventilación para que el interior se seque completamente. Si
no lo hace así, podrían formarse antihigiénicas e insalubres manchas de
moho en algunas zonas de la habitación.
• Cuando no vaya a usar el acondicionador durante un tiempo prolongado, desconecte la [fuente de alimentación].
Si la deja conectada podría llegar a gastar varias decenas de vatios y
también podría provocarse algún incendio debido a la acumulación de
polvo u otras sustancias.
• Cuando vaya a usar de nuevo el acondicionador, conecte la fuente de
alimentación por lo menos 12 horas antes de ponerlo realmente en marcha. No tenga la fuente de alimentación desconectada durante períodos
de uso intenso ya que podría estropearse la unidad.
• Cuando no vaya a utilizar la unidad durante mucho tiempo durante la
temporada de invierno, purgue el agua del interior de la tubería de agua
para evitar que se congele.
1.3. Eliminación de la unidad
Advertencia:
Cuando deba eliminar la unidad, consulte con su distribuidor. Si las conducciones se extraen incorrectamente puede haber fuga de refrigerante (gas de
fluorocarbono) que entre en contacto con su piel causándole daño. La liberación del gas a la atmósfera también perjudica al medio ambiente.
2. Cómo manejar la unidad
2.1. Utilización del mando a distancia
Cómo poner en marcha, detener, cambiar el modo y
ajustar la temperatura del agua
Para poner en marcha
1. Pulse el botón ON/OFF 1.
Se encienden la lámpara de ON 1 y la pantalla.
Nota:
• Cuando se reinicia la unidad, las configuraciones iniciales son las siguientes.
Configuraciones del Mando a distancia
Modo
Configuración de la temperatura
Último valor configurado
Último valor configurado
Para detener el funcionamiento
1. Pulse de nuevo el botón ON/OFF 1.
Se oscurecen la lámpara de ON 1 y la pantalla.
Selección de Modo
1. Con la unidad en funcionamiento, pulse el botón Modo 2 tantas veces como
sea necesario.
• Cada pulsación cambia el funcionamiento al modo siguiente en la secuen-
cia que se muestra a continuación.
El modo seleccionado actualmente se muestra en 2.
PWFY-P100VM-E-BU
Sólo el agua caliente
PWFY-P100/P200VM-E-AU
Calor → Frío
40
Page 41

Para cambiar la configuración de temperatura...
1. Para reducir la temperatura: Pulse el botón Set Temperature 3.
2. Para elevar la temperatura: Pulse el botón
• Cada pulsación cambia la configuración en 1 °C (1 °F). La configuración
actual se muestra en 3.
• Los rangos disponibles son los siguientes. *1, *2
Agua caliente FríoCalor
30 °C - 70 °C
87 °F - 158 °F
Nota:
*1 Los rangos disponibles varían según el tipo de unidad conectada.
*2 Si los límites del rango de temperatura se han fijado en la Selección de Función,
los rangos disponibles serán más reducidos que los mostrados anteriormente.
Si intenta fijar un valor que se encuentre fuera del rango restringido, la pantalla
mostrará un mensaje indicando que el rango está restringido en este momento.
Para más información sobre cómo configurar y borrar estos límites de rango,
consulte la sección 3, punto [3]–2 (3).
*3 Si las Selecciones de Función están configuradas para indicar la temperatura en
grados Fahrenheit. Para más información sobre cómo seleccionar °C o °F,
consulte la sección 3, punto [3]–4 (1).
30 °C - 45 °C
87 °F - 113 °F
10 °C - 30 °C
50 °F - 87 °F
Set Temperature 3.
Cómo configurar el día de la semana y la hora…
Configuración del día de la semana
Configuración de
la hora
1. Pulse o del botón Set Time A para que muestre el indicador 2.
2. Pulse el botón TIMER ON/OFF (SET DAY) 9 para fijar el día.
* Cada pulsación avanza el día que se muestra en 3 : Sun → Mon → ... → Fri
→ Sat.
3. Pulse el botón Set Time apropiado A según sea necesario para configurar la
hora.
* Mientras mantiene presionado el botón, la hora (en 4) avanzará primero en
intervalos de minutos, luego en intervalos de diez minutos y después en
intervalos de una hora.
4. Después de realizar las configuraciones apropiadas en los Pasos 2 y 3, pulse
el botón
Nota:
Sus nuevas entradas en los Pasos 2 y 3 se cancelarán si presiona el botón Modo
(Retorno) 2 antes de presionar el botón CIR.WATER 4.
CIR.WATER 4 para fijar los valores.
GBD
2.2. Ajuste de la temperatura del agua
Para cambiar la temperatura del agua
Pulse el botón
de agua deseada.
Al pulsar una vez
Si continúa pulsando, el ajuste seguirá cambiando en 1 °C.
• La temperatura del interior podrá ajustarse dentro de la gama siguiente.
Agua caliente FríoCalor
30 °C - 70 °C
87 °F - 158 °F
• Es imposible ajustar la temperatura del agua mediante la Temp. de agua de
entrada o la Temp. de agua de salida.
* El margen de temperaturas visualizado es de 0 °C a 100 °C. Fuera de este
margen, la visualización parpadeará en 0 °C o 100 °C para notificarle que la
temperatura del agua es inferior o superior a la visualizada.
2.3.
Utilice esta pantalla para cambiar la configuración de ía
de la semana y hora actual.
Nota:
El día y la hora no aparecerán si se ha desactivado la utilización del reloj en la
Selección de Función.
11
1 [ajuste de la temperatura del agua] y ajuste la temperatura
11
o , el ajuste cambiará 1 ° C.
30 °C - 45 °C
87 °F - 113 °F
10 °C - 30 °C
50 °F - 87 °F
Configuración de día de la semana y hora
Visualización de
día de la semana y
hora
5. Pulse el botón Modo (Retorno) 2 para completar el procedimiento de configu-
ración. Esto volverá a la pantalla de control estándar, donde 1 mostrará ahora el día y la hora recientemente configurados.
2.4. Utilización del temporizador
Esta sección explica cómo configurar y utilizar el temporizador. Puede utilizar la
Selección de Función para seleccionar cuál de los tres tipos de temporizador
utilizar: 1 temporizador semanal, 2 temporizador simple o 3 temporizador
automático.
Para obtener información sobre cómo configurar la Selección de Función, consulte
la sección 3, punto [3]–3 (3).
Utilización del temporizador semanal
1. El temporizador semanal puede utilizarse para configurar hasta seis funciones para cada día de la semana.
• Cada función puede consistir en cualquiera de las siguientes: hora de ON/
OFF junto a una configuración de la temperatura, sólo hora de ON/OFF o
sólo configuración de la temperatura.
• Cuando la hora actual alcanza la hora configurada en este temporizador, la
unidad realiza la acción configurada por el temporizador.
2. El tiempo necesario para la configuración de la hora para este temporizador
es de 1 minuto.
Nota:
*1. El temporizador semanal, el temporizador simple y el temporizador automático
no pueden utilizarse al mismo tiempo.
*2. El temporizador semanal no funcionará si se da alguna de las siguientes
condiciones.
La función de temporizador está desactivada; el sistema se encuentra en un
estado anómalo; hay una sesión de prueba en curso; se está llevando a cabo
una autoprueba o una prueba del mando a distancia; el usuario está configurando
una función; el usuario está configurando el temporizador; el usuario está
configurando el día actual de la semana o la hora; el sistema se encuentra bajo
el control central. En concreto, el sistema no llevará a cabo operaciones
(encendido o apagado de la unidad, configuración de la temperatura) que estén
desactivadas cuando se produzcan estas condiciones.
EINLPGRRUTRGBGBGBGBGB
F
N° de Funcionamiento
SUN
ON
˚C
WEEKLY
41
Page 42

Cómo configurar el temporizador semanal
1. Asegúrese de que se encuentra en la pantalla de control estándar y de que el
indicador del temporizador semanal 1 se muestra en la pantalla.
2. Pulse el botón TIMER MENU B, de modo que aparezca en la pantalla “Set
Up” (en 2). (Recuerde que cada pulsación del botón cambia la pantalla entre
“TEMPORIZADOR” y “VISUALIZAR TEMPORIZAD.”).
3. Pulse el botón TIMER ON/OFF (SET DAY) 9 para configurar el día. Cada
pulsación avanza la pantalla 3 a la próxima configuración en la secuencia
que se indica a continuación: “Sun Mon Tues Wed Thurs Fri Sat” → “Sun” → ...
→ “Fri” → “Sat” → “Sun Mon Tues Wed Thurs Fri Sat”…
4. Pulse el botón
para seleccionar el número de operación apropiado (1 a 6) 4.
* La información introducida en los Pasos 3 y 4 seleccionará una de las cel-
das de la matriz ilustrada a continuación (La pantalla del mando a distancia
en la izquierda muestra cómo se mostraría la pantalla cuando se configura
Operación 1 para el domingo con los valores indicados a continuación).
Matriz de configuración
N° de op.
No. 1
No. 2
GBDF
…
No. 6
Sunday Monday … Saturday
• 8:30
•ON
•
23 °C (73 °F)
• 10:00
• OFF
Nota:
Configurando el día a “Sun Mon Tues Wed Thurs Fri Sat”, puede configurar la
misma operación a la misma hora todos los días.
(Por ejemplo: la Operación 2 arriba mencionada es la misma para todos los días de
la semana).
o INITIAL SETTING (7 o 8) según sea necesario
<Valores de Operación 1
para el domingo>
▲
Iniciar el funcionamiento de la unidad
a las 8:30, con la temperatura fijada
en 23 °C (73 °F).
• 10:00
• OFF
• 10:00
• OFF
• 10:00
• OFF
▲
<Valores de
Operación 2 para
todos los días>
Apagar la unidad
a las 10:00.
12. Para activar el temporizador, pulse el botón TIMER ON/OFF 9, de modo que
el indicador “Timer Off” desaparezca de la pantalla.
Asegúrese de que ya no
se muestre el indicador “Timer Off”.
* Si no hay valores fijados del temporizador, el indicador “Timer Off” parpa-
deará en la pantalla.
Cómo visualizar los valores fijados del temporizador
semanal
Valores fijados del temporizador
1. Asegúrese de que se muestra en la pantalla el indicador del temporizador
semanal (en 1).
2. Pulse el botón TIMER MENU B de modo que se indique en la pantalla
“VISUALIZAR TEMPORIZAD.” (en 8).
3. Pulse el botón TIMER ON/OFF (SET DAY) 9 9 según sea necesario para
seleccionar el día que desea visualizar.
4. Pulse el botón INITIAL SETTING
sario para cambiar el funcionamiento del temporizador mostrado en la
pantalla (en 9).
* Cada pulsación, avanzará a la próxima operación del temporizador, en
el orden de configuración de la hora.
5. Para cerrar el monitor y regresar a la pantalla Standard Control, pulse el
botón Modo (Retorno) de 2.
o ( 7 o 8) según sea nece-
Configuración del temporizador semanal
Muestra la configuración
EINLPGRRUTRGBGBGBGBGB
de la hora
5. Pulse el botón Set Time apropiado A según sea necesario para fijar la hora
deseada (en 5).
* Durante su pulsación, la hora avanza primero en intervalos de un minuto,
luego en intervalos de diez minutos y finalmente en intervalos de una hora.
6. Pulse el botón ON/OFF 1 para seleccionar la operación deseada (ON o OFF),
en 6.
* Cada pulsación cambia al siguiente valor en la secuencia que se indica a
continuación: sin indicación (sin configuración) → “ON” → “OFF”
7. Pulse el botón Set Temperature apropiado 3 para fijar la temperatura desea-
da (en 7).
* Cada pulsación cambia la configuración en la secuencia que se indica a
continuación: sin indicación (sin configuración) ⇔ 5 (41) ⇔ 6 (43) ⇔ ... ⇔
89 (192) ⇔ 90 (194) ⇔ sin indicación.
(Rango disponible: el rango de configuración es de 5 °C (41 °F) a 90 °C (194
°F). El rango real de control de temperatura, sin embargo, variará según el tipo
de unidad conectada).
8. Para borrar los valores actualmente configurados para la operación seleccionada, pulse y suelte rápidamente el botón CHECK (CLEAR) 0 una vez.
* El valor de la hora mostrada cambiará a “—:—”, y desaparecerán tanto los
valores de encendido/apagado como el de temperatura.
(Para borrar todas las configuraciones del temporizador semanal de una
vez, mantenga pulsado el botón CHECK (CLEAR) 0 durante dos o más
segundos. La pantalla comenzará a parpadear, indicando que se han borrado todos los valores fijados).
9. Después de realizar las configuraciones apropiadas en los Pasos 5, 6 y 7,
pulse el botón
CIR.WATER 4 para guardar los valores.
Muestra la operación seleccionada (ON
o OFF)
*
No aparece si no se ha configurado la operación.
Muestra la temperatura
fijada
* No aparece si no se ha fijado
la temperatura.
Para desactivar el temporizador semanal
Pulse el botón TIMER ON/OFF 9 de modo que aparezca “Timer Off” en 0.
Para activar el temporizador semanal
Pulse el botón TIMER ON/OFF 9 de modo que el indicador “Timer Off” (en 0) se
oscurezca.
Utilización del temporizador simple
1. Puede configurar el temporizador simple de cualquiera de las tres formas siguientes.
• Sólo hora de puesta en marcha:
la unidad comenzará a funcionar cuando haya
transcurrido el tiempo fijado.
• Sólo hora de parada: la unidad se detendrá cuando haya transcurrido el
tiempo fijado.
• Horas de puesta en marcha y de parada:
la unidad comienza a funcionar y se detiene cuando hayan transcurrido las horas respectivas.
2. El temporizador simple (puesta en marcha y parada) puede configurarse sólo
una vez en un periodo de 72 horas. La configuración de la hora se realiza en
aumentos de una hora.
Nota:
Sus datos nuevos se cancelarán si pulsa el botón Modo (Retorno) 2 antes de
pulsar el botón CIR.WATER 4.
Si ha configurado dos o más operaciones diferentes para la misma hora exactamente,
sólo se realizará la operación con el número más elevado.
10. Repita los Pasos 3 a 8 según sea necesario para completar tantas celdas
disponibles como desee.
11. Pulse el botón Modo (Retorno) 2 para regresar a la pantalla de control estándar
y completar el procedimiento de configuración.
42
Page 43

ONHr
AFTER
SIMPLE
SIMPLE
Nota:
*1. El temporizador semanal, el temporizador simple y el temporizador automático
no pueden utilizarse al mismo tiempo.
*2. El temporizador simple no funcionará si se da cualquiera de las condiciones
siguientes.
El temporizador está desactivado, el sistema está en estado anómalo, está
realizándose una prueba de funcionamiento, el mando a distancia está
realizando una autoevaluación o diagnóstico, el usuario está seleccionando
una función o configurando el temporizador, el sistema está bajo control
central. (En estas condiciones, la operación de ON/OFF está deshabilitada).
Cómo configurar el temporizador simple
Configuración del temporizador
Acción (ON o OFF)
* Se muestra “— —” si no hay
configuración.
1. Asegúrese de que el indicador del temporizador simple está visible en la pantalla (en 1).
2. Pulse el botón TIMER MENU B , para que aparezca “VISUALIZAR
TEMPORIZAD.” en la pantalla (en 5).
• Si el temporizador simple de encendido o apagado está funcionando, su valor
actual aparecerá en 6.
• Si se han fijado ambos valores, encendido y apagado, aparecen
alternativamente ambos valores.
3. Pulse el botón Modo (Retorno) 2 para cerrar la pantalla del monitor y regre-
sar a la pantalla de control estándar.
Para desactivar el temporizador simple...
Pulse el botón TIMER ON/OFF 9 para que la configuración del temporizador ya no
aparezca en la pantalla (en 7).
GBD
Para iniciar el temporizador simple…
Pulse el botón TIMER ON/OFF 9 para que la configuración del temporizador sea
visible en 7.
1. Asegúrese de que se encuentra en una pantalla de control estándar y de que
el indicador de temporizador simple se muestra en la pantalla (en 1).
Cuando aparezca una indicación distinta de la del temporizador simple, cámbielo a SIMPLE TIMER (TEMPORIZADOR SIMPLE) utilizando la selección
de funciones de la configuración de funciones del temporizador del mando a
distancia (véase 3.[3]–3 (3)).
2. Pulse el botón TIMER MENU B, de modo que aparezca en la pantalla
“TEMPORIZADOR” (en 2). (Recuerde que cada pulsación del botón cambia
la pantalla entre “TEMPORIZADOR” y “VISUALIZAR TEMPORIZAD.”).
3. Pulse el botón ON/OFF 1 para mostrar los valores configurados actuales de
ON o OFF del temporizador simple. Pulse el botón una vez para ver el tiempo
restante hasta el ON y luego de nuevo para ver el tiempo restante hasta el
OFF. (El indicador ON/OFF aparece en 4).
• Temporizador “ON”: la unidad comenzará a funcionar cuando haya transcurrido el número de horas especificado.
• Temporizador “OFF”: la unidad se detendrá cuando haya transcurrido el
número de horas especificado.
4. Mostrando “ON” u “OFF” en 3: pulse el botón Set Time A apropiado según
sea necesario para fijar las horas hasta el encendido (si se muestra “ON”) o
las horas hasta el apagado (si se muestra “OFF”) en 4.
• Rango disponible: 1 a 72 horas
5. Para fijar las horas hasta el ON y el OFF, repita los Pasos 3 y 4.
* Recuerde que las horas de ON y OFF no pueden fijarse en el mismo valor.
6. Para borrar la configuración de ON o OFF actual: Muestre el valor configurado
de ON o OFF (véase el paso 3) y luego pulse el botón CHECK (CLEAR) 0
para borrar la configuración de la hora a “—” en 4. (Si desea utilizar sólo un
valor de configuración de ON o una configuración de OFF, asegúrese de que
la configuración que no desea utilizar se muestra como “—”).
7. Después de completar los Pasos 3 y 6 arriba mencionados, pulse el botón
CIR.WATER 4 para fijar el valor.
Nota:
Sus configuraciones nuevas se cancelarán si pulsa el botón Modo (Retorno) 2
antes de pulsar el botón
CIR.WATER 4.
8. Pulse el botón Modo (Retorno) 2 para regresar a la pantalla de control estándar.
9. Pulse el botón TIMER ON/OFF 9 para iniciar la cuenta atrás del temporizador.
Cuando el temporizador está funcionando, su valor es visible en la pantalla.
Asegúrese de que el valor del temporizador sea visible y apropiado.
Visualización de las configuraciones actuales del
temporizador simple
Configuración del temporizador
Ejemplos
Si se han configurado las horas de ON y OFF en el temporizador simple, el
funcionamiento y la pantalla son según se indica a continuación.
Ejemplo 1:
Inicie el temporizador, con la hora de ON fijada más temprano que la hora de OFF.
Configuración de ON: 3 horas
Configuración de OFF: 7 horas
Al inicio del
temporizador
▲
3 horas después
del inicio del
temporizador
▲
7 horas
después del
inicio del
temporizador
Ejemplo 2:
Inicie el temporizador, con la hora de OFF fijada más temprano que la hora de ON
Configuración de ON: 5 horas
Configuración de OFF: 2 horas
Al inicio del
temporizador
▲
SIMPLE
2 horas después
del inicio del
temporizador
AFTER
ONHr
▲
5 horas
después del
inicio del
temporizador
La pantalla muestra la
configuración de ON del
temporizador (las horas
restantes para llegar al ON).
La pantalla cambia para
mostrar el valor de OFF del
temporizador (las horas
restantes para el OFF).
La hora mostrada es el valor
configurado de OFF (7
horas) “- el valor” configurado
de ON (3 horas) = 4 horas.
La unidad se desactiva y
permanecerá desactivado
hasta que alguien lo reinicie.
La pantalla muestra el valor
de OFF del temporizador (las
horas restantes para el OFF).
La pantalla cambia para mostrar
el valor de ON del temporizador
(las horas restantes para el ON).
La hora indicada es el valor
configurado de ON (5 horas) “–
el valor” configurado de OFF (2
horas) = 3 horas.
La unidad comienza a
funcionar y continuará
funcionando hasta que
alguien lo detenga.
EINLPGRRUTRGBGBGBGBGB
F
43
Page 44

Utilización del temporizador de apagado automático
AUTO OFF
7
1. Este temporizador comienza la cuenta atrás cuando la unidad comienza a
funcionar y apaga la unidad cuando haya transcurrido el tiempo fijado.
2. Los valores disponibles abarcan desde 30 minutos a 4 horas, en intervalos de
30 minutos.
Nota:
*1. El temporizador semanal, el temporizador simple y el temporizador automático
no pueden utilizarse al mismo tiempo.
*2. El temporizador Auto Off no funcionará si se dan cualquiera de las siguientes
condiciones.
El temporizador está desactivado, el sistema está en estado anómalo, está
realizándose una prueba de funcionamiento, el mando a distancia está
realizando una autoevaluación o diagnóstico, el usuario está seleccionando
una función o configurando el temporizador, el sistema está bajo control
central. (En estas condiciones, la operación de ON/OFF está deshabilitada).
GBDF
Comprobación de la configuración actual del
temporizador de apagado automático
Configuración del temporizador
1. Asegúrese de que “Auto Off” esté visible en la pantalla (en 1).
2. Mantenga pulsado el botón TIMER MENU B durante 3 segundos, para que
se indique en la pantalla “VISUALIZAR TEMPORIZAD.” (en 4).
• El tiempo restante para el apagado aparece en 5.
3. Para cerrar el monitor y regresar a la pantalla Standard Control, pulse el botón
Modo (Retorno) de 2.
Para desactivar temporizador de apagado automático...
• Mantenga pulsado el botón TIMER ON/OFF 9 durante 3 segundos, para que
aparezca “Timer Off” (en 6) y desaparezca el valor del temporizador (en 7).
Cómo configurar el temporizador de apagado auto-
EINLPGRRUTRGBGBGBGBGB
mático
1. Asegúrese de que usted se encuentre en una pantalla de control estándar y
que el indicador del temporizador de apagado automático Auto Off se muestre
en la pantalla (en 1).
Cuando aparezca una indicación distinta de la del temporizador de apagado
automático, cámbielo a APAGADO AUTOMÁTICO utilizando la selección de
funciones de la configuración de funciones del temporizador del mando a distancia (véase 3.[3]–3 (3)).
2. Mantenga pulsado el botón TIMER MENU B durante 3 segundos, para que
aparezca “TEMPORIZADOR” en la pantalla (en 2).
(Recuerde que cada pulsación del botón cambia la pantalla entre
“TEMPORIZADOR” y “VISUALIZAR TEMPORIZAD.”).
3. Pulse el botón Set Time apropiado A según sea necesario para configurar la
hora de apagado (en 3).
4. Pulse el botón
Nota:
Los datos introducidos se cancelarán si pulsa el botón Modo (Retorno) 2 antes de
pulsar el botón
5. Pulse el botón Modo (Retorno) 2 para completar el procedimiento de configu-
ración y regresar a la pantalla de control estándar.
6. Si la unidad ya está funcionando, el temporizador comienza inmediatamente
la cuenta atrás.
temporizador aparece correctamente en la pantalla.
CIR.WATER 4 para fijar la configuración.
CIR.WATER 4.
Asegúrese de comprobar que el valor fijado del
Configuración del temporizador
• Alternativamente, desconecte la unidad. El valor del temporizador (en 7)
desaparecer de la pantalla.
Para iniciar el temporizador de apagado automático...
• Mantenga pulsado el botón TIMER ON/OFF 9 durante 3 segundos. Desaparece
la indicación “Timer Off” (en 6) y la configuración del temporizador aparece en
la pantalla (en 7).
• Alternativamente, encienda la unidad. El valor del temporizador aparecerá en 7.
44
Page 45

3. Selección de función
Selección de funciones del controlador remoto
El ajuste de las siguientes funciones del controlador remoto se puede cambiar utilizando el modo Selección de función del controlador remoto. Cambie el ajuste cuando sea
necesario.
Ítem 1
1. Cambio de idioma
(“CHANGE
LANGUAGE”)
2. Límite de funciones
(“SELECCIÓN DE
FUNCIÓNES”)
3. Selección de modo
(“SELECCIÓN DE
MODO”)
4. Cambio de
indicador (“MOSTRAR MODO”)
Ajuste del idioma que aparece en el indicador
(1) Ajuste del límite de funciones (bloqueo de funciones)
(“FUNCIÓN BLOQUEADA”)
(2)
Ajuste de salto de modo de funcionamiento (“ELEGIR MODO”)
(3)
Ajuste del límite de rango de temperatura (“LIMIT TEMP CONSIGNA”)
(1) Ajuste del controlador remoto principal/secundario
(“CONTROL PRINCIPAL/SECUNDARIO”)
(2) Uso del ajuste del reloj (“RELOJ”)
(3)
Ajuste de la función de temporizador (“TEMPORIZA-DOR SEMANAL”)
(4) Ajuste de número de contacto en caso de error (“CALL.”)
(5)
Ajuste del desfase de temperatura (“AJUSTE TEMP DIFERENCIAL”)
(1)
Ajuste del indicador de temperatura °C/°F (“TEMP. GRADOS °C/°F”)
(2) Ajuste del indicador de temperatura agua (“VISUALIZAR
TEMP. AGUA”)
Ítem 2
Ítem 3 (Contenido de ajuste)
• El indicador puede aparecer en distintos idiomas
• Ajuste del rango de límite de funcionamiento (bloqueo de
funcionamiento)
• Ajuste del uso (o no) de cada modo de funcionamiento
• Ajuste del rango de temperatura (máximo, mínimo)
• Selección del controlador remoto principal o secundario
* Si se conectan dos controladores remotos a un grupo, uno de los
controladores debe seleccionarse como secundario.
• Ajuste del uso (o no) de la función de reloj
• Ajuste del tipo de temporizador
• Indicador del número de contacto en caso de error
• Ajuste del número de teléfono
• Ajuste del uso (o no) del ajuste de la cantidad de desfase
•
Ajuste de la unidad de temperatura (°C o °F) que debe aparecer en el indicador
• Ajuste del uso (o no) del indicador de temperatura de aqua
GBD
Diagrama de flujo de selección de función
[1] Apague la unidad para iniciar el modo Selección de función del controlador remoto. → [2] Seleccione del Ítem1. → [3] Seleccione del Ítem2. → [4] Realice el ajuste. (Los
detalles se especifican en el Ítem 3) → [5] Ajuste finalizado. → [6] Cambie el indicador al modo normal. (Fin)
Indicador normal (Indicador que aparece
cuando la unidad está apagado)
(Mantenga pulsado el botón E y presione el botón D
durante dos segundos).
* El indicador no se puede cambiar durante, la prueba de
funcionamiento y el autodiagnóstico.
Ítem 1 Modo de selección de función del
Presione el
botón E.
Presione el
botón G.
Presione el
botón E.
Presione el
botón G.
Presione el
botón E.
Presione el
botón G.
Presione el botón G.
→
Ajuste del límite de funciones (“FUNCIÓN BLOQUEADA”)
Ajuste del salto de modo de funcionamiento (“ELEGIR MODO”)
Ajuste del límite de rango de temperatura (“LIMIT TEMP CONSIGNA”)
→
Ajuste del controlador remoto principal/secundario (“CONTROL PRINCIPAL/SECUNDARIO”)
Uso del ajuste del reloj (“RELOJ”)
Ajuste de la función de temporizador (“TEMPORIZA-DOR SEMANAL”)
Ajuste de número de contacto en caso de error (“CALL.”)
Ajuste del desfase de temperatura (“AJUSTE TEMP DIFERENCIAL”)
→
Ajuste del indicador de temperatura °C/°F (“TEMP. GRADOS °C/°F”)
Ajuste del indicador de temperatura del agua (“VISUALIZAR TEMP. AGUA.”)
Cambio de idioma
(“CHANGE LANGUAGE”)
Límite de funciones
(“SELECCIÓN DE
FUNCIÓNES”)
Presione el
botón E.
Selección de modo
(“SELECCIÓN DE
MODO”)
Cambio de indicador
(“MOSTRAR
MODO”)
controlador remoto
→
→
→→→
→
→
Ítem 2
Presione el botón G.
Presione el botón G.
Presione el botón G.
(Mantenga pulsado el botón E y
presione el botón D durante dos
segundos).
* El controlador remoto registra el
ajuste que se hace de esta forma.
Vea [3]–1
Ítem 3 (Contenido
de ajuste)
Presione el
botón D.
Presione el
botón D
Presione el
botón D
Vea [3]–2. (1)
Vea [3]–2. (2)
Vea [3]–2. (3)
Vea [3]–3. (1)
Vea [3]–3. (2)
Vea [3]–3. (3)
Vea [3]–3. (4)
Vea [3]–3. (5)
Vea [3]–4. (1)
Vea [3]–4. (2)
NOTA
El funcionamiento del temporizador se
detiene cuando se cambia al modo Normal
el indicador de selección de función del
controlador remoto.
Indicador de puntos
El idioma que se selecciona en el modo
CHANGE LANGUAGE
(Cambio de idioma) aparece en este indicador.
En este manual se ha seleccionado el inglés.
EINLPGRRUTRGBGBGBGBGB
F
45
Page 46

Ajuste detallado
[3]–1. Ajuste de CHANGE LANGUAGE (Cambio de idioma)
Se puede seleccionar el idioma que aparece en el indicador de puntos.
• Presione el botón [
1 Inglés (GB), 2 Alemán (D), 3 Español (E), 4 Ruso (RU),
5 Italiano (I), 6 Francés (F), 7 Sueco
[3]–2. Límite de funciones
(1) Ajuste del límite de funciones (bloqueo de funciones)
• Para cambiar el ajuste, presione el botón [
1 no1 : Se realiza el ajuste de bloqueo de funcionamiento en todos los botones
salvo en el botón [
2 no2 : Se realiza el ajuste de bloqueo de funcionamiento en todos los
botones.
3 OFF (Valor del ajuste inicial) : No se realiza el bloqueo de funcionamiento.
* Para que el bloqueo de funcionamiento sea válido en la pantalla normal, hay que
presionar los botones (Presione y mantenga pulsados a la vez los botones
[CIR.WATER] y [
vez que se ha realizado el ajuste anterior.
(2) Ajuste del salto de modo de funcionamiento
Una vez modificado el ajuste, se puede cambiar el modo de funcionamiento dentro
del rango modificado.
• Para cambiar los siguientes ajustes, pulse el botón [
GBDF
1 Modo Calor : Ajusta el uso (o no) del modo Calor.
2 Modo Calor ECO : Ajusta el uso (o no) del modo Calor ECO.
3 Modo Agua caliente : Ajusta el uso (o no) del modo Agua caliente.
4 Modo Anti-congel. : Ajusta el uso (o no) del modo Anti-congel.
5 Modo Frío : Ajusta el uso (o no) del modo Frío.
6 OFF
(valor del ajuste inicial): No se ejecuta el salto de modo de funcionamiento.
* Si se selecciona un ajuste que no sea OFF, los ajustes del salto de los modos
Calor, Calor ECO, Agua caliente, Anti-congel. y Frío se ejecutan al mismo
tiempo.
* Un modo que no esté disponible en la unidad que se va a conectar no se
puede utilizar aunque el ajuste sea “AVAILABLE” (Disponible).
(3) Ajuste del límite de rango de temperatura
EINLPGRRUTRGBGBGBGBGB
Una vez que se realiza el ajuste, se puede cambiar la temperatura dentro del
rango establecido.
• Para cambiar el ajuste, presione el botón [
1 TEMP LIMITE MODO CALOR:
El rango de temperatura se puede cambiar en modo calefacción.
2 TEMP LIMITE MODO AGUA CALIEN.:
El rango de temperatura se puede cambiar en modo calefacción/agua
caliente.
3 TEMP LIMITE MODO ANTICONGEL.:
El rango de temperatura se puede cambiar en modo anticongelación.
4 TEMP LIMITE MODO FRIO:
El rango de temperatura se puede cambiar en modo refrigeración.
5 OFF (ajuste inicial) : No está activo el límite de rango de temperatura.
* Cuando se ajusta una posición distinta de la de desactivación (OFF), se ajusta
a la vez el límite de rango de temperatura en modo agua caliente, anticongelación
y refrigeración. No obstante, no se puede limitar el rango cuando no ha cambiado
el rango de temperatura establecido.
• Para disminuir o aumentar la temperatura, presione el botón [
].
• Rango ajustable
Modo Agua caliente : Límite inferior: 30 ~ 70 °C (87 ~158 °F)
Modo Calor : Límite inferior: 30 ~ 45 °C (87 ~113 °F)
Modo Frío:Límite inferior: 10 ~ 30 °C (50 ~ 87 °F)
* El rango ajustable varía en función de la unidad que hay que conectar.
MENU] para cambiar el idioma.
ON/OFF].
ON/OFF].
ON/OFF] durante dos segundos) en la pantalla normal una
ON/OFF].
ON/OFF].
TEMP. or
Límite superior: 70 ~ 30 °C(158 ~ 87 °F)
Límite superior: 45 ~ 30 °C(113 ~ 87 °F)
Límite superior: 30 ~ 10 °C (87 ~ 50 °F)
[3]–3. Ajuste de selección de modo
(1) Ajuste del controlador remoto principal/secundario
• Para cambiar el ajuste, presione el botón [
1 Principal : El controlador será el principal.
2 Secundario : El controlador será el secundario.
(2) Uso del ajuste del reloj
• Para cambiar el ajuste, presione el botón [
1 ON : Se puede usar la función de reloj.
2 OFF : No se puede usar la función de reloj.
(3) Ajuste de la función de temporizador
• Para cambiar el ajuste, presione el botón [
siguientes funciones).
1 TEMPORIZADOR SEMANAL (Valor del ajuste inicial) :
2 APAGADO AUTOMÁTICO : Se puede usar el temporizador de
3 TEMPORIZADOR SIMPLE : Se puede usar el temporizador simple.
4 TEMPORIZADOR APAGADO: No se puede usar el modo temporizador.
* Cuando el uso del ajuste de reloj está desactivado (OFF), no se puede usar el
“TEMPORIZADOR SEMANAL”.
(4) Ajuste de número de contacto en caso de error
• Para cambiar el ajuste, presione el botón [
1 CALL OFF : Los números de contacto establecidos no aparecen en el
2 CALL **** *** **** : Los números de contacto establecidos aparecen en el
CALL_ : El número de contacto se puede ajustar cuando el
• Ajuste de los números de contacto
Para ajustar los números de contacto, proceda del siguiente modo.
Mueva el cursor parpadeante para ajustar los números. Presione el botón
[
TEMP. o ] F para mover el cursor a la derecha (izquierda).
Presione el botón [
(5) Ajuste de la función de desfase
• Para cambiar los siguientes ajustes, pulse el botón [
1 ON : El ajuste de la cantidad de desfase se muestra bajo el modo de ajuste
2 OFF : El ajuste de la cantidad de desfase no se muestra bajo el modo de
inicial de la temperatura del agua.
ajuste inicial de la temperatura del agua.
indicador en caso de error.
indicador en caso de error.
indicador aparece según se muestra a la izquierda.
CLOCK o ] C para ajustar los números.
Se puede usar el temporizador semanal.
desactivación automática.
ON/OFF] D.
ON/OFF] D.
ON/OFF] D (Elija una de las
ON/OFF] D.
ON/OFF] D.
[3]–4. Ajuste del cambio de indicador
(1) Ajuste del indicador de temperatura °C/°F
• Para cambiar el ajuste, presione el botón [
1 °C: Se utiliza la unidad de temperatura en °C.
2 °F: Se utiliza la unidad de temperatura en ° F.
(2) Ajuste del indicador de temperatura del agua
• Para cambiar el ajuste, presione el botón [
1 ON : Aparece la temperatura del agua.
2 OFF : No aparece la temperatura del agua.
ON/OFF] D.
ON/OFF] D.
46
Page 47

4. Mantenimiento de la máquina
El mantenimiento del colador debe realizarlo una persona de servicio cualificada.
Antes de proceder a tareas de mantenimiento, apague la fuente de alimentación.
Precaución:
• Antes de empezar la limpieza, apague la fuente de alimentación. Recuer-
de que el ventilador está girando en el interior a una velocidad elevada,
lo que supone un grave riesgo de heridas.
• Las unidades interiores están equipadas con un colador que elimina el
polvo del aire aspirado. Limpie el colador utilizado los métodos mostrados en los croquis siguientes.
• La duración del colador dependerá de dónde esté instalada la unidad y
cómo se utilice.
Cómo limpiar el colador
• Para lavar el colador, quite la cubierta y friegue el interior del mismo con un
cepillo.
Precaución:
• No seque el colador exponiéndolo a la luz solar directa ni calentándolo
con fuego, etc. Si lo hiciese, podría causar su deformación.
Precaución:
Nunca vierta agua ni pulverice con esprays inflamables en el acondicionador de aire. Si lo limpia usando estos procedimientos puede provocar averías, un cortocircuito e incluso un incendio.
5. Solución de problemas
Antes de llamar al servicio de averías, compruebe los siguientes puntos:
Estado de la máquina
No se pone en marcha.
El agua sale pero no se
produce suficiente refrigeración ni la calefacción.
No sale agua fría ni
caliente.
Se pone en marcha
durante un momento,
pero se para en seguida.
• Si el aparato deja de funcionar por un fallo de alimentación, el [circuito de prevención de reinicio por fallo de alimentación] se pone en marcha y la unidad permanece
desactivada aunque se restaure la alimentación. En este caso, pulse el botón [ON/OFF] de nuevo para iniciarlo.
Si los fallos de funcionamiento persisten después de haber comprobado todo lo anterior, apague la fuente de alimentación, póngase en contacto con su proveedor e
infórmele del nombre del producto, de la naturaleza del fallo, etc. Si en el visor del mando a distancia se muestran de forma intermitente el indicador “[CHECK]” y un código
de verificación de 4 dígitos, dígale también estos dígitos a su proveedor. No intente nunca reparar personalmente la unidad.
Mando a distancia
El indicador “'” no se enciende.
No se muestra ningún indicador
cuando se pulsa el botón [ON/
OFF].
El visor de cristal líquido
indica que el acondicionador está funcionando.
El visor de cristal líquido
indica que el acondicionador está funcionando.
En el mando de a distancia se
muestran de forma intermitente el indicador “CHECK” y el có-
digo de verificación.
Corte de corriente.
La fuente de alimentación está apagada (OFF).
Ha saltado el fusible de la fuente de alimentación.
Ha saltado el interruptor de pérdida a tierra.
Ajuste inadecuado de la temperatura.
El circuito de prevención de reinicialización está activado durante 3 minutos.
La unidad interior se puso en marcha otra vez durante
la operación de calefacción y desercarchado.
Hay algún obstáculo en la entrada o salida de aire de
la unidad interior o exterior.
El colador está atascado con polvo o suciedad.
Causa
Pulse el botón [ON/OFF] después de que vuelva la corriente.
Encienda la fuente de alimentación (ON).
Sustituya el fusible.
Vuelva a instalar el interruptor de pérdida a tierra.
Después de comprobar en el visor de cristal líquido la temperatura programada y la temperatura de entrada, consulte el apartado [Ajuste de
la temperatura del agua] y programe adecuadamente la temperatura.
Espere un momento.
(Para proteger al compresor, la unidad interior lleva incorporado un circuito de prevención de reinicialización que dura
unos 3 minutos. Por consiguiente, hay algunas ocasiones en
que el compresor no empieza a funcionar inmediatamente. A
veces no será necesario esperar los 3 minutos enteros.)
Espere un momento.
(El proceso de calefacción continuará después de finalizar el desescarchado.)
Quítelo y vuelva a poner en marcha la unidad.
Vuelva a poner en funcionamiento después de limpiar el colador. (Consulte el apartado [Mantenimiento de la máquina].)
Solución del problema
GBD
EINLPGRRUTRGBGBGBGBGB
F
Los siguientes no son síntomas de ninguna avería:
• El aire del acondicionador produce algún tipo de olor. Esto se debe a que el acondicionador aspira el humo de los cigarrillos y el olor de los cosméticos, de las paredes,
de los muebles, etc.
• Se oye un ruido siseante inmediatamente después de poner en marcha o parar el acondicionador. Este ruido se debe al flujo del refrigerante en el interior del
acondicionador de aire. Esto es normal.
• A veces se oye algún chasquido al principio o al final de los modos de refrigeración o calefacción. Este es el ruido de fricción del panel frontal de otras secciones debido
a la expansión y contracción provocadas por el cambio de temperatura. Esto es normal.
47
Page 48

6. Instalación, tareas de transferencia y verificación
Consideraciones sobre el lugar de instalación
Pida a su proveedor información detallada sobre la instalación y el traslado de la
instalación.
Precaución:
Nunca instale el acondicionador de aire en un lugar en que puedan producirse escapes de gas.
Si hay escapes de gas y éste se acumula alrededor de la unidad puede producirse un incendio.
Nunca instale el acondicionador de aire en los siguientes lugares:
• donde haya una gran cantidad de aceite industrial
• cerca de áreas marítimas o playas con un entorno muy salino
• donde haya demasiada humedad
• donde haya manantiales de agua caliente
• donde haya gas sulfúrico
• donde haya maquinaria que funcione con ondas de alta frecuencia (por ejem-
plo, un soldador de alta frecuencia, etc.)
• donde se usen con frecuencia soluciones ácidas
GBDF
• donde se usen con frecuencia esprays especiales
• Instale la unidad en posición horizontal para evitar que se produzcan fugas de
agua.
• Tome medidas contra las interferencias cuando instale el acondicionador de
aire en hospitales o empresas relacionadas con la comunicación.
Si el acondicionador de aire se instala en cualquiera de los ambientes mencionados anteriormente, es de esperar que se produzcan averías frecuentes. Se aconseja evitar estos lugares de instalación.
Pídale más información a su proveedor.
Consideraciones sobre las tareas eléctricas
EINLPGRRUTRGBGBGBGBGB
Precaución:
• Las tareas eléctricas debe llevarlas a cabo personal que esté cualificado
como instalador electricista según los estándares técnicos para las instalaciones eléctricas, que siga las indicaciones del manual de instrucciones para la instalación y use solamente circuitos exclusivos. El uso
de otros productos en la fuente de alimentación puede provocar que
salten los fusibles y los interruptores.
• No conecte nunca el cable de tierra a una tubería de gas o de agua, a un
pararrayos, ni al cable del teléfono. Solicite información de su proveedor.
• En determinados lugares de instalación es obligatorio el uso de interruptores de pérdida a tierra. Solicite información de su proveedor.
Acerca de la instalación de la tubería de agua
• No utilice tubos de acero como tubos de agua. Se recomienda utilizar tubos
de sobre.
• El circuito de agua deberá ser un circuito cerrado.
Consideraciones sobre el traslado de la instalación
• Cuando quite o reinstale el acondicionador de aire porque reforme su hogar o
porque se traslade de domicilio, consulte con su proveedor para determinar
por anticipado el coste del trabajo técnico necesario para trasladar la instalación.
Precaución:
Cuando quiera quitar y reinstalar el acondicionador de aire, consulte con su
proveedor. Una instalación defectuosa puede provocar un cortocircuito, un
incendio, etc.
Tenga también en cuenta
• Cuando realice la instalación, elija un lugar que pueda resistir perfectamente
el peso del acondicionador de aire y en el que se reduzcan al mínimo los
ruidos y las vibraciones.
• Elija un lugar en el que ni el aire frío o caliente ni el ruido de la salida de la
unidad exterior molesten a los vecinos.
• Si hay algún obstáculo cerca de la salida de aire de la unidad exterior, puede
pasar que baje el rendimiento y aumente el ruido. Evite poner cualquier tipo
de obstáculo cerca de la salida de aire.
• Si su acondicionador de aire produce un ruido anormalmente alto, avise a su
proveedor.
Mantenimiento e inspección
• Si el acondicionador de aire se usa durante varias temporadas, su interior
puede ensuciarse, lo que reduciría su rendimiento.
Según sean las condiciones de uso, se pueden generar malos olores y el
drenaje puede verse negativamente afectado por el polvo y la suciedad, etc.
7. Especificaciones
Modelo
Fuente de alimentación
Capacidad de calefacciónkW
Capacidad de refrigeraciónkW
Nivel de sonido
Peso neto kg
Dimensiones
Accesorios
Caudal de agua m
*1 Condiciones nominales de calefacción
Temperatura exterior: 7 °C DB/6 °C WB (45 °F DB/43 °F WB)
Longitud de la tubería: 7,5 m (24-9/16 ft)
Diferencia de nivel: 0 m (0 ft)
Temperatura del agua de entrada 65 °C Caudal de agua 2,15 m3/h
*3 Condiciones nominales de refrigeración
Temperatura exterior: 35 °C DB (95 °F DB)
Longitud de la tubería: 7,5 m (24-9/16 ft)
Diferencia de nivel: 0 m (0 ft)
Temperatura del agua de entrada 23 °C Caudal de agua 1,93 m3/h
*5 Condiciones nominales de refrigeración
Temperatura exterior: 35 °C DB (95 °F DB)
Longitud de la tubería: 7,5 m (24-9/16 ft)
Diferencia de nivel: 0 m (0 ft)
Temperatura del agua de entrada 23 °C Caudal de agua 3,86 m3/h
Altura mm
Anchura mm
Fondo mm
PWFY-P100VM-E-BU
12,5 *
44 dB<A>
60 kg
Colador, Material aislante térmico, juegos conectores × 2,
3
/h
0,6-2,15 1,2-4,3
–
junta de expansión × 2 (PWFY - P200VM - E - AU)
*2 Condiciones nominales de calefacción
*4 Condiciones nominales de calefacción
PWFY-P100VM-E-AU
1 fase 220-230-240 V 50/60 Hz
1
Temperatura exterior: 7 °C DB/6 °C WB (45 °F DB/43 °F WB)
Longitud de la tubería: 7,5 m (24-9/16 ft)
Diferencia de nivel: 0 m (0 ft)
Temperatura del agua de entrada 30 °C Caudal de agua 2,15 m3/h
Temperatura exterior: 7 °C DB/6 °C WB (45 °F DB/43 °F WB)
Longitud de la tubería: 7,5 m (24-9/16 ft)
Diferencia de nivel: 0 m (0 ft)
Temperatura del agua de entrada 30 °C Caudal de agua 4,3 m3/h
12,5 *
11,2 *
29 dB<A>
35 kg
800
450
300
0,6-2,15
2
3
PWFY-P200VM-E-AU
4
25,0 *
5
22,4 *
29 dB<A>
38 kg
48
Page 49

Indice
1. Misure di sicurezza ................................................................................... 49
1.1. Installazione ............................................................................ 49
1.2. Durante il funzionamento dell’unità ......................................... 50
1.3. Eliminazione dell’unità............................................................. 50
2. Come far funzionare i’unita ....................................................................... 50
2.1. Uso del telecomando............................................................... 50
2.2. Regolazione della temperatura dell’acqua .............................. 51
1. Misure di sicurezza
s Leggere attentamente la sezione “Misure di sicurezza” pri-
ma di far funzionare l’unità.
s La sezione “Misure di sicurezza” contiene informazioni im-
portanti sulla sicurezza di funzionamento. Accertarsi che
vengano seguite perfettamente.
Simboli utilizzati nel testo
Avvertenza:
Descrive le precauzioni da prendere per evitare il rischio di lesioni, anche
mortali, per l’utente.
Cautela:
Descrive le precauzioni da prendere per evitare il danneggiamento dell’unità.
Simboli utilizzati nelle illustrazioni
: Indica un’azione da evitare.
: Indica la necessità di rispettare un’istruzione importante.
: Indica la necessità di collegare un componente a massa.
: Attenzione alle scosse elettriche (Questo simbolo è visualizzato sull’eti-
chetta dell’unità principale.) <Colore: giallo>
: Attenzione superficie calda
Avvertenza:
Leggere attentamente le etichette attaccate all’unità principale.
1.1. Installazione
s Dopo aver letto questo manuale, conservarlo assieme al Manuale di in-
stallazione in un luogo sicuro, per utilizzarlo ogni volta che sarà necessario. Nel caso in cui questa unità venga usata da un’altra persona, accertarsi che la stessa legga il contenuto del presente manuale.
Avvertenza:
• L’unità non deve essere installata dall’utente. Richiedere al distributore o
ad una società autorizzata di installare l’unità. Se l’unità non è installata
correttamente, vi è il rischio di perdite d’acqua, di scosse elettriche o di
incendio.
• Utilizzare soltanto accessori autorizzati dalla Mitsubishi Electric e chiedere al proprio distributore o ad una società autorizzata di installarli. Se
questi non sono installati correttamente, vi è il rischio di perdite d’acqua,
di scosse elettriche o di incendio.
• Non toccare l’unità. La superficie dell’unità potrebbe essere calda.
• Non installare l’unità in luoghi in cui vengono generati gas corrosivi.
• Il Manuale di installazione fornisce una descrizione dettagliata del metodo di installazione più adatto. Qualsiasi alterazione strutturale necessaria per l’installazione deve rispettare i regolamenti locali in materia.
• Non riparare mai l’unità o trasferirla in un altro luogo da soli. In caso di
riparazione non effettuata correttamente, vi è il rischio di perdite d’acqua, di scosse elettriche o di incendio. Se l’unità deve essere riparata o
trasferita, occorre consultare il proprio distributore.
• Tenere i componenti elettrici lontano dall’acqua (acqua per lavaggio) etc.
• Potrebbero verificarsi scariche elettriche, incendio o fumo.
Nota1: quando si lava lo scambiatore di calore e la vaschetta di raccolta,
assicurarsi che la scatola di comando, il motore e il LEV restino
asciutti, utilizzando una copertura impermeabile all’acqua.
Note2: non svuotare mai l’acqua di lavaggio per la vaschetta di raccolta e
lo scambiatore di calore utilizzando la pompa di spurgo. Svuotare
separatamente.
• L’apparecchio non è progettato per essere usato dai bambini piccoli o
dalle persone inferme senza sorveglianza.
• I bambini piccoli devono essere controllati per assicurarsi che non giochino con l’apparecchio.
2.3. Impostazione del giorno della settimana e dell’ora ................. 51
2.4. Utilizzo del timer ...................................................................... 51
3. Selezione delle funzioni ............................................................................ 55
4. Manutenzione dell’unità ............................................................................ 57
5. Ricerca dei guasti ..................................................................................... 57
6. Lavori d’installazione e di trasferimento - ispezione ................................. 58
7. Dati tecnici ................................................................................................ 58
• Non utilizzare additivi rivelatori di perdite.
1) Sezione esterna
Avvertenza:
• La sezione esterna deve essere installata su una superficie stabile e perfettamente orizzontale, in un luogo in cui non vi è alcun rischio di accumulo di neve, foglie o rifiuti.
•
Non salire e non appoggiare alcun oggetto sull’unità. Ciò per evitare il rischio di cadere o di far cadere l’oggetto con possibili serie conseguenze.
Cautela:
La sezione esterna deve essere installata in un luogo in cui l’aria ed il rumore emessi dalla stessa non creino alcun disturbo al vicinato.
2) Sezione interna
Avvertenza:
La sezione interna deve essere installata in modo sicuro. Se l’unità non è
ben fissata, rischia di cadere, con il rischio di provocare un incidente serio.
3) Comando a distanza
Avvertenza:
Il comando a distanza deve essere installato in modo tale da rimanere fuori
dalla portata dei bambini.
4) Tubo flessibile di drenaggio
Cautela:
Accertarsi che il tubo flessibile di drenaggio sia installato in modo tale che il
drenaggio dell’unità si svolga correttamente. Un’installazione non corretta
può causare delle fuoriuscite d’acqua con un possibile danneggiamento dei
mobili.
5) Linea dell’alimentazione, fusibile o interruttore di
circuito
Avvertenza:
• Accertarsi che l’unità venga alimentata da una linea d’alimentazione specifica. Altri apparecchi collegati alla stessa linea d’alimentazione possono infatti causare un sovraccarico.
• Accertarsi della presenza di un interruttore di alimentazione principale.
• Accertarsi di rispettare i valori della tensione dell’unità, nonché la capacità nominale del fusibile o dell’interruttore di circuito. Non usare mai un
filo od un fusibile con una capacità nominale superiore a quella specificata.
6) Messa a terra
Cautela:
• L’unità deve essere messa a terra in modo appropriato. Non collegare
mai il filo di massa ad un tubo del gas, ad un tubo dell’acqua, ad un
conduttore di illuminazione o ad un filo di messa a terra del telefono. Ciò
può infatti creare scosse elettriche.
• Controllare frequentemente che il filo di massa della sezione esterna sia
collegato correttamente sia al terminale che all’elettrodo di messa a terra
dell’unità.
GBDFE
INLPGRRUTRGBGBGBGBGB
49
Page 50

1.2. Durante il funzionamento dell’unità
Cautela:
• Non usare alcun oggetto appuntito per premere i pulsanti, in modo da
non danneggiare il comando a distanza.
• Non attorcigliare o tirare il filo del comando a distanza per non danneggiare questo componente e causare un malfunzionamento dell’unità.
• Non rimuovere mai la sezione superiore del comando a distanza. È infatti
estremamente pericoloso rimuovere questa sezione e toccare le schede
a circuiti stampati che si trovano all’interno, per non correre il rischio di
incendio o di un guasto dell’unità.
• Non pulire mai il comando a distanza con benzene, diluente, prodotti
chimici, ecc..., per evitare uno scolorimento o un guasto dello stesso.
Per rimuovere la sporcizia tenace, pulirlo accuratamente con uno straccio immerso in un detergente mescolato con acqua, eliminare la sporcizia e asciugarlo con un panno asciutto.
• Non bloccare o coprire gli ingressi o le uscite interni od esterni dell’unità. La presenza di mobili al di sotto della sezione interna o di oggetti
ingombranti, come grosse scatole, nei pressi della sezione esterna, inciderà negativamente sulle prestazioni dell’unità.
Avvertenza:
• Non spruzzare acqua sull’unità e non toccarla con le mani bagnate. Ciò
può provocare una scossa elettrica.
GBDFE
• Non spruzzare gas combustibile nei pressi dell’unità, per evitare il rischio di un incendio.
• Non piazzare un riscaldatore a gas o qualsiasi altro apparecchio a fiamma aperta in un luogo esposto all’aria scaricata dall’unità. Ciò può essere alla base di una combustione incompleta.
Avvertenza:
• Non rimuovere il pannello anteriore o la griglia di protezione del ventilatore dalla sezione esterna durante il funzionamento dell’unità. Un eventuale contatto con le parti rotanti, roventi o ad alta tensione può infatti
causare conseguenze gravi.
• Non inserire le dita, oggetti appuntiti, ecc..., nei fori di entrata o di uscita
dell’unità per evitare di ferirsi, in quanto il ventilatore all’interno dell’unità ruota ad alta velocità. Esercitare un controllo particolare in presenza
di bambini.
• In presenza di odori par ticolari, arrestare il funzionamento dell’unità, spe-
INLPGRRUTRGBGBGBGBGB
gnere l’interruttore di alimentazione e contattare il proprio distributore.
Ciò per evitare un’interruzione di corrente, una scossa elettrica od un
incendio.
• Qualora vengano notati rumori o vibrazioni di intensità eccezionale, arrestare il funzionamento, spegnere l'unità e contattare il proprio rivenditore.
• Non raffreddare troppo i locali. Le migliori condizioni ambientali sono
ottenute quando la differenza fra la temperatura esterna ed interna non
supera i 5
• Evitare che persone handicappate o bambini sostino nella zona della portata d’aria del condizionatore. Ciò può infatti creare problemi di salute.
°C.
Cautela:
• Non dirigere la portata d’aria verso piante o animali domestici in gabbia.
• Ventilare frequentemente le stanze. Se l’unità viene fatta funzionare continuamente in una stanza chiusa, l’aria diventerà viziata.
In caso di guasto
Avvertenza:
• Non modificare mai il condizionatore d’aria. Consultare il proprio rivenditore per qualsiasi riparazione necessaria. Una riparazione eseguita in
modo non corretto può causare una fuoriuscita d’acqua, scosse elettriche, incendio, ecc.
• Qualora il display del comando a distanza visualizzi un codice di anomalia, e il condizionatore non funzioni o presenti un segno qualsiasi di anormalità, arrestare il funzionamento e contattare il proprio rivenditore. Vi è
infatti un rischio di incendio o guasto del sistema.
• Qualora l’interruttore di corrente venga attivato automaticamente con
una certa frequenza, contattare il proprio rivenditore. Vi è infatti un rischio di incendio o guasto del sistema.
• In caso di fuoriuscita del gas refrigerante, arrestare il funzionamento
dell'unità, ventilare completamente la stanza e contattare il proprio rivenditore. Ciò consente di evitare il rischio di incidenti dovuti alla mancanza di ossigeno.
Quando il condizionatore d'aria non è usato per un
lungo periodo di tempo
• Qualora il condizionatore d’aria non venga utilizzato per un lungo periodo di tempo a seguito delle caratteristiche atmosferiche stagionali, o per
altre ragioni, farlo funzionare durante 4 – 5 ore con la funzione di soffiaggio
dell’aria attivata, fino a quando la parte interna non sarà completamente
asciutta. Il non rispetto di questa raccomandazione può avere come conseguenza la crescita di muffa antigienica e insalubre in vari punti della
stanza.
• In caso di non impiego del condizionatore per lungo tempo, occorre tenere sempre spenta l’unità, per evitare di consumare inutilmente corrente.
Oltre a ciò, l’accumulo di polvere può costituire un rischio d’incendio.
• Accendere l’unità almeno 12 ore prima di avviarne il funzionamento. Evitare di spegnere l’unità durante la stagione di uso intenso, per evitare un
guasto.
• Se non si utilizza l’unità per un lungo periodo durante la stagione invernale, rimuovere l’acqua all’interno della tubazione per evitare il
congelamento.
1.3. Eliminazione dell’unità
Avvertenza:
Se occorre eliminare l’unità, contattare il proprio distributore. Nel caso in cui
i tubi siano rimossi in modo non corretto, il refrigerante (gas fluorocarburo)
può infatti fuoruscire e venire a contatto della pelle, con conseguenze gravi.
Il rilascio di refrigerante nell’atmosfera è inoltre dannoso per l’ambiente.
2. Come far funzionare i’unita
2.1. Uso del telecomando
Come Avviare, Arrestare, Modificare la modalità, e
Regolare la Temperatura dell’acqua
Per avviare il funzionamento
1. Premere il pulsante “ON/OFF” 1.
L’indicatore ON 1 e l’area display sono illuminate.
50
Nota:
• Quando si riavvia l’unità, sono attive le seguenti impostazioni.
Impostazioni del telecomando
Modalità
Impostazione della
temperatura
Ultima impostazione
Ultima impostazione
Interrompere il funzionamento
1. Premere nuovamente il pulsante “ON/OFF” 1.
L’indicatore ON 1 e l’area display si spegneranno.
Selezione della modalità
1. Quando l’unità è in funzione, premere il pulsante Modalità 2 il numero di volte
necessario.
• Ad ogni pressione del pulsante si passa alla modalità di funzionamento suc-
cessiva, in base alla sequenza illustrata di seguito.
La modalità correntemente selezionata è illustrata in 2.
PWFY-P100VM-E-BU
Solo acqua calda
PWFY-P100/P200VM-E-AU
Riscald. → Raffred.
Page 51

Per modificare le impostazioni sulla temperatura...
1. Per abbassare la temperatura: Premere il pulsante 3 “Set Temperature”
2. Per aumentare la temperatura: Premere il pulsante 3 “Set temperature”
• Ad ogni pressione del pulsante le impostazioni correnti vengono modificate
di 1 °C (1 °F). Le impostazioni correnti sono visualizzate in 3.
• Sono disponibili i seguenti intervalli. *1, *2
Acqua C.SANIT. Raffred.Riscald.
30 °C - 70 °C
87 °F - 158 °F
Nota:
*1 Gli intervalli disponibili variano a seconda del tipo di unità collegata.
*2 Se i limiti di temperatura sono stati impostati in Selezione funzioni, gli intervalli
disponibili saranno più ridotti di quelli riportati qui sopra. Se si tenta di impostare
un valore al di fuori dell’intervallo, il display visualizzerà un messaggio in cui si
indica che l’intervallo è attualmente limitato.
Per informazioni su come impostare e annullare questi intervalli limitati, fare
riferimento alla sezione 3, punto [3]–2 (3).
*3 Se in Selezione funzioni si è impostata la visualizzazione della temperatura in
gradi Fahrenheit. Per informazioni su come selezionare i gradi °C o °F, fare
riferimento alla sezione 3, punto [3]–4 (1).
30 °C - 45 °C
87 °F - 113 °F
.
.
10 °C - 30 °C
50 °F - 87 °F
2.2. Regolazione della temperatura dell’acqua
Per modificare la temperatura dell’acqua
Premere il pulsante
peratura desiderata.
Se si preme
Se si continua a premere, la temperatura continua a cambiare di 1 °C.
• La temperatura interna può essere impostata entro i limiti seguenti.
Acqua C.SANIT. Raffred.Riscald.
30 °C - 70 °C
87 °F - 158 °F
• Non è possibile impostare la temperatura dell’acqua tramite Temp. acqua in
ingresso o Temp. acqua in uscita.
* L’intervallo di temperatura dell’acqua nel display va da 0 °C a 100 °C. Al di fuori
di tali limiti il display lampeggia indicando 0 °C o 100 °C per segnalare che la
temperatura dell’acqua è inferiore o superiore alla temperatura visualizzata.
2.3.
Impostazione del giorno della settimana e
11
1 [regolazione temperatura acqua] e impostare la tem-
11
o una volta l’impostazione cambia di 1 °C.
30 °C - 45 °C
87 °F - 113 °F
10 °C - 30 °C
50 °F - 87 °F
dell’ora
Usare questa schermata per modificare il giorno corrente
della settimana e l’impostazione dell’ora.
Nota:
Il giorno e l’ora non saranno visualizzati se in Selezione funzioni è stato disattivato
l’uso dell’orologio.
Display Giorno
della settimana e
ora
Come impostare il giorno della settimana e l’ora…
Impostazione del giorno della settimana
Impostazione dell’ora
1. Premere il pulsante “Set Time” o A per visualizzare il display 2.
2. Premere il pulsante “TIMER ON/OFF” (SET DAY) 9 per impostare il giorno.
* Ad ogni pressione del pulsante si passa al giorno successivo a quello
visualizzato in 3 : Dom Lun → ... Ven → Sab.
3. Premere il pulsante “Set Time” appropriato A per regolare l’ora nel modo de-
siderato.
* Tenendo premuto il pulsante, l’ora (v. 4) aumenterà prima ad intervalli di un
minuto, poi ad intervalli di dieci minuti, e quindi ad intervalli di un’ora.
4. Dopo aver effettuato le impostazioni appropriate ai passaggi 2 e 3 premere il
pulsante 4 CIR.WATER
Nota:
I nuovi valori immessi nei passaggi 2 e 3 saranno cancellati se si preme il pulsante
Modalità (Invio) 2 prima di premere il pulsante 4 CIR.WATER .
5. Premere il pulsante Modalità (Invio) 2 per completare la procedura di
impostazione. Premendo questo pulsante il display visualizzerà nuovamente
la schermata di controllo standard; in 1 saranno visualizzati il giorno e l’ora
appena impostati.
per confermare i valori.
2.4. Utilizzo del timer
In questa sezione si spiega come impostare e utilizzare il timer. Si può usare la
Selezione funzioni per scegliere quale utilizzare tra i tre tipi di timer: 1 Timer
settimanale, 2 Timer semplice, o 3 Timer di arresto automatico.
Per informazioni su come impostare la Selezione funzioni, fare riferimento alla
sezione 3, punto [3]–3 (3).
Utilizzo del timer settimanale
1. Il timer settimanale può essere utilizzato per impostare un massimo di sei
operazioni per ciascun giorno della settimana.
• Si può scegliere tra le seguenti operazioni: ON/OFF timer con impostazione
della temperatura, solo ON/OFF timer, oppure solo Impostazione della temperatura.
• Quando viene raggiunto l’orario impostato per il timer, l’unità esegue l’azione
impostata dal timer.
2. La risoluzione per l’impostazione di questo timer è di 1 minuto.
Nota:
*1. Il Timer settimanale/Timer semplice/Timer di arresto automatico non possono
essere usati contemporaneamente.
*2. Il timer settimanale non funzionerà in presenza di una qualsiasi delle seguenti
condizioni:
La funzione timer è disattivata; il sistema presenta malfunzionamenti; un ciclo
di prova è in esecuzione; il telecomando è sottoposto a un ciclo di verifica o
autoverifica; l’utente sta impostando una funzione; l’utente sta impostando il
timer; l’utente sta impostando il giorno della settimana o l’ora; il sistema è
sottoposto a controllo centrale. (In particolare, il sistema non eseguirà operazioni (accensione unità, spegnimento unità o impostazione della temperatura)
disabilitate in queste condizioni).
N. operazione
SUN
ON
˚C
WEEKLY
GBDFE
INLPGRRUTRGBGBGBGBGB
51
Page 52

Come impostare il timer settimanale
1. Assicurarsi che sia visualizzata la schermata di controllo standard e che l’indicatore corrispondente al timer settimanale 1 sia visualizzato sul display.
2. Premere il pulsante “TIMER MENU” B per visualizzare il messaggio “Set Up”
sullo schermo (in 2). (Tenere presente che ad ogni pressione del pulsante sul
display si alterneranno i messaggi “Set Up” e “Monitor”).
3. Premere il pulsante “TIMER ON/OFF (SET DAY)” 9 per impostare il giorno.
Ad ogni pressione del pulsante in 3 viene visualizzata l’impostazione successiva, in base alla seguente sequenza: “Dom Lun Mar Mer Gio Ven Sab” →
“Dom”→ … → “Ven” → “Sab” → “Dom Lun Mar Mer Gio Ven Sab”…
4.
Premere il pulsante “INITIAL SETTING” o (7 o 8) il numero di volte
necessario per selezionare il numero di operazione desiderato (da 1 a 6) 4.
* Con le scelte effettuate ai passaggi 3 e 4 si selezionerà una delle celle della
matrice illustrata di seguito (Il display del telecomando illustrato a sinistra
mostra l’aspetto del display quando si imposta l’Operazione 1 per Domenica
con i valori riportati di seguito).
Matrice di impostazione
GBDFE
N. op.
No. 1
No. 2
…
No. 6
Sunday Monday … Saturday
• 8:30
•ON
•
23 °C (73 °F)
• 10:00
• OFF
• 10:00
• OFF
• 10:00
• OFF
• 10:00
• OFF
<Impostazioni Operazione 1 per Domenica>
▲
Avviare l’unità alle
8.30, ad una temperatura di 23 °C (73 °F).
▲
<Impostazioni
Operazione 2 per
tutti i giorni>
Spegnere l’unità
alle 10.00.
Nota:
Impostando come giorno “Dom Lun Mar Mer Gio Ven Sab”, si può fare in modo che
la stessa Operazione sia eseguita ogni giorno alla stessa ora. (Esempio: L’Operazione
2 descritta in precedenza, uguale per tutti i giorni della settimana).
Impostazione del timer settimanale
12. Per attivare il timer, premere il pulsante “TIMER ON/OFF” 9 per far scompari-
re dallo schermo l’indicatore “Timer Off”.
Assicurarsi che l’indicatore “Timer
Off” non sia più visualizzato.
* Se non sono attive delle impostazioni timer, l’indicatore “Timer Off” inizierà a
lampeggiare sullo schermo.
Come visualizzare le impostazioni del timer settimanale
Impostazioni del timer
1. Assicurarsi che l’indicatore corrispondente al timer settimanale sia visibile sullo schermo (in 1).
2. Premere il pulsante “TIMER MENU” B per visualizzare il messaggio “Mo-
nitor” sullo schermo (in 8).
3. Premere il pulsante “TIMER ON/OFF (SET DAY)” 9 il numero di volte
necessarie per selezionare il giorno desiderato.
4. Premere il pulsante “INITIAL SETTING”
o (7 o 8) per modificare l’operazione timer visualizzata sul display (in 9).
* Ad ogni pressione del pulsante si passerà all’operazione timer succes-
siva, seguendo l’ordine di impostazione.
5. Per chiudere il monitor e tornare alla schermata di controllo standard,
premere il pulsante Modalità (Invio) 2.
Per disattivare il timer settimanale
Premere il pulsante “TIMER ON/OFF” 9 per visualizzare il messaggio “Timer Off” 0.
Visualizza l’ora impostata
INLPGRRUTRGBGBGBGBGB
Visualizza l’operazione selezionata (ON o OFF)
* Non viene visualizzato se non si è impostata
un’operazione.
Visualizza la temperatura
impostata
*
Non viene visualizzato se non
si è impostata la temperatura.
5. Premere il pulsante “Set Time” A appropriato fino a impostare l’ora desiderata
(in 5).
* Tenendo premuto il pulsante, l’ora aumenta prima ad intervalli di un minuto,
poi ad intervalli di dieci minuti, e quindi ad intervalli di un’ora.
6. Premere il pulsante “ON/OFF” 1 per selezionare l’operazione desiderata (ON
o OFF) in 6.
* Ad ogni pressione del pulsante si passa all’impostazione successiva, in base
alla seguente sequenza: nessun display (nessuna impostazione) → “ON” →
“OFF”
7. Premere il pulsante “Set Temperature” 3 appropriato fino a impostare la tem-
peratura desiderata (in 7).
* Ad ogni pressione del pulsante si passa all’impostazione successiva, in base
alla seguente sequenza: nessun display (nessuna impostazione) ⇔ 5 (41)
⇔ 6 (43) ⇔ ... ⇔ 89 (192) ⇔ 90 (194) ⇔ nessun display.
(Intervallo disponibile: L’intervallo disponibile per questa impostazione è
compreso tra 5 °C (41 °F) e 90 °C (194 °F). Tuttavia l’intervallo effettivo per
il controllo della temperatura varia a seconda del tipo di unità collegata).
8. Per cancellare i valori correntemente impostati per l’operazione selezionata,
premere una volta e rilasciare rapidamente il pulsante “CHECK (CLEAR)” 0.
* L’impostazione dell’ora visualizzata diventerà “—:—”, e le impostazioni di
accensione/ spegnimento (ON/OFF) e di temperatura si spegneranno.
(Per annullare in una sola operazione tutte le impostazioni del timer settimanale, tenere premuto il pulsante “CHECK (CLEAR)” 0 per due o più secon-
di. Il display inizierà a lampeggiare per segnalare la cancellazione di tutte le
impostazioni).
9. Dopo aver effettuato le impostazioni appropriate ai passaggi 5, 6 e 7, premere
il pulsante 4 CIR.WATER
per confermare i valori.
Nota:
Le nuove impostazioni immesse saranno cancellate se si preme il pulsante Modalità
(Invio) 2 prima di premere il pulsante 4 CIR.WATER .
Se si sono impostate due o più operazioni diverse per la stessa ora, sarà eseguita
soltanto l’operazione corrispondente al N. Operazione più alto.
10. Ripetere i passaggi da 3 a 8 fino a riempire tutte le celle disponibili desiderate.
11. Premere il pulsante Modalità (Invio) 2 per tornare alla schermata di controllo
standard e completare la procedura di impostazione.
Attivare il timer settimanale
Premere il pulsante “TIMER ON/OFF” 9 per spegnere l’indicatore “Timer Off” (in 0).
Utilizzo del timer semplice
1. Il timer semplice può essere impostato in uno dei tre modi seguenti.
• Start time only (Solo ora di avvio) :
L’unità si mette in funzione all’ora impostata.
• Stop time only (Solo ora di spegnimento) :
L’unità smette di funzionare all’ora impostata.
• Start & stop times (Ore di accensione e spegnimento) :
L’unità si avvia e si spegne agli orari rispettivamente impostati.
2. Il timer semplice (avvio e arresto) può essere impostato soltanto una volta
nell’arco di 72 ore. L’impostazione dell’ora viene effettuata con incrementi di
un’ora.
Nota:
*1. Il Timer settimanale/Timer semplice/Timer di arresto automatico non possono
essere usati contemporaneamente.
*2. Il timer semplice non funzionerà in presenza di una qualsiasi delle seguenti
condizioni: Il timer è disattivato; presenza di una condizione anomala
dell’impianto; è in corso un test; il telecomando sta effettuando un controllo o
una diagnosi; l’utente sta selezionando una funzione; l’utente sta impostando
il timer; sull’impianto è impostato il controllo centralizzato. (In presenza di
queste condizioni, l’operazione “ON/ OFF” viene disattivata).
52
Page 53
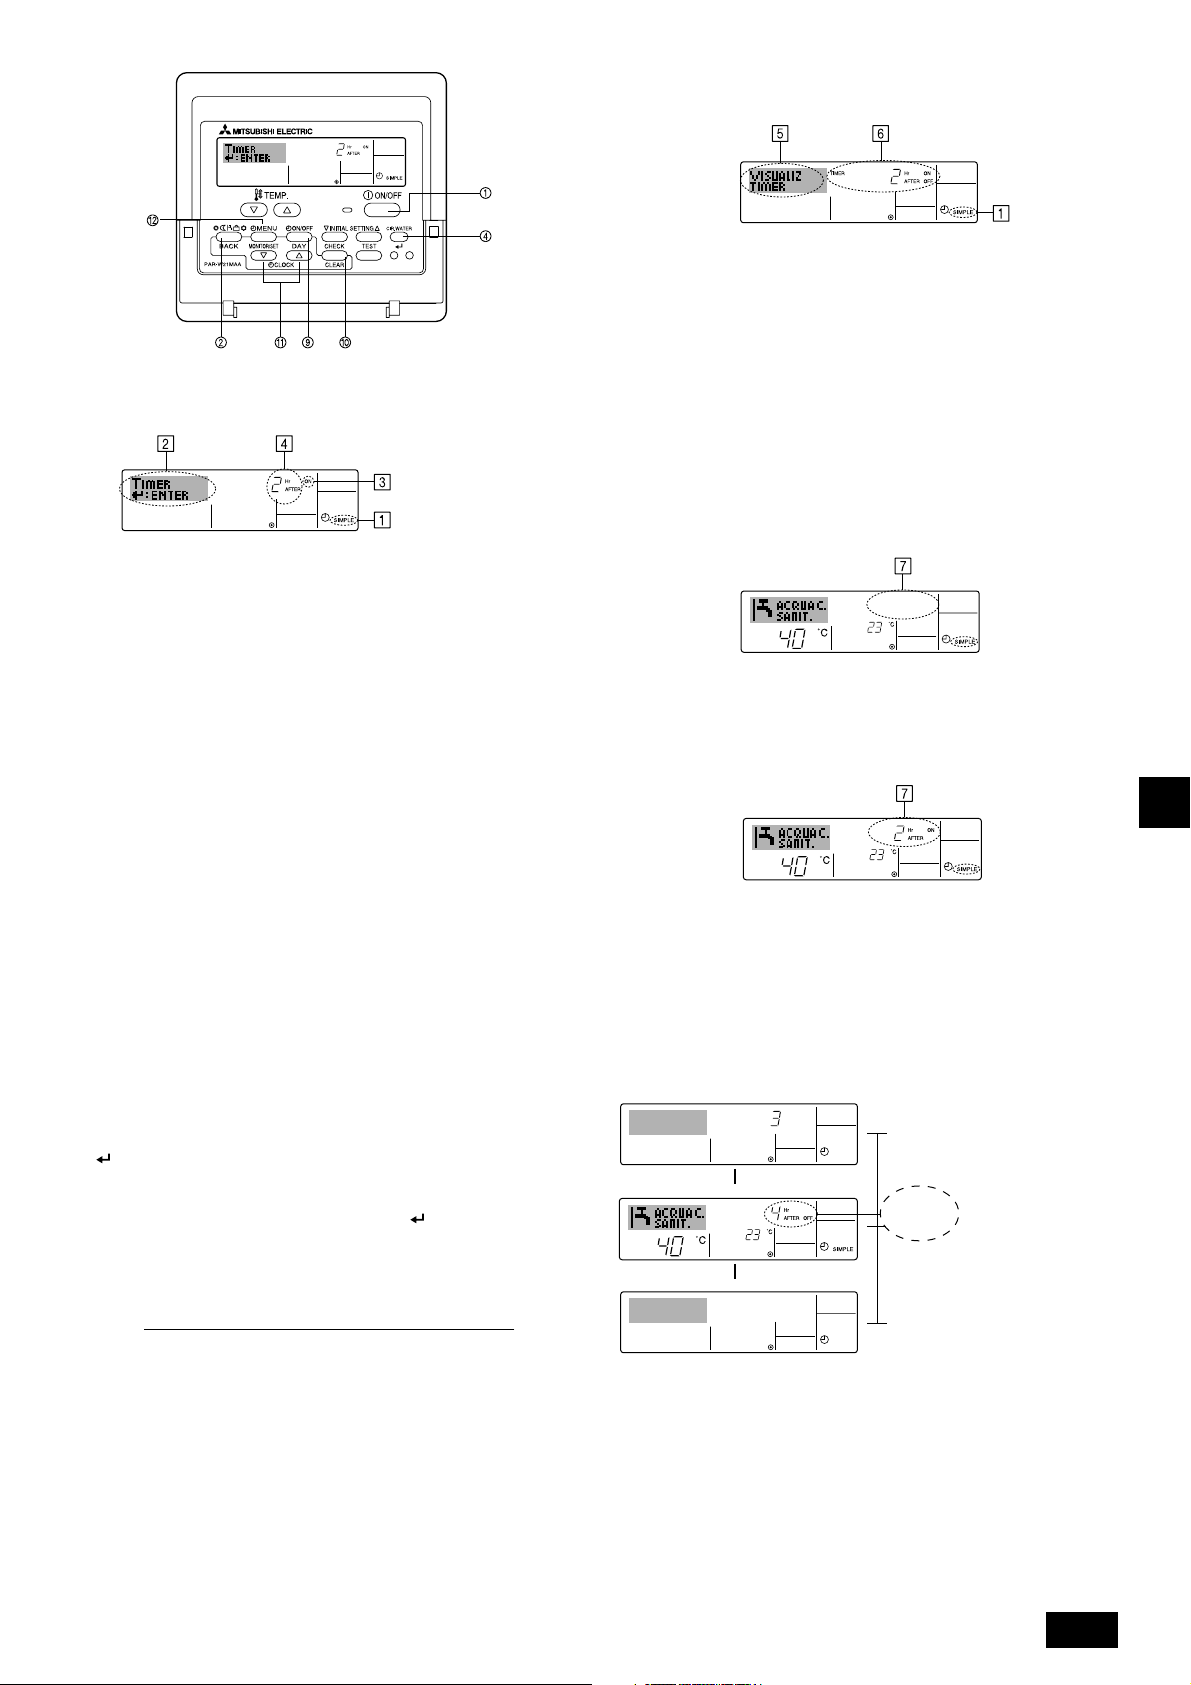
ONHr
AFTER
SIMPLE
SIMPLE
Come impostare il timer semplice
Impostazione del timer
Visualizzazione delle impostazioni correnti del timer semplice
Impostazione del timer
1. Assicurarsi che l’indicatore corrispondente al timer semplice sia visibile sullo
schermo (in 1).
2. Premere il pulsante “TIMER MENU” B per visualizzare il messaggio “Monitor”
sullo schermo (in 5).
• Se è in funzione il timer semplice di accensione (ON) o spegnimento (OFF),
il valore del timer corrente sarà visualizzato in 6.
• Se si sono impostati entrambi i valori di accensione e spegnimento (ON/ OFF),
i due valori vengono visualizzati in sequenza.
3. Premere il pulsante Modalità (Invio) 2 per chiudere il display del monitor e
tornare alla schermata di controllo standard.
Azione (On o Off)
* “— —” viene visualizzato se
non si sono effettuate
impostazioni.
1. Assicurarsi che sia visualizzata la schermata di controllo standard e che l’indi-
catore corrispondente al timer semplice 1 sia visualizzato sul display.
Se il display visualizza informazioni diverse da Simple Timer, impostare su
SIMPLE TIMER utilizzando la selezione delle funzioni (vedi 3.[3]–3 (3)) per
l’impostazione della funzione timer.
2. Premere il pulsante “TIMER MENU” B per visualizzare il messaggio “Set Up”
sullo schermo (in 2). (Tenere presente che ad ogni pressione del pulsante sul
display si alterneranno i messaggi “Set Up” e “Monitor”).
3. Premere il pulsante “ON/OFF” 1 per visualizzare le impostazioni correnti per
l’accensione (ON) o lo spegnimento (OFF) del timer semplice. Premere una
volta il pulsante per visualizzare quanto tempo rimane prima dell’accensione
(ON), e premerlo nuovamente per visualizzare quanto tempo rimane prima
dello spegnimento (OFF). (L’indicatore “ON/OFF” viene visualizzata in 4).
• Timer di accensione (ON): L’unità si metterà in funzione una volta trascor-
so il numero di ore specificato.
• Timer di spegnimento (OFF):L’unità smetterà di funzionare una volta trascor-
so il numero di ore specificato.
4. Con “ON” o “OFF” visualizzati in 3: Premere il pulsante “Set Time” A appro-
priato per impostare l’orario di accensione (se è visualizzato “ON”) o l’orario di
spegnimento (se in 4 è visualizzato “OFF”).
• Intervalli disponibili: da 1 a 72 ore
5. Per impostare l’orario di accensione (ON) e spegnimento (OFF), ripetere i passaggi 3 e 4.
* Tenere presente che non si può impostare lo stesso valore come orario di
accensione e spegnimento.
6. Per annullare le impostazioni di accensione e spegnimento correnti: Visualizzare
l’impostazione di accensione (ON) o spegnimento (OFF) (v. passaggio 3) e
quindi premere il pulsante “CHECK (CLEAR)” 0; l’impostazione dell’ora sarà
cancellata e sarà visualizzato “—” in 4. (Per usare soltanto un’impostazione di
accensione (ON) o spegnimento (OFF), assicurarsi che per l’impostazione che
non si desidera utilizzare sia visualizzato “—” sul display).
7. Dopo aver completato i passaggi da 3 a 6, premere il pulsante 4 CIR.WATER
per confermare il valore.
Nota:
Le nuove impostazioni immesse saranno cancellate se si preme il pulsante Modalità
(Invio) 2 prima di premere il pulsante 4 CIR.WATER
.
8. Premere il pulsante Modalità (Invio) 2 per tornare alla schermata di controllo
standard.
9. Premere il pulsante “TIMER ON/OFF” 9 per avviare il conto alla rovescia del
timer. Quando il timer è in funzione, il valore del timer viene visualizzato sul
display.
Assicurarsi che il valore del timer sia visibile e corretto.
Per disattivare il timer semplice...
Premere il pulsante “TIMER ON/OFF” 9 in modo che l’impostazione timer non sia
più visualizzata sullo schermo (in 7).
Per avviare il timer del semplice…
Premere il pulsante “TIMER ON/OFF” 9 per visualizzare l’impostazione timer in 7.
Esempi
Se gli orari di accensione (ON) e spegnimento (OFF) sono stati impostati sul timer
semplice, l’operazione e il display si presenteranno nel modo seguente.
Esempio 1:
Avvio del timer, con orario di accensione (ON) impostato prima dell’orario di
spegnimento (OFF)
Impostazione di accensione (ON): 3 ore
Impostazione di spegnimento (OFF): 7 ore
All’avvio
del timer
▲
3 ore dopo
l’avvio del
timer
▲
7 ore dopo
l’avvio del
timer
Sul display viene visualizzata
l’impostazione di accensione (ON)
del timer (il numero di ore che
manca all’accensione del timer).
Sul display viene visualizzata
l’impostazione di spegnimento
(OFF) del timer (il numero di ore
che manca allo spegnimento)
L’ora visualizzata è l’impostazione
di spegnimento (OFF - 7 ore) – di
avvio (ON - 3 ore) = 4 ore.
L’unità si spegne e rimane
spenta fino a quando qualcuno la riaccende.
GBDFE
INLPGRRUTRGBGBGBGBGB
53
Page 54

AUTO OFF
7
Esempio 2:
Avvio del timer, con orario di spegnimento (OFF) impostato prima dell’orario di accensione (ON)
Impostazione di accensione (ON): 5 ore
Impostazione di spegnimento (OFF): 2 ore
All’avvio
del timer
▲
SIMPLE
2 ore dopo
l’avvio del
timer
AFTER
ONHr
▲
5 ore dopo
l’avvio del
timer
Sul display viene visualizzata
l’impostazione di spegnimento
(OFF) del timer (il numero di ore
che manca allo spegnimento).
Sul display viene visualizzata
l’impostazione di accensione
(ON) del timer (il numero di ore
che manca all’accensione). L’ora
visualizzata è l’impostazione di
avvio (ON - 5 ore) – di spegnimento (OFF - 2 ore) = 3 ore.
L’unità si spegne e rimane
spenta fino a quando qualcuno la riaccende.
Utilizzo del Timer di arresto automatico (Auto Off)
1. Questo timer inizia il conto alla rovescia quando l’unità si mette in funzione, e
GBDFE
lo spegne all’orario impostato.
2. Le impostazioni disponibili vanno da 30 minuti a 4 ore, in intervalli di 30 minuti.
Nota:
*1. Il Timer settimanale/Timer semplice/Timer di arresto automatico non possono
essere usati contemporaneamente.
*2. Il timer di arresto automatico non funzionerà in presenza di una qualsiasi delle
seguenti condizioni:
Il timer è disattivato; presenza di una condizione anomala dell’impianto; è in
corso un test; il telecomando sta effettuando un controllo o una diagnosi;
l’utente sta selezionando una funzione; l’utente sta impostando il timer;
sull’impianto è impostato il controllo centralizzato. (In presenza di queste
condizioni, l’operazione “ON/ OFF” viene disattivata).
5. Premere il pulsante Modalità (Invio) 2 per completare la procedura
d’impostazione e tornare alla schermata di controllo standard.
6. Se l’unità è già in funzione, il timer inizierà immediatamente il conto alla rove-
scia.
Verificare che le impostazioni timer siano visualizzate correttamen-
te sul display.
Controllo delle impostazioni del timer di arresto automatico
Impostazione del timer
1. Assicurarsi che l’indicatore corrispondente al timer di arresto automatico sia
visibile sullo schermo (in 1).
2. Premere il pulsante “TIMER MENU” B per 3 secondi, fino a visualizzare il
messaggio “Monitor” sullo schermo (in 4).
• In 5 viene visualizzato il tempo che rimane prima dell’arresto dell’apparec-
chio.
3. Per chiudere il monitor e tornare alla schermata di controllo standard, premere
il pulsante Modalità (Invio) 2.
Disattivare il timer di arresto automatico...
• Tenere premuto il pulsante “TIMER ON/OFF” 9 per 3 secondi, fino a quando
viene visualizzato “Timer Off” (in 6) e scompare il valore timer (in 7).
INLPGRRUTRGBGBGBGBGB
Come impostare il timer di arresto automatico
Impostazione del timer
1. Assicurarsi che sia visualizzata la schermata di controllo standard e che l’indi-
catore corrispondente al timer di arresto automatico 1 sia visualizzato sul
display.
Se il display visualizza informazioni diverse da Auto Off Timer, impostare su
AUTO OFF TIMER utilizzando la selezione delle funzioni (vedi 3.[3]–3 (3)) per
l’impostazione della funzione timer.
2. Premere il pulsante “TIMER MENU” B per 3 secondi, fino a visualizzare il
messaggio “Set Up” sullo schermo (in 2).
(Tenere presente che ad ogni pressione del pulsante sul display si alterneranno i messaggi “Set Up” e “Monitor”).
3. Premere il pulsante “Set Time” A appropriato fino a impostare l’ora di spegni-
mento (OFF) desiderata (in 3).
4. Premere il pulsante 4 CIR.WATER
Nota:
Le impostazioni immesse saranno cancellate se si preme il pulsante Modalità
(Invio) 2 prima di premere il pulsante 4 CIR.WATER
per confermare le impostazioni.
.
• In alternativa, spegnere l’unità. Il valore timer (in 7) scomparirà dallo schermo.
Avviare il timer di arresto automatico...
• Tenere premuto il pulsante “TIMER ON/OFF” 9 per 3 secondi. L’indicazione
“Timer off” scompare (in 6), e l’impostazione timer viene visualizzata sul display
(in 7).
• In alternativa, accendere l’unità. Il valore timer sarà visualizzato in 7.
54
Page 55

3. Selezione delle funzioni
Selezione delle funzioni del comando a distanza
L’impostazione delle funzioni del comando a distanza elencate di seguito può essere modificata mediante la modalità di selezione delle funzioni del comando a distanza.
Modificare l’impostazione se necessario.
Elemento 1
1. Modifica lingua
(“CHANGE
LANGUAGE”)
2. Limite funzioni
(“SELEZIONE
FUNZIONI”)
3. Selezione modalità
(“SELEZIONE
MODO”)
4. Modifica display
(“IMPOSTAZIONE
MODO DISPLAY”)
Impostazione lingua visualizzata sul display
(1) Impostazione limite funzioni di funzionamento (blocco
funzionamento) (“BLOCCO FUNZIONI”)
(2)
Impostazione proibizione modo operativo (“PROIBIZIONE MODO”)
(3)
Impostazione limite intervallo temperatura (“LIMITAZIONE TEMPAERATURA”)
(1) Impostazione comando a distanza principale/asservito
(“CONTROLLO MAIN/SUB”)
(2) Uso impostazione orologio (“OROLOGIO”)
(3) Impostazione funzione timer (“TIMER SETTIMANALE”)
(4) Impostazione numero da chiamare in caso di errore
(“CALL.”)
(5) Impostazione offset di temperatura (“IMPOSTA OFFSET”)
(1)
Impostazione display temperatura °C/°F (“TEMPERATURA °C/°F”)
(2) Impostazione display temperatura acqua (“VISUALIZZA
TEMP ACQUA”)
Elemento 2
Elemento 3 (descrizione dell’impostazione)
• La visualizzazione in più lingue è possibile
• Impostazione dell’intervallo del limite di funzionamento (blocco funzio-
namento)
• Impostazione dell’utilizzo o non utilizzo di ogni modo operativo
•
Impostazione dell’intervallo regolabile della temperatura (massima, minima)
• Selezione del comando a distanza principale o asservito
* Se due comandi a distanza sono collegati a un unico gruppo, un
comando a distanza deve essere impostato come asservito.
• Impostazione dell’uso o meno della funzione orologio
• Impostazione del tipo di timer
• Visualizzazione del numero da chiamare in caso di errore
• Impostazione del numero di telefono
• Impostazione dell’utilizzo o non utilizzo di un valore di offset
• Impostazione dell’unità di temperatura (°C o °F) visualizzata
• Impostazione dell’uso o meno del display della temperatura dell’acqua
GBDFE
Flusso di selezione delle funzioni
[1] Arrestare l’unità per avviare la modalità di selezione delle funzioni del comando a distanza. → [2] Selezionare una voce dell’elenco Elemento 1. → [3] Selezionare una voce
dell’elenco Elemento 2. → [4] Eseguire l’impostazione. (I dettagli sono specificati nell’elenco Elemento 3.) → [5] Impostazione completata. → [6] Reimpostare il display normale.
(Fine)
Display normale (quando
l’unità non è in funzione)
Elemento 1
Modifica lingua
(“CHANGE LANGUAGE”)
Premere il
pulsante E.
Limite funzioni
(“SELEZIONE
FUNZIONI”)
Premere il
pulsante E.
Premere il
pulsante E.
Selezione
modalità
(“SELEZIONE
MODO”)
Premere il
pulsante E.
Modifica display
(“IMPOSTAZIONE
MODO
DISPLAY”)
(Tenere premuto il pulsante E, quindi premere il pulsante
D per due secondi.)
* Non è possibile modificare il display durante, la prova di
funzionamento e l’autodiagnosi.
Modalità di selezione delle fun-
Premere il pulsante G.
→
Impostazione limite funzioni di funzionamento (“BLOCCO FUNZIONI”)
Premere il
pulsante G.
Premere il
pulsante G.
Premere il
pulsante G.
Impostazione proibizione modo operativo (“PROIBIZIONE MODO”)
Impostazione limite intervallo temperatura (“LIMITAZIONE TEMPAERATURA”)
→
Impostazione comando a distanza principale/asservito (“CONTROLLO MAIN/SUB”)
Uso impostazione orologio (“OROLOGIO”)
Impostazione funzione timer (“TIMER SETTIMANALE”)
Impostazione numero da chiamare in caso di errore (“CALL.”)
Impostazione offset di temperatura (“IMPOSTA OFFSET”)
→
Impostazione display temperatura °C/° F (“TEMPERATURA °C/°F”)
Impostazione display temperatura acqua (“VISUALIZZA TEMP ACQUA”)
zioni del comando a distanza
Elemento 2
→
→
→→→
→
→
Premere il pulsante G.
Premere il pulsante G.
Premere il pulsante G.
(Tenere premuto il pulsante E, quindi
premere il pulsante D per due secondi.)
* In questo modo il comando a distanza
registra l’impostazione eseguita.
Vedere [3]-1
Elemento 3
(descrizione dell’impostazione)
Premere il
pulsante D.
Premere il
pulsante D.
Premere il
pulsante D.
Vedere [3]–2. (1)
Vedere [3]–2. (2)
Vedere [3]–2. (3)
Vedere [3]–3. (1)
3]–3. (2)
Vedere [
Vedere [3]–3. (3)
Vedere [3]–3. (4)
Vedere [3]–3. (5)
Vedere [3]–4. (1)
Vedere [3]–4. (2)
NOTA
Il funzionamento del timer si arresta quando il
display di selezione delle funzioni del comando
a distanza viene sostituito con il display normale.
Display a matrice di punti
La lingua selezionata mediante la
funzione CHANGE LANGUAGE
(Cambia lingua) viene visualizzata
in questo display. Nel presente manuale è impostata la lingua inglese.
INLPGRRUTRGBGBGBGBGB
55
Page 56

Impostazione dettagliata
[3]–1. Impostazione CHANGE LANGUAGE (Cambia lingua)
La lingua visualizzata nel display a matrice di punti può essere selezionata.
• Per cambiare lingua, premere il pulsante [
1 Inglese (GB), 2 Tedesco (D), 3 Spagnolo (E), 4 Russo (RU), 5 Italiano
(I), 6 Francese (F), 7 Svedese
[3]–2. Limite funzioni
(1) Impostazione limite funzioni di funzionamento (blocco funzionamento)
• Per attivare o disattivare l’impostazione, premere il pulsante [
1 no1 : L’impostazione di blocco del funzionamento viene eseguita per tutti i
pulsanti, tranne il pulsante [
2 no2 : L’impostazione di blocco del funzionamento viene eseguita per tutti i
pulsanti.
3 OFF (Impostazione iniziale) :
* Per rendere effettiva l’impostazione di blocco del funzionamento nel display
(2) Impostazione proibizione modo operativo
Dopo aver modificato l’impostazione, è possibile commutare il modo operativo nella
gamma specificata.
GBDFE
• Per commutare le seguenti impostazioni, premere il tasto [
INLPGRRUTRGBGBGBGBGB
(3) Impostazione limite intervallo temperatura
Una volta eseguita questa impostazione, è possibile modificare la temperatura
entro l’intervallo impostato.
• Per attivare o disattivare l’impostazione, premere il pulsante [
* Quando viene eseguita un’impostazione diversa da OFF, contemporaneamente
• Per aumentare o ridurre la temperatura, premere il pulsante [
• Intervallo impostabile
*L’intervallo impostabile varia a seconda dell’unità da collegare.
L’impostazione di blocco del funzionamento non viene eseguita.
normale, è necessario premere e tenere premuti contemporaneamente per due
secondi i pulsanti [CIR.WATER] e [
eseguito la suddetta impostazione.
1 Modo Riscaldamento : imposta l’utilizzo o il non utilizzo del modo
2 Modo Riscaldamento ECO : imposta l’utilizzo o il non utilizzo del modo
3
Modo Acqua calda sanitaria
4 Modo Antigelo : imposta l’utilizzo o il non utilizzo del modo
5 Modo Raffreddamento : imposta l’utilizzo o il non utilizzo del modo
6 OFF (valore di impostazione iniziale) :
*
Se viene applicata un’impostazione diversa da OFF, le impostazioni di
proibizione dei modi Riscaldamento, Riscaldamento ECO, Acqua calda sanitaria, Antigelo e Raffreddamento vengono eseguite contemporaneamente.
* Sarà impossibile utilizzare un modo non disponibile sull’unità da collegare
anche se l’impostazione è “AVAILABLE (DISPONIBILE)”
1 LIMITE TEMP. RISCALD.:
È possibile modificare il campo di temperatura nel modo riscaldamento.
2 LIMITE TEMP. ACQUA SAN.:
È possibile modificare il campo di temperatura nel modo Riscaldamento/
Acqua calda sanitaria.
3 LIMITE TEMP. ANTIGELO:
È possibile modificare il campo di temperatura nel modo antigelo.
4 LIMITE TEMP. RAFFREDDAMENTO:
È possibile modificare il campo di temperatura nel modo raffreddamento.
5 OFF (impostazione iniziale): Il limite dell’intervallo di temperatura non è attivo.
viene impostato il limite dell’intervallo di temperatura nelle modalità Acqua calda
sanitaria, Antigelo e Raffreddamento. Tuttavia, tale intervallo non può essere
limitato se l’intervallo di temperatura impostato non è stato modificato.
].
Modo Acqua calda sanitaria : Limite inferiore: 30 ~ 70 °C (87 ~ 158 °F)
Modo Riscaldamento : Limite inferiore: 30 ~ 45 °C (87 ~ 113 °F)
Modo Raffreddamento : Limite inferiore: 10 ~ 30 °C (50 ~ 87 °F)
Riscaldamento.
Riscaldamento ECO.
: imposta l’utilizzo o il non utilizzo del modo
Acqua calda sanitaria.
Antigelo.
Raffreddamento.
la proibizione del modo operativo non viene
applicata.
Limite superiore: 70 ~ 30 °C (158 ~ 87 °F)
Limite superiore: 45 ~ 30 °C (113 ~ 87 °F)
Limite superiore: 30 ~ 10 °C (87 ~ 50 °F)
MENU].
ON/OFF].
ON/OFF].
ON/OFF] sul display normale dopo avere
ON/OFF].
ON/OFF].
TEMP. o
[3]–3. Selezione della modalità
(1) Impostazione comando a distanza principale/asservito
• Per attivare o disattivare l’impostazione, premere il pulsante [
1 Main : Il comando a distanza viene impostato come principale.
2 Sub : Il comando a distanza viene impostato come asservito.
(2) Uso impostazione orologio
• Per attivare o disattivare l’impostazione, premere il pulsante [
1 ON : La funzione orologio può essere utilizzata.
2 OFF : La funzione orologio non può essere utilizzata.
(3) Impostazione funzione timer
• Per attivare o disattivare l’impostazione, premere il pulsante [
(Scegliere una delle impostazioni seguenti.)
1 TIMER SETTIMANALE (Impostazione iniziale)
2 AUTO OFF TIMER :
3
TIMER SEMPLIFICATO
4 TIMER OFF : Non è possibile utilizzare la modalità timer.
* Se l’orologio è impostato in modo da non essere usato (OFF), non è possibile
utilizzare il “TIMER SETTIMANALE”.
(4) Impostazione numero da chiamare in caso di errore
• Per attivare o disattivare l’impostazione, premere il pulsante [
1 CALL OFF : I numeri da chiamare impostati non vengono visualizzati in
2 CALL **** *** **** : I numeri da chiamare impostati vengono visualizzati in
CALL_ : Quando il display è come quello mostrato a sinistra, è
• Impostazione dei numeri da chiamare
Per impostare i numeri da chiamare, attenersi alla procedura seguente.
Spostare il cursore lampeggiante per impostare i numeri. Premere i pulsanti
[
TEMP. o ] F per spostare il cursore verso destra e verso
sinistra. Premere i pulsanti [
numeri.
(5) Impostazione funzione offset
• Per commutare le seguenti impostazioni, premere il pulsante [
1 ON : Il valore di offset viene visualizzato sotto il modo di impostazione
2 OFF : Il valore di offset non viene visualizzato sotto il modo di impostazione
iniziale della temperatura dell’acqua.
iniziale della temperatura dell’acqua.
: È possibile utilizzare il timer settimanale.
È possibile utilizzare il timer a disattivazione automatica.
: È possibile utilizzare il timer semplice.
caso di errore.
caso di errore.
possibile impostare i numeri da chiamare.
CLOCK o ] C per impostare i
ON/OFF] D.
ON/OFF] D.
ON/OFF] D
ON/OFF] D.
ON/OFF] D.
[3]–4. Impostazione del display
(1) Impostazione display temperatura °C/°F
• Per attivare o disattivare l’impostazione, premere il pulsante [
1 °C: Viene utilizzata l’unità di temperatura °C.
2 °F: Viene utilizzata l’unità di temperatura ° F.
(2) Impostazione display temperatura acqua
• Per attivare o disattivare l’impostazione, premere il pulsante [
1 ON : La temperatura dell’acqua viene visualizzata.
2 OFF : La temperatura dell’acqua non viene visualizzata.
ON/OFF] D.
ON/OFF] D.
56
Page 57

4. Manutenzione dell’unità
Fare sempre eseguire la manutenzione del filtro da un tecnico dell’assistenza.
Prima di effettuare la manutenzione dell’unità, staccare sempre la corrente.
Cautela:
• Prima di pulire l’unità, arrestare il funzionamento e staccare la corrente.
Non dimenticare che il ventilatore ruota all’interno dell’unità a velocità
elevata e che costituisce un serio rischio di lesioni.
• Le sezioni interne sono dotate di filtri destinati a rimuovere la polvere
dall’aria aspirata. Pulire il filtro utilizzando i metodi illustrati nelle figure
seguenti.
• La durata del filtro dipende dal luogo in cui è installata l’unità e dal modo
di utilizzo.
5. Ricerca dei guasti
Prima di chiedere l’intervento del servizio tecnico, controllare i punti seguenti:
Inconveniente
Non funziona.
L’acqua esce ma non è
abbastanza fredda o
abbastanza calda.
Non esce acqua calda
o acqua fredda.
Funziona brevemente,
ma si arresta poco
dopo.
Comando a distanza
Il display “'” non si illu-
mina. Premendo il pulsante [ON/OFF], non viene attivato alcun display.
Il display a cristalli liquidi
indica che l’unità sta funzionando.
Il display a cristalli liquidi
indica che l’unità sta funzionando.
Il codice di “CHECK” lam-
peggia sul display a cristalli liquidi.
Interruzione di corrente.
L’alimentazione elettrica è interrotta.
Il fusibile di alimentazione è bruciato.
L’interruttore del circuito per dispersione verso terra è
scattato.
Impropria regolazione della temperatura.
Il circuito di prevenzione del riavviamento viene attivato per 3 minuti.
Il funzionamento della sezione interna è stato riavviato
durante le fasi di riscaldamento e sbrinamento.
Vi sono alcuni ostacoli davanti all’ingresso ed all’uscita
dell’aria delle sezioni interna e esterna.
Il filtro è pieno di polvere e sporco.
Causa
Pulizia del filtro
• Per lavare il filtro, rimuovere il coperchio e strofinare l’interno con una spazzo-
la.
Cautela:
• Non asciugare il filtro esponendolo alla luce diretta del sole o riscaldandolo usando fiamme e simili. In caso filtro potrebbe deformarsi.
Cautela:
Evitare di versare acqua o liquidi infiammabili sul condizionatore d’aria. Pulire l’unità usando un metodo diverso può provocare un guato, scosse elettriche o incendio.
Ricerca dei guasti
Premere il pulsante [ON/OFF] dopo il ritorno della corrente.
Accendere l’unità.
Sostituire il fusibile.
Ripristinare l’interruttore del circuito.
Dopo aver controllato la temperatura impostata e la temperatura di ingresso sul display a cristalli liquidi, fare riferimento alla sezione [Regolazione della temperatura dell’ac-
qua] e servirsi del pulsante di regolazione della temperatura.
Attendere un attimo.
(Allo scopo di proteggere il compressore, la sezione interna è dotata di un circuito di prevenzione del riavviamento
incorporato. Se il compressore non si riavvia immediatamente, occorre attendere la scadenza dei 3 minuti.)
Attendere un attimo.
(La funzione di riscaldamento è avviata al termine della fase
di sbrinamento.)
Riavviare dopo aver rimosso gli ostacoli.
Attivare di nuovo dopo aver pulito il filtro. (Fare riferimento
alla sezione [Manutenzione dell’unità]).
GBDFE
INLPGRRUTRGBGBGBGBGB
• Se il funzionamento viene sospeso a causa di un’interruzione della corrente elettrica, il [circuito che impedisce il riavvio all’interruzione della corrente] entra in funzione
e disabilita il funzionamento dell’unità anche al ripristino dell’alimentazione. In tal caso, per avviare il funzionamento, premere il pulsante [ON/OFF].
Qualora le anomalie di funzionamento persistano anche dopo aver controllato quanto sopra, spegnere l’unità e contattare il rivenditore, fornendogli delle informazioni sul
nome del prodotto, sulla natura dell’inconveniente, ecc. Se il display di “[CHECK]” è attivato e il codice di anomalia (4 cifre) lampeggia, riferirne i dettagli al rivenditore. Non
cercare mai di riparare da soli l’unità.
Ciò che segue non è un segno indicativo di un eventuale malfunzionamento dell’unità:
• L’aria soffiata dal condizionatore d’aria può contenere talvolta odori. Ciò può essere dovuto alla presenza nell’aria di fumo di sigarette, di odori di cosmetici, o di odori
provenienti da pareti o mobili del locale.
• Un sibilo viene percepito durante e dopo il funzionamento dell’unità. Questo rumore è causato dallo spostamento del refrigerante all’interno dell’unità. Questo è un fatto
normale.
• Un ticchettio proviene dal condizionatore d’aria al momento dell’avviamento e dell’arresto del modo raffreddamento/riscaldamento. Questo rumore è causato dallo
sfregamento del pannello anteriore e di altre sezioni a seguito dell’espansione o del restringimento causati da una variazione della temperatura. Questo è un fatto
normale.
57
Page 58

6. Lavori d’installazione e di trasferimento - ispezione
Scelta del luogo d’installazione
Consultare il proprio rivenditore per i dettagli relativi all’installazione e al trasferimento dell’unità.
Cautela:
Non installare il condizionatore d’aria in un punto in cui vi è un rischio di
fuoriuscita di gas infiammabili. Qualora vi siano delle perdite di gas che si
accumulano attorno all’unità, ne può risultare un rischio di incendio.
Non installare mai il condizionatore d’aria in uno dei seguenti luoghi:
• dove vi è la presenza di quantità abbondanti di olio di macchinari
• località costiere dove l’aria è ricca di salmastro.
• con umidità elevata
• nei pressi di sorgenti di calore
• dove sono presenti gas solforati
• nei pressi di macchine che emettono onde ad alta frequenza (saldatrici ad alta
frequenza, ecc....)
• dove vengono frequentemente usate soluzioni acide
• dove vengono frequentemente usati spray speciali
GBDFE
• La sezione interna deve essere installata orizzontalmente, per evitare la fuoriuscita di gas.
• Adottare le misure acustiche necessarie durante l’installazione dei condizionatori d’aria in ospedali o in centri di comunicazione.
Qualora il condizionatore d’aria venga utilizzato in uno dei luoghi citati qui sopra,
possono verificarsi spesso dei guasti. È pertanto consigliabile evitare questo tipo
di luoghi.
Per ulteriori dettagli, consultare il proprio rivenditore.
Collegamenti elettrici
Cautela:
• I collegamenti elettrici devono essere eseguiti da personale qualificato,
conformemente agli standard tecnici relativi alle installazioni elettriche,
alle norme sui cablaggi elettrici interni ed al contenuto del manuale di
INLPGRRUTRGBGBGBGBGB
installazione, con l’uso assoluto di circuiti esclusivi. L’uso di circuiti su
cui sono collegati altre unità può provocare la bruciatura degli interruttori e dei fusibili.
• Non collegare mai il filo di messa a terra ad un tubo del gas o dell’acqua,
ad uno scaricatore di sovratensione o ad un filo di messa a terra telefonico. Per ulteriori dettagli, consultare il proprio rivenditore.
• In alcuni tipi di installazione è obbligatorio installare un interruttore del
circuito per dispersione verso terra.
Per ulteriori dettagli, consultare il proprio rivenditore.
Informazioni per l’installazione della tubazione dell’acqua
• Non utilizzare tubi di acciaio per le condutture dell’acqua. Si consigliano tubi in
rame.
• Il circuito idraulico deve essere un circuito chiuso.
Trasferimento dell’installazione
• In occasione della rimozione o della reinstallazione del condizionatore d’aria
in caso di allargamento, restauro o trasloco, consultare in anticipo il proprio
rivenditore per conoscere i costi tecnici richiesti per il trasferimento dell’unità.
Cautela:
Durante il trasferimento o la reinstallazione del condizionatore d’aria, consultare il proprio rivenditore. Un’installazione difettosa può essere alla base
di scosse elettriche, incendio, ecc...
Fare attenzione anche al livello sonoro
• L’unità deve essere installata in un luogo in grado di sopportare perfettamente
il peso del condizionatore d’aria e caratterizzato da un ridotto livello delle vibrazioni e del rumore.
• Selezionare un luogo in cui l’uscita dell’aria calda o fredda dalla sezione esterna non disturbi il vicinato.
• La presenza di un oggetto estraneo nei pressi dell’uscita dell’aria della sezione esterna del condizionatore può provocare una diminuzione del rendimento
e un aumento del livello sonoro. Evitare quindi un qualsiasi ostacolo nei pressi
dell’uscita dell’aria.
• Qualora il condizionatore d’aria produca un qualsiasi rumore anormale, consultare il proprio rivenditore.
Manutenzione e ispezione
• Se il condizionatore d’aria è usato intensivamente durante diverse stagioni, le
parti interne si ricoprono di sporcizia e il rendimento diminuisce.
In funzione delle condizioni d’uso, la presenza di polvere e sporcizia può essere alla base della generazione di cattivi odori e di un deterioramento del funzionamento del drenaggio.
7. Dati tecnici
Modello
Alimentazione
Capacità di riscaldamento kW
Capacità di raffreddamento kW
Rumorosità
Peso netto kg
Dimensioni
Accessorio
Velocità di flusso dell’acqua m
*1 Condizioni di riscaldamento nominali
Temp. esterna: 7 °C DB/6 °C WB (45 °F DB/43 °F WB)
Lunghezza tubo: 7,5 m (24-9/16 ft)
Dislivello: 0 m (0 ft)
Temp. acqua in ingresso 65 °C Velocità flusso dell’acqua 2,15 m3/h
*3 Condizioni di raffreddamento nominale
Temp. esterna: 35 °C DB (95 °F DB)
Lunghezza tubo: 7,5 m (24-9/16 ft)
Dislivello: 0 m (0 ft)
Temp. acqua in ingresso 23 °C Velocità flusso dell’acqua 1,93 m3/h
*5 Condizioni di raffreddamento nominale
Temp. esterna: 35 °C DB (95 °F DB)
Lunghezza tubo: 7,5 m (24-9/16 ft)
Dislivello: 0 m (0 ft)
Temp. acqua in ingresso 23 °C Velocità flusso dell’acqua 3,86 m3/h
Altezza mm
Larghezza mm
Profondità mm
PWFY-P100VM-E-BU
3
/h
PWFY-P100VM-E-AU
1 stadio 220-230-240 V 50/60 Hz
1
12,5 *
–
44 dB<A>
60 kg
Filtro, materiale di isolamento termico, set di connettori × 2,
giunto di espansione × 2 (PWFY - P200VM - E - AU)
0,6-2,15 1,2-4,3
*2 Condizioni di riscaldamento nominali
Temp. esterna: 7 °C DB/6 °C WB (45 °F DB/43 °F WB)
Lunghezza tubo: 7,5 m (24-9/16 ft)
Dislivello: 0 m (0 ft)
Temp. acqua in ingresso 30 °C Velocità flusso dell’acqua 2,15 m3/h
*4 Condizioni di riscaldamento nominali
Temp. esterna: 7 °C DB/6 °C WB (45 °F DB/43 °F WB)
Lunghezza tubo: 7,5 m (24-9/16 ft)
Dislivello: 0 m (0 ft)
Temp. acqua in ingresso 30 °C Velocità flusso dell’acqua 4,3 m3/h
12,5 *
11,2 *
29 dB<A>
35 kg
800
450
300
0,6-2,15
2
3
PWFY-P200VM-E-AU
25,0 *
22,4 *
29 dB<A>
38 kg
4
5
58
Page 59

Inhoud
1. Veiligheidsvoorschriften ............................................................................ 59
1.1. Installatie ................................................................................. 59
1.2. Tijdens gebruik ........................................................................ 59
1.3. Het apparaat verwijderen ........................................................ 60
2. Hoe het apparaat te bedienen .................................................................. 60
2.1. De afstandsbediening .............................................................. 60
2.2. Watertemperatuur instellen ..................................................... 61
1. Veiligheidsvoorschriften
s Lees alle “Veiligheidsvoorschriften” voordat u het apparaat
gaat gebruiken.
s In de “Veiligheidsvoorschriften” staan belangrijke instructies
met betrekking tot de veiligheid. Volg ze zorgvuldig op.
Symbolen die in de tekst worden gebruikt
Waarschuwing:
Beschrijft maatregelen die genomen moeten worden om het risico van verwonding of dood van de gebruiker te voorkomen.
Voorzichtig:
Beschrijft maatregelen die genomen moeten worden om schade aan het apparaat te voorkomen.
Symbolen die in de afbeeldingen worden gebruikt
: Geeft een handeling aan die u beslist niet moet uitvoeren.
: Geeft aan dat er belangrijke instructies opgevolgd moeten worden.
: Geeft een onderdeel aan dat geaard moet worden.
: Kijk uit voor elektrische schok (Dit symbool staat op de sticker van het
apparaat.) <kleur: geel>
: Wees voorzichtig op hete oppervlakken
Waarschuwing:
Lees de stickers die op het apparaat zitten zorgvuldig.
1.1. Installatie
s Bewaar deze gebruiksaanwijzing, nadat u hem gelezen heeft, op een vei-
lige plaats, samen met de Installatiehandleiding, zodat u hem indien nodig
altijd gemakkelijk kunt raadplegen. Als iemand anders het apparaat ook
gaat bedienen, dient u hem of haar deze gebruiksaanwijzing te geven.
Waarschuwing:
• Het apparaat mag niet door de gebruiker zelf worden geïnstalleerd. Vraag
de zaak waar u het apparaat gekocht heeft of een erkend bedrijf om het
apparaat te installeren. Als het apparaat niet juist is geïnstalleerd, kan dit
lekkage, elektrische schokken of brand tot gevolg hebben.
• Gebruik alleen onderdelen die door Mitsubishi Electric zijn goedgekeurd
en vraag de zaak waar u het apparaat gekocht heeft of een erkend bedrijf
om ze te installeren. Als de onderdelen niet juist worden geïnstalleerd,
kan dit lekkage, elektrische schokken of brand tot gevolg hebben.
• Raak het apparaat niet aan. De buitenkant van het apparaat kan heet zijn.
• Installeer dit apparaat niet op een plaats waar het kan worden blootgesteld aan bijtend gas.
• De installatiehandleiding geeft de geadviseerde installatiemethode aan.
Grote wijzigingen die voor de installatie nodig zijn, moeten verenigbaar
zijn met de plaatselijke bouwvoorschriften.
• Probeer nooit zelf het apparaat te repareren of te verplaatsen. Indien een
reparatie niet juist wordt uitgevoerd, kan dit lekkage, elektrische schokken of brand tot gevolg hebben. Raadpleeg uw dealer als het apparaat
gerepareerd of verplaatst moet worden.
• Laat geen water (of zeepsop e.d.) op de elektrische onderdelen komen.
• Vloeistof op elektrische onderdelen zou brand of een elektrische schok
kunnen veroorzaken.
Opmerking 1: Voor het schoonmaken van de warmtewisselaar en de
afvoerbak dient u een waterdichte afdekking aan te brengen, om de regelkast, de motor en de LEV droog te houden.
Opmerking 2: Probeer nooit het waswater voor de afvoerbak en de
warmtewisselaar via de afvoerpomp te lozen. Zorg voor
aparte afvoer daarvan.
• Het apparaat is niet geschikt om zonder toezicht door kleine kinderen of
minder validen bediend te worden.
2.3. De dag van de week en de tijd instellen .................................. 61
2.4. De timer ................................................................................... 61
3. Functiekeuze ............................................................................................ 65
4. Het apparaat schoonhouden .................................................................... 67
5. Problemen oplossen ................................................................................. 67
6. Installatie, verplaatsen van het apparaat en controles ............................. 68
7. Specificaties .............................................................................................. 68
• Bij kleine kinderen moet er op gelet worden dat ze niet met het apparaat
gaan spelen.
• Gebruik geen toevoeging voor lekkagedetectie.
1) Buitenapparaat
Waarschuwing:
• Het buitenapparaat moet worden geïnstalleerd op een stabiele, vlakke
ondergrond, op een plaats waar geen gevaar van ophoping van sneeuw,
bladeren of vuilnis bestaat.
• Ga niet op het apparaat staan en plaats geen voorwerpen op het apparaat. U kunt vallen en gewond raken, of het voorwerp kan vallen en letsel
veroorzaken.
Voorzichtig:
Het buitenapparaat moet worden geïnstalleerd op een plaats waar de door
het apparaat geproduceerde lucht en geluid niet hinderlijk zijn voor de omgeving.
2) Binnenapparaat
Waarschuwing:
Het binnenapparaat moet stevig worden geïnstalleerd. Als het apparaat niet
goed is vastgezet, kan het vallen en letsel veroorzaken.
3) Bedieningspaneel
Waarschuwing:
Het bedieningspaneel moet zo worden geïnstalleerd dat kinderen er niet mee
kunnen spelen.
4) Afvoerslang
Voorzichtig:
Zorg ervoor dat de afvoerslang gemonteerd is zodat de afvoer goed werkt.
Onjuiste montage kan waterlekkage tot gevolg hebben, hetgeen schade aan
het meubilair kan veroorzaken.
5) Netkabel, zekering of stroomonderbreker
Waarschuwing:
• Zorg dat het apparaat wordt aangesloten op een groep van het lichtnet
die hierop is berekend. Andere apparatuur die op dezelfde groep wordt
aangesloten, kan tot overbelasting leiden.
• Zorg ervoor dat er een netschakelaar aanwezig is.
• Controleer of de spanning van het apparaat en de zekering of stroomonderbreker dezelfde is als die van het lichtnet. Gebruik nooit een snoer
of zekering met een hogere spanning dan staan aangegeven.
6) Aarding
Voorzichtig:
• Het apparaat moet goed geaard zijn. Sluit de aardkabel nooit aan op een
aardkabel voor een gasleiding, waterleiding, bliksemafleider of telefoon.
Als het apparaat niet goed geaard is, kan dat elektrische schokken tot
gevolg hebben.
• Controleer regelmatig of de aardkabel van het buitenapparaat correct is
aangesloten op het aardingspunt van het apparaat en de aardelektrode.
1.2. Tijdens gebruik
Voorzichtig:
• Gebruik geen scherpe voorwerpen om de toetsen in te drukken - hiermee
kunt u het bedieningspaneel beschadigen.
• Draai of ruk niet aan het snoer van het bedieningspaneel - dit kan het
paneel beschadigen en storingen veroorzaken.
GBDFE
NLPGRRUTRGBGBGBGBGB
I
59
Page 60

• Verwijder nooit de bovenkant van de afstandsbedieningseenheid. Het is
gevaarlijk om de bovenkant van de afstandsbedieningseenheid te verwijderen en de printkaarten binnenin aan te raken. Als u dit wel doet, kan
dit brand of storingen veroorzaken.
• Veeg de afstandsbedieningseenheid nooit af met benzeen, thinner, doeken met chemische schoonmaakmiddelen, enz. Als u dit wel doet kan dit
verkleuring en storingen veroorzaken. Voor het verwijderen van zware
vlekken kunt u een doek drenken in een neutraal schoonmaakmiddel
verdund met water, de doek goed uitwringen, de vlekken wegvegen en
dan nogmaals afvegen met een droge doek.
• Zorg ervoor dat de toevoer- en afvoeropeningen van het binnen- of buitenapparaat nooit verstopt raken of afgedekt worden. Grote meubelstukken
onder het binnenapparaat of omvangrijke voorwerpen zoals grote dozen
die dicht bij het buitenapparaat worden neergezet, hebben een nadelige
invloed op het rendement van het apparaat.
Waarschuwing:
• Zorg ervoor dat u geen water op het apparaat knoeit en raak het apparaat
nooit met natte handen aan. Dit kan elektrische schokken tot gevolg hebben.
• Spuit niet met brandbaar gas in de buurt van het apparaat. Dit kan brand
tot gevolg hebben.
• Zet geen gasverwarmingstoestel of een ander toestel met open vuur op
een plaats waar het blootstaat aan de lucht die het apparaat uitblaast. Dit
GBDFE
kan onvolledige verbranding tot gevolg hebben.
Waarschuwing:
• Verwijder nooit de beschermkap van de ventilator in het buitenapparaat
terwijl het apparaat aan staat. U kunt gewond raken als u onderdelen
aanraakt die draaien, heet zijn of onder stroom staan.
• Duw nooit uw vingers of stokjes of iets dergelijks in de toevoer- en afvoeropeningen - dit kan tot verwondingen leiden, aangezien de ventilator in
het apparaat met hoge snelheid draait. Wees met name voorzichtig als er
kinderen in de buurt zijn.
• Als u iets vreemds ruikt, dient u het apparaat niet meer te gebruiken.
Draai de schakelaar uit en raadpleeg uw dealer. Doet u dat niet, dan loopt
u het risico van stroomonderbreking, elektrische schokken of brand.
• Wanneer u uitzonderlijk ongewone geluiden of vibraties bemerkt, zet dan
het apparaat stil, schakel de elektriciteit uit en neem contact op met uw
dealer.
• Zorg ervoor dat er niet teveel gekoeld wordt. Het beste is een binnentemperatuur te kiezen die niet meer dan 5
temperatuur.
• Laat geen gehandicapte personen of kinderen in de baan van de luchtstroom van de airconditioner zitten of staan. Dit kan gezondheids-
NLPGRRUTRGBGBGBGBGB
problemen veroorzaken.
I
°C verschilt met de buiten-
Voorzichtig:
• Richt de luchtstroom niet op planten of dieren in kooien.
• Ventileer de kamer regelmatig. Als het apparaat lange tijd constant in
een gesloten ruimte wordt gebruikt, wordt de lucht muf.
In geval van storing
Waarschuwing:
• Probeer niet om aanpassingen te maken in de airconditioner. Raadpleeg
voor eventuele reparatie of inwendig onderhoud uw leverancier. Ondeskundige reparaties kunnen leiden tot waterlekkage, elektrische schokken, brandgevaar e.d.
• Als de afstandsbedieningseenheid een foutmelding weergeeft, de
airconditioner het niet doet of er iets anders ongewoons is, zet dan het
apparaat stil en neem contact op met uw dealer. Als u het apparaat onder
zulke omstandigheden aan laat staan, kan dit brand of storing veroorzaken.
• Als de stroomonderbreker regelmatig in werking treedt, neem dan contact op met uw dealer. Als u het apparaat gewoon blijft gebruiken kan dit
brand of storing veroorzaken.
• Als het koelgas uit het apparaat geblazen wordt of lekt, zet dan de
airconditioner stil, ventileer de kamer goed en neem contact op met uw
dealer. Als u het apparaat gewoon blijft gebruiken kunnen er ongelukken
gebeuren ten gevolge van zuurstofgebrek.
Wanneer de airconditioner lange tijd niet gebruikt zal
worden
• Indien de airconditioner lange tijd niet gebruikt zal worden door
seizoenswisselingen en dergelijke, laat het apparaat dan 4 – 5 uur aan
staan terwijl het lucht blaast, tot de binnenkant volledig droog is. Indien
dit niet gedaan wordt kunnen er onhygiënische, ongezonde schimmelculturen ontstaan in verspreide delen van de kamer.
• Wanneer het apparaat langdurig niet gebruikt wordt, zet dan de [stroomvoorziening] op OFF (UIT).
Als de stroomvoorziening aan blijft staan, worden een aantal of enkele
tientallen Watts verspild. Bovendien kan het verzamelde stof, enz. brand
veroorzaken.
• Zet de stroomvoorziening op ON (AAN) minstens 12 uur voordat het apparaat in werking gesteld wordt. Zet de stroomvoorziening niet op OFF
(UIT) gedurende seizoenen van intensief gebruik. Als u dit wel doet kunnen er storingen optreden.
• Verwijder het water uit de waterleiding om bevriezing te voorkomen als
het apparaat tijdens de winter lange tijd niet gebruikt wordt.
1.3. Het apparaat verwijderen
Waarschuwing:
Raadpleeg de zaak waar u het apparaat gekocht heeft indien u zich van het
apparaat wilt ontdoen. Als de buizen op de verkeerde manier worden verwijderd, kan er koelstof (fluorkoolzuurgas) uit ontsnappen en in contact komen
met uw huid, met letsel tot gevolg. Koelstof in de lucht laten ontsnappen is
ook schadelijk voor het milieu.
2. Hoe het apparaat te bedienen
2.1. De afstandsbediening
Starten, stoppen, de modus wijzigen en de watertemperatuur aanpassen
2
4
˚C
3
3
2
PAR-W21MAA
De werking starten
1. Druk op ON/OFF 1.
Het ON-lampje 1 gaat aan en het schermgebied licht op.
˚C
TEMP.
MENU
MONITOR/SET
BACK DAY
CLOCK CLEAR
ON/OFF
INITIAL SETTING
CHECK TEST
ON/OFF
CIR.WATER
1
1
Opmerking:
• Nadat de unit opnieuw is gestart, zijn dit de begininstellingen.
Instellingen op de
afstandsbediening
Modus
Temperatuurinstelling
Laatste bedieningsmodus
Laatst ingestelde temperatuur
De werking stoppen
1. Druk nogmaals op ON/OFF 1.
Het ON-lampje 1 gaat uit en het schermgebied wordt donker.
De modus selecteren
1. Druk, als de unit aan staat, zo vaak als nodig is op Modus 2.
• Met elke druk op de knop wordt geschakeld naar de volgende modus, in de
hieronder aangegeven volgorde.
De momenteel geselecteerde modus wordt weergegeven bij 2.
PWFY-P100VM-E-BU
Alleen hot water
PWFY-P100/P200VM-E-AU
Heating → Cooling
60
Page 61

De instelling van de temperatuur wijzigen...
1. De temperatuur verlagen: druk op Set Temperature 3.
2. De temperatuur verhogen: druk op
Set Temperature 3.
• Met elke druk op de knop verandert de instelling met 1 °C (1 °F). De huidige
instelling wordt weergegeven bij 3.
• Dit zijn de beschikbare bereiken. *1,*2
Hot Water CoolingHeating
30 °C - 70 °C
87 °F - 158 °F
30 °C - 45 °C
87 °F - 113 °F
10 °C - 30 °C
50 °F - 87 °F
Opmerking:
*1 Het beschikbare bereik verschilt al naargelang het aangesloten type unit.
*2 Als er grenzen aan het temperatuurbereik zijn ingesteld bij Function Selection,
zijn de beschikbare bereiken kleiner dan hierboven aangegeven. Probeert u toch
een waarde buiten dit beperkte bereik in te stellen, dan verschijnt op het display
een bericht met de melding dat het bereik momenteel is verkleind.
Zie paragraaf 3 onder [3]–2 (3) als u meer wilt weten over het instellen en wissen
van deze bereikgrenzen.
*3 Het kan ook zijn dat de temperatuur in Fahrenheit is ingesteld bij Function
Selection.
Zie paragraaf 3 onder [3]–4 (1) als u wilt weten hoe u °C of °F instelt.
2.2. Watertemperatuur instellen
Wijzigen van de watertemperatuur
Druk op de knop
temperatuur in.
Eenmaal drukken op
Met de knop ingedrukt, blijft de instelling met 1 °C wijzigen.
• De binnentemperatuur kan binnen het volgende bereik worden ingesteld.
Hot Water CoolingHeating
30 °C - 70 °C
87 °F - 158 °F
• Het is mogelijk om de watertemperatuur door de watertemperatuur van de
waterinvoer of –uitvoer in te stellen.
* De weergegeven temperatuur ligt tussen de 0 °C en 100 °C. Daarbuiten knip-
pert het scherm 0 °C tot 100 °C om u te informeren dat de watertemperatuur
lager of hoger is dan de weergegeven temperatuur.
2.3.
Via dit scherm wijzigt u de huidige dag van de week en de
tijd.
Opmerking:
De dag en tijd worden niet weergegeven als de klok is uitgeschakeld bij Function
Selection.
2
A
11
1 [ instellen watertemperatuur] en stel de gewenste water-
11
of wijzigt de instelling met 1 °C.
30 °C - 45 °C
87 °F - 113 °F
10 °C - 30 °C
50 °F - 87 °F
De dag van de week en de tijd instellen
1
Weergave dag van
de week en tijd
TIME SUN
˚C
9
4
MENU
MONITOR/SET
BACK DAY
PAR-W21MAA
TEMP.
ON/OFF
CLOCK CLEAR
INITIAL SETTING
CHECK TEST
ON/OFF
CIR.WATER
De dag van de week en de tijd instellen…
3
Dag van de week instellen
2
TIME SUN
4
Tijd instellen
1. Druk op of op van Set Time A zodat 2 wordt weergegeven.
2. Druk op TIMER ON/OFF (SET DAY) 9 om de dag in te stellen.
* Met elke druk op de knop schuift de weergegeven dag bij 3 een dag op: Sun
→ Mon → ... → Fri → Sat (Zo, ma, …. vr, za).
3. Druk zo vaak als nodig is op Set Time A om de tijd in te stellen.
* Als u de knop ingedrukt houdt, neemt de tijd (bij 4) eerst toe in minuten, dan
met een interval van tien minuten en tenslotte met een interval van een uur.
4. Nadat u bij de stappen 2 en 3 de juiste instellingen hebt ingevoerd, drukt u op
CIR.WATER
4 om de waarden te vergrendelen.
Opmerking:
De nieuwe waarden die u hebt ingevoerd bij de stappen 2 en 3 worden geannuleerd
als u op Modus (Terug) 2 drukt voordat u op CIR.WATER 4 hebt gedrukt.
5. Druk op Modus (Terug) 2 om de instelprocedure te voltooien. Het standaard
bedieningsscherm wordt weer weergegeven. Bij 1 wordt nu de zojuist ingestelde dag en tijd weergegeven.
2.4. De timer
Hieronder wordt uitgelegd hoe u de timer instelt en gebruikt. Met behulp van
Function Selection kunt u aangeven welk van de drie typen timers u wilt gebruiken:
1 Weekly timer (schakelklok), 2 Simple timer (enkelvoudige timer) of 3 Auto Off
timer (automatisch uitschakelen).
Zie paragraaf 3 onder [3]–3 (3) als u meer wilt weten over het instellen van Function
Selection.
De Weekly Timer (Schakelklok)
1. Met de schakelklok kunt u maximaal zes handelingen opgeven voor elke dag
van de week.
• Elke handeling kan bestaan uit: ON/OFF-tijd in combinatie met een tempe-
ratuur, alleen de ON/OFF-tijd of alleen de temperatuur.
• Als de huidige tijd op de ingestelde tijd van deze timer komt, wordt de op de
timer ingestelde handeling op het toestel uitgevoerd.
2. De minimale tijd die u kunt instellen op de timer is 1 minuut.
Opmerking:
*1. De schakelklok, enkelvoudige timer en automatisch uitschakelen kunnen niet
tegelijkertijd worden gebruikt.
*2. De schakelklok werkt niet als aan een van de volgende voorwaarden is voldaan.
De timerfunctie is uitgeschakeld; het systeem bevindt zich in een abnormale
staat; er is een testrun gaande; op de afstandsbediening wordt een zelftest of
controle uitgevoerd; de gebruiker schakelt op dit moment een functie of timer
in of stelt de huidige dag van de week of de tijd in; het systeem wordt centraal
bestuurd. (Op het systeem worden met name geen handelingen uitgevoerd
(unit aan, unit uit, temperatuur instellen) die tijdens deze omstandigheden zijn
uitgeschakeld.)
Werkingsnummer (No.)
42 3
B
PAR-W21MAA
TEMP.
MENU
MONITOR/SET
BACK DAY
CLOCK CLEAR
ON/OFF
SUN
˚C
INITIAL SETTING
CHECK TEST
ON
WEEKLY
ON/OFF
CIR.WATER
1
3
1
7 8
4
GBDFE
NLPGRRUTRGBGBGBGBGB
I
2
A90
61
Page 62

Schakelklok instellen
1. Zorg dat u het standaard bedieningsscherm voor u hebt en dat de indicator
van de schakelklok 1 op het display wordt weergegeven.
2. Druk op TIMER MENU B, zodat “Set Up” op het scherm verschijnt (bij 2).
(Met elke druk op de knop schakelt u tussen “Set Up” en “Monitor”.)
3. Druk op TIMER ON/OFF (SET DAY) 9 om de dag in te stellen. Met elke druk
op de knop schuift de weergegeven dag bij 3 een dag op, in de onderstaande
volgorde: “Sun Mon Tues Wed Thurs Fri Sat” → “Sun” → … → “Fri” → “Sat” →
“Sun Mon Tues Wed Thurs Fri Sat” …
4. Druk zo vaak als nodig op
juiste werkingsnummer te selecteren (1 tot en met 6) 4.
* Door middel van uw keuze bij de stappen 3 en 4 wordt een van de cellen uit
de onderstaande matrix geselecteerd (op het display van de afstandsbediening links wordt weergegeven wat op het display komt te staan als u Operation
1 voor Sunday (Werking 1 voor zondag) op de onderstaande warden instelt).
Instellingsmatrix
Sunday Monday … Saturday
• 8:30
•ON
•
23 °C (73 °F)
• 10:00
• OFF
• 10:00
• OFF
GBDFE
Op No.
No. 1
No. 2
…
No. 6
Opmerking:
Als u de dag instelt op “Sun Mon Tues Wed Thurs Fri Sat”, kunt u elke dag dezelfde
handelingen laten uitvoeren op dezelfde tijd.
(Bijvoorbeeld: Operation 2 hierboven, die voor alle dagen van de week gelijk is.)
of INITIAL SETTING (7 of 8) om het
<Operation 1-instellingen voor zondag>
▲
Start het toestel om 8.30
uur, met een ingestelde temperatuur van 23 °C (73 °F).
• 10:00
• OFF
• 10:00
• OFF
▲
<Operation 2-instellingen voor elke
dag>
Zet het toestel uit
om 10.00 uur.
Schakelklokinstellingen weergeven
8
TIMER
1. Controleer dat de schakelklokindicator zichtbaar is op het scherm (bij 1).
2.
Druk op TIMER MENU B, zodat “Monitor” op het scherm verschijnt (bij 8).
3. Druk zo vaak als nodig op TIMER ON/OFF (SET DAY) 9 om de dag weer
te geven waarvan u de instellingen wilt bekijken.
4. Druk zo vaak als nodig op
het juiste werkingsnummer op het display weer te geven (bij 9).
* Met elke druk op de knop wordt geschakeld naar de volgende
timerhandeling, in volgorde van de ingestelde tijd.
5. Als u de monitor wilt sluiten en terug wilt keren naar het standaard
bedieningsscherm drukt u op Modus (Terug) 2.
Timerinstellingen
9
SUN
ON
OFF
˚C
WEEKLY
1
of INITIAL SETTING (7 of 8) om
De schakelklok uitschakelen
Druk op TIMER ON/OFF 9, zodat de indicatie “Timer Off” verschijnt bij 0.
TIME SUN
˚C
WEEKLY
0
˚C
Schakelklok instellen
De ingestelde tijd De geselecteerde handeling (ON of OFF)
SUN
NLPGRRUTRGBGBGBGBGB
5. Druk zo vaak als nodig op de betreffende Set Time-knop A om de gewenste
I
tijd in te stellen (bij 5).
* Als u de knop ingedrukt houdt, neemt de tijd eerst toe in minuten, dan met
een interval van tien minuten en tenslotte met een interval van een uur.
6.
Druk op ON/OFF 1 om de gewenste handeling te selecteren (ON of OFF), bij 6.
* Met elke druk op de knop wijzigt de volgende instelling, in de onderstaande
volgorde: geen weergave (geen instelling) → “ON” → “OFF”
7. Druk zo vaak als nodig op de betreffende Set Temperature-knop 3 om de
gewenste temperatuur in te stellen (bij 7).
* Met elke druk op de knop wijzigt u de instelling, in de onderstaande volg-
orde: geen weergave (geen instelling) ⇔ 5 (41) ⇔ 6 (43) ⇔ ... ⇔ 89 (192) ⇔
90 (194) ⇔ geen weergave.
(Beschikbaar bereik: het instellingsbereik varieert van 5 °C (41 °F) tot 90 °C
(194 °F). Het daadwerkelijke bereik voor de temperatuurregeling is echter
afhankelijk van het type unit dat is aangesloten.)
8. Als u de huidige reeks waarden voor de geselecteerde handeling wilt verwijderen, drukt u eenmaal op CHECK (CLEAR) 0 en laat deze snel weer los.
* De weergegeven tijd verandert in “—:—” en de instellingen ON/OFF en tem-
peratuur verdwijnen allemaal.
(Als u alle schakelklokinstellingen in een keer wilt wissen, houdt u CHECK
(CLEAR) 0 twee seconden of langer ingedrukt. Het display begint te knipperen ter aanduiding dat alle instellingen zijn gewist.)
9. Nadat u bij de stappen 5, 6 en 7 de juiste instellingen hebt ingevoerd, drukt u
op CIR.WATER
4 om de waarden te vergrendelen.
5
6
* Wordt niet weergegeven als de handeling niet
is ingesteld.
ON
˚C
WEEKLY
7
De ingestelde temperatuur
* Wordt niet weergegeven als
de temperatuur niet is ingesteld.
De schakelklok inschakelen
Druk op TIMER ON/OFF 9, zodat de indicatie “Timer Off” donker wordt (bij 0)
TIME SUN
˚C
WEEKLY
0
˚C
De Simple Timer (Enkelvoudige timer)
1. U kunt de enkelvoudige timer op drie manieren instellen.
• Alleen begintijd : het toestel wordt ingeschakeld als de ingestelde tijd is
• Alleen eindtijd : het toestel wordt uitgeschakeld als de ingestelde tijd is
•
Begin- en eindtijden
2. De enkelvoudige timer (starten en stoppen) kan slechts eenmaal binnen een
periode van 72 uur worden ingesteld. De tijd kan worden ingesteld in intervallen van een uur.
Opmerking:
*1. De schakelklok, enkelvoudige timer en automatisch uitschakelen kunnen niet
tegelijkertijd worden gebruikt.
*2. De enkelvoudige timer werkt niet als aan een van de volgende voorwaarden is
voldaan.
De timerfunctie is uitgeschakeld; het systeem bevindt zich in een abnormale
staat; er is een testrun gaande; op de afstandsbediening wordt een zelftest of
diagnose uitgevoerd; de gebruiker stelt op dit moment een functie in; het
systeem wordt centraal bestuurd. (Onder deze voorwaarden is de ON/OFFhandeling uitgeschakeld.)
verstreken.
verstreken.
: het toestel wordt in- en uitgeschakeld als de ingestelde
tijdstippen zijn verstreken.
Opmerking:
De nieuwe waarden worden geannuleerd als u op Modus (Terug) 2 drukt voordat
u op CIR.WATER
4 hebt gedrukt.
Als u twee of meer verschillende handelingen voor precies dezelfde tijd hebt
ingesteld, wordt alleen de handeling met het hoogste Operation No. uitgevoerd.
10. Herhaal, indien nodig, de stappen 3 tot en met 8, om alle gewenste cellen te
vullen.
11. Druk op Modus (Terug) 2 om terug te keren naar het standaard bedienings-
scherm en de instelprocedure te voltooien.
12. Voor het activeren van de timer drukt u op TIMER ON/OFF 9, zodat de indica-
tie “Timer Off” van het scherm verdwijnt.
Controleer of de indicatie “Timer
Off” niet langer wordt weergegeven.
* Als er geen timerinstellingen meer zijn, knippert de indicatie “Timer Off” op
het scherm.
62
ONHr
AFTER
INITIAL SETTING
0
SIMPLE
ON/OFF
CIR.WATER
TEMP.
B
MENU
ON/OFF
MONITOR/SET
BACK DAY
PAR-W21MAA
CLOCK CLEAR
2A9
CHECK TEST
1
4
Page 63

ONHr
AFTER
SIMPLE
SIMPLE
˚C
˚C
OFFHrAFTER
SIMPLE
˚C
˚C
SIMPLE
Enkelvoudige timer instellen
˚C
˚C
SIMPLE
7
7
˚C
˚C
ONHr
AFTER
SIMPLE
2
1. Zorg dat u het standaard bedieningsscherm voor u hebt en dat de indicator
van de enkelvoudige timer 1 op het display wordt weergegeven.
Als niet de enkelvoudige timer wordt weergegeven, maar iets anders, stelt u
de SIMPLE TIMER in via Function Selection (zie 3.[3]–3 (3)) timerfunctie inschakelen.
2. Druk op TIMER MENU B, zodat “Set Up” op het scherm verschijnt (bij 2).
(Met elke druk op de knop schakelt u tussen “Set Up” en “Monitor”.)
3. Druk op ON/OFF 1 om de huidige instelling van de enkelvoudige timer weer
te geven (ON of OFF). Druk eenmaal op de knop om de resterende tijd voor
ON weer te geven en druk dan nogmaals op de knop om de resterende tijd
voor OFF weer te geven. (de indicatie ON/OFF ziet u bij 4).
•“ON”-timer: het toestel wordt ingeschakeld als het opgegeven aantal uren
•“OFF” timer: het toestel wordt uitgeschakeld als het opgegeven aantal
4. “ON” of “OFF” wordt weergegeven bij 3: Druk zo vaak als nodig op de betref-
fende Set Time-knop A om de uren ON in te stellen (als “ON” wordt weergege-
ven) of de uren OFF (als “OFF” wordt weergegeven) bij 4.
• Beschikbaar bereik: 1 tot 72 uur
5.
Als u zowel de ON- als de OFF-tijden wilt instellen, herhaalt u de stappen 3 en 4.
*
De ON- en OFF-tijden kunnen echter niet op dezelfde waarde worden ingesteld.
6. Zo wist u de huidige ON- of OFF-instelling: Geef de ON- of OFF instelling weer
(zie stap 3) en druk vervolgens op CHECK (CLEAR) 0 zodat de tijd op “—”
komt te staan bij 4. (Wilt u alleen een ON-instelling of alleen een OFF-instelling gebruiken, controleer dan of de instelling die u niet wilt gebruiken als “—”
wordt weergegeven.)
7. Nadat u de stappen 3 tot en met 6 hebt ingevoerd, drukt u op CIR.WATER
4 om de waarden te vergrendelen.
Opmerking:
De nieuwe waarden worden geannuleerd als u op Modus (Terug) 2 drukt voordat
u op CIR.WATER
8. Druk op Modus (Terug) 2 om terug te keren naar het standaard bedienings-
scherm.
9. Druk op TIMER ON/OFF 9 om het aftellen te starten. Als de timer aftelt, is de
waarde zichtbaar op het display.
goed wordt weergegeven.
is verstreken.
uren is verstreken.
4 hebt gedrukt.
4
Timer instellen
AFTER
ONHr
SIMPLE
Handeling (On of Off)
3
* “— —” wordt weergegeven
als er niets is ingesteld.
1
Controleer of de timerwaarde zichtbaar en
De enkelvoudige timer uitschakelen...
Druk op TIMER ON/OFF 9, zodat de timerinstelling niet meer op het scherm wordt
weergegeven (bij 7).
De enkelvoudige timer starten…
Druk op TIMER ON/OFF 9, zodat de timerinstelling verschijnt bij 7.
Voorbeelden
Als zowel de ON- als de OFF-tijden zijn ingeschakeld voor de enkelvoudige timer,
is de werking en weergave als volgt.
Voorbeeld 1:
Start de timer, waarbij de ON-tijd vroeger is dan de OFF-tijd
ON-instelling: 3 uur
OFF-instelling: 7 uur
Bij het starten van de
SIMPLE
timer
3 uur na het
starten van
de timer
▲
OFFHrAFTER
˚C
˚C
▲
7 uur na het
starten van
de timer
Display toont de ON-instelling van de timer (resterende
uren tot ON).
Display toont de OFF-instelling van de timer (resterende
uren tot OFF). De weergegeven tijd is OFF (7 uur) –
ON (3 uur) = 4 uur.
Het toestel wordt uitgeschakeld en blijft uitgeschakeld
totdat iemand het opnieuw
inschakelt.
GBDFE
NLPGRRUTRGBGBGBGBGB
I
De huidige instellingen van de enkelvoudige timer
weergeven
5
1. Controleer dat de indicator van de enkelvoudige timer zichtbaar is op het scherm
(bij 1).
2. Druk op TIMER MENU B, zodat “Monitor” op het scherm verschijnt (bij 5).
• Als de ON- of OFF-enkelvoudige timer wordt uitgevoerd, verschijnt de huidige
timerwaarde bij 6.
• Als zowel de ON- als de OFF-waarden zijn ingesteld, worden de beide warden
om en om weergegeven.
3. Druk op Modus (Terug) 2 om de monitorweergave te sluiten en terug te keren
naar het standaard bedieningsscherm.
6
Timer instellen
TIMER ON
OFFHrAFTER
SIMPLE
1
Voorbeeld 2:
Start de timer, waarbij de OFF-tijd vroeger is dan de ON-tijd
ON-instelling: 5 uur
OFF-instelling: 2 uur
Bij het starten van de
SIMPLE
timer
2 uur na het
starten van
de timer
▲
ONHr
AFTER
▲
5 uur na het
starten van
de timer
Display toont de OFF-instelling van de timer (resterende
uren tot OFF).
Display toont de ON-instelling van de timer (resterende
uren tot ON). De weergegeven tijd is ON (5 uur) – OFF
(2 uur) = 3 uur.
Het toestel wordt ingeschakeld en blijft ingeschakeld
totdat iemand het uitschakelt.
63
Page 64

Automatisch uitschakelen (de Auto Off-timer)
AUTO OFF
7
1. Deze timer begint met aftellen als het toestel wordt ingeschakeld en schakelt
het toestel uit als de ingestelde tijd is verstreken.
2. De beschikbare instellingen variëren van 30 minuten tot 4 uur, met intervallen
van 30 minuten.
Opmerking:
*1. De schakelklok, enkelvoudige timer en automatisch uitschakelen kunnen niet
tegelijkertijd worden gebruikt.
*2. De Auto Off-timer werkt niet als aan een van de volgende voorwaarden is
voldaan.
De timerfunctie is uitgeschakeld; het systeem bevindt zich in een abnormale
staat; er is een testrun gaande; op de afstandsbediening wordt een zelftest of
diagnose uitgevoerd; de gebruiker stelt op dit moment een functie in; het
systeem wordt centraal bestuurd. (Onder deze voorwaarden is de ON/OFFhandeling uitgeschakeld.)
AFTER OFF
INITIAL SETTING
INITIAL SETTING
CHECK TEST
CHECK TEST
CLEAR
AUTO OFF
ON/OFF
CIR.WATER
CIR.WATER
4
GBDFE
TEMP.
B
MENU
BACK
MONITOR/SET
BACK DAY
PAR-W21MAA
ON/OFF
MENU
ON/OFF
CLOCK
CLOCK CLEAR
De instelling van de Auto Off-timer controleren
Timer instellen
TIMER
AFTER
5
OFF
AUTO OFF
1
4
1. Controleer dat “Auto Off” zichtbaar is op het scherm (bij 1).
2. Houd TIMER MENU B drie seconden lang ingedrukt, zodat “Monitor” op het
scherm verschijnt (bij 4).
• De tijd tot uitschakeling ziet u staan bij 5.
3. Als u de monitor wilt sluiten en terug wilt keren naar het standaard bedieningsscherm drukt u op Modus (Terug) 2.
De Auto-Off timer uitschakelen...
• Houd TIMER ON/OFF 9 drie seconden lang ingedrukt, zodat “Timer Off” op het
scherm verschijnt (bij 6) en de timerwaarde (bij 7) verdwijnt.
7
AFTER OFF
˚C
AUTO OFF
6
˚C
2A9
Auto Off-timer instellen
Timer instellen
2
NLPGRRUTRGBGBGBGBGB
I
1. Zorg dat u het standaard bedieningsscherm voor u hebt en dat de indicator
van de Auto Off-timer (bij 1) op het display wordt weergegeven.
Als automatisch uitschakelen niet wordt weergegeven, maar iets anders, stelt
u de AUTO OFF TIMER in via Function Selection (zie 3.[3]–3 (3)) timerfunctie
inschakelen.
2. Houd TIMER MENU B drie seconden lang ingedrukt, zodat “Set Up” op het
scherm verschijnt (bij 2).
(Met elke druk op de knop schakelt u tussen “Set Up” en “Monitor”.)
3. Druk zo vaak als nodig op de betreffende Set Time-knop A om de OFF-tijd in
te stellen (bij 3).
4. Druk op CIR.WATER
Opmerking:
De nieuwe waarde wordt geannuleerd als u op Modus (Terug) 2 drukt voordat u
op CIR.WATER 4
5. Druk op Modus (Terug) 2 om de instelprocedure af te sluiten en terug te keren
naar het standaard bedieningsscherm.
6. Als het toestel al aan staat, begint de timer direct met aftellen.
de instelling van de timer correct wordt weergegeven op het display.
hebt gedrukt.
3
AFTER OFF
AUTO OFF
1
4 om de instelling te vast te zetten.
Controleer dat
• Of zet het toestel zelf uit. De timerwaarde (bij 7) verdwijnt van het scherm.
De Auto-Off timer starten...
• Houd TIMER ON/OFF 9 drie seconden lang ingedrukt. De indicatie “Timer Off”
verdwijnt (bij 6) en de timerinstelling licht (bij 7) op het display op.
• Of zet het toestel aan. De timerwaarde wordt weergegeven bij 7.
7
AFTER OFF
˚C
AUTO OFF
6
˚C
64
Page 65
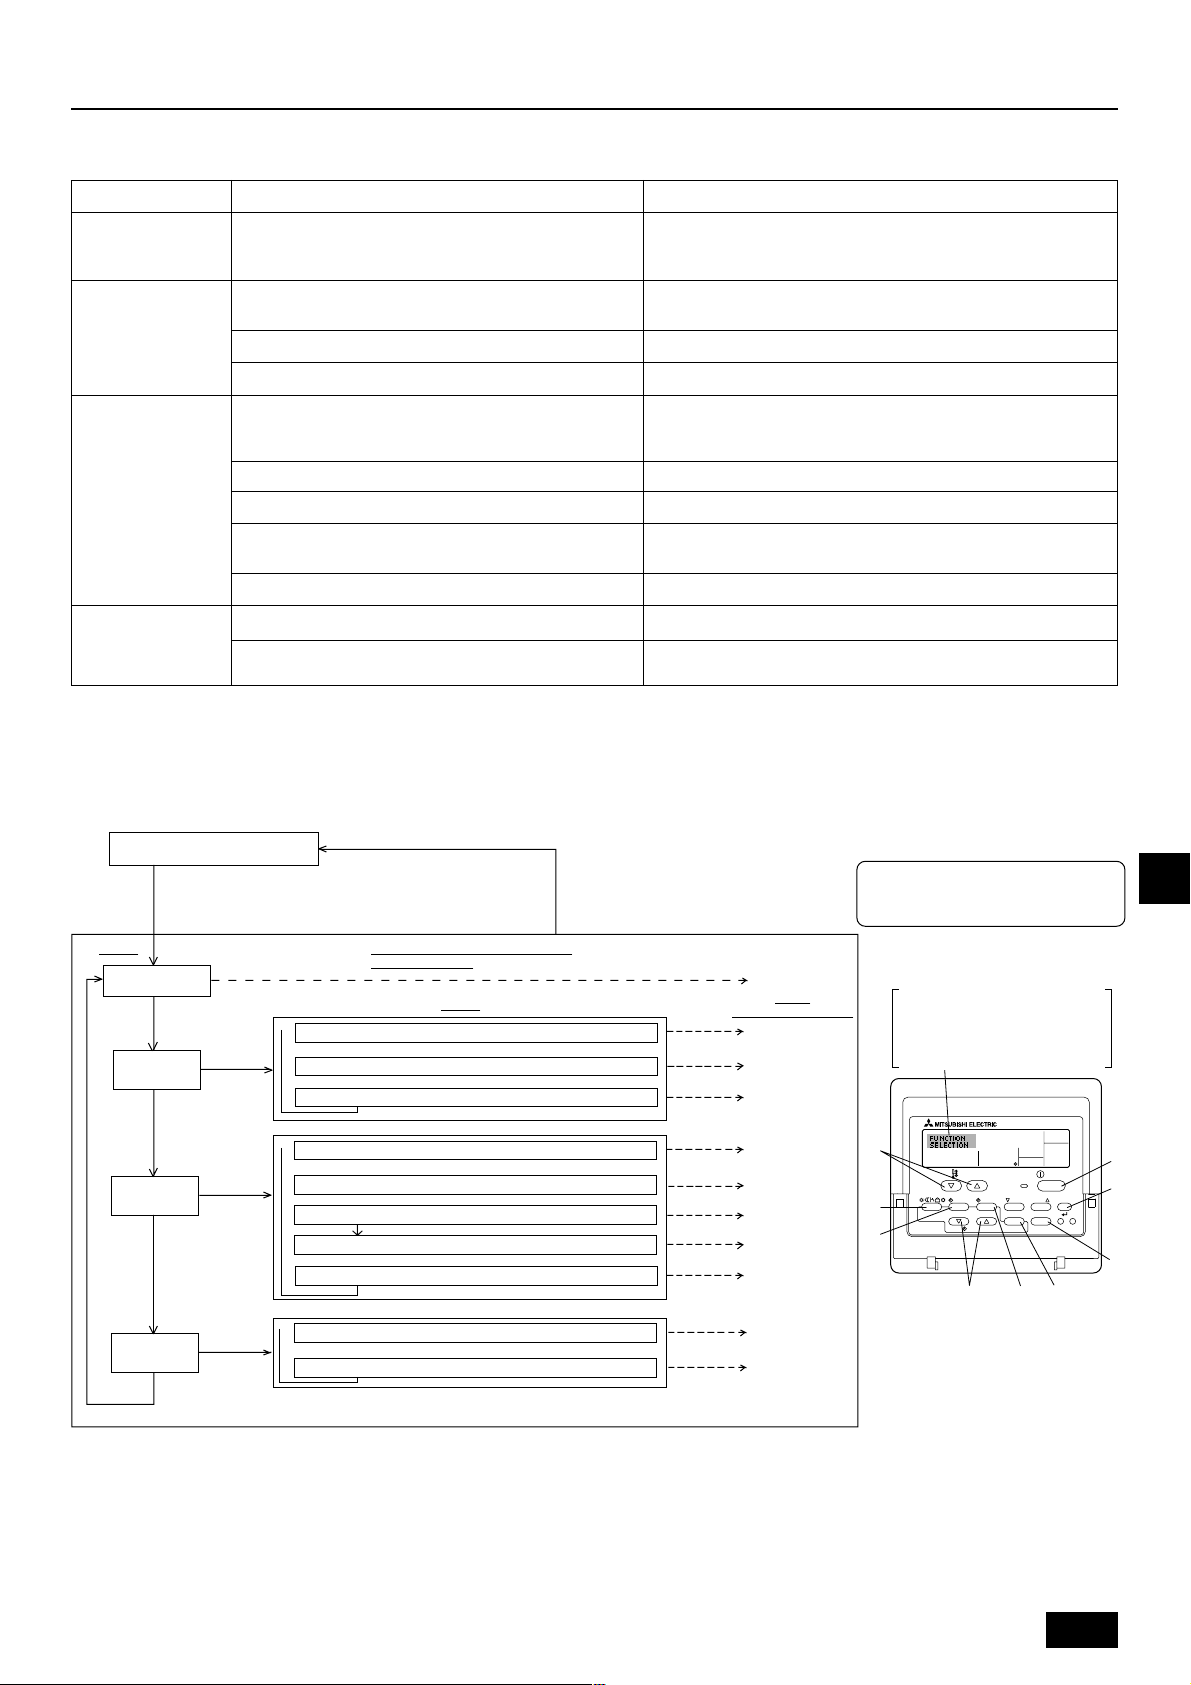
3. Functiekeuze
Functiekeuze van de afstandsbediening
De instelling van de volgende functies van de afstandsbediening kan in de functiekeuzestand van de afstandsbediening worden gewijzigd. Wijzig de instelling indien nodig.
Item 1
1. De taal wijzigen
Instelling displaytaal
Item 2
• Weergave is mogelijk in meerdere talen
Item 3 (betekenis van de instelling)
(“CHANGE
LANGUAGE”)
2. Functiebegrenzing
(“FUNCTION
SELECTION”)
3. Standkeuze
(“MODE
SELECTION”)
4. Display wijzigen
(“DISP MODE
SETTING”)
(1) Instelling begrenzing bedrijfsfuncties (bedrijfsblokkering)
(“LOCKING FUNCTION”)
(2) Bedrijfsstand overslaan (“SELECT MODE”)
(3)
Instelling van de temperatuurbegrenzingen (“LIMIT TEMP FUNCTION”)
(1) Instelling hoofd/sub-afstandsbediening (“CONTROLLER
MAIN/ SUB”)
(2) Instelling klok gebruiken (“CLOCK”)
(3) Instelling van de timerfunctie (“WEEKLY TIMER”)
(4) Instelling contactnummer bij storingen (“CALL.”)
(5) Temperatuurcompensatie (“TEMP OFF SET FUNCTION”)
(1)
Instelling temperatuurweergave °C/°F (“TEMP MODE °C/°F”)
(2) Instelling weergave watertemperatuur (“WATER TEMP
DISP SELECT”)
• Het instellen van de begrenzing van bedrijfsfuncties (bedrijfsblokkering)
• Opgeven of de bedrijfsstand al dan niet moet worden gebruikt
• Instellen van het instelbare temperatuurbereik (maximum, minimum)
• Keuze van de hoofd- of subafstandsbediening
* Indien op één groep twee afstandsbedieningen zijn aangesloten,
dient één afstandsbediening als “sub” te worden ingesteld.
• Instelling van het wel of niet gebruiken van de klokfunctie
• Instelling van het type timer
• Weergave van het te bellen nummer bij storingen
• Instelling van het telefoonnummer
•
Opgeven of de temperatuurcompensatie al dan niet moet worden toegepast
• Instelling van de weer te geven temperatuureenheid (°C of °F)
• Instelling van het wel of niet gebruiken van het display van de water-
temperatuur
Stroomdiagram functiekeuze
[1] Stop het toestel om met de selectieprocedure van de afstandsbediening te kunnen starten. → [2] Maak een keuze uit item 1. → [3] Maak een keuze uit item 2. → [4] Voer
de instelling uit. (De details worden toegelicht in item 3) → [5] Instelling voltooid. → [6] Wijzig het display naar normaal. (Einde)
Normaal display (display als
het toestel niet in bedrijf is)
(Houd toets E ingedrukt en druk gedurende twee seconden op toets D.)
* Het display kan niet worden gewijzigd tijdens het proef-
draaien of de zelfdiagnose.
Item 1 Functiekeuzestand van de af-
De taal wijzigen
(“CHANGE LANGUAGE”)
Druk op de G-knop.
standsbediening
Item 2
Functiebegrenzing
(“FUNCTION
SELECTION”)
Druk op de
E-knop.
Standkeuze
(“MODE
SELECTION”)
Druk op de
E-knop.
Druk op de
G-knop.
Druk op de
E-knop.
Druk op de
G-knop.
Druk op de
E-knop.
→
Instelling begrenzing bedrijfsfuncties (“LOCKING FUNCTION”)
→
→
Bedrijfsstand overslaan (“SELECT MODE”)
Druk op de G-knop.
Instelling van de temperatuurbegrenzingen (“LIMIT TEMP FUNCTION”)
→
Instelling hoofd/sub-afstandsbediening (“CONTROLLER MAIN/SUB”)
→→→
Instelling klok gebruiken (“CLOCK”)
Druk op de G-knop.
Instelling van de timerfunctie (“WEEKLY TIMER”)
→
Instelling contactnummer bij storingen (“CALL.”)
Temperatuurcompensatie (“TEMP OFF SET FUNCTION”)
Display wijzigen
(“DISP MODE
SETTING”)
Druk op de
G-knop.
→
Instelling temperatuurweergave ° C/°F (“TEMP MODE °C/°F”)
→
Druk op de G-knop.
Instelling weergave watertemperatuur (“WATER TEMP DISP SELECT”)
(Houd toets E ingedrukt en druk gedurende twee seconden op toets D.)
*
De afstandsbediening legt de instelling vast die op deze wijze is gemaakt.
Zie [3]–1
Item 3
(betekenis van de instelling)
Druk op de
D-knop.
Zie [3]–2. (1)
Zie [3]–2. (2)
Zie [3]–2. (3)
Druk op de
D-knop.
Zie [3]–3. (1)
Zie [3]–3. (2)
Zie [3]–3. (3)
Zie [3]–3. (4)
Zie [3]–3. (5)
Druk op de
D-knop.
Zie [3]–4. (1)
Zie [3]–4. (2)
OPMERKING
De timer stopt als het display voor de
selectie van de afstandsbedieningsfunctie
is gewijzigd naar normaal.
Matrixdisplay
De taal die is geselecteerd in
CHANGE LANGUAGE (taal wijzigen) wordt in dit display weergegeven. In deze handleiding is
Engels als taal ingesteld.
F
TEMP.
MENU
BACK DAY
MONITOR/SET
CLOCK CLEAR
C
ON/OFF
E
PAR-W21MAA
G
INITIAL SETTING
CHECK TEST
D
ON/OFF
CIR.WATER
H
GBDFE
NLPGRRUTRGBGBGBGBGB
I
I
A
B
65
Page 66

Details van de instellingen
[3]–1. Instelling CHANGE LANGUAGE (taal wijzigen)
De taal in het matrixdisplay kan worden geselecteerd.
• Druk op de [
1 Engels (GB), 2 Duits (D), 3 Spaans (E), 4 Russisch (RU), 5 Italiaans (I),
6 Frans (F), 7 Zweeds
[3]–2. Functiebegrenzing
(1) Instelling begrenzing bedrijfsfuncties (bedrijfsblokkering)
• Om de instelling te wijzigen drukt u op de [
1 no1 : Voor de instelling van de bedrijfsblokkering worden alle toetsen be-
2 no2 : De bedrijfsblokkering wordt via alle toetsen ingesteld.
3 OFF (Initiële instelling) : De bedrijfsblokkering wordt niet ingesteld.
* Om de instelling van de bedrijfsblokkering op het normale scherm van kracht te
laten worden, moeten de [CIR.WATER]- en de [
rende twee seconden tegelijkertijd worden ingedrukt, bij het normale scherm en
nadat de bovenstaande instelling is uitgevoerd.
(2) Bedrijfsstand overslaan
Nadat u de instelling hebt gewijzigd, kunt u de bedrijfsstand voor het gewijzigde
bereik wijzigen.
• Druk op de knop [
1 De modus Heating : De modus Heating in- of uitschakelen.
GBDFE
2 De modus Heating ECO : De modus Heating ECO in- of uitschakelen.
3 De modus Hot Water : De modus Hot Water in- of uitschakelen.
4 De modus Anti-freeze : De modus Anti-freeze in- of uitschakelen.
5 De modus Cooling : De modus Cooling in- of uitschakelen.
6 OFF (standaardinstelling) : Bedrijfsstand overslaan wordt niet uitgevoerd.
* Als u een andere instelling kiest dan OFF, wordt de functie Bedrijfsstand
overslaan voor de modi Heating, Heating ECO, Hot Water, Anti-freeze en
Cooling tegelijkertijd uitgevoerd.
* Een modus die niet beschikbaar is op het aangesloten toestel, kan niet
worden ingeschakeld ook al kiest u de instelling “AVAILABLE” (BESCHIK-
BAAR).
(3) Instelling van de temperatuurbegrenzingen
Nadat deze instelling is gemaakt, kan de temperatuur binnen het ingestelde bereik worden gewijzigd.
• Om de instelling te wijzigen drukt u op de [
1 LIMIT TEMP HEATING MODE:
Het temperatuurbereik kan in de modus Heating worden gewijzigd.
2 LIMIT TEMP HOT WATER MODE:
Het temperatuurbereik kan in de modus Hot water worden gewijzigd.
3 LIMIT TEMP ANTI-FREEZE MODE:
NLPGRRUTRGBGBGBGBGB
I
Het temperatuurbereik kan in de modus Anti-freeze worden gewijzigd.
4 LIMIT TEMP COOLING MODE:
Het temperatuurbereik kan in de modus Cooling worden gewijzigd.
5 OFF (initiële instelling) :
De begrenzing van het temperatuurbereik is niet geactiveerd.
* Wanneer de instelling (behalve OFF) wordt gemaakt, wordt tegelijkertijd de
temperatuurbegrenzing voor Hot water, Anti-freeze en Cooling ingesteld. Het
bereik kan echter niet worden begrensd als het ingestelde temperatuurbereik
niet is gewijzigd.
• Om de temperatuur hoger of lager te maken, drukt u op [
• Instelbaar bereik
De modus Hot Water : Laagste limiet: 30 ~ 70 °C (87 ~158 °F)
De modus Heating : Laagste limiet: 30 ~ 45 °C (87 ~113 °F)
De modus Cooling : Laagste limiet: 10 ~ 30 °C (50 ~ 87 °F)
* Het instelbare gebied varieert afhankelijk van de aan te sluiten unit.
MENU]-toets om de taal te wijzigen.
halve de [
ON/OFF]-knop gebruikt.
ON/OFF] om tussen de volgende instellingen te schakelen.
Hoogste limiet: 70 ~ 30 °C (158 ~ 87 °F)
Hoogste limiet: 45 ~ 30 °C (113 ~ 87 °F)
Hoogste limiet: 30 ~ 10 °C (87 ~ 50 °F)
ON/OFF]-knop.
ON/OFF]-knoppen gedu-
ON/OFF]-knoppen.
TEMP. of ].
[3]–3. Standkeuze-instelling
(1) Instelling hoofd/sub-afstandsbediening
• Om de instelling te wijzigen drukt u op de [
1 Main : De afstandsbediening is de hoofd-afstandsbediening.
2 Sub : De afstandsbediening is de sub-afstandsbediening.
(2) Instelling klok gebruiken
• Om de instelling te wijzigen drukt u op de [
1 ON : De klokfunctie kan worden gebruikt.
2 OFF : De klokfunctie kan niet worden gebruikt.
(3) Instelling van de timerfunctie
• Om de instelling te wijzigen drukt u op de [
volgende.)
1 WEEKLY TIMER (Initiële instelling): De weektimer kan worden gebruikt.
2 AUTO OFF TIMER : De auto-uit-timer kan worden gebruikt.
3 SIMPLE TIMER : De eenvoudige timer kan worden gebruikt.
4 TIMER MODE OFF : De timer kan niet worden gebruikt.
* Indien de instelling voor het gebruik van de klok OFF (uit) is, kan de “WEEKLY
TIMER” niet worden gebruikt.
(4) Instelling contactnummer bij storingen
• Om de instelling te wijzigen drukt u op de [
1 CALL OFF : De ingestelde te bellen nummers worden bij een storing
2 CALL **** *** **** : De ingestelde te bellen nummers worden bij een sto-
CALL_ : Het te bellen nummer kan worden ingesteld als het
• Het instellen van de te bellen nummers
Om de te bellen nummers in te stellen dient u de onderstaande procedures te
volgen.
Verplaats de knipperende cursor naar de in te stellen nummers. Druk op
[
TEMP. of ]-knoppen F om de cursor naar rechts of links te
verplaatsen. Druk op [
nummers in te stellen.
(5) Instelling van de temperatuurcompensatie
• Druk op de [
schakelen.
1 ON : De instelling voor temperatuurcompensatie wordt onder de begin-
2 OFF : De instelling voor temperatuurcompensatie wordt niet onder de
instellingen van de watertemperatuur weergegeven.
modus Begininstellingen van de watertemperatuur weergegeven.
niet getoond.
ring getoond.
display verschijnt dat links wordt getoond.
CLOCK of ]-knoppen C om de
ON/OFF]-knop D om tussen de volgende instellingen te
ON/OFF]-knop D.
ON/OFF]-knop D.
ON/OFF]-knop D(Kies één van de
ON/OFF]-knop D.
[3]–4. Displayweergave-instelling
(1) Instelling temperatuurweergave °C/°F
• Om de instelling te wijzigen drukt u op de [
1 °C: Voor de temperatuur wordt de eenheid °C gebruikt.
2 °F: Voor de temperatuur wordt de eenheid °F gebruikt.
(2) Instelling weergave watertemperatuur
• Om de instelling te wijzigen drukt u op de [
1 ON : De watertemperatuur wordt weergegeven.
2 OFF : De watertemperatuur wordt niet weergegeven.
ON/OFF]-knop D.
ON/OFF]-knop D.
66
Page 67

4. Het apparaat schoonhouden
Laat onderhoud aan het inlaatrooster altijd door onderhoudspersoneel uitvoeren.
Voordat u het apparaat schoonmaakt, zorg er dan voor dat u de stroomvoorziening UIT zet.
Voorzichtig:
• Voordat u begint met schoonmaken, moet u het apparaat stoppen en de
stroomvoorziening UITzetten. Onthoud dat de ventilator in het apparaat
met hoge snelheid draait, hetgeen ernstige verwondingen kan veroorzaken.
• Binnenapparaten zijn uitgerust met inlaatroosters om stof uit ingezogen
lucht te verwijderen. Reinig het inlaatrooster op de manier zoals afgebeeld op de volgende sketches.
• De levensduur van het inlaatrooster hangt af van waar het apparaat geïnstalleerd is en hoe het bediend wordt.
Hoe te reinigen
• Verwijder tijdens het wassen van het inlaatrooster de bescherming en veeg
het inlaatrooster aan de binnenkant met de borstel schoon.
Voorzichtig:
• Laat het inlaatrooster niet drogen door blootstelling aan direct zonlicht
of door het te verwarmen met behulp van vuur, enz. Hierdoor kan vervorming van het inlaatrooster optreden.
Voorzichtig:
Giet of sproei nooit water of een brandbare spray op de airconditioner. Als u
het apparaat op deze manier schoonmaakt kan dit een defect van de
airconditioner, elektrische schokken of brand tot gevolg hebben.
5. Problemen oplossen
Voordat u uw dealer belt om het apparaat te komen repareren, controleer dan eerst de volgende punten:
Probleem met het apparaat
Het apparaat werkt
niet.
Er komt water uit, maar
het koelt of verwarmt
niet voldoende.
Er komt geen koel of
warm water uit.
Het apparaat doet het
heel even en stopt dan
weer.
• Als de werking stopt omdat de stroom uitvalt, treedt het [herstartblokkeercircuit bij stroomuitval] in werking, om te zorgen dat het apparaat uitgeschakeld blijft ook als de
stroomtoevoer wordt hersteld. In dat geval drukt u nogmaals op de [ON/OFF] toets om de werking te hervatten.
Als de problemen niet weggaan nadat u het bovenstaande gecontroleerd hebt, schakel dan de hoofdschakelaar UIT en neem contact op met uw dealer met informatie over
de naam van het product, de aard van het probleem, enz. Als “[CHECK]” en een (4-cijferige) code op de display worden weergegeven, geef deze code dan ook door aan uw
dealer. Probeer nooit het apparaat zelf te repareren.
Afstandsbediening
“'” display brandt niet. Er
verschijnt geen display
op het scherm zelfs als
de [ON/OFF] knop wordt
ingedrukt.
Het LCD display geeft
aan dat het apparaat
aanstaat.
Het LCD display geeft
aan dat het apparaat
werkt.
De “CHECK” en de
controlecode blinken op
de LCD display.
Stroomonderbreking.
De hoofdschakelaar staat niet aan.
De zekering in de voeding is doorgebrand.
De aardlekschakelaar is doorgeslagen.
Onjuiste temperatuuraanpassing.
Het mechanisme om te voorkomen dat het apparaat
binnen 3 minuten opnieuw start, is in werking.
De werking van het binnenapparaat is opnieuw gestart
tijdens de verwarmings- of ontdooiingsfase.
De luchtinlaat en -uitlaat van de binnen- of buitenapparaten zijn geblokkeerd.
Het inlaatrooster zit vol met stof en vuil.
Oorzaak
Druk op de [ON/OFF] knop nadat de stroom weer is her-
Oplossing
steld.
Zet de hoofdschakelaar aan.
Vervang de zekering.
Zet de aardlekschakelaar weer aan.
Nadat u de ingestelde temperatuur en de inlaattemperatuur hebt
gecontroleerd op het LCD display, raadpleeg dan het gedeelte
over hoe u de kamertemperatuur kunt aanpassen en pas dan
de kamertemperatuur aan. [Watertemperatuur instellen]
Wacht een poosje.
(Om de compressor te beschermen is er een mechanisme
ingebouwd dat voorkomt dat het apparaat binnen 3 minuten weer aangaat. Daarom kan het soms gebeuren dat de
compressor niet direkt gaat werken. Het kan zijn dat het 3
minuten duurt voordat het apparaat weer aangaat.)
Wacht een poosje. (Het apparaat zal gaan verwarmen als
het ontdooien klaar is.)
Probeer het opnieuw nadat u de obstakels hebt weggehaald.
Opnieuw aanzetten na het reinigen van het inlaatrooster.
(Raadpleeg [Het apparaat schoonhouden].)
GBDFE
NLPGRRUTRGBGBGBGBGB
I
De volgende symptomen duiden niet op defecten van de airconditioner:
• De uitgeblazen lucht van de airconditioner kan soms een bepaalde geur afgeven. Dit komt door sigarettenrook die in de lucht in de kamer is blijven hangen, de reuk van
cosmetica, geurtjes van muren, meubels, enz. die door de airconditioner zijn opgenomen.
• Een sissend geluid is hoorbaar onmiddellijk nadat de airconditioner gestart of gestopt is. Dit is het geluid van het koelmiddel dat in de airconditioner stroomt. Dit duidt niet
op een storing.
• De airconditioner maakt soms krakende of klikkende geluiden aan het begin of einde van koelen of verwarmen. Dit is het geluid dat wordt veroorzaakt door wrijving op
het voorpaneel veroorzaakt door inkrimping en uitzetting door temperatuurschommelingen. Dit duidt niet op een storing.
67
Page 68

6. Installatie, verplaatsen van het apparaat en controles
Montageplaats
Raadpleeg uw dealer voor montage- en verplaatsingsdetails.
Voorzichtig:
Monteer de airconditioner nooit op een plaats waar er een risico bestaat dat
brandbare gassen kunnen lekken. Als er gas lekt en dit zich rond het apparaat ophoopt, dan kan dit brand tot gevolg hebben.
Monteer de airconditioner nooit op de volgende plaatsen:
• op plaatsen waar veel machineolie aanwezig is
• in kuststreken, op plaatsen waar de lucht erg zout is
• waar de luchtvochtigheid hoog is
• waar er hete bronnen in de omgeving zijn
• op plaatsen waar er zwavelhoudende gassen in de lucht zitten
• waar er zich machines met een hoge frequentie bevinden (een lasapparaat
met een hoge frequentie, enz.)
• waar er veel zuuroplossingen worden gebruikt
• waar regelmatig speciale sprays worden gebruikt
• Monteer het apparaat horizontaal. Anders kan er zich waterlekkage voordoen.
GBDFE
• Neem bij de montage van airconditioners in ziekenhuizen en dergelijke gebouwen voldoende maatregelen voor lawaaibestrijding.
Als de airconditioner wordt gebruikt in één van de hierboven genoemde omgevingen, dan kunt u veel defecten verwachten. Het wordt aanbevolen om deze montageplaatsen te vermijden.
Neem voor meer details contact op met uw dealer.
Elektrische werkzaamheden
Voorzichtig:
• Het elektrische werk moet gedaan worden door een erkend installateur
overeenkomstig [technische normen met betrekking tot elektrische installaties], [interne bedradingsvoorschriften], en de montagehandleiding.
De montage moet gebeuren met gebruik van gescheiden elektrische circuits. Het gebruik van andere producten aangesloten op dezelfde
voedingsbron kan tot kortsluiting leiden.
• Sluit de aardingskabel nooit op een gas- of waterleiding, een bliksemafleider of een aardingskabel voor de telefoon aan. Neem voor details contact op met uw dealer.
• Op sommige montageplaatsen is de montage van een aardlekschakelaar
verplicht. Neem voor details contact op met uw dealer.
Met betrekking tot de installatie van de waterleiding
• Gebruik geen stalen buizen als waterleiding. Koperen buizen worden aanbevolen.
• Het watercircuit dient een gesloten circuit te zijn.
Verplaatsing
• Als u de airconditioner weghaalt of ergens anders monteert als u uw huis verbouwt of als u verhuist, neem dan van te voren contact op met uw dealer om
de kosten van het verplaatsen van het apparaat te berekenen.
Voorzichtig:
Als u de airconditioner verplaats of ergens anders monteert, neem dan contact op met uw dealer. Verkeerde installatie kan resulteren in elektrische schokken, brand, enz.
Let ook op lawaaioverlast
• Selecteer een plaats waar u het apparaat wilt monteren, die het gewicht van
de airconditioner volledig kan dragen en waar lawaai en trillingen kunnen worden verminderd.
• Kies een plaats waar koele en warme lucht en lawaai van de luchtuitlaat van
het buitenapparaat geen probleem geven voor de buren.
• Als u een ander voorwerp vlak naast de luchtuitlaat van het buitenapparaat
plaatst, dan kan de airconditioner minder prestaties en meer lawaai afgeven.
Vermijd het om andere voorwerpen in de buurt van de luchtuitlaat te plaatsen.
• Als de airconditioner een vreemd geluid afgeeft, neem dan contact op met uw
dealer.
Maintenance and inspection
• Als de airconditioner in meerdere seizoenen wordt gebruikt, dan kan de binnenkant vuil worden, hetgeen de prestaties vermindert.
Afhankelijk van de gebruiksomstandigheden kan het apparaat vieze geurtjes
afgeven en kan de afvoer vuil worden door stof en vuil, enz.
NLPGRRUTRGBGBGBGBGB
I
7. Specificaties
Model
Stroomvoorziening
Verwarmingscapaciteit kW
Koelcapaciteit kW
Geluidsniveau
Netto gewicht kg
Afmeting
Accessoir
snelheid waterstroming m
*1 Nominale verwarmingscondities
Buitentemp.: 7 °C DB/6 °C WB (45 °F DB/43 °F WB)
buislengte: 7,5 m (24-9/16 ft)
niveauverschil: 0 m (0 ft)
inlaat watertemp. 65 °C Waterstroomsnelheid 2,15 m
*3 Nominale verkoelingscondities
Buitentemp.: 35 °C DB (95 °F DB)
buislengte: 7,5 m (24-9/16 ft)
niveauverschil: 0 m (0 ft)
inlaat watertemp. 23 °C Waterstroomsnelheid 1,93 m
*5 Nominale verkoelingscondities
Buitentemp.: 35 °C DB (95 °F DB)
buislengte: 7,5 m (24-9/16 ft)
niveauverschil: 0 m (0 ft)
inlaat watertemp. 23 °C Waterstroomsnelheid 3,86 m
Hoogte mm
Breedte mm
Diepte mm
PWFY-P100VM-E-BU
12,5 *
44 dB<A>
Inlaatrooster, verwarming isolatiemateriaal, verbindingsset × 2,
3
/h
0,6-2,15 1,2-4,3
3
/h
3
/h
3
/h
PWFY-P100VM-E-AU
1 fase 220-230-240 V 50/60 Hz
1
–
60 kg
expansieverbinding × 2 (PWFY - P200VM - E - AU)
*2 Nominale verwarmingscondities
Buitentemp.: 7 °C DB/6 °C WB (45 °F DB/43 °F WB)
buislengte: 7,5 m (24-9/16 ft)
niveauverschil: 0 m (0 ft)
inlaat watertemp. 30 °C Waterstroomsnelheid 2,15 m
*4 Nominale verwarmingscondities
Buitentemp.: 7 °C DB/6 °C WB (45 °F DB/43 °F WB)
buislengte: 7,5 m (24-9/16 ft)
niveauverschil: 0 m (0 ft)
inlaat watertemp. 30 °C Waterstroomsnelheid 4,3 m
12,5 *
11,2 *
29 dB<A>
35 kg
800
450
300
0,6-2,15
2
3
PWFY-P200VM-E-AU
25,0 *
22,4 *
29 dB<A>
38 kg
4
5
3
/h
3
/h
68
Page 69

Índice das matérias
1. Precauções de segurança ........................................................................ 69
1.1. Instalação ................................................................................ 69
1.2. Durante o funcionamento ........................................................ 69
1.3. Arrumação do aparelho ........................................................... 70
2. Como funciona .......................................................................................... 70
2.1. Para utilizar o controlo remoto ................................................ 70
2.2. Ajuste da temperatura da água ............................................... 71
1. Precauções de segurança
s Antes de utilizar este aparelho, leia as “Precauções de se-
gurança”.
s As “Precauções de segurança” enumeram os pontos impor-
tantes da segurança. Tome-as em consideração.
Símbolos utilizados no texto
Aviso:
Descreve as precauções a observar para evitar o risco de ferimentos ou a
morte do utilizador.
Cuidado:
Descreve os cuidados a ter para não danificar o aparelho.
Símbolos utilizados nas ilustrações
: Indica uma acção a evitar.
: Indica a existência de instruções importantes a seguir.
: Indica uma peça a ligar à terra.
: Atenção! Choques eléctricos. (Este símbolo aparece no rótulo da unidade
principal.) <Cor: amarelo>
: Tenha o cuidado com a superfície quente.
Aviso:
Leia atentamente os rótulos afixados na unidade principal.
1.1. Instalação
s Depois de ler este manual, guarde-o juntamente com o Manual de Insta-
lação em lugar seguro para o consultar facilmente quando surgir qualquer questão. Se o aparelho for utilizado por outra pessoa, não se esqueça de lhe indicar onde se encontra o manual.
Aviso:
• O aparelho não deve ser instalado pelo utilizador. Peça ao distribuidor
ou a uma empresa autorizada para o instalar. Se o aparelho não for instalado correctamente, pode haver fugas de água, choques eléctricos ou
provocar incêndio.
• Só utilize acessórios autorizados pela Mitsubishi Electric e peça ao seu
distribuidor ou a uma empresa autorizada que os instale. Se os acessórios não forem instalados correctamente, pode haver fugas de água, choques eléctricos ou provocar incêndio.
• Não toque na unidade. A superfície da unidade pode estar quente.
• Não instale a unidade em locais onde há geração de gás corrosivo.
• O Manual de Instalação descreve o método de instalação sugerido. Qualquer alteração estrutural necessária à instalação deve ser conforme aos
requisitos do código de construção local.
• Nunca repare o aparelho nem o transfira para outro local sem ajuda de
alguém. Se a reparação não for executada correctamente, pode haver
fugas de água, choques eléctricos ou provocar incêndio. Se tiver de reparar ou deslocar o aparelho, consulte o seu distribuidor.
• Mantenha as peças eléctricas longe de água (água de lavagem), etc.
• Isso pode resultar em choques eléctricos, incêndio ou fumaça.
Nota 1: Ao lavar o permutador de calor e o recipiente de drenagem, faça
com que a caixa de controlo, o motor e o LEV permaneçam secos, mediante a utilização de uma cobertura à prova d’água.
Nota 2: Nunca drene a água de lavagem do Recipiente de Drenagem e
do Permutador de Calor usando a Bomba de Drenagem. Dreneas separadamente.
• A unidade não deve ser usada por crianças pequenas ou pessoas incapazes sem supervisão.
• As crianças pequenas deverão ser vigiadas para garantir que elas não
brinquem com a unidade.
• Não utilize aditivo detector de fuga.
2.3. Acertar o dia de semana e a hora ........................................... 71
2.4. Utilização do temporizador ...................................................... 71
3. Selecção de Função ................................................................................. 75
4. Cuidados com a máquina ......................................................................... 77
5. Detecção de avarias ................................................................................. 77
6. Instalação, trabalhos de transferência e verificação ................................. 78
7. Especificações .......................................................................................... 78
1) Unidade exterior
Aviso:
• A unidade exterior deve ser montada em superfície estável e nivelada e
num local onde não haja acumulação de neve, folhas ou lixo.
• Não se sente no aparelho nem coloque objectos em cima dele. Tanto
você como os objectos poderiam cair e provocar ferimentos.
Cuidado:
A unidade exterior deve ser montada num local onde o ar e o ruído emitidos
pelo aparelho não perturbem a vizinhança.
2) Unidade interior
Aviso:
A unidade interior deve ser montada com segurança. Caso contrário, pode
cair e provocar ferimentos.
3) Controlador remoto
Aviso:
O controlador remoto deve ser instalado fora do alcance das crianças.
4) Mangueira de drenagem
Cuidado:
Assegure-se de que o tubo de drenagem está instalado de modo que a drenagem possa evacuar suavemente. Sendo instalado incorrectamente, pode
provocar fugas de água e danificar o mobiliário.
5) Linha de alimentação, fusível ou disjuntor de cir-
cuito
Aviso:
• Certifique-se de que a alimentação da unidade é feita com uma linha
separada dedicada. Outros aparelhos ligados à mesma linha pode provocar sobrecarga.
• É necessário um interruptor eléctrico principal.
• As potências nominais da voltagem, do fusível e do disjuntor do aparelho devem ser respeitadas. Nunca utilize um fio ou um fusível com uma
potência nominal superior à especificada.
6) Ligação à terra
Cuidado:
• O aparelho deve ser adequadamente ligado à terra. Nunca ligue o fio de
terra a um tubo de gás ou de água, a um condutor do pára-raios ou a um
fio de terra de telefone. Se o aparelho não estiver correctamente ligado à
terra, pode haver choques eléctricos.
• Verifique frequentemente se o fio de terra da unidade exterior está adequadamente ligado ao terminal de terra e ao eléctrodo de ligação à terra
do aparelho.
1.2. Durante o funcionamento
Cuidado:
• Não utilize objectos pontiagudos para accionar os botões, a fim de não
danificar o controlador remoto.
• Não vergue nem estique demasiado o cabo do controlador remoto, pois
pode danificá-lo e causar mau funcionamento.
• Nunca retire a caixa superior do controlo remoto. É perigoso e pode tocar com os dedos no circuito impresso interno, provocando assim incêndios ou avarias.
• Nunca limpe o controlo remoto com benzina, dissolventes, trapos embebidos em produtos químicos, etc. Isso pode provocar a descoloração e
avarias. Para limpar manchas muito fortes, humedeça um pano em água
misturada com detergente neutro, passe-o em toda a superfície, retire as
manchas e limpe novamente com um pano seco.
GBDFEINL
PGRRUTRGBGBGBGBGB
69
Page 70

• Nunca bloqueie nem tape as admissões ou saídas internas e externas do
aparelho. A presença de peças de mobiliário com grandes dimensões
por baixo da unidade interior ou peças voluminosas, tais como caixas
grandes, colocadas perto da unidade exterior reduzem a eficácia do aparelho.
Aviso:
• Não derrame água sobre o aparelho e não lhe toque com as mãos. Pode
apanhar um choque eléctrico.
• Não vaporize gás combustível perto do aparelho para não provocar incêndio.
• Não ponha um aquecedor a gás nem qualquer outro aparelho com chama viva à saída da descarga de ar do aparelho para não dar origem a
combustão defeituosa.
Aviso:
• Não retire o painel frontal nem a protecção da ventoinha da unidade exterior enquanto ela funcionar. Pode ferir-se tocando em peças rotativas,
quentes ou de alta voltagem.
• Nunca meta os dedos, paus, etc. nas entradas ou saídas para não correr
o risco de se ferir, uma vez que a ventoinha gira a alta velocidade no
interior do aparelho. Tenha um cuidado especial na presença de crianças.
• Se detectar cheiros estranhos, deixe de utilizar o aparelho, desligue o
interruptor da alimentação e consulte o seu distribuidor. Não o fazendo,
GBDFEINL
pode causar uma avaria, apanhar um choque eléctrico ou provocar incêndio.
• Se houver um ruído ou sentir vibração excepcionalmente anormal, pare
a unidade, desligue a corrente e contacte o concessionário.
• Não arrefeça demasiado a peça. A temperatura interior mais conveniente é a que fica 5
• Não permita que pessoas deficientes ou crianças se sentem ou permaneçam na direcção do fluxo de ar do ar condicionado. Isso pode causar
problemas de saúde.
°C aquém da temperatura exterior.
Cuidado:
• Não dirija o fluxo do ar para plantas ou animais engaiolados.
• Ventile frequentemente a peça. Se o aparelho funcionar continuamente
numa peça fechada durante muito tempo, o ar ficará viciado.
Em caso de avaria
Aviso:
• Nunca faça alterações no ar condicionado. Consulte o seu concessionário para qualquer reparação ou serviço. Uma reparação inadequada pode
originar fugas de água, choques eléctricos, incêndios, etc.
• Se o controlo remoto indicar um erro, se o ar condicionado não funcionar ou se houver qualquer anomalia, pare a unidade e contacte o concessionário. Se continuar a funcionar nestas condições, poderá haver o
risco de incêndios ou de avarias.
• Se o disjuntor disparar frequentemente, contacte o seu concessionário.
A eventual anomalia pode provocar incêndios ou avarias.
• Se escapar gás refrigerante do sistema ou houver fugas, pare a unidade
de ar condicionado, ventile profundamente a peça e contacte o seu concessionário. Deixando funcionar a unidade nestas condições pode originar acidentes por falta de oxigénio.
Se o ar condicionado estiver para não ser utilizado
durante um longo período
• Se o ar condicionado estiver para não ser utilizado durante um longo
período, devido à mudança de estação do ano, etc. ponha-o a funcionar
durante 4 – 5 horas em modo de ventilação até o interior ficar completamente seco. Se não o fizer, pode formar-se mofo pouco higiénico e perigoso para a saúde em toda a peça.
• Se a unidade não for para utilizar durante um longo período, tire a ficha
da tomada de corrente.
Se a corrente ficar ligada, gastará alguns Watts ou dezenas de Watts e o
pó acumulado poderá originar incêndios.
• Deixe a corrente ligada mais de 12 horas antes de pôr a unidade a funcionar. Não desligue a corrente durante as estações de utilização intensa,
porque isso pode provocar a avaria da unidade.
• Quando não operar a unidade por períodos prolongados durante o inverno, remova a água no interior do tubo de água, de modo a evitar o
congelamento.
1.3. Arrumação do aparelho
Aviso:
Se necessitar de arrumar o aparelho, consulte o seu distribuidor. Se os tubos forem removidos incorrectamente, o (gás de fluorocarbono) refrigerante pode escapar-se e entrar em contacto com a pele, causando-lhe ferimentos.
A libertação do refrigerante para a atmosfera também é nociva para o ambiente.
2. Como funciona
PGRRUTRGBGBGBGBGB
2.1. Para utilizar o controlo remoto
Como iniciar, parar, alterar o modo e regular a temperatura da água
2
4
˚C
3
3
2
PAR-W21MAA
Para iniciar a operação
1. Prima o botão ON/OFF (LIGADO/DESLIGADO) 1.
Acende-se a luz indicadora de ON (LIGADO) 1 e o mostrador acende-se.
Nota:
• Quando a unidade é posta a funcionar, a configuração predefinida é a seguinte.
Para configurar o controlo remoto
Modo
Regulação da temperatu
ra
˚C
TEMP.
MENU
ON/OFF
MONITOR/SET
BACK DAY
CLOCK CLEAR
Última configuração
Última configuração
INITIAL SETTING
CHECK TEST
ON/OFF
CIR.WATER
1
1
Para parar a operação
1. Prima novamente o botão ON/OFF (LIGADO/DESLIGADO) 1.
Acende-se a luz indicadora de ON (LIGADO) 1 e o mostrador apaga-se.
Seleccionar modo
1. Com a unidade em funcionamento, prima o botão Modo 2 tantas vezes quantas
for necessário.
• Cada pressão muda a operação para o modo seguinte, na sequência mos-
trada em baixo.
Em 2 aparece o modo seleccionado.
PWFY-P100VM-E-BU
Apenas Hot water
PWFY-P100/P200VM-E-AU
Aquecimento → Refrigeração
70
Page 71

Para regular a temperatura...
1. Para baixar a temperatura: Prima o botão Set Temperature (Re-
2. Para aumentar a temperatura: Prima o botão
• Cada pressão altera o valor em 1 °C (1 °F). O valor definido aparece em 3.
• Os intervalos são os seguintes. *1, *2
Água Quente RefrigeraçãoAquecimento
30 °C - 70 °C
87 °F - 158 °F
30 °C - 45 °C
87 °F - 113 °F
Nota:
*1 Os intervalos disponíveis variam de acordo com o tipo de unidade a que o
equipamento estiver associado.
*2 Se tiverem sido definidos limites para a amplitude térmica em Function Selection
(Selecção de função), o intervalo de valores será mais limitado que o mostrado
em cima. Se tentar configurar o valor fora desse intervalo, aparece uma
mensagem indicando que existem limites definidos.
Para informações acerca de como configurar ou eliminar esses limites consulte,
na secção 3, o item [3]–2 (3).
*3 Se as selecções de funções tiverem sido configuradas para mostrar a temperatura
na escala Fahrenheit. Para obter informações sobre como seleccionar °C ou °F,
consulte a secção 3, [3]–4 (1).
gular temperatura) 3.
gular temperatura) 3.
10 °C - 30 °C
50 °F - 87 °F
Set Temperature (Re-
Como acertar o dia da semana e a hora…
3
Acertar o dia de semana
2
1. Prima o botão de Set Time (Acertar hora) ou A para ver a indicação 2.
2. Prima o botão TIMER ON/OFF (Temporizador ligado/desligado) (SET DAY)
(Acertar dia) 9 para acertar o dia.
* Cada pressão avança o dia mostrado em 3 : Sun → Mon → ... → Fri → Sat.
3. Prima o botão Set Time (Acertar hora) desejado A até acertar a hora.
* Mantendo premido o botão para baixo, a hora (em 4) será incrementada;
primeiro em intervalos de um minuto, depois em intervalos de 10 minutos e,
depois, em intervalos de uma hora.
4. Uma vez concluídos os passos 2 e 3 prima o botão CIR.WATER
registar os valores definidos.
Nota:
Os valores introduzidos nos passos 2 e 3 poderão ser cancelados se premir o botão
Modo (Retornar) 2 antes de premir o botão CIR.WATER
TIME SUN
4
Acertar a hora
4.
4 para
GBDFEINL
2.2. Ajuste da temperatura da água
Para alterar a temperatura da água
Carregue na tecla
da água de acordo com a sua escolha.
Ao carregar uma vez em
decréscimos de 1 °C.
Se mantiver a tecla carregada, o ajuste continua a alterar-se em 1 °C.
• A temperatura interna pode ser ajustada de acordo com a faixa a seguir:
Água Quente RefrigeraçãoAquecimento
30 °C - 70 °C
87 °F - 158 °F
• É impossível ajustar a temperatura da água pela Temp. da Água de Entrada
ou de Saída.
* A faixa da temperatura da água em indicação é de 0 °C a 100 °C. Fora desta
faixa, a indicação pisca em 0 °C ou 100 °C, para informar se a temperatura da
água é inferior ou superior do que a temperatura em indicação.
11
1 [ajuste da temperatura da água] e ajuste a temperatura
11
ou , o ajuste á alterado em acréscimos/
30 °C - 45 °C
87 °F - 113 °F
10 °C - 30 °C
50 °F - 87 °F
2.3. Acertar o dia de semana e a hora
Utilize este mostrador para alterar o dia de semana e a
hora actuais.
Nota:
Se o relógio tiver sido desactivado em Function Selection (Selecção de função) o
dia e a hora não aparecem.
1
Visualização do
dia da semana e
da hora
9
4
2
A
MENU
MONITOR/SET
BACK DAY
PAR-W21MAA
TIME SUN
˚C
TEMP.
ON/OFF
CLOCK CLEAR
INITIAL SETTING
CHECK TEST
ON/OFF
CIR.WATER
5. Prima o botão Modo (Retornar) 2 para concluir o processo. É então reposto o
mostrador principal de controlo, onde 1 mostrará o novo dia e hora.
2.4. Utilização do temporizador
Esta secção explica como configurar e utilizar o temporizador. Em Function
Selection (Selecção de função) pode seleccionar qual dos três tipos de temporizador
pretende utilizar. 1 Temporizador Weekly (Semanal), 2 temporizador Simple
(Simples) ou 3 temporizador Auto Off (Desligar automaticamente).
Para informações acerca de como configurar esta função, consulte a secção 3, item
[3]–3 (3).
Para utilizar o temporizador semanal
1. O temporizador semanal pode ser utilizado para definir até seis operações
para cada dia da semana.
• Cada operação pode consistir no seguinte: Tempo para ON/OFF (LIGADO/
DESLIGADO) e temperatura, só tempo para ON/OFF (LIGADO/DESLIGADO) ou só temperatura.
• Quando chega a hora definida para o temporizador, a unidade executa a
acção definida pelo temporizador.
2. A hora definida para este temporizador é de 1 minuto.
Nota:
*1. Os temporizadores Simple (Simples) e Auto Off (Desligar automático) não
podem ser utilizados ao mesmo tempo.
*2. O temporizador semanal não funciona quando se verifica uma das seguintes
condições.
A funcionalidade de temporizador está desligada; o sistema está a funcionar
de uma forma anormal; está a ser executado um teste; o controlo remoto está
a efectuar um autodiagnóstico; o utilizador está a configurar uma funcionalidade;
o utilizador está a configurar o temporizador; o utilizador está a acertar o dia de
semana ou a hora; o sistema está sob o controlo da unidade principal. (Mais
precisamente, o sistema não executará operações (ligar unidade, desligar
unidade, regular temperatura) que, nessas condições, são desligadas.)
N.° de operação
42 3
SUN
TEMP.
B
MENU
MONITOR/SET
BACK DAY
PAR-W21MAA
ON/OFF
CLOCK CLEAR
˚C
INITIAL SETTING
CHECK TEST
ON
WEEKLY
ON/OFF
CIR.WATER
1
3
1
7 8
4
PGRRUTRGBGBGBGBGB
2
A90
71
Page 72

Como configurar o temporizador semanal
1. Certifique-se de que o mostrador é um mostrador inicial de controlo e que o
indicador de temporizador semanal 1 aparece no mostrador.
2. Prima o botão TIMER MENU (Menu de temporizador) B, para aparecer “Set
Up” (Configuração) no mostrador (em 2). (Note que cada pressão no botão
alterna o mostrador entre “Set Up” (Configuração) e “Monitor”.)
3. Prima o botão TIMER ON/OFF (SET DAY (Acertar dia)) 9 para acertar o dia.
Cada pressão avança o mostrador em 3 para o valor seguinte, na seguinte
sequência: “Sun (Dom) Mon (Seg) Tues (Ter) Wed (Qua) Thurs (Qui) Fri (Sex)
Sat (Sab)” → “Sun” (“Dom”) → ... → “Fri” (“Sex”) → “Sat” (“Sáb”) → “Sun
(Dom) Mon (Seg) Tues (Ter) Wed (Qua) Thurs (Qui) Fri (Sex) Sat (Sáb)”...
4. Prima o botão Operation
(Operação) ou INITIAL SETTING (7 ou
8) quantas vezes forem necessárias para seleccionar o número de operação
apropriado (de 1 a 6) 4.
* Os valores que introduzir nos passos 3 e 4 seleccionarão uma das células
da matriz mostrada em baixo.
(O mostrador do controlo remoto à esquerda é o exemplo Operação 1 para
Domingo, com os respectivos valores.)
Matriz de configuração
GBDFEINL
N.° Op.
No. 1
No. 2
…
No. 6
Sunday Monday … Saturday
• 8:30
• ON
•
23 °C (73 °F)
• 10:00
• OFF
• 10:00
• OFF
• 10:00
• OFF
• 10:00
• OFF
<
Configuração de Operação
1 para Domingo>
▲
Pôr a unidade a funcionar
às 8:30, à temperatura
de 23°C (73°F).
▲
<Configuração de
Operação 2 para
todos os dias>
Desligar a unidade
às 10:00.
Nota:
Ao definir o dia como “Sun Mon Tues Wed Thurs Fri Sat (Dom Seg Ter Qua Qui Sex
Sab)”, está a determinar que a operação seleccionada deve ser efectuada todos os
dias.
(Exemplo: Operação 2, em cima; a mesma programação para todos os dias da
semana.)
Configurar o temporizador semanal
Mostra a configuração
da hora
5. Prima o botão Set Time A (Acertar hora) A quantas vezes forem necessárias
PGRRUTRGBGBGBGBGB
para definir a hora desejada (em 5).
5
SUN
* Ao premir o botão para baixo, o temporizador é primeiro incrementado em
intervalos de um minuto e depois em intervalos de uma hora.
6. Prima o botão ON/OFF (LIGAR/DESLIGAR) 1 para seleccionar a operação
desejada (Ligar ou Desligar), em 6.
* Cada pressão muda para o valor seguinte, nesta sequência: sem visualização
(sem configuração) → “ON” → “OFF”
7. Prima o botão Set Temperature (Regular temperatura) 3 quantas vezes fo-
rem necessárias para definir a temperatura desejada (em 7).
* Cada pressão muda para o valor seguinte, nesta sequência: sem visualização
(sem configuração) ⇔ 5 (41) ⇔ 6 (43) ⇔ ... ⇔ 89 (192) ⇔ 90 (194) ⇔ sem
visualização.
(Intervalo disponível: o intervalo de valores para esta definição é de 5 °C (41
°F) a 90 °C (194 °F). O intervalo de valores para regulação, no entanto, varia
consoante o tipo da unidade a que o equipamento estiver associado.)
8. Para apagar os valores definidos para a operação seleccionada, prima e solte
rapidamente uma vez o botão CHECK (CLEAR) (Inspecção (Apagar)) 0.
* A hora muda para “—:—”, a definição ON/OFF e as regulações da tempera-
tura desaparecem.
(Para apagar todas as definições no temporizador semanal de uma só vez,
prima e mantenha premido o botão CHECK (CLEAR) (Inspecção (Apagar))
0, durante dois segundos ou mais. O mostrador começa a piscar, indicando
que todas as definições foram apagadas.)
9. Uma vez concluídos os passos 5, 6 e 7 prima o botão CIR.WATER
registar os valores definidos
Mostra a operação seleccionada (ON
6
(LIGADO) ou OFF (DESLIGADO))
*
Não aparece, se a operação não tiver sido definida.
ON
˚C
WEEKLY
Mostra a temperatura
7
definida
*Não aparece, se a temperatura
não tiver sido definida.
4 para
Nota:
Os novos valores introduzidos serão cancelados se premir o botão Modo (Retornar)
2 antes de premir o botão CIR.WATER
4.
Se tiver definido duas ou mais operações diferentes para exactamente a mesma
hora, apenas a operação com o Operation No. (N.° de Operação) mais elevado será
executada.
10. Repita os passos de 3 a 8 quantas vezes forem necessárias, para preencher
as células que desejar.
11. Prima o botão Modo (Retornar) 2 para concluir o processo de configuração.
12. Para activar o temporizador, prima o botão TIMER ON/OFF (Temporizador
ligar/desligar) 9, para que a indicação “Timer Off” desapareça.
Espere que a
indicação “Timer Off” desapareça do mostrador.
* Se não existirem definições de temporizador, a indicação “Timer Off”
(“Temporizador desligado”) começa a piscar no mostrador.
Para ver a configuração do temporizador semanal
8
TIMER
1. Certifique-se de que o indicador de temporizador semanal está visível
(em 1).
2. Prima o botão do TIMER MENU B para aparecer no mostrador a indica-
ção “Monitor” (em 8).
3. Prima o botão TIMER ON/OFF (Ligar/desligar temporizador) (SET DAY)
(Acertar dia) 9 as vezes que forem necessárias até seleccionar o dia
que deseja ver.
4. Prima o botão de operação
tantas vezes quantas forem necessárias para alterar a operação no mos-
trador (em 9).
* Cada pressão avançará para a operação seguinte, pela ordem crono-
lógica definida.
5. Para fechar o monitor e voltar ao mostrador inicial de controlo, prima o
botão Modo (Retornar) 2.
Configuração de temporizador
9
SUN
ON
OFF
˚C
WEEKLY
1
ou INITIAL SETTING (7 ou 8)
Para desligar o temporizador semanal
Prima o botão TIMER ON/OFF (Ligar/desligar temporizador) 9 para que apareça
a indicação “Timer Off” (Temporizador desligado) em 0.
TIME SUN
˚C
WEEKLY
0
˚C
Para ligar o temporizador semanal
Prima o botão TIMER ON/OFF (Ligar/desligar temporizador) 9 para que a
indicação “Timer Off” (Temporizador desligado) (em 0) se apague.
TIME SUN
˚C
WEEKLY
0
˚C
Para utilizar o temporizador simples
1. Pode utilizar o temporizador simples de três formas.
• Só hora de início : a unidade começa a funcionar na hora progra-
• Só hora de parar : a unidade pára de funcionar na hora progra-
• Horas de início e de parar: a unidade começa a funcionar e pára na hora
2. O temporizador (iniciar e parar) simples só pode ser configurado de 72 em 72
horas. A hora é acertada em incrementos de uma hora.
mada.
mada.
programada.
72
Page 73
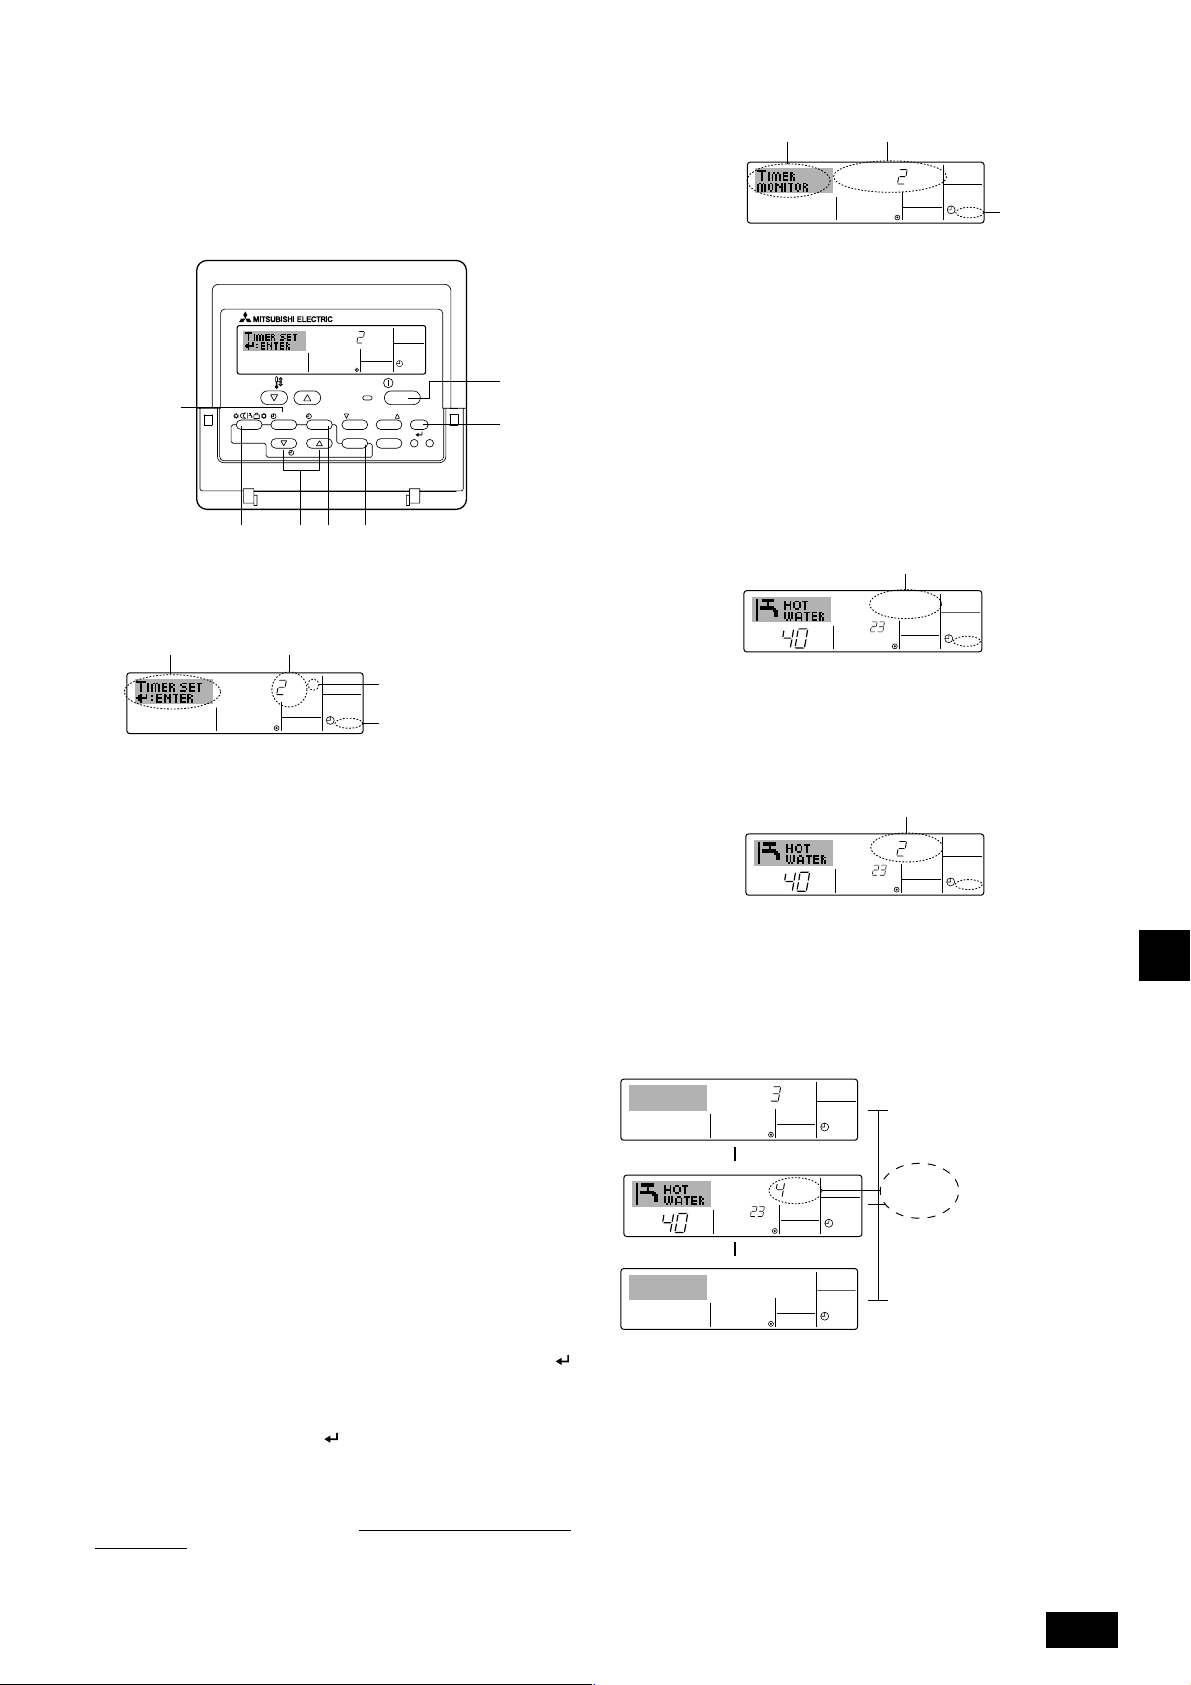
˚C
˚C
SIMPLE
7
7
˚C
˚C
ONHr
AFTER
SIMPLE
ONHr
AFTER
SIMPLE
SIMPLE
Nota:
*1. Os temporizadores Simple (Simples) e Auto Off (Desligar automático) não
podem ser utilizados ao mesmo tempo.
*2. O temporizador simples não funciona quando se verifica uma das seguintes
condições.
Quando a função de temporizador está desligada, quando o sistema está a
funcionar de forma anormal, durante um teste, durante uma auto-verificação ou
diagnóstico do controlo remoto, ou quando o sistema se encontra sob controlo
central. (Nestas condições, a operação “Ligar/Desligar” é desactivada.)
ONHr
AFTER
INITIAL SETTING
SIMPLE
ON/OFF
CIR.WATER
TEMP.
B
MENU
MONITOR/SET
BACK DAY
PAR-W21MAA
ON/OFF
CHECK TEST
CLOCK CLEAR
1
4
Para ver a programação actual do temporizador simples
Programação do temporizador
5
1. Certifique-se de que o indicador do temporizador simples está visível (em 1).
2. Prima o botão TIMER MENU (Menu de temporizador) B para que apareça no
mostrador a indicação “Monitor” (em 5).
• Se estiver em execução o temporizador simples para ON (LIGAR) ou OFF
(DESLIGAR), a programação aparece em 6.
• Se tiverem sido definidos valores para ON (LIGAR) e OFF (DESLIGAR), estes
aparecerão alternadamente.
3. Prima o botão Modo (Retornar) 2 para fechar o mostrador de monitor e voltar
ao mostrador inicial de controlo.
6
TIMER ON
OFFHrAFTER
SIMPLE
1
2A9
0
Como configurar o temporizador simples
2
1. Certifique-se de que o mostrador é um mostrador inicial de controlo e que
aparece o indicador de temporizador simples (em 1).
Quando aparece uma indicação diferente de Simple Timer (Temporizador Simples), active SIMPLE TIMER utilizando a selecção de função (consulte 3.[3]–
3 (3)) da programação da função de temporizador.
2. Prima o botão TIMER MENU (Menu de temporizador) B, para aparecer “Set
Up” (Configuração) no mostrador (em 2). (Note que cada pressão no botão
alterna o mostrador entre “Set Up” (Configuração) e “Monitor”.)
3. Prima o botão ON/OFF (LIGAR/DESLIGAR) 1 para ver a definição actual ON
(LIGAR) ou OFF (DESLIGAR) no temporizador simples. Prima o botão uma
vez para ver o tempo que falta para ON (LIGAR), e prima mais uma vez para
ver o tempo que falta para OFF (DESLIGAR). (Aparece a indicação ON/OFF
(LIGAR/DESLIGAR) em 4).
• Temporizador “ON” (LIGAR): a unidade começará a funcionar quan-
• Temporizador “OFF” (DESLIGAR): a unidade parará de funcionar quando
4. Com “ON” (LIGAR) ou “OFF” (DESLIGAR) visível em 3: Prima o botão Set
Time (Configurar temporizador) A tantas vezes quantas forem necessárias
para acertar as horas para ON (LIGAR) (se estiver visível o indicador “ON”) ou
as horas para OFF (DESLIGAR), (se estiver visível o indicador “OFF”) em 4.
• Intervalo disponível: de 1 a 72 horas
5. Para programar horas para ON (LIGAR) e OFF (DESLIGAR), repita os passos 3 e 4.
* Note que as horas para ON (LIGAR) e OFF (DESLIGAR) não podem ser
programadas com o mesmo valor.
6. Para apagar a programação para ON ou OFF: Veja a hora programada para
ON ou OFF (ver passo 3) e prima o botão CHECK (CLEAR) (Verificar) (Apagar) 0 para que a hora apareça como “—” em 4. (Se desejar utilizar apenas
a programação ON, certifiquese de que a outra opção aparece como “—”.)
7. Depois de concluir os passos de 3 a 6 em cima, prima o botão CIR.WATER
4 para registar o novo valor.
Nota:
Se desejar cancelar os novos valores introduzidos prima o botão Modo (Retornar)
2 antes de premir o botão CIR.WATER
4
Configuração de temporizador
AFTER
ONHr
SIMPLE
3
Acção (Ligar ou desligar)
*
“— —”Se não existir nenhuma
programação, aparece
1
do tiver passado o número de horas programado.
tiver passado o número de horas programado.
4.
Para desligar o temporizador simples...
Prima o botão TIMER ON/OFF (Ligar/desligar temporizador) 9 para apagar a
programação do mostrador (em 7).
Para iniciar o temporizador simples...
Prima o botão TIMER ON/OFF (Ligar/desligar temporizador) 9 para que a
programação apareça em 7.
Exemplos
Se tiverem sido programados ON (LIGAR) e OFF (DESLIGAR) no temporizador
simples, a operação e os respectivos valores aparecem por baixo.
Exemplo 1:
Inicie o temporizador com a programação ON anterior à programação OFF
Programação ON: 3 horas
Programação OFF: 7 horas
Quando o
temporizador
SIMPLE
é iniciado
Três horas depois
de o temporizador
ter sido iniciado
▲
OFFHrAFTER
˚C
˚C
▲
Sete horas
depois de o
temporizador
ter sido iniciado
Aparece no mostrador a
programação ON do temporizador
(as horas que faltam para ON).
Aparece a programação
OFF (e as horas que faltam
para OFF).
A programação que aparece
é: para OFF (7 horas) – para
ON (3 horas) = 4 horas
A unidade desliga-se e fica
desligada até que alguém a
volte a ligar.
GBDFEINL
PGRRUTRGBGBGBGBGB
8. Prima o botão Modo (Retornar) 2 para voltar ao mostrador inicial de controlo.
9. Prima o botão TIMER ON/OFF (Ligar/desligar temporizador) 9 para iniciar a
contagem decrescente do temporizador. Quando o temporizador está a funcionar, a contagem aparece no mostrador.
Certifique-se de que esse valor
está correcto.
73
Page 74

AUTO OFF
7
Exemplo 2:
Inicie o temporizador a programação OFF anterior à programação ON
Programação ON: 5 horas
Programação OFF: 2 horas
OFFHrAFTER
˚C
˚C
▲
ONHr
AFTER
SIMPLE
SIMPLE
Quando o
temporizador
é iniciado
Duas horas depois
de o temporizador
ter sido iniciado
▲
˚C
˚C
SIMPLE
Cinco horas
depois de o
temporizador
Aparece no mostrador a
programação OFF (e as
horas que faltam para OFF).
Aparece a programação ON
(e as horas que faltam para
ON).
A programação que aparece
é: para ON (5 horas) – para
OFF (2 horas) = 3 horas
A unidade liga-se e fica a
funcionar até que alguém a
desligue.
ter sido iniciado
Para utilizar o temporizador Auto Off (Desligar automático)
GBDFEINL
1. Este temporizador inicia a contagem decrescente quando a unidade começa
a funcionar e desliga-a depois do tempo programado.
2. As definições disponíveis são executadas de 30 minutos a 4 horas, em inter-
valos de 30 minutos.
Nota:
*1. Os temporizadores Simple (Simples) e Auto Off (Desligar automático) não
podem ser utilizados ao mesmo tempo.
*2. O temporizador Auto Off (Desligar automático) não funciona quando se verifica
uma das seguintes condições.
Quando a função de temporizador está desligada, quando o sistema está a
funcionar de forma anormal, durante um teste, durante uma auto-verificação ou
diagnóstico do controlo remoto, ou quando o sistema se encontra sob controlo
central. (Nestas condições, a operação Ligar/Desligar é desactivada.)
Nota:
Se desejar cancelar o valor prima o botão Modo (Retornar) 2 antes de premir o
botão CIR.WATER
4.
5. Prima o botão Modo (Retornar) 2 para concluir o processo de configuração e
voltar ao mostrador inicial de controlo.
6. Se a unidade já estiver a funcionar, o temporizador inicia automaticamente a
contagem decrescente.
Certifique-se de que a contagem no mostrador
está correcta.
Para ver a programação actual do temporizador Auto
Off (Desligar automático)
Configuração de temporizador
TIMER
AFTER
5
OFF
AUTO OFF
1
4
1. Certifique-se de que aparece no mostrador a indicação “Auto Off” (Desligar
automático) (em 1).
2. Prima e mantenha premido o botão do TIMER MENU B durante 3 segundos,
para aparecer a indicação “Monitor” no mostrador (em 4).
• Aparece o tempo que falta para desligar em 5.
3. Para fechar o monitor e voltar ao mostrador inicial de controlo, prima o botão
Modo (Retornar) 2.
Para desligar o temporizador Auto Off (Desligar automático)...
• Prima e mantenha premido o botão TIMER ON/OFF (Ligar/desligar temporizador)
9 durante 3 segundos, para que apareça a indicação Timer Off (Desligar
temporizador) (em 6) e a programação do temporizador (em 7) desapareça.
7
AFTER OFF
PGRRUTRGBGBGBGBGB
TEMP.
B
MENU
BACK
MONITOR/SET
BACK DAY
PAR-W21MAA
ON/OFF
MENU
ON/OFF
CLOCK
CLOCK CLEAR
INITIAL SETTING
INITIAL SETTING
CHECK TEST
CHECK TEST
CLEAR
AUTO OFF
ON/OFF
CIR.WATER
CIR.WATER
4
2A9
Como configurar o temporizador Auto Off (Desligar
automático)
2
1. Certifique-se de que o mostrador é um mostrador principal de controlo e que a
indicação Auto Off (Desligar automático) aparece no mostrador (em 1).
Quando aparece uma indicação diferente de Auto Off Timer (Temporizador
Desligar automático), active AUTO OFF TIMER utilizando a selecção de função (consulte 3.[3]–3 (3)) da programação da função de temporizador.
2. Prima e mantenha premido o botão do TIMER MENU B durante 3 segundos,
para que apareça “Set Up” “Configuração” no mostrador (em 2).
(Note que cada pressão no botão alterna o mostrador entre “Set Up” (Configuração) e “Monitor”.)
3. Prima o botão Set Time (Acertar hora) A quantas vezes forem necessárias
para definir a hora para OFF (em 3).
4. Prima o botão CIR.WATER
3
Configuração de temporizador
AFTER OFF
4 para registar o valor.
AUTO OFF
1
AFTER OFF
˚C
AUTO OFF
6
˚C
• Ou então, desligue a unidade. A programação do temporizador (em 7) desaparece
do mostrador.
Para iniciar o temporizador Auto Off (Desligar automático)...
• Prima e mantenha premido o botão TIMER ON/OFF (Ligar/Desligar temporizador)
9 durante 3 segundos. A indicação Timer Off (Desligar temporizador) desaparece
(em 6), e o temporizador acende-se (em 7).
• Ou então, ligue a unidade. A programação do temporizador aparece em 7.
7
AFTER OFF
˚C
AUTO OFF
6
˚C
74
Page 75

3. Selecção de Função
Selecção de função do controlo remoto
As definições das funções do controlo remoto que se seguem podem ser alteradas através do modo de selecção de função do controlo remoto. Altere a definição conforme
necessário.
Item 1
1. Alteração de idioma
(“CHANGE
LANGUAGE”)
2. Limite da função
(“FUNCTION
SELECTION”)
3. Selecção de modo
(“MODE
SELECTION”)
4. Visualização da
alteração (“DISP
MODE SETTING”)
Definição do idioma a visualizar
(1) Definição do limite da função de operação (bloqueio da
operação) (“LOCKING FUNCTION”)
(2) Definição de saltar modo de operação (“SELECT MODE”)
(3)
Definição do limite de variação da temperatura (“LIMIT TEMP FUNCTION”)
(1) Definição do controlo remoto mestre/subordinado
(“CONTROLLER MAIN/SUB”)
(2) Utilização da definição do relógio (“CLOCK”)
(3) Definição da função do temporizador (“WEEKLY TIMER”)
(4) Definição do número de contacto em situação de erro
(“CALL.”)
(5) Definição de compensação da temperatura (“TEMP OFF SET FUNCTION”)
(1)
Definição do visor da temperatura °C/°F (“TEMP MODE °C/°F”)
(2) Definição do visor da temperatura da água (“WATER TEMP
DISP SELECT”)
Item 2
Item 3 (conteúdo da definição)
•É possível a visualização em vários idiomas
• Definição da amplitude do limite de operação (bloqueio da operação)
• Definição da utilização ou não utilização de cada modo de operação
• Definição da variação regulável da temperatura (máximo, mínimo)
• Selecção do controlo remoto mestre ou subordinado
* Quando dois controlos remotos estão ligados a um grupo, um deles
tem que ser definido como subordinado.
• Definição da utilização ou não utilização da função de relógio
• Definição do tipo de temporizador
• Visualização do número de contacto em caso de erro
• Definição do número de telefone
•
Definição da utilização ou não utilização da definição de valor de diminuição
• Definição da unidade de temperatura (°C ou °F) a visualizar
• Definição da utilização ou não utilização da visualização da temperatura
da água
GBDFEINL
Fluxograma de selecção de função
[1] Desligue a unidade para iniciar o modo de selecção de função do controlo remoto. → [2] Seleccione a partir do item 1. → [3] Seleccione a partir do item 2. → [4] Faça
a definição. (Os detalhes estão especificados no item 3) → [5] A definição está completa. → [6] Altere o visor para o normal. (Fim)
Visor normal (visualização quando a
unidade não está em funcionamento)
(Mantenha o botão de E premido e prima o botão de D
durante dois segundos.)
* O visor não pode ser alterado durante o teste de
funcionamento e o diagnóstico automático.
Item 1 Modo da Selecção de Função do
Alteração de idioma
(“CHANGE LANGUAGE”)
Prima o botão de G.
Controlo Remoto
Item 2
Limite da função
(“FUNCTION
SELECTION”)
Prima o
botão de
E.
Selecção de
modo (“MODE
SELECTION”)
Prima o
botão de E.
Prima o
botão de
G.
Prima o botão
de E.
Prima o
botão de
G.
Prima o botão
de E.
→
Definição do limite da função de operação (“LOCKING FUNCTION”)
→
→
Definição de saltar modo de operação (“SELECT MODE”)
Definição do limite de variação da temperatura (“LIMIT TEMP FUNCTION”)
→
Definição do controlo remoto mestre/subordinado (“CONTROLLER MAIN/SUB”)
→→→
Utilização da definição do relógio (“CLOCK”)
Definição da função do temporizador (“WEEKLY TIMER”)
→
Definição do número de contacto em situação de erro (“CALL.”)
Definição de compensação da temperatura (“TEMP OFF SET FUNCTION”)
Prima o
Visualização da
alteração (“DISP
MODE SETTING”)
botão de
G.
→
Definição do visor da temperatura ° C/ ° F (“TEMP MODE °C/°F”)
→
Definição do visor da temperatura da água (“WATER TEMP DISP SELECT”)
(Mantenha o botão de E premido e
prima o botão de D durante dois
segundos.)
* O controlo remoto grava a definição
executada desta forma.
Prima o botão de G.
Prima o botão de G.
Prima o botão de G.
Prima o
botão de D.
Prima o
botão de D.
Prima o
botão de D.
Consulte [3]–1
Item 3
(conteúdo da definição)
Consulte [3]–2. (1)
Consulte [3]–2. (2)
Consulte [3]–2. (3)
Consulte [3]–3. (1)
Consulte [3]–3. (2)
Consulte [3]–3. (3)
Consulte [3]–3. (4)
Consulte [3]–3. (5)
Consulte [3]–4. (1)
Consulte [3]–4. (2)
NOTA
A operação do temporizador é interrompida
quando o visor da selecção de função do
controlo remoto é alterado para o normal.
Visor por matriz de pontos
O idioma seleccionado no modo
CHANGE LANGUAGE aparece
neste visor. Neste manual, está
definido o inglês.
F
TEMP.
MENU
BACK DAY
MONITOR/SET
CLOCK CLEAR
C
ON/OFF
E
PAR-W21MAA
G
INITIAL SETTING
CHECK TEST
D
ON/OFF
CIR.WATER
H
PGRRUTRGBGBGBGBGB
I
A
B
75
Page 76

Definição detalhada
[3]–1. definição de ALTERAR IDIOMA
O idioma que aparece no visor por matriz de pontos pode ser seleccionado.
• Prima o botão de [
1 Inglês (GB), 2 Alemão (D), 3 Espanhol (E), 4 Russo (RU),
5 Italiano (I), 6 Francês (F), 7 Sueco
[3]–2. Limite da função
(1) Definição do limite da função de operação (bloqueio da operação)
• Para alterar a definição, prima o botão de [
1 no1 : A definição de bloqueio da operação é feita em todos os botões,
excepto no botão de [
2 no2 : A definição de bloqueio da operação é feita em todos os botões.
3 OFF
* Para tornar a definição de bloqueio da operação válida no visor normal, é
(2) Definição de saltar modo de operação
Uma vez alterada a definição, é possível mudar o modo de operação dentro da
gama alterada.
• Para mudar as definições que se seguem, prima o botão [
GBDFEINL
(3) Definição do limite de variação da temperatura
Depois de feita esta definição, a temperatura pode ser alterada dentro da varia-
ção definida.
• Para alterar a definição, prima o botão de [
PGRRUTRGBGBGBGBGB
* Quando é feita outra definição além de OFF, a definição do limite de variação da
• Para aumentar ou diminuir a temperatura, prima o botões [
• Definição da variação
* A definição da variação varia de acordo com a unidade a ligar.
(Valor da definição inicial) : A definição de bloqueio da operação não é feita.
necessário premir os botões (mantenha premidos simultaneamente os botões
[CIR.WATER] e [
ter sido feita a definição anterior.
1 Modo Heating : Define a utilização ou não utilização do modo
2 Modo Heating ECO : Define a utilização ou não utilização do modo
3 Modo Hot Water : Define a utilização ou não utilização do modo
4 Modo Anti-freeze : Define a utilização ou não utilização do modo
5 Modo Cooling : Define a utilização ou não utilização do modo
6 OFF
(valor da regulação inicial)
* Se for efectuada uma definição que não seja a definição OFF, as definições
de salto dos modos Heating, Heating ECO, Hot Water, Anti-freeze e Cooling
são executadas simultaneamente.
*Não é possível utilizar um modo que não esteja disponível na unidade a ligar,
mesmo que a definição seja “AVAILABLE” (DISPONÍVEL).
1 LIMIT TEMP HEATING MODE:
É possível alterar a gama de temperatura no modo de aquecimento.
2 LIMIT TEMP HOT WATER MODE:
É possível alterar a gama de temperatura no modo de aquecimento/água
quente.
3 LIMIT TEMP ANTI-FREEZE MODE:
É possível alterar a gama de temperatura no modo anticongelante.
4 LIMIT TEMP HEATING MODE:
É possível alterar a gama de temperatura no modo de arrefecimento.
5 OFF (definição inicial) : O limite de variação da temperatura não está activo.
temperatura nos modos de refrigeração, aquecimento e automático é feita ao
mesmo tempo. Contudo, a variação não pode ser limitada quando a variação de
temperatura definida não tiver sido alterada.
].
Modo Hot Water : Limite inferior: 30 ~ 70 °C (87 ~ 158 °F)
Mode Heating : Limite inferior: 30 ~ 45 °C (87 ~ 113 °F)
Mode Cooling : Limite inferior: 10 ~ 30 °C (50 ~ 87 °F)
MENU] para alterar o idioma.
ON/OFF].
ON/OFF].
ON/OFF] durante dois segundos) no visor normal depois de
ON/OFF].
Heating.
Heating ECO.
Hot Water.
Antifreeze.
Cooling.
: O salto do modo de operação não é executado.
ON/OFF].
TEMP. or
Limite superior:70 ~ 30 °C (158 ~ 87 °F)
Limite superior:45 ~ 30 °C (113 ~ 87 °F)
Limite superior:30 ~ 10 °C (87 ~ 50 °F)
[3]–3. Definição da selecção de modo
(1) Definição do controlo remoto mestre/subordinado
• Para alterar a definição, prima o botão de [
1 Main : O controlo remoto será o mestre.
2 Sub : O controlo remoto será o subordinado.
(2) Utilização da definição do relógio
• Para alterar a definição, prima o botão de [
1 ON : A função do relógio pode ser utilizada.
2 OFF : A função do relógio não pode ser utilizada.
(3) Definição da função do temporizador
• Para alterar a definição, prima o botão de [
opções que se seguem.).
1 WEEKLY TIMER (Valor da definição inicial)
2 AUTO OFF TIMER : O temporizador de desligamento automático pode
3 SIMPLE TIMER : O temporizador simples pode ser utilizado.
4 TIMER MODE OFF : O modo de temporizador não pode ser utilizado.
* Quando a utilização da definição do relógio está em OFF, o “WEEKLY TIMER”
(TEMPORIZADOR SEMANAL) não pode ser utilizado.
(4) Definição do número de contacto em situação de erro
• Para alterar a definição, prima o botão de [
1 CALL OFF : A definição dos números de contacto não é visualizada em
2 CALL **** *** **** : A definição dos números de contacto é visualizada em
CALL_ : O número de contacto pode ser definido quando o visor
• Definição dos números de contacto
Para poder definir os números de contacto, execute os procedimentos que se
seguem.
Desloque o cursor intermitente para definir os números. Prima o botões
[
TEMP. ou ] F para mover o cursor para a direita (esquerda).
Prima o botões [
(5) Definição da função de diminuição
• Para mudar as definições que se seguem, prima o botão [
1 ON : A definição do valor de diminuição é visualizada por baixo do modo
2 OFF : A definição do valor de diminuição não é visualizada por baixo do
de regulação inicial da temperatura da água.
modo de regulação inicial da temperatura da água.
: O temporizador semanal pode ser utilizado.
ser utilizado.
caso de erro.
caso de erro.
se encontra conforme ilustrado à esquerda.
CLOCK ou ] C para definir os números.
ON/OFF] D.
ON/OFF] D.
ON/OFF] D (Escolha uma das
ON/OFF] D.
ON/OFF] D.
[3]–4. Definição de alteração do visor
(1) Definição do visor da temperatura °C/°F
• Para alterar a definição, prima o botão de [
1 °C: É utilizada a unidade de temperatura °C.
2 °F: É utilizada a unidade de temperatura ° F.
(2) Definição do visor da temperatura da água
• Para alterar a definição, prima o botão de [
1 ON : É indicada a temperatura da água.
2 OFF : Não é indicada a temperatura da água.
ON/OFF] D.
ON/OFF] D.
76
Page 77

4. Cuidados com a máquina
Mande sempre fazer a manutenção do filtro a um técnico de assistência.
Antes de proceder à manutenção da máquina desligue a corrente.
Cuidado:
• Antes de iniciar a limpeza, pare a máquina e desligue a corrente. Lembre-se de que a ventoinha gira no interior a elevada velocidade e constitui um grave risco de ferimentos.
• As unidades interiores estão equipadas com filtros para eliminar a poeira do ar aspirado. Limpe o filtro com os métodos ilustrados nos seguintes diagramas.
• A vida-útil do filtro depende do local onde foi instalada a unidade, e como
está a ser operada.
5. Detecção de avarias
Antes de pedir assistência a um técnico, verifique os seguintes pontos:
Estado da máquina
A máquina não funciona.
Há saída de água, mas
não refrigera ou aquece o suficiente.
Não há saída de água
refrigerada ou aquecida.
Funciona alguns instantes e pára.
Controlo remoto
A indicação luminosa “'”
não acende.
Não aparece a indicação luminosa
quando se carrega no botão [ON/OFF].
O visor de cristais líquidos
mostra que não está em
estado de funcionamento.
O visor de cristais líqui-
dos mostra que a máqui-
na está em funcionamento.
A visualização “CHECK”
e o código de diagnósti-
co piscam no visor de
cristais líquidos.
Avaria da corrente.
Corrente desligada.
Fusível da corrente queimado.
O disjuntor desligado.
Regulação da temperatura imprópria.
O circuito de prevenção de arranque está para funcionar dentro de três minutos.
O funcionamento da unidade interna se reiniciou durante
o funcionamento de aquecimento e de descongelamento.
Há qualquer obstáculo na entrada e na saída de ar
das unidades interior e exterior.
O filtro está repleto de pó ou sujidade.
Causa
Como limpar
• Ao lavar o filtro, remova a cobertura e esfregue o seu interior com uma escova.
Cuidado:
• Não segue o filtro mediante exposição à luz solar directa ou aquecendoo ao lume, etc. Tal acção pode resultar na deformação do filtro.
Cuidado:
Nunca deite água nem aerossóis inflamáveis no sistema de ar condicionado. Efectuar assim a limpeza pode causar avarias do ar condicionado, choques eléctricos ou incêndios.
Detecção de avarias
Carregue na tecla [ON/OFF] depois de restaurar a corrente.
Ligue a corrente de alimentação.
Substitua o fusível.
Rearme o disjuntor de descarga para a terra.
Depois de ter verificado a temperatura regulada e a temperatura de admissão no visor de cristais líquidos, consulte
[Ajuste da temperatura da água] e active a tecla de regulação.
Espere um pouco.
(Para proteger o compressor incorporou-se na unidade interior o circuito de prevenção de arranque de três minutos.
Por conseguinte, há ocasiões em que o compressor não
arranca imediatamente. Há casos em que ele não arranca
durante três minutos.)
Espere um momento.
(O funcionamento de aquecimento arranca após a operação de descongelamento determinada.)
Volte a ligar depois de remover o obstáculo.
Retome a operação após a limpeza do filtro. (Consulte [Cuidados com a máquina].)
GBDFEINL
• Se o funcionamento for interrompido devido a uma falha de energia, o [circuito de prevenção de reinício após falha de energia] entra em operação e desactiva o
funcionamento da unidade mesmo após a reposição da energia. Neste caso, pressione novamente o botão [ON/OFF] para iniciar o funcionamento.
Se o mau funcionamento persistir depois de ter verificado os pontos acima, desligue e contacte o seu concessionário, fornecendo-lhe informações sobre o nome do
produto, a natureza do mau funcionamento, etc. Se o visor “[CHECK]” e o código de diagnóstico (4 dígitos) cintilarem, indique ao concessionário os conteúdos da
visualização (código de diagnóstico). Nunca tente reparar você mesmo.
Os sintomas que seguem não são avarias do sistema de ar condicionado:
• O sopro de ar que sai do sistema de ar condicionado pode às vezes exalar odores. Isto deve-se ao fumo de cigarro contido no ar da peça, ao cheiro de cosméticos, das
paredes, do mobiliário, etc. que são absorvidos pelo ar condicionado.
• Pode-se ouvir um ruído cibilante imediatamente após o arranque ou a paragem do sistema de ar condicionado. É o som do fluxo de refrigerante dentro do sistema. Isto
é normal.
• O ar condicionado dá às vezes estalidos e estalos no início ou no fim do modo de arrefecimento/aquecimento. Isto é o som de fricção no painel frontal e nas outras
partes devido à expansão e à contracção causada pela mudança de temperatura. Isto é normal.
PGRRUTRGBGBGBGBGB
77
Page 78

6. Instalação, trabalhos de transferência e verificação
Relativamente ao local de instalação
Peça ao seu concessionário informações sobre a instalação e a transferência
desta.
Cuidado:
Nunca instale o sistema de ar condicionado onde houver riscos de gás inflamável.
Em caso fugas e de acumulação de gás em volta da unidade, há o risco de
incêndios.
Nunca instale o sistema de ar condicionado nos seguintes lugares:
• onde haja muito óleo de máquina
• perto do mar ou áreas de praias onde o ar contenha sal
• onde haja elevada humidade
• onde haja molas quentes na proximidade
• onde haja gás sulfúrico
• onde haja máquinas geradoras de altas frequências (um soldador de alta fre-
quência, etc.)
• onde são utilizadas frequentemente soluções ácidas
GBDFEINL
• onde sejam utilizados frequentemente pulverizadores especiais
• Instale a unidade interior horizontalmente, de outra maneira pode haver fugas
de água
• Tome as medidas suficientes contra o ruído quando instalar o sistema de ar
condicionado em hospitais ou em instalações relacionadas com comunica-
ções.
Se o ar condicionado for utilizado nos ambientes acima mencionados, pode haver
frequentes avarias de funcionamento. É aconselhável evitar estes tipos de lugares de instalação. Para mais informações consulte o seu concessionário.
Relativamente aos trabalhos eléctricos
Cuidado:
• O trabalho eléctrico deve ser empreendido por uma pessoa qualificada,
como um engenheiro eléctrico, segundo as [normas técnicas relativas
às instalações eléctricas], às [regras de cablagem interna], e segundo o
Manual de Instalação, mas sempre com a utilização absoluta de circuitos exclusivos. A utilização de outros produtos alimentados a corrente
pode causar a quebra dos recipientes e que os fusíveis se queimem.
• Nunca ligue o fio de terra a um tubo de gás ou um tubo de água, a um
para-raios ou ao fio de terra do telefone. Para mais informações, consulte o seu concessionário.
• Nalguns tipos de lugares de instalação, a instalação de um disjuntor de
descarga para a terra é obrigatória. Para mais informações, consulte o
seu concessionário.
Acerca da instalação do tubo de água
• Não utilize tubos de aço, tais como tubos para água. Recomenda-se a utiliza-
ção dos tubos de cobre.
• O circuito hidráulico deve ser do tipo fechado.
Relativamente à transferência da instalação
• Se tiver de deslocar ou de reinstalar o sistema de ar condicionado, em caso
de alargamento da sua casa, de restauro ou de mudança de casa, consulte
antecipadamente o seu concessionário para discutirem o preço do trabalho
de engenharia profissional requerido para a transferência da instalação.
Cuidado:
Quando tiver de deslocar ou de reinstalar o sistema de ar condicionado,
consulte o seu concessionário. Uma instalação inadequada pode originar
choques eléctricos, incêndios, etc.
Preste atenção ao ruído demasiado
• Quando instalar o sistema, escolha um local que possa suportar o peso do
sistema de ar condicionado e onde o ruído e as vibrações sejam reduzidos.
• Escolha um local onde o ar frio ou quente e o ruído da admissão do ar exterior
do sistema de ar condicionado não incomode os vizinhos.
• Se for colocado algum objecto estranho perto da admissão de ar do exterior
do sistema de ar condicionado, pode prejudicar a eficácia e aumentar o ruído
da unidade. Evite colocar obstáculos junto da admissão do ar.
• Se o ar condicionado produzir ruídos anormais, consulte o seu concessionário.
Manutenção e inspecção
• Se o ar condicionado for utilizado em várias estações do ano, pode acumularse sujidade no interior e reduzir assim a sua eficácia.
Dependendo das condições de utilização, podem ser gerados odores e a drenagem pode deteriorar devido à poeira, à sujidade, etc.
7. Especificações
PGRRUTRGBGBGBGBGB
Modelo
Fonte de alimentação
Capacidade de aquecimento kW
Capacidade de refrigeraçãokW
Nível sonoro
Peso líquido kg
Dimensões
Acessório
Taxa de fluxo da água m
*1 Condições nominais de aquecimento
Temperatura externa: 7 °C DB/6 °C WB (45 °F DB/43 °F WB)
Pipe length: 7,5 m (24-9/16 ft)
Comprimento do tubo: 0 m (0 ft)
Temp. da Entrada de água 65 °C Taxa de fluxo da água 2,15 m3/h
*3 Condições nominais de refrigeração
Temperatura externa: 35 °C DB (95 °F DB)
Comprimento do tubo: 7,5 m (24-9/16 ft)
Level difference: 0 m (0 ft)
Temp. da Entrada de água 23 °C Taxa de fluxo da água 1,93 m3/h
*5 Condições nominais de refrigeração
Temperatura externa: 35 °C DB (95 °F DB)
Comprimento do tubo: 7,5 m (24-9/16 ft)
Level difference: 0 m (0 ft)
Temp. da Entrada de água 23 °C Taxa de fluxo da água 3,86 m3/h
Altura mm
Largura mm
Profundidade mm
PWFY-P100VM-E-BU
3
/h
PWFY-P100VM-E-AU
1 fase 220-230-240 V 50/60 Hz
1
12,5 *
–
44 dB<A>
60 kg
Filtro, Material de isolamento térmico, Conjuntos de conectores × 2,
Juntas de expansão × 2 (PWFY - P200VM - E - AU)
0,6-2,15 1,2-4,3
*2 Condições nominais de aquecimento
Temperatura externa: 7 °C DB/6 °C WB (45 °F DB/43 °F WB)
Comprimento do tubo: 7,5 m (24-9/16 ft)
Level difference: 0 m (0 ft)
Temp. da Entrada de água 30 °C Taxa de fluxo da água 2,15 m3/h
*4 Condições nominais de aquecimento
Temperatura externa: 7 °C DB/6 °C WB (45 °F DB/43 °F WB)
Comprimento do tubo: 7,5 m (24-9/16 ft)
Level difference: 0 m (0 ft)
Temp. da Entrada de água 30 °C Taxa de fluxo da água 4,3 m3/h
12,5 *
11,2 *
29 dB<A>
35 kg
800
450
300
0,6-2,15
2
3
PWFY-P200VM-E-AU
4
25,0 *
5
22,4 *
29 dB<A>
38 kg
78
Page 79

¶ÂÚȯfiÌÂÓ·
1. ¶ЪФК˘П·ОЩИОТУ М¤ЩЪˆУ ·ЫК·ПВ›·˜ ........................................................ 79
1.1. ∂ÁηٿÛÙ·ÛË ........................................................................... 79
1.2. ™ЩЛ ‰И¿ЪОВИ· ПВИЩФ˘ЪБ›·˜ ....................................................... 80
1.3. ¶¤Щ·БМ· ЩЛ˜ МФУ¿‰·˜ Ы·У ¿¯ЪЛЫЩЛ ..................................... 80
2. ∆ЪfiФ˜ ПВИЩФ˘ЪБ›·˜ ................................................................................. 81
2.1. ГЪ‹ЫЛ ЩЛПВ¯ВИЪИЫЩЛЪ›Ф˘ ......................................................... 81
2.2. ƒ‡ıМИЫЛ ıВЪМФОЪ·Ы›·˜ УВЪФ‡ ................................................ 81
1. ¶ЪФК˘П·ОЩИОТУ М¤ЩЪˆУ ·ЫК·ПВ›·˜
s ¶ЪИУ ı¤ЫВЩВ ЫВ ПВИЩФ˘ЪБ›· ЩЛ МФУ¿‰·, ‚В‚·ИˆıВ›ЩВ fiЩИ ¤¯ВЩВ
‰И·‚¿ЫВИ ФПfiОПЛЪФ ЩФ ЩМ‹М· ВЪ› “¶ЪФК˘П·ОЩИОТУ М¤ЩЪˆУ
·ÛÊ·Ï›·˜”.
s ∆Ф ЩМ‹М· ВЪ› “¶ЪФК˘П·ОЩИОТУ М¤ЩЪˆУ ·ЫК·ПВ›·˜” ВЪИ¤¯ВИ
ЫЛМ·УЩИО¤˜ ПЛЪФКФЪ›В˜ Ы¯ВЩИО¿ МВ ЩЛУ ·ЫК¿ПВИ·.
¶·Ъ·О·ПВ›ЫЩВ У· ‚В‚·ИТУВЫЩВ fiЩИ ВК·ЪМfi˙ВЩВ Щ· М¤ЩЪ·
·ÛÊ·Ï›·˜.
™‡М‚ФП· Ф˘ ¯ЪЛЫИМФФИФ‡УЩ·И ЫЩФ ОВ›МВУФ
¶ÚÔÂȉÔÔ›ËÛË:
¶ВЪИБЪ¿КВИ ЪФК˘П·ОЩИО¿ М¤ЩЪ· Ф˘ Ъ¤ВИ У· П·М‚¿УФУЩ·И БИ· У’·ФКВ‡БВЩ·И
Ф О›У‰˘УФ˜ ЩЪ·˘М·ЩИЫМФ‡ ‹ Ф ı¿У·ЩФ˜ ЩФ˘ ¯Ъ‹ЫЩЛ.
¶ÚÔÛÔ¯‹:
¶ВЪИБЪ¿КВИ ЪФК˘П·ОЩИО¿ М¤ЩЪ· Ф˘ Ъ¤ВИ У· П·М‚¿УФУЩ·И БИ· У’·ФКВ‡БВЩ·И
‚П¿‚Л ЫЩЛ МФУ¿‰·.
™‡М‚ФП· Ф˘ ¯ЪЛЫИМФФИФ‡УЩ·И ЫЩИ˜ ВИОФУФБЪ·К‹ЫВИ˜
: ¢Â›¯ÓÂÈ ÂÓ¤ÚÁÂÈ· Ô˘ Ú¤ÂÈ Ó’·ÔʇÁÂÙ·È.
: ¢В›¯УВИ fiЩИ Ъ¤ВИ У’·ОФПФ˘ıФ‡УЩ·И Ф‰ЛБ›В˜ ЫЛМ·УЩИОФ‡ ВЪИВ¯ФМ¤УФ˘.
: ¢В›¯УВИ М¤ЪФ˜ ЩЛ˜ Ы˘ЫОВ˘‹˜ Ф˘ Ъ¤ВИ У· БВИТУВЩ·И.
: ¶ЪФЫФ¯‹ О›У‰˘УФ˜ ·fi ЛПВОЩЪФПЛН›·. (∞˘Щfi ЩФ Ы‡М‚ФПФ ВМК·У›˙ВЩ·И
ЫЩЛУ ВЩИО¤Щ· ЩЛ˜ О‡ЪИ·˜ МФУ¿‰·˜.) <ГЪТМ·: О›ЩЪИУФ>
: ¶ÚÔÛ¤¯ÂÙ ÙȘ η˘Ù¤˜ ÂÈÊ¿ÓÂȘ
¶ÚÔÂȉÔÔ›ËÛË:
¢И·‚¿˙ВЩВ ЪФЫВ¯ЩИО¿ ЩИ˜ ВЩИО¤ЩВ˜ Ф˘ В›У·И ОФППЛМ¤УВ˜ ¿Уˆ
ЫЩЛУ О‡ЪИ· МФУ¿‰·.
1.1. ∂ÁηٿÛÙ·ÛË
s ∞КФ‡ ‰И·‚¿ЫВЩВ ЩФ ВБ¯ВИЪ›‰ИФ Ф‰ЛБИТУ ¯Ъ‹ЫВˆ˜, К˘П¿НЩВ ЩФ ЫВ О¿ФИФ
·ЫК·П¤˜ М¤ЪФ˜ М·˙› МВ ЩФ ∂Б¯ВИЪ›‰ИФ ∂БО·Щ¿ЫЩ·ЫЛ˜ ЩЛ˜ МФУ¿‰·˜ БИ· У·
Щ· Ы˘М‚Ф˘ПВ‡ВЫЩВ fiЩ·У ¯ЪВИ¿˙ВЩ·И. ∂¿У Л МФУ¿‰· ЪfiОВИЩ·И У·
¯ЪЛЫИМФФИВ›Щ·И ·fi ¿ППФ ¿ЩФМФ, ‚В‚·ИˆıВ›ЩВ fiЩИ ·К‹УВЩВ ЩФ ВБ¯ВИЪ›‰ИФ
Ы’·˘Щfi ЩФ ¿ЩФМФ.
¶ÚÔÂȉÔÔ›ËÛË:
• ∏ ÂÁηٿÛÙ·ÛË Ù˘ ÌÔÓ¿‰·˜ ‰ÂÓ Ú¤ÂÈ Ó· Á›ÓÂÙ·È ·fi ÙÔÓ ¯Ú‹ÛÙË.
∑ËÙ‹ÛÂÙ ·fi ÙÔ Î·Ù¿ÛÙËÌ· Ô˘ ÙËÓ ·ÁÔÚ¿Û·Ù ‹ ·fi ÂÍÔ˘ÛÈÔ‰ÔÙË̤ÓË
ÂÙ·ÈÚ›· Ó· οÓÔ˘Ó ÙËÓ ÂÁηٿÛÙ·ÛË Ù˘ ÌÔÓ¿‰·˜. ∂¿Ó Ë ÂÁηٿÛÙ·ÛË
Ù˘ ÌÔÓ¿‰·˜ ‰ÂÓ Á›ÓÂÈ fiˆ˜ ÚԂϤÂÙ·È, ÂÓ‰¤¯ÂÙ·È Ó· ¤¯ÂÈ Û·Ó
·ФЩ¤ПВЫМ· У· ·ЪФ˘ЫИ·ЫЩВ› ‰И·ЪЪФ‹ УВЪФ‡, У· ЪФОПЛıВ› ЛПВОЩЪФПЛН›·
‹ У· Ы˘М‚В› ˘ЪО·БИ¿.
• ГЪЛЫИМФФИВ›ЩВ МfiУФ ВН·ЪЩ‹М·Щ· Ф˘ В›У·И ВБОВОЪИМ¤У· ·fi ЩЛ Mitsubishi
Electric О·И ˙ЛЩ¿ЩВ ·fi ЩФ О·Щ¿ЫЩЛМ· Ф˘ Щ· ·БФЪ¿˙ВЩВ ‹ ·fi
ВНФ˘ЫИФ‰ФЩЛМ¤УЛ ВЩ·ИЪВ›· У· О¿УФ˘У ЩЛУ ВБО·Щ¿ЫЩ·Ы‹ ЩФ˘˜. ∂¿У Л
ВБО·Щ¿ЫЩ·ЫЛ ЩˆУ ВН·ЪЩЛМ¿ЩˆУ ‰ВУ Б›УВИ fiˆ˜ ЪФ‚П¤ВЩ·И, ВУ‰¤¯ВЩ·И У·
¤¯ВИ Ы·У ·ФЩ¤ПВЫМ· У· ·ЪФ˘ЫИ·ЫЩВ› ‰И·ЪЪФ‹ УВЪФ‡, У· ЪФОПЛıВ›
ЛПВОЩЪФПЛН›· ‹ У· Ы˘М‚В› ˘ЪО·БИ¿.
• ªËÓ ·ÁÁ›˙ÂÙ ÙË ÌÔÓ¿‰·. ∏ ÂÈÊ¿ÓÂÈ· Ù˘ ÌÔÓ¿‰·˜ ÂÓ‰¤¯ÂÙ·È Ó· Â›Ó·È Î·˘Ù‹.
• ªËÓ ÂÁηıÈÛٿ٠ÙË ÌÔÓ¿‰· Û ÛËÌ›· fiÔ˘ ˘¿Ú¯ÂÈ ‰ËÌÈÔ˘ÚÁ›·
‰И·‚ЪˆЩИОТУ ·ВЪ›ˆУ.
• ™ЩФ ∂Б¯ВИЪ›‰ИФ √‰ЛБИТУ БИ· ЩЛУ ∂БО·Щ¿ЫЩ·ЫЛ ı· ‚ЪВ›ЩВ ПВЩФМ¤ЪВИВ˜ Ф˘
·ÊÔÚÔ‡Ó ÙËÓ Ì¤ıÔ‰Ô ÂÁηٿÛÙ·Û˘ Ô˘ Û·˜ ÚÔÙ›ÓÔ˘ÌÂ. √È ÔÈÎÔ‰ÔÌÈΤ˜
·ÏÏ·Á¤˜ Ô˘ Ù˘¯fiÓ ı’··ÈÙËıÔ‡Ó ÁÈ· ÙËÓ ÂÁηٿÛÙ·ÛË Ù˘ ÌÔÓ¿‰·˜ Ú¤ÂÈ
Ó· Á›ÓÔÓÙ·È ˆ˜ ÚԂϤÂÙ·È ·fi ÙȘ ηٿ ÙfiÔ˘˜ ‰È·Ù¿ÍÂȘ ÂÚ› ÔÈÎÔ‰ÔÌÒÓ.
• ¶ÔÙ¤ ÌËÓ ÂÈÛ΢¿˙ÂÙ ÙË ÌÔÓ¿‰· ‹ ÙËÓ ÌÂٷʤÚÂÙ Û ¿ÏÏÔ Ì¤ÚÔ˜ ÔÈ ›‰ÈÔÈ.
∂¿У ФИ ВИЫОВ˘¤˜ ‹ Л МВЩ·КФЪ¿ ‰ВУ Б›УФ˘У fiˆ˜ ЪФ‚П¤ВЩ·И, ВУ‰¤¯ВЩ·И
У· ¤¯ВИ Ы·У ·ФЩ¤ПВЫМ· У· ·ЪФ˘ЫИ·ЫЩВ› ‰И·ЪЪФ‹ УВЪФ‡, У· ЪФОПЛıВ›
ЛПВОЩЪФПЛН›· ‹ У· Ы˘М‚В› ˘ЪО·БИ¿. ∂¿У Л МФУ¿‰· ¯ЪВИ¿˙ВЩ·И ВИЫОВ˘‹ ‹
У· МВЩ·КВЪıВ› ЫВ ¿ППФ М¤ЪФ˜, Ы˘М‚Ф˘ПВ˘ЩВ›ЩВ Ы¯ВЩИО¿ ЩФ О·Щ¿ЫЩЛМ· ·fi
ЩФ ФФ›Ф ЩЛУ ·БФЪ¿Ы·ЩВ.
2.3. ƒ‡ıÌÈÛË Ù˘ Ë̤ڷ˜ Ù˘ ‚‰ÔÌ¿‰·˜ Î·È Ù˘ ÒÚ·˜ ............ 81
2.4. ÃÚ‹ÛË ÙÔ˘ ¯ÚÔÓԉȷÎfiÙË ..................................................... 82
3. ∂ИПФБ‹ ПВИЩФ˘ЪБ›·˜ ................................................................................ 86
4. ºÚÔÓÙ›‰· ÁÈ· ÙÔ Ì˯¿ÓËÌ· ...................................................................... 88
5. ∞Ó›¯Ó¢ÛË ‚Ï·‚ÒÓ .................................................................................... 88
6. ∂ÚÁ·Û›Â˜ ÂÁηٿÛÙ·Û˘ Î·È ÌÂÙ·ÊÔÚ¿˜ Î·È ¤ÏÂÁ¯Ô˜ .......................... 89
7. ¶ÚԉȷÁڷʤ˜ .......................................................................................... 89
с ªЛУ ·К‹УВЩВ Щ· ЛПВОЩЪИО¿ М¤ЪЛ У· ¤ЪıФ˘У ЫВ В·К‹ МВ УВЪfi (УВЪfi
Ï˘Û›Ì·ÙÔ˜) ÎÙÏ.
с ªФЪВ› У· ЪФОПЛıВ› ЛПВОЩЪФПЛН›·, ˘ЪО·БИ¿ ‹ О·Уfi˜.
™ËÌ›ˆÛË1: ŸÙ·Ó ϤÓÂÙ ÙÔÓ ÂÓ·ÏÏ¿ÎÙË ıÂÚÌfiÙËÙ·˜ Î·È ÙÔ ‰Ô¯Â›Ô
·ФЫЩЪ¿ББИЫЛ˜, ‚В‚·ИˆıВ›ЩВ fiЩИ ЩФ ОИ‚ТЩИФ ВП¤Б¯Ф˘, ЩФ МФЩ¤Ъ
О·И ЩФ Ы‡ЫЩЛМ· LEV ı· ·Ъ·МВ›УФ˘У ЫЩВБУ¿,
¯ЪЛЫИМФФИТУЩ·˜ ¤У· ·‰И¿‚ЪФ¯Ф О¿П˘ММ·.
™ËÌ›ˆÛË2: ¶ÔÙ¤ ÌËÓ ÛÙÚ·ÁÁ›˙ÂÙ ÙÔ ÓÂÚfi Ï˘Û›Ì·ÙÔ˜ ÙÔ˘ ‰Ô¯Â›Ô˘
·ФЫЩЪ¿ББИЫЛ˜ О·И ЩФ˘ ВУ·ПП¿ОЩЛ ıВЪМfiЩЛЩ·˜
¯ЪЛЫИМФФИТУЩ·˜ ЩЛУ ·УЩП›· ·ФЫЩЪ¿ББИЫЛ˜. ™ЩЪ·ББ›НЩВ ЩФ
УВЪfi НВ¯ˆЪИЫЩ¿.
• ∏ Û˘Û΢‹ ‰ÂÓ ÚÔÔÚ›˙ÂÙ·È ÁÈ· ¯Ú‹ÛË ·fi ÌÈÎÚ¿ ·È‰È¿ ‹ ¿ÙÔÌ· Ì ·Ó·ËÚ›·
¯ˆÚ›˜ ›‚Ï„Ë.
• ªËÓ ÂÈÙÚ¤ÂÙ ÛÙ· ÌÈÎÚ¿ ·È‰È¿ Ó· ·›˙Ô˘Ó Ì ÙË Û˘Û΢‹.
• ªЛ ¯ЪЛЫИМФФИВ›ЩВ ЪФЫıВЩИОfi ·У›¯УВ˘ЫЛ˜ ‰И·ЪЪФ‹˜.
1) EНˆЩВЪИО‹ ªФУ¿‰·
¶ÚÔÂȉÔÔ›ËÛË:
• ∏ ВБО·Щ¿ЫЩ·ЫЛ ЩЛ˜ ВНˆЩВЪИО‹˜ МФУ¿‰·˜ Ъ¤ВИ У· Б›УВЩ·И ¿Уˆ ЫВ ЫЩ·ıВЪ‹
О·И В›В‰Л ВИК¿УВИ·, ЫВ М¤ЪФ˜ Ф˘ ‰ВУ ˘¿Ъ¯ВИ О›У‰˘УФ˜ Ы˘ЫЫТЪВ˘ЫЛ˜
¯ИФУИФ‡, К‡ППˆУ ·fi ‰¤УЩЪ· ‹ ·ФЪЪИМ¿ЩˆУ.
• ªЛ ЫЩ¤ОВЫЩВ ‹ ЩФФıВЩВ›ЩВ ‰И¿КФЪ· В›‰Л ¿Уˆ ЫЩЛ МФУ¿‰·. ∂У‰¤¯ВЩ·И У·
¤ЫВЩВ ‹ Щ· В›‰Л ВУ‰¤¯ВЩ·И У· ¤ЫФ˘У О·И У· ЪФО·П¤ЫФ˘У ЩЪ·˘М·ЩИЫМfi.
¶ÚÔÛÔ¯‹:
∏ ВБО·Щ¿ЫЩ·ЫЛ ЩЛ˜ ВНˆЩВЪИО‹˜ МФУ¿‰·˜ Ъ¤ВИ У· Б›УВЩ·И ЫВ М¤ЪФ˜ fiФ˘ Ф
·¤Ú·˜ Ô˘ ÂͤگÂÙ·È Î·È Ô ıfiÚ˘‚Ô˜ Ô˘ ·Ú¿ÁÂÙ·È ·fi ÙËÓ ÌÔÓ¿‰· Ó· ÌËÓ
ÂÓÔ¯ÏÔ‡Ó ÙÔ˘˜ Á›ÙÔÓ˜.
2) ∂ЫˆЩВЪИО‹ ªФУ¿‰·
¶ÚÔÂȉÔÔ›ËÛË:
∏ ВБО·Щ¿ЫЩ·ЫЛ ЩЛ˜ ВЫˆЩВЪИО‹˜ МФУ¿‰·˜ Ъ¤ВИ У· Б›УВЩ·И МВ ·ОЪ›‚ВИ·. ∂¿У Л
МФУ¿‰· ‰ВУ В›У·И ЫЩВЪВˆМ¤УЛ О·П¿, ВУ‰¤¯ВЩ·И У· ¤ЫВИ О·И У· ЪФО·П¤ЫВИ
ЩЪ·˘М·ЩИЫМfi.
3) ∆ЛПВ¯ВИЪИЫЩ‹ЪИФ
¶ÚÔÂȉÔÔ›ËÛË:
∏ ВБО·Щ¿ЫЩ·ЫЛ ЩФ˘ ЩЛПВ¯ВИЪИЫЩ‹ЪИФ˘ Ъ¤ВИ У· Б›УВЩ·И МВ Щ¤ЩФИФ ЩЪfiФ ТЫЩВ
·И‰И¿ У· МЛ МФЪФ‡У У· ·›˙Ф˘У М’·˘Щfi ЩФ fiЪБ·УФ.
4) ™ˆÏ‹Ó·˜ ·Ô¯¤Ù¢Û˘
¶ÚÔÛÔ¯‹:
µÂ‚·Èˆı›Ù fiÙÈ ¤¯ÂÈ ÂÁηٷÛÙ·ı› Ô ÛˆÏ‹Ó·˜ ·Ô¯¤Ù¢Û˘ ÒÛÙÂ Ë ·Ô¯¤Ù¢ÛË
Ó· Á›ÓÂÙ·È ÔÌ·Ï¿. §·Óı·Ṳ̂ÓË ÂÁηٷÛÙ¿ÛÙ·ÛË ÂӉ¯Ô̤ӈ˜ Ó· ηٷϋÍÂÈ
Û ‰È·ÚÚÔ‹ ÓÂÚÔ‡ Ô˘ ı· ÚÔηϤÛÂÈ ˙ËÌÈ¿ ÛÙ· ¤ÈÏ·.
5) ∏ПВОЩЪИО‹ О·Пˆ‰›ˆЫЛ, ·ЫК¿ПВИВ˜ ‹ ‰И·ОfiЩЛ˜
΢ÎÏÒÌ·ÙÔ˜
¶ÚÔÂȉÔÔ›ËÛË:
• µВ‚·ИˆıВ›ЩВ fiЩИ Л МФУ¿‰· ЩЪФКФ‰ФЩВ›Щ·И ·fi ·ФОПВИЫЩИО‹ БЪ·ММ‹
·ЪФ¯‹˜. ∂¿У ЫЩЛУ ›‰И· БЪ·ММ‹ ¤¯Ф˘У Ы˘У‰ВıВ› О·И ¿ППВ˜ Ы˘ЫОВ˘¤˜,
ВУ‰¤¯ВЩ·И У· ЪФОПЛıВ› ˘ВЪКfiЪЩˆЫЛ.
• µВ‚·ИˆıВ›ЩВ fiЩИ ˘¿Ъ¯ВИ ЛПВОЩЪИОfi˜ ‰И·ОfiЩЛ˜.
• µВ‚·ИˆıВ›ЩВ fiЩИ ¯ЪЛЫИМФФИФ‡УЩ·И ФИ ЩИМ¤˜ Ф˘ ЪФ‚П¤ФУЩ·И БИ· ЩЛУ
ЛПВОЩЪИО‹ Щ¿ЫЛ ЩЛ˜ МФУ¿‰·˜ О·И БИ· ЩЛУ ·ЫК¿ПВИ· ‹ ЩФ ‰И·ОfiЩЛ ЩФ˘
О˘ОПТМ·ЩФ˜. ¶ФЩ¤ У· ¯ЪЛЫИМФФИФ‡УЩ·И О·ПТ‰И· ‹ ·ЫК¿ПВИВ˜ МВ
˘„ЛПfiЩВЪВ˜ ЩИМ¤˜ ·˘ЩТУ Ф˘ О·ıФЪ›˙ФУЩ·И БИ· ЩИ˜ МФУ¿‰В˜.
GBDFEINLP
GRRUTRGBGBGBGBGB
79
Page 80

6) °Â›ˆÛË
¶ÚÔÛÔ¯‹:
• ∏ МФУ¿‰· Ъ¤ВИ У· БВИТУВЩ·И О·УФУИО¿. ¶ФЩ¤ ‰ВУ Ъ¤ВИ У· Ы˘У‰¤ВЩ·И ЩФ
Ы‡ЪМ· ЩЛ˜ БВ›ˆЫЛ˜ МВ ЩФ ЫˆП‹У· БО·˙ИФ‡ ‹ УВЪФ‡, МВ ЩФ ·ПВНИО¤Ъ·˘УФ ‹
МВ ЩФ ЩЛПВКˆУИОfi Ы‡ЪМ· БВ›ˆЫЛ˜. ∂¿У Л МФУ¿‰· ‰ВУ ¤¯ВИ БВИˆıВ› О·УФУИО¿,
ВУ‰¤¯ВЩ·И У· ¿ıВИ ЛПВОЩЪФПЛН›· ЩФ ¿ЩФМФ Ф˘ ı· ЩЛУ ·ББ›НВИ.
• ∂П¤Б¯ВЩВ Ы˘¯У¿ БИ· У· ‰И·ИЫЩТУВЩВ fiЩИ ЩФ Ы‡ЪМ· БВ›ˆЫЛ˜ ·fi ЩЛУ
ВНˆЩВЪИО‹ МФУ¿‰· Ы˘У‰¤ВЩ·И О·УФУИО¿ ЩfiЫФ МВ ЩФ ЩВЪМ·ЩИОfi БВ›ˆЫЛ˜ ЩЛ˜
МФУ¿‰·˜ fiЫФ О·И МВ ЩФ ЛПВОЩЪfi‰ИФ БВ›ˆЫЛ˜.
1.2. ™ЩЛ ‰И¿ЪОВИ· ПВИЩФ˘ЪБ›·˜
¶ÚÔÛÔ¯‹:
• ªЛ ¯ЪЛЫИМФФИВ›ЩВ ·И¯МЛЪ¿ ·УЩИОВ›МВУ· БИ· У· ·Щ¿ЩВ Щ· ОФ˘МИ¿, Л
ВУ¤ЪБВИ· ·˘Щ‹ ВУ‰¤¯ВЩ·И У· ЪФО·П¤ЫВИ ‚П¿‚Л ЫЩФ ЩЛПВ¯ВИЪИЫЩ‹ЪИФ.
• ªЛ ЫЩЪ›‚ВЩВ ‹ ЩЪ·‚¿ЩВ ЩФ О·ПТ‰ИФ ЩФ˘ ЩЛПВ¯ВИЪИЫЩ‹ЪИФ˘, ФИ ВУ¤ЪБВИВ˜ ·˘Щ¤˜
ВУ‰¤¯ВЩ·И У· ЪФО·П¤ЫФ˘У ‚П¿‚Л ЫЩФ ЩЛПВ¯ВИЪИЫЩ‹ЪИФ МВ ·ФЩ¤ПВЫМ· ЩЛУ
ВП·ЩЩˆМ·ЩИО‹ ЩФ˘ ПВИЩФ˘ЪБ›·.
• ªЛУ ·К·ИЪ¤ЫВЩВ ФЩ¤ ЩФ ¿Уˆ О¿П˘ММ· ЩФ˘ ЩЛПВ¯ВИЪИЫЩЛЪ›Ф˘. ∂›У·И
ВИО›У‰˘УФ У· ·К·ИЪВ›ЩВ ЩФ ¿Уˆ О¿П˘ММ· ЩФ˘ ЩЛПВ¯ВИЪИЫЩЛЪ›Ф˘ О·И У·
·ББ›˙ВЩВ ЩИ˜ ИУ·О›‰В˜ Щ˘ˆМ¤УˆУ О˘ОПˆМ¿ЩˆУ Ф˘ ‚Ъ›ЫОФУЩ·И ЫЩФ
ВЫˆЩВЪИОfi ЩФ˘ ВН·ЪЩ‹М·ЩФ˜. ∆¤ЩФИ· ВУ¤ЪБВИ· ·ФЩВПВ› О›У‰˘УФ ‚П¿‚Л˜ О·И
˘ЪО·БИ¿˜.
GBDFEINLP
• ªЛУ ·ФВИЪ·ıВ›ЩВ ФЩ¤ У· О·ı·Ъ›ЫВЩВ ЩФ ЩЛПВ¯ВИЪИЫЩ‹ЪИФ
¯ЪЛЫИМФФИТУЩ·˜ ОФ˘ЪВПfi·У· МВ ‚ВУ˙fiПИФ, ‰И·П˘ЩИО¤˜ Ф˘Ы›В˜, О·И
ФЩИ‰‹ФЩВ ¿ППФ˘ В›‰Ф˘˜ ¯ЛМИО¿. ∆¤ЩФИФ˘ В›‰Ф˘˜ ·fiВИЪ· О·ı·ЪИЫМФ‡
ЪФО·ПВ› ·Ф¯ЪˆМ·ЩИЫМfi О·И ‚П¿‚В˜. °И· ЩФУ О·ı·ЪИЫМfi ‰˘ЫОfiПˆУ
ПВО¤‰ˆУ, ‚Ъ¤НЩВ ¤У· ·У› ЫВ ¤У· Ф˘‰¤ЩВЪФ ·ФЪЪ˘·УЩИОfi ·У·МВМВИБМ¤УФ
МВ УВЪfi, ЫЩЪ·ББ›НЩВ ЩФ ЩВПВ›ˆ˜ О·И Ы˘УВ¯›ЫЩВ ЫЩЛУ В¿ПВИ„Л ЩˆУ ПВО¤‰ˆУ.
∞КФ‡ ЩВПВИТЫВЩВ ЫКФ˘ББ›ЫЩВ ЩФ ЩЛПВ¯ВИЪИЫЩ‹ЪИФ МВ ¤У· О·ı·Ъfi ЫЩВБУfi
·У›.
• ¶ÔÙ¤ ÌË ÌÏÔοÚÂÙ ‹ ηχÙÂÙ ٷ ·ÓÔ›ÁÌ·Ù· ÂÈÛfi‰Ô˘ Î·È ÂÍfi‰Ô˘ ·¤Ú·
ЩЛ˜ ВЫˆЩВЪИО‹˜ О·И ЩЛ˜ ВНˆЩВЪИО‹˜ МФУ¿‰·˜. А„ЛП¿ ¤ИП· ЩФФıВЩЛМ¤У·
О¿Щˆ ·fi ЩЛУ ВЫˆЩВЪИО‹ МФУ¿‰·, ‹ ФБОТ‰Л ·УЩИОВ›МВУ· fiˆ˜ МВБ¿П·
О·ЫfiУИ· ЩФФıВЩЛМ¤У· ОФУЩ¿ ЫЩЛУ ВНˆЩВЪИО‹ МФУ¿‰·, ВП·ЩЩТУФ˘У ЩЛУ
·ФЩВПВЫМ·ЩИОfiЩЛЩ· ПВИЩФ˘ЪБ›·˜ ЩˆУ МФУ¿‰ˆУ.
¶ÚÔÂȉÔÔ›ËÛË:
• ªЛ ВЩ¿ЩВ ‹ ИЩЫИП›˙ВЩВ УВЪfi ¿Уˆ ЫЩЛ МФУ¿‰· О·И МЛ ЩЛУ ·ББ›˙ВЩВ МВ
‚ЪВБМ¤У· ¯¤ЪИ·. А¿Ъ¯ВИ О›У‰˘УФ˜ У· ЪФОПЛıВ› ЛПВОЩЪФПЛН›·.
• ªЛ „ВО¿˙ВЩВ В‡КПВОЩФ ·¤ЪИФ ОФУЩ¿ ЫЩЛ МФУ¿‰·. ∂У‰¤¯ВЩ·И У· ЪФОПЛıВ›
˘ÚηÁÈ¿.
• ªË ÙÔÔıÂÙ›Ù ıÂÚÌ¿ÛÙÚ· Áη˙ÈÔ‡ ‹ οı ¿ÏÏË Û˘Û΢‹ Ô˘ ·Ú¿ÁÂÈ
Á˘ÌÓ‹ ÊÏfiÁ· Û ̤ÚÔ˜ fiÔ˘ ı· ÂÎÙ›ıÂÙ·È ÛÙËÓ ·Ô‚ÔÏ‹ ·ÂÚ›ˆÓ ·fi ÙË
ÌÔÓ¿‰·. ∏ η‡ÛË Ù˘ ıÂÚÌ¿ÛÙÚ·˜ ÂÓ‰¤¯ÂÙ·È Ó· Â›Ó·È ·ÙÂÏ‹˜.
¶ÚÔÂȉÔÔ›ËÛË:
• ∂УТ Л ВНˆЩВЪИО‹ МФУ¿‰· ‚Ъ›ЫОВЩ·И ЫВ ПВИЩФ˘ЪБ›· ‰ВУ Ъ¤ВИ У· ‚Б¿˙ВЩВ
ЩФ МЪФЫЩИУfi К¿ЩУˆМ· ‹ ЩФУ ЪФК˘П·ОЩ‹Ъ· ЩФ˘ ·УВМИЫЩ‹Ъ·. ∂У‰¤¯ВЩ·И
У· ЩЪ·˘ЩИЫЩВ›ЩВ В¿У ·ББ›НВЩВ ВЪИЫЩЪВКfiМВУ· М¤ЪЛ, ‹ М¤ЪЛ МВ ˘„ЛП‹ Щ¿ЫЛ
ЪВ‡М·ЩФ˜.
• ªË ‚¿˙ÂÙ ٷ ‰¿ÎÙ˘Ï¿ Û·˜, Ì·ÎÚfiÛÙÂÓ· ÙÂÌ¿¯È· ÎÏ Ì¤Û· ÛÙ· ·ÓÔ›ÁÌ·Ù·
ВИЫ·БˆБ‹˜ О·И ВН·БˆБ‹˜ ·¤Ъ· ЩЛ˜ МФУ¿‰·˜, Ф ·УВМИЫЩ‹Ъ·˜ ЫЩФ ВЫˆЩВЪИОfi
GRRUTRGBGBGBGBGB
ЩЛ˜ МФУ¿‰·˜ ВЪИЫЩЪ¤КВЩ·И МВ МВБ¿ПЛ Щ·¯‡ЩЛЩ· О·И В›У·И Иı·Уfi У·
ЪФОПЛıВ› ЩЪ·˘М·ЩИЫМfi˜. ¶Ъ¤ВИ У· ЪФЫ¤¯ВЩВ ·ОfiМЛ ВЪИЫЫfiЩВЪФ В¿У
‚Ъ›ЫОФУЩ·И ·И‰И¿ ОФУЩ¿ ЫЩЛ Ы˘ЫОВ˘‹.
• ∂¿Ó ·Û˘Ó‹ıÈÛÙ˜ Ì˘Úˆ‰È¤˜ ÂΤÌÔÓÙ·È ·fi ÙËÓ ÌÔÓ¿‰·, ÛÙ·Ì·Ù‹ÛÂÙ ӷ
ЩЛ ¯ЪЛЫИМФФИВ›ЩВ, ОПВ›ЫВЩВ ЩФУ ЛПВОЩЪИОfi ‰И·ОfiЩЛ О·И Ы˘М‚Ф˘ПВ˘ЩВ›ЩВ
ЩФ О·Щ¿ЫЩЛМ· ·fi ЩФ ФФ›Ф ЩЛУ ·БФЪ¿Ы·ЩВ. ∂¿У Ы˘УВ¯›ЫВЩВ У· ЩЛ
¯ЪЛЫИМФФИВ›ЩВ, ВУ‰¤¯ВЩ·И У· ЪФОПЛıВ› ‚П¿‚Л, ЛПВОЩЪФПЛН›· ‹ ˘ЪО·БИ¿.
• ªfiÏȘ ·Ú·ÙËÚ‹ÛÂÙ ·Ú¿ÍÂÓÔ˘˜ ‹ ·Û˘Ó‹ıÈÛÙÔ˘˜ ‹¯Ô˘˜, ıfiÚ˘‚Ô, ‹
ОЪ·‰·ЫМФ‡˜, ЫЩ·М·Щ‹ЫЩВ ЩЛУ ПВИЩФ˘ЪБ›· ЩЛ˜ Ы˘ЫОВ˘‹˜ ОПВ›УФУЩ·˜ ЩФУ
‰И·ОfiЩЛ ·ЪФ¯‹˜ ЛПВОЩЪИОФ‡ ЪВ‡М·ЩФ˜ О·И ·ФЩ·ıВ›ЩВ ЫЩФУ МВЩ·ˆПЛЩ‹
Ф˘ Ы·˜ ЩЛУ ЪФМ‹ıВ˘ЫВ.
• ¢ВУ Ъ¤ВИ У· ОПИМ·Щ›˙ВЩВ ЩФ˘˜ ¯ТЪФ˘˜ МВ ОЪ‡Ф ·¤Ъ· ˘ВЪ‚ФПИО¿. ∏
ИФ О·Щ¿ППЛПЛ ıВЪМФОЪ·Ы›· ‰ˆМ·Щ›Ф˘ В›У·И ·˘Щ‹ Ф˘ ‚Ъ›ЫОВЩ·И ВУЩfi˜
ЩˆУ 5 ЖC ·fi ЩЛУ ВНˆЩВЪИО‹ ıВЪМФОЪ·Ы›·.
• ªЛУ ВИЩЪ¤ВЩВ ЫВ ¿ЩФМ· МВ ·У·ЛЪ›· ‹ ЫВ МˆЪ¿ У· О¿ıФУЩ·И ‹ У· ЫЩ¤ОФУЩ·И
ЫЩЛУ О·ЩВ‡ı˘УЫЛ ЪФ‹˜ ЩФ˘ ·¤Ъ· Ф˘ ВН¤Ъ¯ВЩ·И ·fi ЩЛ Ы˘ЫОВ˘‹
ОПИМ·ЩИЫМФ‡. ∂У‰¤¯ВЩ·И У· ЪФОПЛıФ‡У ЪФ‚П‹М·Щ· ˘БВ›·˜.
¶ÚÔÛÔ¯‹:
• ªЛУ О·ЩВ˘ı‡УВЩВ ЩЛУ ЪФ‹ ЩФ˘ ·¤Ъ· ЫВ К˘Щ¿ ‹ ЫВ Ф˘ПИ¿ Ф˘ ‚Ъ›ЫОФУЩ·И
М¤Ы· ЫВ ОПФ˘‚И¿.
• ∂Н·ВЪ›˙ВЩВ Ы˘¯У¿ ЩФ ¯ТЪФ Ф˘ ОПИМ·Щ›˙ВЩ·И. ∂¿У Л МФУ¿‰· ПВИЩФ˘ЪБВ›
Ы˘УВ¯Т˜ ЫВ ОПВИЫЩfi ¯ТЪФ БИ· МВБ¿ПФ ‰И¿ЫЩЛМ·, Ф ·¤Ъ·˜ ·ФОЩ¿ ЩЛ М˘Ъˆ‰И¿
ОПВИЫФ‡Ъ·˜.
™Â ÂÚ›ÙˆÛË ‚Ï¿‚˘
¶ÚÔÂȉÔÔ›ËÛË:
• MЛУ ЩЪФФФИВ›ЩВ ФЩ¤ ЩФ ОПИМ·ЩИЫЩИОfi. ∂ИОФИУˆУ‹ЫЩВ МВ ЩФУ
·УЩИЪfiЫˆfi Ы·˜ БИ· Щ˘¯fiУ ВИЫОВ˘¤˜ ‹ Ы¤Ъ‚И˜. √И ·О·Щ¿ППЛПВ˜ ВЪБ·Ы›В˜
ВИЫОВ˘‹˜ МФЪВ› У· ЪФО·П¤ЫФ˘У ‰И·ЪЪФ‹ УВЪФ‡, ЛПВОЩЪФПЛН›·,
˘ЪО·БИ¿, О.Щ.П.
• ∂¿У ЩФ ЩЛПВ¯ВИЪИЫЩ‹ЪИФ ˘Ф‰ВИОУ‡ВИ ‚П¿‚Л,‹ ЩФ МЛ¯¿УЛМ· ОПИМ·ЩИЫМФ‡
¿„ВИ У· ПВИЩФ˘ЪБВ›, ‹ ФФИ·‰‹ФЩВ ¿ППЛ ·УˆМ·П›· Щ˘¯fiУ ·ЪФ˘ЫИ·ЫЩВ›,
ЫЩ·М·Щ‹ЫЩВ У· ¯ЪЛЫИМФФИВ›ЩВ ЩФ МЛ¯¿УЛМ· О·И ·ФЩ·ıВ›ЩВ ЫЩФУ
МВЩ·ˆПЛЩ‹. ∞К‹УФУЩ·˜ ЩЛУ Ы˘ЫОВ˘‹ ЫВ Щ¤ЩФИ· О·Щ¿ЫЩ·ЫЛ, МФЪВ› У·
ЪФО·П¤ЫВИ ˘ЪО·БИ¿ ‹ ‚П¿‚Л.
• ∂¿У Ф ‰И·ОfiЩЛ˜ ·ЫК¿ПВИ·˜ ВУВЪБФФИВ›Щ·И Ы˘¯У¿, ¤ПıВЩВ ЫВ В·К‹ МВ
ЩФУ МВЩ·ˆПЛЩ‹. ∞К‹УФУЩ·˜ ЩФУ ‰И·ОfiЩЛ ЫВ Щ¤ЩФИ· О·Щ¿ЫЩ·ЫЛ МФЪВ›
У· ЪФО·П¤ЫВИ ˘ЪО·БИ¿ ‹ ‚П¿‚Л.
• ∂¿У ·ЪФ˘ЫИ·ЫıВ› М›· ‰И·К˘Б‹ ‹ ‰И·ЪЪФ‹ ЫЩФ „˘ОЩИОfi ·¤ЪИФ, ЫЩ·М·Щ‹ЫЩВ
У· ¯ЪЛЫИМФФИВ›ЩВ ЩФ МЛ¯¿УЛМ·, ВН·ВЪ›ЫЩВ П‹Ъˆ˜ ЩФУ ¯ТЪФ О·И ·ФЩ·ıВ›ЩВ
ЫЩФУ МВЩ·ˆПЛЩ‹. ∞К‹УФУЩ·˜ ЩЛУ Ы˘ЫОВ˘‹ ЫВ Щ¤ЩФИ· О·Щ¿ЫЩ·ЫЛ МФЪВ›
У· ЪФО·П¤ЫВИ ·Щ˘¯‹М·Щ· ПfiБˆ ЩЛ˜ ·УВ¿ЪОВИ·˜ ФН˘БfiУФ˘.
∂КfiЫФУ ЩФ МЛ¯¿УЛМ· ОПИМ·ЩИЫМФ‡ ‰ВУ ¯ЪЛЫИМФФИВ›Щ·И
БИ· МВБ¿ПФ ¯ЪФУИОfi ‰И¿ЫЩЛМ·
• ∂¿У Л Ы˘ЫОВ˘‹ ‰ВУ ЪfiОВИЩ·И У· ¯ЪЛЫИМФФИЛıВ› БИ· МВБ¿ПФ ¯ЪФУИОfi
‰И¿ЫЩЛМ·, ПfiБˆ ЩЛ˜ ·ПП·Б‹˜ ВФ¯‹˜ В› ·Ъ·‰В›БМ·ЩИ, ·К‹ЫЩВ ЩФ МЛ¯¿УЛМ·
ЪФЛБФ˘М¤Уˆ˜ У· ПВИЩФ˘ЪБ›ЫВИ БИ· 4 – 5 ТЪВ˜ МВ ЩФУ ·¤Ъ· ·УФИ¯Щfi ¤ˆ˜
fiЩФ˘ ЩФ ВЫˆЩВЪИОfi ЩФ˘ В›У·И ЩВПВ›ˆ˜ ЫЩВБУfi. ¶·Ъ¿ПВИ„Л ·˘ЩФ‡ ЩФ˘ ЫЩ·‰›Ф˘
МФЪВ› У· Ы˘УЩВП¤ЫВИ ЫЩЛУ ВМК¿УИЫЛ ·Уı˘БИВИУ‹˜ МФ‡¯П·˜ ЫВ ‰И¿КФЪ· М¤ЪЛ
ЩФ˘ ¯ТЪФ˘.
• ∂КfiЫФУ ЩФ МЛ¯¿УЛМ· ‰ВУ ı· ¯ЪЛЫИМФФИЛıВ› БИ· МИ· ВОЩВЩ·М¤УЛ ВЪ›Ф‰Ф,
ЩfiЩВ ·ФОПВ›ЫЩВ ЩЛУ ·ЪФ¯‹ ЪВ‡М·ЩФ˜ МВ ЩФУ ‰И·ОfiЩЛ, ‰И·ЩЛЪТУЩ·˜ ЩФУ
ЫЩЛУ ı¤ЫЛ - OFF.
∂¿У Л ·ЪФ¯‹ ЪВ‡М·ЩФ˜ Ы˘УВ¯ИЫıВ›, ЩfiЩВ ФПП¤˜ МФУ¿‰В˜ (МФУ¿‰В˜ ИЫ¯‡Ф˜
Watt), ı· О·Щ·У·ПˆıФ‡У ·УВОМВЩ¿ППВ˘ЩВ˜. ∂›ЫЛ˜ Л Ы˘ЫЫТЪВ˘ЫЛ ЫОfiУЛ˜
В› ·Ъ·‰В›БМ·ЩИ, МФЪВ› У· ЪФО·П¤ЫВИ ˘ЪО·БИ¿.
• ∂·У·К¤ЪВЩВ О·И ‰И·ЩЛЪ‹ЫВЩВ ЩЛУ ЪФ‹ ЪВ‡М·ЩФ˜, МВ ЩФУ ‰И·ОfiЩЛ ·ЪФ¯‹˜
ЫЩЛ ı¤ЫЛ - ON ЩФ˘П¿¯ИЫЩФУ БИ· 12 ТЪВ˜ ЪФЩФ‡ У· ¯ЪЛЫИМФФИЛıВ› ЩФ
МЛ¯¿УЛМ·. ªЛУ ·ФВИЪ·ıВ›ЩВ ФЩ¤ У· ‰И·Оfi„ВЩВ ЩЛУ ·ЪФ¯‹ ЪВ‡М·ЩФ˜,
МВ ЩФУ ‰И·ОfiЩЛ ЫЩЛУ ı¤ЫЛ OFF, ЫВ ВЪИfi‰Ф˘˜ Ы˘УВ¯Ф‡˜ ¯Ъ‹ЫЛ˜. ∆¤ЩФИ·
·fiВИЪ· ı· ЪФНВУ‹ЫВИ ‚П¿‚Л ЫЩФ МЛ¯¿УЛМ·.
• ŸЩ·У ‰В ПВИЩФ˘ЪБВ›ЩВ ЩЛ МФУ¿‰· БИ· МВБ¿ПФ ¯ЪФУИОfi ‰И¿ЫЩЛМ· О·Щ¿ ЩЛ
‰И¿ЪОВИ· ЩЛ˜ ¯ВИМВЪИУ‹˜ ВЪИfi‰Ф˘, ·К·ИЪВ›ЩВ ЩФ УВЪfi ЫЩФ ВЫˆЩВЪИОfi ЩФ˘
ЫˆП‹У· УВЪФ‡ ТЫЩВ У· МЛУ ·БТЫВИ.
1.3. ¶¤Щ·БМ· ЩЛ˜ МФУ¿‰·˜ Ы·У ¿¯ЪЛЫЩЛ
¶ÚÔÂȉÔÔ›ËÛË:
∂¿У ı¤ПВЩВ У· ВЩ¿НВЩВ ЩЛ Ы˘ЫОВ˘‹ Ы·У ¿¯ЪЛЫЩЛ, Ы˘М‚Ф˘ПВ˘ЩВ›ЩВ Ы¯ВЩИО¿ ЩФ
О·Щ¿ЫЩЛМ· ·fi ЩФ ФФ›Ф ЩЛУ ·БФЪ¿Ы·ЩВ. ∂¿У ФИ ЫˆП‹УВ˜ ЩЛ˜ Ы˘ЫОВ˘‹˜
·К·ИЪВıФ‡У ·УЩИО·УФУИО¿, ВУ‰В¯ФМ¤Уˆ˜ У· ЩИУ·¯ЩВ› „˘ОЩИОfi ˘БЪfi (·¤ЪИФ
КıФЪИФ‡¯Ф˘ ¿УıЪ·О·) О·И У· ¤ПıВИ Ы’В·К‹ МВ ЩФ ‰¤ЪМ· Ы·˜ МВ ·ФЩ¤ПВЫМ·
ЩФУ ЩЪ·˘М·ЩИЫМfi Ы·˜. ∂›ЫЛ˜, Л ·ВПВ˘ı¤ЪˆЫЛ „˘ОЩИОФ‡ ˘БЪФ‡ ЫЩЛУ
·ÙÌfiÛÊ·ÈÚ· ÚÔηÏ› ˙ËÌÈ¿ ÛÙÔ ÂÚÈ‚¿ÏÏÔÓ.
80
Page 81

2. ∆ЪfiФ˜ ПВИЩФ˘ЪБ›·˜
2.1. ГЪ‹ЫЛ ЩЛПВ¯ВИЪИЫЩЛЪ›Ф˘
¶Т˜ У· НВОИУ‹ЫВЩВ ЩЛ ПВИЩФ˘ЪБ›·, У· ‰И·Оfi„ВЩВ ЩЛ
ПВИЩФ˘ЪБ›·, У· ·ПП¿НВЩВ ЩЛУ О·Щ¿ЫЩ·ЫЛ ПВИЩФ˘ЪБ›·˜ О·И
У· Ъ˘ıМ›ЫВЩВ ЩЛ ıВЪМФОЪ·Ы›· УВЪФ‡
2
4
˚C
3
3
2
PAR-W21MAA
°И· У· НВОИУ‹ЫВЩВ ЩЛ ПВИЩФ˘ЪБ›·
1. ¶И¤ЫЩВ ЩФ П‹ОЩЪФ ON/OFF ПВИЩФ˘ЪБ›·˜ 1.
∞У¿‚Ф˘У Л П˘¯У›· ПВИЩФ˘ЪБ›·˜ 1 Î·È Ë ÂÚÈÔ¯‹ ¤Ó‰ÂÈ͢.
¶·Ú·Ù‹ÚËÛË:
• ŸÙ·Ó Á›ÓÂÈ Â·ÓÂÎΛÓËÛË Ù˘ ÌÔÓ¿‰·˜, ÔÈ ·Ú¯ÈΤ˜ Ú˘ıÌ›ÛÂȘ ¤¯Ô˘Ó ˆ˜ ÂÍ‹˜:
ƒ˘ıМ›ЫВИ˜ ЩЛПВ¯ВИЪИЫЩЛЪ›Ф˘
∫·Ù¿ÛÙ·ÛË
ƒ‡ıМИЫЛ ıВЪМФОЪ·Ы›·˜
°И· У· ‰И·Оfi„ВЩВ ЩЛ ПВИЩФ˘ЪБ›·
1. ¶И¤ЫЩВ Н·У¿ ЩФ П‹ОЩЪФ ON/OFF ПВИЩФ˘ЪБ›·˜ 1.
™‚‹УФ˘У Л П˘¯У›· ПВИЩФ˘ЪБ›·˜ 1 Î·È Ë ÂÚÈÔ¯‹ ¤Ó‰ÂÈ͢.
˚C
TEMP.
MENU
ON/OFF
MONITOR/SET
BACK DAY
CLOCK CLEAR
∆ÂÏÂ˘Ù·›· Ú‡ıÌÈÛË
∆ÂÏÂ˘Ù·›· Ú‡ıÌÈÛË
INITIAL SETTING
CHECK TEST
ON/OFF
CIR.WATER
1
1
°И· У· ·ПП¿НВЩВ ЩЛ Ъ‡ıМИЫЛ ıВЪМФОЪ·Ы›·˜ ‰ˆМ·Щ›Ф˘...
1. °И· У· МВИТЫВЩВ ЩЛ ıВЪМФОЪ·Ы›·:
2. °И· У· ·˘Н‹ЫВЩВ ЩЛ ıВЪМФОЪ·Ы›·:
• ªÂ οı ¿ÙËÌ· ÙÔ˘ Ï‹ÎÙÚÔ˘, ·ÏÏ¿˙ÂÈ Ë Ú‡ıÌÈÛË Î·Ù¿ 1 ÆC (1 ÆF). ∏
ÙÚ¤¯Ô˘Û· Ú‡ıÌÈÛË ÂÌÊ·Ó›˙ÂÙ·È ÛÙÔ 3.
• √И ‰И·ı¤ЫИМВ˜ ВЪИФ¯¤˜ ЩИМТУ ¤¯Ф˘У ˆ˜ ВН‹˜: *1, *2
∑ÂÛÙfi ÓÂÚfi æ‡ÍË£¤ÚÌ·ÓÛË
30 ÆC - 70 ÆC
87 ÆF - 158 ÆF
¶·Ú·Ù‹ÚËÛË:
*1 √И ‰И·ı¤ЫИМВ˜ ВЪИФ¯¤˜ ЩИМТУ ‰И·К¤ЪФ˘У ·У¿ПФБ· МВ ЩФ В›‰Ф˜ ЩЛ˜ МФУ¿‰·˜
Ô˘ Â›Ó·È Û˘Ó‰Â‰Â̤ÓË.
*2 ∞У Щ· fiЪИ· ЩЛ˜ ВЪИФ¯‹˜ ЩИМТУ ıВЪМФОЪ·Ы›·˜ ¤¯Ф˘У Ъ˘ıМИЫЩВ› ЫЩЛУ ВИПФБ‹
ПВИЩФ˘ЪБ›·˜, ФИ ‰И·ı¤ЫИМВ˜ ВЪИФ¯¤˜ ЩИМТУ ı· В›У·И МИОЪfiЩВЪВ˜ ·fi ·˘Щ¤˜
Ф˘ ВМК·У›˙ФУЩ·И ·Ъ·¿Уˆ. ∞У ВИ¯ВИЪ‹ЫВЩВ У· Ъ˘ıМ›ЫВЩВ МИ· ЩИМ‹ ВОЩfi˜
ЩЛ˜ ВЪИФЪИЫМ¤УЛ˜ ВЪИФ¯‹˜, ı· ВМК·УИЫЩВ› ЫЩЛУ ¤У‰ВИНЛ ¤У· М‹У˘М· Ф˘
˘Ф‰ВИОУ‡ВИ fiЩИ Л ВЪИФ¯‹ ЩИМТУ В›У·И В› ЩФ˘ ·ЪfiУЩФ˜ ВЪИФЪИЫМ¤УЛ.
°И· ПЛЪФКФЪ›В˜ Ы¯ВЩИО¿ МВ ЩФУ ЩЪfiФ Ъ‡ıМИЫЛ˜ О·И ‰И·БЪ·К‹˜ ·˘ЩТУ ЩˆУ
ВЪИФЪИЫМТУ ЩЛ˜ ВЪИФ¯‹˜ ЩИМТУ, ·У·ЩЪ¤НЩВ ЫЩЛУ ВУfiЩЛЩ· 3, ·УЩИОВ›МВУФ
[3]–2 (3).
*3 ∞У ФИ ВИПФБ¤˜ ПВИЩФ˘ЪБ›·˜ В›У·И Ъ˘ıМИЫМ¤УВ˜ У· ВМК·У›˙Ф˘У ЩЛ ıВЪМФОЪ·Ы›·
ЫВ º·ЪВУ¿ИЩ. °И· ПЛЪФКФЪ›В˜ Ы¯ВЩИО¿ МВ ЩФУ ЩЪfiФ ВИПФБ‹˜ ЖC ‹ ЖF,
·У·ЩЪ¤НЩВ ЫЩЛУ ВУfiЩЛЩ· 3, ·УЩИОВ›МВУФ [3]–4 (1).
¶И¤ЫЩВ ЩФ П‹ОЩЪФ Ъ‡ıМИЫЛ˜ ıВЪМФОЪ·Ы›·˜
¶И¤ЫЩВ ЩФ П‹ОЩЪФ Ъ‡ıМИЫЛ˜ ıВЪМФОЪ·Ы›·˜
30 ÆC - 45 ÆC
87 ÆF - 113 ÆF
10 ÆC - 30 ÆC
50 ÆF - 87 ÆF
3.
3.
2.2. ƒ‡ıМИЫЛ ıВЪМФОЪ·Ы›·˜ УВЪФ‡
°И· У· ·ПП¿НВЩВ ЩЛ ıВЪМФОЪ·Ы›· ЩФ˘ УВЪФ‡
¶·Ù‹ÛÙ ÙÔ ÎÔ˘Ì› 1 [Ъ‡ıМИЫЛ ıВЪМФОЪ·Ы›·˜ УВЪФ‡] О·И Ъ˘ıМ›ЫЩВ ЩЛ
ıВЪМФОЪ·Ы›· УВЪФ‡ Ф˘ ı¤ПВЩВ.
∞У ·Щ‹ЫВЩВ МИ· КФЪ¿ ЩФ
∞У ·Щ‹ЫВЩВ ·Ъ·ЩВЩ·М¤У·, Л Ъ‡ıМИЫЛ Ы˘УВ¯›˙ВИ У· ·ПП¿˙ВИ О·Щ¿ 1 ЖC.
• ∏ ВЫˆЩВЪИО‹ ıВЪМФОЪ·Ы›· МФЪВ› У· Ъ˘ıМИЫЩВ› ВУЩfi˜ ЩФ˘ ·Ъ·О¿Щˆ В‡ЪФ˘˜.
‹ ÙÔ ·ÏÏ¿˙ÂÈ Ë Ú‡ıÌÈÛË Î·Ù¿ 1 ÆC.
GBDFEINLP
∂ÈÏÔÁ‹ Ù˘ ηٿÛÙ·Û˘
1. ∂УТ ПВИЩФ˘ЪБВ› Л МФУ¿‰·, И¤ЫЩВ ЩФ П‹ОЩЪФ ∆ЪfiФ §ВИЩФ˘ЪБ›·˜ 2 fiÛ˜
ÊÔÚ¤˜ ··ÈÙ›ٷÈ.
• ªВ О¿ıВ ¿ЩЛМ·, МВЩ·‚·›УВИ Л ПВИЩФ˘ЪБ›· ЫЩЛУ ВfiМВУЛ О·Щ¿ЫЩ·ЫЛ
Ы‡МКˆУ· МВ ЩЛУ ·ОФПФ˘ı›· Ф˘ ВМК·У›˙ВЩ·И ·Ъ·О¿Щˆ.
∏ ЩЪ¤¯Ф˘Ы· ВИПВБМ¤УЛ О·Щ¿ЫЩ·ЫЛ ВМК·У›˙ВЩ·И ЫЩФ 2.
PWFY-P100VM-E-BU
ªfiÓÔ Hot water
PWFY-P100/P200VM-E-AU
£¤ÚÌ·ÓÛË → æ‡ÍË
∑ÂÛÙfi ÓÂÚfi æ‡ÍË£¤ÚÌ·ÓÛË
30 ÆC - 70 ÆC
87 ÆF - 158 ÆF
30 ÆC - 45 ÆC
87 ÆF - 113 ÆF
10 ÆC - 30 ÆC
50 ÆF - 87 ÆF
• ¢ВУ В›У·И ‰˘У·Щ‹ Л Ъ‡ıМИЫЛ ЩЛ˜ ıВЪМФОЪ·Ы›·˜ ЩФ˘ УВЪФ‡ ·fi ЩЛ £ВЪМ.
УВЪФ‡ ВИЫfi‰Ф˘ ‹ ЩЛ £ВЪМ. УВЪФ‡ ВНfi‰Ф˘.
* ∆Ф В‡ЪФ˜ ЩЛ˜ ЪФ‚ФП‹˜ ıВЪМФОЪ·Ы›·˜ УВЪФ‡ В›У·И 0 ЖC ¤ˆ˜ 100 ЖC.
∂ОЩfi˜ ·˘ЩФ‡ ЩФ˘ В‡ЪФ˘˜, Л ФıfiУЛ ·У·‚ФЫ‚‹УВИ МВ ¤У‰ВИНЛ В›ЩВ 0 ЖC В›ЩВ
100 ЖC БИ· У· Ы·˜ ВУЛМВЪТЫВИ ·У Л ıВЪМФОЪ·Ы›· УВЪФ‡ В›У·И ¯·МЛПfiЩВЪЛ
‹ ˘„ЛПfiЩВЪЛ ·fi ЩЛ ıВЪМФОЪ·Ы›· Ф˘ ЪФ‚¿ППВЩ·И.
2.3.
ƒ‡ıÌÈÛË Ù˘ Ë̤ڷ˜ Ù˘ ‚‰ÔÌ¿‰·˜ Î·È Ù˘
ÒÚ·˜
ГЪЛЫИМФФИ‹ЫЩВ ЩЛУ ФıfiУЛ ·˘Щ‹ БИ· У· ·ПП¿НВЩВ ЩЛ
Ъ‡ıМИЫЛ ЩЛ˜ ЩЪ¤¯Ф˘Ы·˜ ЛМ¤Ъ·˜ ЩЛ˜ В‚‰ФМ¿‰·˜ ‹ ЩЛ˜
ТЪ·˜.
¶·Ú·Ù‹ÚËÛË:
¢ВУ ı· ВМК·УИЫЩВ› Л ЛМ¤Ъ· О·И Л ТЪ· ·У ¤¯ВИ ·ВУВЪБФФИЛıВ› Л ¯Ъ‹ЫЛ
ЪФПФБИФ‡ ·fi ЩЛУ ВИПФБ‹ ПВИЩФ˘ЪБ›·˜.
1
ŒÓ‰ÂÈÍË Ë̤ڷ˜
Ù˘ ‚‰ÔÌ¿‰·˜
Î·È ÒÚ·˜
9
4
2
A
MENU
MONITOR/SET
BACK DAY
PAR-W21MAA
TIME SUN
˚C
TEMP.
ON/OFF
CLOCK CLEAR
INITIAL SETTING
CHECK TEST
ON/OFF
CIR.WATER
GRRUTRGBGBGBGBGB
81
Page 82
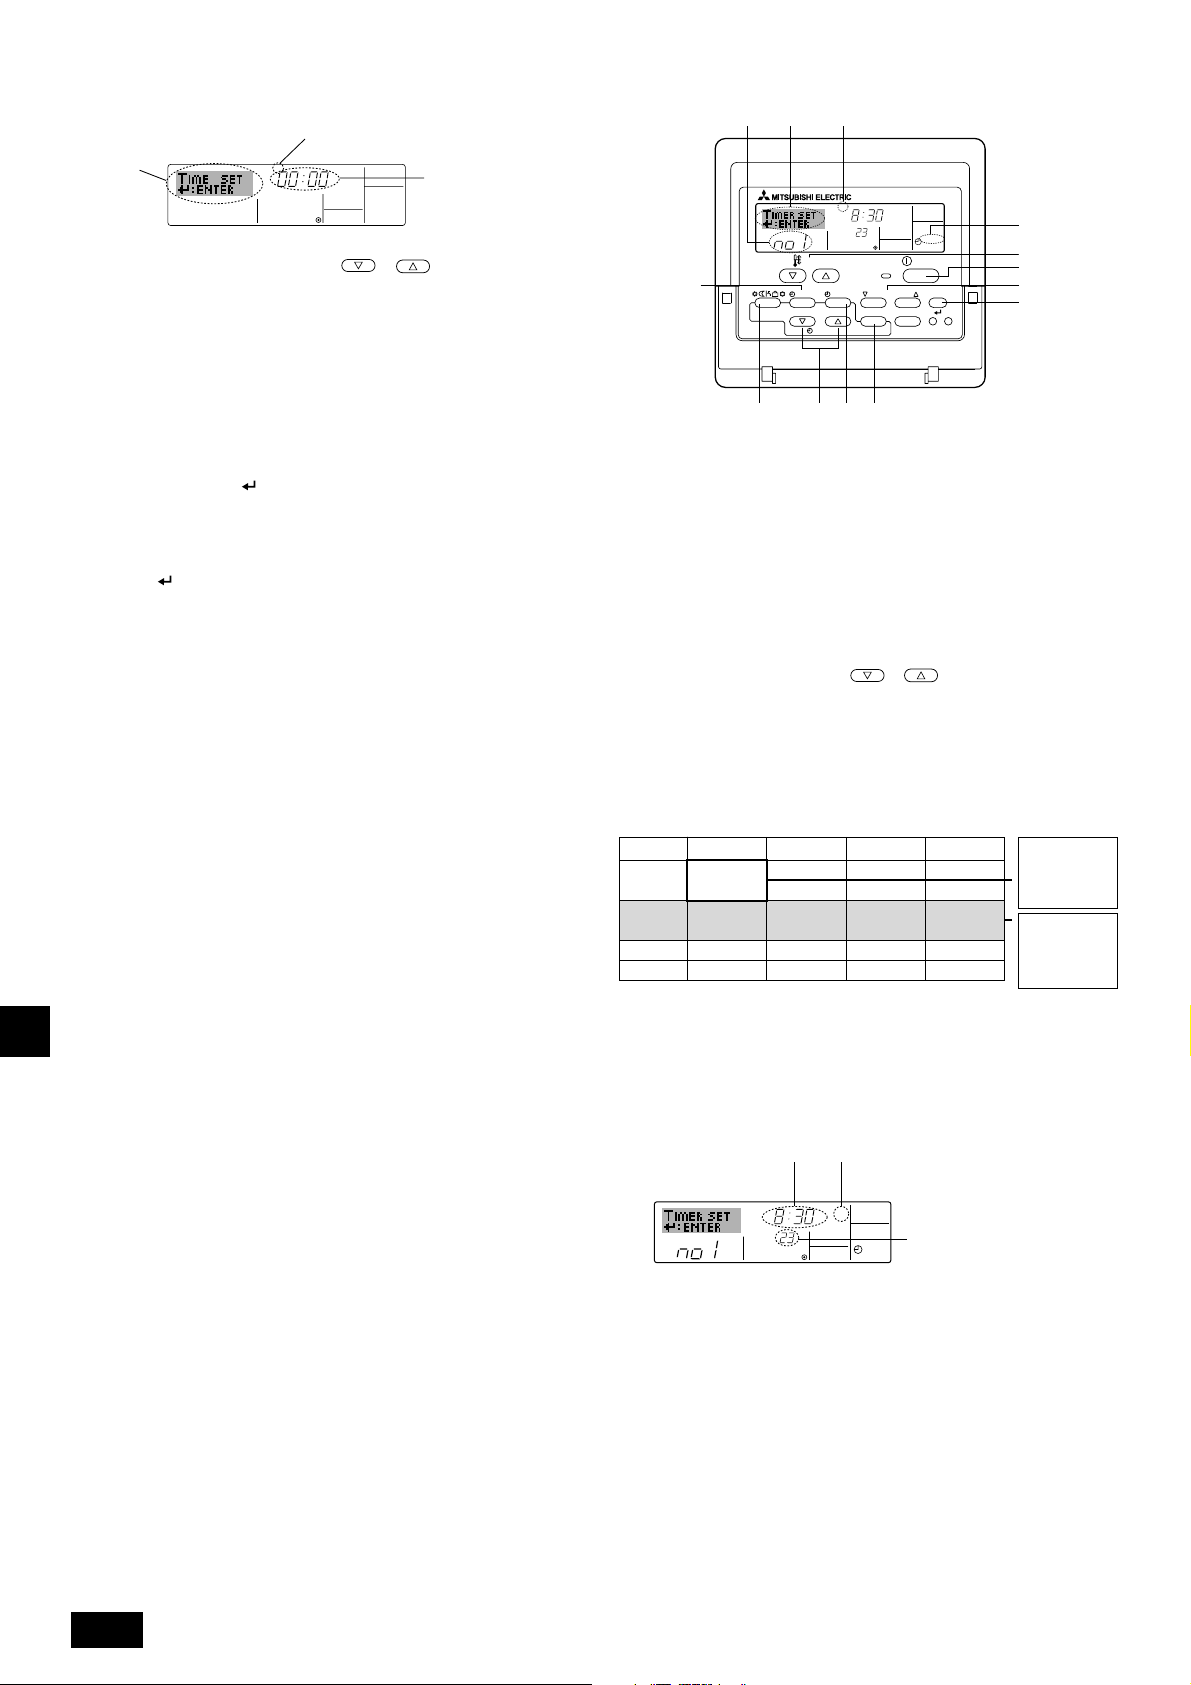
¶Ò˜ Ó· Ú˘ıÌ›ÛÂÙ ÙËÓ Ë̤ڷ Ù˘ ‚‰ÔÌ¿‰·˜ Î·È ÙËÓ ÒÚ·…
ƒ‡ıÌÈÛË Ë̤ڷ˜ Ù˘ ‚‰ÔÌ¿‰·˜
3
2
TIME SUN
ƒ‡ıÌÈÛË ÒÚ·˜
4
1. ¶È¤ÛÙ ÙÔ Ï‹ÎÙÚÔ Ú‡ıÌÈÛ˘ ¯ÚfiÓÔ˘ ‹ A БИ· У· ВМК·УИЫЩВ›
Ë ¤Ó‰ÂÈÍË 2.
2. ¶И¤ЫЩВ ЩФ П‹ОЩЪФ TIMER ON/OFF ПВИЩФ˘ЪБ›·˜ (SET DAY) 9 ÁÈ· Ó·
Ú˘ıÌ›ÛÂÙ ÙËÓ Ë̤ڷ.
* ªÂ οı ¿ÙËÌ· ÙÔ˘ Ï‹ÎÙÚÔ˘, ÚÔ¯ˆÚ¿ÂÈ Ë Ë̤ڷ Ô˘ ÂÌÊ·Ó›˙ÂÙ·È
ÛÙÔ 3 : Sun → Mon → ... → Fri → Sat.
3. ¶И¤ЫЩВ ЩФ О·Щ¿ППЛПФ П‹ОЩЪФ Ъ‡ıМИЫЛ˜ ¯ЪfiУФ˘ A, fiˆ˜ ··ÈÙ›ٷÈ, ÁÈ·
Ó· Ú˘ıÌ›ÛÂÙ ÙËÓ ÒÚ·.
* ∫·ıÒ˜ Ȥ˙ÂÙ ·Ú·ÙÂٷ̤ӷ ÙÔ Ï‹ÎÙÚÔ, Ë ÒÚ· (ÛÙÔ 4) ı· ·˘Í¿ÓÂÙ·È
ÛÙ·‰È·Î¿ ÚÒÙ· Û ‚‹Ì·Ù· ÙÔ˘ ÂÓfi˜ ÏÂÙÔ‡, ηÙfiÈÓ Û ‚‹Ì·Ù· ÙˆÓ
‰¤Î· ÏÂÙÒÓ Î·È ¤ÂÈÙ· Û ‚‹Ì·Ù· Ù˘ Ì›·˜ ÒÚ·˜.
4. ∞КФ‡ О¿УВЩВ ЩИ˜ О·Щ¿ППЛПВ˜ Ъ˘ıМ›ЫВИ˜ ЫЩ· ‚‹М·Щ· 2 О·И 3, И¤ЫЩВ ЩФ
П‹ОЩЪФ CIR.WATER
GBDFEINLP
¶·Ú·Ù‹ÚËÛË:
4 БИ· У· ОПВИ‰ТЫВЩВ ЩИ˜ ЩИМ¤˜.
√И У¤В˜ О·Щ·¯ˆЪ›ЫВИ˜ Ф˘ О¿У·ЩВ ЫЩ· ‚‹М·Щ· 2 О·И 3 ı· ·О˘ЪˆıФ‡У ·У И¤ЫВЩВ
ЩФ П‹ОЩЪФ ∆ЪfiФ §ВИЩФ˘ЪБ›·˜ (ВИЫЩЪФК‹˜) 2 ÚÈÓ È¤ÛÂÙ ÙÔ Ï‹ÎÙÚÔ
CIR.WATER
4.
5. ¶И¤ЫЩВ ЩФ П‹ОЩЪФ ∆ЪfiФ §ВИЩФ˘ЪБ›·˜ (ВИЫЩЪФК‹˜) 2 БИ· У·
ФПФОПЛЪТЫВЩВ ЩЛ ‰И·‰ИО·Ы›· Ъ‡ıМИЫЛ˜. ∏ ¤У‰ВИНЛ ı· ВИЫЩЪ¤„ВИ ЫЩЛУ
Щ˘ИО‹ ФıfiУЛ ВП¤Б¯Ф˘, fiФ˘ ЩФ 1 ı· ‰Â›¯ÓÂÈ ÙÒÚ· ÙËÓ ÚfiÛÊ·Ù·
Ú˘ıÌÈṲ̂ÓË Ë̤ڷ Î·È ÒÚ·.
2.4. ÃÚ‹ÛË ÙÔ˘ ¯ÚÔÓԉȷÎfiÙË
∏ ВУfiЩЛЩ· ·˘Щ‹ ВНЛБВ› ЩФУ ЩЪfiФ Ъ‡ıМИЫЛ˜ О·И ¯Ъ‹ЫЛ˜ ЩФ˘ ¯ЪФУФ‰И·ОfiЩЛ.
ªФЪВ›ЩВ У· ¯ЪЛЫИМФФИ‹ЫВЩВ ЩЛУ ВИПФБ‹ ПВИЩФ˘ЪБ›·˜ БИ· У· ВИП¤НВЩВ ¤У·У
·fi ÙÔ˘˜ ÙÚÂȘ Ù‡Ô˘˜ ¯ÚÔÓԉȷÎfiÙË ÁÈ· ¯Ú‹ÛË: 1 ∂‚‰ÔÌ·‰È·›Ô˜
¯ÚÔÓԉȷÎfiÙ˘, 2 ∞Ïfi˜ ¯ÚÔÓԉȷÎfiÙ˘ ‹ 3 ГЪФУФ‰И·ОfiЩЛ˜ ·˘ЩfiМ·ЩЛ˜
‰И·ОФ‹˜.
°И· ПЛЪФКФЪ›В˜ Ы¯ВЩИО¿ МВ ЩФУ ЩЪfiФ Ъ‡ıМИЫЛ˜ ЩЛ˜ ВИПФБ‹˜ ПВИЩФ˘ЪБ›·˜,
·У·ЩЪ¤НЩВ ЫЩЛУ ВУfiЩЛЩ· 3, ·УЩИОВ›МВУФ [3]–3 (3).
ÃÚ‹ÛË ÙÔ˘ ‚‰ÔÌ·‰È·›Ô˘ ¯ÚÔÓԉȷÎfiÙË
1. ªФЪВ›ЩВ У· ¯ЪЛЫИМФФИ‹ЫВЩВ ЩФУ В‚‰ФМ·‰И·›Ф ¯ЪФУФ‰И·ОfiЩЛ БИ· У·
Ъ˘ıМ›ЫВЩВ ¤ˆ˜ ¤НИ ПВИЩФ˘ЪБ›В˜ БИ· О¿ıВ ЛМ¤Ъ· ЩЛ˜ В‚‰ФМ¿‰·˜.
• ∫¿ıВ ПВИЩФ˘ЪБ›· ВУ‰В¯ФМ¤Уˆ˜ У· ·ФЩВПВ›Щ·И ·fi ФФИ·‰‹ФЩВ ·fi Щ·
ВН‹˜: ГЪfiУФ˜ ¤У·ЪНЛ˜/‰И·ОФ‹˜ ПВИЩФ˘ЪБ›·˜ М·˙› МВ Ъ‡ıМИЫЛ
ıВЪМФОЪ·Ы›·˜ ‹ МfiУФ ¯ЪfiУФ˜ ¤У·ЪНЛ˜/‰И·ОФ‹˜ ПВИЩФ˘ЪБ›·˜ ‹ МfiУФ
Ъ‡ıМИЫЛ ıВЪМФОЪ·Ы›·˜.
• ŸЩ·У Л ЩЪ¤¯Ф˘Ы· ТЪ· В›У·И ›‰И· МВ ЩЛУ ТЪ· Ф˘ ¤¯ВИ Ъ˘ıМИЫЩВ› ЫВ ·˘Щfi
GRRUTRGBGBGBGBGB
ЩФ ¯ЪФУФ‰И·ОfiЩЛ, ЩФ ОПИМ·ЩИЫЩИОfi ВОЩВПВ› ЩЛ ПВИЩФ˘ЪБ›· Ф˘ ¤¯ВИ
Ъ˘ıМИЫЩВ› ЫЩФ ¯ЪФУФ‰И·ОfiЩЛ.
∞Ъ. ПВИЩФ˘ЪБ›·˜
42 3
SUN
TEMP.
B
MENU
MONITOR/SET
BACK DAY
PAR-W21MAA
2
ON/OFF
CLOCK CLEAR
A90
˚C
INITIAL SETTING
CHECK TEST
ON
WEEKLY
ON/OFF
CIR.WATER
1
3
1
7 8
4
¶Ò˜ Ó· Ú˘ıÌ›ÛÂÙ ÙÔÓ Â‚‰ÔÌ·‰È·›Ô ¯ÚÔÓԉȷÎfiÙË
1. µВ‚·ИˆıВ›ЩВ fiЩИ ‚Ъ›ЫОВЫЩВ ЫВ Щ˘ИО‹ ФıfiУЛ ВП¤Б¯Ф˘ О·И ВМК·У›˙ВЩ·И Ф
‰Â›ÎÙ˘ ‚‰ÔÌ·‰È·›Ô˘ ¯ÚÔÓԉȷÎfiÙË 1 ÛÙËÓ ¤Ó‰ÂÈÍË.
2. ¶È¤ÛÙ ÙÔ Ï‹ÎÙÚÔ TIMER MENU B БИ· У· ВМК·УИЫЩВ› ЩФ Set Up ЫЩЛУ
ÔıfiÓË (ÛÙÔ 2). (™ЛМВИТЫ·ЩВ fiЩИ, МВ О¿ıВ ¿ЩЛМ· ЩФ˘ П‹ОЩЪФ˘, ·ПП¿˙ВИ
Ë ¤Ó‰ÂÈÍË ÌÂٷ͇ Set Up Î·È Monitor).
3. ¶È¤ÛÙ ÙÔ Ï‹ÎÙÚÔ TIMER ON/OFF (SET DAY) 9 ÁÈ· Ó· Ú˘ıÌ›ÛÂÙ ÙËÓ
Ë̤ڷ. ªÂ οı ¿ÙËÌ· ÙÔ˘ Ï‹ÎÙÚÔ˘, Ë ¤Ó‰ÂÈÍË ÛÙÔ 3 ÚÔ¯ˆÚ¿ÂÈ ÛÙËÓ
ÂfiÌÂÓË Ú‡ıÌÈÛË Û‡Ìʈӷ Ì ÙËÓ ÂÍ‹˜ ·ÎÔÏÔ˘ı›·: “Sun Mon Tues Wed
Thurs Fri Sat” → “Sun” → ... → “Fri” → “Sat” → “Sun Mon Tues Wed
Thurs Fri Sat”…
4. ¶И¤ЫЩВ ЩФ П‹ОЩЪФ ПВИЩФ˘ЪБ›·˜
fiˆ˜ ··ИЩВ›Щ·И, БИ· У· ВИП¤НВЩВ ЩФУ О·Щ¿ППЛПФ ·ЪИıМfi ПВИЩФ˘ЪБ›·˜ (1
¤ˆ˜ 6) 4.
* ªÂ ÙȘ ηٷ¯ˆÚ›ÛÂȘ Û·˜ ÛÙ· ‚‹Ì·Ù· 3 Î·È 4 ı· ÂÈϤÍÂÙ ¤Ó· ·fi Ù·
ОВПИ¿ ЩФ˘ ›У·О· Ф˘ ·ВИОФУ›˙ВЩ·И ·Ъ·О¿Щˆ
(∏ ¤У‰ВИНЛ ЩЛПВ¯ВИЪИЫЩЛЪ›Ф˘ ЫЩ· ·ЪИЫЩВЪ¿ ·ЪФ˘ЫИ¿˙ВИ ЩФУ ЩЪfiФ Ф˘
ı· ВМК·УИЫЩВ› Л ¤У‰ВИНЛ ·У Ъ˘ıМ›ЫВЩВ ЩЛ ПВИЩФ˘ЪБ›· 1 ЫЩИ˜ ЩИМ¤˜ Ф˘
˘Ф‰ВИОУ‡ФУЩ·И ·Ъ·О¿Щˆ БИ· ЩЛУ ∫˘ЪИ·О‹).
¶›Ó·Î·˜ Ú‡ıÌÈÛ˘
∞Ъ. ПВИЩФ˘ЪБ›·˜
No. 1
No. 2
No. 6
Sunday Monday … Saturday
• 8:30
• ON
•
23 °C (73 °F)
• 10:00
• OFF
…
• 10:00
• OFF
¶·Ú·Ù‹ÚËÛË:
∞У Ъ˘ıМ›ЫВЩВ ЩЛУ ЛМ¤Ъ· ЫВ “Sun Mon Tues Wed Thurs Fri Sat”, МФЪВ›ЩВ У·
Ъ˘ıМ›ЫВЩВ У· Ъ·БМ·ЩФФИЛıВ› Л ›‰И· ПВИЩФ˘ЪБ›· ЩЛУ ›‰И· ТЪ· О¿ıВ ЛМ¤Ъ·.
(¶·Ъ¿‰ВИБМ·: ∏ ПВИЩФ˘ЪБ›· 2 ·Ъ·¿Уˆ, Л ФФ›· В›У·И Л ›‰И· БИ· fiПВ˜ ЩИ˜ ЛМ¤ЪВ˜
ЩЛ˜ В‚‰ФМ¿‰·˜).
‹ INITIAL SETTING (7 ‹ 8)
<ƒ˘ıМ›ЫВИ˜ ПВИЩФ˘ЪБ›·˜ 1 БИ·
ЩЛУ ∫˘ЪИ·О‹>
▲
ŒУ·ЪНЛ ОПИМ·ЩИЫЩИОФ‡ ЫЩИ˜ 8:30,
МВ ЩЛ ıВЪМФОЪ·Ы›· Ъ˘ıМИЫМ¤УЛ
ЫЩФ˘˜ 23 ЖC (73 ЖF).
• 10:00
• OFF
• 10:00
• OFF
▲
<ƒ˘ıМ›ЫВИ˜ ПВИЩФ˘ЪБ›·˜
2 БИ· О¿ıВ ЛМ¤Ъ·>
¢И·ОФ‹ ЩЛ˜ ПВИЩФ˘ЪБ›·˜
ЩФ˘ ОПИМ·ЩИЫЩИОФ‡ ЫЩИ˜
10:00.
2. ∏ ·Ó¿Ï˘ÛË Ú‡ıÌÈÛ˘ ¯ÚfiÓÔ˘ ÁÈ· ÙÔ ¯ÚÔÓԉȷÎfiÙË ·˘Ùfi Â›Ó·È 1 ÏÂÙfi.
¶·Ú·Ù‹ÚËÛË:
*1. ¢ВУ В›У·И ‰˘У·Щfi У· ¯ЪЛЫИМФФИЛıФ‡У Щ·˘Щfi¯ЪФУ·: В‚‰ФМ·‰И·›Ф˜
¯ÚÔÓԉȷÎfiÙ˘/·Ïfi˜ ¯ÚÔÓԉȷÎfiÙ˘/¯ÚÔÓԉȷÎfiÙ˘ ·˘ÙfiÌ·Ù˘
‰È·ÎÔ‹˜.
*2. √ В‚‰ФМ·‰И·›Ф˜ ¯ЪФУФ‰И·ОfiЩЛ˜ ‰ВУ ı· ПВИЩФ˘ЪБВ› fiЩ·У ИЫ¯‡ВИ М›· ·fi ЩИ˜
ВН‹˜ Ы˘Уı‹ОВ˜:
√ ¯ЪФУФ‰И·ОfiЩЛ˜ В›У·И ·УВУВЪБfi˜, ЩФ Ы‡ЫЩЛМ· ‚Ъ›ЫОВЩ·И ЫВ ·УЩИО·УФУИО‹
О·Щ¿ЫЩ·ЫЛ, ‚Ъ›ЫОВЩ·И ЫВ ВН¤ПИНЛ ‰ФОИМ‹, ЩФ ЩЛПВ¯ВИЪИЫЩ‹ЪИФ Ъ·БМ·ЩФФИВ›
·˘ЩФ-¤ПВБ¯Ф ‹ ¤ПВБ¯Ф ЩЛПВ¯ВИЪИЫЩЛЪ›Ф˘, Ф ¯Ъ‹ЫЩЛ˜ ‚Ъ›ЫОВЩ·И ЫЩЛ
‰И·‰ИО·Ы›· Ъ‡ıМИЫЛ˜ МИ·˜ ПВИЩФ˘ЪБ›·˜, Ф ¯Ъ‹ЫЩЛ˜ ‚Ъ›ЫОВЩ·И ЫЩЛ ‰И·‰ИО·Ы›·
Ъ‡ıМИЫЛ˜ ЩФ˘ ¯ЪФУФ‰И·ОfiЩЛ, Ф ¯Ъ‹ЫЩЛ˜ ‚Ъ›ЫОВЩ·И ЫЩЛ ‰И·‰ИО·Ы›· Ъ‡ıМИЫЛ˜
ЩЛ˜ ЩЪ¤¯Ф˘Ы·˜ ЛМ¤Ъ·˜ ЩЛ˜ В‚‰ФМ¿‰·˜ ‹ ЩЛ˜ ТЪ·˜, ЩФ Ы‡ЫЩЛМ· ВП¤Б¯ВЩ·И
ОВУЩЪИО¿. (∂И‰ИОfiЩВЪ·, ЩФ Ы‡ЫЩЛМ· ‰ВУ ı· Ъ·БМ·ЩФФИВ› ПВИЩФ˘ЪБ›В˜
[¤У·ЪНЛ ПВИЩФ˘ЪБ›·˜ МФУ¿‰·˜, ‰И·ОФ‹˜ ПВИЩФ˘ЪБ›·˜ МФУ¿‰·˜ ‹ Ъ‡ıМИЫЛ
ıВЪМФОЪ·Ы›·˜] Ф˘ В›У·И ·ВУВЪБФФИЛМ¤УВ˜ О·Щ¿ ЩЛ ‰И¿ЪОВИ· ЩˆУ
Ы˘УıЛОТУ ·˘ЩТУ).
82
ƒ‡ıÌÈÛË ÙÔ˘ ‚‰ÔÌ·‰È·›Ô˘ ¯ÚÔÓԉȷÎfiÙË
∂ÌÊ·Ó›˙ÂÈ ÙË Ú‡ıÌÈÛË
5
¯ÚfiÓÔ˘
SUN
5. ¶И¤ЫЩВ ЩФ О·Щ¿ППЛПФ П‹ОЩЪФ Ъ‡ıМИЫЛ˜ ¯ЪfiУФ˘ A , fiˆ˜ ··ÈÙ›ٷÈ, ÁÈ·
Ó· Ú˘ıÌ›ÛÂÙ ÙÔÓ ÂÈı˘ÌËÙfi ¯ÚfiÓÔ (ÛÙÔ 5).
* ∫·ıÒ˜ Ȥ˙ÂÙ ÙÔ Ï‹ÎÙÚÔ ·Ú·ÙÂٷ̤ӷ, Ô ¯ÚfiÓÔ˜ ·˘Í¿ÓÂÙ·È ÛÙ·‰È·Î¿
ÚÒÙ· Û ‚‹Ì·Ù· ÙÔ˘ ÂÓfi˜ ÏÂÙÔ‡, ηÙfiÈÓ Û ‚‹Ì·Ù· ÙˆÓ ‰¤Î· ÏÂÙÒÓ
Î·È ¤ÂÈÙ· Û ‚‹Ì·Ù· Ù˘ Ì›·˜ ÒÚ·˜.
6. ¶И¤ЫЩВ ЩФ П‹ОЩЪФ ON/OFF ПВИЩФ˘ЪБ›·˜ 1 ÁÈ· Ó· ÂÈϤÍÂÙ ÙËÓ ÂÈı˘ÌËÙ‹
ПВИЩФ˘ЪБ›· (¤У·ЪНЛ ‹ ‰И·ОФ‹ ПВИЩФ˘ЪБ›·˜) ЫЩФ 6.
* ªÂ οı ¿ÙËÌ· ÙÔ˘ Ï‹ÎÙÚÔ˘, ·ÏÏ¿˙ÂÈ Ë Ú‡ıÌÈÛË Û‡Ìʈӷ Ì ÙËÓ
ÂÍ‹˜ ·ÎÔÏÔ˘ı›·: η̛· ¤Ó‰ÂÈÍË (η̛· Ú‡ıÌÈÛË) → “ON” → “OFF”
∂МК·У›˙ВИ ЩЛУ ВИПВБМ¤УЛ ПВИЩФ˘ЪБ›·
6
(¤У·ЪНЛ ‹ ‰И·ОФ‹ ПВИЩФ˘ЪБ›·˜)
*
¢ВУ ВМК·У›˙ВЩ·И ·У ‰ВУ В›У·И Ъ˘ıМИЫМ¤УЛ Л ПВИЩФ˘ЪБ›·.
ON
˚C
WEEKLY
7
∂МК·У›˙ВИ ЩЛ Ъ‡ıМИЫЛ
ıВЪМФОЪ·Ы›·˜
* ¢ÂÓ ÂÌÊ·Ó›˙ÂÙ·È ·Ó ‰ÂÓ Â›Ó·È
Ъ˘ıМИЫМ¤УЛ Л ıВЪМФОЪ·Ы›·.
Page 83

7. ¶И¤ЫЩВ ЩФ О·Щ¿ППЛПФ П‹ОЩЪФ Ъ‡ıМИЫЛ˜ ıВЪМФОЪ·Ы›·˜ 3 ÁÈ· Ó· Ú˘ıÌ›ÛÂÙÂ
ЩЛУ ВИı˘МЛЩ‹ ıВЪМФОЪ·Ы›· (ЫЩФ 7).
* ªÂ οı ¿ÙËÌ· ÙÔ˘ Ï‹ÎÙÚÔ˘, ·ÏÏ¿˙ÂÈ Ë Ú‡ıÌÈÛË Û‡Ìʈӷ Ì ÙËÓ
ÂÍ‹˜ ·ÎÔÏÔ˘ı›·: η̛· ¤Ó‰ÂÈÍË (η̛· Ú‡ıÌÈÛË) ⇔ 5 (41) ⇔ 6 (43) ⇔ ...
⇔ 89 (192) ⇔ 90 (194) ⇔ О·М›· ¤У‰ВИНЛ.
(¢И·ı¤ЫИМЛ ВЪИФ¯‹ ЩИМТУ: ∏ ВЪИФ¯‹ ЩИМТУ БИ· ЩЛ Ъ‡ıМИЫЛ В›У·И 5 ЖC (41
ЖF) ¤ˆ˜ 90 ЖC (194 ЖF). ŸМˆ˜, Л Ъ·БМ·ЩИО‹ ВЪИФ¯‹ ЩИМТУ ВУЩfi˜ ЩЛ˜
ФФ›·˜ МФЪВ› У· ВП¤Б¯ВЩ·И Л ıВЪМФОЪ·Ы›· ‰И·К¤ЪВИ ·У¿ПФБ· МВ ЩФ В›‰Ф˜
ЩЛ˜ МФУ¿‰·˜ Ф˘ В›У·И Ы˘У‰В‰ВМ¤УЛ).
8. °И· У· ‰И·БЪ¿„ВЩВ ЩИ˜ ЩЪ¤¯Ф˘ЫВ˜ Ъ˘ıМИЫМ¤УВ˜ ЩИМ¤˜ БИ· ЩЛУ ВИПВБМ¤УЛ
ПВИЩФ˘ЪБ›·, И¤ЫЩВ О·И ·К‹ЫЩВ БЪ‹БФЪ· ЩФ П‹ОЩЪФ CHECK (CLEAR) 0
Ì›· ÊÔÚ¿.
* ∏ Ú‡ıÌÈÛË ¯ÚfiÓÔ˘ Ô˘ ÂÌÊ·Ó›˙ÂÙ·È ı· ·ÏÏ¿ÍÂÈ Û “—:—” Î·È ı· Û‚‹ÛÔ˘Ó
ФИ Ъ˘ıМ›ЫВИ˜ ¤У·ЪНЛ˜/‰И·ОФ‹˜ ПВИЩФ˘ЪБ›·˜ О·И ıВЪМФОЪ·Ы›·˜.
(°È· Ó· ‰È·ÁÚ¿„ÂÙ ٷ˘Ùfi¯ÚÔÓ· fiϘ ÙȘ Ú˘ıÌ›ÛÂȘ ‚‰ÔÌ·‰È·›Ô˘
¯ÚÔÓԉȷÎfiÙË, ȤÛÙ ·Ú·ÙÂٷ̤ӷ ÙÔ Ï‹ÎÙÚÔ CHECK (CLEAR) 0
БИ· ‰‡Ф ‰В˘ЩВЪfiПВЩ· ‹ ВЪИЫЫfiЩВЪФ. £· ·Ъ¯›ЫВИ У· ·У·‚ФЫ‚‹УВИ Л
¤Ó‰ÂÈÍË, ˘Ô‰ÂÈÎÓ‡ÔÓÙ·˜ fiÙÈ ¤¯Ô˘Ó ‰È·ÁÚ·Ê› fiϘ ÔÈ Ú˘ıÌ›ÛÂȘ).
9. ∞КФ‡ О¿УВЩВ ЩИ˜ О·Щ¿ППЛПВ˜ Ъ˘ıМ›ЫВИ˜ ЫЩ· ‚‹М·Щ· 5, 6 О·И 7, И¤ЫЩВ ЩФ
П‹ОЩЪФ CIR. WATER
4БИ· У· ОПВИ‰ТЫВЩВ ЩИ˜ ЩИМ¤˜.
¶·Ú·Ù‹ÚËÛË:
√È Ó¤Â˜ ηٷ¯ˆÚ›ÛÂȘ Ô˘ οӷÙ ı· ·Î˘ÚˆıÔ‡Ó ·Ó ȤÛÂÙ ÙÔ Ï‹ÎÙÚÔ ∆ÚfiÔ
§ВИЩФ˘ЪБ›·˜ (ВИЫЩЪФК‹˜) 2 ÚÈÓ È¤ÛÂÙ ÙÔ Ï‹ÎÙÚÔ CIR.WATER
4.
™В ВЪ›ЩˆЫЛ Ф˘ ¤¯ВЩВ Ъ˘ıМ›ЫВИ ‰‡Ф ‹ ВЪИЫЫfiЩВЪВ˜ ‰И·КФЪВЩИО¤˜ ПВИЩФ˘ЪБ›В˜
БИ· ЩЛУ ›‰И· ТЪ·, ı· Ъ·БМ·ЩФФИЛıВ› МfiУФ Л ПВИЩФ˘ЪБ›· МВ ЩФ МВБ·П‡ЩВЪФ
·ЪИıМfi ПВИЩФ˘ЪБ›·˜.
10. ∂·У·П¿‚ВЩВ Щ· ‚‹М·Щ· 3 ¤ˆ˜ 8, fiˆ˜ ··ИЩВ›Щ·И, БИ· У· Ы˘МПЛЪТЫВЩВ
fiЫ· ·fi Щ· ‰И·ı¤ЫИМ· ОВПИ¿ ВИı˘МВ›ЩВ.
11. ¶И¤ЫЩВ ЩФ П‹ОЩЪФ ∆ЪfiФ §ВИЩФ˘ЪБ›·˜ (ВИЫЩЪФК‹˜) 2 ÁÈ· Ó· ÂÈÛÙÚ¤„ÂÙÂ
ЫЩЛУ Щ˘ИО‹ ФıfiУЛ ВП¤Б¯Ф˘ О·И У· ФПФОПЛЪТЫВЩВ ЩЛ ‰И·‰ИО·Ы›· Ъ‡ıМИЫЛ˜.
12. °И· У· ВУВЪБФФИ‹ЫВЩВ ЩФ ¯ЪФУФ‰И·ОfiЩЛ, И¤ЫЩВ ЩФ П‹ОЩЪФ TIMER
ON/OFF ПВИЩФ˘ЪБ›·˜ 9 ТЫЩВ У· Ы‚‹ЫВИ Ф ‰В›ОЩЛ˜ ·УВУВЪБФ‡ ¯ЪФУФ‰И·ОfiЩЛ
·fi ÙËÓ ÔıfiÓË.
µВ‚·ИˆıВ›ЩВ fiЩИ ¤Ы‚ЛЫВ Ф ‰В›ОЩЛ˜ ·УВУВЪБФ‡
¯ÚÔÓԉȷÎfiÙË.
* ∞Ó ‰ÂÓ ˘¿Ú¯Ô˘Ó Ú˘ıÌ›ÛÂȘ ¯ÚÔÓԉȷÎfiÙË, ÛÙËÓ ÔıfiÓË ·Ó·‚ÔÛ‚‹ÓÂÈ Ô
‰В›ОЩЛ˜ ·УВУВЪБФ‡ ¯ЪФУФ‰И·ОfiЩЛ.
°И· У· ВУВЪБФФИ‹ЫВЩВ ЩФУ В‚‰ФМ·‰И·›Ф ¯ЪФУФ‰И·ОfiЩЛ
¶И¤ЫЩВ ЩФ П‹ОЩЪФ TIMER ON/OFF ПВИЩФ˘ЪБ›·˜ 9 ÒÛÙ ӷ Û‚‹ÛÂÈ Ô ‰Â›ÎÙ˘
·УВУВЪБФ‡ ¯ЪФУФ‰И·ОfiЩЛ (ЫЩФ 0).
TIME SUN
˚C
WEEKLY
0
˚C
ГЪЛЫИМФФИ‹ЫЩВ ЩФУ ·Пfi ¯ЪФУФ‰И·ОfiЩЛ
1. ªÔÚ›Ù ӷ Ú˘ıÌ›ÛÂÙ ÙÔÓ ·Ïfi ¯ÚÔÓԉȷÎfiÙË Ì ÙÚÂȘ ÙÚfiÔ˘˜.
• ÃÚfiÓÔ˜ ¤Ó·Ú͢ ÌfiÓÔ :
∆Ф ОПИМ·ЩИЫЩИОfi НВОИУ¿ fiЩ·У ·Ъ¤ПıВИ Ф ¯ЪfiУФ˜ Ъ‡ıМИЫЛ˜.
• ÃÚfiÓÔ˜ ‰È·ÎÔ‹˜ ÌfiÓÔ :
∆Ф ОПИМ·ЩИЫЩИОfi ЫЩ·М·Щ¿ fiЩ·У ·Ъ¤ПıВИ Ф ¯ЪfiУФ˜ Ъ‡ıМИЫЛ˜.
• ÃÚfiÓÔÈ ¤Ó·Ú͢ Î·È ‰È·ÎÔ‹˜ :
∆Ф ОПИМ·ЩИЫЩИОfi НВОИУ¿ О·И ЫЩ·М·Щ¿ fiЩ·У ·Ъ¤ПıФ˘У ФИ ·УЩ›ЫЩФИ¯ФИ ¯ЪfiУФИ.
2. ªФЪВ›ЩВ У· Ъ˘ıМ›ЫВЩВ ЩФУ ·Пfi ¯ЪФУФ‰И·ОfiЩЛ (¤У·ЪНЛ О·И ‰И·ОФ‹)
МfiУФ М›· КФЪ¿ ВУЩfi˜ ¯ЪФУИОФ‡ ‰И·ЫЩ‹М·ЩФ˜ 72 ˆЪТУ. ∏ Ъ‡ıМИЫЛ ¯ЪfiУФ˘
Б›УВЩ·И МВ ‚‹М·Щ· ЩЛ˜ М›·˜ ТЪ·˜.
¶·Ú·Ù‹ÚËÛË:
*1. ¢ВУ В›У·И ‰˘У·Щfi У· ¯ЪЛЫИМФФИЛıФ‡У Щ·˘Щfi¯ЪФУ·: В‚‰ФМ·‰И·›Ф˜
¯ÚÔÓԉȷÎfiÙ˘/·Ïfi˜ ¯ÚÔÓԉȷÎfiÙ˘/¯ÚÔÓԉȷÎfiÙ˘ ·˘ÙfiÌ·Ù˘
‰È·ÎÔ‹˜.
*2. √ ·Пfi˜ ¯ЪФУФ‰И·ОfiЩЛ˜ ‰ВУ ı· ПВИЩФ˘ЪБВ› fiЩ·У ИЫ¯‡ВИ М›· ·fi ЩИ˜ ВН‹˜
Ы˘Уı‹ОВ˜:
√ ¯ЪФУФ‰И·ОfiЩЛ˜ В›У·И ·УВУВЪБfi˜, ЩФ Ы‡ЫЩЛМ· ‰ВУ ‚Ъ›ЫОВЩ·И ЫВ
К˘ЫИФПФБИО‹ О·Щ¿ЫЩ·ЫЛ, ‚Ъ›ЫОВЩ·И ЫВ ВН¤ПИНЛ ‰ФОИМ‹, ЩФ ЩЛПВ¯ВИЪИЫЩ‹ЪИФ
Ъ·БМ·ЩФФИВ› ·˘ЩФ-¤ПВБ¯Ф ‹ ‰И¿БУˆЫЛ, Ф ¯Ъ‹ЫЩЛ˜ ‚Ъ›ЫОВЩ·И ЫЩЛ
‰И·‰ИО·Ы›· ВИПФБ‹˜ МИ·˜ ПВИЩФ˘ЪБ›·˜, Ф ¯Ъ‹ЫЩЛ˜ ‚Ъ›ЫОВЩ·И ЫЩЛ ‰И·‰ИО·Ы›·
Ъ‡ıМИЫЛ˜ ЩФ˘ ¯ЪФУФ‰И·ОfiЩЛ, ЩФ Ы‡ЫЩЛМ· ВП¤Б¯ВЩ·И ОВУЩЪИО¿. (™ЩИ˜
Ы˘Уı‹ОВ˜ ·˘Щ¤˜, ·ВУВЪБФФИВ›Щ·И Л ПВИЩФ˘ЪБ›· ¤У·ЪНЛ˜/‰И·ОФ‹˜).
GBDFEINLP
¶Ò˜ Ó· ÚÔ‚¿ÏÂÙ ÙȘ Ú˘ıÌ›ÛÂȘ ‚‰ÔÌ·‰È·›Ô˘
¯ÚÔÓԉȷÎfiÙË
8
TIMER
1. µÂ‚·Èˆı›Ù fiÙÈ Ô ‰Â›ÎÙ˘ ‚‰ÔÌ·‰È·›Ô˘ ¯ÚÔÓԉȷÎfiÙË ÂÌÊ·Ó›˙ÂÙ·È
ÛÙËÓ ÔıfiÓË (ÛÙÔ 1).
2. ¶È¤ÛÙ ÙÔ Ï‹ÎÙÚÔ TIMER MENU B БИ· У· ВМК·УИЫЩВ› ЩФ Monitor
ÛÙËÓ ÔıfiÓË (ÛÙÔ 8).
3. ¶И¤ЫЩВ ЩФ П‹ОЩЪФ TIMER ON/OFF ПВИЩФ˘ЪБ›·˜ (SET DAY) 9, fiˆ˜
··ÈÙ›ٷÈ, ÁÈ· Ó· ÂÈϤÍÂÙ ÙËÓ Ë̤ڷ Ô˘ ÂÈı˘Ì›Ù ӷ ÚÔ‚¿ÏÂÙÂ.
4. ¶И¤ЫЩВ ЩФ П‹ОЩЪФ ПВИЩФ˘ЪБ›·˜
‹ 8), fiˆ˜ ··ИЩВ›Щ·И, БИ· У· ·ПП¿НВЩВ ЩЛ ПВИЩФ˘ЪБ›· ¯ЪФУФ‰И·ОfiЩЛ
Ô˘ ÂÌÊ·Ó›˙ÂÙ·È ÛÙËÓ ¤Ó‰ÂÈÍË (ÛÙÔ 9).
* ªÂ οı ¿ÙËÌ· ÙÔ˘ Ï‹ÎÙÚÔ˘, ı· ÚÔ¯ˆÚ¿Ù ÛÙËÓ ÂfiÌÂÓË
ПВИЩФ˘ЪБ›· ¯ЪФУФ‰И·ОfiЩЛ Ы‡МКˆУ· МВ ЩЛ ЫВИЪ¿ ЩЛ˜ Ъ‡ıМИЫЛ˜
¯ЪfiУФ˘.
5. °И· У· ОПВ›ЫВЩВ ЩЛУ ·Ъ·ОФПФ‡ıЛЫЛ О·И У· ВИЫЩЪ¤„ВЩВ ЫЩЛУ Щ˘ИО‹
ФıfiУЛ ВП¤Б¯Ф˘, И¤ЫЩВ ЩФ П‹ОЩЪФ ∆ЪfiФ §ВИЩФ˘ЪБ›·˜ (ВИЫЩЪФК‹˜)
2.
ƒ˘ıÌ›ÛÂȘ ¯ÚÔÓԉȷÎfiÙË
9
SUN
ON
OFF
˚C
WEEKLY
‹ INITIAL SETTING (7
1
°И· У· ·ВУВЪБФФИ‹ЫВЩВ ЩФУ В‚‰ФМ·‰И·›Ф ¯ЪФУФ‰И·ОfiЩЛ
¶И¤ЫЩВ ЩФ П‹ОЩЪФ TIMER ON/OFF ПВИЩФ˘ЪБ›·˜ 9 ТЫЩВ У· ВМК·УИЫЩВ› Ф
‰В›ОЩЛ˜ ·УВУВЪБФ‡ ¯ЪФУФ‰И·ОfiЩЛ ЫЩФ 0.
TIME SUN
˚C
WEEKLY
0
˚C
ONHr
AFTER
INITIAL SETTING
0
SIMPLE
ON/OFF
CIR.WATER
TEMP.
B
MENU
ON/OFF
MONITOR/SET
BACK DAY
PAR-W21MAA
2A9
CHECK TEST
CLOCK CLEAR
1
4
¶Ò˜ Ó· Ú˘ıÌ›ÛÂÙ ÙÔÓ ·Ïfi ¯ÚÔÓԉȷÎfiÙË
2
1. µВ‚·ИˆıВ›ЩВ fiЩИ ‚Ъ›ЫОВЫЩВ ЫВ Щ˘ИО‹ ФıfiУЛ ВП¤Б¯Ф˘ О·И ВМК·У›˙ВЩ·И Ф
‰Â›ÎÙ˘ ·ÏÔ‡ ¯ÚÔÓԉȷÎfiÙË ÛÙËÓ ¤Ó‰ÂÈÍË (ÛÙÔ 1).
ŸЩ·У ВМК·У›˙ВЩ·И ¤У‰ВИНЛ ‰И·КФЪВЩИО‹ ЩФ˘ ·ПФ‡ ¯ЪФУФ‰И·ОfiЩЛ, Ъ˘ıМ›ЫЩВ
ЩЛУ ЫЩФ SIMPLE TIMER ¯ЪЛЫИМФФИТУЩ·˜ ЩЛ Ъ‡ıМИЫЛ ПВИЩФ˘ЪБ›·˜
¯ЪФУФ‰И·ОfiЩЛ ЩЛ˜ ВИПФБ‹˜ ПВИЩФ˘ЪБ›·˜ (‚П. 3.[3]–3 (3)).
2. ¶È¤ÛÙ ÙÔ Ï‹ÎÙÚÔ TIMER MENU B БИ· У· ВМК·УИЫЩВ› ЩФ Set Up ЫЩЛУ
ÔıfiÓË (ÛÙÔ 2). (™ЛМВИТЫ·ЩВ fiЩИ, МВ О¿ıВ ¿ЩЛМ· ЩФ˘ П‹ОЩЪФ˘, ·ПП¿˙ВИ
Л ¤У‰ВИНЛ МВЩ·Н‡ Set Up О·И Monitor)
3. ¶И¤ЫЩВ ЩФ П‹ОЩЪФ ON/OFF ПВИЩФ˘ЪБ›·˜ 1 БИ· У· ВМК·УИЫЩВ› Л ЩЪ¤¯Ф˘Ы·
Ъ‡ıМИЫЛ ·ПФ‡ ¯ЪФУФ‰И·ОfiЩЛ ON ‹ OFF. ¶И¤ЫЩВ ЩФ П‹ОЩЪФ М›· КФЪ¿
БИ· У· ВМК·У›ЫВЩВ ЩФ ¯ЪfiУФ Ф˘ ·ФМ¤УВИ ¤ˆ˜ ЩЛУ ¤У·ЪНЛ О·И О·ЩfiИУ
И¤ЫЩВ ЩФ Н·У¿ БИ· У· ВМК·У›ЫВЩВ ЩФ ¯ЪfiУФ Ф˘ ·ФМ¤УВИ ¤ˆ˜ ЩЛ ‰И·ОФ‹.
(√ ‰В›ОЩЛ˜ ¤У·ЪНЛ˜/‰И·ОФ‹˜ ПВИЩФ˘ЪБ›·˜ ВМК·У›˙ВЩ·И ЫЩФ 4).
• ГЪФУФ‰И·ОfiЩЛ˜ ON: ∆Ф ОПИМ·ЩИЫЩИОfi ı· ·Ъ¯›ЫВИ У· ПВИЩФ˘ЪБВ› fiЩ·У
• ГЪФУФ‰И·ОfiЩЛ˜ OFF: ∆Ф ОПИМ·ЩИЫЩИОfi ı· ЫЩ·М·Щ‹ЫВИ У· ПВИЩФ˘ЪБВ› fiЩ·У
4
ƒ‡ıÌÈÛË ¯ÚÔÓԉȷÎfiÙË
AFTER
ONHr
SIMPLE
∂Ó¤ÚÁÂÈ· (On ‹ Off)
3
* ™Â ÂÚ›ÙˆÛË Ô˘ ‰ÂÓ
˘¿Ú¯ÂÈ Ú‡ıÌÈÛË,
1
ÂÌÊ·Ó›˙ÂÙ·È “— —”.
·Ъ¤ПıВИ Ф О·ıФЪИЫМ¤УФ˜ ·ЪИıМfi˜ ˆЪТУ.
·Ъ¤ПıВИ Ф О·ıФЪИЫМ¤УФ˜ ·ЪИıМfi˜ ˆЪТУ.
GRRUTRGBGBGBGBGB
83
Page 84

7
˚C
˚C
ONHr
AFTER
SIMPLE
ONHr
AFTER
SIMPLE
SIMPLE
˚C
˚C
OFFHrAFTER
SIMPLE
˚C
˚C
SIMPLE
4. ªÂ ON ‹ OFF Ó· ÂÌÊ·Ó›˙ÂÙ·È ÛÙÔ 3: ¶И¤ЫЩВ ЩФ О·Щ¿ППЛПФ П‹ОЩЪФ
Ъ‡ıМИЫЛ˜ ¯ЪfiУФ˘ A, fiˆ˜ ··ИЩВ›Щ·И, БИ· У· Ъ˘ıМ›ЫВЩВ ЩИ˜ ТЪВ˜ ¤ˆ˜ ЩЛУ
¤У·ЪНЛ ПВИЩФ˘ЪБ›·˜ (·У ВМК·У›˙ВЩ·И ON) ‹ ЩИ˜ ТЪВ˜ ¤ˆ˜ ЩЛ ‰И·ОФ‹
ПВИЩФ˘ЪБ›·˜ (·У ВМК·У›˙ВЩ·И OFF ЫЩФ 4.)
• ¢И·ı¤ЫИМЛ ВЪИФ¯‹ ЩИМТУ: 1 ¤ˆ˜ 72 ТЪВ˜.
5. °И· У· Ъ˘ıМ›ЫВЩВ ЩИ˜ ТЪВ˜ ¤У·ЪНЛ˜ О·И ‰И·ОФ‹˜ ПВИЩФ˘ЪБ›·˜, В·У·П¿‚ВЩВ
Щ· ‚‹М·Щ· 3 О·И 4.
* ™ЛМВИТЫ·ЩВ fiЩИ ‰ВУ МФЪВ›ЩВ У· Ъ˘ıМ›ЫВЩВ ЩИ˜ ТЪВ˜ ¤У·ЪНЛ˜ О·И ‰И·ОФ‹˜
ПВИЩФ˘ЪБ›·˜ ЫЩЛУ ›‰И· ЩИМ‹.
6. °И· У· ‰И·БЪ¿„ВЩВ ЩЛУ ЩЪ¤¯Ф˘Ы· Ъ‡ıМИЫЛ ¤У·ЪНЛ˜ ‹ ‰И·ОФ‹˜ ПВИЩФ˘ЪБ›·˜:
∂МК·У›ЫЩВ ЩЛ Ъ‡ıМИЫЛ ¤У·ЪНЛ˜ ‹ ‰И·ОФ‹˜ ПВИЩФ˘ЪБ›·˜ (‚П. ‚‹М· 3) О·И
О·ЩfiИУ И¤ЫЩВ ЩФ П‹ОЩЪФ CHECK (CLEAR) 0 ÒÛÙÂ Ë Ú‡ıÌÈÛË ¯ÚfiÓÔ˘
Ó· ·ÏÏ¿ÍÂÈ ÛÂ “—” ÛÙÔ 4 . (™В ВЪ›ЩˆЫЛ Ф˘ ВИı˘МВ›ЩВ У·
¯ЪЛЫИМФФИ‹ЫВЩВ МfiУФ ЩЛ Ъ‡ıМИЫЛ ¤У·ЪНЛ˜ ПВИЩФ˘ЪБ›·˜ ‹ МfiУФ ЩЛ Ъ‡ıМИЫЛ
‰И·ОФ‹˜ ПВИЩФ˘ЪБ›·˜, ‚В‚·ИˆıВ›ЩВ fiЩИ ВМК·У›˙ВЩ·И ˆ˜ “—” Л Ъ‡ıМИЫЛ Ф˘
‰ВУ ВИı˘МВ›ЩВ У· ¯ЪЛЫИМФФИ‹ЫВЩВ).
7. ∞КФ‡ ФПФОПЛЪТЫВЩВ Щ· ·Ъ·¿Уˆ ‚‹М·Щ· 3 ¤ˆ˜ 6, И¤ЫЩВ ЩФ П‹ОЩЪФ
CIR. WATER
4 БИ· У· ОПВИ‰ТЫВЩВ ЩЛУ ЩИМ‹.
¶·Ú·Ù‹ÚËÛË:
√È Ó¤Â˜ Ú˘ıÌ›ÛÂȘ Ô˘ οӷÙ ı· ·Î˘ÚˆıÔ‡Ó ·Ó ȤÛÂÙ ÙÔ Ï‹ÎÙÚÔ ∆ÚfiÔ
§ВИЩФ˘ЪБ›·˜ (ВИЫЩЪФК‹˜) 2 ÚÈÓ È¤ÛÂÙ ÙÔ Ï‹ÎÙÚÔ CIR.WATER
8. ¶И¤ЫЩВ ЩФ П‹ОЩЪФ ∆ЪfiФ §ВИЩФ˘ЪБ›·˜ (ВИЫЩЪФК‹˜) 2 ÁÈ· Ó· ÂÈÛÙÚ¤„ÂÙÂ
ÛÙËÓ Ù˘È΋ ÔıfiÓË ÂϤÁ¯Ô˘.
GBDFEINLP
9. ¶И¤ЫЩВ ЩФ П‹ОЩЪФ ON/OFF ПВИЩФ˘ЪБ›·˜ TIMER 9 БИ· У· НВОИУ‹ЫВЩВ ЩЛУ
·УЩ›ЫЩЪФКЛ М¤ЩЪЛЫЛ ЩФ˘ ¯ЪФУФ‰И·ОfiЩЛ. ŸЩ·У ПВИЩФ˘ЪБВ› Ф
¯ЪФУФ‰И·ОfiЩЛ˜, ˆ˜ ¤У‰ВИНЛ ВМК·У›˙ВЩ·И Л ЩИМ‹ ЩФ˘ ¯ЪФУФ‰И·ОfiЩЛ.
µÂ‚·Èˆı›Ù fiÙÈ Ë ÙÈÌ‹ ÙÔ˘ ¯ÚÔÓԉȷÎfiÙË Â›Ó·È ÔÚ·Ù‹ Î·È ÛˆÛÙ‹.
¶ÚÔ‚ÔÏ‹ ÙˆÓ ÙÚÂ¯Ô˘ÛÒÓ Ú˘ıÌ›ÛÂˆÓ ·ÏÔ‡
¯ÚÔÓԉȷÎfiÙË
5
1. µÂ‚·Èˆı›Ù fiÙÈ Ô ‰Â›ÎÙ˘ ·ÏÔ‡ ¯ÚÔÓԉȷÎfiÙË ÂÌÊ·Ó›˙ÂÙ·È ÛÙËÓ ÔıfiÓË
(ÛÙÔ 1).
2. ¶È¤ÛÙ ÙÔ Ï‹ÎÙÚÔ TIMER MENU B БИ· У· ВМК·УИЫЩВ› Л ¤У‰ВИНЛ Monitor
ÛÙËÓ ÔıfiÓË (ÛÙÔ 5).
• ™В ВЪ›ЩˆЫЛ Ф˘ ‚Ъ›ЫОВЩ·И ЫВ ПВИЩФ˘ЪБ›· Ф ·Пfi˜ ¯ЪФУФ‰И·ОfiЩЛ˜
¤У·ЪНЛ˜ ‹ ‰И·ОФ‹˜ ПВИЩФ˘ЪБ›·˜, ВМК·У›˙ВЩ·И Л ЩЪ¤¯Ф˘Ы· ЩИМ‹ ЩФ˘
¯ЪФУФ‰И·ОfiЩЛ ЫЩФ 6.
• ™Â ÂÚ›ÙˆÛË Ô˘ ¤¯Ô˘Ó Á›ÓÂÈ Î·È ÔÈ ‰‡Ô Ú˘ıÌ›ÛÂȘ ¤Ó·Ú͢ Î·È ‰È·ÎÔ‹˜
ПВИЩФ˘ЪБ›·˜, ВМК·У›˙ФУЩ·И ‰И·‰Ф¯ИО¿ ФИ ‰‡Ф ·˘Щ¤˜ ЩИМ¤˜.
3. ¶И¤ЫЩВ ЩФ П‹ОЩЪФ ∆ЪfiФ §ВИЩФ˘ЪБ›·˜ (ВИЫЩЪФК‹˜) 2 ÁÈ· Ó· ÎÏ›ÛÂÙÂ
GRRUTRGBGBGBGBGB
ÙËÓ ¤Ó‰ÂÈÍË ·Ú·ÎÔÏÔ‡ıËÛ˘ Î·È Ó· ÂÈÛÙÚ¤„ÂÙ ÛÙËÓ Ù˘È΋ ÔıfiÓË
ÂϤÁ¯Ô˘.
6
ƒ‡ıÌÈÛË ¯ÚÔÓԉȷÎfiÙË
TIMER ON
OFFHrAFTER
SIMPLE
1
°И· У· ·ВУВЪБФФИ‹ЫВЩВ ЩФУ ·Пfi ¯ЪФУФ‰И·ОfiЩЛ...
¶И¤ЫЩВ ЩФ П‹ОЩЪФ TIMER ON/OFF ПВИЩФ˘ЪБ›·˜ 9 ÒÛÙÂ Ó· ÌËÓ ÂÌÊ·Ó›˙ÂÙ·È
ϤÔÓ Ë Ú‡ıÌÈÛË ¯ÚÔÓԉȷÎfiÙË ÛÙËÓ ÔıfiÓË (ÛÙÔ 7).
4.
°И· У· НВОИУ‹ЫВЩВ ЩФУ ·Пfi ¯ЪФУФ‰И·ОfiЩЛ…
¶И¤ЫЩВ ЩФ П‹ОЩЪФ TIMER ON/OFF ПВИЩФ˘ЪБ›·˜ 9 ТЫЩВ У· ВМК·УИЫЩВ› Л
Ъ‡ıМИЫЛ ¯ЪФУФ‰И·ОfiЩЛ ЫЩФ 7.
¶·Ú·‰Â›ÁÌ·Ù·
™В ВЪ›ЩˆЫЛ Ф˘ ¤¯Ф˘У Ъ˘ıМИЫЩВ› ФИ ТЪВ˜ ¤У·ЪНЛ˜ О·И ‰И·ОФ‹˜ ПВИЩФ˘ЪБ›·˜
ЫЩФУ ·Пfi ¯ЪФУФ‰И·ОfiЩЛ, Л ПВИЩФ˘ЪБ›· О·И Л ¤У‰ВИНЛ ˘Ф‰ВИОУ‡ФУЩ·И
·Ъ·О¿Щˆ.
¶·Ú¿‰ÂÈÁÌ· 1:
ŒУ·ЪНЛ ¯ЪФУФ‰И·ОfiЩЛ, МВ ЩФ ¯ЪfiУФ ¤У·ЪНЛ˜ ПВИЩФ˘ЪБ›·˜ У· ЪФЛБВ›Щ·И
ЩФ˘ ¯ЪfiУФ˘ ‰И·ОФ‹˜ ПВИЩФ˘ЪБ›·˜
ƒ‡ıМИЫЛ ¤У·ЪНЛ˜ ПВИЩФ˘ЪБ›·˜: 3 ТЪВ˜
ƒ‡ıМИЫЛ ‰И·ОФ‹˜ ПВИЩФ˘ЪБ›·˜: 7 ТЪВ˜
™ÙËÓ ¤Ó·ÚÍË
¯ÚÔÓԉȷÎfiÙË
▲
OFFHrAFTER
˚C
˚C
™ÙȘ 3 ÒÚ˜ ÌÂÙ¿ ÙËÓ
SIMPLE
¤Ó·ÚÍË ÙÔ˘
¯ÚÔÓԉȷÎfiÙË
▲
™ÙȘ 7 ÒÚ˜ ÌÂÙ¿
ÙËÓ ¤Ó·ÚÍË ÙÔ˘
¯ÚÔÓԉȷÎfiÙË
¶·Ú¿‰ÂÈÁÌ· 2:
ŒУ·ЪНЛ ¯ЪФУФ‰И·ОfiЩЛ, МВ ЩФ ¯ЪfiУФ ‰И·ОФ‹˜ ПВИЩФ˘ЪБ›·˜ У· ЪФЛБВ›Щ·И
ЩФ˘ ¯ЪfiУФ˘ ¤У·ЪНЛ˜ ПВИЩФ˘ЪБ›·˜
ƒ‡ıМИЫЛ ¤У·ЪНЛ˜ ПВИЩФ˘ЪБ›·˜: 5 ТЪВ˜
ƒ‡ıМИЫЛ ‰И·ОФ‹˜ ПВИЩФ˘ЪБ›·˜: 2 ТЪВ˜
™ÙËÓ ¤Ó·ÚÍË
¯ÚÔÓԉȷÎfiÙË
▲
AFTER
ONHr
™ÙȘ 2 ÒÚ˜ ÌÂÙ¿ ÙËÓ
SIMPLE
¤Ó·ÚÍË ÙÔ˘
¯ÚÔÓԉȷÎfiÙË
▲
™ÙȘ 5 ÒÚ˜ ÌÂÙ¿
ÙËÓ ¤Ó·ÚÍË ÙÔ˘
¯ÚÔÓԉȷÎfiÙË
∏ ¤У‰ВИНЛ ВМК·У›˙ВИ ЩЛ Ъ‡ıМИЫЛ ¤У·ЪНЛ˜
ПВИЩФ˘ЪБ›·˜ ЩФ˘ ¯ЪФУФ‰И·ОfiЩЛ (ТЪВ˜ Ф˘
·ФМ¤УФ˘У ¤ˆ˜ ЩЛУ ¤У·ЪНЛ ПВИЩФ˘ЪБ›·˜).
∏ ¤У‰ВИНЛ ·ПП¿˙ВИ ТЫЩВ У· ВМК·У›˙ВИ
ЩЛ Ъ‡ıМИЫЛ ‰И·ОФ‹˜ ПВИЩФ˘ЪБ›·˜ ЩФ˘
¯ЪФУФ‰И·ОfiЩЛ (ТЪВ˜ Ф˘ ·ФМ¤УФ˘У
¤ˆ˜ ЩЛ ‰И·ОФ‹ ПВИЩФ˘ЪБ›·˜).
√ ¯ЪfiУФ˜ Ф˘ ВМК·У›˙ВЩ·И В›У·И
Ъ‡ıМИЫЛ OFF (7 ТЪВ˜) – Ъ‡ıМИЫЛ ON
(3 ТЪВ˜) = 4 ТЪВ˜.
™‚‹УВИ ЩФ ОПИМ·ЩИЫЩИОfi О·И
ı· ·Ъ·МВ›УВИ Ы‚ЛЫЩfi ¤ˆ˜
fiЩФ˘ О¿ФИФ˜ ЩФ ı¤ЫВИ Н·У¿
ЫВ ПВИЩФ˘ЪБ›·.
∏ ¤У‰ВИНЛ ВМК·У›˙ВИ ЩЛ Ъ‡ıМИЫЛ ‰И·ОФ‹˜
ПВИЩФ˘ЪБ›·˜ ЩФ˘ ¯ЪФУФ‰И·ОfiЩЛ (ТЪВ˜ Ф˘
·ФМ¤УФ˘У ¤ˆ˜ ЩЛ ‰И·ОФ‹ ПВИЩФ˘ЪБ›·˜).
∏ ¤У‰ВИНЛ ·ПП¿˙ВИ ТЫЩВ У· ВМК·У›˙ВИ
ЩЛ Ъ‡ıМИЫЛ ¤У·ЪНЛ˜ ПВИЩФ˘ЪБ›·˜ ЩФ˘
¯ЪФУФ‰И·ОfiЩЛ (ТЪВ˜ Ф˘ ·ФМ¤УФ˘У
¤ˆ˜ ЩЛУ ¤У·ЪНЛ ПВИЩФ˘ЪБ›·˜).
√ ¯ЪfiУФ˜ Ф˘ ВМК·У›˙ВЩ·И В›У·И
Ъ‡ıМИЫЛ ON (5 ТЪВ˜) – Ъ‡ıМИЫЛ OFF
(2 ТЪВ˜) = 3 ТЪВ˜.
∞У¿‚ВИ ЩФ ОПИМ·ЩИЫЩИОfi О·И
ı· Ы˘УВ¯›˙ВИ У· ПВИЩФ˘ЪБВ›
¤ˆ˜ fiЩФ˘ О¿ФИФ˜ ЩФ Ы‚‹ЫВИ.
7
˚C
˚C
SIMPLE
84
Page 85

AUTO OFF
7
ÃÚ‹ÛË ÙÔ˘ ¯ÚÔÓԉȷÎfiÙË ·˘ÙfiÌ·Ù˘ ‰È·ÎÔ‹˜
1. √ ¯ЪФУФ‰И·ОfiЩЛ˜ ·˘Щfi˜ НВОИУ¿ВИ ·УЩ›ЫЩЪФКЛ М¤ЩЪЛЫЛ fiЩ·У ·Ъ¯›ЫВИ ЩФ
ОПИМ·ЩИЫЩИОfi У· ПВИЩФ˘ЪБВ› О·И ‰И·ОfiЩВИ ЩЛ ПВИЩФ˘ЪБ›· ЩФ˘ ОПИМ·ЩИЫЩИОФ‡
fiЩ·У ·Ъ¤ПıВИ Ф Ъ˘ıМИЫМ¤УФ˜ ¯ЪfiУФ˜.
2. √È ‰È·ı¤ÛÈ̘ Ú˘ıÌ›ÛÂȘ Â›Ó·È ·fi 30 ÏÂÙ¿ ¤ˆ˜ 4 ÒÚ˜, Û ‚‹Ì·Ù· ÙˆÓ
30 ÏÂÙÒÓ.
¶·Ú·Ù‹ÚËÛË:
*1. ¢ВУ В›У·И ‰˘У·Щfi У· ¯ЪЛЫИМФФИЛıФ‡У Щ·˘Щfi¯ЪФУ·: В‚‰ФМ·‰И·›Ф˜
¯ÚÔÓԉȷÎfiÙ˘/·Ïfi˜ ¯ÚÔÓԉȷÎfiÙ˘/¯ÚÔÓԉȷÎfiÙ˘ ·˘ÙfiÌ·Ù˘
‰È·ÎÔ‹˜.
*2. √ ¯ЪФУФ‰И·ОfiЩЛ˜ ·˘ЩfiМ·ЩЛ˜ ‰И·ОФ‹˜ ‰ВУ ı· ПВИЩФ˘ЪБВ› fiЩ·У ИЫ¯‡ВИ М›·
·fi ЩИ˜ ВН‹˜ Ы˘Уı‹ОВ˜:
√ ¯ЪФУФ‰И·ОfiЩЛ˜ В›У·И ·УВУВЪБfi˜, ЩФ Ы‡ЫЩЛМ· ‰ВУ ‚Ъ›ЫОВЩ·И ЫВ
К˘ЫИФПФБИО‹ О·Щ¿ЫЩ·ЫЛ, ‚Ъ›ЫОВЩ·И ЫВ ВН¤ПИНЛ ‰ФОИМ‹, ЩФ ЩЛПВ¯ВИЪИЫЩ‹ЪИФ
Ъ·БМ·ЩФФИВ› ·˘ЩФ-¤ПВБ¯Ф ‹ ‰И¿БУˆЫЛ, Ф ¯Ъ‹ЫЩЛ˜ ‚Ъ›ЫОВЩ·И ЫЩЛ
‰И·‰ИО·Ы›· ВИПФБ‹˜ МИ·˜ ПВИЩФ˘ЪБ›·˜, Ф ¯Ъ‹ЫЩЛ˜ ‚Ъ›ЫОВЩ·И ЫЩЛ ‰И·‰ИО·Ы›·
Ъ‡ıМИЫЛ˜ ЩФ˘ ¯ЪФУФ‰И·ОfiЩЛ, ЩФ Ы‡ЫЩЛМ· ВП¤Б¯ВЩ·И ОВУЩЪИО¿. (™ЩИ˜
Ы˘Уı‹ОВ˜ ·˘Щ¤˜, ·ВУВЪБФФИВ›Щ·И Л ПВИЩФ˘ЪБ›· ¤У·ЪНЛ˜/‰И·ОФ‹˜).
AFTER OFF
INITIAL SETTING
INITIAL SETTING
CHECK TEST
CHECK TEST
CLEAR
AUTO OFF
ON/OFF
CIR.WATER
CIR.WATER
4
TEMP.
B
MENU
ON/OFF
MENU
MONITOR/SET
CLOCK
CLOCK CLEAR
ON/OFF
BACK
BACK DAY
PAR-W21MAA
2A9
ŒÏÂÁ¯Ô˜ Ù˘ ÙÚ¤¯Ô˘Û·˜ Ú‡ıÌÈÛ˘ ¯ÚÔÓԉȷÎfiÙË
·˘ÙfiÌ·Ù˘ ‰È·ÎÔ‹˜
ƒ‡ıÌÈÛË ¯ÚÔÓԉȷÎfiÙË
TIMER
AFTER
5
OFF
AUTO OFF
1
4
1. µÂ‚·Èˆı›Ù fiÙÈ ÂÌÊ·Ó›˙ÂÙ·È ÛÙËÓ ÔıfiÓË Ë ¤Ó‰ÂÈÍË “Auto Off” (ÛÙÔ 1).
2. ¶È¤ÛÙ ·Ú·ÙÂٷ̤ӷ ÙÔ Ï‹ÎÙÚÔ TIMER MENU B ÁÈ· 3 ‰Â˘ÙÂÚfiÏÂÙ·
БИ· У· ВМК·УИЫЩВ› ЩФ Monitor ЫЩЛУ ФıfiУЛ (ЫЩФ 4).
• √ ¯ÚfiÓÔ˜ Ô˘ ·Ô̤ÓÂÈ ¤ˆ˜ ÙË ‰È·ÎÔ‹ ÂÌÊ·Ó›˙ÂÙ·È ÛÙÔ 5.
3. °È· Ó· ÎÏ›ÛÂÙ ÙËÓ ·Ú·ÎÔÏÔ‡ıËÛË Î·È Ó· ÂÈÛÙÚ¤„ÂÙ ÛÙËÓ Ù˘È΋
ФıfiУЛ ВП¤Б¯Ф˘, И¤ЫЩВ ЩФ П‹ОЩЪФ ∆ЪfiФ §ВИЩФ˘ЪБ›·˜ (ВИЫЩЪФК‹˜) 2.
°И· У· ·ВУВЪБФФИ‹ЫВЩВ ЩФУ ¯ЪФУФ‰И·ОfiЩЛ
·˘ÙfiÌ·Ù˘ ‰È·ÎÔ‹˜...
• ¶È¤ÛÙ ·Ú·ÙÂٷ̤ӷ ÙÔ Ï‹ÎÙÚÔ TIMER ON/OFF 9 ÁÈ· 3 ‰Â˘ÙÂÚfiÏÂÙ·
ТЫЩВ У· ВМК·УИЫЩВ› Ф ‰В›ОЩЛ˜ ·УВУВЪБФ‡ ¯ЪФУФ‰И·ОfiЩЛ (ЫЩФ 6) Î·È Ó·
Û‚‹ÛÂÈ Ë ÙÈÌ‹ ÙÔ˘ ¯ÚÔÓԉȷÎfiÙË (ÛÙÔ 7).
7
AFTER OFF
˚C
AUTO OFF
6
˚C
GBDFEINLP
¶Ò˜ Ó· Ú˘ıÌ›ÛÂÙ ÙÔ ¯ÚÔÓԉȷÎfiÙË ·˘ÙfiÌ·Ù˘ ‰È·ÎÔ‹˜
ƒ‡ıÌÈÛË ¯ÚÔÓԉȷÎfiÙË
2
1. µВ‚·ИˆıВ›ЩВ fiЩИ ‚Ъ›ЫОВЫЩВ ЫВ Щ˘ИО‹ ФıfiУЛ ВП¤Б¯Ф˘ О·И ВМК·У›˙ВЩ·И Ф
‰В›ОЩЛ˜ ¯ЪФУФ‰И·ОfiЩЛ ·˘ЩfiМ·ЩЛ˜ ‰И·ОФ‹˜ ЫЩЛУ ¤У‰ВИНЛ (ЫЩФ 1).
ŸЩ·У ВМК·У›˙ВЩ·И ¤У‰ВИНЛ ‰И·КФЪВЩИО‹ ЩФ˘ ¯ЪФУФ‰И·ОfiЩЛ ·˘ЩfiМ·ЩЛ˜
‰И·ОФ‹˜, Ъ˘ıМ›ЫЩВ ЩЛУ ЫЩФ AUTO OFF TIMER ¯ЪЛЫИМФФИТУЩ·˜ ЩЛ Ъ‡ıМИЫЛ
ПВИЩФ˘ЪБ›·˜ ¯ЪФУФ‰И·ОfiЩЛ ЩЛ˜ ВИПФБ‹˜ ПВИЩФ˘ЪБ›·˜ (‚П. 3.[3]–3 (3)).
2. ¶È¤ÛÙ ·Ú·ÙÂٷ̤ӷ ÙÔ Ï‹ÎÙÚÔ TIMER MENU B ÁÈ· 3 ‰Â˘ÙÂÚfiÏÂÙ·
БИ· У· ВМК·УИЫЩВ› ЩФ Set Up ЫЩЛУ ФıfiУЛ (ЫЩФ 2).
(™ЛМВИТЫ·ЩВ fiЩИ, МВ О¿ıВ ¿ЩЛМ· ЩФ˘ П‹ОЩЪФ˘, ·ПП¿˙ВИ Л ¤У‰ВИНЛ МВЩ·Н‡
Set Up О·И Monitor).
3. ¶И¤ЫЩВ ЩФ О·Щ¿ППЛПФ П‹ОЩЪФ Ъ‡ıМИЫЛ˜ ¯ЪfiУФ˘ A, fiˆ˜ ··ÈÙ›ٷÈ, ÁÈ·
Ó· Ú˘ıÌ›ÛÂÙ ÙÔ ¯ÚfiÓÔ ‰È·ÎÔ‹˜ (ÛÙÔ 3).
4. ¶È¤ÛÙ ÙÔ Ï‹ÎÙÚÔ CIR.WATER
¶·Ú·Ù‹ÚËÛË:
∏ О·Щ·¯ТЪИЫЛ Ф˘ О¿У·ЩВ ı· ·О˘ЪˆıВ› ·У И¤ЫВЩВ ЩФ П‹ОЩЪФ ∆ЪfiФ
§ВИЩФ˘ЪБ›·˜ (ВИЫЩЪФК‹˜) 2 ÚÈÓ È¤ÛÂÙ ÙÔ Ï‹ÎÙÚÔ CIR.WATER
5. ¶И¤ЫЩВ ЩФ П‹ОЩЪФ ∆ЪfiФ §ВИЩФ˘ЪБ›·˜ (ВИЫЩЪФК‹˜) 2 БИ· У·
ФПФОПЛЪТЫВЩВ ЩЛ ‰И·‰ИО·Ы›· Ъ‡ıМИЫЛ˜ О·И У· ВИЫЩЪ¤„ВЩВ ЫЩЛУ Щ˘ИО‹
ФıfiУЛ ВП¤Б¯Ф˘.
6. ™В ВЪ›ЩˆЫЛ Ф˘ ПВИЩФ˘ЪБВ› ‹‰Л ЩФ ОПИМ·ЩИЫЩИОfi, Ф ¯ЪФУФ‰И·ОfiЩЛ˜
·Ъ¯›˙ВИ ·М¤Ыˆ˜ ЩЛУ ·УЩ›ЫЩЪФКЛ М¤ЩЪЛЫЛ.
ÛˆÛÙ¿ Ë Ú‡ıÌÈÛË ¯ÚÔÓԉȷÎfiÙË ÛÙËÓ ¤Ó‰ÂÈÍË.
3
AFTER OFF
4 БИ· У· ОПВИ‰ТЫВЩВ ЩЛ Ъ‡ıМИЫЛ.
AUTO OFF
1
µÂ‚·Èˆı›Ù fiÙÈ ÂÌÊ·Ó›˙ÂÙ·È
4.
• ∂У·ПП·ОЩИО¿, Ы‚‹ЫЩВ ЩФ ›‰ИФ ЩФ ОПИМ·ЩИЫЩИОfi. £· Ы‚‹ЫВИ Л ЩИМ‹ ЩФ˘
¯ÚÔÓԉȷÎfiÙË (ÛÙÔ 7) ·fi ÙËÓ ÔıfiÓË.
°И· У· НВОИУ‹ЫВЩВ ЩФУ ¯ЪФУФ‰И·ОfiЩЛ ·˘ЩfiМ·ЩЛ˜
‰И·ОФ‹˜...
• ¶È¤ÛÙ ·Ú·ÙÂٷ̤ӷ ÙÔ Ï‹ÎÙÚÔ TIMER ON/OFF 9 ÁÈ· 3 ‰Â˘ÙÂÚfiÏÂÙ·.
™‚‹ÓÂÈ Ë ¤Ó‰ÂÈÍË “Timer Off” (ÛÙÔ 6) Î·È ÛÙËÓ ÔıfiÓË ÂÌÊ·Ó›˙ÂÙ·È Ë Ú‡ıÌÈÛË
¯ÚÔÓԉȷÎfiÙË (ÛÙÔ 7).
• ∂У·ПП·ОЩИО¿, ·У¿„ЩВ ЩФ ОПИМ·ЩИЫЩИОfi. ∏ ЩИМ‹ ЩФ˘ ¯ЪФУФ‰И·ОfiЩЛ ı·
ВМК·УИЫЩВ› ЫЩФ 7.
7
AFTER OFF
˚C
AUTO OFF
6
˚C
GRRUTRGBGBGBGBGB
85
Page 86

3. ∂ИПФБ‹ ПВИЩФ˘ЪБ›·˜
PAR-W21MAA
ON/OFF
TEMP.
MENU
BACK DAY
CHECK TEST
MONITOR/SET
CLOCK CLEAR
ON/OFF
INITIAL SETTING
CIR.WATER
F
G
C
D
B
I
A
H
E
∂ИПФБ‹ ПВИЩФ˘ЪБ›·˜ ЩЛПВ¯ВИЪИЫЩЛЪ›Ф˘
∏ Ъ‡ıМИЫЛ ЩˆУ ·ОfiПФ˘ıˆУ ПВИЩФ˘ЪБИТУ ЩЛПВ¯ВИЪИЫЩЛЪ›Ф˘ МФЪВ› У· ·ПП¿НВИ МВ ЩЛ ¯Ъ‹ЫЛ ЩЛ˜ ВИПФБ‹˜ ПВИЩФ˘ЪБ›·˜ ЩФ˘ ЩЛПВ¯ВИЪИЫЩЛЪ›Ф˘. ∞ПП¿НЩВ ЩИ˜ Ъ˘ıМ›ЫВИ˜
fiЩ·У В›У·И ··Ъ·›ЩЛЩФ.
™ÙÔÈ¯Â›Ô 1
1. ∞ПП·Б‹ БПТЫЫ·˜
™ÙÔÈ¯Â›Ô 2
ƒ‡ıМИЫЛ БПТЫЫ·˜ ВМК¿УИЫЛ˜
• ∂›У·И ‰˘У·Щ‹ Л ВМК¿УИЫЛ ЩˆУ ВУ‰В›НВˆУ ЫВ ФПП¤˜ БПТЫЫВ˜
™ЩФИ¯В›Ф 3 (¶ПЛЪФКФЪ›В˜ Ъ‡ıМИЫЛ˜)
(“CHANGE
LANGUAGE”)
2. ŸЪИФ ПВИЩФ˘ЪБ›·˜
(“FUNCTION
SELECTION”)
3. ∂ИПФБ‹
ПВИЩФ˘ЪБ›·˜
(“MODE SELECTION”)
GBDFEINLP
4. ∞ÏÏ·Á‹ ÂӉ›ÍˆÓ
(“DISP MODE
SETTING”)
(1) ƒ‡ıМИЫЛ ФЪ›Ф˘ ПВИЩФ˘ЪБ›·˜ (ПВИЩФ˘ЪБ›· ОПВИ‰ТМ·ЩФ˜)
(“LOCKING FUNCTION”)
(2)
ƒ‡ıМИЫЛ ·Ъ¿О·М„Л˜ ЩЪfiФ˘ ПВИЩФ˘ЪБ›·˜ (“SELECT MODE”)
(3)
ƒ‡ıМИЫЛ В‡ЪФ˘˜ ıВЪМФОЪ·Ы›·˜ (“LIMIT TEMP FUNCTION”)
(1) ƒ‡ıМИЫЛ О‡ЪИФ˘/‰В˘ЩВЪВ‡ФУЩФ˜ ЩЛПВ¯ВИЪИЫЩЛЪ›Ф˘
(“CONTROLLER MAIN/SUB”)
(2) ƒ‡ıÌÈÛË ÒÚ·˜ (“CLOCK”)
(3)
ƒ‡ıМИЫЛ ПВИЩФ˘ЪБ›·˜ ¯ЪФУФ‰И·ОfiЩЛ (“WEEKLY TIMER”)
(4) ƒ‡ıМИЫЛ ·ЪИıМФ‡ ВИОФИУˆУ›·˜ ЫВ ВЪ›ЩˆЫЛ ЩВ¯УИОФ‡
ÚÔ‚Ï‹Ì·ÙÔ˜ (“CALL.”)
(5)
ƒ‡ıМИЫЛ ·ВУВЪБФФ›ЛЫЛ˜ ЩЛ˜ Ъ˘ıМИЫМ¤УЛ˜ ıВЪМФОЪ·Ы›·˜ (“TEMP OFF SET FUNCTION”)
(1)
∂ИПФБ‹ МФУ¿‰·˜ М¤ЩЪЛЫЛ˜ ıВЪМФОЪ·Ы›·˜ ЖC/ЖF (“TEMP MODE ЖC/ЖF”)
(2) ƒ‡ıМИЫЛ ¤У‰ВИНЛ˜ ıВЪМФОЪ·Ы›·˜ УВЪФ‡ (“WATER
• ƒ‡ıМИЫЛ ЩФ˘ В‡ЪФ˘˜ ЩФ˘ ФЪ›Ф˘ ПВИЩФ˘ЪБ›·˜ (ПВИЩФ˘ЪБ›· ОПВИ‰ТМ·ЩФ˜)
• ƒ‡ıМИЫЛ ЩЛ˜ ¯Ъ‹ЫЛ˜ ‹ МЛ О¿ıВ ЩЪfiФ˘ ПВИЩФ˘ЪБ›·˜
•
ƒ‡ıМИЫЛ ЩФ˘ В‡ЪФ˘˜ ВИПВБfiМВУЛ˜ ıВЪМФОЪ·Ы›·˜ (М¤БИЫЩЛ ЩИМ‹, ВП¿¯ИЫЩЛ ЩИМ‹)
• ∂ИПФБ‹ ЩФ˘ О˘Ъ›Ф˘ ‹ ЩФ˘ ‰В˘ЩВЪВ‡ФУЩФ˜ ЩЛПВ¯ВИЪИЫЩЛЪ›Ф˘
* ŸЩ·У Ы˘У‰¤ФУЩ·И ‰‡Ф ЩЛПВ¯ВИЪИЫЩ‹ЪИ· ЫВ М›· ФМ¿‰·, ЩФ ¤У·
ЩЛПВ¯ВИЪИЫЩ‹ЪИФ Ъ¤ВИ У· ФЪИЫЩВ› ˆ˜ ‰В˘ЩВЪВ‡ФУ.
• ∂УВЪБФФ›ЛЫЛ ‹ МЛ ЩЛ˜ ПВИЩФ˘ЪБ›·˜ ЪФПФБИФ‡
• ƒ‡ıМИЫЛ ЩФ˘ Щ‡Ф˘ ¯ЪФУФМ¤ЩЪФ˘
• ∞ЪИıМfi˜ ВИОФИУˆУ›·˜ ЫВ ВЪ›ЩˆЫЛ ЩВ¯УИОФ‡ ЪФ‚П‹М·ЩФ˜
• ∂ИПФБ‹ ЩФ˘ ·ЪИıМФ‡ ЩЛПВКТУФ˘
•
ƒ‡ıМИЫЛ ЩЛ˜ ¯Ъ‹ЫЛ˜ ‹ МЛ ЩЛ˜ ВИПВБМ¤УЛ˜ ıВЪМФОЪ·Ы›·˜ ВНФИОФУfiМЛЫЛ˜ ВУ¤ЪБВИ·˜
• ƒ‡ıМИЫЛ ЩЛ˜ МФУ¿‰·˜ ıВЪМФОЪ·Ы›·˜ (ЖC ‹ ЖF) Ф˘ ı· ВМК·У›˙ВЩ·И
• ƒ‡ıМИЫЛ ЩЛ˜ ВМК¿УИЫЛ˜ ‹ МЛ ЩЛ˜ ¤У‰ВИНЛ˜ ıВЪМФОЪ·Ы›·˜ УВЪФ‡
TEMP DISP SELECT”)
¢И¿БЪ·ММ· ВИПФБ‹˜ ПВИЩФ˘ЪБ›·˜
[1] ™Щ·М·Щ‹ЫЩВ ЩЛ ПВИЩФ˘ЪБ›· ЩФ˘ ОПИМ·ЩИЫЩИОФ‡ БИ· У· НВОИУ‹ЫВИ Л ВИПФБ‹ ПВИЩФ˘ЪБ›·˜ ·fi ЩФ ЩЛПВ¯ВИЪИЫЩ‹ЪИФ. → [2] ∫¿ÓÙ ̛· ÂÈÏÔÁ‹ ·fi ÙÔ ÛÙÔÈ¯Â›Ô 1. →
[3] ∫¿ÓÙ ̛· ÂÈÏÔÁ‹ ·fi ÙÔ ÛÙÔÈ¯Â›Ô 2. → [4] ∫¿УЩВ ЩЛ Ъ‡ıМИЫЛ. (√И ПВЩФМ¤ЪВИВ˜ ВВНЛБФ‡УЩ·И ЫЩФ ЫЩФИ¯В›Ф 3) → [5] √ÏÔÎÏ‹ÚˆÛË Ú‡ıÌÈÛ˘. → [6] ∞ПП·Б‹
ЩˆУ ВУ‰В›НВˆУ ФıfiУЛ˜ ЫЩИ˜ О·УФУИО¤˜. (∆¤ПФ˜)
∫·УФУИО¤˜ ВУ‰В›НВИ˜ (∂У‰В›НВИ˜ fiЩ·У
ЩФ ОПИМ·ЩИЫЩИОfi ‰ВУ ПВИЩФ˘ЪБВ›)
(∫Ú·Ù‹ÛÙ ·ÙË̤ÓÔ ÙÔ ÎÔ˘Ì› E Î·È ·Ù‹ÛÙ ÙÔ ÎÔ˘Ì›
D ÁÈ· ‰‡Ô ‰Â˘ÙÂÚfiÏÂÙ·.)
*
∏ ¤У‰ВИНЛ ‰ВУ В›У·И ‰˘У·ЩfiУ У· ·ПП¿НВИ ЫЩЛ ‰И¿ЪОВИ· ЩЛ˜
‰ФОИМ·ЫЩИО‹˜ ПВИЩФ˘ЪБ›·˜ О·И ЩЛ˜ ПВИЩФ˘ЪБ›·˜ ·˘ЩФ‰И¿БУˆЫЛ˜.
™ÙÔÈ¯Â›Ô 1 ∂ÈÏÔÁ‹ ПВИЩФ˘ЪБ›·˜
¶·Ù‹ÛÙ ÙÔ ÎÔ˘Ì› G.
¶·Ù‹ÛÙÂ ÙÔ
ÎÔ˘Ì› E.
¶·Ù‹ÛÙÂ ÙÔ
ÎÔ˘Ì› G.
¶·Ù‹ÛÙÂ ÙÔ
ÎÔ˘Ì› E.
¶·Ù‹ÛÙÂ ÙÔ
ÎÔ˘Ì› G.
¶·Ù‹ÛÙÂ ÙÔ
ÎÔ˘Ì› E.
→
ƒ‡ıМИЫЛ ФЪ›Ф˘ ПВИЩФ˘ЪБ›·˜ (“LOCKING FUNCTION”)
ƒ‡ıМИЫЛ ·Ъ¿О·М„Л˜ ЩЪfiФ˘ ПВИЩФ˘ЪБ›·˜
ƒ‡ıМИЫЛ В‡ЪФ˘˜ ıВЪМФОЪ·Ы›·˜ (“LIMIT TEMP FUNCTION”)
→
ƒ‡ıМИЫЛ О‡ЪИФ˘/‰В˘ЩВЪВ‡ФУЩФ˜ ЩЛПВ¯ВИЪИЫЩЛЪ›Ф˘ (“CONTROLLER MAIN/SUB”)
ƒ‡ıÌÈÛË ÒÚ·˜ (“CLOCK”)
ƒ‡ıМИЫЛ ПВИЩФ˘ЪБ›·˜ ¯ЪФУФ‰И·ОfiЩЛ (“WEEKLY TIMER”)
ƒ‡ıМИЫЛ ·ЪИıМФ‡ ВИОФИУˆУ›·˜ ЫВ ВЪ›ЩˆЫЛ ЩВ¯УИОФ‡ ЪФ‚П‹М·ЩФ˜ (“CALL.”)
GRRUTRGBGBGBGBGB
∞ПП·Б‹ БПТЫЫ·˜
(“CHANGE LANGUAGE”)
ŸЪИФ ПВИЩФ˘ЪБ›·˜
(“FUNCTION
SELECTION”)
¶·Ù‹ÛÙÂ ÙÔ
ÎÔ˘Ì› E.
∂ИПФБ‹ ПВИЩФ˘ЪБ›·˜
(“MODE
SELECTION”)
ЩЛПВ¯ВИЪИЫЩЛЪ›Ф˘
™ÙÔÈ¯Â›Ô 2
→
→
→→→
→
ƒ‡ıМИЫЛ ·ВУВЪБФФ›ЛЫЛ˜ ЩЛ˜ Ъ˘ıМИЫМ¤УЛ˜ ıВЪМФОЪ·Ы›·˜ (“TEMP OFF SET FUNCTION”)
∞ÏÏ·Á‹ ÂӉ›ÍˆÓ
(“DISP MODE
SETTING”)
¶·Ù‹ÛÙÂ ÙÔ
ÎÔ˘Ì› G.
→
∂ИПФБ‹ МФУ¿‰·˜ М¤ЩЪЛЫЛ˜ ıВЪМФОЪ·Ы›·˜ ЖC/ЖF (“TEMP MODE ЖC/ЖF”)
→
ƒ‡ıМИЫЛ ¤У‰ВИНЛ˜ ıВЪМФОЪ·Ы›·˜ УВЪФ‡ (“WATER TEMP DISP SELECT”)
(∫Ú·Ù‹ÛÙ ·ÙË̤ÓÔ ÙÔ ÎÔ˘Ì› E
Î·È ·Ù‹ÛÙ ÙÔ ÎÔ˘Ì› D БИ· ‰‡Ф
‰В˘ЩВЪfiПВЩ·.)
* ∆Ф ЩЛПВ¯ВИЪИЫЩ‹ЪИФ О·Щ·БЪ¿КВИ
ÙË Ú‡ıÌÈÛË Ô˘ Ú·ÁÌ·ÙÔÔÈ›ٷÈ
Ì ·˘Ù‹ ÙË ‰È·‰Èηۛ·.
¶·Ù‹ÛÙ ÙÔ ÎÔ˘Ì› G.
(“SELECT MODE”)
¶·Ù‹ÛÙ ÙÔ ÎÔ˘Ì› G.
¶·Ù‹ÛÙ ÙÔ ÎÔ˘Ì› G.
¶·Ù‹ÛÙÂ ÙÔ
ÎÔ˘Ì› D.
¶·Ù‹ÛÙÂ ÙÔ
ÎÔ˘Ì› D.
¶·Ù‹ÛÙÂ ÙÔ
ÎÔ˘Ì› D.
™∏ª∂πш™∏
∏ ПВИЩФ˘ЪБ›· ЩФ˘ ¯ЪФУФ‰И·ОfiЩЛ ЫЩ·М·Щ¿ВИ
fiЩ·У Л ¤У‰ВИНЛ БИ· ЩЛУ ВИПФБ‹ ПВИЩФ˘ЪБ›·˜
ЩЛПВ¯ВИЪИЫЩЛЪ›Ф˘ ·ПП¿˙ВИ ЫЩЛУ О·УФУИО‹.
µÏ. [3]–1
™ÙÔÈ¯Â›Ô 3
(¶ПЛЪФКФЪ›В˜ Ъ‡ıМИЫЛ˜)
µÏ. [3]–2. (1)
µÏ. [3]–2. (2)
µÏ. [3]–2. (3)
µÏ. [3]–3. (1)
[3]–3. (2)
µÏ.
µÏ. [3]–3. (3)
µÏ. [3]–3. (4)
µÏ. [3]–3. (5)
µÏ. [3]–4. (1)
µÏ. [3]–4. (2)
√ıfiУЛ ОФ˘О›‰ˆУ
∏ БПТЫЫ· Ф˘ ¤¯ВИ ВИПВ¯ıВ› ЫЩЛУ
О·Щ¿ЫЩ·ЫЛ ПВИЩФ˘ЪБ›·˜ CHANGE LANGUAGE (∞§§∞°∏ °§ш™™∞™)
ВМК·У›˙ВЩ·И ЫВ ·˘Щ‹ ЩЛУ ФıfiУЛ. ™В
·˘Ùfi ÙÔ ÂÁ¯ÂÈÚ›‰ÈÔ ¤¯Ô˘Ó ÂÈϯı› Ù·
·ББПИО¿.
86
Page 87
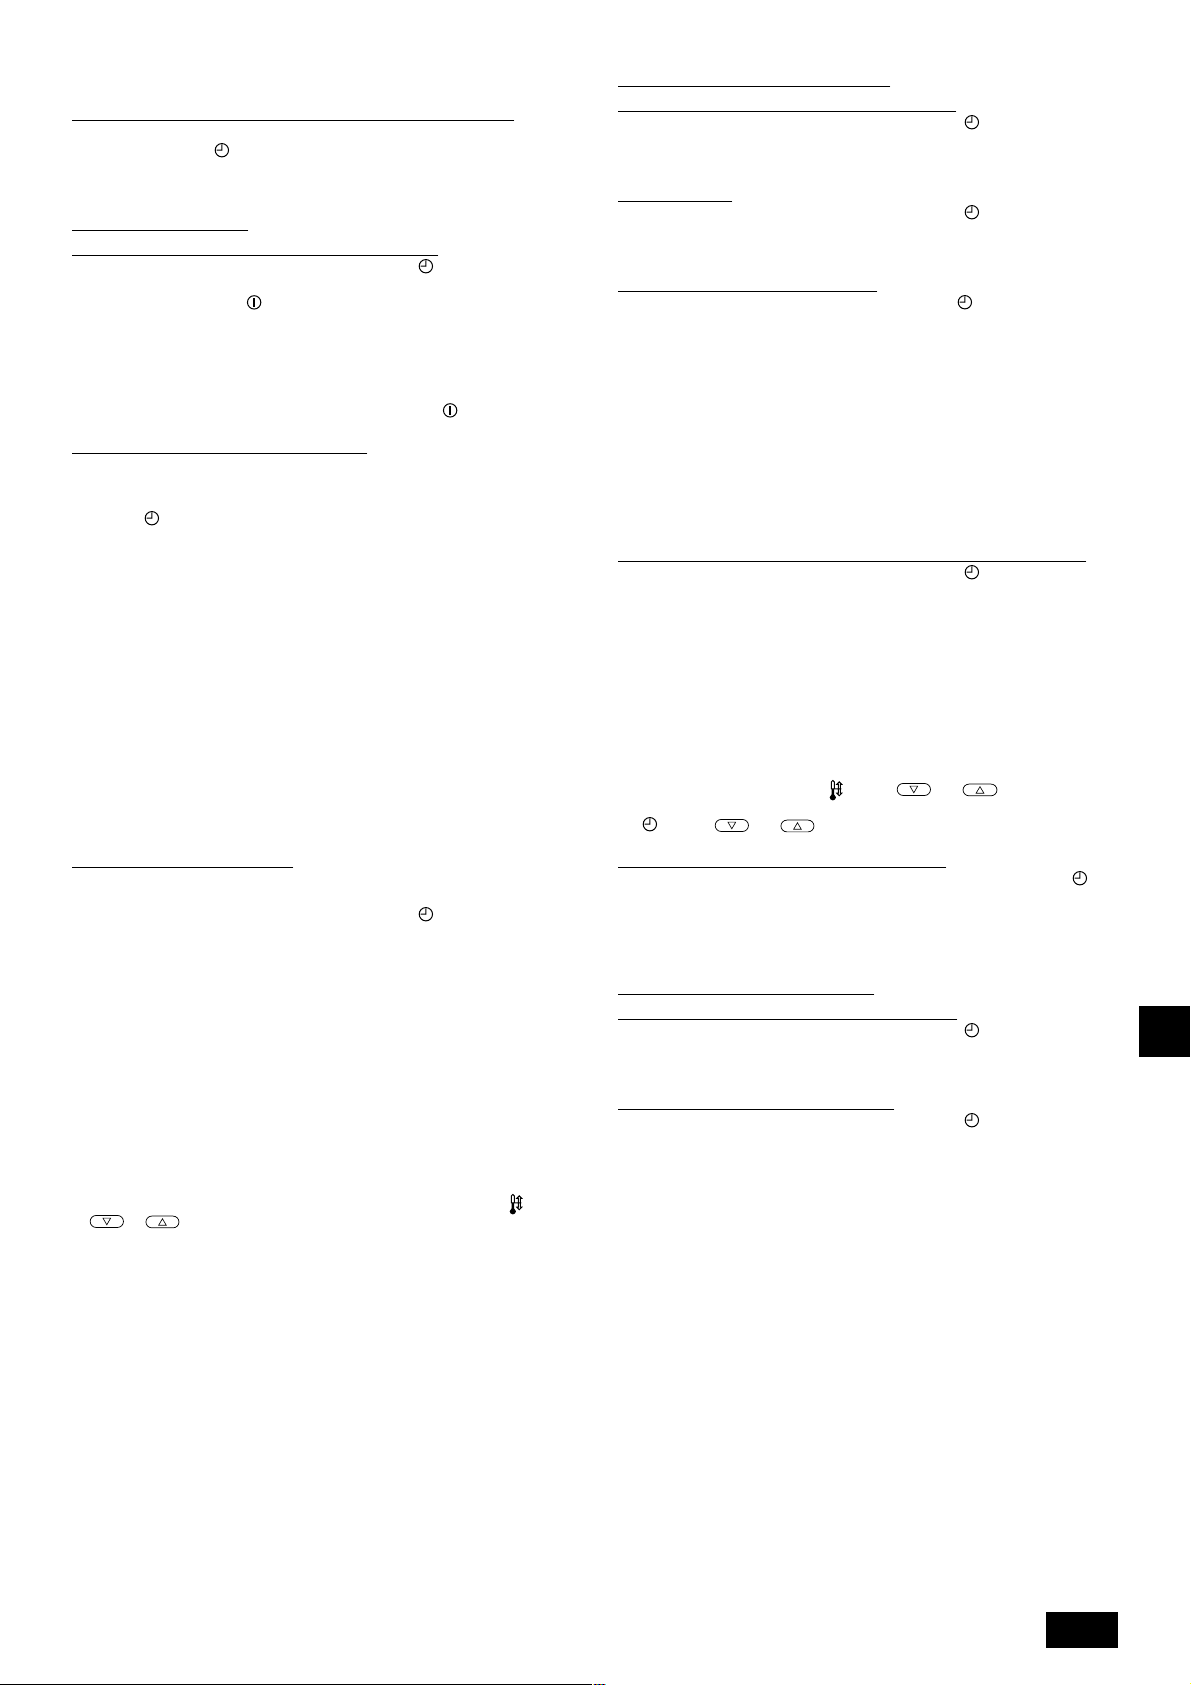
§ÂÙÔ̤ÚÂȘ Ú‡ıÌÈÛ˘
[3]–1. ƒ‡ıÌÈÛË CHANGE LANGUAGE (∞§§∞°∏ °§ø™™∞™)
ªФЪВ› У· ВИПВ¯ıВ› Л БПТЫЫ· Ф˘ ı· ВМК·У›˙ВЩ·И ЫЩЛУ ФıfiУЛ ОФ˘О›‰ˆУ.
• ¶È¤ÛÙ ÙÔ ÎÔ˘Ì› [
1 ∞ББПИО¿ (GB), 2 °ÂÚÌ·ÓÈο (D), 3 πÛ·ÓÈο (E), 4 ƒˆÛÈο (RU),
5 πÙ·ÏÈο (I), 6 °·ÏÏÈο (F), 7 ™Ô˘Ë‰Èο
[3]–2. ŸЪИФ ПВИЩФ˘ЪБ›·˜
(1) ƒ‡ıМИЫЛ ФЪ›Ф˘ ПВИЩФ˘ЪБ›·˜ (ПВИЩФ˘ЪБ›· ОПВИ‰ТМ·ЩФ˜)
• °È· Ó· ·ÏÏ¿ÍÂÙ ÙË Ú‡ıÌÈÛË, ·Ù‹ÛÙ ÙÔ ÎÔ˘Ì› [
1 no1 : ∏ Ъ‡ıМИЫЛ ЩЛ˜ ПВИЩФ˘ЪБ›·˜ ОПВИ‰ТМ·ЩФ˜ ИЫ¯‡ВИ БИ· fiП· Щ· ОФ˘МИ¿
ÂÎÙfi˜ ·fi ÙÔ [
2 no2 : ∏ Ъ‡ıМИЫЛ ЩЛ˜ ПВИЩФ˘ЪБ›·˜ ОПВИ‰ТМ·ЩФ˜ ИЫ¯‡ВИ БИ· fiП· Щ· ОФ˘МИ¿.
3 OFF (∆ИМ‹ ·Ъ¯ИО‹˜ Ъ‡ıМИЫЛ˜) : ∏ ПВИЩФ˘ЪБ›· ОПВИ‰ТМ·ЩФ˜ ‰ВУ В›У·И
* °И· У· ВУВЪБФФИ‹ЫВЩВ ЩЛ Ъ‡ıМИЫЛ ПВИЩФ˘ЪБ›·˜ ОПВИ‰ТМ·ЩФ˜ ЫЩЛУ О·УФУИО‹
ÔıfiÓË, Â›Ó·È ··Ú·›ÙËÙÔ Ó· ·Ù‹ÛÂÙ οÔÈ· ÎÔ˘ÌÈ¿ (¶·Ù‹ÛÙ ٷ˘Ùfi¯ÚÔÓ·
Î·È ÎÚ·Ù‹ÛÙ ·ÙË̤ӷ Ù· ÎÔ˘ÌÈ¿ [CIR.WATER] Î·È [
‰В˘ЩВЪfiПВЩ·) ЫЩЛУ О·УФУИО‹ ФıfiУЛ ·КФ‡ Б›УВИ Л ·Ъ·¿Уˆ Ъ‡ıМИЫЛ.
(2) ƒ‡ıМИЫЛ ·Ъ¿О·М„Л˜ ЩЪfiФ˘ ПВИЩФ˘ЪБ›·˜
∞КФ‡ Ъ·БМ·ЩФФИЛıВ› Л ·ПП·Б‹ ЩЛ˜ Ъ‡ıМИЫЛ˜, МФЪВ›ЩВ У· ВИП¤НВЩВ ¤У·У
·fi ЩФ˘˜ ‰И·ı¤ЫИМФ˘˜ ЩЪfiФ˘˜ ПВИЩФ˘ЪБ›·˜.
• °И· ВУ·ПП·Б‹ МВЩ·Н‡ ЩˆУ ·Ъ·О¿Щˆ Ъ˘ıМ›ЫВˆУ ПВИЩФ˘ЪБ›·˜, ·Щ‹ЫЩВ ЩФ
ÎÔ˘Ì› [
1 Heating : ƒ˘ıМ›˙ВИ ЩЛ ¯Ъ‹ЫЛ ‹ МЛ ЩЛ˜ ПВИЩФ˘ЪБ›·˜
2 Heating ECO : ƒ˘ıМ›˙ВИ ЩЛ ¯Ъ‹ЫЛ ‹ МЛ ЩЛ˜ ПВИЩФ˘ЪБ›·˜
3 Hot Water : ƒ˘ıМ›˙ВИ ЩЛ ¯Ъ‹ЫЛ ‹ МЛ ЩЛ˜ ПВИЩФ˘ЪБ›·˜ Hot
4 Anti-freeze : ƒ˘ıМ›˙ВИ ЩЛ ¯Ъ‹ЫЛ ‹ МЛ ЩЛ˜ ПВИЩФ˘ЪБ›·˜ Anti-
5 Cooling : ƒ˘ıМ›˙ВИ ЩЛ ¯Ъ‹ЫЛ ‹ МЛ ЩЛ˜ ПВИЩФ˘ЪБ›·˜
6 OFF (
* ŸÙ·Ó ÂÈϯı› ÌÈ· Ú‡ıÌÈÛË ÂÎÙfi˜ Ù˘ Ú‡ıÌÈÛ˘ OFF, ·Ú·Î¿ÌÙÔÓÙ·È
* ŒУ·˜ ЩЪfiФ˜ ПВИЩФ˘ЪБ›·˜ Ф˘ ‰ВУ В›У·И ‰И·ı¤ЫИМФ˜ ЫЩЛ МФУ¿‰· ‰ВУ
(3) ƒ‡ıМИЫЛ В‡ЪФ˘˜ ıВЪМФОЪ·Ы›·˜
∞КФ‡ Ъ·БМ·ЩФФИЛıВ› ·˘Щ‹ Л Ъ‡ıМИЫЛ, МФЪВ› У· ВИПВ¯ıВ› М›· ıВЪМФОЪ·Ы›·
·У¿МВЫ· ЫЩФ О·ıФЪИЫМ¤УФ В‡ЪФ˜.
• °È· Ó· ·ÏÏ¿ÍÂÙ ÙË Ú‡ıÌÈÛË, ·Ù‹ÛÙ ÙÔ ÎÔ˘Ì› [
1 LIMIT TEMP HEATING MODE:
2 LIMIT TEMP HOT WATER MODE:
3 LIMIT TEMP ANTI-FREEZE MODE:
4 LIMIT TEMP COOLING MODE:
5 OFF (·Ъ¯ИО‹ Ъ‡ıМИЫЛ) : ∆Ф В‡ЪФ˜ ıВЪМФОЪ·Ы›·˜ ‰ВУ В›У·И ВУВЪБfi.
* ŸÙ·Ó Á›ÓÂÈ Ú‡ıÌÈÛË ¿ÏÏË ¤Ú·Ó Ù˘ OFF (∞¶∂¡∂ƒ°√¶√π∏™∏), Á›ÓÂÙ·È
Щ·˘Щfi¯ЪФУ· Л Ъ‡ıМИЫЛ ЩФ˘ В‡ЪФ˘˜ ıВЪМФОЪ·Ы›·˜ БИ· ЩИ˜ ПВИЩФ˘ЪБ›В˜
·˘ÙfiÌ·ÙË, „‡ÍË Î·È ı¤ÚÌ·ÓÛË. ŸÌˆ˜, ‰ÂÓ Â›Ó·È ‰˘Ó·Ùfi Ó· ÙÂı› fiÚÈÔ ÁÈ· ÙÔ
В‡ЪФ˜ fiЩ·У ‰ВУ ¤¯ВИ ·ПП¿НВИ Л ВИПВБМ¤УЛ ıВЪМФОЪ·Ы›·.
• °И· У· ·˘Н‹ЫВЩВ ‹ У· МВИТЫВЩВ ЩЛ ıВЪМФОЪ·Ы›·, ·Щ‹ЫЩВ ЩФ ОФ˘М› [
• ∂‡ÚÔ˜ Ú‡ıÌÈÛ˘
§ВИЩФ˘ЪБ›· Hot Water : ∫·ЩТЩВЪФ fiЪИФ: 30 ~ 70 ЖC (87 ~ 158 ЖF)
§ÂÈÙÔ˘ÚÁ›· Heating : ∫·ЩТЩВЪФ fiЪИФ: 30 ~ 45 ЖC (87 ~ 113 ЖF)
§ÂÈÙÔ˘ÚÁ›· Cooling : ∫·ЩТЩВЪФ fiЪИФ: 10 ~ 30 ЖC (50 ~ 87 ЖF)
* ∆Ô Â‡ÚÔ˜ Ú‡ıÌÈÛ˘ ·ÏÏ¿˙ÂÈ ·Ó¿ÏÔÁ· Ì ÙË Û˘Ó‰Â‰Â̤ÓË ÌÔÓ¿‰·.
ON/OFF].
·Ú¯È΋ ÙÈÌ‹ Ú‡ıÌÈÛ˘
Щ·˘Щfi¯ЪФУ· ФИ ПВИЩФ˘ЪБ›В˜ Heating, Heating ECO, Hot Water, Anti-freeze
О·И Cooling.
МФЪВ› У· ¯ЪЛЫИМФФИЛıВ› ·ОfiМЛ О·И ·У Л Ъ‡ıМИЫЛ В›У·И “AVAILABLE”
(¢π∞£∂™πª∏).
∆Ф В‡ЪФ˜ ıВЪМФОЪ·Ы›·˜ МФЪВ› У· ·ПП¿НВИ ЫВ ПВИЩФ˘ЪБ›· ı¤ЪМ·УЫЛ˜.
∆Ф В‡ЪФ˜ ıВЪМФОЪ·Ы›·˜ МФЪВ› У· ·ПП¿НВИ ЫВ ПВИЩФ˘ЪБ›· ı¤ЪМ·УЫЛ˜/
ıВЪМФ‡ УВЪФ‡.
∆Ф В‡ЪФ˜ ıВЪМФОЪ·Ы›·˜ МФЪВ› У· ·ПП¿НВИ ЫВ ПВИЩФ˘ЪБ›· ·ФК˘Б‹˜
·БВЩФ‡.
∆Ф В‡ЪФ˜ ıВЪМФОЪ·Ы›·˜ МФЪВ› У· ·ПП¿НВИ ЫВ ПВИЩФ˘ЪБ›· „‡НЛ˜.
‹ ].
MENU] БИ· У· ·ПП¿НВЩВ ЩЛ БПТЫЫ·.
ON/OFF].
ON/OFF].
ВУВЪБФФИЛМ¤УЛ.
ON/OFF] ÁÈ· ‰‡Ô
ı¤ÚÌ·ÓÛ˘.
Heating ECO.
Water.
freeze.
Cooling.
) : ¢ВУ ВОЩВПВ›Щ·И ·Ъ¿О·М„Л ЩФ˘ ЩЪfiФ˘
ПВИЩФ˘ЪБ›·˜.
ON/OFF].
TEMP.
∞УТЩВЪФ fiЪИФ: 70 ~ 30 ЖC (158 ~ 87 ЖF)
∞УТЩВЪФ fiЪИФ: 45 ~ 30 ЖC (113 ~ 87 ЖF)
∞УТЩВЪФ fiЪИФ: 30 ~ 10 ЖC (87 ~ 50 ЖF)
[3]–3. ƒ‡ıМИЫЛ ВИПФБ‹˜ ПВИЩФ˘ЪБ›·˜
(1) ƒ‡ıМИЫЛ О‡ЪИФ˘/‰В˘ЩВЪВ‡ФУЩФ˜ ЩЛПВ¯ВИЪИЫЩЛЪ›Ф˘
• °È· Ó· ·ÏÏ¿ÍÂÙ ÙË Ú‡ıÌÈÛË, ·Ù‹ÛÙ ÙÔ ÎÔ˘Ì› [
1 Main : ∆Ф ЩЛПВ¯ВИЪИЫЩ‹ЪИФ ı· В›У·И ЩФ О‡ЪИФ ЩЛПВ¯ВИЪИЫЩ‹ЪИФ.
2 Sub : ∆Ф ЩЛПВ¯ВИЪИЫЩ‹ЪИФ ı· В›У·И ЩФ ‰В˘ЩВЪВ‡ФУ ЩЛПВ¯ВИЪИЫЩ‹ЪИФ.
(2) ƒ‡ıÌÈÛË ÒÚ·˜
• °È· Ó· ·ÏÏ¿ÍÂÙ ÙË Ú‡ıÌÈÛË, ·Ù‹ÛÙ ÙÔ ÎÔ˘Ì› [
1 ON : ∏ ПВИЩФ˘ЪБ›· ЪФПФБИФ‡ В›У·И ВУВЪБФФИЛМ¤УЛ.
2 OFF : ∏ ПВИЩФ˘ЪБ›· ЪФПФБИФ‡ ‰ВУ В›У·И ВУВЪБФФИЛМ¤УЛ.
(3) ƒ‡ıМИЫЛ ПВИЩФ˘ЪБ›·˜ ¯ЪФУФ‰И·ОfiЩЛ
• °È· Ó· ·ÏÏ¿ÍÂÙ ÙË Ú‡ıÌÈÛË, ·Ù‹ÛÙ ÙÔ ÎÔ˘Ì› [
¤Ó· ·fi Ù· ·ÎfiÏÔ˘ı·.).
1 WEEKLY TIMER (∆ÈÌ‹ ·Ú¯È΋˜ Ú‡ıÌÈÛ˘):
2 AUTO OFF TIMER : ªФЪВ› У· ¯ЪЛЫИМФФИЛıВ› Ф ¯ЪФУФ‰И·ОfiЩЛ˜
3 SIMPLE TIMER : ªФЪВ› У· ¯ЪЛЫИМФФИЛıВ› Ф ·Пfi˜
4 TIMER MODE OFF : ¢ВУ МФЪВ› У· ¯ЪЛЫИМФФИЛıВ› Л ПВИЩФ˘ЪБ›·
* ŸЩ·У ЩФ ЪФПfiИ В›У·И ·ВУВЪБФФИЛМ¤УФ (Ъ‡ıМИЫЛ OFF), ‰ВУ МФЪВ› У·
¯ЪЛЫИМФФИЛıВ› Ф “WEEKLY TIMER” (∂µ¢√ª∞¢π∞π√™ Гƒ√¡√¢π∞∫√¶∆∏™).
(4) ƒ‡ıМИЫЛ ·ЪИıМФ‡ ВИОФИУˆУ›·˜ ЫВ ВЪ›ЩˆЫЛ ЩВ¯УИОФ‡ ЪФ‚П‹М·ЩФ˜
• °È· Ó· ·ÏÏ¿ÍÂÙ ÙË Ú‡ıÌÈÛË, ·Ù‹ÛÙ ÙÔ ÎÔ˘Ì› [
1 CALL OFF : ™Â ÂÚ›ÙˆÛË Ù¯ÓÈÎÔ‡ ÚÔ‚Ï‹Ì·ÙÔ˜ ‰ÂÓ ÂÌÊ·Ó›˙ÔÓÙ·È
2 CALL **** *** **** : ™Â ÂÚ›ÙˆÛË Ù¯ÓÈÎÔ‡ ÚÔ‚Ï‹Ì·ÙÔ˜ ÂÌÊ·Ó›˙ÔÓÙ·È
CALL_ : √ ·ЪИıМfi˜ ВИОФИУˆУ›·˜ МФЪВ› У· ВИПВ¯ıВ› fiЩ·У Л
• ∂ИПФБ‹ ЩˆУ ·ЪИıМТУ ВИОФИУˆУ›·˜
°И· У· ВИП¤НВЩВ ЩФ˘˜ ·ЪИıМФ‡˜ ВИОФИУˆУ›·˜, ·ОФПФ˘ı‹ЫЩВ ЩЛУ
·Ъ·О¿Щˆ ‰И·‰ИО·Ы›·.
ªВЩ·ОИУ‹ЫЩВ ЩФУ ‰ЪФМ¤· Ф˘ ·У·‚ФЫ‚‹УВИ БИ· У· ФЪ›ЫВЩВ ЩФ˘˜
·ЪИıМФ‡˜. ¶И¤ЫЩВ ЩФ ОФ˘М› [
МВЩ·ОИУ‹ЫВЩВ ЩФУ ‰ЪФМ¤· ЪФ˜ Щ· ‰ВНИ¿ (‹ ·ЪИЫЩВЪ¿). ¶И¤ЫЩВ ЩФ ОФ˘М›
[
CLOCK Î·È ] C ÁÈ· Ó· ÔÚ›ÛÂÙ ÙÔ˘˜ ·ÚÈıÌÔ‡˜.
(5) ƒ‡ıМИЫЛ ПВИЩФ˘ЪБ›·˜ ВНФИОФУfiМЛЫЛ˜ ВУ¤ЪБВИ·˜
• °È· ÂÓ·ÏÏ·Á‹ ÌÂٷ͇ ÙˆÓ ·Ú·Î¿Ùˆ Ú˘ı̛ۈÓ, ·Ù‹ÛÙ ÙÔ ÎÔ˘Ì› [
OFF] D.
1 ON : ∏ Ъ‡ıМИЫЛ ЩЛ˜ ıВЪМФОЪ·Ы›·˜ ВНФИОФУfiМЛЫЛ˜ ВУ¤ЪБВИ·˜ ВМК·У›˙ВЩ·И
2 OFF : ∏ Ъ‡ıМИЫЛ ЩЛ˜ ıВЪМФОЪ·Ы›·˜ ВНФИОФУfiМЛЫЛ˜ ВУ¤ЪБВИ·˜ ‰ВУ
О¿Щˆ ·fi ЩЛУ ·Ъ¯ИО‹ Ъ‡ıМИЫЛ ıВЪМФОЪ·Ы›·˜ УВЪФ‡.
ВМК·У›˙ВЩ·И О¿Щˆ ·fi ЩЛУ ·Ъ¯ИО‹ Ъ‡ıМИЫЛ ıВЪМФОЪ·Ы›·˜ УВЪФ‡.
ªФЪВ› У· ¯ЪЛЫИМФФИЛıВ› Ф В‚‰ФМ·‰И·›Ф˜
¯ЪФУФ‰И·ОfiЩЛ˜.
·˘ЩfiМ·ЩЛ˜ ·ВУВЪБФФ›ЛЫЛ˜.
¯ÚÔÓԉȷÎfiÙ˘.
¯ÚÔÓԉȷÎfiÙË.
ФИ О·ıФЪИЫМ¤УФИ ·ЪИıМФ› ВИОФИУˆУ›·˜.
ФИ О·ıФЪИЫМ¤УФИ ·ЪИıМФ› ВИОФИУˆУ›·˜.
¤Ó‰ÂÈÍË Ù˘ ÔıfiÓ˘ Â›Ó·È fiÌÔÈ· Ì ÂΛÓË ÛÙ·
·ЪИЫЩВЪ¿.
TEMP. Î·È ] F ÁÈ· Ó·
ON/OFF] D.
ON/OFF] D.
ON/OFF] D (∂ÈϤÍÙÂ
ON/OFF] D.
ON/
[3]–4. ƒ‡ıÌÈÛË ·ÏÏ·Á‹˜ ÂӉ›ÍˆÓ
(1) ∂ИПФБ‹ МФУ¿‰·˜ М¤ЩЪЛЫЛ˜ ıВЪМФОЪ·Ы›·˜ ЖC/ЖF
• °È· Ó· ·ÏÏ¿ÍÂÙ ÙË Ú‡ıÌÈÛË, ·Ù‹ÛÙ ÙÔ ÎÔ˘Ì› [
1 ЖC: ГЪЛЫИМФФИВ›Щ·И Л МФУ¿‰· ıВЪМФОЪ·Ы›·˜ ЖC.
2 ЖF: ГЪЛЫИМФФИВ›Щ·И Л МФУ¿‰· ıВЪМФОЪ·Ы›·˜ ЖF.
(2) ƒ‡ıМИЫЛ ¤У‰ВИНЛ˜ ıВЪМФОЪ·Ы›·˜ УВЪФ‡
• °È· Ó· ·ÏÏ¿ÍÂÙ ÙË Ú‡ıÌÈÛË, ·Ù‹ÛÙ ÙÔ ÎÔ˘Ì› [
1 ON : ∂МК·У›˙ВЩ·И Л ıВЪМФОЪ·Ы›·˜ УВЪФ‡.
2 OFF : ¢ВУ ВМК·У›˙ВЩ·И Л ıВЪМФОЪ·Ы›·˜ УВЪФ‡.
ON/OFF] D.
ON/OFF] D.
GBDFEINLP
GRRUTRGBGBGBGBGB
87
Page 88
4. ºÚÔÓÙ›‰· ÁÈ· ÙÔ Ì˯¿ÓËÌ·
¶·Ъ·¤МВЩВ ¿УЩ· ЩЛ Ы˘УЩ‹ЪЛЫЛ ЩФ˘ ‰ИЛıЛЩ‹Ъ· ЫВ ВНВИ‰ИОВ˘М¤УФ˘˜ ЩВ¯УИОФ‡˜.
¶ЪИУ КЪФУЩ›ЫВЩВ ЩФ МЛ¯¿УЛМ·, ОПВ›ЫЩВ ЩФ ЪВ‡М·.
¶ÚÔÛÔ¯‹:
• ¶ЪИУ ·Ъ¯›ЫВЩВ ЩФУ О·ı·ЪИЫМfi, ЫЩ·М·Щ‹ЫЩВ ЩЛ ПВИЩФ˘ЪБ›· О·И ОПВ›ЫЩВ ЩФ
ЪВ‡М·. £˘МЛıВ›ЩВ fiЩИ Ф ·УВМИЫЩ‹Ъ·˜ ВЪИЫЩЪ¤КВЩ·И М¤Ы· МВ МВБ¿ПЛ Щ·¯‡ЩЛЩ·
О·И ·ФЩВПВ› ЫФ‚·Ъfi О›У‰˘УФ ЩЪ·˘М·ЩИЫМФ‡.
• √И ВЫˆЩВЪИО¤˜ МФУ¿‰В˜ В›У·И ВНФПИЫМ¤УВ˜ МВ ¤У· ‰ИЛıЛЩ‹Ъ· БИ· ЩЛУ
·К·›ЪВЫЛ ЩЛ˜ ЫОfiУЛ˜ Ф˘ ·ФЪЪФК¿Щ·И. ∫·ı·Ъ›ЫЩВ ЩФ ‰ИЛıЛЩ‹Ъ·
¯ЪЛЫИМФФИТУЩ·˜ ЩИ˜ МВıfi‰Ф˘˜ Ф˘ ВМК·У›˙ФУЩ·И ЫЩ· ·Ъ·О¿Щˆ Ы¯¤‰И·.
• ∏ ‰È¿ÚÎÂÈ· ˙ˆ‹˜ ÙÔ˘ ‰ÈËıËÙ‹Ú· ÂÍ·ÚÙ¿Ù·È ·fi ÙÔ ¯ÒÚÔ Ô˘ ›ӷÈ
ВБО·Щ·ЫЩЛМ¤УЛ Л МФУ¿‰· О·И ЩФУ ЩЪfiФ ПВИЩФ˘ЪБ›·˜ ЩЛ˜.
5. ∞Ó›¯Ó¢ÛË ‚Ï·‚ÒÓ
¶ÚÈÓ ˙ËÙ‹ÛÂÙ ÙËÓ ˘ËÚÂÛ›· ۤڂȘ, ÂϤÁÍÙ ٷ ·ÎfiÏÔ˘ı· ÛËÌ›·:
∫·Ù¿ÛÙ·ÛË ÙÔ˘ Ì˯·Ó‹Ì·ÙÔ˜
GBDFEINLP
¢ВУ ПВИЩФ˘ЪБВ›.
À¿Ú¯ÂÈ ¤ÍÔ‰Ô˜ ÓÂÚÔ‡
·ÏÏ¿ ‰ÂÓ Â›Ó·È ·ÚÎÂÙ¿
ÎÚ‡Ô ‹ ·ÚÎÂÙ¿ ˙ÂÛÙfi.
¢ÂÓ ˘¿Ú¯ÂÈ ¤ÍÔ‰Ô˜
ÎÚ‡Ô˘ ‹ ˙ÂÛÙÔ‡ ÓÂÚÔ‡.
§ÂÈÙÔ˘ÚÁ› ÁÈ· Ï›ÁÔ ·ÏÏ¿
Û‡ÓÙÔÌ· ÛÙ·Ì·Ù¿ÂÈ.
ГВИЪИЫЩ‹ЪИФ ВН ·ФЫЩ¿ЫВˆ˜
“'”
›‰ÂÈÍË ‰ÂÓ ·Ó¿‚ÂÈ. ¢ÂÓ
ÂÌÊ·Ó›˙ÂÙ·È Î·Ì›· ›‰ÂÈÍË
·ОfiМЛ ОИ fiЩ·У ЩФ ОФ˘М› [ON/
OFF] В›У·И ·ЩЛМ¤УФ.
∏ В›‰ВИНЛ ЩФ˘ ˘БЪФ‡
ОЪ˘ЫЩ¿ППФ˘ ‰В›¯УВИ fiЩИ ‚Ъ›ЫОВЩ·И
ЫВ О·Щ¿ЫЩ·ЫЛ ПВИЩФ˘ЪБ›·˜.
∏ ФıfiУЛ ˘БЪФ‡
ОЪ˘ЫЩ¿ППФ˘ ‰В›¯УВИ fiЩИ
‚Ъ›ЫОВЩ·И ЫВ ПВИЩФ˘ЪБ›·.
∆Ô “CHECK” Î·È Ô ÎÒ‰Èη˜
ÂϤÁ¯Ô˘ ·Ó·‚ÔÛ‚‹ÓÔ˘Ó ÛÙËÓ
ÔıfiÓË ˘ÁÚÔ‡ ÎÚ˘ÛÙ¿ÏÏÔ˘.
¢И·ОФ‹ ЪВ‡М·ЩФ˜
∆Ф ЪВ‡М· В›У·И ОПВИЫЩfi.
∏ ·ЫК¿ПВИ· В›У·И О·М¤УЛ.
√ ‰И·ОfiЩЛ˜ ЩЛ˜ ·ЫК¿ПВИ·˜ В›У·И ОПВИЫЩfi˜.
§·Уı·ЫМ¤УЛ Ъ‡ıМИЫЛ ıВЪМФОЪ·Ы›·˜.
∆Ф О‡ОПˆМ· ·ФЩЪФ‹˜ В·У·ПВИЩФ˘ЪБ›·˜ ‚Ъ›ЫОВЩ·И
ЫВ ПВИЩФ˘ЪБ›· БИ· 3 ПВЩ¿.
∏ ПВИЩФ˘ЪБ›· ЩЛ˜ ВЫˆЩВЪИО‹˜ МФУ¿‰·˜ ¿Ъ¯ИЫВ Н·У¿
О·Щ¿ ЩЛ ‰И¿ЪОВИ· ПВИЩФ˘ЪБ›·˜ ı¤ЪМ·УЫЛ˜ О·И ·fi„˘НЛ˜.
А¿Ъ¯Ф˘У МВЪИО¿ ВМfi‰И· ЫЩЛУ В›ЫФ‰Ф О·И ¤НФ‰Ф
·¤Ъ· ЩЛ˜ ВЫˆЩВЪИО‹˜ О·И ВНˆЩВЪИО‹˜ МФУ¿‰·˜.
∆Ô ‰ÈËıËÙ‹Ú·˜ ¤¯ÂÈ ÁÂÌ›ÛÂÈ Ì ÛÎfiÓË Î·È ·Î·ı·Úۛ˜.
∞ÈÙ›·
∆ЪfiФ˜ О·ı·ЪИЫМФ‡
• ŸЩ·У П¤УВЩВ ЩФ ‰ИЛıЛЩ‹Ъ·, ·К·ИЪ¤ЫЩВ ЩФ О¿П˘ММ· О·И ЩЪ›„ЩВ ЩФ ВЫˆЩВЪИОfi
ÙÔ˘ ‰ÈËıËÙ‹Ú· Ì ÌÈ· ‚Ô‡ÚÙÛ·.
¶ÚÔÛÔ¯‹:
• ªЛ ЫЩВБУТУВЩВ ЩФ ‰ИЛıЛЩ‹Ъ· ВОı¤ЩФУЩ·˜ ЩФ ¿МВЫ· ЫЩФУ ‹ПИФ О·И МЛ ЩФ
˙ВЫЩ·›УВЩВ ¯ЪЛЫИМФФИТУЩ·˜ КˆЩИ¿, ОЩП. ∫¿ЩИ Щ¤ЩФИФ МФЪВ› У· ЪФО·П¤ЫВИ
·Ъ·МfiЪКˆЫЛ ЩФ˘ ‰ИЛıЛЩ‹Ъ·.
¶ÚÔÛÔ¯‹:
ªЛ ¯‡УВЩВ ФЩ¤ УВЪfi ‹ В‡КПВОЩ· ЫЪ¤¸ ¿Уˆ ЫЩЛ МФУ¿‰· ОПИМ·ЩИЫМФ‡.
∫·ı·ЪИЫМfi˜ ЩЛ˜ МФУ¿‰·˜ ОПИМ·ЩИЫМФ‡ М’ ·˘Щ¤˜ ЩИ˜ МВıfi‰Ф˘˜ МФЪВ› У·
ЪФО·П¤ЫВИ ‚П¿‚Л ЩЛ˜ МФУ¿‰·˜, ЛПВОЩЪФПЛН›· ‹ ˘ЪО·˚¿.
∞У›¯УВ˘ЫЛ ‚П¿‚Л˜
ªВЩ¿ ЩЛУ ·ФО·Щ¿ЫЩ·ЫЛ ЪВ‡М·ЩФ˜, ·Щ‹ЫЩВ ЩФ ОФ˘М› [ON/OFF].
∞УФ›НЩВ ЩФ ‰И·ОfiЩЛ ЪВ‡М·ЩФ˜.
∞ПП¿НЩВ ЩЛУ ·ЫК¿ПВИ·.
∞УФ›НЩВ ЩФ ‰И·ОfiЩЛ ЩЛ˜ ·ЫК¿ПВИ·˜.
∞КФ‡ ВП¤БНВЩВ ЩЛ Ъ˘ıМИЫМ¤УЛ ıВЪМФОЪ·Ы›· О·И ЩЛ ıВЪМФОЪ·Ы›·
ВИЫfi‰Ф˘ ЫЩЛУ ФıfiУЛ ЩФ˘ ˘БЪФ‡ ОЪ˘ЫЩ¿ППФ˘, ‚П¤ВЩВ ЩФУ [ƒ‡ıМИЫЛ
ıВЪМФОЪ·Ы›·˜ УВЪФ‡], О·И ¯ЪЛЫИМФФИ‹ЫЩВ ЩФ ОФ˘М› Ъ‡ıМИЫЛ˜.
¶ВЪИМ¤УВЩВ БИ· П›БФ.
(°И· ЩЛУ ЪФЫЩ·Ы›· ЩФ˘ Ы˘МИВЫЩ‹, ¤У· О‡ОПˆМ· ·ФЩЪФ‹˜
В·У·ПВИЩФ˘ЪБ›·˜ 3 ПВЩТУ В›У·И ВУЫˆМ·ЩˆМ¤УФ ЫЩЛУ
ВЫˆЩВЪИО‹ МФУ¿‰·. °И ·˘Щfi ˘¿Ъ¯Ф˘У ВЪИЩТЫВИ˜ fiФ˘
Ф Ы˘МИВЫЩ‹˜ ‰ВУ ·Ъ¯›˙ВИ У· ПВИЩФ˘ЪБВ› ·М¤Ыˆ˜. А¿Ъ¯Ф˘У
ВЪИЩТЫВИ˜ fiФ˘ ‰В ПВИЩФ˘ЪБВ› М¤¯ЪИ БИ· 3 ПВЩ¿.)
¶ВЪИМ¤УВЩВ БИ· П›БФ. (∏ ПВИЩФ˘ЪБ›· ı¤ЪМ·УЫЛ˜ ·Ъ¯›˙ВИ
МВЩ¿ ЩФУ ЩВЪМ·ЩИЫМfi ПВИЩФ˘ЪБ›·˜ ·fi„˘НЛ˜.)
∂·У·ı¤ЫЩВ ЫВ ПВИЩФ˘ЪБ›· МВЩ¿ ЩЛУ ·К·›ЪВЫЛ.
¢ФОИМ¿ЫЩВ Н·У¿ ЩЛ ПВИЩФ˘ЪБ›· МВЩ¿ ЩФУ О·ı·ЪИЫМfi ЩФ˘
‰ИЛıЛЩ‹Ъ·. (µП¤ВЩВ [ºЪФУЩ›‰· БИ· ЩФ МЛ¯¿УЛМ·]).
• ∞У Л ПВИЩФ˘ЪБ›· ЫЩ·М·Щ‹ЫВИ ПfiБˆ ‰И·ОФ‹˜ ЪВ‡М·ЩФ˜, ПВИЩФ˘ЪБВ› ЩФ [О‡ОПˆМ· В·УВОО›УЛЫЛ˜-ЪФК‡П·НЛ˜ ЫВ ВЪ›ЩˆЫЛ ‰И·ОФ‹˜ ЪВ‡М·ЩФ˜] О·И ·ВУВЪБФФИВ›
ЩЛ ПВИЩФ˘ЪБ›· ЩЛ˜ МФУ¿‰·˜ ·ОfiМЛ О·И МВЩ¿ ЩЛУ В·У·КФЪ¿ ЩФ˘ ЪВ‡М·ЩФ˜. ™В ·˘Щ‹У ЩЛУ ВЪ›ЩˆЫЛ, ·Щ‹ЫЩВ ¿ПИ ЩФ ОФ˘М› [ON/OFF] О·И НВОИУ‹ЫЩВ ЩЛ
ПВИЩФ˘ЪБ›·.
∞У Ы˘УВ¯›˙Ф˘У ФИ ‚П¿‚В˜ ·КФ‡ ¤¯ВЩВ ВП¤БНВИ Щ· ·Ъ·¿Уˆ, ОПВ›ЫЩВ ЩФ ЪВ‡М· О·И ·ФЩ·ıВ›ЩВ ЫЩФ ¤МФЪfi Ы·˜ МВ ПЛЪФКФЪ›В˜ Ы¯ВЩИО¿ МВ Щ’ fiУФМ· ЩФ˘
ЪФ˚fiУЩФ˜, ЩЛ К‡ЫЛ ЩЛ˜ ‚П¿‚Л˜ ОП. ∞У Л В›‰ВИНЛ “[CHECK]” О·И Ф (ЩВЩЪ·„‹КИФ˜) ОТ‰ИО·˜ ВП¤Б¯Ф˘ ·У·‚ФЫ‚‹УФ˘У, В›ЩВ ЫЩФУ ¤МФЪФ ЩФ ВЪИВ¯fiМВУФ (ОТ‰ИО·
ВП¤Б¯Ф˘) ЩЛ˜ В›‰ВИНЛ˜. ªЛУ ЪФЫ·ıВ›ЩВ ФЩ¤ У· ЩФ ВИЫОВ˘¿ЫВЩВ ВЫВ›˜.
∆· ·ОfiПФ˘ı· Ы˘МЩТМ·Щ· ‰ВУ ·ФЩВПФ‡У ‚П¿‚В˜ ЩЛ˜ МФУ¿‰·˜ ОПИМ·ЩИЫМФ‡:
• √ ·¤Ъ·˜ Ф˘ ВОЪ¤ВИ ·fi ЩЛ МФУ¿‰· ОПИМ·ЩИЫМФ‡ МФЪВ› МВЪИО¤˜ КФЪ¤˜ У· М˘Ъ›˙ВИ. ∞˘Щfi ФКВ›ПВЩ·И ЫВ О·Уfi ·fi ЩЫИБ¿Ъ· Ф˘ ˘¿Ъ¯ВИ ЫЩФУ ·¤Ъ· ЩФ˘
‰ˆМ·Щ›Ф˘, ЫВ М˘ЪФ˘‰И¤˜ О·ПП˘УЩИОТУ, ЩФ›¯ˆУ, В›ПˆУ ОП. Ф˘ ВИЫ¤Ъ¯ФУЩ·И ЫЩЛ МФУ¿‰· ОПИМ·ЩИЫМФ‡.
GRRUTRGBGBGBGBGB
• ∞М¤Ыˆ˜ МВЩ¿ ЩЛ ПВИЩФ˘ЪБ›· О·И ЩФ ЫЩ·М¿ЩЛМ· ЩЛ˜ МФУ¿‰·˜ ОПИМ·ЩИЫМФ‡ ·ОФ‡БВЩ·И ¤У· ЫК›ЪИБМ·. ∞˘Щfi В›У·И Ф ‹¯Ф˜ ЩЛ˜ ЪФ‹˜ ЩФ˘ „˘ОЩИОФ‡ М¤Ы· ЫЩЛ МФУ¿‰·
ОПИМ·ЩИЫМФ‡. ∞˘Щfi В›У·И К˘ЫИФПФБИОfi.
• ∏ МФУ¿‰· ОПИМ·ЩИЫМФ‡ МВЪИО¤˜ КФЪ¤˜ О¿УВИ МИОЪФ‡˜ ıФЪ‡‚Ф˘˜ О·Щ¿ ЩЛУ ¤У·ЪНЛ ‹ ЩФУ ЩВЪМ·ЩИЫМfi ЩЛ˜ ПВИЩФ˘ЪБ›·˜ „‡НЛ˜/ı¤ЪМ·УЫЛ˜. ¶ЪfiОВИЩ·И БИ· ЩФУ ‹¯Ф
ЩЪИ‚‹˜ ЩФ˘ МЪФЫЩИУФ‡ П·ИЫ›Ф˘ О·И ¿ППˆУ ВН·ЪЩЛМ¿ЩˆУ ПfiБˆ ‰И·ЫЩФП‹˜ О·И Ы˘ЫЩФП‹˜ Ф˘ ЪФО·ПВ›Щ·И ·fi ЩЛУ ·ПП·Б‹ ЩЛ˜ ıВЪМФОЪ·Ы›·˜. ∞˘Щfi В›У·И
К˘ЫИФПФБИОfi.
88
Page 89

6. ∂ÚÁ·Û›Â˜ ÂÁηٿÛÙ·Û˘ Î·È ÌÂÙ·ÊÔÚ¿˜ Î·È ¤ÏÂÁ¯Ô˜
™¯ÂÙÈο Ì ÙËÓ ÙÔÔıÂÛ›· ÂÁηٿÛÙ·Û˘
™˘Ì‚Ô˘Ï¢ı›Ù ÙÔÓ ¤ÌÔÚfi Û·˜ ÁÈ· ÏÂÙÔ̤ÚȘ Û¯ÂÙÈο Ì ÙËÓ ÂÁηٿÛÙ·ÛË
Î·È ÌÂÙ·ÊÔÚ¿ ÂÁηٿÛÙ·Û˘.
¶ÚÔÛÔ¯‹:
ªЛУ ВБО·Щ·ЫЩВ›ЩВ ФЩ¤ ЩЛ МФУ¿‰· ОПИМ·ЩИЫМФ‡ ЫВ ЫЛМВ›· fiФ˘ ˘¿Ъ¯ВИ
О›У‰˘УФ˜ ‰И·ЪЪФ‹˜ В‡КПВОЩˆУ ·ВЪ›ˆУ.
∞У Ы˘БОВУЩЪˆıВ› ·¤ЪИФ Б‡Ъˆ ·fi ЩЛ МФУ¿‰· ı· ЪФО·П¤ЫВИ ˘ЪО·˚¿.
ªЛУ ВБО·Щ·ЫЩВ›ЩВ ФЩ¤ ЩЛ МФУ¿‰· ОПИМ·ЩИЫМФ‡ ЫЩ· ·ОfiПФ˘ı· ЫЛМВ›·:
• fiÔ˘ ˘¿Ú¯ÂÈ Ôχ Ï¿‰È Ì˯·Ó‹˜
•
ОФУЩ¿ ЫВ ·Ъ·ı·П¿ЫЫИВ˜ ВЪИФ¯¤˜ fiФ˘ Ф ·¤Ъ·˜ ¤¯ВИ ˘„ЛП‹ ВЪИВОЩИОfiЩЛЩ· ЫВ ·П¿ЩИ
• fiÔ˘ Ë ˘ÁÚ·Û›· Â›Ó·È ÌÂÁ¿ÏË
• fiÔ˘ ˘¿Ú¯Ô˘Ó ıÂṲ́˜ ËÁ¤˜
• fiÔ˘ ˘¿Ú¯ÂÈ ıÂÈÔ‡¯Ô ·¤ÚÈÔ
• fiФ˘ ˘¿Ъ¯ВИ МЛ¯·УИЫМfi˜ Ф ФФ›Ф˜ ВВНВЪБ¿˙ВЩ·И ˘„ЛП¤˜ Ы˘¯УfiЩЛЩВ˜
(МЛ¯¿УЛМ· Ы˘БОfiППЛЫЛ˜ МВ ˘„ЛП‹ Ы˘¯УfiЩЛЩ· ОП.)
• fiФ˘ ¯ЪЛЫИМФФИФ‡УЩ·И Ы˘¯У¿ ‰И·П‡ЫВИ˜ ФН¤ˆУ
• fiФ˘ ¯ЪЛЫИМФФИФ‡УЩ·И Ы˘¯У¿ ВИ‰ИО¿ ЫЪ¤¸
• ∂БО·Щ·ЫЩ‹ЫЩВ ЩЛУ ВЫˆЩВЪИО‹ МФУ¿‰· ФЪИ˙ФУЩ›ˆ˜. ¢И·КФЪВЩИО¿ ı· ЪФОПЛıВ›
‰È·ÚÚÔ‹ ÓÂÚÔ‡.
• §¿‚ÂÙ ·Ú΋ ̤ÙÚ· ÂÓ·ÓÙ›ÔÓ ÙÔ˘ ıÔÚ‡‚Ô˘ fiÙ·Ó ÂÁηٷÛÙ›Ù ÙȘ ÌÔÓ¿‰Â˜
ОПИМ·ЩИЫМФ‡ ЫВ УФЫФОФМВ›· ‹ ЫВ ВИ¯ВИЪ‹ЫВИ˜ Ы¯ВЩИО¤˜ МВ ВИОФИУˆУ›В˜.
∞У Л МФУ¿‰· ОПИМ·ЩИЫМФ‡ ¯ЪЛЫИМФФИВ›Щ·И ЫВ ФФИФ‰‹ФЩВ ·fi Щ· ·Ъ·¿Уˆ
ВЪИ‚¿ППФУЩ·, ЪФЫ‰ФОФ‡УЩ·И Ы˘¯У¤˜ ‚П¿‚В˜ ЫЩЛ ПВИЩФ˘ЪБ›·. ™˘УИЫЩФ‡МВ У’
·ФКВ‡БВЩВ ·˘ЩФ‡˜ ЩФ˘˜ Щ‡Ф˘˜ ЩФФıВЫИТУ ВБО·Щ¿ЫЩ·ЫЛ˜.
°И· ВЪИЫЫfiЩВЪВ˜ ПВЩФМ¤ЪИВ˜, Ы˘М‚Ф˘ПВ˘ıВ›ЩВ ЩФУ ¤МФЪfi Ы·˜.
™¯ВЩИО¿ МВ ЛПВОЩЪИО‹ ВЪБ·Ы›·
¶ÚÔÛÔ¯‹:
•
∏ ЛПВОЩЪИО‹ ВЪБ·Ы›· Ъ¤ВИ У’ ·У·П·М‚¿УВЩ·И ·fi ¿ЩФМФ ЩФ ФФ›Ф В›У·И
ВНВИ‰ИОВ˘М¤УФ Ы·У ЛПВОЩЪФПfiБФ˜ МЛ¯·УФПfiБФ˜ Ы‡МКˆУ· МВ Щ· [ЩВ¯УИО¿
ЪfiЩ˘· Ы¯ВЩИО¿ МВ ЛПВОЩЪИО¤˜ ВБО·Щ·ЫЩ¿ЫВИ˜], [О·УФУИЫМФ‡˜ ВЫˆЩВЪИО‹˜
О·Пˆ‰›ˆЫЛ˜] О·И Ф‰ЛБ›В˜ ВБО·Щ¿ЫЩ·ЫЛ˜ МВ ЩЛУ П‹ЪЛ ¯Ъ‹ЫЛ ·ФОПВИЫЩИОТУ
О˘ОПˆМ¿ЩˆУ. ∏ ¯Ъ‹ЫЛ ¿ППˆУ ЪФ˚fiУЩˆУ ЫЩФ ›‰ИФ О‡ОПˆМ· ·ЪФ¯‹˜ ЪВ‡М·ЩФ˜
МФЪВ› У· ЪФО·П¤ЫВИ ЩФ О¿„ИМФ ‰И·ОfiЩˆУ ·ЫК¿ПВИ·˜ О·И ·ЫК·ПВИТУ.
• ªË Û˘Ó‰¤ÂÙ ÔÙ¤ ÙÔ Î·ÏÒ‰ÈÔ Á›ˆÛ˘ Û ۈϋӷ ·ÂÚ›Ô˘, ۈϋӷ ÓÂÚÔ‡,
Ы˘ППЛЩ‹Ъ· ‹ БВ›ˆЫЛ ЩЛПВКˆУИО‹˜ БЪ·ММ‹˜. °И· ПВЩФМ¤ЪИВ˜,
Ы˘М‚Ф˘ПВ˘ıВ›ЩВ ЩФУ ¤МФЪfi Ы·˜.
• ™В МВЪИОФ‡˜ Щ‡Ф˘˜ ЩФФıВЫ›·˜ ВБО·Щ¿ЫЩ·ЫЛ˜, Л ВБО·Щ¿ЫЩ·ЫЛ ·ЫК¿ПВИ·˜
Ì ‰È·ÎfiÙË Â›Ó·È ˘Ô¯ÚˆÙÈ΋. °È· ÏÂÙÔ̤ÚȘ, Û˘Ì‚Ô˘Ï¢ı›Ù ÙÔÓ
¤ÌÔÚfi Û·˜.
™¯ÂÙÈο Ì ÙËÓ ÂÁηٿÛÙ·ÛË ÙÔ˘ ۈϋӷ ÓÂÚÔ‡
• ªЛ ¯ЪЛЫИМФФИВ›ЩВ ЩФ˘˜ ·ЩЫ¿ПИУФ˘˜ ЫˆП‹УВ˜ ˆ˜ ЫˆП‹УВ˜ УВЪФ‡.
™˘ÓÈÛÙ¿Ù·È Ë ¯Ú‹ÛË ÛˆÏ‹ÓˆÓ ¯·ÏÎÔ‡.
• ∆Ф О‡ОПˆМ· УВЪФ‡ ı· Ъ¤ВИ У· В›У·И ¤У· ОПВИЫЩfi О‡ОПˆМ·.
™¯ÂÙÈο Ì ÙË ÌÂÙ·ÊÔÚ¿ Ù˘ ÂÁηٿÛÙ·Û˘
• ŸÙ·Ó ÌÂٷʤÚÂÙ ‹ ·ӷϷ̂¿ÓÂÙ ÙËÓ ÂÁηٿÛÙ·ÛË Ù˘ ÌÔÓ¿‰·˜
ОПИМ·ЩИЫМФ‡ fiЩ·У МВБ·ПТУВЩВ ЩФ Ы›ЩИ Ы·˜, ·ПП¿˙ВЩВ ЩЛ МФЪК‹ ‹
МВЩ·ОФМ›˙ВЩВ, Ы˘М‚Ф˘ПВ˘ıВ›ЩВ ЩФУ ¤МФЪfi Ы·˜ ВО ЩˆУ ЪФЩ¤ЪˆУ БИ· У·
ВН·ОЪИ‚ТЫВЩВ ЩФ ОfiЫЩФ˜ ЩЛ˜ В·ББВП·ЩИО‹˜ МЛ¯·УФПФБИО‹˜ ВЪБ·Ы›·˜ Ф˘
··ÈÙÂ›Ù·È ÁÈ· ÙË ÌÂÙ·ÊÔÚ¿ Ù˘ ÂÁηٿÛÙ·Û˘.
¶ÚÔÛÔ¯‹:
ŸЩ·У МВЩ·К¤ЪВЩВ ‹ В·У·П·М‚¿УВЩВ ЩЛУ ВБО·Щ¿ЫЩ·ЫЛ ЩЛ˜ МФУ¿‰·˜
ОПИМ·ЩИЫМФ‡, Ы˘М‚Ф˘ПВ˘ıВ›ЩВ ЩФУ ¤МФЪfi Ы·˜. ∏ П·Уı·ЫМ¤УЛ ВБО·Щ¿ЫЩ·ЫЛ
МФЪВ› У· ЪФО·П¤ЫВИ ЛПВОЩЪФПЛН›·, ˘ЪО·˚¿ ОП.
∂›Û˘ ‰ÒÛÙ ÚÔÛÔ¯‹ ÛÙÔ ıfiÚ˘‚Ô
• °È· ÙËÓ ÂÁηٿÛÙ·ÛË, ‰È·Ï¤ÍÙ ¤Ó· ¯ÒÚÔ Ô˘ ı· ÌÔÚ¤ÛÂÈ Ó’ ·ÓÙ¤ÍÂÈ
П‹Ъˆ˜ ЩФ ‚¿ЪФ˜ ЩЛ˜ МФУ¿‰·˜ ОПИМ·ЩИЫМФ‡ О·И fiФ˘ Ф ıfiЪ˘‚Ф˜ О·И ФИ
‰ФУ‹ЫВИ˜ МФЪФ‡У У· МВИˆıФ‡У.
• ¢È·Ï¤ÍÙ ¤Ó· ̤ÚÔ˜ fiÔ˘ Ô „˘¯Úfi˜ ‹ ıÂÚÌfi˜ ·¤Ú·˜ Î·È Ô ıfiÚ˘‚Ô˜ ·fi
ЩЛУ ВНˆЩВЪИО‹ ¤НФ‰Ф ·¤Ъ· ЩЛ˜ МФУ¿‰·˜ ОПИМ·ЩИЫМФ‡ ‰ВУ ı· ВУФ¯П‹ЫВИ
ЩФ˘˜ БВИЩfiУФ˘˜.
• ∞У ЩФФıВЩЛıВ› О¿ФИФ Н¤УФ ЫТМ· ОФУЩ¿ ЫЩЛУ ВНˆЩВЪИО‹ ¤НФ‰Ф ·¤Ъ· ЩЛ˜
МФУ¿‰·˜ ОПИМ·ЩИЫМФ‡ МФЪВ› У· ЪФО·П¤ЫВИ МВ›ˆЫЛ ЩЛ˜ ·fi‰ФЫЛ˜ О·И
·‡ÍËÛË ÙÔ˘ ıÔÚ‡‚Ô˘.
∞ФКВ‡БВЩВ ЩЛУ ЩФФı¤ЩЛЫЛ ·УЩИОВИМ¤УˆУ ОФУЩ¿ ЫЩЛУ ¤НФ‰Ф ·¤Ъ·.
• ∞У Л МФУ¿‰· ОПИМ·ЩИЫМФ‡ ‰ЛМИФ˘ЪБВ› ФФИФ˘Ы‰‹ФЩВ ·УТМ·ПФ˘˜ ıФЪ‡‚Ф˘˜,
Û˘Ì‚Ô˘Ï¢ı›Ù ÙÔÓ ¤ÌÔÚfi Û·˜.
™˘УЩ‹ЪЛЫЛ О·И ВИıВТЪЛЫЛ
• ∞У Л МФУ¿‰· ОПИМ·ЩИЫМФ‡ ¯ЪЛЫИМФФИВ›Щ·И БИ ·ЪОВЩ¤˜ Ы·И˙fiУ, ЩФ ВЫˆЩВЪИОfi
ı· ‚ЪФМ›ЫВИ О·И ı· МВИТЫВИ ЩЛУ ·fi‰ФЫЛ.
∞У¿ПФБ· МВ ЩИ˜ Ы˘Уı‹ОВ˜ ¯Ъ‹ЫЛ˜, МФЪВ› У· ‰ЛМИФ˘ЪБЛıВ› О·ОФЫМ›· О·И
МФЪВ› У· ¯ВИЪФЩВЪ¤„ВИ Л ·ФЫЩЪ¿ББИЫЛ ПfiБˆ ЫОfiУЛ˜, ‚ЪФМИ¿˜ ОП.
GBDFEINLP
7. ¶ÚԉȷÁڷʤ˜
ªФУЩ¤ПФ
¶ЛБ‹ ЛПВОЩЪИОФ‡ ЪВ‡М·ЩФ˜
πЫ¯‡˜ ı¤ЪМ·УЫЛ˜ kW
πÛ¯‡˜ „‡Í˘ kW
∂›Â‰Ô ‹¯Ô˘
∫·ı·Úfi ‚¿ÚÔ˜ kg
¢È·ÛÙ¿ÛÂȘ
∞ÍÂÛÔ˘¿Ú
ƒ˘ıÌfi˜ ÚÔ‹˜ ÓÂÚÔ‡ m
*1 √ÓÔÌ·ÛÙÈΤ˜ Û˘Óı‹Î˜ ı¤ÚÌ·ÓÛ˘
∂НˆЩВЪИО‹ ıВЪМ.:
ª‹ОФ˜ ЫˆП‹У·: 7,5 m (24-9/16 ft)
¢È·ÊÔÚ¿ ÂȤ‰Ô˘: 0 m (0 ft)
£ÂÚÌ. ÂÈÛfi‰Ô˘ ÓÂÚÔ‡ 65 °C ƒ˘ıÌfi˜ ÚÔ‹˜ ÓÂÚÔ‡ 2,15 m3/h
*3 √ÓÔÌ·ÛÙÈΤ˜ Û˘Óı‹Î˜ „‡Í˘
∂НˆЩВЪИО‹ ıВЪМ.: 35 °C DB (95 °F DB)
ª‹ÎÔ˜ ۈϋӷ: 7,5 m (24-9/16 ft)
¢È·ÊÔÚ¿ ÂȤ‰Ô˘: 0 m (0 ft)
£ÂÚÌ. ÂÈÛfi‰Ô˘ ÓÂÚÔ‡ 23 °C ƒ˘ıÌfi˜ ÚÔ‹˜ ÓÂÚÔ‡ 1,93 m3/h
*5 √ÓÔÌ·ÛÙÈΤ˜ Û˘Óı‹Î˜ „‡Í˘
∂НˆЩВЪИО‹ ıВЪМ.: 35 °C DB (95 °F DB)
ª‹ÎÔ˜ ۈϋӷ: 7,5 m (24-9/16 ft)
¢È·ÊÔÚ¿ ÂȤ‰Ô˘: 0 m (0 ft)
£ÂÚÌ. ÂÈÛfi‰Ô˘ ÓÂÚÔ‡ 23 °C ƒ˘ıÌfi˜ ÚÔ‹˜ ÓÂÚÔ‡ 3,86 m3/h
⁄„Ô˜ mm
¶Ï¿ÙÔ˜ mm
µ¿ıÔ˜ mm
7 °C DB/6 °C WB (45 °F DB/43 °F WB)
PWFY-P100VM-E-BU
3
/h
PWFY-P100VM-E-AU
1 ÛÙ¿‰ÈÔ 220-230-240 V 50/60 Hz
1
12,5 *
–
44 dB<A>
60 kg
¢ИЛıЛЩ‹Ъ·˜, £ВЪМФМФУˆЩИОfi ˘ПИОfi, ™ВЩ Ы˘У‰¤ЫВˆУ × 2,
™‡Ó‰ÂÛË Â¤ÎÙ·Û˘ × 2 (PWFY - P200VM - E - AU)
0,6-2,15 1,2-4,3
*2 √ÓÔÌ·ÛÙÈΤ˜ Û˘Óı‹Î˜ ı¤ÚÌ·ÓÛ˘
∂НˆЩВЪИО‹ ıВЪМ.: 7 °C DB/6 °C WB (45 ° F DB/43 °F WB)
ª‹ÎÔ˜ ۈϋӷ: 7,5 m (24-9/16 ft)
¢È·ÊÔÚ¿ ÂȤ‰Ô˘: 0 m (0 ft)
£ÂÚÌ. ÂÈÛfi‰Ô˘ ÓÂÚÔ‡ 30 °C ƒ˘ıÌfi˜ ÚÔ‹˜ ÓÂÚÔ‡ 2,15 m3/h
*4 √ÓÔÌ·ÛÙÈΤ˜ Û˘Óı‹Î˜ ı¤ÚÌ·ÓÛ˘
∂НˆЩВЪИО‹ ıВЪМ.: 7 °C DB/6 °C WB (45 ° F DB/43 °F WB)
ª‹ÎÔ˜ ۈϋӷ: 7,5 m (24-9/16 ft)
¢È·ÊÔÚ¿ ÂȤ‰Ô˘: 0 m (0 ft)
£ÂÚÌ. ÂÈÛfi‰Ô˘ ÓÂÚÔ‡ 30 °C ƒ˘ıÌfi˜ ÚÔ‹˜ ÓÂÚÔ‡ 4,3 m3/h
2
12,5 *
3
11,2 *
29 dB<A>
35 kg
800
450
300
0,6-2,15
PWFY-P200VM-E-AU
25,0 *
22,4 *
29 dB<A>
38 kg
4
5
GRRUTRGBGBGBGBGB
89
Page 90

Содержание
1. Меры предосторожности ....................................................................... 90
1.1. Установка .............................................................................. 90
1.2. В период эксплуатации ......................................................... 91
1.3. Утилизация прибора ............................................................. 91
2. Эксплуатация прибора ........................................................................... 92
2.1. Использование пульта дистанционного управления ......... 92
2.2. Регулировка температуры воды .......................................... 92
1. Меры предосторожности
s До начала эксплуатации прибора ознакомьтесь с
разделом «Меры предосторожности».
s В разделе «Меры предосторожности» перечислены
важные принципы соблюдения безопасности.
Обязательно следуйте им.
Условные обозначения, принятые в тексте
Предупреждение:
GBDFEINLPGR
Указывает меры предосторожности, которые следует соблюдать для
того, чтобы избежать риска личной травмы или гибели.
Внимание:
Указывае меры, которые следует соблюдать для того, чтобы избежать
повреждения прибора.
Символы, указанные на иллюстрациях
: Указывает действие, которого следует избегать.
: Указывает, что это важная инструкция.
: Указывает, что эта часть должна быть заземлена.
: Осторожно: опасность электрошока (Этот символ указан на этикетке
основного прибора.) <цвет: желтый>
: Будьте осторожны, чтобы не прикоснуться к горячей поверхности
Предупреждение:
Внимательно прочтите надписи на этикетках, закрепленных
на основном приборе.
2.3. Установка дня недели и времени ........................................ 92
2.4. Использование таймера ....................................................... 93
3. Выбор функции ....................................................................................... 96
4. Уход за прибором.................................................................................... 98
5. Исправление неполадок ........................................................................ 98
6. Установка прибора, его перемещение и проверка .............................. 99
7. Технические условия ............................................................................. 100
• Это может привести к короткому замыканию, возгоранию или
задымлению.
Примечание 1: При мытье теплообменного устройства и подноса для
стока воды убедитесь в том, что коробка управления,
мотор и LEV остаются сухими, пользуйтесь
водозащитным покрытием.
Примечание 2: Никогда не сливайте воду, используемую для мытья
подноса для стока воды и теплообменного
устройства с помощью сливного насоса. Сливайте
воду отдельно.
• Данное устройство не предназначено для использования без
присмотра детьми или немощными людьми.
• Следует внимательно присматривать за маленькими детьми и
следить за тем, чтобы они не играли с данным устройством.
• Не пользуйтесь добавкой для определения утечки.
1) Внешний прибор
Предупреждение:
• Внешний прибор должен быть установлен на ровной прочной
поверхности в том месте, где не наблюдается скопления снега,
листьев или мусора.
• Не ставьте какие-либо посторонние предметы на прибор. Он может
упасть или посторонний предмет может упасть с него, причинив
личную травму.
Внимание:
Внешний прибор должен быть установлен в таком месте, где
выдуваемый из него воздух и производимый им шум не будут
беспокоить соседей.
1.1. Установка
s После того как вы прочтете данное руководство, сохраните его и
Руководство по установке в надежном месте, чтобы
консультироваться с ними при возникновении вопросов. Если с
прибором будет работать другой человек, убедитесь в том, что он
ознакомится с данным руководством.
Предупреждение:
• Данны прибор не должен устанавливаться пользователем.
Обратитесь к поставщику или в специализированное предприятие
и закажите установку прибора. При неправильной установке может
произойти утечка воды, электрический шок или пожар.
RUTRGBGBGBGBGB
• Используйте только те дополнительные приспособления, которые
санкционированы «Мitsubishi Electric», и обратитесь к вашему
поставщику или в специализированное предприятие и закажите их
установку. При неправильной установке дополнительных
приспособлений может произойти утечка воды, электрический шок
или пожар.
• Не прикасайтесь к устройству. Поверхность устройства может быть
горячей.
• Не устанавливайте устройство в местах, где образуется
коррозионный газ.
• В руководстве по установке указаны предлагаемые методы
установки. Любые изменения в конструкции здания, необходимые
для установки, должны соотетствовать местным строительным
правилам и стандартам.
• Никогда не занимайтесь ремонтом или переносом прибора другого
угое место самостоятельно. При неправильном заполнении ремонта
может произойти утечка воды, электрический шок или пожар. Если
вам требуется перенести или отремонтировать ремонт, обращайтесь
к поставщику.
• Не допускайте попадания воды в электрические части (при мойке)
и т.д.
2) Внутренний прибор
Предупреждение:
Внутренний прибор должен быть надежно установлен. Если прибор
закреплен слабо, он может упасть, причинив личную травму.
3) Пульт дистанционного управления
Предупреждение:
Пульт дистанционного управления должен быть установлен в таком
месте, где он недоступен для детей.
4) Дренажный шланг
Внимание:
Убедитесь в том, что дренажный шланг установлен таким образом, что
дренаж происходит бесперебойно. Неправильная установка может
привести к утечке воды, что повредит мебель.
5) Линии лектропроводки, предохранитель или
прерыватель цепи
Предупреждение:
• Убедитесь в том, что прибор подключен к отдельной линии
электропитания. Подключение других электроприборов к этой же
линии электропитания может привести к перегрузке.
• Убедитесь в том, что на линии подачи тока имеется выключатель.
• Обязательно соблюдайте напряжение, указанное для прибора, и
номиналы предохранителя или прерывателя цепи. Никогда не
используйте провод или предохранитель более высокого номинала
по сравнению с тем, который указан.
90
Page 91

6) Заземление
Внимание:
• Прибор следует правильно заземлить. Никогда не подсоединяйте
провод заземления к проводу заземления газовой трубы, трубы для
воды, громоотвода или телефонной линии. При неправильном
заземлении прибора может произойти электрический шок.
• Часто проверяйте, что провод заземления от внешнего прибора
должным образом подсоединен к выводам заземления прибора и к
электроду заземления.
1.2. В период эксплуатации
Внимание:
• е используйте какие-либо острые предметы для нажатия кнопок,
поскольку это может повредить пульт дистанционного управлени я.
• Не перекручивайте и не тяните за шнур пульта дистанционного
управления, поскольку это может повредить пульт дистанционного
управления и вызвать неполадки в работе прибора.
• Никогда не удаляйте верхнюю часть корпуса пульта дистанционного
управления. Снятие верхней крышки пульта дистанционного управления
не рекомендуется, нельзя трогать печатные платы, расположенные под
ней. Это может привести к пожару и поломке прибора.
• Никогда не протирайте пульт дистанционного управления бензином,
разбавителем, химическими веществами и т.д. Это может повредить
краску прибора и привести к его поломке. Для удаления пятен
возьмите отрезок ткани, смочите его в растворе нейтрального
детергента с водой, тщательно отожмите ее и протрите пятно, а затем
снова протрите это место сухой тканью.
• Никогда не блокируйте и не закрывайте отверстия входа и выхода
внутреннего или внешнего приборов. Высокие предметы мебели,
находящиеся под внутренним прибором, или крупногабаритные
предметы (например, большие коробки), помещенные вблизи
внешнего прибора, будут снижать эффективность его работы.
Предупреждение:
• Не проливайте на прибор воду и не дотрагивайтесь до прибора
мокрыми руками. Это может привести к электрошоку.
• Не разбрызгивайте вблизи от прибора горючий газ. Это может
привести к пожару.
• Не помещайте газовый обогреватель или другой прибор с открытым
пламенем там, где он будет испытывать воздействие воздуха,
выдуваемого из прибора. Это может привести к неполному сгоранию.
Предупреждение:
• Не снимайте переднюю панель или защиту вентилятора с внешнего
прибора, когда он работает. Вы можете получить личную травму, если
дотронетесь до вращающихся частей, горячих частей или частей под
высоким напряжением.
• Никогда не вставляйте пальцы, палки и т.д. в отверстия входа или
выхода, в противном случае вы можете получить личную травму,
поскольку вентиля тор, находящийся внутри прибора, вращается
на большой скороти. Проявляйте особую осторожность в
присутствии детей.
• Если вы почувствуете странные запахи, остановите прибор, отключите
питание и проконсультируйтесь с вашим поставщиком. В противном
случае может произойти поломка прибора, пожар или электрошок.
• Если вы заметите ненормально сильный шум или вибрацию,
остановите прибор, отключите главный выключатель питания и
свяжитесь с вашим поставщиком.
• Не допускайте переохлаждения. Наиболее приемлемая температура
в помещении - это температура в пределах 5 °С по сравнению с
температурой снаружи.
• Не оставляйте инвалидов или маленьких детей сидящими или
стоящими на пути воздушного потока, поступающего из
кондиционера. Это может нарушить их здоровье.
Внимание:
• Не направляйте поток воздуха на растения или на животных или
птиц в клетках.
• Часто проветривайте помещение; При постоянной работе прибора
в закрытом помещении в течение длительного периода времени
воздух становится затхлым.
В случае неисправности прибора
Предупреждение:
• Никогда не меняйте конфигурацию кондиционера. По любым
вопросам ремонта и техобслуживания консультируйтесь с
поставщиком. Неправильно проведенные ремонтные работы могут
привести к утечке воды, электрическому шоку, пожару и т.д.
• Если на пульте дистанционного управления указана индикация
ошибки, кондиционер не работает, или если в его работе
наблюдается ненормальное явление, остановите прибор и
свяжитесь с вашим поставщиком. Если вы не предпримите меры в
таких условиях, то это может привести к пожару или поломке
прибора.
• Если часто срабатывает прерыватель цепи, свяжитесь с вашим
поставщиком. Непринятие мер в таких случаях может привести к
пожару или поломке.
• Если происходит выброс или утечка газа хладагента, остановите
работу кондиционера, тщательно проветрите помещение и
свяжитесь с вашим поставщиком. Если вы не предпримите меры,
это может привести к авариям, связанным с кислородной
недостаточностью.
Если кондиционер не используется в течение
длительного периода времени
• Если кондиционер не используется в течение длительного периода
времен в связи с сезонными изменениями климата и т.д., включите его
на 4 – 5 часов с тем, чтобы продолжался выдув воздуха и кондиционер
полностью просох. Если вы не выполните это, то в помещении возможно
образование негигиеничной нездоровой плесени.
• Если кондиционер не используется в течение длительного периода
времени, следует отключить главный выключатель питания.
Если вы оставите главный выключатель питания включенным, то
вы будуте зря тратить десятки ватт электроэнергии. Также это
приведет к накоплению пыли и т.д., что может привести к пожару.
• До возобновления эксплуатации кондиционера включите главный
выключатель сети на период свыше 12 часов. Не выключайте
главный сетевой выключатель в периоды интенсивного
использования прибора.
Это может привести к его поломки.
• В случае длительного перерыва в эксплуатации устройства в зимний
период, слейте воду из труб, чтобы предотвратить замерзание.
1.3. Утилизация прибора
Предупреждение:
Когда вам потребуется ликвидировать прибор, обратитесь к вашему
дилеру. При неправильном удалении труб может произойти выброс
хладагента (фтороуглеродного газа), который, попав на кожу, приведет к
травме. Выброс хладагента в атмосферу наносит вред окружающей среде.
GBDFEINLPGR
RUTRGBGBGBGBGB
91
Page 92

2. Эксплуатация прибора
2.1. Использование пульта
дистанционного управления
Запуск, останов, изменение режима работы и
настройка температуры воды
GBDFEINLPGR
Для начала работы
1. Нажмите кнопку ON/OFF 1.
Загорится лампа включения 1 и индикатор дисплея.
Примечание:
• После перезапуска устройства устанавливаются следующие параметры:
Настройки пульта дистанционного управления
Режим
Настройка температуры
Для останова операции
1. Нажмите еще раз кнопку ON/OFF 1.
Будут отключены лампа включения 1 и индикатор дисплея.
Последняя настройка
Последняя настройка
2.2. Регулировка температуры воды
Для изменения температуры воды
Нажмите кнопку
нужную температуру воды.
Однократное нажатие на кнопку
установки на 1 °C.
При длительном нажатии значение будет продолжать изменяться на 1 °C.
• Температура внутри помещения устанавливается в следующем
диапазоне.
Горячая вода ОхлаждениеHarрев
30 °C - 70 °C
87 °F - 158 °F
• Установка температуры воды путем изменения параметров температуры
поступающей воды и температуры выходящей воды невозможна.
* Диапазон индикации температуры составляет от 0 °C до 100 °C. За
пределами этого диапазона будет мигать индикация либо 0 °C, либо 100
°C, информируя о том, что температура воды находится ниже или выше
отображаемой температуры.
2.3.
Установка дня недели и времени
Используйте этот экран для изменения настроек
текущего дня недели и времени.
Примечание:
День недели не будет отображаться, если функция часов отключена на
дисплее выбора функции (Function Selection).
11
1 [регулировка температуры воды] и установите
11
или приводит к изменению
30 °C - 45 °C
87 °F - 113 °F
10 °C - 30 °C
50 °F - 87 °F
Индикатор дня
недели и часов
Выбор режима работы
1. Во время работы устройства нажмите кнопку Pежим 2 необходимое
число раз.
• Каждое нажатие кнопки выполняет переход к следующему режиму в
указанной ниже последовательности.
Текущий выбранный режим отображается в 2.
PWFY-P100VM-E-BU
Толко горячая вода
PWFY-P100/P200VM-E-AU
Обогрев → Охлаждение
RUTRGBGBGBGBGB
Изменение установок температуры...
1. Для понижения температуры:
Нажмите кнопку настройки температуры
2. Для повышения температуры:
Нажмите кнопку настройки температуры
• Каждое нажатие кнопки выполняет приращение значения на 1 °C
(1° F). Текущая установка отображается в 3.
• Доступные значения диапазонов: *1, *2
Горячая вода ОхлаждениеHarрев
30 °C - 70 °C
87 °F - 158 °F
Примечание:
*1 Доступные диапазоны различаются в зависимости от типа подключенного
устройства.
*2 Если настройка интервала температур была выполнена на экране выбора
функции (Function Selection), доступные диапазоны будут уже, чем
показанные выше. Если вы попытаетесь установить значение вне этого
диапазона, на дисплее отобразится сообщение, что установка такого
диапазона запрещена.
Для получения информации о настройке и отмене предельных значений
диапазонов см. пункт [3]–2 (3) в разделе 3.
*3 Если экран выбора функций (Function Selections) настроен для отображения
температуры в градусах Фаренгейта. Для получения информации о
настройке отображения °C или °F см. пункт [3]–4 (1) в разделе 3.
30 °C - 45 °C
87 °F - 113 °F
10 °C - 30 °C
50 °F - 87 °F
3.
3.
Установка дня недели и времени…
Установка дня недели
Установка
времени
1. Нажмите кнопку настройки времени или A для включения
отображения на дисплее 2.
2. Нажмите кнопку включения/выключения TIMER “ON/OFF” (SET DAY) 9
для установки дня недели.
* Каждое нажатие кнопки переключает день, как показано на 3 : Sun
(Вск) → Mon (Пнд) → ... → Fri (Птн) → Sat (Сбт).
3. Нажмите соответствующую кнопку настройки времени A для установки
времени.
* Пока вы удерживаете кнопку нажатой (4), временные интервалы
сначала будут иметь приращение по минуте, затем по десять минут, а
посте этого по одному часу.
4. После выполнения соответствующих настроек в действиях 2и 3 нажмите
кнопку “CIR.WATER”
Примечание:
Новые установленные значения действий 2 и 3 будут отменены, если перед
кнопкой “CIR.WATER”
4 для сохранения значений.
4вы нажмете кнопку выбора Pежим (Bозврата) 2.
92
Page 93

5. Нажмите кнопку выбора Pежим (Bозврата) 2 для завершения процедуры
настройки. После этого отобразится дисплей стандартного экрана
управления, где в поле 1 будут отображаться установленные день недели
и время.
2.4. Использование таймера
В этом разделе приводится описание настроек работы таймера. Можно
использовать экран выбора функции (Function Selection) для выбора одного
из трех типов таймера: 1 Weekly timer (Недельный таймер), 2 Simple timer
(Простой таймер) или 3 Auto Off (Таймер автоматического выключения).
Для получения информации о настройке функций см. пункт [3]–3 (3) в
разделе 3.
Использование недельного таймера
1. Недельный таймер может использоваться для настройки до шести
операций в день в течение недели.
• Каждая операция может состоять из: времени ON/OFF с настройками
температуры или только времени включения/выключения, или только
настроек температуры.
• Когда наступает установленное для таймера время, кондиционер
начинает выполнять действие, назначенное для таймера.
2. Настройка времени таймера может быть выполнена с точностью в 1
минуту.
Примечание:
*1. Таймеры недельный/простой/автоматического отключения не могут
использоваться одновременно.
*2. Недельный таймер не будет работать в случае наличия следующих
условий:
Функция таймера выключена; система находится в неисправном
состоянии; выполняется тест системы; пульт дистанционного управления
выполняет процедуру самотестирования или проверку пульта
дистанционного управления; пользователь выполняет настройку таймера;
пользователь выполняет настройку текущего дня недели или времени;
система управляется из центрального пульта управления. (В частности,
система не будет выполнять действия (включать или выключать
устройство или контролировать температуру), которые отключены в
результате возникновения этих условий).
Nо операции
SUN
ON
˚C
WEEKLY
Таблица настройки
№ операции
No. 1
No. 2
No. 6
Примечание:
Устанавливая день для параметра “Sun Mon Tues Wed Thurs Fri Sat”, вы
Sunday Monday … Saturday
•8:30
•ON
•
23 °C (73 °F)
• 10:00
• OFF
…
• 10:00
• OFF
• 10:00
• OFF
• 10:00
• OFF
<Настройка операции 1
для воскресенья>
▲
Включение кондиционера
в 8:30 при температуре до
23 °C (73° F).
▲
<Настройка операции
2 на каждый день>
Отключение
кондиционера в
10:00.
можете выполнить одно и то же действие каждый день в одно и тоже время.
(Например, приведенная выше операция 2, которая одинакова для всех
дней недели).
Настройка недельного таймера
Показывает
установки времени
5. Нажмите соответствующую кнопку настройки времени A необходимое
число раз для установки времени (5).
* Пока вы удерживаете кнопку нажатой, временные интервалы сначала
будут иметь приращение по минуте, затем по десять минут, а посте
этого по одному часу.
6. Нажмите кнопку “ON/OFF” (ВКЛ./ВЫКЛ.) 1 для выбора нужной операции
(ON или OFF) (6).
* Каждое нажатие кнопки изменяет следующую настройку в
последовательности: не отображается (нет настройки) → “ON” (ВКЛ.)
→ “OFF” (ВЫКЛ.)
7. Нажмите соответствующую кнопку настройки температуры 3 для
установки нужного значения температуры (7).
* Каждое нажатие кнопки изменяет настройку в последовательности:
не отображается (нет настройки) ⇔ 5 (41) ⇔ 6 (43) ⇔ ... ⇔ 89 (192) ⇔
90 (194) ⇔ не отображается.
(Доступный диапазон: от 5 °C (41 °F) до 90 °C (194 °F). Действительный
диапазон контролируемых температур может отличаться в зависимости
от типа подключенного устройства).
8. Для очистки значений текущих настроек для выбранной операции
нажмите и быстро отпустите кнопку CHECK (CLEAR) 0.
* Отображаемая настройка времени изменится на “—:—”, а индикаторы
“ON/OFF” и установки температуры исчезнут.
(Для одновременной очистки настроек таймера удерживайте нажатой
в течение двух или более секунд кнопку CHECK (CLEAR) 0 Индикатор
начнет мигать, показывая, что все настройки были удалены).
9. После выполнения соответствующих настроек в действиях 5, 6 и 7
нажмите кнопку “CIR.WATER”
Показывает выбранную операцию
(ON (ВКЛ.) или OFF (ВЫКЛ.))
* Не отображается, если операция не
выбрана.
Показывает установки
температуры.
* Не отображается, если
температура
4 для сохранения значений.
GBDFEINLPGR
Настройка недельного таймера
1. Убедитесь, что отображается стандартный экран управления, а также
индикатор недельного таймера (1).
2. Нажмите кнопку TIMER “MENU” Bпосле чего на экране отобразится
сообщение “Set Up” (Установка) (2). (Помните, что каждое нажатие
кнопки переключает дисплей между режимами отображения “Set Up”
(Установка) и “Monitor” (Монитор)).
3. Нажмите кнопку включения/выключения TIMER “ON/OFF” (SET DAY) 9
для установки дня недели. Каждое нажатие кнопки отображает 3
следующий параметр настройки в последовательности: “Вск Пнд Втр
Срд Чтв Птн Сбт” → “Вск” → ... → “Птн” → “Сбт” → “Вск Пнд Втр Срд
Чтв Птн Сбт”…
4. Нажмите
раз для установки нужного значения (1 - 6) 4.
* Во время выполнения действий 3 и 4 будет выбран один из элементов
показанной ниже таблицы.
(Слева на дисплее пульта дистанционного управления показывается
отображение индикации в случае установки приведенных далее
значений операции 1 для воскресенья (Sunday)).
или INITIAL SETTING (7 или 8) необходимое число
Примечание:
Новые значения будут отменены, если перед кнопкой “CIR.WATER”
4 в ы
нажмете кнопку выбора Pежим (Bозврата) 2.
Если вы настроили две или более операции для одного и того же времени,
будет выполнена только операция с наивысшим номером операции.
10. Повторите действия с 3 по 8 для заполнения необходимого числа ячеек.
11. Нажмите кнопку Pежим (Bозврата) 2 для возврата к стандартному
экрану управления и продолжения процедуры настройки.
12. Для активизации таймера нажмите кнопку включения/выключения TIMER
“ON/OFF” 9, после чего индикатор “Timer Off” (Выкл. таймер) исчезнет с
экрана.
Убедитесь, что индикатор “Timer Off” бо лее не отображается.
* Если настройки таймера отсутствуют, на экране будет мигать индикатор
“Timer Off” (Выкл. таймер).
93
RUTRGBGBGBGBGB
Page 94

Отображение настроек недельного таймера
Настройка простого таймера
Настройка таймера
1. Убедитесь, что индикатор недельного таймера отображается на
экране (1).
2. Нажмите кнопку TIMER “MENU” B после чего на экране отобразится
сообщение “Monitor” (Монитор) (8).
3. Нажмите кнопку включения/выключения TIMER “ON/OFF” (SET DAY)
9 необходимое число раз для выбора дня.
4. Нажмите кнопку операции
8) для изменения отображаемой на дисплее операции таймера (9).
* Каждое нажатие кнопки осуществит переход к следующей
операции таймера в порядке выполненных настроек времени.
5. Для закрытия монитора и возврата к стандартному экрану
управления нажмите кнопку Pежим (Bозврата) 2.
GBDFEINLPGR
Для отключения недельного таймера.
Нажмите кнопку включения/выключения TIMER “ON/OFF” 9, после чего на
экране появится индикатор “Timer Off” (Таймер выкл.) (0).
или INITIAL SETTING (7 или
Для включения недельного таймера.
Нажмите кнопку включения/выключения TIMER “ON/OFF” 9, после чего
индикатор “Timer Off” (Выкл. таймер) (0) потемнеет на экране.
Использование простого таймера
1. Вы можете настроить простой таймер тремя способами:
• Только время включения:
устройство начнет работу после наступления установленного времени.
• Только время выключения:
устройство прекратит работу после наступления установленного времени.
• Время включения и включения:
устройство начинает и прекращает работу в установленное время.
2. Простой таймер (включение и выключение) может быть настроен только
для 72-х часового интервала времени. Настройки времени могут быть
сделаны с приращением в один час.
RUTRGBGBGBGBGB
Примечание:
*1. Таймеры недельный/простой/автоматического отключения не могут
использоваться одновременно.
*2. Простой таймер не будет работать в случае наличия следующих условий:
Таймер выключен; система находится в неисправном состоянии;
выполняется тест системы; пульт дистанционного управления выполняет
процедуру самотестирования или диагностики; пользователь пытается
выбрать режим работы; пользователь выполняет настройку таймера;
система управляется из центрального пульта управления. (В этих условиях
операции включения и отключения запрещены).
Настройка таймера
Действие (On (Вкл.) или
Off (Выкл.))
* “— —” отображается в
случае отсутствия
установок.
1. Убедитесь, что отображается стандартный экран управления, а также
индикатор простого таймера (1).
В случае отображения индикации, отличной от индикации простого
таймера (Simple Timer), установите ее в “SIMPLE TIMER”, используя
функцию настройки таймера (см. 3.[3]–3 (3)).
2. Нажмите кнопку TIMER “MENU” B, после чего на экране отобразится
индикатор “Set Up” (Установка) (2). (Помните, что каждое нажатие
кнопки переключает дисплей между режимами отображения “Set Up”
(Установка) и “Monitor” (Монитор)).
3. Нажмите кнопку “ON/OFF” (ВКЛ./ВЫКЛ.) 1 для отображения текущих
настроек простого таймера (ON или OFF). Нажмите кнопку один раз для
отображения оставшегося времени до включения, а затем еще раз для
отображения времени, оставшегося до выключения. (Индикатор “ON/
OFF” отображается в 4).
• “ON” – таймер включения:
устройство начнет работу после прохождения установленного числа часов.
• “OFF” – таймер отключения:
устройство прекратит работу после прохождения установленного числа часов.
4. Когда в 3 отображается “ON” или “OFF”: нажмите соответствующую
кнопку настройки времени A для установки необходимого числа часов
для включения (если отображается “ON”) или для выключения (если в
4 отображается “OFF”).
• Доступный диапазон: 1 - 72 часа
5. Для настройки времени включения и отключения повторите действия 3
и 4.
* Помните, что для включения и выключения не может быть установлено
одно и тоже время.
6. Для очистки текущих настроек времени включения и выключения:
Отобразите настройки включения или выключения (см. действие 3) и
нажмите кнопку CHECK (CLEAR) 0 для очистки настроек в значение
“—” (4). (Если нужно использовать только параметр включения или
только отключения, убедитесь, что необходимый параметр не имеет
значения “—”.)
7. После выполнения действия с 3 по 6 нажмите кнопку “CIR.WATER”
для сохранения значения.
Примечание:
Новые настройки будут отменены, если перед кнопкой “CIR.WATER”
вы нажмете кнопку Pежим (Bозврата) 2.
8. Нажмите кнопку Pежим (Bозврата) 2 для возврата к стандартному
экрану управления.
9. Нажмите кнопку включения/выключения TIMER “ON/OFF” 9 для начала
работы таймера. Во время работы таймера его значение отображается
на дисплее.
соответствует выполненным настройкам.
Проверьте, что значение таймера отображается, и оно
4
4
Отображение текущих настроек простого таймера
Настройка таймера
1. Убедитесь, что на экране отображается индикатор простого таймера (1).
2. Нажмите кнопку TIMER “MENU” B, после чего на экране отобразится
сообщение “Monitor” (Монитор) (5).
• Если простой таймер будет работать для включения или выключения,
его установленное текущее значение отобразится в 6.
• Если были установлены оба значения (“ON” (ВКЛ.) и “OFF” (ВЫКЛ.)),
будут отображены оба значения.
3. Нажмите кнопку Pежим (Bозврата) 2 для закрытия индикатора монитора
и возврата к стандартному экрану управления.
94
Page 95

Для отключения простого таймера отключения...
Нажмите кнопку включения/выключения TIMER “ON/OFF” 9 , чтобы
настройки таймера не отображались на экране (7).
Для запуска простого таймера…
Нажмите кнопку включения/выключения TIMER “ON/OFF” 9 чтобы настройки
таймера начали отображаться на экране (7).
Примеры
Если для простого таймера были установлены значения включения и
отключения, действия и информация на дисплее будут подобны показанной
далее информации.
Пример 1:
Запуск таймера с временем включения раньше времени отключения
Время включения: 3 часа
Время выключения: 7 часов
ONHr
AFTER
▲
SIMPLE
В момент
запуска
таймера
Через 3 часа
после запуска
таймера
▲
Через 7 часов
после запуска
SIMPLE
таймера
Пример 2:
Запуск таймера с временем выключения раньше времени включения
Время включения: 5 часов
Время выключения: 2 часа
В момент
запуска
SIMPLE
таймера
Через 2 часа
после запуска
таймера
▲
ONHr
AFTER
▲
Через 5 часов
после запуска
таймера
На дисплее отображаются
настройки таймера включения (ON)
(осталось часов до включения).
Настройки таймера на дисплее
изменились на OFF (ВЫКЛ.)
(осталось часов до включения).
Отображается настройка для
времени отключения (OFF - 7
часов) – включения (ON - 3 часа)
= 4 часа.
Устройство будет
выключен до тех пор, пока
кто-либо не включит его.
На дисплее отображаются настройки
таймера отключения (OFF) (осталось
часов до отключения).
Настройки таймера на дисплее
изменились на ON (ВКЛ.) (осталось
часов до включения).
Отображается настройка для
времени включения (ON - 5 часов) –
выключения (OFF - 2 часа) = 3 часа.
Устройство включится и
продолжит работу до тех
пор, пока кто-либо не
выключит его.
Использование таймера автоматического выключения
1. Этот таймер начинает отсчет времени после включения устройства и
выключает его в указанное в настройках время.
2. Можно установить значения от 30 минут до 4 часов с 30-минутным
приращением.
Примечание:
*1. Таймеры недельный/простой/автоматического отключения не могут
использоваться одновременно.
*2. Таймер автоматического отключения не будет работать в случае наличия
следующих условий:
Таймер выключен; система находится в неисправном состоянии;
выполняется тест системы; пульт дистанционного управления выполняет
процедуру самотестирования или диагностики; пользователь пытается
выбрать режим работы; пользователь выполняет настройку таймера;
система управляется из центрального пульта управления. (В этих условиях
операции включения и отключения запрещены).
Настройка таймера автоматического выключения
Настройка таймера
1. Убедитесь, что отображается стандартный экран управления и индикатор
таймера отключения (Auto Off) (1).
В случае отображения индикации, отличной от индикации таймера
автоматического отключения (Auto Off Timer), установите ее в “AUTO OFF
TIMER”, используя функцию настройки таймера (см. 3.[3]–3 (3)).
2. Удерживайте нажатой кнопку TIMER “MENU” B в течение 3 секунд, до
появления на экране индикации “Set Up” (Установка) (2).
(Помните, что каждое нажатие кнопки переключает дисплей между
режимами отображения “Set Up” (Установка) и “Monitor” (Монитор)).
3. Нажмите соответствующую кнопку настройки времени A для установки
времени отключения (3).
4. Нажмите кнопку “CIR.WATER”
Примечание:
Настройки будут отменены, если перед кнопкой “CIR.WATER”
нажмете кнопку Pежим (Bозврата) 2.
5. Нажмите кнопку Pежим (Bозврата) 2 для продолжения процедуры
настройки и возврата к стандартному экрану управления.
6. Если устройство уже работает, таймер начнет немедленный отсчет
времени.
Обязательно проверьте правильность настроек, которые
должны отобразиться на дисплее.
4 для сохранения настроек.
4 вы
GBDFEINLPGR
RUTRGBGBGBGBGB
95
Page 96
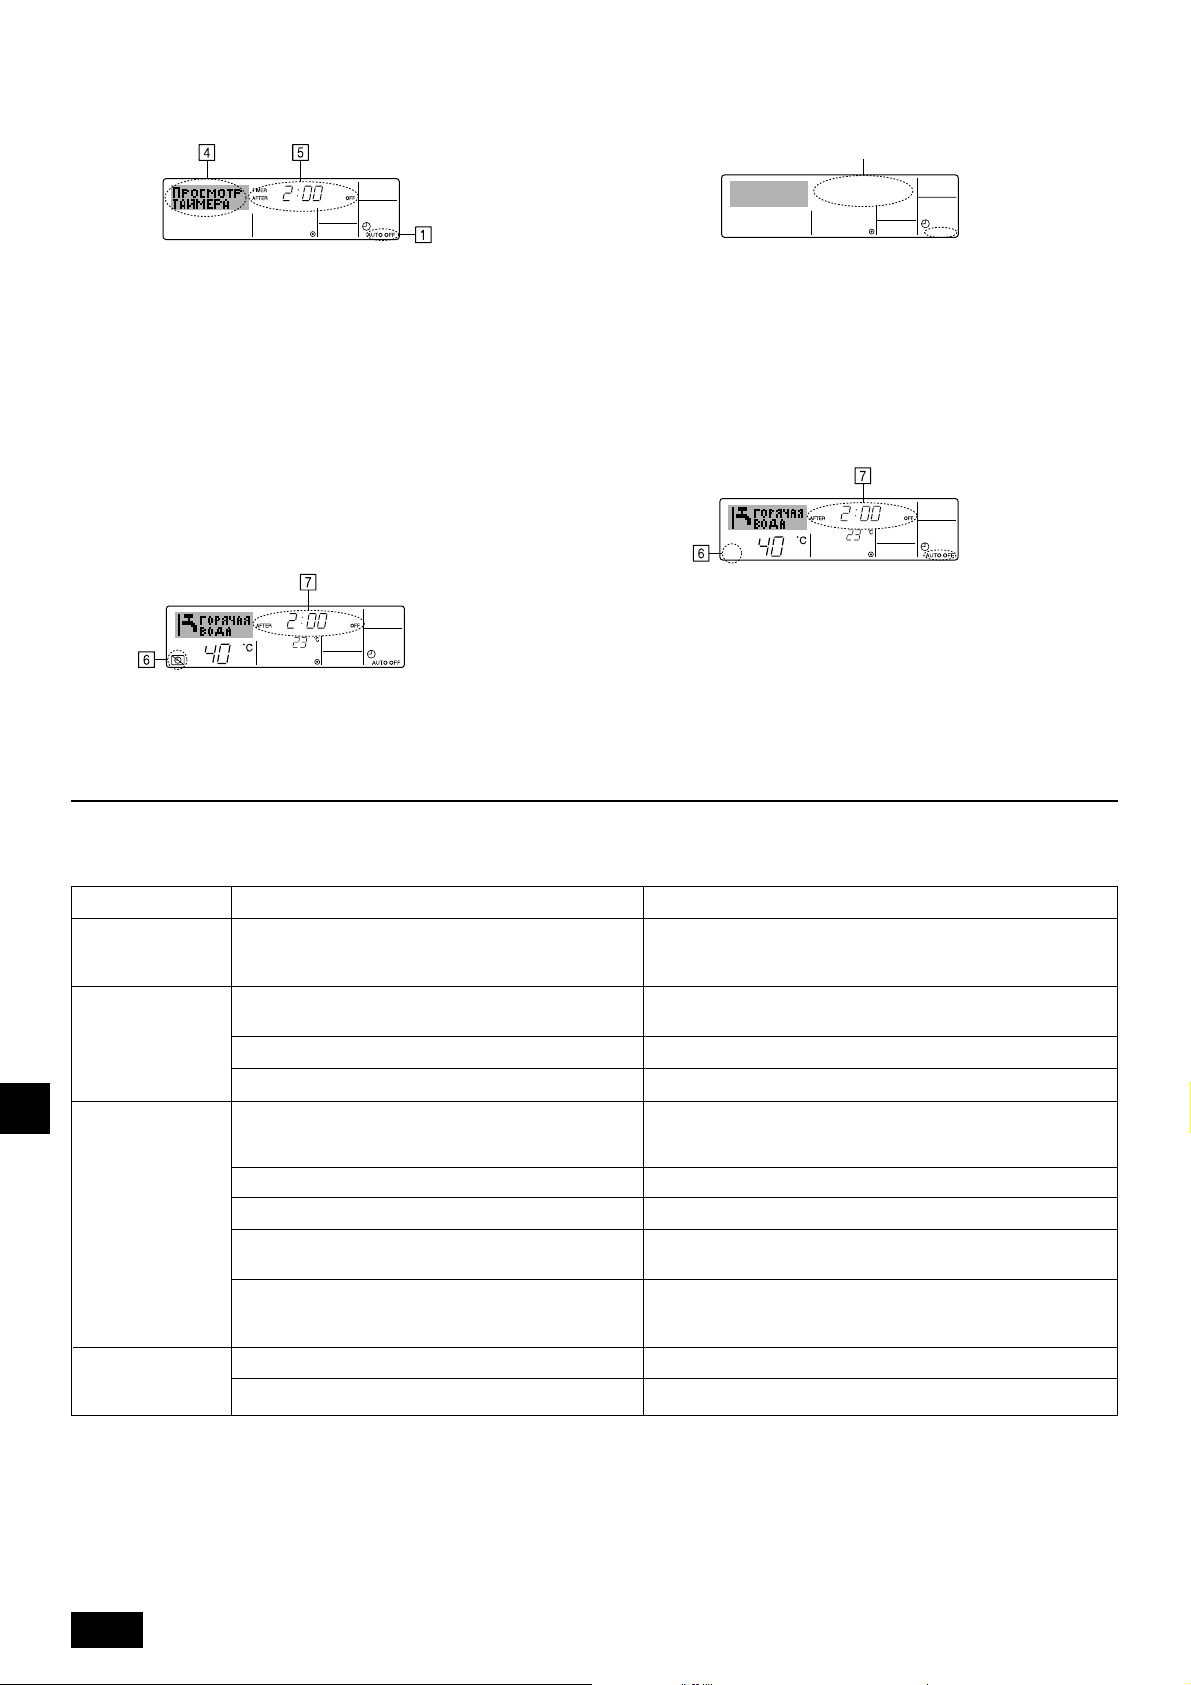
Проверка текущих настроек таймера
AUTO OFF
7
автоматического выключения
Настройка таймера
1. Убедитесь, что на экране отображается “Auto Off” (Выкл. автоматический
режим) (1).
2. Удерживайте нажатой кнопку TIMER “MENU” B в течение 3 секунд до
появления на экране индикации “Monitor” (Монитор) (4).
• Появится сообщение, что таймер отключен (5).
3. Для закрытия монитора и возврата к стандартному экрану управления
нажмите кнопку Pежим (Bозврата) 2.
Для отключения таймера автоматического
отключения...
• Удерживайте нажатой кнопку включения/выключения TIMER “ON/OFF”
GBDFEINLPGR
9 в течение 3 секунд, после чего появится сообщение “Timer Off” (Выкл.
таймер) (6), а значение настройки таймера (7) исчезнет.
• В качестве альтернативы для этого можно также выключить кондиционер
воздуха. Значение настройки таймера (7) исчезнет с экрана.
Для включения таймера автоматического
выключения...
• Удерживайте нажатой кнопку включения/выключения TIMER “ON/OFF”
9 в течение 3 секунд. Сообщение “Timer Off” (Выкл. таймер) исчезнет
(6), а значение настройки таймера (7) появится на дисплее.
• В качестве альтернативы для этого можно также включить кондиционер
воздуха. Значение настройки таймера появится в 7.
3. Выбор функции
Выбор функции с помощью пульта дистанционного управления
В режиме выбора функции с помощью пульта дистанционного управления можно настраивать нижеприведенные функции. При необходимости измените
настройку.
Пункт 2
Пункт 3 (Описание настройки)
• Возможен вариант индикации на разных языках
• Настройка диапазона ограничения режима работы (блокировка
режима работы)
•
Параметр для использования или неиспользования любого из режимов работы
•
Настройка включения или отключения режима фиксированного воздушного потока
•
Выбор основного или подчиненного пульта дистанционного управления
*
При подключении двух пультов дистанционного управления к одной
группе один из пультов необходимо настроить как дополнительный.
• Настройка включения или отключения функции часов
• Настройка типа таймера
• Индикация номера контакта в случае возникновения ошибки
• Настройка номера телефона
• Параметр для использования или неиспользования функции
настройки величины изменения температуры в дежурном режиме
обогрева/охлаждения
• Настройка индикации единиц измерения температуры (°C или °F)
•
Настройка включения или отключения индикации температуры воды
1. Выбор языка
(“CHANGE
LANGUAGE”)
2. Ограничение
функций
(“ВЫБОР
ФУНКЦИИ”)
3. Выбор режима
RUTRGBGBGBGBGB
(“ВЫБОР
РЕЖИМА”)
4.
Изменение индикации
(“НАСТРОЙКА
ИНДРЕЖИМА”)
Пункт 1
Выбор языка отображения
(1) Настройка ограничений рабочей функции (блокировка
режима работы) (“ФУНКЦИЯ БЛОКИРОВКИ”)
(2)
Параметр пропуска режима работы (“УДАЛИТЬ РЕЖИМ”)
(3)
Настройка ограничения диапазона температуры (“ОГРАНИЧЕНИЕ УСТ. ТЕМПЕРАТ.”)
(1) Настройка пульта дистанционного управления
(основной/дополнительный) (“ОСНОВНОЙ ПУЛЬТ/
ДОПОЛНИТЕЛЬНЫЙ ПУЛЬТ”)
(2) Использование настройки часов (“ЧАСЫ”)
(3)
Настройка функции таймера (“НЕДЕЛЬНЫЙ ТАЙМЕРА”)
(4) Настройка номера контакта при возникновении ошибки
(“CALL.”)
(5)
Погрешность измерения (“ПОГРЕШНОСТЬ ИЗМЕРЕНИЯ”)
(1)
Настройка индикации температуры (°C/°F) (“Eдин. темпер.°C/°F”)
(2)
Настройка индикации температуры воды (“ИНДИКАЦИЯ t° ВОДЫ ”)
96
Page 97

Схема выбора функции
[1] Выключите кондиционер, чтобы включить режим выбора функции с помощью пульта дистанционного управления. → [2] Выберите одну из функций,
перечисленных в пункте 1. → [3] Выберите одну из функций, перечисленных в пункте 2. → [4] Выполните настройку. (Подробная информация приведена в пункте
3) → [5] Настройка завершена. → [6] Переключите индикацию в нормальный режим. (Конец)
Нормальный режим индикации (индикация,
отображаемая при выключенном кондиционере)
(Удерживая нажатой кнопку E, нажмите кнопку D и
удерживайте ее две секунды.)
* Индикацию невозможно изменить во время теста
системы и самодиагностики.
Пункт 1
Выбор языка
(“CHANGE LANGUAGE”)
Ограничение функций
(“ВЫБОР
ФУНКЦИИ”)
Нажмите
кнопку E.
Выбор режима
(“ВЫБОР
РЕЖИМА”)
Изменение индикации
(“НАСТРОЙКА
ИНДРЕЖИМА”)
Нажмите кнопку G.
Нажмите
кнопку E.
Нажмите
кнопку G.
Нажмите
кнопку E.
Нажмите
кнопку G.
Нажмите
кнопку E.
Нажмите
кнопку G.
→
Настройка ограничений рабочей функции (“ФУНКЦИЯ БЛОКИРОВКИ”)
→
→
Параметр пропуска режима работы (“УДАЛИТЬ РЕЖИМ”)
Настройка ограничения диапазона температуры (“ОГРАНИЧЕНИЕ УСТ. ТЕМПЕРАТ.”)
→
Настройка пульта дистанционного управления (основной/
дополнительный) (“ОСНОВНОЙ ПУЛЬТ/ДОПОЛНИТЕЛЬНЫЙ ПУЛЬТ”)
→→→
Использование настройки часов (“ЧАСЫ”)
Настройка функции таймера (“НЕДЕЛЬНЫЙ ТАЙМЕРА”)
→
Настройка номера контакта при возникновении ошибки (“CALL.”)
Погрешность измерения (“ПОГРЕШНОСТЬ ИЗМЕРЕНИЯ”)
→
Настройка индикации температуры (°C/°F) (“Eдин. темпер.°C/°F”)
→
Настройка индикации температуры воды (“Индикация t° воды”)
Режим выбора функции с помощью
пульта дистанционного управления
Пункт 2
Нажмите кнопку G.
Нажмите кнопку G.
Нажмите кнопку G.
(Удерживая нажатой кнопку E,
нажмите кнопку D и удерживайте
ее две секунды.)
*
Пульт дистанционного управления
запоминает настройку, выполненную
таким образом.
См. [3]–1
Пункт 3
(Описание настройки)
Нажмите
кнопку D.
Нажмите
кнопку D.
Нажмите
кнопку D.
См. [3]–2. (1)
См. [3]–2. (2)
См. [3]–2. (3)
См. [3]–3. (1)
См. [3]–3. (2)
См. [3]–3. (3)
См. [3]–3. (4)
См. [3]–3. (5)
См. [3]–4. (1)
См. [3]–4. (2)
ПРИМЕЧАНИЕ
При переключении индикации для выбора функции
с помощью пульта дистанционного управления в
нормальный режим таймер отключается.
Индикация
Данная индикация отображает
язык, выбранный в режиме
CHANGE LANGUAGE (выбор
языка). В данном руководстве
установлен английский язык.
GBDFEINLPGR
Детальная настройка
[3]–1. Настройка CHANGE LANGUAGE (выбор языка)
Можно выбрать язык, на котором отображаются индикации на дисплее.
• Нажмите кнопку [
1 Английский (GB), 2 Немецкий (D), 3 Испанский (E), 4 Русский (RU),
5 Итальянский (I), 6 Французский (F), 7 Шведский
[3]–2. Ограничение функций
(1) Настройка ограничений рабочей функции (блокировка режима работы)
• Чтобы включить настройку, нажмите кнопку [
1 no1 : Настройка блокировки режима работы осуществляется всеми
кнопками, кроме кнопки [
2 no2 : Настройка блокировки режима работы осуществляется всеми
кнопками.
3 OFF (Исходное значение настройки) :
Настройка блокировки режима работы не осуществляется.
* Чтобы установить правильную настройку блокировки режима работы в
нормальном режиме индикации экрана, необходимо нажать следующие
кнопки (одновременно нажмите кнопки [CIR.WATER] и[
удерживайте их в течение двух секунд) в нормальном режиме индикации
экрана после выполнения настройки, упомянутой выше.
(2) Настройка параметра пропуска режима работы
После изменения значения параметра, режим работы можно изменить в
пределах измененного диапазона.
• По нажатию кнопки [
параметров.
1 Режим “Нагрев” : определяет использование или
2 Режим “Нагрев эконом.” : определяет использование или
3 Режим “Горячая вода” : определяет использование или
4 Режим “Антифриз” : о пределяет использование или
5 Режим “Охлаждение” : о пределяет использование или
6 ВЫКЛ (исходное значение параметра)
MENU], чтобы выбрать язык.
ON/OFF].
ON/OFF].
ON/OFF] и
ON/OFF] происходит переключение следующих
неиспользование режима обогрева
неиспользование режима “Нагрев эконом.”.
неиспользование режима “Горячая вода”.
неиспользование режима “Антифриз”.
неиспользование режима “Охлаждение”.
: Пропуск режима работы не выполняется
* В случае задания значения, отличного от OFF, одновременно
выполняется настройка пропуска режимов “Нагрев”, “Нагрев эконом.”,
“Горячая вода”, “Антифриз”, и “Охлаждение”.
* Режим, несуществующий в подключаемом блоке, невозможно
использовать даже при значении параметра “AVAILABLE”
(“ДОСТУПНО”)
(3) Настройка ограничения диапазона температуры
После выполнения настройки можно изменить значение температуры в
пределах установленного диапазона.
• Чтобы включить настройку, нажмите кнопку [
1 РЕЖИМ “НАГРЕВ” С ОГРАНИЧЕНИЕМ ТЕМПЕРАТУРЫ:
В режиме нагрева можно изменять интервал температур.
2 РЕЖИМ “ГОРЯЧАЯ ВОДА” С ОГРАНИЧЕНИЕМ ТЕМПЕРАТУРЫ:
В режиме нагрева/подачи горячей воды можно изменять интервал
температур.
3 РЕЖИМ “АНТИФРИЗ” С ОГРАНИЧЕНИЕМ ТЕМПЕРАТУРЫ:
В режиме “Антифриз” можно изменять интервал температур.
4 РЕЖИМ “ОХЛАЖДЕНИЕ” С ОГРАНИЧЕНИЕМ ТЕМПЕРАТУРЫ:
В режиме охлаждения можно изменять интервал температур.
5 OFF (исходная настройка) :
Ограничение диапазона температуры выключено.
* Если установлено значение кроме OFF (выкл.), одновременно выполняется
настройка ограничения диапазона температуры в режимах охлаждения и
обогрева, а также в автоматическом режиме. Тем не менее, диапазон
невозможно ограничить, если установленный диапазон температуры не
изменялся.
• Чтобы повысить или понизить температуру, нажмите кнопку [
и ].
• Устанавливаемый диапазон
Режим “Горячая вода” :
Режим “Нагрев” :
Режим “Охлаждение” :
* Устанавливаемый диапазон изменяется в зависимости от подключенного
блока
нижний предел:от 30 до 70 °C (от 87 до 158 °F)
верхний предел:от 70 до 30 °C (от 158 до 87 °F)
нижний предел:от 30 до 45 °C (от 87 до 113 °F)
верхний предел:от 45 до 30 °C (от 113 до 87 °F)
нижний предел:от 10 до 30 °C (от 50 до 87 °F)
верхний предел:от 30 до 10 °C (от 87 до 50 °F)
ON/OFF].
TEMP.
RUTRGBGBGBGBGB
97
Page 98

[3]–3. Настройка выбора режима
(1) Настройка пульта дистанционного управления (основной/дополнительный)
• Чтобы включить настройку, нажмите кнопку [
1 Основной : контроллер будет установлен как основной.
2 Дополнительный : контроллер будет установлен как дополнительный.
(2) Использование настройки часов
• Чтобы включить настройку, нажмите кнопку [
1 ON : Можно использовать функцию часов.
2 OFF : Функция часов использовать невозможно.
(3) Настройка функции таймера
• Чтобы включить настройку, нажмите кнопку [
одну из настроек, приведенных ниже.).
1 Heдeлый таймер (Исходное значение настройки):
2 ABTO от кпочy. по тaймерy :
3 Пpocтoй тaймер : Можно использовать обычный таймер.
4 Taймер выкл. : Режим таймера использовать невозможно.
* Если настройка часов имеет значение OFF, “Heдeлый таймер”
использовать невозможно.
(4) Настройка номера контакта при возникновении ошибки
GBDFEINLPGR
• Чтобы включить настройку, нажмите кнопку [
1 CALL OFF : В случае ошибки настроенные контактные номера не
2 CALL **** *** **** : В случае ошибки настроенные контактные номера
CALL_ : Контактный номер можно настроить, если
Можно использовать еженедельный таймер.
Можно использовать таймер автоотключения.
отображаются.
отображаются.
индикация отображается слева.
ON/OFF] D.
ON/OFF] D.
ON/OFF] D (Выберите
ON/OFF] D.
• Настройка контактных номеров
Для настройки контактных номеров следуйте перечисленным процедурам.
Для настройки номеров перемещайте мигающий курсор. Нажмите кнопку
[
TEMP. или ] F для перемещения курсора вправо (влево).
Нажмите кнопку [
(5) Погрешность измерения
• По нажатию кнопки [
параметров.
1 ON : В режиме настройки исходной температуры воды отображается
значение погрешности измерения.
2 OFF : В режиме настройки исходной температуры воды не
отображается значение погрешности измерения.
CLOCK или ] C для настройки номеров.
ON/OFF] D происходит переключение следующих
[3]–4. Настройка изменения индикации
(1) Настройка индикации температуры (°C/°F)
• Чтобы включить настройку, нажмите кнопку [
1 °C: Используемая единица измерения температуры - °C.
2 °F: Используемая единица измерения температуры - °F.
(2) Настройка индикации температуры воды
• Чтобы включить настройку, нажмите кнопку [
1 ON : Температура воды отображается.
2 OFF : Температура воды не отображается.
ON/OFF] D.
ON/OFF] D.
4. Уход за прибором
Обслуживание фильтра должно всегда выполняться специалистом по
техобслуживанию.
До проведения обслуживания прибора отключите электропитание
(положение ВЫКЛ.).
Внимание:
• Прежде чем начать чистку, остановите работу прибора и отключите
подачу электропитания. Помните, что внутренний вентилятор
работает на высокой скорости, что сопряжено с риском личной
травмы.
• Внутренние приборы оборудованы фильтрами для удаления пыли
из засасываемого воздуха. Очистку сетчатого фильтра следует
выполнять методами, показанными на следующих иллюстрациях.
• Срок эксплуатации сетчатого фильтра зависит от того, где
установлено устройство, и как оно эксплуатируется.
5. Исправление неполадок
Прежде чем вызывать техобслуживание, проверьте следующее:
Состояние прибора
RUTRGBGBGBGBGB
Не работает.
Вода подается, однако
она недостаточно
холодная или горячая.
Не подается
холодная или горячая
вода.
Прибор работает
непродолжительное
время, а затем
останавливается.
Пульт дистанционного управления
«'» не горит.
Индикатор дисплея не
загорается даже при
нажатии кнопки [ON/OFF].
Жидкокристаллический
дисплей показывает, что прибор
находится в состоянии работы.
Индикация на
жидкокристаллическом
дисплее указывает, что
прибор находится в
состоянии работы.
На жидкокристаллическом
дисплее мигает индикация
«CHECK» и показан ход
проверки.
Перебой в подаче электроэнергии
Подача электроэнергии отключена.
Перегорел предохранитель в системе подачи электроэнергии.
Перегорел прерыватель цепи заземления.
Неправильная настройка температуры
В течение трех минут срабатывает механизм
задержки возобновления работы прибора.
Работа внутреннего прибора возобновилась во
время операции обогрева и размораживания.
На входе и выходе воздуха внутреннего и внешнего
прибора имеется препятствие.
Сетчатый фильтр забит пылью и грязью.
Причина
Методы прочистки
• Для промывки сетчатого фильтра снимите крышку и очистите его внутри
с помощью щетки.
Внимание:
• Не сушите сетчатый фильтр под прямыми солнечными лучами, или
нагревая его с помощью огня и т.п. Это может привести к его
деформации.
Внимание:
Никогда не проливайте на кондиционер воду и не опрыскивайте его
аэрозолем с возгорающимся составом. Чистка такими методами может
привести к поломке кондиционера, электрическому шоку или пожару.
Неполадка
Нажмите кнопку [ON/OFF] после возобновления подачи электроэнергии.
Включите подачу электроэнергии.
Замените предохранитель.
Установите прерыватель цепи заземления.
После проверки настройки температуры и температуры входа на
жидкокристаллическом дисплее обратитесь [Регулировка температуры
воды] и воспользуйтесь для регулировки кнопкой регулировки температуры.
Подождите некоторое время.
(Для защиты компрессора во внутренний прибор
встроен механизм трехминутной задержки
возобновления работы. Поэтому иногда компрессор не
приступает немедленно к работе. Иногда он не
приступает к работе в течение 3 минут.)
Подождите некоторое время
(Функция отопления включается после окончания функции размораживания).
Удалите препятствие и снова включите прибор.
Повторите операцию после очистки сетчатого фильтра.
(cм. [Уход за прибором]).
98
Page 99

• Если работа останавливается из-за сбоя в подаче электропитания, срабатывает [предотвращение возобновления работы при сбое электропитания],
предотвращающее включения прибора даже после восстановления подачи питания. В этом случае нажмите кнопку [ON/OFF] еще раз и начните работу.
Если неполадки в работе прибора продолжаются после того как вы проверили вышеуказанные параметры, отключите подачу электроэнергии свяжитесь с
вашим поставщиком, имея наготове информацию относительно названия изделия, характера неполадки и т.д. Если мигает индикатор [CHECK] и код проверки
(4-цифровой), сообщите поставщику, что указывает дисплей (код проверки). Никогда не пытайтесь производить ремонт самостоятельно.
Указанные ниже симптомы не являются неполадками кондиционера:
• Иногда воздух, выдуваемый из кондиционера, может иметь неприятный запах. Это объясняется сигаретным дымом, который присутствует в комнате,
запахом косметики, стен, мебели и т.д., которые поглощаются в кондиционере.
• После включения или останова кондиционера может быть слышен попеременно шипящий звук. Этот звук является звуком хладагента, который перемещается
внутри кондиционера. Это нормальное явление.
• Иногда кондиционер издает резкий звук или щелкает в начале или в конце операции охлаждения/отоплен ия. Это звук трения передней панели и других
частей, который вызван расширением и сужением деталей в связи с перепадами температуры. Это нормальное явление.
6. Установка прибора, его перемещение и проверка
Место установки
Проконсультируйтесь с вашим поставщиком относительно подробностей
установки и переноса оборудования.
Внимание:
Никогда не устанавливайте кондиционер там, где имеется риск утечки
воспламеняющегося газа.
При утечке и аккумулации газа вокруг прибора может возникнуть пожар.
Никогда не устанавливайте кондиционер в указанных ниже местах:
• там, где много машинного масла
• в местах, расположенных близко к океану и пляжу, где много соли.
• в местах с высокой влажностью
• в местах, расположенных близко от горячих источников
• в местах наличия сернистого газа
• в местах, где расположено высокочастотное оборудование
(высокочасточное сварочное оборудование и т.д.)
• в местах, где часто используются кислотные растворы
• в местах, где часто используются специальные распылители
• устанавливайте внутренний прибор строго горизонтально. В противном
случае может произойти утечка воды.
• Предпринимайте достаточные меры по сокращению шума при установке
кондиционеров в больницах или в помещениях, связанных с
телекоммуникацией.
Если кондицинер используется в любом из вышеуказанных местоположений,
возможны частые неполадки в функционировании прибора. Рекомендуется
избегать установки прибора в вышеуказанных местах.
За дополнительной информацией обращайтесь к поставщику.
Рекомендации по электропроводке
Внимание:
• Электропроводка должна выполняться квалифицированным
специалистом электриком в соответствии с [техническими
стандартами установки электрооборудования], [правила внутренней
проводки], а также инструкциями, приведенными в руководстве по
установке и при использовании специальных линий
электропроводки. Использование других приборов на этой линии
подачи электропитания может привеси к перегоранию
прерывателей и предохранителей.
• Никогда не подсоединяйте провод заземления к проводам
заземления газовой трубы, трубы для воды, разрядника или
телефонной линии. За подробной информацией обращайтесь к
поставщику.
• При некоторых типах установки в обязательном порядке должен
устанавливаться прерыватель цепи заземления. За подробной
информацией обращайтесь к поставщику.
Информация относительно установки водяной трубы
• Не используйте в качестве водяных труб стальные трубы. Рекомендуется
использовать медные трубы.
• Водяной контур должен быть замкнутым.
Перенос прибора
• При снятии или повторной установке кондиционера в связи с
расширением помещения, перепланировкой или переездом,
проконсультируйтесь с вашим поставщиком заранее, чтобы оценить
стоимость работы профессионального инженера, услуги которого
требуются при переносе прибора.
Внимание:
При переносе и повторной установке кондиционера
проконсультируйтесь с вашим поставщиком. Неправильная установка
может привести к электрическому шоку, пожару и т.д.
Необходимо также обращать внимание на фактор шума
• При установке прибора выберите такое место, которое абсолютно
способно выдерживать вес кондиционера, и там, где возможно сократить
шум и вибрацию.
• Выберите такое место, где шум холодного или теплого воздуха,
выходящего из внешнего прибора кондиционера, не будет беспокоить
соседей.
• Если перед выходом воздуха внешнего прибора кондиционера находится
какой-то посторонний предмет, это ухудшает его работу и может привести
к повышенному уровню шума. Избегайте ставить какие-либо посторонние
предметы вблизи от выхода воздуха.
• Если кондиционер производит необычный шум, проконсультируйтесь с
вашим поставщиком.
Техобслуживание и инспекция
• Если кондиционер используется на протяжении нескольких сезонов, его
внутренние части могут запачкаться, что приведет к ухудшению работы.
В зависимости от условий использования прибор может генерировать
неприятный запах и дренажное устройство может начать плохо
функционировать в связ с накоплением пыли, грязи и т.д.
GBDFEINLPGR
RUTRGBGBGBGBGB
99
Page 100

7. Технические условия
Модель
Источник питания
Нагревательная способность kW
Охлаждающая способность kW
Уровень шума
Вес нетто kg
Размер
Дополнительные принадлежности
Рас ход вод ы m
*1 Номинальные условия обогрева
Наружная температура
Длина трубы: 7,5 m (24-9/16 ft)
Перепад уровней: 0 m (0 ft)
Температура поступающей воды 65 °C Расход воды 2,15 m3/h
*3 Номинальные условия охлаждения
Наружная температура
GBDFEINLPGR
Длина трубы: 7,5 m (24-9/16 ft)
Перепад уровней: 0 m (0 ft)
Температура поступающей воды 23 °C Расход воды 1,93 m3/h
*5 Номинальные условия охлаждения
Наружная температура
Длина трубы: 7,5 m (24-9/16 ft)
Перепад уровней: 0 m (0 ft)
Температура поступающей воды 23 °C Расход воды 3,86 m3/h
Высота mm
Ширина mm
Глубина mm
:7 °C DB/6 °C WB (45 °F DB/43 °F WB)
: 35 °C DB (95 °F DB)
: 35 °C DB (95 °F DB)
PWFY-P100VM-E-BU
1
12,5 *
–
44 dB<A>
60 kg
Сетчатый фильтр, теплоизоляционный материал, соединительные комплекты × 2,
3
/h
компенсатор теплового расширения × 2 (PWFY - P200VM - E - AU)
0,6-2,15 1,2-4,3
*2 Номинальные условия обогрева
Наружная температура
Длина трубы: 7,5 m (24-9/16 ft)
Перепад уровней: 0 m (0 ft)
Температура поступающей воды 30 °C Расход воды 2,15 m3/h
*4 Номинальные условия обогрева
Наружная температура
Длина трубы: 7,5 m (24-9/16 ft)
Перепад уровней: 0 m (0 ft)
Температура поступающей воды 30 °C Расход воды 4,3 m3/h
PWFY-P100VM-E-AU
1 стадия 220-230-240 V 50/60 Hz
2
12,5 *
3
11,2 *
29 dB<A>
35 kg
800
450
300
0,6-2,15
:7 °C DB/6 °C WB (45 °F DB/43 °F WB)
:7 °C DB/6 °C WB (45 °F DB/43 °F WB)
PWFY-P200VM-E-AU
25,0 *
22,4 *
29 dB<A>
38 kg
4
5
RUTRGBGBGBGBGB
100
 Loading...