

Page 1

TABLE OF CONTENTS
USING THIS GUIDE .......... 2
P
HONE OVERVIEW ........ 3
D
ISPLAY ICONS ............. 4
G
ETTING STARTED ......... 6
INSERTING THE SIM CARD.....6
A
TTACHING THE BATTERY .... 6
HARGING BATTERY ........... 7
C
ATTERY SAFETY TIPS ......... 8
B
BASIC PHONE
O
PERATIONS .............. 9
TURNING ON THE PHONE ..... 9
TANDBY SCREEN .............. 9
S
AKING A CALL ................ 9
M
C
ONVERSATION OPTIONS .. 10
NSWERING A CALL ...... ... 10
A
NDING A CALL ............... 11
E
K
EYPAD LOCK .......... ....... 11
URNING OFF THE PHONE .. 11
T
ETWORK MESSAGES ....... 12
N
SAFETY INFORMATION .. 13
CARE AND MAINTENANCE . 18
ECURITY CODES ............ . 19
S
GENERAL FEATURES ..... 20
DIALING STORED NUMBERS.20
S
PEED DIALING ............... 21
ILENT ALERT MODE ........ 21
S
UTING ........................ 22
M
V
OLUME ADJUSTMENT ...... 22
ANDSFREE SPEAKING ...... 22
H
ENDING DTMF
S
T
OUCH TONES ........... 22
OLDING/RETRIEVING CALL 23
H
ALL WAITING ................ 24
C
C
ONFERENCE CALLS ......... 24
MENU SYSTEM ........... 26
MENU MAP .......... ......... 26
E
NTERING TEXT ........ .... ... 27
®
TEXT INPUT METHOD .. 27
T9
ETWORK SERVICES OR
N
D
IRECT LINKS ............ 30
HONE BOOK .............. ... 31
P
ESSAGES .................... 34
M
C
ALLS & TIMERS ............. 39
ETTINGS ...................... 43
S
FFICE TOOLS ................ 60
O
G
AMES .............. ........... 63
NTERNET MODE ............ . 64
I
APPENDIX .................. 70
USING THE HEADSET ....... 70
C
HANGING THE
F
RONT COVER ......... 71
CCESSORIES LIST ........... 72
A
G
LOSSARY .............. ....... 73
ROUBLESHOOTING .......... 75
T
RROR MESSAGES ........... 76
E
INDEX ....................... 78
W
ARRANTY ................. 82
1
Page 2

USING THIS GUIDE
Your G320 phone operates on the GSM network which provide s fraud protection, short
message service (SMS), integrated voice mail, superior voice quality and clear, static-free
sound. One of the most important GSM advantages is the remova ble SIM (su bscriber identity
module) card, which holds your personal information such as phone numbers, missed calls,
voice mail notifications and text messages.
Your phone uses a built-in micro browser to reach the Internet and other services such as
e-mail. This micro browser uses the WAP (Wireless Application Protocol) specification, which
standarizes the way that wireless devices can access the Internet and many services. WAP uses
WML (Wireless Markup Language), a language that translates Web pages into a format that
can be viewed on wireless devices. Whil e on line, your phone can also v i ew pictures, jump to
other links, and enter information into a Web page or service.
When available, your phone will use GPRS (General Packet Radio Service) technology.
GPRS is the fastest way yet to transmit data over mobile phone networks. With GPRS, the
information is split into separate but related "packets" before being transmitted and
reassembled at the receiving end. Packet switching means that GPRS radio resources are used
only when users are actually sending or receiving data. No dial-up modem connection is
necessary. This is why GPRS users are sometimes referred to be as being "always connected."
Certain features included in this guide called Network Services are supplied by wireless service
providers. You must order a subscription to the services from your home service provider to be
able to use them. Please ask your service provider for details of Network Services.
Key Symbols
Left softkey Right arrow on Express Key
Right softkey Left arrow on Express Key
SEND key Up arrow on Express Key
END/Power key Down arrow on Express Key
Store
Select ___ Use and on the Express Key to scroll to the desired
Press softkey below the term to perform that action. For
example, Store means press the softkey under the
word Store. Softkey actio ns and l abe ls chan ge wit h ea ch
new screen.
item in the menu and choose by pressing .
For examp le, select Phone Book means scroll to the
menu item Phone Book and choose by pressing .
2
Page 3
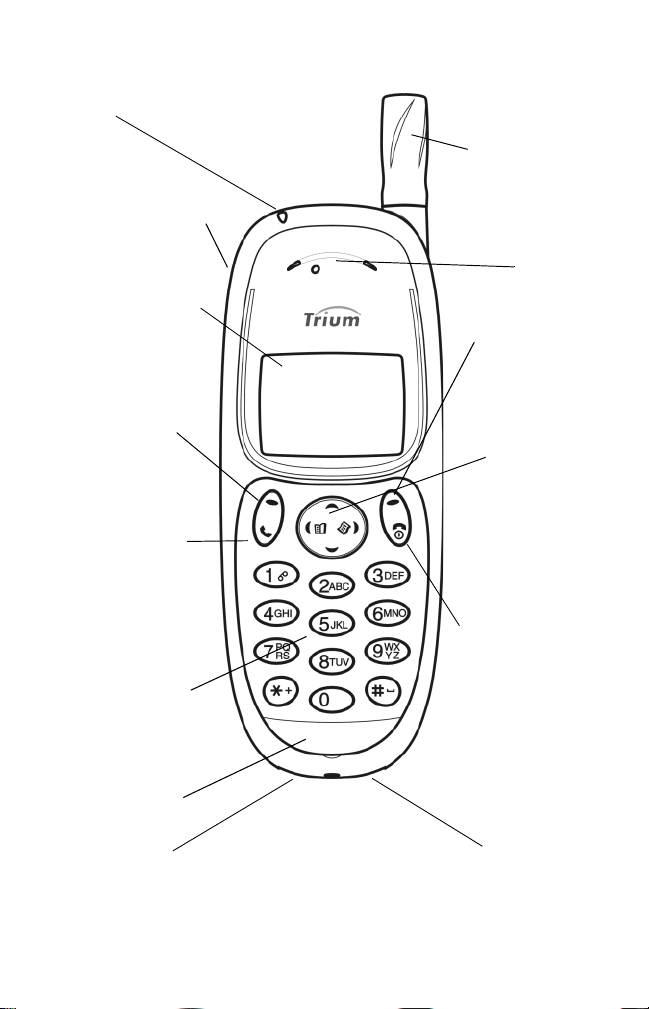
G320 PHONE OVERVIEW
LED
Call and
battery charge
indicator
Headset socket
Connect the
headset here
Graphic display
screen
Phone numbers,
menus, messages,
etc. are displayed
here
Left softkey
Performs action
indicated by text
directly above it
Send, Ans w er
key
Dials displayed
number or name
and answers calls.
Press to see Last
dialed number list
Alphanumeric
keys
Enter telephone
numbers and text
Fixed antenna
Earpiece
Right softkey
Performs action
indicated by text
directly above it
Express Key
Navigates around
the Phone book
and menus. Press
up or down during
conversation to
adjust volume
Power, End key
Press and hold to
turn the phone
on or off. Press to
end a call or
return to standby
screen
Microphone
AC Adapter
socket
Accessories
socket
3
Page 4
Display Icons
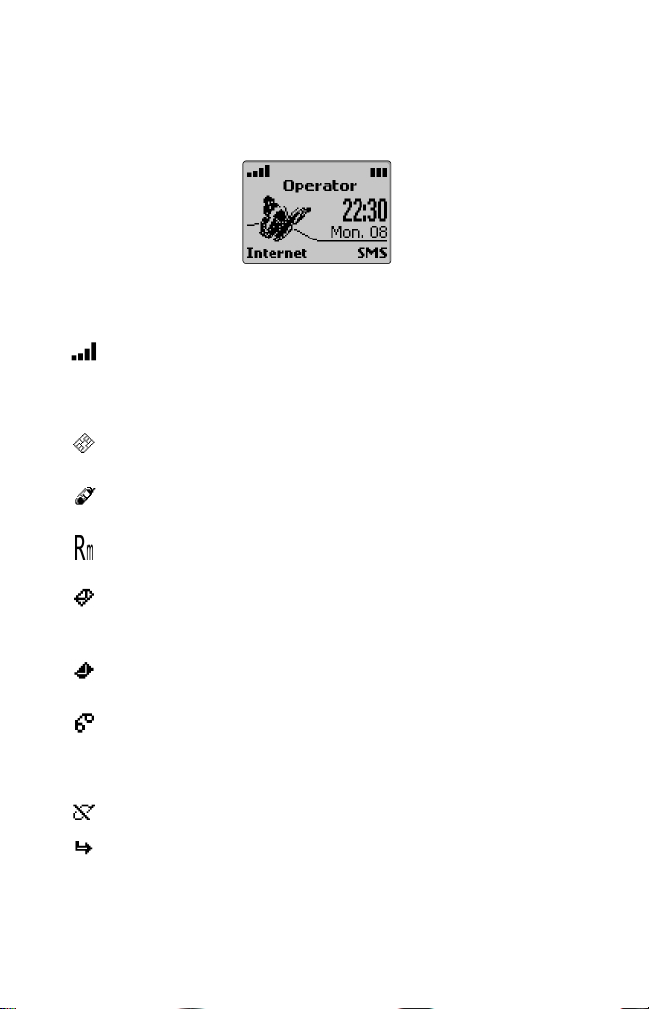
The display screen shows pictures, icons, numbers, text and animations.
The softkey labels are words in bold appearing on the bottom line. See
softkey descriptions on pages 2 and 3.
Display screen in standby mode
Icon Item Description
Signal strength
level
Phone Book
SIM card
Phone Book
Phone card
Roaming Phone is logged on to a network other
Short message
service (SMS)
or Text message
SMS message bank
is full
Voice mail Voice mail message has been received
Unanswered Call Incoming call is missed (unanswered)
Four levels indicate the strength of the
received signal from network on whi ch
phone is currently registered. If no network
is available, the icon does not appear
Accessing names stored in the SIM
Phone Book
Accessing names stored in the phone
Phone Book
than its home network
SMS text message has been received and
stored. Must be offered by service
provider and subscription purchased
SMS message bank is full and cannot
store new messages
and stored by the network’s voice mail
center. Must be offered by service
provider and subscription purchased
Call Forwarding Incoming calls are being forwarded.
Must be offered by service provider and
subscription purchased
4
Page 5
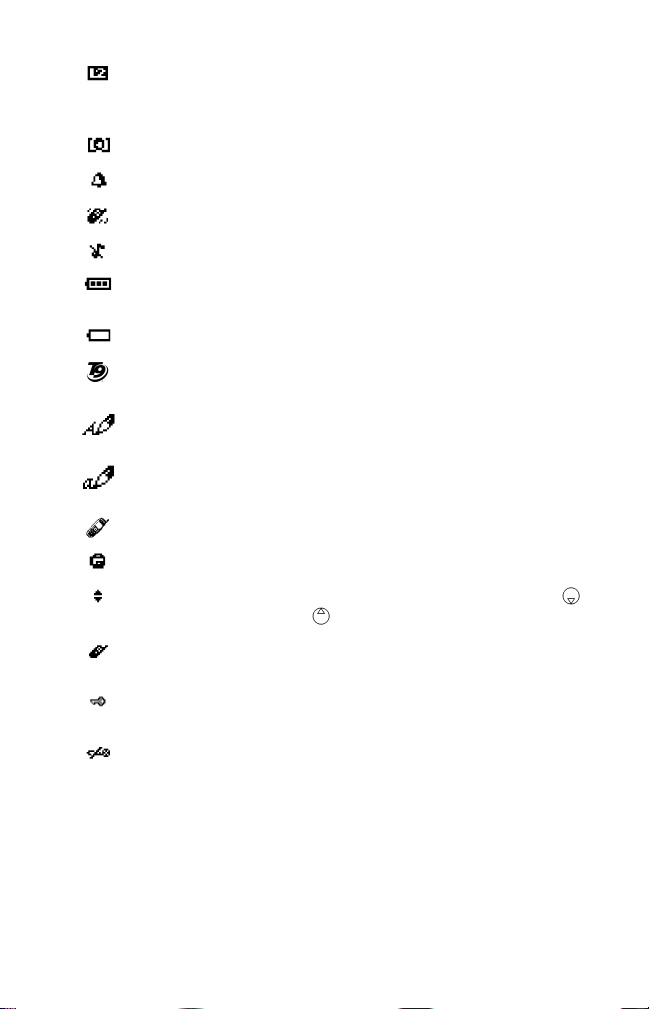
Line 2 Indicates Line 2 is in use. Must be offered
CUG Closed User Group service is active
Alarm clock Alarm clock is set
Vibrate mode Vibrate alert set for incoming call
Ring tone off Incoming ring tone is turned off
by service provider and subscription purchased
Battery level Three le vels indicate the battery charge
Low battery Flashes when the battery is nearly empty
T9® Text Input mode
Text mode
Upper case
Text mode
Lower case
Conversation mode Currently connected to call
Keypad lock Keypad lock is activated
Scroll arrows More menu items can be displayed if
WAP connection Connected to online services of your
WAP connection in
security mode
Mute Microphone is muted
level; low, medium, high
Enter text with one key press per
character
Upper case text can be entered
Lower case text can be entered
or are pressed
service provider
Connected to online services of your
service provider in secure mode
T9® is a registered trademark of Tegic Communications, Inc.
5
Page 6
GETTING STARTED
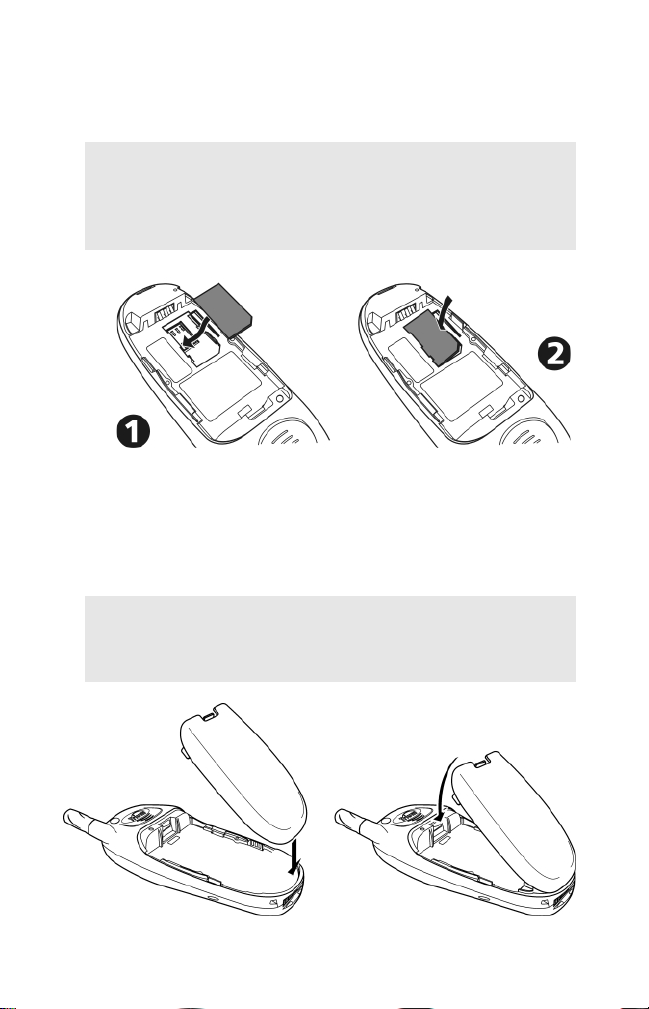
Inserting the SIM Card
Unpack the phone and insert the SIM card into the holder.
Open the SIM card holder as shown.
1
Insert the SIM card gently as shown with the gold contacts
2
facing down and the bevelled corner of the card at the top
left.
Push the SIM card holder back into position.
3
If the SIM card has been inserted the wrong way or is damaged, Check
SIM! will display. Remove the SIM card, check this illustration and re-in-
sert it as described.
Attaching the Battery
Position the battery onto the phone as shown.
1
Push down the opposite end of the battery onto the phone
2
until the battery catch 'clicks' shut.
Check that the battery is securely in place.
6
Page 7

Charging the Battery
Note: The battery must be fully charged before using the phone for the
first time. To charge the battery, follow procedure below. For the first
three times you charge the battery, turn the phone off
battery until the Battery Full screen appears. Discharge the battery
each time by using the phone until it shuts itself off.
Connect the AC Adapter to the phone as shown.
Image not yet available.
Make sure the battery is properly installed on your phone.
1
Connect the AC Adapter to the socket at the base of the
2
phone. Plug in the other side of the AC Adapter to a
standard 120 volt o utlet.
Make sure the proper charging indicators are showing as
3
stated below.
Disconnect the AC Adapter when the Battery Full!
4
message displays.
and charge the
When the phone is off, battery charging is
indicated by Charging... message. The LED
light will be red. When charging is finished,
Battery Full! displays and the LED light will
change to green.
When the phone is on, charging is indicated
by the battery icon flashing 1-2-3 bars
continuously. When charging is completed,
the battery icon will show three solid bars.
If a call is received during charging, the LED
light will flash green rapidly.
If the phone is used while charging, the charging time will be longer.
7
Page 8

Battery Charging Times
Approximate battery recharging time using the AC Rapid Charging Adapter:
Battery Type Charging time
1000 mAh NiMH Standard TBD
Low Battery W arni ng
When the battery power falls to its lowest level, the message Low
Battery! displays and a low battery warning tone sounds.
If you are on a call, end the call and turn off the phone by pressing and
holding . Recharge the battery as described or replace it with a
charged one.
Battery Safety Tips
• Replace the battery when it will not hold a charge, or when operating time decreases dramatically.
• Use only the Mitsubishi chargers specified for this battery. Using other chargers or batteries
will void the warranty and may cause damage.
• It is normal for batteries to become warm during charging.
• Do not leave NiMH batteries connected to a charger longer than necessary; overcharging will
shorten battery life.
• Disconnect battery chargers from the power source when not in use.
• Do not leave the phone in a closed car during hot summer or cold winter conditions or exposed
to intense sunlight. The phone may temporarily not work with a hot or cold battery.
• The recharging temperature range is 32°--104° F (0°--40° C). If you attempt to recharge
when the battery is above or below this range, acid leakage or overheating may result.
• Do not use or leave the battery near a heat source such as a stove, oven, heater or fir e (170° F
= 76° C or higher).
• The battery is not waterproof. Do not immerse it in liquid or allow it to get wet.
• Avoid contact of the battery terminals with metal objects (such as keys, paper clips, coins,
chains) or excessive static electricity which may short circuit the battery.
• If the battery terminals become soiled, clean them with a soft cloth.
• Do not try to disassemble or modify the battery as injury or burns may result.
• Do not drop or subject the batteries to strong physical shocks.
• Keep batteries out of the reach of children.
• Batteries may explode if discarded into a fire or heated.
• Do not dispose of old batteries together with household wa ste. Starti ng in 2001, the R echa rgeable Battery Recycling Corporation will be collecting many types of batteries. Call 1-800-8228837 or visit their website at www.rbrc.org.
8
Page 9
BASIC PHONE OPERATIONS
Turning On the Phone
1 Press and hold . A picture animation displays and a turn-
on tone sounds.
If the phone is locked, Enter lock code will display. Enter
2
the 4-digit Lock Code and press OK .
If your SIM is PIN protected, Enter PIN will display.
3
Enter the PIN code and press OK .
> See pages 19 and 48 for more details on Lock and PIN Codes.
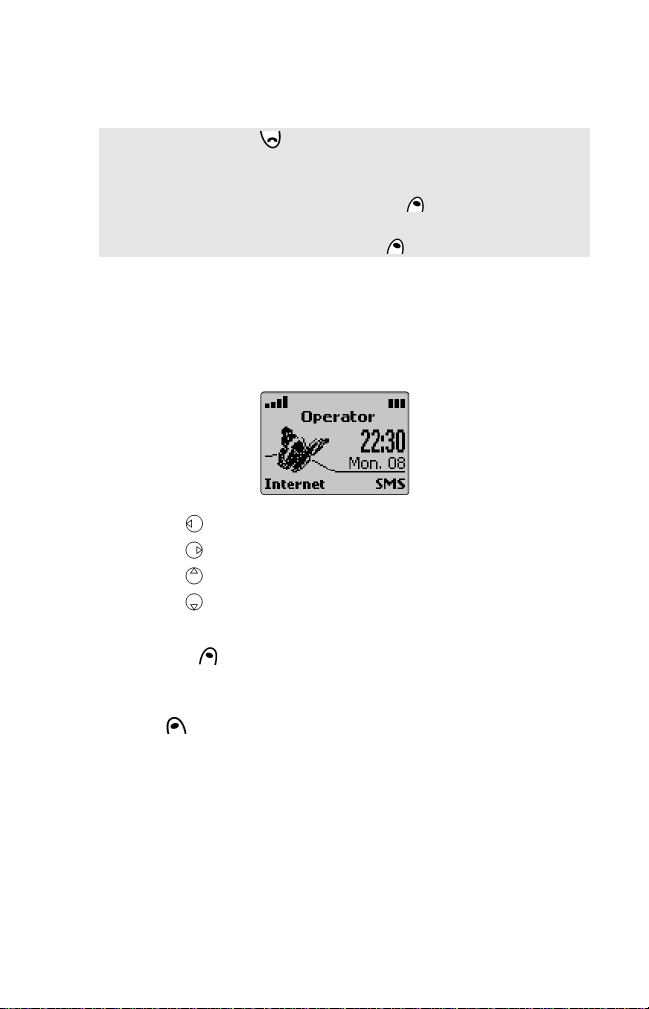
Standby Screen
The standby screen shows the na me of the networ k and/or servi ce provider,
signal strength and battery level icons and
Press to go to your Phone Book (see page 31).
Press to go to the phone main menu (see page 26).
to go to volume control (see page 44).
Press
Press to silence incoming ring tone (see page 43).
To set time and date, see page 51.
• Press Internet to access the Internet main menu from which you
can dial the Home Page offered by your service provider. See page 64
to learn more about this feature.
• Press SMS to access the Short Message Service menu offered by
your service provider. See page 35 to learn more about this feature.
Internet and SMS softkeys.
Making a Call
The phone can only make and receive calls when it is turned on, unlocked,
has a valid S IM card inserted and is located in an area that has GSM
network service coverage. If the phone cannot find a network, the display
remains blank.
9
Page 10
Enter the telephone number you wish to dial.
1
Correct any mistakes by pressing Clear . Press and hold
this key to erase the entire entry.
2
Press to dial (send) the number.
To store the dialed number in the Phone Book, press Store before
pressing to connect the call. Follow the display prompts to finish
storing.
International calls can be prefixed either with 00 or +. To enter the +
symbol before a number, press and hold until + appears in the
display.
When the call connects, the call timer displays.
• Busy Called party’s line is busy. If Auto Retry is on, the phone will
attempt to call again (see page 48 for details).
• Not allowed (fixed dialing) Number dialed is not authorized by the
FDN list (see page 34 for details).
• Line 2 icon ( ) appears when call connects (if active) indicating call
was made using this line (see page 42 for details).
Volume Adjustment During Conversation
Press or on the Express Key to increase or decrease the
earpiece volume through eight levels.
Answering a Call
When there is an incoming call, the phone rings. The LED light on the top
of the phone flashes green and a flashing icon appears. The backlight also lights up if the phone was set to do so or if in silent mode.
Press to answer the call.
Press Silence to stop incoming ring tone.
• If the ring tone volume is set to zero (off) or if the phone is in
'Silent mode' or 'Vibrate mode', no audible sound will be
heard.
Press to send the call to voice mail.
10
Page 11
Call Display Notes
• The caller’s number (if available) displays. If you stored this number in
the Phone Book, the person’s name displays.
• If the caller’s number is not available, Unknown number displays
first, then Call 1 displays when you answer.
• If the caller has withheld their number, Withheld num ber displays
first, then Call 1 displays when you answer.
• When the call connects, the call timer appears.
• Line 2 icon ( ) appears if the call is received on your Line 2 number.
See page 42 for details.
Ending a Call
Press to end a call.
After ending the call, the call timer will stop and will disappear. Wait
a few seconds or press Back softkey to return to the standby screen.
Keyp ad Lo ck
When Keypad lock is activated, it prevents accidental key presses or calls
being made when the phone is carried in a pocket, briefcase or
handbag. Keypad lock is suspended during incoming calls and resumes
when the call ends. Emergency calls can still be made.
To activate Keypad Lock,
Press and hold . The screen will show .
To deactivate Keypad Lock,
Press Unlock , then press .
Turning Off the Phone
Press and hold .
A turn off tone will sound. During turn off, a picture animation displays,
then the phon e will turn off.
Do not turn off the phone by removing the battery, as data which may
need to be saved in the SIM will be lost.
11
Page 12
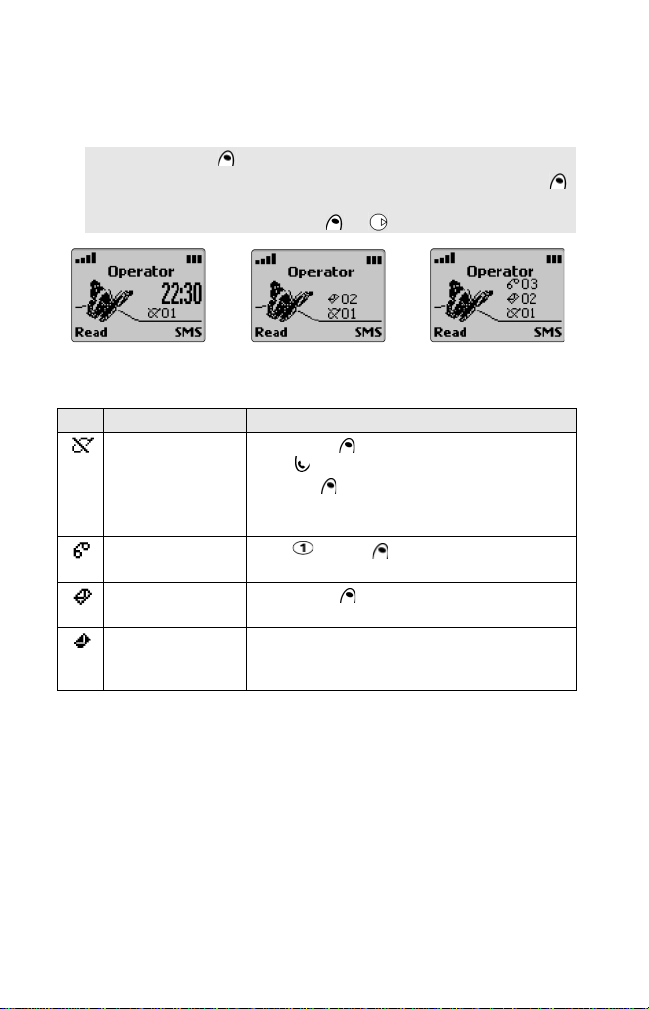
Network Messages
A Network Message icon will appear when you have missed an incoming
call, received a voice message, or received an SMS message. An alert tone
will also sound for voice and SMS messages.
Press Read to view the message.
1
If there is more than one type of message, pressing Read
2
will display a list of the message types. Scroll to the desired
message and press Select or to view the message.
The display shows the message type icon and number of messages.
Follow these actions to pick up your messages.
Icon Item Action
Unanswered Call
Voice Mail
SMS Message
SMS Message
bank is full
Press Read . The caller’s number appears.
Press to call the number, or press
Options . Unanswered call numbers are
stored in the Unanswered Call Log. See page
39 for details.
Press or Call to speed dial your voice
mail message center. See page 52 for details.
Press Read to view the SMS Inbox
messages. See SMS Messages on page 35.
Delete at least one old received message to
be able to receive new messages.
See Managing SMS Me ss ages on page 35.
12
Page 13

SAFETY INFORMATION
STATEMENT OF COMPLIANCE
This device complies with part 15 of the
FCC Rules. Operation is subject to the
following two conditions: 1) Th is de vice
may not cause harmful interference, and
2) this device must accept any interfer-
ence that may cause undesired op era tio n.
CAUTION: Changes or modifications not
expressly approved by Mitsubishi Wireless
Communications, Inc. could void your
authority from the FCC to operate the
equipment.
EXPOSURE TO RADIO
FREQUENCY SIGNALS
Your wireless handheld portable telephone is a low power radi o transmitter
and receiver. When it is ON, it receives
and also sends out radio f requency (RF)
signals.
In August 1996, the Federal Communications Commissions (FCC) adopted RF
exposure guideline s with safety lev els for
hand-held wireless phon es. These guidelines are consistent with the safety standards previously set by both U.S. and
international standards bodies:
*ANSI C95.1 (199 2)
*NCRP Report 86 (1986)
*ICNIRP (1996)
*American National Standards Institute;
National Council o n Radiation Prot ection and
Measurements; Inte rnational Commission on
Non-Ionizing Radiation Protection
Those standards were ba sed on comprehensive and periodic evaluations of the
relevant scientific literature. For example,
over 120 scientists, eng ineers, and physicians from universities, government
health agencies, and industry reviewed
the available bod y of res earch to develo p
the ANSI Standard (C95.1).
The design of your p hone complies with
the FCC guidelines (and those standards).
THIS MODEL PHONE MEETS THE
GOVERNMENT’S REQUIREMENTS
FOR EXPOSURE TO RADIO
WAVES.
Your wireless phone is a radio transmitter
and receiver. It is designed and ma nufactured not to exceed the emission limits
for exposure to radiofrequency (RF)
energy set by the Federal Communica-
tions Commission of the U.S. Government. These limits are part of
comprehensive guidelines and establish
permitted levels of RF energy for the
general population. The guidelines are
based on standards that were developed
by independent scientific organizations
through periodic and thorough evaluation of scientific studies. The standards
include a substantial safety margin
designed to assure the safety of all
persons, regardless of age and health.
The exposure standard for wireless mobile
phones employs a unit of meas urement
known as the Specific Absorption Rate, or
SAR. The SAR limit set by the FCC is 1.6 W/
kg.* Tests for SAR are conducted using
standard operatin g positions spe cified by
the FCC with the phon e tra nsm it tin g at it s
highest certified power level in all te sted
frequency bands. Although the SAR is
determined at the hig hes t c ert if ie d po we r
level, the actual SAR level of the phone
while operating can be well below the
maximum value. This is because the
phone is designed to opera te at multiple
power levels so as t o use only t he power
required to reach the network. In general,
the closer you are to a wireless base
station antenna, the lower the power
output.
Before a phone model is available for sale
to the public, it must be tested and certified to the FCC that it does not exceed the
limit established by the governmentadopted requirement for safe exposure.
The tests are performed in positions and
locations (e.g., at the ear and worn on the
body) as required by the FCC for each
model. The highest SAR value for this
model phone when tested for use at the
ear is ____ and when worn on the body, as
describ ed in th is us er g uid e, is __ _. (B odyworn measurements differ among phone
models, depending upon available accessories and FCC requirements.) While there
may be differences between the SAR levels
of various phones a nd at various positions,
they all meet the government requirement
for safe exposure.
The FCC has granted an Equipment
Authorization for this model phone with
all reported SAR levels evaluated as in
compliance with the FCC RF emission
guidelines. SAR information on this model
13
Page 14

phone is on file with th e FCC and can be
found under the Display Grant section of
http://www.fcc.gov/oet/fccid after searching on FCC ID BGB MT289.
Additional information on Specific Absorption Rates (SAR) can be found on the
Cellular Telecommunications Industry
Association (CTIA) website at http://
www.phonefacts.net.
* In the United States and Canada, the SAR
limit for mobile phones used by the public is
1.6 watts/kilogram (W/kg) averaged over
one gram of tissue. The standard incorporates a substantial mar gin of safety to give
additional protection for the public and to
account for any variations in measurements.
Your phone has been tested and meets
the limits for radio frequency (RF)
exposure set by the FCC for normal
handheld use next to t he ear or worn o n
the body using a Mitsubishi brand belt
clip accessory specified for this phone,
and used as intend ed. Operation of the
phone in other situ ations such as in shirt
pockets or non-Mitsubishi br and bel t clip s
or holsters have not been tested. Therefore operation of the phone in non-tested
situations may not meet the lim its for RF
exposure set by the FCC and must be
avoided.
ANTENNA CARE
Use only the supplied or an approved
replacement antenna. Unauthorized
antennas, modifications, or attachments
could damage the phon e an d may violate
FCC regulations.
PHONE OPERATION
Hold the phone as you would any othe r
telephone with the antenna poin ted up
and over your shoulder.
For your phone to operate most efficiently, extend the antenna f ully (if appli cable) and do not touch the antenna
unnecessarily when t he phone is in use.
Contact with the antenna affects call
quality and may cause the phone to
operate at a higher powe r leve l than otherwise needed.
DRIVING
Check the laws and regulations on the
use of wireless telephones in the areas
where you drive. Always obey them. Also,
if using your phone while driving, please:
• Giv e full attention to driving - driving
14
safely is your first responsibility.
• Use hands-free operation, if available.
• Pull off the road and park before making or answering a call if driving conditions so require.
ELECTRONIC DEVICES
Most modern electronic equipment is
shielded from RF signals. However, certain
electronic equipment may not be shielded
against the RF signals from you r wireless
phone.
Pacemakers
The Health Industry M anufacturers Asso-
ciation recommends that a minimum separation of six (6”) i nches be maintained
between a handheld wireless phone and
a pacemaker to avoid potential interference with the pacemaker. These recommendations are consistent with the
independent research by and recommendations of Wireless Technology Research.
Persons with pacemakers:
• Should ALWAYS keep the phone more
than six inches from their pacemaker
when the phone is turned ON
• Should not carry the phone in a breast
pocket
• Should use the ear opposite the p ace-
maker to minimize the potential for
interference
• If you have any reason to suspect that
interference is taking place, turn your
phone OFF immediate l y
Hearing Aids
Some digital wireless phones may interfere
with some hearing aids. In the event of
such interference, you may want to consult
your service pro vider (or call the c ustomer
service line to discuss alternatives).
Other Medical Devices
If you use any other personal medical
device, consult the manufact urer of your
device to determine if they are adequately
shielded from external RF energy. Your
physician may be ab le to help you obtain
this information.
Turn your phone OFF in health care facilities when any regulati ons pos ted in these
areas instruct you to do so. Hospitals or
health care facil ities may be using e quip-
Page 15

ment that could be sensitive to external RF
energy.
Vehicles
RF signals may af fect improper ly installed
or inadequately shielded electronic
systems in motor vehicle s. Che ck with the
manufacturer or its represen tative reg arding your vehicle. You should also consult
the manufacturer of any equipme nt that
has been added to your vehicle.
Posted Facilities
Turn your phone OFF in any fac ility w here
posted notices so require.
AIRCRAFT
FCC regulations prohibit using your phone
while in the air.
Switch OFF your phone before boarding
an aircraft.
BLASTING AREAS
To avoid in terfering with blasting oper ations, turn your phone OFF when in a
“blasting area” o r in areas posted “Turn
off two-way radio.” Obey all signs and
instructions.
POTENTIALLY EXPLOSIVE AREAS
Turn your phone OFF when in any area
with a potentially explosive atmosphere
and obey all signs and instructions. Sparks
in such areas could ca use an explosi on or
fire resulting in bodily injury or even
death. Areas with a p otentially explosive
atmosphere are often but not always
clearly marked. They in clude fueling areas
such as gasoline stations; be low deck on
boats; fuel or chemical transfer or storage
facilities; vehicles using liquefied petroleum gas (such as propane or butane);
areas where the air contains chemicals or
particles, such as grain, dust, or metal
powders; and any othe r area where you
would normally be advised to turn off
your vehicle engine.
FOR VEHICLES EQUIPPED WITH
AIR BAGS
An air bag inflates with great force. DO
NOT place objects, including both installed
or portable wireless equipment, in the area
over the air bag or in the air bag deployment area. If in-vehicle wireless equipment
is improperly installed and the air bag inflates, serious injury could result.
The U.S. Food and Drug Administration’s Center for Dev ices
and Radiological Health
Consumer Update on
Mobile Phones
FDA has been receiving inquiries about the
safety of mobile phones, including cellular
phones and PCS phones. The following
summarizes what is known--and what
remains unknown--about whether these
products can pose a hazard to health, and
what can be done to minimize any potential risk.
Why the concern?
Mobile phones emit low levels of radio
frequency energy (i.e., radio frequency
radiation) in the microwave range while
being used. They als o emit v ery low lev els
of radio frequency energy (RF), considered
non-significant, when in the stand-by
mode. It is well known that high levels of
RF can produce biological damage
through heating effects (this is how you r
microwave oven is able to cook food).
However, it is not known whether, to what
extent, or through what mechanism,
lower levels of RF might cause adverse
health effects as well. Although some
research has been done to address these
questions, no cle ar picture of t he biological effects of this type of radiation has
emerged to date. Thus, the available
science does not allow us to conclude that
mobile phones are a bsolutely safe, or that
they are unsafe. However, the available
scientific evidenc e does not
any adverse health effects associated with
the use of mobile phones.
What kinds of phones are in
question?
Questions have been raised about handheld mobile phones, the kind that have a
built-in antenna that is positioned close to
the user’s head dur ing normal telephone
conversation. These types of mobile
phones are of concern because of the
short distance between the phone’s
antenna--the primary source of the RF-and the person’s head. The exposure to RF
from mobile phones in which the antenna
demonstrate
15
Page 16

is located at greater distances from the
user (on the outside of a car, for example)
is drastically lower than that from handheld phones, because a person’s RF
exposure decreases rapidly with distance
from the source. The safety of so-called
”cordless phones,” which have a base unit
connected to the telephone wiring in a
house and which operate at far lower
power levels and frequencies, has not
been questioned.
How much ev idence is there th a t
hand-held mobile phones might be
harmful?
Briefly, there is not enough evidence to
know for sure, either way; however,
research efforts are on-going.
The existing scien tific evidenc e is conflicting and many of the studies that have
been done to date have suffered from
flaws in their research methods. Animal
experiments investigating the effects of RF
exposures characteri stic of mobile pho nes
have yielded conflicting results. A few
animal studies, however, have suggested
that low levels of RF could accelerate the
development of cancer in laboratory ani mals. In one study, mice genetically
altered to be predisposed to developing
one type of cancer developed more than
twice as many such cancers when they
were exposed to RF energ y compared to
controls. There is much uncertainty
among scientists about whether results
obtained from an im al studies apply to the
use of mobile phones. Fi rst, it is unc ertai n
how to apply the res ults obtained in rats
and mice to humans. Second, many of the
studies that showed increased tumor
development used animals that had
already been tre ated with cancer-caus ing
chemicals, and o ther studies expo sed the
animals to the RF virtually continuously-up to 22 hours per day.
For the p as t fiv e yea r s i n th e U ni t ed St a te s,
the mobile phone industry has supported
research into the safety of mobile phones.
This research h as resulted in two f indings
in particular that merit additional study:
1. In a hospital-based, case-control study, researchers looked for
an association between mobile phone use and either glioma
(a type of br ai n c ance r ) o r aco us ti c ne uro ma ( a b en ig n t um or
of the nerve sheath). No statistically significant association
was found between mobile phone use and acoustic neuroma.
There was also no association between mobile phone use and
gliomas when all types of types of gliomas were considered
16
together. It should be noted that the average length of mobile
phone exposure in this study was less than three years.
When 20 types of glioma were considered separately, however, an association was found between mobile phone use and
one rare type of glioma, neuroepithelliomatous tumors. It is
possible with multiple comparisons of the same sample that
this association occurred by chance. Moreover, the risk did not
increase with how often the mobile phone was used, or the
length of the calls. In fact, the risk actually decreased with
cumulative hours of mobile phone use. Most c ancer causing
agents increase risk with increased exposure. An ongoing study
of brain cancers by the National Cancer Institute is expected to
bear on the accuracy and repeatability of these results.
2. Researchers conducted a large battery of laboratory tests to
assess the effects of exposure to mobile phone RF on genetic
material. These included tests for several kinds of abnormalities, including mutations, chromosomal aberrations, DNA
strand breaks, and structural changes in the genetic material
of blood cells called lymphocytes. None of the tests showed
any effect of the RF except for the micronucle us assay, which
detects structural effects on the genetic material. The cells in
this assay showed changes after exposure to simulated cell
phone radiation, but only after 24 hours of exposure. I t is p o ssible that exposing the test cells to radiation for this long
resulted in heating. Since this assay is known to be sensitive to
heating, heat alone could have caused the abnormalities to
occur. The data already in the literature on the response of the
micronucleus assay to RF are conflicting. Thus, follow-up
research is necessary.
FDA is currently working with government, industry, and academic groups to
ensure the proper follow-up to these
industry-funded research findings. Collaboration with the C ellular Telecommunications Industry Association (CTIA) in
particular is expecte d to lead to FDA providing research recommendations and scientific oversight of new CTIA-funded
research based on such recommendations.
Two other studies of interest have been
reported recently in the literature:
1. Two groups of 18 people were exposed to simulated mobile
phone signals under laboratory conditions while they
performed cognitive function tests. There were no changes in
the subjects’ ability to recall words, numbers, or pictures, or in
their spatial memory, but they were able to make choices
more quickly in one visual test when they were exposed to
simulated mobile phone signals. This was the only change
noted among more than 20 variables compared.
2. In a study of 209 brain tumor cases and 425 matched
controls, there was no increased risk of brain tumors
associated with mobile phone use. When tumors did exist in
certain locations, however, they were more likely to be on the
side of the head where the mobile phone wa s used. Because
this occurred in only a small number of c ases, the increased
likelihood was too small to be statistically signif icant.
In summary, we do not have enough
information at this point to assure the
2
1
3
4
Page 17

public that there are, or are not , any low
incident health problems associated with
use of mobile phones. FD A continues to
work with all parties, including other
federal agencies and industry, to assure
that research is u n dert a ken to provide the
necessary answers to the outstanding
questions about the safety of mobile
phones.
What is known about cases of
human cancer that have been
reported in users of hand-held
mobile phones?
Some people who have used mobile
phones have been diag nosed with brain
cancer. But it is important to understand
that this type of cancer also occurs among
people who have not used mobile phones.
In fact, brain cancer occurs in the U.S.
population at a rate of about 6 new cases
per 100,000 people each year. At that
rate, assuming 8 0 million users of mobile
phones (a number increasing at a rat e of
about 1 million per mon th), about 4800
cases of brain cancer would be expected
each year among th ose 80 mill ion peop le,
whether or not they used their phones.
Thus it is not possi ble to tell whether any
individual’s cancer arose because of the
phone, or whether it would have
happened anyway.
A key question is whether the risk of
getting a particular form of cancer is
greater among people who use mobile
phones than among the rest of th e po pulation. One way to answer that question is
to compare the usag e of mobile phones
among people with brain cance r with the
use of mobile phones among appropriately matched people without brain
cancer. This is called a case-con trol study.
The current case-control study of brain
cancers by the National Ca ncer Institute,
as well as the follow-up research to be
sponsored by industry, will begin to
generate this type of information.
What is FDA’s role concerning the
safety of mobile phones?
Under the law, FDA does not r eview the
safety of radiation-emitting consumer
products such as mobile phones before
marketing, as it does with ne w drugs or
medical devices. However, the agency has
authority to take action if mobile phones
are shown to emit radiation at a level that
is hazardous to the user. In such a case,
FDA could require the manufacturers of
mobile phones to notify users of the
health hazard and to repair, replace or
recall the phones so tha t the hazard no
longer exists.
Although the existing scientific data do
not justify FDA regulatory actions a t this
time, FDA has urged the mobile phone
industry to take a number of steps to
assure public safety. The agency has recommended that the industry:
support needed research into possible
biological effects of RF of the type
emitted by mobile phones
design mobile phones in a way that
minimizes any RF exp osure to the user
that is not necessary for device function
cooperate in providing mobile phone
users with the best possible information
on what is known about possible
effects of mobile phone use on huma n
health.
At the same time, FDA belongs to an interagency working group of the federal
agencies that have responsibility for different aspects of mobile phone safety to
ensure a coordinated effort at the federal
level. These agencies are:
National Institute for Occupational
Safety and Health
Environmental Protection Agency
Federal Communications Commission
Occupational Health and Safety Admin-
istration
National Telecommunications and Infor-
mation Administration
The National Institutes of Health also
participates in this group.
In the absence of conclusive
information about any possible risk,
what can concerned individuals do?
If there is a risk from these pr oducts--and
at this point we do not know that there is-
-it is probably very small. But if peop le are
concerned about avoi ding even potential
risks, there are simple steps they can take
to do so. For example, time is a key factor
in how much exp osure a perso n receives.
Those persons who spend long period s of
time on their hand-held mobile phones
could consider holdi ng lengthy conversations on conventional phones and reserving the hand-held models for shorter
17
Page 18

conversations or for situations when other
types of phones are not available.
People who must conduct extended conversations in their c ars daily could s witch
to a type of mobile phone that places
more distanc e between their bodies a nd
the source of th e RF, since the exposure
level drops off dramatically with distance.
For example, they could switch to a
mobile phone in which the antenna is
located outside the vehicle,
hand-held phone with a built-in
antenna connected to a different
antenna mounted on the outside of
the car or built into a separate
package, or
headset with a remote antenna to a
mobile phone carried at the waist.
Again, the scientific data do not
demonstrate that mobile phones are
harmful. But if you are concerned about
the radio frequency energy from these
products, taking the precautions out lined
above can reduce any possib le risk.
Where can I find more information?
See the foll owing websites:
Federal Communications Commission
(FCC)
RF Safety Program (select ”Information on
Human Exposure to RF Fi elds from Cellular
and PCS Radio Transmitters”):
http://www.fcc.gov/oet/rfsafety
World Health Organization (WHO)
International Commission on Non-Ionizing
Radiation Protection (select Qs & As):
http://www.who.int/emf
United Kingdom, National Radiological
Protection Board
http://www.nrpb.org.uk
Cellular Telecommunications Industry
Association (CTIA)
http://www.wow-com.com
U.S. Food and Drug Administration
(FDA)
Center for Devices and Radiological Health:
http://www.fda.gov/cdrh/consumer/index.html
1. Muscat et al. Epidemiological Study of Cellular Telephone Use and
Malignant Brain Tumors. In: State of the Science Symposium;1999
June 20; Long Beach, Califo r nia.
2. Tice et al. Tests of mobile phone signals for activity in genotoxicity
and other laboratory assays. In: Annual Meeting of the Environmental Mutagen Soc iety; Mar ch 29, 19 99, Washi ngton, D.C.; an d personal communication, unpublished results.
3. Preece, AW, Iwi, G, Davies-Smith, A , Wesnes, K, Butler, S, Lim, E,
and Varey, A. Effect of a 915-MHz simulated mobile phone signal on
cognitive function in man. Int. J. Radiat. Biol., April 8, 1999.
4. Hardell, L, Nasman, A, Pahlson, A, Hallquist, A and Mild, KH. Use of
cellular telephones and the risk for brain tumors: a case-control
study. Int. J. Oncol., 15: 113-116, 1999.
Care and Maintenance
This telephone is the prod uct of ad vanced
engineering, design and craftsmanship
and should be treated with care. The
suggestions below wi ll he lp yo u enj oy t his
product for many years.
• Do not ex pose the phone to high temperatures or humidity.
• Do not e xpose or store in cold temper atures. When the phon e warms up after
power on, moisture can form inside and
may damage the electrical parts.
• Do not try to disassemble the phone.
There are no serviceable parts inside
that you can replace.
• The phon e is no t waterproo f. Water or
liquids can damage it.
• Dropping, knocking or violent shaking
can damage the phone.
• Wipe the phone only with a soft,
slightly dampened cloth. Do not clean it
with strong chemicals or solvents.
• Do not place the telephone near computer discs, credit cards or other magnetic media. The i nformation on discs
or cards may be affected by the phone.
• The use of third party equipment or
accessories not made or authorized by
Mitsubishi Wireless Communications
Inc. may invalidate the warranty of your
phone and may be a safety risk.
• The num bers on the labels are important for service purposes. Do not
remove the labels.
• Contact an authorized service center if a
defect is noticed.
18
Page 19

Emergency Calls
In the U.S., provided the phone has
GSM service, emergency calls can be
made by dialing 911. Emergency calls
can even be made if the phone is PIN or
electronically locked or call barred.
Security Code s
The phone and SIM card are pre-programmed with codes that protect the
phone and SIM card against unauthorized
use.
When asked to enter any of the codes, key
in the numbers (appear as * asterisks) and
press OK .
Press Clear to erase mistakes. If you
enter the wrong code, a warning m ess age
appears.
PIN and PIN2 codes (4-8 dig its)
All SIM cards are supplied with a PIN
(Personal Identity Numb er) to protect the
card against unauthorized use.
Some SIM cards are supplied with a PIN2
code for another se curity level fo r certain
features such as fixed dialing numbers.
If Enter PIN appears, enter the PIN code
and press OK .
If the wrong PIN code is entered three
times in a row, SIM Blocked
the SIM card is disabled. Contact
provider also appears. To unblock the
SIM, you must enter the PUK (PIN Unblock
Key) code, available only from your service
provider. See page 50 for more details.
PUK and PUK2 codes (8 di gits)
Also supplied with the SIM card is the PUK
(PIN Unblock Key) code to unblock a
disabled SIM card.
When requested, enter the PUK code and
press OK . Then you will be asked to
reset the PIN code.
If the wrong PUK code is entered ten times
in a row, the SIM card must be replaced.
Contact your service provider.
The PUK2 code must be used to unblock
the PIN2 code.
appears and
Call barring password (4 digits)
Used to bar certain types of calls from the
phone, this passwor d is supplied by the
service provider. See page 50 for d etails.
Phone lock code (4 digits)
This code is set to four zeros by the manufacturer and can be reset. Once ch anged, it
cannot be identi fied by the manufacturer
over the phone. See page 48 for details.
Keep a record of your codes and
store them in a safe place.
19
Page 20
GENERAL FEATURES
Dialing Stored Numbers
Any number stored in the phone’s memory can be recalled to the
display and dia l ed .
...from the Phone Book
Press to enter the Phone Book list.
1
Press or to scroll to the desired number. If you choose
2
a multiple number Phone Card, then scroll to select one of
the numbers to dial (for example, Work or Cellular).
3
Press to dial the number.
> See Phone Book, page 31.
...from the Last numbers dialed list
The last 10 numbers you have dialed are stored in the Call logs.
1
Press to display the Last numbers dialed list.
Press or to scroll to the desired number.
2
3
Press to dial the number.
...from the Call logs list
The last 10 numbers dialed, the last 10 received call numbers, and the
last 10 unanswered call numbers are stored in the Call logs.
Press to enter the main menu. Select Calls & Timers.
1
Select Call log.
2
Select Last dial, Received call, or Unanswered call.
3
Press or to scroll to the desired number.
4
5
Press to dial the number.
...from SMS text messages
The call-back number on an SMS message header or a phone number
included within an SMS message can be dialed directly.
Press to enter the main menu. Select Messages.
1
Select Inbox.
2
Press or to scroll to the desired message header.
3
4
Press and hold to dial the number.
>
See Messages, page 34.
20
Page 21
...from the Scratchpad
Press to enter the main menu. Select Office Tools.
1
Select Scratchpad, then select Read.
2
Press or to scroll to the desired memo entry.
3
4
Press and hold to dial the number.
> See Scratchpad, page 60.
Speed Dialing
Any number stored in the SIM, except Fixed Dialing Numbers (see page
34), can be speed dialed using the 1-9 keys.
Press and hold the desired key ( - ) from the standby screen.
The stored name will be recalled to the screen and the number
will be dialed. If it is a multiple number Phone card, scroll to the
desired number and press Select .
>
By default, is always assigned to the voice mail number.
> See Speed Dialing on page 47 to set up Speed Dial numbers.
Silent Alert Mode
Controls whether the incoming ring and alert tones will be heard.
To activate silent alert mod e.
1
Press .
Select Silent, Vibrate or Vibrate then ring.
2
The vibrate icon displays when this feature is turned on.
To deactivate silent alert mode,
1
Press .
Select Ring.
2
If the ring tone volume is set to zero, the Ring Tone Off icon
>
displays as a warning. See Tones - Alert mode on page 43.
To turn off ring of current incoming call,
Press Silence .
You can turn on or off the following alert tones separately.
Voice Mail alert -- p. 53 Broadcast (CB) alert -- p. 60
SMS Message alert -- p. 38 Alarm clock alert -- p. 62
21
Page 22
Conversation Options
Mute/Unmute
To mute or unmute your phone’s microphone during conversation,
To mute, press Options . Select Mute and select Yes.
1
The microphone turns off. appears.
To unmute, press Options and select Unmute.
2
The microphone turns back on and disappears.
Adjusting Volume
To adjust the caller’s audio level during conversation,
1
Press or on the Express Key to increase or decrease the
earpiece volume through eight levels.
The new volume level stores automatically.
2
> See also Volume adjustments on page 44 .
Handsfree Speaking
While in your car or if you wish to share the conversation with others
nearby, use the handsfree speaker to send your caller’s voice through
the phone’s loudspeaker.
During conversation or while accepting an incoming call,
press Speak.on to broadcast your caller’s voice.
To turn off the loudspeaker, press Speak.off .
Sending DTMF Touch Tones
You can send Dual Tone Multi-Frequency (DTMF) touch tones to
communicate with computerized systems, such as answering machines,
voice mail or banking-by-phone. These tones can also be used for credit
card calls or long distance calling cards.
A DTMF touch tone is a digit or string of digits that produces tone
signals. DTMF strings can also be stored in the Phone Book. Refer to
Storing Names and Telephone Numbers on page 31.
MANUALLY
To send DTMF touch tones direct ly from the keypad during conversation,
Press the desired keys (0-9, * and # keys). The tones will be heard
in the earpiece and sent immediately.
22
Page 23
AUTOMATICALLY
To send a consecutive string of DTMF tones during conversation,
Press Options and select Auto DTMF.
1
Enter the DTMF numbers by using the keypad or from a
2
number stored in the Phone Book (under Names ).
Press OK to send the tones. After the tones have been
3
sent the normal conversation screen displays.
>
DTMF touch tones cannot be sent when a call is on hold.
Pause Feature
DTMF number strings, separated by pauses, can be stored in the Phone
Book the same way you store phone numbers.
To insert an automatic 1.5 second pause befo re DTMF tones are sent,
Press and hold . The symbol * appears first, then the symbol +,
then the letter p will appear on the screen.
To automatically pause for 3 seconds, enter ‘pp.’
Any number of pauses can be stored together with a maximum of 20-46
characters (dependent upon the SIM and the phone’s memory capacity).
Holding and Retrieving a Call
Press to put a call on hold during conversation.
Press or Unhold to retrieve a call.
To make a second call when one call is on hold,
After putting the call on hold, enter a number, press and
1
establish the call.
2
Press to swap between the two calls.
To end either the current call or the held call, select End
3
active or End held call in the Options menu. The remaining
call is automatically retrieved.
4
Press to end the remaining ca ll.
Both calls can be ended at the same time by pressing .
>
Another wa y to hold, retrieve and make a second call during conversation is
to press Options and select Hold. Follow the steps listed above.
When a call is on hold, the Options menu has Retrieve choice.
See also Conference Calls on page 24.
23
Page 24
Call Wai ting
Call waiting is a network service that allows you to put an existing call
'on hold' while you answer or make a second call.
To activate or cancel call waiting,
1
Press . Select Settings. Select Services.
Select Call waiting.
2
To check the current setting, select Status. The network will
3
send a display stating whether Call Waiting is active or not.
To change the s etting, select Activate or Cancel.
4
Requesting displays. The network will confirm your request.
USING CALL WAITING
When a second call comes in, you will hear a 'double beep'; and an
animated phone icon and the phone number (if available) will display.
• Either press to answer the call and put the first call on hold or pre ss
Reject to send the incoming call to voice mail.
• Press to swap between the two calls.
• Press Replace to end the first call and take the incoming call.
• See Step 3 in Holding and Retrieving a Call to end one or both calls.
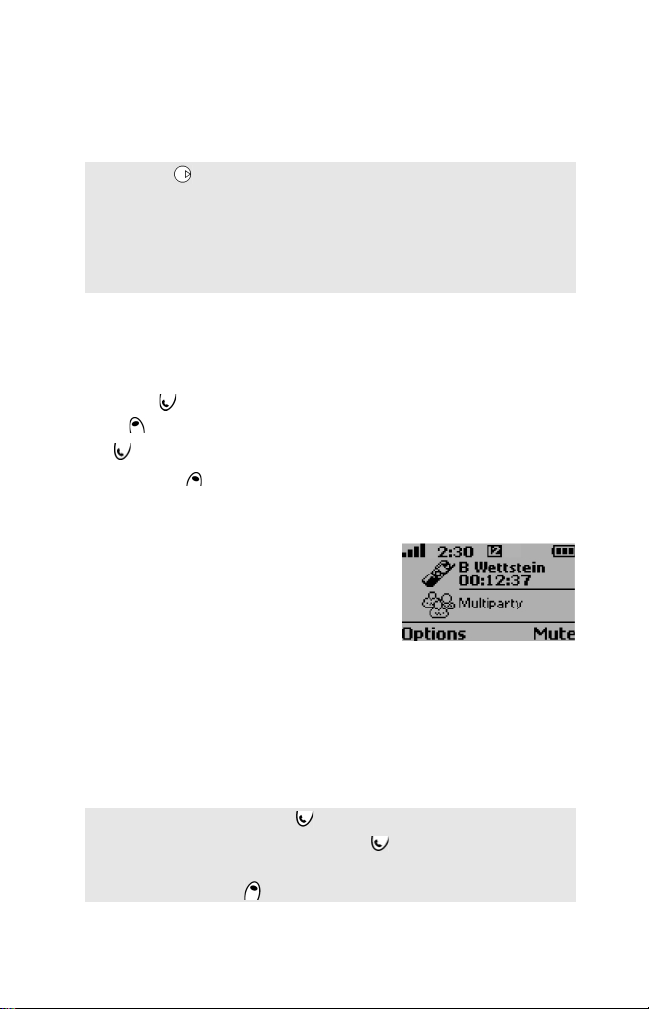
Example of a multiparty call screen.
The signal strength, time of day, Line 2 in use,
and battery lev el icons ap pe ar on the t op line .
The active call type is in bold, displaying
name and call time elapsed.
If possible, the time elapsed from the start of
the multiparty call may display.
Conference Calls
This feature allows you to make or receive between 2 to 5 calls at the
same time with all parties being able to hear and talk with each other.
1
Enter a number, press and establish the call.
2
Enter another number and press . The first call will be put
on hold while the second call becomes active.
3
Press Options for these options:
24
Page 25

Option Confer-
ence
Auto-DTMF • Allows a DTMF string to be
Swap • Swaps between active and call
Join • Joins active and call on hold to
Mute/Unmute • • Turns on or off the microphone
Hold/Retrieve • • Holds or retrieves the call
Private with • Allows you to select and have a
End held • Ends the call on hold
End active • Ends active call and connects
End one • Allows you to select and end
End all • • Ends all the calls
Throughout the call, the screen confirms the actions you have selected.
• For alternate line service (ALS) subscribers, conference calls cannot be
made between Line 1 and Line 2. For de tails, see Alt ernate Line Servi ce
on page 42.
Nonconference
Description
entered to the active call only
on hold
make a conference call
private conversation with one of
the conference callers while
putting all the other calls on
hold
with call on hold
one of the conference call
participants
25
Page 26

MENU SYSTEM
Use the Express Key to access the easy to use menu system, where all of the
phone’s features and function settings are stored. The menu is also used for
features you have requested from your service provider. Your SIM card
presents these features through the menu system.
• Press (labeled MEM ) to go to all stored telephone numbers in the
Phone Book.
• Press (labeled MENU) to enter the main menu from the standby
screen.
• To navigate through the main menu items, press or .
• All other functions and features are then selected by pressing or
Select .
• To return to a previous menu, press or Back .
• To exit the menus, press and hold Clear ; or if no call is in
progress.
Menu Map
Network Serv. * Calls & Timers Internet
Direct Links *
Applications * Call timers Bookmarks *
Services * Call costs * Other site *
Information * Li ne selection * Profile list *
Phone Book Settings
Recall Phone settings
Store Voice mail
Remaining Services
Own numbers Broadcast
Fixed dialing *
Messages
Inbox * Currency converter
Outbox * Alarm clock
Write new
Settings *
Draft texts * Reshape *
Alert * Push *
Storage * Options *
* Appears if offered by service provider and subscription is purcha sed.
Call log Home page *
Settings *
Office Tools
Scratchpad
Games *
26
Page 27

ENTERING TEXT
To store names and email addresses in the Phone Book, write SMS text
messages, use the Scratchpad or use the Internet services, you will enter
and edit text in the display.
In the text input screen, select from two modes:
• Alpha -- to enter alpha characters
• T9 -- to enter alpha characters using quick T9 Text Input
Press and hold to switch between the modes.
These icons appear in the text input screen:
Alpha mode
Upper case
Alpha mode
Lower case
T9® Text Input mode Enter text with one key press per
> The upper and lower case icons appear both in Alpha mode and T9
mode.
T9® Text Input Method
There are two methods for ent er ing characters and numbers. In the c on ventional alpha method, you keep pressing each key until the desired letter
appears. This can be cumbersome when entering a lot of text. For a quick
text entry method, use T9 Text Input to press each key just once to allow
the T9 softwa re to as s em bl e t h e wo rd f o r y ou . The T9 da ta b as e ra nk s
words by common usa ge s o on e en tr y give s th e ch oi c e of sev e ra l wo rds .
To use T9 Text Input mode:
To enter a word, press each key containing the desired letters
1
only once.
Be sure to type the entire word first before editing.
Check to see if the desired word appears. If it does, press
2
to enter a space and continue entering text.
If the desired word is not displayed, press to cycle to other
3
word choices.
If the desired word doesn’t appear, press to change to
4
the alpha mode to enter the word.
Use the arrow keys to move the cursor to insert characters or
5
make corrections.
Upper case text can be entered
Lower case text can be entered
character
27
Page 28

T9® Text Input Exampl e
T9 Text Input mode is ready when the icon displays.
Press keys corresponding to the letters you need, just as if the phone
keypad were a typewriter. Type for space and for period.
For example:
h e l l o w o r l d .
T9 Text Input key actions
Key Action
Press to shift - upper/lower case
Press briefly to automatically capitalize the
current letter
Clear
number keys Press and hold to enter numbers
Clear character or backspace
Press and hold to clear entire entry
Press to enter space
Press and hold to view symbols
Scroll to other word choices
Enters a period, --, or ... Press 1 key, then press
zero key repeatedly to scroll to , - ‘ @ : ?
To type contractions such as you’re, type y-o-u-1-
r-e. The period will change to an apostrophe.
Press to switch between T9 Text Input and alpha
modes
Press to move cursor between words
Adding words to T9 Text Input database
Words that do not appear in T9 Text I nput dat abase can be added e asily
using the alpha mode . In alpha mode, ty pe the desired wo rd into the tex t
of your message. The unknown word is automatically added to the
database so you can type it using T9 Text Input in the future.
For example, to enter ‘Jenna’ to the T9 database,
1. Press to go to alpha mode.
2. Press to capitalize, then press 5 key once to enter ‘ J.’ Press 3
key twice to enter ‘e.’ Press 6 key twice to enter ‘n.’ Wait for
cursor to move then press 6 key twice to enter another ‘n.’
Press 2 key once to enter ‘a.’
28
Page 29

3. Press to go to T9 Text Input mode to complete the message.
4. The name Jenna is automatically stored in the T9 database .
T9® is a registered trademark of Tegic Communications, Inc.
Alpha Text Entry Method
To type each letter of a word, press the desired key
1
one, two, three or four times, corresponding to the letter’s
position on the key.
See chart below:
2
Alpha method key actions
Key Action
Press to shift - upper/lower case
Press briefl y to automatically capitalize the cur rent
letter
Press and hold to shift lock upper/lower case
Clear
number keys Press and hold to enter numbers
Clear character or backspace
Press and hold to clear entire entry
Press to enter space
Press and hold to view symbols
Press to enter 1 . , - @ : ?
Press to switch between T9 Text Input and alpha
modes
Press to move cursor between letters or words
For example, to enter ‘Card’ in the Scratchpad,
1. Press , then press three times to select Office Tools.
2. Select Scratchpad, then select Write.
3. Press briefly to go to upper case mode, icon is displayed.
Press briefly three times to enter C in the screen.
4. Wait for the cursor to move or press to move to the next position,
notice that is displayed. Press briefly once to enter a.
5. Press briefly three times to enter r.
6. Press once to enter d. The word Card will now be in the screen.
7. Press to exit from this example.
29
Page 30

Entering Symbols
Shortcut for entering punctuation marks in alpha mode,
Press from one to eight times to enter 1 . , - ' @ : ?
To select and insert a symbol into the text,
Press and hold to view symbols. Press to scroll to
1
additional symbols on pages 2 and 3.
The symbols are arranged as the 1 - 9 keys are arranged on
2
the keypad. To select and enter a symbol into your text,
press the number key corresponding to the desired symbol’s
location on the screen. For example, press to select ( and
insert it directly into the text.
You will be returned to the text entry screen and the symbol
3
will be in place.
Symbol page 1
NETWORK SERVICES OR DIRECT LINKS
The menu item Network Serv. or Direct Links may appear at the
beginning of the menu if your network provider elects to offer certa in
value added services and contact phone numbers. These services and
phone numbers will be stored in your SIM. Contact your network
provider for details on these services. A service provider may present
these in one of three ways:
SIM application tool kit
An automatic way to provide services related to your network and not
to your phone. These services are SIM dependent.
SDN numbers stored in the SIM
Up to 32 Service Dialing Numbers may be stored in the SIM which
cannot be changed.
Information numbers
A list or a menu to enable you to call network or information services
offered by your network.
Some providers can offer two of the above services on the same SIM, in
which case the Network Serv. or Direct Links item in the main menu will
present two menu items, Applications and Services or Information.
30
Page 31

PHONE BOOK
The SIM and the phone have areas of memory use d for storing names
and telephone numbers known as the Phone Book.
The phone can store up to 100 “extended” vCards (called Phone Cards).
These cards store first and last names; home, work, an d cell phone
numbers; and note. The phone also supports SIM Cards with up to 255
entries but the actual number and capacity is dependent upon the SIM
itself. The SIM Cards store name and number.
The phone and SIM memory locations are interconnected, and both are
searched when you recall a name or number.
Storing Names and Telephone Numbers
Names and numbers can be stored directly in the Phone Book or moved
from other stored areas such as from SMS messages, scratchpad
(numbers only) or last dialed number list, etc.
If you travel abroad, it is best to store numbers in international format
using the '+' prefix before the country code followed by the telephone
number. To enter +, press and hold until + appears on the screen.
See page 27 for instructions on entering text.
To store Phone Card entries,
Enter the number. Press Store . Another way is to
1
press ,
Select Phone names.
2
Select the category of the number you entered. Choices are
3
Home, Work, or Cellular.
Enter last name and press OK .
4
Enter first name and press OK .
5
Enter informati on into any of these categories.
6
Press OK after each entry.
Stored displays and the remaining number of open entries.
7
select Phone Book, and select Store.
Home phone number
Work phone number
Cellular phone number
Notes
31
Page 32

To store SIM Card entries,
Enter the number. Press Store . Another way is to
1
press ,
Select SIM names.
2
Confirm the number and press OK .
3
Enter the name and press OK . Stored displays and the
4
remaining number of open entries.
Numbers stored in the last dialed, received, unanswered, scratchpad
(numbers only) and SMS message locations can all be stored in the Phone
Book.
To enter a Phone or SIM Card from other stored locations,
Display a number from one of the above, press Options .
1
Select Store, then select Phone names or SIM names.
2
Follow directions above for storing Phone Cards or SIM
Cards, starting at step 3.
>
• The characters *, +, P (pause), # and _ can be stored together with
numbers.
• If the SIM or Phone Book is full, a warning message will display when
selecting the Phone Book.
select Phone Book, and select Store.
During number and name entry, press Clear to erase the last
character. Press and hold Clear to erase the entire entry.
Free Space in the Phone Book
To see how many empty Phone Book spaces remain in the SIM or the
phone,
1
Press . Select Phone Book.
2
Select Remaining and use or to display the remaining
available spaces in the phone or SIM
>
If available, the free memories in the FDN list will also be shown.
.
Viewing and Dia ling Numbers in the Phone Book
Phone Book entries can be recalled into the screen to be edited, deleted,
copied, moved or dialed from either the phone or SIM.
To go to a Phone Book entry,
1
Press to view the Phone Book or press and select
Phone Book.
Select Recall.
2
32
Page 33

Either press OK or enter up to the first 3 initials of the
3
name desired and then press OK .
If no initial is entered, the screen will show the first alphabet
ical entry in the Phone Book. The list of Phone Book entries
will be displayed in alphabetical order. An icon indicates
whether the entry is stored in the SIM or the phone memory.
4
Press or to scroll to the desired phone entry.
To go directly to an entry, press the corresponding alphabet
key. For example, to go directly to entries starting with 'N'
press twice.
5
Press to dial the numb er, or
press Options to display the following menu:
Item Action
Edit Edits the entry
Delete Deletes the entry
Copy Copies the entry to the SIM or the phone or vice
Move Moves the entry to another position.
Call Calls the number displayed. If there are multip le
versa. Editing allowed before copying
Editing allowed before moving
numbers, a list will display from which you can
choose the desired number to dial.
Own Number Display
You can view your own PCS number, and if you have a subscription, your
Line 2 PCS number (Alternate Line Service), data and fax numbers. All of
these numbers are stored in the SIM by your service provider.
To view your own number(s),
1
Press . Select Phone Book.
Select Own numbers. Your PCS number displays.
2
3
Use or to view Line 2, data and fax numbers
(if you have a subscription for them).
33
Page 34

Fixed Dialing Numb ers (FDN )
Fixed dialing restricts outgoing calls to 'fixed' numbers or 'prefixes' contained in SIMs that support this feature. It prevents dialing numbers, call
forwarding and sending SMS messages to numbers that are not in the FDN
list. The amount of FDN numbers that can be stored depends on the SIM
capacity. PIN 2 code is required to turn on FDN or enter numbers into the
FDN list.
To turn on or off FDN operation,
1
Press . Select Phone Book.
Select Fixed dialing. Select Status.
2
Select On or Off. If selecting On, enter the PIN2 code.
3
Press OK to confirm the setting.
4
To view the numbers in the list,
1
Press . Select Phone Book.
Select Fixed dialing.
2
3
Select View and use or to view all the entries. Press
Options to edit, delete or copy numbers to phone or SIM.
To enter, edit or delete numb ers in the FDN list,
1
Press . Select Phone Book.
Select Fixed dialing.
2
Select Add new. Enter the PIN2 code if not entered yet. It is
3
now possible to add new numbers as well as ed it, delet e and
copy numbers to the phone or SIM.
Wild card spaces can be used with the numbers stored in the FDN
>
list. For example, the number 727 8_ _ 9 al lows calls to a ll numbers
between 727 8009 to 727 8999 to be dialed. When recalled to the
standby screen, the number can be edited and dialed.
MESSAGES
SMS message service enables you to send or receive short text messages
of up to 160 characters to or from other digital cellular phones with the
same capability. The messages are not sent directly to the other mobile
phone but go via your service provider’s message center . Store, edit and
forward text messages, as well as saving any of the numbers they may
contain. You can also use the Outbox to store, edit, and forward
messages as well as saving any of the numbers they contain.
34
Page 35

Reading a New SMS or Email Message
When the phone receives an SMS message, an SMS message alert tone
sounds and displays. The message is automatically stored in the SIM.
Press Read to read all new received messages (Inbox).
READING STORED SMS MESSAGES
1
Press . Select Messag e s.
Select Inbox to display the first message header.
2
3
Press or select Options , then select Read text to
read the message text.
• Each message header disp lays the sender’s call-back number, date/
time stamp, first line of message, message state icon, and number of
messages in the Inbox.
• Message state icons: Unread (new) message Read message
• Use and to scroll between pages or between messages.
• If appears, the SMS message storage is full. Delete old messages to
be able to receive new messages.
Managing SMS Messages
After reading the text message, press Options for these options:
Item Action
Read text Displays remainder of text
Delete Deletes the message
Reply Replies to sender of the messa ge
Reply (+ text) Replies to sender of the message with the
Forward Forwards the message to another phone
Forward to n Forwards a set of several messages
Numbers Stores or calls the number(s) contained in
> The items of this menu may vary and are dependent upon
the type of message received.
initial text
(5 maximum) to 5 different addresses
the SMS header or text
35
Page 36

Set up to Send SMS Messages
Before writing a new SMS message, check to see that the network’s SMS
message center number is stored in the phone.
1
Press . Select Messages.
Select Settings.
2
Select Message center.
3
If a number already appears, your service provider supplied
the number. Press OK . If empty, call your service provider.
If desired, you can select and change the following options.
The default settings are in place unless you change them.
Option Description Default
Time held at message center. 12 hrs,
Validity
Format
Paid reply toYou may pay for the reply to a mes-
Status
report to
The phone is now ready to send SMS messages.
1 day, 2 days or Maximum (defined by
service provider)
Selects format of message; Text, Voice,
Fax or Pager
sage, if a reply is sent by the addressee
Requests a status report. Must be
supported by your service provider
Maximum
Text
Off
Off
Creating a Draft Message
A set of 10 message texts or templates, initially empty, may be used as
text templates when entering message text. Each of these texts can be
up to 50 characters in length. These draft messages are stored in the
phone draft text memory.
To create a draft text,
1
Press . Select Messages.
Select Draft texts.
2
Choose a blank template [...] and press Edit .
3
Enter the message text. See Entering Text on page 27.
4
When finished, press OK .
To edit an existing draft text,
1
Press . Select Messages.
Select Draft texts.
2
Select the draft text to modify and press Edit .
3
Edit the text. When finished, press OK .
4
36
Page 37

Sending a New SMS Message to One Addressee
1
Press . Select Messages.
Select Write new.
2
Choose a draft text or enter the message text. See Entering
3
Text on page 27. When finished, press OK .
Select Send.
4
Enter the destination number or select Names to choose a
5
number from a Phone Book entry and press to select.
Press OK . Sent confirmation will display.
If you select Store, the message will store in the Outbox.
6
Sending a New SMS Message to Many Addressees
1
Press . Select Messages.
Select Write new.
2
Choose a draft text or enter the message text. See Entering
3
Text on page 27. When finished, press OK .
Select Multicast.
4
Enter up to 5 destination numbers or select Names to
5
choose up to 5 numbers from the Phone Book and press to
select. Press OK . Sent confirmation will display.
If you select Store, the message will store in the Outbox.
6
Outbox Messages
The Outbox contains unsent draft messages and stored sent messages,
identified by their headers. These messages can be selected from the
Outbox menu and can be modified and resent as new SMS messages.
To select an Outbox message,
1
Press . Select Messag e s.
Select Outbox.
2
Use or to scroll to the desired message header.
3
Each message header displays whether the message has
already been “sent” or “not sent” , the first line of
message, and number of messages.
Press Options for the following menu:
4
37
Page 38

Item Action
Read Display the remainder of the text
Delete Delete the message
Status
Send Send (or resend) to one addressee
Edit Edit the message
Send to many Send (or resend) to many addressees
5
Use or to select and follow the screen prompts.
Available only for sent messages.
Requests a status report. Must be supported by your service provider
SMS Alert Tone
To hear a tone each time an SMS message arrives,
1
Press . Select Messages.
Select
Alert
2
. Select On or
Off
.
Default = On
Storage Available in SMS Memory
To view the amount of available memory in the Inbox and Outbox,
1
Press . Select Messag e s.
Select Storage.
2
Scroll to view total SMS storage, SMS outbox and
3
SMS inbox.
Message Templates
If your SIM can store message templates, then Msg templates will appear in the Messages - Settings menu. Each of these templates can be
named, then selected and used whenever needed.
1
Press . Select Messages. Select Se ttings .
Select Msg templates. Choose any blank [...] template and
2
press Edit
Enter the template Name, Msg Center number, Validity
3
period and Format.
• Default settings for Reply and Status are set to ‘No’ unless you change
them to ‘Yes.’
• If only one template is set, it is automatically used by default.
• If more than one is set, any one can be selected to write a new message.
.
38
Page 39

CALLS & TIMERS
Details of incoming and outgoing calls, duration of the last call, and accumulated total of all calls made are stored in Calls & Timers menu.
Call Log
The Call log stores details of the last 10 numbers dialed, the last 5
unanswered calls, and the last 5 received (answered) calls. The call logs
are common for both Line 1 and Line 2.
To view or dial a number from the call log,
1
Press . Select Calls & Timers.
Select Call log.
2
Select Last dial, Unanswered or Received.
3
4
Use or to scroll through the call lists.
5
Press at a highlighted number to dial that number.
• The most recent number dialed or received is displayed first .
• For unanswered and received calls, if the caller’s number is in your
Phone Book, the name is shown. If not, ‘Unknown number’ displays.
To edit or delete call log entries,
1
Press . Select Calls & Timers.
Select Call log.
2
Select Last dial, Unanswered or Received.
3
Select the desired entry.
4
Press Options to go to the following menu:
5
Item Action
Store Store number in Phone Book
Delete Delete the entr y
Delete all Delete all the entries
Edit Edit the displayed number
Details
Call Dial the number
6
Use or to select and follow the screen prompts.
Press in the standby screen for one touch access to the 10 last
>
dialed call s.
View the name, n umber, date, time , and call
length of the highlighted number.
39
Page 40

Call Timers
The length of the last call, total accumulated time of all calls, and total
time of calls for Line 1 and Line 2 are stored.
Times for calls made and received through the home subscription network and through other networks are displayed in Details
To view call timers,
1
Press . Select Calls & Timers.
Select Call timers.
2
Select Show.
3
4
Use or to view Last call, All calls, Calls L1, and Calls
L2. The top time (>>) indicates time of outgoing calls and
the bottom time (<<) indicates time of incoming calls.
Press Details for call times on My network, National
5
roaming, and International roaming calls.
.
Balance Information (subscription service only)
This subscription service provided by some networks enables you to ask for
your remaining airtime balance. Contact your service provider for details.
1
Press . Select Calls & Timers.
Select Call timers.
2
Select Balance information.
3
Select Call or Set number.
4
•If Call is selected and the balance information number is
entered, the balance information center is dialed.
• If a number has not been entered, select Set number and
enter the number. Press OK to store your number or to
store and dial the information center number.
Press when the call is ended.
5
40
Page 41

Reminder - Call Duration
A call duration reminder beeps to remind you of how long you have
been on a call. It can be set in 1 minute increments (1 - 59 mins).
1
Press . Select Calls & Timers.
2
Select Call timers.
3
Select Reminder. Select On (or Off to turn off).
4
Enter 2 digits (to signify 1 to 59 mins). Press OK .
Default = Off
Reset Call Timer
To reset all the call timers,
1
Press . Select Calls & Timers.
Select Call timers.
2
Select Reset.
3
Select Yes (or No to exit).
4
Enter your 4-digit phone lock code and press OK .
5
A confirm message will appear.
Call Costs - Management (subscription service)
Some networks offer an Advice of Charge (AoC) subscription service to
see the cost of the last call made, the accumulated total cost of all calls,
and the remaining balance in units or currency of any 'cost limit' set.
To display these costs in the currency of your choice, first select the
currency and cost per unit. If not selected, call costs in units will display.
To set currency and cost per unit,
1
Press . Select Calls & Timers.
Select Call costs. Select Display cost type.
2
Select Currency. The present currency settings display.
3
Press Edit . Enter the PIN 2 code and press OK .
4
Enter the abbreviated letters of the currency. Press OK .
5
Enter the cost per unit in the selected currency.
6
Press OK to confirm. The screen will confirm your selection.
To set call cost type to units,
1
Press . Select Calls & Timers.
2
Select Call costs. Select Display cost type.
3
Select Units.
When the cost type is set to units, the credit limit and the remaining
>
credit are shown in units.
41
Page 42

Setting the Credit Limit
After setting the currency and cost per unit, if desired and available in
your subscription, you can also set a credit limit. When the credit limit is
reached, the phone cannot make or receive any chargeable calls. This
does not prevent the phone from making emergency calls.
1
Press . Select Calls & Timers. Select Call costs.
Select Credit limit. Screen shows the present credit limit.
2
Press Edit . Enter the PIN 2 code and press OK .
3
Enter the credit limit (use to enter a decimal point). Press
4
OK to confirm.
When a credit l imi t is ente red , the 'Cr edi t Li mit ' sel ec tion wi ll be Edit
>
or Set No Limit.
Show Costs
If offered by your service provider, you can view the cost of your last call,
all calls, and your remaining credits.
1
Press . Select Calls & Timers. Select Call costs.
Select Show.
2
Scroll to display the cost of the Last Call, All Calls and the
3
Remaining credits.
>
The remaining credit is shown in either units or currency as set by
Cost Type menu above.
Reset Call Costs
To reset all the call costs to zero,
1
Press . Select Calls & Timers. Select Call costs.
Select Reset.
2
Select Yes to reset the costs or No to exit.
3
If Yes is selected, enter the PIN 2 number and press OK .
All Costs Reset will briefly display.
Alternate Line Service - Line 2 (subscription service)
Some GSM 1900 operators offer the use of a second line. This is normally
a subscription service and allows, for example, separating calls for
business or private use. Line 2 has a separate PCS number.
1
Press . Select Calls & Timers.
Select Line selection. The current line selection displa ys.
2
3
Scroll to the desired line. Press Select or .
42
Page 43

SETTINGS
Phone Settings
KEYPAD LOCK
When keypad lock is activated, it prevents accidental key presses and
menu access. The key tones are also silenced.
Keypad lock is suspended during incoming calls and resumed when the
call ends. Emergency calls can still be made.
1
Press and hold to activate key pad lock. displays.
2
Press Unlock plus to deactivate keypad lock.
> Keypad lock is cancelled when connected to the handsfree car kit.
To activate or deactivate keypad lock from the menu,
1
Press . Select Settings. Select Phone settings.
Select Keypad lock to activate keypad lock .
2
3
Press Unlock plus to deactivate keypad lock.
LANGUAGE SELECTION
If offered by your service provider, all the screen messages can be shown
in one of three languages: English, French, or Spanish.
To select the language of your choice,
1
Press . Select Settings. Select Phone settings.
Select Language.
2
3
Use or to select a language from the list. Press .
To reset the phone to the language of the SIM, enter *# 0000#.
>
To reset the phone language to English, enter *#00 44#.
Default = English
TONES - ALERT MODE
There are two ways to turn off the incoming ring tone, key tones and all alert
tones and alarm tones. If either 'Vibrate' or 'Vibrate then ring' options are
chosen, all alert and alarm tones are replaced by the vibrating action.
Shortcut to turn alert tones on or off,
1
Press to display Ring, Silent, Vibrate, Vibrate & ri ng,
or Vibrate then ring.
2
Scroll to desired setting. Press to select. If any of the
vibrate options are selected, the phone will vibrate briefly.
43
Page 44

To turn alert tones on or off from the menu,
1
Press . Select Settings. Select Phone settings.
Select Tones.
2
Select Alert tones.
3
Select Ring, Vibrate, Vibrate & ring, or Vibrate then
4
ring.
Default = Ring
•If any Vibrate options are selected, the icon appears. It takes precedence over the icon.
•If Ring is selected but the ring tone volume is set to Off, the icon
appears.
• When the phone is connected to either the Desktop Charger, Handsfree
Headset, Cigarette Lighter Adapter, or AC Adapter, the vibrator mode cannot work so the phone will ring instead.
RING TONE SELECTION
Choose the sound of the incoming ring tone from a stored selection.
To hear your chosen ring tone or melody, wait several seconds before
confirming your choice. The tone or the melody will play.
1
Press . Select Settings. Select Phone settings.
Select Tones. Select Melodies.
2
To help you identify incoming calls, you can give different
3
ring tones to Standard/Line 1, Phone names, SIM
names, Line 2 and Alarm.
Use or to scroll to the different ring tones. Wait several
3
seconds to hear the tone. After choosing a tone, press to
select the tone.
Default = Trium
VOLUME ADJUSTMENTS
During a call, you can adjust the volume by using or .
Shortcut to adju st volume of the ring tone, key tones and incoming audio,
1
Press . Continue with step 4 below.
To adjust volumes from the menu,
1
Press . Select Settings. Select Phone settings.
Select Tones.
2
44
Page 45

Select Volume.
3
Select Ring, Keys, Conversation or Alarm.
4
The screen will name the volume type to be adjusted.
5
Use or to adjust the setting. Press OK to confirm.
> The ring tone volume off setting is not saved when the phone is turned off.
Default = mid-levels
RAMPING
Ramping causes the incoming ring tone to gradually increase to maximum volume level if the call is not answered after the first ring.
1
Press . Select Settings. Select Phone settings.
Select Tones.
2
Select Volume.
3
Select Ramping.
4
Select On or Off. Press OK to confirm.
5
Default = Off
BACKLIGHT - SETTING
This option controls the backlight during key entry or incoming ring tone.
Choose from two settings:
• On for 10 sec.: Screen and key backlight stay on for
10 seconds after the last key press or incoming call.
• Off: Backlight stays off.
1
Press . Select Settings. Select Phone settings.
Select Display.
2
Select Backlight.
3
Select On for 10 sec. or Off. Press OK to confirm.
4
Default = Off
• The backlight sett ing will be On for 10 sec. when the phone is connected to the Desktop Charger, Handsfree Headset, Cigarette Lighter
Adapter or AC Adapter.
45
Page 46

DISPLAY CONTRAST
To modify the screen contrast,
1
Press . Select Settings. Select Phone settings.
Select Display.
2
Select Contrast.
3
4
Adjust the contrast using or . Press OK to confirm.
Default = mid-level
MENU GRAPHICS
Choose a preferred set of menu graphics. Selecting a set immediately
changes the phone graphics: main menu images, sprites and icons.
1
Press . Select Settings. Select Phone settings.
Select Menu graphics.
2
3
Use or to scroll to the sets of menu graphics.
Press Select or .
Default = TBD
ANY KEY ANSWER
This feature enables any key (except and Silence ) to be pressed
to answer an incoming call.
1
Press . Select Settings. Select Phone settings.
Select Keys. Select Any key answer.
2
Select On or Off.
3
Default = Off
SOFTKEYS FUNCTIONS
The right and left softkey shortcut can be changed so your standby
screen can have a shortcut to the menus of your choice. The options
available are shown in the menu during selection.
Shortcut to softkeys functions:
Press and hold or . Continue with Step 5 below.
1
To change softkey functions from the menu:
1
Press . Select Settings. Select Phone settings.
Select Keys.
2
Select Softkey functio ns.
3
Select Left softkey or Right softkey.
4
5
Use or to scroll through the softkey option choices.
46
Page 47

Press Select to select an option.
6
Press Back or to return to the standby screen, which
7
shows your new softkey function.
> If (......) appears, it means the softkey has no function. Either you chose No
function in the menu option or a previously SIM dependent or subscription
service assigned to th at s oftkey is no longer available, for example, Line 2
selection.
Defaults: Left softkey = Internet
Right softkey = Messages
SPEED DIALING
Phone Book numbers can be assigned to Keys 2 - 9 which when held
down will dial those numbers. Key 1 is reserved for the voice mail ce nter
number. Numbers stored in the SIM and in the phone (except fixed
dialing numbers) can be selected.
To assign Phone Book numbers to the sp eed dialing keys,
1
Press . Select Settings. Select Phone settings.
Select Keys.
2
Select Speed dial.
3
4
Use or to scroll to the next Empty Key number.
Select Names to go to the Phone Book and scroll to the
5
desired entry.
Press Select . The Phone Book name will appear with the
6
assigned Key number.
If a number which was assign ed to a spe ed di al key is del et ed from the Phone
>
Book, the same number is automatically deleted fro m the speed dial key.
If you choose a Phon e Card w ith multi ple num bers, then when you speed di al
that Key, you will have to select one of the numbers to dial (for example, Work
or Cellular).
To change or delete assigned speed dial keys,
1
Press . Select Settings. Select Phone settings.
Select Keys. Select Speed dial.
2
3
Use or to scroll to the desired Key number.
Select Options . Select Names to go to the Phone Book to
4
replace current phone number. Scroll to desired Phone Book
entry and press Select
entry. The Phone Book name will appear with the assigned
Key number.
Select Delete to delete the current Phone Book Entry. The
5
Key screen will display ‘Empty.’
>
Key 1 cannot be changed or deleted.
to replace with new Phone Book
47
Page 48

AUTO ANSWER
When the phone is connected to a handsfree car kit or headset, the
phone will automatically answer an incoming call after approximately 5
seconds without having to press any keys.
1
Press . Select Settings. Select Phone settings.
Select Auto features. Select Auto-answer.
2
Select On or Off.
3
Default = Off
AUTO RETRY
The phone will automatically redial the number of a failed call up to 10
times, due to a busy system or unavailable signal from the network.
1
Press . Select Settings. Select Phone settings.
Select Auto features. Select Auto-retry.
2
Select On or Off.
3
Default = Off
When activated, Auto-retry and a countdown timer to the next call
attempt appears. A warning tone sounds each time a new call attempt
is made. If it is successful, proceed with the call. Press Back or any
key during Auto-retry to end dialing for that call.
SECURITY FEATURES
The following security features protect your phone from unauthorized use.
Tips on using security codes:
• When requested, enter the co de, which appear as asterisks (*), and
press OK .
• If you make a mistake, press Clear then enter the correct digit(s).
• Do not use codes such as emergency 911 to prevent accidently dialing
these numbers.
Change your default codes at once, write them down and
store them in a separate place.
PHONE LOCK CODE
When Phone lock is turned on, the phone lock code must be entered
each time the phone is turned on. The phone lock code is also required
to reset the call timers.
The factory setting is 0000. In order for the security system to work
properly, reset this code, write it down and keep it in a safe place,
separate from the phone.
48
Page 49

To change the phone lock code,
1
Press . Select Settings. Select Phone settings.
Select Security. Select Phone lock.
2
Select Change code and follow the screen prompts.
3
Press OK to confirm the new code.
4
Default = 0000
To turn Phone lock on or off,
1
Press . Select Settings. Select Phone settings.
Select Security. Select Phone lock.
2
Select On or Off.
3
Enter the phone lock code to confirm your selection.
4
Emergency calls can still be made when Phone lock is turned on.
>
Default = Off
PIN CODE
Your SIM is provided with a 4 to 8-digit PIN code to protect it from
unauthorized use. When PIN code lock is enabled, the PIN code must be
entered each time the phone is turned on. If you enter the wrong PIN
code three times in a row, your SIM card is blocked and you must enter
the 8-digit PUK code supplied from your service provider (see page 19).
To enable or disable the PI N code lock,
1
Press . Select Settings. Select Phone settings.
Select Security.
2
If already off, PIN enable will show.
If already on, PIN disable and PIN change will show.
Press Select and follow the screen prompts.
3
Press OK to confirm. PIN enab l e d or PIN disabled
4
briefly displayed will confirm your action.
To change the PIN code (PIN l ock must first be enabled),
1
Press . Select Settings. Select Phone settings.
Select Security.
2
Select PIN change and follow the screen prompts.
3
Press OK to confirm your new PIN. Confirmation will display.
4
49
Page 50

PIN2 CODE
The PIN2 code prevents access to some features such as turning on or
off FDN operations, modifying the FDN Phone Book, setting calls costs
to zero, or modifying the costs displ ay . It can be changed bu t not turned
on or off.
To change the PIN2 code,
1
Press . Select Settings. Select Phone settings.
Select Security.
2
Select PIN2 change and follow the screen prompts.
3
Press OK to confirm your new PIN2 code.
4
PUK AND PUK2 CODES
See page 19 for details of PUK and PUK2 codes.
CALL BARRING PASSWORD
The call barring password, supplied by your service provider, selects the call
barring levels listed in the
To change the call barring password,
1
Press . Select Settings. Select Services.
Select Call barring.
2
Select Change password and follow the screen prompts.
3
Press OK to confirm.
4
Code/Password Entry Su mmary Chart
Password Length
Unlock code 4 digits Unlimited
PIN 4-8 digits 3 PUK code unblocks
PIN2 4-8 digi ts 3 PU K2 code unblocks
PUK 8 digits 10 Call service provider
PUK2 8 digits 10 Call service provider
Call barring
password
Services - Call Barring menu (see page 57).
4 digits
Number of
tries allowed
Network
determined
If blocked or
forgotten
Return phone to
manufacturer
Call service provider
50
Page 51

TIME & DATE SETTING
To set the current time,
1
Press . Select Settings. Select Phone settings.
Select Time & date.
2
Select Set time.
3
Enter the time using the number keys. Enter 0 (zero) first for
4
single digit hours and minutes. In the standby screen, the
zero before the hour digit will not appear. Use and to
move the cursor. Press OK to set.
Select am or pm. Press OK to set.
5
To set the current date,
1
Press . Select Settings. Select Phone settings.
Select Time & date.
2
Select Set date.
3
Enter the date using the number keys. When entering date,
4
format is month/day/year. Enter 0 (zero) first for single digit
months and days. Enter all four digits of the year. Use and
to move the cursor. In the standby screen, the day of the
week and the date will appear.
Press OK to set.
5
• Time and date appear only while the phone is turned on. The time, the day
of the week and the date appear on the standby screen.
• An internal battery maintains the date and time setting for up to 3 hours
when the phone is turned off and without a battery, or with a completely
discharged battery attached. After this 3 hour period, you may need to
reset the clock when the phone is turned on again.
• An error message appears if you make an incorrect entry.
DEFAULT (FACTORY) SETTINGS
Use Default settings to return the phone settings back to the factory
settings. The Phone Book entries, phone lock code, or voice mail and SMS
message alert tones will not change. Only the features named below will
be affected.
1
Press . Select Settings. Select Phone settings.
Select Default settings.
2
Select Yes or No.
3
51
Page 52

Factory Default Settings Summary
Feature Factory setting
Alert Tones Ring
Ring Tones Trium
Volume, Ring, Key, Conversation, Alarm Mid-levels
Backlight
Contrast
Any key answer, Auto-retry and
Auto-answer features
Ramping Off
Menu graphics Trium
On for 10 sec.
Mid-level
Off
Voice Mail
You can receive voice mail messages if offered by your service provider.
Your voice mail box must first be set up with your service provider
before receiving voice mail messages.
CALLING THE VOICE MAIL CENTER TO CHECK FOR MESSAGES
To dial the voice mail center directly after receiving a message,
Press and hold .
To dial the voice mail center using the menu,
1
Press . Select Settin gs. Se lect Voice mail.
Select Call.
2
VIEWING YOUR VOICE MAIL CENTER NUMBER
To view your voice mail center number,
1
Press . Select Settings. Select Voice mail.
Select Number. The phone number of your voice mail center
2
appears.
If you subscribe to 'Line 2' service, you can view the voice mail center number
>
the same way.
The voice mail number is automatically assigned to speed dial location Key 1.
See Speed Dialing on page 47.
52
Page 53

VOICE MAIL ALERT TONE
To hear a tone each time that a voice mail message arrives,
1
Press . Select Settings. Select Voice mail.
Select Alert. Select On or Off.
2
Default = On
Services
CALL FORWARDING (NETWORK SERVICE)
Call forwarding service forwards incoming calls, whether voice, fax or
data, to another number.
To set up call forwarding,
1
Press . Select Settings. Select Services.
2
Select Call forwarding for the following menu:
Forward options Action
All Voice calls
When not reachable
On no reply
When busy
All conditions
Cancel all Cancels all Forwards
All FAX calls
All DATA calls
Scroll to select the desired forwarding condition and select.
3
Select Activate.
4
Select Names or Number.
5
If Names was selected, choose the number to forward your
6
incoming calls to from the Phone Book. If Number was
selected, enter a phone number. Press Select or OK .
Requesting displays. The network will confirm your request.
Forwards all incoming voice calls before
call is sent to your phone
Forwards all voice calls only when the
phone cannot be reached (out of service)
Forwards all voice calls only when the
phone does not answer
Forwards all voice calls only when the
phone is busy
Forwards all voice calls only during 3
conditions; When not reachable, On no
reply and When busy. Your phone will ring
first before call is forwarded
Forwards all incoming fax calls before call
is sent to your phone
Forwards all incoming data calls before cal l
is sent to your phone
53
Page 54

CALL FORWARDING NOTES
• If the ‘On no reply’ option is selected, you must enter a delay period of 5,
15, or 30 seconds.
• Call forwards for Line 1 and 2 must be set for each line. During call forward
set up, only the line currently selec ted is affec ted . To choose a call forward
for the other line, you must select this other line first (see Alternate Line
Service on page 42).
To cancel or check the status of individual call forwards,
1
Press . Select Settings. Select Services.
Select Call forwarding.
2
3
Select the desired forward option and press .
Select Cancel or Status. Requesting displays.
4
The network will respond with current status.
To cancel all (multiple) call forwards,
1
Press . Select Settings. Select Services.
Select Call forwarding.
2
Select Cancel all.
3
Select Cancel. Requesting displays. The network will
4
confirm your request.
This action cancels all voice forwards (for voice, faxes and data calls) for the line
>
currently in use. To ca ncel call forwards for the other line, first select this other
line (see Alternate Line Servic e on pa ge 4 2 ).
CALLER LINE IDENTITY - SHOWING/HIDING YOUR PCS NUMBER
Most networks allow the Caller Line Identity feature (CLI) which shows
the incoming number (ID) while receiving a call. Select Receiving caller
ID to check if this is available from your network.
RECEIVING CALLER ID
To check if a network presents the caller ID of incoming calls,
1
Press . Select Settings. Select Services.
Select Receiving caller ID. Requesting displays.
2
The network will return either Calling user ID
presentation a va ila bl e or presentation unavai lable.
To disable sending your own number on a call by call basis,
Enter #31# before the number you are calling.
1
If your service provider has disabled sending your PCS number, then to show
your number on a call by call basis,
1
Enter *31# before the number you are calling.
54
Page 55

SENDING CALLER ID
To check if your PCS phone number is sent to other phones,
1
Press . Select Settings. Select Services.
Select Sending my ID.
2
Select Status. Requesting displays. The network will
3
respond with your current setting.
To show or hide your PCS phone number to other phones,
1
Press . Select Settings. Select Services.
Select Sending my ID.
2
Select My settings.
3
Select Hide my ID or Show my ID. Requesting displays.
4
The network will respond with an appropriate message.
To reset to the standard network setting for sending your PCS number,
1
Press . Select Settings. Select Services.
Select Sending my ID.
2
Select My settings.
3
Select Preset. Requesting displays. The phone resets to the
4
network setting agreed to with your service provider.
NETWORK SEARCH
When the phone is turned on, it automatically searches for the last network it was registered on (usually the home network). If this is not available, the phone will automatically search and select a network from the
preferred network list contained in the SIM.
PREFERRED NETWORK LIST
The phone contains a list of networks which can be selected and
transferred to the preferred networks list stored in the SIM. When
traveling, you may wish to choose a particular network to use.
To edit or change the order and name of the networks in the preferred
networks list,
1
Press . Select Settings. Select Services.
Select Network.
2
Select Preferred list. A Preferred list screen appears with
3
several [...] signifying empty lines.
The highlighted [...] will be filled with your choice.
4
Press Options to select:
5
55
Page 56

Option Description
Modify by list
Modify by code
Delete
A list of networks displays. Scroll to your preferred network
6
and highlight it. Press Select to place your selection in the
preferred list.
To add more to the list, scroll to the next empty line [...] and
7
continue with step 4. To replace or delete an entry on your
preferred list, highlight the entry, press Options and
continue with step 5.
Displays a list of all known networks contained in the phone in alphabetical order
Edits or enters a network number
(MCC MNC) if you know this information
Deletes an entry (appears only when network name is already listed)
FORBIDDEN NETWORK LIST AND HOME NETWORK NAME
Your SIM may contain a forbidden list of networks which cannot be
used. The SIM also stores the home network name.
To view the forbidden list or show the home network name,
1
Press . Select Settings. Select Services.
Select Network.
2
Select either Forbidden or Home network.
3
A list of forbidden networks or the home network displays.
AUTOMATIC NETWORK SEARCH (NORMAL DEFAULT SETTING)
To perform an automatic search from the preferred list,
1
Press . Select Settings. Select Services.
Select Network.
2
Select Search.
3
Select Automatic. An automatic search is performed.
4
MANUAL NETWORK SEARCH
When you wish to select a specific network which has better coverage in
your current location, choose manual network search.
1
Press . Select Settings. Select Services.
Select Network.
2
Select Search.
3
56
Page 57

Select Manual. Scanning for Networks displays, followed
4
by a list of the networks found.
5
Choose a network and press .
Requesting displays. The network will send a confirmation.
6
> You can not d e lete a network from the forbidden list. This list
automatically updates when the manual network selection is performed.
CALL BARRING (NETWORK SERVICE)
Call barring stops certain types of calls from being made or received. You
must use a Call barring password available only from your service provider.
To put on a call bar,
1
Press . Select Settings. Select Services.
Select Call barring.
2
Select Outgoing calls or Incoming calls. Choose from:
3
Options Description
Outgoing - All outgoing Al l ou t g o ing calls are barr ed
- Int'nal calls
- Int'nal excl.
- home
Incoming - All in coming All incoming calls are barred
- Roaming
- only
Select the desired option. Press Select .
4
Select Activate. Enter the Call barring password and press
5
Select .
The network will respond with a confirm message.
Only outgoing international
calls are barred
All outgoing international calls
except to other subscribers
within your home network
All incoming calls when not on
the home network
To remove or check the status of a Call bar,
1
Press . Select Settings. Select Services.
Select Call barring.
2
Continue with step 3 above, then select Cancel to remove a
3
Call bar or select Status and press .
If removing a Call bar, the password is required.
57
Page 58

To change the Call bar password,
1
Press . Select Settings. Select Services.
Select Call barring.
2
Select Change password.
3
Enter the old password. Enter the new password, then enter
it again to confirm. The network will confirm.
CLOSED USER GROUP -- CUG (SUBSCRIPTION SERVICE)
This network service allows the phone to make or receive calls only from
selected groups of people. The groups, level of access, and if one of the
groups has preferential calling access is set up at the time of subscription. This is mainly for businesses wishing to use closed, internal communications. This feature is not available for personal use.
Up to 10 groups may be set up. Unauthorized calls made or received
from numbers outside the group are not permitted.
To turn on and off CUG and select type of CUG service,
1
Press . Select Settings. Select Services.
Select CUG. The current CUG status displays.
2
Press Set to display these options:
3
Options Description
No CUG
Partial CUG
CUG Only
4
Select an option. Press . Follow the screen prompts.
CUG is off. No groups active. Calls can be
made outside the group
Limited calls to and from users outside the
group and from users within the group
Only able to make and receive calls from
users within the group
Default = No CUG
Broadcast - Cell Broadcast (CB) Messages
These are messages broadcast by the networks to all GSM customers. They
provide general information about local area dialing codes, weather reports
and traffic news, etc.
Choose up to 3 message types to receive from the 16 standard message
types stored. Contact your service provider for details on the types and
quantity of CB broadcast messages available. Before you can turn on the
broadcast service, enter at least one message type in the Message types list.
58
Page 59

ENTER A CB MESSAGE TYPE
1
Press . Select Settings. Select Broadcast.
Select Message types. Press Options .
2
Select Modify by list or Modify by code (if known).
3
Scroll to the desired message type. Press Select to add
4
the message type. The screen confirms your choice.
5
To add more message types, press to highlight an empty
row [...]. Press Options and continue at Step 3.
CHANGE OR DELETE A CB MESSAGE TYPE
1
Press . Select Settings. Select Broadcast.
Select Message types.
2
Scroll to the desired message type and press Options .
3
To change a message type, select Modify by list or Modify
4
by code and continue with Step 4 in Enter a CB Message.
To delete a message type, select Delete.
5
Standard Message Type Codes Chart
Code No. Description Code No. Description
000 Index 052
022 Doctors 054 Operator services
030 National road report 056 Phone directo ry
032 Local road report 057 Int’l directory
034 Taxis 058 Customer care
040 Weather reports 059 Int’l customer care
Network
Information
TURN ON OR OFF CB BROADCAST SERVICE
1
Press . Select Settings. Select Broadcast.
Select On/Off.
2
Select On or Off.
3
> When the broadcast service is turned on continuously, the battery
standby time is reduced.
Default = Off
READING CB BROADCAST MESSAGES
Broadcast messages are shown in the standby screen only . A message can
be up to 93 characters in length and cover several pages. Pages will scroll
automatically approximately every five seconds or press to scr o ll.
59
Page 60

Options during message display:
Clear
Press
Press t o dial the number shown within the message.
Press
Options
Option Action
Delete Delete the current message
Delete All Deletes all stored messages
Numbers
Broadcast Off Turns off cell broadcast service
to clear the message currently d isplayed.
for these options:
Displays all phone numbers in message
text. Option to dial or store in scratchpad
BROADCAST MESSAGE ALERT TONE
1
Press . Select Settings. Select Broadcast.
Select Alert.
2
Select On or Off.
3
Default = On
BROADCAST LANGUAGE
If offered by your service provider, all the CB Broadcast messages can be
shown in one of three languages: English, French, or Spanish.
To select a lang u a g e,
1
Press . Select Settings. Select Broadcast.
Select Language.
2
3
Use or to select a language from the list. Press .
Default = English
OFFICE TOOLS
Office Tools menu contains a scratchpad, currency converter, and Alarm clock.
Scratchpad
Scratchpad can store up to 5 separate entries of 20 characters each.
1
Press . Select Office Tools.
Select Scratchpad.
2
3
Select Read. Use or to scroll through the entries.
Select Write to make a new scratchpad entry. See Entering
text on page 27. Press and hold desired key to enter a number. When entering phone numbers, do not enter spaces or
dashes. The entry will be date and time stamped.
60
Page 61

Press Options for these options while in Read mode:
Item Action
Store * To save a number to the phonebook
Edit Modifies an entry
Delete Deletes an entry
Delete all Deletes all entries
Call * Calls the number displayed in the entry
* These items appear only if the scratchpad entry is a telephone number.
Currency Converter
To use the currency converter, you must first set up the currencies and
the exchange rate. The conversion is calculated on the per unit exchange
rate of the second currency selected.
To select the currencies and the exchange rate,
1
Press . Select Office Tools.
Select Currency converter.
2
Select Settings.
3
Enter the first currency name (e.g. Dollar). Press OK .
4
Enter the second currency name (e.g. Yen). Press OK .
Enter the exch ange rate using to enter a decimal point.
5
Press OK to confirm the entry.
>
If you wish to use your Currency converter as a Euro converter for participating
currencies to the European Monetary Union ("Euroland currencies"), please
enter the complete Euro exchange rate with at least three significant figures.
For example: 1 Euro = £ 1.52.
To calculate the conversion between the chosen currencies,
1
Press . Select Office Tools.
Select Currency converter.
2
Select one of the two first options.
3
In our example: either Dollar->Yen or Yen->Dollar.
Enter the amount to be converted. Press to insert a decimal
4
point, if needed. Press OK . The converted amount displays.
>
Conversion from one Euroland c urrency to another, or to non-Euroland
currencies, should normally follow "triangulation" rules (i.e. conversion of local
currency to Euro and then Euro to other local currency). Your Currency
converter cannot do this. Your result will be only a close approximation
61
Page 62

Alarm Clock
You can set a daily 'Power On' or a daily 'Reminder alarm.'
Caution - Please remember to turn off the alarm feature in places
where cellular phone use is not permitted. You can also remove
the battery after turning off the phone. See the Safety warnings
on page 13.
To set a time and turn on the alarm,
1
Press . Select Office Tools.
Select Alarm clock (If a previous alarm time was entered,
2
then that time displays).
Select On. Enter the alarm time using 0 (zero) for single digit
3
hours or minutes. Press OK .
Select am or pm and press Select . Stored displays
4
briefly.
5 Press Back or to return to the standby screen.
icon appears on the top line of the screen.
Standby screen with alarm icon
When alarm time arrives, an alarm sounds for up to to 1 minute. Alarm
clock! and vibrating bell icon appear and the LED light flashes red.
Silence turns off the alarm tone only. Valid. validates the alarm
(that is, turns off the alarm until the next day). To clear (turn off) the
alarm permanently, you must select Off in the Alarm clock menu. See
next page.
If the phone is off at alarm time, the phone will automatically turn on
and the alarm tone sounds and screen messages appear.
To use as a Reminder or Snooze Alarm,
Press Silence , or any other key (except Valid. ) to stop the
alarm tone. The alarm icon and Alarm clock! warning remain on
screen. The alarm rings again 3 minutes later.
or
Press Valid. to validate the alarm (that is, turn it off until the
next day).
62
Page 63

ALARM CLOCK NOTES
• If the phone is turned off and is locked or the PIN lock is set , the alarm
will turn on the phone. However, the phone remains blocked until you
enter the phone lock code or PIN code.
• The alarm rings for 1 minute until any key (except Valid. soft key) is
pressed to stop the alarm tone. The alarm is still active, and it repeats
3 minutes later. If Valid. softkey is not pressed after the third alarm
tone, the alarm is not repeated but the phone remains turned on and
alarm indicators remain for up to 15 minutes. Then it reverts back to
the standby screen.
• If the alarm time arrives during a call, an 'In Call' alert beep sounds
every 20 seconds. Press Valid. softkey to turn off alarm.
• If the alarm time arrives while dialing or receiving a call, the alarm is
suspended until the call connects. An 'In Call' alert beep sounds every
20 seconds.
• If the phone is turned off when alarm time arrives, the phone will turn
on. If the alarm is not validated, the phone remains on for 15 minutes,
then turns off.
To turn off the alarm permanently,
1
Press . Select Office Tools.
Select Alarm clock.
2
Select Off. Confirmation displays.
3
GAMES
If available from your service provider, two games are available in the
phone, Reshape and Push.
Choose from 3 sound effects options - Music, electronic sound effects
(Sfx), or No sound in the Options item in the menu.
To select a game,
1
Press . Select Games.
Choose the desired game and press Se lect .
2
Select Help for instructions on how to play the game and the
3
controls to be used.
Select Play to start the game.
4
Select Code to enter and play the game at your skill level.
5
63
Page 64

• Reshape is a game with 250 skill levels in which you reorder shapes
on the right side to be the same as the left side. Push is a game with
50 skill levels in which you move blocks of ice to their final place. As
each level is successfully played within the allotted time, you will play
at the next higher skill level.
• After successfully playing 'X' amount of levels, you are given a code to
re-enter the game at your previously attained skill level.
• The player’s name can be entered with final scores.
• If a call is received while a game is being played, the game is suspended and you may answer the call normally . When the call is ended,
the game will resume.
• To exit from the games menu, press Back or press to return to
the standby screen.
INTERNET MODE
Your G320 phone has an Internet browser allowing you access to
services such as News, Sports, Weather and Stock quotes.
The types of service and content offered while in Internet Mode
are supplied ent ir ely by yo ur service/Internet pro v id er .
To access Internet Mode, your service provider must first set up and
register unique IP and email addresses for your phone. You must also
purchase a data subscription from your service provider.
Set Up Connection Settings
Before starting, check with your service provider as to whether the
connection settings have been already set up or if you must enter the
settings yourself. If your service provider has already completed these
connection settings, these options may not appear or they m ay be
locked.
If you have not already done so, set the current time and date as described on page 51.
64
Page 65

PROFILES
To create a new profile,
1
Press . Select Internet.
Select Profile list.
2
Select an empty profile [...] and press Options .
3
Select Edit. Enter the 4 digit lock code (default code 0000).
4
Press OK
Enter a Proxy name,
5
a Phone number (to access data services),
an Analog or Numeric connection type,
the speed if required (9600 or 14400),
a Login name ,
a Login password
an IP address,
a Home Page address
Select On or Off to activate security.
Enter the Port number if required.
Press OK after each entry.
The new profile will appear in the profiles list.
.
(each character will change to an * asterisk),
SELECT A PROFILE
If your service provider offers multiple WAP profiles, you may select a
WAP profile to connect to at start-up, or edit or delete prof iles.
1
Press . Select Internet.
Select Profile list.
2
3
Use or to scroll to the desired profile and press
Options to choose Select, Edit or Delete. Follow screen
prompts.
INTERNET SETTINGS
Select if you want to clear cache memory, turn off downloading pictures
to speed up data transmission, allow scripting, and set the autodisconnect time period.
1
Press . Select Internet.
Select Settings.
2
Scroll to these options:
3
65
Page 66

Option Action
While you are online, some of the services
Clear cache
Download
pictures
Scripting
Auto-disconnect
and web pages you have accessed are
stored in a memory area called the cache.
Select Yes to delete this cache memory.
Some Internet pages may have
pictures which take time to download to
the phone. Select Off to stop picture
downloads.
Many Internet pages use scripts to run a
sequence of commands. Select Off to
turn off scripting.
Set a time period that your phone will
disconnect from the Internet if there is no
activity. Enter the period (0-60 minutes)
and press OK .
0 deactivates the auto-disconnect.
Connecting to the Internet
To connect to the Internet services offered by your service provider,
Press Internet from the standby screen or
1
press and select Internet.
Select Start.
2
Connecting to... then your profile name will display while
3
the phone is connecting to the data network.
Then Loading... will display while the Home page is loading.
Once your phone displays your service provider’s Home page, you can
access the online services presented on the Home page. Check with your
service provider for information on the content of their online services.
The Internet icon on the bottom of the screen indicates that you are
connected to the online services of your service provider.
SECURE CONNECTION
While online, you can request a secure connection via “Security on” (see
page 65). This closes the current non-secure session and allows you to
navigate within the cache pages. When an Internet connection is
needed again, a secure connection will be requested. When the secure
connection is established, the icon appears to confirm it. In some
cases the secure connection procedure may not work properly because
of server restrictions. In this case, you may need to start a new Internet
session.
66
Page 67

Interactive Web browsing
Use and to move line-by-line through the page.
1
If a page contains an interactive line; for example, a link to
2
another web page, press or to highlight the interactive
phrase or picture.
To select it, either press the right softkey (labeled Link,
3
Edit, Enter, Expand, Reduce, View) or press . For
Options menu, press . See Options menu chart below.
To return to the previous page, either press Back softkey (when
displayed), or press left softkey or and select Back.
PICTURES
Y ou may view pictures on screen. If the picture is wider than the screen,
press View to see th e complete picture. Navigate within the picture
by using
, , , and keys as in a map.
LINKS
To go to an underlined link of another web page,
Use or to highlight the link.
1
Press Link to go to the linked address.
2
ENTER INFORMATION
You may wish to enter information into a Web page. For example, a
people search website usually has a box in which you begin by entering
the last name of a person that you want to find.
Use or to highlight the box.
1
Press Edit to type the name into the box. See Entering
2
Text on page 27. Follow screen prompts.
Options Menu
While online, press Options or to access these options:
Item Action
Back Returns to previous page
Zoom +/- Increases or decreases text size
67
Page 68

Disconnect
Clear cache *
Add bookmark * Adds a current card or page to the list of
Go to bookmark * Goes to a previously stored bookmark
Home page Reloads and returns to the Home page
Reload Reloads the current page
Close session Disconnects the phone from the Internet
* The appearance of these items in the options menu depends on the
service provider and/or the settings in the Settings menu.
Disconnects the browser from the network
but leaves the current page locally active
within the phone browser
Clears the browser’s cache, which contains
the most recent Web files you downloaded
bookmarks
Ending Connection
Press to end the Internet connection.
You can also select Close session under the Options menu.
Other site
This Internet menu option allows you to type in a known website
address and go directly to that website. If the phone cannot link to that
website, it’s possible that the website may not be able to be translated
into Wireless Markup Language (WML) which is the language your
phone uses to present Internet information. Also, just as when you surf
the Internet from your computer, web server traffic may be too heavy to
allow a connection.
Press Internet from the standby screen or
1
press and select Internet.
Select Other site.
2
Enter the desired website address. For example, enter
3
www.yahoo.com. Press OK .
Internet connection will begin.
To store a favorite website address, see Bookmarks.
Bookmarks
Most likely, you will want to use some services and websites frequently.
These services or pages can be stored as Boo kmarks which take you directly
68
Page 69

to that web address. Your phone can store up to 5 Bookmarks, if they are
available on the curre nt connection settings of your service provider.
CREATE A BOOKMARK
Shortcut to create a bookmark while currently viewing a Web site,
Press to display the Options menu.
1
Select Add bookmark, enter a shortcut name and
2
press OK .
To create a bookmark from the standby screen,
Press Internet from the standby screen or
1
press and select Internet.
Select Bookmarks.
2
Press Options and select Modify.
3
In the Alias screen, type in the name you wish to give your
4
bookmark. Press OK
Type in the Internet address of the desi red bookmark in the
5
Go to screen. Press OK
Bookmarks can only be edited or deleted while offline.
Press Internet from the standby screen or
1
press and select Internet.
Select Bookmarks and scroll to the desired bookmark.
2
Press Options to choose from Go here, Modify,
3
Remove or Clear list.
.
.
Go to a Bookmark
Shortcut to go to a bookmark while online,
Press to display the Options menu.
1
Select Go to bookmark .
2
Select the desired Bookmark.
3
To go to a bookmark from the standby screen,
Press Internet from the standby screen or
1
press and select Internet.
Select Bookmarks.
2
3
Scroll to the desired bookmark and press .
The phone will connect to the Internet and go to your Book-
4
mark web address.
69
Page 70

ACCESSORIES
Using the Headset
Insert the headset plug in the phone headset connector as shown. TBD
Place the headset earpiece
in your ear. The headset
microphone is then at a
convenient level for
speaking.
You can answer calls by
pressing and end calls
by pressing .
Adjust the earpiece
volume using and .
Disconnect the headset plug as shown. TBD
70
Page 71

Changing the Front Cover
Before changing the front cover, always turn off the phone and disconnect
from any charging device or car kit.
Removing the Fr ont Cover
To be determined.
1
.
2
Replacing the Front Cover
To be determined.
1
2
3
• Do not use excessive force when changing the front cover.
• Avoid bending the front cover.
• Do not leave in direct sunlight.
• Always use the phone with the front cover attached.
• Do not clean the phone with alcohol, strong chemicals or solvents.
Wipe it only with a soft, slightly dampened cloth. Read the Care and Mainte-
nance instructions on page 18.
71
Page 72

Accessories List
Handsfree kits Part numbers
Headset (earphone + microphone)
Simple Holder with bracket (mounts in car to hold
phone)
Batteries and Chargers Part numbers
Standard battery (Nickel Metal Hydride)
Desktop Battery Charger (for phone + spare
battery)
AC Rapid Charging Adapter 120V (for battery
charging using wall outlet)
Cigarette Lighter Adapter - plug one end into car
cigarette lighter, other end into phone jack to use
and charge phone in your car
Miscellaneous Part number
Belt Clip w/Button
Data Connector Part number
PC cable (RS232C)
Contact Data Kit (Software + PC cable)
To use data and fax numbers, refer to the instructions in the Contact Data kit and/or contact your
service provider for details.
Also allows you to create and download melodies,
manage abbreviated dial numbers, and perform
SMS functions on your PC.
To purchase accessories, contact your service provider or shop online at
www.mitsubishiwireless.com.
Do you have questions about accessories or would you like to place an
order by phone?
Please call toll free 1-877-581-8776
M-F 5:00 am - 9:00 pm PT • Sat 6:00 am - 8:00 pm PT • Sun 8:00 am - 5:00 pm PT
72
Page 73

GLOSSARY
Term Description
AC adapter Alternating Current adapter
Active call The call currently in conversation
ALS Alternate Line Service (Line 2)
AoC Advice of Charge. Cost of calls made
CB Cell Broadcast. General messages broadcast to GSM
CLI Caller Line Identity. Displays caller’s telephone number
Conversation mode When the phone is making or receiving a call
CUG Closed User Group. Preset group of user phone num-
DTMF Dual tone multifrequency tones or touch tones
FDN Fixed Dialing Number. Outgoing calls restricted to fixed
Forwarding Forwards incoming calls to another number
GPRS General Packet Radio Service. Packet-switched data
GSM Global Sys tem for Mobile communications . One of
LCD Liquid Crystal Display
LED Light Emitting Diode
PIN/PIN2 Personal Identification Number. Supplied by your
PUK/PUK2 PIN Unblocking Key. Used to unlock PIN and PIN2.
customers
bers
phone numbers
transmission in which the wireless phone sends and receives bursts, or packets , of data . A rad io channel is occupied only for the duration of the data transmission
instead of continuously as in circuit-switched.
three American digital cellular phone technologies in
the 1900 MHz band. Allows roaming between North
America and Europe by removing SIM card from American phone and placing in European network’s phone
or vice-ver s a
network/service provider
Supplied by your network/service provider
73
Page 74

Roaming (Rm) Make and receive calls on networks other than your
SDN Service Dialing Number of your service provider
SIM Subscriber Identity Module card. Supplied by your net-
SMS Short Message Service. Text messages can be sent and
Standby mode When the phone is on, registered onto a network but
Standby time Amount of time a f u lly c har ge d wir e les s phone can be
URL
WAP
WML
home network at home or abro ad
work/service pr ovider, hold s phone numbe rs and oth er
network information
received to your phone via the service provider’s message center.
not making or receiving a call
on before the phone’s battery will lose power
Uniform Resource Locator. Address of a file (resource)
accessible on the Internet
Wireless Application Protocol. Specification that
standarizes the way that wireless devices can be used
for Internet access
Wireless Markup Language. Language derived from
HTML that translates Web pages into a format that can
be viewed on wireless devices. Formerly called HDML
(Handheld Devices Markup Language)
74
Page 75

TROUBLESHOOTING
Problem Possible cause and solution
Phone will not turn on• Remove and replace battery assuring that the bat-
Charging LED not lit
red and no flashing
battery Icon
Short standby and
talk times
Calls cann ot be
made or received
Stored tel ephone
numbers cannot be
recalled
Numbers cannot be
entered in the
screen
Phone turns on but
there is no display
Battery icon not
flashing 1-2-3 during charging
Flashing • There is not enough memory to store another SMS
tery is charged and correctly attached to the phone
• Check wall outlet. Power may be out
• The AC/DC charger may be defective. Return it to
your dealer, try another Mitsubishi adapter
• Cell broadcast is perma nently on, using more battery power
• Phone is in a poor signal area and therefore always
on full power
• Incorrect charging and discharging. Always charge
and discharge your battery fully
• The battery is wearing out. Replace the battery
• Check that you have at least one s ignal strength bar
). Try in a stronger signal strength area
(
• If the name of a network is not disp layed, che ck that
your SIM is OK, check registration with your service
provider
• Call barring option is turned on. Turn it off (see
page 57)
• Call cost limit is reached (see page 42)
• Fixed Dialed Number or Call Barring features are
turned on. Turn off the features (see pages 34
and 57)
• Keypad lock is on ( is displayed). Press Unlock
and to turn Keypad lock off
• Remove and replace battery assuring that the battery is charged and correctly attached to the phone
• Display contrast is turned down to low. Reset
contrast (see page 46)
• Indicates a charging or battery problem. Turn off
and disconnect the adapter. Reconnect and try
again. If the problem persists, contact your dealer.
message. You must delete one or more of the
existing stored messages.
75
Page 76

ERROR MESSAGES
Message Possible cause and solut i on
Allowed credit
reached!
Busy
Call failed
Cancelle d. No t yp e
selected
Cannot execute
command
Can't display
message
Check SIM!
Check your password
Check your request
Check your
subscription
CUG call failed
Error!
Failed
Incorrect entry
Invalid number
• Allowed credit limit has already been reached
• Allowed credit limit is reached duri ng an outgoing
call (the call is then cancelled).
• Destination number is being used
• Caller’s phone is turned off
• Number is out of order or unreachable
• Network system is busy or does not answer
• Option to hide your p hon e num be r wh en c alling is
not supported by the network
• CUG is in use and the call is not allowed or not
recognized by the network
• Control and verification of CUG parameters not
confirmed, or CUG availability on network
• Cell broadcast activation has been requested but no
message type is selected
• Cannot perform request in the current call situation
• Characters not recognized, incorrect format of
short message text
• No SIM is present or the SIM is incorrectly i nserted.
See page 6 for more details
• Call barring password was changed
• Call barring service status was changed
• Entered password is incorrect
• Your request for a service cannot be fulfilled
• You have no subscription for requested network
service. Check your subscription regarding the
related service use rights or access
• CUG (Closed user group) call is rejected because the
network does not recognize the CUG parameters
• Dialed number is not in the same CUG
• Dialed number has no CUG as sociation
• Network cannot perform your request
• An SMS message cannot be sent
• Character string has a syntax error
• Network does not recognize the phone number
• Phone number is too long t o be stored or moved to
the selected location
76
Page 77

Locked! Press (Unlock)(#) to unlock
Low battery!
Network busy
Network not allowed
New PIN1 incorrect.
Try again
New PIN2 incorrect.
Try again
No response
Not allowed
Not allowed (fixed
dialing)
Not Available
Number changed
PIN blocked
PIN2 blocked
PUK2 blocked
Reaching allowed
credit!
Ring volume Off
Service not available
SIM blocked. Contact
provider
SIM fixed full
SIM names full
Phone names full
SMS memory location s
are full
Wrong code. Try
again
Wrong PIN/PIN2, or
Wrong PUK/PUK2,
try again
• A key was pressed while keypad is locked
• Battery is too low and phone will soon turn off
automatically
• Call is rejected by the network due to overload
• When selecting networ k manual search, you have
selected a network that rejects the connection
• Second new PIN code entry is different than first
• Second new PIN2 code entry is different than first
• Call was made to a remote phone with no response
• Number or character entry is not allowed
• Number dialed does not match any of the fixed
dialing numbers in memory
• No more SIM storage available
• Called number has changed
• Wrong PIN code entered 3 times. Enter PUK code
• Wrong PIN2 code entered 3 times. Enter PUK2 code
• Wong PUK2 code has been entered 10 times.
The SIM services protected by the PIN2 code have
now been permanently disabled
• Cost limit is about t o be reached. Connec ted call will
end automatically when limit is reached.
• Ring volume is set to 0 (no volume)
• You have requested some services that are not
available on the network
• Wrong PUK has been entered 10 times. The SIM
card has been permanently disabled and must be
replaced by a new one.
• Corresponding phone book memory is full
• New message storage is full while writing a new
SMS
• Wrong phone lock code has been entered
• Wrong code has been entered
77
Page 78

INDEX
A
Accessories 70
Adjusting volume 22
Alarm clock 62
Alert mode 43
Alert tone
Broadcast 60
SMS message 38
Voice mail 53
Alternate line service 42
Auto answer 48
Auto retry 48
AutoDTMF, sending 23
Automatic search 56
B
Backlight 45
Balance information 40
Basic phone operations 9
Battery
Attaching 6
Charging 7
Safety Tips 8
Bookmarks 68
Broadcast
Alert tone 60
Language 60
Message types 59
Messages 58
On/Off 59
C
Call
Answering 10
Ending 11
Holding 23
Making 9
Retrieving 23
Call barring 57
Call barring password 19, 50
Call costs 41
Call duration reminder 41
Call forwarding 53
Call log 20, 39
Call timers 40
Call waiting 24
Caller line identity (Caller ID) 54
Calls & Timers 39
Call costs 41, 42
Call log 39
Call timers 41
Dialing from 20
Line selection 42
Care and Maintenance 18
CB messages 58
Alert tone 60
Language 60
Message types 59
On/Off 59
Reading 59
Cell broadcast messages 58
Changing front cover 71
Charging batt e ry 7
Clear cache 68
Closed user group 58
Conference calls 24
Consumer Update on
Mobile Phones 15
Contrast 46
Creating a draft message 36
Credit limi t 42
CUG 58
Currency converter 61
D
Date & time setting 51
Default settings 51
Dialing a number 9
Dialing stored numbers 20
78
Page 79

Direct Links 30
Display contrast 46
Display ico ns 4
Draft texts 36
DTMF tones, send 22, 23
E
Edit online 67
End key 2, 3
Ending a call 11
Ending Internet connection 68
Entering symbols 30
Entering text 27
Error messages 76
Express Key 2, 3
F
Fixed dialing numbers (FDN) 34
Forwarding, call 53
Front cover, changing 71
G
Games 63
Getting started 6
Glossary 73
GPRS 2
GSM network 2
H
Headset, using 70
Holding a call 23
I
Icons, display 4
Inbox 20, 35
Information numbers 30
Interactive Web browsing 67
Internet
Bookmarks 68
Clear cache 68
Connecting to 66
Edit online 67
Ending connection 68
Links 67
Mode 64
Options menu 67
Other site 68
Profile li st 65
Secure connection 66
Set up connection 64
Settings 65
K
Keypad lock 11, 43
L
Language
Broadcast 60
Menus 43
Last dial 20, 39
LED light 3, 7, 10
Line selection 42
Links, Internet 67
Lock keypad 11, 43
Lock phone 48
M
Making a call 9
Managing SMS Messages 35
Melodies, ring tone 44
Menu
Graphics 46
Language 43
Map 26
System 26
Messages
Error 76
Network 12
Messages (SMS) 34
Alert tone 38
Draft texts 36
Indicator 12
Managing 35
79
Page 80

Reading 35
Settings 36
Storage 38
Templates 38
Write new 37
Messages, broadcast 58
Multicast 37
Mute/Unmute 22
N
Network messages 12
Network search 55
Network Services 30
O
Office Tools 60
Alarm clock 62
Currency converter 61
Scratchpad 60
On/off key 2, 3
Other site 68
Outbox messages 37
Overview 3
Own number, showing/hiding 54
Own numbers 33
P
Pause feature 23
Phone Book 31
Dialing numbers 32
Fixed dialing 34
Own numbers 33
Recall 32
Remaining 32
Storing in Phone memory 31
Storing in SIM memory 32
Storing numbers 31
Viewing numbers 32
Phone lock 48
Phone lock code 19, 48
Phone names, storing
numbers in 31
Phone overview 3
Phone settings 43
Auto features 48
Default 51
Display 45, 46
Keypad lock 43
Keys 46, 47
Language 43
Security 49
Time & date 51
Tones 44, 45
Pictures, view 67
PIN/PIN2 codes 19, 49, 50
Power key 2, 3
Problems 75, 76
Profile list, Internet 65
PUK/PUK2 codes 19
Push (game) 63
R
Ramping 45
Reading a new SMS message 35
Received call 20, 39
Receiving Caller ID 54
Reset call costs 42
Reset call timer 41
Reshape (game) 63
Retrieving a call 23
Ring tone 43
Ring tone selection 44
S
Safety information 13
Scratchpad 21, 60
SDN numbers 30
Security codes 19
Security features 48
Send key 2, 3
Sending a new SMS message
to many addressees 37
Sending a new SMS message
to one addressee 37
80
Page 81

Sending my ID 55
Services 53
Call barring 50, 57
Call forwarding 53
CUG 58
Network search 56
Receiving ID 54
Sending ID 55
Settings
Broadcast 58
Phone settings 43
Services 53
Voice mail 52
Show costs 42
Silent alert mode 21, 43
SIM application tool kit 30
SIM card 6
SIM names, storing
numbers in 32
SMS messages 34
Softkeys 2, 3
Softkeys functions 46
Solutions 75, 76
Speed dialing 21, 47
Standby screen 9
Storage -- available
SMS memory 38
Storing names/numbers 31
Symbols, entering 30
U
Unanswered call 12, 20, 39
Unlock keypad 11
Using this guide 4
V
vCards 31
Vibrate mode 43
View pictures 67
Voice mail 52
Alert tone 53
Call 52
Indicator 12
Number 52
Volume
Alarm 44, 45
Conversation 10, 22, 44, 45
Keys 44, 45
Ring 44, 45
W
WAP 2
WAP connection 5, 66
WAP connection, secure 5, 66
Web browsing 67
Write new SMS message 37
T
T9 text entry 27
Text entering
Alpha method 29
T9 Text Input 27
Time & date setting 51
Touch tones (DTMF) 22
Troubleshooting 75
Turning off the phone 11
Turning on the phone 9
81
Page 82

ONE YEAR LIMITED WARRANTY
MODEL G320
Mitsubishi Wireless Communications Inc.
Mitsubishi Electric Sales Canada Inc.
4299 14th Avenue, Markham, Ont. L3R OJ2
Mitsubishi Wireless Communications, Inc. (MWCI) warrants this product
to the original purchaser (Purchaser) against defects in materials and
workmanship as set forth below. If ownership of the product is
transferred, this warranty is terminated. This warranty applies only to
product purchased or repaired in the United States or Canada.
For the period of time specified below from the date of first retail
purchase, MWCI shall at its sole and absolute opinion either repair or
replace the defective product or part with a new or comparable
refurbished product or part. Mitsubishi brand accessories are covered
under this warranty for one year. Batteries are covered under this
warranty for 90 days. Carrying cases are covered under this warranty for
one year.
To obtain warranty service in the US, please contact MWCI at 1-800-8889879 to obtain the nearest location of the MWCI authorized service
center so as to make arrangements for repair or replacement. To obtain
warranty service in Canada, please contact Mitsubishi Electric Sales
Canada, Inc. (MESCA) at (905) 475-7728 or at the Canadian address
above. Purchaser must present proof of purchase in the form of a retail
bill of sale, invoice or other document that will show that the product is
within the applicable warranty period. No charge will be made for parts
or labor directly related to the repair or replacement of the defective
product or part. The repaired or replaced product will be warranted fo r
90 days from the date of return shipment or for the balance of the
original warranty, whichever is longer.
800-888-9879
Corporate Service Division
(905) 475-7728
Repair or replacement, as provided under this warranty, is the only
remedy provided to the purchaser. MWCI SHALL NOT BE LIABLE FOR ANY
INCIDENTAL OR CONSEQUENTIAL DAMAGES INCURRED BY PURCHASER
such as, but not limited to, interruption of service, loss of anticipated
82
Page 83

benefits or profits, or damage to any other equipment resulting from the
use or operation of the product, or arising from breach of express or
implied warranties on this product. MWCI SHALL NOT BE LIABLE FOR
DAMAGE TO TELEPHONE EQUIPMENT, VEHICLES, AND/OR PERSONAL
PROPERTY CAUSED BY IMPROPER INSTALLATION OR USAGE.
THIS WARRANTY DOES NOT COVER FUSES OR CLAIMS OF DAMAGE DUE
TO ALTERATION, ACCIDENT, MISUSE, ABUSE, NEGLECT, IMPROPER
INSTALLATION OR MAINTENANCE, CONNECTION TO AN IMPROPER
VOLTAGE SUPPLY, RECEPTION PROBLEMS CAUSED BY INADEQUATE
SIGNALS, LIQUID SPILLS, OR DAMAGE THAT IS ATTRIBUTABLE TO ACTS OF
GOD. REMOVAL AND INSTALLATION COSTS ARE NOT COVERED BY THIS
WARRANTY. COSMETIC DAMAGE, SUCH AS MARS, SCRATCHES, CRACKS,
BLEMISHES, AND THE WEARING OF PRINTED LOGOS OR KEYS, IS NOT
COVERED BY THIS WARRANTY. DAMAGE RESULTING FROM THE USE OF
ACCESSORIES THAT ARE NOT MITSUBISHI BRAND ACCESSORIES IS NOT
COVERED.
LOSS AND DAMAGE OCCURRING DURING TRANSIT ARE NOT COVE RED BY
THIS WARRANTY. Products repaired or replaced under warranty will be
returned to the P ur cha ser trans p ort ati on pr epa id. R etu r n sh ipp in g cos t s
for out-of-warranty repairs shall be paid by the Purchaser.
ANY IMPLIED WARRANTY OF MERCHANTABILITY OR FITNESS FOR A
PARTICULAR PURPOSE IS EXCLUDED EXCEPT WHERE PROHIBITED BY
LAW, AND WHERE PROHIBITED, IS LIMITED TO THE MINIMUM PERIOD
PERMITTED BY SUCH LAW.
Some States or Provinces do not allow the exclusion or limitation of
incidental or consequential damages, or limitations on an implied
warranty, so the above limitations or exclusions may not apply to you.
This warranty gives you specific legal rights, and you may also have other
rights which vary from State to State, or Province to Province.
83
 Loading...