

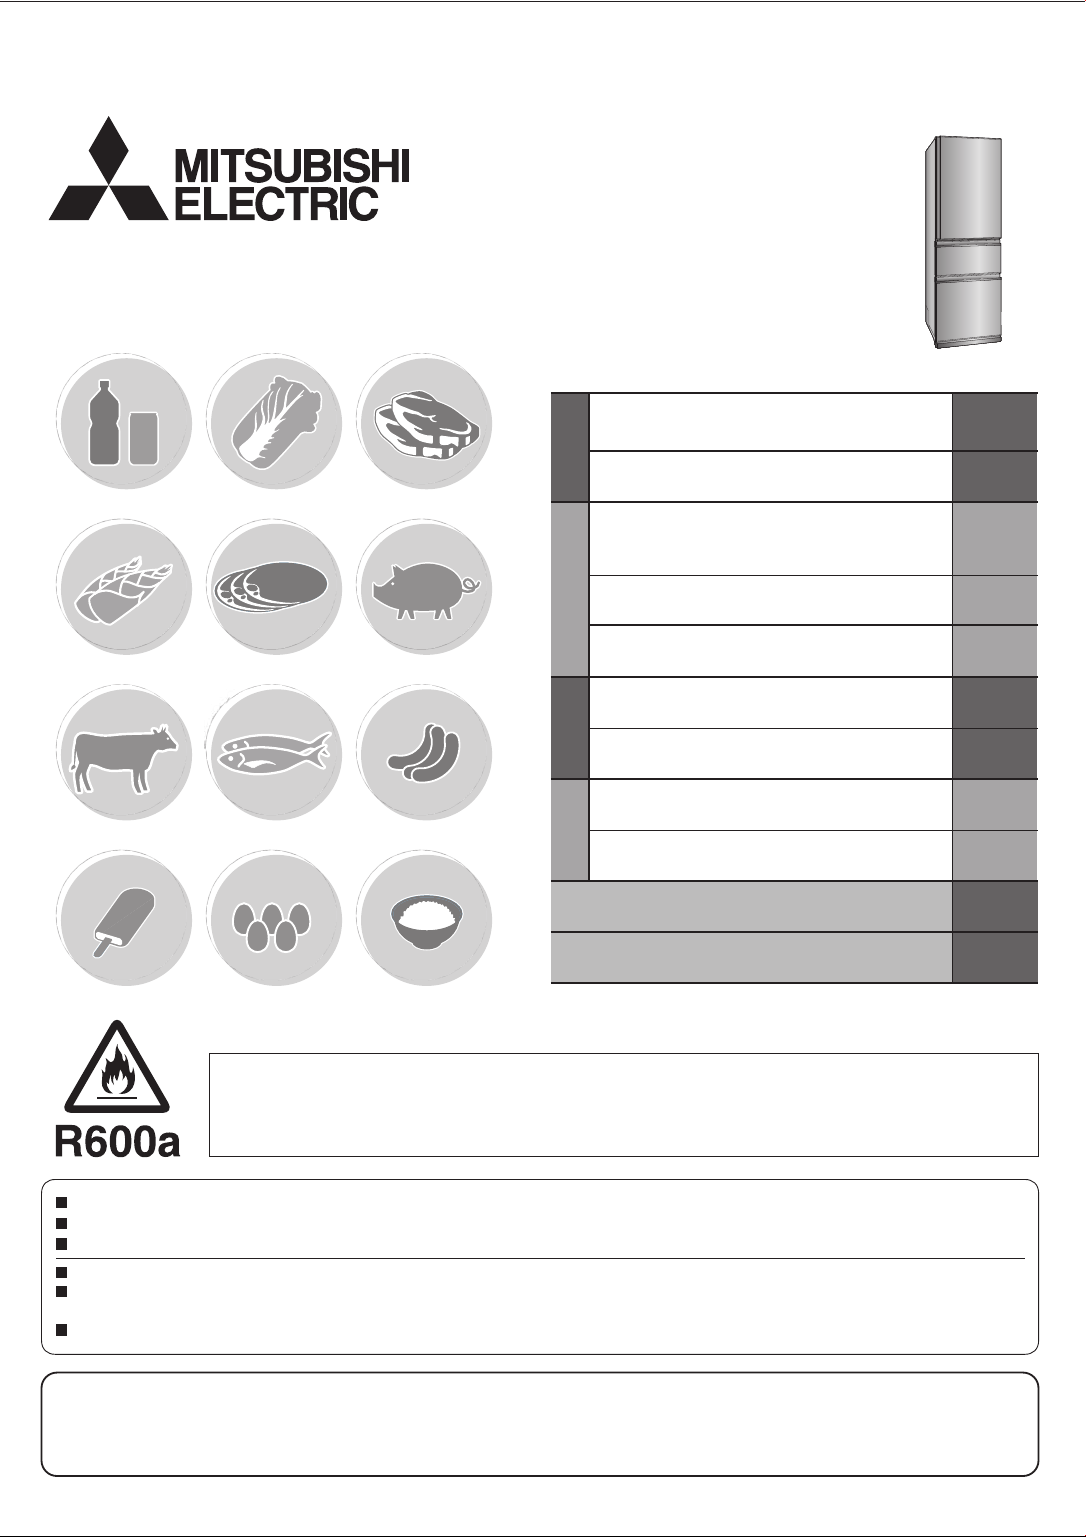
SERIES MODEL
MR-CX370EJ
Refrigerator-Freezer
OPERATING INSTRUCTIONS
MR-CX402EJ
Contents
For your safety, please be sure to follow
these instructions
From installing to running your refrigerator
Before useOperationCleaning
Using each compartment
Refrigerator
How to adjust the temperature
Automatic Ice-Maker
How to remove and clean accessories
How to maintain your automatic ice-maker
What to do in these situations
Troubleshooting
When in trouble
Accessories
/
Sliding case / Vegetable and Freezer Compartments
Page
2 - 3
4 - 5
6 - 7
8
9 - 1 0
1 1 - 1 2
1 3
1 4 - 1 5
1 5 - 1 7
1 8
MEMO
1 9
Non-Freon Refrigerators
This refrigerator uses non-Freon refrigerant (isobutane) and non-Freon foam insulation (cyclopentane).
These materials are harmless to the environment and do not affect the ozone layer and global warming.
Please read this manual carefully and follow the information contained within. In particular, be sure to read the safety precautions before using this refrigerator.
Be sure to receive your copy of the warranty from the retailer and confirm that the purchase date and retailer name are written on the warranty.
Store this operating instructions manual and the warranty in a safe place.
This refrigerator was manufactured for refrigerating and freezing of foods in general households. For commercial use, please use a commercial refrigerator-freezer.
The photographs and illustrations contained in this manual are for the MR-CX402EJ. While the capacity and dimensions of the MR-CX402EJ are different from
the MR-CX370EJ, the operation is the same.
The principal plastic components indicate the material name to facilitate recycling.
Cleaning Instruction - Important!
It is strongly recommended to use only lukewarm water and a soft cloth when cleaning.
Cleaning agents can cause cracking to the plastic components of your refrigerator.
For your safety, please be sure to follow
For your safety, please be sure to follow
these instructions
these instructions
ٹ
The symbols illustrated below have
The types of danger that can result from improper
handling are explained in the sections below.
Mishandling can lead to serious injury
Warning
Caution
or death.
Mishandling can lead to bodily injury or
loss of home and household contents.
the following meanings.
Do not do
Do not get
wet
Caution
Always follow
instructions
Always connect
an earth wire
Always unplug
electrical plug
from socket
Warning
When installing your unit
Do not install in an outdoor area
where water can get on it or
where there is a lot of moisture.
Do not get wet
Always follow
instructions
Always connect
an earth wire
Due to insulation failure, it may cause
an electric shock or fire.
Allow some space around the refrigerator.
If the refrigerant (gas) leaks, it can remain in
the area and there’s a risk that it may cause
a fire or explosion.
To be prepared for an earthquake, affix to
a strong wall or column.
Not doing so may cause injuries from
the refrigerator toppling over.
Attach ground wire and earth leakage breakers
when use in a humid place and moist place.
(Please consult with the shop).
It may cause electric shock when electric leakage.
And the following ground connection may
cause electric shock, explosion and fire.
・
Water pipe/gas pipe.
・
Telephone ground lines and lightning rod.
➡ Page 4
➡ Page 4
➡ Page 5
➡ Page 4
About the electrical outlet and electrical plug
Do not push the electrical plug with
the back of the refrigerator.
Do not damage the electrical cord.
Do not do
Always follow
instructions
If the plug is pressed by the refrigerator,
or if the cord is bent, bundled, or a
heavy object is placed on it, it can
cause an electric shock or a fire.
Do not use damaged cords or plugs or loose outlets.
Using them can result in an electric shock or injury.
Do not remove the electrical plug by pulling the cord.
The cord can become damaged and can cause
an electric shock or a fire.
Do not plug or unplug the electrical plug with wet hands.
It can cause an electric shock.
Use a dedicated outlet for the power supply that meets
the rating specified on the rating label. (The rating label is
located on the door-liner of the refrigerator compartment.)
Using an extention cord or plugging in too many power cords
into the outlet can cause heat buildup or a fire.
Keep the electrical plug cord facing
downwards and insert the plug in fully.
If it is plugged with the cord facing upward, extra pressure
gets exerted on it which can cause it to heat up or ignite.
If the power cord is damaged.
If the power cord is damaged call Mitsubishi Electric
Service Centre for a technician to replace power cord.
The power cord should be designed for this model.
➡ Page 4
About the electrical outlet and electrical plug
Remove dust from the electrical
plug.
Always follow
instructions
Always unplug electrical
plug from socket
Not doing so can cause a fire
from insulation failure.
When replacing the interior refrigerator
light or when taking care of the unit,
pull out the electrical plug.
Not doing so can result in an electric shock
or injury.
About using your refrigerator
Do not damage the refrigerant circuit (piping)
of the refrigerator; do not drive in screws.
Because a flammable refrigerant (gas) is used,
Do not do
This appliance is not intended for use by young children or infirm
persons unless they have been adequately supervised by a responsible
person to ensure that they can use the appliance safely.
Young children should be supervised to ensure that they
do not play with the appliance.
This appliance is not intended for use by persons (including children)
with reduced physical, sensory or mental capabilities, or lack
of experience and knowledge, unless they have been given
supervision or instruction concerning use of the appliance by
a person responsible for their safety. Children should be
supervised to ensure that they do not play with the appliance.
there is the danger of igniting or explosion.
Do not use electrical products inside
the refrigerator unit.
If the refrigerant (gas) is leaking inside the unit,
there is a risk that a spark from the electrical product’s
contact can be a source for ignition or explosion.
Do not store volatile products that can easily ignite.
Benzine, cosmetics and hair styling products can
be the cause for igniting fires and explosion.
Do not store pharmaceuticals or scientific test material.
Anything that needs strict supervision must not
be stored in a home-use refrigerator.
Do not place items on top of the refrigerator.
Items may drop from opening and
closing the door and can cause injury.
Do not hang on the door or door handle, and
do not get on compartment drawer-type doors.
The refrigerator can topple over causing injury.
Do not add a strong impact on the
glass shelf.
The glass will broke and it may cause injury.
Do not put your hands in the mechanical part of the
automatic ice-maker (the upper part of the ice storage box).
Doing so will cause injury.
Do not use flammable sprays nearby.
A spark from the electrical contact can ignite and cause a fire.
2
When something abnormal or unusual
occurs, turn off immediately and consult with
“the store where you purchased the unit” or
with a “Mitsubishi Electric repair counter.”
Warning
About using your refrigerator
Do not use in a shed or a garage.
If small animals damage the wiring,
it can cause an electric shock or a fire.
Do not do
Do not get wet
Always follow
instructions
About Malfunctions / Long Term Care
Do not do
Always follow
instructions
Always unplug
electrical plug
from socket
Always follow
instructions
Do not encapsulate refrigerant other than
our specification.
It may cause rupture, explosion, fire, etc.
when using, repairing, disposal, etc.
Do not put any vessels, jars, etc. that
contain water on top of the refrigerator.
If water gets onto electrical parts, it will cause
an electric shock or a fire.
Do not wash with water or spill liquid
food items on the unit.
If water and food liquids get on the unit, it can cause an
electric shock or a fire. If that happens, dry off immediately.
If you sense a gas leakage, do not touch the refrigerator.
Open the window and ventilate the room.
A spark from the electrical contact can cause
an explosion or a fire.
When the doors are opened or closed,
beware not to hit any furniture.
The door or furniture may be damaged and
cause any injury.
Do not take apart, repair or convert.
Do not continue to use with damaged parts.
This can cause injury, an electric shock or
a fire.
If the refrigerant circuit (piping) is
damaged, do not touch the refrigerator,
open the window and ventilate the room.
When the refrigerant circuit is damaged,
please consult the store in which the unit
was purchased.
If you will not be using the refrigerator for a long
period of time, after pulling out the electrical
plug, open the door and let the interior dry out.
If it is not dried adequately, the cooling unit may
corrode causing the refrigerant (gas) to leak which
can then cause the danger of ignition or explosion.
If something abnormal occurs (such as a
burning smell), pull out the electrical plug
and stop the refrigerator from running.
If it continues to run in an abnormal state,
it can cause an electrical shock or a fire.
When Recycling
If there is a possible danger of a child
getting trapped inside while the refrigerator
is not in use, please pull off the door seal.
It is dangerous if the child gets shut inside.
When disposing of the unit, transfer it to the
store that you purchased it or to the municipality.
If it is neglected and refrigerant (gas) leaks, ignition or
an explosion may be caused due to heat from a fire.
Caution
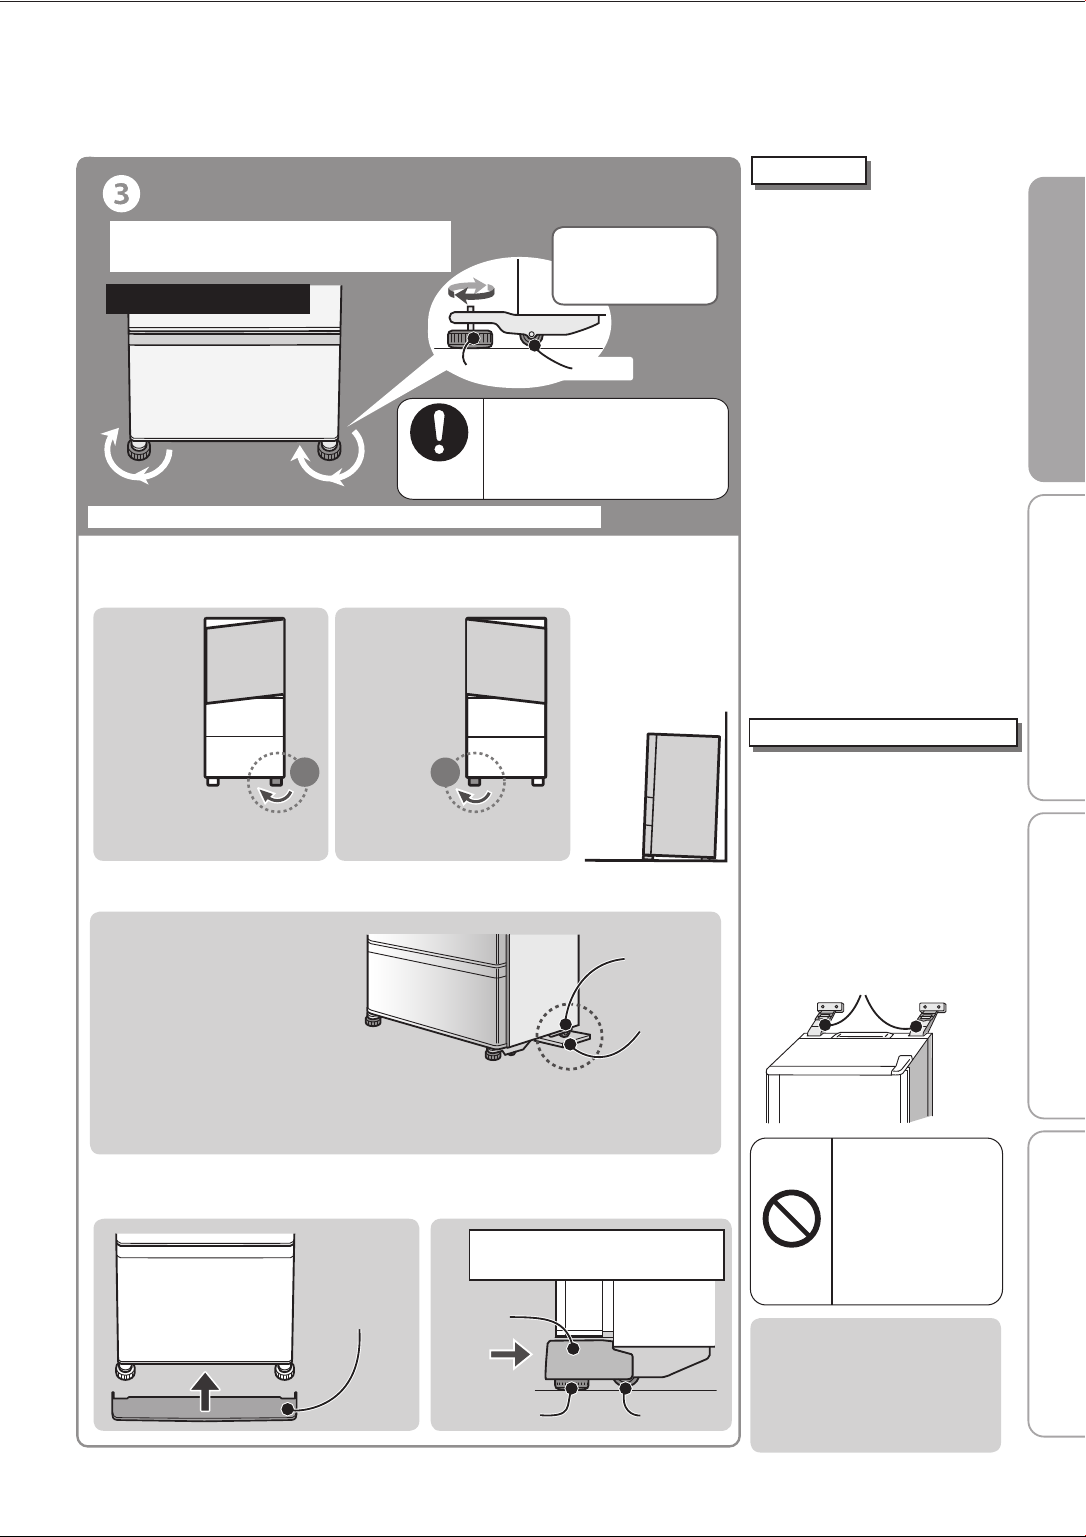
Installing and Transporting
Install on a strong level floor and adjust
the adjustable legs to fix firmly.
The refrigerator may move and cause injury.
Always follow
instructions
About using your refrigerator
Do not do
Caution
Always follow
instructions
➡ Page 4〜5
When carrying, use the handles made for
carrying.
If other parts are held while carrying,
it can cause injury.
Be careful not to damage the floor
or injure yourself when moving
the refrigerator.
Lay a protective sheet on the floor
and move the refrigerator slowly.
Do not force food items into the refrigerator.
Do not use force to pull out shelves.
Food items may fall out, causing injury.
Do not store bottles in the freezer
compartment.
If the center freezes and bottles crack,
it will cause injury.
Do not place your hands or feet
under the refrigerator.
You can get injured from something
such as the steel plate.
Do not eat foods that have a bad smell
or are discolored.
Doing so may cause food poisoning or other
illnesses.
Observe the following when opening and
closing the doors.
!"#$"%$&"$'(%"$)"*+$,("&-(".$$),"/-(%
another person is touching the refrigerator.
!"#$"%$&"'0&"1$0)"23%4(),"$%"&-("&$'"(.4(
of a drawer type door while closing it.
!"
Do not open or close the doors with excessive
force. (Food may fall out and cause injury.)
!"5("*6)(20+"%$&"&$"&)6'"1$0)"23%4(),"$)
any other part of your body.
!"5("*6)(20+"%$&"-3&"6"'6)&"$2"1$0)"7$.18
!"#$"%$&"&)6'"1$0)"2((&"/3&-"&-(
bottom drawer. (Danger of your
toes caught by the drawer.)
Not doing this may cause injury.
Do not touch foods or containers
in the freezer compartment
with wet hands.
Doing so can cause freezer burn.
➡ Page 14
Please take care when removing ice
from the ice box.
503+&90'"2)$,&":61"*60,("3%;0)1"/-(%")(:$<3%48
Make sure that glass shelves or
pockets are attached properly.
If insufficiently attached, it may fall out
and may cause injury.
Before use Operation Cleaning When in trouble
3
From installing to running your refrigeratorFrom installing to running your refrigerator
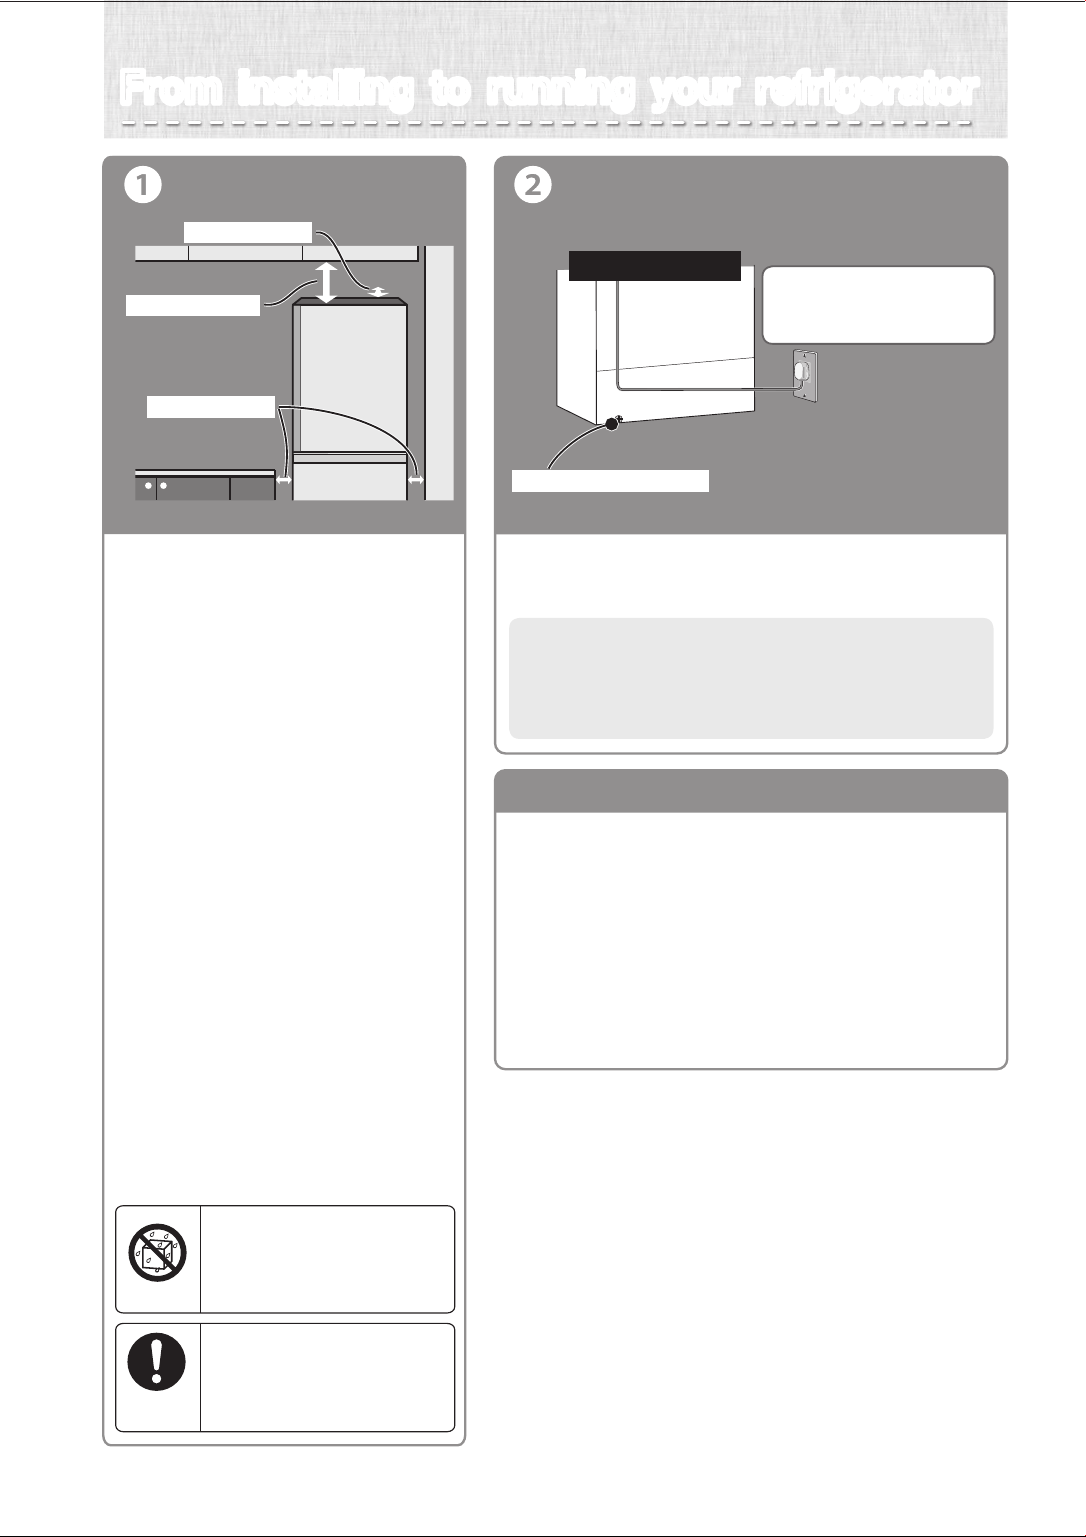
Installation
5 cm. or more
10 cm. or more
2 cm. or more
Where to install your fridge
Install in a place where there is no direct
●
sunlight or heat, and with good ventilation.
This protects against a decrease in cooling power
and saves on electricity bills.
Install in a place with low humidity.
●
This prevents rust, electric shock or fires from
occurring.
Install on a solid and level floor.
●
This prevents vibrations, noise, and partially
open doors or doors left ajar.
Prevent changes or discoloring by its
mass or heat.
※If the refrigerator adjustment feet sink easily
into the flooring material, please lay a strong
board on top of the flooring.
Install away from other appliances.
●
This prevents noise or image disturbances to
the television, etc.
Leave a space of more than 2 cm to
●
the left and right, and more than 10 cm
from the ceiling, and more than 5 cm
from the back.
This is to allow heat to escape from the top,
the back and sides.
※If refrigerator is too near to the wall,
it will cause the sound.
Please care to remove the dust within the gap.
Turning on the power
Lower back section
Earth screw connection
●
Turn on the power of the refrigerator as soon as possible.
The refrigerator will not be damaged even if you turn on the power
immediately after the installation.
Use a dedicated outlet for the
power supply that meets the
rating specified on the rating label.
How to remove the energy label
●
Remove the energy label carefully. A glue residue may remain,
particularly if the label has been in place for a long period of time.
●
Apply either Eucalyptus or Tea Tree oil directly on any residue.
●
Do not allow the oil to run or drip onto plastic parts as it may
cause the plastic to degrade and potentially crack over time.
●
Allow the oil to sit for approximately 1-2 minutes, or until the
glue residue has softened.
●
Wipe off with a damp cloth.
●
If any residue remains, repeat the above process.
●
Rinse with clear water.
●
Dry thoroughly.
To get the refrigerator
cooled down faster, plug
it in right after installing.
4
Do not get wet
Always follow
instructions
Do not install in an outdoor area
where water can get on it or
where there is a lot of moisture.
Due to insulation failure, it may
cause an electric shock or fire.
Allow some space around
the refrigerator.
If the refrigerant (gas) leaks, it can
remain in the area and there’s a risk
that it may cause a fire or explosion.
(to provide half-opened
Adjustment and affixing
Turn the adjustable legs to get
them to touch the floor, then affix.
Refrigerator/front lower
Always follow
instructions
※Before adjusting, please pull the leg cover to the front and remove it.
●Please fix the tilt by adjusting the legs.
Please adjust the adjustable leg as the following picture to level the refrigerator.
If the left side
of the door
is sagging
If the right side
of the door
is sagging
door/noise/move/vibrate)
Turn in the direction of
the arrows and lower
the adjustable legs to
place on the floor.
Adjustable leg
Fix firmly by adjustable legs
in the level and strong floor.
The refrigerator may move and
cause injury.
Caster
Keep the front at a slightly
higher angle. This makes
closing the door easier
and prevents the door
from partially opening.
Start using
●
It takes time to cool down.
tPut in warm food items or ice
cream after the refrigerator has
been adequately cooled down.
tKeep opening and closing of
the door for to a minimum,
and open in a short time.
tIn the summer, it will take
approx. 24 hours to make
the first batch of ice.
●It may smell of plastic.
t
The smell will gradually disappear.
Please be ventilation of the
room not to filled a bad odor.
●
When the refrigerator is in cooling
mode the following may occur
(also occurs during summer).
tThe side will be hot to radiate
outside of the refrigerator for cooling.
tOperating noise will loud due
to the compressor is high-speed
operation.
Preparation for the earthquake
Before use Operation Cleaning When in trouble
Right
Left
Raise the right side Raise the left side
※After several days from installing, it may sink to the floor by weight.
Please re-adjust the adjustable legs again.
When the tilt cannot be corrected
with the adjustable legs.
If installed in a corner of a room,
there are times when one side of
the back legs sinks into the floor.
When that happens, please make
adjustments in the rear with
caster support (separately sold)
or a strong board underneath
(normally, the thickness of the
board should be 2 – 3 mm.)
●After adjusting please insert the toe grille.
(Toe grille included in the refrigerator)
For the caster support, please contact
to the shop where you purchased.
Model No.: MRPR-03CS
Please insert in parallel until
the cover hit in depth.
Toe grille
Toe grille
Adjustable leg
Rear support
Caster support
or strong board
Caster
●
We recommend you to fix
in the strong places such
as walls, pillars.
t
Please consult with the store
where you purchased for fall
prevention belt for the refrigerator
(Sold separately).
Model No.: MRPR-02BL (2 pcs.)
Fixed via belt with the
supports (2 places)
Do not damage the
refrigerant circuit (piping)
of the refrigerator;
do not drive in screws.
Because a flammable
Do not do
refrigerant (gas) is used,
there is the danger of
igniting or explosion.
Use in hot spring areas
Corrosion control treatment must be
applied for the refrigerant circuit (pipe)
due to generation of corrosive gases.
Contact the retail store where you
purchased the refrigerator.
5
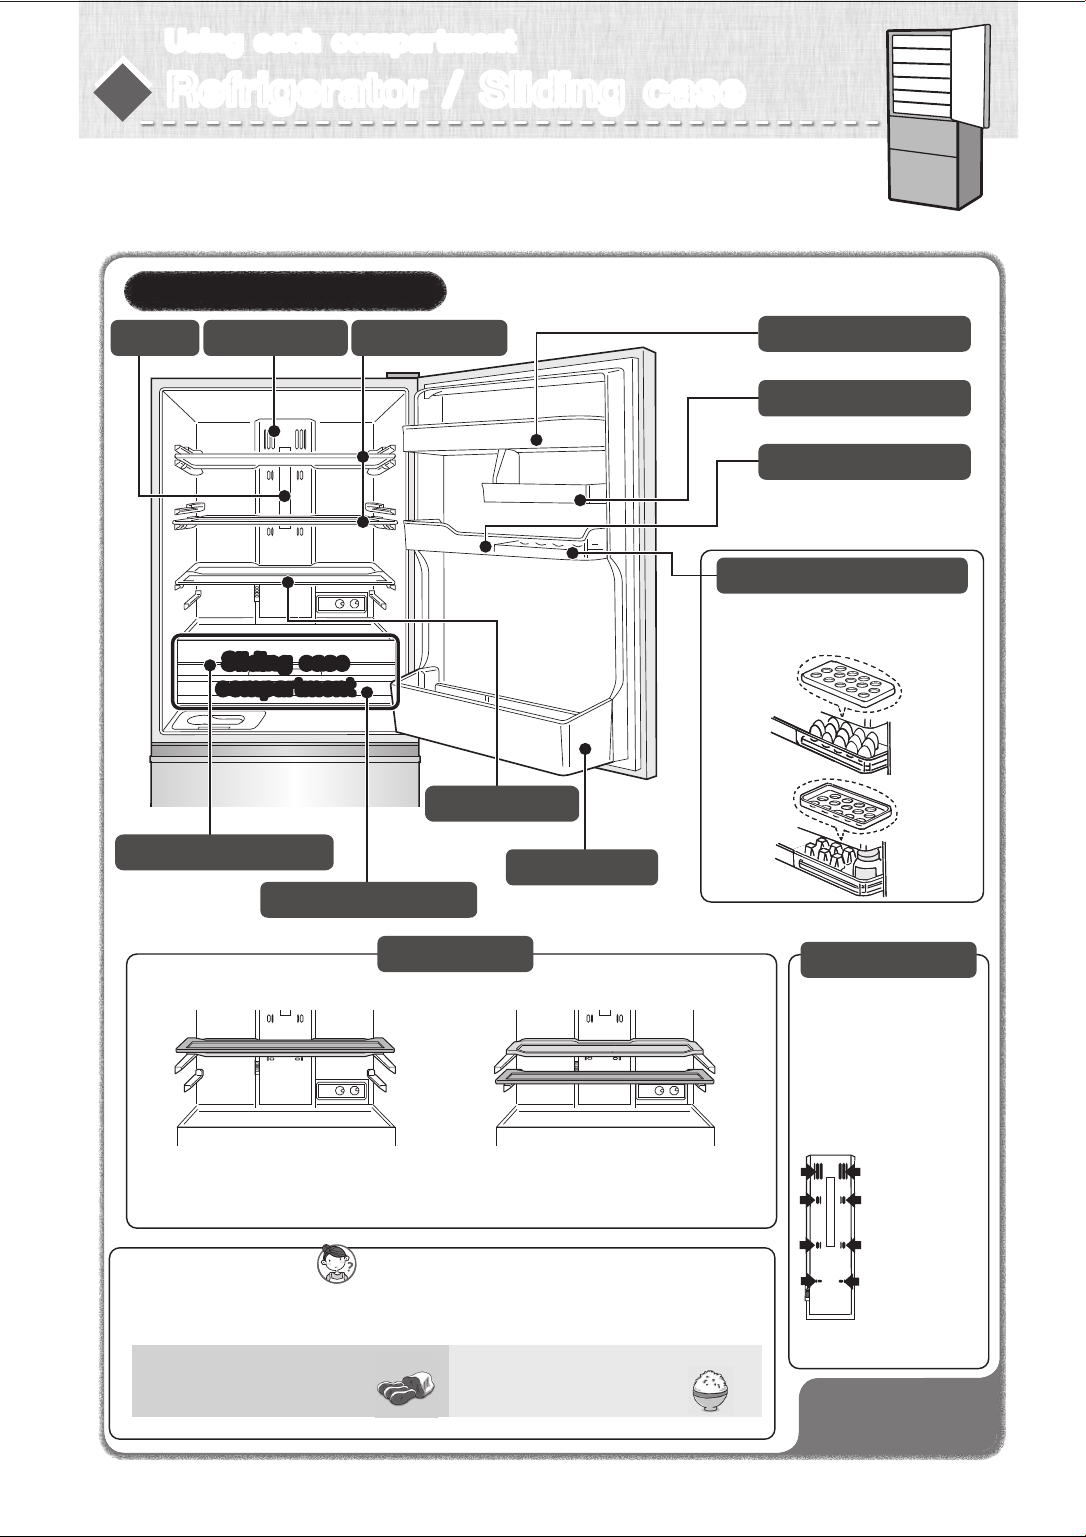
Using each compartment
Refrigerator / Sliding caseRefrigerator / Sliding case
Insert drinks or immediately used foods in refrigerator compartment.
Sliding case can store meats, fish, dairy products, processed foods,
etc. at a lower temperature than the refrigerator compartment.
Refrigerator Approx.0℃〜6℃
LED light
Air blowing outlet
Sliding case
Sliding case
compartment
compartment
Adjustable shelf
How to remove shelf, pocket, case
One-two shelf
Sliding case (upper)
Bottle pocket
Sliding case (lower)
Illustration of MR-CX402EJ※
One-two shelf
The layout of shelves can be rearranged.
It makes a large space when set up
by overlapping back of the shelf.
The shelf can be added by set the lower level.
Install a space to accommodate tall
stuffs in front.
To prevent odors?
We recommend you wrap or store the foods in airtight
containers.
➡Page 12
Free pocket (large)
Small-Items pocket
Free pocket (small)
Free egg tray
It’s an egg case and a small items tray.
By turning the egg case upside-down,
it converts into a small items tray.
Air blowing outlet
Food items with a lot of
moisture may freeze if put
near air blowing outlet.
(Especially canned beer
or carbonated drink,
there is a risk of rupture
when freezing.)
Air blowing outlet
MR-CX370EJ
has 6 places,
MR-CX402EJ
has 8 places.
6
Foods with strong odor
Kimchi, dumplings, sardine
(seafood), beef, etc.
Foods that easy to absorb odor
Rice, potato salad, etc.
Door alarm will inform
when the door is left open.
➡ Page 8

Vegetable compartmentVegetable compartment
Approx.3℃〜9℃
Please insert fruit, vegetables and drinks.
If you wrap fruit and vegetables, they will stay fresh longer.
Sliding Case
For smaller items that get damaged easily such as
tomatoes and fruit.
Before use Operation Cleaning When in trouble
Vegetables Case
LED light in the vegetable case
The LED light with specially selected light spectrum
installed in the Vegetable compartment can increase
the Vitamin C and preserve freshness in green vegetables
by introducing photosynthesis process.
Please note
Do not put tall items in the sliding case.
●
It can damage food items or damage the sliding case.
●
If the sliding case is taken out and used separately, the vegetable compartment will become dry.
Suggestions
●Store vegetables using transparent containers or wrappings to enable exposure to the LED light.
●
With exposure to the LED light, photosynthesis process for green vegetables will be enabled, the effect will depends on the initial freshness of the vegetables stored.
●
Do not use any sharp objects to scratch or adjust the LED light to prevent damage which may affect its normal operation and effectiveness.
●
If the LED light is damaged or not operating, do not adjust or repair, please seek technical assistance from the authorized service center.
Freezer compartmentFreezer compartment
Approx.-21℃〜-17℃
You can storage frozen food, ice cream, bread, meat, fish, etc.
Freezing Case (upper)
Ice Storage Container
Freezing Case (lower)
Door alarm will inform
when the door is left open.
➡ Page 8
Notice
Put foods in the Freezing Case to below the embossed line level seen at the front.
Maximum level for storing foods
Door
Maximum level for storing foods
※For the temperatures indicated, the freezer and refrigerator compartments were adjusted at the “Normal” position,
with an ambient temperature of 30
stabilized, the temperature criteria was measured toward the lower-mid interior of the refrigerator.
Freezing Case (upper)
Freezing Case (lower)
o
C, with refrigerator doors closed and containing no food; after the temperature
When closing the door, food can get in the way causing
●
the door not to close properly. This can cause frost to form
in the inside, or improper freezing, and will cause a malfunction.
●This may damage food and the freezing case, as well as
the automatic ice-maker.
7

How to adjust the temperatureHow to adjust the temperature
You can stop ice-making, adjust the temperature in refrigerator/freezing
compartment by using the operation unit in the back of the refrigerator
compartment.
Ice-making stop setting
Ice-making stop light (red)
Red light off…Auto ice-maker is working.
Red light on….Auto ice-maker is stopped.
Ice-making stop switch
Press when you want to stop auto ice-making,
or restart ice-making.
➡Page 10
Refrigerator and Vegetable compartment
If it’s too cold
Gets 2~3 oC
warmer than “MID”
※Illustration of MR-CX402EJ
Usually set at
“MID” setting
If you want it colder
Gets 2~3 oC
colder than “MID”
Freezer compartment
If it’s too cold
“MID” setting
Gets 2~3 oC
warmer than “MID”
Usually set at
If you want it colder
Gets 2~3 oC
colder than “MID”
Approx. -2~+2 oC
The refrigerator compartment can be
switched over to be a chilled compartment.
Chilled
For storing meat, fish, processed
foods (dumplings, etc.) and
yogurt for around 1 week.
When alarm ringing/when interior light blinking (door alarm)
When the refrigerator or freezing door is open for more than 1 minute, the door alarm
(alarm sound/interior light) will work to inform you.
The number of time of sound and light by the door opening time are as the follows.
・
Door opening time
Alarm sound
Interior light
Pi Pi Pi Pi
Piiii Piiii
1 min. 2 min. 3 min. 4 min.
Pi Pi Pi Pi
Piiii Piiii Piiii
Lighting
Pi Pi Pi Pi Piiii
Piiii Piiii Piiii
Piiii continuity
after
Pi Pi Pi Pi
Blink 2 times every 1 min.
More than 5 min.
More than 60 min.
Pi Pi continuity
Turned off
If alarm does not stop after the door is closed, please check “When alarm non-stop”
Make sure that the door is not
half-opened, and pinching the foods
(at the back of packing/case)
(please check one time a month).
Door open-close sensor is attached
・
in the doors of refrigerator/freezing
compartment.
Yogurt
➡Page 15
8

Automatic Ice-MakerAutomatic Ice-Maker
You can make ice cubes by puting water in the water supply tank of the
refrigerator compartment. Please do periodically maintain to make a good ice cube
by cleaning. Please drain the water in the water supply tank when you do not make ice.
About the first batches of ice.
Please discard the first 2 - 3 batches of ice
(approx. 30 cubes) made at the very beginning.
Also, discard ice that isn’t used in over 1 week.
Water supply Tank Approx. 1.1 L.
Tank Plug
Tank Lid
Purification Filter
Pipe
There may be times when there may be dust
or an odor on them.
Before use Operation Cleaning When in trouble
Water Supply Pump
Water Supply Pipe
How to
make ice
Ice-Maker Tray (in freezer compartment)
(Do not remove.)
Noise Reduction Mat
Reduces noise of dropping ice
Do not remove.
Ice Server
Ice Storage Box
Water to Use for Your Auto Ice-Maker.
We recommend that you use water such as tap
water which contains less bacteria.
If you use mineral water or water from a filtering machine,
please increase the number of cleaning times, and be sure
to clean it thoroughly.
Take out the water supply
tank, remove the tank plug,
and fill with water.
➡Page 13
How to remove the tank plug.
Turn to the “Open” position and lift off.
Tank plug
Fill water to the
“full line” mark.
OPEN
CLOSED
Warning
Fill with potable
water only.
Put the tank plug on the water supply
tank, carry carefully without tilting it,
and return to its original position.
●
When carrying the water supply tank, make sure
that the “ ” symbol is in the closed position.
If the tank is tilted, water will spill out.
●
●
If the water supply tank is not properly in position,
ice cannot be made. Make sure that there is
nothing blocking the tank receiving area.
How to put in the tank plug.
Tank plug
OPEN
CLOSED
9

Press button
when the ice-making
stop light (red) is on.
The ice-making stop
light (red) will
turn off.
To stop
ice-making
Press button
when the ice-making
stop light (red) is off.
Press
Red light
The ice-making stop
light (red) will turn on.
●The red light is on when
ice-making stopped.
(Control panel in the
refrigerator compartment)
When you will not make ice for a long time
To restart
ice-making
※
Also do this when moving or transporting unit.
Empty the ice-making tray by taking out the ice or by forcing water to go into the ice storage box.
Take out the water supply tank,
close the freezer door.
Water supply tank
Press for about 5 seconds. (at temperature adjustment panel,
inner back of refrigerator compartment.) - (Press until it makes a beeping sound.)
●
The Stop ICE MAKER OFF light (red) will blink for about 1 minute. (It drops down the ice-making tray’s water or ice.)
●
When the light stops blinking, it will return to the previous indication.
Take out the freezing case (upper) and the ice storage box.
And discard water or ice.
Freezing case
(upper)
Stop making ice.
●If the ICE MAKER OFF light (red) is off, press and check to confirm
that the ICE MAKER OFF light is on.
Wash with water, dry, and put back in place: the water supply tank (water supply pump,
pipe, water filter), freezing case (upper), ice storage box and the noise reduction mat.
To restart ice-making, press to cancel the ICE MAKER OFF function.
(The ICE MAKER OFF light will go off.)
➡Page 13
Put the water supply
tank back in place.
Please note
●Do not put the food items when making ice.
●Please do not store anything above the level on the side
of the freezing case (upper).
(The door may half-open and it may cause failure/damage).
Do not insert any drinks such as hot water, juice, tea, soft drink, etc.
●
Ice server
Freezing Case (upper)
Maximum level for
storing foods
Ice tray
Detection Lever
(Detects volume
of ice stored.)
other than water in water supply tank (heatproof temperature 60
It may cause failure.
Door
Keep ice at an even level
Ice storage box
Ice-making will stop when the amount of storage ice is given quantity.
●
Ice cube will flat when it thick some, please insert ice server
horizontally in front side of ice storage corner as the left figure.
●
Please gently close the door of freezing compartment.
Ice cube may get dirty.
Do not insert water over full water mark in water supply tank.
●
The ice cubes connected Protrusion on the ice
Water channel in the ice tray may freeze, ice cube may
connect together, and convex may come out, if insert
water over the mark or pour water by kettle.
About the ice
●
Ice made with water containing a lot of mineral substances
●
such as mineral water, can cause to ice to form with a white
sediment (white crystals). These are only mineral substances
that have become crystallized. It is harmless.
●
If ice is stored for a long period of time, the
ice cubes may cling together or become smaller.
(This is known as the phenomenon of sublimation.)
Ice-making may take longer with frequent
opening/closing of the door, or depending
on the ambient temperature.
Please pay enough attention
when crush the ice which stuck
in ice storage corner.
Caution
It may cause injuries.
o
C).
10

How to remove and clean accessoriesHow to remove and clean accessories
Unplug the electrical plug.
If it is not unplugged, it will
Always unplug electrical
plug from socket
※Wait 10 minutes or more before you replug the electrical plug into the outlet. If you plug it in
cause an electric shock.
Do not do
Do not take apart, repair or convert.
Do not continue to use with damaged parts.
This can cause injury, an electric shock
or a fire.
immediately after unplugging it, the refrigerator will not run.
How to maintain Q&A
Q. If dirt is noticed.
A.
Please wipe as soon as possible.
●
Wipe with soft towel soak with warm water.
For hard to remove dirt, please use a kitchen
●
detergent (neutral type) and wipe off with water.
Wipe off oil stain or citrus juice immediately.
●
●
Door packing may cause damage or cold air
leakage if you leave the dirt. Please wipe off
the moisture with dry towel after wipe off with
soft and soak towel.
Q.
Can the shelf, case and pocket be removed?
Please take heed
●Do not use the following items.
Alkalinity or alkalescent kitchen detergent, polishing
powder, soap powder, alcohol, benzine, thinner,
petroleum, acid, scrub brush, hot water, etc.
Plastic parts (door handle, cap, case, etc.)
will crack, and glass shelf or painted surface may
damage or rust.
A. For removable parts,
please see
➡Page 12
Before use Operation Cleaning When in trouble
Power Plug
For safety, please do periodically care of
power plug and cords.
Unplug the electrical plug from
the outlet and inspect.
Is there any damage or abnormal
heat coming from the plug or cord?
Wipe away dust from the plug
and around the plug area with
a dry cloth.
Insert the electrical plug fully
into the outlet.
Wipe out the dust in power plug
periodically.
Always follow
instructions
It may cause fire or insulation failure.
Change
Dust
Maintain
Refrigerator rear side and floor
Dust and dirt can accumulate in the ventilation
space behind the refrigerator. Please clean
periodically for energy saving purposes.
Remove the toe grille.
Turn the adjustable supports to raise them
from the floor,and pull out the refrigerator.
We recommend laying out protective
materialon the floor to prevent
the floor from being damaged.
Also, be careful not to injure yourself.
Remove the dust from the rear panels,
walls and floor, and wipe off any dirt.
Check for water dripping on the floor.
Do not put your hands or feet
under the refrigerator.
Do not do
It may cause injury.
Soot and dust
11

Use reverse procedures to put accessories back in place.
Glass shelf / One-two shelf
Pull forward and take out.
Bottle pocket
※Illustration of MR-CX402EJ
Vegetable Compartment
Open the drawer-door
fully.
Lift out the case.
Take out the small vegetables
case. While lifting the
drawer-door slightly,
draw out and tilt downward.
Lift out the case.
Lift up the front side by both hands.
※
If forcefully pulled outward damage may occur to door side.
Please slowly pull and take out.
To ensure that glass side is attached
or removed.
Always follow
instructions
If the glass is not attached properly, it will out
and falls which may cause injury.
Free pocket (large), (small) /
Bottle pocket / Small-Items pocket
Lift upward holding right
and left sides.
※
The piece is
attached quite firmly.
Draw forward to remove.
Make sure that you removed
and attached properly.
Always follow
instructions
Point when attach free pocket
Insert the left and right
partway, push the top
of claw part in the center
of free pocket, and fit
the claw part.
It may fall if not attached properly,
and may cause injury.
12
Freezer Compartment
Open the drawer-door fully.
Lift up the freezing case
(upper) towards you.
Take out the freezing case
(upper), and while slightly
lifting up the door draw
out and tilt downwards.
Lift up the freezing case
(lower) towards you.
Toe grille
Remove by pulling
forward on
both sides.
Sliding case (upper), (lower)
Pull forward.
Sliding case lid
Sliding case (upper) Sliding case (lower)
Wide chilled case lid cannot be removed.
※
If difficult to take out, please remove wide chilled
※
case after removing the bottle pocket.
Liquid-Catching Indentations
Wipe away any dirt, liquid or condensation.
Liquid catchers

How to maintain your automatic ice-makerHow to maintain your automatic ice-maker
Please do periodic care to prevent the occurrence of water
scale, mold, etc. Please remove water when not making ice.
For once-a-week
Water supply tank / Purification filter
※
Do not use a dishwasher or dryer
because it may cause deformation.
If mold forms easily in the certain types of water, clean about 2 or 3 times a week.
Remove and wash with water.
Normally, it does not need replacing.
Please replace for the following reasons:
●
If something other than water was put in
and the opening got blocked.
●
If it is damaged.
●
If mold, etc. is forming.
Impeller
The claw on the cap ( )
is turned to put onto the
For once-a-month
Water tank
Take off the lid
and wash with
water.
(Temperature
tolerance
approx 60
o
C)
Water supply pump
Remove it from
Pipe
tank.
Purification filter
Pointers for assembling the water supply pump
If it is not assembled properly, it may not make ice or it may make
a loud sound. Please check on the following.
protruding part ( ) of
Turn the pump
and take out.
Water supply pump
Turn
②
Turn
①
Water supply tank
the water supply pump.
※Check to make sure that
the impeller is inside.
Attach the water supply
pump properly to the
Take out the pipe,
Pipe
Impeller※
Cap
Turn the cap and remove,
Take out the impeller
and wash with water.
※
The impeller is made with a
magnetic material. Clean thoroughly
with water, making sure there
are no substances on it.
Return parts by following the reverse procedure.
Pipe
Water supply tank
water supply tank by
turning and attaching.
Insert the pipe into the
water supply tank opening,
Connect the pipe to the
water supply pump.
※
Check to make sure that there are no substances
at the connection point of the two pipes.
To buy another filter, please
inquire at the store where
you bought your unit.
①
②
Before use Operation Cleaning When in trouble
For once-a-month
Water supply pipe
Hose part
Take out the
Water supply pipe
water supply pipe
Take out
Water supply
tank
Water supply
pipe
the water
supply tank.
Water receptacleWater receptacle
Cleaning the ice-making tray (rinsing)
Take ice out of the
ice storage container,
close the freezer door.
Fill water supply tank
with water, put back
in original position.
Notice
●
Do not use washing agents such as kitchen detergents, benzene or bleach to clean the water filter. It will cause ice to have an odor.
If you use a bleach to clean your water supply tank or lid, please follow product directions carefully.
●
Assemble the water supply pump properly and firmly. If it is not assembled properly, it may not make ice or it may make a loud sound.
●
Please attach the lid of water supply tank securely. If the lid is not attached properly, the lid may be out and the water supply tank will fall.
●
Take out
ice cubes.
and wash with
running water.
The water receptacle
and hose part
cannot be removed.
Press for about 5 seconds (at temperature adjustment
panel at inner back of freezer compartment.)
●
The stop ice-maker light (red) will blink for about 1 minute.
(It rinses the ice-maker tray with water from the water supply tank.)
●
When light stops blinking, it will return to the previous indication.
Repeat 2 or 3 times.
Remove the Freezing Case (upper) discard water and ice.
Do not throw out the noise prevention mat.
Facet A
Facet B
Return the water supply tank and, if does not
sit in properly, re-set the water supply pipe.
If removal or assembly are not done correctly,
a problem such as a water leakage will occur.
Return back to
original positions.
Make sure to insert the water
supply pipe properly so that
there’s no difference in surface
level between facet A and facet B is.
Freezing Case
(upper)
13

What to do in these situationsWhat to do in these situations
When there’s a power failure
・
Minimize opening/closing of doors and avoid putting in more food.
When not in use for a long time (Remove the power plug)
Clean the auto ice-maker.
➡Page 10, 13
Clean the interior after unplugging the refrigerator.
Keep the door open for 2 - 3 days to let it get dry.
※
If not allowed to dry properly, mold and odors can occur, or refrigerant (gas)
may leak due to corrosion of the cooling unit.
When transporting
Empty any water or ice from the water supply tank and ice-making tray.
Wear protective gear (gloves).
Remove the toe grille, and then rotate and raise the adjustable leg.
Remove the power plug.
Lay towels under the drainage port and the lower rear edge of
the refrigerator and position a container or tray with a height of
about 3 cm. on the towels to collect the water.
※
The towels prevent floor damage, and water from being spilled on the floor.
Tilt the refrigerator slowly to the rear by about 30 degrees, and drain
the water from the evaporation tray via the drainage port on the
lower rear side. (The evaporation tray is not visible from the outside.)
※
Because the refrigerator is heavy, the work must be performed by at least 2 people.
※
The work must not be performed by small children or people who are not
capable of doing heavy work. Ask a specialist transportation company.
2 or more people should hold the hand-holds on the lower inside of the
front and the upper side of the rear, and carry the refrigerator slowly.
・
Do not lay or load on its side (it will cause damage to the compressor.)
➡Page 10
➡Page 5
Water discharge outlet
Front side - lower
section inner edge
Back side - upper
section handle
When takes time to move such as relocation
・
The frost may melt, and the water may spill from the cooler in back of freezer compartment during transport.
・
It may take 1 day from unplug until frost melt.
Do not damage the refrigerant circuit (piping) of the
refrigerator; do not drive in screws.
Because a flammable refrigerant (gas) is used, there is the danger
Do not do
of igniting or explosion.
When moving the unit / when changing the direction of the unit
Remove the toe grille, and then rotate and raise the adjustable leg.
When changing the direction of the unit, please use caster wheels or place a protective cloth under the back legs.
Move in a forward or backward direction.
※
If moved other than in a forward or backward direction, there’s a risk of damaging the floor.
➡
Page 5
14

What to do in these situationsWhat to do in these situations
(continue)(continue)
When alarm rings continuously
Make sure that each door closes without any gaps.
Inspection is required due to a possibility that an abnormality has occurred.
Please contact the store where you purchased the unit.
How to stop alarm (PiPi continuous sound)
You can stop alarm sound temporarily.
Press button (ice-making stop switch) in control part of refrigerator compartment more than 5 seconds.
※
Please note that if we press icon to stop door alarm, ice cube or water will be driven to
ice storage box. Please refer Page13 Cleaning the ice-making tray (rinsing).
※
If alarm did not stop, or if alarm continue ring periodically, please check around the device.
➡
When ice-making light (red) blink
Inspection is required due to a possibility that the abnormality has occurred such as the refrigerator not cooling.
Please contact the store where you purchased the unit.
※
The light (red) may blink during cleaning the ice tray, this is not abnormal situation.
➡
Page 13
Before use Operation Cleaning When in trouble
TroubleshootingTroubleshooting
Please check the following points before request for repair or contact us.
If the problem cannot be solved, please contact the store where you purchased the unit.
Especially when starting use or summer time
Not cooling at all!
・It takes time to cool when starting use.
In summer time, it may take approx. 24 hours
until cooling.
・Check that it is not unplugged or the circuit
breaker has tripped.
If this happens…
It doesn’t cool
properly.
It only makes small
amounts of ice.
How to cool
The ice is melting.
Foods get frozen
in compartments
besides the freezer.
➡Page 5
Please check this out.
Is it right after installing the unit?
Is the temperature adjustment
set on a left of “MID”?
Is the flow of cold air being blocked?
Are doors being opened often, or
are doors improperly sealed shut?
Is there not enough space around the unit, is the sun
directly on it, or is the radiation of heat being blocked?
Is the refrigerator compartment temperature
set at “COLDER” or at right of “COLDER”?
Are foods with a lot of moisture
placed at the back end of the shelf?
Is the ambient temperature less
than 5 oC?
Outside of the refrigerator is hot!
・
It may hot outside especially after installation
or during the summer (approx. 50 – 60
It is because there is the heat radiation and dew
formation preventing pipes on the side and ceiling.
There is no problem in this situation because
this operation is necessary to keep the unit cool.
・
There is a radiating fan at the bottom,
the warm air may come out.
o
C).
Please do this. This is the reason.
It will take about 4~5 hours to cool down. During
summer, it may take about 24 hours to make ice.
Please adjust the temperature to “MID” or
“COLDER.”
Please check to see that too much food isn’t
placed in the refrigerator and that the door
is properly sealed shut.
Please check to see that it’s installed properly.
➡Page 4
Please adjust the refrigerator compartment
temperature to “MID.”
Please put foods such as tofu, vegetables, fruit, and foods
with a lot of moisture or drinks towards the front part.
If the freezer compartment temperature is adjusted to a left
of “MID”, foods will be less likely to freeze.
Heat radiation
pipe
Dew formation
preventing pipe
➡
Page 8
15

Troubleshooting
Troubleshooting
(continue)
(continue)
If this happens…
It doesn’t make
ice at all Water in
the tank doesn’t
decrease It takes
too long to make
ice.
Automatic Ice-MakerSound
Water supply
tank/pipe freeze.
Ice cube is small
Ice cube stick
together.
There are protrusions
on the ice. 2~3 cubes
get connected.
The ice has white
“things” in it.
Clattering sound.
It’s got a loud sound
It’s got sounds
that worry me
The following sounds
do not mean there’s
a problem.
Doors open easily
Doors don’t close.
Doors
Alarm rings.
Please check this out.
Is it just a short time after
installation?
Are food items or the ice server
left in the water supply box?
Is the ice-maker in the “ICE MAKER OFF”
setting? (red light on.)
Are the water supply pump and pipe properly
attached to the water supply tank?
Is there enough water in the water
supply tank? Is the refrigerator tilted?
Did you attach water supply tank/pipe in
refrigerator compartment without any gaps?
Or, did you attach tank pipe in
water supply tank without any gaps?
Was the ice cube in the ice
storage corner for a long time?
−
Are you using mineral water to
make ice?
Did the surrounding items make
contact with the refrigerator?
The sound suddenly gets louder.
The sound changes.
There’s a “phyoon” sound when
I close the door.
When I open the door, there’s sometimes
a “krik” sound coming from the
inside, or a sound like water running.
Sometimes there are sounds like “shuu”
or “plub-plub” (boiling water sound)
or “shaaa”(water flowing sound).
Sometimes there’s a “wheeen” or
“klik-klak” sound (every 1~2 hours).
After plugging it in, there’s sometimes
a “gu” or “gween” sound (every
1~2 hours) when the ice-maker is off.
Is food or a case blocking the
door?
Is there food caught at the back
of the case of a drawer-door?
Is the electrical cord caught between
the body of the unit and the door?
Does the refrigerator wobble or
seem unstable?
Are the adjustable legs touching the floor?
Make sure again that you close
the doors properly.
Please do this. This is the reason.
It takes about 12 hours to make the first batch of ice.
In the summer, it may take about 24 hours.
The ice-maker will judge that there is a lot of ice.
Please take food items, etc. out of the ice storage box.
Also, please level the ice evenly to the forefront.
Please turn off the “ICE MAKER OFF”
red light.
Please place the outlet for the pipe inside
the tank correctly.
The number of ice cubes in one batch may be reduced.
Pour water into the water supply tank.
Please check the attachment around water
supply tank. If there is a gap, cool air may
leak and water may freeze.
The ice cube will become small or stick together if put in
the ice storage corner for a long time (calls sublimation).
We recommend you to stop doing ice-making
when not use the ice cube.
This is because there is a waterway that flows water
evenly into the ice-maker tray. Please do not fill water
above the “full line” mark on the water supply tank.
If ice is made with water that has a lot of mineral substances,
white sediment may form inside the cubes. It is harmless.
Please give a gap around. It makes sound when
the refrigerator connect with the goods or walls.
If it is right after installation, or hot out, or
if doors are open/closed often, it goes into
high-speed operation to chill with greater power.
This is the sound of the fan motor starting up.
This creaking sound occurs when warm air
enters and the plastic expands.
This is the sound of refrigerant (gas) flowing
through.
This is the auto ice-maker sound. Even if there’s no
water in the water supply tank, the auto ice-maker and
the pump will make a sound about every 100 minutes.
This is the sound of the auto ice-maker
doing a operations check. Even when it is on
“ICE MAKER OFF” it will do the checking.
Put away items properly so that they don’t
interfere when closing the door.
Remove the item. Please do not let food
items, the electrical cord, plastic bags, etc.
get in the way.
Bring the adjustable leg down, and raise
the front higher, with a slightly raised front,
closing doors becomes easier.
Please check “when alarm rings”,
“When alarm did not stop”.
➡Page 8, 10
➡ Page 13
➡Page 9
➡Page 13
➡ Page 8
➡ Page 5
➡ Page 8, 15
16

Troubleshooting
Troubleshooting
(continue)
(continue)
If this happens…
Dew attached in the outer
or inside the refrigerator
Frost adhere to the
freezer compartment
Dew/Frost
Water dripping on the floor.
There is a scratch line
in transparent parts.
I get static noise
Others
from the TV, etc.
The odor bothers me
(Food items / ice).
Non-Freon Refrigerator
■
This refrigerator uses non-freon foam insulation material. Non-freon foam insulation material (cyclopentane)
does not deplete the ozone layer and their contribution to global warming is extremely low, making them
environmentally friendly substances.
Please check this out.
Did you open the door frequently,
or are there gaps?
Is there a time of rainy weather
or elevated humidity?
Is the surface in a thin line
stepless in both sides?
Is the refrigerator installed near a TV?
Is the power source for the refrigerator
taken from near the antenna cable inlet?
Have you put in strong-smelling
foods without using a food wrap?
Is the water supply tank unclean?
Please do this. This is the reason.
Please close the door properly.
Dews and frost will come out when the moisture in the air is cooled.
Dews and frost attach when the humidity is high.
Dew may temporarily attach. Please wipe with dry towel.
And frost is easily attach in the freezer compartment.
It is a mark get when molding of the plastic.
It seem a resin molding mark. It is not a scratch.
Please set your refrigerator at a distance from TVs, etc.
We recommend a single power outlet and
that earthing is checked.
If the smell is strong, the odor-removing device
cannot remove it all, so please wrap such items.
Please do a regular cleaning maintenance.
➡
Page 13
To economize power
Before use Operation Cleaning When in trouble
Quickly open and close the door
Cold air may leak outside, or power
consumption may increase if open a long
time or open the door frequently.
Leave some space between the foods.
Cool air may not flow very well, the
foods may not easily get cold if you
not leave a space between the foods.
Leave space
Do not block the air outlet or suction port
The foods may not easily get cold if block
the cool air. The temperature near air outlet
may decrease, moist foods may easy to freeze.
Cool down hot foods before put in the refrigerator
The temperature inside may rise,
and may affect to freshness of
the other foods.
17

AccessoriesAccessories
Model name
Accessories
Adjustable shelf
One-two shelf
Sliding case (upper)
Sliding case (lower)
Water supply tank (including purification filter)
Free pocket (large)
Free pocket (small)
Small-Item pocket
Refrigerator compartment
Free egg tray
Bottle pocket
Vegetable case
Sliding case
Vegetable
compartment
Freezing case (upper)
Freezing case (lower)
Noise reduction mat
Ice server
Freezer compartment
Toe grille
This appliance is designed for use in Australia and New Zealand only and cannot be used in any other country.
No service is available outside of Australia and New Zealand."
MR-CX370EJ MR-CX402EJ
Quantity Quantity
1
1
1
1
1
1
1
1
1
1
1
1
1
1
1
1
2
1
1
1
1
1
1
1
1
1
1
1
1
1
1
1
1
MODEL NAME COUNTRY NAME
MR-CX370EJ/CX402EJ-A AUSTRALIA / NEW ZEALAND
When you hear noise from the lower rear of the refrigerator
Part of the cooling system is the compressor, which operating, does create a more noticeable increase in noise level.
This is normal. However, if the noise is quite loud, this could be because the refrigerator is not installed correctly on
a hard level surface, or there may be a problem that may need service.
CAUTION
1. This appliance is designed for use in ambient temperature listed below.
MODEL NAME AMBIENT TEMPERATURE RANGE CLIMATIC CLASS
MR-CX370EJ, CX402EJ-A 16
The internal temperatures could be affected by such factors as the location of the refrigerating appliance, ambient
temperature and the frequency of door opening, and, if appropriate, a warning that the setting of any temperature
control device might have to be varied to allow for these factors.
2. A rise in temperature of the frozen food during manual defrosting, maintenance or cleaning could shorten the storage life.
3. Food to be frozen is not to be placed in direct contact with food in storage and, if appropriate, that it could be necessary
to reduce the quantity to be frozen if freezing every day is anticipated.
4. The electrical power failure for 1-2 hour will only slightly affect the inside temperature. However, opening and closing the
door results in temperature loss. In case there is more than 24 hours electrical power failure, the food should be taken
out from the fridge.
5. In case you are leaving or there is no food in the fridge for more than 3 weeks, The fridge should be unplugged and
cleaned.
o
C ~ 43 oC T
18

MEMOMEMO
Before use Operation Cleaning When in trouble
19

The appliance is not intended for use by young
children or infirm persons without supervision.
Young children should be supervised to ensure
that they do not play with the appliance.
WARNING - Do not use mechanical devices
or other means to accelerate the defrosting
process, other than those recommended by the
manufacturer.
WARNING - Do not use electrical appliances
inside the food storage compartments of
the appliance, unless they are of the type
recommended by the manufacturer.
WARNING - Just in case of having damaged the
refrigerant circuit, do not use electric items or fire
equipments near by, and open the window to
ventilate the room. And contact the retail store
at which you purchased it or the following
The refrigerator contains flammable refrigerant
(R600a: iso-butane).
The refrigeration system behind and inside the
refrigerator contains refrigerant.
Do not allow any sharp objects to come into
contact with the refrigeration system.
Do not block the openings on the circumstances
of the refrigerator.
The user manual should be handed over to any
person who would use or handle the refrigerator
whenever the refrigerator would be transferred to
another location and delivered to a recycling plant.
This refrigerator uses flammable foaming gas for
insulation.
Please deliver the unit to specialized industrial
waste dealer when you do away it.
Please follow the rules in your country.
MITSUBISHI SERVICE CENTER.
R600a Refrigerant Warning
●
This appliance contains a small quantity of R600a refrigerant which is flammable.
●
During transportation and installation, ensure that the tubing of the refrigerant circuit is not damaged.
●
Leaking refrigerant can ignite and may damage the eyes.
●
In the event any damage does occur, avoid exposure to open fires and any device which creates a spark.
Disconnect the appliance from the mains power.
●
Thoroughly ventilate the room in which the appliance is located for several minutes.
●
Notify Mitsubishi Electric Australia Pty Ltd. for necessary action and advice.
●
The room for installing the appliance must be at least 1 cubic metre per 8 grams of refrigerant.
The refrigerant quantity contained in this appliance is noted on the Rating Label of the appliance.
●
If your Mitsubishi Electric Refrigerator should require service, please contact Mitsubishi Electric Australia
Pty Ltd see back page of this user manual for contact details.
NOTE: MITSUBISHI ELECTRIC AUSTRALIA PTY LTD. DO NOT ALLOW SERVICE
TO THE REFRIGERATION CIRCUIT OF THIS APPLIANCE.
If an abnormality or malfunction occurs, stop operation immediately and contact the retail store where
you purchased the refrigerator or MITSUBISHI ELECTRIC SERVICE CENTRE or its service agent.
SOLE AGENT in Australia
MITSUBISHI ELECTRIC AUSTRALIA PTY LTD.
(Incorporated in New South Wales) ABN 58 001 215 792
New South Wales:
348 Victoria Road, Rydalmere NSW 2116 Phone: (02) 9684 7777, Fax: (02) 9898 1043
Queensland:
Da Vinci Business Park, Building 101, 2A Boronia Road, Brisbane Airport QLD 4008
Phone: (07) 3623 2000, Fax: (07) 3860 6761
South Australia / Northern Territory:
Suite 1, 224 Glen Osmond Road, Fullarton SA 5063 Phone: (08) 8338 1001, Fax: (08) 8338 0501
Western Australia:
Unit 5, 329 Collier Road, Bassendean WA 6054 Phone: (08) 9377 3400, Fax: (08) 9377 3499
Victoria / Tasmania:
Unit 5, 12 Compark Circuit Mulgrave VIC 3170 Phone: (03) 9535 7800, Fax: (03) 9535 7801
SOLE AGENT in New Zealand
BLACK DIAMOND TECHNOLOGIES LIMITED (BDT)
Wellington Office (Head Office)
1 Parliament Street Lower Hutt PO Box 30772 Phone: (04) 560 9147, Fax: (04) 560 9133
Auckland Office
Unit 1, 4 Walls Road Penrose PO Box 12726 Phone: (09) 526 9347, Fax: (09) 526 9348
Christchurch Office
44 Halwyn Drive Hornby PO Box 16904 Phone: (03) 341 2837, Fax: (03) 341 2838
NZ79C617H01
 Loading...