

Mitsubishi MR-BX52W-N-P, MR-BX52W-BR-P, MR-BX52W-N-ML, MR-BX52W-N-H, MR-BX52W-BR-ML Operating Instructions Manual
MR-BX52W-N-P
(230-240V)
MR-BX52W-BR-P
(230-240V)
MR-BX52W-N-ML
(230-240V)
MR-BX52W-BR-ML
(230-240V)
MR-BX52W-N-H
(220V)
冷藏冷凍雪櫃
Non-Freon Refrigerators
This refrigerator uses non-Freon refrigerant
(isobutane) and non-Freon foam insulation
(cyclopentane).
Th e se ma te r ia l s ar e har m le s s to th e
environment, which does not affect the
ozone layer and global warming.
非使用氟利昂的雪櫃
這個雪櫃使用非氟利昂冷媒 ( 異丁烷 )
和非氟利昂發泡隔熱材料(環戊烷)。
這些物料不會對環境造成破壞,也不會
破壞臭氧層以及使全球暖化問題惡化。
R600a
Refrigerator-Freezer
MODEL
OPERATING INSTRUCTIONS
使用須知

The assist function that makes it possible to
save power comfortably and with fun.
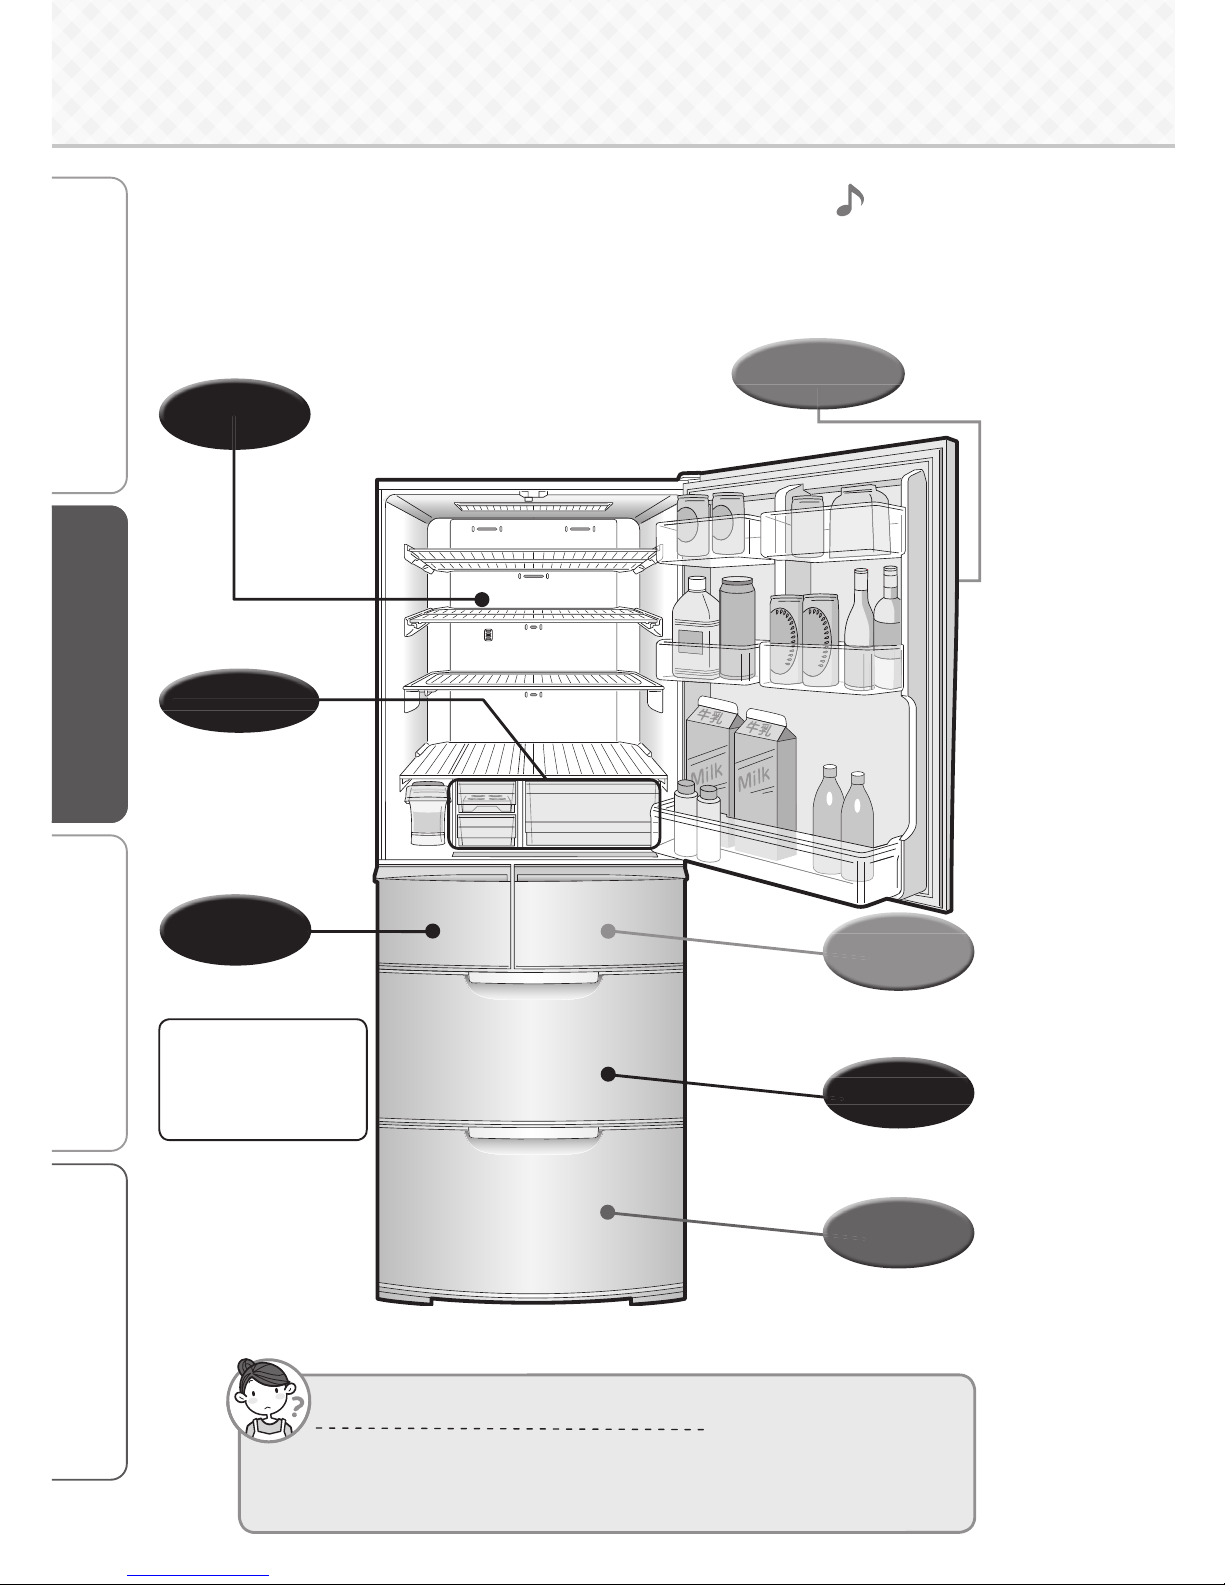
Refrigerator
compartment
Freezer
compartment
Ice making
compartment
Versa
compartment
Vegetable
compartment
Page 20
Page 22
Pressing the
button on the operation panel
restarts power-saving mode
automatically.
This function reduces operation
of the set compartment to
actively save power.
This refrigerator is manufactured for refrigerating and freezing foods in general households. For industrial use, please use a
commercial refrigerator.
This refrigerator uses non-freon refrigerant (isobutane) and non-freon foam insulation material (cyclopentane).
The material names are indicated on the main plastic parts to facilitate recycling.
ECO MODE
Power Save Mode
Deliciousness, convenience, and even power
saving!
Smart power saving by controlling to detail with the temperature
sensor and the door opening and closing sensor of the
compartments. Freeze to savory taste.
Refrigerator
compartment
Useful!
Large
capacity
AUTO Shelf
Page 25
Shelves can be moved up
and down without removing
food, which allows you
to store a tall pot into the
refrigerator easily.
Page 20
ECO GUIDE
The ECO Level of the
previous 24 hours, which is
determined by factors such
as the temperature
settings
of the compartments and the
frequency of opening the doors,
is indicated by three marks.
(Ice making and
versa compartment)
Operation
panel
Chilled
compartment
Function Overview
If you store the Supercool
Freezing food in the freezer
compartment, it can be
stored for a long time without
losing its taste and texture.
Safety Precautions
4-5
From Installation to Operation
6-7
Placing Food Inside
8-9
How to Use the Operation Panel
10-11
Adjusting the Temperature of Each
Compartment
12-13
Cooling Quickly (Fast Cooling)
14
Freezing for Delicious Food
(Supercool Freezing)
15
Tips for Supercool Freezing
16-17
Making ice
18-19
Power Saving
20-22
Other Settings
(Setting Reset, Child Safety Lock)
23
Refrigerator Compartment
24-25
Versa, Freezer, and Vegetable
Compartments
26
Ice Making Compartment
(Automatic Ice Maker)
27
Cleaning the Automatic Ice Maker
28-29
Removing and Cleaning the Parts
30-31
Other Issues
32-34
Specifi cations
35
Troubleshooting
36-38
Before Use Operation Cleaning TroubleshootingTroubleshootingCleaningOperationBefore Use
Versa
compartment
Pages 15 - 17
Freezer
compartment
Due to printed materials, the photographs and illustrations may
slightly differ from the actual product.
Freeze to your taste. Can
be cooked immediately
without thawing. Taste
of food is different.
Quickness is different.
Page
Contents
4
Before Use Operation Cleaning TroubleshootingBefore Use
Install level
Use the
hand-holds
Use protective
material
Prohibited
The danger and degree of
danger caused by improper
handling are categorized
and described with the
following indicators.
Improper handling that can
result in death or serious
injury.
Improper handling that can
result in personal injury
or damage to your house,
household furnishings, etc.
Never do
Never touch
Never attempt to
disassemble, repair
or alter
Never expose to
water
Never touch with
wet hands
Be sure to follow
the instructions
Be sure to remove
the power plug from
the socket
Meaning of symbols
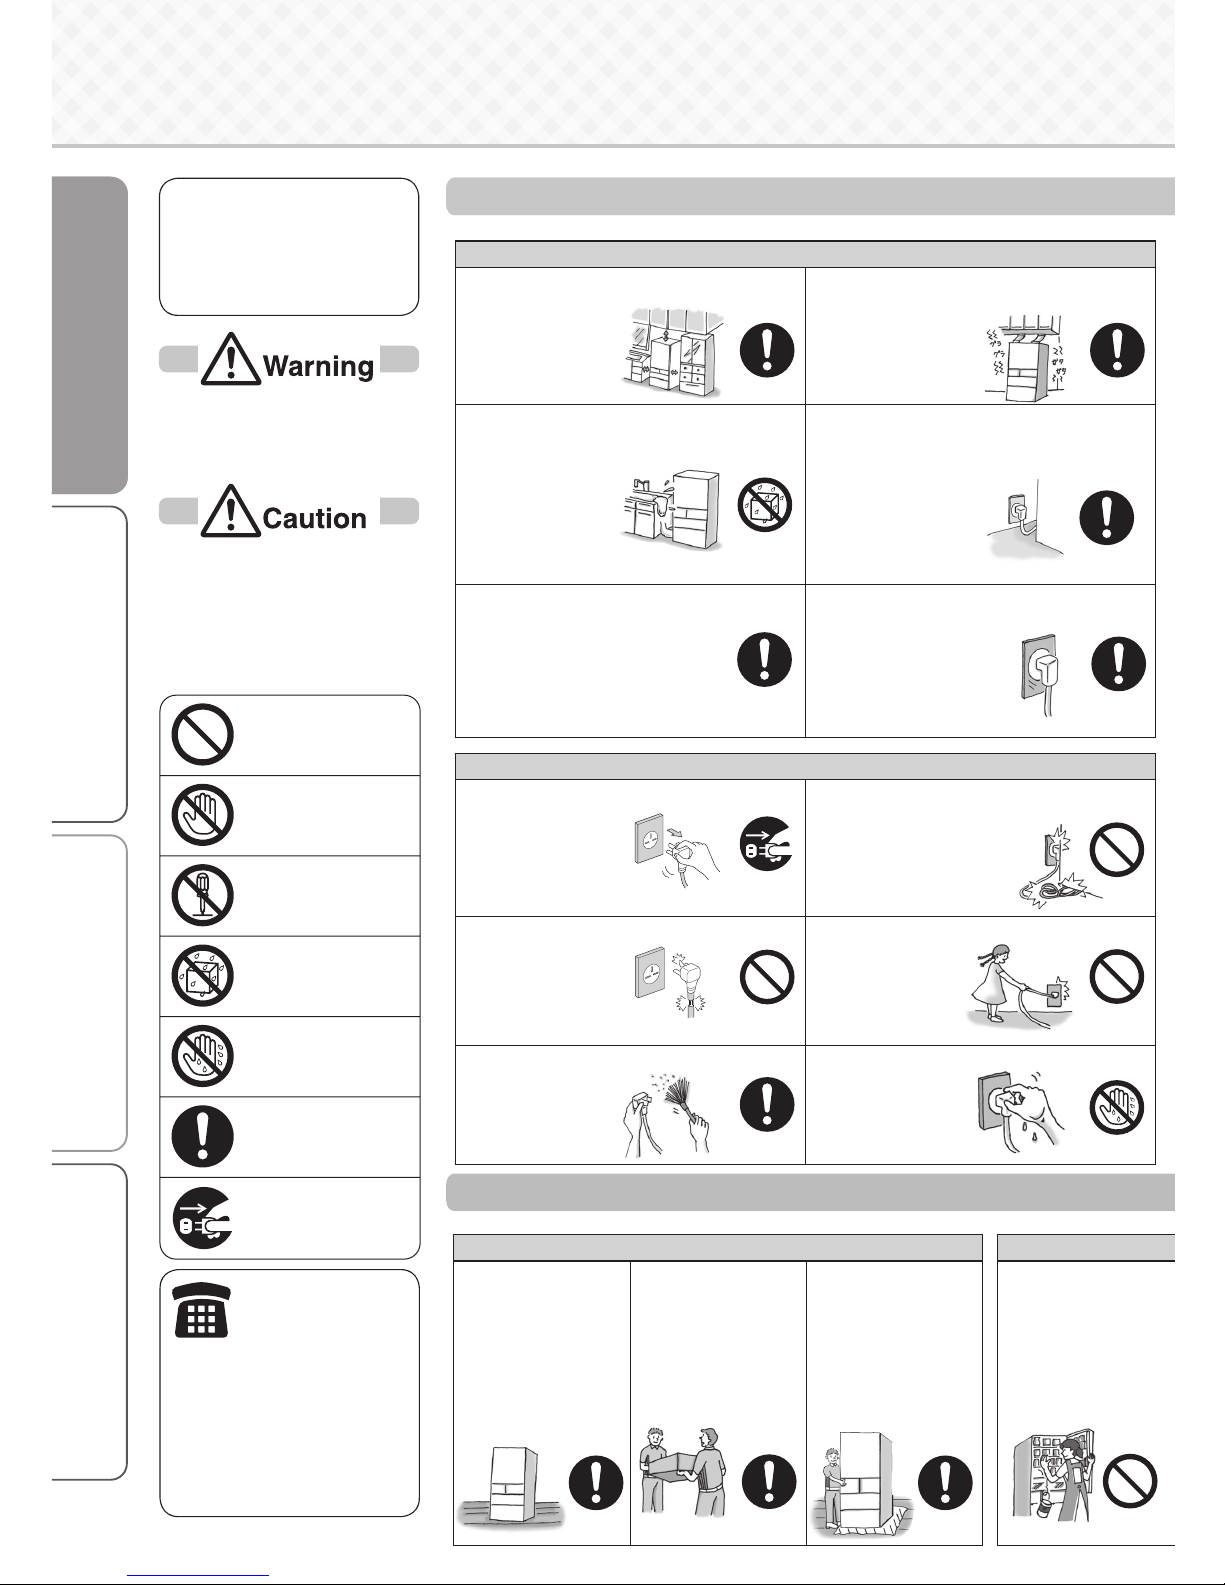
Installation
Leave space around the refrigerator.
If refrigerant leaks, it
may accumulate and
catch fi re or explode.
Page 6
Anchor the refrigerator to a strong wall
or post to protect against damage during
earthquakes.
The refrigerator may tip
over and cause injury.
P
ag
e 7
Do not install the refrigerator outdoors or in places
exposed to water or excessive humidity.
Water may cause
insulation failure,
resulting in an electric
shock or fi re.
Page 6
Use a dedicated outlet for the power supply
that meets the rating specifi
ed on the rating
label. (The rating label is located on the doorliner of the refrigerator compartment.)
Using extension cords
and plugging too many
leads into a single
socket can cause heat
build-up or fi re.
P
age 6
If the power cord is damaged, call our MITSUBISHI
ELECTRIC SERVICE CENTER for the replacement.
If the power cord is damaged, purchase a
new cord from MITSUBISHI ELECTRIC
SERVICE CENTER. Make sure that the
power cord is designed for this model.
Page 6
Insert the power plug with the cord facing
down, and fully insert the prongs
Inserting the plug upsidedown places stress on the
cord and may cause heat
generation or fi re.
Power and power plug
Remove the power plug before cleaning.
Otherwise an electric
shock or injury may
result.
Do not crush the power plug with the rear of the
refrigerator. Do not damage the power cord.
Pressing, folding, bundling or placing
heavy objects on the power cord may
cause an electric shock or fi re.
Do not use damaged cords or plugs, or loose
sockets.
Doing so may cause an
electric shock or fi re.
Do not pull the cord when unplugging the
power plug
The cord may be
damaged, resulting in
electric shock or fi re.
Remove dust periodically from the power
plug.
Dust may cause
insulation failure,
resulting in fi re.
Do not plug in or out the power plug with wet
hands.
Doing so may cause an
electric shock.
If an abnormality or
malfunction occurs,
stop operation
immediately and contact
the retail store where you
purchased the refrigerator
or a Mitsubishi Electric
Maintenance Service
or Customer Service
representative.
Leave space
Remove dust
Prevent tipping
Cord facing down
Service Call
Water prohibited
Remove plug
Do not use
Prohibited
Prohibited
Wet hands
prohibited
Installation and transportation
Anchor the
refrigerator to a
strong and level
fl oor by adjusting the
adjustable supports.
Otherwise, the
refrigerator may move
and cause injury.
Pages 6 - 7
Use the
transportation
hand-holds when
transporting the
refrigerator.
Holding other parts may
result in injury.
Page 32
Be careful not to
damage the fl oor
or injure yourself
when moving the
refrigerator.
Lay a protective sheet on
the fl oor and move the
refrigerator slowly.
Do not pack in
excessive amounts
of food.
Do not pull the
shelves with
excessive force.
Food may fall and cause
an injury
Only use an outlet that meets the specifi ed rating.
Safety Precautions
5
Before Use Operation Cleaning TroubleshootingBefore Use
Wet hands
prohibited
Do not touch
Do not store Prohibited
Prohibited
Operation
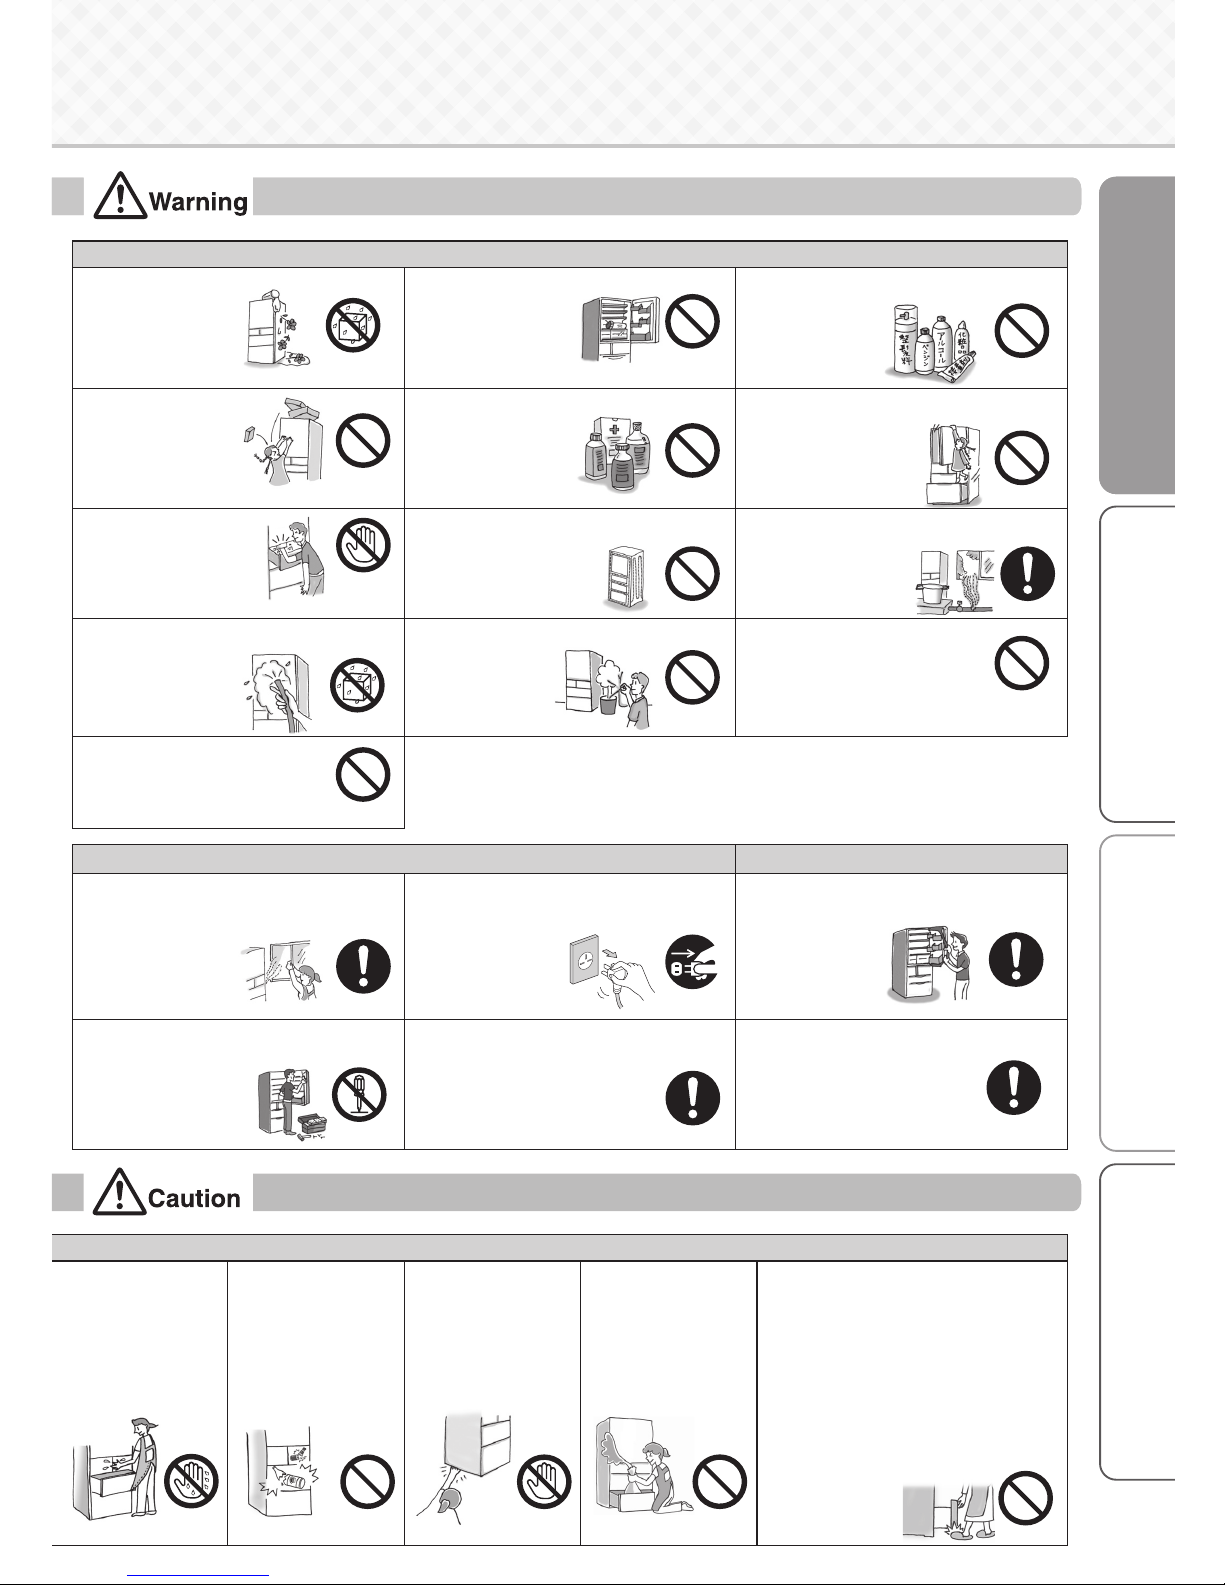
Do not place water containers on top of the
refrigerator.
Exposing electrical parts
to water may cause an
electric shock or fi re.
Do not use electrical appliances inside the
refrigerator.
The refrigerant gas leaking
into the compartment with
sparks from an electrical
contact may cause fi re and
explosion.
Do not place volatile, infl ammable objects
inside the refrigerator.
Benzene, cosmetics
and hair dressing
products may catch
fi re or explode.
Do not place objects on
top of the refrigerator.
Objects may fall when
the doors are opened or
closed and cause injury.
Do not store chemicals or scientifi c specimens
in the refrigerator.
Substances that require strict
control must not be stored
in household refrigerators.
Do not hang from the door or handle. Do
not climb on an open door. Do not apply a
heavy load.
The refrigerator may tip
over and cause injury.
Do not touch the
mechanical area of the
automatic ice maker
(area above the ice tray).
Doing so may result in
injury.
Do not damage or drive screws into the
refrigerator's refrigerant circuit (pipes).
Because combustible
refrigerant is used, this may
result in fi re or an explosion.
If you notice a gas leak, do not touch the
refrigerator. Open windows to ventilate.
Sparks from an electrical
contact may cause an
explosion or fi re.
Do not wash with water or spill soup or
juice onto the refrigerator.
Water or other liquid may
cause an electric shock or
fi re. Wipe off any liquid
immediately.
Do not use combustible sprays near the
refrigerator.
Sparks from an
electrical contact may
cause an ignition and
fi re.
Do not use in a shed or garage.
Small animals may damage the
electrical wiring and cause an electric
shock or fi re.
When the doors are opened or
closed, beware not to hit any furniture
The door or furniture may be damaged
and cause any injury.
Malfunctions and long-term storage When Recycling
If the refrigerant circuit (pipe) is damaged,
do not touch the refrigerator and avoid
using fl ames. Open windows to ventilate.
If the refrigerant circuit
is damaged, contact the
retail store.
If an abnormality occurs (such as a burning
odor), unplug the power plug and stop the
refrigerator operation.
Continuing to operate
with an abnormality
may cause an electric
shock or fi re.
For storage, make sure to pull out and
remove the door seal.
There is a possibility
of a child getting
trapped in the
refrigerator during
storage.
Do not disassemble, repair or alter. Do not
use while parts are damaged.
Doing so may cause
injury, electric shock or
fi re.
When not using the refrigerator for a long
time, unplug the power plug and open the
doors to dry the refrigerator.
If the refrigerator is not dried
suffi ciently, refrigerant may leak due to
condenser corrosion and cause a fi re or
explosion.
Contact the retail store or municipal
government for details about correct
refrigerator disposal.
Improper disposal may cause
refrigerant leaks, resulting in a fi re or
explosion if exposed to a fl ame.
Ventilate
Remove door seal
Dry
Ventilate
Dispose properly
Water prohibited
Prohibited
Do not store
Prohibited
Do not use
Do not use
Prohibited
Prohibited
Do not store
Prohibited
Water prohibited
Remove plug
Do not disassemble
Do not touch
Operation
Do not touch food
or containers in the
freezer compartment
with wet hands.
It may cause a cold
injury.
Do not place glass
bottles in the freezer,
ice making and versa
compartment.
The bottle may break if
the liquid inside freezes,
causing an injury.
Do not put your
hands or feet under
the refrigerator.
The steel plates
or other parts may cause
injury.
Do not eat food that
is discolored or has a
bad odor.
It may result in food
poisoning or illness.
Observe the following when opening and
closing the doors.
• Do not open or close the doors when another person
is touching the refrigerator.
• Do not put your fi ngers on the top edge of a drawertype door while closing it.
• Do not open or close the doors with excessive force.
(Food may fall out and cause injury.)
• Be careful not to trap your fi ngers or any other part of
your body.
• Be careful not hit a part of your body.
• Do not trap your feet with the bottom drawer.
(Danger of your toes caught by the drawer.)

Connect the power supply
* Connect power supply soon after installing the refrigerator
2
Install the refrigerator at:
A place with good ventilation
and not exposed to direct
sunlight or hot air
To keep good cooling performance and
reduce power costs.
A place with low humidity
To prevent it from rusting, electric shock
and fi re.
A strong and level place
To prevent vibration, noise, and ajar or
tilting doors.
To prevent deformation or discoloration of
the fl oor materials due to the weight or heat.
If the refrigerator supports may sink into the
fl oor, lay a strong plate or board underneath.
A place away from other
devices
To prevent noise or video interference
with devices such as televisions.
There should be space of 2 cm
or more on the left and right of
the refrigerator, and 10 cm or
more from the ceiling.
To allow heat to dissipate from the top
and the sides of the refrigerator.
Use a dedicated outlet
Use a dedicated outlet for the power supply that meets the rating specifi ed on the rating
label. (The rating label is located on the door-liner of the refrigerator compartment.)
The refrigerator will not be damaged even if the power is
supplied soon after installation.
It takes a while for the refrigerator to cool, therefore supply
power as soon as possible.
Electrical Connections
Make sure this unit is properly grounded.
The refrigerator should always be plugged into its dedicated electrical outlet.
This will provide the best performance and prevent electrical circuits
from being overloaded and causing a fi re.
Make sure that the electrical outlet provides the proper voltage.
Extension cords are not recommended.
If your refrigerator is installed in the high humidity location, not only
ground connection but also installation of the earth leakage breaker is
recommended.
If the power cord is damaged, purchase a new cord from MITSUBISHI
ELECTRIC SERVICE CENTER. Make sure that the power cord is
designed for this model.
If the power cord is damaged, call our MITSUBISHI ELECTRIC
SERVICE CENTER for the replacement, in order to avoid a hazard.
Installation
1
It takes time for cooling even
after turning on the refrigerator.
The outer walls heat up.
The operation noise gets louder
immediately after installation.
Immediately after instillation, when: the
weather is hot, the doors are frequently opened
or closed, the fast cooling operation is engaged,
or any similar situation; the operation noise will
get louder because the refrigerator will switch to
high-speed operation to cool with high power.
Warning
Using outlets that do not meet the specifi ed rating or plugging in too
many leads into a single socket can cause heat buildup or fi re.
6
Before Use Operation Cleaning TroubleshootingBefore Use
• Wait until the refrigerator has been
fully cooled before storing noncooled food or ice cream.
•
Do not open the doors more than
necessary, and close them as soon as
possible.
When the weather is hot in summer,
it may take more than 24 hours.
When making ice for the fi rst time
Space of 10 cm
or more
Space of 2cm or
more
• Heat dissipation causes the temperature
to rise to about 50°C to 60°C or more
when operation is fi rst started, and
during the summer.
Dedicated
outlet that meets
the specifi ed rating.
Turn on the power of the
refrigerator as soon as
possible.
The refrigerator will not be
damaged even if you turn on
the power immediately after
the installation.
Warning
Do not obstruct the refrigerator vents
or the space around the refrigerator.
If refrigerant leaks, it may accumulate
and catch fi re or explode.
Corrosion control treatment may be
required for the refrigerant circuit (pipe)
due to generation of corrosive gases.
Contact the retail store where you
purchased the refrigerator.
Use in hot spring areas
From Installation to
Operation
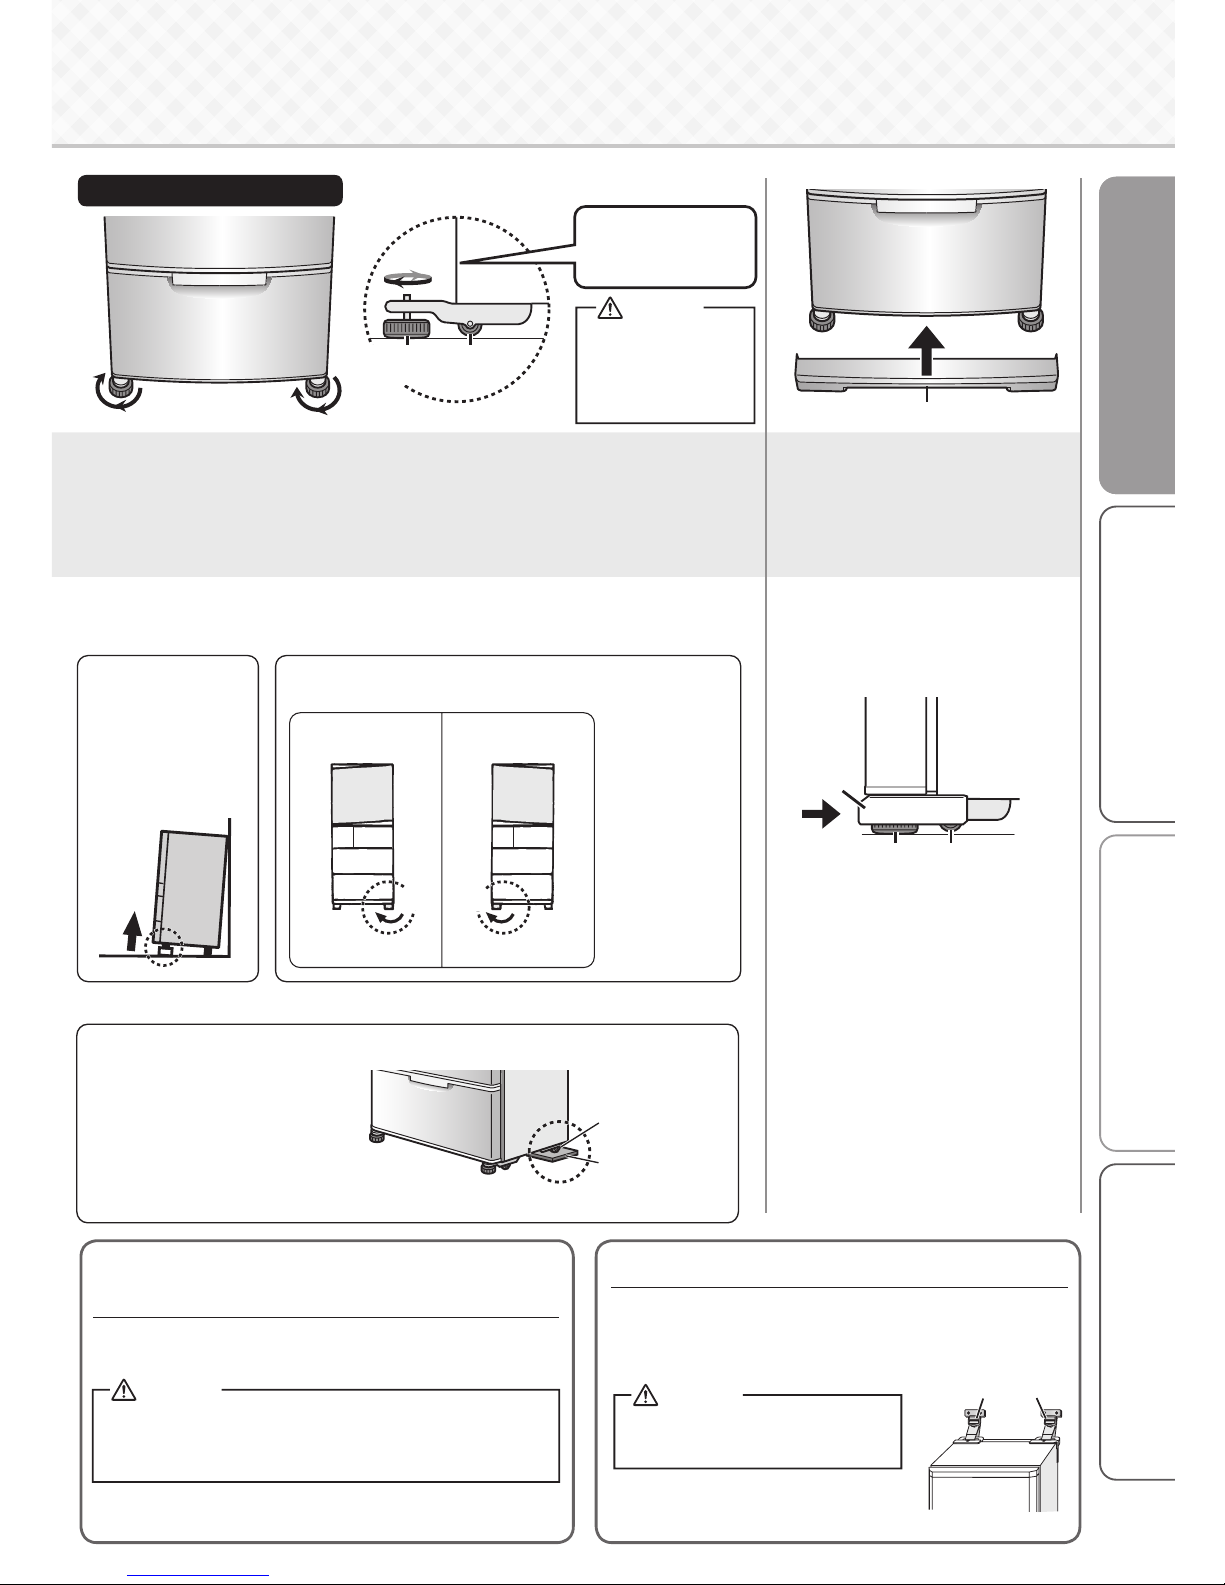
If the door is still tilted after adjustment of the supports
Installing the adjustable
support cover
Fully insert the adjustable support cover
horizontally until it touches the rear side.
Adjustment and anchoring
(To prevent vibration, noise, movement, and doors left ajar)
Turn and lower the adjustable supports until they touch the fl oor
and the front casters are raised from the fl oor to fi x the refrigerator.
3
Adjustable
support cover
The adjustable support cover
is stored inside the refrigerator
compartment at shipment.
4
Do not damage the refrigerant circuit
(pipes) or drive screws into it.
Prepare for earthquakes
Preventing doors
from being left ajar
Adjusting a tilted door or unevenness
7
Before Use Operation Cleaning TroubleshootingBefore Use
Adjust the supports to
make the refrigerator
level.
If the front of the
refrigerator is slightly
raised, the doors are
easier to close.
When installing the refrigerator in
the corner of a room, one of the
rear supports may sink, causing the
refrigerator to tilt. If this happens,
use a caster support or strong board
for adjustment. (Normally, use a
board with a thickness of 2 to 3 mm.)
Adjust the adjustable supports as shown
in the fi gures below.
Right
Left
Adjustable
support
cover
Adjustable support
Caster
Rear support
Caster support
or strong board
If the installation
location is not
level or the
supports sink after
a few days of
installation due to
the weight of the
food, the doors
may appear tilted.
Readjust the
supports.
* More than 100
kg of food can
be stored in the
refrigerator.
Although R600a refrigerants are combustible, the refrigerant
circuit is hermetically sealed and normally leaks will not occur.
Should the refrigerant circuit be damaged:
1. Do not use fl ames or electrical appliances nearby.
2. Open the windows to fully ventilate the room.
Warning
Then, contact the retail store where you purchased the
refrigerator.
Pass 2 strong belts through the hand-holds on the top
rear of the refrigerator and anchor them to a strong
location, such as wall or post.
Warning
The refrigerator may tip over
and cause injury.
Adjustable
support
Caster
Turn the adjustable
supports in the arrow
direction until they
touch the fl oor.
Adjustable support cover
Bottom front of refrigerator
Strong belts
The left door tilts
down
Lower the right support
The right door tilts
down
Lower the left support
If the supports are
not adjusted properly,
the refrigerator may
move and cause
injury.
Caution
You are now a skillful storage organizer
Get the most out of your refrigerator to make cooking
more fun and dishes tastier!
Before Use Operation Cleaning TroubleshootingOperation
8
Use the refrigerator, freezer, and vegetable compartments set to "M" usually.
Use the versa compartment in your preferred setting.
Initial settings (at time of purchase): refrigerator, freezer, and vegetable compartments ..."M,"
versa compartment ..."Soft freezing, M"
Approximate temperature setting
Refrigerator
compartment
Operation panel
Versa
compartment
Pages 24 - 25
Pages 10 - 11
Page 24
Freezer
compartment
Page 26
Page 26
Vegetable
compartment
Page 26
Ice making
compartment
Page 27
Chilled
compartment
Ice is made
automatically.
"Making Ice"
Pages 18 - 19
Placing Food Inside
Note
The temperatures described here are measured in the lower center of the refrigerator after the temperature has
stabilized when the surrounding temperature is 30°C and the doors are closed without any food inside. The
temperature fl uctuates with factors such as food storage conditions and how often the doors are opened and closed.
Plastic may have odors when you fi rst start using the refrigerator. Ventilate the room to prevent odors from being
contained, just in case. Odors will gradually disappear.
Caution
Do not stack food higher than the case. (The food will be caught at the rear of the case and may leave the door ajar.)
Before Use Operation Cleaning TroubleshootingOperation
9
About 3°C to
9
°C
Vegetable
compartment
About 0°C to
6
°C
Refrigerator
compartment
Soft freezing: About -9°C to
-5
°C (Can be changed to freezing)
Versa
compartment
About
-22
°C to
-16
°C
Freezer
compartment
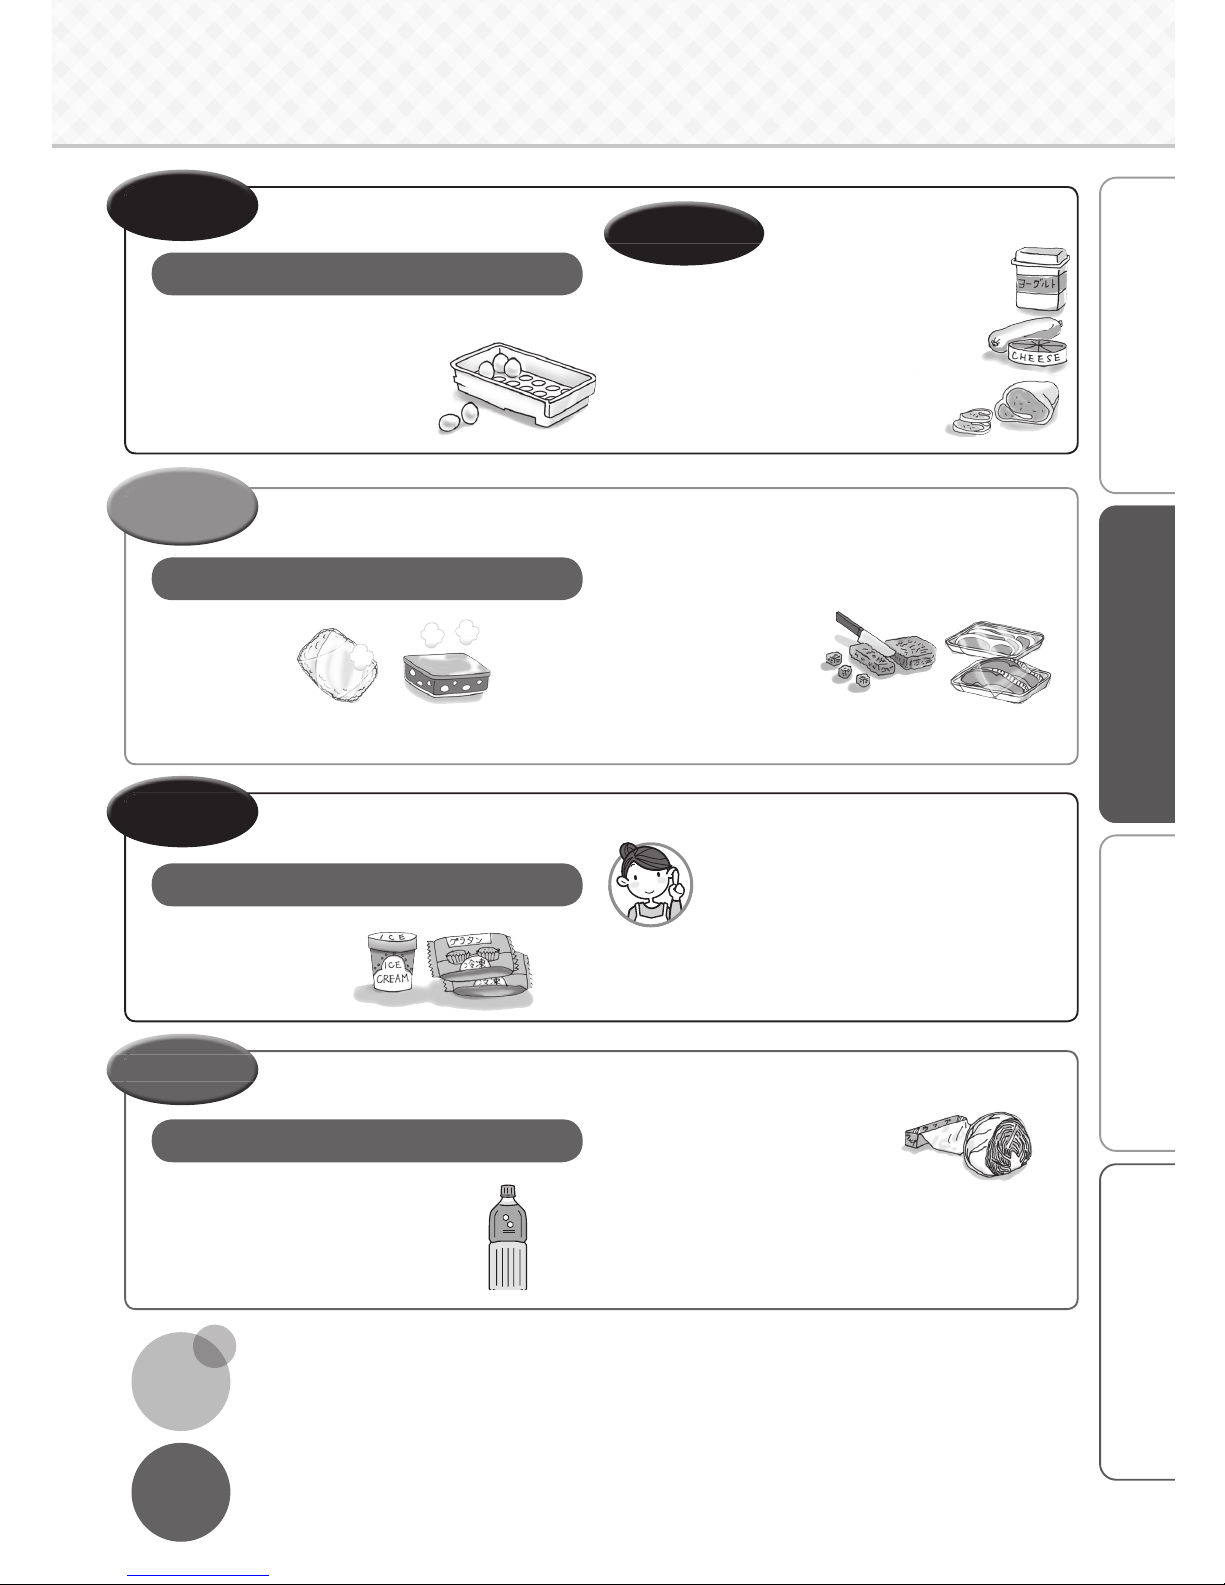
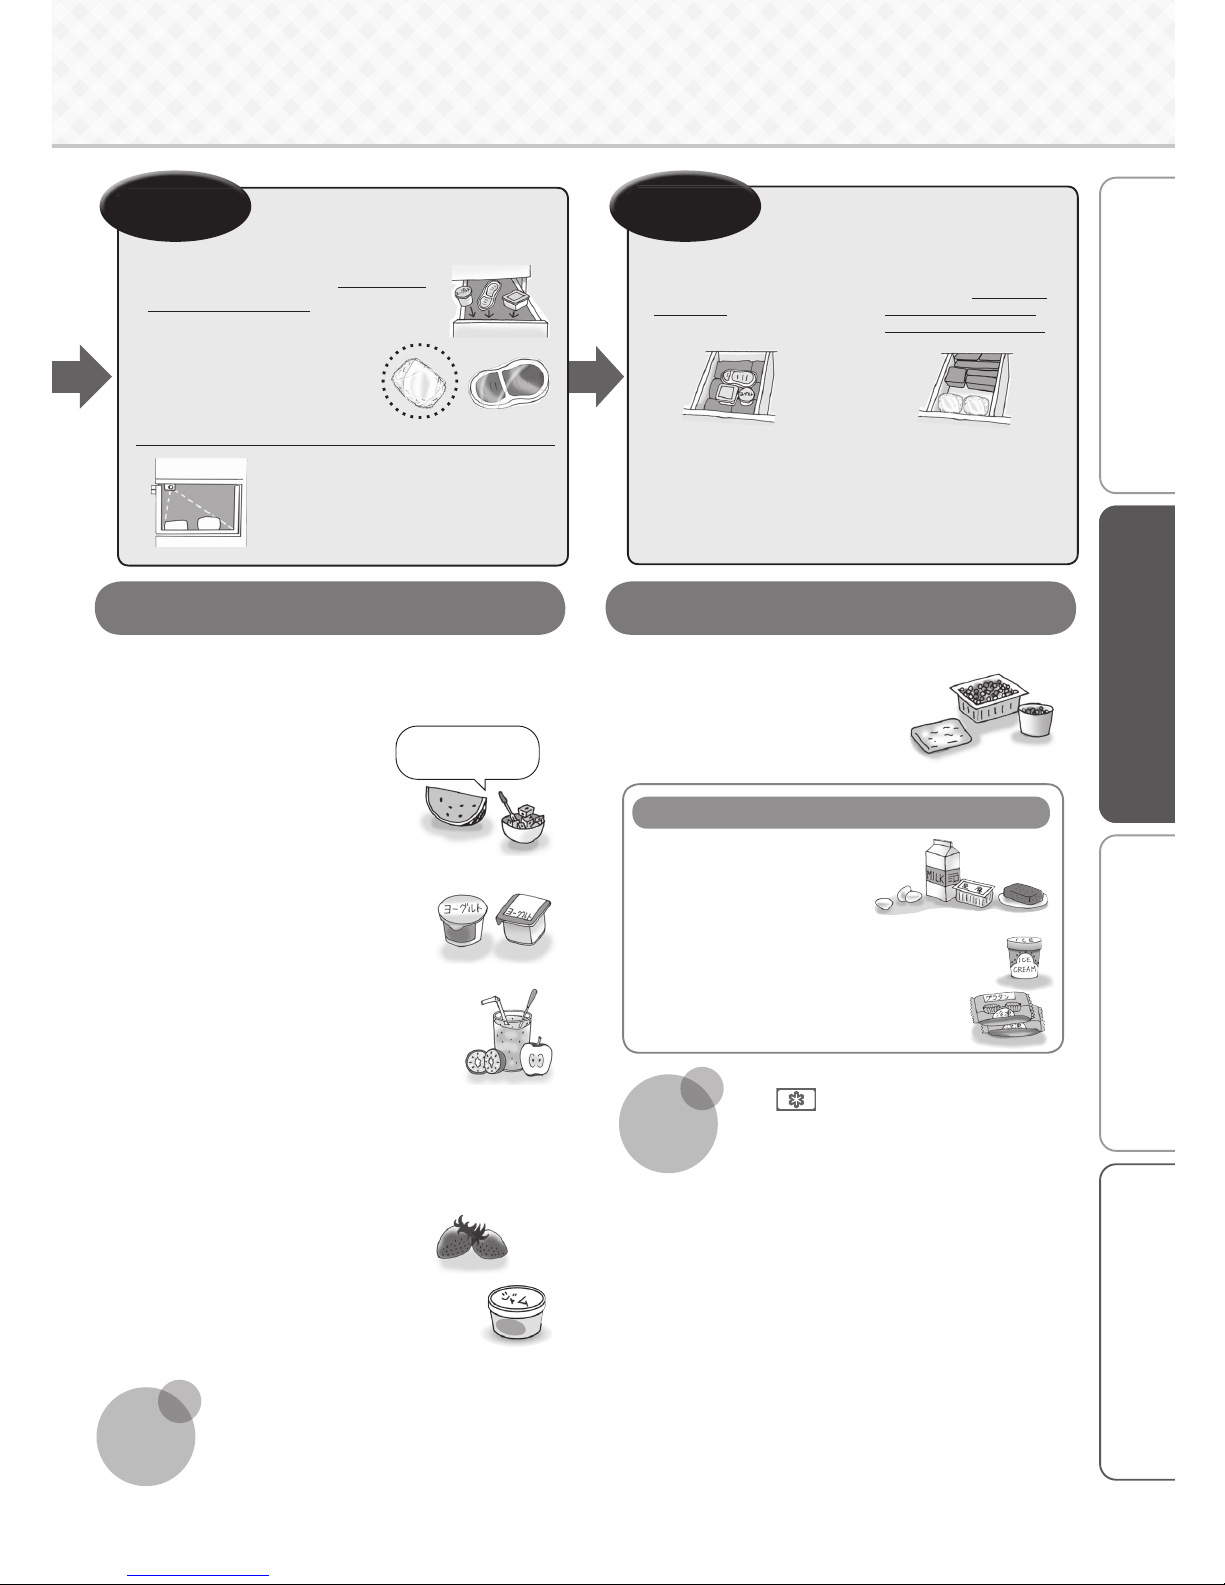
Food or ingredients used daily
Keep eggs in the chilled egg
compartment
Food you do not want to
freeze
The water that evaporates
from the food is kept inside
the compartment to maintain
the moisture. Storing fruit and
vegetables in plastic wrap
keeps them even fresher.
If you store the food that is Supercool
Freezing in the freezer compartment,
it can be stored for a long time without
losing its taste and texture.
Dairy products: Yoghurt, cheese, etc.
Fish paste products: Steamed fi sh
paste, fi sh cake, etc.
Processed food: Ham, sausages, etc.
Fresh food: Meat, fi
sh,
shellfi sh, etc.
Food to be used soon
Food you want to Supercool Freezing
Food for long-term storage
Vegetables and fruits
Cooked rice
Curry
Sauces
Blocks of meat
Ground meat
Cutlets, cod roe
Tips for Supercool Freezing
Pages 16 - 17
Frozen food
Ice cream
Vegetables
Fruit
Drinks
Chilled
compartment
About
-3°C to
3
°C
Food frozen at home
Bread

Note
After a door is closed, the ECO GUIDE and
displays light up for about 30 seconds.
The ice tray is operating while
is blinking. Do not remove the ice tray.
If you have forgotten the settings or to return the settings to their intial condition (at the time of purchase) (setting
reset)
Page 23
Before Use Operation Cleaning TroubleshootingOperation
10
*
All items are displayed
for illustrative purposes.
The "ECO Level" of the refrigerator is
indicated by three marks.
Page 20
ECO GUIDE
ECO MODE can be set.
Page 20
Power Save Mode can be set.
Page 22
Power saving button
The temperature setting of each
compartment can be set.
Pages 12-13
The setting of the ice making
compartment can be selected.
Page 18
Supercool freezing and fast cooling
can be set.
Pages 14-15
The settings for each compartment
are displayed.
Setting display area
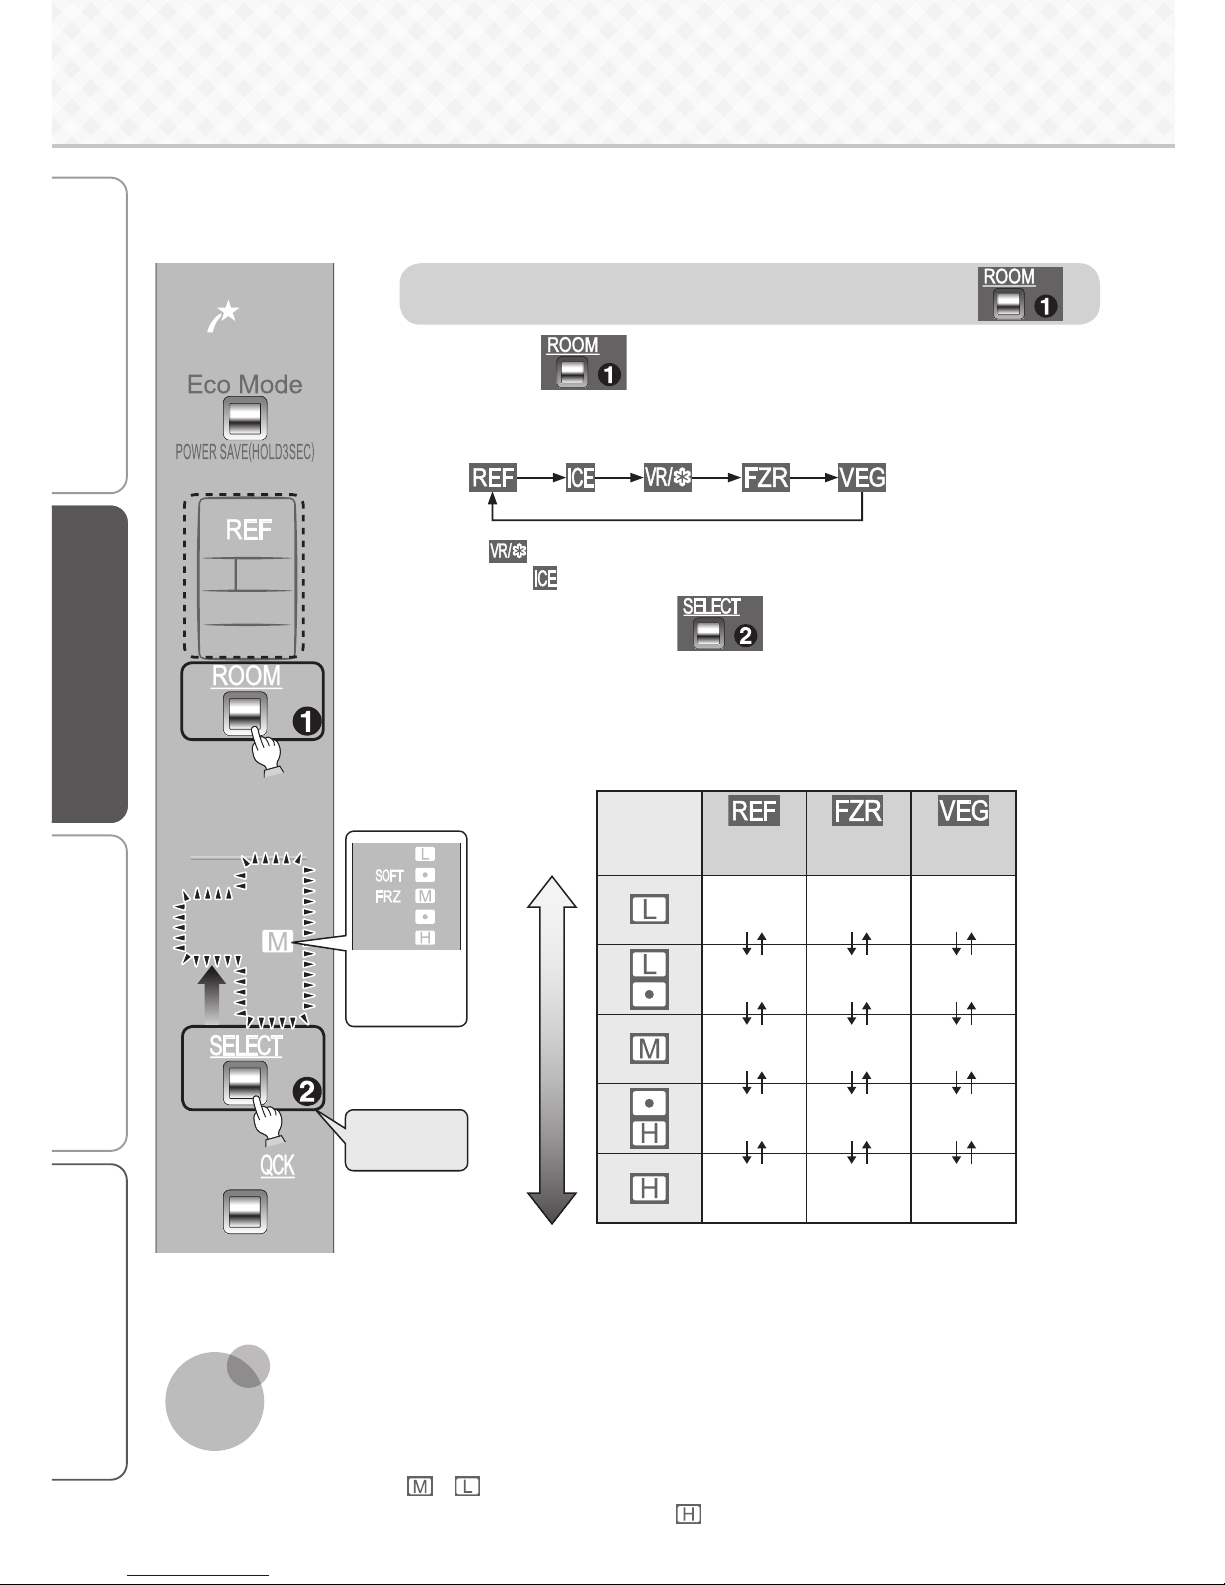
The display changes in the following
order each time the button is pressed.
is displayed at the time of purchase.
The selected compartment is
displayed.
Compartment display area
display
The display for the supercool freezing/fast cooling
button changes, depending on the displayed
compartment or the temperature setting.
Display names
Displayed compartment
When displaying the versa
compartment (with soft freezing).
Page 15
When displaying the refrigerator,
versa compartment (with freezing),
freezer, and vegetable compartments
Page 14
When displaying the ice making compartment
• When the versa compartment
is set to Power Save Mode
Page 22
* A setting is not valid unless
the display is lit. (A buzzer
sounds once.)
*
The name of the button lights up according to the
displayed compartment and the temperature setting.
Temperature/
setting button
Supercool freezing/
fast cooling button
Compartment
selection button
The operation panel indications are not lit in the normal state for the purpose of power saving.
To check the setting status, press a operation panel button to light up the display.
Set each compartment when the operation panel display lights up.
To save power, the operation panel display turns off if there is no operation for about 30 seconds.
•
If the operation panel display turns off, the display of the buttons ( ) also turns off.
•
stays displayed during supercool freezing.
How to Use the Operation
Panel
About the door alarm and interior light
The door alarm sounds when either door is open for 1 minute or longer.
When a door is open for 4 minutes or longer, the interior light of the refrigerator
compartment blinks.
If the door is left open for 60 minutes or longer, the light turns off.
The number of times the door alarm sounds and the action of the interior light are as
follows depending on how long the door has been left open.
Time for which
the door left open
1 minute 2 minutes 3 minutes 4 minutes
5 minutes
or longer
60 minutes
or longer
Alarm
2 beeps 3 beeps 4 beeps
Continuous
long beeps
Continuous short beeps
Interior light
On Blinks twice per minute Off
Check that the doors are not left ajar or do not have any food trapped (the packing, the back of the drawer cases). (Check at least once a month.)
If the alarm keeps sounding even after closing the doors
Page 33
Compartment display area
Example: When the doors of the
refrigerator and ice making
compartments are open
blinks in time
with the door
alarm sound.
Before Use Operation Cleaning TroubleshootingOperation
11
If the operation
panel display
blinks
The refrigerator is in the demonstration mode when the entire display blinks 3
times in regular intervals, or the compartment display and temperature control
display blinks repeatedly.
The refrigerator does not cool in this mode.
Cancel the demonstration operation.
Page 33
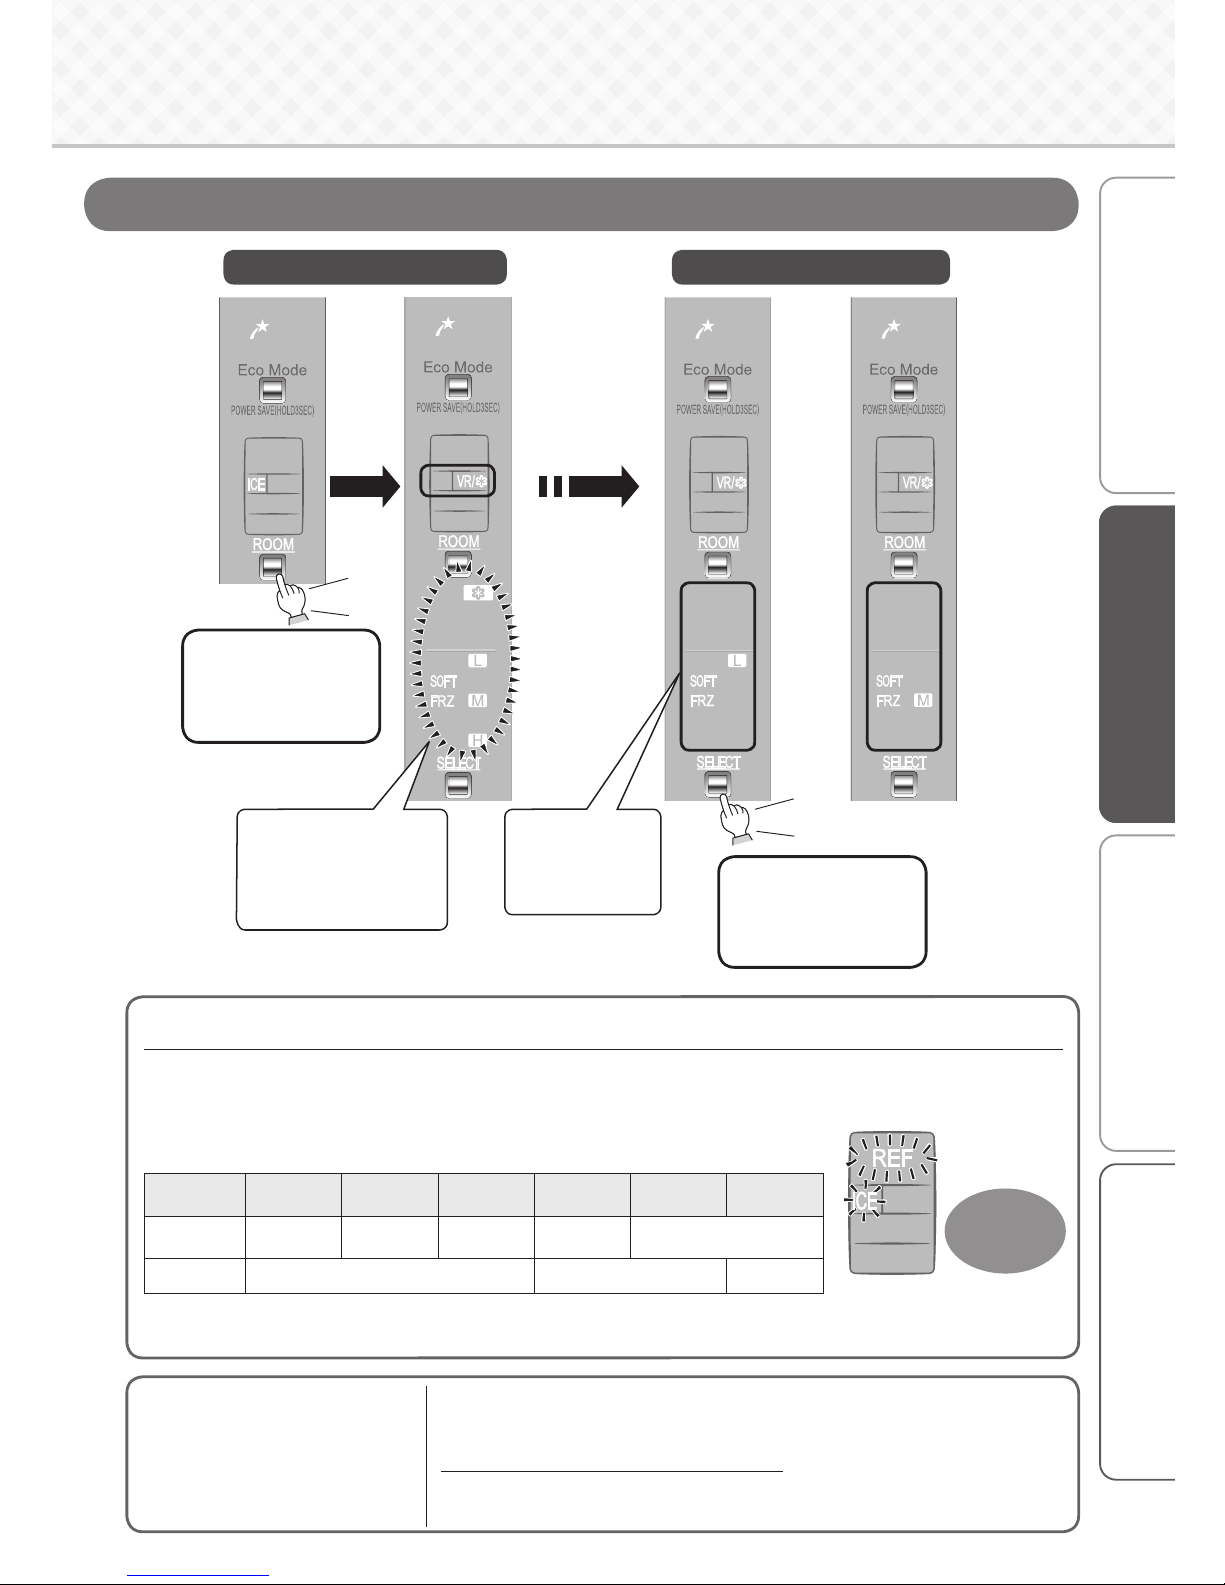
Operation example
Select the compartment Set the temperature
Press the
compartment
selection button to
light up the versa
compartment.
Press the
temperature/setting
button to select
"Soft freezing/M".
The display will light up
for about one second
to inform what you can
set for the selected
compartment.
Automatically
switches to light
up the current
setting.
A buzzer
sounds once.
After about
1 second
A buzzer
sounds once.
* Display at the time of
setting completion
(when selecting "Versa compartment" for the compartment and "Soft
freezing/M" for the temperature and settings)
Note
The temperatures described here are measured in the lower center of the refrigerator after the temperature has
stabilized when the surrounding temperature is 30°C and the doors are closed without any food inside. The
temperature fl uctuates with factors such as food storage conditions and how often the doors are opened and closed.
Before and after defrosting, the temperature inside the refrigerator may drop or rise temporarily.
If food in the refrigerator compartment freezes in the following kinds of situations, set the refrigerator compartment
temperature on
to .
• When the temperature setting of the compartments is
• In winter or at other times when the surrounding temperature is 5°C or less
Before Use Operation Cleaning TroubleshootingOperation
12
1
Press to light up the compartment display
that you want to adjust the temperature for.
The compartment display changes each time the button is pressed.
is displayed at the time of purchase.
* To set
Page 18
2
Repeatedly press to select the temperature.
The temperature settings for the refrigerator, freezer,
and vegetable compartments
The display changes each time the button is pressed and the temperature can be set
to 5 different levels.
* The freezer compartment temperature is different from the freezing
temperature of the versa compartment.
To control the temperature more precisely Page 34
Display of
setting
Refrigerator
compartment
Freezer
Compartment
Vegetable
compartment
About 6°C About -16°C About 9°C
About 5°C About -17°C About 8°C
About 3°C About -19°C About 6°C
About 1°C About -21°C About 5°C
About 0°C About -22°C About 3°C
Higher
temp.
Medium
temp.
Lower
temp.
* Display example
Press the
button.
*
Light up the displays on the operation panel. (Press .)
The temperature of each compartment can be adjusted according to the conditions of use.
Initial settings (at time of purchase): refrigerator, freezer, and vegetable compartments ..."M,"
versa compartment ..."Soft freezing/M"
Adjusting the Temperature
of Each Compartment
The set
display
lights up.

Before Use Operation Cleaning TroubleshootingOperation
13
The storage time is different due to a difference in their temperatures.
Select
when you want to store food with soft freezing and when you want to store food for a
long time.
Difference between and of the versa compartment
Display of setting
Application Other functions
When storing food such as meat or fi sh
with Soft-Freezing for
about 2 to 3 weeks
Supercool Freezing
Page 15
When storing meat, fi sh and other processed foods
for
about 1 month
Fast cooling
Page 14
Display of setting
Versa
compartment
Application
About -5°C
For frozen food that is too hard to cut
Store food with a high moisture content on
.
• Boiled vegetables
•
Large blocks of low-fat meat
About -7°C
The optimum temperature for Supercool
Freezing
The food is easy to cut even when frozen.
Can be frozen in its package.
About -9°C
For food that is diffi cult to freeze
Store food that has a high salt or sugar
content on .
• Food pickled in soy sauce or miso
• Cod roe
About -12°C
For preserving food containing a lot of
salt or sugar
Enjoy the texture of the food.
About -15°C
For preserving food that was frozen at
home
About -18°C
For preserving frozen food and ice
cream that were purchased
Preserves ice cream at the optimum hardness
so that it is easy to eat.
*
The freezer compartment temperature is different from that of the versa compartment's freezer setting.
* After changing from freezing to soft freezing mode, it takes some time for the temperature inside the
refrigerator to stabilize (about 2 hours).
To control the temperature more precisely Page 34
The temperature setting of the versa compartment
The display changes each time the button is pressed and the temperature can be set to 6 different levels.
Ice cream or frozen food that was
purchased cannot be stored in modes
or .
Note
The sound of the refrigerator running gets louder during fast cooling, because it is operating at high speed. Also, the
actual temperature can be lower than the set temparature.
Fast cooling can be done while food is inside.
Before Use Operation Cleaning TroubleshootingOperation
14
2
Press .
lights up when the setting is fi nished.
If there is no operation of control buttons for about 30 seconds, displays turn off.
Fast cooling stops automatically after about 2 hours.
(
turns off.)
Fast cooling cannot be performed when the versa compartment is set to
or Power Save Mode.
Press the button when
is displayed.
This lights up
if fast cooling
is set.
* Display
example
When you buy foods in bulk and store them, the foods can be cooled quickly to
preserve their freshness.
Fast cooling can be done in the refrigerator, versa (during the
setting), freezer, and vegetable
compartments.
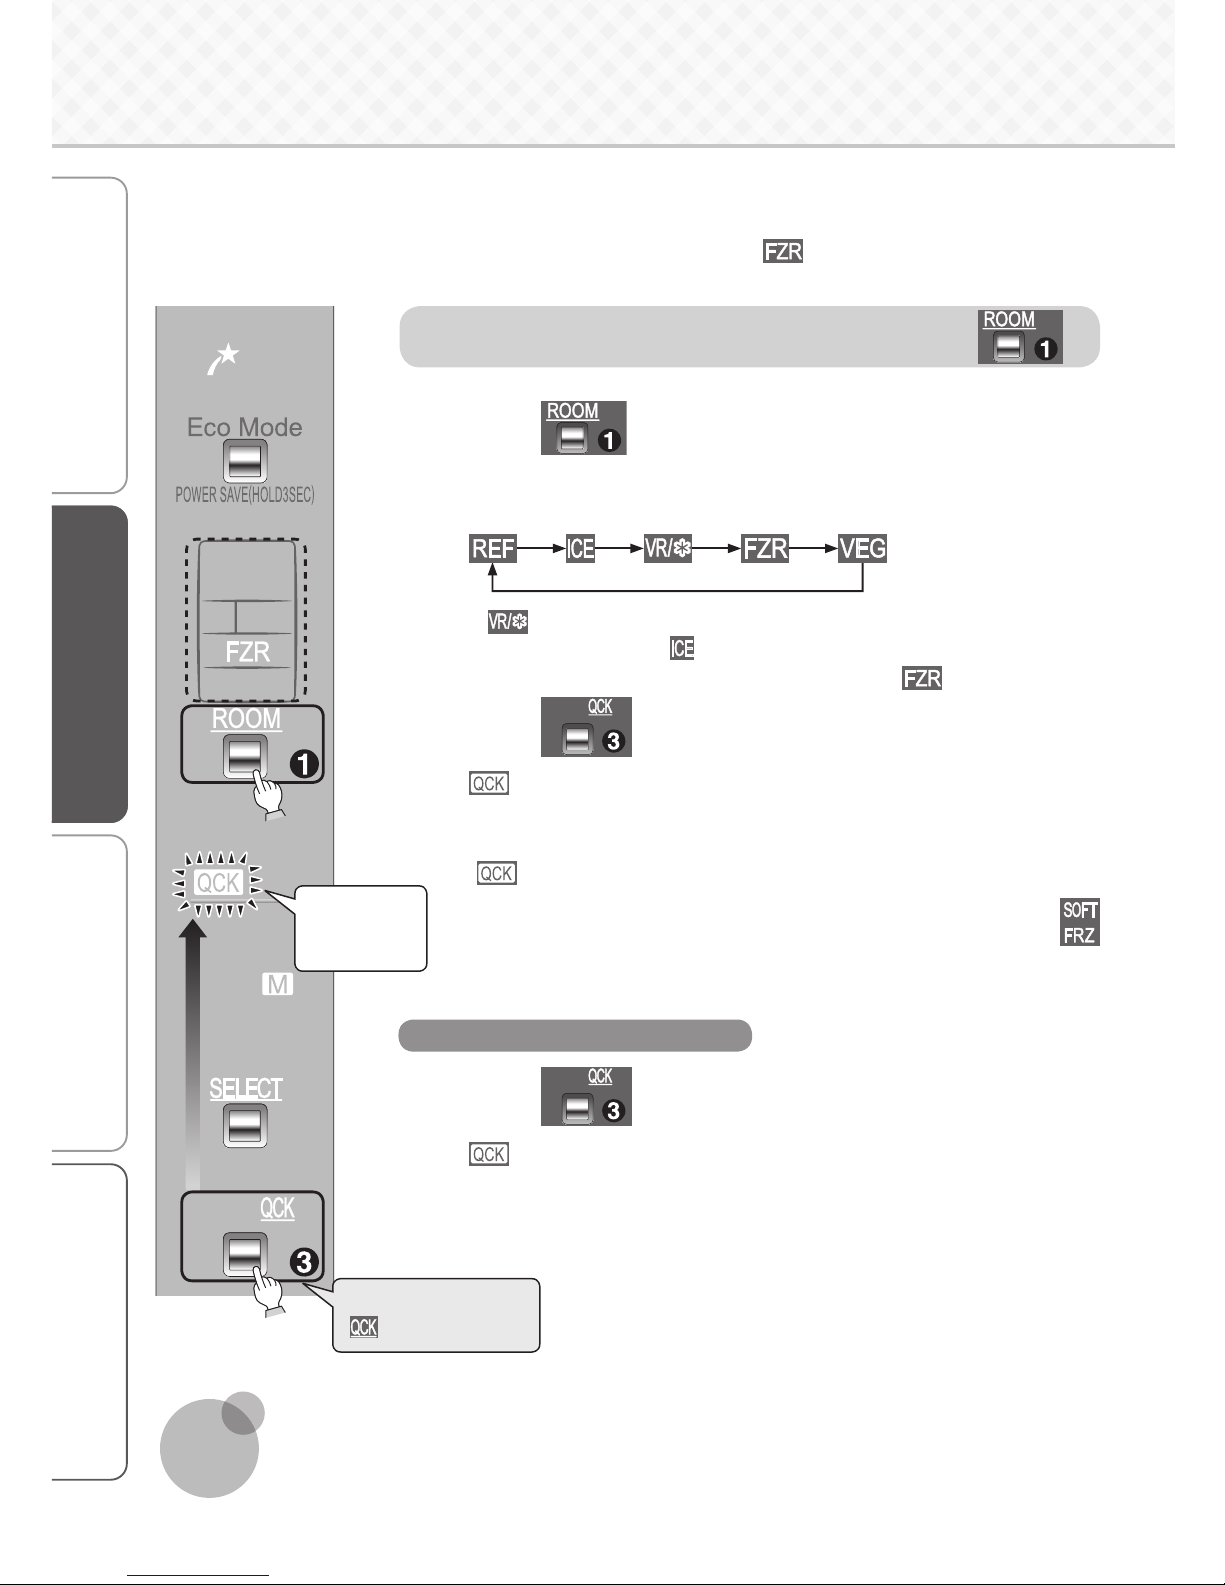
1
Press again.
goes off when the setting is canceled.
To cancel in the middle of setting
1
Press to light up the compartment display
that you want to cool quickly for.
The compartment display changes each time the button is pressed.
is displayed at the time of purchase.
*1: When you want to cool
quickly (quick ice making)
Page 18
*2:
The versa compartment can be cooled quickly during the setting.
*1 *2
Light up the displays on the operation panel. (Press .)
Cooling Quickly
(Fast Cooling)
Note
The door of the versa compartment can be opened and closed even during supercool freezing.
You can use supercool freezing even when other foods are still inside.
If there is no operation of control buttons for about 30 seconds, all displays other than
turn off.
Supercool freezing cannot be performed when the versa compartment is set to Power Save Mode or the setting.
Before Use Operation Cleaning TroubleshootingOperation
15
1
Press again.
goes off when the setting is canceled.
If the versa compartment is set to
during supercool freezing, supercool freezing
is canceled.
If the versa compartment is set to during supercool freezing, supercool freezing is
canceled.
Page 22
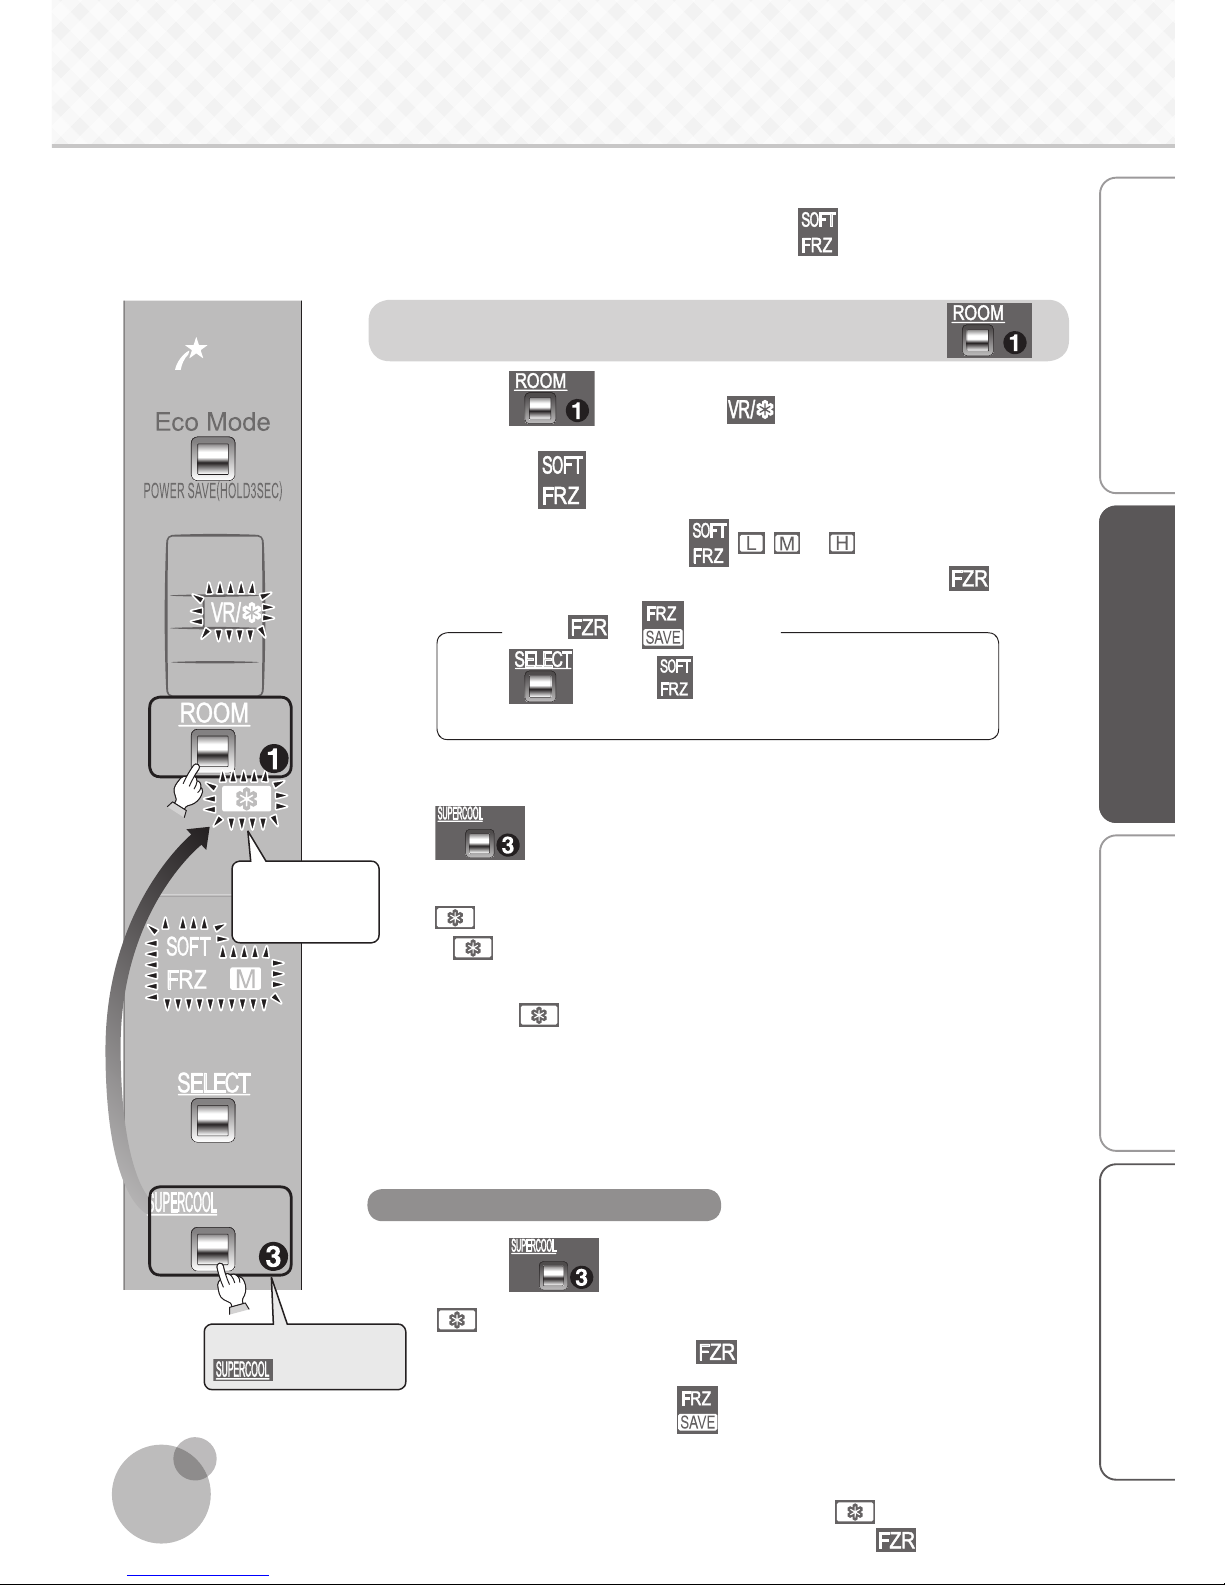
2
Check if lights up.
Supercool freezing can be set in
, , , or
.
Supercool freezing cannot be performed during Power Save Mode or the setting.
When or lights up
Press to display , and then wait until the temperature
stabilizes (after about 2 hours) before performing from step 1.
3
Store food in the versa compartment and press
.
* If display turns off while you store food inside, light up the operation panel display to set.
lights up when the setting is fi nished.
does not turn off during supercool freezing.
Supercool freezing fi nishes automatically after about 3 to 12
hours.
*
( turns off.)
* The time varies depending on the amount, temperature and type of food.
After supercool freezing fi nishes, the food is stored with Soft-Freezing. (Meat,
fi sh, etc. can be stored for 2 to 3 weeks.)
If you want to store the food for a long time, move it to the freezer compartment
after supercool freezing has fi nished. (Meat, fi sh, etc. can be stored for
about 1 month
.)
* This lights up
during supercool
freezing.
Press the button when
is displayed.
To cancel in the middle of setting
* Display
example
1
Press to light up .
Light up the displays on the operation panel. (Press .)
Freezing food with Supercool Freezing, you can keep its moisture and fl avor.
Supercool freezing can be performed in the versa compartment
(during the setting).
"Tips for Supercool Freezing" Pages 16-17
Freezing for Delicious Food
(Supercool Freezing)
Note
When performing soft freezing after
freezing, or freezing after soft freezing,
use the food within a short period of time
(about 1 to 2 weeks).
If you want to store the food for a long
time, move it to the freezer compartment
after supercool freezing has fi nished.
Food can be frozen without losing its
taste and texture by supercool freezing.
After supercool freezing finishes, the
food is stored with Soft-Freezing. The
food is easy to cut even when frozen,
saving time for preparing smaller
portions before freezing or thawing
them.
Food that is not normally suitable for freezing (bamboo
shoots, potatoes, etc) and hot food can be frozen to taste.
What is Supercool Freezing?
Before Use Operation Cleaning TroubleshootingOperation
16
Potatoes can
also be kept
tasty
You can
slice easily
You can
cut smoothly
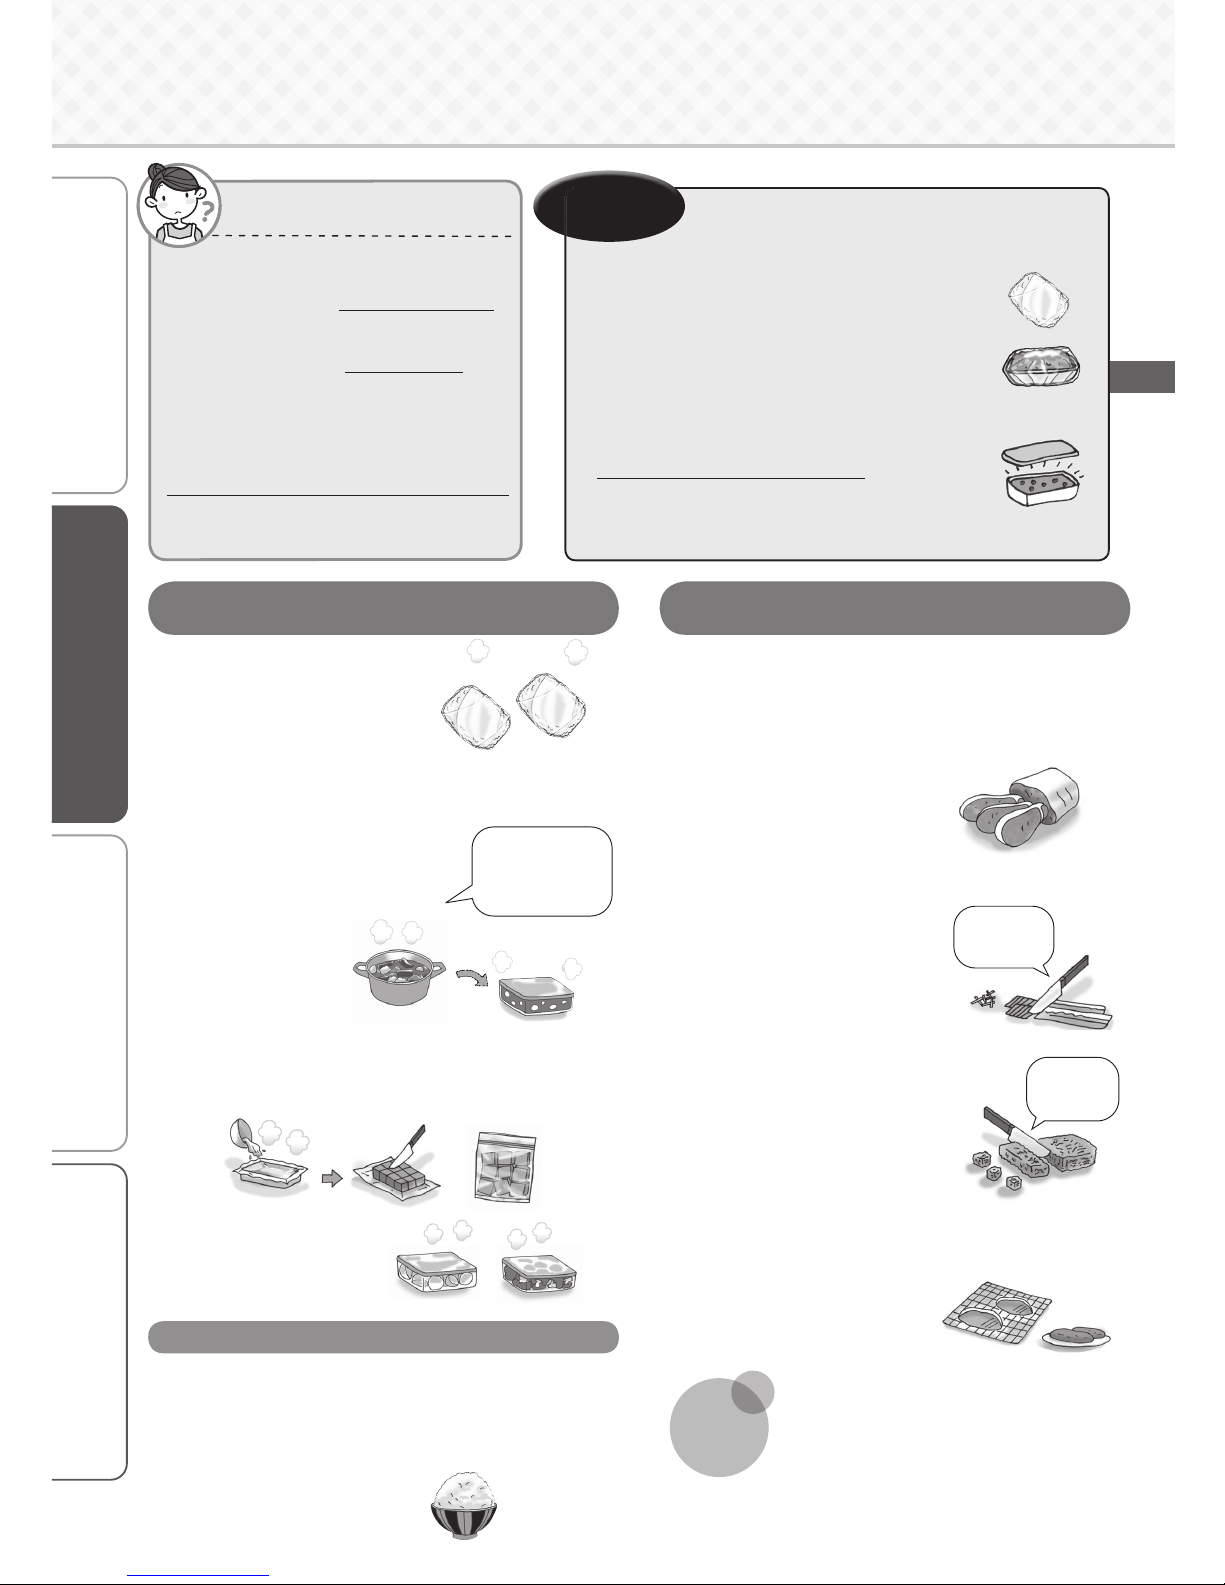
Use plastic wrap to cover containers
or wrap rice.
When storing food in sealed
containers, fi ll food tightly until the
container is completely full.
Do not store food that is hotter than 80°C.
Freshly cooked rice
is about 70°C
Avoid using aluminum foil or paper wrapping,
because it interferes with accurate measurement of the
food temperature.
If there is not much food in a container, the food
temperature may be measured inaccurately.
If food is too hot, it may deform nearby containers. Also,
when food is too hot to hold with your bare hands,
be very careful not to burn yourself.
Rice
For leftover rice, divide it by the
amount per serving, wrap them
while still warm and supercool
freeze it. Can be frozen without
losing moisture and taste.
It can be preserved for about 2 weeks with soft freezing.
It thaws well with no unevenness.
Curry
Leftover curry can be put in the
versa compartment while still hot
for supercool freezing.
Sauces
Freshly cooked sauce poured into a storage container
while still hot can be supercool frozen. After hardened,
the sauce can be diced and put into a storage bag,
which takes up less space and lets you take out only the
amount that you need each time.
Potatoes and broccoli
Boiled vegetables to be used
in croquettes or salads
can be cooled down using
supercool freezing.
Blocks of meat
We recommend supercool freezing for blocks of meat of
about 100 to 400 grams. Meat that has been stored in the
freezer or was purchased frozen can be transferred to soft
freezing.
Depending on the size of
the food, it can be cut in
about 2 to 5 hours after having
been transferred from freezing.
Thinly sliced meat or bacon
They will thaw while basting and
you can easily separate them.
If they cannot be separated
immediately after taken out of the
compartment, wait for a while and
try again.
Ground meat
You can cut out only the necessary
amount with a kitchen knife.
If you cut the meat into cubes and
leave them in room temperature for
about 15 to 30 minutes, they will
have thawed enough to be kneaded by
hand.
Cutlets and cod roe
Cutlets can be cooked on a low fl ame without thawing
them fi rst.
Food with a high salt content, such
as cod roe, does not freeze and so
can be used immediately.
What about storage containers?
Step
Step
1
Precautions
Supercool freezing of hot food
Storing meat and fi sh with Soft-Freezing
Tips for Supercool Freezing
Food not suitable for Supercool Freezing
Note
Even after supercool freezing has fi nished
and
turns off, the food may not be
completely frozen.
(With supercool freezing and soft freezing,
food is frozen at about -7°C, so it takes about
24 hours for the food to freeze completely.)
Note
When fruit is thawed it does not return to its original
condition. Eat frozen fruit without thawing it.
The freezing time varies depending on the sugar content.
Leave for one night after supercool freezing.
If fruit is stored for more than one week with soft freezing,
its taste may change. To enjoy the fresh texture, we
recommend eating within 2 to 3 days.
When adding foods to be stored, refrain from opening the
doors often.
Supercool freezing may not be possible or the degree of
freezing or freezer burn may vary if the food type, cooking
method, storage arrangement (stacking, storage location), the
amount of food, and the period of storage change.
Depending on the amount of sugar, salt or fat contained in
foods, freezing may not be possible or the food may harden
when frozen (cannot be cut immediately with a kitchen knife).
If the food has frozen too hard, leave it for about 5 to 15
minutes at room temperature and you should be able to cut it
with a kitchen knife.
Set the temperature according to how the food is frozen.
Pages 12-13
Before Use Operation Cleaning TroubleshootingOperation
17
Sweet fruits are
recommended
Lay out the food that you
want to supercool freeze
fl at on top in the versa
compartment.
Set to supercool freezing after storing food.
Page 15
We recommend that
hot food be separated
from the frozen food
and placed at the front.
If more food is added afterward, the
supercool freezing may not work.
If hot food and cold food below
room temperature are placed inside
at the same time, priority is given
to cooling the hot food.
Natto
Natto can be mixed immediately
after removal from the compartment.
Fried bean curd
You can cut out the necessary amount.
Food that has already
thawed once
The texture and quality
cannot be guaranteed.
Food that cannot be frozen
(Konjac (devil's tongue), tofu, milk, raw eggs, etc.)
Preservation of the pre-freezing texture
and quality cannot be guaranteed.
Ice cream or frozen food purchased
Store them in the freezer compartment.
The hot food may
touch and thaw the
frozen food.
When food is hidden
behind other foods, its
temperature cannot be
measured accurately.
Fruit juice
Mix supercool frozen fruit with yoghurt and milk in a
blender to make a simple, healthy drink.
Frozen fruits
Make frozen fruits by cutting fruits
into bite-size pieces and supercool
freezing them.
You can try with lots of different fruits.
Frozen yogurt
Sweetened yogurt can be supercool frozen
while still in its cup. After one night,
it becomes a fi ne, smooth texture.
Smoothie
(apple and kiwi smoothie)
Cut half a peeled apple into large bite-size
pieces, and a peeled kiwi into circular slices
with a thickness of 1 cm.
Supercool freeze
them.
Put the supercool frozen apple and kiwi
into a blender with 250 cc of milk and some
honey (if you like), and blend until smooth (makes 2
servings).
Jam
(strawberry jam)
Put 1 pack of strawberries (about 300 grams) into a container
and mash them thoroughly.
Mix in 60 to 100 grams of sugar (depending
on the sweetness of the strawberries) and
supercool freeze the mixture.
Leave for one night and it turns into a
tasty strawberry jam.
Easy to make from even a small amount of fruit.
Try it next time you have some leftover fruit!
Do not store in a glass container.
It may break down.
The infrared sensor monitors food
temperature from the top of the versa
compartment. Arrange the food to make
it easy for the sensor to measure the
temperature.
Supercool freeze together
at the same time.
When putting food inside
Where should the food be placed?
Step
Step
2
Step
Step
3
Delicious fruit and desert recipes
Various foods for Supercool Freezing!
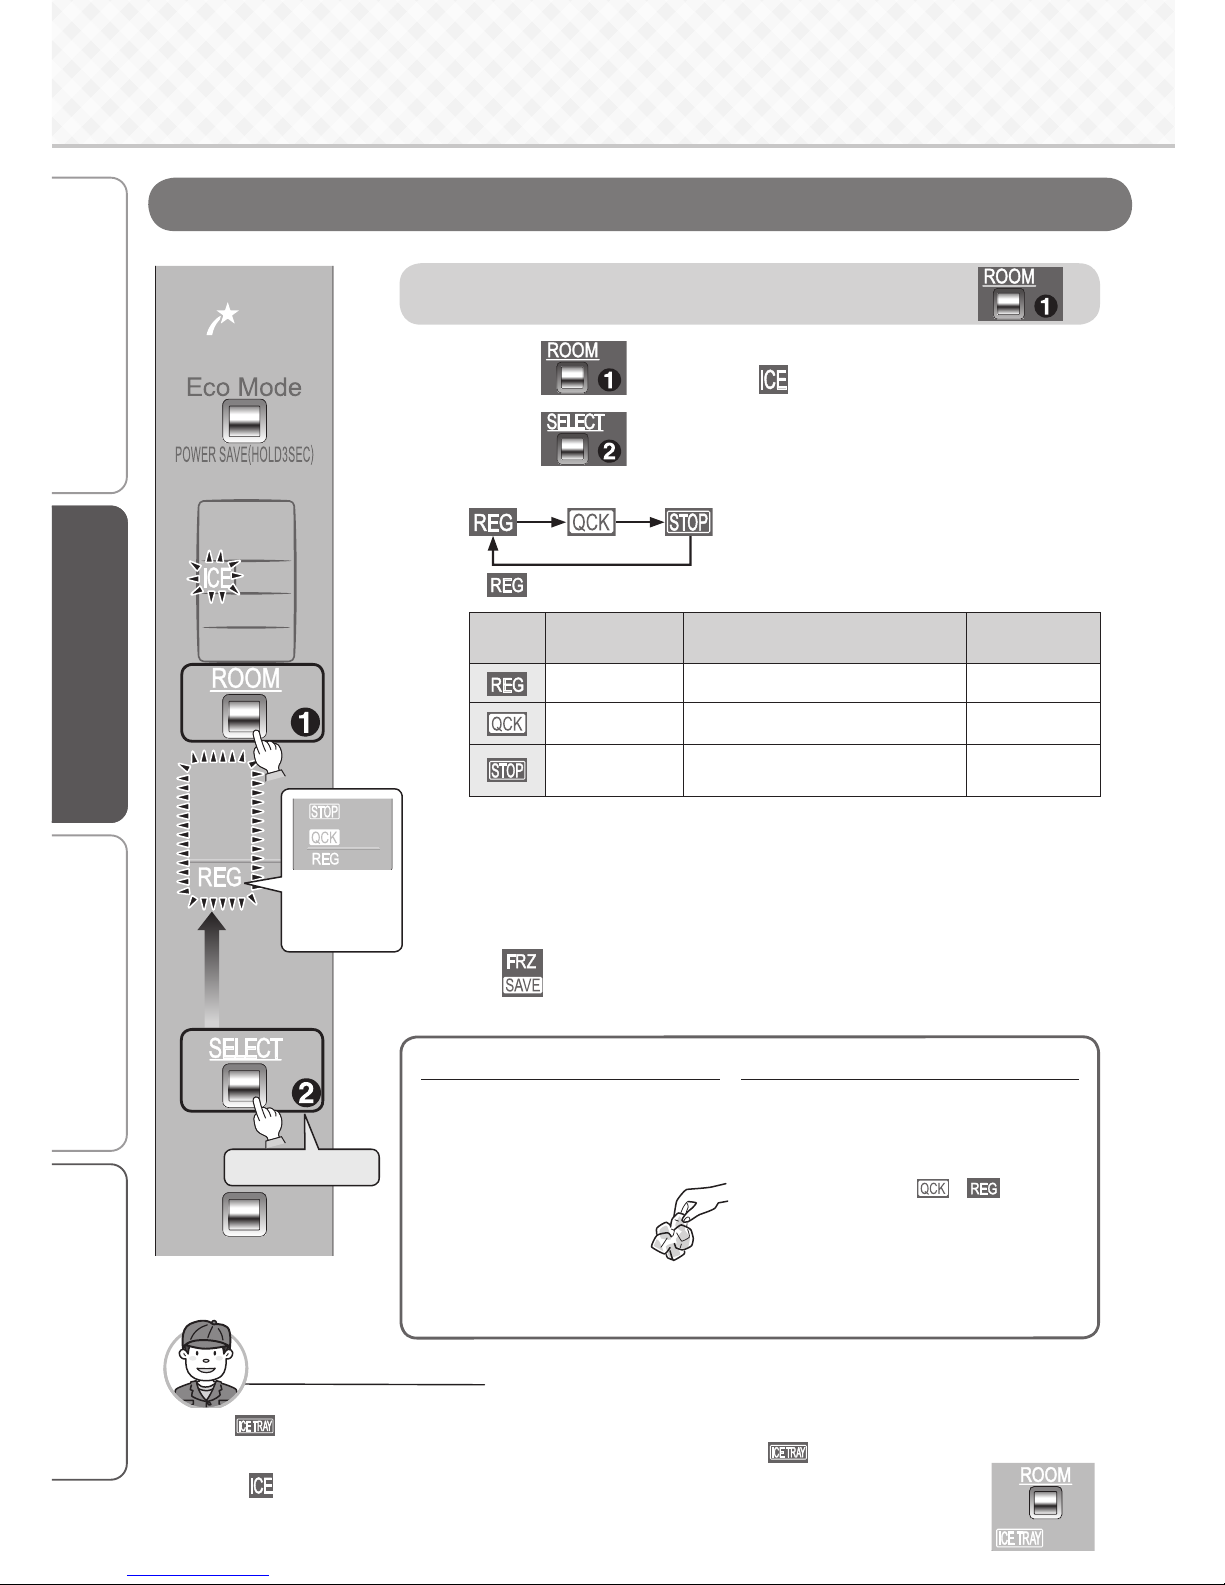
Display
of setting
Settings Application
Approximate ice
making time
Regular ice making
When you want to make ice About 2 hours
Quick ice making
When you want to make ice quickly 60 to 80 minutes
Stop ice making
When you want to clean the ice making
compartment
*1
−
Ice tray precautions
The ice cube size and the number of ice cubes
in one batch depends on various factors, such
as the amount of water in the water tank.
About 10 to 12 ice cubes can be made each time.
If the ice is stored in the ice
storage box for a long time, the
ice cubes may join together or
shrink (due to a phenomenon
called sublimation).
If you try to crush ice that has joined together,
be careful not to injure your hands.
In the following cases, quick ice making is stopped
automatically.
•
When the ice storage box is full (about 80 to 140 ice cubes)
• When there is no water in the water tank
•
When about 10 hours have passed in quick ice making mode
(The display changes from to
)
The sound of the refrigerator running gets louder during quick
ice making, because the refrigerator is operating at high speed.
It may take more than 24 hours to make ice immediately after
installation, even in quick ice making mode.
When quick ice making is performed, the ice may split or crack
because the freezing is performed quickly.
About the ice About quick ice making
The
display lights up when the ice tray or ice tray lock lever is not installed correctly. (How to install ice tray:
Page 28
)
Before making ice, install the ice tray and lock the ice lock lever, making sure that
is off.
When
of the compartment display is blinking, the ice tray is operating.
If you unlock the ice tray lock lever while the ice tray is operating, you will be alerted by a repetitive buzzer.
Do not remove the ice tray while it is operating. It may cause injury or failure.
Before Use Operation Cleaning TroubleshootingOperation
18
1
Press to light up .
2
Press to select the ice making setting.
The display changes in the following order each time the button is pressed.
is displayed at the time of purchase.
The ice making time is the approximate time for a single batch (10 to 12 ice cubes).
In addition to the surrounding temperature, water type, and water volume and temperature in the water
tank, ice making times may vary with the following conditions, and be longer than those described above.
•
When the ambient temperature is low, such as during winter
•
When the doors are frequently opened and closed
•
When the freezer compartment is set to low
•
When the refrigerator is set to ECO MODE
Page 20
• When the ice tray is pulled out and reinserted during ice making
If
is displayed, ice cannot be made. Cancel the setting.
Page 22
* Display example
Press the button.
Light up the displays on the operation panel. (Press .)
*1: For short term storage of frozen food. Not to be used for long term storage of frozen food or ice cream.
Set the ice making compartment
Making Ice
The set
display
lights up.
Note
Wash the water tank, water supply pipe and ice tray before making ice for the fi rst time, or
if you have not made ice for more than a week. Odors or dust may adhere to the parts.
Before Use Operation Cleaning TroubleshootingOperation
19
Hold with
both hands
Water tank
Return the water tank to its original position
Hold horizontally
with both hands
Ice
storage
box
Stop ice making and empty the water from the ice tray and water tank if not making ice for a long time.
Water tank
Return the water tank
to its original position
3
Remove the water tank.
1
Set to or for the ice
making compartment.
Page 18
5
Close the water tank cap, and push it in
until it makes contact with the inner side.
Check that there are no foreign objects between the tank
holder and the water supply pipe area. It may cause freezing.
Page 28
Push in the water tank until it makes contact with the
inner side. Setting the water tank incorrectly may prevent
ice from forming.
Full position
Water supply
port
4
Slide open the water
tank cap
and pour water
into the water supply port
up to the full position.
If the tank is fi lled beyond the full
position, water may spill out when you
carry or tilt it. Further, this may cause the
water channels in the ice tray to freeze, or cause
the ice to join together or form a protrusion.
WARNING-Fill with potable water only.
2
Make sure that on the
operation panel is not on.
If the lamp is on, insert the ice tray and lock the
ice tray lock lever.
Page 28
2
Remove the water tank and
empty the water.
3
Remove the ice tray and empty
the water and ice.
For details on removal, see the page that describes
the cleaning methods.
Page 28
4
Remove the ice storage
box and empty the
water and ice.
Do not dispose of the
soundproof mat.
5
Wash the water tank (water supply
pump, tank pipe, optical catalyst and
lead-cleaning fi lter), water supply
pipe, ice storage box, soundproof
mat, ice tray and ice server, dry them
completely, and then return them to
their original positions.
Pages 28-29
If the water tank is not
returned to its original
position, the food
inside the refrigerator
compartment may freeze.
If you will not make ice for a long time
1
Set the ice making setting of the
ice making compartment to
.
Page 18
Making ice

Before Use Operation Cleaning TroubleshootingOperation
20
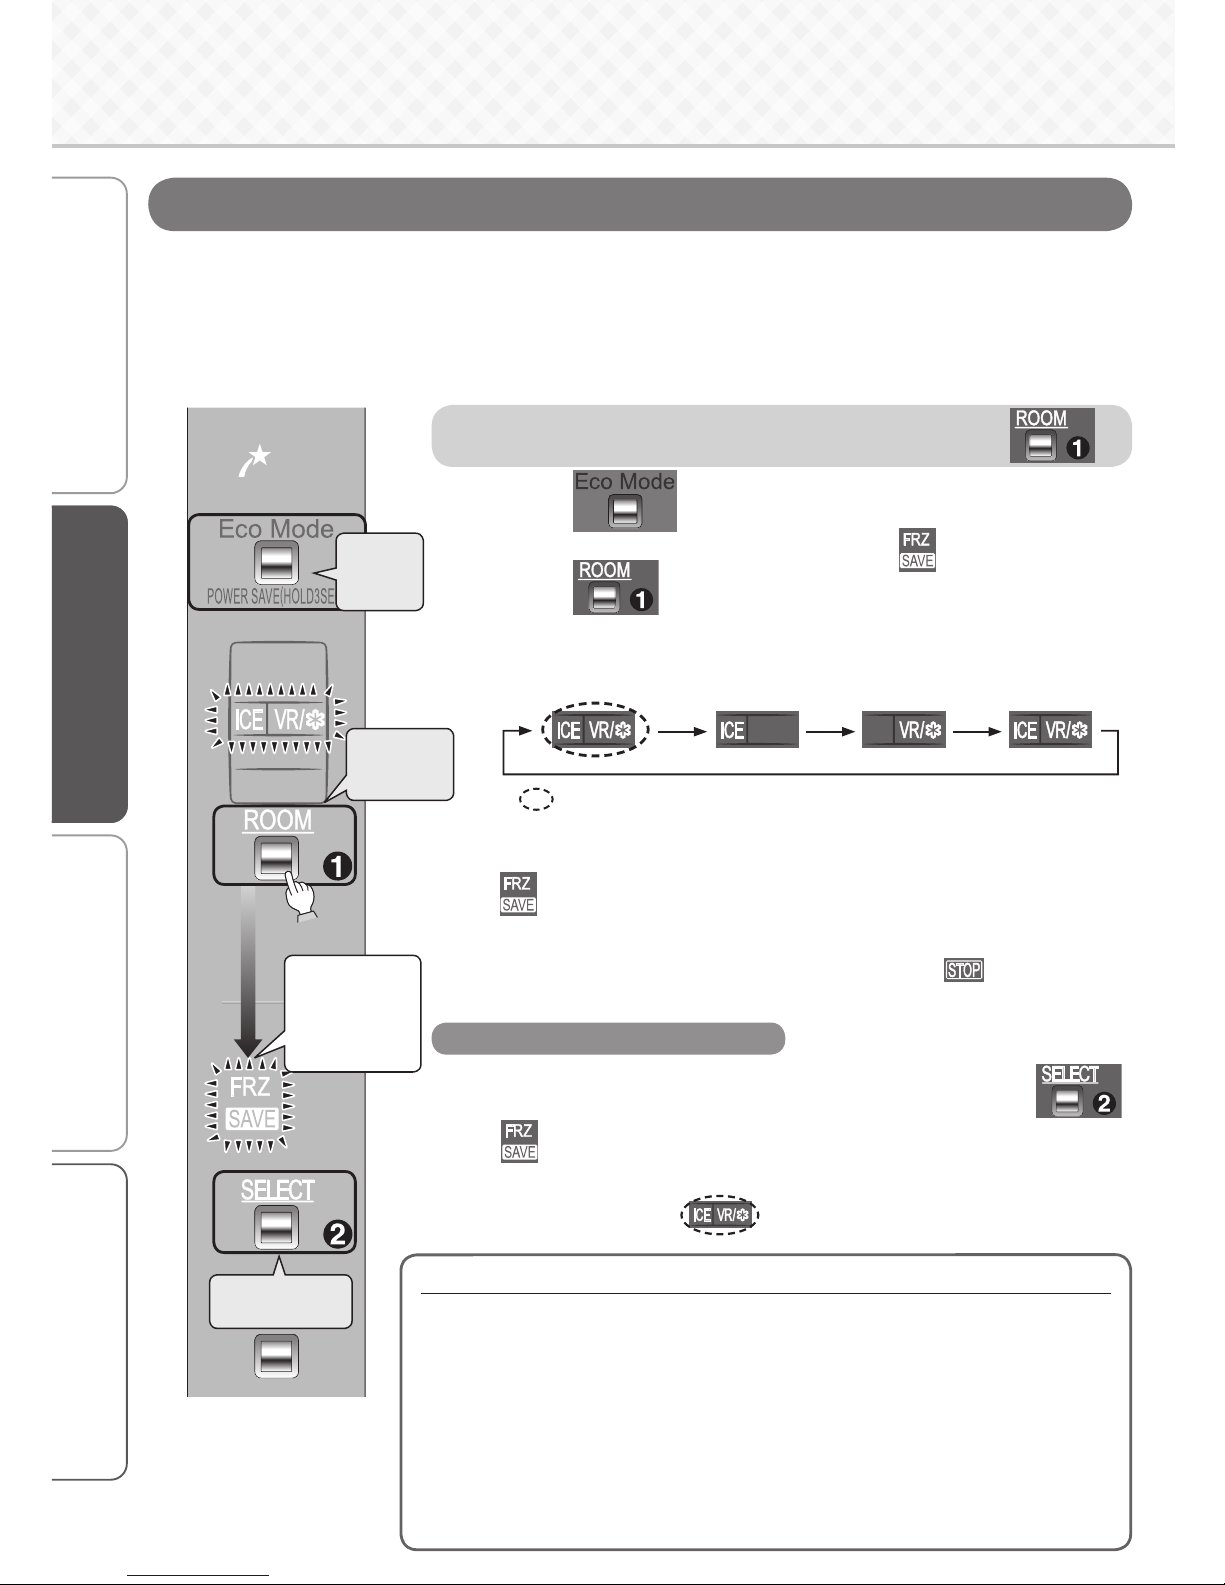
Light up the displays on the operation panel. (Press .)
Set ECO MODE
When the temperature inside the refrigerator is stable, the
power-saving operation is performed automatically. This is
not set initially.
Set Power Save Mode
Performs the power-saving operation by reducing refrigerating
capacity. This mode can be set for the ice making and versa
compartments.
Page 22
Do not open the doors more than necessary,
and close them as soon as possible
If doors are opened frequently or are kept open for a long time, cold
air escapes from the refrigerator and more power is consumed.
Even when a door is open only slightly, it can cause frost or
condensation, reduce the cooling performance, or generate water drips.
Set the temperature relatively high
By setting the temperature of each compartment relatively
high, power consumption can be reduced. We also recommend
setting the versa compartment to soft freezing.
How can I increase the ECO level?
1
Press .
lights up when the setting is fi nished.
lights up when the power-saving operation is started.
If there is no operation of control buttons for about 30 seconds, it turns off.
Appropriate timing is selected for each compartment, and the power-saving operation
is performed automatically. With the power saving operation, the temperature of the
compartment is set a little higher while compartment operations are performed.
Even when ECO MODE is set, the power-saving operation may stop and may go off; for example, when
the doors are frequently opened, after defrosting, or during fast cooling. (After the freezer compartment is
suffi ciently cooled and the temperature is stable, the power-saving operation is restarted automatically.)
1
Press again.
goes off when the setting is canceled.
ECO level 1
ECO level 2
ECO level 3
*
Blinking of the level 1 means the level 0 (for example,
when the doors are opened and closed frequently or
the surrounding temperature of the refrigerator is hot).
The ECO Level is indicated in 4 levels from 0 to 3. (Eco-friendly use can save
power and increase the ECO level.)
The ECO Level is updated about once every hour. (If there is no change in the
ECO Level, the number of the mark does not change.)
At the time of purchase, level 1 is displayed.
The ECO GUIDE is displayed even when ECO MODE is not set.
After a door is closed, the ECO GUIDE and
displays light up for about 30
seconds. (Then they go off.)
To cancel
* Display
example
lights
up during
ECO
MODE
settng.
Set Eco Mode (ECO MODE)
ECO GUIDE
The ECO Level of the previous 24 hours, which is determined by factors such as the
temperature settings of the compartments and the frequency of opening the doors, is
indicated by three marks.
Power Saving
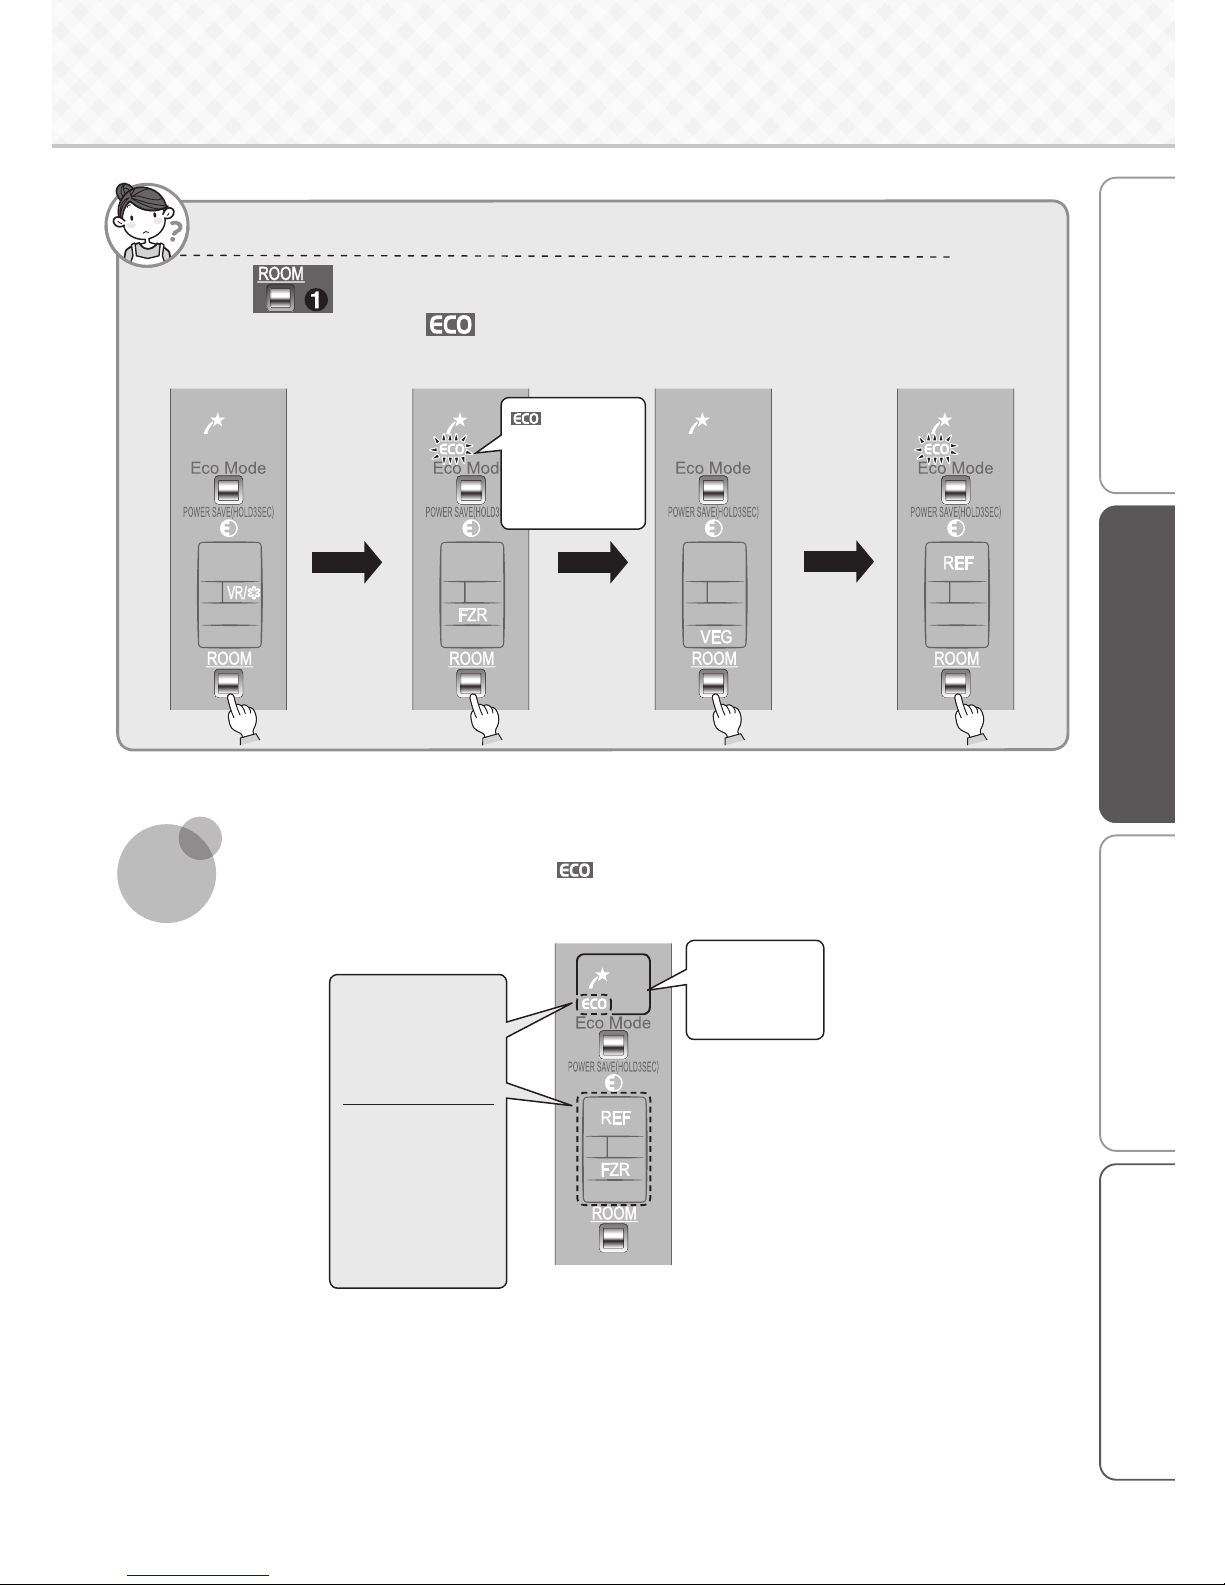
Before Use Operation Cleaning TroubleshootingOperation
21
If you press to switch the compartment display area, you can check the compartment in
the power-saving operation by
.
Example: When the freezer compartment and the refrigerator compartment are in the power-saving operation
To check the power-saving conditions of the each compartment
lights
up for the
compartment in
the power-saving
operation.
Example: When the freezer compartment and the refrigerator compartment are in the power-saving operation
Note
After a door is closed, the ECO GUIDE and
displays light up for about 30 seconds. (Then they go off.)
When ECO MODE
is set, it informs
the compartment
in power saving
operation.
* Even though ECO
MODE is set,
the display does
not light up if the
compartment is
not on the power
saving mode.
Inform ECO
Level with ECO
GUIDE.
Before Use Operation Cleaning TroubleshootingOperation
22
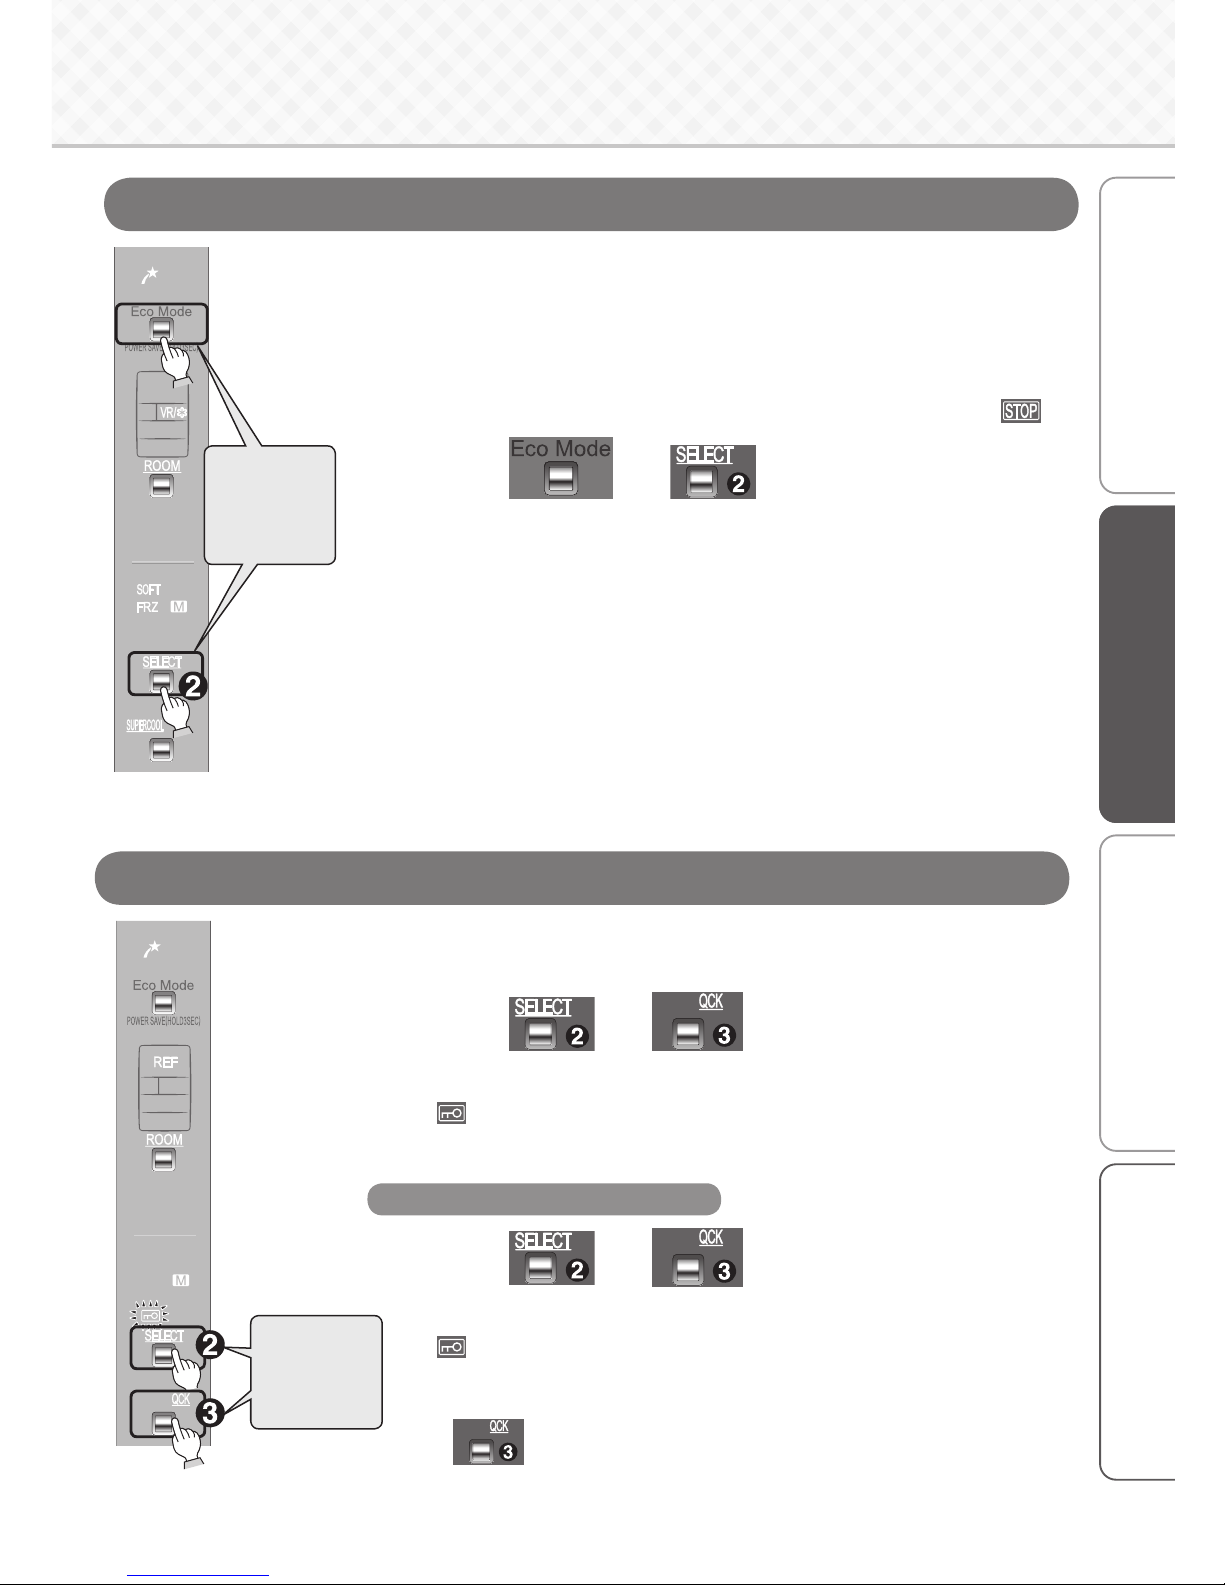
Light up the displays on the operation panel. (Press .)
Food that can be stored in Power Save Mode
(Dry foods) Seaweeds, seasoning powder, coffee beans, nuts, dry noodles, (pasta,
vermicellifi ne noodles, etc.) etc.
(Seasonings) Salt, sugar, spice powder, etc.
(Grains) Rice, wheat, potato starch, etc.
(Sweets) Dry confectioneries, chocolates, cookies, etc.
In Power Save Mode, the freezing temperature is set to between about -10°C and 0°C.
It is not suitable for storing ice, fresh food, frozen food, ice cream, and food frozen at home. Move
food from the versa compartment to the freezer compartment in advance.
Check the items in the compartment before setting.
Temperature may be lower when the ambient temperature is low, such as during winter, or when
the freezer compartment is set to high.
Do not store food higher than the ice storage box into the ice making compartment (because it may
cause an ajar door, malfunction or damage).
This function reduces freezing capability of the set compartment for power saving.
Can be set for the ice making compartment and the versa compartment.
If the ice making compartment is set to Power Save Mode, ice making is stopped automatically. (Ice
cannot be stored.) Empty the water in the water tank as well as the water and ice in the ice tray and the
ice storage box, and then set to Power Save Mode.
(The operation in "If you will not make ice for a long time" 2-5
Page 19)
1
Press for about 3 seconds or more
(until the buzzer sounds twice)
and make
blink.
2
Press to light up the compartment display that
you want to set for.
The lit compartment is set to Power Save Mode.
The display changes in the following order each time the button is pressed.
To cancel
1
Select the compartment in this mode and press .
goes off when the setting is canceled.
If the temperature setting of the compartment in this mode is adjusted, the setting is canceled.
Also can be canceled if is selected in steps 1 and 2 of the setting procedure.
3
changes from blinking to lit after a time,
and the setting is fi nished
(until the buzzer sounds twice).
If the ice making compartment is set to Power Save Mode,
is also displayed.
If there is no operation of control buttons for about 30 seconds, it turns off.
* Display example
This will be
displayed
during Power
Save Mode.
Press the
button.
represents a blinking display. This is the condition where Power Save Mode
was canceled.
Power Save Mode is canceled at the time of purchase.
Press for
about 3
seconds.
Press the button
to cancel.
Set Power Save Mode
Power Saving
(Continued)
Before Use Operation Cleaning TroubleshootingOperation
23
1
Press and at the same time for about
three seconds
(until the buzzer sounds twice).
lights up when the setting is fi nished.
Even when the Child Safety Lock is set, the compartment selection can be operated.
1
Press and for about three seconds
(until the buzzer sounds twice).
1
Press and at the same time for about
three seconds
(until the buzzer sounds twice).
goes off when the setting is canceled.
To cancel
is a display example. The display for the button changes depending on
the selected compartment or temperature.
Page 10
To return each setting to their initial condition (at the time of
purchase), if you have forgotten the settings, etc.
The temperature setting of the versa compartment does not change.
Fast cooling, quick ice making, supercool freezing, ECO MODE, and Power
Save Mode will be canceled.
The setting does not change when the ice making compartment is set to
.
Locks the operation panel to prevent accidental button operation
by children.
To reset setting
To prevent accidental button operation (Child Safety Lock)
* Display example
Press the
buttons at the
same time for
about three
seconds
* Display example
Press the
buttons at the
same time for
about three
seconds
Other Settings
(Setting Reset, Child Safety Lock)

Slide chilled case
Chilled egg compartment
Chilled (-3 to 3°C)
• Cannot adjust the temperature.
• Do not store food that is easy to be frozen.
Store food such as meat, fish, processed
food (fi sh cake, ham, etc.) and yoghurt.
Before Use Operation Cleaning TroubleshootingOperation
24
Interior light
Two-way
flexishelf
Adjustable pocket
Bottle pocket
Small item
case (upper)
Small item case (lower)
Egg shelf
Air outlet
The interior light uses 10 LEDs.
AUTO Shelf
If food with a high water content is placed
near the air outlets, it may freeze.
Page 37
When a door is open, you will be informed with the door alarm, interior light, and compartment display area.
Page 11
Wrap foods that have strong
odor thoroughly before storage
Rakkyo, dried fi sh, natto, miso,
beef, takuan, sardines, kimchi,
jiaozi, etc.
Food that transfers odors easily
Puddings, ice cream, rice, potato
salad, tofu, bread, milk, cake, ice,
etc.
Food to which odors may easily be transferred
Refrigerator Compartment

Before Use Operation Cleaning TroubleshootingOperation
25
Do not close the door while food is
in front of the slide chilled case or
the small item case.
Note
A long-life LED is used as the interior light, so usually
replacement is not required.
Fully stow away
the cases.
Do not leave food hanging over
shelves or pockets.
Do not place glass bottles that
cannot fi t all the way to the
bottom at the front of the bottle
pocket.
The bottle may keep a door ajar, or the bottle
may break.
Also, food may fall and cause an injury
Do not attach a case that you
purchased separately onto the
outside of a pocket.
It may keep a door ajar and reduce the
cooling performance, or food may fall and
cause an injury or damage to a case or lid.
You can move the shelves and
pockets.
Removing the AUTO Shelf
Page 30
Removing the two-way fl exishelf
Page 30
Removing the pockets
Page 31
As a wide shelf
Halve the shelf
width
to store tall
objects
Move the lever to the left or right to adjust the space
between the shelves.
1
2
(One)
(Two)
AUTO shelf
Two-way fl exishelf
Adjustable pocket
Adjustable to 2
positions

Before Use Operation Cleaning TroubleshootingOperation
26
Vegetable compartment
Caution
Vegetable case
Slide case
Freezer compartment
Caution
Do not place tall objects in the
freezing case (lower).
Food or the freezing case (upper) may
be damaged.
The door may not be closed.
Do not put in plastic drink bottles other than those meant
for freezing.
The frozen contents may break the bottle.
Freezing
case (upper)
Freezing
case (lower)
Versa compartment
Caution
Do not stack food higher than the case.
The door may not be closed.
Food may be damaged.
Food may be thawed.
Versa case
Infrared sensor
The food temperature is detected with an infrared sensor.
Aluminum tray
The cold tray quickly cools the food.
When a door is open, you will be informed with the door alarm and compartment display area.
Page 11
Do not stack food higher than the case.
• Food or the slide case may be damaged.
• The door may not be closed.
Because the vegetable compartment has a high
humidity depending on the amount or types of
vegetables, frost or condensation may form on the roof
of the vegetable compartment or the surface of the
cases.
When condensation forms, wipe it off with a dry cloth.
Freezer
Compartment
Vegetable
Compartment
Versa
compartment

Before Use Operation Cleaning TroubleshootingOperation
27
Ice making compartment
Do not pour anything other than
cold water into the water tank, such
as warm water, juice, tea, soft drink,
or other liquids (the tank can resist
heat up to 60°C).
Pouring anything other than cold water into the
tank may damage the automatic ice maker or
water supply pump.
Do not pour water directly into the ice tray to make ice.
Unfrozen water in the ice tray may fall into the ice storage box, and
the ice may join not forming cubes.
When ice is made using water with a high mineral
content, such as mineral water, white deposits
(white crystals) may form in the ice.
This is the crystallized mineral content and is not harmful.
Clean the ice maker periodically to ensure that the ice is pure and delicious.
Pages 28 - 29
When a door is open, you will be informed with the door alarm and compartment display area.
Page 11
Do not place objects at the rear of the ice storage box.
Store food lower than the red line of the ice making compartment
label (because it may cause an ajar door, malfunction or damage).
Do not store foods other than ice when the ice making compartment
is set to
or .
The level of the ice storage is checked automatically by the sensor
lever, and ice making is stopped when the ice reaches a certain level
(about 80 to 140 ice cubes). To detect the ice storage level correctly,
make sure that the ice is fl at and that the ice server is kept in its
storage position in the front right of the ice storage box.
Ice server
Ice storage box
Ice tray
Sensor lever
(Detects the ice
storage level)
Door
Lay fl at
Ice making precautions
Ice Making Compartment
(Automatic Ice Maker)
Water tank lid
Water tank cap
Water supply pipe
Ice tray
Ice making
compartment
label
Soundproof mat
Reduces the sound of dropping ice.
Do not dispose of it.
It can be removed
for cleaning.
The lid can be set on the
tank in both directions,
facing the front or rear.
Water tank
(about 1.2 L)
Water tank setting position line
Ice storage box
Ice tray lock lever
Ice server
This is the guideline for
the water tank setting
position.
Push in the water tank
until it makes contact with
the inner side. Make sure
that the line can be seen
in front of the water tank.
Tank
Pipe
Water supply pump
Optical catalyst and leadcleaning fi lter

Before Use Operation Cleaning TroubleshootingCleaning
28
Water supply pipe
Tank holder
Water supply pipe
Tank holder
Packing
Aluminum
Pipe
Water supply
pipe
Tank
packing
Horizontally
Not to let
foreign
objects in
Clean the ice maker periodically to ensure that the ice is
pure and delicious.
Do not pour water into the tank
holder. Doing so may cause a
malfunction.
Rotate and remove the
aluminum pipe.
* White minerals or chlorine
accumulation may be adhered to
the parts, this is not abnormal.
Wash off such substances and
reuse the parts.
Push in the water supply
pipe fi rmly so that there is no
unevenness. Using the water
supply pipe while it is unevenly
set may cause a malfunction.
If the water supply pipe is not
installed, the food inside the
refrigerator compartment may freeze.
If the parts are not inserted
fi rmly or there are gaps due to
foreign objects, it may cause
abnormal noise or prevent
ice from forming. It may also
cause the water in the water
tank or food in the refrigerator
compartment to freeze.
* If mold forms easily in the certain types of water,
clean about 2 or 3 times a week.
When using bleach to clean the water tank and
lid, follow the product instructions.
* Do not use a dishwashing machine, because it may deform the parts.
Prevents formation of water scale and mold.
Align the mark on
the water tank cap
with the mark on the
lid, and remove it.
Mark
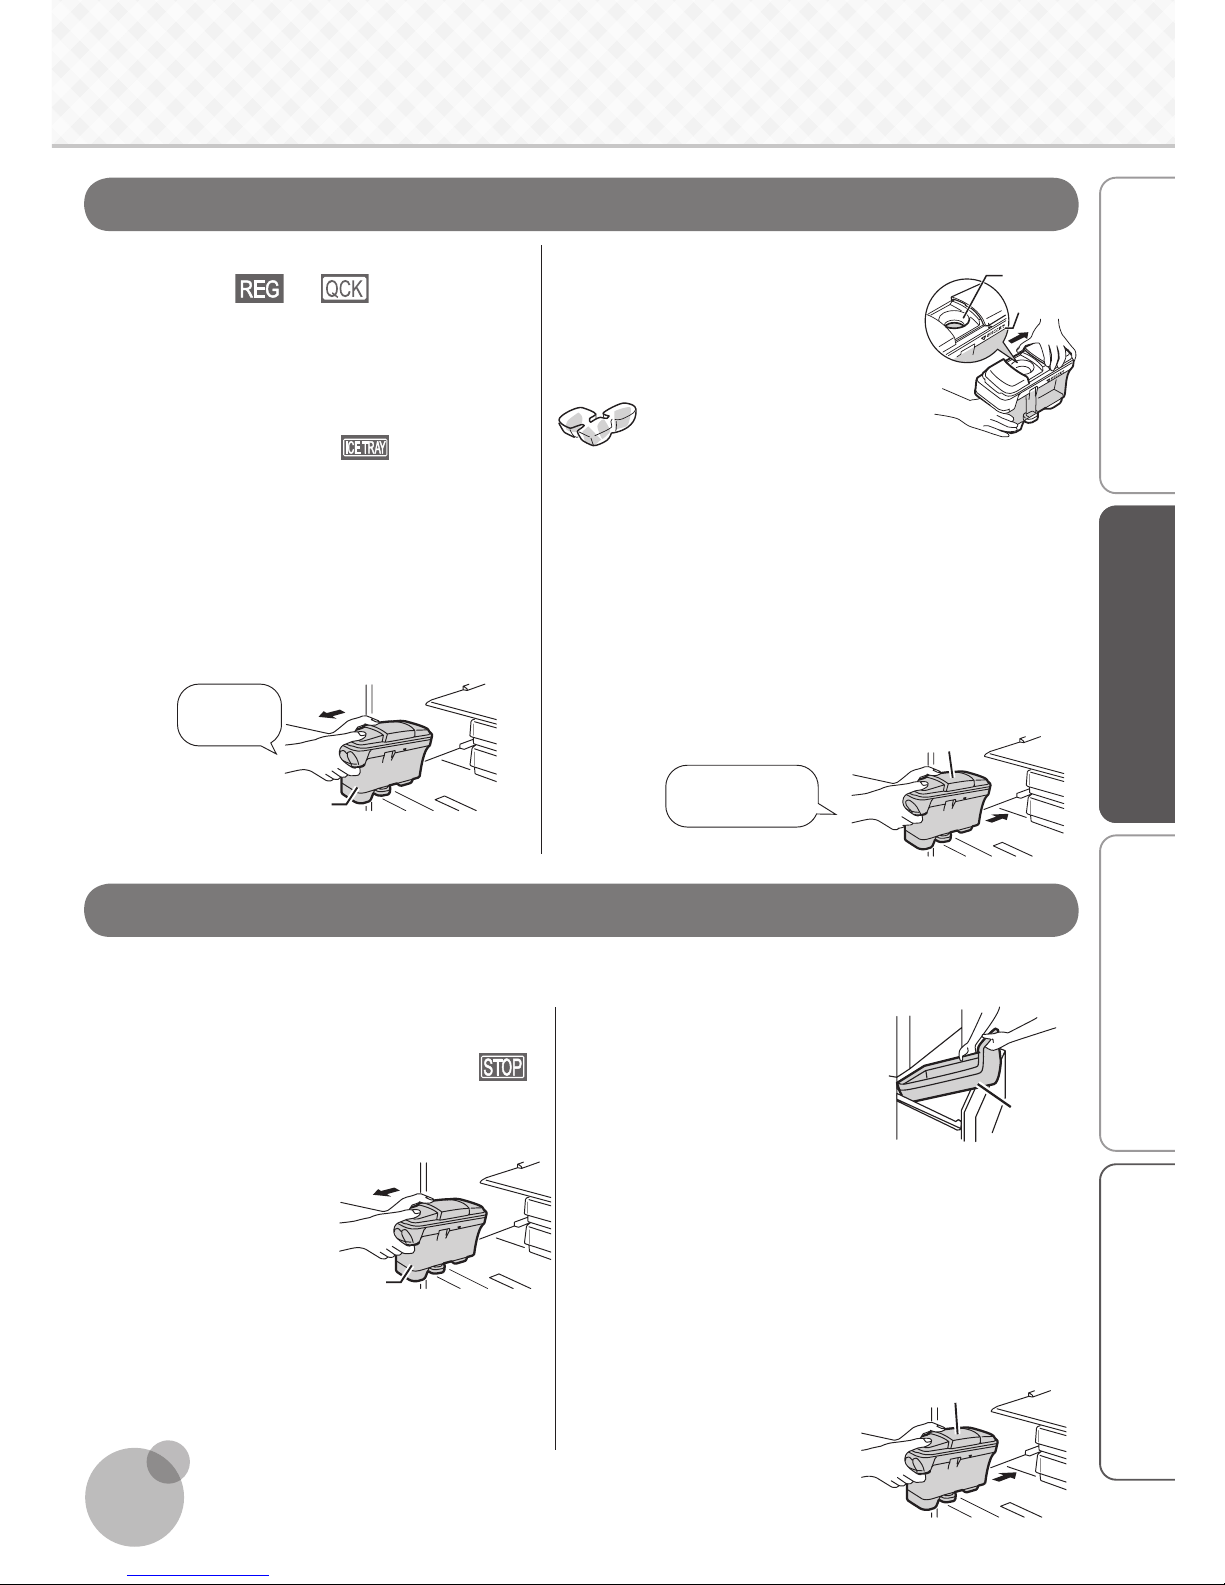
2
Open the door of the ice
making compartment and
unlock the ice tray lock lever.
When the ice tray lock lever is unlocked the display turns on.
If the buzzer sounds continuously after removing the ice
tray lock lever, close the door.
When
is blinking, perform the operation 2 after waiting
for the blinking to be fi nished.
Page 18
1
Set the ice making setting of the ice
making compartment to
.
6
Set the ice making setting of the ice making
compartment to
or .
Page 18
After washing the tray, dry off any moisture.
4
Empty the ice tray and wash it.
There is a risk of the water spilling.
Pull out the tray slowly.
3
Pull the ice tray
towards the front and
then remove it.
Lift slowly to
remove it
Easier to disassemble/
assemble when wetted
5
Push in the ice tray until it makes a clicking
sound, and then lock the ice tray lock lever.
Check that
is off.
If the lamp is on, check the setting status such as the position of the
ice tray lock lever and the up and down orientation of the ice try.
Ice tray lock lever is locked
Ice tray lock lever is released
Ice tray
Water tank
Water supply pipe and tank holder
1
Remove the lid and wash it.
(Upper temperature limit about 60°C)
1
Pull out the water supply
pipe and wipe the tank
holder with a clean cloth.
2
Disassemble and
wash the parts.
3
Follow the procedure in reverse to
return the parts to their
original positions.
4
Check that there are no foreign objects
between the water supply pipe and the tank
packing or tank holder.
month
once a
year
1~2 times
a
week
once a
Cleaning the Automatic Ice
Maker

Note
If the tank packing is not installed, it may cause the water in the water tank or food in the refrigerator compartment to freeze.
Replacement is not usually required for the optical catalyst and lead-cleaning fi lter. However, it may require
replacement in the following cases.
• When it clogs because something other than water was put in the tank
•
When it is damaged • When mold has formed
To purchase a new fi lter, contact the retail store where you purchased the refrigerator.
* If mold forms easily in the certain types of water, clean about 2 or 3 times a month.
Procedures for returning the water supply
pump and tank pipe to their original positions
Assembling the water supply pump Installing the tank pipe
Incorrect assembly may prevent ice from forming,
or increase the operation noise.
Before Use Operation Cleaning TroubleshootingCleaning
29
Water
supply pump
Tank pipe
Impeller
Lid
Optical
catalyst and
lead-cleaning
fi lter
Cap
Tank
Pipe
Water
supply
pump
Tank packing
Rotate
1
Fit the fi lter into the cap.
4
Rotate and fi x the tab () of the
cap into the projection () on
the water supply pump.
* Make sure that the impeller is inside.
5
Rotate and set the water supply
pump onto the water tank.
* Align the triangle
mark on the
bottom of the
water tank with
the triangle mark
on the fi lter and
push in while
making sure that
there is no gap.
2
Fit the lid onto the cap.
3
Attach the impeller onto
the water supply pump.
Remove the
cap while
opening the
tab with your
fi nger.
Rotate
Do not use cleaners such as kitchen
detergents (neutral), benzene or
bleach to clean the optical catalyst
and lead-cleaning fi lter.
Doing so may result in odors of the ice.
When setting,
align the triangle
mark on the
tank with the
triangle mark on
the packing and
fully put them
together.
The impeller is
made from a
magnet.
Wash it thoroughly
to remove any
foreign objects.
Completed
view
Tank
Packing
Tank pipe
Water supply pump
Caution
Do not let foreign
objects block the
hole.
1
Insert the tank pipe into the water
tank.
2
Connect the tank pipe to the water
supply pump.
* Check that
there are
no foreign
objects
between
the tank
pipe and the
water supply
pump.
Tank
Pipe
Water
supply
pump
Completed
view
Completed
view
Completed
view
Tank pipe, water supply pump, optical catalyst and lead-cleaning fi lter
1
Pull out the tank packing from
the water tank.
2
Pull out the tank pipe, and
rotate and remove the water
supply pump.
3
Disassemble the parts
and wash them.
4
Return the water supply pump, tank pipe, tank
packing to their original positions.
week
once a
Do not use the following for cleaning.
Items such as sponges or scrubbers that may damage surfaces, or cleaners such as alkaline detergents, scouring powder,
boiling water, petroleum or acid

How to cleanBefore cleaning
Step
Step
2
Step
Step
1
Before Use Operation Cleaning TroubleshootingCleaning
30
Remove the power plug.
Wait at least 10 minutes before reinserting the power
plug into the socket.
If you insert the plug immediately, the mechanism
will not function.
Wipe with a soft cloth soaked in warm water, or remove and rinse with
(Wipe the operation panel with a soft, dry cloth.)
For stubborn dirt, wipe using water mixed with a weak concentration of kitchen
In particular, be sure to wipe off oily dirt because leaving it may damage
Do not use alkaline or low alkaline kitchen detergents,
alcohol, benzene, thinner, petroleum, acid, scrubbers, boiling
Doing so may cause the plastic parts (such as the door
or damage or rust the door handles or painted surfaces.
Push in and lift up.
Fully pull out the case.
Lift out to the front.
Make sure that the lever is on the right side.
Make sure that the 4 metal stoppers are
fi tted, and place the shelf lightly so that the 4
supports are aligned with the 4 metal stoppers.
Push in each of the 4 supports in turn
from above. (A clicking sound is made.)
Move the lever to the left and right
and check that the AUTO Shelf is kept
level when moved up and down. (If
the shelf is not kept level, remove the
AUTO Shelf and repeat steps to .)
Shelf removalTray removal Shelf installation
Move the lever to the right end.
Remove the tray before
performing this.
Remove the tray before performing this.
Strongly push up each support,
one by one. (4 locations.)
(A clicking sound is made when
the support disengages.)
If the supports are fi rmly set and
diffi cult to disengage, tilt the
inner tabs to the inner side.
Remove from the refrigerator.
* Cannot replace
the small item
case (upper) with
the small item
case (lower).
Pull out with both hands.
Lift up the rear of the tray until the 3
front tabs and the 2 side tabs disengage.
* There is a risk of the tray falling.
Move it slowly.
Push up the tray while pulling the 3
white tabs on the rear of the tray to the
front with your fi nger.
Warning
Otherwise an electric
shock or injury may be
caused.
Two-way fl exishelf
Slide chilled case and small item case (Upper) (Lower)
AUTO Shelf
(Do not disassemble the AUTO Shelf, or use chemicals such as grease to clean it. Doing so may cause a malfunction.)
Removing and Cleaning the
Parts

After cleaning and periodically
Step
Step
3
Before Use Operation Cleaning TroubleshootingCleaning
31
water.
detergent (neutral).
the plastic parts.
scouring powder, powdered soap,
water, or similar substances.
caps and cases) to split,
Check the power plug and cord
For safety, clean periodically.
Unplug the power plug from the socket and check it.
•
Check for damage or abnormal heating on the power plug and cord.
Remove any dust from the power plug and surrounding
area, and then wipe with a dry cloth.
Firmly insert the power plug into the socket.
Fully pull out.
Lift out to the front.
Lift up the left and right of the pocket alternately. (The pockets are fi rmly installed.)
Pull out to the front.
• Make sure that the pockets are securely set.
(Incorrect setting may cause a pocket to disengage and fall out,
causing an injury.)
Wipe off any dirt, dripping or
condensation.
Drip
gutters
Shelf installation
* The illustration represents the
versa compartment. The ice making
compartment is the same.
Warning
If the power plug or
cord is damaged or
dust accumulates, it
may cause an electric
shock or a fi re.
Fully pull out the door.
Lift the upper case out to the front.
Pull out while slightly lifting up the door,
and then tilt.
Lift the lower case out to the front.
* The illustration represents the freezer
compartment.
The vegetable compartment is the same.
Freezer and vegetable compartments
Adjustable pockets and bottle pockets
Ice making and versa
compartments
Recessed portion of
the drip gutters
Remove the adjustable support cover.
Turn the adjustable supports to raise them from the
fl oor, and pull out the refrigerator. (We recommend
laying out protective material on the fl oor to
prevent the fl oor from being damaged.Also, be
careful not to injure yourself.)
Remove the dust from the rear panels, walls and
fl oor, and wipe off any dirt.
(These areas are prone to buildup of dust and black
dirt due to air convection. Periodical cleaning will
also improve power effi ciency.)
Check for water dripping on the
fl oor.
Refrigerator rear side and fl oor
For installation, follow the procedure in reverse to the removing methods.
Adjustable support cover
Push the left and right sides of the
support covers inward alternately, and
pull the support covers to the front to
remove them.
Caution
Do not put your hands
under the refrigerator. It
may cause injury.
Grime
and dust

Before Use Operation Cleaning TroubleshootingTroubleshooting
32
Issue Action
Drainage port
Front lower inside Rear upper side
When the transportation time is long, for example when moving house
Frost from the condenser inside the freezer compartment will melt, and may spill water when the
refrigerator is transported.
It may take 1 day to defrost after unplugging the power plug.
Minimize the frequency of opening the doors, and avoid adding more food.
Operation panel settings other than the temperature settings may change. Check the settings.
(Child safety lock, fast cooling, etc.)
A power outage
occurred
To move the
refrigerator
or change its
orientation
When not using the
refrigerator for a
long time
To transport the
refrigerator
(when moving house,
etc.)
Rotate and raise the adjustable supports.
Page 7
Lay protective material under the casters and rear supports.
Move the refrigerator in the forward and backward directions.
*Dragging in any direction other than forward and backward may damage the fl oor.
Clean the automatic ice maker.
Pages 28-29
Unplug the power plug, clean the interior of the refrigerator, and open the doors for 2 to 3
days to dry the inside.
* If the refrigerator is not dried suffi ciently, it may cause mold, odors, or refrigerant (gas) leaks due to
condenser corrosion.
Pages 19, 28
Empty any water or ice from the water tank and ice tray.
Wear protective gear (gloves).
Remove the adjustable support cover, and then rotate
and raise the adjustable supports.
Remove the power plug.
Lay towels under the drainage port and the
lower rear edge of the refrigerator, and position
a container or tray with a height of about 3 cm
on the towels to collect the water.
* The towels prevent fl oor damage, and water from
being spilled on the fl oor.
Tilt the refrigerator slowly to the rear by about
30 degrees, and drain the water from the
evaporation tray via the drainage port on the
lower rear side. (The evaporation tray is not
visible from the outside.)
* Because the refrigerator is heavy, the work must be
performed by at least 2 people.
*
The work must not be performed by small children or
people who are not capable of doing heavy work. Ask a
specialist transportation company
.
2 or more people should hold the hand-holds on
the lower inside of the front and the upper side of the
rear, and carry the refrigerator slowly.
Do not lay down the refrigerator on its side.
(The compressor may be damaged.)
Do not damage the refrigerant circuit, because it contains a combustible
refrigerant.
If the refrigerant (gas) leaks, it may cause a fi re or explosion.
Warning
Other Issues

Before Use Operation Cleaning TroubleshootingTroubleshooting
33
Issue Action
The refrigerator does not cool in this mode. Contact the retail store
where you purchased the refrigerator, or cancel the demonstration
mode with the procedure below.
To cancel the demonstration mode
Keep the doors of the refrigerator compartment open.
Press
twice.
Press
, , and at the same time for 5
seconds or more.
Make sure that there is no blinking of the display area a minute after
closing the door.
(If the display still blinks, the demonstration mode has not been
canceled.)
Demonstration
mode status
When the entire
display blinks 3 times
at regular intervals
even though you have
not operated any
buttons
When the
compartment and
temperature control
displays on the
operation panel blink
in turns
When the mark
blinks rapidly
(about 5 times
per second)
An inspection is required. Contact the retail store where you
purchased the refrigerator.
* Regarding
, the
display for the
button may change
depending on the
setting.
When the alarm
keeps sounding
Press for about 5 seconds to stop the alarm. Check if the
doors are closed. If the alarm sounds even after closing the door, an
inspection is required. Contact the retail store where you purchased
the refrigerator.

Before Use Operation Cleaning TroubleshootingTroubleshooting
34
Issue Action
To control the
temperature more
precisely
(temperature fi ne
adjustment mode)
The temperature can be set to 19 different
levels for the refrigerator compartment, freezer
compartment, or versa compartment (with
freezing setting), while it can be set to 5 different
levels for versa compartment (soft freezing).
When temperature fine adjustment mode is set, the
compartment display blinks about every 10 seconds.
Set the compartment to the temperature
fi ne adjustment mode
Press for about 3 seconds or more
(until the buzzer sounds twice).
To cancel
The same operation as above.
Perform the temperature fi ne adjustment
Example:To set the refrigerator compartment
lower by 1.2°C than the low setting
(when the setting is refrigerator
compartment 5)
Press
to select the
compartment to perform
temperature fi ne adjustment.
Repeatedly press
to perform temperature fine
adjustment.
* The values on the right are
approximate. The temperature may
differ from the values on the right,
depending on factors such as food
storage conditions and how often the
doors are opened.
represents a blinking display.
Display of setting
Refrigerator/
freezer
compartments
Versa
compartment
(Freezing
setting)
1
Low setting
Page 12
About -12°C
Page 13
2
2345
About 0.3°C
lower
than “L”
About 2.4°C
higher
than “M”
3
About 0.6°C
lower
than “L”
About 2.1°C
higher
than “M”
4
About 0.9°C
lower
than “L”
About 1.8°C
higher
than “M”
5
About 1.2°C
lower
than “L”
About 1.5°C
higher
than “M”
6
Low medium
setting
Page 12
About 1.2°C
higher
than “M”
7
978
About 0.9°C
higher
than “M”
About 0.9°C
higher
than “M”
8
About 0.6°C
higher
than “M”
About 0.6°C
higher
than “M”
9
About 0.3°C
higher
than “M”
About 0.3°C
higher
than “M”
10
Medium setting
Page 12
About -15°C
Page 13
11
1311 12
About 0.3°C
lower
than “M”
About 0.3°C
lower
than “M”
12
About 0.6°C
lower
than “M”
About 0.6°C
lower
than “M”
13
About 0.9°C
lower
than “M”
About 0.9°C
lower
than “M”
14
Medium high
setting
Page 12
About 1.2°C
lower
than “M”
15
15 16 17 18
About 1.2°C
higher
than “H”
About 1.5°C
lower
than “M”
16
About 0.9°C
higher
than “H”
About 1.8°C
lower
than “M”
17
About 0.6°C
higher
than “H”
About 2.1°C
lower
than “M”
18
About 0.3°C
higher
than “H”
About 2.4°C
lower
than “M”
19
High setting
Page 12
About -18°C
Page 13
"Refrigerator"
blinks about
every 10 seconds
"H"
blinks
Display of
setting
Versa compartment
(Soft Freezing
setting)
1
About -5°C
2
About -6°C
3
About -7°C
4
About -8°C
5
About -9°C
Other Issues
(Continued)

Parts Quantity
Model
MR-BX52W
AUTO shelf
Two-way fl exishelf
Slide chilled case
Water tank
(with optical catalyst and lead-
cleaning fi lter)
Adjustable pocket
Small item case (upper)
Small item case (lower)
Egg shelf
Bottle pocket
1
2
1
1
4
1
1
1
1
Ice tray
Ice storage box
Soundproof mat
Ice server
1
1
1
1
Versa case
Aluminum tray
1
1
Vegetable case
Slide case
1
1
Freezing case (upper)
Freezing case (lower)
1
1
Adjustable support cover
1
Before Use Operation Cleaning TroubleshootingTroubleshooting
35
Refrigerator Compartment
Ice making
compartment
Versa
compartment
Vegetable
Compartment
Freezer
Compartment
MR-BX52W-N-P
and
MR-BX52W-BR-P are designed
for use in Singapore only and can
not be used in any other country.
No servicing is available outside of
Singapore.
MR-BX52W-N-ML
and
MR-BX52W-BR-ML are designed
for use in Malaysia only and can
not be used in any other country.
No servicing is available outside of
Malaysia.
MR-BX52W-N-H
is designed for
use in Hong Kong only and can
not be used in any other country.
No servicing is available outside of
Hong Kong.
Specifi cations

Before Use Operation Cleaning TroubleshootingTroubleshooting
36
The refrigerator does not cool at all!
The operation panel
turns off automatically!
Smells the strong odor
on the food or ice!
The outer walls heat up!
The refrigerator takes time to cool when you fi rst start
using it. In summer, it may take up to 24 hours for the
inside to be fully cooled.
Are the displays on the operation panel blinking?
Demonstration operation:
Page 33
Is the power plug disconnected or has the circuit breaker
tripped?
If 30 seconds pass without any
operation panel button operations,
displays turn off.
Do you clean the water tank and the
water supply pump once a week?
Have you placed food with strong odor
inside the refrigerator without sealing
in a container?
The outer walls heat up signifi cantly (to about 50 to
60°C) immediately after installation and in summer.
This is because the heat discharging and condensation
prevention pipes are located on the sides and the top of
the refrigerator. They are required for cooling and the
heat is not an abnormality.
A heat discharging fan is located under the refrigerator.
Warm air may be discharged from here.
First, check the items described in this section. If the problem persists, contact the retail store where
you purchased the refrigerator as soon as possible.
Frequently asked questions in the initial
period and in summer
Questions about operation
and handling
Page 10
Pages 28 - 29
Page 24
Problem Check Explanation and action
Is “L” set as the temperature for the compartment?
Has enough time passed after installation?
Is heat discharge being blocked? Check if there is
gap around the refrigerator and the refrigerator is not
exposed to direct sunlight.
Is the fl ow of cold air being blocked? Are the doors
being opened frequently, or left ajar?
Are the ice making and versa compartments set to
Power Save Mode?
Set the temperature to “M” or “H”.
It takes about 4 to 5 hours for the refrigerator to cool,
and 24 hours or more in summer to fully cool.
Check that the refrigerator is installed correctly.
Check the quantity of food inside and any door left ajar.
Cancel Power Save Mode.
Does not cool
well
Not much ice is
made
Ice melts
Page 6
Page 20
Page 22
Has ice been stored inside the ice storage box for a
long time?
Is the ice making compartment set to Power Save
Mode?
If the ice is stored for a long time, ice cubes may join together
or shrink. (Due to a phenomenon called sublimation.)
Cancel Power Save Mode.
Ice is small or
joined together
Page 22
Water tank or
water supply pipe
freezes
Are the water supply pipe and the pipe installed fi rmly
in the water tank? Is there a foreign object between
the water tank and the water supply pipe?
Has food, a plastic bag, or another object fallen behind the
case in the ice making compartment or freezer compartment?
When the installation is incorrect or a gap is caused by a foreign
object, the cold air may fl ow in reverse and cause freezing.
The cold air may fl ow in reverse and cause freezing.
Remove any objects.
Page 28
Has enough time passed after installation?
Is the ice tray installed correctly?
Has
on the operation panel turned on?
Are the water supply pump and tank pipe installed
correctly onto the water tank?
Is the water supply pipe installed correctly in the tank
holder area?
Has food, the ice server or other object been left in
the ice storage box?
Is the ice making setting on the operation panel for
the ice making compartment set to “STOP”?
Is the ice making compartment set to Power Save
Mode?
Is there enough water in the water tank?
Is the refrigerator tilted?
It takes about 4 to 5 hours after fi rst starting operation
for the refrigerator to cool, and 24 hours or more in
summer to make ice.
Set the ice tray lock lever to the correct position. Check
the setting status of the ice tray.
Install them correctly onto the water tank.
(In particular, ensure that the opening of the tank pipe inside
the tank is installed fi rmly to the tank.)
When the installation is incorrect or a gap is caused by
a foreign object, the cold air may fl ow in reverse and
prevent ice from forming.
The ice storage box is judged to be full of ice. Remove
food or other objects from the ice storage box. Also,
spread the ice out fl at all the way to the front.
Set to “REG” or “QCK”.
Cancel Power Save Mode and then set the ice making
compartment to “REG” or “QCK”.
The number of ice cubes in one batch may be reduced.
Pour water into the water tank.
Install the refrigerator level.
Cannot make ice
Water in the tank
stays at the same
level
Page 28
Page 19
Page 29
Page 28
Page 22
Page 18
Troubleshooting

Before Use Operation Cleaning TroubleshootingTroubleshooting
37
Cannot adjust the
temperature
Is
displayed?
Cancel the Child Safety Lock.
Page 23
Cannot perform
supercool
freezing (
does
not light up)
Is the compartment display “Supercool freezing” and
the temperature setting display “Soft freezing”?
Change the setting of the versa compartment to soft freezing,
and then set the supercool freezing. Supercool freezing is
only available when the versa compartment is set to soft
freezing.
Page 15
Doors open easily
Doors do not
close
Is a door making contact with food or a case?
Is too much food packed inside?
Has food fallen behind a case in a drawer door, or is
the power cord or another object trapped between the
refrigerator and a door?
Is the refrigerator installed stably?
Are the adjustable supports making contact with the
fl oor?
Store food so that the door does not make contact with
objects when closed.
Remove any objects. Make sure that the door does not
trap objects such as food, power cords or plastic bags.
Lower the adjustable supports to raise the front side
slightly and make the doors easier to close.
Page 7
Problem Check Explanation and action
Is the temperature on the operation panel set to “H”?
Is food with a lot of moisture stored at the rear of the
shelf?
Is the surrounding temperature 5°C or less?
Is the water supply pipe installed correctly?
Set the temperature to “M”. The temperature drops
temporarily depending on the setting.
Place drinks and food containing a lot of water, such as
tofu, vegetables, and fruit at the front.
Freezing is likely to be prevented when the temperature
settings of the refrigerator compartment and vegetable
compartment are set to “L”.
When the installation is incorrect or a gap is caused by a
foreign object, the cold air may fl ow in reverse and cause
food in the refrigerator compartment to freeze.
Food freezes in
the refrigerator
and vegetable
compartments
Food in the versa
compartment
melts
Has enough time passed after temperature adjustment
or installation?
Is food stuck up in the upper area?
Did the hot food make contact with other food?
Did you set the supercool freezing after placing hot
food inside?
Was ice cream or frozen food stored with the “FZR”
“L” or “FZR” “M” setting?
Is the versa compartment set to Power Save Mode?
The refrigerator takes time to cool completely. Wait 30
minutes before placing food inside, or use fast cooling.
Leave a gap in the upper area so that the cold air can fl ow.
Frozen food may thaw if it makes contact with hot
food.
Set the supercool freezing after placing hot food inside.
The food temperature will drop quickly.
Set to “FZR” “H”.
Cancel Power Save Mode.
Page 22
Door alarm sounds
Interior light turns
off
The displays on
the operation
panel blink
Are any of the doors open?
Close the door. The alarm sounds at every minute
after the door is opened, and after 4 minutes it sounds
continuously.
If the alarm sounds even after closing the door, press
the SUPERCOOL/QCK button for about 5 seconds
to stop it. An inspection is required. Contact the retail
store where you purchased the refrigerator.
Page 11
Supercool frozen
food does not
taste good
Did you press the SUPERCOOL button?
Is the food that you want to supercool freeze placed
in the top of the versa compartment, and not being
overlapped by other food?
Has enough time passed after changing the versa
compartment to “Soft freezing”?
Press the SUPERCOOL button. Check that
is
displayed on the panel.
The food temperature is measured with the infrared sensor.
Lay out the food for supercool freezing fl at and on top in the
versa compartment.
Set to soft freezing, and when the temperature has
stabilized (after about 2 hours),
perform supercool freezing.
Page 17
Page 15
Page 15
This is because of the anti-freeze heater.
It is not an abnormality.
Water tank or
water supply pipe
is warm

Before Use Operation Cleaning TroubleshootingTroubleshooting
38
Troubleshooting
(Continued)
Problem Check Explanation and action
Is the refrigerator installed near to an electronic device
such as a television?
Is the power to the refrigerator supplied from a socket
near the entry hole of the antenna cable?
Install the refrigerator away from electronic devices
such as televisions.
We recommend using a separate power supply. When
there is no grounded terminal on the plug, connect the
grounding wire.
Noise interferes
with televisions or
other devices
Condensation
forms on the outer
walls and inside
the refrigerator
Frost forms
in the freezer
compartment
Water drips onto
the fl oor
Are the doors being opened frequently, or left ajar?
Is the humidity high, for example is it raining?
When moisture in the air cools, it forms frost or
condensation. Even when a door is open only slightly,
it can cause frost or condensation, or dripping onto
the fl oor.
Condensation may form temporarily. Wipe off with a dry
cloth. Condensation may cause frost to form in Freezer
compartment. Please minimize the time that doors are
kept open.
Page 20
The noise gets louder suddenly or the tone changes.
A rattling or squeaking sound is made sometimes
(every 1 to 2 hours).
After turning on the power, a thumping or creaking
sound is made sometimes in the ice making "STOP"
mode (every 1 to 2 hours).
A whistling sound is made after closing a door.
A hissing, bubbling or running water sound is
made sometimes.
A whipping or dripping sound is sometimes heard
from inside the refrigerator after a door is opened.
A buzzing sound is made sometimes.
A low whirring sound is made after opening the
freezer compartment door.
Immediately after installation, when the weather is hot, when
the doors are frequently opened and closed, during the fast
cooling operation, and in similar situations, the refrigerator
switches to high-speed operation and cools with high power.
This is the sound of the automatic ice maker.
Even when there is no water in the water tank, the
automatic ice maker and pump make a sound about
every 100 minutes.
This is the sound of the automatic ice maker's
operation check.
The check is performed even in the "STOP" ice
making mode.
This is the sound of the fan motor starting.
This is the sound of the refrigerant (gas) fl owing.
This is the creaking sound as warm air enters and
expands the plastic.
This is the operating sound of the damper as it adjusts
the air fl ow.
This is the sound of air blowing through the cooling fan.
Loud noises
Annoying noise
(These noises
are normal)

Memo

讓您能持續輕鬆節電的輔助功能
冷藏室
冷凍室
製冰室 切換室
蔬菜室
58頁
60頁
只要按下操控面板的
按鍵,雪櫃就會自
動開始節電運轉。
設定的儲藏室會抑制運轉,藉
以積極節電。
■本雪櫃主要針對一般家庭的食品冷凍、冷藏保存用途研製。商業用途請使用商用雪櫃。
■這個雪櫃使用非氟氯碳化物冷媒 ( 異丁烷 ) 和非氟氯碳化物發泡隔熱材料(環戊烷)。
■為因應資源的回收及再利用,主要的塑膠配件均標示材料名稱。
ECO 模式
節電模式
美味、好用、節電。
各儲藏室都由溫度感應器與櫃門開閉感應器仔細監控
所以能聰明節能,保存美味。
冷藏室
ᎵᏸᤶḪ
Ḑጙᅟ
ጆጄፖᣂᴴ៲
63頁
可以在放置食品的狀態
下,上下移動棚架,較高
的鍋子也能輕鬆放入。
58頁
ECO 顯示幕
本雪櫃會依照各冷藏室的溫度
設定、 開關 櫃門的頻繁程度
等,以 3 個★標記來告知您 最
近 24 小時的節電水準。
(製冰室、切換室)
操控
面板
微凍室
功能介紹

好切瞬冷凍
把食物以好切瞬冷凍保存在
冷凍室裡,可保持美味與口
感,也可以長時間保存。
安全注意事項
42-43
從安裝到開始運轉
44-45
放入食品
46-47
操控面板的使用方式
48-49
各儲藏室的溫度調節
50-51
快速冷卻食物
(急冷)
52
美味冷凍
(好切瞬冷凍)
53
好切瞬冷凍的最佳使用方法
54-55
製作冰塊
56-57
節電
58-60
其他操作
(重置設定˙兒童按鍵鎖)
61
冷藏室
62-63
切換室、冷凍室、蔬菜室
64
製冰室
(自動製冰機)
65
自動製冰機的保養
66-67
配件的拆卸方式與保養
68-69
特殊情況
70-72
規格
73
故障排除
74-76
使用前
使用方法
保養
有需要幫助的時候
有需要幫助的時候
保養
使用方法
使用前
切換室
53∼55頁
冷凍室
本說明書為印刷品,所以照片及圖片與實物可能有若干差異。
將食材冷凍, 並保存美味。
不須解凍就可直接調理。
美味升級。省時方便。
目錄
頁

42
使用前
使用方法
保養
有需要幫助的時候
使用前
水平擺放
握住把手 使用保護材料 禁止
絕對禁止
絕對不要觸摸
絕對不要拆解、修
理或改造
絕對不要以水潑灑
或淋濕
絕對不要用潮濕的
手觸摸
請務必遵照指示
進行
請務必將電源插頭
從插座中拔出
採用以下的標示,區分、說
明錯誤操作時可能發生的
危險與其程度。
操作錯誤時,將可能導致死亡
或重傷
操作錯誤時,將可能導致個人
受傷或家居、財物受損等
■圖形標示代表的意義如下。
安裝
雪櫃四周留有空間
如果冷媒出現滲漏
並積聚,將可能會
導致火災或爆炸。
▲
44
頁
為預防地震,請將雪櫃安置於穩固的牆壁
或樑柱邊
否則雪櫃傾倒,將可
能導致受傷。
▲
45
頁
避免擺放在室外、水氣或濕氣較重的地方
否則可能因絕緣不
良,導致觸電或引
起火災。
▲
44
頁
請使用符合技術規格標籤上所示規格且為
雪櫃單獨專用的電源插座。(技術規格標籤
位於冷藏室門墊上。)
若使用延長線或分接插頭,
將可能導致發熱或引起火災。
▲
44
頁
當電線損壞時,必須通知三菱電機服務中心更換
如電源線破損時,請到三菱電機服
務中心購買一根新的電源線。務必
確定所購買的電源線專為本機而設。
▲
44
頁
插入電源插頭時,請將電源線朝下並向
內插到底
若反方向插入時,電源
線負荷過高,將可能導
致發熱、燃燒。
電源及電源插頭
保養時,請先將電源插頭拔掉,
否則可能導致觸電
及受傷。
避免雪櫃背面擠壓到插頭,避免損傷電源
線
擠壓插頭、承載重物、彎折、
綁束電源線等,都可能導致
觸電或引起火災。
請勿使用受損的電源線、插頭與過鬆的
插座
導致觸電或引起火災。
請勿以拉扯電源線的方式拔下插頭
否則可能使電源線
受損,導致觸電或
引起火災。
請定期清除電源插頭的灰塵
否則可能因絕緣不
良,導致火災。
請勿以沾濕了的手拔下插頭
否則可能導致觸電。
發生異常或故障時,
請立刻中止運轉,
並洽詢「購買處的
經銷商」或「三菱電機維修
中心 / 服務中心」。
保留空間
清除灰塵
防止傾倒
電源線向下
禁止潮濕
拔除插頭
禁止使用
禁止
禁止
禁止濕手
安裝及搬運
請擺放於穩固、水平
的地板,並以可調
式支撐腳確實固定
雪櫃如移動,可能導
致受傷。
▲
44~45
頁
搬運時
請握住搬運
用把手
若是手握其他部份,
可能導致受傷。
▲
70
頁
搬運時,
請舖上保
護用布
慢慢移動,
以避免損壞地面或受
傷。
請勿將食物強行
塞入雪櫃或將層
架大力拉出
否則可能因食品掉
落而導致受傷。
請求維修
只可使用指定規格的電源插座
安全注意事項

43
使用前
使用方法
保養
有需要幫助的時候
使用前
禁止濕手 禁止碰觸禁止儲藏 禁止
禁止
使用時
請勿在雪櫃上放置裝有水的容器
否則若接觸到電子零
件時,將可能導致觸
電或引發火災。
請勿在雪櫃內使用電器
雪櫃內如果冷媒洩漏,
並且接觸電器,其電
器接點的火花可能會
產生爆炸或火災。
請勿存放易燃的揮發性物品
揮發油、化妝品、
美髮用品等,可能
導致燃燒或爆炸。
請勿在雪櫃上放置物品
否則可能在開關雪
櫃門時跌下, 導致受
傷。
請勿保存藥品或化學試料
家用雪櫃無法保存需
要嚴密管理的物品。
請勿吊掛在雪櫃門或把手上請勿坐在
滑動拉門上請勿承載
重物
否則雪櫃傾倒,將可
能導致受傷。
請勿將手伸入自動製冰機的機械部份
(製冰盤的上方)
否則可能導致受傷。
請勿損毀冷媒迴路或配管,
或用螺絲釘在上面安裝其他物品
冷媒是可燃性氣體,
冷媒洩漏可能會產生爆
炸或火災。
發現瓦斯漏氣時,請打開窗戶換氣及通
風,不要觸摸雪櫃
否則可能因接電點
的火花,導致爆炸
或引起火災。
請勿用水清洗或噴濺到食物湯汁
若濺到水或食物湯汁,
將可能導致觸電或引
起火災。請立即擦拭
乾淨。
請勿在附近使用可燃性噴霧
否則電氣接點的火
花,將可能導致燃
燒或引起火災。
請勿在倉庫和車庫內使用
小動物損壞電線時,將可能導致
觸電或引起火災。
開關雪櫃門時,請避免讓門碰撞到周
圍的家具等物品
若雪櫃門或家具破損,
可能造成受傷。
故障及長期儲存 回收
如果冷媒迴路損毀,請勿觸摸雪櫃及避免在
附近使用明火,並打開窗戶換氣
如果冷媒迴路損毀,
請洽經銷商。
有異常狀況時(焦臭味等),請拔掉電
源插頭,中止雪櫃運轉
如果持續在異常狀態
下運轉,將可能導致
觸電或引起火災。
保管將回收之雪櫃時,請先將門密封墊
拔除
否則可能造成幼兒
被關在雪櫃內的情
況。
請勿自行拆解、修理或改造,及使用
部品已損壞的雪櫃
否則可能導致受傷、
觸電或引發火災。
如果長時間不使用雪櫃,請從電源插座拔
掉插頭,並且打開雪櫃門風乾內部
如果雪櫃內部未足夠風乾,冷媒
可能由於冷凝器腐蝕而洩漏,並
且造成爆炸或火災。
棄掉本雪櫃時,請交給零售商店或專
業的工業廢物回收商
不正確棄掉而導致冷媒洩漏,會
成為著火的原因並且造成爆炸或
火災。
換氣
拔除門密封墊
風乾
換氣
正確棄置
禁止潮濕
禁止
禁止儲藏
禁止
禁止使用 禁止使用
禁止
禁止
禁止儲藏
禁止
禁止潮濕
拔除插頭
禁止拆解
禁止碰觸
使用時
手部潮濕時,請
勿觸摸冷凍室的
食品或容器
否則可能導致凍傷。
請勿將瓶類放入冷
凍室、製冰室或切
換室
否則瓶身可能因內容
物結凍而破裂,導致
受傷。
請勿將手、腳伸入
雪櫃下方
否則可能被鐵板等割
傷。
請勿食用走味、變
色的食品
否則可能導致食物中
毒或生病。
在開關櫃門時
• 在其他人接觸雪櫃時不開關櫃門
• 關閉櫃門時,手指不放在抽屜式櫃門上面
•
不猛地開關櫃門
(食品掉落會導致受傷。)
•
當心夾到手指等身體部分
•
當心夾到身體部分
•
當心被下面的抽屜夾到腳
(可能會夾傷
腳趾)

安裝的位置
●請選擇陰涼無熱氣、通風的位置
以防止冷卻能力降低、節省電費。
●濕氣少的位置
以預防生鏽、觸電和火災。
●穩固、水平的位置
以防止振動和產生噪音、門半閉及傾斜。
防止因熱度或重量導致地板變形或變色。
若地板為容易陷入的材料,
在雪櫃底下鋪墊堅固的板材。
●遠離其他電器的位置
以防止電視出現雜音或影像受到干擾。
● 在左右預留 2 公分以上,上方
10 公分以上的空間
以便讓熱氣可從兩側與雪櫃頂散逸。
●請使用雪櫃單獨專用的電源
請使用符合技術規格標籤上所示規格且為雪櫃單獨專用的電源插座。
(技術規格標籤位於冷藏室門墊上。)
● 即使安裝後不久接上電源,雪櫃也不會損毀。雪櫃需要一段時
間才會冷卻,因此盡快給雪櫃接上電源。
●接線
為保證人體安全,這一設備應有良好的接地。
●這一架冷藏冷凍雪櫃的電源插塞一定要插入自己專用電源插口。
這是發揮冷藏冷凍雪櫃性能,並也避免了因雪櫃內連接線過負荷的
原因而引起火災。
必須確認來自電源插口的電壓是正確的。
又無故延長導線,也是不很妥當的。
● 如果雪櫃安裝在濕度高的地方,建議不單只接地,還要安裝漏電斷
路器。
● 如電源線破損時,請到三菱電機服務中心購買一根新的電源線。務
必確 定所購買的電源線專為本機而設。
● 為防止意外發生,當電線損壞時,必須通知三菱家庭電器服務中心
更換。
安裝
1
插上電源後,
需要一段時間後才能冷卻
機體外側會變熱
剛安裝好時
運轉的聲音會比較大
剛安裝好後、天氣炎熱時、櫃門
開關頻繁或急冷運轉時等高速運
轉的狀況下,雪櫃會切換為強力
冷卻,所以運轉聲會變大。
44
使用前
使用方法
保養
有需要幫助的時候
使用前
請勿堵塞雪櫃的通氣孔,並且應在
雪櫃周圍預留通風位。
如果冷媒出現滲漏並積聚,將可能
會導致火災或爆炸。
因腐蝕性氣體的產生,可能需要為冷媒
管路(配管)進行防鏽處理。請向購買
處的經銷商查詢。
溫泉地區的使用
•沒有冷卻的食品及雪榚,請在
雪櫃充分冷卻之後放進去。
•儘量減少、縮短櫃門的開閉。
5cm 以上
在夏季天氣較熱時,可能需要
24 小時以上。
第一次製成冰塊
10 公分以上的空間
2 公分以上的空間
•因為雪櫃外側放熱,雪櫃在剛
開始使用或於夏季時,溫度可
能達到 50∼60℃以上。
接上電源
※ 雪櫃安裝後不久接上電源
2
附合指定規格、單
獨專用的電源插座
儘快接通電源
雪櫃安裝好之後,即使馬上
接通電源,也不會損毀雪櫃。
警告
若使用不符合指定規格的電源插座或使用分接插頭,將可能
導致發熱或引起火災。
從安裝到開始運轉

●
防止雪櫃門無法完全閉合
●調整傾斜的門及雪櫃平行
●用可調式支撐腳無法糾正傾斜時
●支撐腳蓋的安裝方法
平行插入支撐腳蓋,直至頂到進深
方向。
調節與固定
轉動可調式支撐腳,直至支撐腳觸及地面,
而滑輪從地面提起固定。
3
支撐腳蓋
支撐腳蓋在發貨時隨產
品包裝在冷藏室內。
4
請勿損毀冷媒迴路或配管,
或打釘安裝其他物品
預防地震
45
使用前
使用方法
保養
有需要幫助的時候
使用前
請調整支撐腳,使其
水平後固定。
前側稍高,櫃門容易
關閉。
如果雪櫃安裝在房間的角落,
後面的其中一個支撐腳可能會
下沉。此時請在雪櫃後面鋪墊
滑輪座或堅固的板材。(一般板
材需要 2 至 3mm 厚。)
請依下圖所示來調整可調式支撐腳。
右左
支撐腳蓋
可調式支撐腳 滑輪
後部支撐腳
滑輪座或
堅固的板材
如果安裝的地面
不平整,或數日
後因食品重量使
雪櫃的支撐腳下
沉,門會因此下
垂。
請重新調整。
※ 食品的重量
可能超過
100kg。
R600a 冷媒是可燃性氣體,但冷媒迴路是密閉的,因此
正常情況下不會滲漏。
如果冷媒迴路已毀損
1. 請勿在附近點火或使用電器用品
2. 打開窗戶使室內空氣流通
接下來請聯絡購買處的經銷商。
將堅韌的固定帶穿過背面上方的固定孔(兩個),
固定在穩固的牆壁或樑柱上
若雪櫃傾倒,將可能導致受傷。
可調式支撐腳
滑輪
按箭頭方向轉動可
調式支撐腳直至支
撐腳觸及地面。
支撐腳蓋
(以防止振動和產生噪音、雪櫃移動及門半閉)
未充分調整支
撐腳可能因雪
櫃移動而造成
受傷。
雪櫃正面底部
堅韌的固定帶
當櫃門的左側
下垂時
請調降右方可調式支撐腳的高度
當櫃門的右側
下垂時
請調降左方可調式支撐腳的高度

今天起,你也是收納高手了
充分利用雪櫃,做出更快樂更美味的飯菜!
使用前
使用方法
保養
有需要幫助的時候
使用方法
46
平常使用時,請把冷藏室、冷凍室、蔬菜室設定為「中」。
切換室請您依照喜好自由設定。
●您剛購買時的預設設定:冷藏室、冷凍室、蔬菜室…「中」,切換室…「軟冷凍 • 中」。
溫度應該設定為幾度?
冷藏室
操控
面板
切換室
▲
62∼63
頁
▲
48∼49
頁
▲
62
頁
冷凍室
▲
64
頁
▲
64
頁
蔬菜室
▲
64
頁
製冰室
▲
65
頁
微凍室
可自動製作冰塊。
「製作冰塊」
▲
56∼57
頁
放入食品

說明
● 上述溫度,是在室溫 30 度,未放入食品並關閉雪櫃門,待溫度穩定後在雪櫃內靠近中央稍下一點處測得
的溫度。根據食品的放置狀態、櫃門開閉等使用狀況,溫度會與上述溫度有所差異。
● 剛開始使用雪櫃時,塑膠配件可能會散發出氣味。為了讓氣味散去,請讓房間保持通風。如此塑膠氣味就
會漸漸散去。
注意
●放入食品時,請勿超出冷凍箱的高度。(否則可能導致食品夾在冷凍箱的後面,或者門半閉)
使用前
使用方法
保養
有需要幫助的時候
使用方法
47
約3℃
∼
9
℃
蔬菜室
約0℃
∼
6
℃
冷藏室
軟冷凍:約-9℃
∼
-5
℃(也可以切換到冷凍)
切換室
約
-22
℃
∼
-16
℃
冷凍室
●日常使用的食材與食品
●雞蛋放到微凍雞蛋架
●不希望冷凍的食品
把食品蒸發出來的水分鎖在蔬
菜室內,以此保持濕度。蔬菜、
水果如果包著保鮮膜保存,保
鮮更持久。
如果把食物以好切瞬冷凍保存在冷凍室
裡,可以長時間保存,同時保持美味的
口感。
●乳製品:乳酪和芝士等
●魚漿加工品:魚片和或獅子狗等
●加工食品:火腿和香腸等
●生鮮食品:肉類和海鮮等
馬上就用的食品
想以好切瞬冷凍來保存的食品
長期保存的食品
蔬菜、水果
●飯
●咖哩
●醬類
●肉塊
●碎肉
●魚肉切片、鱈魚
好切瞬冷凍的最佳使用方法
▲
54∼55
頁
●冷凍食品
●雪糕
●蔬菜
●水果
●飲料
微凍室
約-3℃
∼
3
℃
●在家裡保存的食品
●白麵包

說明
●關閉櫃門後,ECO顯示幕會顯示 的字樣約 30 秒,以告知您現在為節電狀態。
●
正在閃爍時,表示製冰盤正在運轉。請勿取出製冰盤。
●忘了目前的設定為何、或想回復到剛購買的狀態時,(重置設定)。
▲
61
頁
使用前
使用方法
保養
有需要幫助的時候
使用方法
48
※ 為了方便說明,上圖
的所有項目皆為亮起
的狀態。
以3個★標記來告知雪櫃的節電狀態。
▲
58頁
ECO 顯示幕
● 可設定為 ECO模式。
▲
58
頁
●
可設定為節電模式。
▲
60
頁
節電按鍵
●可設定各儲藏室的溫度。
▲
50∼51
頁
●可選擇製冰室的設定。
▲
56
頁
溫度 ˙ 設定按鍵
可設定瞬冷凍與急冷。
▲
52∼53
頁
瞬冷凍、急冷按鍵
各儲藏室的設定內容將會顯示。
設定室顯示區域
每按下一次,顯示就會依下方的順序
改變。
●您剛購買時,會顯示出
。
儲藏室選擇按鍵
您所選擇的儲藏室將會顯示。
儲藏室顯示區域
關於的顯示
瞬冷凍、急冷按鍵的名稱顯示,會依目前
顯示的儲藏室的溫度設定,而有所不同。
名稱顯示 目前顯示的儲藏室
當目前顯示切換室(軟冷凍
時)時
▲
53
頁
當顯示冷藏室、切換室(冷
凍設定時)、冷凍室、蔬菜室
時
▲
52
頁
• 當目前顯示製冰室時
• 當切換室設定為節電模式
時
▲
60
頁
※ 如沒有任何顯示,則無法
進行設定(會發出“嗶”
的聲響)。
※ 按鍵會依據目前顯示的儲藏室與溫度
設定,而顯示出相對應的名稱。
操控面板的使用方式
為了節電,操控面板的各項顯示在平常都是熄滅的狀態。
● 想確認設定狀況時,請觸碰操控面板的任一個按鍵,使其亮起。
● 請在操控面板的圖示亮起的狀態下,進行各儲藏室的設定。
● 為了節電,如果約 30 秒沒有操作按鍵,操控面板的顯示就會熄滅。
˙ 當操控面板的顯示熄滅時,按鍵的名稱顯示 (
) 也會熄滅。
˙ 在進行瞬冷凍時,
不會熄滅。

關於櫃門蜂鳴器與雪櫃內燈泡
任何一個櫃門開啟 1 分鐘以上,櫃門蜂鳴器就會響起。
開啟 4 分鐘以上,冷藏室的雪櫃內燈泡就會閃爍。
如櫃門開啟 60 分鐘以上,雪櫃內燈泡就會暫時熄滅。
蜂鳴聲的次數與雪櫃內燈泡的閃爍方式,會因櫃門開啟的時間而改變,詳述如下。
櫃門開啟時間
1 分鐘 2 分鐘 3 分鐘 4 分鐘 5 分鐘以上 60 分鐘以上
蜂鳴聲
嗶—嗶—
嗶—嗶—嗶—
嗶—嗶—嗶—嗶—
連續嗶—聲(長音)
連續嗶嗶聲(短音)
雪櫃內燈泡
燈亮起 每分鐘閃爍 2 次 燈泡熄滅
●請確認門是否未關緊、(門密封墊、活動架的後方)是否夾到食物(請每個月檢查一次)。
●關上門後,蜂鳴器依然會響起
儲藏室顯示區域
例:冷藏室與製冰室的門被
打開時
會隨著
櫃門蜂鳴器
閃爍
使用前
使用方法
保養
有需要幫助的時候
使用方法
49
當操控面板的顯示
開爍時
如果全部圖示反覆在一定的間隔閃爍 3 次,或操控面板的儲藏室顯示與溫
度設定顯示不斷重複閃爍時,表示目前處於示範運轉狀態。
在示範運轉的狀態下,雪櫃完全沒有冷藏的功能。
請將示範運轉解除。
▲
71
頁
▲
71
頁
操作範例
(儲藏室為 「切換室」,且溫度.設定為… 「軟冷凍˙ 中」 時)
選擇儲藏室 設定溫度
① 按下儲藏室選擇按
鍵,讓切 換室亮起
② 按下溫度 ˙ 設定按
鍵, 並選擇 「軟冷
凍.中」
您所選擇的儲藏室所能
設定的項目,會亮起約
1 秒鐘。
將會自動切換,
目前的設定也會
亮起。
嗶
約1秒後
嗶
※ 設定結束時的顯示

說明
●上述溫度,是在室溫 30 度,未放入食品,關上櫃門,待溫度穩定後在雪櫃中央下方所測得的。
的溫度。溫度會隨著食品的擺放狀態,與櫃門的開閉情況而有所變動。
●除霜的前後,櫃內的溫度可能暫時降低或升高。
●在下列情況下冷藏室的食品出現凍結時,請將冷藏室的溫度設定為
∼ 。
• 冷藏室的溫度設定為
的時候
• 當室溫降到 5℃以下時
使用前
使用方法
保養
有需要幫助的時候
使用方法
50
1
請按下 ,使想進行溫度設定的儲藏室顯示亮起。
每按一次,儲藏室顯示就會改變。
●您剛購買時,會顯示出
。
※ 要設定
時
▲
56
頁
2
重複按下 以設定溫度
■冷藏室、冷凍室、蔬菜室的溫度設定
每觸碰一次顯示就會改變,
可 5 階段設定溫度。
※ 冷凍室的冷凍與切換室的冷凍,兩者溫度是不一樣的。
■如果想對溫度進行詳細設定
▲
72
頁
設定顯示
冷藏室 冷凍室 蔬菜室
約 6℃ 約 -16℃ 約 9℃
約 5℃ 約 -17℃ 約 8℃
約 3℃ 約 -19℃ 約 6℃
約 1℃ 約 -21℃ 約 5℃
約 0℃ 約 -22℃ 約 3℃
標準
高
低
※ 顯示範例
按下按鍵
※
讓操控面板的顯示亮起(按下 )
各儲藏室的溫度調節
您可以依照您的使用狀況,來調整各儲藏室的溫度。
● 您剛購買時的預設設定:冷藏室、冷凍室、蔬菜室… 「中」,切換室… 「軟冷凍 ˙ 中」
您所設定的
項目會亮起。

使用前
使用方法
保養
有需要幫助的時候
使用方法
51
因為溫度不同,所以保存時間也不同。
想以好切冷凍保存時,請選擇
,想長時間保存時,請選擇 。
切換室的
與
有什麼不同?
設定顯示 用途 另有其他功能
肉、魚可用好切冷凍
保存大約2∼3個禮拜
好切瞬冷凍
▲
53
頁
肉、與、其他加工食品
可保存大約1個月
急冷
▲
52
頁
設定顯示
切換室
用途
約 -5℃
●當食品被凍結至很難切開時
含有較多水份的食品請用
保存。
• 熟青菜
•
脂肪較少的大肉塊
約 -7℃
● 好切瞬冷凍的最適合溫度
即使冷凍也可輕鬆切開。
可直接連袋子一起冷凍。
約 -9℃
●當食品不易冷凍時
含有較多鹽分、糖份的食品請用
保
存。
• 醬油醃製食品、味噌醃製食品
•鱈魚
約 -12℃
● 要保存較多鹽分、糖份的食品時
依然能保持冷凍前的口感。
約 -15℃ ● 保存曾冷凍過的食品時
約 -18℃
● 保存市售的冷凍食品、雪榚時
能讓雪榚保持在容易食用的硬度。
※ 冷凍室的冷凍與切換室的冷凍,兩者溫度是不一樣的。
※ 從冷凍切換到軟冷凍後,櫃內的溫度需要一段時間才能達到穩定(約2 小時)。
■如果想對溫度進行詳細設定
▲
72
頁
■切換室的溫度設定
每觸碰一次顯示就會改變,可 6 階段設定溫度。
、 無法保存市售的冷凍
食品與雪榚。

說明
●由於急冷中為高速運轉,所以雪櫃的聲音會變大。另外,實際溫度可能會比您所設定的還低。
●如原有其他食物,依然也可急冷。
使用前
使用方法
保養
有需要幫助的時候
使用方法
52
2
按下
就會亮起,設定結束。
●如果約 30 秒沒有操作按鍵,顯示就會熄滅。
急冷會在約 2 小時候自動結束( 會熄滅)。
● 切換室在 與節電模式的設定下,無法進行急冷。
當 顯示
時按下按鍵
設定為急冷
後,就會亮
起。
※ 顯示範例
可在大量採購後,把大量的食品放入,並用急冷來保持食品的新鮮。
●冷藏室、切換室(設定為 )、冷凍室、蔬菜室可進行急冷。
1
請再次按下
就會熄滅,設定也會解除。
想中途停止時
1
請按下,讓想進行急冷的儲藏室顯示亮起。
每按一次,儲藏室顯示就會改變。
●您剛購買時,會顯示出
。
※1:想將
急冷(急速製冰)時
▲
56
頁
※2:切換室在設定為 時,可進行急冷。
※1 ※2
讓操控面板的顯示亮起(按下 )
快速冷卻食物
(急冷)

說明
●當瞬冷凍在進行中時,切換室仍然可以開關門。
●冷凍室中如原有其他食物,仍然可以使用瞬冷凍。
●如果約 30 秒沒有操作觸控面板,
以外的顯示就會熄滅。
●切換室在節電模式與
設定的狀態下,無法進行瞬冷凍。
使用前
使用方法
保養
有需要幫助的時候
使用方法
53
1
請再次按下
就會熄滅,設定也會解除。
● 將瞬冷凍中的切換室設定為 後,瞬冷凍就會解除。
● 將瞬冷凍中的切換室設定為
後,瞬冷凍就會解除。
▲
60
頁
2
請確認 是否已點亮。
●
的
之中的任何一個,都可以設定為瞬冷凍。
●
在節電模式與設定為
的狀態下,無法瞬冷凍。
或是
點亮時
請按下 ,使
顯示後,待溫度穩定(約2 小時後),
再度從1開始操作。
3
把食品放入切換室後按下
※ 如果在放入食品時顯示熄滅了,請讓操控面板點亮後,再進行設定。
就會亮起,設定結束。
●在進行瞬冷凍時, 不會熄滅。
瞬冷凍會在約3∼12小時後※,會自動結束( 會熄滅)。
※ 時間長短會因食品的數量、溫度、種類而有所不同。
瞬冷凍結束後,食物會以好切冷凍(軟冷凍)的方式保存(肉與魚大約可以保存 2
∼3 個星期)。
●
如想將食物長期保存,請在瞬冷凍結束後,立刻將食物移到冷凍室內
進行保存。(肉與魚大約可以保存 1個月)。
在瞬冷凍中
會亮起。
想中途停止時
※ 顯示範例
1
請按下 ,使 亮起。
讓操控面板的顯示亮起(按下 )
當 顯示
時按下按鍵
美味冷凍
(好切瞬冷凍)
如果將食物以好切瞬冷凍的方式冷凍,則可以保存食物的水份與美味。
●切換室
(設定為 時)
可進行瞬冷凍。
● 「好切瞬冷凍的最佳使用方法」
▲
54∼55
頁

說明
●從冷凍轉為軟冷凍,以及從軟冷凍轉為
冷凍的食品,只能保存 1 ∼ 2 星期,請
盡早食用。
●瞬冷凍結完成後如想長期保存,請立即
將食品移到冷凍室裡。
瞬冷凍可防止食品的味道與口感劣
化,並保持食物的美味。
瞬冷凍後,會以好切冷凍(軟冷
凍)進行保存。在冷凍的狀態下依
然可輕鬆切開,因此可省去在冷凍
分裝食物的麻煩,也可省去解凍的
時間。
平常不適合冷凍的食品(竹筍、蕃薯等)或
熱食也可冷凍,並保存美味。
何謂好切瞬冷凍?
使用前
使用方法
保養
有需要幫助的時候
使用方法
54
內含蕃薯也能
保持美味
可切碎
可輕鬆
切開
保鮮紙最適合包裝容器與米飯。
要把食品裝入密閉容器時,
請用食品把容器裝滿。
請勿放入
80℃以上的熱食。
熟飯:約 70℃
錫紙、包裝紙可能會造成食物溫度偵測不正確,
請盡可能拿走。
如果容器內只放了少量的食品,則可能無法偵測到
食品的正確溫度。
否則可能會使旁邊的容器變形。另外,放置無法直接
用手拿的熱食時請小心燙傷。
飯
剩下的熱飯,請直接
以 1 人份為單位,用保鮮紙包妥,
並瞬冷凍。這樣就能抑制水份蒸發,保持飯的美味。
可用軟冷凍保存約 2 個禮拜。
可減少解凍不均勻,解凍效果好。
咖哩
剩下的咖哩,請直接放入切換室
以瞬冷凍保存。
醬油類
可以把做好的醬類趁熱倒進容器裡,並以瞬冷凍保
存。凝固後用菜刀切成塊狀,裝入保存袋內,這樣
就能節省空間,並可取出需要的量來使用。
馬鈴薯、西蘭花
使用於炸薯餅與沙律的熟
青菜可也可用瞬冷凍綁保
存。可進行降溫。
肉塊
想瞬冷凍時,建議切為 100 ∼ 400g 的肉塊。冷凍保
存的肉,或購買的冷凍肉,可在切換為軟冷凍後使用。
●因大小而異,從冷凍移至軟冷凍約2∼5小時候
就可以輕鬆切開。
薄肉片、煙肉
在添加烤生薑等醬料的同時,肉就會自然解凍,接著
就可一片片剝下。
●如取出後無法馬上剝下請暫時
放置一段時間後再剝下。
碎肉
用菜刀切下所需的份量就能使用。
接著切成塊狀,在室溫下放置
15∼30分鐘,
就能解凍至可用手剝開的程度。
魚肉切片、鱈魚
魚片不須解凍,可直接以小火烹煮。
鱈魚等鹽分含量較高的食品
不會完全凍結,因此可直接烹
調。
要使用哪種保存容器?
步驟
步驟
1
注意事項
好切瞬冷凍的最佳使用方法
直接將熱食瞬冷凍 用好切冷凍來保存肉、魚

不適合好切瞬冷凍的食品
說明
● 即使在瞬冷凍結束,
熄滅,食
品還是可能有冷凍不完全的現象。
(由於瞬冷凍、軟冷凍是以約-7℃將食
品凍結,所以食品可能需要約24小時才
能完全冷凍。)
說明
●水果在解凍後,不會回復到冷凍前的狀態。
請您不要解凍,在冰凍的狀態下直接食用。
●
凍結所需的時間,會因糖份的多寡而改變。
請以瞬冷凍保存一個晚上。
●如果水果以軟冷凍保存 1 個星期以上,可能
會變味。為保有新鮮的口感,請在 2∼3天
內食用完畢。
●剛放入新的食品時,請盡量減少開關櫃門的次數。
● 根據食品種類、調理方式、食品擺放方式(堆疊方式、
放置的場所)、食品的數量、保存時間的不同,可能會
造成無法瞬冷凍,凍結與冷凍後造成的變味程度也會隨
著不同。
● 食品中糖份、鹽分、脂肪的含有量多寡,可能會造成食
品無法凍結,或是凍結過度(無法馬上使用菜刀切開)。
● 如果凍結過度,則只要把食品放置在室溫下5∼15分
鐘後,就能用菜刀切開。
●請根據食品的冷凍程度來調整溫度。
▲
50∼51
頁
使用前
使用方法
保養
有需要幫助的時候
使用方法
55
建議使用甜度
較高的水果
請把想瞬冷凍的食品,
平放排列在切換室的
最上方。
將食品擺放完畢後,請設定為瞬冷凍。
▲
53
頁
請讓溫熱的食物與冷
凍的食物保持距離,
並放置在前方。
●如果之後再多放入其他食物,則
可能無法瞬冷凍。
●如果將溫熱的食物與常溫
以下的食物一起放入,雪櫃
會優先冷卻溫熱的食物。
納豆
取出後馬上可攪拌。
油豆腐
切下所需的份量就能使用。
曾解凍過的食品
無法保證口感與品質。
無法冷凍的食品
(蒟蒻、豆腐、牛奶、生蛋等)
無法保證能維持冷凍前的口感與品質。
市售的雪榚、冷凍食品
請保存於冷凍室。
● 冷凍的食品請勿與
熱食接觸,否則可
能溶解。
● 如果食物被遮蓋,則
可能無法測量到正
確的溫度。
果汁
把瞬冷凍的水果加上乳酪或牛奶,加以攪拌後,就能輕
鬆做出健康飲料。
水果冰
切成一口的大小再瞬冷凍,就會變
成水果冰。
請用各種不同的水果嘗試看看。
冷凍乳酪
把加糖的乳酪放入杯子後直接進行瞬冷
凍。經過一晚後,就會變成細緻的冷凍
乳酪。
沙冰
(蘋果、奇異果健康果露)
① 將 1/2 個蘋果去皮,切為一口的大小,
準備 1 個奇異果,切成 1cm 厚的片狀。
去皮,並進行瞬冷凍。
② 將牛奶 250cc、蜂蜜(依個人喜好)與瞬冷凍的蘋果、
奇異果混合,攪拌到順滑為止(2 人份)。
果醬
(草莓果醬)
①
將 1 包草莓(約 300g)放到容器中,並仔細壓碎。
② 加入砂糖 60 ∼ 100g(份量可依草莓的甜度做調整),
攪拌後以瞬冷凍保存。
③放置一晚後就完成了。
●用少量的水果就可製作,
因此如果手邊有剩下水果,不妨嘗試看看。
● 請勿保存於玻璃容器中。
否則容器可能破損。
切換室上方的紅外線感應器可監測
食品的溫度。請將食品放置在容易
測量溫度的位置。
多項食品同時瞬冷凍。
要放入食品時 該把食品放在哪裡?
步驟
步驟
2
步驟
步驟
3
水果、甜點的美味食譜
這些食材也能好切瞬冷凍!

設定顯示 設定內容 用途
製冰所需的大約時間
通常製冰 想製作冰塊時 約 2 小時
急速製冰
想快速製作冰塊時 60 ∼ 80 分鐘
製冰停止
製冰室的保養方式
※1
─
關於製冰盤的注意事項
● 冰塊的大小,與每次製作的冰塊數量,會
因儲水槽的水量等因素而改變。
●
1 次能製作的冰塊約為 10 ∼ 12 個。
● 如果將冰塊長時間存放在儲
冰箱裡,冰塊會黏在一起,
也會變小(此現象稱為昇華
作用)。
● 當您要把黏在一起的冰塊敲碎
時請注意不要弄傷手。
●
如遇下列情況,急速製冰將自動停止。
• 儲冰箱裡的冰塊已滿時(約 80 ∼ 140 個)
•儲水槽裡沒有水時
•
急速製冰超過 10 小時
(
顯示為從
切換為
)
● 由於急速製冰為高速運轉,所以雪櫃的聲
音會變大。
●
如果在剛安裝好就進行急速製冰,則可能需
要 24 小時以上才能將冰塊製作完成。
●
由於急速製冰是採用急速冷凍,因此冰塊
可能會有裂痕。
關於冰塊 關於急速製冰
●
的顯示亮起時,表示製冰盤或是製冰盤鎖閉桿沒有正確安裝(製冰盤的安裝方式:
66
頁
)。
製作冰塊前,請先安裝好製冰盤、插入製冰鎖閉桿,並確認
已熄滅。
● 儲藏室顯示的
閃爍時,表示製冰盤正在運轉。
製冰盤在運轉時,如拔出製冰鎖閉桿,則雪櫃會發出“嗶嗶嗶嗶嗶”的聲響。
製冰盤在運作時,請勿取出製冰盤。否則可能引致受傷或產品故障。
使用前
使用方法
保養
有需要幫助的時候
使用方法
56
1
請按下 ,使 亮起。
2
請按下 來設定製冰室。
每觸碰一次,顯示就會依下方的順序改變。
●您剛購買時的預設設定為
。
●上述為製冰 1 次(10 ∼ 12 個)的大約時間。
●室溫、水的種類、儲水槽的水量、溫度,以及以下的的使用狀況,都可能會造成製
冰時間比上述長。
•在冬天室溫較低時 •櫃門開關頻繁時
•把冷凍室設定為弱時 •設定為 ECO 模式時
▲
58
頁
•在製冰途中抽出製冰盤
●當
顯示時,就無法製冰。請將設定解除。
▲
60
頁
※ 顯示範例
按下按鍵
讓操控面板的顯示亮起(按下 )
※1:用於短時間存放冷凍食品。請勿在製冰室內長時間存放冷凍食品或霜淇淋。
製作冰塊
設定製冰室
您所設定的
項目會亮起。

說明
● 首次使用,或是超過 1 個星期沒使用,請用水清洗儲水槽、給水管、製冰盤。因為
可能會有異味或灰塵。
使用前
使用方法
保養
有需要幫助的時候
使用方法
57
用兩手
拿著
儲水槽
把儲水槽安裝回去
用兩手水平
拿著
儲冰箱
如果長時間不製作冰塊,請將製冰功能停止,並將製冰盤與儲水槽裡的水清空。
儲水槽
把儲水槽安裝
回去
3
取出儲水槽
1
把製冰室設定為 或
▲
56
頁
5
關上儲水槽栓、把儲水槽推至最入
● 請確認水槽座與給水管裡有無異物。異物可能造成
凍結。
66
頁
●
請將儲水槽推至底部。
如果未正確安裝,可能無法
製造冰塊。
滿水位置
給水口
4
滑動儲水槽栓
從給水口
加水
至滿水位置
●
如果注水超過滿水位置,傾斜或手
持搬運時可能會弄瀉。
另外,還可
能造成製冰盤的水管凍結,以及冰
塊相黏、形狀不美觀等。
警告:僅限飲用水。
2
請確認操控面板的
是否有顯
示
●顯示出現時,就無法製冰,請放入製冰盤,
並將製冰鎖閉桿插入。
66
頁
2
取出儲水槽將水倒掉
3
取出製冰盤,將水與冰倒掉
● 取出的方法,請參照
保養章節。
66
頁
4
取出儲冰箱,將水與冰
倒掉
●請勿丟棄靜音墊。
5
請用水清洗給水槽
(給水泵、水管、除氯濾網)
給水管、儲冰箱、靜音墊、製冰盤、冰鏟,
完全晾乾後,再安裝回去
66~67
頁
● 如未將儲水槽安裝回去,
冷藏室的食品可能會
凍
結。
長時間不製作冰塊時
1
把製冰室設定為
▲
56
頁
製作冰塊

使用前
使用方法
保養
有需要幫助的時候
使用方法
58
讓操控面板的顯示亮起(按下 )
節電
設定 ECO 模式
當雪櫃內的溫度穩定後,雪櫃就會自動進行節電運轉。
您剛購買時為未設定的狀態。
設定節電模式
雪櫃會以降低冷凍能力的方式進行節電運轉。可將製冰室
與切換室設定為此模式。
▲
60
頁
減少開門次數,儘快關上櫃門
頻繁開門,或是開啟時間太長,會造成雪櫃的冷氣流失,
導致電力的消耗增加。
● 即使是微小的隙縫,也會使雪櫃產生結霜、結露、滴水
的現象,並使雪櫃喪失冷藏的功能。
將溫度設定得稍高一些
把各冷藏室的溫度設定得高一點,就能減少電力的消耗。
建議您把切換室設定為軟冷凍。
如何提高節電效能?
1
按下
就會亮起,設定結束。
●進行節電運轉後, 就會點亮。
●如果約 30 秒沒有操作按鍵,顯示就會熄滅。
各儲藏室會選擇適當的時機,自動進行節電運轉。在節電運轉時,各儲藏室的溫度會設
定得稍高一些。
●設定為ECO模式後,頻繁開關櫃門、除霜後、急冷運轉,都會造成節電停止, 也會熄滅。(當冷凍室
充分降溫,且溫度穩定後,便會自動重新開始自動運轉)。
1
請再次按下
就會熄滅,設定也會解除。
節電效能 1
節電效能 2
節電效能 3
※ 在效能 0、效能 1 的狀態下會閃爍 (櫃門開閉特
別頻繁,或是雪櫃的周圍溫度較高時)。
● 「節電效能」 會分為 0 ∼3 等 4個階段來告知使用者。(當您善用雪櫃,節
省越多電時,「節電效能」就會上升)。
● 「節電效能」 大約一小時更新一次。(如 「節電效能」 沒有變化,則★的數
量也不會改變。)
● 您剛購買時,節電效能會顯示為 1。
● 即使目前並非 ECO 模式,ECO 顯示幕也依然會顯示。
● 關閉櫃門後,ECO 顯示幕會顯示
的字樣約 30 秒,以告知您現在為節
電狀態(約 30 秒後就會熄滅)。
想解除時
※ 顯示範例
節電模式
如目前為
ECO 模式,
就會
亮起。
設定 Eco Mode(ECO 模式)
關於 ECO 顯示幕
本雪櫃會依照各冷藏室的溫度設定、開關櫃門的頻繁程度等「使用方式」,以 3 個★標記
來告知您最近 24 小時的「節電效能」。

使用前
使用方法
保養
有需要幫助的時候
使用方法
59
按下 來切換儲藏室顯示區域後,可藉由 來確認正在進行節電運轉的儲藏室。
例:冷凍室與冷藏室正在進行節電運轉
如何確認各個儲藏室的節電狀態?
正在進行節電運轉
的儲藏室,
的圖示會亮起。
例:冷藏室與冷凍室正在進行節電運轉
說明
● 關閉櫃門後,ECO 顯示幕會顯示 的字樣約 30 秒,以告知您現在為節電狀態 (約30 秒後就會消失)。
在設定 ECO 模式時,
會告知哪些儲藏室正
在進行節電運轉。
────────
※ 設定為ECO模式
但卻未進行節電
運轉時,圖示並
不會亮起。
以ECO顯示幕
告知節電效能。

使用前
使用方法
保養
有需要幫助的時候
使用方法
60
節電
(續)
讓操控面板的顯示亮起(按下 )
可用節電模式保存的食物
(乾燥食物類) 海藻、香鬆、茶葉、咖啡豆、豆類、乾麵(意大利粉、幼麵等)等
(調味料) 鹽、砂糖、粉末狀香料等
(穀類) 米、小麥粉、生粉等
(甜食類) 糖果、朱古力、餅乾等
●節電模式的冷凍溫度約為 -10℃∼0℃。
● 不適合保存冷凍過的食品,例如冰鮮、生食品、冷凍食品、雪榚等。請將切換室的食品,
移到冷凍室中。
●請確認儲藏室中的食品後再進行設定。
●冬天的室溫低,或是冷凍室設定為強時,溫度可能降低。
● 把食物放入製冰室時,請勿超過儲冰箱的高度(可能造成門無法關緊,或是產品的故障、破
損)。
降低儲藏室的冷凍能力來達到節電的目的。
●可將製冰室與切換室設定為此模式。
● 當您把製冰室設定為節電模式時,雪櫃就會自動設定為製冰停止(也無法保存冰塊)。請將儲水槽的水、製
冰盤、儲冰箱的水與冰倒掉後,再設定為節電模式。
(「長時間不製作冰塊時」的操作
2∼5
▲
57
頁
)。
1
按著 3秒以上
(直到發出“嗶嗶“的聲響),接著
會開
始閃爍
2
按下 ,讓您想設定的儲藏室顯示亮起
燈號亮起的儲藏室,表示已被設定為節電模式。
每觸碰一次,顯示就會依下方的順序改變。
想解除時
1
請選擇目前被設定為節電模式的儲藏室,然後
按下
就會熄滅,設定也會解除。
●調整欲解除的儲藏室的溫度設定後,就會解除。
●依照設定步驟
1 ∼2 的操作方式,也可選擇 解除。
3
過不久後, 的閃爍會變為恆亮, 設定完畢
(會響起“嗶嗶“聲)
● 將製冰室設定為節電模式後, 也會一併顯示。
●如果約 30 秒沒有操作按鍵,顯示就會熄滅。
※ 顯示範例
設定為節電模
式後就會顯示
按下按鍵
●
會開始閃爍。節電模式已被解除的狀態。
● 您剛購買時,節電模式為解除的狀態。
按住
3 秒以上
想解除時請按下
按鍵
設定節電模式

使用前
使用方法
保養
有需要幫助的時候
使用方法
61
1
同時觸碰 與 3 秒以上
(直到發出“嗶嗶”的聲響為止)
就會亮起,設定結束。
●即使已設定兒童按鍵鎖,依然可以進行儲藏室選擇。
1
按下 與 3 秒以上
(直到發出“嗶嗶”的聲響為止)
1
再次按下 與 3 秒以上
(直到發出“嗶嗶”的聲響為止)
就會熄滅,設定也會解除。
想解除時
● 為顯示範例。按鍵名稱會因您選擇的儲藏室與溫度 而有所改變。
▲
48
頁
其他操作
(重置設定
˙
兒童按鍵鎖)
如果您已經忘了目前的設定為何,可以藉由重置,讓設定回復到剛
購買的狀態。
●切換室的溫度設定不會改變。
●急冷或急速製冰、瞬冷凍、ECO 模式、節電模式都會被解除。
●製冰室的設定如果為
,則設定不會改變。
防止惡作劇等,使誤觸的按鍵無法進行任何設定。
想重置設定時
想防止錯誤設定
(兒童按鍵鎖)
※ 顯示範例
同時按下按鈕
3 秒以上
※ 顯示範例
同時按下按鈕
3 秒以上

滑動微凍箱
微凍雞蛋架
微凍室(-3∼3℃)
無法調節溫度。
請勿放入容易結凍的食品。
保存肉、魚、加工食品(魚糕、火腿等)、
乳酪等。
使用前
使用方法
保養
有需要幫助的時候
使用方法
62
雪櫃內燈泡
二變式靈活摺
架
活動盤
瓶架
小件箱(上)
小件箱(下)
活動雞蛋架
吹風口
雪櫃內燈泡共由10個LED所構成。
高度調節架
在吹風口附近放置水分較多的食品,可
能會凍結。
75
頁
■櫃門開啟時,櫃門蜂鳴器、雪櫃內燈泡、儲藏室顯示區域都會發出通知。
49
頁
冷藏室
味道較重的食品,
請仔細密封保存
薤、鹹魚等乾貨、 納豆、味噌醬、牛
肉、鹹菜、沙甸魚、泡菜、餃子等
容易令其他食物變味的食品
布丁、 雪榚、 米飯、 土豆沙律、豆
腐、麵包、牛奶、蛋糕、冰塊等
容易變味的食品

使用前
使用方法
保養
有需要幫助的時候
使用方法
63
如果滑動微凍箱、小件箱的外部放
有食品時,請不要關門
說明
● 因照明燈使用長壽命發光二極體(LED),所以通常不
需要更換。
盒子
要確實放好
擺放食品時,請勿突出於棚架瓶
架的前列,請勿放置無法放到底
的瓶罐
這樣做雪櫃門可能無法完全閉合及瓶罐掉
落破碎。
另外,如食品掉落可能導致受傷。
請勿在雪櫃門盤架外側放置市售
的管架
雪櫃門無法完全閉合, 冷卻效果也會降
低,或是因食品掉落導致受傷,也可能造
成箱和蓋等破損。
棚架、瓶架可動
①
②
①
②
①
②
①
②
■高度調節架的拆卸和安裝方法
68
頁
■二變式靈活摺架的拆卸和安裝方法
68
頁
■活動盤的拆卸和安裝方法
69
頁
用作開闊的棚架
縮減一半,
放置較高
的東西
左右移動拉桿,調整架子的間隔
高度調節架
二變式靈活摺架
活動盤
可兩段式調整
1
2
<一>
<二>

使用前
使用方法
保養
有需要幫助的時候
使用方法
64
蔬菜室
注意
蔬菜箱
滑動箱
冷凍室
注意
請勿在冷凍箱(下)中放入高度比較
高的物品。
●食品與冷凍箱(上)可能會受損。
●會導致門無法關上。
請勿放入專用冷凍膠樽飲料瓶以外的容器。
●否則液體凝固後會使容器裂開。
冷凍箱(上)
冷凍箱(下)
切換室
注意
食品不能堆得比箱子高。
●會導致門無法關上。
●食品可能會受損。
●食品可能會融化。
切換箱
紅外線感測器
紅外線感測器檢測食品的溫度。
鋁盤
冷卻的托盤可以迅速冷卻食品。
●
櫃門開啟時,櫃門蜂鳴器、儲藏室顯示區域都會發出通知
。
49
頁
食品不能堆得比箱子高。
• 食品與滑動箱可能會受損。
• 室門會無法關上。
某種特定的蔬菜,或是蔬菜量多時,蔬菜蒸發的水份會
結為霜或露,並附附著於蔬菜室的頂部,或箱子的表面。
如果有水滴形成,請用乾布擦拭。
冷凍室
蔬菜室
切換室

使用前
使用方法
保養
有需要幫助的時候
使用方法
65
製冰室
除了水以外, 請勿於儲水槽加入熱
水、果汁、茶及冰的飲料等其他液體
(耐熱溫度約為 60℃)
加入水以外的液體,可能導致自動製冰機及
給水泵故障。
請勿直接於製冰盤加水製冰
製冰盤的水未凍結時落入儲水箱, 製作出的冰塊可能會黏在一
起。
如用礦泉水等礦物質成分多的水製作的冰塊中,可
能會有白色沉澱物(白色結晶)。
這是礦物成分的結晶物,對身體無害。
●為了確保冰塊的衛生和可口,請定期清洗、保養。
66∼67
頁
■櫃門開啟時, 櫃門蜂鳴器、儲藏室顯示區域都會發出通知。
49
頁
請勿在儲冰箱深處放置物品
● 將食品儲存在製冰室中,請勿超過製冰室標示的紅線高度(否
則可能造成故障或雪櫃門無法完全閉合)。
把製冰室設定為
或 時,請勿放入冰塊以外
的食
品。
● 檢測桿會自動偵測儲冰存量,到達一定程度(約 80~140 塊)
就會停止製冰。為正確檢測儲冰量,請將冰塊推平,並將冰鏟
置於儲冰箱右前方的收納處。
冰鏟
儲冰箱
製冰盤
檢測桿(檢測儲
冰存量)
門
將冰塊推平
製冰時的注意事項
製冰室
(自動製冰機)
儲水槽蓋
儲水槽栓
給水管
製冰盤
製冰室標示
靜音墊
減低冰塊掉落在儲冰箱中的聲音。
請勿丟棄。
可以拆下來
清洗保養。
蓋子向前或者向後都能
安裝到給水槽上。
儲水槽
(約 1.2L)
儲水槽安裝位置線
儲冰箱
製冰盤鎖桿
冰鏟
儲水槽安裝位置的標
準。
插入儲水槽,碰到內壁
後,請確認能看見儲水
槽前面的線。
水管
給水泵
除氯濾網

使用前
使用方法
保養
有需要幫助的時候
保養
66
給水管
水槽座
給水管
水槽座
襯墊
鋁
管
給水管
給水槽
襯墊
保持水平
請勿夾
入異物
為了確保冰塊的衛生和可口,請定期清洗、保養。
• 請不要讓水流入水槽座。否
則可能造成故障。
• 請以左右旋轉的方式把鋁管
拆下。
※ 給水管可能因為石灰與礦物
質附著而呈現白色,這並非
異常。請清洗水管後繼續使
用。
• 請確實插入給水泵,不能出
現段差。使用時若有落差,
可能會導致故障。
• 若未將給水管安裝回去,冷
藏室的食品可能會凍結。
• 若未確實插入,或者由於
異物造成縫隙時,可能
會導致發出異響或無法製
冰。而且,也會導致給水
槽的水或冷藏室的食品凍
結。
※ 根據水的種類, 若容易發霉,請每週保養 2、3 次。
使用漂白劑保養給水槽、蓋子時,請遵照
相應的注意事項操作。
※ 請勿使用洗碗機、烘碗機來清洗,否則可能會造成變形。
可防止水垢與霉菌等的產生。
把給水栓的刻印對準
蓋的刻印後拆下。
刻印
2
打開製冰室門,取下
製冰盤鎖桿
• 鬆開製冰盤鎖桿後, 燈亮起。
• 鬆開製冰盤鎖桿後,如果發出“嗶嗶嗶嗶嗶”的聲音,
請關上室門。
• 當
燈閃爍時,請等待閃爍停止,再進行步驟2的
操作程序。
▲
56
頁
1
把製冰室設定為
6
將製冰室設定為
或
▲
56
頁
• 以水沖洗,並擦乾。
4
清空製冰盤,再以清水清洗
• 水可能會溢出, 請慢慢地拉
出。
3
將製冰盤向外拉,
並取出製冰盤。
稍微向上
抬起取出
以水蘸濕後,就可
輕鬆拆解、組裝
5
插入製冰盤,直到聽見“喀嚓”的
聲音,固定住製冰盤鎖桿
• 請確認 燈已熄滅。
亮燈時,請確認製冰盤鎖桿的位置,與製冰盤是否上
下顛倒。
扣住 沒有扣住
自動製冰機的保養
製冰盤
給水槽
給水管、水槽座
1
拆下槽蓋,以清水清洗
(耐熱溫度約為 60℃)
1
拔除給水管以乾淨的
抹布將水槽座擦拭乾淨
2
拆解後以清水清洗
3
以相反順序組裝回原狀
4
請確認給水管、給水槽襯墊和水槽座之
間是否有異物
月
每
1次
年
每
12次
週
每
1次

說明
●如未將水槽襯墊安裝回去,儲水槽的水與冷藏室的食品可能會凍結。
●在一般的情況下,不用更換除氯濾網。但在以下的情況時敬請更換。
• 倒入水以外的物體,造成堵塞時 • 破損時 • 當濾網發霉時
請聯絡購買處的經銷商。
※ 根據水的種類,若容易發霉,請每週保養 2、3 次。
將給水泵、水管恢復原位的順序
組裝給水泵 安裝水管
組裝不完全時,會造成無法製冰、或雪櫃的聲
音變大的問題。
使用前
使用方法
保養
有需要幫助的時候
保養
67
給水泵
水管
翼片
蓋
光觸媒
除鉛
濾網
蓋帽
水管
給水泵
給水槽襯墊
旋轉
1
將濾網嵌入蓋帽
4
旋轉蓋帽的鉤部(①),鉤住給
水泵的凸塊部(②)
※ 請確認翼片在給水泵內。
5
旋轉給水泵安裝到給水槽上
※ 將給水槽底部的三角標記對
準濾網的三角標記插入,確
保不留縫隙。
2
將蓋子嵌入蓋帽上
3
將翼片裝到給水泵上
用手指將鉤部
撐開的同時將
蓋帽拆下。
旋轉
②
①
清洗光觸媒除鉛濾網時,請勿使用廚
房用中性清潔劑、揮發油或漂白劑等
清潔用品
• 否則導致冰塊出現異味。
安裝時請對準水
槽的刻印和襯墊
的刻印位置後,
嵌入到底部。
翼片用磁石製成。
請確實用水清洗,
不要殘留異物。
完成圖
完成圖
完成圖
完成圖
水槽
襯墊
水管
給水泵
注意
請勿讓異物堵塞通
孔
1
將水管插入給水槽
2
連接水管和給水泵
※ 請確認水管與給水泵之間沒有異物。
水管
給水泵
水管、給水泵、除氯濾網
1
把給水槽襯墊從給水槽拔出
2
拔下水管,再將給水泵以旋
轉方式拔下。
3
分別拆除部件,並且用
清水清洗
4
將給水泵、水管、給水槽襯墊恢復至原位
週
每
1次
保養時,請勿使用如下物品。
海綿和刷子等會損傷表面的物品、鹼性洗滌精、上光粉、熱水、石油、酸

保養方式保養前
步驟
步驟
2
步驟
步驟
1
使用前
使用方法
保養
有需要幫助的時候
保養
68
①
②
②
①
將電源插頭拔掉
請隔 10 分鐘以上,再將電源插頭插回。
如果立刻插回,機器將不會運作。
如果不拔掉插頭,可
能導致觸電或受傷。
•
用柔軟的抹布蘸溫水擦拭,或者拆卸下來水洗。
(請用柔軟的抹布擦拭操控面板)
•
對難以去除的污垢,請用稀釋後的廚房用清潔劑(中性)清洗後,
特別是油漬,如不去除掉會導致塑膠部件破裂。
請勿使用鹼性弱鹼性廚房用清潔劑、研磨粉、粉狀
石油、酸、鮑魚刷、熱水等。
否則會導致塑膠部件(門的箱蓋、收納箱等)破裂,
而導致生鏽。
將摺架推入,再稍微外拉,向上抬
起取出。
①將箱盒向外拉到底。
②向上抬起取出。
① 確定拉桿已完全推向右方。
② 確定 4 個金屬阻擋物已牢固地裝入,
然後輕力地將摺架裝入,4 個支撐物
要對齊 4 個阻擋物。
③ 逐次將 4 個支撐物從上向下推。(會聽
到“喀嚓”聲。)
④
將拉桿向左右兩邊推,檢查高度調節架
向上下移動時是否保持平行。(如果棚
架無法保持平行地上下移動,請將高度
調節架拆除,並重複步驟
①
至 ②)
拆除棚架 安裝棚架
③用雙手取出托盤。
② 將托盤後部向上推,直至前側的鉤
(3 個)和兩側的鉤(2 個)鬆開。
※ 托盤可能會掉落。
請慢慢地提起托盤。
①把拉桿推向右邊。
請先拆下托盤再進行以下動作。
請在拆下托盤的情況下進行以下動作。
② 逐次用力推起各個支撐物
(共4個)。
(鬆開時會聽到“喀嚓”聲)
如果支撐物不容易鬆開,
請將內鉤向內推。
③ 取出到雪櫃外。
※
小件箱 (上) 與小
件箱 (下) 無法交
換放置。
① 用手指將棚架後部的白色鉤(3 個)
向前拉,同時將托盤向上推。
配件的拆卸方式與保養
二變式靈活摺架 滑動微凍箱、小件箱(上)(下)
高度調節架
(請勿拆解高度調節架,或使用潤滑脂等化學物品。)

保養後定期檢修
步驟
步驟
3
使用前
使用方法
保養
有需要幫助的時候
保養
69
如果電源插頭、電源
線受損,或有灰塵堆
積,
可能導致觸電或火
災。
再以水擦拭。
肥皂、酒精、揮發油、溶劑、
門把手與
油漆面也可能受損
電源插頭與電源線的檢查
為確保安全,請定期保養
① 請先拔掉電源插頭再進行檢查。
• 電源插頭、電源線上有無損傷、發熱的現象。
②用乾抹布擦掉電源插頭及周圍的灰塵。
③將電源插頭確實地插回插座。
②
①
②
①
②
①
①將室門向外拉到底。
②向上抬起取出。
①
左右兩邊交替地提起。(活動盤及瓶架均牢固地安裝)。
②向前拉出。
•
確認已經確實裝好。
如果未安裝到位,可能會掉落導致受傷。
將污垢、汁液與結露擦拭乾淨。
承水盤
安裝時
※ 圖片為切換室。
製冰室亦同。
①將室門向外拉到底。
②將上段箱朝前方抬起。
③將室門拉出時稍微向上傾斜,抬起。
④將下段箱朝前方抬起。
※ 圖片為冷凍室。
蔬菜室亦同。
冷凍室、蔬菜室
活動盤、瓶架
製冰室、切換室 承水盤凹下處
①卸下支撐腳蓋。
② 請旋轉可調式支撐腳,使支撐腳懸空,向前移
動雪櫃(為防止地板受損,建議鋪上保護材。
也請注意避免受傷)。
③ 將背面、牆壁與地板的污垢擦拭乾淨。
(由於空氣對流的關係,雪櫃背面與地板比較容
易堆積灰塵及出現污垢。打掃乾淨有助於節電,
請定期清掃。)
④請確認地板上有無漏水。
請勿將手伸到雪櫃的下面,否
則可能導致受傷。
雪櫃的背面、地板
裝回時,請依照與拆卸時相反的順序進行。
支撐腳蓋
① 分別從左及右兩側向內推,同時拉
向自己。
①
①
①
②
③
④
黑斑、
灰塵

使用前
使用方法
保養
有需要幫助的時候
有需要幫助的時候
70
特殊情況 請這樣解決
排水口
正面下方內側 背面上方
警告
搬家等長時間運時
在搬運途中,冷凍室內部的冷卻器的霜可能會溶解,可能會有水滴滴出。
拔除電源插頭後,霜需要約 1 天左右才會溶解。
請減少櫃門的開啟次數,並避免再放入新的食品。
溫度設定以外的設定有可能改變。請再次確認設定(兒童按鍵鎖、急冷等)。
停電時
移動時
改變面向時
長時間 不使用時
搬運時
(搬家等)
①向上調節支撐腳。
②請在滾輪及後部的支撐腳下部鋪上布片等保護地。
③按前後方向移動。
※ 如果不按照前後方向推移,將會損壞地板。
▲
45
頁
①請清理自動製冰機。
②拔掉電源插頭後清掃雪櫃內部,完成後請打開櫃門放置 2 ∼ 3 天,使內部風乾。
※ 如沒完全乾燥,可能會造成發霉、異味,冷卻器也可能因此腐蝕而導致冷媒外漏。
▲
66∼67
頁
▲
57, 66
頁
①將儲水槽與製冰盤的冰與水倒掉。
②請帶上護具(棉質手套等)。
③拆除支撐腳蓋、向上調整支撐腳。
④拔除電源插頭。
⑤ 在排水口的下部及雪櫃的背面下角部鋪墊毛巾,
上面放一個接水用的高約 3cm 的容器或水盤等。
※ 鋪墊毛巾可以防止水流到地板上及損壞地板。
⑥ 向後緩慢傾斜約 30 度,從背面的下部排水口倒
掉蒸發 水盤裡的水。(從外部看不到蒸發水盤)
※ 因雪櫃很重,務必由 2 人以上進行搬運作業。
※ 年幼的孩童或者對自己的力氣沒有把握的人
員,請勿搬運, 請聯絡專業搬運人員等。
⑦
由 2 個人以上,手持正面下方內側與背面上方,
小心搬運。
請勿平放。(避免壓縮機故障)
因為使用的是可燃性冷媒,請勿毀損冷媒迴路。
如果冷媒氣體外洩,將可能導致燃燒或爆炸。
特殊情況

使用前
使用方法
保養
有需要幫助的時候
有需要幫助的時候
71
特殊情況 請這樣解決
在示範運轉的狀態下,雪櫃完全沒有冷藏的功能。請聯絡購買處的經銷
商,或是以下列方法解除示範運轉。
解除示範運轉的方法
①讓冷藏室的門保持開啟。
②按
2 次。
③同時按著
與 與 5 秒以上。
④ 關上櫃門 1分鐘後,請確認顯示部份是否正在閃爍。
(如果正在閃爍,就表示範運轉尚未解除)。
示範運轉狀態
並未操作任何按鈕,
但所有的圖示卻反覆
在一定的間隔後閃爍
三次時
操控面板的儲藏室顯
示或溫度設定顯示不
斷重複閃爍時
標記快速
(約1秒5次)閃爍
時
代表雪櫃需要檢查,請聯絡購買處的經銷商。
※
按鍵的名稱顯
示有可能隨著設
定內容的不同而
改變。
蜂鳴聲如果不停止
按下 5 秒以上,蜂鳴聲就會停止。請確認櫃門是否已關上。
如果櫃門關上後,蜂鳴聲依然不停止,代表雪櫃需要檢查,請聯絡購買
處的經銷商。

使用前
使用方法
保養
有需要幫助的時候
有需要幫助的時候
72
特殊情況 請這樣解決
想微調溫度時
(溫度微調模式)
冷藏室、冷凍室、切換室(冷凍設定時)的溫度設
定共有 19 階段,切換室(軟冷凍)的溫度設定有
5 階段。
溫度微調時,儲藏室顯示約每 10 秒閃爍 1 次。
■設定為溫度微調模式
按下 3 秒以上
(直到發出“嗶嗶”的聲響為止)
解除方式
與上述的操作相同。
■微調溫度
例: 將冷藏室設定為比弱還低 1.2℃時(設定冷
藏室5時)
① 按下
選擇您想微調溫度的儲藏室
② 重複按下
來微調溫度
※ 右方的溫度為大概的估計值。實際
的溫度,可能因不同的食品擺放狀
態,與櫃門的開關情況,而與右方
的溫度有所差異。
表示閃爍。
設定顯示 冷藏室 ˙ 冷凍室
切換室
(冷凍設定)
1
設定為 「弱」
▲
50
頁
約 -12℃
▲
51
頁
2
2345
比弱
低約 0.3℃
比中
高約 2.4℃
3
比弱
低約 0.6℃
比中
高約 2.1℃
4
比弱
低約 0.9℃
比中
高約 1.8℃
5
比弱
低約 1.2℃
比中
高約 1.5℃
6
設定為 「中弱」
▲
50
頁
比中
高約 1.2℃
7
978
比中
高約 0.9℃
比中
高約 0.9℃
8
比中
高約 0.6℃
比中
高約 0.6℃
9
比中
高約 0.3℃
比中
高約 0.3℃
10
設定為 「中」
▲
50
頁
約 -15℃
▲
51
頁
11
1311 12
比中
低約 0.3℃
比中
低約 0.3℃
12
比中
低約 0.6℃
比中
低約 0.6℃
13
比中
低約 0.9℃
比中
低約 0.9℃
14
設定為 「中強」
▲
50
頁
比中
低約 1.2℃
15
15 16 17 18
比弱
高約 1.2℃
比中
低約 1.5℃
16
比弱
高約 0.9℃
比中
低約 1.8℃
17
比弱
高約 0.6℃
比中
低約 2.1℃
18
比弱
高約 0.3℃
比中
低約 2.4℃
19
設定為 「強」
▲
50
頁
約 -18℃
▲
51
頁
「冷藏」
約每10秒
鐘閃爍一次
「強」
會開始
閃爍
設定顯示
切換室
(軟冷凍設定)
1
約 -5℃
2
約 -6℃
3
約 -7℃
4
約 -8℃
5
約 -9℃
特殊情況
(續)

配件數量
型號
MR-BX52W
冷
藏
室
高度調節架
二變式靈活摺架
滑動微凍箱
儲水槽
(
內附除氯濾網
)
活動盤
小件箱(上)
小件箱(下)
活動雞蛋架
瓶架
1
2
1
1
4
1
1
1
1
製
冰
室
製冰盤
儲冰箱
靜音墊
冰鏟
1
1
1
1
切
換
室
切換箱
鋁盤
1
1
蔬
菜
室
蔬菜箱
滑動箱
1
1
冷
凍
室
冷凍箱(上)
冷凍箱(下)
1
1
支撐腳蓋
1
使用前
使用方法
保養
有需要幫助的時候
有需要幫助的時候
73
■ MR-BX52W-N-P 和 MR-BX52W-BR-P 僅設計為新
加坡使用,而不能在任何其他國家使用。在新
加坡以外的地方不會提供任何維修服務。
■ MR-BX52W-N-ML 和 MR-BX52W-BR-ML 僅 設 計
為馬來西亞使用,而不能在任何其他國家使用。
在馬來西亞以外的地方不會提供任何維修服務。
■ MR-BX52W-N-H 僅設計為香港使用,而不能在
任何其他國家使用。在香港以外的地方不會提
供任何維修服務。
規格

使用前
使用方法
保養
有需要幫助的時候
有需要幫助的時候
74
完全不冷!
操控面板背景燈自行熄滅!
冰塊與食品有異味!
機體外側發熱!
● 剛開始使用時,需要一定的時間才能冷卻下來。夏
季充分冷卻下來一般需要 24 小時。
● 操控面板的顯示是否在閃爍?
→示範運轉:
● 電源插頭是否插好?斷路器是否被斷開?
● 為了節電,如果約 30 秒沒有操
作按鍵,顯示就會熄滅。
● 是否每週清理一次儲水槽與給水
泵?
● 是否沒有密封包住味道較重的食
物,就放入雪櫃?
● 剛安裝好時或者在夏季, 機體外側特別容易發熱
(約 50 ∼ 60℃)。這是因為機體側面及頂部裝有散
熱、防冷凝的管道。這是冷卻所必須的功能,並非
異常。
● 下面也裝有散熱風扇,因此會排出熱氣。
請先依以下步驟檢查,如果還有故障情況,請立刻洽詢購買處的經銷商。
■剛開始使用及夏季時特別容易出現的問題 ■操作方法等
▲
48
頁
▲
66∼67
頁
▲
62
頁
▲
71
頁
狀況 請確認 解決方式、原因。
①該儲藏室的溫度設定是否為「弱」?
②雪櫃是否剛剛安裝好?
③ 雪櫃是否不能正常散熱?例如雪櫃四周沒有留出
空間、雪櫃受到陽光直射等?
④ 內部冷氣流動是否有受到阻礙?或者是頻繁開門、
雪櫃門沒有關緊?
⑤
製冰室與切換室是否設定為節電模式?
①請將溫度設定為「中」或「強」。
② 雪櫃需要4∼5小時才能完全冷卻。夏天則可能需
要24小時。
③請確認是否有正確安裝。
④食品是否塞得太多?雪櫃門是否有關緊?
⑤請將節電模式解除。
雪櫃冷度不足
製冰量少
冰塊會融化
▲
44
頁
▲
58
頁
▲
60
頁
①是否長時間將冰塊放在儲冰箱中?
②切換室是否設定為節電模式?
①
如果將冰塊長時間存放在儲冰箱裡,冰塊會黏在一起,
也會變小(此現象稱為昇華作用)。
②
請將節電模式解除。
冰塊小、會連在一
起
▲
60
頁
儲水槽
給水管凍結
① 給水管、水槽管是否確實安裝在儲水槽上?儲水
槽與給水管的連接部是否有異物附著?
② 是否有食品或塑膠掉落到製冰室或冷凍室儲存箱
後方?
① 安裝不確實或是因異物造成縫隙時,就會導致冷氣
逆流,並使冷藏室的食品結凍。
② 冷氣會逆流,可能會造成凍結。請取去掉落的食品
或塑膠。
▲
66
頁
①雪櫃是否剛剛安裝好?
② 製冰盤的安裝是否正確?
操控面板的
是否點亮?
③ 給水管、水槽管是否確實安裝於儲水槽上?
④ 水槽座與給水管的安裝是否正確?
⑤ 儲冰箱內是否有放置食品或冰鏟等物品?
⑥請確認操控面板的製冰室設定是否為「冰停止」。
⑦
製冰室是否設定為節電模式?
⑧儲水槽內是否有足夠的水?
雪櫃是否有傾斜的現象?
① 雪櫃需要4∼5小時才能完全冷卻。夏天則可能需
要 24 小時才能製冰完成。
②請確認製冰盤鎖桿是否位於正確的位置,並檢查製
冰盤的安裝狀態。
③ 請正確安裝儲水槽
(特別要將水槽管的出口正確安裝至儲
水槽上)。
④
安裝不確實或是因異物造成縫隙時,就會導致冷氣
逆流,並使雪櫃無法製作冰塊。
⑤ 雪櫃判斷冰已堆滿。請將儲冰箱的食品取出。或將
冰塊朝前方推平。
⑥請設定為「通常」或「急冷」。
⑦ 請把節電模式解除,並將製冰室設定為「通常」或
「急冷」。
⑧有時其中一次的製冰數會較少。
請把水倒入儲水槽中。
請將雪櫃水平放置。
無法製冰
水槽的水不會減
少
▲
66
頁
▲
57
頁
▲
67
頁
▲
66
頁
▲
60
頁
▲
56
頁
故障排除

使用前
使用方法
保養
有需要幫助的時候
有需要幫助的時候
75
無法設定溫度
① 是否點亮。
①請將兒童按鍵鎖的設定解除。
▲
61
頁
無法瞬冷凍
( 不會點亮)
① 儲藏室的顯示是否顯示為「瞬冷凍」、溫度設定顯
示是否顯示為「軟冷凍」。
① 請把切換室設定為軟冷凍後,再設定為瞬冷凍。切
換室只有在軟冷凍時,才能設定為瞬冷凍。
▲
53
頁
櫃門容易自行開
啟
櫃門無法關上
① 櫃門是否觸碰到食品或收納箱?
是否儲存過多食品?
② 檢查拉門收納箱後方是否有食品掉落?確認櫃門
與本體之間是否有電線等異物卡在當中?
③ 各項安裝是否確實?
腳架是否確實抵住貼在地面?
① 請勿讓存放的食品在櫃門關上時,碰觸到櫃門。
② 請將夾在櫃門間的物品清除。例如食品、電源線、
塑膠袋等。
③ 調整可調式支撐腳,使雪櫃前方稍微提起,如此關
門會較容易。
▲
45
頁
狀況 請確認 解決方式、原因。
① 請確認操控面板的溫度設定是否設定為「強」。
②是否將水分較多的食品放在棚架深處?
③周圍的溫度是否低於 5℃?
④ 給水管安裝是否正確?
①請將溫度設定為「中」。此外,急冷運轉時,雪櫃內
的溫度會暫時降低。
② 豆腐、蔬菜、水果等水分含量較多的食品與飲料,
請放在外側。
③請將冷藏室及蔬菜室的溫度設定為「弱」,這樣比較
不容易結凍。
④
安裝不確實或是因異物造成縫隙時,就會導致冷氣逆
流,並使冷藏室的食品結凍。
冷藏室、蔬菜室的
食品凍結
切換室的食品融
化
① 剛剛調整過溫度,或者雪櫃剛剛安裝好?
②上部的食品是否放得太密集?
③是否接觸直接放入雪櫃的熱食?
④
放入熱食時,是否設定為瞬冷凍?
⑤ 雪糕與冷凍食品, 是否有以「冷凍 ˙ 弱」或是「冷
凍 ˙ 中」來保存?
⑥
切換室是否設定為節電模式?
① 雪櫃充分冷卻需要一定的時間。請等待 30 分鐘以
上再放入食品,或使用急冷。
②
請在上部預留足夠的間隙,讓冷氣流動。
③ 冷凍的食品請勿與熱食接觸,否則可能融化。
④ 放入熱食時,請設定為瞬冷凍。食品的溫度會快速
下降。
⑤請設定為「冷凍 ˙ 強」。
⑥
請將節電模式解除。
▲
60
頁
蜂鳴聲響起
雪櫃內燈泡熄滅
操控面板的儲藏
室顯示是否在閃
爍
① 請確認櫃門是否開著。 ① 請將門關上。櫃門打開後每過 1 分鐘會發出門開警
告,4 分鐘以後會持續發出警告。
如果關上門後蜂鳴聲也沒有停止,請按住「瞬冷凍、
急冷按鍵」約 5 秒,蜂鳴聲就會停止。這樣的狀況
代表雪櫃需要檢查,請與購買處的經銷商。
▲
49
頁
進行了瞬冷凍,
但是吃起來味道
不好
①是否按了「瞬冷凍按鍵」?
② 是否把想瞬冷凍的食品,平放排列在切換室的最
上方?
③ 是否剛剛把切換室變更為「軟冷凍」?
① 請按下「瞬冷凍按鍵」,並確認面板上的
是否亮
起。
② 切換室上方的紅外線感應器可測量出食品的溫度。
請把想瞬冷凍的食品,平放排列在切換室的最上方。
③ 請設定為軟冷凍,並待溫度穩定後
(約兩小時後)再進行瞬冷凍。
▲
55
頁
▲
53
頁
▲
53
頁
因為內部裝有防止凍結的加熱器。
並非異常。
給水槽與給水
管有溫熱的現象

使用前
使用方法
保養
有需要幫助的時候
有需要幫助的時候
76
狀況 請確認 解決方式、原因。
①聲音突然變大。音色改變。
② 時常(每1∼2小時)發出“嗡、咕嘟咕嘟”
的聲音。
③ 通電後,在製冰停止的時候時常(每1∼2小時)
發出“咕、啾因”的聲音。
④關閉雪櫃門時,發出“咻”的聲音。
⑤ 時常發出“啾”或“波波波”(沸騰音)或
“沙”(流水聲)的聲音。
⑥ 關閉雪櫃門時,雪櫃內會發出“嗶咻”或
水滴滴落的聲音。
⑦時常發出如蚊子般的“嗡嗡”聲。
⑧打開冷凍室的門,雪櫃就會發出低沉“嗡翁”聲。
① 在剛安裝好、氣溫炎熱時、雪櫃門頻繁開關,或
急冷運轉等時,雪櫃會切換至高速運轉來強力降
溫。
② 此為自動製冰機的聲音。即使儲水槽沒水,自動
製冰機與給水泵還是會每隔 100 分鐘左右發出一
次聲音。
③此為自動製冰機自行檢測的聲音。
在「製冰停止」的狀態下,還是會進行檢測。
④此為風扇摩打開始運轉的聲音。
⑤此為冷媒流動的聲音。
⑥ 暖空氣流入雪櫃內,塑膠因膨脹而發出的擠壓聲。
⑦ 此為調節風量的擋板的運作聲。
⑧ 此為冷卻風扇送風時的風切聲。
運轉聲音很大
雪櫃發出怪聲
以下幾種聲音
並非異常狀況
①是否把雪櫃安裝在電視附近?
② 雪櫃的電源是否太靠近天線的連接口?
①請把雪櫃安裝在遠離電視的位置。
② 請使用專用電源。使用兩腳插頭時,請使用接地
線。
電視出現雜音
雪櫃外側或內部
結霜
冷凍室結霜
地面有水滴滴落
① 是否頻繁開關門?雪櫃門有沒有關緊?
② 目前是否正處於下雨等高濕的狀態。
① 空氣中的濕氣冷卻後,會有結露或結霜現象。即
使是微小的隙縫,也會使雪櫃產生結霜、結露、
水滴落至地板的現象。
② 可能會暫時產生結露的現象。請用乾布擦拭。冷
凍室內容易有結霜出現。請盡量縮短打開雪櫃門
的時間。
▲
58
頁
故障排除
(續)

Memo

Memo

Memo

SOLE AGENT in Singapore
MITSUBISHI ELECTRIC ASIA PTE LTD
307, Alexandra Road, #05-01/02,
Mitsubishi Electric Building, Singapore 159943
Head Office: Tel. 473-2308 URL: www.MitsubishiElectric.com.sg
SOLE AGENT in Malaysia
MITSUBISHI ELECTRIC SALES MALAYSIA SDN. BHD.
Lot 11, Jalan 219, PO Box 1036, 46860 Petaling Jaya,
Selangor Darul Ehsan, Malaysia
Tel. 03-7955 2088 Fax. 03-7958 2576
Service Hotline: 03-7955 3997 URL: www.melcosales.com.my
SOLE AGENT in Hong Kong
MITSUBISHI ELECTRIC RYODEN AIR-CONDITIONING
& VISUAL INFORMATION SYSTEMS (HONG KONG) LTD.
9/F, Skyline Tower, 39 Wang Kwong Road, Kowloon Bay, Kowloon, Hong Hong
Head Office: Tel. (852) 2510-1564 Service Center: Tel. (852) 2427-8484
香港總代理
三菱電機菱電空調•影像設備(香港)有限公司
香港九龍九龍灣宏光道39號宏天廣場9樓
電話 (852) 2510-1564 服務中心:電話 (852) 2427-8484
AZ 7 9L1 92H 0 1
Printed in Japan
■
The user manual should be handed over to any
person who would use or handle the refrigerator
whenever the refrigerator would be transferred to
another location and delivered to a recycling plant.
■
MR-BX52W-N-P 和 MR-BX52W-BR-P 僅設計
為新加坡使用,而不能在任何其他國家使
用。在新加坡以外的地方不會提供任何維修
服務。
■
MR-BX52W-N-ML 和 MR-BX52W-BR-ML 僅
設計為馬來西亞使用,而不能在任何其他國
家使用。在馬來西亞以外的地方不會提供任
何維修服務。
■
MR-BX52W-N-H 僅設計為香港使用,而不
能在任何其他國家使用。在香港以外的地方
不會提供任何維修服務。
■
本雪櫃使用易燃的泡沫氣體作隔熱之用。
棄掉本雪櫃時,請交給專業的工業廢物回收
商。
請按照您所在國家的法例處理。
■
本產品不適合幼童或體弱者在沒有監管的情
況下使用。
■
注意看管幼童,確保他們不會把玩本產品。
■
警告 — 除了製造商建議的方法外,請勿使用
機械裝置或其他方法加速解凍程序。
■
警告 — 除了製造商建議的電器類型外,請勿
在本產品的食物儲存室內使用其他電器。
■
警告 — 如果冷媒迴路已損毀,不要使用周圍
的電器用品或滅火設備,並開啟窗戶以使室
內空氣流通。請聯絡您購買本雪櫃的商店或
以下的三菱電機服務中心。
■
本雪櫃含有易燃的冷媒 (R600a:異丁烷)。
■
雪櫃內部及背後的製冷系統含有冷媒,嚴禁
以任何尖銳物體接觸製冷系統。
■
不要堵塞雪櫃周圍的空間。
■
如果雪櫃要 搬 運 到另一地方或交給回收商,
使用說明書亦應該與雪櫃一併交給處理和運
送的人士。
■
MR-BX52W-N-P and MR-BX52W-BR-P are
designed for use in Singapore only and can not be
used in any other country. No servicing is available
outside of Singapore.
■
MR-BX52W-N-ML and MR-BX52W-BR-ML are
designed for use in Malaysia only and can not be
used in any other country. No servicing is available
outside of Malaysia.
■
MR-BX52W-N-H is designed for use in Hong Kong
only and can not be used in any other country. No
servicing is available outside of Hong Kong.
■
This refrigerator uses flammable foaming gas for
insulation.
Please deliver the unit to specialized industrial
waste dealer when you do away it.
Please follow the rules in your country.
■
The appliance is not intended for use by young
children or infirm persons without supervision.
■
Young children should be supervised to ensure
that they do not play with the appliance.
■
WARNING - Do not use mechanical devices or
other means to accelerate the defrosting process,
other than those recommended by the manufacturer.
■
WARNING - Do not use electrical appliances inside
the food storage compartments of the appliance, unless
they are of the type recommended by the manufacturer.
■
WARNING - Just in case of having damaged the
refrigerant circuit, do not use electric items or
fire equipments near by, and open the window
to ventilate the room. And contact the retail
store at which you purchased it or the following
MITSUBISHI ELECTRIC SERVICE CENTER.
■
The refrigerator contains flammable refrigerant
(R600a: iso-butane).
■
The refrigeration system behind and inside the
refrigerator contains refrigerant.
Do not allow any sharp objects to come into
contact with the refrigeration system.
■
Do not block the openings on the circumstances of
the refrigerator.
 Loading...