

Page 1
INDUSTRIAL
MODEL
LS2-1130
classes
High-Speed
Single-Needle
SEWING
MACHINE
Lockstitch
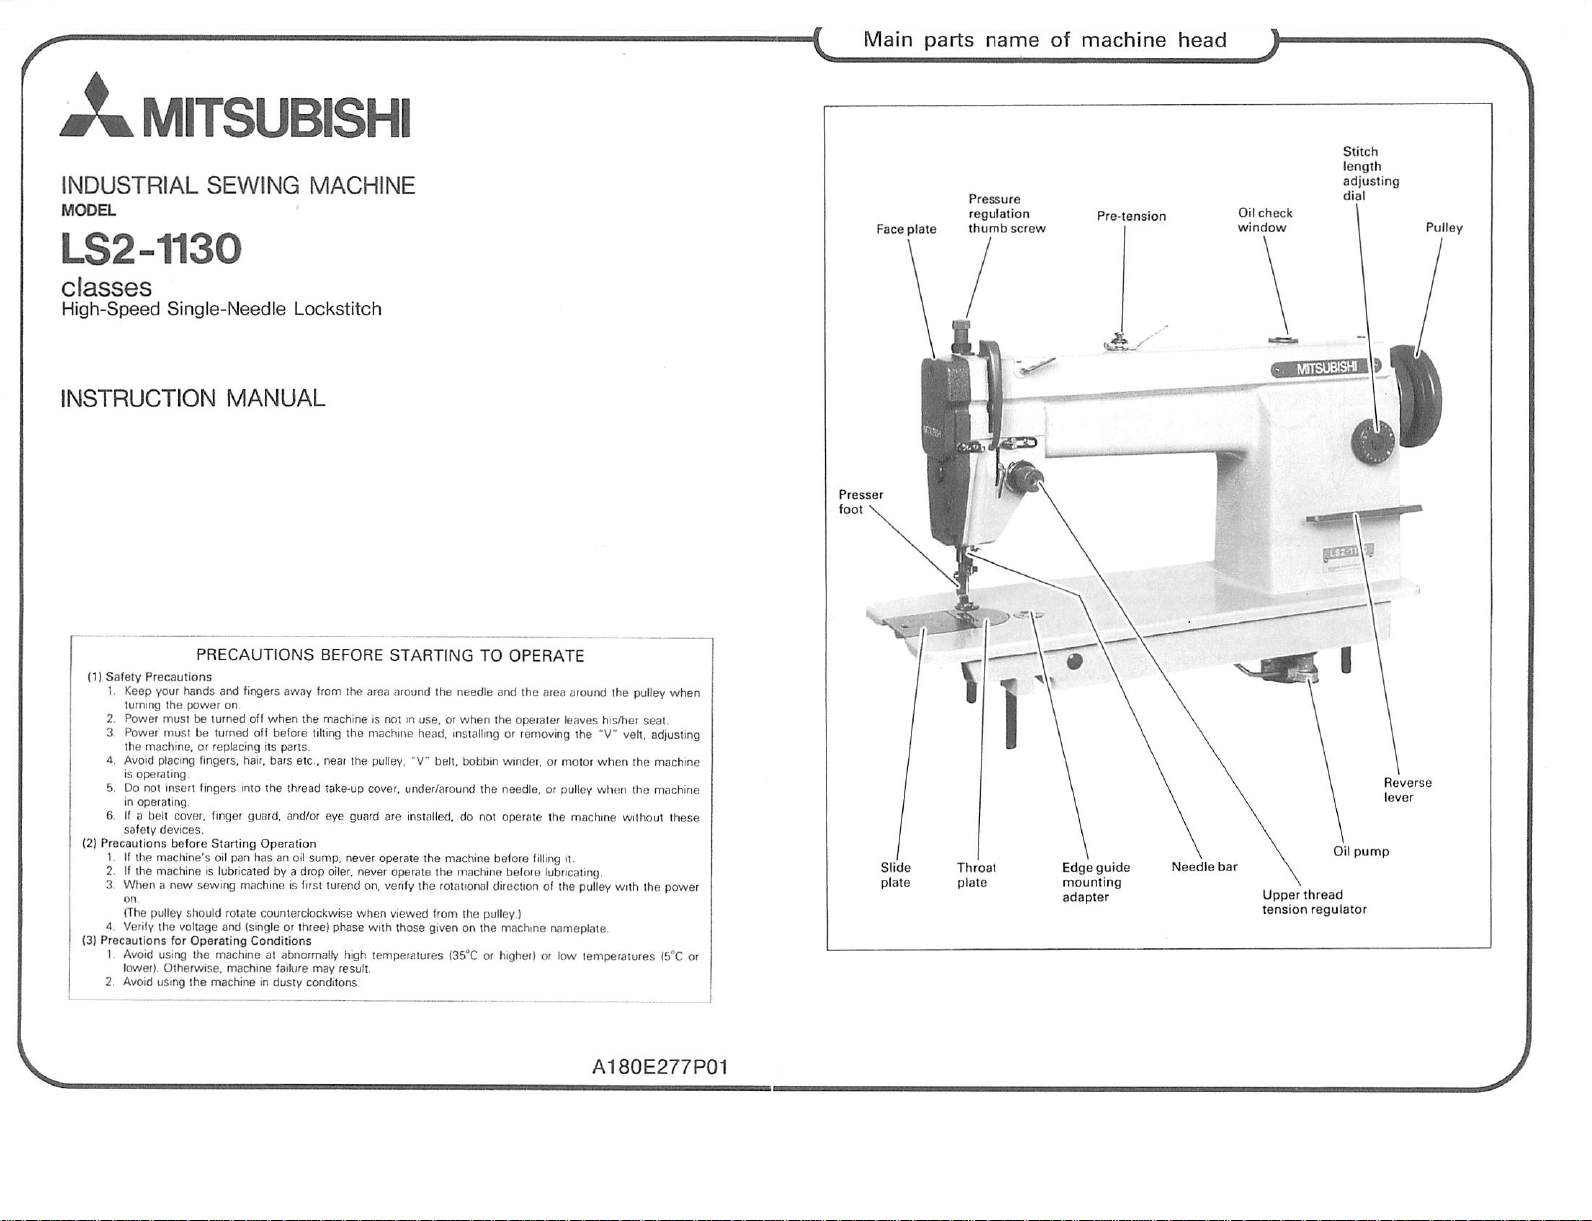
Main
Face
plate
parts
name
Pressure
regulation
thutnb
screw
of
machine
head
Oil
window
check
Stitch
length
adjusting
dial
INSTRUCTION
(1)
Safety
Precautions
1 Keep your hands and fingers away from the area around the needle and Ihe area around the pulley when
turning
the
2. Power must be turned off when the machine is not in use, or when the operaier leaves his/her seal.
3. Power must be turnedoff before
the
machine,
4. Avoid placing fingers, hair,
is
operating.
5. Do not insert fingers into the thread take-up cover, under/around the needle, or pulley when the machine
in operating,
6. If a belt cover, finger guard, and/or eye guard are installed, do not operate the machine wilfwut
safety
(21
(3) Precautions for OperatingCorKlitions
devices.
Precautions
1. Ifthe machine's oilpan has an oil sump, never operate the machine before
2. Ifthe machine is lubricated bya dropoiler,never operate the machinebefore
3. Whena new sewing machine is first turend on, verifythe rotational direction of the pulley with the power
on
(Trve
pulley should rotate counterclockwise when viewed from the pulley.)
Verify
Ihe voltage and {singleor three) phase with those given on the machine nnmeplate.
4.
1.
Avoid
using the machine at
lower).
Otherwise,
2. Avoid using the machine in
MANUAL
PRECAUTIONS
power
on.
or replacing its
before
Starting
machine
parts.
bars
etc.,
Operation
attfiormally
failure
dusiy
BEFORE
tilling
the
machine
near tlie pufiey, "V"
high temperatures
may
result.
conditons
STARTING
head,
belt,
TO
OPERATE
installingorremoving
bobbin
winder,ormotor
filling
lubricating
I35°Corhigher)
or low temperatures
the "V"velt,
it.
when
the
adjusting
machine
these
{5"C
'T\'
(I
Slide
piste plate
or
Throat
\ \ \
Edge
guide
mounting
adapter Upperthread
Needle
bar \
tension
\
regulator
Oil
pump
A180E277P01
Page 2
How
to
use
the
machine
Note:
Before
making
the
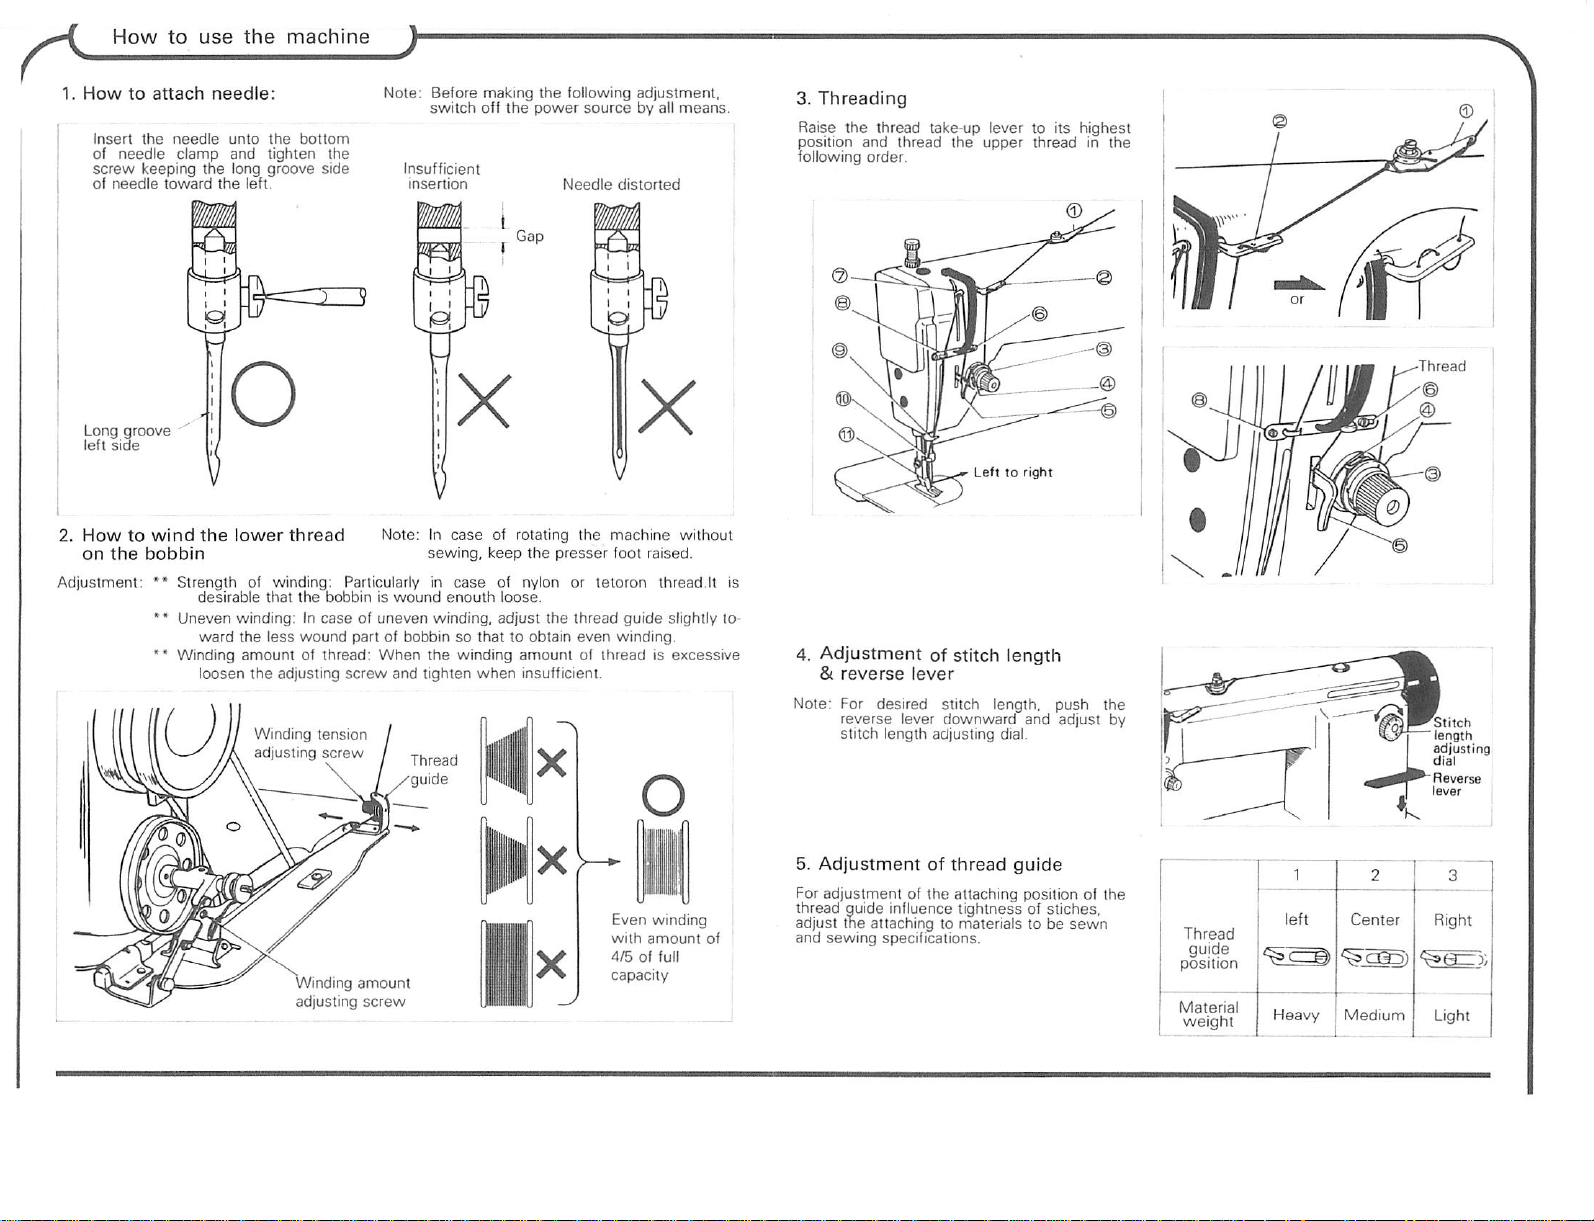
1.
How
to
attach
Insert
of
screw
of
needle
the
needle
keeping
needle
clamp
toward
needle:
the
the
unto
and
long
left.
the
tighten
groove
bottom
the
side
switch
Insufficient
insertion
off
the
power
following
Needle
source
adjustment,
by all
distorted
means.
3.
Threading
Raise
position
Tollowing
the
thread take-up lever to its
and
thread
the
order.
upper
highest
threadinthe
Long
groove
left
side
2.
Howtowind
on
the
o
the
lower
bobbin
Strength of winding: Particularly in
desirable
Uneven
ward
Winding
loosen
thread
that
the
bobbiniswound
winding;Incaseofuneven
the
less
wound
amountofthread:
the
adjusting
Winding
adjusting
part of bobbinsothattoobtain
screw
tension
screw
Winding
adjusting
amount
screw
Note: In
When
and
X X
case
sewing,
case
enouth
winding,
the
tighten
of rotating
keep
winding
when
of nylon or
loose-
adjust
the
the
presser
tetoron
the
thread
even
amountofthreadisexcessive
insufficient.
machine
foot raised.
without
thread,It is
guide
slightly
winding.
Even winding
with
amount
4/5offull
capacity
Lefttoright
to
4.
Adjustment
&
reverse
Note: For desired stitch length, push
reverse
stitch length adjusting dial,
5.
Adjustment
For
adjustmentofthe
thread quide influence
adjust
the
and
of
sewing
of stitch
lever
lever
downward
of
thread
attaching
attachingtomaterials
specifications.
tightnessofstiches,
length
and
guide
position of
to be
adjust
sewn
the
the
by
Thread
guide
position
left
CenterIRight
Stitch
length
adjusting
dial
Reverse
lever
Heavy fvledium Light
Page 3

6.
Adjustmentofpressure
presser
Pressureonthe
in
accordance
7.
Adjustment
OWell
I
8.
Upper
"•*
Upper thread is
lower
• •
Upper
regulating
For
special
the
desired
adjusting
thread take-up spring.
9.
Lower
r
Thread
spring
10.
Adjustmentofhook
foot
presser
with
balanced
stitch ^
thread
thread
tension.
thread
thumb
fabric
tension
the
strenghth
thread
tension
Strengthen
^ / Lowerthread tension
/ can be
I
foot
materialstobe
of
thread
tension:
adjusted
tensionisadjustedbytension
nut.
sewing withspecial thread,
canbeobtained
and operating
tension:
Weaken
cnrpw
on
is tobeadjusted
sewn.
tension:
V
In
is
threadistoo
according to
by
range
^justed
(®
by
oil
lubrication:
Adjustment is made by rotatingscrew ®.
For
weight
material
(weaken)
caseofupper
too
strongorlower
the
of
In
caseofcotton
#
60,
tension
as the
andifthe
slowly,
is
obtained.
light
thread
weak.
the
canbechecked
pulled
the
regular
out thread,
bobbin
proper
Pressure
3 ^
X
thread
thread
case
tension
regulating
For
heavy
material
In
caseofupper
too
weakorlower
is
too
strong.
fall
thumb
weight
(tighten)
Weaken
screw
thread
thread
Thread
tension
nut
trengthen
Rotation
of
bobbin
11.
Adjustmentofoil
For
the
regular
the
adjustment
speed operation, if
check window on the machine arm is reduced,
close
the
12.
Adjustmentoftimingtoopen
upper
is
Adjust timing
ing to
open
for
the
clearance
of
presser
1. Remove
screw
2.
Move
the
Positionedtothe
Positionedtothe
3.
Tighten
condition
been
• It is
same
of
the
beneath
sewing,
of oil
oil
bypass
thread
with
the
tension disc can be adjusted
(within
foot.
the
rubber plug and loosen the
(S>
the
thread
right or
the
the screw ® after the opening
of
the
checked.
convenienttooperate
thickness
pressure
the
presser
pump:
it is not
pump,
oil
flow
hole
tension
the
following knackastim
tension
left.
left....
thread
of plateasthe
foot
necessary
butincaseoflow
amount for
of oil
pump.
regulator
the
limits of
releasing
right... quick
slow
tension
by fitting
you
intendtoloosen
foot.
for
oil
tension
2~7mm)
cam
disc
has
the
clearance
Standard
0.5-1.0
By-pass
disc
to
Rubber
hole
of
Driver
\ II
(
VLef_^^
plu
gap
/ ^
Right
Adjusting
Thread
releasing
Pin
plate
tension
cam
Screw®
Presser
bar
lifter
tension
Presser
Upper thread
regulator
foot
Specifications
MODEL
LS2-1130-MOB
LS2-1t30HO8
LS2-1130-BOB
MATERIAL
WEIGHT
Standard
heavy
heavy
4500
3500
3500
SPEED
Max
spm
spm
spm
ROTARY
HOCK
Lub/Aut
Standard
heavy
Large
size
heavy
NEEDLE
DBX1
DBX1
DBX1
FEED
3
3
3
Pieces
type
Pieces
type
Pieces
type
DOG
STITCH
LENGTH
0—5mm
0~7mm
0~7mm
PRESSER
STROKE
KNEEAW>JD
13/6mm
13/6mm
13/6mm
BAR
NEEDLE
BAR
STROKE
30.5mm
33.0mm
35.0mm
Decrease
Increase
MITSUBISHI
ELECTRIC
CORPORATION
Page 4

TftJUduiiun
ueiufB
siaruny
lu
uperaie
1
lUUUtB
0(
nB|Jclll
1.
Lubrication-1
Before
startingtooperate
sion
(A)
of oil tank. While
questedtocheck
andincase
the position
(A).
Use
2.
Lubrication-2
When starting to
idlefor a longtime withoutusinq it is essential
to
oil
ber
plug.
3.
Condition
While operating
to
check
through
4. Periodical
'
Remove
clean
MC70M
enough
the
the
oil
volume
(B)
replenish oil up to the position
oil
specified
through
of
the
the
condition
oil
check
cleaning•Remove
the
throat
feed
dog.
pour
oil up
the
operating
oil
volume
would
periodically,
come
you
by Mitsubishi.
sew
initialy
and after kept
the oilholes in the rub
oil
lubrication
machine
window.
plate and
of
it is
and
neccessary
oil
clean
'
Law
and
the
posi-
are
less
than
lubrication
the
throat
the
down
clean
re
feed
the
the
plate
dog.
machine
hook.
Oil
check
head
Knee lift pin
Rubber
plug
window
' Lay
Oil removing
dowm
and
clean
screen.
the
the
screw
machine
oil
pump
head
Skip
irregular
stitch
Thread
stiching
cuts
1)
Needle
•
Bent
•
Not
suited
thread
needle
deposit
deposit
with
attached
not
distorted
with
side
thread
too
take-up
too
weak
thread
too
bent
attached
size
thread
too
tension
case
thread
inserted
into
bobbin
weak
weak
strong
in
thread
21
Wrong
needle
•
Insertion
enough
•
Needle
Attached
opposite
1)
Upper
tension
2)
Thread
spring
3)
Lower
tension
11
Poor
2)
Needle
*
Needle
* Wrong
needle
* Thread too big for
the
3)
Upper
tension
*
Dust
between
discs.
*
Excissiveoruneven
windingoflower
tfireadonthe
bobbin.
'
Dust
bobbin
' Damaged
tensiononbobbin
Wrong
bobbin
Repairing
Change the
Replace with proper one accoding to the thicknessol thread.
Insert
Attach the needle as its hole faces side ways. (But. using the nylon
or
ing of
its
Correct the attaching side.attach the needle keeping its groove side
toward the left, arxfconcave
Turn the upper thread tension regulator thumb nut to the
strengthen.
Turn the tension
Turn
!Change the thread with
Change
See
needle
with
properlyasper
polyester
thread,
loop
finish.)
stud
the
bobbin
case
the
needle
No.2 of skip stiching.
with
new
one.
instruction
distance
manual.
the
needle
side
toward the right.
the right to strertgthen.
tension
screwtothe
better
quality one.
new
one.
hole
somewhat,
right to strertgthen.
Either change with proper size thread or with proper needle.
'
Turn
the
tension
regulator
nuttothe
Remove
the
tension
discs and clean by brush.
Rewinding correctly with the winding amount of 4/5 of its full
capacity.
: Remove the bobbin
Change
witt>
' Replace the bobbin correctly, so that to
when
the
thread
new
one,
is pulled-out.
case
and clean by brush.
lefttoweaken.
rotate
the
after
check
right
bobbin clockwise
to
Feed
dog
base
Oil
screen
pump
Feed
dog
Puckering
f)
Needle&thread
too
big
2)
Thread
(upperorlower
thread)
3)
Pressure
presser
for
tension
of
foot
fabric
Change with proper size needle and thread for fabric.
Adjust the thread tension by regulator thumb nut, take-up spring,
adjusting
screw
Weaken by
on the bobbin
turnir^g
the regulatii^g
case.
thumb
screw
to the left.
 Loading...