

Page 1
MODEL
875HJ9801
Hand dryer
JT-MC106G-W-NA
Unit color -W
INSTRUCTION MANUAL
■ Read the manual thoroughly before using the unit to ensure it is used safely and correctly.
After reading the manual, store it in an easily accessible location for future reference.
(White)
Location of Name plate indicating
Model name and Electrical ratings
Input Power: 120 Vac Single-phase
Indoor use only
For User
You should not attempt to install the unit yourself,
as this may affect the safety and functionality of the unit.
This unit is intended for the purpose of drying hands and is not covered by a warranty if used for any other purpose.
It has no sterilizing or disinfecting functions.
INDEX
Safety Precautions
Names of Parts
2
3
EnglishFrançais
How to use the unit
■ How to open/close the front cover
Precautions for when opening/closing the front cover
■ If not using for a long period
■ How to use the unit
■ Turning the heater on
Maintenance
Precautions for when opening/closing the front cover
① Turning the sensor off before maintenance
② Cleaning the unit exterior and hand drying area
③ Cleaning the air filter
④ Emptying and cleaning the drain tank
Trouble shooting
Specifi cations
4
4
4
5
5
6
7
7
10
11
12
8
8
9
− NA - 1 −
Page 2
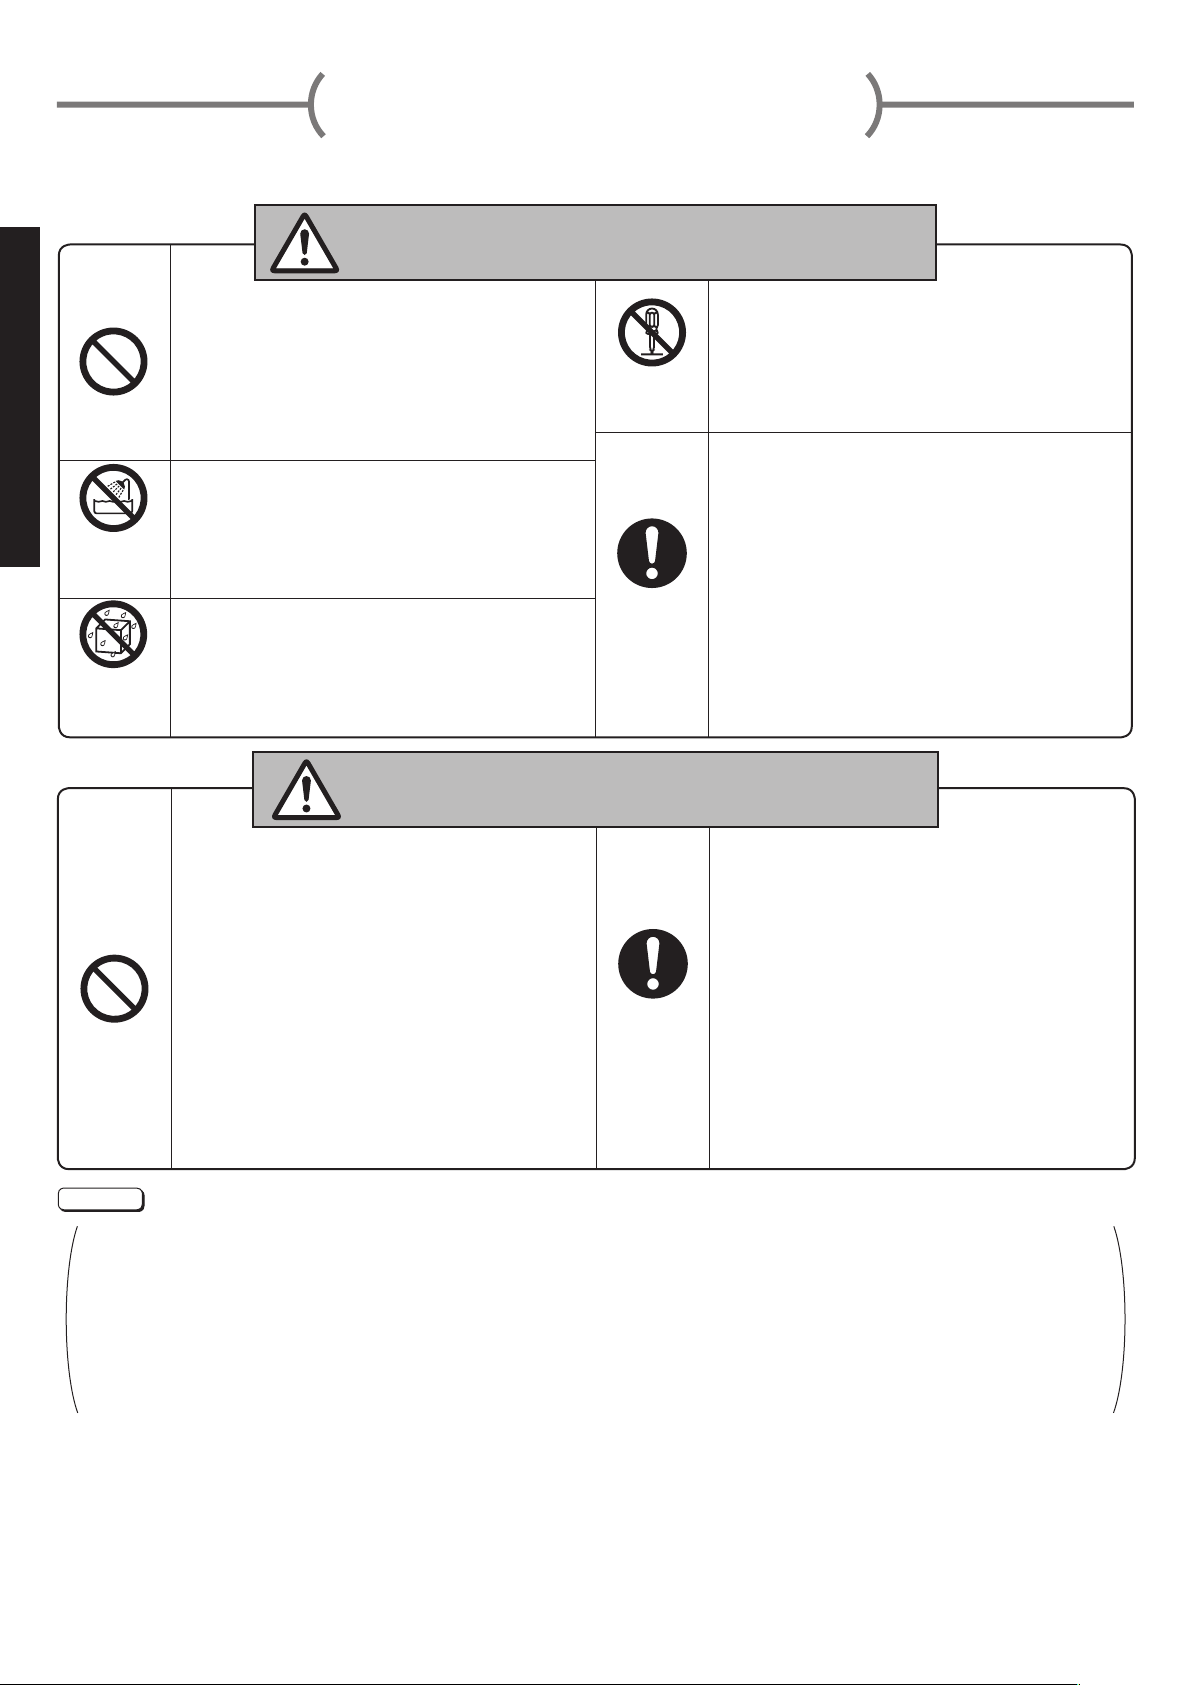
Safety Precautions
Prohibited
Do not install in locations where they may be
leakages of combustible gas.
This may cause fires.
Do not use at locations where salt damage
may occur or where corrosive, neutral or
reductive gases are present.
The above may cause fire, electric shocks or
malfunctions.
Do not
disassemble
Do not modify or disassemble the unit.
Doing so may result in fires, electric shocks or
injuries.
When changing the installation place, consult
your dealer or installer.
There is a risk of injury.
Important !
Follow
instructions.
Input Power: 120 Vac Single-phase.
Using the incorrect power supply may cause fires,
electric shocks or malfunctions.
Use exclusive wiring for the power source.
Using this unit with other devices on a branch
socket may cause abnormal heat, which may
cause fires.
Do not use
in the baths/
shower room.
Do not use in a shower room or other
locations with a great deal of humidity in the
air or where condensation may form on the
unit.
This may cause electric shocks or malfunctions.
Do not allow
the unit
to get wet.
Do not allow water to get on the unit.
This may cause electric shocks or malfunctions.
Prohibited
This unit is not intended for use by young
children or infirm persons unless they are
adequately supervised by a responsible person
to ensure that they can use the unit safely.
Do not let children hang from the unit.
Young children should be supervised to ensure
that they do not play with the unit.
Do not use for purposes other than drying hands.
Inappropriate use may cause an accident.
Do not open the front cover too wide.
The front cover may come off, fall and cause
injury or damage.
※ The front cover is designed to come off in
order to prevent damage if it is opened at a 90°
angle or more. (refer to Page 4)
Important !
Follow
instructions.
Wear gloves during maintenance work.
Not doing so may result in injuries.
Always use the unit with the drain tank, air
filter and front cover attached.
Any water entering the unit may cause short
circuits, electric shocks or damage.
If the unit stops working or if a malfunction
occurs, turn off the power switch and ground
fault circuit interrupter at the branch circuit
to prevent an accident before contacting your
dealer for an inspection and repairs.
Failure to do any of the above may result in electric
shocks or short circuits or fires due to short circuiting.
The dangers arising from improper handling and the extents of the dangers are classifi ed and explained as shown below.
The following may lead to death or
Warning
English
serious personal injury if handled
incorrectly.
The following may lead to injuries
Caution
NOTE
Outdoors Locations where the temperature could be lower than 32F (0C). Locations where there is a lot of dust.
Locations where the temperature could be higher than 104F (40C). Locations where there is a lot of condensation.
Locations where salt damage may occur. In vehicles (including ships and airplanes) Near food or tableware
Locations where the unit is in direct or strong sunlight (may cause the sensor to malfunction).
Kitchens (Where there is a risk of water splashing.)
Locations where the unit may come into direct contact with water.
Rooms that have a sterilization basin, swimming pools baths.
Locations where corrosive, neutral, or reductive gasses are present. (This may shorten the working life of the unit and/
or cause malfunctions.)
Do not use with chemicals on your hands.
(This may damage the surface of the unit or cause discoloration or cracking.)
Please thoroughly wipe off any detergents or chemicals that may be on the unit. Do not use any detergents
other than those that have been prescribed.
(Failure to do so may damage the surface of the unit, or cause discoloration or cracking.)
Please refer to "Maintenance" (Page 7) for details on detergents.
If water enters the unit, do not let the air fi lter or intake area come in close contact with water as this may cause
the machine to malfunction or cause the acoustic materials to absorb water and allow bacteria to grow.
Do not use in the following locations.
or damage to property if the unit is
handled incorrectly.
− NA - 2 −
Page 3
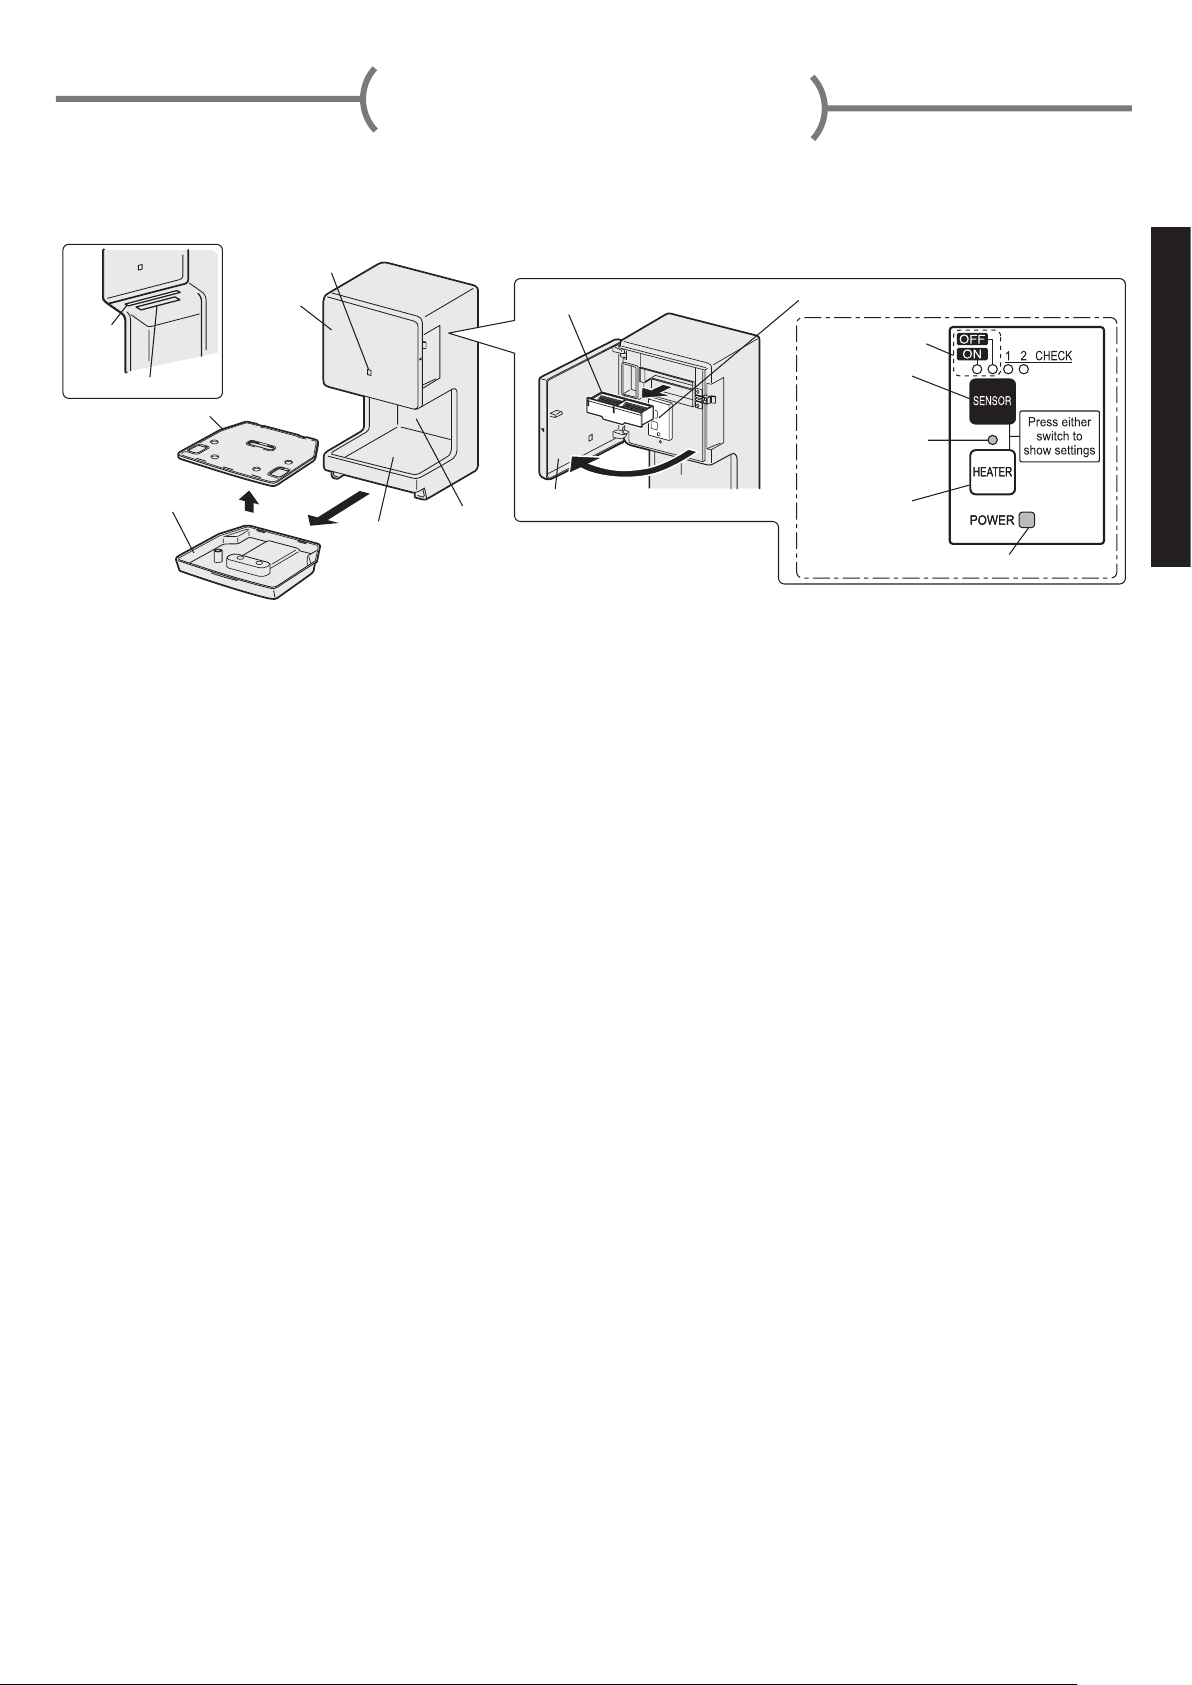
Names of Parts
※ Shaded areas in the fi gure indicate antibacterial material (excluding outlet nozzle areas).
Inside the front cover
Power light
(Refer to "How to open/close the front cover" on page 4)
Nozzle
Sensor
Lid
Drain tank
Front cover
Water
receiver
area
Hand
drying
area
Air fi lter
Front cover
Open
Setting switches
Sensor light
Sensor switch
Heater light
Heater switch
Power light
Please refer to "Turning the heater on" (Page 6) while turning the
heater on/off.
Please refer to "Turning the sensor off before maintenance"
(Page 8) while turning the sensor on/off.
English
− NA - 3 −
Page 4
How to use the unit
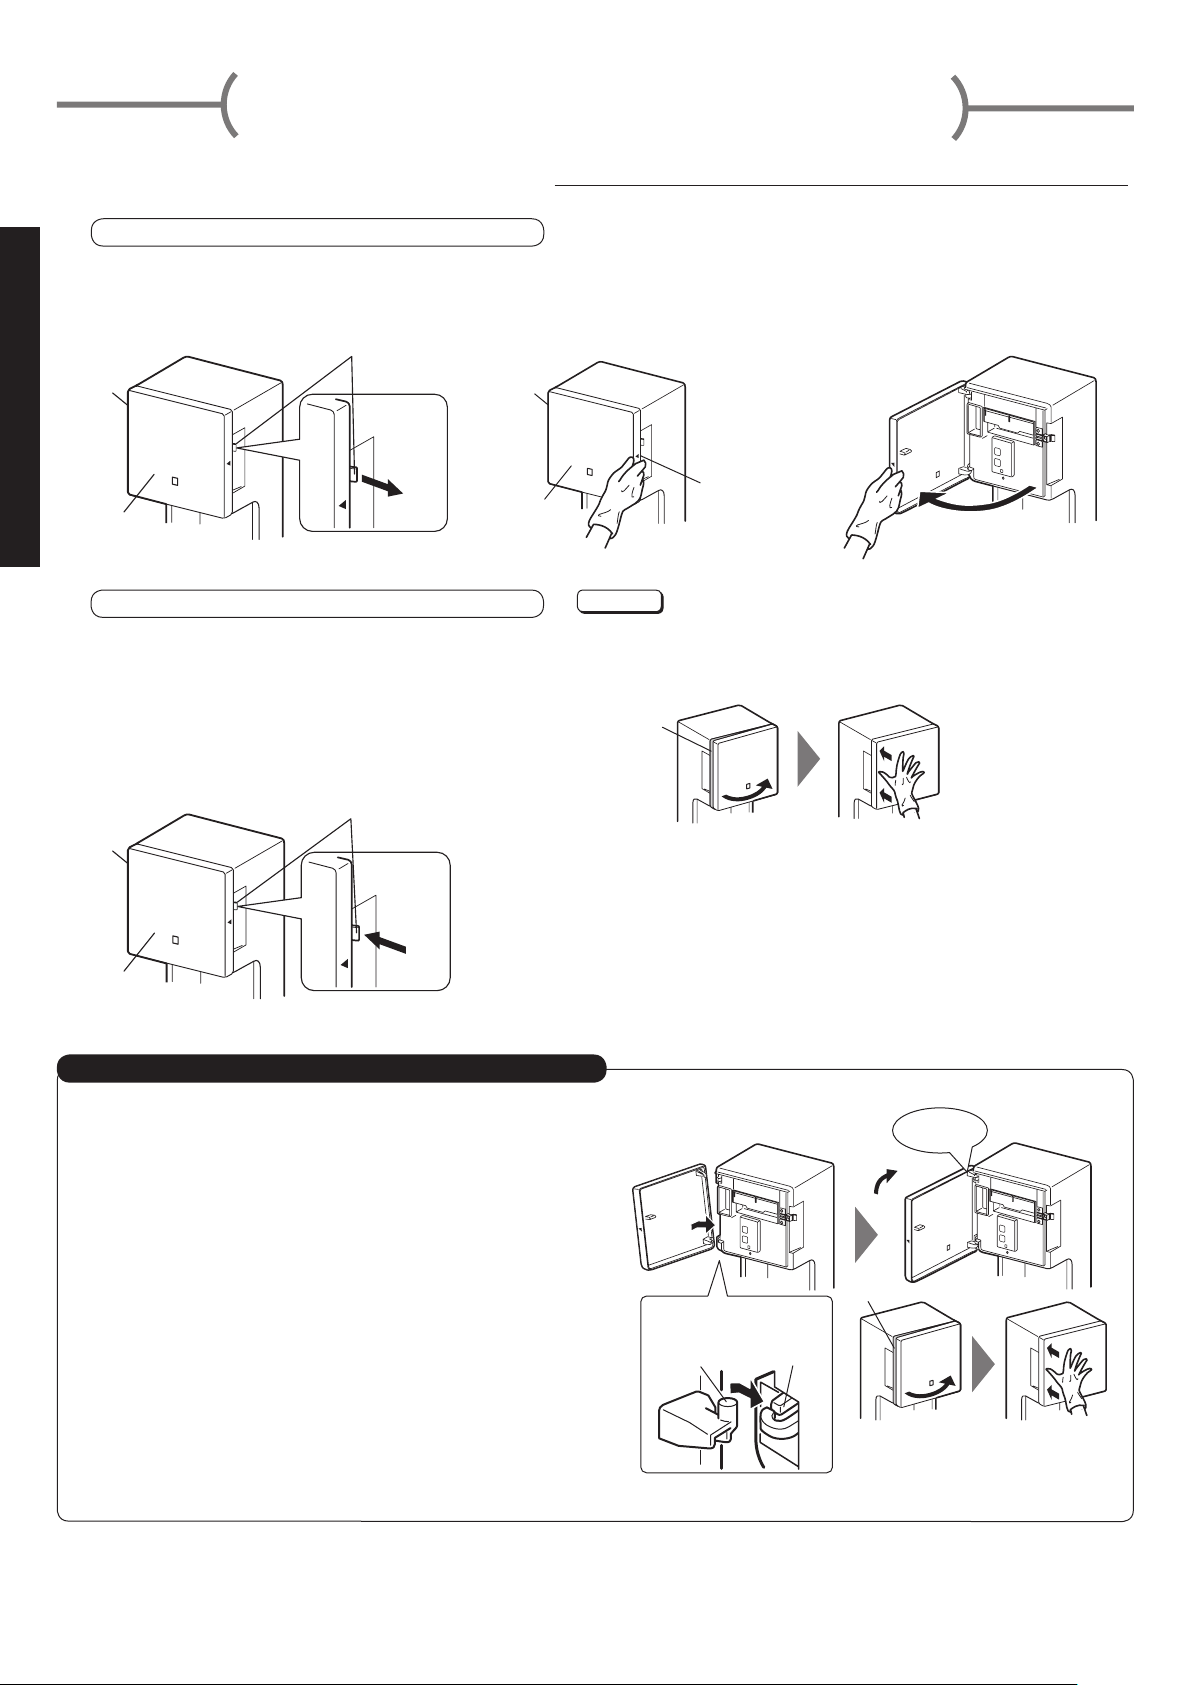
■ How to open/close the front cover
How to open the front cover
English
Pull the tab for opening the
1
front cover.
Ta b
Main
unit
Front
cover
How to close the front cover
Close the front cover with the procedures for
opening it in reverse.
Pull
Close the front cover so that there
is no gap between the front cover
and the main unit and push the tab
in to latch the front cover shut.
Main
unit
Ta b
Hold the handle are on the
2
right hand side of the main
unit.
Main
unit
Handle
Front cover
NOTE
Check to see that the front cover is fitted securely.
Press the front cover on the upper and lower parts
against the main unit so that it is securely closed.
Gap
① Close the right side ② Close the left side (both the
Open.
3
Open
upper and lower parts)
Front
cover
Precautions for when opening/closing the front cover
If the front cover comes off, please reattach it with the
ollowing procedures.
f
※ It is designed to come off in order to prevent damage if it
is opened too wide.
Press the bottom connecting part of the
1
Push
removed front cover into the bottom panel
hook of the unit.
Press the top connecting part of the front
2
cover into the top panel hook of the unit.
Check that the front cover is fi tted securely.
3
Connecting
part of the
front cover
Click
Gap
Panel
hook of
the unit
Make sure that there is no gap
between the front cover and the
unit when the front cover is closed.
− NA - 4 −
Page 5

■ If not using for a long period
Then turn the breaker off.
■ How to use the unit
Hand detection area
Hand drying area
Rub your hands together after the
water is blown off.
The dryer starts automatically when your hands
enter the hand drying area.
※ Refer to "Hand detection area"
Caution
Do not use with disinf
alcohol or chemicals on your hands.
(This may damage the unit.)
ectants such as
English
About 9cm
• Please use within the area above.
※ The hand detection area may differ depending on the environment.
Automatic Stop Function
The power light fl ashes and the dryer stops automatically if the unit is used continually for more than 40 seconds.
To continue using the hand dryer, remove your hands, and then re-insert them.
Nozzle
Sensor
− NA - 5 −
Page 6

■ Turning the heater on
Open the front cover.
1
Refer to "How to open/close the front cover" on page 4.
Press the heater switch or the sensor switch
2
and let the settings light turn on.
Turn the heater switch "ON".
3
Open
Front cover
※ The heater may not operate during continued use as there is
the danger of scalding when the temperature of the warm air
rises.
The air may not feel warm when the room temperature is low
English
(68F (20C) or below).
Checking the settings
The heater light and sensor light turn off after about
10 seconds after their settings are made (to sa
To check the settings, press either the heater or sensor
switch.
Simple heater
Softens the feeling of cold air.
If the room temper
too high.
NOTE
If the room temperature is less than 64F (18C), the air may feel cold.
ature is above 80F (30C), the heater will stop working to prevent the temperature from rising
ve energy).
Heater switch
Heater
light
Heater
switch
− NA - 6 −
Page 7

Maintenance
Warning
Always turn off the sensor switch during
maintenance work.
Failure to do so may result in an electric shock.
Do not allow water to get on the unit.
This may cause electric shocks or malfunctions.
Caution
NOTE
The unit e
after cleaning.
(Failure to do so may damage the surface of the unit, or cause discoloration or cracking.)
※ "Alcohol" means a disinfectant with an ethanol content of 83% or less.
After wiping the unit clean with alcohol, be sure to dispose of any alcohol that has collected in the
drain tank.
※ Do not spray alcohol directly onto the unit.
Do not use any of the following cleaning materials
Acid, alkaline or chlorine detergentsMold and mildew removers
Citrus- based or other plant- based detergentsAntiseptics.
Please also refrain from using nylon scourers or abrasives.
(They may damage the surface of the unit or cause discoloration or cracking.)
Disinfectants cause damage to the unit.
When cleaning the unit, use a neutral detergent. (pH: 6 – 8)
(Please do not use plant-based detergents as they may cause damage to plastic parts.)
When using a chemical cloth, be sure to follow the instructions carefully.
Factors such as rust may shorten the working life of the unit.
(Damage to the unit caused by the use of prohibited agents
such as solvents, detergents, and abrasives (also damage
due to factors such as rust) is not covered by the warranty.)
The area that has undergone antibacterial processing
(the shaded area in the right fi gure) produces
antibacterial effects when bacteria adhere to the
surface.
(The antibacterial effects are not produced when the surface
is unclean.)
xterior can be cleaned with alcohol, but be sure to wipe off any alcohol that remains
Caution
Wear gloves during maintenance work.
Not doing so may result in injuries.
Always turn off the sensor switch during
maintenance work.
Solvents such as thinner or benzene
English
Precautions for when opening/closing the front cover
If the front cover comes off, please reattach it with the
ollowing procedures.
f
※ It is designed to come off in order to prevent damage if it
is opened too wide.
Press the bottom connecting part of the
1
removed front cover into the bottom panel
hook of the unit.
Press the top connecting part of the front
2
cover into the top panel hook of the unit.
Check that the front cover is fi tted securely.
3
− NA - 7 −
Connecting
part of the
front cover
Click
Gap
Panel hook
of the unit
Make sure that there is no gap between
the front cover and the unit when the
front cover is closed.
Page 8

Maintenance - Continuation
1
1
Main unit
Front cover
English
3
2
Turning the sensor off before maintenance
Pull the tab and open the front cover.
Ta b
Pull
Perform cleaning.
Refer to 2 to 4 below.
Open the cover and press the sensor switch.
2
The sensor light "OFF" is lit.
Front cover
After cleaning, turn the sensor switch "ON".
4
The sensor light "ON" is lit.
Cleaning the unit exterior and hand drying area
Front cover
Sensor
light
Sensor
switch
Pull the tab, open the front cover and turn the
1
The sensor light "OFF" is lit.
Refer to "How to open/close the front cover" on page 4.
Sensor
light
Sensor
switch
Open
sensor switch "OFF".
Exterior
Hand drying area
Panel hook of
the unit (both the
upper and lower
parts)
Cotton swab,
toothbrush, etc.
Open
Panel hook of the unit
Nozzle
Sensor
Hook of the
front cover
Hook of the front cover
Cotton swab,
toothbrush, etc.
Wipe the unit exterior, the inside of the front
2
cover, and the hand drying area with a damp
piece of cloth.
When it is unclean, wipe it with a piece of damp cloth
that has been soaked in neutral detergent, thoroughly
remove the remaining neutral detergent and wipe it with
a piece of dry cloth.
Clean the sensor area.
※ The sensor may lose its sensitivity and malfunction if
the transparent surface inside the hand drying area
is covered with a white-colored substance. Please
clean it once a week.
Clean the dust off of the hook of the
3
front cover with a commercially available
toothbrush or cotton swab.
NOTE
The front cover is designed to come off in order to
prevent damage if it is opened too wide.
If it comes off, please reattach it while referring to "Precautions
for when opening/closing the front cover" (Page 4).
Turn the sensor switch "ON" and close the front
4
cover so that there is no gap and push the tab.
The sensor light "ON" is lit.
− NA - 8 −
Caution
Water may enter the unit and cause short circuits, electric
shocks or damage if the front cover is left open.
Page 9

Maintenance - Continuation
3
Caution
Front cover
Cleaning the air fi lter
Around once a week
A dir
Air fi lter
ty air fi lter will shorten the working life of the motor and heater and decrease the drying performance
due to insuffi cient air volume and air speed and bacteria can grow in the fi lter area due to dust deposits.
Pull the tab, open the front cover and turn the
Sensor
light
Sensor
switch
Open
Air fi lter
1
sensor switch "OFF".
The sensor light "OFF" is lit.
Remove the air fi lter.
2
Clean the air fi lter.
3
Tap it lightly or vacuum off the dust.
Wipe with lukewarm or cold water if it is extremely
unclean.
NOTE
After washing the air filter with water, dry it thoroughly.
English
Caution
Water may enter the unit and cause short
circuits, electric shocks or damage if the front
cover is left open.
Caution
Never dry the air filter with a heat source such as a hair
dryer.
Reattach the air fi lter.
4
Make sure that the air filter is fitted properly.
(Dirt and dust may get into the unit and shorten its
working life if the air fi lter is out of position.)
Turn the sensor switch "ON" and close the
5
front cover so that there is no gap and push
the tab.
The sensor light "ON" is lit.
− NA - 9 −
Page 10

Maintenance - Continuation
4
Empty the water in the drain tank at least once a week before the drain water exceeds the full line.
If the drain water is left inside, it can cause foul odors or the water can spill onto the fl oor and tarnish it.
Front cover
English
Emptying and cleaning the drain tank
Before it fi lls up (at least once a week)
Pull the tab, open the front cover and turn the
Sensor
light
Sensor
switch
Open
1
sensor switch "OFF".
The sensor light "OFF" is lit.
Refer to "How to open/close the front cover" on page 4.
Remove the drain tank while keeping it
2
upright.
Keep it upright when carrying it so that the drain water
does not spill.
Drain tank
Lid
Full line
Caution
If it is used after the full line has been exceeded, please
be careful of water spilling out of the overflow hole.
(The full line is reached at 0.6L.)
Drain tank
Overfl ow hole
Click
Drain tank
Lid
Main unit
Open the lid and empty out the drain water.
3
Wash the drain tank and lid, and wipe them
4
thoroughly.
Put the lid back on the drain tank and reattach
5
it to the main unit.
Press the lid of the drain tank down using the tabs until
they make clicking sounds, and make sure that it is fitted
properly.
Push the drain tank all the way into to the main unit and
make sure that it is fitted properly.
Drain tank
Turn the sensor switch "ON" and close the
6
front cover so that there is no gap and push
the tab.
The sensor light "ON" is lit.
Caution
Water may enter the unit and cause short
circuits, electric shocks or damage if the front
cover is left open.
− NA - 10 −
Page 11

Trouble shooting
Implement the inspections and procedures below in the following cases.
In such cases Inspections Procedures
No air blows even if
hands are inserted.
Air does not stop.
Stops operating
during hand drying.
Are any lights in the display on?
Has a power blackout occurred?
Are you putting your hands in all the way?
Was the sensor switch turned on while your hands
or an object was inside the hand drying area?
Is the sensor blocked by dirt or dust?
Is the sensor in the hand drying area unclean?
Has the dryer been used continually
for more than 40 seconds?
Are any lights fl ashing?
The heater lamp is off.
Turn on the ground fault circuit interrupter at the branch circuit.
Turn the sensor switch "ON".
Place your hands all the way inside the hand drying area.
Remove any foreign substances or dirt after
turning the sensor switch "OFF". Wait for at least
1 minute after turning the sensor switch "OFF",
and then turn it back "ON" again.
If the hand dryer is used continually for more than
40 seconds, the power light fl ashes and the dryer
automatically stops. Remove your hands and then
re-insert them.
Contact the dealer about any changes to the settings.
Costs are as agreed with the dealer.
English
The air is cold.
Air does not warm
up.
The power light does not
light up even when the
power is switched on.
The power light is
fl ashing.
The sensor light
and heater light do
not light up.
Turning the heater
off.
Air conditioning is not working.
Is the room temperature too high?
Was there a power blackout?
Is the ground fault circuit interrupter
"OFF"?
This may fl ash if there is a malfunction
in the power supply.
Has the dryer been used continually
for more than 40 seconds?
Are any lights fl ashing?
It turns off 10 seconds after the
sensor switch or heater switch are
controlled to save energy.
The heater can be turned off.
The air may not feel warm if the room temperature is
less than 68
If the room temperature is above 86F (30C),
the heater will stop working to prevent the
temperature from rising too high.
Turn the ground fault circuit interrupter "ON" at
the branch circuit and then turn the power switch
"ON".
Turn the power off, check that all of the lights on
the display section are off and then wait for 1
minute before the power back on.
If the hand dryer is used continually for more than
40 seconds, the power light fl ashes and the dryer
automatically stops. Remove your hands and then
re-insert them.
When the sensor switch or heater switch are
pressed, the light turn back on in the state where
the settings have been made.
Please refer to "Turning the heater on" (Page 6)
while turning the heater off.
F (20C).
The front cover has
come off.
The front cover is designed to come off in order
Has the front cover been opened too
wide?
If the above procedures do not work, turn off the power and the ground fault circuit interrupter
at the branch circuit and have your dealer inspect and if necessary, repair the unit.
(Costs are as agreed with the dealer.)
− NA - 11 −
to prevent damage to the main unit if it is opened
too wide.
Please reattach it while referring to "Precautions for
when opening/closing the front cover" (Pages 4 and 7).
Page 12

Specifi cations
Model Voltage Frequency Heater Power Input (W) Current (A) Weight (kg) Dimensions (W × D × H)
JT-MC106G-W-NA
• The capacity of the drain tank is 0.6 L.
Single-phase
120 Vac
60Hz
ON 890 7.6
6
OFF 600 5.2
7
9
/8× 7 × 18 7/8 (in.)
(250 × 170 × 480 (mm))
■ Settings and drying times guide
Drying times guide
English
(approx.) 13 seconds
※ Drying times are based on Mitsubishi measurements. (50mg of water per hand)
Working life of the motor/heater
The w
No air blows as the motor dies. (There may be odors or noise when the motor dies, but this does not indicate a
orking life of the motor and heater is 7 years when used 200 times per day.
The working life may be shortened if the unit is used in a location where the power supply voltage is high or when
the operation times per user are long.
malfunction.)
The air becomes cold when the heater dies. Please contact the dealer for a replacement when the heater dies.
(subject to fees)
※
Noise
(approx.)
64dB
Tokyo Building 2-7-3, Marunouchi, Chiyoda-ku, Tokyo 100-8310, Japan
− NA - 12 −
 Loading...