

Page 1
MITSUBISHI
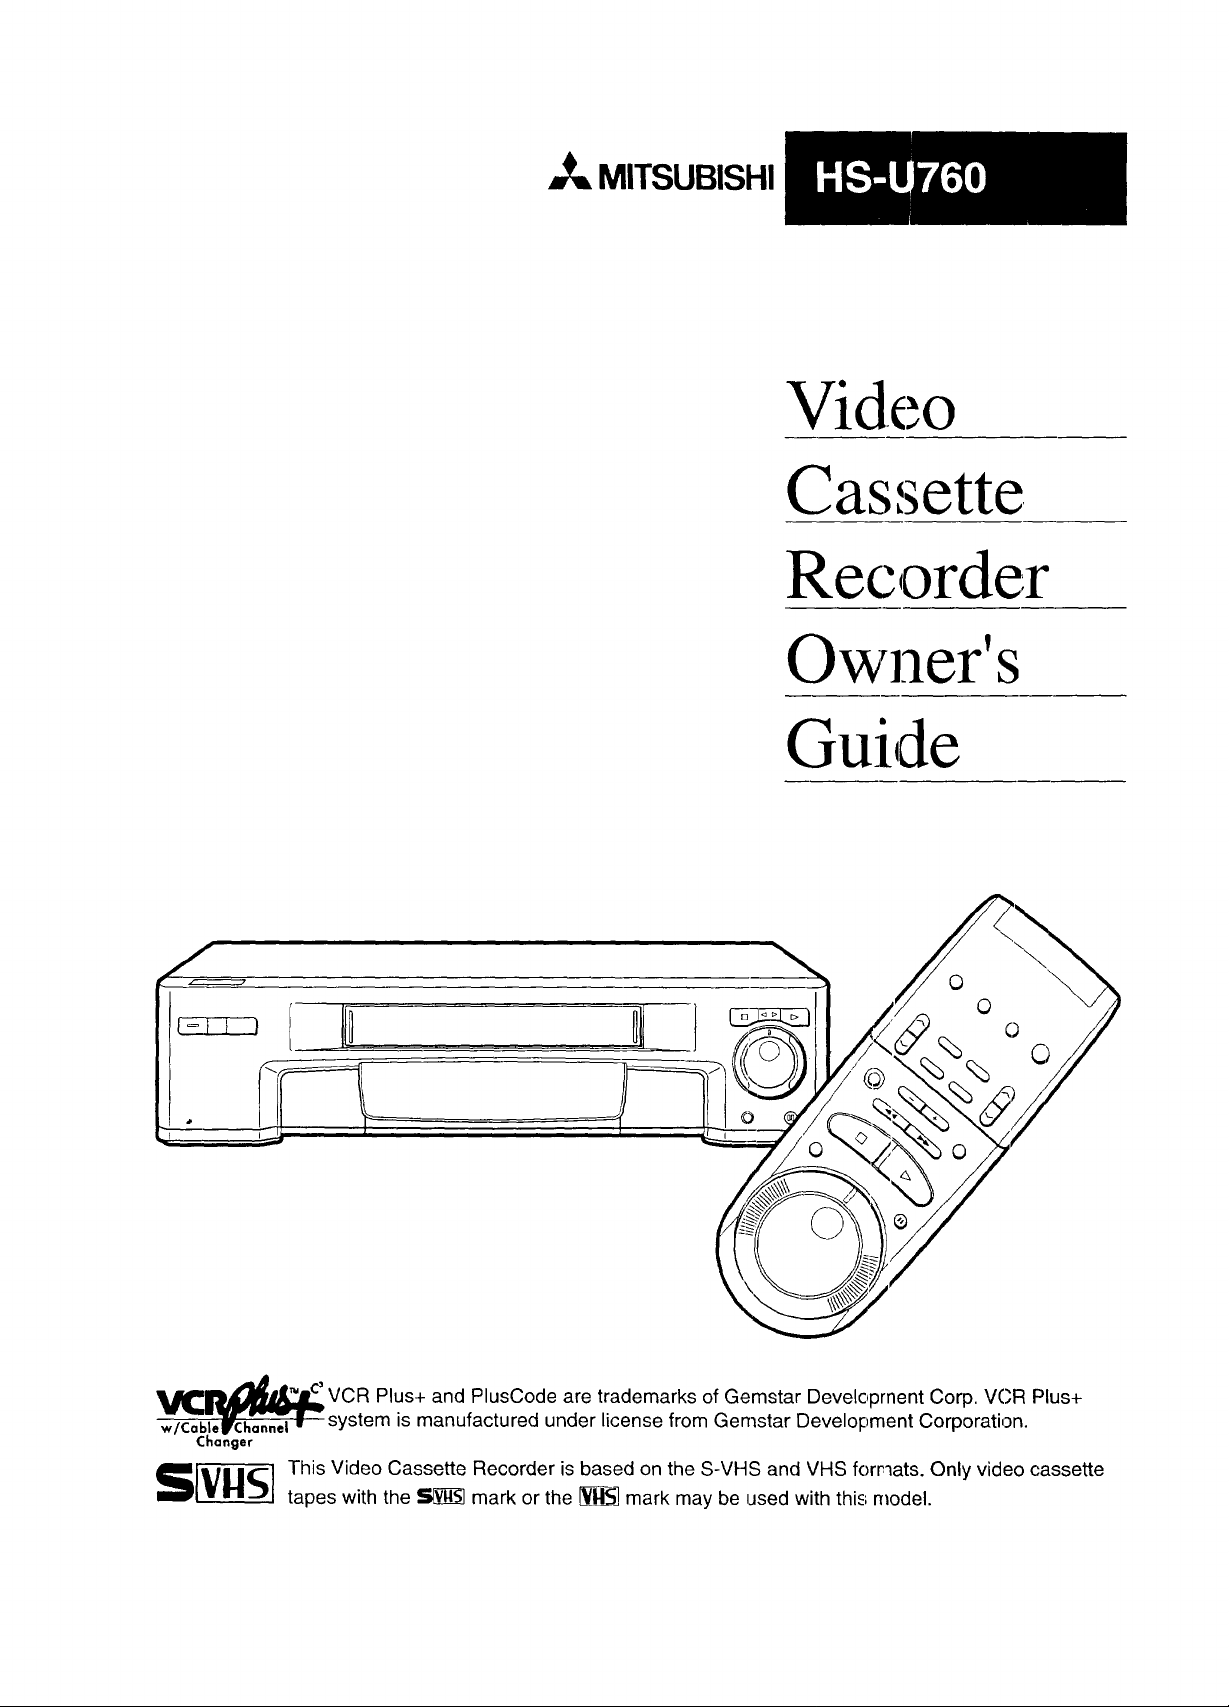
Video
Cassette
Recorder
Owner's
Guide
VCR Plus+ and PlusCode are trademarks of Gemstar Developrnent Corp. VCR Plus+
(;hanger
S[_] his Video Cassette Recorder is based on the S-VHS and VHS forrlats. Only video cassette
system is manufactured under license from Gemstar Development Corporation.
tapes with the _ mark or the _ mark may be used with this; model.
Page 2
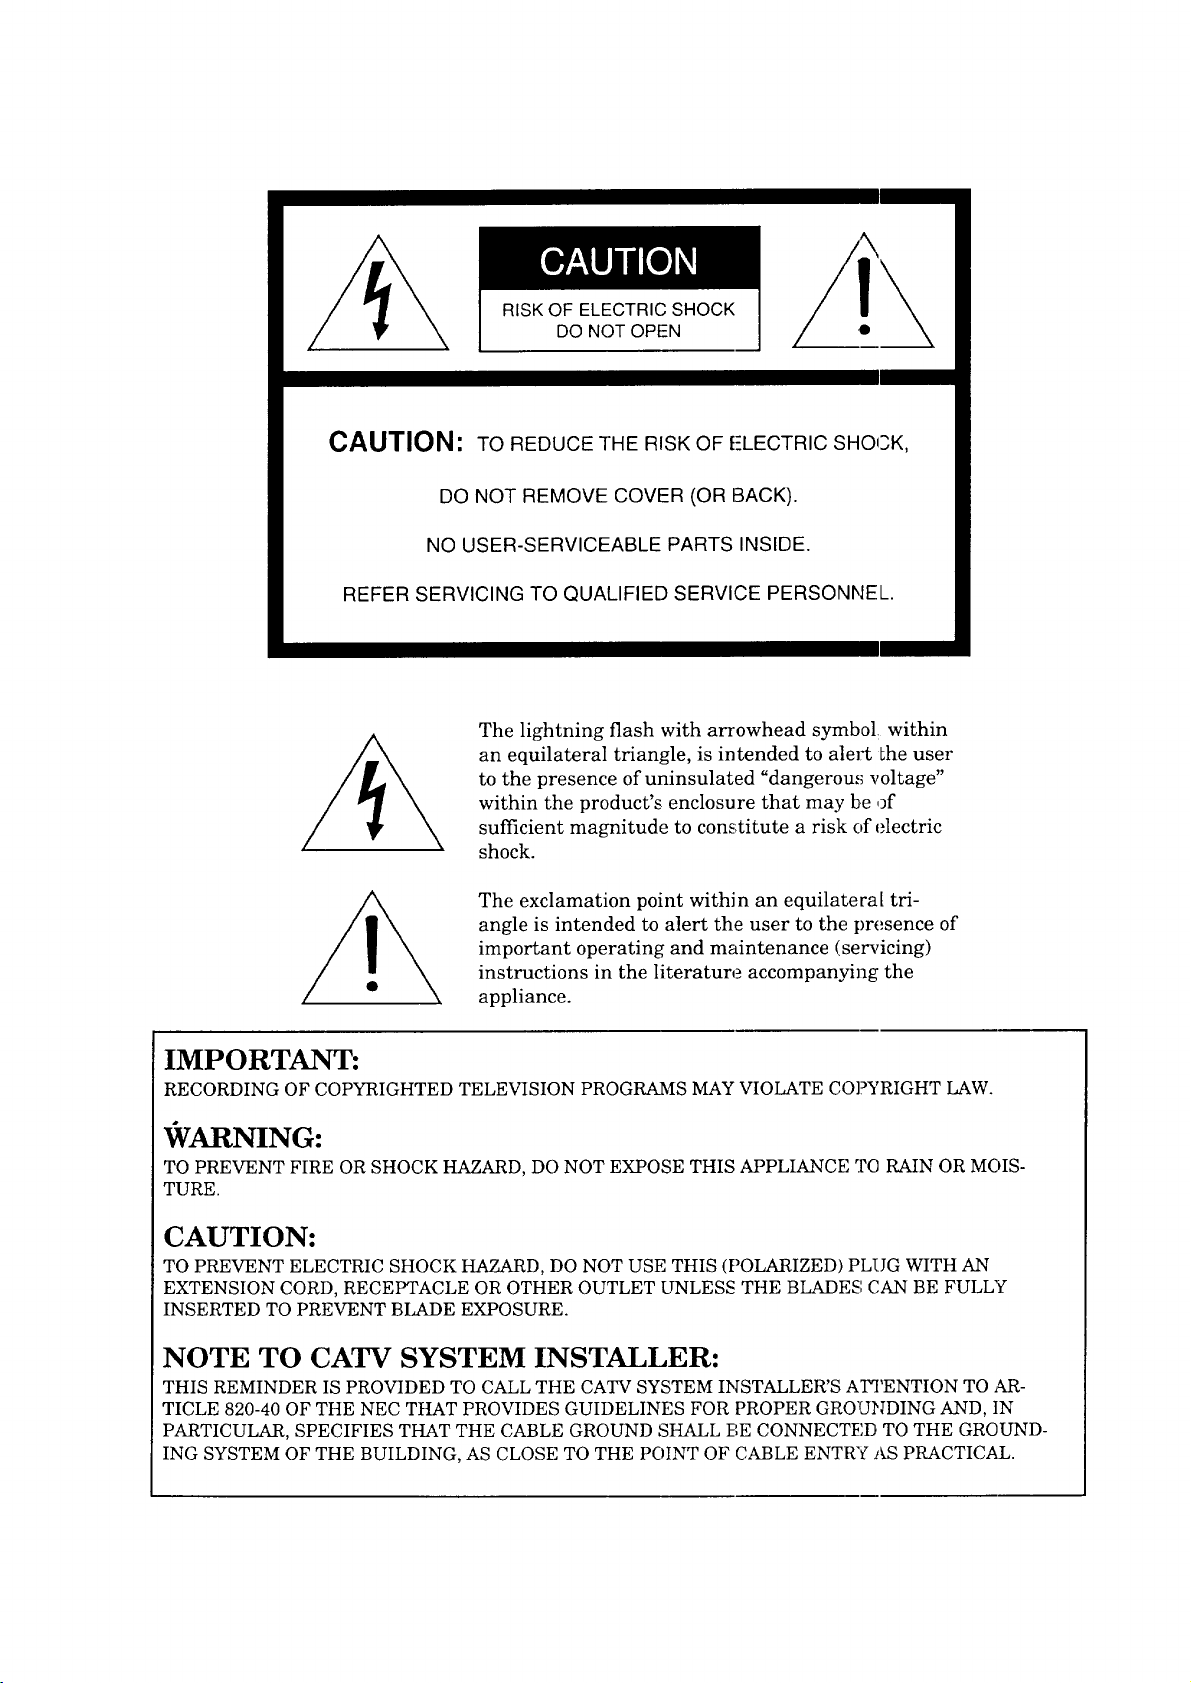
RISK OF ELECTRIC SHOCK
DO NOT OPEN
CAUTION: TO REDUCE THE RISK OF f:LECTRIC SHOCK,
DO NOT REMOVE COVER (OR BACK).
NO USER-SERVICEABLE PARTS INSIDE.
REFER SERVICING TO QUALIFIED SERVICE PERSONNEL.
The lightning flash with arrowhead symbol within
an equilateral triangle, is intended to alert Lhe user
to the presence of uninsulated "dangerou,_ voltage"
within the product's enclosure that may be of
/
sufficient magnitude to constitute a risk of electric
shock.
The exclamation point within an equilateral tri-
angle is intended to alert the user to the presence of
important operating and maintenance (servicing)
instructions in the literature accompanying the
appliance.
IMPORTANT:
RECORDING OF COPYRIGHTED TELEVISION PROGRAMS MAY VIOLATE CO]?YRIGHT LAW.
VARNING:
TO PREVENT FIRE OR SHOCK HAZARD, DO NOT EXPOSE THIS APPLIANCE TCI RAIN OR MOIS-
TURE.
CAUTION:
TO PREVENT ELECTRIC SHOCK HAZARD, DO NOT USE THIS (POLARIZED) PLUG WITH AN
EXTENSION CORD, RECEPTACLE OR OTHER OUTLET UNLESS THE BLADES (',AN BE FULLY
INSERTED TO PREVENT BLADE EXPOSURE.
NOTE TO CATV SYSTEM INSTALLER:
THIS REMINDER IS PROVIDED TO CALL THE CATV SYSTEM INSTALLER'S ATTENTION TO AR-
TICLE 820-40 OF THE NEC THAT PROVIDES GUIDELINES FOR PROPER GROUNDING AND, IN
PARTICULAR, SPECIFIES THAT THE CABLE GROUND SHALL BE CONNECTED TO THE GROUND-
ING SYSTEM OF THE BUILDING, AS CLOSE TO THE POINT OF CABLE ENTRY AS PRACTICAL.
Page 3
TableofContents
Important Safeguards ................................ 2
Preface
Welcome to Mitsubishi ............................... 5
Unpacking Your VCR .................................. 5
Chapter One
Getting to Know Your VCR ....................... 6
Front Panel Buttons and Functions ........... 6
Fluorescent Display ..................................... 7
Overview of the Remote Control ................. 9
Rear Panel Terminals ................................ 11
Chapter Two
Connecting Your VCR .............................. 12
Connecting the Antenna or Cable
to the VCR .............................................. 12
Connecting cable antennas .................... 12
Connecting other antennas .................... 13
Connecting separate UHF/VHF
antennas .............................................. 14
Connecting the Television ......................... 15
Determining if you need a splitter ......... 15
Connecting a regular TV to the VCR ..... 16
Connecting a TV with audio and
video inputs ......................................... 17
Connecting a Satellite Receiver (optional) 18
Connecting the A/V Network (optional) .... 19
Chapter Three
Operating Your VCR ................................. 21
Setting Up Your VCR for the First Time .. 21
Setting up your VCR if you are using a
regular TV ........................................... 21
Setting up your VCR if you are using a
monitor TV ........................................... 22
Using the Remote Control ......................... 22
• Using the remote control to operate
the VCR ............................................... 22
Using the remote control to operate
the TV .................................................. 23
Viewing the Picture Coming from
Your VCR ................................................ 25
Loading and Unloading Tapes .................. 26
Playing a Tape ........................................... 27
Playing back a tape ................................ 27
Using basic playback controls ................ 27
Selecting the On-screen Language ........... 28
Using the Audio and Video Functions ...... 28
Selecting and adjusting the audio and
video functions ..................................... 29
Descriptions of audio functions .............. 29
Descriptions of video :;unctions .............. 30
Using the Menus to Set the Time ............. 31
Programming the VCR to Receive TV
Channels ................................................. 33
Programming channels automatically .. 33
Using video mute ..................................... 36
Addir_g and deleting channels ................ 36
Selecting a channel ................................. 37
Setting the VCR Plus+ Guide Channel
Numhers ................................................. 38
Recording ................................................... 40
Recording a current broadcast ............... 40
Progq'amming your VCR to record ......... 41
Programming with VCR Plus+ .............. 44
Using Quick Program ............................. 45
Using One-Touch Re,:ording (OTR) ....... 46
Using One Key Programming ................. 47
Notes about progranlmed recording ...... 50
Chapter Four
Using tile Advanced Features ................. 53
Using r_heAdvanced P]ayback Controls .... 53
Using special effects ............................... 53
Adjusting the tracking ........................... 54
Using the time counter ........................... 55
Using the Advanced R_cording Controls ..55
Using the PerfecTape TM feature ............. 56
Displaying the time gauge and the
remaining time .................................... 57
Displaying the present time .................... 58
Searching Techniques ................................ 58
Quick searching ....................................... 58
Edit searching .......................................... 59
Speed searching ....................................... 59
Searching by time ................................... 60
Searching for a blank portion of tape .... 61
Ind¢x search techniques ......................... 61
Using the Active A/V Network Feal;ures ..64
Making a Copy of a Tape ........................... 66
Using your HS-U760 to record from
another VCR ........................................ 66
Using your HS-U763 to play back to
another VCR ........................................ 67
Using edit control .................................... 68
Using Child Lock ........................................ 69
Chapter Five
Troubleshooting .......................................... 70
Index ............................................................... 71
Page 4
IMPORTANTSAFEGUARDS
PLEASE READ ALL THESE INSTRUCTIONS REGARDING YOUR VCR AND RETAIN FOR
FUTURE REFERENCE. FOLLOW ALL WARNINGS AND INSTRUCTIONS MARKED ON THE
VCR.
Read Instructions
°
All the safety and operating instructions
should be read before the appliance is
operated.
.
Retain Instructions
The safety and operating instructions
should be retained for future reference.
.
Heed Warnings
All warnings on the appliance and in the
operating instructions should be adhered to.
Follow Instructions
.
All operating and use instructions should be
followed.
°
Cleaning
Unplug this video product from the wall
outlet before cleaning. Do not use liquid
cleaners or aerosol cleaners. Use a damp
cloth for cleaning.
Attachments
.
Do not use attachments not recommended
by the video product manufacturer as they
may cause hazards.
Water and Moisture
.
Do not use this video product near water --
for example, near a bath tub, wash bowl,
kitchen sink, or laundry tub, in a wet
basement, or near a swimming pool, and
the like.
.
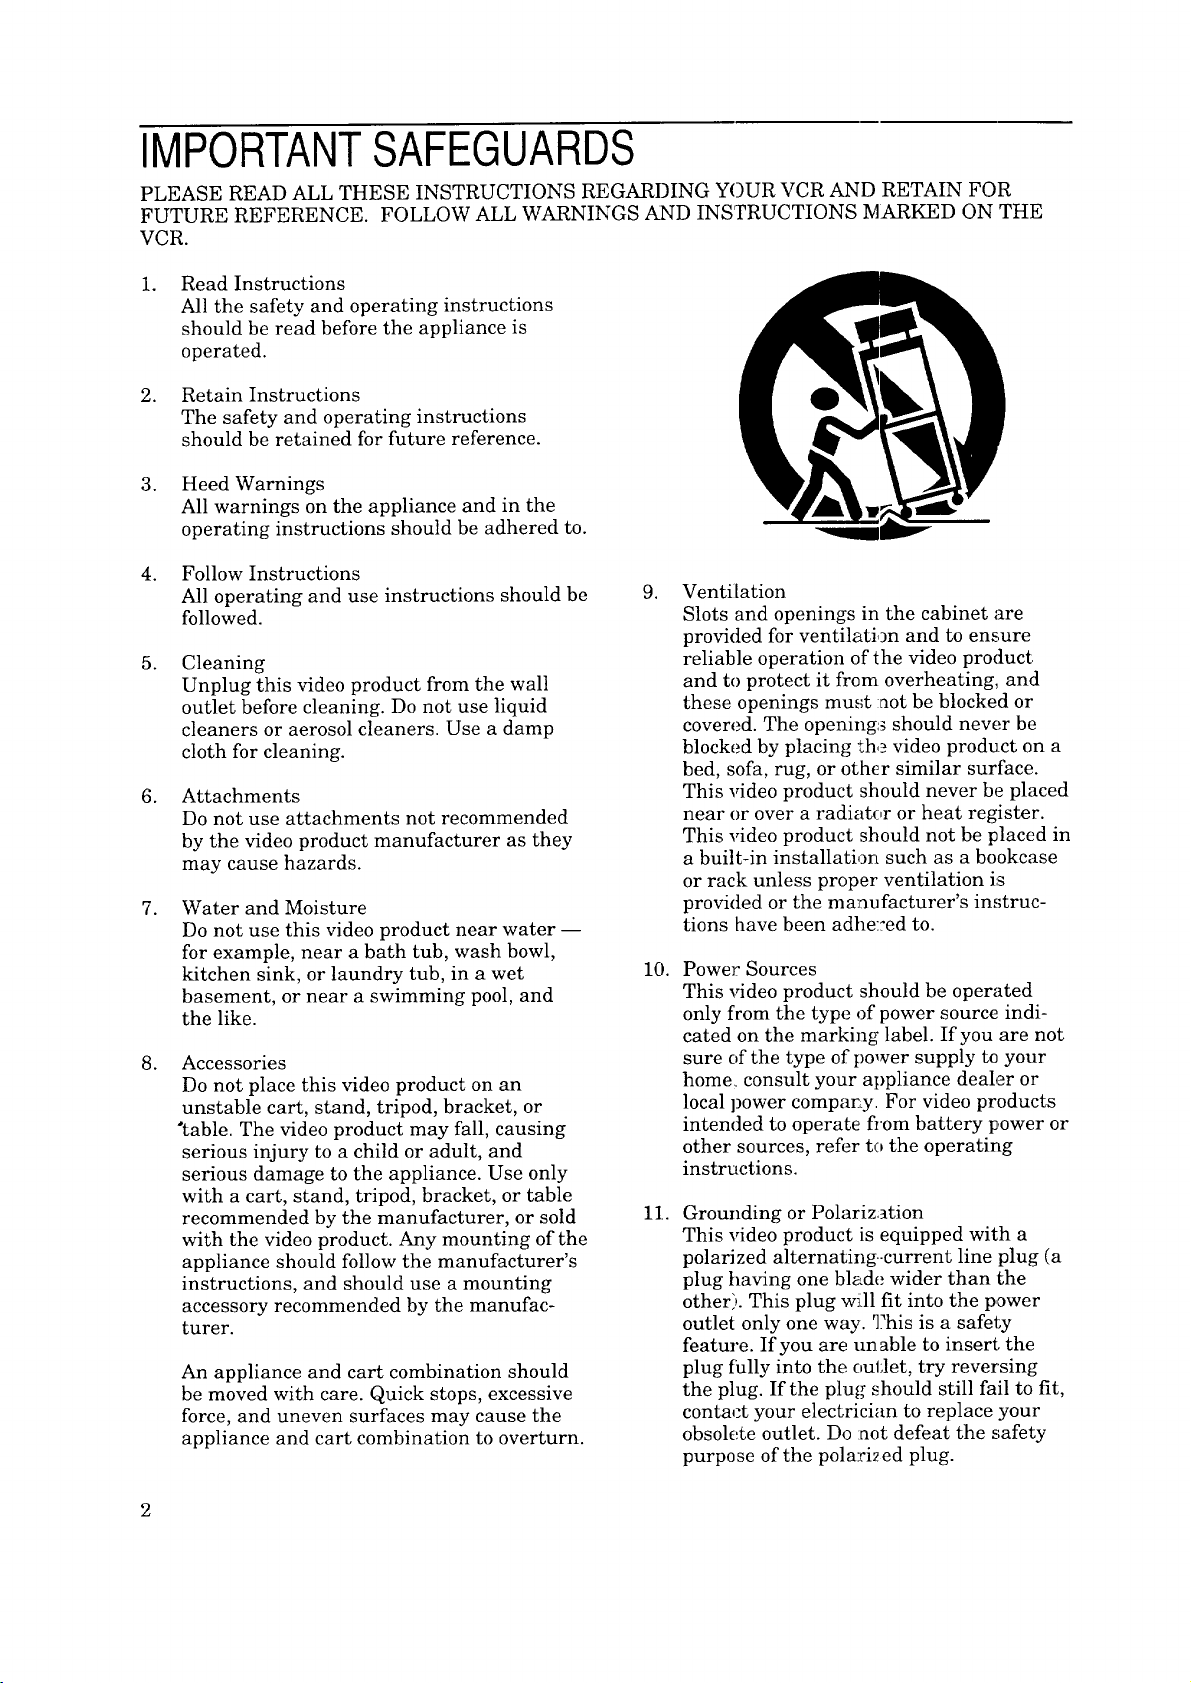
Accessories
Do not place this video product on an
unstable cart, stand, tripod, bracket, or
"table. The video product may fall, causing
serious injury to a child or adult, and
serious damage to the appliance. Use only
with a cart, stand, tripod, bracket, or table
recommended by the manufacturer, or sold
with the video product. Any mounting of the
appliance should follow the manufacturer's
instructions, and should use a mounting
accessory recommended by the manufac-
turer.
An appliance and cart combination should
be moved with care. Quick stops, excessive
force, and uneven surfaces may cause the
appliance and cart combination to overturn.
Ventilation
.
Slots and openings in the cabinet are
provided for ventilation and to ensure
reliable operation of the video product
and to protect it from overheating, and
these openings must :not be blocked or
covered. The opening_ should never be
blocked by placing th,_ video product on a
bed, sofa, rug, or other similar surface.
This video product should never be placed
near or over a radiator or heat register.
This video product should not be placed in
a built-in installation such as a bookcase
or rack unless proper ventilation is
provided or the ma_ufacturer's instruc-
tions have been adhe::ed to.
10.
Power Sources
This _ddeo product should be operated
only from the type of power source indi-
cated on the marking label. If you are not
sure of the type of power supply to your
home. consult your appliance dealer or
local power compar_y. For video products
intended to operate from battery power or
other sources, refer to the operating
instructions.
11.
Grounding or Polarization
This video product is equipped with a
polarized alternating.-current line plug (a
plug having one blade wider than the
other). This plug will fit into the power
outlet only one way. ']?his is a safety
feature. If you are un able to insert, the
plug fully into the outlet, try reversing
the plug. If the plug should still fail to fit,
contact your electrician to replace your
obsolete outlet. Do :net defeat the safety
purpose of the polari2 ed plug.
2
Page 5
12.
Power-Cord Protection
Power-supply cords should be routed so
that they are not likely to be walked on or
pinched by items placed upon or against
them, paying particular attention to cords
at plugs, convenience receptacles, and the
point where they exit from the appliance.
13.
Lightning
For added protection for this video prod-
uct receiver during a lightning storm, or
when it is left unattended and unused for
long periods of time, unplug it from the
wall outlet and disconnect the antenna or
cable system. This will prevent damage to
the video product due to lightning and
power-line surges.
14.
Power Lines
An outside antenna system should not be
located in the vicinity of overhead power
lines or other electric light or power
circuits, or where it can fall into such
power lines or circuits. When installing
an outside antenna system, extreme care
should be taken to keep from touching
such power lines or circuits as contact
with them might be fatal.
15.
Overloading
Do not overload wall outlets and exten-
sion cords as this can result in a risk of
fire or electric shock.
16.
Object and Liquid Entry
Never push objects of any kind into this
video product through openings as they
may touch dangerous voltage points or
short-out parts that could result in a fire
or electric shock. Never spill liquid of any
kind on the video product.
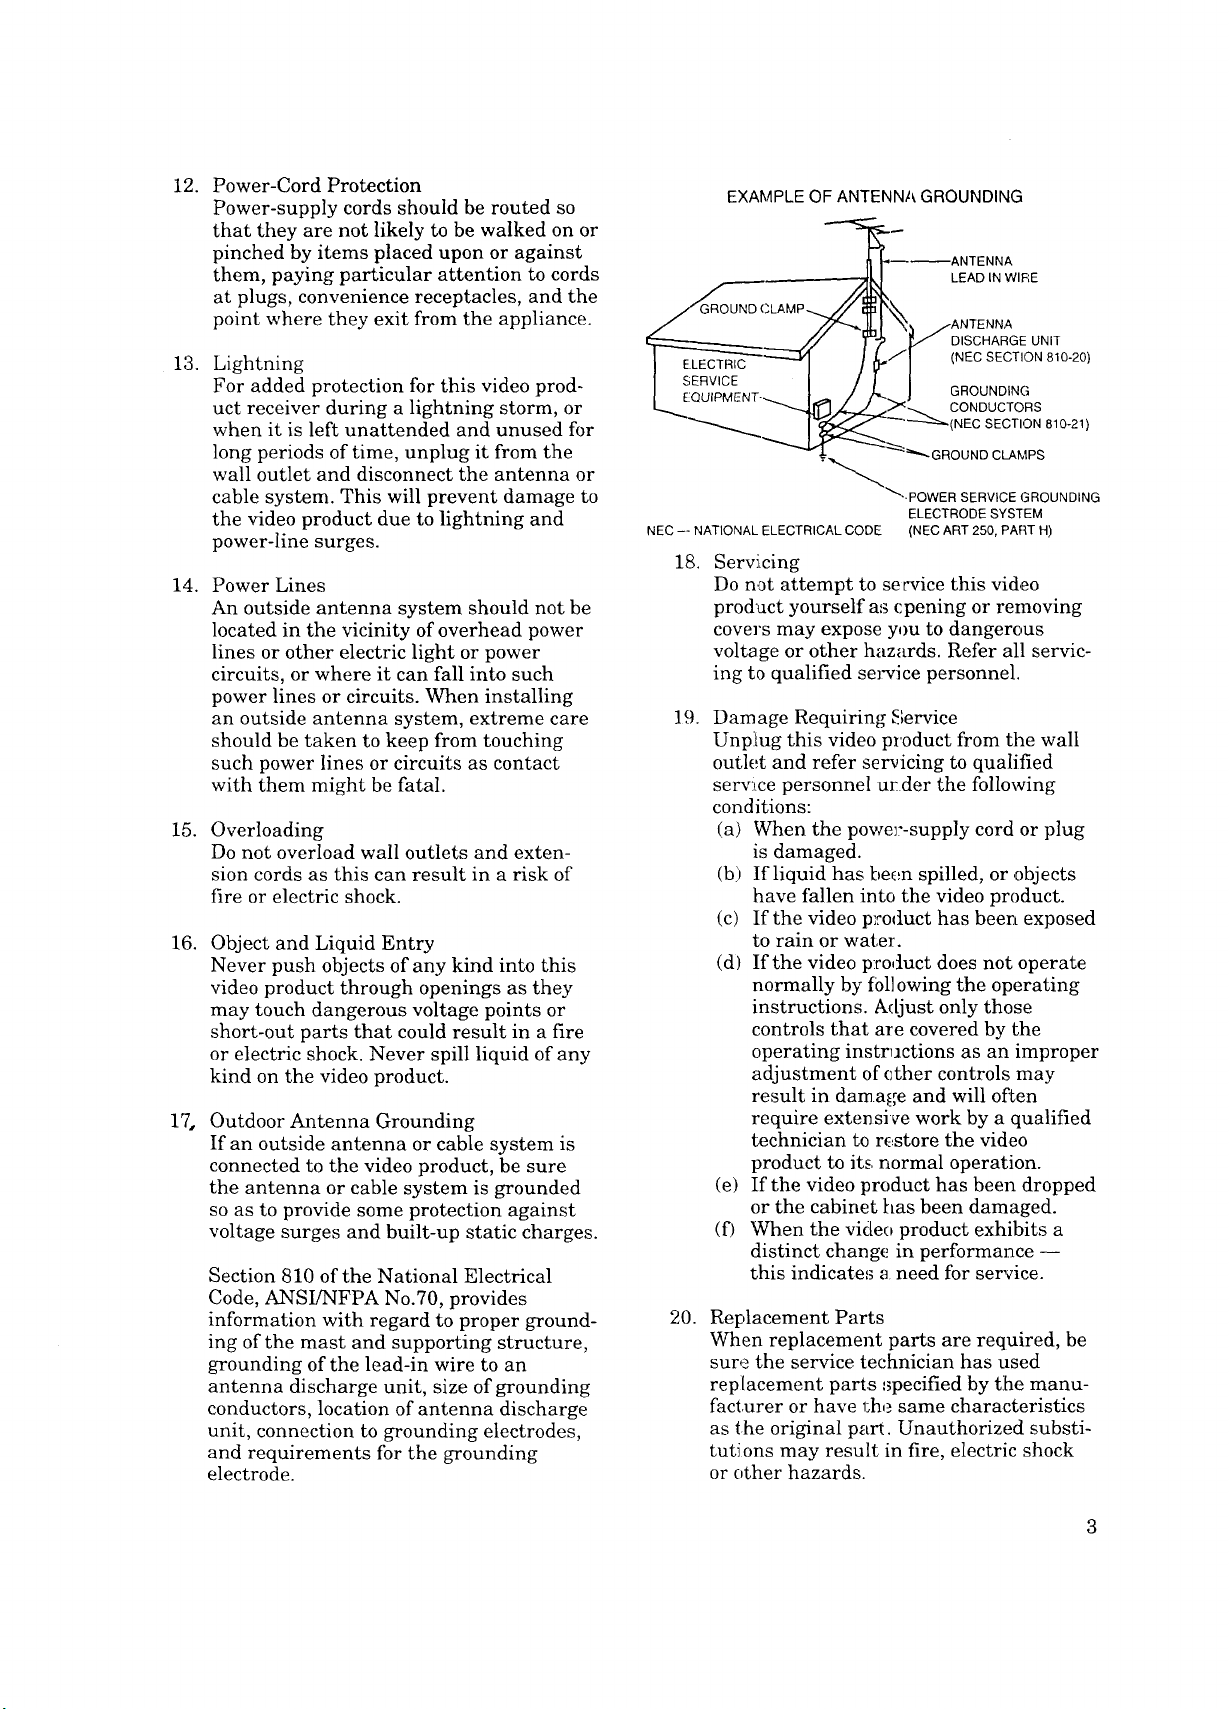
17.
Outdoor Antenna Grounding
If an outside antenna or cable system is
connected to the video product, be sure
the antenna or cable system is grounded
so as to provide some protection against
voltage surges and built-up static charges.
Section 810 of the National Electrical
Code, ANSUNFPA No.70, provides
information with regard to proper ground-
ing of the mast and supporting structure,
grounding of the lead-in wire to an
antenna discharge unit, size of grounding
conductors, location of antenna discharge
unit, connection to grounding electrodes,
and requirements for the grounding
electrode.
EXAMPLE OF ANTENNA GROUNDING
----ANTENNA
--_k I LEAD IN WIRE
i/'_'r_l _) /ANTENNA
/./ T-_ _/" DISCHARGE UNIT
I ] ZI'NECSECTION0'0"20'
I s_vicE- , c J --
I EOU_MENT-_I_ / }"-. l GROUNDING
k...__ _< CONDUCTORS
__='_-GROUND CLAMPS
"_'.POWER SERVICE GROUNDING
NEC -- NATIONAL ELECTRICAL CODE (NEC ART 250, PART H)
18.
Servi_cing
Do not attempt to se cvice this video
prodact yourself as cpening or removing
covers may expose you to dangerous
voltage or other hazards. Refer all servic-
ing to qualified service personnel.
19.
Damage Requiring Service
Unpitug this video product from the wall
outlet and refer ser,icing to qualified
serv:tce personnel urder the following
conditions:
(a) When the power--supply cord or plug
is damaged.
(b) If liquid has been spilled, or ,objects
have fallen into the video product.
(c) If the video product has been exposed
to rain or water.
(d) If the video p:roduct does not operate
normally by loll owing the operating
instructions. Adjust only those
controls that are covered by the
operating instructions as an improper
adjustment of ether controls may
result in damage and will o_Len
require extensive work by a qualified
technician to restore the video
product to its, normal operation.
(e) If the video product has been dropped
or the cabinet has been damaged.
(f) When the video product exhibits a
distinct change! in performance --
this indicates a need for ser"vice.
20.
Replacement Parts
When replacement parts are required, be
sure the service technician has used
replacement parts specified by the manu-
facturer or have 1;he same characteristics
as the original part. Unauthorized substi-
tutions may result in fire, electric shock
or other hazards.
ELECTRODE SYSTEM
Page 6
ImportantSafeguards
21.Safety Check
Upon completion of any service or repairs
to this video product, ask the service
technician to perform safety checks to
determine that the video product is in safe
operating condition.
CONDENSATION
Leave the VCR on, without a tape in it, for 2
hours if the VCR has been exposed to sudden
changes in temperature. Sudden temperature
changes cause moisture to form on the metal
parts inside the VCR. This moisture can cause
the tape to stick and damage the head.
Leaving the VCR on for a 2 hour period will
dry the inside of the VCR.
PROTECT THE POWER CORD
Do not damage the power cord. Damage to the
power cord may cause a fire or shock hazard.
When unplugging the power cord, please hold
it by the plug and remove it carefully.
DONOTPLACEANYTHINGONTHE
RECORDER
Heavy objects placed on tt:e recorder will
cause damage. The top of the recorder is also
slotted to provide ventilation. Do not obstruct
these ventilation slots.
WHEN NOT IN USE
When you finish operating; the recorder',
always unload the cassette and turn OFF the
VCR POWER.
CARE OFTHE VIDEOCASSETTETAPES
• Avoid violent vibration or shock.
• Do not place in a locati on where strong
magnetic fields exist (r.ear a motor, trans-
former or magnet).
• Never ])lace or store in direct sunlight.
• Avoid dusty places.
• Place the cassette in tl:e cassette case and
store w_rtically.
• Never ,_tore tape in a high humidity loca-
tion.
INFORMATION
This equipment has been tested and found to comply with the limits for a ()lass B digital device,
pursuant to Part 15 of the FCC Rules. These limits are designed to provide re_sonable protection
against harmful interference in a residential installation. This equipment generates, uses, land
can radiate radio frequency energy and, if not installed and used in accordance with the instruc-
tions, may cause harmful interference to radio communications. However, there is no guarantee
that interference will not occur in a particular installation. If this equipment does cause harmful
interference to radio or television reception, which can be determined by turning the equipment
off and on, the user is encouraged to try to correct the interference by one or more of the following
measures:
* • Reorient or relocate the receiving antenna;
• Increase the separation between the equipment and receiver;
• Connect the equipment into an outlet on a circuit different from that to which the receiver
is connected;
• Consult the dealer or an experienced radio/TV technician for help.
Changes or modifications not expressly approved by the party responsible for compliance could
void the user's authority to operate the equipment.
If necessary, the user should consult the dealer or an experienced radio/television technician for
additional suggestions. The user may find the following booklet prepared by the Federal Commu-
nications Commission helpful:
"How to Identify and Resolve Radio-TV Interference Problems."
This booklet is available from the US Government Printing Office, Washington, D.C., 20402,
Stock No. 004-000-00345-4.
4
Page 7
A PREFACE
WelcometoMitsubishi
# UnpackingYourVCR
Congratulations on your purchase of this Mi tsubishi Video
Cassette Recorder. Your new VCR produces superior sound and
the highest resolution S-VHS picture available. It includes VHS
Hi-Fi audio recording and playback, deliver!ng compact disc-
quality audio. Your VCR also includes the: VCR Plus+ system and
converter box control for simplified progran: ruing.
Your owner's guide has been designed with easy-to-follow expla-
nations and directions. In addition, your VC.R comes with
Mitsubishi's exclusive _il[ _on-screen ope:ating system. This
system has been developed toosimplify the (_peration of your VCR
with clear, understandable i(anguage and design.
Thank you for selecting our product and welcome to Mitsubishi.
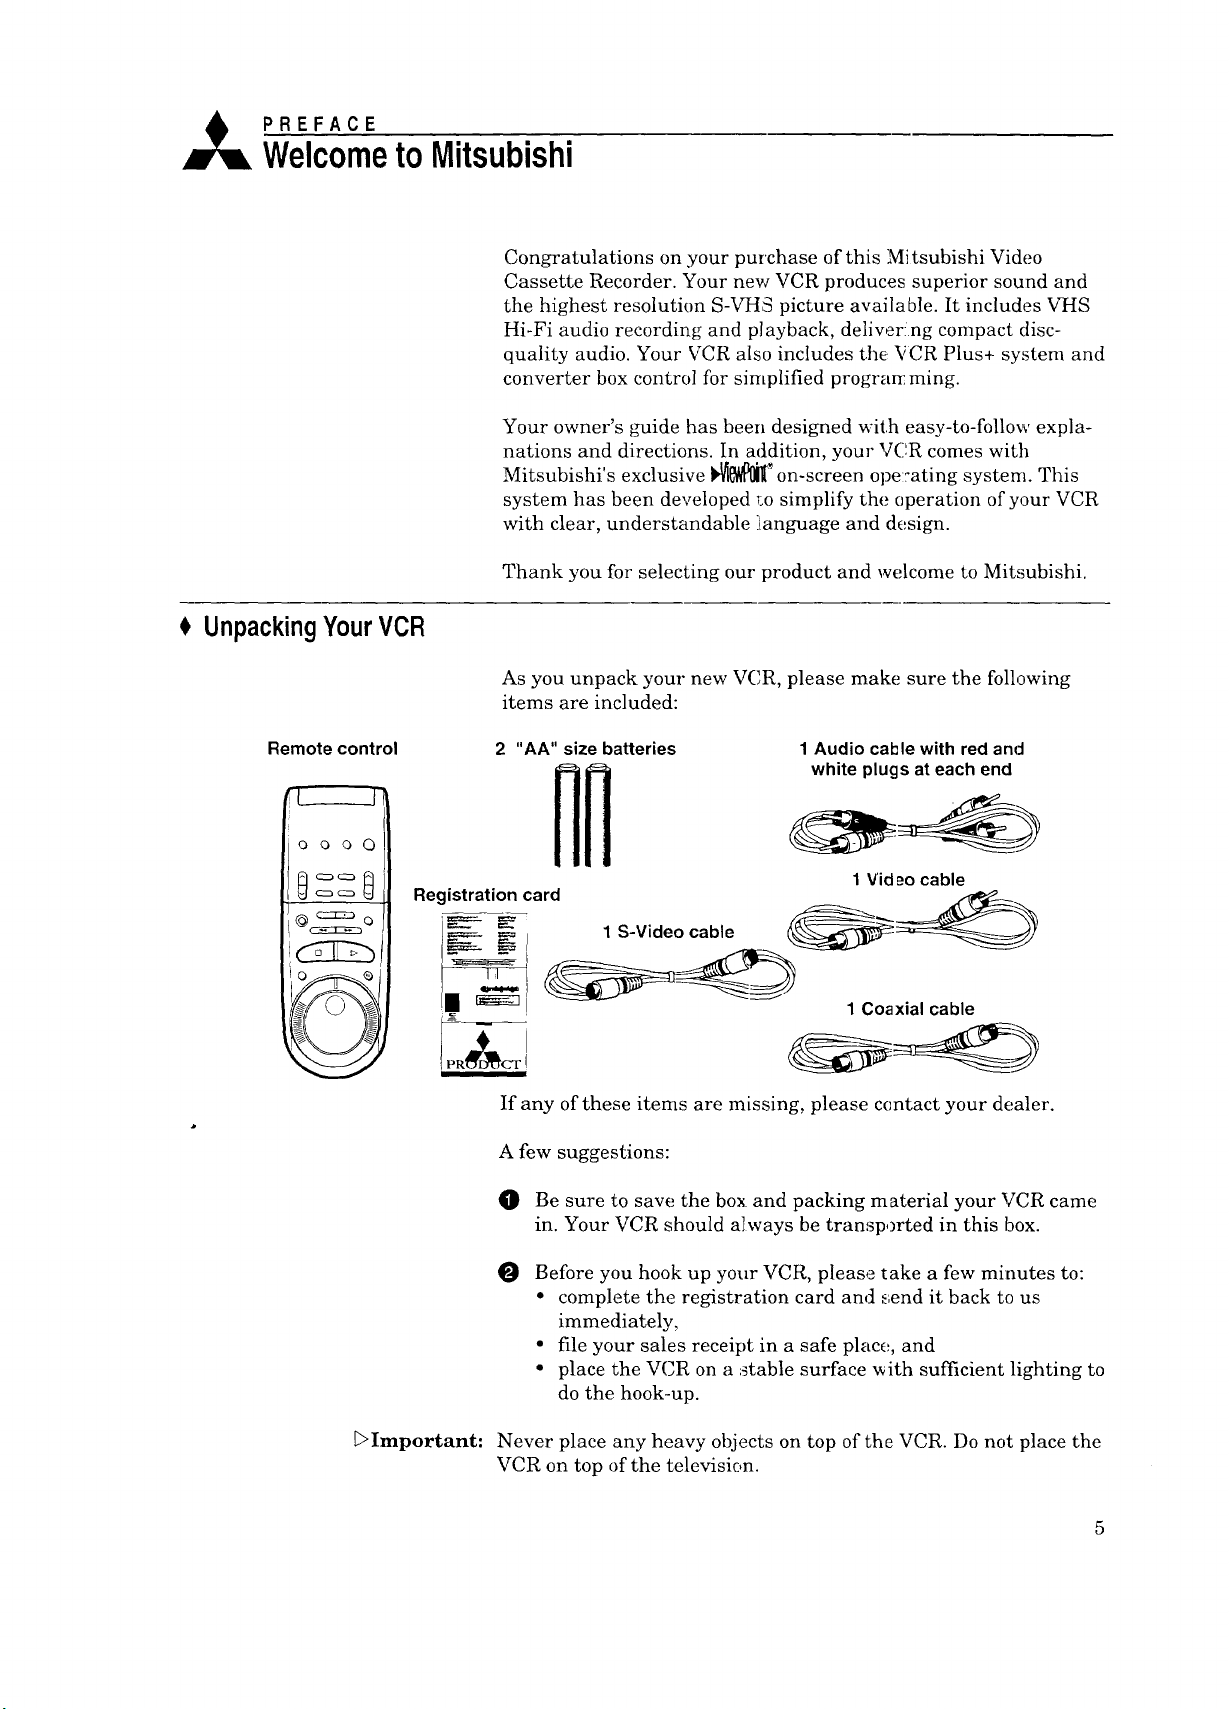
As you unpack your new VCR, please make sure the following
items are included:
Remote control 2 "AA" size batteries
Registration card
t_==___ 1 S-Videocable
,_====- I
I P R_I_CT
If any of these items are missing, please contact your dealer.
A few suggestions:
I_ Be sure to save the box and packing material your VCR came
in. Your VCR should always be transported in this box.
0 Before you hook up your VCR, please take a few minutes to:
• complete the registration card and send it back to us
immediately,
• file your sales receipt in a safe place, and
• place the VCR on a stable surface ,_ith sufficient lighting to
do the hook-up.
1 Audio cal_lewith red and
white plugs at each end
1 Vid _o cable
1 Coaxial cable
[:>Important: Never place any heavy objects on top of the VCR. Do not place the
VCR on top of the television.
Page 8
,_ CHAPTER ONE
Gettingto KnowYourVCR
Now that you have unpacked :your player and read through the
safety information, it's time to become familiar with the buttons
and controls.
If you are experienced with using VCRs, you may just want to
glance at this section and refer to it later. If¥CRs are new to you,
you may want to take your tirae and become familiar with the
locations of all the controls.
On the following pages, you'll find information on:
$ FrontPanelButtonsand Functions
0 Overviewof theRemoteControl
$ RearPaneITerminals
FrontPanelButtonsand Functions
FluorescentDisplay
Q
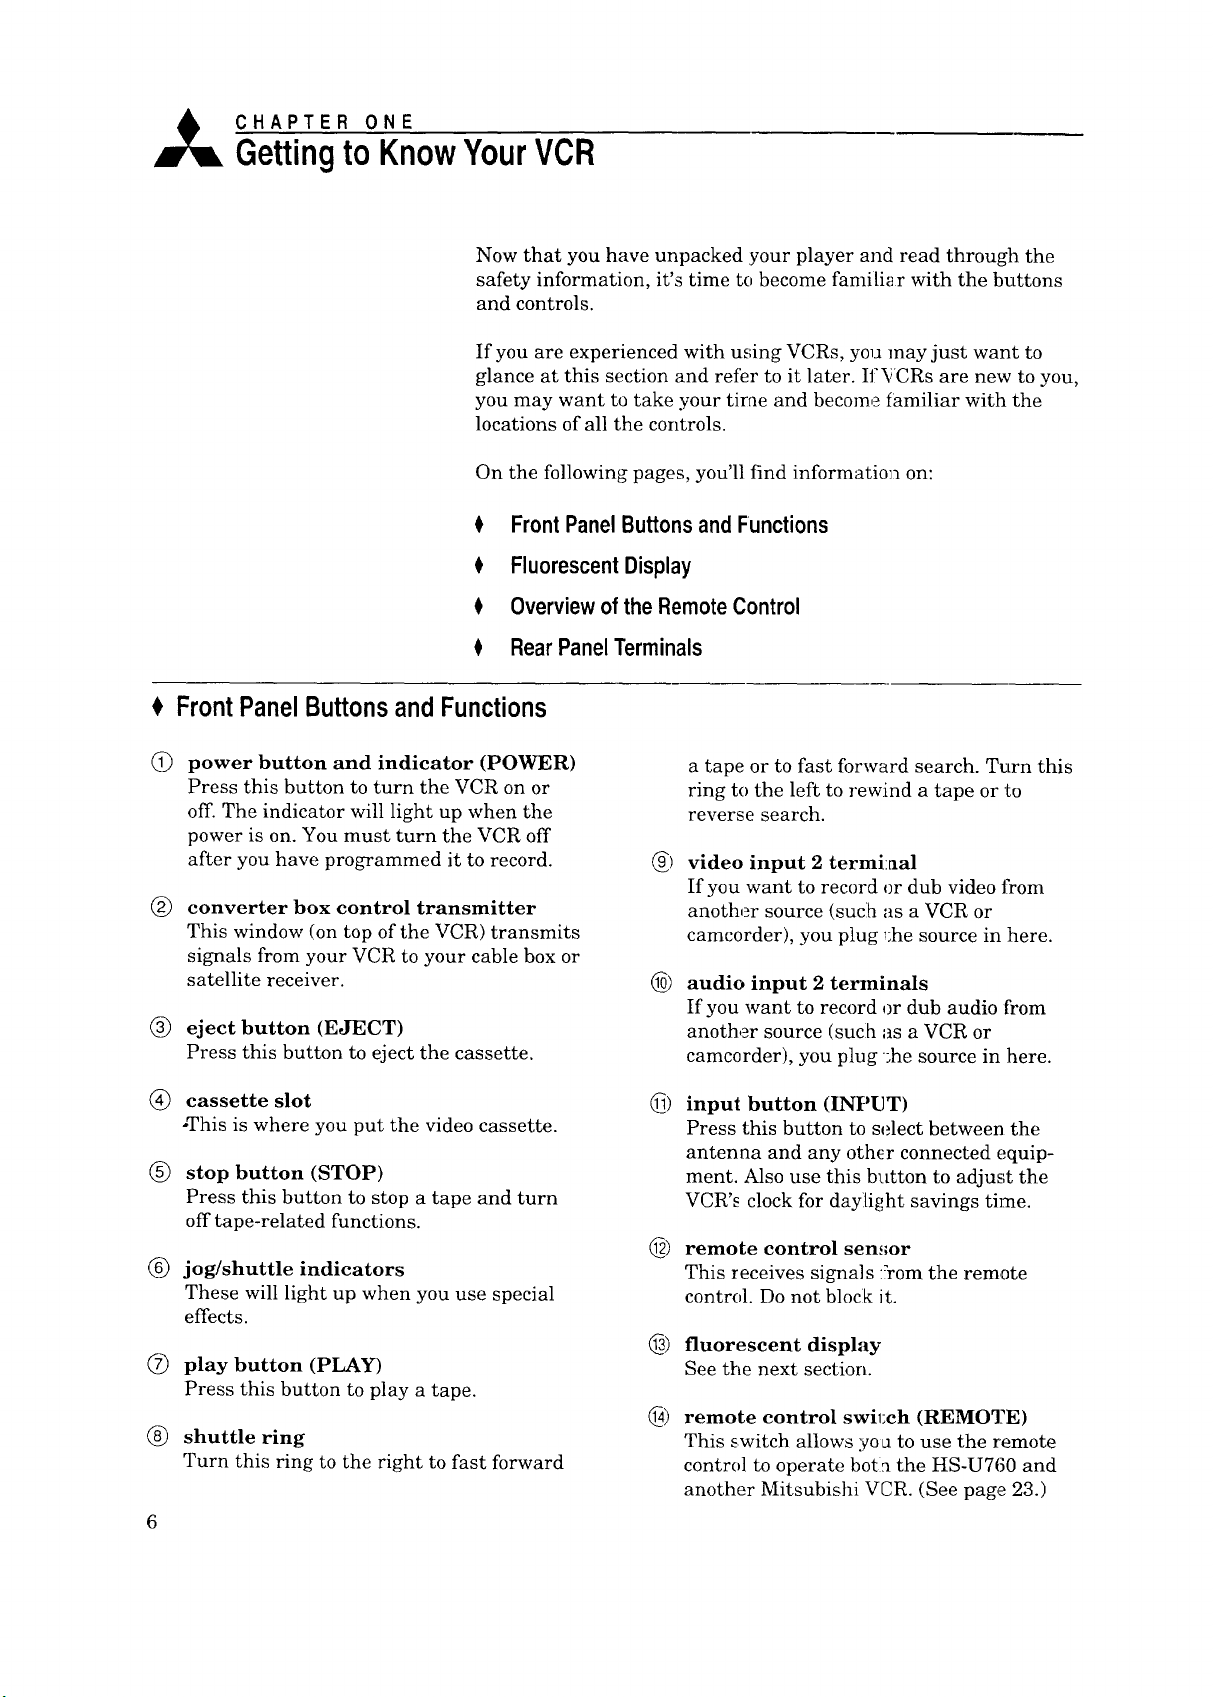
power button and indicator (POWER)
Press this button to turn the VCR on or
off. The indicator will light up when the
power is on. You must turn the VCR off
after you have programmed it to record.
converter box control transmitter
®
This window (on top of the VCR) transmits
signals from your VCR to your cable box or
satellite receiver.
(_) eject button (EJECT)
Press this button to eject the cassette.
(_) cassette slot
-This is where you put the video cassette.
(_) stop button (STOP)
Press this button to stop a tape and turn
off tape-related functions.
(_) jog/shuttle indicators
These will light up when you use special
effects.
(_ play button (PLAY)
Press this button to play a tape.
(_ shuttle ring
Turn this ring to the right to fast forward
a tape or to fast forward search. Turn this
ring to the left to rewind a tape or to
reverse search.
6)
video input 2 termi:aal
If you want to record or dub video from
another source (suclh as a VCR or
camcorder), you plug _:he source in here.
6)
audio input 2 terminals
If you want to record or dub audio from
another source (such as a VCR or
camcorder), you plug _he source in here.
_)
input button (INPUT)
Press this button to select between the
antenna and any other connected equip-
ment. Also use this button to adjust the
VCR's clock for dayli[_ht savings time.
6)
remote control sen,;or
This receives signals :¥om the remote
control. Do not block it.
6) fluorescent display
See the next section.
® remote control swil:ch (REMOTE)
This switch allows yon to use the remote
control to operate boti_ the HS-U760 and
another Mitsubishi VCR. (See page 23.)
Page 9
123
PO_I_R AE_CT
z 567
i
I
9 101112
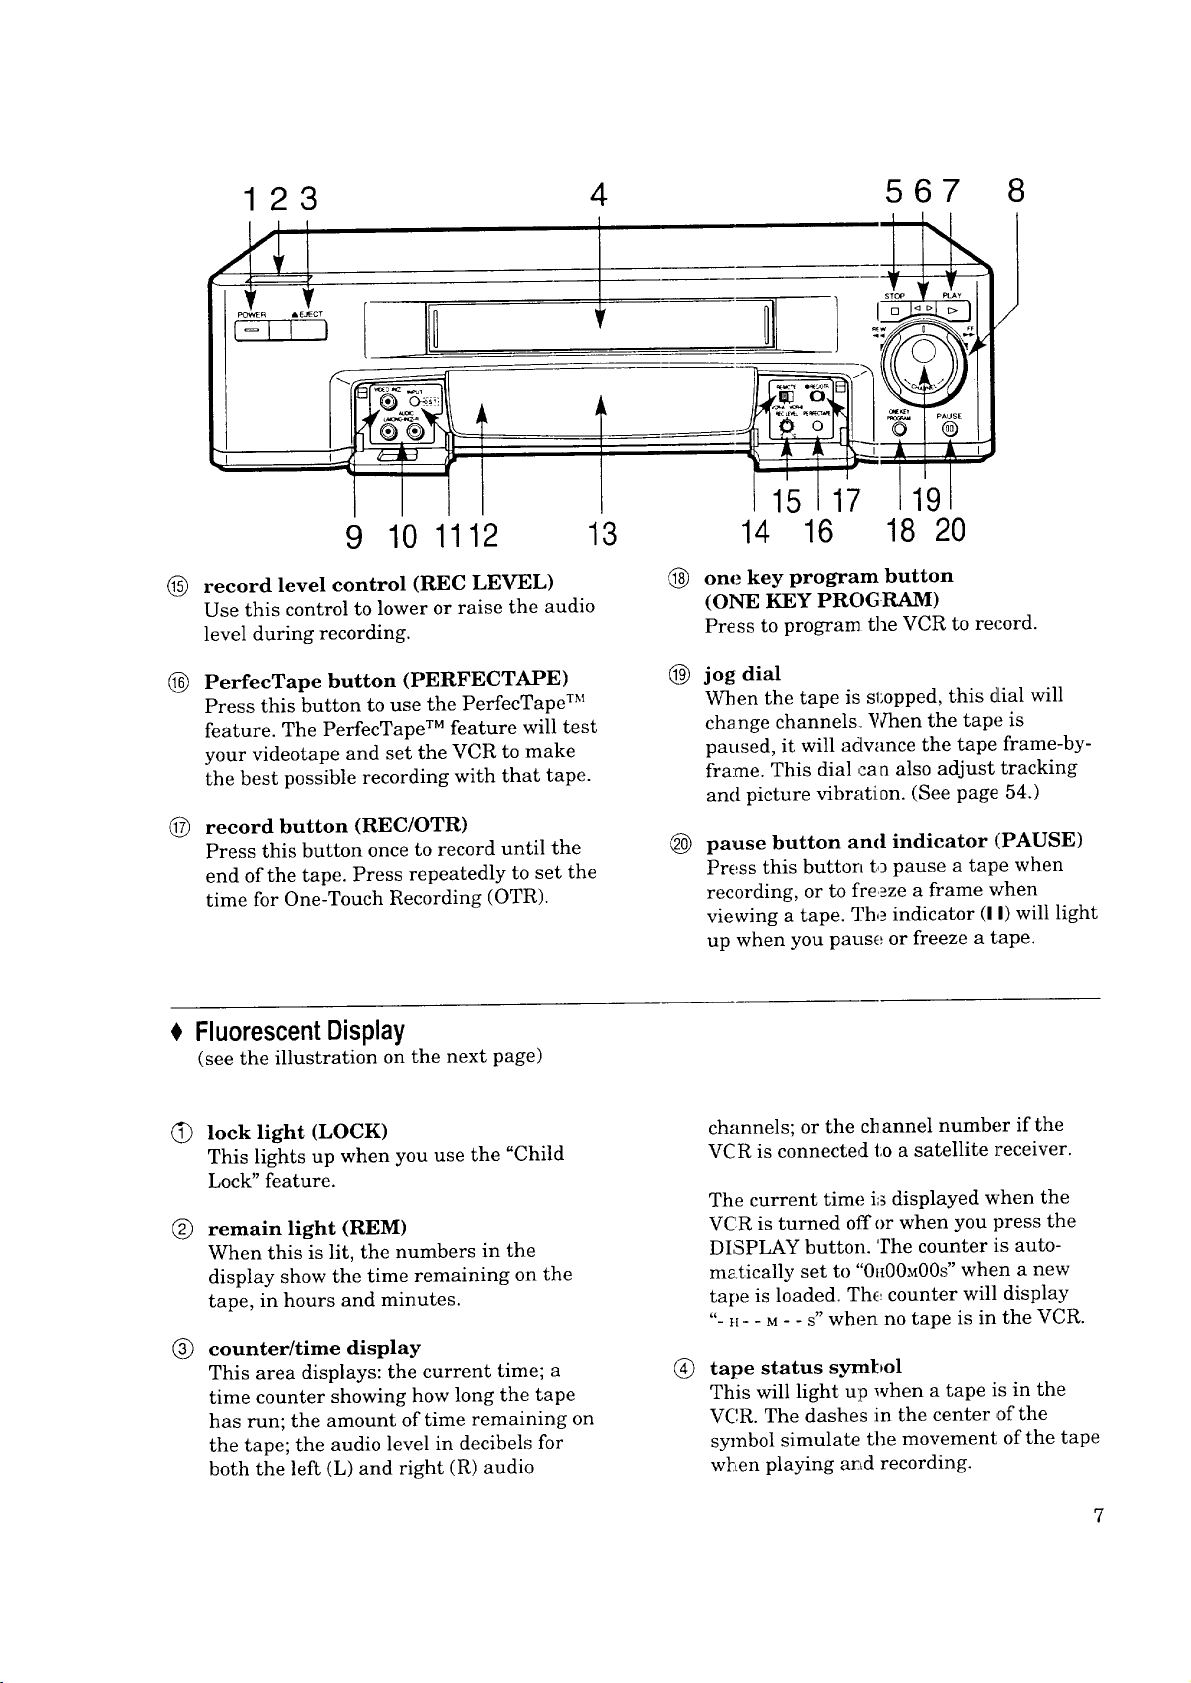
®
record level control (REC LEVEL)
Use this control to lower or raise the audio
level during recording.
®
PerfecTape button (PERFECTAPE)
Press this button to use the PerfecTape TM
feature. The PerfecTape TM feature will test
your videotape and set the VCR to make
the best possible recording with that tape.
©
record button (REC/OTR)
Press this button once to record until the
end of the tape. Press repeatedly to set the
time for One-Touch Recording (OTR).
FluorescentDisplay
(see the illustration on the next page)
15 17 1191
13 14 16 18 20
@ one key program button
(ONE KEY PROGI_)
Press to program the VCR to record.
@
jog dial
When the tape is sl;opped, this dial will
change channels Waaen the tape is
paused, it will advance the tape frame-by-
frame. This dial cam also adjust tracking
and picture vibration. (See page 54.)
®
pause button and indicator (PAUSE)
Press this button to pause a tape when
recording, or to fre._ze a frame when
viewing a tape. The indicator (I I) will light
up when you pause or freeze a tape.
lock light (LOCK)
This lights up when you use the "Child
Lock" feature.
®
remain light (REM)
When this is lit, the numbers in the
display show the time remaining on the
tape, in hours and minutes.
®
counter/time display
This area displays: the current time; a
time counter showing how long the tape
has run; the amount of time remaining on
the tape; the audio level in decibels for
both the left (L) and rigbt (R) audio
channels; or the channel number if the
VCR is connected to a satellite receiver.
The current time i;_displayed when the
VCR is turned offor when you press the
DISPLAY button. The counter is auto-
m_.tically set to "0_{00M00S"when a new
tape is loaded. The counter will display
"- t[- - M - - S" when no tape is in the VCR.
®
tape status symbol
This will light up when a tape is in the
VCR. The dashes in the center ,ofthe
symbol simulate the movement of the tape
wl:_en playing and recording.
Page 10
Chapter1:GettingtoKnowYourVCR FitorescentDisplay(cont.)
1 2 3
L ;
\-,_REMONd_20127 4 2 L2+40FFWK SU
• 11111I. I-II I I I-I I-I.
{_' LiCK --
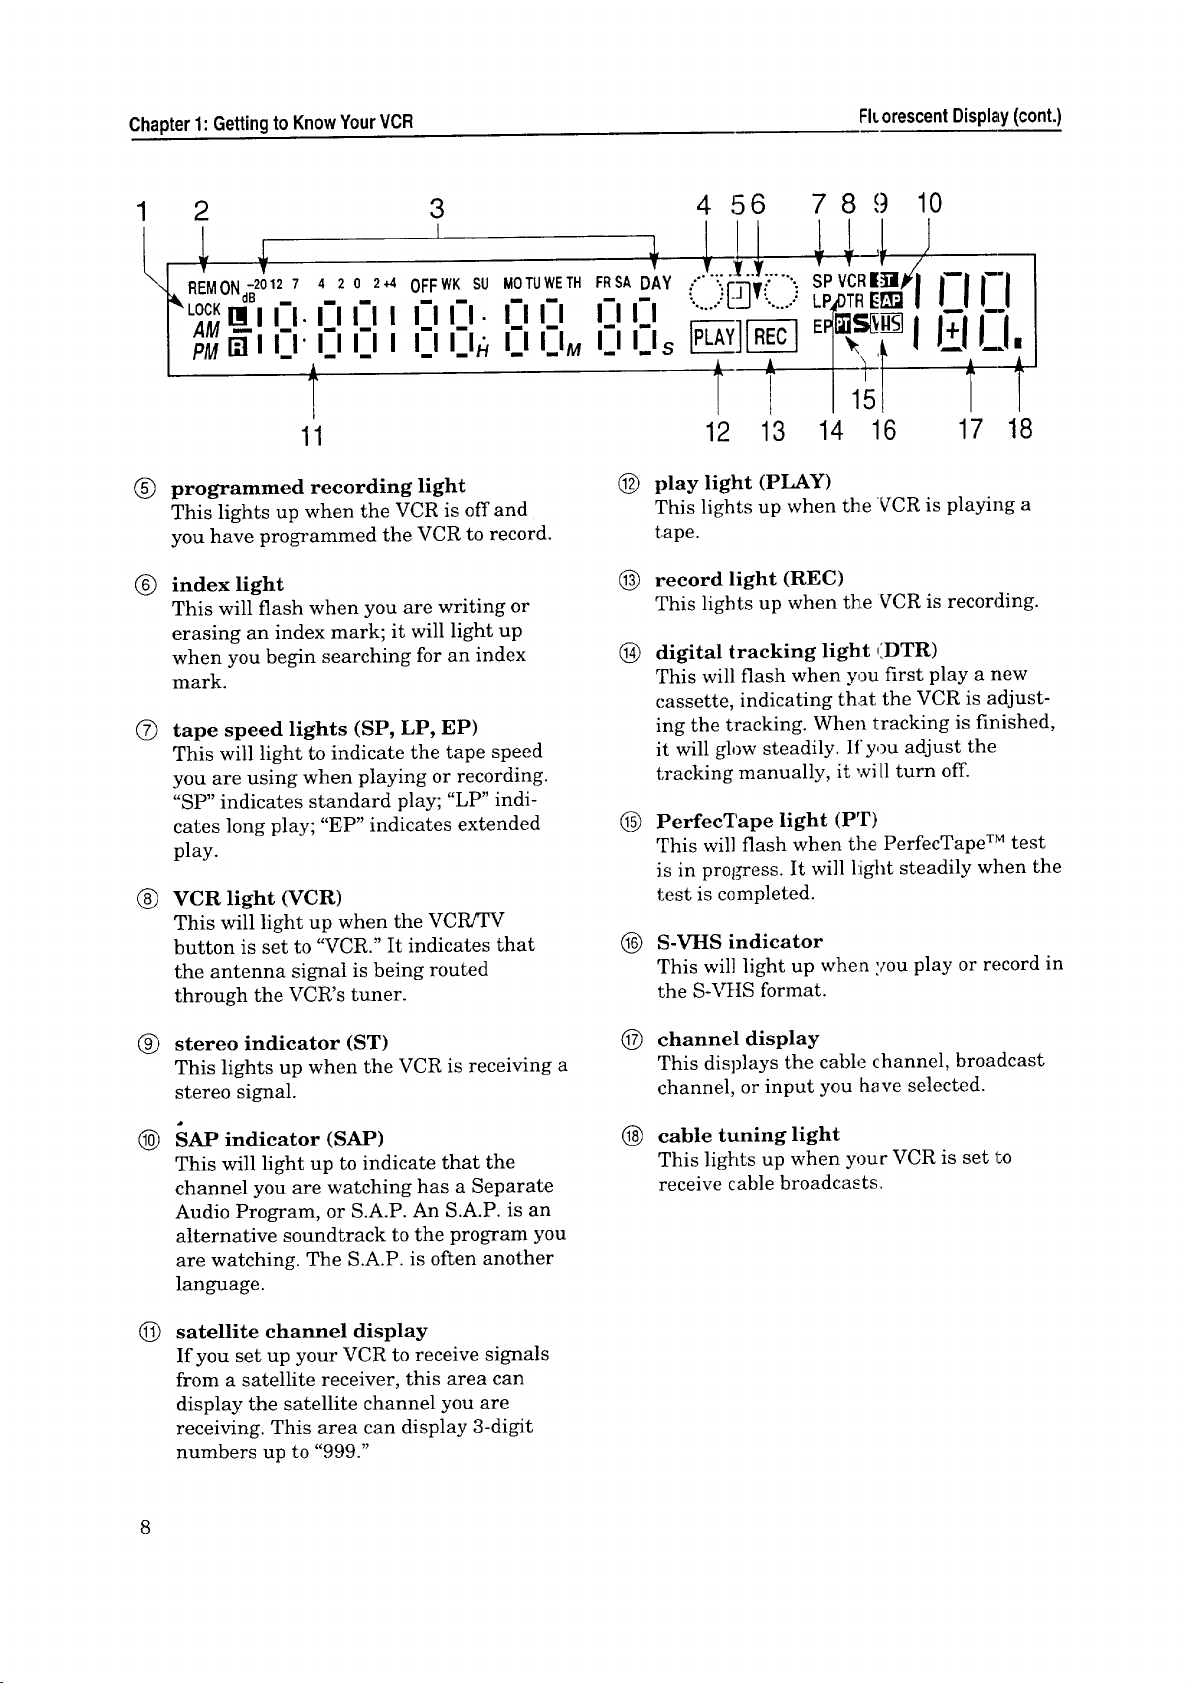
®
programmed recording light
This lights up when the VCR is off and
you have programmed the VCR to record.
®
index light
This will flash when you are writing or
erasing an index mark; it will light up
when you begin searching for an index
mark.
®
tape speed lights (SP, LP, EP)
This will light to indicate the tape speed
you are using when playing or recording.
"SP" indicates standard play; "LP" indi-
cates long play; "EP" indicates extended
play.
®
VCR light (VCR)
This will light up when the VCtbzFV
button is set to "VCR." It indicates that
the antenna signal is being routed
through the VCR's tuner.
n i-ll n i-i g l n _ _
11
._ozu T,
I_1 I_1
I_1 I_IM
4 56 78 9 10
FRSADAY
m
1!!.....!!1
-:i.ii:;[-J_-....::" SPVCR|_I/€|
LP4OTRI_EFJI I"1 rl
I_1II
I_1I_1s
t t
12 13 14 16 17 8
@
play light (PLAY)
This lights up when the VCR is playing a
tape.
@
record light (REC)
This lights up when the VCR is recording.
®
digital tracking light (DTR)
This will flash when you first play a new
cassette, indicating that the VCR ]s adjust-
ing the tracking. When tracking is finished,
it will glow steadily. If you adjust the
tracking manually, it wi [1turn off.
®
PerfecTape light (PT)
This will flash when the PerfecTape TM test
is in progress. It will l:ight steadily when the
test is completed.
S-VHS indicator
®
This will light up when you play or record in
the S-VHS format.
®
stereo indicator (ST)
This lights up when the VCR is receiving a
stereo signal.
SAP indicator (SAP)
®
This will light up to indicate that the
channel you are watching has a Separate
Audio Program, or S.A.P. An S.A.P. is an
alternative soundtrack to the program you
are watching. The S.A.P. is often another
language.
©
satellite channel display
If you set up your VCR to receive signals
from a satellite receiver, this area can
display the satellite channel you are
receiving. This area can display 3-digit
numbers up to "999."
©
channel display
This displays the cable channel, broadcast
channel, or input you have selected.
@
cable tuning light
This lights up when your VCR is set 150
receive cable broadcasts.
Page 11
Overviewofthe RemoteControl
i
1
2
11
12
13
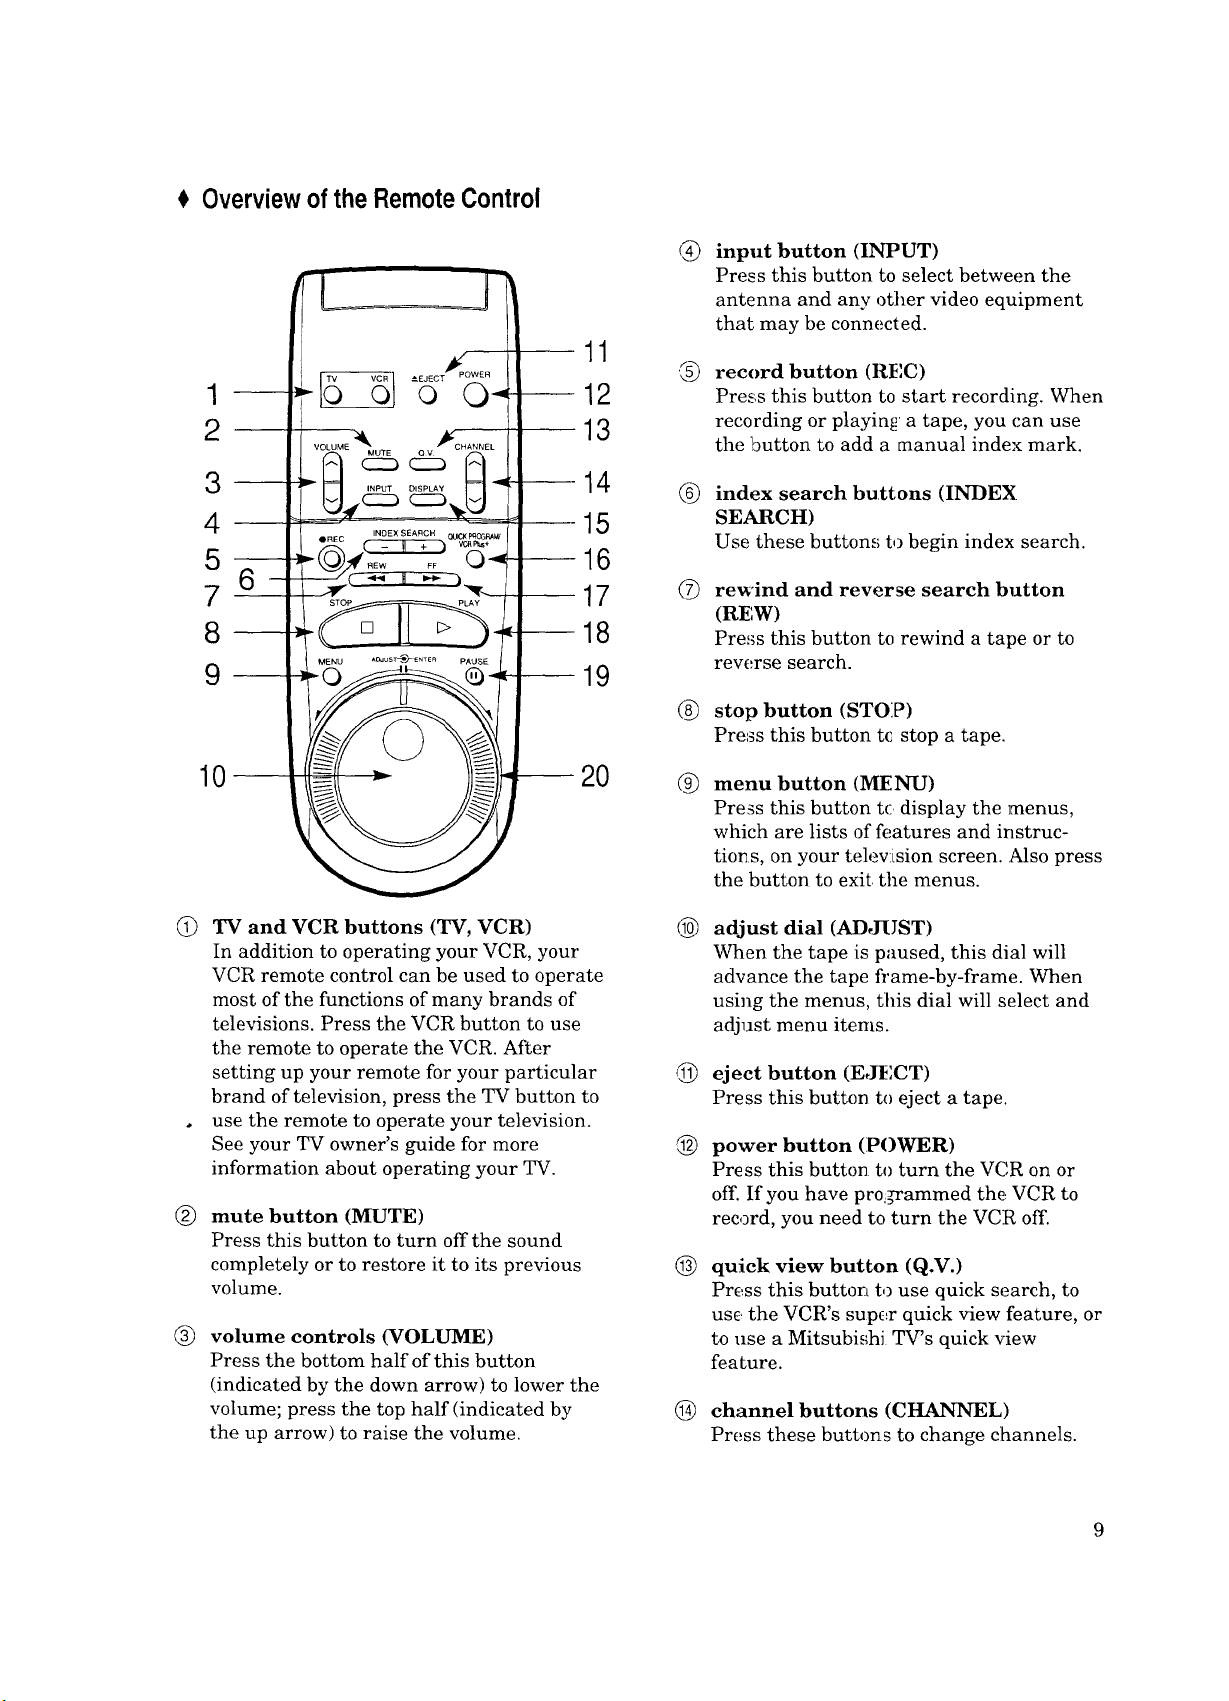
@
input button (INPUT)
Press this button to select between the
antenna and any other video equipment
that may be connected.
@
record button (REC)
Press this button to start recording. When
recording or playin_ a tape, you can use
the button to add a manual index mark.
3
--14
4
5
7 6-
8
__
10--
(_) TV and VCR buttons (TV, VCR)
In addition to operating your VCR, your
VCR remote control can be used to operate
most of the functions of many brands of
televisions. Press the VCR button to use
the remote to operate the VCR. After
setting up your remote for your particular
brand of television, press the TV button to
• use the remote to operate your television.
See your TV owner's guide for more
information about operating your TV.
®
mute button (MUTE)
Press this button to turn off the sound
completely or to restore it to its previous
volume.
®
volume controls (VOLUME)
Press the bottom half of this button
(indicated by the down arrow) to lower the
volume; press the top half (indicated by
the up arrow) to raise the volume.
--17
--18
--19
-- 20
15
16
(9 index search buttons (INDEX
SEARCH)
Use these buttons to begin index search.
rewind and reverse search button
@
(RF, W)
Pre,,;s this button to rewind a tape or to
reverse search.
(_ stop button (STOP)
Press this button tc stop a tape.
®
menu button (MENU)
Press this button t(: display the menus,
which are lists of features and instruc-
tions, on your telev:Lsion screen. Also press
the button to exit. the menus.
®
adjust dial (ADJUST)
When the tape is paused, this dial will
advance the tape fl'ame-by-frame. When
using the menus, this dial will select and
adjust menu items.
©
eject button (EJECT)
Press this button to eject a tape.
@
power button (POWER)
Press this button to turn the VC,R on or
off. If you have proiFammed the. VCR to
record, you need to turn the VCR off.
@
quick view button (Q.V.)
Press this button t,) use quick search, to
use the VCR's super quick view feature, or
to use a Mitsubishi TV's quick view
feature.
channel buttons (CHANNEL)
@
Press these buttons to change channels.
9
Page 12
Chapter1:GettingtoKnowYourVCR Overviewofthe RemoteControl(cont.)
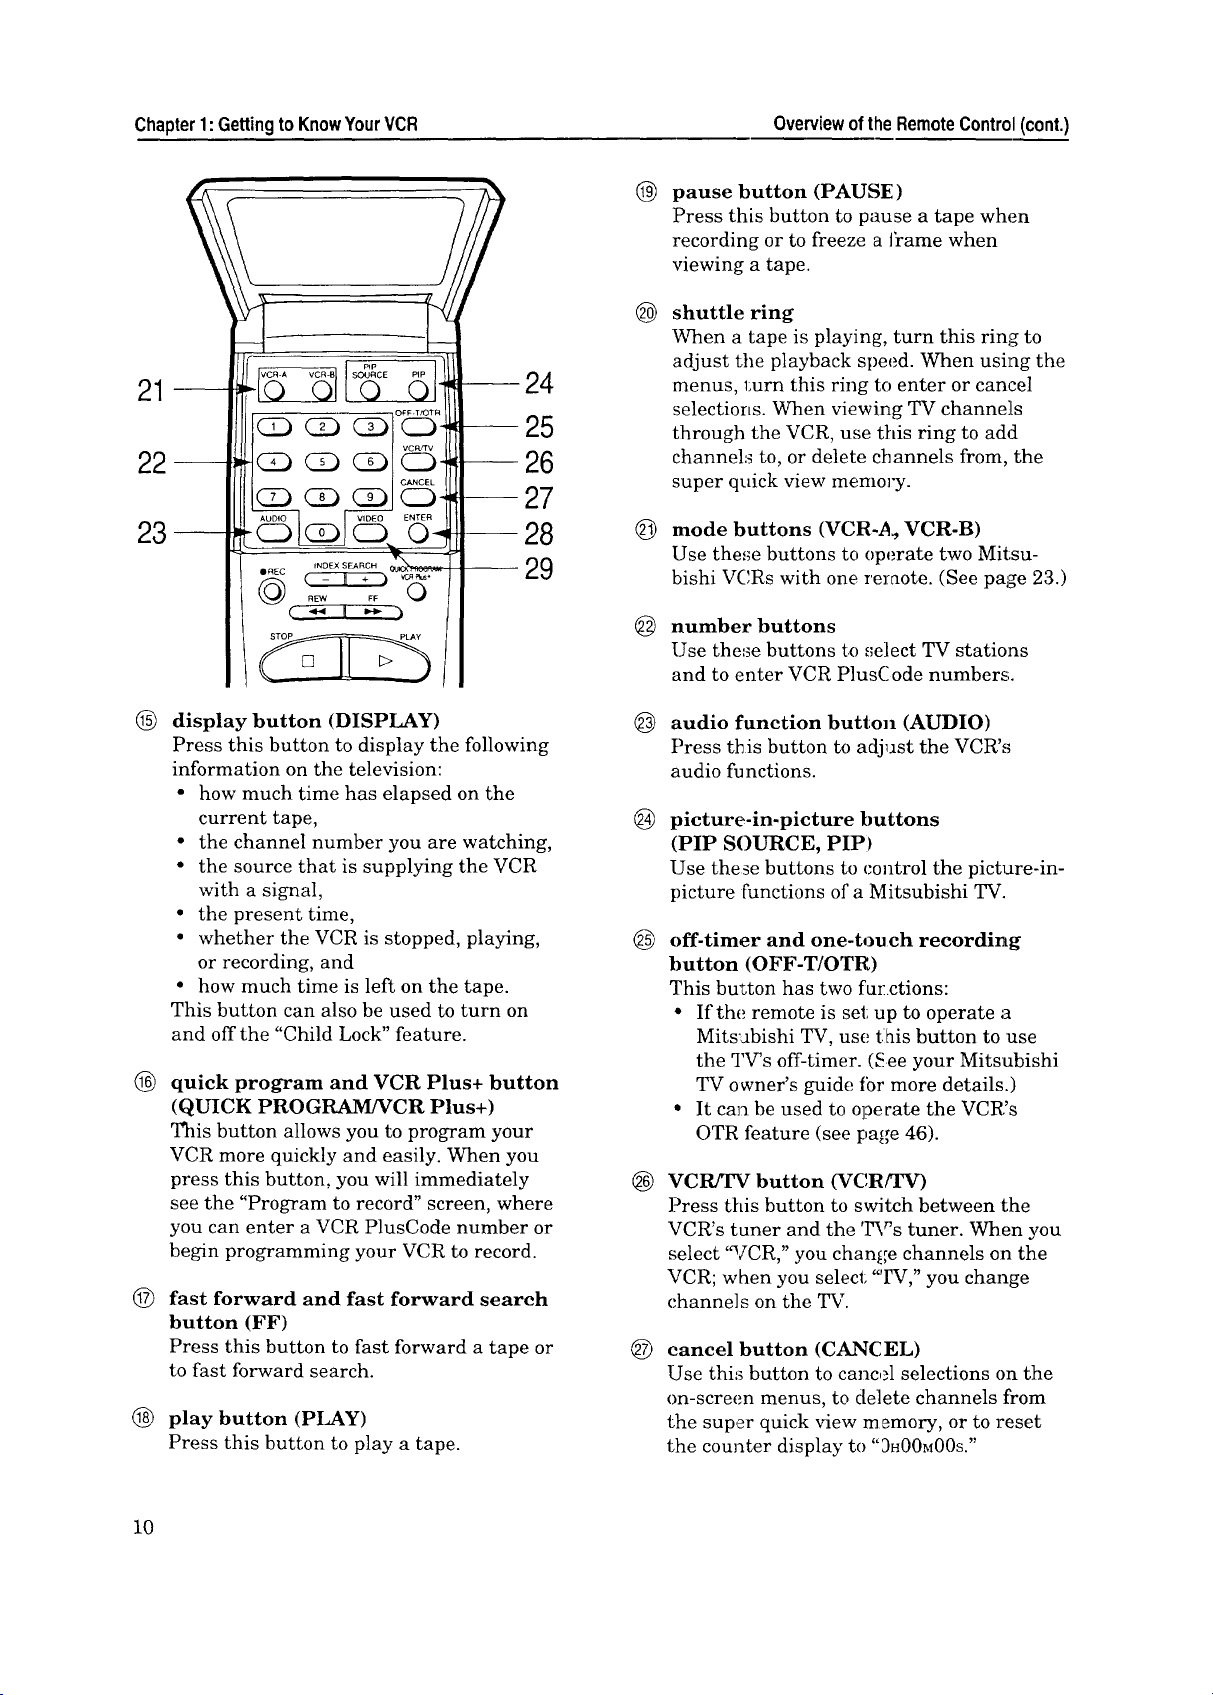
®
pause button (PAUSE)
Press this button to pause a tape when
recording or to freeze a I?ame when
viewing a tape.
®
shuttle ring
When a tape is playing, turn this ring to
adjust the playback speed. When using the
21
22--
24
-- 25
-- 26
menus, 1:urn this ring to enter or cancel
selections. When viewing TV channels
through the VCR, use this ring to add
channels to, or delete channels from, the
super quick view memory.
-- 27
@
23--
-- 28
-- 29
mode buttons (VCR-,_, VCR-B)
Use these buttons to operate two Mitsu-
bishi VCRs with one remote. (See page 23.)
number buttons
@
Use these buttons to ,';elect TV stations
and to enter VCR Plus(i ode numbers;.
®
display button (DISPLAY)
Press this button to display the following
information on the television:
• how much time has elapsed on the
current tape,
• the channel number you are watching,
• the source that is supplying the VCR
with a signal,
• the present time,
• whether the VCR is stopped, playing,
or recording, and
• how much time is left on the tape.
This button can also be used to turn on
and off the "Child Lock" feature.
®
quick program and VCR Plus+ button
(QUICK PROGRAM/VCR Plus+)
This button allows you to program your
VCR more quickly and easily. When you
press this button, you will immediately
see the "Program to record" screen, where
you can enter a VCR PlusCode number or
begin programming your VCR to record.
@
fast forward and fast forward search
button (FF)
Press this button to fast forward a tape or
to fast forward search.
®
play button (PLAY)
Press this button to play a tape.
audio function button (AUDIO)
@
Press this button to adjust the VCR's
audio functions.
@
picture-in-picture buttons
(PIP SOURCE, PIP)
Use these buttons to control the picture-in-
picture [unctions of a Mitsubishi TV.
@
off-timer and one-touch recording
button (OFF-T/OTR)
This bu_ton has two fur ctions:
• If the remote is set: up to operate a
Mits:abishi TV, use tlhis button to use
the TV's off-timer. (See your Mitsubishi
TV owner's guide tbr more details.)
• It cala be used to operate the VCR's
OTR feature (see page 46).
®
VCR/TV button (VC,RfFV)
Press this button to switch between the
VCR's tuner and the 'I_'s tuner. When you
select 'a[CR," you change channels on the
VCR; when you select "IV," you change
channels on the TV.
®
cancel button (CANCEL)
Use this button to cancel selections on the
on-screen menus, to delete channels from
the super quick view memory, or to reset
the counter display to "3H00M00S."
10
Page 13
enter button (ENTER)
@
Use this button to add channels to the
super quick view memory or to enter
selections on the on-screen menus.
RearPanelTerminals
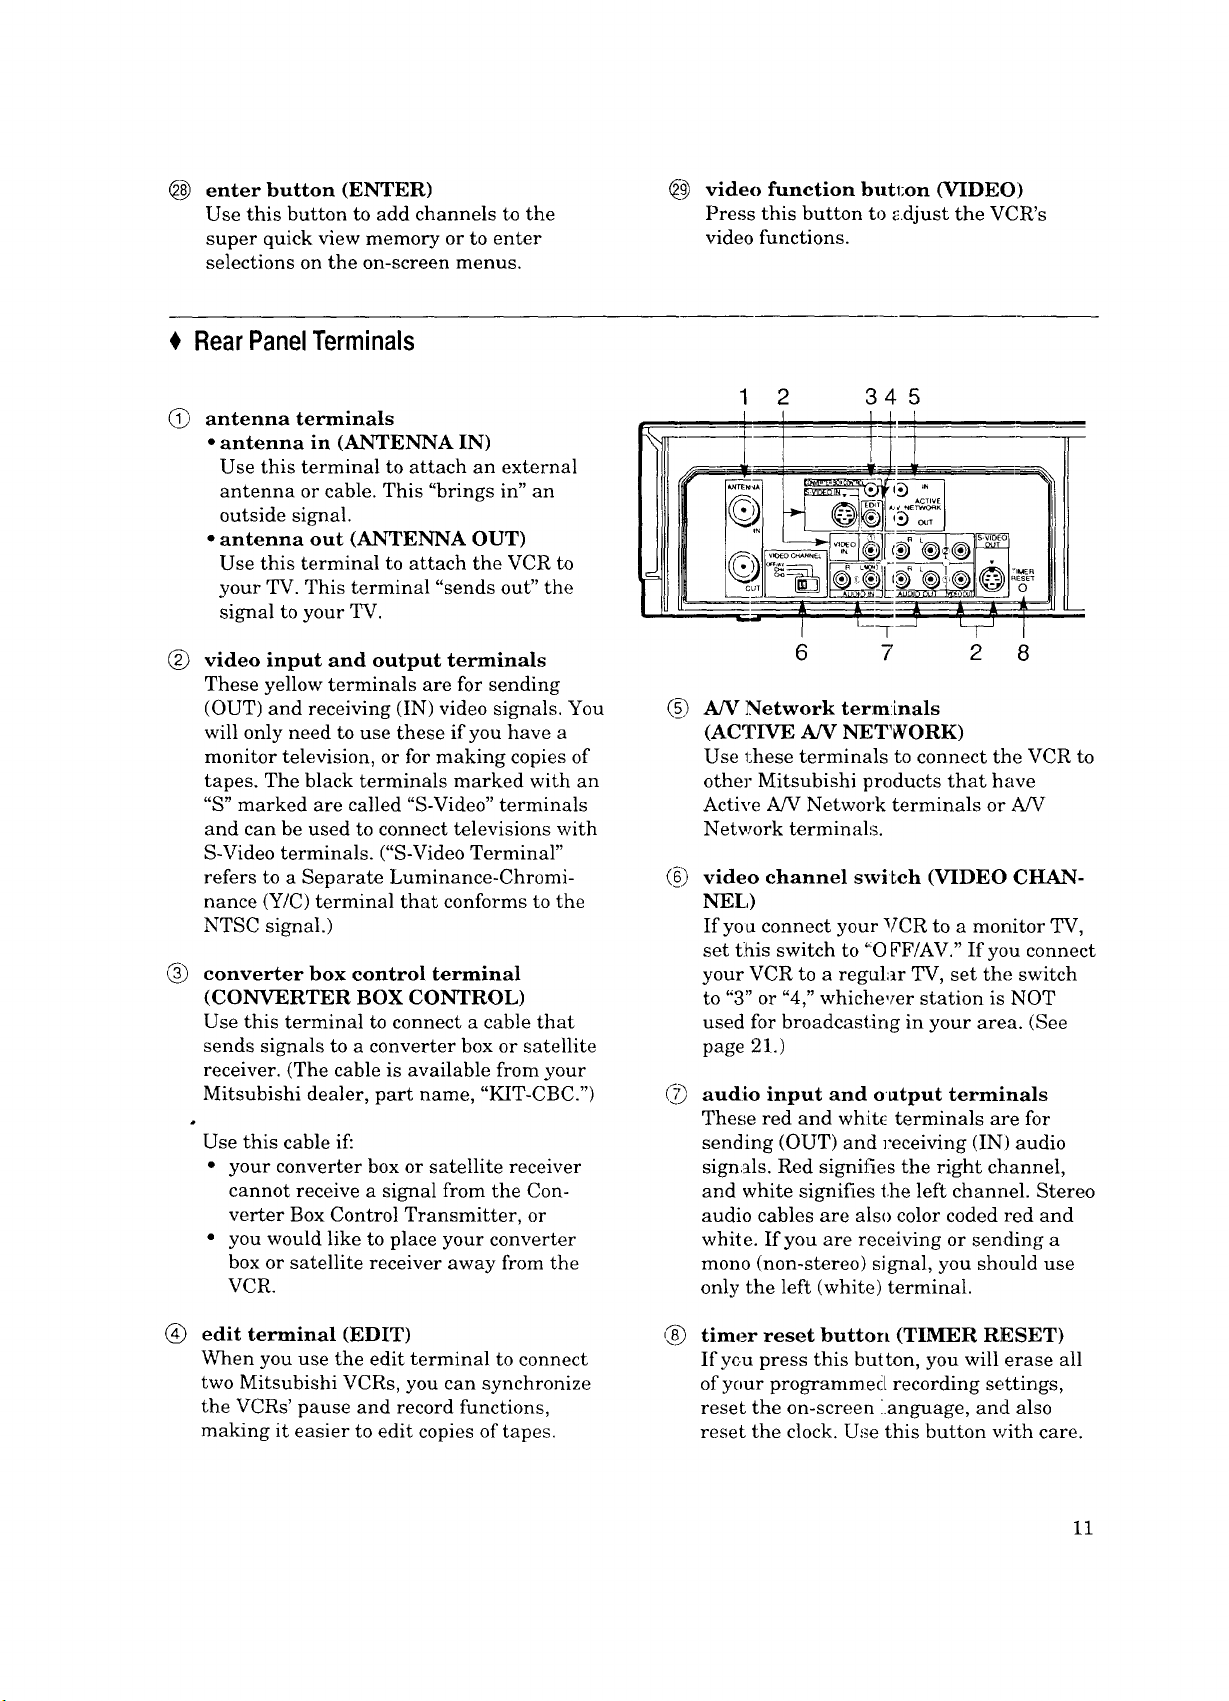
antenna terminals
G
• antenna in (ANTENNA IN)
Use this terminal to attach an external
antenna or cable. This "brings in" an
outside signal.
• antenna out (ANTENNA OUT)
Use this terminal to attach the VCR to
your TV. This terminal "sends out" the
signal to your TV.
®
video input and output terminals
These yellow terminals are for sending
(OUT) and receiving (IN) video signals. You
will only need to use these if you have a
monitor television, or for making copies of
tapes. The black terminals marked with an
"S" marked are called "S-Video" terminals
and can be used to connect televisions with
S-Video terminals. ("S-Video Terminal"
refers to a Separate Luminance-Chromi-
nance (Y/C) terminal that conforms to the
NTSC signal.)
®
converter box control terminal
(CONVERTER BOX CONTROL)
Use this terminal to connect a cable that
sends signals to a converter box or satellite
receiver. (The cable is available from your
Mitsubishi dealer, part name, "KIT-CBC.")
Use this cable if:
• your converter box or satellite receiver
cannot receive a signal from the Con-
verter Box Control Transmitter, or
• you would like to place your converter
box or satellite receiver away from the
VCR.
_9) video function butl;on (VIDEO:)
Press this button to adjust the VCR's
video functions.
1
A/V Network terminals
(ACTIVE A/V NETWORK)
Use these terminals to connect the VCR to
other Mitsubishi products that have
Active A/V Network terminals or A!V
Network terminals.
(b
video channel swiLch (VIDEO CHAN-
NEL)
If you connect your VCR to a monitor TV,
set tlhis switch to "O FF/AV." If you connect
your VCR to a regular TV, set the switch
to "3" or "4," whichever station is NOT
used for broadcasting in your area. (See
page 21.)
©
audio input and oatput terminals
These red and wh:[t(! terminals are for
sending (OUT) and receiving (IN) audio
signals. Red signifies the right channel,
and white signifies the left channel. Stereo
audio cables are also color coded red and
white. If you are receiving or sending a
mono (non-stereo) signal, you should use
only the left (white) terminal.
®
edit terminal (EDIT)
When you use the edit terminal to connect
two Mitsubishi VCRs, you can synchronize
the VCRs' pause and record functions,
making it easier to edit copies of tapes.
®
timer reset button (TIMER RESET)
If you press this button, you will erase all
of your programmed recording settings,
reset the on-screen language, and also
reset the clock. Use this button with care.
11
Page 14
A CHAPTER TWO
ConnectingYourVCR
Now that you're familiar with some of your VCR's features, you're
ready to connect the antenna and the televi,;ien. You won't have
to complete all of the connections you see in this chapter -- make
only those connections that apply to your equipment.
You should keep in mind that there are two steps you need to
take to connect your VCR: first, connect the antenna or cable to
the VCR, then connect the VCR to the telev:ision.
$ ConnectingtheAntennaorCableto the VCR
$ ConnectingtheTelevision
Connectinga Satellite Receiver(optional)
0 ConnectingtheAN Network(optional)
ConnectingtheAntennaorCableto theVCR
0
The first thing you need to do is connect the antenna or cable.
Because there are at least three different types of antennas, this
chapter will show how to conr_ect all of thera. You don't need to
make all the connections. Fir_;t, find out what kind of antenna you
have. Then, make the connection for that type of antenna. You
can then go to the next section, "Connecting the Television."
This section shows you:
• Connecting cable anter, nas,
• Connecting other antermas, and
° Connecting separate UHF/VHF antenrLas.
Connectingcableantennas
If you have cable TV, this is tlhe only antenna you need to ihook
up. Because some cable companies require a cable box (for un-
scrambling cable sign als), there are two kind:_ of cable connec-
tions shown: with and without a cable box.
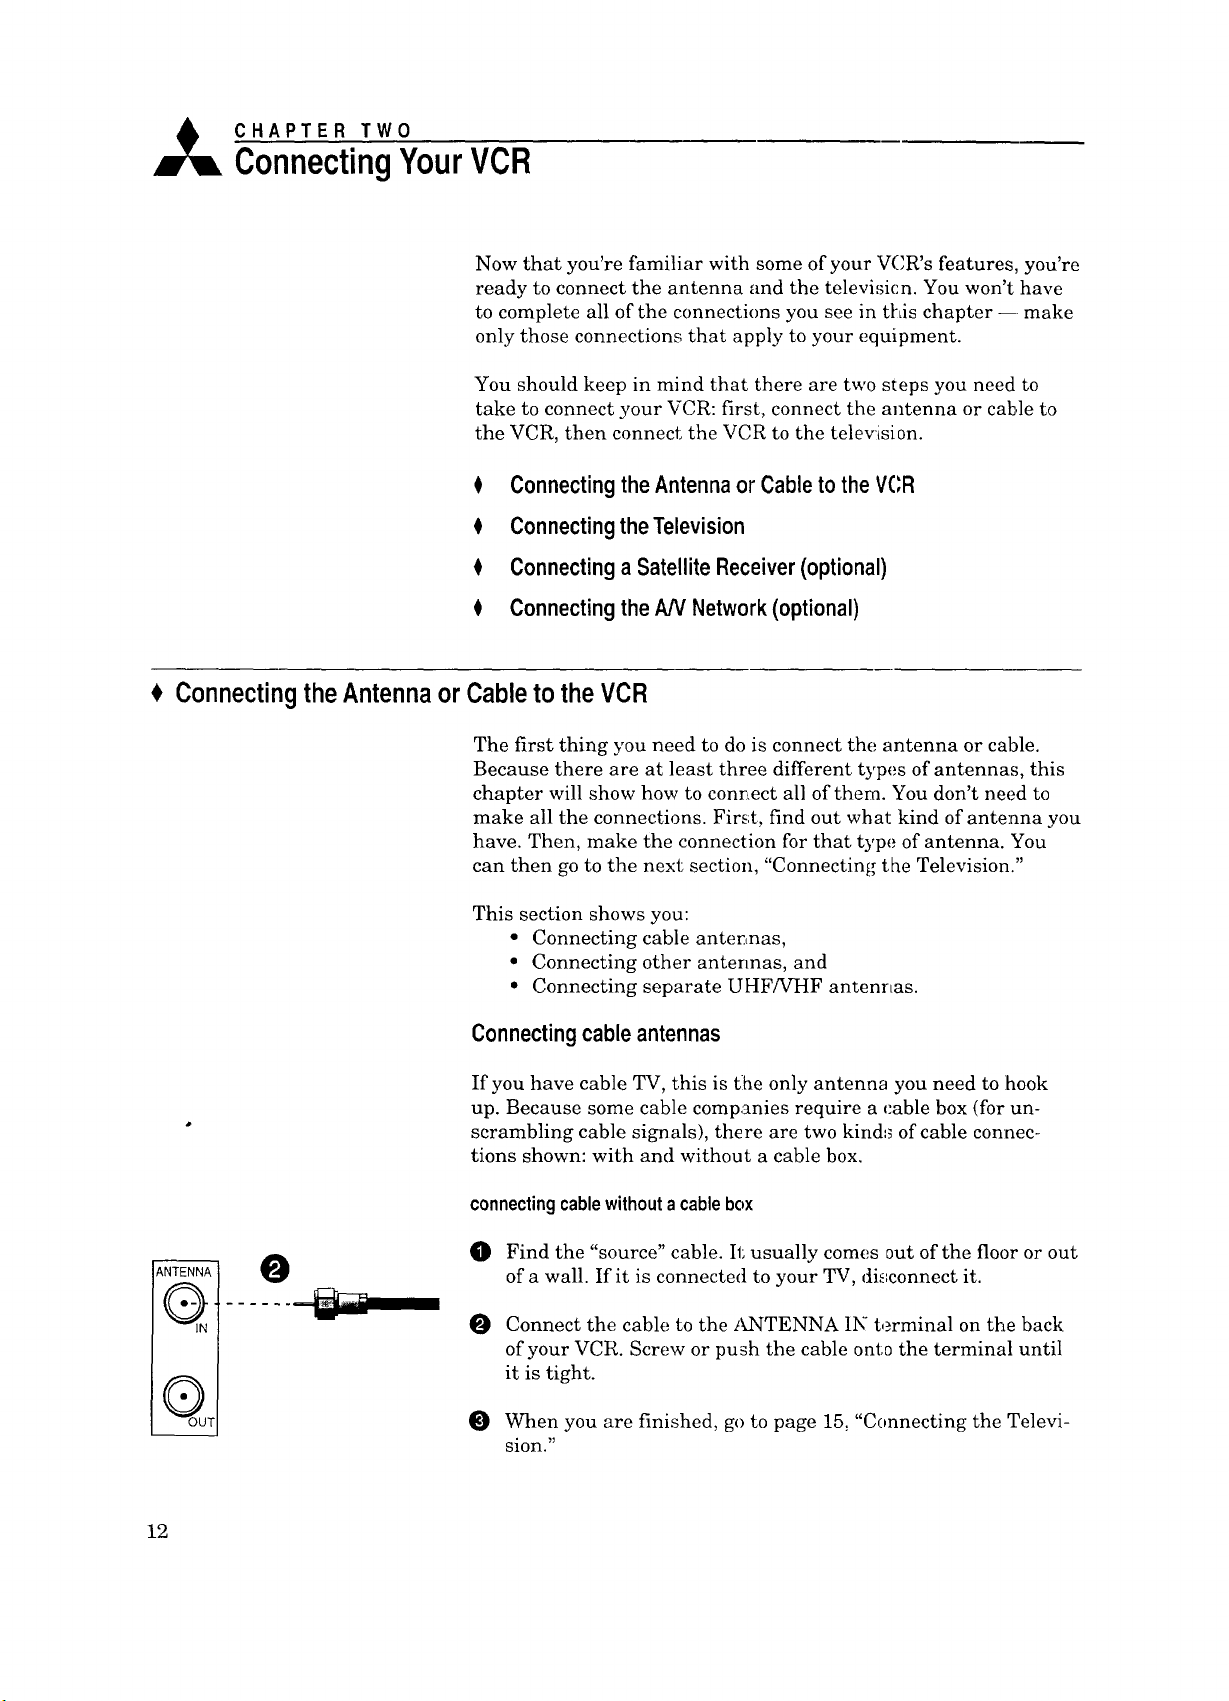
connectingcablewithoutacablebox
0
Find the "source" cable. It usually comes out of the floor or out
of a wall. If it is connected to your TV, di_=connect it.
0
Connect the cable to the ANTENNA IN terminal on the back
of your VCR. Screw or push the cable onto the terminal until
it is tight.
12
When you are finished, go to page 15, "Connecting the Televi-
sion."
Page 15
I
IQ
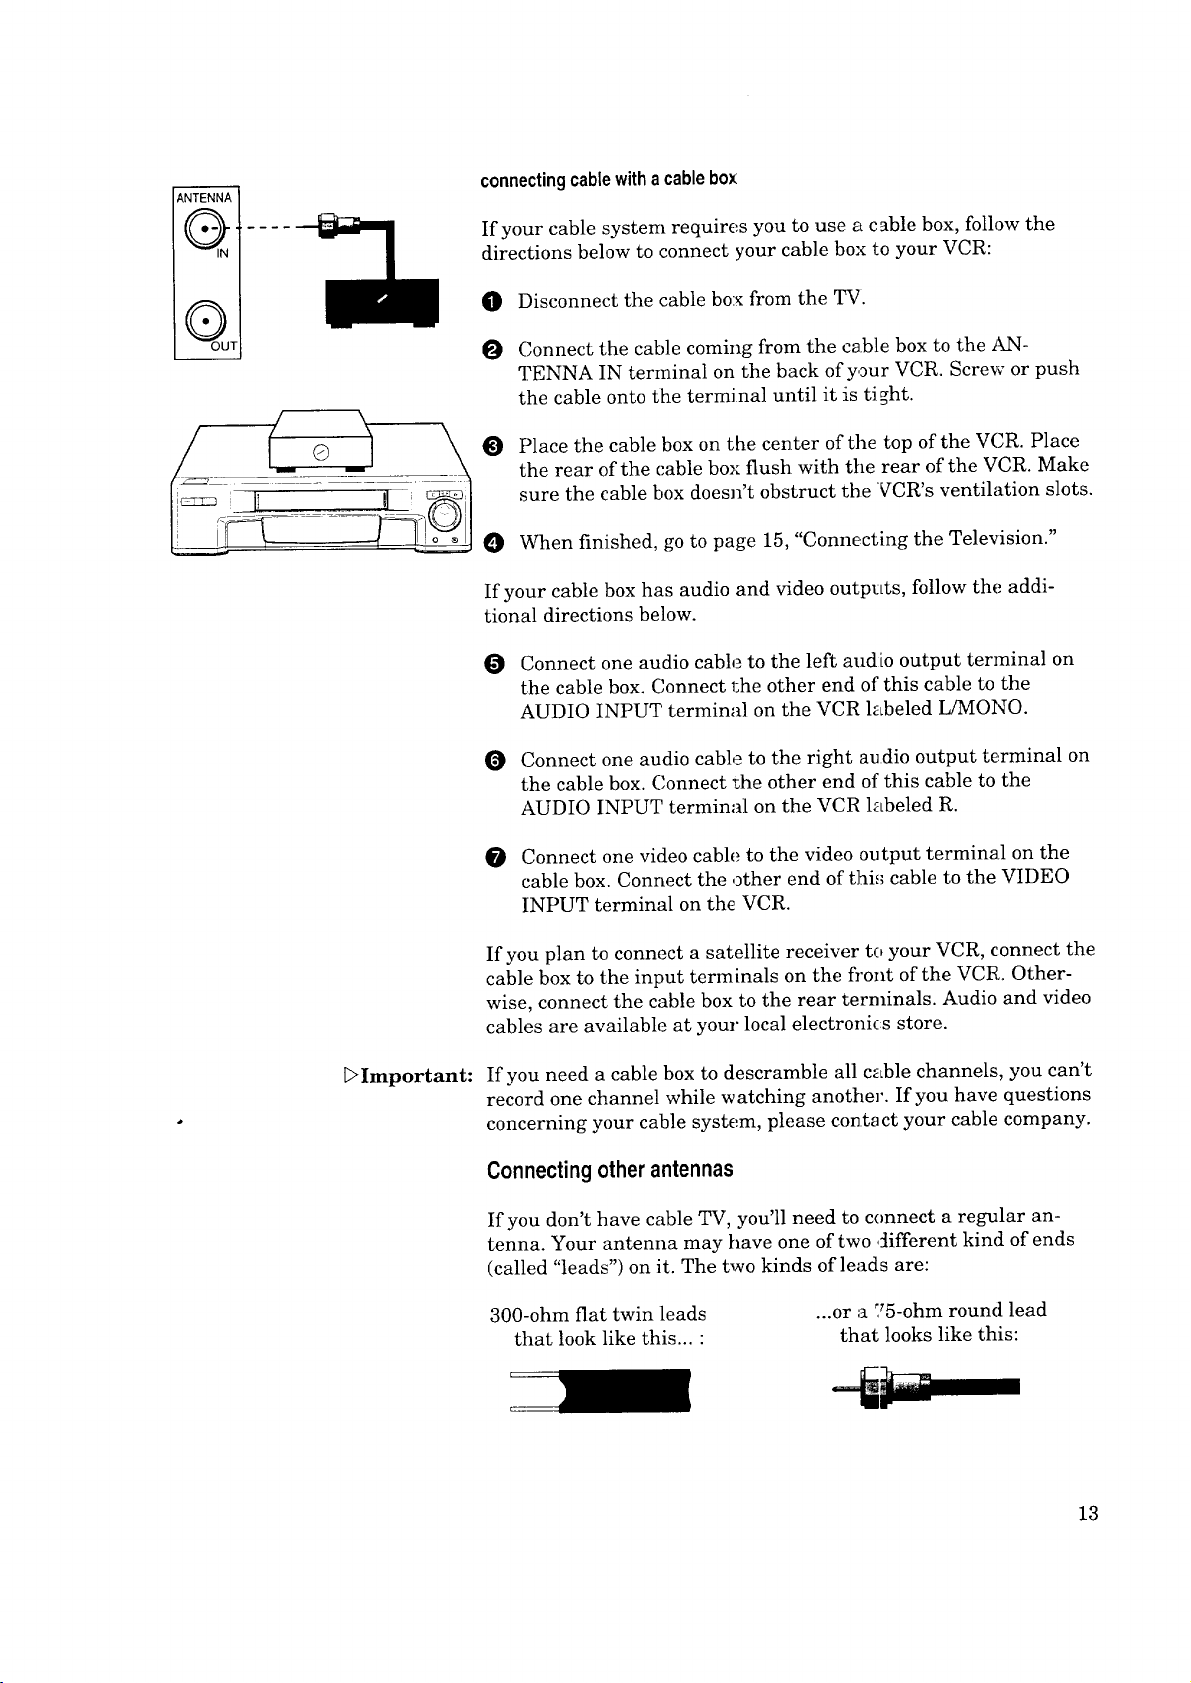
connectingcablewithacablebox
If your cable system requires you to use atc able box, follow the
directions below to connect your cable box to your VCR:
0 Disconnect the cable box from the TV.
Connect the cable coming from the cable box to the AN-
TENNA IN terminal on the back of your VCR. Screw or push
the cable onto the termi hal until it is ti ght.
Place the cable box on the center of the top of the VCR. Place
the rear of the cable box flush with tile rear of the VCR. Make
sure the cable box doesn't obstruct the VCR's ventilation slots.
When finished, go to page 15, "Connect_ing the Television."
If your cable box has audio and video outp_Lts, follow the addi-
tional directions below.
Connect one audio cable to the left audio output terminal on
the cable box. Connect 1:he other end of"this cable to the
AUDIO INPUT terminal on the VCR labeled L/MONO.
Connect one audio cable to the right audio output terminal on
the cable box. Connect _he other end ot! this cable to the
AUDIO INPUT terminal on the VCR labeled R.
_Important:
Connect one video cable to the video output terminal on the
cable box. Connect the other end of thi,; cable to the VIDEO
INPUT terminal on the VCR.
If you plan to connect a satellite receiver to your VCR, connect the
cable box to the input terminals on the front of the VCR. Other-
wise, connect the cable box to the rear terminals. Audio and video
cables are available at your local electroni_:s store.
If you need a cable box to descramble all cable channels, you can't
record one channel while watching another. If you have questions
concerning your cable system, please contract your cable company.
Connectingotherantennas
If you don't have cable TV, you'll need to connect a regular an-
tenna. Your antenna may have one of two ,_ifferent kind of ends
(called "leads") on it. The two kinds of leads are:
300-ohm flat twin leads
that look like this... "
...or a :_5-ohm round lead
that looks like this:
13
Page 16
Chapter2:ConnectingYourVCR ConnectingtheAntennao,'CabletotheVt..,R(cont.)
Follow the procedures for connecting the kind of leads your
antenna has, then go to page 15, "Connecting the Television."
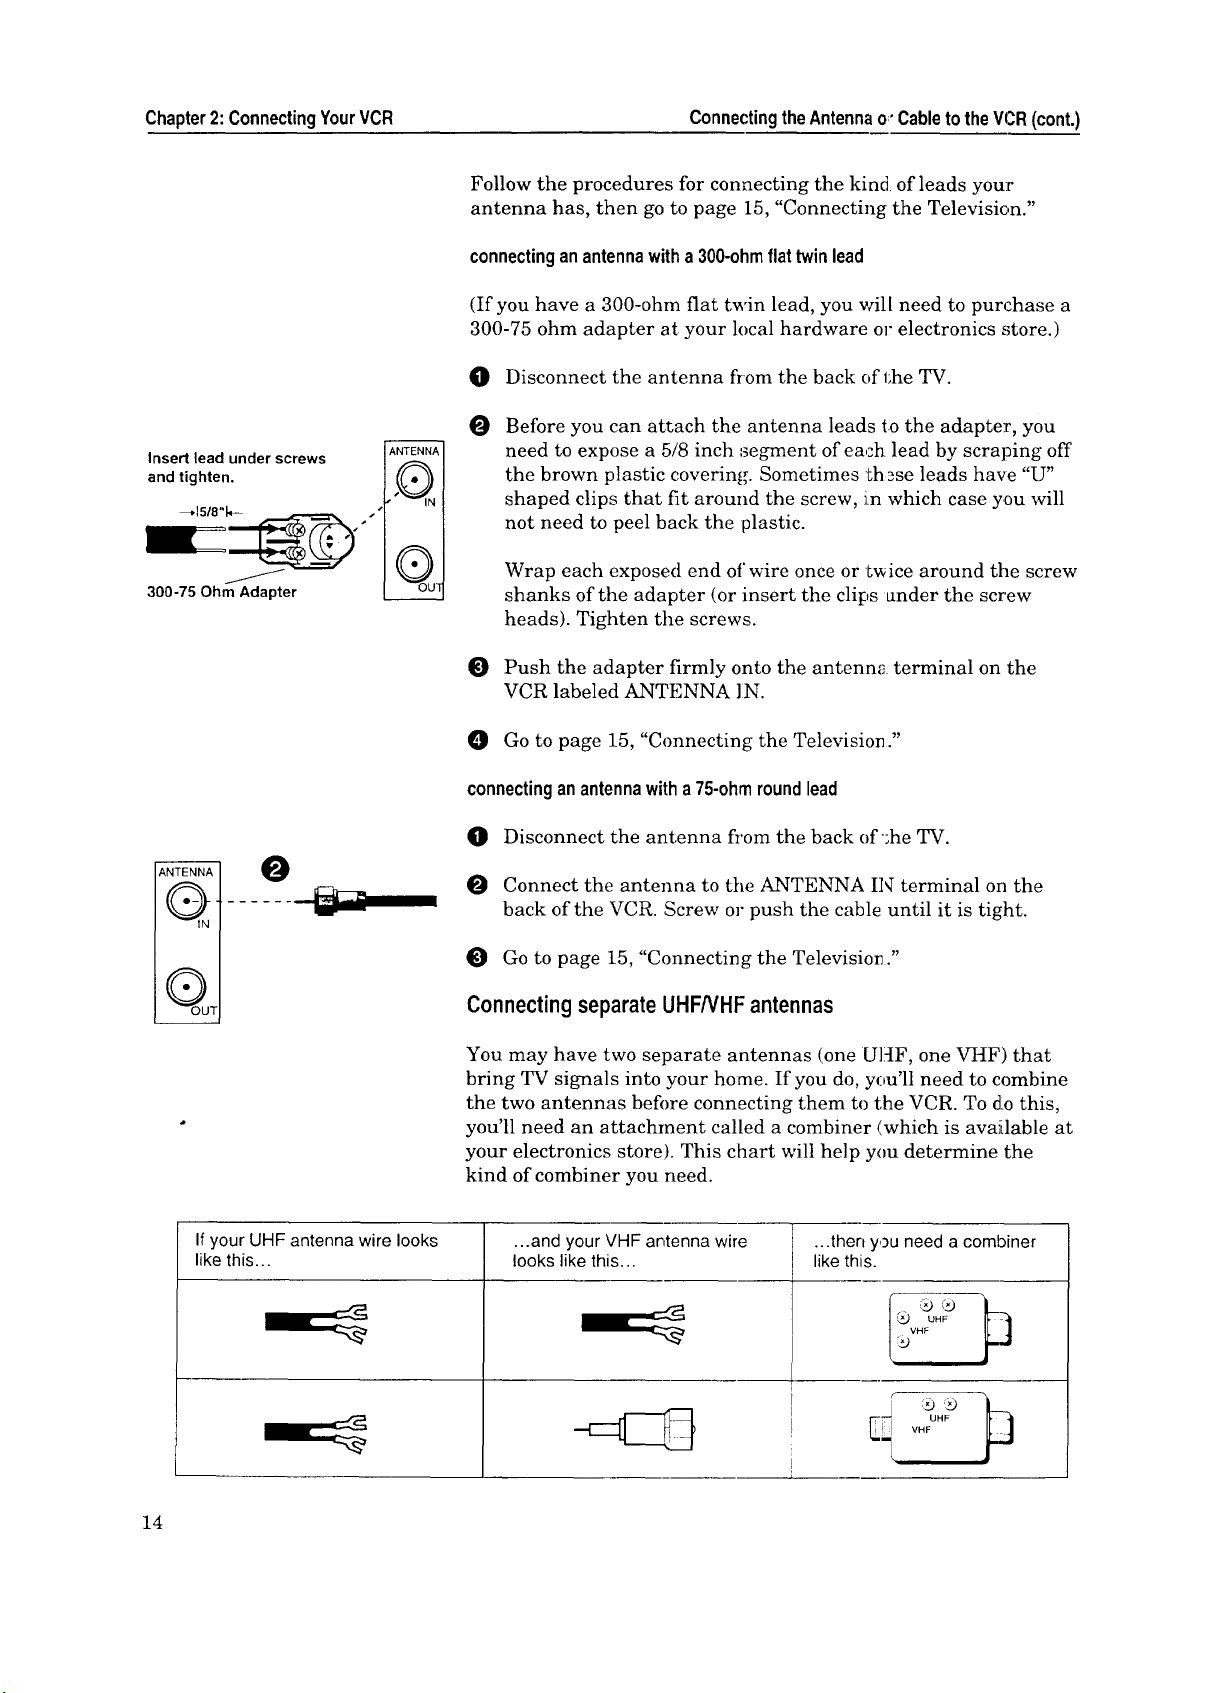
connectinganantennawitha300-ohmflattwinlead
(If you have a 300-ohm flat twin lead, you will need to purchase a
300-75 ohm adapter at your local hardware or electronics store.)
O Disconnect the antenna from the back of 1;he TV.
Insert lead under screws ANTENNA__
m
and tighten. . • .
,____._.
,1 Q II
300-75 Ohm Adapter !__
ANTENN-_
I1 o-ll- ....... - -
A
II • II
______._.J
O Before you can attach the antenna leads to the adapter, you
need to expose a 5/8 inch segment of each lead by scraping off
the brown plastic covering. Sometimes these leads have "U"
shaped clips that fit around the screw, i.n which case you will
not need to peel back the plastic.
Wrap each exposed end of wire once or twice around the screw
shanks of the adapter (or insert the clips _nder the screw
heads). Tighten the screws.
O Push the adapter firmly onto the antenna terminal on the
VCR labeled ANTENNA ]IN.
0 Go to page 15, "Connecting the Television."
connectinganantennawitha75-ohmroundlead
O Disconnect the antenna from the back of';heTV.
Connect the antenna to tile ANTENNA IN terminal on the
back of the VCR. Screw or push the cable until it is tight.
Go to page 15, "Connecting the Televisio_ ."
ConnectingseparateUHFNHF antennas
You may have two separate antennas (one U]_IF, one VHF) that
bring TV signals into your home. If you do, you'll need to combine
the two antennas befi)re connecting them to the VCR. To d:o this,
you'll need an attachment called a combiner (which is available at
your electronics store). This chart will help you determine the
kind of combiner you need.
Ifyour UHF antenna wire looks ...and your VHF antenna wire ...then you need a combiner
like this.., looks like this... likethis.
_x_VHF
14
Page 17
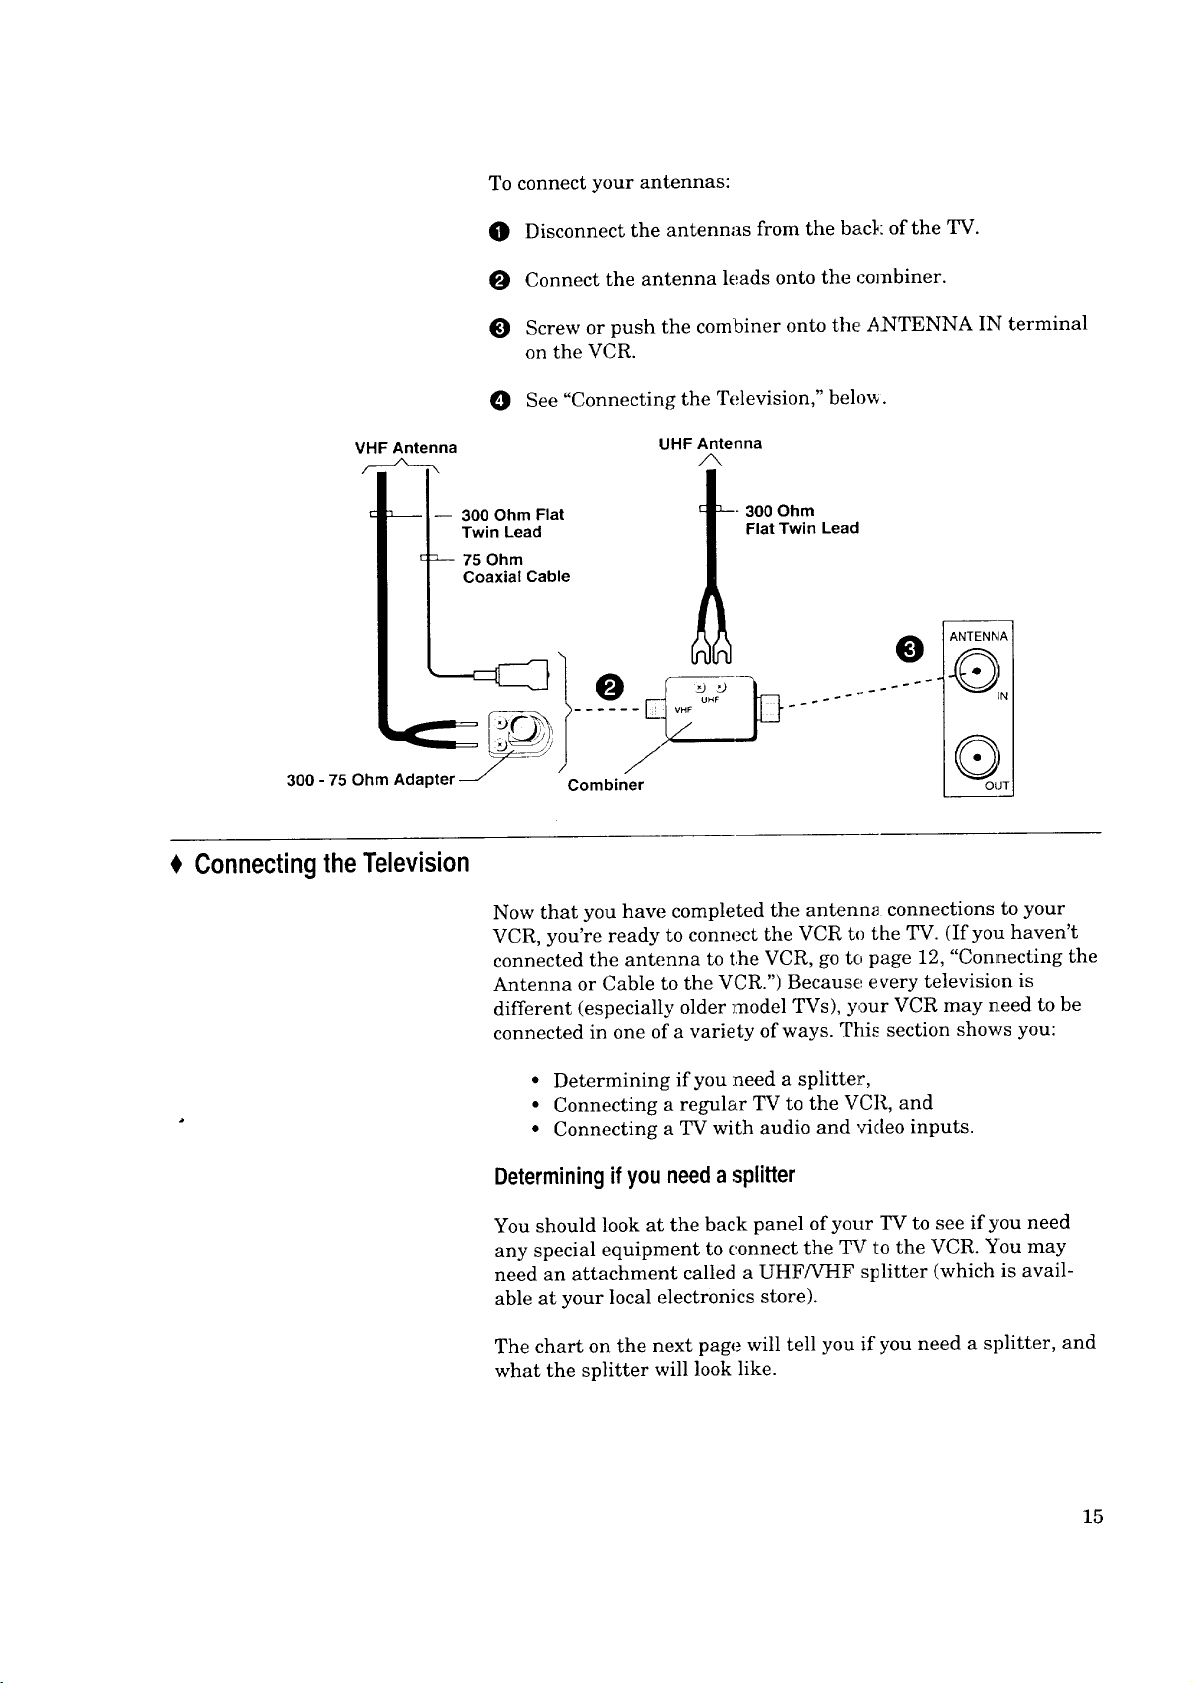
To connect your antennas:
O Disconnect the antennas from the back of the TV.
O Connect the antenna leads onto the combiner.
Screw or push the combiner onto the ANTENNA IN terminal
on the VCR.
0 See "Connecting the Television," below.
VHF Antenna
-- 300 Ohm Flat
300- 75 Ohm Adapter _/ °- Combiner
Connecting the Television
UHF Antenna
300 Ohm
Twin Lead
75 Ohm
Coaxial Cable
Flat Twin Lead
ANTENNIA ]
@
::::: :
Now that you have completed the antenn_t connections to your
VCR, you're ready to connect the VCR to the TV. (If you haven't
connected the antenna to the VCR, go to page 12, "Connecting the
Antenna or Cable to the VCR.") Because every television is
different (especially older l:nodel TVs), your VCR may need to be
connected in one of a variety of ways. This section shows you:
• Determining if you need a splitter,
• Connecting a regular TV to the VCR, and
° Connecting a TV with audio and video inputs.
Determiningifyou needa splitter
You should look at the back panel of your YV to see if you need
any special equipment to connect the TV to the VCR. You may
need an attachment called a UHF/VHF sIJlitter (which is avail-
able at your local electronics store).
The chart on the next page will tell you if you need a splitter, and
what the splitter will look like.
15
Page 18

Chapter2: ConnectingYourVCR ConnectingtheTelevision(cont.)
If the TV's antenna terminal looks like this...
®
ANTENNA IN
O©
UHF
®
VHF
OO
UHF
©©
VHF
Connectinga regularTV to the VCR
O Take the black cable (called a coaxial cable) that is supplied
with your VCR and attach it to the terminal labeled AN-
TENNA OUT on the back of your VCR.
O
Connect the other end of this cable to the terminal on your TV
labeled ANTENNA IN. This terminal is sometimes also called
"ANT-IN" or '_VHF IN." If you have an old er TV without this
kind of terminal, you will have to use a st:litter and then
connect the splitter to the television.
...then you will need a splitter that looks like this.
No splitter needed
UHF/VHF splitter Connect to
__--_-_
__:"_ Connect to
From ANTENNA OUT on VCR VHF IN on TV
UHF/VHF splitter _ _ Connect to
__ _______UHF IN on "IV
_'_ _'_. Connect to
From ANTENNA OUT on VCR _ VHF IN on TV
___jUHF IN or,TV
VCR ANTENNA TERMINAL
ANTENNA O
s
II • "11
OUTI
TV without an ANTENNA IN terminal (single antenna terminal for VHF and UHF)
UHF/VHF Splitter Connect to
From ANTENNA OUT Connect to
on VCR
O If you have a TV with audio and video inputs, you should
proceed to the next section, "Connecting ,_ TV with audio and
video inputs." Otherwise, your connections are complete.
*=-ANTENNA OUT ANTENNA IN
A
UHF/VHF Splitter 3onnect to
TV.
VHF IN on
TV.
OUT on VCR VHF IN(,nTV.
TV ANTENNA TERMINAL
O
AN'-ENNA IN
__ JHF IN on TV.
16
Page 19
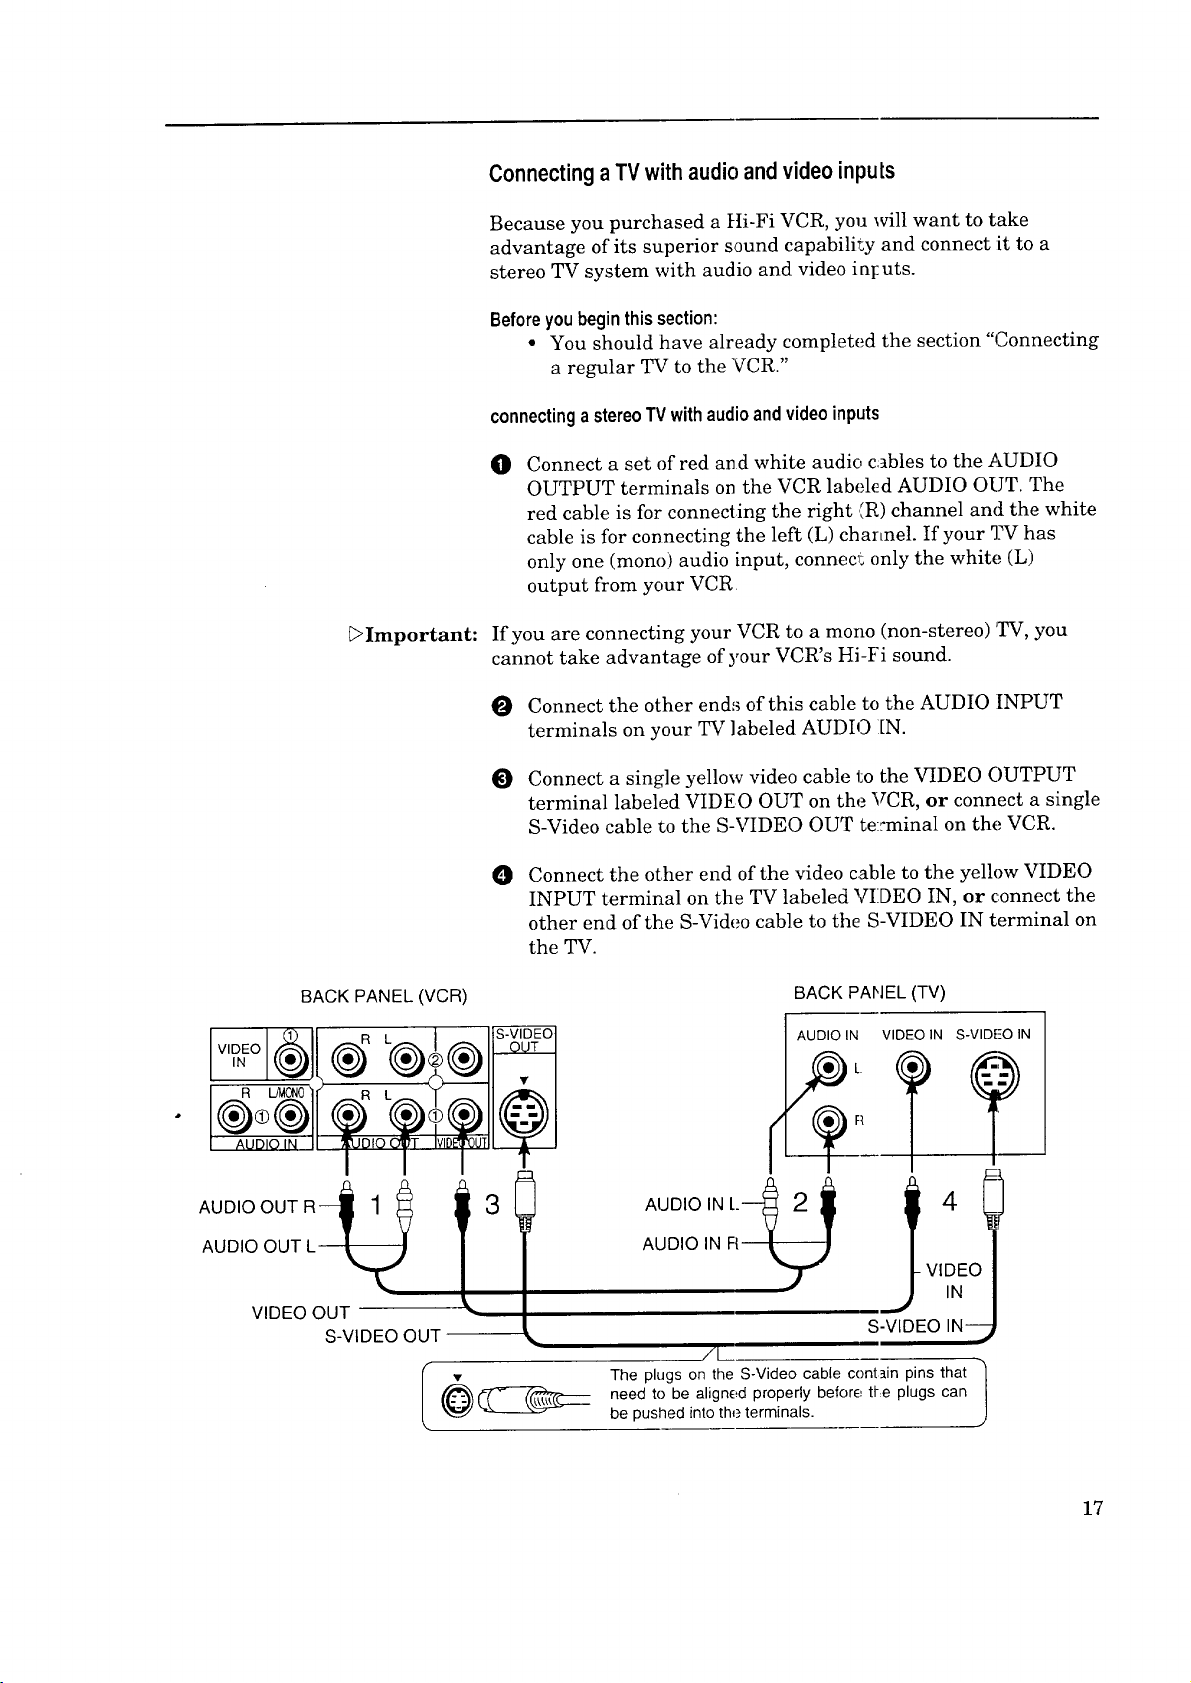
ConnectingaTV withaudio andvideo inputs
Because you purchased a tti-Fi VCR, you will want to take
advantage of its superior sound capability and connect :it to a
stereo TV system with audio and video int:uts.
Before you begin this section:
• You should have already completed the section "Connecting
a regular TV to the VCR."
connectingastereoTVwithaudioandvideoinputs
Connect a set of red an d white audio cables to the AUDIO
0
OUTPUT terminals on the VCR labeh!d AUDIO OUT. The
red cable is for connecting the right (R) channel and the white
cable is for connecting the left (L) channel. If your 3.Whas
only one (mono) audio input, connect: only the white (L)
output from your VCR
_Important:
BACK PANEL(VCR)
I I
If you are connecting your VCR to a mono (non-stereo)TV, you
cannot take advantage of your VCR's Hi-Fi sound.
O Connect the other ends of this cable to the AUDIO INPUT
terminals on your TV labeled AUDIO I[N.
O Connect a single yellow video cable 1;othe VIDEO OUTPUT
terminal labeled VIDEO OUT on the VCR, or connect a single
S-Video cable to the S-VIDEO OUT te::minal on the VCR.
Connect the other end of the video cable to the yellow VIDEO
O
INPUT terminal on the TV labeled VIDEO IN, or connect the
other end of the S-Video cable to the S-VIDEO IN terminal on
the TV.
BACK PANEL (TV)
AUDIO IN VIDEO IN S-VlDE'O IN
AUDIOOUT L
AUDIO OUT R-_
VIDEO OUT
S-VIDEO OUT
1 j4
3
S-VIDEO IN--
/L
The plugs on the S-Video cable contain pins that
•
need to be aligned properly before tl-e plugs can
be pushed into the terminals.
J
17
Page 20
Chapter2: ConnectingYourVCR
€ Connectinga Satellite Receiver(optional)
If you have an RCA Satellite Receiver, you can connect the
receiver to your VCR. This will not only allow you to record TV
programs coming from the receiver, but it will allow you to control
the receiver through the VCR.
connectinga satellitereceiver
To connect the satellite receiver, you will need an S-Video cable
and one stereo audio cable. You can purchase, these cables at your
Mitsubishi dealer or at your local electronics store.
beforeyou begin, you should:
• have completed all connections between :_our VCR, TV, and
cable or antenna; (see pages 12-17) and
• make sure that your satellite receiver has been installed
correctly. (See your satellite receiver's manual for more
information.)
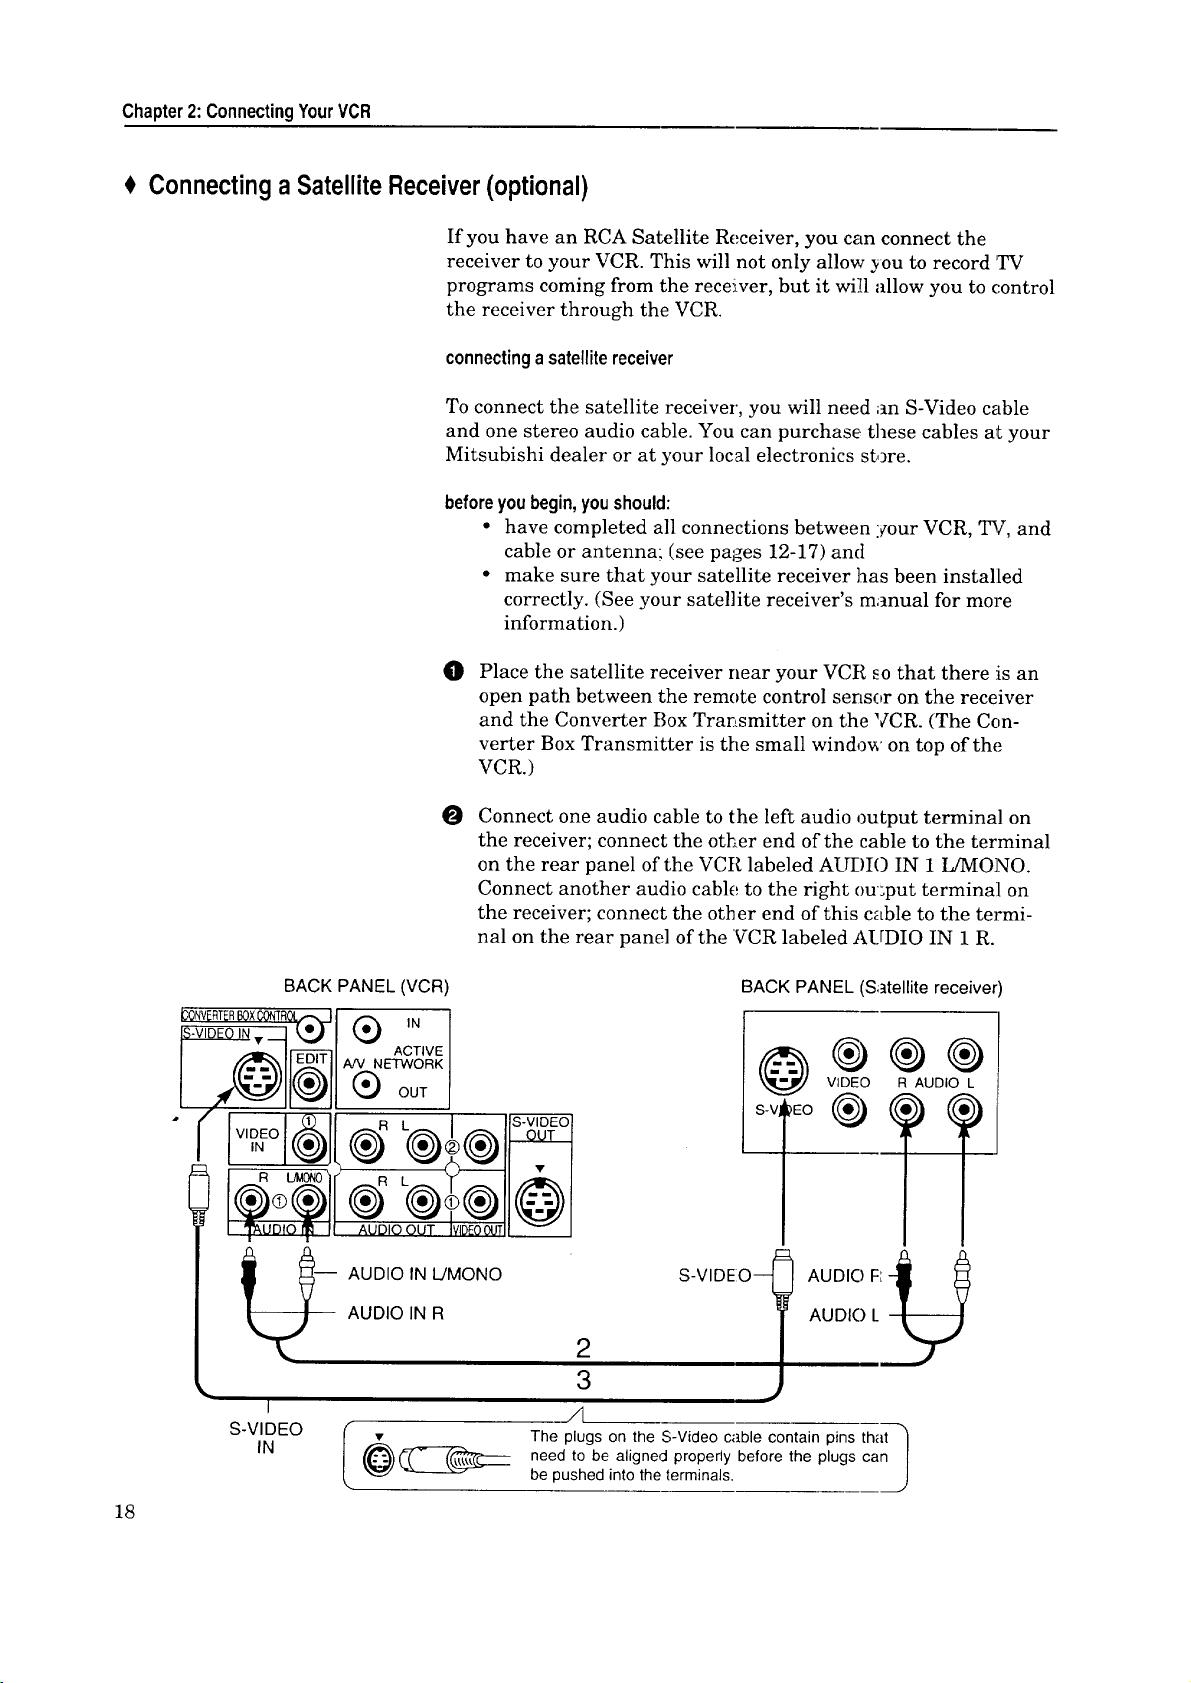
O
Place the satellite receiver near your VCR so that there is an
open path between the remote control sensor on the receiver
and the Converter Box Transmitter on the VCR. (The Con-
verter Box Transmitter is the small window on top of the
VCR.)
iCONVERTERBOXCONTR_.J
• _ EDIT
!l
18
O
Connect one audio cable to the left audio output terminal on
the receiver; connect the other end of the cable to the terminal
on the rear panel of the VCR labeled AUDIO IN 1 IAVIONO.
Connect another audio cable to the right ou:put terminal on
the receiver; connect the other end of this cable to the termi-
nal on the rear panel of the VCR labeled AUDIO IN 1 R.
BACK PANEL(VCR) BACK PANEL (Satellite receiver)
_ IN
ACTIVE
AN NETWORK
(_ OUT
(_R L(_(_ S'VIDEOOUT.
AUDIO OUT IVIDEOOff
-- AUDIO IN L/MONO
AUDIO IN R
S-VIDEO--
@®®®
S-V, _)EO
VIDEO R AUDIO L
2
3
I
S-VIDEO
IN
,4
__ The plugs on the S-Video cable contain pins that |
need to be aligned properly before the plugs can
i
Jbe pushed into the terminals.
Page 21
O Connect an S-Video cable to the S-Video output terminal on
the receiver; connect the other end of tt:Lecable to the terminal
on the rear of the VCR ]abeled S-VIDEO IN.
_>Important:
If possible, you should have connected your VCR to your TV with
an S-Video cable. Not only will this provicle you with a better
picture, but it will allow you to watch the satellite video signal on
your TV even when the VCR is off. If you connect your VCR to
your TV with a standard video cable, you will have to turn your
VCR on to watch the video signal from the ;satellite receiver. (You
will be able to hear the audio signal from your satellite receiver
both when the VCR is on and when it is off.)
If you want to connect a cable box with audio/video outputs to
your VCR, connect it to the terminals on the front of the VCR.
When you connect a satellite receiver to the S-Video input on the
rear of the VCR, you cannot record through the standard video
input on the rear of the VCR.
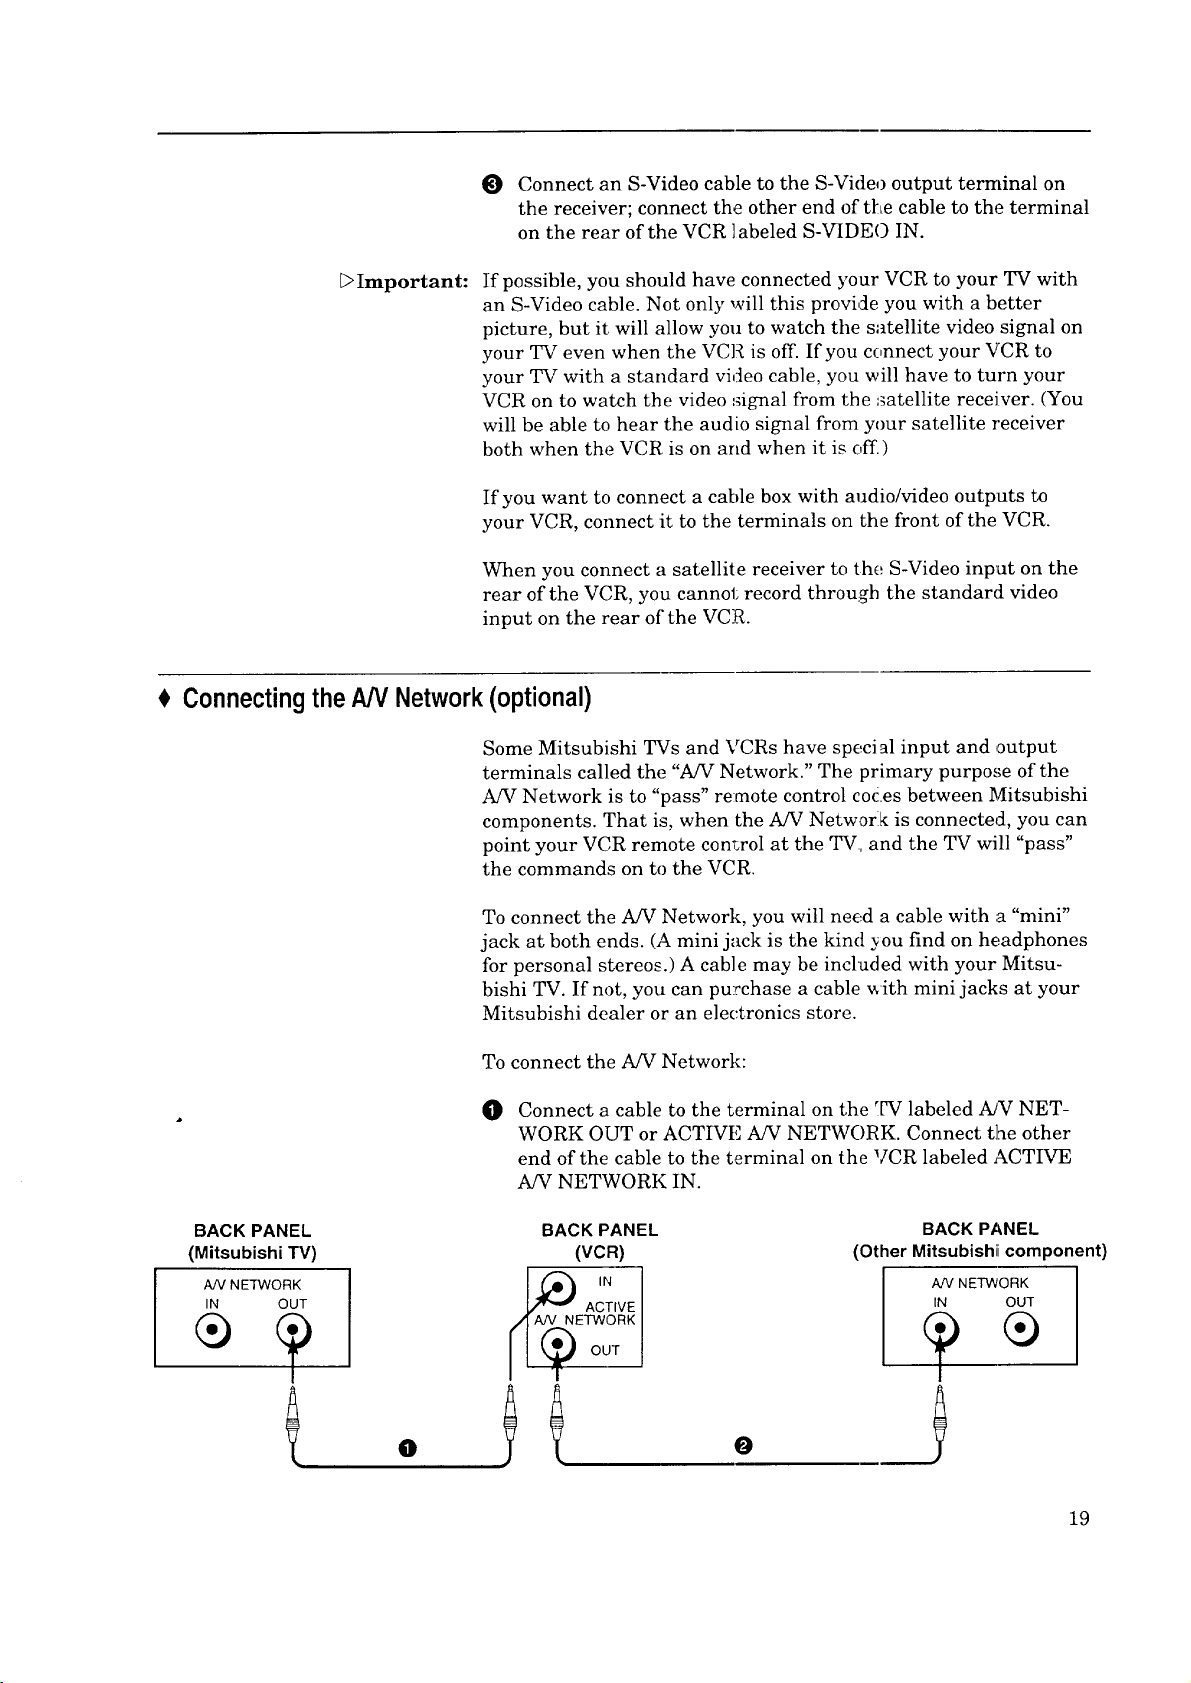
ConnectingtheAN Network(optional)
Some Mitsubishi TVs and VCRs have special input and output
terminals called the "A/V Network." The primary purpose of the
A/V Network is to "pass" remote control codes between Mitsubishi
components. That is, when the A/V Network is connected, you can
point your VCR remote conr,rol at the TV, and the TV will "pass"
the commands on to the VCR.
BACK PANEL
(MitsubishiTV)
A/V NETWORK
IN OUT
To connect the A/V Network, you will need a cable with a "mini"
jack at both ends. (A mini jack is the kind you find on headphones
for personal stereos.) A cable may be included with your Mitsu-
bishi TV. If not, you can purchase a cable _ith mini jacks at your
Mitsubishi dealer or an electronics store.
To connect the A/V Network:
Connect a cable to the terminal on the TV labeled A/V NET-
O
WORK OUT or ACTIVE A/V NETWORK. Connect the other
end of the cable to the terminal on the VCR labeled ACTIVE
A/V NETWORK IN.
BACK PANEL
(VCR)
0
O
(Other Mitsubishiicomponent)
BACK PANEL
AN NETWORK
IN OUT
19
Page 22
Chapter2:ConnectingYourVCR ConnectingtheAN Hetwork(optional)(cont.)
0 If you have another Mitsubishi componen Lequipped with A/V
Network, attach a cable to the terminal on the VCR labeled
ACTIVE A/V NETWORK OUT. Attach tb _ other end of this
cable to the terminal on tile other component labeled .4JV
NETWORK IN or ACTIVE A/V NETWORK IN.
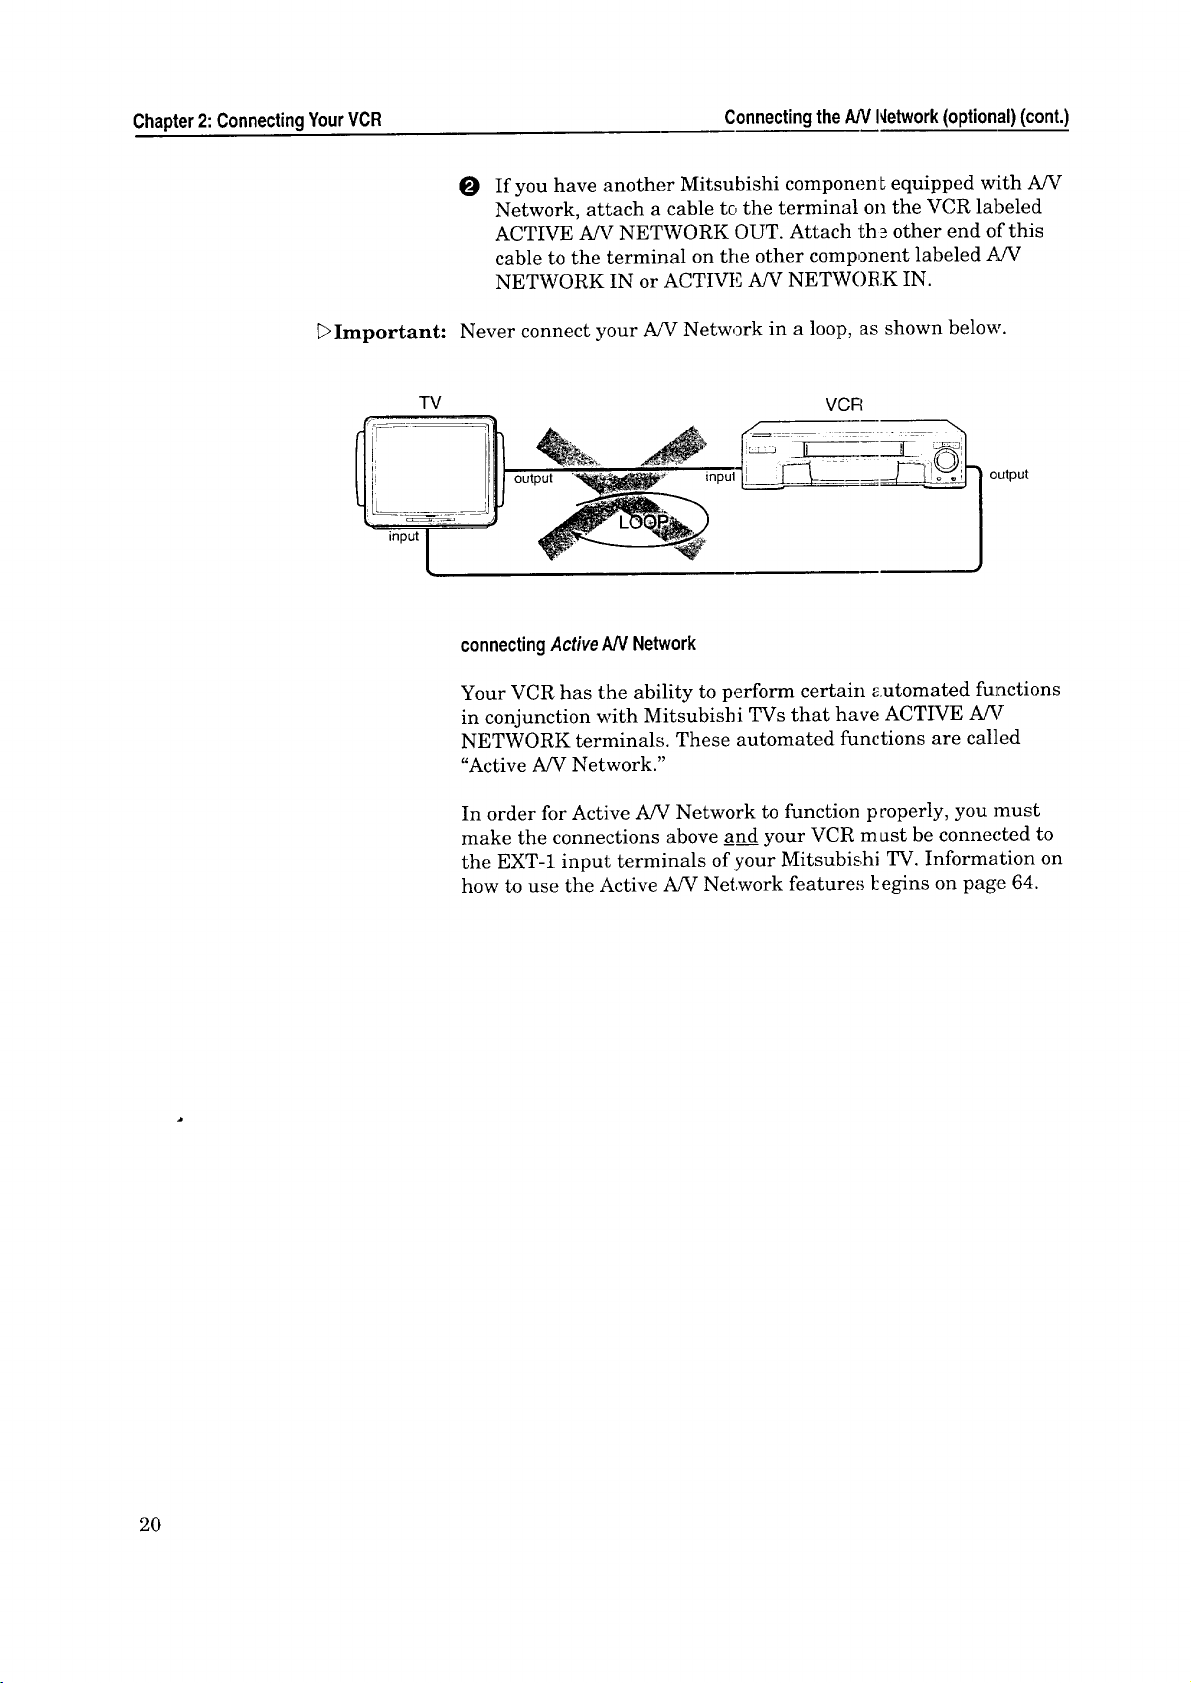
Important:
input
Never connect your A/V Network in a loop, as shown below.
TV
output output
inpul _
VCR
connectingActiveAN Network
Your VCR has the ability to perform certain automated functions
in conjunction with Mitsubishi TVs that have ACTIVE A/V
NETWORK terminals. These automated functions are called
"Active A/V Network."
In order for Active A/V Network to function properly, you must
make the connections above and your VCR m ust be connected to
the EXT-1 input terminals of your Mitsubishi TV. Information on
how to use the Active A/V Network features [:egins on page 64.
2O
Page 23
A CHAPTER THREE
OperatingYourVCR
Now that you've completed your antenna, VCR, and TV connec-
tions, you're ready to start enjoying your equipment. To get the
most satisfaction out of your VCR, you sh _uld carefully read the
two sections, "Setting Up Your VCR for tile First Time" and
'aCiewing the Picture Coming from Your VCR." Then you can start
exploring what your new VCR can do.
In this chapter, you'll learn:
Setting UpYourVCRfor the FirstTime
Usingthe RemoteControl
Viewingthe PictureComingfrom YourVCR
$ Loadingand UnloadingTapes
PlayingaTape
$ Selectingthe On-screenLanguage
Usingthe AudioandVideoFunctions
Usingthe Menusto Set the Time
Programmingthe VCRto ReceiveTV Channels
0 SettingtheVCRPlus+ GuideChannelNumbers
Recording
Setting UpYourVCRfor the FirstTime
It's important that your VCR is set up correctly before you try to
use it. If you carefully read this section, you will avoid confusion
later and get the most out of operating your system.
This section teaches you about:
• Setting up your VCR if you are using a regular TV, and
• Setting up your VCR if you are usiag a monitor TV.
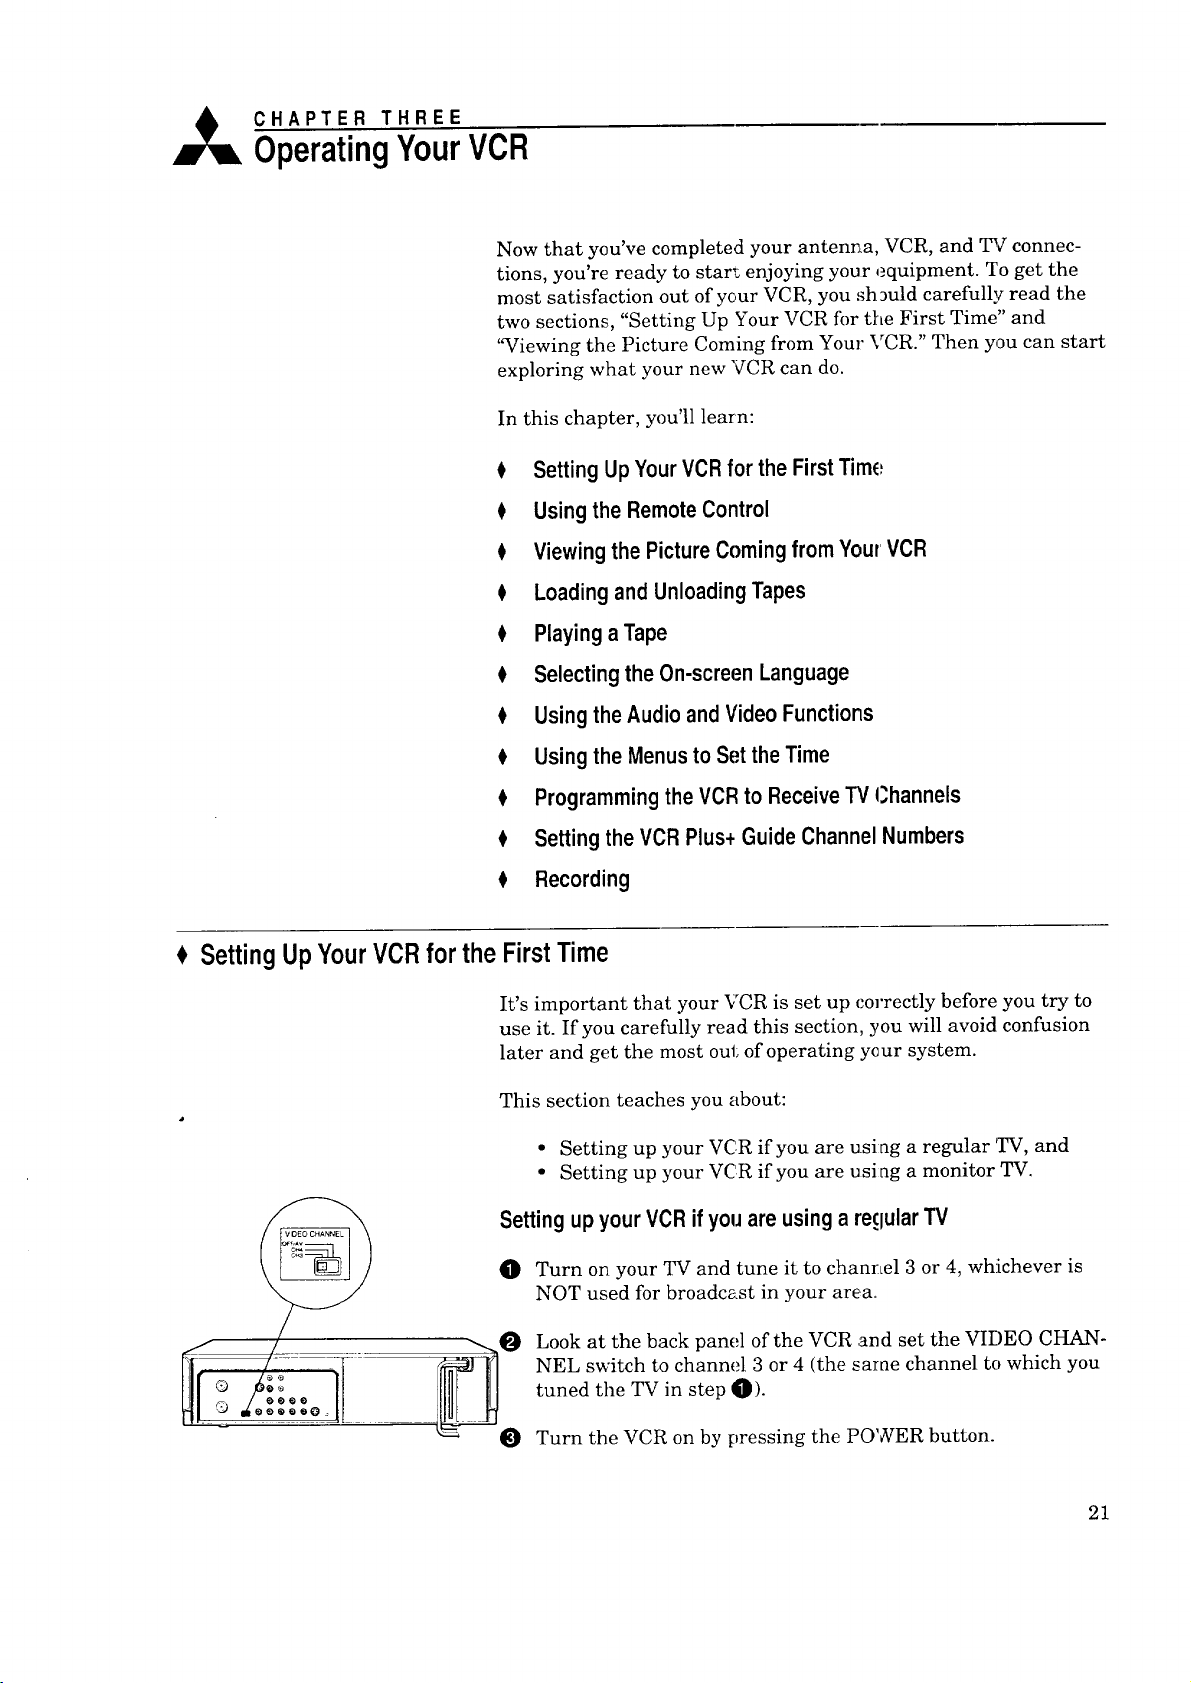
Settingupyour VCR ifyouare usinga reqularTV
Turn on your TV and tune it to channel 3 or 4, whichever is
NOT used for broadcast in your area.
Look at the back panel of the VCR and set the VIDEO CHAN-
NEL switch to channel 3 or 4 (the sarae channel to which you
tuned the TV in step _).
0
Turn the VCR on by pressing the POWER button.
21
Page 24

Chapter3:OperatingYourVCR SettingUpYourVCRfortheFirstTime(cont.)
Settingupyour VCR ifyou are usinga monitorTV
O Turn on your TV and switch it to the COtT_ct external input.
(For most Mitsubishi TVs, this means pressing the TV's
INPUT button until you see the words "Ext-l" on the screen.)
Look at the back panel of the VCR and set the VIDEO
CHANNEL switch to OFF/AV.
Turn the VCR on by pressing the POWER button.
HelpfulInformation
Usingthe RemoteControl
WhatisaMonitor TV?
A monitor TVis one that has both audio and _4deo inputs. This
enables the TV to display the .picture and pJ'ay the sound from an
external tuner, such as a VCR tuner.
If your TV does not have both audio and videe inputs, it is a
"regular" TV.
Once you know what type of 72Zyou are using; you might want to
mark it here so that you (and others) won't fo:'get.
Monitor [_ "Regular" [_
In this section, you'll learn how to set up and use your remote
control. This section includes:
• Using the remote control to operate the VCR, and
• Using the remote control to operate the TV.
Usingthe remotecontrolto operatethe VCR
22
installingthe batteries
O Unpack two AA size batteries.
To remove the back cover, press the ridged area gently, then
push the cover in the direction of the arrow and lift.
Load the batteries, making sure the polarities (+) and (-) are
correct.
® ®
® ®
For best results, please use Durace/1 AA MN-1500 batteries.
Page 25

operatingtheremotecontrol
O Make sure the REMOTE switch on the front panel of the VCR
is set to "VCR-A."
Press the VCR button on the remote control. This "tells" the
remote that you want to control the VCR.
Press the VCR-A button on the remote control.
O While within 23 feet of the VCR, poir_t the remote control
toward the VCR and press the buttorLs you desire.
usingoneremotetooperatetwoMitsubishiVCRs
If you have another Mitsubishi VCR in addition to your HS-U760,
you can use the HS-U760 remote control to operate both.
O Set the REMOTE swJ tch on the HS-U760 to '%_CR-B."
Set the REMOTE switch on the other Mitsubishi VCR to
O
'_CR-A." If the other Mitsubishi VCR has a REMOTE switch
with ON/OFF settings, set it to ON. ]f it does not ]have a
REMOTE switch, do not change ar._y settings.
Code Buttons
1"
2*
3*
4
5
6
7
8
9
0
ENTER
CANCEL
VCR/TV
AUDIO
*Use button 1, 2, or 3 to set up your
remote for use with Mitsubishi TVs.
I_ To operate the HS-U760, press the VCR button on the remote
control, then press the VCR-B butter. The remote will be set
to control the HS-U760.
!_ To operate the other VCR, press the VCR button on the
remote control, then press the VCF-A button. The remote will
be set to control the other VCR.
Usingthe remote controlto operatethe TV
The HS-U760 remote con trol can operate many of the frequently-
used functions of your TV. This way, you need to use only one
remote to operate both your VCR and rIW.
The HS-U760 remote control is pre-set to operate Mitsubishi
televisions, but it can also operate TVs from other manufacturers.
If you need to set your remote control ibr your particular brand of
television, follow the instructions below.
settingupyourremotecontrolto operateyour_'
0
Turn off your TV.
0
On the HS-U760 remote control, press the TV button.
0
While holding in the PIP button, press one of the buttons
listed in the "Code Buttons" list to the left. If your TV turns
on, proceed to step _.
23
Page 26

Chapter3: OperatingYourVCR UsingtheRemoteControl(cont.)
O If your TV does not turn on, repeat step O, but try a different
button listed in the "Code Buttons" list. Keep trying the
buttons until your TV turns on.
O Once your TV has turned on, your remote is set up to operate
your brand of TV. You may want to circle tile code button that
you used.
You do not need to perform this set-up again unless you change
the batteries, set up your remote for another brand of television,
or you get a new TV.
Once you have correctly set your remote control[ to operate your
TV, you will be able to use the POWER, CHANNEL, VOLUME,
MUTE and number buttons to operate your 3_v".
Additionally, you will be able to use the DISPL._Y, INPUT and
ENTER buttons, depending on which type of TV you have. Please
refer to the table below.
_Important:
_Important:
Ifyouusedthiscode
buttonto set up
your remote...
1
2
3
4
5
6
7
8
9
o
ENTER
CANCEL
VCR/TV
AUDIO
... thenthe DISPLAY ... andthe INPUt
buttonwillworklike buttonwillwo
this button.., thisbutton ,.
DISPLAY
DISPLAY
DISPLAY
DISPLAY
RECALL
RECALL
DISPLAY
INPU]
TV/VIDE )
TV/VIDE :)
TV/VIDE)
TV/VT[
AUX
TV/VIDE)
TVNIDE)DISPLAY
DISPLAY
DISPLAY TV/VTF
DISPLAY TVA/IDE0
... andtheENTER
buttonwillwork like
this button...
ENTER
100
ENTER
ENTER
ENTER
100
100
ENTER
100
ENTER
ENTER
Depending on the model TV you have, all or some of the buttons
may not function, or they may operate different features than
indicated above. You may need to use the T_'s remote control.
Sometimes manufacturers will change the remote control codes
for their products, or they will ase more than one code. If this is
the case, your remote may not be able to control your TV.
24
_Important:
When you replace the batteries in your remote, the remote will
return to its initial setting (code button "r'). Repeat the steps
above to reset your remote com;rol. If you enter a new code, the
previous code will be erased.
operatingyourTVwiththeHS-U760remotecontrol
O Press the TV button on the HS-U760 remote control.
Page 27
O PointtheremotecontroltowardstheremotesensorontheTV
andpressthedesiredbuttons.
ToonceagaincontroltheVCR,presstheVCRbutton.
_>Important:
Becauseofvariationsamongmodels,someorallbuttonsmaynot
work,ortheymayoperatedifferentfunctionsthanlistedabove,
foryourparticularTV.If thisoccurs,youmayneedtouseyour
TVremotecontrol.
Viewingthe PictureComingfrom YourVCR
This is the most important part of using your VCR, but often the
most confusing: how do you view a picture coming from the VCR?
Beforeyou begin, you should know:
• whether you are viewing a "Monitor TV" or a "Regular TV."
(See page 22.)
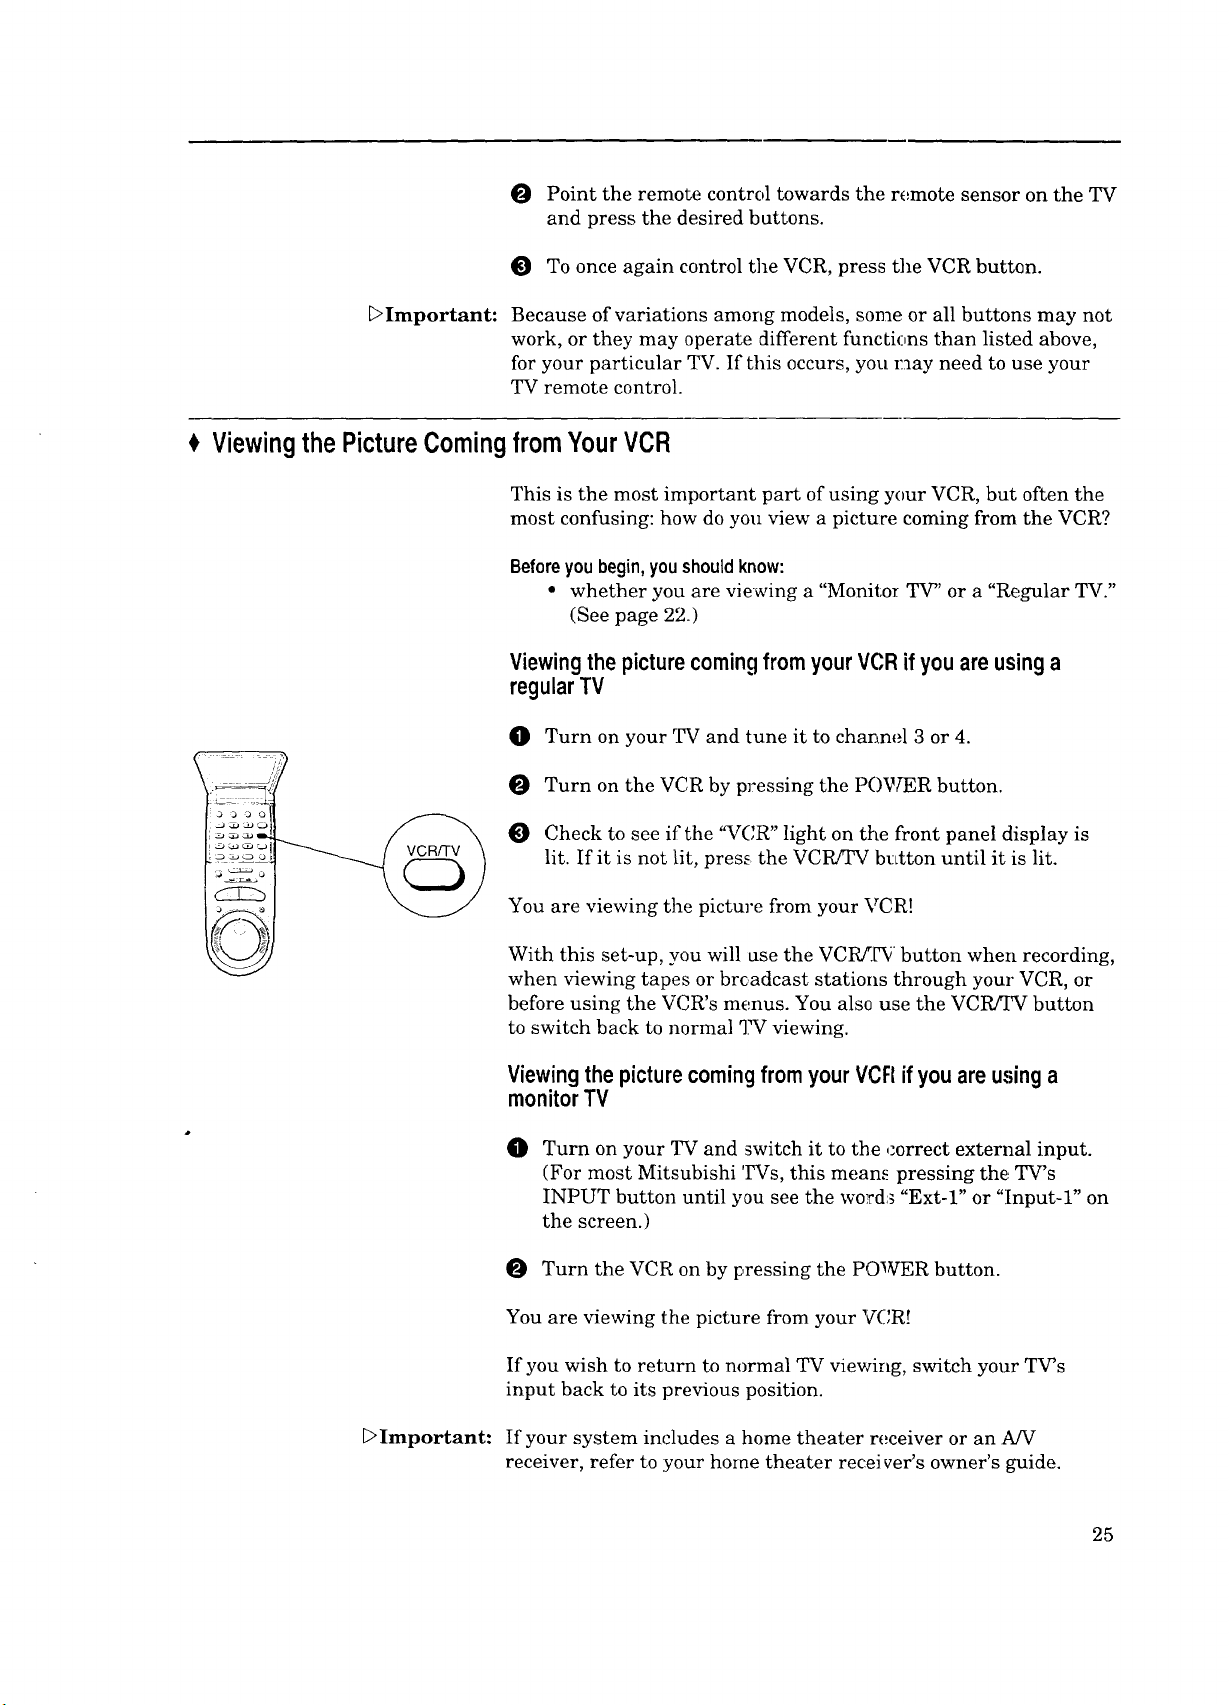
ViewingthepicturecomingfromyourVCRifyouareusinga
regularTV
O Turn on your TV and tune it to channel 3 or 4.
0 Turn on the VCR by pressing the POWER button.
O Check to see if the "VCR" light on the front panel display is
lit. If it is not lit, press the VCR/TV button until it :is lit.
_>Important:
You are viewing the picture from your VCR!
With this set-up, you will use the VCI_.[_ button when recording,
when viewing tapes or brc.adcast stations through your VCR, or
before using the VCR's menus. You also use the VCR/q_ button
to switch back to normal TV viewing.
Viewingthe picturecomingfrom yourVCR if you are usinga
monitorTV
0
Turn on your TV and switch it to the correct external input.
(For most Mitsubishi TVs, this means pressing the. TV's
INPUT button until you see the words "Ext-l" or "Input-l" on
the screen.)
Turn the VCR on by pressing the POWER button.
You are viewing the picture from your VCR!
If you wish to return to normal TV viewing, switch your TV's
input back to its previous position.
If your system includes a home theater receiver or an A/V
receiver, refer to your horae theater recei ver's owner's guide.
25
Page 28

Chapter3: OperatingYourVCR
LoadingandUnloadingTapes
Loading atape
Correct _ /
Incorrect
_,'
_>Important:
_>Important:
Tapes can be loaded into your VCR as long as the VCR is plugged
in. Even when the VCR POWER is off, loading a tape will auto-
matically turn the VCR on. Use only tapes that have a _ label
or an S_ label.
O
Hold the tape so that the long narrow edge with the contents
label faces towards you. The other edge is hinged and should
face towards the VCR. The plastic window that shows the
videotape should face up.
O Gently insert the tape into the cassette slot until the VCR
automatically takes it in.
Your VCR will eject the tape if you improperly load it. If the VCR
ejects the tape, remove the tape, check to see l:hat the contents
label is facing you, that the geared tape reels are facing down-
wards, wait a few seconds, and try again.
Unloadingatape
O Press the EJECT button on the front of the VCR or on the
remote control. If the VCR POWER is off, tl:.e VCR will turn
on, eject the tape, then turn off.
Remove the tape.
_>Important:
T " i
Erasure prevention tab
>'Warning: JWe recommend that you take any broken or torn tapes to a
You cannot eject a tape while it is recording. You must first press
STOP.
Preventingaccidental erasure
Tapes come with a tab that, when removed, prevents you from
recording on the tape. If you attempt to record over a tape that
has had this tab removed, the VCR will briefly display an error
message on the TV screen and will eject the tape. To record over
such a tape, simply place a piece of vinyl tape over the opening.
Usingrepairedtapes
] professional for repair. If you repair a torn tape with improper
Imaterials, you could damage your VCR when you play the tape.
Headcleaning
Your VCR automatically cleans the head and the drum of the
VCR whenever you load a tape. If you see "noise" or snow when
playing a tape, eject the tape, re-load the tape, then wait 3 or 4
seconds. Repeat this process several times to b_]prove the picture.
26
Page 29
PlayingaTape
Now that your VCR is connected and properly set up, and you
know how to view a picture coming from your VCR, it's time to
play a tape. This section describes:
• Playing back a tape, and
• Using basic playback controls.
Playing backa tape
Beforeyoubegin,youneedto know:
• how to view the picture coming from your VCR (page 25).
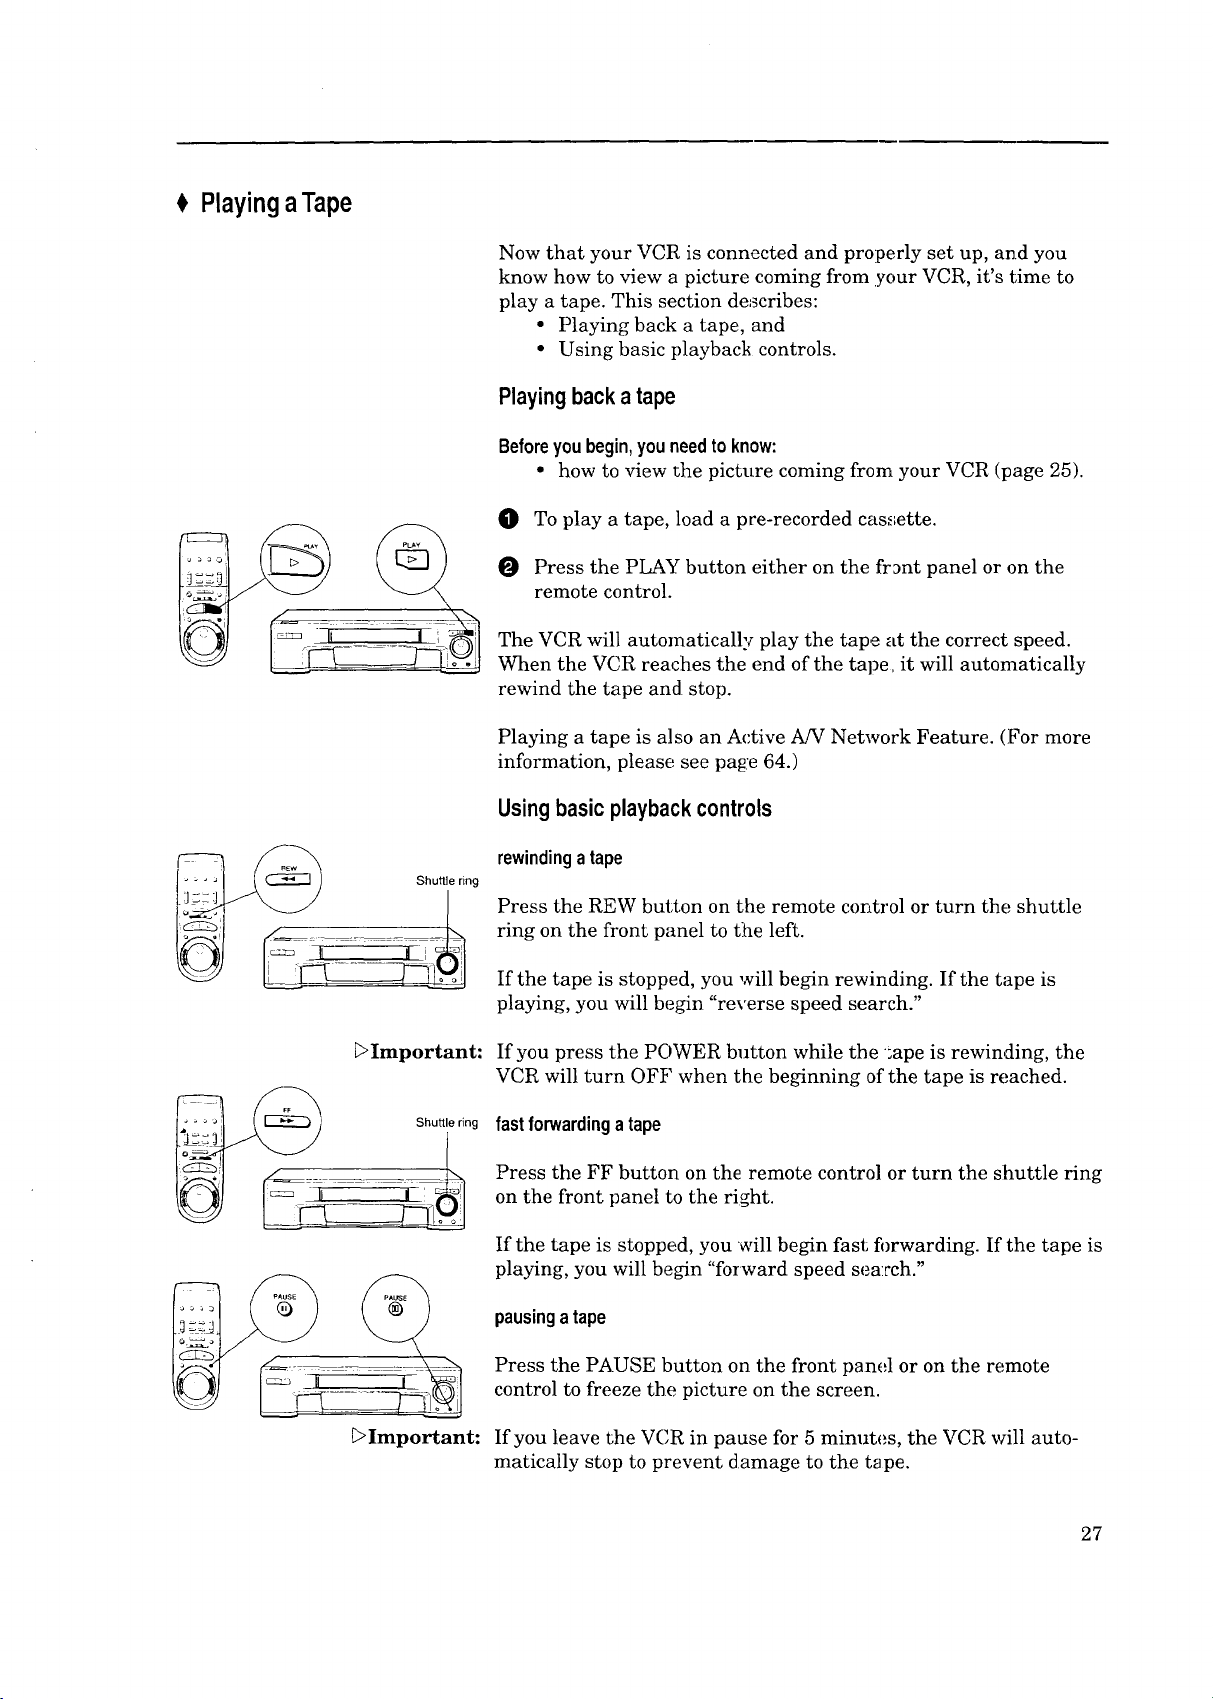
O To play a tape, load a poe-recorded cassette.
O Press the PLAY button either on the front panel or on the
remote control.
The VCR will automatically play the tape at the correct speed.
When the VCR reac:hes the end of the tape, it will automatically
rewind the tape and stop.
Playing a tape is also an Active A!V Network Feature. (:For more
information, please see page 64.)
I_! Shuttle ring
_ ,
E>Important:
([_ Shuttle ring
Usingbasicplaybackcontrols
rewindingatape
Press the REW button on the remote control or turn the shuttle
ring on the front panel to the left.
If the tape is stopped, you will begin rewinding. If the tape is
playing, you will begin "reverse speed search."
If you press the POWER button while the ;ape is rewinding, the
VCR will turn OFF when the beginning of the tape is reached.
fast forwardinga tape
Press the FF button on the remote control or turn the Shuttle ring
on the front panel to the right.
If the tape is stopped, you will begin fast fi)rwarding. If the tape is
playing, you will begin "forward speed sea:rch."
pausingatape
Press the PAUSE button on the front panel or on the remote
control to freeze the picture on the screen.
[>Important:
If you leave the VCR in pause for 5 minutes, the VCR will auto-
matically stop to prevent damage to the t_ pe.
27
Page 30

Chapter3: OperatingYourVCR PlayingaTape(cont.)
controllingvibrationduringstillframe
Jog dial
If the picture vibrates during still frame, turn the jog dial while
holding down the ONE KEY PROGRAM button on the front pane]
until the picture is steady.
Selecting theOn-screenLanguage
You can set your VCR to display on-screen mes_;ages, menus, and
functions in English or French. You should do this before you use
the menus or set any audio/video functions.
Before you begin, you need to know:
• how to view the picture coming from your VCR. (See page 25.)
0
Make sure you are viewing the picture com=ng from your
VCR. Then, press the MENU button on the remote control. If
this is the first time the menus have been used, you will see
Frangais
the menu for selecting an on-screen lan_lai,_e.
Turn the ADJUST dial on the remote control to move the
0
cursor next to the desired hmguage.
0
Turn the shuttle ring right on the remot_ control. The menu
will change to the '_VCR Main Menu."
Press the MENU button to exit the menus.
_Important: The "Select Language" menu is unique. While all other menus can
be accessed at almost any time, the "Select LarLguage" menu will
not automatically appear again after it is first set. To see the
"Select Language" menu, press the TIMER RESET button on the
back of the VCR, then follow the procedure on _:his page.
Usingthe AudioandVideoFunctions
You can use the remote control to select many of the VCR's audio
and video functions and adjust their settings. _?he VCR will
display the settings on the television's screen.
This section will teach you about:
• Selecting and adjusting the audio and video function%
• Descriptions of audio functions, and
• Descriptions of video functions.
The audio functions you can adjust are:
-- audio monitor,
-- normal record,
--level meter, and
-- front display.
28
Page 31
Thevideofunctionsyoucanadjustare:
-- recordspeed,
-- recordformat,
-- tape,
-- intelligentpicture(I.P.),and
-- sharpness.
Selecting and adjusting the audio andvideo functions
Below are instructions on how to select arLd adjust the audio and
video functions. If you are not familiar wi;h the purpose of these
functions, definitions begin below.
Beforeyou begin, you need to know:
• how to view the picture coming h'om your VCR (page 25).
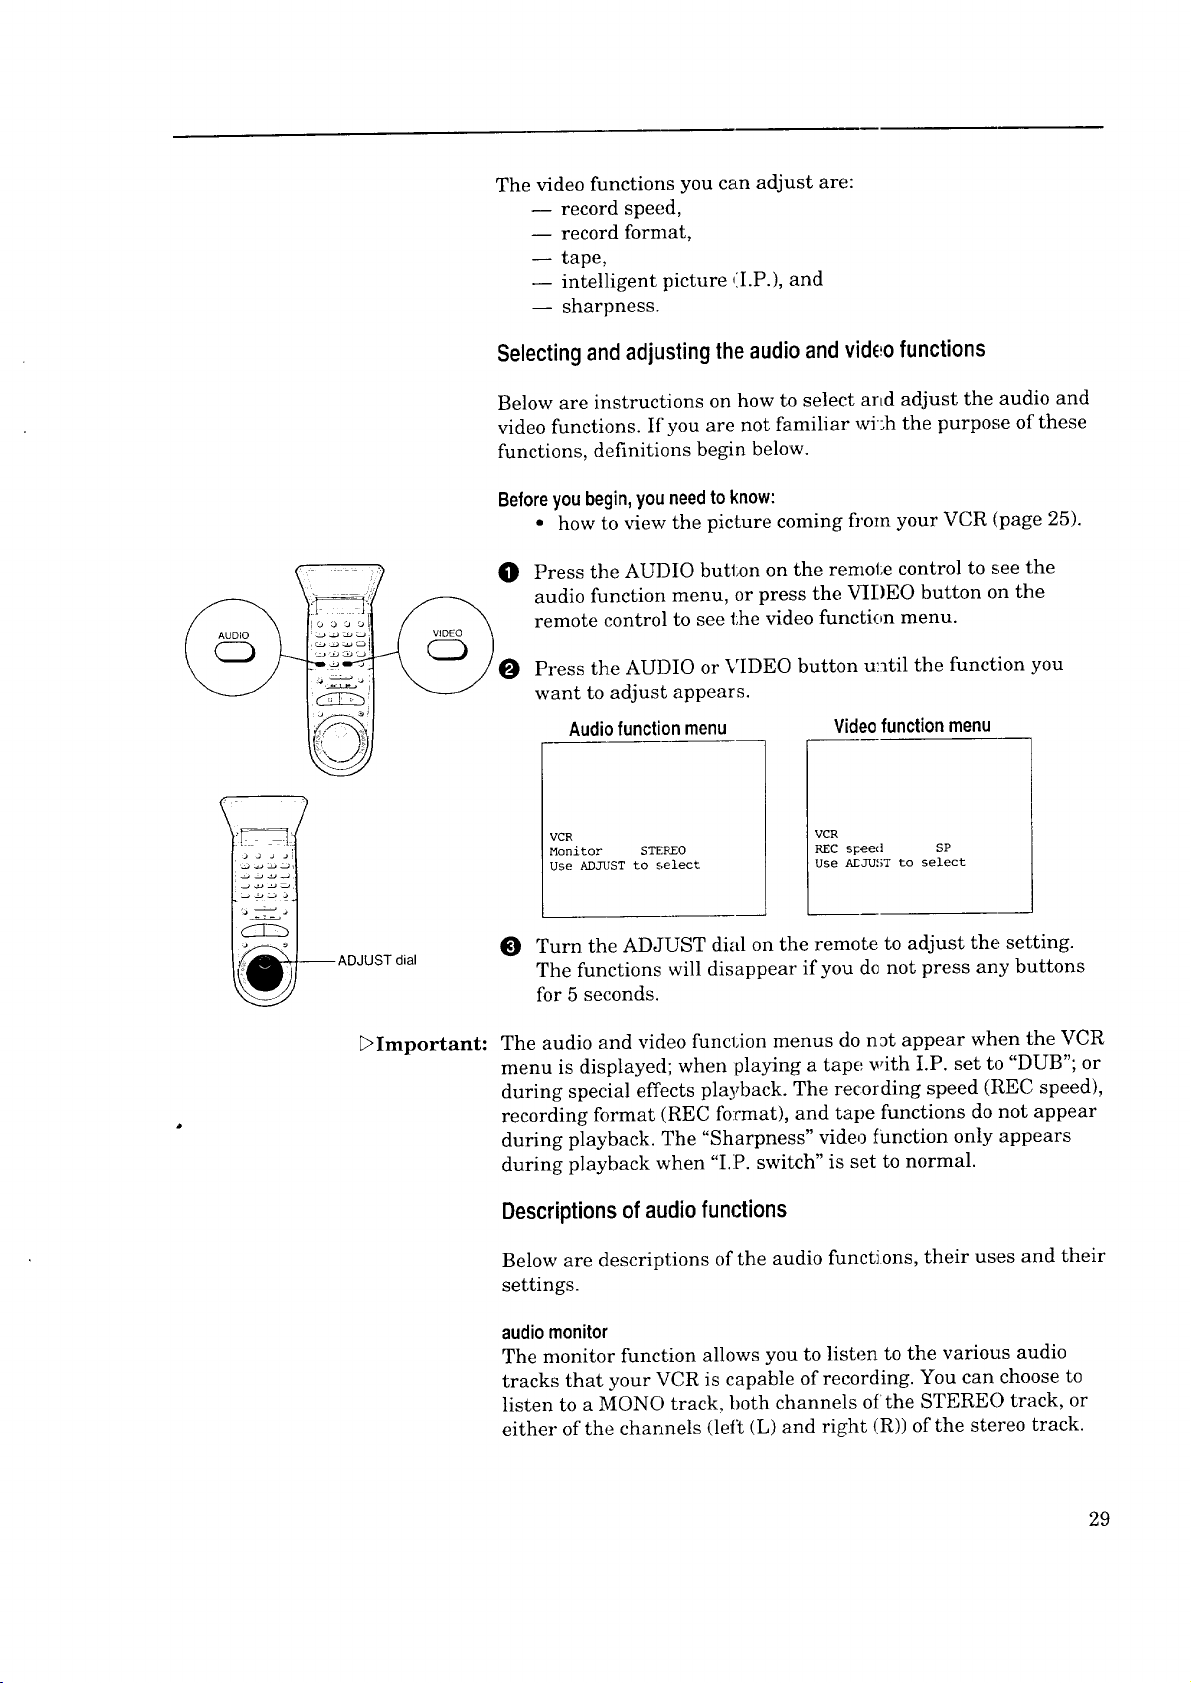
O Press the AUDIO button on the remote control to see the
audio function menu, or press the VIDEO button on the
remote control to see the video function menu.
Press the AUDIO or VIDEO button until the function you
want to adjust appears.
Audiofunction menu Videofunction menu
dial
Important:
VCR
Monitor STEREO
Use ADJUST to _,elect
VCR
REC speed SP
Use AEJUST to select
Turn the ADJUST dial on the remote to adjust the setting.
The functions will disappear if you dc not press any buttons
for 5 seconds.
The audio and video function menus do n_t appear when the VCR
menu is displayed; when playing a tape with I.P. set to "DUB"; or
during special effects playback. The recording speed (REC speed),
recording format (REC format), and tape functions do not appear
during playback. The "Sharpness" video function only appears
during playback when "I.P. switch" is set to normal.
Descriptions of audio functions
Below are descriptions of the audio functions, their uses and their
settings.
audiomonitor
The monitor function allows you to listen to the various audio
tracks that your VCR is capable of recording. You can choose to
listen to a MONO track, both channels of the STERE() track, or
either of the channels (left (L) and right (R)) of the stereo track.
29
Page 32

Chapter3:OperatingYourVCR UsingtheAudioandVideoFunctions(cont.)
Choose L to listen to the left channel of a stereo track.
Choose R to listen to the right channel (Ifthe stereo track.
Choose STEREO to listen to both stereo channels.
The MONO track is lower in quality tlhan the others, and
the monitor is automatically set to MONO if you are
watching a tape that was not recordec[ in VHS Hi-Fi. Set
the audio monitor to MONO to hear an S.A.P. signal
recorded on the mono track of a Hi-Fi tape (see below).
E>Important:
If you have your VCR connected to a surround sound system, set
the audio monitor to STEREO. Surround sound requires both left
and right channels to create the rear channel effects.
normal recording (NormalREC)
When your VCR is recording, it actually records the audio portion
of a program twice: once on the stereo Hi-Fi tracks, and once on
the mono track. Additionally, your VCR is able to receive
Separate Audio Program broadcasts, also known as an S.A.P.
broadcast. An S.A.P. broadcast, is an alternati-e audio soundtrack
for a program; it is often a soundtrack in another language.
You can use the normal recording function to record the S.A.P.
broadcast on the mono track by choosing "SAF." Otherwise_.
choose "L+R." In either case, the main prograra is recorded on the
stereo Hi-Fi track. Also, if there is no S.A.P. broadcast, the VCR
will record the main program on the mono track.
Be careful if you choose S.A.P. If you play your tapes on a non-
Hi-Fi VCR, you only hear the mono track. You may have to watch
your favorite show in a language you don't u_nderstandt
level meters (Levelmeter)
Use this function to turn the fl'ont panel level meters on or off.
3O
frontdisplay(Frontdisp)
Use the front display function to dim or brig ht,en the front panel.
Descriptionsof videofunctions
Below are descriptions of the video functions, Lheir uses and their
settings. To select these functions or to adjust their settings, refer
to the section "Selecting and adjusting the audio and video
functions." (See page 29.)
recordingspeed(RECspeed)
The recording speed has an effect on picture quality. SP produces
the best picture quality and records up to two hours of video on a
T-120 tape. Mitsubishi's EP speed has only slightly poorer qual-
ity, and records up to six hours on a T-120. You can only record in
SP or EP speed, but play back tapes recorded in SP, LP or EP.
recordingformat(RECformat)
This function allows you to choose between recording in standard
VHS or Super-VHS (S-VHS).
Page 33
tape(Tape)
Adjust this function to ensure the accur_,cy of the Tape Remain-
ing display. If you are using a tape that !s two hours long or less
(labeled T-30 through T-120), set this function to "T-120." If you
are using a tape labeled T-160, set the fi:mction to "T-160." If you
are using a tape labeled T-180, set the fi:Lnction to "T-180." You
cannot use this function with a tape that is less than 30 minutes
long, or with a tape labeled "T-210."
Intelligentpicture (I.P.Switch)
This function is used to turn on the Inr,elligent Picture (I.P.)
circuitry, which automatically maximize_ picture quality. Set the
switch to "ON" when playing an older tape, a poor quality tape, or
rental tapes. Set it to "DUB" when you are using the HS-U760 to
dub to another VCR.
sharpness(Sharpness)
Use this function to adjust between sharp (+) and soft (-) picture.
UsingtheMenusto Setthe Time
This section will show you how to use the on-screen menus. You
will use the menus to operate many features, such as setting the
time, programming to record, and memorizing channels.
Your choices are:
Customize choices
Memorize channels
Add/delete channels
Set VCR Plus+ Guides
une--
Year _99_
Date 1 Thursday
Clock 12:00P_
Daylight savings (OFF)
Month Ju_e
Date I Thhrsday
Clock 12:00PM
Daylight savings (OFF)
Beforeyou begin,youneedto know:
• how to view the picture coming from your VCR (page 25),
• that you use the ADJUST dia] an(] shuttle ring on the
remote control, not: on the front ]panel, to use the menus.
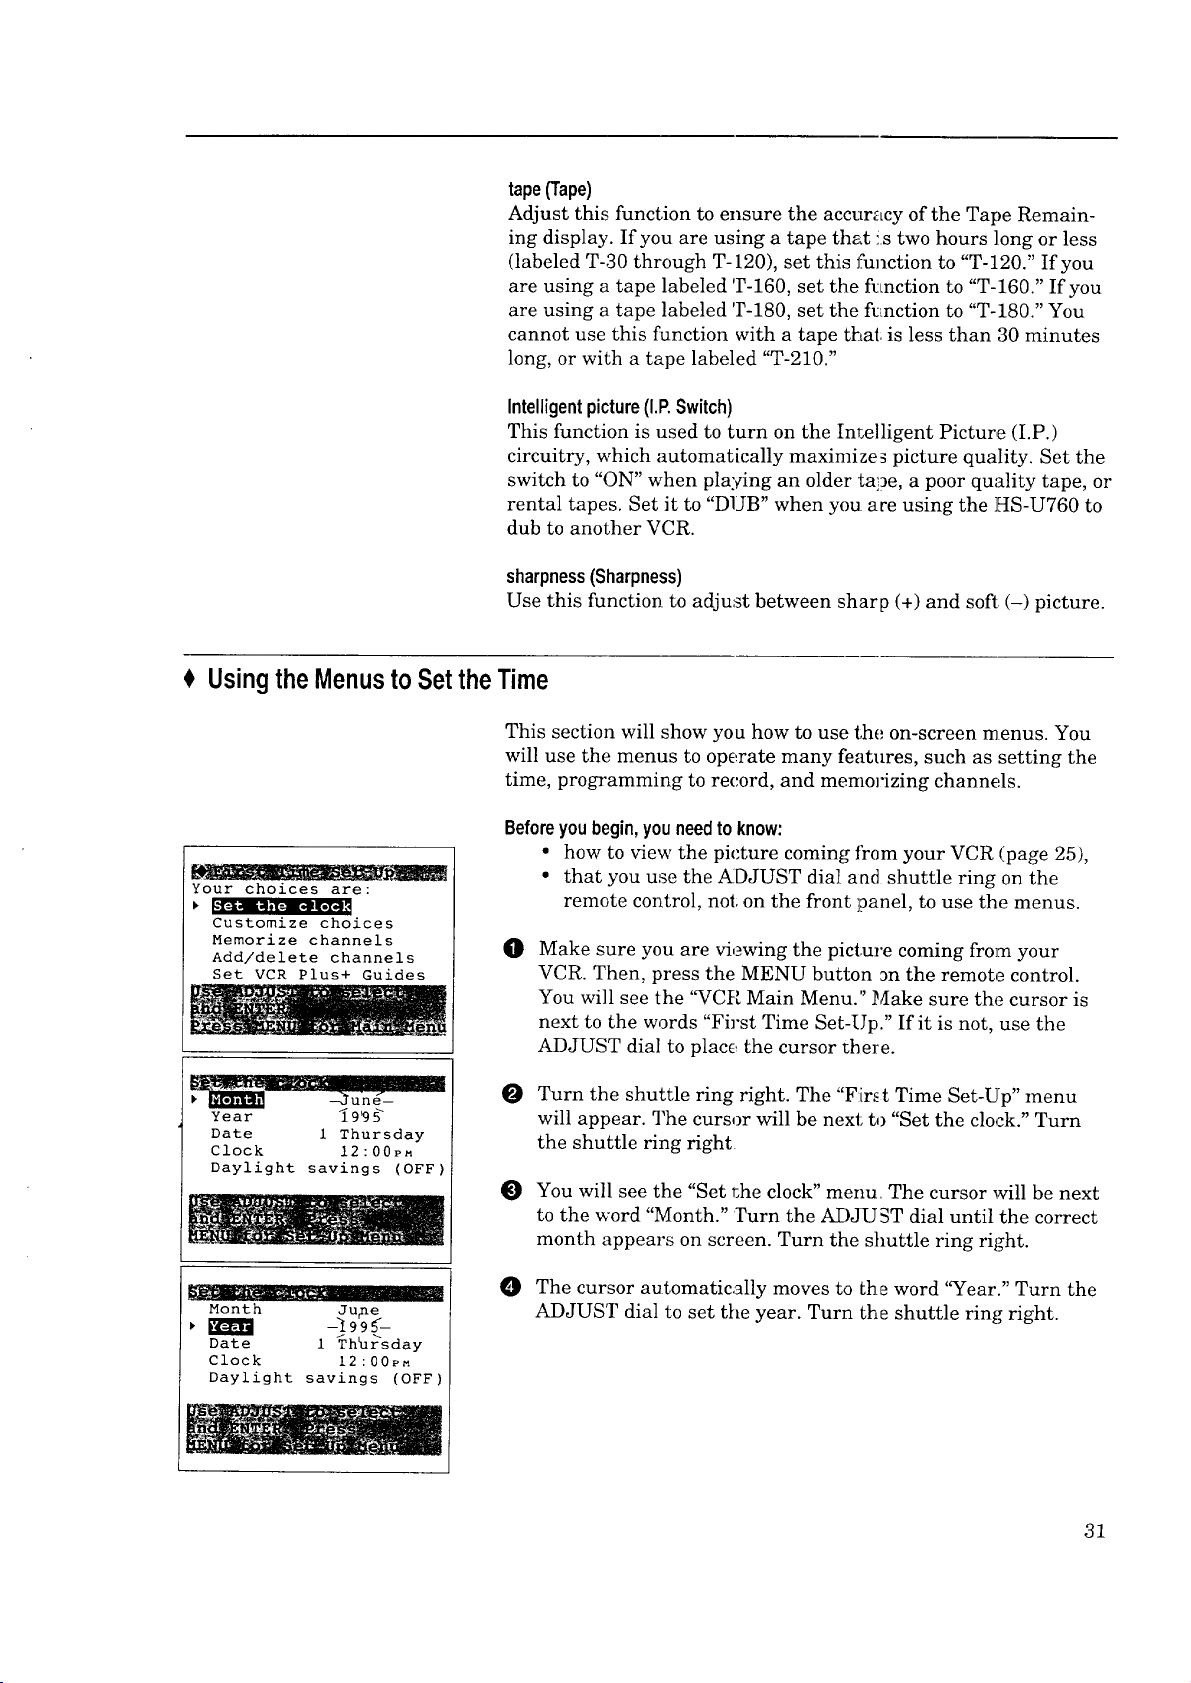
O
Make sure you are viewing the picture coming from your
VCR. Then, press the MENU button _n the remote control.
You will see the '%CR Main Menu." Make sure the cursor is
next to the words "First Time Set-Up." If it is not, use the
ADJUST dial to place, the cursor there.
Turn the shuttle ring right. The "First Time Set-Up" menu
will appear. The cursor will be next to "Set the clock." Turn
the shuttle ring right
@) You will see the "Set r,he clock" menu. The cursor will be next
to the word "Month." rurn the ADJUST dial until the correct
month appears on screen. Turn the slmttle ring right.
O
The cursor automatically moves to Lhe word "Year." Turn the
ADJUST dial to set the year. Turn the shuttle ring right.
31
Page 34

Chapter3: OperatingYourVCR UsingtheMenustoSettheTime(cont.)
The cursor automatically moves to the word "Date." Turn the
Month June
Year _ I_95
_ --18 Sunday--
Clock I_:00PM
Daylight savings (OFF)
ADJUST dial to set the date. Turn the shuttle ring right.
Month June
Year 1995
Date 18 Svnday,
Daylight savxflgs (OFF)
Month June
Year 1995
Date 18 Sund,ay
Daylight savzngs (OFF)
Month June
Year 1995
Date 18 Sunday
Clock 7:30P_
l_._-,Di_-I,i_m_,bm,_ (OFF)
/ \ /1_
• /i
O The cursor automatically moves to the word "Clock." The hour
numbers and the am/pm indicator will be blinking. Turn the
ADJUST dial to set the hour and andpm at: the same time.
Turning the dial right moves the clock tbrward; turning the
dial left moves the clock backwards.
Turn the shuttle ring right.
The minutes numbers will now be blinking. Turn the
ADJUST dial to set: the minutes. When you have set the
correct time, turn the shuttle ring right.
O The cursor automatically moves to the words "Daylight
savings." If you are currently following Daylight Savings
Time, use the ADJUST dial to select "ON":; otherwise, use the
ADJUST dial to select "OFF." Turn the shuttle ring right; the
display will return to the "First Time Set-Up" menu and the
clock will start running.
O Press the MENU button ollce to return to the "VCR Main
Menu"; press the MENU button again to turn off the menus.
settingtheclockforwardorbackwardbyonehour(adju:_tingfor Daylight
SavingsTime)
32
_Important:
You can adjust the Daylight Savings Time setting without enter-
ing the menus. With the VCR turned off, pres_ the INPUT button
on the front panel. If Daylight Savings is currently ON, this will
turn it off and set the clock back one hour. If it is currently OFF,
this will turn it on and set the clock forward one hour. Each time
you press the INPUT button, the Daylight Savings setting will
switch between "ON" and "OFF." Any time you adjust this
setting, check your programmed recordings to be sure they are set
to the correct time.
If you want to adjust the clock when your VCI_ is in stand-by for
programmed recording, simply press the POWER button on the
front panel. This turns off the programmed cecording light, but
the VCR will remain turned off. When you fin!sh adjusting the
clock, press the POWER button again, and m_!_ke sure that the
programmed recording light is back on.
If you have a Mitsubishi TV with both Active ._/V Network and
"StarSight" features, you don't have to set the time on your VCR.
See your TV Owner's Guide for details.
Page 35

I Programmingthe VCRto ReceiveTVChannels
Before your VCR can receive television channels, you need to
program all of the channels you can receive into your VCR.
Fortunately, our menu system makes this an easy process. This
section will also explain some other channel-related functions.
This section explains:
• Programming channels automatically,
• Using video mute,
• Adding and deleting channels, and
• Selecting a channel.
Programmingchannelsautomatically
Using this process, your VCR will automatically tune in all of the
television stations you can receive. You can later get rid of
unwanted or unused stations.
A specialnoteto
cable boxsubscribers
i
:o
_Wc
Your choices are:
Program to record
Advanced Features
Search by time
| II _,.-li i Ilk II. [._HD,."_ _illl
Your choices are:
Set the clock
Customize choices
[=111 [I]II ilI IP, IIII II'; III I I,:II II
Add/delete channels
Set VCR Plus+ Guides
If your local cable box company scrambles some or all stations,
and/or requires you to use a cable box, then your ability to
prog-ram channels' will be limited. The cable box receives all of
your channels and then _ends only one to your TV (and your
VCR), usually on channel 3 or 4.
If you are required to use a cable box, you should the choose
"Cable box only" option hi step _ on the next page. Your
HS-U760 will use its spedaI Converter _Box Control technology
to change the channels on the cable box.
If your cable box or cable system seems i+_compatible with your
new VCR, call your cable company. They may be able to provide
solutions to your problems.
Beforeyou begin, you should:
• have completed all cormections between your VCR, TV, cable,
antenna, cable box, and satellite receiver (if any); (]pages 12-20)
• know how to view the picture coming :;rom your VC.R; (page 25)
• know how to use the menus. (See page 31.)
To program channels automatically:
0 Press the MENU button on the remoge control. You will see
the '%rCR Main Menu" on the TV screen.
Use the ADJUST dial on the remote Lo move the cursor next
to "First Time Set-Up." Turn the shu Ltle ring right.
The "First Time Set-lJp" menu appe_rs on your screen. Turn
the ADJUST dial to move the cursor next to "Memorize
channels." Turn the shuttle ring right.
_Important: If you are recording or playing back a tape, the words "Not
available" will flash and an error message will appear. To correct
this, stop the tape.
33
Page 36

Chapter3:OperatingYourVCR ProgrammingtheVCRto ReceiveTVChannels(cont.)
You will see the menu for automatically me:_orizing chan-
O
Hhat type of antenna is
connected to the VCR?
_ (OFF)
Cable
Cable box only
Indoor/outdoor
nels. If you are using an RCA satellite receiver, turn the
ADJUST dial to seh.'ct "Sat. receiver," then _se the shuttle
ring tx) change "OFF" to "1." If you are not: using a satellite
receiver, make sure "Sat. receiver" is set to "OFF."
O
Using the list below as a reference, turn the ADJUST dial to
select the kind of antenna you connected.
• If you are using a cable box that sends signals to your VCR
on only one channel and can be operated by a remote
control, choose "(',able box only," and skit:, to step O, below.
• If you are using any othe:_ cable combinal;ion, including a
cable box with an A!B switch, choose "Cable."
• If you are using an antenna that receives only over-the-air
broadcasts, such as "rabbit ears" or a rooF-mounted an-
tenna, choose "Indoor/outdoor."
After you have selected, turn the shuttle :ring right.
Now memorizing all the
stations you can receive
Channel 3
Stand by this may take
a few minutes
_Important:
Please enter code from
your Owner's Guide:
_ --
Manufacturer
ABC
Archer
Century
Citizen
Diamond
Eagle
Eastern
G C Electronic
Gemini
General Electric
General Instrument
Hamlin
Hitachi
Jerrold
Macom
CodeNumber
1,2,11
29, 58, 65
29, 65
29, 65
54, 58
17, 18, 19, 61, 62, 63
68
29, 65
5, 60
35
1,2,3,4,5,41,42,43,44,69,91
22, 23, 45, 46, 47
24
1,2,3,4,5,41,42,43,44,69,91
28
34
O
If you choose "Cable" or "Inctoor/outdoor," an on-screen mes-
sage and the display on the front of your VCR will show you
that the VCR is memorizing: the stations you can receive. You
can cancel the memorization at any time by pressing CAN-
CEL on the remote control. After the VCR has programmed
all the channels, the screen will return the VCR's picture.
Automatic programming may include vacant ct:.annels if there are
stray signals or noise on those c:hannels. If this occurs, you can
manually delete the channels using the procedure in the section
"Adding and deleting channels."
Ifyouchoose"Cableboxonly,"
You need to tell the VCR which manufacturer makes your cable
box, and on which channel the cable box sends a signal. You will
see the screen to the left.
O The cursor will be next to "Brand code." Turn the ADJUST
dial or press the number buttons to select; the manufacturer's
code number for your cable box. The codes are listed below:
Manufacturer
Magnavox
Movietime
NSC
OAK
Panasonic
Paragon
Pioneer
Philips
RCA
Realistic
Regal
Regency
Rembrandt
Samsung
Scientific Atlanta
CodeNumber
59, 61, 67
30, 31, 51, 54
;20, 51, 52
27, 39, 40, 49, 50, 61
14, 21,25
6,7
14, 15, 16, 92, 93, 94
26, 61,62, 63, 64
14,21,25
37, 38
45, 48
68
55, 56
5, 14, 21, 25, 29
10, 11, 12, 13
Manufacture
Sheritech
SL Marx
Sprucer
Stargate
Sylvania _
Teknika
Texscan
Tocom
Toshiba
Unika
United Cable
Universal
Videoway
Viewstar
Zenith
CodeNumber
57
5, 14,29
14, 21,25
5, 14, 29, 65
66
36
53, 66
1,2,3,4,5,41,42,43,44,69,91
32, 33, 34
48
2
30, 31,54, 65
6,7
17, 18, 19, 61,62, 62
,6,7,8,9
Page 37

Your cable box sends a
signal on which channel?
Brand code i
Your cable box sends a
signal on which channel?
Brand code 1
['_ L1
Now memorizing all the
stations you can receive
Channe! 3
Stand by this may take
a few minutes
3
O
After you have selected the manufacturer's code, turn the
shuttle ring right. The cursor will move to "Channeh"
O
Use the ADJUST dial to select the channel on which your
cable box sends a signal to the VCR. I_you connected your
cable box with audio!video cables, use. the INPUT button to
select "LI" if you connected them to the rear panel or "L2" if
you connected them tc, the front panel.
@
You need to determine whether or not you have selected the
correct "Brand Code." To do this, pres _the CHANNEL
buttons on the remote control. As you press the buttons, the
channel number on the front of your VCR should change.
Watch your cable box. Your cable box should show the exact
same number a moment after it appears on your VCR.
If your cable box does not change channels at all, or does not
show the exact same number, do one of the following:
• Try moving the cable box on top of'_he VCR.
• If more than one "Brand Code" is li _ted for your type of
cable box, try a different one. (You can use the CANCEL
button to move back to the "Brand Code" option.)
@
After you haw_ determined that you a:re using the c.orrect
Brand Code, turn the _huttle ring right to begin memorizing
channels. The TV screen will show you a message that the
VCR is memorizing the channels coming from your cable box.
Your TV screen, the front of your VCR, and your cable box
should all display each channel numb _r, one by one.
When the VCR is finished memorizing, it will return to the VCR's
picture.
DImportant: If no code number is listed for your cable box, or if none of the
numbers listed wil! work, try each code, from 01 to 94.
If your cable box cannot be operated by a remote control (i.e., if it
is operated with a mechanical dial or slide), then your VCR will
not be able to change channels on the cable box.
If your cable box will not respond to any or the codes, your VCR
cannot change channels on the cable box. You will need to change
channels yourself, using the cable box's remote control. You
should re-program your VCR, choosing "Cable" in step O on page
34. When programming to record, you will need to leave your
cable box ON and tuned to the channel :gou wish to record.
If you connected a satellite receiver, press the CHANNEL buttons
to see that the TV shows the channels coming from the receiver.
If it does not., try repositioning or moving _he satellite receiver.
_Important: Automatic programming may include vacant channels if there are
stray signals or noise on those channels. Ir this occurs, you can
manually delete the channels using the procedure in the section
"Adding and deleting cha_nels."
35
Page 38

Chapter3:OperatingYourVCR Programmingthe VCRto ReceiveTVChannel,,;(cont.)
Usingvideomute
When you turn video mute ON, any blank section of tape, or any
station with a weak signal, will be replaced by a blue screen. The
sound will also be turned off. If there is a time when you would
like to try to tune in a weak station, turn video mute OFF.
Beforeyou begin, you should knowhow:
• to view the picture coming from your VCR; (see page 25)
• to use the menus. (See page 31.)
_t_;i_ _e_s e_u_ " _i
Your choices are:
Set the clock
ii, II "
Memorize channels
Add/delete channels
Set VCR Plus+ Guides
PerfecTape (AUTO)
A/V Network (OFF)
(ON)
O Press the MENU button on the remote con Lrol. The "VCR
Main Menu" appears on yo ar TV.
Use the ADJUST dial on the remote to move the cursor next
to "First Time Set-Up." Turn the shuttle ring right.
O The "First Time Set-Up" menu appears on your screen. Use
the ADJUST dial to move the cursor next 1:o"Customize
choices" and turn the shuttle ring right;.
O Use the ADJUST dial to select '%ideo mute." Then, turn the
shuttle ring to set video mute to ON or OF P.
Press the MENU button once to return to the "First Time Set-
O
Up" menu; press the MENU button a second time to return to
the '_VCR Main Menu;" press the MENU batten a third time
to turn off the menus.
Addingand deletingchannels
If necessary, you can manually add or delete channels after you
have completed the automatic channel pro_'amming. (You cannot
do this for channels coming from a satellite receiver.)
Beforeyoubegin,youshouldknowhow:
• to view the picture coming from your VCR; (see page 25)
• to use the menus. (See page 31.)
Your choices are:
Set the clock
Customize choices
Memorize channels
Set VCR Plus+ Guides
36
_Important:
Ii) Make sure that video mute is ON. (See above.)
Press the MENU button on the remote cot trol. The "VCR
Main Menu" appears on ycur TV.
O Turn the ADJUST dial on the remote control to move the
cursor next to "First Time Set-Up." Turn the shuttle ring
right.
O You will see the "First Time Set-Up" menu. Turn the
ADJUST dial to move the cursor next to "Add/delete
channels." Turn the shuttle ring right.
If you are recording or playing back a tape, or if you are watching
a channel from a satellite receiver, then the w_rds "Not available"
will flash and you will see an error message.
Page 39

You will see the screen for adding or deleting chammls. Use
0
the ADJUST dial to select the channel that .you want to add
or delete. Press the ENTER button or turr_ the shuttle ring
right to add the channel; press the CANCEL button or turn
the shuttle ring left to delete it.
O When you are finished adding or deleting channels, press the
MENU button once to returr, to the "First Time Set-Up"
menu; press the MENU button a second time to return to the
"VCR Main Menu"; press the MENU button a third time to
turn off the menu.
_>Important:
If you use automatic programming again, you will lose all of the
manual changes you made. All of the channels you deleted will be
added; all of the channels you added will be deleted. If you are
using a cable box that receives only one or two digit channels, you
cannot add a three-digit channel.
Selectinga channel
Now that you have programmed your channels, and added or
deleted some, you will want to be able to select channels. (If you
have not yet programmed your channels, see page 33.)
There are two basic ways to select channels: sequentially or
directly. You can also use the super quick view memory.
selecting channelssequentially
Press the CHANNEL buttons on the remote control or turn the
jog dial on the VCR front panel. This will cycle _hrough the
channels in sequential numericM order. If you tlave connected
your VCR to a satellite receiver, you can change channels in
10-digit increments by holding down the CHANNEL button for
one second or Ly turning the jog dial quickly.
selectingchannelsdirectly
Use the number buttons on the :remote control. For example, to
choose channel 23, press the "2" button, then the "3" button.
E>Important:
To select a single digit channel, such as channel 5, press the "0"
button, then the number button, "5." You can also press the
number button "5," then turn the shuttle ring right.
The VCR can receive UHF/VHF channels 2-69, cable box chan-
nels 1-99, cable channels 1-125, and satellite channels 100-!)99.
If you try to select a channel number that the VCR cannot re-
ceive, the VCR will not change channels. If you are using a
satellite receiver, you cannot select cable channels 100-125.
usingsuperquickview memory
Super quick view lets you quickly switch to your favorite
channels. To use super quick view, you add channels to the super
quick view memory, then use the Q.V. button to cycle through
those channels.
37
Page 40

Chapter3: OperatingYourVCR ._,- Programmingthe VCRto ReceiveTV 3hannels(cont.)
To add a channel to the super quick view memory:
O Select the channel you want to add, either with the CHAN-
NEL button or the number buttons.
While the channel number is still[ on the screen, turn the
O
shuttle ring right on the remote control. The lett._rs "SQV"
VCR CH
SOY
will appear, indicating that the channel has been added to the
super quick view memory.
Now, when you press the Q.V. button, you will cycle through all of
the channels you added to the super quick view memory.
To remove a channel from the super quick view memory:
O Select the channel you want to remove, either w_th the
CHANNEL button, the number buttons, or the Q.V. button.
While the channel number is still on the screen, press the
O
CANCEL button on the remote control or turn the shuttle
ring left. The letters "SQV" will disappear, indicating that the
channel has been removed from Lhe super quick view
memory.
, SettingtheVCR Plus+GuideChannelNumbers
The VCR Plus+ system allows you to program you.r VCR to record
television shows by simply entering a PlusCode number found
after each program in your TV listings.
VCR Plus+ assigns a unique number to each channel in your
area. You must do a one-time set-up of your VCR using these
assigned guide channel numbers in order to record correctly when
using the PlusCode numbers.
A specialnote to cable
boxsubscribers
If your local cable company scrambles some or all st:ations, and/er
requires you to use a cable box, then you may need to take an
extra step when using" VCR Plus+ to program your VCR.
If the HS-U760 is able to com_,rol your cable t:ox (and you
have chosen "Cable box only" when you memorized chan-
nels), simply follow the instructions below.
If the HS-U760 is unable to control your ca:ble box (or you
have chosen "Cable" when you memorized channels), you
will need to set all of the VCR Plus+ Channel Guides to the
channel on which your cable box sends a signal (usually
channel 3 or 4). Then, when you program, leave your cable
box turned ON, tuned to the channol you wish to record.
38
If you have difficulty recording, your cable compare.7 may be able
to suggest an alternative hook-up method that will allow you to
use VCR Plus+ without leaving the cable box on, or they may be
able to provide additional solutions Contact them iOr more help.
Page 41

Beforeyoubegin,youneed:
• to know how to view the picture coming from your VCR;
(see page 25), and
• to know how to use the menus. (See page 31.)
Your choices are:
Set the clock
Customize choices
Memorize channels
Add/delete channels
_Important:
Most importantly, you need to have a list of the VCR Plus+
Channel Guides for your area. This list can be found in IFV Guide.
Your local newspaper or your cable company may also be able to
provide you with this list.
TosettheVCRPlus+ChannelGuides:
Complete the following set-up procedure only for each station
whose assigned guide channel number is different from the
channel number that you receive it on. For example, if the guide
channel number for HBO is 33, and your VCR receives HBO on
27, you need to "set up" these numbers usir_g the procedure
described below. For channels whose guide numbers are the same
(for example, if the guide number for HBO i[s 33, and your VCR
also receives HBO on 33), you can skip this set-up procedure.
O Press the MENU button on the remor, e control. Turn the
ADJUST dial to move tlhe cursor next to "First Time Set-Up."
Turn the shuttle ring right.
The "First Time Set-Up" menu appears on your screen. Turn
the ADJUST dial to move the cursor next to "Set VCR Plus+
Guides." Turn the shutlfle ring right.
Plus Guide BOX Channel
001 i
002 002
003 003
OO4 0O4
005 005
Plus Guide BOX Channel
031 031
032 032
034 034
O35 035
036 036
0
You will see the "Set VCR Plus+ Guides" menu on your
screen. In the "Plus Guide" column on the left is a list of the
VCR Plus+ guide channel numbers, an_ in the "BOX Chan-
nel" or '%CR Channel" column on the right is a list of the
actual channels your VCR receives in your home.
0
Turn the ADJUST dial to place the cursor next to a
VCR Plus+ guide number for the channel you want to set. For
example, if you want tc set HBO, and if the VCR Plus+ guide
channel number for HBO is "33," move the cursor next to "33."
You may have to cycle _hrough a nuraber of"screen,s" before
the higher number guide channels are displayed on the
screen.
39
Page 42

Chapter3:OperatingYourVCR SettingtheVCRPlus+GuideChannelNumbers(cont.)
0
Use the number buttons to enter the actual VCR channel on
Plus Guide BOX Channel
031 031
032 032
033
034 034
035 035
036 036
_027i
which you receive the station. For example, if your VCR
receives HBO on channel 27, enter the n umber "27" next to
the VCR Plus+ guide channel for HBO.
If you are using a cable box that the VC}I cannot control,
enter the channel on which your cable box sends signals to
your VCR (usually channel 3 or 4).
0
To change more guide channel numbers, repeat steps O and
O. When you are finished, press the MENU button three
times to exit the menus.
Recording
Your new VCR offers a wide variety of rec,ording options _Lhattake
full advantage of our advanced electronics. This section tells you
about the following recording procedures:
• Recording a current broadcast,
• Programming your VCR to record,
• Programming with VCR Plus+,
• Using Quick Program,
• Using One-Touch Recording (OTR),
° Using One Key Programming, and
• Notes about programmed recording.
Recordinga currentbroadcast
Before you begin, you need to know how:
• to view the picture coming from your VCR. (See p;tge 25.)
To record a TV program that is currently playing:
O
Load a tape with its erasure tab intact into the VCR. If you
ha%,e not yet recorded o_ this tape, the VCR will test the tape
with the PerfecTape feature. For more information on this
feature, please see page 56.
Set the VCR's input to tuner. To do this, press the INPUT
button on the front panel or on the remote until the channel
display shows on-screen or on the front panel.
O If you have not already done so, set the speed at which you
would like to record. (See "Selecting and adjusting the audio
and video functions" on page 29.)
O
Select the channel you would like to record by using the
CHANNEL button or the jog dial on the front panel. (If you
are using a cable box that the VCR cannot control, select
channel 3 or 4 on the VCR, and change the channel on the
cable box, not on the VC R.)
40
Page 43

O Presstherecordbutton(REC)ontheremotecontrolorthe
recordbutton(REC/OTR)onthefrontpaneloftheVCR.
Recordingwill start.Whenyoureachtheeadofthetape,the
VCRwill automaticallyrewind.Youcanst_precordingatany
timebypressingtheSTOPorPAUSEbutton.Toresume
recordingfromSTOP,pressREC.Toresurgerecordingfrom
PAUSE,pressPAUSE.(YoucannotusetheRECiOTRbuttonto
resumerecordingfromPAUSE.)
_>Important:
If youpausetheVCRforfiveminutes,recordingwill stop
automaticallytoprotectthetape.If youre_ordin extendedplay
(EP),youwill onlybeabletoplaythetapeonaVCRequippedfor
EPplay,suchasthisone.]f youattempttorecordonatapethat
hashadits erasurepreventiontabremoved,theVCRwill eject
thetapeandbrieflydisplayanerrormessageonyour_I_Vscreen.
usingtherecordlevel
While recording, you can manually adjust the Hi-Fi soundtrack.
To do this, set the "Monitor" audio function to STEREO and the
"Level meter" function to ON. Then, adjusL the REC LEVEL
control while observing the peak level meters. The meters are
divided into green and red sections. Adjus: the REC LF,VEL
control so that the green bars are lit, wi_:h the red bars only
occasionally lit.
using record cancel
Record cancel allows you to stop a recording you started acciden-
tally and then rewind the tape to the point where recording
started. You can use record cancel only :if you start recording from
the record-pause mode. To use record cancel, press the rewind
button (REW) or turn the shuttle ring on 1;he front panel left
within eight seconds of when you accidentally started recording.
The VCR rewinds to where the recording :started and enters the
record-pause mode.
ProgrammingyourVCRto record
You can program your VCR to record with the help of Mitsubishi's
on-screen operating system. You can schedule up to eight
recording "events" within a one month period.
Beforeyou begin, you must:
• know how to view the picture coming from your VCR; and
• have set the clock. (See page 31.)
To program your VCR to record:
O
Load a tape with its erasure tab intact into the VCR. If you
have not yet recorded on this tape, the VCR will test the tape
with the PerfecTape feature. For mor_ information on this
feature, please see pa_ge 56.
41
Page 44

Chapter3: OperatingYourVCR Recording(cont.)
Press the MENU button on the remote control. The "VCR
O
Your choices are:
Advanced Features
Search by time
First Time Set-Up
Main Menu" appears on your screen. Use the ADJUST dial on
the remote control to move the cursor next to "Program to
record." Turn the shuttle ring right.
If there is at least one programmed recording already entered,
you will see the "recap" screen. You can choose an empty
recording slot, or wait four seconds and the VCR will auto-
matically choose the first empty slot.
O
Use number keys to enter
VCR PlusCode
You will see the VCR Plus+ "Program to record" menu. (For
more information on using VCR Plus+ to program your VCR,
see page 44.) Turn the shuttle ring right to skip this screen.
O
You will see the "Program to Record" m_nu. Turn the AD-
JUST dial to choose the channel you would like to record (for
Day - -
Start time --:--
Stop time -- :--
Record speed AUTO
example, channel 2). Turn the shuttle ring right.
• If you are using a cable box that the VCR cannot control,
enter the channel number on which the cable box sends a
signal to your VCR (usually channel ,3 or 4).
• If you wish to record fi_om an external[ source, press the
INPUT button or turn the ADJUST dial until "External
LI" or "External L2" appears. Select ";External Lr' to
record from an external source connected to the rear panel;
select "External L2" to record from an external source
Channel 2
_ _ondaY i9
Start time .....
Stop time -- :--
Record speed AUTO
connected to the front pane].
• If you are recording from a satellite receiver, you do not
need to select "LI." Simply choose the channel you would
like to record (for example, channel 245.)
E>Important:
Channel 2
Day Mondajy 19 .
Stop time "L,_':_:,
Record speed
42
The "Day" will flash. Turn the ADJUST dial to highlight the
day on which you want to record (for example, Monday the
nineteenth). Turn the shuttle ring right.
When selecting a day, your choices are: a single day up to one
month away, every day from Monday throu;,_h Friday, or the same
day every week. To program for every day fi_om Monday through
Friday (to tape a soap opera, for example), turn the ADJUST dial
until "Monday-Friday" appears. To program the same day every
week (to tape your favorite weekly sitcom, for example), turn the
ADJUST dial until "Every" and the desired day of the week
appear.
The hour numbers of the starting time, along with the am/pm
indicator, will flash. Turn the ADJUST dial to set the hour
when you wish recording to start. Turn the shuttle ring right.
Page 45

Channel 2
Day Monday 1,9
Stop time --:'-'-'
Record speed AUTO
Channel 2
Day Monday 19
Start time II:30_
Record speed AUTO'"
Channel 2
Day Monday 19
Start time 11:30AM
_ 1 :':30"PM
Record speed AUTo"
The minute numbers of the start time will flash. Turn the
O
ADJUST dial to set the minutes when you wish recording to
start. Turn the shuttle ring right.
O
The hour numbers of the stop time, ahmg with the am/pm
indicator, will flash. Turn the ADJUST dial to set the hour
when you wish recording to stop. Turn the shuttle ring right.
O
The minute numbers of the stop time will flash. Turn the
ADJUST dial to set the minutes when you wish recording to
stop. Turn the shuttle ring right.
Channel 2
Day Monday 19
Start time 11:30AM
Stop time I:30PM
/ ,
CH DAY ON OFF
2 MOI9 Ii :30A i :30PSP
.......... SP
--: SP
• ............... SP
_Important:
@ Turn the ADJUST diall to set the recording speed (SP, EP, or
auto recording speed (AUTO)). (See '%_to speed program-
ming" on page 50 for an explanation of the auto speed record-
ing feature.) Turn the shuttle ring right.
@ The contents of the programmed memory will appear on the
I
"recap" screen.
@
To program additional recording times, select an empty
program line by turning the ADJUST dial. Then, turn the
shuttle ring right. You will return to the VCR Plus+ "Program
to record" screen. Continue the programming procedure from
step O.
Only four of the eight program lines appear on-screen at any one
time. To see additional program lines, turn the ADJUST dial to
scroll the lines on the screen.
@ When you are finished with all programming, turn the VCR
power OFF and make sure the programmed recording light
(_) is lit. However, if you have a cable box, leave it turned
ON. Additionally, if the HS-U760 doe_,;not control your cable
box, leave the box tuned to the statior you wish to record.
43
Page 46

Chapter3:OperatingYourVCR Recording(cont.)
changingsettingswhileprogramming
If you wish to change one of your settings (such as start time)
while you are programming, turn the shuttle ring on the remote
to select the setting you wish to change. Turning the ring right
will move you forward through the list, whil _ turning the ring left
will move you backwards. Then, use the ADJUST dial to change
the setting.
Your choices are:
Advanced Features
Search by time
First Time Set-Up
_Important:
If you turn the shuttle ring left while the eu:sor is next to the
channel number, you will cancel the entire program.
Programmingwith VCRPlus+
VCR Plus+ allows you to program your VCB. to record by simply
entering a VCR Plus+ number. You can find this number in TV
Guide or (possibly) your local TV listings.
Beforeyoubegin,
• you need to know how to view the picLure coming from your
VCR; (see page 25)
• you must have set the clock; (see page 31) and
• you must have set your VCR Plus+ Channel Guides. (See
page 38.)
Load a tape with its erasure tab intact into the VCR.
If you have not yet recorded on this tape, the VCR will test
the tape with the PerfecTape feature. For more information
on this feature, please see page 56.
Press the MENU button on the remote control. The "VCR
O
Main Menu" appears on your screen. U_e the ADJUST dial on
the remote control to move the cursor next to "Program to
record." Turn the shuttle ring right.
If there is at least one programmed recording already entered,
you will see the "recap" screen. You can choose an empty
recording slot, or' wait four seconds and the VCR will auto-
matically choose the first empty slot.
Use number keys to enter
VCR PlusCode
5678 ....
44
O You will see the VCR Plus+ "Program. to record" screen. Use
the number buttons on _:}_eremote control to enter the
PlusCode number for the television sho_ you want to record.
For example, if the PlusCode number fi:,r the program you
want to record is 5678, ,,_imply enter "5(!;78."
O
If you enter a number incorrectly, turn the shuttle ring left or
press the CANCEL button on the remote control. When you
have finished entering the PlusCode number, turn the shuttle
ring right.
Page 47

VCR PlusCode: 5678
Daily
Weekly
Use the ADJUST dial to select whethe:r you want to, record
O
your program once, daily, or weekly.
• If you choose "Once," your VCR will only record the show
once.
• If you choose "Daily," your VCR will record the same
channel at the same time, Monday through Friday.
• If you choose "Week]),," your VCR will record the same
channel at tlhe same time, on the same day, each week.
After you have made your choice, turn tile shuttle ring :right.
_Important:
CH DAY ON OFF
2 MOI9 II:30A I:30pSP
.......... SP
.......... SP
.......... SP
If two programmed recording times overlap, the message, "VCR is
already programmed for that time" will dfi;play on the screen. You
will need to erase the previous program before you can enter the
new one. If the code number you entered[ i,; wrong, the message,
'WCR PlusCode, Not a valid code" will dJsl:,lay on the screen.
The program you have chosen to record will appear in the
"recap" format, and will flash for three seconds.
O If you wish to change the record speed, turn the shuttle ring
right repeatedly until the record speed is flashing. Change the
recording speed by turning the ADJUST dial. When finished,
turn the shuttle ring right once more.
O To program additional recording times, select an empty
program line by turning the ADJUST Jial. Then, turn the
shuttle ring right. You will return to the VCR Plus+ "Program
to record" screen. Continue the VCR Plus+ programming
procedure from step _.
O When you are finished with all progra:zlming, turn the VCR
power OFF and make sure the programmed recording light
(_) is lit. However, if you have a cable box, leave it turned
ON. Additionally, if the HS-U760 does not control your cable
box, leave the box tuned to the station you wish to record.
UsingQuick Program
Quick Program is an exclusive Mitsubishi feature that simplifies
the process of programming your VCR to record. When you press
the QUICK PROGRAM/VCR Plus+ button on the remote control,
you will immediately see the VCR Plus+ "Program to record"
menu and can begin programming right away.
You can use this fi_ature even when the VCR is stopped, playing,
recording, fast forwarding, rewinding, or eft. However, the
QUICK PROGRAM/VCR Plus+ button does not function during
One Key Programming.
Quick Program is also an ':Active A!V Network" feature. If you
have a Mitsubishi TV with Active AZV ]_er.work, see page 64 for
more information.
45
Page 48

Chapter3: OperatingYourVCR Recording(cont.)
To use quick program:
O
Press the QUICK PROGRAM/VCR Plus+ button on the
remote control. If the VCR is off, it will turn on. After tuning
Use number keys to enter
VCR PlusCode
your TV to the correct channel or inpuL you will see the
VCR Plus+ "Program to Record" screen
If the VCR's memory is full, you will see the recap screen
(below left) instead of the VCR Plus+ "Program to Record"
screen. You will need to use the CANCEL button to erase an
entry before you can add another one.
O Complete programming as described in "Programming your
.H _AY .N FF
2 MOI9 II:30A I:30PSP
i0 TH22 9:00PI0:00PEP
7 E-WE 8:00A 9:00AEP
29 FR23 5:30P 5:45pEP
8 TU27 ll:00P 0:30ASP
33 M-F 7:00P 7:15PEP
15 SA 1 8:00P 9:00PEP
46 SU25 7:00A 9:00ASP
VCR to record," or "Progr.amming with VCR Plus+." When you
are finished, press the QUICK PROGRAM/VCR Plus+ button
again. If the VCR is stopped, it will turn off and be ready to
record your program at a later time. If the VCR is playing,
recording, fast forwarding or rewinding, the menus will turn
off, but the VCR power will remain on.
When you are finished with all programming, be sure the
VCR power is OFF and the programmed recording light (_)
is lit. However, if'you have a cable box, lc,ave it turned. ON.
Additionally, if the HS-U760 does not control your cable box,
leave the box tuned to the station you wish to record.
F>Important:
If you press the QUICK PROGRAM/VCR t'kLs+ button, but the
clock is not set, you will see the "Set the clock" menu.
If you have set the A/V Network to ACTIVE, you should point
your remote control at the television when using Quick Program.
UsingOne-Touch Recording(OTR)
One-Touch Recording (also called OTR) is a way to begin :record-
ing immediately, but have your VCR stop :recording and turn off
automatically after your show is over.
Beforeyoubegin,youneedtoknowhow:
• to view the picture coming from your VCR. (See page 25.)
O
Load a tape with its erasure tab intact into the VCR. If you
have not yet recorded on this tape, the VCR will test the tape
with the PerfecTape feature. For more information on this
feature, please see page 56.
O
Set the VCR's input to tuner. To do this, press the INPUT
button on the front panel or on the reraote control until the
channel display shows on-screen or on the front panel fluores-
cent display.
46
@) Use the CHANNEL buttons on the remote control or the jog
dial on the front panel to select the charlnel you would like to
record.
Page 49

If you are using a cable box that the VCR does not control,
select channel 3 or 4 on the VCR, and change the channel on
the cable box.
O
Press the REC/OTR button on the front panel twice. The first
time you press the button, recording will b _gin. The second
time you press the button, 30 minutes is added to the OTR
timer, which is displayed on the front pand. (You can also use
the OTR/OFF-T button on the remote cont::ol. When you first
press this button, the VCR will begin recording and 30 rain-
utes is added to the OTR timer.)
Press the REC/OTR button or OTR/OFF-T button for each 30
O
minutes you want to add to the OTR timer, up to 4 hours. If
you press the button 10 times, you will see the word "End" on
the front panel display. The VCR will reco::d until the end of
the tape. If you press the button an elew_nLh time, the VCR
will resume normal recording.
The OTR timer will begin to count down. Whe:a it reaches zero,
the VCR will stop recording ar(d turn off. Ifyoa have previously
programmed your VCR to record, the VCR will be ready to record
what you've programmed. If the end of the tai:e is reached before
OTR is finished, the VCR will stop and the power will turn off.
_Important:
If you attempt to record on a tape that has had its erasure pre-
vention tab removed, the VCR will eject the tape. In addition, the
VCR will briefly display an error message on .],our TV screen.
Ifyou program too much time into the OTRtimer,
continue pressing the REC/OTR button or OTI_OFF-T button.
You will "cycle" around once you have reached the 4-hour point.
You can start over, adding time in 30 minute intervals.
howOTRaffectsothercontrols
If you press the PAUSE button during OTR, tlhe VCR will pause
recording, but the OTR timer continues to count down.
If you press STOP during OTR, you erase the OTR programming.
You cannot use the REC/OTR button on the front panel to resume
recording from the record-pause mode.
UsingOneKeyProgramming
One Key Programming is a programming method that is simple
to use and easy to learn, without using the remote control.
Beforeyoubegin,
• you need to know how to view the picture coming from your
VCR; (see page 25) and
• you must have set the clock. (See page 31.)
47
Page 50

Chapter3:OperatingYourVCR Recording(cont.)
To use One-Key Programming:
O Load a tape with its erasure tab intact into the VCR.
If you have not yet recorded on this tape:, the VCR will test
the tape with the PerfecTape feature. For more information
on this feature, please see page 56.
O Press the ONE KEY PROGRAM button. (If you have not set
the time, the "Set the Clock" menu will appear. Set the clock,
and then proceed.) If there is already a program in the VCR's
memory, you will see the "recap" screen. You can use the ONE
KEY PROGRAM button to select an empty programming slot,
or you can wait 4 second,; for the VCR to automatically select
an empty slot.
O You will see the ':'Program to Record" screen. Press the ONE
Day --
Start time --:--
Stop time --:--
Record speed AUTO
KEY PROGRAM button until the channel you would like to
record (for example, charmel 2) appears. Then, wait for 4
seconds. The cursor will :move down to the next position,
"Day." (If you are recording from a cable box that the VCR
cannot control, set the channel to 3 or 4, whichever the cable
box sends signals on.)
_Important:
Channel 2
[_ -MondaY i9
Start time --:--
Stop time --:--
Record speed AUTO
Channel 2
Monday 19,
• Stop time _-_-'"-2_
Record speed AUTO
Channel 2
Day Monday I_9
Stop time -- /-'£"
Record speed AUTO
If you wish to record from an external source, press the ONE KEY
PROGRAM button until "Exl;ernal LI" or "External L2" appears.
O
Press the ONE KEY PROGRAM button _o choose the day you
would like to record (for example, Mond_y the nineteenth).
Then, wait for 4 seconds. The cursor will move to the starting
time, and the hours will flash.
O Press the ONE KEY PROGRAM button to choose the hour
when you wish recording to start. Then, _ait for 4 seconds.
The minute numbers will( begin to flash.
Press the ONE KEY PROGRAM button to choose the minute
O
when you wish recording to start. Then, wait for 4 seconds.
The cursor will move to "Stop time."
48
Page 51

Channel 2
Day Monday 19
Start time ii:30_
Record speed AUTO'
Channel 2
Day Monday 19
Start time II:3_0AM
Record speed AOTO"
Press the ONE KEY PROGRAM button to choose the hour
O
when you wish recording to stop. Then, wait for 4 seconds.
The minute numbers will begin to flash.
Press the ONE KEY PROGRAM button to choose the minute
0
when you wish recording to stop. Then, wait for 4 seconds.
The record speed will flash.
Channel 2
Day Monday 19
Start time 11:30AM
Stop time l:3,0Pz
Press the ONE KEY PROGRAM button to set the recording
speed. After 4 seconds, the menus will turn off.
@
When you are finished with all programming, turn the VCR
power OFF and make sure the programmed recording liglht
([]) is lit. However, if you have a cable box, i.eave it turned
ON. Additionally, if the HS-IJ760 does not control your c_,ble
box, leave the box tuned to the station you wish to record.
The VCR is ready to record what you've programmed. If you want
to exit One Key Programming, press STOP.
changingsettingswhileprogramming
If you make a mistake when using One Key Program:
O Turn the shuttle ring on the front panel to move the cursor to
the setting you wish to change. Turning the ring right will
move you forward, while turning the ring lelt will move you
backward. If you wish to use the remote con;rol, you can use
ENTER to move forward or CANCEL to move backward.
Once you have chosen a setting, you can change it by using
the jog dial on the front panel or the ADJUST dial on the
remote control.
_Important:
Once you have corrected the setting, turn the shuttle ring
right or press ENTER on the remote control to resume your
place.
If you press CANCEL or turn the shuttle ring left while the
cursor is next to the channel number, you will cancel the entire
program. If you want to stop using One Key Programming, press
the STOP button.
49
Page 52

Chapter3: OperatingYourVCR -"_ .2 Recording(cont.)
Notes aboutprogrammedrecording
>Important:
You cannot use the VCR when the programmed recording light
(_) is lit. If you want to use the VCR before programmed record-
ing begins, press the POWER button on the remote once. This
turns the programmed recording light off and the VCR on.
If you use the POWER button on the front panel for this purpose,
you will have to press it twice, l:'ressing it once _;urns off the
programmed recording light; pressing it a second time turns the
VCR on.
When you are finished using the VCR, turn the VCR power off
again, either with the POWER button on the remote or the
POWER button on the f_ont panel. Make sure the programmed
recording light is back on.
After a program has been recorded, the VCR memory is cleared
(unless you have scheduled the VCR to record the program every
day or every weekl.
If there is already a program in the VCR's memory, you will see
the "recap" screen when you bring up the rnenu_ for programming
to record (unless you are, programming with the QUICK PRO-
GRAM/VCR Plus+ button). If the VCR's memory is full, you must
erase a program before you can enter a new one,
_>Important:
If a tape runs out during programmed recording, the VCR ejects
the tape and the programmed recording light (El) and the tape
status symbol (,IY_:II_)will flash. Load a new tape and press the
REC button. The VCR will resume recording. Dc_not overlap the
recording times you program.
Remember that when your VCR is off, it may also be in stand-by
for programmed recording. Also remember that the VCR, when
programmed, will record over the next section oJ' tape. So, to ,avoid
recording over tapes you want tc save, remember that the VCR
automatically shuts off during OTR recording and "rewind & off."
Your VCR will not record over a tape that has the erasure preven-
tion tab removed (see "Preventing accidental er_.sure"). All rental
movies have this tab removed, so they are safe f!:om being acci-
dentally erased.
autospeedprogramming
Use auto speed programming if you want to record as much of the
program as possible in standard play (SP) speed, but you want
the VCR to automatically switch to extended ph_y (EP) if there is
not enough tape left.
Auto speed programming is only available in the-_first program-
ming slot. In this first slot, the recording speed is automatically
50
Page 53

set to AUTO. If you want to use auto speed programming in this
programming slot, you don't need to chang._ anything.
_Important:
Make sure that the "Tape" video function r3atches the kind of
tape you are using. (See "Selecting and adjusting the audio and
video functions" on page 29.)
Set the time for recording to end a minut_ _r two beyond the
program's scheduled broadcast time.
programmingTVprogramsthatendonthedayafter
If you want to start the recording at 11:00 PM and end it at 2:00
AM the next day, simply set the start time to 11:00 PM on the
recording start day and the end time to 2:00 AM. There is no need
to change the day of the week.
skippingprograms
If you have already entered a program into your VCR's :memory,
you can skip the program without going :inl;o the VCR's menus.
Simply press the POWER button on the front panel once. The
programmed recording light ([]) will turn off, and the program
will be skipped. If you decide not to skip the program, press the
POWER button on the front panel twice; the programmed record-
ing light will light up again.
I
__ CH DAY ON OF_
2 MOI9 II:30A I:30PSP!
I0 TH22 9:00PI0:00PEP
changingprogrammedrecordingsettings
If you want to change the programmed recording settings:
O Turn the VCR on with the POWER button.
Press the MENU button on the remote control.
O
Turn the ADJUST dial to select "Pro;_m to record." Turn the
shuttle ring right. You'll1 see the "recap :_screen.
O
Turn the ADJUST dial to place the cursor next to the pro-
gram you wish to change. Turn the shuttle ring right. You
will see the "Program to record" menu.
Repeatedly turn the shuttle ring right to place the cursor next
to the item you wish to change. Use th,!_ADJUST dial to
change it.
Use the MENU button to turn off the menus. Then, use the
POWER button to turn off the VCR. Make sure the pro-
grammed recording light is on.
51
Page 54

Chapter3: OperatingYourVCR Recording(cont.)
cancelingaprogrammedrecording
O Press POWER to turn the VCR on.
Press the MENU button on the remote (:ontrol. The _VCR
O
Main Menu" appears on your screen. Use the ADJUST dial on
the remote control to move the cursor next to "Program to
record." Turn the shuttle ring right.
CH DAY ON OFF
2 M019 II:30A I:30PSP
10 TH22 9:00PI0:00PEP
@) You will see the "recap" screen. Use tile ADJUST dial to place
the cursor next to the program you wish to cancel.
Press the CANCEL button. The prograr_ is erased.
Press the MENU button once to return _o the Main Menu;
press it again to turn off the menus.
usingtheTIMERRESETbutton
You can use the TIMER RESET button oll the rear panel to erase
both the time and all programmed recordinl_s.
To use the TIMER RESET button, press it with a pencil or a ball
point pen. The power will turn off and the clock will reset. All
programmed recording is erased.
Additionally, the TIMER RESET button wiill reset the on-screen
language you selected. The next time you u;_e the menus, you will
have to select the on-screen language. (See page 28.)
loadinga tapefor programming
If, after programming, you forget to load a tape, or if you load a
tape with its erasure tab removed, then the programmed record-
ing light and the tape status symbol will fl_!.sh. A tape without an
erasure tab will be ejected. To correct this, load a tape with its
erasure tab intact, and turn off the VCR.
usingthesatellitereceiver
Your VCR can turn your satellite receiver cn and off when it is
time for a programmed recording.
You can view satellite channels through :_oar VCR when your
VCR is off only if you connected your VCR and TV with an
S-Video cable. If you used a standard video cable, you can only
view satellite channels through your VCR when the VCR is on.
memorybackup
If the VCR is without power for 30 minutes or less, it will retain
the time and the programmed settings, provided the VCR has
been plugged in for at least an hour beforehand. If the power is
lost for more than 30 minutes, the time and the programmed
settings will be lost.
52
Page 55

,_ CHAPTER FOUR
UsingtheAdvancedFeatures
Now that you've learned about the basic operation of your VCR,
you're ready to discover its advanced features. You'll find infor-
mation on:
Usingthe AdvancedPlaybackControls
$ Using the AdvancedRecording Controls
SearchingTechniques
$ UsingtheActiveA/V NetworkFeatures
Makinga Copy ofa Tape
$ UsingChild Lock
Before you use the advanced features, you should be familiar with
all of the VCR's basic operations, including' viewing a picture
coming from your VCR (page 25), playing back a tape (page 27),
using the menus (page 31), and recording (page 40). If you find
any of the intbrmation in this section confl_sing, you may want to
review the previous chapters.
UsingtheAdvancedPlaybackControls
In this section, you'll discover some of the advanced playback
features of your VCR. These include:
• Using special effects,
• Adjusting the tracking, and
• Using the time counter.
Usingspecialeffects
You can use the shuttle ring and the jog dial on the front panel, or
the shuttle ring and ADJU,_T dial on the remote to control the
playback speed of the tape.
usingtheshuttleringwhenthetapeispaused
Turning the shuttle ring will change the playback speed in steps.
1 Reverse high speed search
2 Reverse speed search
3 Reverse fast playback
4 Reverse playback
5 Reverse slow-motion playback
6 Still
7 Slow-motion playback
8 Playback
9 Quickview
10 Forward speed search
11 Forward high speed search
O
While the VCR is playing a tape, press Lhe PAUSE button to
freeze the picture on the screen.
O
Turn the shuttle ring and hold it to play the tape at a particu-
lar speed (see the chart to the left). If you release the ring, it
will come back to the center position, and the still (PAUSE)
mode will resume.
To resume normal playback, press the PLAY button.
53
Page 56

Chapter4: UsingtheAdvancedFeatures UsingtheAdvancedPlaybackControls(cont.)
E>Important:
1 Reverse high speed search
2 Reverse speed search
3 Reverse fast playback
4 Playback
5 Quickview
6 Forward speed search
7 Forward high speed search
After about five minutes in the still or slow-motion mode, the
VCR will automatically stop to avoid damage to the tape.
Depending on the type of TV you are using, the picture may
vibrate vertically when you pause the VCR's picture.
using the shuttle ringwhen the tape is playing
You can also change the playback speed with Lhe shuttle ring
without entering the PAUSE ]node. To do thi_, turn the shuttle
ring and hold it to play the tape at a particul;_r speed (see the
diagram to the ]eft). If you release the ring, it will come back to
the center position, and normal playback w_illresume.
usingthejog dialorADJUSTdial
You can use the jog dial or the ADJUST dial to advance the tape
frame by frame.
O While the VCR is playing a tape, press th _ PAUSE button to
freeze the picture on the screen.
Turn the jog dial or ADJUST dial clockwise to advance the
tape forward. Turn it counter-clockwise to reverse the tape.
The faster you turn the dial, the faster the tape will move.
To resume normal playback, press the PIo,AY button.
I IIII IIII :'/ "-": OTR
:" ": "" :" "'_ SP VCR
IH -II1_ I_llls
DTR light
jog/shuttleindicators
When you are using special effects, the jog/shuttle indicators (I_
and •) and the pause indicator (I I) will light; up as follows:
-- I I will light up when you are in still frame
--I_ will light up when you use a special effect in the forward
direction; • will light up when you use a special effect in
the reverse direction
-- I I and I_ will light up when you move t_ame by frame
forward. I I and• will light up when you move frame by
frame in reverse.
usingstilladjustment
Sometimes during still frame, the picture m_y vibrate or shake.
To correct this problem, turn the jog dial on the front panel while
pressing the ONE I@;Y PROGRAM button. (Side-to-side vibration
cannot be corrected.)
Adjustingthe tracking
automatictracking
Your VCR automatically adjusts the tape to i,rive you the best
quality picture, when you press the PLAY button, the DIGITAL
TRACKING light will flash, showing that _:h,?VCR is adjusting
the picture, when the VCR has finished adjl:sting the picture, the
DTR light will shine steadily.
54
E>Important:
A certain amount of"noise" in the picture or sound is normal
while the VCR is tracking a tape.
Page 57

manualtracking
From time to time, you might play a tape tt_at has excess "noise"
in the picture (often looking like vibration or interference at the
top or bottom of the screen). To correct the picture, you will have
to manually track the tape.
O While the tape is playing, press and hold the ONE KEY
PROGRAM button and _urn the jog dial until the picture is
clear of excess "noise."
To continue automatic tracking, press the ONE KEY PRO-
GRAM button on the front panel. Automatic tracking: will also
resume when you eject the tape.
slow tracking
Slow tracking is used to adjust the playback quality during slow
motion playback and still frame. You can only use slow tracking if
your tape was recorded in extended play (EP) speed. To adjust the
slow tracking, put a tape into slow motion, then press and hold
the ONE KEY PROGRAM button and tuEa the jog dial on the
front panel of the VCR until the best picture! is obtained.
Usingthe timecounter
0_2012 7 i 2 0 2 +4 .-" ..--
BIIII Ill [ I I_II'I l-II'i _'-} ('_)
[]11 I III I I_ II1_ I Il_ls][P_l
Time counter
tape has run in hours, minutes, and seconds. This counter is
useful when you want to find specific points on a tape. The
counter will not work with blank tapes, on blank sections of tape,
or when the VCR's power is off.
setting the counter
To set the counter to "0H00M00S," press the CANCEL button on
the remote control. (You cannot reset the co_:nter if the VCR
channel number is being displayed on the TV or if you are using
the VCR's menus.)
Your VCR will automatically reset the count.er to "0H00m00s"
when you load a tape into the VCR. It will display "- H - - m- - S"
when there is no tape in the VCR.
Your VCR has a time counter that shows the amount of ti[me the
_Important:
The counter cannot display times greater th_n "9H59M59S" in
either the forward or reverse direction. If you are using a tape
labeled T-210, the counter will not be displayed correctly when
the tape runs longer than "9_59M59S."
4, Using theAdvanced RecordingControls
In this section, you'll learn about some of the advanced recording
features of your VCR, including:
• Using the PeffecTape TM feature,
• Displaying the time gauge and the remaining time, and
• Displaying the present time.
55
Page 58
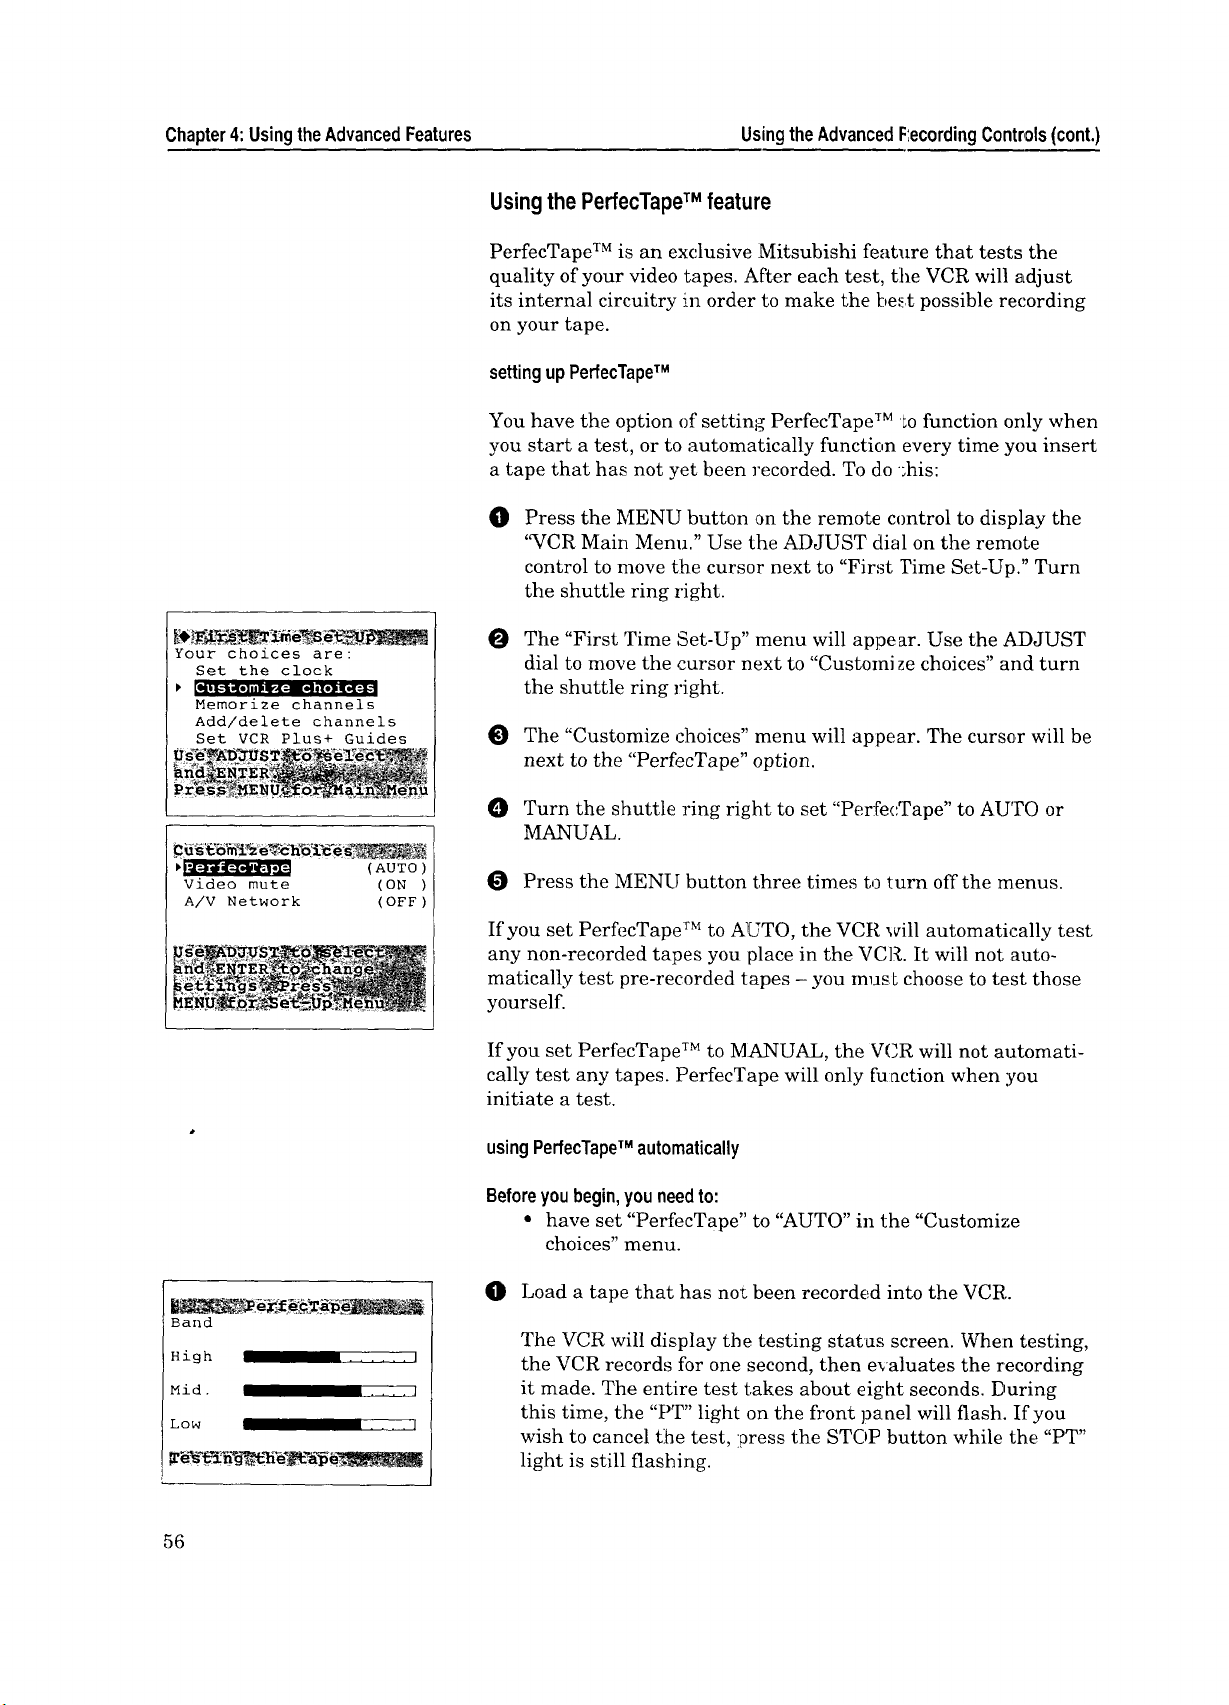
Chapter4:UsingtheAdvancedFeatures UsingtheAdvancedF:ecordingControls(cont.)
Usingthe PerfecTapeTM feature
PerfecTape TM is an exclusive Mitsubishi feature that tests the
quality of your video tapes. After each test, the VCR will adjust
its internal circuitry m order to make the be_t possible recording
on your tape.
settingupPerfecTapeTM
You have the option of setting PerfecTape TM Lo function only when
you start a test, or to automatically function every time you insert
a tape that has not yet been recorded. To do _his:
O
Press the MENU button on the remote control to display the
'_VCR Main Menu." Use the ADJUST dial on the remote
control to move Lhe cursor next to "First Yime Set-Up." Turn
the shuttle ring right.
Your choices are:
Set the clock
Memorize channels
Add/delete channels
Set VCR Plus+ Guides
(AUTO)
Video mute (ON )
A/V Network (OFF)
The "First Time Set-Up" menu will appear. Use the ADJUST
dial to move the cursor next to "Customize choices" and turn
the shuttle ring right.
@) The "Customize choices" menu will appear. The cursor will be
next to the "PerfecTape" option.
Turn the shuttle ring right to set "PerfecTape" to AUTO or
MANUAL.
Press the MENU button three times to *.urn off the menus.
If you set PerfecTape TM to AUTO, the VCR will automatically test
any non-recorded tapes you place in the VCR. It will not auto-
matically test pre-recorded tapes - you mus Lchoose to test those
yourself.
If you set PerfecTape TM to MANUAL, the VCR will not automati-
cally test any tapes. PerfecTape will only function when you
initiate a test.
usingPerfecTapeTM automatically
Beforeyoubegin,youneedto:
• have set "PerfecTape" to "AUTO" in the "Customize
choices" menu.
Band
High ...... I
Mid ..... l
Low .... J
56
0 Load a tape that has not been recorded into the VCR.
The VCR will display the testing status screen. When testing,
the VCR records for one second, then evaluates the recording
it made. The entire test takes about eight seconds. During
this time, the "PT" light on the front panel will flash. If you
wish to cancel tlhe test, press the STOP button while the "PT"
light is still flashing.
I
Page 59

Your tape is rated
[
Average Excellent
The VCR will test your
tape. However, it must
record over a small
portion of your tape.
When the test is finished, the VCR will display the rating of
your tape for eight seconds. On the frort panel, the "PT" light
will shine steadily, indicating that the VCR has set its inter-
nal circuitry to make the best possible ,'ecording on this tape.
usingPerfecTapeTM manually
O Load a tape that has its erasure tab intact into the VCR.
O Find a portion of the tape that is OK to record over; this
feature will record over one second of your tape.
@) Press the PERFECTAPE button on the front panel. You wilt
see the PerfecTape TM explanation scree a.
O
Press the PERFECTAPE button again _o begin the test. The
VCR will display the te,_ting status scr_z,en. When testing, the
VCR records for one second, then evalu _tes the recording it
made. The test takes about eight seconds. During this time,
the "PT" light on the front panel will fl_!_sh.To cancel[ the test,
press the STOP button while the "PT" light is still fl_.ashing.
When the test is finished, the VCR will display the rating of
your tape for eight seconds. On the front panel, the "PT" light
will shine steadily, indicating that the VCR has set its inter-
nal circuitry to make the best recordin_ on the tape. You can
quickly turn off the display by pressing the STOP button or
the PERFECTAPE button.
IVCR
Stop
I REM I:4G
! 0h20m08s
[
Remaining Time
f
I" -I I_1 II H I- I_1M I_1 I-I s
RE. I. I I I-I II III IIII
Time
gauge
Remaining
Time
If you would like to record without the settings that resulted
from the test, press the PERFECTAPE button to turn off the
PT light on the fluorescent display. If you would like to
restore the settings, press the PERFECTAPE button to turn
the PT light back on. Should you wish to erase the settings,
eject the tape. The settings will also be erased if you press the
TIMER RESET button or if the VCR loses power.
Displayingthe timegaugeandthe remainingtime
The time gauge is a graphic representation of your position on a
video tape. The left side of the gauge is the start (S) of the tape,
and the right side is the end (E) of the tape. For a T-120 length
tape, played at standard (SP) speed, each n:.ark on the gauge
represents about 15 minutes. The remaining time display shows
the time, in hours and minutes, left until the end of a tape.
Thetimegaugeandthe remainingtimeautomaticallyappear:
during fast forward and rewind (from a stopped tape), during
timed searches, index searches, when rewir ding for repeat
playback, during skip search, and during searches for blank
sections of tape.
You can turn off the time gauge and the re,uaining time by
pressing the DISPLAY button twice.
57
Page 60

Chapter4:UsingtheAdvancedFeatures UsingtheAdvancedRecordingControls(cont.)
Tomakethetimegaugeandtheremainingtimeappear:
Press the DISPLAY button once. The time gauge and remaining
time will appear on the TV screen, and the remaining time will
appear on the fluorescent display. They will disappear after four
seconds when playing a tape. To turn off the display, press the
DISPLAY button twice.
Present Time
!- II
PM
VCR
Stop
SErE
Sun 7:30P
0h20m08s
_Important:
,'::','-' ,, ,,, ,,,:,
- I_IH I- I_I_ I_I l_is
Present
Time
The time gauge and remaining time work b5 detecting control
signals on recorded tapes. They will therefore not function with
tapes that have not yet been recorded. Also, you must have set
the "Tape" video function correctly.
Depending on the length of the tape being u;_ed, it may take a
moment for the display to appear.
The tape remaining display :may not show the correct remaining
time if the tape function is incorrectly set (see "Using the Audio
and Video Functions" on page 28), if you are using speed search, if
you are using a special length cassette (such as T-10 length or T-
210 length), or if you are using a cassette with an adapter.
Displayingthe presenttime
The present time display on the fluorescent display panel or on
the TV screen shows the current time. If you have not set the
f.._-
clock, or if there has been a power failure of longer than 30
minutes, the display will show - : - -. The cu::rent time will be
displayed when the VCR is off. To see the current time when the
VCR is on:
0 Press the DISPIAY button on the remol;e control twice. The
peak level meter will be replaced by the present time.
To turn offthe present time, press DISI:'LAY once.
SearchingTechniques
58
The VCR lets you search through a tape i:n a number of ways.
These include:
• Quick searching,
• Edit searching,
• Speed searching,
• Searching by time,
• Searching for a blank portion of tape, and
• Index search techniques.
Quicksearching
This feature lets you search through the tape you are playing in
30 second intervals. It is de_,;igned so that you can quickly speed
through any commercials you may have recorded.
Page 61

",,," indicates 30
seconds of quick
search time
I
oe ooo ooo •
," ; ,° ";
;, o.. o°: ;°... °°:
O While playing a tape, press the Q.V. b_Ltton. The VCR will
speed through 30 seconds of tape, then resume playback.
O Press the Q.V. button again for an add:tional 30 second
interval of quick search. You can press Q.V. up to 4 times, for
a quick search total of 2 minutes. The quick search time is
indicated on the fluore,;cent display.
Edit searching
Edit search is very useful for editing out commercials if you are
recording a program while you are watching it. It is also useful as
a general editing feature. This feature is sometimes called EE
(electronic-to-electronic) editing. This function works only when
you are in "record-pause" mode.
During record pause, press the FF or REW button or use the
shuttle ring to locate the point where, you want to resume
recording.
O
When you find the point where you want to continue record-
ing (e.g. the last frame before the commercial), stop operating
the buttons or shuttle ring. After 3 seconds, the VCR will
return to record pause; you will see the live picture.
_Important:
_Important:
Press the PAUSE button (NOT the REC button) to resume
recording (when the commercials are o,rer).
Edit search will begin any time you are in record-pause and
operate the REW or FF buttons or the shuttle ring. Edit search
will end after 3 seconds of not using the bu';tons or shuttle ring.
Speedsearching
You can use speed search to visually sear'ct:: through the contents
of a videotape. To do this:
While playing a tape, press FF or REW button on the remote
control. You will see the picture as it fa_t forwards or rewinds.
It is normal to see some "noise bars."
If you press the FF or REW button and hold it down for about
1 second, the search speed will increase.
To resume normal playback, press FF or REW again quickly,
or press PLAY.
The fastest search speed that allows you to see the picture is
about 30 times normal speed. Using fast forward or rewind
without the picture allows you to search up to 200 times normal
speed. The fastest way to move through tlhe tape is without a
picture. It is normal for the number of noise bars on the screen to
increase and roll from top to bottom as the visual search speed
increases.
59
Page 62
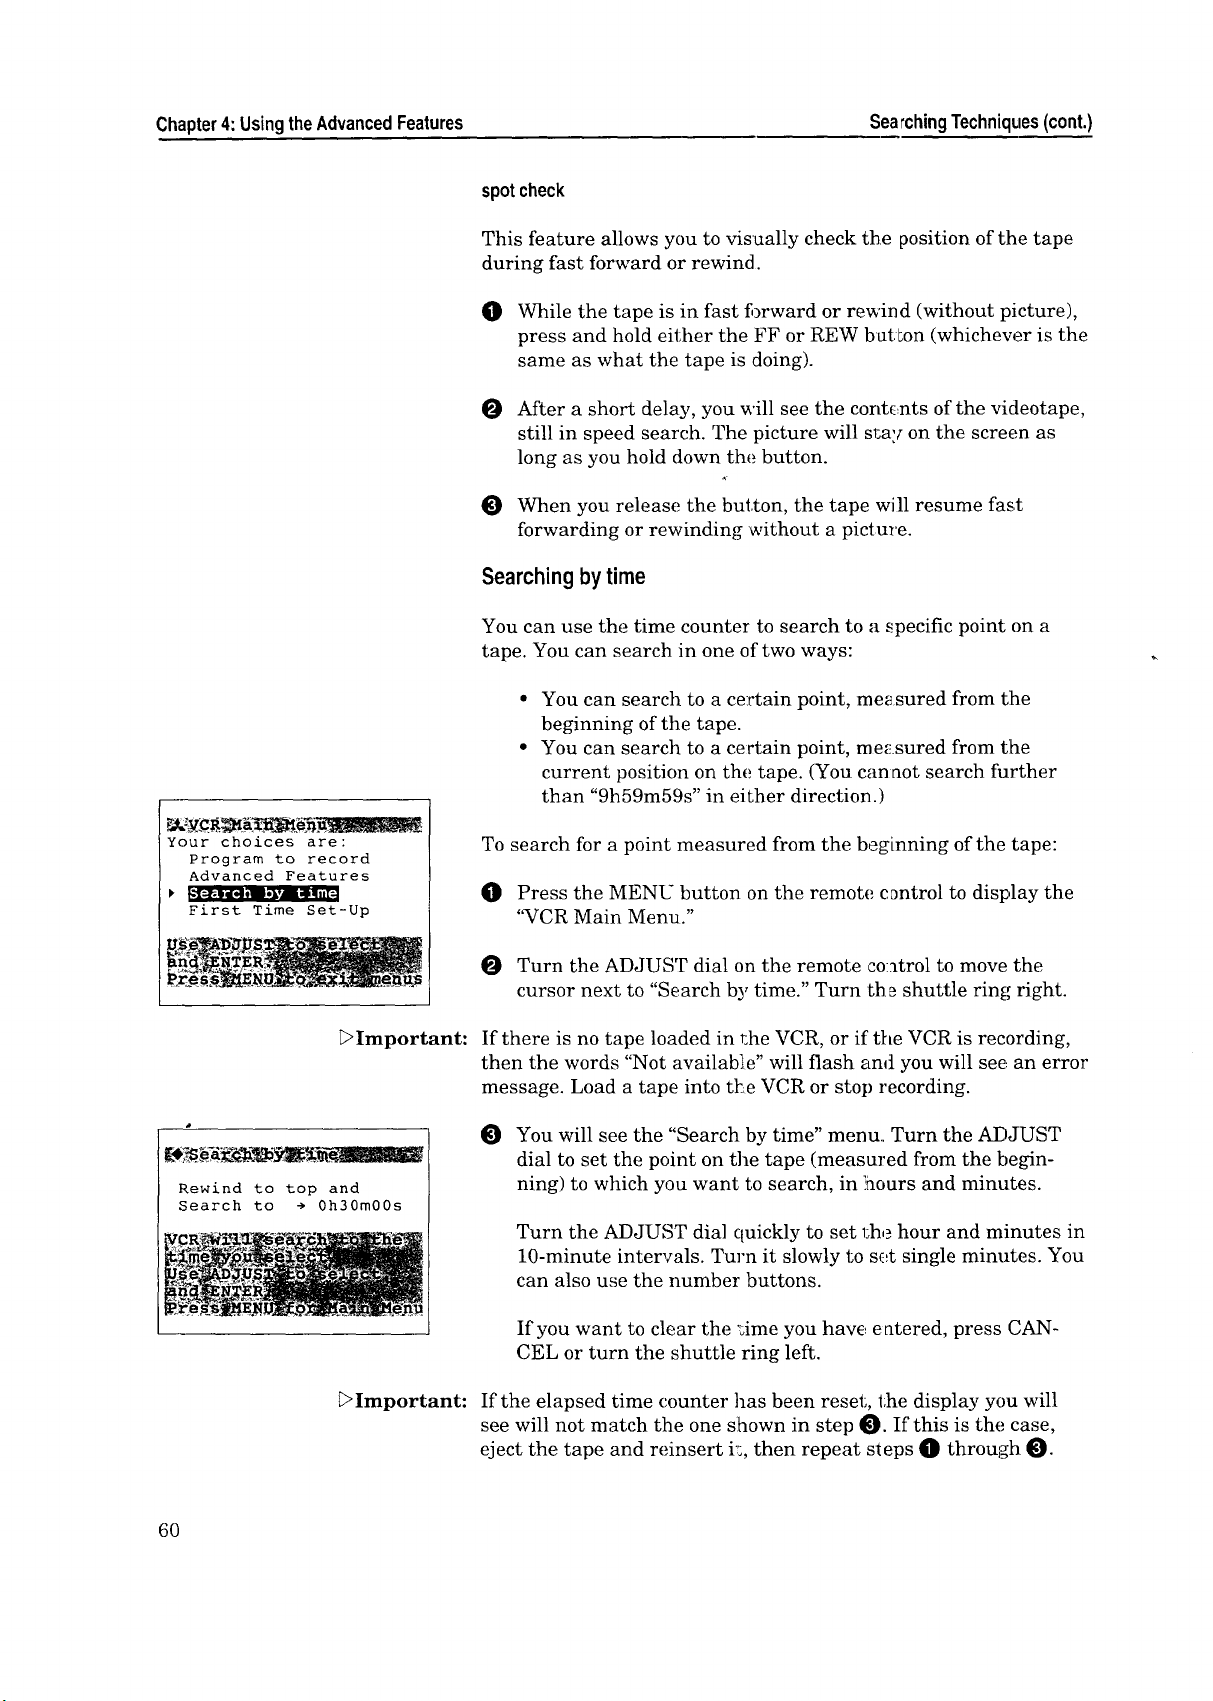
Chapter4: UsingtheAdvancedFeatures Sea;chingTechniques(cont.)
spotcheck
This feature allows you to visually check the position of the tape
during fast forward or rewind.
I01 While the tape is in fast t_)rward or rewind (without picture),
press and hold either the FF or REW button (whichew_r is the
same as what the tape is doing).
O After a short delay, you will see the contents of the videotape,
still in speed search. The picture will sr,ay on the screen as
long as you hold clown the button.
O When you release the button, the tape will resume fast
forwarding or rewinding without a picture.
Searchingbytime
You can use the time counter to search to a specific point on a
tape. You can search in one of two ways:
• You can search to a certain point, measured from tlhe
beginning of the tape.
• You can search to a certain point, rne_!.sured from tlhe
current position on the tape. (You cannot search further
than "9h59m59s" in either direction.)
Your choices are:
Program to record
Advanced Features
First Time Set-Up
_Important:
Rewind to top and
Search to ÷ 0h30m00s
_Important:
To search for a point measured from the beginning of the tape:
O Press the MENU button on the remote, control to display the
'%CR Main Menu."
O Turn the ADJUST dial on the remote ,control to move the
cursor next to "Search by time." Turn th_ shuttle ring right.
If there is no tape loaded in _:he VCR, or if the VCR is recording,
then the words "Not available" will flash and you will see an error
message. Load a tape into tl_e VCR or stop recording.
You will see the "Search by time" menu.. Turn the ADJUST
dial to set the point on the tape (measured from the begin-
ning) to which you want to search, in ]nours and minutes.
Turn the ADJUST dial quickly to set l:he hour and minutes in
10-minute intervals. Turn it slowly to set single minutes. You
can also use the number buttons.
If you want to clear the ";ime you have entered, press CAN-
CEL or turn the shuttle ring left.
If the elapsed time counter has been reset, the display you will
see will not match the one slhown in step 0. If this is the case,
eject the tape and reinsert k, then repeat steps _ through _.
60
Page 63
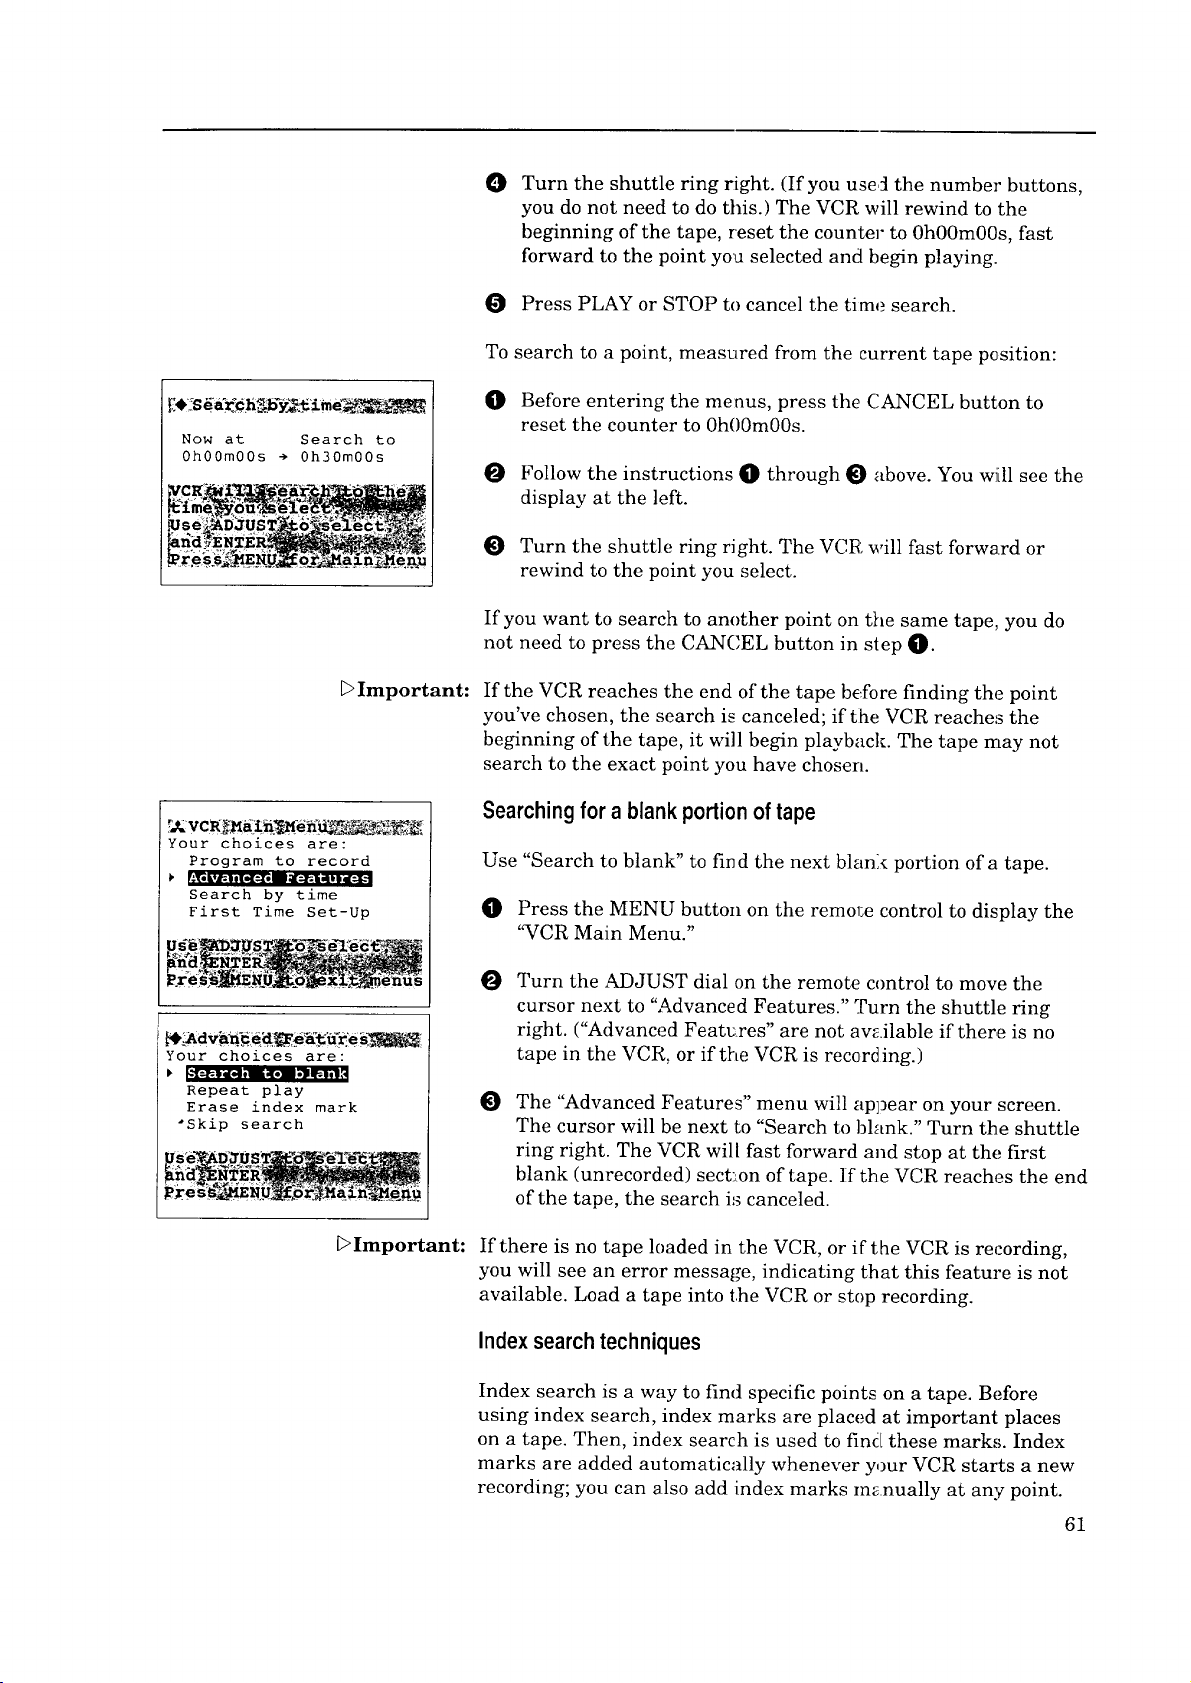
Now at Search to
0h00m00s ÷ 0h30m00s
O
Turn the shuttle ring right. (If you use,_ the number buttons,
you do not need to do this.) The VCR will rewind to the
beginning of the tape, reset the counter to 0h00m00s, fast
forward to the point you selected and begin playing.
O Press PLAY or STOP to cancel the time search.
T0
search to a point, measured from the current tape position:
O
Before entering the menus, press the CANCEL button to
reset the counter to 0h00m00s.
O
Follow the instructions O through 0 above. You will see the
display at the left.
O
Turn the shuttle ring right. The VCR will fast forward or
rewind to the point you select.
If you want to search to another point on the same tape, you do
not need to press the CANCEL button in step O.
Your choices are:
Program to record
Search by time
First Time Set-Up
Your choices are:
Repeat play
Erase index mark
*Skip search
E>Important:
DImportant:
If the VCR reaches the end of the tape before finding the point
you've chosen, the search is canceled; if t:he VCR reache,_ the
beginning of the tape, it will begin playback. The tape may not
search to the exact point you have chosen.
Searching for a blank portion of tape
Use "Search to blank" to fin d the next blank portion of a tape.
0 Press the MENU button on the remote control to display the
"VCR Main Menu."
O Turn the ADJUST dial on the remote control to move the
cursor next to "Advanced Features." [['urn the shuttle ring
right. ("Advanced Features" are not available if there is no
tape in the VCR, or if the VCR is record ing.)
O
The "Advanced Features" menu will appear on your screen.
The cursor will be next to "Search to bhmk." Turn the shuttle
ring right. The VCR will fast forward and stop at the first
blank (unrecorded) sect:_on of tape. If the VCR reaches the end
of the tape, the search is canceled.
If there is no tape h)aded in the VCR, or if the VCR is recording,
you will see an error message, indicating that this feature is not
available. Load a tape into the VCR or stop recording.
Indexsearchtechniques
Index search is a way to find specific points on a tape. Before
using index search, index marks are placed at important places
on a tape. Then, index search is used to find these marks. Index
marks are added automatically whenever your VCR starts a new
recording; you can also add index marks manually at any point.
61
Page 64

Chapter4:UsingtheAdvancedFeatures SearchingTechniques(cont.)
automaticindexmarks
Whenever recording is begun from the STOP mode, an index
mark is automatically added to the tape. The index light (T) will
flash on the fluorescent display, and an on-screen message will
indicate that the mark is being recorded.
VCR Looking
for index+ 1
S[ZIZZZZ3E
REM 1:40
0h20m08s
VCR Looking
for index- 1
S_E
REM 1:40
0h20m08s
!>Important:
_Important:
Index marks are not added when you press PAUSE to begin
recording from the record-pause mode.
manualindexmarks
To add an index mark yourselt, press the REC button on the
remote control while a tape is recording or plagng.
Index marks must be added at least one minu Leapart. You
cannot add an index mark to a tape with its erasure tab removed.
When you add an index mark to a playing tape, the sound on the
mono track will turn off. To search for an index mark:
O Press the INDEX SEARCH "+" button on the remote control
to begin a forward search; press INDEX SEARCH "-" to
search in the reverse direction. The VCR will fast forward or
rewind and display one of two screens (left) on the TV.
Once the VCR finds an index mark, it will begin playing back
the tape from that: point.
O You can press the plus (+) or minus (-) buttons up to 1!9times
to search for that many index marks. For example, to find the
third index mark ahead, press the plus (+) button three times.
The on-screen display will count down the number of marks
to be passed before playback begins.
-- • _
Your choices are:
Search to blank
Repeat play
Skip search
62
@) To cancel index search, press PLAY or STOP.
erasingindexmarks
0 Make sure the video mute function is on. (See "Using Video
Mute" on page 36.)
O Press the MENU button on the remote control, The "VCR
Main Menu" will appear on your screen.
Use the ADJUST dial on the remote cont::ol to move the
O
cursor next to "Advanced Features." Turn the shuttle ring
right. ("Advanced Features" are not available if there is no
tape in the VCR, or if the VCR is recording.)
O The "Advanced Features" menu will app_,ar on your screen.
Turn the ADJUST dial to move the cursor next to "Erase
index mark." Then, turn 1;he shuttle ring right.
Page 65

DImportant:
Find the section that
includes the index mark
you would like to erase•
Press PLAY,
then press REC
before the index mark.
If there is no tape loaded in r,he VCR, if the VCR is recording, or if
the tape has had its erasure tab removed, you will see an error
message indicating that this feature is not available. Load a tape
into the VCR, stop recording, or place a piece of tape over the
erasure tab to correct this.
O You will see the "Erase Index Mark" me_u (left). Without
exiting the menus, use the INDEX SEARCH buttons to find
the index mark you wish to erase.
When the index mark has been located, and playback has
begun, press STOP.
O
Rewind the tape for a few seconds, then press STOP.
O
Press the PLAY button, l_hen the REC button on the remote
control. The index light (¥) on the fluorescent display will
light up. When the index mark is found, the index light ( T ) on
the fluorescent display _ill flash, and th_ mark will be
erased.
O When the index mark has been erased, I:ress STOP.
• : ...... y --
Your choices are:
Program to record
. - -- I:I';.I :
l[ollll;-I Ill, l[:-][ellllill:l';.14111 iI
Search by time
First Time Set-Up
Your choices are:
Search to blank
Erase index mark
Skip search
_>Important:
When you erase an index mark from a tape, you cannot hear the
sound on the mono track.
usingrepeatplayback
You can play back a section of tape over and over using the
following procedure. The tape will play unroll the next index mark,
rewind to the previous index mark, and resume playing. If there
is only one index mark on the tape, then the VCR will play or
rewind to that mark and resume playback IJ' there is no index
mark, the entire cassette will repeat.
O
Press the MENU button on the remote control. The '%TCR
Main Menu" will appear on your screen. Use the ADJUST
dial to place the cursor next to "Advanced Features." [['urn the
shuttle ring right.
The "Advanced Features" menu will appear on the screen.
Use the ADJUST dial on the remote control to move the
cursor next to "Repeat play." Turn the shuttle ring right.
When the VCR encounters the next mark (or the end of the
tape), it will automatically rewind to the previous mark and
begin playback.
[:>Important:
If there is no tape loaded in the VCR, or if the VCR is recording,
you will see an error message indicating that this feature is not
available. Load a tape into the VCR or stop recording.
O Press the STOP button tc cancel the repeat.
63
Page 66

Chapter4:UsingtheAdvancedFeatures SearchingTechniques(cont.)
skipsearch
When you use skip search, the VCR will fast forward or rewind
Your choices are:
Program to record
Search by time
First Time Set-Up
(without picture) through the tape, showing you short sections of
the tape wherever it finds an index mark. Skip search only works
if there are index marks recorded on the tape.
Press the MENU button on the remote control. The "VCR
O
Main Menu" will appear on your screen., Use the ADJUST
dial to move the cursor next to "Adwmced Features." Turn the
shuttle ring right.
Your choices are:
Search to blank
Repeat play
Erase index mark
The "Advanced I eature_ menu will apt:ear on the screen.
Use the ADJUST buttons on the remote control to move the
cursor next to "Skip search." Turn the slmttle ring right.
The VCR will fast forward until it finds an index mark. Then,
it will show the tape in visual forward s:peed search for about
five seconds. Then it will fast forward again, looking for the
next index mark.
DImportant: If there is no tape loaded in the VCR, or if the VCR is recording,
you will see an error message indicating that this feature is not
available. Load a tape into the VCR or stop recording.
Press PLAY when you see the section you are looking for.
O Press REW to reverse the direction of the skip search.
Press STOP or PLAY to cancel skip search.
_Important: When searching forward, skip search will only find index marks
recorded more than three minutes apart; when searching in
reverse, skip search will only find index marks recorded at least
ten minutes apart.
UsingtheActiveAN NetworkFeatures
The Active A/V Network is a benefit of certain Mitsubishi TVs
and VCRs. The Active A/V Network allows you to use many of the
commonly used features of your system at the press of one button.
Before
64
youbegin,
your VCR must be connected to Exte:mal 1 (EXT-1) of a
Mitsubishi TV with Active A/V Network; (pages 15-17)
you must have turned on video mute (page 36);
you must have turned on the Active A/V Network setting
on your TV (see your TV's owner's guide for information);
you must have set the VCR remote mode to VCR-A; and
you must have connected a cable from the Active A/V
Network OUT terminal of the TV to l:he Active A/V Net-
work IN terminal of the VCR (page, 1.9).
Page 67

Your choices are:
Set the clock
Memorize channels
Add/delete channels
Set VCR Plus+ Guides
PerfecTape (AUTO)
Video mute (ON )
(ACTIVE)
To turn on the Active A/V Network on your VCR:
O Press the MENU button on the remote control. The "VCR
Main Menu" appears on :your TV.
O Use the ADJUST dial on the remote tc, move the cursor next
to "First Time Set-Up." Turn the shuttle ring right.
The "First Time Set-Up" menu appears c_nyour screen. Use
the ADJUST dial to move the cursor next to "Customize
choices." Turn the shuttle ring right.
Use the ADJUST dial to move the cursor next to "A/V Net-
work."
Turn the shuttle ring right to set "A/V Network" to ACTIVE.
Press the MENU button three times to t_rn off the menus.
whattheActiveANNetworkdoes
The Active A!V Network makes it easier and faster to use the
VCR's Quick Program and P]ay commands;.
WhenyoupressQUICKPROGRAMNCRPlus+tobeghprogramming:
• Active A/V Network will turn on your VCR and bring it to
the VCR Plus+ "Program to Record" S:reen.
• Active A/V Network will turn on your TV (if it is off), and
switch the TV to EXT-1.
WhenyoupressQUICKPROGRAMNCRPlus+toendprogramming:
• Active A/V Network will turn offyour VCR (unless a tape is
currently playing or recording).
• Active A/V Network will return your 2_Vto the channel it
was on before, or turn it off (if it was (lff originally).
WhenyoupressPLAYontheremote:
• Active A/V Network will turn your VCR on and begin
playing the tape.
• Active A/V Network will turn the TV (,n, set to EXT-1.
Whenyou turnyourIV off:
• Your VCR will turn off', unless it is playing or recording.
Active A/V Network also affects your VCR when your TV',s P.I.P.
function is used. Active A/V Network can set your VCR's clock if
your TV is equipped with the "StarSight" feature. See your TV
Owner's Guide for more information.
_Important:
When using the Active A/V Network, you should always point
your remote control at your television, not at your VCR.
65
Page 68

Chapter4: UsingtheAdvancedFeatures
MakingaCopyofa Tape
There are two basic ways to make a copy of a tape. One way is to
use the HS-U760 to play a tape and use another VCR to record.
The other way is to use another VCR to play a tape and the
HS-U760 to record.
Whichever method you choose, you will need one RCA audio cable
and one RCA video cable (or one S-Video cable) to connect the two
VCRs. If you do not have these cables, they are available at your
local electronics retailer. In this section you'll learn:
• Using your HS-U760 to record from another VCR,
• Using your HS-U760 to play back to another VCR, and
• Using edit control.
Usingyour HS-U760to recordfrom anotherVCR
[RECORDING]
®®
[ PLAYBACK I
'-- tttt -'--
SIVlDEOIN-- 1_ _---EDIT EDIT--__S-VIDEOOUT
.oo,o,.._ oo.< j uo,oo .t._
_)_ be aligned properly before the plugs
i "'q need to "] You only need to use this cable when connecting
O Connect one RCA audio cable to the AUDIO
OUTPUT terminal on the other VCR.
Connect the other end of this cable to the
AUDIO INPUT terminal on the HS-U760
, labeled L/MONO. If the other VCR is mono,
this is the only audio connection necessary.
O
If the other VCR has stereo outputs, connect
another RCA audio cable to the AUDIO
OUTPUT terminal of the playback VCR.
Connect the other end of this cable to the
AUDIO INPUT terminal on the HS-U760
(labeled R).
O
If you are recording from a standard VHS
VCR, connect a video cable to the VIDEO
OUTPUT terminal on the playback VCR.
Connect the other end of this cable to the
VIDEO INPUT terminal on the HS-U760
The plugs on the cable contain pins that car- be | to a Mitsubishi VCR with an EDIT terminal. 1
pushed into the terminals.
(labeled VIDEO IN). If' you are dubbing from
an S-V_HS VCR, connect an S-Video cable to
the S-VIDEO OUTPUT terminal on the
playback VCR. Connect the other end of this
cable to the S-VIDEO INPUT terminal on the
HS-U760 (labeled S-VIDEO IN).
If you want to record from a standard video
source connected to the HS-U760's rear
panel, :you must disconnect any S-Video
cables (such as those from a satellite
receiver.)
O If you are using another Mitsubishi VCR
with an EDIT terminal, connect a cable
between the two VCR's EDIT terminals.
If the other VCR is a Hi-Fi deck, set, the
audio monitor to "STEREO."
%
J
•
66
Page 69

O
If you attached the connection cables to
the back of the HS-U760, use the INPUT
button to set the HS-U760 to External 1
(L1). If you attached the cables to the front
of the HS-U760, use the INPUT button to
set the HS-U760 to External 2 (L2).
O
If you connected the EDIT terminals, see
"Using edit control" later in this chapter.
O
Put a blank tape into the HS-U760 and
find where you want to begin recording.
Press STOP. If you are recording in
S-VHS, you should use an S-VHS tape and
set the recording format to S-VHS.
UsingyourHS-U760to play backtoanotherVCR
O
Put the tape you wart to copy into the other
VCR and find the place from whic:h you
want to begin copying. Press STOP.
@
On the HS-U760, press REC, then PAUSE.
@
On the other VCR, press PLAY, then
PAUSE.
@ Release the PAUSE button on both VCRs at
the same time.
@ When finished, press STOP on both VCRs.
I PLAYBACK I
--S-VIDEO OUT
--AUDIO OUT L
The plugs on the cable contain pins that need to
be aligned properly before the plugs can be
pushed into the terminals.
O Connect one RCA audio cable to the AUDIO
INPUT terminal on the other VCR. Connect
the other end of this cable to the AUDIO
OUTPUT terminal on the HS-U760 (labeled
L). If the other VCR is mono, you need a
Y-adapter to record both audio channels.
O
If the other VCR has stereo outputs, connect
another RCA audio cable to the AUDIO
INPUT terminal of the other VCR. Connect
the other end of this cable to the AUDIO
OUTPUT terminal on the HS-U760 (R).
O
If you are dubbing to a standard VCR,
connect a video cable to the VIDEO INPUT
terminal on the other VCR. Connect the
other end of this cable to the VIDEO OUT-
PUT terminal on the HS-U760 (VIDEO
[RECORDING I
tttt
S-VIDEOIN_i_ _-EDIT
Auo,o,N -AuD,o,NR
"_ _ use this cable when connecting
_ L to a Mitsubishi VCR with an EDIT terrrlinal. 1
OUT). If you are dubbing to a Super VHS
VCR, connect an S-Video cable to the S-
VIDE() INPUT termirLal on the other VCR.
Connect the other end of this cable to the
S-VIDEO output term:[nal on the HS-U760
(S-VIDEO OUT).
O
If you are using another Mitsubishi VCR
with an EDIT jack, you can connect, the two
VCRs ibr synchronized editing. This makes
editing much easier az:d requires only one
additional video cable for connection. Con-
nect the cable between the EDIT jacks on
the both VCRs.
Set the audio monitor on the HS-U760 to
"STEREO." (See "Selecting and adjusting
the audio and video functions," on page 29.)
67
Page 70

Chapter4:UsingtheAdvancedFeatures MakingaCopyofaTape(cont.)
0
Set the I.P. switch on your HS-U760 to "I)UB." This turns off
the sharpness control and improves the quality of your copy.
In addition, the on-screen displays will not appear, so they
won't be accidentally copied onto your new tape. Make sure to
set the I.P. switch to ON or NORMAL wlLen you're done.
0
Set the input of the other VCR to "External."
0
If you connected the EDIT jack, see "Using edit control" later
in this chapter to make the copy.
0
Put a blank tape into the other VCR and find the place where
you want to begin record:mg. Press STOP. If the other VCR is
a Super VHS VCR, be sure to use an S-VHS tape, and. to set
the recording format to S-VHS.
@
Put the tape you want to copy into the HS-U760 and find the
place from which you want to begin copying. Press STOP.
0
On the other VCR, press record (REC), and then PAUSE.
0
On the HS-U760, press PLAY and then ]?AUSE.
Release the PAUSE button on both VCRs at the same time.
0
0
Press STOP on both VCRs when you ar_ finished.
Usingeditcontrol
If the other VCR you are using is a Mitsubi_hi VCR with an EDIT
jack, you can synchronize the starting and stopping of the VCRs
when editing. This greatly simplifies editing_;, and requires only
the additional connection of an edit cable between the two VCRs.
Connect the two VCRs as described in the pcevious section (Using
your HS-U760 to play back to another VCRI, anct follow the
instructions in the table at the top of the _e_t page.
68
Page 71

HS-U760 OtherMitsubishiVCRwithanEDITjack
(PlaybackVCR) (RecordingVCR)
Locate the start of the scene you want to Locate the point where you want recording
copy and press PAUSE. to begin, press PAUSE, then RECORD.
Press the PLAY button. Your HS-U760
automatically rewinds a short way and then
begins to play back. (This function, called
"preroll," allows the HS-U760 to get up to
speed before the edit begins, resulting in
cleaner edits.)
Press the PAUSE button when you want to
stop the edit.
You may use the ADJUST dial, the shuttle
ring, or the jog dial to find the next edit
point. When you have located the edit point,
press PLAY.
€ UsingChildLock
The child lock feature prevents others from using your VCR. To
lock the VCR:
LOCK light
O
I -_1_7 42o2,1
LOCK[l_l I I I I I
EIlII III
I I_1 I--I I--I I'1
IH I I_IM I_1 I_ls
O
Once PIAY is pressed on the HS-U760,
recording will automatically begin on this
VCR.
This VCR will automati :ally PAUSE.
This VCR will begin recording.
Press and hold down the DISPLAY button on the remote
control for about 8 seconds. The LOCK light on the fluores-
cent display will light up.
To cancel the child lock, press and hold down the DISPLAY
button for about 8 seconds, until the LOCK light on the
fluorescent display goes out.
_Important:
You can lock the VCR with the power off, even if the VCR is
standing by for a programmed recording. If you lock the VCR with
no cassette in it, the VCR will not accept a cassette.
69
Page 72

oul lesl oo ng
Problems PossibleSolutions
The VCR won't turn on.
The VCR power is on but •
no controls work. •
You can't see the VCR's
picture on your TV.
Poor picture when watch- • Check the VIDEO CHANNEL setting on the
ing the VCR's tuner on your back of your VCR.
TV. • Check your TV's fine tuning.
VCR REC button doesn't
function.
No picture during
recording.
Check the power cord and the AC outlet.
Is the LOCK light ON? If so, press and hold
the DISPLAY button for more than 8 seconds
until the LOCK light disappears.
Press the TIMER RESET button.
Is the LOCK light ON? If so, press and hold
the DISPLAY button for more than _ seconds
until the LOCK light disappears.
• Check the TV's input setting.
• Check to see that your VCR is not set to "LI"
or "L2."
• Check the erasure prevention tab or_ the
cassette.
• Check the hook-up.
• Check to see if your TV is set to the correct
channel or input.
Fo_"MoreInformation
See Chapter 1, "Getting to
Know Your VCR."
See Chapter 3, "Operating
Your VCR."
See Chapter 3, "Operating
Y_:,urVCR."
S_zeChapter 3, "Operating
Your VCR."
S_.e Chapter 3, ",Operating
Your VCR."
See Chapter 2, =,Connect-
ing Your VCR" or Chapter
3, "Operating Your VCR."
VCR does not record TV. •
The VCR timer recording
does not operate.
Noise in the picture and
distorted sound.
Poor or no Hi-Fi sound.
Playback is noisy or
"snowy".
VCR remote does not
function.
Your converter box or
satellite receiver does not
respond to any signals from
the VCR's Remote Control
Transmitter (the small
window on top of the VCR).
70
Check the VCR tuning.
Check the input selection on the VCR. Does
the front panel display show "LI" or "L2"? If so,
you must switch it to tuner by pressing the
INPUT button.
• Check that the programmed recording light
lights up on the fluorescent display.
• Check the clock time.
• Check the tracking control. Adjust manually if
necessary.
• Check the monitor settings.
• Check the quality of the video tape.
• Try automatic head cleaning.
• Have your VCR video heads cleaned by a
qualified service technician.
• Press the VCR button on the remote control
before operating your VCR.
• Press the TV button on the remote control
before operating your TV.
• Try moving the cable box so that there is a
clear line of sight between the transmitter and
the box's remote sensor.
• Sometimes a cable box needs to be ,;et by the
cable company to receive signals. Contact your
cable company.
• You may need to connect a cable (part number,
"KIT-CBC" to the CONVERTER BOX CON-
TROL terminal on the rear of the ¥CR.
Contact your Mitsubishi dealer for more help.
See Chapter 3, "Operating
Your VCR."
See Chapter 3, "Operating
Your VCR."
See Chapter 4, _Using the
Advanced Features."
See Chapter 3, "Operating
Y_ur VCR."
See Chapter 3, "Operating
YDur VCR."
S _e Chapter 3, "Operating
Your VCR."
Page 73

A Index
A
A/V Network:
active ................................ 64
connecting ........................ 19
terminals .......................... 11
adding channels .................. 36
adjust dial .............................. 9
antenna
connecting ........................ 12
terminals .......................... 11
audio
connecting a TV with
inputs ............................ 17
function button ................ 10
input terminals ............ 6, 11
monitor ............................. 29
using functions ................. 28
auto speed programming .... 50
B
backup, memory .................. 52
batteries
installing .......................... 22
blank, searching for ............ 61
¢
cable box
code numbers ................... 34
connecting ........................ 13
cable tuning light .................. 8
cable, connecting ................. 12
cancel button ....................... 10
canceling programmed record-
ing ..................................... 52
cassette slot ........................... 6
changing programmed
settings ............................. 51
cha_ging settings while
programming ............. 44, 49
channel buttons ..................... 9
channel display ..................... 8
channels
adding and deleting ......... 36
programming the VCR to
receive ........................... 33
selecting ........................... 37
VCR Plus+ guides ............ 38
child lock ............................. 69
cleaning, head ..................... 26
clock, setting ........................ 31
Connecting Your VCR ......... 12
connecting
A/V Network .................... t9
antenna ............................. 12
cable ................................. 12
cable box ........................... 13
satellite ............................. 18
television .............. 15, 16, 17
UHF/VHF antennas ........ :[4
converter box
control terminal ............... :[1
transmitter ......................... 6
copying a tape ...................... (;6
counter display ...................... 7
counter, time ....................... 55
D
daylight savings time .......... 32
deleting channels ................ 36
digital tracking (DTR) light.. 8
display button ..................... 10
dubbing ................................ 66
E
edit search ........................... 59
eject button ........................ 6, 9
enter button .......................... 11
erasure, preventing tape .... 26
F
fast forward button ............. 10
fast forwarding .................... 27
features, advanced .............. 5.3
fluorescent display ............ 6, 7
fran_ais ................................ 28
Front Panel Buttons and
Functions ........................... 6
front display ........................ 30
G
guides, VCR Plus+
channel ............................. 38
H
head cleaning ...................... 2(;
I
Important Safeguards ........... 2,
index
light .................................... 8
marks ............................... 62
search .............................. 61
search buttons .................... 9
input
audio terminal ............. 6, 11
button ............................. 6, 9
video terminals ............ 6, 11
installing the batteries ....... 22
intelligent picture ............... 31
J
jog dial .................................... 7
L
L+R ...................................... 30
language, selecting ............... 28
level met_rs ......................... 30
loading tapes ....................... 26
lock light ................................ 7
lock, child ............................ 69
M
memorizing channels .......... 33
memory backup ................... 52
menu button .......................... 9
menus, using ....................... 31
mode buttons ....................... 10
monitor television ............... 22
mono ..................................... 30
mute button ............................ 9
mute, video ........................... 36
N
normal recording ................. 30
number bu.ttons ................... 10
0
OFF-T button ...................... 10
one key program button ........ 7
one key programming ......... 47
one-touch recording (OTR)
button ........................... 7, 10
using ................................... 46
P
pause button ..................... 7, 10
pausing a tape ..................... 27
71
Page 74
Index
PerfecTape
button ................................. 7
light .................................... 8
using ................................. 56
picture-in-picture (PIP)
buttons ............................ 10
picture, viewing the one
coming from your VCR .... 25
PIP source button ............... 10
play button ...................... 6, 10
play light ............................... 8
playback controls ................ 27
advanced .......................... 53
power button ..................... 6, 9
programmed recording light. 8
programming
auto speed ........................ 50
changing settings
while ........................ 44, 49
one key ............................. 47
the VCR to receive
channels ........................ 33
TV shows that end the day
after ............................... 51
VCR Plus+ ........................ 44
VCR to record ................... 41
Q
quick program
button ............................... 10
using ................................. 45
quick search ........................ 58
quick view button .................. 9
quick view, super ................ 37
R
record button ..................... 7, 9
recording format ................. 30
re_ord light ............................ 8
recording speed ................... 30
recording
advanced controls ............ 55
canceling .......................... 52
changing programmed
settings .......................... 51
current broadcast ............. 40
notes about ....................... 50
one key programming ...... 47
one-touch .......................... 46
programming your
VCR to ........................... 41
Quick Program ................. 45
VCR Plus+ ........................ 44
remain light ........................... 7
remaining time ................ :... 57
remote control
buttons ............................... 9
installing batteries .......... 22
overview ............................. 9
sensor ................................. 6
switch .................................. 6
using ................................. '52
repaired tapes ..................... 26
repeat playback ................... 63
rewind button ........................ 9
rewinding ............................ 27
S
safeguards, important ........... 2
SAP ...................................... :30
SAP indicator ........................ 8
satellite
channel display .................. 8
connecting ........................ 18
memorizing channels ....... 33
programming to record .... 42
search
blank ................................. 61
edit .................................... 59
index ................................. 61
quick ................................. 58
skip .................................... 64
speed ................................. 59
techniques ........................ 58
time .................................. 60
setting the clock .................. 31
sharpness ............................ 31
shuttle ring ....................... 6, 10
skip search .......................... 64
skipping programs .............. 51
slow motion ......................... 53
special effects ...................... 53
speed search ........................ 59
spot cheek ............................ 60
stereo ................................... 30
stereo indicator ..................... 8
stop button ........................ 6, 9
super quick view ................. 37
T
tape speed light ..................... 8
tape status symbol ................. 7
tape
copying ............................. 66
function ............................. 31
loading .............................. 26
playing .............................. 27
preventing erasure .......... 26
repaired ............................ 26
repeating .......................... 63
searching for blank .......... 61
unloading ......................... 26
television
conneci:ing ........................ 15
monil;or. ............................ 22
operating with remote ..... 23
terminals, rear panel .......... 11
time cour,ter ........................ 55
time, setting ........................ 31
time
gauge ................................ 57
present ............................... 58
remaining .......................... 57
search ................................ 60
timer reset button ......... 11, 52
tracking ................................ 54
TV button .............................. 9
U
UHFAi]-IF antennas,
connec;ing ........................ 14
unloading tapes ................... 26
V
VCR Plus+
button ............................... 10
programming with ........... 44
setting channel guides ..... 38
VCR-P_fv'CR-B button ......... 10
VCI_."IV button .................... 10
VCR
A/B remote control switch. 6
button ................................. 9
light .................................... 8
locking .............................. 69
operating ........................... 21
operattng two with one
remote ............................ 23
operating with remote ..... 22
setting up ......................... 21
viewing the picture coming
from your ....................... 25
vibration, controlling .......... 28
video channel switch ..... 11, 21
video
connecting a TV with
inputs ............................ 16
function button ................ 11
input ,erminals ............ 6, 11
mute ................................. 36
using Functions ................. 28
volume controls ..................... 9
72
Page 75

MITSUBISHI
VIDEO CASSE-I-rE RECORDER
LIMITED WARRANTY
MITSUBISHI ELECTRONICS AMERICA, INC. ("MELA") warrants to the original purchaser of this vi,teo cassette recorder if purchased
from an authorized MITSUBISHI Audio/Video Dealer that, should it prove defective by reason of improper workmanship and/or material:
a. Parts. For one year from the date of original purchase at retail, we will repair or replace, at our option, any defective part
including the video head without charge for the part. Parts used for replacement are warranted for the remain :ler of the original warranty period.
at an authorized MITSUBISHI service center.
applicable warranty time period.
1. TO OBTAIN WARRANTY SERVICE, deliver your VCR to the nearest MITSUBISHI service center.
Shipping expenses are your responsibility. The name and address of the nearest service center can be obtained from your MIT'SUBISHI Dealer,
or by writing or calling MELA at the address and telephone number below. Proof of purchase date from an authorized MITSUBISHI Dealer is
required when requesting warranty service. Present your sales receipt or other document which establishes proof and date of purchase. THE
RETURN OF THE OWNER REGISTRATION CARD IS NOT A CONDITION OF WARRANTY COVERAGE[. I--Iowever, please detach and return
the Owner Registration Card so that we can contact you should a question of safety arise which could affe(:t you.
2. THIS WARRANTY DOES NOT COVER damage caused by: modification, alteration, repair or service of this product by anyone other
than an authorized MITSUBISHI service center; physical abuse to, or misuse of, the VC R;operation in a marine r contrary to the instructions which
accompany the VCR; freight damage; or any damage caused by acts of God such as lightning or fluctuation in electrical power. This warranty
also excludes all costs arising from installation, adjustment of user controls, external ante qna systems, service of products purchased or serviced
outside the U.S.A., initial technical adjustments (set-up) and user-required maintenance including head cleaning. Consult the operating
instructions enclosed with the product for information regarding user controls.
b. Labor. For six months from the date of original purchase at retail, we will provide the lab3r for a warranty repair without charge
c. Notice. To obtain warranty service, you must notify an authorized MITSUBISHI servi{'e center of any defect within the
3. ANY EXPRESS WARRANTY NOT PROVIDED HEREIN, AND ANY REMEDY WHICH, BUT FOR -'HIS PROVISION, MIGHT ARISE
BY IMPLICATION OR OPERATION OF LAW, IS HEREBY EXCLUDED AND DISCLAIMED. THE IMPLIED WARRANTIES OF MERCHANT-
ABILITY AND OF FITNESS FOR ANY PARTICULAR PURPOSE ARE EXPRESSLY LIMITED TO A TERM OF ONE YEAR.
4. UNDER NO CIRCUMSTANCES SHALL MELA BE LIABLE TO PURCHASER OR ANY OTHER PERSON FOR ANY INCIDENTAL,
SPECIAL OR CONSEQUENTIAL DAMAGES, WHETHER ARISING OUT OF BREACH OF WARRANfY, BREACH OF CONTRACT, OR
OTHERWISE.
5. Some state do not allow limitations on how long an implied warranty lasts, or the exclusion or Imitation of incidental, special, or
consequential damages, so the above limitations or exclusions may not apply to you.
6. This warranty gives you specific legal rights and you may also have other rights which vary from state to state.
7. BEFORE REQUESTING SERVICE, please review the instruction booklet to _nsure proper installation and correct customer control
adjustment. If the problem persists, contact your nearest MITSUBISHI Dealer for name(s) of authorized MITSUBISHI Service Center(s). If you
are unable to obtain the information, please call 1-800-332-2119, or write us at the address below.
MITSUBISHI ELECTRONICS AMERICA, INC.
P.O. Box 5025
Norcross, GA 30091-5025
RETAIN THIS PORTION FOR YOUR RECORDS
SERIAL NO.
MITSUBISHI
CUSTOMER NAME
STREET ADDRESS
CITY ZIP
STATE
PHONE ( ) PURCHASE DATE / /
MO DAY YR
PLACE OF PURCHASE
Page 76

_,=MITSUBISHI
MITSUBISHI ELECTRONICS AMERICA, INC.
6100 Atlantic Boulevard
Norcross, GA 30071-1305
© 1995 Mitsubishi Electronics America, Inc.
872C137A3
PRINTED IN JAPAN
 Loading...