


S
M
E
S
M
FFDDAA SSeerriieess SSpplliitt SSyysstteemmss
FFDDAA SSeerriieess MMuullttii SSyysstteemms
E
A
A
R
R
N
N
VII
V
U
U
C
C
A
A
E
L
E
L
s


MITSUBISHI HEAVY INDUSTRIES - PAC SERVICE MANUAL
INDEX
MAINTENANCE DATA 2
ERROR CODES 4
PCB INDOOR UNITS 8
ERROR DISPLAY & REMEDY CHART 12
PCB OUTDOOR UNITS 22
ERROR DISPLAY – OUTDOOR UNIT 25
OPERATIONAL DATA CHECK – WIRED CONTROLLER 35
REMOTE CONTROL – WIRED 36
- SETTING FUNCTIONS 37
ERROR DISPLAY – WIRELESS CONTROL 43
REMOTE CONTROL WIRELESS 44

1. MAINTENANCE DATA
1.1 Servicing
(1) Evacuation
The evacuation is a procedure to purge impurities, such as noncondensable gas, air, moisture from the refrigerant equipment by
using a vacuum pump. Since the refrigerant R410A is very insoluble in water, even a small amount of moisture left in the refriger-
ant equipment will freeze, causing what is called ice clogging.
Evacuation procedure
Make sure that the both service valves of gas and liquid line are fully opened.
(a) Check to ensure that there is no internal pres-
sure in the unit. If there is an internal pres-
sure, it should be relived through the service
port.
(b) Connect the charging hose of the gauge mani-
Outdoor unit
fold to the service port of the gas piping.
Close high pressure valve 2 of gange mani-
fold.
(c) Connect the charging hose A to a vacuum
pump.
Repeat evacuation in the following sequence.
Handle Lo
Please run the
vacuum pump for at
least one hour after
the vacuum gauge
Vacuuming begins
shows -101kPa or
lower. (-755mmHg or
lower)
When the vacuum gauge's needle pointer creeps up,
there is moisture left in the system or a leak. Pull air
again after you have checked the system for a leak and
rectified it. Use a reverse flow stop adapter to prevent
the vacuum pump's lubricant oil from flowing into the
refrigerant system.
No increase in the
reading of the
vacuum gauge's
needle pointer.
Vacuuming completed
Vacuum gauge check
Notes (1) Refer to the exterior-view drawing for the position of the service valve.
Notes (2) When connecting of ther service valve, flare connection for both the
Charge hose
(for R410A only)
Charge valve
Vacuum adapter
(for R410A only)
indoor and outdoor unit.
Indoor unit
Gus line
Liquid line
Charge port
Gauge manifold
(for R410A only)
12
Vacuum
pump
Handle Hi
Charge hose A
(for R410A only)
3
Refrigerant
cylinder
Notes (1) Do not use the refrigerant pressure to expel air.
Notes (2) Do not use the compressor for evacuation.
Notes (3) Do not operate the compressor in a vacuum condition.
-
-
2

(2) Refrigerant charging
(a) After the evacuation shown in the above, change the connection of the charge hose A to the refrigerant cylinder.
(b) Purge air from the charge hose A .
First loosen the connecting portion of the charge hose at the gauge manifold side and open valve 3 for a few seconds, and
then immediately retighten it after observing that gas has blown out from loosened connecting portion.
(c) Open valves 1 and 3 then gas refrigerant begins flowing from the cylinder into the unit.
When refrigerant has been charged into the unit to some extent, refrigerant flow becomes stagnant. When that happens, start
the compressor in cooling cycle until the system is filled with the specified amount of gas, then close valves 1 and 3 and
remove the gauge manifold. Cover the service port with caps and tighten them securely.
(d) Check for gas leakage by applying a gas leak detector around the piping connection.
(e) Start the air conditioner and make sure of its operating condition.
1.2 Trouble shooting for refrigerant circuit
(1) Judgement of operating condition by operation pressure and temperature difference
Making an accurate judgement requires a skill that is acquired only after years of experience, one trouble may lead to an another
trouble from a single trouble source and several other troubles may exist at the same time which comes from a undetected different
trouble source.
Filtering out the trouble sources can be done easier by comparing with daily operating conditions. Some good guides are to judge
the operating pressure and the temperature difference between suction air and delivery air.
Following are some pointers,
Pressure
Indi-
Circuit
cation
Too low
A little low
A little
Normal
high
High side ¡
Low side ¡
Too high
1) Excessive overcharging of refrigerant
2) Mixture of non condensable gas (air etc.)
Trouble cause
High side ¡ Ineffective compression
Low side ¡ (defective compressor)
High side ¡
Low side ¡
1) Insufficient refrigerant in circuit
2) Clogging of strainer
3) Gas leakage
4) Clogging of air filter (in cooling)
5) Decrease in heat load (in cooling)
6) Locking of indoor fan (in cooling)
High side ¡
Low side ¡
1) Locking of outdoor unit fan (in cooling)
2) Dirty outdoor heat exchanger (in cooling)
3) Mixture of non condensable gas (air etc.)
High side ¡
Low side ¡
1) Too high temperature of room
-
-
3

(1) Selfdiagnosis function
(a) Check Indicator Table
Whether a failure exists or not on the indoor unit and outdoor unit can be know by the contents of remote controller eroor code
and microcomputer normality pilot lamp) or red LED (check pilot lamp).
1) Indoor unit side
1.3 Diagnosing of microcomputer circuit
, indoor/outdoor unit green LED (power pilot lamp
Remote
controller
error code
No-indication
LCD flashes
continuously
or is off.
-
4
Green
Keeps flashing
Stays OFF Stays OFF Stays OFF
Keeps flashing
Keeps flashing
Keeps flashing Keeps flashingStays OFF 2 time flash
Keeps flashing
Red
Stays OFF
Stays OFF
*3 time flash
Stays OFF
Keeps flashing
Keeps flashing
Keeps flashing
Keeps flashing
-
E1
E5
E6
E7
E8
E9
E10
E16
E28
Note (1) The green LED in the outdoor unit is used in the FDCA301 ~ 601 models only.
Stay OFF or Lights
continously
Keeps flashing
Keeps flashing
Keeps flashing
Keeps flashing
Keeps flashing
Keeps flashing
Keeps flashing Keeps flashing1 time flash Stays OFF
Keeps flashing
Keeps flashing
Keeps flashing
Keeps flashing
Stay OFF
Stay OFF
2 time flash
2 time flash
2 time flash
1 time flash
1 time flash
1 time flash
Stays OFF
Stays OFF
Stays OFF
Keeps flashing
Keeps flashing
Keeps flashing
Keeps flashing
Keeps flashing
Keeps flashing
Keeps flashing
Keeps flashing
Keeps flashing
Keeps flashing
Outdoor unit LEDIndoor unit LED
Green
Stays OFF
Red
Stays OFF
Stays OFF
Stays OFF
Stays OFF
Stays OFF
Stays OFF
Stays OFF
2 time flash
Stays OFF
Stays OFF
Stays OFF
Stays OFF
Stays OFF
Stays OFF
Stays OFF
Stays OFF
Cause
Normal
Power OFF, L phase wiring is open, power source failure
Indoor unit microcomputer failure
Remote controller wires X and Y are reversely connected. *For wire breaking at
power ON, the LED is OFF. Remote controller wire is open. (X wire breaking : A
beep is produced and no indication is made. Z wire breaking : No beep and no
indication) The remote controller wires Y and Z are reversely connected.
Poor connection or disconnection in wires connecting the indoor and outdoor
units.
When multiple remote controllers are used for control, the power supply to some
indoor units is OFF.
Indoor unit PCB fault
The remote controller wire Y is open. The remote controller wires X and Y are
reversely connected. Noise is penetrating the remote control lines. The remote
controller or indoor control PCB is faulty. (The communications circuit is faulty.)
Indoor / outdoor transmission error.
Outdoor unit control PCB is faulty when the power is turned on, or the inverter
parts are faulty (FDCVA 151~251 type).
Outdoor unit microcomputer failure
Indoor unit heat exchanger thermistor failure
Indoor unit return air thermistor failure
Heating overload (indoor heat exchanger temperature is abnormally high) and
indoor heat exchanger thermistor is faulty.
The float SW operates (with FS only). Drain up kit wiring fault.
When multi-unit control by remote controller is performed, the number of units is
over (more than 17 units). Two remote controller are provided for one controller is
performed.
Fan motor is faulty (FDTA 501, 601 type, FDKN type).
Remote controller thermistor failure

Outdoor unit LEDIndoor unit LED
Green
Keeps flashing
Keeps flashing
Keeps flashing
Keeps flashing
Keeps flashing
Keeps flashing
Keeps flashing
Keeps flashing
Keeps flashing
Keeps flashing
Keeps flashing
Keeps flashing
Keeps flashing
Keeps flashing
Keeps flashing
Keeps flashing
Keeps flashing
Keeps flashing
Red Green
Stays OFF
Stays OFF
Stays OFF
Stays OFF
Stays OFF
Stays OFF
Stays OFF
Stays OFF
Stays OFF
Stays OFF
1 time flash
1 time flash
1 time flash
1 time flash
1 time flash
1 time flash
1 time flash
1 time flash
1 time flash
1 time flash
Red
Wiring is open or reversal phase (FDCA 301~601 type)
Abnormal current cut of compressor (FDCA 301~601 type)
52C secondary side L3-phase wiring is open. (FDCA 301~601 type)
Discharge temperature abnormality.
Discharge pipe thermistor failure
63H1 operation (FDCA 301~601 type)
Outdoor air temperature thermistor failure
Inverter Over-voltage Trouble. (FDCVA 151~251 type)
DC fan motor abnormal. (FDCVA 151~251 type)
Remote
controller
error code
E32
E33
E34
E36
E37
E38
E39
E40
E47
E48
Cause
Keeps flashing Keeps flashing
Stays OFF 1 time flash
E35
Keeps flashing
Stays OFF 1 time flash
Current (Abnormalities in a compressor over current)
E42
Keeps flashing Keeps flashing
Stays OFF Lights contiously
52C abnormal. (FDCA 301~601 type)
E52
Keeps flashing
Keeps flashing
Stays OFF 1 time flash
Power transistor thermistor is faulty or disconnection or connector
connections are poor. (FDCVA 151~251 type)
E56
Keeps flashing
Stays OFF 1 time flash
Insufficient refrigerant.
E57
1 time flash
Keeps flashing
Stays OFF 2 time flash
Compressor startup error (FDCVA 151~251 type)
E59
3 time flash
Keeps flashing
Stays OFF 1 time flash
Compressor loader position detection error. (FDCVA 151~251 type)
E60
Outdoor unit heat exchanger thermistor
failure
Outdoor heat exchanger temperature is high or outdoor heat exchanger thermistor
is faulty.
Inverter primary side current is abnormal. (FDCVA151~251 type)
2) Outdoor unit side
-
5
-
Note (1) The green LED in the outdoor unit is used in the FDCA301 ~ 601 models only.

(b) Display sequence of error, inspection display lamp
1) One kind error
Display corresponding to the error is shown.
2) More than one errors.
Section Display section
Error code of remote controller
Inspection LED (red) of indoor unit PCB
Inspection LED (red) of outdoor unit PCB
• Displays the error of higher priority (When plural errors are persisting)
• Displays the present errors.
(When a new error has occurred after the former error was reset.)
3) Timing of error detection
● Indoor unit side.
Error detail Error code Timing of error detection
······················
Drain error (float switch motion)
Wrong connection between the indoor and
outdoor units.
Transmission error of remote controller
indoor unit
Transmission error between indoor/outdoor
units
The number of connected indoor units
exceeds the connection limit (when
multiple units are control by a single remote
controller).
Broken wire of indoor unit return air
thermistor
Broken wire of heat exchanger thermistor
● Outdoor unit side.
Error detail Error code Timing of error detection
Broken wire of outdoor air temperature
thermistor
Broken wire of heat exchanger thermister
Broken wire of discharge pipe thermistor
Broken wire of power transistor
thermistor
“ Wait ”
Normally, 30 seconds after the power is turned ON.
No communications even once with the outdoor unit.
After 1 or more communications of the indoor unit with the remote controller
following power on, transmission errors cause an interruption for 2 minutes.
After communications with the outdoor unit 1 or more times, communications
are abnormal continuously for 2 minutes.
Normally after the power is turned ON (during communications).
When an input temperature of –50°C or lower is measured by the return air
thermistor is measured for 5 seconds or longer within 60 minutes after the
first detection.
When an input temperature of –50°C or lower is measured by the heat
exchanger thermistor is measured for 5 seconds or longer within 60 minutes
after the first detection.
When a thermistor input temperature of –30°C or lower is measured for 5
seconds or longer 3 times within 40 (60) minutes after the 1st detection
between 2 minutes and 2 minutes 20 seconds after compressor operation
starts.
When a thermistor input temperature of –30°C or lower is measured for 5
seconds or longer 3 times within 40 (60) minutes after the 1st detection
between 2 minutes and 2 minutes 20 seconds after compressor operation
starts.
When a thermistor input temperature of –10°C or lower is measured for 5
seconds or longer 3 times within 40 (60) minutes after the 1st detection
between 10 minutes and 10 minutes 20 seconds (between 2 minutes and 2
minutes 20 seconds) after compressor operation starts.
When the under-dome thermistor input temperature of –10°C is measured for
5 seconds or longer 3 times within 40 minutes after the 1st detection between
10 minutes and 10 minutes 20 seconds after compressor operation starts.
Notes (1) Values in ( ) show for the FDCA301~601 models.
(2) The power transistor temperature sensor is used in the FDCVA151~251 models only.
-
6
-

4) Recording and reset of error
Error display Memory Reset
Error code of remote
controller
Indoor unit inspection lamp
(red)
Outdoor unit inspection lamp
(red)
Notes (1) Priority is in the order of E1 > ... > E10 > ... > E60.
• Saves in memory the mode
priority
• Cannot save in memory
• Saves in memory the mode
priority
(1)
of higher
(1)
of higher
• Stop the unit operation by pressing the ON/OFF switch of remote
controller.
• Operation can be started again if the error has been reset.
Indoor unit
: Press the ON/OFF button on the remote controller. Or disconnect and reconnect the power supply connector
(CNW1 or CNW0) on the indoor unit control PCB or turn the main power supply OFF.
Outdoor unit
: Turn the main power supply OFF.
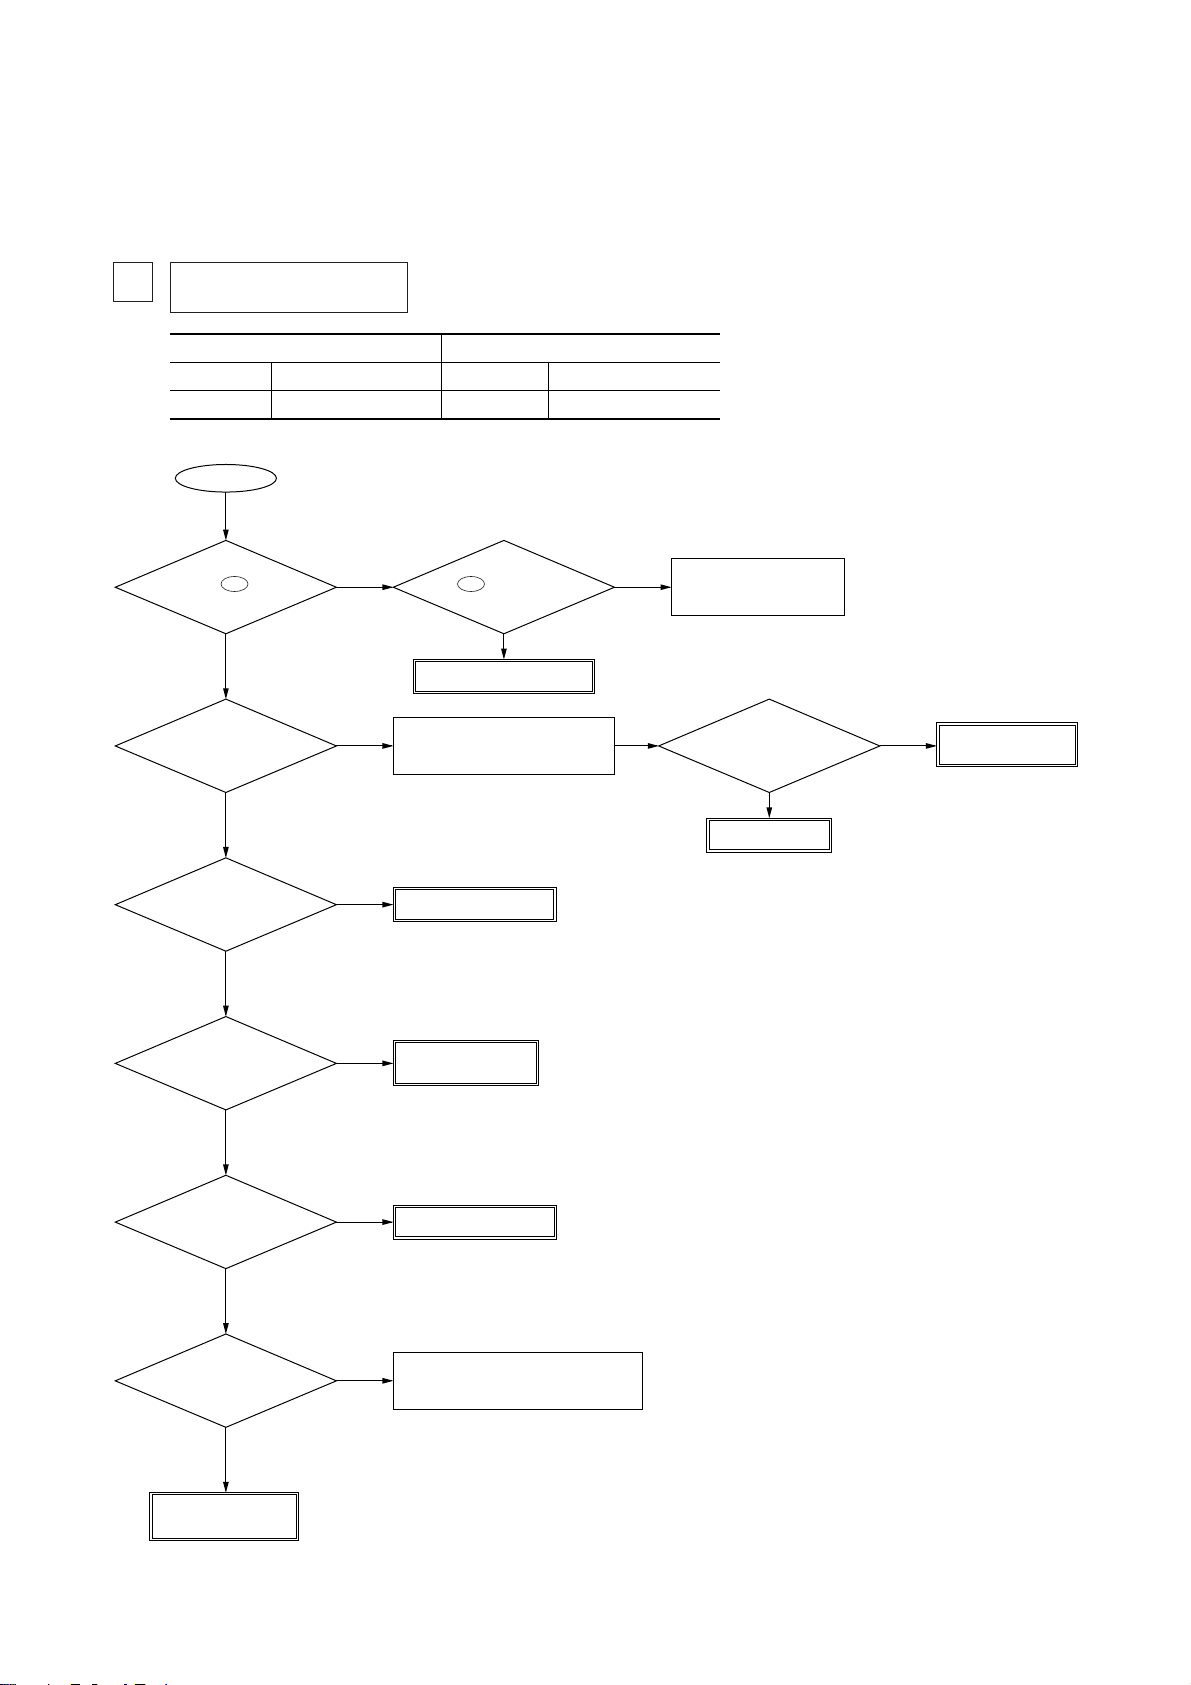
(2) Procedures of trouble diagnosis
When any error occurs, inspect in following sequence. Detailed explanation on each step is given later in this text.
Error Power supply reset
Replacement or repair of defective
parts Test run/adjustment
Note (1) It means the operation to turn off the power and back on again more than 1 min. later in order to reset the malfunction of microcomputer due to the
effect of power supply conditions or accidental noise.
Power supply check
(indoor/outdoor unit)
Check of inspection display [In-
door/outdoor unit PCB, remote
controller or Indication board]
Check of unit
controller
(1)
Check of inspection display [In-
door/outdoor unit PCB, remote
controller or Indication board]
(3) Error diagnosis procedures at the indoor unit side
To diagnose the error, measure the voltage (AC, DC), resistance, etc. at each connector around the circuit board of indoor unit
based on the inspection display or the operation state of unit (no operation of compressor or blower, no switching of 4-way valve,
etc.) If any defective parts are discoverd, replace with the assembly of parts as shown below.
(a) Single-unit replacement parts for circuit board of indoor unit. (Peripheral electric parts for circuit board.)
Indoor unit printed circuit board, thermistor (return, heat exchanger), operating switches, limit switches, transformers, fuses.
Note (1) Use normal inspection methods to determine the condition of strong electrical circuits and frozen cycle parts.
(b) Replacement procedure of indoor unit microcomputer printed circuit board
Microcomputer printed circuit board can be replaced with following procedure.
(i) Confirm the parts numbers. (Refer to the following parts layout drawing for the location of parts number.)
Model
FDTA 151~401
FDTA 501, 601
FDE
Parts number
PJA505A122ZD
PJA505A122ZC
PJA505A128ZF
Model
FDKA 151~251
FDKA 301
FDUR
-
-
7
Parts number
PHA505A018ZF
PHA505A018ZG
PJA505A131ZC

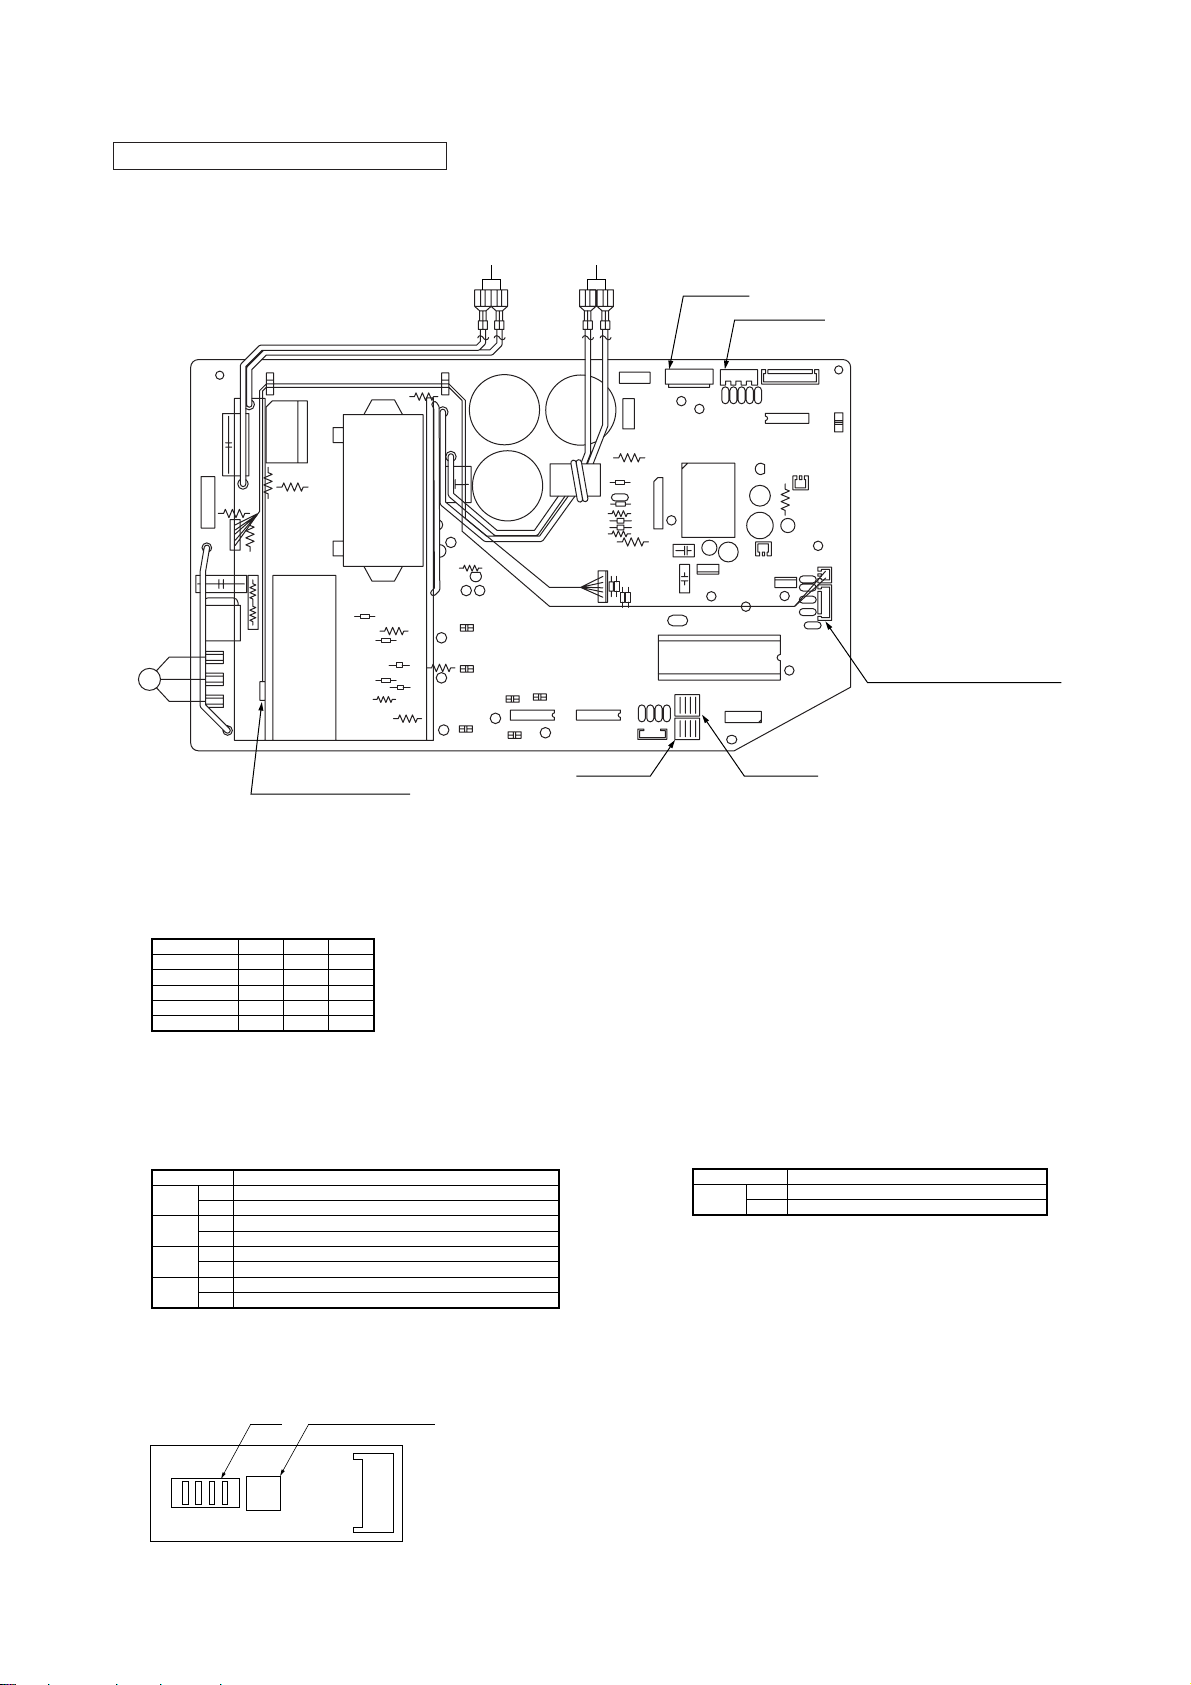
Parts layout on the indoor unit PCB
Model: FDT series
To power supply PCB
(501, 601) (CNW9)
Fan motor
(501, 601)
Power supply PCB
(CNW8)
Connector
(CNT)
Address switch
(SW2)
Heat exchanger thermistor,
Return air thermistor
(Thi-R1, Thi-A)
CNT
CNM2
C13
CNW8
CNY
PC5
L1
C58
CNW9
C12
C1
IC2
IC3
C2
C3
IC9
CNI
Heat exchanger
thermistor
(Thi-R2)
CNM3
52X6 52X1 52X2 52X3
PC3
C4
SW2
CNH CNN1
IC12
X1
J8
J10
J9~J11
(SW10)
Fan motor
(151~401)
CNR
52X4
CNG
LED2
C5
SW10
J11
J12
1234
SW5
J5J6J7
LED1
ON
52X8-2
CNE
SW8
J8
SW7
J1J2J3
1234
C41
J4
ON
SW9
DIP switch
(SW5)
KN1
TVS1
J5~J6
(SW8)
CNV
IC8
IC11
F1
F2
J1~J4
(SW7)
DIP switch
(SW9)
Z2D
52X7
To power supply
(CNW7)
L2
R17
IC7
D2
ZD1
R16
CNJ
Remote
controller
Louver motor
CNW7
C23
TM1
52X8-1
PC2 PC1
C11
CNB
Z3D
Z4D
Z5D
● Change by the jumper wire
Name Function
J1 (SW7-1)
J2 (SW7-2)
J3 (SW7-3)
J4 (SW7-4)
J5 (SW8-1)
J6 (SW8-2)
“None” means that jumper wire is not provided on the PCB or the
Note (1)
connection is cut
The replacement board is not equipped with jumpers J1 ~ J6. Instead,
(2)
SW7 and 8, with the same functions as jumpers J1~J6, are used in the
position where the jumpers were previously. Set SW7 and 8 locally in
accordance with the above table.
With
Input signal - Reverse invalid
(1)
None
Input signal - Rus stop
With
Heating thermostat OFF-Lo
(1)
None
Heating thermostat OFF-Stop, Lo
With
Normal operation operable
(1)
None
Operation permission prohibited
With
Normal
(1)
None
Heating temp. +3
With
Louver free stop control - Invalid
(1)
None
Louver free stop control - Effective
With
Freeze prevention fan control activated.
(1)
None
Freeze prevention fan control deactivated.
● Control change switch (SW5, SW9, SW10)
Function of DIP switch SW5 (Usually all turned OFF)
Switch Function
ON
SW5-4SW5-3
OFF
Setting time : 1000hrs. (Unit stop)
ON
Setting time : 1000hrs. (Display)
OFF
Setting time : 600hrs. (Display)
ON
Setting time : 180hrs. (when shipped from factory)
OFF
Function of DIP switch SW9 (Usually all turned OFF)
Switch Function
SW9-3
SW9-4
Note (1) It is normally ON only in the case of SW9-4.
Emergency operation
ON
Normal
OFF
Fan control : Powerful mode
ON
Fan control : Mild mode
OFF
Function of DIP switch SW10 (Usually all turned OFF)
SW10-1 (J9)
SW10-2
(J10)
Switch Function
OFF
SW10-3
(J11)
ON
Auto swing fanction - None
OFF
Auto swing function - With
ON
Remote controller air flow –
OFF
Remote controller air flow 1 speed
ON
Remote controller air flow 2 speed
OFF
Remote controller air flow 3 speed
ON
-
-
8

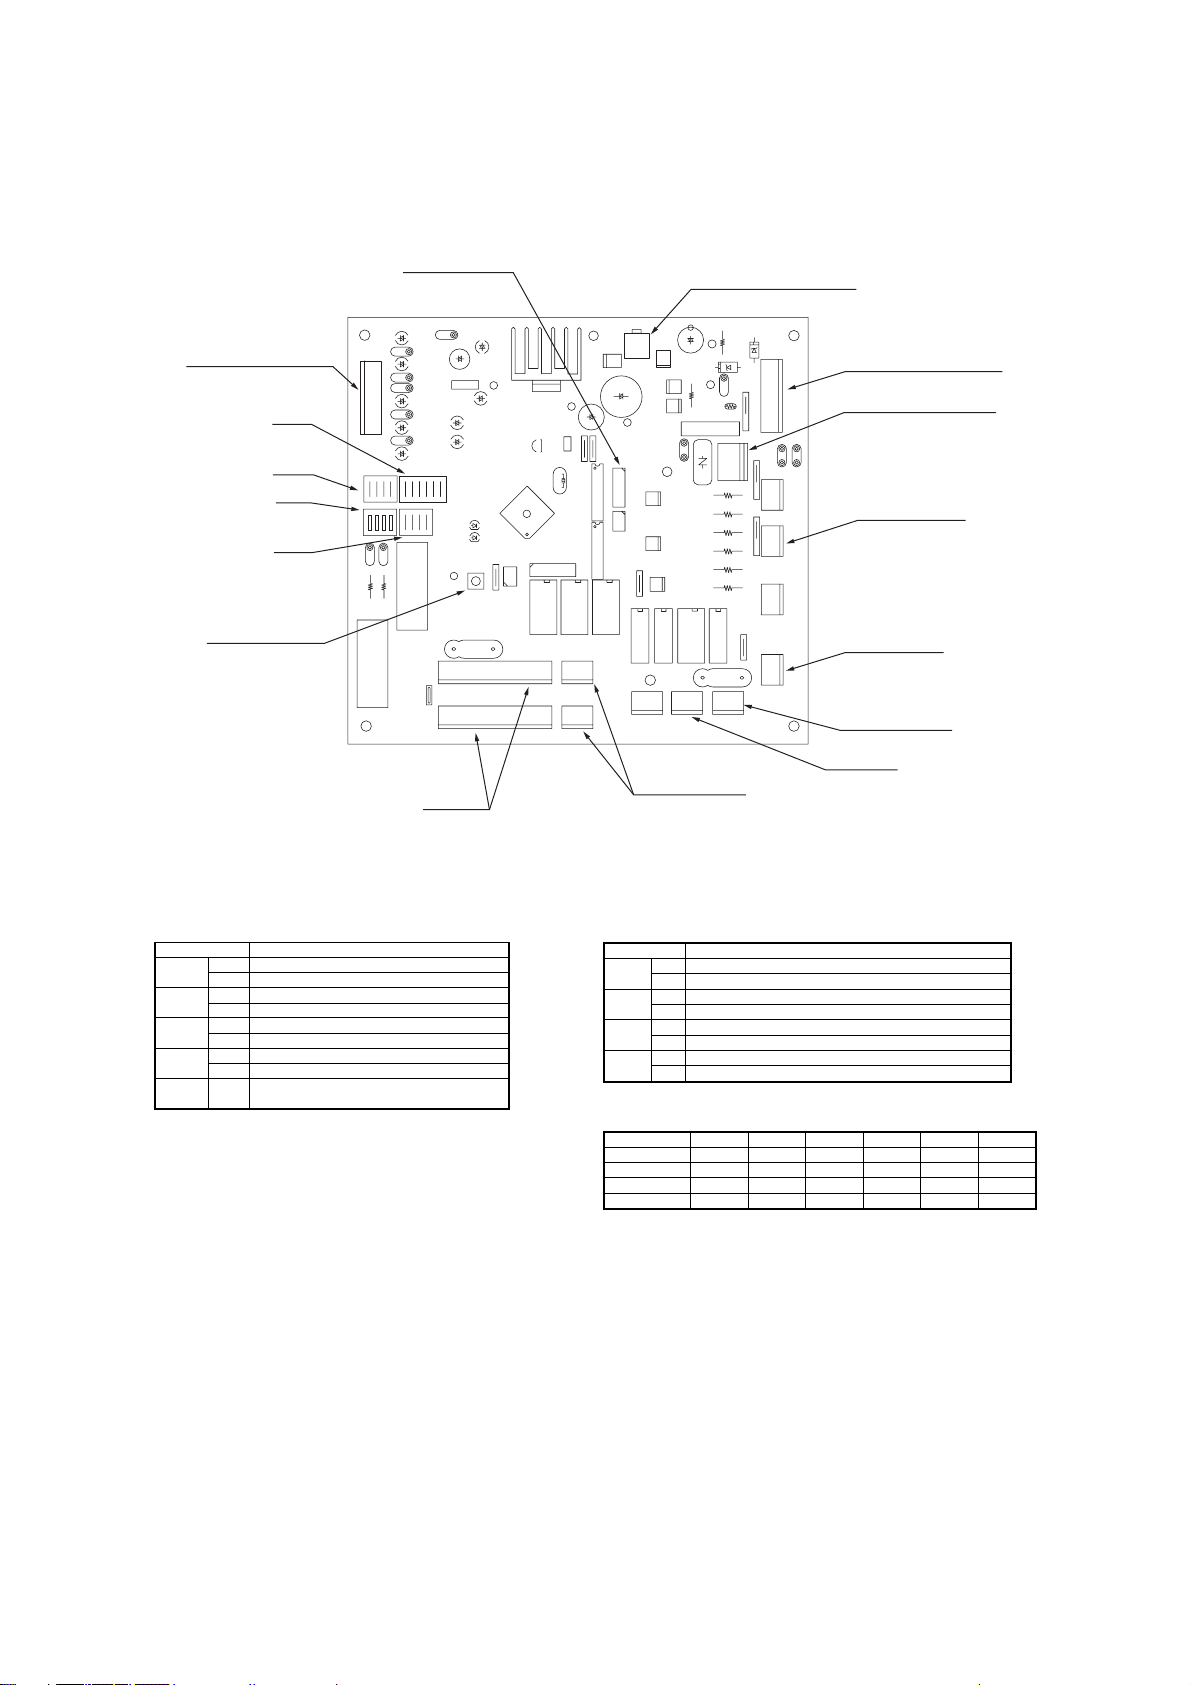
Model: FDEN series
Fan motor
CNJ2CNM3CNRCNV
PCB power supply connector
(Primary side)
Power supply
L2
CNW1
52X5
52X352X252X252X652X4
CNW0
CNM1
L3
F1
ZNR
L1
IC8IC7
PCB power supply
connector
(Secondary side)
Remote controller
52X8-2
52X8-1
KN1
52X7
C57
CNQ CNT
Connector
(CNT)
Heat exchanger thermistor,
Return air thermistor
(Thl-R1, Thl-A)
● Change by the jumper wire
Name Function
J1 (SW7-1)
J2 (SW7-2)
J3 (SW7-3)
J4 (SW7-4)
J5 (SW8-1)
J6 (SW8-2)
“None” means that jumper wire is not provided on the PCB or the
Note (1)
connection is cut
The replacement board is not equipped with jumpers J1 ~ J6. Instead,
(2)
SW7 and 8, with the same functions as jumpers J1~J6, are used in the
position where the jumpers were previously. Set SW7 and 8 locally in
accordance with the above table.
With
Input signal - Reverse invalid
(1)
None
Input signal - Rus stop
With
Heating thermostat OFF-Lo
(1)
None
Heating thermostat OFF-Stop, Lo
With
Normal operation operable
(1)
None
Operation permission prohibited
With
Normal
(1)
None
Heating temp. +3
With
Louver free stop control - Invalid
(1)
None
Louver free stop control - Effective
With
Freeze prevention fan control activated.
(1)
None
Freeze prevention fan control deactivated.
CNE
LED1
LED2
CNB CNW2
DIP switch
(SW5)
SW2 SW5
CNH CNN1
SW8
SW7SW9SW10
J5, J6
(SW8)
J1~J4
(SW7)
DIP switch
Address switch
(SW2)
J9~J11
(SW10)
(SW9)
Heat exchanger thermistor
(Thl-R2)
● Control change switch (SW5, SW9, SW10)
Function of DIP switch SW5 (Usually all turned OFF)
Switch Function
ON
SW5-4SW5-3
OFF
Setting time : 1000hrs. (Unit stop)
ON
Setting time : 1000hrs. (Display)
OFF
Setting time : 600hrs. (Display)
ON
Setting time : 180hrs. (when shipped from factory)
OFF
Function of DIP switch SW9 (Usually all turned OFF)
Switch Function
SW9-3
SW9-4
Note (1) It is normally ON only in the case of SW9-4.
Emergency operation
ON
Normal
OFF
Fan control : Powerful mode
ON
Fan control : Mild mode
OFF
Function of DIP switch SW10 (Usually all turned OFF)
SW10-1 (J9)
SW10-2
(J10)
Switch Function
OFF
SW10-3
(J11)
ON
Auto swing fanction - None
OFF
Auto swing function - With
ON
Remote controller air flow –
OFF
Remote controller air flow 1 speed
ON
Remote controller air flow 2 speed
OFF
Remote controller air flow 3 speed
ON
-
-
9

Model: FDKN series
This diagram shows the PCB for the 151~251. The component layout on the 301 PCB is different, but the functions are the
same.
Heat exchanger thermistor,
Dip switch
(SW5)
J9~J11
(SW10)
Dip switch
(SW9)
J5~J8
(SW8)
J1~J4(SW7)
Adress switch
(SW2)
CNZ
SW10
J10
J11
J9
SW8
J5J6J7
J8
SW2
IC9 IC10
LED1
SW5
SW9
J1J2J3
CNE
CNH
IC11
C2
R62
BZ
Return air thermistor
(Thl-R1, Thl-A)
R17
L1
CNW1
CNM
Heat exchanger thermistor
J31
(Thl-R2)
CNN1
CNB
J31
J4
SW7
L4
CNL
C92
CNG
CNY CNJ
IC8
CNT
R16
L2
R151
C104
Remote controller
PCB power supply
connector
(Primary side)
PCB power supply
connector
(Secondary side)
TB,3
TB,2
TB,1
G
● Change by the jumper wire
Name Function
J1 (SW7-1)
J2 (SW7-2)
J3 (SW7-3)
J4 (SW7-4)
J5 (SW8-1)
J6 (SW8-2)
J8 (SW8-4)
“None” means that jumper wire is not provided on the PCB or the
Note (1)
connection is cut
The replacement board is not equipped with jumpers J1 ~ J8. Instead,
(2)
SW7 and 8, with the same functions as jumpers J1~J8, are used in the
position where the jumpers were previously. Set SW7 and 8 locally in
accordance with the above table.
With
Input signal - Reverse invalid
(1)
None
Input signal - Rus stop
With
Heating thermostat OFF-Lo
(1)
None
Heating thermostat OFF-Stop, Lo
With
Normal operation operable
(1)
None
Operation permission prohibited
With
Normal
(1)
None
Heating temp. +3
With
Louver free stop control - Invalid
(1)
None
Louver free stop control - Effective
With
Freeze prevention fan control activated.
(1)
None
Freeze prevention fan control deactivated.
With
Model 151~251
(1)
None
Model 301
Louver motor
(CNT)
Fan motorConnector
● Control change switch (SW5, SW9, SW10)
Function of DIP switch SW5 (Usually all turned OFF)
Switch Function
ON
SW5-4SW5-3
OFF
Setting time : 1000hrs. (Unit stop)
ON
Setting time : 1000hrs. (Display)
OFF
Setting time : 600hrs. (Display)
ON
Setting time : 180hrs. (when shipped from factory)
OFF
Function of DIP switch SW9 (Usually all turned OFF)
Switch Function
SW9-1
SW9-2
SW9-3
SW9-4
Note (1) It is normally ON only in the case of SW9-4.
Custom code - Change
OFF
Custom code - Normal
ON
Power failure security - Effective
OFF
Power failure security - Invalid
ON
Emergency operation
ON
Normal
OFF
Fan control : Powerful mode
ON
Fan control : Mild mode
OFF
Function of DIP switch SW10 (Usually all turned OFF)
SW10-1 (J9)
SW10-2
(J10)
Switch Function
OFF
SW10-3
(J11)
ON
Auto swing fanction - None
OFF
Auto swing function - With
ON
Remote controller air flow –
OFF
Remote controller air flow 1 speed
ON
Remote controller air flow 2 speed
OFF
Remote controller air flow 3 speed
ON
-
10
-

Model: FDUR series
Drain motor
CNT
Connector
(CNT)
Heat exchanger thermistor,
Return air thermistor
(Thl-R1, Thl-A)
Heat exchanger thermistor
(Thl-R2)
CNN1
CNH
CNV
CNO
Remote controller
CNF
CNN2
CNB
CNQ
Address swith
(SW2)
DIP switch
(SW5)
SW2 SW10
SW5 SW7
LED2
J10~J11
(SW10)
J6
(SW8)
DIP switch
(SW9)
J1~J4
Float switch
(SW7)
CNZ CNI
SW9SW8
CNO
52X5 52X4
CNJ2 CNR
L3L2
52X3
52X2 52X1 52X6
CNW1
CNM3
PCB power supply connector
(Primary side)
● Change by the jumper wire
Name Function
J1 (SW7-1)
J2 (SW7-2)
J3 (SW7-3)
J4 (SW7-4)
J6 (SW8-2)
“None” means that jumper wire is not provided on the PCB or the
Note (1)
connection is cut
The replacement board is not equipped with jumpers J1 ~ J4, J6.
(2)
Instead, SW7 and 8, with the same functions as jumpers J1~J4, J6, are
used in the position where the jumpers were previously. Set SW7 and 8
locally in accordance with the above table.
With
Input signal - Reverse invalid
(1)
None
Input signal - Rus stop
With
Heating thermostat OFF-Lo
(1)
None
Heating thermostat OFF-Stop, Lo
With
Normal operation operable
(1)
None
Operation permission prohibited
With
Normal
(1)
None
Heating temp. +3
With
Freeze prevention fan control activated
(1)
None
Freeze prevention fan control deactivated
LED1
L4
F1
L1
CNW0
CNE
CNG
Power supply
CNW2
PCB power supply connector
F2
CNK2CNK1
CNA
F3
(Secondary side)
● Control change switch (SW5, SW9, SW10)
Function of DIP switch SW5 (Usually all turned OFF)
Switch Function
ON
SW5-4SW5-3
OFF
Setting time : 1000hrs. (Unit stop)
ON
Setting time : 1000hrs. (Display)
OFF
Setting time : 600hrs. (Display)
ON
Setting time : 180hrs. (when shipped from factory)
OFF
Function of DIP switch SW9 (Usually all turned OFF)
Switch Function
SW9-3
SW9-4
Emergency operation
ON
Normal
OFF
Fan control : High speed (High Ceiling)
ON
Fan control : Standard
OFF
-
11
Function of DIP switch SW10 (Usually all turned OFF)
Switch Function
(J10)
OFF
ON
SW10-3
(J11)
SW10-2
Remote controller air flow –
OFF
Remote controller air flow 1 speed
ON
Remote controller air flow 2 speed
OFF
Remote controller air flow 3 speed
ON
-
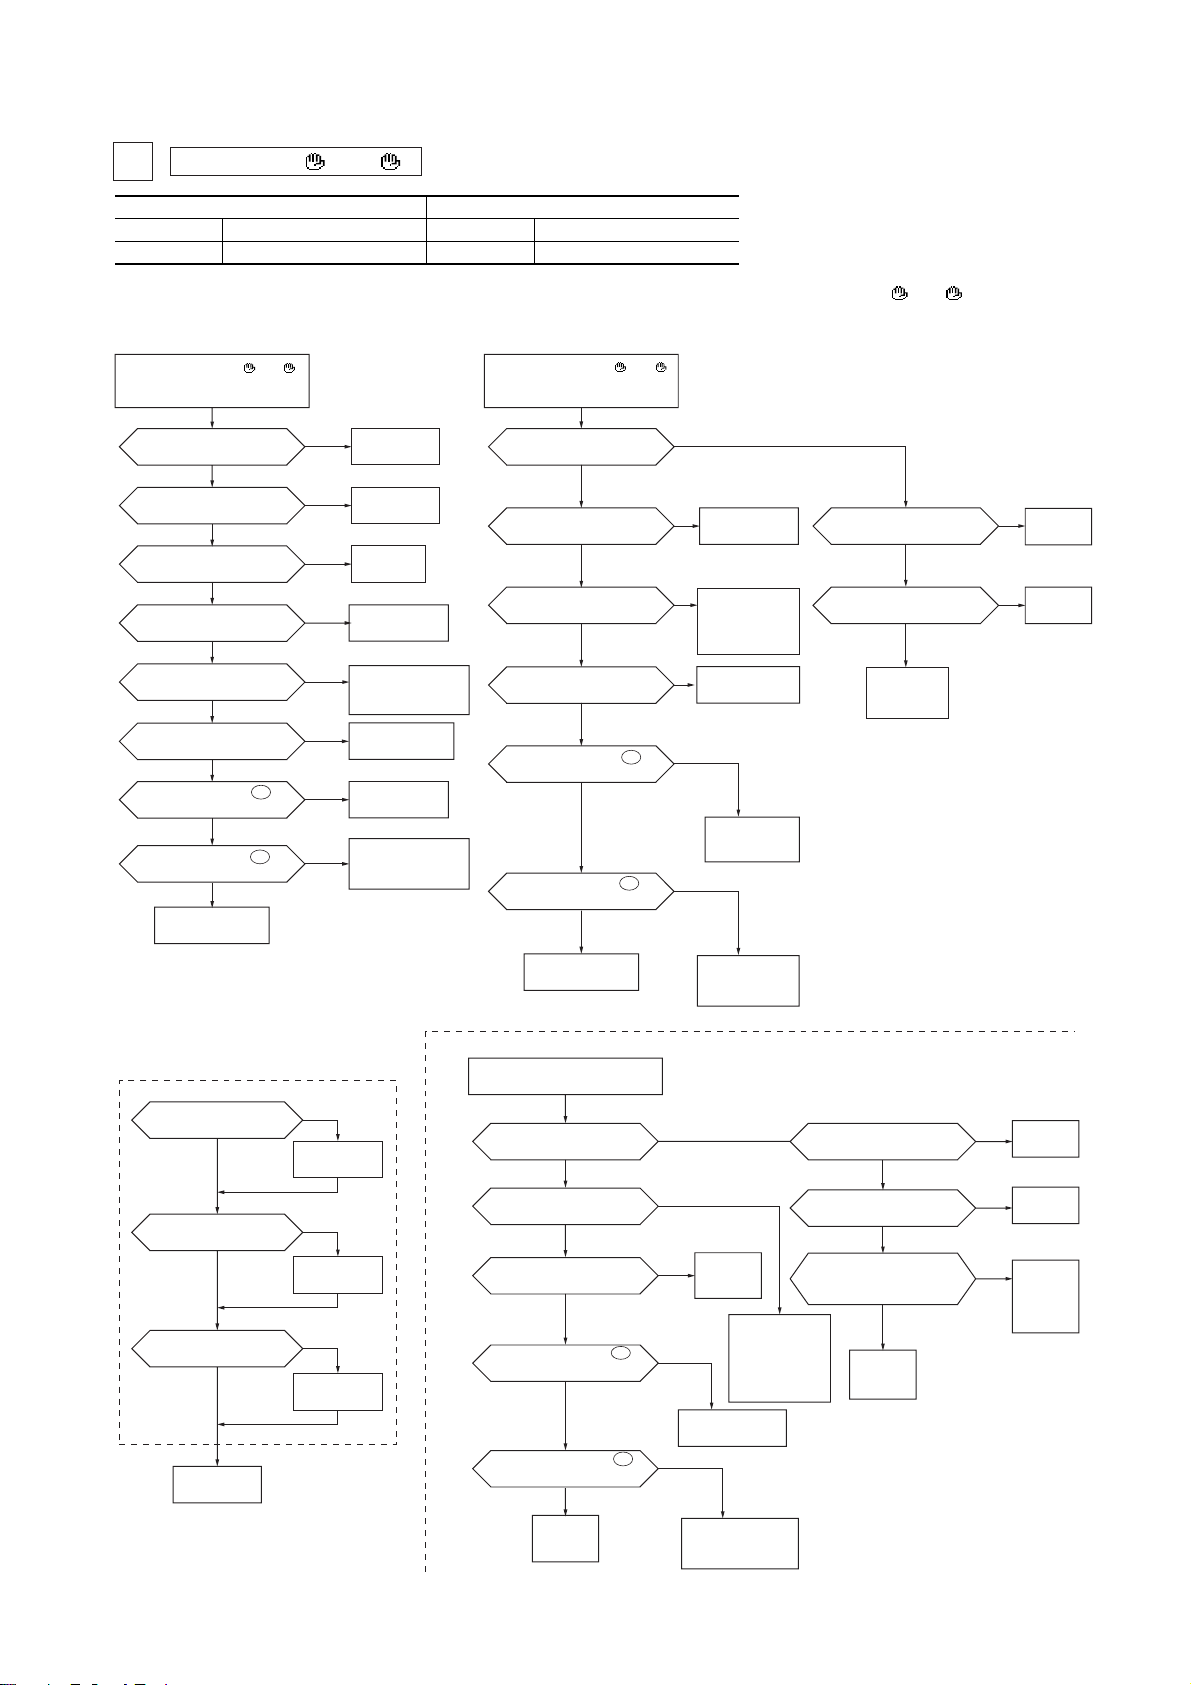
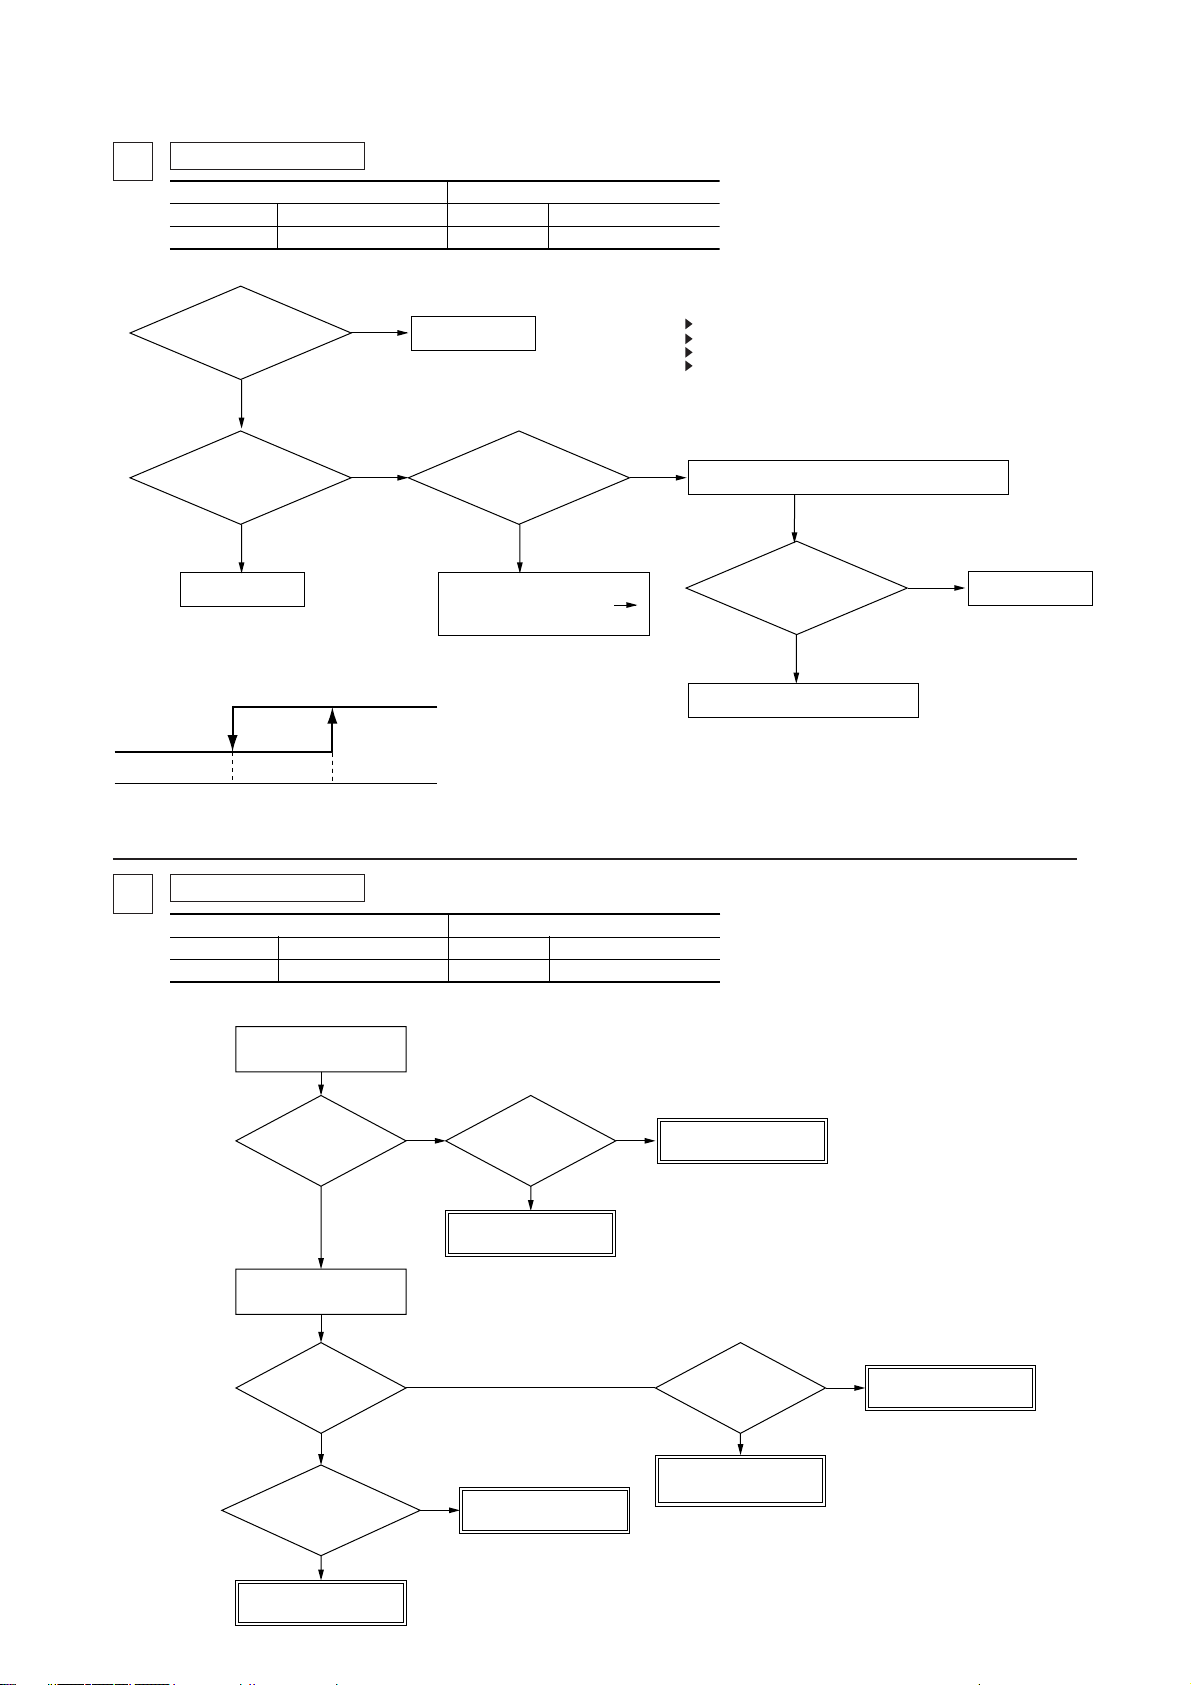
(c) Check method when the error code is display
Remote controller or Indication board: Inspection LED, error code
Indoor unit PCB: Red LED (inspection display), Green LED (CPU. normal display)
Outdoor unit PCB: ARed LED (inspection display), Green LED (CPU. normal display)
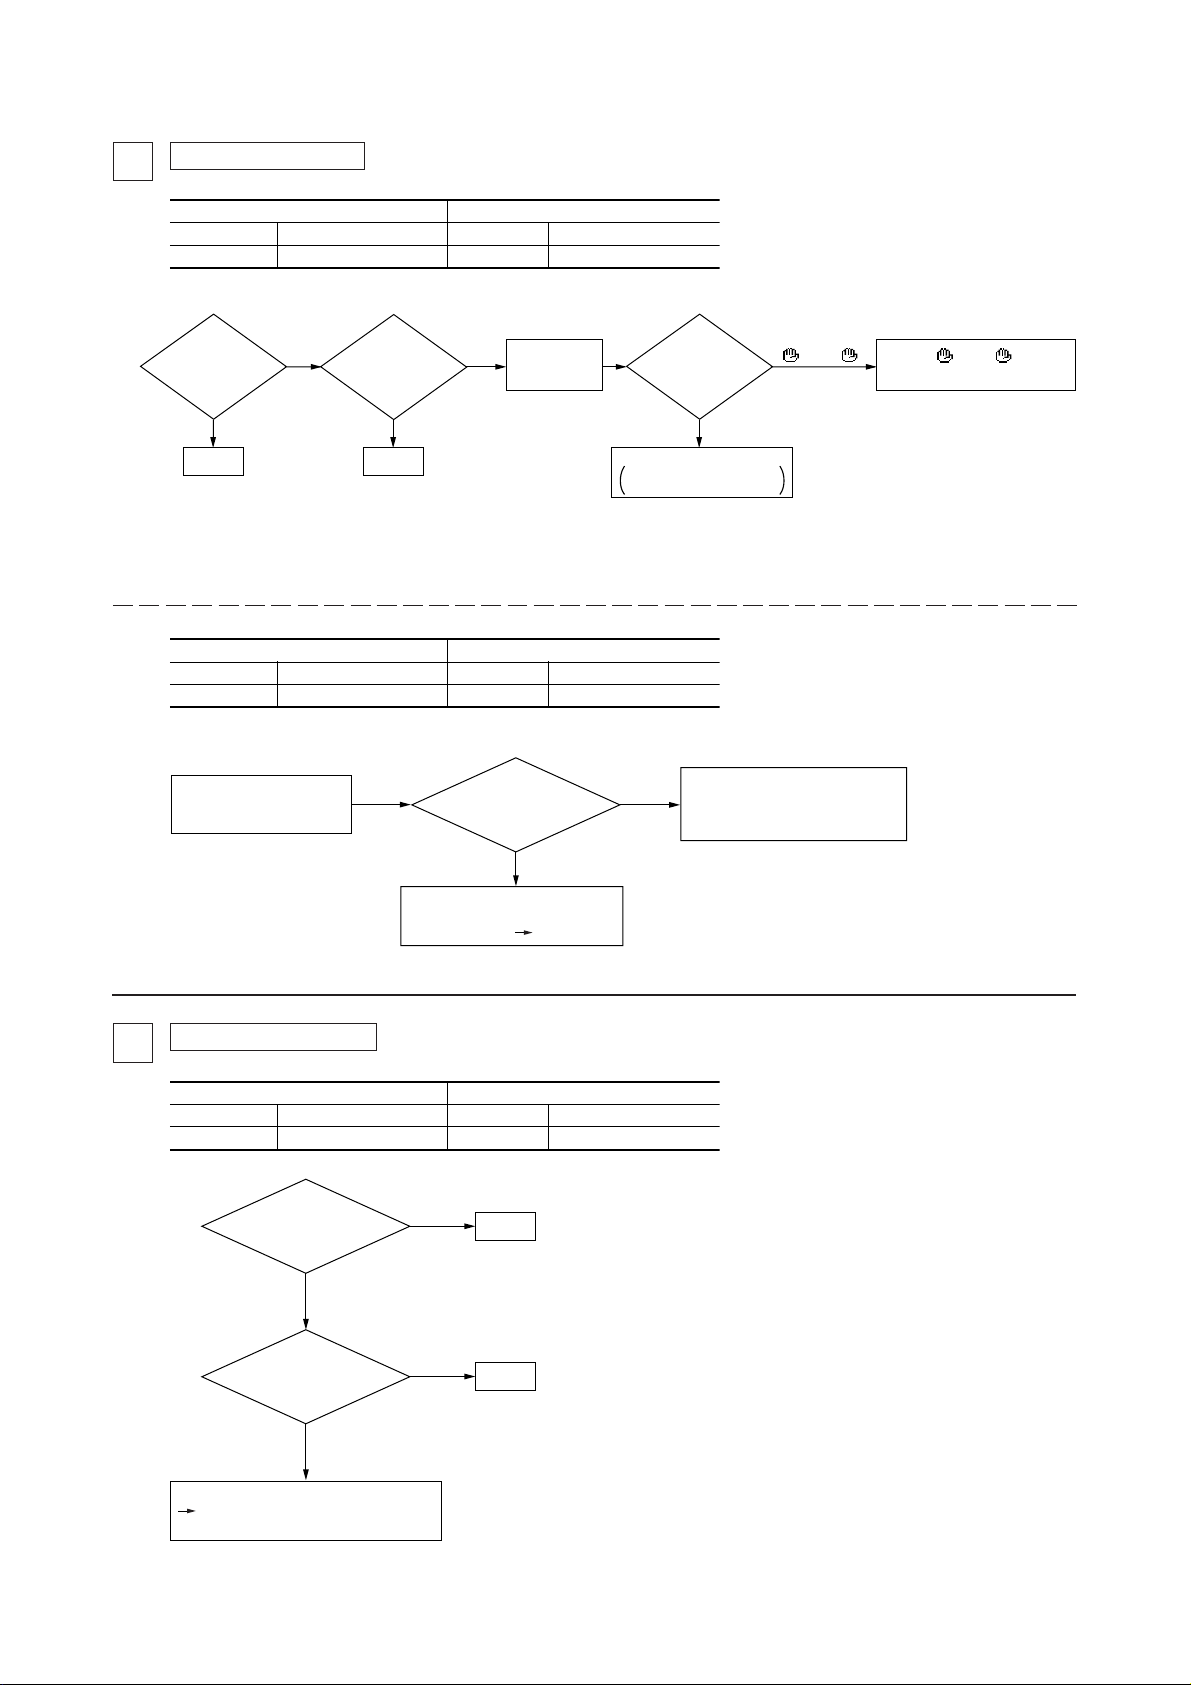
Error display : No display
1
LCD display : No display
[Power supply line error]
Indoor unit
Red LED
Green LED
Note (1) The green LED in the outdoor unit is used in the FDCA301 ~ 601 models only.
Stays OFF
Stays OFF
Red LED
Green LED
Outdoor unit
Start
Is the voltage
between 1 and 2/N of the indoor
unit’s terminal block
AC220/240V?
YES
NO YES
Voltage between
1 and 2/N of the outdoor unit’s
terminal block is
AC220/240V.
NO
Outdoor unit check
Fuse
OK?
YES
Is the voltage at
CNW3 or 10
(1)
transformer’s secondary side
(red – red) on the
14 V or higher?
YES
NO NO
NO
Disconnect the transformer’s primary side
(CNW1) and measure the resistance on
both ends of CNW1 (using a tester, etc.).
Notes (1) In models other than FDT, replace the fuse.
(2) FDT only
Transformer exchange
Note (1) In models other than FDT, it is CNW2.
Stays OFF
Stays OFF
Control lines connected
wrong or disconnected.
Several 10K Ω or higher.
YES
Fuse exchange
Replacement indoor unit
power supply PCB
Is the voltage
between CNW5 2 and 3
DC 12V?
YES
Is the voltage
between CNW8 2 and 3
DC 12V?
YES
Does it return
to normal when the power
supply is reset?
NO
Replacement indoor unit
control PCB
(1)(2)
(1)(2)
NO
NO
YES
Replacement indoor unit
power supply PCB
Note (1) 3 is GND
Harness disconnection
Unit is normal.
(Malfunction was due to noise, etc.)
-
-
12

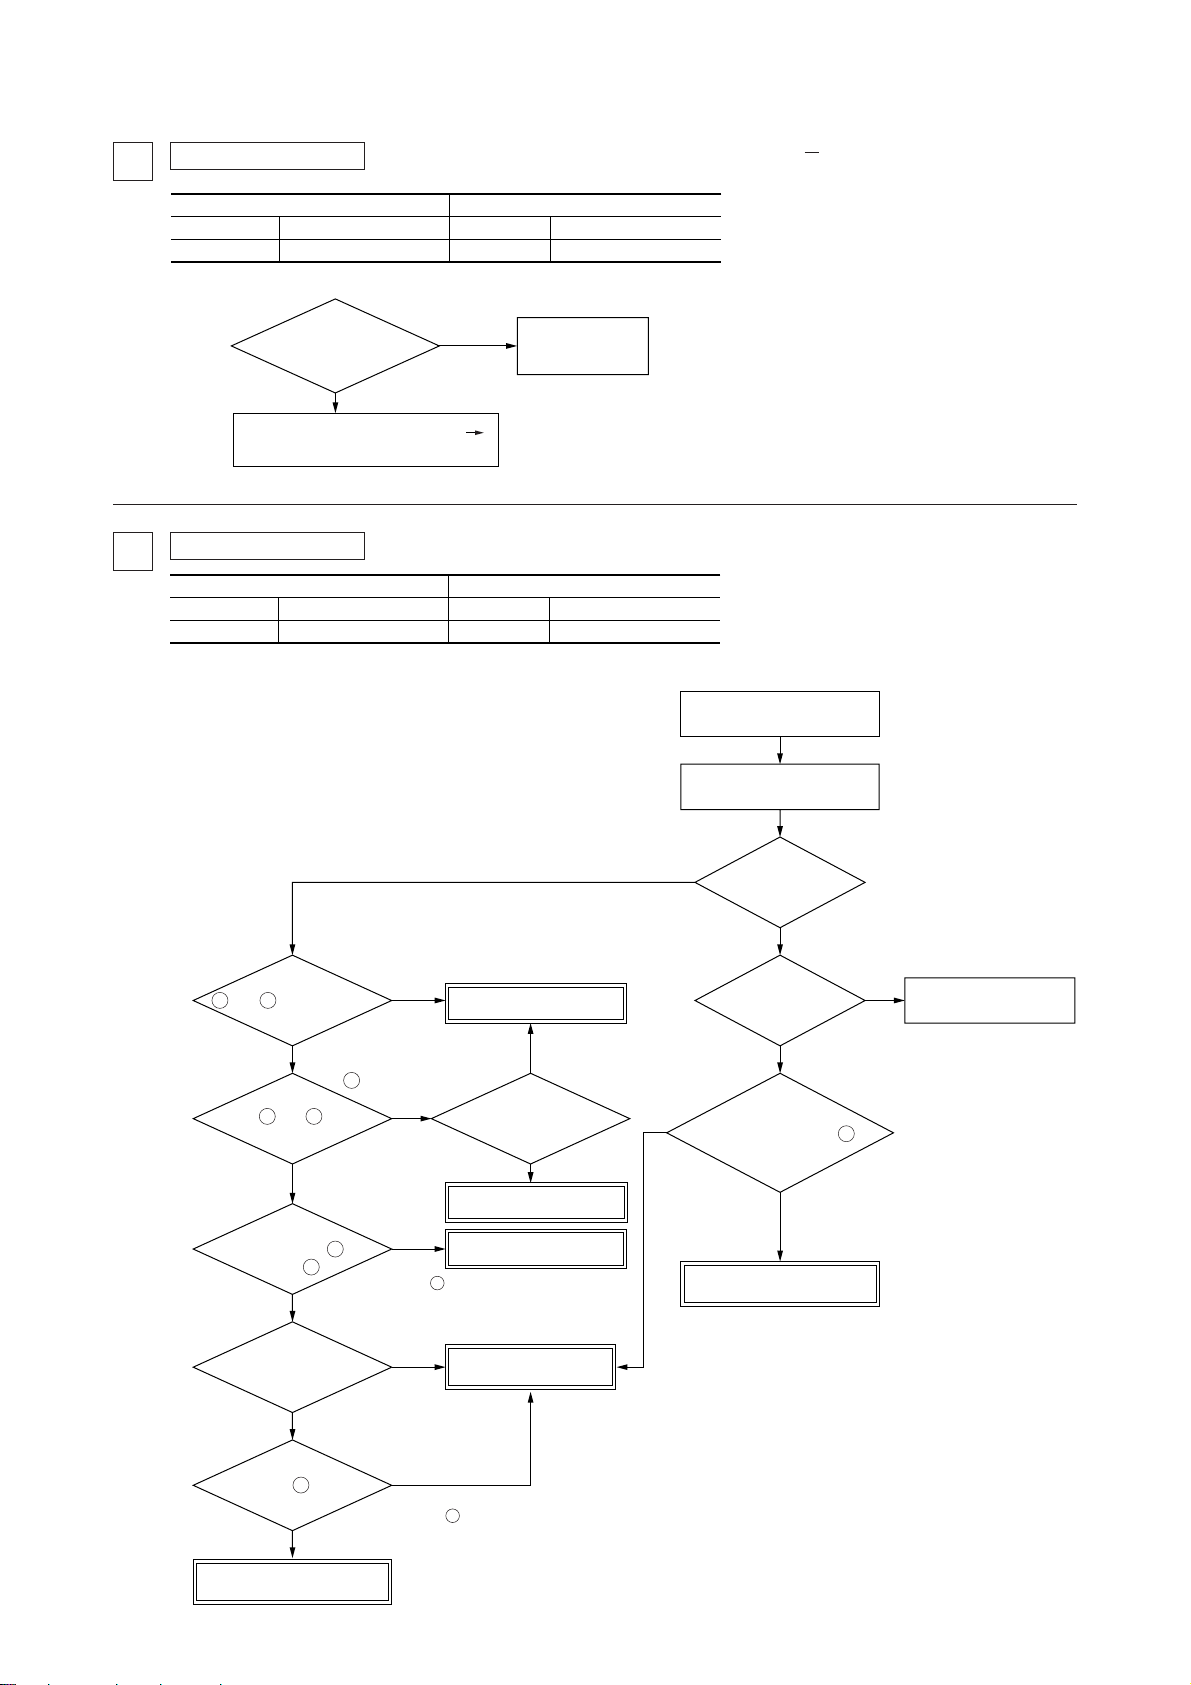
Indoor unit
Red LED 3 time flash
Green LED
Note (1) The green LED in the outdoor unit is used in the FDCA301 ~ 601 models only.
Keeps flashing
Red LED Stays OFF
Green LED
Outdoor unit
Keeps flashing
Remote
controller wiring
connect check (Red·
White·Black)
OK
Approximately
(1)
10 ~ 11 V between
X and Z.
Note (1) Z is GND.
NO
Remote controller wire
is removed
YES
Remeasure
between X~Z.
10~11V.
NO
(2)
Is the voltage
between CNW8 1-3
12V?
YES
NO
YES
YES
Remote controller wire short circuit?
Remote controller defective
NO
Note (2) 3 is GND.
Correction
Power supply reset
Check the
CNW5-8 harness.
NG
Harness exchange
OK
Normal?
NO
YES
Maltifunction by
accidental noise
Only case of FDT
Replacement indoor unit power
supply PCB
Remote controller wire
disconnection?
Remote controller defective
Replacement indoor
unit control PCB
-
13
-
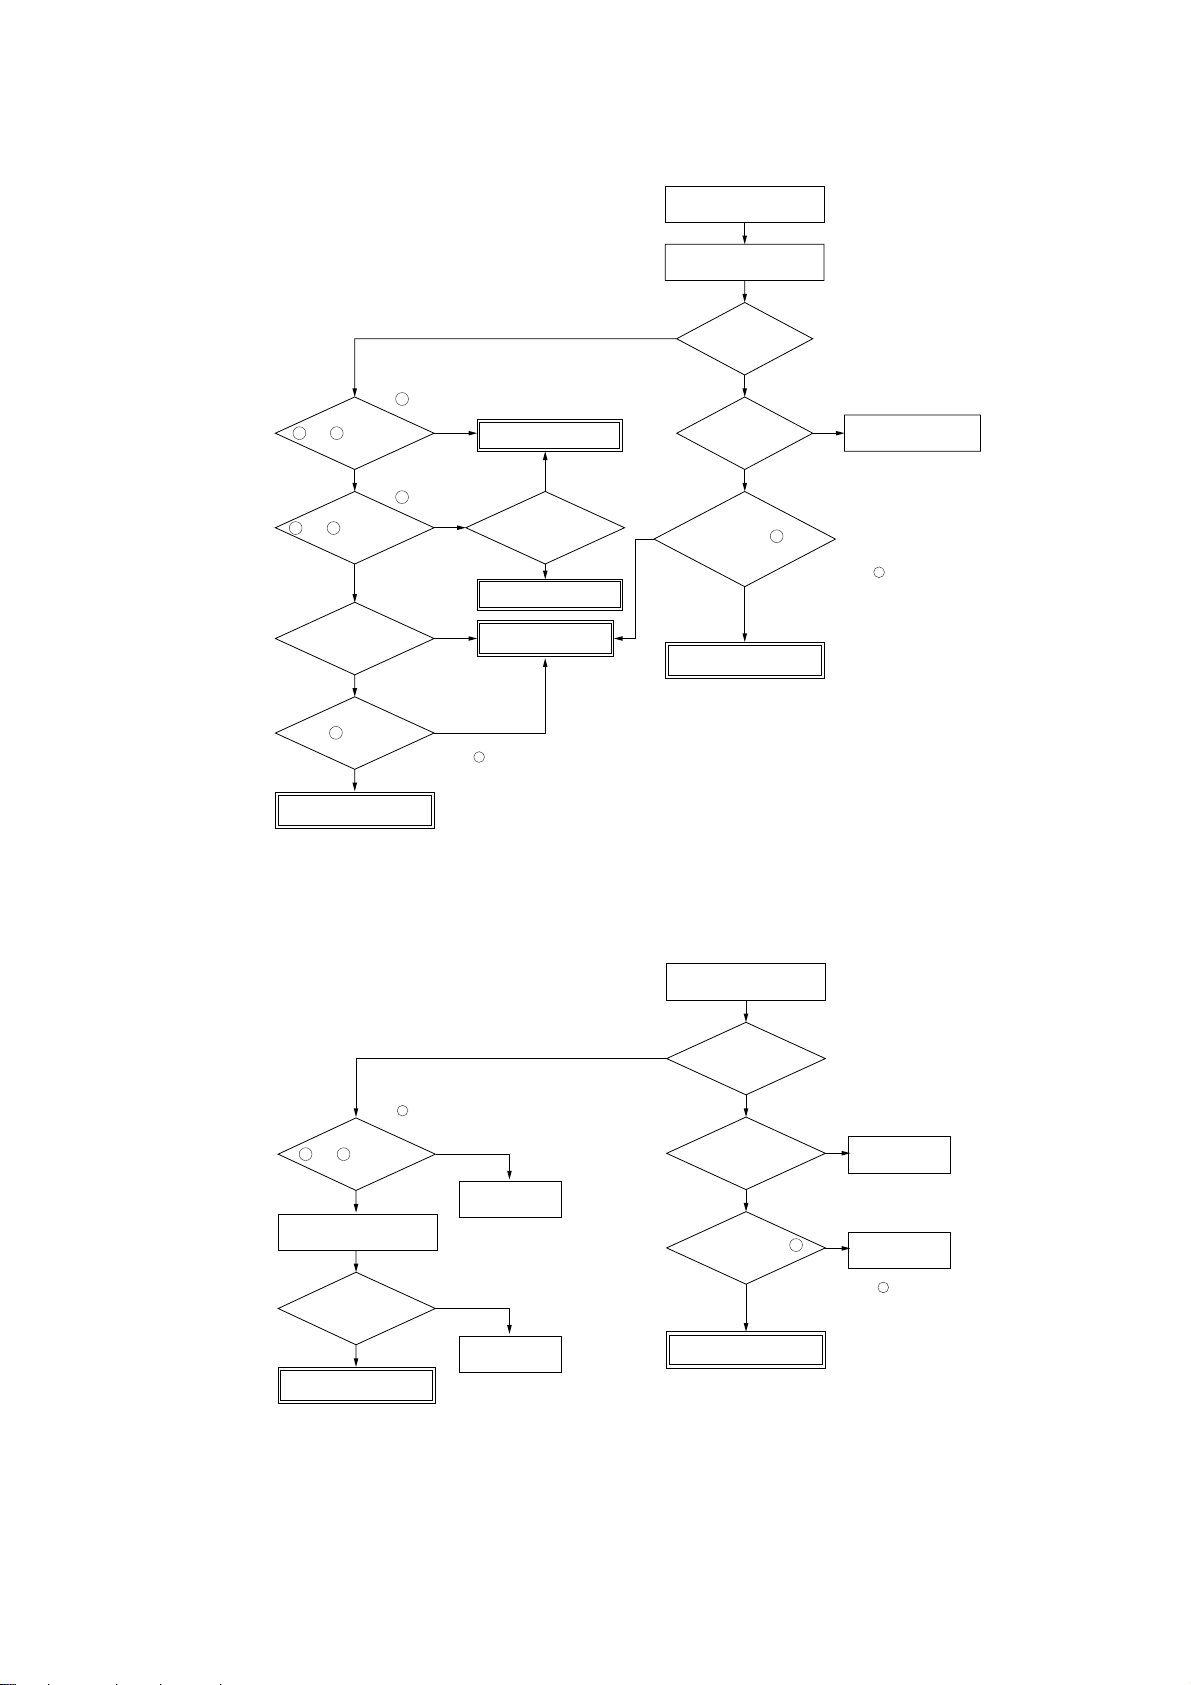
Indoor – outdoor communications trouble
2
Red LED
Green LED
Notes (1)
Error display “ WAIT
Indoor unit
Stays OFF
Keeps flashing
If trouble occurs during communications, the error code E5 is displayed (Outdoor, Red LED flashes 2 times). The check procedure is as shown below. (However, excluding
”
(Initial (when the power is turned on)
Outdoor unit
Red LED
Green LED
connection related problems) Also, if the power supply is reset after E5 occurs, if the trouble is intermittent, it will be displayed in the LCD(“ WAIT ”).
The green LED in the outdoor unit is used in the FDCA301 ~ 601 models only.
(2)
● 151~251 ● 301~601
The remote controller’s LCD(“ WAIT ”)
display remains unchanged after waiting 2
minutes after the power is turned on.
YES
Is the outdoor unit controller's
power fuse F5 (20A) blown?
YES
YES
(1)
(1)
Is the voltage at the secondary side
of the noise filter AC220/240V?
Are the wires connecting to the
noise filter board OK?
YES
Is the indoor unit’s green LED
flashing?
YES
Is the outdoor unit’s control red
LED flashing 2 times?
YES
Are the wires connecting the indoor
and outdoor units connected
according to specifications?
Measure the voltage between 2/N and
3 of the outdoor unit’s terminal block.
Measure the voltage between 2/N and
3 of the indoor unit’s terminal block.
YES
DC 20V
Approx.
0V DC
Approx.
0V DC
DC 20V
Indoor unit control
PCB defect
Note (1) 1 phase is removed.
NO
Power supply
fuse exchange
NO
Noise filter
exchange
NO
Connects
corrently
NO
Indoor unit control
PCB defect
Indoor/outdoor unit control PCB
NO
defect Remote controller defect
Remote controller wire
disconnection (Y)
Repair the wires
NO
connecting the indoor
and outdoor units.
Outdoor unit
control PCB defect
Connection wires are
faulty (disconnection)
Noise
The remote controller’s LCD (“ WAIT ”)
display remains unchanged after waiting 2
minutes after the power is turned on.
*
Is the outdoor green LED
Is the indoor green LED
Is the outdoor red LED
flashing 2 times?
Are the wires connecting the indoor
and outdoor units connected according
to specifications?
Measure the voltage between 2/N and
3 of the outdoor unit’s terminal block.
Measure the voltage between 2/N and
3 of the indoor unit’s terminal block.
Keeps flashing
YES
flashing?
YES
flashing?
YES
YES
YES
DC 20V
Approx.
20V DC
2 time flash
NO
NO
Indoor unit control
PCB defect
NO
Indoor unit control PCB
defect
Remote controller defect
Remote controller wire
disconnection (Y)
Repair the wires
NO
connecting the indoor
and outdoor units.
Approx.
0V DC
Outdoor unit
control PCB
Approx.
0V DC
defect
Is the fuse (10A) OK?
YES
Is the voltage on the outdoor unit’s
transformer secondary side (red –
red) 14 V?
YES
Outdoor unit
control PCB
defect
NO
Fuse
exchange
(1)
NO
Transformer
defect
Inverter check before replacing the power supply fuse.
Is the noise filter out of
phase or short circuited?
YES
Are there any cracks or burnouts in
the power module or diode stack?
YES
Is the reactor abnormal?
YES
Power supply
fuse exchange
NO
Nois filter
exchange
NO
Replacement outdoor
unit control PCB
NO
Reactor
exchange
Indoor unit control
PCB defect
Remote controller does not display
after the power is turned on.
YES
Is the indoor green LED
flashing?
YES
Is the outdoor red LED
flashing 2 times?
YES
Are the wires connecting the indoor
and outdoor units connected according
to specifications?
YES
Measure the voltage between 2/N
and 3 of the outdoor unit’s
terminal block.
Approx. 20V DC
Measure the voltage between 2/N
and 3 of the indoor unit’s
terminal block.
Approx. 20V DC
Indoor unit
control PCB
defect
Connection wires are
faulty (disconnection)
NO
NO
Repair the
NO
connection
lines.
Approx.
0V DC
Outdoor unit control
PCB defect
Approx. 0V DC
Connection wires are
faulty (disconnection)
Noise
Noise
Is the fuse on the indoor unit
Is the voltage on the outdoor
unit’s transformer secondary
side (red – red) AC15V?
Is the voltage between the red and
black wires in the remote
controller DC10~11V when the
remote controller is disconnected?
The indoor/outdoor
control board is faulty.
The remote controller
is faulty.
The X or Z lines in the
remote controller are
disconnected.
control PCB OK?
YES
YES
YES
Remote
controller
defect
NO
NO
NO
Fuse
exchange
Transformer
defect
The remote
controller
wires are
short
circuited.
-
14
-
Error display :
3
e1
[Communication error between remote controller~Indoor unit]
Indoor unit
Red LED
Green LED
Note (1) The green LED in the outdoor unit is used in the FDCA301 ~ 601 models only.
Stays OFF
Keeps flashing
Voltage
between X and Z
approximately
10~11 V?
Red LED
Green LED
YES
Replacement remote
Outdoor unit
controller
NO
Voltage
fluctuates between
5~11 V between
Y and Z.
NO
Power supply OFF
YES
Voltage
fluctuates between
5~10 V between
Y and Z
indoors.
NO
Remote controller
wire disconnection
YES
Voltage
fluctuates between
5~10 V between
CNB Y and Z.
NO
Terminal block CNB
harness is defective.
YES
Indoor unit
resets every
4 minutes.
YES
NO
❇
❇
After the green LED lights up once,
it begins flashing again continuously.
The louver moves once in the
Power supply reset
close direction.
Stays OFF
Keeps flashing
Replacement remote
Remote controller
wire is removed
Is the
YES
resistance between
Y~Z on the remote controller
approximately
10kΩ?
Resistance is
approximately 10kΩ
between indoor
Y~Z.
YES
Remote controller
wire short circuit
YES
Normal?
NO
controller
NO
NO
Replacement
remote controller
Replacement indoor
unit control PCB
Noise?Power supply reset
YES
Normal?
Noise
NO
Replacement indoor
unit control PCB
Indoor unit
Red LED
Green LED
Note (1) The green LED in the outdoor unit is used in the FDCA301 ~ 601 models only.
Stays OFF
Stays OFF or Lights
continuously
Red LED
Green LED
Outdoor unit
● Only case of FDT
Stays OFF
Lighting
Is the voltage
between CNW8
2-3 12V?
YES
Power supply reset
NO
Check the CNW5CNW8 harness.
● Cases of other than FDT
NO
Normal
YES
The unit is normal.
(The malfunction is due to noise, etc.)
Replacement indoor
unit control PCB
Power supply
reset
-
15
Stays OFF
Keeps flashing
-
Disconnection ?
NO
Is the
voltage at the transfomer's
secondary side (red-red) 15V
or higher?
YES
Replacement indoor unit
power supply PCB
Is it normalized?
NO
Defective indoor unit control PCB
Replace. (Defective CPU)
YES
NO
YES
(Runaway of indoor
unit CPU due to
noise, etc.
Transient trouble)
Harness
exchange
Transformer
exchange
Unit is normal.
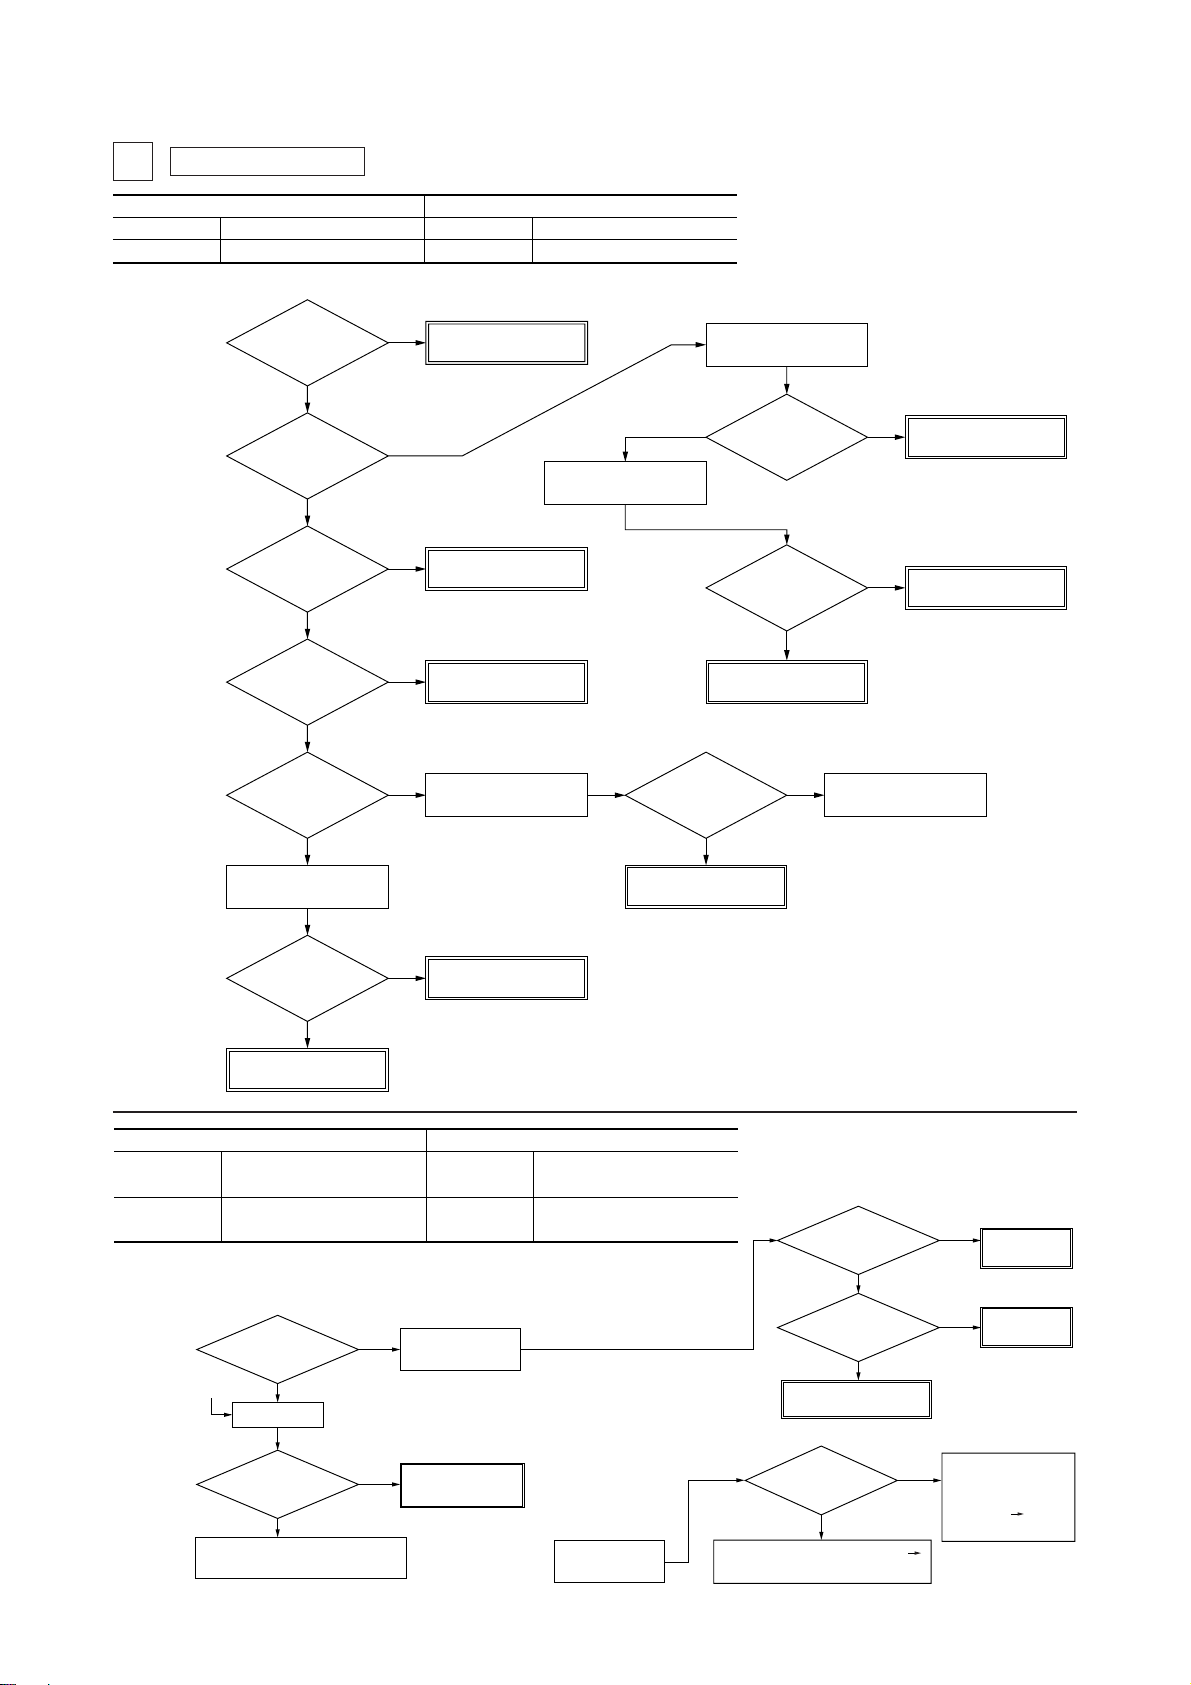
Error display :
4
e6
[Defective indoor unit heat exchanger thermistor]
Indoor unit
Red LED
Green LED
Note (1) The green LED in the outdoor unit is used in the FDCA301 ~ 601 models only.
Is the indoor
unit heat exchanger
thermistor connector
connection OK?
Correction
1 time flash
Keeps flashing
NO
Red LED
Green LED
YES
Outdoor unit
Stays OFF
Keeps flashing
Defective indoor unit control PCB
Replace-ment (Defective indoor unit
heat exchanger thermistor input circuit)
YES
Are characteristics
of indoor unit heat
exchanger thermistor OK
or is there any
broken wire?
NO
Defective indoor unit heat exchanger
thermistor Replacement
Return air thermistor (Th
Indoor unit heat exchanger thermistor
(ThI-R1, R2)
Resistance temperature characteristics
15
10
Resistance (kΩ)
5
010 304020 50
Temperature (˚C)
Note (1) 22.5 kΩ at -6˚C
● Display condition
If a temperature of –50ºC or lower is detected continuously for 5 seconds or longer by the thermistor, the compres-
sor stops. After a 3 minute delay, the compressor restarts. If this state is detected again within 60 minutes after the
first detection.
I-
A)
5kΩ at 25˚C
Error display :
5
Red LED
Green LED
Note (1) The green LED in the outdoor unit is used in the FDCA301 ~ 601 models only.
e7
Indoor unit
1 time flash
Keeps flashing
Is the return air
thermistor connector
connection OK?
[Detective return air thermistor]
Outdoor unit
Red LED
Green LED
YES YES
NO
Correction
● Display condition
If a temperature of –50ºC or lower is detected continuously for 5 seconds or longer by the thermistor, the compres-
sor stops. After a 3 minute delay, the compressor restarts. If this state is detected again within 60 minutes after the
first detection.
Stays OFF
Keeps flashing
Is the return air
thermistor characteristics
OK or is there a
broken wire?
NO
Defective return air
thermistor Replacement
Defective indoor unit control PCB
Replacement (Defective return air
thermistor input circuit)
Note (1) Characteristics as per the above
graph.
-
16
-
Error display :
6
Red LED
Green LED
Note (1) The green LED in the outdoor unit is used in the FDCA301 ~ 601 models only.
e8
Indoor unit
1 time flash
Keeps flashing
[Heating overload]
Outdoor unit
Red LED
Green LED
Stays OFF
Keeps flashing
Is the air filter clogged?
NO
Are the connections to
the indoor heat exchanger thermistor
OK?
NO
Repair
YES
YES
Clean it.
Are the characteristics of
the indoor heat exchanger thermistor
OK?
NO
Defective indoor unit heat
exchanger thermistor
Replacement
● Abnormal Temperature Detection
Abnormal stop
Heating is
possible.
● Display condition
An abnormal stop occurs if this state is detected 5 times within 60 minutes of the
56
63
first detection, or if the overload state is detected continuously for 6 minutes.
Indoor unit heat exchanger temp. (˚C)
Error display :
7
Red LED
Green LED
Note (1) The green LED in the outdoor unit is used in the FDCA301 ~ 601 models only.
e9
Indoor unit
1 time flash
Keeps flashing
[Drain trouble]
Outdoor unit
Red LED
Green LED
Notes (1) Check if the overload state exists or not using the following check points.
Is there a short circuit?
Is the indoor heat exchanger dirty or clogged?
Is the outdoor unit’s fan control normal?
((
Is the indoor or outdoor air temperature too high?
(2) See the figure page 142 for indoor heat exchanger thermistor characteristics.
YES
Stays OFF
Keeps flashing
Check the remote controller for abnormal data.
Does the heating
overload state exist?
NO
Check the cooling system.
YES
((
Adjust
Abnormal data check
in remote controller
Is there any
overflow?
YES
Drain motor ON from
remote controller.
DM
operation
YES
Is drain
piping unclogged?
Is the slop OK?
YES
DM check
NO
NO
NO
DC 12 V
at both terminals
of CNI?
YES
Float switch check
Correction
-
17
NO
Replacement indoor
unit PCB
AC 220/240 V
at both terminals
of CNR?
YES
DM check of
motor wiring
NO
Replacement indoor
unit control PCB
-
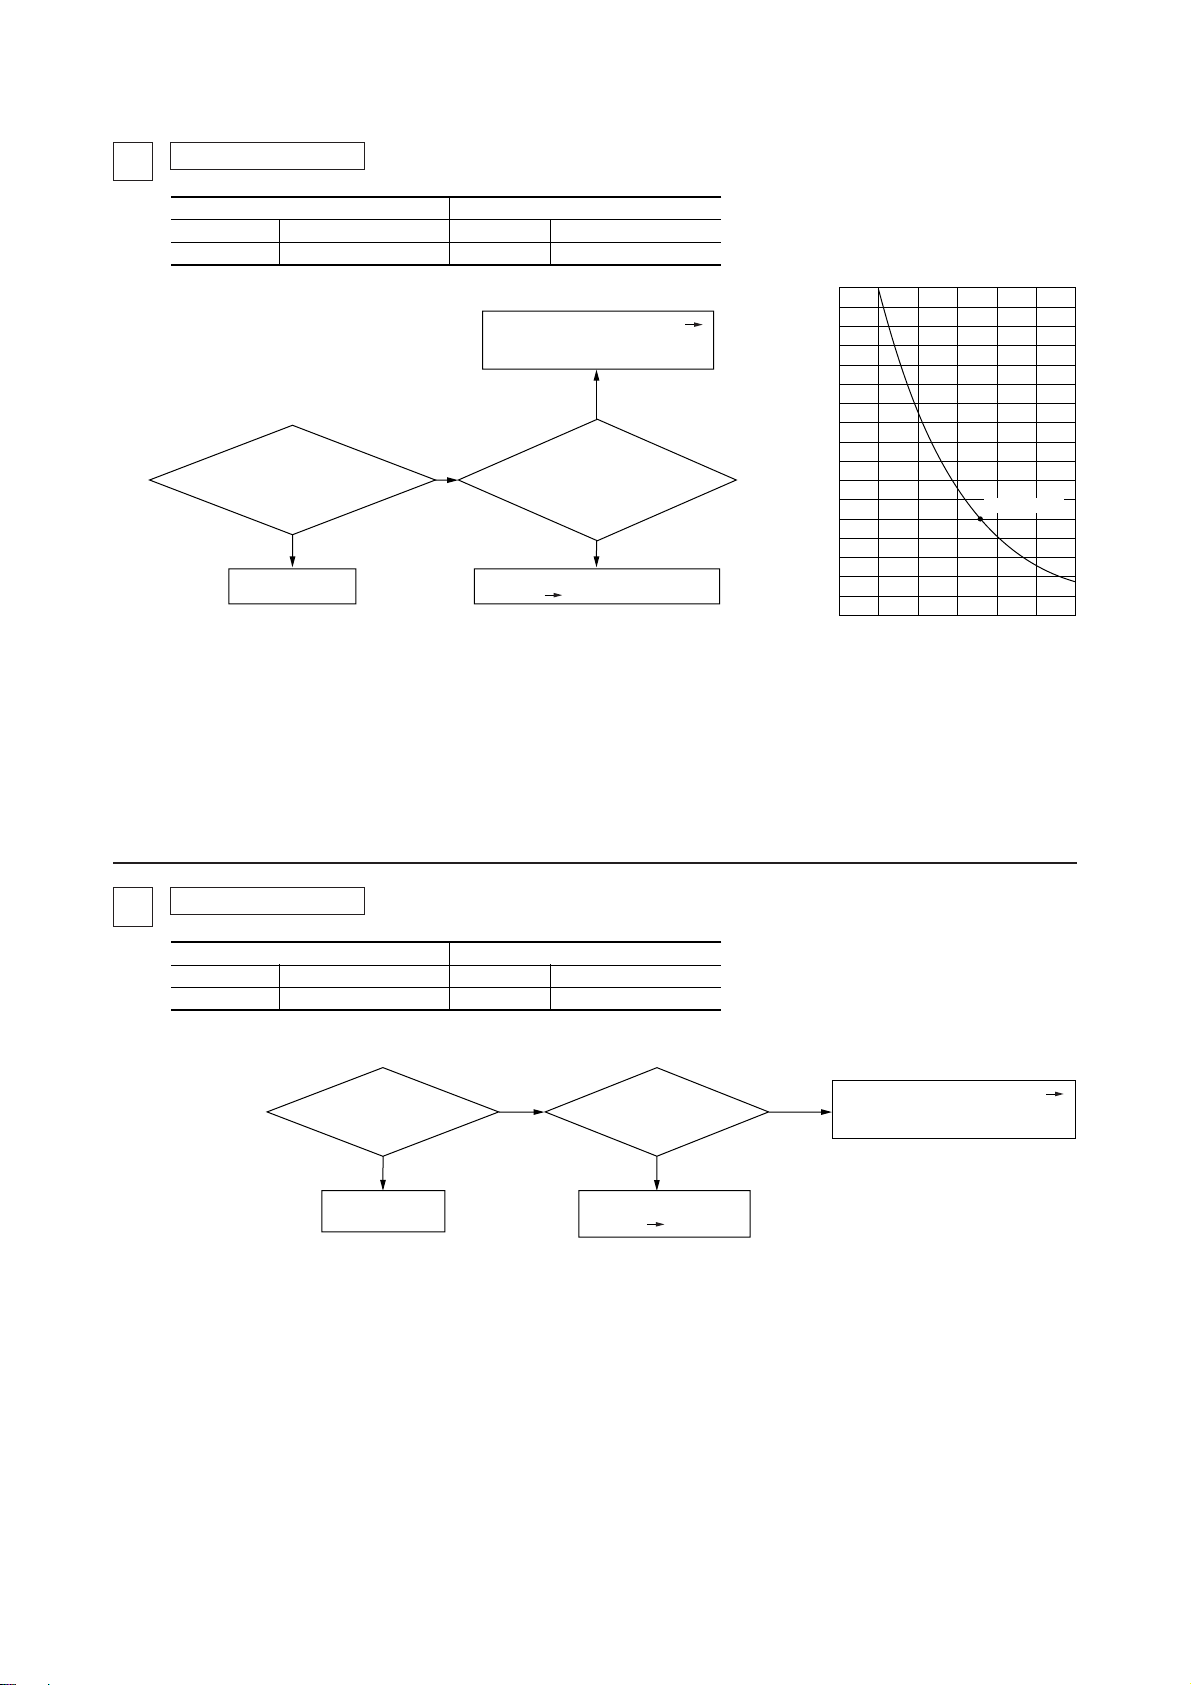
Error display :
8
Red LED
Green LED
Note (1) The green LED in the outdoor unit is used in the FDCA301 ~ 601 models only.
e10
Indoor unit
Stays OFF
Keeps flashing
[Control of 1 remote controller VS multiple units
Excessive number of units (more than 17 units) ]
Outdoor unit
Red LED
Green LED
Stays OFF
Keeps flashing
Are more
than 17 units connected
to a remote
controller?
NO
Defective indoor unit control PCB
Replacement
Error display :
9
Red LED
Green LED
Note (1) The green LED in the outdoor unit is used in the FDCA301 ~ 601 models only.
e16
Indoor unit
Keeps flashing
[Fan motor abnormalities]
Stays OFF
YES
Red LED
Green LED
Reduce to 16 units
or less
Outdoor unit
S Only case of FDTA501, 601 types
Stays OFF
Keeps flashing
NO
Abnormal data check
with remote controller
After check reset,
fan runs on weak.
Fan ON?
CNM1
1 and 3 (Red – White)
DC280V?
CNW9
1 and 3
DC15V?
DC 15V
between CNW9- 3 and
CNM2 4 ?
Does the
fan motor turn
smoothly by
hand?
Is the voltage
at CNM2 3 DC 1V
or higher?
White is GND.
YES YES
3 is GND.
YES
Note (1) CNW9- 3 is GND.
YES
YES
(2)
NO
NO
NO
(1)
NO
NO
YES
Note (2) CNW9- 3 is GND.
Replacement indoor
unit power supply PCB
side of transformer
Replacement transformer
Replacement indoor
unit control PCB
Detective fan motor
Secondary
(red-red) 15V
or more
NO
YES
NO
Was it reproduced?
YES
When the
motor is turning, does
the voltage at CNM2 2
fluctuate between
0 ~ 15 V?
YES
Replacement indoor
unit control PCB
NO
Check the
circumstances.
● Display conditions
If an indoor unit fan motor’s speed is detected to be less than
200 rpm continuously for 30 seconds, the fan motor stops for 2
seconds. After 2 seconds, it starts again, but this occurs 4 times
within a period of 1 hour.
Replacement indoor
unit control PCB
-
18
-
S Only case of FDKN
Only case of 151~251 types
Abnormal data check
with remote controller
After check reset,
fan runs on Me.
3 (Black) is GND.
CNM
1 and 3 (Red – Black)
DC280V?
YES YES
3 (Black) is GND.
CNM
4 and 3 (White-Black)
DC15V?
YES
Does the
fan motor turn
smoothly by
hand?
YES
Is the voltage
at CNM 5 (Yellow) DC 1V
or higher?
Replacement indoor
unit control PCB
(2)
Note (2) CNM 3 (Black) is GND.
NO
NO
Replacement indoor
NO
side of transformer
Replacement transformer
NO
Detective fan motor
YES
unit control PCB
Secondary
(red-red) 14V
or more
NO
NO
NO
Fan ON?
YES
Was it reproduced?
YES
When the
motor is turning, does
the voltage at CNM 6 (Blue)
fluctuate between
DC 0 ~ 15 V?
Replacement indoor
unit control PCB
(1)
YES
NO
Note (1) CNM 3 (Black) is GND.
Check the
circumstances.
● Display conditions
If an indoor unit fan motor’s speed is detected to be less than
200 rpm continuously for 30 seconds, the fan motor stops for 2
seconds. After 2 seconds, it starts again, but this occurs 4 times
within a period of 1 hour.
Only case of 301 type
CNM
1 and 4 (Red-Blue)
DC 0~60V ?
NO
Turn the power off and wait
a short time (30 min. ~ 1 hr.)
YES
When tried again,
the fan goes ON.
YES
Replacement indoor
unit control PCB
3 (black) is GND.
YES
YES
Replacement fan
motor
Check the
circumstances.
After check reset,
fan runs on Me.
NO
NO
Fan ON ?
YES
Was it reproduced?
YES
When
the motor is turning,
does the voltage at CNM 5
(White) fluctuate between
DC 0 ~ 15 V?
YES
Replacement indoor
unit control PCB
NO
(1)
NO
Note (1) CNM 4 (Blue) is GND.
Check the
circumstances.
Replacement fan
motor
● Display conditions
If an indoor unit fan motor’s speed is detected to be less than
200 rpm continuously for 30 seconds, the fan motor stops for 2
seconds. After 2 seconds, it starts again, but this occurs 4 times
within a period of 1 hour.
-
19
-
10
Error display :
e28
[Directive remote controller thermistor.]
Indoor unit
Red LED
Green LED
Note (1) The green LED in the outdoor unit is used in the FDCA301 ~ 601 models only.
Is the remote controller
thermistor connector connection OK?
Resistance-temperature characteristic of remote controller thermister
Temperrature(°C)
Resistance value (kΩ)
0
1
2
4
6
8
10
12
Stays OFF
Keeps flashing
NO
Correction
65
62
59
53
48
44
40
36
YES
Temperrature(°C)
14
16
18
20
22
24
26
28
Red LED
Green LED
Resistance value (kΩ)
Outdoor unit
Stays OFF
Keeps flashing
Are characteristics of
remote controller thermistor OK or is there any
broken wire?
NO
Detective remote controller
thermistor Replacement
Temperrature(°C)
33
30
27
25
23
21
19
18
30
32
34
36
38
40
42
44
YES
Resistance value (kΩ)
16
15
14
13
12
11
9.9
9.2
Detectivie remote controller PCB
Replacement (Detective remote thermistor input circuit)
Temperrature(°C)
Resistance value (kΩ)
46
48
50
52
54
56
58
60
8.5
7.8
7.3
6.7
6.3
5.8
5.4
5.0
-
20
-

(4) Error diagnosis procedures at the outdoor units side
At the error diagnosis related to the outdoor unit, check at first the error code of remote controller and the illumination patterns of
norma1 and inspection display lamps in the same manner as the case of indoor unit.
Then estimate the outline, the cause and the location of error based on the pattern and proceed to the inspcetion and repair.
Since the self diagnosis function by means of the microcomputers of indoor/outdoor units provide the judgement of error of
microcomputers them selves irregularity power supply line, overload, etc. caused by the installation space, inadequate volume of
refrigerant etc., the location and cause of trouble will be discovered without difficulty.
In addition, the display lamps error code of indoor/outdoor unit is kept flashing, (except when the power supply is iterrupted) after
the irregularity is automatically recovered to give irregularity information to the service presonnel. If any mode of higher priority
than the error retained in memory occurs after the reset of error, it is switched to that mode and saved in the memory.
(a) Replacement parts assembly related to the outdoor unit controller
Outdoor unit PCB, power transistor module, capacitor, noise filter, thermistor, (heat exchanger, discharge pipe, outdoor
temperature, power transistor), fuse, transformer, etc.
(b) Replacement procedure of outdoor unit microcomputer printed circuit board.
Microcomputer printed circuit board can replaced with following procedure.
1) Confirm the parts numbers. (Refer to the following parts layout drawing for the location of parts number.)
Parts No.
PCA505A080Z
PCA505A065ZN
PCA505A065ZS
FDCVA151HEN, 201HEN, 251HEN
FDCA301HEN, 401HEN
FDCA301HES, 401HES, 501HES, 601HES
Applicable Model
2) Set the model using the model setting switch (SW6). (In the case of the 151~251 only).
Switch Setting Table (All switches are set in the OFF position when shipped from the factory.)
Model
151 201 251
Switch Setting Table
Set the switches ON or
OFF for each switch
No.
( ON, OFF)
1 2 3 4
ON
1 2 3 4
ON
ON
1 2 3 4
3) Set the overcurrent value using the overcurrent setting switch for CM (SW3). (In the case of the 301~601 only)
Switch Setting Table (All switches are set in the OFF position when shipped from the factory.)
Model
Setting Value (A)
Switch Setting Table
Set the switches ON or
OFF for each switch
No.
( ON, OFF)
301HEN 301HES 401HEN
17 2710
1 2 3 4 5 6
ON
1 2 3 4 5 6
ON
ON
401HES 501HES 601HES
11 1412
1 2 3 4 5 6
ON
1 2 3 4 5 6
1 2 3 4 5 6
ON
1 2 3 4 5 6
ON
4) Set the control select switch to match the previously set settings on the previous board.
If the previously set settings were set with jumper wires, the control select switch should be set in the ON position if there
was a jumper wire and in the OFF position if there wasn’t a jumper wire.
5) Connect the faston terminals and connectors to the control board.
When connecting the wires to the faston terminals, connect each wire to the terminal printed with the same color on the
board.
Note (1) When connecting the faston terminals to the control board, connect them so that there is no deformation of the far end of the circuit board.
-
-
21
Parts layout on the outdoor unit PCB
S FDCVA151~251 type
Sub PCB
(Noise filter)
Reactor
Fan motor
Stepping motor
T2
T4
F2
CNI
T8
W
T7
VU
CN
T6
Power transistor thermistor
(Tho-IPM)
● Change by the jumper wire
Model
JA1 (SW7-1)
JA5 (SW6-1)
JA6 (SW6-2)
JA7 (SW6-3)
JA8 (SW6-4)
151 201 251
None
None
None
None
With
None
None
None
With
With
CNM
F3
T5
T1
F1
CNQ
SW7
SW6
DIP switch
(SW6)
None
Notes (1) “None” means that jumper wire is not provided on the PCB or the connection is cut
None
Notes (2) The replacement PCB is not equipped with jumper wires JA1 and JA5~JA8. Instead, SW6 and 7
None
With
With
are mounted in the same position and have the same functions as jumper wires JA1 and JA5~JA8.
Carry out the local settings in accordance with the table using SW6 and 7.
CNI2CNV1
CNW
CNI3
CNL CNTR
CNE
DIP switch
(SW7)
Outdoor air temp. thermistor,
Outdoor heat exchanger themistor,
Discharge pipe thermistor
(Tho-A, Tho-R, Tho-D)
● Function of DIP switches (SW5) (Usually all turned OFF)
Switch Function
ON
SW5-1
SW5-2
SW5-3
SW5-4
Defrost Setting Select For cold regions.
OFF
Normal
Snow-guard fan control-Effective
ON
Snow-guard fan control-Invalid
OFF
ON
Low refrigerant protection control-Effective
OFF
Low refrigerant protection control-Invalid
ON
Test run operation-Heating
OFF
Test run operation-Cooling
External PCB
SW5 SW9
Test run operation switch
SW9
SW5
1234
CNQ1
-
22
● Change by the JA3
Switch Function
with
JA3
(SW7-3)
Model selection-Energy saving
None
Model selection-Standerd
Note (1) “None” means that jumper wire is not provided on the
PCB or the connection is cut.
-
S FDCA301~601 type
Outdoor air thermistor,
Outdoor heat exchanger
thermistor,
Discharge pipe thermistor
(Tho-A, Tho-D, Tho-R1, 2)
SW3
SW6
SW5
SW4
SW2
(Test run operation switch)
SW5
L11
CNL
1234
CT1
SW6
J5
J8J7J6
L12
Stepping motor
L5
C6
L6
C13
C7
IC12
L7
C6
C8
L8
C9
L10
C10
SW3
J14
J13
J12
J11
J15
J16
SW4
J4J3J2
J1
CT2
Fan motor
PCB power supply connector
(Secondary side)
C5
CNA2
C3
Outdoor unit power supplly
C1
CNV1
X07 X05 X01 X06
CNS CNO
CNQ
CNE
X04 X03 X02
HT1
CNM3
CNM4
C2
C4
C11
C12
LED-R
LED-G
SW2
KN1
CNM1
CNM2
CNW
PCB power supply connector
(Primary side)
CNA1
High pressure switch
(63H1)
CNRCNP3CNP1CNP2
KN2
Crankcase heater
Magnetic contactor
(52C)
4 way valve
Capacitor for FMo
● Change by the jumper wire ● Function of DIP switches (SW5) (Usually all turned OFF)
Switch Function
J1
(SW4-1)
J2
(SW4-2)
J6
(SW6-2)
J7
(SW6-3)
J8
(SW6-4)
1 Phase
with
(1)
None
3 Phase
Cooling
with
(1)
None
Heating
Defrost recovery temperature 14ºC
with
(1)
Defrost recovery temperature (See page 88)
None
Defrost prohibited temperature 45 min.
with
(1)
Defrost prohibited temperature 37 min.
None
(1)
None
-
Switch Function
SW5-1
SW5-2
SW5-3
SW5-4
Defrost Setting Select For cold regions.
ON
Normal
OFF
Snow-guard fan control-Effective
ON
Snow-guard fan control-Invalid
OFF
Low refrigerant protection control-Effective
ON
Low refrigerant protection control-Invalid
OFF
Test run operation-Heating
ON
Test run operation-Cooling
OFF
● Overcurrent Setting
Notes (1) “None” means that jumper wire is not provided on the
PCB or the connection is cut
Notes (2) The replacement board is not equipped with jumper
wires JA1~JA8. Instead, SW4 and 6 are mounted in
the same position and have the same functions as
jumper wires JA1~JA8. Carry out the local settings in
accordance with the above table using SW4 and 6.
Model
Setting Value (A)
J11 (SW3-1)
J12 (SW3-2)
J13 (SW3-3)
301HEN17301HES10401HEN27401HES11501HES12601HES
With
With
None
None
(1)
(1)
None
None
(1)
(1)
With
None
With
(1)
With
None
With
(1)
With
With
None
14
With
With
(1)
With
Notes (1) “None” means that jumper wire is not provided on the PCB or the
connection is cut
Notes (2) The replacement board is not equipped with jumper wires J11~J13.
Instead, SW3 is mounted in the same position and has the same functions as jumper wires J11~J13. Carry out the local settings in accordance with the above table using SW3.
(3) The overcurrent setting value becomes the above setting value (A)
automatically in accordance with the settings on J11(SW3-1) ~
J13(SW3-3) and J1(SW4-1).
-
23
-

L
N
E
TB
TB
Red
White
Y/NG
LED1
Red
T1 T5
Red
White
Black
Orange
Yellow
UVW
T6 T7 T8
CM
F2 (250V 20A)
CnTR
Control PCB
Power transistor module
CNI3 T2 T4
6
DC280V
F3 (250V 1A)
F5
(
20A
)
4321
CNI2
FM
0
T21
T22
Sub PCB
(Noise filter)
T24
T25
T26
T30
T27T28CNI1
Orange
Gray To indoor unit
Brown
Temperature
[
T
]
(
˚C
)
T
<
80˚C
T
>
80˚C
100
50
0
10
5
0
Thermistor resistance (kΩ)
[
T
<
=
80˚C
]
Thermistor resistance (kΩ)
[
T
>
=
80˚C
]
0 20 50 80 100 120
Power transistor thermistor temperature and
resistance characteristics check
Power transistor module
check: Is there a short circuit, open circuit or damage? (See 160 page for the
check procedure.)
DC Reactor Continuity
Check: 50 mΩ or higher,
less than 100 mΩ.
Fuse Check: There should be continuity.
If faulty, replace the control PCB.
When the outdoor
unit fan motor is
abnormal:
(Refer to page 157)
Noise Filter Check:
There should be continuity.
There should be no shorts between phases.
LED1 (Red) Check
Light continuously :
Keeps flashing :
1~3 time flash :
Normal
EEV
Refer to 131 page
Power Supply Check
Measure the power supply at L.N.
(It is normal if it is AC 220/240V.)
❇
Fuse Check: There should be
continuity.
●
Outdoor unit check points
Check items with the *mark when the power is ON.
Outdoor Unit controller failure diagnosis circuit diagram
FDCVA151~251 type
-
24
-
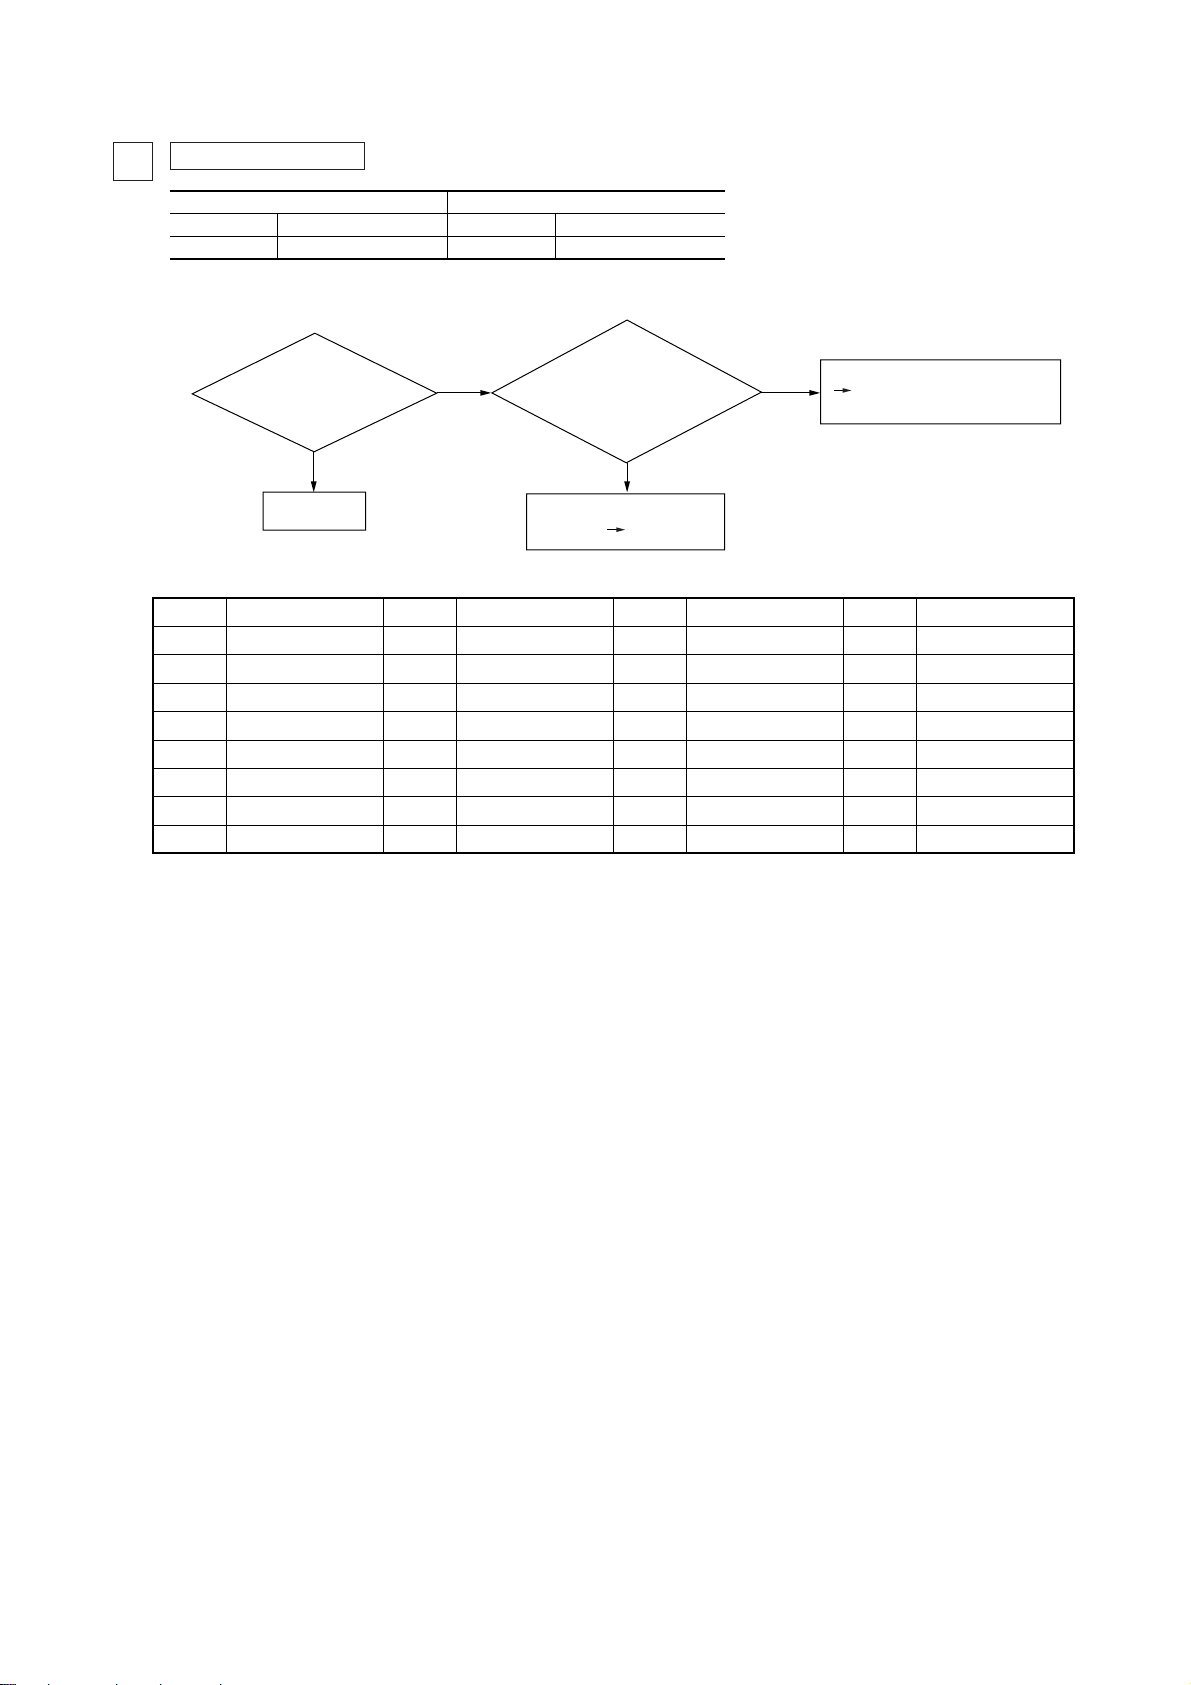
Error display :
1
e5
[Communications error during operation]
Indoor unit
Red LED
Green LED
Note (1) The green LED in the outdoor unit is used in the FDCA301 ~ 601 models only.
Is the connection
of the signal wires at the
outdoor unit poor?
YES
Repair Repair
Notes (1) Check for poor connections (disconnection, looseness) on the outdoor unit’s terminal block.
(2) Check for poor connections or disconnection of the signal lines between the indoor and outdoor units.
Red LED
Green LED
Note (1) The green LED in the outdoor unit is used in the FDCA301 ~ 601 models only.
Reset power supply.
2 time flash
Keeps flashing
(1) (2)
NO
Indoor unit
Is the connection
of the signal wires at the
indoor unit poor?
YES YES
2 time flash
Keeps flashing
Did it return to normal?
Red LED
Green LED
NO
Red LED
Green LED
Outdoor unit
Reset power
supply.
Outdoor unit
NO
2 time flash
Keeps flashing
Did the remote
controller’s LCD return
to normal?
The unit is normal.
Malfunction was due to
transient noise, etc.
Stays OFF
Keeps flashing
YES
(The outdoor unit’s CPU went
out of control due to noise during
power on.)
Malfunction is due to noise, etc.
“ WAIT ”
“ WAIT ”
Go to display diagnosis (page 140).
Error display :
2
Red LED
Green LED
e32
Indoor unit
Stays OFF
Keeps flashing
Are the power supply
phases reversed?
NO
Are the connections
to the reverse phase detection
circuit lines correct?
YES
[Power supply phases reversed] [Only case of 301~601 type]
Outdoor unit’s control PCB is
faulty. (Network communications
circuit is faulty.) Replace
Outdoor unit
1 time flash
Keeps flashing
YES
NO
Red LED
Green LED
Repair
Repair
Outdoor unit’s control PCB is faulty.
Replace
(Reverse phase detection circuit is faulty.)
-
25
-

Error display :
3
e33
[Inverter primary current abnormal] [Only case of 151~251 type]
Indoor unit
Red LED
Green LED
Is the power supply normal?
Is the voltage within
the specified range?
Is there any foreign matter
such as dust or dirt on the control
PCB soldered surfaces?
Replace the control PCB.
Stays OFF
Keeps flashing
NO
YES
NO
YES
NO
YES
Red LED
Restore it to the
normal state.
Restore it to the
normal state.
Remove any foreign matter
such as dust or dirt.
Outdoor unit
1 time flash
● Display Conditions
If the inverter’s primary current exceeds the set value for 3 sec-
onds, the compressor stops. After a 3 minute delay, it restarts, but
when this occurs 5 times within 60 minutes.
[Compressor overcurrent trouble] [Only case of 301~601 type]
Outdoor unit
1 time flash
Keeps flashing
Red LED
Green LED
Indoor unit
Stays OFF
Keeps flashing
Red LED
Green LED
Is the voltage
AC220/240V between the
L1 and L3 phases and between the L2
and L3 phases on the 52C
secondary side?
YES
Is there overcurrent
at the compressor?
NO
Outdoor unit control PCB is
faulty. Replace
(The CT input circuit is faulty.)
NO
(1)
YES
Out of phase between the
L1 and L2 phases.
•
Is the power supply voltage proper? (Isn’t it too low?)
•
Are the power lines proper? (Aren’t they too thin?)
•
Is the overcurrent setting correct? (SW3 setting)
•
Is the compressor running with an overload?
• Is the compressor locked?
Notes (1) Measure the overcurrent value to make sure.
Also make sure the overcurrent setting set with SW3 and SW4-1 on the outdoor unit control PCB
is not incorrect.
• 52C is faulty.
• There is a disconnection between
52C and CM or in the L1 and L2
phases between TB1 and 52C.
Check the unit side.
• During cooling: Is FMo turning?
• During heating: Is FM
Is the service valve (gas side) fully open?
Is the filter clogged?
• Is there an overcharge?
• Is the installation space for the indoor and
outdoor units proper?
•
Is there a short circuit in the indoor or outdoor units?
• Compressor is faulty. Replace
I
turning?
-
26
-

Error display :
4
[Open phase at L3 phase of 52C secondary side] (Only case of 301~601 type)
e34
Indoor unit
Red LED
Green LED
secondary side L3 phase
52C
open?
Stays OFF
Keeps flashing
(1)
NO
Red LED
Green LED
YES
(2)
Outdoor unit
Repair
The outdoor unit control PCB is faulty.
(The CT circuit is faulty) Replace
Error display :
5
Indoor unit
Red LED
Green LED
Note (1) The green LED in the outdoor unit is used in the FDCA301 ~ 601 models only.
Are the
characteristics of the
outdoor heat exchanger thermistor
normal?
[Cooling overload operation]
e35
Stays OFF
Keeps flashing
YES
Red LED
Green LED
Is there cooling overload
operation?
Outdoor unit
NO
Replace the outdoor heat
exchanger thermistor.
Is the unit normal?
NO
Abnormal Temperature Detection
Error stop
Is high pressure control
normal?
Abnormal temperature detection
Is it (the actual measurement) correct?
NO
The outdoor control PCB
is faulty. Replace
Return
1 time flash
Keeps flashing
Notes (1) Also check if there is voltage at the L3 phase on the 52C primary
side, but no voltage on the secondary side (coil wire disconnec-
tion or faulty contacts).
(2) If there is voltage at the L3 phase on the 52C primary side and it
is not abnormal, the outdoor unit control PCB is faulty.
AAA
AAAAAAAAAAAAAAAAAAAAAAAA
If the unit is operated with the service valve closed, 49C (internal thermostat) operates. E34 may also be displayed. Check the service valve.
AAAAAAAAAAAAAAAAAAAAAAAA
1 time flash
Keeps flashing
Check the unit side.
• Is there a short circuit in the outdoor unit?
• Is the installation space proper?
• Is the refrigerant level too high?
• Is the heat exchanger dirty or clogged?
(1)
The compressor’s speed drops when all the following conditions are met
(151~251). In the case of the 301~601, expansion valve control is performed.
1
Outdoor heat exchanger temperature: A˚C or higher
2
Outdoor air temperature: 41ºC or higher
3
The outdoor unit’s fan runs at 7 speed (UHi)
30 seconds or longer.
(2) Control is cancelled when the temperature drops to BºC or lower.
Model
less than 88
88 to less than 108
108 or higher
151~251 type
Compressor
speed
(rps)
301~601 type
Note (1) Values in ( ) show for the case of the 301~601 models.
Item
(1)
continuously for
A
58.5
53.5
48.5
58
53.5
48.5
43.5
AAA
B
53
(1)
48 65
Outdoor air temp. (ºC)
Note (1) In the case of the 151 ~
251, the abnormal stop
temperature differs
depending on the
compressor’s speed.
Compressor speed
(rps)
less than 88
88 to less than 108
108 or higher
Indoor heat exchanger
temprature (˚C)
65 or more
60 or more
55 or more
-
27
● Display Conditions
If the outdoor heat
exchanger temperature
becomes 65ºC 5 times
within 60 minutes,
including while the
compressor is stopped,
or if it continues at that
temperature for 10
minutes or longer.
-
Outdoor unit heat exchanger
themistor (Tho-R)
Resistancetemperature characteristics
15
10
(kΩ)
Resistance
5
010 304020 50
5kΩ at 25°C
Temperature (°C)

Error display :
6
[Discharge temperature error]
e36
Indoor unit
Red LED
Green LED
Note (1) The green LED in the outdoor unit is used in the FDCA301 ~ 601 models only.
Is the
discharge pipe ther-
mistror characteristics
normal?
Stays OFF
Keeps flashing
Discharge
temperature error?
YES
(At cooling/heating
operation)
Red LED
Green LED
Outdoor unit
1 time flash
Keeps flashing
Check the unit side.
Insufficient refrigerant
Charge the refrigerant (measure)
Is it the oveload operation?
NO
Discharge pipe thermistor replacement
Is the unit
normalized
NO
Is discharge temperature
control normal?
Abnormal temperature sensed
Is the (actual measurement) normal?
NO
Defective outdoor unit PCB
Replacement
● Display conditions
If the discharge temperature is as shown at left 2 (5) times within 60
minutes, or continuously for 60 minutes, including when the com-
pressor is stopped.
Note (1) Values in ( ) show for the case of the 301~601 models.
Abnormal Temperature Detection
151~251 type 301~601 type
Error stop Error stop
Operoble Operoble
80 105
Discharge pipe temp. (°C) Discharge pipe temp. (°C)
80 121
● 151~251 type
Temperature-resistance characteristics
of discharge pipe thermistor (Tho-D)
100
50
Thermistor resistance
0
Check the unit side.
During cooling: Is FM0 operating?
During heating: Is FM1 operating?
Are service valves (both liquid,
gas) fully opened during both
cooling and heating.
Is the installation space of indoor/
outdoor unit adequate?
Is there any short circuit air flow
for indoor/outdoor units?
If the discharge pipe temperature exceeds the set value,
the compressor’s speed (151~251) or the expansion
valve’s opening angle (301~601) is controlled to prevent
the discharge pipe temperature from rising.
Compressor control
Hold
Release
151~251 type
301~601 type
80 90
90
Discharge pipe temperature (°C)
● 301~601 type
100
80°C]
<
[T
(kΩ)
50
Temperature [T] (°C) Temperature [T] (°C)
140120100806040200
Thermistor resistance
The compressor’s capacity
is lowered (Each minute the
speed is reduced (151~251).
Expansion valve control
(301~601)
100
Temperature-resistance characteristics
of discharge pipe thermistor (Tho-D)
T<80˚C
0
0 50 80 100
T>80˚C
10
80°C]
>
[T
(kΩ)
5
0
Thermistor resistance
Error display :
7
Indoor unit
Red LED
Green LED
Note (1) The green LED in the outdoor unit is used in the FDCA301 ~ 601 models only.
Is the outdoor
unit heat exchanger
thermistor connector
OK?
NO
Repair
[Defective outdoor unit heat exchanger thermistor]
e37
Outdoor unit
Stays OFF
Keeps flashing
YES
Red LED
Green LED
Are the outdoor unit
heat exchanger thermistor
characteristics OK, is there
any broken wire?
NO
Defective outdoor unit
heat exchanger
thermistor Replacement
● Display conditions
If the temperature sensed by the thermistor is –30ºC or lower con-
tinuously for 5 seconds between 2 minutes and 2 minutes 20 seconds
after the compressor goes ON, the compressor stops. After a 3 minute
delay, the compressor restarts. If this state is detected 3 times in 40
(60) minutes.
Note (1) Values in ( ) show for the case of the 301~601 models.
-
1 time flash
Keeps flashing
-
28
Defective outdoor unit control
YES
PCB Replacement (Defective
outdoor unit heat exchanger
thermistor input circuit)
Outdoor unit heat exchanger
thermistor (ThO-R)
Resistance temperature characteristics
15
)
Ω
10
(k
Resistance
5
010 304020 50
5kΩ at 25°C
Temperature (°C)

Error display :
8
[Defective outdoor air temperature thermistor]
e38
Indoor unit
Red LED
Green LED
Note (1) The green LED in the outdoor unit is used in the FDCA301 ~ 601 models only.
Is the outdoor
air temperature thermistor
connector connection
OK?
NO
Repair
Stays OFF
Keeps flashing
YES
Red LED
Green LED
air temperature thermistor
characteristics OK, is there
Defective outdoor air
temperature thermistor
Replacement
Outdoor unit
1 time flash
Keeps flashing
Is the outdoor
no broken wire?
NO
● Display conditions
If the temperature sensed by the thermistor is –30ºC or lower continu-
ously for 5 seconds between 2 minutes and 2 minutes 20 seconds after
the compressor goes ON, the compressor stops. After a 3 minute delay,
the compressor restarts. If this state is detected 3 times in 40 (60) min-
utes.
Note (1) Values in ( ) show for the case of the 301~601 models.
Defective outdoor unit control PCB
YES
Replacement (Defective outdoor air
temperature thermistor input circuit)
400
300
(kΩ)[T<0°C]
200
Thermistor resistance
100
0
---50
Temperature-resistance
characteristics of outdoor air
temperature thermistor (ThO-A)
T < 0°C
T > 0°C
050
Temperature [T](°C)
40
30
(kΩ)[T>0°C]
20
Thermistor resistance
10
0
Error display :
9
Indoor unit
Red LED
Green LED
Note (1) The green LED in the outdoor unit is used in the FDCA301 ~ 601 models only.
Is the discharge
pipe thermistor
connector connection
OK?
NO
Repair
Keeps flashing
[Defective discharge pipe thermistor]
e39
Outdoor unit
Stays OFF
YES
Red LED
Green LED
Are the discharge
pipe thermistor characteristics
OK, is there no
broken wire?
NO
Defective discharge pipe
thermistor Replacement
● Display conditions
If the temperature sensed by the thermistor is –10ºC or lower con-
tinuously for 5 seconds between 10 minutes and 10 minutes 20
seconds (2minutes and 2minutes 20seconds) after the compressor
goes ON, the compressor stops. After a 3 minute delay, the com-
pressor restarts. If this state is detected 3 times in 40 (60) minutes.
Note (1) Values in ( ) show for the case of the 301~601 models.
1 time flash
Keeps flashing
YES
80°C]
<
[T
(kΩ)
Thermistor resistance
Defective outdoor unit control
PCB Replacement (Defective
discharge pipe thermistor
input circuit)
Temperature-resistance
characteristics of discharge
pipe thermistor (Th
O-
D)
100
<
T
80°C
50
0
05020 80 100 120
Temperature [T] (°C)
10
80°C]
>
>
T
80°C
[T
(kΩ)
5
0
Thermistor resistance
-
29
-
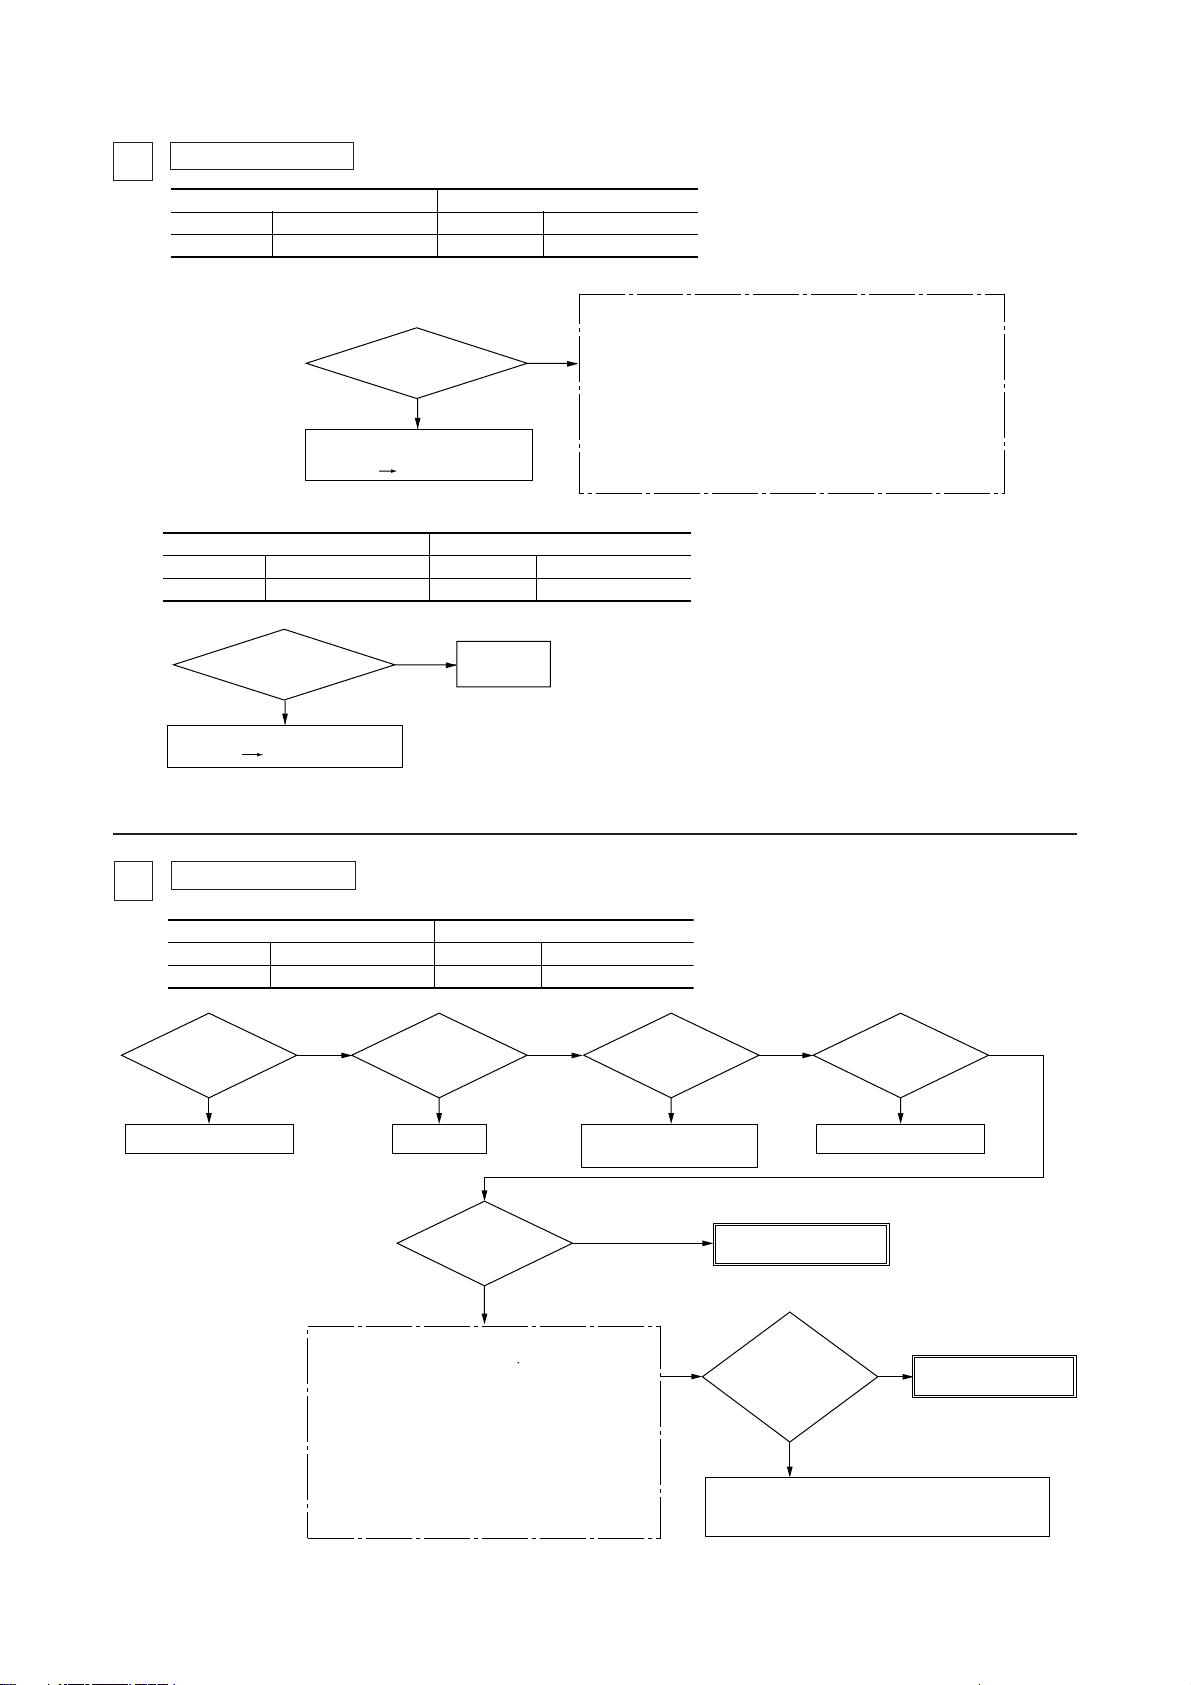
Error display :
10
[63H1 operation] (Only case of 301~601 type)
e40
Outdoor unit
YES
Red LED
Green LED
Indoor unit
Stays OFF
Keeps flashing
Is the 63H1 operating?
The outdoor unit control PCB
is faulty. (The 63H1 input circuit
is faulty.) Replace
Red LED
Green LED
NO
[Open phase at L3-phase of 52C primary side]
Indoor unit
Red LED
Green LED
primary side L3 phase
The outdoor unit control PCB
is faulty. Replace
Stays OFF
Keeps flashing
52C
open?
NO
(1)
Red LED
Green LED
YES
(2)
Outdoor unit
Repair
1 time flash
Keeps flashing
While the 63H1 is operating
1. During Cooling
• Is the outdoor unit fan motor running?
• Is there a short circuit in the outdoor unit?
• Is there enough space for inlet and outlet?
2. During Heating
• Is the indoor unit heat exchanger thermistor separated
from the sensing case?
• Is the filter clogged?
3. During Cooling and Heating
• Is the refrigerant overcharge?
• Is the service valve fully open?
1 time flash
Keeps flashing
Notes (1) Also check if there is voltage at the L3 phase on the 52C primary
side, but no voltage on the secondary side (coil wire disconnection
or faulty contacts).
(2) If there is voltage at the L3 phase on the 52C primary side and it is
not abnormal, the outdoor unit control PCB is faulty.
Error display :
11
Red LED
Green LED
Is the power
supply voltage
proper?
NO
Check the power supply.
e42
Indoor unit
Stays OFF
Keeps flashing
YES YES YES YES
● Display conditions
If the inverter’s output current ex-
ceeds the set value, the compres-
sor stops. After a 3-minute delay, it
restarts, but if this occurs 3 times
within 20 minutes.
• Is the installation space for the indoor and outdoor
• Is there a short circuit in the indoor or outdoor
• During cooling: Is FMo operating?
• During heating: Is FMI operating?
• Is liquid flowing back to the compressor?
• Is the compressor making abnormal noises?
[Current cut] (Only case of 151~251 type)
Outdoor unit
1 time flash
pressure during operation
Check the refrigerant level
and refrigerant circuit.
NG
valve fully open?
units proper?
units?
Red LED
Is the service
NO
Open it fully.
Check the
power transistor module
(See page 160)
OK
Is the service valve fully open?
Is the service valve fully open?
Is the filter clogged?
Is the high
proper?
NO
Check the
compressor's insulation
resistance and winding
resistance.
NO
Replace the compressor.
Replace the outdoor
unit control PCB.
Does it return to
normal if the power
supply is reset
(2 of 3 times)?
YES
It may be malfunction due to transient noise. If
there is a noise source nearby, take measures to
eliminate it.
NOYES
Replace the outdoor
unit control PCB.
-
30
-
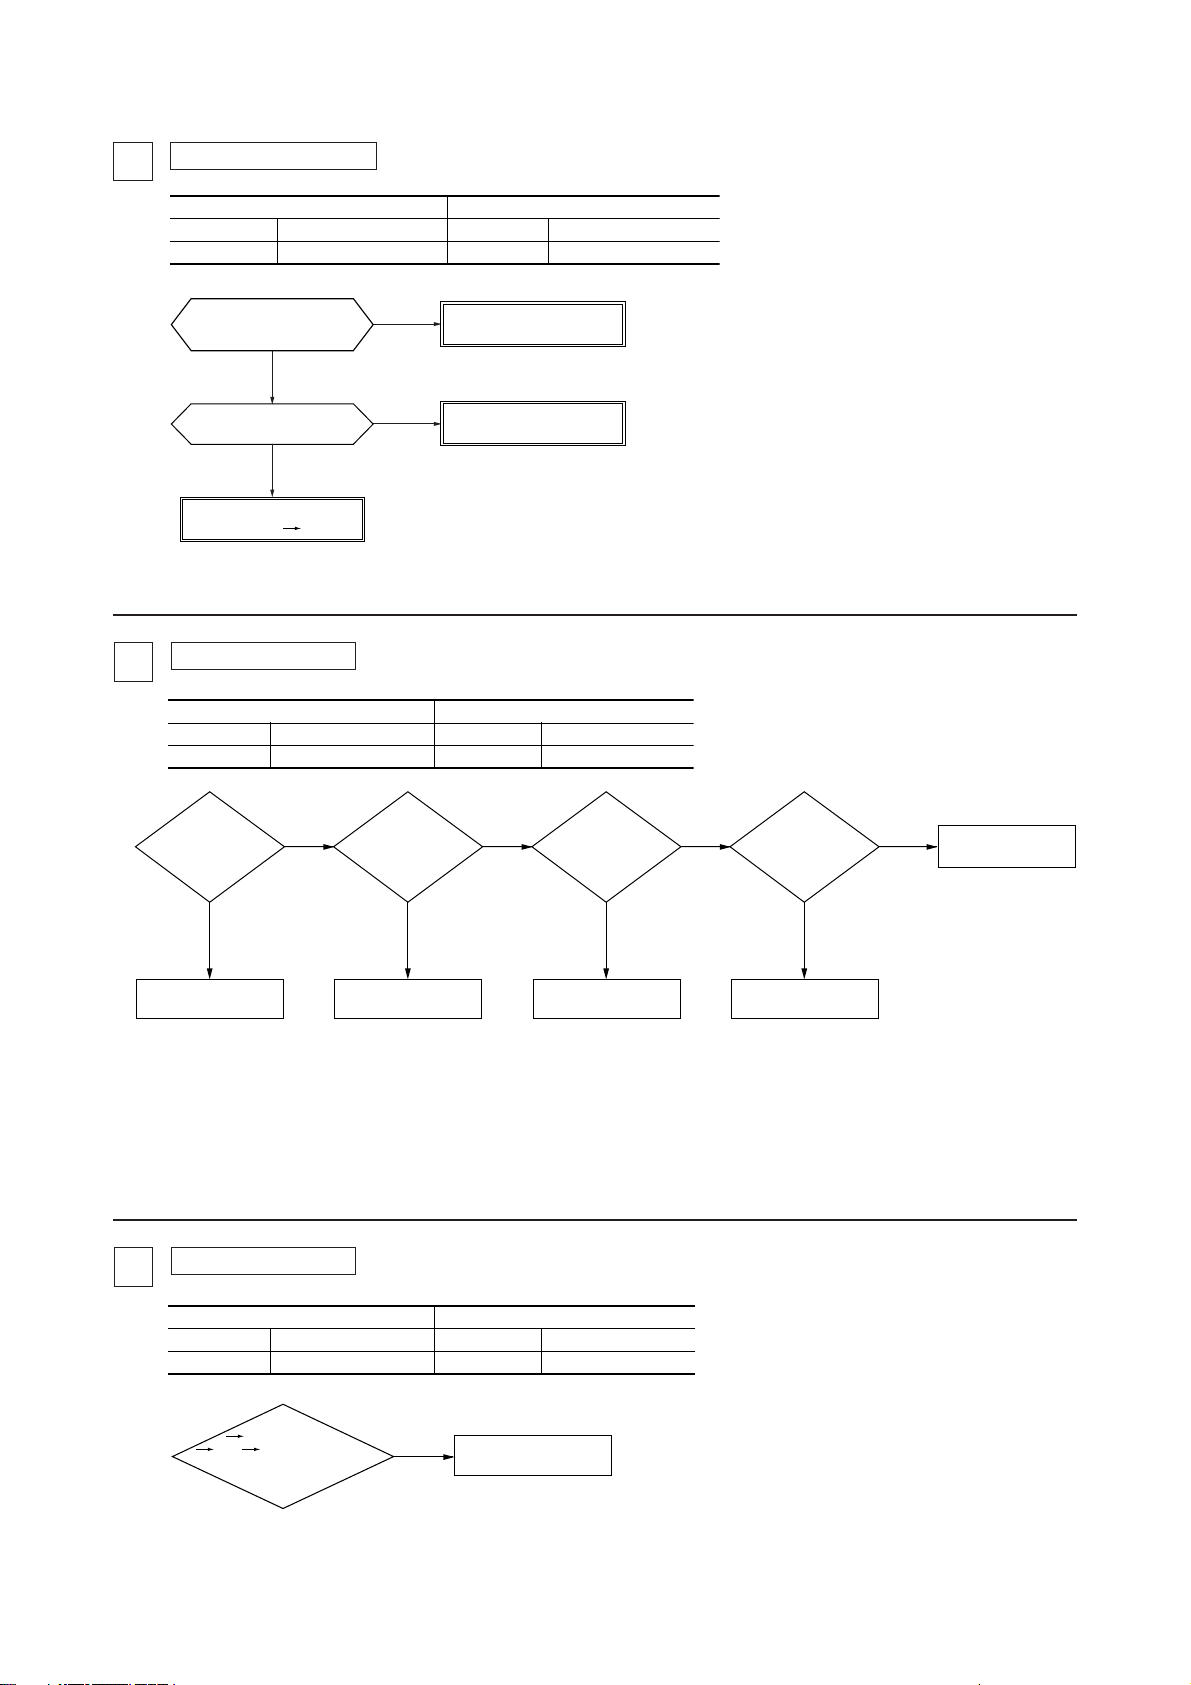
12
Error display :
e47
[Inverter over-voltage trouble] (Only case of 151~251 type)
Red LED
Green LED
such as dust or dirt on the soldered
Error display :
13
Red LED
Green LED
Indoor unit
Stays OFF
Keeps flashing
Is there foreign matter
surfaces of the control PCB?
NO
Is the fuse (F1: 250V, 20A)
blown?
NO
The outdoor unit control
PCB is faulty. Replace
e48
Indoor unit
Stays OFF
Keeps flashing
Outdoor unit
1 time flash
YES
YES
Red LED
Remove the foreign matter
such as dust and dirt.
Replace
● Display Conditions
If the inverter voltage exceeds 340V, (3 times in 20 min-
utes), this error is displayed. After 3 minutes passes, it
can be reset using the remote controller.
[DC Fan motor abnormal] (Only case of 151~251 type)
Outdoor unit
Red LED
1 time flash
Is any foreign
object wedged into the
rotating parts of the
fan motor?
NO
Remove the foreign object.
YES
Turn the
fan by hand several
revolutions. Does itturn
smoothly?
NO
Replace the fan motor.
YES
Is there
foreign matter
such as dust or dirt on
the soldered surfaces
of the control
PCB?
NO
Remove the foreign mater
such as dust or dirt.
YES
Is fuse F3
(250V, 1A)
blown?
Replace the fuse.
● Display conditions
When the DC fan motor’s output is ON, if the fan motor’s speed drops to 75 rpm or lower continuously
for 30 seconds or longer, the compressor stops. After a 3-minute delay, the compressor is restarted, but
if this state is detected 5 times within 60 minutes.
Error display :
14
Red LED
Green LED
Indoor unit
Keeps flashing
[52C Abnormal] (Only case of 301~601 type)
e52
Outdoor unit
Stays OFF
Red LED
Green LED
Lights contiously
Keeps flashing
NO
YES
Replace the outdoor
unit control PCB.
Is E52
Cooling operation
E52 Heating operation
displayed in the remote
controller’s
screen?
YES
The 52C is abnormal.
-
31
-
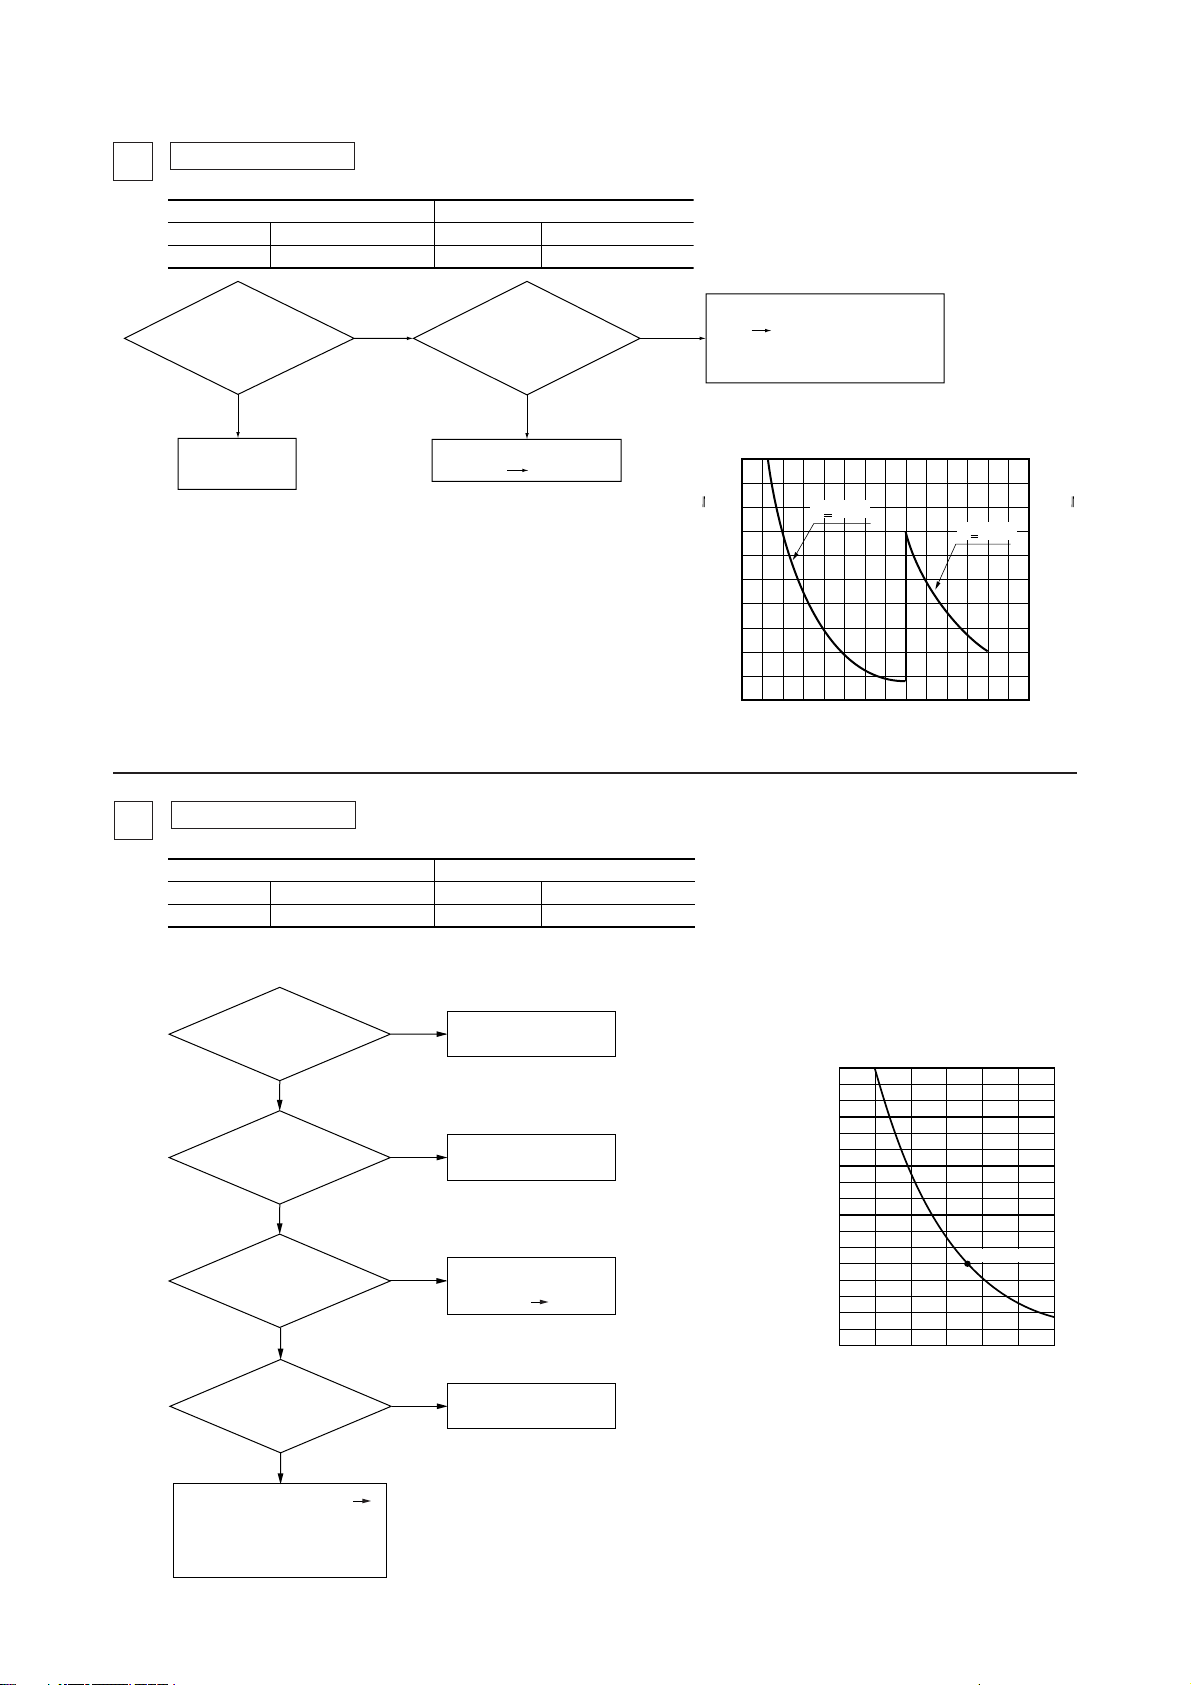
Error display :
15
[Power transistor thermistor faulty.] (Only case of 151~251 type)
e56
Indoor unit
Red LED
Green LED
Is the
power transistor thermistor
connector connection
OK?
NO
Repair
Stays OFF
Keeps flashing
YES
Red LED
thermistor characteristics
Defective power transistor
thermistor Replacement
Outdoor unit
Are the
power transistor
OK, is there no
broken wire?
NO
● Display conditions
If the temperature sensed by the thermistor is –10ºC or lower con-
tinuously for 5 seconds between 10 minutes and 10 minutes 20
seconds after the compressor goes ON, the compressor stops. Af-
ter a 3 minute delay, the compressor restarts. If this state is de-
tected 3 times in 40 minutes.
1 time flash
YES
80°C]
<
[T
(kΩ)
Thermistor resistance
Defective outdoor unit control
PCB Replacement (Defective
power transistor thermistor input
circuit)
Temperature-resistance
characteristics of power
transistor thermistor (Th
100
<
T
80°C
50
0
05020 80 100 120
Temperature [T] (°C)
O-
D)
10
80°C]
>
>
T
80°C
[T
(kΩ)
5
0
Thermistor resistance
Error display :
16
Indoor unit
Red LED
Green LED
Note (1) The green LED in the outdoor unit is used in the FDCA301 ~ 601 models only.
Is the service valve
opened fully?
connections of the connectors
to the indoor heat exchanger and return
air thermistor OK?
characteristics of the indoor
heat exchanger and return air
thermistor OK?
Is the low pressure during
operation normal?
Keeps flashing
YES
Are the
YES
Are the
YES
[Insufficient refrigerant volume.]
e57
Stays OFF
Red LED
Green LED
NO
NO
NO
NO
Fully opened.
Normal
Indoor heat exchanger and
return air thermistor faulty
Replace
Charge with refrigerant.
Outdoor unit
1 time flash
Keeps flashing
Return air thermistor (ThI-A)
Indoor unit heat exchanger thermistor
(Th
I-R1, R2)
Resistance temperature characterisics
15
10
(kΩ)
Resistance
5
010 304020 50
5kΩ at 25°C
Temperature (°C)
YES
Indoor control PCB faulty
Replace
(The indoor heat exchanger
and return air thermistor input
circuits are faulty.)
● Display conditions
If insufficient refrigerant protection (See page 92) is implemented
3 times within 30 minutes.
-
-
32
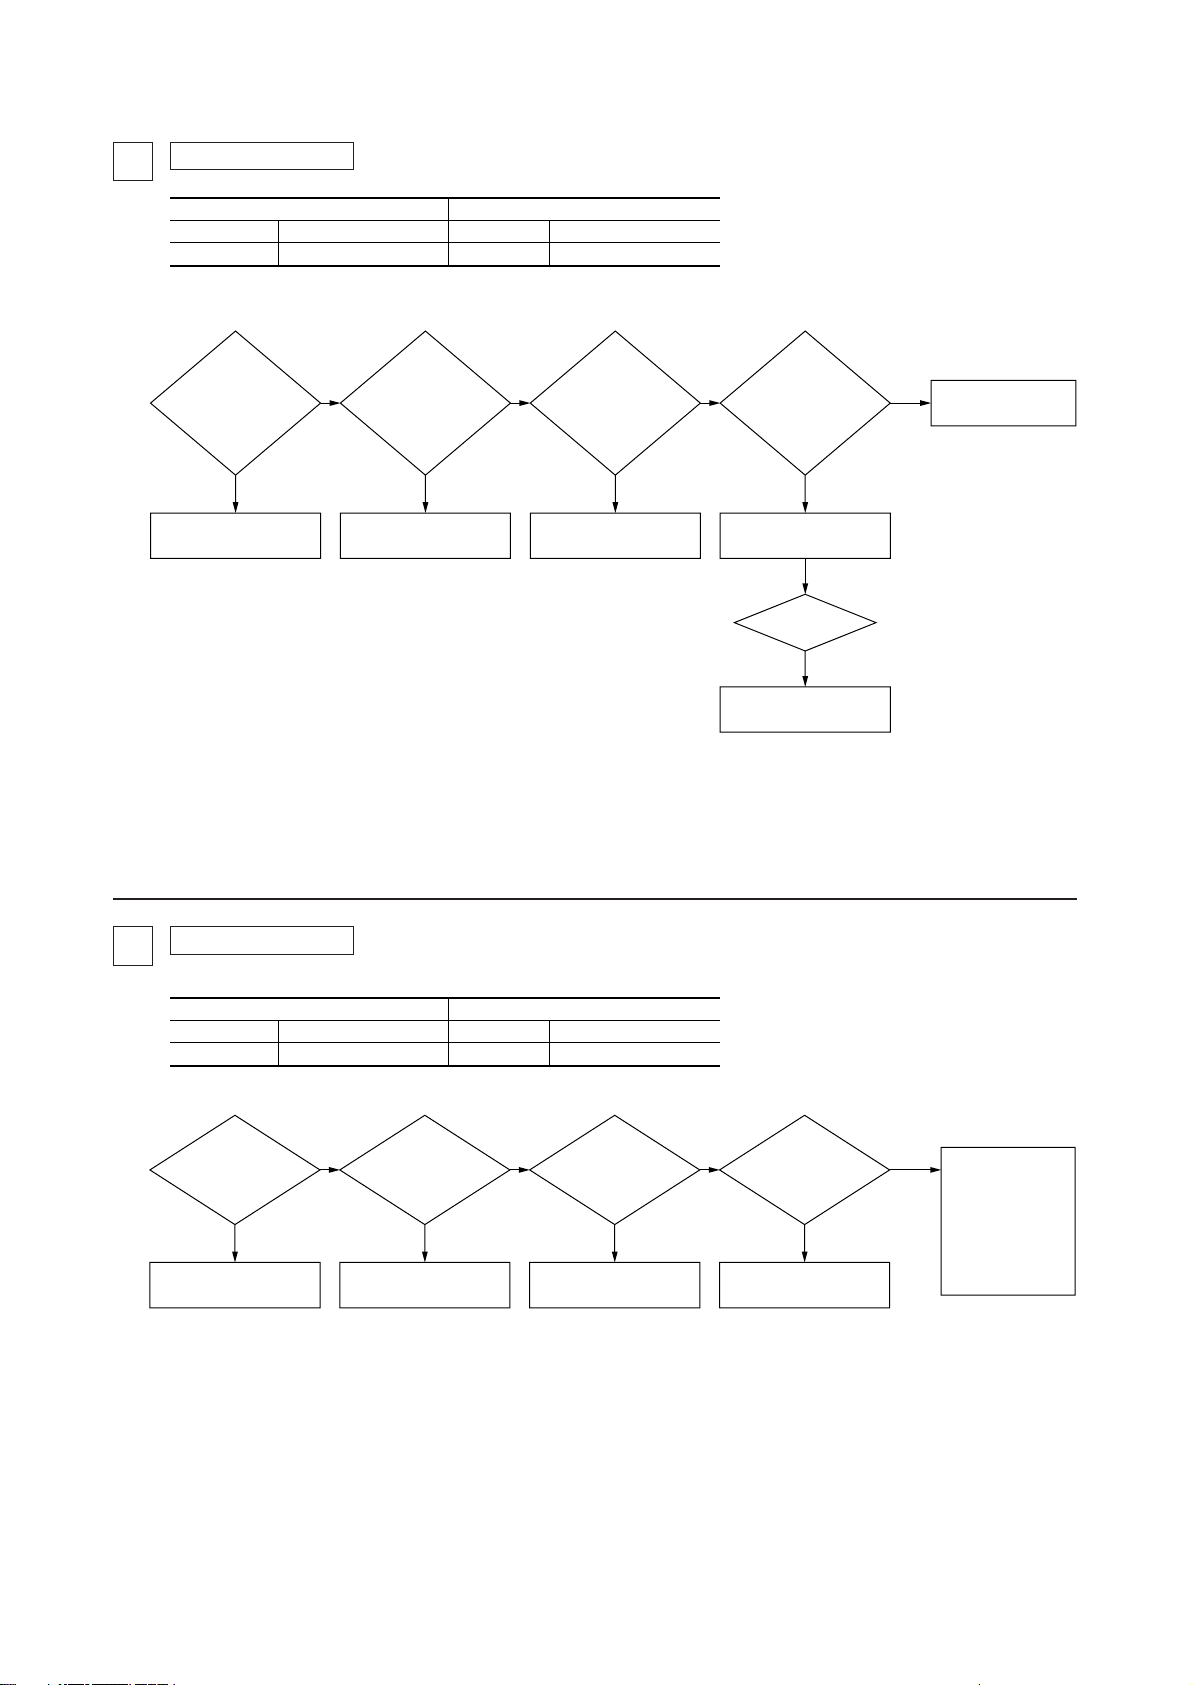
17
e59
[Abnormalities in compressor starting] (Only case of 151~251 type)Error display :
Indoor unit
Red LED
Green LED
Is the power
supply voltage
correct proper?
NO NO
Check of power supply
Note (1) If the test operation is repeated 2 or 3 times, the liquid re-
frigerant inside the compressor may be expelled from the
compressor may recover from its starting abnormality.
Stays OFF
Keeps flashing
YES
Is the balance
pressure appropriate
during starting?
Check the refrigerant level
and refrigerant circuit.
Red LED
YES
Outdoor unit
1 time, 2 time, 3 time flash
Check
the compressor’s
insulation resistance
and winding
resistance.
NG
Replacement
compressor
Check of
power transistor
OK
module
(Reference to 160)
Inverter
OK
Carry out test operation
(starting) another 2 or 3 times.
Did it improve?
NO
Replacement
compressor
Inverter
NG
(1)
● Display conditions
(1) If it won’t start 2 times out of 7 attempted starts.
(2) Remote controller reset is possible after 3 minutes have passed.
Replacement
control PCB
[Compressor loader position detection error] (Only case of 151~251 type)Error display :
18
Red LED
Green LED
Note (1) Check if the power supply system is normal.
Again
Operation
Does the compressor
start?
NO (E59) It does. It does.
E59 diagnosis E42 diagnosis Compressor check
e60
Indoor unit
Stays OFF
Keeps flashing
YES
Red LED
Does E42 occur?
Outdoor unit
It
doesn’t.
1 time flash
Does the
compressor make
any abnormal
noise?
doesn’t.
It
return to normal
Does it
when the power
is reset?
E60 recurs.
Replacement
control PCB
It doesn’t
recur.
It is possible that
transient noise
could be causing
malfunction. If
there is a noise
source, take countermeasures to
prevent it.
● Display conditions
(1) If a rotor position detection operation is conducted, then the rotor position cannot be detected again after that (4 times in 15
minutes), an abnormal state is displayed.
(2) After 3 minutes passes, it is reset with the remote controller is possible.
-
33
-
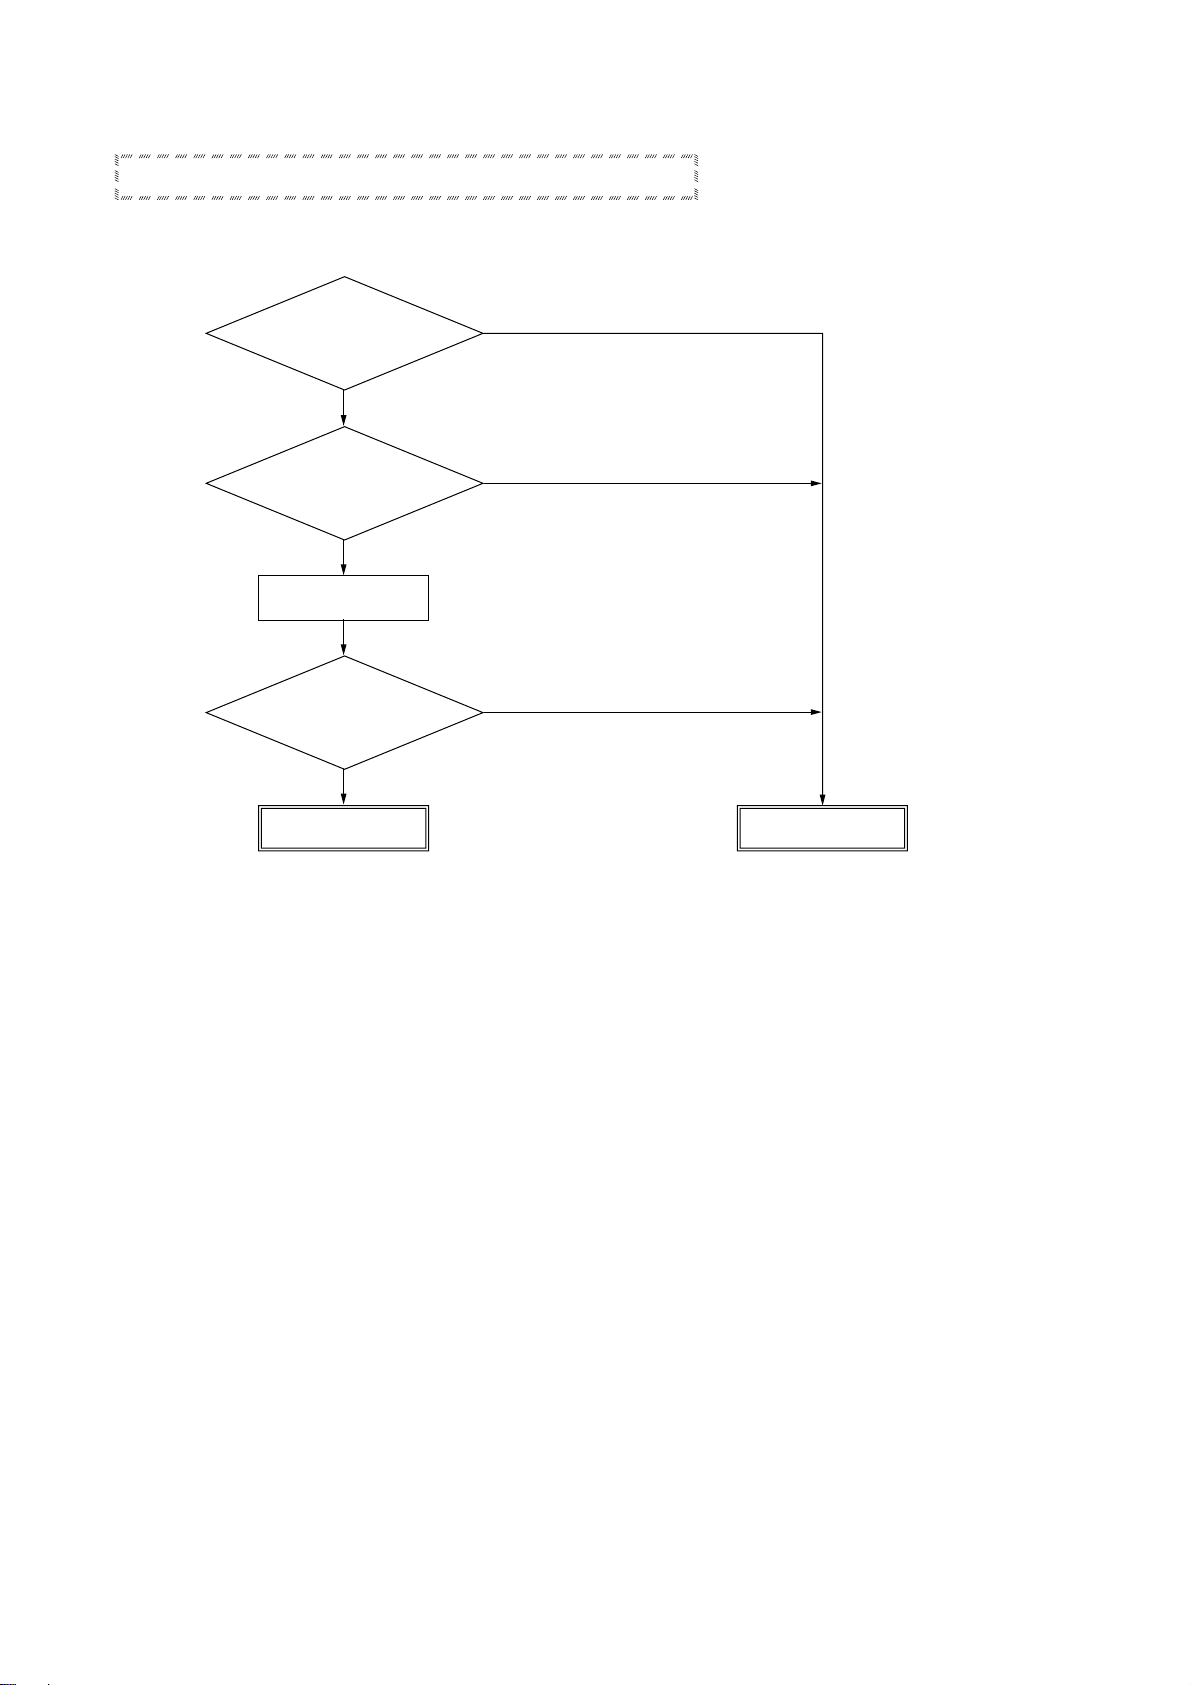
Power transistor module (including drive circuit) check method
Is the power
transistor module
cracked or burnt?
YES
Is there a
short circuit between the
power transistor module
terminals?
Compressor operation
Is the balance
between the compressor
current phases good?
YES
YES
Normal
❇
1
NO
NO
NO
If there is a 10% or greater difference
in the current in different phases.
(except during acceleration or deceleration)
Replacement
control PCB
❇
1 Power transistor module terminal short circuit check procedure
Disconnect the compressor wiring, then conduct a short circuit check.
P-U, P-V, P-W
N-U, N-V, N-W
Check between the P-N terminals.
Bring the tester probes in contact with the following places on each terminal.
P: Power transistor P terminal, U: End of red harness to compressor
N: Power transistor N terminal, V: End of white harness to compressor
W: End of black harness to compressor
-
34
-
(4) Check abnormal operation data with the remote controller
Operation data are recorded when there is an abnormal state and these data can be displayed in the remote controller by
operating the remote controller buttons.
(1) Press the CHECK button.
The display will change from “
(2) Press the
button once. The display will change to “ERROR DATA
FUNCTION” → “
SET ” → “OPERATION DATA ”
”.
(3) Press the SET button to enter the abnormal operation data display mode.
(4) If there are abnormalities from the past, they will be displayed by an error code and unit No.
(Example) “E8” (Lighted up)
“I/U No. 00
” (Flashing)
(5) Using the or button, select the indoor unit No. you want to display the error data for.
If only one indoor unit is connected, the indoor unit No. does not change.
(6) Fix the selection using the SET button. (The displayed indoor unit No. will change from flashing to light up continuously.)
(Example) “E8”
“DATA LOADING” (This message flashes while data are being read.)
↓
“E8”
“ERROR DATA
”
The data are then displayed beginning with item No. 01.
Displayed items are as shown below.
(7) Display the other data for when the error occurred in order from the currently displayed operation data No. 01 using
or button.
the
❇
Depending on the model, items for which corresponding data do not exist are not displayed.
(8) To change the indoor unit, press the AIR CON No. button and return to the indoor unit selection display.
(9) Press the ON/OFF button to end the abnormal operation data check.
If you press the RESET button during the settings, the display returns to the previous setting screen.
No. Data item
01 Operation mode (Example: )
02 SET TEMP. 27°C
03 RETURN AIR 28°C
04 I/U HEAT EXCH1 6°C
05 I/U HEAT EXCH2 5°C
07 I/U FAN Hi
11 TOTAL I/U RUN 10500H
21 OUTDOOR 35°C
22 O/U HEAT EXCH1 55°C
23 O/U HEAT EXCH2 55°C
24 COMP HERTZ 85.0Hz
26 Lo PRESSURE 0.40MPa
27 DISCHARGE 98°C
28 DOME BOTTOM 56°C
29 CT 26A
31 O/U FAN Hi
32 SILENT MODE ON
34 63H1 ON/OFF
35 DEFROST OFF
36 TOTAL COMP RUN 8500H
37 EEV1 480PULS
38 EEV2 480PULS
-
35
-

2
OUTLINE OF OPERATION CONTROL BY MICROCOMPUTER
(1) Remote controller
(a) Wired remote controller
The figure below shows the remote controller with the cover opened. Note that all the items that may be displayed in the
liquid crystal display area are shown in the figure for the sake of explanation.
Characters displayed with dots in the liquid crystal display area are abbreviated.
Pull the cover downward to open it.
Central control display
Displayed when the air conditioning
system is controlled by the option controller.
Timer operation display
Displays the settings related to
timer operation.
Temperature setting switches
These switches are used to set
the temperature of the room.
TIMER switch
This switch is used to select
a timer mode.
27
Vent Indicator
Indicates operation in the
Ventilation mode.
Weekly timer display
Displays the settings of
the weekly timer.
Operation setting display area
Displays setting temperature,
airflow volume, operation mode and
operation message.
Operation/Check indicator light
During operation: Lit in green
In case of error: Flashing in red
Operation/Stop switch
This switch is used to operate and
stop the air conditioning system.
Press the switch once to operate
˚
C
the system and press it once again to
stop the system.
MODE switch
This switch is used to switch between
operation modes.
Timer setting switches
These switches are used to set
the timer mode and time.
GRILL switch
This switch has no function.
When this switch is pressed,
(Invalid Operation)
is displayed, but it does not mean a failure.
AIR CON No. (Air conditioning system No.) switch
Displays the number of the connected
air conditioning system.
CHECK switch
This switch is used at servicing.
TEST switch
This switch is used during test operation.
*If you oress any of the switches above and " " is display, the switch has no function.
But it does not mean a failure.
FAN SPEED switch
This switch is used to set the
airflow volume.
VENT switch
Switch that operates the
connected ventilator.
LOUVER switch
This switch is used to operate/stop
the swing louver.
SET switch
This switch is used to apply the timer
operation setting.
This switch is also used to make silent
mode operation settings.
RESET switch
Press this switch while making settings
to go back to the previous operation.
This switch is also used to reset the
“FILTER CLEANING” message display.
(Press this switch after cleaning the air filter.)
-
36
-
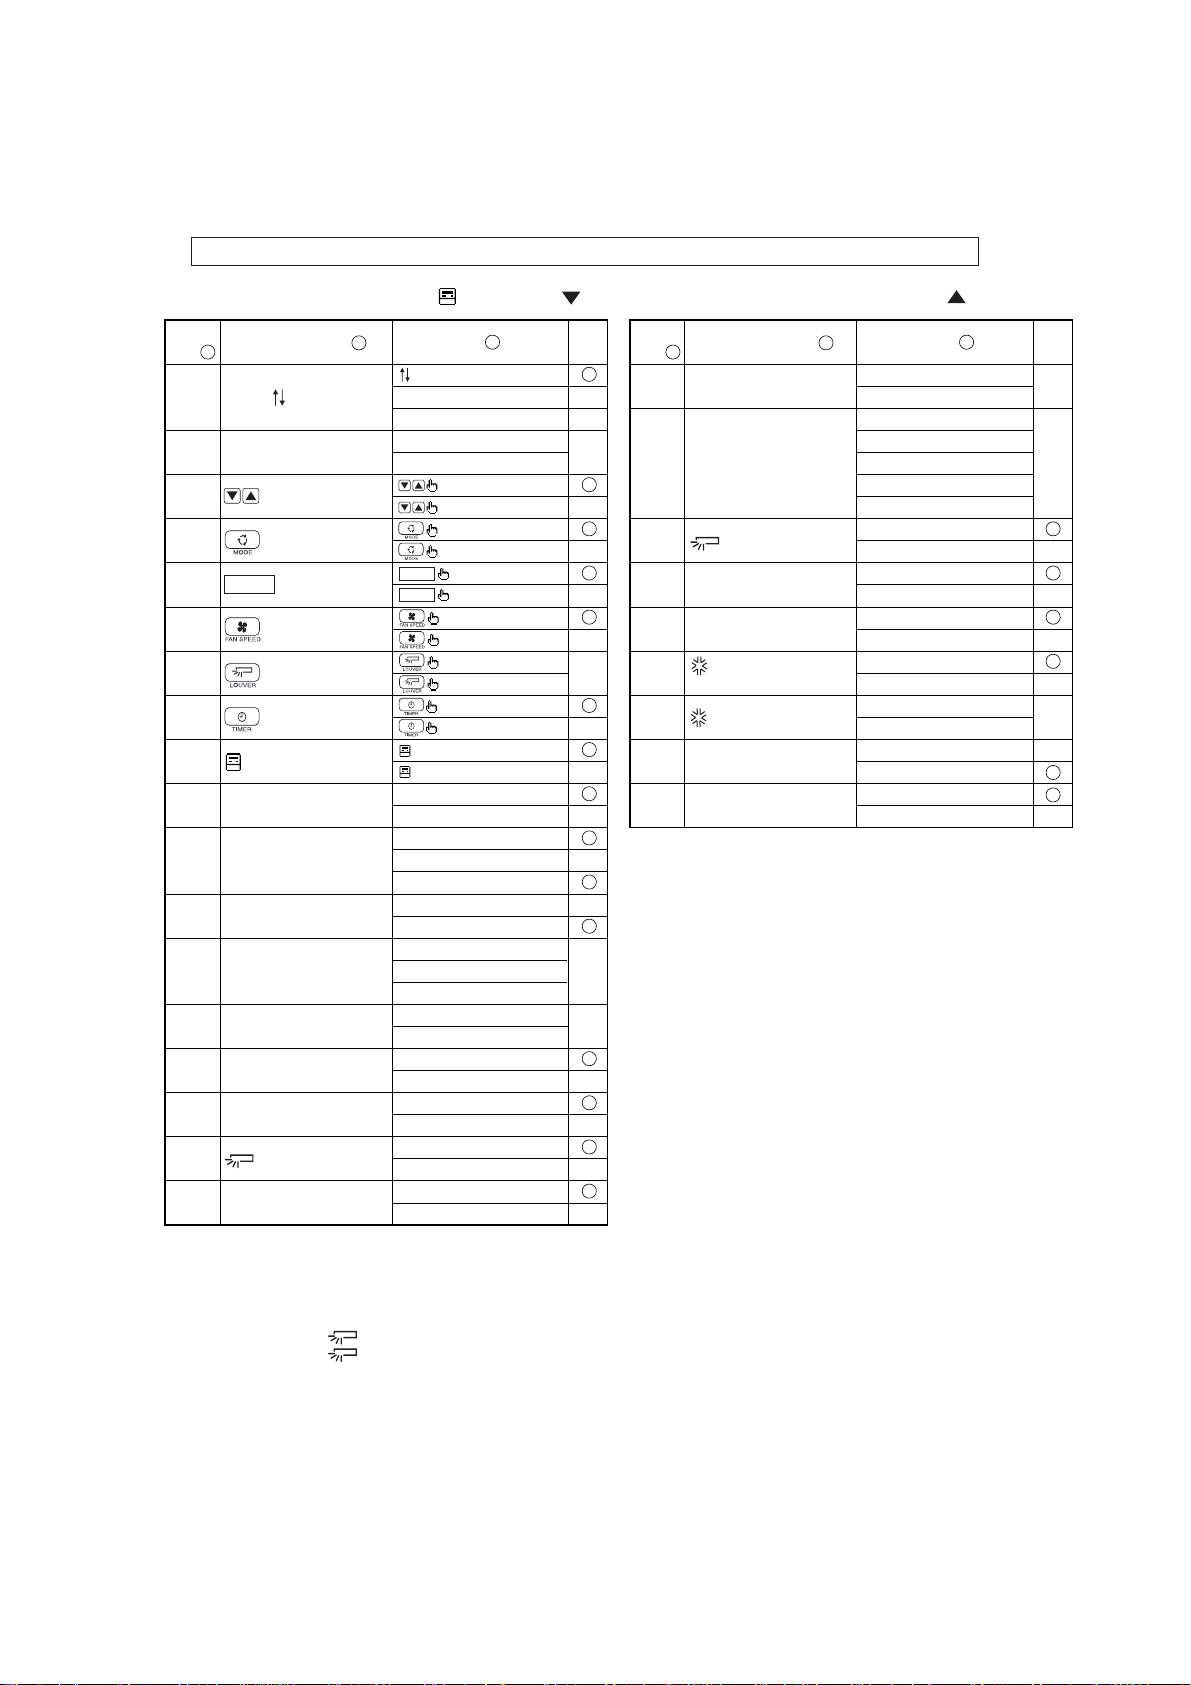
(2) Setting functions using the remote controller
(a) The factory settings of this unit's functions are as follows: If you want to charge a setting, follow the
procedure found in the installation manual and set to your desired setting.
For the method of setting, please refer to the installation manual of a remote control unit.
1 Remote controller unit functions ( FUNCTION )
Function
number A
Notes(1)
Function description
01
GRILLE SET
02
AUTO RUN SET
03
TEMP S/W
04
MODE S/W
ON/OFF
05
ON/OFF S/W
06
FANSPEED S/W
07
LOUVER S/W
08
TIMER S/W
09
SENSOR S/W
POWER FAILURE
10
COMPENSATION SET
11
VENTI SET
12
TEMP RANGE SET
13
I/U FA SPEED
14
MODEL TYPE
15
EXTERNAL CONTROL SET
16
ERROR DISP SET
17
POSITION
18
°C/°F SET
Setting marked with [] are the default setting.
(2)
Setting marked with [
according to an indoor unit or an outdoor unit connected.
Please check default settings with the indoor unit's installation
manual.
When Item 17 : “ POSITION” is changed, please also
(3)
change Item 04 “ POSITION” setting found in
“Indoor unit functions”.
B
Grille lift
()
panel setting
Remote control
()
sensor setting
Indoor unit
()
fan speed setting
Louver
()
control setting
INVALID
50Hz AREA ONLY
60Hz AREA ONLY
AUTO RUN ON
AUTO RUN OFF
VALID
INVALID
VALID
INVALID
ON/OFF
VALID
ON/OFF
INVALID
VALID
INVALID
VALID
INVALID
VALID
INVALID
INSENSOR OFF (Invalid)
SENSOR ON (Valid)
INVALID
VALID
NO VENTI
VENTI LINK SET
NO VENTI LINK
DISP CHARGE
NO DISP CHARGE
3 FAN SPEED
2 FAN SPEED
1 FAN SPEED
HEAT PUMP
COOLING ONLY
INDIVIDUAL OPERATION
SAME OPERATION FOR ALL UNITS
ERROR DISP
NO ERROR DISP
FIX (1 OF 4) (4 position stop)
IN MOTION (Free stop)
°C
°F
] are those that are set automatically
*
Setting
C
Factory
setting
*
*
*
*
*
2 Indoor unit functions (I/U FUNCTION
Function
number A
Notes(1)
Function description
01
Hi CEILING SET
03
FILTER SIGN SET
04
05
06
07
08
09
10
POSITION
EXTERNAL INPUT SET
OPERATION PERMISSION
PROHIBITED
ROOM TEMP OFF SET
(Heating room temperature off set)
FAN CONTROL
FREEZE PREVENT TEMP
FREEZE PREVENT CONTROL
Setting marked with [] are the default setting.
(2)
Setting marked with [
according to an indoor unit or an outdoor unit connected.
Please check default settings with the indoor unit's installation
manual.
B
Louver control
()
setting
Heating
()
fan control
] are those that are set automatically
*
Setting
STANDARD (Mild mode)
Hi CEILING 1
NO DISPLAY
AFTER 180H
AFTER 600H
AFTER 1000H
1000H→STOP
FIX (1 OF 4) (4 positiion stop)
IN MOTION (Free stop)
LEVEL INPUT
PULSE INPUT
NORMAL OPERATION
VALID
NORMAL OPERATION
TEMP SHIFT +3˚C
LOW FAN
STOP→LOW FAN (Intermittent operation)
TEMP Hi
TEMP Lo
FAN CONTROL ON
FAN CONTROL OFF
(Powerful mode)
)
C
Factory
setting
*
*
*
-
37
-
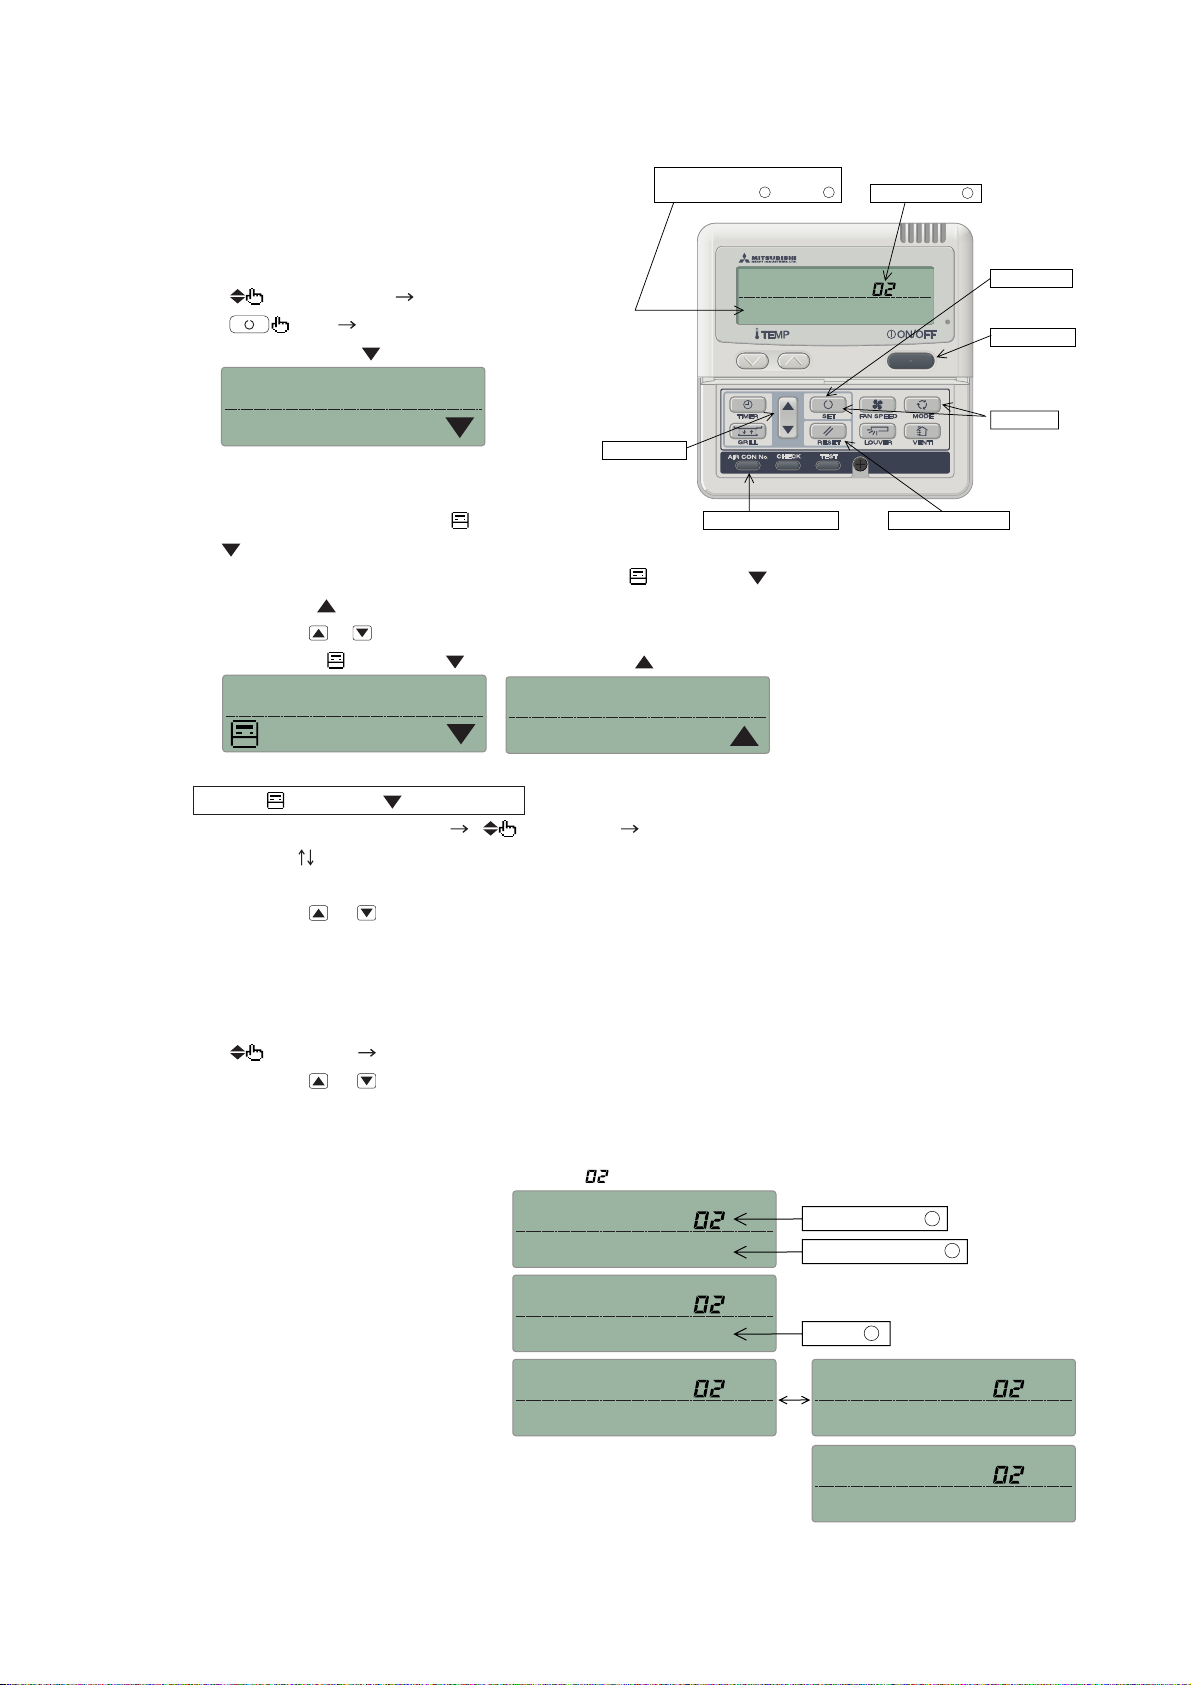
(b) Function setting method
1) Stop the air conditioner
2) Press the SET and MODE buttons simultaneously
for 3 seconds or longer.
The screen display will be switched as follows:
SELECT ITEM”
“
“
“FUNCTION SET
SET"
”
Operating guide message
Function description: B , Settting: C
AUTO RUN SET
Function number: A
Confirm Button
ON/OFF Button
FUNCTION SET
3) Press the SET button.
The unit will enter the function setting mode. The
screen display will charge to “
”.
4) Check which category your desired setting belongs to, “
FUNCTION " (Indoor unit function).
5) Press either
Select either “ FUNCTION ” or “I/U FUNCTION ”.
or button.
FUNCTION
6) Press the SET button.
When “
1 “DATA LOADING” (blinking)
“GRILLE SET” (Function number: A, Function description: B)
The screen display will be switched like this.
2 Press either
“Function number: A, Function description: B “from the list of remote controller unit functions will be displayed one
by one. Select a desired function.
3 Press the SET button.
The screen display will be switched as follows:
“
4 Press either or button.
A list of “Settings: C” will be displayed one by one. Select your desired setting.
5 Press the SET button.
The selected setting is displayed
for 2 seconds, then followed by
“SET COMPLETE” and the
function setting process is com-
pleted.
Then the screen display will be
swiched to “Function number:
A, Function description: B,” s o
if you want to comtinue to set
another function, repeat the steps
as explained above.
To finish the function setting pro-
cess, please proceed to Step (c).
FUNCTION ” is selected.
or button.
SETTING” “Setting: C” (ex. “AUTO RUN ON”)
FUNCTION
I/U FUNCTION
“
FUNCTION”
* When “ AUTO RUN SET ” is selected.
AUTO RUN SET
AUTO RUN ON
AUTO RUN ON AUTO RUN OFF
Selector button
Previous screen buttonIndoor unit selector button
FUNCTION (Remote controller unit function)” or “I/U
Function number: A
Function description: B
Setting: C
SET COMPLETE
Start Button
-
38
-

When “I/U FUNCTION ” is selected.
1 The screen display will be switched as follows:
“
I/U SELECT” “
SET”
“I/U No.00” (blinking)
I/U No.00
2 Press either
Select the indoor unit number that you want to change settings. If only one indoor unit is connected, the indoor unit
number will not charge, so please proceed to Step 3.
If “ALL I/U
3 Press the SET button.
Indoor unit number indication will change from blinking to lit continuously, The screen display will be switched as
follows:
"DATA LOADING" (blinking for about 2 to 23 seconds)
(Function number: A, Function description: B)
* When “ Hi CEILING SET” is selected.
Hi CEILING SET
4 Press either
“Function number: A, Function description: B” from the list of indoor unit functions will be displayed one by one.
Select a desired function.
5 Press the SET button.
The screen display will be switched as follows: “
STANDARD
or button.
” is selected while indoor group control is in effect, you can set all units to the same settings.
“ FUNCTION” “Hi CEILING SET”
Function number: A
Function description: B
or button.
SETTING” “Setting: C” (ex. “STANDARD”)
Settings: C
6 Press either or button.
A list “Setting: C” will be displayed one by one. Select your desired setting.
7 Press the SET button.
The selected setting is displayed for 2 seconds, then followed by “SET COMPLETE” and the function setting process is
completed.
Then the screen display will be switched to “Function number: A, Function description: B” so if you want to continue to set
another function, repeat the stepa as explained above. To finish the function setting process, please proceed to Step 8.
8 Press AIR CON No. button.
The screen display will go back to the indoor unit selection screen (ex. “ I/U No.00”).
If you want to continue to set another indoor unit, please follow the steps explained above.
(c) Press the ON/OFF button.
This ends a function setting process. Even if a function setting process is not completed, this ends the process.
Please note that any setting that is not complated will become void.
● Pressing the RESET button during a function setting process will allow you to go back the previous
step. Please note that any setting that is not completed will become void.
● Method of checking the current setting
While following the above mentioned step, the setting that appears when the SET button is pressed for each “Function
number: A, Function description: B” is the current setting “Stting: C”. (When "ALL I/U
the indoor unit with the lowest number is displayed)
● Settings are stored in the controller and not lost even a power outage occurs.
" is selected, the setting of
-
39
-

(d) Changing the remote controller’s temperature setting range
1) The temperature setting range of the remote controller can be changed.
Through remote controller button operations, the upper limit and lower limit set temperature values can be changed
individually.
During heating operation, the changed upper limit value becomes valid and at times other than during heating operation,
(during cooling, dehumidification, auto and fan operation), the changed lower limit value becomes valid.
Range of Possible Changes
Upper Limit Value: 22~30ºC (valid during heating) Lower Limit Value: 18 ~ 26ºC (valid at times other than during
heating)
2) Operation
a) With the remote controller in the stopped state, press the SET and MOFDE buttons simultaneously for 3 seconds or
longer. The display will changed from “
b) Press the
c) Press the SET button to enter the temperature range setting mode.
d) Using the
e) If “Hi LIMIT SET” is selected,
1 The display changes from “
2 Using the “
3 Press the SET button to fix the setting. Display example: “Hi LIMIT 22ºC” (lighted up)
f) If “Lo LIMIT SET” is selected,
1 The display changes from “
2 Using the
3 Press the SET button to fix the setting. Display example: “Lo LIMIT 26ºC” (lighted up)
g) Press the ON/OFF button to end the setting procedure.
(The procedure also ends if the ON/OFF button is pressed during the setting operation. However, settings which have
not been fixed become invalid, so exercise caution.)
• If the RESET button is pressed during a setting operation, the display returns to the previously displayed setting screen.
However, settings which have not been fixed become invalid, so exercise caution.
* If “NO DISP CHANGE” is selected in No. 12, “TEMP RANGE SET” of the remote controller’s functions, No. 1 of
the function setting modes, the remote controller’s display does not change even if the temperature range has been
changed.
button once. The display will change to TEMP RANGE
or
button, select “Hi LIMIT SET
” button, select the upper limit value. Display example: “Hi LIMIT 22ºC ” (flashing)
button, select the upper limit value. Display example: “Lo LIMIT 26ºC
SELECT ITEM” “
” or “Lo LIMIT SET
SET UP” “Hi LIMIT 22ºC ” (flashing).
SET UP” “Lo LIMIT 26ºC
.
SET” “FUNCTION SET
,” the press the SET button.
” (flashing).
” (flashing)
”
(Example) If the upper limit is set at 28˚C
Function No. A
12
Function Contents B Setting Contents C
TEMP RANGE SET
DISP CHANGE
NO DISP CHANGE
Control Contents
The remote controller’s display and sent
data upper limit changes to 28°C.
The remote controller’s display upper
limit remains at 30ºC and only the upper
limit of the sent data is changed to 28°C.
-
40
-
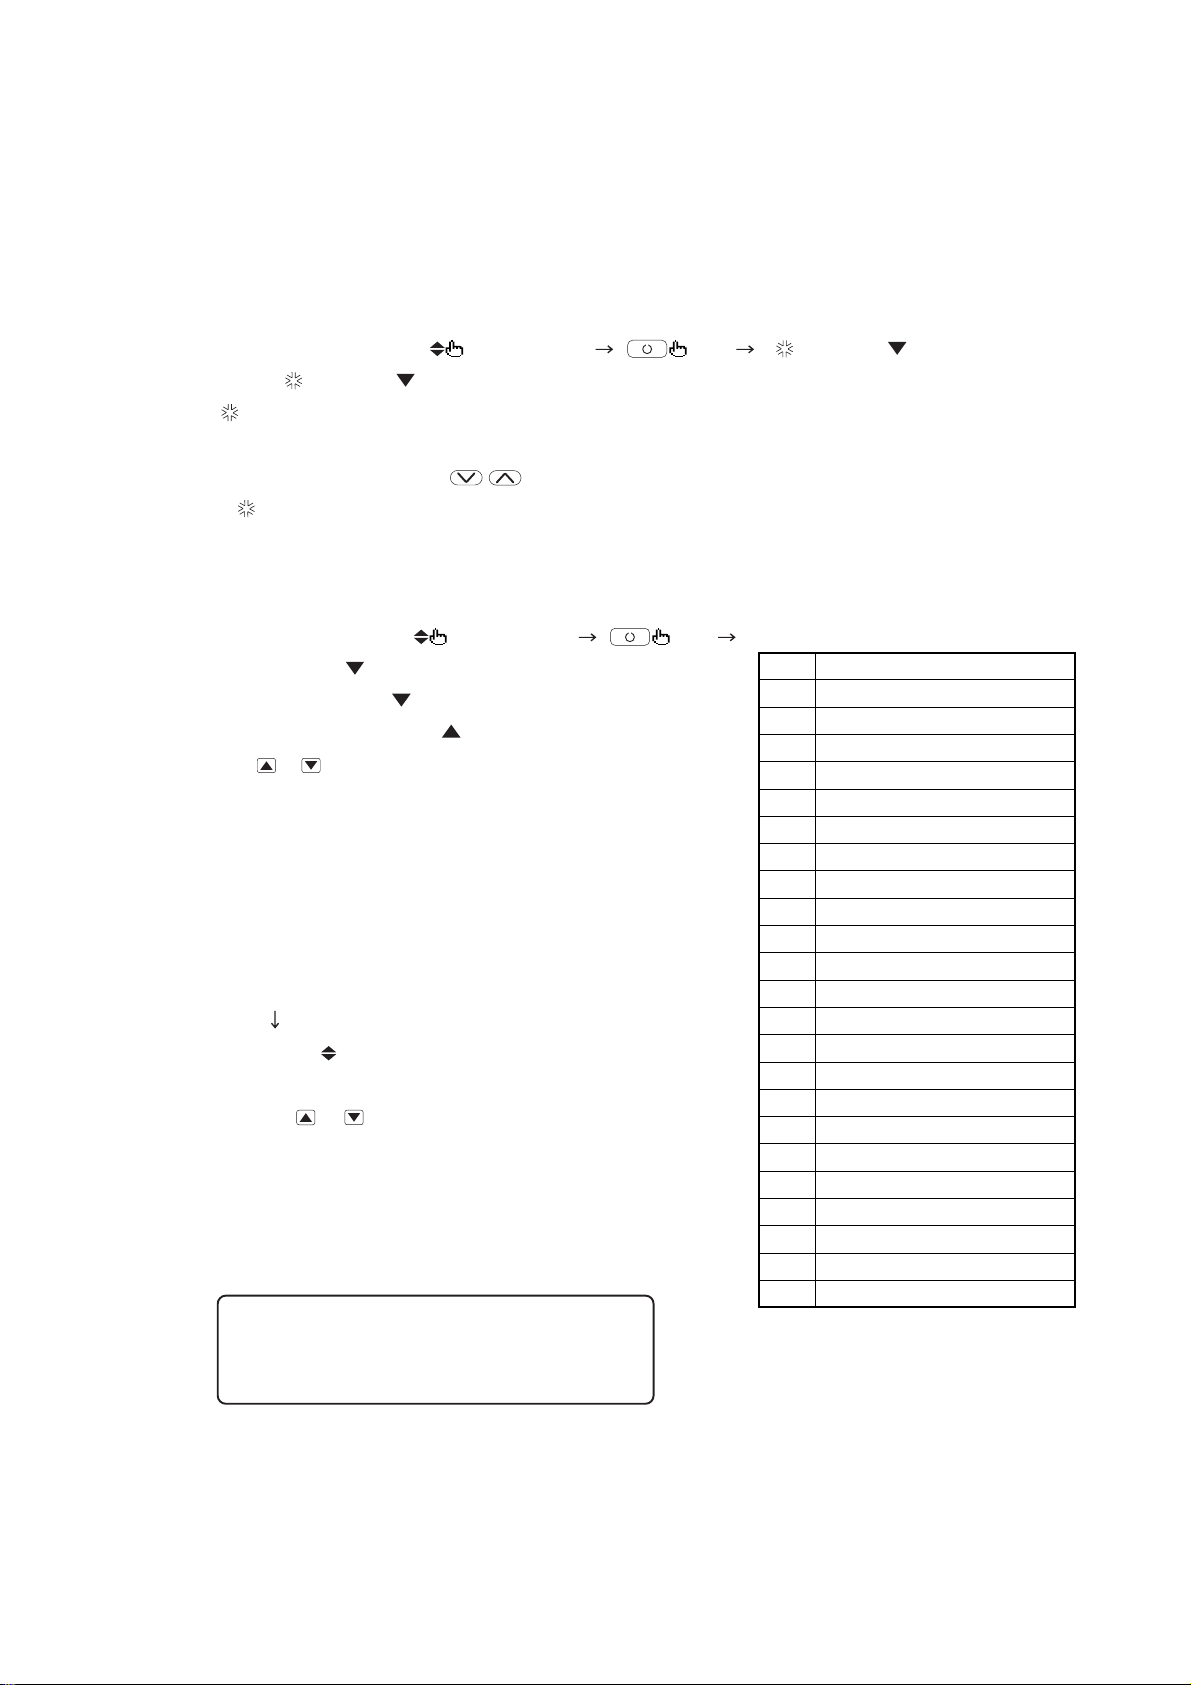
(3) Cooling Test Operation Procedure
Carry out the following test operation procedure using the remote controller.
(a) Starting the Cooling Test Operation
1 Press the ON/OFF button to start operation.
2 Press the MODE button and select “COOL.”
3 Press the TEST button continuously for 3 seconds or longer.
The display changes from “
4 When “
TEST RUN.”
(b) Canceling the Cooling Test Operation
Pressing the ON/OFF button or the
The “
(4) Checking Operation Data
Operation data can be checked using the remote controller.
1 Press the CHECK button.
The display will change from “
“OPERATION DATA
2 When “OPERATION DATA
3 The display changes to “I/U No. 00
Using the
display.
(When there is only one indoor unit connected, the indoor unit No. does not
change.)
4 Fix the No. by pressing the SET button.
(The indoor unit No. changes from flashing to lighted up continuously.)
The message “DATA LOADING” is displayed flashing while data are being
read.
“OPERATION DATA
5 Display the other data in order from the currently displayed operation data No.
01 by using the
The items displayed are as shown at right.
Note (1) Depending on the model, items for which corresponding data do not exist are not displayed.
6 To change the indoor unit, press the AIR CON No. button and return to the
indoor unit selection display.
7 Press the ON/OFF button to end the data check.
TEST RUN
TEST RUN” display is cleared.
or
button, select the number of the indoor unit you want to
or button.
.”
” and data No. 01 are displayed.
SELECT ITEM” “
” is displayed, press the SET button to begin the cooling test operation. The display shows “
button ends the cooling test operation.
SELECT ITEM” “
” is displayed, pres the SET button.
” (flashing).
SET" “
SET"
TEST RUN
Number
01
02
03
04
05
07
11
21
22
23
24
26
27
28
29
31
32
33
34
35
36
37
38
.”
DATA ITEM
Operation mode
Temperature setting
Intake temperature
Indoor heat exchanger temperature 1
Indoor heat exchanger temperature 2
Indoor fan speed
Indoor unit operation hours
Outside air temperature
Outdoor heat exchanger temperature 1
Outdoor heat exchanger temperature 2
Operation Hz
Low pressure
Discharge pipe temperature
Temperature beneath the dome
CT current
Outdoor fan speed
Silent mode enabled/disabled
63H2 ON/OFF
63H1 ON/OFF
Defrost ON/OFF
Compressor operation hours
Expansion valve opening 1
Expansion valve opening 2
If the RESET button is pressed during the setting opera-
tion, the screen returns to the previous setting screen.
-
-
41

(5) Test run
(a) Test run method
1) A test run can be initiated from an outdoor unit by using SW9 (SW2) and SW5-4 for on-site setting.
2) Models FDCVA151~251
When SW9 (press button switch) is pressed for 1 second and then released, the compressor will start operation approxi-
mately 5 seconds later.
Models FDCA301~601
Press SW2 (push-button switch) for one second. The compressor will start when the button is released. The compressor
will stop when 30 minutes elaps.
3) The unit will start a cooling operation, when SW5-4 is OFF, or a heating operation, when SW5-4 is ON.
4) When a test run is completed, press SW9 (SW2) (push-button switch) again for one second and then release it.
Note (1) Items in ( ) show for the FDCA 301~601.
(b) Checking the state of the unit in operation
Check discharge pressure and suction pressure, using the check joint provided inside the outdoor unit and the gas charge
valve charge port. The check joint in the unit is provided on the pipe connecting the four-way valva and the heat exchanger,
and these points offer different pressure measurements depending on a cooling or heating operation as summarized in the
table below.
Cooling
Heating
(c) Setting SW5-1, SW5-2 on-site
1) Defrost conteol switching (SW5-1)
a) When this switch is turned on, the unit will run in the defrost mode more frequentiy.
b) Please set this switch to ON, when installed in a region where outdoor temperaure falls below zero during the season
the unit is run for a heating operation.
2) Snow guard fan control (SW5-2)
a) When this switch is turned on, the outdoor unit fan will run for 10 seconds in every 10 minutes, when outdoor tempera-
ture falls to 3˚C or lower and the compressor is not running.
b) When the unit is used in a very snowy country, please set this switch to ON.
Discharge pressure (high pressure)
Check joint in the unit
Suction pressure (low pressure)
Gas operation valve charge port
Suction pressure (low pressure)
Discharge pressure (high pressure)
-
-
42

3. Check display on wireless specification models (FDTN · FDEN · FDKN)
(1) Indication board
(a) FDEN Series
Romote controller signal receiving part
TIMER
CHECK
RUN
Backup switch
Operation display light (Green)
• Lights continously: Under air conditioner operaton
• Keeps flashing: Under heating preparation (At the time of heating operation)
• 3 time flash: Under reception of a remote controller signal
Timer/Check display light (Yellow)
Check monitor
(Error code display E1~E60)
0.5 second lighting,0.5 second stays OFF
•
2 second lighting, 1 second stays OFF
: At the time of abnormalities
: Filter sign
• Lights continously: Under timer operation
•
(b) FDKN Series
This figure shows the display on the 301 model. The shape of the display differs slightly on other models, but the functions
are the same.
Error code [ ~ ]
Operation display light (Green)
The following two kinds are displayed.
• Lights contimously: Under air conditioner operation
• Keeps flashing: Under heating preparation
Flashes 3 times when a
signal is received from
the remote controller.
TIMER/CHECK
TIMER/CHECK
RUN
Timer/Check display (Yellow)
The following three kinds are displayed.
• Lights contimously:Under timer operation
•
Long lighting (2 second lighting, 1 second stays OFF)
(Clean the air filter when this display is output.)
•
Short lighting (0.5 second lighting, 0.5 second stays OFF)
: Filter sign
:
At the time of the abnormalites air conditioner
-
43
-

(c) Wireless remote controller
OPERATION MODE indicator
Indicates selected operation mode
Fan speed
Indicates the selected fan speed
Auto swing
Indicates the selection of swing louver.
Timer ON time
Indicates the timer ON time.
When the timer mode is “CONT” or “OFF”,
the present time is indicated.
OPERATION MODE select button
This button, whenever pressed, changes the
mode in the following order.
AUTO ➞ COOL ➞ DRY
➞
HEAT FAN
FAN SPEED button
Every time when the button is pressed, the
mode is sequentially changed HI →LOW.
Air flow direction button
Used to start or stop the swing louver.
AUTO COOL DRY FAN HEAT
FILTER
FAN HI ME LO
°
AM
ON
PM
C
AM
OFF
PM
MODE TEMP ON/OFF
AIR FLOW FILTER
FAN SPEED
TIMER
SET
TIMEACL
Signal sender
Signals are sent to the air conditioner
from here.
Filter reset indicator
The
FILTER RESET button is pressed.
mark is indicated when the
FILTER
Temperature indicator
Set temperature is indicated.
Timer OFF time
Indicated the timer OFF time.
When the timer mode is “CONT” or
“OFF”, there is no indication.
ON/OFF button
When the button is pressed, the air conditioner
is started, and when the button is pressed once
again, it is stopped. (When the air conditioner
is stopped, the present time only is indicated.
When the air conditioner is operating, details
of setting are indicated.)
ROOM TEMP. button
Room temperature is set within the
range of 18-30˚C by operating the ∆ ,
or button.
∇
Filter button
Used to reset (turn off) the filter sign.
(Press for more than 1 second.)
Press the button only after completing
the filter cleaning.
Timer mode button
Every time when the button is pressed, the
mode is sequentially changed CONT → ON
→ OFF → PROGRAM.
Reset switch
Used to reset the microcomputer when something is wrong on the remote controller display.
• Above figure shows all indications for the
purpose of explanation, but practically
only the pertinent parts are indicated.
TIME button
Used to set the present time and the timer
operation time.
Set button
Used to switch from the hour to minute or vice
versa when setting the present time or timer
operation time.
Clock switch
Press this before setting the present time.
-
44
-

NOTICE
The installation of this equipment must comply with all
NATIONAL, STATE and LOCAL CODES.
This Service Guide does not cover all installation circumstances
and is meant for guidance only and therefore will not form part
of any legally binding contract. An installation guide is provided
with the air conditioning equipment.
3D Air Sales Ltd
Sales & Marketing Office
840 Brighton Road,
Purley, Surrey, CR8 2BH
Telephone: 020 8668 1112
Facsimile: 020 8668 1113
CE
These Air Conditioners comply with: -
EMC Directive 89/336/EEC
LV Directive 73/23/EEC
3D Air Sales Ltd
Technical, Sales Admin., Spares, Warranty
Anglia House, Priors Way,
Coggeshall, Essex, CO6 1TL
Telephone: 01376 565 505
Facsimile: 01376 565 525
 Loading...