

Page 1

DX-VS1UE Manual Ver 1.0
Mitsubishi Video Server Box
DX-VS1
User’s Manual
Page 2

Table of Contents
I. Introduction.................................................................................................................................... 3
1. Product Introduction........................................................................................................................ 3
1) What is DX-VS1UE?.......................................................................................................... 3
2) Features............................................................................................................................... 3
2. System Requirement........................................................................................................................4
II.
II. Product Description .................................................................................................................. 5
II. II.
1. Confirmation of the Accessories..................................................................................................... 5
2. DX-VS1UE View and Description ................................................................................................. 6
1) Front View and Description................................................................................................ 6
2) Rear View and Description................................................................................................. 7
3) LEDs of Ethernet port......................................................................................................... 8
4) Descriptions on DIP Switches.............................................................................................8
III. DX-VS1UE Initial Configuration............................................................................................ 10
1. Installation Summary .................................................................................................................... 10
2. Connecting..................................................................................................................................... 10
3. Installing DX-VS1UE Setup Program........................................................................................... 14
4. Assigning IP Address and setting Administrator Condition ......................................................... 14
5. Connecting a digital recorder to DX-VS1UE................................................................................ 16
1) Connecting BNC cable...................................................................................................... 16
2) Connecting RS-232C cable............................................................................................... 16
IV.
IV. Accessing DX-VS1UE Homepage & Monitoring Real-time Image.................................... 18
IV. IV.
1. Starting Web browser.................................................................................................................... 18
2. Composition of a screen................................................................................................................ 18
3. Login Page......................................................................................Error! Bookmark not defined.
1) Login to the simple viewer page........................................Error! Bookmark not defined.
2) Logging into DVR/PTZ control page ................................Error! Bookmark not defined.
3) Logging into the DVR Configuration Page .......................Error! Bookmark not defined.
4) DX-VS1UE ActiveX..........................................................Error! Bookmark not defined.
4. Real Time Monitoring at the Simple Viewer Page ........................Error! Bookmark not defined.
1) Image control.....................................................................Error! Bookmark not defined.
2) Pop-Up Menu.....................................................................Error! Bookmark not defined.
3) Real time monitoring in Server Push Mode.......................Error! Bookmark not defined.
4) DVR Control Button..........................................................Error! Bookmark not defined.
5) Capture Button...................................................................Error! Bookmark not defined.
5. DVR/PTZ Control Page.................................................................Error! Bookmark not defined.
1) Pan/Tilt/Zoom mechanism.................................................Error! Bookmark not defined.
2) Digital Recorder Control mechanism.................................Error! Bookmark not defined.
6. DVR Configuration Page...............................................................Error! Bookmark not defined.
V.
V. Server Configuration Page............................................................Error! Bookmark not defined.
V. V.
1. Administrator Login.......................................................................Error! Bookmark not defined.
1) Access from the Setup Program.........................................Error! Bookmark not defined.
2) Access using only Web browser.........................................Error! Bookmark not defined.
2. Description on setting items...........................................................Error! Bookmark not defined.
1) System Configuration ........................................................Error! Bookmark not defined.
1
DX-VS1UE User
DX-VS1UE User’’’’ s Manual
DX-VS1UE UserDX-VS1UE User
s Manual
s Manuals Manual
Page 3

2) Password Configuration.....................................................Error! Bookmark not defined.
3) Network Configuration......................................................Error! Bookmark not defined.
4) Security Configuration.......................................................Error! Bookmark not defined.
5) Video Config urat ion...........................................................Error! Bookmark not defined.
6) Application Configuration................................................................................................20
7) Pan/Tilt/Zoom Configuration............................................................................................ 22
8) Serial Port Configuration.................................................................................................. 25
9) Sensir Input Configuration................................................................................................ 27
10) Alarm Configuration....................................................................................................... 27
11) Customizing .................................................................................................................... 28
Detailed Specifications of DX-VS1UE........................................................................................... 30
1. Hardware....................................................................................................................................... 30
2. Video and Compression................................................................................................................30
3. Network......................................................................................................................................... 30
4. Misc functions and I/O.................................................................................................................. 31
Serial connection with digital recorder .........................................................................................32
Frequently Asked Questions.............................................................................................................33
1. The feature of DX-VS1UE............................................................................................................ 33
2. About installation and operation of DX-VS1UE........................................................................... 34
2
DX-VS1UE User
DX-VS1UE User’’’’ s Manual
DX-VS1UE UserDX-VS1UE User
s Manual
s Manuals Manual
Page 4

Introduction
I.
1.
1.
Product Introduction
1. 1.
1) What is DX-VS1UE?
Video server box DX-VS1UE offers the solution of the network type remote surveillance server
having many features, such as an internet server, a image compression device, and serial device control. You can operate Mitsubishi digital recorder DX-TL800E or several pan/tilt/zoom cameras
through DX-VS1UE remotely.
DX-VS1UE utilizes Wavelet image compression and Linux operating system. Wavelet and Linux
enable DX-VS1UE to transfer high quality images faster and with a greater degree of reliability.
2) Features
•
Ease of Use - DX-VS1UE requires Microsoft Internet Explorer 5.0 (or later) for use. Connect
DX-VS1UE to the Internet and it is ready for use.
•
Wave let Im age Format - Since DX-VS1UE has adopted the WAVELET compression system
which can compress a picture at the high rate of compression, without spoiling quality of image,
DX-VS1UE makes it possible to monitor image at maximum 30 frames per second.
(The number of frames of a monitoring image receives influence from state and bandwidth of network or the performance of client PC)
•
Maximum 720x486 Picture resolution - Monitoring image resolution can be chosen from
720x486, 720x243, 360x243, 180x121(x2) and 90x60(x4).
•
MultiClient - DX-VS1UE can be monitored from arbitrary PC linked to the network. The num-
ber of users which can monitor simultaneously is 100 users maximum.
•
External Device Connection - External devices such as IR-sensor, digital recorder or
pan/tilt/zoom camera can be connected to DX-VS1UE
•
Access restrictions using password - Password can be set at each levels(Simple Viewer Level,
DVR Configuration Level, DVR/PTZ Control Level, Server Configuration Level) and unauthor-
ized access can be rejected.
•
Simple Administration - DX-VS1UE can be configured and managed directly from its own
web page.
3
DX-VS1UE User
DX-VS1UE User’’’’ s Manual
DX-VS1UE UserDX-VS1UE User
s Manual
s Manuals Manual
Page 5

•
Notification function under unusual condition- The function makes it possible to transmit im-
age taken when something unusual occurs through e-mail or FTP.
•
FireWall compatible - Even if DX-VS1UE is connected into the network protected by fire wall,
by the server push function, it is possible to monitor image from outside of the firewall using
server-push mode. (The number of simultaneous monitoring may be restricted.)
System Requirement
2.
2.
2.2.
For DX-VS1UE
• Network: 10 Base-T LAN (Leased line, xDSL)
For PC to access DX-VS1UE
Processor: Intel Pentium series or Intel Celeron series, and the IBM PC/AT compatible machine
•
with CPU of 400 or more Mhzes.
OS: Windows 98SE/ME/NT4.0 WS SP6/2000/XP SP1
•
• RAM: 128MB and More
• Video board and monitor which can display image at 1024x768 pixel or higher and more than
32768 colors.
• Web Browser: MS Internet Explorer 5.0 or later.
NIC(Network Interface Card) which works normally on the above-mentioned environment.
•
Notice
• All devices which meets the above mentioned conditions shall not be guaranteed to be available
for using DX-VS1UE normally.
4
DX-VS1UE User
DX-VS1UE User’’’’ s Manual
DX-VS1UE UserDX-VS1UE User
s Manual
s Manuals Manual
Page 6

Product Description
II.
II.
II. II.
1.
1.
Confirmation of the Acce ssories
1. 1.
Check that all the supplied accessories listed below are included.
item description amount remarks
DX-VS1UE Video Server Box 1
Manual DX-VS1UE Setup Guide 1
Crossover LAN cable Crossover cable(Length:1m) 1 Red
Straight LAN cable Straight cable(Length:2m) 1 White
RS-232C serial cable
Plastic Anchor Anchors for fixing DX-VS1UE 4
Tapping Screw Screws for fixing DX-VS1UE 4
CD-ROM Setup Program and User’s manual 1
AC Adapter DC(direct current)12V, MAX:1.5A 1
Power Code AC(alternate current) 220V 1
RS-232C serial cable(Lengt h:1m)for connecting a digital recorder with DX-VS1UE
1
5
DX-VS1UE User
DX-VS1UE User’’’’ s Manual
DX-VS1UE UserDX-VS1UE User
s Manual
s Manuals Manual
Page 7
2.
2.
DX-VS1UE View and Description
2. 2.
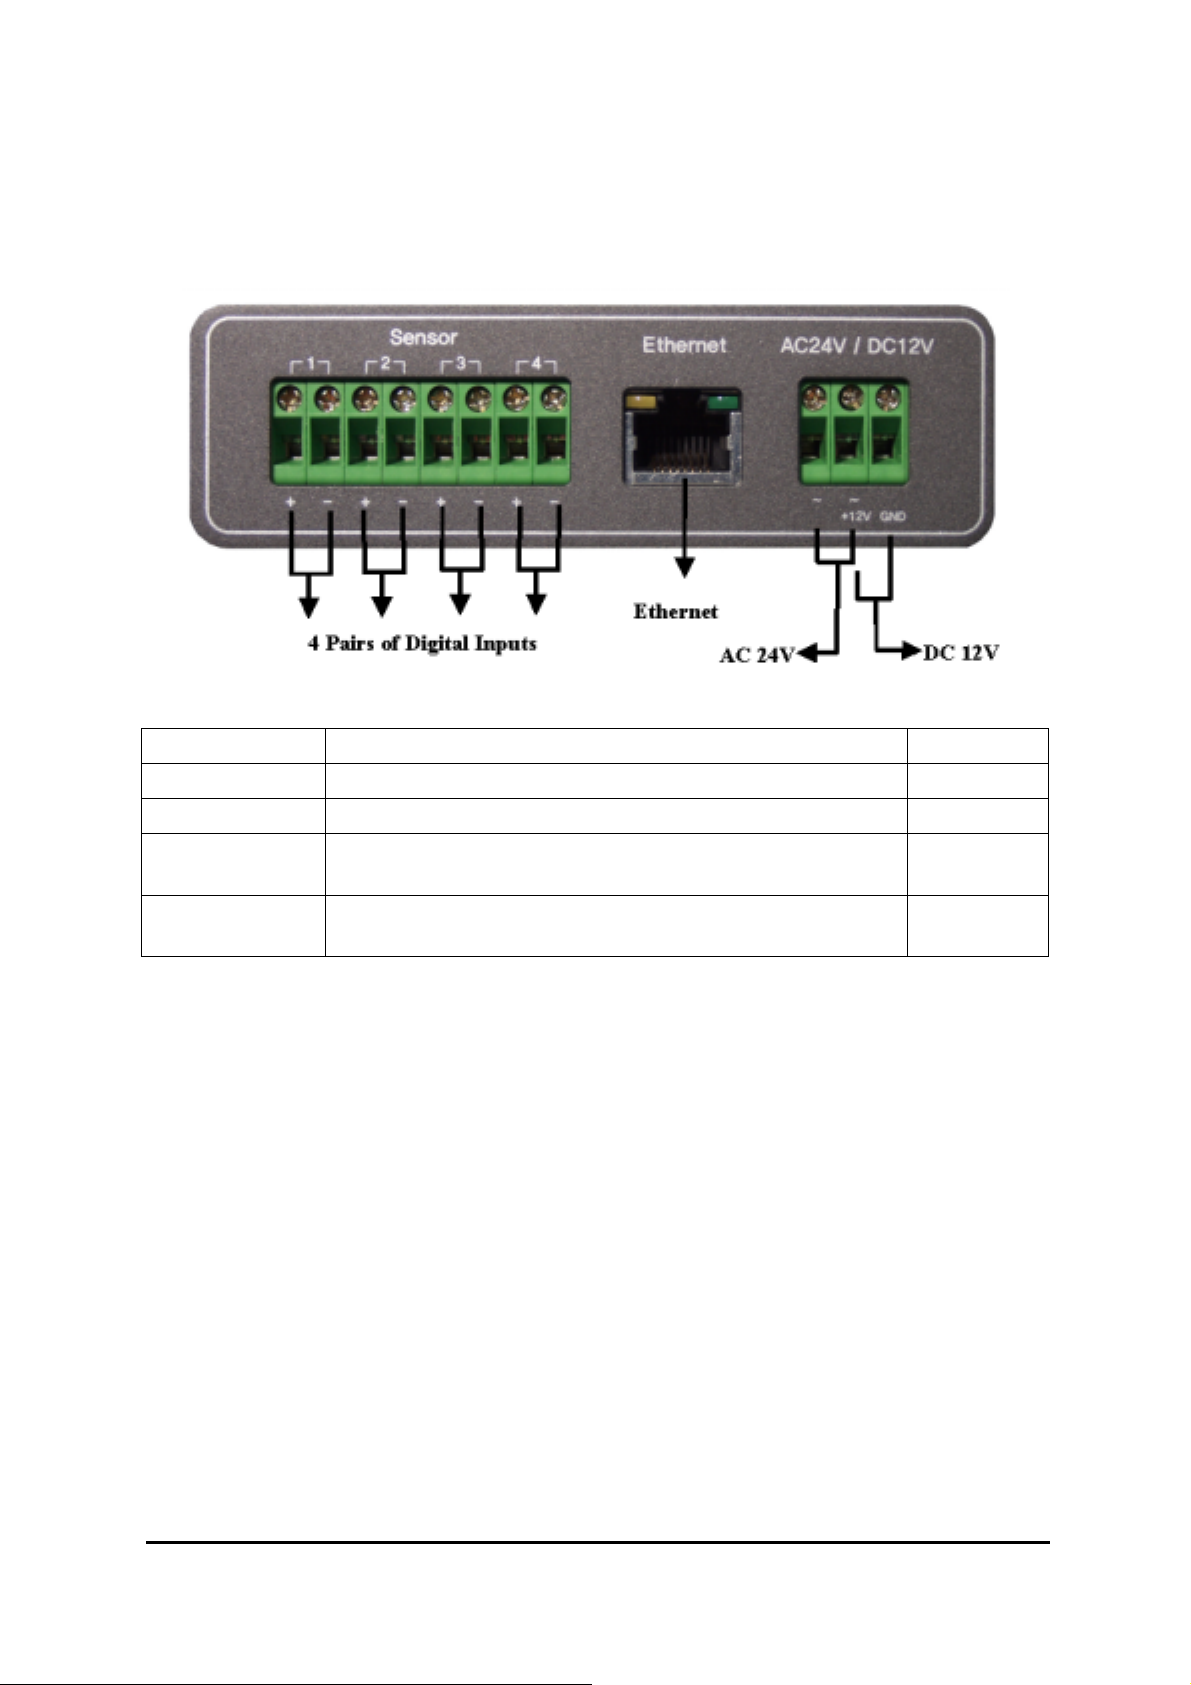
1) Front View and Description
connector description remarks
Sensor 4 pairs of connectors for sensor signal input
Ethernet Connector for connecting 10BASE-T ethernet cable Refer to 3)
AC 24V
DC 12V
Connector for connecting AC(alternate current)24V power
supply unit
Connector for connecting DC(direct current)12V power supply unit
6
DX-VS1UE User
DX-VS1UE User’’’’ s Manual
DX-VS1UE UserDX-VS1UE User
s Manual
s Manuals Manual
Page 8
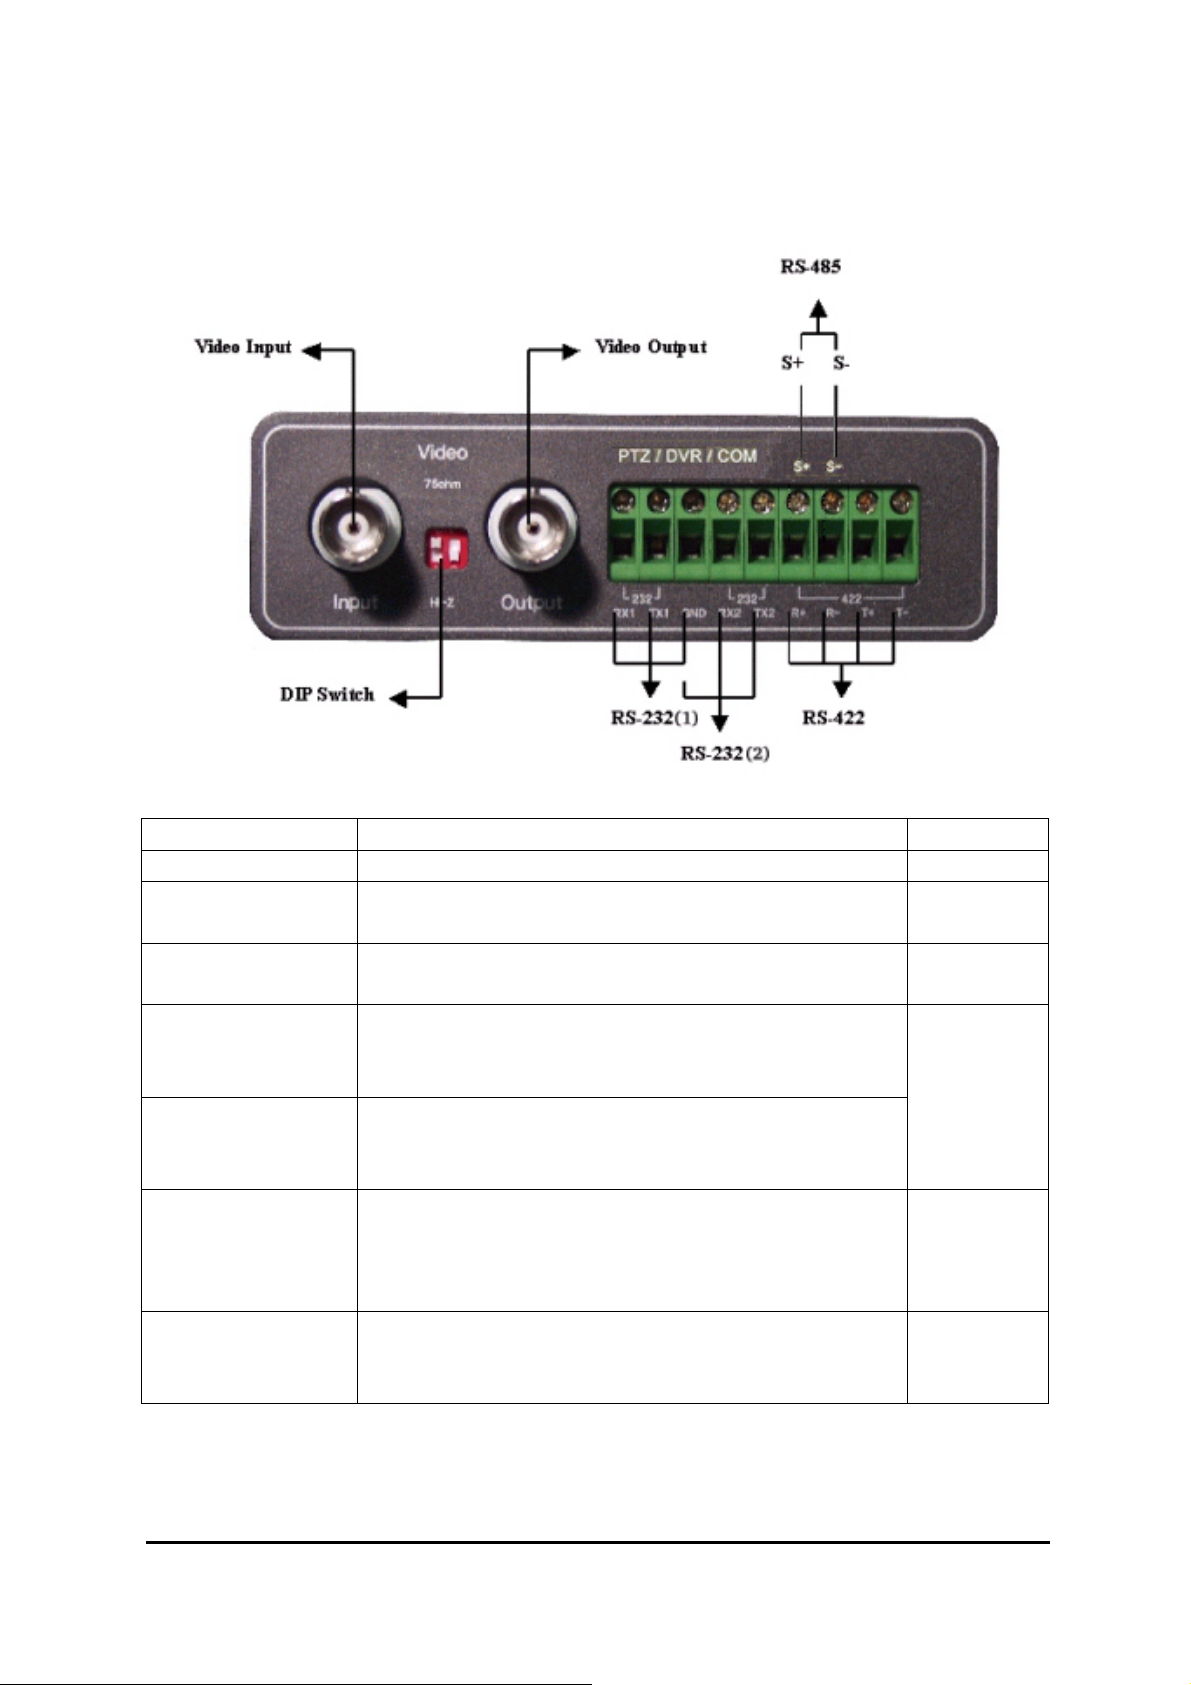
2) Rear View and Description
connector name description remarks
Video Input Connector for inputting video signal using BNC cable
DIP Switch
Video Output
PTZ/DVR/COM
(RS-232(1))
PTZ/DVR/COM
(RS-232(2))
Switch for designating terminal of video signal of
video input BNC connector(Only left swith is used)
Connector For outputting video signal using BNC cable
Connector for connecting DX -VS1UE with digital recorder in order to operate digital recorder. This consists of RX1,TX1 and GND.
Connector for connecting DX-VS1UE with
pan/tilt/zoom cameras in order to operate digital recorder. This consists of RX2,TX2 and GND.
Refer to 4)
GND terminal is
used in
common
Connector for communication between DX-VS1UE
PTZ/DVR/COM
(RS-422)
and pan/tilt/zoom cameras which support RS-422 pro-
tocol. This is half duplex and consits of R+,R-,T+
and T-.
PTZ/DVR/COM
(RS-485)
Connector for communication between DX-VS1UE
and pan/tilt/zoom cameras which support RS-485 pro-
tocol. This consists of S+ and S-.
While you are using one of serial connecters among RS-232(2) , RS-422 and RS-485 connector,
you can’t use the other two connectors.
7
DX-VS1UE User
DX-VS1UE User’’’’ s Manual
DX-VS1UE UserDX-VS1UE User
s Manual
s Manuals Manual
Page 9
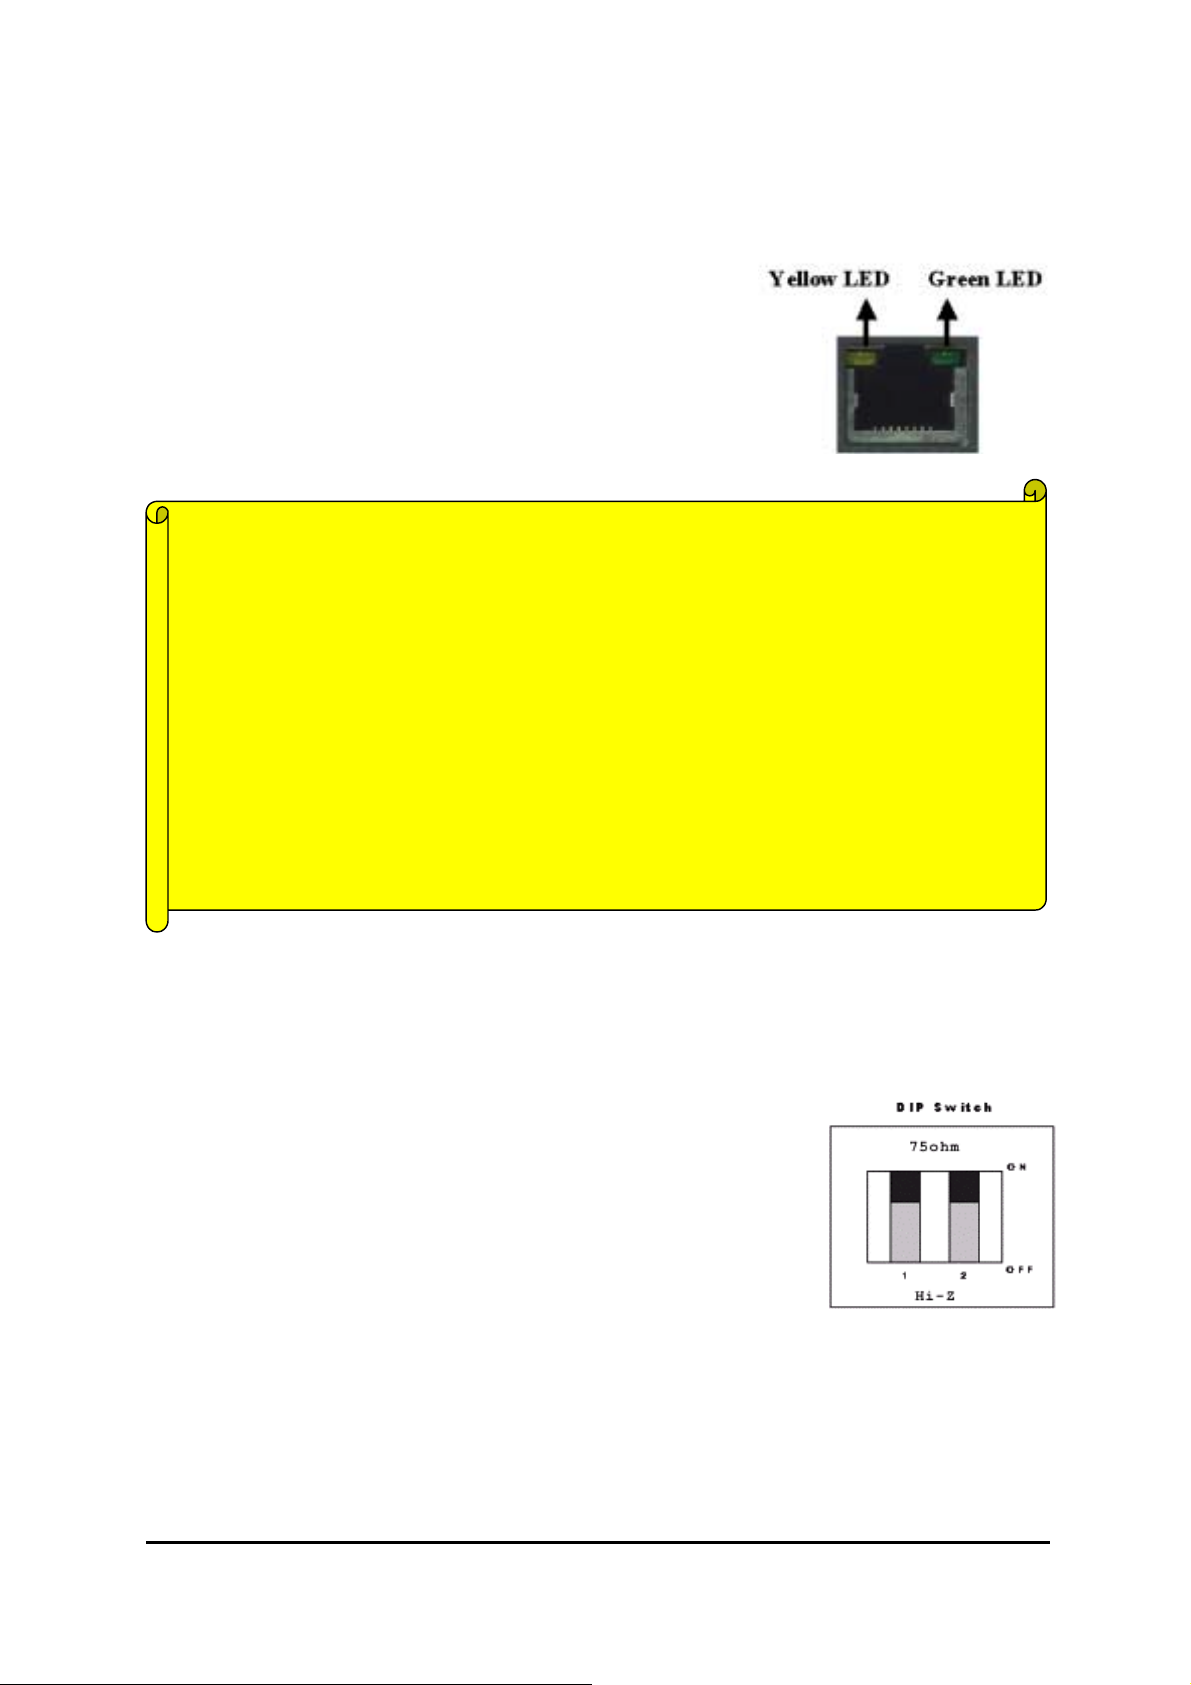
3) LEDs of Ethernet port Yellow LED: This LED indicates the status of data transmission.
After power is supplied, it is on for the fi rst 4-5 seconds and then
it goes off. And it blinks continuously when a user access DXVS1UE and DX-VS1UE transmits data.
Green LED: This LED indicates the status of networking. After
power is supplied, it is on for the first 1-2 seconds, and then it
blinks once at every one second as long as the network is connected.
Diagnostic information on failure using LED
Problem on Network
•
Green LED blinks once every 4 seconds.
Check that ethernet cable is connected properly and network has no problem.
Problem on Hardware
•
Neither Yellow LED nor Green LED light up at all.
Since DX-VS1UE is in unstable operation, restart DX-VS1 by supplying power again.
If DX-VS1UE would not restore regardless of restarting, stop using and contact with store.
4) Description of DIP Switches
This is used to designate video signal termination. If you want to monitor real time image through a
CCTV monitor as well as DX-VS1UE, connect a digital recorder to ‘Video Input’ connector and a
CCTV monitor to ‘Video Output’ connector. In this case, the terminal of video signal need setting
properly.
If you connect a digital recorder to ‘Video Input’ and monitor real time
video only through a PC, place the left-hand side DIP switch at upper position ‘ON’ (the side of ‘75ohm’).
8
DX-VS1UE User
DX-VS1UE User’’’’ s Manual
DX-VS1UE UserDX-VS1UE User
s Manual
s Manuals Manual
Page 10

V
Digital Video
V
Recorder
ideo signal flows via
BNC cable.
Video signal flows via
LAN cable
2. If you monitor real time video through a CCTV monitor as well as a
PC, connect a digital recorder to ‘Video Input’ and a CCTV monitor to
‘Video Output.’ And place the left-hand side DIP switch at lower position ‘OFF’ (the side of ‘HI-Z’). CCTV monitor is set as termination of
the video signal.
The right-hand side DIP swith is not available.
ideo signal flows via
LAN cable
PC
Digital Video
Recorder
PC
Video signal flows via
BNC cable
CCTV Monitor
9
DX-VS1UE User
DX-VS1UE User’’’’ s Manual
DX-VS1UE UserDX-VS1UE User
s Manual
s Manuals Manual
Page 11
DX-VS1UE Initial Configuration
III.
1.
1.
Installation Summary
1.1.
• Connect ethernet cable and supply power to DX-VS1UE on local network for configuration.
• Install a setup program of DX-VS1UE in a PC on local network.
Assign an IP address to DX-VS1UE and set administrator condition.
•
• Set user condition.
2. Connecting
2. Connecting
2. Connecting2. Connecting
• Connect ethernet cable to the ethernet port on the rear.
Connect power supply unit to a power supply port on the rear..
•
• Confirm that the LEDs of ethernet port keep blinking.
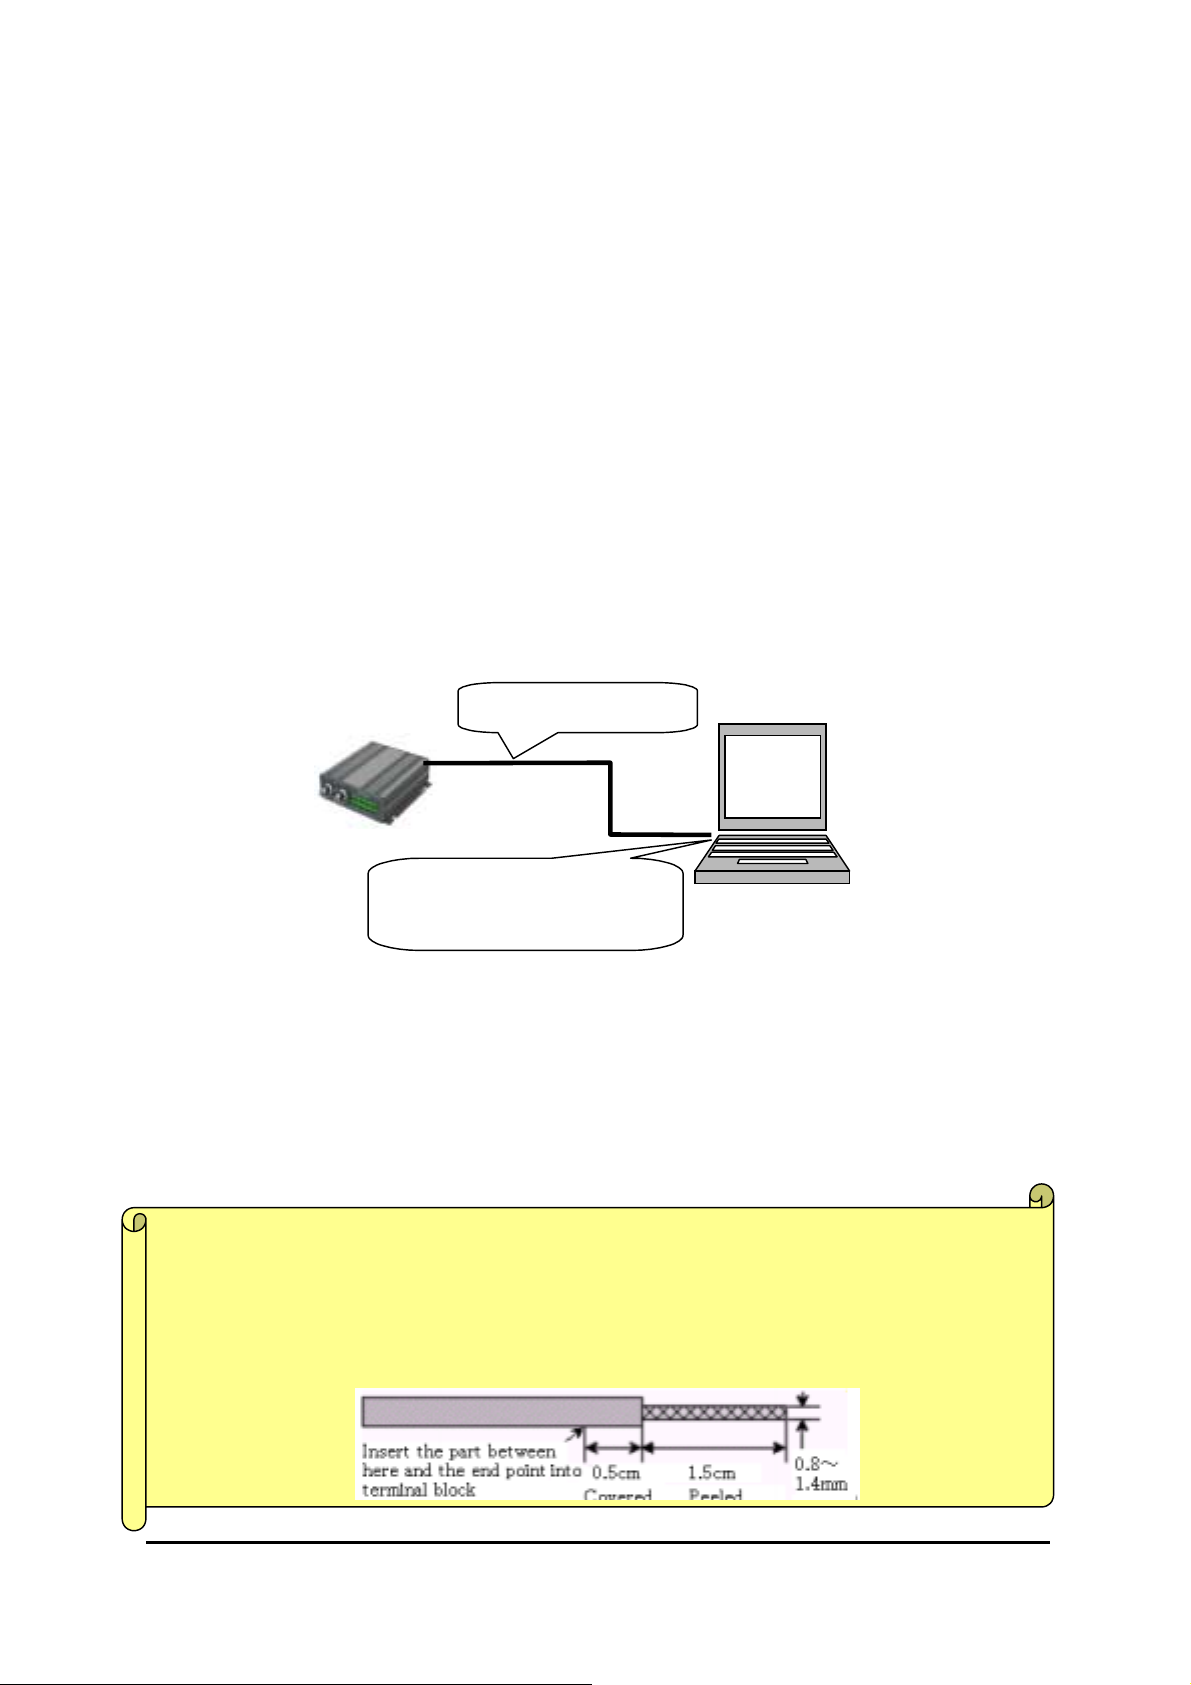
・
・Connecting DX-VS1UE with PC
・・
You may use crossover cable (red colored one) to directly connect DX-VS1UE to a PC.
Crossover Cable
Connect DX-VS1UE directly
to PC through LAN ports.
*If you use the crossover cable (red colored one) enclosed and follow the method illustrated in the
above diagram, but you cannot access, try to connect through HUB using direct cable. Otherwise,
set 10Mbps to the communcation speed in terms of network interface configuration of your PC, if
it’s possible. In case you cannot access even though you tried the above mentioned method, something can be wrong with PC(including OS setting). Please contact with makers which pr ovide your
PC or OS.
Note in connecting cable to terminal block
When you connect cable to terminal block, you should peel off the cover of cable by 1.5cm and
insert the cable by 2cm into the terminal block.(communication., sensor input, alarm and etc).
The white line on cover of power cable indicates “+”.
10
DX-VS1UE User
DX-VS1UE User’’’’ s Manual
DX-VS1UE UserDX-VS1UE User
s Manual
s Manuals Manual
Page 12
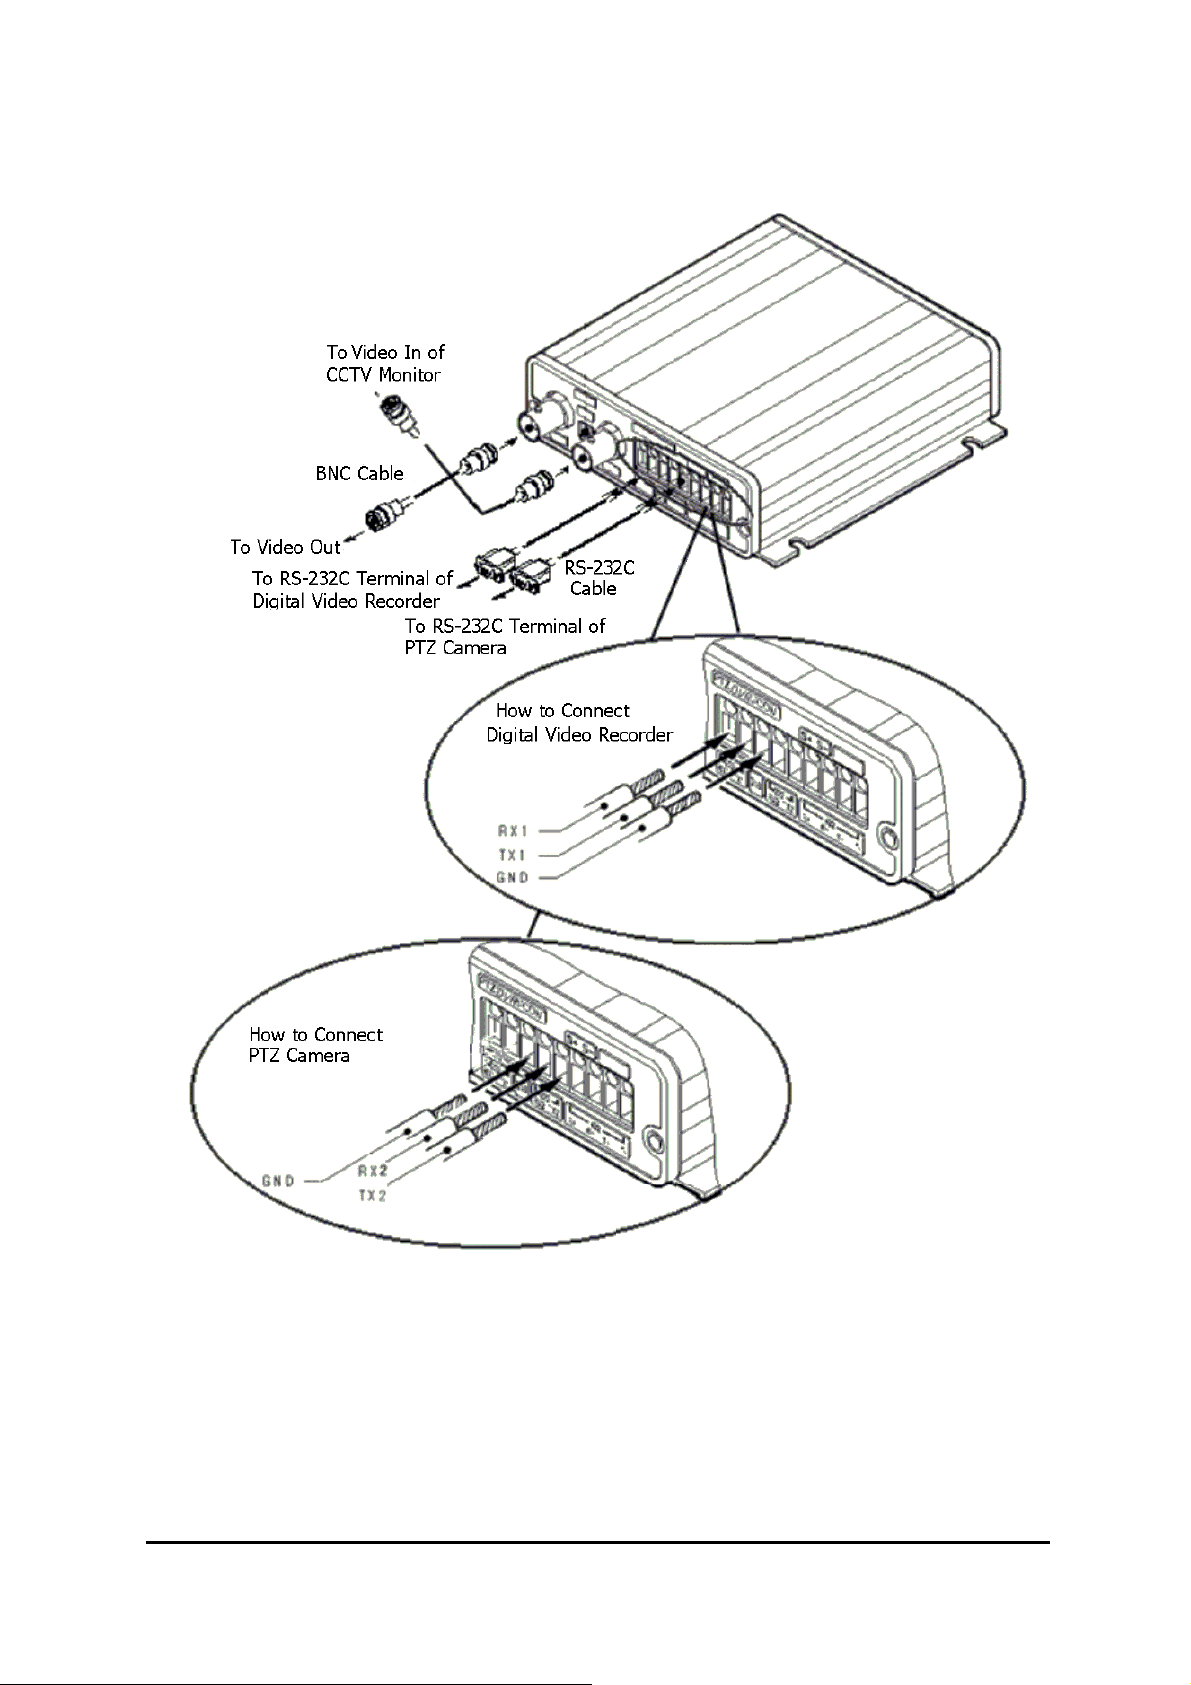
Illustration of the method of connection
When you connect a cable to the terminal, fix the screw on the upper part of the terminal
completely, after loosening the screw and inserting the cable. please be careful not to shortcircuit adjacent cables. Also, please don’t twist each cable when wiring.
11
DX-VS1UE User
DX-VS1UE User’’’’ s Manual
DX-VS1UE UserDX-VS1UE User
s Manual
s Manuals Manual
Page 13

When you connect a cable to the terminal, fix the screw on the upper part of the terminal
completely, after loosening the screw and inserting the cable. please be careful not to shortcircuit adjacent cables. Also, please don’t twist each cable when wiring.
12
DX-VS1UE User
DX-VS1UE User’’’’ s Manual
DX-VS1UE UserDX-VS1UE User
s Manual
s Manuals Manual
Page 14

・ The circuit diagram of a sensor terminal.
13
DX-VS1UE User
DX-VS1UE User’’’’ s Manual
DX-VS1UE UserDX-VS1UE User
s Manual
s Manuals Manual
Page 15
3.
3.
Installing DX-VS1UE Setup Program
3. 3.
Copy DX-VS1Setup.exe file from the enclosed CD-ROM
•
• Click the file on your PC to run Setup program.
4.
4.
Assigning IP Addre ss and setting Administrator Condition
4. 4.
*
Important
To access DX-VS1UE, you firstly have to assign an appropriate IP address.
When you assign an IP address to DX-VS1UE, make sure to use unoccupied IP address.
For details, please ask your network administrator.
・
・Starting the Setup Program for DX-VS1UE
・・
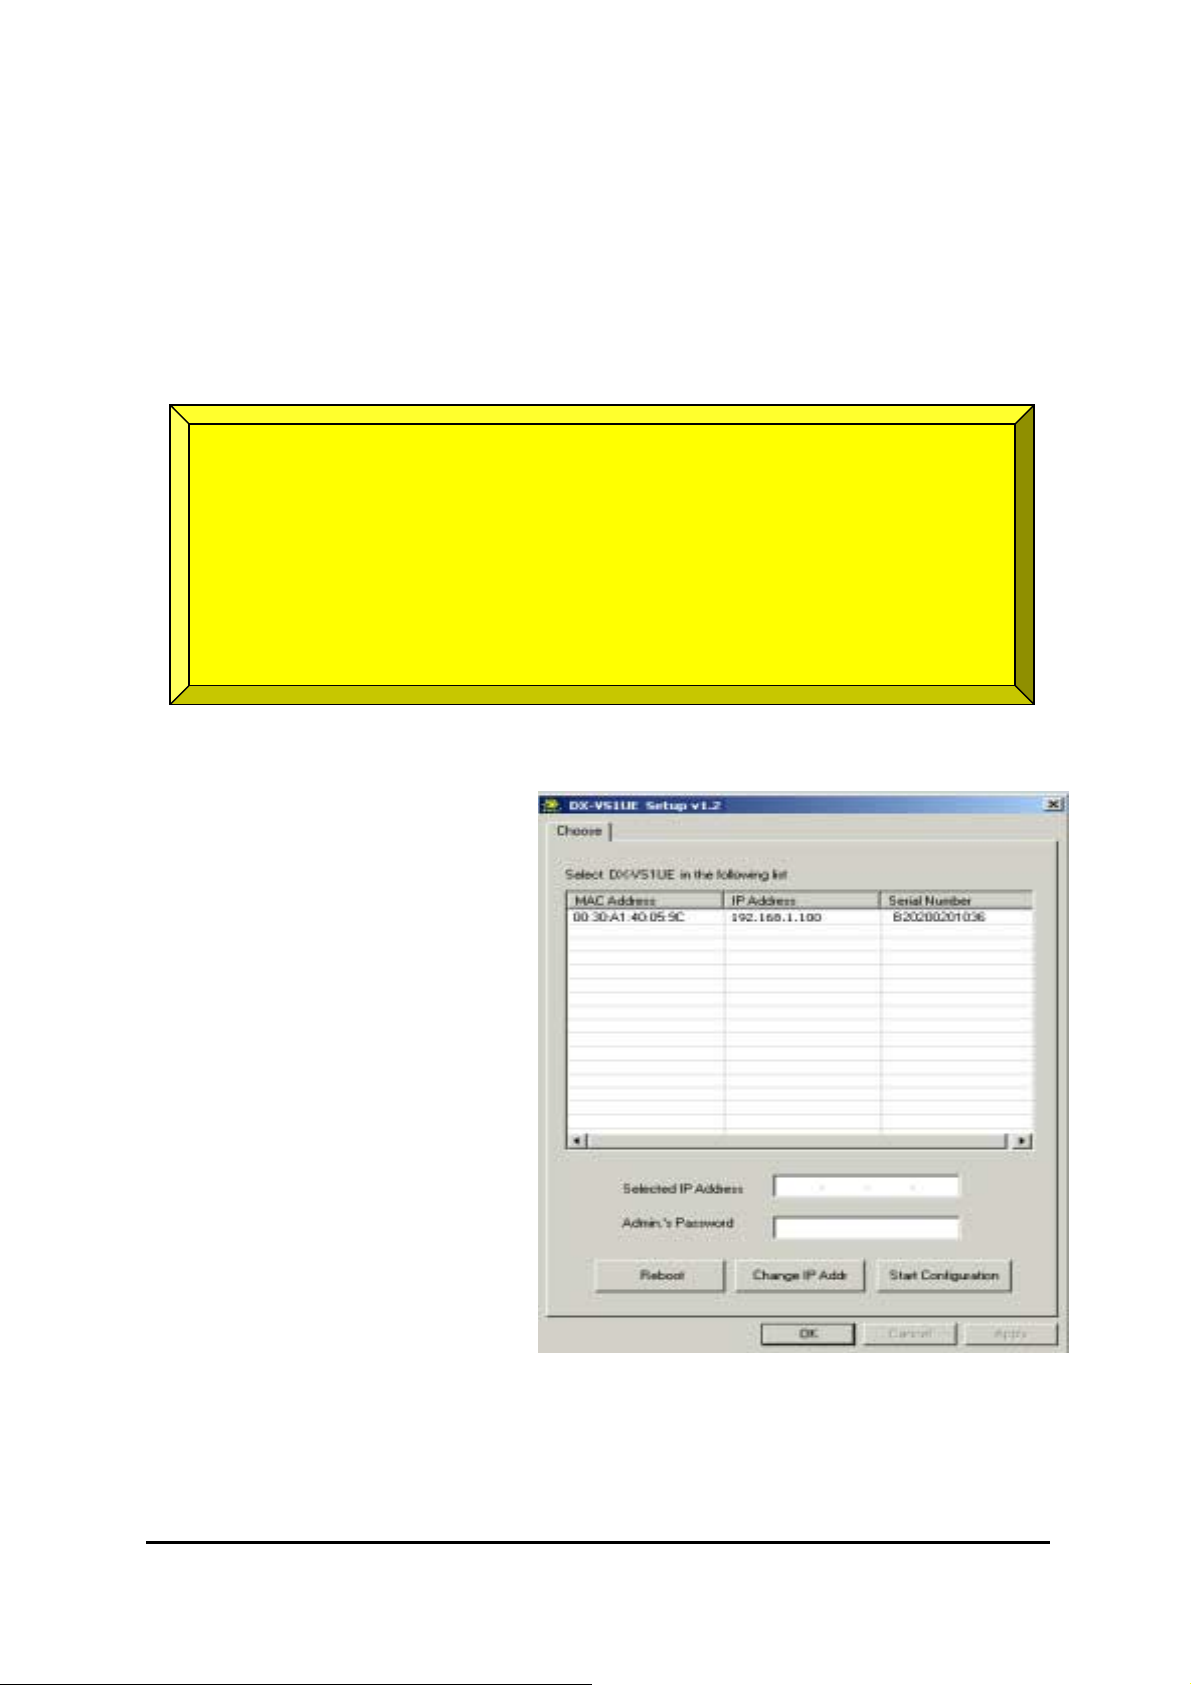
Run the “DX-VS1Setup.exe”. When the
setup program is started, the setup program detects and shows all DXVS1UEs connected with the local network.
From the DX-VS1UEs listed, select one
to assign a new IP address. (Default
value is 192.168.1.100) To select a DXVS1UE, click on its MAC Address or
IP address.
*
When a DX-VS1UE is selected, its IP
address will appear in the “Selected IP
Address” box. enter a password in the
Admin’s Password box to change the IP
address, reboot DX-VS1UE, or start
configuration. The default password is
‘admin’.
14
DX-VS1UE User
DX-VS1UE User’’’’ s Manual
DX-VS1UE UserDX-VS1UE User
s Manual
s Manuals Manual
Page 16

To change the IP address, enter the Administrator’s
password and press “Change IP Addr.”, enter the new IP
address and press “OK.” Button. The “Reboot” button will
reboot the DX-VS1UE. This process takes 10-20 seconds.
・
・Setting Administrator Conditions
・・
To access the Server Configuration Page in DX-VS1UE
from the Setup Menu, enter the admin’s password and press the “Start Configuration” button. (For more detailed information, refer to Chapter V
“Server Configuration Page”)
* Terminology *
IP Address
IP address is an identification code for computers and devices on a TCP/IP network.
Networks using TCP/IP protocol routes based on the IP address of the destination. IP
addresses can be assigned at random as long as each one is unique on closed network. However, connecting a private network to the Internet requires using registered IP addresses to avoid duplicates. IP address can be acquired from a network
administrator or an Internet service provider.
MAC Address (Media Access Control Address)
MAC address is a hardware identification code that uniquely identifies each node of a network. The MAC layer directly interfaces with the network media. Consequently, each type
of network media requires a unique MAC layer. The MAC address of DX-VS1UE is composed of 12-digit numbers. A unique MAC address can be found on the label at the bottom
of each DX-VS1UE.
Crossover Cable
The crossover cable (red) provided with the DX-VS1UE is used to connect DX-V S1UE with
a PC. A HUB is not necessary for connecting DX-VS1UE to a PC if a crossover cable is
used.
Straight Cable
The straight cable (white) is used if a HUB is used as an intermediary between DX-VS1UE
and PC.
15
DX-VS1UE User
DX-VS1UE User’’’’ s Manual
DX-VS1UE UserDX-VS1UE User
s Manual
s Manuals Manual
Page 17

5.
5.
Connecting a digital recorder to DX-VS1UE
5.5.
1) Connecting BNC cable
Connect one end of BNC cable with the video input connector of DX-VS1UE and the other end
with one of video output connector on the rear surface of digital recorder. Use 75ohm(3C-2V type
or more) type cable as BNC cable.
2) Connecting RS-232C cable
Connect RS-232C connector of a digital recorder to the RS-232(1) (refer to the following image)
connector of DX-VS1UE using the attached serial cable for digital recorder connection. One end of
the attached serial cable consists of three wires(red,yellow,black). Connect red wire to RX1, yellow
one to TX1 and black one to GND terminal. For connecting, loosen each fixing screw , insert three
wires into each terminal and fasten each fixing screw.
16
DX-VS1UE User
DX-VS1UE User’’’’ s Manual
DX-VS1UE UserDX-VS1UE User
s Manual
s Manuals Manual
Page 18

Connect to
RX1,TX1, GND of
PTZ/DVR/CO
M terminal
Connect to RS232C connector on
the rear surface
Supplied serial
cable
17
DX-VS1UE User
DX-VS1UE User’’’’ s Manual
DX-VS1UE UserDX-VS1UE User
s Manual
s Manuals Manual
Page 19
Accessing DX-VS1UE Homepage & Monitoring Real-
IV.
IV.
IV.IV.
time Image
After assigning IP address and gateway address, subnet mask, broadcast address to DX-VS1UE
properly, you may access DX-VS1UE and monitor real-time image on Internet.
1.
1.
Starting Web browser
1.1.
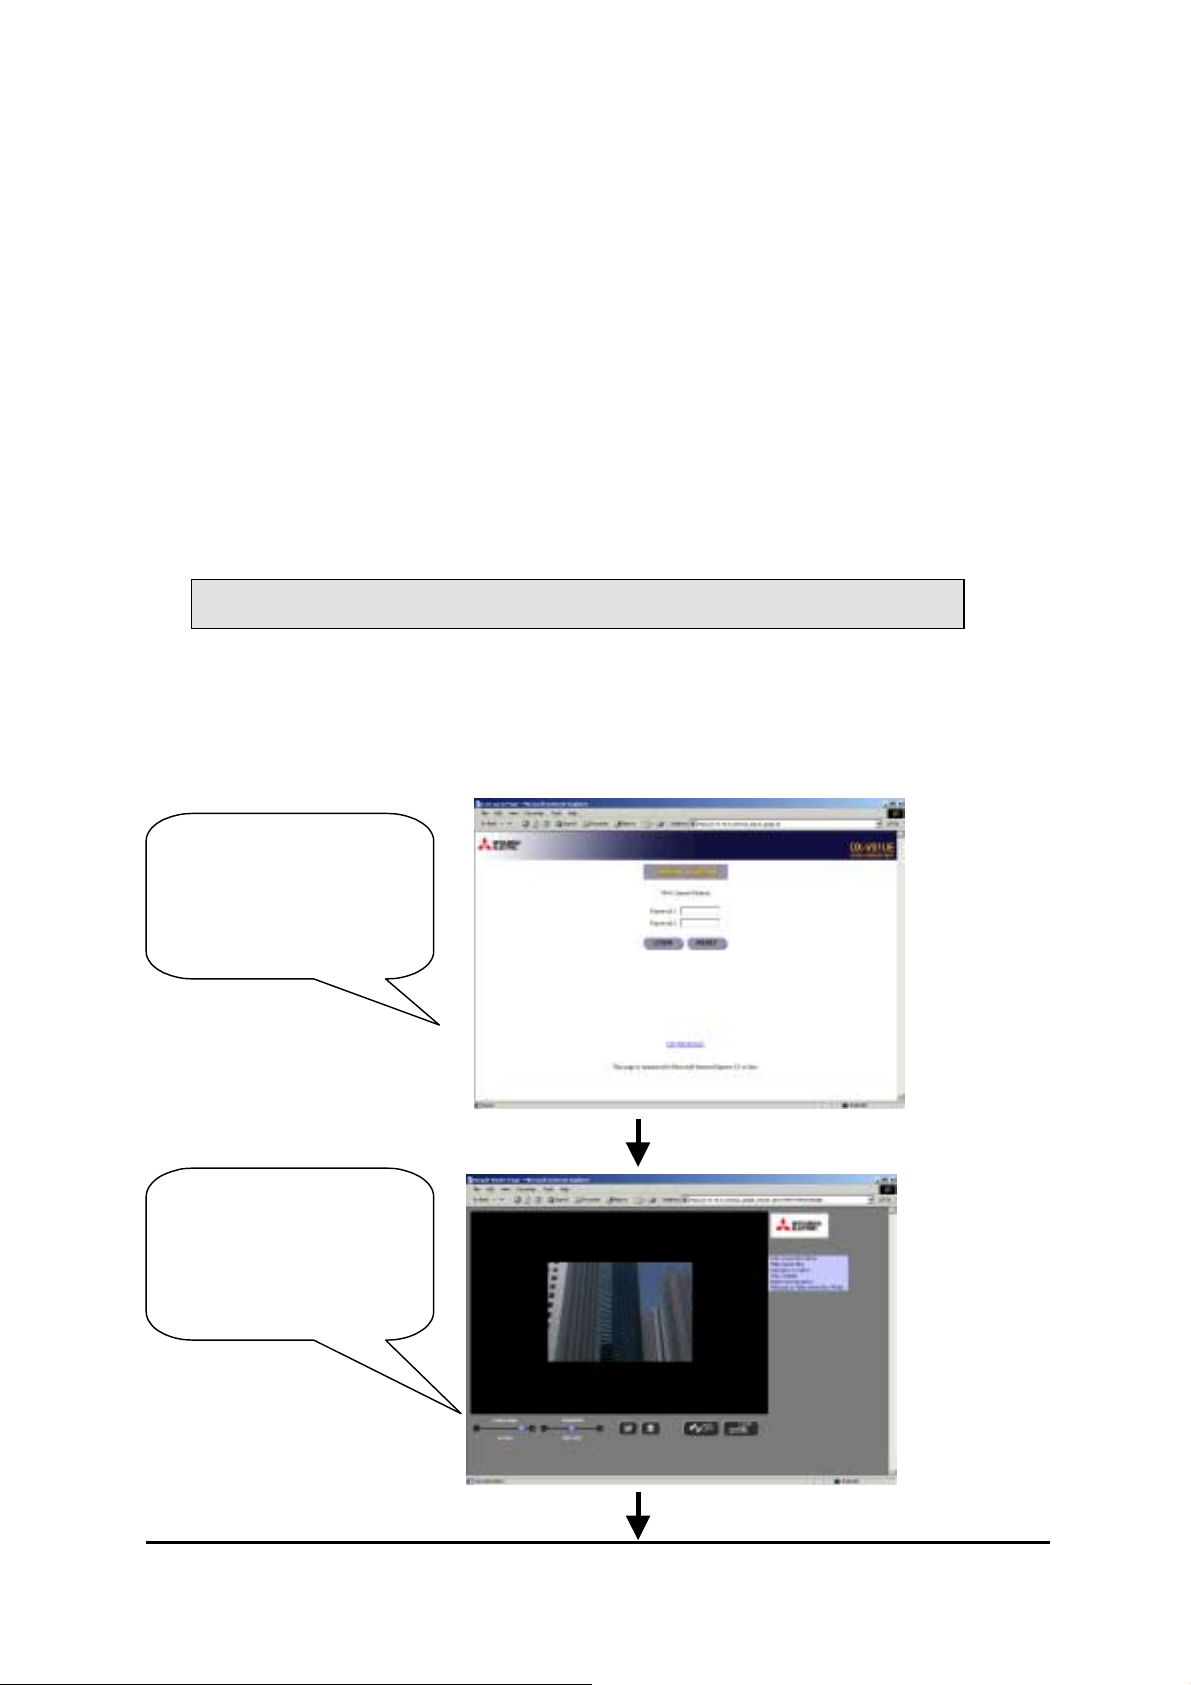
Start your web browser and enter IP address assigned to DX-VS1UE. Then you can see the user
login page of DX-VS1UE.
• Ex)
http://192.168.1.100/
DX-VS1UE supports up to 100 simultaneous access. But, the larger the number of simultaneous access user gets, the slower the monitoring rate of rea lt im e im ag e gets.
2.
2.
Composition of a screen
2.2.
User Login Page (This
page appears firstly when
you access DX-VS1UE.)
Simple Viewer
Page(refer to chapter IV
“Accessing DX-VS1UE
Homepage &
Monitoring Real-time
18
DX-VS1UE User
DX-VS1UE User’’’’ s Manual
DX-VS1UE UserDX-VS1UE User
s Manual
s Manuals Manual
Page 20

DVR/PTZ level login
page
DVR/PTZ control page
(refer to 5.DVR/PTZ
control page)
DVR configuration
level login page
Server configuration level login
19
DX-VS1UE User
DX-VS1UE User’’’’ s Manual
DX-VS1UE UserDX-VS1UE User
s Manual
s Manuals Manual
Page 21

6) Application Configuration This page is used to set e-mail and file
transmission function.
(1) Recipient E-mail Address
This is used to designate a person to
receive E-mail.
(2) Sender’s E-mail Address
This is used to put a person’s e-mail
address that is considered as the e-mail
sender.
This menu plays an important role
since this is used for avoiding the
problem that e-mails are blocked by
some mail servers. Some e-mail servers don’t receive any e-mail that
doesn’t have valid domain name such
as abc@abc defg.com. It is because
there are a lot of junk e-mails. So, in
some cases, DX-VS1UE and other devices which do not have valid domain
names or have only IP address can’t
send e-mails. To avoid this problem,
DX-VS1UE has the menu to put
sender’s e-mail address. The default
value is invalid, so administrator
should change the address with valid
one. Administrator can put his/her e-mail address.
(1) Check E-Mail Options
Relay Mail Server: Against the same problem as e-mail blocking, DX-VS1UE has a func-
tion to relay its e-mail through an available e-mail server so that e-mail can have the relay
server’s domain name. After activating “Use Relay Mail Server” menu, you enter a server’s
domain name such as ‘@abcdefg.com’. Since the default value of the e-mail server is invalid, don’t use the default value when you use the relay mail server function.
Content-Transfer-Type: This shows supported e-mail format. Only ‘Base64’ format is supported.
(2) E-Mail Event Configuration
Event source: Administrator should define in which event E-mail should be delivered among MD
(motion detection), sens or 1, sensor 2, sensor3, and sensor 4. If administrator clicks on sensor 1, e-
20
DX-VS1UE User
DX-VS1UE User’’’’ s Manual
DX-VS1UE UserDX-VS1UE User
s Manual
s Manuals Manual
Page 22

mail is sent when the sensor1 detects events. (To use sensor input detection, a sensor should be connected to DX-VS1UE. If administrator clicks on periodic sending, e-mail is sent periodically every
preset time. The interval may be modified.)
File name: Regarding the file name of images sent in MD or Sensor event, the file name is decided
combining all options. Regarding the file name image sent in periodic sending event, administrator
can decide how to name image files among three methods. Administrator names a file with data &
time (DATETIME; E.g IMG-CH00-2001030-223031.eye) or sequential number (SEQNUM; E.g.
IMG-CH00-SN1.eye). Also administrator names the file with fixed string (Manually assigned filename). The image file has ‘.eye’ file extension so that the file can be reproduced on Internet
browser. With DATETIME or SEQNUM format, DX-VS1UE automatically put ‘.eye’ file extension. When a file name is set manually, make sure to put ‘.eye’ file extension(e.g. manual.eye). If
not, the file cannot be reproduced on Internet browser or other program.
Note: If you’ve selected sequencial number as the method of file naming , whenever the ‘Apply’
button is pressed, the sequential number is reset to initial value.
Image quality: Administrator can set image resolution delivered by e-mail. The resolution can be
selected among 90x60, 180x121, 360x243, 720x243, and 720x486. The image of 90 by 60 pixels is
the lowest resolution and the smallest size.
Check Points for E-mail Sending Problem
If you have problem in sending e-mail, check the followings;
! You have set DNS address properly in the “Network Configuration” page.
! You have set sender’s e-mail address properly in the “Application Configuration”
page.
! You have set relay mail server properly in the “Application Configuration” page.
(5) FTP directory configuration
Administrator assigns FTP server address, FTP user account, FTP user password, and FTP user path
to receive files when an event occurs.
21
DX-VS1UE User
DX-VS1UE User’’’’ s Manual
DX-VS1UE UserDX-VS1UE User
s Manual
s Manuals Manual
Page 23

(6) FTP event configuration
Administrator can set transmission conditions, image resolution, and file name. The setting method
of image resolution, filename, and transmission conditions of FTP is the same as that of e-mail.
Transmission Performance of E-mail and FTP
! DX-VS1UE can send e-mail once per five minutes at most in case administrator
set DX-VS1UE to send e-mail periodically. If there were no restriction in
sending e-mail, DX-VS1UE might cause a serious problem to the recipient’s
mail server. However, there is no limit in e-mail transmission triggered by motion detection event or sensor event.
! There is no limit.in the FTP funcion. If you set 0 to the periodic sending menu,
DX-VS1UE transmits files at best performance.
! Regarding the FTP function, if the interval between two events is within 2 sec-
onds, the second event may be neglected. If the second event occurs within 3
seconds after image transmission, the second image file is not transmitted at
times.
! Regarding the e-mail function, if the interval between two events is within 3 sec-
7) Pan/tilt/zoom Configuration
This page is used to select the serial port for connectiing with a pan/tilt/zoom camera and to set
pan/tilt/zoom functions such as ‘Mode’, ‘Preset’, etc.
(1) Select Serial Port
It is to select a serial port among Serial#2, and Serial#3 with which a Pan/ tilt/zoom control receiver
is connected to DX-VS1UE. Serial#2 are RS232-C interfaces and Serial#3 is RS-422/RS485 interface.
(2) Serial Port Base Address
This menu is used to identify the base addresses (camera ID or camera Number) between DXVS1UE and a Pan/tilt/zoom camera. Administrator can connect pan/tilt/zoom camera through analogue pan/tilt/zoom controller.
When RS485 is chosen as an interface and two or more Pan/tilt/zoom cameras are connected, it is
necessary to set Camera ID to each camera and to set it to the base address(Camera ID) to which
DX-VS1UE corresponds.
22
DX-VS1UE User
DX-VS1UE User’’’’ s Manual
DX-VS1UE UserDX-VS1UE User
s Manual
s Manuals Manual
Page 24

(3) Advanced Pan/tilt/zoom Configuration
You can register preset points and set
mode.
When you register preset, you should
stop other users from controlling pan/
tilt/zoom mechanism.
For controlling Pan/tilt/zoom mechanism, please refer to Chapter IV “Accessing DX-VS1UE Homepage &
Monitoring Real-time Image.”
New Preset
You register a new preset point as follows. You can register up to 64 presets.
! Focus on a certain point to register as a preset point
controlling Pan/tilt/zoom mechanism.
! Click a “New Preset” button, then a dialog box “New
Preset” appears.
! Select a number from 1 to 64
! Set the preset name.
! Click “Add/Change” button
! In “Current Preset List” panel, you may view preset points
that are registered currently. At the bottom of this window, you can check if the selected number is occupied or
not.。
New Group
You can make a new group by combining registered presets. You can make up to 6 groups. Each group can store
up to 64 points. The procedure for making the group is as
follows.
! Click “New Group” button, then a dialog box “New
Group” appears.
! Select a number from 1 to 6.
! Set the group name.
! Set interval time. This value is the time interval be-
tween when a camera gets to one preset point and
when the camera starts to move to the next preset
point.You should set sufficient time so that you can
monitor image.
! List proper preset point among registered ones in
“Current Group Member.” According to the order
that you listed in a group, a external camera travels.
! Click “Add/Change” button
! In “Current Group Member” panel, all registered pre-
23
DX-VS1UE User
DX-VS1UE User’’’’ s Manual
DX-VS1UE UserDX-VS1UE User
s Manual
s Manuals Manual
Page 25

set points appear. At the bottom of this window, you can check if the selected number
is occupied or not.
Mode Configuration
There are three modes: “Normal Mode”, “Swing
Mode” and “Group Mode.”
! In the normal mode, user can control pan/tilt/
zoom mechanism of an external camera
through the dvr/ptz control page.
! If the swing mode is selected, the connected
pan/tilt/zoom camera swings between two
preset points. Time duration of “Wait (some)
seconds” signifies the same meaning that of
group mode. Administrator sets two swing
points among up to 64 preset points that are
listed.
! If the group mode is selected, the dome camera
travels by way of preset points set as a group according to the listed order. Administrator selects the group from up to 6 groups listed in the “Select Group”.
24
DX-VS1UE User
DX-VS1UE User’’’’ s Manual
DX-VS1UE UserDX-VS1UE User
s Manual
s Manuals Manual
Page 26
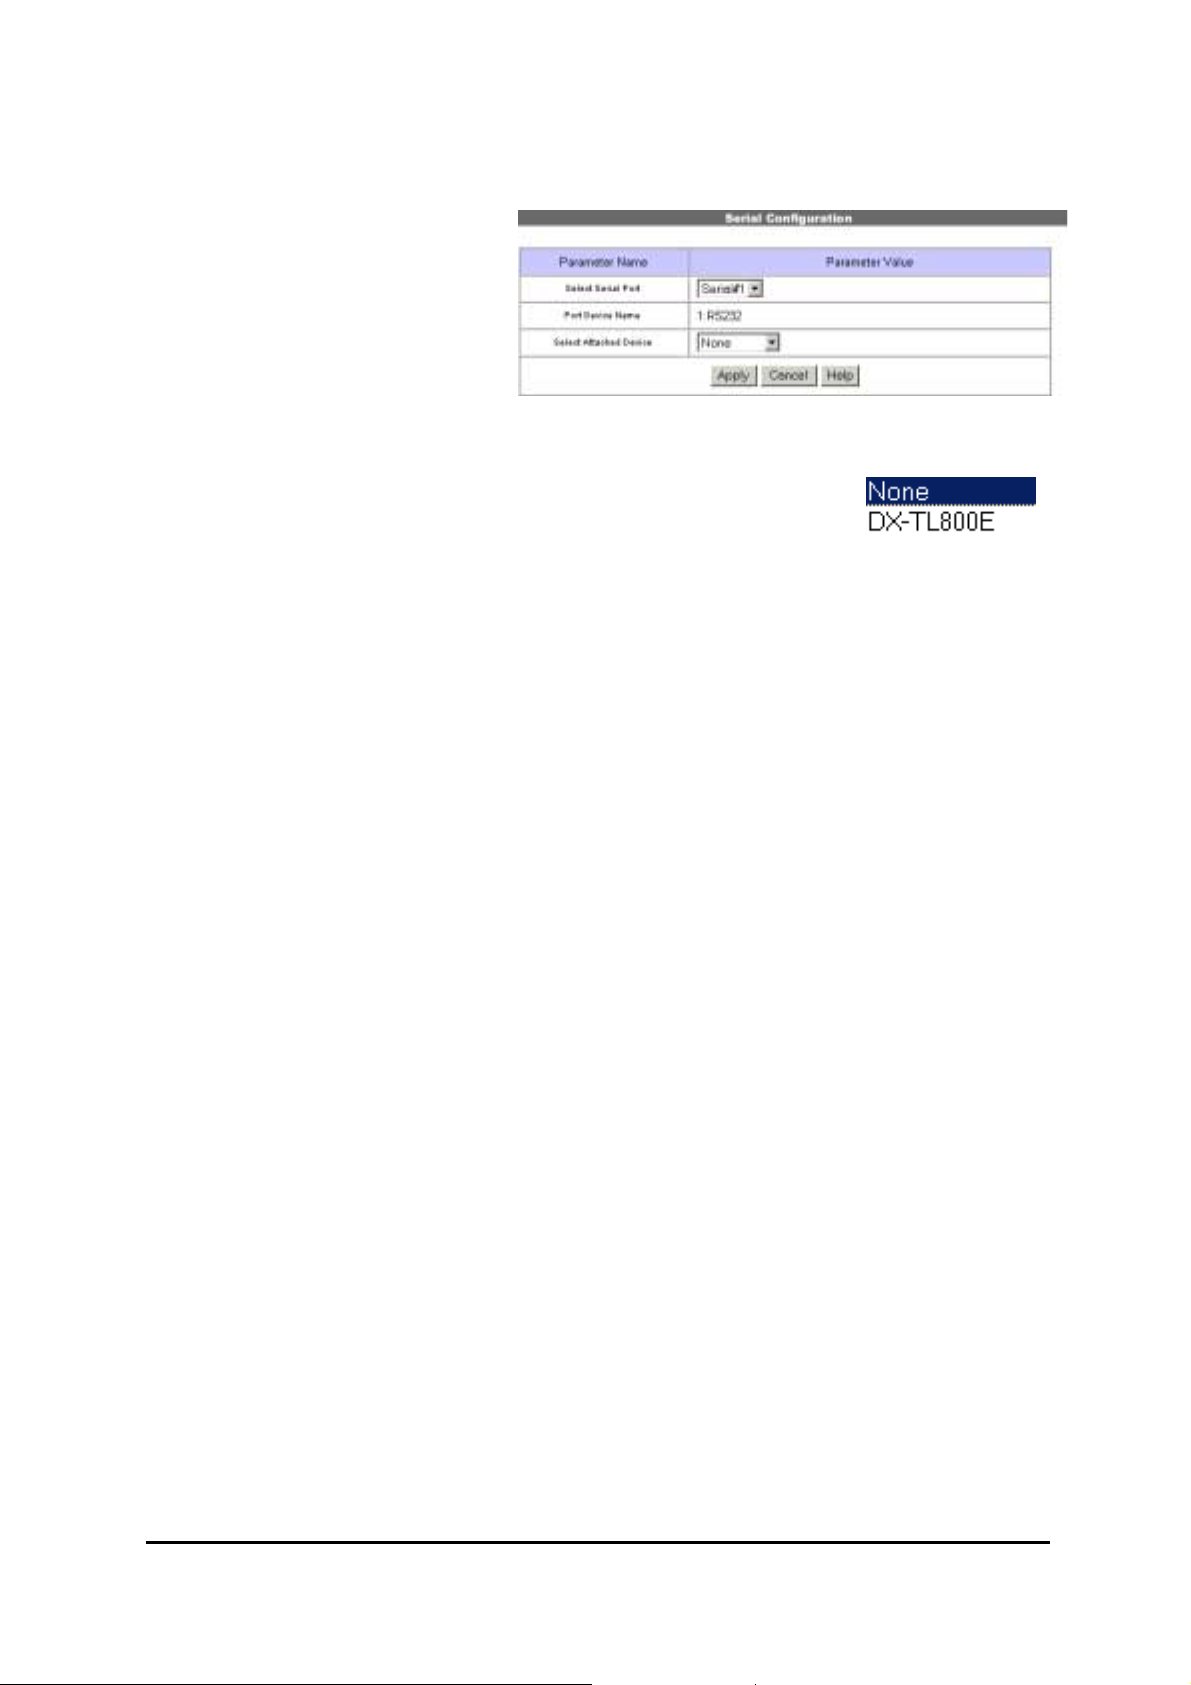
8) Serial Port Configuration This page is used to select a commu-
nication protocol among listed ones.
(1) Serial Port Selection
Administrator selects a serial port to
set. DX-VS1UE has three serial ports.
Serial#1 and Serial#2 are RS232-C
interface ports, and Serial#3 is a RS422/RS485 interface port.
(2) Select Attached Device
Administrator selects a communication protocol that an attached external device satisfies among listed protocols.
Manual Setting
If you can’t find protocol for your external device in the list, you can define the protocol by selecting “manual setting” and setting values to control parameters and pan/tilt/zoom commands. For detailed information, refer to the “PTZ Command for Manual Script” explained at the next page.
※ Although this machine is equipped with two or more communication protocols which con-
trol pan/tilt/zoom cameras of other companies, operation to all the cameras of other companies and Pan/tilt/zoom operation are not guaranteed. In addition, it has not answered the
inquiry about combination with the camera etc. of other companies.
(3) Control Parameters
You can also set control parameters such as “Baud Rate”, “Stop Bits”, “Data Bits”, and “Parity
Check” according to the setting of the connected digital recorder or external camera.
25
DX-VS1UE User
DX-VS1UE User’’’’ s Manual
DX-VS1UE UserDX-VS1UE User
s Manual
s Manuals Manual
Page 27

PTZ Command for Manual Script
r
1. Escape Characters
# Special command
@ Hexadecimal character
% Decimal character
^ Character
, Break character
; End of current packet
& Special operation
2. Special command (Followed by #)
A Address assigned by pan/tilt/zoom config uration
X Acceleration rate selected by user
S
x
= 0 Sum of entire frame, size = 1byte
x
x = 1 Sum of entire frame, size = 2byte
x = 2 Sum of entire frame except first byte(sync), size = 1byte
x = 3 Sum of entire frame except first byte(STX) and last byte(ETX), size = 1byte
x = 4 Sum and one's complement of entire frame except first byte(STX) and last byte(ETX),
x = 5 XOR sum of entire frame, size = 1byte
x = 6 XOR sum of entire frame, size = 2byte
= 7 XOR sum of entire frame except first byte(sync), size = 1byte
x
= 8 XOR sum of entire frame except first byte(STX) and last byte(ETX), size = 1byte
x
= 9 XOR sum and one's complement of entire frame except first byte(STX) and last byte(ETX),
x
Checksum calculation method
size = 1byte
size = 1byte
3. Special Operation (Followed by &)
Sx Delay about ( ([acceleration rate] + 1) * (100 * x) ) ms
x 0 ~ 4
4. Exceptions
Normal character following Escape Sequence, must use break character for identifying the end of sequence
* Some protocols are not to be made command script with above method. It is because they use anothe
method of checksum calculation.
26
DX-VS1UE User
DX-VS1UE User’’’’ s Manual
DX-VS1UE UserDX-VS1UE User
s Manual
s Manuals Manual
Page 28

9) Sensir Input Configuration This page is used to set sensor input
status. This is related with E-mail and
FTP function and Alarm preset function.
(1) Device Type for Input Ports
Administrator defines active state of
4 digital input ports. If you connect
normal open type device to input
port, you should select “NO (Normal
Open).” With normal close type device, you should select “NC (Normal
Close).”
(2) Current State for Input Ports
DX-VS1UE shows current status of the 4 input ports used for connecting with a sensor device. In
the status panel, active state or Non-active state message appears. “Non Active” state means that
connected device didn’t detect any event when the ‘Apply’ button was clicked. Though this message is not updated until you click ‘Apply’ button again, DX-VS1UE keeps receiving status information from the connected device.
10) Alarm Configuration This page is used to set conditions for
image recording in event status, so that
DX-VS1UE sends the images through email or FTP.
(1) Motion Detection Threshold
Administrator sets threshold for motion
detection function. Threshold ‘0’ is the
most sensitive state and ‘900’ is the
dullest state.
(2) Alarm Parameters for E-mail /
FTP Application
Administrator defines the conditions for
recording image to DX-VS1UE, if DXVS1UE detects some event through motion detection function (MD Event) or external devices (SID1, SID2, SID3, and SID4). DX-VS1UE
can record 2 frames for 2 seconds before the event and 2 frames for 2 seconds after the event as well
as 1 frame at the moment of event. The maximum recording rate is 1 frame per second and the total
frames are maximum 5. DX-VS1UE records the images and send them through e-mail or FTP ac-
27
DX-VS1UE User
DX-VS1UE User’’’’ s Manual
DX-VS1UE UserDX-VS1UE User
s Manual
s Manuals Manual
Page 29
cording to preset conditions on the “Application Configuration” page and “Alarm Configuration”
page. If event keeps arising, DX-VS1UE sends images without duplicating regardless of overlapped
time setting. The resolution of the image is fixed as 360x243.
※ Depending on the load condition of network or server, there is the possibility that f ewer pic-
tures are transmitted than usual.
(3) Alarm Preset
This is used to match any preset point to one of external sensor. If you enable this function and
match a certain preset with an external sensor, the subject of the connected camera moves to the
preset point.
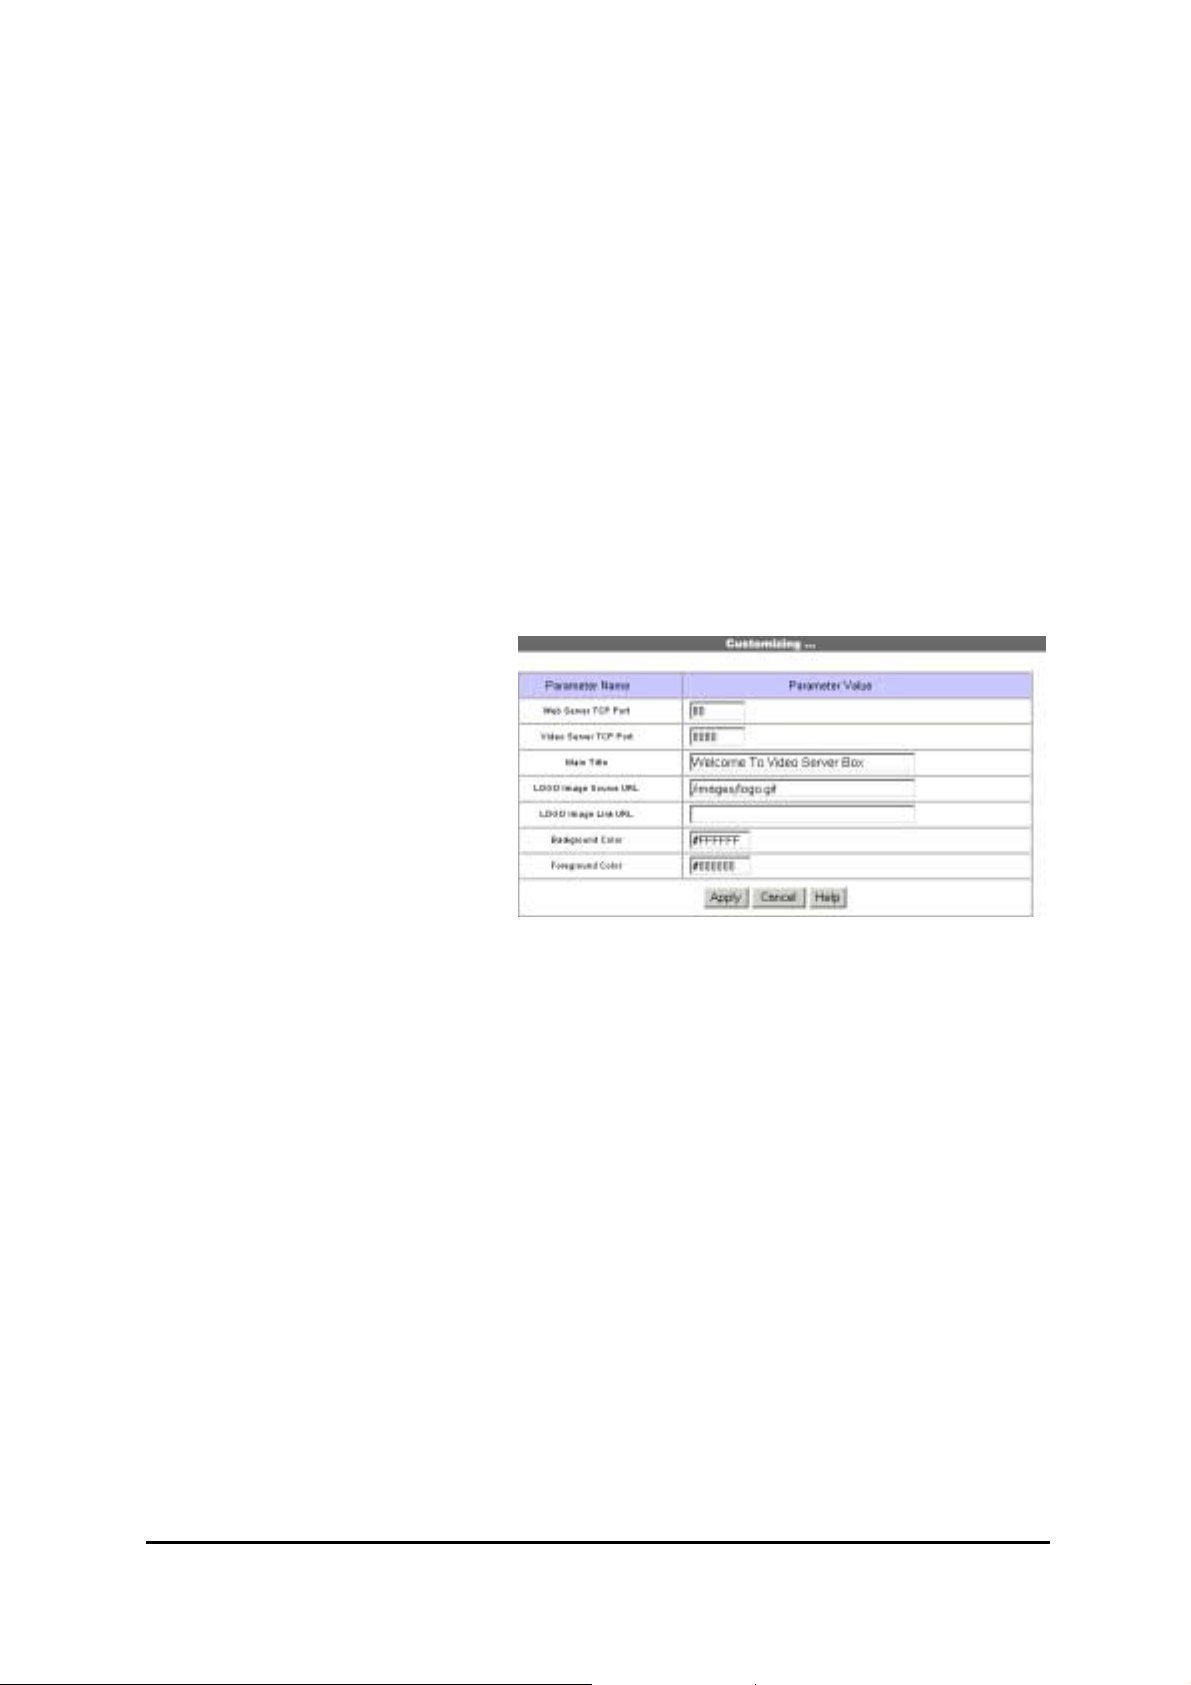
11) Customizing This page is used to customize TCP ports of data transmission and design of the login pages.
(1) Web Server TCP Port
Administrator assigns a web server
TCP port for user access to DXVS1UE and data transmission from
DX-VS1UE. 80th port is assigned as
the default value.Please note that it
becomes impossible to access the
homepage of DX-VS1UE in normal
method if you change the web server
TCP port.
(2) Video Server TCP Port
Administrator assigns a video server
TCP port through which DX-VS1UE transmits images to users. 8080th port is assigned as the default value.
28
DX-VS1UE User
DX-VS1UE User’’’’ s Manual
DX-VS1UE UserDX-VS1UE User
s Manual
s Manuals Manual
Page 30

(3) Login Page Editing
The login pages are designed so that administrator can edit easily. Editable parts are as bellows.
! Main Title: This is used to change the title written on each login page.
! Logo Image Source URL: To show a logo image, administrator set the path or the URL
where the logo image is stored. The logo appears on each login page. Please make the
logo image with a height of 192 pixels or less and a width of 256pixels or less.
! Logo Image Link URL: Administrator can link the logo with a certain web page.
! Background Color and Foreground Color: You can change the background color and
foreground color of login pages. Administrator can set the color with RGB value.
When the changed settings are reflected?
You have to click the ‘Apply’ button at each server configuration page to reflect the changed
settings on your DX-VS1UE.
29
DX-VS1UE User
DX-VS1UE User’’’’ s Manual
DX-VS1UE UserDX-VS1UE User
s Manual
s Manuals Manual
Page 31

(appendix 1)
Detailed Specifications of DX-VS1UE
1. Hardware
General
Power Consumption DC 12V, 1.0A
AC 24V 50/60Hz, 0.5A
External Power AC 100~250V 50/60Hz, 0.5A
DC 12V, MAX: 1.5A
Operation temperature 5℃~40℃
Operation humidity max 80%
Dimension 121(width)×33(height)×130(depth)mm
Weight 350g
CPU 32bit RISC Embedded Processor
Flash memory 8M bytes
Main Memory 16M bytes
OS Embedded Linux
2. Video and Compression
Video signal system NTSC/P AL
Video input 1 input BNC connector
Video through output 1 output BNC connector
Image resolution 720x486, 720x243, 360x243, 180x121, 90x60
Image compression system WAVELET
Image compression rate 10:1 ~200:1
Image transmission rate max 30fps(NTSC) / 25fps(PAL) (resolution:360x243 or lower)
Decord rate 2 ~ 30fps
3. Network
Connector 10 Based-T Ethernet (RJ-45)
Installation Assign IP address using setup program
Management Setup program and web server built in sever configuration page achieves
configuration
Browser Microsoft Internet Explorer 5.0 or later
30
DX-VS1UE User
DX-VS1UE User’’’’ s Manual
DX-VS1UE UserDX-VS1UE User
s Manual
s Manuals Manual
Page 32

4. Misc functions and I/O
Pan/tilt/zoom 1ch RS-232C, 1ch RS-422/RS-485
Control
Digital recorder 1ch RS-232C
Control
Sensor input 4 inputs support, DC4.5~13.2V 1.6~20mA
Alarm Motion detection
Automatic e-mail transmission
Automatic image transmission via FTP
Security Password (user authentication-based)
IP filtering(secure mode)
Image encryption mode
Misc functions Image quality control (10levels)
Periodical imag e transm iss ion (E-Mail, FTP)
Gray mode
Product specification and appearance may change without notice for improvement
31
DX-VS1UE User
DX-VS1UE User’’’’ s Manual
DX-VS1UE UserDX-VS1UE User
s Manual
s Manuals Manual
Page 33

(appendix 2)
Serial connection with digital recorde r
When you connect this equipment with Mitsubishi digital recorder using serial connection, use the
supplied serial cable. If you can’t use the supplied serial cable due to installation location, connect
in accordance with the setting illustrated below.
RS-232C terminal of digital recorder
Pin number
1DCDData carrier detect 6 DS
2RXDReceived data 7 RT
3TXDTransmitted data 8 CT
4DTRData terminal ready 9 RI Ring Indocator
5GNDSignal ground
NameSignal Pin num-
NameSignal
ber
Data set ready
R
Request to send
S
Clear to send
S
32
DX-VS1UE User
DX-VS1UE User’’’’ s Manual
DX-VS1UE UserDX-VS1UE User
s Manual
s Manuals Manual
Page 34

(付録 3)
Frequently Asked Questions
1. The feature of DX-VS1UE Q. What is the DX-VS1UE
A. Video server box DX-VS1UE offers the solution of the network type remote surveillance
server having many features, such as an internet server, and a picture compression device,
serial device control. Monitoring and operation of the image of a digital recorder or a
Pan/tilt/zoom camera can be performed through DX-VS1UE.
When you use the supplied crossover cable (red) and you cannot access by the above connection, please use two straight cables and try on the connection via the hub.
Q. What kind of preparation are needed to monitor images
A. You need to prepare a BNC cable and a digital recorder or an external camera.
Q. What kind of image compression system has been adopted?
A. DX-VS1UE has adopted the WAVELET compression system as picture compression.
The WAVELET compression system is the still picture-based compression algorithm like
JPEG well known for picture compression. Moreover, unlike MPEG, the standard image
compression system, DX-VS1UE deals with image as a collection of still pictures and compresses the still pictures at high speed, and transmits it.
Q. What is the difference between the WAVELET compression system and JPEG?
A. The difference between the WAVELET compression system and JPEG lies in the method
of encoding. WAVELET algorithm uses DWT (distributed WAVELET conversion) to JPEG
using DCT (distributed cosign conversion). WAVELET was adopted as the standard of digital image compression in JPEG2000 by virtue of the high reliability.
Q. Can two or more users monitor image in different resolution simultaneously using DXVS1UE?
A. DX-VS1UE makes it possible for 100 users to monitor the image simultaneously at different resolution. Furthermore, DX-VS1UE supports gray mode for the users who connect
through low speed network line. Even if a certain user is viewing monochrome image in
standard resolution (360x243), another user can view color image in the highest resolution
(720x486).
Q. What is the maximum transmission speed?
A. DX-VS1UE compresses and transmits at speed of 30 fps in case of 10BASE-T network.
However, all users cannot monitor image at the speed. It’s because transmission speed is
greatly dependent on simultaneous connection of the performance of client PC, and network
environment and two or more users.
Q. Up to how many users can connect with DX-VS1UE simultaneously?
A. DX-VS1UE supports simultaneous connection of up to 100 users. In this case, each user
can receive one frame per about 10 seconds, respectively.
Q. Is there any pan/tilt/zoom functions in DX-VS1UE?
33
DX-VS1UE User
DX-VS1UE User’’’’ s Manual
DX-VS1UE UserDX-VS1UE User
s Manual
s Manuals Manual
Page 35

A. DX-VS1UE has Pan/tilt/zoom setting functions in its software. If a camera with
pan/tilt/zoom functions is connected to DX-VS1UE, direction of camera lenz can be
changed and zoom in/out can be executed remotely by setting in the homepage of DXVS1UE. A pan/tilt/zoom camera is connectable with RS232C, RS422, and RS485 communication interface.
A. Is there any limitation on the password setting?
Q. Yes. The password can be composed of only alphanumeric characters and the length of the password must be less than or equal to 9 characters.
2. Installation and operation of DX-VS1UE
Q. What kind of network line can be used?
A. Ethernet can be used.
Q. What is the maximum extension width of a network line?
A. UTP cable used for LAN can be extended up to 100 meters without bridging.
Q. Can telephone line be used for DX-VS1UE?
A. Although telephone line can be used for DX-VS1UE, it is necessary to install a modem
and a router.
Q. Though my PC is directly connected with DX-VS1UE using the supplied crossover cable, DX-VS1UE cannot be accessed. How should I solve this problem?
A. Please try to connect with two straight cables and a hub. if it is possible to set transmission speed, please set the transmission speed to 10Mbps. If you cannot access to DXVS1UE after th may be in the PC side (including a setting item and an interface) when it
cannot access, even if you try the above, please consult with each maker.
Q. When the network consists of one global IP address and two or more private IP addresses, can DX-VS1UE be connected to a network with the private IP address?
A. DX-VS1UE is a Web server. Although a private IP address can be assigned to DXVS1UE, DX-VS1UE must be specified as a local server. The router is usually connected to
the network with a fixed IP address, and a local network with two or more private IP addresses is constituted. In this case, as for all the devices connected to the local network, a
private IP address is assigned. However, all devices communicate with a remote device using a fixed IP address. A router changes a private IP address into a fixed IP address, and a
local device enables it to access it at a remote device. This function is called NAT (Network
Address Translation).
In case a router is set up, a local device can be specified as a local server out of all devices.
And you have to input the IP address of DX-VS1UE into the column of a local server address. Otherwise, DX-VS1UE cannot be accessed from a remote network.
Q. When the network consists of only private IP addresses, can DX-VS1UE be connected
to thea network?
A. DX-VS1UE is connectable with LAN which consists of only private addresses, as long
as a local user accesses DX-VS1UE. However, all networks may be downed when specification in which network apparatus, such as a hub, supports all devices appropriately is not
fulfilled.
When many DX-VS1UE are especially connected to the network of narrow band width, this
34
DX-VS1UE User
DX-VS1UE User’’’’ s Manual
DX-VS1UE UserDX-VS1UE User
s Manual
s Manuals Manual
Page 36

state may happen.
Q. When a fire wall is in a network, can you install DX-VS1UE and can operate it?
A. In order for DX-VS1UE to transmit data and a picture, the default port number of 80
th
and 8080th needs to be vacant.
However, usually only the 80th port is vacant in the network with a fire wall because of security. In this case, a user can change a picture transmission port into the other port which
can pass fire walls from 8080th.
A user can set up on Customizing Page of Server Configuration Page.
Q. How can a user monitor the image transmitted from DX-VS1UE?
A. A user can see the real-time image of DX-VS1UE using 5 or later versions of Internet
Explorer. It is necessary to install the DX-VS1UE ActiveX control for Internet Explorer at
this time. This ActiveX control is used on the page (Simple Viewer Page, DVR Configuration Page, Pan/tilt/zoom Control Page, etc.) where a user monitors an image.
When the ActiveX (DX-VS1UE Control) is already installed, it can delete and install.
Q. If the ActiveX is not installed properly, what should I do?
A. Depending on the kind of computer, the ActiveX Control (the DX-VS1UE control program) may not be installed appropriately. In this case, Any image cannot be seen or a message “No input” is displayed. In order to solve this problem, please remove the DX-VS1UE
control program as follows, and re-install.
The DX-VS1UE control program is installed in C:\windows\Downloaded Program Files in
case of Windows 98 or Windows Me. In case of Windows NT or Windows 2000, it is installed in C:\winnt\Downloaded Program Files.
Please put the mouse cursor on the DX-VS1UE control program, click the right button, and
choose remove menu.
When you access DX-VS1UE once again, the DX-VS1UE control program will be installed.
Q. When the ActiveX causes an error at the time of execution, how can I solve the problem?
A1. In case a message box like “Mismatched Version” is displayed, please do the following.
The ActiveX in DX-VS1UE is re-installed.
A2. In case a message box like “DX-VS1UE client initializing failed” is displayed, please
do the following.
The Winsock2 library is not installed. The Winsock2 library for Windows 95/98 can be
downloaded from a public site. Please install Winsock2 in your system after download, and
restart your browser.
Q. The image of DX-VS1UE is not displayed. What is the problem?
A. There is the possiblility that BNC cable is not connected appropriately. If the cable is
connected appropriately, connection of DX-VS1UE and an external Pan/tilt/zoom camera
may be unstable. Please check the connection of the BNC cable, or whether the BNC cable
35
DX-VS1UE User
DX-VS1UE User’’’’ s Manual
DX-VS1UE UserDX-VS1UE User
s Manual
s Manuals Manual
Page 37

is available.
Q. What kind of digital recorder can be connected with DX-VS1UE?
A. There is a function with which you can control a digital recorder on-line through DXVS1UE. DX-VS1UE is connected with a digital recorder via RS232-C. Mitsubishi DXTL800E can be used as a digital recorder which you can operate through DX-VS1UE.
Q. There seemes to be some problem when accessing DX-VS1UE. At one time I can access
the DX-VS1UE, but at other time, I cannot access the DX-VS1UE. How can I solve the
problem?
A. In many cases, this problem occurs in case you use cable line or xDSL line. You need to
use a router for get DX-VS1UE connecting to ISP. If the DX-VS1UE doesn’t use the line
for a while, Some ISPs compulsorily disconnect the session between DX-VS1UE and
them. It is because they would like to avoid the excessive load on their server and network
capacity which would occur without the forcible disconnection. If DX-VS1UE is disconnected by ISP, there is no way users can access DX-VS1UE. You can use session keep alive
function, which many kinds of routers equip, in order to get around such a situation. This
function makes it possible for DX-VS1UE to automatically connect to your ISP again when
disconnected.
Q. The ActiveX of DX-VS1UE cannot be downloaded automatically. What causes the
problem?
A. The ActiveX control of Internet Explorer is designed so that it can be downloaded to
user’s computer automatically and installed in it. However, if the registry information is
broken, it may be unable to be downloaded and installed to the computer. In order to solve
this problem, the installation program of DX-VS1UE ActiveX was prepared. Please use the
program.
1. Download the installation program.
2. Execute “DX-VS1Control installer.exe.”
Q. The setup program included in CD-ROM attached to DX-VS1UE cannot be executed.
What is the problem?
A. The setup program is a windows program based on MFC. If your OS doesn’t have
MFC42.dll inside or the MFC42.dll is not installed properly, the setup program doesn’t
work correctly. You have to install MFC42.DLL, if a message like “MFC42.DLL not
found” is displayed.
Installation procedure
1. Download MFC42.CAB.
2. Expand the .cab in a folder temporarily.
3. Execute “mfc42.exe”.
Q. Regarding the setup program, if one of DX-VS1UEs is chosen from the list box and the
“Change IP Addr” button is clicked, the setup program returns a message like “No response”.
A. In case the option “Obtain an IP address automatically” is being used by IP setup of the
TCP/IP property(Start>Control Panel->Network(and Dial Up Config)), please change into
“Use the following IP address” temporarily. And change the configuration of subnet into
36
DX-VS1UE User
DX-VS1UE User’’’’ s Manual
DX-VS1UE UserDX-VS1UE User
s Manual
s Manuals Manual
Page 38

the subnet as both your PC and DX-VS1UE is included in.
Q. Regarding the setup program, If one of DX-VS1UE is chosen from the list box and the
Reboot button or Start Configuration button is clicked, the setup program returns a message
like “No response.”
A. If the IP address of the DX-VS1UE you selected is not included in the subnet to which
your PC belongs, the setup program returns a message like “No response”. Please set up the
IP address of DX-VS1UE again by pressing “Change IP Addr” button so that the IP address
of DX-VS1UE is included in the subnet to which your PC belongs.
Q. When changing the TCP port number of a Web server into 60000th from 80th, it became
impossible to access the homepage of DX-VS1UE. What is necessary to do?
A. Usually, a 80th port is the port number for transmitting and receiving data. Since this
number has been changed, it is impossible for DX-VS1UE and your browser to transmit
and receive data to each other. Please input an IP address into your browser as below and
connect with it.
http://***.***.***.***:60000/
“***.***.***.***” is the IP address of DX-VS1UE. If the homepage of DX-VS1UE is displayed now, please return the TCP port number of a Web server to 80th of origin immediately.
Q. I forgot the password of server configuration level. What is necessary to do?
A. Please consult the store where you purchased DX-VS1UE.
Q. Any operation of a digital recorder or an external camera cannot be performed.
A. Is the serial configuration set up appropriately? It is necessary to connect a digital recorder to RX1, TX1, and GND of the serial port#1 by the RS232C cable. Moreover, when connecting an external camera via RS232C, it is necessary to connect with RX2, TX2, and
GND of the serial port#2. Furthermore, please check whether communication setting of
baud rate, stop bits, data bits, parity check, etc of an external camera or a digital recorder
corresponds with that of DX-VS1UE In the case of an external camera, please check
whether the Pan/tilt/zoom configuration is also set up correctly.
Q.The “LOADING” message keeps appearing on the homepage of DX-VS1UE. Why does
this occur?
A. This message may keep appearing when DX-VS1UE starts without input video signal.
Please check the input video signal.
37
DX-VS1UE User
DX-VS1UE User’’’’ s Manual
DX-VS1UE UserDX-VS1UE User
s Manual
s Manuals Manual
 Loading...