

Page 1

DIGITAL RECORDER
INSTALLATION AND
OPERATION MANUAL
MODEL
DX-TL1600EM
ENGLISH
DEUTSCH
FRANÇAIS
SLD Security & Communications
The Old Forge, Ockham Lane, Ockham, Surrey GU23 6PH England
Phone +44.1483225633 · Fax +44.1483225634
sales@sld.co.uk · www.sld.co.uk
CASTELLANOOTHERS
THIS INSTRUCTION MANUAL IS IMPORTANT TO YOU. PLEASE READ IT BEFORE USING YOUR DIGITAL RECORDER.
1
Page 2

•
Features
DX-TL1600EM Digital Recorder
The DX-TL1600EM is a high resolution digital recorder that records M-JPEG images and can playback over 450
lines of resolution. The DX-TL1600EM has an internal disk capacity of 60GB and record in 5 user selectab le picture
grades and 8 recording time modes. The DX-TL1600EM also has a built in 16 camera multiplexer with motion
detection per input. Individual field recording per input in both standard and alarm recording are supported. Normal
VCR like functions such as a JOG/SHUTTLE, Menu, timer and rear terminals are featured.
Built-in 16-input multiplexer functions
• Camera switching and split-screen display
Throughout terminals for non-simultaneous connection of 16 cameras. Split-screen modes of Single screen, SPLIT
4, SPLIT 9 or SPLIT16 screens for sequential display.
• Motion detection
This function detects moving objects captured by any of the 16 camer as connected to the unit, and initiates Alarm
Recording. The following settings can be made separately as desired: motion detection area, detection area divided by 10 x 12 dots, sensitivity of motion detection, and minimum dot-count for initiating Alarm Recording.
Archive and copy functions
T o handle applications requiring long-term storage of recorded images, this unit is capab le of using optional backup
/archive devices to create backups and copies without interrupting hard disk recording.
• ARCHIVE media
Backup capability using the recording devices available.
• Backup while recording
Backup and copying operations without interrupting the non-stop recording operation.
Convenient maintenance b y using the Timer Program to designate the time of simultaneous backup oper ation; for
example, to create a complete backup on a given day of every week.
• Peripheral hard disk expansion
1 hard disk drive (total capacity becomes 369GB) can be added to supplement the built-in hard disk when extended recording time is needed.
User-friendly operation
A control panel featuring the same control key layout of time-lapse VCRs and a JOG /SHUTTLE is provided for
user friendly operations.
Versatile functions to support surveillance
• Image-alteration recognition function
Processing of each image recorded using a proprietary image-alteration recognition technology.
• Versatile high-speed search operation
Easy search functions using a proprietary algorithm. Search options include Time Date, Skip, Index and Alarm
search. All search functions can specify a specific camera or ALL cameras to be used for the search.
• Excellent expandability
Standard RS-232C interface for remote PC control, and various control terminals.
• Pre-alarm Recording function
Recording of images before the alarm sensor detects disturbances is also available.
••••••••••••••••••••••••••••••••••••••••••••••••••••••••••••••••••••••••••••••••••••••••••••••••••••••••••••••••••••••••••••••••••••••••••••
2
Page 3

Caution and care
HEAVY OBJECTS SHOULD NEVER BE PLACED ON THE UNIT (E.G., TV)
NEVER TOUCH OR INSERT ANY OBJECT INSIDE THE UNIT
T ouching the inside of the cabinet or inserting foreign objects of any kind not only creates a saf ety hazard but can also
cause extensive damage.
PROTECT THE POWER CORD
Damage to the power cord may cause fire or shock hazard. If the mains cord is damaged, switch off the mains outlet
and carefully unplug the cord by holding the mains plug.
UNPLUG THE POWER CORD DURING A LONG ABSENCE
Turn off the power and unplug the power cord during a long absence.
MAINTAIN GOOD VENTILATION
Do not obstruct the many ventilation holes on the unit. For maximum ventilation, leave some space around the unit and
place the unit on a hard level surface only, and ensure it is not co vered during use. Heavy objects should never be placed
on the unit.
WHEN NOT IN USE
When not in use always turn OFF the unit's POWER.
CABINET CARE
Never use petroleum-based cleaners. Clean with a soft cloth moistened with soap and water and wipe dry.
PVC cables or leads should not be left in contact with the cabinet surface for long periods.
ATTACHING THE FERRITE CORE
The ferrite core is essential to avoid radio interference from the cables connected the unit against peripheral device. Be sure
to attach the ferrite core to all cables connected to ALARM IN terminals (GND terminals) and I/O terminals.
ENGLISH
INSTALLATION LOCATION
For excellent performance and lasting reliability install in a location that is:-
1. Well ventilated, out of direct sunlight and away from direct heat.
2. A solid vibration-free surface.
3. Free from high humidity, excessive dust and away from magnetic fields.
4. Please ensure that the ventilation fan located on the unit’s back panel is not blocked.
UNSUITABLE LOCATIONS
Placing the unit in the following places might shorten the product life:
• Extremely cold places, such as refrigerated warehouses and ice houses
• Places where excessive hydrogen sulfide is likely to be generated, such as hot-springs areas
• Places or locations with salt air environment.
WARNING: TO PREVENT FIRE OR SHOCK HAZARD, DO NOT EXPOSE THIS APPARATUS TO RAIN OR
MOISTURE. THIS APPARATUS MUST BE GROUNDED.
MAINS LEAD CONNECTION
The mains lead on this Unit is fitted with a non-rewireable mains plug, incorporating a 5A fuse. If you need to
replace the fuse, use a 5A fuse approved by BSI or ASTA to BS 1362, ensuring you refit the fuse cover. If the
mains plug is not suitable for the sockets in your home, and you require to remove the plug, remove the fuse, cut
off the plug then dispose of the plug immediately, to avoid a possible electric shock hazard. To refit a new plug,
follow these instructions; Green-and-yellow: Earth, Blue: Neutral and Brown: Live.
As the colours in the mains lead of this Unit may not correspond with the coloured markings identifying the
terminals in your plug, proceed as follows.
•The wire which is coloured green-and-yellow must be connected to the terminal in the plug which is marked by
the letter E or by the safety earth symbol » or coloured green or green-and-yellow.
•The wire which is coloured blue must be connected to the terminal which is marked with the letter N or coloured black.
•The wire which is coloured blown must be connected to the terminal which is marked with the letter L or coloured red.
This Unit complies with the requirements of the EC Directive 89/336/EEC, “EMC Directive” , as amended by Directive
93/68/EEC. The requirements for the susceptibility according to EN 55024 and the requirements for interference
according to EN 55022 are observed for the operation on residential areas, business, light industrial premises and in
small scale enterprises, inside as well as outside of the building. All places of operation are characterised by their
connection to the public low voltage power supply system. This unit is manufactured in accordance with EN 60950.
There may be cases when the unit’s built-in MOTION DETECTION function does not operate properly due to
external condition or video input signal or other factors.
The user will not be indemnified for problems (e.g., recording failure or playback failure) that occur with either the
unit or a connected device during operation. It is recommended that backups of important recordings are made
regularly as a precaution against possible breakdowns and accidents.
••••••••••••••••••••••••••••••••••••••••••••••••••••••••••••••••••••••••••••••••••••••••••••••••••••••••••••••••••••••••••••••
Beginning
3
Page 4

•
Contents
Features ....................................................................2
Caution and care ...................................................... 3
Contents....................................................................4
Major operations and their functions..................... 6
Front View ..................................................................... 6
Rear View...................................................................... 8
I/O terminals .................................................................. 9
Basic Operations....................................................10
How to use JOG dial and SHUTTLE ring .................... 10
Setting the character size............................................ 10
Exiting the menu.......................................................... 10
Setting the present time ............................................... 11
The daylight saving ...................................................... 11
Present time display ..................................................... 11
Storage space indicator function ................................. 12
Multiplexer functions.................................................... 12
Multiplexer buttons ...................................................... 12
Basic recording............................................................ 12
Setting the image quality ............................................. 12
Setting the maximum recording fields ......................... 13
Selecting the recording mode of the cameras............. 13
Setting the define group .............................................. 14
Basic playback ............................................................ 15
Basic searching function ............................................. 15
Time date search......................................................... 15
Copying the data from HDD
to a copying device or an archive device .................... 16
Language selection setting.......................................... 17
Connections ........................................................... 18
Connecting to CCTV camera, monitor, sensor,
the electric power supply and ferrite core.................... 18
Turning ON/OFF this Unit by peripheral source .......... 18
Attaching the ferrite core ............................................. 18
Alarm Recording Connection ...................................... 19
Connecting with peripheral recording devices............. 19
Peripheral devices to be connected ............................ 19
Usable cables.............................................................. 19
Connection when using 1 peripheral recording device 19
Connection when using several
peripheral recording devices ....................................... 19
Initial settings ......................................................... 20
How to install an external hard disk drive.................... 20
How to remove an external disk drive
and copying device...................................................... 20
Confirming the connected device ................................ 20
Setting this unit to delay the boot up time ................... 21
Menu functions.......................................................22
MENU SETTING ......................................................... 22
SEARCH SELECTION MENU .................................... 24
COPY SELECTION MENU ......................................... 24
INFORMATION MENU ................................................ 24
How to set up..........................................................25
How to display menus ................................................. 25
Various settings .....................................................25
Setting Display Mode .................................................. 25
Setting character size.................................................. 25
Setting Display Position............................................... 25
Setting Multiplexer functions ....................................... 26
Setting Timer program ................................................. 26
Setting recording functions.......................................... 26
Data Clear Selection ................................................... 26
Rear Terminal Setting (MODE OUT setting)................ 26
Capacity remain setting............................................... 27
CALL OUT setting ....................................................... 27
Buzzer setting.............................................................. 28
Service menu setting................................................... 28
Power Failure list......................................................... 28
Resetting the Archive Pointer ...................................... 28
Initializing menus......................................................... 29
IM-CHECK MODE setting ........................................... 29
Initial set up ................................................................. 30
Clock setting................................................................ 30
HDD repeat recording ................................................. 30
HDD repeat playback .................................................. 30
Archive medium overwrite setting ............................... 30
Auto-eject setting......................................................... 31
ARCHIVE DATA setting............................................... 31
FIFO/OVERWRITE MODE setting .............................. 32
Motion Detection setting.............................................. 32
The <INFORMATION> menu ...................................... 33
Showing the recorded period ...................................... 33
Connected SCSI device .............................................. 33
Elapsed time display ................................................... 33
Quick setting................................................................ 34
RDD}MENU DATA LOADING setting ......................... 34
MENU DATA SAVING}RDD setting............................ 34
Various recording settings.................................... 35
V arious recording settings ........................................... 35
Image quality setting ................................................... 35
The maximum recording fields setting......................... 35
Estimated recording time <ESTD TIME> .................... 35
Image quality, Max recording fields , Define group
setting and Alarm recording duration setting ............... 35
Camera Alarm Rec setting .......................................... 37
Pre-alarm recording setting ......................................... 37
M - DET setting............................................................ 38
Selection camera NO. ................................................. 38
CH. motion detection setting ....................................... 38
Setting the detection mask .......................................... 39
Sensitivity setting......................................................... 39
Motion threshold setting .............................................. 40
Test mode setting ........................................................ 40
Multiplexer functions ............................................. 41
Multiplexer functions.................................................... 41
Multiplexer buttons ...................................................... 41
How to use the ZOOM button...................................... 41
How to use the camera number buttons ..................... 42
SPLIT/SEQUENCE button .......................................... 42
The functions of the SPLIT/SEQUENCE button,
ZOOM button and camera number buttons................. 42
Multiplexer display....................................................... 43
SCREEN SW PATTERN settings ................................ 43
SPLIT4 SCREEN setting............................................. 43
SPLIT9 SCREEN setting............................................. 43
SPLIT16 SCREEN setting........................................... 44
Image quality of split screen........................................ 44
SEQUENCE setting..................................................... 44
Displaying the title ....................................................... 45
Camera title setting ..................................................... 45
Alarm display setting ................................................... 46
Operation examples............................................... 47
Operation example 1:
Simultaneous Backup using the Timer ........................ 47
Operation example 2:
Endless Repeat recording ........................................... 48
Making copies as needed............................................ 48
Making backups as needed......................................... 48
••••••••••••••••••••••••••••••••••••••••••••••••••••••••••••••••••••••••••••••••••••••••••••••••••••••••••••••••••••••••••••••••••••••••••••
4
Page 5

Operation example 3 ................................................... 48
Operation example 4 ................................................... 49
Using the Timer ...................................................... 50
Setting the Timer ......................................................... 50
Setting SPECIAL DW (special day of the week) ......... 51
Overlapping Timer settings.......................................... 52
M-DET APPLICATION setting ..................................... 52
Alarm Recording .................................................... 53
Alarm Recording.......................................................... 53
Alarm Recording operation.......................................... 53
Setting Alarm Recording.............................................. 53
Operations during Alarm Recording ............................ 53
Alarm Recording time indicators ................................. 53
Alarm Recording indicators ......................................... 53
Operation after Alarm Recording ................................. 53
Indexing Alarm Recording time ................................... 53
Alarm recording cameras ............................................ 53
ARCHIVE button operation ......................................... 62
Cancelling Backup operation....................................... 62
Individual settings during Backup operation................ 62
Choosing a backup system ......................................... 62
Auto-eject at the completion of backup ....................... 62
Timer Backup .............................................................. 63
Other convenient functions .................................. 63
Power failure reset recording ...................................... 63
Power failure time display ........................................... 63
Power failure compensation circuit.............................. 64
RESET button.............................................................. 64
Simple lock function .................................................... 64
PASSWORD LOCK function ....................................... 64
COMMUNICATION settings ................................... 65
RS-232C settings ........................................................ 65
Transmission speed .................................................... 65
TCP / IP settings.......................................................... 65
ENGLISH
Various recordings................................................. 54
Basic recording............................................................ 54
Pre-alarm Recording ................................................... 54
Repeat Recording ....................................................... 54
Operation when the hard disk drive becomes full ....... 54
Series Recording......................................................... 55
Series Recording menu settings (for both units) ......... 55
Operation during Series Recording ............................. 55
Various playback functions................................... 56
Playing still frames ...................................................... 56
Shuttle viewing ............................................................ 56
Shuttle hold ................................................................. 56
Direct shuttle viewing .................................................. 56
Frame-by-frame playback ........................................... 56
Reverse playback........................................................ 56
Changing playback intervals ....................................... 56
High-speed fast-forward/high-speed rewind................ 57
Monitor display settings and playback operation......... 57
Various search........................................................ 57
Time date Search ........................................................ 57
Index Search ............................................................... 57
How to count index signals.......................................... 58
Skip Search ................................................................. 58
Alarm List Search ........................................................ 58
Jump to Start point (oldest recording) ......................... 59
Connecting to a personal computer..................... 65
Connecting with a personal computer ......................... 65
Connection via modem................................................ 65
Direct connection......................................................... 65
RS-232C terminal ........................................................ 66
RS-232C cable ............................................................ 66
Setting the communicating mode ................................ 66
Command codes .................................................... 66
Command code and status ......................................... 66
Example of Command operation................................. 66
Details of the numbers ................................................ 67
Character Search ................................................... 79
Character Search ........................................................ 79
Character Search commands...................................... 79
Characters can be used .............................................. 79
Sample operation ........................................................ 80
Recording time table.............................................. 81
Recording time table ................................................... 81
Pre-alarm recording time table .................................... 81
Recording duration is set to “LONG”. .......................... 81
Recording duration is set to “MEDIUM”....................... 81
Recording duration is set to “SHORT”......................... 81
Troubleshooting ..................................................... 82
Using peripheral devices....................................... 59
SCSI ID number allocation .......................................... 59
Selecting other devices ............................................... 59
Glossary.................................................................. 83
Glossary ...................................................................... 83
Warnings and CALL OUT output .......................... 84
Making copies ........................................................ 59
Copying from the hard disk to the copying device....... 59
Restoring items
onto the hard disk from the copying device................. 60
Restoring items from
the archive device to the hard disk.............................. 60
Setting of Copy range................................................. 60
Manual setting of Copy range .................................... 60
Automatic settings for Copy range .............................. 60
Automatic adjustments of Copy range ........................ 60
Procedure for setting “ ** ” ........................................ 61
Warnings and their appropriate countermeasures ...... 84
Specifications......................................................... 85
POWER ON/POWER OFF/ALARM IN/REC/
CLOCK ADJ Input terminal.......................................... 85
ALARM OUT/MODE OUT Output terminal.................. 85
CALL OUT Output terminal ......................................... 85
Making backups ..................................................... 61
Cancelling Copy operation .......................................... 61
Backup operation ........................................................ 61
Restrictions during Backup Recording ........................ 62
••••••••••••••••••••••••••••••••••••••••••••••••••••••••••••••••••••••••••••••••••••••••••••••••••••••••••••••••••••••••••••••
Beginning
5
Page 6

•
Major operations and their functions
■ Front View
16
DIGITAL RECORDER DX-TL1600E
SPLIT/SEQUENCE
ZOOM
0
TIMER RECPOWER
12
1. POWER button
Press to turn the power on, press again to turn the
power off. This b utton lights/goes off when the pow er
is on/off. It flashes when switching between functions
such as during setup. While the POWER button is
flashing, all button related functions will not work.
2. TIMER REC button
This button is pressed when a timer recording is to
be made. Press again to cancel timer recording.
3. COM (COMMUNICATION) button
Please press this button to make the communication
settings. Use a ballpoint pen or a similar instrument.
The settings can be cancelled by pressing the button
one more time. Also, please note that the RS-232C
setting located on the back of the unit will not function
when the communication setting button is pressed.
COMMUNICATION indicator
REMOTE indicator
Illuminates while the recorder is engaged in data
communication.
CONNECT indicator
Illuminates when connection to an external communication device has been established.
RECEIVE indicator
Illuminates when the unit is receiving a signal.
TIMER REC M-DET PRE ALARM REC
REC
ACCESS LOCK
MODE
MODE
REMOTE CONNECT RECEIVE SEND
COM
4
5
3
Digital
69
Multplex
&
Record
1098 11 12 13 14 15 1671 32 654
SEARCH
COPY
SET UP
INFO
MENU
7
LOCK indicator
Illuminates when the LOCK button is set to “ON”.
5. LOCK button
Press this button to lock the unit front panel. When
pressed with a ball point pen or similar object, keeps
the operation buttons from functioning and locks the
unit in the current mode. Release the lock by pressing the LOCK button again. This button also can be
used for PASSWORD LOCK function. Refer to page
64 f or details. This function will not work when power
is off. In addition, this function can only be used until
the password lock function is set. Once the password lock function has been set, the SIMPLE LOCK
FUNCTION becomes inoperative.
6. Recording indicators
TIMER REC indicator
Illuminates during timer recording and timer recording stand-by mode. The POWER button will not work
while the TIMER REC indicator is illuminating. T o turn
on the power while the TIMER REC indicator is illuminating, press the TIMER REC b utton to cancel the
timer recording stand-by mode and then press the
POWER button.
M-DET indicator
Illuminates when the MOTION DETECTION is active mode.
WARNING
RESET
8
17
PLAY DEVICE
ARCHIVE
EJECT
10
CLEAR/
REW
JOG
PAUSE
SHUTTLE
HOLD
19
SHUTTLE
REV PLAY
-+
PLAY MODE
REC
ARCHIVE
MAIN
COPY
18
STOP
11 1213 14 15
PLAY
ENTER/
FF
SEND indicator
Illuminates when the unit is transmitting a signal.
PRE ALARM REC indicator
Illuminate during pre-alarm recording and pre-alarm
recording stand-by mode.
4. MODE indicators
7. MENU buttons
ACCESS indicator
Illuminates during access to hard disk drive or peripheral recording devices.
Press one of the buttons to display its associated
menu. Press again to exit the menu.
••••••••••••••••••••••••••••••••••••••••••••••••••••••••••••••••••••••••••••••••••••••••••••••••••••••••••••••••••••••••••••••••••••••••••••
6
Page 7

INFO button
Press this button to display the <INFORMATION>
menu.
SET UP button
Press this button to display the <MENU SETTING>
menu.
14. PLAY MODE buttons
These buttons can be used to switch the playback
interval while in playback mode and reverse playback mode.
ENGLISH
15. PLAY button
Press to begin playback.
COPY button
Press this button to display the <COPY SELECTION> menu. This button does not work if the peripheral device is not connected to SCSI ID 4 or SCSI
ID 5.
SEARCH button
Press this button to display the <SEARCH SELECTION> menu.
COPY indicator
The Indicator will start to blink during Copy or Restore operation. This light is on while recorded content is being copied or during Restore operation.
8. WARNING RESET button
Used to clear a warning displayed on the monitor.
9. PLAY DEVICE button
Used to select a playback device. If there is no peripheral recording device connected, this button cannot be activated.
EJECT button
Used to eject the medium of playback devices. Use
this button to eject the medium of peripheral recording devices connected to this unit. If there is no peripheral recording device connected, this button cannot be used.
16. Multiplexer buttons
Camera number button (1 to 16)
Press the button to display the image of the camera
connected to this unit on the monitor. In addition, they
can be used as the P ASSW ORD LOCK function key.
SPLIT/SEQUENCE button
Used to switch the display to the single screen, SPLIT
4 , SPLIT 9 screen or SPLIT 16 screen. Also used to
switch the sequence functions. Refer to page 42 for
details.
ZOOM button
Pressing this button displays the Zoom in pointer (X)
on the monitor. Pressing 1 button (ZOOM IN) enlarges the selected part, and pressing 2 button
(ZOOM OUT) reduces the image. Pressing 3, 4, 5
or 6 button moves the image to the direction that the
pointer (X) moves. In addition, this can be used as
the PASSWORD LOCK function key.
ZOOM IN button (Camera number button 1)
Pressing this button after pressing the ZOOM button
enlarges the image in 2 steps.
ZOOM OUT button (Camera number button 2)
Pressing this button after pressing the ZOOM IN
button reduces the image.
10. PLAY DEVICE indicators
The indicator of the device selected by the PLAY
DEVICE button illuminates.
11. STOP button
Press to stop recording or playback. When pressed
during alarm recording, the recording stops. The MOTION DETECTION function, the operation can be
frozen for two seconds after pressing the ST OP button to stop the recording by the MOTION DETECTION function.
12. PAUSE button
When pressed during recording, the recording
pauses. Press again to resume recording. When
pressed during playback, a still picture is displayed.
SHUTTLE HOLD button
This button keeps the particular playback or reverse
playback speed depending on the degree to which
the SHUTTLE ring is turned. Refer to the page 56
for operating this button.
13. REV PLAY button
Press to begin reverse playback.
Move buttons (Camera number button 3 to 6)
Press these buttons to move the ZOOM POINTER
to desired position.
17. REC button
Press to begin recording.
18. ARCHIVE button
Press to begin making backup. If there is no peripheral recording device connected, this button cannot
be used.
19. JOG and SHUTTLE operation
SHUTTLE ring
Used to set various menus and search functions,
adjusting the playback speed, and rewinding or forwarding the image.
JOG dial
Used to set various menus and search functions,
forwarding or reversing the image during playback
(field-by-field).
••••••••••••••••••••••••••••••••••••••••••••••••••••••••••••••••••••••••••••••••••••••••••••••••••••••••••••••••••••••••••••••
Beginning
7
Page 8

•
Major operations and their functions (continued)
■ Rear View
1
CLOCK ADJ
REC
POWER ON
CAMERA IN
CAMERA OUT
POWER OFF
ALARM OUT
MODE OUT
CALL OUT
8
CALL OUT GND
1234 5678 910111213141516
1234 5678 910111213141516
GNDGND
ETHERNET
56
RS-232C
ALARM IN
987654321
7
16151413121110
GND
1. CAMERA IN connectors
Input connector for signal of camera (BNC connector).
2. CAMERA OUT connectors
Output connector for signal of camera which is provided via CAMERA IN (BNC connector).
GND
GND
2
RESET
DC 5V OUT
MAX 30mA
ON
OFF
SCSI
TERMINATION
SCSI
9
10
6. RS-232C socket
This terminal is used to connect to host device
with RS-232C terminal. This unit can be controlled by the other device through this terminal.
7. ALARM IN terminals
Input terminal for alarm signal.
3
VIDEO OUT
Y/C
4
3. VIDEO OUT connectors
Output connector for video signal to monitor(BNC
connector).
S(Y/C) OUT connector
Output connector for separate Luminance and
Chrominance signal. Output signal with VIDEO OUT
connector at the same time.
4. AC power socket
This socket connects to the power cord. Earth terminal is for safety. Use the 100 - 240V plug with
earth for the power of this unit.
Do not connect the earth terminal of a plug to
gas pipe, water pipe, lightning rod and so on.
5. ETHERNET socket
Use in combination with the PC software DX-PC3.
For further information, please refer to the DX-PC3
user’s manual. Use a 10BaseT cable to connect to
the Ethernet terminal. Please note, however, that
only category 3 and category 5 10BaseT cables can
be used. Please do not connect the unit to a common network.
GND terminals
Input ground terminal for ALARM IN terminal. Use
only the terminal for this unit. It may cause damage or poor connection.
8. I/O terminals
Refer to notes on page 9.
9. SCSI terminal
This terminal is for connecting this unit to other
optional peripheral recording devices.
10. RESET button
When pressed, the present time is erased and initialized, then the power is turned off.
SCSI TERMINA TION switch
When set to “ON”, the internal terminator function
is active, and when set to “OFF”, the function is
provided by the peripheral device. Set it to “ON”
when not connecting to a peripheral SCSI device.
••••••••••••••••••••••••••••••••••••••••••••••••••••••••••••••••••••••••••••••••••••••••••••••••••••••••••••••••••••••••••••••••••••••••••••
8
Page 9

■ I/O terminals
GND terminals
The ground terminals for Input/Output terminals.
CLOCK ADJ terminal
Input terminal to set the present time. Time display is
adjusted to the nearest hour (00 minutes 00 seconds)
when this terminal receives the CLOCK ADJ signal.
REC terminal
Input terminal to start recording.
POWER ON terminal
Input terminal to turn on this unit through a peripheral
device.
POWER OFF terminal
Input terminal to turn off this unit through a peripheral
device.
ALARM OUT terminal
Output terminal to indicate that the alarm recording is in
process.
MODE OUT terminal
Output terminal to indicate the unit’s current mode. Select the unit’s condition by MODE OUT setting in the
<REAR TERMINAL> menu.
ENGLISH
CALL OUT terminal / CALL OUT GND terminal
This is the ISOLATION output terminal. (Refer to page
85.) Output terminal and its GND terminal to indicate information such as “HDD FULL”. Information that can be
transmitted externally consists of CALL OUT settings
made on the I/O terminal settings menu screen as well
as fixed output settings.
DC 5V OUT terminal
This terminal is for direct current voltage output. The
maximum electric current is 30mA.
••••••••••••••••••••••••••••••••••••••••••••••••••••••••••••••••••••••••••••••••••••••••••••••••••••••••••••••••••••••••••••••
Beginning
9
Page 10
•
Basic Operations
■ How to use JOG dial and SHUTTLE ring
The JOG/SHUTTLE is used in the various Menus and for
special playback features. In the Menu process, the Jog
dial is used to navigate through the units Menus and Submenus. It is also used to change the individual Menu
settings.The SHUTTLE is used to select a specific Menu
and to select the needed entry in the individual Menu settings. Follow the example below to learn how to use the
JOG/SHUTTLE in a Menu application.
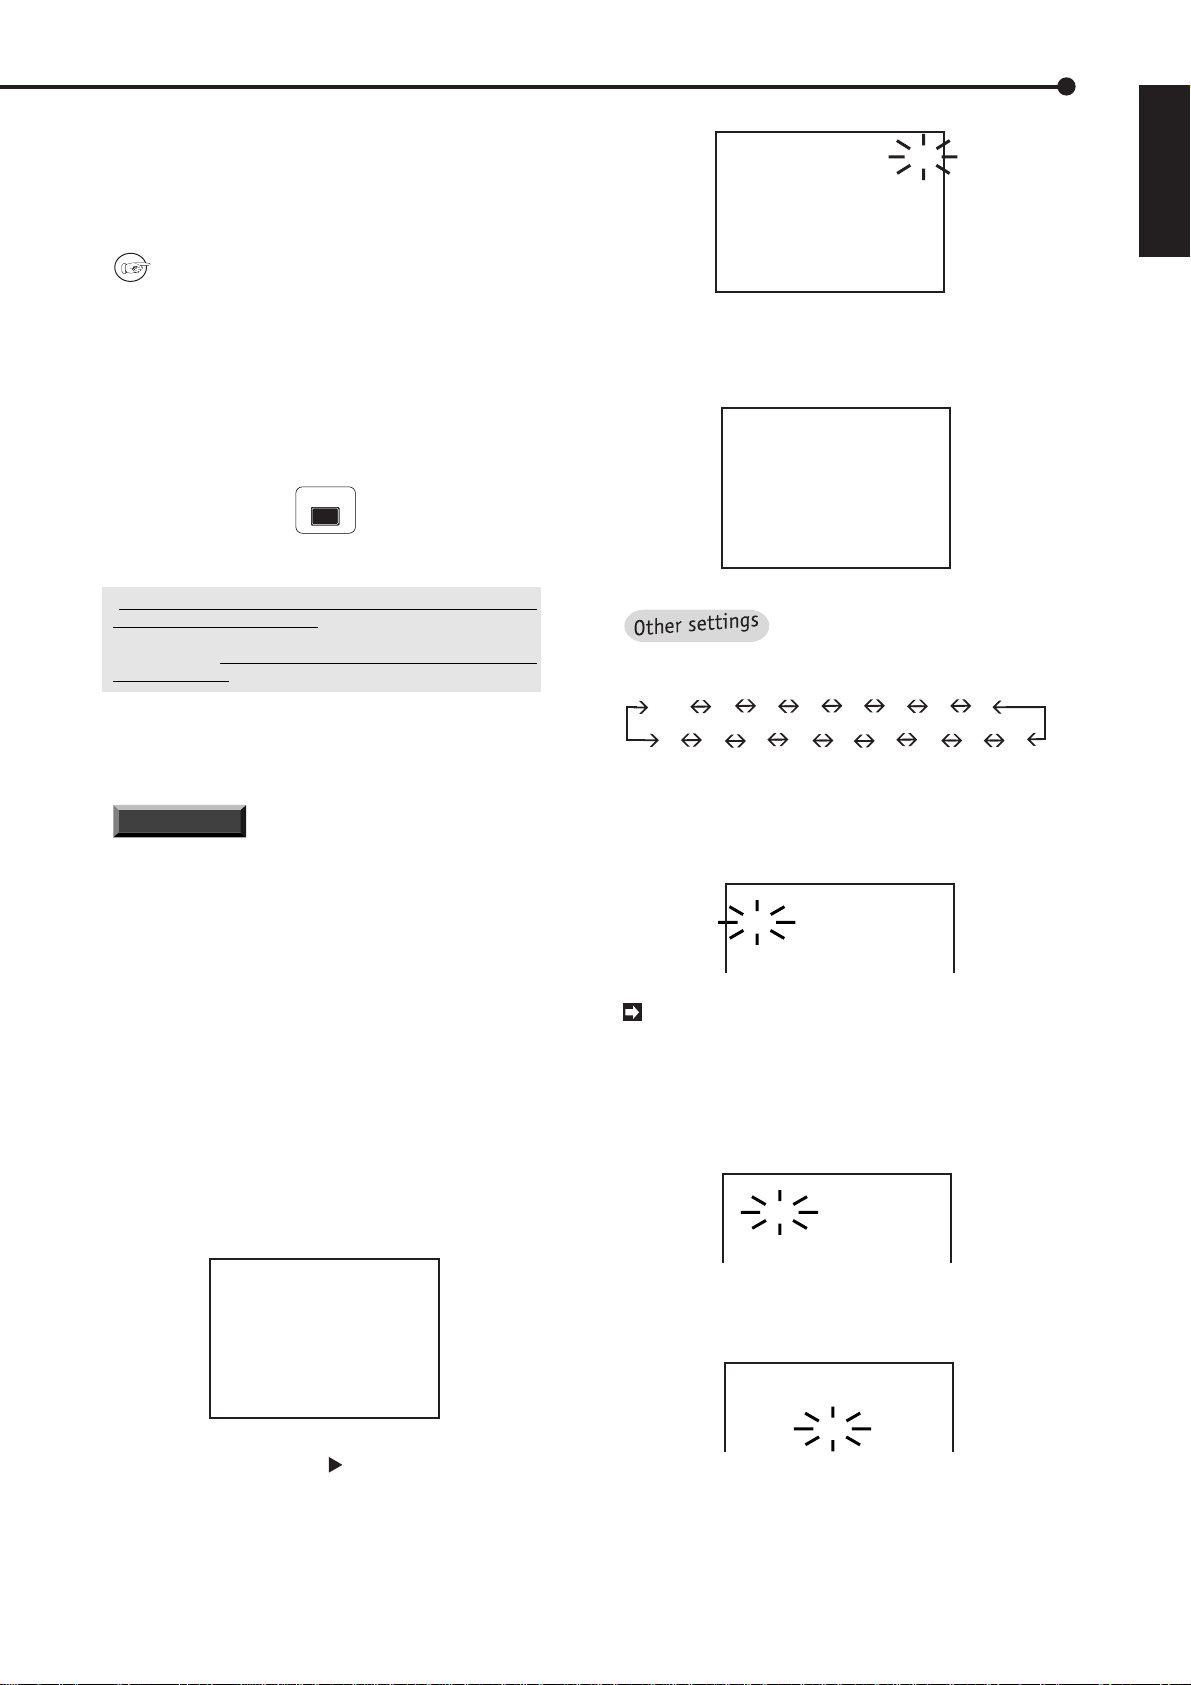
♦ Setting the character size
Example: Setting the CHARACTER SIZE to “LARGE” (the
default setting is “SMALL”).
1. Press the SET UP button on the front of the Unit.
• The <MENU SETTING> menu will appear.
<MENU SETTING>
@TIME DATE DISPLAY
MPX DISPLAY
TIMER PROGRAM
2. Mak e sure that the cursor is set to the TIME DATE DISPLAY
and turn the SHUTTLE ring to the right.
• Turning the SHUTTLE ring to the right displays the next
menu.
SHUTTLE ring
Example: Exiting the <TIME DATE DISPLAY> menu after
setting the character size.
1. Make sure that the sub-item of the selected item is not
flashing and changed correctly.
• If the sub-item is flashing, that item is not entered. See
steps 4 on the left and enter the setting.
<TIME DATE DISPLAY>
DISPLAY MODE
@CHARACTER SIZE
CLOCK LOCATION
LARGE
OFF
1
• T o set additional settings or to confirm the settings, turning
the SHUTTLE ring once to the left displays the previous menu.
<MENU SETTING>
@TIME DATE DISPLAY
MPX DISPLAY
TIMER PROGRAM
2. Turn the SHUTTLE ring twice to the left .
• The display will return to the present time display.
• Pressing the MENU button which is pressed to display the
MAIN MENU also returns the menu display to the present
time display.
INFO
SET UP
MENU
SEARCHCOPY
3. Turn the JOG dial to select the CHARACTER SIZE.
• T urning the JOG dial to the right moves the cursor downwar d.
T urning the JOG dial to the left moves the cursor upward.
JOG dial
4. Turn the SHUTTLE ring to the right to flash the sub-item.
• The sub-item “SMALL” will start flashing.
<TIME DATE DISPLAY>
DISPLAY MODE
@CHARACTER SIZE
CLOCK LOCATION
SMALL
OFF
1
While the sub-item is flashing, the menu display
will not disappear when you press the SET UP button.
5. Turn the JOG dial to change the sub-item to “LARGE”.
• The “LARGE” will start flashing.
<TIME DATE DISPLAY>
DISPLAY MODE
@CHARACTER SIZE
CLOCK LOCATION
LARGE
OFF
1
6.Turn the SHUTTLE ring to the right to enter the selection.
• The sub-item will stop flashing.
<TIME DATE DISPLAY>
DISPLAY MODE
@CHARACTER SIZE
CLOCK LOCATION
LARGE
OFF
1Ł
♦ Exiting the menu
The following explains how to exit the menu using JOG
dial and the SHUTTLE ring.
INFORMATION
There are 4 diff erent types of MAIN
MENU as shown below:
1) The <MENU SETTING> menu (press the SET
UP button to display the menu).
<MENU SETTING>
@TIME DATE DISPLAY
MPX DISPLAY
TIMER PROGRAM
NORMAL REC SETTING
A-REC/M-DET SETTING
DATA CLEAR SELECTION
COMMUNICATION SETTING
REAR TERMINAL
SERVICE
INITIAL SET UP
2) The <SEARCH SELECTION> menu (press the
SEARCH button to display the menu).
<SEARCH SELECTION>
@SELECTION CAMERA NO.ALL
TIME DATE SEARCH
INDEX SEARCH
SKIP SEARCH
ALARM LIST SEARCH
JUMP TO START POINT
3) The <INFORMATION> menu (press the INFO
button to display the menu).
<INFORMATION>
@RECORDED PERIOD
CONNECTED SCSI DEVICE
<ELAPSED TIME>
MAIN 2H
ARCHIVE 0H
COPY 0H
10
•••••••••••••••••••••••••••••••••••••••••••••••••••••••••••••••••••••••••••••••••••••••••••••••••••••••••••••••••••••••••••••••••••••••••••••
Page 11
•
4) The <COPY SELECTION> menu (press the
COPY button to display the menu).
<COPY SELECTION>
@COPY DIRECTION HDD}COPY
OVERWRITE OFF
TRANSFER PERIOD MAN
FROM:06-09-01 18:43:52
TO:06-10-01 18:43:52
EXECUTE OFF
Refer to “Menu functions” on pages 22 - 24
for the construction of the menus.
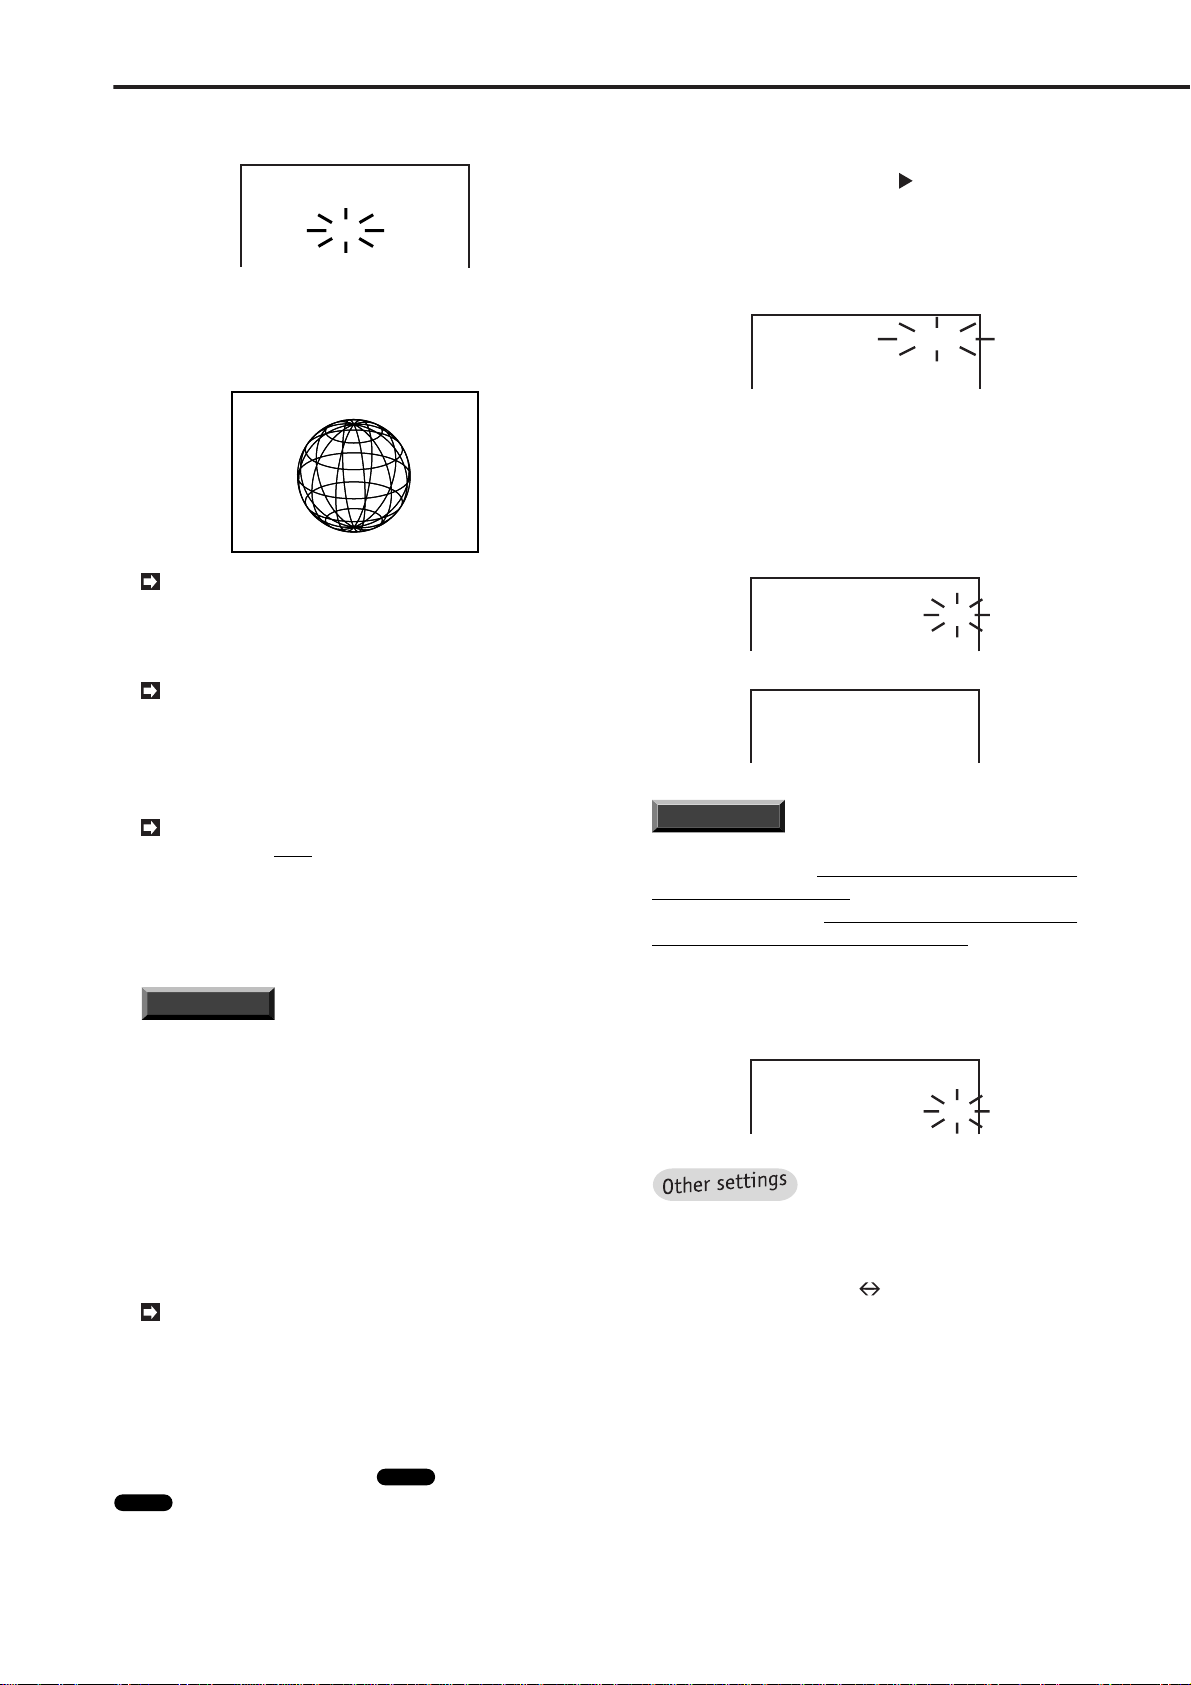
♦ Setting the present time
Please follow steps below to set the present time.
7. Turn the SHUTTLE ring to the left to accept the setting.
• The seconds value is reset to “00”, and the display will return
to the <INITIAL SET UP> menu.
♦ The daylight saving
The clock is put forward one hour by setting the menu. The
default setting for this function is “OUT”. On the DAYLIGHT
SAVING in <TIME D A TE ADJUST > menu, turn the JOG dial
to flash “IN” (the daylight saving function is activating) and
turn the SHUTTLE ring to the right to enter the selection.
♦ Present time display
The following display will appear when this unit is turned
on. (When the DISPLAY MODE is set to “3”.)
Day of
Date
Month
the week Alarm recording number
Year
ENGLISH
Example: Setting the present time to 6:30 p.m., March 15,
2001.
1. Press the SET UP button.
• The <MENU SETTING > menu will appear.
<MENU SETTING>
@TIME DATE DISPLAY
MPX DISPLAY
TIMER PROGRAM
2. Turn the JOG dial to select the INITIAL SET UP, and turn
the SHUTTLE ring to the right.
• The <INITIAL SET UP> menu will appear.
<INITIAL SET UP>
@TIME DATE ADJUST
HDD FULL
HDD PB REPEAT
ARCHIVE OVERWRITE
AUTO EJECT
STOP
STOP
OFF
ON
3. Confirm that the cursor is next to the TIME DATE ADJUST,
and turn the SHUTTLE ring to the right.
• The <TIME DATE ADJUST> menu will appear.
4. Turn the SHUTTLE ring to the right twice.
• The sub-item of DATE will start flashing.
<TIME DATE ADJUST>
DAYLIGHT SAVING OUT
DATE 01
MONTH 01
YEAR 2000
01-01-2001 MON A0001
00:00:00 25F 50% C01
Time
Second
Minute
Non-operation camera mark
Recording interval
Recorded capacity of the Hard Disk
Refer to “Setting Display Mode” on page 25 for
detailed settings of the display.
Camera number
Alarm recording number will be displayed during
alarm recording.
If a picture of the camera which is not set to be
operated is displayed on the screen, Non-operation
Camera mark will be shown on the present time display.
The amount of space used in the total HDD in-
cluding external devices is displayed during recording. When recording is stopped, this figure will not
be displayed. (It will stay displayed during PAUSE.)
When recording is started again, this figure will appear again after a few moments.
5. Turn the JOG dial to set the date number to 15, and turn the
SHUTTLE ring to the right.
• The sub-item of MONTH will start flashing.
<TIME DATE ADJUST>
DAYLIGHT SAVING OUT
DATE 15
MONTH 01
YEAR 2000
6. Set the month, year, hour, 10 minute digit and minute digit
in a similar fashion.
• Seconds cannot be set.
• The sub-item of D AYLIGHT SA VING will flash when you turn
the SHUTTLE ring to the right after setting the minute.
<TIME DATE ADJUST>
DAYLIGHT SAVING OUT
DATE 15
MONTH 03
YEAR 2001
TIME 18:30:00
TURN THE SHUTTLE RING
< < TO EXECUTE.
INFORMATION
This unit has a four-digit year dis-
play. It can display dates from January 1, 2000 to
December 31, 2030. It also has a built-in function to
automatically calculate leap years. After December
31, 2030, the date indicator will return to 2000.
INFORMATION
The on-screen clock can be reset
to the nearest hour, by applying a signal to the
CLOCK ADJ terminal. For example, if the current
time is 11:29:59, it will be reset to 11:00:00, and if
the current time is 11:30:00, it will be reset to
12:00:00.
••••••••••••••••••••••••••••••••••••••••••••••••••••••••••••••••••••••••••••••••••••••••••••••••••••••••••••••••••••
Basic Operations
11
Page 12
•
Basic Operations (continued)
♦ Storage space indicator function
This unit is capable of constantly displaying the amount of
data recorded in the recording device designated on-screen
Glossary
(i.e., the main unit or an archive device
).
Also, when the designated remaining amount has been reached,
the amount used (%) display will begin flashing. In the case of
the HDD, the percent displayed is the percentage relative to the
entire HDD storage capacity as recognized in the MAIN HDD
setting. In the case of the backup device, the percentage is relative to the storage capacity of the medium. The following settings are necessary to bring these functions into effect.
1) On the <REAR TERMINAL> menu, use CAPACITY REMAIN to select the device and set the remaining capacity (refer to page 27).
2) On the <TIME DATE DISPLAY> menu, set the
DISPLAY MODE to “3” (refer to page 25).
3) Select one screen using the multiplexer buttons.
When using the multiple screen display, set the CH.
TITLE parameter on the <MPX DISPLA Y> men u to
NONE (refer to page 45).
■ Multiplexer functions
You can activated multiplexer functions by using the multiplexer buttons found on front of the unit.
♦ Multiplexer buttons
1.Camera number buttons (1 to 16)
2. SPLIT/SEQUENCE button
SPLIT/SEQUENCE
71 32 654
16
2. SPLIT/SEQUENCE button
Display of the SPLIT 16, SPLIT 9 (a, b), and the four types of
SPLIT 4 (a – d) set in SPLIT SCREEN of the MUL TIPLEXER
settings is switched in the following order: SINGLE SCREEN
SEQUENTIAL, SPLIT 4 SEQUENTIAL, SPLIT 9 SEQUENTIAL. (Sequential displays are skipped during playback.) In
addition, the unit can also be set to switch between SINGLE
SCREEN SEQUENTIAL and SPLIT 4 SEQUENTIAL/SPLIT
9 SEQUENTIAL displays.
3. ZOOM button
When this button is pressed, the ZOOM POINTER (X) appears on the screen.
By pressing this button, Camera
number buttons 1 to 6 change its function as follows:
4. ZOOM IN button (Camera number button 1)
Press this button after pressing ZOOM button, the displayed
picture will be enlarged by 2 steps: twice as large and 4 times
as large as the original picture size. The enlarging ratio will
be displayed on the top left-hand corner of the screen.
5. ZOOM OUT button (Camera number button 2)
Press this button anytime after operating ZOOM button and
ZOOM IN button, the picture size will be reduced in 2 steps
from the enlarged picture. The enlagement ratio will be displayed on the top left-hand corner of the screen.
6. MOVE buttons (Camera number buttons 3 to 6)
Using these MOVE buttons, the pointer (X) activated by
the ZOOM button can be moved to a different area that
you wish to have enlarged. After using camera number
button 1 to enlarge the image, these buttons can be used
to move the magnified area. For more details please refer
to “Multiplexer buttons” on page 41.
ZOOM
0
5. ZOOM OUT button
4. ZOOM IN button
3. ZOOM button
6. MOVE buttons
You cannot operate the multiplexer buttons when
the menu is displayed on screen. The multiplexer
functions does not work when the unit is accessing
the peripheral recording device or ARCHIVE button, COPY button or PLAY button is flashing.
1. Camera number buttons
By pressing these buttons, the images from cameras connected
to CAMERA IN terminals at the rear of the unit will be displayed
on screen. If the images of the camera that is not set to be operated is selected on the <DEFINE GROUP SETTING> menu,
the Non-operation camera mark will be displayed on screen.
09-06-2001 SAT
00:00:00 25F
Non-operation camera mark
By pressing the camera number buttons, you can
view the video from the camera even it is not set to
be recorded.
■ Basic recording
For details of each setting, please refer to the following
pages of this instruction manual:
After confirming all settings of recording, please proceed
as written below.
♦ Setting the image quality
Two modes of recording are supported by this unit. Normal Recording enables none Alarm recording. For example to see activity at a cash register through out the day.
Alarm recording is set to record activity only when an alarm
sensor or if motion detection is set to monitor and trigger
an alarm when a specific door is opened. Recording criteria such as Image quality (grade), Fields and for Alarm,
Time needs to be set for the record process. F or details of
Normal recording refer to the steps given below.
Example: Setting the image quality to “STANDARD” (the
default setting is “HIGH”).
1. Turn the unit on after turning the peripheral recording device
on.
If the <DEVICE CHECK> menu appears at this stage,
the setting of the peripheral recording device may have
been changed. For details please refer to “How to install an external hard disk drive ” on page 20.
2. Press the SET UP button to display the <MENU SETTING>
menu.
12
•••••••••••••••••••••••••••••••••••••••••••••••••••••••••••••••••••••••••••••••••••••••••••••••••••••••••••••••••••••••••••••••••••••••••••••
Page 13
•
<NORMAL REC SETTING>
IMAGE QUALITY STANDARD
@MAX REC FIELDS 6.25F
SELECT REC MODE (A)
DEFINE GROUP SETTING
<ESTD TIME> 1D12H11M
<NORMAL REC SETTING>
IMAGE QUALITY STANDARD
MAX REC FIELDS 6.25F
@SELECT REC MODE (A)
DEFINE GROUP SETTING
3. Turn the JOG dial to move the cursor ( ) to NORMAL
REC SETTING then turn the SHUTTLE ring to the right.
• The <NORMAL REC SETTING> menu appears.
<NORMAL REC SETTING>
@IMAGE QUALITY HIGH
MAX REC FIELDS 12.5F
SELECT REC MODE (A)
DEFINE GROUP SETTING
4. Check that the cursor is next to the IMAGE QUALITY and
turn the SHUTTLE ring to the right.
• The sub-item of IMAGE QUALITY will start flashing.
<NORMAL REC SETTING>
@IMAGE QUALITY HIGH
MAX REC FIELDS 12.5F
SELECT REC MODE (A)
DEFINE GROUP SETTING
5. Display STANDARD by turning the JOG dial then turn the
SHUTTLE ring to the right.
• The flashing will stop. Now the setting has been completed.
<NORMAL REC SETTING>
@IMAGE QUALITY STANDARD
MAX REC FIELDS 12.5F
SELECT REC MODE (A)
DEFINE GROUP SETTING
When MOTION DETECTION setting in the INI-
TIAL SET UP menu is turned ON, the MAX REC
FIELDS for each time setting will be automatically
altered as follows. These settings will not automatically revert to their former values even if MOTION
DETECTION is turned OFF.
Case of <NORMAL REC SETTING> menu and <AREC/M-DET SETTING> menu.
“25F” } “12.5F”, “8.33F” } “6.25F” , “5F” } “4.17F”
Case of “MODE” in the <TIMER PROGRAM> menu.
“25” } “12.5”, “8.33” } “6.25” , “5” } “4.17”
The setting you are making here is only for the normal recording, NOT for the timer recording or alarm
recording. You need to make the timer recording settings on the <TIMER PROGRAM> menu. And y ou need
to make the alarm recording setting on the <A-REC/
M-DET SETTING> menu. For details please refer to
“Various recording settings” on page 35.
ENGLISH
age quality setting will be changed as below :
By turning the JOG dial, the im-
HIGH SUPERIOR BASIC
MEDIUM STANDARD
♦ Setting the maximum recording fields
Example: Setting the maximum recording fields to “6.25F”
(the default setting is “12.5F”).
1. After step 5 of IMA GE QU ALITY setting procedures abo ve,
turn the JOG dial and move the cursor to “MAX REC FIELDS”.
<NORMAL REC SETTING>
IMAGE QUALITY STANDARD
@MAX REC FIELDS 12.5F
SELECT REC MODE (A)
DEFINE GROUP SETTING
2. Turn the SHUTTLE ring to the right to flash the sub-item.
<NORMAL REC SETTING>
IMAGE QUALITY STANDARD
@MAX REC FIELDS 12.5F
SELECT REC MODE (A)
DEFINE GROUP SETTING
3. Turn the JOG dial to display “6.25F” then turn the SHUTTLE
ring to the right.
• The “6.25F” is now selected.
<NORMAL REC SETTING>
IMAGE QUALITY STANDARD
@MAX REC FIELDS 6.25F
SELECT REC MODE (A)
DEFINE GROUP SETTING
By turning the JOG dial, the maxi-
mum recording fields setting will be changed as
below:
25F 12.5F 8.33F 6.25F
The settings made f or IMAGE QU ALITY and MAX
REC FIELDS are shared with A, B, and C of SELECT REC MODE.
Press the SET UP button to exit settings.
4. Check the estimated recording time.
• After setting the image quality the <ESTD TIME> will be
displayed. By changing recording settings, <ESTD TIME>
will change its length of time (Alarm recording setting does
not affect this setting).
The available recording time will be changed de-
pending on the setting of the image quality and the
max recording fields. This estimated recording time
display will include all HDD including external devices.
For available recording time, please refer to “Recording time table” on pages 81.
♦ Selecting the recording mode of the cameras
There are 3 types of the recording mode : A, B and C.
This setting is to choose the SELECT REC MODE on the
<NORMAL REC SETTING> menu.
Example: Choose SELECT REC MODE (B) (the default
setting is (A)).
1. After step 3 of MAX REC FIELDS setting procedures abo v e ,
turn the JOG dial and move the cursor to “SELECT REC MODE”.
1F 2.5F 4.17F 5F
The underlined items cannot be selected when
the MOTION DETECTION setting is active.
••••••••••••••••••••••••••••••••••••••••••••••••••••••••••••••••••••••••••••••••••••••••••••••••••••••••••••••••••••
Basic Operations
13
Page 14

•
Basic Operations (continued)
<DEFINE GROUP> (B)
CH PRI FILD CH PRI FILD
Q 1
1.56
O -
W 2 0.78
P -
E 3 0.52
{ -
R 5 0.31
} -
@T - q -
Y - w -
2. Turn the SHUTTLE ring to the right to flash the sub-item.
<NORMAL REC SETTING>
IMAGE QUALITY STANDARD
MAX REC FIELDS 6.25F
@SELECT REC MODE (A)
DEFINE GROUP SETTING
3. Turn the JOG dial to display MODE (B) then turn the
SHUTTLE ring to the right.
• The “(B)” is now selected.
<NORMAL REC SETTING>
IMAGE QUALITY STANDARD
MAX REC FIELDS 6.25F
@SELECT REC MODE (B)
DEFINE GROUP SETTING
Setting cannot be altered in either the NORMAL
REC SETTING menu or the A-REC/M-DET SETTING menu when the PRE A-REC menu is set to
SHORT, MEDIUM, or LONG. In addition, the SELECT REC MODE (in the <NORMAL REC SETTING> menu) will display A-REC.
♦ Setting the define group
The PRI(PRIORITY) setting can be made for individual
camera channels in each of the define groups A, B, and
C. This PRI(PRIORITY) setting is made by entering “ 1 ”
in the desired camera channel. If you don’t record in that
camera channel, you select the “ – ”. In addition, the recording frequency can be adjusted for camera channels
using the PRI (PRIORITY) setting.
Example: Setting the CAMERA CH.W as PRI to “ 2 ”, CAMERA CH.E as PRI to “ 3 ”, CAMERA CH.R as PRI to “ 5 ”
and CAMERA CH. T - O as PRI to “ - ” (the default setting is CAMERA CH. Q - R as PRI to “ 1 ” and CAMERA
CH. T - r as PRI to “ - ”).
1. After step 3 of SELECT REC MODE setting procedures
above, turn the JOG dial and move the cursor to “DEFINE
GROUP SETTING” and turn the SHUTTLE ring to the right .
• The <DEFINE GROUP> menu appears.
<DEFINE GROUP> (B)
CH PRI FILD CH PRI FILD
1.56
@Q 1
W 1 1.56
E 1 1.56
R 1 1.56
T - q -
Y - w -
U - e -
I - r -
O -
P -
{ -
} -
2. Turn the JOG dial to select the CAMERA CH.W and turn
the SHUTTLE ring to the right.
• The sub-item will start flashing.
<DEFINE GROUP> (B)
CH PRI FILD CH PRI FILD
1.56
Q 1
@W 1 1.56
E 1 1.56
R 1 1.56
T - q -
3. Turn the JOG dial to display “2” then turn the SHUTTLE ring
-
O -
P -
{ -
} -
-
to the right.
• The “2” is now selected.
<DEFINE GROUP> (B)
CH PRI FILD CH PRI FILD
1.56
Q 1
0.78
1.56
1.56
@W 2
E 1
R 1
T - q -
O -
P -
{ -
} -
4. Repeat Step 2 and 3 setting CAMERA CH.E, R and turn
the SHUTTLE ring to the right .
• The sub-item will stop flashing. Check that the CAMERA
CH. is defined correctly.
In DEFINE GROUP, each camera channel (A, B,
C) used in SELECT REC MODE must be assigned
at least one PRIORITY setting (from 1 – 5). Please
note that you cannot exit the settings menu screen
until each SELECT REC MODE is given at least one
PRIORITY setting.
By turning the JOG dial, the priority setting will
be changed as below:
1 2 3
- 5 4
For camera channels with the PRIORITY setting
“ON”, the recording interval set in MAX REC FIELDS
is divided according to the value entered in the PRI
setting. The unit will record one time using the v alue
entered in the PRI setting. The operation of the “FILD
(FIELDS)” setting could var y. While the recording
interval could change for each of the camera channels, regardless of the PRIORITY setting made, the
total number of fields (Max. Rec field)will not change.
5. Press the SET UP button to go back to the present time
display.
• Press the camera number button and confirm if there is a
picture to the CH you have selected to be recorded.
6. Press the REC button.
• The REC button starts illuminating and the recording starts.
• If you press the PAUSE button during recording, recording
will be in pause mode. To release it, press the pause button
again.
7. Press the STOP button to stop recording.
• The REC button will stop illuminating.
INFORMATION
A warning appears when the unit
records while there is no input signal in the designated camera channel. (Please refer to “Warnings
and CALL OUT output” on page 84 for more details.) In addition, please select “ - ” in the <DEFINE
GROUP> menu for those cameras with no input, or
that should not be used.
14
•••••••••••••••••••••••••••••••••••••••••••••••••••••••••••••••••••••••••••••••••••••••••••••••••••••••••••••••••••••••••••••••••••••••••••••
Page 15
•
<SEARCH SELECTION>
@SELECTION CAMERA NO.ALL
TIME DATE SEARCH
INDEX SEARCH
SKIP SEARCH
ALARM LIST SEARCH
JUMP TO START POINT
<SEARCH SELECTION>
@SELECTION CAMERA NO. 3
TIME DATE SEARCH
INDEX SEARCH
SKIP SEARCH
ALARM LIST SEARCH
JUMP TO START POINT
<TIME DATE SEARCH> 3
05-01-2000 00:00:00
EXECUTE OFF
■ Basic playback
The recorded image can be played back in various ways.
In this Basic Operations, the most basic playback function
is explained. Refer to the pages shown below for the other
playback functions.
Please refer to page 56 for Various playback
functions.
ENGLISH
1. Turn on the power of the connected peripheral recording
device , then turn this unit on.
2. Select the playback device.
• Press the PLAY DEVICE button on the front panel to select
the playback device. The indicator of the selected device will
illuminate. (The indicator will not switch when a peripheral
recording device is not connected.)
PLAY DEVICE
3. Press the PLAY button.
• After displaying a paused image, playback will begin.
• The oldest recording will be played back when pressing the
PLA Y button f or the first time after the power is turned on or
the recording is finished. If you want to playback the newest
recorded data, press the REV PLAY button before pressing
the PLAY button after finishing recording.
4. Press the PAUSE button to pause playback.
• Press the PAUSE button again to resume playback.
5. Press the STOP button to stop playback.
INFORMATION
When recording with more than
one camera, the playback interval per camera will
be the time that multiplies the recording interval by
the number of the cameras.
■ Basic searching function
This unit has various functions for searching a specific
point. The following explains time date search. By using
this function, you can search for a specified point of the
data by setting the selected camera number, date, hour,
and minutes. Refer to pages 57 - 59 for the other searching functions.
♦ Time date search
Example: To search a recording which was made on May
17 2001, 9:25:40 p.m. by the camera number 3.
3.Turn the JOG dial to display “ 3” then turn the SHUTTLE
ring to the right.
• The flashing will stop.
By turn the JOG dial, the selec-
tion camera number will be changed as below :
ALL Q W E R T Y U
r e w q } { P O I
4. Turn the JOG dial to select the TIME DATE SEARCH, and
turn the SHUTTLE ring to the right.
•
The <TIME DATE SEARCH> menu will appear and the date
number will start flashing.
<TIME DATE SEARCH> 3
01-01-2000 00:00:00
EXECUTE OFF
To exit the <TIME DATE SEARCH> menu with-
out activating the search, press the SEARCH button on the front of the unit.
5. Turn the JOG dial to set the date number to 17.
• Turn the SHUTTLE ring to the right. The next item will start
flashing.
1. Press the SEARCH button to display the <SEARCH
SELECTION> menu.
<SEARCH SELECTION>
@SELECTION CAMERA NO.ALL
TIME DATE SEARCH
INDEX SEARCH
SKIP SEARCH
ALARM LIST SEARCH
JUMP TO START POINT
6. Set the month, year, hour, minutes and seconds digit in a
similar fashion.
• The sub-item “OFF” will start flashing.
<TIME DATE SEARCH> 3
17-05-2001 21:25:40
EXECUTE OFF
2. Make sure that the cursor ( ) is set to the <SELECTION
CAMERA NO.> menu, and turn the SHUTTLE ring to the right.
• The sub-item of <SELECTION CAMERA NO.> will start
••••••••••••••••••••••••••••••••••••••••••••••••••••••••••••••••••••••••••••••••••••••••••••••••••••••••••••••••••••
flashing.
Basic Operations
15
Page 16
•
Basic Operations (continued)
<COPY SELECTION>
COPY DIRECTION HDD}COPY
@OVERWRITE OFF
TRANSFER PERIOD MAN
FROM:29-01-01 09:25:24
<COPY SELECTION>
COPY DIRECTION HDD}COPY
OVERWRITE OFF
@TRANSFER PERIOD MAN
FROM:29-01-01 09:25:24
7. Turn the JOG dial to select “ON”.
<TIME DATE SEARCH> 3
17-05-2001 21:25:40
EXECUTE ON
TURN THE SHUTTLE RING
>> TO EXECUTE.
8. Turn the SHUTTLE ring to the right to execute.
• The time date search will start and pause the playback
display at the specified time point to select the camera number
(or the nearest point from the specified time).
17-05-2001 21:25:40 C03
Search results are displayed on a SPLIT 16 screen
when “ALL” is selected in the SELECTION CAMERA
NO. setting, and displayed on a single screen when
an individual camera number is selected.
To change the search image from SPLIT 16
screen to the single screen, select the camera
number by pressing the Camera number button on
the front of this unit. The selected image will be sho wn
on the Single screen mode.
4. Press the COPY button.
• The <COPY SELECTION> menu will appear.
5. Make sure that the cursor ( ) is next to the COPY
DIRECTION, and turn the SHUTTLE ring to the right.
• The sub-item will be different depending on the connected
devices.
• Use JOG dial to choose the desired device to copy to and
turn the SHUTTLE ring to the right to enter the selection.
<COPY SELECTION>
@COPY DIRECTION HDD}COPY
OVERWRITE OFF
TRANSFER PERIOD MAN
FROM:29-01-01 09:25:24
6. Turn the JOG dial to move the cursor to OVERWRITE and
turn the SHUTTLE ring to the right.
• The default setting is “OFF”. You have to select whether to
overwrite previous recorded data (ON) or copying from the
end of the recording exists on the media (OFF). Turn the
JOG dial to make the desired setting to flash, then turn the
SHUTTLE ring to the right to enter the selection.
<COPY SELECTION>
COPY DIRECTION HDD}COPY
@OVERWRITE ON
TRANSFER PERIOD MAN
FROM:29-01-01 09:25:24
If there is no recording or no data which is re-
corded on the
date you have set, the time date
search will not be activated and the date number
will start flashing again.
9. To play back the searched image.
• Press either the PLAY button or the PAUSE button.
INFORMATION
Press the SEARCH button to clear
the <TIME DATE SEARCH> menu.
10. Press the STOP button to stop playback and still frame
mode.
• Press the SEARCH button, the display will revert to its
original state.
■ Copying the data from HDD to a copying
device or an archive device
This unit can copy the data which is recorded on hard disk
drive to an archive device media or a copying device media. The following e xplains how to copy the data manually.
Make sure that the peripheral recording device is
connected and set correctly before you start copying.
1. Turn on the power of the peripheral recording device
connected to the unit.
INFORMATION
The f ollowing sub-items can be set
for the overwrite copying:
• If you set to “ON”,
the copy will start from the very
beginning of the media.
• If you set to “OFF”, the copy will start from the end
of the last recorded part of the media.
7. Set the TRANSFER PERIOD.
• T urn the JOG dial to move the cur sor next to the “TRANSFER
PERIOD” then turn the SHUTTLE ring to the right. The subitem of “MAN” (manual) will start flashing.
The f ollowing sub-item can be set
for the “TRANSFER PERIOD” of copying.
By turning the JOG dial, the sub-item will be changed
as below:
MAN S/E
“MAN”: Set the start time and end time of copying
manually.
“S/E”: Copy all data from the start to the end of the
device which is recognized as a device to copy from.
2. Turn on the power of the digital unit.
3. Insert media to archive device
.
Glossary
16
••••••••••••••••••••••••••••••••••••••••••••••••••••••••••••••••••••••••••••••••••••••••••••••••••••••••••••••••••••••••••••••••••••••••••••
Glossary
or a copying device
8. Turn the JOG dial to move the cursor to the start time
(FROM), and set the date, month, year, hour, minute and
second of the data to copy from.
• Turn the JOG dial to set the start time.
• Turn the SHUTTLE ring to the right to enter the selection.
Page 17
@TRANSFER PERIOD MAN
<LANGUAGE SELECTION>
@ENGLISH
DEUTSCH
FRANCAIS
CASTELLANO
SVENSKA
<LANGUAGE SELECTION>
ENGLISH
@DEUTSCH
FRANCAIS
CASTELLANO
SVENSKA
FROM:29-01-01 09:25:24
TO:29-01-01 09:25:24
EXECUTE OFF
9. Turn the JOG dial to move the cursor to the stop time (TO),
and set the date, month, year, hour, minutes and second of
the data to copy to.
• Turn the JOG dial to set the stop time.
• Turn the SHUTTLE ring to the right to enter the selection.
TRANSFER PERIOD MAN
FROM:29-03-01 00:25:24
@ TO:29-03-01 01:25:24
EXECUTE OFF
10. Set the cursor to EXECUTE and turn the SHUTTLE ring to
the right.
• The sub-item “OFF” will start flashing.
11. Turn the JOG dial to select “ON”.
TRANSFER PERIOD MAN
FROM:29-03-01 00:25:24
TO:29-03-01 01:25:24
@EXECUTE ON
TURN THE SHUTTLE RING
>> TO EXECUTE.
12. Turn the SHUTTLE ring to the right to start copying.
• Press the WARNING RESET button to stop copying.
INFORMATION
You can copy the data even during
recording.
ENGLISH
4. Move the cursor next to DEUTSCH then turn the SHUTTLE
ring to the right.
5. The display will return to the present time display.
♦ Language selection setting
With this unit, the menu screen display can be selected
from five languages. As “ENGLISH” is selected for the initial setting, please perform setting according to the following procedure if you want to select a language other than
“ENGLISH”.
Example: Setting language selection to “DEUTSCH” (the
default is “ENGLISH”).
1. Press the SET UP button to display the <MENU SETTING>
menu.
<MENU SETTING>
@TIME DATE DISPLAY
MPX DISPLAY
TIMER PROGRAM
NORMAL REC SETTING
A-REC/M-DET SETTING
DATA CLEAR SELECTION
COMMUNICATION SETTING
REAR TERMINAL
SERVICE
INITIAL SET UP
2. Move the cursor next to INITIAL SET UP then turn the
SHUTTLE ring to the right.
• The <INITIAL SET UP> menu appears.
<INITIAL SET UP>
@TIME DATE ADJUST
HDD FULL
HDD PB REPEAT
ARCHIVE OVERWRITE
AUTO EJECT
ARCHIVE DATA
MOTION DETECTION
LANGUAGE SELECTION
STOP
STOP
OFF
ON
ALL
OFF
3. Turn the JOG dial until the cursor is next to LANGUAGE
SELECTION and turn the SHUTTLE ring to the right.
• The <LANGUAGE SELECTION> menu appears.
•••••••••••••••••••••••••••••••••••••••••••••••••••••••••••••••••••••••••••••••••••••••••••••••••••••••••••••••••••••
Basic Operations
17
Page 18
•
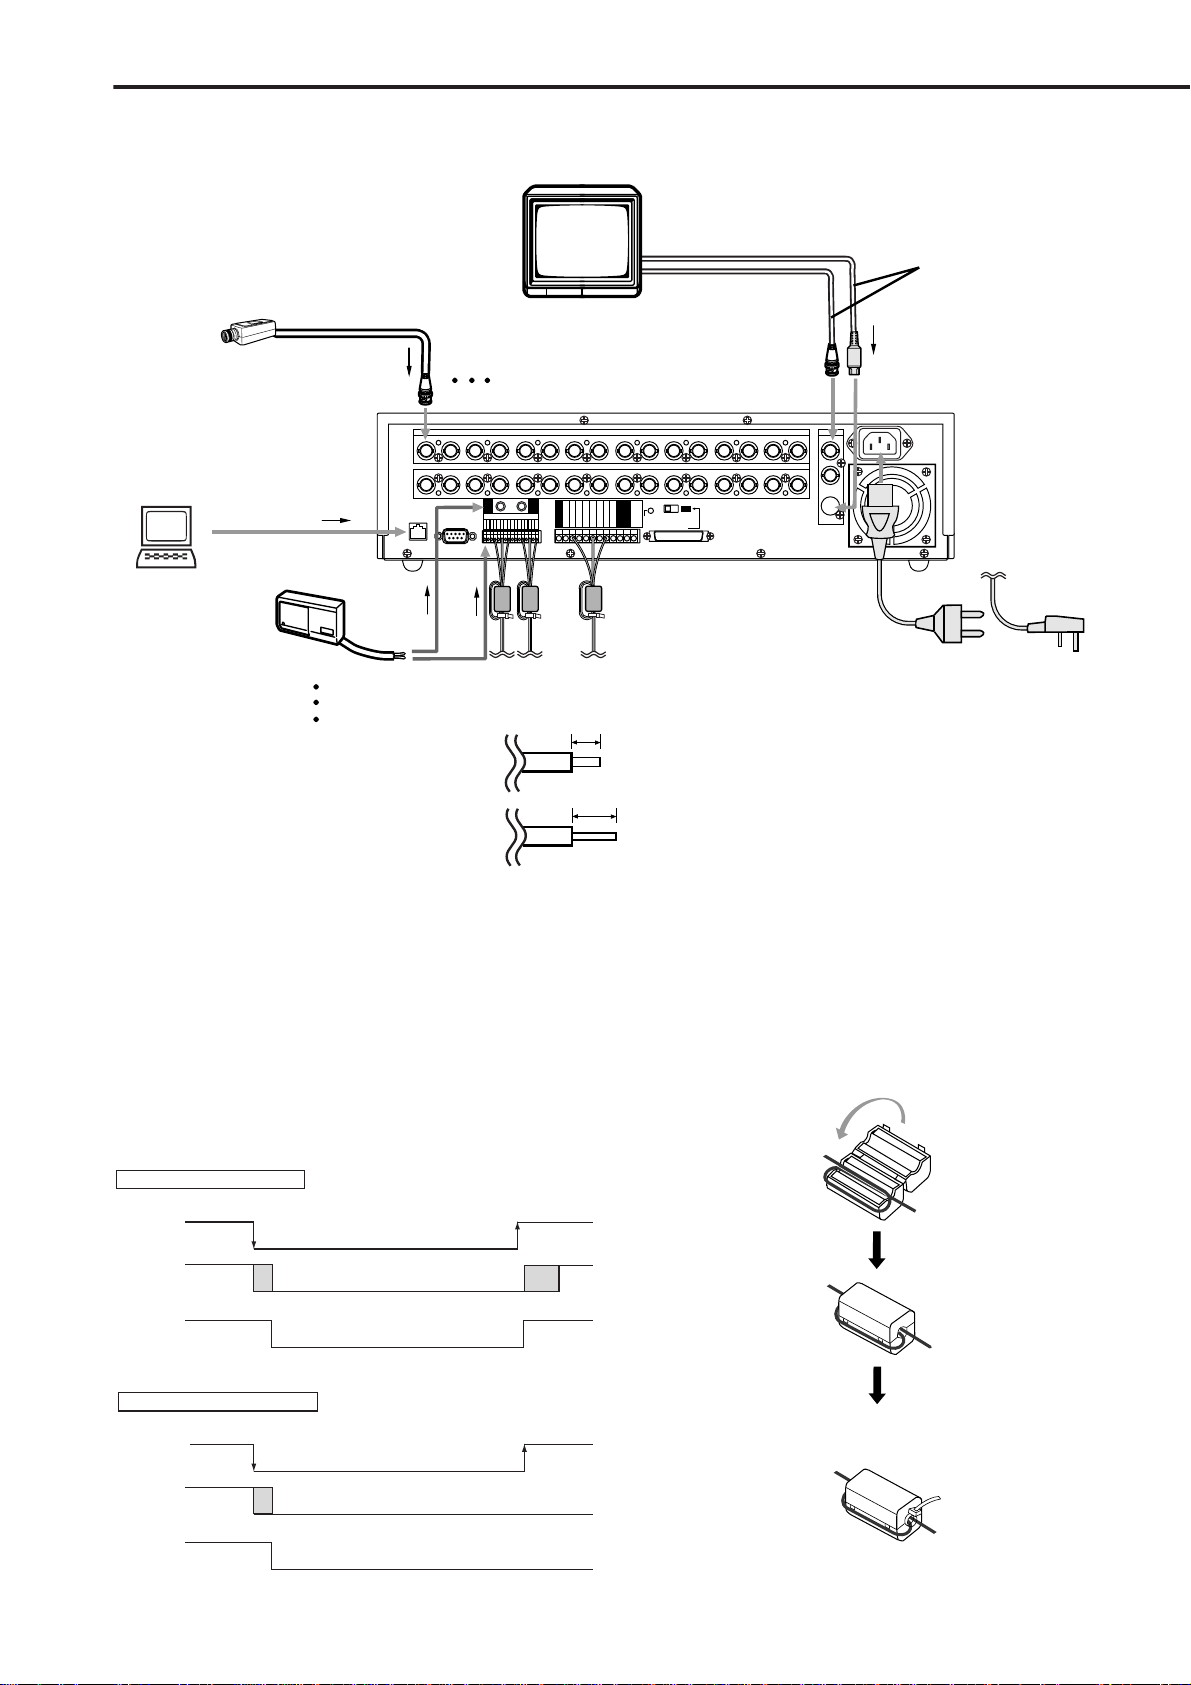
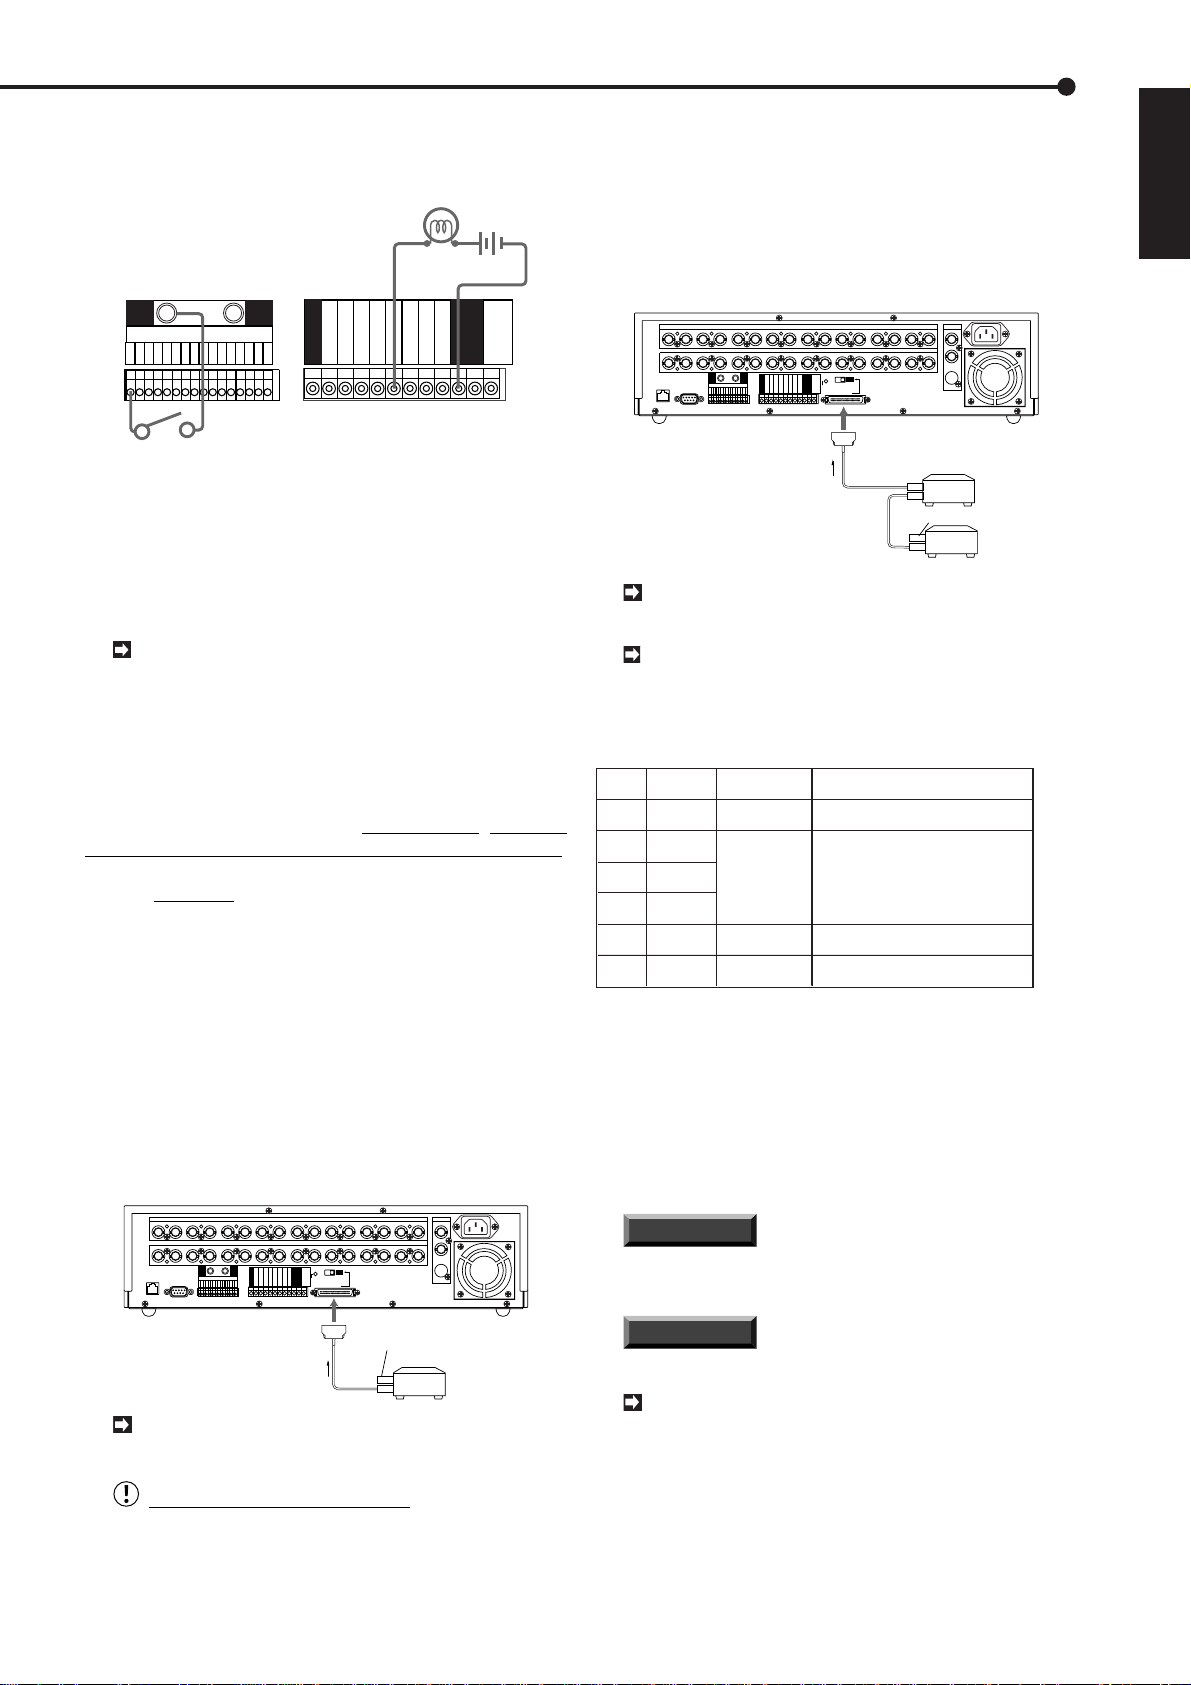
Connections
■ Connecting to CCTV camera, monitor, sensor, the electric power supply and ferrite core
MONITOR
To S(Y/C) IN
terminal
One of either codes should
be connected.
CAMERA #1
To ETHERNET
Socket
Up to 16 cameras
To CAMERA IN 1
terminal
terminal
SENSOR #1
1234 5678910111213141516
1234 5678910111213141516
GNDGND
RS-232C
ALARM IN
987654321
ETHERNET
To GND
CAMERA IN
CAMERA OUT
ON
OFF
SCSI
RESET
16151413121110
CLOCK ADJ
REC
POWER ON
POWER OFF
ALARM OUT
GND
MODE OUT
CALL OUT
CALL OUT GND
GND
GND
DC 5V OUT
MAX 30mA
TERMINATION
SCSI
Ferrite core
To ALARM IN terminal
corresponds to the
CAMERA #.
5~7mm
10~12mm
Processing the connecting line
Connection on the ALARM IN side
Compatible power lines
ø0.32 ~ ø0.65 mm (AWG 28 ~ 22)
Connection on the I / O side
Compatible power lines
ø0.4 ~ ø1.2 mm (AWG 26 ~ 16)
Cut the designated area from the electric
wire’s outer covering (vinyl portion).
To
VIDEO OUT
or
S(Y/C) OUT
terminal
VIDEO OUT
Y/C
for U.Kfor the Continent
POWER CORD
■ T urning ON/OFF this Unit by peripheral source
By using POWER ON/POWER OFF terminal on (I/O terminals) , it is possible to turn on/off this unit externally. This
function is related to the output of DC 5V OUT terminal.
The relationship between POWER ON/POWER OFF terminal, DC 5V OUT terminal and turning on/off this unit is shown
in the diagram. Please use suitable peripheral devices to connect with this unit.
Using POWER ON terminal
POWER ON
terminal
Unit's
power
DC 5V OUT
(4.5-5.5V
Max.30mA)
power on
DC 5V
shut down
Using POWER OFF terminal
POWER OFF
terminal
Unit's
power
DC 5V OUT
(4.5-5.5V
Max.30mA)
power on
shut down
DC 5V
ground
power off
0V
ground
power off
0V
boot
up
power on
■ Attaching the ferrite core
T o a void interf erence from the cables connected to the unit
against other apparatus, attach the ferrite core to all cables connected to the control terminal cables and ALARM
IN terminals (GND terminals) as indicated and place it as
close to the unit as possible. Use the ferrite core to bundle
together all of the cables connected to each terminal.
To the other apparatus
Tie cables at the band
18
•••••••••••••••••••••••••••••••••••••••••••••••••••••••••••••••••••••••••••••••••••••••••••••••••••••••••••••••••••••••••••••••••••••••••••
Page 19
■ Alarm Recording Connection
Example: When using the alarm switch corresponding to camera number 1.
peripheral alarm lamp
or buzzer
sure that the terminator is always attached to the last
peripheral device. (Depending on the device, the terminator may be built into the device. In this case, please
set the built-in terminator correctly .) Please use an active terminator for SCSI.
♦ Connection when using several peripheral
recording devices
ENGLISH
GND GND
ALARM IN
987654321
16151413121110
CLOCK ADJ
REC
GND
POWER ON
POWER OFF
ALARM OUT
MODE OUT
CALL OUT
CALL OUT GND
GND
GND
DC 5V OUT
MAX 30mA
alarm switch
■ Connecting with peripheral recording devices
By connecting peripheral recording devices to the main unit
through its SCSI interface (SCSI-II half-pitch 50-pin), storage
space can be increased and archive and copying functions
can be performed. Please consult with your retailer for information regarding which peripheral recording devices can be
used.
Make sure to turn off this Unit when connecting with
peripheral recording devices.
♦ Peripheral devices to be connected
When the unit is connected to peripheral devices, its PLAY
DEVICE button is used to SELECT the designated device.
Response may be slow depending on the type of peripheral device used. In this case, the indicator light on the
designating playback device will begin flashing; other operations cannot be performed when in this condition.
Resume operation only after the playback device’s indicator light illuminate. Please use the unit’s EJECT button to
eject the peripheral device media even if the peripheral
device is equipped with its own eject button. When the
peripheral device is being used as the playback device, all
of the front panel buttons (PLAY, STOP, PAUSE, MULTIPLEXER functions and ZOOM) will function normal as they
do when the MAIN HDD is being accessed.
♦ Usable cables
Connections between the unit and its peripherals are made
using standard SCSI cables.
♦ Connection when using 1 peripheral recording
device
12345678 910111213141516
12345678 910111213141516
ETHERNET
ALARM IN
RS-232C
CAMERA IN
CAMERA OUT
GNDGND
987654321
16151413121110
CLOCK ADJ
REC
POWER ON
POWER OFF
ALARM OUT
GND
MODE OUT
CALL OUT
CALL OUT GND
OFF
ON
SCSI
RESET
TERMINATION
GND
GND
DC 5V OUT
MAX 30mA
SCSI
VIDEO OUT
Y/C
12345678 910111213141516
12345678 910111213141516
ETHERNET
ALARM IN
RS-232C
CAMERA IN
CAMERA OUT
GNDGND
987654321
16151413121110
CLOCK ADJ
REC
POWER ON
POWER OFF
ALARM OUT
GND
SCSI
terminal
MODE OUT
CALL OUT
CALL OUT GND
GND
GND
DC 5V OUT
RESET
MAX 30mA
ON
TERMINATION
OFF
SCSI
SCSI
SCSI cable
SCSI cable
VIDEO OUT
Y/C
Peripheral
recording
device
Terminator
SCSI cable
When connecting a peripheral recording device, the
SCSI TERMINATION switch must be set to OFF.
Please set the SCSI ID number to suit the use/pur-
pose of the peripheral recording device. Refer to the
operation manual of each peripheral recording device
for setting its SCSI ID Number.
Connected
SCSI ID
Number
0
1
2
3
4
5
device
Built-in HDD
HDD
HDD
HDD
DDS/RDD
DDS/RDD
Purpose
Recording
HDD expansion/
HDD recording
Archive
Copy
Maximum recording capacity is 103GB
per unit.
Will be recognized as an archive device.
Will be recognized as a copy device.
Notes
* RDD: Abbreviation of removable disk drive.
Select a disk drive which can eject the recording medium.
* HDD: Abbreviation of hard disk drives.
Please use those which include self-defect capabilities.
* DDS: Abbreviation of digital data storage.
Select a recording medium which uses tape.
* When hard disk drives are connected to ID1, ID2, or ID3, the displayed estimates
of recording time will include the expanded HDD. When storage capacity is
expanded to its maximum, however, there will be instances where the times set
for long recording intervals are not displayed correctly.
INFORMATION
Please use the devices we have rec-
ommended for this unit’ s peripheral recording devices .
Please consult with your dealer for details.
INFORMATION
Storage capacity is indicated in
gigabytes (GB). (1GB = 1000 x 1000 x 1000 bytes.)
For details of functions of the archive device and
the copy device, please refer to “Glossary” on page
83.
SCSI cable
Terminator
Peripheral
recording
device
SCSI
terminal
When connecting a peripheral recording device, the
SCSI TERMINATION switch must be set to OFF.
Warning concerning connections
A terminator is necessary to maintain proper electrical
connections to the peripheral devices. Please make
••••••••••••••••••••••••••••••••••••••••••••••••••••••••••••••••••••••••••••••••••••••••••••••••••••••••••••••••••••••••••
Connections
19
Page 20
•
Initial settings
■ How to install an external hard disk drive
Example: Installing a 9GB hard disk drive to ID1.
When the power of the unit is turned on , the unit
will automatically detect peripheral recording devices
Glossary
connected to its SCSI terminal
must be initialized each time hard disks are added,
connections are made or ID numbers are altered, etc.
When additional hard disk drives are added to this
unit, all data stored on all (internal and external HDD
ONLY) will be erased. The reason is that this unit
looks at all drives as one. Before adding external
drives to this unit, if the information stored on the existing drives is needed, please Backup the information first before adding external drives. Data is not
erased (lost) when an external HDD or other peripheral is removed from the chain.
With the digital units Power OFF, turn the Terminator
switch on the back of the digital unit to OFF. Set the
external drive to ID1, terminate at the external drive,
connect the SCSI connector from the external drive
to the SCSI connector of the digital unit and turn power
“ON” on the external drive . Next Turn “ON” the power
of the digital unit. When this unit comes-up, it will
automatically detect all external connected devices
and the DEVICE CHECK screen will be displayed.
Notice that the external drive is recognized on ID1.
1. Press the POWER button.
• If the change is recognized, the screen below will appear.
<DEVICE CHECK>
SCSI ID0:HDD( 60GB)
ID1:HDD( 9GB)
ID2:NONE
ID3:NONE
ID4:NONE
ID5:NONE
@PWR-OFF INITIALIZE
BOOT UP DELAY 00
. The system
If the screen below appears after performing Step
1, it is possible that there is either a poor connection,
overlapping SCSI ID numbers, or an error in SCSI ID
number settings. In this case, turn the SHUTTLE ring
twice in the clockwise direction. Main power to the unit
will turn off; please then check the connection and SCSI
ID settings of the external devices.
ID4:RDD
ID5:DDS
@PWR-OFF
BOOT UP DELAY 00
■ How to remove an external hard disk drive
and copying device
Ensure all devices including this unit are turned OFF. Disconnect the the cable of the external drive and or copy
device from the back of this unit SCSI terminal. Enable
(turn to ON) the termination switch on the back of this unit.
1. Press the POWER button.
• The screen below will appear. It will not appear when you
remove the DDS or RDD which is connected to ID4 or ID 5.
ID5:RDD
@PWR-OFF CONFIG.
BOOT UP DELAY 00
2. Make sure that the connected de vice is recognized correctly .
3. Turn the JOG dial to select “CONFIG.”, and turn the
SHUTTLE ring to the right twice.
When CONFIG. is selected, the unit will save the
data recorded on the connected peripheral recording
device (which has not been removed) as well as the
data recorded on the built-in HDD. Data recorded on
a removed peripheral recording device is not aff ected.
2. Make sure that the connected device is recognized
correctly.
• If the connected device is not displayed correctly, make
sure that the cursor is set to POWER OFF and turn the
SHUTTLE ring twice to the right. The power of this unit will
be turned off. Make sure that the connection of the external
device and the setting of the SCSI ID number is correct.
<DEVICE CHECK>
SCSI ID0:HDD( 60GB)
ID1:HDD( 9GB)
ID2:NONE
ID3:NONE
ID4:NONE
ID5:NONE
@PWR-OFF INITIALIZE
BOOT UP DELAY 00
3. Turn the JOG dial to select INITIALIZE.
ID5:NONE
PWR-OFF @INITIALIZE
BOOT UP DELAY 00
4. Turn the SHUTTLE ring to the right.
• Turn the SHUTTLE ring to the right to EXECUTE.
The unit will initialize its system when data is erased
from its built-in hard disk and hard disks connected to
ID0 through ID3. Data is not erased from hard disks
connected to ID4 and ID5.
4. The unit will start setting up.
■ Confirming the connected device
1. Press the INFO button.
• The <INFORMATION> menu will appear.
2. Turn the JOG dial to select CONNECTED SCSI DEVICE.
<INFORMATION>
RECORDED PERIOD
@CONNECTED SCSI DEVICE
3. Turn the SHUTTLE ring to the right.
• The <CONNECTED SCSI DEVICE> menu will appear.
<CONNECTED SCSI DEVICE>
SCSI ID0:HDD( 60GB)
ID1:NONE
ID2:NONE
ID3:NONE
ID4:NONE
ID5:NONE
Connected device for ID4 and ID5 will display
“NONE” when no archive or copying devices are connected to the unit.
20
••••••••••••••••••••••••••••••••••••••••••••••••••••••••••••••••••••••••••••••••••••••••••••••••••••••••••••••••••••••••••••••••••••••••••
Page 21
■ Setting this unit to delay the boot up time
Because the unit searches for connected devices when power
is turned on, peripheral devices must be turned on before power
is turned on to the digital recorder. To handle peripherals which
take a long time to start up, the unit can be preset to delay the
timing of its search for these devices.
1. Press the POWER button while pressing the REC button to
turn the power on.
• The <DEVICE CHECK> menu will appear.
<DEVICE CHECK>
SCSI ID0:HDD( 60GB)
ID1:NONE
ID2:NONE
ID3:NONE
ID4:NONE
ID5:NONE
@INITIALIZE ALL HDD
BOOT UP DELAY 00
2. Turn the JOG dial to select BOOT UP DELAY, and turn the
SHUTTLE ring to the right.
• The sub-item of the BOOT UP DELAY will start flashing.
ID5:RDD
INITIALIZE ALL HDD
@BOOT UP DELAY 00
3. Turn the JOG dial to set the delay time, and turn the
SHUTTLE ring to the right to enter the selection.
• You can set up to 99 seconds.
ENGLISH
ID5:RDD
INITIALIZE ALL HDD
@BOOT UP DELAY 10
When BOO T UP DELAY is set and timer recording
is performed, the unit will begin recording later than
the time set as the recording time.
4. Press the POWER button.
• The power of this unit will be turned off.
5. Press the POWER button again.
• This unit will start setting up after the preset delayed time
has passed.
If a different peripheral recording device was con-
nected from the last time the unit was booted up, the
<DEVICE CHECK> menu will appear.
••••••••••••••••••••••••••••••••••••••••••••••••••••••••••••••••••••••••••••••••••••••••••••••••••••••••••••••••••••••••••
Initial settings
21
Page 22
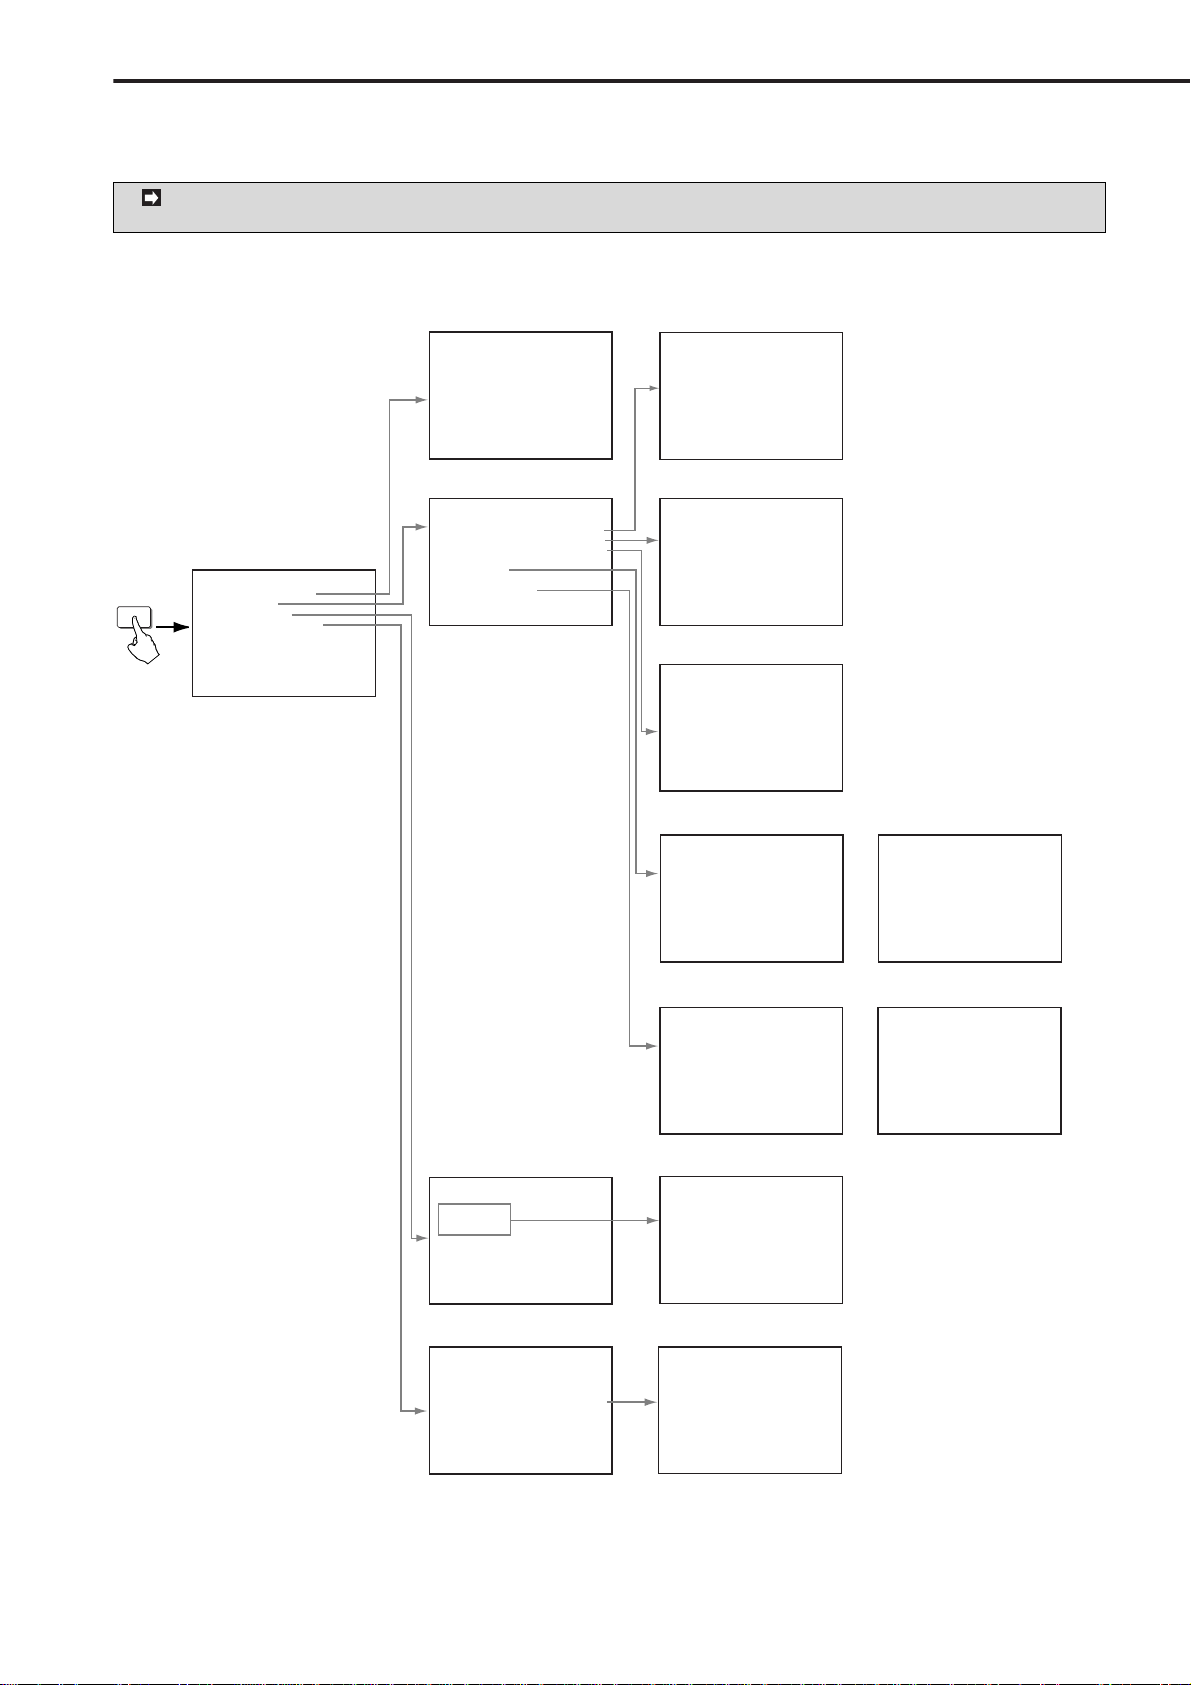
•
Menu functions
■ MENU SETTING
You can set the basic settings for this unit in the MENU SETTING. Refer to pages shown below for details.
During playback, recording, pre-alarm recording stand-by mode and accessing peripheral recording device,
you cannot change setting of some MENUs.
SUB MENU (1) SUB MENU (2)
<TIME DATE DISPLAY>
@DISPLAY MODE 1
CHARACTER SIZE SMALL
CLOCK LOCATION OFF
EX.<MODE 1>
01-01-2000 00:00:00
TIME DATE DISPLAY page 25
♦
<SPLIT4 SCREEN SETTING>
@SPLIT4a SPLIT4b
Q W
E R
SPLIT4c SPLIT4d
O P
{ }
T Y
U I
q w
e r
♦ SPLIT4 SCREEN SETTING page 43
SET UP
MAIN MENU
<MENU SETTING>
@TIME DATE DISPLAY
MPX DISPLAY
TIMER PROGRAM
NORMAL REC SETTING
A-REC/M -DET SETTING
DATA CLEAR SELECTION
COMMUNICATION SETTING
REAR TERMINAL
SERVICE
INITIAL SET UP
<MPX DISPLAY>
@
SCREEN SW PATTERN ALL
SPLIT 4 SCREEN SETTING
SPLIT 9 SCREEN SETTING
SPLIT 16 SCREEN SETTING
IMAGE QLTY HIGH
SEQUENCE
CH.TITLE CH.NO
CAMERA TITLE
ALARM DISPLAY ON
♦ MPX DISPLAY page 43-46
<SPLIT9 SCREEN SETTING>
@SPLIT9a SPLIT9b
Q W E
R T Y
U I O
Q W P
{ } q
w e r
♦ SPLIT9 SCREEN SETTING page 43, 44
<SPLIT16 SCREEN SETTING>
@SPLIT16
Q W E R
T Y U I
O P { }
q w e r
♦ SPLIT16 SCREEN SETTING page 44
<SEQUENCE>
SEQ. 1
♦
<CAMERA TITLE>
CH TITLE
@
♦
CH.@
2
3
4
5
6
7
8
9
SEQUENCE(1/2) page 44,45
...............
Q
...............
W
...............
E
...............
R
...............
T
...............
Y
...............
U
...............
I
CAMERA TITLE(1/2) page 45,46
TIME 1S
Q
W
E
R
T
Y
U
I
O
1S
1S
1S
1S
1S
1S
1S
1S
.
.
.
.
.
.
.
.
<SEQUENCE>
CH.@
SEQ. 10
11
12
13
14
15
16
SPLIT4
SPLIT9
SEQUENCE(2/2) page 44,45
♦
<CAMERA TITLE>
CH TITLE
...............
O
@
...............
P
...............
{
...............
}
...............
q
...............
w
...............
e
...............
r
CAMERA TITLE(2/2) page 45,46
♦
P
{
}
q
w
e
r
a b c d
a b
TIME 1S
.
.
.
.
.
.
.
.
1S
1S
1S
1S
1S
1S
1S
1S
22
<TIMER PROGRAM>
@SELECTED PATTERN P1
DEFINE P1
DEFINE P2
DEFINE P3
<M-DET APPLICATION>
REC MODE (A) OFF
REC MODE (B) OFF
REC MODE (C) OFF
REC MODE (POWER) OFF
TIMER PROGRAM page 50-53
♦
♦
M-DET APPLICATION page 52,53
<NORMAL REC SETTING>
@IMAGE QUALITY HIGH
MAX REC FIELDS 12.5F
SELECT REC MODE (A)
DEFINE GROUP SETTING
<ESTD TIME> 1D12H49M
♦
NORMAL REC SETTING
page 12-14
<TIMER PROGRAM> P1
DW START END MODE
@ ––– ––:–– ––:–– ––––––
2 ––– ––:–– ––:–– ––––––
3 ––– ––:–– ––:–– ––––––
4 ––– ––:–– ––:–– ––––––
5 ––– ––:–– ––:–– ––––––
6 ––– ––:–– ––:–– ––––––
7 ––– ––:–– ––:–– ––––––
8 ––– ––:–– ––:–– ––––––
SPECIAL DW:SUN–SAT
TIMER PROGRAM page 50
♦
<DEFINE GROUP> (A)
CH PRI FILD CH PRI FILD
@Q 1 0.78
W 1 0.78
E 1 0.78
R 1 0.78
T 1 0.78
Y 1 0.78
U 1 0.78
I 1 0.78
<ESTD TIME> 1D12H49M
♦
DEFINE GROUP page 14
O 1 0.78
P 1 0.78
{ 1 0.78
} 1 0.78
q 1 0.78
w 1 0.78
e 1 0.78
r 1 0.78
•••••••••••••••••••••••••••••••••••••••••••••••••••••••••••••••••••••••••••••••••••••••••••••••••••••••••••••••••••••••••••••••••••••••••••
Page 23
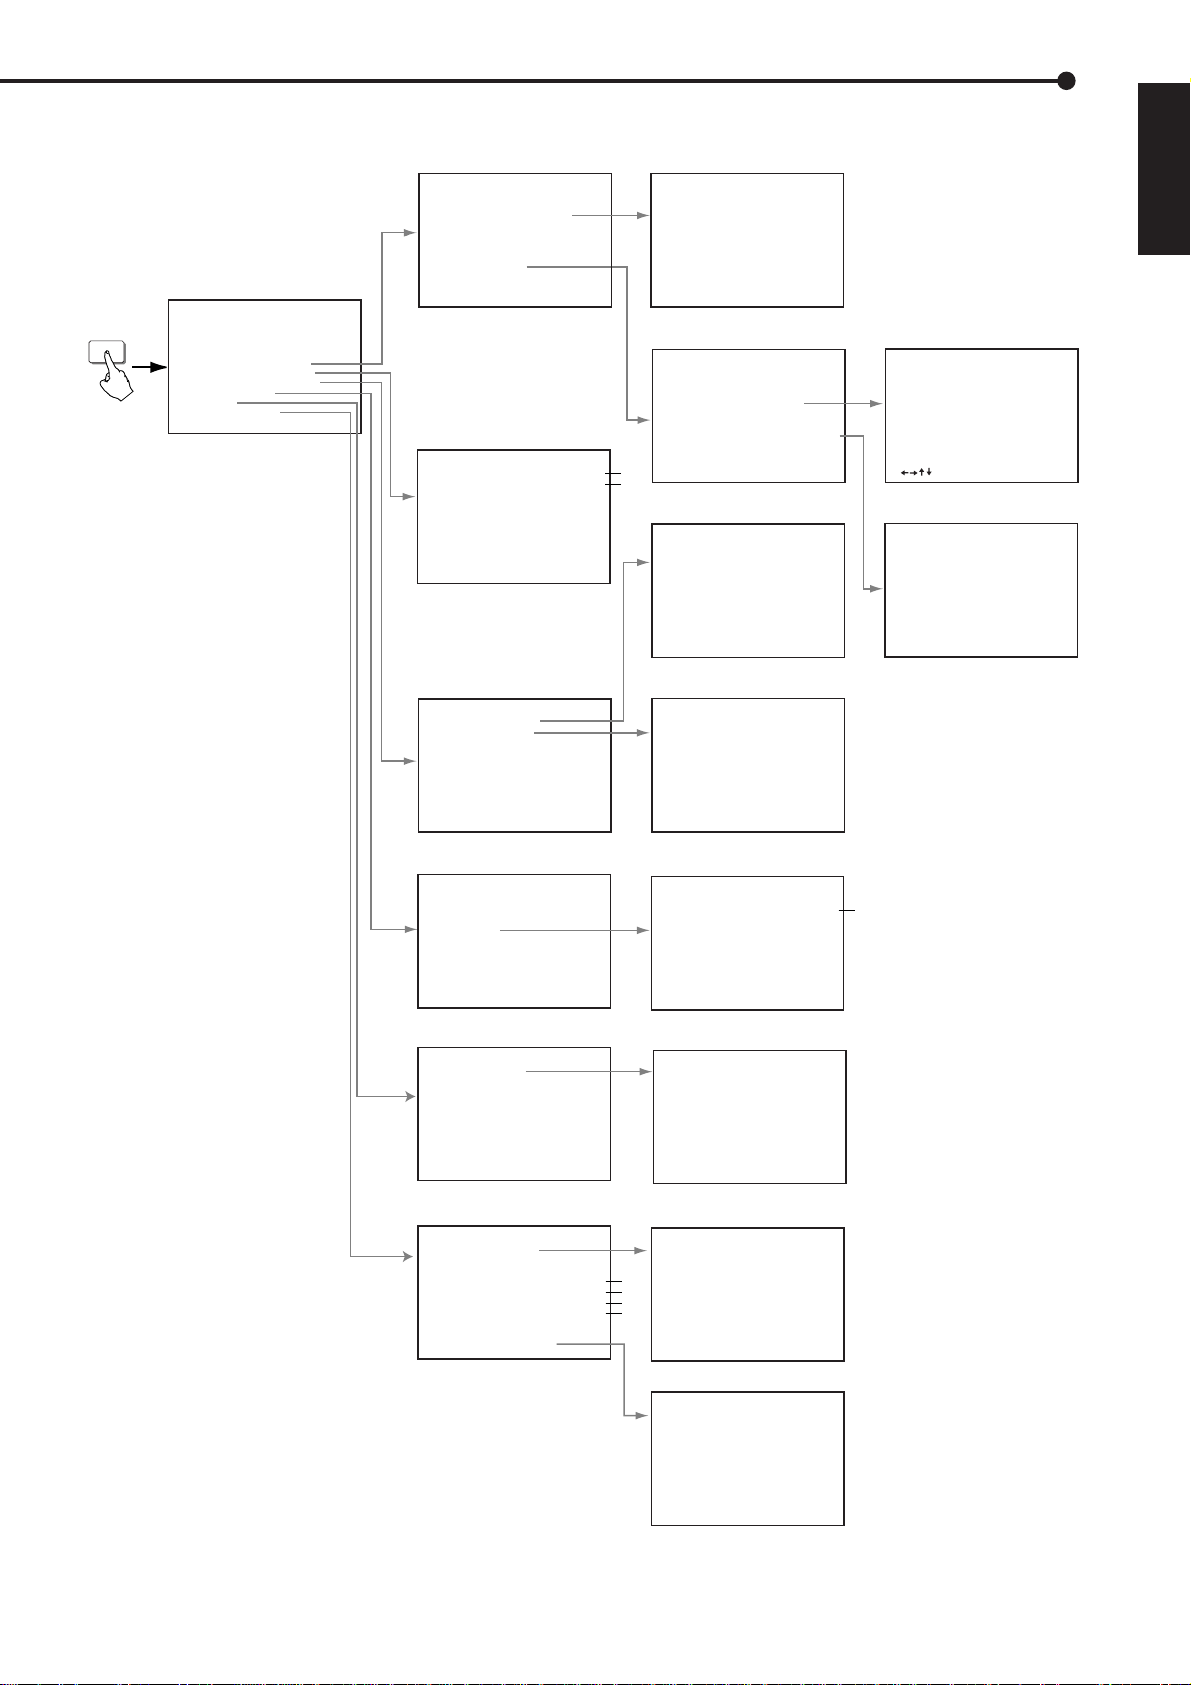
SET UP
MAIN MENU
<MENU SETTING>
TIME DATE DISPLAY
MPX DISPLAY
TIMER PROGRAM
NORMAL REC SETTING
@A-REC/M-DET SETTING
DATA CLEAR SELECTION
COMMUNICATION SETTING
REAR TERMINAL
SERVICE
INITIAL SET UP
SUB MENU (1)
<A-REC/M-DET SETTING>
@IMAGE QUALITY HIGH
MAX REC FIELDS 12.5F
DEFINE GROUP SETTING
A-REC DURATIOM 15S
RECORD ALARM SEP
PRE A-REC OFF
M-DET SETTING
♦ A-REC/M-DET SETTING
page 35-40
<DATA CLEAR SELECTION>
@COPY DATA CLEAR OFF
ARCHIVE DATA CLEAR OFF
HDD DATA CLEAR OFF
♦ DATA CLEAR SELECTION
page 26
SUB MENU (2)
<DEFINE ALARM GROUP>
CH PRI FILD CH PRI FILD
@Q 1
W 1
E 1
R 1
T 1
Y 1
U 1
I 1
♦ DEFINE ALARM GROUP page 36
<MOTION>
@SELECTION CAMERA NO. 1
CH.MOTION DETECTION OFF
SET DETECTION MASK
SENSITIVITY MED
MOTION THRESHOLD 2
TEST MODE OFF
#1
#2
♦ MOTION page 38
<RS-232C SETTING>
@TRANSMISSION RATE 1200Ł
DATA BIT LENGTH 8BIT
PARITY BIT NONE
STOP BIT LENGTH 1BIT
DELIMITER CR
♦ RS-232C SETTING page 65
O 1
P 1
{ 1
} 1
q 1
w 1
e 1
r 1
SUB MENU (3)
● ● ● ● ● ● ● ● ● ● ● ●
● ● ● ● ● ● ● ● ● ● ● ●
● ● ● ● ● ● ● ● ● ● ● ●
● ● ● ● ● ● ● ● ● ● ● ●
● ● ● ● ● ● ● ● ● ● ● ●
● ● ● ● ● ● ● ● ● ● ● ●
● ● ● ● ● ● ● ● ● ● ● ●
● ● ● ● ● ● ● ● ● ● ● ●
● ● ● ● ● ● ● ● ● ● ● ●
● ● ● ● ● ● ● ● ● ● ● ●
: MOVE < < : EXIT
♦ SET DETECTION MASK
page 39
• • ••••••••••
• • ••••••••••
• • ••••••••••
• • ••••••••••
• • ••••••••••
• • ••••••••••
• • ••••••••••
• • ••••••••••
• • ••••••••••
• • ••••••••••
< < : EXIT
♦ TEST MODE page 40
ENGLISH
<COMMUNICATION SETTING>
@RS-232C SETTING
TCP/IP SETTING
♦ COMMUNICATION SETTING
page 65
<REAR TERMINAL>
@MODE OUT REC
CAPACITY REMAIN HDD-10%
CALL OUT
BUZZER KEY
♦ REAR TERMINAL page 26-28
<SERVICE>
@POWER FAILURE
ARCHIVE POINT RESET OFF
MENU INITIALIZE OFF
IM-CHECK MODE OFF
♦ SERVICE page 28, 29
<INITIAL SET UP>
@TIME DATE ADJUST
HDD FULL STOP
HDD PB REPEAT STOP
ARCHIVE OVERWRITE OFF
AUTO EJECT ON
ARCHIVE DATA ALL
FIFO/OVERWRITE MODE
MOTION DETECTION OFF
LANGUAGE SELECTION
♦ INITIAL SET UP page 30-33 ♦ TIME DATE ADJUST page 11
#1 : Only displayed when a copying device is connected to ID5.
#2 : Only displayed when an ARCHIVE device is connected to ID4.
#3 : Only displayed when the HDD is connected to ID4.
OFF
<TCP/IP SETTING>
@SELF IP ADDRESS
192.168.001.100Ł
SUBNET MASK
255.255.255.000Ł
<MAC ADDRESS>
08-00-70-2E-3F-FF
♦ TCP/IP SETTING page 65
<CALL OUT>
HDD(ID:0~3) FULL
@ARCHIVE(ID:4) NONE
♦ CALL OUT page 27,28
<POWER FAILURE>
No. DATE TIME INFO.
02 24-01-00 12:00 PW-LOS
01 23-01-00 20:00 PW-LOS
♦ POWER FAILURE page 28
<TIME DATE ADJUST>
@DAYLIGHT SAVING
DATE
MONTH
#2
YEAR
TIME
#2
#2
TURN THE SHUTTLE RING
#3
<< TO EXECUTE.
<LANGUAGE SELECTION>
@ENGLISH
DEUTSCH
FRANCAIS
CASTELLANO
SVENSKA
00:00:00
♦ LANGUAGE SELECTION page 17
OUT
2000
01
01
#2
••••••••••••••••••••••••••••••••••••••••••••••••••••••••••••••••••••••••••••••••••••••••••••••••••••••••••••••••••••••••••••
Operations
23
Page 24
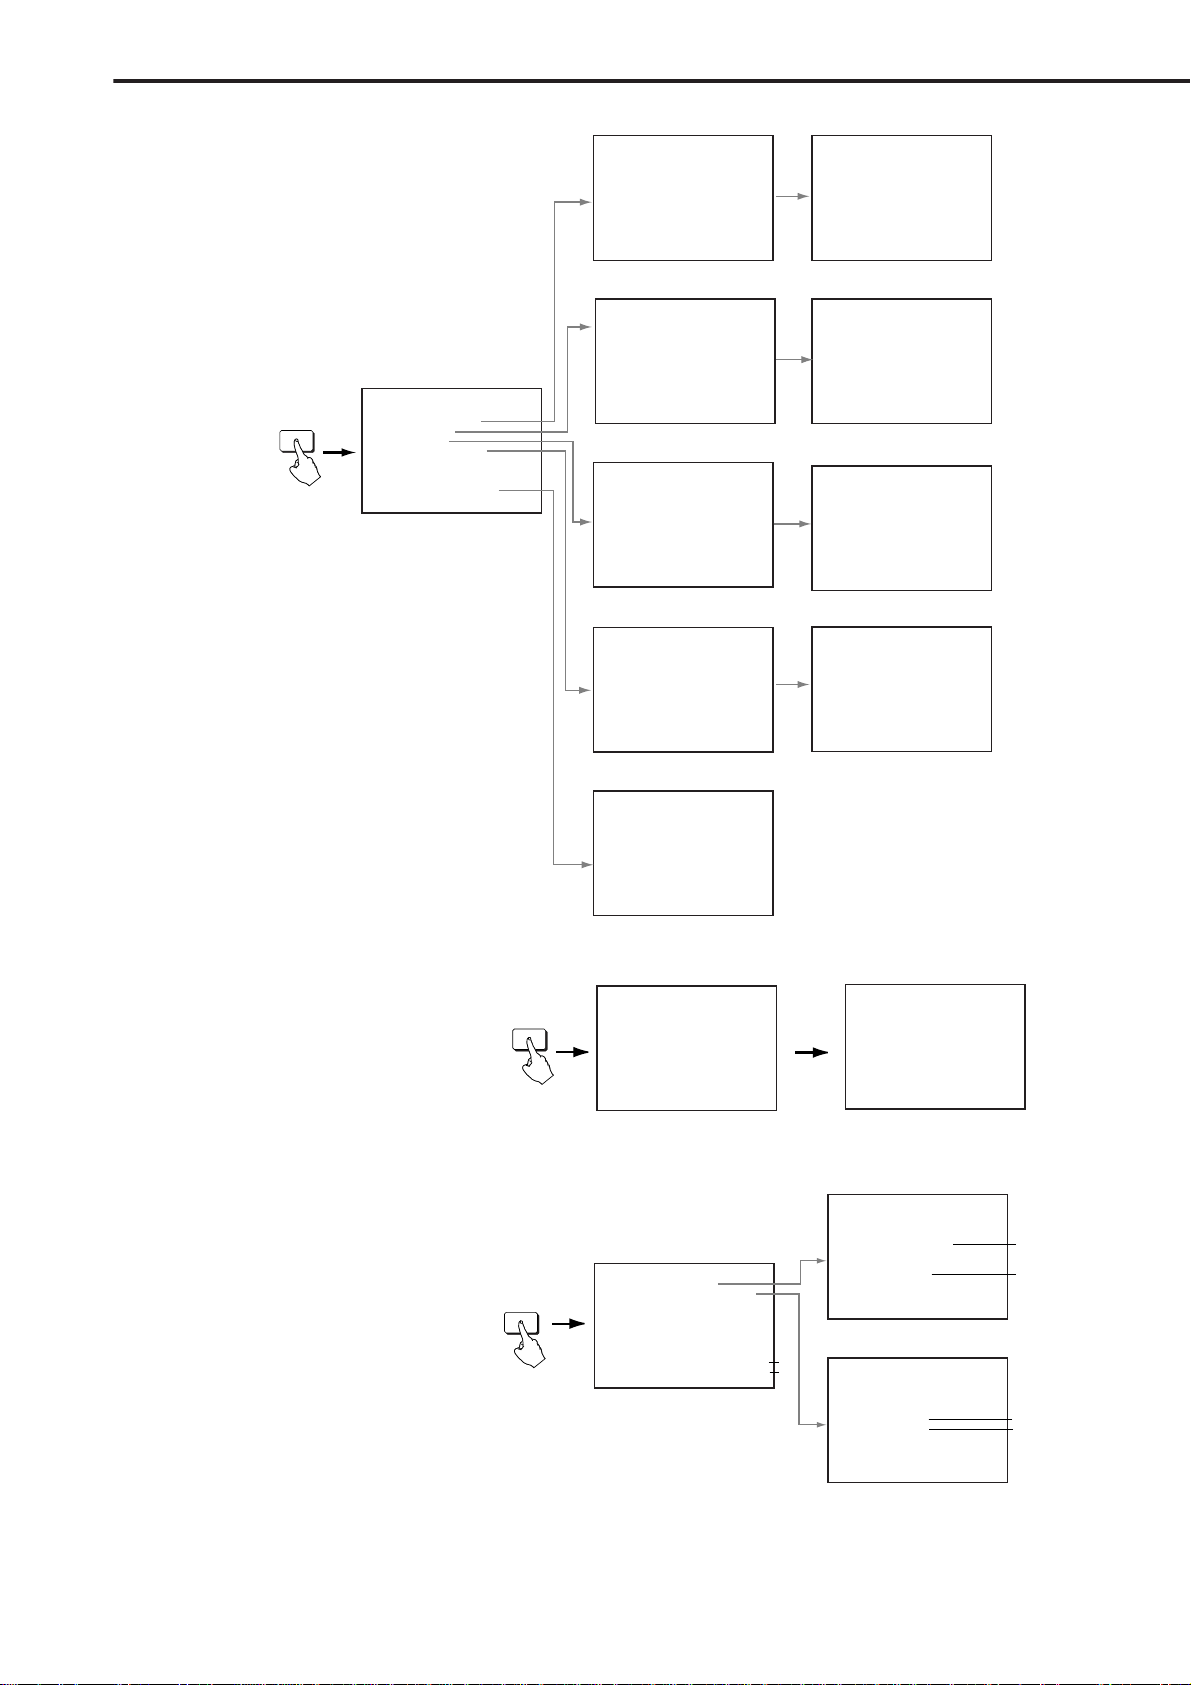
•
Menu functions (continued)
■ SEARCH SELECTION MENU
MAIN MENU
<SEARCH SELECTION>
@SELECTION CAMERA NO. ALL
SEARCH
TIME DATE SEARCH
INDEX SEARCH
SKIP SEARCH
ALARM LIST SEARCH
JUMP TO START POINT
SUB MENU (1)
<TIME DATE SEARCH> ALL
06-09-2001 04:10:20
EXECUTE ON
TURN THE SHUTTLE RING
>> TO EXECUTE.
♦ TIME DATE SEARCH page 15,16
<INDEX SEARCH> ALL
01
INPUT INDEX NUMBER
TURN THE SHUTTLE RING
<< OR >> TO VIEW NEXT
ALARM.
♦ INDEX SEARCH page 57, 58
<SKIP SEARCH> ALL
TURN THE SHUTTLE RING
<< OR >> TO
PREVIEW EACH ALARM.
♦ SKIP SEARCH page 58
<ALARM LIST SEARCH>
@No. DATE TIME C
0001 13-12-01 19:11:00 1
SUB MENU (2)
<TIME DATE SEARCH>
06-09-2001 04:10:20
SEARCHING...
<INDEX SEARCH>01
SEARCHING...
<SKIP SEARCH>
SEARCHING...
<ALARM LIST SEARCH>
13-12-01 19:11:00
SEARCHING...
■ COPY SELECTION MENU
■ INFORMATION MENU
COPY
INFO
♦ ALARM LIST SEARCH
page 58, 59
<JUMP TO START POINT>
TURN THE SHUTTLE RING
>> TO PLAY BACK
OLDEST RECORDED DATA.
♦ JUMP TO START POINT page 59
MAIN MENU SUB MENU(1)
<COPY SELECTION>
@COPY DIRECTION HDD}COPY
OVERWRITE OFF
TRANSFER PERIOD MAN
FROM:29-01-01 00:25:24
TO:28-02-01 13:25:29
EXECUTE OFF
♦ COPY DIRECTION page 59,60
♦ OVERWRITE page 59,60
♦ TRANSFER PERIOD page 60,61
<COPY SELECTION>
COPY DIRECTION HDD}COPY
OVERWRITE OFF
@TRANSFER PERIOD S/E
FROM:29-01-01 00:25:24
TO:28-02-01 13:25:29
EXECUTE OFF
GET S/E INFORMATION.
TURN THE SHUTTLE RING
> > TO EXECUTE.
SUB MENU (1)
<RECORDED PERIOD>
MAIN DEVICE:
FROM 05-03-00 12:00:00
TO 14-03-00 12:30:00
ARCHIVE DEVICE:
MAIN MENU
<INFORMATION>
@RECORDED PERIOD
CONNECTED SCSI DEVICE
<ELAPSED TIME>
MAIN 0H
ARCHIVE 0H
COPY 0H
♦ INFORMATION page 33
♦ ELAPSED TIME page 33
FROM
**-**-** **:**:**
TO **-**-** **:**:**
COPY DEVICE:
FROM FF-FF-FF FF:FF:FF
TO FF-FF-FF FF:FF:FF
♦ RECORDED PERIOD page 33
#2
<CONNECTED SCSI DEVICE>
#1
SCSI ID0:HDD( 60GB)
ID1:NONE
ID2:NONE
ID3:NONE
ID4:DDS
ID5:RDD
#2
#1
#2
#1
24
♦ CONNECTED SCSI DEVICE
page 33
#1 : Only displayed when a copying device is connected to ID5.
#2 : Only displayed when an ARCHIVE device is connected to ID4.
•••••••••••••••••••••••••••••••••••••••••••••••••••••••••••••••••••••••••••••••••••••••••••••••••••••••••••••••••••••••••••••••••••••••••••
Page 25
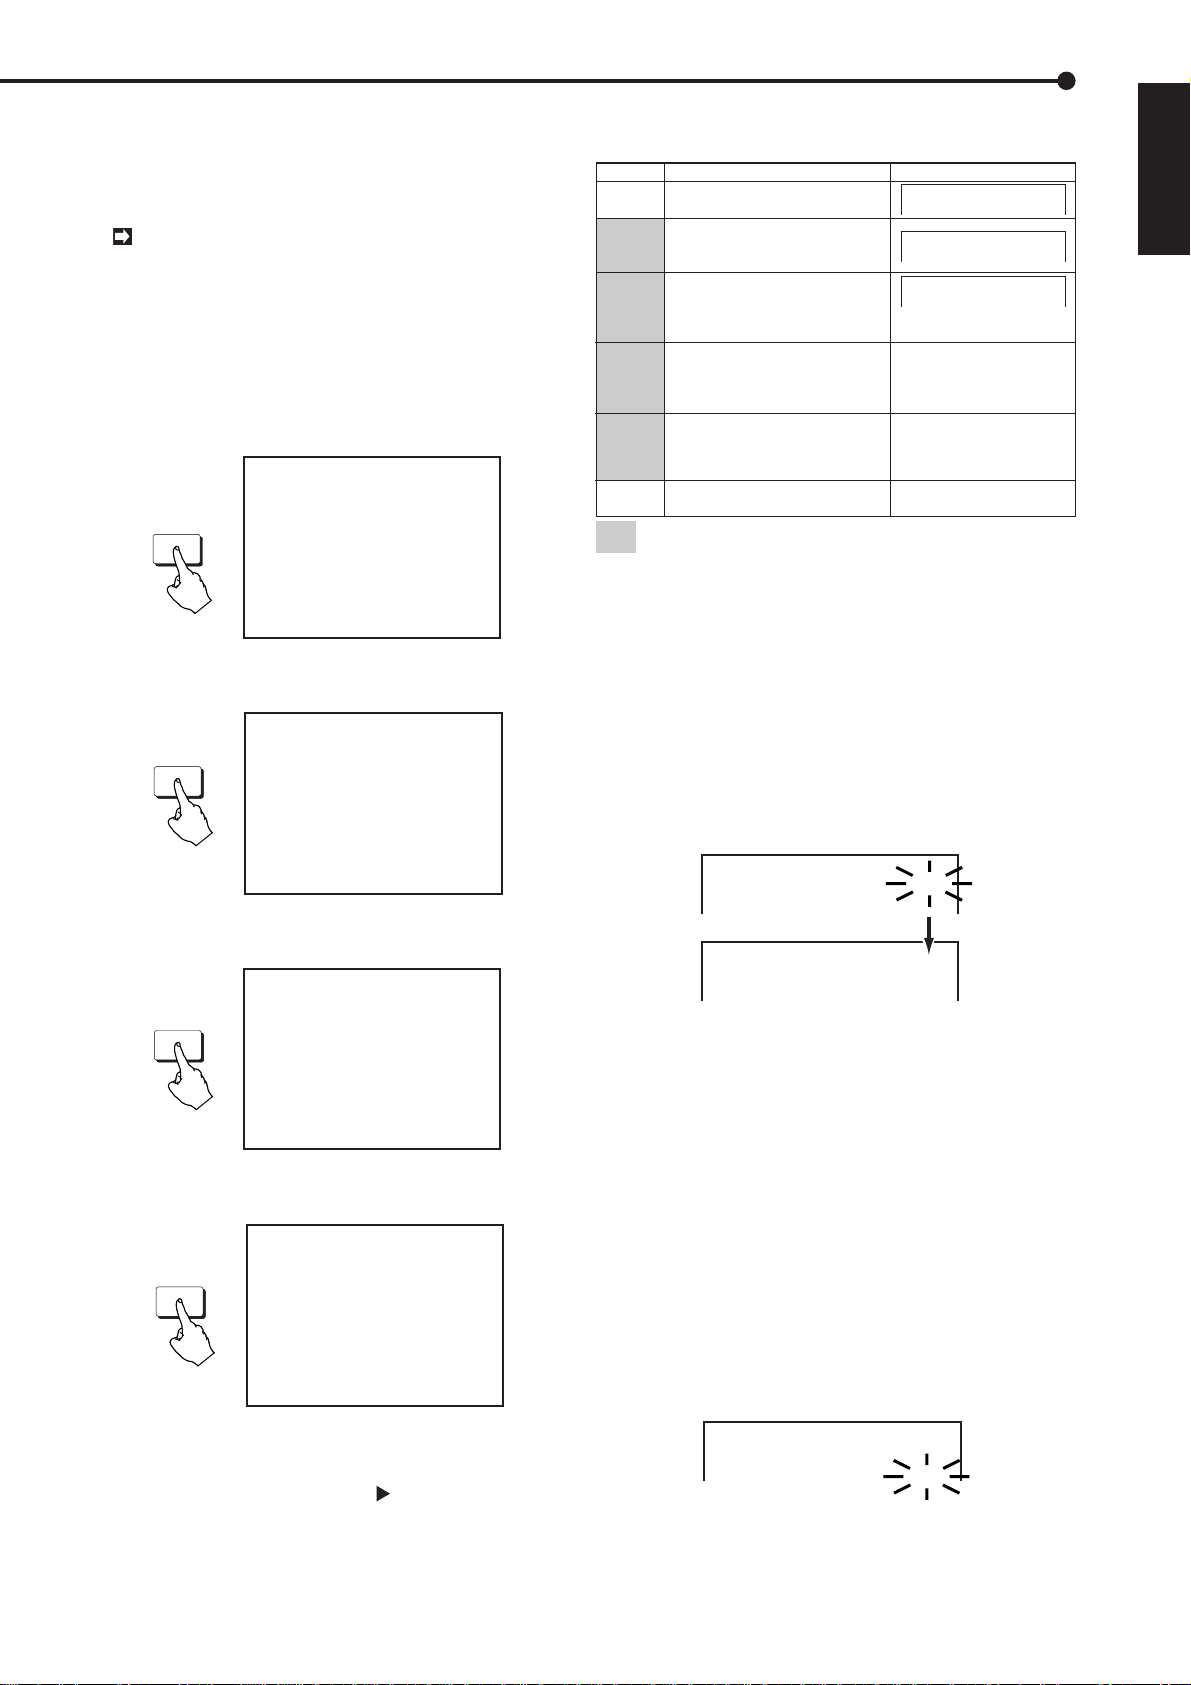
How to set up / Various settings
Various settings
How to set up
■ How to display menus
As shown in the menu displayed on pages 22 - 24, the
menus are divided into several layers. The following steps
show how to display the desired menu on the screen.
When any of the menu displays are shown on the
screen, the SPLIT/SEQUENCE button, the Camera
number button and the ZOOM button do not work.
1. Find the menu you want to view from the menu overview on
pages 22 - 24 and press the correct key to activate the menu.
2. When the menu you want to view is active:
• The <MENU SETTING> menu, press the SET UP button on
the front panel of this unit.
<MENU SETTING>
▲
TIME DATE DISPLAY
MPX DISPLAY
SET UP
• The <SEARCH SELECTION> menu, press the SEARCH
button on the front panel of this unit.
SEARCH
• The <INFORMATION> menu, press the INFO button on the
front panel of this unit.
INFO
• The <COPY SELECTION> menu, press the COPY button on
the front panel of this unit.
COPY
Then, the main menu of each category will be shown on
the screen.
3. Turn the JOG dial until the cursor ( ) is next to the desired
item and turn the SHUTTLE ring to the right to show its setting.
• Please refer to the relevant section of this manual for the
detailed setting of each menu.
TIMER PROGRAM
NORMAL REC SETTING
A-REC/M-DET SETTING
DATA CLEAR SELECTION
COMMUNICATION SETTING
REAR TERMINAL
SERVICE
INITIAL SET UP
<SEARCH SELECTION>
▲
SELECTION CAMERA NO. ALL
TIME DATE SEARCH
INDEX SEARCH
SKIP SEARCH
ALARM LIST SEARCH
JUMP TO START POINT
<INFORMATION>
▲
RECORDED PERIOD
CONNECTED SCSI DEVICE
<ELAPSED TIME>
MAIN
ARCHIVE
COPY
<COPY SELECTION>
▲
COPY DIRECTION HDD}COPY
OVERWRITE OFF
TRANSFER PERIOD MAN
FROM:06-09-01 02:59:12
TO:06-09-01 03:59:12
EXECUTE OFF
10000H
10000H
10000H
■ Setting Display Mode
Type and setting of display.
Display Mode
Date, Present time,Camera number
1
display
Date, Day of the week, Present time,
Recording interval, Camera number
2
display
Date, Day of the week, Present time,
Recording interval, Camera number
3
display, Recording capacity of HDD
will be displayed.
No indication
(When alarm signal is input, Date, Day of
4
the week, Present time, Recording interval
will be displayed.)
No indication
(When warning signal is input,
5
warining indicator will be displayed.)
No indication
6
Display mode 2 to 5 are only available when single screen is displayed or
"CH. TITLE" is set to "NONE" on the <MPX DISPLAY> menu.
Example: Selecting DISPLAY MODE to “3” (the default
setting is “1”).
1. Display the <MENU SETTING> menu on the screen. Check
the cursor is next to TIME DATE DISPLAY and turn the
SHUTTLE ring to the right.
• The <TIME DATE DISPLAY> menu appears.
2. Chec k that the cursor is ne xt to “DISPLAY MODE” and turn
the SHUTTLE ring to the right.
• The sub-item will start flashing.
3. Turn the JOG dial until “3” flashes and turn the SHUTTLE
ring to the right.
4. Turn the SHUTTLE ring to the left or press the SET UP
button, to exit.
♦ Setting character size
Refer to page 10 “Basic Operations” for the setting of character size.
♦ Setting Display Position
1. Repeat steps 1 to 2 of display mode to display the <TIME
DATE DISPLAY > menu.
2. Turn the JOG dial until the cursor is next to “CLOCK
LOCATION” and turn the SHUTTLE ring to the right.
• The sub-item will start flashing.
3. Check that the “ON” is flashing. Turn the SHUTTLE ring to
the right.
• The monitor display switches to the display position setting
menu.
Display Sample
09-06-2001 11:39:10 C01
09-06-2001 SAT
11:39:10 25F C01
09-06-2001 SAT
11:39:10 25F 99% C01
<TIME DATE DISPLAY>
@DISPLAY MODE 1
CHARACTER SIZE SMALL
<TIME DATE DISPLAY>
@DISPLAY MODE 3
CHARACTER SIZE SMALL
<TIME DATE DISPLAY>
DISPLAY MODE 3
CHARACTER SIZE SMALL
@CLOCK LOCATION ON
ENGLISH
••••••••••••••••••••••••••••••••••••••••••••••••••••••••••••••••••••••••••••••••••••••••••••••••••••••••••••••••••••••••••••
Operations
25
Page 26
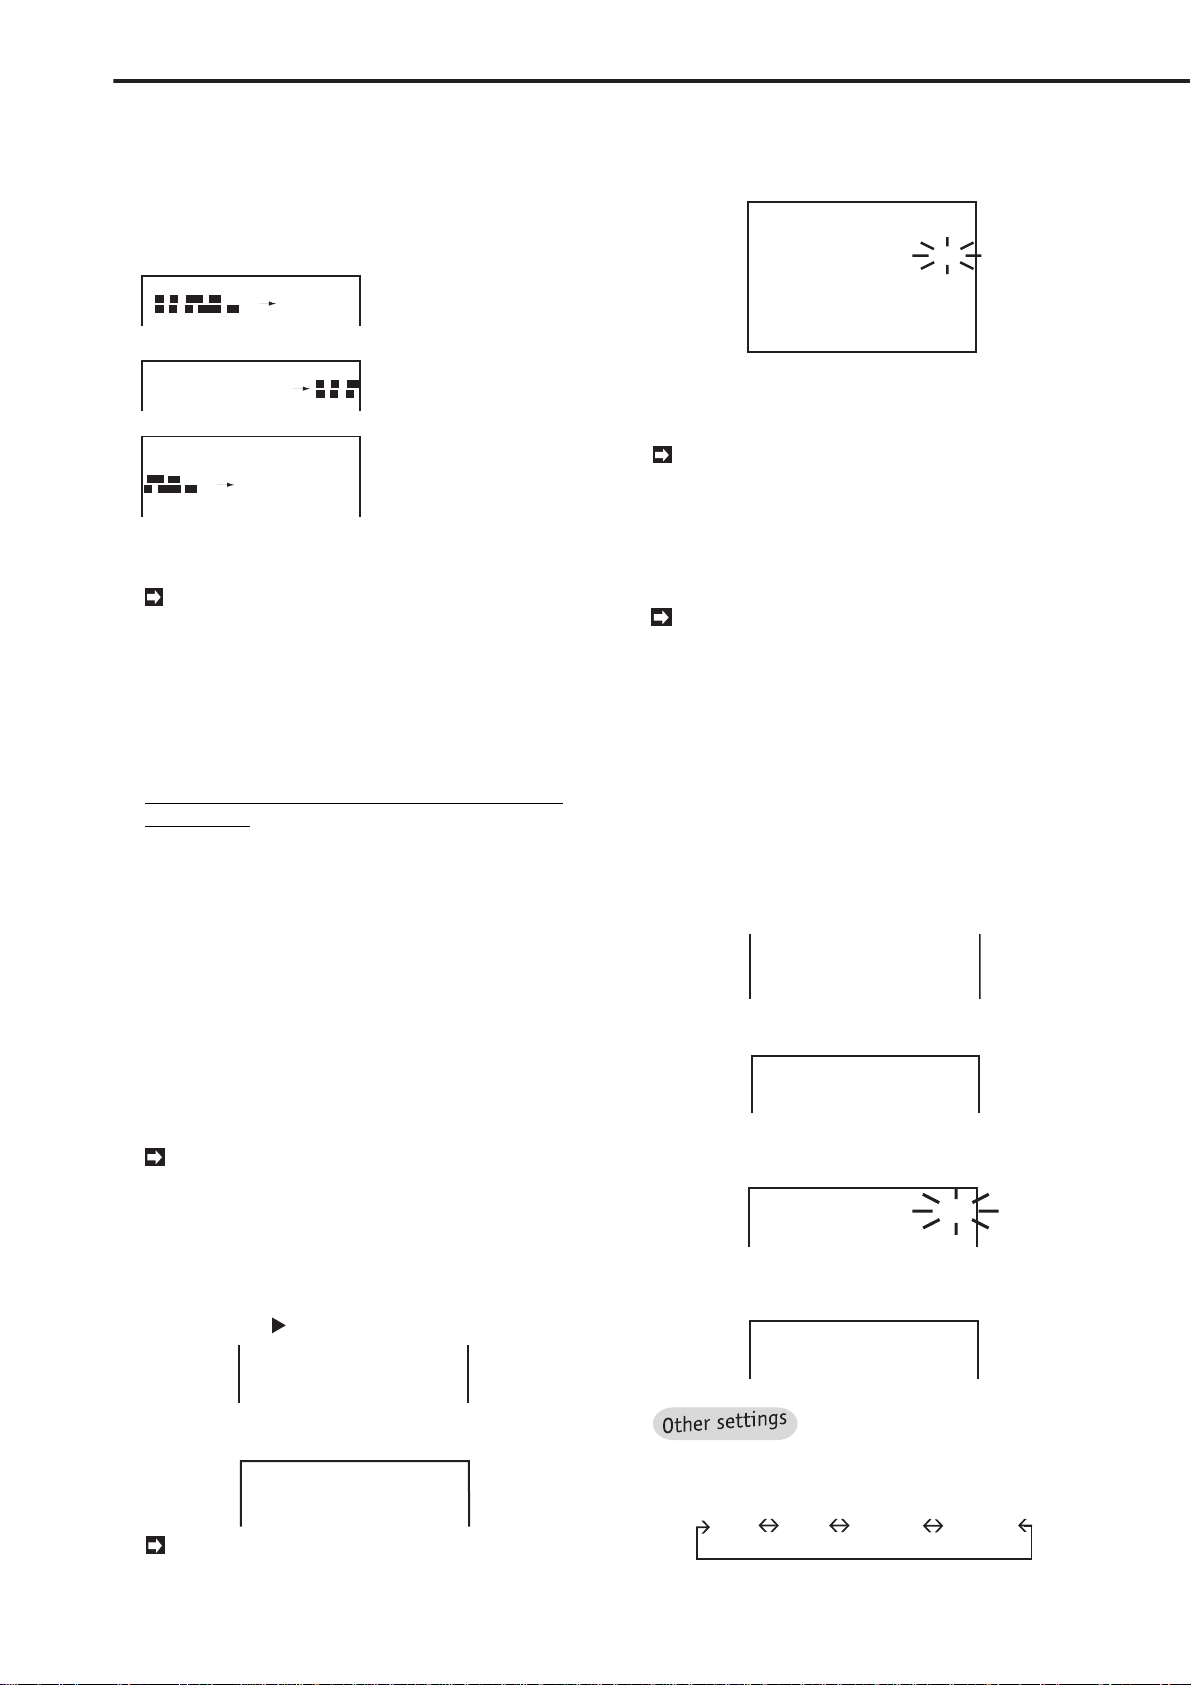
•
Various settings (continued)
<DATA CLEAR SELECTION>
COPY DATA CLEAR OFF
ARCHIVE DATA CLEAR OFF
@HDD DATA CLEAR OFF
ALL DATA AND ALL DRIVE
DATA WILL BE ERASED.
REC PLAY POWER REMAIN
4. Turn the JOG dial until the present time display moves to
the desired position.
• The present time display moves to the right when turning
the JOG dial to the right. When the time display reaches the
right edge of the screen, it goes down to the next line.
• The time display moves to the left when turning the JOG
dial to the left. When the time display reaches the left edge
of the screen, it goes up to the next line.
1)
- -
::
Turn the JOG dial to
the right to move the
display to the right.
2)
By continuing to turn the
- -
JOG dial, the screen will
::
scroll to its rightmost border.
3)
After the screen has been
moved to its rightmost
border, it will move down
one level.
5. When the time display reaches the desired position, turn
the SHUTTLE ring to the right.
The display position can be changed when the
setting of “CH. TITLE” in the <MPX DISPLAY>
menu is as follows:
• When set to “NONE”, the display position can be
changed on single-screen, SPLIT 4, SPLIT 9 and
SPLIT 16 screen.
• When set to “CH.NO” the display position can be
changed on single screen only.
If “TITLE” is selected, the display position cannot
be changed.
■ Setting Multiplexer functions
Refer to page 41, “Multiplexer functions” for details.
■ Setting Timer program
Refer to page 50, “Setting the Timer” for details.
■ Setting recording functions
Refer to page 35, “Various recording settings” for details.
■ Data Clear Selection
This unit provides a menu to select the device and its data
to erase.
“WARNING – This function will erase all the data
on the selected device. In case of the hard disk drive,
all data on all internal and external HDD will be erased”
To edit this procedure press the SET UP key.
3. Turn the JOG dial until the cursor is next to “HDD DATA
CLEAR” and turn the SHUTTLE ring to the right.
• The “OFF” flashing and the message, “ALL DATA AND ALL
DRIVE DATA WILL BE ERASED.” appears on the screen.
4. Turn the JOG dial until “ON” flashes.
• The message, “TURN THE SHUTTLE RING >> T O EXECUTE. ”
appears on the screen.
“COPY DATA CLEAR” or “ARCHIVE DATA
CLEAR” appears on the screen when copy device
or archive device is connected.
5. Turn the SHUTTLE ring to the right to clear the data.
• If not needed, turn the JOG dial until “OFF” flashes and turn
the SHUTTLE ring to the right.
Please note that you cannot exit from the menu
when clearing the data and “ON” is flashing on the
screen.
6. Turn the SHUTTLE ring to the left or press the SET UP
button.
■ Rear Terminal Setting (MODE OUT setting)
A signal is output sending the status of this unit.
Example: Setting MODE OUT to “PLAY” (the default set-
ting is “REC”).
1. Display the <MENU SETTING> menu and turn the JOG
dial until the cursor is next to “REAR TERMINAL”.
DATA CLEAR SELECTION
COMMUNICATION SETTING
@REAR TERMINAL
SERVICE
2. Turn the SHUTTLE ring to the right to show the <REAR
TERMINAL> menu.
<REAR TERMINAL>
@MODE OUT REC
CAPACITY REMAIN HDD-10%
3. Check the cursor is next to “MODE OUT”, then turn the
SHUTTLE ring to the right.
• The sub-item will start flashing.
<REAR TERMINAL>
@MODE OUT REC
CAPACITY REMAIN HDD-10%
Example: Clearing the data recorded on main HDD.
1. Display the <MENU SETTING> menu and turn the JOG
dial until the cursor( ) is next to “DATA CLEAR SELECTION”.
A-REC/M-DET SETTING
@DATA CLEAR SELECTION
COMMUNICATION SETTING
2. Turn the SHUTTLE ring to the right to show the <DATA
CLEAR SELECTION> menu.
<DATA CLEAR SELECTION>
COPY DATA CLEAR OFF
ARCHIVE DATA CLEAR OFF
@HDD DATA CLEAR OFF
26
By turning JOG dial, to select the medium of the
data clear.
•••••••••••••••••••••••••••••••••••••••••••••••••••••••••••••••••••••••••••••••••••••••••••••••••••••••••••••••••••••••••••••••••••••••••••
4. T urn the JOG dial until “PLA Y” flashes and turn the SHUTTLE
ring to the right.
• The sub-item stops flashing.
<REAR TERMINAL>
@MODE OUT PLAY
CAPACITY REMAIN HDD-10%
By turning the JOG dial, the item
of MODE OUT shown on the screen switches as
shown below:
Page 27

“REC”: The signal is output during recording.
DATA CLEAR SELECTION
<REAR TERMINAL>
@MODE OUT REMAIN
CAPACITY REMAIN HDD-10%
CALL OUT
<CALL OUT>
@HDD(ID:0~3) FULL
ARCHIVE(ID:4) NONE
<CALL OUT>
@HDD(ID:0~3) 10%
ARCHIVE(ID:4) NONE
“PLAY”: The signal is output during playback.
“POWER”: The signal is output when the unit’ s power
switch is on.
“REMAIN”:
The signal is output when the remaining storage capacity of main HDD, archive device reaches the
rate which is set in CAPACITY REMAIN.
5. T urn the SHUTTLE ring to the left or press the SET UP button.
♦ Capacity remain setting
When MODE OUT is set to “REMAIN” and the remaining storage capacity of main HDD or archive device is running out,
this unit gives a warning. The following shows how to set the
device and its remaining capacity ratio to give warning.
When the remaining storage capacity reaches
the assigned % remain during recording:
• The display of the recorded storage capacity
flashes when “DISPLAY MODE 3” is selected.
• The buzzer sounds when BUZZER in the <REAR
TERMINAL> menu is set to “REMAIN”.
Example: Setting CAPACITY REMAIN to “HDD-50%” (the
default setting is “HDD-10%”).
♦ CALL OUT setting
With this setting, the signal from CALL OUT terminal is emitted externally to indicate a warning. The signal is emitted from
the CALL OUT terminal when the remaining storage capacity
reaches the preset amount. Likewise, the remaining storage
capacity of archive medium can be set. The CALL OUT signal
is also emitted when HDD FULL in the <INITIAL SET UP>
menu is set to “STOP”. In addition, while the CALL OUT signal is not included in these settings, there is a setting for CALL
OUT output when a problem occurs.
INFORMATION
For more on the relation between
Warning Display and CALL OUT terminal, please refer
to page 84. When the emission parameter in CALL
OUT is set to “Fixed”, the warning display will appear
unconditionally; when the parameter is set to
“Selectable”, the unit can be made to emit a CALL OUT
signal through additional settings. For example, when
the BUZZER setting on the <REAR TERMINAL> menu
is set to “WRNG”, the unit will sound a buzzer when
the remaining amount on the hard disk has reached
the figure specified on the <CALL OUT> menu.
Example: Setting CALL OUT of main HDD to “10%” (the
default setting is “FULL”) and CALL OUT of archive medium to “20%” (the default is “NONE”).
ENGLISH
1. Display the <MENU SETTING> menu and turn the JOG
dial until the cursor is next to “REAR TERMINAL”.
COMMUNICATION SETTING
@REAR TERMINAL
SERVICE
2. Turn the SHUTTLE ring to the right to show the <REAR
TERMINAL> menu.
3. Turn the JOG dial until the cursor is next to “CAPACITY
REMAIN” and turn the SHUTTLE ring to flash the sub-item.
• The sub-item of the device will start flashing first. Choose
the device you want to set by using the JOG dial and SHUTTLE
ring. Then sub-item of the remain will start flashing.
<REAR TERMINAL>
MODE OUT PLAY
@CAPACITY REMAIN HDD-10%
4. Turn the SHUTTLE ring and JOG dial to show “HDD-50%”
and turn the SHUTTLE ring to the right to complete setting.
By turning the JOG dial, the subitem of CAP A CITY REMAIN shown on the menu will
be changed as follows:
HDD ARC NONE
1. Press the SET UP button to display the <MENU SETTING>
menu.
2.Turn the JOG dial to move the cursor to REAR TERMINAL
then turn the SHUTTLE ring to the right.
• The <REAR TERMINAL> menu will appear.
3. Turn the JOG dial until the cursor is next to “CALL OUT”
and turn the SHUTTLE ring to the right to show the <CALL
OUT> menu.
4. Confirm that the cursor is next to “HDD” and turn the
SHUTTLE ring to the right to flash the sub-item.
<CALL OUT>
@HDD(ID:0~3) FULL
ARCHIVE(ID:4) NONE
5. Turn the JOG dial to flash “10%” and turn the SHUTTLE
ring to the right to complete setting.
item of CAP A CITY REMAIN shown on the menu will
By turning the JOG dial, the subbe changed as follows:
10% 15% 20% 30% 40%
8% 6% 4% 2% 50%
5. Turn the SHUTTLE ring to the left or press the SET UP
button.
••••••••••••••••••••••••••••••••••••••••••••••••••••••••••••••••••••••••••••••••••••••••••••••••••••••••••••••••••••••••••••
of CALL OUT shown on the screen switches as
shown below:
FULL 2% 4% 6% 8% 10%
NONE 50% 40% 30% 20% 15%
“NONE”: No signal is emitted from the CALL OUT
terminal.
By turning the JOG dial, the item
Operations
27
Page 28

•
Various settings (continued)
6. Turn the JOG dial until the cursor is ne xt to “ARCHIVE” and
turn the SHUTTLE ring to the right.
• The sub-item will start flashing.
<CALL OUT>
HDD(ID:0~3) FULL
@ARCHIVE(ID:4) NONE
7. Turn the JOG dial to flash “20%” and turn the SHUTTLE
ring to the right.
• The sub-item stops flashing.
<CALL OUT>
HDD(ID:0~3) 10%
@ARCHIVE(ID:4) 20%
8. T urn the SHUTTLE ring to the left or press the SET UP button.
♦ Buzzer setting
You can set to sound a buzzer warning when the remaining storage capacity of the Hard Disk Drive reaches the
amount set in CAPACITY REMAIN setting on the <REAR
TERMINAL> menu. In addition to the above setting of
CALL OUT setting section, it is also possible to sound the
buzzer when other errors occur.
To sound the buzzer when the remaining storage capacity
reaches the preset amount.
1) Select “REMAIN” of BUZZER in the <REAR TERMINAL > menu.
2) Set the device and its remaining storage capacity of CAPACITY REMAIN in the <REAR TERMINAL> menu.
Example: Setting BUZZER to “REMAIN” (the default setting is “KEY”).
1. Display the <MENU SETTING> menu and turn the JOG
dial until the cursor is next to REAR TERMINAL. Then turn
the SHUTTLE ring to the right.
• The <REAR TERMINAL> menu appears.
<REAR TERMINAL>
@MODE OUT REMAIN
CAPACITY REMAIN HDD-10%
CALL OUT
2. Turn the JOG dial until the cursor is next to BUZZER and
turn the SHUTTLE ring to the right to flash the sub-item.
CALL OUT
@BUZZER KEY
3. Turn the JOG dial to show “REMAIN” and turn the SHUTTLE
ring to the right to complete setting.
• The sub-item stops flashing.
CALL OUT
@BUZZER REMAIN
By turning the JOG dial, the item of BUZZER
shown on the screen switches as shown below.
KEY WRNG REMAIN OFF
“REMAIN”: The buzzer sounds when the remaining
storage capacity of main HDD and ARCHIVE reaches
the preset amount selected in CAPACITY REMAIN.
Press WARNING RESET button to stop the buzzer.
“OFF”: The buzzer does not sound.
4. Turn the SHUTTLE ring to the left or press the SET UP
button.
■ Service menu setting
In the <SERVICE> menu, you can see the power failure
time, reset the Archive Pointer, initialize menus and IMCHECK mode.
♦ Power Failure list
The list of times when the power failure occurred is available.
Example: Displaying POWER FAILURE list.
Up to 50 power failure start times are shown on
the list. If more than 50 times, the last 50 start times
are shown.
1. Display the <MENU SETTING > menu and turn the JOG
dial until the cursor is next to SERVICE. Tur n the SHUTTLE
ring to the right.
• The <SERVICE> menu appears.
<SERVICE>
@POWER FAILURE
ARCHIVE POINT RESET OFF
MENU INITIALIZE OFF
IM-CHECK MODE OFF
2. Chec k that the cursor is next to PO WER FAILURE and turn
the SHUTTLE ring to the right.
<POWER FAILURE>
No. DATE TIME INFO.
02 25-01-01 12:02 PW-LOS
01 23-01-01 12:35 PW-LOS
• The <POWER FAILURE> list appears on the screen.
• The number of times, the date and the time when the power
failure occurred are given on the list.
To reset the power failure start time, press the
WARNING RESET button when the <PO WER F AILURE> list is shown on the screen.
3. Turn the SHUTTLE ring to the left or press the SET UP
button.
♦ Resetting the Archive Pointer
This unit writes down an Archive Pointer
ing where the last archive stopped. In the next archive, it
starts from the point where the Archive Pointer is last
placed. If y ou want to reset this Archiv e Pointer, f ollow the
steps shown below.
1. Press the SET UP button to display the <MENU SETTING>
menu.
Glossary
indicat-
28
2. Move the cursor next to SERVICE then turn the SHUTTLE
“KEY”: The buzzer sounds when any button is
pressed, or JOG dial or SHUTTLE ring is turned.
“WRNG”: The buzzer sounds when a warning occurs. Refer to page 84, “War nings and CALL OUT
output”, for details.
ring to the right.
• The <SERVICE> menu appears.
<SERVICE>
@POWER FAILURE
ARCHIVE POINT RESET OFF
MENU INITIALIZE OFF
IM-CHECK MODE OFF
•••••••••••••••••••••••••••••••••••••••••••••••••••••••••••••••••••••••••••••••••••••••••••••••••••••••••••••••••••••••••••••••••••••••••••
Page 29

3. T urn the JOG dial until the cursor is ne xt to ARCHIVE POINT
RESET and turn the SHUTTLE ring to the right.
• The sub-item will start flashing.
4. Turn the JOG dial until “ON” flashes.
<SERVICE>
POWER FAILURE
@ARCHIVE POINT RESET ON
MENU INITIALIZE OFF
IM-CHECK MODE OFF
5. When the message, “TURN THE SHUTTLE RING >> TO
EXECUTE.” is shown on the screen, turn the SHUTTLE ring
to the right.
• The Archive Pointer is now reset.
• If not executing, turn the JOG dial until “OFF” is shown.
<SERVICE>
POWER FAILURE
@ARCHIVE POINT RESET ON
MENU INITIALIZE OFF
IM-CHECK MODE OFF
TURN THE SHTTLE RING
>> TO EXECUTE.
6. Turn the SHUTTLE ring to the left or press the SET UP
button.
♦ Initializing menus
Selecting “ON” of MENU INITIALIZE in the <SERVICE>
menu initializes the setting ,except for the built-in HDD
and the peripheral recording device.
• Please note that time date display, timer program setting,
the title of all cameras set in CAMERA TITLE of the <MPX
DISPLAY> menu are not initialized.
• The SELECTED PATTERN setting will be initialized to P1 of
TIMER PROGRAM on the <MENU SETTING> menu. Please
refer to the Menu displays on page 50.
♦ IM-CHECK MODE setting
This function is designed to confirm whether alterations
have been made to the data recorded by the unit.
Example: Setting IM-CHECK MODE to “ON” (the default is
“OFF”).
1. Press the SET UP button to display the <MENU SETTING>
menu.
2. Move the cursor next to SERVICE then turn the SHUTTLE
ring to the right.
• The <SERVICE> menu appears.
3. Turn the JOG dial until the cursor is next to IM-CHECK
MODE and turn the SHUTTLE ring to the right.
• The sub-item will start flashing.
4. Turn the JOG dial until “ON” flashes.
<SERVICE>
POWER FAILURE
ARCHIVE POINT RESET OFF
MENU INITIALIZE OFF
@IM-CHECK MODE ON
ENGLISH
Example: Setting MENU INITIALIZE to “ON” (the default
is “OFF”).
1. Press the SET UP button to display the <MENU SETTING>
menu.
2. Mov e the cursor next to SERVICE then turn the SHUTTLE
ring to the right.
• The <SERVICE> menu appears.
3. Turn the JOG dial until the cursor is next to MENU
INITIALIZE and turn the SHUTTLE ring to the left to show
“ON”.
<SERVICE>
POWER FAILURE
ARCHIVE POINT RESET OFF
@MENU INITIALIZE ON
IM-CHECK MODE OFF
4. When “PUSH WARNING RESET KEY THEN ALL MENU
WILL BE INITIALIZED.” appears on the screen, press the
WARNING RESET button.
<SERVICE>
POWER FAILURE
ARCHIVE POINT RESET OFF
@MENU INITIALIZE ON
IM-CHECK MODE OFF
PUSH WARNING RESET KEYŁ
THEN ALL MENU
WILL BE INITIALIZED.
• If not executing, change the sub-item to “OFF” and turn
the SHUTTLE ring to the right.
5. Turn the SHUTTLE ring to the left or press the SET UP
button.
INFORMATION
To distinguish alterations to recorded data:
• Use the PLAY DEVICE button to select the device
that is to be inspected for alterations.
• Press the PLAY button to begin playback of recorded data.
• If an alteration is detected on part of the data during
playback, “ ■ ” will appear to the right of the “A” (Alarm
Recording number) in the Time Display. “ ■ ” indicates the CAMERA channel of the altered data.
28-10-2001 SUN A
00:00:00 25F 50% C16
WARNING: MODIFIED IMAGE
(
QWERTYUIOP{}qwer
)
• The displayed “ ■ ” and the W ARNING displa y can
be cleared by pressing the WARNING RESET button.
• This function does not work with the communication function.
5. SPLIT 16 screen will be shown on the monitor and all menus
are initialized.
06-09-2000 12:12:05
Q
W
ER
T
Y
O
P{
q
w
I
U
}
e
r
If you don’t use this function, please select the
sub-item “OFF”.
••••••••••••••••••••••••••••••••••••••••••••••••••••••••••••••••••••••••••••••••••••••••••••••••••••••••••••••••••••••••••••
Operations
29
Page 30

•
Various settings (continued)
STOP REC•STANDBY
ALARM•PROT REPEAT
<INITIAL SET UP>
TIME DATE ADJUST
HDD FULL STOP
@HDD PB REPEAT STOP
ARCHIVE OVERWRITE OFF
AUTO EJECT ON
ARCHIVE DATA ALL
<INITIAL SET UP>
TIME DATE ADJUST
HDD FULL STOP
@HDD PB REPEAT REPEAT
ARCHIVE OVERWRITE OFF
AUTO EJECT ON
ARCHIVE DATA ALL
■ Initial set up
In the <INITIAL SET UP> menu, it is possible to set several items such as the present day and time, a function of
this unit when the storage capacity of HDD runs out and
during playback.
5. Turn the SHUTTLE ring to the left or press the SET UP
button.
♦ Clock setting
Refer to page 11, “Setting the present time” for details.
♦ HDD repeat recording
This function is used to set the function of this unit when
the storage capacity of HDD is running out.
Example: Setting HDD FULL to “REC•STANDBY” (the default setting is “STOP”).
1. Press the SET UP button to display the <MENU SETTING>
menu.
2. Turn the JOG dial to move the cursor next to INITIAL SET
UP and turn the SHUTTLE ring to the right.
• The <INITIAL SET UP> menu will appear.
<INITIAL SET UP>
@TIME DATE ADJUST
HDD FULL
HDD PB REPEAT
ARCHIVE OVERWRITE
STOP
STOP
OFF
3. Turn the JOG dial until the cursor is next to HDD FULL and
turn the SHUTTLE ring to the right.
• The sub-item flashes.
<INITIAL SET UP>
TIME DATE ADJUST
@HDD FULL
HDD PB REPEAT
ARCHIVE OVERWRITE
STOP
STOP
OFF
4. Turn the JOG dial to show “REC•STANDBY” and turn the
SHUTTLE ring to the right.
• The sub-item stops flashing.
<INITIAL SET UP>
TIME DATE ADJUST
@HDD FULL
HDD PB REPEAT
ARCHIVE OVERWRITE
REC•STANDBY
STOP
OFF
♦ HDD repeat playback
It is a function which repeats playback of the recording on
main HDD.
Example: Setting HDD PB REPEAT to “REPEAT” (the default is “STOP”).
1. Display the <MENU SETTING> menu on the screen and
turn the JOG dial until the cursor is next to INITIAL SET UP
and turn the SHUTTLE ring to the right.
• The <INITIAL SET UP> menu appears.
<INITIAL SET UP>
@TIME DATE ADJUST
HDD FULL
HDD PB REPEAT
ARCHIVE OVERWRITE
AUTO EJECT
ARCHIVE DATA
MOTION DETECTION
LANGUAGE SELECTION
STOP
STOP
OFF
ON
ALL
OFF
2. Turn the JOG dial until the cursor is next to HDD PB REPEAT
and turn the SHUTTLE ring to the right.
• The sub-item will start flashing.
3. Turn the JOG dial until “REPEAT” flashes and turn the
SHUTTLE ring to the right.
• The sub-item stops flashing.
item of HDD FULL will be changed as follows:
“STOP”: When the disk reaches its end during re-
cording, the recording stops and “HDD FULL” is
shown on the screen.To start recording again, press
the WARNING RESET button to clear the warning
message and press the REC button.
“REC•STANDBY”: If the storage capacity of HDD
runs out, the recording stops and the unit stays on
the stand-by mode (power on). Then, once REC
terminal is grounded or press the REC button, it
starts recording again.
“REPEAT”: When the disk reaches its end during
recording, the recording starts again from the beginning of the disk.
“ALARM•PROT”: If there is an alarm recording after
finishing the ALARM•PROT setting, the action of this
unit is the same as when set to “STOP”. If there is
no alarm recording during recording, this unit starts
recording again from the beginning of the disk.
30
•••••••••••••••••••••••••••••••••••••••••••••••••••••••••••••••••••••••••••••••••••••••••••••••••••••••••••••••••••••••••••••••••••••••••••
By turning the JOG dial, the sub-
Another setting of HDD PB REPEAT:
“STOP”: The unit stops pla ybac k at the end of HDD .
4. Turn the SHUTTLE ring to the left or press the SET UP
button.
♦ Archive medium overwrite setting
Setting whether to overwrite on archive medium when making a new archive can be selected on the menu.
Example: Setting ARCHIVE OVERWRITE to “ON” (the
default setting is “OFF”).
When ARCHIVE O VER WRITE is set to “ON”, all
data on the archive medium will be erased. Make
sure to confirm the content in the archive medium
before starting to make the backup.
1. Display the <MENU SETTING> menu on the screen. Turn
the JOG dial until the cursor is next to “INITIAL SET UP” and
turn the SHUTTLE ring to the right.
• The <INITIAL SET UP> menu is shown on the screen.
Page 31

COMMUNICATION SETTING
HDD PB REPEAT STOP
ARCHIVE OVERWRITE OFF
@AUTO EJECT OFF
ARCHIVE DATA ALL
<INITIAL SET UP>
@TIME DATE ADJUST
HDD FULL
HDD PB REPEAT
ARCHIVE OVERWRITE
AUTO EJECT
ARCHIVE DATA
MOTION DETECTION
LANGUAGE SELECTION
STOP
STOP
OFF
ON
ALL
OFF
HDD PB REPEAT STOP
ARCHIVE OVERWRITE OFF
AUTO EJECT OFF
@ARCHIVE DATA ALL
HDD PB REPEAT STOP
ARCHIVE OVERWRITE OFF
AUTO EJECT ON
@ARCHIVE DATA ALARM
REAR TERMINAL
SERVICE
@INITIAL SET UP
2. Move the cursor to ARCHIVE OVERWRITE and turn the
SHUTTLE ring to the right until the sub-item flashes.
<INITIAL SET UP>
TIME DATE ADJUST
HDD FULL
HDD PB REPEAT
@ARCHIVE OVERWRITE
AUTO EJECT
ARCHIVE DATA
MOTION DETECTION
LANGUAGE SELECTION
STOP
STOP
OFF
ON
ALL
OFF
3. Turn the JOG dial until “ON” flashes and turn the SHUTTLE
ring to the right.
• The sub-item stops flashing.
<INITIAL SET UP>
TIME DATE ADJUST
HDD FULL
HDD PB REPEAT
@ARCHIVE OVERWRITE
The Archive Pointer
Glossary
STOP
STOP
ON
is recorded when
backup is either temporarily stopped or finished.
Using this, the unit will begin the next backup at the
end point of the previous backup.
4. Turn the SHUTTLE ring to the left or press the SET UP
button.
Archive medium is also ejected when the ARCHIVE
button is pressed once again, after operation has been
initiated with the ARCHIVE button. Refer to page 62,
“Auto-eject at the completion of backup” for details.
♦ ARCHIVE DATA setting
When backing up records onto backup media, it is possible to select and back up only the “ALARM” part of the
records by setting ARCHIVE DATA to “ALARM”.
Example: Setting backup operation selection to “ALARM”
(the default is “ALL”).
1. Press the SET UP button to display the <MENU SETTING>
menu.
2. Move the cursor to INITIAL SET UP and turn the SHUTTLE
ring to the right.
• The <INITIAL SET UP> menu will be displayed.
ENGLISH
4. Turn the SHUTTLE ring to the left or press the SET UP
button.
<INITIAL SET UP>
TIME DATE ADJUST
HDD FULL
HDD PB REPEAT
@ARCHIVE OVERWRITE
AUTO EJECT
♦ Auto-eject setting
This setting is for ejecting the medium of an archive device
STOP
STOP
ON
ON
3. Turn the JOG dial move the cursor to ARCHIVE DATA. Turn
the SHUTTLE ring to the right.
• Turn the JOG dial to make the selection options flash.
automatically. If you set to “ON” and make the back up
timer program, the archive medium is ejected automatically at the end of the programmed time. If you set to “OFF”,
the archive medium will not be ejected.
Example: Setting AUTO EJECT to “OFF” (the default is
“ON”).
4. Turn the JOG dial to make the “ALARM” option flash.Tur n
the SHUTTLE ring to the right.
• The sub-item stops flashing.
1. Display the <MENU SETTING> menu on the screen and
turn the JOG dial until the cursor is next to INITIAL SET UP
and turn the SHUTTLE ring to the right.
• The <INITIAL SET UP> menu appears.
<INITIAL SET UP>
@TIME DATE ADJUST
HDD FULL
HDD PB REPEAT
ARCHIVE OVERWRITE
AUTO EJECT
ARCHIVE DATA
STOP
STOP
OFF
ON
ALL
2. Turn the JOG dial until the cursor is next to AUTO EJECT
and turn the SHUTTLE ring to the right.
• When the sub-item is flashing, turn the JOG dial until “OFF”
starts flashing.
HDD PB REPEAT STOP
ARCHIVE OVERWRITE OFF
@AUTO EJECT OFF
ARCHIVE DATA ALL
3. Check “OFF” is flashing and turn the SHUTTLE ring to the
right.
••••••••••••••••••••••••••••••••••••••••••••••••••••••••••••••••••••••••••••••••••••••••••••••••••••••••••••••••••••••••••••
5. Turn the SHUTTLE ring to the left or press the SET UP
button.
By turning the JOG dial, the subitem of ARCHIVE DATA sho wn on the menu will be
changed as follows:
“ALL”: This backs up all the data recorded on the
main HDD after the ARCHIVE POINTER. Alternatively, all data will be backed up.
“ALARM”: Of all the data blocks recorded on the
main HDD(1 MB units), this will back up only the
data blocks that contain the alarm record. Some data
either side of the alarm record may be included when
backing up a small alarm record.
Operations
31
Page 32

•
Various settings (continued)
1). Backing up a data block containing the alarm record.
Normal recording
Main
HDD
Archive
media
Alarm recording
1MB
Backup recording
1MB
2). Backing up a small alarm record.
Main
HDD
Archive
media
Normal recording
1MB
Alarm recording
Normal recording
1MB
Backup recording
♦ FIFO/OVERWRITE MODE setting
This is the setting for repeated backup to the HDD connected
to ID4. The setting item for this function is displayed in the
menu only when an HDD is connected to ID4. When a power
failure has occurred during a backup, the backup operation
does not recover automatically. Press the ARCHIVE button
to restart the backup. (At the time of timer reservation, backup
restarts automatically after recovery from the power failure.)
At this time, all data backed up until the occurrence of
the power failure will be lost, and the backup pointer
also returns to the backup start point before the occurrence of the power failure. Please pay attention to this.
Before making the FIFO/OVERWRITE MODE
setting, confirm that an HDD is connected correctly
to ID4.
Example: Setting FIFO/OVERWRITE MODE to “ON” (the
default is “OFF”).
1. Press the SET UP button to display the <MENU SETTING>
menu.
2. Move the cursor to INITIAL SET UP and turn the SHUTTLE
ring to the right.
• The <INITIAL SET UP> menu will be displayed.
<INITIAL SET UP>
@TIME DATE ADJUST
HDD FULL
HDD PB REPEAT
ARCHIVE OVERWRITE
AUTO EJECT
ARCHIVE DATA
FIFO/OVERWRITE MODE
MOTION DETECTION
LANGUAGE SELECTION
STOP
STOP
OFF
ON
ALL
OFF
OFF
3. Turn the JOG dial move the cursor to FIFO/OVERWRITE
MODE. Turn the SHUTTLE ring to the right.
• Turn the JOG dial to make the selection options flash.
ARCHIVE OVERWRITE OFF
AUTO EJECT OFF
ARCHIVE DATA ALL
@FIFO/OVERWRITE MODE OFF
4. Turn the JOG dial to make the “ON” option flash.Turn the
SHUTTLE ring to the right.
• The sub-item stops flashing.
ARCHIVE OVERWRITE OFF
AUTO EJECT OFF
ARCHIVE DATA ALL
@FIFO/OVERWRITE MODE ON
5. Turn the SHUTTLE ring to the left or press the SET UP
button.
♦ Motion Detection setting
To use MOTION DETECTION, first turn the setting “ON” in
the INITIAL SET UP menu.
The <MOTION DETECTION> menu cannot be
displayed when this setting is OFF. The sub menu
of M-DET SETTING menu of A-REC/M-DET SETTING cannot be accessed when the MOTION DETECTION is set to OFF.
Example: Setting MOTION DETECTION to “ON” (the default is “OFF”).
1. Display the <MENU SETTING> menu on the screen and
turn the JOG dial to select the INITIAL SET UP ,and turn the
SHUTTLE ring to the right.
• The <INITIAL SET UP> menu appears.
<INITIAL SET UP>
@TIME DATE ADJUST
HDD FULL
HDD PB REPEAT
ARCHIVE OVERWRITE
AUTO EJECT
ARCHIVE DATA
MOTION DETECTION
LANGUAGE SELECTION
STOP
STOP
OFF
ON
ALL
OFF
2. Turn the JOG dial to select the MOTION DETECTION and
turn the SHUTTLE ring to the right.
• The sub-item will start flashing.
<INITIAL SET UP>
TIME DATE ADJUST
HDD FULL
HDD PB REPEAT
ARCHIVE OVERWRITE
AUTO EJECT
ARCHIVE DATA
@MOTION DETECTION
LANGUAGE SELECTION
STOP
STOP
OFF
ON
ALL
OFF
3. Turn the JOG dial until ON flashes and turn the SHUTTLE
ring to the right.
• The sub-item stops flashing.
<INITIAL SET UP>
TIME DATE ADJUST
HDD FULL
HDD PB REPEAT
ARCHIVE OVERWRITE
AUTO EJECT
ARCHIVE DATA
@MOTION DETECTION
LANGUAGE SELECTION
STOP
STOP
OFF
ON
ALL
ON
4. Turn the SHUTTLE ring to the left or press the SET UP
button.
Please set the MOTION DETECTION to “OFF” ,
when the function is not needed.
When the MOTION DETECTION setting in the
INITIAL SET UP menu is turned ON, the MAX REC
FIELDS for each time setting will be automatically
altered as follows. These settings will not auto-
matically revert to their former values even if
MOTION DETECTION is turned OFF.
32
•••••••••••••••••••••••••••••••••••••••••••••••••••••••••••••••••••••••••••••••••••••••••••••••••••••••••••••••••••••••••••••••••••••••••••
Page 33

Case of <NORMAL REC SETTING> menu and <A-
<ELAPSED TIME>
MAIN 1500H
ARCHIVE 200H
COPY 120H
REC/M-DET SETTING> menu.
“25F” } “12.5F”, “8.33F” } “6.25F” , “5F” } “4.17F”
Case of “MODE” in the <TIMER PROGRAM> menu.
“25” } “12.5”, “8.33” } “6.25” , “5” } “4.17”
When the MOTION DETECTION setting in the
<INITIAL SET UP> menu is turned ON, “A-REC DURATION” setting in the <A-REC/M-DET SETTING>
menu can not select to “MAN”. Prior setting of “MAN”
will automatically be changed to “2S”.
When the MOTION DETECTION setting is subsequently set to
“OFF”, this setting will not revert to the former
values ; they will remain “2S”.
■ The <INFORMATION> menu
This unit has functions which allow you to check information such as the recorded period and SCSI ID number of
the main HDD and peripheral devices.
♦ Showing the recorded period
The recorded period of the main HDD, the archive device
and the copying device is shown on the screen.
1. Press the INFO button.
• The <INFORMATION> menu appears.
2. Check that the cursor is next to RECORDED PERIOD and
turn the SHUTTLE ring to the right.
3. The message, “GET S/E INFORMATION. TURN THE
SHUTTLE RING >> TO EXECUTE.” is shown on the screen
and then turn the SHUTTLE ring to the right.
• The <RECORDED PERIOD> menu is shown.
<RECORDED PERIOD>
MAIN DEVICE:
FROM 05-03-01 06:19:56
TO 15-03-01 09:02:52
ARCHIVE DEVICE:
FROM 05-03-01 06:19:56
TO 15-03-01 09:02:52
COPY DEVICE:
FROM 05-03-01 06:19:56
TO 15-03-01 09:02:52
4. Turn the SHUTTLE ring to the left or press the INFO button.
■ Elapsed time display
The elapsed time of main HDD, archive device and copy
device are shown on the screen. ELAPSED TIME for ARCHIVE or COPY will not be displayed unless an ARCHIVE
device or COPY device has been connected to the unit.
The elapsed time of main HDD is counted while
the unit’s power is turned on.
The elapsed time of the peripheral device (ID4) is
counted as shown below:
1) While the ARCHIVE button illuminates or flashes.
2) While the PLAY or REV PLAY button illuminates
or flashes when the archive device is selected as a
playback device using the PLAY DEVICE button.
Refer to page 15, “Basic playback” for details.
3) While the COPY indicator illuminates or flashes
when restoring the data from archive device to main
HDD.
The elapsed time of the peripheral device (ID5)
is counted as shown below.
1) While the PLAY or REV PLAY button illuminates
or flashes when the copying device is selected as a
playback de vice using the PLA Y DEVICE button. Refer to page 15, “Basic playback” for details.
2) While the COPY indicator illuminates or flashes
when copying the data from main HDD to the copy
ing device.
3) While the COPY indicator illuminates or flashes
when restoring the data from the copying device to
main HDD .
1. Press the INFO button.
• The elapsed time is shown on the lower part of the screen.
ENGLISH
♦ Connected SCSI device
The SCSI ID number of connected devices can be confirmed on the screen.
1. Press the INFO button.
• The <INFORMATION> menu appears.
2. Turn the JOG dial until the cursor is next to “CONNECTED
SCSI DEVICE” and turn the SHUTTLE ring to the right.
• SCSI ID numbers are shown on the screen.
<CONNECTED SCSI DEVICE>
SCSI ID0:HDD( 60GB)
ID1:HDD( 9GB)
ID2:NONE
ID3:NONE
ID4:DDS
ID5:NONE
2. After confirming the elapsed time, turn the SHUTTLE ring
to the left.
• To exit the menu, press the INFO button again.
• The elapsed time of archive device or copying device will
not be reset even though those devices are disconnected.
• The elapsed time of archive device includes the time when
the ARCHIVE button is pressed (when pressed, the ARCHIVE
button illuminates) even in the case where there is no data
on the main HDD such as an alarm stand-by mode.
• The elapsed time shown on this menu may not be consistent
with the regulation guaranteed period of the stock of wearing
parts subject to wear or the guaranteed life span.
INFORMATION
The elapsed time is shown up to
999999 hours at the maximum.
3. Turn the SHUTTLE ring to the left or press the INFO button.
••••••••••••••••••••••••••••••••••••••••••••••••••••••••••••••••••••••••••••••••••••••••••••••••••••••••••••••••••••••••••••
Operations
33
Page 34

•
Various settings (continued)
■ Quick setting
Complex menu settings, made in response to various uses,
can be saved on RDD media connected to the unit through
ID5. These settings can also be read by the unit from the
RDD when needed.
One set of menu settings can be saved per one
unit of RDD media. As men u settings are overwritten
each time the same unit of RDD media is used to
save this information, only the most recently saved
set of menu settings is left stored on the medium.
Furthermore, menu settings are also overwritten
when the unit reads them from the RDD.
♦ RDD
Example: The unit reads menu settings stored on the RDD
medium.
1. Press the POWER button while pressing the ARCHIVE
button to turn the power on.
}}
} MENU DATA LOADING setting
}}
• The <QUICK SETTING> menu will appear.
<QUICK SETTING>
@RDD}MENU DATA LOADING
MENU DATA SAVING}RDD
POWER OFF
POWER OFF is displayed if a peripheral device
is not connected to ID5.
5. The message, “COMPLETED.” is shown on the screen
and then turn the SHUTTLE ring to the left.
• The message “COMPLETED.” will disappear.
6. Turn the JOG dial to select the POWER OFF, and turn the
SHUTTLE ring to the right to define the setting.
• The power of this unit will be turned off.
<QUICK SETTING>
RDD}MENU DATA LOADING
MENU DATA SAVING}RDD
@POWER OFF
♦ MENU DATA SAVING
}}
} RDD setting
}}
Example: The RDD media saves menu settings stored on
the unit.
1. Press the POWER button while pressing the ARCHIVE
button to turn the power on.
• The <QUICK SETTING> menu will appear.
<QUICK SETTING>
@RDD}MENU DATA LOADING
MENU DATA SAVING}RDD
POWER OFF
When settings are being made, the POWER but-
ton blinks and the unit does not accept any other
commands.
2. Make sure that the cursor ( ) is set to the “RDD}MENU
DATA LOADING”, and turn the SHUTTLE ring to the right.
• When “TURN THE SHUTTLE RING >> TO EXECUTE.”
appears on the screen.
<QUICK SETTING>
@RDD}MENU DATA LOADING
MENU DATA SAVING}RDD
POWER OFF
TURN THE SHUTTLE RING
> > TO EXECUTE.
3. Turn the SHUTTLE ring twice to the right.
• “LOADING...” is displayed, and data reading is initiated.
<QUICK SETTING>
@RDD}MENU DATA LOADING
MENU DATA SAVING}RDD
POWER OFF
LOADING...
4. “COMPLETED.” is displayed when data reading has been
completed.
<QUICK SETTING>
@RDD}MENU DATA LOADING
MENU DATA SAVING}RDD
POWER OFF
COMPLETED.
POWER OFF is displayed if a peripheral device
is not connected to ID5.
When settings are being made, the POWER but-
ton blinks and the unit does not accept any other
commands.
2. Turn the JOG dial to select the “MENU D A TA SAVING}RDD”,
and turn the SHUTTLE ring to the right.
• When “TURN THE SHUTTLE RING >> TO EXECUTE.”
appears on the screen.
<QUICK SETTING>
RDD}MENU DATA LOADING
@MENU DATA SAVING}RDD
POWER OFF
TURN THE SHUTTLE RING
> > TO EXECUTE.
3. Turn the SHUTTLE ring twice to the right.
• “SAVING...” is displayed, and data saving is initiated.
“COMPLETED.” is displayed when data saving has been
completed.
<QUICK SETTING>
RDD}MENU DATA LOADING
@MENU DATA SAVING}RDD
POWER OFF
SAVING...
4. The message , “COMPLETED.” is shown on the screen
and then turn the SHUTTLE ring to the left.
• The message “COMPLETED.” will disappear.
5. Turn the JOG dial to select the POWER OFF, and turn the
SHUTTLE ring to the right to define the setting.
• The power of this unit will be turned off.
•••••••••••••••••••••••••••••••••••••••••••••••••••••••••••••••••••••••••••••••••••••••••••••••••••••••••••••••••••••••••••••••••••••••••••
34
Page 35

Various recording settings
<A-REC/M-DET SETTING>
@IMAGE QUALITY HIGH
MAX REC FIELDS 12.5F
DEFINE GROUP SETTING
A-REC DURATION 15S
■ Various recording settings
This Unit has many settings for various recordings needs. You have to make settings on different pages for normal
recording and timer recording. Please refer to the table below for details. If the channel which is to be operated on
<DEFINE GROUP SETTING> is not set, the warning will appear .
Recording
Setting
Image quality
Normal recording
IMAGE QUALITY in
<NORMAL REC SETTING>
Recording by setting manually Timer recording
<NORMAL REC SETTING>
IMAGE QUALITY
MAX REC FIELDS
SELECT REC MODE
HIGH
12.5F
(A)
Alarm recording
Page
IMAGE QUALITY in
<A-REC/M-DET SETTING>
page
<A-REC/M-DET SETTING>
IMAGE QUALITY
12
MAX REC FIELDS
DEFINE GROUP SETTING
12.5F
HIGH
Normal recording
Page
IMAGE QUALITY in
<NORMAL REC SETTING>
This
<NORMAL REC SETTING>
IMAGE QUALITY
page
MAX REC FIELDS
SELECT REC MODE
HIGH
12.5F
(A)
Alarm recording
Page
IMAGE QUALITY in
<A-REC/M-DET SETTING>
page
<A-REC/M-DET SETTING>
IMAGE QUALITY
12
MAX REC FIELDS
DEFINE GROUP SETTING
HIGH
12.5F
Page
This
page
ENGLISH
Maximum
recording
setting
MAX REC FIELDS in
<NORMAL REC SETTING>
<NORMAL REC SETTING>
IMAGE QUALITY
MAX REC FIELDS
SELECT REC MODE
HIGH
12.5F
(A)
MAX REC FIELDS in
<A-REC/M-DET SETTING>
page
<A-REC/M-DET SETTING>
13
IMAGE QUALITY
MAX REC FIELDS
DEFINE GROUP SETTING
12.5F
A-REC DURATION in
Recording
duration
Recording
camera channel
(CH)
Selected SELECT REC
MODE pattern on
<NORMAL REC SETTING>
<NORMAL REC SETTING>
IMAGE QUALITY
MAX REC FIELDS
SELECT REC MODE
HIGH
12.5F
(A)
<A-REC/M-DET SETTING>
DEFINE GROUP SETTING
A-REC DURATION
RECORD ALARM
PRE A-REC
Selected RECORD ALARM
setting on
<A-REC/M-DET SETTING>
page
DEFINE GROUP SETTING
13
A-REC DURATION
RECORD ALARM
PRE A-REC
♦ Image quality setting
For details please refer to “Setting the image quality” on
page 12.
♦ The maximum recording fields setting
For details please refer to “Setting the maximum recording
fields” on page 13.
♦ Estimated recording time <ESTD TIME>
For details please refer to “Setting the maximum recording
fields” on page 13.
MAX REC FIELDS in
<A-REC/M-DET SETTING>
page
<A-REC/M-DET SETTING>
50
IMAGE QUALITY
MAX REC FIELDS
DEFINE GROUP SETTING
12.5F
A-REC DURATION in
<A-REC/M-DET SETTING>
page
DEFINE GROUP SETTING
50
A-REC DURATION
RECORD ALARM
PRE A-REC
Selected RECORD ALARM
setting on
<A-REC/M-DET SETTING>
page
DEFINE GROUP SETTING
50
A-REC DURATION
RECORD ALARM
PRE A-REC
HIGH
15S
SEP
OFF
15S
SEP
OFF
HIGH
15S
SEP
OFF
15S
SEP
OFF
MODE setting in
<TIMER PROGRAM>
page
36
<TIMER PROGRAM> P1
DW START END MODE
WED 09:30 10:00 A-12.5
2 --- --:-- --:-- ------
START and END time in
<TIMER PROGRAM>
page
<TIMER PROGRAM> P1
36
DW START END MODE
WED 09:30 10:00 A-12.5
2 --- --:-- --:-- ------
Selected SELECT REC
MODE pattern on
MODE setting
of <TIMER PROGRAM>
page
<TIMER PROGRAM>
37
DW START END MODE
WED 09:30 10:00 A-12.5Ł
2 --- --:-- --:-- ------
“5M” (the default setting is “15S”).
To use “PRI” setting, first turn the setting “ALL”
on the “RECORD ALARM” setting. The “FILD” setting will appear.
1. Displa y the <MENU SETTING> menu. Turn the JOG dial to
A-REC/M-DET SETTING then turn the SHUTTLE ring to the
right.
• The <A-REC/M-DET SETTING> menu will appear.
page
36
page
36
page
37
♦ Image quality, Max recording fields, Define group
setting and Alarm recording duration setting
When the ALARM IN terminal is triggered by an alarm sensor and CH. MOTION DETECTION setting, the unit will
2. Turn the JOG dial to move the cursor to IMAGE QUALITY
and turn the SHUTTLE ring to the right.
• The sub-item will start flashing.
switch to its preset recording intervals, and can record at
both the regular recording intervals and another recording
interval. In addition, settings can be made for the recording intervals and image quality used when the ALARM IN
terminal is triggered.
The image quality settings for NORMAL REC
@IMAGE QUALITY HIGH
MAX REC FIELDS 12.5F
DEFINE GROUP SETTING
SETTING have to be set on the same menu. For
Example: Setting the IMAGE QUALITY to “BASIC” (the
default setting is “HIGH”). Set the MAX REC FIELDS to
details of settings for recordings, please refer to page
12.
“6.25F” (the default setting is “12.5F”). Setting the CAMERA CH.Q on the SELECT REC MODE menu as PRIORITY to “5”, CAMERA CH.5 as PRIORITY to “-” (the
default setting is all “1” ). Setting the A-REC DURATION to
••••••••••••••••••••••••••••••••••••••••••••••••••••••••••••••••••••••••••••••••••••••••••••••••••••••••••••••••••••••••••••
Operations
35
Page 36

•
Various recording settings (continued)
<DEFINE ALARM GROUP>
CH PRI FILD CH PRI FILD
@Q 1 0.39 O 1 0.39
W 1 0.39 P 1 0.39
E 1 0.39 { 1 0.39
R 1 0.39 } 1 0.39
T 1 0.39 q 1 0.39
<DEFINE ALARM GROUP>
CH PRI FILD CH PRI FILD
@Q 5 0.07 O 1 0.39
W 1 0.39 P 1 0.39
E 1 0.39 { 1 0.39
R 1 0.39 } 1 0.39
T 1 0.39 q 1 0.39
<DEFINE ALARM GROUP>
CH PRI FILD CH PRI FILD
Q 5 0.08 O 1 0.41
W 1 0.41 P 1 0.41
E 1 0.41 { 1 0.41
R 1 0.41 } 1 0.41
@T - q 1 0.41
Y 1 0.41 w 1 0.41
U 1 0.41 e 1 0.41
I 1 0.41 r 1 0.41
3. Turn the JOG dial to flash “BASIC” and turn the SHUTTLE
ring to the right.
• The sub-item stops flashing. Check that the IMAGE QUALITY
is defined correctly.
@IMAGE QUALITY BASIC
MAX REC FIELDS 12.5F
DEFINE GROUP SETTING
item of the IMAGE QLTY shown on the menu will be
changed as follows:
HIGH SUPERIOR BASIC
4. Turn the JOG dial to move the cursor to MAX REC FIELDS
and turn the SHUTTLE ring to the right.
• The sub-item will start flashing.
5. Turn the JOG dial to display “6.25F” and turn the SHUTTLE
ring to the right to define the setting.
• The sub-item will stop flashing. Check that the MAX REC
FIELDS is defined correctly.
By turning the JOG dial, the sub-
MEDIUM STANDARD
@MAX REC FIELDS 12.5F
DEFINE GROUP SETTING
A-REC DURATION 15S
8. Turn the JOG dial to display “ 5 ” then turn the SHUTTLE
ring to the right.
• The “-” is now selected.
9. Repeat Step 7 and 8 setting CAMERA CH.T and turn the
SHUTTLE ring to the right .
• The sub-item will stop flashing. Check that the CAMERA
CH. is defined correctly.
@MAX REC FIELDS 6.25F
DEFINE GROUP SETTING
A-REC DURATION 15S
By turning the JOG dial, the sub-
item of the MAX REC FIELDS shown on the menu
will be changed as follows:
25F 12.5F 8.33F 6.25F
1F 2.5F 4.17F 5F
The underlined items cannot be selected when
the MOTION DETECTION setting is active.
When the MOTION DETECTION setting in the
INITIAL SET UP menu is turned ON, the MAX REC
FIELDS for each time setting will be automatically
altered as follows. These settings will not automatically revert to their former values even if MOTION
DETECTION is turned OFF.
Case of <NORMAL REC SETTING> menu and <AREC/M-DET SETTING> menu.
“25F” } “12.5F”, “8.33F” } “6.25F” , “5F” } “4.17F”
Case of “MODE” in the <TIMER PROGRAM> menu.
“25” } “12.5”, “8.33” } “6.25” , “5” } “4.17”
When the “ - ” is assigned, the camera is disabled.
By turning the JOG dial, the sub-
item of the priority shown on the menu will be
changed as follows:
1 2 3
- 5 4
The define group settings for normal recording
have to be set on the DEFINE GROUP SETTING in
the <NORMAL REC SETTING> menu. For details
of settings for recordings, please refer to page 14.
10. Turn the SHUTTLE ring to the left.
• The <A-REC/M-DET SETTING> menu will appear.
11. Turn the JOG dial to move the cursor to A-REC DURATION
and turn the SHUTTLE ring to the right.
• The sub-item will start flashing.
12. Turn the JOG dial to display “5M” and turn the SHUTTLE
ring to the right to define the setting.
• The sub-item will stop flashing. Check that the A-REC
DURATION is defined correctly.
@A-REC DURATION 15S
RECORD ALARM ALL
PRE A-REC
6. Turn the JOG dial and move the cursor to “DEFINE GROUP
SETTING” and turn the SHUTTLE ring to the right .
• The <DEFINE ALARM GROUP> menu appears.
36
7. Check that the cursor is next to the CAMERA CH.1 and
turn the SHUTTLE ring to the right.
• The sub-item will start flashing.
•••••••••••••••••••••••••••••••••••••••••••••••••••••••••••••••••••••••••••••••••••••••••••••••••••••••••••••••••••••••••••••••••••••••••••
<DEFINE ALARM GROUP>
CH PRI FILD CH PRI FILD
@Q 1 0.39 O 1 0.39
W 1 0.39 P 1 0.39
E 1 0.39 { 1 0.39
R 1 0.39 } 1 0.39
T 1 0.39 q 1 0.39
Y 1 0.39 w 1 0.39
U 1 0.39 e 1 0.39
I 1 0.39 r 1 0.39
@A-REC DURATION 5M
RECORD ALARM ALL
PRE A-REC
“MAN”: Alarm recording continues until the
ALARM IN terminal is cleared.
By turning the JOG dial, the subitem of the A-REC DURATION shown on the menu
will be changed as follows:
15S 30S 45S 1M 2M 5M
10S 5S 2S MAN 10M
Page 37

Please note that in the A-REC DURATION set-
A-REC DURATION 5M
@RECORD ALARM ALL
PRE A-REC OFF
A-REC DURATION 5M
RECORD ALARM ALL
@PRE A-REC LONG
ting, MAN cannot be selected when the MOTION DETECTION setting in the <INITIAL SET UP> menu is
“ON”.
13. Turn the SHUTTLE ring to the left or press the SET UP
button.
INFORMATION
Please refer to “Alarm Recording op-
eration” on page 53 for details of the alarm recording.
1. Make settings for IMAGE QUALITY , MAX REC FIELDS ,
DEFINE GROUP SETTING, A-REC DURA TION and RECORD
ALARM as shown on page 35 - 37 .
2. Turn the JOG dial to move the cursor to PRE A-REC and
turn the SHUTTLE ring to the right to flash the sub-item.
A-REC DURATION 5M
RECORD ALARM ALL
@PRE A-REC OFF
ENGLISH
♦ Camera Alarm Rec setting
This is the setting for the camera to start recording when
ALARM IN terminal is grounded (alarm recording signal is
input). This setting is only effective during alarm recording.
After alarm recording, operations return to their prior settings.
Example: Setting the RECORD ALARM to “ALL” (the default setting is “SEP”).
1. Press the SET UP button to display the <MENU SETTING>
menu.
2. Turn the JOG dial to move the cursor to A-REC/M-DET
SETTING then turn the SHUTTLE ring to the right.
• The <A-REC/M-DET SETTING> menu will appear.
3. Turn the JOG dial to move the cursor to RECORD ALARM
then turn the SHUTTLE ring to the right to fix setting.
• The sub-item will start flashing.
4. Turn the JOG dial to display “ALL”, and tur n the SHUTTLE
ring to the right to fix setting.
• The sub-item will stop flashing.
A-REC DURATION 15S
@RECORD ALARM ALL
PRE A-REC OFF
By turning the JOG dial, the sub -
item of RECORD ALARM will be changed as follows:
SEP ALL
“SEP”: The alarm recording will star t only with the
camera which received the alarm signal. If several
cameras received alarm input at once, all of those
cameras will start alarm recording.
“ALL”: The alarm recording will start with all cameras
set to be operated on the <DEFINE ALARM GROUP>
menu when ALARM IN terminal is grounded.
5. Turn the SHUTTLE ring to the left or press the SET UP
button.
When the RECORD ALARM setting is set to “SEP”,
the “PRI” setting on the <DEFINE GROUP SETTING>
menu at this time can only be either “ 1 ” or “ - ”, and
then the “FILD” will not be appear on screen.
♦ Pre-alarm recording setting
During alarm recording, it is possible to record the information before the ALARM IN terminal is activated.
Example: Set the PRE A-REC to “LONG” (the default setting is “OFF”).
3. Turn the JOG dial to flash LONG, and turn the SHUTTLE
ring to the right. The unit will be in stand-by mode for the
Pre-alarm recording.
• PRE ALARM REC indicator on the front of the unit will start
illuminating.
By turning the JOG dial, the sub-
item of PRE A-REC will be changed as follows:
OFF SHORT
LONG MEDIUM
4. Ground the ALARM IN terminal.
• The unit will start alarm recording.
The duration of recording before the ALARM IN ter-
minal is triggered depends on the MAX REC FIELDS,
IMAGE QUALITY, and PRE A-REC settings. Please
refer to “Pre-alarm Recording” on page 54 for details.
Setting cannot be altered in either the NORMAL
REC SETTING menu or the A-REC/M-DET SETTING menu when the PRE A-REC menu is set to
SHORT, MEDIUM, or LONG. In addition, the SELECT REC MODE (in the <NORMAL REC SETTING> menu) will display A-REC.
INFORMATION
To activate pre-alarm recording on
Timer programmes, please refer to “Pre-alarm Recording” on page 54.
Following the end of Pre-alarm recording, the regular value
of the Alarm Recording settings returns to the value set in
the IMAGE QU ALITY , MAX REC FIELDS , DEFINE GROUP
SETTING, and A-REC DURATION settings.
Alarm input
(ALARM IN signal)
Recording
Mode
Effective
recording
setting
Effective
recording
CAMERA CH
setting
When you wish to use the ALARM IN signal to activate Alarm Recording,
CAMERA CH of the cameras to be used must be set to something other than "—".
Pre-alarm
recording
LONG/MEDIUM/SHORT of
PRE A-REC
IMAGE QUALITY/
MAX REC FIELDS of A-REC
All the CAMERA CH
set in PRIORITY settings
1 – 5 of the DEFINE
ALARM GROUP setting.
When RECORD ALARM setting is SEP,
only the CAMERA CH receiving an
Alarm Recording signal.
When RECORD ALARM setting is ALL,
all the CAMERA CH specified in the
DEFINE GROUP SETTING setting.
Alarm
recording
IMAGE QUALITY/
MAX REC FIELDS/
A-REC DURATION
••••••••••••••••••••••••••••••••••••••••••••••••••••••••••••••••••••••••••••••••••••••••••••••••••••••••••••••••••••••••••••
Operations
37
Page 38

•
Various recording settings (continued)
<MOTION>
SELECTION CAMERA NO. 5
@CH.MOTION DETECTION ON
SET DETECTION MASK
SENSITIVITY MED
MOTION THRESHOLD 2
TEST MODE OFF
All the camera channels set in the Alarm Re-
cording’s DEFINE GROUP SETTING are used for
the Pre-alarm Recording camera channels, even if,
for example, the SEP is selected in the RECORD
ALARM setting.
♦ M-DET setting
These settings are used to make adjustments to the MOTION DETECTION function, which initiates Alarm Recording when movement is detected within the images captured
by the cameras. To setup the M-DET SETTING, first turn the
MOTION DETECTION setting “ON” in the <INITIAL SET UP>
menu. The M-DET SETTING screen will not be displayed
when this setting is “OFF”. Please refer to <INITIAL SET UP>
menu, MOTION DETECTION setting on page 32.
1. Press the SET UP button to display the <MENU SETTING>
menu.
2. Turn the JOG dial to select the A-REC/M-DET SETTING
and turn the SHUTTLE ring to the right.
• The <A-REC/M-DET SETTING> menu will appear.
<A-REC/M-DET SETTING>
@IMAGE QUALITY HIGH
MAX REC FIELDS 12.5F
DEFINE GROUP SETTING
A-REC DURATION 15S
RECORD ALARM SEP
PRE A-REC OFF
M-DET SETTING
3. Turn the JOG dial to select the M-DET SETTING and turn
the SHUTTLE ring to the right.
• The <MOTION> menu will appear.
<MOTION>
@SELECTION CAMERA NO. 1
CH.MOTION DETECTION OFF
SET DETECTION MASK
SENSITIVITY MED
MOTION THRESHOLD 2
TEST MODE OFF
When the MOTION DETECTION setting in the
INITIAL SET UP menu is turned ON, the MAX REC
FIELDS for each time setting will be automatically
altered as follows. These settings will not auto-
matically revert to their former values even if
MOTION DETECTION is turned OFF.
Case of <NORMAL REC SETTING> menu and <AREC/M-DET SETTING> menu.
“25F” } “12.5F”, “8.33F” } “6.25F” , “5F” } “4.17F”
<MOTION>
@SELECTION CAMERA NO. 1
CH.MOTION DETECTION OFF
SET DETECTION MASK
SENSITIVITY MED
MOTION THRESHOLD 2
TEST MODE OFF
2. Turn the JOG dial to display “ 5” then turn the SHUTTLE
ring to the right.
• The sub-item stops flashing.
<MOTION>
@SELECTION CAMERA NO. 5
CH.MOTION DETECTION OFF
SET DETECTION MASK
SENSITIVITY MED
MOTION THRESHOLD 2
TEST MODE OFF
When the SELECTION CAMERA NO. setting has
been made, the background display will switch to
the selected camera. By exiting the menu, the display will revert to its original state.
♦ CH. motion detection setting
MOTION DETECTION function can make activated for
each of the connected cameras. The MOTION DETECTION function becomes operative only after this setting has
been activated.
Example: Setting the CH. MOTION DETECTION to “ON”
(the default setting is “OFF”).
1. After step 3 of M-DET SETTING procedures left. Turn the
JOG dial to select the CH. MOTION DETECTION and turn
the SHUTTLE ring to the right.
• The sub-item will start flashing.
<MOTION>
SELECTION CAMERA NO. 5
@CH.MOTION DETECTION OFF
SET DETECTION MASK
SENSITIVITY MED
MOTION THRESHOLD 2
TEST MODE OFF
2. Turn the JOG dial to display ON then turn the SHUTTLE
ring to the right.
• The sub-item stops flashing.
Case of “MODE” in the <TIMER PROGRAM> menu.
“25” } “12.5”, “8.33” } “6.25” , “5” } “4.17”
♦ Selection camera NO.
In this step, the cameras used for the MOTION DETECTION setting are selected.
Example: Setting the SELECTION CAMERA NO. to “5”(the
default setting is “1”).
1. After step 3 of M-DET SETTING procedures above. Check
that the cursor is next to the SELECTION CAMERA NO. and
turn the SHUTTLE ring to the right.
38
• The sub-item will start flashing.
•••••••••••••••••••••••••••••••••••••••••••••••••••••••••••••••••••••••••••••••••••••••••••••••••••••••••••••••••••••••••••••••••••••••••••
Page 39

♦ Setting the detection mask
In this step, the dots which will activate the MOTION DETECTION function are set. Images inputted from each of
the connected cameras are divided into a 10 x 12 verticalhorizontal grid. The DETECTION MASK can be selected
as desired from the 120 dots displayed within the grid, and
this setting can then be established.
Example: Using the images provided by the camera channel set in SELECTION CAMERA NO., the right half of the
screen is selected as the DETECTION MASK and the activate symbol “
” is displayed. (The inactive symbol “ • ” is
displayed on the left half of the screen.) The def ault setting
is active “ ” for the entire area in the DETECTION MASK
setting.
” : Active symbol (Indicates the area where CH.
“
MOTION DETECTION is active.)
“ • ” : Inactive symbol (Indicates the area where CH.
MOTION DETECTION is inactive.)
•
• • • • • ● ● ● ● ● ●
•
• • • • • ● ● ● ● ● ●
•
• • • • • ● ● ● ● ● ●
•
• • • • • ● ● ● ● ● ●
•
• • • • • ● ● ● ● ● ●
•
• • • • • ● ● ● ● ● ●
•
• • • • • ● ● ● ● ● ●
•
• • • • • ● ● ● ● ● ●
•
• • • • • ● ● ● ● ● ●
•
• • • • • ● ● ● ● ● ●
: MOVE < < : EXIT
INFORMATION
To move to the left, press camera button 3 “ ”.
To move to the right, press camera button 4 “ ”.
To move up, press camera button 5 “ ”.
To move down, press camera button 6 “ ”.
To select the entire screen, press camera button 1 “+”.
T o deselect the entire screen, press camer a b utton 2 “ - ”.
Other settings cannot be made while the SET
DETECTION MASK settings are being made. If you
wish to escape the screen while making settings,
turn the SHUTTLE ring to the left.
ENGLISH
1. After step 3 of M-DET SETTING procedures on page 38.
Turn the JOG dial to select the SET DETECTION MASK and
turn the SHUTTLE ring to the right.
• The <SET DETECTION MASK> menu will appear.
● ● ● ● ● ● ● ● ● ● ● ●
● ● ● ● ● ● ● ● ● ● ● ●
● ● ● ● ● ● ● ● ● ● ● ●
● ● ● ● ● ● ● ● ● ● ● ●
● ● ● ● ● ● ● ● ● ● ● ●
● ● ● ● ● ● ● ● ● ● ● ●
● ● ● ● ● ● ● ● ● ● ● ●
● ● ● ● ● ● ● ● ● ● ● ●
● ● ● ● ● ● ● ● ● ● ● ●
● ● ● ● ● ● ● ● ● ● ● ●
: MOVE < < : EXIT
2. Confirm that the active symbol “ ” is flashing on the upper
left part of the screen, then turn the JOG dial to display the
inactive symbol “ • ”.
• The inactive symbol “ • ” will start flashing.
•
● ● ● ● ● ● ● ● ● ● ●
● ● ● ● ● ● ● ● ● ● ● ●
● ● ● ● ● ● ● ● ● ● ● ●
● ● ● ● ● ● ● ● ● ● ● ●
● ● ● ● ● ● ● ● ● ● ● ●
● ● ● ● ● ● ● ● ● ● ● ●
● ● ● ● ● ● ● ● ● ● ● ●
● ● ● ● ● ● ● ● ● ● ● ●
● ● ● ● ● ● ● ● ● ● ● ●
● ● ● ● ● ● ● ● ● ● ● ●
: MOVE < < : EXIT
3. Next, press the camera button 4 “ ” located on the unit’s
front face to move to the right.
• The active symbol “ ” will start flashing.
•
● ● ● ● ● ● ● ● ● ● ●
● ● ● ● ● ● ● ● ● ● ● ●
● ● ● ● ● ● ● ● ● ● ● ●
● ● ● ● ● ● ● ● ● ● ● ●
● ● ● ● ● ● ● ● ● ● ● ●
● ● ● ● ● ● ● ● ● ● ● ●
● ● ● ● ● ● ● ● ● ● ● ●
● ● ● ● ● ● ● ● ● ● ● ●
● ● ● ● ● ● ● ● ● ● ● ●
● ● ● ● ● ● ● ● ● ● ● ●
: MOVE < < : EXIT
5. Turn the SHUTTLE ring to the left to finish setting.
♦ Sensitivity setting
In this step, the detection sensitivity to movement within
the image data is set. For each camera, image data is sampled and compared every 0.6 seconds. SENSITIVITY is
the difference in the degree of brightness between the sampled images, and is divided into settings of five different
levels. Select “HIGHER” to make the unit sensitive to the
even the smallest changes. Please note, however, that
false alarms may be caused by, for example, the flickering of fluorescent lighting fixtures.
Example: Setting the SENSITIVITY to “HIGH” (the default
setting is “MED”).
1. After step 3 of M-DET SETTING procedures on page 38.
Turn the JOG dial to select the SENSITIVITY and turn the
SHUTTLE ring to the right.
• The sub-item will start flashing.
<MOTION>
SELECTION CAMERA NO. 5
CH.MOTION DETECTION ON
SET DETECTION MASK
@SENSITIVITY MED
MOTION THRESHOLD 2
TEST MODE OFF
2. Turn the JOG dial to display HIGH then turn the SHUTTLE
ring to the right.
• The sub-item stops flashing.
<MOTION>
SELECTION CAMERA NO. 5
CH.MOTION DETECTION ON
SET DETECTION MASK
@SENSITIVITY HIGH
MOTION THRESHOLD 2
TEST MODE OFF
4. Turn the JOG dial to display “ • ” then turn the SHUTTLE
ring to the right. Repeat the above steps 2 - 4. The inactive
mark “ • ” is displayed on the left half of the screen.
sitivity setting will be changed as below:
By turning the JOG dial, the sen-
MED LOW LOWER
HIGH HIGHER
••••••••••••••••••••••••••••••••••••••••••••••••••••••••••••••••••••••••••••••••••••••••••••••••••••••••••••••••••••••••••••
Operations
39
Page 40

•
Various recording settings (continued)
♦ Motion threshold setting
In this step, the MOTION THRESHOLD setting, which
serves as the trigger to initiate Alarm Recording, is set. In
this setting, the minimum number of active dots required to
initiate the MOTION DETECTION is established. The dots
are activated in the MOTION DETECTION function settings. Using this value, the unit begins the MOTION DETECTION when motion has been detected in more than
the specified minimum number of dots.
When establishing a value for the MOTION
THRESHOLD setting, use a value which does not
exceed the number of active dots set for the MOTION DETECTION function.
Please note that the
MOTION DETECTION function will not operate if
a larger value is used.
Example: Setting the MOTION THRESHOLD to “5” (the
default setting is “2”).
1. After step 3 of M-DET SETTING procedures on page 38.
Turn the JOG dial to select the MOTION THRESHOLD and
turn the SHUTTLE ring to the right.
• The sub-item will start flashing.
<MOTION>
SELECTION CAMERA NO. 5
CH.MOTION DETECTION ON
SET DETECTION MASK
SENSITIVITY HIGH
@MOTION THRESHOLD 2
TEST MODE OFF
2. Turn the JOG dial to display 5 then turn the SHUTTLE ring
to the right.
• The sub-item stops flashing.
2. Turn the JOG dial to display ON then turn the SHUTTLE
ring to the right.
• The <TEST MODE> menu will appear.
The area where the MO TION DETECTION func-
tion has been activated is displayed using “ • ”. When
motion is detected on more dots than specified in
the MOTION THRESHOLD setting, i.e., when Alarm
Recording is initiated, the active symbol “
” will
appear on-screen. Please redo settings if the unit
does not operate as intended.
3. To finish setting, turn the SHUTTLE ring to the left.
When motion is continuously detected within the
active area established for the MOTION DETECTION function, Alarm Recording will also continue.
In this case, each Alarm Recording will be extended
the duration that selecting sub-item in the A-REC
DURATION setting; these recordings will not, however , not be registered on the ALARM LIST. If Alarm
Recording stops once, then re-starts at a later time,
this event will be registered on the ALARM LIST.
MOTION DETECTION HOLD FUNCTION
When Alarm Recording continues as a result of
motion being continuously detected, the unit cannot
receive instructions for other functions. In this situation, the MOTION DETECTION function can be frozen for two seconds after pressing the ST OP button
to stop the Alarm recording, which will override and
halt Alarm Recording. Settings can then be made
for other functions during this time. If settings are
not altered, the unit will automatically return to recording after two seconds.
<MOTION>
SELECTION CAMERA NO. 5
CH.MOTION DETECTION ON
SET DETECTION MASK
SENSITIVITY HIGH
@MOTION THRESHOLD 5
TEST MODE OFF
♦ Test mode setting
Testing MOTION DETECTION setting.
Example: Setting the TEST MODE to “ON” (the def ault set-
ting is “OFF”).
To set the TEST MODE, please turn ON the CH.
MOTION DETECTION.
1. After step 3 of M-DET SETTING procedures on page 38.
Turn the JOG dial to select the TEST MODE and turn the
SHUTTLE ring to the right.
• The sub-item will start flashing.
<MOTION>
SELECTION CAMERA NO. 5
CH.MOTION DETECTION ON
SET DETECTION MASK
SENSITIVITY HIGH
MOTION THRESHOLD 5
@TEST MODE OFF
As the ALARM IN terminals located on the unit’s
rear are always active, their input signals are given
priority during Alarm Recording. In addition, when
the MOTION DETECTION function has been activated, Alarm Recording will begin depending on the
input signals from each of the terminals.
The MOTION DETECTION function cannot be
accessed when menus are left open.
The M-DET indicator light is off when the MO-
TION DETECTION function cannot be accessed.
There may be cases when the unit’s builtin MOTION DETECTION function does not
operate properly due to external condition
or video input signal or other factors.
When you wish to use the MOTION DETECTION
function to activate Alarm Recording, the CAMERA
CH of the cameras to be used must be set to something other than “ - ” in the PRI (priority) setting of the
DEFINE ALARM GROUP menu.
40
•••••••••••••••••••••••••••••••••••••••••••••••••••••••••••••••••••••••••••••••••••••••••••••••••••••••••••••••••••••••••••••••••••••••••••
Page 41

X4
Multiplexer functions
■ Multiplexer functions
Please refer to “Multiplexer functions” on Basic Operation
page 12 for details about the functions.
■ Multiplexer buttons
The use of SPLIT/SEQUENCE button
By pressing the SPLIT/SEQUENCE button, you can
switch the display mode as follows:
SPLIT 16 SPLIT 9a SPLIT 9b SPLIT 4a SPLIT 4b SPLIT 4c SPLIT 4d
SPLIT 9 Sequential SPLIT 4 Sequential Single screen sequential
The refresh cycle of camera images becomes
longer as the number of cameras increases. Image
can be viewed faster when cameras which are not
needed are removed from the cameras designated
in the DEFINE GROUP SETTING parameter on the
<NORMAL REC SETTING> menu and <A-REC/MDET SETTING> menu.
Images are displayed in real time during single
screen display.
For details of the Camera number buttons and
SPLIT/SEQUENCE button, please refer to “The
functions of the SPLIT/SEQUENCE button, ZOOM
button and camera number buttons” on next page.
INFORMATION
SPLIT DISPLAY settings on SPLIT SCREEN SETTING in the <MPX DISPLAY> menu. For details
please refer to pages 43,44 , “SPLIT 4 SCREEN
setting”,“SPLIT 9 SCREEN setting”,“SPLIT 16
SCREEN setting”.
You can arrange the layout of all
♦ How to use the ZOOM button
1. Display the ZOOM POINTER (X) by pressing the ZOOM
button.
• The display enlargement function can be used only during
single screen display.
X
2. Move the pointer to the desired position by pressing the
camera number buttons 3 to 6.
X
3. Pressing the number 1 button (ZOOM IN)will enlarge the
picture twice (X2) and four times (X4) as large as the actual
display size.
X2
ENGLISH
tings of SPLIT DISPLAY during playback by press-
It is also possible to select set-
ing the SPLIT/SEQUENCE button:
Pressing the camera number 2 button (ZOOM
OUT button) will change the size of the display picture to actual display size. During enlarged display
viewing, cannot display the menu.
SPLIT 16 SPLIT 9a SPLIT 9b SPLIT 4a
SPLIT 4d SPLIT 4c SPLIT 4b
When the SPLIT SW PATTERN setting of the
MPX DISPLAY menu is set to “SHORT”, display is
limited to either SPLIT16 or single screen.
The ZOOM POINTER’S position does not
change when the display screen changes or when
power is turned off. This is conv enient for situations
where the desired viewing areas, such as the counter or cash register, are determined in advance. In
addition, the ZOOM POINTER can be used during
When Non-operation camera was set in SPLIT9
playback of recorded images.
and SPLIT 4 setting on the <SPLIT SCREEN SETTING> menu, “ - ” appears where the camera
number is supposed to be displayed.
When playing back images from multiple cam-
eras on single screen, if the ZOOM control is used
during the pause mode there is a possibility that a
06-09-2000 12:12:05
1 3
black screen will be displayed. In this case, the de-
sired enlarged image can be obtained by moving
through frames using the JOG dial.
–
9
INFORMATION
• Because ZOOM display function
involves electronic enlargement, details of the im-
You can view any picture in actual screen size
by pressing the camera number button during SPLIT/
SEQUENCE button is used. Y ou can go bac k to the
previous SPLIT DISPLAY by pressing the SPLIT/
age will appear pixelized when enlarged.
• Enlarged display is cancelled if the Alarm recording
start is triggered during enlarged display viewing.
SEQUENCE button again.
••••••••••••••••••••••••••••••••••••••••••••••••••••••••••••••••••••••••••••••••••••••••••••••••••••••••••••••••••••••••••••
Operations
41
Page 42

•
Multiplexer functions (continued)
♦ How to use the camera number buttons
By pressing each camera number button, you can view the camera’s picture which is connected to the CAMERA
INPUT on the rear of this unit. If the picture of the camera which is not set to operate on DEFINE GROUP SETTING of
the <NORMAL REC SETTING> menu and <A-REC/M-DET SETTING> menu, the Not-operated camera mark (
appear next to the time display. You can also view the picture of the camera when watching SPLIT or SEQUENCE
screen by pressing the camera number button.
■ SPLIT/SEQUENCE button
By pressing the SPLIT/SEQUENCE button, the SPLIT picture modes will be switched as follows:
) will
SPLIT 9aSPLIT 16
SPLIT 9b
SPLIT 4a SPLIT 4b SPLIT 4c
Single screen sequential SPLIT 4 sequential SPLIT 9 sequential
SPLIT 4d
■ The functions of the SPLIT/SEQUENCE button, ZOOM button and camera number buttons
The present time display is changed to be DISPLAY MODE 1, when in SPLIT or SEQUENCE screen mode.
You cannot arrange the place of the present time display. If the camera picture without the picture input signal
is displayed, the screen will be shown as a blue screen. When in SPLIT or SEQUENCE screen mode,
Not-operated camera's picture will be shown as a black screen.
Display
SPLIT 16
06-09-2000 12:12:05 12.5F
2134
6578
1091112
1413 15 16
SPLIT 9 MODE a (9a)
SPLIT 9 MODE b (9b)
06-09-2000 12:12:05 12.5F
2
3
1
4
56
7
89
SPLIT 4 MODE a (4a)
SPLIT 4 MODE b (4b)
SPLIT 4 MODE c (4c)
SPLIT 4 MODE d (4d)
06-09-2000 12:12:05 12.5F
2
1
3
4
SPLIT/
SEQUENCE
SPLIT/SEQUENCE
OFF
SPLIT/SEQUENCE
OFF
SPLIT/SEQUENCE
OFF
ZOOM
button
ZOOM
OFF
ZOOM
OFF
ZOOM
OFF
The video of operated camera will be displayed in SPLIT 16 mode.The video of cameras will
be shown in order. Set the order on DEFINE GROUP SETTING of the <NORMAL REC
SETTING> menu and <A-REC/M-DET SETTING> menu. Camera number button which is set
to be operated on DEFINE GROUP SETTING of <NORMAL REC SETTING> menu and
<A-REC/M-DET SETTING> menu will only illuminates.
Images taken from the camera number selected as SPLIT9 a (or b) of the SPLIT 9 SETTING
on the <MPX DISPLAY> menu are displayed on a 9-split screen. Images will be changed in
sequence and displayed as the selected camera’s camera number button is lit. Please set
DEFINE GROUP SETTING on <NORMAL REC SETTING> or <A-REC/M-DET SETTING>
menu. Camera number button which is set to be operated on DEFINE GROUP SETTING of
<NORMAL REC SETTING> menu and <A-REC/M-DET SETTING> menu will only illuminates.
Images taken from the camera number selected as SPLIT4 a (b,c or d) of the SPLIT 4
SETTING on the <MPX DISPLAY> menu are displayed on a 4-split screen. Images will be
changed in sequence and displayed as the selected camera’s camera number button is lit.
Please set DEFINE GROUP SETTING on <NORMAL REC SETTING> or <A-REC/M-DET
SETTING> menu. Camera number button which is set to be operated on DEFINE GROUP
SETTING of <NORMAL REC SETTING> menu and <A-REC/M-DET SETTING> menu will
only illuminates.
Flashing/illuminating
Of Camera number buttons
Page
44
43, 44
43
Single screen Seqential
06-09-2000 12:12:05 12.5F
SPLIT 4 Sequential
06-09-2000 12:12:05 12.5F
2
1
5
6
SPLIT 9 Sequential
06-09-2000 12:12:05 12.5F
2
3
1
4
56
7
89
Not
enlarged
Single
screen
Enlarged
During Alarm recording
and Pre-alalrm recording
*If the Alarm signal
and pre-alarm signal
is input during
SPLIT/SEQUENCE
mode.
SPLIT/SEQUENCE
Illuminating
SPLIT/SEQUENCE
Illuminating
SPLIT/SEQUENCE
Illuminating
SPLIT/SEQUENCE
OFF
SPLIT/SEQUENCE
OFF
ZOOM
OFF
ZOOM
OFF
ZOOM
OFF
ZOOM
OFF
ZOOM
Illuminating
Display the picture of the camera for the time which is set on SEQUENCE of the
<MPX DISPLAY> menu. Camera number button which has display is illuminating.
When a screen from a camera designated as non-operational is displayed, the camera
number display will show
the recording time.
SPLIT 4 display (abcd,abc,ab or a) which is set on SEQUENCE of the
<MPX DISPLAY> menu will be displayed for set up time. Camera number
button which is set to be operated on DEFINE GROUP SETTING of <NORMAL
REC SETTING> menu and <A-REC/M-DET SETTING> menu will only
illuminates. When a screen from a camera designated as non-operational is
displayed, the camera number display will show "-" .
SPLIT 9 display (ab or a) which is set on SEQUENCE of the <MPX DISPLAY>
menu will be displayed for set up time. Camera number button which is set to
be operated on DEFINE GROUP SETTING of <NORMAL REC SETTING>
menu and <A-REC/M-DET SETTING> menu will only illuminates.
When a screen from a camera designated as non-operational is displayed,
the camera number display will show "-".
"-"
and the non-operational camera mark ( ) will appear next to
Camera number button which has display is illuminating.
Camera buttons which has been activated as DISPLAY-1, X2 or X4 will be
illuminated.
Regardless of SPLIT 16,SPLIT 9, SPLIT 4 or DISPLAY-1mode, camera number
buttons which are activated via an Alarm recording and Pre-alarm recording
start flashing.
41
41, 43
41, 43
41
41
53, 54
42
•••••••••••••••••••••••••••••••••••••••••••••••••••••••••••••••••••••••••••••••••••••••••••••••••••••••••••••••••••••••••••••••••••••••••••
Page 43

■ Multiplexer display
♦ SCREEN SW PATTERN settings
In this steps, the screen switch pattern is set.
Example: Setting the
default setting is “ALL”).
1. Press the SET UP button to display the <MENU SETTING>
menu.
2. Turn the JOG dial to move the cursor to MPX DISPLA Y and
turn the SHUTTLE ring to the right.
• The <MPX DISPLAY> menu will appear.
3. Chec k that the cursor is next to the SCREEN SW PATTERN
and turn the SHUTTLE ring to the right.
• The sub-item will start flashing.
4. Turn the JOG dial to display SHOR T then turn the SHUTTLE
ring to the right.
• The sub-item stops flashing.
“ALL” : using this setting, all the display modes and
sequential display modes for SPLIT9, SPLIT4, and
single screens can be selected.
“SHORT” : using this setting, single screen sequential, SPLIT4, SPLIT9 sequential and SPLIT16 displays can be selected. By combining SEQUENCE
with the split-screen display setting, a fixed splitscreen display pattern can be established. Please
note that, in this case, only single screen and
SPLIT16 can be selected during playback.
5. Turn the SHUTTLE r ing to the left or press the SET UP
button.
♦ SPLIT 4 SCREEN setting
SPLIT 4 SCREEN setting mode, you can choose between
a to d of SPLIT 4 display mode. Before you choose the
setting, arrange the camera position as you like in this section.
1. Press the SET UP button to display the <MENU SETTING>
menu.
2. Turn the JOG dial to move the cursor to MPX DISPLA Y and
turn the SHUTTLE ring to the right.
• The <MPX DISPLAY> menu will appear.
screen switch pattern
<MPX DISPLAY>
@SCREEN SW PATTERN ALL
SPLIT 4 SCREEN SETTING
SPLIT 9 SCREEN SETTING
SPLIT 16 SCREEN SETTING
IMAGE QLTY HIGH
SEQUENCE
CH.TITLE CH.NO
CAMERA TITLE
ALARM DISPALY ON
<MPX DISPLAY>
@SCREEN SW PATTERN ALL
SPLIT 4 SCREEN SETTING
SPLIT 9 SCREEN SETTING
SPLIT 16 SCREEN SETTING
IMAGE QLTY HIGH
<MPX DISPLAY>
@SCREEN SW PATTERN SHORT
SPLIT 4 SCREEN SETTING
SPLIT 9 SCREEN SETTING
SPLIT 16 SCREEN SETTING
IMAGE QLTY HIGH
to “SHORT” (the
3. Turn the JOG dial to move the cursor to SPLIT 4 SCREEN
SETTING then turn the SHUTTLE ring to the right.
• The <SPLIT4 SCREEN SETTING> menu will appear.
<SPLIT4 SCREEN SETTING>
@SPLIT4a SPLIT4b
Q W
E R
SPLIT4c SPLIT4d
O P
{ }
T Y
U I
q w
e r
4. Make sure that the cursor is next to “SPLIT4a”. Turn the
SHUTTLE ring to the right.
5. Check that the top left number (default setting is set to 1) is
flashing. Turn the JOG dial to display the desired camera
number then turn the SHUTTLE ring to the right to fix setting.
• The flashing will move to the next camera number.
<SPLIT4 SCREEN SETTING>
@SPLIT4a SPLIT4b
Q W
E R
SPLIT4c SPLIT4d
O P
{ }
T Y
U I
q w
e r
6. Set all camera numbers according to the steps written on
the previous page.
<SPLIT4 SCREEN SETTING>
@SPLIT4a SPLIT4b
W T
O I
SPLIT4c SPLIT4d
w E
{ r
Q Y
U }
P q
e R
7. Chec k that all camera numbers are set .Turn the SHUTTLE
ring to the right to fix setting.
• The flashing will stop.
• Settings cannot be made when the same camera number is
in SPLIT 4 SCREEN setting mode. (Possible if using a different
SPLIT4 operation) When the same camera has been selected,
the blinking light will return to its original state even if all the
camera numbers have been input. Check to see if the same
camera number has been entered; if the same number has
been entered, please change the settings.
8. Press the SET UP button.
• The <SPLIT4 SCREEN SETTING> menu will disappear.
♦ SPLIT 9 SCREEN setting
Example: Displaying desired camera pictures with desired
layout in SPLIT 9 SCREEN.
1. Press the SET UP button to display the <MENU SETTING>
menu.
2. Turn the JOG dial to move the cursor to MPX DISPLAY and
turn the SHUTTLE ring to the right.
• The <MPX DISPLAY> menu will appear.
3. Turn the JOG dial to move the cursor to SPLIT 9 SCREEN
SETTING then turn the SHUTTLE ring to the right.
• The <SPLIT9 SCREEN SETTING> menu will appear.
<SPLIT9 SCREEN SETTING>
@SPLIT9a SPLIT9b
Q W E
R T Y
U I O
Q W P
{ } q
w e r
ENGLISH
••••••••••••••••••••••••••••••••••••••••••••••••••••••••••••••••••••••••••••••••••••••••••••••••••••••••••••••••••••••••••••
Operations
43
Page 44

•
SPLIT 16 SCREEN SETTING
@IMAGE QLTY HIGH
SEQUENCE
Multiplexer functions (continued)
4. Make sure that the cursor is next to “SPLIT 9a” . Turn the
SHUTTLE ring to the right.
5. Repeat steps 5 to 7 of SPLIT 4 SCREEN setting on page
43 to set the rest of the position.
• Y ou cannot set the same number in SPLIT 9 SCREEN setting.
If the flashing goes back to the original position, you have to
change settings to make sure the same camera numbers are
not set at different positions.
6. Press the SET UP button.
• The <SPLIT9 SCREEN SETTING> menu will disappear.
You cannot exit the menu if you set same cam-
era numbers at different positions. In this case,
please change settings.
♦ SPLIT 16 SCREEN setting
Example: Displaying desired camera pictures with desired
layout in SPLIT 16 SCREEN.
1. Press the SET UP button to display the <MENU SETTING>
menu.
2. Turn the JOG dial to move the cursor to MPX DISPLAY and
turn the SHUTTLE ring to the right.
• The <MPX DISPLAY> menu will appear.
3. T urn the JOG dial to mov e the cursor to SPLIT 16 SCREEN
SETTING then turn the SHUTTLE ring to the right.
• The <SPLIT16 SCREEN SETTING> menu will appear.
<SPLIT16 SCREEN SETTING>
@SPLIT16
Q W E R
T Y U I
O P { }
q w e r
4. Make sure that the cursor is next to “SPLIT 16”. Turn the
SHUTTLE ring to the right.
5. Repeat steps 5 to 7 of SPLIT 4 SCREEN setting on page
43 to set the rest of the position.
• You cannot set the same number in SPLIT 16 SCREEN
setting. If the flashing goes back to the original position, you
have to change settings to make sure the same camera
numbers are not set at different positions.
6. Press the SET UP button.
• The <SPLIT16 SCREEN SETTING> menu will disappear.
You cannot exit the menu if you set same cam-
era numbers at different positions. In this case,
please change settings.
♦ Image quality of split screen
It is possible to set the image quality for split-screen display mode. Fine details are visible when image quality is
set to “HIGH”, and screen flicker is reduced when set to
“NO FLICKER”. Ver tical resolution decreases when split
screen image quality(IMAGE QLTY) is set to “NO
FLICKER”.
By setting IMAGE QLTY to “NO FLICKER”, im-
ages being displayed in either SPLIT4, SPLIT9, or
SPLIT16 modes will show reduced flicker, although
vertical resolution may slightly degraded.
Example: Setting the image quality of split screen to “NO
FLICKER” (the default setting is “HIGH”).
1. Press the SET UP button to display the <MENU SETTING>
menu.
2. Turn the JOG dial to move the cursor to MPX DISPLAY
then turn the SHUTTLE ring to the right.
• The <MPX DISPLAY> will appear.
3. Turn the JOG dial to move the cursor to IMAGE QLTY then
turn the SHUTTLE ring to the right to select the sub-item.
4. Turn the JOG dial to choose “NO FLICKER” and turn the
SHUTTLE ring to the right to fix setting.
• The sub-item will stop flashing.
SPLIT 16 SCREEN SETTING
@IMAGE QLTY NO FLICKER
SEQUENCE
5. Turn the SHUTTLE ring to the left or press the SET UP
button to finish setting.
♦ SEQUENCE setting
The sequential setting is designed to automatically switch
the on-screen image in the order in which the connected
cameras are displayed. The switching time can be set as
well. The two types of display patterns set in the SPLIT 9
setting and the four types of display patterns set in the SPLIT
4 setting can be made to automatically switch in sequence.
Repeated registration of the same camera is also possi-
ble. The same camera can also be registered repeatedly.
1. Press the SET UP button to display the <MENU SETTING>
menu.
2. Turn the JOG dial to move the cursor to MPX DISPLAY
then turn the SHUTTLE ring to the right.
• The <MPX DISPLAY> menu will appear.
3. Move the cursor to SEQUENCE then turn the SHUTTLE
ring to the right.
• The <SEQUENCE> menu will appear.
4. Turn the JOG dial to select the desired camera number,
then turn the SHUTTLE ring to the right.
• The channel number will start flashing.
<SEQUENCE>
SEQ. 1
2
3
4
CH.@ TIME 1S
1
2
3
4
1S
1S
1S
The SEQUENCE menu is composed of two
screens. By rotating the jog to move the cursor from
its position next to the CH.Q number to CH.9, the
menu will automatically scroll to the next screen.
<SEQUENCE>
SEQ. 10
SPLIT4
SPLIT9
11
12
13
14
15
16
CH.@
P
{
}
q
w
e
r
a b c d
a b
TIME 1S
1S
1S
1S
1S
1S
1S
1S
1S
5. Turn the JOG dial till desired channel number appears and
turn the SHUTTLE ring to the right to enter the selection.
• The flashing will move to “TIME”.
•••••••••••••••••••••••••••••••••••••••••••••••••••••••••••••••••••••••••••••••••••••••••••••••••••••••••••••••••••••••••••••••••••••••••••
44
Page 45

<SEQUENCE>
<MPX DISPLAY>
@SCREEN SW PATTERN ALL
SPLIT 4 SCREEN SETTING
SPLIT 9 SCREEN SETTING
SPLIT 16 SCREEN SETTING
IMAGE QLTY HIGH
SEQUENCE
CH.TITLE CH.NO
CAMERA TITLE
ALARM DISPALY ON
<CAMERA TITLE>
CH TITLE
@
Q
................
W
................
E
................
R
................
T
................
Y
................
U
................
I
................
CAMERA
NUMBER
CAMERA TITLE
SEQ. 1
2
3
4
CH.@ TIME 1S
1
2
3
4
1S
1S
1S
6. Turn the JOG dial to display desired length of time then turn
the SHUTTLE ring to the right to fix setting.
• Maximum of 30 seconds can be set.
<SEQUENCE>
SEQ. 1
2
3
4
CH.@ TIME10S
1
2
3
4
1S
1S
1S
7. Repeat steps 4,5 and 6 above to fix settings for other
cameras.
8. (If you wish to display SPLIT 4 between a to d) Tur n the
JOG dial to move the cursor to SPLIT 4 and turn the SHUTTLE
ring to the right to choose pattern from abcd, abc, ab or a.
• The selected pattern will start flashing.
item of CH. TITLE will be changed as follows:
By turning the JOG dial, the sub-
TITLE CH.NO NONE
“TITLE” : captions set in the title display setting are
displayed.
“CH. NO” : only channel numbers are displayed.
“NONE” : no captions are displayed.
5. Turn the SHUTTLE ring to the left or press the SET UP
button.
♦ Camera title setting
Operation titles can be added to each of the cameras connected to the unit.
ENGLISH
<SEQUENCE>
SEQ. 10
SPLIT4
SPLIT9
11
12
13
14
15
16
CH.
@
P
{
}
q
w
e
r
a b c d
a b
TIME10S
10S10S
10S
10S
10S
10S
15S
10S
1S
Four SPLIT 4 display switching patterns can be
selected: abcd, abc, ab, and a. Two SPLIT 9 display switching patterns can be selected: ab and a.
Camera images automatically switched in the SPLIT
4 and SPLIT 9 display modes are from the cameras set in the SPLIT 9 and SPLIT 4 settings of the
<MPX DISPLA Y> menu. Furthermore, by selecting
“a”, it is also possible to fix camera switching during sequential display.
♦ Displaying the title
You can chose whether to display the channel title (TITLE
on the <CAMERA TITLE > menu) or CH n umber on screen.
Example: Display title on screen (the default setting is
“CH.NO”).
1. Press the SET UP button to display the <MENU SETTING>
menu.
In one-screen display mode, up to 16 characters
can be displayed. In SPLIT 4 MODE, the first 8 char-
acters are displayed. Titles cannot be displayed in
SPLIT 9 MODE and SPLIT 16 MODE. In addition,
displayed titles do not get recorded.
Example: Setting the Camera CH (channel) 5 .The title
will be “EXIT” .
1. Press the SET UP button to display the <MENU SETTING>
menu.
2. Move the cursor (
) to MPX DISPLAY then turn the
SHUTTLE ring to the right.
• The <MPX DISPLAY> menu will appear.
3. Turn the JOG dial to move the cursor to CAMERA TITLE
and turn the SHUTTLE ring to the right.
2. Turn the JOG dial to move the cursor to MPX DISPLAY
then turn the SHUTTLE ring to the right.
• The <MPX DISPLAY> menu will appear.
3. Turn the JOG dial to mov e the cursor to CH.TITLE then turn
the SHUTTLE ring to the right.
• The sub-item will start flashing.
@CH.TITLE CH.NO
CAMERA TITLE
ALARM DISPLAY ON
4. Turn the JOG dial until “TITLE” flashes and turn the
SHUTTLE ring to the right to finish setting.
@CH.TITLE TITLE
••••••••••••••••••••••••••••••••••••••••••••••••••••••••••••••••••••••••••••••••••••••••••••••••••••••••••••••••••••••••••••
CAMERA TITLE
ALARM DISPLAY ON
The <CAMERA TITLE> menu is composed of
two screens. By rotating the JOG dial to move the
cursor from its position next to the camera number
to CHI, the menu will automatically scroll to the
next screen.
Operations
45
Page 46

•
Multiplexer functions (continued)
<CAMERA TITLE>
CH TITLE
@
O
................
P
................
{
................
}
................
q
................
w
................
e
................
r
................
4. Turn the JOG dial to the right to move the cursor next to CH
5
and turn the SHUTTLE ring to the right to flash the first
column of the TITLE setting.
4 ................
@5 ................
6 ................
5. Turn the JOG dial to display “E” and turn the SHUTTLE ring
to the right to move the flashing to next column.
4 ................
@5 E...............
6 ................
4 ................
@5 EXIT............
6 ................
6. Repeat Steps 4 and 5 to input “EXIT” .
• Turning the SHUTTLE ring to the left while inputting will
erase the character. To exit the TITLE column, move the
flashing to the right end, then turn the SHUTTLE ring to the
right to fix title setting.
• T o continue title setting, turn the JOG dial to move the cursor
to desired camera CH.
4 ................
5
EXIT............
@
6
................
<MPX DISPLAY>
@SCREEN SW PATTERN ALL
SPLIT 4 SCREEN SETTING
SPLIT 9 SCREEN SETTING
SPLIT 16 SCREEN SETTING
IMAGE QLTY HIGH
SEQUENCE
CH.TITLE CH.NO
CAMERA TITLE
ALARM DISPALY ON
3. Turn the JOG dial to move the cursor to ALARM DISPLAY
and turn the SHUTTLE ring to the right.
• The sub-item flashes.
<MPX DISPLAY>
SCREEN SW PATTERN ALL
SPLIT 4 SCREEN SETTING
SPLIT 9 SCREEN SETTING
SPLIT 16 SCREEN SETTING
IMAGE QLTY HIGH
SEQUENCE
CH.TITLE CH.NO
CAMERA TITLE
@ALARM DISPALY ON
4. Turn the JOG dial until “OFF” flashes and turn the SHUTTLE
ring to the right.
• The sub-item stops flashing.
<MPX DISPLAY>
SCREEN SW PATTERN ALL
SPLIT 4 SCREEN SETTING
SPLIT 9 SCREEN SETTING
SPLIT 16 SCREEN SETTING
IMAGE QLTY HIGH
SEQUENCE
CH.TITLE CH.NO
CAMERA TITLE
@ALARM DISPALY OFF
5. Turn the SHUTTLE ring to the left or press the SET UP
button.
4 ................
5
EXIT............
@
6
................
7. To finish setting, turn the SHUTTLE ring to the left or press
the SET UP button.
• You cannot exit the menu till you complete title setting. To
fix the setting please refer to step 4.
♦ Alarm display setting
During alarm signal input, display will be changed from the
regular screen or split-screen modes to show images from
the camera responsible f or the alarm signal. If, during Alarm
Recording, a different Alarm Recording is initiated, images
from the newest alarm input channel will be shown on a
single-screen display. The screen display will revert to its
original state upon completion of Alarm Recording.
Example: Setting the ALARM DISPLAY to “OFF” (the default setting is “ON”).
1. Press the SET UP button to display the <MENU SETTING>
menu.
2. Move the cursor (
) to MPX DISPLAY then turn the
SHUTTLE ring to the right.
• The <MPX DISPLAY> menu will appear.
46
•••••••••••••••••••••••••••••••••••••••••••••••••••••••••••••••••••••••••••••••••••••••••••••••••••••••••••••••••••••••••••••••••••••••••••
Page 47

Operation examples
<DEFINE GROUP> (A)
CH PRI FILD CH PRI FILD
@Q 1 0.09 O 1 0.09
W 1 0.09 P 1 0.09
E 1 0.09 { 1 0.09
R 1 0.09 } 1 0.09
T 1 0.09 q 1 0.09
Y 1 0.09 w 1 0.09
U 1 0.09 e 1 0.09
I 1 0.09 r 1 0.09
<CAMERA TITLE>
CH TITLE
@
1
ENTRANCE........
2
ATM1............
3
ATM2............
4
COUNTER1........
5
COUNTER2........
6
COUNTER3........
7
VAULT...........
8
EXIT............
<TIMER PROGRAM> P1
DW START END MODE
@ DAY 00:00•00:00 A– 1
2 SUN 00:00 05:00 EJECT
3 ––– ––:–– ––:–– ––––––
4 ––– ––:–– ––:–– ––––––
■ Operation example 1: Simultaneous
Backup using the Timer
The Timer can be used for making weekly data backups
when the unit is running in continuous recording mode. The
unit will automatically eject the storage medium upon completion of the backup, and a new one may then be inserted
into the machine.
ENGLISH
System configuration
Example of a system using the following peripherals:
• 16 video cameras
• Archive device connected to ID4
• Monitor
CAMERA IN
CAMERA OUT
GNDGND
OFF
ON
SCSI
RESET
TERMINATION
16151413121110
CLOCK ADJ
REC
POWER ON
POWER OFF
ALARM OUT
MODE OUT
CALL OUT
CALL OUT GND
GND
GND
DC 5V OUT
MAX 30mA
GND
SCSI
(Up to 16 cameras)
VIDEO OUT
Y/C
Monitor
1 2 3 4 5 6 7 8 9 10 11 12 13 14 15 16
1 2 3 4 5 6 7 8 9 10 11 12 13 14 15 16
ALARM IN
ETHERNET
RS-232C
987654321
ID4: archive device
Images provided by each of the connected cameras
are recorded 24 hours a day, and the unit will make
a backup of one week’ s volume of image data while
it continues to record current images. The unit
records one field per second and IMAGE QUALITY
is set to “BASIC”, a recording rate of one field per
16 seconds for each camera.
00 : 00
From Monday
to Sunday
00 : 00 05 : 00
Sunday
Archive
Archive media auto eject
24-hours recording
24 : 00
Settings
1) Record settings are made as follows.
• Set IMAGE QUALITY to “BASIC”.
<NORMAL REC SETTING>
@IMAGE QUALITY BASIC
MAX REC FIELDS 1F
SELECT REC MODE (A)
DEFINE GROUP SETTING
<ESTD TIME> 48D21H31M
The capability to record continuously o ver a one-
week period is dependent on the settings for IMAGE QUALITY and MAX REC FIELDS. For details
on the relationship between intervals and image
quality, refer to “Recording time table” on page 81.
• Set MAX REC FIELDS to “1F”.
• Set HDD FULL to “REPEAT”.
<INITIAL SET UP>
TIME DATE ADJUST
@HDD FULL
HDD PB REPEAT
ARCHIVE OVERWRITE
REPEAT
STOP
OFF
The number of cameras used in each of the opera-
tional modes A, B, C can be adjusted. Refer to page
13 for details.
3) Enter the following settings under P1 on the <TIMER
PROGRAM> menu:
• In Timer programming number 1, set the action to “A– 1”
for the daily start time of 00:00 to the next day’s end time of
00:00. (This setting activates, for all of the cameras in
operational mode A, a recording rate of one frame per second.)
• In Timer programming number 2, set the action to “EJECT”
for Sunday’s start time of 00:00 to end time of 05:00.
The symbol “ ” will appear between the start-
time and end-time columns. This symbol indicates
that recording will continue until the following day.
INFORMATION
“SKIP”: This is set when timer recording is to be
paused temporarily . Then the po wer will be switched
off and the specified time period for that program
number will not be recorded.
“POWER”: During the specified time, the power sup-
ply is stopped in “ON” condition. This is used for
execution of alarm recording during timer reserva-
tion.
“ARC”(ARCHIVE): The recording contents of the
HDD are backed up to the backup device.
“EJECT”: After backup of the recording contents of
the HDD to the backup device, the medium is ejected
automatically .
2) Camera settings and camera title settings are made as
follows.
• Make the settings for the 16 cameras listed under (A) on the
<DEFINE GROUP SETTING> menu.
••••••••••••••••••••••••••••••••••••••••••••••••••••••••••••••••••••••••••••••••••••••••••••••••••••••••••••••••••••••••••••
Operations
47
Page 48

•
Operation examples (continued)
Monday
00 : 00
05 : 00
Saturday and Sunday
08 : 00 17 : 00
Monday to Friday
08 : 00 15 : 00
Archive
SELECT REC MODE (A)
20 : 00
SELECT REC MODE (B)
SELECT REC MODE (B)
replace archive medium
INFORMATION
Non-regular recording mode can
be set using the P2 operational mode in the <TIMER
PROGRAM> menu. Once these settings are entered, the system can be switched between regular
and non-regular operational modes.
4) Set the Timer Program’s operational mode to P1.
Upon completing the above settings, press the TIMER REC
button. The unit will be in timer recording stand-by mode.
■ Operation example 2: Endless Repeat
recording
Copies and backups of up to 3 days’ of recorded data can
be made when the unit is running in continuous recording
mode. (Refer to page 60 for details on copying.)
System configuration
Example of a system using the following peripherals:
• 16 connected video cameras
• Archive device connected to ID4 or copying device
connected to ID5
• Monitor
CAMERA IN
CAMERA OUT
GNDGND
ON
OFF
SCSI
RESET
TERMINATION
16151413121110
CLOCK ADJ
REC
POWER ON
POWER OFF
ALARM OUT
MODE OUT
CALL OUT
CALL OUT GND
GND
GND
DC 5V OUT
MAX 30mA
GND
SCSI
(Up to 16 cameras)
VIDEO OUT
Y/C
ID4: archive device
ID5: copy device
Monitor
1 2 3 4 5 6 7 8 9 10 11 12 13 14 15 16
1 2 3 4 5 6 7 8 9 10 11 12 13 14 15 16
ALARM IN
ETHERNET
RS-232C
987654321
■ Operation example 3
Cameras can differ between operational modes A and B,
and you may specify which set of cameras goes into eff ect
at what time and/or on which day(s). Recording
intervals(IMAGE QUALITY) can be reduced when the
number of operational cameras is large, and recording in-
tervals can be increased when using fewer cameras.
System configuration
Settings are entered so that the backups are created every
Monday morning between 00:00 and 05:00. To facilitate
the exchange of the storage medium after the backup has
been completed, MODE is set to “EJECT”.
Cameras in SELECT REC MODE (A) are set to operate
from 08:00 to 15:00 on Monday through Friday. Cameras
in SELECT REC MODE (B) are set to operate from 15:00
to 20:00 on these same days.
Cameras in SELECT REC MODE (B) are set to operate
from 08:00 to 17:00 on Saturday and Sunday. The o verall
schedule is as shown in the following chart.
Images from each cameras are recorded 24 hours a day.
• Set IMAGE QUALITY to “HIGH”.
• Set MAX REC FIELDS to “2.5F”.
<NORMAL REC SETTING>
IMAGE QUALITY HIGH
@MAX REC FIELDS 2.5F
SELECT REC MODE (A)
DEFINE GROUP SETTING
<ESTD TIME> 7D16H 9M
• Set HDD FULL to “REPEAT”.
<INITIAL SET UP>
TIME DATE ADJUST
@HDD FULL
HDD PB REPEAT
ARCHIVE OVERWRITE
REPEAT
STOP
OFF
Upon completing the above settings, press the unit’s REC
button to initiate continuous recording operation.
♦ Making copies as needed
To copy segments of recorded data while the unit is running
in continuous recording mode, follow the steps below:
• Change the automatic copy range setting to MANUAL,
and enter the desired start-time and end-time of the data
to be copied. (Refer to page 60.)
♦ Making backups as needed
To make backups, while the unit is running in continuous
recording mode, of portions of the total data stored in the
unit’s hard disk, load the appropriate medium into the archive device and press the ARCHIVE button.
Settings
1) Settings for NORMAL REC SETTING are made as fol-
lows.
• Set IMAGE QUALITY to “STANDARD”.
• Set MAX REC FIELDS to “1F”.
• Set HDD FULL to “REPEAT”.
2) Camera settings and camera title settings are made as
follows. (Refer to page 45.)
• Set cameras Q through 9 to operational mode A.
<DEFINE GROUP> (A)
CH PRI FILD CH PRI FILD
@Q 2
W 1 0.17 P -
E 1 0.17 { -
R 1 0.17 } -
T 1 0.17 q -
Y 1 0.17 w -
U 3 0.05 e -
I 2 0.08 r -
• Set cameras 1,W ,E,I ,O,} and w to operational mode B.
<DEFINE GROUP> (B)
CH PRI FILD CH PRI FILD
@Q 2
W 1
E 1
R T Y U I 2
0.08 O 1 0.17
0.11 O 1 0.22
0.22 P -
0.22 { -
} 1 0.22
q -
w 1 0.22
e -
0.11 r -
•••••••••••••••••••••••••••••••••••••••••••••••••••••••••••••••••••••••••••••••••••••••••••••••••••••••••••••••••••••••••••••••••••••••••••
48
Page 49

3) Settings for TIMER PROGRAM are made as follows.
<DEFINE ALARM GROUP>
CH PRI FILD CH PRI FILD
@Q 2
0.11 O 1 0.22
W 1
0.22 P -
E 1
0.22 { -
R -
} 1 0.22
T -
q -
Y -
w 1 0.22
U -
e -
I 2
0.11 r -
<TIMER PROGRAM>
SELECTED PATTERN
DEFINE P1
DEFINE P2
DEFINE P3
<M-DET APPLICATION>
REC MODE (A) OFF
REC MODE (B) OFF
REC MODE (C) OFF
@REC MODE (POWER) ON
P1
• Designate Monday to Friday as the days of operation
(SPECIAL DW). Then, in Program #1, set the action (MODE)
to “A– 1” for 08:00 to 15:00 on the designated days(SPL).
• In Program #2, set the action to “B– 1” for 15:00 to 20:00 on
the designated days.
• In Program #3, set the action to “B– 1” for 08:00 to 17:00 on
Saturday .
• In Program #4, set the action to “B– 1” for 08:00 to 17:00 on
Sunday .
• In Program #5, set the action to “EJECT” for Sunday’ s starttime of 00:00 to end-time of 05:00.
Upon completing the above settings, press the unit’s TIMER
REC button to initiate Timer operation.
• On the <DEFINE ALARM GROUP> menu, set the cameras
Q,W ,E,I,O ,} and w .
ENGLISH
2) Settings for MOTION DETECTION SETTING are made
as follows.
To make the M-DET SETTING, first turn the MOTION
DETECTION setting “ON” in the <INITIAL SET UP> menu.
■ Operation example 4
This is an operation example of a Timer setting that combines NORMAL REC with Alarm Recording using MOTION
DETECTION.
System configuration
Settings are entered so that the backups are created every
Monday morning between 00:00 and 05:00. To facilitate
the exchange of the storage medium after the backup has
been completed, MODE is set to “EJECT”.
Cameras in SELECT REC MODE (A) are set to operate
from 08:00 to 15:00 on Monday through Friday. Set the
unit on POWER from 15:00 to 08:00 the next morning.
Cameras in SELECT REC MODE (B) are set to operate
from 08:00 to next day 08:00 on Saturday and Sunday.
The overall schedule is as shown in the following chart.
00 : 00
Monday
Monday to Friday
00 : 00
Saturday and Sunday
00 : 00
Settings
1) Enter the same settings for the camera operation setting A as those for operation e xample 3 in the following: the
CAMERA TITLE setting (on the <MPX DISPLAY> menu),
DEFINE GROUP SETTING (on the <NORMAL REC SETTING> menu), and recording conditions. Set the power setting that uses MOTION DETECTION as follows.
05 : 00
Archive
replace archive medium
08 : 00 15 : 00
SELECT REC MODE (A)
08 : 00
POWER
08 : 00
SELECT REC MODE (B)
SELECT REC MODE (B)
24 : 00
POWER
24 : 00
• Using SELECTION CAMERA NO., set each of the following
camera numbers Q, W, E, I , O, } and w as follows.
• Set CH.MOTION DETECTION to “ON”.
• Set SET DETECTION MASK, SENSITIVITY, MOTION
THRESHOLD TEST MODE.
<MOTION>
@SELECTION CAMERA NO. 1
CH.MOTION DETECTION ON
SET DETECTION MASK
SENSITIVITY HIGH
MOTION THRESHOLD 5
TEST MODE OFF
3) Settings for TIMER PROGRAM are made as follows.
• Select “P1” for the setting “SELECTED PATTERN” in the
<TIMER PROGRAM> menu and select “ON” for the setting
“REC MODE (POWER)” in the <M-DET APPLICATION> menu.
• Designate Monday to Friday as the days of operation
(SPECIAL DW). Then, in Program #1, set the action (MODE)
to “A– 1” for 08:00 to 15:00 on the designated days(SPL).
• In Program #2, set the action to “POWER” for 15:00 to 08:00
the next morning.
• In Program #3, set the action to “POWER” for 08:00 to 08:00
the next morning.
• In Program #4, set the action to “POWER” for 08:00 to 08:00
the next morning.
• In Program #5, set the action to “EJECT” for Sunday’ s start-
time of 00:00 to end-time of 05:00.
Upon completing the above settings, press the unit’s TIMER
REC button to initiate Timer operation.
• Set IMAGE QUALITY to “HIGH”.
• Set MAX REC FIELDS to “1F”.
• Set A-REC DURATION to “5M”.
• Set RECORD ALARM to “ALL”.
••••••••••••••••••••••••••••••••••••••••••••••••••••••••••••••••••••••••••••••••••••••••••••••••••••••••••••••••••••••••••••
• Set PRE A-REC to “MEDIUM”.
Operations
49
Page 50

•
Using the Timer
■ Setting the Timer
When using the Timer to initiate Rec operation, the DEFINE P1 – P3 screens can be used to set different patterns
of operation as desired.
Set the date and current time before recording.
Refer to page 11 for details on how to set date and
time.
Example: Using Progr am #1 in DEFINE P2, mode A cameras will record at intervals of 25F from 12:00 to 13:00
each day.
1. Press the SET UP button to display the <MENU SETTING>
menu.
2. Turn the JOG dial to move the cursor to TIMER PROGRAM
then turn the SHUTTLE ring to the right.
• The <TIMER PROGRAM> menu will appear.
3. Check that the cursor is next to SELECTED PATTERN,
then turn the SHUTTLE ring to the right to fix setting.
<TIMER PROGRAM>
@SELECTED PATTERN
DEFINE P1
DEFINE P2
DEFINE P3
4. Turn the JOG dial to the right to flash P2, then turn the
SHUTTLE ring to the right.
• Timer program pattern 2 is selected now.
5.Turn the JOG dial to move the cursor to DEFINE P2 and
turn the SHUTTLE ring to the right.
• The <TIMER PROGRAM> P2 will appear.
<TIMER PROGRAM> P2
DW START END MODE
@ ––– ––:–– ––:–– ––––––
2 ––– ––:–– ––:–– ––––––
3 ––– ––:–– ––:–– ––––––
TIMER SETTING screen
a) Program Number
b) Day of the Week Display
c) Recording Start Time
d) Next Day Indicator
e) Recording End Time
<TIMER PROGRAM> P1
DW START END MODE
1 ––– ––:–– ––:–– ––––––
2 ––– ––:–– ––:–– ––––––
3 ––– ––:–– ––:–– ––––––
4 ––– ––:–– ––:–– ––––––
5 ––– ––:–– ––:–– ––––––
6 ––– ––:–– ––:–– ––––––
7 ––– ––:–– ––:–– ––––––
8 ––– ––:–– ––:–– ––––––
SPECIAL DW:SUN–SAT
g) Special Day of the Week setting
a) Settings for up to 8 programs can be made per screen.
b) Settings for the DW column include:
• The days of the week from Monday to Sunday (SUN-SAT).
• DAY (to record at the same time every day).
• SPL (to record on the days displayed at the bottom of the
screen).
c) Time is displayed in 24-hour format. When settings for
recording times overlap, the unit will give priority to the
higher-numbered Program.
P1
f) Recording Mode
d) This symbol indicates that recording time overlaps into
Using the Timer
the following da y. Continuous recording is programmed by
selecting “DAY” in the DW column and entering the same
time in both the start-time and end-time settings.
e) Display of the program’s end-time.
f) Display of the selected setting for recording interval.
g) Display of the user-specified days for a program. When
“SPL” is selected in the DW column, the unit will initiate the
program on the days specified.
6. Check to see that the cursor is on Program #1, then turn the
SHUTTLE ring to the right to select the DW column.
<TIMER PROGRAM> P2
DW START END MODE
@ ––– ––:–– ––:–– ––––––
2 ––– ––:–– ––:–– ––––––
3 ––– ––:–– ––:–– ––––––
7. Turn the JOG dial until “DAY” is displayed on-screen, then
turn the SHUTTLE ring clockwise to complete this setting.
• The cursor will move to the start-time column.
<TIMER PROGRAM> P2
DW START END MODE
@ DAY ––:–– ––:–– ––––––
2 ––– ––:–– ––:–– ––––––
3 ––– ––:–– ––:–– ––––––
If the wrong day has been selected, turn the
SHUTTLE ring counterclockwise to return to the Day
of the week(DW) column. Use the JOG dial to correct the entry, then once again turn the SHUTTLE
ring clockwise to complete this setting.
8. Use the JOG dial to select “12” in the hour column, then
turn the SHUTTLE ring to the right to complete this setting.
• The cursor will move to the left half of the minutes column.
<TIMER PROGRAM> P2
DW START END MODE
@ DAY 12:–– ––:–– ––––––
2 ––– ––:–– ––:–– ––––––
3 ––– ––:–– ––:–– ––––––
9. Use the JOG dial to select “00” in the minutes column, then
turn the SHUTTLE ring clockwise to complete this setting.
• The cursor will move to the right half of the minutes column.
Using this same process, complete the setting for the
program’s end-time.
<TIMER PROGRAM> P2
DW START END MODE
@ DAY 12:00 ––:–– ––––––
2 ––– ––:–– ––:–– ––––––
3 ––– ––:–– ––:–– ––––––
10. Set the MODE column.
• The first field is for selecting the camera mode( A, B or C ).
Use the JOG dial to select “A–”, and turn the SHUTTLE ring
clockwise to complete this setting.
• The next field is for setting the MAX REC FIELDS. Use the
JOG dial to select the desired interval, then turn the SHUTTLE
ring clockwise to complete this setting.
<TIMER PROGRAM> P2
DW START END MODE
@ DAY 12:00 13:00 A- 25
2 ––– ––:–– ––:–– ––––––
3 ––– ––:–– ––:–– ––––––
For effective multiplication, various settings for
operational cameras and recording intervals can be
selected in the Action fields. Refer to page 14 for
details on DEFINE GROUP SETTING.
If entries for one or more fields in a program are
left empty, the cursor will return to the DW column.
complete the program setting.
50
•••••••••••••••••••••••••••••••••••••••••••••••••••••••••••••••••••••••••••••••••••••••••••••••••••••••••••••••••••••••••••••••••••••••••••
Page 51

<TIMER PROGRAM>
SELECTED PATTERN
@DEFINE P1
DEFINE P2
DEFINE P3
P1
7 SPL 12:00 13:00 A- 25
8 DAY 13:00 14:25 B- 1
@ SPECIAL DW:TUE–FRI
7 SPL 12:00 13:00 A- 25
8 DAY 13:00 14:25 B- 1
@ SPECIAL DW:MON–FRI
7 SPL 12:00 13:00 A- 25
8 DAY 13:00 14:25 B- 1
@ SPECIAL DW:MON–FRI
11. To set other programs, repeat steps 5 through 10.
• Up to 8 programs can be set per screen.
• To erase a program entry, press the “WARNING RESET”
button during the programming procedure.
12. Turn the SHUTTLE ring to the right or press the SET UP
button.
• Turning the SHUTTLE ring to the left moves the cursor to
the previous entry. Pressing the SET UP button closes the
<TIMER PROGRAM> menu.
13. Press the TIMER REC button.
• The TIMER REC indicator illuminate.
• If the current time is covered by a program, the unit will
begin recording immediately.
• If the current time is not covered by a program, the unit will
turn the power off and go into stand-by mode.
• Operation can be shut down completely by pressing the
TIMER REC button once more.
Program
1
2
Recording time
for one day (A)
60 minutes
360 minutes
Possible duration for
Consecutive Recording (B)
1104 minutes
2209 minutes
HDD recording
space (A/B)
5.4%
16.3%
♦ Setting SPECIAL DW (special day of the week)
By entering a program’s start-day and end-day, the unit
can be set to record during a specific time frame over any
number of days in the week. The unit will record on the
days entered into the program which displays “SPL” in its
DW column.
Example: MON - FRI are designated as the days used in
DEFINE P1.
ENGLISH
“SKIP”: This is set when timer recording is to be
paused temporarily . Then the po wer will be switched
off and the specified time period for that program
number will not be recorded.
“POWER”: During the specified time, the power supply is stopped in “ON” condition. This is used for
execution of alarm recording during timer reservation.
“ARC”(ARCHIVE): The recording contents of the
HDD are backed up to the backup device.
“EJECT”: After backup of the recording contents of
the HDD to the backup device, the medium is ejected
automatically .
Estimating recording when using the Timer
Please note when using the Timer that there may
be instances where, because of max recording fields,
image quality, there is insufficient recording space
on the unit’s hard disk drive to complete the Timer
recording as programmed.
Please note that when the max recording fields
setting differs on the NORMAL REC SETTING screen
and TIMER PROGRAM screen, its possible recording duration will differ from the duration displayed in
ESTD TIME on the NORMAL REC SETTING screen.
The settings for the start-day and the end-day
cannot be identical.
1. Press the SET UP button to display the <MENU SETTING>
menu.Turn the JOG dial to move the cursor to TIMER
PROGRAM then turn the SHUTTLE ring to the right.
• The <TIMER PROGRAM> menu will appear.
2. Turn the JOG dial to move the cursor to DEFINE P1 then
turn the SHUTTLE ring to the right to display the <TIMER
PROGRAM> menu of P1.
3. Turn the JOG dial to move the cursor to select “SPECIAL
DW”, then turn the SHUTTLE ring to the right.
4. Turn the JOG dial to select “MON” then turn the SHUTTLE
ring to the right.
5. Turn the JOG dial to select “FRI” then turn the SHUTTLE
ring to the right.
• The flashing will stop.
When setting the Timer f or multiple programs, please
refer to the Recording Time tab le on page 81 to confirm the amount of hard disk space the recording duration will take up under different setting conditions.
<TIMER PROGRAM> P2
DW START END MODE
1 DAY 12:00 13:00 A– 25
@ DAY 16:00 22:00 A–12.5
3 ––– ––:–– ––:–– ––––––
Using the Timer setting as an example of estimating
possible recording duration, the chart on next column
shows that everything is recorded on the 4th day, and
on the 5th day only remain 7.8% of Program 2 content is
6. Press the TIMER REC button.
• The TIMER REC indicator will illuminate.
• If the current time is covered by a program, the unit will
begin recording immediately.
• If the current time is not covered by a program, the unit will
turn the power off and go into stand-by mode.
• Operation can be shut down completely by pressing the
TIMER REC button once more.
The unit will not record if there is an error in Timer settings .
The following provides a list of measures for dealing with
errors in Timer settings.
recorded on the hard disk drive. (Conditions ; Image
Quality is set to “HIGH”, built-in 60GB hard disk drive. )
••••••••••••••••••••••••••••••••••••••••••••••••••••••••••••••••••••••••••••••••••••••••••••••••••••••••••••••••••••••••••••
Operations
51
Page 52

•
<TIMER PROGRAM>
@SELECTED PATTERN
DEFINE P1
DEFINE P2
DEFINE P3
<M-DET APPLICATION>
REC MODE (A) OFF
REC MODE (B) OFF
REC MODE (C) OFF
REC MODE (POWER) OFF
P1
Using the Timer (continued)
Symptom 1)
The TIMER REC indicator is flashing. The buzzer sounds
if the BUZZER setting is set to WRNG.
Reason for Error
1) The present time or the Timer is not set.
2) The timer program has been made on <TIMER PROGRAM> page, but the correct SELECTED PATTERN is not
selected on the <TIMER PROGRAM> menu.
3) Menu setting is not yet completed.
Countermeasure
1) Set the correct present time (page 11).
2) Select the correct SELECTED PATTERN (page 50).
3) Complete the menu setting.
Symptom 2)
The Timer recording would not start ev en when the time is
ready for timer recording.
Reason for Error
1) HDD FULL setting on the <INITIAL SET UP> menu is
set to “STOP” or “ALARM•PROT”.
Countermeasure
1) Set the HDD FULL to other settings except “STOP” or
“ALARM•PROT” (pages 30,54).
Symptom 3)
The Timer backup would not star t even when the time is
ready for timer backup.
Reason for Error
1) The medium of the peripheral de vice.
Example #2
• Program #1 is set for 14:00 to 17:00 with a recording
interval of 2.5F.
• Program #2 is set for 15:00 to 16:00 with the SKIP setting.
Again, the unit will give priority to Program #2 for the duration
of the overlapping period. As shown in the illustration below,
the unit will activate the Skip setting from 15:00 to 16:00.
Example 2)
14:00 15:00 16:00 17:00
In Program #1, recording is set for
every 2.5F, from 14:00 to 17:00.
In Program #2, the SKIP setting is
entered for 15:00 to 16:00.
In this situation, the unit gives priority to the higher-numbered Program #2.
14:00 15:00 16:00 17:00
Actual recording
Setting for the prioritized Program #2.
2.5F
2.5F
SKIP
NO
RECORDING!
2.5F
If TIMER REC is used while the unit is operating
under the PRE A-REC setting, the unit will record
images using the conditions established in the PRE
A-REC setting even if there is no ALARM signal at
the start of recording.
♦ M-DET APPLICATION setting
When a timer reservation is made while the motion detection function is effective , the operation of the motion detection function during execution of timer reservation can be
set individually by camera operation and energization state.
Countermeasure
1) Insert the new medium and press the WARNING RESET button to erase warning on screen. Press the TIMER
REC button to release the timer, then press the TIMER
REC button again.
♦ Overlapping Timer settings
When Timer settings overlap, the unit will give priority to
the higher-numbered program.
Example #1
• Program #1 is set for 14:00 to 17:00 with a recording
interval of 2.5F.
• Program #2 is set for 15:00 to 16:00 with recording interval of 5F.
Under this condition, the unit will give priority to Program #2
for the duration of the overlapping period, from 15:00 to 16:00.
The unit will operate as shown in the chart below.
Example 1)
In Program #1, recording is set for every
2.5F, from 14:00 to 17:00.
In Program #2, recording is set for
every 5F, from 15:00 to 16:00.
In this situation, the unit gives priority to the higher-numbered Program #2.
52
Actual recording will occur as follows.
•••••••••••••••••••••••••••••••••••••••••••••••••••••••••••••••••••••••••••••••••••••••••••••••••••••••••••••••••••••••••••••••••••••••••••
14:00 15:00 16:00 17:00
2.5F
5F
14:00 15:00 16:00 17:00
5F
2.5F 2.5F
Setting for the prioritized Program #2.
When “POWER” has been selected as the op-
eration setting in the <TIMER PROGRAM> menu,
the effectiveness of the e xecution of the motion detection function during the specified time in power
ON state is set.
Example: Set “ON” as the <M-DET APPLICATION> setting
in regard to REC MODE (A).(the default setting is “OFF”).
1. Press the SET UP button to display the <MENU SETTING>
menu.
2. Move the cursor (
) to TIMER PROGRAM then turn the
SHUTTLE ring to the right.
• The <TIMER PROGRAM> menu will appear.
3. Turn the JOG dial to move the cursor to M-DET
APPLICATION and turn the SHUTTLE ring to the right.
• The sub-item flashes.
<M-DET APPLICATION>
@REC MODE (A) OFF
REC MODE (B) OFF
REC MODE (C) OFF
REC MODE (POWER) OFF
Page 53

Using the Timer (continued) /
Alarm Recording
4. Turn the JOG dial until “ON” flashes and turn the SHUTTLE
ring to the right.
• The sub-item stops flashing.
5. Turn the SHUTTLE ring to the left or press the SET UP
button.
<M-DET APPLICATION>
@REC MODE (A) ON
REC MODE (B) OFF
REC MODE (C) OFF
REC MODE (POWER) OFF
■ Alarm Recording
When an alarm sensor connected to the ALARM IN terminal is triggered or the MOTION DETECTION function detect the motion, the unit will switch to the interval setting
established for Alarm Recording.
When running in Alarm Recording mode, the unit
will continue to record for the entire Alarm Record-
ing duration even if the end-time specified in a Timer
Program has been exceeded. Refer to page 35.
♦ Alarm Recording operation
When the ALARM IN terminal is triggered or the MOTION
DETECTION function detect the motion during normal operation, the unit will respond as shown in the illustration
below.
Example: The unit is programmed for 2.5F recording intervals, and Alarm Recording is set at intervals of 6.25F and
for a duration of 2 minutes.
ALARM SET IN or detect the motion
and turn the SHUTTLE ring to retrieve the entry. (Refer to
page 58 for details on “Alarm List Search”.)
In addition, when the MOTION DETECTION set-
ting on the <INITIAL SET UP> menu is set to “ON”,
please note that “MAN” cannot be selected for the
Alarm Recording time.
1) Alarm Recording start-times can be registered up to 800
times. After the 800th time , the first start-time will be erased
and the 801st start-time will be added to the list.
2) As an index signal is also automatically stored at the
beginning of Alarm Recording, the Alarm Recording starttime can also be retrieved using INDEX SEARCH. (Refer
to page 57 for details on “Index Search”.)
♦ Alarm Recording indicators
1) If the DISPLA Y MODE is set f or values other than 5 or 6,
an Alarm Recordings count will automatically appear onscreen while the unit is running in Alarm Recording mode.
(Refer to page 25 for details on DISPLAY MODE.)
2) The Alarm Recording indicator will flash on and off during Alarm Recording, and will stay on at the completion of
Alarm Recording.
If the Alarm recording was made even once , the
ALARM REC indicator would stay illuminating.
3) The Alarm Recording counter has a maximum of 9999.
When this figure is exceeded, the count will return to 0001.
ENGLISH
recording at 2.5F
normal recording normal recording
alarm recording
2 minutes
recording at 2.5Frecording at 6.25F
♦ Setting Alarm Recording
For details of the setting please refer to page 35.
♦ Operations during Alarm Recording
1) An index signal will automatically be stored in memory
when Alarm Recording begins.
Alarm recording number
01-01-2001 MON A0001
00:00:00 25F 50% C01
2) If the unit receives a new alarm signal or detect the
motion while running in Alarm Recording mode, the unit
will complete the Alarm Recording session initiated by the
new signal.
3) If the unit receives an alarm signal while settings are
being made on the on-screen menus, the unit will exit the
menu screen and begin Alarm Recording.
♦ Operation after Alarm Recording
1) At the end of Alarm Recording, the unit will return to the
same recording intervals which were in effect before the
activation of Alarm Recording.
♦ Indexing Alarm Recording time
When the RECORD ALARM on the <A-REC/M-DET SETTING> menu is set to “SEP”, the index signal small number
will be included at the top of the entry for the designated
camera.
♦ Alarm recording cameras
Please refer to “Camer a Alarm Rec setting” on page 37 f or
details.
♦ Alarm Recording time indicators
When Alarm Recording is started, the unit will store the
date and time it receives the alarm signal. To access this
data, press the SEARCH button to call-up the <SEARCH
SELECTION> menu and select ALARM LIST SEARCH.
Use the JOG dial to move the cursor to the desired entry,
••••••••••••••••••••••••••••••••••••••••••••••••••••••••••••••••••••••••••••••••••••••••••••••••••••••••••••••••••••••••••••
Operations
53
Page 54

•
Various recordings
<INITIAL SET UP>
TIME DATE ADJUST
@HDD FULL
HDD PB REPEAT
ARCHIVE OVERWRITE
AUTO EJECT
ARCHIVE DATA
STOP
STOP
OFF
ON
ALL
■ Basic recording
Please refer to “Basic recording” on page 12 for details.
■ Pre-alarm Recording
When Alarm Recording is in effect, the unit is also able
record images taken a few seconds before the ALARM IN
terminal is triggered or the MOTION DETECTION function
detect the motion.
Time
Camera input
Recording process
• Images captured prior to the ALARM IN terminal being
triggered or the motion detected will be recorded.
according to the setting of Pre-alarm Recording. The
duration of the recording may be changed depending on such factors as the recording fields and Image quality.
• When Pre-Alarm Recording has been set, all the cameras designated under DEFINE GROUP SETTING in the
<A-REC/M-DET SETTING> menu will execute this function. After the alarm is triggered, only the channels using
cameras selected in the RECORD ALARM setting will be
recorded. Because of this, when the RECORD ALARM is
set to “SEP”, the number of recording cameras used in
pre-alarm and post-alarm recording will differ, and the recording intervals between the two stages will also differ
during playback.
The Pre-alarm Recording function can also be used with
Timer operation.
1. Set the action in TIMER PROGRAM to POWER.
2. Follow the procedure described in Pre-Alarm recording on
page 37 to make necessary settings for pre-alarm recording.
3. Press the TIMER REC button.
• Pre-alarm stand-by mode will start when time is ready.
4. Activate the ALARM IN terminal or detect the motion.
• Pre-alarm Recording will start automatically.
■ Repeat Recording
When HDD FULL is selected in the <INITIAL SET UP>
menu, it is possible to specify the unit function when its
HDD becomes full. By selecting “REPEAT” in the HDD
FULL setting, the unit will continue to record by automatically over-writing the data on its hard disk.
Example: “REPEAT” is selected in the HDD FULL setting.
1. Press the SET UP button to display the <MENU SETTING>
menu.
2. Turn the JOG dial to move the cursor ( ) to INITIAL SET UP.
54
•••••••••••••••••••••••••••••••••••••••••••••••••••••••••••••••••••••••••••••••••••••••••••••••••••••••••••••••••••••••••••••••••••••••••••
disturbance
Alarm input
Records data on HDD before alarm is input.
The duration of the Pre-alarm Recording will vary
REAR TERMINAL
SERVICE
@INITIAL SET UP
3. Turn the SHUTTLE ring to the right to display the <INITIAL
SET UP > menu.
<INITIAL SET UP>
@TIME DATE ADJUST
HDD FULL
HDD PB REPEAT
ARCHIVE OVERWRITE
AUTO EJECT
ARCHIVE DATA
STOP
STOP
OFF
ON
ALL
4. Turn the JOG dial to move the cursor to HDD FULL, then
turn the SHUTTLE ring to the right to flash the sub- item.
5. Turn the JOG dial till REPEA T appears . Turn the SHUTTLE
ring to the right to fix setting.
• The sub-item will stop flashing.
<INITIAL SET UP>
TIME DATE ADJUST
@HDD FULL
HDD PB REPEAT
ARCHIVE OVERWRITE
AUTO EJECT
ARCHIVE DATA
REPEAT
STOP
OFF
ON
ALL
6. Turn the SHUTTLE ring to the right or press the SET UP
button.
♦ Operation when the hard disk drive becomes full
“STOP”: The unit will stop recording at the moment the hard
disk becomes full, and will display the HDD FULL message
on the monitor. When WRNG is entered as the BUZZER
value (found in the <REAR TERMINAL> menu), the buzzer
will also be activated. The unit will stop recording when there
is no more storage space in memory. When the CALL OUT
setting in the <REAR TERMINAL> menu set to something
other than “NONE”, a CALL OUT signal will be emitted from
the CALL OUT terminal. To restart over-writing on the hard
disk, first press the WARNING RESET button to cancel HDD
FULL, and then press the REC button.
“REC•STANDBY”(Recording standby): The unit stops recording at the moment its hard disk becomes full. The unit
will begin recording by over-writing on its hard disk when
the unit receives an alarm signal or a REC terminal signal,
or when the REC button is pushed.
“REPEAT”: When the disk reaches its end during recording, the recording starts again from the beginning of the
disk.
“ALARM•PROT”(Alarm protection): Protects all / any Alarm
Recording, the unit will stop recording the moment its hard
disk becomes full and will display the HDD FULL message
on the monitor. When WRNG is entered as the BUZZER
value (found in the <REAR TERMINAL> menu), the buzz er
will also be activated. When the CALL OUT setting in the
<REAR TERMINAL> menu set to something other than
“NONE”, a CALL OUT signal will be emitted from the CALL
OUT terminal. If there are no instances of Alarm Recording
during recording, the unit will continue recording by automatically over-writing all its information on the hard disk.
Page 55

■ Series Recording
<REAR TERMINAL>
MODE OUT
@CAPACITY REMAIN
REC
HDD-10%
<REAR TERMINAL>
MODE OUT
@CAPACITY REMAIN
REC
HDD-10%
<REAR TERMINAL>
@MODE OUT
CAPACITY REMAIN
REMAIN
HDD-10%
<INITIAL SET UP>
@TIME DATE ADJUST
HDD FULL
HDD PB REPEAT
ARCHIVE OVERWRITE
AUTO EJECT
ARCHIVE DATA
STOP
STOP
OFF
ON
ALL
<INITIAL SET UP>
TIME DATE ADJUST
@HDD FULL
HDD PB REPEAT
ARCHIVE OVERWRITE
AUTO EJECT
ARCHIVE DATA
STOP
STOP
OFF
ON
ALL
<INITIAL SET UP>
TIME DATE ADJUST
@HDD FULL
HDD PB REPEAT
ARCHIVE OVERWRITE
AUTO EJECT
ARCHIVE DATA
REC•STANDBY
STOP
OFF
ON
ALL
By connecting multiple units as show in the chart below
and selecting REC•ST ANDBY in the HDD Repeat Recording setting, this unit can perform Series Recording. In Series Recording, when the first unit’s hard disk has become
full, the second unit automatically begins recording.
5. Turn the JOG dial till desired capacity remain appears and
then turn the SHUTTLE ring to the right.
• The sub-item will stop flashing.
ENGLISH
System configuration (using two units)
First Unit
REC
POWER OFF
POWER ON
INFORMATION
MODE-OUT
ALARM-OUT
CALL OUT GND
CALL OUT
GND
GND
DC 5V OUT
MAX 30mA
1
In this example, when the first unit’ s
Second Unit
CLOCK ADJUST
REC
POWER ON
GND
POWER OFF
ALARM OUT
MODE OUT
CALL OUT
hard disk reaches its maximum storage capacity,
the second unit will begin recording; when the second unit’s hard disk reaches its maximum storage
capacity, the first unit will begin recording by overwriting its hard disk. If you do not want the first unit
to begin the over-writing process, then please you
don’t connect the connection 1.
INFORMATION
Through use of the CALL OUT ter-
minal, settings can be made so that a second unit
begins recording in the event that something goes
wrong with the recorder and it cannot continue recording.
REC
POWER ON
First Unit
MODE-OUT
ALARM-OUT
POWER OFF
CALL OUT
CALL OUT GND
GND
GND
DC 5V OUT
MAX 30mA
Second Unit
CLOCK ADJUST
REC
POWER ON
GND
POWER OFF
ALARM OUT
MODE OUT
CALL OUT
CALL OUT GND
GND
GND
CALL OUT GND
GND
GND
6. Turn the JOG dial to move the cursor to MODE OUT and
turn the SHUTTLE ring to the right.
• The sub-item will start flashing.
<REAR TERMINAL>
@MODE OUT
CAPACITY REMAIN
REC
HDD-10%
7. Turn the JOG dial to flash “REMAIN”and turn the SHUTTLE
ring to the right.
• The sub-item will stop flashing.
8. Display the <INITIAL SET UP> menu.
• Press the SET UP button to display the <MENU SETTING>
menu. Move the cursor to INITIAL SET UP and turn the
SHUTTLE ring to the right.
9. Turn the JOG dial to move the cursor to HDD FULL and
turn the SHUTTLE ring to the right.
• The sub-item will start flashing.
Operation of
unit #1
Operation of
unit #2
Something goes wrong with the recorder
Recording
Recording
10. Turn the JOG dial to display REC•STANDBY and turn the
SHUTTLE ring to the right.
• The sub-item will stop flashing.
♦ Series Recording menu settings (for both units)
1. Press the SET UP button to display the <MENU SETTING>
menu.
2. T urn the JOG dial to move the cursor to the REAR TERMINAL
then turn the SHUTTLE ring to the right.
<REAR TERMINAL>
@MODE OUT
CAPACITY REMAIN
REC
HDD-10%
3. Turn the JOG dial to move the cursor to CAPACITY REMAIN
then turn the SHUTTLE ring to the right.
• The sub-item will start flashing.
<REAR TERMINAL>
MODE OUT
@CAPACITY REMAIN
REC
HDD-10%
4. Chec k that the “HDD” is flashing. Turn the SHUTTLE ring to
the right.
• Choose the HDD so that the second unit begins recording
when the first unit’s hard disk approaches its storage limit.
••••••••••••••••••••••••••••••••••••••••••••••••••••••••••••••••••••••••••••••••••••••••••••••••••••••••••••••••••••••••••••
• The flashing will move to capacity setting.
11. Turn the SHUTTLE ring to the left or press the SET UP
button.
♦ Operation during Series Recording
When the storage capacity of the first unit’s HDD reaches
a pre-specified level, the second unit will begin recording.
Conversely, when the second unit’ s HDD capacity reaches
a pre-specified level, the first unit will begin recording.
Through this exchange, recording will continue uninterrupted.
Overlapping period Overlapping period
Operation of
unit #1
Operation of
unit #2
Recording
Recording
Recording
Operations
55
Page 56

•
Various playback functions
■ Playing still frames
1. Press the PAUSE button during playback.
• The unit will shift into still frame mode. By pressing the
PAUSE button once again, the unit will return to its previous mode.
• By pressing the Camera number button while the still
frame is displayed, the unit will search for that channel’s
images and immediately display them on-screen.
■ Shuttle viewing
The SHUTTLE ring can be used to adjust playback speed
to varying rates. Playback speed will vary according to how
far the SHUTTLE ring is turned.
1. Press the PAUSE button during playback, and then turn
the SHUTTLE ring.
4
3
2
1
1
Reverse speed search (1MB units)
2
Reverse speed search (skip 5fields)
3
Reverse speed search (skip 3fields)
4
Still frame playback
5
Forward speed search (skip 3fields)
6
Forward speed search (skip 5fields)
7
Forward speed search (1MB units)
The unit will shift to still frame playback mode
when the SHUTTLE ring is returned to its former
position.
5
6
7
• Turn the JOG dial to the right to mov e forward one frame
and to the left to move back one frame. Continue turning
the JOG dial to the right for forward playback of consecutive frames and to the left for reverse playback of consecutive frames. Stop turning the dial for still frame viewing.
• During frame-by-frame playback in single-screen display
mode, playback will lag behind rapid JOG dial rotation because the unit is simultaneously engaged in searching for
images in the displayed channel.
■ Reverse playback
1. Press the REV PLAY button when the unit is not in operation.
• The unit will begin reverse playback.
On the first reverse playback after the power
switch is turned on or after recording, the unit will
start by displaying the last recorded image.
■ Changing playback intervals
When the PLAY or REV PLAY button is pressed while the
unit is in operation, playback will occur at the same intervals as the recorded intervals. Playback intervals can be
changed, when the PLAY or REV PLAY button is pressed
while the unit is in playback or reverse playback operation.
Playback intervals can be confirmed on-screen
by using the single-screen display mode and entering “2” or “3” in the DISPLAY MODE setting of the
<TIME DATE DISPLAY> menu.
• Playback or reverse playback intervals are increased up
when the PLA Y b utton is pressed, and playbac k or re verse
playback intervals are slowed down when the REV PLAY
button is pressed.
■ Shuttle hold
By pressing the P A USE button during pla yback (or rev erse
playback), the unit will shift into still frame mode. Rotate
the SHUTTLE ring in the desired direction and to the desired search speed, then press the PAUSE button while
holding the SHUTTLE ring to position. Search speed will
be maintained even when the SHUTTLE ring is returned
to its original position.
■ Direct shuttle viewing
Direct shuttle playback can be activated by turning the
SHUTTLE ring during playback or reverse playback.
1. Turn the SHUTTLE ring during playback.
Please refer to the above diagram for the playback speed.
The unit will shift to regular pla yback mode when
the SHUTTLE ring is returned to its former position.
INFORMATION
When playback images recorded
at different recording intervals, there may be rare
occasions when playback speed differs from the
original recording rate.
■ Frame-by-frame playback
1. Turn the JOG dial in either direction during still frame
playback.
INFORMATION
This is a convenient function for
slow viewing of recordings with fast movement as
well as fast playback of images captured at long
recording intervals.
56
•••••••••••••••••••••••••••••••••••••••••••••••••••••••••••••••••••••••••••••••••••••••••••••••••••••••••••••••••••••••••••••••••••••••••••
Page 57

Various search
<SEARCH SELECTION>
@SELECTION CAMERA NO.ALL
TIME DATE SEARCH
INDEX SEARCH
SKIP SEARCH
ALARM LIST SEARCH
JUMP TO START POINT
<SEARCH SELECTION>
@SELECTION CAMERA NO. 5
TIME DATE SEARCH
INDEX SEARCH
SKIP SEARCH
ALARM LIST SEARCH
JUMP TO START POINT
<SEARCH SELECTION>
SELECTION CAMERA NO. 5
TIME DATE SEARCH
@INDEX SEARCH
SKIP SEARCH
ALARM LIST SEARCH
JUMP TO START POINT
<INDEX SEARCH> 5
10
INPUT INDEX NUMBER
TURN THE SHUTTLE RING
<< OR >> TO VIEW NEXT
ALARM.
Various playback functions (continued) /
■ High-speed fast-forward/high-speed rewind
When the SHUTTLE ring is turned clockwise or counter
clockwise for ov er one second during STOP mode , the unit
will shift into high-speed fast-forward or high-speed rewind
mode, and an indicator will appear at the bottom left of the
monitor. “S” denotes the start point of the data stored in the
hard disk, and “E” denotes the end point. The vertical line
marks the current position.
01-01-2001 MON
00:00:00 25F 30% C16
SE
■ Monitor display settings and playback
operation
• Single screen : The screen will change frame by frame at
a rate equal to the recording interval multiplied by the
number of cameras used in the recording.
• SPLIT 4 : Each mini-screen will change frame by frame at
a rate equal to the recording interval multiplied by the
number of cameras used in the recording. The screen display shift to still frame mode during playback from a camera which is not indicated.
• SPLIT 9 : Each mini-screen will change frame by frame at
the recorded interval. The screen display shift to still frame
mode during playback from a camera which is not indicated.
3. Turn the JOG dial to display 5 then turn the SHUTTLE ring
to the right.
4. Turn the JOG dial to select the INDEX SEARCH, and turn
the SHUTTLE ring to the right.
Various search
• The flashing will stop.
tion camera number will be changed as below :
ALL Q W E R T Y U
r e w q } { P O I
•
The <INDEX SEARCH> menu will appear .
By turn the JOG dial, the selec-
ENGLISH
• SPLIT 16 : Each mini-screen will change frame by frame
at the recorded interval. The screen display shift to still frame
mode during playback from a camera which is not indicated.
5. Turn the JOG dial to display the desired index count, then
■ Time date search
Please refer to page 15 for detailed operation.
■ Index Search
During Alarm Recording, an index signal will automatically
be written onto the hard disk. Index Search is a process of
retrieving still frames using their associated index signal to
select the camera number.
turn the SHUTTLE ring to the desired search direction. (Turn
right to move forward, turn left to move in reverse.)
• Index Search begins, and the images corresponding to the
set index count are displayed either on a SPLIT 16 screen if
“ALL” is selected in the SELECTION CAMERA NO. setting,
or on a single screen if an individual camera number has
been selected.
• The index count will begin blinking if the index signal has
not been recorded, i.e., the Index Search will not be executed.
Press the SEARCH button and the unit returns to normal
playback mode.
The inde x count can be set, as desired, up to 99.
Example: Enter 10 for the index count, then start a search
to select the camera number 5.
1. Press the SEARCH button to display the <SEARCH
SELECTION> menu.
<SEARCH SELECTION>
@SELECTION CAMERA NO.ALL
TIME DATE SEARCH
INDEX SEARCH
SKIP SEARCH
ALARM LIST SEARCH
JUMP TO START POINT
2. Make sure that the cursor ( ) is set to the SELECTION
When “ALL” is selected in the setting parameter,
switching the search result display from SPLIT 16
screen to the Single screen display for a specific
camera number requires the following process. First
press the SEARCH button, then delete the
<SEARCH SELECTION> menu.
Select the camera
number by pressing the Camera number buttons on
the front of this unit. The selected image will be
shown on the Single screen mode.
CAMERA NO. menu, and turn the SHUTTLE ring to the right.
••••••••••••••••••••••••••••••••••••••••••••••••••••••••••••••••••••••••••••••••••••••••••••••••••••••••••••••••••••••••••••
• The sub-item of SELECTION CAMERA NO. will start flashing.
When using DDS tape, index searches can be
performed in the
forward direction only.
Operations
57
Page 58

•
Various search (continued)
Using the backup device/copy device
Can not change the display, during the search
selection menu will appear.
6. To play back search results.
• Press either the PLAY button or the PAUSE button.
Refer to page 56 for details on Various playback
functions.
To exit the <INDEX SEARCH> menu without ac-
tivating the search, press the SEARCH button on
the front of the unit.
7. Press the ST OP button to stop pla yback and still frame mode.
• Press the SEARCH button, the display will revert to its
original state.
♦ How to count index signals
Present time in the diagram below represents the point of
playing back or stopped pla ying back. To search index with
“ +”, turn the SHUTTLE ring to the right to search forward.
To search index with “ - ”, turn the SHUTTLE ring to the left
to search backward.
A•REC: Alarm Recording
-15 -1-2 +1 +15+2
A•REC A•REC A•REC A•REC A•REC A•REC
Beginning of playback device
Present position
End of playback device
■ Skip Search
Skip Search is a process where the unit automatically
searches for an index signal, then retrieves the visuals
associated with that index and plays back the images for 5
seconds each to select the camera number.
To play back search results, press the PLAY but-
ton for the desired image.
1. Press the SEARCH button to display by the <SEARCH
SELECTION> menu. Setting the <SELECTION CAMERA NO.>
menu, repeat the steps 2, 3 of the INDEX SEARCH setting
procedures.
The unit cannot be selected to single screen dis-
play mode during Skip Search.
4. Press the STOP button to stop searching.
When reverse SKIP SEARCH is used on recorded
content that includes five seconds or less of alarm
recording, those five seconds or less of alarm recording may be played back repeatedly. If this happens, press the stop button to halt SKIP SEARCH,
use reverse playback to get past the content being
played back repeatedly, and then resume with reverse SKIP SEARCH.
■ Alarm List Search
When Alarm Recording is initiated (refer to page 53), the
Alarm Recording start time will be added to the Alarm List.
Alarm List Search is a process which uses the associated
Alarm Recording start time to retrieve a desired image for
still frame playback to select the camera number.
Up to 800 Alarm Recording start-times can be
registered. After the 800th time, the first star t-time
will be erased and the 801st start-time will be added
to the list.
1. Press the SEARCH button to display by the <SEARCH
SELECTION> menu. Setting the <SELECTION CAMERA NO.>
menu, repeat the steps 2, 3 of the INDEX SEARCH setting
procedures.
2. Turn the JOG dial to select the ALARM LIST SEARCH, and
turn the SHUTTLE ring to the right.
•
The <ALARM LIST SEARCH> menu will appear .
<SEARCH SELECTION>
SELECTION CAMERA NO. 5
TIME DATE SEARCH
INDEX SEARCH
SKIP SEARCH
@ALARM LIST SEARCH
JUMP TO START POINT
58
2. Turn the JOG dial to select the SKIP SEARCH, and turn the
SHUTTLE ring to the right.
•
The <SKIP SEARCH> menu will appear .
<SEARCH SELECTION>
SELECTION CAMERA NO. 5
TIME DATE SEARCH
INDEX SEARCH
@SKIP SEARCH
ALARM LIST SEARCH
JUMP TO START POINT
3. Turn the SHUTTLE ring to desired direction (Forward search
3. Turn the JOG dial till the cursor goes to desired alarm list
number, then turn the SHUTTLE ring to the right.
• The unit begins the Alarm List Search, and retrieves the
image associated with the selected time (or the time closest
to the selected time).
• Playback is displayed on a SPLIT 16 screen when “ALL” is
selected in the SELECTION CAMERA NO. setting, and
displayed on a single screen when an individual camera
number is selected.
<ALARM LIST SEARCH>
No.
0003
0002
@
0001
DATE
26-01-01
26-01-01
25-01-01
TIME
18:54:25
18:34:40
18:20:00
C
5
5
5
to the right and reverse to the left).
• The unit begins the Index Search, and plays back the images
associated to the index for five seconds each. Playback is
displayed on a SPLIT 16 screen when “ALL” is selected in
the SELECTION CAMERA NO. setting, and displayed on a
single screen when an individual camera number is selected.
The JOG dial can be used to move the cursor
line-by-line through the list. When the cursor reaches
either the top or the bottom of the list, the <ALARM
LIST SEARCH> menu will scroll to the next page.
To move through the pages, place the cursor over
<SKIP SEARCH> 5
TURN THE SHUTTLE RING
<< OR >> TO
PREVIEW EACH ALARM.
“No.”, and turn the SHUTTLE ring.
•••••••••••••••••••••••••••••••••••••••••••••••••••••••••••••••••••••••••••••••••••••••••••••••••••••••••••••••••••••••••••••••••••••••••••
Page 59

Various search (continued) /
Using peripheral devices / Making copies
When over-writing data stored on the hard disk
drive, the start-time for a given Alarm Recording will
be automatically erased from the Alarm List when
the image data recorded at the start of that Alarm
Recording is over-written.
4. To play back search results.
• Press either the PLAY button or the PAUSE button.
5. Press the ST OP button to stop playbac k and still frame mode.
• Press the SEARCH button, the display will revert to its
original state.
■ Jump to Start point (oldest recording)
A process for finding the start point of oldest recorded data,
and delivering that start-point on-screen as a still frame.
1. Press the SEARCH button to display the <SEARCH
SELECTION> menu.
2. Turn the JOG dial to select the JUMP TO START POINT,
and turn the SHUTTLE ring to the right.
<SEARCH SELECTION>
SELECTION CAMERA NO. 5
TIME DATE SEARCH
INDEX SEARCH
SKIP SEARCH
ALARM LIST SEARCH
@JUMP TO START POINT
During playback of the archive device or copying
device media, playback can be made using an interval that differs from the recording interval by pressing the PLA Y button or the REV PLAY button. Visual
quality will depend on the device’s transmission
speed.
3. Select the de vice to be played b y pressing the PLA Y DEVICE
button on the front of this unit. The selected device’s indicator
light will turn on.
PLAY DEVICE
Check whether the connected device’s access
lamp is on.
4. Press the PLAY button.
• The device will start playing after a still picture has been
displayed.
V arious pla y and search options using the SHUT-
TLE ring are possible during playback of the copy
ing device, although there will be some delay before images are displayed.
INFORMATION
If a DDS-type tape media is con-
nected as an external recording device, playback,
eject and other functions may take a few minutes
depending on the media’s recording condition.
ENGLISH
3. Turn the SHUTTLE ring to the right when the <JUMP TO
START POINT> menu appears.
• The unit displays the still frames of the 1st part of the
recording on a SPLIT 16 screen. For full-screen viewing of a
particular frame, press the button of that image’s camera
number.
<JUMP TO START POINT>
TURN THE SHUTTLE RING
> > TO PLAY BACK
OLDEST RECORDED DATA.
To play back search results, press either the PLA Y
button or the PAUSE button.
4. Press the STOP button to stop searching.
• The display will revert to its original state.
■ SCSI ID number allocation
ID0 to ID3 are allocated to the main hard disk drive. ID4 is
allocated to the archive device, and ID5 is allocated to the
copying device.
■ Selecting other devices
The device to be used in playback can be chosen using
the PLAY DEVICE button located on the main unit’s front
face. Check to see that the selected device’s PLAY DEVICE indicator is on.
■ Copying from the hard disk to the copying
device
This unit features the capability to use a designated copy
device to copy data recorded on its hard disk. In addition,
the Copy range can be specified.
The copying device must be connected to ID5
when copying recorded material. Refer to page 19
for more details on ID numbers.
• Set the COPY DIRECTION on the <COPY SELECTION>
}
menu to “HDD
• Set the OVER WRITE on the <COPY SELECTION> menu
to “OFF”. Refer to page 16 for details on the <COPY SELECTION> menu settings.
When “ON” is selected, previously recorded data
will be erased and the designated Copy range will
be copied. When “OFF” is specified, copying will
begin at a point after the previously recorded data.
COPY”.
1. Press the POWER button.
2. Insert the medium of archive device or copying device.
••••••••••••••••••••••••••••••••••••••••••••••••••••••••••••••••••••••••••••••••••••••••••••••••••••••••••••••••••••••••••••
Operations
59
Page 60

•
Making copies (continued)
■ Restoring items onto the hard disk from the
copying device
This unit features the capability to restore recorded data to
the hard disk from a copying device. In addition, the restore range can be specified.
• Set the COPY DIRECTION on the <COPY SE-
}
LECTION> menu to “COPY
HDD”.
• “ON” is the only setting available for the
OVERWRITE on the <COPY SELECTION> menu.
■ Restoring items from the archive device to
the hard disk
This unit features the capability to restore recorded data to
the hard disk from an archive device. In addition, the Restore range can be specified. “ON” is the only available
setting for the Restore function.
The archive device must be connected to ID4
when making backups of recorded material. Refer
to page 19 for more details on ID numbers.
■ Setting of Copy range
♦ Manual setting of Copy range
1. Press the COPY button.
• The <COPY SELECTION> menu will appear.
• Use the JOG dial / SHUTTLE ring to designate the copy
destination.
If the Copy range exceeds the amount of avail-
able storage space in the copy medium, the unit will
issue a size error warning during copy operation. In
this case, either reset the Copy range or replace the
copy medium. Refer to page 84 for more details on
warning indicators. In addition, if the COPY button
is pressed when the Copy range is set to “S/E”, the
unit will automatically input the Copy range. This
does not mean, howev er, that the Cop y function has
been started.
INFORMATION
The unit is capable of recording
onto its hard disk while executing the Copy function. The unit generates a OVER TAKE warning during copying when hard disk over-writing is being approached. When it is exceeded, a CALL OUT signal
will be emitted from the CALL OUT terminal, and
the Copy function will be stopped.
When setting the copying range, if the setting
covers a day in which no data is included, the COPY
SIZE ERROR warning message will appear. The
range must be specified for dates that have data.
♦ Automatic settings for Copy range
By setting “TRANSFER PERIOD” to “S/E”, the process of
setting copy range becomes simplified. Refer to steps 1 to
3 on the left for the setting procedure.
2. Use the JOG dial to move the cursor to “TRANSFER
PERIOD”, then turn the SHUTTLE ring clockwise to select
“MAN”.
<COPY SELECTION>
COPY DIRECTION HDD}COPY
OVERWRITE OFF
@TRANSFER PERIOD MAN
FROM:01-01-01 00:00:00
3. Turn the SHUTTLE ring clockwise to enter the MAN setting,
then use the JOG dial to move the cursor to the start-time field
and turn SHUTTLE ring clockwise.
• The Date column will start blinking.
<COPY SELECTION>
COPY DIRECTION HDD}COPY
OVERWRITE OFF
TRANSFER PERIOD MAN
@ FROM:01-01-01 00:00:00
4. Use the JOG dial and SHUTTLE ring to set the desired
start-time and end-time.
• To establish the start-time and end-time settings, use the
SHUTTLE ring to move the flashing cursor to the far right,
then turn the SHUTTLE ring clockwise.
<COPY SELECTION>
COPY DIRECTION HDD}COPY
OVERWRITE OFF
TRANSFER PERIOD MAN
FROM:28-05-01 12:23:42
@ TO:28-05-01 12:25:42
5. Use the JOG dial to move the cursor to EXECUTE, then
turn the SHUTTLE ring clockwise to select “ON”.
FROM:28-05-01 12:23:42
TO:28-05-01 12:25:42
@EXECUTE ON
TURN THE SHUTTLE RING
>> TO EXECUTE.
• When “S/E” is selected, the start- and end-times of the
data recorded in the hard disk are displayed. Select “S/E”
in step 2 of the procedure outlined on the left, then complete steps 5 and 6 to complete this setting.
Limits to the copy range can be established by first using
the automatic setting procedure described above to set
start-time and end-time, then performing the manual settings on the copy range described on the left.
• Still frame playback copy mode
The P A USE button on the unit’ s front can be used to freez e
the image during data playback. When the COPY button is
then pressed, the time of the paused image will be set in
both the “FROM” and “TO” fields of the COPY menu.
♦ Automatic adjustments of Copy range
This copying method automatically adjusts copy size to the
copy medium’s available storage space, using one limit of
the Copy range as a fixed point.
a) Designating start-time
Copy start-time is set manually, then end-time is adjusted
automatically according to the copy medium’s available
storage space.
• Designate start-time.
• Set end-time in the (** - ** - ** ** : ** : **)
field.
When the copy end-point is automatically ad-
justed, the actual recording proceeds as shown in
the following chart.
60
6. Turn the SHUTTLE ring clockwise to initiate the Copy or
Restore functions.
• When Copy range is set manually, the unit will execute the
Copy function at a range slightly larger than the setting.
•••••••••••••••••••••••••••••••••••••••••••••••••••••••••••••••••••••••••••••••••••••••••••••••••••••••••••••••••••••••••••••••••••••••••••
Page 61

TRANSFER PERIOD MAN
@ FROM:28-05-01 12:25:34
TO:
**-**-** **:**:**
EXECUTE OFF
TRANSFER PERIOD MAN
FROM:
**-**-** **:**:**
@ TO:
**-**-** **:**:**
EXECUTE OFF
Recording
on HDD
Archive Pointer
Tuesday Wednesday Thursday
Previous backup
range
Making copies (continued) /
Making backups
1) When the amount of data in the copy source is
larger than the amount of data in the copy destination.
Start point End point ** (Auto)
Copy source
Copy destination
2) When the amount of data in the copy source is
smaller than the amount of data in the copy destination.
Start Point
End Point
(Auto)
**
Copy source
Copy destination
b) Copying the newest copyable data from the hard disk
Copy range is automatically adjusted to the copy medium’s available storage space using the end-point of recording on the hard disk.
• Set start-time and end-time in the (** - ** -
: ** : **) field.
**
When the unit is set to copy the last function
from the hard disk, the actual recording proceeds
as shown in the following chart.
**
2. Turn the SHUTTLE ring clockwise to select the “Year” field
of the Copy start/end-time display, and use the JOG dial to
select “
• When the start point of a) is specified, “ ** ” is displayed
at the Year position of the end-point. When copying using
method b), “ ** ” is displayed at the Year position of the
start-point. When the Year position of the start point is set to
display “ ** ” , the end-time display is automatically set to
display “ ** ” .
3. Use steps 5 and 6 from “Manual settings for Copy range ” to
initiate the Copy function.
**
” .
♦ Cancelling Copy operation
The COPY process can be stopped by pressing the W ARNING RESET button while the recorder is operating in COPY
mode.
■ Backup operation
The unit can be made to record unsaved hard disk data in
its archive device each time the ARCHIVE b utton is pressed.
This backup process is conducted as follows:
ENGLISH
1) When the amount of data in the copy source is
larger than the amount of data in the copy destination.
Start Point ** (Auto) End Point
Copy source
Copy destination
2) When the amount of data in the copy source is
smaller than the amount of data in the copy destination.
Start Point ** (Auto)
Copy source
Copy destination
End Point
♦ Procedure for setting “ ** ”
1. Use steps 1 to 3 from “Manual settings for Copy range ”
written on the previous page.
TRANSFER PERIOD MAN
@ FROM:29-01-01 09:25:24
TO:05-02-01 10:22:53
EXECUTE OFF
During Backup operation, backups are created
starting with the oldest data stored on the hard disk
drive.
The position of the Archive Pointer
Glossary
will
not be erased when the unit’s main po wer switch is
turned off. To cancel the position of the pointer, use
the “ARCHIVE POINT RESET” setting in the <SERV ICE> menu. Refer to page 28 for more details.
When the ARCHIVE button is pressed, the unit will use its
archive device to make backups of data recorded
after the
point indicated by the Archive Pointer.
••••••••••••••••••••••••••••••••••••••••••••••••••••••••••••••••••••••••••••••••••••••••••••••••••••••••••••••••••••••••••••
Operations
61
Page 62

•
Making backups (continued)
♦ Restrictions during Backup Recording
1. Selectable recording intervals for simultaneous backup
Recording interval for simultaneous backup of recorded
data is determined by the data-writing speed of the connected device. For reference, the following chart provides
a list of interval modes which can be selected when the
unit is used in conjunction with a Hewlett-Packard C1556A
drive (DDS3). (The same modes apply when the main hard
disk drive has been expanded.)
IMAGE QUALITY
Field/sec.
25F 12.5F 8.33F 6.25F
SUPERIOR
HIGH
MEDIUM
Nonselectable
STANDARD
BASIC
:Simultaneous backup is possible
2. Precautions when designating Timer simultaneous
backup
The Backup Program, which can be designated as an individual operation, can also be designated with the RECORD
and POWER Programs. The following items apply when
designating these multiple program modes.
1) There may be restrictions imposed by the other recording devices, it is recommended that adequate program
checks are run before actual operation.
Precautions when connecting devices requiring time to
*)
halt startup (e.g., archive devices, tape recording devices
etc.)
• Using the Backup setting’s designated time plus 5 minutes (the halt startup time of the peripheral recording devices) as a gauge, set the unit so that modes do not change.
(Refer to illustration 1.)
• Even when only designating the backup mode, add one
minute or more to the backup operation time, and set other
programs to start and stop. ( Refer to Illustration 2. )
RECORDING A-8.33
(or POWER setting)
Backup
RECORDING A-8.33
(or POWER setting)
Backup
RECORDING A-8.33
(or POWER setting)
data has been transferred, thus ending the backup process.
♦ Cancelling Backup operation
Press the ARCHIVE button during Backup Recording to
halt operation. The Archive P ointer will be re-positioned to
where operation was stopped, and the next Backup Recording will begin at this point. The unit will halt operation
while the ARCHIVE button is blinking; please w ait until the
button’s light stays on.
■ Individual settings during Backup
operation
♦ Choosing a backup system
Select either “ON” or “OFF” for the ARCHIVE O VERWRITE
setting on the <INITIAL SET UP> menu.The default setting is “OFF”. Use the JOG dial and SHUTTLE ring to check
that settings are as desired. (Refer to page 30.)
a) “OFF”: Data will be added to the storage medium from
the point where previous Backup Recording was completed.
Archive pointer
Default setting
before backup recording
After finishing backup
TUE
pointer
Archive
TUE WED THU
Additional recording from the Archive pointer
b) “ON”: Data previously recorded on the storage medium
will be over-written and erased.
This data will be erased.
Default setting
before backup recording
After backup
recording
TUE
WED THU FRI
Overwriting backup
♦ Auto-eject at the completion of backup
The unit can be set so that the storage medium will be
automatically ejected upon completion of Backup process.
Refer to page 31 for details on the setting procedure.
Besides this setting, the archive medium will be automatically ejected under the following conditions.
(Archive media)
capacity
( Archive media)
Capacity
62
Longer than 5 minutes
Illustration 1:
Correct setting
Longer than 1 minutes
Illustration 2
Longer than 1 minutes
• When the archive medium becomes full during One-touch
Backup.
• When the archive medium becomes full during Timer
Backup.
• When the ARCHIVE button is pressed once again, after
♦ ARCHIVE button operation
The transfer of data, for backup purposes, from the unit’s
HDD to a peripheral recording device is performed in fixed
operation has been initiated with the ARCHIVE button.
• When a recording malfunction, medium error, or system
error occurs during Backup operation.
data amounts each time. Data transfer begins when 30MB
is recorded onto the HDD . Accordingly , e ven if the ARCHIVE
button is lit, there are times when the operation of archive
devices are stopped in order to reduce wear on these devices. To end the backup, please press the ARCHIVE button one more time as the button remains lit even after the
backup process is finished. The ARCHIVE button will start
blinking when pressed, and will stop blinking when recorded
•••••••••••••••••••••••••••••••••••••••••••••••••••••••••••••••••••••••••••••••••••••••••••••••••••••••••••••••••••••••••••••••••••••••••••
Page 63

<TIMER PROGRAM> P2
DW START END MODE
1 SAT 19:30 22:30 A– 25
2 TUE 10:00 11:00 B–12.5
3 SPL 10:00 17:00 B– 1
4 WED 07:00 08:00 B– 1
@ DAY 00:00 05:00 ARC
Making backups (continued) /
Other convenient functions
■ Timer Backup
The timer can be used to archive data in the main hard
disk drive which has not yet been backed up. The unit can
archive data even if it is currently in the process of Timer
Recording. Please check the settings for backup over-writing. (Refer to page 30 for more details.)
Make sure to connect the archive device using
SCSI ID4.
Example: Use Program #5 in the Timer operational mode
P2 to make a backup everyday between 00:00 to 05:00.
(All data is backed up in one session.)
1. Press the SET UP button to display the <MENU SETTING>
menu.
2. Turn the JOG dial to mov e the cursor to TIMER PR OGRAM.
3. Turn the SHUTTLE ring to the right to display the <TIMER
PROGRAM> menu. Check that the cursor is next to
SELECTED PATTERN, turn the SHUTTLE ring to the right.
• The sub-item will start flashing.
<TIMER PROGRAM>
SELECTED PATTERN
@DEFINE P1
DEFINE P2
DEFINE P3
4. Turn the JOG dial to select “P2” and turn the SHUTTLE ring
to the right.
<TIMER PROGRAM>
SELECTED PATTERN
@DEFINE P1
DEFINE P2
DEFINE P3
5. Turn the JOG dial to move the cursor to DEFINE P2, then
turn the SHUTTLE ring to the right.
• The <TIMER PROGRAM> of P2 appears.
<TIMER PROGRAM> P2
DW START END MODE
@ SAT 19:30 22:30 A– 25
2 TUE 10:00 11:00 B–12.5
3 SPL 10:00 17:00 B– 1
6. Turn the JOG dial to move the cursor to Program #5, then
turn the SHUTTLE ring clockwise to move the cursor to the
DW column.
• Group the backup program to the largest available program
number.
• Use the JOG dial to select “DW” and turn the SHUTTLE ring
clockwise to complete this setting.
• Repeating the above procedure, use the JOG dial and
SHUTTLE ring to set start time and end time.
<TIMER PROGRAM> P2
DW START END MODE
1 SAT 19:30 22:30 A– 25
2 TUE 10:00 11:00 B–12.5
3 SPL 10:00 17:00 B– 1
4 WED 07:00 08:00 B– 1
@ ––– ––:–– ––:–– ––––––
P1
P2
The start point of the backup is at the position of
Glossary
the Archive Pointer
, and its end point is
where backup is terminated within the designated
time frame. When backup is completed within the
designated time frame, the unit saves the Archive
Pointer at this position, and will start the next backup
at this position.
8. Turn the SHUTTLE ring to the left or press the SET UP
button.
• The Timer Backup is grouped as shown in the following
illustration.
A recording operation w arning is displayed when
hard disk drive data which has yet to be backed up
is about to be over-written. After that, a recording
malfunction message will be displayed when that
point has been exceeded.
INFORMATION
The unit can be set so that a CALL
OUT signal is emitted when the archive medium has
run out of storage space. Refer to page 27 for more
details on CALL OUT settings.
■ Power failure reset recording
The unit will restart recording after the event of a power
failure, even if the unit was running in recording mode prior
to the power failure. When running Timer Recording, the
unit will restart recording if the power failure ends before
the user-specified time frame. After a power outage, a mark
“X” will appear on the monitor ne xt to the time displa y. This
can be removed by pushing the WARNING RESET button.
In the case of a power failure during recording,
image quality may be partially degraded and search
functions may not operate normally.
■ Power failure time display
The start-times of power failures are recorded when the
unit is turning on electricity, and can be confirmed later.
(Start times of power failures occurring during backup operation are not recorded.) Refer to page 28 for more details.
ENGLISH
7. When MODE column is flashing, select “ARC” then turn the
SHUTTLE ring to the right.
<TIMER PROGRAM> P2
DW START END MODE
1 SAT 19:30 22:30 A– 25
2 TUE 10:00 11:00 B–12.5
3 SPL 10:00 17:00 B– 1
4 WED 07:00 08:00 B– 1
@ DAY 00:00 05:00 ––––––
••••••••••••••••••••••••••••••••••••••••••••••••••••••••••••••••••••••••••••••••••••••••••••••••••••••••••••••••••••••••••••
Operations
63
Page 64

•
Connecting to a personal computer
Other convenient functions
RS-232C settings
Other convenient functions (continued)
■ Power failure compensation circuit
The unit is equipped with an internal power failure compensation circuit, and, after a full recharge of 48 or more
hours, will preserve data and time settings for one month.
Timer settings and menu settings will also be preserved.
Time settings will not be precise, if the unit has been unplugged for a long period of time.
■ RESET button
The following conditions occur when the RESET button
located on the unit’s back panel is pressed (using a ballpoint pen or other object): the current time is erased, the
system is reset, and main power is turned off. Recorded
data and menu settings will not be erased.
■ Simple lock function
When the LOCK button is pressed (with a ball-point pen,
for example), the unit’s buttons, JOG dial, and SHUTTLE
ring cannot be used, and the unit will remain fixed in its
current settings. The Multiplexer button (refer to page 7),
however, can be used with the LOCK function. Press the
LOCK button to cancel this function. The LOCK indicator
light will show when the unit is in Lock mode. In addition,
this function can only be used until the password lock function is set. Once the password lock function has been set,
the SIMPLE LOCK FUNCTION becomes inoperative.
■ PASSWORD LOCK function
Pressing the LOCK button on the front of the unit will enable you to record a password. Once the password has
been entered and the unit has been locked, the functions
other than the camera switch will not operate unless the
correct password is entered. This function will not work
when power is off.
Example: Recording the password for the first time.
<PASSWORD SETTING>
1. - - - -
2. - - - -
PASSWORD ERROR
• The display reading “TURN THE SHUTTLE RING >> TO
ENTER.” appears when the menu is displayed. If the
password is not enter, turning the SHUTTLE ring to the left
will result in an error.
• If a password error occurs, the incorrect password may be
cleared using the WARNING RESET key.
<PASSWORD LOCK>
PASSWORD ERROR
4. Turn the SHUTTLE ring to the right.
• The password is now set, and the normal operating screen
appears.
Example: Turning the P ASSW ORD LOCK functions on and
off.
“OFF”: The PASSWORD LOCK functions can be disabled
by pressing the LOCK button on the front of the unit and
entering the password.
“ON”: To return to locked status, press the LOCK button
again.
<PASSWORD LOCK>
- - - -
INPUT PASSWORD
TURN THE SHUTTLE RING
>> TO ENTER.
1. Hold the LOCK key down for at least 5 seconds.
• The <PASSWORD SETTING> menu will appear.
<PASSWORD SETTING>
@1. - - - -
2. - - - -
INPUT PASSWORD
TURN THE SHUTTLE RING
>> TO ENTER.
2. Enter the password.
• Enter a four-digit password.
<PASSWORD SETTING>
1. - - - -
@2. - - - -
INPUT PASSWORD AGAIN
TURN THE SHUTTLE RING
>> TO ENTER.
• The password may consist of the numbers from 1 to 9 which
are assigned to the camera switch button located on the front
of the unit. 0 is assigned to the ZOOM key. (Refer to page 7.)
3. Re-enter the password.
• “TURN THE SHUTTLE RING >>TO ENTER.” will appear on
the screen.
• If the wrong password is enter , the menu will display the
PASSWORD ERROR, and the all the “ ” will be cleared.
Enter the password again.
NOTE: Contact the dealer if you forget your password.
Example: Changing passwords.
1. During unlocking, press the LOCK button for five seconds.
• The <PASSWORD LOCK> menu will appear.
<PASSWORD LOCK>
- - - -
INPUT PASSWORD
TURN THE SHUTTLE RING
>> TO ENTER.
2. Enter the current password.
3. The <PASSWORD SETTING> menu will appear.
• Using the same procedure for setting the original password,
enter and set the new password.
<PASSWORD SETTING>
@1. - - - -
2. - - - -
INPUT PASSWORD
TURN THE SHUTTLE RING
>> TO ENTER.
64
•••••••••••••••••••••••••••••••••••••••••••••••••••••••••••••••••••••••••••••••••••••••••••••••••••••••••••••••••••••••••••••••••••••••••••
Page 65

<TCP/IP SETTING>
@SELF IP ADDRESS
000.000.000.000Ł
SUBNET MASK
000.000.000.000Ł
<MAC ADDRESS>
08-00-70-2E-3F-FF
<TCP/IP SETTING>
@SELF IP ADDRESS
000.000.000.000Ł
SUBNET MASK
000.000.000.000Ł
<MAC ADDRESS>
08-00-70-2E-3F-FF
<TCP/IP SETTING>
@SELF IP ADDRESS
192.168.001.100Ł
SUBNET MASK
255.255.255.000Ł
<MAC ADDRESS>
08-00-70-2E-3F-FF
t
COMMUNICATION settings / Connecting to a personal computer
■ RS-232C settings
This connection can be used for remote control and recording supplementary information when the main unit is
connected to a PC.
♦ T ransmission speed
Example: Transmission speed is set for 4800 bps.
ENGLISH
1. Press the SET UP button to display the <MENU SETTING>
menu.
2. Turn the JOG dial to move the cursor to COMMUNICATION SETTING then turn the SHUTTLE ring to the right.
• The <COMMUNICATION SETTING> menu will appear.
<COMMUNICATION SETTING>
@RS-232C SETTING
TCP/IP SETTING
3. Check that the cursor is next to RS-232C SETTING and
turn the SHUTTLE ring to the right.
• The <RS-232C SETTING> menu will appear.
<RS-232C SETTING>
@TRANSMISSION RATE
DATA BIT LENGTH
PARITY BIT
STOP BIT LENGTH
DELIMITER
1200
8BIT
NONE
1BIT
CR
4. Check that the cursor is next to TRANSMISSION RATE
and turn the SHUTTLE ring to the right to flash the sub-item.
<RS-232C SETTING>
@TRANSMISSION RATE
DATA BIT LENGTH
PARITY BIT
STOP BIT LENGTH
DELIMITER
1200
8BIT
NONE
1BIT
CR
5. Turn the JOG dial to select “4800” and turn the SHUTTLE
ring to the right to finish setting.
<RS-232C SETTING>
@TRANSMISSION RATE
DATA BIT LENGTH
PARITY BIT
STOP BIT LENGTH
DELIMITER
4800
8BIT
NONE
1BIT
CR
6. Press the SET UP button.
• The <RS-232C SETTING> menu will disappear.
■ TCP / IP settings
The IP address, subnet mask setting, and MAC address
used to specify the connected recorder can be referred to
here (refer to page 8).
Press the COMMUNICA TION button on the unit’ s
front face to activate the TCP/IP communication
function.
1. Press the SET UP button to display the <MENU SETTING>
menu.
4. Check that the cursor is next to SELF IP ADDRESS and
turn the SHUTTLE ring to the right to flash the sub-item .
5. Turn the JOG dial to input the SELF IP ADDRESS and turn
the SHUTTLE ring to the right to finish setting.
6. Press the SET UP button or turn the SHUTTLE ring to the
left.
• The <TCP/IP SETTING> menu will disappear.
■ Connecting with a personal computer
This connection can be used for remote control and recording supplementary information when the main unit is
connected to a PC.
Please use RS-232C Straight cable (9pin) to con-
nect a modem with this unit. The setting of CTS
should be set to “HIGH” or “ON”. Please refer to the
instruction manual of a modem for details about connection.
♦ Connection via modem
Personal Compu
CAMERA IN
12 34 567 8910111213141516
CAMERA OUT
12 34 567 8910111213141516
GNDGND
ALARM IN
ETHERNET
RS-232C
987654321
16151413121110
CLOCK ADJ
REC
POWER ON
POWER OFF
ALARM OUT
MODE OUT
GND
VIDEO OUT
Y/C
OFF
ON
SCSI
RESET
TERMINATION
CALL OUT
CALL OUT GND
GND
GND
DC 5V OUT
MAX 30mA
SCSI
♦ Direct connection
phone line
Modem Modem
RS-232C straight cable (9 pin)
2. Turn the JOG dial to move the cursor to COMMUNICATION SETTING then turn the SHUTTLE ring to the right.
• The <COMMUNICATION SETTING> menu will appear.
<COMMUNICATION SETTING>
@RS-232C SETTING
TCP/IP SETTING
3. Turn the JOG dial to move the cursor to TCP / IP SETTING
then turn the SHUTTLE ring to the right.
••••••••••••••••••••••••••••••••••••••••••••••••••••••••••••••••••••••••••••••••••••••••••••••••••••••••••••••••••••••••••••
• The <TCP / IP SETTING> menu will appear.
CAMERA IN
1 2 3 4 5 6 7 8 9 10 11 12 13 14 15 16
CAMERA OUT
1 2 3 4 5 6 7 8 9 10 11 12 13 14 15 16
GNDGND
ALARM IN
ETHERNET
RS-232C
987654321
16151413121110
CLOCK ADJ
REC
POWER ON
POWER OFF
ALARM OUT
MODE OUT
GND
Please use RS-232C crossover cable (9pin) to
connect a modem with a personal computer. RS 232C Crossover cable diff ers depending on the personal computer.
VIDEO OUT
Y/C
OFF
ON
SCSI
RESET
TERMINATION
CALL OUT
CALL OUT GND
GND
GND
DC 5V OUT
MAX 30mA
SCSI
RS-232C crossover cable
Personal Computer
Operations
65
Page 66

•
Connecting to a personal computer
Command code
Connecting to a personal computer (continued)
/ Command codes
♦ RS-232C terminal
5
1
RS-232C
6
9
Pin NO.
2
3
4
5
Transmition Contents Transmition Contents
Letters Letters
RXD
Receiving Data
TXD
Transmission Data
DTR
Data Terminal Ready
GND
Signal Ground
Pin NO.
6
7
8
DSR
Data Set Ready
RTS
Transmission
Requirement
CTS
Transmission Clear
♦ RS-232C cable
Please use the following RS-232C Crossover cable to connect your personal computer to the Unit.
1) When RS-232C terminal of personal
computer is D-SUB 25 pin
1
20
2
3
4
5
6
7
FG
TXD
RXD
RTS
CTS
DSR
GND
DTR
FRAME
2
RXD
3
TXD
4
DTR
5
GND
6
DSR
7
RTS
8
CTS
D-SUB 9 pin (unit) D-SUB 25 pin(Personal computer)
2) When Pesonal cpmputers RS-232C
terminal is D-SUB 9 pin
2
RXD
3
TXD
4
DTR
5
GND
6
DSR
7
RTS
8
CTS
D-SUB 9 pin D-SUB 9 pin
FRAMEFRAME
2
RXD
3
TXD
4
DTR
5
GND
6
DSR
7
RTS
8
CTS
♦ Setting the communicating mode
The settings can be made on RS-232C SETTING of the <REAR TERMINAL> menu. Set the Unit and the modem or a personal
computer with same settings. Please refer to the diagram for possible setting rate.
Synchronization Name on Menu
Transmission rate at
1
the data received/
sent
2
Data bit length
3
Parity bit setting
4
Stop bit length
5
Line feed setting
TRANSMISSION
RATE
DATA BIT LENGTH
PARITY BIT
STOP BIT
DELIMITER
Asynchronous
1200/2400/4800/
9600
8 BIT/7 BIT
NONE/ODD/EVEN
1 BIT/2 BIT
CR/CR•LF
# Set other functions on the personal
computer as shown below.
Synchronization Name on Menu
1
X control
2
S parameter
3
CS-RS hamd-shake
Not available
Not available
Available
Please note that the RS-232C interface (located on the back of the unit) does not function while the unit is in commu-
nication mode.
■ Command code and status
Operation and setting of this unit by a personal computer is executed by command codes and error codes.
1) Command : an order from a personal computer to the unit
Command code
2) Command : a reply from the unit ( indicated on a personal computer)
Status
Parameter 1
• • • • • • • • • •
Parameter 1
• • • • • • • • • •
Parameter 2
, ,
Parameter n
,
Parameter 2
, ,
Parameter n
,
• • • • • • • • • •
Delimeter
(sending) #1
• • • • • • • • • •
Delimeter
(receiving) #2
#1: If you set the DELIMITER setting to "CR" on the RS-232C setting menu,
input a Carrige return code (0DH).
If you set the DELIMITER setting to "CR • LF" on the RS-232C setting menu,
input a carrige return code (0DH) and a line
#2: If you set the DELIMITER setting to "CR" on the RS-232C setting menu,
output a Carrige return code (0DH).
If you set the DELIMITER setting to "CR • LF" on the RS-232C setting menu,
output a carrige return code (0DH) and a line
Make sure to send commands in an interval of 0.1 second.
****
****
code (0AH).
code (0AH).
66
♦ Example of Command operation
Example 1) Turn the Unit on.( when DELIMITER is set to "CR" on the RS-232C setting menu)
Command from
personal computer
CR
PW1
Replied status code from uint
to a personal computer
CR
RC
CR
EX
Meaning
Sending a command to turn the Unit on.
The unit received a command.
The unit received a command and executed.
•••••••••••••••••••••••••••••••••••••••••••••••••••••••••••••••••••••••••••••••••••••••••••••••••••••••••••••••••••••••••••••••••••••••••••
Page 67

Command codes (continued)
♦ Details of the numbers
#1 : When the setting of DELIMITER on RS-232C setting display is set to CR, carriage return code (0DH) will be input. If the
setting is CR•LF, carriage return code (0DH) and line feed code (0AH) will be input.
#2 : When the setting of DELIMITER on RS-232C setting display is set to CR, carriage return code (0DH) will be output. If the
setting is CR•LF, carriage return code (0DH) and line feed code (0AH) will be output.
: Indicates one number or a character.
*
Commands Functions Status, when normal execute
IA?
#1
VC?
#1
PW
*
#1
SP
#1
PB
#1
RP
#1
RC
#1
PU
*
#1
FA
#1
RA
#1
PF
*
#1
PR
*
#1
RW
*
TR
#1
*
#1
AV
*
#1
LO
*
#1
LM
PO?
#1
(1)
(2)
(3)
,
,
PO
*
BASIC FUNCTIONS
MB
***
#1
MB?
#1
FD?
PS
**
,
*
*
*
#1
(1)
(2)
,
**
Acquire information on MAC ADDRESS
Acquire information on model identification code
POWER ON/OFF * : 0 ~ 1 0 : OFF 1 : ON
STOP
PLAYBACK
REVERSE PLAYBACK
RECORDING
PAUSE SETTING/RELEASE
: 0 ~ 1 0 : ON 1 : OFF
*
Forward advance
Reverse advance
Forward Speed search
: Playback speed(1~ 4)
*
[Playback] 1 : Skip 3 fields 2,3 : Skip 5 fields
[STOP] 1 ~ 4 : Skip 2 MByte
Reverse Speed search
: Playback speed (1 ~ 4)
*
(Refer above for settings)
Rewind DDS cassette
: 0 ~ 1 0 : ID4 1 : ID5
*
Timer REC ON/OFF
: 0 ~ 1 0 : OFF 1 : ON
*
ARCHIVE ON/OFF
LOCK ON/OFF or PASSWORD LOCK ON
: 0 ~ 1
*
0 : LOCK OFF 1 : LOCK ON or PASSWORD LOCK ON
Acquire information on status of LOCK or PASSWORD
LOCK function
Acquire information on whether password has been
registered for PASSWORD LOCK function
(4)
PASSWORD LOCK OFF
#1
(1)
,
*
*
Switch over playback interval to
***
001 : 25F 002 : 12.5F 003 : 8.33F
004 : 6.25F 005 : 5F 006 : 4.17F
007 : 2.5F 008 : 1F
Acquire information on playback interval
Acquire information on time and date recorded on data
Move date and present time display
#1
(1) :
**
(Display mode 1, Character size large : 00 ~ 28)
(Display mode 1, Character size small : 00 ~ 28)
(Display mode 2 or 3, Character size large : 00 ~ 28)
(Display mode 2 or 3, Character size small : 00 ~ 28)
(2) :
**
(Display mode 1, Character size large : 03 ~ 26)
(Display mode 1, Character size small : 03 ~ 26)
(Display mode 2 or 3, Character size large : 01 ~ 26)
(Display mode 2 or 3, Character size small : 01 ~ 26)
4 : Skip 1 MByte
(2)
(3)
(4)
,
,
*
*
: (001 ~ 008)
(Horizontal)
(Vertical)
: 0 ~ 1 0 : OFF 1 : ON
*
: Password (0 ~ 9)
#2
RC IA
**,**,**,**,**,**
#2
#2
#2
#2#2
#2#2
#2#2
#2#2
#2#2
#2#2
#2#2
#2#2
#2#2
#2#2
#2
#2#2
#2
#2
#2
*
#2#2
*
#2#2
#2#2
***
**
**
#2
#2
(1)
**
,
**
(2)
: Month
(5)
: Minute
#1
(2)
(3)
,
**
**
#2
RC DX1601
RC EX
RC EX
RC EX
RC EX
RC EX
RC EX
RC EX
RC EX
RC EX
RC EX
#2
RC EX
RC EX
(during POWER ON only)
#2
RC EX
#2
RC EX
(ER08 : PASSWORD input during LOCK OFF)
(ER17 is output if LO0 is input while PASSWORD
LOCK is set to ON.)
#2
RC LM
: 0 ~ 1 0 : OFF 1 : ON
*
RC PO
: 0 ~ 1 0 : No password registered 1 : Password registered
*
RC EX
(ER16 : PASSWORD ERROR)
RC EX
#2 #2
RC MB
: (001 ~ 008)
***
(Same as playback interval shown above)
#2
RC FD
(1)
: Day
**
(4)
: Hour
**
#2
RC EX
,
**
**
(4)
,
**
(3)
: Year
(6)
: Second
#2
(5)
(6)
,
#2
**
ENGLISH
••••••••••••••••••••••••••••••••••••••••••••••••••••••••••••••••••••••••••••••••••••••••••••••••••••••••••••••••••••
Command Codes
67
Page 68

•
Command codes (continued)
Commands Functions Status, when normal execute
#1
LC
DP00
ST0
PI
#1
#1
#1
Acquire information on current position of date and
present time display
Exits MENU display
Stop the selected item on the menu to flash
Acquire information on currently displayed menu and
whether the setting is proceeding
BASIC FUNCTIONS
CP?
PA?
PD
PD?
EJ
#1
#1
#1
*
#1
#1
*
Acquire information on the used memory of device
selected in CAPACITY REMAIN
Acquire information whether time and date information
recorded in playback picture is alarm recording
PB DEVICE setting
: 0 ~ 2 0 : HDD 1 : ARCHIVE 2 : COPY
*
Acquire information on PB DEVICE setting
Ejecting media out of DEVICE
: 1 ~ 2 1 : ARCHIVE 2 : COPY
*
(1)
(1)
(1)
#2
,
**
and
(1)
,
***
(2)
#2
(2)
of Move date and present time display)
**
(2)
#2
,
*
(2)
#2
#2
RC LT
(Same as
RC EX
RC EX
RC ON
**
00 : current date and time display
01 : NORMAL REC SETTING
02 : TIME DATE DISPLAY
03 : TIMER PROGRAM M-DET APPLICATION
04 :MPX DISPLAY
06 : DIFINE GROUP
07 : MENU SETTING
08 : TIME DATE ADJUST
09 : COMMUNICATION SETTING
10 : INITIAL SETUP
11 : SERVICE
12 : POWER FAILURE
13 : REAR TERMINAL
14 : RS232C SETTING
15 : DATE CLEAR SELECTION
16 : CLOCK LOCATION
17 : CAMERA TITLE
19 : SCREEN SW PATTERN
20 : SPLIT16 SCREEN SETTING
21 : SPLIT9 SCREEN SETTING
22 : SPLIT4 SCREEN SETTING
24 : SPECIAL FUNCTION MENU
25 : CALL OUT
26 : VER.UP SELECTION
29 : A-REC/M-DET SETTING
30 : DEFINE ALARM GROUP
31 : LANGUAGE SELECTION
32 : INFORMATION
36 : CONNECTED SCSI DEVICE
37 : RECORDED PERIOD
40 : MOTION
41 : SET DETECTION MASK
42 : TEST MODE
43 : TCP/IP SETTING
49 : TIME DATE SEARCH SEARCHING
50 : INDEX SEARCH SEARCHING
51 : ALARM LIST SEARCH SEARCHING
52 : SKIP SEARCH SEARCHING
53 : COPY SELECTION
54 : PASSWORD SETTING
55 : PASSWORD LOCK
58 : TIMER PROGRAM P1
59 : TIMER PROGRAM P2
60 : TIMER PROGRAM P3
64 : SEARCH SELECTION
65 : TIME DATE SEARCH
66 : INDEX SEARCH
67 : SKIP SEARCH
68 : ALARM LIST SEARCH
69 : JUMP TO START POINT
*
RC CP
*
0 : HDD 1 : ARCHIVE 2 : OFF
***
(FFF is shown when used memory is less than 1% or
WRNG is set to OFF.)
RC PA
*
RC EX
RC PD
*
RC EX
**
**
#2
#2
#2 #2
#2
**
(1) :
00 ~ 69
(2)
: 0 ~ 1 0 : define 1 : menu is flashing
#2
*
(1)
: selection of used memory (0 ~ 2)
(2)
: used memory (001 ~ 100) (%)
#2
*
: 0 ~ 1 0 : without alarm 1 : with alarm
#2 #2
#2 #2
*
: 0 ~ 2 0 : HDD 1 : ARCHIVE 2 : COPY
#2 #2
68
•••••••••••••••••••••••••••••••••••••••••••••••••••••••••••••••••••••••••••••••••••••••••••••••••••••••••••••••••••••••••••••••••••••••••••
Page 69

Commands Functions Status, when normal execute
#2 #2
#1
CF
CF?
SA?
**
#1
#1
The command code appointed the camera filter search
when execute the search (Use together the command
code when execute the search)
: 00 ~ 16 (Camera number)
**
00 : ALL 01 ~ 16 : Camera CH(1-16)
Acquire information on camera filter when execute the
search
Acquire information on camera number that during alarm
recording
BASIC FUNCTIONS
#1
DM
*
#1
DM?
#1
CH
*
#1
FS1
DISPLAY MENU
#1
CU
*
#1
CU?
#1
SG
*
#1
SG?
(1)
(5)
(10)
(14)
(2)
,
*
*
(6)
,
,
*
*
(11)
,
,
*
(15)
,
,
*
(1)
#1
?
CS
*
*
*
CS
*
(3)
,
,
*
(7)
(8)
,
*
(12)
,
*
*
(16)
,
*
*
DISPLAY MODE setting
Acquire information on DISPLAY MODE setting
Character size setting present time and display
: 0 ~ 1 0 : SMALL 1 : LARGE
*
Acquire information on character size setting for present
time and date display
CAMERA USAGE setting
: 0 ~ 2 0 : A 1 : B 2 : C
*
Acquire information on CAMERA USAGE setting
IMAGE QLTY setting
: 0 ~ 1 0 : HIGH 1 : NO FLICKER
*
Acquire information on IMAGE QLTY setting
(4)
,
DEFINE GROUP setting
*
(9)
,
*
(13)
(17)
(1)
,
: Pattern selection (0 ~ 2) 0 : A 1 : B 2 : C
*
(2)
,
~
*
#1
0 : invalid 1 ~ 5 : valid (priority number)
Acquire information on DEFINE GROUP setting
(1)
: Pattern selection (0 ~ 2) 0 : A 1 : B 2 : C
*
(1)
(1)
,
**
,
**
**
,
**
,
**
?
,
**
#1
?
(2)
(6)
(10)
(13)
(16)
#1
#1
,
**
,
**
,
**
,
**
,
**
(2)
,
(3)
(7)
(11)
CH. TITLE setting
(1)
**
(2)
**
Acquire information on CH. TITLE setting
(1)
**
(4)
,
SPLIT SCREEN SETTING
**
(8)
,
(14)
(17)
**
,
(1)
,
: Screen setting (0 ~ 6)
*
0 : SPLIT16 1 : SPLIT9a 2 : SPLIT9b 3 : SPLIT4a
,
4 : SPLIT4b 5 : SPLIT4c 6 : SPLIT4d
#1
(2)
**
( When
When
When
Acquire information on SPLIT SCREEN SETTING
(1)
: Screen setting (0 ~ 6)
*
0 : SPLIT16 1 : SPLIT9a 2 : SPLIT9b 3 : SPLIT4a
4 : SPLIT4b 5 : SPLIT4c 6 : SPLIT4d
CT
**
Text data
CT
**
(1)
SL
*
(5)
,
**
(9)
,
**
(12)
**
(15)
**
Split16
(2) **(3) **(4) **(5)
**
(6) **(7) **(8) **(9)
MPX FUNCTIONS
**
(10)**(11)**(12)**(13)
**
(14)**(15)**(16)**(17)
**
Split9
(2)**(3)**(4)
**
(5)**(6)**(7)
**
(8)**(9)**(10)
**
Split4
(2)**(3)
**
(4)**(5)
**
(1)
SL
*
: 1 ~ 6
*
(10)
: Status of
CH1 to CH16 (0 ~ 5)
*
: Camera CH (01 ~ 16)
: Character numbers (Within 16 characters. )
: Camera CH (01 ~ 16)
(17)
~
: Camera CH position (01 ~ 16)
**
(1)
is set to 0, input data to
*
(1)
is set to 1 or 2, input data to
*
(1)
is set to 3, 4 ,5 or 6, input data to
**
*
(2)
~
**
**
(2)
~
**
(17)
**
(2)
.
(10)
~
**
RC EX
#2
RC CF
** : 00 ~ 16 (Camera number)
00 : ALL 01 ~ 16 : Camera CH(1-16)
#2
RC SA
(11)
,
*
*
1)
~
*
*
0 : No alarm recording 1 : During alarm recording
#2 #2
RC EX
#2
RC DM
#2 #2
RC EX
RC CZ
#2
: 0 ~ 1 0 : SMALL 1 : LARGE
*
#2 #2
RC EX
#2 #2
RC CU
: 0 ~ 2 0 : A 1 : B 2 : C
*
#2 #2
RC EX
#2 #2
RC SG
: 0 ~ 1 0 : HIGH 1 : NO FLICKER
*
#2
RC EX
#2
RC CS
(11)
,
*
*
(Same as DEFINE GROUP setting shown above)
#2
RC EX
RC CT
#2
(1)
: Camera CH (01 ~ 16)
**
RC EX
#2 #2
.
(5)
.)
#2
RC SL
(8)
**
(15)
**
(Same as SPLIT SCREEN SETTING shown above.)
( When
When
When
#2
**
(1)
(2)
(3)
,
(14)
*
,
,
*
: 1 ~ 6
(4)
,
*
*
(15)
(16)
,
*
,
*
*
(12)
(13)
,
,
*
*
(16)
(the corresponding camera number) : 0 ~ 1
#2
* *
#2
*
*
*
#2
(1)
(2)
(3)
(10)
,
(14)
(2)
*
,
,
(17)
(4)
,
*
(15)
,
*
(2)
,Text data
(3)
**
(11)
**
#2
,
*
,
,
*
(16)
**
,
**
,
*
*
(12)
(13)
,
,
*
*
#2
(1)
,
**
**
(1)
,
*
**
(9)
,
,
**
**
(16)
,
,
**
**
(1)
is set to 0, output data to
*
(1)
is set to 1 or 2, output data to
*
(1)
is set to 3, 4 ,5 or 6, output data to
*
(5)
(6)
(7)
,
,
,
*
*
#2
(5)
(6)
(7)
,
,
,
*
*
(17)
,
#2
*
#2
(2)
: Character numbers
**
(4)
(5)
,
,
**
**
(12)
(13)
,
**
(2)
~
**
**
(2)
**
*
*
,
~
**
(8)
,
(8)
,
(6)
**
(17)
**
(2)
*
*
~
,
**
(14)
.
(9)
(9)
(10)
**
ENGLISH
(10)
,
,
*
(10)
,
,
*
(7)
,
,
.
(5)
.)
••••••••••••••••••••••••••••••••••••••••••••••••••••••••••••••••••••••••••••••••••••••••••••••••••••••••••••••••••••
Command Codes
69
Page 70

•
Command codes (continued)
Commands Functions Status, when normal execute
(1)
(2)
SQ
**
**
**
**
**
SM
**
**
,
**
**
SQ
SM
AC
AC?
,
*
**
(4)
,
**
(8)
,
**
(11)
,
**
(14)
,
**
(17)
#1
(1)
,
*
**
(4)
,
**
(8)
,
**
(12)
,
**
(15)
,
**
(1)
?
*
(1)
?
*
#1
*
#1
(5)
(9)
(5)
(9)
#1
(12)
(15)
(16)
#1
,
,
(2)
,
**
,
**
(13)
,
**
**
**
,
**
,
**
,
**
,
**
,
**
(6)
(10)
(6)
(10)
(3)
,
**
,
(13)
(16)
(3)
,
**
,
**
(14)
(17)
,
Displayed sequential channel setting
(7)
(1)
,
: Screen setting (0 ~ 2)
*
0 : Single screen 1 : SPLIT4 screen 2 : SPLIT9 screen
(2)
,
**
,
SPLIT9
SPLIT4
00 : abcd setting 01 : abc setting 02 : ab setting 03: a setting
(When SPLIT4 screen and SPLIT9 screen is selected,set
,
Displayed time of sequential channel setting
(7)
(1)
,
: Screen setting (0 ~ 2)
*
(11)
0 : Single screen 1 : SPLIT4 screen 2 : SPLIT9 screen
,
**
#1
(When SPLIT4 screen and SPLIT9 screen is selected, set
Acquire information on displayed sequential channel
setting
(1)
: Screen setting (0 ~ 2)
*
0 : Single screen 1 : SPLIT4 screen 2 : SPLIT9 screen
Acquire information on displayed time of sequential
channel setting
(1)
: Screen setting (0 ~ 2)
*
0 : Single screen 1 : SPLIT4 screen 2 : SPLIT9 screen
ALARM REC CH. setting
:
*
Acquire information on ALARM REC CH. setting
(17)
~
:
Camera CH order (01 ~ 16, 00) (00 = invalid camera)
**
(2)
: 00 ~ 01 00 : ab setting 01: a setting
**
(2)
: 00 ~ 03
**
(2)
(17)
~
:
Displayed time of each camera (01 ~ 30)
**
0 ~ 1 0 : ALL 1 : SEP
MPX FUNCTIONS
#1
CI
*
#1
CI?
SW
#1
**
#1
SW?
(1)
,
PG
*
*
(5)
,
,
**
**
(8)
,
*
***
TIMER PROGRAM
(2)
(3)
,
*
(6)
,
**
(9)
#1
CH. TITLE setting
:
0 ~ 2 0 : TITLE 1 : CH. NO 2 : NONE
*
Acquire information on CH. TITLE setting
Multiplexer screen switch setting
:
00 ~ 09 , 80 ~ 88 ,90 ~ 96
**
00 : SPLIT16 01 : SPLIT9a 02 : SPLIT9b
03 : SPLIT4a 04 : SPLIT4b 05 : SPLIT4c
06 : SPLIT4d
Single screen sequential
07 :
08 : SPLIT4
09 : SPLIT9
80 ~ 88 : CH1 ~ CH9 (Single screen display)
90 ~ 96 : CH10 ~ CH16 (Single screen display)
Acquire information on Multiplexer screen switch setting
(4)
Timer program setting
,
**
(1) :
(7)
,
*
:
P1 2 : P2 3 : P3
1
(2) :
*
(3) :
*
:
SUN 1 : MON 2 : TUE 3 : WED 4 : THU
0
:
FRI 6 : SAT 7 : DAY 8 : SPL
5
(4) :
**
(5) :
**
(6) :
**
(7) :
**
(8) :
*
:
A 1 : B 2 : C
0
***
(001 ~ 008, SKP, PWR, ARC,AEJ)
001 : 25F 002 : 12.5F 003 : 8.33F 004 : 6.25F
005 : 5F 006 : 4.17F 007 : 2.5F 008 : 1F
SKP : SKIP PWR : POWER ARC : ARCHIVE AEJ : EJECT
(When SKP, PWR, ARC or AEJ is selected, set
screen sequential
screen sequential
SELECTED PATTERN (1 ~ 3)
Program number(1 ~ 8)
Day of the week (0 ~ 8)
Rec starting hour (00 ~ 23)
Rec starting minute (00 ~ 59)
Rec ending hour (00 ~ 23)
Rec ending minute (00 ~ 59)
CAMERA USAGE pattern (0 ~ 2)
(9) :
Recording interval
**
**
(8)
to 0, 1, or 2.)
*
(2)
(2)
#2
#2
RC EX
only.)
#2
RC EX
only.)
RC
**
(Same as Displayed sequential channel setting shown above.)
(When SPLIT4 screen and SPLIT9 is selected, only
**
RC SM
,
**
(Same as Displayed time of sequential channel setting shown
above.)
only
RC EX
RC AC
:
*
RC EX
RC CI
:
*
RC EX
RC SW
(Same as Multiplexer screen switch setting shown above.)
RC EX
#2
(1)
(2)
(3)
(4)
(5)
,
**
**
,
**
,
(15)
(5)
**
,
,
**
(15)
(6)
**
(6)
,
**
#2
SQ
,
,
,
*
**
(10)
(11)
,
**
(2)
is output.)
#2
(10)
,
**
(When SPLIT4 screen and SPLIT9 is selected,
(2)
**
#2 #2
#2 #2
0 ~ 1 0 : ALL 1 : SEP
#2 #2
#2 #2
*
0 ~ 2 0 : TITLE 1 : CH. NO 2 : NONE
#2
#2 #2
(12)
,
**
(1)
,
*
**
(11)
(12)
,
**
is output.)
*
#2
,
**
(2)
,
**
,
**
**
(13)
(13)
(3)
**
,
**
,
**
,
**
(14)
(4)
(14)
,
**
,
**
#2 #2
,
**
(16)
,
**
(16)
(7)
,
**
,
**
,
(7)
**
(17)
,
**
(17)
(8)
#2
(8)
#2
,
**
,
**
(9)
,
(9)
70
•••••••••••••••••••••••••••••••••••••••••••••••••••••••••••••••••••••••••••••••••••••••••••••••••••••••••••••••••••••••••••••••••••••••••••
Page 71

Commands Functions Status, when normal execute
(1)
(2)
(3)
DW
DW?
CA
PM
PP
PP?
MC
*
*
(1)
*
(1)
*
#1
*
#1
***
,
*
#1
#1
,
*
SPECIAL DW setting
(1) :
SELECTED PATTERN (1 ~ 3)
*
:
1
P1 2 : P2 3 : P3
(2) :
Start day of the week (0 : SUN ~ 6 : SAT)
*
(3) :
End day of the week (0 : SUN ~ 6 : SAT)
*
Acquire information on SPECIAL DW setting
(1) :
SELECTED PATTERN (1 ~ 3)
*
:
1
P1 2 : P2 3 : P3
RC EX
RC DW
*
:
1
*
(2)
#1
,
*
(2)
#1
,
*
Clearing timer program
(1) :
SELECTED PATTERN (1 ~ 3)
*
:
1
P1 2 : P2 3 : P3
(2) :
Program number(1 ~ 8)
*
Acquire information on timer program setting
(1) :
SELECTED PATTERN (1 ~ 3)
*
:
P1 2 : P2 3 : P3
1
(2) :
Program number(1 ~ 8)
*
RC EX
RC MP
***
*
:
1
*
*
*
:
0
:
5
**
**
**
**
*
:
0
***
(001 ~ 008, SKP, PWR, ARC, AEJ, - - - )
001 : 25F 002 : 12.5F 003 : 8.33F 004 : 6.25F
005 : 5F 006 : 4.17F 007 : 2.5F 008 : 1F
SKP : SKIP PWR : POWER ARC : ARCHIVE AEJ : EJECT
(–, – –, – – – is output on
SELECTED PATTERN setting
:
1 ~ 3 1 : P1 2 : P2 3 : P3
*
Acquire information on SELECTED PATTERN setting
#1
REC interval setting
: REC MODE
***
001 : 25F 002 : 12.5F 003 : 8.33F 004 : 6.25F
005 : 5F 006 : 4.17F 007 : 2.5F 008 : 1F
(During stop)
(001 ~ 008)
RC EX
RC PP*
*
RC EX
#2#2
(1)
(2)
(3)
,
*
(1) :
SELECTED PATTERN (1 ~ 3)
P1 2 : P2 3 : P3
(2) :
Start day of the week (0 : SUN ~ 6 : SAT)
(3) :
End day of the week (0 : SUN ~ 6 : SAT)
#2
(1) :
SELECTED PATTERN (1 ~ 3)
P1 2 : P2 3 : P3
(2) :
Program number(1 ~ 8)
(3) :
Day of the week (0 ~ 8, - )
SUN 1 : MON 2 : TUE 3 : WED 4 : THU
FRI 6 : SAT 7 : DAY 8 : SPL
(4) :
(5) :
(6) :
(7) :
(8) :
CAMERA USAGE (0 ~ 2,- )
A 1 : B 2 : C
#2 #2
#2
:
1 ~ 3 1 : P1 2 : P2 3 : P3
#2 #2
*
#2#2
(1)
,
*
*
(9)
#2
Rec starting hour (00 ~ 23, - - )
Rec starting minute (00 ~ 59,- - )
Rec ending hour (00 ~ 23,- - )
Rec ending minute (00 ~ 59,- - )
(9) :
Recording interval
#2
#2#2
,
*
(2)
(3)
4)
,
,
*
**
(3)
~
*
(5)
,
,
**
**
(9)
when no program is set)
***
ENGLISH
(6)
(7)
**
(8)
,
,
*
,
MD
#1
#1
QR
*
#1
QR?
RECORDING SET UP TIMER PROGRAM
AM
***
Acquire information on REC interval setting
Recording Picture Grade (IMAGE QUALITY)
:
1 ~ 5
*
:
1
BASIC 2 : STANDARD 3 : MEDIUM
:
HIGH 5
4
Acquire information on Recording Picture Grade
#1
Alarm REC interval setting
:
***
001 : 25F 002 : 12.5F 003 : 8.33F 004 : 6.25F
005 : 5F 006 : 4.17F 007 : 2.5F 008 : 1F
001 ~ 008
: SUPERIOR
#2
RC MD
:
***
001 : 25F 002 : 12.5F 003 : 8.33F 004 : 6.25F
005 : 5F 006 : 4.17F 007 : 2.5F 008 : 1F
#2 #2
RC EX
#2
RC QR
:
1 ~ 5
*
:
1
BASIC 2 : STANDARD 3 : MEDIUM
:
4
HIGH 5
#2 #2
RC EX
#2
***
REC MODE
#2
*
(001 ~ 008)
: SUPERIOR
••••••••••••••••••••••••••••••••••••••••••••••••••••••••••••••••••••••••••••••••••••••••••••••••••••••••••••••••••••
Command Codes
71
Page 72

•
Command codes (continued)
Commands Functions Status, when normal execute
#1
AS1
AD
AS0
QA
QA?
AL
AL?
#1
**
#1
#1
*
#1
#1
*
#1
Acquire information on Alarm REC interval setting
Alarm REC duration setting
:
01 ~ 11
**
:
MAN 02 : 2S 03 : 5S 04 : 10S
01
:
15S 06 : 30S 07 : 45S 08 : 1M
05
:
2M 10 : 5M 11 : 10M
09
Acquire information on Alarm REC duration setting
Alarm Recording Picture Grade (IMAGE QUALITY)
:
1 ~ 5
*
:
BASIC 2 : STANDARD 3 : MEDIUM
1
:
HIGH 5 : SUPERIOR
4
Enquiry about Alarm
Pre-Alarm
*
(1 ~ 3 available in STOP mode)
Acquire information on Pre-Alarm
Recording
:
0 ~ 3 0 : OFF 1 : SHORT 2 : MEDIUM 3 : LONG
Recording Picture Grade
setting
RECORDING SET UP
ES?
#1
Acquire information on ESTD (estimated) TIME
Recording
setting
setting
#2
RC AM
:
001 ~ 008
***
001 : 25F 002 : 12.5F 003 : 8.33F 004 : 6.25F
005 : 5F 006 : 4.17F 007 : 2.5F 008 : 1F
RC EX
#2
RC AP
:
01 ~ 11
**
(Same as Alarm REC duration setting shown above )
#2
RC EX
#2 #2
RC QA
:
1 ~ 5
*
(Same as
#2
RC EX
#2
RC AL
:
0 ~ 3
*
:
OFF 1 : SHORT 2 : MEDIUM 3 : LONG
0
#2
RC ES
(1) :
***
#2
***
#2#2
#2
**
#2
*
Alarm Recording Picture Grade
#2
#2
*
(1)
(2)
(3)
***
Day
,
**
**
(2) :
,
**
Hour
#2
**
shown above )
(3) :
Minute
#1
MS
*
#1
MS?
M-DET
A-REC/
#1
MO
*
RM
#1
(1)
(2)
,
**
#1
#1
CL
*
CL?
*
REAR TERMINAL
(1)
(2)
,
**
#1
RT
RT?
*
#1
MOTION DETECTION setting
:
0 ~ 1 0 : OFF 1 : ON
*
Acquire information on MOTION DETECTION setting
MODE OUT setting
:
0 ~ 3
*
:
0
REC 1 : PLAY 2 : POWER 3 : REMAIN
Acquire information on MODE OUT setting
CALL OUT setting
(1)
: 0 ~ 1 0 : HDD 1 : ARCHIVE
*
(2)
: 00 ~ 11
**
00 : NONE 01 : FULL 02 : 2% 03 : 4%
04 : 6% 05 : 8% 06 : 10% 07 : 15%
08 : 20% 09 : 30% 10 : 40% 11 : 50%
Acquire information on CALL OUT setting
(1)
: 0 ~ 1 0 : HDD 1 : ARCHIVE
*
CAPACITY REMAIN setting
(1)
: 0 ~ 2 0 : HDD 1 : ARC 2 : NONE
*
(2)
: 02, 04, 06, 08, 10, 15, 20, 30, 40, 50(%)
**
(When
Acquire information on CAPACITY REMAIN setting
(1)
is set to 2, it is not necessary to input
*
**
#2
#2
RC EX
#2
RC MS
:
0 ~ 1 0 : OFF 1 : ON
*
#2
RC EX
RC MR
#2 #2
:
0 ~ 3
*
:
0
REC 1 : PLAY 2 : POWER 3 : REMAIN
#2 #2
RC EX
#2
RC CL
(1)
: 0 ~ 1 0 : HDD 1 : ARCHIVE
*
(2)
**
00 : NONE 01 : FULL 02 : 2% 03 : 4%
04 : 6% 05 : 8% 06 : 10% 07 : 15%
08 : 20% 09 : 30% 10 : 40% 11 : 50%
#2 #2
RC EX
(2)
)
#2
RC RT
(1)
: 0 ~ 2 0 : HDD 1 : ARC 2 : NONE
*
(2)
**
(When
#2
*
#2
*
(1)
(2)
#2
,
*
**
: 00 ~ 11
(1)
(2)
#2
,
**
**
(2)
is not output)
*
: 02, 04, 06, 08, 10, 15, 20, 30, 40, 50(%)
(1)
is set to 2,
*
72
•••••••••••••••••••••••••••••••••••••••••••••••••••••••••••••••••••••••••••••••••••••••••••••••••••••••••••••••••••••••••••••••••••••••••••
Page 73

Commands Functions Status, when normal execute
BZ
#1
BUZZER setting
*
*
:
0
FS2
#1
Acquire information on BUZZER setting
REAR TERMINAL
PN
PT
#1
#1
Acquire current power failure number
Acquire information on power failure list
**
**
PC
MI
HM?
SER VICE
DH?
AM?
BR
CB
SD
**
DT
SC
**
TM
DF
#1
#1
#1
#1
#1
#1
#1
(1)
(2)
,
,
**
**
#1
(1)
(2)
#1
,
**
#1
#1
Clearing POWER FAILURE list
Initialization of the menu (available in MAIN MENU )
(Refer to “Initializing menus” for all initialized menu.
RS-232C setting menu is also initialized when executed.)
Acquire information on MAIN HDD ELAPSED TIME
setting
Acquire information on COPY ELAPSED TIME setting
Acquire information on ARCHIVE ELAPSED TIME setting
ARCHIVE POINT RESET setting
Stop the coping, restoring
(3)
Current date setting
#1
**
Acquire information on current date setting
Current time setting
**
Acquire information on current time setting
HDD FULL setting
*
*
0 : STOP 1 : REC•STANDBY
2 : REPEAT 3 : ALARM•PROT
#1
FS0
INITIAL SET UP
DE
#1
Acquire information on HDD FULL setting
AUTO EJECT setting
*
DE?
RD
#1
#1
*
Acquire information on AUTO EJECT setting
ARCHIVE DATA setting
*
RD?
HP
#1
#1
*
Acquire information on ARCHIVE DATA setting
HDD PB REPEAT setting
*
*
HP?
AW
#1
#1
Acquire information on HDD PB REPEAT setting
ARCHIVE OVERWRITE setting
*
*
AW?
MR
#1
#1
Acquire information on ARCHIVE OVERWRITE setting
FIFO/OVERWRITE MODE setting
*
MR?
#1
*
Acquuire informatoin on FIFO/OVERWRITE MODE setting
(1)
: 0 ~ 3
KEY 1 : WRNG 2 : REMAIN 3 : OFF
: power failure number (01 ~ 50)
(1)
: Day
(1)
: Hour
**
(2)
: Month
(2)
: Minute
(3)
: Year (00 ~ 30)
**
**
: 0 ~ 3
: 0 ~ 1 0 : ON 1 : OFF
: 1 ~ 2 1 : ALL 2 : ALARM
: 0 ~ 1 0 : STOP 1 : REPEAT
: 0 ~ 1 0 : OFF 1 : ON
:
0 ~ 1 0 : OFF 1 : ON
#2 #2
RC EX
#2
RC BZ
(1)
*
:
0
KEY 1 : WRNG 2 : REMAIN 3 : OFF
RC PN
**
(00 is shown when no power failure occurs)
RC PT
**
**
(ER08 is output when no power failure occurs)
RC EX
RC EX
RC HM
******
RC DH
******
RC AM
******
RC EX
RC EX
RC EX
RC TD
**
(4)
*
RC EX
RC TI
**
RC EX
RC TE
(1)
*
:
0
STOP 1 : REC•STANDBY
:
2
REPEAT 3 : ALARM•PROT
RC EX
RC DE
:
*
RC EX
RC RD
: 1 ~ 2 1 : ALL 2 : ALARM
*
RC EX
RC HP
: 0 ~ 1 0 : STOP 1 : REPEAT
*
RC EX
RC AW
RC EX
(Only activated when the HDD is connected to ID4.)
RC MR
(Only activated when the HDD is connected to ID4.)
#2
*
: 0 ~ 3
#2
: power failure number (01 ~ 50, 00)
#2 #2
(1)
(4)
#2
#2 #2
#2
#2
#2
#2 #2
#2 #2
#2 #2
#2
(1)
: Day of the week (0 ~ 6) 0 : SUN ~ 6 : SAT
#2 #2
#2
(1)
#2 #2
: 0 ~ 3
#2 #2
#2
0 ~ 1 0 : ON 1 : OFF
#2 #2
#2
#2
**
(1)
(2)
,
**
: Day
: Hour
#2
: Day
**
**
**
#2
******
: elapsed time (000000 ~ 999999)
******
: COPY elapsed time (000000 ~ 999999)
******
:
ARCHIVE elapsed time (000000 ~ 999999)
(1)
,
**
**
(2)
(3)
,
**
(2)
: Month
(5)
: Minute
#2
#2
#2
(2)
(3)
,
**
: Month
**
(1)
(2)
**
: Hour
,
**
,
**
(2)
: Minute
(3)
**
#2#2
*
#2
*
#2
*
#2 #2
#2
#2
*
#2 #2
#2 #2
* *
#2 #2
#2 #2
:
:
* *
(4)
,
**
(3)
: Year
(5)
,
**
**
(4)
#2
,
*
(3)
: Year (00 ~ 30)
**
#2
(3)
: Second
**
0 ~ 1 0 : OFF 1 : ON
0 ~ 1 0 : OFF 1 : ON
ENGLISH
••••••••••••••••••••••••••••••••••••••••••••••••••••••••••••••••••••••••••••••••••••••••••••••••••••••••••••••••••••
Command Codes
73
Page 74

•
Command codes (continued)
Commands Functions Status, when normal execute
HE?
AE?
RJ?
#1
#1
#1
Acquire information on RECORDED PERIOD of HDD
Acquire information on RECORDED PERIOD of COPY
DEVICE
Acquire information on RECORDED PERIOD of
ARCHIVE DEVICE
INFORMATION
#1
DV?
(1)
(2)
,
**
,
**
,
**
,
**
#1
,
**
(5)
,
**
(8)
,
**
(11)
,
**
DB
**
**
**
*
(4)
(7)
(10)
(13)
**
COPY SELECTION
Acquire information on ID number of CONNECTED SCSI
DEVICE
(3)
Setting and executing COPY/RESTORE
,
(6)
(1)
,
(9)
,
(12)
: 0 ~ 3
*
0 : HDD COPY (COPY, OVERWRITE)
1 : HDD COPY (COPY, ADD)
,
2 : ARC HDD (RESTORE, OVERWRITE)
3 : COPY HDD (RESTORE, OVERWRITE)
(2)
: Start Day
**
(4)
: Start Year
**
(6)
: Start Minute
**
(8)
: End Day
**
(10)
: End Year
**
(12)
: End Minute
**
<Copy up to the maximum capacity of media>
31, 12, 00, 10, 10, 10 (Start time)
FF, FF, FF, FF, FF, FF (End time)
<Copy new data to media up to its maximum capacity>
FF, FF, FF, FF, FF, F1 (Start time)
FF, FF, FF, FF, FF, F1 (End time)
(3)
: Start
**
(5)
: Start Hour
**
(7)
: Start Second
**
(9)
: End
**
(11)
**
(13)
**
Month
Month
: End Hour
: End Second
(1)
(2)
(3)
(4)
(5)
#2
RC HE
(7)
,
**
**
(1)
: Start
**
(3)
: Start Year
**
(5)
: Start Minute
**
(7)
: End
**
(9)
: End Year
**
(11)
: End Minute
**
When no recording : RC HE FF, FF, FF, FF, FF, FF, FF,
FF, FF, FF, FF, FF
#2
RC AE
(7)
,
**
**
(1)
: Start
**
(3)
: Start Year
**
(5)
: Start Minute
**
(7)
: End
**
(9)
: End Year
**
(11)
: End Minute
**
When no recording : RC AE FF, FF, FF, FF, FF, FF, FF,
FF, FF, FF, FF, FF
#2
RC RJ
(7)
,
**
**
(1)
: Start
**
(3)
: Start Year
**
(5)
: Start Minute
**
(7)
: End
**
(9)
: End Year
**
(11)
: End Minute
**
When no recording : RC RJ FF, FF, FF, FF, FF, FF, FF,
FF, FF, FF, FF, FF
#2
RC DV
(8)
***
ID0
*
ID1
*
ID2
*
ID3
*
ID4
*
ID5
*
(1)
(3)
,
*
*
0 : NONE 1 : HDD 2 : RDD 3 : DDS
(2)
***
: 000 ~ 103 (GB) (
and Capacity of archive device and copying device is output as FFF.
#2 #2
RC EX
,
**
**
(8)
(9)
,
,
**
**
Day
Day
#2
(1)
(2)
,
**
**
(8)
(9)
,
,
**
**
Day
Day
#2
(1)
(2)
,
**
**
(8)
(9)
,
,
**
**
Day
Day
#2
(1)
*
(9)
,
*
(1)
: Type of DEVICE
(3)
: Type of DEVICE
(5)
: Type of DEVICE
(7)
: Type of DEVICE
(9)
: Type of DEVICE
(11)
: Type of DEVICE
(5)
,
*
,
***
(2)
,
***
(10)
,
***
(7)
(9)
,
,
*
*
(4)
,
***
Capacity shown next to unused ID number,
,
**
,
**
,
**
**
,
,
,
*
**
(10)
**
**
**
**
**
#2
**
(10)
**
**
**
**
**
#2
(10)
**
**
**
**
**
#2
*
*
(11)
(6)
,
(2)
(10)
(3)
,
(2)
(10)
(3)
,
(2)
(10)
(3)
(11)
,
***
,
,
**
**
(11)
,
**
**
: Start Month
(4)
: Start Hour
(6)
: Start Second
(8)
: End Month
: End Hour
(12)
: End Second
(4)
,
,
**
**
(11)
,
**
**
: Start Month
(4)
: Start Hour
(6)
: Start Second
(8)
: End Month
: End Hour
(12)
: End Second
(4)
,
,
**
**
(11)
,
**
**
: Start Month
(4)
: Start Hour
(6)
: Start Second
(8)
: End Month
: End Hour
(12)
: End Second
(4)
,
: 0 ~ 3
***
,
***
***
***
***
***
***
***
,
*
(12)
(2)
(4)
(6)
(8)
(10)
(12)
(8)
,
***
,
**
(12)
#2
(5)
,
**
(12)
#2
(5)
,
**
(12)
#2
(5)
,
***
#2
: Capacity
: Capacity
: Capacity
: Capacity
: Capacity
: Capacity
(10)
,
***
(6)
,
(6)
,
(6)
,
(6)
(7)
,
,
*
(12)
)
74
•••••••••••••••••••••••••••••••••••••••••••••••••••••••••••••••••••••••••••••••••••••••••••••••••••••••••••••••••••••••••••••••••••••••••••
Page 75

Commands
(1)
(2)
(3)
TF
**
IF
IR
SF
SR
AN
AT
AQ?
**
(4)
,
**
***
***
#1
#1
#1
***
#1
,
**
#1
#1
#1
,
**
(5)
,
**
TIME DATE SEARCH setting
,
(6)
#1
(1)
: Day
**
(4)
: Hour
**
INDEX SEARCH (forward) setting
: 001 ~ 099
***
INDEX SEARCH (reverse) setting
: 001 ~ 099
***
SKIP SEARCH (forward)
SKIP SEARCH (reverse)
Acquire a current alarm recording number
Acquire information on selected alarm recording
:
***
***
Acquire a current alarm recording registration number
SEARCH SELECTION
***
***
****
#1
#1
#1
#1
#1
Acquire alarm number that selected alarm recording
registration number
: 001 ~ 800
***
Searching alarm list that selected alarm recording
registration number
: 001 ~ 800
***
Searching selected alarm recording number
: 0001 ~ 9999
****
Jump to start-point
Acquire warning status
AO?
AB
AF
JS
WN
OTHERS
#1
CA0
VS?
VN?
#1
#1
Clearing warning
Acquire information on status of video input
(During recording and when pressed the WARNING
RESET button to reset the warning, replied status code
"VS0".)
Acquire information on CH without video signal
(During recording and when pressed the WARNING
RESET button to reset the warning, replied only status
code "VN".)
Functions
(2)
: Month
**
(5)
: Minute
**
th alarm information on alarm list (001 ~ 800)
**
**
(3)
: Year
(6)
: Second
Status, when normal execute
#2 #2
RC EX2
(given when search is completed)
#2 #2
RC EX1
(given when search is completed)
#2 #2
RC EX1
(given when search is completed)
#2 #2
RC EX
#2 #2
RC EX
RC AN
: 0001 ~ 9999
****
#2
RC AT
**
**
**
**
RC AQ
***
RC AO
**
(1)
: Day
(3)
: Year
(5)
: Minute
(7)
:
Camera number (01 ~ 16)
#2 #2
: 001 ~ 800
#2 #2
: 0001 ~ 9999
****
(1)
,
**
***
****
#2#2
(2)
(3)
(4)
(5)
,
**
,
**
**
**
,
**
(2)
:
Month
(4) :
Hour
(6)
: Second
,
**
(6)
,
**
**
****
#2
#2
RC EX5
#2
#2
RC EX5
#2
RC EX6
RC WN
**
00 : NONE
01 : HDD FULL
02 : HDD NEAR END
03 : NO SIGNAL
04 : COPY CHECK MEDIA/BACKUP CHECK MEDIA/
05 : COPY SIZE ERROR/BACKUP SIZE ERROR/
06 : ARCHIVE FULL
07 : ARCHIVE NEAR END
08 : COPY OVERTAKE ERROR/
BACKUP OVERTAKE ERROR
09 : COPY NEAR OVERTAKE/
BACKUP NEAR OVERTAKE
10 : REC SYSTEM ERROR/COPY SYSTEM ERROR/
BACKUP SYSTEM ERROR/
RESTORE SYSTEM ERROR/SYSTEM ERROR
11 : COPY R/W ERROR/BACKUP R/W ERROR/
RESTORE R/W ERROR
RC EX
RC VS
: 0 ~ 1
*
0 : with Video Signal 1 : without Video Signal
RC VN
**
**
**
(ER08 is output when CH without Video Signal)
#2
#2
: 00 ~ 11
RESTORE CHECK MEDIA
RESTORE SIZE ERROR
#2 #2
#2 #2
,......,
**,**
#2
**
*
(1)
(2)
(3)
(4)
(5)
#2
(8)
,
**
(16)
: CH without Video Signal (maximum of 16CH)
,
,
,
**
**
(10)
,
**
**
(11)
(9)
,
**
#2
#2
,
**
**
(12)
,
,
**
**
(13)
,
**
,
**
(6)
(14)
,
**
,
**
ENGLISH
(7)
#2
(7)
,
(15)
,
••••••••••••••••••••••••••••••••••••••••••••••••••••••••••••••••••••••••••••••••••••••••••••••••••••••••••••••••••••
Command Codes
75
Page 76

•
Command codes (continued)
Commands
#1
SS
(MAIN DEVICE•HDD)
Functions
Acquire the current status
Status, when normal execute
#2 #2
RC ST00 Power off
#2 #2
RC ST01 during set up
#2 #2
RC ST02 Power on/standby mode
#2 #2
RC ST03 PB•Reverse speed search mode
#2 #2
RC ST04 PB•Forward speed search mode
#2 #2
RC ST05 PB•Playback mode
#2 #2
RC ST06 PB•Pause mode
#2 #2
RC ST09 RPB•Playback mode
#2 #2
RC ST10 RPB•Pause mode
#2 #2
RC ST11 REC•Recording mode
#2 #2
RC ST12 REC•Pause mode
#2 #2
RC ST13
#2 #2
RC ST15
#2 #2
RC ST17 Time date search
#2 #2
RC ST19 Index search (FF)
#2 #2
RC ST20 Index search (REW)
#2 #2
RC ST21 Skip search (FF)
#2 #2
RC ST22 Skip search (REW)
#2 #2
RC ST25 Character search (FF)
#2 #2
RC ST26 Character search (REW)
#2 #2
RC ST27 Alarm list search
#2
RC ST28 Jump to start point
#2
RC ST29 Timer REC
#2
RC ST30 Reserve of Timer REC
#2
RC ST31 Timer reserve error
#2
RC ST33 Clearing device
#2
RC ST36 Restoring
#2
RC ST47 PRE-ALARM Recording•Standby mode
A-REC (during standby)•Recording mode
A-REC (during recording)•Recording mode
#2
#2
#2
#2
#2
#2
#2
#1
SS1?
(ARCHIVE DEVICE)
OTHERS
Acquire the current status
#2 #2
RC SS1,00 Power off
#2 #2
RC SS1,01 during set up
#2 #2
RC SS1,02 Power on/standby mode
#2 #2
RC SS1,03
#2 #2
RC SS1,04
#2 #2
RC SS1,05 PB•Playback mode
#2 #2
RC SS1,06 PB•Pause mode
#2 #2
RC SS1,09 RPB•Playback mode
#2 #2
RC SS1,10 RPB•Pause mode
#2 #2
RC SS1,17 Time date search
#2 #2
RC SS1,19 Index search (FF)
#2 #2
RC SS1,20 Index search (REW)
#2 #2
RC SS1,21
#2 #2
RC SS1,22
#2 #2
RC SS1,25 Character search (FF)
#2 #2
RC SS1,26 Character search (REW)
#2 #2
RC SS1,27 Alarm list search
#2 #2
RC ST1,28 Jump to start point
#2 #2
RC SS1,29 Timer REC
#2 #2
RC SS1,30 Reserve of Timer REC
#2 #2
RC SS1,31 Timer reserve error
#2
RC SS1,33 Initializing device
#2
RC SS1,34 Archiving
#2
RC SS1,36 Restoring
RC SS1,46 Rewinding (DDS only)
PB•Reverse speed search mode (RDD only)
PB•Forward speed search mode (RDD only)
Skip search (FF) (RDD only)
Skip search (REW) (RDD only)
#2
#2
#2
#2#2
76
•••••••••••••••••••••••••••••••••••••••••••••••••••••••••••••••••••••••••••••••••••••••••••••••••••••••••••••••••••••••••••••••••••••••••••
Page 77

Commands
#1
SS2?
(Copy device)
OTHERS
#1
DC
*
BT
#1
**
#1
BT?
Functions
Acquire the current status
Operation on DEVICE CHECK menu
: 0 ~ 1 0 : PWR-OFF 1 : CONFIG/INITIALIZE
*
Boot-up delay setting
: Second (00 ~ 99)
**
Acquire information on boot-up delay setting
Status, when normal execute
#2 #2
RC SS2,00 Power off
#2 #2
RC SS2,01 during set up
#2 #2
RC SS2,02 Power on/standby mode
#2 #2
RC SS2,03
#2 #2
RC SS2,04
#2 #2
RC SS2,05 PB•Playback mode
#2 #2
RC SS2,06 PB•Pause mode
#2 #2
RC SS2,09 RPB•Playback mode
#2 #2
RC SS2,10 RPB•Pause mode
#2 #2
RC SS2,17 Time date search
#2 #2
RC SS2,19 Index search (FF)
#2 #2
RC SS2,20 Index search (REW)
#2 #2
RC SS2,21
#2 #2
RC SS2,22
#2 #2
RC SS2,25 Character search (FF)
#2 #2
RC SS2,26 Character search (REW)
#2 #2
RC SS2,27 Alarm search
#2 #2
RC ST2,28 Jump to start point
#2 #2
RC SS2,29 Timer REC
#2 #2
RC SS2,30 Reserve of Timer REC
#2 #2
RC SS2,31 Timer reserve error
#2
RC SS2,33 Initializing media of device
#2
RC SS2,34 copying
#2
RC SS2,36 Restoring
RC SS2,46 Rewinding (DDS only)
#2 #2
RC EX
#2 #2
RC EX
#2
RC BT
: Second (00 ~ 99)
PB•Reverse speed search mode (RDD only)
PB•Forward speed search mode (RDD only)
Skip search (FF) (RDD only)
Skip search (REW) (RDD only)
#2
#2
#2
#2#2
#2
**
**
ENGLISH
••••••••••••••••••••••••••••••••••••••••••••••••••••••••••••••••••••••••••••••••••••••••••••••••••••••••••••••••••••
Command Codes
77
Page 78

Command codes (continued)
SPECIAL FUNCTION MENU
Commands
#1
DI
*
#1
WN?
Initializing the disk
:
0 ~ 2
*
:
0
HDD 1 : ARCHIVE 2 : COPY
Acquire warning status for serviceman
Functions
SPECIAL FUNCTION MENU
RC EX
RC WN
**
00 : NONE
01 :
02 : HDD R/W ERROR
03 : DEVICE R/W ERROR
06 : NO SIGNAL
07 : SUB MICRO COMPUTER HANG UP
08 :
09 :
11 :
12 : SYSTEM RE-STARAT
13 : FLASH MEMORY ERROR
14 : REC SYSTEM ERROR
Status, when normal execute
#2
#2
#2
**,**
: 00 ~ 16 ( MAX )
OVERTAKE ERROR
TEMPERATURE SENSOR ERROR
SYSTEM ERROR
STOPPING THE FUN ERROR
Table of Error Code Table of Status Code
Error code
#2
ER00
#2
ER01
#2
ER02
#2
ER03
#2
ER04
#2
ER05
#2
ER06
#2
ER07
#2
ER08
#2
ER09
#2
ER10
#2
ER11
#2
ER12
#2
ER13
#2
ER14
#2
ER15
#2
ER16
#2
ER17
No power supply
–
–
–
–
WARNING ERROR
Present time or Timer program has not been set
Alarm recording underway
Unfeasible (NAK)
–
Incorrect command
Incorrect parameter
Overflow on receiver
Data was not received
–
Data clearing underway (Command not accepted)
PASSWORD ERROR
PASSWORD LOCK is set
Meaning of error
Status code
#2
CE
**
#2
DC
*
Meaning of status
given when error occurred during copy/restore
: Error code (02 ~ 04)
**
02 : Copy/restore size error
03 : Copy/archive/restore R/W error
04 : Copy/restore media error
given when DEVICE CHECK menu appears
: 0 ~ 2
*
0 : Select PWR-OFF, CONFIG
1 : Select PWR-OFF, INITIALIZE
2 : Only PWR-OFF
,......,
#2
**
•••••••••••••••••••••••••••••••••••••••••••••••••••••••••••••••••••••••••••••••••••••••••••••••••••••••••••••
78
Command Codes
Page 79

Character Search
■ Character Search
Characters can be added to both visuals and audio using a PC when the unit is connected to a PC via the RS-232C interface.
These characters will appear on screen during playback. (There is also the possibility that the characters will not be displayed.)
In addition, searches of images incorporating these characters, a process called Character Search, can also be performed.
Searches are carried out by designating the characters associated with a particular image.
♦ Character Search commands
Commands Functions Status,when normal execute
#1
CR0
#1
CR1
#1
CR?
#1
CM?
#1
CC
CW**, T ext data
(Up to 48 characters)
#1
CM**
LF**, T ext data
(Up to 48 characters)
Do not display characters on-screen (Playback only)
Display characters on-screen (Playback only)
Acquire information on character display settings
Acquire information on recalled display settings (Playback only)
Clear character display
Create sets of written characters
(1)
#1
#1
: Character count (01-48)
**
Record character sets ** : Camera number 01-16
Forward character search (During stop, pause, playback)
: Character count (01-48)
**
Abridged search by
Searches can be made using only a specified number of characters
found at the head of recorded comments.
✽
code
RC#2EX
RC#2EX
RC#2CR
RC CM**,Text data
(Text data up to 48 characters)
**
RC#2EX
RC#2EX
RC#2EX
RC EX4
(Reply at the completion of search)
#2
#2
#2
: 0-1)
(
*
#2 #2
: Character count (01-48)
#2
*
#2
#2
#2
#2
0 : OFF 1 : ON
ENGLISH
LR**, T ext data
(Up to 48 characters)
#1
♦ Characters can be used
Alphabet
ASCII code
Character
ASCII code
Number
ASCII code
ABCDEFG
65 66 67 68 69 70 71 72 73 74
#2
%>()
32 37 40 41 45 46 47 58 60 62
1234567 98
0
48 49 50 51 52 53 54 55 56 57
Reverse character search (During stop, pause, playback)
: Character count (01-48)
**
Abridged search by
Searches can be made using only a specified number of characters
found at the head of recorded comments.
✽
code
HIJKLMNO
PQRS T
75 76 77 78 79 80 81 82 83 84 85 86 87 88 89 90
-
.
/:
<
#2: a space
#2
RC EX4
(Reply at the completion of search)
#2
U
VWXYZ
•••••••••••••••••••••••••••••••••••••••••••••••••••••••••••••••••••••••••••••••••••••••••••••••••••••••••••••
Character Search
79
Page 80

Character Search (continued)
♦ Sample operation
1) Record characters “ABCDEF” and images simultaneously at the camera CH number 5.
(On the RS-232C settings screen, set DELIMITER to “CR”.)
The following are the two steps required for recording characters:
1 Set the character (or characters string) to be recorded;
2 Record the selected character(s).
By using the CM command, characters which have been set once can be recorded any number of times. To record a different
character set, use the CW command.
Command from personal computer
CW06,ABCDEF
CM05
CR
means a carriage return code (0DH).
CR
CR
Replied status code from unit
to a personal computer
CR CR
RC EX
CR CR
RC EX
Meaning
Sending a command for setting "ABCDEF" .
The unit received a command and executed.
Sending a command to record set characters at the camera
CH number 5 (it is able to execute while recording).
The unit executed a command.
• Set the CH. TITLE setting to “NONE” to display characters during segmented display mode.
2) Search for the scene associated with the recorded character set “ABCDEF”. (On the RS-232C settings screen, set DELIMITER
to “CR”.)
Command from personal computer
CR1
CR
LF06,ABCDEF
CR
CR
means a carriage return code (0DH).
Replied status code from unit
to a personal computer
CR CR
RC EX
CR CR
RC EX4
Meaning
Display characters on-screen (Playback only).
The unit received a command and executed.
Sending a command for serching "ABCDEF" by character
search in a direction of the time being.
The unit received a command and executed.
3) Search for the scene associated with the recorded character set “ABCDEFG”. (On the RS-232C settings screen, set DELIMITER
to “CR”.)
By using abridged search by ✽ code, search can be made using only a specified number of characters found at the head of
recorded characters.
For the recorded characters “ABCDEFG” ,searches can be made using any of the following patterns specified for number of
character data.
Example of commands : LF02,A ✽ / LF03,AB ✽ / LF04,ABC ✽ / LF05,ABCD ✽ / LF06,ABCDE ✽ / LF07,ABCDEF ✽
Command from personal computer
CR1
CR
LF04,ABC ✽
CR
CR
means a carriage return code (0DH).
Replied status code from unit
to a personal computer
CR CR
RC EX
CR CR
RC EX4
Meaning
Display characters on-screen (Playback only).
The unit received a command and executed.
Sending a command for serching "ABC ✽" by abridged
search by ✽ code in a direction of the time being.
The unit received a command and executed.
• Character searches can only be performed during stop, pause, and playback modes.
• The unit will fast forward or rewind until it finds the character string, then shift into still frame mode.
• If the unit does not find the character string, it will stop automatically.
• When there are multiple instances of the same character string, repeat character search if the retrieved image is not the
desired image.
• Character searches may be time-consuming as the process involves searching through all the data.
• Forward searching is the only option available when using a DDS device for playback.
•••••••••••••••••••••••••••••••••••••••••••••••••••••••••••••••••••••••••••••••••••••••••••••••••••••••••••••
80
Character Search
Page 81

Recording time table
■ Recording time table
Approximate recording time (if recording is made internal 60 GB HDD)
This recording time display chart is only valid when PRIORITY in DEFINE GROUP SETTING has
been set to “1” for all camera numbers.
25F, 8.33F, and 5F cannot be used for REC INTERVAL when the MOTION DETECTION setting is
active.
IMAGE QUALITY
Field/sec.
SUPERIOR
HIGH
MEDIUM
STANDARD
BASIC
25F 12.5F 6.25F 4.17F 2.5F 1F
12H
1D 1H
18H
1D12H
1D 3H
1D12H
2D
2D 6H
4D 1H
3D
8.33F
1D14H
2D 7H
3D 9H
4D12H
6D 2H
2D 2H
3D 1H
4D13H
6D
8D 3H
5F
2D15H
3D20H
5D16H
7D12H
10D 4H
3D 4H
4D14H
6D19H
9D 1H
12D 5H
5D 7H
7D16H
11D 9H
15D 1H
20D 8H
12D16H
18D 9H
27D 7H
36D 4H
48D21H
NUMBER OF
RECORDING
FIELD
1,143,000
1,657,000
2,457,000
3,257,000
4,400,000
■ Pre-alarm recording time table
♦ Recording duration is set to “LONG”.
57s
NUMBER OF
RECORDING
FIELD
60
87
129
171
231
IMAGE QUALITY
Field/sec.
SUPERIOR
HIGH
MEDIUM
STANDARD
BASIC
25F 12.5F 6.25F 4.17F 2.5F 1F8.33F 5F
2s
3s
5s
6s
9s
4s
7s
10s
13s
18s
7s
10s
15s
20s
27s
9s
13s
20s
27s
37s
12s
17s
25s
34s
46s
14s
20s
31s
41s
55s
24s
34s
51s
1min8s
1min32s
1min23s
2min3s
2min44s
3min41s
ENGLISH
♦ Recording duration is set to “MEDIUM”.
IMAGE QUALITY
Field/sec.
SUPERIOR
HIGH
MEDIUM
STANDARD
BASIC
25F 12.5F 6.25F 4.17F 2.5F 1F8.33F 5F
1s
2s
3s
4s
6s
3s
4s
6s
9s
12s
♦ Recording duration is set to “SHORT”.
IMAGE QUALITY
Field/sec.
SUPERIOR
HIGH
MEDIUM
STANDARD
BASIC
25F 12.5F 6.25F 4.17F 2.5F 1F8.33F 5F
0s
1s
1s
2s
3s
1s
2s
3s
4s
6s
4s
7s
10s
13s
18s
2s
3s
5s
6s
9s
6s
9s
13s
18s
24s
3s
4s
6s
9s
12s
8s
11s
17s
22s
30s
4s
5s
8s
11s
15s
9s
13s
20s
27s
37s
4s
7s
10s
13s
18s
16s
23s
34s
45s
1min1s
8s
11s
17s
22s
30s
38s
55s
1min22s
1min49s
2min27s
19s
27s
41s
54s
1min13s
NUMBER OF
RECORDING
FIELD
40
58
86
114
154
NUMBER OF
RECORDING
FIELD
20
29
43
57
77
••••••••••••••••••••••••••••••••••••••••••••••••••••••••••••••••••••••••••••••••••••••••••••••••••••••••••••••
Recording Time Table
81
Page 82

Troubleshooting
If problems with the unit persist even after you’ve followed the suggestions below, please disconnect the power cord
and contact the retailer from whom you purchased the unit.
PagePlease consult the followingDescription of problem
The unit will not turn on.
Power is on, but the unit will not
operate.
INSTALLATIONRECORDING
Images are not appearing on
the monitor.
The quality of the monitor
picture is poor.
The unit will not start recording.
The unit will not stop recording.
The unit will not perform Repeat
Recording.
The unit will not perform Timer
Recording.
The unit will not perform Alarm
Recording.
Is the power cord properly plugged in?
Is the LOCK indicator light on?
Is the TIMER REC indicator light on?
Is the LOCK indicator light on?
Is the POWER button blinking? (The unit cannot be operated
when the POWER button is blinking and it's the same when
the other buttons and indicators are blinking.)
It is possible that the safety features are in operation.
Restart the unit by pressing the RESET button located at the
back of the unit using a ballpoint pen or similar object.
Is the remote indicator light on? Press the communication
setting button to turn it off.
Are the monitor and camera(s) connected correctly?
Is the unit receiving an input signal from the selected camera?
Check this by setting the unit to SPLIT 16.
Is the connecting cord connected correctly?
Is the camera’s focus adjusted correctly?
Is there any recording space left on the disk?
The unit begins recording only after the specified recording
time.
Was the unit stopped during the specified recording time?
Is the PRE ALARM REC indicator light on?
Is the LOCK indicator light on?
Is the unit running in Timer Recording mode? If so, cancel the
Timer Recording and press the TIMER REC button once again.
Is the unit running in Repeat Recording mode?
Are the date and current time set accurately?
Are the Recording Start-/End-times and the recording
interval set correctly?
If the recording interval has been set correctly, then has the
recording medium been placed in the unit? Has the
recording medium’s write-protect been removed?
Is the HDD Repeat Recording setting set on REC•STANDBY?
Is the unit in stand-by mode?
Are the peripheral switches, etc., connected correctly?
6,64
6
6,64
6
8,64
6
18
42
-
-
13
6
6,64
6
54
11
13,50,51
-
54
6
18,19
82
The unit will not perform
playback.
PLAYBACK
The copying device/archive
device does not respond.
Power is on, but I cannot get
past the "SETTING UP ..."
display.
Is the LOCK indicator light on?
Has the image data been erased?
Has the playback device been selected correctly?
Is the PRE ALARM REC indicator light on?
Has the recording medium been inserted correctly into the unit?
Is the unit currently in the middle of loading the recording medium?
Has the playback device been selected correctly?
Has the peripheral recording device been selected correctly?
Is the peripheral recording device’s SCSI ID number set
correctly?
Is the SCSI TERMINATION switch off?
PERIPHERAL RECORDING DEVICE
••••••••••••••••••••••••••••••••••••••••••••••••••••••••••••••••••••••••••••••••••••••••••••••••••••••••••••••
6,64
26
59
6
-
59
19
19
8
Troubleshooting
Page 83

Troubleshooting (continued)
/ Glossary
PagePlease consult the followingDescription of problem
The unit will not perform the
motion detection function.
The unit will not respond to PC
control.
The DEVICE CHECK menu does
appear when power is turned on.
The unit is not detecting its
peripheral recording device(s).
OTHERS
Black screens are being
displayed during multi-screen
display.
Button operation is not working.
Button operation of camera
numbers is not working.
Is the motion detection in the <INTIAL SET UP> menu
setting on?
Is the value of the MOTION THRESHOLD setting greater than
the DOT value entered in the SET DETECTION MASK setting?
The MOTION DETECTION function cannot be accessed when
menus are left open. (The M-DET indicator light is off when the
MOTION DETECTION cannot be accssed.)
Is the RS-232C setting set correctly?
Are the unit and computer connected correctly?
Is there a defect in the connecting cable?
Is the proper connecting cable being used?
Is the remote indicator light on? Press the communication
setting button to turn it off.
Is peripheral device’s SCSI ID setting set correctly?
Inspect the connecting cable.
Is the SCSI TERMIMATION switch on?
Have the peripheral devices been disconnected?
Are the recommended peripheral devices being used?
Operations settings have not been made, in the Camera
Operation Setting parameter of the DEFINE GROUP
SETTING. Input from cameras displaying the “ - ” symbol
will appear black on the monitor.
Is the PLAY DEVICE indicator light blinking? Wait until the
light stays on, then start operation once more. If the light
does not stop blinking for a long period, use the RESET
button located at the back of the unit.
Is the LOCK function or the PASSWORD LOCK function in
effect? If so, please cancel the function(s).
Is the Menu screen being displayed? (Camera number
buttons cannot be used when the Menu screen is displayed.)
Is the unit currently accessing a peripheral recording device?
Check the ACCESS indicator.
32
39,40
40
8,65
-
-
6
19
8
-
14,36
7
64
12
6
ENGLISH
■ Glossary
Simultaneous Backup (Copying) method
In Simultaneous Backup (Copying), images input from the cameras are
recorded once on the unit’s hard disk and simultaneously copied from
the hard disk onto a removable archive/copying medium. In addition, the
unit marks the end of backup recording time through the use of the Archive Pointer.
Archive Pointer
The Archive P ointer is used to mark, on the archive medium, the completion of a backup process. For example, 100 hours of data recorded on
the unit’s hard disk is to be transf erred to a medium with only 80 hours of
available recording space. When the backup process is completed, the
Archive Pointer will memorize the hard disk’s 80-hour mark. When the
next backup process is initiated, backup will begin at this point.
Copying Device
The copying device is the peripheral device assigned to SCSI ID5. By
using the unit’s COPY button, this device can be made to copy (restore) image data recorded over a designated time frame.
Archive Device
The archive device is the peripheral device assigned to SCSI ID4,
and performs the following: backup specification using the ARCHIVE
button or Timer Program, and backing up of image data using the
Restore function in the Copy settings.
Restore
Restore is the process in which image data transferred to the peripheral recording device is restored on the unit’s hard disk. During
the Restore process, image data currently stored on the unit’s hard
disk is completely over-written.
SCSI Interface
The SCSI interface is the connection used expressly for transferring
image data between the unit and its peripheral devices. Each peripheral is connected to the unit in a daisy-chain configuration, and is
given a unique ID number for detection/identification by the unit.
Relation of recording operation to the number of
cameras and recording interval settings
The recording pattern of this unit is as illustrated in the diagram below. Image data input from all the connected cameras is recorded
sequentially at a rate of [number of cameras x recording interval].
(25F recording interval during normal recording, and 12.5F recording interval when the M-DET SETTING is active.) For example, when
four cameras are recording at intervals of 1 second, the unit takes
four seconds to receive one cycle of image data from the cameras.
When this data is played back on a single-screen, the display is
refreshed once every four seconds.
Circuit recording interval per camera
[ recording interval x # of cameras ]
1 second x 4 cameras = 4 seconds
4 seconds
C4-1
C3-1
C2-1
C1-1
4 seconds
C1-2
12.5F
C1-3
C4-2
C3-2
C2-2
12:00:00~
12:00:08~
12:00:04~
Examples of time displayed
during playback.
••••••••••••••••••••••••••••••••••••••••••••••••••••••••••••••••••••••••••••••••••••••••••••••••••••••••••••••••••••••••
Glossary
83
Page 84

Warnings and CALL OUT output
■ Warnings and their appropriate countermeasures
Options in the CALL OUT options column:
• Selectable: CALL OUT output can be selected/de-selected on the menu.
• Fixed: a CALL OUT signal is emitted without prior selection of this function using the menu.
Warning
HDD FULL
HDD NEAR END
ARCHIVE FULL
ARCHIVE NEAR END
COPY OVERTAKE
ERROR
ARCHIVE OVERTAKE
ERROR
COPY NEAR
OVERTAKE
ARCHIVE NEAR
OVERTAKE
COPY SIZE ERROR
ARCHIVE SIZE ERROR
RESTORE SIZE ERROR
Status Countermeasure
The internal hard disk drive
is full when either “STOP” or
“ALARM•PROT” has been
selected in “REPEAT”.
The storage capacity of the
hard disk drive is approaching the value entered into
the HDD capacity setting.
The storage medium in the
backup recording device is
full.
The limit of the archive
medium's storage capacity
is being reached.
Non-backed up data was
over-written while the HDD
was in Repeat mode.
The HDD is in Repeat mode,
and data which has not been
backed up will be over-written.
(The amount of time remaining
before the unit begins overwriting is approx. 0.5% of the
time indicated as the possible
recording duration.)
When using the copy or
restore functions, either the
amount of data to be
transferred exceeds the
limits of the storage medium,
or there is no data to be
copied.
• When the warning is canceled, the unit
will start over-writing the oldest data
remaining in the hard disk drive.
• Archive or copy data as necessary.
• Archive or copy data as necessary.
• Replace the medium in the backup
recording device.
• Replace the medium in the backup
recording device.
• If you do not wish to have the data overwritten, stop recording.
• Change the settings for recording interval and image quality.
lengthen intervals and lowre image quality.)
• If you do not wish to have the data overwritten, stop recording.
• Change the settings for recording interval and image quality.
lengthen intervals and lowre image quality.)
• Reset the range of backup or copying.
• Replace the archive/copy medium.
(More specifically,
(More specifically,
Canceling
the warning
Press the
WARNING
RESET button.
Press the
WARNING
RESET button.
Press the
WARNING
RESET button.
Press the
WARNING
RESET button.
Press the
WARNING
RESET button.
Press the
WARNING
RESET button.
Press the
WARNING
RESET button.
CALL OUT
output
Selectable
Selectable
Selectable
Selectable
Fixed
Fixed
Fixed
Reference
54
27,28
60-63
27,28
27,28
27,28
60-63
60-63
60-63
COPY CHECK MEDIA 1
ARCHIVE CHECK MEDIA 1
RESTORE CHECK MEDIA 1
An error has occurred in
either the RDD device or
the DDS device.
NO SIGNAL
(Q W E R T Y U I
O P { } q w e r)
[The warning will
indicate the number
of the non-functioning
camera.]
Visual signal was absent
for over 5 seconds during
recording.
SYSTEM ERROR
REC SYSTEM ERROR
COPY SYSTEM ERROR
ARCHIVE SYSTEM ERROR
SCSI connection error or
system malfunction.
RESTORE SYSTEM ERROR
COPY R/W ERROR
ARCHIVE R/W ERROR
A data-writing error occurred
during backup or copying.
RESTORE R/W ERROR
• Check the storage medium in the RDD
or DDS device. (Insert medium if there
is none. If medium is present and you
with to use it, undo the write-protection.
If medium is present and you do not
wish to use it, replace the medium.)
• Check whether the unit and camera are
properly connected, and that electricity
is on.
• Check whether the visual signal is
being properly outputted.
• Check whether the unit’s camera
setting is set to an empty channel.
• Confirm that the SCSI cable is properly
connected.
• Restart operation.
• Inspect the HDD/archive/copy device.
• Inspect the archive/copy device.
Press the
WARNING
RESET button.
• Either turn off
• Press the
Press the
WARNING
RESET button.
Press the
WARNING
RESET button.
••••••••••••••••••••••••••••••••••••••••••••••••••••••••••••••••••••••••••••••••••••••••••
recording or, if the
visual signal has
been restored,
cancel the warning
WARNING RESET
button.
Fixed
Fixed
Fixed
Fixed
60-63
14,18,36
19,20
19
Warnings and CALL OUT output
84
Page 85

Specifications
Rated Power Supply: AC 100-240V 50/60Hz
Rated Input: 1.0 - 0.5A (100-240V)
Color System: PAL-type color system.
Operating Temperature: 41°F-104°F (5°C to 40°C).
Relative Humidity: Max.80(%)
Altitude: Max.2000(m)
Dimensions: 425(Width) x 380(Depth) x 113(Height)(mm).
Weight: 7.5kg
Recording System Digital recording system with JPEG compression method.
Sampling 13.5MHz
Data Compression JPEG
Compression Unit Field
Resolution 684 x 288
Recording Device 60GB HDD
Video Input: 16 Input BNC-Connector: 1.0 V(p-p), 75 ohms.
Monitor Output: S-Connector: Y-Signal: 1.0 V(p-p), 75 ohms.
C-Signal: 0.286 V(p-p), 75 ohms.
BNC-Connector: 1.0 V(p-p), 75 ohms.
Throughout Output: 16 Output BNC-Connector: 1.0 V(p-p), 75 ohms.
Timer Program: 8programs-Daily start and stop time for one week x3set.
Memory Backup: Lasts for more than 1 month.
CONNECTORS
POWER ON Input: Terminal for power ON. LOW: POWER OFF / HIGH: POWER ON
POWER OFF Input: Terminal for power OFF. LOW: POWER OFF
ALARM IN(1-16) Input: Terminal for starting alarm recording.
CLOCK ADJ Input: Terminal for adjusting clock.
REC Input: Terminal for start recording.
GND: Terminal for ground.
ALARM OUT Output: Terminal for output while alarm recording is under way.
MODE OUT Output: Terminal for indication of recording selected mode.
DC 5V OUT Output: Terminal for DC 5V OUT.
CALL OUT/CALL OUT GND: Terminal for external warning device.
ENGLISH
Rating:
ALARM OUT / Active: “Low” Level. Max. Drive current 7mA DC.
MODE OUT Non active: Open. Max. Voltage +24V DC.
ALARM IN / CLOCK ADJ / Active: When terminals are short-circuited
REC or “Low” Level voltage is applied.
CALL OUT / Active: ON. Max. Drive current 7mA DC.
CALL OUT GND Non active: Open. Max. V oltage +24V DC.
RS-232C RS-232C (D-SUB 9pin) terminal for connection with personal computer.
SCSI SCSI2 (Half pitch 50pin) terminal.
Accessories
AC power cord (for U.K / for the Continent) 2
Ferrite core 3
Cable tie 3
Weight and dimensions shown are approximate.
Design and specifications are subject to change without notice.
POWER ON/POWER OFF/
ALARM IN/REC/CLOCK ADJ
Input terminal
• Input Circuit
10kΩ
Input
terminal
GND
<Interface circuit inside the unit>
22kΩ
0.047µF
5V
5V
Non active: Open.
ALARM OUT/MODE OUT Output terminal
• Output Circuit
Output terminal
GND terminal
<Interface circuit inside the unit>
CALL OUT output terminal
• Output Circuit
<Interface circuit inside the unit>
CALL OUT terminal
CALL OUT GND terminal
••••••••••••••••••••••••••••••••••••••••••••••••••••••••••••••••••••••••••••••••••••••••••••••••••••••••••••••••••
Specifications
85
Page 86

SLD Security & Communications
The Old Forge, Ockham Lane, Ockham, Surrey GU23 6PH England
Phone +44.1483225633 · Fax +44.1483225634
sales@sld.co.uk · www.sld.co.uk
872C273B5 PRINTED IN JAPAN
 Loading...