

Page 1

Instruction Manual
DX-PC25U (Ver. 1.0)
For Windows® 98SE
For Windows® ME
For Windows® 2000
For Windows® XP
This instruction manual is important to you. Please read this before to use the software.
Page 2

End User Software License Agreement
Mitsubishi Digital Electronics America, Inc. ("MDEA"), which is a wholly owned U.S. subsidiary of
Mitsbishi Electric Corporation ("MELCO"), reserves all intellectual property rights to this software
for DX-PC25U("Software") and its associated instruction manual("Instruction Manual") on behalf of
MELCO, who is the owner of the Software, and MDEA is a licensee from MELCO of the Software.
MDEA grants user ("User") a limited non-exclusive license and right under this Agreement
("Agreement") to use this Software.
The User may not reverse engineer, de-compile, or disassemble this Software, except and only to
the extent that such activity is expressly permitted by this Agreement and applicable law.
Unauthorized total or partial reproduction, copying, sale, import, export, use, or leasing of either this
Software or it's Instruction Manual by User is strictly prohibited by this Agreement and U.S.
Copyright Law.
Software specifications, software design and the contents of the Instruction Manual are subject to
change by MDEA without notice to User.
This Software is designed to playback, to display, to copy and to save digitally recorded audio and
video data. Unauthorized copying by User of copyright protected audio and video data is not
permitted under this Agreement or U.S. Copyright Law.
MDEA assumes no responsibility or liability for privacy violation or copyright infringement or any
intellectual property violation by User incurred from the Users transfer of audio or video data
during the use of this Software.
MDEA assumes no responsibility or liability to User for damage, or demands of any kind, incurred
during the use of this Software.
MITSUBISHI ELECTRIC CORP. - 2 -
Page 3
Disclaimers
- The copyright holder of this software is Mitsubishi Electric Corporation.
- Mitsubishi assumes no responsibility for damages, demands, etc, relating to such damages incurred
during the use of this software in the method out of the software licensing agreement.
- Unauthorized reproductions or uses (total or partial) of either this software or instruction manual are
subject to change without notice for improvements.
- Reverse engineering and alternations of this software are prohibited.
- Precaution is necessary when handling copyright-protected audio-video.
Microsoft and Windows are registered trademarks of the Microsoft Corporation
in the US and other regions. (The official name of Windows is Microsoft
Windows Operating System.) IntelliMouse is a trademark of the Microsoft Corporation
in the US and other regions.
This software is based in part on the work of the Independent JPEG Group.
All other company and product names appearing herein are the property of their respective
owners.
- Windows 98SE is an abbreviation of Microsoft Windows 98 Second Edition.
- Windows 2000 is an abbreviation of Microsoft Windows 2000 Professional.
- Windows Me is an abbreviation of Microsoft Windows Millennium Edition.
- Windows XP is an abbreviation of Microsoft Windows XP.
©2003 Mitsubishi Electric Corporation. All rights reserved.
MITSUBISHI ELECTRIC CORP. - 3 -
Page 4

Contents
1. Introduction
1.1 Product Features
1.2 System Requirement
1.3 Compatible Digital Recorder
2. Installation
2.1 DX-PC25U Installation
2.2 Uninstalling
3. Viewing Live Pictures
3.1 How to connect
3.1.1 Starting DX-PC25U Setting up connection
3.1.2 Connecting
3.2 Viewing Live Video
3.3 Zooming Live Pictures
3.4 Assigning Camera Position
3.5 Changing Picture Quality
3.6 Controlling Telemetry Cameras
4. Search and Viewing Recorded Video
4.1 Playback
4.2 Time Date Search
4.3 Alarm List Search
4.4 Zooming Picture
5. Copying Video to a local PC
5.1 Copying Single Picture to a local PC
5.2 Exporting Picture File to a local PC
6. Alarm Notification to a connected PC
6.1 Setting up
7. Alarm Notification by e-mail
7.1 Setting up
8. Administrator Functions
8.1 Setting up a new User, Password and Access Rights
8.2 Changing the unit name or adding sites
9. Setting up menu of the unit over network
MITSUBISHI ELECTRIC CORP. - 4 -
Page 5

10. Convenient Functions
10.1 Bookmarks
10.2 Help Menu
10.3 Renew Info
10.4 Front Switch Operation of TL2500U
MITSUBISHI ELECTRIC CORP. - 5 -
Page 6

1. Introduction
Mitsubishi DX-PC25U is viewing software designed for the Digital Video Recorder (DVR) DX-TL2500U. This
software enables you to connect and communicated via a network with the DVR and also to playback saved
images (saved on CFC or CD from DVR) on your PC
► View live or playback video of all cameras connected to the recorder.
► Search for a specific video Date&Time, Alarm or Recording Index.
► Save a still picture as a bitmap or JPEG format. It is also possible to convert the still pictures into
AVI format.
► Control functions of the recorder and PTZ camera remotely.
► Change the setting of the recorder via network.
1.1 Product Features
▪ View live images across a network in full or split screen mode.
▪ Control PTZ cameras
▪ View recorded images across a network with split screen modes, Search via Fast Forward, Rewind,
Time and Date or Alarm List.
▪ Copy images to the user’s PC.
▪ Receive alarms notice
▪ Control and SETUP menu of DX-TL2500U from a network.
1.2 System requirements
- IBM PC/AT-compatible with Intel Pentium series or Intel Celeron series CPU (500MHz or faster)
- Microsoft Windows 98SE, Windows 2000, Windows Me or Windows XP
- RAM: 256MB or more
- Display resolution: 1024 pixels x 768 lines (XGA) or more (recommended). Use a video card and
monitor capable of displaying 32,000 or more colors.
- Free HD space: 200MB or more
- SCSI adapter : Adaptec AHA-2940 Series, SlimSCSI etc. compatible with
WINASPI32 and SCSI-2 (when SCSI-connected peripheral devices are used) Under
Windows 2000, WinASPI must be installed in advance for the playback of SCSI-connected devices.
Please read the instruction manual for Adaptec SCSI board for the installation of WinASPI.
- Sound adapter : Windows-compatible type; SoundBlaster etc.
- Installed browser: MS Internet Explorer 5.01 Service Pack 2 or later
- Network interface (10Base-T) card compatible with the environment described above
Note: Operations are not guaranteed for all environments confirming to the above description.
MITSUBISHI ELECTRIC CORP. - 6 -
Page 7
1.3 Compatible Digital Recorders
- DX-TL2500U
- DX-TL900U Series (Playback of copied data on digital storage media only. Some of the functions
may not work properly.)
2. Installation
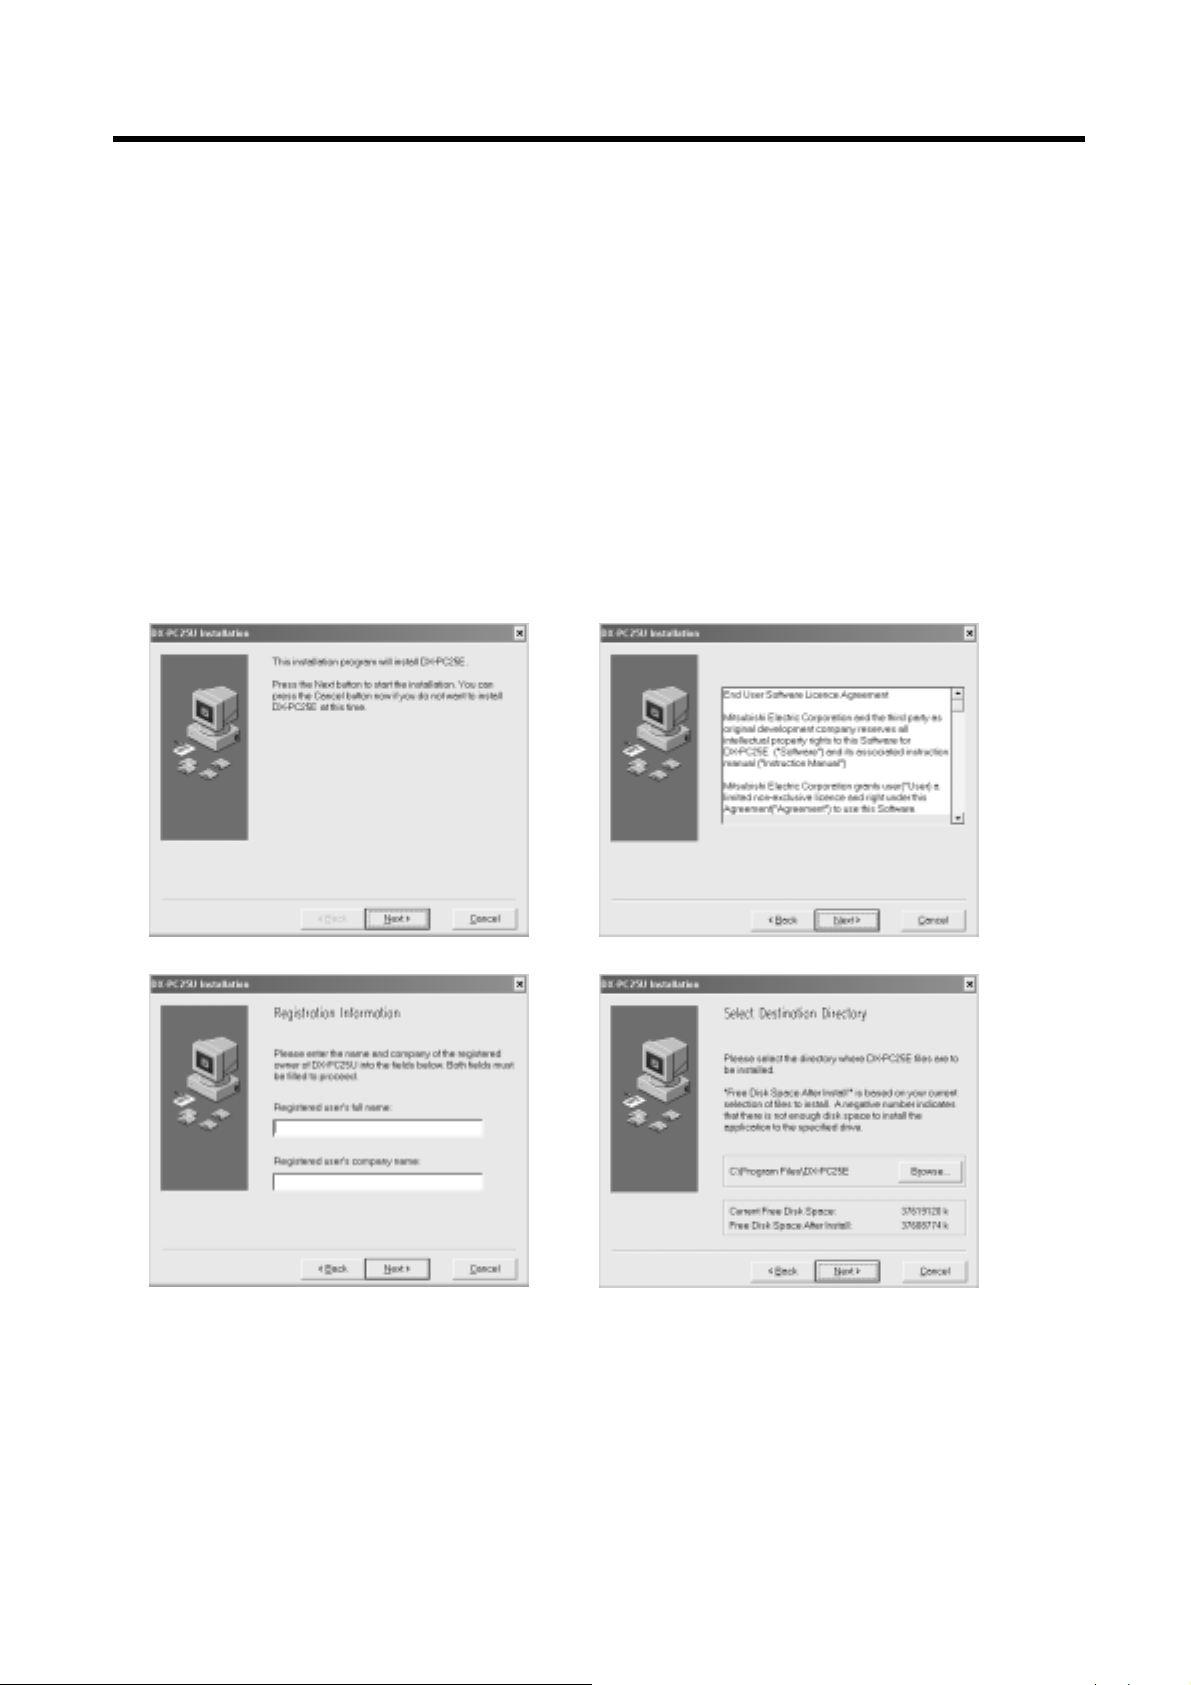
2.1 DX-PC25U Installation
To install the DX-PC25U, first start up SETUP.EXE on the provided CD. Follow the series of instructions that
appear on-screen, and then the software will be installed automatically.
The default directory for the installation is C:/Program Files/DX-PC25U.
2.2 Uninstalling
To uninstall DX-PC25U, open the Install/Remove Applications dialog box in the Operation Panel and select
DX-PC25U for deleting or select the Uninstall DX-PC25U command from the Start menu, and follow the series
of instructions that appear on-screen to complete the procedure.
MITSUBISHI ELECTRIC CORP. - 7 -
Page 8
3. Connecting to a DX-TL2500U and Viewing live Video
3.1 How to connect
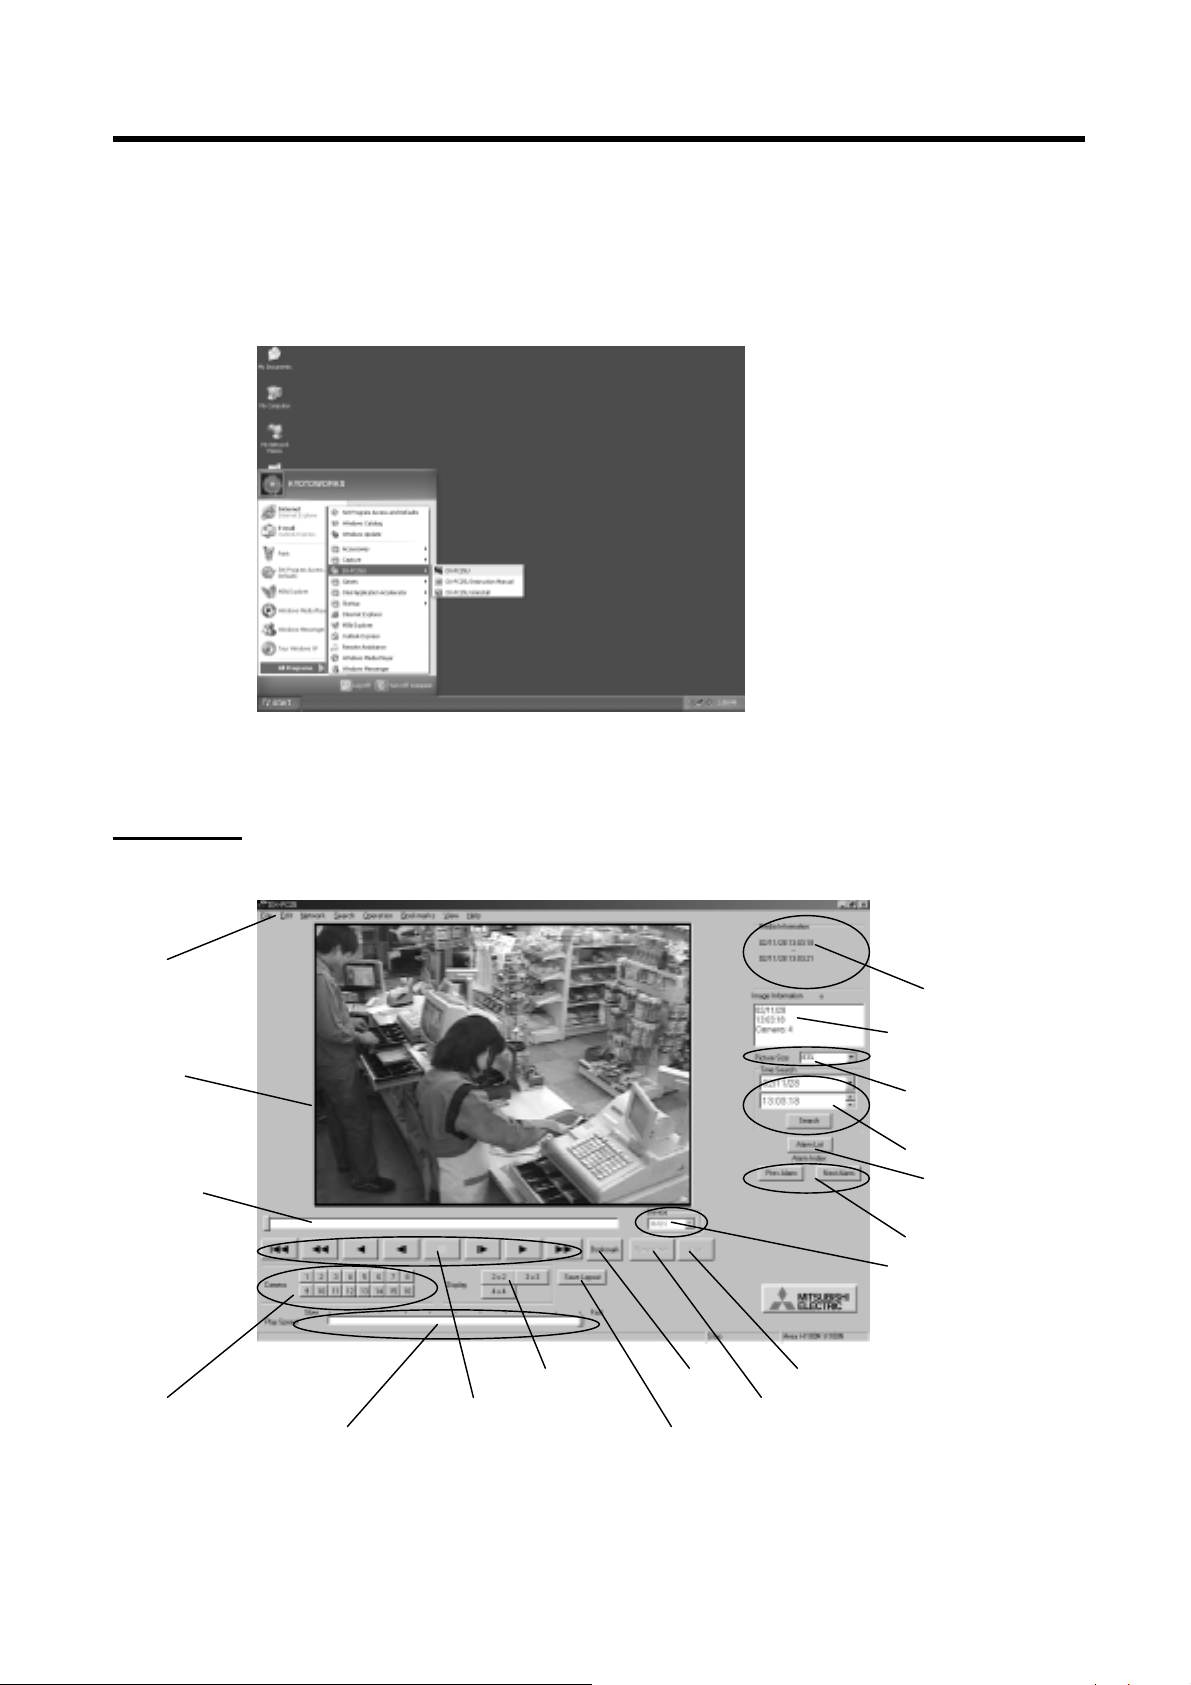
3.1.1 Starting DX-PC25U
After the program installation, go to Start Menu of Windows and choose DX-PC25U from the menu.
Then the DX-PC25U starts and opens control panel.
Control panel
Menu bar
Media information window
Image information window
Video window
Picture size
Playback position slider Alarm list search
Time & Date search
Index search buttons
Play device
Display format buttons Bookmark Live button
Playback control buttons Renew information button
Camera select buttons Playback speed control slider Layout save button
MITSUBISHI ELECTRIC CORP. - 8 -
Page 9
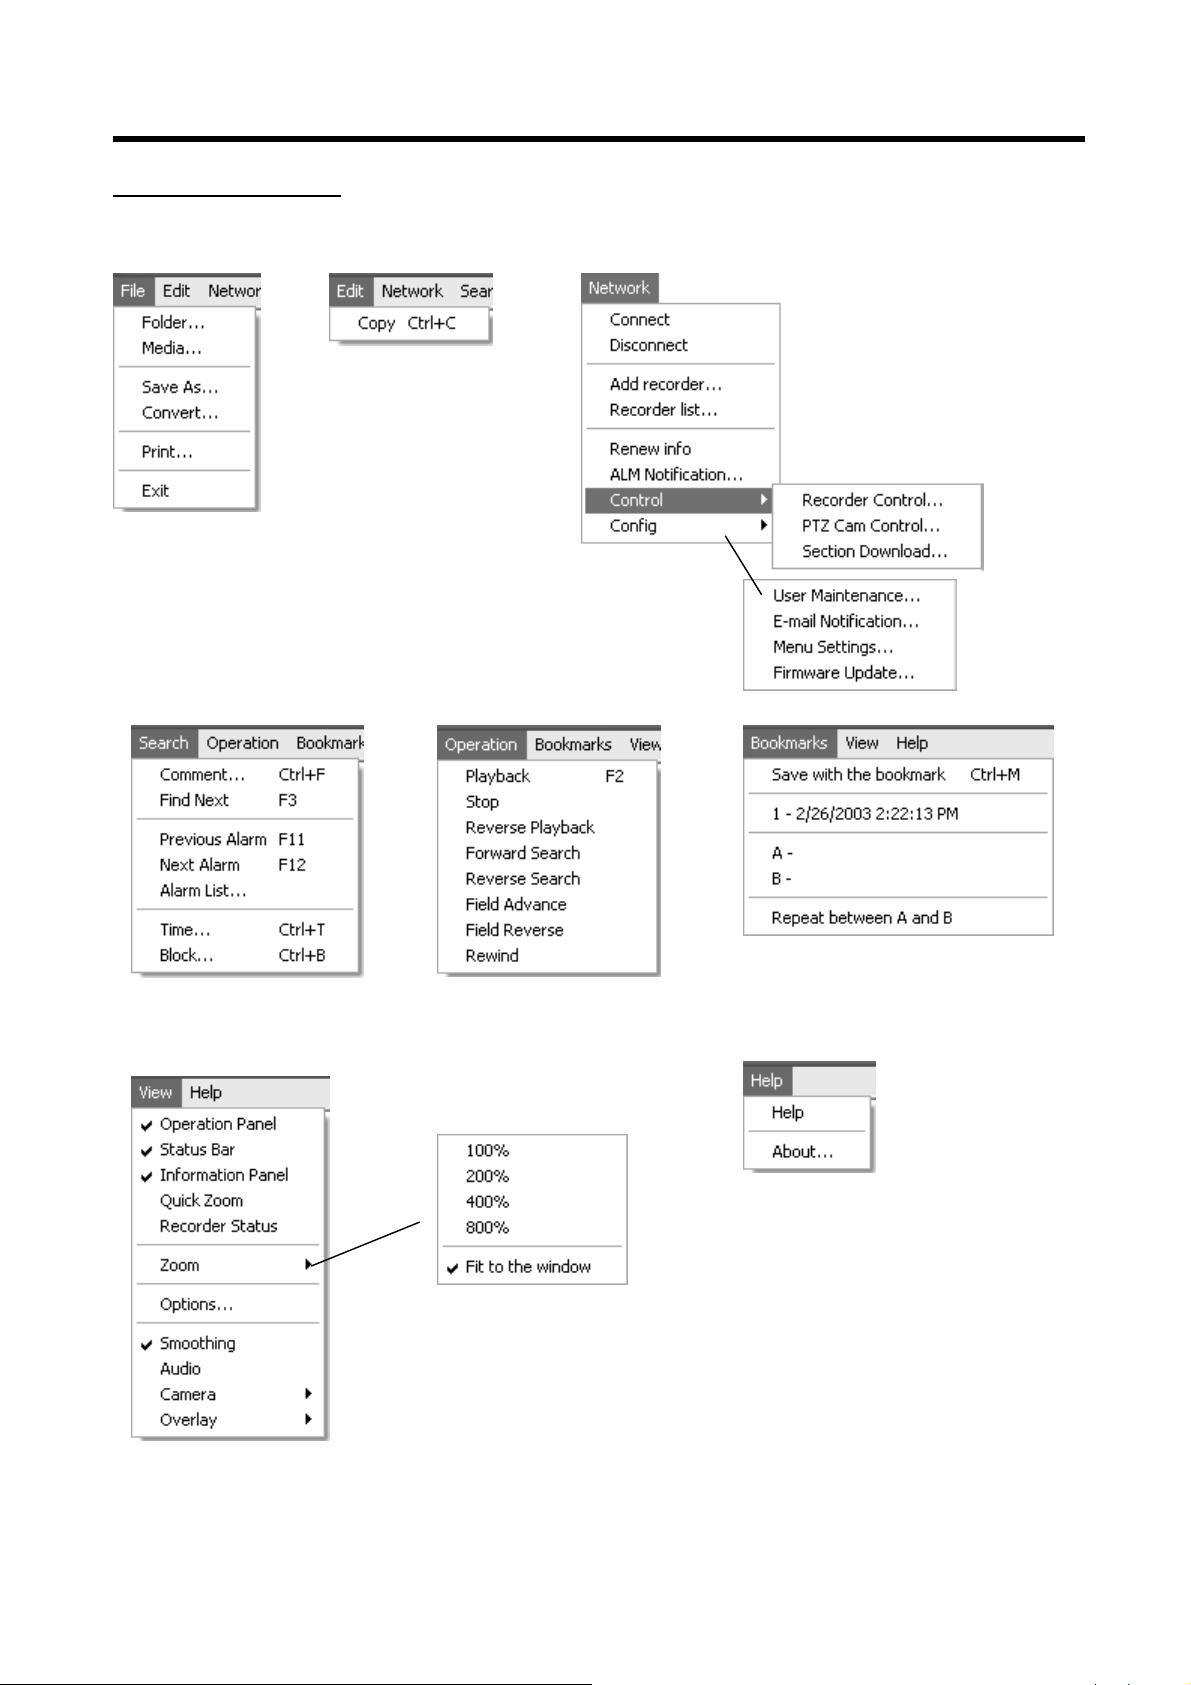
Commands in menu bar
MITSUBISHI ELECTRIC CORP. - 9 -
Page 10
Commands in video window
.1.2 Setting up connection
3
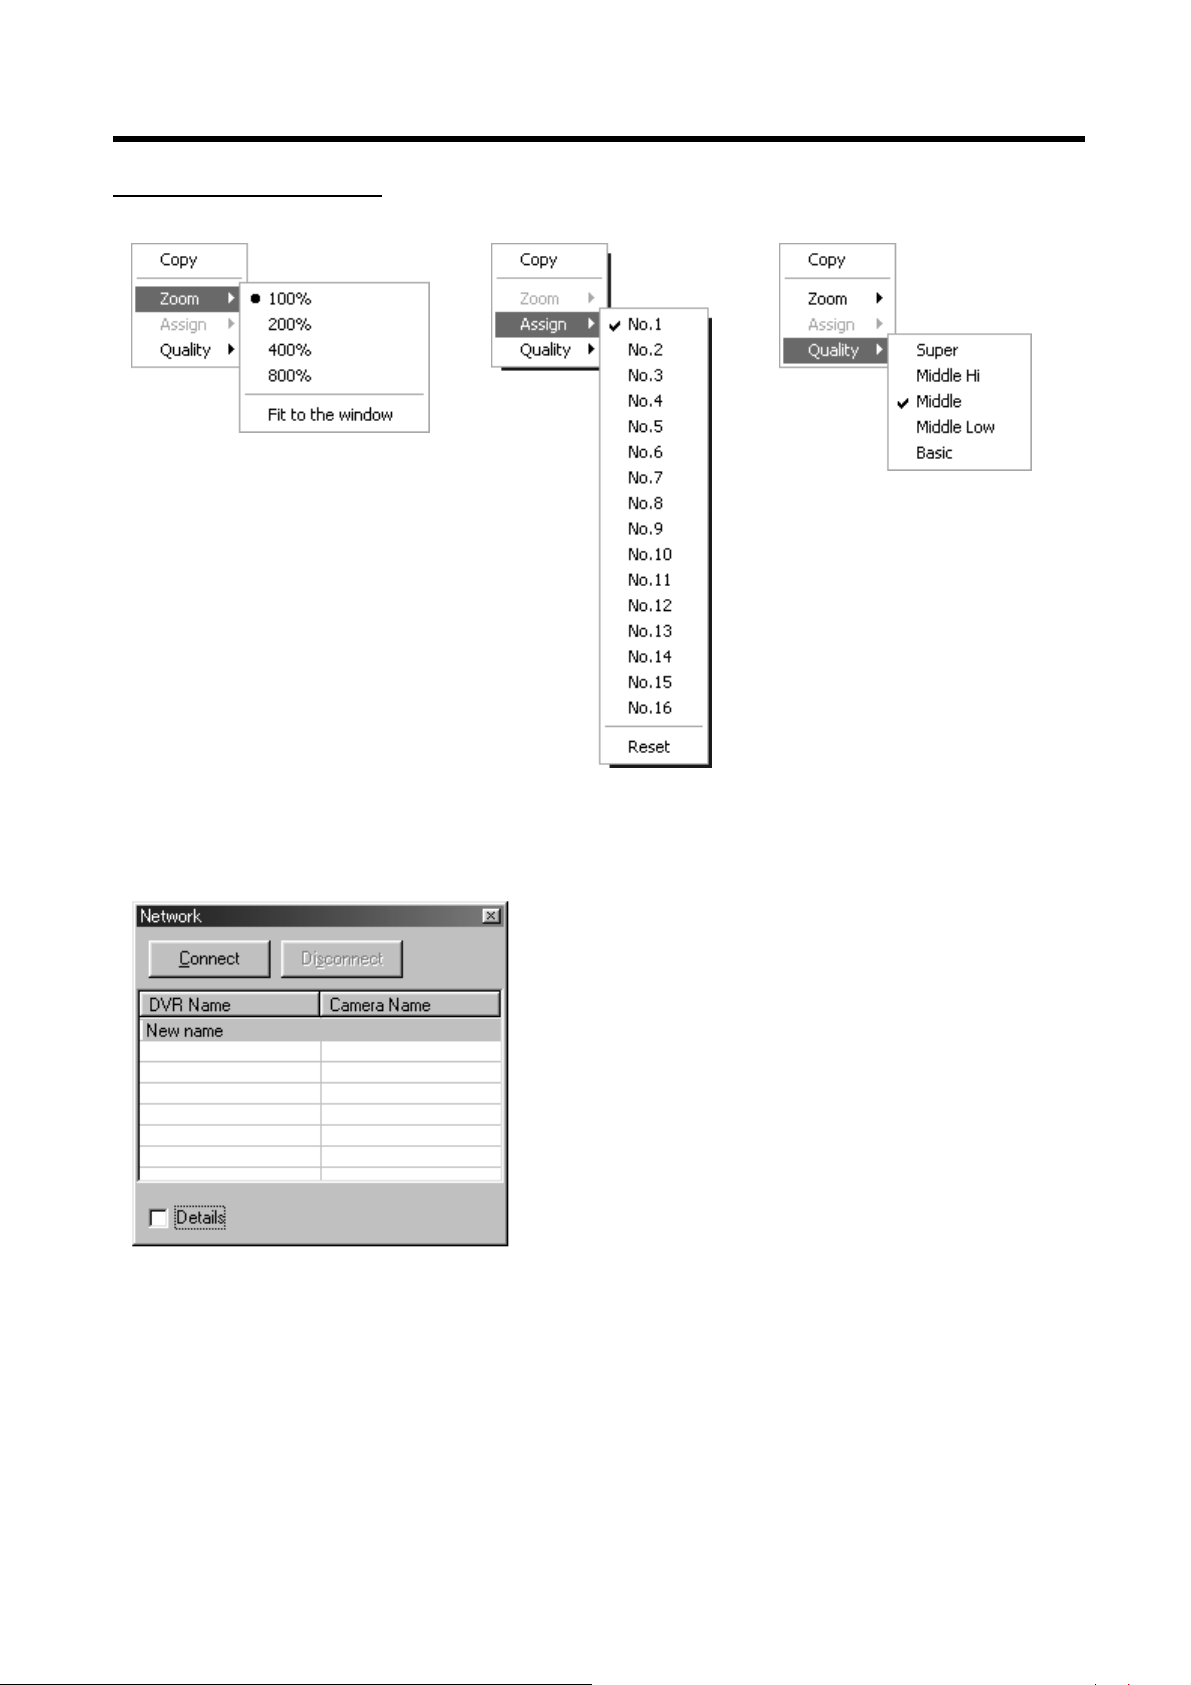
When you start the DX-PC25U, you see the Network box..
To
view all the settings of the listed recorder or to register a
new recorder, click the check box of Details.
MITSUBISHI ELECTRIC CORP. - 10 -
Page 11

default setting is IP address; 192.168.0.100, and Info Port; 53705, which are same as DX-TL2500U’s default
setting.
To register new recorder, click Add button.
-
- To change the setting of registered recorde
Edit button.
- registered recorder, choose the recorder name you wish to delete, then click Delete button.
To delete the
DVR Name : To name the registering DVR your favorite.
-
- Camera Nam : To name a camera connected to a recorder onto th
- IP Address : Input the recorders IP address.
- Recorder Ch : You can choose either specific c
picture format.
- r’s port number into this box.
Info Port No : Input the recorde
e e list.
amera channel or saved layout. The default is 4x4 multi
r, choose the recorder name you wish to change, then click
MITSUBISHI ELECTRIC CORP. - 11 -
Page 12

3.1.3 Connecting
elect your desired recorder and click on the Connect button to display
S
Login box. Enter your User Name and Password as required and click OK
button.
Note. The default user name is
User name and password can be changed for each user.
hen you logged in successfully, the following message appeares, and DX-PC25U
W
X-PC25U connected to the recorder successfully, the following
D
dialog box appears and tells you what kind of qualification you logged
in.
root and password is admin000.
hen Login failed, Error message appears “Input Error”
W
When the specified recorder can’t be found, Error messag
“ Recorder not found”.
e appears
MITSUBISHI ELECTRIC CORP. - 12 -
Page 13
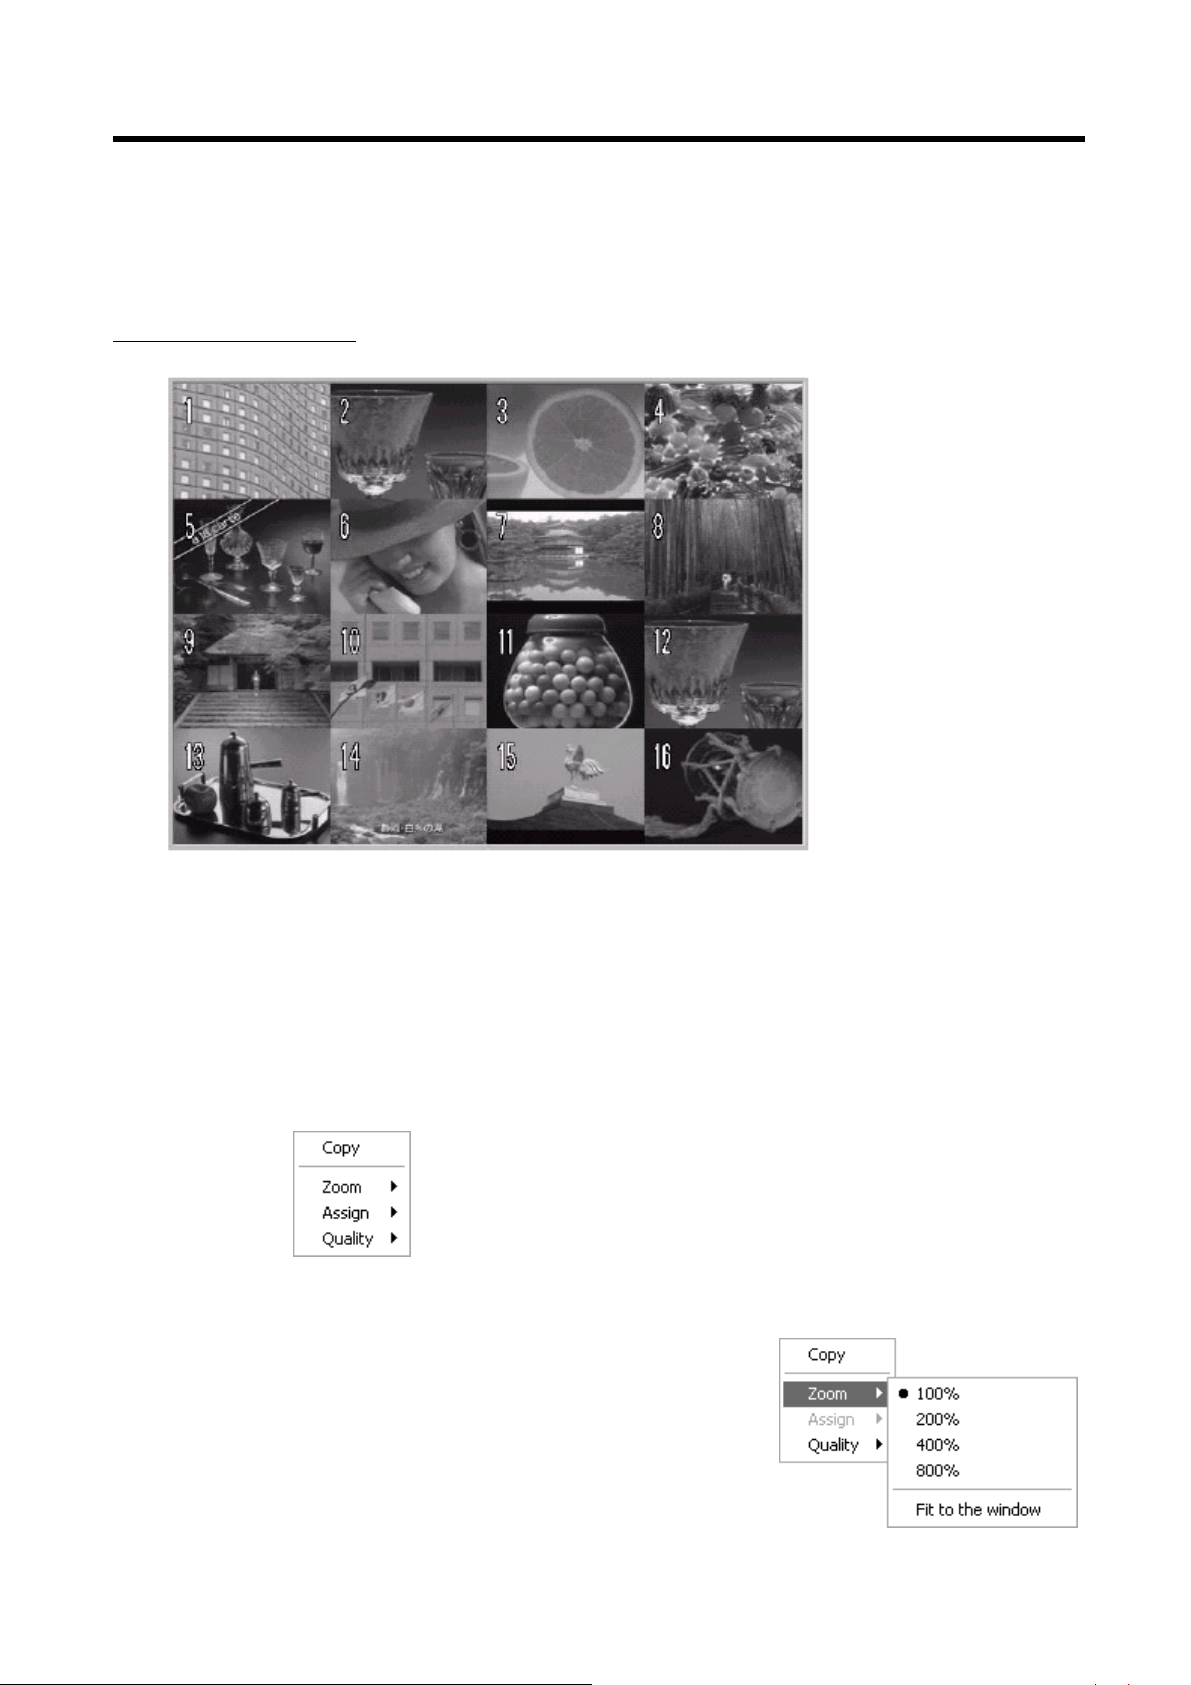
3.2 Viewing Live Video
Live pictures can be viewe
Note: Selecting multi picture format may slow down the refresh r
xample of 16-Split Format
E
the Multi Picture Format, the camera number changes from green to yellow to indicate just updated picture.
In
By clicking the primary mouse button (“left clicking” in the standard setting) on a picture displayed in the video
window, the Multi Picture Format can be changed to a Single Picture Format. By clicking the secondary
mouse button (“right clicking” in the standard setting) on any part of the video window, the following menu
be opened.
.3 Zooming Live Picture
3
Place a cursor on image a
screen mode. Select Zoom and check a desired zooming rate. Back to
the original, right click again to display Zoom command and check Fit to
the window.
d in a single or multi picture format.
ate on the display.
can
nd right click to zoom live picture in a full
MITSUBISHI ELECTRIC CORP. - 13 -
Page 14

3.4 Assigning Camera Position
By selecting camera number from
assigned to the position you have selected. The assigned camera
number gets saved in the registry, and will appear in that position at the
start of the next session.
.5 Changing Picture Quality
3
The initial pictures are transmit
picture refresh rate. Place a cursor on the video window and right click to
change image quality. Select Quality and choose a desired image quality.
ote:
N
ame camera number is assigned onto the several positions in the
If the s
video window, these pictures will be updated at the same time.
.6 Controlling PTZ Camera
3
PTZ Cameras can be controlle
viewing live pictures by clicking LIVE button before open the
camera control window.
o control PTZ Camera;
T
(1) From the Network Me
(2) Choose PTZ Cam Control.
nu, choose CONTROL.
the Assign list, any cameras can be
ted at Middle quality to speed up the
d by using DX-PC25EU Stop
MITSUBISHI ELECTRIC CORP. - 14 -
Page 15

Camera Number Tilt Up button
Name and IP address of connected recorder is showed.
Zoom control buttons
Pan left button
Preset positio
Video Window
Focus control buttons
Iris control buttons
n controls
Pan Right button Interval Time (ms)
Tilt Down button
amera Number : Choose the camera you want to control.
C
Panning : Click or button to change the
camera angle in horizontal direction.
Tilting : Click or button to move camera to vertical direction.
Panning ntal + vertical
+ Tilting : Click or or or button to move camera to horizo
directions (PAN & Tilt). en you find any problem at the one of the direction, W
h
please change the interval time between PAN command and Tilt command.
) Zoom control
(1
- Wide button
: To start zooming out, press this button.
- Tele button : To start zooming in, press this button.
- Stop button : To stop zooming, press this button.
) Focus control
(2
- Near button
: To focus the lens on one step near side, press this button.
- Far button : To focus the lens on one step far side, press this button.
- Auto button : To activate Auto-Focus function of the lens, press this but
ton.
) Iris control
(3
- ( - ) button
: To close the iris, press this button. Then the iris level becomes 1 step lower.
- ( + ) button : To open the iris, press this button. Then the iris level becomes 1 step higher.
- AUTO button : To activate auto iris control, press this button. Then iris level is controlled auto
matically.
) Preset position control
(4
- To register a new preset p
- To point the camera toward the desired preset position, choose a position number and pr
osition, choose a position number and press Resister button.
ess Jump button.
MITSUBISHI ELECTRIC CORP. - 15 -
Page 16

4 Search and viewing recorded Video
Playing back recorded video
Video can be played back from t
Playback buttons are at the bottom portion of Main Window. Each of the
described below.
peration Panel
O
Playback position slider
he Digital Recorder by using DX-PC25U.
ontrol Icons
C
buttons has a different function as
Icons Functions Descriptions
Top Search Jumps to the beginning of the recording.
Reverse
Search
Reverse
Playback
Plays the video toward the beginning of the recording with a higher
speed than normal playback. The search speed is changed from X1 > X2
> X4 > X8 to X1 again every pressing.
Plays the video toward the beginning.
Field
R
everse
Plays a still picture one field before.
Shift
Stop
Stops to playback, and start to playback audio data, if it is recorded
with the picture, when audio command is activated in the menu.
Field
advance
Plays a still picture one field after.
Shift
Play Plays the video.
Plays the video toward the latest recording with a higher speed than
Search
normal playback. The search speed is changed from X1 > X2 > X4 > X8
to X1 again every pressing
MITSUBISHI ELECTRIC CORP. - 16 -
Page 17

A
Device Allows you to select playback device.
Bookmark
Live Shows Live pictures. Audio is not played in Live Mode.
Renew
Information
Position
slider
Resisters the picture displayed in the video window onto the bookmark
list.
Renews the information.
Shows position of the picture in the video sequence.
Icons Function Descriptions
to
Camera
number
4-Multi
9-Multi
Changes the
cameras are selected in a single picture format, those camera pictures
are switched sequentially. To select several cameras in single picture
format, press the your favorite camera number with pressing Ctrl key
on your keyboard. You can select the only available cameras in live
mode.
is changed from 4a > 4b > 4c > 4d > 4a again every pressing. In default
setting 4a contents from 1 to 4 channel, 4b (5 to 8ch), 4c (9-12ch) and 4d
(13 –16ch).
is changed from 9a > 9b > 9a again every pressing. In default setting 9a
contents from 1 to 9 channel, and 9b from 10 to 16ch, 1ch and 2 ch.
camera displayed in the video window. If more than two
s the display format in the video window to 4-Multi. The displayChange
display format in the video window to 9-Multi. The displayChanges the
16-Multi Changes the display format in the video window to 16-Multi.
Playback
Speed
Slider
Save
Layout
llows you to adjust playback speed or to adjust request rate in Live
Mode.
Allows you to save your favorite display format in the video window.
MITSUBISHI ELECTRIC CORP. - 17 -
Page 18

Media Information box
edia information box displays recording period on the selected
M
device.
If a SCSI device is selected, the name of this device is also
displayed in this box.
age Information Box
Im
he recording data such as recording date, time and camera
T
number and comment (if it is written.) are displayed in this Im
information box.
If an alarm pictur
a
ppear
e is played in the video window, a red dot will
icture Size
P
To change the size of video window, input the size in %.
The size can be changed from 25 – 800%.
4.5 Time and Date Search
This function is to search for a specific scene according to its recorded date
and time information. To search the scene, just input the date and time you
want to see and then click the Search button. PC25U displays a picture
recorded exactly at the required time or if nothing available for the provided
time, it will display the nearest recorded time.
o open time search box,
T
- Choose Time from Search
bar.
- C Date and Time you want to see, and
hoose
press Search button to search the picture.
- T
o close this box, press Close button.
MITSUBISHI ELECTRIC CORP. - 18 -
Command in the menu
age
Page 19

4.6 Alarm List Search
- To search for a specif
and then press Search button.
- To close the Alarm list box, press
- To save the alarm list as a text file press the Save bu
- To update the list press the Reload button.
ic Alarm, press the Alarm List button and choose the Alarm number you want to see,
the Close button.
tton.
.4 Zooming Image during play back (Same operation as Live image zooming)
4
Place a cursor on image and right click to zoom live image in a full screen mode. Sel
desired zooming rate (25 – 800%). Back to the original, right click again to display Zoom command and check
Fit to the window.
ect Zoom and check a
MITSUBISHI ELECTRIC CORP. - 19 -
Page 20

5 Copying images to a local PC
l PC
5.1 Copying Single Image to a loca
Single live or playback image can be cop
Go to Edit menu or right click on the video window and open copy command.
.2 Exporting Image File to a local PC
5
ive or Playback images can be saved to a user’s
L
computer in AVI format. Go to Network menu and select
control, Section Download. Then the following display
appears:
- Input the period that should be transferred from the recorder to your PC.
- Choose the desired cameras you want to download.
- To start downloading, press Download.
- If you want to continue downloading othe
- To cancel the downloading, press Cancel.
ied to a user’s computer in JPEG format.
r data, press Continue.
MITSUBISHI ELECTRIC CORP. - 20 -
Page 21

6 Alarm notification to a local PC
ways runs with Windows and receives alarms from recorders anytime the Alarm notification software, AN25, al
PC is running. When AN25 receives an alarm, POP UP box appears on the screen automatically.
Change to “Warning”
.1 Setting up
6
6.1.1 Setting
See ETHERNET ALARM NOTIF
6.1.2 Setting up DX-PC25U
Go to Network menu and selec
hen the following setting box is displayed. Check each box of any items that need to generate an Alarm
T
Warning. After specifying all required alarms, click OK to start receiving alarms.
up the recorder
ICATION SETTING in Operation Manual (page 56 and 57)
t ALM Notification.
MITSUBISHI ELECTRIC CORP. - 21 -
Page 22

Alarm notification by e-mail
7
DX-TL2500U can send Alarm N
SMTP server. DX-PC25U sets up all necessary items of the
recorder.
7.5 Settin
From Network
Notification.
g up
menu, choose Config, choose E-mail
otification by e-mail through
MITSUBISHI ELECTRIC CORP. - 22 -
Page 23

Then the following input box appears.
arget Address (Receiver’s address)
T
Input e-mail addresses of the users w
SMTP Sever, POP Server and DNS Server shall be determined after contracting w
Provider or you may need to ask the IT department for detail of setting up the e-mail feature.
e-mail sends the same kinds of alarms as what you set up in Alarm Notification.
ho will receive the notifications from the recorder.
ith Internet Service
MITSUBISHI ELECTRIC CORP. - 23 -
Page 24

SMTP Server : Input the address of SMTP server used by the recorder.
OP Server : Input the address of POP server used by the recorder.
P
ccount : Input the account name to log in the above servers.
A
assword : Input the password to log in the above servers.
P
wn e-mail address: This mail address is used as the sender’s address of alarm mail.
O
ime Zone : Input the GMT.
T
VR ID : To informed the receivers which DVR sent the alarm email.
D
Administrator functions
8
8.1 Setting up a new user and
New users and passwords can be added to
features. Go to Network menu and Select config and User maintenance.
password
the user list by the administrator and given access rights to certain
MITSUBISHI ELECTRIC CORP. - 24 -
Page 25

When added or modified, click Regist box of DVR.
8.2 Changing the unit name or Adding Sites
Go to Network menu and select Recorder List to display the following box:
Select either Add or Edit box, and the following box appears:
MITSUBISHI ELECTRIC CORP. - 25 -
Page 26

Change or add DVR Name, Camera Name, IP Address, and
9 Setting up menu of the unit via a local PC
You can adjust the calendar and clock setting of the recorder through a network.
Daylight Saving Function : If you set this function ON, clock setting is automatically adjusted at the day
when summertime is started or finished.
Daylight Setting : Set the begin date&time and finish date&time of summer time.
Date Time : To set the new date for the recorder, press Apply Date.
To set the new time for the recorder, press Apply Time.
MITSUBISHI ELECTRIC CORP. - 26 -
Page 27

To adjust the Calendar position, choose Clock, and set the position by Up/Down/Right/Left keys.
It is also possible to adjust the horizontal position of Clock and Camera numbers/Titles/Comments.
To adjust this position, choose Display, and set the position by Up/Down/Right/Left keys.
MITSUBISHI ELECTRIC CORP. - 27 -
Page 28
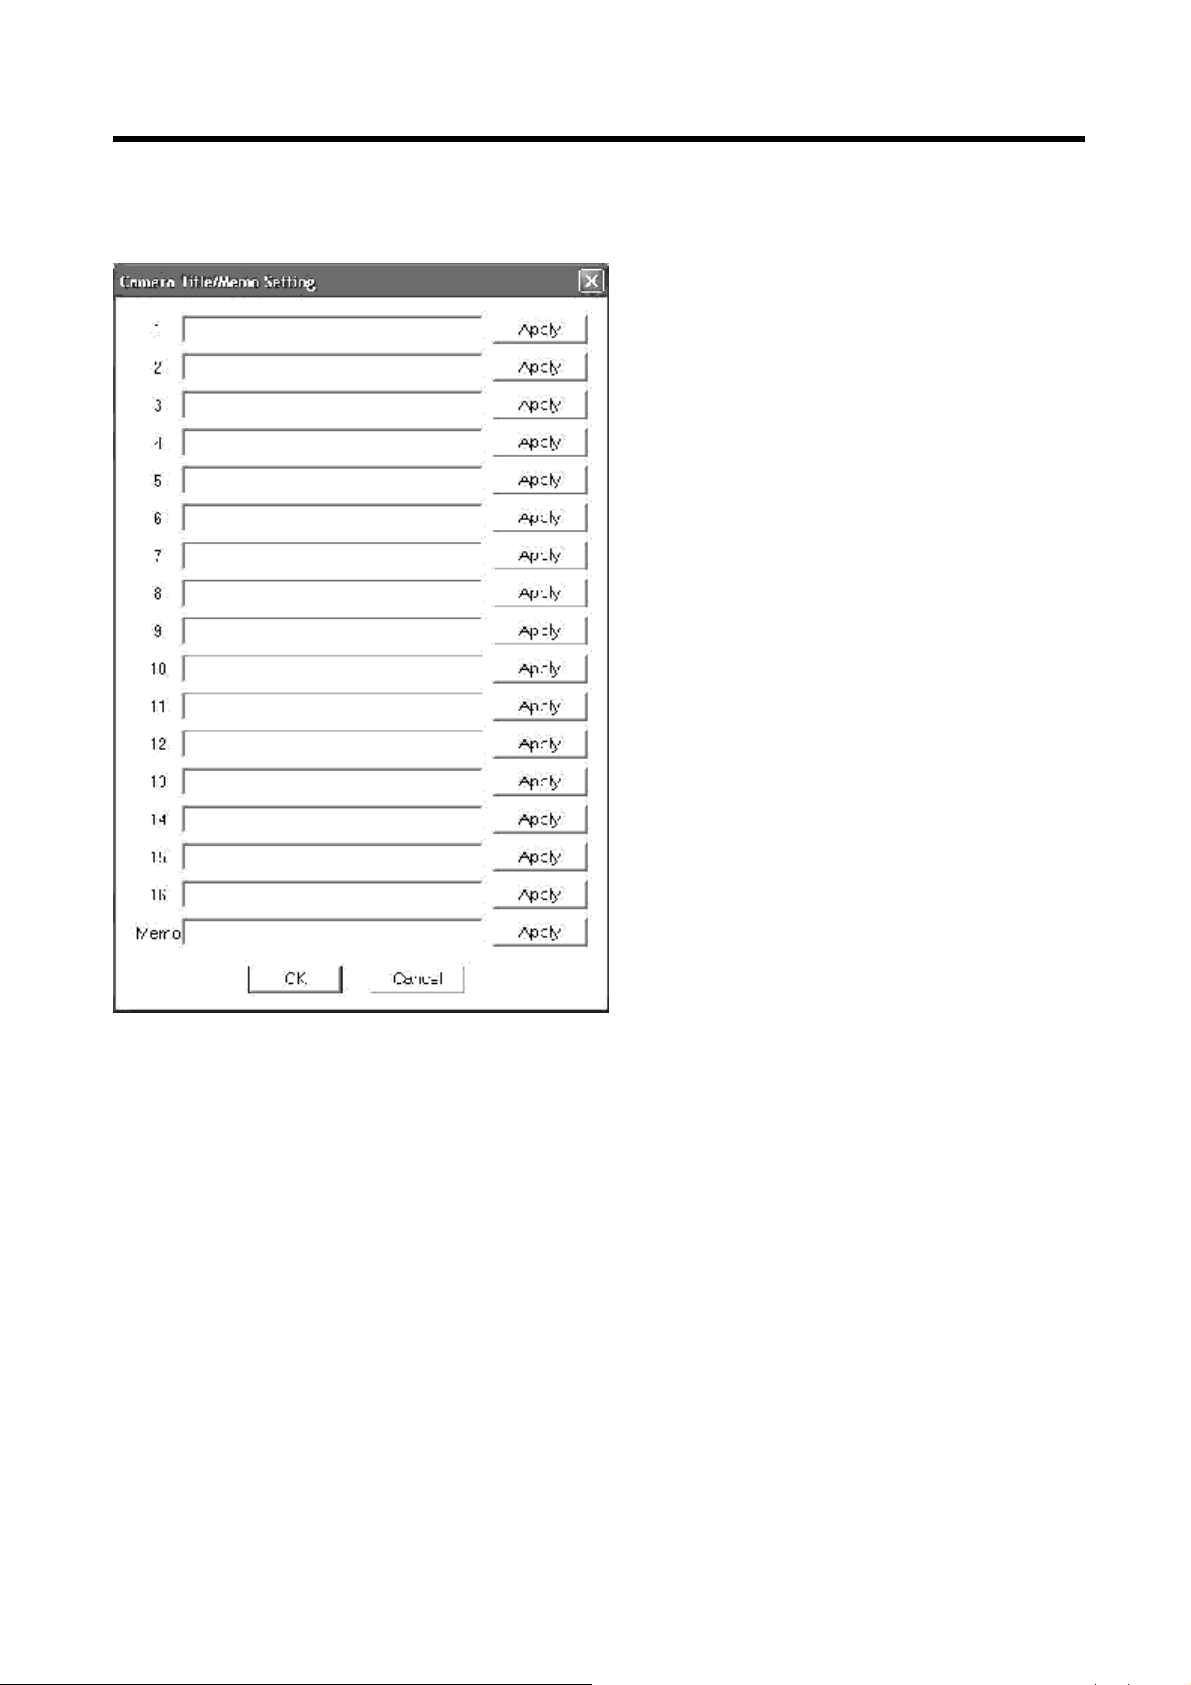
You can edit the camera titles from the following box. Only the characters supported by the recorder should be
used. To set the camera title, input title and then press apply button.
MITSUBISHI ELECTRIC CORP. - 28 -
Page 29

You can set the positions of cameras in multi picture formats on the analog monitor connected to the recorder
from the following box. To place the desired camera onto desired position, click the position number
desired camera number is displayed.
until
MITSUBISHI ELECTRIC CORP. - 29 -
Page 30

You can edit the Motion Detection Mask from the following box.
To activate the sensing area, press Ctrl Key and right click button of the mouse and go over the sensor marks
in the video window. To deactivate the sensing area, press Shift Key and right click button of the mouse and
go over the sensor marks
in the video window.
MITSUBISHI ELECTRIC CORP. - 30 -
Page 31

You can set up the alarm setting of the recorder from the following box.
Choose the alarm camera and Trigger, then press apply button.
MITSUBISHI ELECTRIC CORP. - 31 -
Page 32

10 Useful functions
10.1 Bookmarks
The current playback position can be registered on the bookmark list by saving with bookmark command. Up
to 30 bookmarks can be registered. When this limit is exceeded, bookmarks will be erased starting with the
oldest bookmark. All the book marks are cancelled when DX-PC25E session is closed.
10.2 Help Menu
Help can be displayed by selecting the Help command in the Help menu.
10.3 Renew Info and Recorder status
To show the above Status box, put a check mark on Recorder Status.
To get the latest status press Renew Info. button.
MITSUBISHI ELECTRIC CORP. - 32 -
Page 33

10.4 Front Switch Operation of DX-TL2500U
You can control the front panel of the recorder from the following box.
Change to “SPLIT”
MITSUBISHI ELECTRIC CORP. - 33 -
 Loading...