

Page 1
MITSUBISHI
INDUSTRIAL
DN-260
A
SEWING
MACHINE
Model
classes
INSTRUCTION
FOR
OPERATION
MANUAL
Page 2
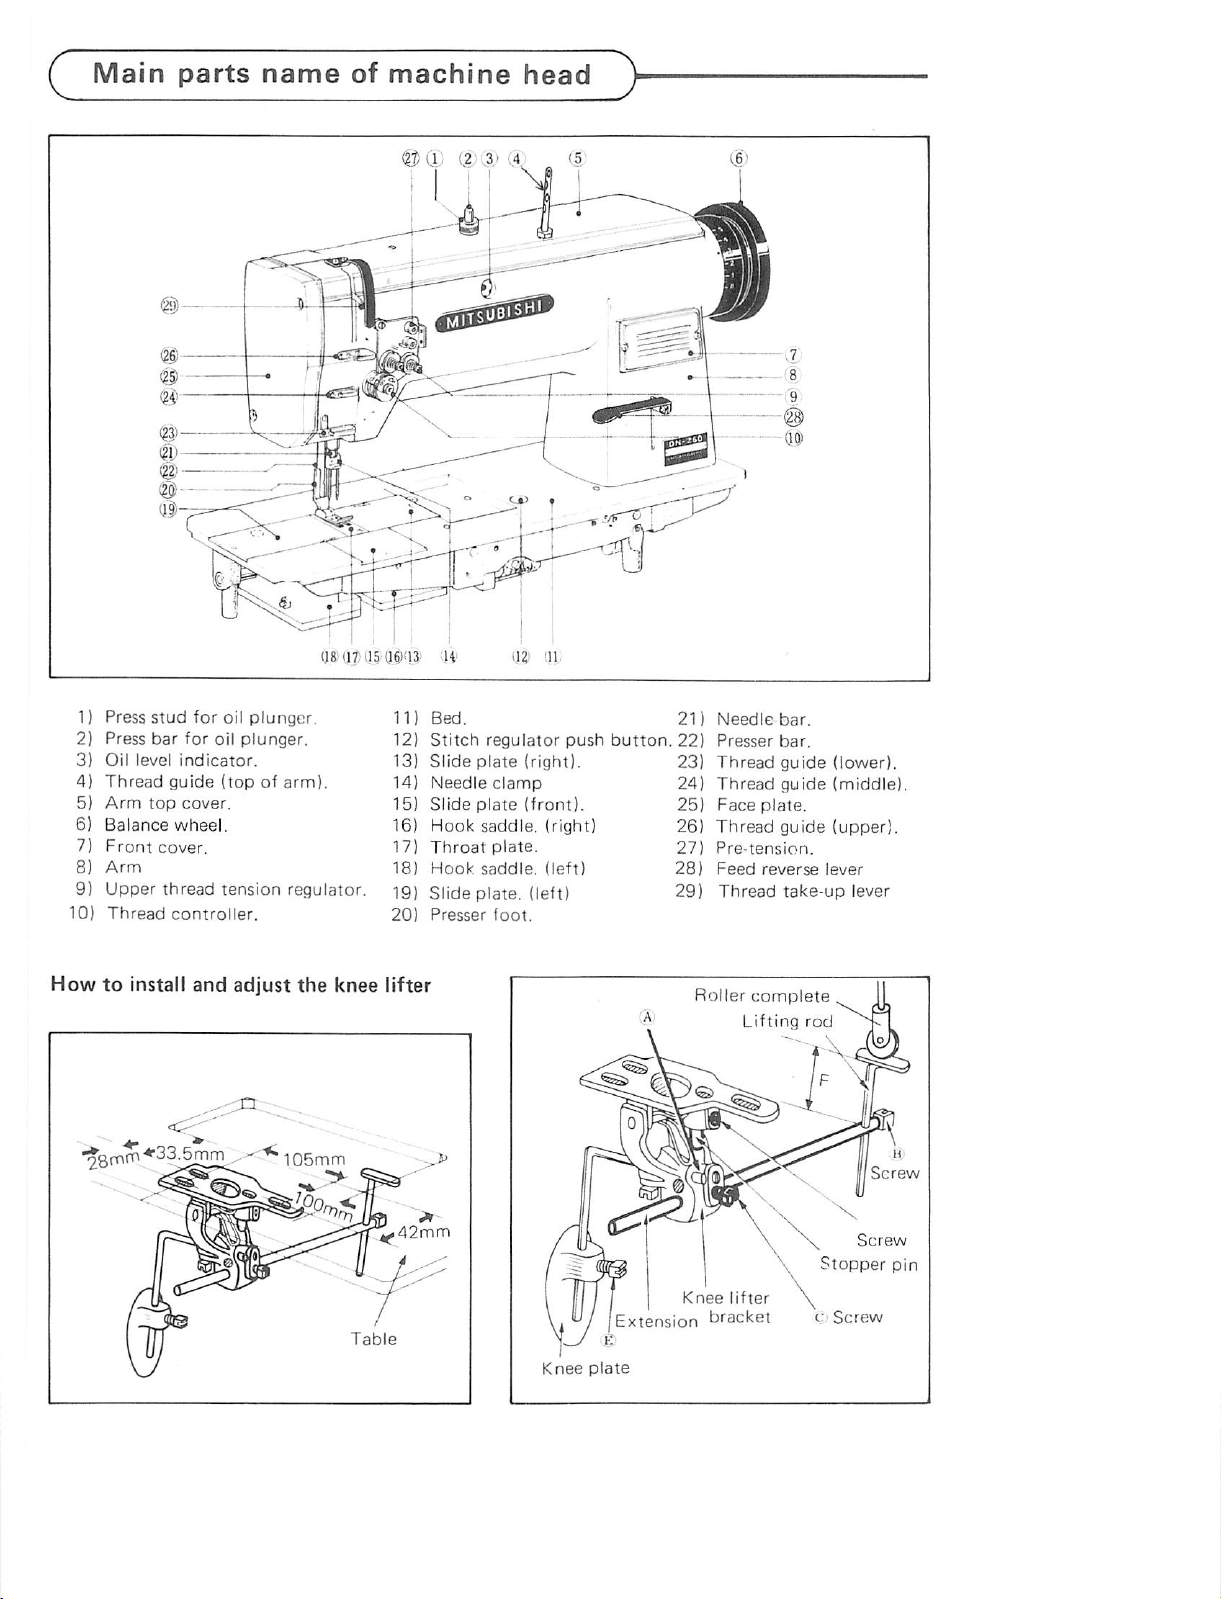
Main
parts
name
of
machine
head
1) Press
2) Press
3)
4)
5)
6)
7)
8)
9)
10)
Oil
level
Thread
Arm
Balance
Front
Arm
Upper
Thread
stud
bar
guide
top
cover.
thread
Howtoinstall
•28mm*33.5mm
for
oil plunger.
for oil plunger.
indicator.
(topofarm).
cover.
wheel,
tension
controller,
and
adjust
^
regulator.
the
knee lifter
11)
12)
13)
14)
15)
16)
17)
18)
Bed.
Stitch
Slide
Needle
Slide
Hook
Throat
Hook
regulator
plate
clamp
plate
saddle,
plate.
saddle,
(right).
(front).
(right)
(left)
push
button.
21)
22)
23)
24)
25)
26)
27)
28)
19) Slide plate, (left) 29)
20)
Presser
foot.
Needle
Presser
Thread
Thread
Face
Thread
Pre-tension.
Feed
Thread
Roller
bar.
bar.
guide
guide
plate.
guide
reverse
take-up
complete.
Lifting
(lower).
(middle)
(upper).
lever
lever
rod
Knee
I j
'Extension
plate
Knee
bracket
lifter
\
c
Screw
Page 3
How
to
use
the
machine
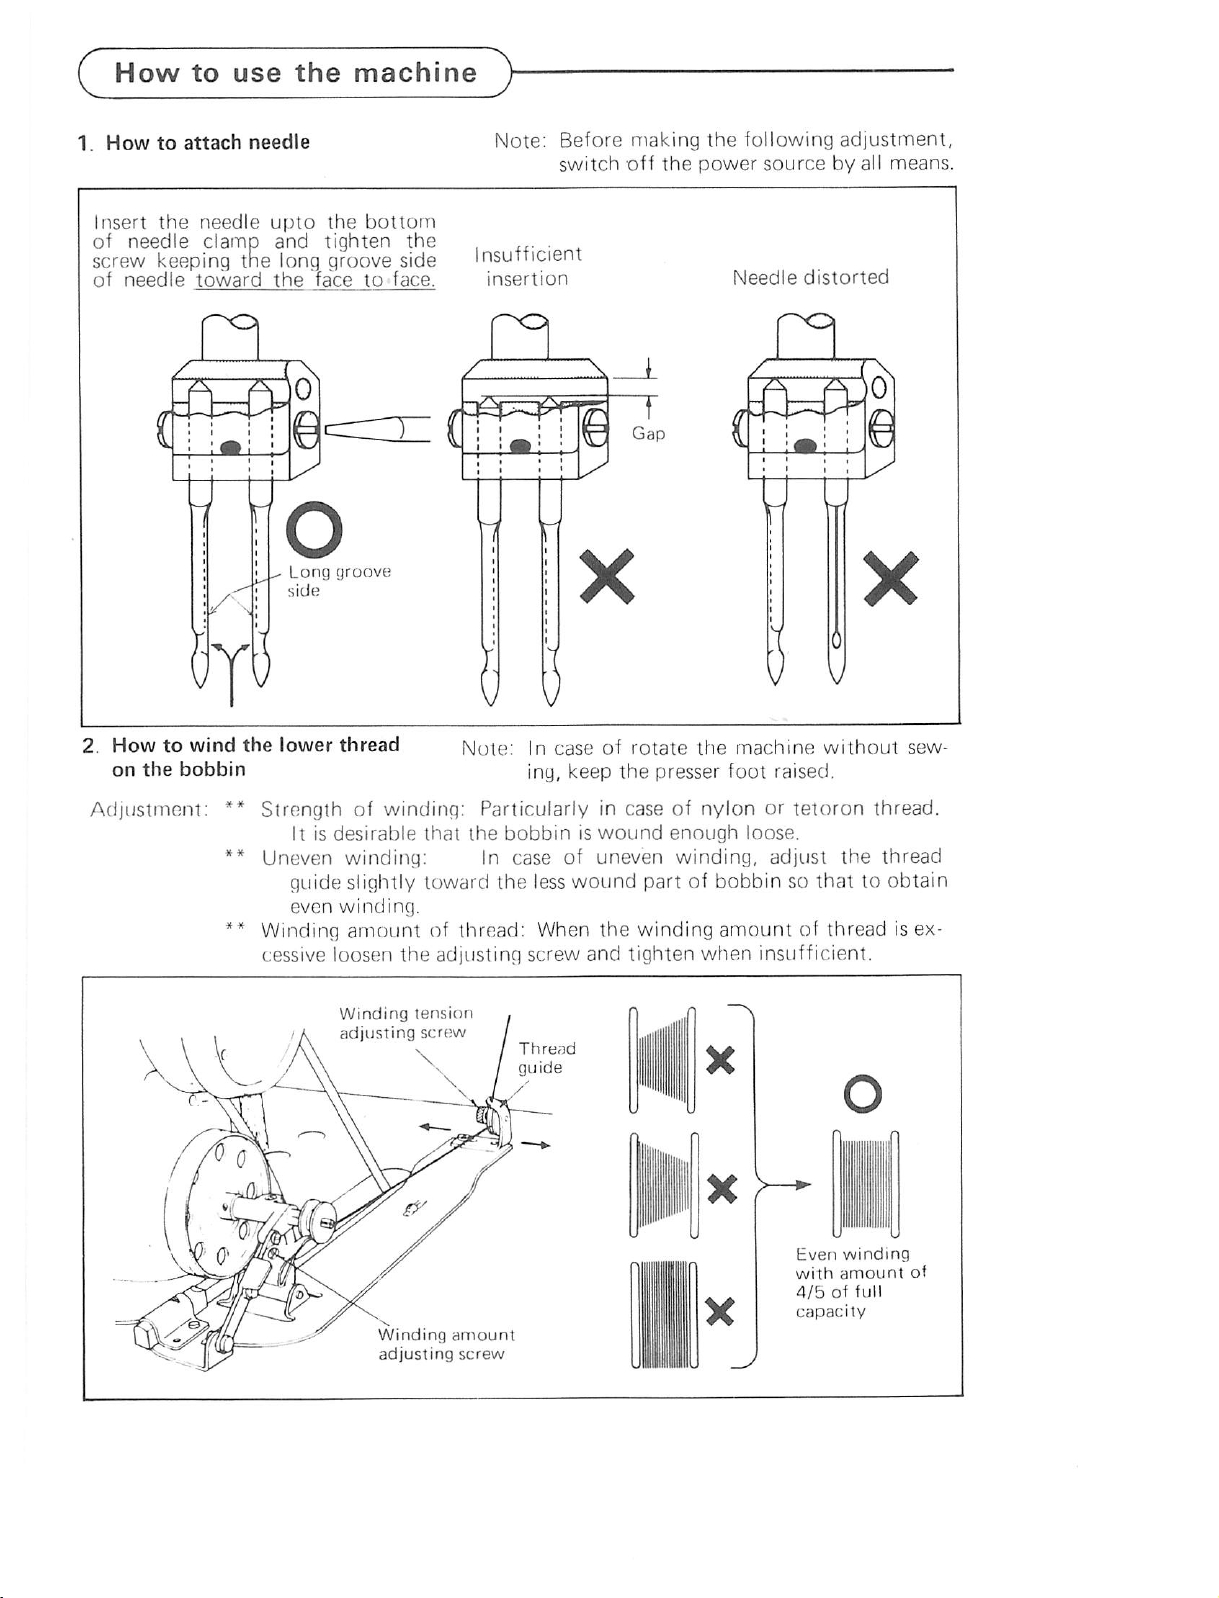
1.
Insert
of
screw
screw
of
How
needle
to
the
needle
keeoina
keeping
attach
needle
clamp
toward
needle
opto
the
and tighten the
the
lona
long
the
afoove
groove
face
the
bottom
side
side
to
face.
Note:
Insufficient
insertion
Before
switch
making
off
the
the
power
Needle
following
source
distorted
adjustment,
by
all
means.
2.
How
to
on
the
Adjustinent:
wind
the
lower
bobbin
**
Strength
It is
thread
of winding: Particularly in case of
desirable
that
Note:
In
case
ing,
the
bobbiniswound
keep
of
rotate
the
** Uneven winding: In case of uneven winding,
guide slightly toward
even
** Winding
cessive loosen
winding.
amount
Winding
adjusting
Winding
adjusting
of thread: When
the
tension
screw
\
the
less
adjusting screw
Thread
guide
amount
screw
wound
the
and
part of bobbin so
winding
tighten
the
machine
presser
foot
nylonortetoron
enough
loose.
amountofthread
when
without
raised.
adjust
the
thattoobtain
insufficient.
Even
winding
with
amount
4/5offull
capacity
sew
thread.
thread
is ex
of
Page 4

How
to
c
3.
Threading
machine
Note:
guide (A) should
be
above
spool.
4.
Adjustment
Stitching
the
bed
1)
2)
Caution:
while
To change
tacking,
lowest
pleted.
The
positioned
the
stitch
and
the
Pushing
turn
the
ward
you.
So
that
further
ning.
At
this
the
dial
the
marking
release
Fig.
the
position
use
the
machine
the
thread
just
thread
/gff
of
stitch
length
length
regulator
and
the
NEVER
machineisrunning.
the
depress
can
be
adjusted
push
button
balance
the
balance
the
time
on
push
push
the
set
the
on
push
wheel.
button
wheel
button
balance
the
Balance
the
button
arm
graduation of
depress
direction of feed for back
feed
reverse lever
until
back
]
with
on
the
down
slowly
goes
wheel
Wheel
the
tackiscom
down
and
shown
button
Mark
and
to
run
with
then
in
to
Raise
the
position
following
(R7)
r
Right
to
left
Howtoplace
into
the
Note:
thread
and
order.
(L7)
take-up
thread
the
(L5){L3')(L2'ML1)
1(L6)
R12)
Left
to
right
the
shuttle
In caseofplacing
the
shuttle
by
thread
in Fig.
hook
making
in
bobbin
hook,
correct
levertoits
upper
»(Detail)
Thread
the
place
winding
direction
highest
threadinthe
bobbin
the
toward
into
bobbin
the
shown
Stitch
o
regulating
button
^
Balance
wheel
Feed reverse lever
Winding
Slide
towardofthread
plate
(b;
Hook
shaft
Slide
plate
(K)
Hook
Shaft
Page 5

c
How
to
use
the
machine
>
Lower
threading
1) Lead the end of thread to the groove
of the shuttle hook 0 shown In F
and
2)
through
thread
Holding
by
left
wheel
thread
from
foot.
out.
slowly.
the
Thread
Bobbin
the
hand
and
holditon
underneath
the
end
and
horn
case
of
Pull
opener
the
turn
out
the
of
(2) . pull
upper
the
the
the
other
ig.
the
Thread
thread
balance
lower
side
presser
7.
Adjustment
Upper
**
**
For
thread,
tained
erating
The
is
lower
cx
The
threadistoo
of
thread
Upper
to
the
Upper
tension
special
by
of
thread
tensionofthe
too
loose,orthe
threadistight.
tensionofthe
the
lower
tension
thread
lower
thread
thread
regulating
fabric
the
desired tension can be ob
adjusting
range
of
tension
Proper
tight,orthe
threadistoo
is
adjusted
Stitch
upper
tensionofthe
upper
tension.
tensionisadjusted
thumb
sewing
the
tnread
with
strength
take-up
thread
tension
loose.
according
nut.
special
and
spring.
by
op
9.
Lower
Thread
thread
tension
screw
I
tension
Thread
tension
nut
Strenathen
Weaken
(0^
10.
Adjustment
on
presser
Pressure
on
of
foot
the
pressure
presser
footistobead
justed in accordance with materials to
be
sewn.
Pressure
Strong
regulating
Weak
screw
Page 6

^
Trouble&Repair
^
Skip
Irregular
stitch
Trouble
stitching
1)
*
*
2)
*
'
•
1}
2)
3)
1)
2)
•
•
•
Causes
Needle
Bent
Not
suited
thread
Wrong
needle
Insertion
enough
Needle
Attached
opposite
Upper
tension
Thread
spring
Lower
tension
Poor
Needle
Needle
Wrong
needle
Thread
for
the
size
attached
not
distorted
side
thread
too
take-up
too
thread
too
thread
bent
attached
too
needle
with
with
weak
weak
weak
big
Repairing
Change
Replace
of
Insert
Attach
the
what,
its
Correct
groove
right.
Turn
the
Turn
Turn
strengthen.
Change
Change
See
Either
needle.
the
needle
with
thread.
proper
properlyasper
the
needle
nylonortetoron
after
checkingofloop
the
attaching
side
toward
the
upper
righttostrengthen.
the
the
the
the
No.2of
change
thread
tension
bobbin
thread
needle
skip
with
with
new
one
accordingtothe
instruction
as its
hole
thread,
side,
the
left,
tension
studtothe
case
tension
with
better
with
new
stitching.
proper
one.
manual.
faces
side
distance
ways.
the
finish.)
attach
the
and
needle
concave
regulator
righttostrengthen.
screwtothe
quality
one.
one.
size
threadorwith
thickness
needle
keeping
side
thumb
right
(But,
hole
toward
nut
to
proper
using
some
its
the
to
Thread
Puckering
cuts
3)
Upper
thread
tension
*
Dust
deposit
between
discs.
*
Excessive
uneven
of
lower
on
the
*
*
*
1)
2)
case
Wrong
bobbin
Dust
deposit
bobbin
Damaged
tension
inserted
bobbin
bobbin
Needle&thread
too
big
Thread
(upperorlower
thread)
3)
Pressure
presser
too
strong
tension
or
winding
thread
case
thread
on
bobbin
into
case
for
fabric
tension
of
foot
Turn
the
tension
Remove
the
Rewinding correctly with
of
its full
capacity.
in
Remove
Change
Replace
clockwise
the
with
the
Change with
Adjust
spring,
the
adjusting
Weaken by
tension
bobbin
new
bobbin
when
proper
thread
turning
regulator
discs
case
nuttothe
and
clean
the
winding
and
cleanbybrush.
by
one.
correctly,sothattorotate
the
threadispulled-out.
size needle
and
thread for fabric.
tension by regulators
screwonthe
the
bobbin
regulating
thumb
lefttoweaken.
brush.
amountof4/5
the
thumb
nut,
case.
screwtothe
bobbin
take-up
left.
Page 7

Precaution
1.
Lubrication—1
Before
the
position,
of
oil
tank.
Oil
indicator
high
level
(DO
NOT
OVERFILL)
starting
point
before
to
arm,
'
operate
bed
and
starting
pour
oil
hook
upto
saddle
to
operate
Lubrication—2
The
volume
of
5-6
lubrications
drops.
2)
Bed
oil
tank
Oil
filler
hole
Oil
indicator
3) Hook saddle oil tank (left to right)
Oil
gauge
Oil
filler
hole
-VOi! gauge'
m
Open
slide
oiltoall
just
under
the
slide
plate.
ptate^and
wicks
apply
r,
fWi
2. Adjustment of rotating hook oil flow regulator
l\
Decrease
Adjusting
Hook Hook
^^1
saddle saddle
.
Nut
o \oj jo I o
Adjusting
screw
Page 8

Howtomount
rubber
with
The
vibration-preventing
prevent
thereby
the
machine.
cornersofthe
•
Achieve
and
of
facingtothe
is
achieved.
• Nail
down
as
shown
^
Specifications"^
vibration-preventing
table
the
machine
to
provide
Fit
tableasshown
spot
facing
13 mm
the
depthatthe
table. Be
faceAwhere
the
vibration-preventing
at
the
four
in Fig.
these
rubber
from
vibrating
smooth
rubber
of
operation
20
suretogive
corners
is used
at
in Fig.
mm
four
spot
of
the
and
the
four
radius
corners
smooth
facing
rubbers
table
of
to
5.5m/m
Vibration
preventing
Table
ISm/in
rubber
MODEL
Number
Speed
Rotary
Max.
Needle
Presser
Spaceatright
of
Needle
Reverse
Typeoftable
Gauge
Bed
stitch
needle
dimension
of
hook
bar
stroke
foot
lever
(Standard)
(Special)
needle
length
lift
hinges
DN-260-10
two
4,000
s.p.m.
regular
5mm((5
33.4mm(1-5/16")
7.2mm(9/32")
245mm(9-11/16")
l35x7(DPx7)
DN
3.2mm(1/8").
2.4mm(3/32"),
8mm(5/16"),
16.0mm(5/8"),
and
517mmx178mm
(20-3/8"x7")
size
s.p.i.)
Type
38.9mm(1-1/2")
DN-265-10
two
3,500
regular
same
33.4mm(1-5/16")
same
same same
/5'14./5'16
same
equipped
same
4.8mm(3/16"),and
4.0mm(5%32"),
9.5mm(3/8"),
12.7mm(1/2").
25.4mm(1").
same
s.p.m.
size
6.4mm
(1/4")
5.6mm{7/32"),
28.5mm(1-1/8"),
DN-260-22
two
3,000
s.p.m.
large
size
same
35mm(1-3/8")
same
same
same
same
same
but
not
for
38.0mm(1
same
DN-265-22
two
3,000
large
same
3bmm(
same
same
same
equipped
same
same
ailable
av
-
1/2")
same
s.p.m.
size
1-3/8")
A
MITSUBISHI
HEAD OFFICE
MITSUBISHI
OEMKI BLDG MARUNOUCMI
ELECTRIC
TOKYO
CORPORATION
'00
TELEX
J24532
CABLE
MElCO
TOKYO
PrintedinJapan
 Loading...