

Page 1

♦
MITSUBISHI
INDUSTRIAL
SEWING
MACHINE
Model
classes
M
Series
INSTRUCTION
FOR
OPERATION
MANUAL
Page 2
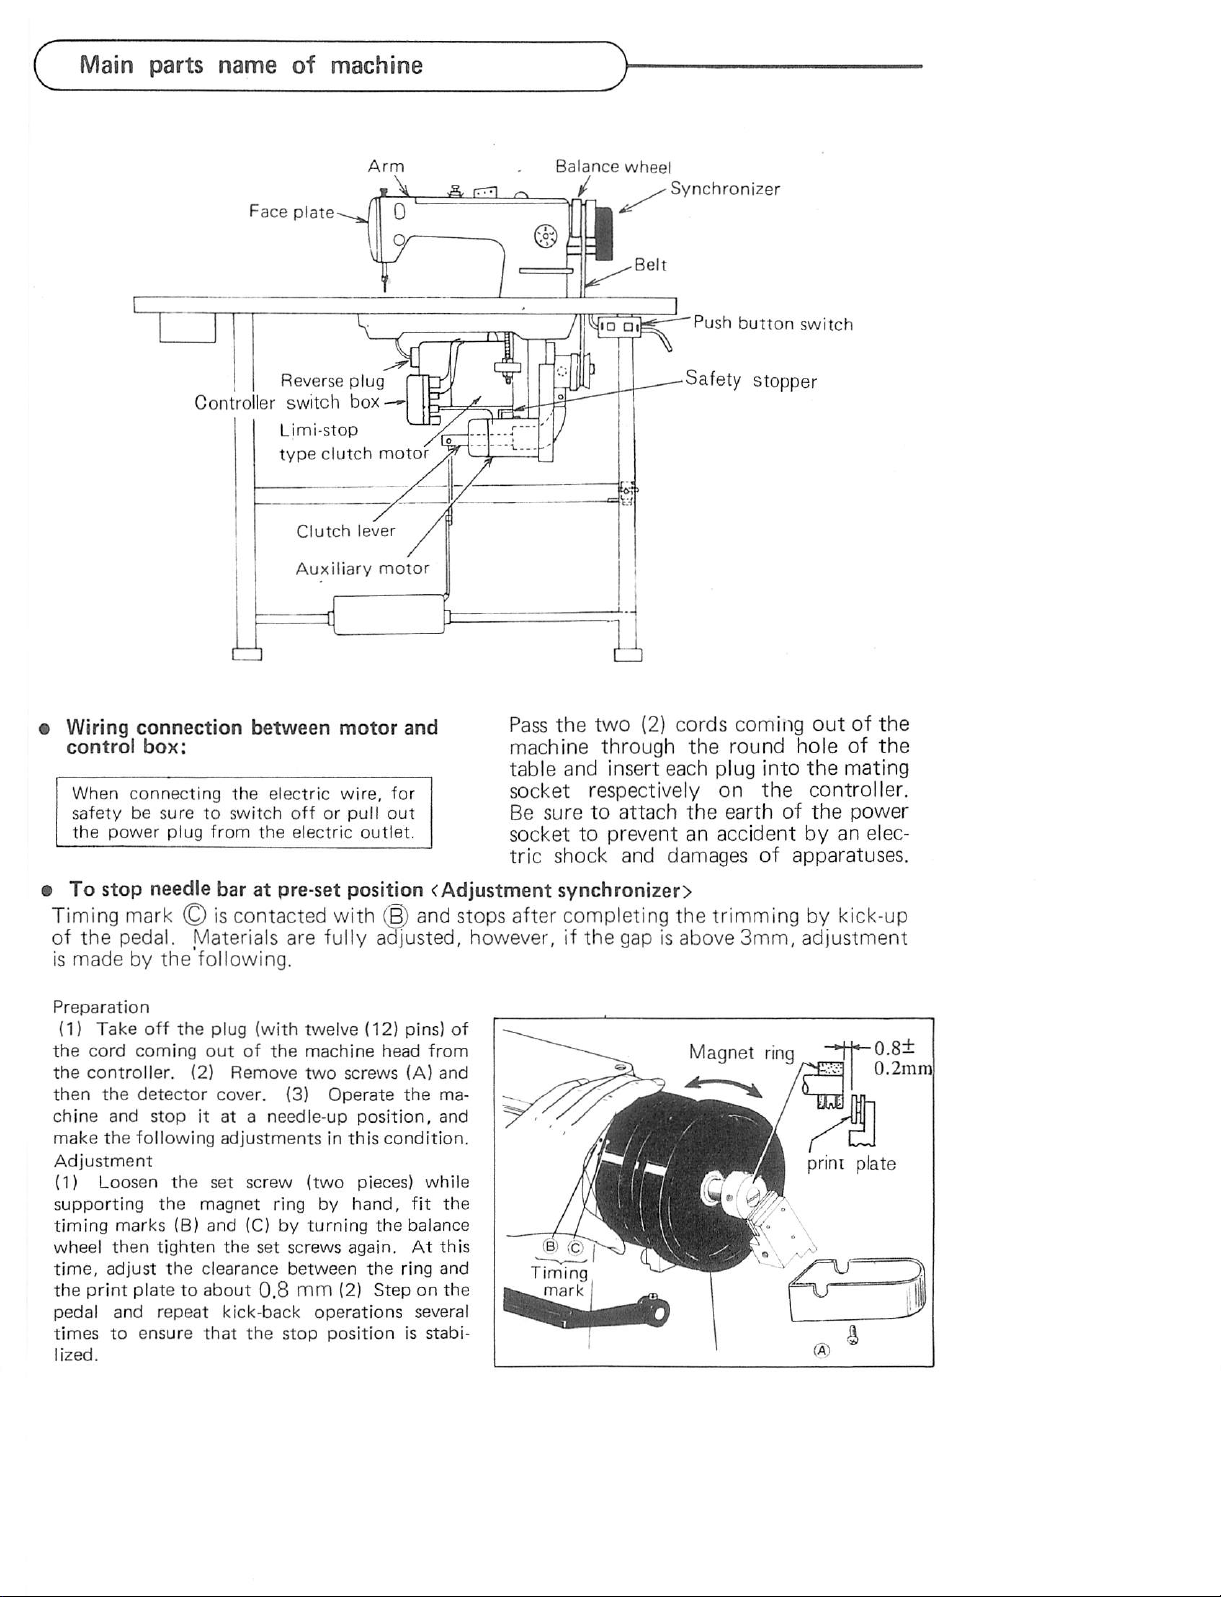
Main
parts
name
of
machine
Balance
/ /
Face
plate--.^Jll
I I
Reverse
Contrciier
switch
Limi-stop
type
clutch
Clutch
Auxiliary
\ Wiring connection between motor and Pass the two
control
When
When
safety
safety be sure to switch off or pull out Be
the
the power plug from the electric outlet.
I
To
Timing
of the
is
made by the'following.
box;
connecting
connecting
be
suretoswitch
power
stop
needle
mark©is
pedal.
the
electric
the
electric
plug
from
offorpull
the
electric
baratpre-set position
contacted
Materials
are
fully
0
plug
box-» :
^
motor
lever
y'
motor
machine
table
wire,
for
wire,
for socket respectively on
out
outlet.
sockettopreventanaccident
tric
cAdjustment
with(©and
a^usted,
stops
after
however,
through
and
insert
suretoattach
shock and damages of
synchronizer>
completing
ifthe
wheel
Synchronizer
•Safety
(2)
cords coming
the
each
plug
the
the
trimmingbykick-up
gapisabove
button
stopper
round
earth
3mm,
switch
out
hole
into
the
the
controller,
of
the
by
apparatuses.
adjustment
of the
of
the
mating
power
an elec
Preparation
(1)
Take
off
the
the
cord
the
controller.
then
the
chine
and
make
the
Adjustment
(1)
Loosen
supporting
timing
wheel
time,
the
pedal
times
lized.
marks
then
adjust
print
and
to
plug (with
coming
detector
following
platetoabout
ensure
stop
the
the
(B)
tighten
the
repeat
outofthe
(2)
Remove
cover.
itata
adjustmentsinthis
set
magnet
and
the
clearance
kick-back
that
twelve
machine
two
screws
(3)
Operate
needle-up
screw
(two
ring
by
(C)byturning
set
screws
between
0.8
mm
(2)
operations
the
stop
positionisstabi
(12) pins)
head
position,
condition.
pieces)
hand,
the
again.
the
Steponthe
from
(A)
the
while
fit
balance
At
ring
several
and
ma
and
the
this
and
of
Timing
_
mark
Magnet
^ ^
ring
nsm
print plate
*11*
0-8—
0.2mm
Page 3
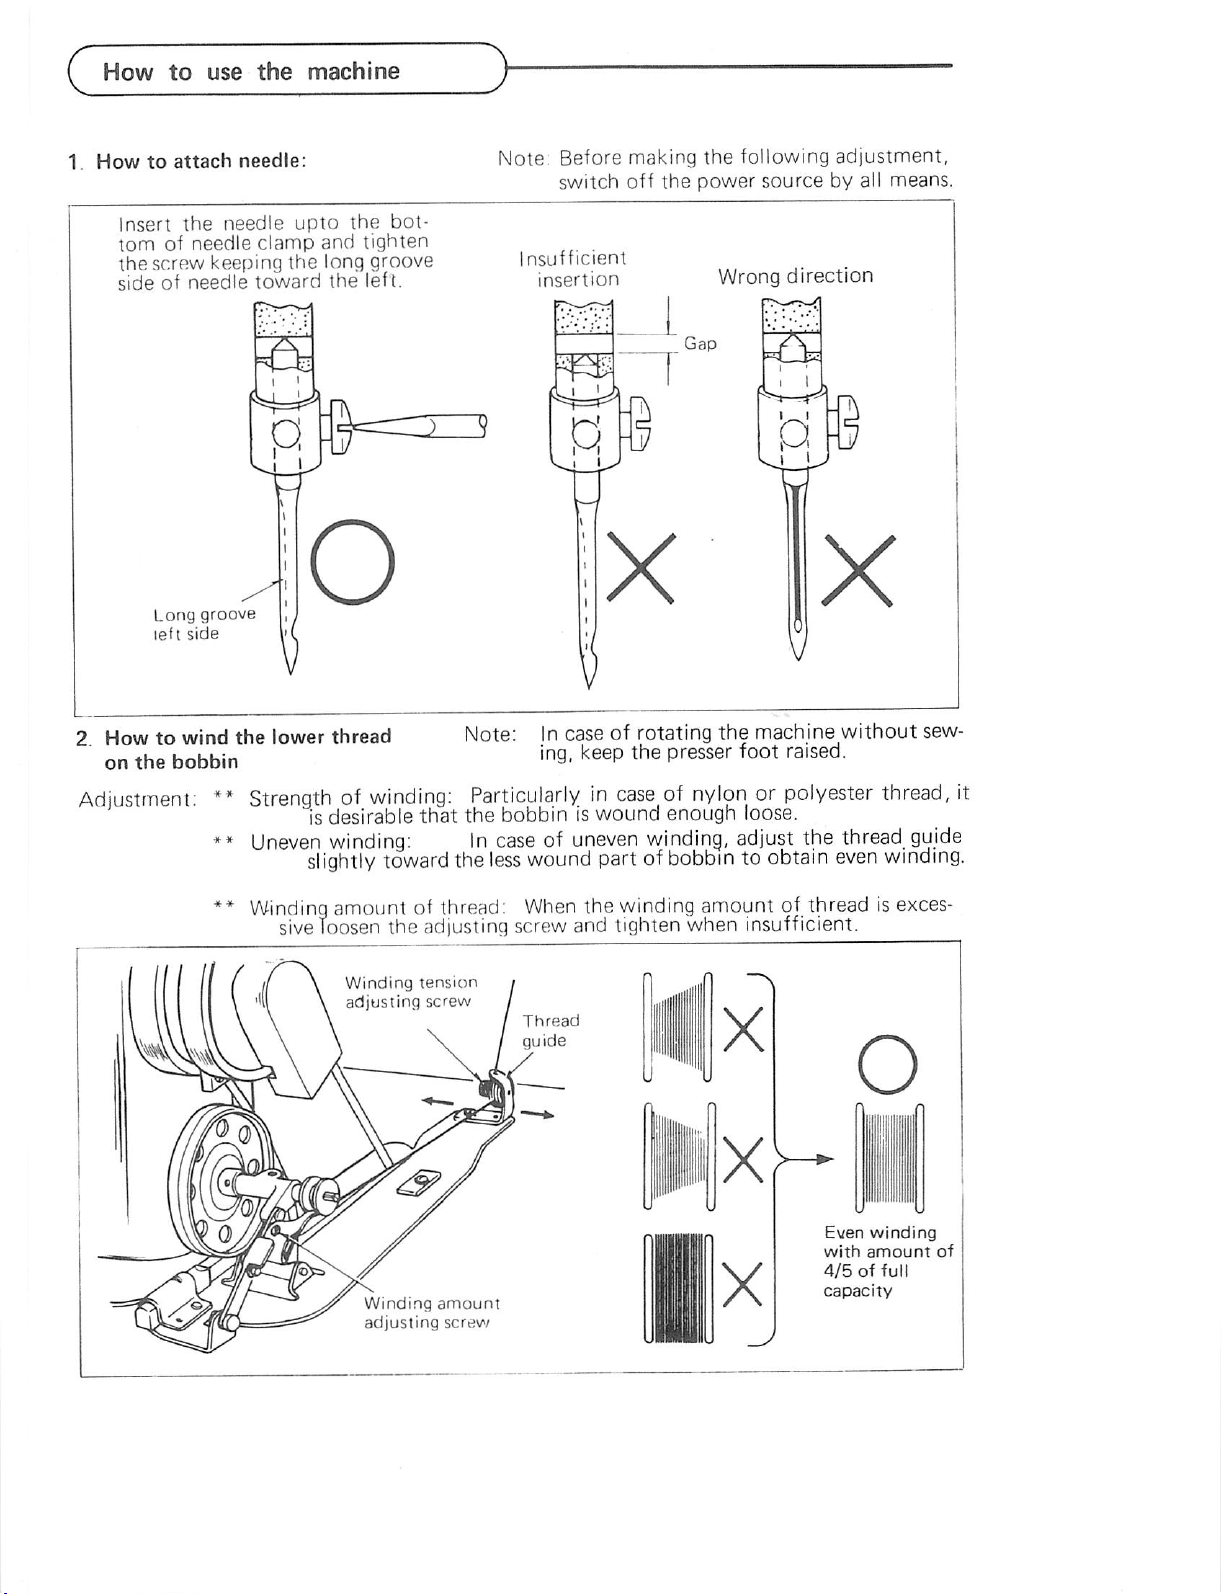
die
clamp
ing
the
toward
upto
and
long
the
the
tighten
groove
left.
bot-
ote.
Insuff
inse
sw
Be
g
direction
on
the
Adjustment;
bobbin
**
**
Strengt
Uneven
Wmdin
i
o
is
sli
i
Winding
adjusting
X
tension
screw
O
i
Winding
adjusting
amount
screw
Even
with
4/5offull
capacity
winding
amount
of
Page 4

Howtouse
3.
Threading
Raise
the
thread
est
position
in
the
following
and
the
take-up
thread
order.
machine
levertoits high
the
upper
t
thread
Thread
Thread
spring
take-up
^
Note:
5.
The
thread
istobe
Adjustmentofpressure
on
presser
Pressure on
guide (A) of
put
foot
the
presser
just
aboveofspool.
foot
justed in accordance with materials to be
sewn.
For
weight
rnaterial
(weaken)
Pressure regulating thumb screw
light
For
heavy
weight
material
istrenqthen]
cotton
is to be ad
stand
4.
Adjustmentofstitch
&
reverse
Note:
Stitch
adjusting
For
desired
reverse
by
stitch
length
Reverse
lever
lever
lever
dial
stitch
downward
length
\
Upper
guide
length
length,
adjusting
thread
and
dial.
push
adjust
the
•When
sewing is made all while
is pushed by pushing
the
touch
back
is
fixed,
the
push-button
the
push-button
reverse
lightly during sewing. When the hand is
set
free
sewing
from
turns
^ ^
the
into
push-button,
forward sewing.
reverse
^
1]
/if
j/ j
•
If^P
HI .
^Push-button
mm
Page 5

How
c
6.
Adjustment
thread
O
7.
Upper
**
Upper
the
*»
Upper
tension
For
thread,
tained
erating
Standard
ment
take-up
8.
Lower
Thread
spring--.
to
use
of
tension:
Well
balanced
stitch
thread
lower
special
the
by
range
adjust
of
thread
spring
thread
tension:
threadisadjusted
thread
thread
regulating
fabric
desired
adjusting
of
Light
weight
Medium
weight
tension
Strengthen
the
machine
y/
tension.
tensionisadjusted
thumb
sewing
tension
the
thread
tension:
Lower
canbeadjusted
screw
according
nut.
with
can
strength
take-up
Tension
strength
lOg
15-30g
Weaken
thread
A.
in
case
too
strongorlower
is
too
to
by
special
be
ob
and
op
spring.
Operating
range
6 —
7mm
6 —
8mm
tension
by
>
weak
upper
In
ff60,
sion
following.
pulled
the
the
tained.
thread
thread
case
the
can
out
bobbin
proper
is
^
of
cotton
regular
be
thread
checked
Hold
thread,
case
fall
tensionisob
the
In
case
too
weakorlower
is
too
thread
ten
as
the
end
of
and
if
slowly,
upper
strong
thread
Weaken
is
thread
Thread
tension
nut
Strengthen
Rotation
of
bobbin
9.
Adjustment
lubrication:
of
hook
oil
Adjustment ismade by means of oil lubri
cation
(0
ring (A). Regular
less
- 3
more)
amount;
1.5—2.0
Page 6

How
*10
The
(1)
stitching
speed stitching. (3)
down
up position after thread cutting.
• Speed adjustment is possible by
the amount of step-on between the above (1)
and (2). Direct kick-back
also ensures
11. Howtotreat
(1)
to
use
the
machine
Orderofpedal
(Operation
peda!
can be operatedinfour
Light
forward
(inching).
position.
startofstitching
Open
stitching
operation
of
machine)
step-on :
(2) Deep step-on :
Neutral
(4) Kick-back : Stop at
normal
thread cutting.
the
Low
: Stop at needle-
from
needle thread at
When starting to stitch
having
presser
IS
cloth
this
the
foot, the end of
stitched
together
case
start
upper thread held by
to
the
reverse
with lower thread. In
the
first
very slowly to prevent
of
the
thread
from
the
(4) steps.
speed
controlling
(2) to (4)
without
upper
sideofthe
2 - 3
stitches
the
slip
needle
High
needle-
thread
out
hole.
Upper
Upper
Lower
Upper
thread
thread
thread
thread
(2) When upper thread held under pres
ser
foot
the
mains
on
the
endofupper
surfaceofcloth.
thread
re
For
this way of stitch, it is advisable to
pull out the sewnfabric to the other
side.
12.
Adjustment
taif
for
length
of the
thread
In case the length of the upper thread
tail is changed according to the stitching
condition, adjustment can be
pretension
spring pressure.
made
by
Tighten the tension; Short thread tail
Loosen
• In case of using the cotton thread and
the
tension:
Long
thread
tail
the thick polyester thread, change the
pretension spring with the thick one.
• In case of making
the
upper thread
further lengthen, make the thread
guide
operate.
Howtooperate
Take
1.
the
presser bar lifter.
2.
Attach
off
the
thread
the
face plate and pull up
the
wire
guide
in
the
accessory
(Hook the wire in holes of the bell
crank
shown
and
in Fig.)
the
thread
guide
as
Insideofface
Bell
crank
Wire
Pretension
\
plate
'Thread
guide
Page 7

Precaution before starting to operate
1.
Lubrication—1
Before starting to operate pour oil up
to
the
operating
position
the oil volume periodically, and in
case
oil
the
the
3
While
essary
lubrication
dow.
volume
position
position
Knee
Condition
operating the machine it is nec
to
you
(A)ofoil
are
requestedtocheck
would
tank.
come
(B) replenish oil uo to
(A).
lift
pin
of
oil
lubrication
check
through
the
the
condition
oil
check
less
While
than
of
oil
win
2
Lubrication—2
When starting to sew initially and
after
kept
using it is essential to oil
idle for a long
through
the
oil
holesinthe
time
without
enough
red
color
ed rubber plug.
r Right side
Oil
check
Periodical
*
Remove
plate
dog.
window
and
cleaning
the
clean
f'
I
the
throat
feed
^Remove
and
clean
the
*Lay
head
hook.
throat
the
down
plate
feed dog.
the
and
clean
machine
the
The
filterisremoved
pulling
after
machine
the
the
laying
filter.
head.
clip
down
by
spring
the
Clean
Feed
dog
base
Page 8

Q
Specifications
MODEL
Submodel*
For
Speed (Max.)
MaX.
stitch
Needle
bar
Pressure-
foot
clearance
Needle
type
Light to
weight
4(XX)
lengtit
stroke
jw/o I
ForWiHand
! .
For W I
w/
Organ
Singer
Schmetz
Knee
h
1 j
Knee
Hand
5mm(5
33.0mm
lifterf9mm
'
7.2mm
lifteri8mm
j 6mm(15/64")
-IDBXl
14:25Nm90
DB-189-10
-WM:-WBM;-FWM:-FWBM
medium
materil
s.p.m.
s.p.i.)
(1-19/64")
j
I
.4.
;
40(X)
14 mm (6 s.p.i.)
(23/64")
(9/32")
(5/16")
#14
SY1513#14
DB-189-11
Light
weight
material
s.p.m.
30.5mm
6mm
4mm
5mm
3mm
(15/64")
(5/32")
(3/16")
(1/8")
DBXl
SY1513
14:25Nm75
(1-3/16")
#-11
#11
OB-189-12
-M:-BM
Medium to heavy : Heavy weight
material
weight
3500
s.p.m.
5 mm (5 s.p.i.)
35.0mm (1-3/8") | 35.0mm
9mm
7.2mm
DBXl
#21
SY2254
14:25
Nm
#21
130
(23/64")
(9/32")
j
DB-189-13
material,
3500
s.p.m.
5 mm (5 s.p.i.)
DBXl
#23
SY2254
14:25
#23
Nm
JEANS
160
Notes:
Cautions
J
B:
wftouch-back
2. Needle type
:
1.
Please
case
The
deformation.
be
for
exclusive
bobbins
The
device.F:w.Ifloating
(Organ
sure
for
specification
needles
to
use
the
usetothe
use shall beofgood
foot.
are
standard)
needle
automatic
may
plate,
condition
partially changed
W:wjwiper
hook
under
and
trimer.
without
device.
bobbin
any
for
improvement.
Amitsubishi
HEAD
Office
f/iTSuB'SHi
DENK
electric
BlOG
VIAPuNOuCHi
TOKVQ
corporation
100
TElEX
j?4532
CABLE
WT—00640X02
VElCO
^QKYO
printedinJapan
 Loading...