

Mitsubishi Electric CX Owner's Manual
CX SERIES
Owner’s Handbook
PACT
OM
C

CX SERIES
OWNER’S HANDBOOK
ESKTOP
D
(KL) E
DITION
Microsoft, MS-DOS, Windows and Windows NT are registered trademarks of
Microsoft Corporation in the US and other countries.LANDesk is a registered
trademark of Intel Corporation.
LANDesk is a registered trademark of Intel Corporation.
Other trademarks mentioned within this document and not listed above are the
properties of their respective owners.
Information contained in this document is subject to change without notice and does
not represent a commitment on the part of Apricot Computers Limited. Any software
described in this manual is furnished under a license agreement. The software may be
used or copied only in accordance with the terms of this agreement. It is against the law
to copy any disk supplied for any purpose other than the purchaser’s personal use.
No part of this manual may be reproduced or transmitted in any form or by any means
electronic or mechanical including photocopying and recording, for any purpose,
without the express written permission of the publishers.
Copyright © Apricot Computers Limited 1998. All rights reserved.
Published by:
Apricot Computers Limited
3500 Parkside
Birmingham Business Park
Birmingham, England
B37 7YS
http://www.mitsubishi-computers.com
Printed in the United Kingdom

SAFETY AND REGULATORY NOTICES
General
Electrical
The system employs a safety ground
Das System benötigt aus Sicherheitsgründen einen Masseanschluß
Le système doit être mis à la terre
Dette system bruger en sikkerhedsjordforbindelse
Apparaten skall anslutas till jordat uttag när den anslutas till ett nätverk
The system unit AC power cord is its ‘disconnect device’. Ensure that the system
unit is positioned close to the AC power outlet and that the plug is easily accessible.
The power cord packed with the computer complies with the safety standards
applicable in the country in which it is first sold. Use only this power cord. Do not
substitute a power cord from any other equipment.
To prevent fire and electric shock, do not expose any part of the computer to rain or
moisture. Turn off the computer and unplug all power cords before moving or
cleaning the system unit, or removing the system unit top cover.
Battery
This product contains a lithium battery.
Do not use a metal or other conductive implement to remove the battery. If a shortcircuit is made between its positive and negative terminals the battery may explode.
Replace a discharged battery with one of the same type; another type may explode
or ignite. Follow the instructions contained in the Owner’s Handbook to replace the
battery. Dispose of a discharged battery promptly and in accordance with the
battery manufacturer’s recommended instructions. Do not recharge, disassemble or
incinerate the discharged battery. Keep away from children.
Laser products
Any CD-ROM drive fitted in this system is classified as a CLASS 1 LASER
PRODUCT according to IEC825 Radiation Safety of Laser Products (Equipment
Classification: Requirements and User's Guide). The CLASS 1 LASER PRODUCT
label is located on the underside of the system unit.
The CD-ROM drive contains a laser system which is harmful to the eyes if exposed.
Do not attempt to disassemble the CD-ROM drive; if a fault occurs, call an
authorised maintainer.
Use the CD-ROM drive only as described in this manual. Failure to do so may
result in exposure to hazardous radiation.
NOTICES/i

Safety & Regulatory Notices
Ergonomic
When positioning the system unit, monitor and keyboard, take into account any
local or national regulations relating to ergonomic requirements.
Anti-static precautions
Warning
Static electricity can cause permanent damage to electronic components. You
should be aware of this risk, and take precautions against the discharge of static
electricity into the computer.
The computer is at risk from static discharge while the top cover is off. This is
because the electronic components of the motherboard are exposed. Memory
modules, expansion cards and replacement processors are examples of electrostatic
sensitive devices (ESSDs).
All work that involves removing the cover must be done in an area completely free
of static electricity. We recommend using a Special Handling Area (SHA) as defined
by EN 100015-1: 1992. This means that working surfaces, floor coverings and
chairs must be connected to a common earth reference point, and you should wear
an earthed wrist strap and anti-static clothing. It is also a good idea to use an ionizer
or humidifier to remove static from the air.
When installing any upgrade, be sure you understand what the installation
procedure involves before you start. This will enable you to plan your work, and so
minimise the amount of time that sensitive components are exposed.
Do not remove the system unit cover, nor the anti-static bag or wrapping of any
upgrade, until you need to.
Handle static-sensitive items with extreme care. Hold expansion cards and add-on
components only by their edges, avoiding their electrical contacts. Never touch the
components or electrical contacts on the motherboard or on expansion cards. In
general, do not handle static-sensitive items unnecessarily.
Keep all conductive material, and food and drink, away from your work area and the
open computer.
Thermalcote bonding compound
The thermal bonding compound used between the system processor and its heat
sink can cause skin irritation and stain clothing. Avoid prolonged or repeated
contact with skin. Wash thoroughly with soap and water after handling. Avoid
contact with eyes and inhalation of fumes. Do not ingest.
NOTICES/ii

Maintenance
Transporting
Safety & Regulatory Notices
Switch off and disconnect all cables before attempting to clean the computer.
Do not use sprays, solvents or abrasives that might damage the system unit surface.
Do not use cleaning fluids or sprays near air vents, ports, or the diskette and CDROM drives.
Occasionally wipe the system unit with a soft, slightly damp, lint-free cloth.
Occasionally wipe over the air vents on the rear and sides of the system unit. Dust
and fluff can block the vents and limit the airflow.
Occasionally clean the diskette and CD-ROM drives using a proprietary head
cleaner.
Occasionally wipe the monitor with a soft, slightly damp, lint-free cloth. It is best to
use anti-static glass cleaner on the monitor screen, but do not spray glass cleaner
directly onto the screen; it could run down inside the case and damage the circuitry.
Use common sense when handling the computer; hard disks in particular can be
damaged if the computer is dropped or handled roughly. As a precaution, back up
the contents of the hard disks to tape or diskettes before moving the computer.
Switch off and disconnect all cables before attempting to move the computer,
particularly do not try to move the computer while it is plugged into the AC power
supply.
When lifting and carrying the computer, use the metal sides of the system unit and
never attempt to lift the system unit with a monitor still on top.
If you need to transport the computer any great distance, use the original packing
materials.
If you are planning to use the computer in another country, it may not be suitable,
check with your supplier, particularly on the availability of the correct AC power
cords.
Note
Any existing maintenance or warranty agreement may not be supportable in another
country. The system may have to be returned to the supplier.
NOTICES/iii

Safety & Regulatory Notices
Legalities
This equipment complies with the relevant clauses of the following European
Directives (and all subsequent amendments):
Low Voltage Directive 73/23/EEC
EMC Directive 89/336/EEC
Telecommunications Directive 91/263/EEC
CE Marking Directive 93/68/EEC
Important
This system, when supplied, complies with the CE Marking Directive and its strict
legal requirements. Use only parts tested and approved by Mitsubishi Electric PC
Division. All expansion cards, drives and peripherals should carry the CE mark.
Standards
Safety
This product complies with the International Safety Standard IEC950 and
additional requirements thereto to comply with European Safety Standard
EN60950.
Electro-magnetic Compatibility (EMC)
This product complies with the following European EMC standards:
Emissions EN50022 Class B
Immunity EN50082-1
This product also complies with the following International EMC standards:
VCCI (Japan) Class B
Notes
NOTICES/iv
All interconnecting cables (for example, signal and communication cables) should
be less than 2 metres in length. If cable extensions are used, ensure adequate earth
connections are provided and screened cables are used.
If any metal casework components are removed, during upgrade work for example,
ensure that all metal parts are correctly re-assembled and all internal and external
screws are re-fitted and correctly tightened.
This system has an on-board network connection. If you add an additional network
card, any attempt to use two network connections simultaneously may result in the
product no longer being compliant with the CE Marking Directive. Consult your
Mitsubishi Electric PC dealer for up to date information.

Safety & Regulatory Notices
125V
Power Connection
Typical AC plugs
250V
E
LN
250V
E
NL
E
N
L
250V
L
N
E
BS1363A SHUCO NEMA 5-15P SRAF 1962/DB16/87 ASE 1011
U. K. Austria Belgium Taiwan Denmark Switzerland
Finland France Thailand
Italy Germany Japan
Sweden Norway USA
Holland Canada
Checking the AC power supply
When this product is delivered, it is ready for the commercial AC power supply
generally available in the country in which it is first sold. It has been set for the
correct voltage range, and is supplied with an AC power cord and plug which
comply with the relevant safety standards.
Before using the product in a country other than that in which it was originally
sold, you must check the voltage and frequency of that country’s AC power supply,
and the type of power cord required there. Check the power rating labels on the rear
of the computer’s system unit and its monitor to ensure that they are compatible
with the AC power supply.
The computer can function within two alternative AC power supply ranges,
according to the position of the voltage selection switch on the rear of the system
unit:
250V
Switch setting AC power supply (voltage and frequency)
115 100 - 120 volt AC, 50 - 60 Hz
230 220 - 240 volt AC, 50 - 60 Hz
The voltage setting of the monitor must always be the same as the voltage setting of the
system unit. See the User’s Guide that accompanies the monitor or consult your
supplier to find out how to change the voltage setting.
Caution
It is imperative that the computer is set to the correct voltage range before use. If not,
the machine may be irreparably damaged.
NOTICES/v

Safety & Regulatory Notices
Connecting to the AC power supply
Important
Any peripheral equipment that requires an AC power cord must be earthed.
Use the following guidance to connect the components together. It is important
that you take each step in the order indicated.
1. Before connecting any components, ensure that the AC power supply is
switched off or disconnected, and that the system unit, the monitor, and any
peripherals are turned off.
2. Connect the component signal cables to their respective ports on the system
unit: keyboard, mouse, monitor, audio (where appropriate) and any other
peripherals.
Where appropriate, connect the computer to the network.
3. Connect the component power cords: system unit, monitor to system, plus
any other peripherals to nearby, grounded AC power outlets. (Never
substitute a power cord from any other appliance). Then switch on or
connect the AC power supply.
4. Turn on the system unit first, then the monitor, then other peripherals.
Warning
The Owners Handbook contains procedures which require opening of the system unit.
Ensure all cables (including modem and network cables) are disconnected before the
system unit is opened
.
Power Cable Connections - UK ONLY
This equipment is supplied with an AC power cord that has a non-removable
moulded plug.
Always replace the fuse with one of the same type and rating which is BSI or ASTA
approved to BS1362. Always refit the fuse cover, never use the plug with the fuse
cover omitted.
External Speakers (where supplied)
Always switch off or disconnect the AC supply before disconnecting any of the
speaker leads, whether audio or power. Disconnect the AC supply from the speaker
power unit when not in use for any period of time.
To prevent the risk of electric shock, do not remove speaker covers.
Connecting the speaker power cord to any other cords or joining cords together can
cause fire and risk of electric shock.
NOTICES/vi

CONTENTS
1 Welcome
Unpacking 1/1
Pictorial guide to the system unit 1/2
General advice 1/6
Connecting the components 1/7
2 Getting Started
Turning on the PC 2/1
Power management 2/2
Power management and Windows 2/2
Shutting down the PC 2/4
Using the computer for the first time 2/5
Contents
Backing-up the pre-installed software 2/5
Improving your display settings 2/6
If your hard disk is larger than 2 gigabytes 2/7
3 Diskettes and CDs
Diskette drive 3/1
CD-ROM drive (optional) 3/3
4 Expansion Cards
Configuring the card 4/2
Installing the card 4/5
Reserving ISA legacy resources 4/6
Telling Windows about the new hardware 4/7
OWNER’S HANDBOOK I

Contents
5 Motherboard
Features summary 5/1
Components 5/2
Microprocessor 5/3
Second level cache memory 5/3
PCI enhanced IDE interface 5/3
Input/Output (I/O) controller 5/3
Real-Time clock 5/4
Universal Serial Bus (USB) support 5/4
On-board video graphics controller 5/5
Additional A.G.P. support 5/6
BIOS 5/7
PCI auto configuration 5/7
IDE auto configuration 5/7
ISA plug and play capability 5/7
Security passwords 5/8
Power management 5/8
Hardware monitor 5/10
Audio subsystem (Optional) 5/10
Upgrading components 5/12
The processor 5/12
How to install memory 5/15
How to replace the CMOS battery 5/18
How to clear the passwords 5/19
Motherboard resources 5/20
Memory map 5/20
II OWNER’S HANDBOOK

DMA channels 5/20
I/O map 5/20
PCI configuration space map (figures in hex) 5/22
Interrupts 5/22
6 Drive Upgrades
Configuring an E-IDE drive 6/1
Installing a drive 6/2
Removing the drive assembly 6/2
Fitting a 3.5" drive 6/3
Fitting a 5.25" drive 6/4
Reassembling the system 6/4
Configuring new drives 6/5
Partitioning and formatting hard disk drives 6/5
7 BIOS Setup & POST
Contents
Using the Setup utility 7/2
Setup modes 7/2
Starting Setup 7/3
If BIOS Setup starts on its own 7/3
Setup menus 7/4
Function keys 7/4
Maintenance menus 7/5
Main menu 7/6
Advanced menu 7/7
IDE configuration 7/11
Floppy options 7/13
OWNER’S HANDBOOK III

Contents
DMI Event Logging 7/13
Security menu 7/16
Power menu 7/17
Boot menu 7/18
Exit menu 7/20
Upgrading the BIOS 7/21
Power-on self-test 7/24
Recoverable POST errors 7/24
Terminal POST errors and beep codes 7/27
8 Troubleshooting
Problems when starting 8/1
If you suspect a blown fuse 8/1
Power-on self-test (POST) 8/2
Failure to boot 8/2
Common problems 8/3
Equipment Log
IV OWNER’S HANDBOOK

1WELCOME
This chapter gives you a quick tour of your new CX Personal
Computer. As soon as you’ve unpacked the components and
assembled them, you should progress to the next chapter, Getting
Started.
Throughout this manual ‘Windows’ means your pre-installed copy
of one of Microsoft’s Windows family of operating systems, unless
otherwise stated. The family currently comprises Windows for
Workgroups 3.11, Windows 95, Windows 98, and Windows NT.
Warning
Read the Safety & Regulatory Notices section at the start of this manual
before using the computer for the first time.
Unpacking
After unpacking your computer, keep all the cartons, boxes and
packaging materials; you will need them again if you have to
transport the computer elsewhere.
Welcome
Use the page at the end of this manual to make a note of the
manufacturer’s data recorded on the various components (product
codes, serial numbers, etc.). A service engineer may need this
information if the computer develops a fault.
OWNER’S HANDBOOK 1/1
Welcome
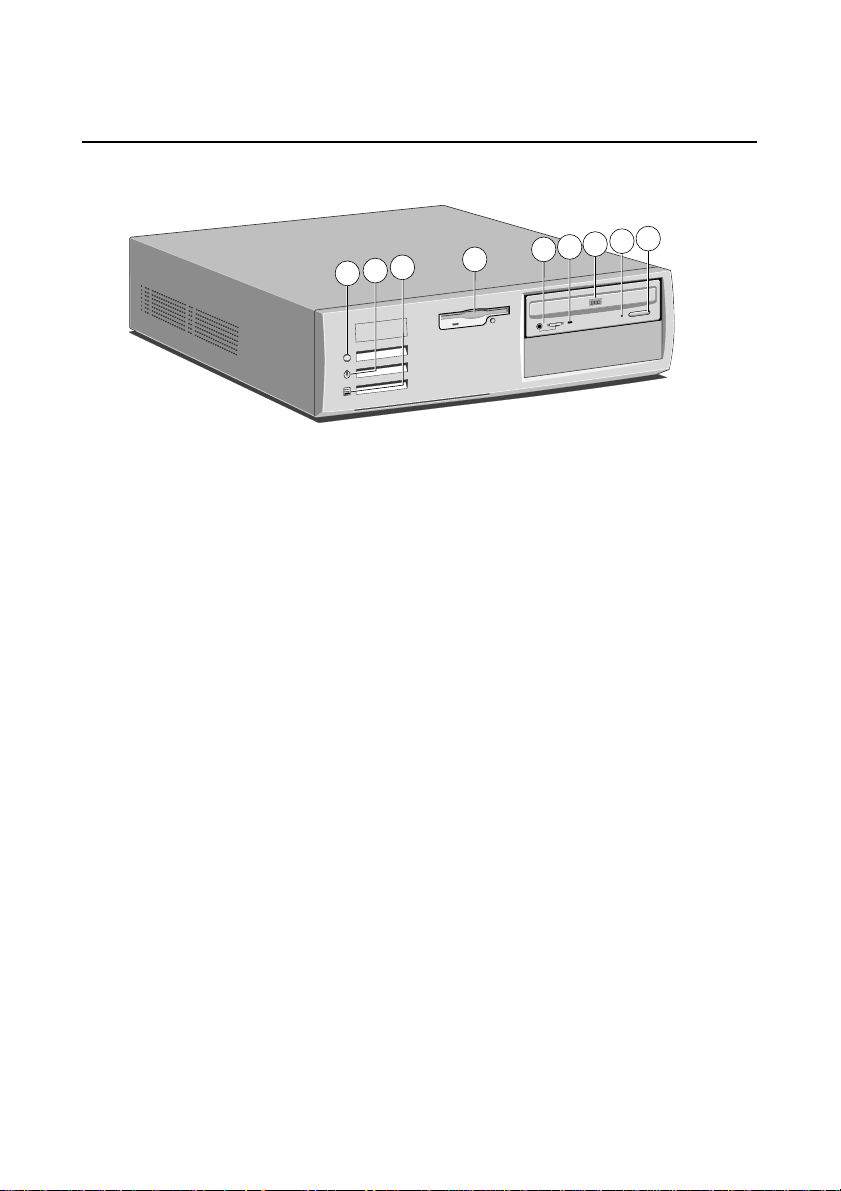
Pictorial guide to the system unit
7
8
9
6
1
2
3
4
5
T
C
A
P
M
O
C
1CD E
button 6 Diskette drive
JECT
2 CD emergency eject hole 7 Hard disk activity indicator
3 CD-ROM disc drawer (platter) 8 Power Mode indicator
4 CD activity indicator 9 P
OWER
button
5 CD phono jack & volume control
Use the P
button to turn on the computer and change power
OWER
modes. The Power Mode light on the button changes colour to
show the current mode. See the Getting Started chapter for more
information.
Not all systems are fitted with a CD-ROM drive.
1/2 OWNER’S HANDBOOK
19
18
17
16
15
14
1
2
3
4
5
6
7
8
9
10
11
12
13
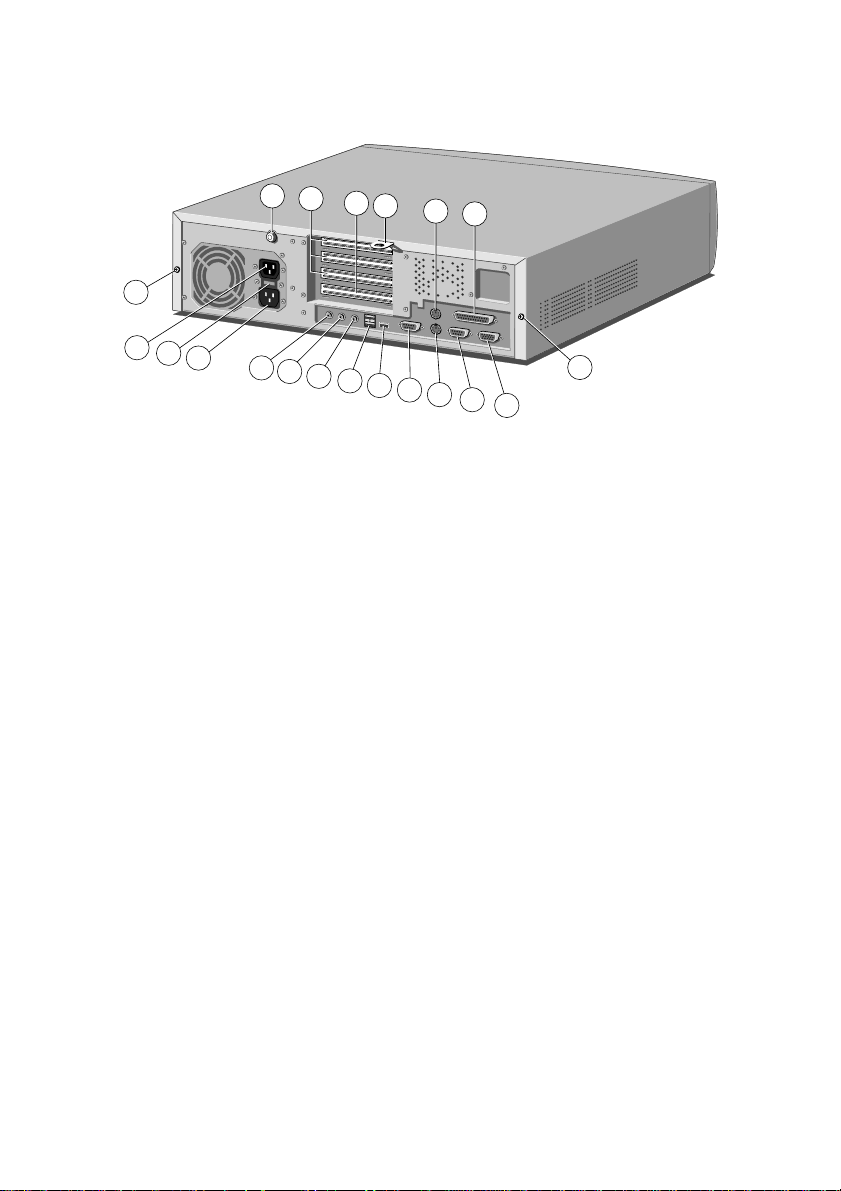
1
1Casing screws for the top cover 8 RJ-45 network port
2AC power outlet for monitor 9 USB port
3 Voltage selection switch 10 Serial port 2
4AC power inlet from AC supply 11 Keyboard port
5 Audio input socket 12 Serial (modem) port 1
6 Microphone socket 13 Monitor port
7 Audio output socket for 14 Parallel (printer) port
headphones or ‘active’ speakers 15 Mouse port
(ones which connect to mains 16 Security loop for cable or padlock
power) only. Do not connect 17 ISA or PCI slot
‘passive’ (non-amplified) speakers, 18 3 PCI slots
as damage to the motherboard 19 Caselock
may occur.
Welcome
OWNER’S HANDBOOK 1/3

Welcome
To remove the system unit cover
1. Shut down the computer and turn off the monitor.
2. If your AC power outlets have switches, set them to their off
positions.
3. Unplug all power cords from the rear of the system unit.
4. Turn the caselock key to the unlocked position.
5. Unfasten the two casing screws.
6. Slide the top cover rearwards slightly, then lift it off.
Refitting is the reverse of removal. Take effective anti-static
precautions while the top cover is off, as explained in the Safety &
Regulatory Notices at the start of this manual.
Some models incorporate a security feature that can detect if the top
cover has been removed while the computer was turned off.
Optional DMI software such as Intel’s LANDesk Client Manager is
required to operate this feature. Contact your Mitsubishi Electric
supplier for more details.
See the Motherboard chapter for more information about the
system’s motherboard.
1/4 OWNER’S HANDBOOK
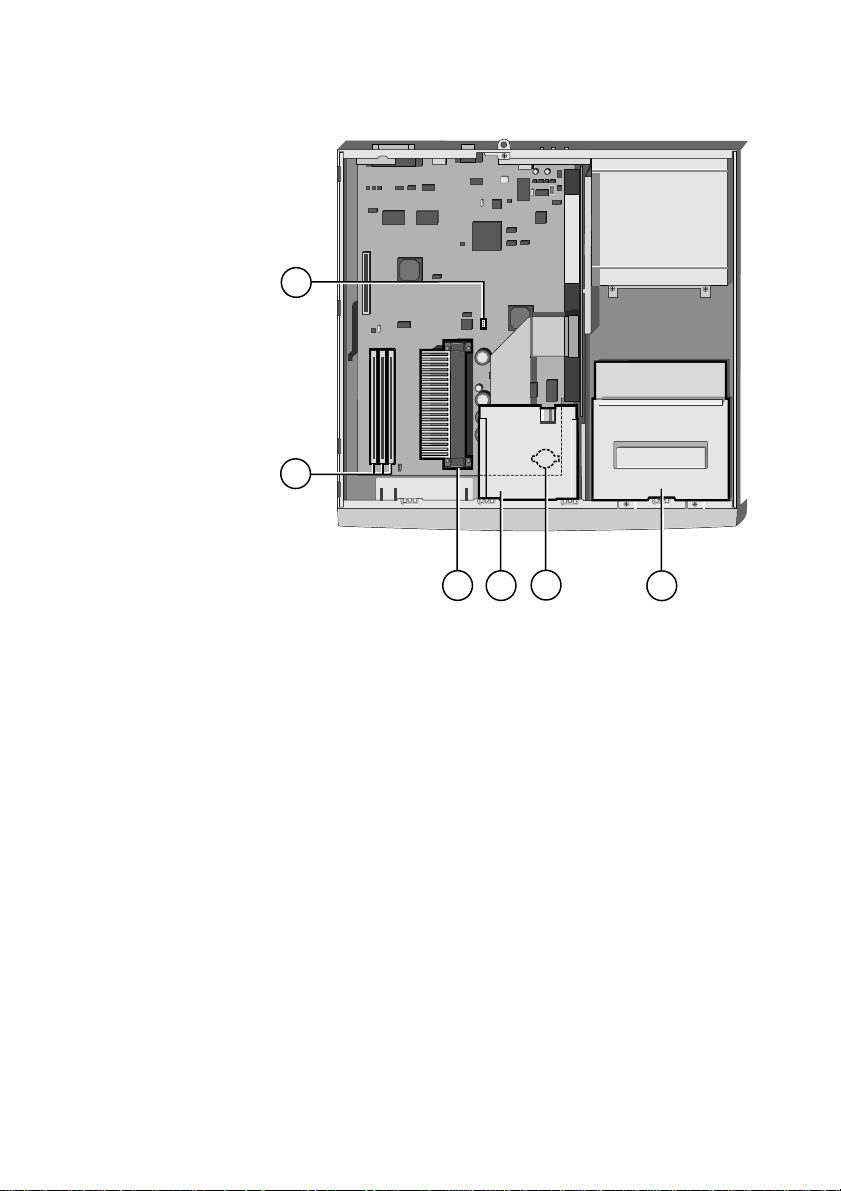
Welcome
1
2
3
1 Configuration jumper
2 DIMM sockets for system memory upgrades
3 Processor socket; Slot 1.
4 Diskette drive
5 Battery
6 Drive assembly, with optional CD-ROM drive.
5
4
OWNER’S HANDBOOK 1/5
6

Welcome
General advice
This computer is designed to be used in a normal home or office
environment. Here are a few hints for choosing a suitable site:
Place the system unit flat on a sturdy, level surface, free from
vibration.
Site the computer away from moisture, direct sunlight, and
extremes of heat and cold. Avoid situations in which the
surrounding temperature or humidity may change rapidly.
When the computer is in use, the temperature should be
between 10 and 35
o
C and humidity between 20% and 80%
(with no condensation).
When positioning the system unit, monitor and keyboard, take
into account any local or national regulations relating to
ergonomic requirements. For example, you should ensure that
little or no light is reflected off the monitor screen as glare, and
that the keyboard is placed in a comfortable position for
typing.
Give the computer plenty of room so that air can circulate on
all sides. Air is drawn into the system unit through vents at the
front and on the left-hand side, and expelled through the vent
on the back. Ensure that these vents are never obstructed.
Do not allow any cables, particularly power cords, to trail across the
floor where people walking past can snag them.
Warning
The computer uses the system unit AC power cord as its ‘disconnect
device’. Ensure that the system unit is positioned close to the AC power
outlet, and that the plug is easily accessible.
To prevent fire and electric shock, do not expose any part of the system
unit to rain or moisture.
1/6 OWNER’S HANDBOOK

Connecting the components
Use the following guidance to connect the components together. It
is important that you take each step in the order indicated.
1. Before connecting any components, ensure that the AC power
supply is switched off or disconnected, and that the system
unit, the monitor, and any peripherals are turned off.
2. Connect the components’ signal cables to their respective ports
on the system unit: keyboard, mouse, monitor, audio (where
appropriate) and any other peripherals. Where appropriate,
connect the computer to the network.
3. Connect the components’ power cords: monitor to system
unit, and system unit and any other peripherals to nearby,
grounded AC power outlets. Then switch on or connect the
AC power supply.
With AC power applied, the system unit is usually in Off mode
[LED unlit]. See the Getting Started chapter for more information
about power modes.
Some models incorporate a feature, controlled in BIOS Setup, that
automatically boots the PC to Power Controlled [green] mode if AC
power is restored, for example, after a power failure. The PC can
also be set to wake up from Power Minimised [amber] in the event
of incoming information from a modem or from the network. See
the BIOS Setup and POST chapter for more information.
Welcome
OWNER’S HANDBOOK 1/7

Getting Started
2 GETTING STARTED
You should read this chapter even if you do not read any other. It
provides important information to help you to use your Mitsubishi
Electric CX Series computer safely and efficiently.
Turning on the PC
To turn on the computer, simply press the P
Power Mode indicator lights up [green]. Remember that the
monitor has its own power button or switch; see the monitor’s User
Guide for details.
Power-on self-test (POST)
Whenever the computer is turned on, a power-on self-test (POST)
routine tests various hardware components, and compares the actual
configuration of the computer with that recorded in its permanent
memory. During this time, BIOS sign-on and POST messages may
be displayed. These messages are not significant unless they report
errors – see the BIOS Setup & POST chapter.
Booting the operating system
Provided that POST succeeds without discovering any serious errors
or configuration discrepancies, the computer attempts to find an
operating system; that is, it attempts to ‘boot’.
Mitsubishi Electric PCs are typically supplied with either
Windows 3.11 (Windows for Workgroups), Windows 95,
Windows 98, or Windows NT 4.0 already in place or ‘pre-installed’
on the hard disk, so that the operating system is ready for you when
you turn on the computer.
OWER
button. The
Note
If a diskette is in the diskette drive when the computer is turned on, the
computer will attempt to boot using that diskette. This will succeed only
if the diskette is a ‘system diskette’; that is, one bearing at least the
rudiments of an operating system.
OWNER’S HANDBOOK 2/1

Getting Started
Power management
The overall power state of the computer is signalled by the colour of
the Power Mode light on the front:
[unlit] Off. The computer is turned off, but while still
[amber] Power Minimised. The computer’s processor stops, the
[green] Power Controlled. The computer is awake and
In its Power Minimised state your computer complies with the
requirements of the “Energy Star” programme for energy-saving
systems. In its Power Controlled state your computer does its best to
reduce power usage but may not always reach Energy Star levels.
connected to the AC power supply it is ready to be
turned on (or turn itself on) when needed.
hard disk stops spinning and the monitor goes blank,
but your files are unaffected.
working. However, during periods of inactivity it can
automatically reduce power consumption to idle
components. For example, the monitor screen may go
blank.
If a suitable modem is installed, you can tell the computer to wake
itself up from the Power Minimised or Off state when an incoming
call is received. A networked computer can also be woken up by
remote control, if it is fitted with a network card that supports
IBM’s “Wake On LAN” technology.
Power management and Windows
Mitsubishi Electric CX Series computers support the two types of
power management that may be used by Windows operating
systems: Advanced Power Management (APM) and Advanced
Configuration & Power Interface (ACPI).
Windows 3.11 and Windows NT 4.0
Windows 3.11 (Windows for Workgroups) and Windows NT 4.0
support neither APM nor ACPI. The P
simple on/off control.
2/2 OWNER’S HANDBOOK
button acts as a
OWER

Windows 95 and Windows 98
Power Minimised states
Getting Started
In Windows 95/98, the P
button becomes a suspend/resume
OWER
button. In other words you can enter a Power Minimised state just
by briefly pressing the P
OWER
button.
You can also enter a Power Minimised state from the Windows
Start menu:
In Windows 95, click the Start button in the Windows
taskbar, then click Suspend.
In Windows 98, click the Start button, click Shut Down,
select Stand by and then click Yes.
In each case, you must press the P
button to resume from a
OWER
Power Minimised [amber] state.
Power Controlled states
You can also configure the Control Panel Display applet to suppress
or shut off power to the monitor after specified periods of inactivity.
In Windows 98 only, you can configure the Control Panel Power
applet to suppress power to the hard disk drives after a specified
period of inactivity.
Outside Windows, you can use the BIOS Setup utility to configure
the computer to enter a Power Minimised Standby mode after a
specified period of inactivity. You can also set separate Power
Controlled hard disk and video (screen blanking) inactivity
timeouts.
The computer arrives with these features turned off. In each case,
you must move the mouse or press any keyboard key to resume
from a Power Controlled state.
Note
Hard disk or display timeouts set with Windows’ Control Panel applets
overrule any hard disk and video timeouts set in BIOS Setup.
OWNER’S HANDBOOK 2/3

Getting Started
Shutting down the PC
To shut down the computer safely, do the following:
1. Wait until all the activity indicators on the front bezel show
‘not busy’.
2. Turn off any attached peripherals, except for the monitor and
other peripherals that are designed to be kept on permanently.
3a. In Windows 95/98, click the Start button in the taskbar, then
click Shut Down. Select Shutdown the computer and click
Yes. You do not have to press the P
3b. In Windows NT 4.0, click the Start button in the taskbar,
then click Shut Down. Select Shutdown the computer and
click Yes. When told that it is safe to do so, press the P
button to turn off the computer.
3c. In Windows 3.11 (Windows for Workgroups), click the File
menu in Program Manager, then click Exit Windows. Once
back in MS-DOS, press the P
OWER
OWER
button.
button.
OWER
3d. In MS-DOS, or during POST, press the P
After you shut down the computer, wait at least 5 seconds before
turning it on again. The computer may not initialise itself properly
if you turn it off then on again in quick succession.
Emergency shut down for Windows 95/98
In exceptional circumstances, you can turn off the computer
without shutting down Windows first. To do this, press and hold
down the P
(If you press the P
Windows 3.11, Windows NT or MS-DOS or while it is performing
the power-on self-test, the computer turns itself off directly.)
Caution
In an emergency shut down, you may lose any recent changes made to
the files you are currently working on.
2/4 OWNER’S HANDBOOK
button for at least four seconds.
OWER
button while the computer is running
OWER
OWER
button.

Using the computer for the first time
First time with Windows 95/98 or Windows NT
The first time you turn on your computer you must tell Windows
your name (and the name of the company for which you work, if
applicable) and agree to the legal terms and conditions of the
Windows Licence Agreement. Windows then spends a few minutes
analysing your computer and configuring itself to take full
advantage of your computer’s components. Windows 95 and
Windows 98 also offer you the opportunity to install a printer.
First time with Windows 3.11
The first time you turn on your computer a message appears
explaining the legal terms and conditions that govern the use of the
software pre-installed on the computer’s hard disk. Once you have
read this message, you can press the <F3> key to continue. By doing
so you are acknowledging that you have read, understood and
accepted the terms and conditions.
Backing-up the pre-installed software
Getting Started
We strongly recommend that you copy or ‘back-up’ the operating
system and any pre-installed software soon after setting up the
system. This is particularly important for systems that are supplied
without installation diskettes for the software on the hard disk. A
back up copy will safeguard the pre-installed software against loss if
the hard disk fails or if you accidentally overwrite or delete files.
The Microsoft Create System Disks tool (Windows 95/98) or
the Disk Maker utility (Windows NT or Windows 3.11)
allows you to create installation diskettes from disk images preinstalled on the hard disk.
To back up other pre-installed software (and your own files)
use the Backup tool (Windows 95/98 and Windows NT) or
Backup for Windows (Windows 3.11).
In general, any copy you make of pre-installed software must be
used only as a back-up copy, in case the pre-installed version is lost.
OWNER’S HANDBOOK 2/5

Getting Started
You are not allowed to use installation diskettes created from disk
images to install the software onto another computer.
Improving your display settings
Your pre-installed copy of Windows is configured for a standard
monitor setting (640 x 480 pixels in a maximum of 256 different
colours), so that Windows is sure to display correctly whatever
monitor you have.
Most modern monitors, including Mitsubishi Electric monitors, can
display higher resolutions than standard VGA. You can change the
setting to one that more closely matches your own monitor, to get
the best performance from it.
Display settings in Windows 95/98 or Windows NT
The monitor setting is changed by using the Settings tab of the
Display Properties dialog. See Windows
changing display settings.
Tip
To view the Display Properties dialog, right-click with the mouse while
pointing at the background area of the Windows desktop, then select
Properties from the pop-up menu.
Help for instructions on
’
Display settings in Windows 3.11
The monitor setting is changed by using the ATI Desktop utility in
the Mitsubishi Electric group. Open ATI Desktop, choose Screen
Adjustment, then choose Select Monitor. This offers a list of all
current Mitsubishi Electric monitors. Once you have selected the
correct monitor, you can select the required resolution. See ATI
Desktop’s on-line help for more information.
2/6 OWNER’S HANDBOOK

Getting Started
If your hard disk is larger than 2 gigabytes
If your Mitsubishi Electric PC is pre-installed with Windows 95 or
Windows 98, the entire hard disk is initially formatted as one
partition.
If you have Windows NT 4.0, the first 2 Gbytes are formatted
(using FAT) as a primary partition. The rest of the disk is
untouched. You can re-partition and reformat the disk using the
Disk Administrator tool in the Administrative Tools (Common)
folder.
If you have Windows 3.11 (Windows for Workgroups), the first 2
Gbytes are formatted as the primary partition. The remainder of the
disk is divided into formatted partitions of no more than 2 Gbytes
and no less than 512 Mbytes.
OWNER’S HANDBOOK 2/7
Diskettes & CDs
3 DISKETTES and CDs
Diskette drive
Your PC is fitted with a 1.44 Mbyte diskette drive. This accepts
either 1.44 Mbyte (HD) or 720 Kbyte (DD) diskettes.
Each diskette has a rigid plastic cover, with a metal shutter that
guards the disk surface. Never touch the exposed surface under the
shutter – you could deform the disk or leave a fingerprint that
might make the diskette difficult to read.
Keep diskettes away from dust, moisture, magnetic objects, and
equipment that generates magnetic fields. Also, avoid extremes of
temperature and exposure to direct sunlight. Otherwise, data
recorded on the diskette may become corrupted.
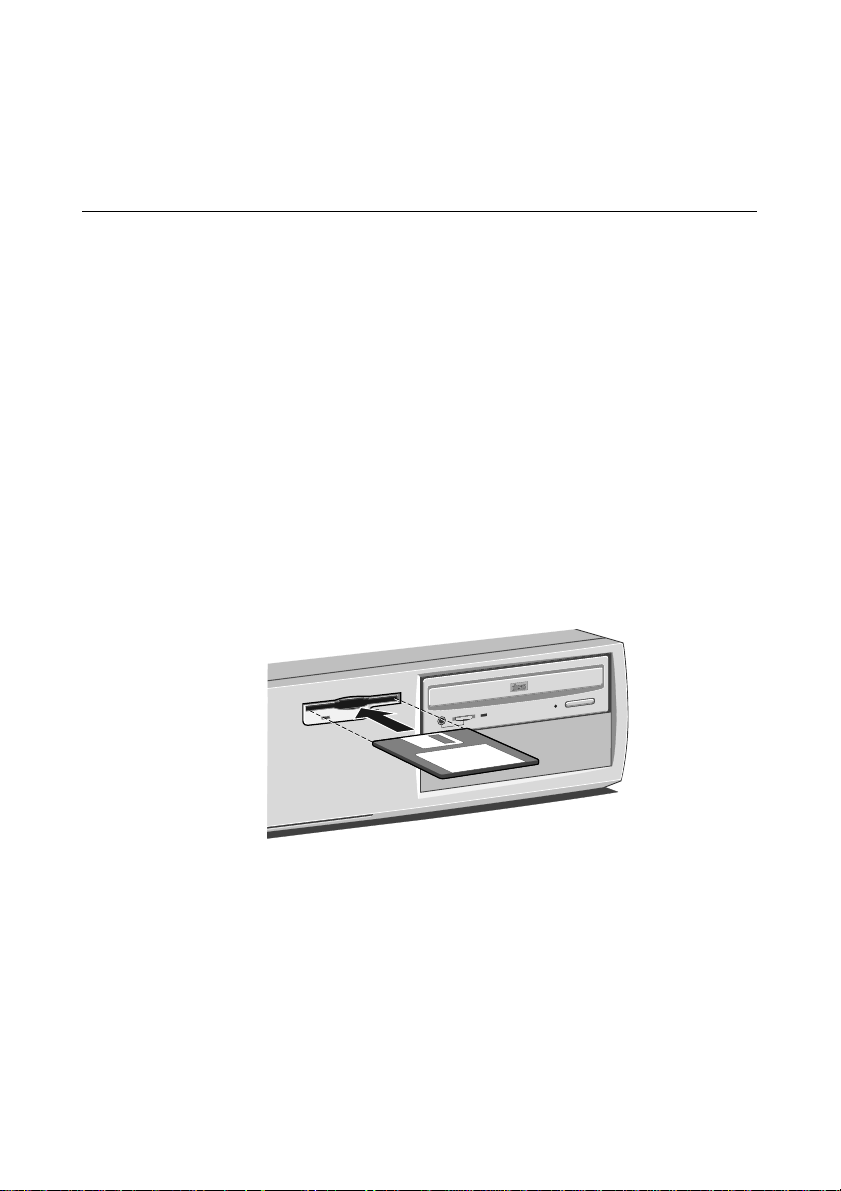
Inserting a diskette
1. Insert the diskette with the metal shutter foremost, and with
the label side facing upwards.
T
C
A
P
M
O
C
2. Push the diskette all the way in until it ‘clicks’ into place. The
drive’s
button pops out slightly. The drive flap stays
EJECT
open, leaving the diskette just visible.
OWNER’S HANDBOOK 3/1
Diskettes & CDs
Ejecting a diskette
Wait until the drive’s activity indicator is unlit, then press the
EJECT
If a diskette becomes stuck in the drive, perhaps because its label has
peeled back, do not attempt to remove it with tweezers or any
similar implement; you risk damaging the drive. Call an authorised
maintainer.
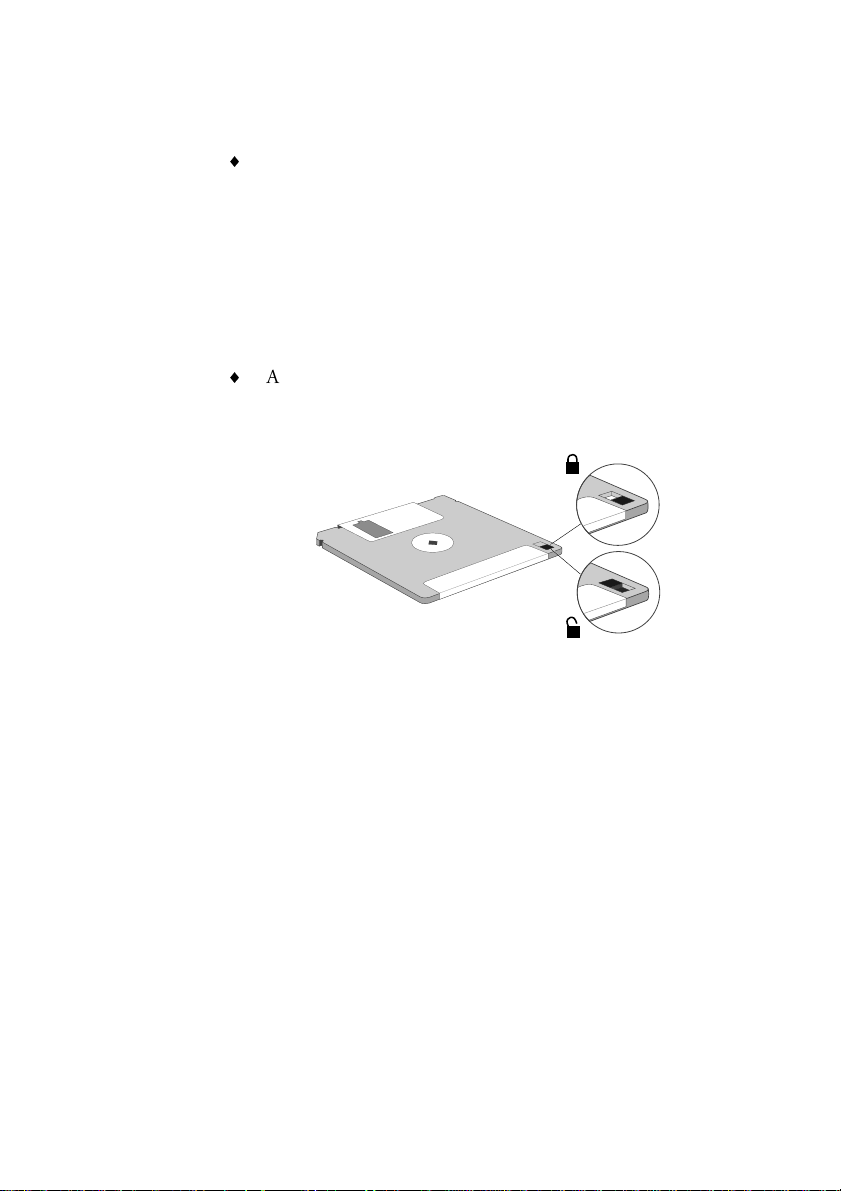
Write-protecting a diskette
A diskette can be write-protected by sliding a tab towards the
edge of the diskette to expose the small hole beneath it (see
illustration).
button.
You can read, copy or print the files on a write-protected diskette,
but you cannot create, rename or delete any files.
3/2 OWNER’S HANDBOOK
CD-ROM drive (optional)
The CD-ROM drive can retrieve multimedia data from CD-ROM
discs and multi-session Photo-CD discs. It can also play normal
music CDs (the drive has its own headphone jack and associated
volume control).
Keep CDs well away from dust and moisture, and avoid touching
the surface of the CD. Avoid extremes of temperature and exposure
to direct sunlight as these may cause the disc to warp.
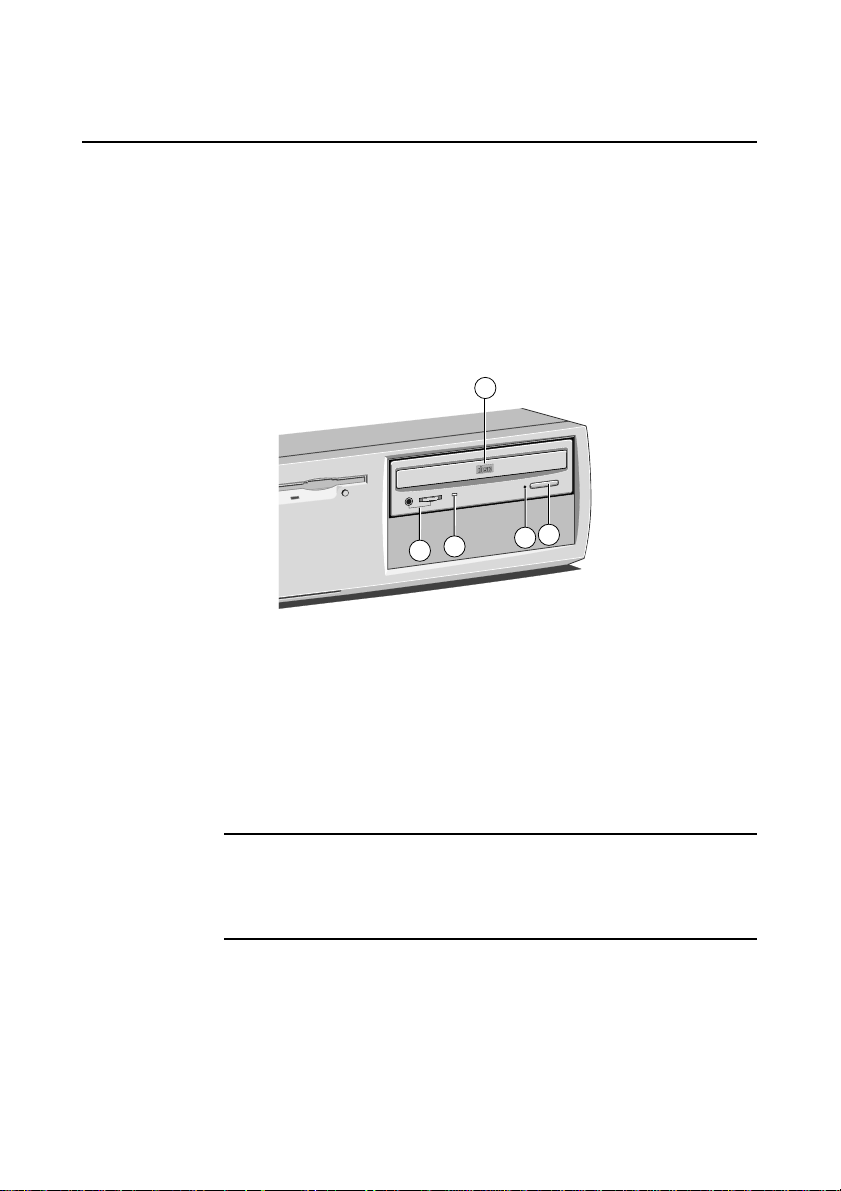
Diskettes & CDs
1
T
C
A
P
M
O
C
5
3
2
4
1 CD-ROM disc drawer (platter)
2 Headphone jack & volume control
3 Activity indicator (amber = busy)
4 CD emergency eject hole
5E
button (doesn’t work while PC is turned off)
JECT
Do not attempt to move the computer while a CD is in the drive,
especially if the CD is being played at the time.
Warning
The laser beam inside the CD-ROM drive is harmful to the eyes if
looked at directly. Do not attempt to disassemble the CD-ROM drive.
If a fault occurs, call an authorised maintainer.
OWNER’S HANDBOOK 3/3
 Loading...