

Mitsubishi CS-40805, CS-35805 Owner's Manual
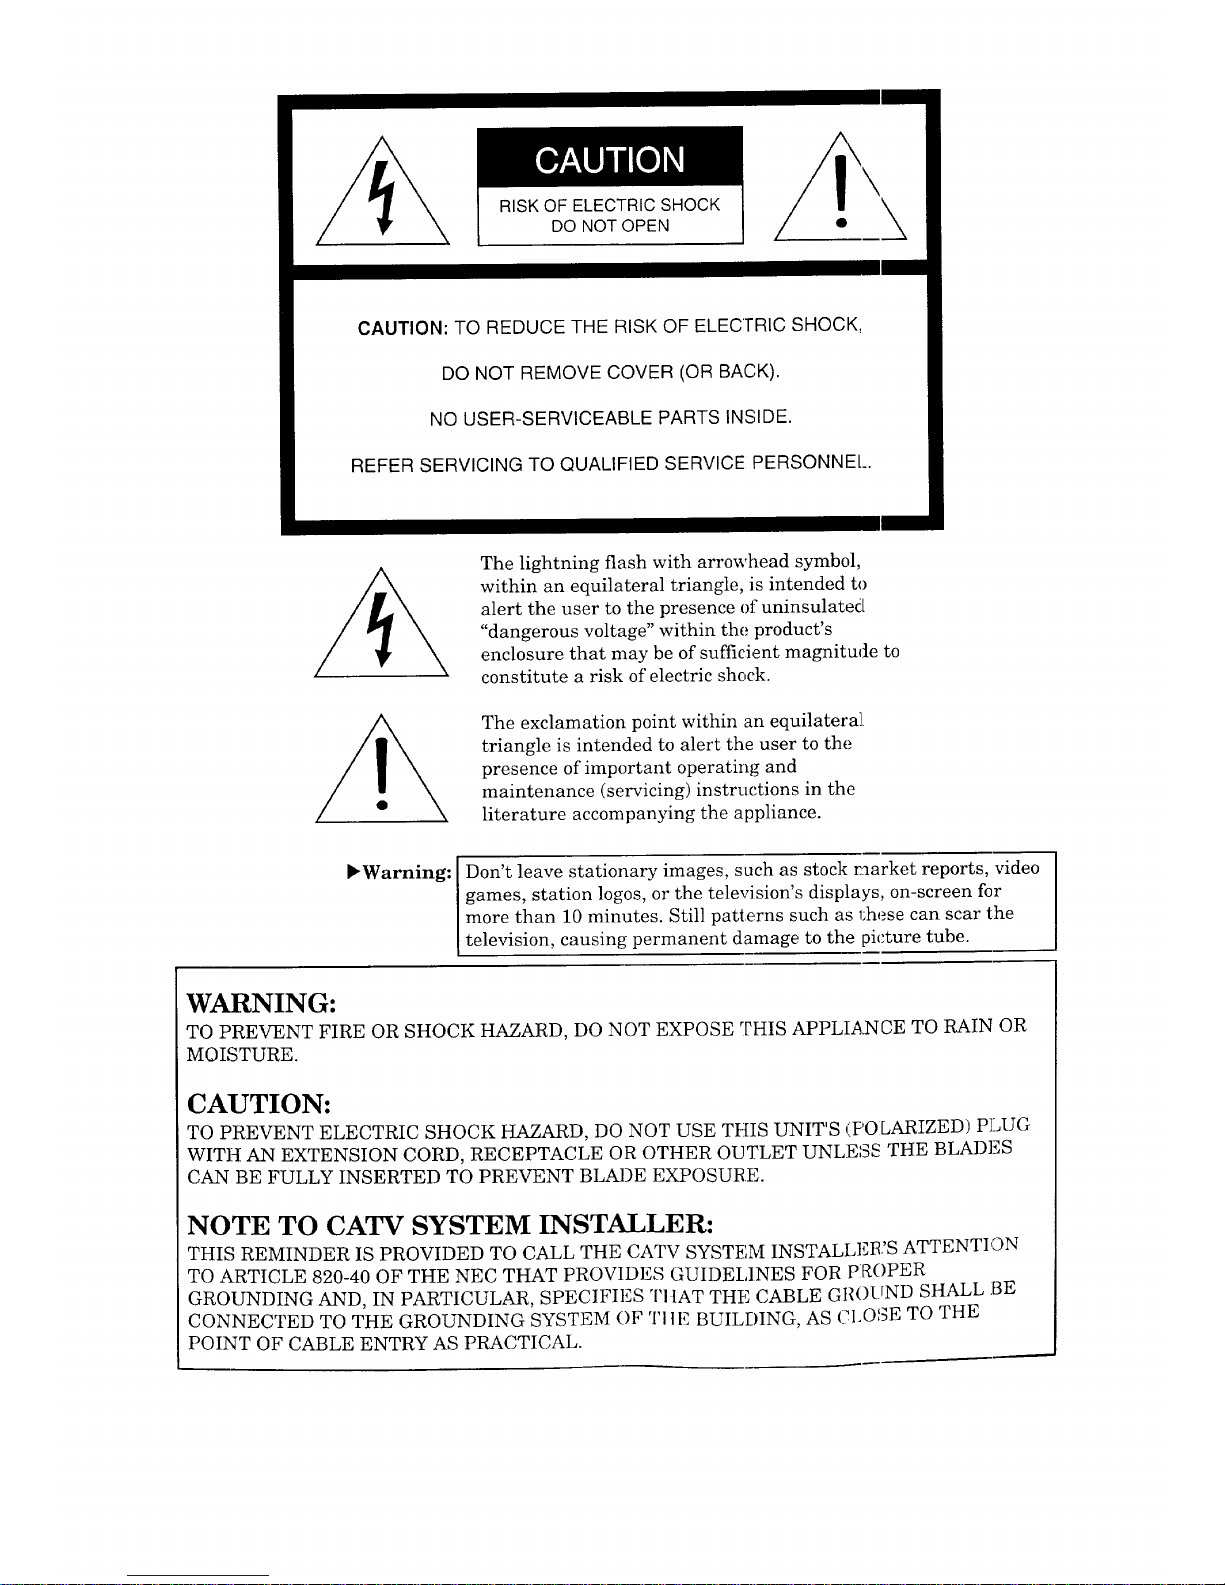
RISKOFELECTRICSHOCK
DONOTOPEN \
CAUTION: TO REDUCE THE RISK OF ELECTRIC SHOCK,
DO NOT REMOVE COVER (OR BACK).
NO USER-SERVICEABLE PARTS INSIDE.
REFER SERVICING TO QUALIFIED SERVICE PERSONNEl...
The lightning flash with arrowhead symbol,
within an equilateral triangle, is intended to
alert the user to the presence of uninsulated
"dangerous voltage" within the product's
enclosure that may be of sufficient magnitude to
constitute a risk of electric shock.
The exclamation point within an equilatera].
triangle is intended to alert the user to the
presence of important operating and
maintenance (servicing) instructions in the
literature accompanying the appliance.
,Warning:
Don't leave stationary images, such as stock raarket reports, video
games, station logos, or the television's displays, on-screen for
more than 10 minutes. Still patterns such as these can scar the
television, causing permanent damage to the picture tube.
WARNING:
TO PREVENT FIRE OR SHOCK HAZARD, DO NOT EXPOSE THIS APPLIANCE TO RAIN OR
MOISTURE.
CAUTION:
TO PREVENT ELECTRIC SHOCK HAZARD, DO NOT USE THIS UNIT'S (POLARIZED) PLUG
WITH AN EXTENSION CORD, RECEPTACLE OR OTHER OUTLET UNLESS THE BLADES
CAN BE FULLY INSERTED TO PREVENT BLADE EXPOSURE.
NOTE TO CATV SYSTEM INSTALLER:
THIS REMINDER IS PROVIDED TO CALL THE CATV SYSTEM INSTALLER'S ATTENTION
TO ARTICLE 820-40 OF THE NEC THAT PROVIDES GUIDEHNES FOR pROPER
GROUNDING AND, IN PARTICULAR, SPECIFIES TItAT THE CABLE Gt{OUND SHALL :BE
CONNECTED TO THE GROUNDING SYSTEM OF Tile BUILDING, AS CI.OSE TO THE
POINT OF CABLE ENTRY AS PRACTICAL.
A MITSUBISHI OWNER'S GUIDE
Table of Contents
Chapter 1: Getting to Know Your Television .......................................... 1
Overview of the Control Panel ............................................................... 2
Ove_ew of the Remote Control ............................................................. 5
Getting ready to use the remote control ........................................... 5
Remote control buttons and functions ................................................ 7
Chapter 2: Operating Your Television ...................................................... 13
Getting Started ...................................................................................... 14
Adjusting the color purity ................................................................. 15
Using the remote control to operate VCRs, cable boxes
and other equipment .................................................................... 17
Turning the television on/off .............................................................. 22
Selecting the input source ................................................................. 23
Changing channels .............................................................................. 24
Understanding the ViewPoint III on-screen menus ...................... 27
Memorizing channels ........................................................................ 28
Setting the clock ................................................................................ 30
Adding and deleting channels ......................................................... 33
Setting the A/V Network .................................................................. 34
Selecting the menu type ................................................................... 36
Renaming the inputs ........................................................................ 38
Naming the channels ....................................................................... 39
Locking A/V functions ...................................................................... 40
Adjusting the sound ......................................................................... 41
Adjusting the picture ....................................................................... 44
Using the closed caption decoder ..................................................... 46
Using the Advanced Features ............................................................... 48
Setting the timer .............................................................................. 49
Using the parental lock .................................................................... 50
Using Super Quick View if you hawm't subscribed to StarSight .. 54
Using Super Quick View if you've subscribed to StarSight .......... 56
Selecting an advanced PIP function ............................................... 58
Resetting the sound and the picture ............................................... 59
Table of Contents (cont.)
Chapter 3: Using the Special Features ..................................................... 61
Understanding the On-Screen Displays ............................................... 62
Using the Off-Timer ............................................................................... 63
Setting the off-timer .......................................................................... 64
Changing or canceling the off-timer ................................................ 65
Using the Advanced Picture-in-Picture (PIP) Mode,_ ......................... 66
Activating the PIP image ................................................................. 67
Changing the picture in the PIP image ........................................... 68
Exchanging the picture and sound of the PIP image
and the main image .................................................................... 70
Moving the PIP image ...................................................................... 71
Freezing the PIP image .................................................................... 72
Using the Snap-shot feature ............................................................ 73
Using the Replay feature ................................................................. 74
Using the Active A/V Network Feature ................................................. 75
Chapter 4: Troubleshooting ........................................................................ 77
Cleaning ................................................................................................. 81
Caution and Care ................................................................................... 82
Calling for Service .................................................................................. 83
Appendix: Procedure for Bypassing the
Parental Lock .................................................................................................. 85
Index ................................................................................................................. 87
Warranty .......................................................................... Inside Back Cover
ii Table of Contents
A CHAPTER ONE
Getting to Know Your Television
[>Important:
Now that you have connected your television and subscribed to the
StarSight service*, it's time to understand the exciting features
your Mitsubishi television offers.
If you have not connected your television and subscribed to
StarSight, please see Booklet #1, "Mitsubishl Installation and
Setup Guide" before reading this owner's gldde.
This chapter will introduce you to the range of options available
when using the buttons on the remote control cr on the control
panel of the television. You'll find information in these two sec-
tions:
• Overview of the Control Panel
• Overview of the Remote Control
*"StarSight" is a subscription service offered by S_;arSight Telecast, Inc.,
not a service of Mitsubishi Consumer Electronics America, Inc. Yo_ must
obtain and maintain a subscription from StarSigbt _?elecast to use the
StarSight features of your television. You must b_ able to receive a local
PBS station in order to receive the StarSight transmission, and your
StarSight features will not work if StarSight Teleza_t is not providing
schedule information.

Overview of the Control Panel
q
Press here to open the
control panel
@ ®
@
power/program timer indicator
This indicator lights up in green when you turn the
television on; it lights up in red when the timer is set and the
television's power is off; it lights in orange if the timer is set
and the television's power is on.
(_) power button (POWER)
Use to turn the television on or off.
®
S-VIDEO input terminal
Use to connect the S-video output of a VC_L, laserdisc player, or
camcorder to the television. If you connect an S-video cable to
this terminal, the Video input next to it cannot be used.
(_) video input terminal
Use to connect the video output f_om a staadard VCR or
another component to the television.
2 Chapter 1: Getting to Know Your Television
®
®
audio input terminals
Use to connect the audio output from a VCR or other
equipment.
input button (INPUT)
Use to select the input source you wish to watch:
• Antenna A,
• Antenna B, or
• Input 1, 2, or 3.
(Z) volume controls (VOLUME)
Press the • button to turn up the volume _:nd the • button to
turn down the volume.
(_) channel controls (CHANNEL)
Use the • button to switch to a channel with a higher number
and the • button to switch to a channel "¢¢i_ha lower number.
®
A/V reset button (AN RESET)
Press to reset all audio and video functions to their normal
level or setting except for volume, the "L:isten to:" function
(stereo/SAP/mono), woofer, speaker (internal/internal center
channel/external), monitor out (variable/fi_:ed), and closed
captioning.
(_) degauss button (DEGAUSS)
Use this button to correct color-impurity
©
timer reset button (TIMER RESET)
Use this button to reset the clock time and to erase any timer
settings. The television will turn off whea :_ou press this
button.
(_) menu button (MENU)
Use this button to display the on-screen menu system, which
contains additional instructions for special functions.
@
cancel button (CANCEL)
This button is used to cancel a channel r_umber, to clear a
channel programmed into super quick view memory, and to
clear the settings of some on-screen menus.
® enter button (ENTER)
Use this button after selecting a channel number or after
selecting an item from the on-screen menu system. It is also
used with the PIP functions.
Overview of the Control Panel 3
Overview of the Control Panel (cont.)
_Important:
® adjust buttons (ADJUST)
After selecting an audio or video function, use these bul:tons to
adjust it. These buttons can be used to:
increase or decrease the function (e.g., color),
- shift from one end of a scale to the other (e.g., balance), or
- change a setting (e.g., stereo).
Also use these button to select items from the on-screen menu.
These buttons cannot be used to adjust audi:o/video setting,s when
you subscribe to StarSight. If you subscribe to StarSight, use the
left/right buttons on the remote to adjust audio/video settings.
®
audio and video controls (AUDIO, VIDEO)
Use these buttons to select audio and video functions that you
want to adjust. To select an audio or video function, repeatedly
press the AUDIO button or VIDEO but'_on. After you [Lave
selected a function, use the ADJUST buttons to adjust it.
audio function button (AUDIO) --- Use to select one of
the following audio functions:
stereo/SAP/mono,
bass,
treble,
woofer,
balance,
surround off/simulate/hall,
speaker internal/internal center channel/externM, or
monitor out variable/fixed.
video function button (VIDEO) .... Use to select one of
the following video functions:
tint,
color,
contrast,
brightness,
sharpness,
video noise reduction on/off,
color temperature high!middle/low,
color bias average/accurate/skin-tone, or
closed captioning.
@ color purity adjustment switches
Set these switches according to the placement and position of
your television.
4 Chapter 1: Getting to Know Your Television
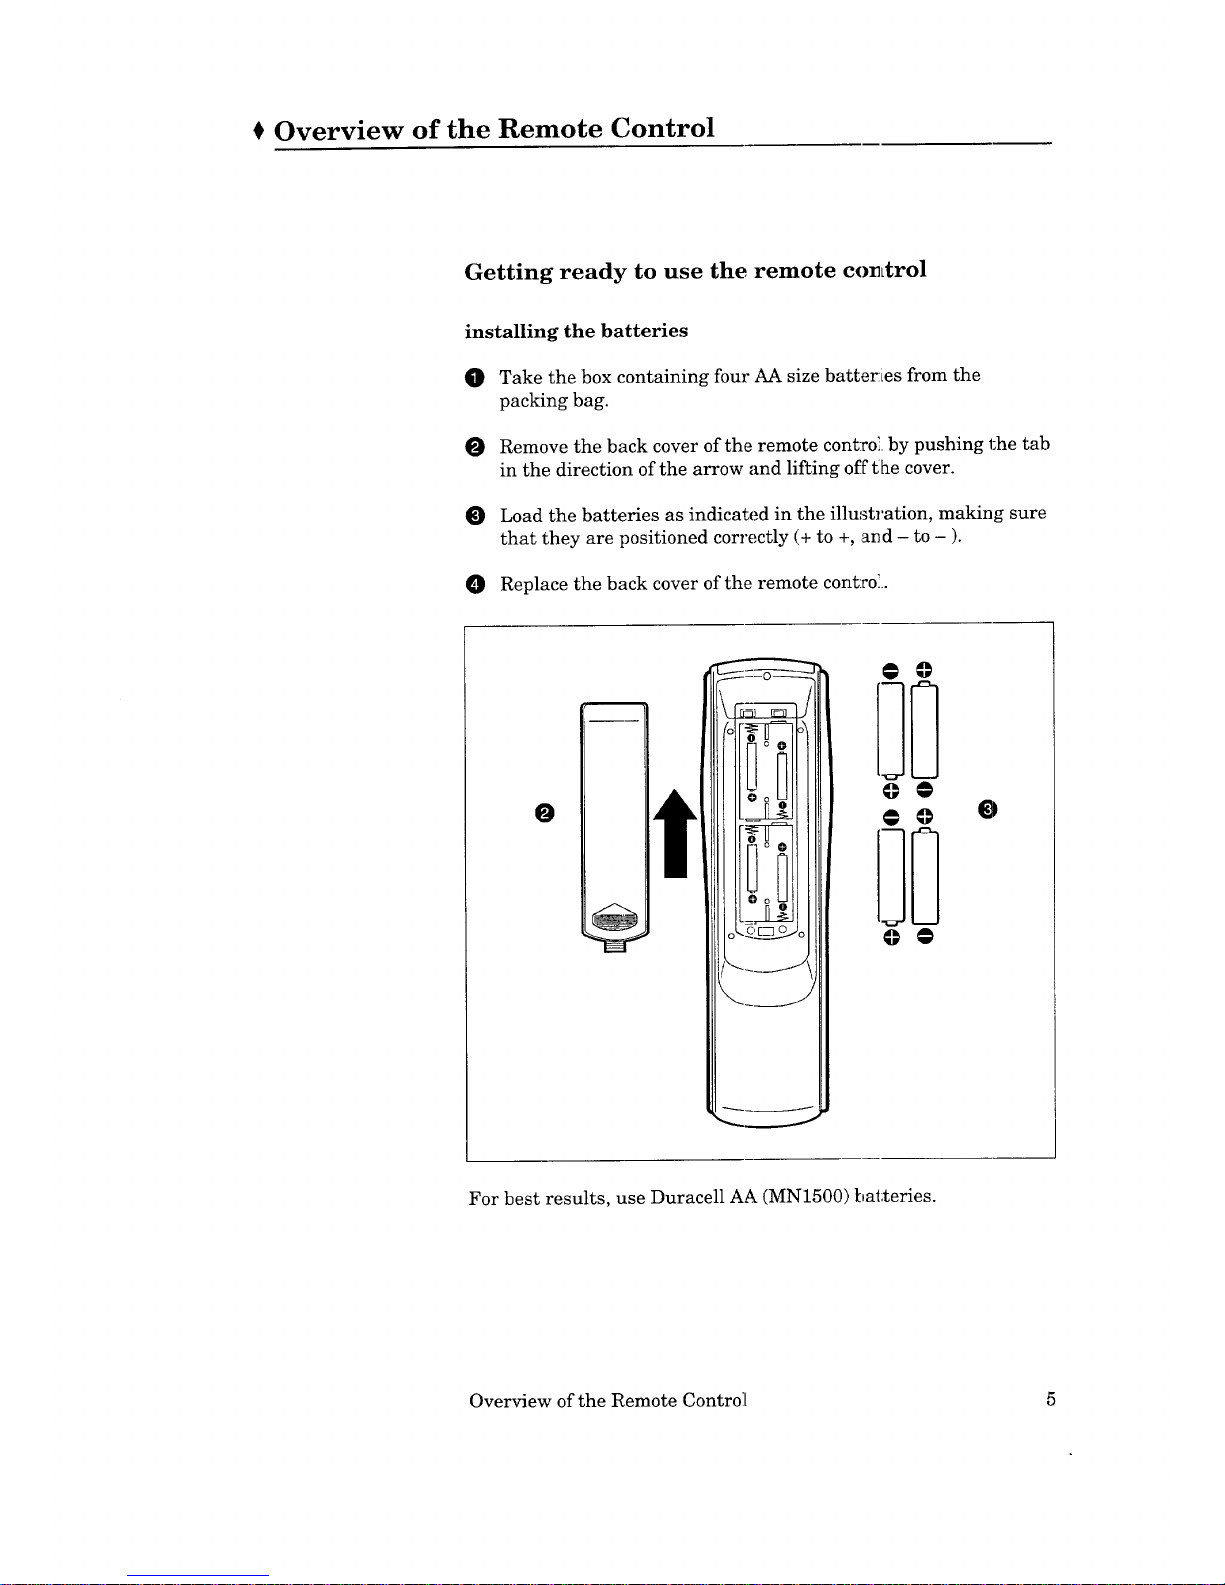
t Overview of the Remote Control
Getting ready to use the remote control
installing the batteries
0 Take the box containing four AA size batterLes from the
packing bag.
O Remove the back cover of the remote contrd by pushing the tab
in the direction of the arrow and lifting off the cover.
Load the batteries as indicated in the illustration, making sure
that they are positioned correctly (+ to +, and - to - ).
Replace the back cover of the remote control
O
@ @
@ @
For best results, use Duracell AA (MN1500) batteries.
Overview of the Remote Control 5

Getting ready to use the remote control (cont.)
some do's and don'ts
To ensure that your remote control will continue working properly,
follow these guidelines:
• Don't press two or more buttons at the same time, unless you
are specifically instructed to do so in this c,wner's guide.
• Don't allow the remote control to get wer_ or become hea£ed.
• Avoid dropping the remote control on a hacd surface.
• When cleaning the remote control, don't u,_e any harsh
chemicals. Use only a soft, slightly moisl;ened cloth.
general instructions
When using the remote control to operate the television, VCR, or cable
box, follow these procedures:
O Be within 20 feet of the desired equipment.
O Point the tip of the remote control toward the equipment.
O Press the appropriate button or sequence of buttons.
guidelines for using batteries
• Don't use a new battery with an old one
• Don't heat, take apart, or throw batteries :into a fire.
6 Chapter 1: Getting to Know Your Television
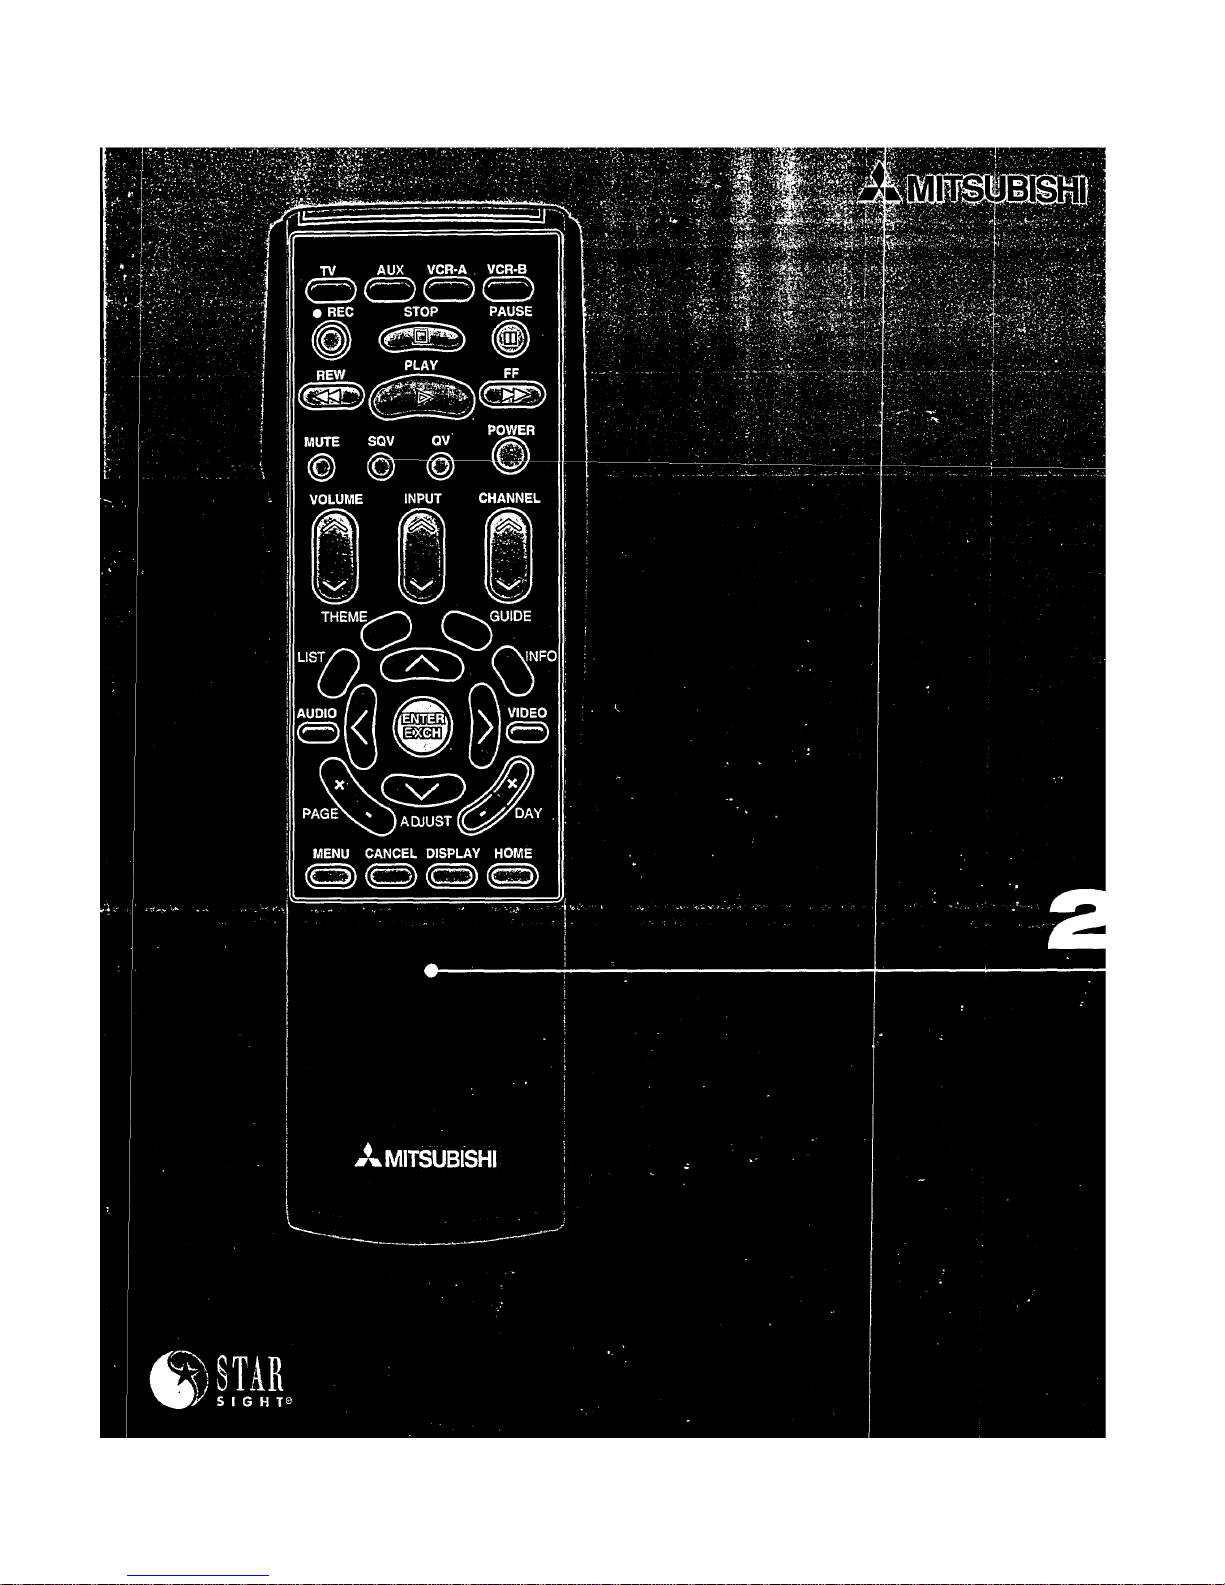
Remote control buttons and functions
This section provides you with an overview of the remote control's
buttons and the features that they control.
This section does not provide detailed explanal_ions on the use of
these buttons. To determine which buttons arc_ used with a
particular feature, refer to the instructions for that feature.
The instructions for individual features are found in Chapter 2,
"Operating Your Television," and Chapter 3, "Using the Special
Features."
Overview of the Remote Control 7
Remote control buttons and functions (cont.)
@
®
@
@
®
r-a F-q _ [::2
TV AUX VCR-A VCR-B
CC3 CC3 (Z) CC)
II REC STOP PAUSE
©_®
REW PLAY FF
SGV
-g .o 6...O
VOLUME INPUT CHANNEL
MENU CANCEL DISPLAY HOME
CZb CZ) (Z) (Z3
(D Q ® c!:S
CHANNEl
VCFffTV
o®Q® [_
1:!3® ® ®
INDEX SWAPj } SOURCE
(:ZZZ_ (_) C_ CZ3
=,t=MITSUBISHI
- ®
®
@
®
@
@
®
8 Chapter 1: Getting to Know Your Television
(!)select buttons
Your remote control has four layers: the
TV layer, the VCR-A layer, the VCR-B
layer, and the AUX layer. You can set up
each of these layers to operate a
different piece of equipment. Use the four
buttons across the top of the remote to
select the layer you want to set up or use.
When you press a button on the remote,
the lights above the select buttons will
indicate the layer you are using.
(_)VCR buttons
Use these buttons to control most
Mitsubishi VCRs, or set up the remote to
use them to control other brands of VCRs.
The PLAY button is also used with the
Active A!V Network Feature (page 75).
(_) power button (POWER)
Use to turn the television on or off. When
you turn the television on, the power
indicator will light in green.
(!) mute control (MUTE)
Use to turn the sound off completely or to
restore it to its original volume.
(_)super quick view button (SQV)
Press to view channels you have
programmed into super quick view
memory.
(_) quick view button (QV)
P_Zess this button to instantly switch to the
channel that you designated as the "quick
view" channel. If you are watching the
quick view channel, you will switch to the
last channel viewed.
(_) light button
Use to light up the remote (for 3 seconds).
(_) volume control (VOLUME)
Press the top part of the button to turn up
the volume; press the bottom part of the
button to turn down the volume.
(_) input button (INPUT)
Use to select the input s_urce you wi,_h to
watch:
• Antenna A,
• Antenna B, or
• Input 1, 2, or 3.
(_)channel control (CHANNEL)
Press the top part of tlhe button to change
to a channel with a higher number; press
the bottom part to change to a channel
with a lower number.
(_) enter button (ENTER / EXCH)
Use this button after ,_e]ecting a channel
number, after selecting an item from
the on-screen menu system, or with the
picture-in-picture mode.
(_) adjust buttons (A, V,.4, b )
After selecting an audio or video function,
use these buttons to adj ast it. Also use
these with the picture-in-picture mode, and
to select items in the menus.
@cancel button (CANCEL)
This button is used to cancel a channel
numben to clear a channel programmed
into super quick view memory, and to clear
the settings of some on-screen menus.
(_)menu button (MENU)
Use this button to display the on-screen
menu system, which contains additional
instructions for special thnctions.
(_)display button (DISPLAY)
Use to view an on-screen summary of the
current settings for the Lelevision or cable
functions and the display related to Ex-
tended Data Services (XDS).
@ home button (HOME)
Press to return to reg_alar TV viewing
from the on-screen men_s and to turn off
the on-screen displays.
Overview of the Remote Control 9
Remote control buttons and functions (cont,,)
®
©
®
@
TV AUX VCR-A VCR-B
CZ_ C:_ CZ_ CZ_
• REC STOP PAUSE
REW PLAY FF
_C2b_
MUTE SOV QV /" _
©©©
VOLUME INPUT CHANNEL
8_88
MENU CANCEL DISPLAY HOME
CZ_ CZ_ CZ:) CZ_
_,, MITSUBISHI
®
10 Chapter 1: Getting to Know Your Television
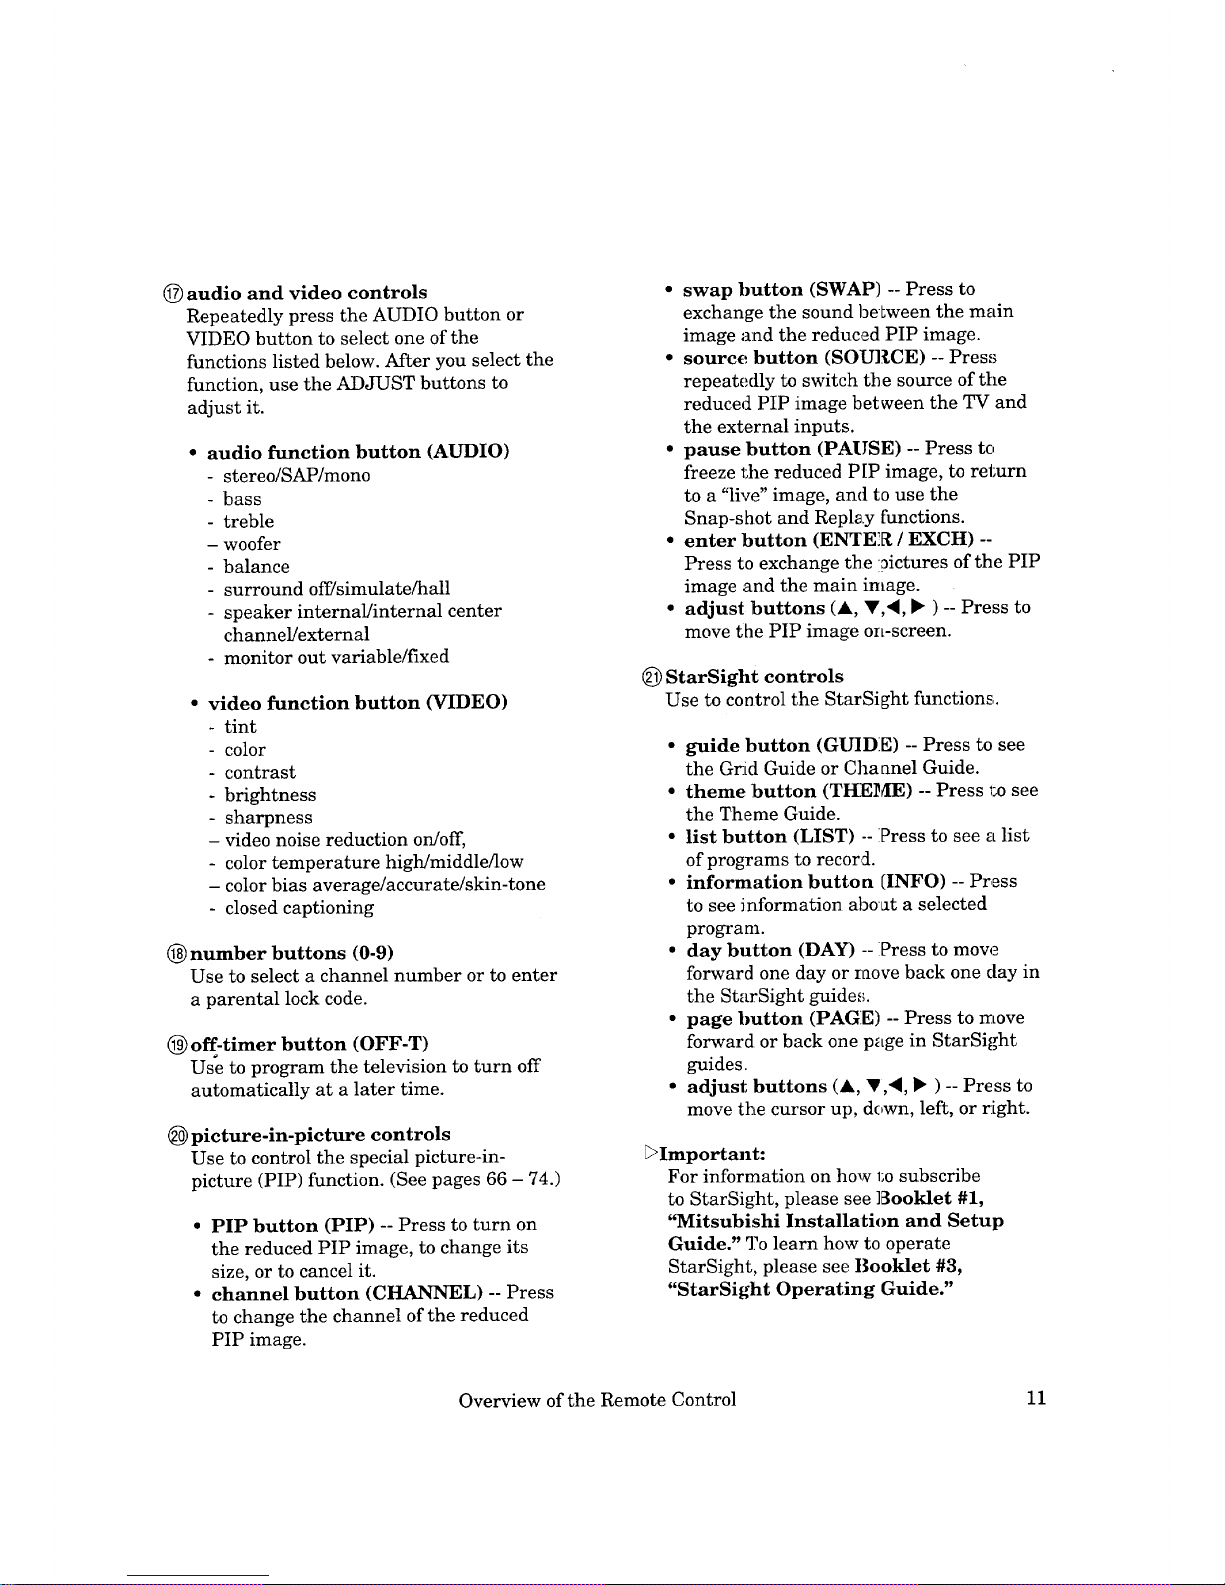
(_audio and video controls
Repeatedly press the AUDIO button or
VIDEO button to select one of the
functions listed below. After you select the
function, use the ADJUST buttons to
adjust it.
audio function button (AUDIO)
- stereo/SAP/mono
- bass
- treble
- woofer
- balance
- surround off/simulate/hall
- speaker internal/internal center
channel/external
- monitor out variable/fixed
• video function button (VIDEO)
- tint
color
- contrast
- brightness
- sharpness
- video noise reduction on/off,
- color temperature high/middle/low
- color bias average/accurate/skin-tone
- closed captioning
@)number buttons (0-9)
Use to select a channel number or to enter
a parental lock code.
(_) off-timer button (OFF-T)
Use to program the television to turn off
automatically at a later time.
(_ picture-in-picture controls
Use to control the special picture-in-
picture (PIP) function. (See pages 66 - 74.)
• PIP button (PIP) -- Press to turn on
the reduced PIP image, to change its
size, or to cancel it.
• channel button (CHANNEL) -- Press
to change the channel of the reduced
PIP image.
• swap button (SWAP) -- Press to
exchange the sound be Lween the main
image and the reduced PIP image.
• source button (SOURCE) -- Pres,_
repeatectly to switch the source of the
reduced PIP image between the TV and
the external inputs.
• pause button (PAUSE) -- Press to
freeze the reduced PIP image, to return
to a "live" image, anti to use the
Snap-shot and Replay functions.
• enter button (ENTE
_CHAPTER
• TWO
Operating Your Television
_Important:
This chapter will explain how to operate your Le]evision, first
focusing on functions that are basic and easy and then explaining
some of the advanced features.
Please see Booklet #3, "StarSight Operatir_g Guiding" for
information on using the StarSight feature.
This chapter explains:
Getting Started
Using the Advanced Features
13
€ Getting Started
This section is designed to get you started enjo_4ng your new
television. If you follow these procedures one by one, you will soon
begin discovering everything your television can do.
You'll find information on:
• Adjusting the color purity,
• Using the remote control to operate VCRs, cable boxes,
and other equipment,
• Turning the television on/off,
• Selecting the input source,
• Changing channels,
• Understanding the ViewPoint III on-screen menus,
• Memorizing channels,
• Setting the clock,
• Adding and deleting channels,
• Setting the AN Network,
• Selecting the menu type,
• Renaming the inputs,
• Naming the channels,
• Locking AN functions,
• Adjusting the sound,
• Adjusting the picture, and
• Using the closed caption decoder.
bWarning: Don't leave stationary images, such as stock raarket reports, video
games, station logos, or the television's displays, on-screen for
more than 10 minutes. Still patterns such as _:hese can scar the
television, causing permanent damage to the picture tube.
14 Chapter 2: Operating Your Television
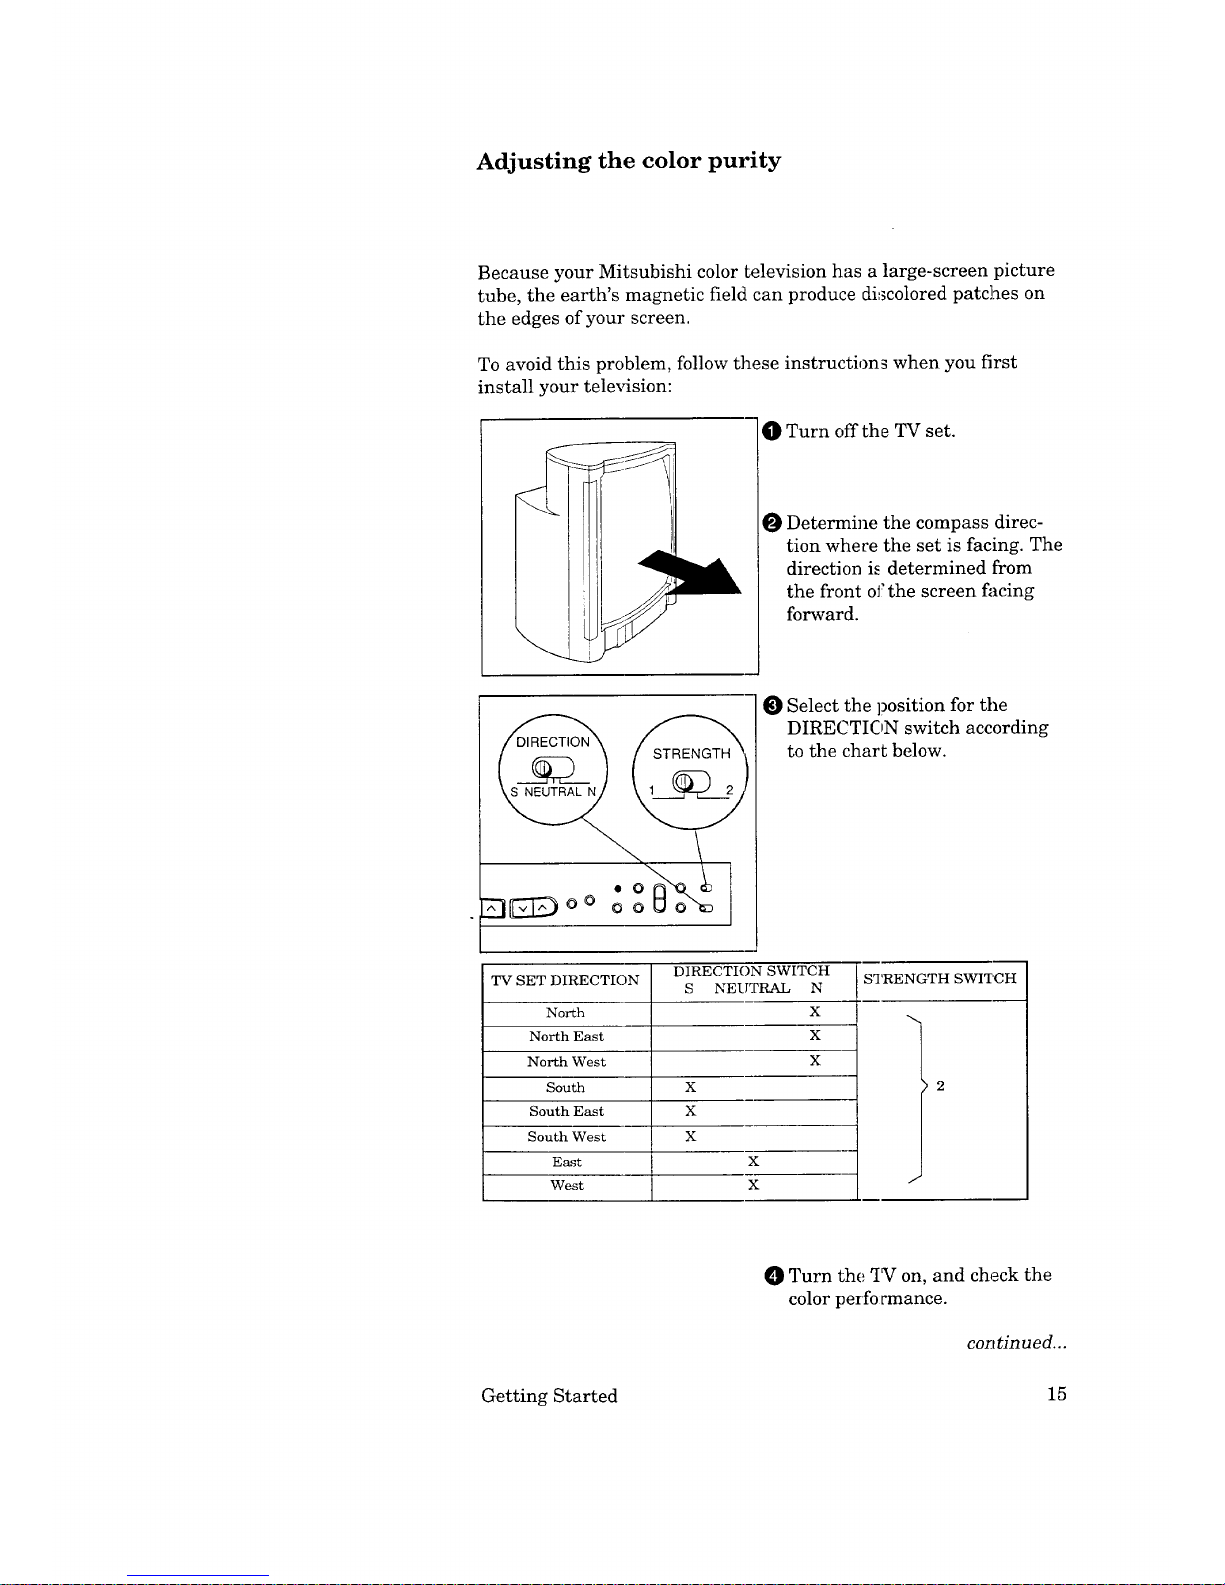
Adjusting the color purity
Because your Mitsubishi color television has a large-screen picture
tube, the earth's magnetic field can produce discolored patches on
the edges of your screen.
To avoid this problem, follow these instructions when you first
install your telex4sion:
O Turn off the TV set.
O Determine the compass direc-
tion where the set is facing. The
direction is determined from
the front of the screen facing
forward.
• O
o° o o
Select the position for the
"_ ) •
DIRECTIC N switch according
to the chart below.
TV SET DIRECTION
North
North East
North West
South
South East
South West
East
West
DIRECTION SWITCH
STRENGTH SWITCH
S NEUTRAL N
X
X
X
X
X
X
X
X
t
0 Turn the if7 on, and check the
color performance.
continued...
Getting Started 15
Adjusting the color purity (cont.)
_Important:
If color impurity is still present, change the STRENGTH switch
to position "1." If there is still impurity, wail_ a few minutes,
then press the DEGAUSS button on the control panel.
You must adjust the color purity switches each time you move
the set to a new location.
If there is still color impurity after adjusting the switches,
please contact your Mitsubishi Authorized Warranty Center.
Color impurity can also be caused by unshielde_ speakers and
strong magnets. Move these items away from y_ur TV.
16 Chapter 2: Operating Your Television
Using the remote control to operate VCRs, cable
boxes, and other equipment
about your remote control
This television's remote control has four "layers": the TV layer, the
VCR-A layer, the VCR-B layer, and the AUX layer. Each layer can
be used to operate a different component in :your A/V system. You
select the layer you want to use by pressing ore of the "select"
buttons across the top of the remote control.
When you first receive your remote control, the TV layer is set up
to operate your Mitsubishi television, the VCR-A and VCR-B layers
are programmed to operate Mitsubishi VCRs, and the AUX layer is
set to operate Mitsubishi audio components.
You can use the following buttons
• power button
• pause button
• mute control
• super quick view button
• quick view button
• volume control
• input button
• channel control
• enter button
• audio and video controls
to operate your television.
• StarSight function buttons
• menu button
• cancel button
• display button
• home butLon
• off-timer button
• number buttons
• PIP control_
• PLAY bul_tcn
If you have a cable box, a non-Mitsubishi VCI_:, a Mitsubishi
laserdisc player, or a Mitsubishi A2¢"receiver, you can "set up" the
layers in the remote control to operate these components.
The VCR-A layer can be set to operate a non-Mitsubishi VCR; the
VCR-B layer can be set to operate a VCR, cab:.e box, or Mitsubishi
laserdisc player; the AUX layer can be set up to operate a (:able
box, laserdisc player, or A/V receiver; and the TV layer can be set to
operate an AN receiver.
setting up the remote control to operate your VCR
Turn offyour VCR.
Press one of the select buttons across the top of the remote to
choose the layer you want to set up: VCR-A or VCR-B.
O While holding in the POWER button on the remote control,
enter the code number listed in the chart on the following page
for your brand of VCR. Be ,sure to enter both digits of the code
number. If more than one number is listed, try the first one.
Getting Started 17

Using the remote control to operate VCRs, cable
boxes, and other equipment (cont.)
If your VCR
is this brand...
Mitsubishi (A)
Mitsubishi (B)
Canon
Emerson
Funai
General Electric
Goldstar
Hitachi
JVC
...enterthis
code
01
02
03
04, 05
06
03
07
08
09
If yourVCR
is thisbrand...
Magnavox
Multitech
NEC
Panasonic
Philco
Philips
Quasar
RCA
Sanyo
...enterthis
code
03, 10, 11
06
12
03
03, 10
03, 10, 11
03
08, 13, 20
14
Ifyour Vl
is this bral
Scot
Sharp
Sony
Sylvania
Symphonic
Teknika
Toshiba
Totevision
Zenith
...enter'this
code
15
16
17, [8___
03, 101_11
06
04, 06
15
07
1£
O Release the POWER button.
O Press the POWER button again. Your VCR should turn on. If
the VCR turns on, your remote control is ngw set to operate
your VCR.
If your VCR does not turn on, repeat the instructions, trying each
code number listed for your brand of VCR. If none of these code
numbers work, try each number, 01 through 20.
using your remote control to operate your VCR
After you have set up your remote control for ),our particular brand
of VCR, you can use the remote to operate your VCR.
Use the select buttons across the top of the remote cont_:ol to
choose the layer that you "set up" to operate your VCR: VCR-A
or VCR-B.
O Point the remote control at the VCR and p::ess the desired
buttons.
If you are using a Mitsubishi VCR, you will be able to use all of the
buttons on the remote control to operate your VCR except for MUTE,
VOLUME and the PIP function buttons, which will always operate
the television itself.
If you are using another brand of VCR, you can use the POWER,
CHANNEL, REC, STOP, PAUSE, REW, PLAY, FF and TV/VCR
buttons to operate your VCR.
setting up the remote control to operate your cable box
O Turn on your cable box.
Press one of the select buttons across the top of the remote to
choose the layer you want lx) set up: AID[ cr VCR-B.
18 Chapter 2: Operating Your Television
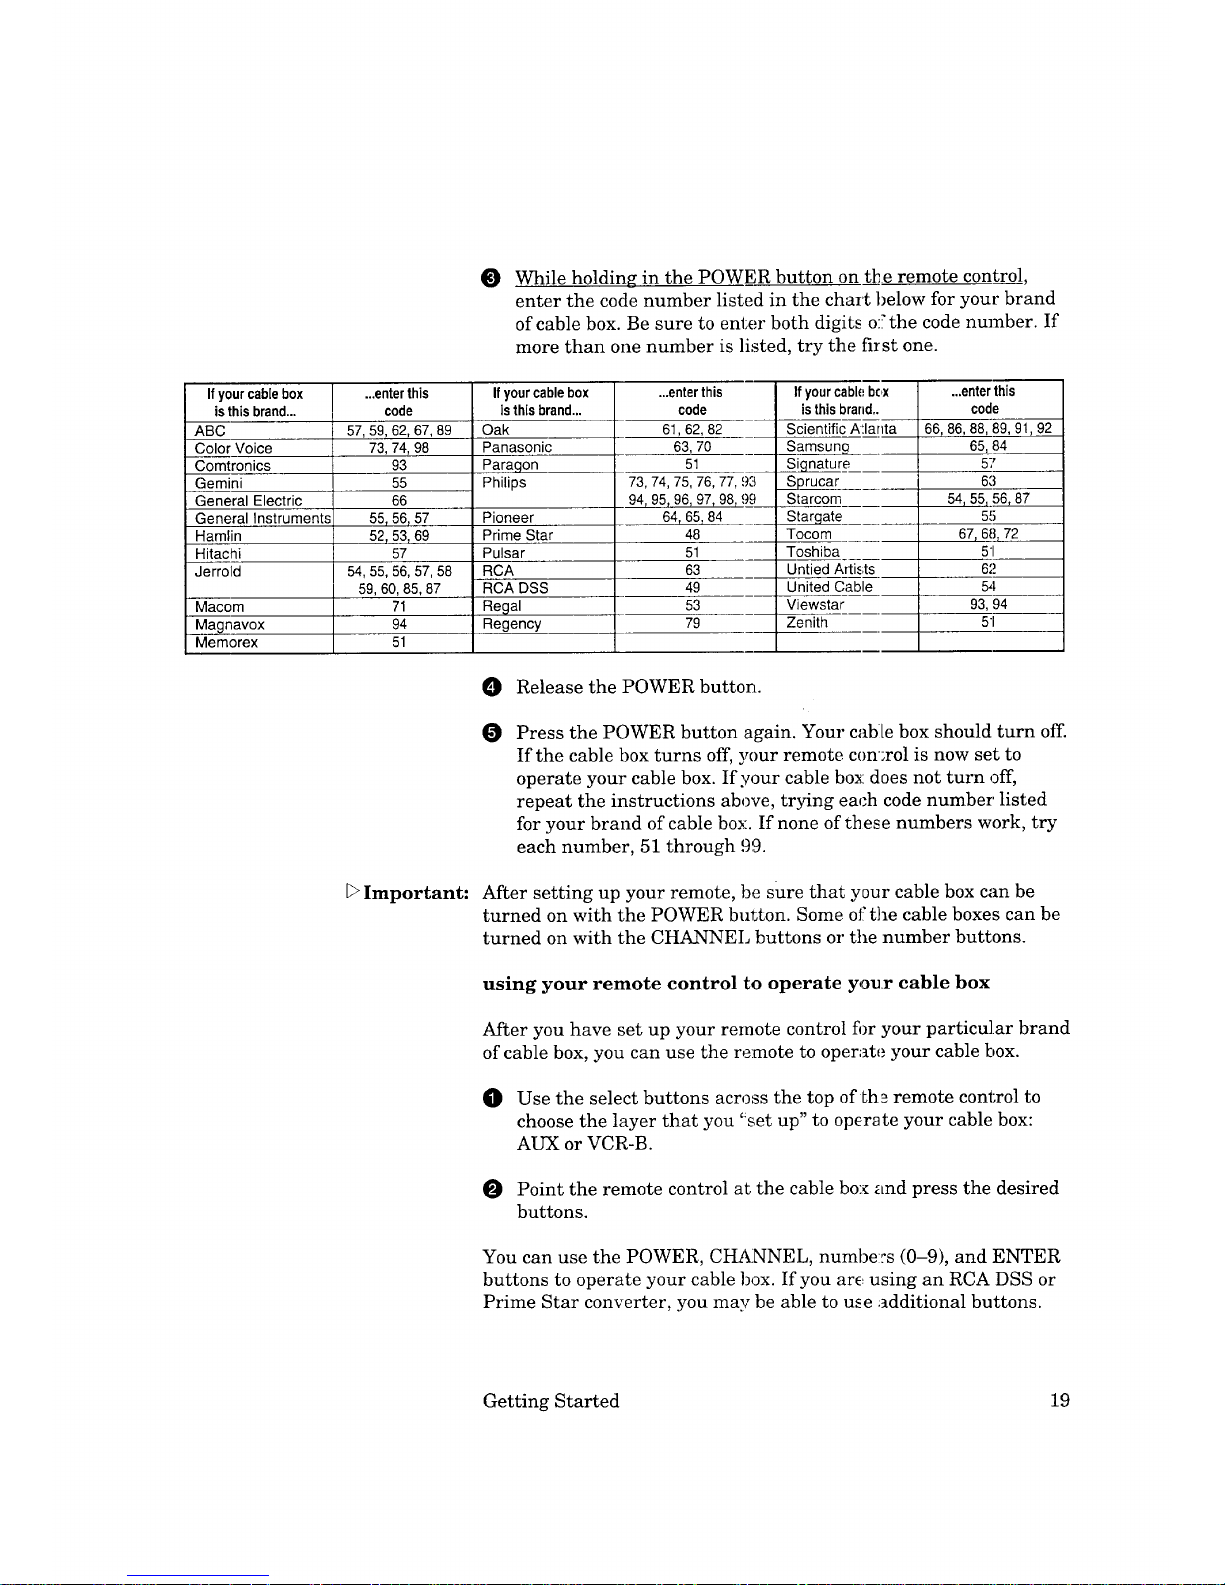
O
While holding in the POWER button on tbe remote control.,
enter the code number listed in the chart below for your brand
of cable box. Be sure to enter both digits o:_the code number. If
more than one number is listed, try the first one.
Ifyourcablebox
isthis brand...
ABC
Color Voice
Comtronics
Gemini
General Electric
General Instruments
Hamlin
Hitachi
Jerrold
Macom
Magnavox
Memorex
...enterthis
code
57,59, 62, 67, 89
73, 74, 98
93
55
66
55, 56_57
52, 53,69
57
54, 55, 56, 57, 58
59, 60, 85, 87
71
94
51
If yourcablebox
isthisbrand...
Oak
Panasonic
Paragon
Philips
Pioneer
Prime Star
Pulsar
RCA
RCA DSS
Regal
Regency
...enterthis
code
61,62, 82
63, 70
51
73, 74, 75, 76, 77,
94, 95, 96, 97, 98,
64, 65, 84
48
51
63
49
53
79
If your cablebc,x
is this brand..
Scientific Atlanta
_SamsunpQ___
Signature
Sorucar
Starcom
Stargate
Tocom
Toshiba
Untied Artists
United Cable
Viewstar
Zenith
...enterthis
code
66, 86, 88, 89, 91, 92
65, 84
57
6.'3
54_55_56 87
55
67, 68, 72
51
6.'!
5,1
93, 94
51
O Release the POWER button.
O Press the POWER button again. Your cable box should turn off.
If the cable box turns off, your remote cen:rol is now set to
operate your cable box. If your cable box does not turn off,
repeat the instructions above, trying each code number' listed
for your brand of cable box. If none of these numbers work, try
each number, 51 through 99.
[>Important: After setting up your remote, be sure that your cable box can be
turned on with the POWER button. Some of the cable boxes can be
turned on with the CHANNEL buttons or the number buttons.
using your remote control to operate yo_.r cable box
After you have set up your remote control fi)r your particular brand
of cable box, you can use the remote to operate your cable box.
O Use the select buttons across the top of Lh_ remote control to
choose the layer that you "set up" to operate your cable box:
AUX or VCR-B.
Point the remote control at the cable box and press the desired
buttons.
You can use the POWER, CHANNEL, numbe:s (0-9), and ENTER
buttons to operate your cable box. If you are using an RCA DSS or
Prime Star converter, you may be able to use additional buttons.
Getting Started 19

Using the remote control to operate VCRs, cable
boxes, and other components (cont.)
setting up the remote control to operate your Mitsubishi
audio component (laserdisc player or A/V receiver)
O Turn offyour audio component.
O Press one of the select buttons across the top of the remote to
choose the layer you want to set up. For a [aserdisc player,
choose AUX or VCR-B. For an A/V receiver, choose TV or AUX.
O While holding in the POWER button on the remote conl_rol,
enter one of these code numbers:
• For a Mitsubishi A/V receiver: 30 or 31
• For a Mitsubishi laserdisc player: 32 or 33
Be sure to enter both digits of the code number. If more than
one number is listed, try the first one.
O Release the POWER button.
O Press the POWER button again. Your audio component, should
turn on. If it does, your remote control is now set to operate
your cable box. If it does not turn on, repeat the instructions
above, trying the other code number listed for your component.
using your remote control to operate your Mitsubishi
laserdisc player
After you have set up your remote control fi)r your laserdisc player,
you can use the remote to operate the player.
Use the select buttons across the top of the remote control to
choose the layer that you "set up" to operate your laserdisc
player: AUX or VCR-B.
Point the remote control at the laserdisc player and press the
desired buttons.
You can use the POWER, CHANNEL, numbers (0-9), DISPLAY,
MENU, CANCEL, STOP, PAUSE, REW, PLAY, INDEX, and FF
buttons to operate your laserdisc player.
20 Chapter 2: Operating Your Television
_Important:
_>Important:
using your remote control to operate your Mitsubishi AN
receiver
After you have set up your remote control fbr your A/V receiver, you
can use the remote to operate it.
O Use the select buttons across the top of the remote control to
choose the layer that you "set up" to operate your AN receiver:
TV or AUX.
O Point the remote control at the A/V receiver and press the
desired buttons.
If you are using a Mitsubishi HTS-100, you can use the POWER,
VOLUME, and MUTE buttons to operate the receiver.
If you are using a Mitsubishi HTS-300, you can use the POWER,
CHANNEL, INPUT, VOLUME, ENTER, nuraber (0-9), DISPLAY,
MENU, CANCEL, AUDIO, VIDEO, ADJUST, and MUTE buttons
to operate the receiver.
notes about your remote control
Sometimes manufacturers will change their :products, or they may
use more than one code. If this is the case, your remote may not be
able to operate your VCR, cable box, or audk_ component.
When you replace the batteries in your remo_e control, the remote
will usually return to its initial setting. You :may need to set up
your remote again.
Getting Started 21
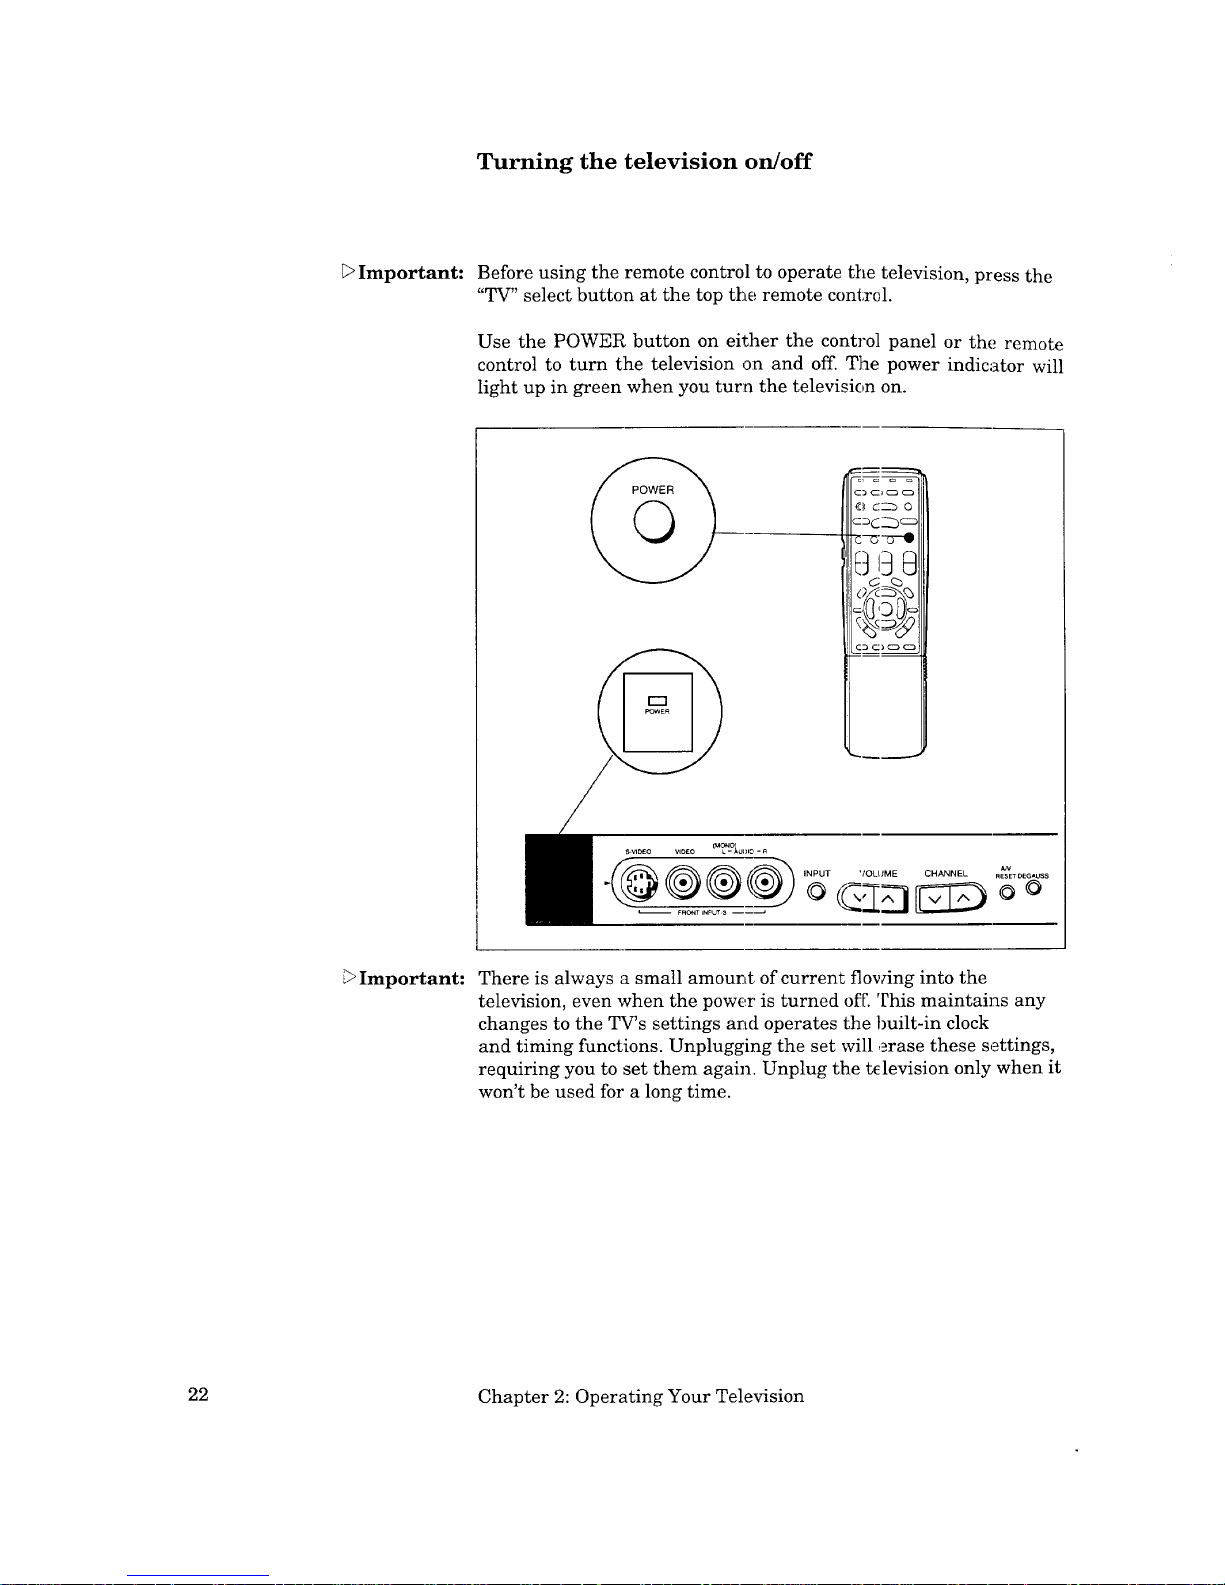
Turning the television on/off
F>Important: Before using the remote control to operate the television, press the
"TV" select button at the top the remote contrd.
Use the POWER button on either the control panel or the remote
control to turn the television on and off. The power indicator will
light up in green when you turn the television on.
c-_-oQ
_1_-- S-vl_:o vloEo CMLONO_u_JJO- A
,NPUT '/OLL'ME CHANNEL
AN
RES_ OEGA_S
_0
:_Important:
There is always a small amount of current flowing into the
television, even when the power is turned off. This maintains any
changes to the TV_s settings and operates the built-in clock
and timing functions. Unplugging the set will ._rase these settings,
requiring you to set them again. Unplug the tclevision only when it
won't be used for a long time.
22 Chapter 2: Operating Your Television
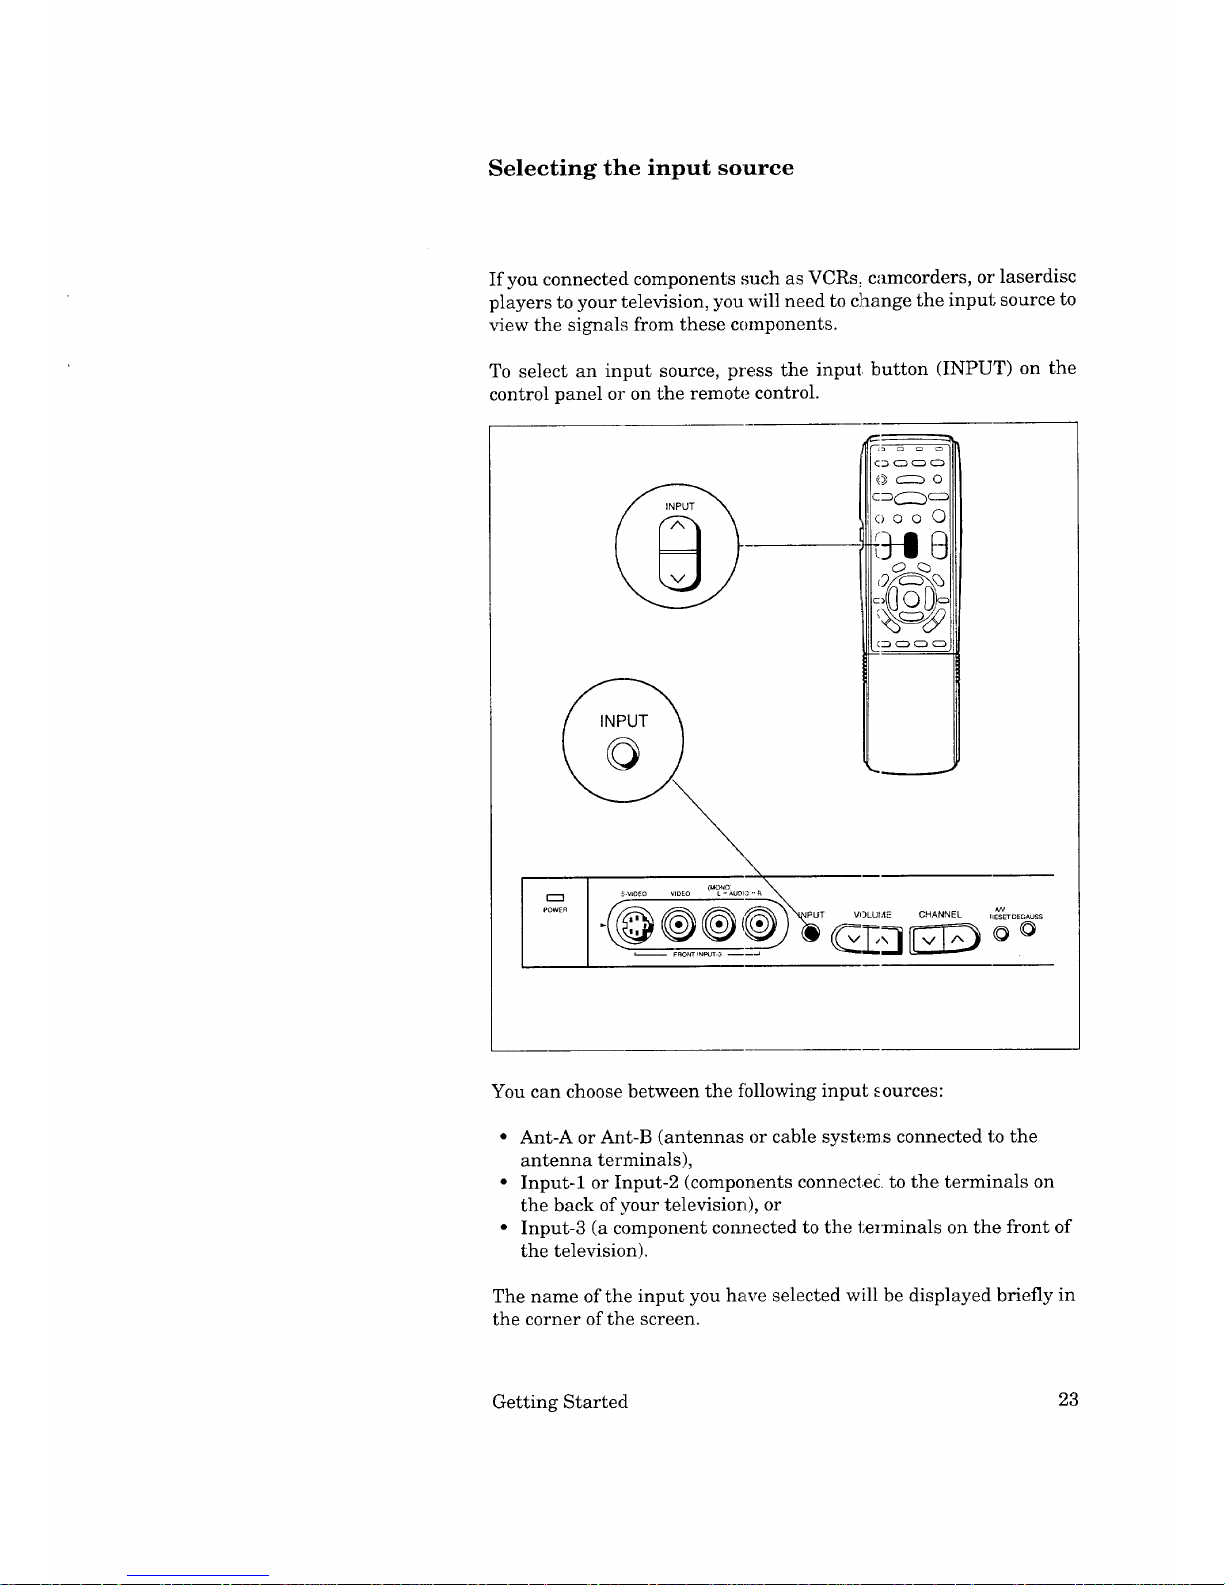
Selecting the input source
If you connected components such as VCRs, camcorders, or laserdisc
players to your television, you will need to change the input source to
view the signals from these components.
To select an input source, press the input button (INPUT) on the
control panel or on the remote control.
@dZbO
C_Z223
oo o 0
C3
,_v
VOLUME CHANNEL _IESETDEGAUSS
You can choose between the fbllowing input _ources:
• Ant-A or Ant-B (antennas or cable systems connected to the
antenna terminals),
• Input-1 or Input-2 (components connected to the terminals on
the back of your television), or
• Input-3 (a component connected to the terminals on the front of
the television).
The name of the input you have selected will be displayed briefly in
the corner of the screen.
Getting Started 23
Changing channels
_>Important:
[:>Important:
Your television offers you four ways of changin G' channels once
their numbers have been programmed into channel memory:
• selecting channels one-by-one with the chan:ael controls,
• directly accessing a channel by pressing the number buttons,
• using the special Quick View option to switch to a particular
memorized channel, and
° using the Super Quick View function to alternate between
channels on a user-chosen list.
To change channels faster, use either of the following procedures:
€" Enter three digits for every channel number, using zeros where
needed. (For example, enter "004" to view channel 4 and "028"
to view channel 28.)
/ Press the ENTER button after selecting the number of the
channel. (For example, press "4" and "ENTER" to view
channel 4.)
Cable channel numbers 0 and greater than 126 are not used.
TV stations 0, 1, and 70 through 999 are not used. If you select one
of these channel numbers, your television will[ not change channels.
24 Chapter 2: Operating Your Television
 Loading...