

Mitsubishi CK-35804, CS-35803 Operating Manual

MITSUBISHI OPERATING GUIDE
Table of Contents
Chapter 1: Getting to Know Your TV .............................................................................................. 1
Overview of the Control Panel ..................................................................................................... :2
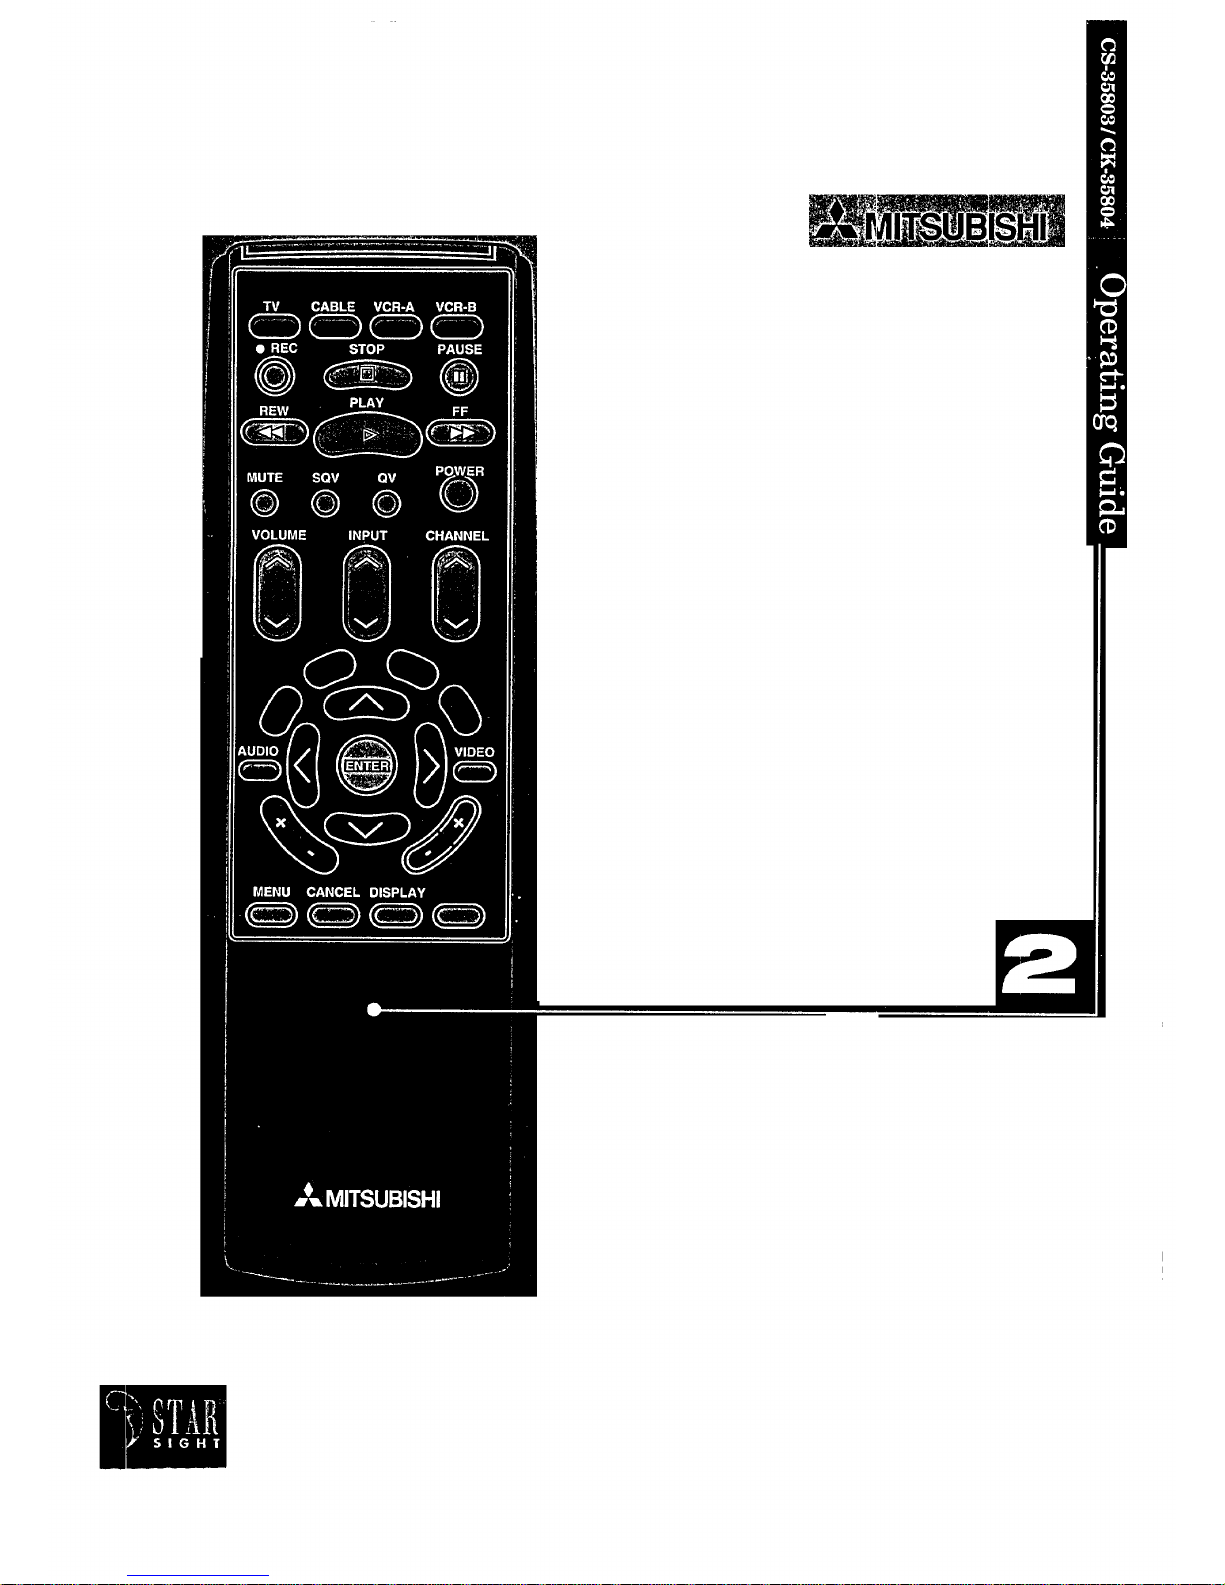
Overview of the Remote Control .................................................................................................... 4
Getting ready to use the remote control ................................................................................. 4
Remote control buttons and functions .................................................................................... 6
Chapter 2: Operating Your TV ......................................................................................................... 13
Getting Started ............................................................................................................................. 14
Adjusting the color purity ....................................................................................................... 15
Using the remote control .......................................................................................................... 16
Turning the TV on/off ................................................................................................................ 19
Selecting the input source ........................................................................................................ 20
Changing channels ................................................................................................................... 21
Understanding the ViewPoint III on-screen menus ................................................................ 24
Memorizing channels ............................................................................................................... 25
Setting the clock ....................................................................................................................... 27
Adding and deleting channels ................................................................................................. 29
Setting the A/V Network ......................................................................................................... 30
Choosing a menu display ......................................................................................................... 32
Renaming the inputs ............................................................................................................... 34
Naming the channels ............................................................................................................... 35
Locking A/V functions ............................................................................................................. 36
Using the advanced PIP functions ........................................................................................... 37
Using the power restore feature ............................................................................................. 39
Adjusting the sound ................................................................................................................. 40
Adjusting the picture ............................................................................................................... 42
Using the closed caption decoder ............................................................................................ 43"
Using the Advanced Features ...................................................................................................... 44
Setting the timer ....................................................................................................................... 45
Using the parental lock ........................................................................................................... 46
Using Super Quick View ......................................................................................................... 48
Using home theater ................................................................................................................. 52
Resetting the sound and the picture ......................................................................................... 53
Chapter 3: Using the Special Features ............................................................................................ 55
Understanding the On-Screen Displays ........................................................................................ 56
Using the Off-Timer ...................................................................................................................... 57
Setting the off-timer ................................................................................................................ 58
Changing or canceling the off-timer ......................................................................................... 59
Table of Contents i
Using Picture-in-Picture (PIP) ...................................................................................................... 60
Selecting the PIP image .......................................................................................................... 61
Selecting the source and channel ............................................................................................ 62
Exchanging and moving the PIP image .................................................................................. 63
Switching the sound reception ................................................................................................ 64
Freezing the PIP image ........................................................................................................... 65
Using the Snap-shot feature ..................................................................................................... 66
Using the Replay feature ......................................................................................................... 67
Using the Active A/V Network Feature ....................................................................................... 68
Chapter 4: Troubleshooting .............................................................................................................. 73
Caution and Care ........................................................................................................................... 76
Calling for Service ......................................................................................................................... 77
Appendix: Automatic Procedure for the Parental Lock ............................................................... 79
Index .................................................................................................................................................. 81
ii Table of Contents
CHAPTER 1
Getting to Know Your TV
_>Important:
Now that you have connected your TV and subscribed to the
StarSight service, it's time to understand the exciting features :your
Mitsubishi TV offers.
If you have not connected your TV and subscribed to StarSight,
please see Booklet #1, '_YIitsubishi Installation and Setup
Guide" before reading this owner's guide.
This chapter will introduce you to the range of options avai:[able by
using the buttons on the control panel of the TV or the remote
control. You'll find information on:
Overview of the Control Panel.
Overview of the Remote Control

Overview of the Control Panel
POWER O PROG. TIMER
I
Push to open the cont_._ol panel
Control Panel
@ @
• VOL •
@@@
• CH • INPUT
Op°wer button (POWER)
Use to turn the TV on or off.
C)program timer indicator (PROG. TIMER)
Lights up when the TV is programmed to turn on at a particular
time.
@volume controls (VOL)
Press the .button to turn tip the volume and theVbutton to
turn down the volume.
@channel controls (CH)
Use the ,button to switch toa channel with a higher number
and the Vbutton to switch to a channel with a lower number.
input button (INPUT)
Use this button to select the input source to view:
• Antenna A,
• Antenna B, or
• External 1, 2 or 3.
2 Chapter 1 : Getting to Know Your TV
_>Important:
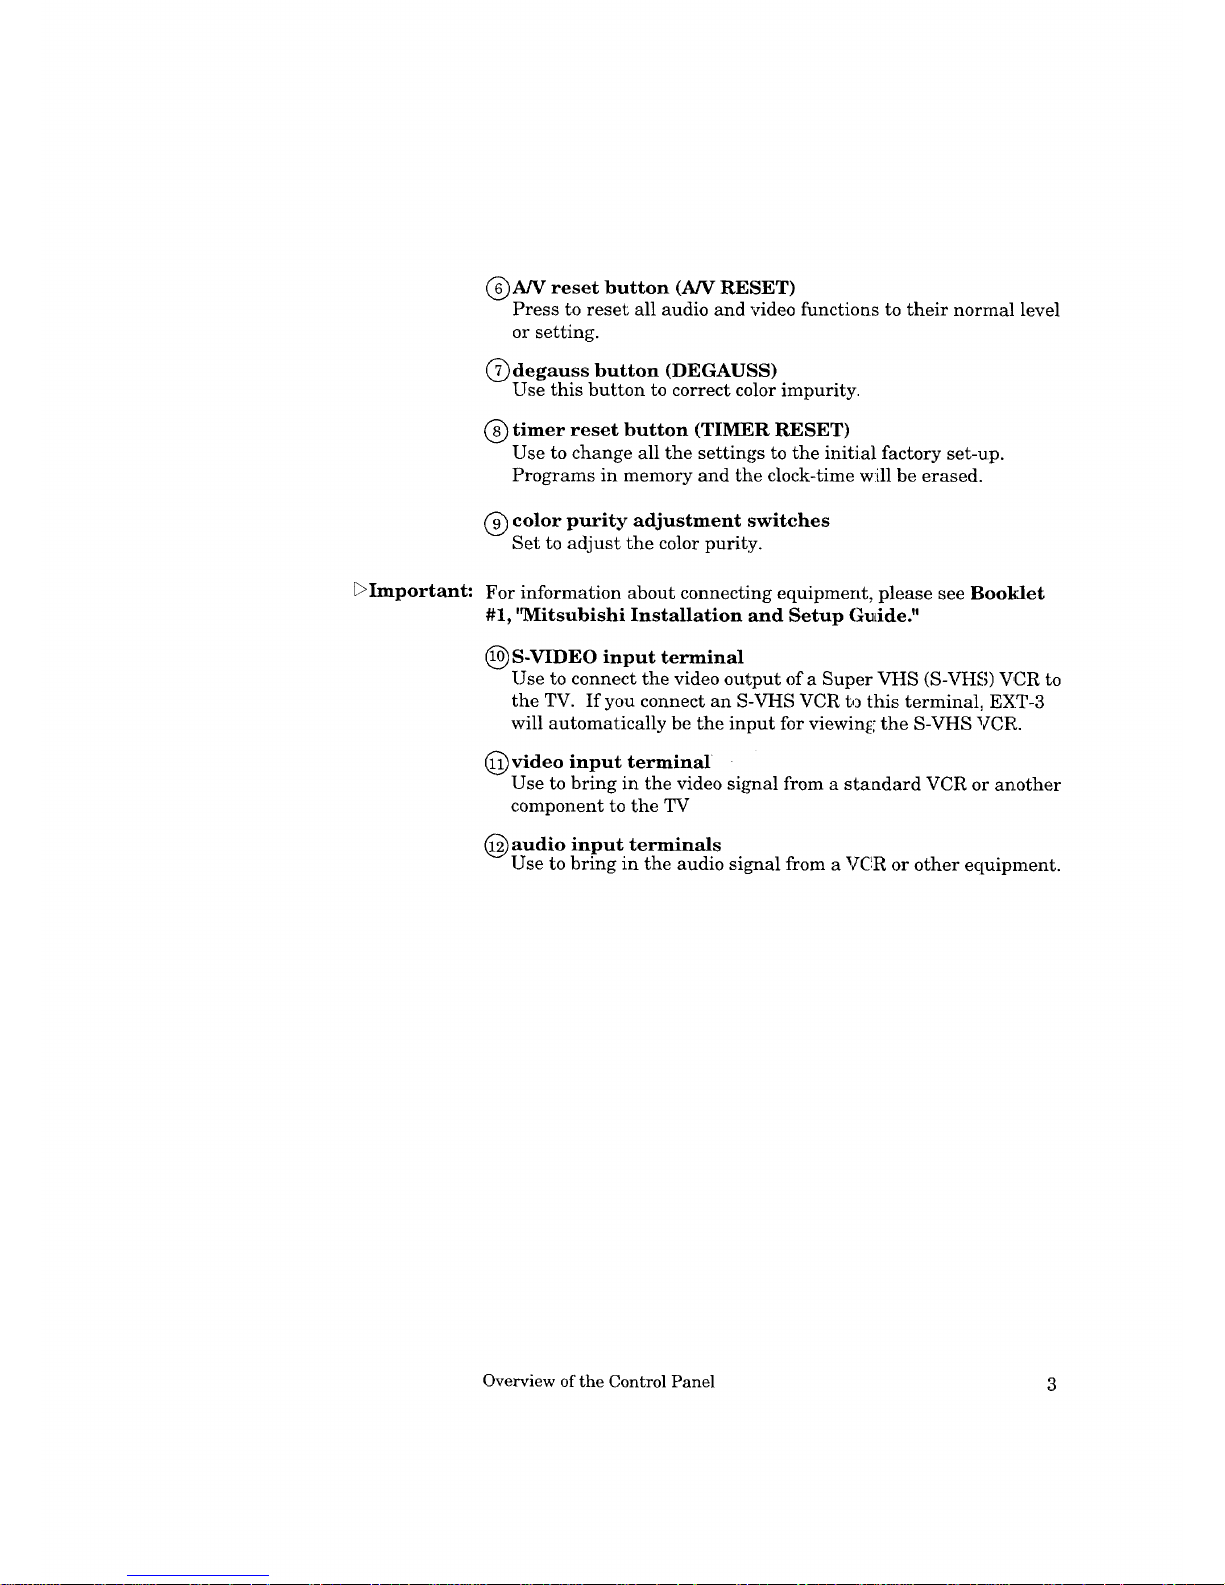
C)A]V reset button (AN RESET)
Press to reset all audio and 'video functions to their normal level
or setting.
@ degauss button (DEGAUSS)
Use this button to correct color impurity.
@ timer reset button (TIMER RESET)
Use to change all the settings to the initial factory set-up.
Programs in memory and the clock-time will be erased.
@ color purity adjustment switches
Set to adjust the color purity.
For information about connecting equipment, please see Booklet
#1, '_Iitsubishi Installation and Setup Gudde."
(_) S-VIDEO input terminal
Use to connect the video output of a Super VHS (S-VHS) VCR to
the TV. If you connect an S-VHS VCR to this terminal, EXT-3
will automatically be the input for viewing; the S-VHS VCR.
(_) video input terminal
Use to bring in the video si_mal from a standard VCR or another
component to the TV
(_)audio input terminals
Use to bring in the audio signal from a VCR or other ectuipment.
Overview of the Control Panel 3
. Overview of the Remote Control
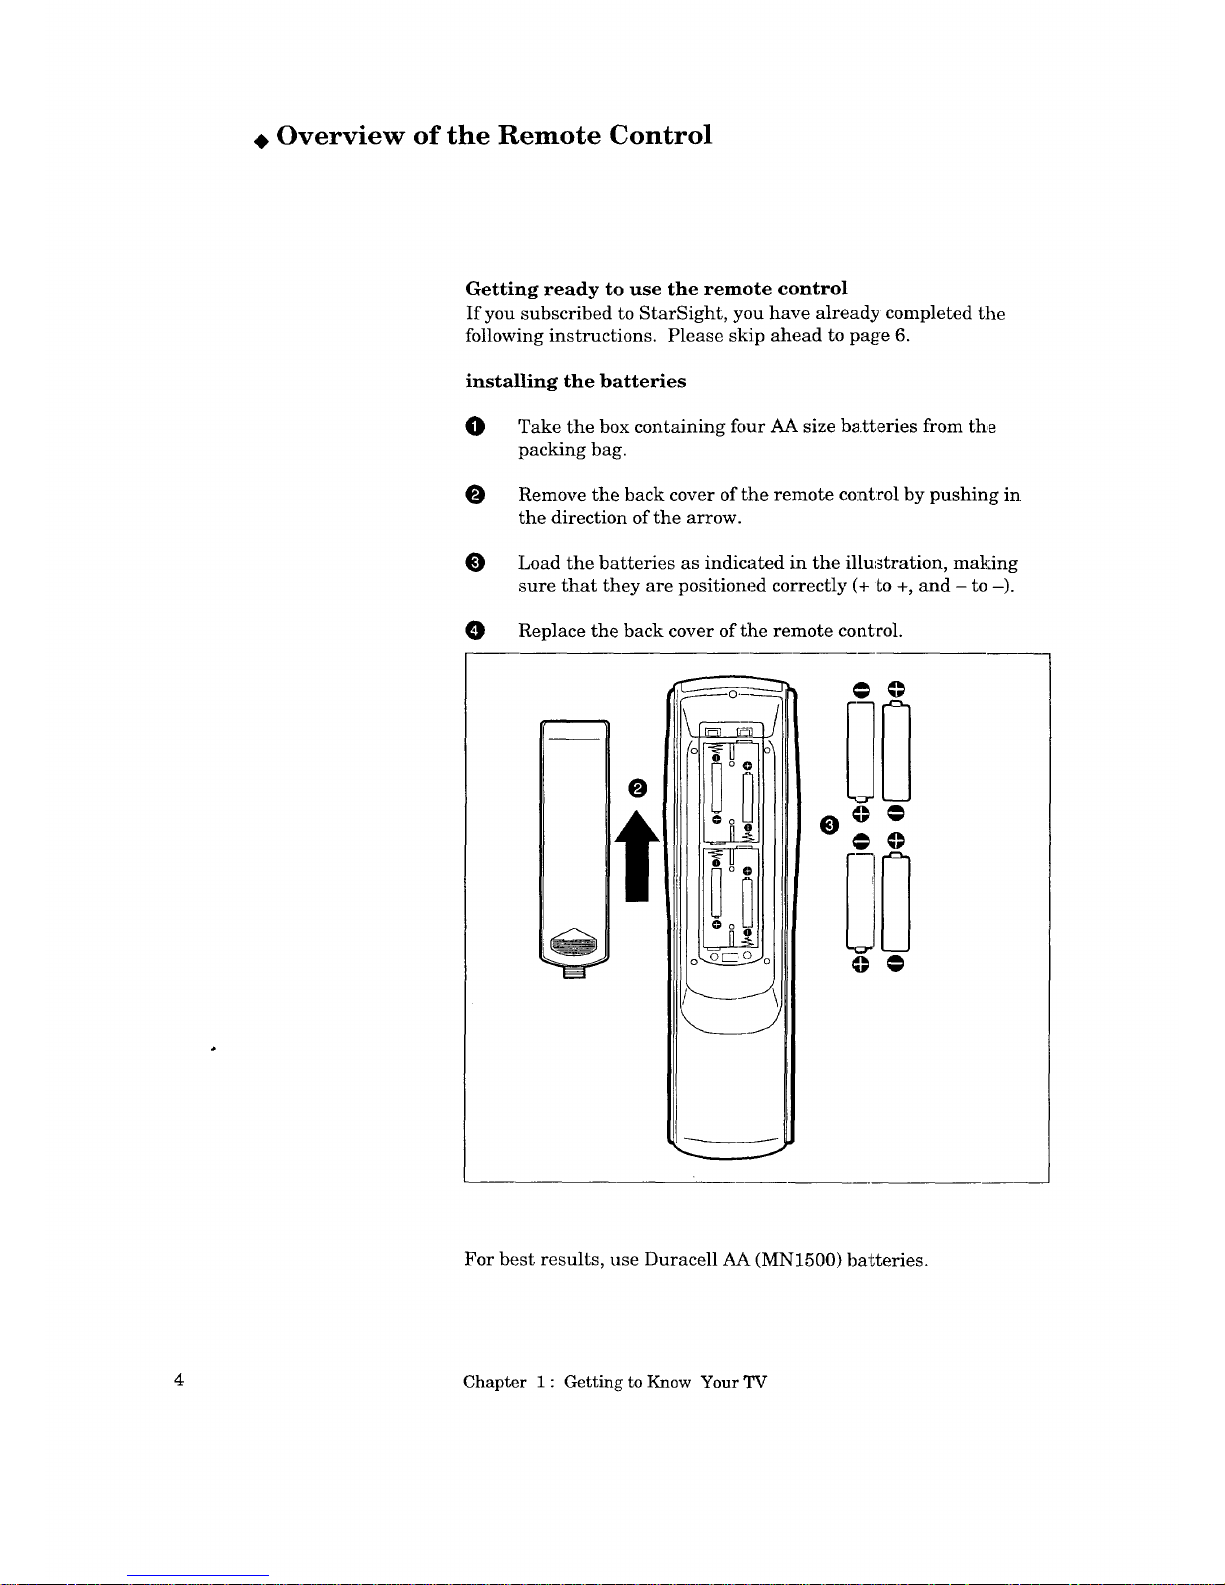
Getting ready to use the remote control
If you subscribed to StarSight, you have already completed the
following instructions. Please skip ahead to pa_e 6.
installing the batteries
O
Take the box containing four AA size batteries from the
packing bag.
O Remove the back cover of the remote control by pushing in
the direction of the arrow.
O
Load the batteries as indicated in the illu.._tration, making
sure that they are positioned correctly (+ to +, and - to -).
O Replace the back cover of the remote coatvol.
@ @
@ @
For best results, use Duracell AA (MN1500) ba_teries.
4 Chapter 1 : Getting to Know Your TV
some dos and don'ts
To ensure that your remote control will continue working properly,
follow these guidelines:
Don't press two or more buttons at the same time, unless
specifically instructed to do so in this owner's guide.
Don't allow the remote control to get we1; or become heated.
Avoid dropping the remote control on a ]lard surface.
When cleaning the remote control, don't use any harsh
chemicals. Use only a soft, slightly moistened cloth.
general instructions
When using the remote control to operate the TV, VCR or cable box:
O Be within 20 feet of the desired equipment.
Point the top of the remote control towa:cd the equipraent.
Press the appropriate button or groups of buttons.
guidelines for using batteries
• Don't use a new battery with an old one.
• Don't heat, take apart, or throw batteries into a fire.
The following section explains more about the range of options
available when using the remote control.
Overview of the Remote Control
5
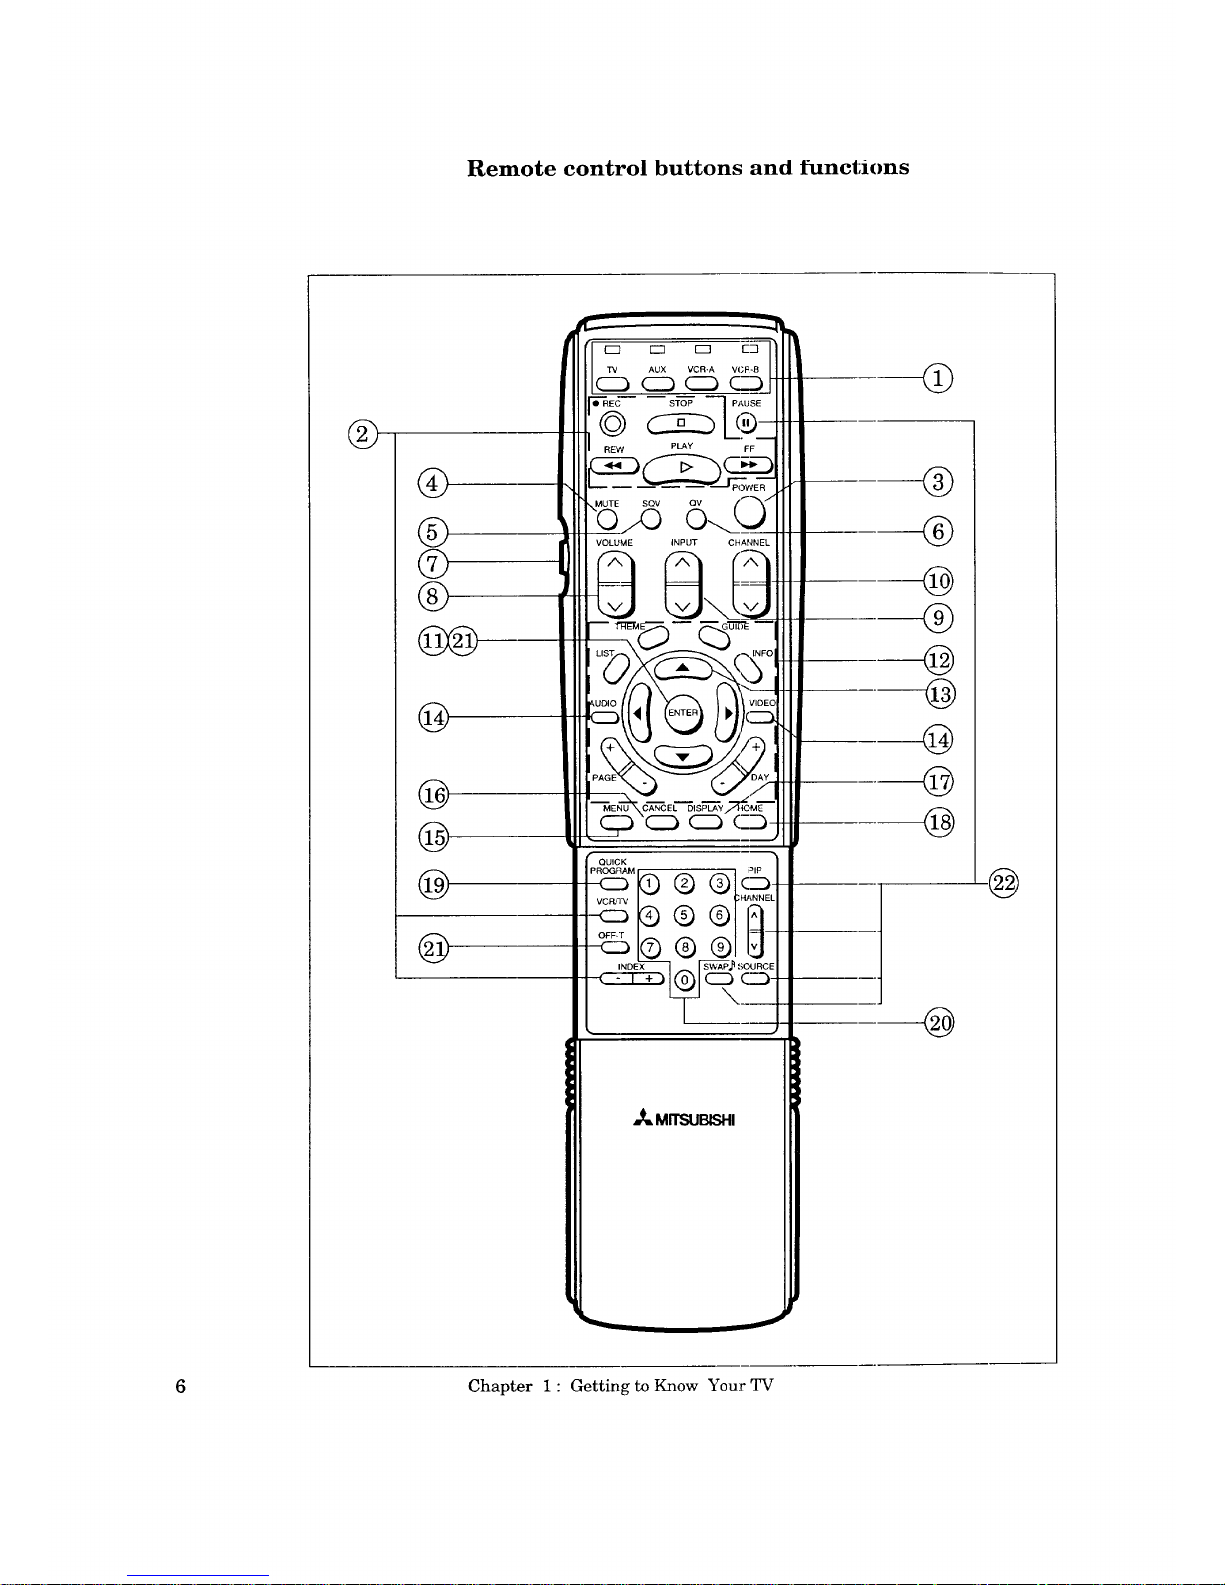
Remote control buttons and l_nctmns
®
@
®
©
®
@
@
@
@
@
(_ AUX VCR-A VCF-8
CDCD_
O'RE_ STOP
REW PLAY FF
MUTE SQV QV /_'_7
VOLUME INPUT CHANNEL
8 8 8-
'IDE(]
:::)
Pc_ c_ c5
QUICK
-_l®® ® ?
INDEX
@
®
®
@
®
@
@
@
@
@
@
@
6 Chapter 1 : Getting to Know Your TV
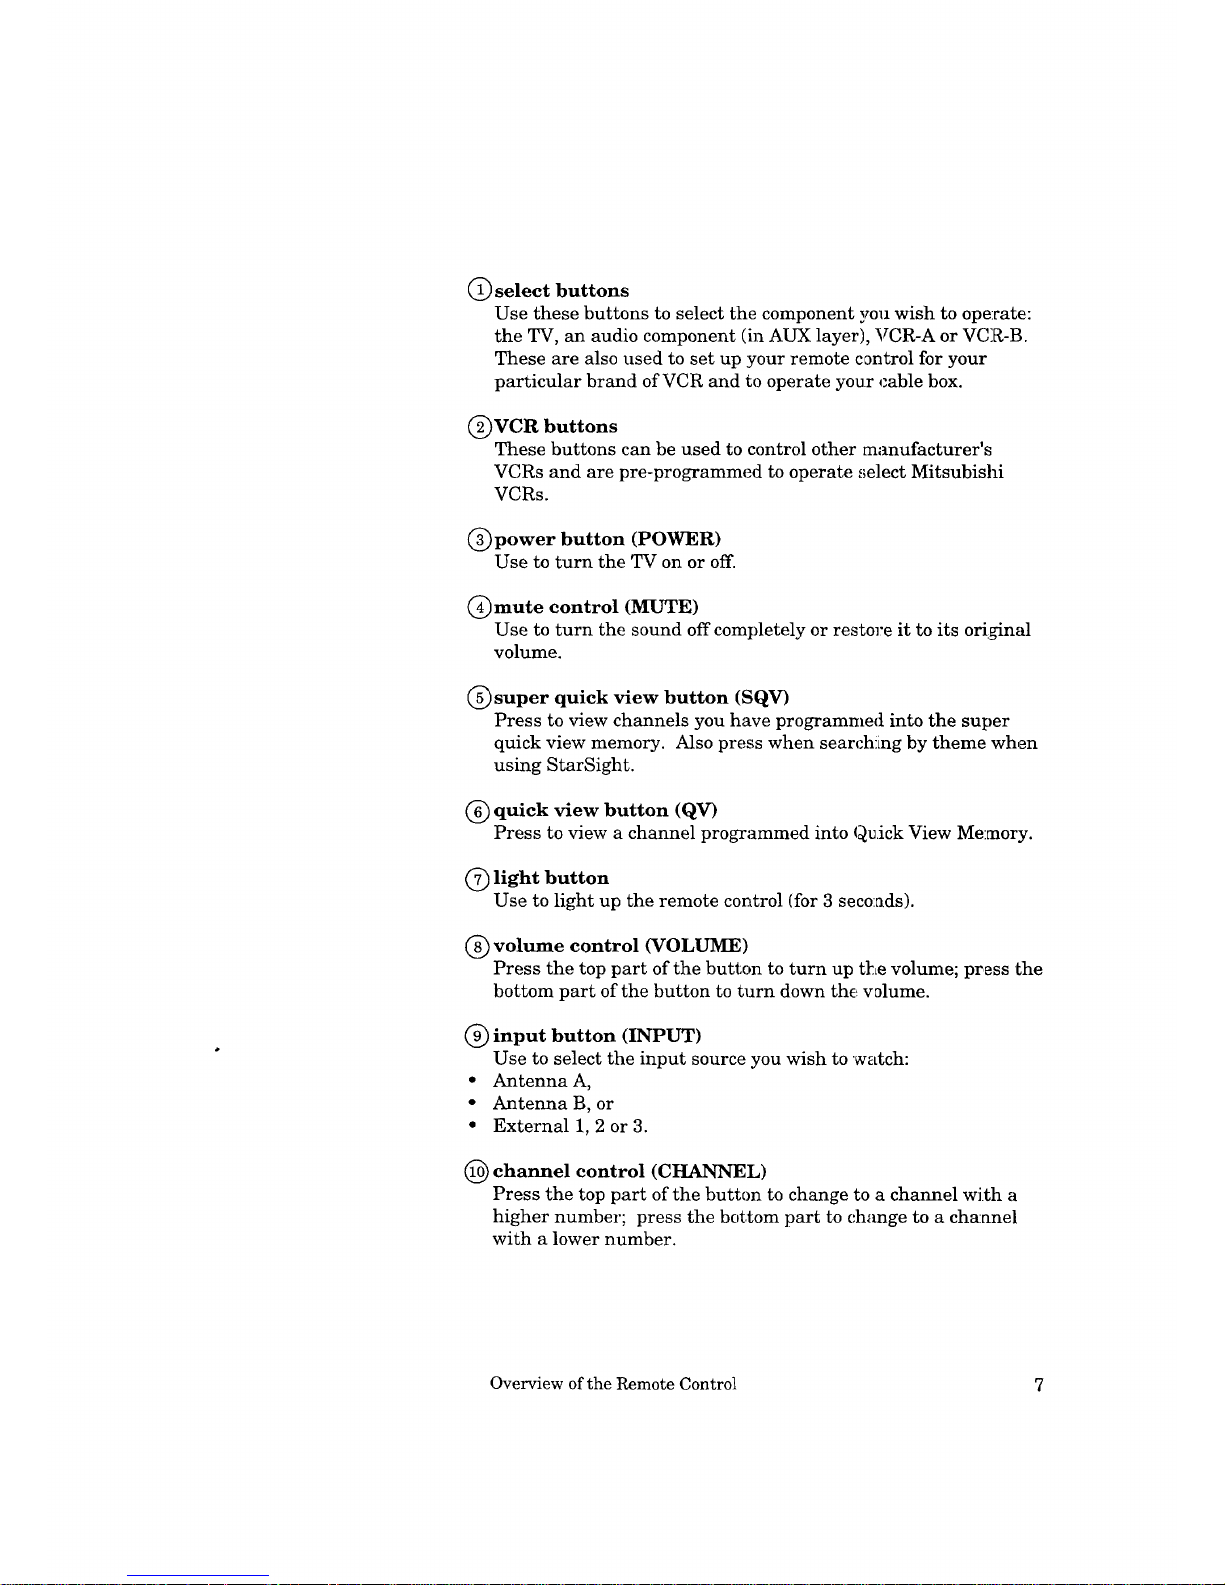
C) select buttons
Use these buttons to select the component you wish to ope:rate:
the TV, an audio component (in AUX layer), VCR-A or VCR-B.
These are also used to set up your remote control for your
particular brand of VCR and to operate your (:able box.
C)VCR buttons
These buttons can be used to control other manufacturer's
VCRs and are pre-programmed to operate ,;elect Mitsubishi
VCRs.
(_)power button (POWER)
Use to turn the TV on or off.
(_)mute control (MUTE)
Use to turn the sound off completely or restore it to its original
volume.
(_ super quick view button (SQV)
Press to view channels you have programmed into the super
quick view memory. Also press when searchlLng by theme when
using StarSight.
(_ quick view button (QV)
Press to view a channel programmed into Qu.ick View Memory.
C) light button
Use to light up the remote control (for 3 seconds).
(_) volume control (VOLUME)
Press the top part of the button to turn up the volume; press the
bottom part of the button to turn down the volume.
(_) input button (INPUT)
Use to select the input source you wish to watch:
• Antenna A,
• Antenna B, or
• External 1, 2 or 3.
(_ channel control (CHANNEL)
Press the top part of the button to change to a channel with a
higher number; press the bottom part to c.hange to a channel
with a lower number.
Overview of the Remote Control 7
Remote control buttons and functions (cont.)
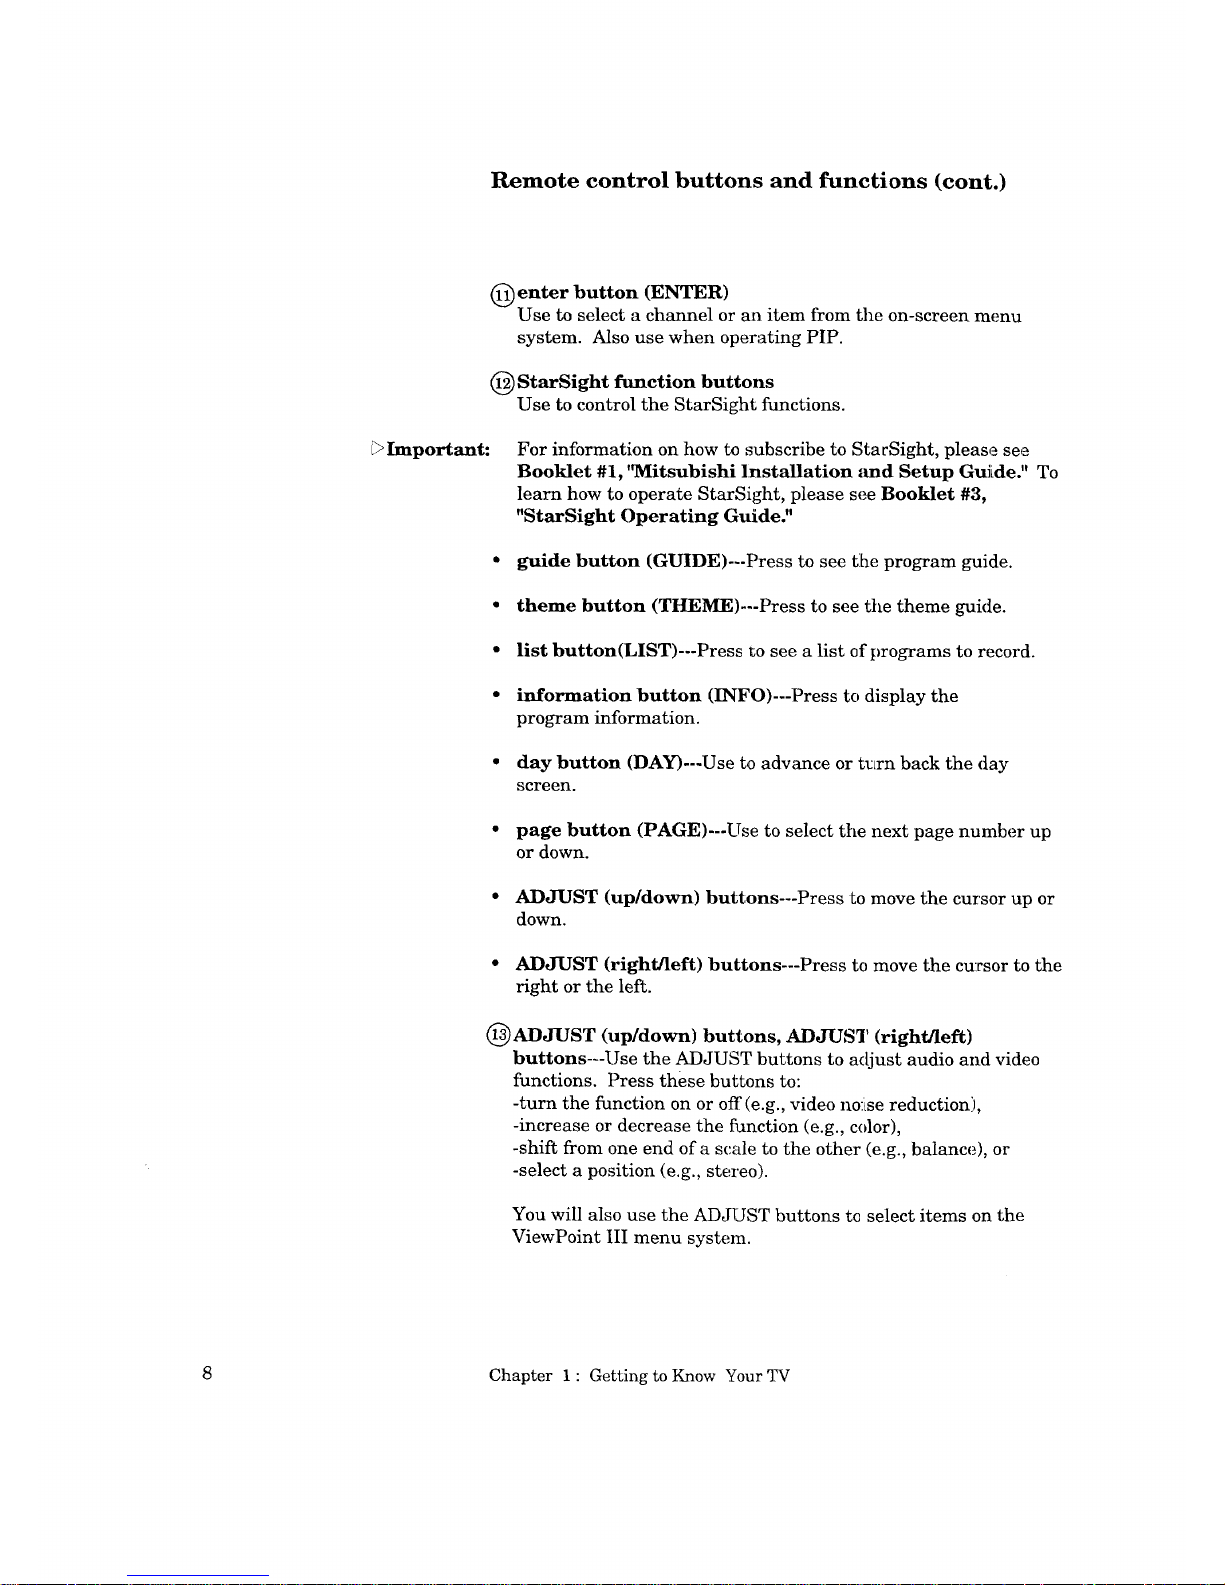
(_ enter button (ENTER)
Use to select a channel or an item from the on-screen menu
system. Also use when operating PIP.
(_ StarSight function buttons
Use to control the StarSight functions.
Important:
For information on how to subscribe to StacSight, please see
Booklet #1, 'WIitsubishi Installation _md Setup Guide." To
learn how to operate StarSight, please see Booklet #3,
"StarSight Operating Guide."
• guide button (GUIDE)---Press to see tlhe program guide.
• theme button (THEME)---Press to see the theme guide.
• list button(LiST)---Press to see a list of programs to record.
• information button (INFO)---Press to display the
program information.
• day button (DAY)---Use to advance or t_Lrn back the (tay
screen.
• page button (PAGE)---Use to select tile next page number up
or down.
• ADJUST (up/down) buttons---Press to move the cursor up or
down.
• ADJUST (right/left) buttons---Press to move the cursor to the
right or the left.
(I_ADJUST (up/down) buttons, ADJUST (right/left)
buttons---Use the ADJUST buttons to adjust audio and video
functions. Press these buttons to:
-turn the function on or off(e.g., video noise reduction:),
-increase or decrease the function (e.g., color),
-shift from one end of a scale to the other (e.g., balance), or
-select a position (e.g., stereo).
You will also use the ADJUST buttons tc select items on the
ViewPoint III menu system.
8 Chapter 1 : Getting to Know Your TV
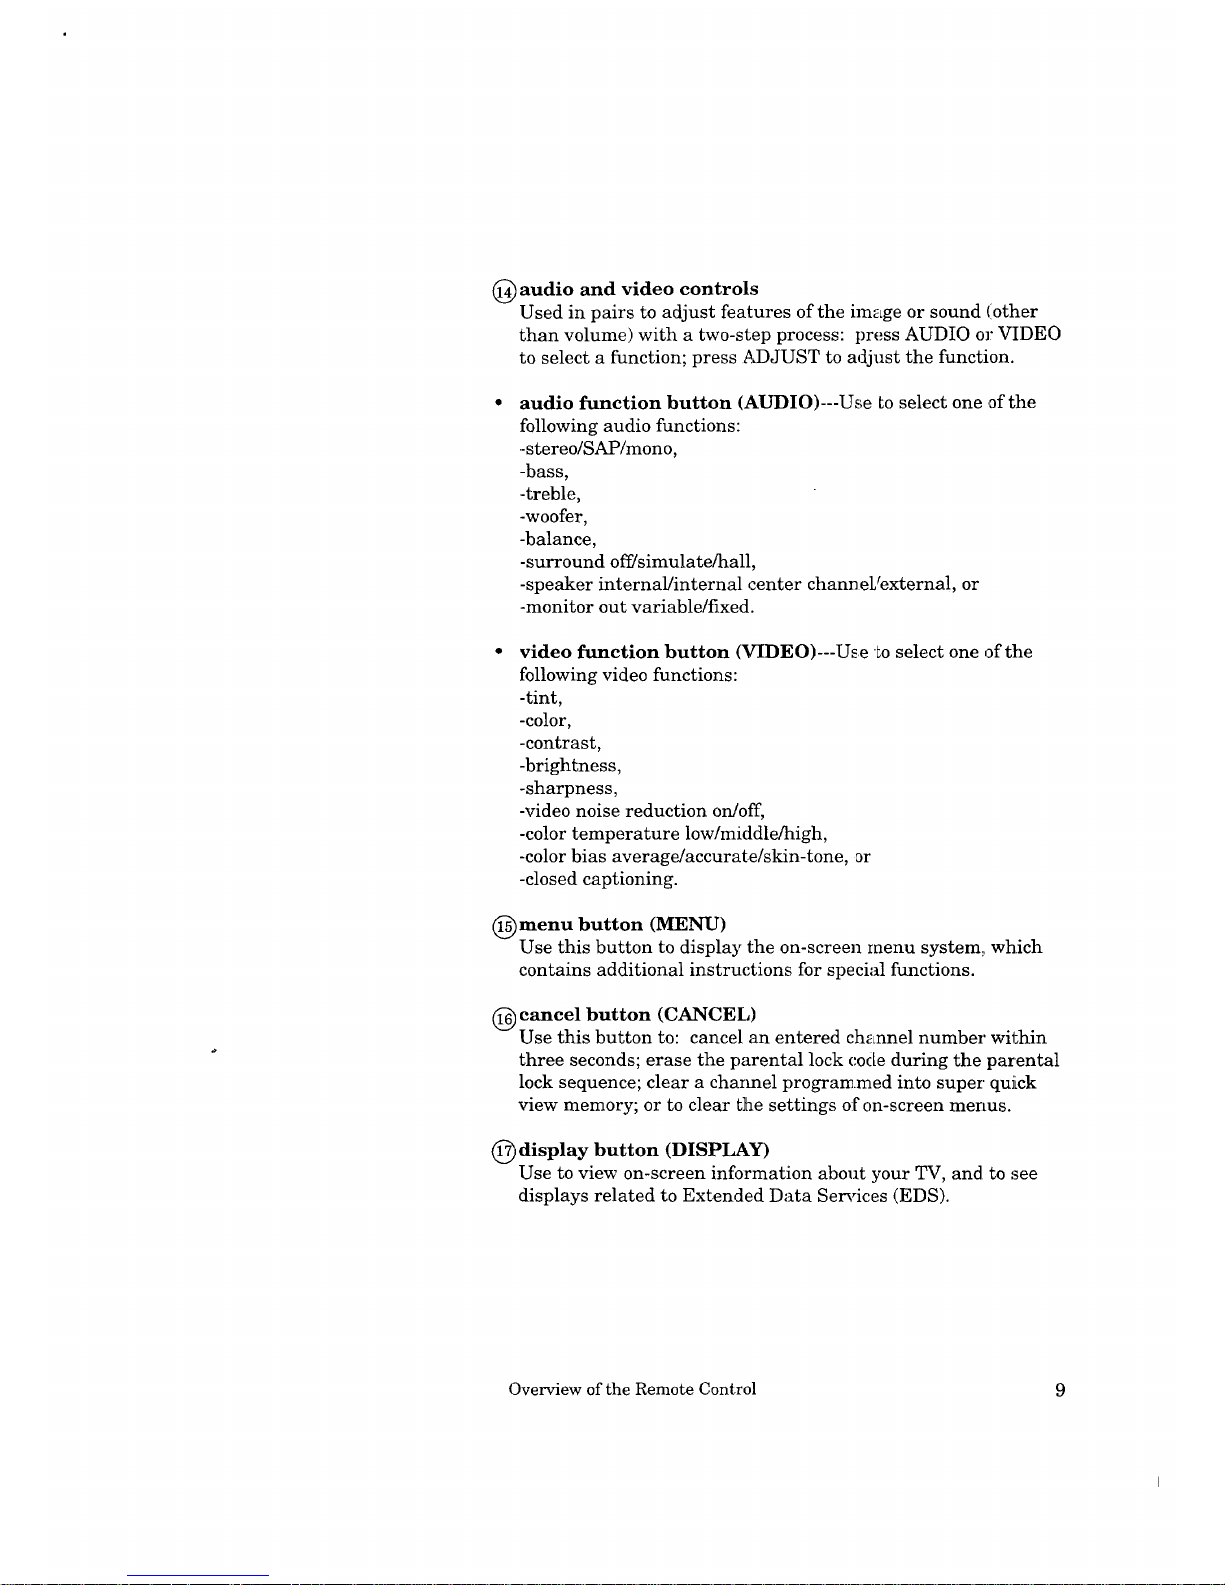
(_) audio and video controls
Used in pairs to adjust features of the image or sound (other
than volume) with a two-step process: press AUDIO or VIDEO
to select a function; press _J)JUST to adjust the function.
audio function button (AUDIO)---Use Loselect one of the
following audio functions:
-stereo/SAP/mono,
-bass,
-treble,
-woofer,
-balance,
-surround off/simulate/hall,
-speaker internal/internal center channeL_external, or
-monitor out variable/fixed.
video function button (VIDEO)---U_e Lo select one of the
following video functions:
-tint,
-color,
-contrast,
-brightness,
-sharpness,
-video noise reduction on/off,
-color temperature low/middle/high,
-color bias average/accurate/skin-tone, _r
-closed captioning.
(_) menu button (MENU)
Use this button to display the on-screen menu system: which
contains additional instructions for special functions.
(_ cancel button (CANCEL)
Use this button to: cancel an entered channel number within
three seconds; erase the parental lock code during the parental
lock sequence; clear a charmel programmed into super' quJLck
view memory; or to clear the settings of on-screen menus.
(_ display button (DISPLAY)
Use to view on-screen information about your TV, and to :see
displays related to Extended Data Services (EDS).
Overview of the Remote Control
9

Remote control buttons and functions (cont.)
@home button (HOME)
Press to return to regular TV viewing from tlhe on-screen
displays and menus.
_) quick program button (QUICK PROGRAlVl)
Use this button to quickly program your Mitsubishi VCR to
record.
_>Important: You must connect your Mitsubishi VCR wiLtLthe A/V Network to
use Quick Program.
number buttons (0-9)
Use to select a channel number, and to enter the parental lock
code.
@ off-timer button (OFF-T)
Use to program the TV to turn off automatically at a later time.
@picture-in-picture controls
Use to control the special picture-in-picture (PIP) function.
• PIP button (PIP)---Press to see the PIP iLmage or cance] it.
• channel button (CHANNEL)---Press to c_Lange the channel of
the reduced PIP image.
10 Chapter 1 : Getting to Know Your TV
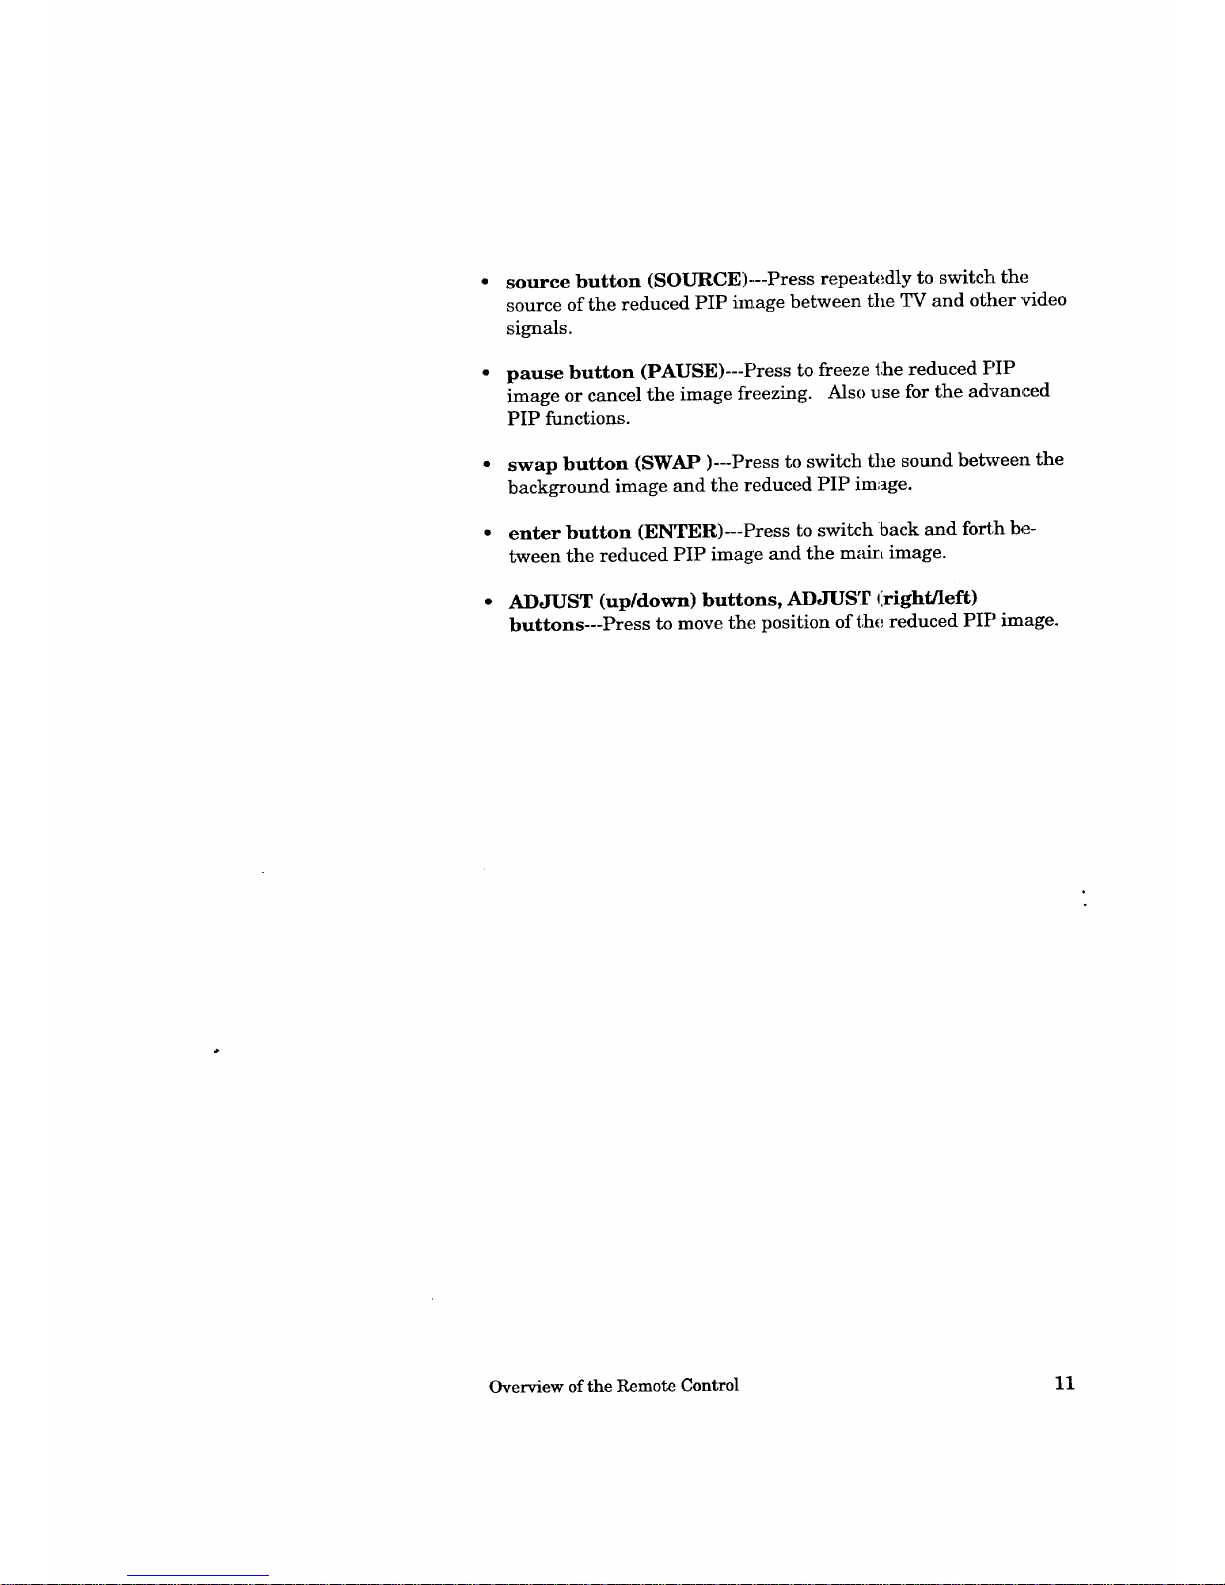
source button (SOURCE)-.--Press repeat_._dly to switch the
source of the reduced PIP image between the TV and other video
signals.
pause button (PAUSE)---Press to freeze the reduced PIP
image or cancel the image freezing. Also use for the advanced
PIP functions.
swap button (SWAP)---Press to switch the sound between the
background image and the reduced PIP image.
enter button (ENTER)---Press to switch back and forth be-
tween the reduced PIP image and the main image.
ADJUST (up/down) buttons, ADJUST (right/left)
buttons---Press to move the position of the reduced PIP image.
Overview of the Remote Control 11

CHAPTER 2
Your
_Important:
This chapter will explain how to operate your TV, first focusing on
functions that are basic and easy and then explaining some of the
advanced features.
Please see Booklet #3, "StarSight Operating Guide" for
information on using the StarSight feature.
This chapter explains:
• Getting Started
• Using the Advanced Features
. Getting Started
This section will introduce you to the basic features of your
Mitsubishi TV.
You'll find information on:
Adjusting the color purity,
Using the remote control,
Turning the TV on/off,
Selecting the input source,
Changing channels,
Understanding the ViewPoint III on-screen menus,
Memorizing channels,
Setting the clock,
Adding and deleting channels,
Setting the AN Network,
Choosing the menu display,
Renaming the inputs,
Naming the channels,
Locking AN functions,
Using the advanced PIP functions,
Using the power restore feature,
Adjusting the sound,
Adjusting the picture, and
Using the closed caption decoder.
,Warnin_
--Do_t leave stationary images, such as those generated from stock
market reports or video games, on-screen for more than 10 min-
utes. Still patterns can scar the TV causing permanent damage
to the picture tube.
14 Chapter 2 : Operating Your TV
Adjusting the color purity
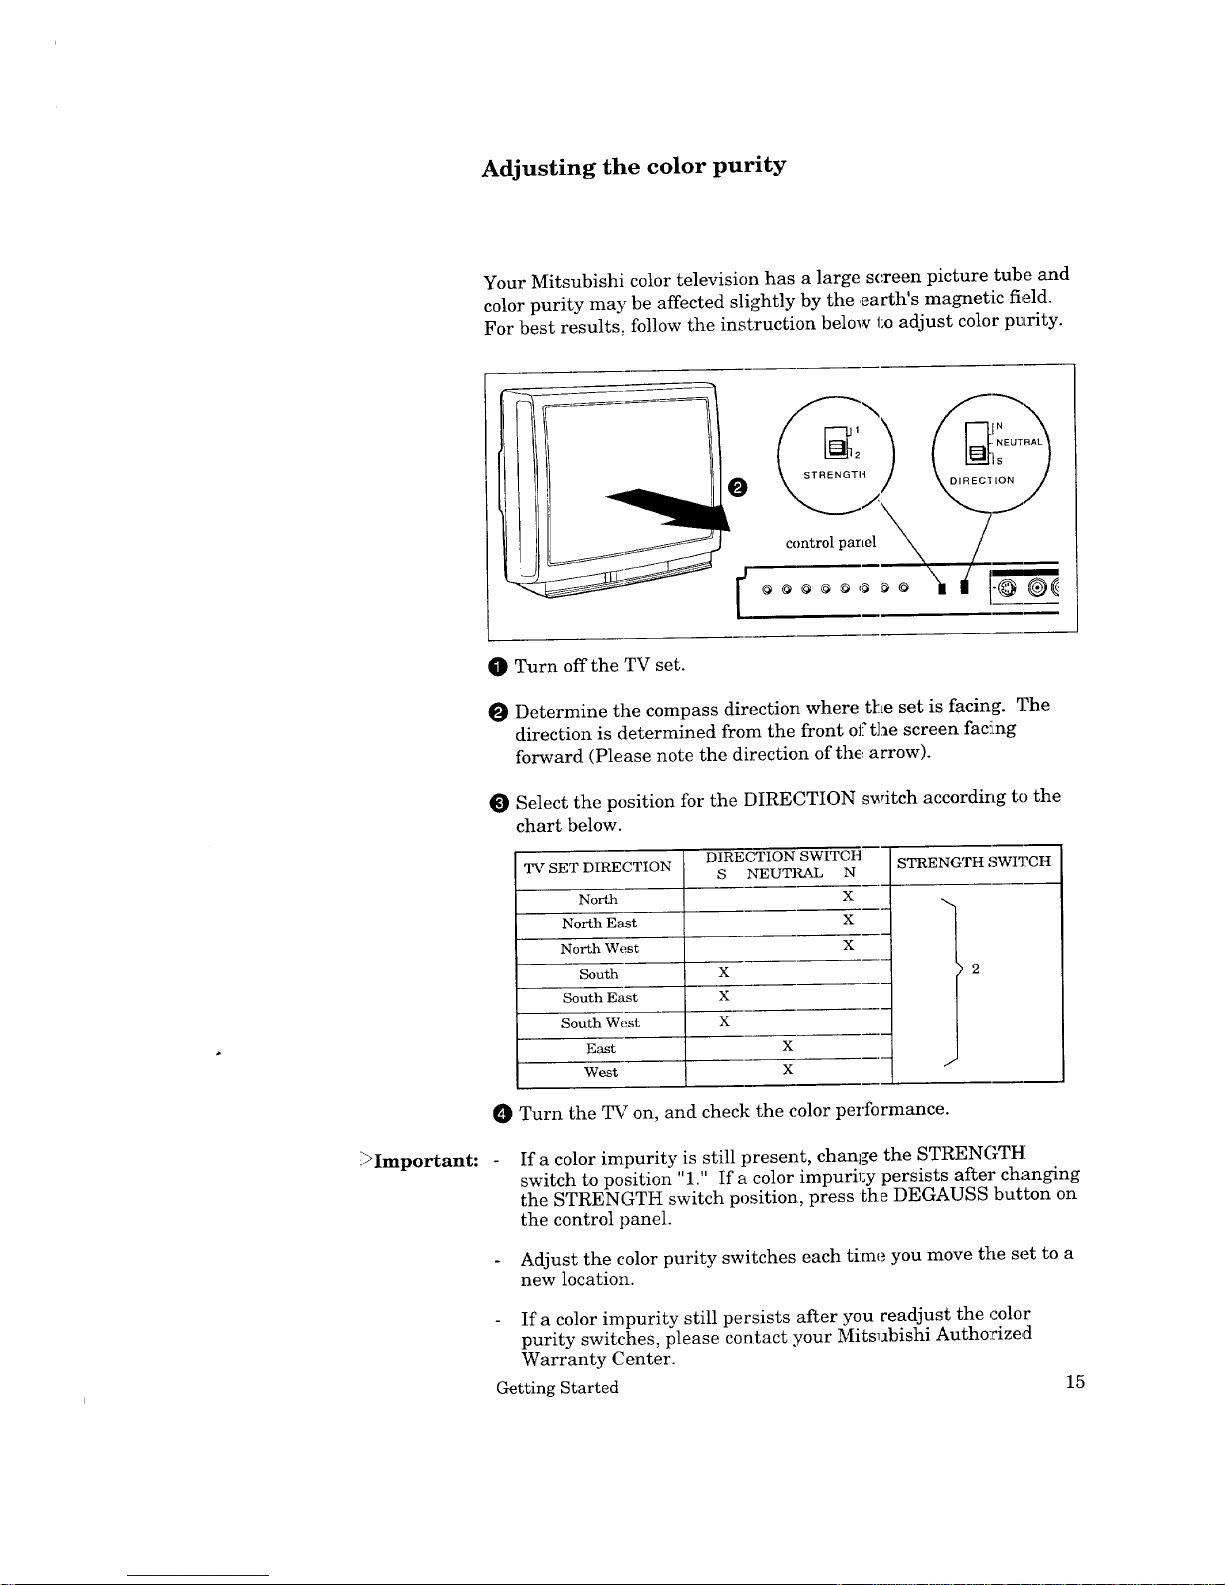
Your Mitsubishi color television has a large screen picture tube and
color purity may be affected slightly by the .earth's magnetic field.
For best results_ follow the instruction below to adjust color purity.
O
k
[
control parLel
!
_Important:
O Turn off the TV set.
O Determine the compass direction where t[_e set is facing. The
direction is determined from the front of the screen fac!ing
forward (Please note the direction of the, arrow).
Select the position for the DIRECTION switch according to the
chart below.
TV SET DIRECTION
North
North East
North West
South
South East
South West
East
West
DIRECTION SWITCH
S NEUTI_AL N
X
X
X
X
X
X
X
X
STRENGTH '_WI3?CH
O Turn the TV on, and check the color performance.
If a color impurity is still present, change the STRENGTH
switch to position "1." If a color impuril:y persists after changing
the STRENGTH switch position, press the DEGAUSS button on
the control panel.
Adjust the color purity switches each time you move tile set to a
new location.
If a color impurity still persists after you readjust the color
purity switches, please contact your Mitsubishi Authorized
Warranty Center.
Getting Started 15
Using the remote control
_Important:
Operating Mitsubishi components
The remote control comes programmed to operate Mitsubishi TVs,
and VCRs. The SELECT buttons determine which component tlhe
remote control will operate.
Select the equipment you wish to control (TV, AUX, VCR-A or VCR-
B) by pressing the appropriate SELECT buttc,n. The remote wil]L
control the selected piece of equipment until you choose anotlher
setting.
The following buttons are available to control your TV set.
power button
PLAY button
pause button
mute control
super quick view button
quick view button
volume control
input button
channel control
enter button
audio and xSdeo controls
StarSight function buttons
menu b_Ltton
cancel button
display button
home button
quick program button
off-timer button
number buttons
PIP controls
swap button
adjust up/down, left]Iight
Operating other manufacturers' VCRs
The remote control is pre-set to operate Mitsubishi VCRs, b_Lt it can
also operate VCRs from other manufacturers as well. If you have a
VCR from another manufacturer, you can set up your remote to
control it.
You can set each layer (AUX, VCR-A or VCR-B} to operate your
VCR.
<setting up the remote control to operate your VCR>
O Turn off your VCR.
Choose a layer for controlling a VCR by pressing a SELECT
button on the remote control: VCR-A, VCR-3 or AUX.
While holding in the POWER button on the :cemote contr_
enter the code number listed :in the chart on the following; page
for your brand of VCR. Be sure to enter both digits of the code
number. (If more than one code number is listed, try the first
one. If that code does not work, try the next one until you find
the correct code.)
O Release the POWER button.
Press the POWER button again. Your VCR should turn on.
Your remote control is now set to operate yo _r VCR.
16 Chapter 2 : Operating Your TV
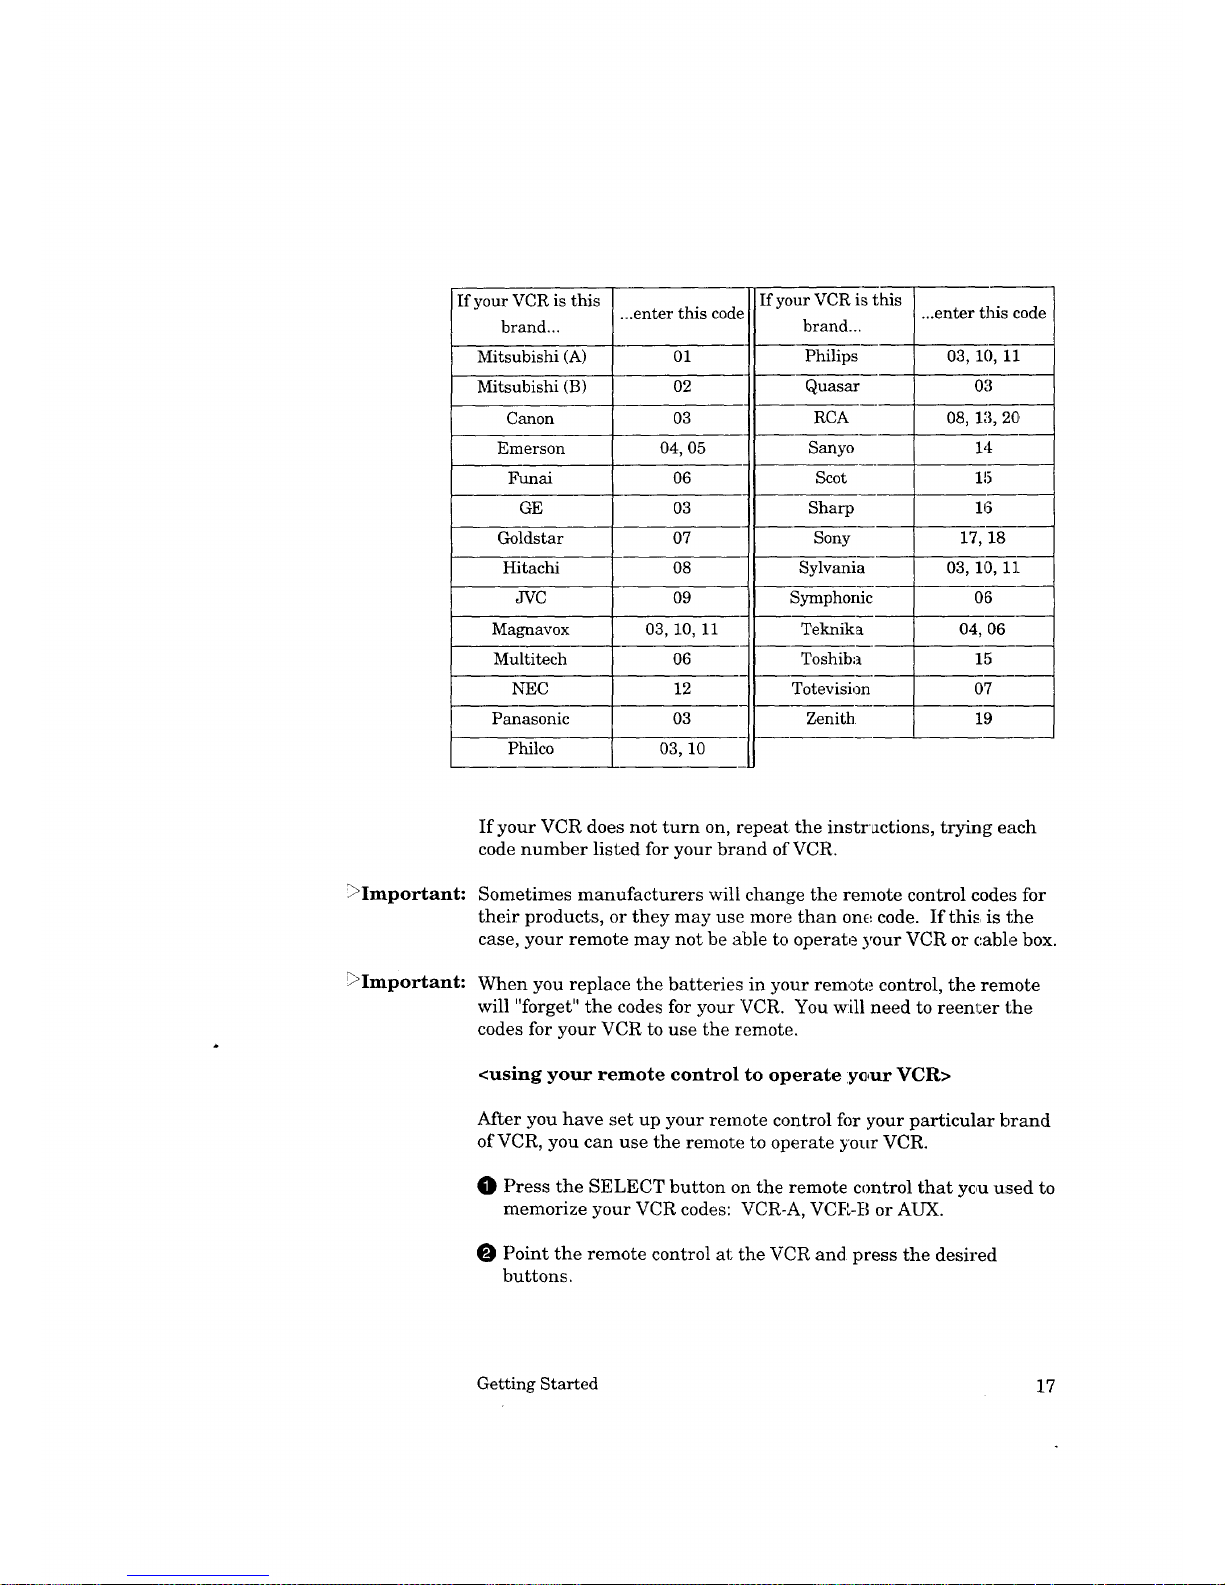
If your VCR is this
brand...
Mitsubishi (A)
Mitsubishi (B)
Canon
Emerson
Funai
GE
Goldstar
Hitachi
JVC
Magnavox
Multitech
NEC
Panasonic
Philco
If your VCR this
...enter this code ...enter this code
brand..
Philips 03, 10, 11
Quasar 03
RCA 08, 1"3, 20
Sanyo 14
Scot 15
Sharp 16
Sony 17, 18
Sylvani_ 03, 10, 11
Symphon" 06
TeknikE 04, 06
Toshib_ 15
Totevisi,: 07
Zenith 19
Ol
02
03
04, 05
06
O3
07
08
O9
03, 10, 11
06
12
03
II
_Important:
_Important:
If your VCR does not turn on, repeat the instractions, trying each
code number listed for your brand of VCR.
Sometimes manufacturers will change the remote control codes for
their products, or they may use more than one code. If this is the
case, your remote may not be able to operate your VCR or cable box.
When you replace the batteries in your remote control, the remote
will "forget" the codes for your VCR. You will need to reenl:er the
codes for your VCR to use the remote.
<using your remote control to operate yc,ur VCR>
After you have set up your remote control fi)r your particular brand
of VCR, you can use the remote to operate your VCR.
O Press the SELECT button on the remote control that yc,u used to
memorize your VCR codes: VCR-A, VCR-B or AUX.
Point the remote control at the VCR and press the desired
buttons.
Getting Started 17
Using the remote control (cont.)
_>Important: If you are using a Mitsubishi VCR, you will be able to use all of the
buttons on the remote control to operate your VCR except for
MUTE, VOLUME and the PIP hmction buttons.
If you are using another brand of VCR, you can use the POWER,
CHANNEL, REC, STOP, PAUSE, REW, PLAY, FF and INDEX
buttons to operate your VCR.
<using your remote control to operate your cable box>
If you wish to use your remote control to operate a cable box, please
see Booklet #1, '_¢Iitsubishi Installation and Setup Guide."
18 Chapter 2: Operating Your TV
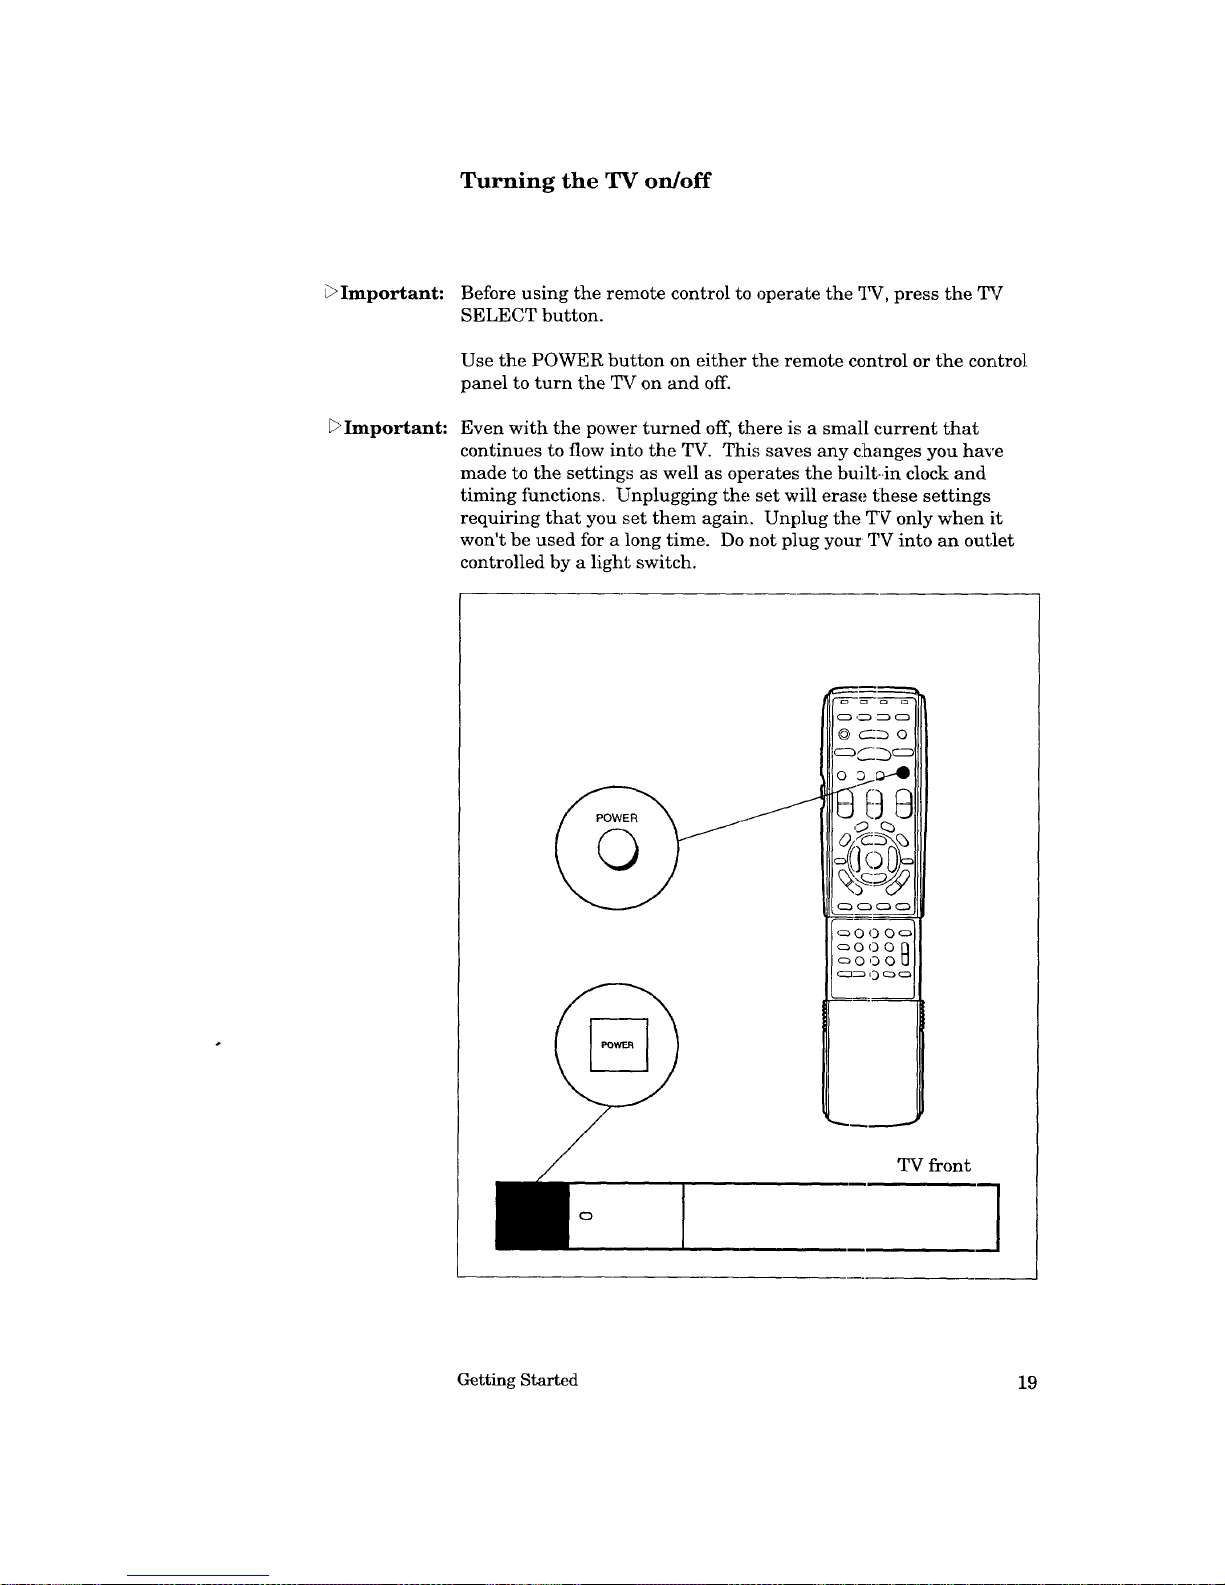
Turning the TV on/off
_Important:
_Important:
Before using the remote control to operate the _IW, press the TV
SELECT button.
Use the POWER button on either the remote control or the control
panel to turn the TV on and off.
Even with the power turned off, there is a small current that
continues to flow into the TV. This saves any clhanges you have
made to the settings as well as operates the built-.in clock and
timing functions. Unplugging the set will erase these settings
requiring that you set them again. Unplug the T_ only when it
won't be used for a long time. Do not plug your TV into an outlet
controlled by a light switch.
o D o
C:::_ _ C:3 C:3
c:_O O
TV front
]
Getting Started 19
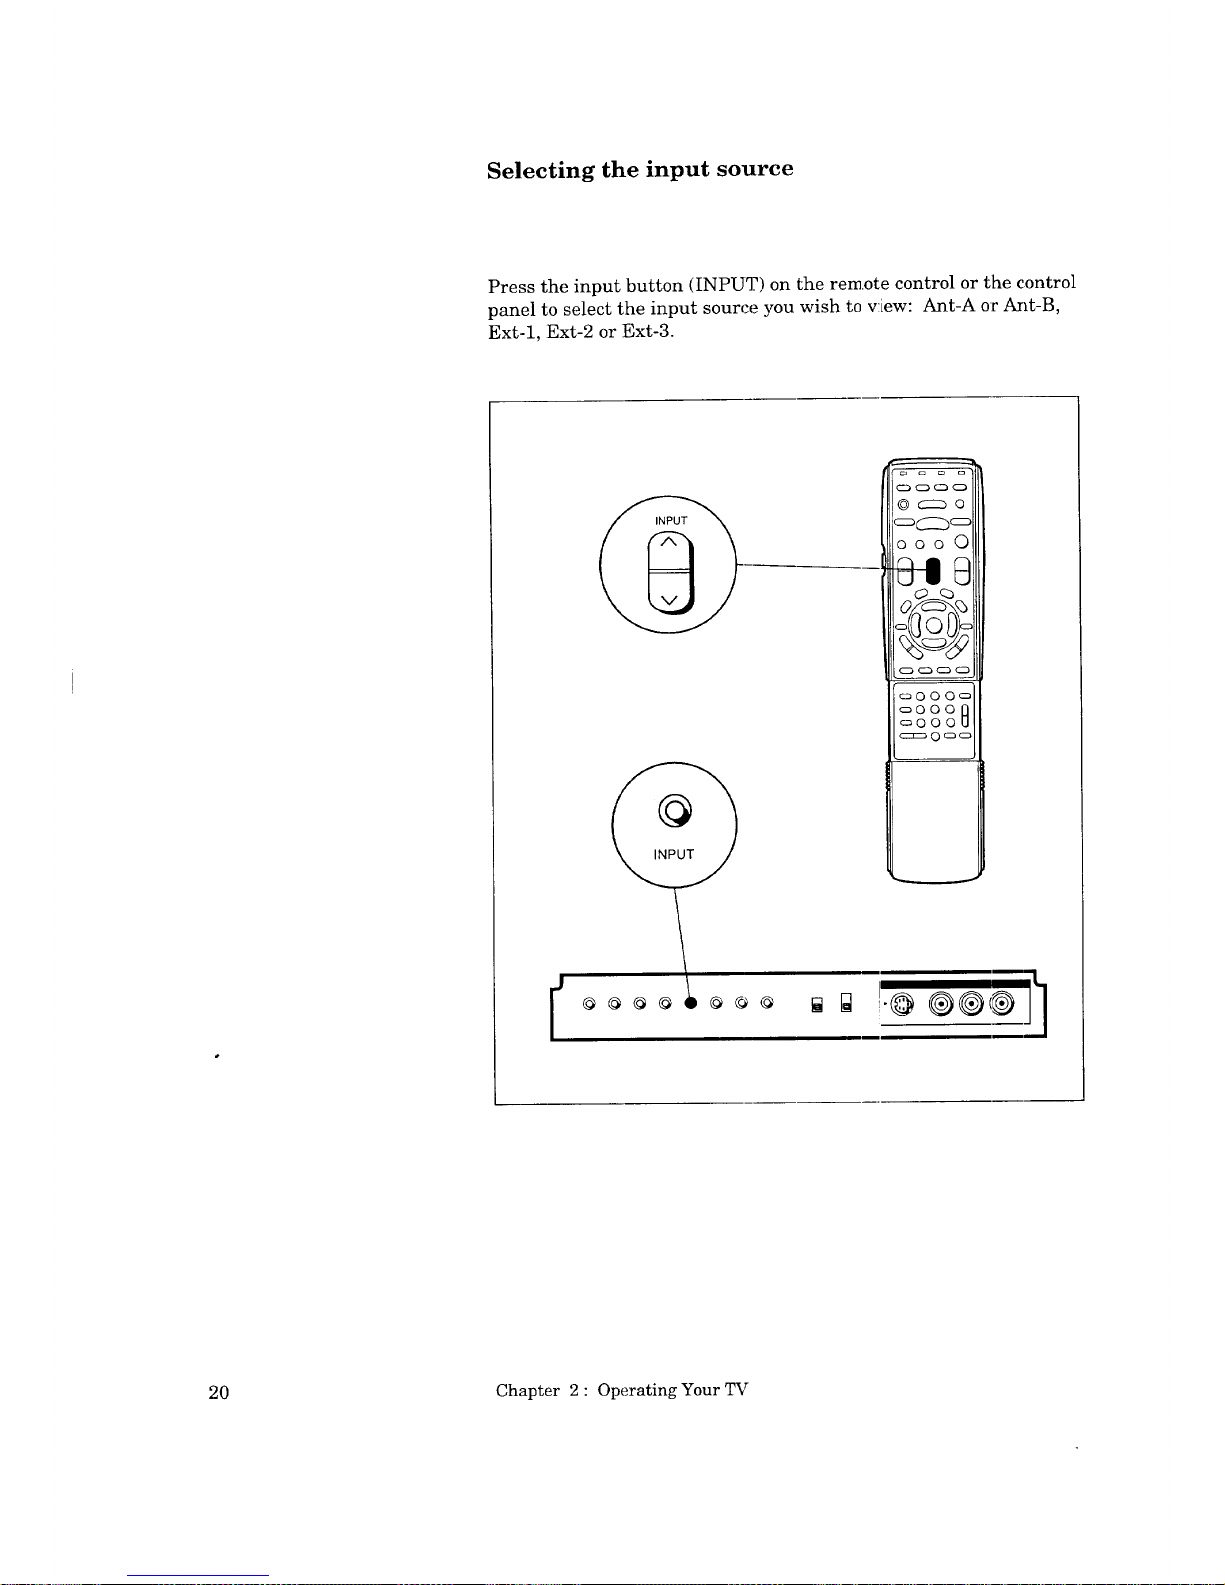
Selecting the input source
Press the input button (INPUT) on the remote control or the control
panel to select the input source you wish to view: Ant-A or Ant-B,
Ext-1, Ext-2 or Ext-3.
© _:::b o
_(::::_c::)
O0 0 0
c_O 00c_
c_O
oo° 0
c:_ 0 c_o
@
20 Chapter 2 : Operating Your TV
Changing channels
Your TV offers you four ways of changing channels once their
numbers have been programmed into channel memory.
• changing channels automatically;
• changing channels directly;
• using the quick view option; or
• using the Super Quick View option.
Important:
To change channels faster:
Enter three digits for every channel number, using zeros where
needed. (For example, enter "004" to v!Lewchannel 4 and "028"
to view channel 28.)
€" Press the ENTER button after selectin_g the number of the
channel. (For example, press "4" and "ENTER" to view channel
4.)
Cable stations channel numbers 0 and greater than 126 are
unassigned. If you are using an antenna system with your TV,
stations 0, 1 and 70 through 999 are unassiigned. If you press these
channel numbers, the channel remains unchanged.
Getting Started 21
Changing channels (cont.)
oo00
_000o
o000
o000_
I @@@@
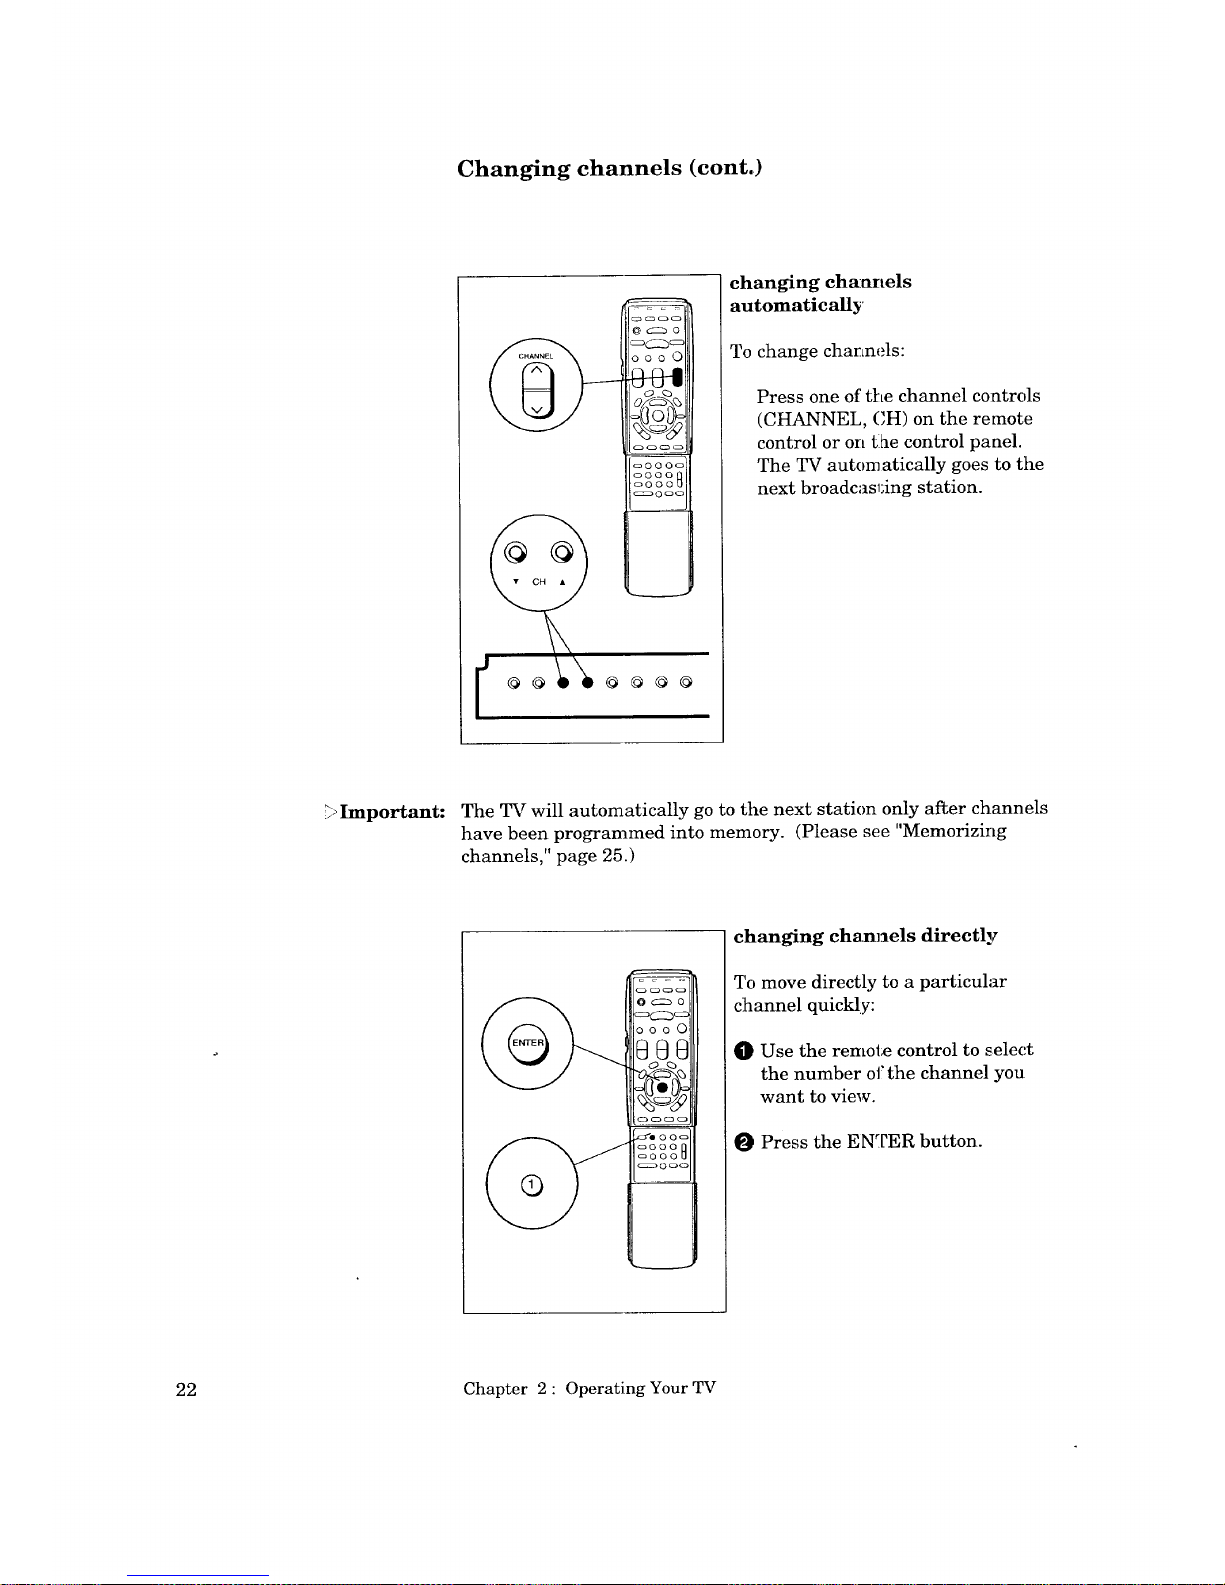
changing ch_anels
automatically
To change channels:
Press one of the channel controls
(CHANNEL, CH) on the remote
control or on tlhe control panel.
The TV automatically goes to the
next broadcasl:ing station.
_,Important: The TV will automatically go to the next station only after channels
have been programmed into memory. (Please see "Memorizing
channels," page 25.)
000 0
_,o'e 00o
o000
_000_
changing cham_els directly
To move directly to a particular
channel quickly:
_]} Use the remote control to selec.t
the number oi, the channel you
want to view.
Press the ENTER button.
22 Chapter 2 : Operating Your TV
_000_
_000_
_O00U
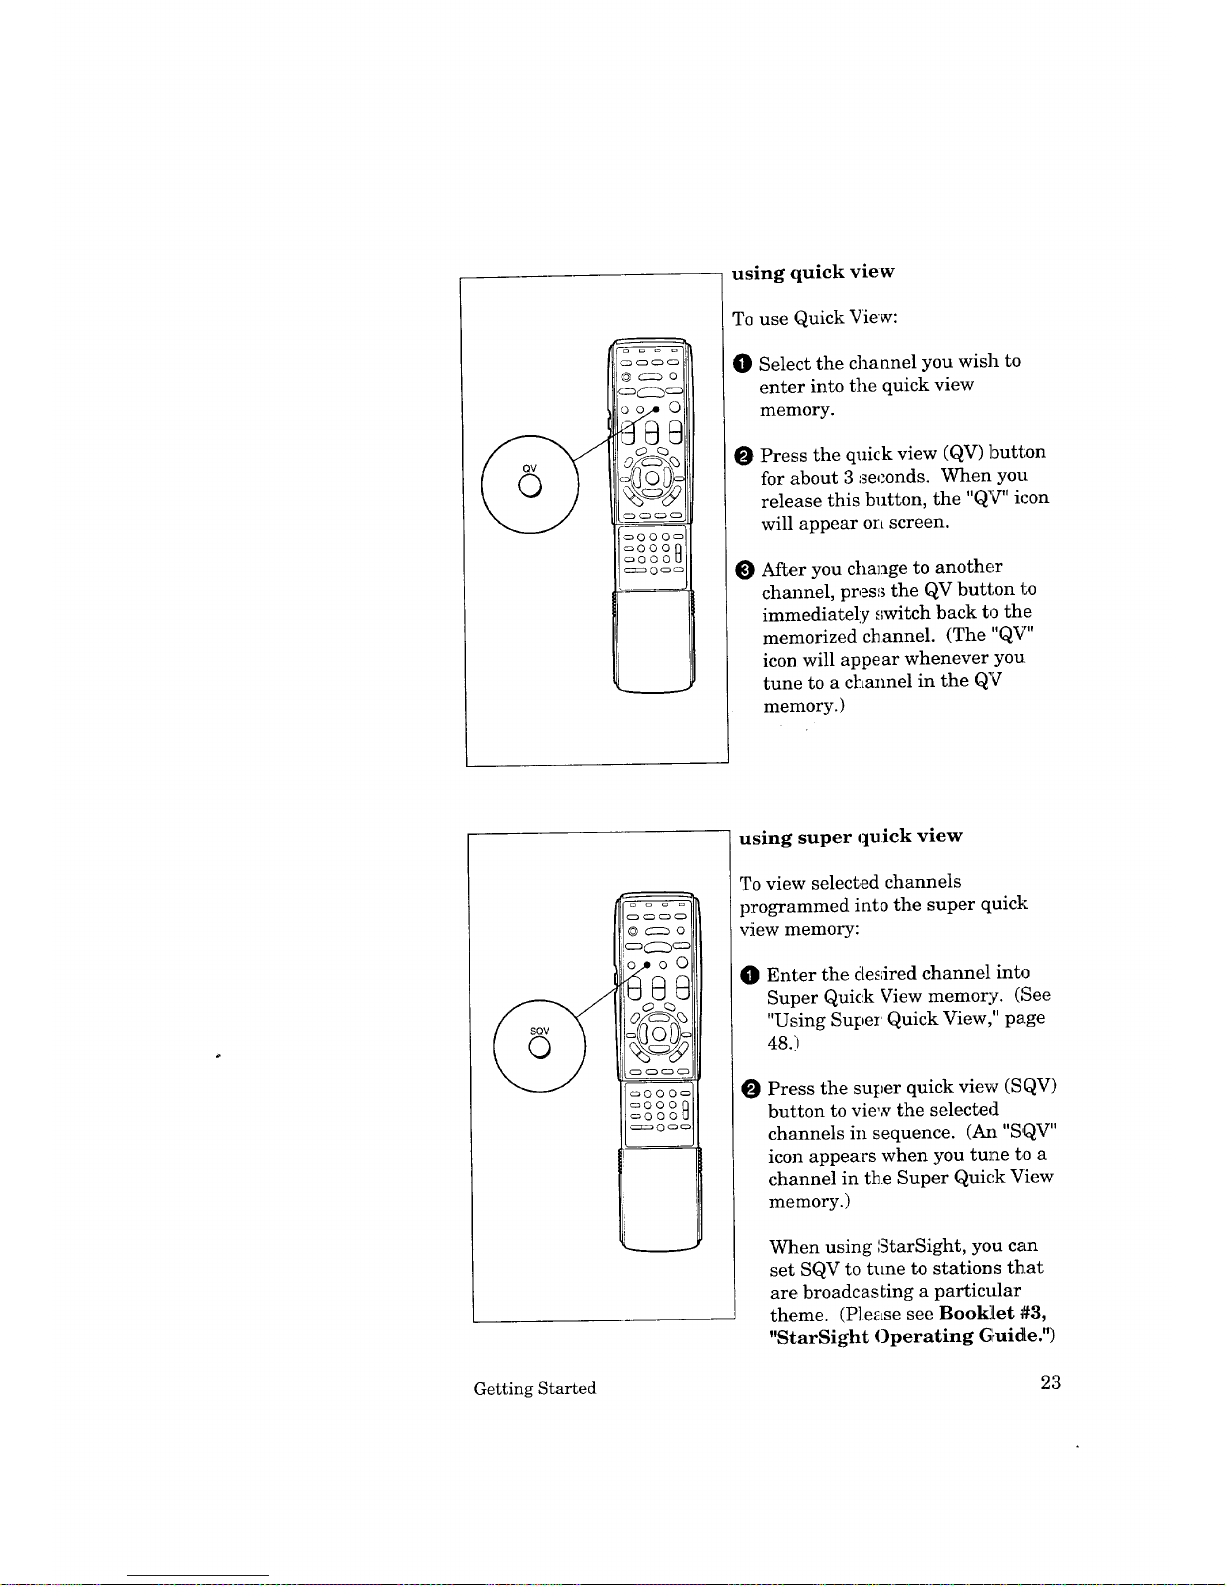
using quick view
To use Quick View:
O Select the channel you wish to
enter into the quick view
memory.
O Press the quick view (QV) button
for about 3 seconds. When you
release this button, the "QV" icon
will appear on screen.
O After you change to another
channel, press the QV button to
immediately switch back to the
memorized channel. (The "QV"
icon will appear whenever you
tune to a cl:Lannel in the QV
memory.)
© c::_ o
_000_
_O0OQ
_0OOU
c_zs_ 0 _ _
using super quick view
To view selected channels
programmed into the super quick
view memory:
O
Enter the desired channel into
Super Quick View memory. (See
"Using Super Quick View," page
48.)
O Press the super quick view (SQV)
button to view the selected
channels in sequence. (Azl "SQV"
icon appears when you tune to a
channel in the Super Quick View
memory.)
When using StarSight, you can
set SQV to tune to stations that
are broadcasLing a particular
theme. (Please see Booldet #3,
"StarSight Operating G_uide.")
Getting Started 23
 Loading...