

Page 1
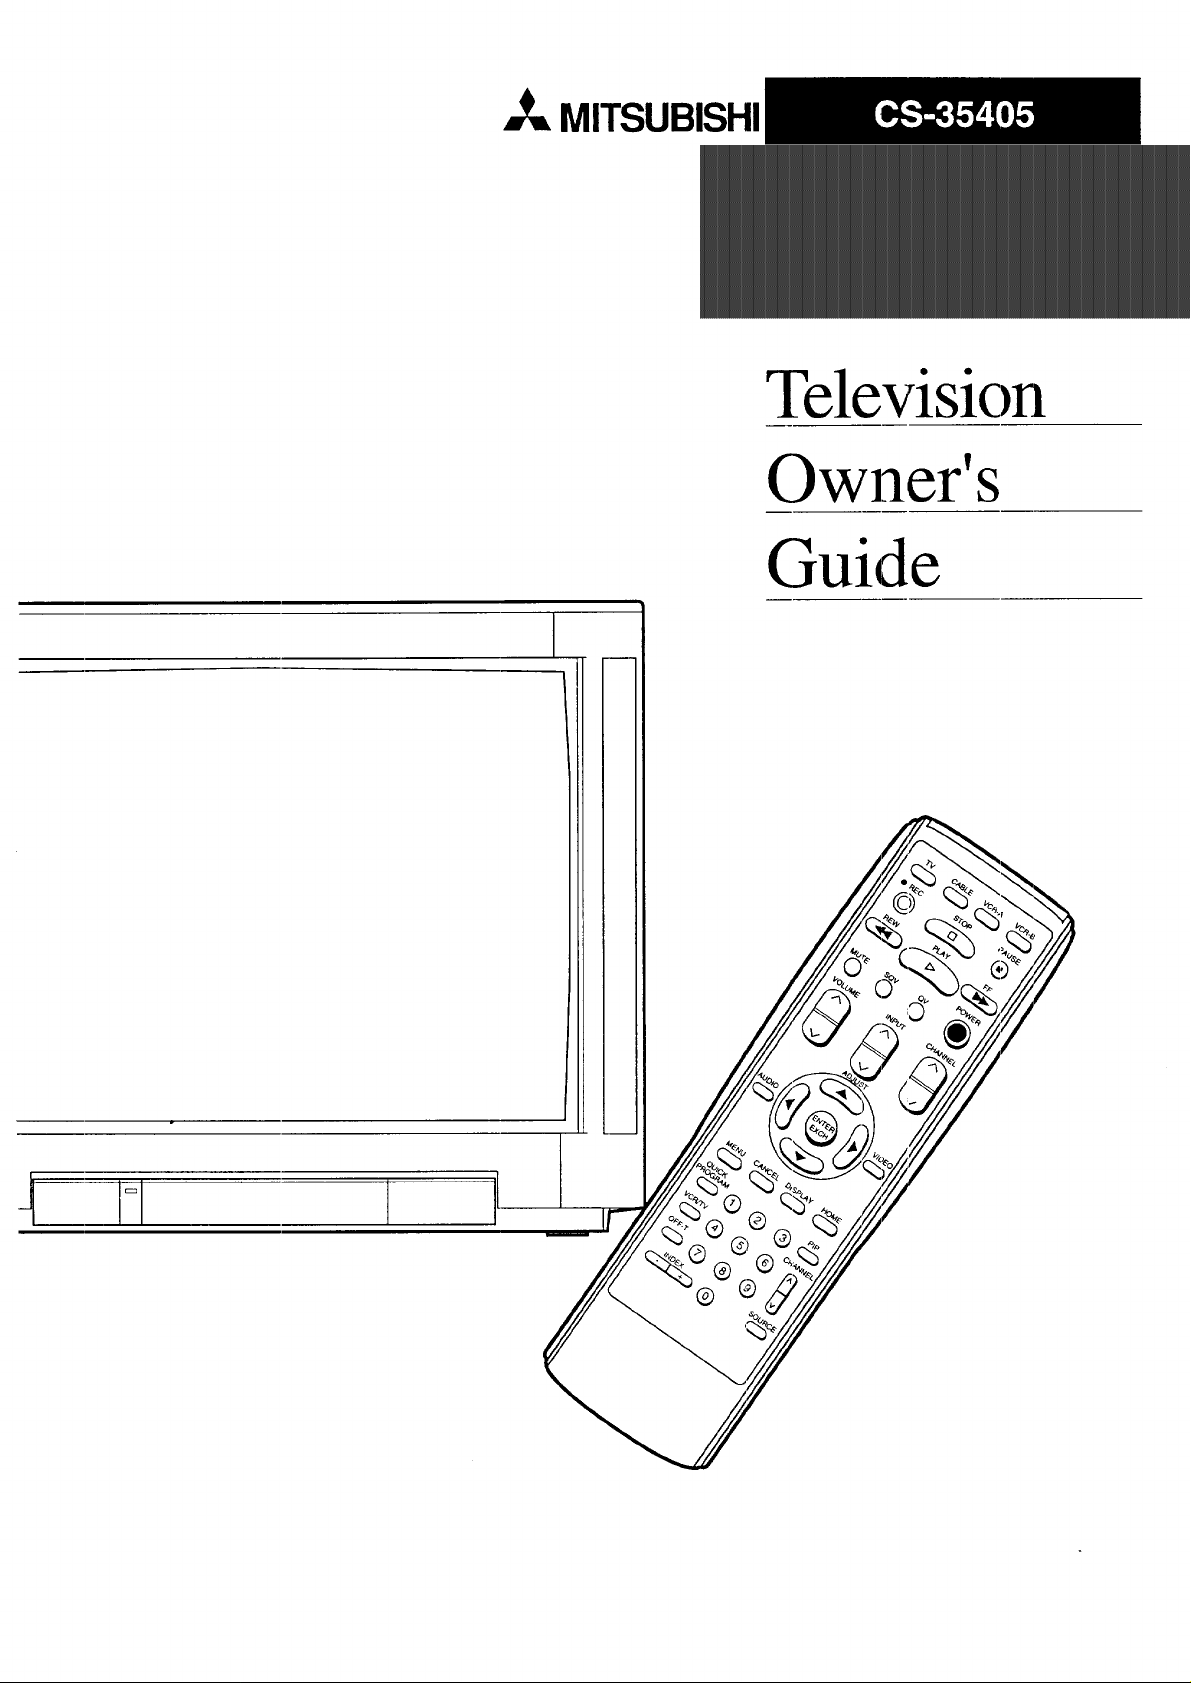
_,_ MITSUBISHI
I
Television
Owner's
Guide
N 1
Page 2
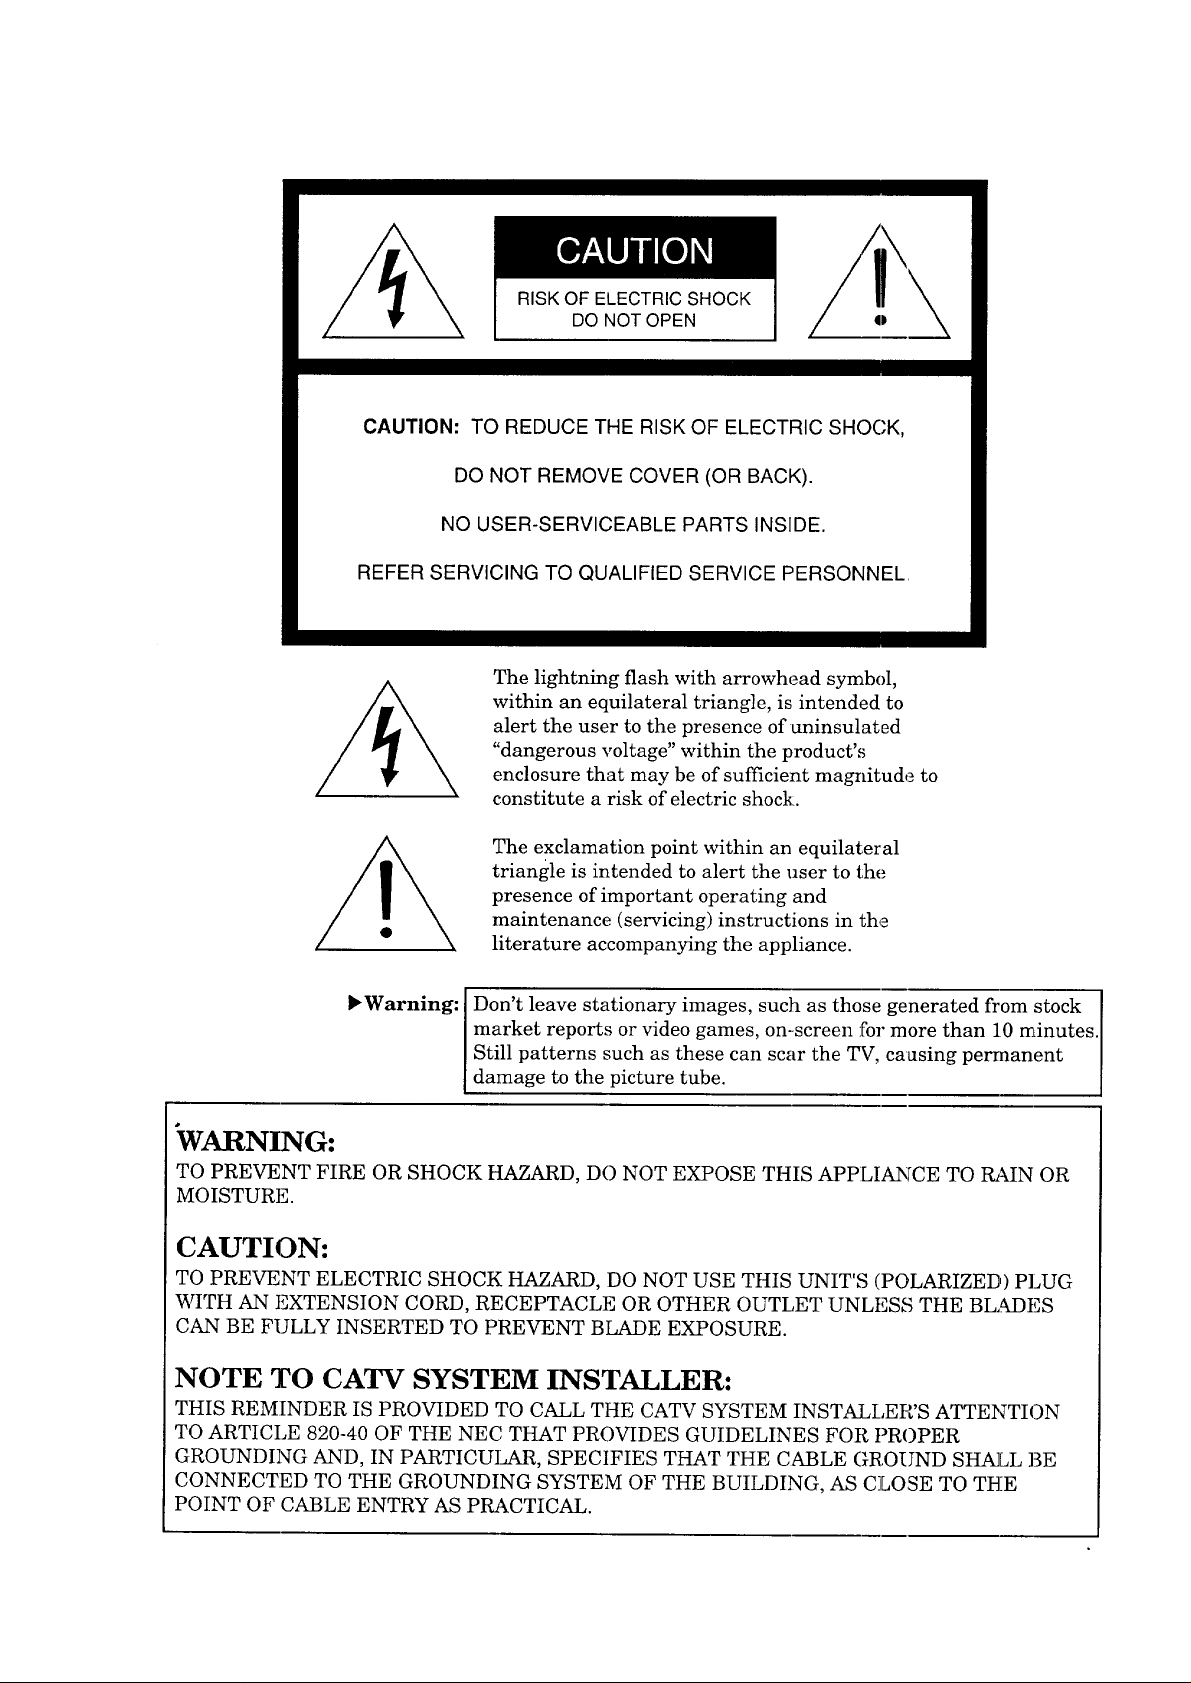
RISK OF ELECTRIC SHOCK
DO NOT OPEN
CAUTION: TO REDUCE THE RISK OF ELECTRIC SHOGK,
DO NOT REMOVE COVER (OR BACK).
NO USER-SERVICEABLE PARTS INSIDE.
REFER SERVICING TO QUALIFIED SERVICE PERSONNEL
The lightning flash with arrowhead symbol,
within an equilateral triangle, is intended to
alert the user to the presence of uninsulated
"dangerous voltage" within the product's
enclosure that may be of sufficient magnitude to
constitute a risk of electric shock:.
The exclamation point within an equilateral
triangle is intended to alert the user to the
presence of important operating and
maintenance (servicing) instructions in the
literature accompanying the appliance.
Don't leave stationary images, such as those generated from stock
market reports or video games, on-screen for more than 10 minutes.
Warning: I
Still patterns such as these can scar the TV, causing permanent
damage to the picture tube.
VARNING:
TO PREVENT FIRE OR SHOCK HAZARD, DO NOT EXPOSE THIS APPLIANCE TO l_kIN OR
MOISTURE.
CAUTION:
TO PREVENT ELECTRIC SHOCK HAZARD, DO NOT USE THIS UNIT'S (POLARIZED,) PLUG
WITH AN EXTENSION CORD, RECEPTACLE OR OTHER OUTLET UNLESS THE BLADES
CAN BE FULLY INSERTED TO PREVENT BLADE EXPOSURE.
NOTE TO CATV SYSTEM INSTALLER:
THIS REMINDER IS PROVIDED TO CALL THE CATV SYSTEM INSTALLER'S ATTENTION
TO ARTICLE 820-40 OF THE NEC THAT PROVIDES GUIDELINES FOR PROPER
GROUNDING AND, IN PARTICULAR, SPECIFIES THAT THE CABLE GROUND SHALL BE
CONNECTED TO THE GROUNDING SYSTEM OF THE BUILDING, AS CLOSE TO THE
POINT OF CABLE ENTRY AS PRACTICAL.
Page 3
_ MITSUBISHI OWNER'S GUIDE
Table of Contents
Important Safeguards ................................................................ 3
Preface: Welcome to Mitsubishi ............................................. 5
Summary of Special Features ........................................... 6
Unpacking Your TV ............................................................ 7
What's in Each Chapter ...................................................... 8
Some Conventions Used in this Guide .............................. 9
Chapter 1: Getting to Know Your TV .................................. 11
Overview of the Control Panel ........................................ 12
Overview of the Remote Control ..................................... 14
Getting ready to use the remote control .................... 14
Remote control buttons and functions ....................... 16
Chapter 2: Connecting Your TV ............................................ 23
Overview of the Back Panel .............................................. 24
Basic Connections ............................................................. 26
TV + antenna or cable without a
decoder box .............................................................. 27
TV + cable with a decoder box ..................................... 28
TV + separate UHF and VHF antennas .................... 30
TV + VCR + antenna or cable without
a decoder box ........................................................... 31
TV + VCR + cable with a decoder box ........................ 34
TV + audio system ....................................................... 37
TV + Mitsubishi products that have MV Network
terminals ................................................................. 38
Chapter 3: Operating Your TV .............................................. 41
Getting Started ................................................................. 42
Adjusting the color purity .............................................. 43
Using the remote control to operate cable boxes
and other brands of VCRs ...................................... 44
Turning the TV on/off .................................................. 48
Selecting the input source ........................................... 49
Changing channels ....................................................... 50
Understanding the on-screen menus ......................... 53
Setting the clock ........................................................... 54
Memorizing channels ................................................... 56
Adding and deleting channels .................................... 57
Setting the A/V Network ............................................. 58
Renaming the input ..................................................... 59
Selecting the menu language ...................................... 60
Using video mute ......................................................... 61
Adjusting the sound ..................................................... 62
Adjusting the picture ................................................... 64
Using the closed caption decoder ................................ 65
2 Table of Contents
Page 4
UsingtheAdvancedFeatures..........................................67
Settingthetimer..........................................................68
Usingtheparentallock..................................................69
UsingtheSuperQuickViewtuning..........................73
SelectinganadvancedPIPfunction...........................75
Chapter 4: Using the Special Features ............................... 77
Understanding the On-Screen Displays ......................... 78
Using the Off-Timer .......................................................... 79
Setting the off-timer .................................................... 80
Changing or canceling the off-timer ........................... 81
Using the Advanced Picture-in-Picture (PIP) Modes ...... 82
Selecting the PIP image ................................................ 83
Selecting the PIP source ............................................... 84
Selecting the channel .................................................... 84
Exchanging the PIP image and the main image ........ 85
Moving the PIP image ................................................. 85
Freezing the PIP image ............................................... 86
Using the Snap-shot feature ....................................... 87
Using the Replay feature ............................................. 88
Using the Active A/V Network Feature ............................ 89
Chapter 5: Troubleshooting ................................................... 93
Caution and Care .............................................................. 96
Calling fbr Service ................................................................ 97
Appendix: Procedure for Bypassing the
Parental Lock ............................................................................. 99
Index .......................................................................................... 101
Warranty ...................................................... Inside Back Cover
2 Table of Contents
Page 5
IMPORTANT SAFEGUARDS
PLEASE READ ALL THESE INSTRUCTIONS REGARDING YOUR TELEVISION SET AND
RETAIN FOR FUTURE REFERENCE. FOLLOW ALL WARNINGS ,._ND INSTRUCTIONS
MARKED ON THE TV RECEIVER.
1. Read Instructions
All the safety and operating instructions should be
read before the appliance is operated.
2. Retain Instructions
The safety and operating instructions should be
retained for future reference.
3. Heed Warnings
All warnings on the appliance and in the operating
instructions should be adhered to.
4. Follow Instructions
All operating and use instructions should be followed.
Warning:
5. Cleaning
Unplug this TV receiver from the wall outlet before
cleaning. Do not use liquid or aerosol cleaners to
clean your TV. Use a damp cloth for cleaning.
Cleaners may permanently damage your screen.
6. Attachment and Equipment
Never add any attachments and/or equipment
without approval of the manufacturer as such
additions may result in the risk of fire, electric shock
or other personal injury.
7. Water and Moisture
Do not use this TV receiver where contact with or
immersion in water is a possibility. Do not use near:
bath tubs, wash bowls, kitchen sinks, laundry tubs,
or swimming pools, etc.
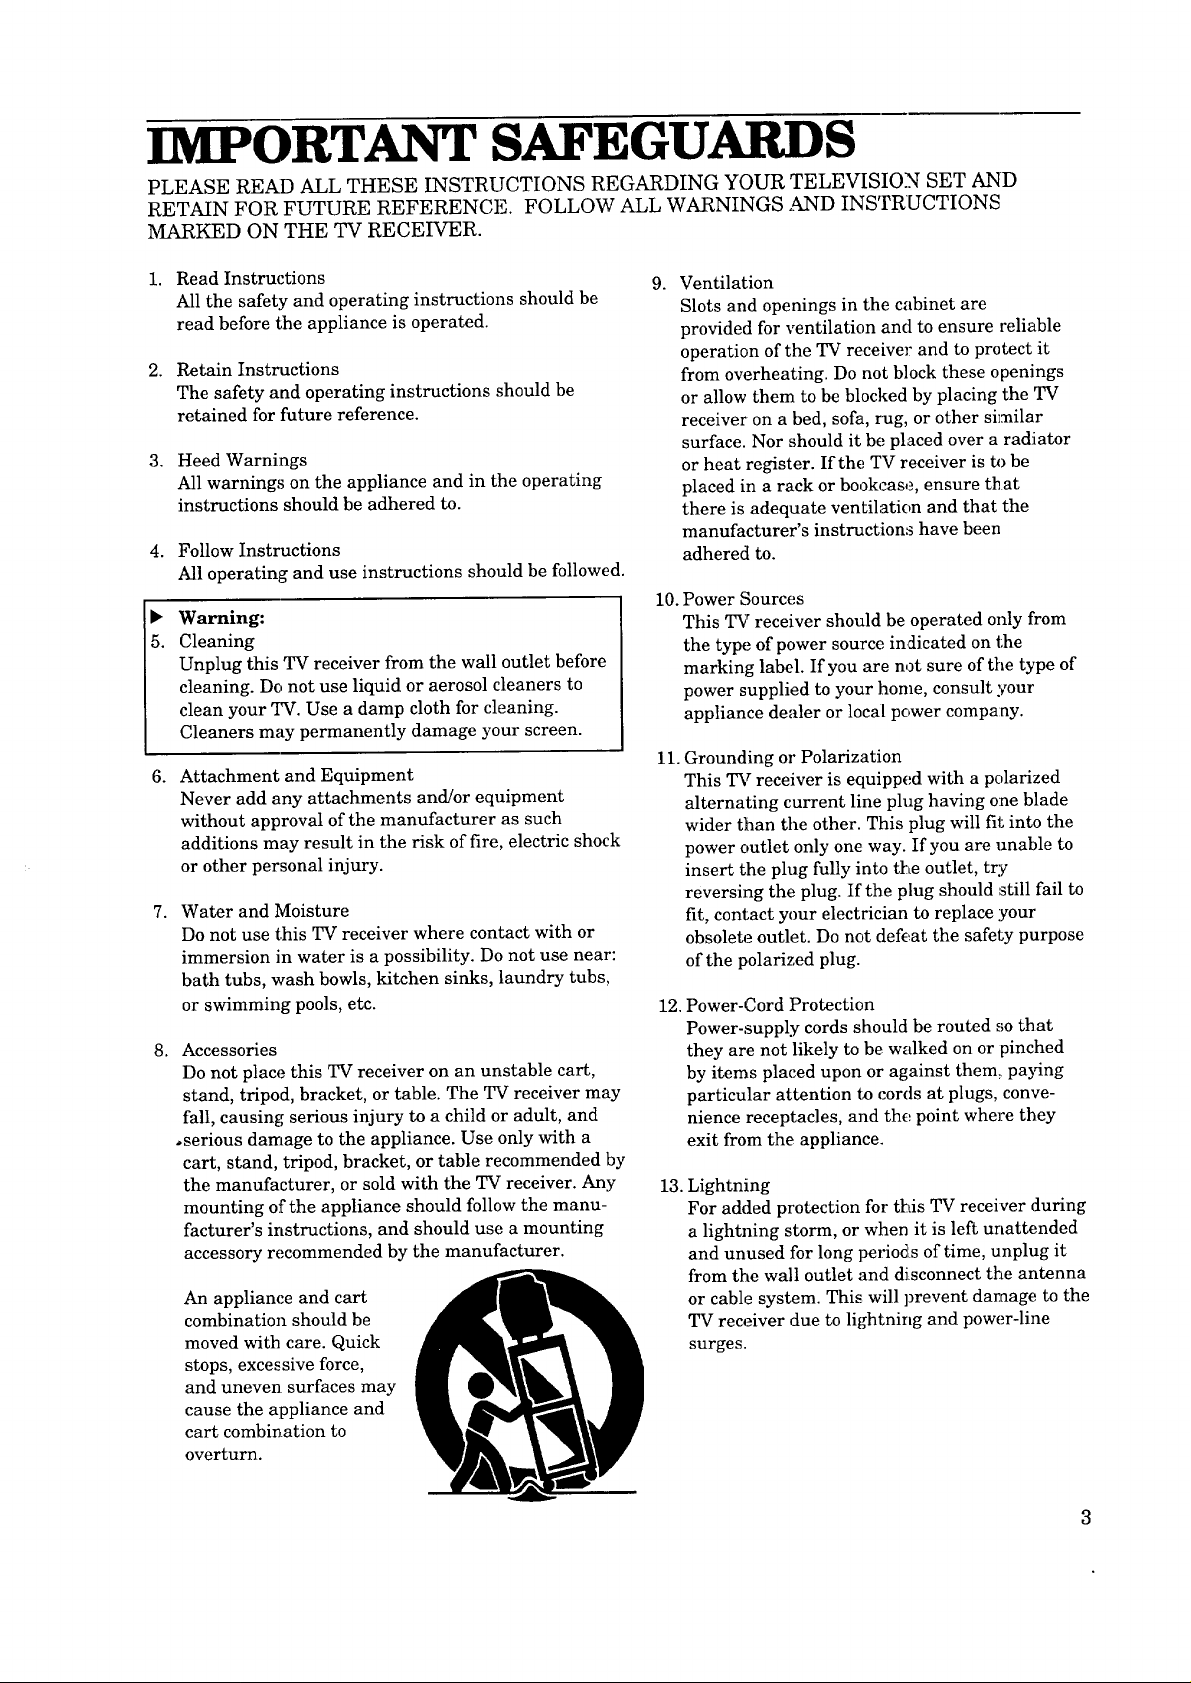
Accessories
8,
Do not place this TV receiver on an unstable cart,
stand, tripod, bracket, or table. The TV receiver may
fall, causing serious injury to a child or adult, and
•serious damage to the appliance. Use only with a
cart, stand, tripod, bracket, or table recommended by
the manufacturer, or sold with the TV receiver. Any
mounting of the appliance should follow the manu-
facturer's instructions, and should use a mounting
accessory recommended by the manufacturer.
An appliance and cart
combination should be
moved with care. Quick
stops, excessive force,
and uneven surfaces may
cause the appliance and
cart combination to
overturn.
9. Ventilation
Slots and openings in the cabinet are
provided for ventilation ancl to ensure reliable
operation of the TV receiver and to protect it
from overheating. Do not block these openings
or allow them to be blocked by placing the TV
receiver' on a bed, sofa, rug, or other similar
surface. Nor should it be placed over a radiiator
or heat register. If the TV receiver is to be
placed in a rack or bookcase, ensure that
there is adequate ventilation and that the
manufacturer's instructions have been
adhered to.
10. Power Sources
This TV receiver should be operated only from
the type of power source indicated on the
marking label. If you are not sure of the type of
power supplied to your home, consult your
appliance dealer or local pc,,wer company.
11.
Grounding or Polarization
This TV receiver is equipped with a polarized
alternating current line plug having one blade
wider than the other. This plug will fit into the
power outlet only one way. If you are unable to
insert the plug fully into the outlet, try
reversing the plug. If the plug should still fail to
fit, contact your electrician to replace your
obsolete outlet. Do not defc_at the safety purpose
of the polarized plug.
12. Power-Cord Protection
Power-supply cords should be routed so that
they are not likely to be walked on or pinched
by items placed upon or against them, paying
particular attention te cords at plugs, conve-
nience receptacles, and the point where they
exit from the appliance.
13.
Lightning
For added protection for this TV receiver during
a lightning storm, or when it is left unattended
and unused for long periods of time, unplug it
from the wall outlet and disconnect the antenna
or cable system. This will prevent damage to the
TV receiver due to lightning and power-line
surges.
Page 6
14.PowerLines
Anoutsideantennasystemshouldnotbelocated
inthevicinityofoverheadpowerlinesorother
electriclightorpowercircuits,orwhereit canfall
intosuchpowerlinesorcircuits.Wheninstalling
anoutsideantennasystem,extremecareshould
betakentokeepfromtouchingsuchpowerlines
orcircuitsascontactwiththemmightbefatal.
15.Overloading
Donotoverloadwalloutletsandextensioncords
asthiscanresultinariskoffireorelectricshock.
16.Objectand:LiquidEntry
NeverpushobjectsofanykindintothisTV
receiverthroughopeningsastheymaytouch
dangerousvoltagepointsorshort-outpartsthat
couldresultinafireorelectricshock.Neverspill
liquidofanykindontheTVreceiver.
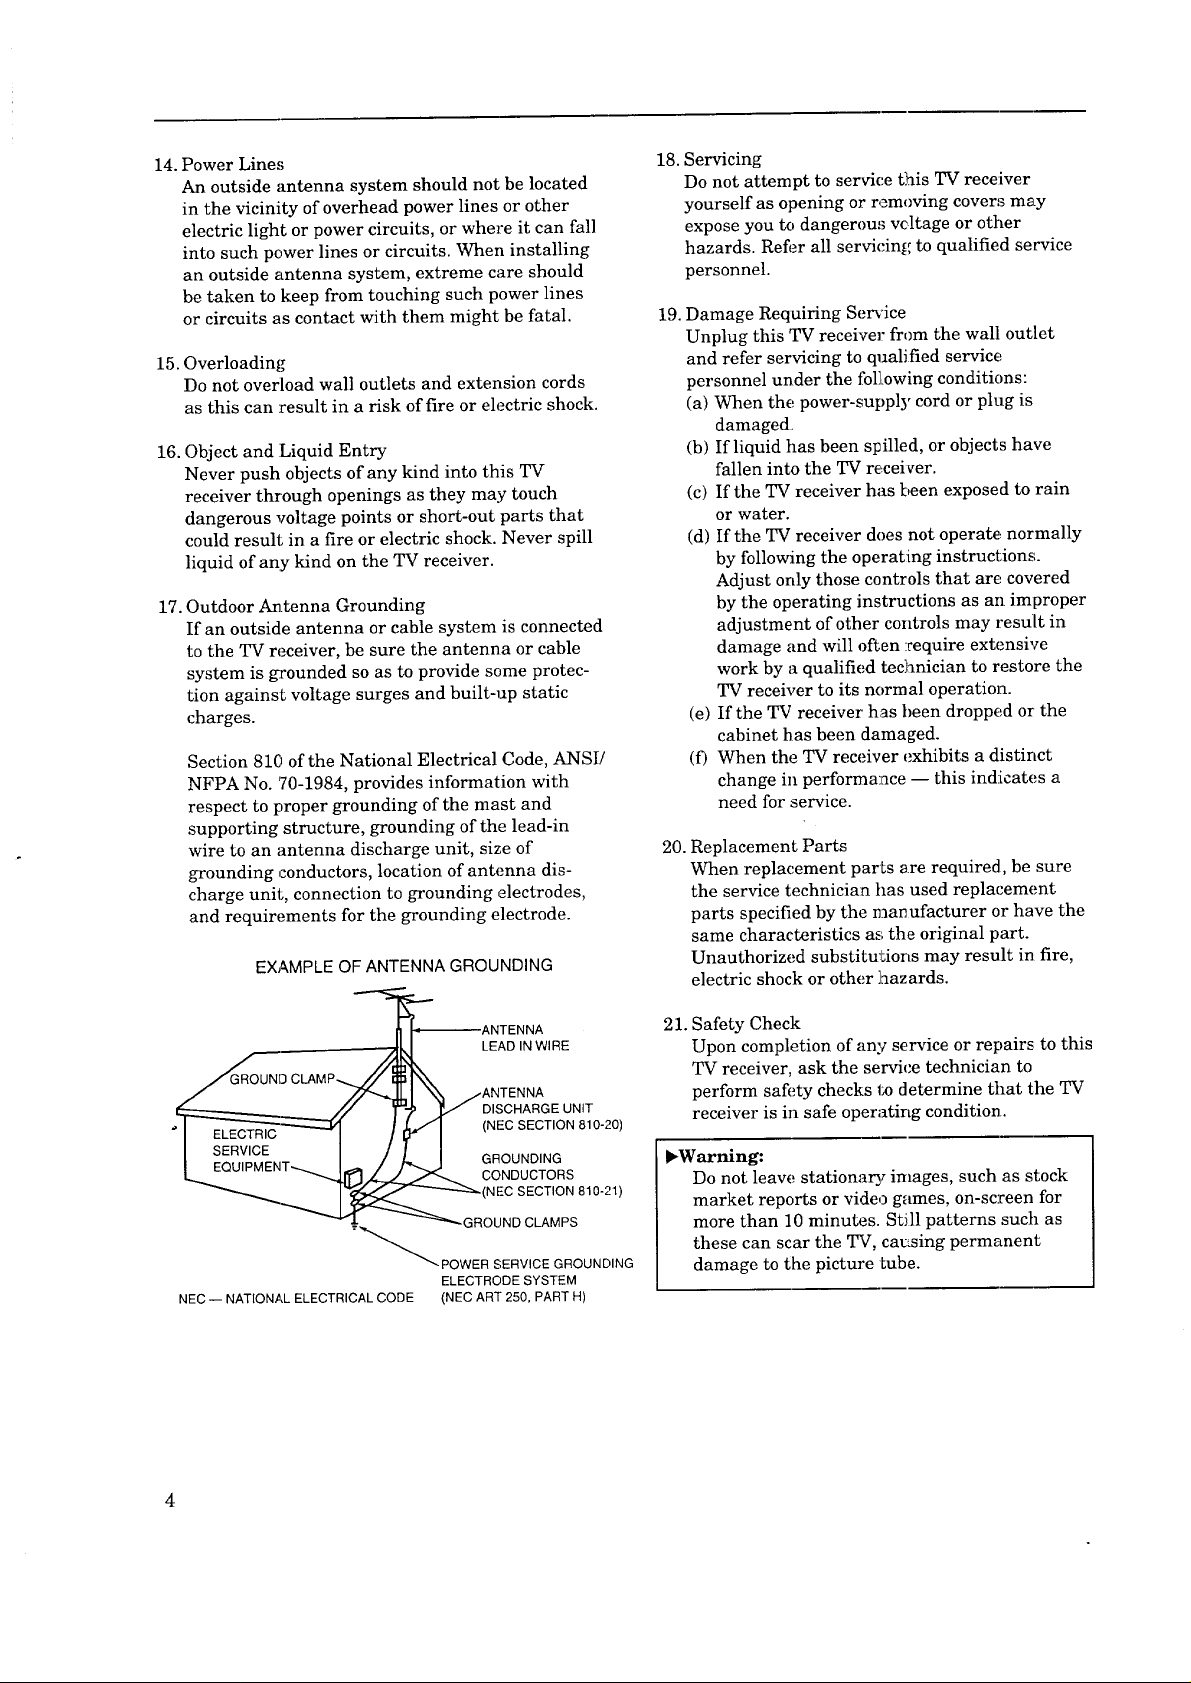
17.OutdoorAntennaGrounding
Ifanoutsideantennaorcablesystemisconnected
totheTVreceiver,besuretheantennaorcable
systemisffcoundedsoastoprovidesomeprotec-
tionagainstvoltagesurgesandbuilt-upstatic
charges.
Section810of the National Electrical Code, ANSI/
NFPA No. 70-1984, provides information with
respect to proper grounding of the mast and
supporting structure, grounding of the lead-in
wire to an antenna discharge unit, size of
grounding conductors, location of antenna dis-
charge unit, connection to grounding electrodes,
and requirements for the grounding electrode.
EXAMPLE OF ANTENNA GROUNDING
18. Servicing
Do not attempt to service this TV receiver
yourself as opening or r,_moving covers may
expose you to dangerou,_ vcltage or other
hazards. Refi_r all servicing to qualified service
personnel.
19. Damage Requiring Service
Unplug this TV receiver from the wall outlet
and refer servicing to qualified service
personnel under the foil,owing conditions:
(a) When the power-supply cord or plug is
damaged,
(b) If liquid has been spilled, or objects have
fallen into the TV receiver.
(c) If the TV receiver has been exposed to rain
or water.
(d) If the TV receiver does not operate, normally
by following the operating instructions.
Adjust only those controls that are covered
by the operating instructions as an improper
adjustment of other controls may result in
damage and will often :require extensive
work by a qualified technician to restore the
TV receiver to its normal operation.
(e) If the TV receiver has been dropped or the
cabinet has been damaged.
(t) When the TV receiver exhibits a distinct
change in performa:ace -- this indicates a
need for service.
20. Replacement Parts
When replacement parts ere required, be sure
the service technician has used replacement
parts specified by the manufacturer or have the
same characteristics as the original part.
Unauthorized substitutions may result in fire,
electric shock or other laazards.
LEAD IN WIRE
DISCHARGE UNIT
(NEC SECTION 810-20)
GROUNDING
CONDUCTORS
_(NEC SECTION810-21)
ELECTRODE SYSTEM
NEC -- NATIONAL ELECTRICAL CODE (NEC ART 250, PART H)
4
21. Safety Check
Upon completion of any service or repairs to this
TV receiver, ask the service technician to
perform safety checks _ determine that the TV
receiver is in safe operating condition..
_Warning:
Do not leave stationary images, such as stock
market reports or video games, on-screen for
more than 10 minutes. Still patterns such as
these can scar the TV, ca_:sing permanent
damage to the picture Lube.
Page 7

PREFACE
Welcome to Mitsubishi
Congratulations on your purchase of this Mitsubishi TV. Your TV
is designed for superb viewing pleasure as well as continued[
reliability.
To familiarize you with your TV and owner's guide, we suggest that
you read through the preface, which provides t:he following
impol_ant information:
0 Summary of Special Features
0 Unpacking Your TV
0 What's in Each Chapter
0 Some Conventions Used in this Guide
Mitsubishi has strived to create your TV so that it will bring you
years of viewing enjoyment. Similarly, your owner's guide is
designed with a "user friendly" philosophy thaL will help you take
advantage of all of your equipment's features.
Once again, thank you for selecting our product 8nd welcome to
Mitsubishi!
Page 8
Summary of Special Features
Your top rated Mitsubishi TV delivers:
• 181-Channel Capacity --- programs up to 181 channels,
ensuring your continued viewing pleasure as cable ser_rice,_
continue to expand.
• Two-Speaker Sound System --- a special speaker system that
produces clear stereo sound.
• Expanded Sound Capability --- allows you to connect the TV
to an external audio system for enhanced listening pleasure.
In addition to the standard features found on most advanced TVs,
Mitsubishi is proud to offer the following distinctive features:
Remote Control with TV/VCR]CABLE', Function .... uses a
single remote control transmitter for the television, certain
Mitsubishi VCRs, and also some VCRs and cable boxes; from
other manufacturers.
On-Screen Displays --- appear whenever you adjust your TV,
showing you the status of your _[W's various functions.
On-Screen Menu --- simplifies the television's features _th
easy-to-follow instructions.
Closed Caption Decoder --- decodes hidden text information
included with TV shows and displays the text on-screen.
• Tri-lingual menu system --- allows you to set the TV to show
menus and on-screen displays in English, Spanish, or French.
Extended Data Services --- (also known as "XDS,') allows
broadcasters to supply you with channel information, program
information, and the time of day. You can display this
information on-screen.
• Picture-in-Picture Mode --- allows you to view two different
sources at the same time.
• Active A/V Network --- allows you to perform many of the
commonly used features of your system at the press of'just one
button.
Each of these features will be explained in more detail in
Chapter 3, "Operating Your TV," and Chapter _.:,"Using t:he Special
Features."
6 Preface: Welcome to Mitsubishi
Page 9
Unpacking Your TV
What you will find
As you unpack your new TV, please check to be sure that along
with the TV, the following items are included:
• an owner's guide containing a warranty,
• a registration card,
• a remote control transmitter,
• a set of two AA size batteries for the remote control, and
• an A/V network cable.
A few suggestions
Before you hook up your new TV, please take a few minutes to:
O Complete the registration card. The registration card as.ks tbr
the TV's serial number, which you'll find on the back of the
unit.
Keep the box and packing materials for future use.
File your sales receipt.
Place the TV on a stable surface with sufficient lighting to do
the hook-up.
Unpacking Your TV 7
Page 10
What's in Each Chapter
Here's what you will find in this owner's guide:
Chapter 1, "Getting to Know Your TV," introduces you to the
location and functions of the buttons and controls of your _.
Chapter 2, "Connecting Your TV," explains bow to connect a
VCR, antenna, decoder box, and other equipment to your _i_¢.
Chapter 3, "Operating Your TV," provides the step-by-step
instructions you need in order to use your TV.
Chapter 4, "Using the Special Features," explains how to use
some of the special features of the TV.
Chapter 5, '_roubleshooting," summarizes the problems you
may have along with suggestions for remedyiag these problems.
The appendix explains a procedure that allows you to bypass the
parental lock.
You'll also find a detailed index at the back of the book.
8 Preface: Welcome to Mitsubishi
Page 11
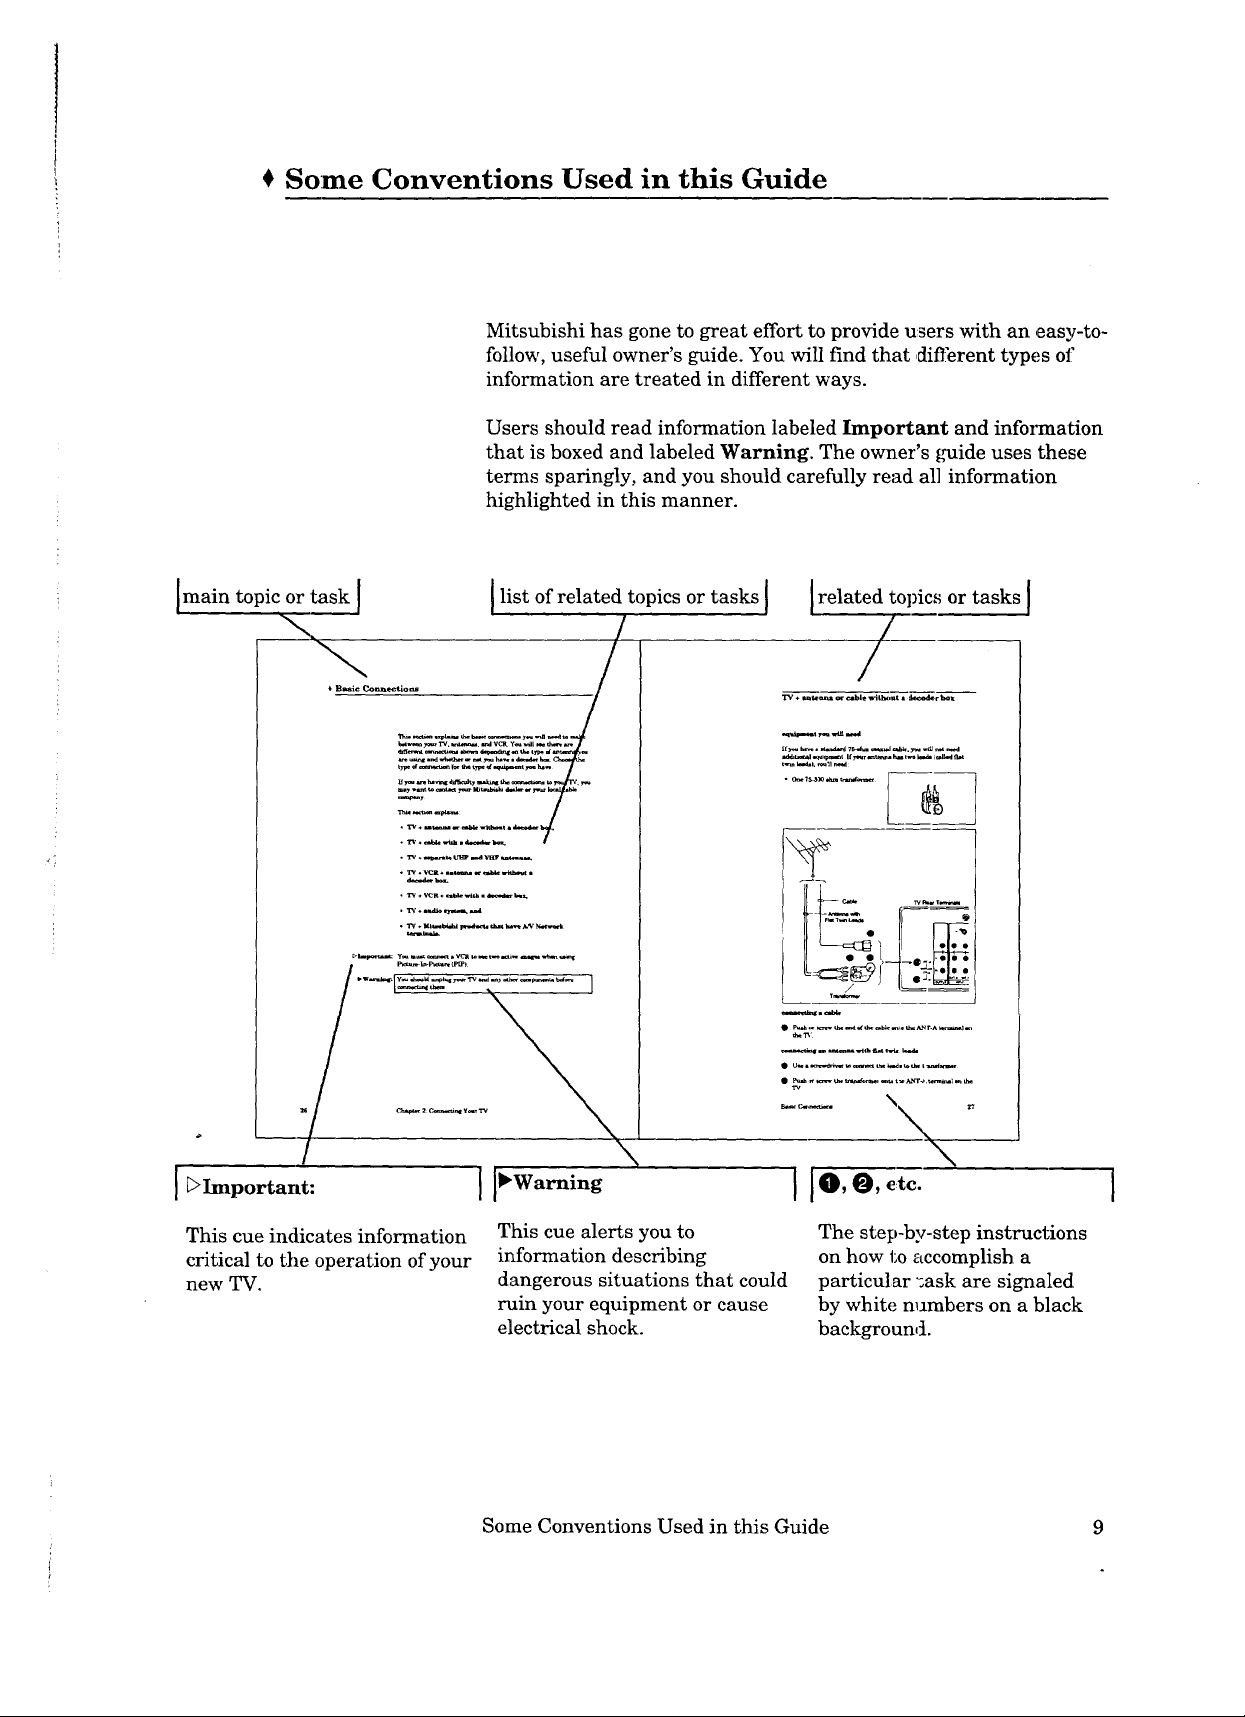
} Some Conventions Used in this Guide
Mitsubishi has gone to great effort to provide users with an easy-to-
follow, useful owner's guide. You will find that ,different types of
information are treated in different ways•
Users should read information labeled Important and infol_nation
that is boxed and labeled Warning. The owner's guide uses these
terms sparingly, and you should carefully read all information
highlighted in this manner•
main topic or task {
t B_ic Conn_tio_
• .
list of related topics or tasks {
related topics or tasks ]
/
t_ tmdaL _21 r*_d
[ _Important:
This cue indicates information
critical to the operation of your
new WV.
{Io,e,€,c.
This cue alerts you to
information describing
dangerous situations that could
ruin your equipment or cause
electrical shock•
Some Conventions Used in this Guide 9
The step-by-step instructions
on how to accomplish a
particular "_ask are signaled
by white m_mbers on a black
background.
I
Page 12

Page 13
_ CHAPTER ONE
Getting to Know Your TV
Now that you've unpacked your TV, read through the safety
information, and glanced at the overview explaining how this
owner's guide is organized, it's time to become familiar with the
buttons and controls you'll be using when you operate the TV. This
chapter will introduce the range of options awdlable when using
the buttons on the remote control or on the T_'s control panel. It
also offers some general guidelines for using the :remote control
Most functions can be controlled by using either the control panel
or the remote control, but certain specialized fhnctions require the
use of one or the other. This chapter, which wi:ll thmiliarize you
with the full range of button functions, contains l_he following
sections:
0 Overview of the Control Panel
0 Overview of the Remote Control
11
Page 14
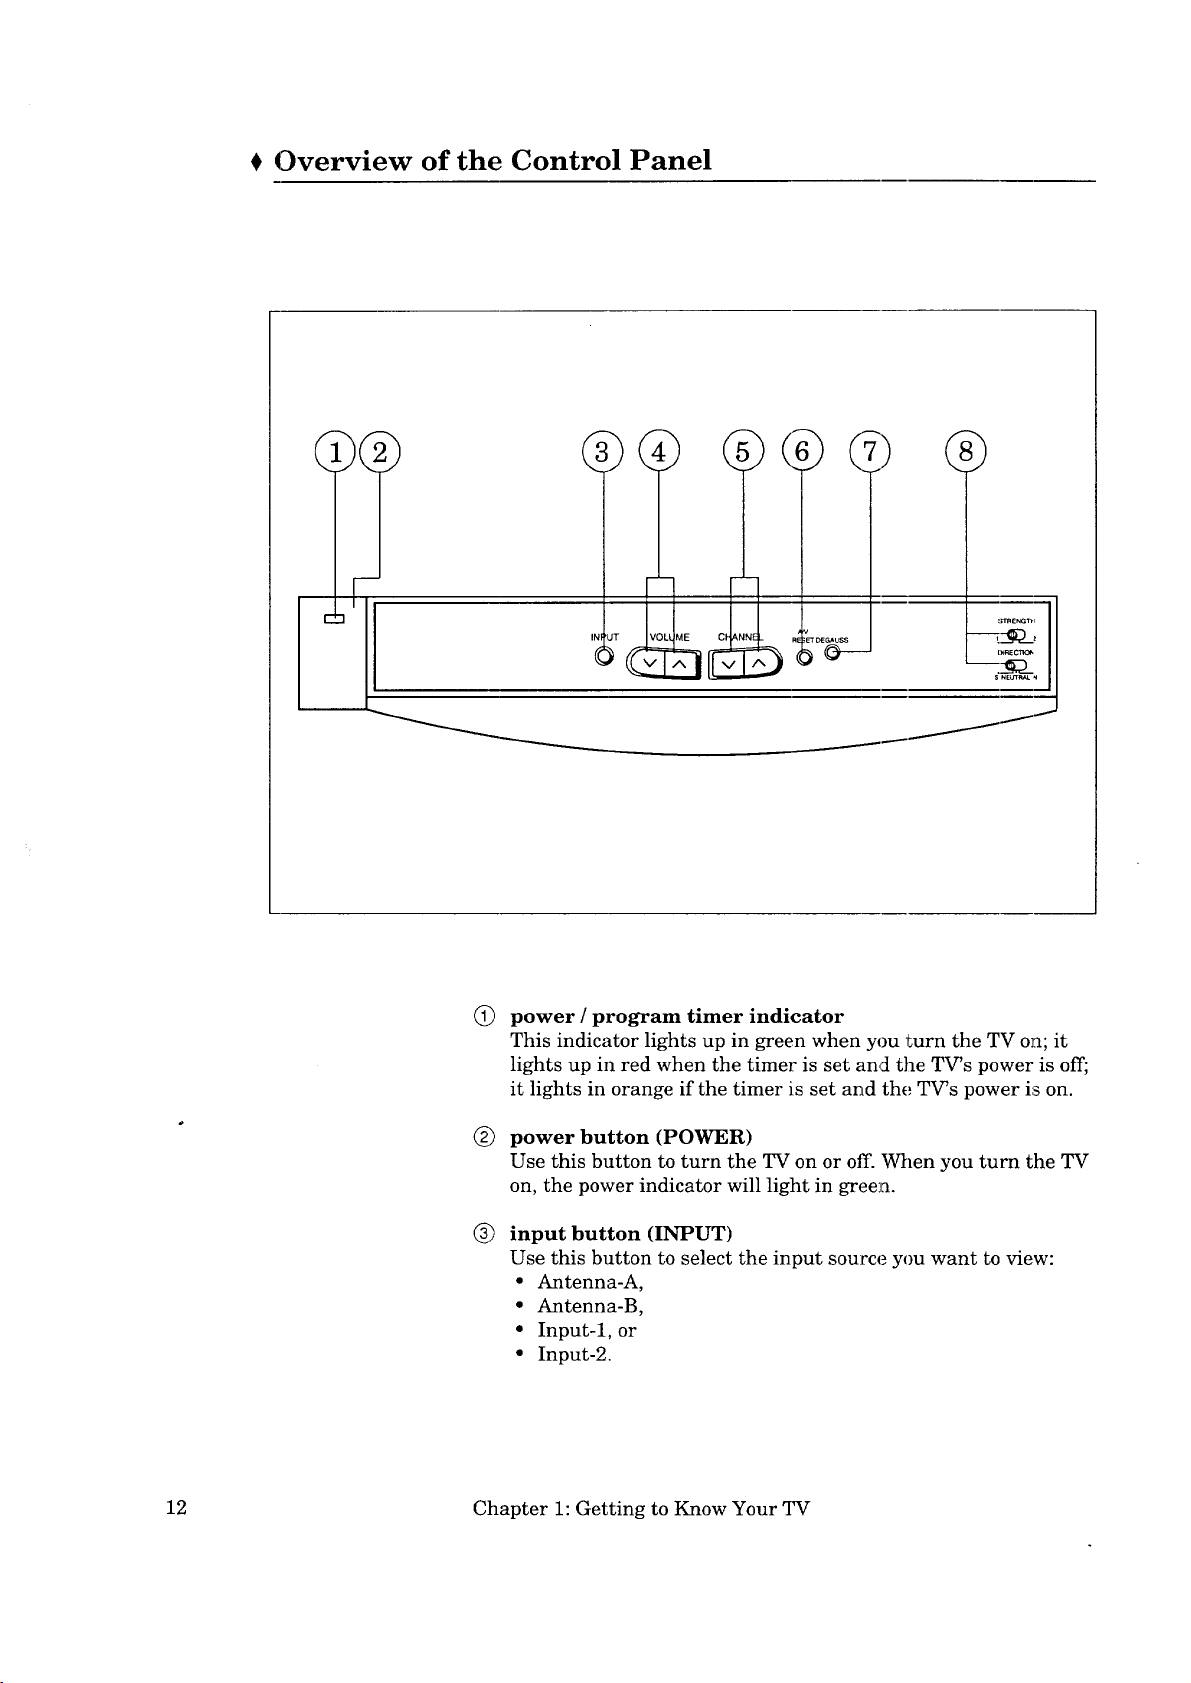
Overview of the Control Panel
0 6 7)
Q
power / program timer indicator
This indicator lights up in green when you turn the TV o1%it
lights up in red when the timer is set and the TV's power is off;
it lights in orange if the timer is set and the TV's power is on.
®
power button (POWER)
Use this button to turn the TV on or off. When you turn the TV
on, the power indicator will light in gree_a.
®
input button (INPUT)
Use this button to select the input source you want to view:
• Antenna-A,
• Antenna-B,
° Input-l, or
• Input-2.
12 Chapter 1: Getting to Know Your TV
Page 15
®
volume controls (VOLUME)
Press the v button to turn down the volume and the ^ button
to turn up the volume.
®
channel controls (CHANNEL)
Use the v button to switch to a channel with a lower number
and the ^ button to switch to a channel with a higher number.
A/V reset button (A/V RESET)
®
Press this button to reset all audioand video functions to their
normal level or setting, except: volume, reception mode,
speaker, monitor out, and closed captioning.
(2) degauss button (DEGAUSS)
If there is color impurity in your TV's picture, press thiLsbutton.
®
color purity adjustment switches (STRENGTH,
DIRECTION)
Set these switches according to the placement of your
television. (Please see page 43.)
Overview of the Control Panel 13
Page 16
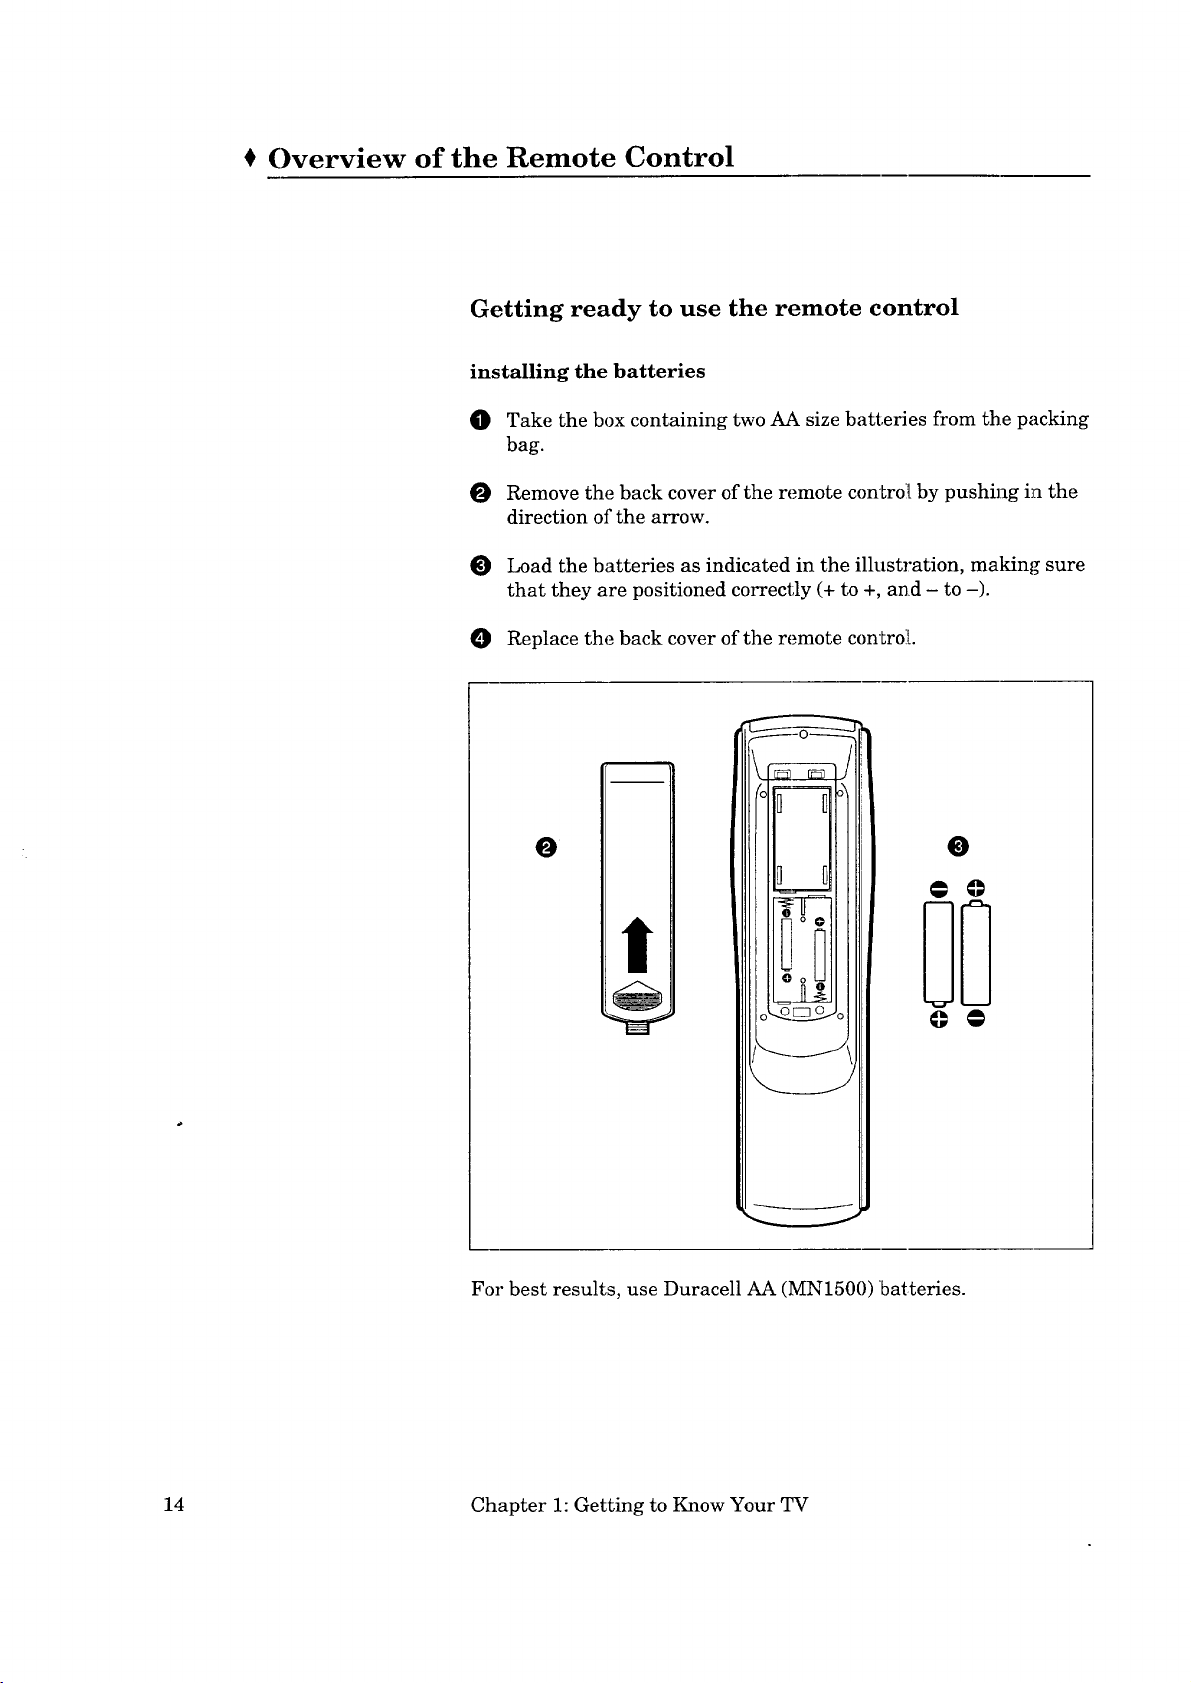
Overview of the Remote Control
Getting ready to use the remote control
installing the batteries
O Take the box containing two AA size batteries from the packing
bag.
O Remove the back cover of the remote controll by pushing in the
direction of the arrow.
O Load the batteries as indicated in the illustration, making sure
that they are positioned correctly (+ to +, and - to -).
O Replace the back cover of the remote controil.
O
0 u
O oLJ
n N
_J
_J
For best results, use Duracell AA (MN1500) batteries.
0
@ ©
@ @
14 Chapter 1: Getting to Know Your TV
Page 17
some do's and don'ts
To ensure that your remote control will continue working properly,
follow these guidelines:
• Don't press two or more buttons at the same time, unless
specifically instructed to do so in this owner's guide.
• Don't allow the remote control to get wet or become heated.
• Avoid dropping the remote control on a hard ,;urface.
• When cleaning the remote control, don't use any harsh
chemicals. Use only a soft, slightly moistened cloth.
general instructions
When using the remote control to operate the TV, VCR, or cable
box, follow these procedures:
O Be within 20 feet of the desired equipment.
O Point the top of the remote control toward, the equipment.
Press the appropriate button or sequence of buttons.
guidelines for using batteries
• Don't use a new battery with an old one.
• Don't heat, take apart, or throw batteries into a fire.
The following section explains more about the range of options
available when using the remote control.
Overview of the Remote Control 15
Page 18

@
Remote control buttons and functions
(_ CABLE VCR-A VCR-B
_CDCD
• REC STOP PAUSE
© c2_ ®-
REW PLAY PF
@
@
©
®
®
@
@
@
@
@
QV
VOLUME INPUT CHANNEL
___
MENO'_ANCELO,SPJ_O_E
C:9 C_ 0 C9-
QUICK
PROGRAI
CD
QQ GI_--
VCR/TV
-_®®®
OFF-T
-<=_©® ®
CHANNEL
SOURCE
@
®
@
@
@
16 Chapter 1: Getting to Know Your TV
©
Page 19
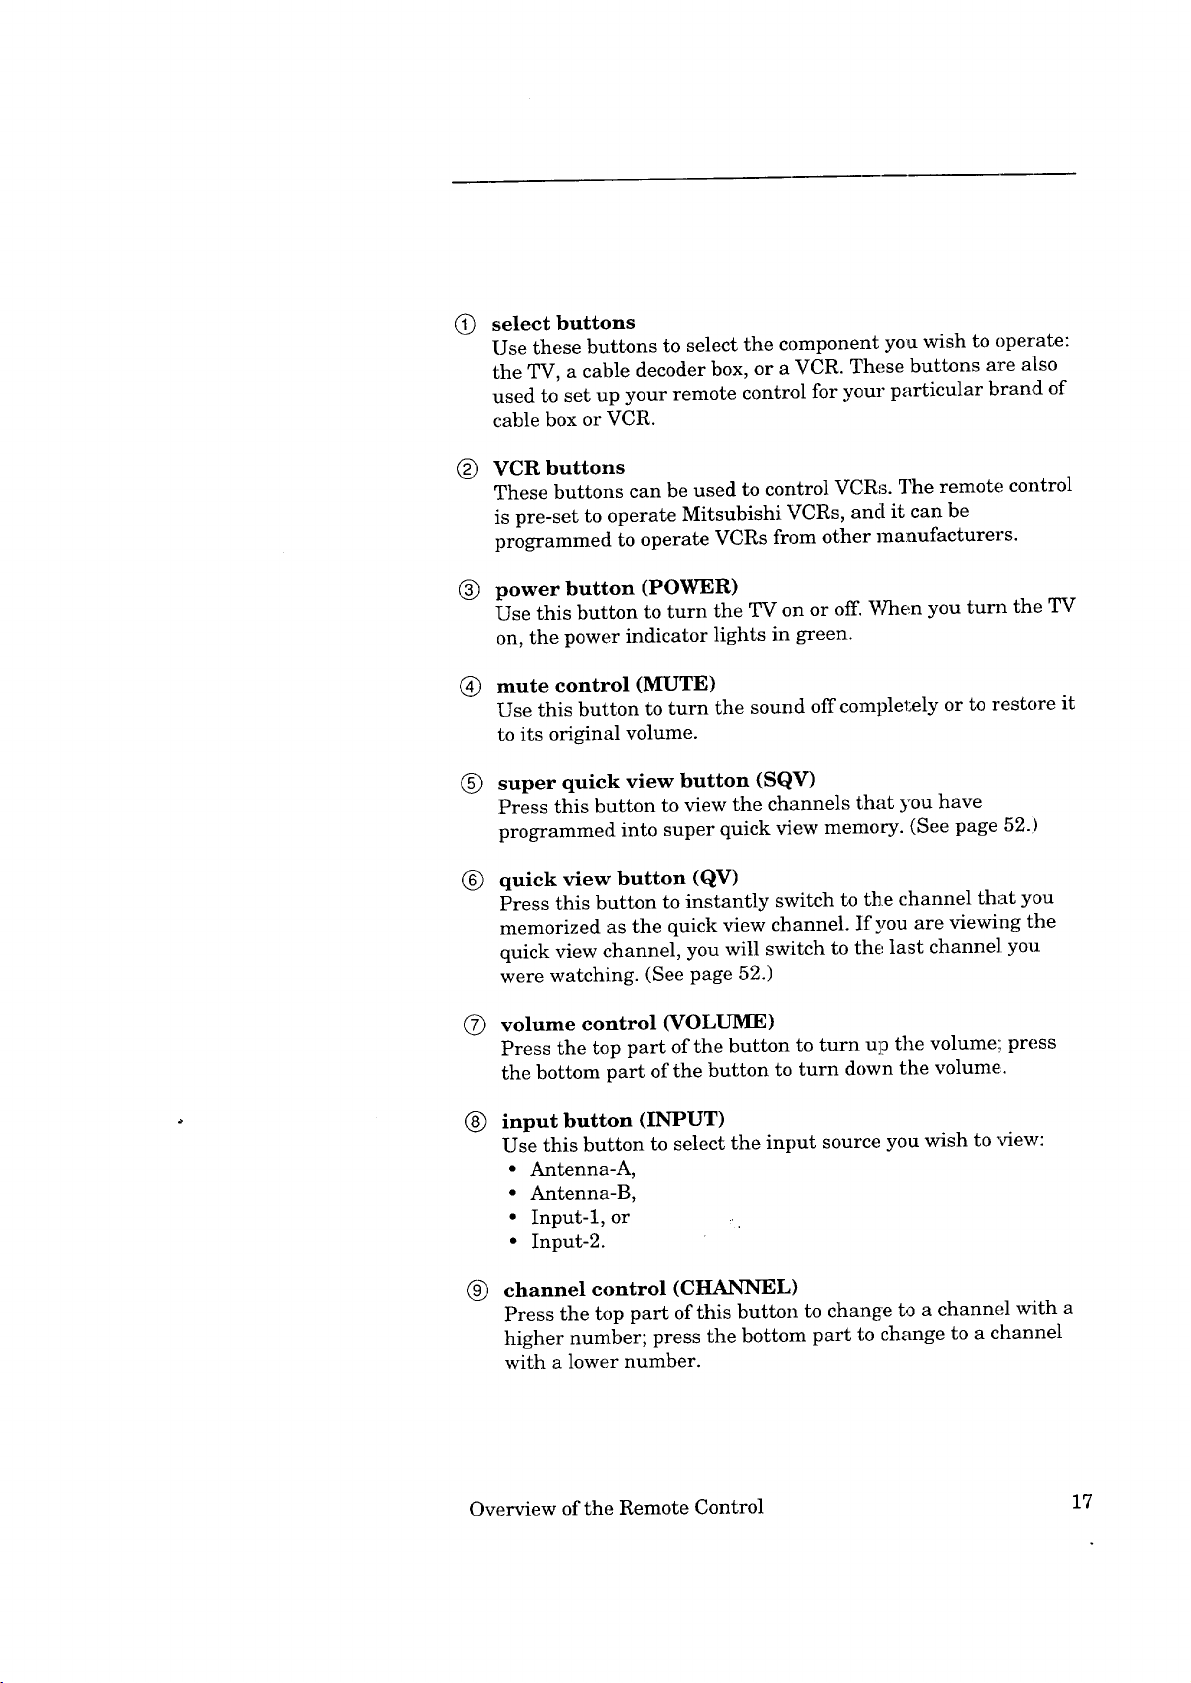
Q
select buttons
Use these buttons to select the component you wish to operate:
the TV, a cable decoder box, or a VCR. These buttons are also
used to set up your remote control for your particular brand of
cable box or VCR.
VCR buttons
®
These buttons can be used to control VCRs. The remote control
is pre-set to operate Mitsubishi VCRs, and it can be
programmed to operate VCRs from other manufacturers.
®
power button (POWER)
Use this button to turn the TV on or off. When you turn the TV
on, the power indicator lights in green.
®
mute control (MUTE)
Use this button to turn the sound off completely or to restore it
to its original volume.
®
super quick view button (SQV)
Press this button to view the channels that you have
programmed into super quick view memocy. (See page 52.)
®
quick view button (QV)
Press this button to instantly switch to the channel that you
memorized as the quick view channel. If you are viewing the
quick view channel, you will switch to the last channel you
were watching. (See page 52.)
®
volume control (VOLUME)
Press the top part of the button to turn u]o the volume',; press
the bottom part of the button to turn down the volume.
®
input button (INPUT)
Use this button to select the input source you wish to view:
• Antenna-A,
• Antenna-B,
• Input-l, or ..
• Input-2.
®
channel control (CHANNEL)
Press the top part of this button to change to a channel with a
higher number; press the bottom part to change to a channel
with a lower number.
Overview of the Remote Control 17
Page 20

Remote control buttons and functions (cont.)
®
enter and exchange button (ENTEPJEXCH)
Use this button after selecting a channel 1lumber or airier
selecting an item from the on-screen menu system. You will
also use this button with the PIP modes.
audio and video controls
©
These buttons are used together to adjust audio and video
functions (other than volume) with a two-step process: you use
the audio or video button to select a function, then you use the
adjust up/down buttons or left/right buttons to adjust it.
audio function button (AUDIO) --- Use this button to
select one of the following audio functions:
- stereo/S.A.P./mono,
- bass,
- treble,
- balance,
- surround off/simulate/hall,
- speaker on/off, or
- monitor out variable/fixed
video function button (VIDEO) --- Use this button to
select one of the following video functions::
- tint,
- color,
- contrast,
- brightness,
- sharpness,
- color temperature high/middle/low, or
- closed captioning.
adjust buttons (ADJUST • V), left/right buttons ('')
After selecting an audio or video function, use the Z_DJUST
buttons (• • ) or left/right buttons (4 ,) to adjust the
function you've selected. These buttons can be used to:
- turn the function on or off (e.g., speaker),
- increase or decrease the function (e.g., color),
- shift from one end of a scale to the other (e.g., balance), or
- select a position (e.g., stereo).
You will also use the adjust buttons with the Picture-in-
Picture modes and to select items on the on-screen menus.
18 Chapter 1: Getting to Know Your TV
Page 21
(_) menu button (MENU)
Use this button to display the on-screen menu system, which
gives you access to your TV',_ features.
cancel button (CANCEL)
@
This button is used to cancel[ a channel number, to clear' a
channel from super quick view memory, and to clear the
settings of on-screen menus.
® display button (DISPLAY)
Use this button to view an on-screen summary of the current
TV settings and the displays related to Ex'_ended Data Services
(XDS).
home button (HOME)
@
Press this button to return to regular TV x4ewing from the on-
screen displays and menus. This button can also be used to
turn off captions.
®
quick program button (QUICK PROGRAM)
Use this button to perform automated programming operations
with both your TV and your Mitsubishi VCR When you press
this button, your TV will switch to Input-_i, your VCR will turn
on, and the VCR's "Program to record" menu will appear. _nen
you are finished programming your VCR, press this button
again; your VCR will turn off, and your TV will return to its
previous position.
Important:
If you press this button while tbe TV is locked, or while using
the television's menus, then the VCR will turn on, but the TV
will not switch inputs.
You must have connected your VCR to your 7_ with an
A/V Network cable to use this feature.
(_) number buttons (0-9)
Use these buttons to select a channel number and to enter the
parental lock code.
@ off-timer button (OFF-T)
Use this button to program the TV to turn off automatically at
a later time.
Overview of the Remote Control 19
Page 22
Remote control buttons and functions (cont.)
@ picture-in-picture controls
Use these buttons to control the special picture-in-picture (]PIP)
modes. (For more information, see pages 82-88.)
PIP button (PIP) --- Press this button to begin displayiing
the PIP image, to change the image's size, or to cancel it.
This button is also used with the Active A/V Network (see
page 89).
• channel button (CHANNEL) --- Press this button to
change the channel of the PIP image when you are using the
PIP mode with the Actiw_ A/V Network
• source button (SOURCE) --- Press this button to switch
the source of the PIP image between the TV and the inputs.
• pause button (PAUSE) --- Press this button to freeze the
PIP image or to return the image to a "live" picture. You can
also use this button with the Snap-shot and Replay features.
• enter and exchange button (ENTEtUEXCH) --- Press
this button to exchange the contents of the PIP image and
the main image.
• adjust (up/down) buttons, left/right buttons --- Press
these buttons to move the PIP image on the screen.
20 Chapter 1: Getting to Know Your TV
Page 23

21
!
J
I
Page 24
Page 25
_ CHAPTER TWO
Connecting Your TV
This chapter offers step-by-step instructions fc,r completing the
most common hook-ups. It contains the following sections:
Overview of the Back Panel
€ Basic Connections
23
Page 26
Overview of the Back Panel
r
r
(_ AI"IT'A
VHF/UHF
(75_)
!l
®
I
}
® F
EXT-2 t EXT-1
JT
; INI_UT
(_ ACTIVEAN NETWORK
!
I
,
v
I
D
E
O
A
U
D
I
O
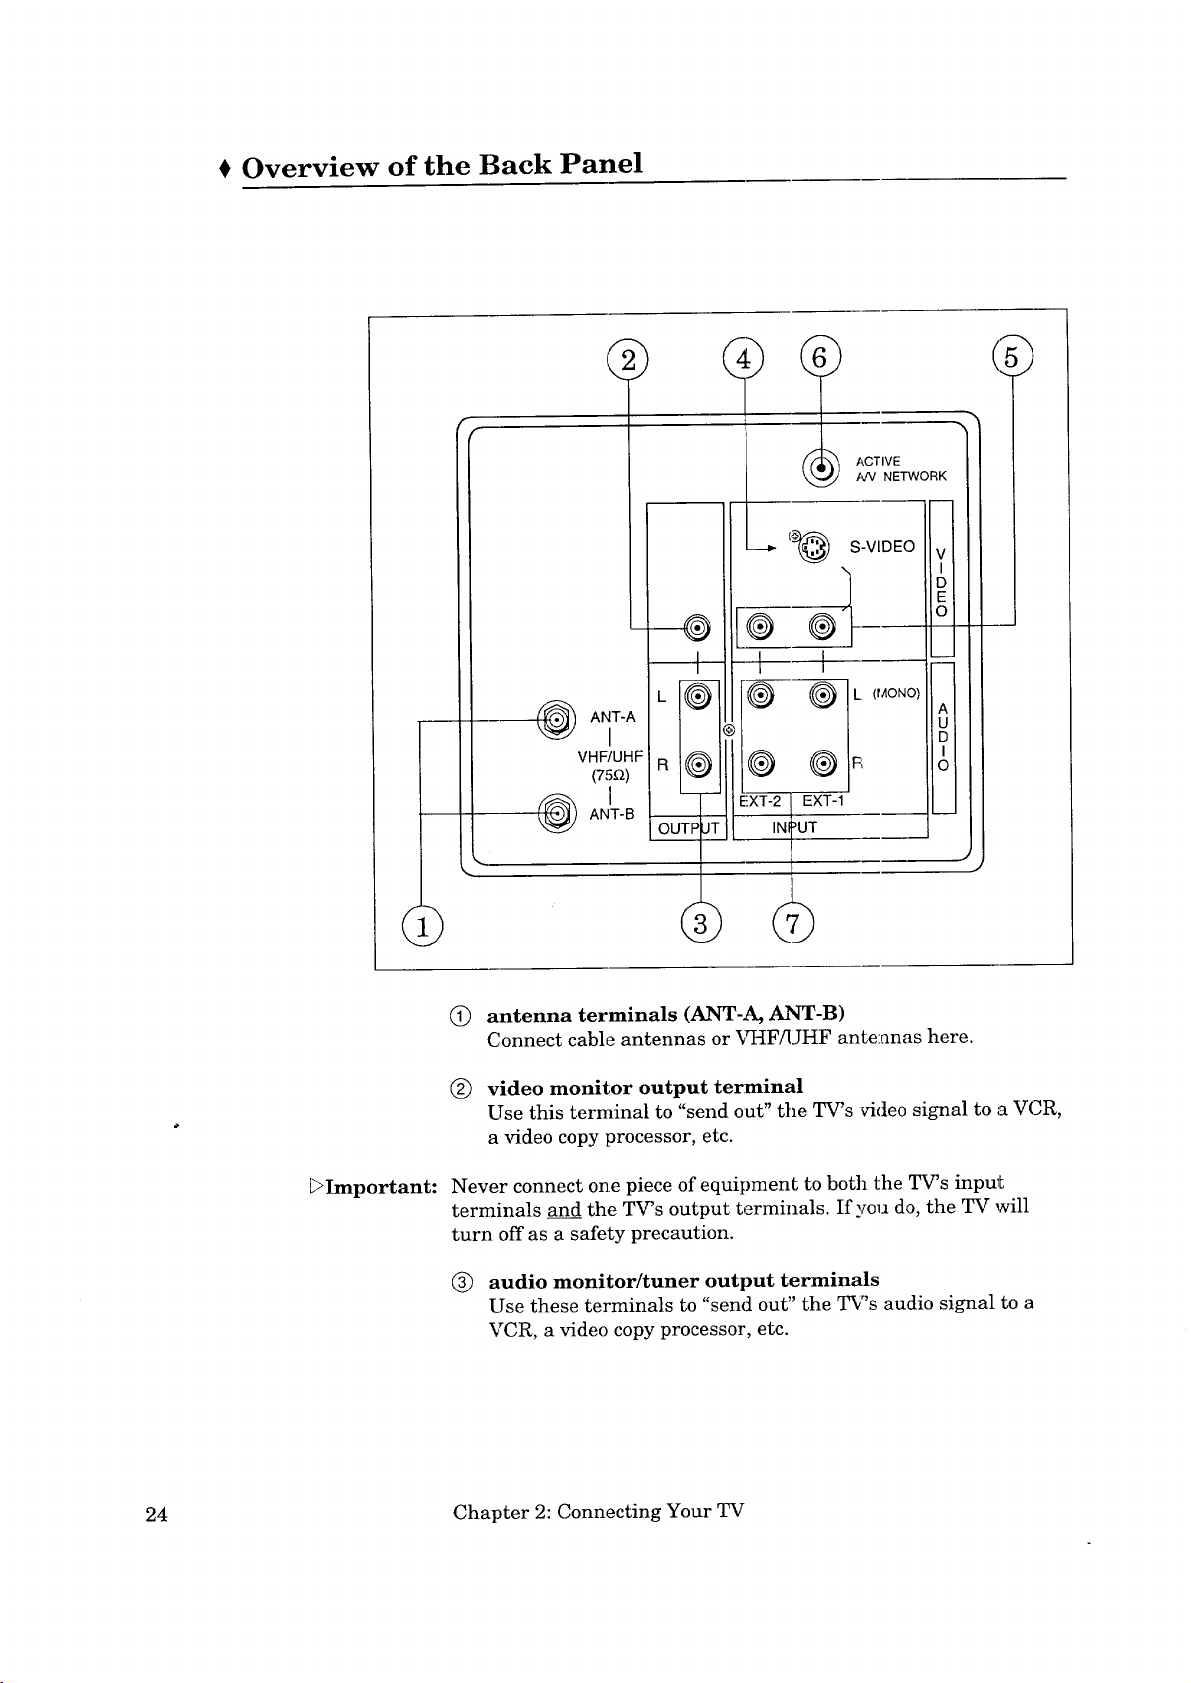
(_) antenna terminals (ANT-A, ANT-B)
Connect cable antennas or _%IF/UHF antennas here.
(_) video monitor output terminal
Use this terminal to "send out" the TV's v-ideosignal to a VCR,
a video copy processor, etc.
_Important:
Never connect one piece of equipment to both the TV's input
terminals and the TV's output terminals. If you do, the TV will
turn off as a safety precaution.
(_) audio monitor/tuner output terminals
Use these terminals to "sen(] out" the T_'s audio signal to a
VCR, a video copy processor, etc.
24 Chapter 2: Connecting Your TV
Page 27
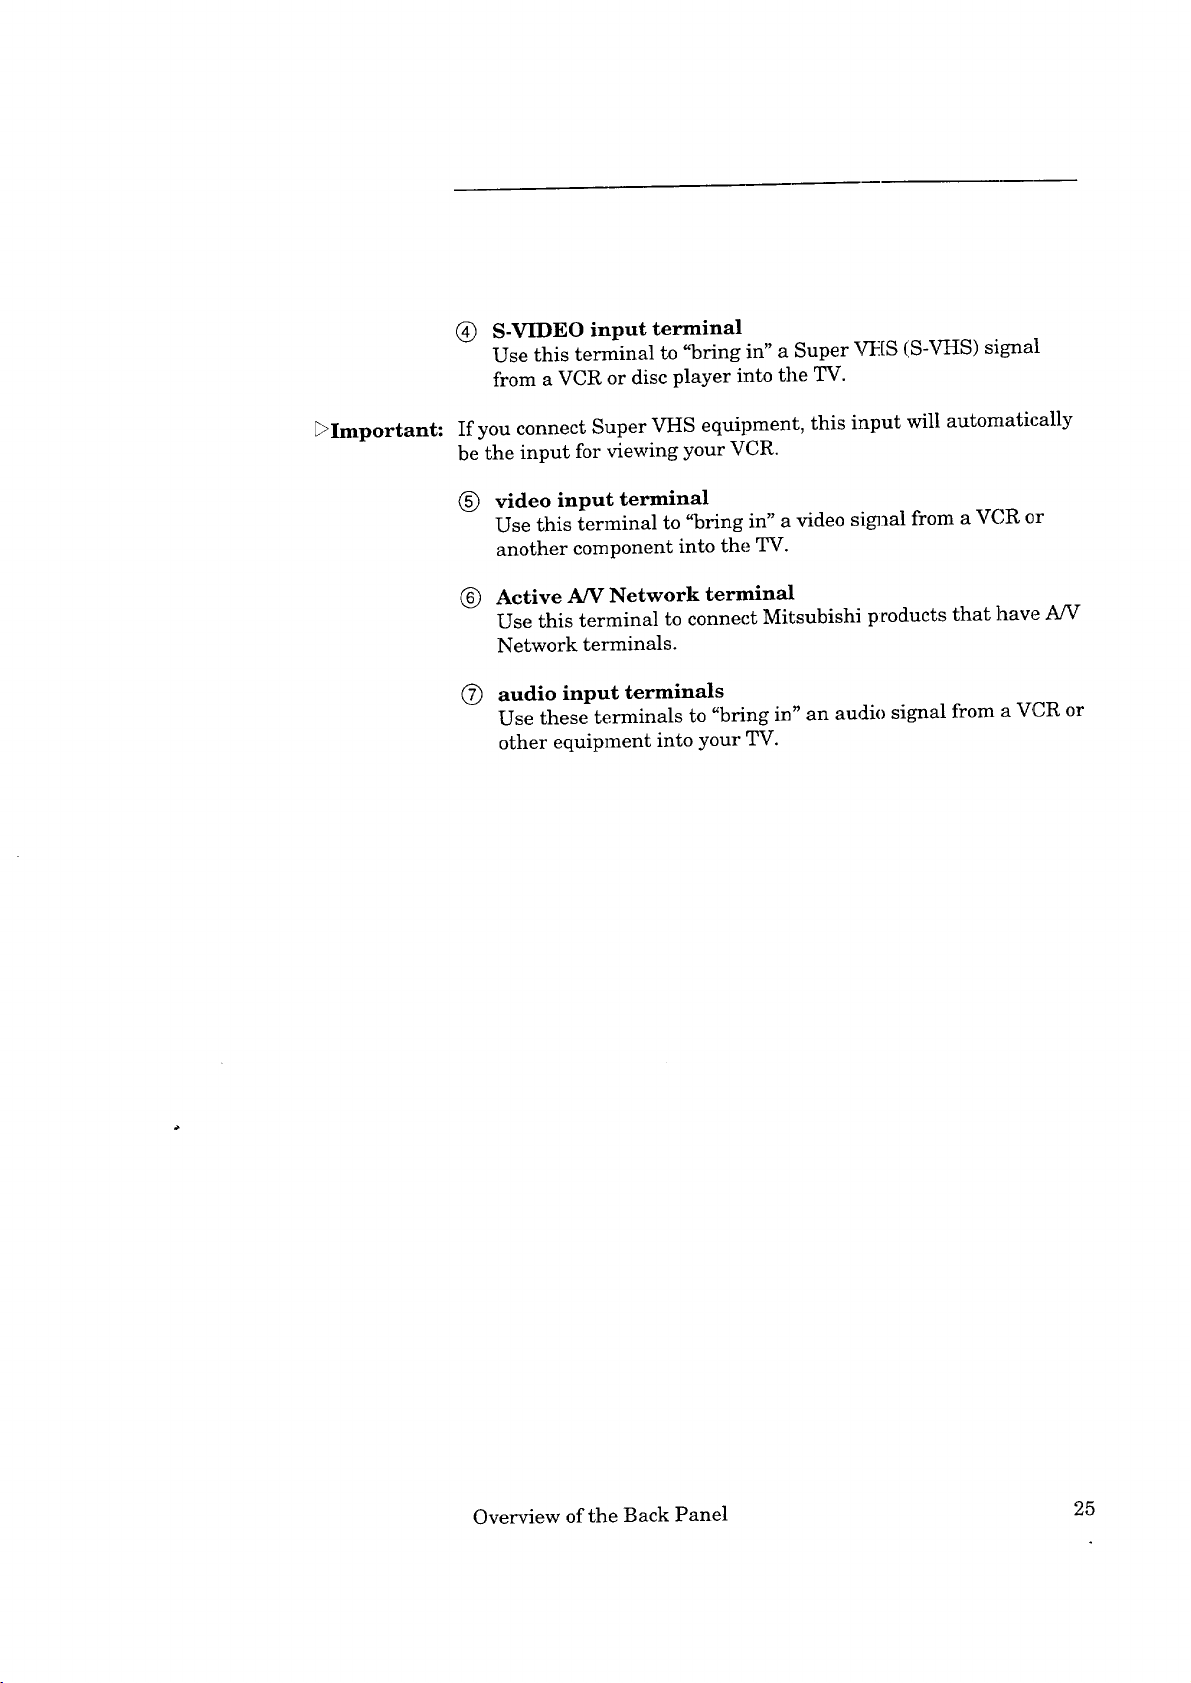
(_) S-VIDEO input terminal
Use this terminal to "bring in" a Super VHS (S-VHS) signal
from a VCR or disc player into the TV.
_Important:
If you connect Super VHS equipment, this input will automatically
be the input for viewing your VCR.
(_) video input terminal
Use this terminal to "bring in" a video si_]al from a VCR or
another component into the TV.
(_) Active A/V Network terminal
Use this terminal to connect Mitsubishi pcoducts that hawe A/V
Network terminals.
(7) audio input terminals
Use these terminals to "bring in" an audio signal from a VCR or
other equipment into your TV.
Overview of the Back Panel 25
Page 28
Basic Connections
This section explains the basic connections you will need to make
between your TV, antennas, and VCR. You will see there are
different connections shown depending on the type of antenna you
are using and whether or not you have a decodc_r box. Choose the
type of connection for the type of equipment you have.
If you are having difficulty making the connections to your TV, you
may want to contact your Mitsubishi dealer cr your local cable
company.
This section explains:
• TV + antenna or cable without a decoder box,
• TV + cable with a decoder box,
• TV + separate UHF and VHF antennas,
• TV + VCR + antenna or cable without a
decoder box,
• TV + VCR + cable with a decoder box,
• TV + audio system, and
• TV + Mitsubishi products that have A/V Network
terminals.
DImportant: You must connect a VCR to see two active images when using
Picture-In-Picture (PIP).
"Warning: [You should unplug your TV and any other components before
[ connecting them.
26 Chapter 2: Connecting Your TV
Page 29
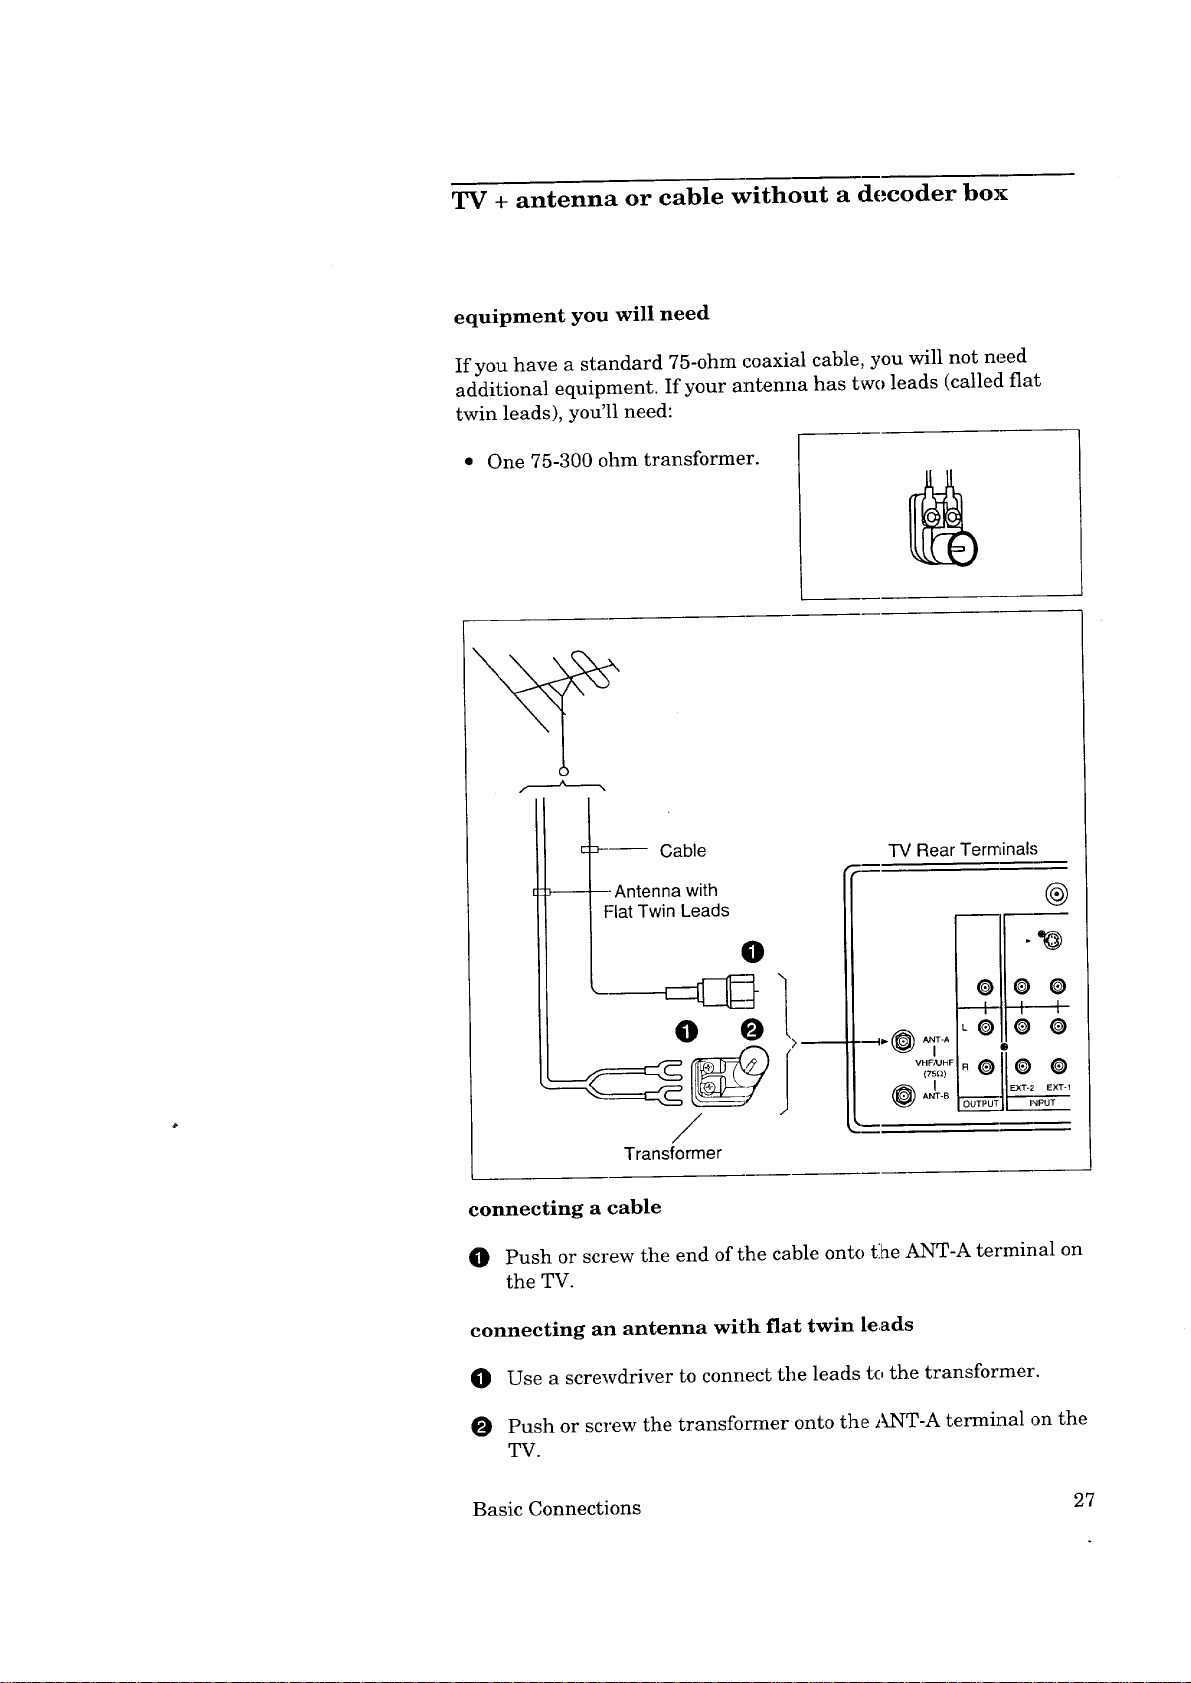
TV + antenna or cable without a decoder box
equipment you will need
If you have a standard 75-ohm coaxial cable, you will not need
additional equipment. If your antenna has two leads (called fiat
twin leads), you'll need:
One 75-300 ohm transformer.
:>--- Cable
-- Antenna with
Flat Twin Leads
IV Rear Terminals
0
O O O
ii-o
I I I
LO @ O
VHF,'UHF
(TSl_)
o
o11oo
@,4_°
/
Transformer
connecting a cable
0 Push or screw the end of the cable onto ti_e ANT-A terminal on
the TV.
connecting an antenna with fiat twin leads
O Use a screwdriver to connect the leads to the transformer'.
O Push or screw the transformer onto the ANT-A terminal on the
TV.
Basic Connections 27
Page 30
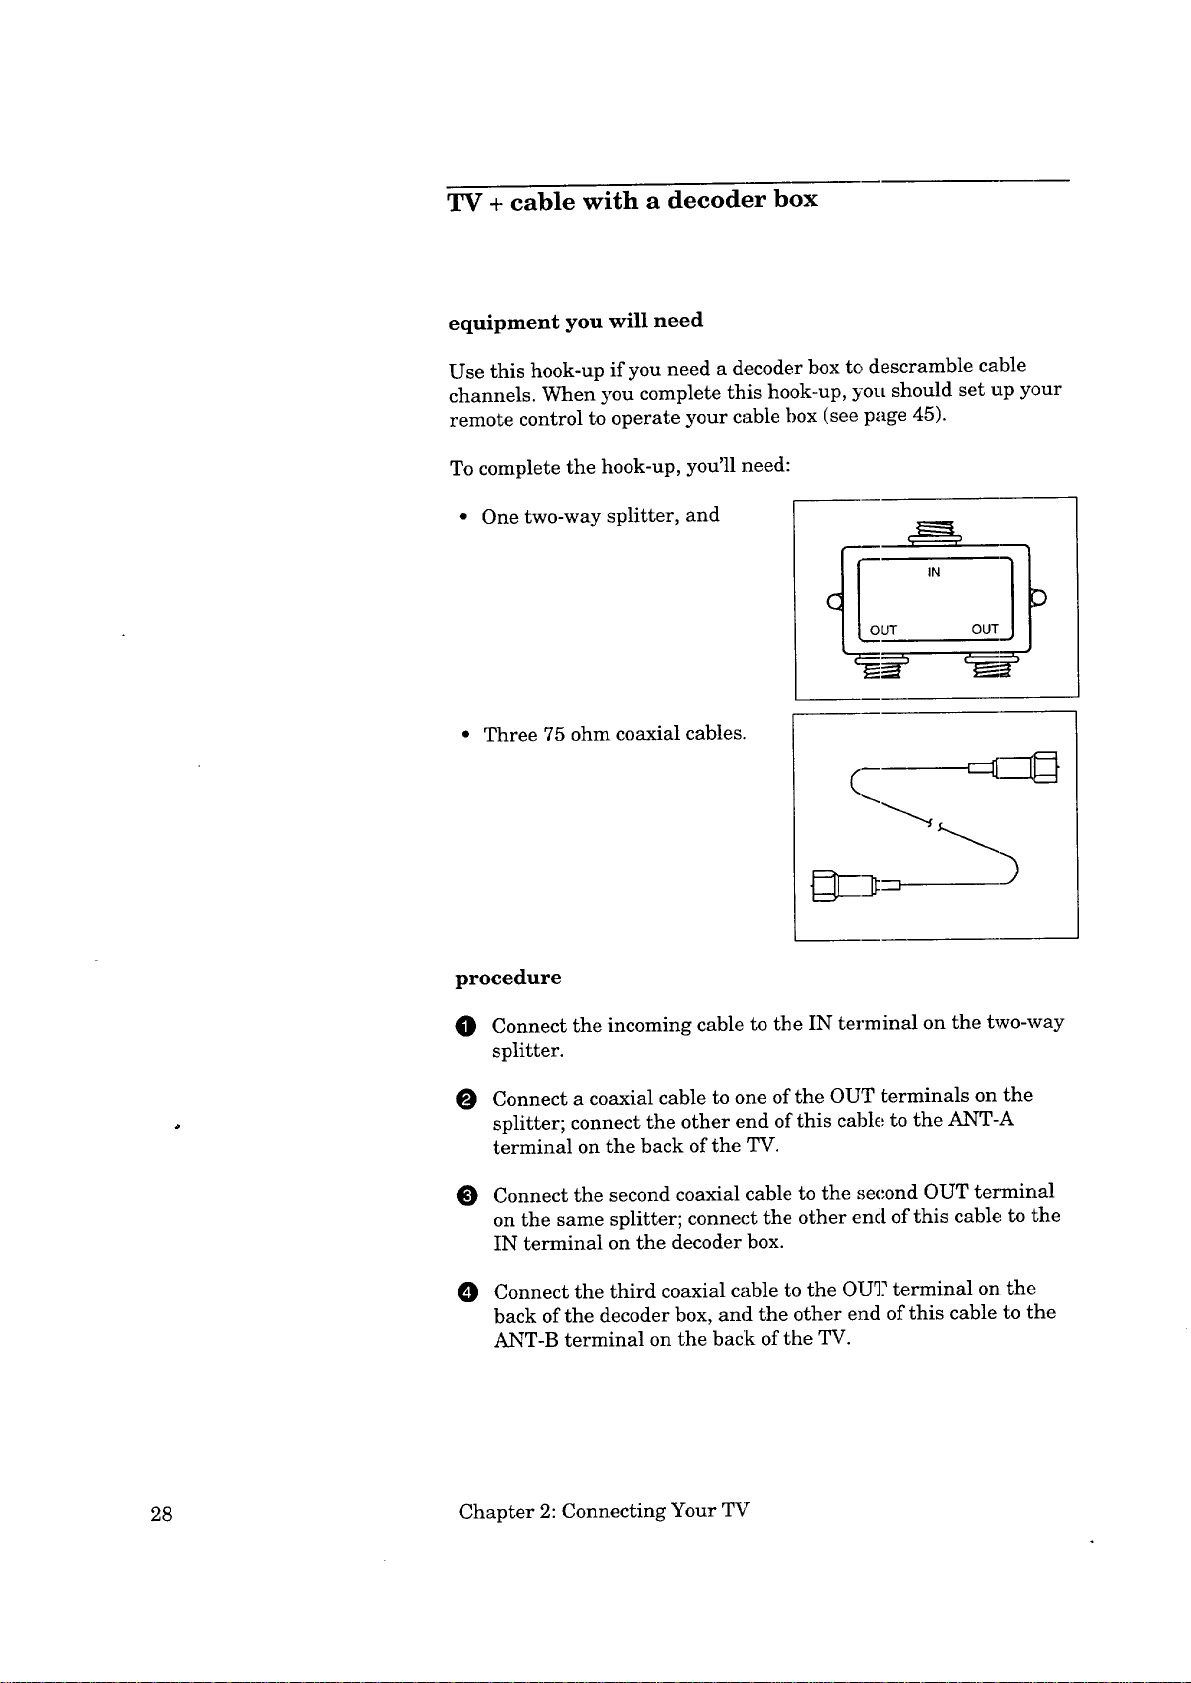
TV + cable with a decoder box
equipment you will need
Use this hook-up if you need a decoder box to descramble cable
channels. When you complete this hook-up, you should set up your
remote control to operate your cable box (see page 45).
To complete the hook-up, you'll need:
One two-way splitter, and
Three 75 ohm coaxial cables.
procedure
O Connect the incoming cable to tbe IN terminal on the two-way
splitter.
Connect a coaxial cable to one of the OUT terminals on the
splitter; connect the other end of this cablE,, to the ANT-A
terminal on the back of the TV.
Connect the second coaxial cable to the second OUT terTninal
on the same splitter; connect the other end of this cable to the
IN terminal on the decoder box.
Connect the third coaxial cable to the OU_? terminal on the
back of the decoder box, and the other end of this cable to the
ANT-B terminal on the back of the TV.
28 Chapter 2: Connecting Your TV
Page 31

0
CABLES
_Cable Decoder Box
Rear Terminals
O
TV Rear Terminals
----_ (l_l_ '_TA
VHFAJHF
(Ts,{z)
_ __,.(@A_.B
(_ ACTIVEAN NETWORK
El 0
I
Q () @.
EX['-2 EXT-1
INPUT
S-VIDEO
-!
v
I
D
E
C,
if:
Io
Basic Connections 29
Page 32

TV + separate UHF and VHF antennas
equipment you will need
If UHF and VHF signals are brought into your home with two
separate antennas, you'll need to combine the aatennas in order to
connect them to the TV. To do this, you will need a UHF/VHF
combiner. (There are different combiners for ciifferent kinds ,of
leads. Check with your local electronics store fo:r the kind of
combiner you need.)
Pictured to the right is a
standard combiner.
To connect separate UHF and VHF antennas to your TV:
O Connect the UHF and VHF antenna leads to the appropriate
terminals on the UHF/VHF combiner.
O Press the combiner onto the ANT-A terminal.
VHF Antenna UHF Antenna
(Channels2-13) (Channels14-69)
nil/ ",x_,_,'
L-,
: Flat Twin Lead --I
--_ Flat Twin Lead
External
Antenna
or Cable
300 Ohm to
75 Ohm
O Combiner O
Back Side
/
TV Rear Terminal,,;
-++v:T:
@,a+
o o o
I 1 I ]
_O 0 0
oool,--,!
EXT-2 EXT-I
OUT_I INPU_
.'o) ,<
+II
30 Chapter 2: Connecting Your TV
Page 33

TV + VCR + antenna or cable without a
decoder box
equipment you will need
You may want to connect a VCR along with yo_ar antennas or cable.
To complete this hook-up, you may need the following equipme:at:
• One 75 ohm coaxial cable,
One set of RCA pin-type audio
cables,
One RCA pin-type video cable,
(if connecting a standard VCR),
or
• One S-Video cable for
S-VHS VCRs.
[=IllID
c m]3
)
Basic Connections 31
Page 34

TV + antenna or cable without a
decoder box (cont.)
procedure
(See illustration on the following page.)
O Connect the incoming cable or antenna to the ANTENNA IN
terminal on the VCR.
O Connect one end of a coaxial cable to the ANTENNA OUT
terminal on the VCR.
Connect the other end of the coaxial cable to the ANT-A
terminal on the TV.
O Connect an RCA pin-type video cable to the VIDEO OUT
terminal on the back of the VCR. Connect the other end of this
cable to the VIDEO INPUT terminal on the back of the
television.
_Important:
_Important:
_Important:
If you are connecting a Super VHS (S-VHS) VCR, _ise an S-Video
cable instead of an RCA pin-type video cable. Connect this S-Video
cable to the S-VIDEO OUT terminal on the VCR. Connect the other
end of this cable to the S-VIDEO INPUT terminal on the back of
the TV.
O Connect a set of RCA pin-type audio cables to the AUDIO OUT
terminals on the back of the VCR. Use the red cable to connect
the right (R) channel and the white cable to connect the left (L)
channel.
O Connect the other ends of these cables to the AUDIO INPUT
terminals on the back of the TV.
If your VCR is monaural (non-stereo), you only need to connect a
single RCA pin-type audio cable. Connect the cabl_ to the VCR,
then connect the other end of the cable to the L (LEFT) audio input
on the back of the TV.
If your VCR has a video channel switch, set it to "OFF/AV." See
your VCR's owner's guide for details.
Start playing a tape on your VCR.
O Use the INPUT button on your TV_s remote cc,ntrol to select
Input-1.
32 Chapter 2: Connecting Your TV
Page 35

VCR Antenna Terminals
@
IN
Antenna
@
Incoming Cable
or Antenna
Cable
O
OUT
Lead
Red Lead
TV Rear Terminals
AUDIO OUT
LO
O O LIM°"°I_
VCR Rear Terminals
Connect either one _[_
ACTIVE
AN N_I3NORK
-- EZ[D_::_---
'r'ellow Lead
VHFAJHF R O
(75_)
- Red Lead
,
OUTPUT
O
EXT-2
INPUT
O
_hite Lead
Basic Connections 33
Page 36

TV + VCR + cable with a decoder box
equipment you will need
This hook-up will allow you to record scrambled channels while
watching a non-scrambled channel. When you complete this hook-
up, you should set up your remote control to opera';e your cable box
(see page 45). To complete the hook-up, you will m_,ed:
Four 75 ohm coaxial cables,
One two-way splitter,
One set of RCA pin-type audio
cables,
One RCA pin-type video cable,
(if connecting a standard VCR),
or
One S-Video cable for S-VHS
VCRs.
I
34 Chapter 2: Connecting Your TV
Page 37

procedure
(Please see the illustration on the following page.)
O Connect the incoming cable to the IN terminal on the two-way
splitter.
O Connect a coaxial cable to one of the OUT terminals on the
splitter; connect the other end of this cable tc the ANT-A
terminal on the back of the TV.
O Connect a second coaxial cable to the other C,UT terminal on
the splitter; connect the other end of this cable to the IN
terminal on the decoder box.
Connect the third coaxial cable to the OUT terminal on the
back of the decoder box; connect the other end of this cable to
the ANTENNA-IN terminal on the back of the VCR.
O Connect the fourth coaxial cable to the ANT]gNNA-OUT
terminals on the back of the VCR. Connect the other end of this
cable to the ANT-B terminal on the back of_he TV.
Connect an RCA pin-type video cable to the VIDEO OUT
terminal on the back of the VCR. Connect the other end of this
cable to the VIDEO INPUT terminal on the back of the TV.
_Important:
_Important:
_Important:
If you are connecting a Super VHS (S-VHS) VCR, use an S-Video
cable instead of an RCA pin-type video cable. Connect this S-Video
cable to the S-VIDEO OUT terminal on the VCR. Connect the other
end of this cable to the S-VIDEO INPUT terminal on the back of
the TV.
O
Connect a set of RCA pin-type audio cables to the AUDIO OUT
terminals on the back of the VCR. Use the i'ed cable to connect
the right (R) channel and the white cable for connecting the left
(L) channel.
Connect the other ends of this cable to the AUDIO INPUT
terminals on the back of the TV.
If your VCR is monaural (non-stereo), you only need to connect a
single RCA pin-type audio cable. Connect the cable to the VCR,
then connect the other end to the L (LEFT) audio input on the back
of the TV.
If your VCR has a video channel switch, set it to "OFF/AV." See
your VCR's owner's guide for details.
Basic Connections 35
Page 38
VCR
Antenna
Terminals
Antenna
@
OUT
TV + VCR + cable with a decoder box (cont.)
O Start playing a tape on your VCR.
O Use the INPUT button on your TV's remote col_trol to select
Input-1 or Input-2.
Incoming Cable
EEE:[[_- Cable Decoder Box
I__ -__N RearTermi'lals 1
VCR Rear Terminals
Lead
AUDIO OUT
0
Lead
O
Cable ---c
O
TV Rear Terminals
"°@4_...... R
i i I- b
L .......... [_
e!O @...........
(TS_)
ACTIVEA/V NE'RNORK
-/.@2T-O
36 Chapter 2: Connecting Your TV
Connect either one---_
I
Lead
White L.ead
_ Red Lead ___
Page 39

TV + audio system
equipment you will need
To hook up an audio system, you will need:
• One set of RCA pin audio cables.
procedure
O Connect the audio cables to the
AUDIO MONITOR OUTPUT
terminals on the back of the TV.
Use the red cable to connect the
right (R) channel and the white
cable to connect the left (L) channel.
Connect the other ends of these cables to the AUX IN
terminals on the back of the audio system.
O
Turn off the television's speakers. To do this, press the
AUDIO function button on the remote control until you see
the "Speaker" display. Set the speakers to "Off" by pressing
the adjust (up/down) buttons. See "Adjusting the sound," on
page 62.
O Set the audio system's input to the "AUX" position.
Audio System Rear Terminals
White Lead
[_- Red Lead O
TV Rear Terminals
AUX
0
- White Lead
_0
(75P)
Red Lead
Basic Connections 37
Page 40

TV + Mitsubishi products that have A/V Network
terminals
The A/V Network is a special system that Mitsubishi developed to
make it easier to use the remote control. When the ;supplied cable is
connected between two Mitsubishi products with the A/V Network,
you can point the remote control at one product and. it will "pass"
the remote control command to the other.
equipment you will need
• One A/V network cable
(included with the TV)
procedure
O Connect one end of an A/V network cable to the ACTIVE AfV
NETWORK terminal on the back of the TV.
O Connect the other end of this cable to the A/V NETWORK IN
terminal on the back of a Mitsubishi component that has A/V
network terminals.
You can now point your component remote (such as a VCR
remote) directly at the TV. Tile A/V cable will "pass" the remote
commands to the component.
The method of connecting the A/V network can change, depending
on which components you have and the way you plan to use your
equipment. More detailed information is contained in the owner's
guide of each particular Mitsubishi component.
38 Chapter 2: Connecting Your TV
Page 41

TV Rear Terminals
_ AT÷A
L _ _ _ L (MONO)
VHFA_HF
(75n)
OUTPUT P 1 R
._ s-v,oEol_
ooo" I_
"' IH
Mitsubishi Component Rear Terminals
Basic Connections 39
Page 42

Page 43

_ CHAPTER THREE
Operating Your TV
Now that your TV is connected to the cable, ante:ana, or external
components, it's time to enjoy your equipment. This chapter will
explain how to operate the TV, first focusing on functions that are
basic and easy and then explaining some advanced features.
This chapter explains:
0 Getting Started
0 Using the Advanced Features
41
Page 44

Getting Started
This section is designed to get you started enjoying your new TV. If
you follow these procedures one by one, you will soon begin
discovering everything your tele_4sion can do.
You'll find information on:
• Adjusting the color purity,
• Using the remote control to operate cable boxes and
other brands of VCRs,
• Turning the TV on/off,
• Selecting the input source,
• Changing channels,
• Understanding the on-screen menus,
• Setting the clock,
• Memorizing channels,
• Adding and deleting channels,
• Setting the A/V Network,
• Renaming the input,
• Selecting the menu language,
• Using video mute,
• Adjusting the sound,
• Adjusting the picture, and
• Using the closed caption decoder.
42 Chapter 3: Operating Your TV
Page 45

Adjusting the color purity
Your television has a large screen picture tube, _,nd its color purity
can be affected slightly by the earth's magnetic f:_eld. For best
results, follow the instructions below to adjust the color purity.
O Turn off the TV set.
Select the desired location and install the set. Determine the
compass direction where the set is facing. Tile direction is
determined from the front of the screen facing forward.
O Set the DIRECTION switch according to the chart below.
TV SET DIRECTION
North
North East
North West
South
South East
South West
East
West
DIRECTION SWITCH
S NEUTRAL N
X
X
X
X
X
STRENGTH SWITCH
X
X
X
Turn the TV on, and check the color perfol:mance.
If color impurity is still present, change the STRENGTH
switch to position "1." If there is still ir_purity, wait a few
minutes, then press the DEGAUSS bu'_ton.
The color purity switches must be adjusted each time the set
is moved to a new location.
If there is still color impurity after adjusting the switches,
contact your Mitsubishi dealer or a Mitsubishi Authorized
Warranty Service Center.
43
Page 46

Using the remote control to operate cable boxes
and other brands of VCRs
operating Mitsubishi components
This TV's remote control comes programmed to op_rate Mitsubishi
TVs and VCRs. The select buttons (across the top of the remote
control) determine which component the remote control will
operate.
The following buttons are available
• power button
• pause button
• mute control
• super quick view button
• quick view button
• volume control
• input button
• channel control
• enter button
• audio and video controls
operating cable boxes or VCRs from other manufacturers
The remote control is pre-set to operate Mitsubishi VCRs, but it
can also operate VCRs from other manufacturers as well. If you
have a VCR from another manufacturer, or if you have a cable box,
you should "set up" the remote control.
Each layer on the remote control (CABLE, VCR-A, or VCR-B) can
be set for either a cable box or a VCR.
setting up the remote control to operate your VCR
when using this TV:
• menu button
• cancel button
• display button
• home button
• off-timer button
• number buttons
• PIP controls
• VCR buttons
• quick prograln button
O Turn off your VCR.
O Press one of the select buttons across the top of the remote
control to choose the layer that you want to "set up." You can
choose between VCR-A, VCR-B, or CABLE.
O
While holding in tbe POWER button on the remote control,
enter the code number listed in the chart on the following page
for your brand of VCR. Be sure to enter both digits of the code
number. If more than one number is listed, try the first one.
Release the POWER button.
O Press the POWER button again. Your VCR should turn on. If
the VCR turns on, your remote control is now set to operate
your VCR.
44 Chapter 3: Operating Your TV
Page 47

IfyourVCRdoesnotturn on,repeattheinstructions,trying
eachcodenumberlistedforyourbrandofVCR.If noneof"those
codenumberswork,try eachnumber,01through20.
IfyourVCRisthis
brand...
Mitsubishi(A)
Mitsubishi(B)
Canon
Emerson
Funai
GE
Goldstar
Hitachi
JVC
Magnavox
Multitech
NEC
Panasonic
Philco
setting up the remote control to operate your cable box
O Turn on 3'our cable box.
•..enter this code
01
02
O3
04, 05
06
03
07
O8
09
03, 10, 11
06
12
03
03, 10
If your V(:R is this
brm
Phi tps
Quasar
R(
Sm ,yo
Se
Sh: T'
So y
Sylvania
Symphonic
Tek
Tos]
Tote_" '
Zer
...enter this code
03, 10, 11
03
08, 13, 20
14
15
16
17, 18
03, 10, 11
O6
04,06
15
07
lq
Press one of the select buttons across the top of the remote
control to choose the layer that you want to "set up." You can
choose between VCR-A, VCR-B, or CAELE.
O
While holding in the POWER button on. the remote control,
enter the code number listed in the chart on the following page
for your brand of cable box. Be sure to enter both dig_ts of the
number. If more than one number is listed, try the first one.
O Release the POWER button.
O Press the POWER button again. Your (:able box should 'turn off.
If the cable box turns off, your remote control is now set to
operate your cable box. If your cable box does not turn off,
repeat the instructions above, trying each number listed for
your brand of cable box. If none of these numbers work, try
each number, 51 throug:h 99.
L>Important: Some cable boxes turn on only when you press the channel buttons.
Getting Started 45
Page 48

Using the remote control to operate cable boxes
and other brands of VCRs (cont.)
If your cable box is
this brand...
Zenith
Hamlin
Jerrold
G.I.
Oak
Pioneer
Scientific Atlanta
_>Important:
•..enter this code ...enter this code
51
52, 53, 69
54, 57, 58, 59, 60, 85, 87
55, 56
61, 62, 82
64, 65, 84
66, 86, 88, 89, 91, 92
Sometimes manufacturers will change their products, or they may
If your cable box is
this brand..•
%_com
Panasonic
Macom
Philips
Regency
67,68,72
63,70
71
73,74,75,76,77,
93,94,95,96,97,98,99
79
use more than one code. If this is the case, your remote may not be
able to operate your VCR or cable box
_>Lmportant:
Each layer (CABLE, VCR-A, or VCR-B) can be set for either a cable
box or a VCR.
_Important: When you replace the batteries in your remote control, the remote
will return to its initial setting.
using your remote control to operate your VCR
After you have set up your remote control for your particular brand
of VCR, you can use the remote to operate your VCR.
O Use the select buttons across the top of the remote control to
choose the layer you "set up" to operate the VCR: VCR-A,
VCR-B, or CABLE.
Point the remote control at the VCR and press the desired
buttons.
If you are using a Mitsubishi VCR, you will be able to use all of the
buttons on the remote control to operate yore' VCR except for
MUTE, VOLUME and the PIP flmction button,;, which will always
operate the TV itself.
If you are using another brand o:fVCR, you can use the POVYER,
CHANNEL, REC, STOP, PAUSE, REW, PLAY and FF buttons to
operate your VCR.
46 Chapter 3: Operating Your TV
Page 49
using your remote control to operate your cable box
After you have set up your remote control for your particular brand
of cable box, you can use the remote to operate your cable bo.'<.
O Use the select buttons across the top of the remote control to
choose the laver you "set up" to operate the cable box: VCR-A,
VCR-B or CABLE.
O Point the remote control :at the cable box and press the desired
buttons.
Only the POWER and CHANNEL buttons can be used when
operating your cable box.
Important:
Some cable boxes only turn on when you press the channel buttons.
Getting Started 47
Page 50

Turning the TV on!off
_Important:
_Important:
Before using the remote control to operate the TV, press the "TV"
select button on the remote control.
Use the POWER button on either the control panel or the remote
control to turn the TV on and off. The power indicator will light up
in green when you turn the TV on.
There is always a small amount of current flowing into the TV,
even when the power is turned off. This maintains any changes to
the settings and operates the built-in clock and timing functions.
Unplugging the set will erase these setting& requiring you to set
them again. Unplug the TV only when it won't be used for a long
time.
When you turn on your TV for the first tim_,, the screen may be
disp]ayingthe "SelectLanguage" menu. You shouldselect'the
on-screenlanguage you want touse.For more information:see
page 60,"Selectingthemenu language."
48 Chapter 3: Operating Your TV
Page 51
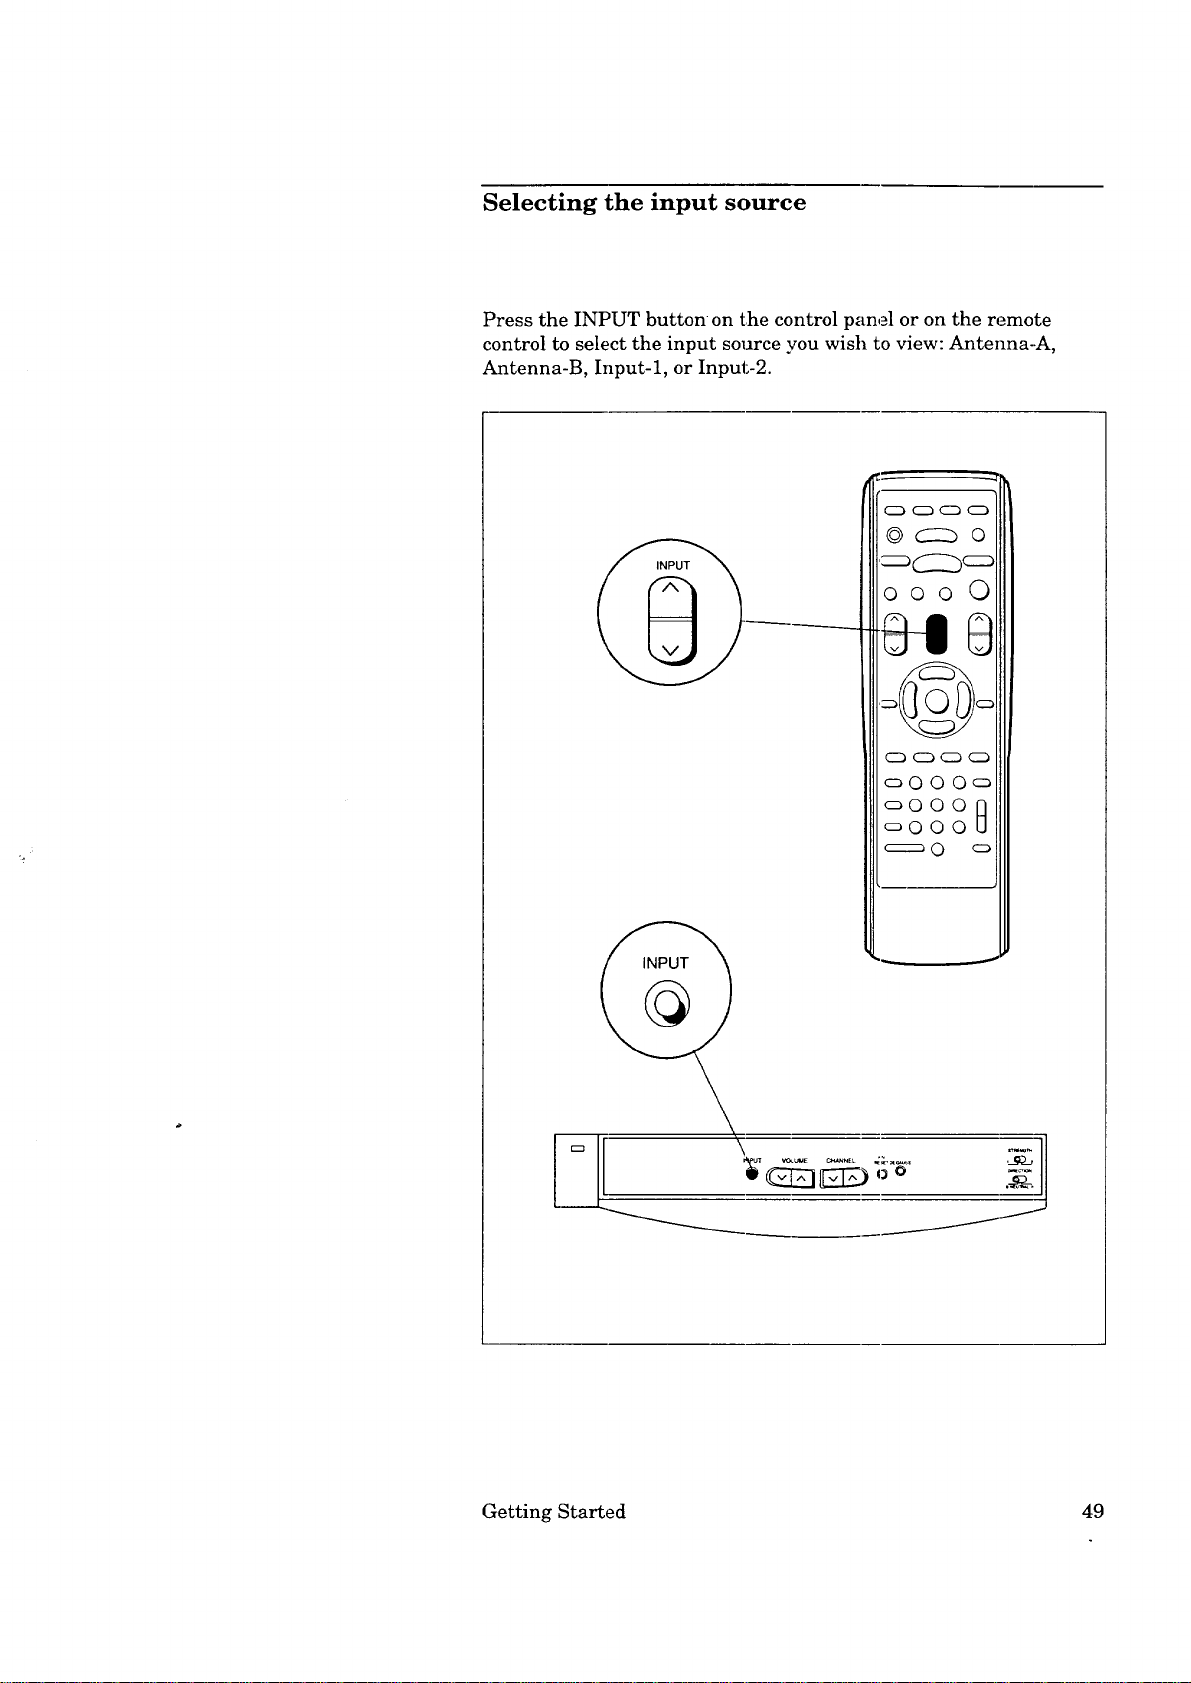
Selecting the input source
Press the INPUT button on the control panel or on the remote
control to select the input source you wish to view: Antenna-A,
Antenna-B, Input-l, or Input-2.
0 0
Getting Started 49
Page 52
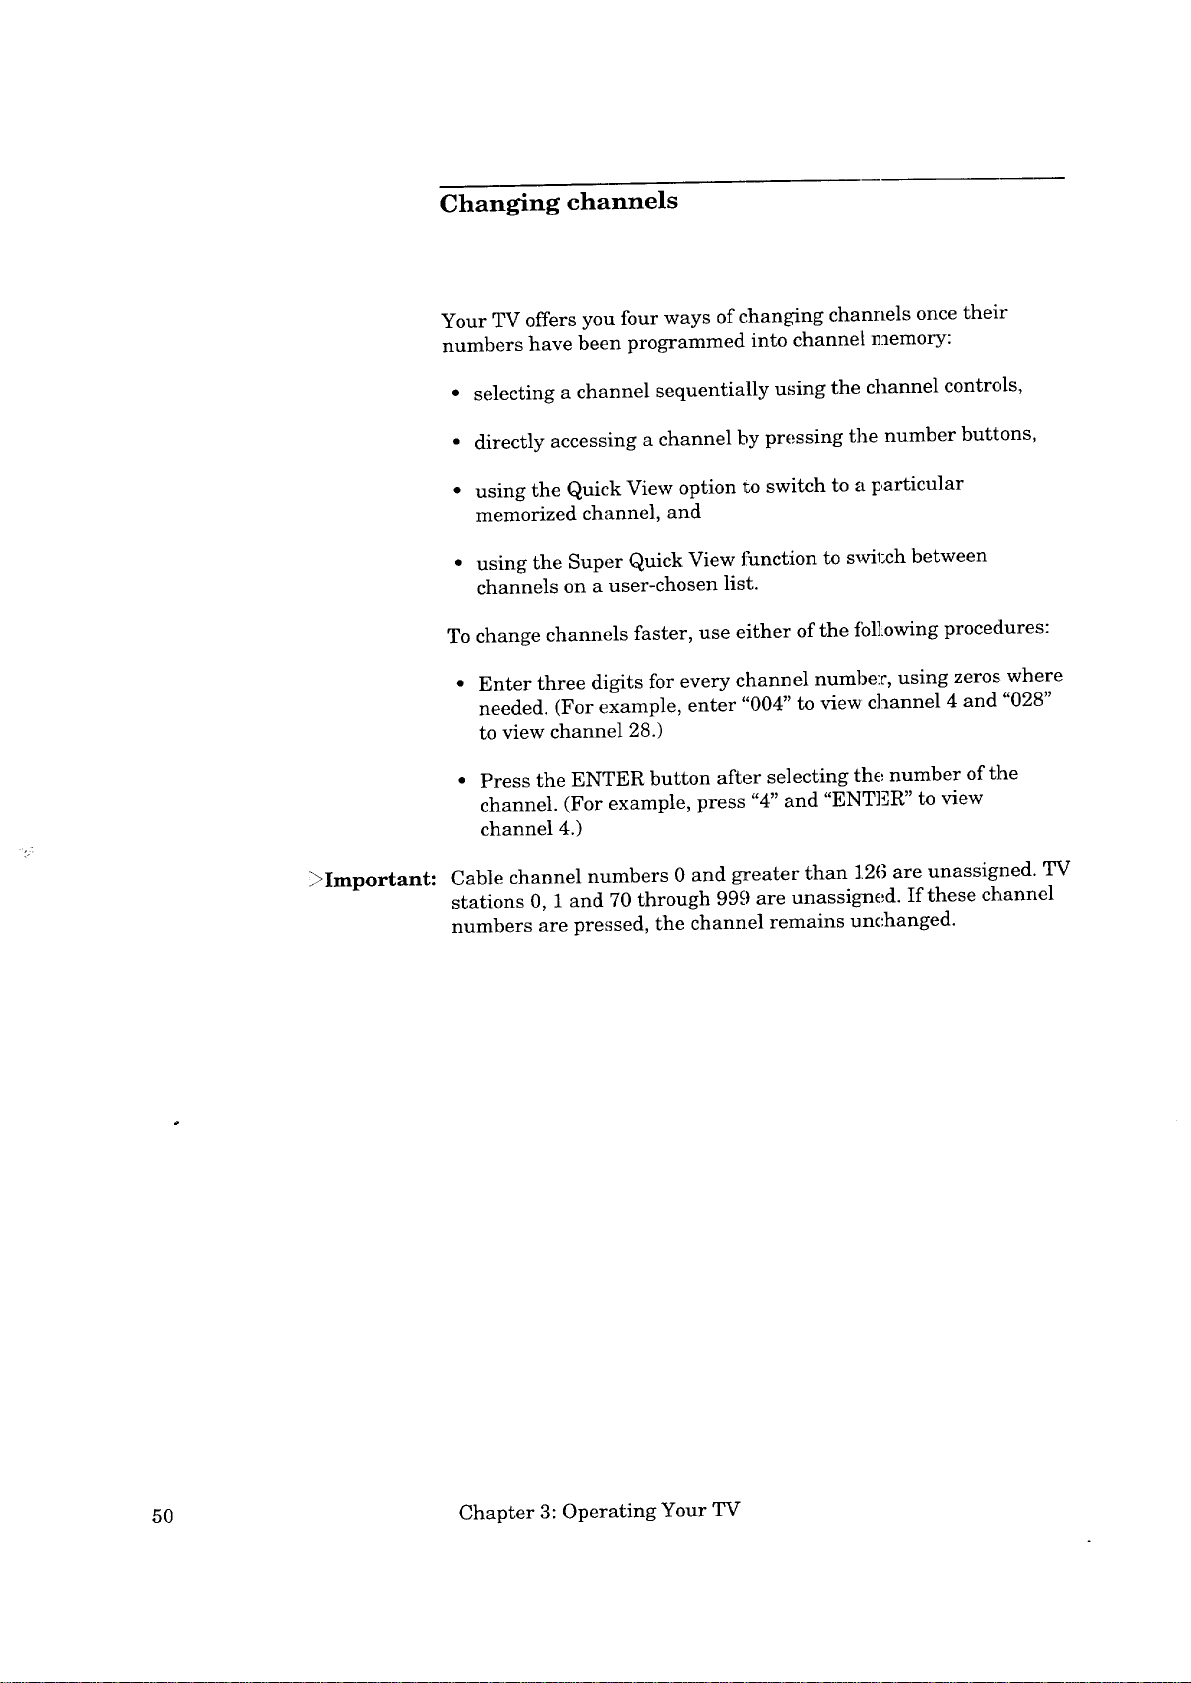
Changing channels
Your TV offers you four ways of changing channels once their
numbers have been programmed into channel n]emory:
• selecting a channel sequentially using the channel controls,
• directly accessing a channel by pressing the number buttons,
• using the Quick View option to switch to a It,articular
memorized channel, and
• using the Super Quick View function to swil:ch between
channels on a user-chosen list.
To change channels faster, use either of the tbl] owing procedures:
• Enter three digits for every channel numbe:c, using zeros where
needed. (For example, enter "004" to view channel 4 and "028"
to view channel 28.)
• Press the ENTER button after selecting the number of the
channel. (For example, press "4" and "ENTER" to view
channel 4.)
_Important:
Cable channel numbers 0 and greater than 126 are unassigned. TV
stations 0, 1 and 70 through 999 are unassigned. If these channel
numbers are pressed, the channel remains unc,hanged.
50 Chapter 3: Operating Your TV
Page 53
changing channels
sequentially
oCZ_
oooO
To change channels:
q[]}Press one of the channel
control,_ (CHANNEL) on the
oooo_
_ooo
oooo_
control panel or on the remote
control. The TV will
automatically tune to the next
memor:ized channel.
0 o
_Important: You cannot change channels sequentially until available channels
have been programmed into memory. (See "Memorizing channels,"
page 56.)
changing channels directly
To move directly to a particular
channel without going through the
prograinraed channels in between:
388
_Jf_
O Use the remote control to select
the number of the channel you
want to view.
Press the ENTER button.
Getting Started 5t
Page 54
Changing channels (cont.)
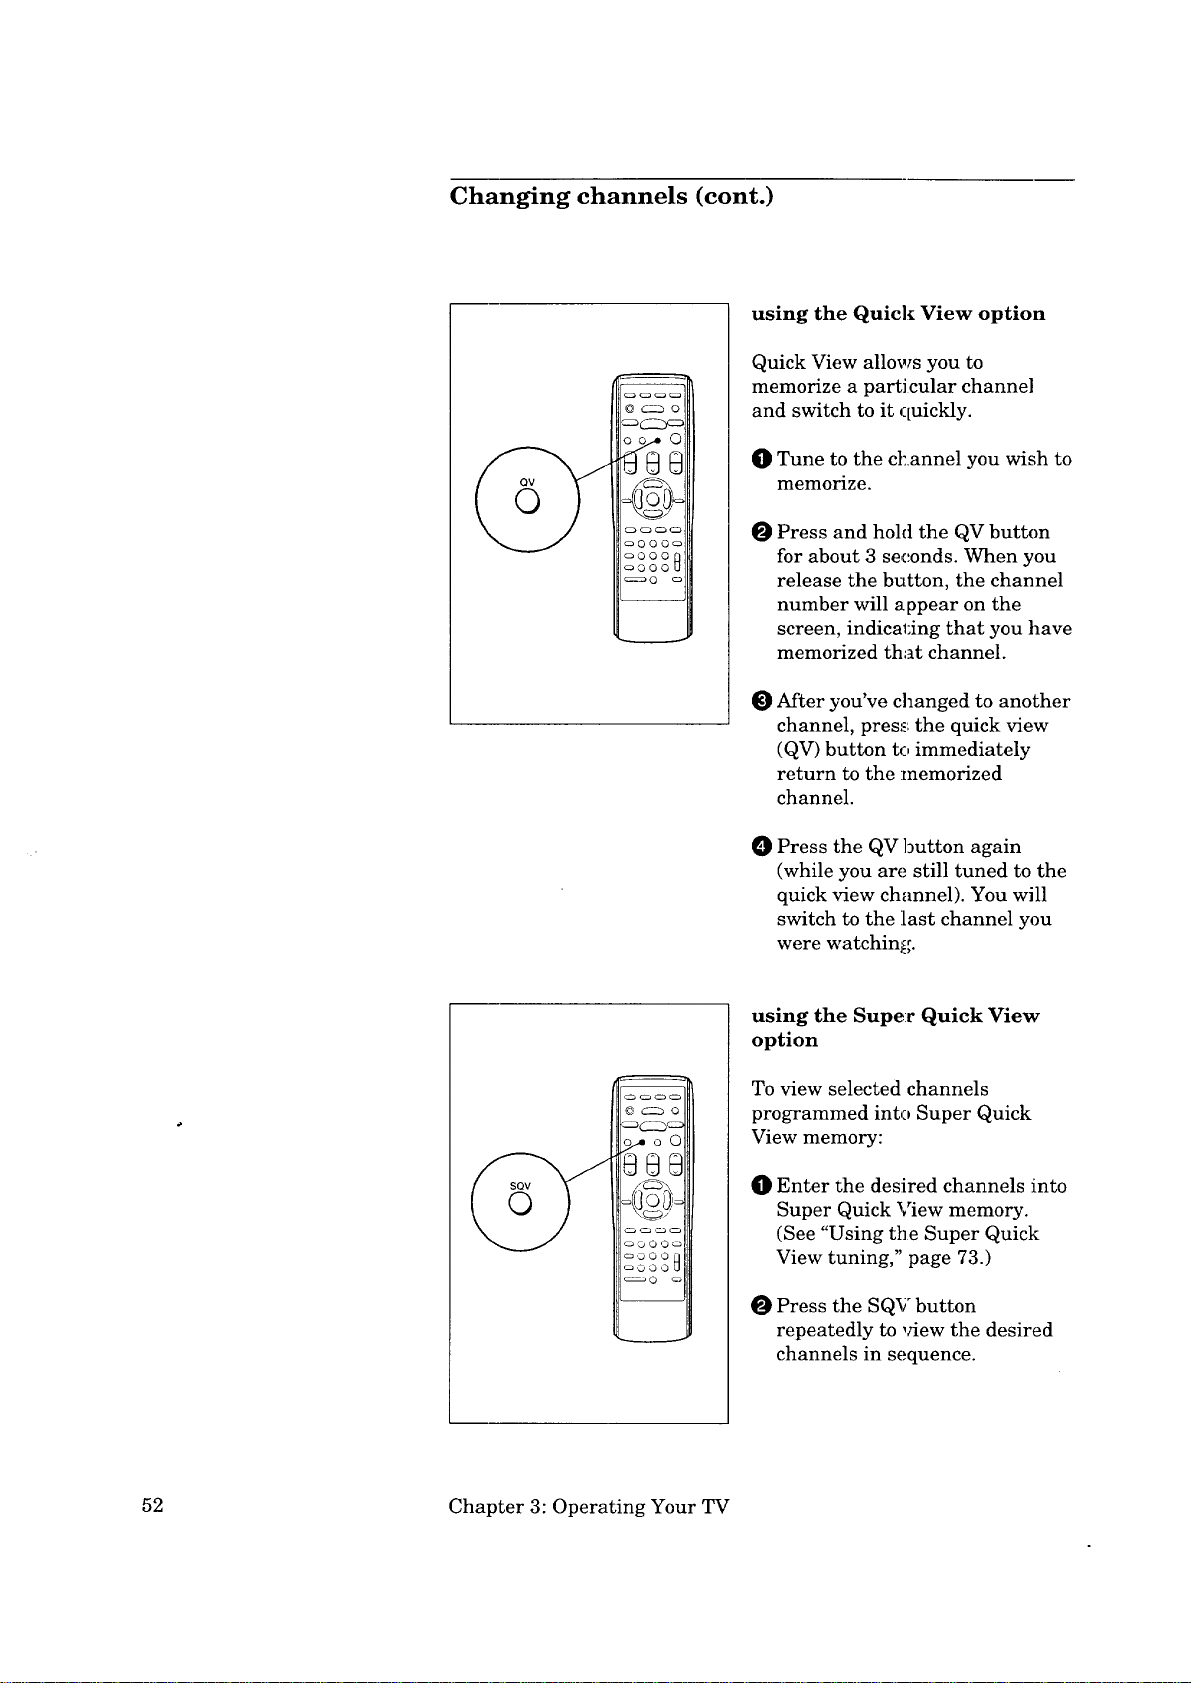
using the Quick View option
Quick View allows you to
memorize a particular channel
and switch to it quickly.
O Tune to the ct:annel you wish to
memorize.
O
Press and hoM the QV butten
for about 3 seconds. When you
release the button, the channel
number will appear on the
screen, indical;ing that you have
memorized that channel.
O After you've changed to another
channel, press the quick view
(QV) button to immediately
return to the memorized
channel.
oy, oo
/¢-z_
_'D O O
0 Press the QV button again
(while you are still tuned to the
quick view ch;mnel). You will
switch to the last channel you
were watching.
using the Super Quick View
option
To view selected channels
programmed into Super Quick
View memory:
Enter the desired channels into
0
Super Quick View memory.
(See "Using tim Super Quick
View tuning," page 73.)
Press the SQV button
repeatedly to view the desired
channels in sequence.
52 Chapter 3: Operating Your TV
Page 55

Understanding the on-screen menus
One of the distinctive features of this TV is an on-screen menu
system that provides step-by-step instructions for using some of the
T_Ps special capabilities.
When using any of the on-screen menus, please keep the following
in mind:
• The on-screen menus will clear if no item i_,_selected within 5
minutes.
• Unavailable menu items are indicated by light blue letters,
instead of the normal white letters.
• Some on-screen menu items must be set be:_ore other items are
available. For example, "Set the timer" will[ only be available if
"Set the clock" has been set.
• You can exit the on-screen menus any time, by pressing the
MENU button repeatedly. You will then return to regular TV
viewing.
• You can also exit the on-screen menus by pressing the HOME
button on the remote control.
Getting Started 53
Page 56

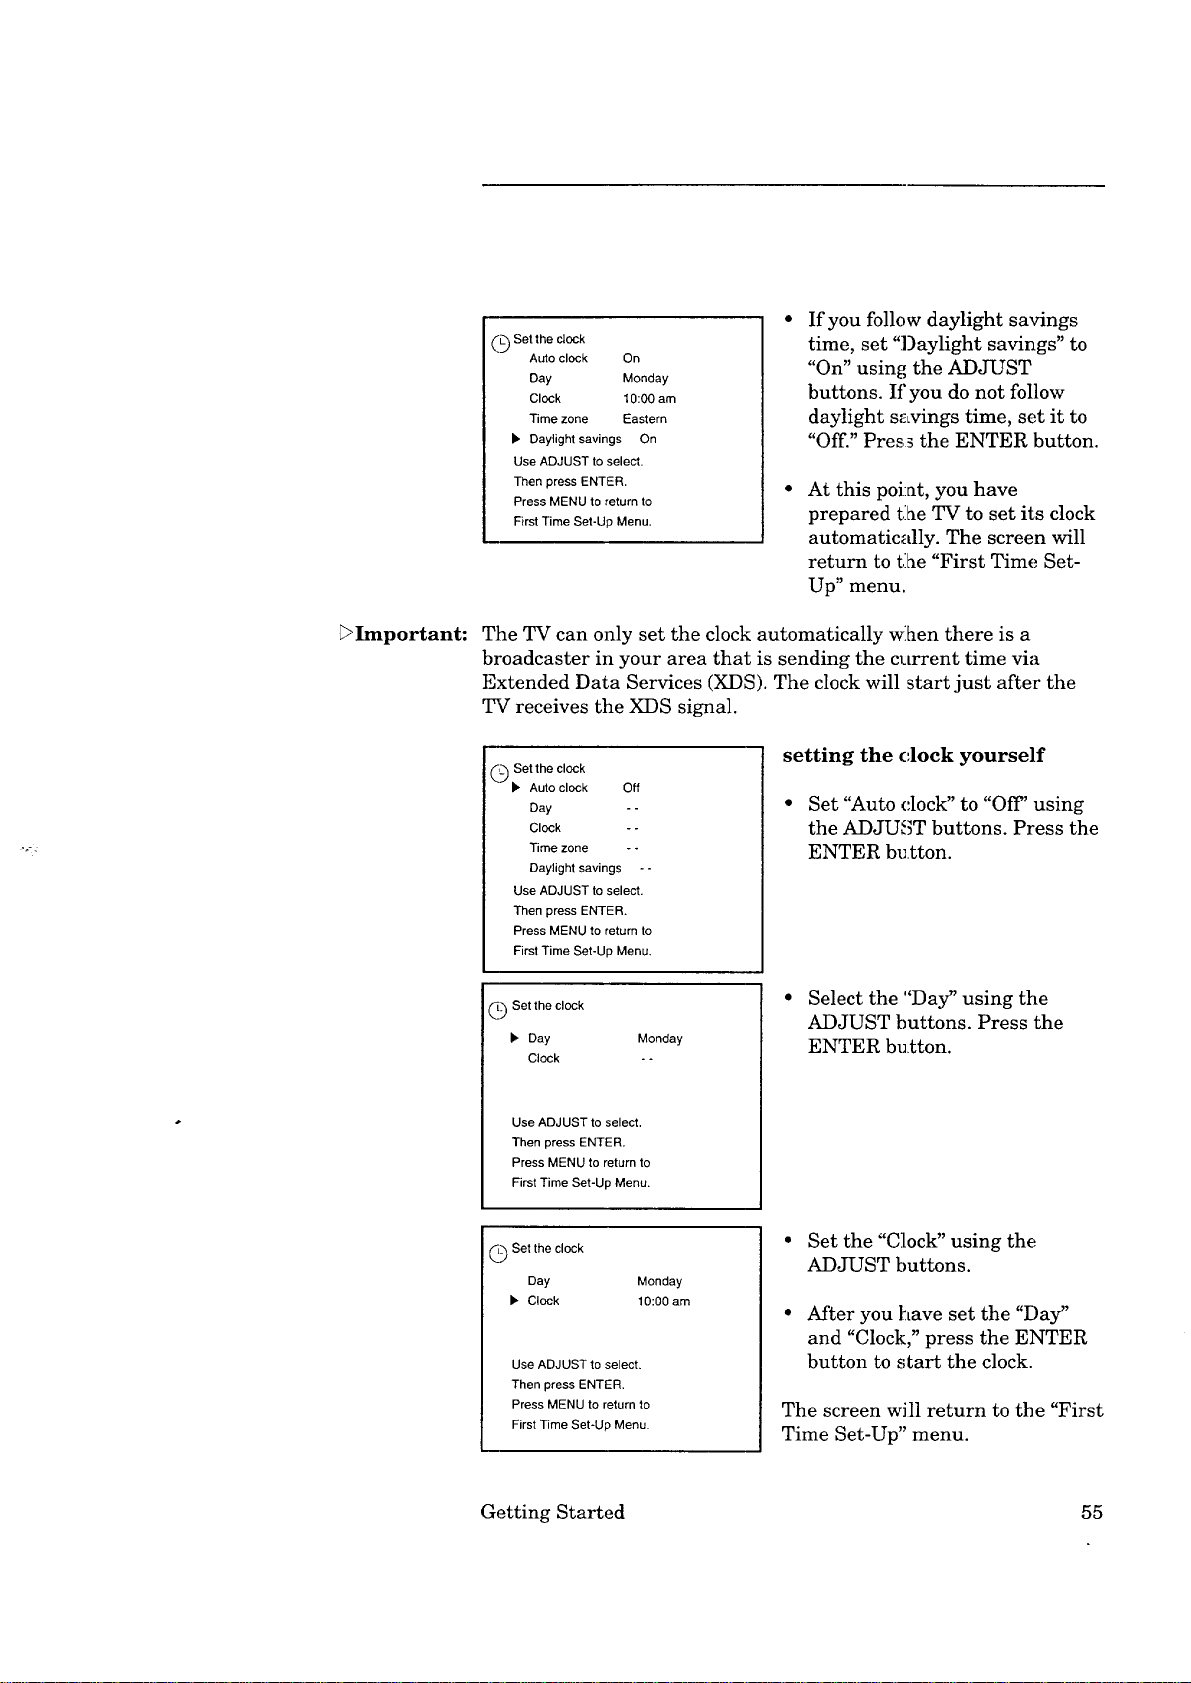
Setting the clock
Your TV contains an internal clock to indicate the current time. If
there is a broadcaster in your area that is sending the current time
along with its regular broadcast signal, then your TV can
automatically set its clock with this signal. Otherwise, you can set
the clock yourself.
A,_ TV Main Menu
_] First Time Set-Up
Customize Viewing
_ Advanced Features
Use ADJUST to select.
Then press ENTER.
Press MENU to exit menus.
Q First Time Set-Up
I* Set the clock
Memorize channels
Add/delete channels
Set AN Network
Use ADJUST to select.
Then press ENTER.
Press MENU to return to
TV Main Menu.
Set the clock
• Auto clock On
Day --
Clock --
Time zone Atlantic
Daylight savings On
Use ADJUST to select.
Then press ENTER.
Press MENU to return to
First Time Set-Up Menu.
O Press the MENU button oil the
remote control. The TV Main
Menu will at:pear on the screen.
O Select "First Time Set-Up"
using the ADJUST buttons;
then, press the ENTER button.
You will see Lhe "First Time
Set-Up" screen. Select "Set the
clock" using '_he ADJUST
buttons; then, press the ENTER
button.
If you want your TV to set its
clock automatically, use the
ADJUST buttons to set. "Auto
clock" to "On"; if you want to set
the clock yourself, set "Auto
clock" to "Off'"
using automatic clock setting
• Set "Auto clack" to "On" using
the ADJUS3: buttons; press the
ENTER button.
('_ Set the clock
Auto clock On
Day Monday
Clock 10:00 am
k Time zone Atlantic
Daylight savings On
Use ADJUST to select.
Then press ENTER.
Press MENU to return to
First Time Set-Up Menu.
54 Chapter 3: Operating Your TV
Use the ADJUST buttons to
select the "Time zone" you are
in; then, press the ENTER
button.
The available time zones are:
Atlantic, Eastern, Central,
Mountain, Pacific, Alaska and
Hawaii.
Page 57
('L_ Set the clock
%.J
Auto clock On
Day Monday
Clock 10:00 am
Time zone Eastern
1. Daylight savings On
Use ADJUST to select.
Then press ENTER.
Press MENU to return to
First Time Set-Up Menu.
If you follow daylight savings
time, set "Daylight savings" to
"On" using the ADJUST
buttons. If you do not follow
daylight savings time, set it to
"Off." Press the ENTER button.
At this pot:at, you have
prepared the TV to set its clock
automatically. The screen will
return to t.:he"First Time Set-
Up" menu.
_Important:
The TV can only set the clock automatically w:hen there is a
broadcaster in your area that is sending the current time via
Extended Data Services (XDS). The clock will start just after the
TV receives the XDS signal.
_ Set the clock
Auto clock Off
Day - -
Clock - -
Time zone - -
Daylight savings --
Use ADJUST to select.
Then press ENTER.
Press MENU to return to
First Time Set-Up Menu.
_._ Set the clock
1. Day
Clock
Use ADJUST to select.
Then press ENTER.
Press MENU to return to
First Time Set-Up Menu.
Monday
setting the (',lock yourself
• Set "Auto (:lock" to "Off' using
the ADJUncT buttons. Press the
ENTER button.
• Select the "Day" using the
ADJUST buttons. Press the
ENTER bu.tton.
___ Set the clock
Day
• Clock
Monday
10:00 am
• Set the "Clock" using the
ADJUST buttons.
• After you ]:Lave set the "Day"
and "Clock," press the ENTER
Use ADJUST to select.
Then press ENTER.
Press MENU to return to
First Time Set-Up Menu.
button to start the clock.
The screen will return to the "First
Time Set-Up" menu.
Getting Started 55
Page 58

Memorizing channels
You can use the menus to automatically memorize the channels
your TV can receive. Once channels are memorized, you can scan
through them using the channel controls on the :remote control or
on the front panel.
First Time Set-Up
Set the clock
i* Memorize channels
Add/delete channels
Set A]V Network
Use ADJUST to select.
Then press ENTER.
Press MENU to return to
TV Main Menu.
[] Memorize channels
On which input would you
like to memorize?
I_ Ant-A
Ant-B
Use ADJUST to select.
Then press ENTER.
Press MENU to return to
First Time Set-Up Menu.
i[] Memorize channels
What is connected to
your TV on Ant-A?
b Cable antenna
Indoor/outdoor antenna
Use ADJUST to select.
Then press ENTER.
Press MENU to return to
First Time Set-Up Menu.
O Press the MENU button oil the
remote control. The TV Main
Menu will al:pear on the screen.
O Select "First Time Set-Up"
using the ADJUST buttons;
then, press ENTER.
Select "Memorize channels"
using the ADJUST buttons;
then, press ENTER.
Use the ADJUST button to
O
select the input to which you
attached an antenna or cable
(ANT-A or Ai_qT-B). Press
ENTER. (If you attached an
antenna to each input, you
should memorize the channels
for one input now, and for the
other input later.)
Use the ADJUST buttons to
O
choose the type of antenna you
connected: Cable antenna or
Indoor/outdoor antenna. Press
ENTER.
]Memorize channels
Now memorizing all the
stations you can receive
on Ant-A.
Channel 004
Not in memory
Please stand-by.
To cance{ memorization,
press CANCEL.
Important:
Channel controls will work only after channels have
been memorized. After memorization, use the channel controls
(CHANNEL) to automatically advance to the next memorized
channel. Use the number buttons to select individual channels.
56 Chapter 3: Operating Your TV
O
You will see a message that
channel memorization is in
progress. A channel being
added to memory will be labeled
"In memory." Channels not
being added will be labeled "Not
in memory." You can stop
channel memorization at any
time by pres,dng CANCEL.
Page 59

Adding and deleting channels
After all available channels have been programmed automatically,
channels with weaker signals can be added or deleted with the
following procedure.
Either "In memory" or
"Not in memory" will
appear.
First Time Set-Up
Set the clock
Memodze channels
• Add/delete channels
Set AN Network
Use ADJUST to select.
Then press ENTER.
Press MENU to return to
TV Main Menu.
-1- Add/delete channels
Antenna Ant-A
Channel 006
In memory
Use ADJUST to select
another channel.
Press CANCEL to delete.
Press MENU to return to
First Time Set-Up Menu.
O Press the MENU button on the
remote cot trol. The TV Main
Menu will appear on the screen.
O Select "First Time Set-Up"
using the ADJUST buttons;
then, pres_; ENTER.
Select "Add/delete channels"
using the ADJUST buttons;
then, press ENTER.
The "Add/delete channels"
screen will appear. Use the
ADJUST tmttons to select the
channel you would like to add
or delete.
(You can also use the
CHANNEL button and the
INPUT bu_:ton on the remote
control to change channels and
inputs.)
If a channel is labeled "In
O
memory," use the CANCEL
button to remove it from
memory. If a channel is labeled
"Not in memory," use the
ENTER button to add it to
memory.
When you are finished adding
and deletil:Lg channels, press
the HOME', button to return to
normal TV viewing.
Getting Started 57
Page 60

Setting the AN Network
The A/V Network is a special system that Mitsubishi developed to
make it easier to operate many products with one remote control.
When the A/V Network is connected between two Mitsubishi
products, you can point the remote control at one product and it
will "pass" the remote control command to the other. To set up the
A/V Network:
Press the MENU button on the
O
Q First Time Set-Up
Set the clock
Memodze channels
Add/delete channels
• Set A/V Network
Use ADJUST to select.
Then press ENTER.
Press MENU to return to
TV Main Menu.
Set A/V Network
•off
Basic
Active
Use ADJUST to select.
Then press ENTER.
Press MENU to return to
First Time Set-Up Menu.
remote control. The TV Main
Menu will appear on the screen.
Use the ADJUST buttons to
O
select "First 3:ime Set-Up";
then, press ENTER.
Use ADJUST to select "Set A/V
O
Network"; th_=.n, press ENTER.
Use the ADJUST buttons to
O
select "Active,," "Basic," or "Off."
Check the re_.r terminals of
your VCR, then use the chart
below to determine how you
should set yollr TV.
Press the EN]_ER or MENU
O
button to return to the "First
Time Set-Up" menu.
If your VCR has a rear ...and you have set your ...then set your
terminal that reads: VCR to: TV to:
&IV Network N/A Basic
Active A/V Network Off Basic
Active A/V Network Active Active
Does not have an A/V
Network rear terminal N/A Off
If you are not sure how to set your VCR's A/V Network setting,
refer to your VCR's owner's guide.
Important:
The A/V Network can still be used to pass remote control signals
when the TV's "A/V Network" setting is "Off."
Important:
If you do not use the A/V Network system, set "2JV Network" to
"Off," or your system might not work correctly.
Important:
If you have a Mitsubishi VCR with A/V Network or Active A/V
Network, it should be connected to Input-1 ofyoar TV.
58 Chapter 3: Operating Your TV
Page 61

Renaming the input
This feature allows you to rename the external inputs. For
example, you might want to name one input "VCR," and the other
input "DISC." The name you give the input wL1 appear on tile
on-screen display.
"iV Main Menu
(_ First Time Set-Up
I_] Customize Viewing
_ Advanced Features
Use ADJUST to select.
Then press ENTER.
Press MENU to exit menus.
Customize Viewing
_. Rename the input
Select language
Use Video mute
Use ADJUST to select.
Then press ENTER.
Press MENU to return to
TV Main Menu.
Rename the input
Input label New name
_" Input-1
Use ADJUST to select.
Then press ENTER.
Press MENU to return to
Customize Viewing Menu.
Rename the input
Input label New name
Input-1 - ....
Use ADJUST to select.
Then press ENTER.
Press MENU to return to
Customize Viewing Menu.
O Press the MENU button on the
remote control. The TV Main
Menu will appear on the screen.
O Select "Cu,_tomize Viewing"
using the ADJUST buttons;
press ENTER.
You will see the "Customize
O
Viewing" s_reen. Select
"Rename t]_e input" using the
ADJUST buttons; press
ENTER.
Use the ADJUST buttons to
O
select the !input (Input-1 or
Input-2) you want to rename.
Press ENTER.
O
Set the new name using the
ADJUST buttons and the
ENTER button.
You can rename the inputs
using letters (A-Z), numbers
(0-9), or s_mbols (:/., ( ) ! " # $
% & ' blank + ; < = > ? blank -).
When you press the CANCEL
button while setting the name,
the cursor will move one posi-
tion to the left. You can clear
the entire l_ame by pressing
CANCEL when the cursor is at
the left-most position.
O
After you have finished, press
the MENU button; the screen
will return to the "Customize
Viewing" menu.
Getting Started 59
Page 62

Selecting the menu language
This TV allows you to display the on-screen menus in one of three
languages: English, Spanish, or French.
Customize Viewing
Rename the input
• Select language
Use Video mute
Use ADJUST to select.
Then press ENTER.
Press MENU to return to
TV Main Menu.
[]Select Language
• English
EspaSol
Fran_ais
Use ADJUST to select.
Then press ENTER.
Press MENU to return to
Customize Viewing Menu.
O Press the MENU button on the
remote control The TV Main
Menu will appear on the screen.
O Select "Custoraize Viewing"
using the AD,]-LIST buttons;
press ENTER,.
Select "Select Language" using
the ADJUST buttons; press
.ENTER.
O Use the ADJUST buttons to
select the language you want.
Press the ENTER or MENU
button to return to the
"Customize Viewing" menu.
60 Chapter 3: Operating Your TV
Page 63

Using video mute
When you use the video mute function, your TV will display a blue
screen whenever it is receiving a very weak TV signal or a weak
signal from a VCR. If you want to try viewing a weak signal, you
can turn the video mute off.
O Press the MENU button on the
_1_ Customize Viewing
Rename the input
Select language
b, Use Video mute
Use ADJUST to select.
Then press ENTER.
Press MENU to return to
"IV Main Menu.
remote control. The TV Main
Menu will appear on the screen.
O Select "Cu _tomize Viewing"
using the ADJUST buttons;
press ENTER.
Select Us,+ Video mute" using
the ADJUST buttons; press
ENTER.
___ Use Video mute
), Automatic
Off
Use ADJUST to select.
Then press ENTER.
Press MENU to return to
Customize Viewing Menu.
O
Using the ADJUST buttons,
select "Automatic" to turn Video
mute on or "Off' to turn video
mute off.
Press the F,NTER or MENU
button to return to the
"Customize Viewing" menu.
Getting Started 61
Page 64

Adjusting the sound
You can customize all of your TV_s sound functions with a set of
buttons; you select a function with the AUDIO buLton, then you
adjust the function with the ADJUST buttons or left/right buttons.
You use the ADJUST buttons to:
• select a position (e.g., stereo),
• increase or decrease the function (e.g., bass), or
• shift from one end of a scale to the other (e.g., balance).
After adjusting the sound, an on-screen display will indicate the
function and level you've selected.
what you will adjust:
"Listen to: Stereo/SAP/Mono" allows you to chan_:e the audio
reception mode to stereo, separate audio programming (S.A.P.), or
monaural (mono), depending on the type of broadcast you are
receiving. As you change this setting, remember l_he following:
• The "Stereo" setting allows you to receive both mono and stereo
broadcasts.
• The separate audio programming ("S.A.P.") setting offers you
the option of listening to a separate audio pro_am. For
example, a station may broadcast news, weat_._er, or a foreign
language soundtrack on the S.A.P. program.
• The "Mono" setting reduces unwanted background noise when
the TV is receiving a weak stereo broadcast signal. When you
use the "Mono" setting, you will hear the bro_.dcast in monaural
even when the broadcast signal is in stereo.
>Important
62 Chapter 3: Operating Your TV
An on-screen display appears when programs are broadcast in
stereo or when separate audio programming (S.A.P.) is available.
"Bass" controls the volume of low frequency sour d.
"Treble" controls the volume of high frequency sound.
"Balance" adjusts the level of sound between the left and right
speakers.
"Surround: Off/Simulate/Hall" allows you to simulate or expand
stereo sound.
• "Off' does not change the sound.
• "Simulate" gives you a pseudo-stereo effect when receiving
monaural sound broadcasts.
• "Hall" makes stereo sound seem wider and extend around
behind you.
Page 65
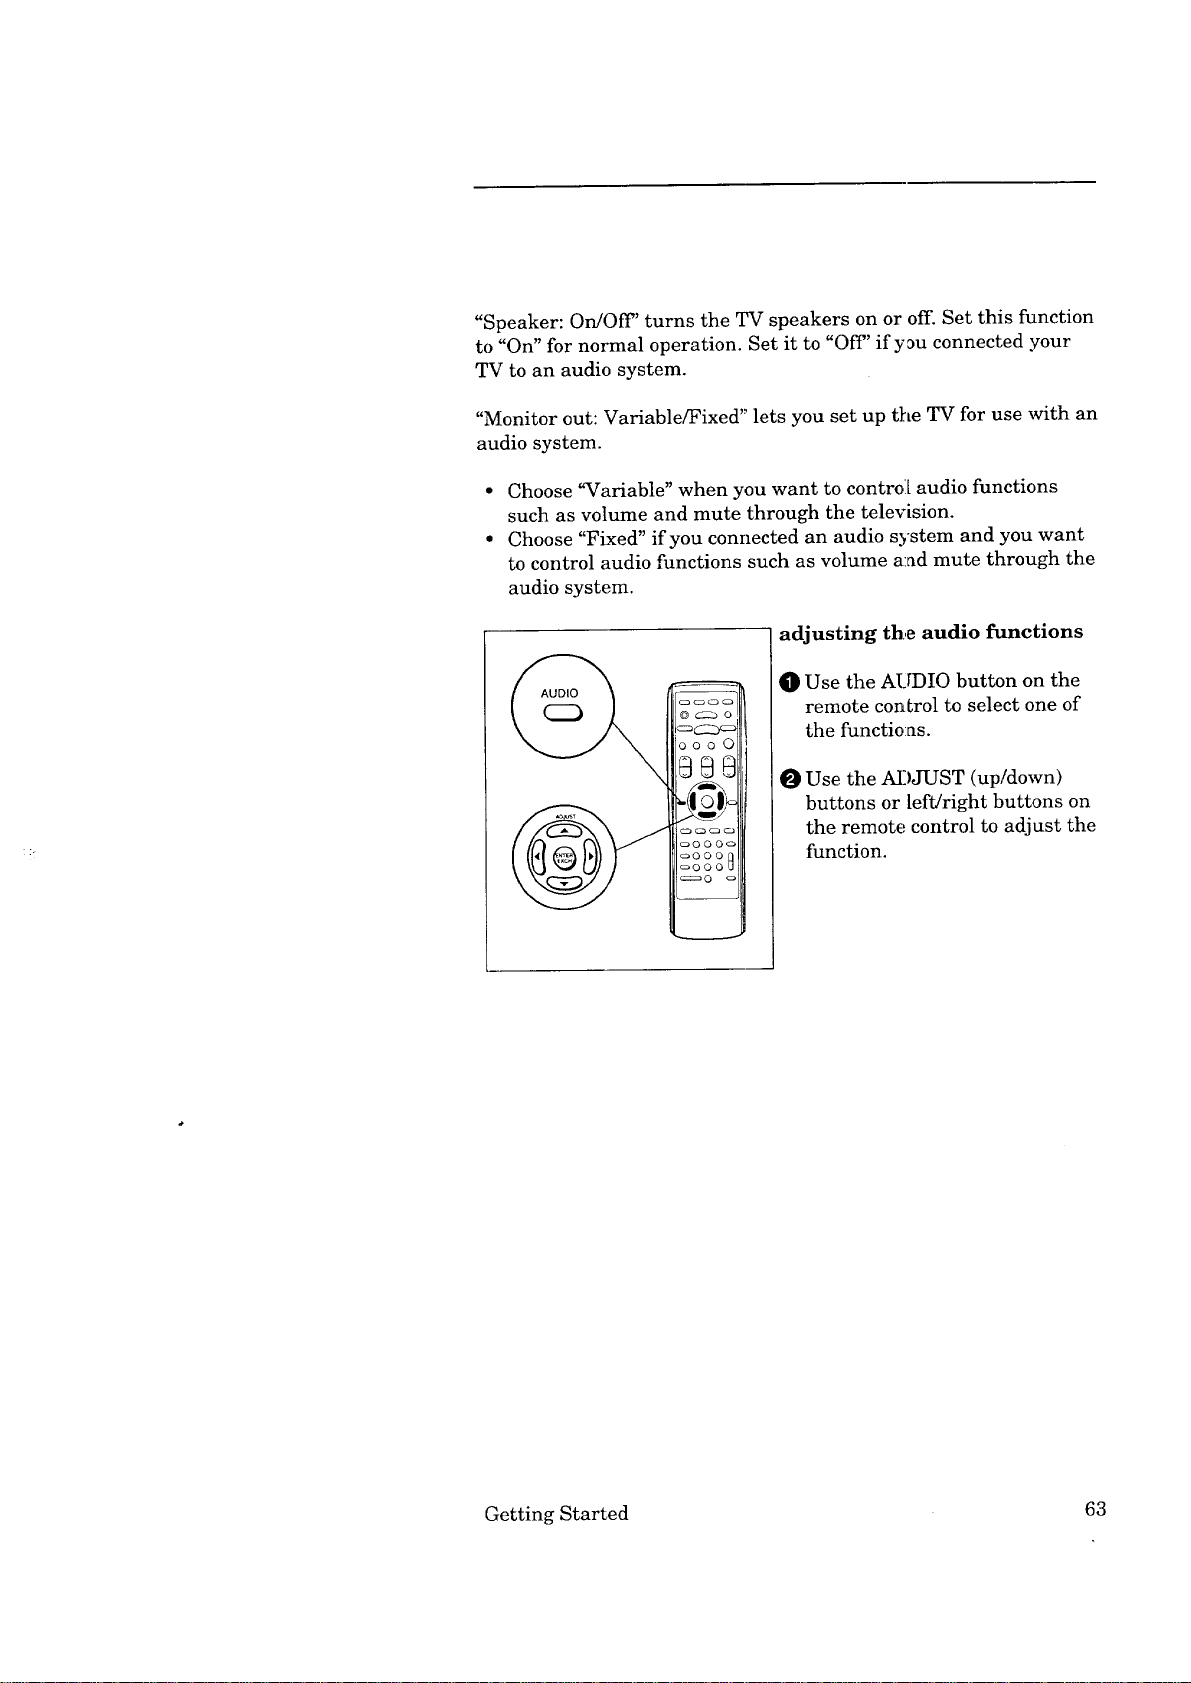
"Speaker:On/Off'turnstheTVspeakersonoroff.Setthisfunction
to"On"fornormaloperation.Setit to"Off'if y_uconnectedyour
TVtoanaudiosystem.
"Monitorout:Variable/Fixed"letsyousetuptheTVforusewith an
audiosystem.
Choose"Variable" when you want to control[ audio functions
such as volume and mute through the television.
Choose "Fixed" if you connected an audio system and you want
to control audio functions such as volume and mute through the
audio system.
adjusting the audio functions
O Use the AUDIO button on the
remote conLrol to select one of
DO0 C)
the functions.
O Use the ADJUST (up/down)
buttons or left/right buttons on
the remote control to adjust the
function.
Getting Started 63
Page 66

Adjusting the picture
You can customize all of your TV's picture functions with a set of
buttons: you select a function with the VIDEO button, then you can
adjust the function with the ADJUST buttons or the left/right
buttons. You use the ADJUST tmttons to:
• shift from one end of a scale to the other (eg., tint),
• increase or decrease the function (e.g., color),
• select a position (e.g., closed captioning).
After adjusting the picture, an on-screen display will indicate the
function and level you've selected.
what you will adjust:
"Tint" adjusts the proportion of red to green that determines the
delicate tones of color.
"Color" determines the intensity of the color.
"Contrast" controls the level of white-to-black in the picture.
"Brightness" controls the light :level of the image on screen.
"Sharpness" adjusts the detail and clarity of the picture.
"Color temp(erature): Low/Middle/High" is used to change the
relative warmth of the picture.
"_C-_ (closed captioning): 1/2/3/4/Text l/Text 2/Text 3/Text 4/
When muting/Off' is used to display text intbrmation on the TV
screen. For details, please see "Using the closed caption decoder,"
on page 65.
adjusting the video functions
m
O Use the V]:DEO button on the
©00 C
remote control to select one of
the functions.
0 Use the ADJUST (up/down)
button cr left/right buttons on
_000[
oO00L
the remote control to adjust the
Jhnction.
64 Chapter 3: Operating Your TV
Page 67

Using the closed caption decoder
Many broadcasters now supply closed captioning information along
with their regular broadcasts. Your TV can decode that information
and display it on your TV screen.
There are two types of captioning that broadcasters can send:
"standard" and "text." Standard captioning iLsrelated to the pro-
gram that is being shown. Standard captioning usually fi)llows the
dialogue of the characters on-.screen.
Text captioning does not usually relate to the program being
shown. It often contains information such a,_ weather or l_ews. Text
captioning often blocks out the program you are watching.
Your TV can decode four different "standard[ captioning" signals
and four different "text captioning" signals on each TV channel.
However, each station may be broadcasting only one or two
captioning signals, or none at all.
To use the closed caption decoder:
Repeatedly press the VIDEO
button on the remote control
OOO C
@@@
_10 I)-
_'.i/
o@00c
o0002
oO00L,
until the closed captioning
([_) display appears on the
screen.
Press the ADJUST buttons or
left!Hght buttons on the remote
control t_ select the captioning
signal you wish to display:
i/_ 2/_ 3/_ 4/
Text 1/[-C-_ Text 2/
Text 3/_ Text 4/
[CC_When muting/Off.
You can choose to display one of four "standard captioning" signals
(indicated by the symbol _] and a number); to display one of four
"text captioning" signals (indicated by the word "Text" and a
number); to display captions when muting; or to turn the captions
off.
If you select "When muting," the standard captioning sig_al _ 1
wi]l appear whenever you use the MUTE button.
Getting Started 65
Page 68

Using the closed caption decoder (cont.)
uses for closed captioning
Closed captioning was initially designed so tha_ those with hearing
difficulties can enjoy viewing television more. However, closed
captioning can also be used in other ways, such as:
• helping children learn to read,
• learning a foreign language, and
• using the television without disturbing othe,rs.
Important:
If you cannot display any captions on the screen, please keep in
mind that not all broadcasters, video tapes, or laserdiscs supply
closed caption signals.
Additionally, captions will not appear if you are playing a video
tape that is worn or deteriorated, or if you are switching from
STILL mode or SEARCH mode to PLAY mode on a Laser Disc
player that cannot decode closed captioned signals when usiLng
these features.
66 Chapter 3: Operating Your TV
Page 69

Using the Advanced Features
This section explains how to use some of the more advanced func-
tions. You'll learn about:
• Setting the timer,
• Using the parental lock,
• Using the Super Quick View tuning, and
• Selecting an advanced PIP function.
67
Page 70

Setting the timer
This special feature allows you to program the TV to turn on
automatically at a preset time. To set the timer:
O Press the MENU button on the
m,_ TV Main Menu
0 First Time Set-Up
remote control. The TV Main
Menu will appear on the screen.
1_ Customize Viewing
[_ Advanced Features
Use ADJUST to select.
]hen press ENTER,
Press MENU to exit menus.
_ Advanced Features
Set the timer
Use Parental lock
Use Super Quick View
Use Advanced PIP
Use ADJUST to select.
Then press ENTER.
Press MENU to return to
TV Main Menu.
Set the timer
1, Day --
Start time - -
Antenna - -
Channel - -
Use ADJUST to select.
Then press ENTER.
Press MENU to return to
Advanced Features Menu.
O Select "Advanced Features"
using the .ADJUST but[ons;
press ENTER.
You will see the "Advanced
Features" screen. Select "Set
the timer':' using the ADJUST
buttons; press ENTER.
0 Use the ADJUST buttons and
the ENTER button to ,,_etDay,
Start time, Antenna, and
Channel.
After setting the timer, make sure
that the program timer indicator
is lit. The indicator will light in
orange when the TV is turned on
and light :tn red when the TV is
turned off: The indicator will light
in green when using the :menus, or
when you have locked the TV.
_Important:
When the timer turns the TV on, the display will flash. If you do
not press any TV function buttons for about 5 minutes, the TV will
automatically turn off. Press a TV function button (such as the
display button) to keep the TV on and turn off the flashing display.
68 Chapter 3: Operating Your TV
If you press the CANCEL button
while setting the timer, the cursor
will move to the previous item. To
clear the timer, press CANCEL
with the cursor next to "Day."
Page 71
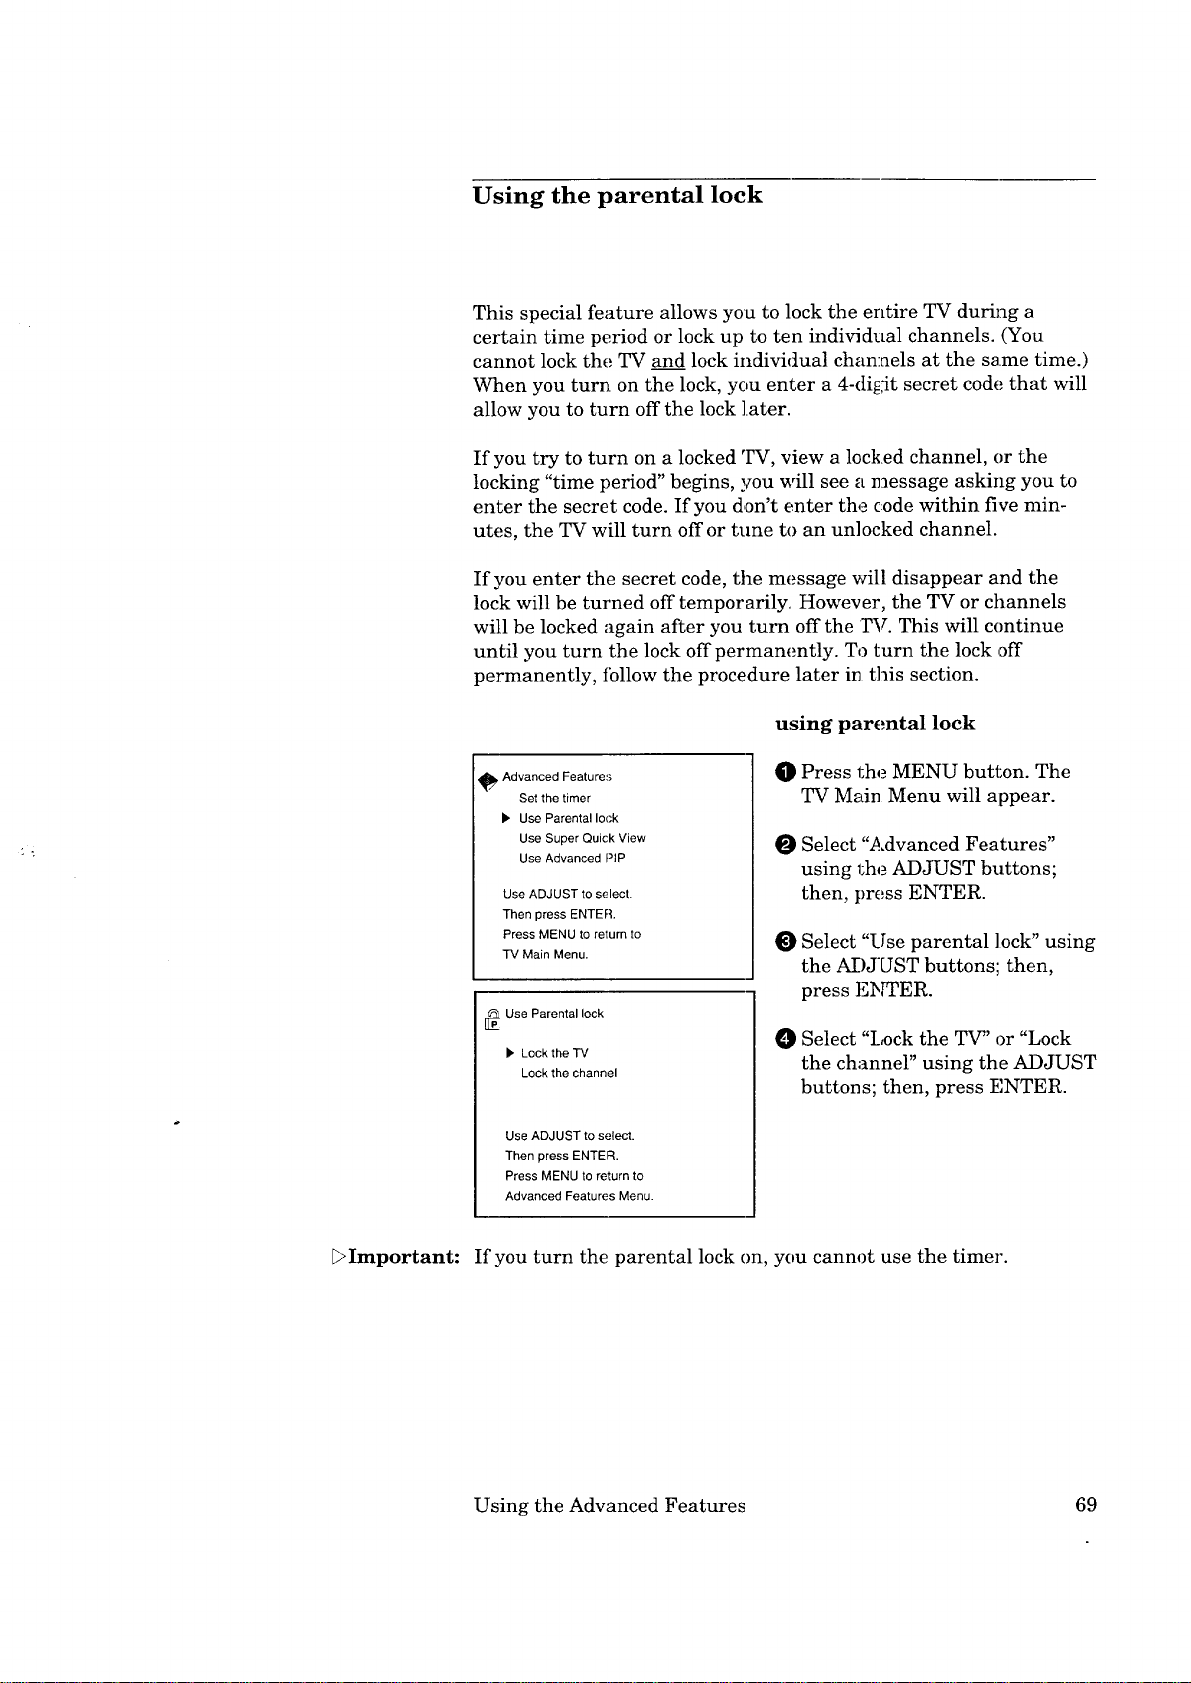
Using the parental lock
This special feature allows you to lock the entire TV during a
certain time period or lock up to ten individual channels. (You
cannot lock the TV and lock individual channels at the same time.)
When you turn on the lock, you enter a 4-digit secret code that will
allow you to turn off the lock later.
If you try to turn on a locked TV, view a locked channel, or the
locking "time period" begins, you will see a message asking you to
enter the secret code. If you don't enter the code within five min-
utes, the TV will turn off or tune to an unlocked channel.
If you enter the secret code, the message will disappear and the
lock will be turned off temporarily. However, the TV or channels
will be locked again after you turn off the TV. This will continue
until you turn the lock off permanently. To turn the lock off
permanently, fbllow the procedure later in this section.
using parental lock
_ Advanced Features
Set the timer
• Use Parental lock
Use Super Quick View
Use Advanced PIP
Use ADJUST to select.
Then press ENTER.
Press MENU to return to
TV Main Menu.
Press the MENU button. The
TV Main Menu will appear.
Select "Advanced Features"
using 1;he ADJUST buttons;
then, press ENTER.
Select "Use parental lock" using
the ADJ-[JST buttons; then,
press Eb_ER.
[__pUse Parental lock
• Lock the "FV
Lock the channel
Select "Lock the TV" or "Lock
the channel" using the ADJUST
buttons; then, press ENTER.
Use ADJUST to select.
Then press ENTER.
Press MENU to return to
Advanced Features Menu.
_>Important: If you turn the parental lock on, you cannot use the timer.
Using the Advanced Features 69
Page 72

Using the parental lock (cont.)
locking the TV
• The message for locking the TV
IT_ Lock the TV
will appear.
The lock is now off.
Enter your personal code
using NUMBER buttons.
Then press ENTER
to set the lock.
Press MENU to return to
Advanced Features Menu.
Lock the TV
• Start : 2:00pm
End : 3:00pro
Use ADJUST to select.
Then press ENTER.
Press CANCEL to clear.
Press MENU to return to
Advanced Features Menu.
Lock the TV
Start : 2:00pm
• End :3:00pm
Use ADJUST to select.
Then press ENTER.
Press MENU to return to
Advanced Features Menu.
• Enter a four-digit secret code
using the number buttons (0-9);
then, pres,; the ENTER button.
Use the ADJUST buttons to
select "Start"; press E!NTER.
Use the ADJUST buttons to set
the time at which you want the
TV lock to turn on. Press
ENTER.
Use the AiDJUST buttc,ns to set
the time at which you want the
TV lock to turn off. Press
ENTER. If you want the TV
lock to be in effect all the time,
set the _,;ame "End" time as you
set for the "Start" time.
Press HOME to exit the menus.
This TV is locked.
Enter your personal code
using NUMBER buttons.
Then press ENTER
to watch this TV.
i>Important: The TV lock will work even if the clock has not been set.
70 Chapter 3: Operating Your TV
When you turn on a locked TV,
you will be asked to enter your
four-digit secret code. Enter the
code to temporarily disable the
lock. The lock will be enabled
again when you turn the TV off.
Page 73
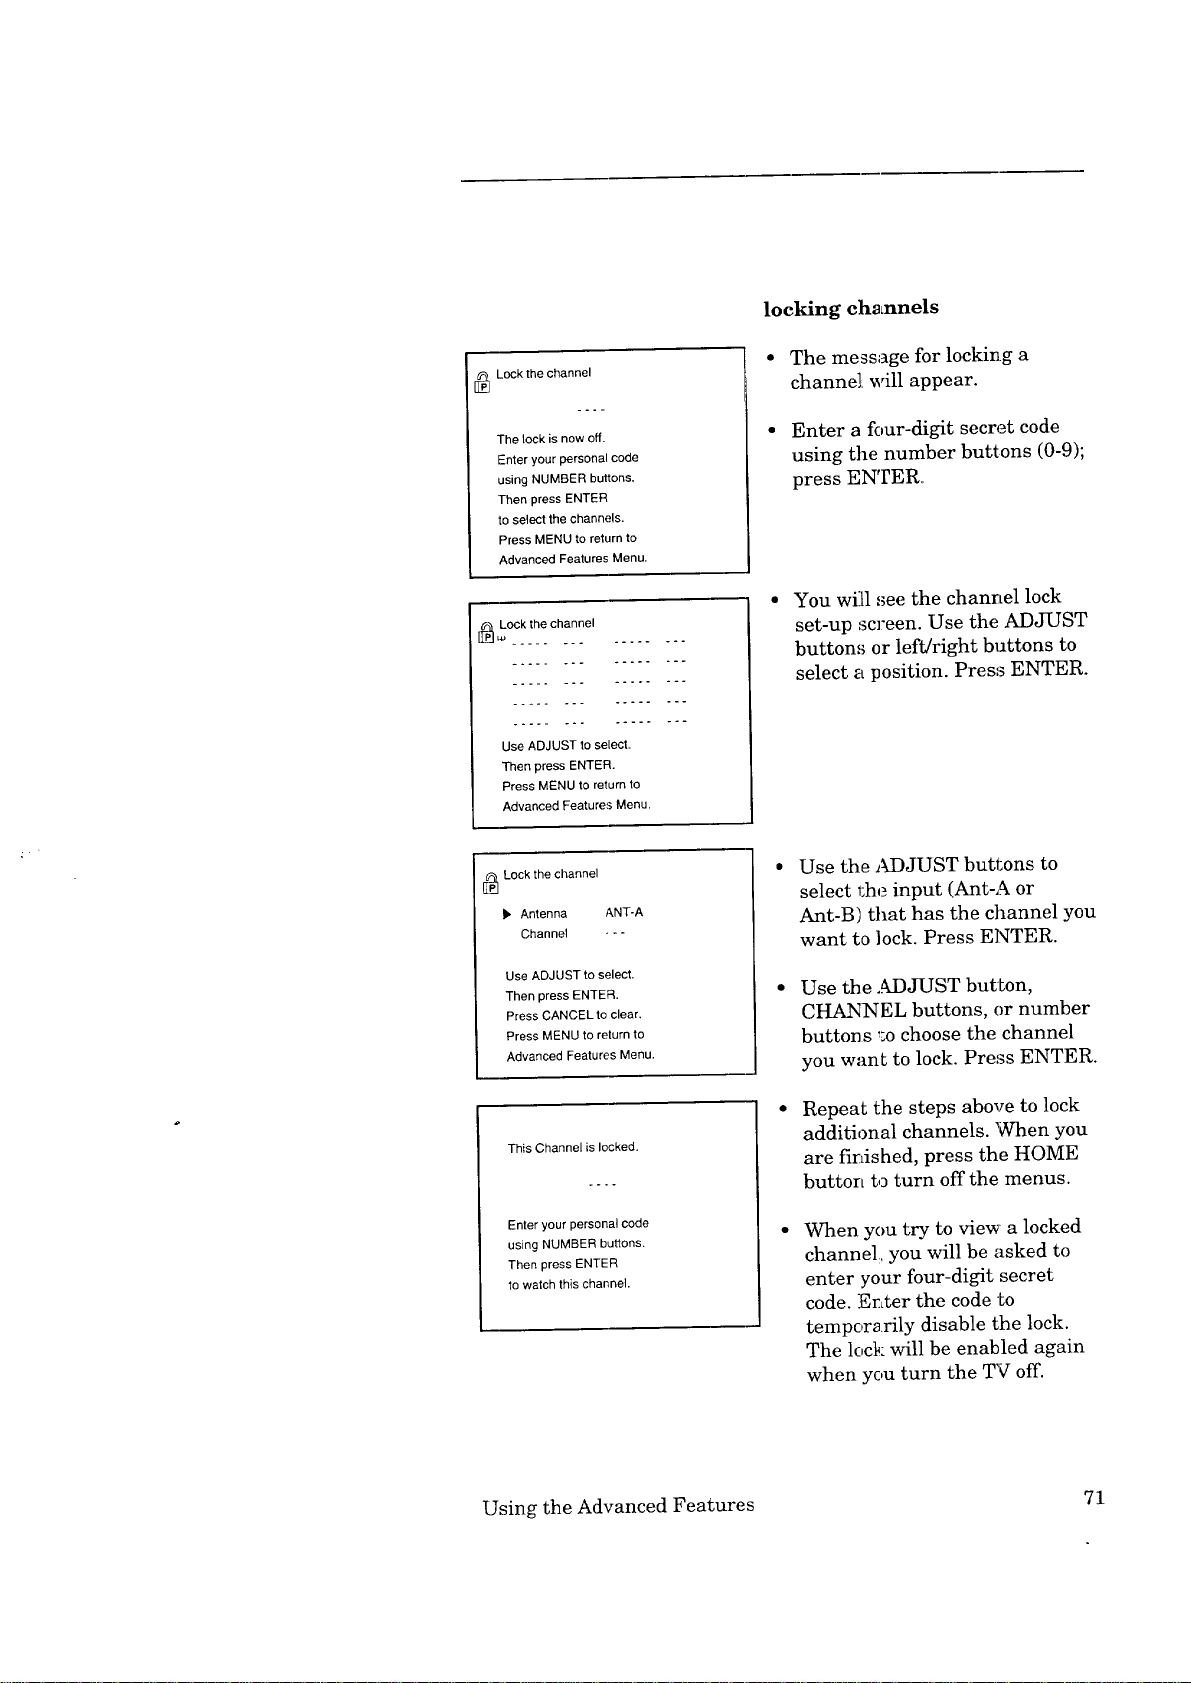
locking channels
[[_ Lock the channel
The lock is now off.
Enter your personal code
using NUMBER buttons.
Then press ENTER
to select the channels.
Press MENU to return to
Advanced Features Menu.
[_ Lock the channel
L4J .............
Use ADJUST to select.
Then press ENTER.
Press MENU to return to
Advanced Features Menu.
[_ Lock the channel
). Antenna ANT-A
Channel - - -
Use ADJUST to select.
Then press ENTER.
Press CANCEL to clear.
Press MENU to return to
Advanced Features Menu.
• The message for locking a
channel will appear.
• Enter a four-digit secret code
using the number buttons (0-9);
press ENTER°
You will ,_ee the channel lock
set-up screen. Use the ADJUST
button,_ or left/right buttons to
select a position. Press ENTER.
o..
Use the ADJUST buttons to
select 1:he input (Ant-A or
Ant-B/that has the channel you
want to lock. Press ENTER.
Use the .._X)JUST butLon,
CHANNEL buttons, or number
button s _o choose the channel
you want to lock. Press ENTER.
Repeat the steps above to lock
Thfs Channel is locked.
additional channels. When you
are finished, press the HOME
button to turn off the menus.
Enter your personal code
using NUMBER buttons.
Then press ENTER
to watch this channel.
When you try to view a locked
channel, you will be asked to
enter your four-digit secret
code. Enter the code to
temporarily disable the lock.
The lock will be enabled again
when you turn the TV off.
Using the Advanced Features 71
Page 74

Using the parental lock (cont.)
canceling or changing
parental lock
O Press t:he MENU button. The
TV Main Menu will appear on
the screen.
O Select ":Advanced Features"
using the ADJUST buttons;
press ENTER.
_ LocktheTV
Select ":Use parental lock" using
The lock is now on.
Enter your personal code
using NUMBER buttons.
Then press ENTER
to change the lock.
Press MENU to return to
Advanced Features Menu.
[_ Lock the TV
• Start .-:--
End
the ADJUST buttons; press
ENTER.
O Enter the four digits of your
secret code using the !Lumber
buttons (0-9); press ENTER.
If you we::e using the _.Wlock,
press the CANCEL button to
turn off the TV lock.
_Important:
Use ADJUST to select.
Then press ENTER
Press CANCEL to clear.
Press MENU to retum to
Advanced Features Menu.
O
[_ Lock the channel
• Antenna
Channel - - -
If you were using the channel
lock, use the ADJUST button to
place the cursor next to the
channel[ whose lock you want to
cancel. Press ENTER.
Use ADJUST to select.
Then press ENTER.
Press CANCEL to clear.
Press MENU to return to
Advanced Features Menu.
Press the CANCEL button to
O
unlock that channel, or use the
ADJUST buttons to change the
channe]i to a new one.
Press the MENU button to
return to the "Advanced Fea-
tures" menu.
If you forget your four-digit secret code, please see page 99.
72 Chapter 3: Operating Your TV
Page 75

Using the Super Quick View tuning
Super-Quick-View allows you to cycle through a list of up to ten
numbers with the SQV button. You use the :menus to add channels
to the list or to remove channels from the list. You can also add
channels to the list using only the remote control.
, Advanced Features
Set the timer
Use Parental lock
• Use Super Quick View
Use Advanced PIP
Use ADJUST to select.
Then press ENTER.
Press MENU to return to
TV Main Menu.
Use Super Quick View
ig• ................
Use ADJUST to select.
Then press ENTER.
Press MENU to return to
Advanced Features Menu.
_TUse Super Quick View
I_ Antenna Ant-A
Channel - - -
Use ADJUST to select.
Then press EN1-ER.
Press CANCEL Io clear.
Press MENU to return to
Advanced Features Menu.
customizing the Super Quick
View list with the menus
O Press the MENU button on the
remote control. The TV Main
Menu v_[ll appear on the screen.
O Select "Advanced Features"
using the ADJUST buttons;
press ENTER.
O Select "Use Super Quick View"
using tbe ADJUST buttons;
then, press the ENTER button.
0 Use the ADJUST buttons to
select a position in the list;
press ENTER.
O Use the ADJUST buT:tons to
select an input (Ant-A or
Ant-B). Press ENTER.
g Use Super Quick View
Antenna Ant-A
• Channel 003
Use ADJUST to select.
Then press ENTER.
Press MENU to return to
Advanced Features Menu.
Using the Advanced Features
O Use tihe ADJUST buttons,
CHANNEL buttons or number
buttons to add a channel to the
list; press ENTER. You can
clear a channel by pressing the
CANCEL button.
O Repeat steps _, O, and O to
add channels to the Super
Quick View memory.
O Press the MENU buLton to exit
this menu.
Page 76

Using the Super Quick View tuning (cont.)
adding channels to the list with the remote control
O Use the channel controls to tune the TV to the channel you
want to add to the list.
O Press and hold the SQV button for about 3 seconds. When you
release the button, the letters "SQV" will appear under the
channel number, indicating that the channel has beela added to
Super Quick View memory.
74 Chapter 3: Operating Your TV
Page 77

Selecting an advanced PIP function
When you are using the PIP features, there are special functions
you can use. Before using these advanced functions, you need to
choose one in the menu. These adwmced functions are:
• TV Still,
• Snap-shot, or
• Replay.
In "TV Still," the PIP image switches between still and moving. In
"Snap-shot," you can view and mow_ several frozen PIP images. In
"Replay," you can view still PIP images in sequence for a "strobe"
animation effect. These images will appear in sets of three (from a
total of seven stored images) at the speed you select. (See "Using
the Advanced Picture-in-Picture (PIP) Modes," page 82.)
O Press the MENU butten on the
, Advanced Features
Set the timer
Use Parental lock
Use Super Quick View
• Use Advanced PIP
Use ADJUST to select.
Then press ENTER.
Press MENU to return to
TV Main Menu.
[] Use Advanced PIP
• Current setting :
Use ADJUST to select.
Then press ENTER.
Press MENU to return to
Advanced Features menu.
[] Use Advanced PIP
Current setting:
• Replay speed : 1
Use ADJUST to select.
Then press ENTER.
Press MENU to return to
Advanced Features Menu.
"IV Still
Replay
remote control. The TV Main
Menu will appear on tile screen.
O Select "Advanced Features"
using the ADJUST buttons;
press E:_PER.
Select "U_e Advanced PIP"
using the ADJUST buttons;
press ENTER.
O Use the ADJUST buttens to
select the advanced feature you
would like to use: TV Still,
Snap-shot, or Replay. Press
ENTER.
When you select "Replay," the
next option will be "Replay
speed." U_e the ADJUST
buttons to set the replay speed
f¥om 1 to 9. (l=short interval
and 9=hmg interval.) Press
ENTER. (See "Using the Replay
Jhature" on page 88 for more
information.)
Press the MENU button to
return to the "Advanced Fea-
tures" metro.
Using the Advanced Features 75
Page 78

Page 79

_ CHAPTER FOUR
Using the Special Features
In addition to the basic and advanced features explained in the
previous chapter, this TV offers the user sew_ral special features
not generally available on other brand TVs. This chapter will
explain how to use these distinctiw; features. It contains the
following topics:
0 Understanding the On-Screen Displays
Using the Off-Timer
0 Using the Advanced Picture-in-Picture
(PIP) Modes
Using the Active AN Network Feature
77
Page 80
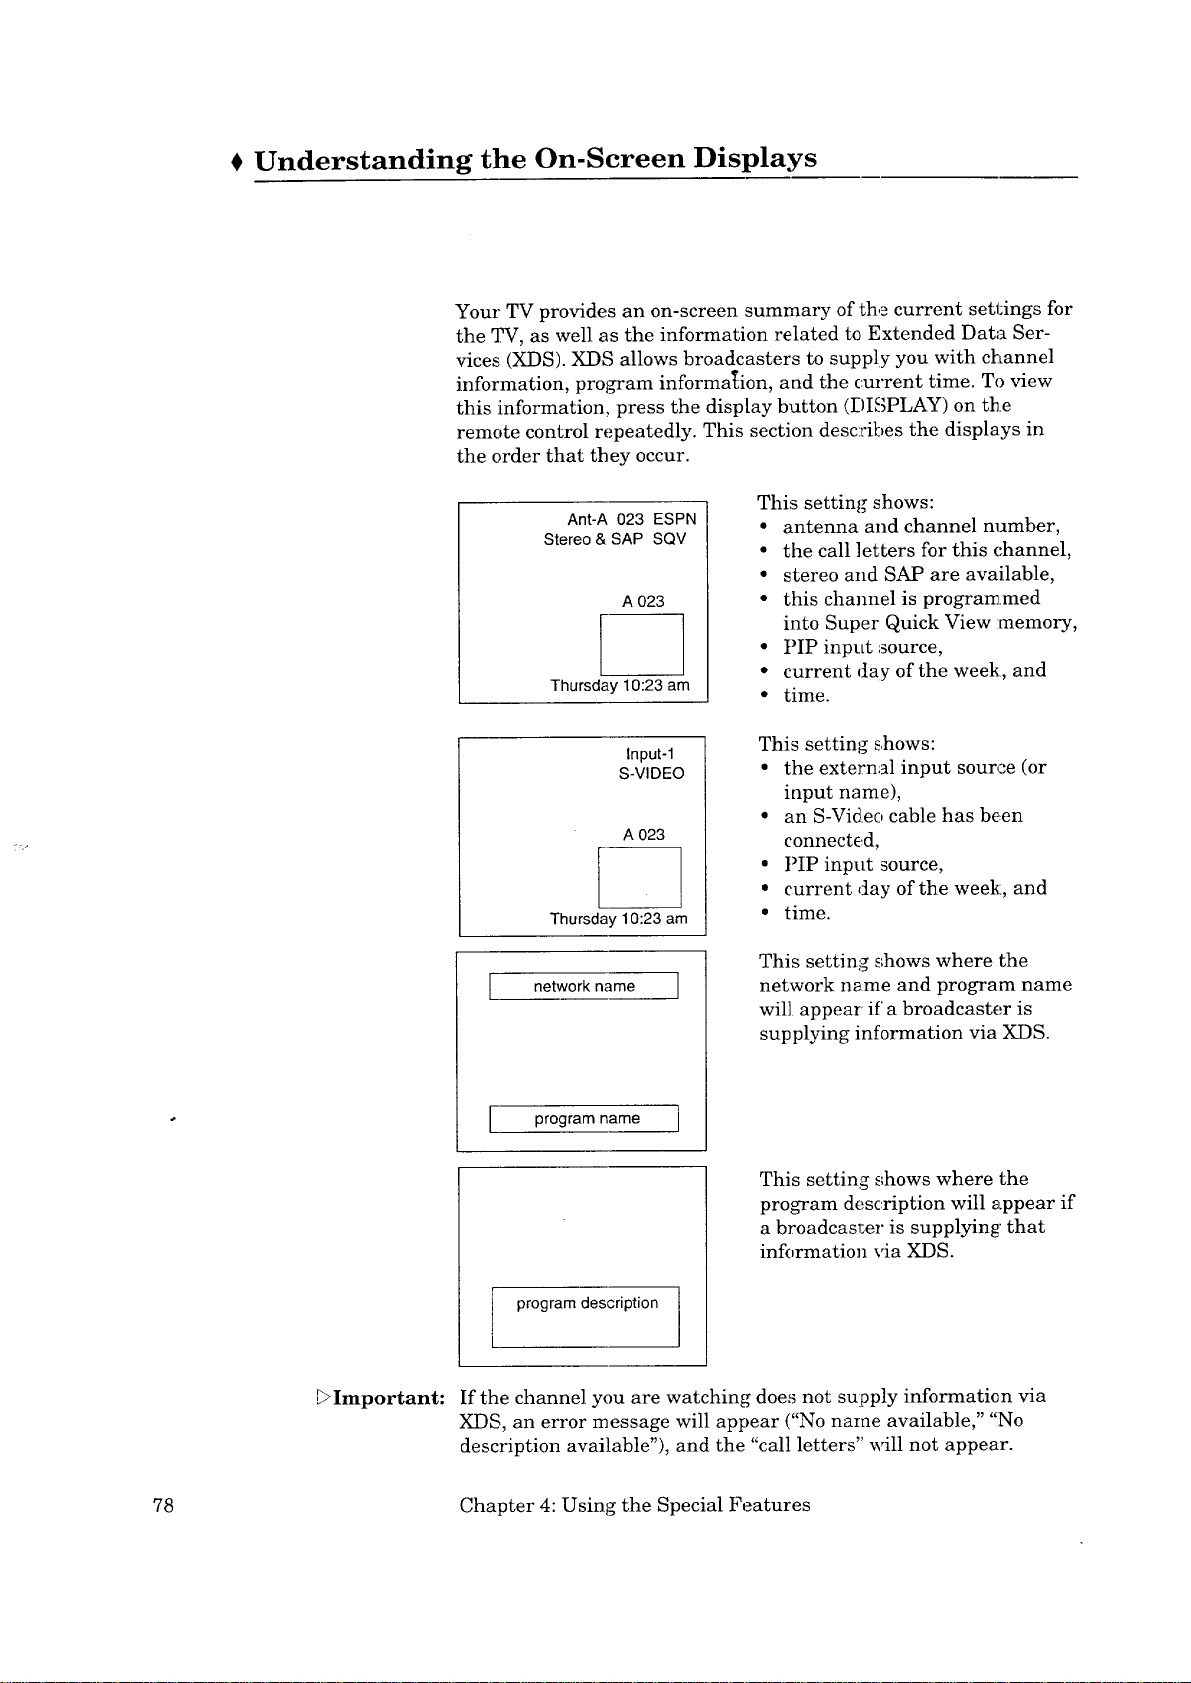
Understanding the On-Screen Displays
Your TV provides an on-screen summary of the current settings for
the TV, as well as the information related to Extended Data Ser-
vices (XDS). XDS allows broadcasters to supply you with channel
information, program information, and the current time. To view
this information, press the display button (DISPLAY) on the
remote control repeatedly. This section describes the displays in
the order that they occur.
Ant-A 023 ESPN
Stereo & SAP SQV
A 023
Thursday 10:23 am
Input-1
S-VIDEO
A 023
Thursday 10:23 am
[ network name ]
This setting shows:
• antenna and channel number,
• the call letters for this channel,
• stereo and SAP are available,
• this channel is programmed
into Super Quick View :memory,
• PIP input source,
• current day of the week, and
• time.
This setting shows:
• the external input source (or
input name),
• an S-Video cable has been
connected,
• PIPinput source,
• current day of the week, and
• time.
This setting shows where the
network name and program name
will appear if a broadcaster is
supplying information via XDS.
[ program name ]
This setting shows where the
program description will _.ppear if
a broadcaster is supplying' that
information via XDS.
program description
,_Important: If the channel you are watching does not supply information via
XDS, an error message will appear ("No name available," "No
description available"), and the "call letters" _411 not appear.
78 Chapter 4: Using the Special Features
Page 81

€ Using the Off-Timer
This special function allows you to set the TV to tu.rn off automati-
cally. You can set the TV to turn off after a period of time ranging
from 10 to 120 minutes. In this section you'll learn:
• Setting the off-timer, and
• Changing or canceling the off-timer.
Using the Off-timer 79
Page 82
Setting the off-timer
O Press the off-timer button
(OFF-T) on the remote control.
_Important:
TV Off timer 120 min.
O Select how long you want the
TV to stay on by repeatedly
p:ressing the off-timer button
(OFF-T). The time will decrease
in 10 minute intervals each
time you press the button.
If you later want to check on
how much time is left in the off-
timer, press the off-timer
button (OFF-T)once. The on-
screen display reads "off-timer"
and shows the amount of time
remaining.
During the last minute before the TV is set to turn off, "Off-timer 1
rain." will flash in red to remind you that the off-timer is set.
TV Off timer 1_min.
80 Chapter 4: Using the Special Features
Page 83

Changing or canceling the off-timer
Press the off-timer bul:ton
TV Off timer 10 min.
0
(OFF-T) on the remote control.
An on-screen display will
indicate the amount of time
remaining until the TV will
turn off.
O Continue pressing the off-timer
button (OFF-T) repeatedly to
change the remaining time or
cancel _he off-timer. T]he off-
timer i,_ canceled when" "
appears instead of the remain-
ing time.
Using the Off-timer 81
Page 84
Using the Advanced Picture-in-Picture (PIP) Modes
The special features of this TV include the advanced picture-in-
picture (PIP) modes, which allow you to view stud manipulate the
images of two different sources at the same tirae. In this section
you'll learn about:
• Selecting the PIP image,
• Selecting the PIP source,
• Selecting the channel,
• Exchanging the PIP image and the main image,
• Moving the PIP image,
• Freezing the PIP image,
• Using the Snap-shot feature, and
E>Important:
• Using the Replay feature.
You must have a VCR connected to the TV r.o see two different live
pictures when using PIP.
82 Chapter 4: Using the Special Features
Page 85
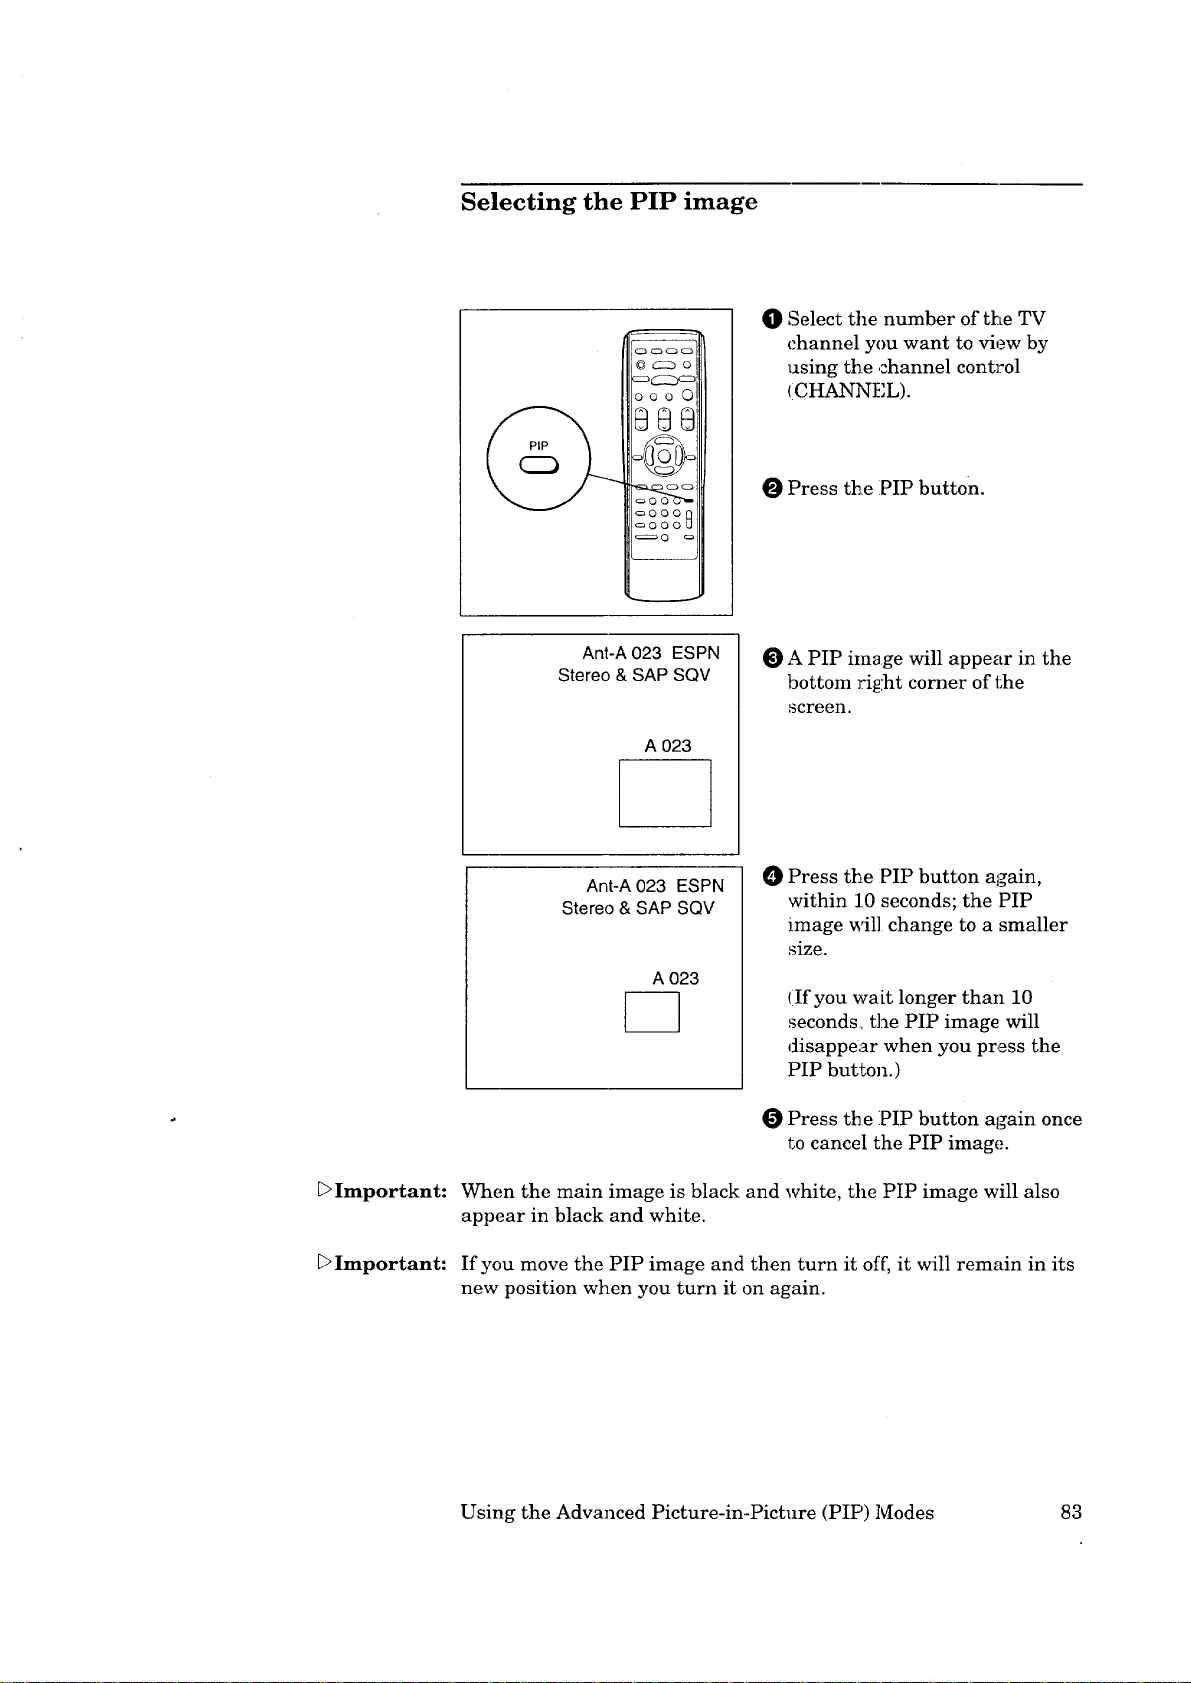
Selecting the PIP image
O Select the number of the TV
channel you want to view by
using the channel control
(CHANNEL).
O Press th.e :PIP button.
_>Important:
Ant-A 023 ESPN
Stereo & SAP SQV
A 023
Ant-A 023 ESPN
Stereo & SAP SQV
A 023
F-]
When the main image is black and white, the PIP image will also
appear in black and white.
A PIP image will appear in the
bottom right corner of the
screen.
0
Press the PIP button again,
within 10 seconds; the PIP
image will change to a smaller
size.
(If you wait longer than 10
seconds, the PIP image will
disappear when you press the
PIP button.)
Press the PIP button again once
to cancel the PIP image.
Important:
If you move the PIP image and then turn it of[', it will remain in its
new position when you turn it on again.
Using the Advanced Picture-in-Picture (PIP) Modes 83
Page 86

Selecting the PIP source
000 C)
SOURCE
=ftJ _ t!/=
c:,O 00 c:_
O Turn your VCR on and select a
channel oil the VCR that is
different tlhan the channel you
see on your TV screen.
O Press the source button
(SOURCE) on the remote
control repeatedly to select the
source of the PIP image: TV or
Input.
The PIP iinage will change as
follows.
[-,TV-_lr@ut.l-.input_2 -J
_Important:
To change the input of the background (mainl image while a PIP
image is on the screen, press the input button (INPUT) on the
control panel or on the remote control.
Selecting the channel
Press the PI]? channel button
(CtIANNEL) on the remote control
to change the channel of the PIP
image when :you are using the PIP
000 0
%tJL_Up
_ 0 (,.) _,.ll
oO0011
mode with Active A/V Network.
_>Important: When the source of both the main image and the PIP image is the
TV, the PIP channel button will change the channels of both the
main image and the PIP image.
84 Chapter 4: Using the Special Features
Page 87
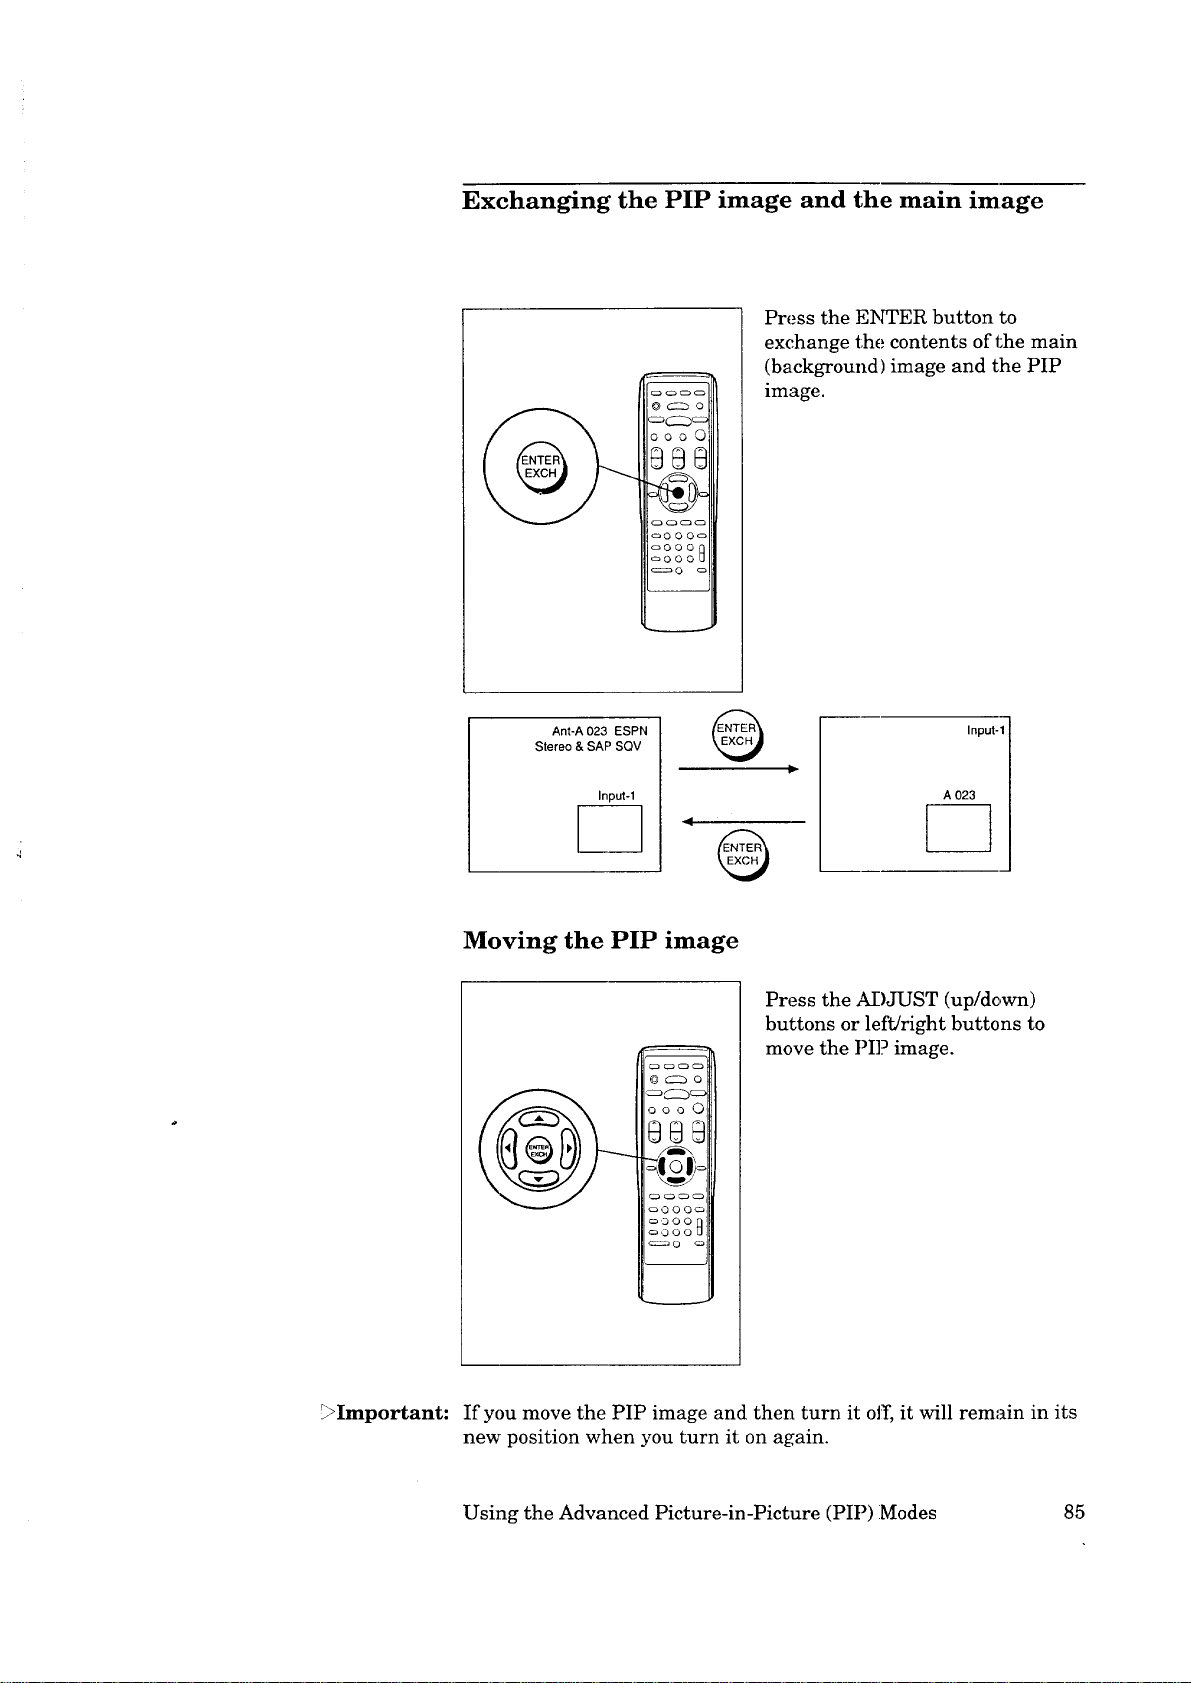
Exchanging the PIP image and the main image
Press the ENTER button to
exchange the contents of the main
(background) image and the PIP
0 c::_ o
000 0
image.
0@@
_000
Ant-A 023 ESPN
Stereo & SAP SQV
Input-1
Moving the PIP image
000 C) ¸
@@@
_DO0
_::_O c:_
Input-1
A 023
Press the ADJUST (up/down)
buttons or left/right buttons to
move the PI]? image.
i
_>Important: If you move the PIP image and then turn it off, it will remain in its
new position when you turn it on again.
Using the Advanced Picture-in-Picture (PIP):Modes 85
Page 88
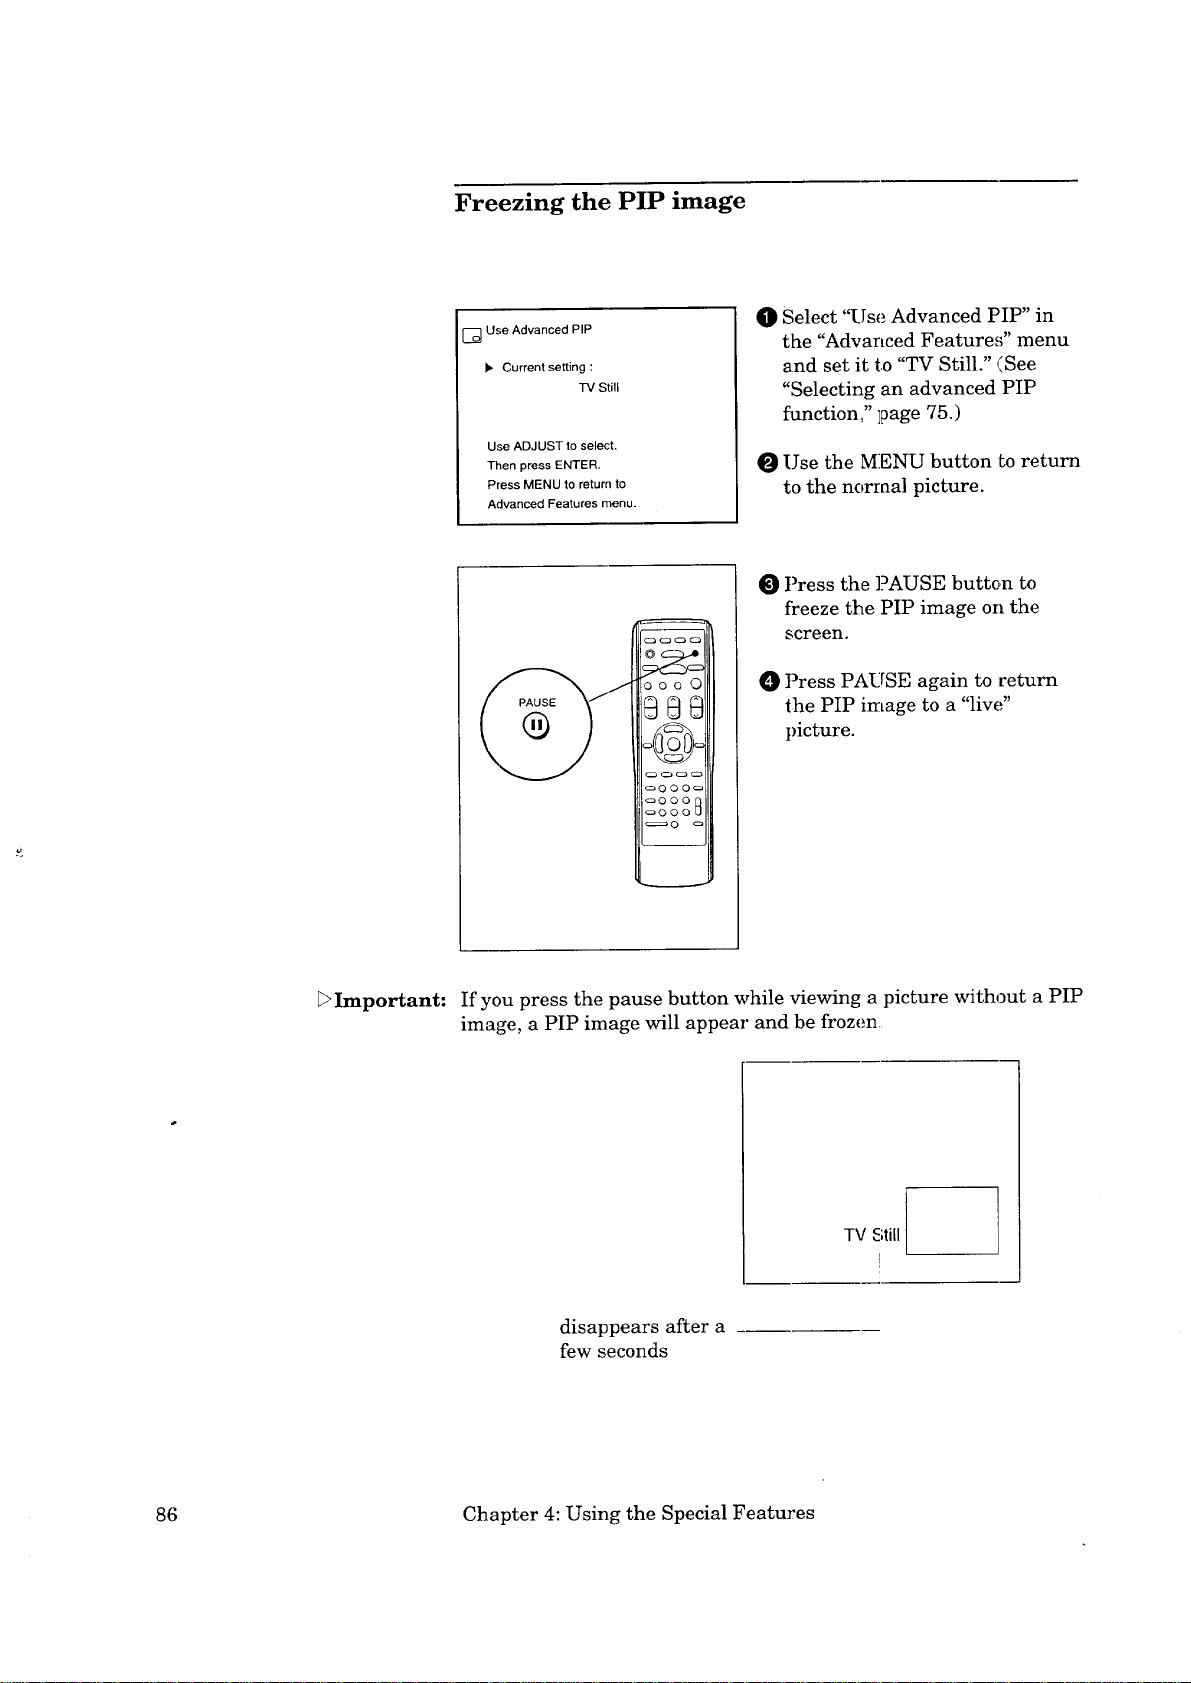
Freezing the PIP image
[] Use Advanced PIP
• Current setting :
TV Still
Use ADJUST to select.
Then press ENTER.
Press MENU to return to
Advanced Features menu.
Select "Use Advanced PIP" in
O
the "Advanced Features" menu
and set it to "TV Still." (See
"Selecting an advanced PIP
function," ]page 75.)
O Use the MENU button Lo return
to the norraa] picture.
O Press the PAUSE butten to
freeze the PIP image on the
screen.
ooo0
_]) Press PAUSE again to return
the PIP image to a "live"
picture.
L>Important: If you press the pause button while viewing a picture without a PIP
image, a PIP image will appear and be frozen
TV Still
I
disappears after a
few seconds
86 Chapter 4: Using the Special Features
Page 89

Using the Snap-shot feature
[] Use Advanced PIP
_. Current setting :
Snap-shot
Use ADJUST to select.
Then press ENTER.
Press MENU to return to
Advanced Features Menu.
ooo0
_88
_O O O_s_
c_300
_OOO_
_0
O Select "Use Advanced PIP" in
the "Advanced Features" menu
and set it to "Snap-shot." (See
"Selecting an advanced PIP
function," page 75.)
O Use the MENU button to return
to the norraa] picture.
O Press the PAUSE button once;
a frozen P]IP image and a
moving PIP image will appear.
Press the PAUSE button again;
a third PIP image will appear,
moving. The previous two PIP
images will be frozen.
Each time you press the
PAUSE button, the PIP images
will shift upwards one by one:
the top image will be replaced
by the second image, the second
image will be replaced by the
third, and a new moving image
will appear in the third space.
3!o cancel the PIP image, press
the PIP button twice.
if the PIP image is off
PAUSE
®
A
if the PIP image is on
PAUSE
B
®
[]
*A, B, C, D: the moving images
_a, b, c, d: the frozen images of A, B, C, and D at the instant the PAUoE
button is pressed.
Using the Advanced Picture-in-Picture (PIP) Modes 87
PAUSE
®
PAUSE
®
E_
E_
EQ
Ea3
E_
Ec3 c
PAUSE
®
c
PAUSE
®
v_
[]
[] o
Page 90

Using the Replay feature
Use Advanced PIP
Current setting :
Reptayspeed : 1
Use ADJUST to select.
TbenjxessE_NT.E_R_......
Press MENU to return to
Advanced Features Menu.
[] Use Advanced PIP
Current setting:
• Replay speed : 1
Use ADJUST to select.
Thenpre.ssENT.gR_.....
Press MENU to return to
Advanced Features Menu.
Replay
Replay
ID Select "Use Advanced PIP" in
the "Advanced Features" menu
and set it to "Replay." (See
"Selecting an advanced PIP
function," ]page 75.)
O Set the replay speed between 1
(short interval) and 9 (long
interval).
Use the MENU button to return
to the normal picture.
O Press the PAUSE button. The
TV will memorize seven frames
of video from the main image
and display the first three of
these frames as PIP images.
(The interval between the
t_ames is determined by the
replay speed set in step _.)
_OOO_
_OOOU
*al - a7 : memorized frames
I PAUSE PAUSE PAUSE PAUSE
A
=ALISE
T
EN
[@
Each time you press the
PAUSE button, the memorized
frames will shift upwards.
To cancel the PIP images, press
the PIP button twice.
PAUSE PAUSE ._
88 Chapter 4: Using the Special Features
Page 91

Using the Active AN Network Feature
The A/V Network is a special feature that makes it easier to use
your TV and your other A/V components together. When you
connect the A/V Network, you can point the remote control at the
TV, and it will "pass" the remote control command to the other
components.
Additionally, you will gain even more benefits if you have a Mitsu-
bishi VCR equipped for the Active A/V Network. The Active A/V
Network allows you to perform many of the commonly used fea-
tures of your system at the press of just one button.
This section will explain the various features of the Active A/V
Network.
before you begin
You must have connected an A/V Network cable from the Active
AFV Network terminal of your TV to the A/V Network IN
terminal of your VCR. See "TV + Mitsubishi products that have
Arv Network terminals," page 38.
Important:
• You must have connected your VCR to Input-1 of your _.
• You must have set your TV's "A/V Network" setting to "Active"
or "Basic." See "Setting the A/V Network," ]page 58.
• Your VCR's remote control switch (if any) should be set to
'_VCR-A."
• Your VCR's video mute setting should be turned ON.
what the Active A/V Network does
The Active A/V Network makes it easier and fiaster to use the
VCR's Quick Program and Play commands and the TV's PIP
commands.
When using the Active A/V Network, you should always point your
remote control at your TV.
Using the Active A/V Network Feature 89
Page 92

Using the Active AN Network Feature (conlL.)
using the QUICK PROGRAM button (QUICK PROG_LkM)
When you press QUICK PROGRAM to begin programming your
VCR:
• Active A/V Network will turn on your VCR and bring it to the
"Program to Record" screen. If tile VCR's clock has not been set,
you will see the "Set the clock" screen. (Se,_ your VCR's Owner's
Guide for information about setting the clock.)
• Active A/V Network will turn on your TV (if it is off), and switch
the TV to Input-1.
You can program your VCR by pointing your remote control at the
TV.
When you press QUICK PROGRAM to end programming ::our
VCR:
• Active A/V Network will turn off'your VCR (unless a tape is
currently playing or recording).
• Active A/V Network will return your TV to the channel it was
on before, or turn it off (if it; was off originally).
)>Important:
using the PLAY button (AUTO PLAY)
When you press PLAY on the remote:
• Active A/V Network will turn your VCR oll and begin playing
the tape (if any).
• Active A/V Network will turn your TV on and switch it to
Input-1.
when you turn your TV off:
• If you set your TV's A/V Network setting to "Active," your VCR
will turn off. unless it is playing or record:[ng.
using the PIP button (SIMULATED TWO TUNER PIP)
You must be watching a broadcast channel on Antenna-A or
Antenna-B to use the Active A/V Network PIP function co_rrectly.
When you press the PIP button on t_he remote to bring up a PIP
image:
• Your VCR will automatically turn on.
• You can see the VCR's picture in the small PIP image.
90 Chapter 4: Using the Special Features
Page 93

While the PIP image is on the screen:
• The PIP function buttons (SOURCE, CHANNEL, ENTER, left/
right, adjust up/down, PAUSE) will all work as they do with
standard PIP.
• The PIP CHANNEL button (on the lower right ]portion of th_,
remote control) will automatically control the small PIP image.
The standard CHANNEL button and the number buttons (0--9)
change channels on the main image.
When you press the PIP button on the remote to turn offthe PIP
image:
• CHANNEL, the number buttons, and all other functions will[
work normally again.
Important:
Important:
If you leave the TV turned on, set to Input-l, but the TV is not
receiving a signal on Input-l, it will automatically turn off after
two and a half minutes. (If you use a TV menu during this time., the
TV will turn off two and a half minutes after you sl;op using the
menus.)
If the TV automatically turns off because of the situation described
above, it will return to the last channel you viewed on Antenna-A
or Antenna-B when you turn the TV back on.
Using the Active A/V Network Feature 91
Page 94

Page 95

_ CHAPTER FIVE
Troubleshooting
Even though you're now familiar with the bas!Lc and advanced
operations of the TV, you may run inLo trouble from time to time as
you become accustomed to the TV. This chapter offers solutions to
some of the common problems you may encounter. We suggest that
you consult this chart before contacting a Mit,_ubishi service
representative.
93
Page 96
Troubleshooting (cont.)
Problems
The remote control doesn't
work.
The TV takes several
seconds to respond to button
commands.
Possible Solutions For More Information
Check that the batteries are
installed correctly.
Check that the select button
is set to "TV."
Be sure that you are point-
ing the top of the remote
control toward the TV from
a distance of no more than
20 feet.
• Use the ENTER button to
avoid delays.
See "Getting ready to use
the remote control" !in
Chapter 1 for an explanation
of how to install batteries in
the remote control.
See "Remote control buttons
and fhnctions" in Chapter 1,
which explains where the
select buttons are located.
See "Getting ready to use
the remote control" m
Chapter 1, which co!atains
pointers for using tl_e remote
control.
See "Changing channels" in
Chapter 3, which explains
the fimction of the ENTER
button.
You can't access a channel.
94 Chapter 5: Troubleshooting
• Be sure that the channel you
want to view is programmed
into memory.
• Check that the TV is tuned
to the correct input source
(antenna) for that channel.
See "Memorizing channels"
in Chapter 3, which explains
how to :program channe]s
into the TV's memory.
See "Selecting the input
source" in Chapter 3, which
explains how to change the
input source.
Page 97
Problems
Possible Solutions
For More Information
On-screen displays appear
each time you adjust a
function.
There's no sound even when
the volume is turned up.
• You forget the code you used • Use the alternate procedure
to set the parental lock. that doesn't require the use
• This is part of the normal
operation of the TV.
• Check that the MUTE
button isn't on.
• The TV's reception mode
may be set to "separate
audio program" (S.A.P.).
of the code.
See "Understanding the On-
Screen Displays" in Chapter
4 for a fall explanation of
the on-screen displays.
See "Re:mote control buttons
and fimctions" in Chapter 1,
which explains the location
and fimction of the MUTE
button.
See "Adjusting the sound" in
Chapter 3, which explains
how to select the appropri-
ate reception mode.
• See the Appendix, "Proce-
dure for Bypassing tlhe
Parental Lock."
You can't program the TV to
turn on automatically.
The sound doesn't match the
image on screen.
There is a large black
rectangle on the screen.
• The TV may be locked.
• The TV's reception mode
may be set to "separate
audio program" (S.A.P.).
The TV has been set to
"text" mode, but there is no
text information being
broadcast.
Troubleshooting 95
See "Using the parental
lock" under "Using t:he
Advanced Features" in
Chapter 3.
See "Adjusting the sound" in
Chapter 3, which explains
how to select the appropri-
ate reception mode.
See "Using the closed
caption decoder" under
"Getting started" in
Chapter 3.
Page 98

_Warning: I
Caution and care
Don't leave stationary images, such as those generated from stock
market reports or video games, on-screen fi_r more than 10 min-
utes. Still patterns can scar the TV causing permanent damage to
the picture tube.
_Important:
_Important:
If you plan to place speakers next to the TV, make sure they are
magnetically shielded. Ordinary speakers wi]l cause distol_ion in
the picture due to their strong magnets. This distortion, however,
will not harm the picture tubes.
For maximum enjoyment and safe operation of your MITSUBISHI
Color TV, please read the "IMPORTANT SAPEGUARDS" carefully
and apply them properly.
To keep your TV from toppling in the event o:fan earthquake, you
can use the clamp attached to the back of tlhe television to secure it
to the wall. Simply run a cord or rope through the clamp, l_hen
attach the rope to the wall directly behind the television.
96 Chapter 5: Troubleshooting
Page 99
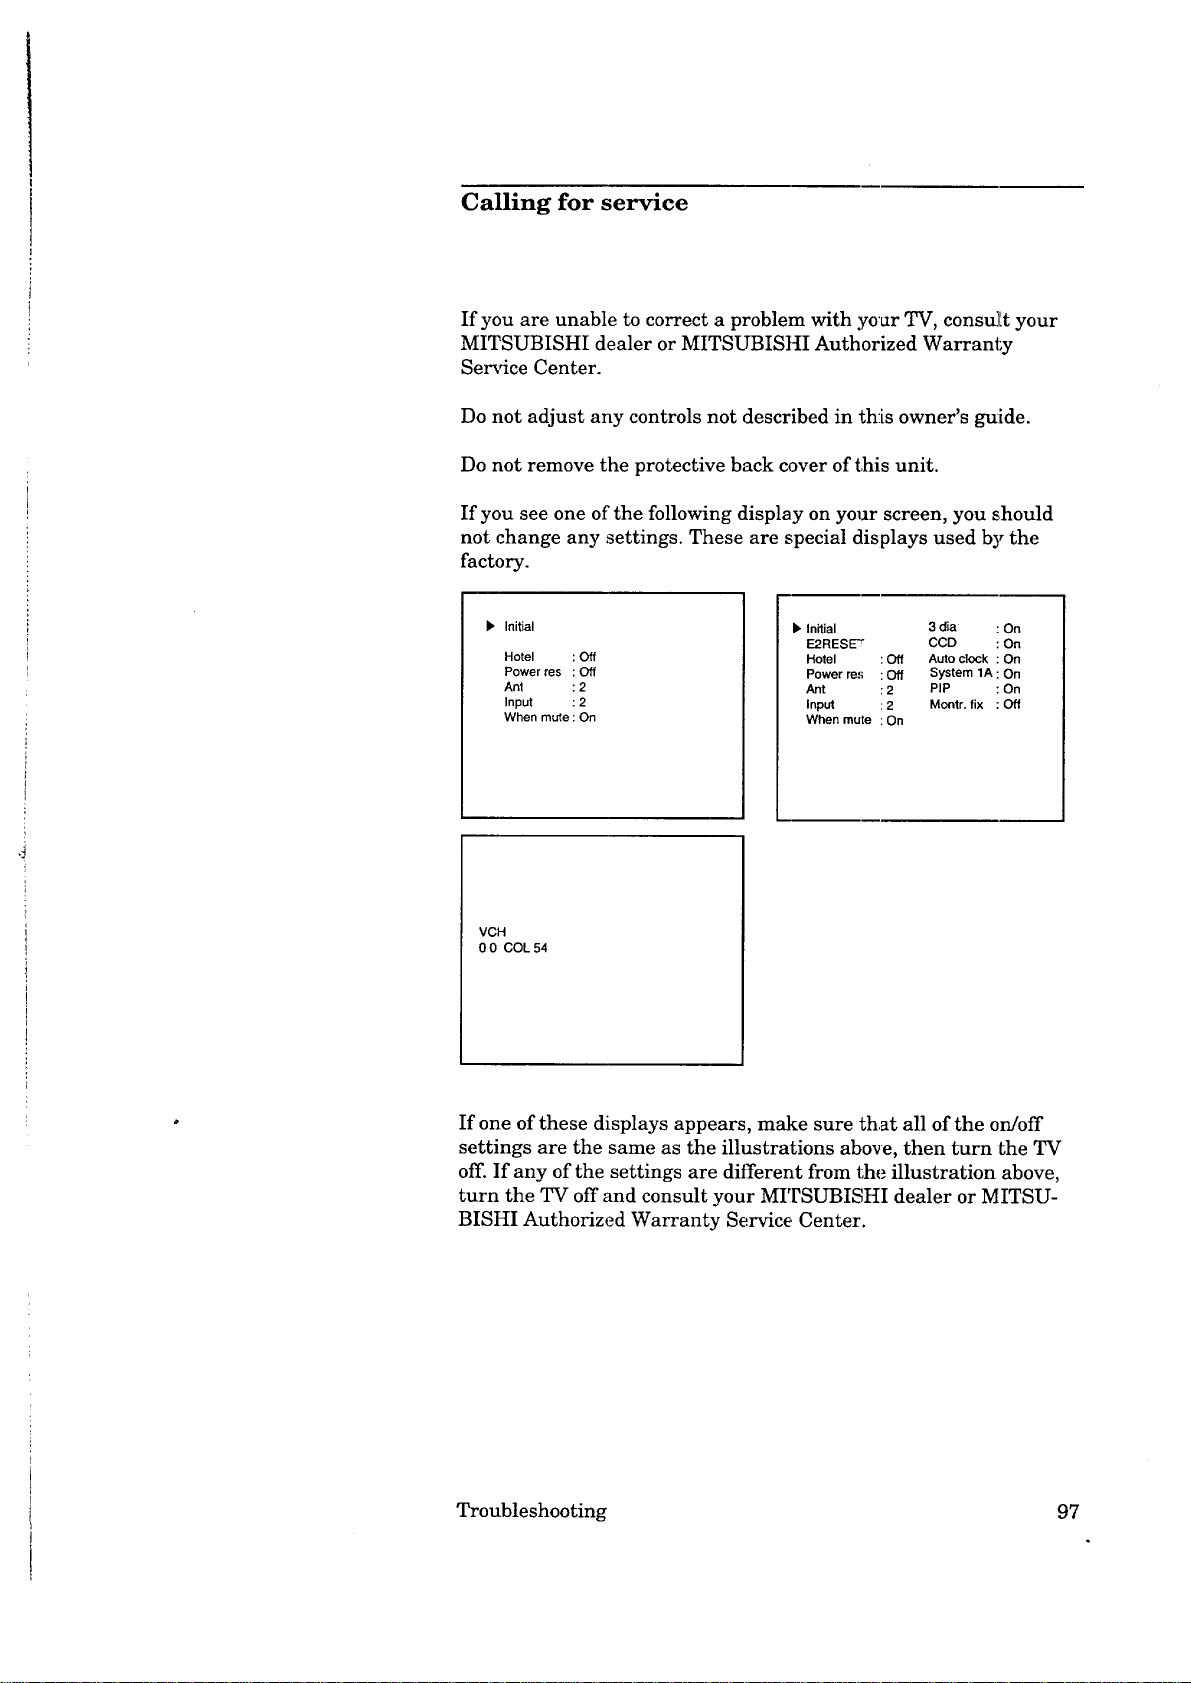
Calling for service
If you are unable to correct a problem with yo'_r TV, consu][t your
MITSUBISHI dealer or MITSUBISHI Authorized Warranty
Service Center.
Do not adjust any controls not described in this owner's g_ide.
Do not remove the protective back cover of this unit.
If you see one of the following display on your screen, you should
not change any settings. These are special displays used by the
factory.
I, Initial
Hotel : Off
Power res : Off
Ant : 2
Input : 2
When mute : On
VCH
0 0 COL 54
lb Initial 3 dia : On
E2RESE" CCD : On
Hotel : Off Auto clock : On
Power res : Off System 1A : On
Ant : 2 PIP :On
Input : 2 Montr. fix : Off
When mute : On
If one of these displays appears, make sure that all of the on/off
settings are the same as the illustrations above, then turn Lhe TV
off. If any of the settings are different from the illustration above,
turn the TV off and consult your MITSUBISHI dealer or MITSU-
BISHI Authorized Warranty Service Center.
Troubleshooting 97
Page 100

 Loading...